

Page 1
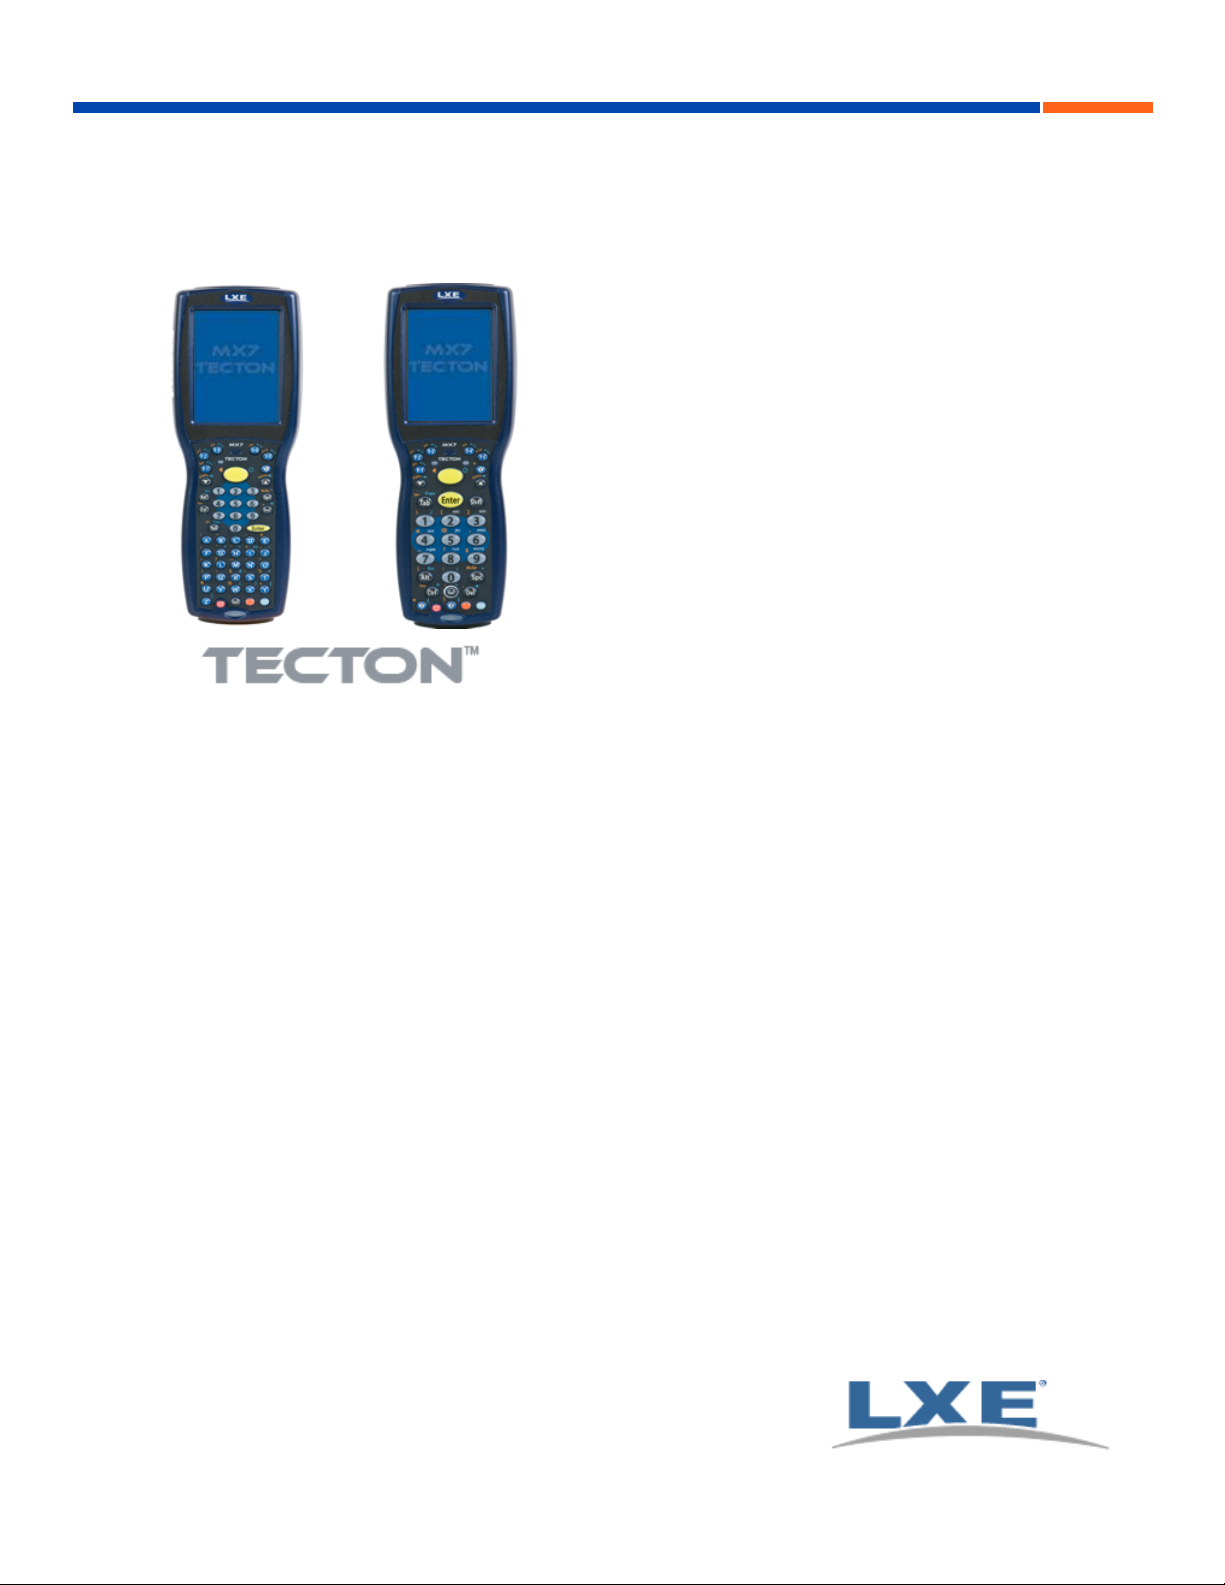
MX7 Tecton™ CE Reference Guide
Microsoft® Windows® Embedded CE 6 Operating System
E-EQ-MX7CERG-A
Copyright © 2011 by LXE®, Inc., An EMS Technologies Company. All Rights
Reserved.
Page 2

Notice
LXE Inc. reserves the right to make improvements or changes to published information at any time without notice. While
reasonable efforts have been made in the preparation of this publication to assure its accuracy, LXE assumes no liability
resulting from any errors or omissions in this publication, or from the use of the information contained herein. Further, LXE
Incorporated, reserves the right to revise this publication and to make changes to it from time to time without any obligation to
notify any person or organization of such revision or changes.
Trademarks
Copyright © 2011 by LXE Inc., An EMS Technologies Company, 125 Technology Parkway, Norcross, GA 30092 U.S.A. (770)
447-4224
LXE® and Spire® are registered trademarks of LXE Inc.
RFTerm® is a registered trademark of EMS Technologies, Norcross, GA.
Microsoft®, ActiveSync®, MSN, Outlook®, Windows®, Windows Mobile®, the Windows logo, and Windows Media are
either registered trademarks or trademarks of Microsoft Corporation in the United States and/or other countries.
Intel and Intel XScale are trademarks or registered trademarks of Intel Corporation or its subsidiaries in the United States and
other countries.
Summit Data Communications, Inc. Summit Data Communications, the Summit logo, and “The Pinnacle of Performance” are
trademarks of Summit Data Communications, Inc.
The Cisco Square Bridge logo is a trademark of Cisco Systems, Inc.; Aironet, Cisco and Cisco Systems are registered
trademarks of Cisco Systems, Inc. and/or its affiliates in the United States and certain other countries.
The Bluetooth® word mark and logos are owned by the Bluetooth SIG, Inc. and any use of such marks by LXE, Inc. is under
license.
PowerScan is a registered trademark of Datalogic Scanning, Inc., located in Eugene, OR.
Symbol® is a registered trademark of Symbol Technologies. MOTOROLA® and the Stylized M Logo are registered
trademarks of Motorola®, Inc.
Hand Held® is a registered trademark of Hand Held Products, Inc., located in Skaneateles Falls, NY.
Wavelink®, the Wavelink logo and tagline, Wavelink Studio™, Avalanche Management Console™, Mobile Manager™, and
Mobile Manager Enterprise™ are trademarks of Wavelink Corporation, Kirkland.
When any part of this publication is in PDF format: “Acrobat ® Reader Copyright © 2011 Adobe Systems Incorporated. All
rights reserved. Adobe, the Adobe logo, Acrobat, and the Acrobat logo are trademarks of Adobe Systems Incorporated”
applies.
Other product names mentioned within this publication may be trademarks or registered trademarks of other companies.
Page 3

Table of Contents
Introduction 1
Components 2
I/O Port and Cables 3
Scanner / Imager Aperture 4
Handle 5
Handstrap 5
Keypads 6
Reboot Sequences 8
Suspend / Resume 8
Warmboot 8
Restart 8
MX7 Tecton Troubleshooting 9
Hardware 10
System Hardware 10
802.11 a/b/g Wireless Client 10
Central Processing Unit 10
System Memory 11
Internal SD Card Slot 11
Video Subsystem 11
Power Supply 11
COM Ports 12
RS-232 Serial Port 12
USB Client Port 12
Audio Connection 12
Audio Support 12
Scanner / Imager Port 13
Bluetooth LXEZ Pairing 13
Keypads 14
Using the 55 Key Alpha-Numeric Keypad 14
Using the 32 Key Numeric-with Triple-Click Alpha 15
Display 16
Display Backlight Timer 16
Status LEDs 17
Cold Storage Configuration 18
Cold Storage Battery 18
Snowflake Decal 18
Heating Elements 18
E-EQ-MX7CERG-A [ i ] MX7 Tecton™ CE Reference Guide
Page 4

Table of Contents
Recharging Batteries 19
Normal Operation Temperature Ranges 19
Power 20
Power Modes 20
On Mode 20
Suspend Mode 20
Off Mode 20
Batteries 21
Checking Battery Status 21
Main Battery Pack 21
Battery Hotswapping 21
Low Battery Warning 22
Super-cap Internal Battery 22
Handling Batteries Safely 22
Software 23
Introduction 23
Operating System 23
Windows CE Operating System 23
General Windows CE Keyboard Shortcuts 24
Warmboot 25
Clearing Persistent Storage / Reset to Default Settings 25
Folders Copied at Startup 25
Saving Changes to the Registry 25
Software Load 26
Software Applications 26
ActiveSync 26
Bluetooth (Optional) 26
LXE RFTerm (Optional) 26
Avalanche 27
Software Development 27
MX7 Tecton Utilities 28
LAUNCH.EXE 28
LAUNCH.EXE and Persistent Storage 30
REGEDIT.EXE 30
REGLOAD.EXE 30
REGDUMP.EXE 30
WARMBOOT.EXE 30
WAVPLAY.EXE 30
MX7 Tecton Command-line Utilities 30
E-EQ-MX7CERG-A [ ii ] MX7 Tecton™ CE Reference Guide
Page 5

Table of Contents
PrtScrn.EXE 30
Desktop 31
Desktop Icons 31
Taskbar 32
My Device Folders 32
Wavelink Avalanche Enabler (Optional) 33
Internet Explorer 33
Start Menu Program Options 34
Communication 35
Connect and LXEConnect 35
Start FTP Server / Stop FTP Server 35
Summit 35
Certs 35
Command Prompt 36
eXpress Scan 37
Internet Explorer 37
Microsoft Wordpad 37
Remote Desktop Connection 37
Settings 37
Transcriber 38
Windows Explorer 38
Taskbar 39
General Tab 39
Advanced Tab 40
Taskbar Icons 41
Reflash the MX7 Tecton 42
Introduction 42
Reflashing and Language Options 42
Preparation 42
Procedure 42
Troubleshooting 44
Battery State and OS Upgrade 44
Enhanced Launch Utility 45
Introduction 45
Registry Based Launch Items 45
Launch Startup options 47
Example 47
Script Based Launch Items 48
Enhanced Launch Utility Use 48
File Names 49
E-EQ-MX7CERG-A [ iii ] MX7 Tecton™ CE Reference Guide
Page 6

Table of Contents
Command line structure 49
Comments 49
Commands Supported by Launch 50
Launch Error Messages 64
Example Script File 66
Using ActiveSync 67
Introduction 67
Initial Setup 68
Connect via USB 68
Cable for USB ActiveSync Connection: 68
Explore 68
Backup Data Files using ActiveSync 69
Prerequisites 69
Connect 69
Disconnect 69
MX7 Tecton with a Disabled Touchscreen 69
Reset and Loss of Host Re-connection 69
Troubleshooting ActiveSync 70
Configuring the MX7 Tecton with LXEConnect 71
Install LXEConnect 71
Using LXEConnect 72
Control Panel 74
About 75
Version Tab and the Registry 75
Languages 76
Identifying Software Versions 76
MAC Address 76
Accessibility 77
Administration - for AppLock 78
Introduction 78
Factory Default Settings - AppLock 79
Setup a New Device 80
Administration Mode 81
End User Mode 82
Passwords 82
End-User Switching Technique 83
Using a Stylus Tap 83
Using the Switch Key Sequence 83
Hotkey (Activation hotkey) 83
End User Internet Explorer (EUIE) 84
E-EQ-MX7CERG-A [ iv ] MX7 Tecton™ CE Reference Guide
Page 7

Table of Contents
Application Configuration 85
Application Panel 86
Launch Button 87
Auto At Boot 88
Auto Re-Launch 89
Manual (Launch) 90
Allow Close 91
Match 92
Security Panel 93
Options Panel 94
Status Panel 95
View 95
Log 96
Save As 96
Troubleshooting AppLock 96
Battery 97
Bluetooth 98
Bluetooth Devices 100
Discover 101
Bluetooth Device Menu 103
Bluetooth Device Properties 104
Settings 105
Turn Off Bluetooth 105
Options 106
About 108
Using Bluetooth 109
Initial Use 109
Subsequent Use 110
Bluetooth Indicators 111
Bluetooth Barcode Reader Setup 112
MX7 Tecton with Label 112
MX7 Tecton without Label 113
Bluetooth Beep and LED Indications 114
Easy Pairing and Auto-Reconnect 114
Brightness 115
Certificates 116
Data Collection Wedge 117
Introduction 117
Barcode Readers 118
Return to Factory Default Settings 118
E-EQ-MX7CERG-A [ v ] MX7 Tecton™ CE Reference Guide
Page 8

Table of Contents
Data Processing Overview 119
Factory Default Settings 120
Main Tab 121
Continuous Scan Mode 122
COM1 Tab 123
Notification Tab 124
Internal Scanner Sound 124
Vibration 124
Data Options Tab 125
Enable Code ID 126
Buttons 126
Data Options - Symbology Settings 127
Advanced Button 128
Clear Button 129
Enable, Min, Max 130
Strip Leading/Trailing Control 131
Barcode Data Match List 132
Barcode Data Match Edit Buttons 132
Match List Rules 133
Add Prefix/Suffix Control 134
Symbologies 135
Custom AIM IDs 135
Codabar - Advanced Properties 136
Code11 - Advanced Properties 137
Code39 - Advanced Properties 138
Interleaved 2 of 5 - Advanced Properties 139
MSI - Advanced Properties 140
Custom Code IDs - Symbol 141
HHP Custom IDs 142
Codabar - Advanced Properties 144
Code11 - Advanced Properties 145
Code39 - Advanced Properties 146
EAN8 - Advanced Properties 147
EAN13 - Advanced Properties 148
Interleaved 2 of 5 - Advanced Properties 149
Mesa - Advanced Properties 150
MSI - Advanced Properties 151
OCR Properties - Advanced 152
Planet - Advanced Properties 153
Posicode - Advanced Properties 154
E-EQ-MX7CERG-A [ vi ] MX7 Tecton™ CE Reference Guide
Page 9

Table of Contents
Telepen - Advanced Properties 155
UPCA- Advanced Properties 156
UPCE0- Advanced Properties 157
UPCE1- Advanced Properties 158
Ctrl Char Mapping 159
Translate All 159
Parameters 159
Custom Identifiers 161
Parameters 161
Buttons 162
Control Code Replacement Examples 163
Barcode Processing Examples 164
HHP Properties 165
Centering 166
DecodeMode 166
LinearRange 167
AimTimer 167
LeaveLightsOn 167
About Tab 168
Length Based Barcode Stripping 169
Date / Time 171
Dialing 172
Display 173
Background 174
Appearance 174
Backlight 175
Input Panel 176
Internet Options 177
Keyboard 180
Keypad Backlight 181
KeyPad 182
KeyMap Tab 183
LaunchApp Tab 185
RunCmd Tab 186
License Viewer 187
Mixer 188
Output Panel 189
Input Panel 190
Mouse 191
MX7TOptions 192
E-EQ-MX7CERG-A [ vii ] MX7 Tecton™ CE Reference Guide
Page 10

Table of Contents
Communication 192
Enable TCP/IP Version 6 192
Allow Remote Desktop Autologon 192
Autolaunch TimeSync 193
Misc 194
CapsLock 194
Touch Screen Disable 194
Enable Keypad Backlight 194
Status Popup 195
Network and Dialup Options 196
Owner 197
Password 199
PC Connection 200
Peripherals 201
Heaters 201
Power 202
Regional and Language Settings 204
Registry 206
Remove Programs 207
Stylus 208
System 209
General Tab 209
Memory Tab 210
Device Name Tab 210
Copyrights Tab 211
Volume and Sounds 212
Good Scan and Bad Scan Sounds 213
WiFi Control Panel 213
Enabler Installation and Configuration 214
Introduction 214
Installation 214
Installing the Enabler on LXE Devices 214
Briefly . . . 214
Enabler Uninstall Process 215
Stop the Enabler Service 215
Update Monitoring Overview 215
Mobile Device Wireless and Network Settings 216
Preparing an LXE Device for Remote Management 217
Using Wavelink Avalanche to Upgrade System Baseline 218
Version Information on LXE Mobile Devices 218
E-EQ-MX7CERG-A [ viii ] MX7 Tecton™ CE Reference Guide
Page 11

Table of Contents
User Interface 219
Enabler Configuration 220
File Menu Options 221
Avalanche Update using File | Settings 222
Menu Options 222
Connection 223
Execution 224
Server Contact 225
Preferences 226
Taskbar 227
Scan Config 228
Display 229
Shortcuts 230
Adapters 231
Status 234
Exit 235
Using Remote Management 236
Using eXpress Scan 237
Step 1: Create Barcodes 237
Step 2: Scan Barcodes 237
Step 3: Process Completion 239
Wireless Network Configuration for LXE Devices 240
Important Notes 240
Summit Client Utility 241
Help 241
Summit Tray Icon 241
Wireless Zero Config Utility and the Summit Radio 242
Main Tab 243
Admin Login 244
Profile Tab 245
Buttons 246
Profile Parameters 247
Status Tab 249
Diags Tab 250
Global Tab 251
Custom Parameter Option 252
Global Parameters 253
Sign-On vs. Stored Credentials 257
How to: Use Stored Credentials 257
E-EQ-MX7CERG-A [ ix ] MX7 Tecton™ CE Reference Guide
Page 12

Table of Contents
How to: Use Sign On Screen 257
Windows Certificate Store vs. Certs Path 259
User Certificates 259
Root CA Certificates 259
Configuring the Profile 261
No Security 261
WEP 262
LEAP 263
PEAP/MSCHAP 264
PEAP/GTC 267
WPA/LEAP 269
EAP-FAST 271
EAP-TLS 273
WPA PSK 275
Certificates 276
Generating a Root CA Certificate 277
Installing a Root CA Certificate 281
Generating a User Certificate 283
Installing a User Certificate 289
Verify Installation 291
Keymaps 293
55 key Alphanumeric Keymap - Primary Delete 293
55 Key 5250 Alphanumeric KeyMap - Primary Delete 299
32 key Numeric-Alpha Keymap 305
55 key Alphanumeric Keymap - Primary Backspace 311
Technical Specifications 317
Hardware 317
Dimensions and Weight 318
Environmental Specifications 318
Network Card Specifications 319
Summit 802.11 a/b/g SDIO 2.4/5.0GHz 319
Bluetooth 319
AC Wall Adapter 319
AppLock Error Messages 320
Hat Encoding 327
Revision History 328
Index 329
E-EQ-MX7CERG-A [ x ] MX7 Tecton™ CE Reference Guide
Page 13
Introduction
The LXE® MX7 Tecton with Microsoft® Windows® Embedded CE 6 operating system (MX7 Tecton) is a rugged, portable,
hand-held mobile computer capable of wireless data communications. The MX7 Tecton can transmit information using an
802.11 network card and it can store information for later transmission through an RS-232 or USB port. The MX7CS (Cold
Storage) device functions normally in various temperature ranges.
The MX7 Tecton is vertically oriented and features backlighting for the display. Keypads are available in 55-key alphanumeric
and 32-key numeric-alpha versions.
This device can be scaled from a limited function batch computer to an integrated wireless scanning computer. A trigger handle
is available as an accessory.
The stylus attached to the handstrap is used to assist in entering data and configuration. Protective film for the touchscreen is
available as an accessory.
The MX7 Tecton is powered by a 2200mAh Lithium-Ion main battery pack and an internal Super-capacity (Super-cap) battery.
MX7CERG Reference guide for the user of an MX7 Tecton with a Windows Embedded CE 6 operating system.
MX7RG Reference guide for the user of an MX7 with a Windows CE 5 operating system.
End User License Agreement (EULA)
When a new MX7 Tecton starts up a EULA is displayed on the touchscreen. It remains on the screen until the Accept or
Decline button is tapped with a stylus.
Tap the Accept button to accept the EULA terms and the MX7 Tecton continues the startup process. The EULA is not
presented to the user again.
Tap the Decline button to decline the EULA and the MX7 Tecton will reboot. It will continue to reboot until the Accept button is
tapped with the stylus.
Note: The EULA will be presented after any operating system upgrade or re-installation, including language-specific
operating systems.
E-EQ-MX7CERG-A [ 1 ] MX7 Tecton™ CE Reference Guide
Page 14
Components
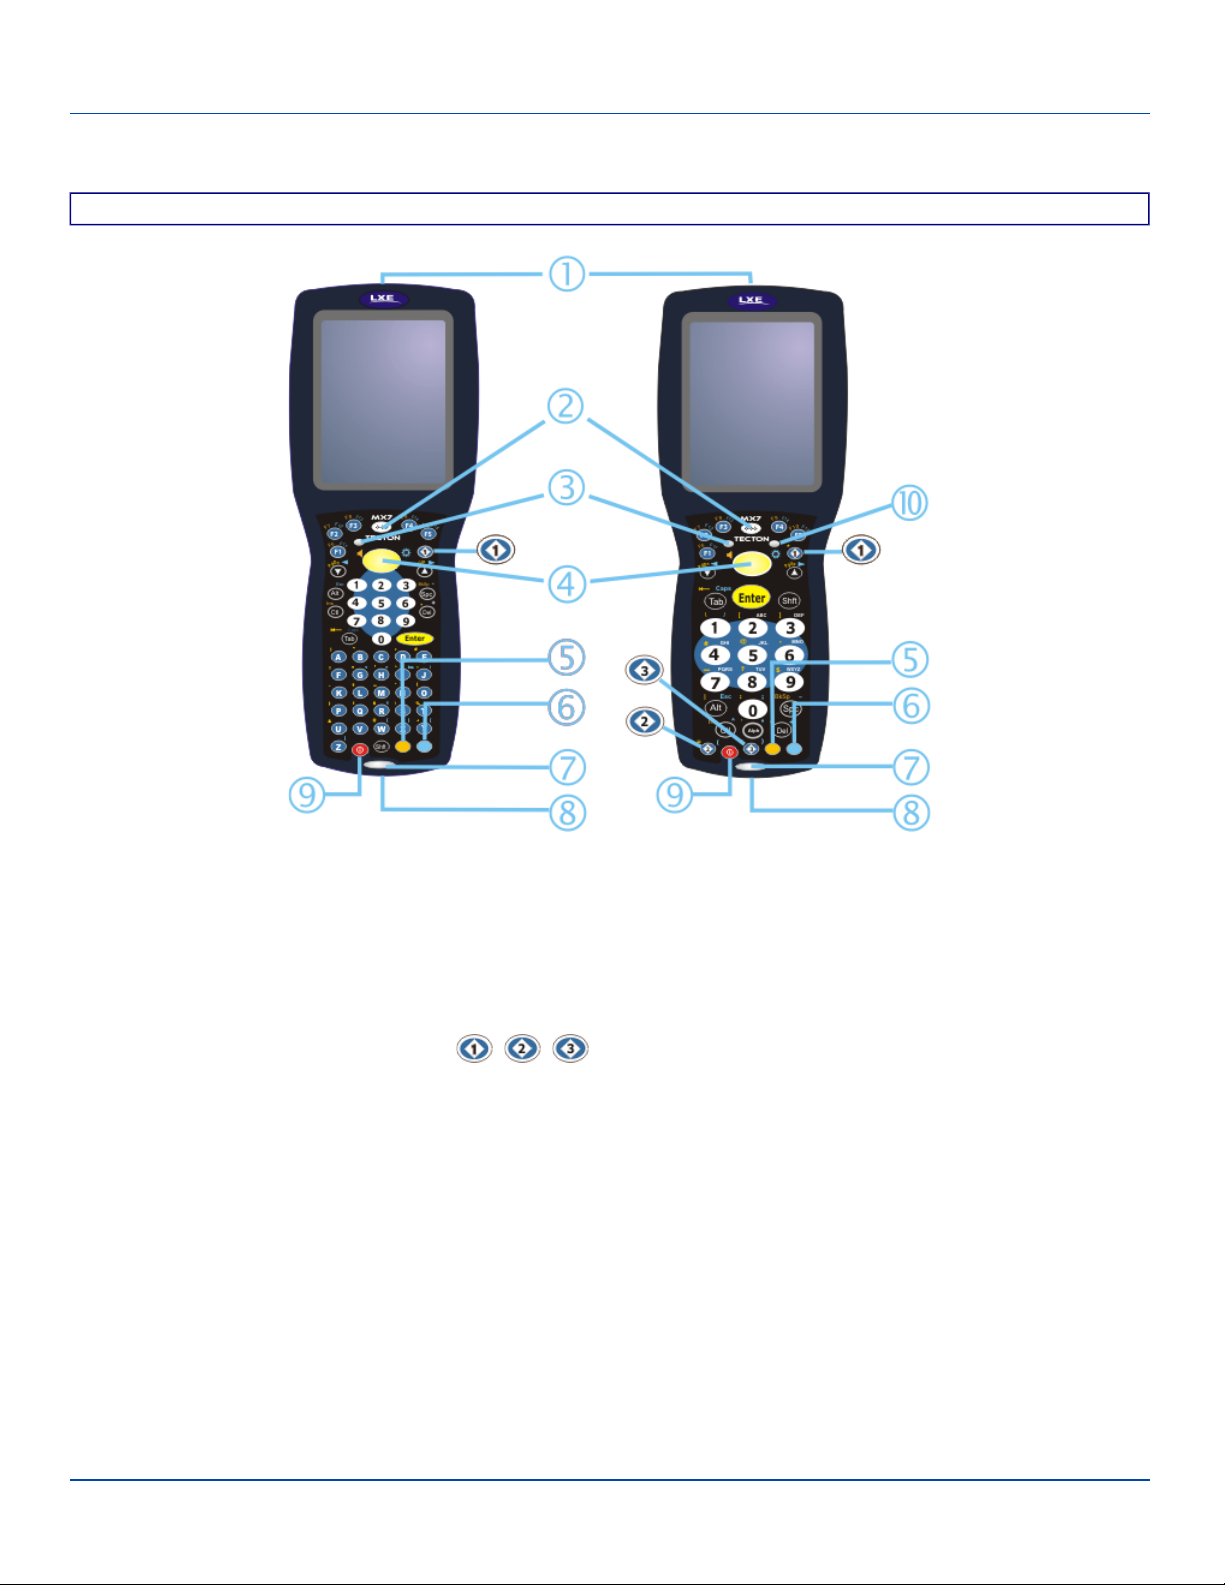
Components
Front
1. Scanner/Imager Aperture
2. Speaker
3. System Status LED
4. Scan Button
5. Orange Key (Sticky Key)
6. Blue Key (Sticky Key)
7. Scan Status LED
8. Cable Port
9. On / Off Button
10. Alpha Lock LED (32 Key keypad only)
Diamond Keys
E-EQ-MX7CERG-A [ 2 ] MX7 Tecton™ CE Reference Guide
Page 15
I/O Port and Cables
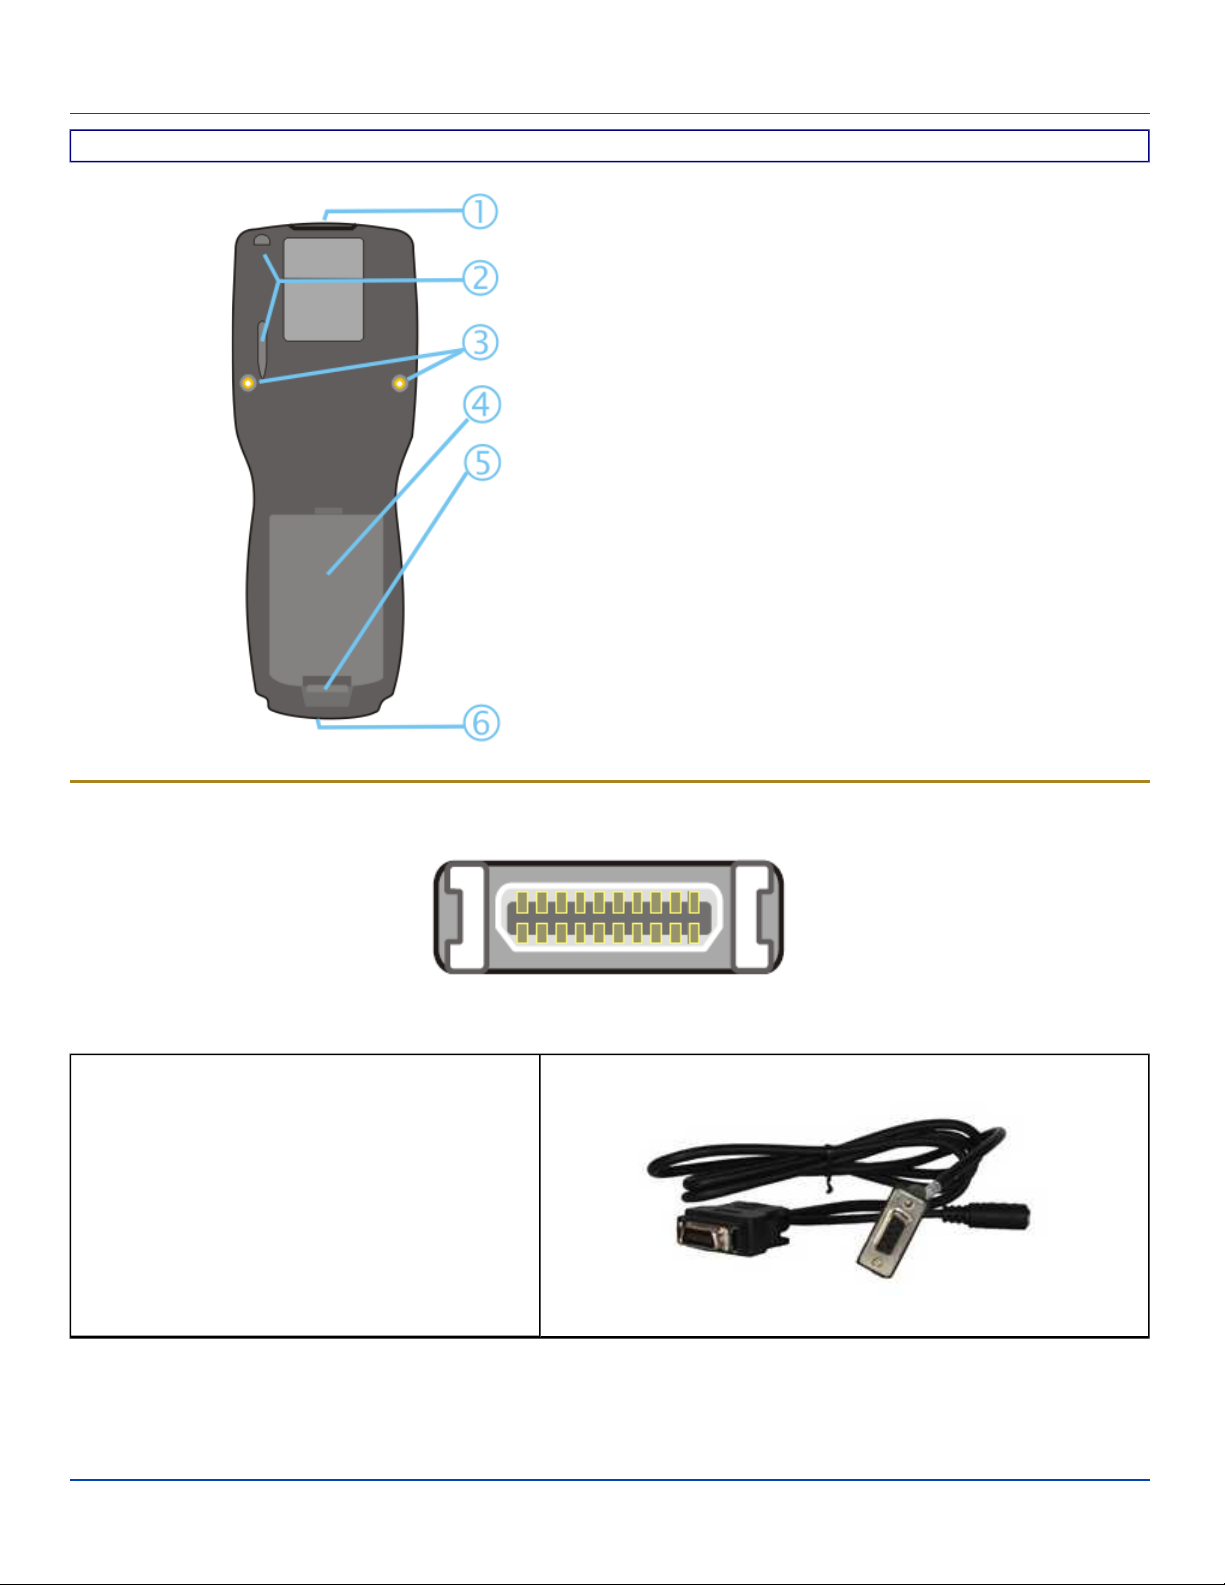
Back
1. Scanner/Imager Aperture
2. Stylus and Stylus Pocket
3. Trigger Handle Attach Points
4. Main Battery
5. Battery Fastener
6. Cable Port
I/O Port and Cables
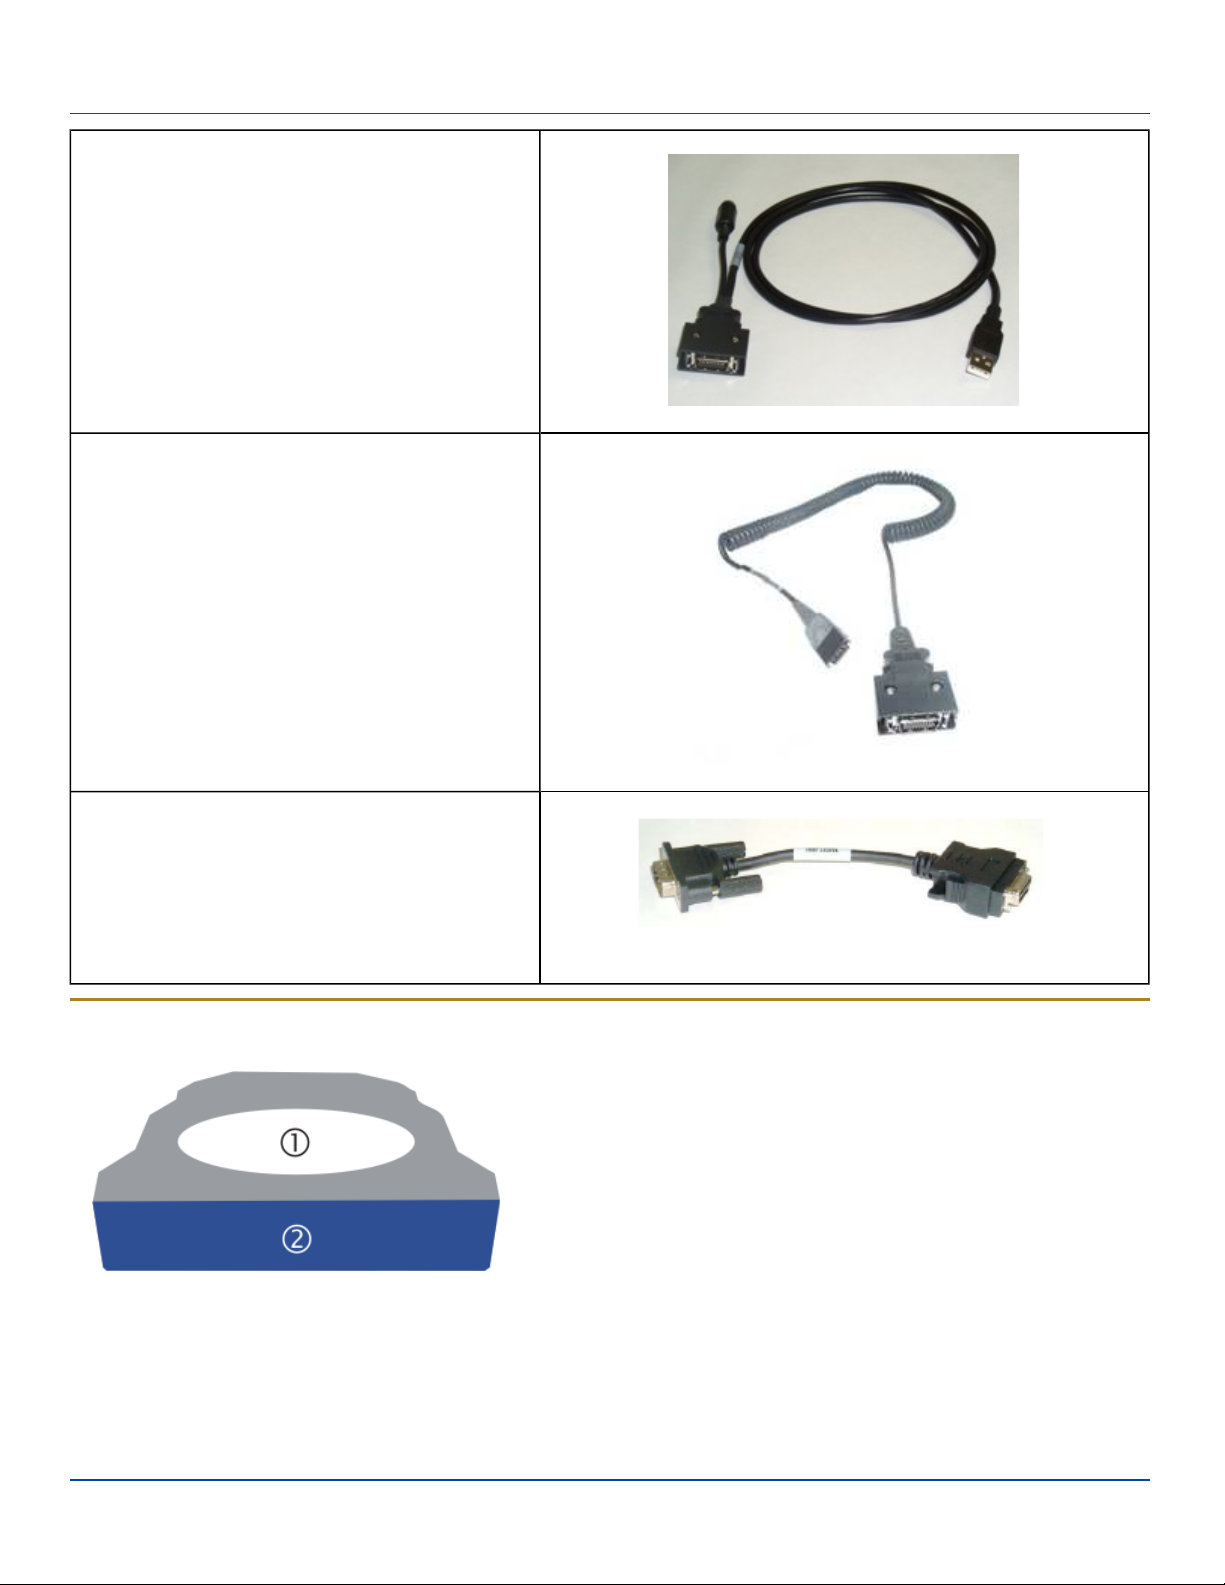
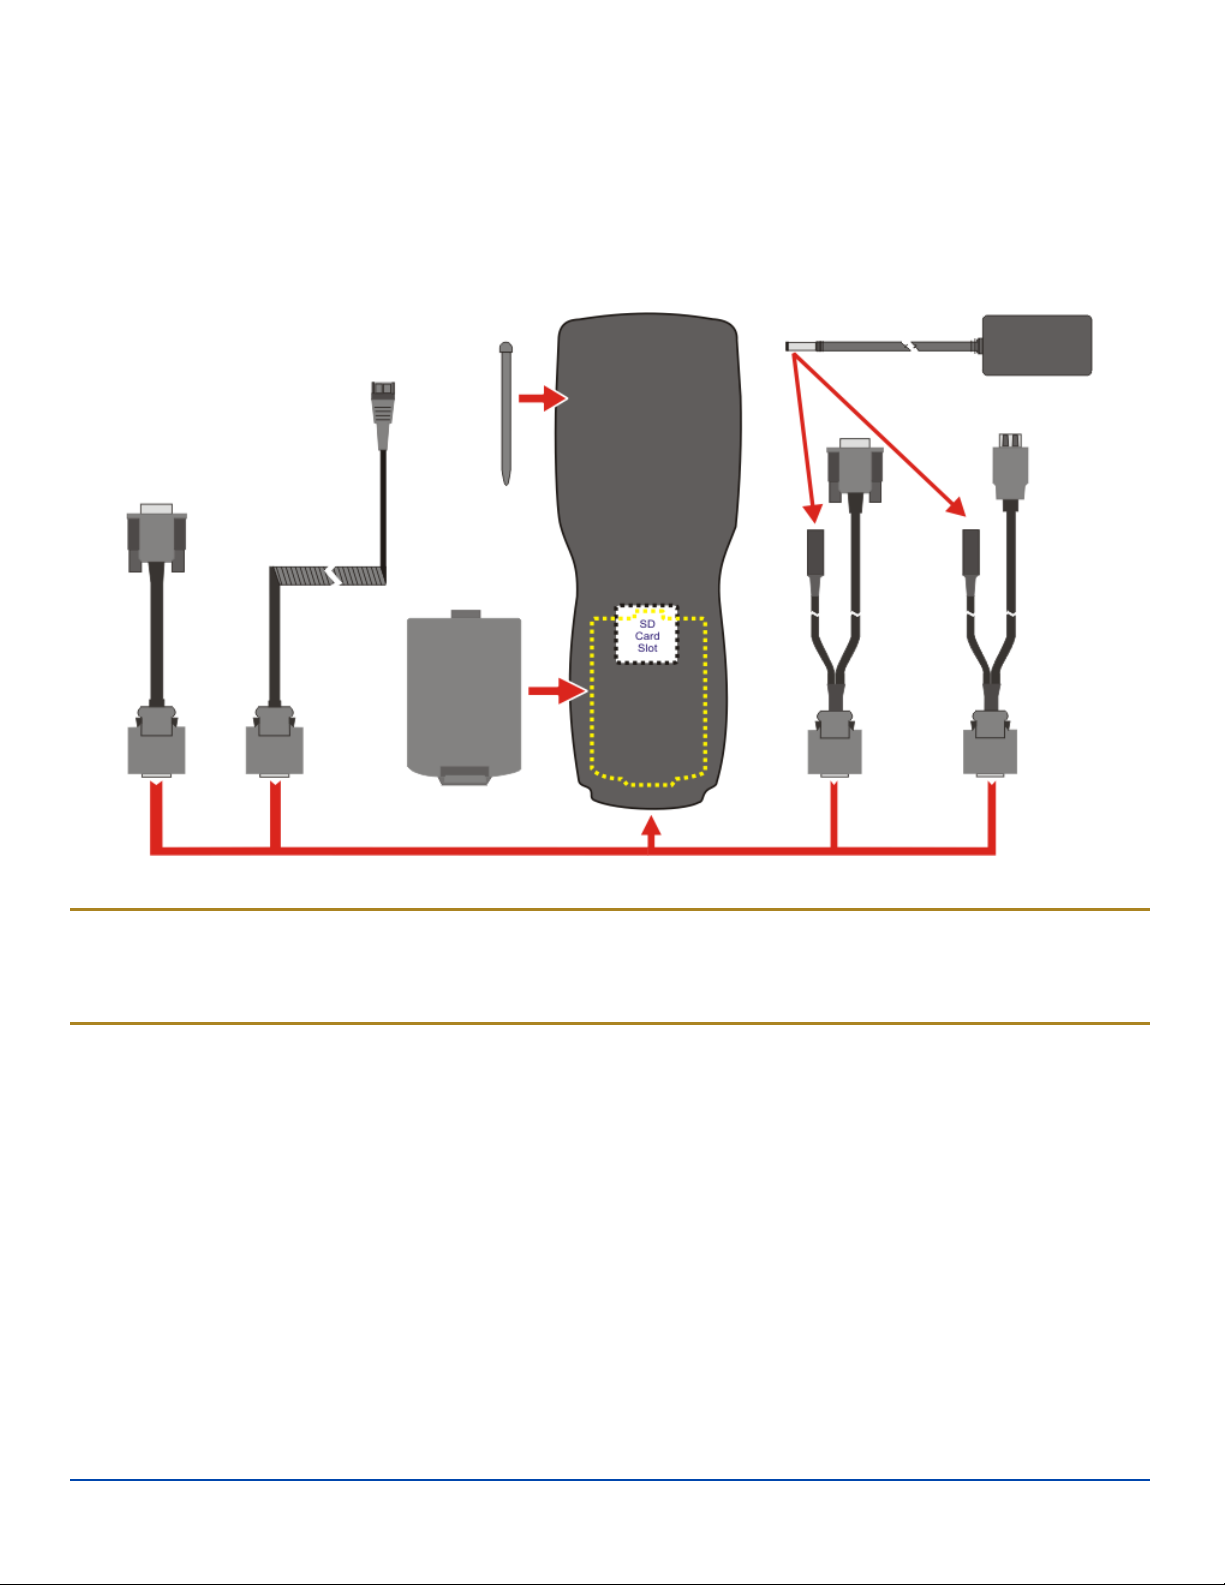
Cable: Multipurpose RS-232 and Power
MX7055CABLE
I/O Port
E-EQ-MX7CERG-A [ 3 ] MX7 Tecton™ CE Reference Guide
Page 16
Scanner / Imager Aperture
Cable: Multipurpose USB and Power
MX7052CABLE
Adapter/Cable : Audio
MX7060CABLE
Adapter: RS-232 PC port to D9 male
MX7058CABLE
Scanner / Imager Aperture
1. Scanner Aperture
2. MX7 Tecton Front
Caution: Never stare directly into the beam aperture.
If Continuous Scan Mode has been enabled (default is disabled), the laser is always on and decoding. Caution: Laser beam
is emitted continuously. Do not stare into the laser beam.
E-EQ-MX7CERG-A [ 4 ] MX7 Tecton™ CE Reference Guide
Page 17
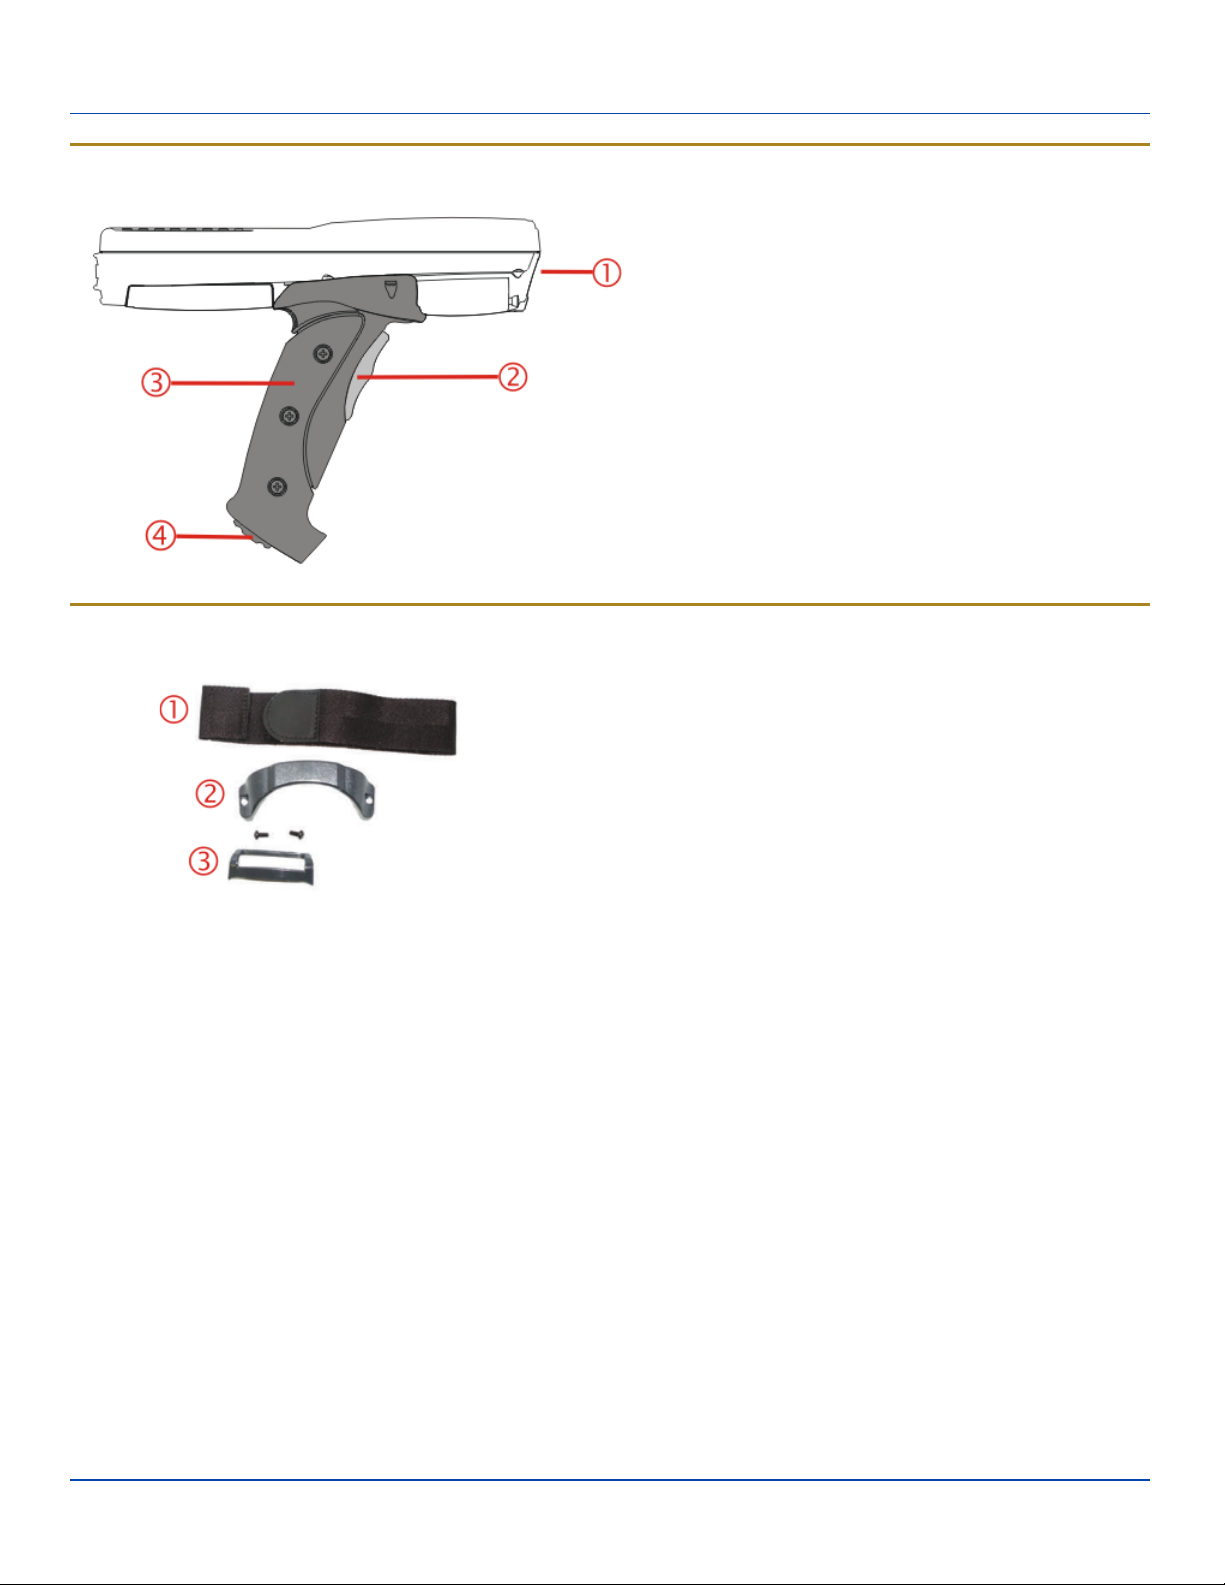
Handle
Handle
Handstrap
1. Imager / Scanner Aperture
2. Trigger
3. Handle
4. Tether Attach Point
1. Handstrap
2. Handstrap Retainer Bracket and mounting screws
3. Handstrap Clip
E-EQ-MX7CERG-A [ 5 ] MX7 Tecton™ CE Reference Guide
Page 18
Keypads
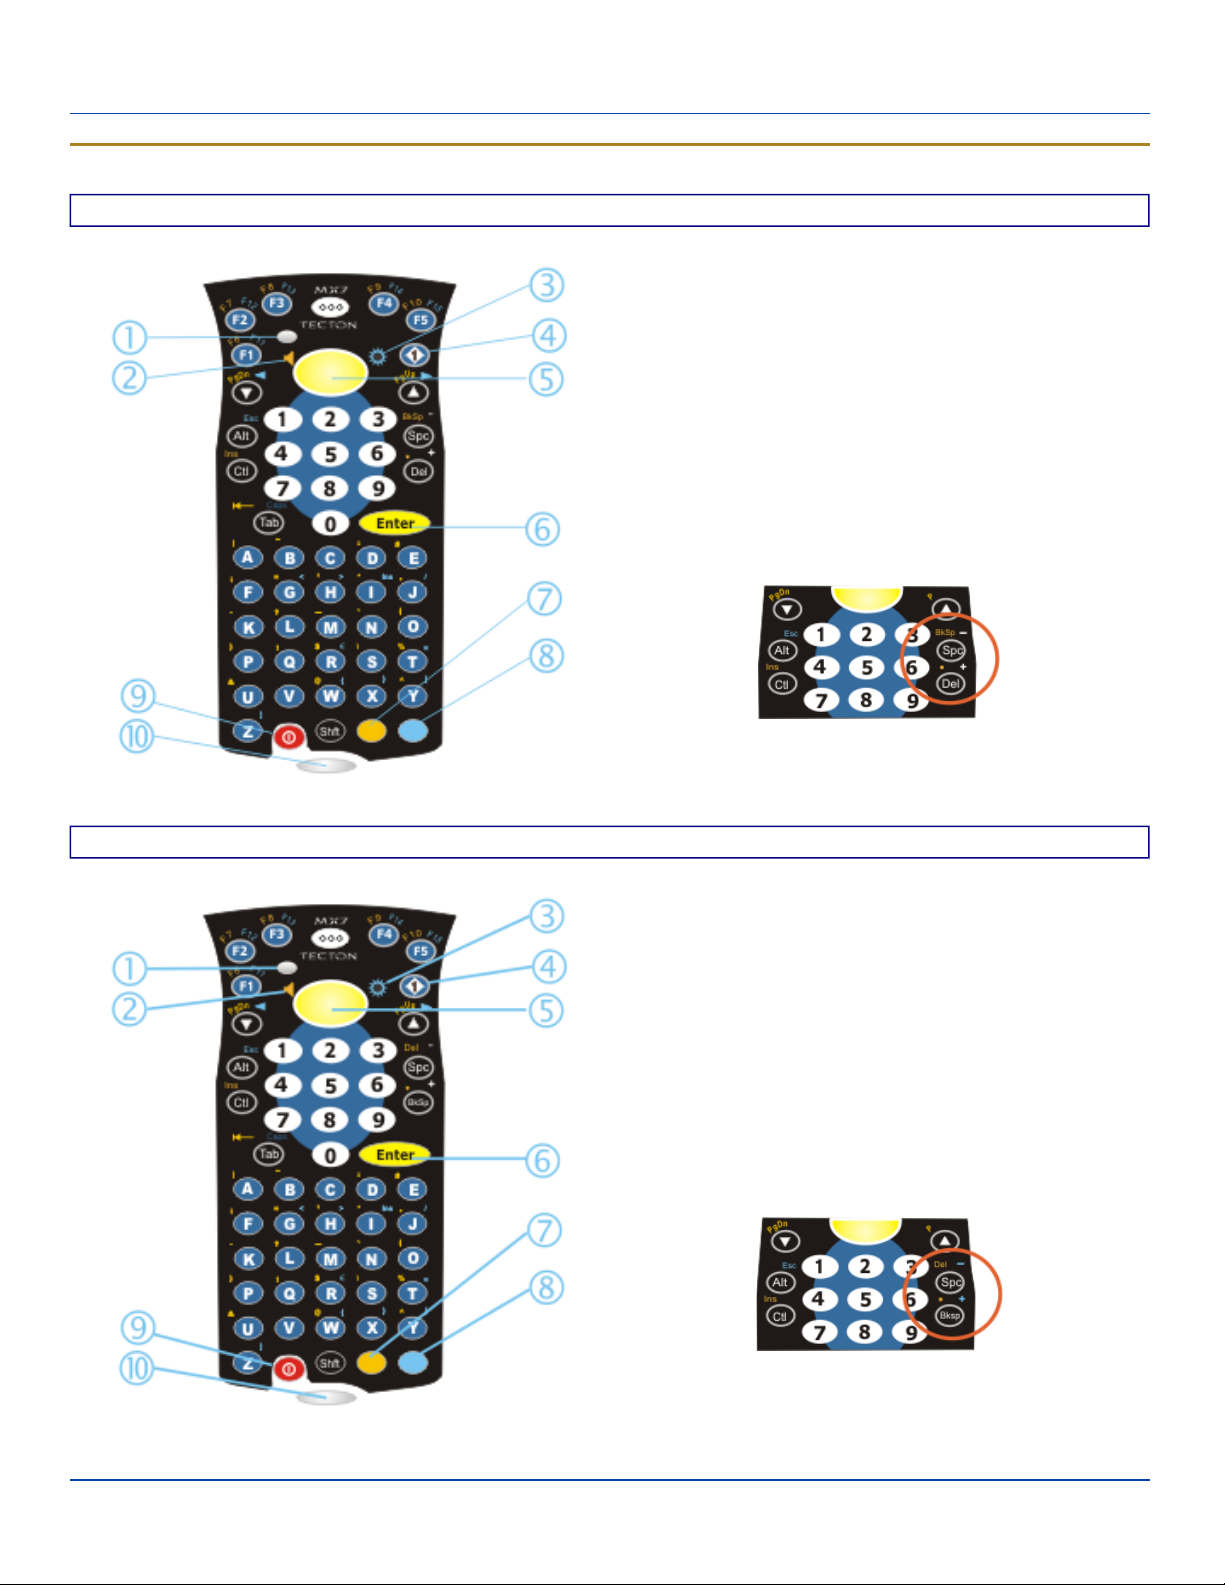
Keypads
55 Key Delete Primary ANSI Keypad
1. System Status LED
2. Volume Control Icon
3. Display Brightness Icon
4. Diamond Key
5. Scan Button
6. Enter Key
7. Orange Key (Sticky Key)
8. Blue Key (Sticky Key)
9. On Off Button
10. Scan Status LED
55 Key Backspace Primary ANSI Keypad
Spc and Del key location
1. System Status LED
2. Volume Control Icon
3. Display Brightness Icon
4. Diamond Key
5. Scan Button
6. Enter Key
7. Orange Key (Sticky Key)
8. Blue Key (Sticky Key)
9. On Off Button
10. Scan Status LED
Spc and Bksp key location
E-EQ-MX7CERG-A [ 6 ] MX7 Tecton™ CE Reference Guide
Page 19
Keypads
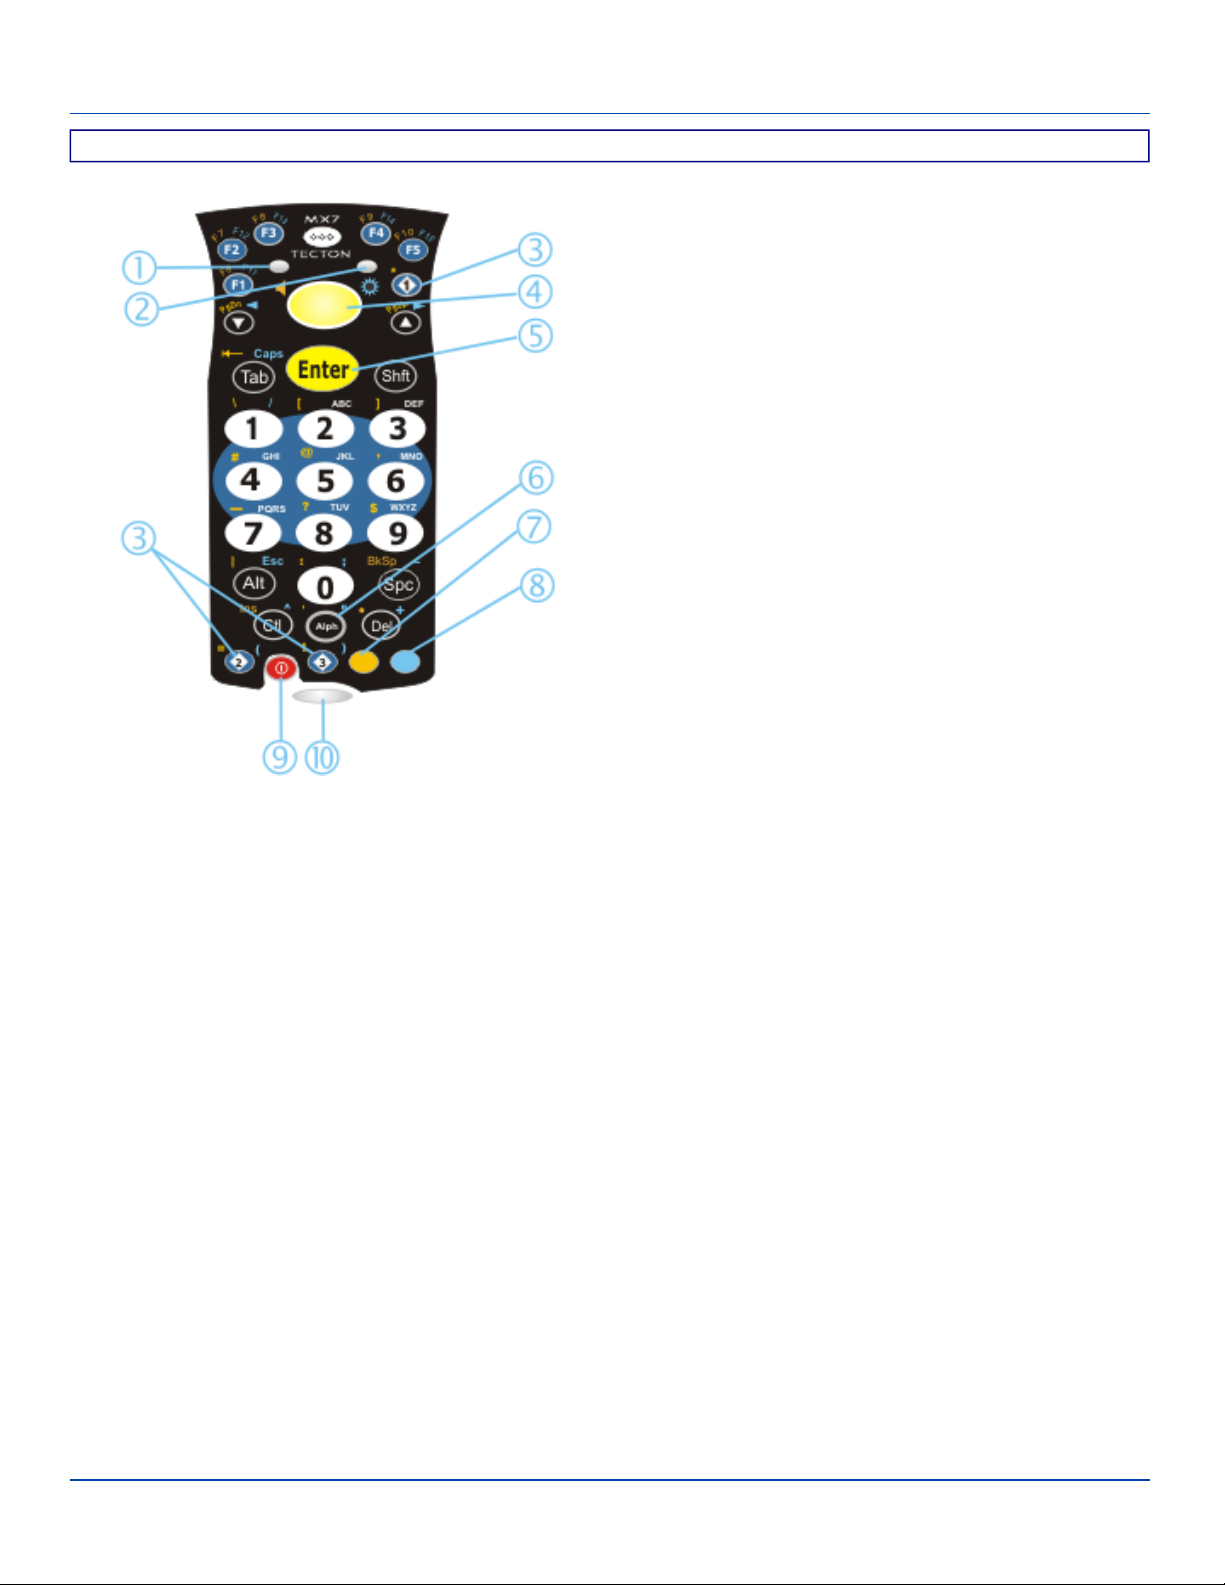
32 Key Numeric-Alpha Keypad
1. System Status LED
2. Alpha Status LED
3. Diamond Keys
4. Scan Button
5. Enter Key
6. Alph Key
7. Orange Key (Sticky Key)
8. Blue Key (Sticky Key)
9. On Off Button
10. Scan Status LED
E-EQ-MX7CERG-A [ 7 ] MX7 Tecton™ CE Reference Guide
Page 20

Reboot Sequences
Reboot Sequences
When the Desktop is displayed or an application begins, the power up sequence is complete. If you have previously saved
your settings, they will be restored on reboot. Application panel changes are saved when ok is tapped on an application
properties panel.
During the processes that follow there may be small delays while the wireless client connects to the network and Bluetooth
relationships establish or re-establish.
Suspend / Resume
Quickly tapping the Power key places the MX7 Tecton in Suspend mode. Quickly tapping the Power key again, pressing any
key, pressing the trigger (on the trigger handle), or tapping the touchscreen, returns the MX7 Tecton from Suspend. The
System LED blinks green when the video display is Off (and the device is not in Suspend Mode or critical suspend).
or
Tap Start then tap Suspend. The MX7 Tecton enters suspend mode. Quickly tapping the Power key again, pressing any key,
pressing the trigger (on the trigger handle), or tapping the touchscreen, returns the MX7 Tecton from Suspend
Warmboot
A warmboot reboots the MX7 Tecton without erasing any registry data. Configuration settings and data in RAM are preserved
during a warmboot. Network sessions are lost and any data in running applications that has not been previously saved may be
lost. CAB files already installed remain installed.
l Using the Registry, select Start | Settings | Control Panel | Registry and tap the Warmboot button. The MX7 Tecton
immediately warmboots.
l Using the Start menu, select Start | Run and type WARMBOOT in the text box. Press Enter. The MX7 Tecton imme-
diately warmboots. The WARMBOOT text command is not case-sensitive1.
l Using the keypad, press the Ctl key and release it, press the Alt key and release it, press the Del key and release it. The
MX7 Tecton immediately warmboots.
Restart
Start | Settings | Control Panel | Registry
Tap the Restart button on the Registry panel. The operating system performs the operation and then the MX7 Tecton restarts.
The OS and CAB files are reloaded. Restart erases the contents of RAM but preserves all registry configuration settings. Any
files that are stored only in RAM drives will be lost. Restart erases any user-stored applications or data, but preserves anything
stored on the System drive in flash (which are files explicitly copied to the System folder, plus the registry files created by the
OS). All CABs / applications that are configured are reinstalled by LXE’s launch utility. Touch screen calibration data is
preserved. Network sessions are lost, and any data in running applications that has not been specifically sent to storage may
be lost.
1
The text typed in the text box can be upper or lower case or a combination of upper and lower case letters.
E-EQ-MX7CERG-A [ 8 ] MX7 Tecton™ CE Reference Guide
Page 21

MX7 Tecton Troubleshooting
MX7 Tecton Troubleshooting
Can’t change the date/time or
adjust the volume.
Touchscreen is not accepting
stylus taps or needs
recalibration.
The MX7 Tecton seems to
lockup as soon as it is rebooted.
New MX7 Tecton main batteries
don't last more than a few hours.
Keep losing ActiveSync
connection between my host
computer and the MX7 Tecton.
AppLock is installed and may be running in User Mode on the MX7 Tecton. AppLock user
mode restricts access to the control panels.
If the touchscreen is not accepting stylus taps, press <Ctrl>+<Esc> to force the Start
Menu to appear. Use the tab, backtab, arrow keys and Enter to move the highlight to Start |
Settings | Control Panel | Registry | Warmboot. Press Enter and the MX7 Tecton
warmboots.
There may be slight delays while the wireless client connects to the network, authorization
for voice-enabled applications complete, Wavelink Avalanche management of the MX7
Tecton startup completes, and Bluetooth relationships establish or re-establish. When the
desktop appears or an application begins, the MX7 Tecton is ready for use.
New batteries must be fully charged prior to first use. Li-Ion batteries (like all batteries)
gradually lose their capacity over time (in a linear fashion) and never just stop working. This
is important to remember – the MX7 Tecton is always ‘on’ even when in the Suspend state
and draws a small amount of battery power at all times.
Note: Cold Storage Battery Life – minimum 2.5 hours while the unit is roaming,
powered on with ambient temperature -10°C (14°F) or above, Display backlight
turned on, Keypad LED backlight on, radio connected to Access Point, and scanner
decoding barcodes. The LXE Li-Ion main battery (MX7A381BATT) has been
designed specifically for the Cold Storage device. This 1250mAh battery has a blue
label while the standard 2200mAh battery has a white (MX7A380BATT) label.
Disconnect the cable, wait 1-2 seconds and reconnect the cable. The MX7 Tecton will not
enter suspend as long as an ActiveSync session is running. ActiveSync session prevents
it from going into suspend.
E-EQ-MX7CERG-A [ 9 ] MX7 Tecton™ CE Reference Guide
Page 22
System Hardware
Hardware
802.11 a/b/g Wireless Client
The MX7 Tecton has an LXE 802.11 network card that supports diversity with two internal antennas. The CPU board does not
allow hot swapping the network card. WEP, WPA and LEAP are supported.
Central Processing Unit
The CPU is an 806MHz Intel Xscale PXA320 CPU. The operating system is Microsoft Windows Embedded CE 6.0. The OS
image is stored in internal flash and is loaded into RAM for execution. Xscale turbo mode switching is supported and turned on
by default.
The MX7 Tecton supports the following I/O components of the core logic:
l One SD card slot under the main battery pack.
l One serial port.
l One Digitizer Input port (Touchscreen).
Program CAB files, MX7 Tecton utilities, wireless drivers, the registry and registry backup information are stored in internal
Flash.
E-EQ-MX7CERG-A [ 10 ] MX7 Tecton™ CE Reference Guide
Page 23

System Memory
System Memory
The CPU configuration supports 256MB on-board flash. The system optimizes for the amount of RAM available.
Internal flash is used for boot loader code and system low-level diagnostics code. Bootloader code is validated at system
startup.
Internal SD Card Slot
One SD Memory card slot for Expansion Memory, located in the main battery well, and protected by a rubber flap. 1GB and
4GB flash memory cards are available from LXE.
Video Subsystem
The touchscreen is a 3.5” (8.9 cm) diagonal viewing area, ¼ VGA 320 by 240 pixel TFT Reflective Active Color LCD.
Backlighting is available and can be turned on and off with key sequences. The turn-off timing is configured through the Start |
Settings | Control Panel| Display icon. The display controller supports Microsoft CE 6 graphics modes.
A touchscreen allows mouse functions (tapping on the display or signature capture) using an LXE approved stylus. The
touchscreen has an actuation force with finger less than 100 grams. The color display has an LED backlight and is optimized
for indoor use.
The display appears black when the MX7 Tecton is in Suspend Mode.
Power Supply
The MX7 Tecton uses one of two batteries for operation.
l Main Battery A replaceable 2200 mAh Lithium-Ion (Li-Ion) battery pack. The battery pack recharges while in the MX7
Tecton when the device is connected to the optional external MX7 Tecton AC/DC power source. The main battery pack
can be removed from the MX7 Tecton and inserted in the MX7 Tecton Multi- Charger which simultaneously charges up
to five battery packs in four hours. A new main battery pack can be fully charged in 6 hours when it is in an MX7 Tecton
connected to AC power and 3.5 hours when it is in the MX7 Tecton multicharger.
l Low temperature Lithium-Ion (Li-Ion) batteries have a 1250 mAh capacity.
l Super-capacitor (Super-cap). No backup "battery" is used. Super-cap internal battery maintains RAM and other vital set-
tings during a critical shutdown.
Note: An uninterrupted external power source (wall AC adapters) transfers power to the MX7 Tecton’s internal charging
circuitry which, in turn, recharges the main battery and Super-cap battery. Frequent connection to an external power
source, if feasible, is recommended to maintain main battery charge status as the Super-cap battery cannot be recharged
by a dead or missing main battery.
E-EQ-MX7CERG-A [ 11 ] MX7 Tecton™ CE Reference Guide
Page 24

COM Ports
COM Ports
The MX7 Tecton has one mini D 20-pin serial port (a multifunction I/O port) that can be configured by the user. It has a power
input interface to allow powering the MX7 Tecton from an external source (AC/DC power supply or vehicle power). The power
input interface range is 10 - 18VDC.
RS-232 Serial Port
Configured as COM1. Bi-directional full duplex and supports data rates up to 115 Kb/s. The port does not have RI or CD
signals nor does it support 5V switchable power on pin 9 for tethered scanners. The serial port driver supports full duplex
communications over the serial port. It supports data exchange via ActiveSync, but does not automatically start ActiveSync
when connected. The Cable, Multipurpose RS-232 and Power and Adapter, RS-232 terminal port to D9 male accessories can
be used with the RS-232 serial port. External AC power is available when the multipurpose RS-232/Power cable is connected.
External AC power is not available for the Adapter, RS-232 terminal port to D9 male option. Power is drawn from the main
battery pack when this adapter is connected..
USB Client Port
The MX7 Tecton has one USB Client port for ActiveSync applications. An accessory USB cable, Cable, Multipurpose USB
and Power is available to connect the MX7 Tecton to a USB Type A plug on a PC for ActiveSync functions. External AC power
is available when the multipurpose USB Client/Power cable is connected.
Audio Connection
An audio headset interface is available using the Adapter, Audio accessory with the I/O port. The connection cable connects
the MX7 Tecton to a Voxware quick disconnect 4-pin interface. This cable adapts to specific styles of headsets for voice input,
stereo or mono output. The MX7 Tecton with a Summit Client supports mono only. A 3-wire connector with (at a minimum)
connections for ground, microphone, and 1 speaker. Connecting the headset to the MX7 Tecton COM port turns off audio
output to the MX7 Tecton speaker on the front of the mobile device. All sounds previously directed to the speaker are redirected
to the headphone, including beeps. Bias voltage for an electric condenser microphone is available. External AC power is not
available for this option. Power is drawn from the main battery pack.
Audio Support
Speaker The speaker supplies audible verification signals normally used by the Window’s CE operating system. The speaker
is located on the front of the MX7 Tecton, above the MX7 Tecton logo. The mobile device emits a Sound Pressure Level
(loudness) of at least 102 dB measured as follows:
l Frequency: 2650 + 100 Hz
l Distance: 10 cm on axis in front of Speaker opening in front of unit.
l Duration : Continuous 2650 Hz tone.
The default is 1 beep for a good scan and 2 beeps for a bad scan.
Volume Control. Volume control is managed by a Windows CE control panel applet, an API and the Orange-Scan up/down
arrow key sequence.
Voice. All Microsoft-supplied audio codecs are included in the OS image. The hardware codecs, the input and output analog
voice circuitry and the system design are designed to support voice applications using a headset connected to the Adapter,
Audio accessory cable and the MX7 Tecton I/O connector.
E-EQ-MX7CERG-A [ 12 ] MX7 Tecton™ CE Reference Guide
Page 25

Scanner / Imager Port
Scanner / Imager Port
The MX7 Tecton has one integrated barcode scanner/imager port. Only one scan engine is installed at a time. Scan engines
are not “hot swappable”. The MX7 Tecton may have one of three Symbol laser scan engines:
l Short Range Laser Scanner, 955I
l Low Power Scanner, 955E (see Note)
l Multi-Range "LORAX" Laser, 1524ER
or a Hand Held Products 2D Area Imager, 5300.
Note: Low Power Scanner, 955E does not support aim mode. Any attempt to adjust the aiming beam using SE955
programming barcodes will fail. The Low Power scanner does not decode Codablock, Code93i, Matrix 2 of 5 or Telepen
symbologies.
The integrated scan engine activates when the Scan button on the front of the MX7 Tecton is depressed or when the trigger on
an installed trigger handle is depressed. A system applet (Start | Settings | Control Panel | Data Collection) is available to
set scanner/imager options.
Functionality of the integrated scan engine driver is based on the decoder driver version installed in the MX7 Tecton. Functions
may include audible tones on good scan (at the maximum db supported by the speaker), failed scan, Scan LED indication of a
scan in progress, among other functions. If enabled, a vibration device provides a tactile response on a good scan event.
Bluetooth LXEZ Pairing
The MX7 Tecton contains Bluetooth version 2.1 with Enhanced Data Rate (EDR). Bluetooth device connection (or pairing) can
occur at distances up to 32.8 ft (10 meters) Line of Sight. The wireless client retains network connectivity while Bluetooth is
active.
The user will not be able to select PIN authentication or encryption on connections from the MX7 Tecton. However, the MX7
Tecton supports authentication requests from pairing devices. If a pairing device requests authentication or encryption, the
MX7 Tecton displays a prompt for the PIN or passcode. Maximum encryption is 128 bit. Encryption is based on the length of
the user’s passcode.
Bluetooth devices can be paired and managed using the LXEZ Pairing control panel (Start | Settings | Control Panel |
Bluetooth).
l The MX7 Tecton does not have a Bluetooth managed LED.
l The LED on a mobile Bluetooth scanner illuminates during a scanning operation; the Scan LED on the MX7 Tecton does
not illuminate.
l Barcode data captured by a mobile Bluetooth scanner is manipulated by the settings in the MX7 Tecton Data Collection
panel.
l Multiple beeps may be heard during a barcode scan using a mobile Bluetooth scanner; beeps from the mobile Bluetooth
scanner as the barcode data is accepted/rejected, and other beeps from the MX7 Tecton during final barcode data
manipulation.
E-EQ-MX7CERG-A [ 13 ] MX7 Tecton™ CE Reference Guide
Page 26
Keypads
Keypads
Using the 55 Key Alpha-Numeric Keypad
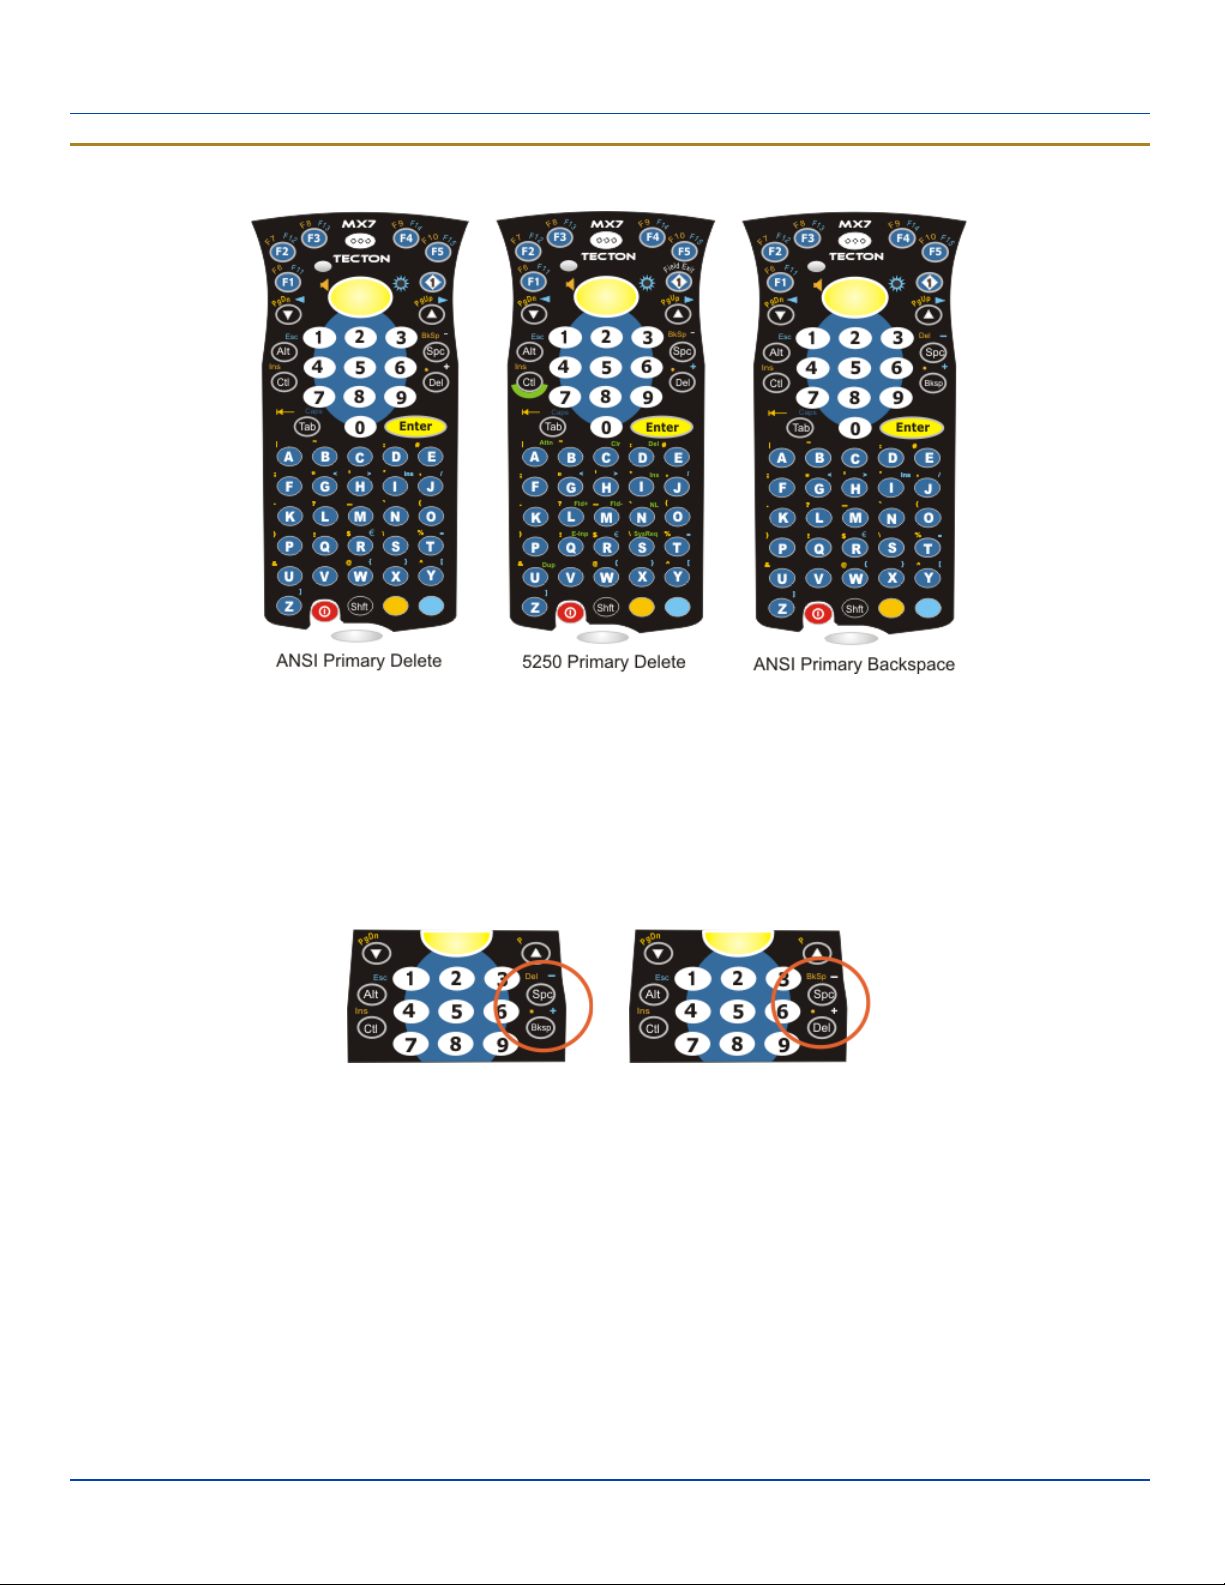
There are three options available for the 55 key keypad:
1. ANSI Primary Delete
2. 5250 Primary Delete. 5250 commands are displayed on the keypad overlay next to the affected keys.
3. ANSI Primary Backspace. This keypad resembles the ANSI Primary Delete keypad with the exception that the Del key
function on the ANSI Primary Delete keypad is replaced by the BkSp key function.
l When using a sequence of keys that includes a sticky key, press the sticky key first, release it, then press the rest of
the key sequence.
l When using a sequence of keys that includes the Orange or Blue keys, press the color key first then the rest of the key
sequence.
l Alphabetic keys default to lower case letters. Press the Shft key, then the alphabetic key for an uppercase letter.
l When the computer boots, the default condition of Caps (or CapsLock) is Off. The Caps (or CapsLock) condition can be
toggled with Blue plus Tab key sequence.
E-EQ-MX7CERG-A [ 14 ] MX7 Tecton™ CE Reference Guide
Page 27
Using the 32 Key Numeric-with Triple-Click Alpha
Using the 32 Key Numeric-with Triple-Click Alpha
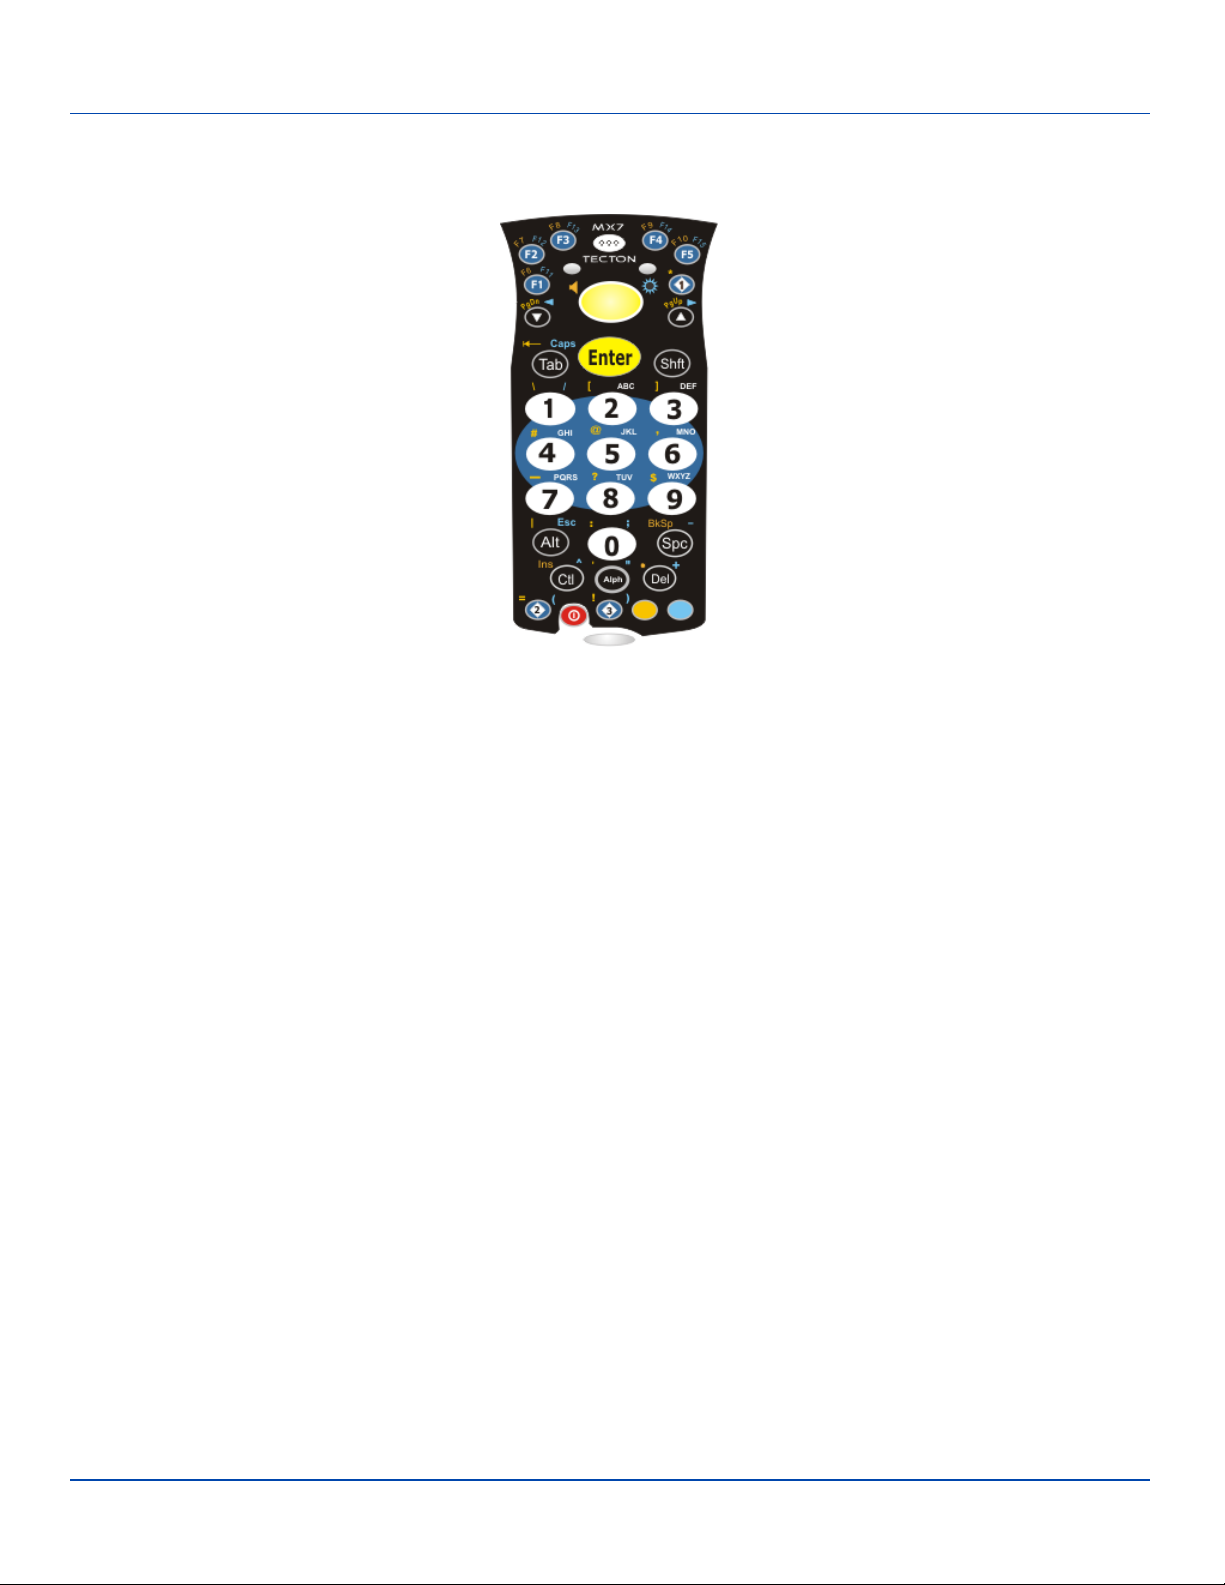
l When using a sequence of keys that require an alpha key, first press the Alph key. Use the Shft sticky key or the Caps
key sequence (Blue+Tab) for upper case alphabetic characters.
l Pressing the Alph key forces “Alpha” mode for the 2,3,4,5,6,7,8, and 9 keys. The 1 and 0 keys continue to place a 1 and
0 into the text field.
l To create a combination of numbers and letters before pressing Enter, remember to tap the Alph key to toggle between
Alpha and Numeric mode.
l When using a sequence of keys that do not include the Alph key but does include a sticky key, press the sticky key first
then the rest of the key sequence.
E-EQ-MX7CERG-A [ 15 ] MX7 Tecton™ CE Reference Guide
Page 28

Display
Display
The touchscreen display is an active color LCD unit capable of supporting VGA graphics modes. Display size is 240 x 320
pixels in portrait orientation. The covering is designed to resist stains. The touchscreen allows signature capture and touch
input. A pen stylus is included. The touchscreen responds to an actuation force (touch) of 4 oz. of pressure (or greater). The
color display is optimized for indoor lighting. The display is black when the device is in Suspend Mode or when both batteries
have expired and the unit is Off.
Display Backlight Timer
When the Backlight timer expires the display backlight is turned off. The default value for the battery power timer is 3 seconds.
The default value for the external power timer is “never” and the checkbox is blank.
The backlight timer dims the backlight on the touch screen and the keypad at the end of the specified time.
When the display wakes up, the Backlight timer begins the countdown again.
The keypad backlight can be synchronized with the display backlight activity.
E-EQ-MX7CERG-A [ 16 ] MX7 Tecton™ CE Reference Guide
Page 29
Status LEDs
Status LEDs
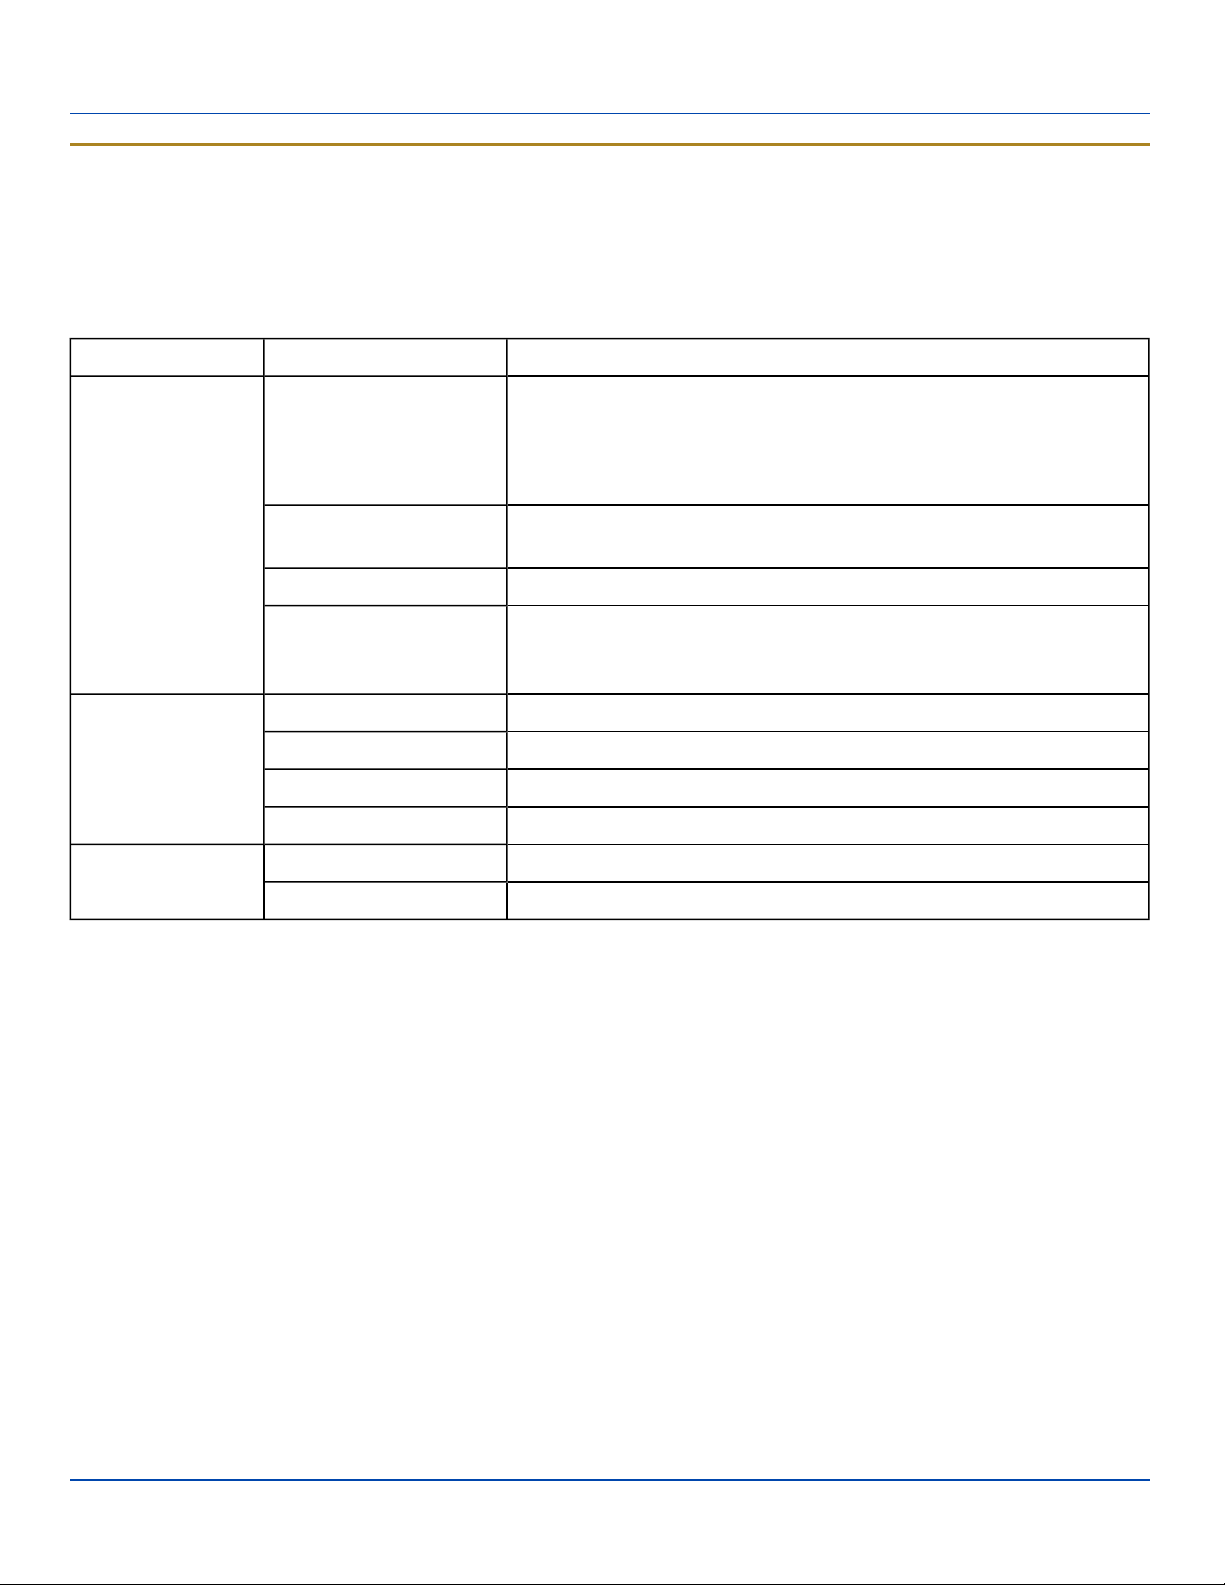
l The MX7 Tecton does not have a Bluetooth managed LED. Bluetooth activity indicators are located in the Desktop task-
bar.
l System Status LED is located at the top left of the keypad, above the Scan button.
l The Scan Status LED is located below the keypad.
l The Alpha Mode LED is located below the F4 key on the 32-key keypad (Numeric-Alpha keypad).
LED Color - Activity Indicates ...
Power fail. Replace the main battery with a fully charged main battery.
Red - Blinking
Or
Connect the MX7 Tecton to external AC power then replace the main
battery with a fully charged main battery.
System Status
Scan Status
Alpha Mode
(Alph LED)
Red - Steady
Main Battery Low. If the main battery is not replaced with a fully charged
battery before the main battery fails, the MX7 Tecton is turned Off.
Green - Blinking Display Off. No user intervention required.
MX7 Tecton is either full on - with the display on (backlights may be
No Color
dimmed when the status LED has no color) or in Suspend - with the display off.
Green - Steady Good scan.
Red – Steady Scan in progress.
No color Integrated Scanner / Imager ready for use.
Amber - Steady Barcode decoder engine is storing changed parameters.
Green - Steady MX7 Tecton 32-key is in Alpha character input mode.
No color MX7 Tecton 32-key is in Numeric key input mode.
E-EQ-MX7CERG-A [ 17 ] MX7 Tecton™ CE Reference Guide
Page 30
Cold Storage Configuration
Cold Storage Configuration
Highlights
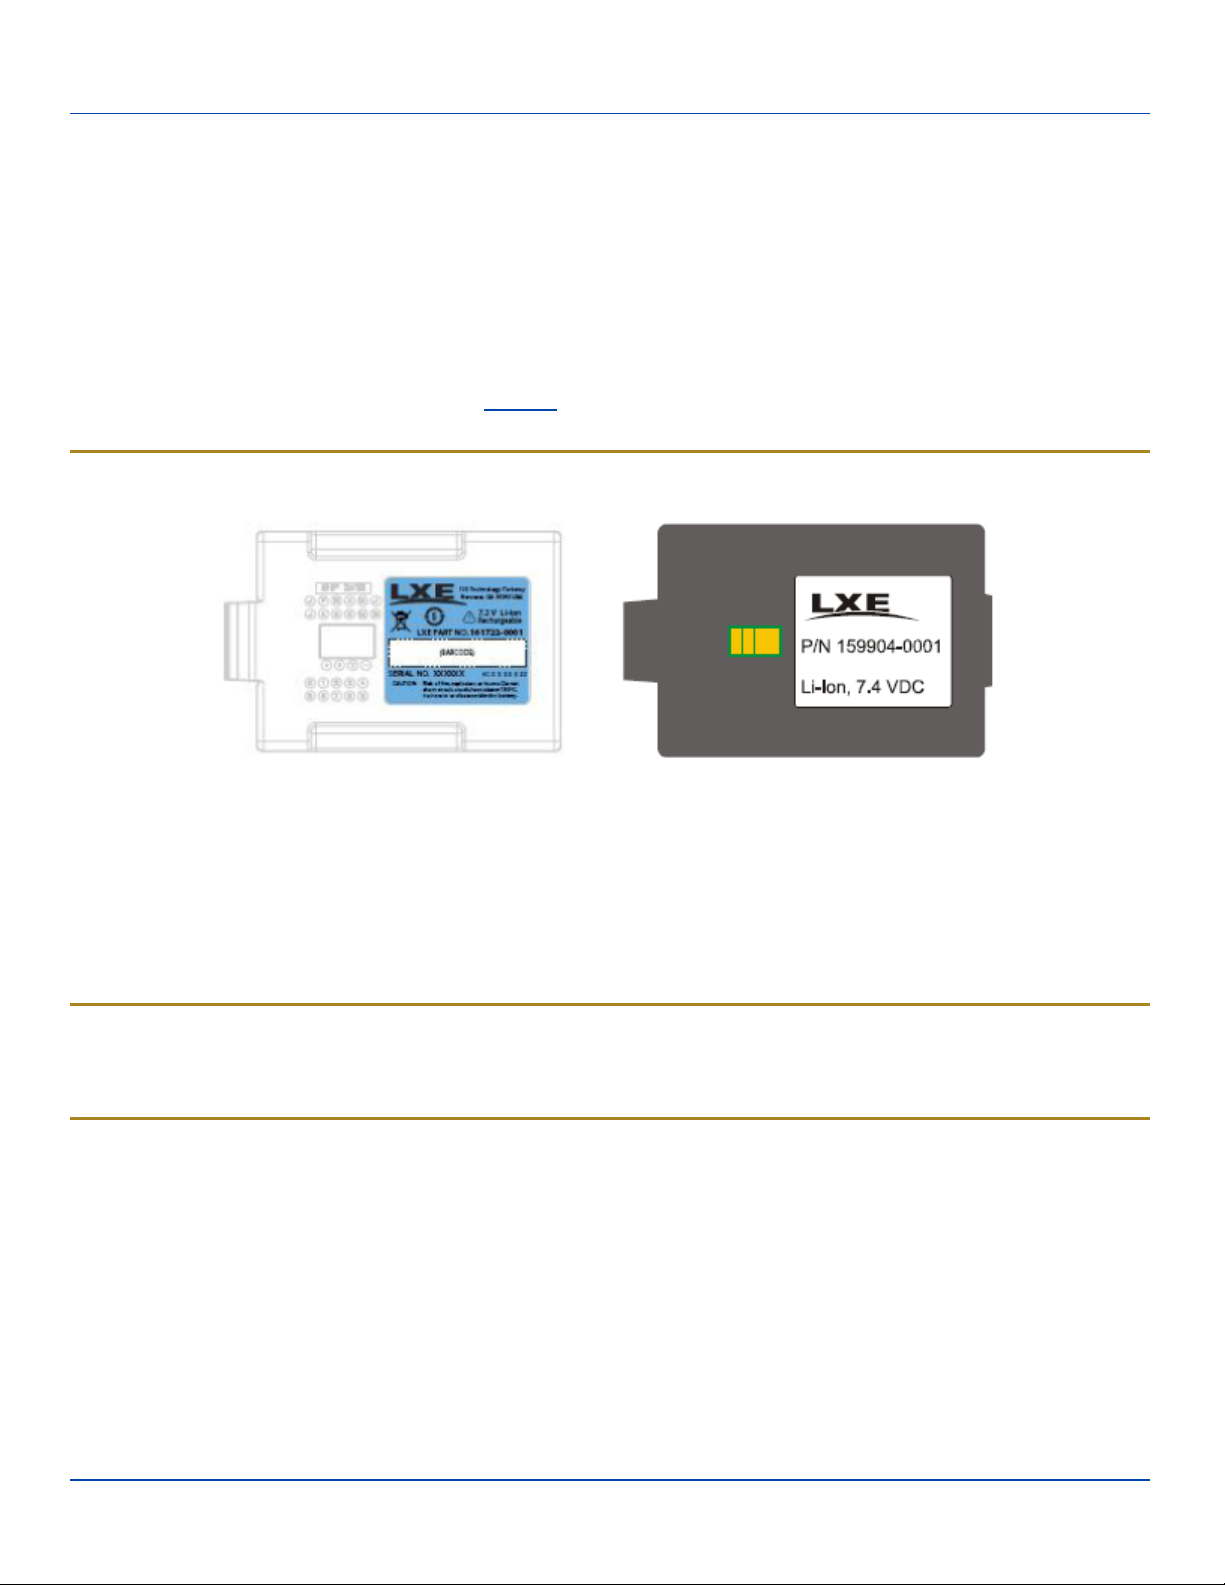
l MX7 Tecton 1250mAh Cold Storage battery has a blue label.
l Snowflake decal above the MX7 Tecton keypad.
l Heating element visible on the touchscreen and the scan aperture.
l Cold storage battery is recharged in the MX7 Tecton Battery Charger, MX7 Tecton Desk Cradle and when in an MX7
Tecton attached to an external power source (e.g. AC adapter).
The Cold Storage version is designed to operate normally when reading barcodes and moving from, and into, cold storage
warehouses, freezers and vehicles where the temperatures may vary between -30°C and 5°C (-22°F and 41°F).
Cold Storage Battery
Cold Storage Battery Label(L)andStandard MX7 Tecton Battery Label (R)
There is no change in the way the Cold Storage battery is inserted into and removed from the MX7 Tecton battery well. See the
section in the MX7 Tecton User Guide titled Inserting Fully Charged Battery for instruction.
Cold Storage Battery Life – minimum 2.5 hours while the unit is roaming, powered on with ambient temperature -10°C (14°F) or
above, Display backlight turned on, Keypad LED backlight on, radio connected to Access Point, and scanner decoding
barcodes. The LXE Li-Ion main battery (MX7A381BATT) has been designed specifically for the Cold Storage device. This
1250mAh battery has a blue label while the standard MX7 Tecton 2200mAh battery has a white (MX7A380BATT) label.
Snowflake Decal
A Cold Storage device has a snowflake decal between the touchscreen and the keypad. The decal is located to the left when
the mobile device screen is facing forward.
Heating Elements
Heating elements activate when ambient temperature drops below 0°C (32°F). LXE recommends using the stylus when
performing screen touch functions. There may be some condensation as the Cold Storage device moves in and out of cold
storage areas. The condensation on the touchscreen and the scan aperture quickly dissipates.
The touchscreen heating elements and scanner aperture heating elements may be visible when the Cold Storage device is
tilted slightly. No user interaction is required to turn the heating elements on/off. Stylus taps on the touchscreen function
normally. Due to the heating element overlaying the scan aperture, barcode scanning may require the user to move the scan
aperture closer to the barcode for good scan results.
E-EQ-MX7CERG-A [ 18 ] MX7 Tecton™ CE Reference Guide
Page 31

Recharging Batteries
Recharging Batteries
The Cold Storage battery pack can be recharged to full capacity while in a Cold Storage MX7 Tecton connected to an external
power source and also while the Cold Storage battery pack is inserted in the charging bay in a powered MX7 Tecton desk
cradle. The battery pack temperature must be above 10°C (50°F) before re-charging can begin.
Battery packs in the Battery Charger begin charging when the battery pack temperature is between 10°C (50°F) and 40°C
(100°F).
To charge the Cold Storage battery pack to full capacity, the Battery Charger firmware must be at V1.07 or greater. The
firmware version is noted on the battery charger label on the bottom of the device.
Contact your LXE representative if your battery charger firmware needs to be upgraded.
The Battery Charger and AC adapter are not designed to operate in a freezer or cold storage environment. Please refer to the
MX7 Tecton Battery Charger Guide for instruction and technical information.
Hot-swapping the Cold Storage Battery
The Cold Storage mobile device, with a fully charged Super-cap battery, retains data during a main battery hot-swap at -30°C (22°F) for at least 90 seconds. The temperature of the fully charged replacement Cold Storage main battery must be +10°C
(14°F), or above.
Normal Operation Temperature Ranges
l In the freezer where the temperature ranges between –30°C to -18°C (-22°F to 0°F).
l In the loading dock where temperature ranges between 0°C to 5°C (32°F to 41°F) with the relative humidity at 65%
l Moving between the freezer and a loading/unloading area where the temperature transitions from -30°C to 5°C (-22°F to
41°F).
E-EQ-MX7CERG-A [ 19 ] MX7 Tecton™ CE Reference Guide
Page 32

Power
Power Modes
On Mode
The Display
When the display is On:
l the keypad, touchscreen and all peripherals function normally
l the display backlight is on until the Backlight timer expires
The MX7 Tecton
After a new MX7 Tecton has been received, a charged main battery inserted, and the Power key tapped, the MX7 Tecton is
always On until both batteries are drained completely of power.
When the main battery and Super-cap battery are drained completely, the unit is in the Off mode. The unit transitions from the
Off mode to the On mode when a charged main battery is inserted or external power is applied and the Power key is pressed.
Suspend Mode
The Suspend mode is entered when the unit is inactive for a predetermined period of time or the user taps the Power key. MX7
Tecton Suspend timers are set using Start | Settings | Control Panel Power | Schemes tab.
Wake-up Events - all configurable via an LXE Power Management API call:
l Any key on the keypad
l Stylus touch on the touchscreen
l Handle trigger press
l Connecting to AC adapter
l Power button tap
l USB connection
l COM port control CTS
l Real time clock
l Bluetooth device reconnect / disconnect message
When the MX7 Tecton wakes up, the Display Backlight and the Power Off timers begin the countdown again. When any one of
the above events occurs prior to the Power Off timer expiring, the timer starts the countdown again. The MX7 Tecton does not
need to be placed in Suspend mode before hotswapping the main battery.
Off Mode
The unit is in Off Mode when the main battery and the Super-cap battery are depleted. Insert a fully charged main battery and
press the Power key to turn the MX7 Tecton On.
E-EQ-MX7CERG-A [ 20 ] MX7 Tecton™ CE Reference Guide
Page 33

Batteries
Batteries
The MX7 Tecton is designed to work with a Lithium-Ion (Li-ion) battery from LXE. Under normal conditions it should last
approximately eight to ten hours before requiring a recharge. The more you use the scanner or the wireless transmitter, the
shorter the time required between battery recharges.
A suspended MX7 Tecton maintains settings for a minimum of two days using a main battery that has reached the Low
Warning point and a fully charged Super-cap internal battery. The MX7 Tecton retains data, during a main battery hot swap, for
at least 5 minutes.
Note: New main battery packs must be charged prior to use. This process takes up to four hours in an MX7 Tecton
Battery Charger and six hours when the MX7 Tecton is connected to external power.
Checking Battery Status
Tap the Start | Settings | Control Panel | Power | Battery tab. Battery level, power status and charge remaining is
displayed.
Note: Power drain increases substantially in Turbo mode.
Note: When the Battery control panel is displayed power Management is disabled, meaning the backlights and display
will not turn off nor will the unit suspend, after the configured inactivity times expire.
Main Battery Pack
The main battery pack has a rugged plastic enclosure that is designed to withstand the ordinary rigors of an industrial
environment. Exercise care when transporting the battery pack making sure it does not come in contact with excessive heat or
any power source other than the MX7 Tecton Multi-Charger or the MX7 Tecton unit.
When the main battery pack is properly installed in the unit it provides up to eight hours of operation depending upon use and
accessories installed. The battery pack is resistant to impact damage and falls of up to four feet to a concrete surface. Under
normal conditions it should last approximately eight hours before requiring a recharge. The more you use the scanner or the
wireless transmitter, the shorter the time required between battery recharges.
Battery Hotswapping
Important: When the internal battery power is Low or Very Low (Start | Settings | Control Panel | Power) connect the AC
adapter to the MX7 Tecton before replacing the main battery pack.
When the main battery power level is low, the MX7 Tecton will signal the user with the low battery warning indicator (the Status
LED remains a steady red) that continues until the main battery is replaced, the battery completely depletes, or external power
is applied to the MX7 Tecton using an AC Adapter.
You can replace the main battery by first placing the MX7 Tecton in Suspend Mode then removing the discharged main battery
and installing a charged main battery within a five minute time limit (or before the Super-cap internal battery depletes). When
the main battery is removed the MX7 Tecton enters Critical Suspend state; the MX7 Tecton remains in Suspend mode, the
display is turned off and the internal battery continues to power the unit for at least five minutes.
Though data is retained, the MX7 Tecton cannot be used until a charged main battery is installed. After installing the new
battery, press the Power key. Full operational recovery from Suspend can take several seconds while the client is
reestablishing a network link. If the internal battery depletes before a fully charged main battery can be inserted, the MX7
Tecton will turn Off.
E-EQ-MX7CERG-A [ 21 ] MX7 Tecton™ CE Reference Guide
Page 34

Low Battery Warning
Low Battery Warning
It is recommended that the main battery pack be removed and replaced when its energy depletes. When the main battery Low
Battery Warning appears (the Status LED remains a steady red) perform an orderly shut down, minimizing the operation of any
installed devices and insuring any information is saved that should be saved.
Super-cap Internal Battery
The MX7 Tecton has an internal battery that is designed to provide limited-duration electrical power in the event of main battery
failure. The energy needed to maintain the internal battery near full charge at all times is drawn from the MX7 Tecton main
battery. It takes 5 minutes or less to fully charge the internal battery. The duration of internal battery life is dependent upon
operation of the MX7 Tecton, its features and any operating applications. The internal battery has a minimum service life of two
years. The Super-cap internal battery is replaced by LXE.
Handling Batteries Safely
l Never dispose of a battery in a fire. This may cause an explosion.
l Do not replace individual cells in a battery pack.
l Do not attempt to pry open the battery pack shell.
l Be careful when handling any battery. If a battery is broken or shows signs of leakage do not attempt to charge it. Dis-
pose of it using proper procedures.
Caution
Nickel-based cells contain a chemical solution which burns skin, eyes, etc. Leakage from cells is the only possible way for
such exposure to occur. In this event, rinse the affected area thoroughly with water. If the solution contacts the eyes, get
immediate medical attention.
NiMH and Li-Ion batteries are capable of delivering high currents when accidentally shorted. Accidental shorting can occur
when contact is made with jewelry, metal surfaces, conductive tools, etc., making the objects very hot. Never place a battery
in a pocket or case with keys, coins, or other metal objects.
E-EQ-MX7CERG-A [ 22 ] MX7 Tecton™ CE Reference Guide
Page 35

Software
Introduction
There are several different aspects to the setup, configuration and operation of the MX7 Tecton. Many of the setup and
configuration settings are dependent upon the optional features such as hardware and software installed on the unit. The
examples found in this section are to be used as examples only, the configuration of your specific MX7 Tecton computer may
vary. The following sections provide a general reference for the configuration of the MX7 Tecton and some of its optional
features.
Operating System
Your MX7 Tecton operating system is Microsoft® Windows® Embedded CE 6. The MX7 Tecton operating system revision is
displayed on the Desktop. This is the LXE factory default setting for the Desktop Display Background.
Windows CE Operating System
Note: For general use instruction, please refer to commercially available Windows CE user’s guides or the Windows CE
on-line Help application installed with the MX7 Tecton
This segment assumes the system administrator is familiar with Microsoft Windows options and capabilities loaded on most
standard Windows computers.
Therefore, the sections that follow describe only those Windows capabilities that are unique to the MX7 Tecton and its
Windows CE environment.
E-EQ-MX7CERG-A [ 23 ] MX7 Tecton™ CE Reference Guide
Page 36

General Windows CE Keyboard Shortcuts
General Windows CE Keyboard Shortcuts
Use the keyboard shortcuts in the chart below to navigate with the MX7 Tecton keyboard. These are standard keyboard
shortcuts for Windows CE applications.
Press these keys … To …
CTRL + C Copy
CTRL + X Cut
CTRL + V Paste
CTRL + Z Undo
DELETE Delete
SHIFT with any of the arrow keys
Select more than one item in a window or on the desktop, or select text
within a document.
CTRL+A Select all.
ALT+ESC Cycle through items in the order they were opened.
CTRL+ESC Display the Start menu.
ALT+Underlined letter in a menu name Display the corresponding menu.
Underlined letter in a command name on an
open menu
Carry out the corresponding command.
ESC Cancel the current task.
Shift and Ctrl keys can be used with the touch screen for multiple selection of items as well. To select disconnected items,
press the Ctrl key and then touch the screen for the items to be selected. Press the Ctrl key again to terminate this mode. To
select a contiguous set of items, press the Shift key, then touch the first item in the series and the last item in the series. Press
the Shift key again to terminate the selection mode.
The touchscreen provides equivalent functionality to a mouse:
l A touch on the touchscreen is equivalent to a left mouse click.
l Many items can be moved by the “drag and drop” method, touching the desired item, moving the stylus across the
screen and releasing the stylus in the desired location.
l A double stylus tap is equivalent to a double click.
l A touch and hold is equivalent to a right mouse click
l LXE Devices with Shift and Ctrl Keys The Shift and Ctrl keys can be used with the touch screen for multiple item selec-
1
.
tion.
l To select disconnected items, press the Ctrl key and then touch each item to be selected in the set. Press the
Ctrl key again to terminate this mode.
l To select a connected set of items, press the Shift key, then touch the first item in the series. Touch the last item
in the series. Press the Shift key again to terminate the selection mode.
1
Some applications may not support this right click method. Please review documentation for the application to see if it pro-
vides for right mouse click configuration.
E-EQ-MX7CERG-A [ 24 ] MX7 Tecton™ CE Reference Guide
Page 37

Warmboot
Warmboot
A warmboot reboots the MX7 Tecton without erasing any registry data. Configuration settings and data in RAM are preserved
during a warmboot. Network sessions are lost and any data in running applications that has not been previously saved may be
lost. CAB files already installed remain installed.
There are several warmboot methods available:
l Using the Registry, select Start | Settings | Control Panel | Registry and tap the Warmboot button. The MX7 Tecton
immediately warmboots.
l Using the Start menu, select Start | Run and type WARMBOOT in the text box. Press Enter. The MX7 Tecton imme-
diately warmboots. The WARMBOOT text command is not case-sensitive1.
l Using the keypad, press the Ctl key and release it, press the Alt key and release it, press the Del key and release it. The
MX7 Tecton immediately warmboots.
Clearing Persistent Storage / Reset to Default Settings
Use the Registry control panel Restart button to set the MX7 Tecton registry back to LXE factory defaults. No other clearing is
available or necessary.
Folders Copied at Startup
The following folders are copied on startup:
System\Desktop copied to Windows\Desktop
System\Favorites copied to Windows\Favorites
System\Fonts copied to Windows\Fonts
System\Help copied to Windows\Help
System\Programs copied to Windows\Programs
This function copies only the folder contents, no sub-folders.
The following folders are NOT copied on startup:
l Windows\AppMgr
l Windows\Recent
l Windows\Startup
Because copying these has no effect on the system or an incorrect effect.
Files in the Startup folder are executed, but only from System\Startup. Windows\Startup is parsed too early in the boot process
so it has no effect.
Executables in System\Startup must be the actual executable, not a shortcut, because shortcuts are not parsed by Launch.
Saving Changes to the Registry
The MX7 Tecton saves the registry when you:
l Perform a Suspend / Resume function (by pressing the Pwr key and then pressing it again).
The registry save process takes 0 – 3 seconds. If nothing has been changed, nothing is saved (e.g. 0 seconds)
The registry is automatically saved every 5 seconds. It is also saved every 256th time the registry settings are changed.
Registry settings are changed when control panel applet (e.g. Date/Time) parameters are changed by the user. A warmboot is
not required.
1
The text typed in the text box can be upper or lower case or a combination of upper and lower case letters.
E-EQ-MX7CERG-A [ 25 ] MX7 Tecton™ CE Reference Guide
Page 38

Software Load
Software Load
The software loaded on the MX7 Tecton consists of Microsoft® Windows® Embedded CE 6 OS, hardware-specific OEM
Adaptation Layer, device drivers, Internet Explorer 6.0 for Windows CE browser and utilities. The software supported is
summarized below:
l Full Operating System License: Includes all operating system components, including Microsoft® Windows® Embed-
ded CE 6 kernel, file system, communications, connectivity (for remote APIs), device drivers, events and messaging,
graphics, keyboard and touchscreen input, window management, and common controls.
l Network and Device Drivers
l Bluetooth (Optional)
Note: Please contact your LXE representative for software updates and CAB files as they are released by LXE.
Software Applications
The following applications are included:
l WordPad
l LXE Data Collection Wedge (barcode result manipulation)
l ActiveSync
l Transcriber
l Internet Explorer
ActiveSync
ActiveSync is pre-loaded on all LXE mobile devices. Using Microsoft ActiveSync you can copy files from your MX7 Tecton to
your desktop/laptop , and vice versa. After an ActiveSync relationship (partnership) has been established with a
desktop/laptop, ActiveSync will automatically startup each time the MX7 Tecton is cabled to the desktop/laptop.
Bluetooth (Optional)
Start | Settings | Control Panel | Bluetooth
Only installed on a Bluetooth equipped MX7 Tecton. The System Administrator can Discover and Pair targeted Bluetooth
devices for each MX7 Tecton. The System Administrator can enable / disable Bluetooth settings and assign a Computer
Friendly name for each MX7 Tecton.
The Bluetooth control panel can also be accessed by double-tapping the Bluetooth icon in the taskbar or on the desktop.
LXE RFTerm (Optional)
Start | Programs | RFTerm
Installed by LXE. The application can also be accessed by double clicking the RFTerm desktop icon.
E-EQ-MX7CERG-A [ 26 ] MX7 Tecton™ CE Reference Guide
Page 39

Avalanche
Avalanche
The Wavelink Avalanche Enabler installation file is loaded on the MX7 Tecton by LXE; however, the device is not configured to
launch the installation file automatically. The installation application must be run manually the first time Avalanche is used.
Following installation, the Wavelink Avalanche Enabler will be an auto-launch application. This behavior can be modified by
accessing the Avalanche Update Settings panel through the Enabler Interface.
Software Development
See Also: LXE CE API Programming Guide
The LXE CE API Programming Guide documents LXE-specific API calls for the MX7 Tecton. It is intended as an addition to
Microsoft Windows CE API documentation.
A Software Developers Kit (SDK) and additional information about software development can be found on LXE's Developer
Portal. For more information and to access the portal, go to www.lxe.com/developer or contact your LXE representative.
E-EQ-MX7CERG-A [ 27 ] MX7 Tecton™ CE Reference Guide
Page 40

MX7 Tecton Utilities
MX7 Tecton Utilities
The following files are pre-loaded by LXE.
LAUNCH.EXE
Launch works in coordination with registry settings to allow drivers or applications to be loaded automatically into DRAM at
system startup. Registry settings control what gets launched; see the App Note for information on these settings. For
examples, you can look at the registry key
HKEY_LOCAL_MACHINE \ Software \ LXE \ Persist
Launch will execute .CAB files, .BAT files, or .EXE files.
App Note
All applications to be installed into persistent memory must be in the form of Windows CE CAB files. These CAB
files exist as separate files from the main installation image, and are copied to the CE device using ActiveSync,
or using a Compact Flash ATA card. The CAB files are copied from ATA or using ActiveSync Explore into the
folder System, which is the persistent storage virtual drive. Then, information is added to the registry, if desired,
to make the CAB file auto-launch at startup.
The registry information needed is under the key HKEY_LOCAL_MACHINE \ Software \ LXE \ Persist, as follows. The main
subkey is any text, and is a description of the file. Then 3 mandatory values are added:
FileName is the name of the CAB file, with the path (usually \System).
Installed is a DWORD value of 0, which changes to 1 once auto-launch installs the file.
FileCheck is the name of a file to look for to determine if the CAB file is installed. This will be the name of one of
the files (with path) installed by the CAB file. Since the CAB file installs into DRAM, when memory is lost this file
is lost, and the CAB file must be reinstalled.
There are three optional fields that may be added:
1. Order is used to force a sequence of events. Order=0 is first, and Order=99 is last. Two items which have the same
order will be installed in the same pass, but not in a predictable sequence.
2. Delay is used to add a delay after the item is loaded, before the next is loaded. The delay is given in seconds, and
defaults to 0 if not specified. If the install fails (or the file to be installed is not found), the delay does not occur.
3. PCMCIA is used to indicate that the file (usually a CAB file) being loaded is a radio driver, and the PCMCIA slots should
be started after this file is loaded. By default, the PCMCIA slots are off on powerup, to prevent the “Unidentified
PCMCIA Slot” dialog from appearing. Once the drivers are loaded, the slot can be turned on. The value in the PCMCIA
field is a DWORD, representing the number of seconds to wait after installing the CAB file, but before activating the slot
(a latency to allow the thread loading the driver to finish installation). The default value of 0 means the slot is not powered on. The default values for the default radio drivers (listed below) is 1, meaning one second elapses between the
CAB file loading and the slot powering up.
The auto-launch process proceeds as follows:
l The launch utility opens the registry database and reads the list of CAB files to auto-launch.
l First it looks for FileName to see if the CAB file is present. If not, the registry entry is ignored. If it is present, and the
Installed flag is not set, auto-launch makes a copy of the CAB file (since it gets deleted by installation), and runs the
Microsoft utility WCELOAD to install it.
l If the Installed flag is set, auto-launch looks for the FileCheck file. If it is present, the CAB file is installed, and that reg-
istry entry is complete. If the FileCheck file is not present, memory has been lost, and the utility calls WCELOAD to reinstall the CAB file.
l Then, the whole process repeats for the next entry in the registry, until all registry entries are analyzed.
E-EQ-MX7CERG-A [ 28 ] MX7 Tecton™ CE Reference Guide
Page 41

LAUNCH.EXE
l To force execution every time (for example, for AUTOEXEC.BAT), use a FileCheck of “dummy”, which will never be
found, forcing the item to execute.
l For persist keys specifying .EXE or .BAT files, the executing process is started, and then Launch will continue, leaving
the loading process to run independently. For other persist keys (including .CAB files), Launch will wait for the loading
process to complete before continuing. This is important, for example, to ensure that a .CAB file is installed before the
.EXE files from the .CAB file are run.
l Note that the auto-launch process can also launch batch files (*.BAT), executable files (*.EXE), registry setting files
(*.REG), or sound files (*.WAV). The mechanism is the same as listed above, but the appropriate CE application is
called, depending on file type.
Note: Registry entries may vary depending on software revision level and options ordered with the MX7 Tecton.
E-EQ-MX7CERG-A [ 29 ] MX7 Tecton™ CE Reference Guide
Page 42

LAUNCH.EXE and Persistent Storage
LAUNCH.EXE and Persistent Storage
If any of the following directories are created in the System folder, Launch automatically copies all of the files in these folders:
AppMgr
Desktop
Favorites
Fonts
Help
Programs
Recent
Note: Files in the Startup folder are executed, but only from System | Startup. They are not copied to another folder.
REGEDIT.EXE
Registry Editor – LXE recommends caution when editing the Registry and also recommends making a backup copy of the
registry before changes are made.
REGLOAD.EXE
Double-tapping a registry settings file (e.g. REG) causes RegLoad to open the file and make the indicated settings in the
registry.
REGDUMP.EXE
Registry dump – Saves a copy of the registry as a text file. The file, REG.TXT, is located in the root folder.
Note: The REG.TXT file is not saved in persistent storage. To use the REG.TXT file as a reference in the event of a
restart, LXE recommends copying the file to the System folder on the MX7 Tecton or storing a copy of the REG.TXT file
on a PC.
WARMBOOT.EXE
Double click this file to warm boot the computer (i.e., all RAM is preserved). It automatically saves the registry before rebooting
which means configuration changes are not lost.
WAVPLAY.EXE
Double tapping a sound file (e.g. WAV) causes WavPlay to open the file and run it in the background.
MX7 Tecton Command-line Utilities
Command line utilities can be executed by Start | Run | [program name].
PrtScrn.EXE
Command line utility which performs a screen print and saves the file in .BMP format in the \System folder. Tap Start | Run and
type prtscrn and tap OK, or press Enter. There is a 10 second delay before the screen print is made. The device beeps and the
screen captured file (scrnnnnn.bmp) is placed in the \System folder. The numeric filename is incremented by 1 each time the
PrtScrn function is activated. The command is not case-sensitive.
E-EQ-MX7CERG-A [ 30 ] MX7 Tecton™ CE Reference Guide
Page 43
Desktop
Desktop
Note: For general use instruction, please refer to commercially available Windows CE user’s guides or the Windows online Help application installed in the mobile device.
The MX7 Tecton Desktop appearance is similar to that of a desktop PC running Windows 2000 or XP.
At the bottom of the screen is the Start button. Tapping the Start Button causes the Start Menu to pop up. It contains the
standard Windows menu options: Programs, Favorites, Documents, Settings, Help, and Run.
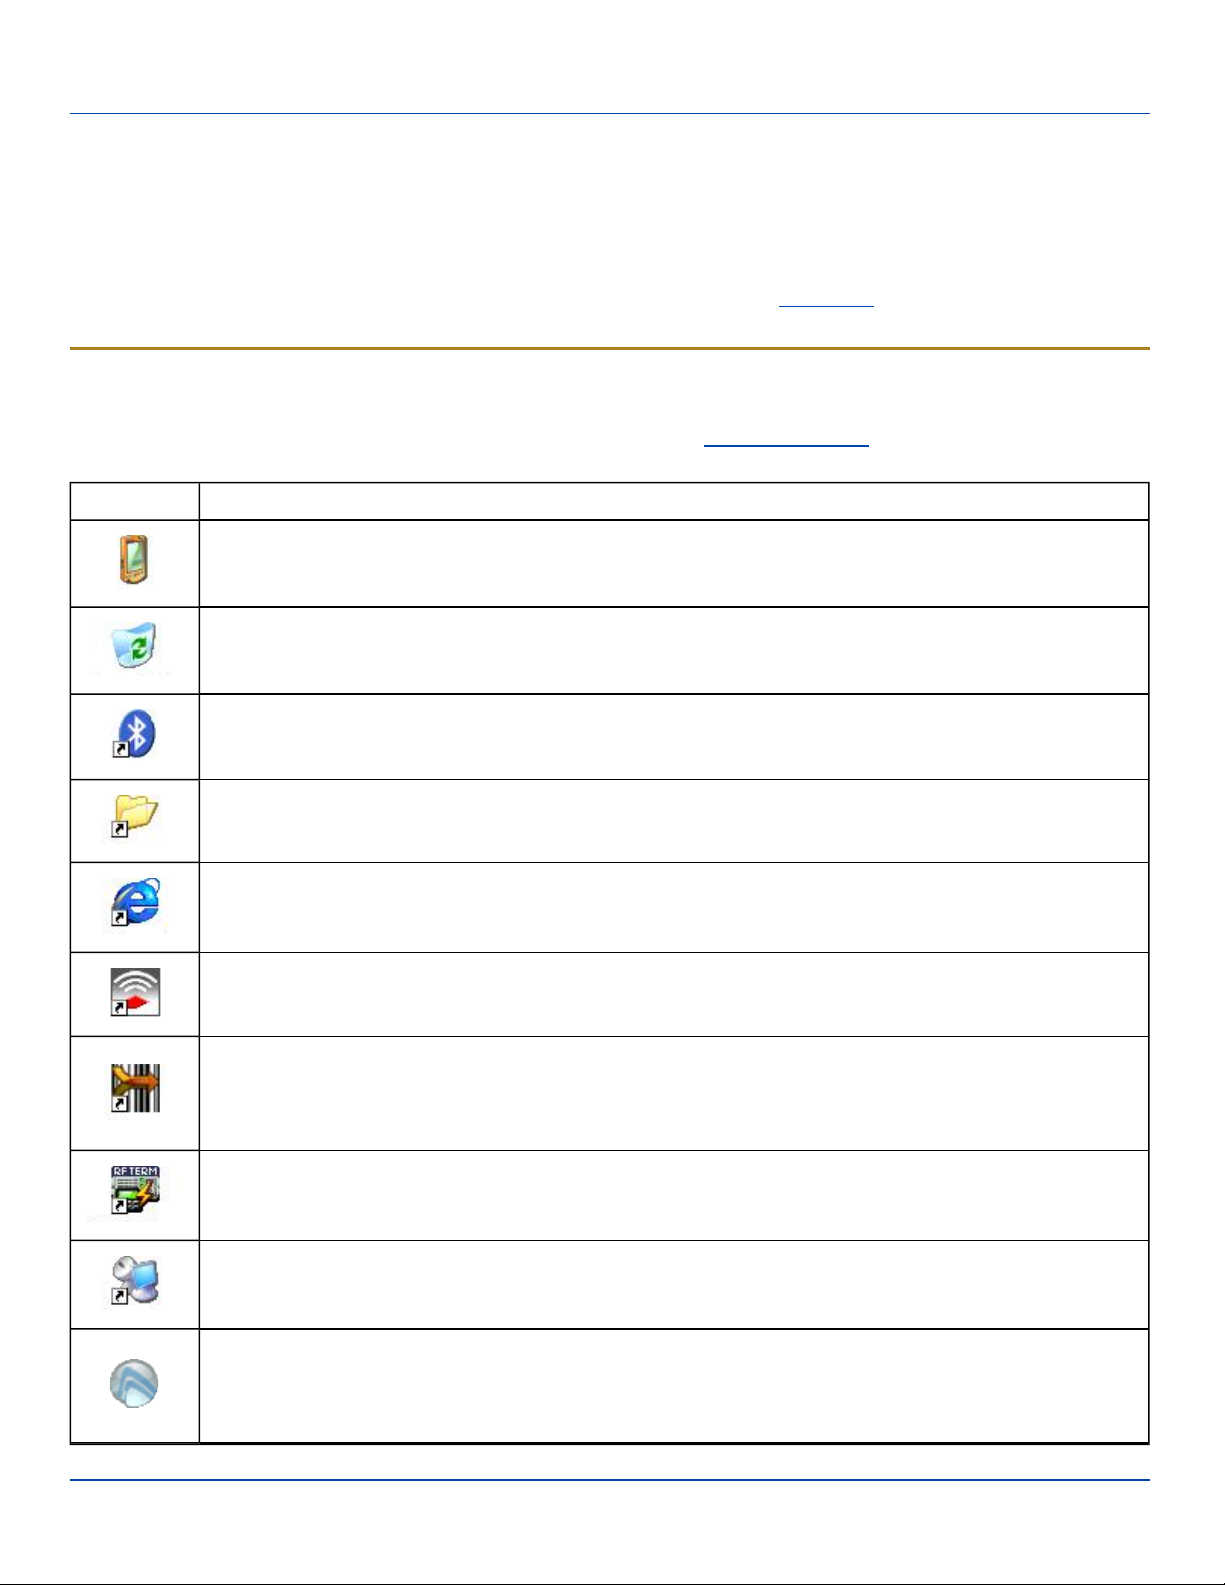
Desktop Icons
At a minimum, the desktop displays icons for My Device, Internet Explorer and the Recycle Bin. Following are a few of the
other icons that may be on the MX7 Tecton Desktop. Please Contact your LXE representativeabout the latest updates and
upgrades for your operating system.
Icon Function
My Device. Access files and programs.
Recycle Bin. Storage for files that are to be deleted.
Bluetooth shortcut. Discover and then pair with nearby discoverable Bluetooth devices.
My Documents. Storage for downloaded files / applications.
Internet Explorer. Connect to the Internet/intranet (requires radio card and Internet Service Provider – ISP
enrollment is not available from LXE).
SCU shortcut. Used for accessing the appropriate wireless configuration, SCU (Summit Client Utility).
Wavelink Avalanche eXpress Scan shortcut. The eXpress Scan utility allows an administrator to scan barcodes to provide the initial network and Avalanche Mobile Device Server address configuration. This eliminates the need to edit radio parameters manually on the LXE device. eXpress Scan uses barcodes created
with eXpress Config.
LXE RFTerm shortcut. RFTerm is an optional terminal emulation program for LXE devices with a Windows
operating System. When RFTerm is installed, this icon is displayed on the desktop.
A shortcut to the Remote Desktop utility.
Avalanche shortcut. Wavelink® Avalanche Mobility Center™ (Avalanche MC) is a remote client management
system that is designed to distribute software and configuration updates to monitored devices, including
LXE® computers with Microsoft® Windows® CE. The enabler for Wavelink Avalanche is loaded on the LXE
device but not installed. When the enabler is installed the Avalanche icon is displayed on the desktop.
E-EQ-MX7CERG-A [ 31 ] MX7 Tecton™ CE Reference Guide
Page 44
Taskbar
Icon Function
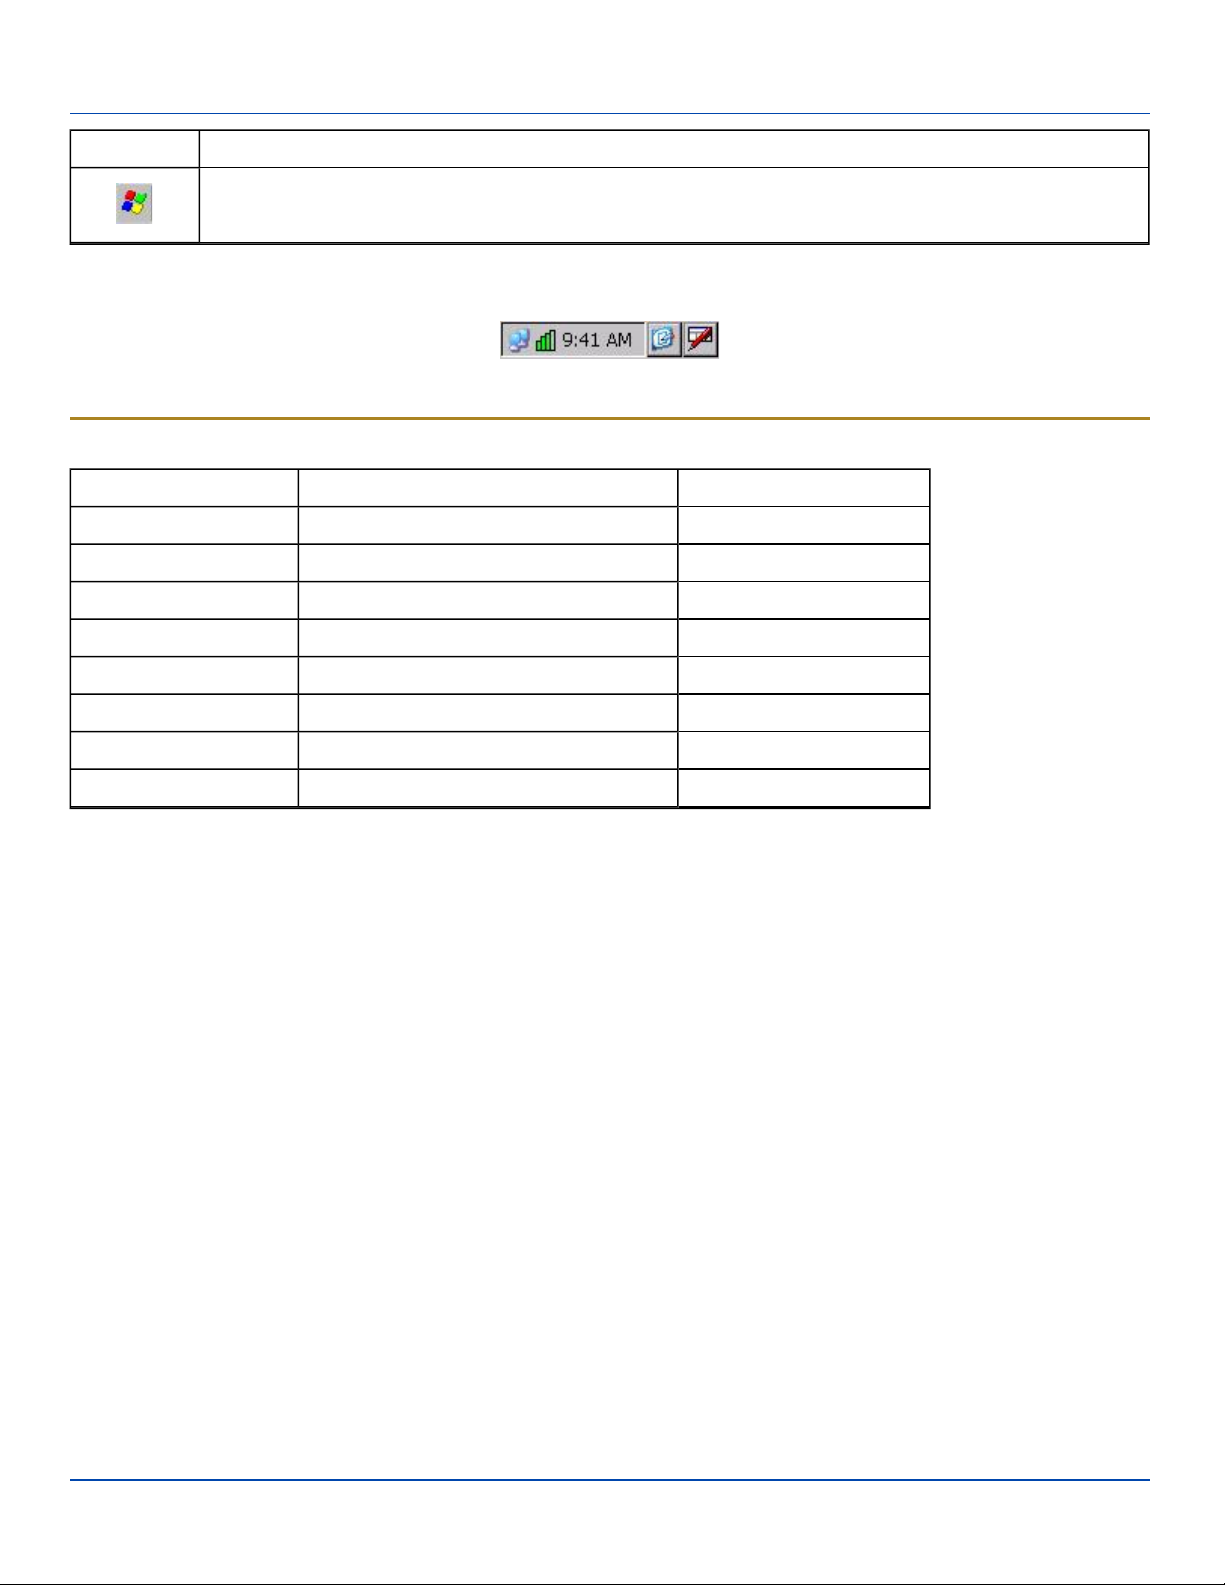
Start button. Access programs, select from the Favorites listing, documents last worked on, change/view settings for the control panel or taskbar, on-line help or run programs.
Taskbar
The number and type of icons displayed are based on the device type, installed options and configuration of the MX7 Tecton.
My Device Folders
Folder Description Preserved upon Reboot?
Application Data Data saved by running applications No
My Documents Storage for downloaded files / applications No
Network Mounted network drive No
Program Files Applications No
System Internal Flash Card (CAB file storage) Yes
Storage Card or SD Card Additional optional storage space Yes
Temp Location for temporary files No
Windows Operating System in Secure Storage No
E-EQ-MX7CERG-A [ 32 ] MX7 Tecton™ CE Reference Guide
Page 45

Wavelink Avalanche Enabler (Optional)
Wavelink Avalanche Enabler (Optional)
Note: If the user is NOT using Wavelink Avalanche to manage their mobile device, the Enabler should not be installed on
the mobile device(s).
The following features are supported by the Wavelink Avalanche Enabler when used in conjunction with the Avalanche
Manager.
After configuration, Enabler files are installed upon initial bootup and after a hard reset. Network parameter configuration is
supported for:
l IP address: DHCP or static IP
l RF network SSID
l DNS hosts (primary, secondary, tertiary)
l Subnet mask
l Enabler update
Related Manual: Using Wavelink Avalanche on LXE Windows Computers
The MX7 Tecton has the Avalanche Enabler installation files loaded, but not installed, on the mobile device when it is shipped
from LXE. The installation files are located in the System folder on CE devices. The installation application must be run
manually the first time Avalanche is used.
After the installation application is manually run, a reboot is necessary for the Enabler to begin normal performance. Following
this reboot, the Enabler will by default be an auto-launch application. This behavior can be modified by accessing the
Avalanche Update Settings panel through the Enabler Interface.
The designation of the mobile device to the Avalanche CE Manager is LXE_MX7CE.
Internet Explorer
Start | Programs | Internet Explorer
This option requires a radio card and an Internet Service Provider. There are a few changes in the Windows CE version of
Internet Explorer as it relates to the general desktop Windows PC Internet Explorer options. Tap the “?” button to access
Internet Explorer Help.
E-EQ-MX7CERG-A [ 33 ] MX7 Tecton™ CE Reference Guide
Page 46

Start Menu Program Options
Start Menu Program Options
The following list represents the factory default program installation. Your system may contain different items from those
shown below, based on the software and hardware options purchased.
Communication Stores Network communication options
Connect Run this command after setting up a connection
Start (or Stop) FTP
Server
Command Prompt The command line interface in a separate window
eXpress Scan Option. Requires Wavelink Avalanche option eXpress Config
Internet Explorer Access web pages on the world wide Internet
Microsoft WordPad Opens an ASCII notepad
Remote Desktop Connection Log on to a Windows Terminal Server
RFTerm Option. Terminal emulation application
Settings
Summit Set Summit radio / network parameters
Transcriber Enter data using the stylus on the touchscreen
Wavelink Avalanche Option. Remote management for networked devices
Windows Explorer File management program
Begin / end connection to FTP server
Access to all Control Panels, a shortcut to the Network and Dialup Control Panel and
access to Taskbar options
l If installed, RFTerm runs automatically at the conclusion of each reboot.
l If installed and enabled, AppLock runs automatically at the conclusion of each reboot.
l The wireless client connects automatically during each reboot.
l Bluetooth re-connects to nearby paired devices automatically at the conclusion of each reboot.
l If installed and pre-configured, Wavelink Avalanche connects remotely and downloads updates automatically during
each reboot.
E-EQ-MX7CERG-A [ 34 ] MX7 Tecton™ CE Reference Guide
Page 47

Communication
Communication
Start | Programs | Communication
Connect and LXEConnect
Upon cabling your MX7 Tecton to the desktop/laptop, and ActiveSync on the desktop/laptop opens, if the Connect or
LXEConnect installation does not open on your host PC, contact your LXE representative for assistance.
Start FTP Server / Stop FTP Server
Start | Communication | Start (or Stop) FTP Server
These shortcuts call the Services Manager to start and stop the FTP server. The server defaults to Off (for security) unless it is
explicitly turned on from the menu.
Summit
Start | Settings | Control Panel | Summit
Use this option to set up radio client profiles.
The Summit Control Panel can also be accessed by doubletapping the Summit icon in the taskbar or on the desktop.
Certs
The Certs option displays a readme file containing details on how the Summit Configuration Utility (SCU) handles certificates
for WPA authentication.
E-EQ-MX7CERG-A [ 35 ] MX7 Tecton™ CE Reference Guide
Page 48
Command Prompt
Command Prompt
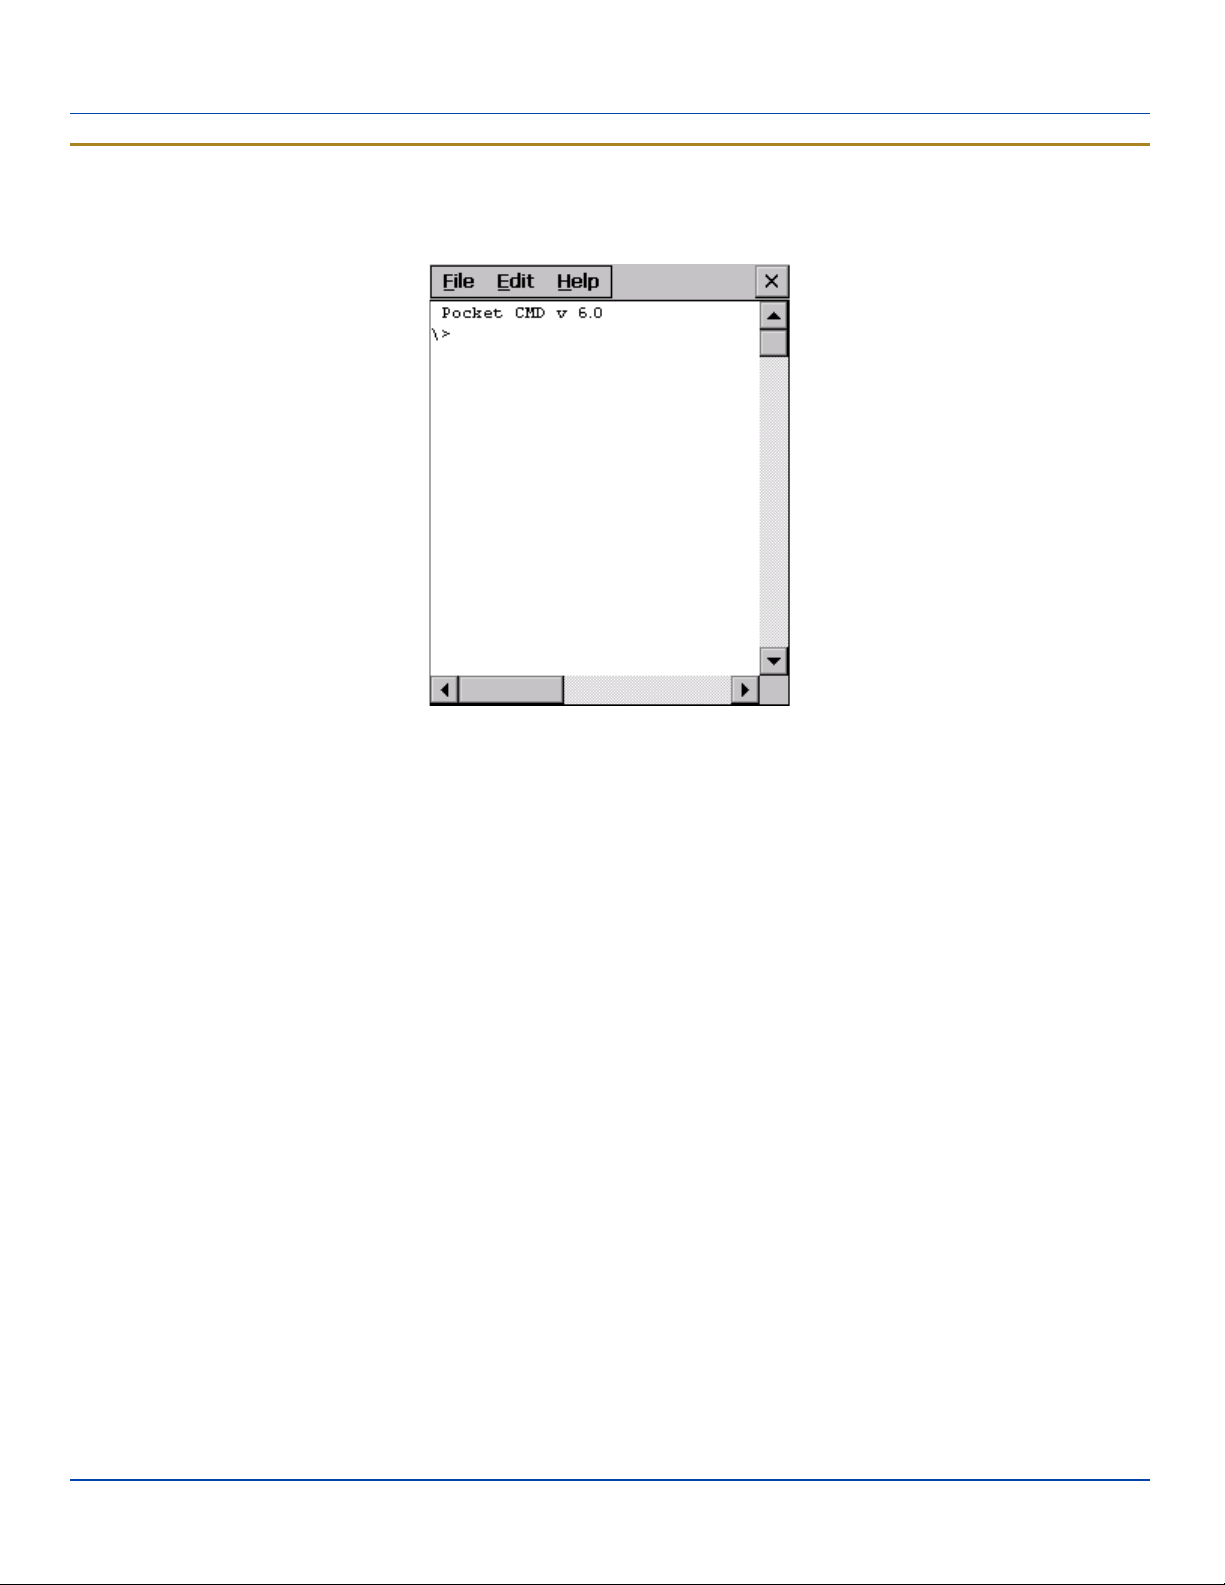
Start | Programs | Command Prompt
Pocket CMD Prompt Screen
Type help cmd at the command prompt to view valid Pocket PC (Console) commands.
Exit the command prompt by typing exit at the command prompt or tap File | Close.
E-EQ-MX7CERG-A [ 36 ] MX7 Tecton™ CE Reference Guide
Page 49

eXpress Scan
eXpress Scan
The eXpress Scan utility allows an administrator to scan barcodes to provide the initial network and Avalanche Mobile Device
Server address configuration.This eliminates the need to edit radio parameters manually on the MX7 Tecton.
eXpress Scan uses barcodes created with eXpress Config.
Internet Explorer
Start | Programs | Internet Explorer
This option requires a radio card and an Internet Service Provider. There are a few changes in the Windows CE version of
Internet Explorer as it relates to the general desktop Windows PC Internet Explorer options. Tap the ? button to access Internet
Explorer Help.
Microsoft Wordpad
Start | Programs | Microsoft WordPad
Create and edit documents and templates in WordPad, using buttons and menu commands that are similar to those used in the
desktop PC version of Microsoft WordPad.
By default WordPad files are saved as .PWD files. Documents can be saved in other formats e.g. .RTF or .DOC.
Tap the ? button to access WordPad Help.
Remote Desktop Connection
Start | Programs | Remote Desktop
There are few changes in the Windows CE version of Remote Desktop as it relates to the general desktop Windows PC
Microsoft Remote Desktop options.
If installed, Remote Desktop on the MX7 Tecton can be accessed by Start | Programs | Remote Desktop.
Select a computer from the drop down list or enter a host name and tap the Connect button.
Tap the Options >> button to access the General, Display, Local Resources, Programs and Experience tabs. Tap the ? button
to access Remote Desktop Connection Help.
Settings
Start | Settings
The Settings menu option may include the following:
Control Panel All control panels
Network
Taskbar Set Taskbar parameters
Shortcut to the Network and Dialup Connections control panel. Connect to a network, create a new
connection, and adjust parameters for client connections.
E-EQ-MX7CERG-A [ 37 ] MX7 Tecton™ CE Reference Guide
Page 50

Transcriber
Transcriber
Start | Settings | Control Panel | Input
To make changes to the Transcriber application, tap the keyboard icon in the status bar. Select Transcriber from the pop-up
menu. Then open the Input control panel and tap the Options button. Transcriber Options (Start | Settings | Control Panel | Input
Panel) are available only when Transcriber is selected as the active input method. Tap the “?” button or the Help button to
access Transcriber Help.
Windows Explorer
Start | Programs | Windows Explorer
There are a few changes in the Windows CE version of Windows Explorer as it relates to the general desktop PC Windows
Explorer options. Tap the “?” button to access Windows Explorer Help.
E-EQ-MX7CERG-A [ 38 ] MX7 Tecton™ CE Reference Guide
Page 51
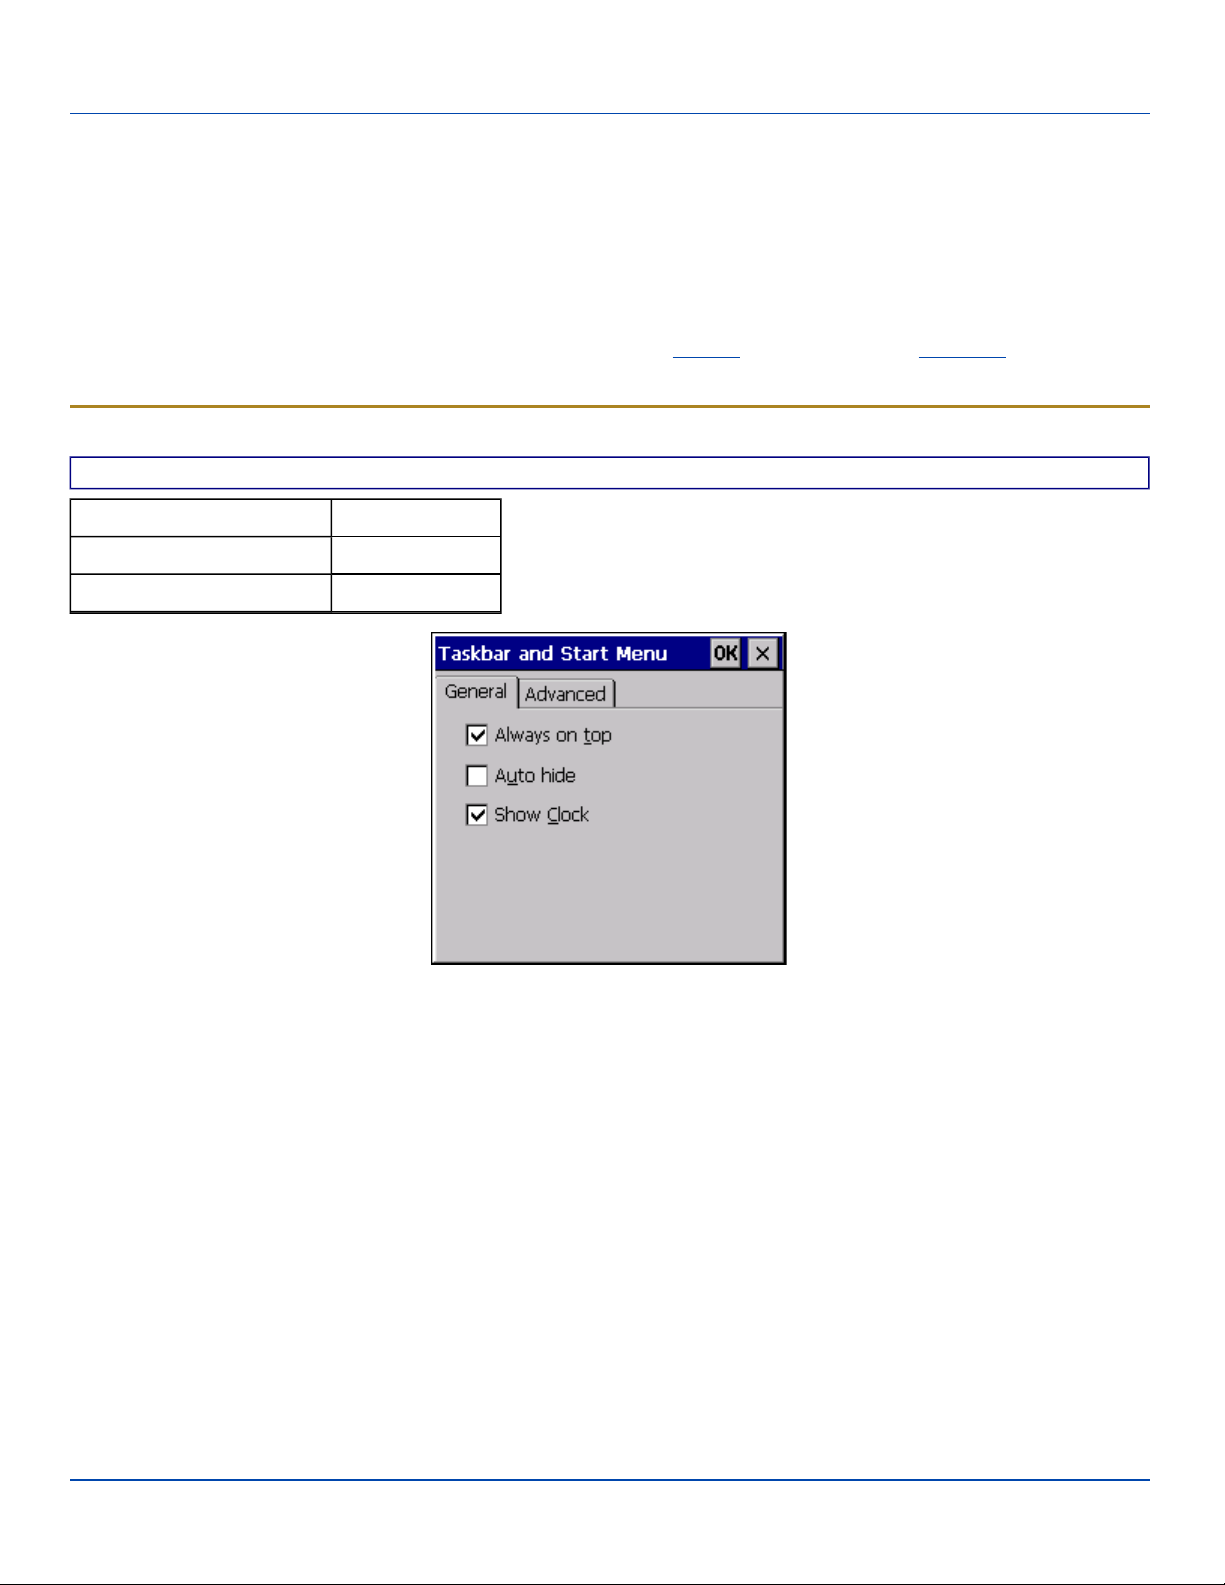
Taskbar
Taskbar
Start | Settings | Taskbar
There are a few changes in the Windows CE version of Taskbar as it relates to the general desktop PC Windows Taskbar
options.
When the taskbar is auto hidden, press the Ctrl key then the Esc key to make the Start button appear.
Clicking the Taskbar option on the Settings menu displays theTaskbar General tab and the Taskbar Advanced tab.
See "Taskbar Icons" on page 41
General Tab
Factory Default Settings
Always on Top Enabled
Auto hide Disabled
Show Clock Enabled
Taskbar Properties, General Tab
E-EQ-MX7CERG-A [ 39 ] MX7 Tecton™ CE Reference Guide
Page 52
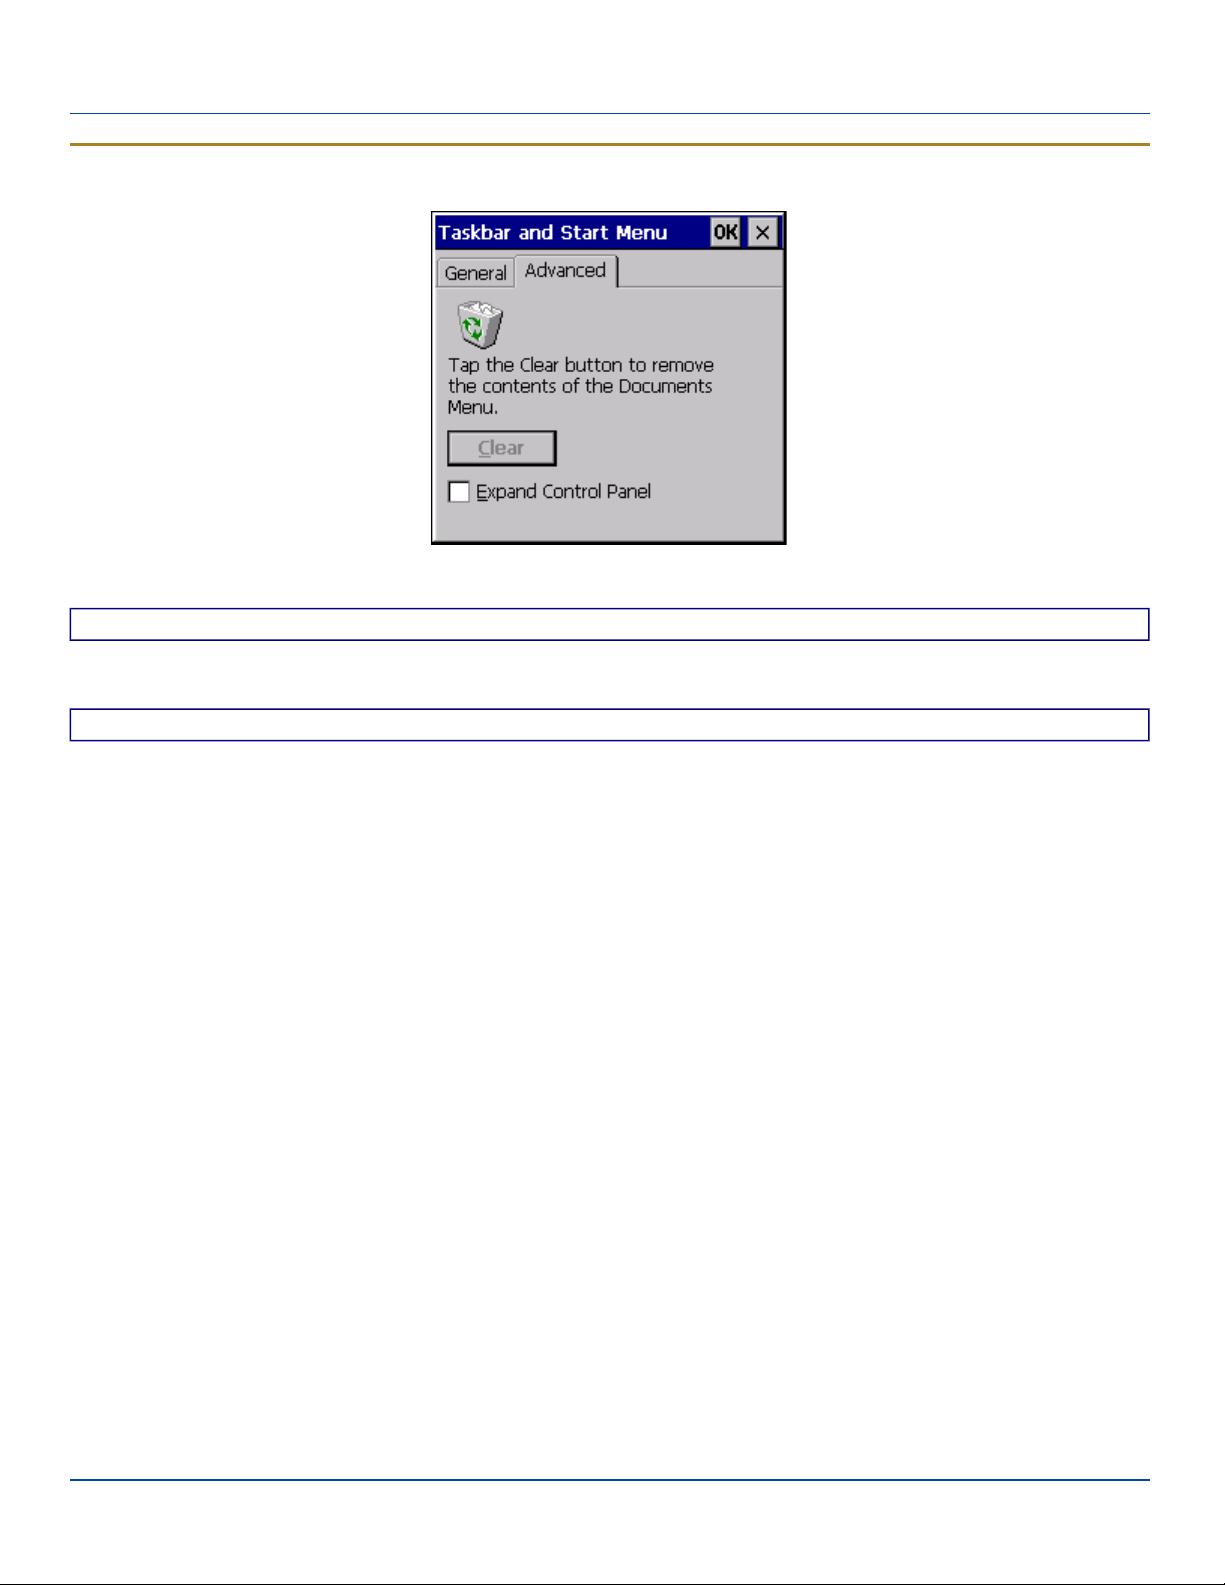
Advanced Tab
Advanced Tab
Taskbar Properties, Advanced Tab
Expand Control Panel
Tap the checkbox to have the Control Panel folders appear in drop down menu format from the Settings | Control Panel menu
option.
Clear Contents of Document Folder
Tap the Clear button to remove the contents of the Document folder.
E-EQ-MX7CERG-A [ 40 ] MX7 Tecton™ CE Reference Guide
Page 53
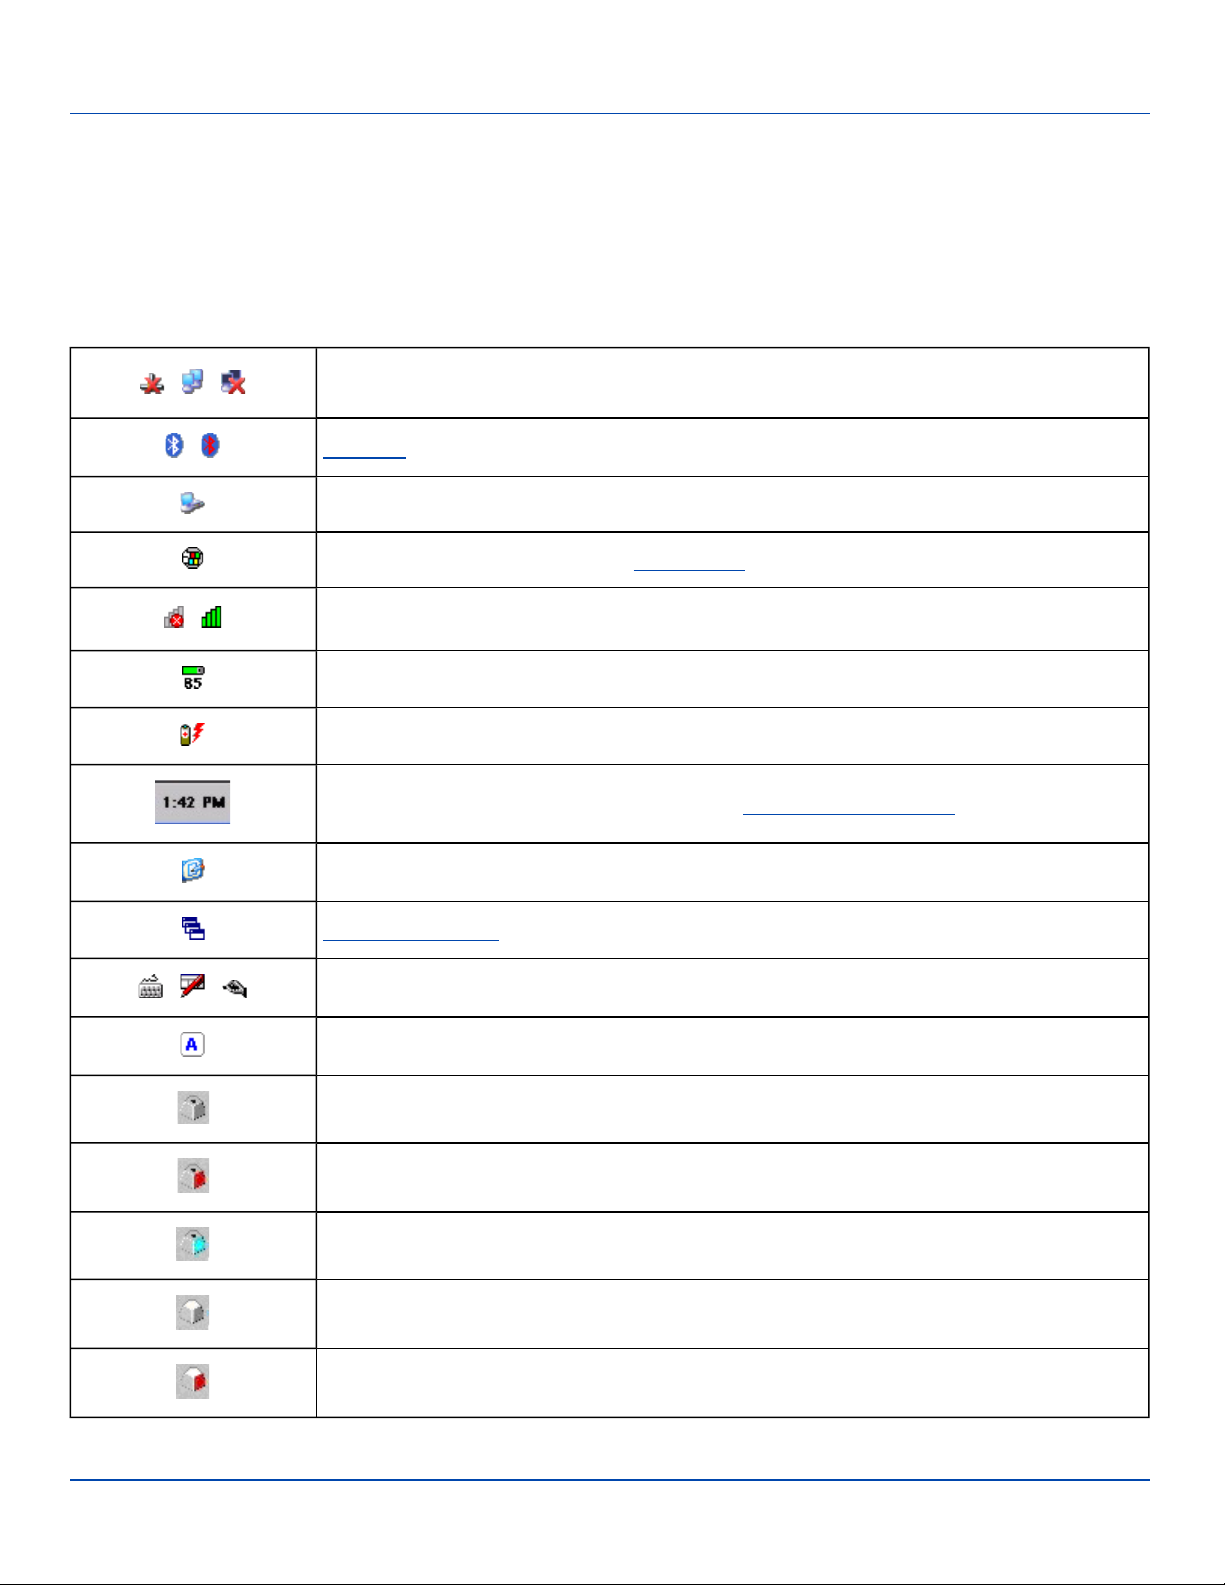
Taskbar Icons
Taskbar Icons
As MX7 Tecton devices and applications open and change state, icons are placed in the Taskbar. In most cases, tapping the
icon in the Taskbar opens the related application.
Refer to Start | Help for an explanation of standard Windows CE taskbar icons.
Following are a few of the MX7 Tecton and LXE unique taskbar icons that may appear in the Taskbar. These icons are in
addition to the Windows CE taskbar icons.
Wireless Zero Config Inactive / Connected / Not Connected.
Clicking on the icon opens the Wireless Zero Config utility.
Bluetooth connected / disconnected. Clicking the icon opens the Bluetooth control panel.
ActiveSync Connection
Cerdisp connected (displayed when LXEConnect is connected)
Summit Client signal indicator no signal/ excellent signal. Clicking on the icon opens the
Summit Client Utility
Battery charge indicator. Percent of battery charge is indicated.
External power connected
Current time. Clicking the time display opens the Date/Time control panel.
Click this icon to return to the Desktop.
AppLock switchpad.
Input method, keyboard / input panel / transcriber
CapsLock active
No modifier key is in focus
Orange modifier key active
Blue modifier key active
Shift modifier key active
Multiple modifier keys active, Shift plus Orange
E-EQ-MX7CERG-A [ 41 ] MX7 Tecton™ CE Reference Guide
Page 54
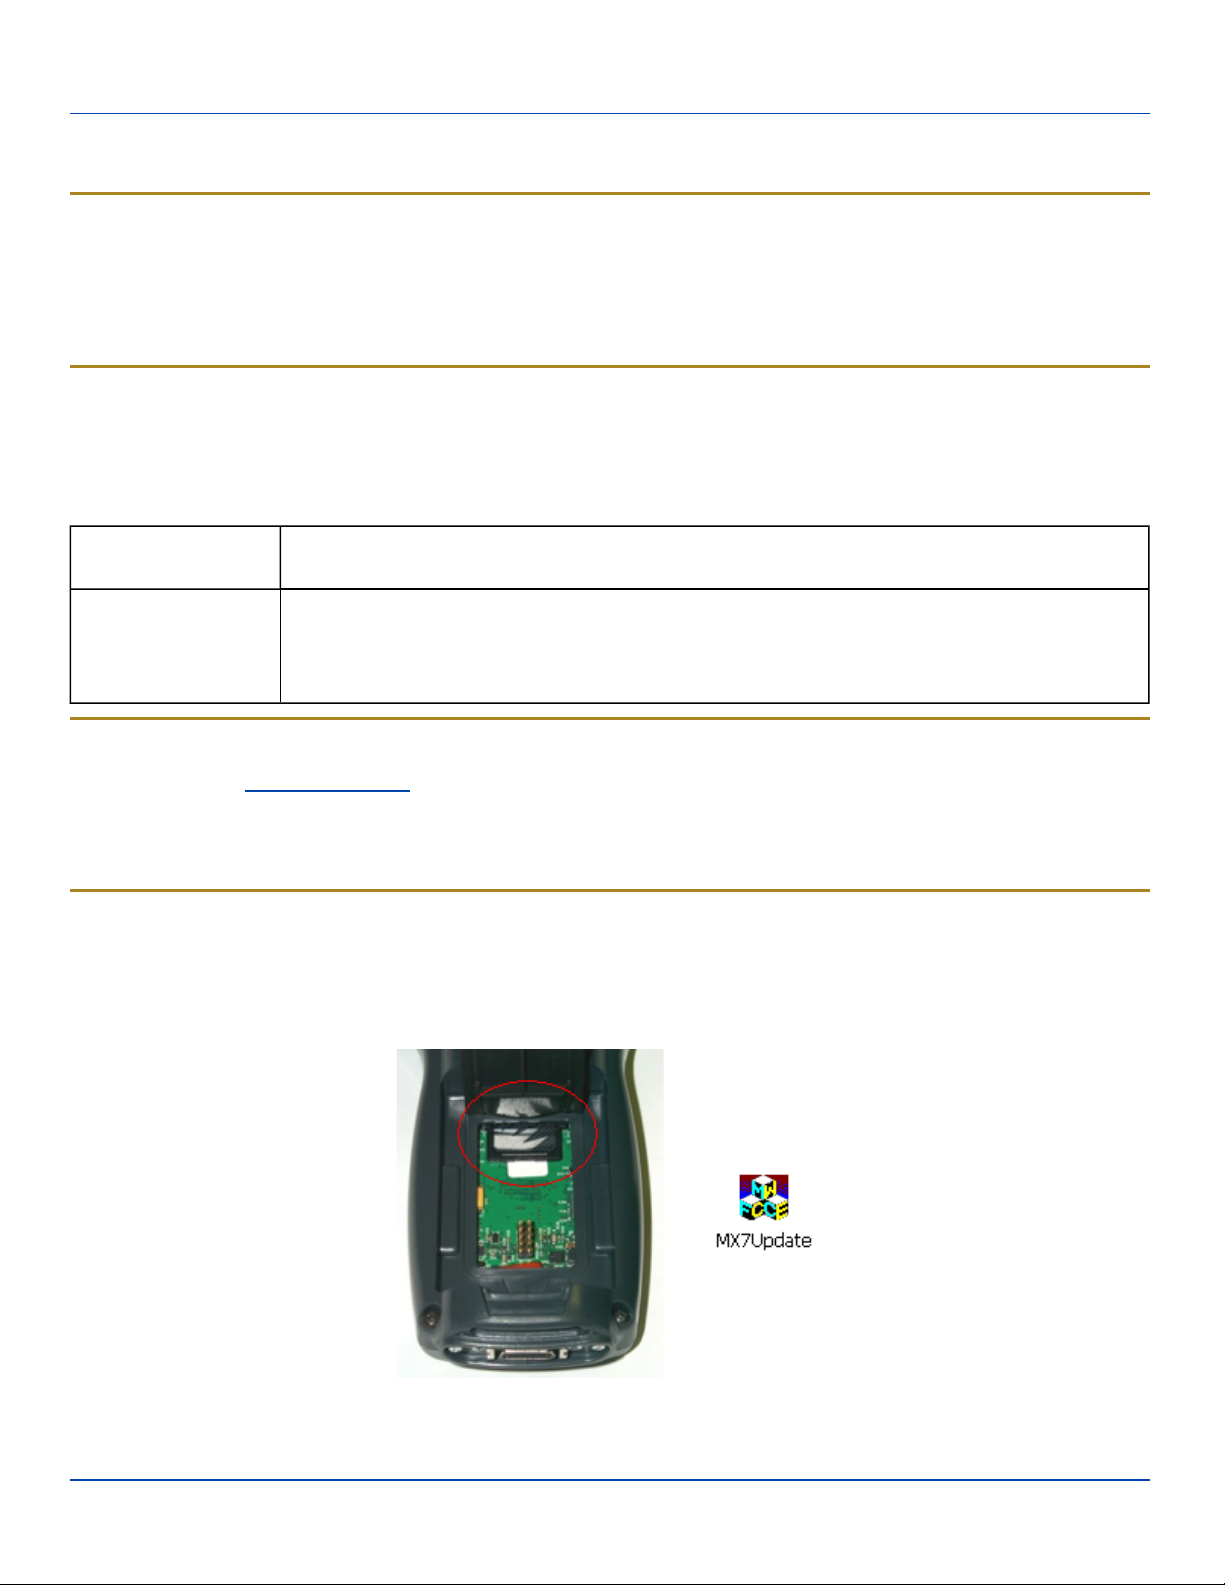
Reflash the MX7 Tecton
Reflash the MX7 Tecton
Introduction
Depending on the size of the operating system, the total time required for successful reflashing may require several minutes.
The OS upgrade files are unique to your MX7 Tecton's physical configuration and date of manufacture. OS upgrade files
designed for one device configuration should not be used on a different device configuration. The SD Flash card must be
formatted as FAT and be less than 1GB.
Reflashing and Language Options
Note: If the image to be updated is a non-English Language image (48M), check the Non- English checkbox before
updating to a Simplified Chinese, Traditional Chinese, Korean or Japanese version of the OS. The update process may
take between 6 and 10 minutes when Non-English is checked. The Non-English checkbox is greyed when the Update is
processing.
Same Language to
Same Language
Change Language
during Reflash
Process
During the reflash process all settings revert to factory defaults. Parameters will need to be changed
from factory defaults to your preferred values at the conclusion of the reflash process.
When changing from one language to another during the reflash process, all files in the System
folder will be deleted as the system is repartitioned and all system settings are cleared. Parameters
will need to be changed from factory defaults to your preferred values at the conclusion of the reflash
process.
Preparation
l Contact your LXE representative to get the OS Upgrade files from LXE.
l LXE recommends that removal or installation of the SD Flash card be performed on a clean, well-lit surface.
l Always perform MX7 Tecton updates when it has a fully charged main battery and/or a dependable external power
source connected to the MX7 Tecton and a fully charged internal battery.
Procedure
Place new image files on a SD card.
Place the MX7 Tecton in Suspend Mode and remove the main battery pack.
Lift the rubber barrier and slide the SD card out of the slot. Do not remove the rubber barrier.
Flash Disk Location Update Icon
E-EQ-MX7CERG-A [ 42 ] MX7 Tecton™ CE Reference Guide
Page 55
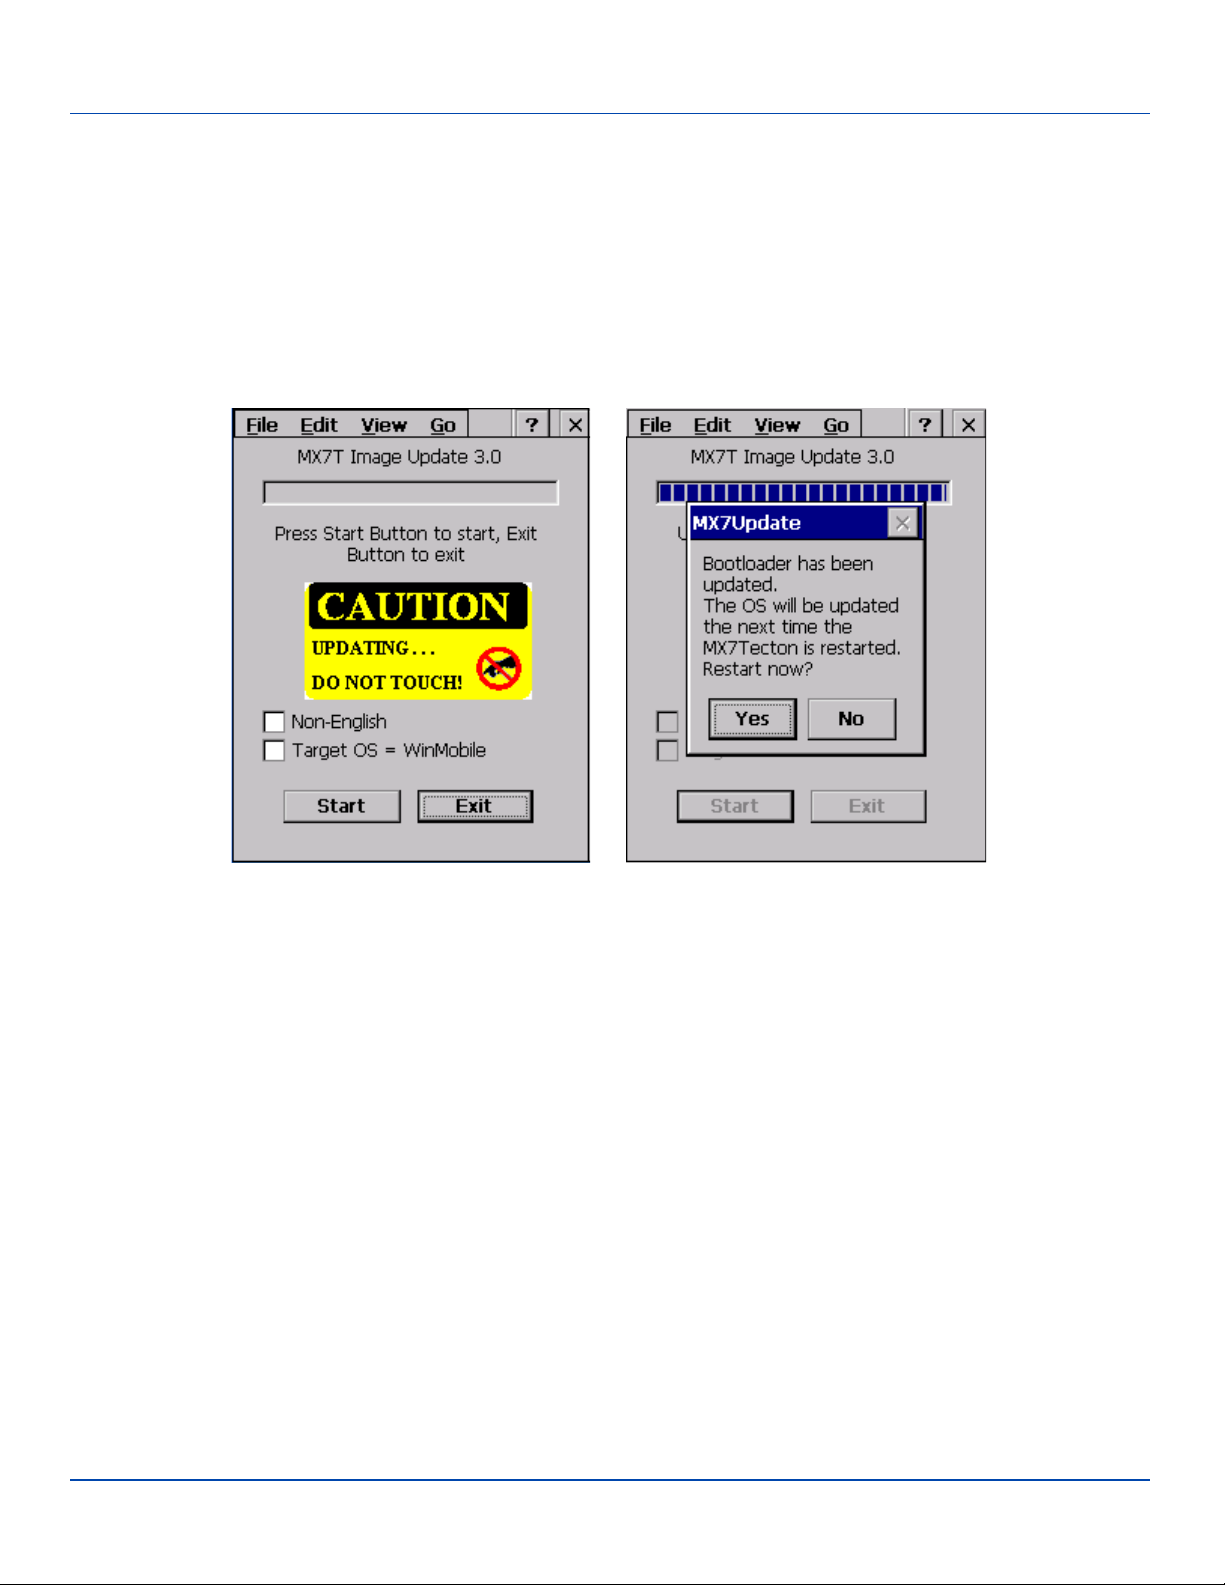
Procedure
1. Place the SD flash card with new image files on it into the SD slot. The label on the SD card is facing up.
2. Launch MX7UPDATE.EXE in My Device | Storage Card.
3. English Windows CE OS: Verify the Non-English and Windows Mobile checkboxes are not checked.
4. Non-English Windows CE OS: Verify the Windows Mobile checkbox is not checked and the Non-English checkbox is
checked.
Important: If a failure occurs during the update, DO NOT RESTART (coldboot). Follow the instructions on the screen to
Exit the update utility. Restart the update utility.
5. Tap Start to start the update. The Non-English checkbox is dimmed when the Update is processing. The Windows
Mobile checkbox is dimmed when the Update is processing. Tap Exit to exit without updating.
Tap the Yes button to restart immediately. Tap the No button to restart later.
When the flash update is complete, remove the SD card (if desired), replace the rubber barrier and replace the main battery.
The unit automatically performs a Restart.
Check the OS update version by selecting Start | Settings | Control Panel | About | Software tab.
Note: If the application displays “Update OS Image Failed” or “Update Boot Loader Image Failed”, do not Restart the
system manually. Perform a warm boot, then try reflashing again. Restarting will cause an MX7 Tecton system crash,
since there is no valid image in the system.
E-EQ-MX7CERG-A [ 43 ] MX7 Tecton™ CE Reference Guide
Page 56

Troubleshooting
Troubleshooting
The powered device won't boot up after reflashing finished.
Send the MX7 Tecton to LXE Service and Support to be reflashed.
Warning: Opening the device e.g. removing endcaps or access panels, etc. could void the user's authority to
operate this equipment.
Battery State and OS Upgrade
LXE recommends a fully charged main battery be installed in the MX7 Tecton prior to reflashing or upgrading the operating
system. A prompt may appear when the battery reaches Critical Low that informs the user there is not enough power in the
main battery to perform the update.
The operating system will not be able to execute the OS update when the battery level is too low (25% or less), as there is a
high risk that the power remaining in the battery expires when executing the update and the MX7 Tecton will be left in an
inoperable state.
When main battery power level is too low, connect external power to the MX7 Tecton before performing the reflash procedure.
Do not disconnect external power before the reflash process is complete.
E-EQ-MX7CERG-A [ 44 ] MX7 Tecton™ CE Reference Guide
Page 57
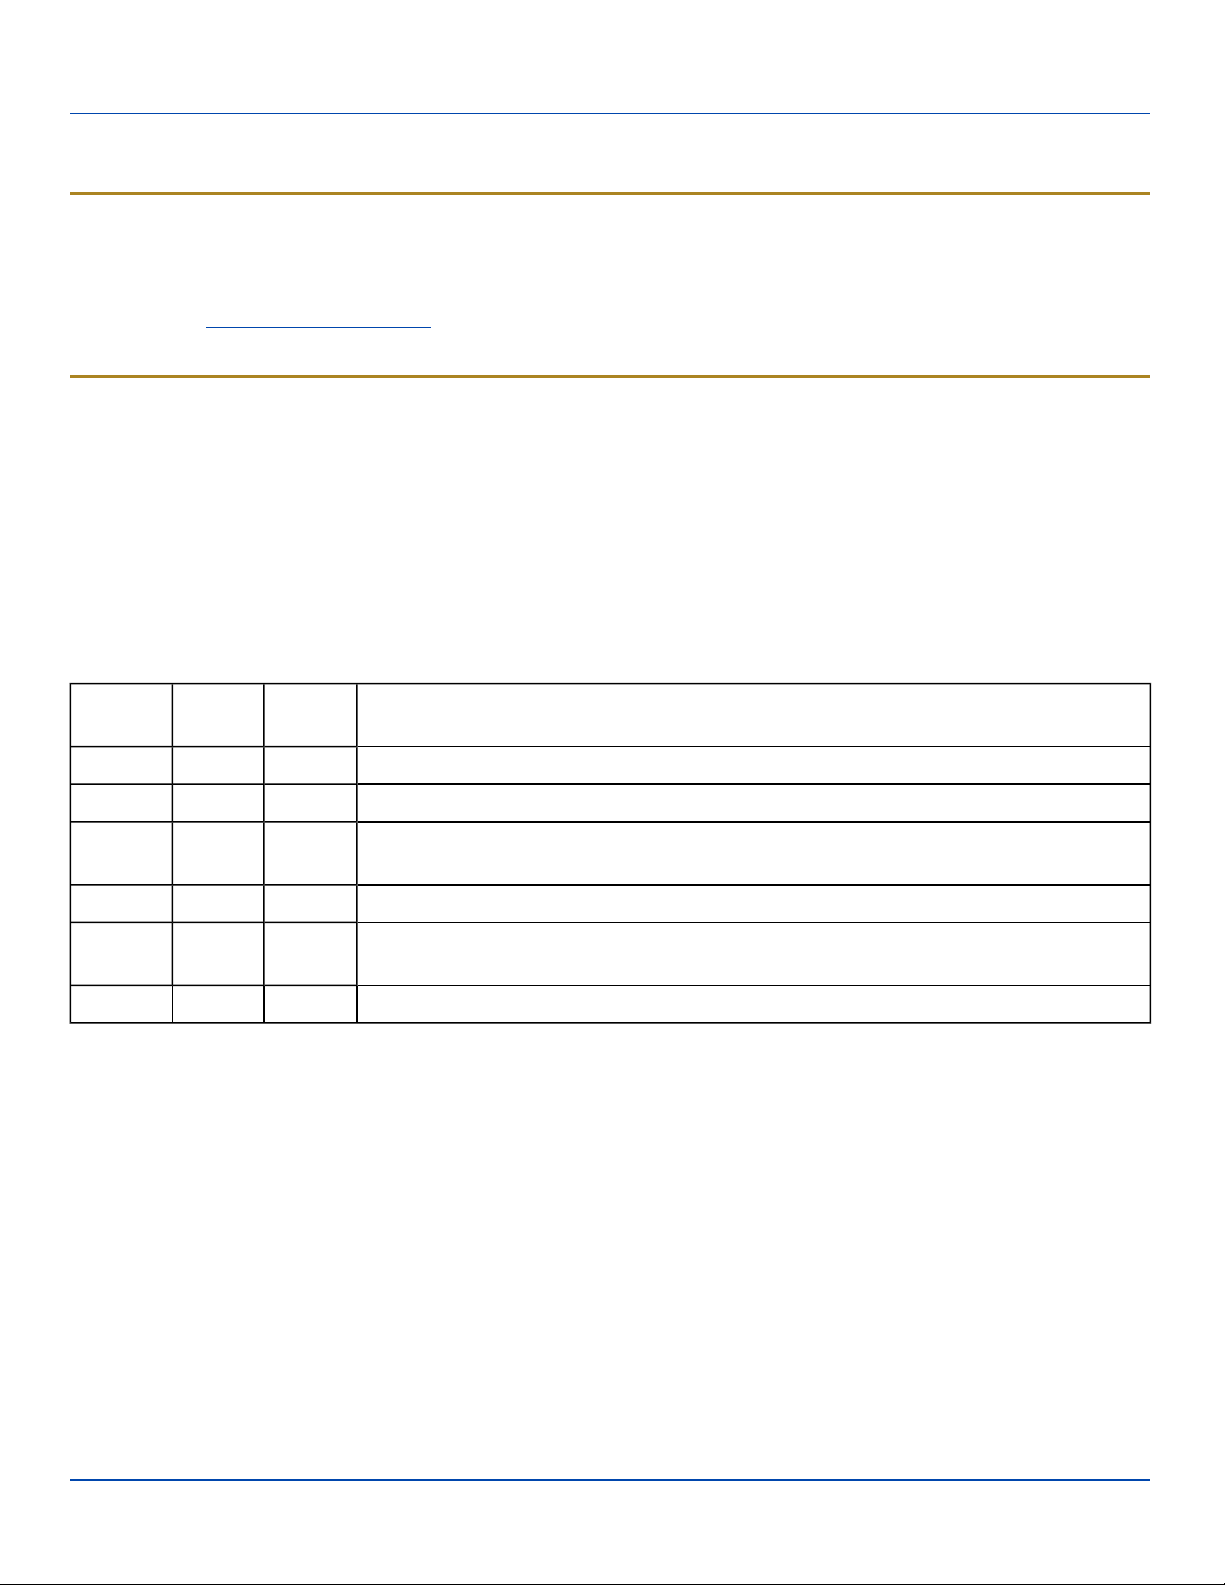
Enhanced Launch Utility
Enhanced Launch Utility
Introduction
The launch utility on the MX7 Tecton has two functions:
l Process registry based Launch items
l Process script based Launch items.
The registry based Launch items are processed before the script based Launch items.
Registry Based Launch Items
Note: The Registry based Launch items (documented here) are processed before the Script Based Launch items.
The Launch utility can use registry entries to auto-launch Windows CAB files. These CAB files exist as separate files from the
main installation image, and are copied to the device using ActiveSync, or using the optional SD card. The CAB files are
copied into the folder System, which is the internal Flash drive. Then, information is added to the registry, if desired, to make
the CAB file auto-launch at startup.
The registry information needed is under the key
HKEY_LOCAL_MACHINE\SOFTWARE\LXE\Persist
The main subkey is any text, and is a description of the file. Then the values are added:
Value Need
Data
Type
Description
FileName Required String Name of the CAB file, with full path (usually \System)
Installed Required DWORD Starts as 0, changed to 1 when the CAB file is installed
FileCheck Required String
File name, with full path, of a file installed by the CAB file. If this file is not found, Launch
assumes the CAB file is not installed or memory was lost.
Order Optional DWORD Determines sequence of installation. Order=0 is installed first, order=99 is installed last.
Delay Optional DWORD
Delay, in seconds, after this item is installed and before the next one is installed. If the
install fails (or is not found) the delay does not occur.
PCMCIA Optional DWORD 1=power up PCMCIA/CF slot after installation
The auto-launch process is as follows.
1. The launch utility opens the registry database and reads the list of CAB files to auto-launch.
2. First it looks for FileName to see if the CAB file is present.
l If not, the registry entry is ignored.
l If it is present, and the Installed flag is not set, auto-launch performs the installation.
3. If the Installed flag is set, auto-launch looks for the FileCheck file.
l If it is present, the CAB file is installed and that registry entry is complete.
l If the FileCheck file is not present, memory has been lost, and the auto-launch installs the CAB.
4. This process repeats for the next entry in the registry, until all registry entries are analyzed.
E-EQ-MX7CERG-A [ 45 ] MX7 Tecton™ CE Reference Guide
Page 58

Registry Based Launch Items
Notes:
l To force execution every time, use a FileCheck of “dummy”, which is never found, forcing the item to execute. If an
AUTOEXEC.BAT file is found, the terminal runs it by default.
l For persist keys specifying .EXE or .BAT files, the executing process is started, and then Launch continues, leaving
the loading process to run independently.
l For other persist keys (including .CAB files), Launch waits for the loading process to complete before continuing. This
is important, for example, to ensure that a .CAB file is installed before the .EXE files from the .CAB file are run.
l The Order field is used to force a sequence of events; Order=0 is first, and Order=99 is last. Two items which have the
same order are installed in the same pass, but not in a predictable sequence.
l The Delay field is used to add a delay after the item is loaded, before the next is loaded. The delay is given in seconds,
and defaults to 0 if not specified. If the install fails (or the file to be installed is not found), the delay does not occur.
l The PCMCIA field is used to indicate that the file (usually a CAB file) being loaded is a radio driver, and the PCMCIA
slots must be started after this file is loaded. By default, the PCMCIA slots are off on power up, to prevent the “Unidentified PCMCIA Slot” dialog from appearing. Once the drivers are loaded, the slot can be turned on. The value in the
PCMCIA field is a DWORD, representing the number of seconds to wait after installing the CAB file, but before activating the slot (a latency to allow the thread loading the driver to finish installation). The default value of 0 means the slot
is not powered on. The default values for the default radio drivers (listed below) is 1, meaning one second elapses
between the CAB file loading and the slot powering up.
l Note that the auto-launch process can also launch batch files (*.BAT), executable files (*.EXE), registry setting files
(*.REG), or sound files (*.WAV). The mechanism is the same as listed above, but the appropriate OS application is
called, depending on file type.
E-EQ-MX7CERG-A [ 46 ] MX7 Tecton™ CE Reference Guide
Page 59
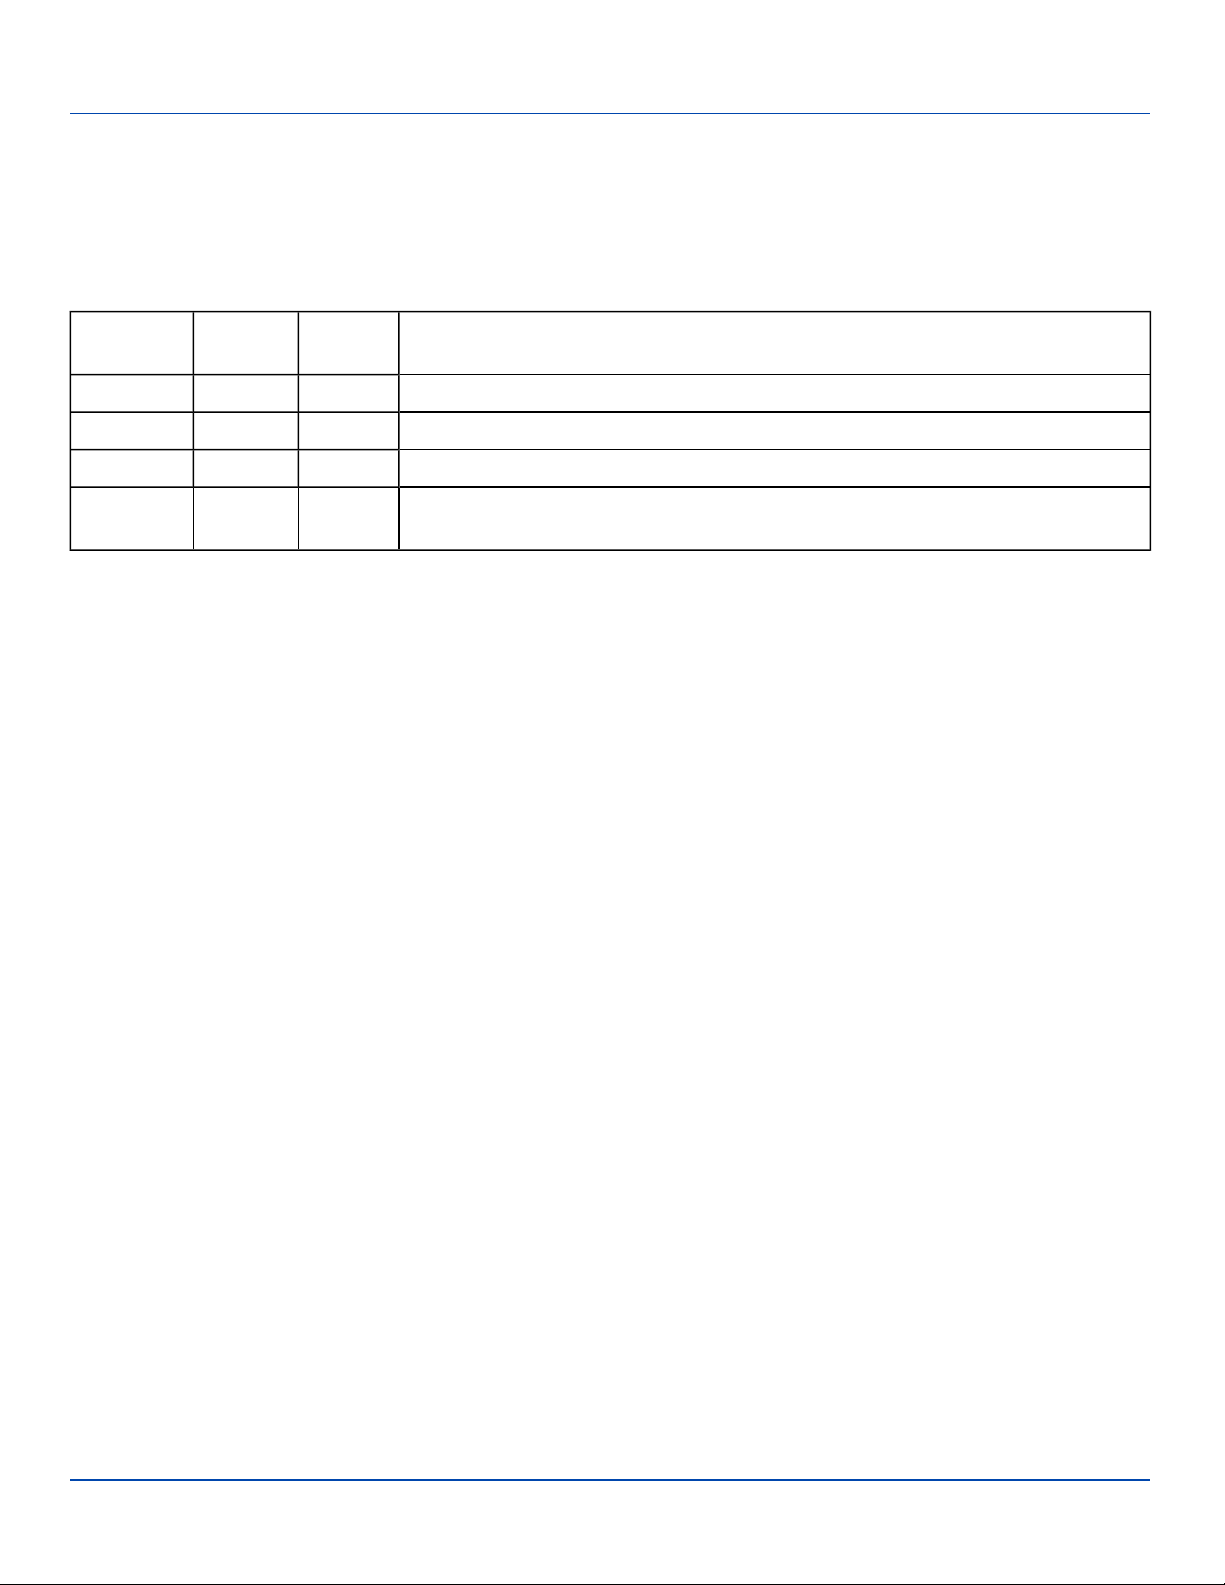
Launch Startup options
Launch Startup options
The Launch utility uses registry entries to enable or disable startup options. These flags are located in the registry key:
HKEY_LOCAL_MACHINE\Software\LXE\Launch
These can be configured using RegEdit. The options are as follows:
Value
LaunchPSM 1 0 Execute the Persist keys
JumpStart 1 0 Look for and execute JumpStart scripts
LaunchStart 1 0 Execute any auto-install files in \System\Startup
TimeService 0 0
It can often be useful to disable these as necessary, to troubleshoot system startup.
Ship
Default
LTK
Default
Description
Launches the GrabTime utility as a service, so that the time and date are periodically
automatically updated.
Example
The following example loads and launches RFTerm.
;; ------- RFTerm support
[HKEY_LOCAL_MACHINE\SOFTWARE\LXE\Persist\LXE TE]
"FileName"="\\System\\RFTERM.CAB"
"Installed"=dword:0
"FileCheck"="\\WINDOWS\\LXE\\RFTERM.EXE"
"Order"=dword:11
;; run the app after it has loaded and client device is ready
[HKEY_LOCAL_MACHINE\SOFTWARE\LXE\Persist\RFTERM]
"FileName"="\\WINDOWS\\LXE\\RFTERM.EXE"
"Installed"=dword:0
"FileCheck"="ALWAYSEXEC"
"Order"=dword:40
"Delay"=dword:1
E-EQ-MX7CERG-A [ 47 ] MX7 Tecton™ CE Reference Guide
Page 60

Script Based Launch Items
Script Based Launch Items
Note: The Script Based Launch items (documented here) are processed after the Registry Based Launch items
(documented earlier).
The Enhanced (script based) portion of the Launch utility provides several features:
l Launch .CAB file
l Run .EXE file
l Run .EXE file using specified parameters
l Run .BAT file
l Process .REG file
l Copy file, with or without overwriting of existing file
l Delete file
l Create directory
l Remove directory
l Add / Update a registry field
l Delete a registry field
l Add a registry subkey
l Delete a registry key
l Display an on-screen message; message requires OK to continue
l Conditional commands, based on existence of file or folder
l Conditional commands, based on device type
l End block of conditional commands
l Create a shortcut
l Perform a Warm boot (Restart is not useful in this context)
The script developer has the option of pausing script file execution until the current action completes, or continuing script file
processing. The script developer is also able to pause for a specified number of milliseconds between commands.
The utility also processes .REG files, using the same format as the legacy Launch Utility. It does this by calling the RegLoad
utility. It can also process .BAT files, by calling the Command Prompt utility.
This utility allows the user to configure separate processing for Suspend/Resume and Warmboot.
l By default, Enhanced Launch processes both registry entries and scripts, if present. There are registry settings to ena-
ble/disable processing of both types of files.
l Script files may have the extension .WRM (for warm boot). With this extension, they may be clicked to execute from
the File Explorer. When clicked directly, the extensions do not matter (a script ending in .WRM does not have to be preceded by a suspend/resume).
Enhanced Launch Utility Use
The Enhanced Launch Utility can be used at OS startup to execute commands from a script file or to launch programs. The
user can configure scripts or registry entries for different operation after Suspend/Resume and Warm Boot. Use of scripts and
registry entries is documented in the following sections.
E-EQ-MX7CERG-A [ 48 ] MX7 Tecton™ CE Reference Guide
Page 61

File Names
File Names
From a Warm Boot it looks for JmpStart.wrm. The Launch program can also be run manually. Unless it is given a file as part of
the command line it tries to run Launch.txt. The script file may be in ASCII or Unicode.
When trying to find a script file, Launch looks in the following locations (in sequence):
root directory of the Flash (\System\Launch.xxx)
root directory of the SD card (\SD Card\Launch.xxx).
In addition, a script file can be written (with a .wrm extension), and can be double-clicked to run from the File Explorer.
Command line structure
Each command takes up one line. Every command uses the format:
COMMAND,PARAMETER1,PARAMETER2,...etc.
Parameters are separated by a single comma. If a parameter requires a comma within it, the whole parameter must be
enclosed in quote marks ("). Extra spaces are ignored between the comma and the next parameter.
For Example
To delete a file called Ive, got, commas, in, my, name.txt, use the command
delete,"Ive, got, commas, in, my, name.txt".
Enclosing quotes are used to allow commas inside a parameter, but are removed prior to executing the command. Thus,
delete,deleteme.txt is the same as delete,"deleteme.txt". If a parameter requires a quote mark within it, the whole parameter
must first be enclosed within quote marks, and the required quote mark is represented by two quote marks (""). For example, to
place the message This is how you display "quote marks" on the screen, use the command
message,This is a heading,"This is how you display ""quote marks""".
The case of a command is ignored, so delete is the same as DELETE and DeLeTe.
Comments
Any line that starts with a semicolon (;), a slash (‘/’) or an asterisk (*) is treated as a comment, and ignored by Launch.
Launch also ignores any extra parameters (more than the required number) in a command. It is not recommended that
comments be placed on the end of lines as any future changes could render your script files incompatible.
Blank lines are also ignored.
E-EQ-MX7CERG-A [ 49 ] MX7 Tecton™ CE Reference Guide
Page 62

Commands Supported by Launch
Commands Supported by Launch
Copy ElseIfFIile IfFile Mkdir
Delete EndIf IfTerm Rmdir
DelRegData EndIfFile Launch SetRegData
DelRegKey EndIfTerm LaunchCmd SetRegKey
ElseIf FCopy Message Shortcut
Warmboot
The commands supported by Launch are detailed below. Square brackets indicate that a parameter is optional. Characters in
Italics represent a variable, and not a literal.
Copy
Description
Copies a file but does not overwrite an existing file.
Syntax
Copy,source-file,destination-file
Parameters
source-file: The file to be copied, including its path
destination-file: The destination path and filename
Example
copy,\Storage Card\MyData.dat,\Temp\MyData.dat
Notes
If the destination file already exists, it is not overwritten, and no error is given.
If the source file is blank, a zero-byte file is created.
Delete
Description
Deletes the specified file.
Syntax
Delete,source-file
Parameters
source-file: The file to be deleted, including its path
Example
delete,\Temp\MyData.dat
E-EQ-MX7CERG-A [ 50 ] MX7 Tecton™ CE Reference Guide
Page 63

Commands Supported by Launch
DelRegData
Description
Deletes a specified registry data field.
Syntax
Delregdata,key,subkey,field
Parameters
key: The abbreviated major registry key where you want to delete a field. Can be one of:
l cr or hkcr (HKEY_CLASSES_ROOT)
l cu or hkcu (HKEY_CURRENT_USER)
l lm or hklm (HKEY_LOCAL_MACHINE).
The case of key doesn’t matter
subkey: The subkey that holds the field you want to delete.
field: The field that you want to delete.
Example
delregdata,LM,Software\WidgetsPlc\OurApp,AppName
Notes
An error isn’t displayed if you specify a non-existent field, but is displayed if you specify a non-existent key or subkey.
E-EQ-MX7CERG-A [ 51 ] MX7 Tecton™ CE Reference Guide
Page 64

Commands Supported by Launch
DelRegKey
Description
Deletes a specified registry subkey.
Syntax
DelRegKey,key,subkey
Parameters
key: The abbreviated major registry key where you want to delete the subkey. Can be one of:
l cr or hkcr (HKEY_CLASSES_ROOT)
l cu or hkcu (HKEY_CURRENT_USER)
l lm or hklm (HKEY_LOCAL_MACHINE).
The case of key doesn’t matter
subkey: The subkey you want to delete.
Example
delregkey,LM,Software\WidgetsPlc\OurApp
Notes
Deletes the specified subkey and all of its contents (if any).
ElseIf
Description
Begins conditional command block, executed only if the previous IF command was FALSE.
Syntax
ElseIf
Parameters
None
Example
See IfFile , below
Notes
Results are unpredictable if not paired properly with If… command.
E-EQ-MX7CERG-A [ 52 ] MX7 Tecton™ CE Reference Guide
Page 65

Commands Supported by Launch
ElseIfFIile
Description
Begins conditional command block executed only if the file specified in the previous IfFile does not exist.
Syntax
ElseIfFile
Parameters
None
Example
See IfFile , below
Notes
Results are unpredictable if not paired properly with IfFile command.
EndIf
Description
Ends conditional command block begun with the previous IF command.
Syntax
EndIf
Parameters
None
Example
See IfFile, below
Notes
Results are unpredictable if not paired properly with If… command.
E-EQ-MX7CERG-A [ 53 ] MX7 Tecton™ CE Reference Guide
Page 66

Commands Supported by Launch
EndIfFile
Description
Ends conditional command block begun with the previous IF command.
Syntax
EndIfFile
Parameters
None
Example
See IfFile , below
Notes
Results are unpredictable if not paired properly with IfFile command.
EndIfTerm
Description
Ends conditional command block executed only if the device type specified in IfTerm matches.
Syntax
EndIfTerm
Parameters
None
Example
See IfTerm , below
Notes
Results are unpredictable if not paired properly with IfTerm command.
E-EQ-MX7CERG-A [ 54 ] MX7 Tecton™ CE Reference Guide
Page 67

Commands Supported by Launch
FCopy
Description
Copies a file, overwriting any existing file.
Syntax
fcopy,source-file,destination-file
Parameters
source-file: The file to be copied, including its path
destination-file: The destination path and filename
Example
fcopy,\Storage Card\MyData.dat,\Temp\MyData.dat
Notes
If the destination file already exists it is overwritten.
If the source file is blank, a zero-byte file is created.
E-EQ-MX7CERG-A [ 55 ] MX7 Tecton™ CE Reference Guide
Page 68

Commands Supported by Launch
IfFile
Description
Begins the conditional execution of a block of commands only if the specified file exists.
Syntax
IfFile,file
Parameters
file: The path and filename to determine if the commands should be executed
Example
IfFile,\System\MyData.dat
any number of commands, executed if file exists
ElseIfFile
any number of commands, executed if file does not exist
EndIfFile
Notes
If the file already exists the commands are executed.
This test does not care if file is a file or directory.
Nesting is supported.
E-EQ-MX7CERG-A [ 56 ] MX7 Tecton™ CE Reference Guide
Page 69

Commands Supported by Launch
IfTerm
Description
Begins the conditional execution of a block of commands only if the terminal matches the specified terminal type.
Syntax
IfTerm,terminal
Parameters
terminal: The terminal type to determine if the commands should be executed
Example
IfTerm,MX3X
any number of commands
EndIfTerm
Notes
If the terminal type is identical (not case-dependent) the commands are executed.
Nesting with IfFile is supported. Nesting with IfTerm is meaningless.
Launch
Description
Runs a program.
Syntax
Launch,program,wait-code
Parameters
program: The full path and filename of the program to be run.
wait-code Tells Launch how to behave when the program is running.
w(ait) causes Launch to stop processing the script until the program has finished executing.
c(ontinue) makes Launch continue processing the script while the program is executing.
Example
launch,\Windows\Calc.exe,w
Notes
This differs from LaunchCmd in that Launch has no parameters.
E-EQ-MX7CERG-A [ 57 ] MX7 Tecton™ CE Reference Guide
Page 70

Commands Supported by Launch
LaunchCmd
Description
Runs a program with arguments.
Syntax
Launchcmd,program,arguments,wait-code
Parameters
program: The full path and filename of the program to be run.
wait-code Tells Launch how to behave when the program is running.
w(ait) causes Launch to stop processing the script until the program has finished executing.
c(ontinue) makes Launch continue processing the script while the program is executing.
arguments: The command line arguments for program.
Example
launchcmd,\Windows\Pword.exe,\My Documents\Doc1.doc,w
Notes
This differs from Launch in that LaunchCmd allows parameters.
Message
Description
Displays a message on the screen.
Syntax
Message,message-title,message-body
Parameters
message-title: A heading for the message. Can be left empty.
message-body: The main body of the message. To display a message over multiple lines, use the \n character combination
at the end of each line. To display a single backslash use two together (\\).
Example
message,This is a message,"This is the first line,\nand this is the second"
Notes
Displaying a message pauses the execution of the script file until the message is OK’d. This is displayed with a modal dialog.
E-EQ-MX7CERG-A [ 58 ] MX7 Tecton™ CE Reference Guide
Page 71

Commands Supported by Launch
Mkdir
Description
Creates a directory.
Syntax
Mkdir,dir
Parameters
dir: The full path and name of the directory to be created.
Example
mkdir,\Program Files\MyApp
Notes
A new directory cannot be created if its parent directory doesn’t exist.
For example, to create a directory called \MyApp with a subdirectory called SubDir1, use mkdir,\MyApp followed by
mkdir,\MyApp\SubDir1.
Rmdir
Description
Removes a directory.
Syntax
Rmdir,dir
Parameters
dir: The full path and name of the directory to be removed.
Example
rmdir,\Program Files\MyApp
Notes
A directory cannot be removed if it contains files or subdirectories.
E-EQ-MX7CERG-A [ 59 ] MX7 Tecton™ CE Reference Guide
Page 72

Commands Supported by Launch
SetRegData
Description
Adds or updates a data field in the registry.
Syntax
Setregdata,key,subkey,type,field,data[,data2][,data3]...
Parameters
key: The abbreviated major registry key where you want to create/update the subkey. Can be one of:
l cr or hkcr (HKEY_CLASSES_ROOT)
l cu or hkcu (HKEY_CURRENT_USER)
l lm or hklm (HKEY_LOCAL_MACHINE).
The case of key doesn’t matter
subkey: The subkey you want to create/update a field in.
type: The data type of the field you wish to create/update. Can be s (for string value), dd (for decimal value), dx
(for hexadecimal value) or b (for binary value). The case of type doesn’t matter. If you’re altering an existing
field, type can be different from the current type
field: The name of the new field to be created/updated.
data: The value of the field being created. This depends on the type of field. Binary fields can have many values
(up to 2000 bytes). In this case the data field holds the number of bytes in the binary field, and each byte is
given as a subsequent parameter in hexadecimal (data2, data3 etc.).
Example
Setregdata,LM,WidgetsPlc\Info,s,AppName,The Widget Program
Setregdata,LM,WidgetsPlc\Info,dx,HexField,FA5B
Setregdata,LM,WidgetsPlc\Info,b,5,d3,62,58,f1,9c
E-EQ-MX7CERG-A [ 60 ] MX7 Tecton™ CE Reference Guide
Page 73

Commands Supported by Launch
SetRegKey
Description
Adds a sub key to the registry.
Syntax
Setregkey,key,subkey
Parameters
key: The abbreviated major registry key where you want to create the subkey. Can be one of:
l cr or hkcr (HKEY_CLASSES_ROOT)
l cu or hkcu (HKEY_CURRENT_USER)
l lm or hklm (HKEY_LOCAL_MACHINE).
The case of key doesn’t matter
subkey: The subkey you want to create.
Example
Setregkey,LM,Software\MyApp
Notes
Attempting to create a key that already exists does not cause an error.
E-EQ-MX7CERG-A [ 61 ] MX7 Tecton™ CE Reference Guide
Page 74

Commands Supported by Launch
Shortcut
Description
Creates a shortcut.
Syntax
Shortcut,name,target
Parameters
name: The path and name of the shortcut file. The file name must end in .lnk for Windows to recognize it as a short-
cut.
target: The target of the shortcut. If the target has a space in it quote marks must be used (see Command Line
Structure section and example below).
Example
shortcut,\Program Files\Widget.lnk,"""\My App\Widget.exe"""
Notes
No validation is performed on target to be sure it is executable.
E-EQ-MX7CERG-A [ 62 ] MX7 Tecton™ CE Reference Guide
Page 75

Commands Supported by Launch
Warmboot
Description
Warm boots the device.
Syntax
Warmboot
Parameters
None
E-EQ-MX7CERG-A [ 63 ] MX7 Tecton™ CE Reference Guide
Page 76

Launch Error Messages
Launch Error Messages
Launch displays a message if it encounters an error during the processing of a script. It is possible to get cascading error
messages, as Launch does not stop processing the script if it encounters an error. An example of this would be a failure
creating a directory causing the failure of all files copied to that directory.
Here is a list of the possible error messages that could be given:
Error Message Given by Description
Bad wait code wait-code
Directory Creation Failed errorcode
Directory Removal Failed errorcode
Error reading script file - An error occurred reading the script file.
File Copy Failed error-code
File Delete Failed error-code Delete There was a problem encountered deleting the file
Invalid Command: command - The command wasn’t recognized
Invalid Data Length data SetRegData Tried to set more than 2000 byte values in a binary field
Invalid Data Type type SetRegData The value of the type parameter is invalid
Invalid decimal data data SetRegData The data field doesn’t contain decimal data
Invalid hex data data SetRegData The data field doesn’t contain hexadecimal data
Invalid Registry Key key
Launch
The wait-code wasn’t recognized
LaunchCmd
MkDir There was a problem encountered creating the directory
RmDir There was a problem encountered removing the directory
Copy
There was a problem encountered copying the file
Fcopy
DelRegData
DelRegKey
The key parameter to the command has not been recognized
SetRegData
DelRegKey
Parms: Invalid Create Directory MkDir Not enough parameters were supplied.
Parms: Invalid Create Registry
Key
Parms: Invalid Create Shortcut Shortcut Not enough parameters were supplied.
Parms: Invalid Delete Registry
Data
Parms: Invalid Delete Registry
Key
Parms: Invalid File Copy
Parms: Invalid File Delete Delete Not enough parameters were supplied.
Parms: Invalid Program Name
E-EQ-MX7CERG-A [ 64 ] MX7 Tecton™ CE Reference Guide
SetRegKey Not enough parameters were supplied.
DelRegData Not enough parameters were supplied.
DelRegKey Not enough parameters were supplied.
Copy
Not enough parameters were supplied.
Fcopy
Launch
Not enough parameters were supplied.
LaunchCmd
Page 77

Launch Error Messages
Error Message Given by Description
Parms: Invalid Remove Directory RmDir Not enough parameters were supplied.
Parms: Invalid Set Registry Data SetRegData Not enough parameters were supplied.
Parms: Invalid User Message Message Not enough parameters were supplied.
Program Launch couldn't get
ExitCode error-code
Program Launch Failed error-code
Registry Key Create Failed errorcode
Registry Key Delete Failed errorcode
Registry Value Delete Failed errorcode
Registry Value Set Failed errorcode
Shortcut Creation Failed errorcode
Unable to open file script-file -
Launch
There was a problem getting the exit status of the program.
LaunchCmd
Launch
There was a problem executing the program.
LaunchCmd
SetRegKey There was a problem creating the registry key given.
DelRegKey There was a problem deleting the registry key given.
DelRegData There was a problem deleting the registry data. Most likely a bad subkey.
SetRegData There was a problem setting the registry data. Most likely a bad subkey.
Shortcut There was a problem encountered creating the shortcut.
There was a problem opening the script-file. This message is only
displayed when manually running Launch.
E-EQ-MX7CERG-A [ 65 ] MX7 Tecton™ CE Reference Guide
Page 78

Example Script File
Example Script File
iffile,\System\applock.cab
launchcmd,\Windows\wceload.exe,"/noaskdest /noui \System\applock.cab",w
launch,\Windows\applockprep.exe,c
endiffile
launchcmd,\Windows\wceload.exe,"/noaskdest /noui \System\wedge.cab",w
iffile,\System\summit.cab
launchcmd,\Windows\wceload.exe,"/noaskdest /noui \System\summit.cab",w
endiffile
iffile,\System\RFTerm.cab
launchcmd,\Windows\wceload.exe,"/noaskdest /noui \System\RFTerm.cab",w
endiffile
iffile,\System\Java.cab
launchcmd,\Windows\wceload.exe,"/noaskdest /noui \System\Java.cab",w
launchcmd,\Windows\wceload.exe,"/noaskdest /noui \Windows\Jeode.cab",w
endiffile
launch,\System\regrest.exe,w
coldboot
E-EQ-MX7CERG-A [ 66 ] MX7 Tecton™ CE Reference Guide
Page 79

Using ActiveSync
Using ActiveSync
Introduction
Once a relationship (partnership) has been established with Connect (on a desktop computer), ActiveSync will synchronize
using the USB cable on the MX7 Tecton.
Requirement : ActiveSync (version 4.5 or higher for Windows XP desktop/laptop computers) must be resident on the host
(desktop/laptop) computer. Windows Mobile Device Center is required for a Windows Vista/Windows 7 desktop/laptop
computer. ActiveSync and Windows Mobile Device Center for the PC is available from the Microsoft website. Follow their
instructions to locate, download and install ActiveSync or Windows Mobile Device Center on your desktop computer.
Note: For readability in this section, ActiveSync will be used in instructions and explanations. If you have a Windows
Vista or Windows 7 operating system on your desktop/laptop, replace ActiveSync with Windows Mobile Device Center.
Using Microsoft ActiveSync, you can synchronize information on your desktop computer with the MX7 Tecton and vice versa.
Synchronization compares the data on your mobile device with your desktop computer and updates both with the most recent
data.
For example, you can:
l Back up and restore your device data.
l Copy (rather than synchronize) files between your device and desktop computer.
l Control when synchronization occurs by selecting a synchronization mode. For example, you can synchronize con-
tinually while connected to your desktop computer or only when you choose the synchronize command.
By default, ActiveSync does not automatically synchronize all types of information. Use ActiveSync Options to specify the
types of information you want to synchronize. The synchronization process makes the data (in the information types you
select) identical on both your desktop computer and your device.
When installation of ActiveSync is complete on your desktop computer, the ActiveSync Setup Wizard begins and starts the
following processes:
l connect your device to your desktop computer,
l set up a partnership so you can synchronize information between your device and your desktop computer, and
l customize your synchronization settings.
Because ActiveSync is already installed on your device, your first synchronization process begins automatically when you
finish setting up your desktop computer in the ActiveSync wizard. For more information about using ActiveSync on your
desktop computer, open ActiveSync, then open ActiveSync Help.
E-EQ-MX7CERG-A [ 67 ] MX7 Tecton™ CE Reference Guide
Page 80
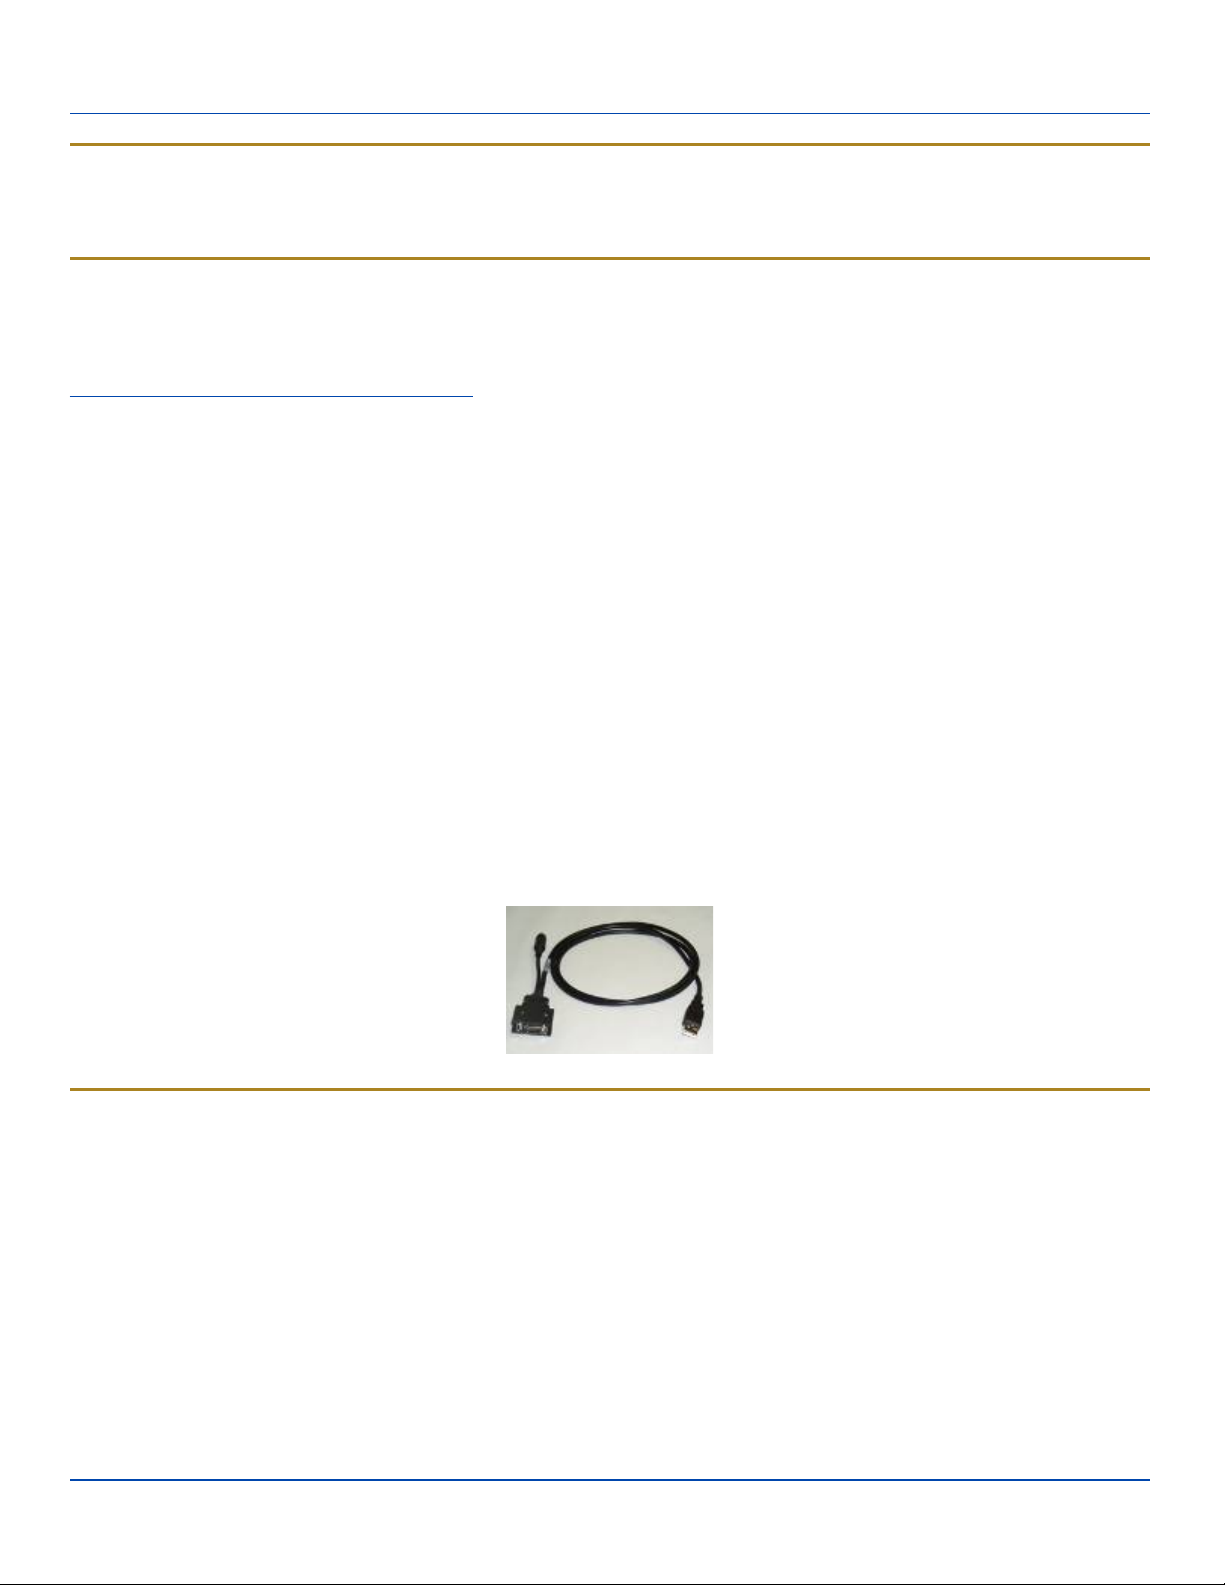
Initial Setup
Initial Setup
The initial setup of ActiveSync must be made via a USB connection. When there is a Connect icon on the desktop, this section
can be bypassed. Partnerships can only be created using USB cable connection.
Connect via USB
The default connection type is USBClient
To verify it is set to USB, select
Start | Settings | Control Panel | PC Connection
Tap the Change button. From the popup list, choose
USB Client
This will set up the mobile device to use the USB port. Tap OK and ensure the check box for “Allow connection with desktop
computer when device is attached” is checked.
Tap OK to return to the Control Panel. If desired, any control panel windows may be closed.
Connect the USB cable to the PC (the host) and the mobile device (the client) as detailed below. USB will start automatically
when the USB cable is connected, not requiring you to select “Connect” from the start menu.
When the MX7 Tecton loses connection, e.g. enters Suspend Mode, etc., the connection to ActiveSync will be lost. When the
MX7 Tecton resumes, the ActiveSync session will automatically re-connect.
Cable for USB ActiveSync Connection:
MX7052CABLE - MX7 Tecton Charge/Comm Interface Cable with USB Client port for ActiveSync. USB end of cable
connects to PC/Laptop USB port.
l Connect the MX7 Tecton end of the cable to the I/O port on the bottom of the MX7 Tecton
l The USB type A connector on the cable connects to a USB port on a PC or laptop.
l It is not necessary to connect the power connector on the cable in order to use ActiveSync.
Explore
From the ActiveSync Dialog on the Desktop PC, tap the Explore button, which allows you to explore the mobile device from
the PC side, with some limitations. You can copy files to or from the mobile device by drag-and-drop. You will not be allowed to
delete files or copy files out of the \Windows folder on the mobile device. (Technically, the only files you cannot delete or copy
are ones marked as system files in the original build of the Windows image. This, however, includes most of the files in the
\Windows folder).
E-EQ-MX7CERG-A [ 68 ] MX7 Tecton™ CE Reference Guide
Page 81

Backup Data Files using ActiveSync
Backup Data Files using ActiveSync
Use the following information to backup data files from the mobile device to a desktop or laptop PC using the appropriate cable
and Microsoft’s ActiveSync.
Prerequisites
A partnership between the mobile device and ActiveSync has been established.
l A desktop or laptop PC with an available USB port and a mobile device with a USB port. The desktop or laptop PC must
be running Windows XP or greater.
l Use the LXE-specific USB cable as listed in Connect Via USB.
Connect
Connect the USB cable to the PC (the host) and the mobile device (the client).
The “Get Connected” wizard on the host PC checks COM ports to establish a connection for the first time.
Note: USB synchronization will start automatically when the cable is connected.
Disconnect
l Disconnect the cable from the MX7 Tecton.
l Open the status bar icon in the lower right hand corner of the status bar. Then tap the Disconnect button.
When the MX7 Tecton loses connection, e.g. enters Suspend Mode, etc., the connection to ActiveSync will be lost. When the
MX7 Tecton resumes, the ActiveSync session will automatically re-connect.
MX7 Tecton with a Disabled Touchscreen
An MX7 Tecton touchscreen can be disabled (using the Options control panel Misc tab). In these cases, it may be easier to
configure the MX7 Tecton using ActiveSync and LXEConnect rather than using the MX7 Tecton keypad only.
Reset and Loss of Host Re-connection
ActiveSync assigns a partnership between a client and a host computer. A partnership is defined by two objects – a unique
computer name and a random number generated when the partnership is first created. An ActiveSync partnership between a
unique client can be established to two hosts.
When the mobile device is reset (return to default settings), the random number is deleted – and the partnership with the last
one of the two hosts is also deleted. The host retains the random numbers and unique names of all devices having a
partnership with it. Two clients cannot have a partnership with the same host if they have the same name. (Control Panel |
System | Device Name)
If the reset mobile device tries to reestablish the partnership with the same host PC, a new random number is generated for the
mobile device and ActiveSync will insist the unique name of the mobile device be changed. If the mobile device is associated
with a second host, changing the name will destroy that partnership as well. This can cause some confusion when reestablishing partnerships with hosts.
E-EQ-MX7CERG-A [ 69 ] MX7 Tecton™ CE Reference Guide
Page 82

Troubleshooting ActiveSync
Troubleshooting ActiveSync
ActiveSync on the host says that a device is trying to connect, but it cannot identify it
One or more control lines are not connected. This is usually a cable problem, but on a laptop or other device, it may indicate a
bad serial port.
If the MX7 Tecton is connected to a PC by a cable, disconnect the cable from the MX7 Tecton and reconnect it again.
Check that the correct connection is selected (USB “Client” if this is the initial ActiveSync installation).
See Also: “Cold Boot and Loss of Host Reconnection”.
ActiveSync indicator on the host (disc in the toolbar tray) turns green and spins as soon as you connect the cable, before
tapping the Connect icon (or REPLLOG.EXE in the Windows directory).
One or more control lines are tied together incorrectly. This is usually a cable problem, but on a laptop or other device, it may
indicate a bad serial port.
ActiveSync indicator on the host turns green and spins, but connection never occurs
Baud rate of connection is not supported or detected by host. Check that the correct connection is selected (USB “Client” if this
is the initial ActiveSync installation).
-or-
Incorrect or broken data lines in cable.
ActiveSync indicator on the host remains gray
Solution 1: ActiveSync icon on the PC does not turn green after connecting USB cable from MX7 Tecton.
1. Disconnect MX7 Tecton USB cable from PC.
2. Suspend/Resume or Restart the MX7 Tecton.
3. In ActiveSync | File | Connection Settings on PC disable Allow USB Connections and click OK.
4. Re-enable Allow USB Connections on the PC and click OK.
5. Reconnect USB cable from MX7 Tecton to PC.
Solution 2: The host doesn’t know you are trying to connect. May mean a bad cable, with no control lines connected, or an
incompatible baud rate. Try the connection again, with a known good cable.
E-EQ-MX7CERG-A [ 70 ] MX7 Tecton™ CE Reference Guide
Page 83
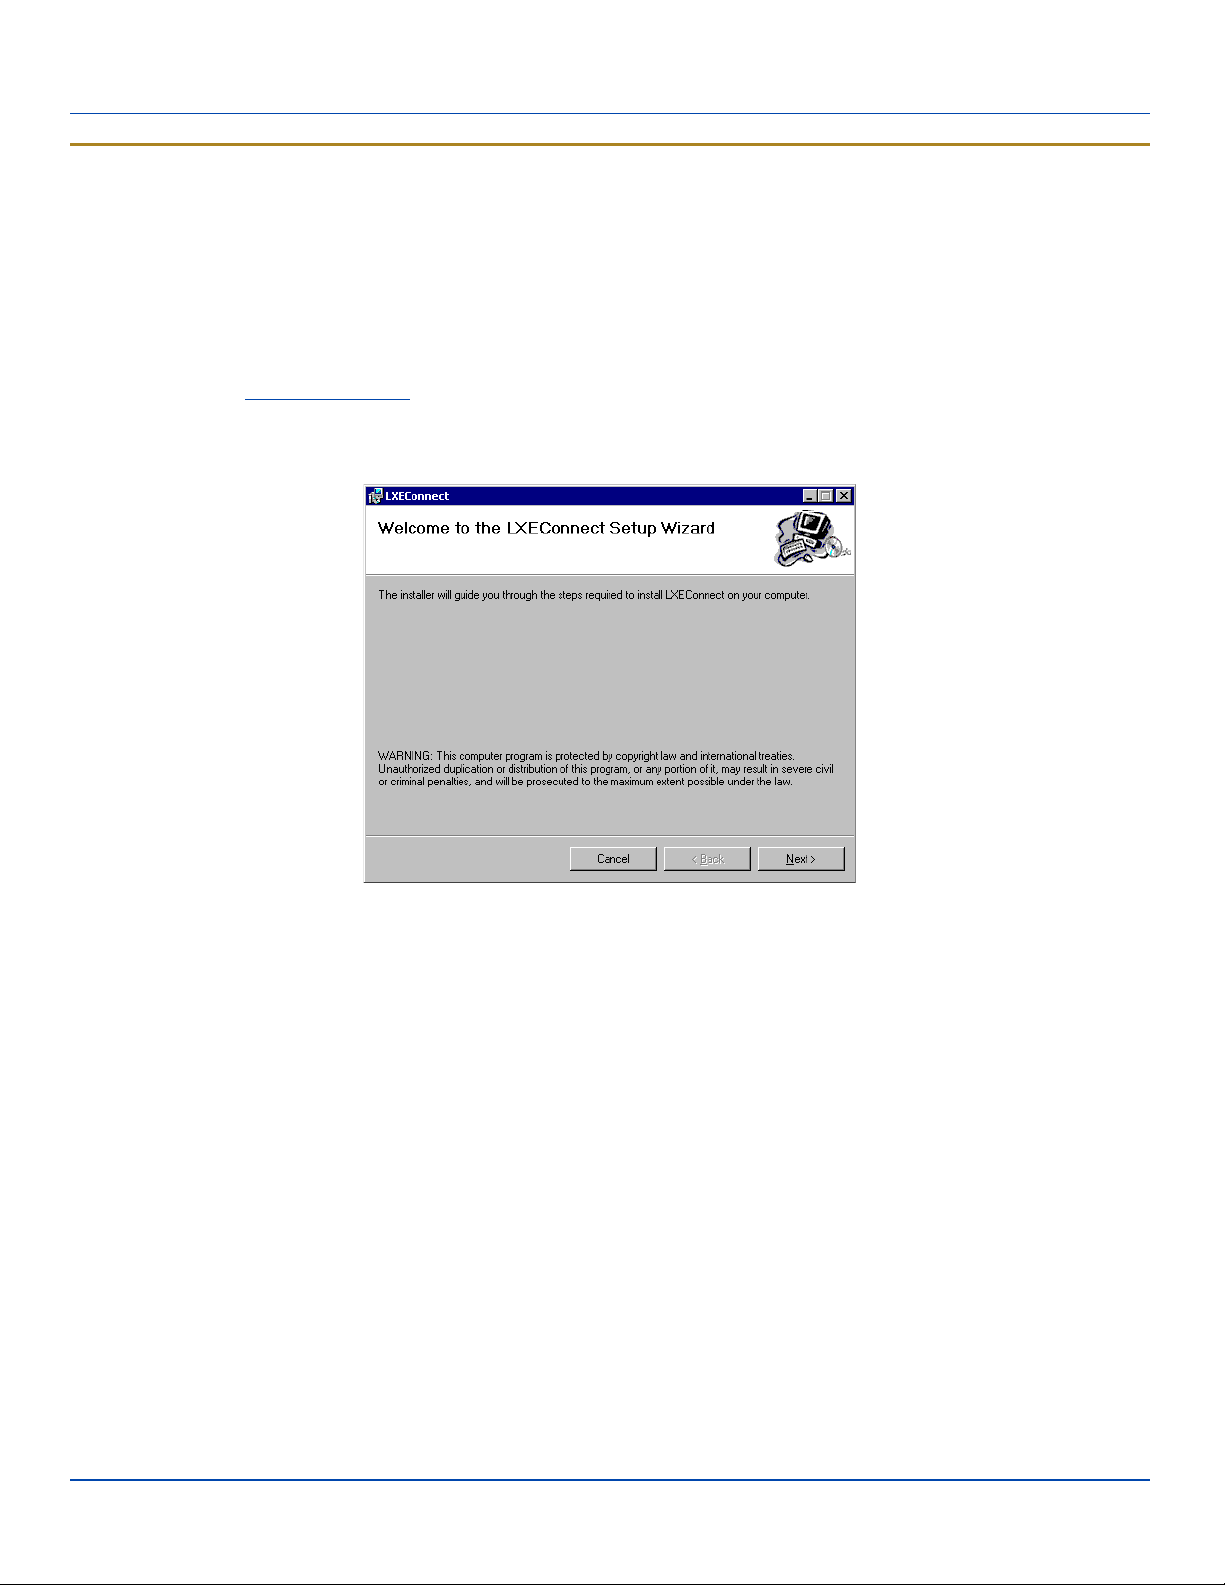
Configuring the MX7 Tecton with LXEConnect
Configuring the MX7 Tecton with LXEConnect
LXEConnect allows a user to view the MX7 Tecton screen remotely from a PC using an ActiveSync connection:
Requirements: ActiveSync version 4.5 (or higher) must be resident on the host (desktop/laptop) computer.
ActiveSync is already installed on the MX7 Tecton. The MX7 Tecton is preconfigured to establish a USB ActiveSync
connection to a host PC when the USB cable is attached to the MX7 Tecton and the host PC.
Install LXEConnect
1. Contact your LXE representative for the LXEConnect files.
2. Download the files to a location on your host PC hard drive.
3. Execute the setup.exe file that was copied to the host PC. This setup program installs the LXEConnect utility.
LXEConnect Setup
4. Follow the on screen installation prompts. The default installation directory is C:\Program Files\LXE\LXEConnect.
5. When the installation is complete, create a desktop shortcut to the following file: C:\Program Files\LXE\LXEConnect\LXEConnect.exe. If a different directory was selected during installation, please substitute the appropriate
directory.
6. LXEConnect is now installed on the host PC and ready to use.
E-EQ-MX7CERG-A [ 71 ] MX7 Tecton™ CE Reference Guide
Page 84
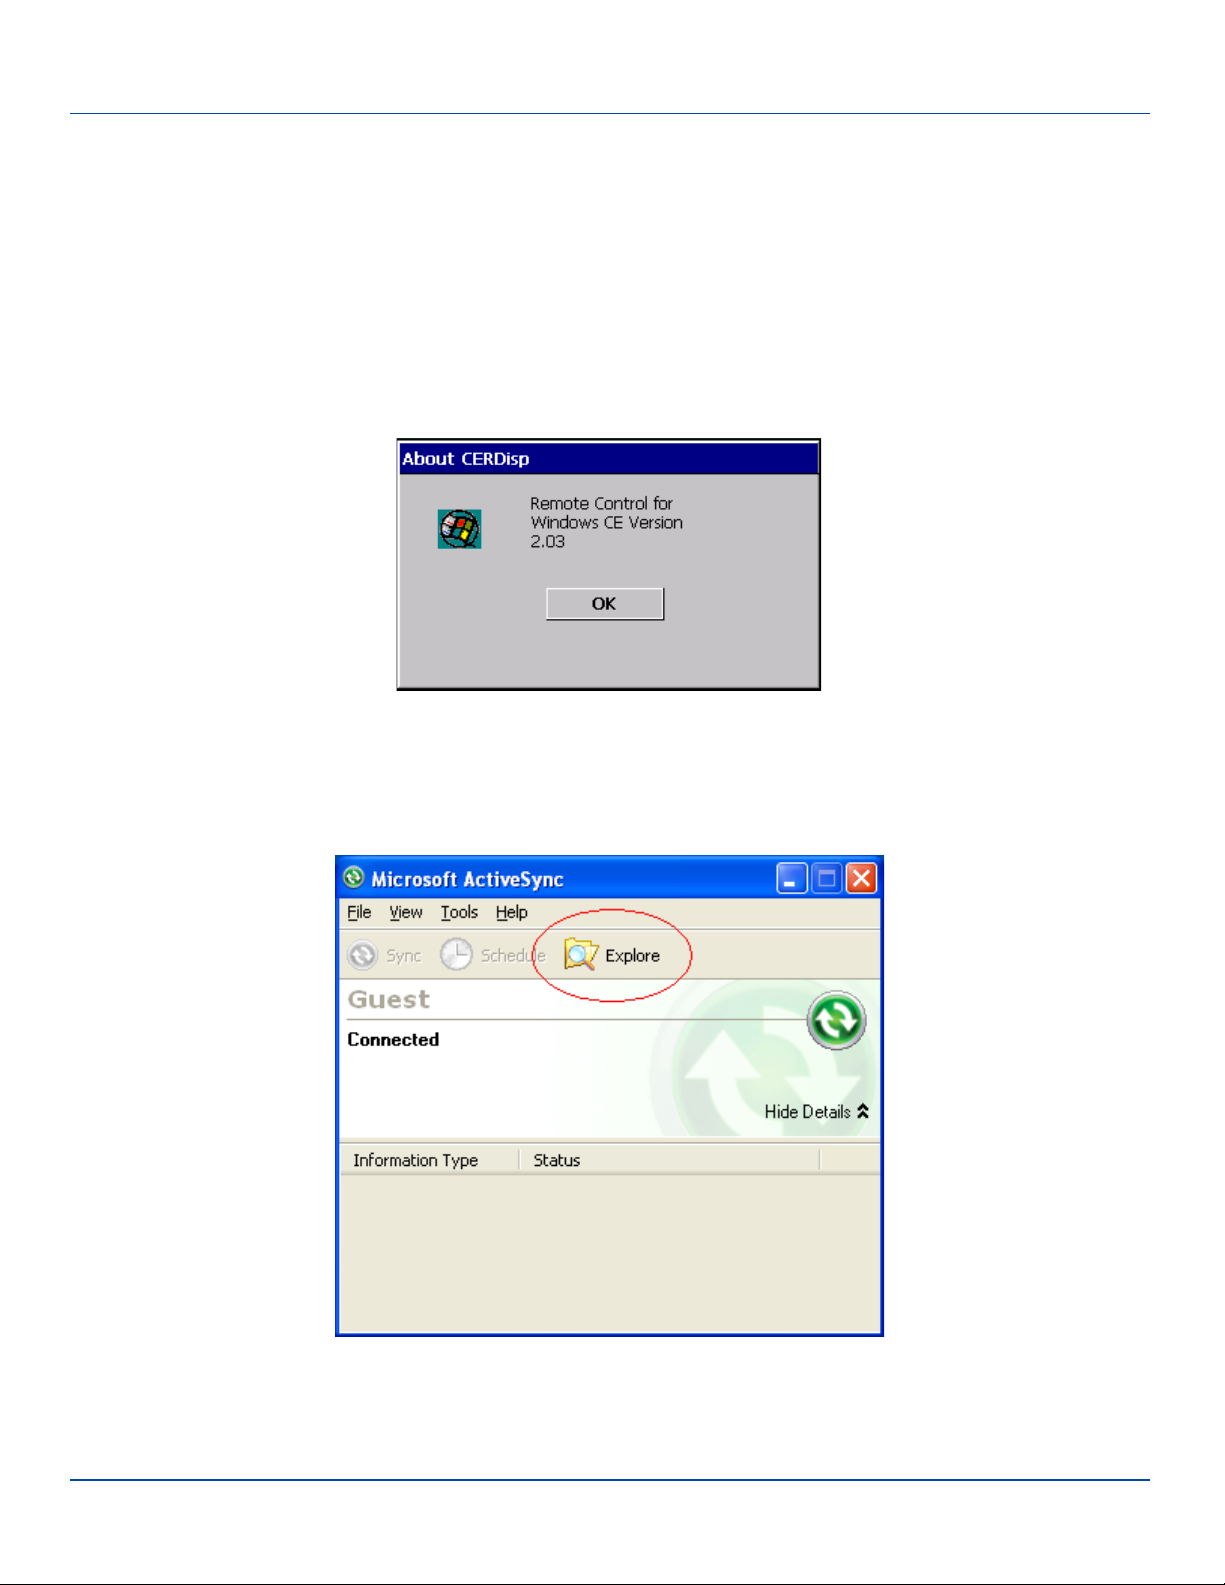
Using LXEConnect
Using LXEConnect
1. Power up the MX7 Tecton.
2. Connect the MX7 Tecton to the host PC using the USB connection cable. Once connected, the ActiveSync dialog box
appears and the ActiveSync connection is automatically established.
3. Select “No” for partnership when prompted. Dismiss any ActiveSync dialog boxes warning a partnership is not set up. It
is not necessary to establish a partnership to use LXEConnect. However, if a partnership is desired for other reasons,
one may be established now.
4. Double-click the LXEConnect icon that was created on the PC desktop.
5. LXEConnect launches.
Example LXEConnect Notice
6. Click the OK button to dismiss the About CERDisp dialog box (see Example LXEConnect Notice image above) on the
MX7 Tecton desktop by clicking the OK button in the LXEConnect window on the PC desktop. The dialog box automatically times out and disappears after approximately 20 seconds.
ActiveSync Explore
7. On the ActiveSync screen on the PC select Explore.
8. An explorer window is displayed for the MX7 Tecton.
E-EQ-MX7CERG-A [ 72 ] MX7 Tecton™ CE Reference Guide
Page 85
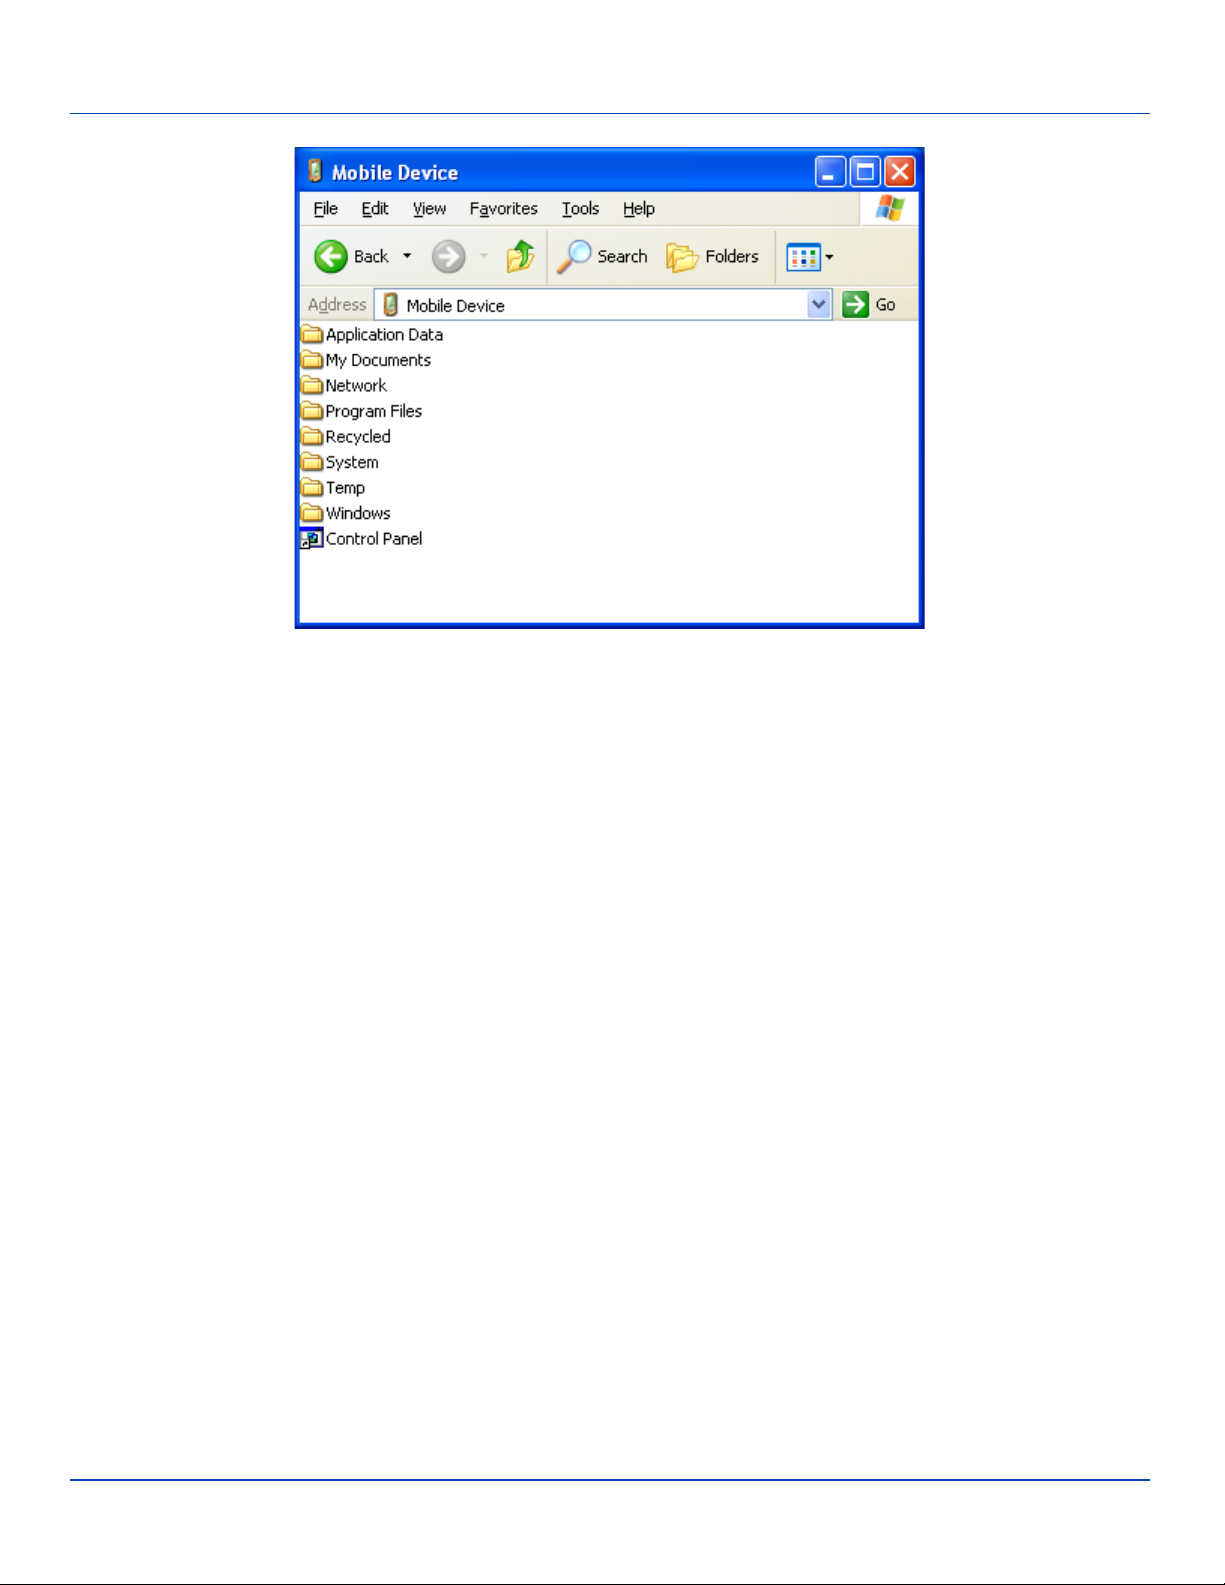
Using LXEConnect
Explorer Window on PC
9. The MX7 Tecton can now be configured from the LXEConnect window. Input from the PC’s mouse and keyboard are
recognized as if they were attached to the MX7 Tecton.
10. When the remote session is completed, close the LXEConnect program by selecting File | Close or clicking on the X in
the upper right hand corner to close it then disconnect the ActiveSync cable.
E-EQ-MX7CERG-A [ 73 ] MX7 Tecton™ CE Reference Guide
Page 86
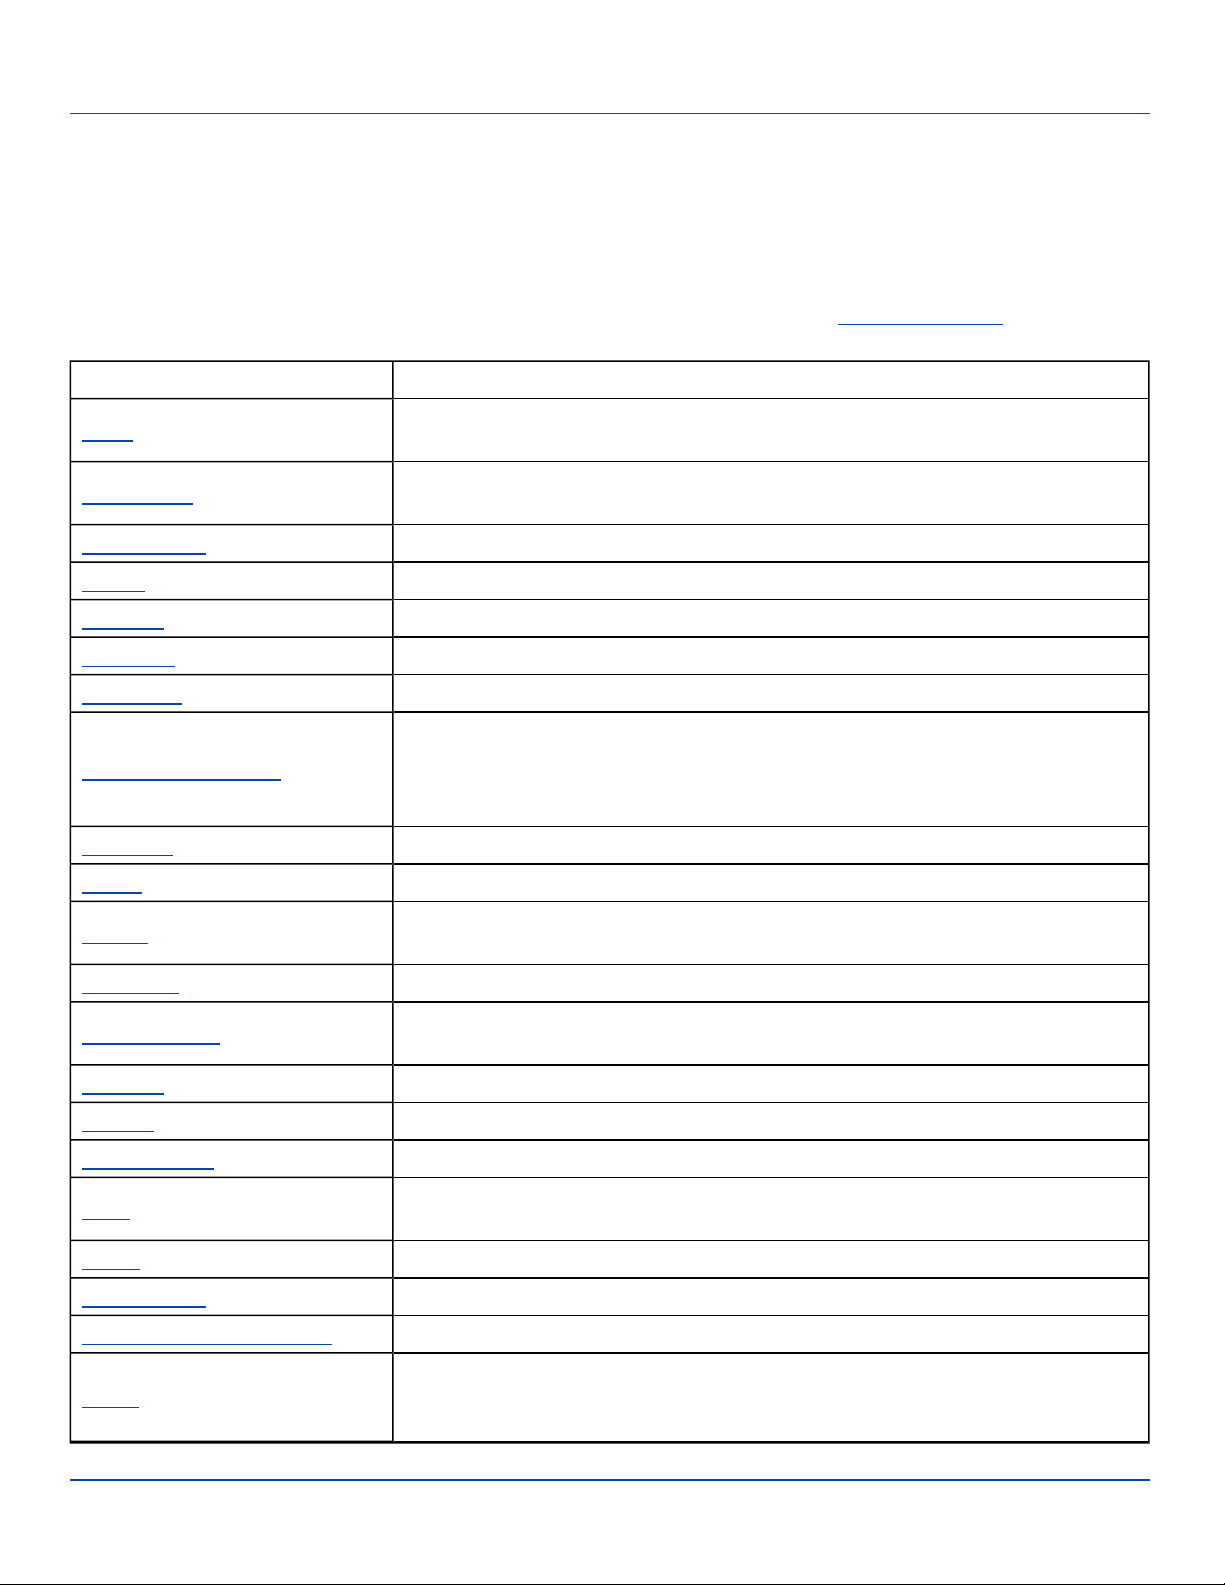
Control Panel
Control Panel
Start | Settings | Control Panel or My Device | Control Panel link
Note: Change the language displayed on the touchscreen by choosing Start | Settings | Control Panel | Keyboard and
then the Key map dropdown list.
Tap the ? button for Help when changing MX7 Tecton Control Panel options. Contact your LXE representative for updates as
they become available.
Option Function
About
Accessibility
Administration LXE AppLock Administration utility.
Battery View voltage and status of the main and backup batteries.
Bluetooth Set the parameters for Bluetooth device connections.
Brightness Adjust the screen brightness
Certificates Manage digital certificates used for secure communication.
Data Collection Wedge
Date/Time Set Date, Time, Time Zone, and Daylight Savings.
Dialing Connection setup for modem attached to COM port or Compact Flash slot.
Display
Input Panel Select the current key / data input method. Select custom key maps.
Software, hardware, versions and network IP. No user intervention allowed.
Integrated scanner type is identified.
Customize the way the keyboard, audio, display or mouse function for users with
hearing or viewing difficulties.
LXE Data Collection Wedge utility. Wedge utility for data collected from barcode
scans. Set data collection device, notifications, data stripping, prefix/suffix, and
vibration (if installed) options. Assign baud rate, parity, stop bits and data bits for
COM1 port. Assign collected data manipulation parameters.
Set background graphic and scheme. Set touchscreen and keypad backlight
properties and timers.
Internet Options
Keyboard Select a Key Map (or font). Set key repeat delay and key repeat rate.
KeyMap Configure KeyMap keys, LaunchCmd and LaunchApp.
License Viewer Displays license information for installed licensed applications.
Mixer
Mouse Set the double-tap sensitivity for stylus taps on the touchscreen.
MX7T Options Set various device specific configuration options.
Network and Dial Up Options Set network driver properties and network access properties.
Owner
E-EQ-MX7CERG-A [ 74 ] MX7 Tecton™ CE Reference Guide
Set General, Connection, Security, Privacy, Advanced and Popups options for
Internet connectivity.
Adjust the input and output parameters – volume, sidetone, and record gain, for
headphone, software and microphone.
Set the mobile device owner details (name, phone, etc). Enter notes. Enable / disable
Owner display parameters. Enter Network ID for the device – user name, password,
domain.
Page 87
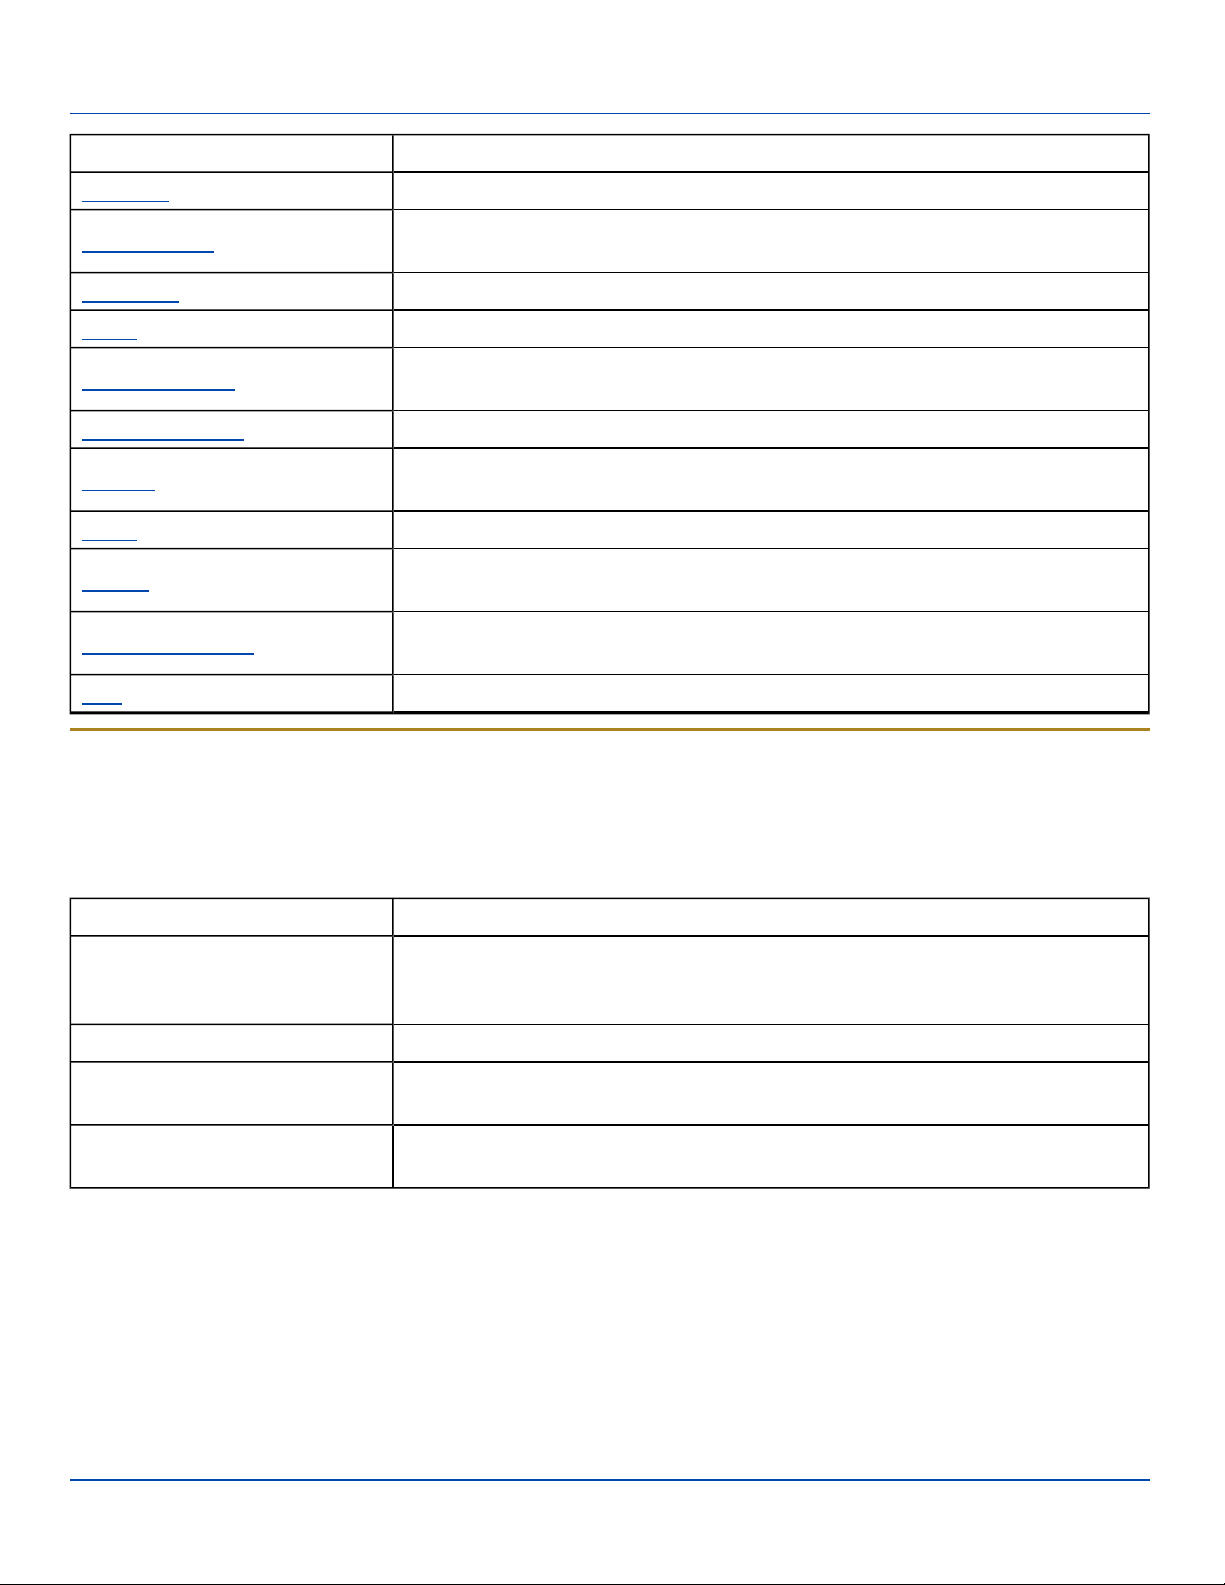
About
Option Function
Password Set OS access password properties for signon and/or screen saver.
PC Connection
Peripherals Set the touch screen and scan aperture heaters on or off, if installed.
Power Set Power scheme properties. Review device status and properties.
Regional Settings
Remove Programs Select to remove specific user installed programs.
Registry
Stylus Set double-tap sensitivity properties and/or calibrate the touch panel.
System
Volume and Sounds
WiFi Set the parameters for a Summit client.
Control the connection between the mobile device and a local desktop or laptop
computer.
Set appearance of numbers, currency, time and date based on country region and
language settings.
Load User Defaults, Save User Defaults, Load Factory Defaults, Warmboot and
Restart.
Review System and Computer data and revision levels. Adjust Storage and Program
memory settings. Enter device name and description. Review copyright notices.
Enable / disable volume and sounds. Set volume parameters and assign sound WAV
files to events.
About
Start | Settings | Control Panel | About
Note: The data cannot be edited by the MX7 Tecton user on these panels.
Tab Contents
GUID, Windows CE Version, OAL Version, Bootloader Version, Compile Version,
Software
Hardware CPU Type, Codec Type, Display, Flash memory, and DRAM memory
Versions
Network IP
Version window information is retrieved from the registry.
Programmable Component Version(s) and Language. Language indicates localized
version.
Revision level of LXE software modules and .NET Compact Framework Version. LXE
Utilities, LXE Drivers, LXE Image, LXE API, and Internet Explorer.
Current IP address, MAC address, and gateway address for all network ports (radio,
ActiveSync).
Version Tab and the Registry
Modify the Registry using the Registry Editor. LXE recommends caution when editing the Registry and also recommends
making a backup copy of the registry before changes are made.
The registry settings for the Version tab are under HKEY_LOCAL_MACHINE \ Software \ LXE \ Version in the registry.
To add a user application to the Version panel, create a new string value under the HKLM\Software\LXE\Version key. The
string name should be the Application name to appear in the Version window. The data for the value should be the version
number to appear in the Version window .
E-EQ-MX7CERG-A [ 75 ] MX7 Tecton™ CE Reference Guide
Page 88

Languages
Version strings can be equal to or less than 254 characters. Because the strings are displayed in a text box, any number can be
accommodated, up to the 64K byte text box limitation.
Languages
The Software tab displays any languages built into the OS image. The languages built into the OS image are noted in the
Language section of this tab:
l English only – No additional languages are built into the OS
l Japanese
l Simplified Chinese
l Traditional Chinese
l Korean
l Spanish
The above listed Asian languages are ordered separately and built-in to the OS image. Built-in languages are added to registry
entries and are available immediately upon startup. Thai, Hebrew, Arabic and Cyrillic Russian languages are available in the
(English only) default (extended) fonts.
Identifying Software Versions
The Versions tab displays the versions of many of the software programs installed. Not all installed software installed on the
mobile device is included in this list and the list varies depending on the applications loaded on the MX7 Tecton. The LXE
Image line displays the revision of the system software installed. Refer to the last three digits to determine the revision level.
MAC Address
The Network IP tab displays the MAC address of the network card.
E-EQ-MX7CERG-A [ 76 ] MX7 Tecton™ CE Reference Guide
Page 89
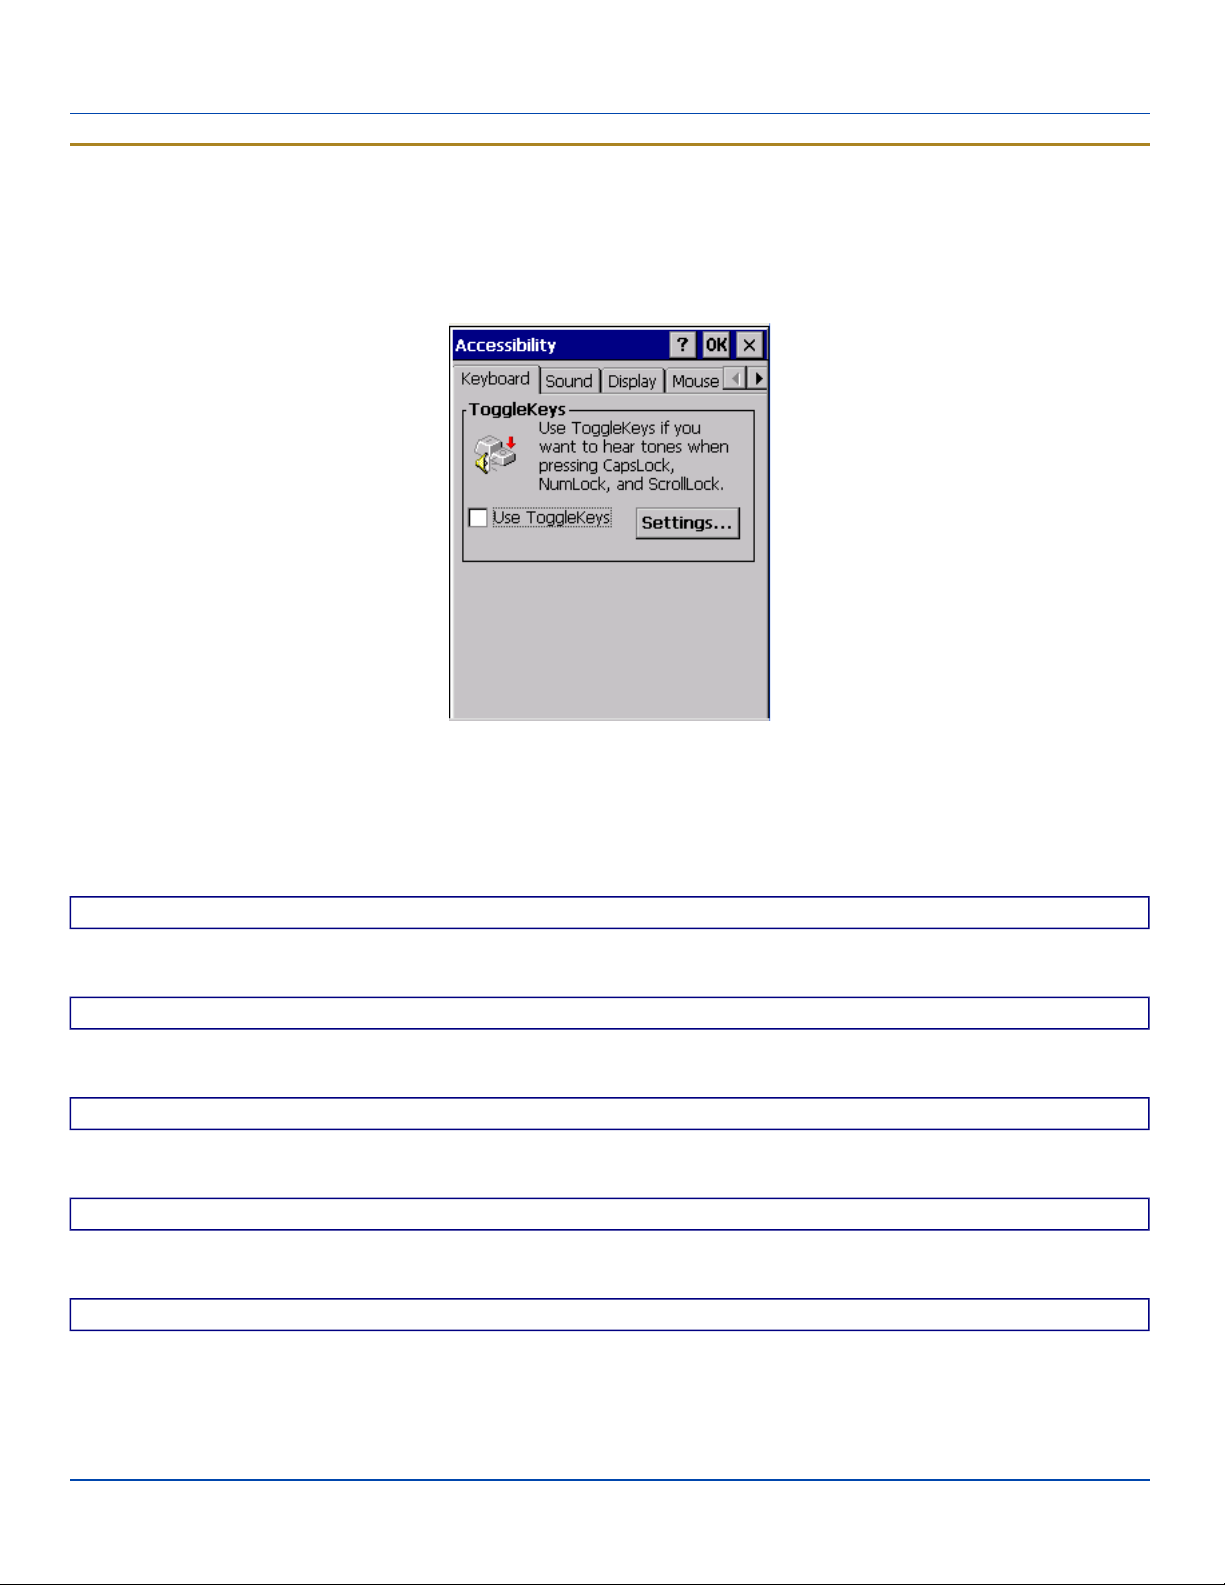
Accessibility
Accessibility
Start | Settings | Control Panel | Accessibility
Customize the way the MX7 Tecton keyboard, sound, display, mouse, automatic reset and notification sounds function. There
are a few changes from general Windows desktop Accessibility options.
The following exceptions are due to a limitation in the Microsoft Windows CE operating system:
l If the ToggleKeys option is selected, please note that the ScrollLock key does not produce a sound as the CapsLock
and NumLock keys do.
l If the SoundSentry option is selected, please note that ScrollLock does not produce a visual warning as the CapsLock
and NumLock keys do.
Keyboard Tab
ToggleKeys - Disabled by default. Tap the Use ToggleKeys checkbox to enable this option. Tap the Settings button to view or
change parameters.
Sound Tab
SoundSentry is disabled by default. Tap the Use SoundSentry checkbox to enable this option. Tap the Settings button to view
or change parameters.
Display Tab
High Contrast is disabled by default. Tap the Use High Contrast checkbox to enable this option. Tap the Settings button to
view or change parameters.
Mouse Tab
MouseKeys is disabled by default. Tap the Use MouseKeys checkbox to enable this option. Tap the Settings button to view or
change parameters.
General Tab
Automatic reset is disabled by default. Tap the Turn off accessibility features checkbox to enable this option and use the
dropdown option to assign a timer. Notification is enabled by default. Sounds are emitted when turning a feature on or off.
E-EQ-MX7CERG-A [ 77 ] MX7 Tecton™ CE Reference Guide
Page 90

Administration - for AppLock
Administration - for AppLock
Introduction
LXE’s AppLock is designed to be run on LXE certified Windows CE based devices only. LXE loads the AppLock program as
part of the LXE customer installation process.
MX7 Tecton AppLock is setup by the Administrator by tapping Start | Settings | Control Panel | Administration.
Configuration parameters are specified by the AppLock Administrator for the mobile device end-user. AppLock is password
protected by the Administrator.
End-user mode locks the end-user into the configured application or applications. The end user can still reboot the mobile
device and respond to dialog boxes. The administrator-specified applications are automatically launched in the specified order
and run in full screen mode when the device boots up.
When the mobile device is reset to factory default values, for example after a cold reset, the Administrator may need to
reconfigure the AppLock parameters.
The assumption, in this section, is that the first user to power up a new mobile device is the system administrator.
Note: AppLock Administrator Control panel file Launch option does not inter-relate with similarly-named options
contained in other MX7 Tecton Control Panels.
Note: A few applications do not follow normal procedures when closing. AppLock cannot prevent this type of application
from closing, but is notified that the application has closed. For these applications, AppLock immediately restarts the
application (see Auto Re-Launch) which causes the screen to flicker. If this type of application is being locked, the
administrator should close all other applications before switching to end-user mode to minimize the screen flicker.
AppLock is updated periodically as new options become available. Contact your LXE representative for assistance, downloads
and update availability.
E-EQ-MX7CERG-A [ 78 ] MX7 Tecton™ CE Reference Guide
Page 91

Factory Default Settings - AppLock
Factory Default Settings - AppLock
Application Panel
Filename Blank
Title Blank
Arguments Blank
Order 1
Internet Disabled
Global Key Ctrl+Spc
Global Delay 10 sec
Input Panel Disabled
Launch Button Panel
Auto at Boot Enabled
Auto at Boot Retries 0
Auto at Boot Delay 10 sec
Auto Re-launch Enabled
Auto Re-launch Retries 0
Auto Re-launch Delay 0 sec
Manual Launch Disabled
Allow Close Disabled
Security Panel
Hotkey (Activation key) Shft+Ctl+A
Password Blank
Status Panel
Filename \System\applock.txt
View Level None
Log Level None
E-EQ-MX7CERG-A [ 79 ] MX7 Tecton™ CE Reference Guide
Page 92

Setup a New Device
Setup a New Device
LXE devices with the AppLock feature are shipped to boot in Administration mode with no default password, thus when the
MX7 Tecton is first booted, the user has full access to the device and no password prompt is displayed. After the administrator
specifies the applications to lock, a password is assigned and the device is rebooted or the hotkey is pressed, the device
switches to end-user mode.
Briefly, the process to configure a new device is as follows:
1. Connect an external power source to the device and press the Power button.
2. Adjust screen display, audio volume and other parameters if desired. Install accessories.
3. Tap Start | Settings | Control Panel | Administration icon.
4. Assign applications on the Control (single application) or Application (dual application) tab screen.
5. Assign a password on the Security tab screen.
6. Select a view level on the Status tab screen, if desired.
7. Tap OK
8. Press the hotkey sequence to launch AppLock and lock the configured application(s)
9. The device is now in end-user mode.
E-EQ-MX7CERG-A [ 80 ] MX7 Tecton™ CE Reference Guide
Page 93

Administration Mode
Administration Mode
Administration mode gives full access to the mobile device, hardware and software configuration options.
The administrator must enter a valid password (when a password has already been assigned) before access to Administration
mode and configuration options are allowed. The administrator can configure the following options:
l Create/change the keystroke sequence to activate administrator access.
l Create/change the password for administrator access.
l Assign the name of the application, or applications, to lock.
l Select the command line of the application to lock.
In addition to these configuration options, the administrator can view and manage the status logs of AppLock sessions.
Administrator default values for this device:
Administrator Hotkey
Shift+Ctrl+A
Password
none
Application path and name
none
Application command line
none
E-EQ-MX7CERG-A [ 81 ] MX7 Tecton™ CE Reference Guide
Page 94

End User Mode
End User Mode
End-user mode locks the end-user into the configured application or applications. The end user can still reboot and respond to
dialog boxes. Each application is automatically launched and runs in full screen mode when the device boots up.
The user cannot unintentionally or intentionally exit the application nor can the end user execute any other applications. Normal
application exit or switching methods and all Microsoft defined Windows CE key combinations, such as close (X) icon, File
Exit, File Close, Alt-F4, Alt-Tab, etc. are disabled. The Windows CE desktop icons, menu bars, task bar and system trays are
not visible or accessible. Task Manager is not available.
If the end-user selects File/Exit or Close from the applications menu bar, the menu is cleared and nothing else happens; the
application remains active. Nothing happens when the end-user clicks on the Close icon on the application’s title bar and the
application remains active.
Note: A few applications do not follow normal procedures when closing. AppLock cannot prevent this type of application
from closing, but is notified that the application has closed. For these applications, AppLock immediately restarts the
application which causes the screen to flicker. If this type of application is being locked, the administrator should close all
other applications before switching to end user mode to minimize the screen flicker.
Windows accelerator keys such as Alt-F4 are disabled.
Passwords
A password must be configured. If the password is not configured, a new device switches into Administration mode without
prompting for a password. In addition to the hotkey press, a mode switch occurs if inaccurate information has been configured
or if mandatory information is missing in the configuration.
There are several situations that display a password prompt after a password has been configured.
If the configured hotkey is pressed, the password prompt is displayed. In this case the user has 30 seconds to enter a
password. If a valid password is not entered within 30 seconds, the password prompt is dismissed and the device returns to
end-user mode.
All other situations that present the password prompt do not dismiss the prompt -- this is because the other situations result in
invalid end-user operation.
These conditions include:
l If inaccurate configuration information is entered by the administrator, i.e. an application is specified that does not exist.
l If the application name, which is mandatory for end-user mode, is missing in the configuration.
l Invalid installation of AppLock (e.g. missing DLLs).
l Corrupted registry settings.
To summarize, if an error occurs that prevents AppLock from switching to user mode, the password will not timeout and
AppLock will wait until the correct password is entered.
Forgotten password?
See: Troubleshooting
E-EQ-MX7CERG-A [ 82 ] MX7 Tecton™ CE Reference Guide
Page 95
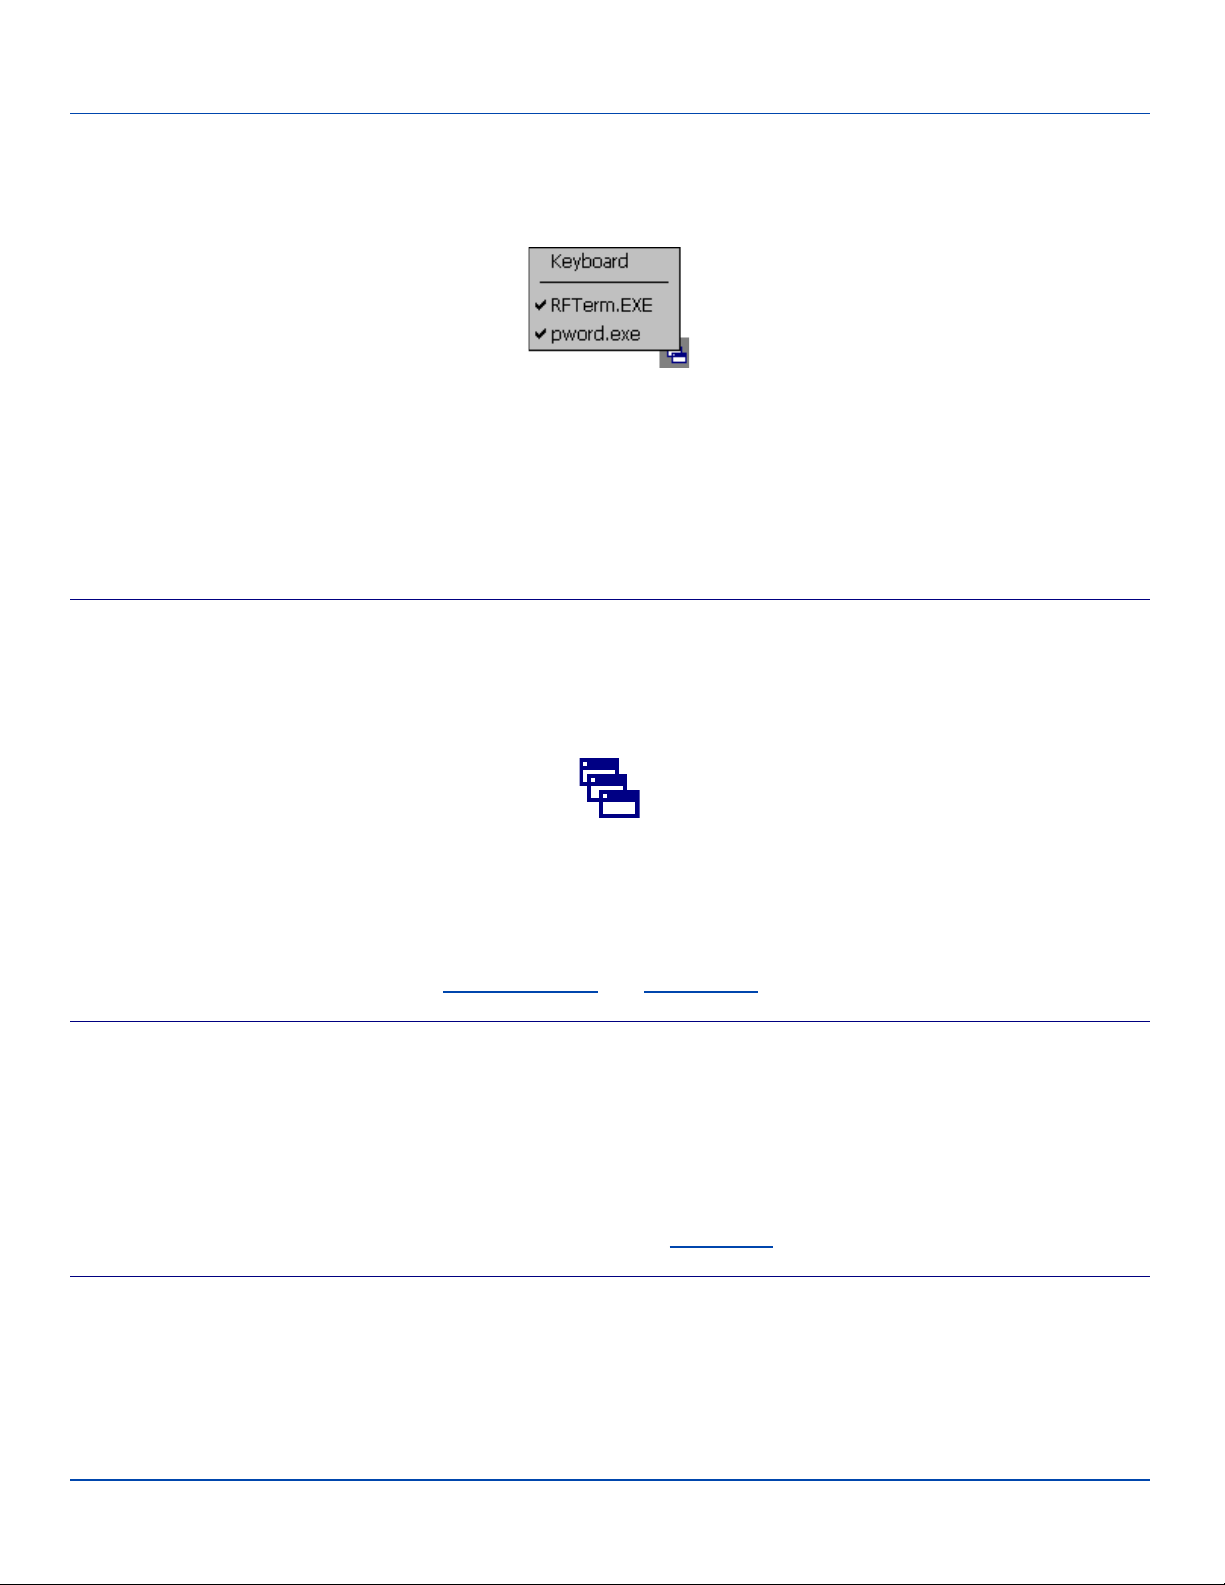
End-User Switching Technique
End-User Switching Technique
Note: The touch screen must be enabled.
Switchpad Menu
A checkmark indicates applications currently active or available for Launching by the user. When Keyboard is selected, the
MX7 Tecton default input method (Input Panel, Transcriber, or custom input method) is activated.
The check to the left of the application name indicates that the application is active.
If the application is listed but does not have a checkmark to the left of the application name, this means the application is
configured in AppLock and can be manually launched by clicking on the application name in the list.
Using a Stylus Tap
When the mobile device enters end-user mode, a Switchpad icon (it looks like three tiny windows one above the other) is
displayed in the lower right corner of the display. The Switchpad is always visible on top of the application in focus. However, if
only one application is configured in AppLock and the Input Panel is disabled the Switchpad is not visible.
When the user taps the Switchpad icon, a menu is displayed showing the applications available to the user. The user can tap
an application name in the popup menu and the selected application is brought to the foreground. The previous application
continues to run in the background. Stylus taps affect the application in focus only. When the user needs to use the Input
Panel, they tap the Keyboard option. Input Panel taps affect the application in focus only.
See Also: Application Panel | Launch | Manual (Launch) and Allow Close
Using the Switch Key Sequence
One switch key sequence (or hotkey) is defined by the administrator for the end-user to use when switching between locked
applications. This is known as the Activation key. The Activation key is assigned by the Administrator using the Global Key
parameter. When the switch key sequence is pressed on the keypad, the next application in the AppLock configuration is
moved to the foreground and the previous application moves to the background. The previous application continues to run in
the background. End-user key presses affect the application in focus only.
See Also: Start | Settings | Administration | Application Panel | Global Key
Hotkey (Activation hotkey)
If the mobile device uses LXE’s Multi AppLock to allow the user to switch between applications, the default Activation key is
Ctrl+Spc. The key sequence switches the focus between one application and another. Data entry affects the application
running in the foreground only. Note that the system administrator may have assigned a different key sequence to use when
switching applications.
E-EQ-MX7CERG-A [ 83 ] MX7 Tecton™ CE Reference Guide
Page 96

End User Internet Explorer (EUIE)
End User Internet Explorer (EUIE)
AppLock supports applications that utilize Internet Explorer, such as .HTML pages and JAVA applications. The end user can
run an application by entering the application name and path in Internet Explorer’s address bar.
To prevent the end user from executing an application using this method, the address bar and Options settings dialog are
restricted in Internet Explorer. This is accomplished by creating an Internet Explorer that is used in end user mode: End-user
Internet Explorer (EUIE.EXE). The EUIE executes the Internet Explorer application in full screen mode which removes the
address bar and status bar. The Options Dialog is also removed so the end user cannot re-enable the address bar.
The administrator specifies the EUIE by checking the Internet checkbox in the Application tab of the Administrator applet. The
internet application should then be entered in the Application text box.
When the Internet checkbox is enabled, the Menu and Status check boxes are available.
Enabling the Menu checkbox displays the EUIE menu which contains navigation functions like Back, Forward, Home,
Refresh, etc., functions that are familiar to most Internet Explorer users. When the Menu checkbox is blank, the EUIE menu is
not displayed and Navigation functions are unavailable.
When the Status checkbox is enabled, the status bar displayed by EUIE gives feedback to the end-user when they are
navigating the Internet.
If the standard Internet Explorer that is shipped with the mobile device is desired, it should be treated like any other application.
This means that IEXPLORER.EXE should be specified in the Application text box and the internet application should be
entered in the command line. In this case, do not check the Internet checkbox.
E-EQ-MX7CERG-A [ 84 ] MX7 Tecton™ CE Reference Guide
Page 97

Application Configuration
Application Configuration
Settings | Control Panel | Administration icon
The default Administrator Hotkey sequence is Shift+Ctrl+A.
Administrator mode allows access to all features on the device. When the hotkey is pressed to switch into Administrator mode,
a password prompt is displayed (if a password has been configured). A password must be entered within 30 seconds (and
within three tries) or the password prompt is removed and the device remains in end-user mode with the focus returned to the
locked application. Without entry of a valid password, the switch into Administrator mode will not occur.
The password prompt is displayed if a password has been configured. When the valid password is entered, the Administration
Control panel is displayed. When a valid password is not entered within 30 seconds, the user is returned to the System Control
Panel.
If a password has not been configured, the Administrator Control panel is displayed.
Important: Before setting up multiple instances of the same application, make sure the targeted software application
will allow two instances to run at the same time.
E-EQ-MX7CERG-A [ 85 ] MX7 Tecton™ CE Reference Guide
Page 98
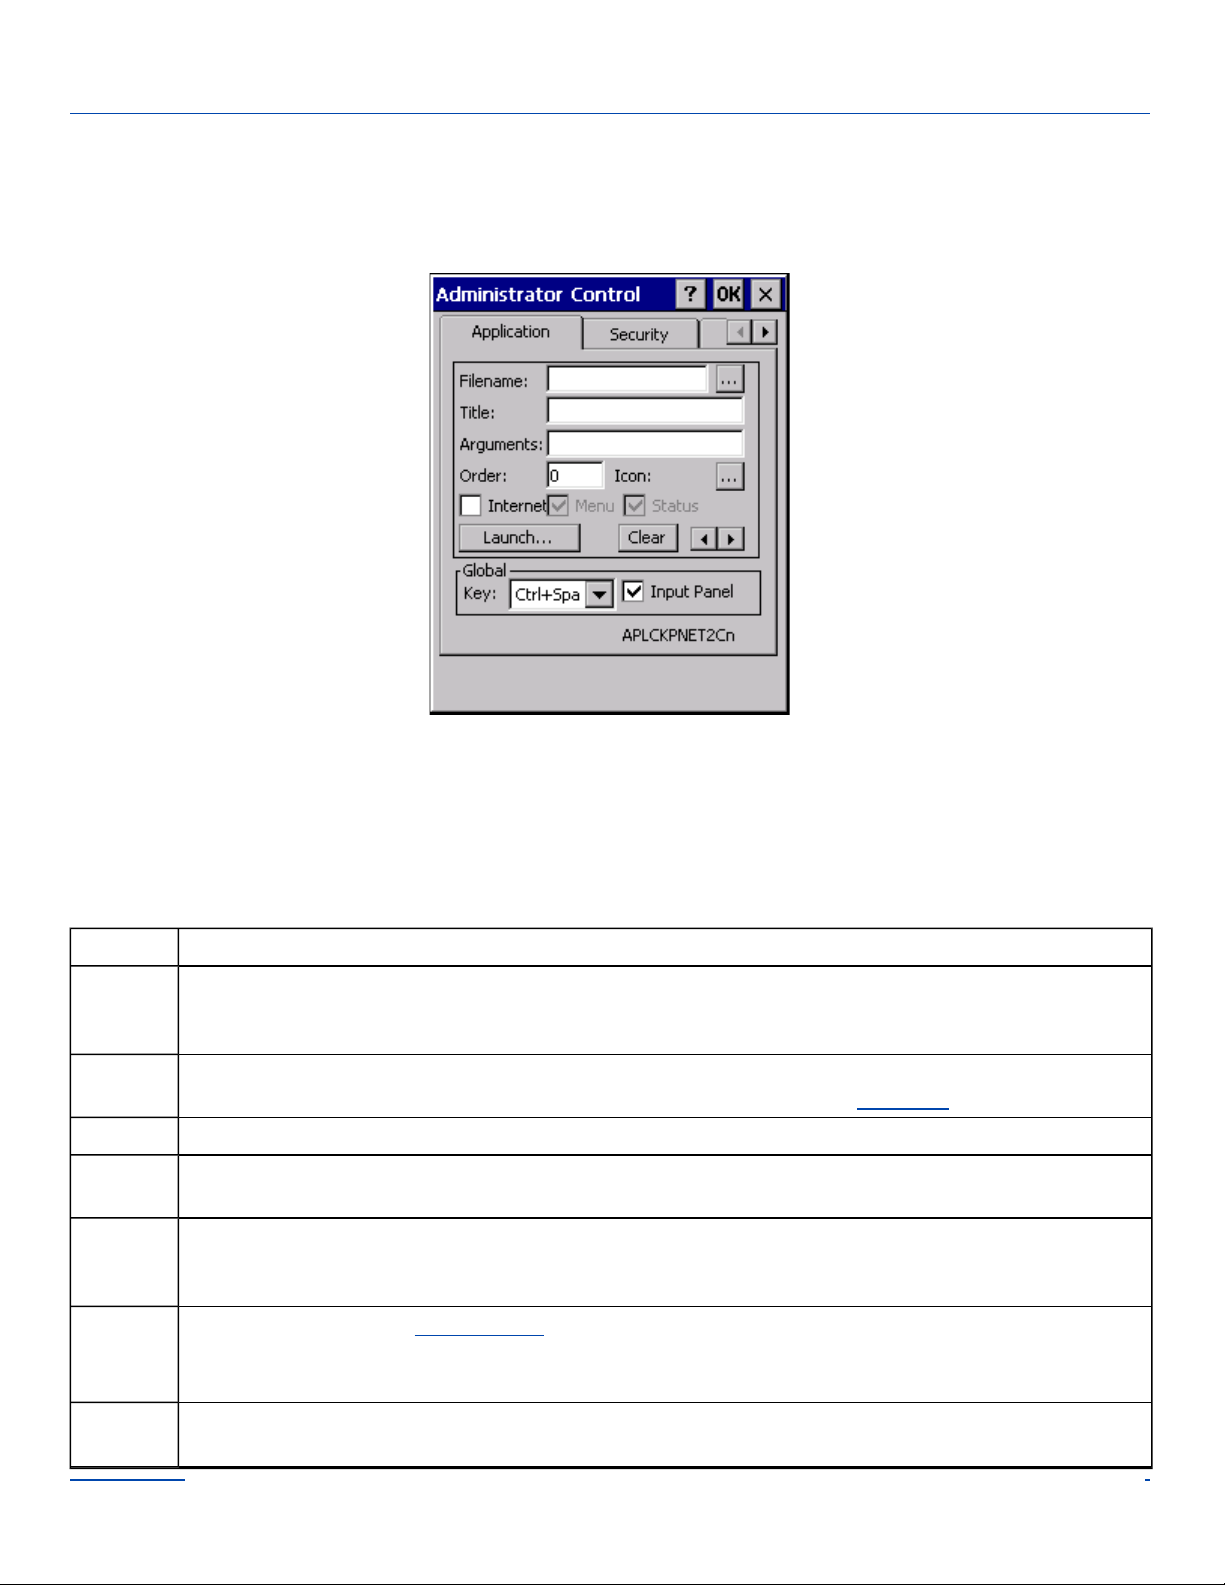
Application Panel
Application Panel
Note: Users of Single-Application AppLock have a Control tab instead of an Application tab. Some of the options in this
section do not apply to the Control tab.
Application Panel
Note: If your Application Panel does not look like the figure shown above, you may have the Single Application version.
Use the Application tab options to select the applications to launch when the device boots up in End-user Mode.
If no application is specified when the Administrator Control Panel is closed, the mobile device reboots into Administrator
mode. If a password has been set, but an application has not been specified, the user will be prompted for the password before
entering administration mode. The password prompt remains on the display until a valid password is entered.
Option Explanation
Default is blank. Move the cursor to the Filename text box and either type the application path or tap the Browse
Filename
Title
Arguments Default is blank. Enter the command line parameters for the application in the Arguments text box.
Order
Internet
Launch
Button
button (the … button). The standard Windows CE Browse dialog is displayed. After selecting the application
from the Browse dialog, tap OK.
Default is blank. Enter the Title to be associated with the application. The assumption is that multiple copies of
the same application may need unique titles in order to differentiate them in the Switchpad.
Default is 1. Enter the Order in which the application is to be loaded or presented to the end-user. Applications
are launched in lowest to highest number order and do not need to be sequential.
Default is Disabled. Enable the Internet checkbox to use the End-user Internet Explorer (EUIE.EXE) When the
checkbox is enabled, the Internet Menu and Internet Status are available. See the section titled End-user Internet
Explorer (EUIE) for more details.
See following section titled Launch Button.
Note: AppLock Administrator Control panel file Launch option does not inter-relate with similarly-named
options contained in other LXE Control Panels.
Global Key
Default is Ctrl+Spc. Select the Global Key key sequence the end-user is to press when switching between
applications. The Global Key default key sequence must be defined by the AppLock Administrator. The Global
E-EQ-MX7CERG-A [ 86 ] MX7 Tecton™ CE Reference Guide
Page 99
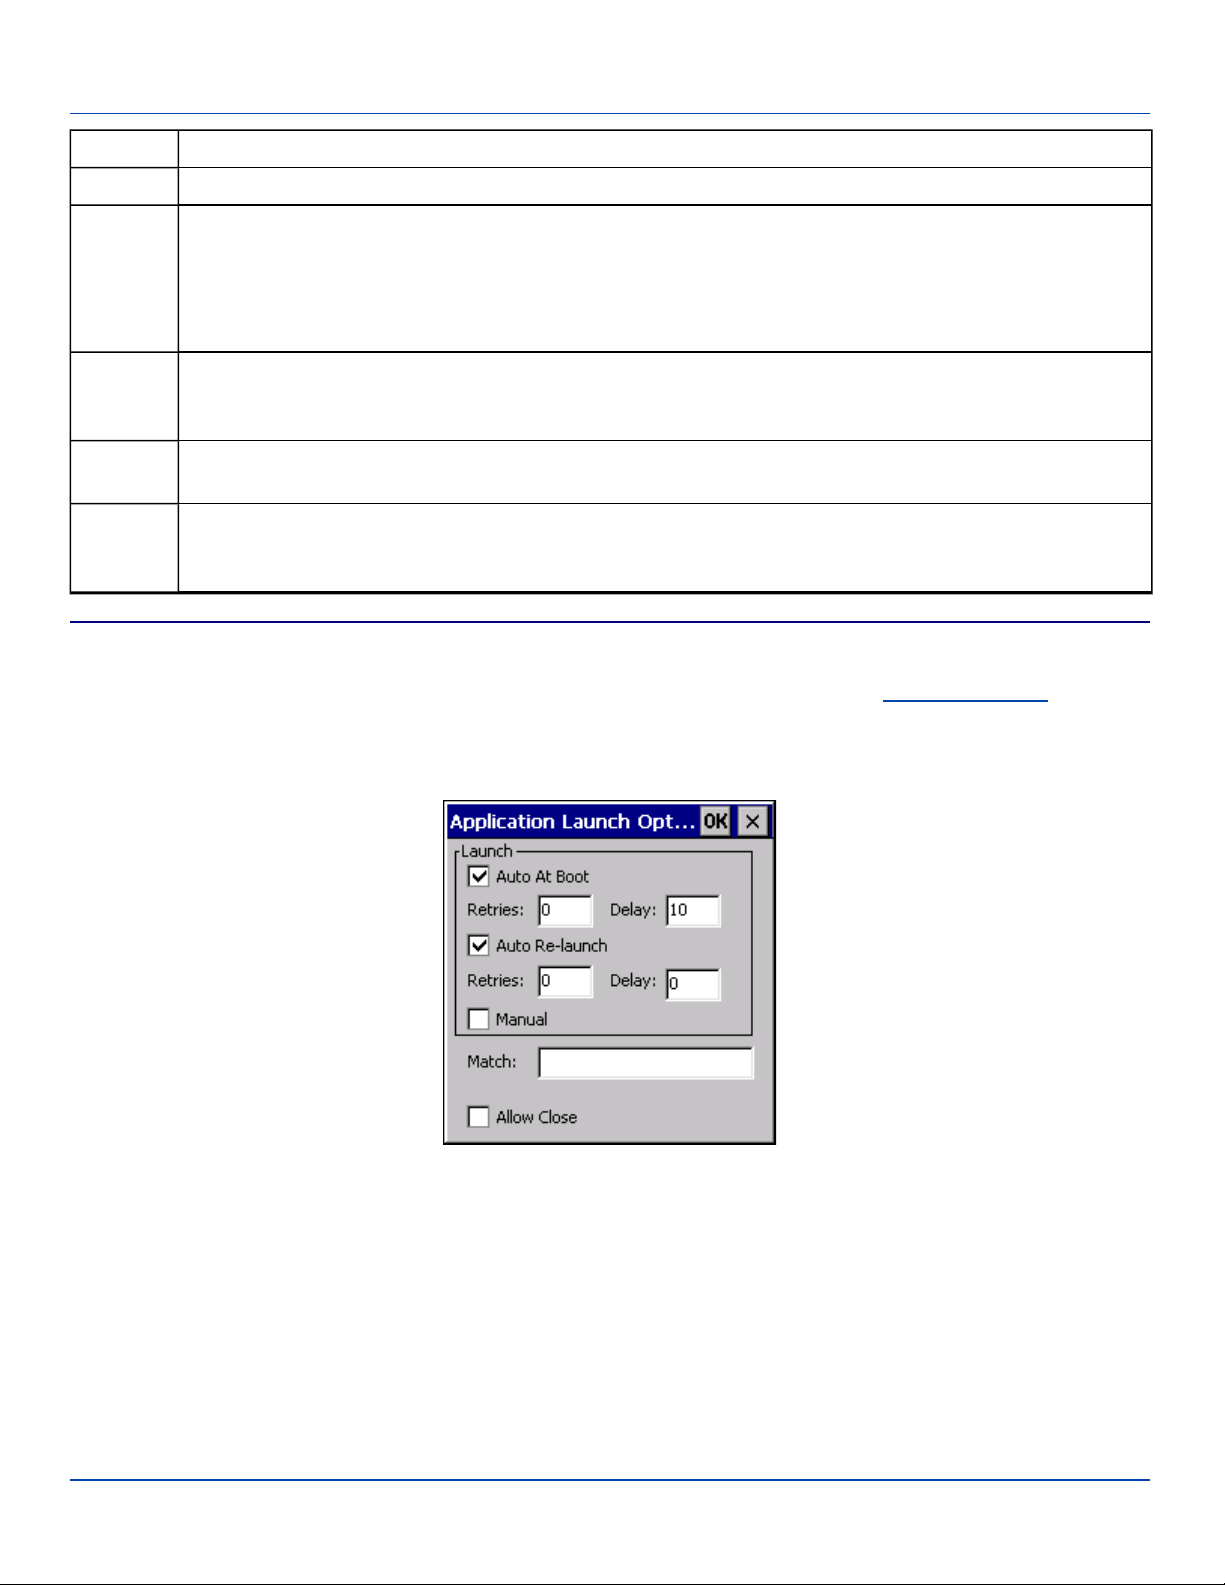
Launch Button
Option Explanation
key is presented to the end-user as the Activation key.
Default is 10 seconds. Enter the number of seconds that Applications must wait before starting to run after
Global
Delay
reboot.
Note: Delay (Global) may not be available in all versions of AppLock. You can simulate a Global Delay
function by setting a delay for the first application (lowest Order) launched and setting the delay to 0 for all
other applications. See Boot Options.
Input
Panel
Clear
Button
Scroll
Buttons
Default is Disabled. Enable (check) to show the Keyboard option on the Switchpad menu. When enabled the
input panel cannot be enabled or disabled for each individual application, and is available to the user for all
configured applications.
Tap the Clear button to clear all currently displayed Filename or Application information. The Global settings are
not cleared.
Use the left and right scroll buttons to move from application setup screen to application setup screen. The left
and right buttons update the information on the screen with the previous or next configured application
respectively.
Launch Button
Note: The Launch button may not be available in all versions of Multi-AppLock. Contact your LXE representative for
assistance, downloads and AppLock update availability.
When clicked, displays the Launch options panel for the Filename selected on the Administration panel.
Application Launch Options
Note: Launch order is determined by the Order specified in the Application tab. The Order value does not have to be
sequential.
E-EQ-MX7CERG-A [ 87 ] MX7 Tecton™ CE Reference Guide
Page 100
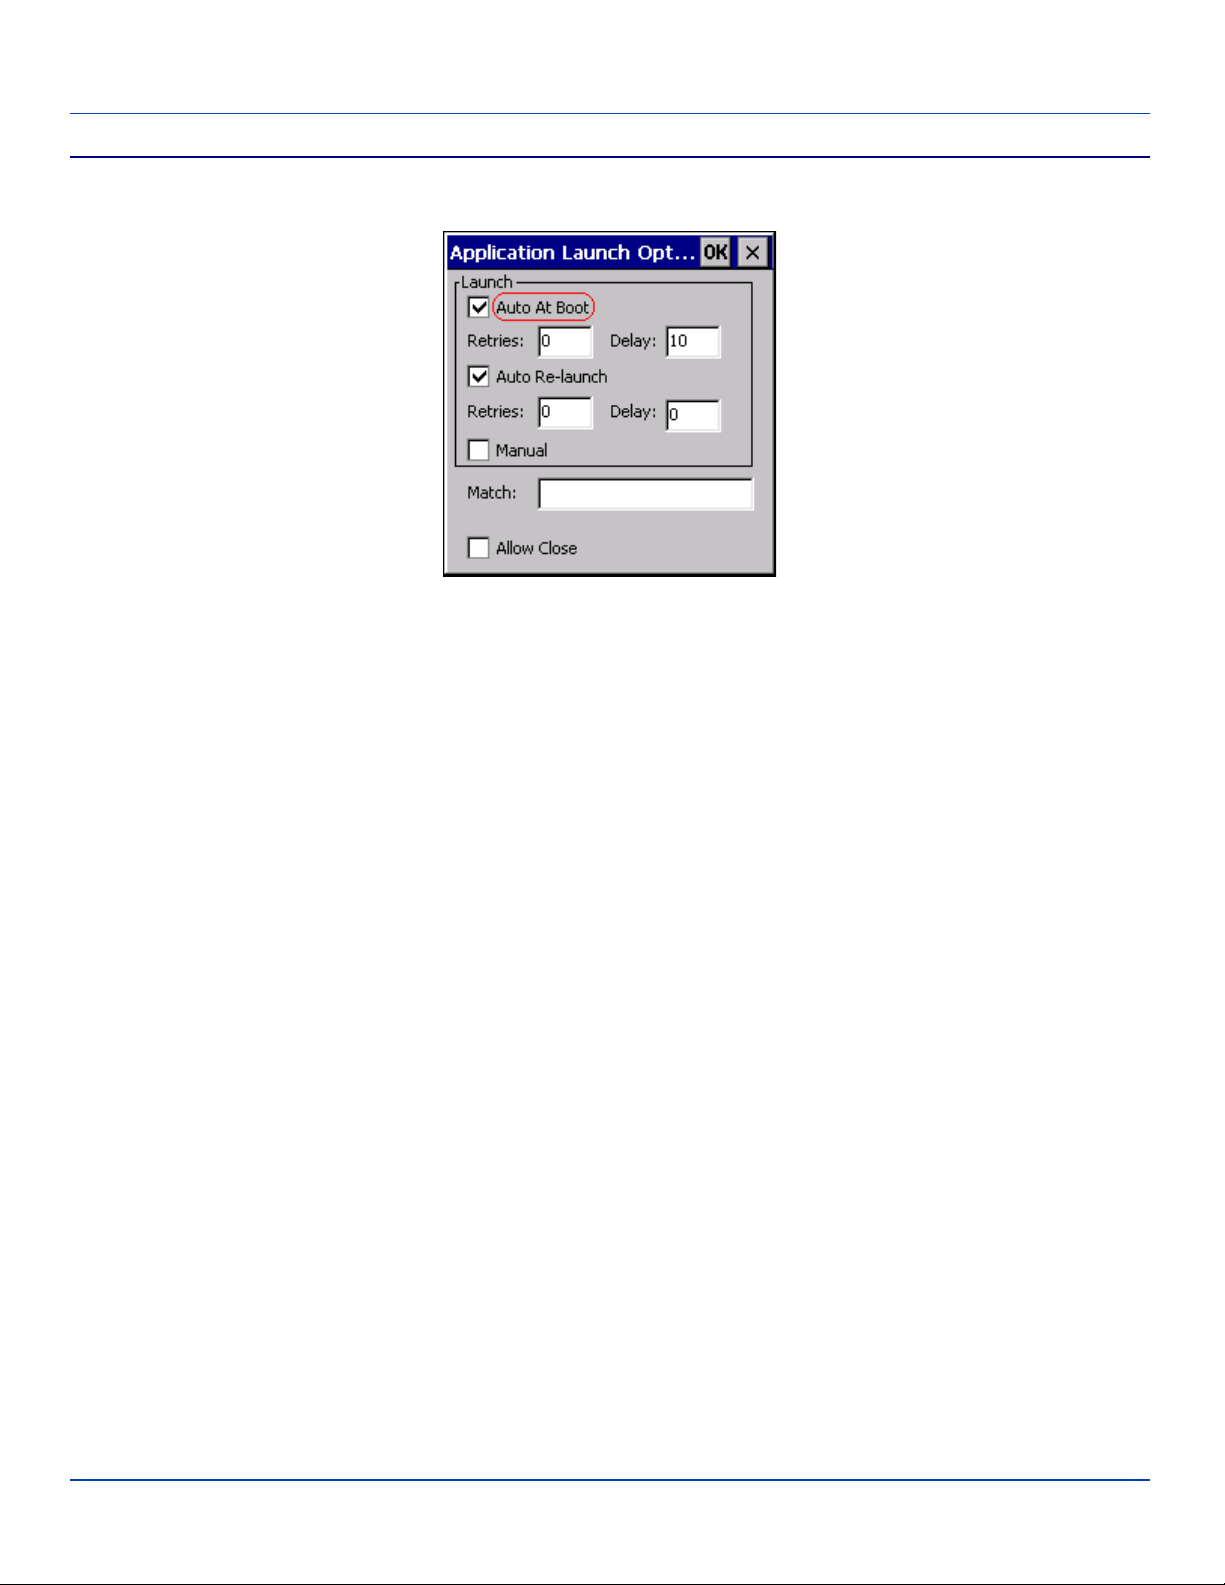
Auto At Boot
Auto At Boot
Default is Enabled.
Auto At Boot Settings
Auto At Boot
When enabled, automatically launches (subject to the specified Delay in seconds) the application after the unit is rebooted. If a
Delay in seconds is specified, AppLock waits for the specified period of time to expire before launching the application. The
Delay default value is 10 seconds; valid values are between 0 “no delay” and a maximum of 999 seconds.
Retries
This is the number of times the application launch will be retried if a failure occurs when the application is automatically
launched at bootup. Valid values are between 0 (no tries) and 99 tries or -1 for infinite. Infinite tries ends when the application
successfully launches. The default is 0 retries.
Delay
This timer is the time that AppLock waits prior to the initial launch of the selected application when it is automatically launched
at bootup. Delay default is 10 seconds. Valid values are between 0 seconds (no delay) and 999 seconds.
The Auto At Boot delay is associated for each application; it will be either a value specified by the Administrator or it will be the
delay default value. At startup, when a delay has been assigned for each application, AppLock waits for the delay associated
with the first application to expire before launching the first application then AppLock waits for the delay associated with the
second application to expire before launching the second application. AppLock continues in this manner until all applications
are launched.
Note: A “Global Delay” can be accomplished by setting a timed delay for the first application to be launched (by lowest
Order number) and no delay (0 seconds) for all other applications.
Note: Launch order is determined by the Order specified in the Application tab. The Order value does not have to be
sequential.
E-EQ-MX7CERG-A [ 88 ] MX7 Tecton™ CE Reference Guide
 Loading...