

Page 1
MX6 PPC Reference Guide
(For Microsoft® Windows Pocket PC® 2002 Equipped MX6’s)
IMPORTANT NOTICE
LXE’s MX6 running Windows Pocket PC 2002 is obsolete.
This electronic manual has been made available as a courtesy to LXE's
customers. Please contact your LXE customer support representative for
assistance and mobile device replacement.
Copyright © 2005 by LXE Inc.
All Rights Reserved
E-EQ-MX6PCRG-C-ARC
Page 2

Notices
LXE Inc. reserves the right to make improvements or changes in the products described in this document at any
time without notice. While reasonable efforts have been made in the preparation of this document to assure its
accuracy, LXE assumes no liability resulting from any errors or omissions in this document, or from the use of the
information contained herein. Further, LXE Incorporated, reserves the right to revise this document and to make
changes to it from time to time without any obligation to notify any person or organization of such revision or
changes.
Copyright:
This document is copyrighted. All rights are reserved. This document may not, in whole or in part, be copied,
photocopied, reproduced, translated or reduced to any electronic medium or machine-readable form without prior
consent, in writing, from LXE Inc.
Copyright © 2005 by LXE Inc. An EMS Technologies Company.
125 Technology Parkway, Norcross, GA 30092 U.S.A. (770) 447-4224
Trademarks:
LXE® is a registered trademark of LXE Inc. Microsoft, ActiveSync, MSN, Outlook, Windows, the Windows logo,
and Windows Media are either registered trademarks or trademarks of Microsoft Corporation in the United States
and/or other countries. All other brand or product names are trademarks or registered trademarks of their respective
companies or organizations. When this manual is in PDF format: "Acrobat ® Reader Copyright © 1987-2005
Adobe Systems Incorporated. All rights reserved. Adobe, the Adobe logo, Acrobat, and the Acrobat logo are
trademarks of Adobe Systems Incorporated." applies.
Note: The original equipment’s User Manuals are copyrighted by Hand Held Products® Incorporated (HHP).
This manual has been amended by LXE® Inc., for the MX6 PPC and Docking Cradles with HHP’s express
permission.
Initial Release Dec 2003
Revision Notice
B Chapter 1 – Introduction (Oct 2005)Identified obsolete tethered scanners in “Accessories”.
B Chapter 2 – Getting Started Added “Saving Your Changes”.
Chapter 3 – Physical
B
Description and Layout
B Appendix A – Keymaps Added function key F7 through F12 keymapping to the 35-key keypad.
B Appendix C – Multicharger Added WEEE statement.
C Entire Manual
Added “Upgrading the Mobile Device OS.” Updated keypad figures.
Added section titled “Function Keys.” Added WEEE statement to
“Battery”.
(Dec 2005) MX6 running Windows Pocket PC 2002 is obsolete as of
March 2005. Manuals are Archived to the LXE ServicePass website.
Replacement mobile device is the MX6 Windows Mobile handheld
device.
Page 3

Table of Contents
HAPTER 1 INTRODUCTION 1
C
Overview.................................................................................................................... 1
Identify Your MX6 Device .........................................................................................
Important Battery Information ................................................................................. 2
Components .............................................................................................................. 3
When to Use This Guide........................................................................................... 6
Document Conventions.........................................................................................................................7
Imager Decode Zone................................................................................................. 7
Using the Stylus........................................................................................................ 8
System Tray Icons .................................................................................................... 9
Soft Input Panel....................................................................................................... 10
Repeating Keystrokes.......................................................................................................................... 10
International Characters ...................................................................................................................... 10
General Windows Keyboard Shortcuts................................................................. 11
Getting Help............................................................................................................. 12
User Guides.........................................................................................................................................12
Accessories.......................................................................................................................................... 12
1
CHAPTER 2 GETTING STARTED 15
First . . . .................................................................................................................... 15
In Brief ..................................................................................................................... 15
Insert Fully Charged Battery .................................................................................. 16
Low Battery Condition........................................................................................................................ 16
Power Key................................................................................................................ 16
Connect External Power Supply (Optional).......................................................... 17
Align the Touchscreen ........................................................................................... 18
Set the Date and Time ............................................................................................ 19
Setting Display Backlight Action........................................................................... 20
Dim Backlight if device is not used for: ............................................................................................. 21
Turn off backlight if device is not used for:........................................................................................ 21
Turn on backlight when a button is pressed or the screen is tapped ................................................... 21
Backlight Intensity .............................................................................................................................. 21
Set the Power Off Timer .........................................................................................
Accessing Files in Flash Memory..........................................................................
My Documents Folder......................................................................................................................... 23
The IPSM Folder................................................................................................................................. 23
22
23
Connect the Audio Jack (Optional) ....................................................................... 24
Set The Audio Speaker Volume .............................................................................
24
Adjust the Handstrap.............................................................................................. 25
Enter Data ................................................................................................................
Keypad Entry ...................................................................................................................................... 26
26
E-EQ-MX6PCRG-C-ARC MX6 PPC Reference Guide
Page 4

ii Table of Contents
Stylus Data Entry ................................................................................................................................ 26
The Integrated Imager ............................................................................................ 27
Preparation .......................................................................................................................................... 27
Using the Imager................................................................................................................................. 27
Distance from Label ......................................................................................................................... 27
Successful Scan ................................................................................................................................ 27
Unsuccessful Scan ............................................................................................................................ 28
Aiming the Barcode Imager ............................................................................................................. 28
CHAPTER 3 PHYSICAL DESCRIPTION AND LAYOUT 29
Hardware Configuration ......................................................................................... 29
System Hardware ................................................................................................................................ 29
Central Processing Unit....................................................................................................................... 29
Core Logic........................................................................................................................................... 30
System Memory .................................................................................................................................. 30
Video Subsystem................................................................................................................................. 30
Power Supply ...................................................................................................................................... 30
Audio Interface ................................................................................................................................... 30
Secure Digital Cards ........................................................................................................................... 31
SD Installation / Removal................................................................................................................. 31
COM Ports ............................................................................................................... 32
RS-232 Serial Port .............................................................................................................................. 33
Integrated Imaging Port....................................................................................................................... 34
Tethered Scanners ............................................................................................................................... 34
IR Port................................................................................................................................................. 34
Reset or Reboot ...................................................................................................... 35
Soft Reset ............................................................................................................................................ 35
Hard Reset...........................................................................................................................................35
Troubleshooting – Cold Boot/Hard Reset...........................................................................................35
Upgrading the Mobile Device OS....................................................................................................... 36
Power Modes........................................................................................................... 37
On Mode ............................................................................................................................................. 37
The Display ...................................................................................................................................... 37
The MX6 PPC .................................................................................................................................. 37
New Unit........................................................................................................................................37
Both Batteries Dead ....................................................................................................................... 38
Main Battery Hot-swapped ............................................................................................................ 38
Suspend Mode.....................................................................................................................................38
Off Mode............................................................................................................................................. 38
The Keypads............................................................................................................
Special Keys........................................................................................................................................ 40
SCAN Key........................................................................................................................................ 40
Power Key ........................................................................................................................................ 40
Shift (SFT)........................................................................................................................................ 40
Enter (ENT)...................................................................................................................................... 40
Escape (ESC)....................................................................................................................................40
Tab....................................................................................................................................................40
Backlight .......................................................................................................................................... 40
Alpha Lock (ALPHA) ...................................................................................................................... 40
39
MX6 PPC Reference Guide E-EQ-MX6PCRG-C-ARC
Page 5

Table of Contents iii
Backspace (BKSP) ........................................................................................................................... 40
Delete (DEL) .................................................................................................................................... 40
Arrow Keys ...................................................................................................................................... 41
Modifier Keys ..................................................................................................................................... 41
Keypress Sequences ............................................................................................................................ 41
Function Keys ..................................................................................................................................... 41
Touch Screen .......................................................................................................... 42
Display Backlight Timer..................................................................................................................... 42
Cleaning the Glass Display and Imager Aperture............................................................................... 42
Speaker .................................................................................................................... 43
Battery...................................................................................................................... 44
Checking Battery Status...................................................................................................................... 44
Handling Batteries Safely ................................................................................................................... 44
Main Battery Pack............................................................................................................................... 45
Battery Hot-Swapping......................................................................................................................... 45
Low Battery Warning.......................................................................................................................... 45
Backup Battery.................................................................................................................................... 46
Battery Maintenance Publication ........................................................................................................ 46
Charging the Main Battery Pack ............................................................................ 47
Using the Four Bay Charger/Analyzer (Optional) .............................................................................. 47
Charging a Battery Using the Desktop Docking Cradle ..................................................................... 48
Docking Cradles...................................................................................................... 48
Indicators and LEDs............................................................................................................................ 49
CHAPTER 4 SYSTEM CONFIGURATION 51
Introduction ............................................................................................................. 51
Windows for Pocket PC.......................................................................................... 51
Installed Software ................................................................................................... 51
Software Load ..................................................................................................................................... 52
The Start Menu ........................................................................................................ 53
Edit Start Menu Item List.................................................................................................................... 53
Inbox ...................................................................................................................................................54
Programs Options................................................................................................... 55
HHP Demos ........................................................................................................................................ 55
HHP Utils............................................................................................................................................ 56
IPConfig ........................................................................................................................................... 56
Ping................................................................................................................................................... 57
Route ................................................................................................................................................ 57
RASMan........................................................................................................................................... 58
Reboot .............................................................................................................................................. 58
RegBackup ....................................................................................................................................... 58
RegRestore ....................................................................................................................................... 58
ScanWedge....................................................................................................................................... 58
Suspend ............................................................................................................................................ 58
SysInfo.............................................................................................................................................. 59
Games.................................................................................................................................................. 59
Calculator ............................................................................................................................................ 59
ActiveSync .......................................................................................................................................... 59
E-EQ-MX6PCRG-C-ARC MX6 PPC Reference Guide
Page 6

iv Table of Contents
Tools................................................................................................................................................. 61
File Explorer ....................................................................................................................................... 62
Infrared Receive.................................................................................................................................. 62
Internet Explorer ................................................................................................................................. 62
Pocket Excel........................................................................................................................................ 62
Pocket Word........................................................................................................................................ 63
Terminal Services Client.....................................................................................................................63
Settings Options ..................................................................................................... 64
Personal Tab........................................................................................................................................ 64
Buttons.............................................................................................................................................. 64
Up/Down Control .......................................................................................................................... 64
Input.................................................................................................................................................. 64
Menus ............................................................................................................................................... 65
Owner Information ........................................................................................................................... 65
Password........................................................................................................................................... 65
Sounds and Notifications.................................................................................................................. 66
Today................................................................................................................................................66
System Tab.......................................................................................................................................... 67
About ................................................................................................................................................ 67
Backlight .......................................................................................................................................... 67
Clock ................................................................................................................................................ 68
CPU Speed........................................................................................................................................ 68
802.11b WLAN Settings .................................................................................................................. 69
Status Tab ...................................................................................................................................... 69
Ping Utility .................................................................................................................................. 71
Config Tab ..................................................................................................................................... 72
Preferred Profiles......................................................................................................................... 72
Active SSIDs ............................................................................................................................... 73
Operation Buttons ....................................................................................................................... 73
Advanced Tab ................................................................................................................................ 74
Power Save Mode........................................................................................................................ 74
Preamble Mode ........................................................................................................................... 74
Authentication Algorithm ........................................................................................................... 75
Operation Buttons ....................................................................................................................... 75
About Tab ...................................................................................................................................... 75
Creating and Modifying Profiles ................................................................................................... 76
Create a New Profile ...................................................................................................................77
Modify an Existing Profile.......................................................................................................... 77
Network Name and Type..........................................................................................................77
WEP.......................................................................................................................................... 78
Deleting a Profile ........................................................................................................................ 79
Wireless Status Icon in Toolbar........................................................................................................ 80
Meetinghouse AEGIS Client............................................................................................................ 81
Main Screen ................................................................................................................................... 81
Protocol Configuration .................................................................................................................. 82
User tab ....................................................................................................................................... 82
System tab ................................................................................................................................... 82
Server tab..................................................................................................................................... 82
Port Configuration .........................................................................................................................83
Configure..................................................................................................................................... 83
MX6 PPC Reference Guide E-EQ-MX6PCRG-C-ARC
Page 7

Table of Contents v
Status Displays............................................................................................................................... 83
Logging.......................................................................................................................................... 84
Registration.................................................................................................................................... 84
Memory ............................................................................................................................................ 85
Power................................................................................................................................................85
Radio Manager ................................................................................................................................. 85
Regional Settings.............................................................................................................................. 86
Remove Programs............................................................................................................................. 86
Screen ............................................................................................................................................... 87
Connections Tab ................................................................................................................................. 88
AvantGo Connect ............................................................................................................................. 88
Beam................................................................................................................................................. 88
Connections ...................................................................................................................................... 89
Dialing Locations........................................................................................................................... 89
Network Adapters............................................................................................................................. 90
Find ..........................................................................................................................
Help ..........................................................................................................................
91
91
APPENDIX A KEY MAPS 93
35-Key Numeric-Alpha Keypad.............................................................................. 93
Inactive Keys on the 35-key Keypad ..................................................................................................97
56-Key Full Alpha Numeric Keypad....................................................................... 98
APPENDIX B TECHNICAL SPECIFICATIONS 103
Physical Specifications ........................................................................................ 103
Display Specifications.......................................................................................... 104
Environmental Specifications.............................................................................. 104
MX6 PPC .......................................................................................................................................... 104
AC Wall Adapter............................................................................................................................... 104
APPENDIX C MX6 MULTICHARGER 105
Introduction ........................................................................................................... 105
Using the Multicharger ......................................................................................... 106
Inserting/Removing a Battery Pack .................................................................................................. 106
Charging............................................................................................................................................ 107
Analyzing .......................................................................................................................................... 107
Battery Capacity Indicator LEDs ................................................................................................... 107
Analyzer Slot Status LED .............................................................................................................. 107
Technical Specifications ......................................................................................
Troubleshooting....................................................................................................
108
108
I
NDEX 109
E-EQ-MX6PCRG-C-ARC MX6 PPC Reference Guide
Page 8

vi Table of Contents
Illustrations
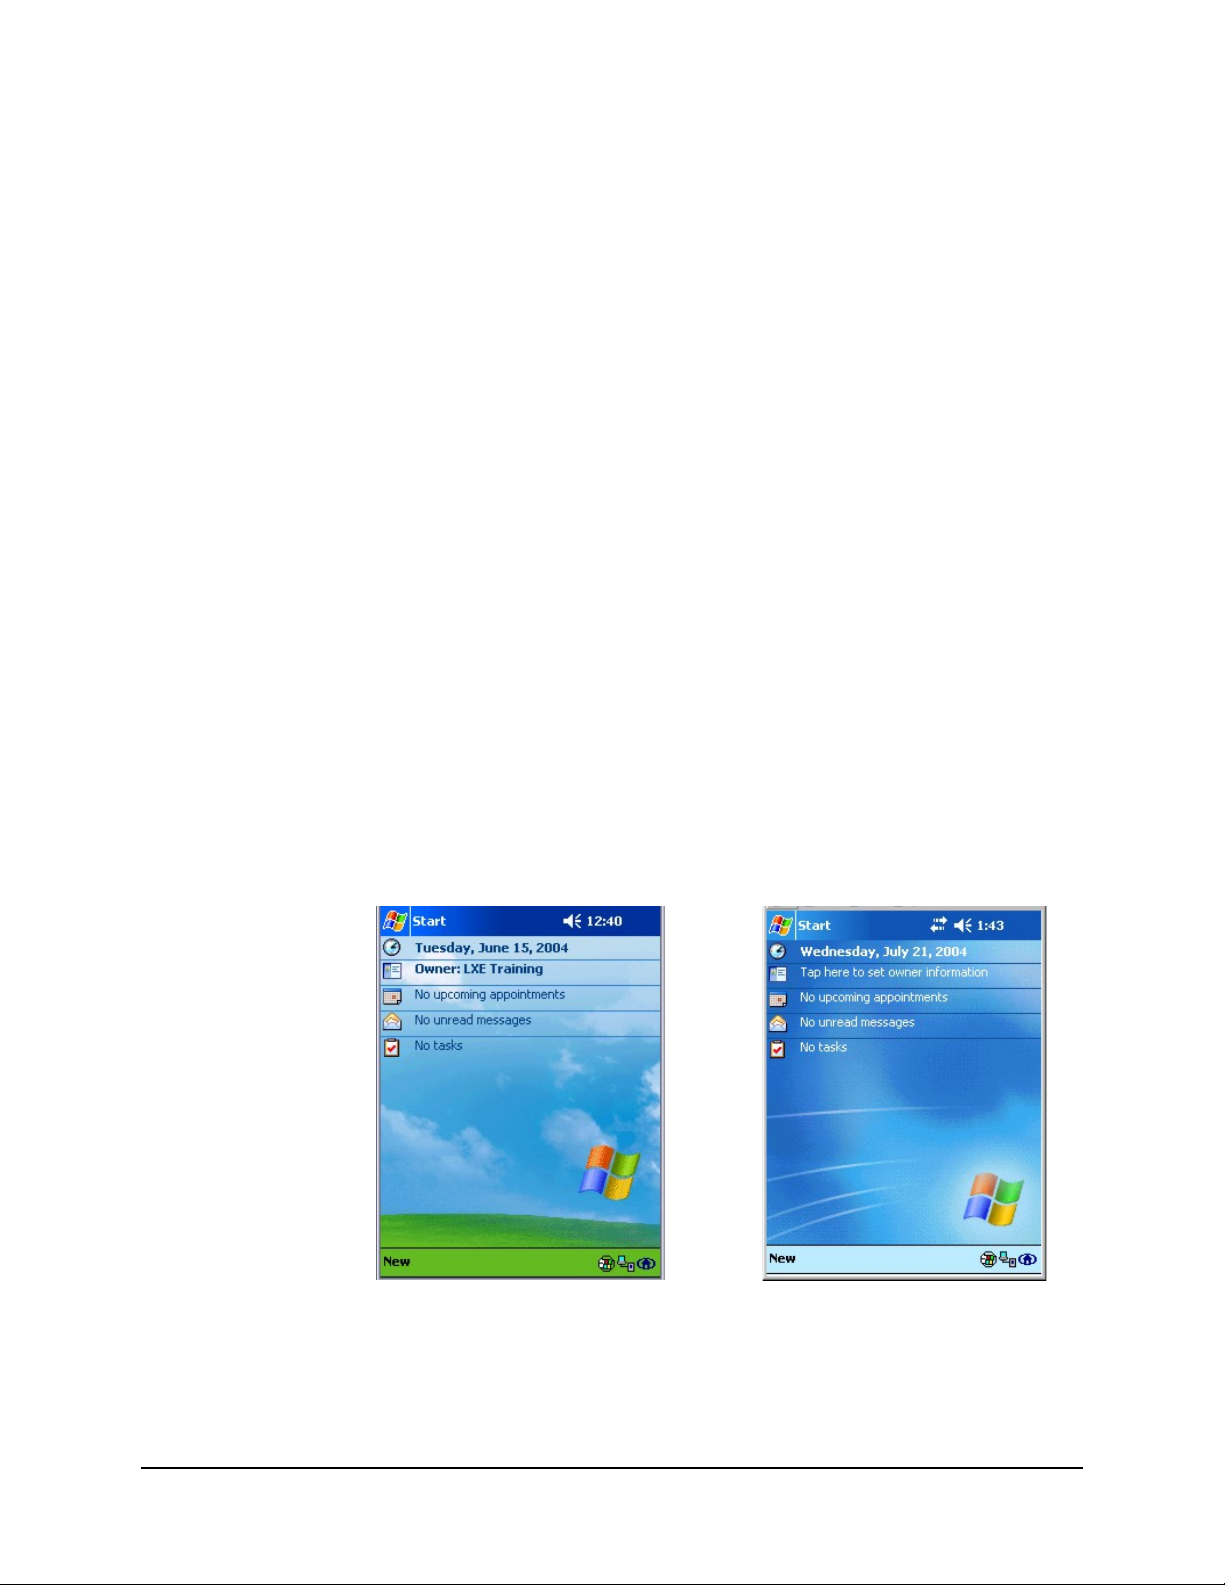
Figure 1-1 Start Screen - Pocket PC 2002 ...........................................................................................................1
Figure 1-2 Start Screen - Windows Mobile .........................................................................................................1
Figure 1-3 Front of 56-key MX6 PPC .................................................................................................................3
Figure 1-4 Back of MX6 PPC..............................................................................................................................4
Figure 1-5 With Trigger Handle Installed............................................................................................................5
Figure 1-6 RS-232/USB Communications and Charging Port ............................................................................5
Figure 1-7 Imager Decode Zone..........................................................................................................................7
Figure 1-8 Stylus Storage Locations....................................................................................................................8
Figure 1-9 Tapping with the Stylus .....................................................................................................................9
Figure 1-10 System Tray Icons............................................................................................................................9
Figure 1-11 Soft Input Panel.............................................................................................................................. 10
Figure 2-1 AC/DC 12V External Power Supply................................................................................................17
Figure 2-2 Align the Touchscreen .....................................................................................................................18
Figure 2-3 Set the Date and Time ......................................................................................................................19
Figure 2-4 Set Backlight ....................................................................................................................................20
Figure 2-5 Audio Jack Location ........................................................................................................................24
Figure 2-6 Handstrap .........................................................................................................................................25
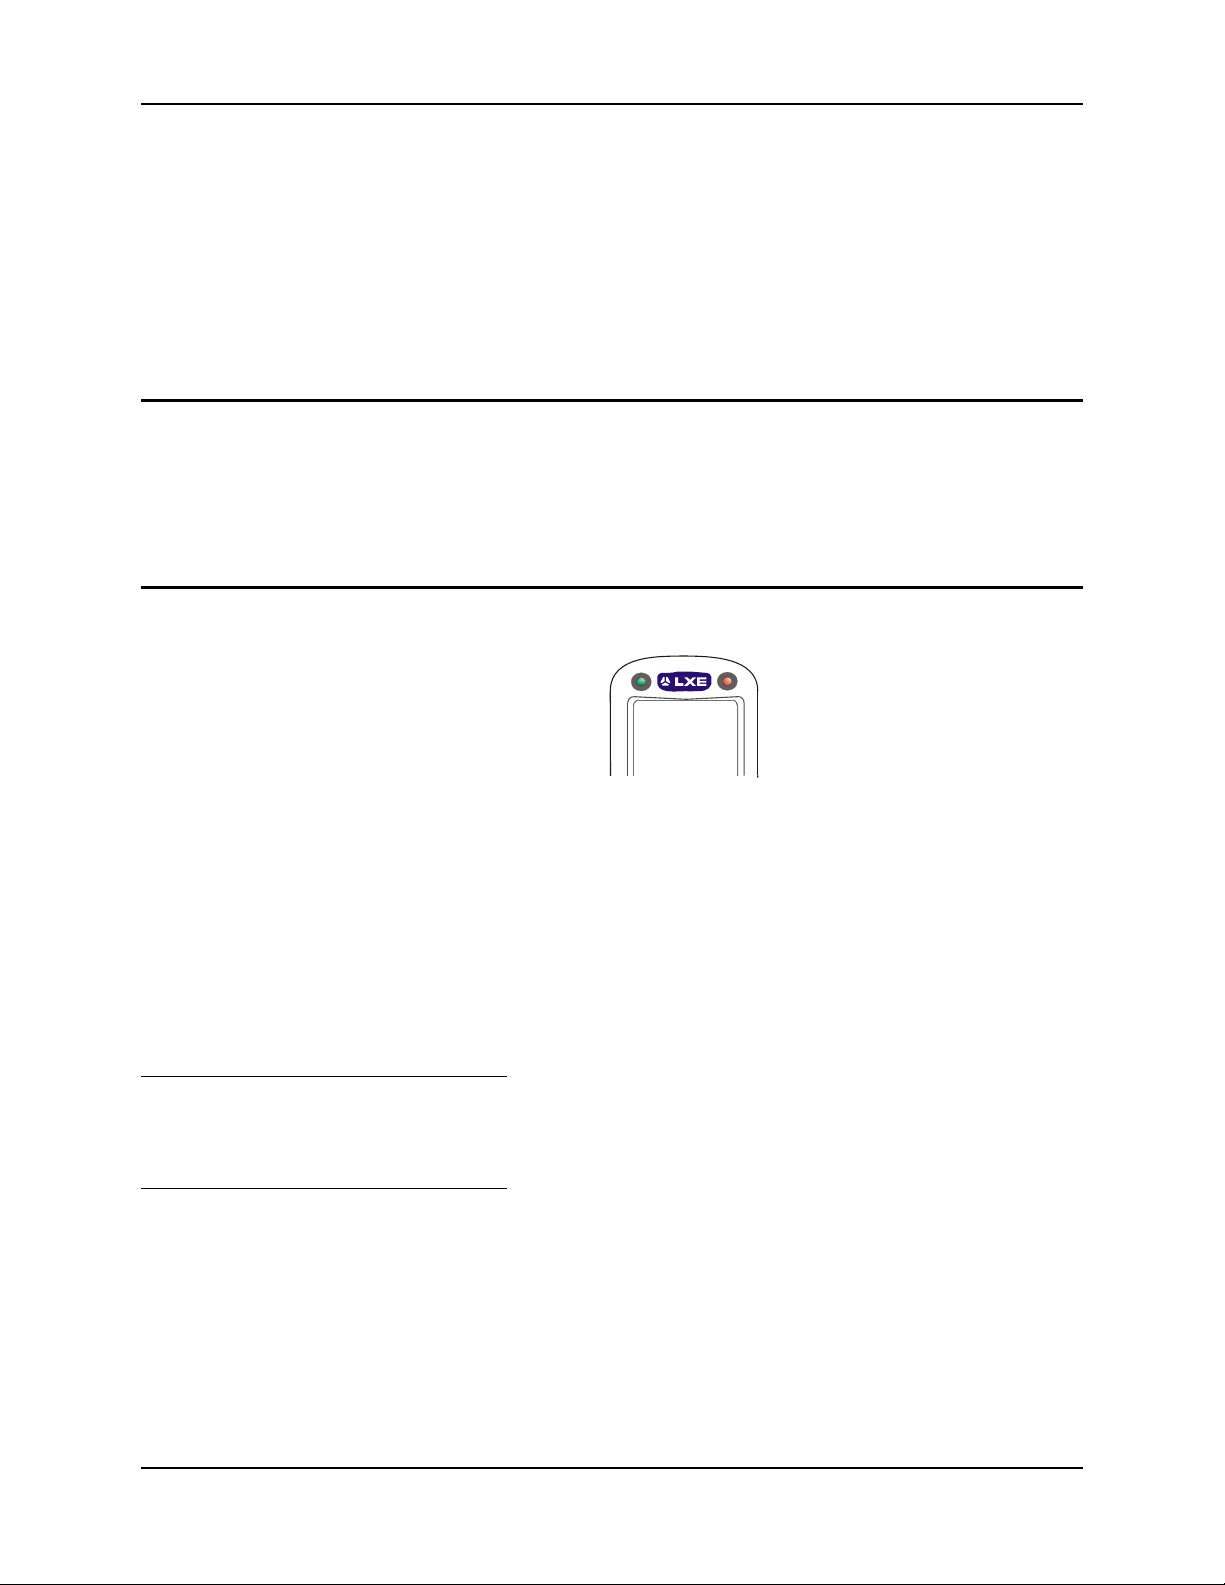
Figure 2-7 Scan and Decode LEDs....................................................................................................................27
Figure 2-8 Scan Beam........................................................................................................................................28
Figure 3-1 System Hardware .............................................................................................................................29
Figure 3-2 Secure Digital Memory Interface Card Location .............................................................................31
Figure 3-3 COM Ports .......................................................................................................................................32
Figure 3-4 MX6 PPC RS-232 Port ....................................................................................................................33
Figure 3-5 IR Port Location...............................................................................................................................34
Figure 3-6 Power Modes – On, Suspend and Off..............................................................................................37
Figure 3-7 The 35-key and 56-key Keypads......................................................................................................39
Figure 3-8 Modifier Keys ..................................................................................................................................41
Figure 3-9 MX6 Multicharger ...........................................................................................................................47
Figure 4-1 Inbox ................................................................................................................................................54
Figure 4-2 Start ActiveSync...............................................................................................................................61
Figure 4-3 WLAN Settings – Status Screen ......................................................................................................69
Figure 4-4 Ping Utility .......................................................................................................................................71
Figure 4-5 WLAN Settings – Config Screen.....................................................................................................72
Figure 4-6 WLAN Settings – Advanced Screen................................................................................................74
Figure 4-7 WLAN Settings – About Screen ......................................................................................................75
Figure 4-8 Add / Edit Network Profiles Display ...............................................................................................77
Figure 4-9 Delete a Profile.................................................................................................................................79
Figure 4-10 WLAN Status Icon.........................................................................................................................80
Figure 4-11 Align Screen................................................................................................................................... 87
MX6 PPC Reference Guide E-EQ-MX6PCRG-C-ARC
Page 9
Overview
Chapter 1 Introduction
The LXE® MX6 is a lightweight hand-held computer that uses Microsoft® Windows® for
Pocket PC 2002 software (MX6 PPC) and a powerful, battery-saving Xscale™ processor. The
MX6 PPC can transmit information using a 802.11b 2.4 GHz radio (with an internally mounted
antenna) and it can store information for later transmission through an RS-232, InfraRed or
communication port.
The computer is vertically oriented and features backlighting for the display and the keypad. The
touch-screen display supports graphic features and icons that the Pocket PC operating system
supports. The MX6 PPC is powered by a 2000 mAh Lithium-Ion main battery pack and an
internal backup battery.
An MX6 PPC with a 35-key keypad is slightly different from the MX6 PPC with a 56-key keypad
creating differences in keymapping. Portions of this guide will be split between the the 35-key
device and the 56-key device. Sections that do not differentiate between one or the other contain
instructions or information that is applicable to both devices.
A stylus is attached to the MX6 PPC to assist in entering data and configuring the unit.
Identify Your MX6 Device
LXE offers the MX6 with a Pocket PC 2002 operating system (MX6 PPC) and the MX6 with a
Windows Mobile operating system (MX6).
This guide, the MX6 PPC Reference Guide, is specifically for the user with an MX6 running
Pocket PC 2002.
Figure 1-1 Start Screen -
Pocket PC 2002
If your MX6 Start screen looks like the Figure titled “Start Screen - Windows Mobile”, please
refer to the MX6 User’s Guide and the MX6 Reference Guide.
Figure 1-2 Start Screen -
Windows Mobile
E-EQ-MX6PCRG-C-ARC MX6 PPC Reference Guide
Page 10

2 Important Battery Information
Important Battery Information
• Until the main battery and backup battery are completely depleted, the MX6 PPC is
always drawing power from the batteries (On).
• New batteries must be fully charged prior to use. Individual battery packs can be charged
in a powered single bay charger or a 4-bay battery charger.
• When a new battery is installed in the MX6 PPC for the first time (or when the backup
battery is completely depleted), the Time and Date must be re-set.
• When disposing of the MX6 PPC main battery, the following precautions should be
observed:
The battery should be disposed of properly. The battery should not be disassembled or
crushed. The battery should not be heated above 212°F (100°C) or incinerated.
Important: If the main battery has been out of the MX6 PPC for an extended period of
time or becomes fully discharged or dead, a fully charged backup battery will
last for up to 24 hours. If this happens, the device will hard reset the next time
power is applied from either AC power or a charged main battery. A hard reset
will cause loss of data and custom programs. Always store unused MX6 PPC’s
with a fully charged main battery pack installed. The MX6 PPC requires
periodic connection to an external power source to maintain an optimum
backup battery charged status.The MX6 PPC batteries will not re-charge
unless a main battery is present in the device.
The “MX6 PPC User’s Guide” contains MX6 PPC user instruction and information.
Please refer to the “MX6 Cradle Reference Guide” when using the MX6 PPC with a desktop or
vehicle mounted docking cradle.
MX6 PPC Reference Guide E-EQ-MX6PCRG-C-ARC
Page 11
Components 3
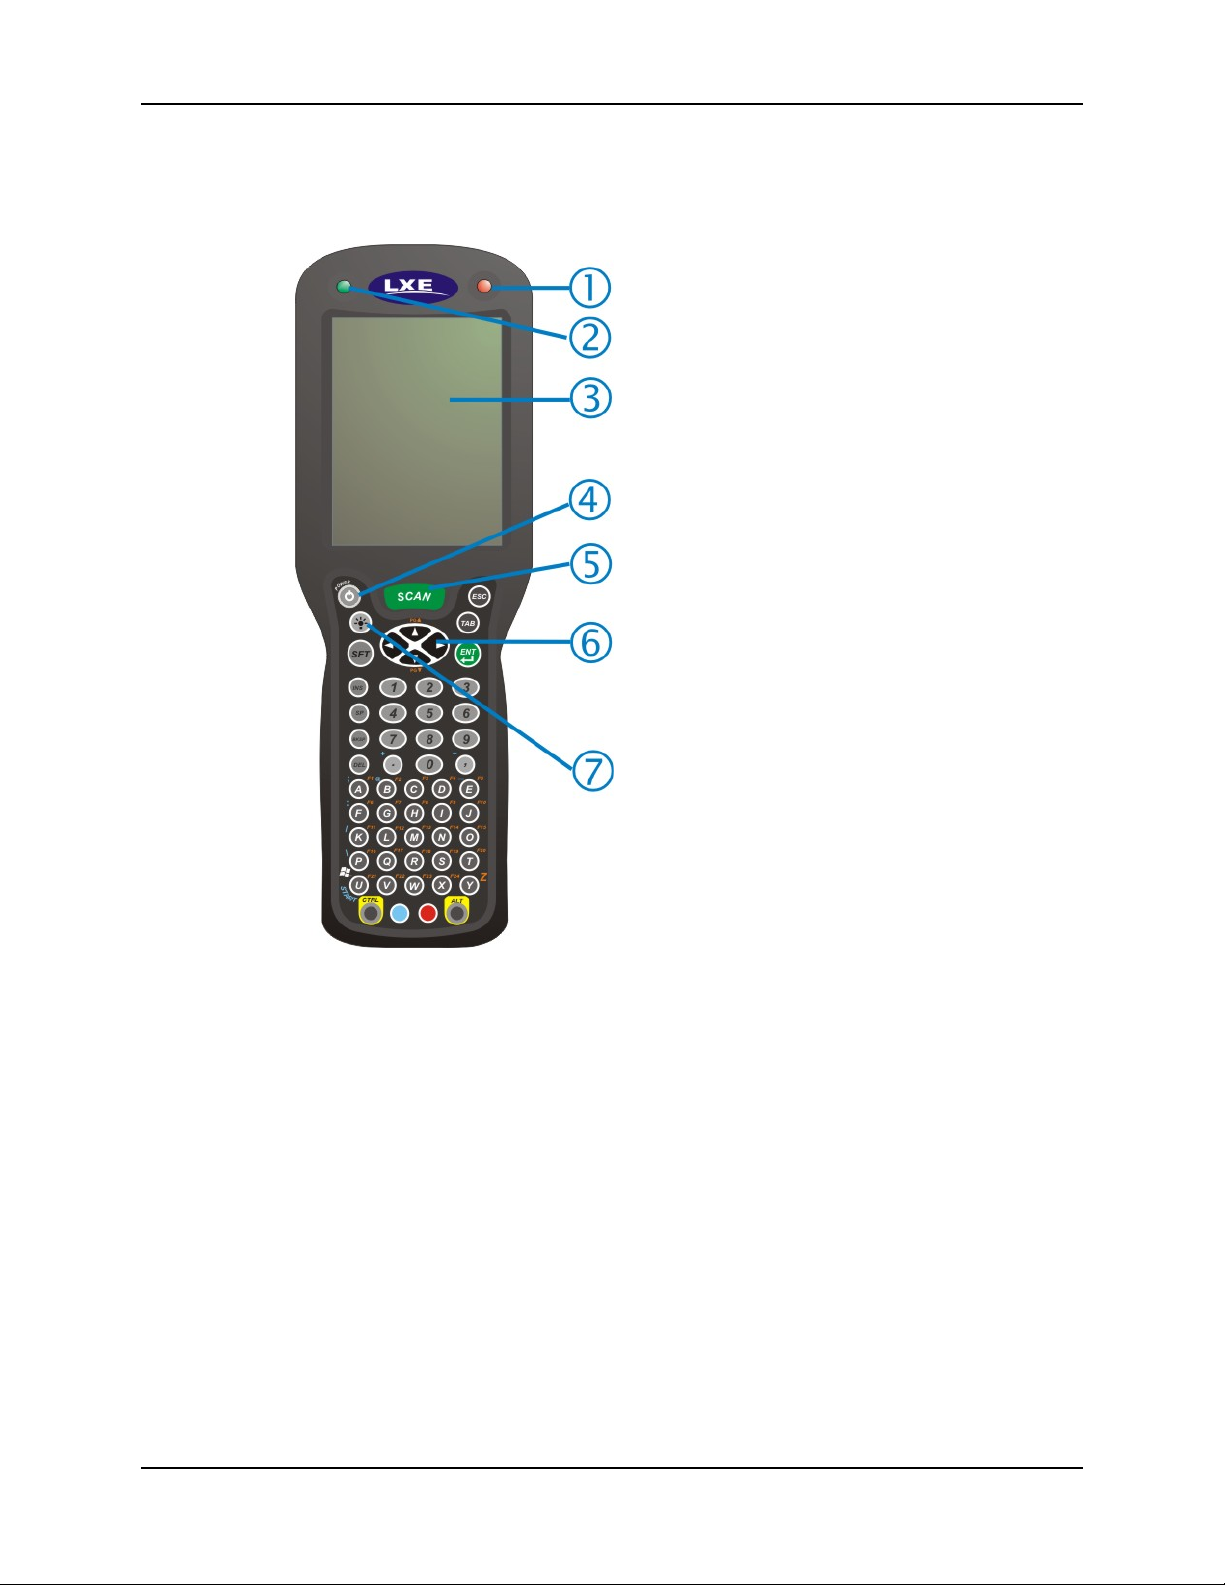
Components
1. Scan LED
2. Decode LED
3. Touchscreen Display
4. Power key
5. Scan key
6. Cursor keys
7. Backlight Toggle key on the
56-key keypad.
Figure 1-3 Front of 56-key MX6 PPC
E-EQ-MX6PCRG-C-ARC MX6 PPC Reference Guide
Page 12
4 Components
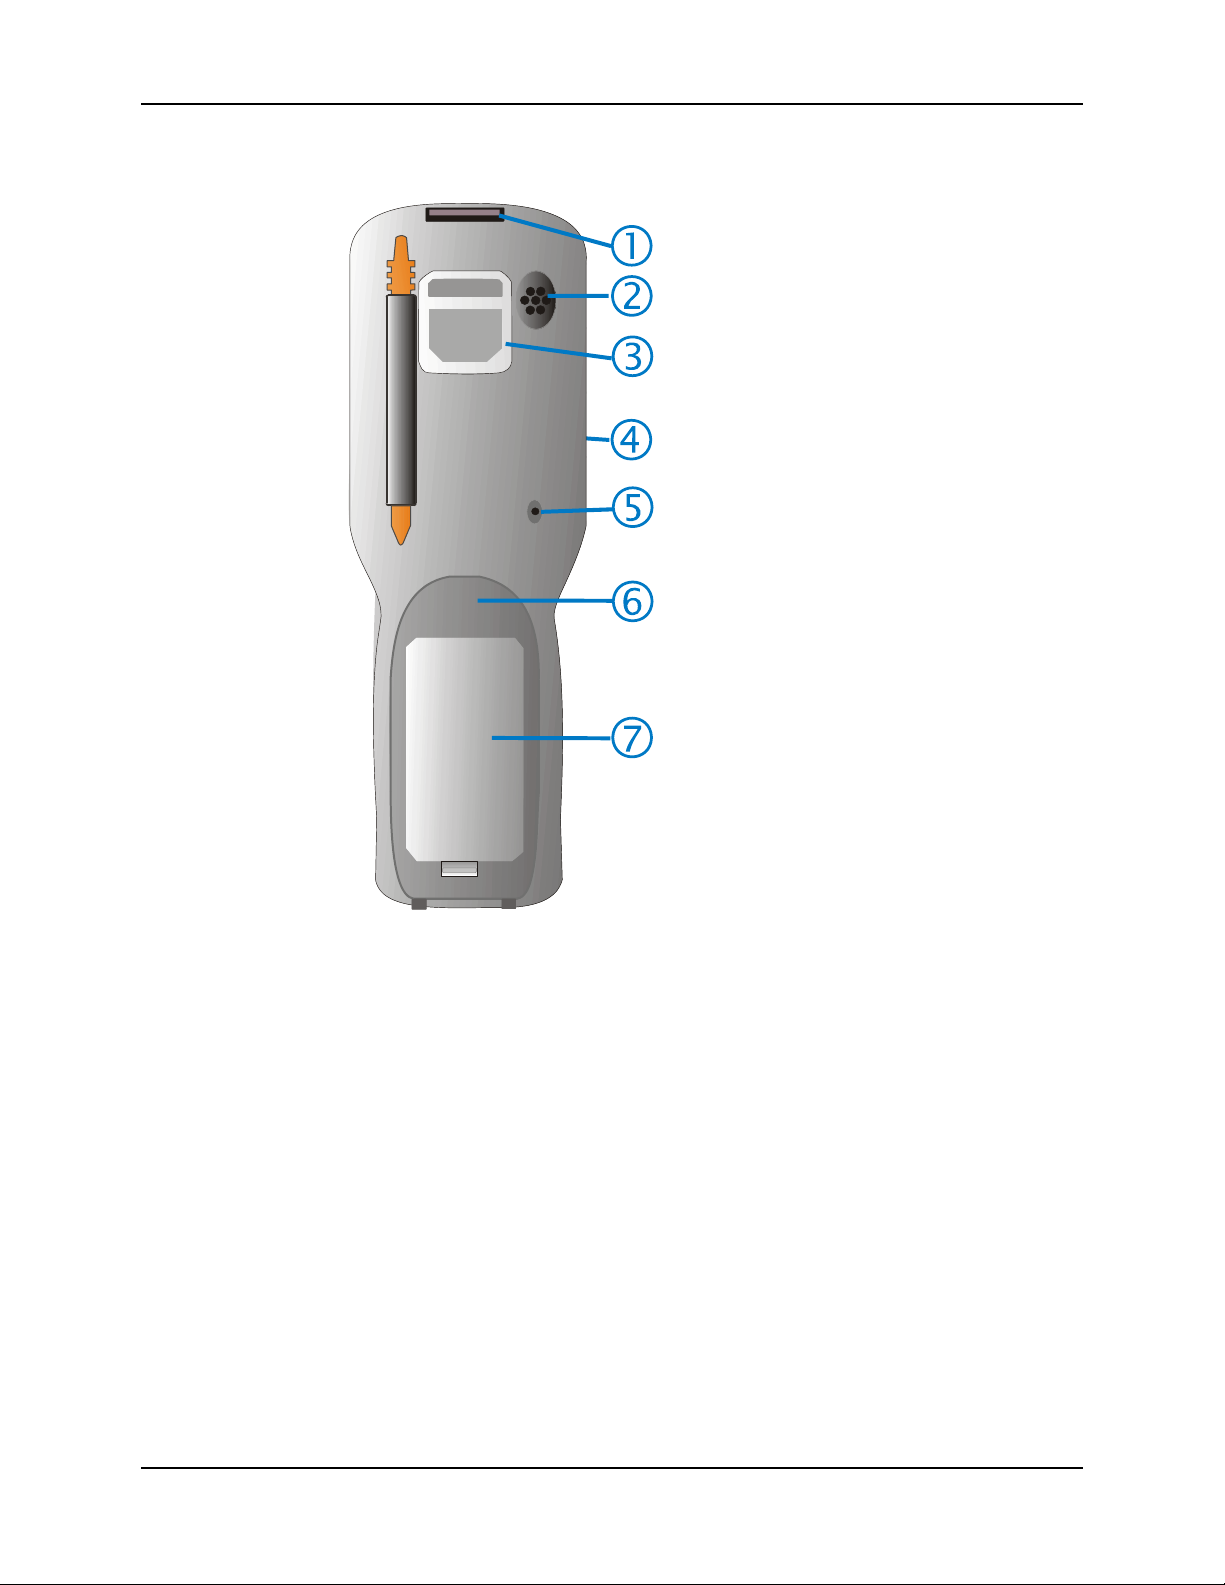
1. Image Aperture
2. Speaker
3. Handstrap Connector
4. Stylus (No Trigger Handle)
5. Microphone
6. Battery Well
7. Battery
Figure 1-4 Back of MX6 PPC
MX6 PPC Reference Guide E-EQ-MX6PCRG-C-ARC
Page 13
Components 5
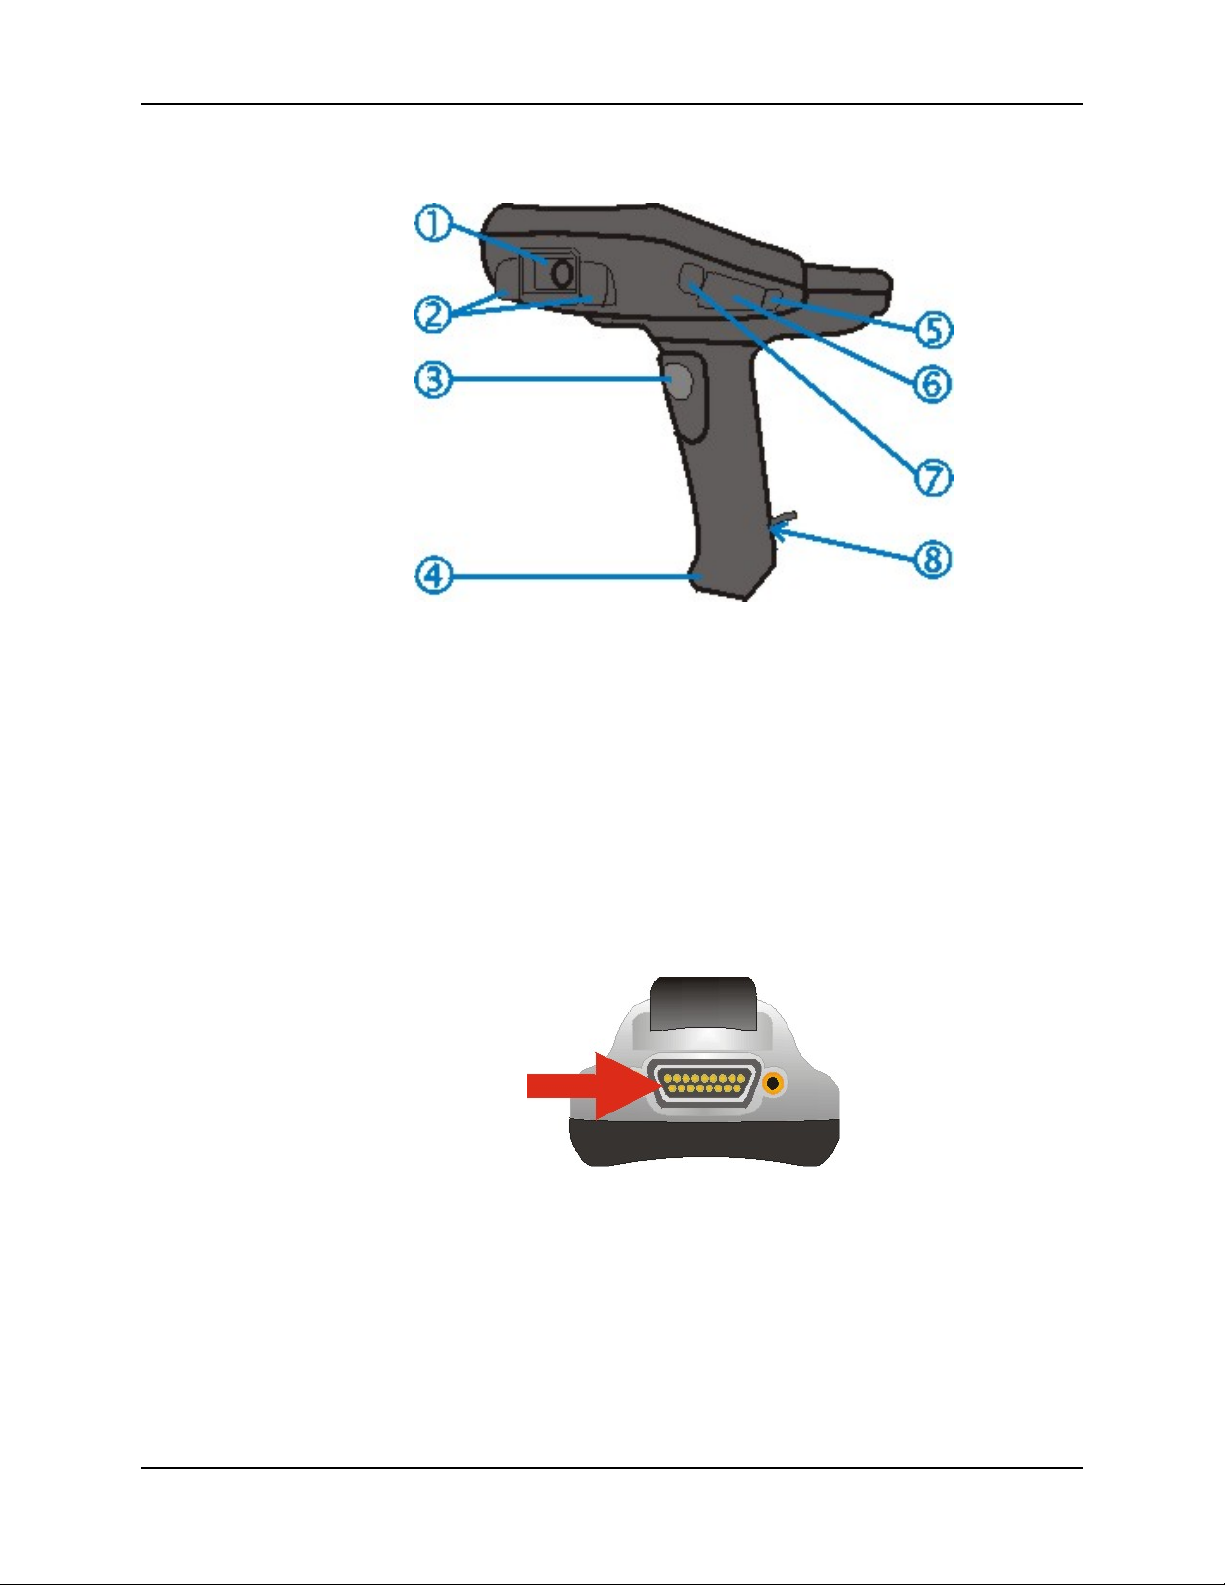
Figure 1-5 With Trigger Handle Installed
1. Imager Aperture
2. Rubber Nose Bumpers
3. Scan Trigger
4. Rubber Bumper
5. Headphone Jack
6. Secure Digital Access Door
7. IrDA Port
8. Stylus and Tether (storage inside base of handle)
Figure 1-6 RS-232/USB Communications and Charging Port
E-EQ-MX6PCRG-C-ARC MX6 PPC Reference Guide
Page 14

6 When to Use This Guide
When to Use This Guide
As the reference for the MX6 PPC with a Pocket PC 2002 operating system, this guide provides
detailed information on its features and functionality. Use this reference guide as you would any
other source book -- reading portions to learn about the MX6 PPC, and then referring to it when
you need more information about a particular subject. This guide takes you through all aspects of
installation and configuration.
Operating and safety instructions for the general user are contained in the “MX6 PPC User’s
Guide.”
This chapter, “Introduction”, describes this reference guide's structure, a list of reference guides
and MX6 PPC accessories, and explains how to get help.
Chapter 2, “Getting Started”, contains initial setup instruction and briefly describes general use
and data entry processes.
Chapter 3 “Physical Description and Layout”, describes the function and layout of the MX6
PPC, controls and connectors. Also describes the power supplies and docking cradle options for
the MX6 PPC.
Chapter 4 “System Configuration” takes you through the Pocket PC 2002 operating system
setup and the MX6 PPC file structure.
Appendix A “Key Maps” describes the keypress sequences for the keypads.
Appendix B “Technical Specifications” lists MX6 PPC technical specifications.
Appendix C “MX6 Multicharger” describes the function, controls and connectors of the MX6
four bay charger/analyzer for MX6 main battery packs.
MX6 PPC Reference Guide E-EQ-MX6PCRG-C-ARC
Page 15
Imager Decode Zone 7
Document Conventions
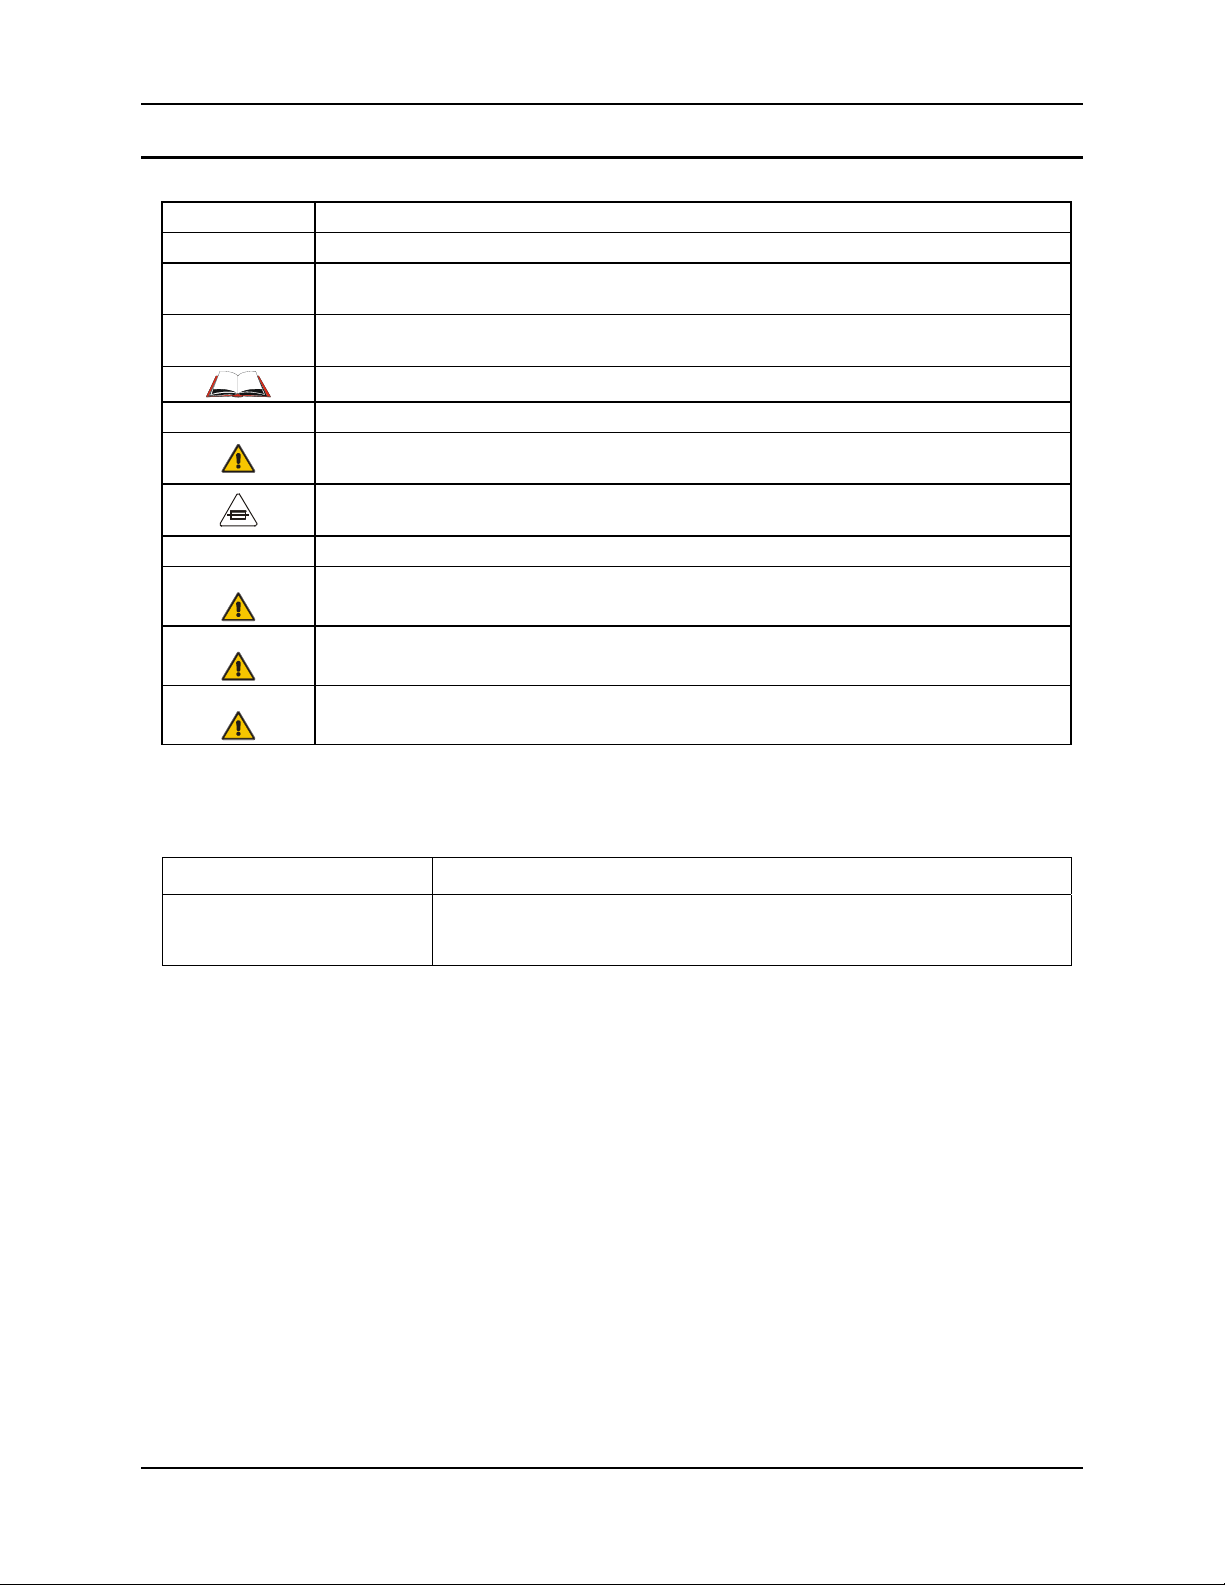
Convention Meaning
ALL CAPS All caps are used to represent disk directories, file names, and application names.
Menu | Choice
"Quotes"
ATTENTION
Note: Keyword that indicates immediately relevant information.
CAUTION
WARNING
DANGER
Rather than use the phrase "choose the Save command from the File menu", this guide uses the
convention "choose File | Save".
Indicates the title of a book, chapter or a section within a chapter (for example, "Document
Conventions").
Indicates a reference to other documentation.
Keyword that indicates vital or pivotal information to follow.
Attention symbol that indicates vital or pivotal information to follow. Also, when marked on product,
means to refer to the user’s guide.
International fuse replacement symbol. When marked on the product, the label includes fuse ratings
in volts (v) and amperes (a) for the product.
Keyword that indicates a potentially hazardous situation which, if not avoided, may result in minor
or moderate injury.
Keyword that indicates a potentially hazardous situation which, if not avoided, could result in death
or serious injury.
Keyword that indicates a imminent hazardous situation which, if not avoided, will result in death or
serious injury.
Imager Decode Zone
Engine Imager Decode Zone
Standard Range (SR)
2.5 in. to 12.5 in.
6.3 cm to 32 cm
Figure 1-7 Imager Decode Zone
E-EQ-MX6PCRG-C-ARC MX6 PPC Reference Guide
Page 16
8 Using the Stylus
Using the Stylus
Note: Always use the point of the stylus for tapping or making strokes on the display. Never use
an actual pen, pencil or sharp object to write on the touch screen. Use only the supplied
stylus or plastic-tipped pens intended for use with a touchscreen display.
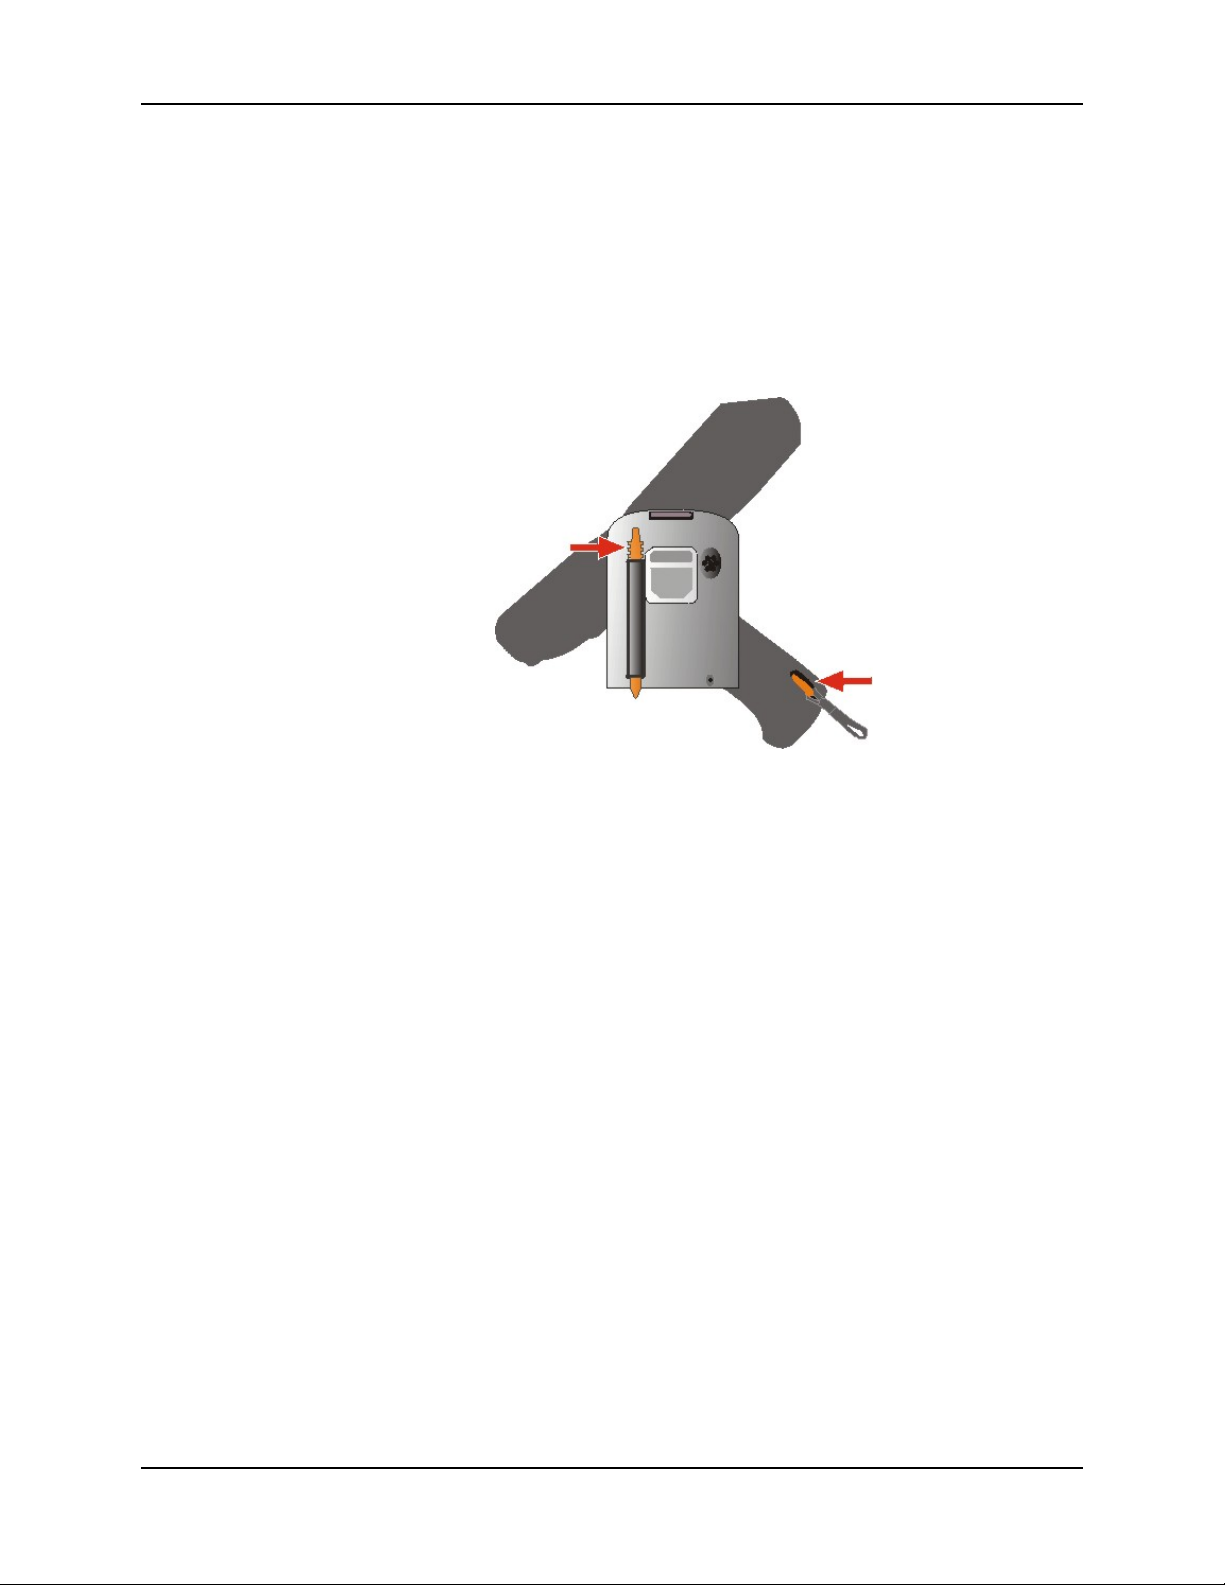
The stylus is located on the back of an MX6 PPC without a handle, and in the back of the handle
of an MX6 PPC with a handle. A tether is connected to the stylus in the handle.
Figure 1-8 Stylus Storage Locations
Pull the stylus straight out of the Stylus holder and hold the stylus as if it were a pen or pencil.
Touch an element on the screen with the tip of the stylus then remove the stylus from the screen.
Slide the stylus into the stylus holder on the MX6 PPC when the stylus is not in use.
Like using a mouse to left-click icons on a desktop computer screen, using the stylus to tap icons
on the MX6 PPC display is the basic action that can:
• Open applications
• Choose menu commands
• Select characters in the Soft Input Panel
• Select options in dialog boxes or drop-down boxes
• Drag the slider in a scroll bar
• Select text by dragging the stylus across the text
• Place the cursor in a text box prior to typing in data or retrieving data using the integrated
barcode scanner or an input/output device connected to the serial port.
An extra or replacement stylus can be ordered from LXE. See the section titled "Accessories" for
the stylus part number.
MX6 PPC Reference Guide E-EQ-MX6PCRG-C-ARC
Page 17
System Tray Icons 9
Figure 1-9 Tapping with the Stylus
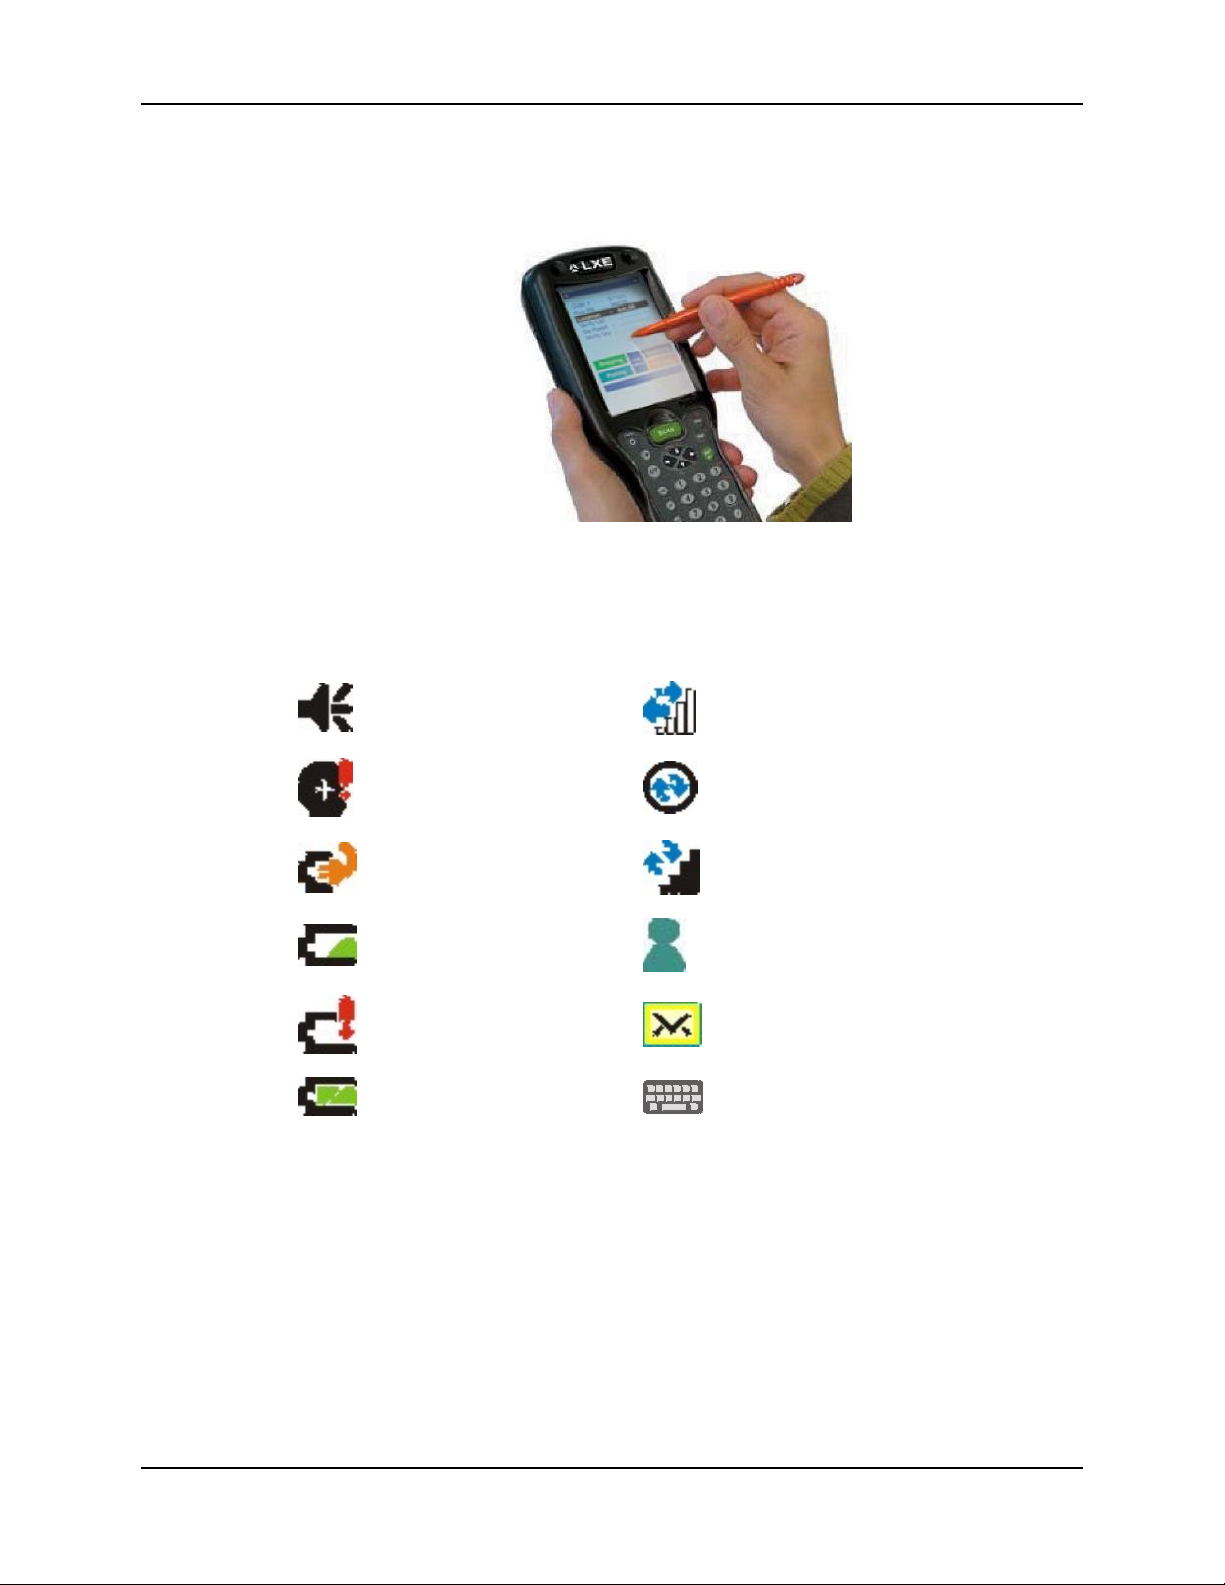
System Tray Icons
Turns all system sounds on
and off and adjusts volume.
Backup battery is low.
Main batteries are charging.
Main batteries are low.
Main batteries very low.
Main batteries are full.
Figure 1-10 System Tray Icons
Connection is active.
Synchronization is beginning or ending.
Synchronization is occuring.
One or more instant messages are
waiting acknowledgment.
One or more e-mail messages are
waiting acknowledgment.
Soft Input Panel. Tap to show the Panel.
E-EQ-MX6PCRG-C-ARC MX6 PPC Reference Guide
Page 18
10 Soft Input Panel
Soft Input Panel
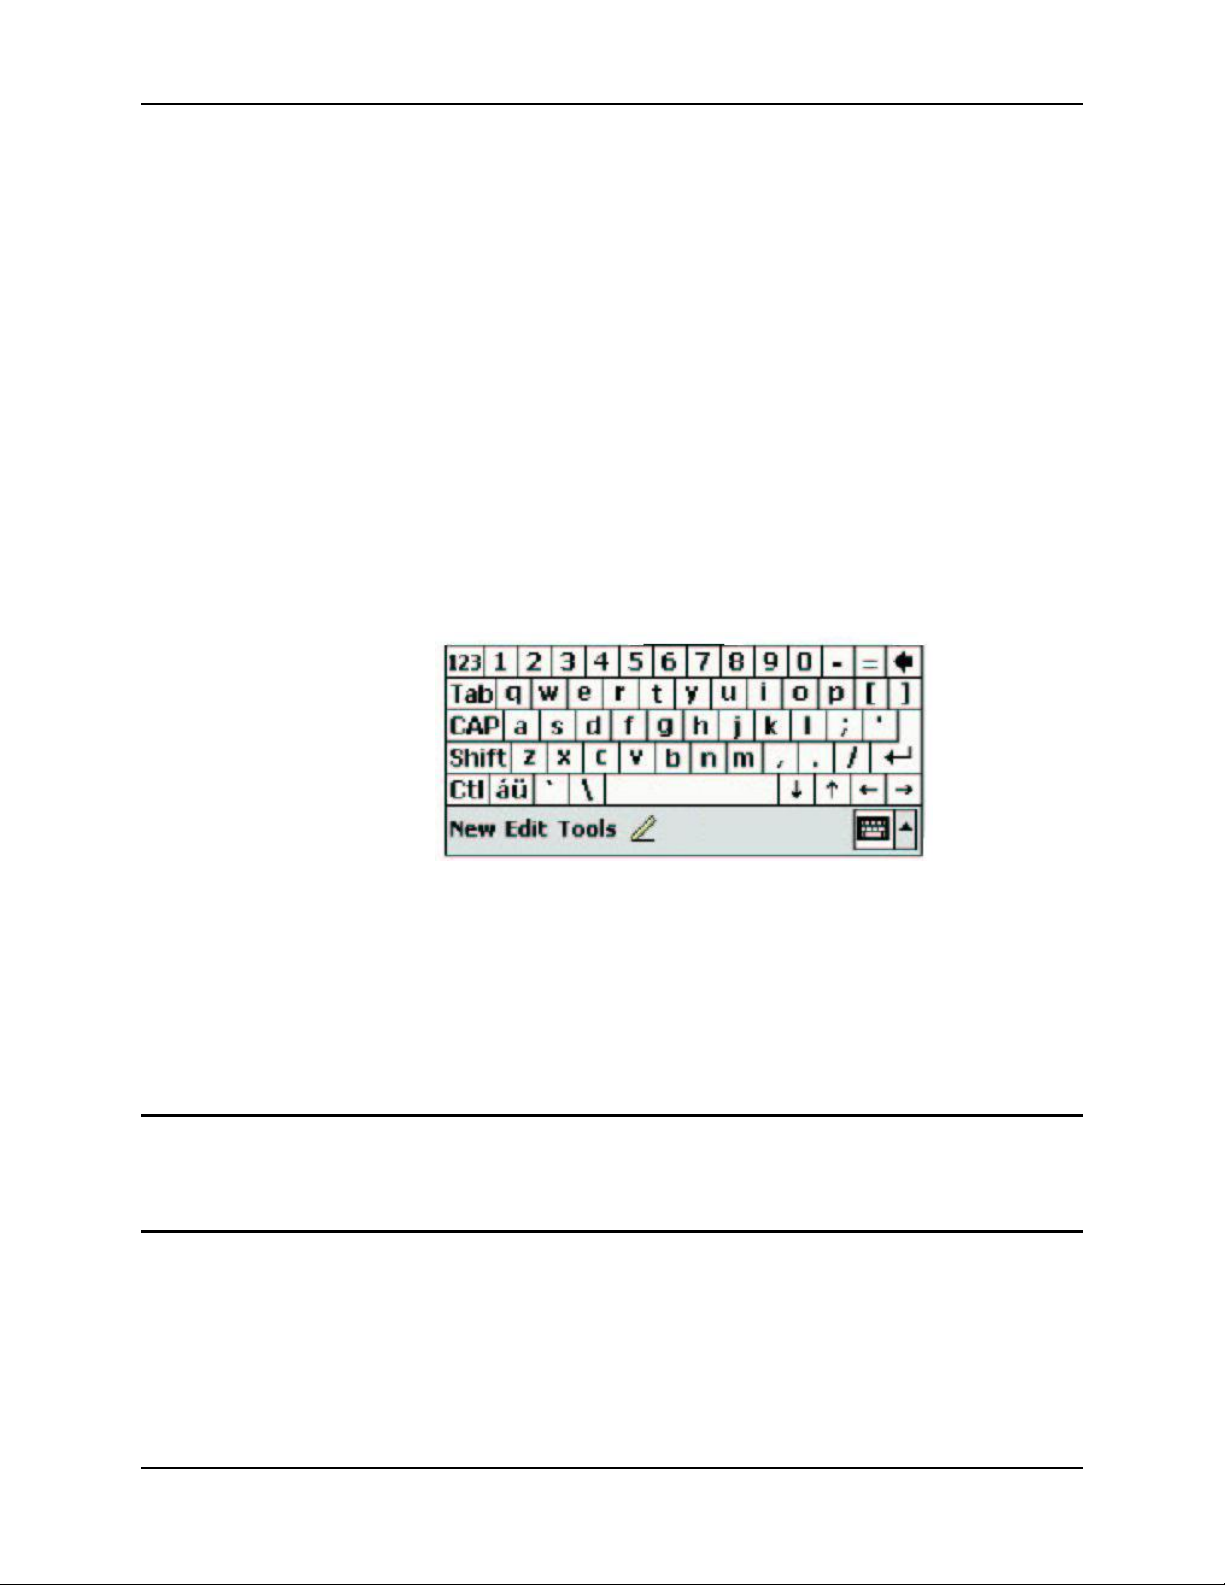
The Soft Input Panel (SIP) is always available by tapping the SIP icon in the system tray when the
MX6 PPC is powered On. It is always available with one exception – when the Today screen is
displayed.
To show or hide the input panel, tap the Input Panel button (the icon looks like a keyboard and is
shown in the System tray). Tap the arrow next to the SIP icon to see the soft input panel Choices
menu.
When you use the input panel, the word completion program anticipates the word you are typing
or writing and displays it above the input panel. When you tap the displayed word, it is inserted
into your text at the insertion point.
To change word suggestion options, such as the number of words suggested at one time, tap Start
| Settings | Personal | Input | Word Completion tab.
Use the input panel to enter information in any program. You can either type on the soft keyboard
or write on the touch screen using Letter Recognizer or Block Recognizer. In either case, the
characters appear as typed text on the screen.
• Tap the 123 key to display either an alphanumeric keyboard or a numeric keyboard with
characters usually accessed by capitalizing alphanumeric keys on a physical keyboard.
• Tap the Shift key to type one capital letter.
• Tap the CAP key to type all capital letters.
• Tap the au key to access symbols.
Repeating Keystrokes
The Soft Input Panel does not support repeating keystrokes. The MX6 PPC keypads allow
repeating keystrokes.
International Characters
Use the Soft Input Panel and the stylus to add International Characters to data entries. Open the
Soft Input Panel by tapping the Input Panel icon in the system tray.
Tap the áü key on the Soft Input Panel to enable international characters.
Figure 1-11 Soft Input Panel
MX6 PPC Reference Guide E-EQ-MX6PCRG-C-ARC
Page 19

General Windows Keyboard Shortcuts 11
General Windows Keyboard Shortcuts
Use the keyboard shortcuts in the chart below to navigate the 35 and 56-key keypads. These are
standard keyboard shortcuts for Windows applications.
Press these keys … To …
CTRL + C Copy
CTRL + X Cut
CTRL + V Paste
CTRL + Z Undo
DELETE Delete
SHIFT with any of the arrow keys
CTRL+A Select all.
ALT+ESC Cycle through items in the order they were opened.
CTRL+ESC 1 Display the Start menu.
ALT+Underlined letter in a menu
name
Underlined letter in a command
name on an open menu
ESC Cancel the current task.
Select more than one item in a window or on the
desktop, or select text within a document.
Display the corresponding menu.
Carry out the corresponding command.
1
Holding this key sequence down longer than needed to display the Start menu will cause a Hard
Reset.
E-EQ-MX6PCRG-C-ARC MX6 PPC Reference Guide
Page 20

12 Getting Help
Getting Help
LXE user guides are now available on CD and they can also be viewed/downloaded from the LXE
ServicePass website. Contact your LXE representative to obtain the LXE Manuals CD.
You can also get help from LXE by calling the telephone numbers listed on the LXE Manuals
CD, in the file titled “Contacting LXE”. This information is also available on the LXE website.
Explanations of terms and acronyms used in this manual are located in the file titled "LXE
Technical Glossary" on the LXE Manuals CD and on the LXE ServicePass website.
User Guides
The following guides are available on the LXE Manuals CD and the LXE ServicePass website:
• MX6 PPC User’s Guide
• LXEbook – MX6 PPC User’s Guide (designed to be downloaded to MX6 device)
• MX6 Cradle Reference Guide
• RFTerm Reference Guide
• Getting the Most from Your Batteries
• LXE Technical Glossary
Accessories
Scanners
MX6, Scanner adapter cable, 7.5”, D17 to D9M MX6A056CBL3IND17D9M
MX6 Vehicle Cradle, Scanner adapter cable, 7.5”, D9F to D9M MX6A057CBL3IND9MD9M
5300-92 Auto Range Scanner, 7ft D9 Interface Cable (Obsolete) 8110IP530092C07DWW
5300-92 Auto Range Scanner, 15ft D9 Interface Cable (Obsolete) 8110IP530092C15DUS
P304PRO PDF-417 Scanner, 8ft D9 Interface Cable (Obsolete) 8210A326PRO8DA9F
P304PRO PDF-417 Scanner, 20ft D9 Interface Cable (Obsolete) 8210A327PRO20DA9F
PowerScan SR Scanner, 8ft D9 Interface Cable 8300A326SCNRPWRSR8DA9F
PowerScan SR Scanner, 12ft D9 Interface Cable 8300A327SCNRPWRSR12DA9F
PowerScan LR Scanner, 8ft D9 Interface Cable 8310A326SCNRPWRLR8DA9F
PowerScan LR Scanner, 12ft D9 Interface Cable 8310A327SCNRPWRLR12DA9F
PowerScan ALR Scanner, 8ft D9 Interface Cable 8320A326SCNRPWRXLR8DA9F
PowerScan ALR Scanner, 12ft D9 Interface Cable 8320A327SCNRPWRXLR12DA9F
5770 RF/Wireless Scanner Kit, ALR, D9 Interface Cable (see Note) 8410A326SCNRALRDA9
LS3408 Fuzzy Logic SR Scanner, 9ft D9 Interface Cable 8510A326SCNRFZYDA9F
LS3408 Extended Range Scanner, 9ft D9 Interface Cable 8520A326SCNRERDA9F
Batteries and Battery Charger/Analyzers
Main Battery, Lithium Ion MX6A380BATT
4 Unit Main Battery Charger, Includes analyzing capabilities US ** MX6A383CHGR4US
4 Unit Main Battery Charger, Includes analyzing capabilities * MX6A384CHGR4WW
Carrying Cases, Holsters, Hand Straps
Replacement MX6 Hand Strap – Imager version only MX6A411HANDSTRP
Holster for MX6 without handle – Imager version only MX6A409HOLSTER
Holster for MX6 with handle – Imager and laser version MX6A410HOLSTERHAND
Imager only - Case for MX6 w/o handle, plastic over keyboard MX6A407CASE1
Imager only - Case for MX6 w/o handle, No plastic covering MX6A408CASE2
Imager only - Case for MX6 with handle MX6A409CASEHANDLE
Wrist Strap/lanyard for MX6 with handle MX6A412WRISTSTP
Imager only - Case for MX6 w/o plastic over keyboard MX6A414CASELASER
Imager only - Case for MX6 w/ plastic covering MX6A415CASELASER
MX6 PPC Reference Guide E-EQ-MX6PCRG-C-ARC
Page 21

Getting Help 13
Vehicle Mount Cradles
MX6 Vehicle Cradle, For use with a Standard MX6 MX6A007VMCRADLE
MX6 Vehicle Cradle, For use with Handle MX6A008WHVMCRADLE
12V Vehicle Cradle Power Supply, Cig Lighter Adapter MX6A382PSVEHMT12V
24-48V Vehicle Cradle Power Cable, Bare Wire, 6ft MX6A386PWRCBL6FT
48-72V Vehicle Cradle Power Supply 9000A316PS24V72VMX6
MX6 Vehicle Stand, Plastic Holder MX6A009VMSTAND
MX6 Cig Lighter Power Adapter MX6A385PSAUTO12V
Desktop Cradles
MX6 Single Unit Desktop Cradle, USB/RS232, w/ single unit battery
charging slot, US **
MX6 Single Unit Desktop Cradle, USB/RS232 w/ single unit battery
charging slot, WW *
MX6 4-Bay Docking Cradle, US ** MX6A012MULTIDOCKUS
MX6 4-Bay Docking Cradle, WW * MX6A013MULTIDOCKWW
MX6 4-Bay Comms Docking Cradle, US (Ethernet Capabilities) ** MX6A010NETCRADLEUS
MX6 4-Bay Comms Docking Cradle, WW (Ethernet Capabilities) * MX6A011NETCRADLEWW
Desktop Cradle Wall Mounting Kit MX6A014WALLMTGKIT
USB Cradle to PC Interface Cable, 6ft MX6A057CBL6USB
RS-232 Cradle to PC Interface Cable, 6ft MX6A059CBL6RS232
Interface Cables
MX6 Charge/Comm Interface Cable, RS232 MX6A054CBLD17RS232
MX6 Charge/Comm Interface Cable, USB MX6A055CBLD17USB
MX6 Scanner/Printer Adapter Cable, 17-pin D to DB9M MX6A056CBL3IND17D9M
MX6 Vehicle Cradle Scanner/Printer Adapter Cable, D9F to D9M MX6A057CBL3IND9MD9M
Charge/Comm Cable Power Supply ** MX6A307PSACUS
Charge/Comm Cable Power Supply * MX6A308PSACWW
Miscellaneous Accessories
Replacement Stylus Kit, 3-pack MX6A510STYLUS
Replacement Stylus Kit, w/ Tether, 3-Pack, For with MX6 w/ Handle MX6A511STYLUS
Universal Vehicle Docking Cradle Mounting Bracket – Clamp Style MX6A015MTGBRCKT
Replacement US Power Cord 9000A066CBLPWRAC
MX6 Software Development Kit (HHP Branded for PC 2002 units) MA6A501PPCSDK
MX6 Software Development Kit (LXE Branded) MX6A502PPCSDK
MX6A005DESKCRADLEUS
MX6A006DESKCRADLEWW
* Power Cable / Cord not included
** Power Cable / Cord included
Note: 8410A326SCNRALRDA9 can only be used in conjunction with the MX6 Vehicle Cradle due to
base station power consumption.
When using the 8500 series tethered scanners (LS3408), the tethered scanner Power Mode must
be set to “Reduced Power Mode”. The default is “Continuous On”. Setting the scanner to
Reduced Power Mode will not impact performance of the 8500 series tethered scanners.
E-EQ-MX6PCRG-C-ARC MX6 PPC Reference Guide
Page 22

14 Getting Help
MX6 PPC Reference Guide E-EQ-MX6PCRG-C-ARC
Page 23

First . . .
In Brief
Chapter 2 Getting Started
Charge the main battery pack and the internal backup battery completely. A main battery pack
charge takes four hours and the backup battery charge takes 8 hours (new batteries only).
The main battery can be charged in one of three ways –
• either while in the MX6 PPC in a powered docking cradle, or
• by placing the main battery in a powered MX6 battery charger.
• in-unit battery charging using the Communications cable with power supply.
The sequence of events for a new MX6 PPC is:
1. Insert a fully charged battery. (Always put a fully charged battery in the MX6 PPC at the
beginning of the shift or work day.)
2. Turn the MX6 PPC on by pressing the Power key.
3. Align (calibrate) the touchscreen.
4. Complete the simple exercise showing how to use the stylus and pop-up menus.
5. Set the time zone for your location. Please wait while programs install.
6. When the Today screen is displayed, tap the Clock icon and set the correct date and time.
7. Set the wireless radio parameters, if necessary. Refer to Chapter 4 “System Configuration”.
Note: Before setting WPA on an MX6 PPC running the Pocket PC 2002 operating system,
an OS upgrade to Windows Mobile 2003 is required.
8. Edit the terminal emulation parameters, if necessary. Refer to the RFTerm Reference Guide.
9. Tap Start | HHP Utils | RegBackup to permanently save your settings.
If you remove the battery or the battery fails, there is a 30 minute window in which to insert a
charged main battery before the backup battery fails and the contents of the Flash memory are
lost.
Note: The sequence of steps in “Getting Started” must be also be completed when the MX6
PPC returns from a Cold Boot and when a new OS version is loaded. The radio, flash
card, virtual keyboard and scanner parameters may also need to be reset after a cold
boot.
E-EQ-MX6PCRG-C-ARC MX6 PPC Reference Guide
Page 24
16 Insert Fully Charged Battery
Insert Fully Charged Battery
Note: The unit will not function unless the battery compartment cover is in place and securely
latched. Be sure to place the unit in suspend before removing the battery. If you don’t,
you may lose all unsaved data.
The main battery is located in a compartment on the back of the unit. To insert or replace the
battery, complete the following steps:
1. Tap the Power button to place the MX6 PPC in Suspend mode.
2. Detach the bottom hook of the elastic handstrap (if installed).
3. Press the battery locking tab up to release the main battery pack. The battery case serves
as the back cover for the battery well for the MX6 PPC.
4. Pull the battery up and out of the battery well with a hinge motion. Place the discharged
battery pack in a powered charging cradle or charger.
5. Tilt the end (without the latch) of the fully charged battery pack into the upper end of the
battery compartment, and firmly press the other end (with the latch) until it is fully
inserted into the battery compartment.
6. Push down on the battery pack until it clicks into place.
7. Replace the handstrap hook in its holder.
Note: The battery should not be replaced in a dirty or harsh environment. When the battery is
out of the MX6 PPC, any dust or moisture that enters the battery compartment can get
into the main unit, potentially causing damage.
Low Battery Condition
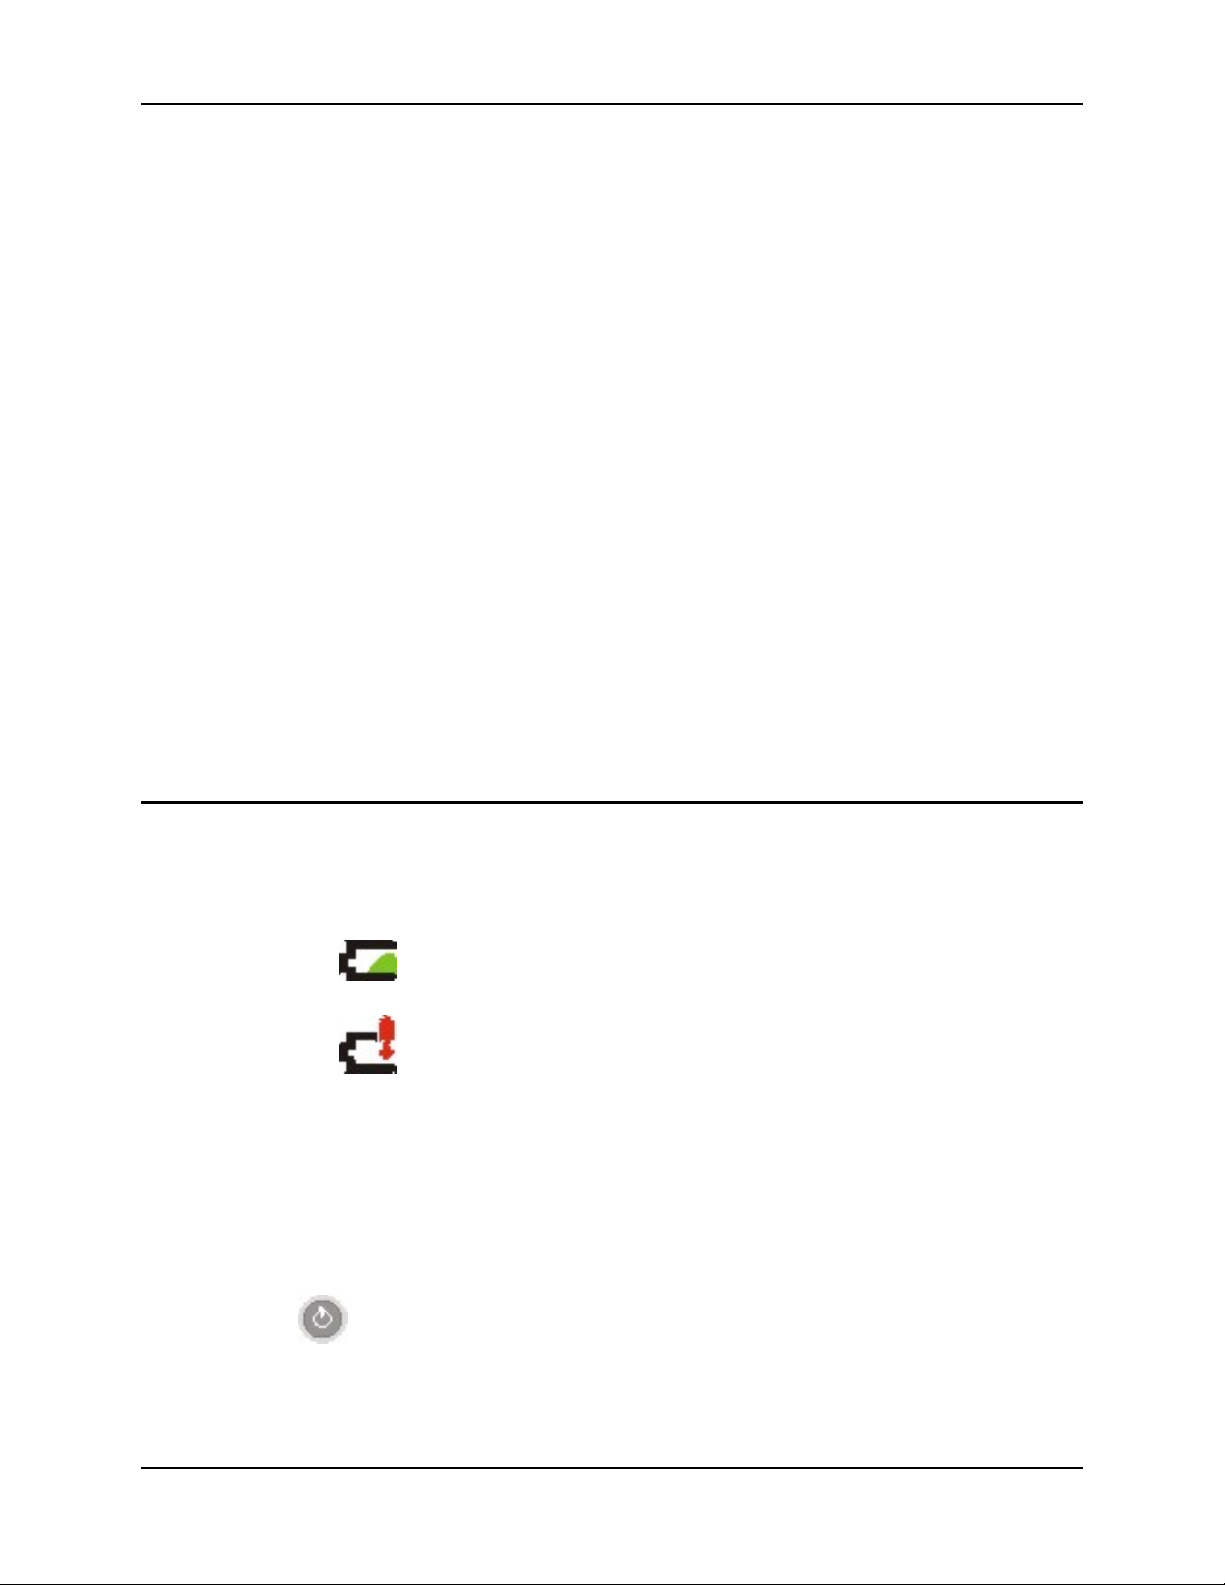
When the main battery is low, a dialog box pops up with an Alert to charge the battery. The
window can be closed, but the dialog box will continue to pop up before the battery reaches the
Battery Dead/Off condition.
Main Low
Main Very Low
When the battery reaches the Battery Dead condition, the battery sensor initiates a shutdown of all
applications and closes the RF network connection. When the main battery is replaced with a fully
charged main battery, the MX6 PPC will resume as before.
Power Key
The Power key is located in the top left corner of the keypad. Press the Power key to
turn the MX6 PPC on, place it into Suspend or to wake it from Suspend modes.
Icons are visible in the taskbar indicating battery strength.
You can also use the Scan key (or trigger if installed) to wake the MX6 PPC from
Suspend.
MX6 PPC Reference Guide E-EQ-MX6PCRG-C-ARC
Page 25
Connect External Power Supply (Optional) 17
Connect External Power Supply (Optional)
The MX6 PPC DC power jack is located at the base of the MX6 PPC. The main battery recharges
when the MX6 PPC is connected to an external power source and the “Main Batteries are
Charging” icon is displayed in the toolbar.
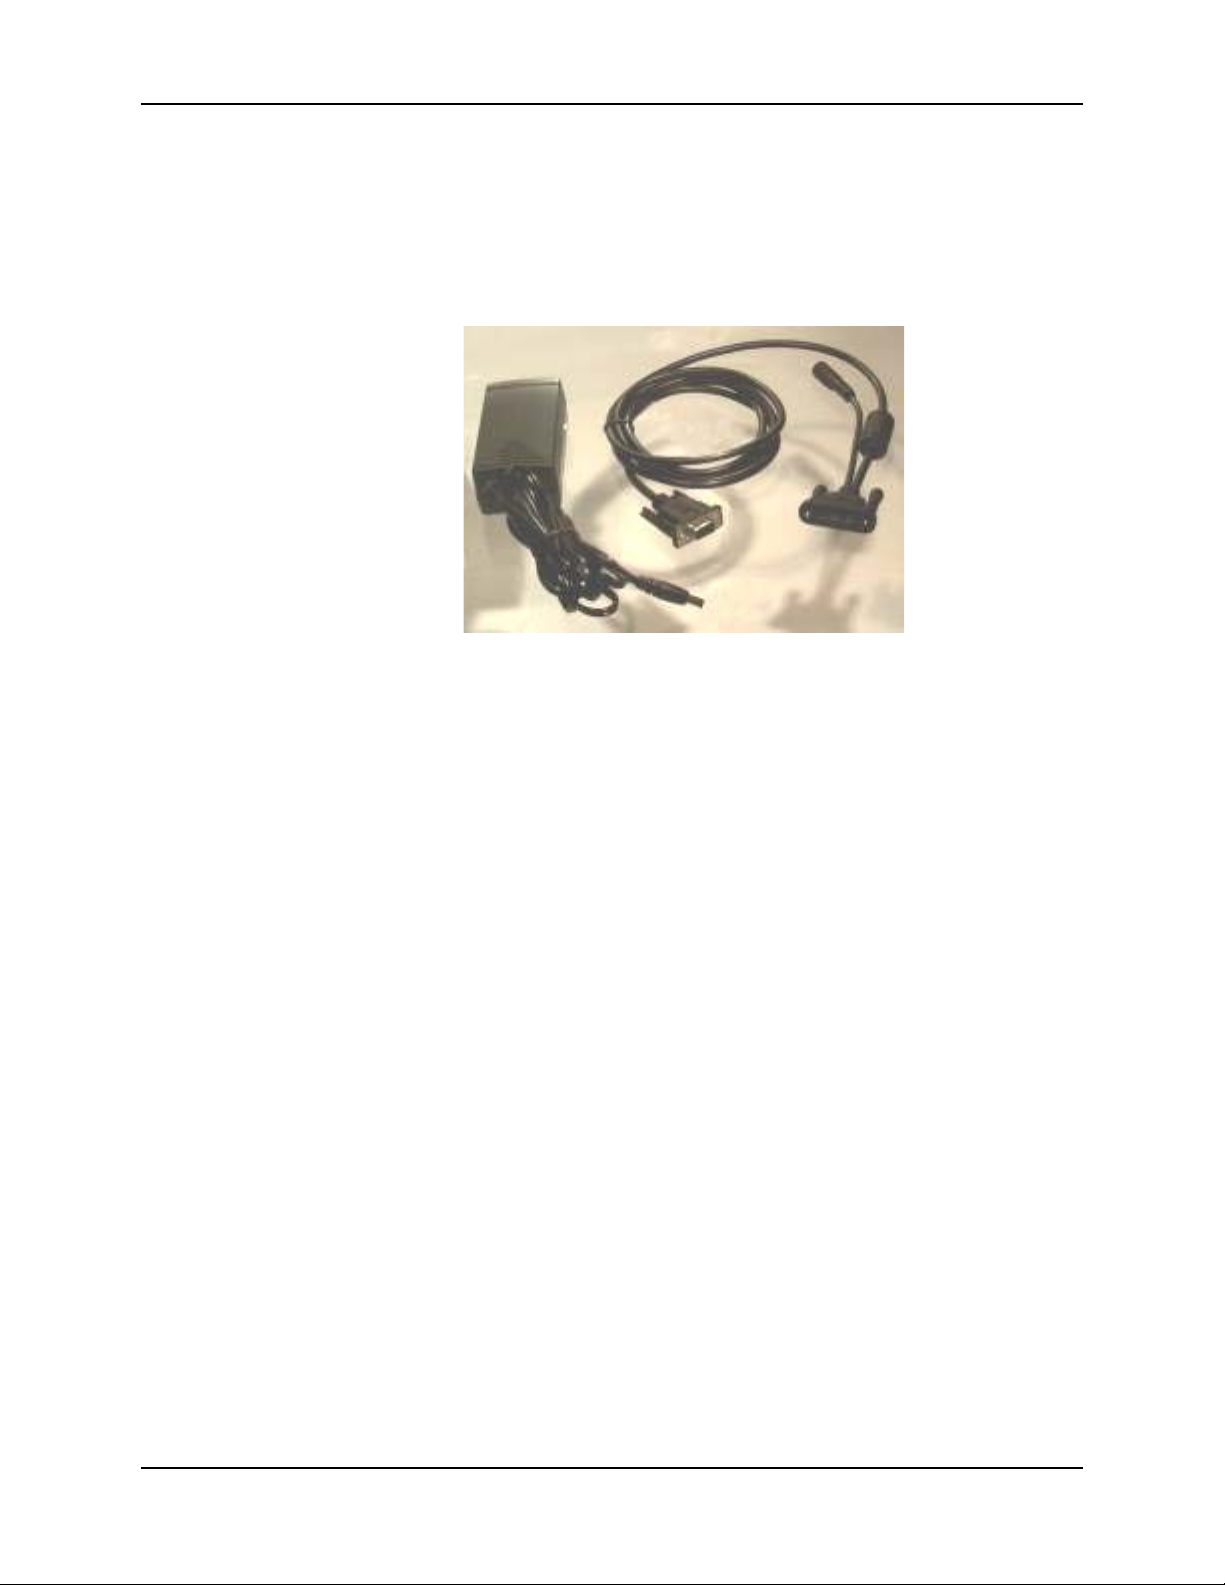
Figure 2-1 AC/DC 12V External Power Supply
Push the 17-pin power cable connector into the MX6 PPC serial port. When the connector is
seated over the pins, twist the cable fasteners to the right to secure the cable to the MX6 PPC.
Twist to the left to loosen and remove the cable. Insert the barrel end of the AC/DC Power adapter
into the short cable end on the power cord connected to the MX6 PPC.
E-EQ-MX6PCRG-C-ARC MX6 PPC Reference Guide
Page 26
18 Align the Touchscreen
Align the Touchscreen
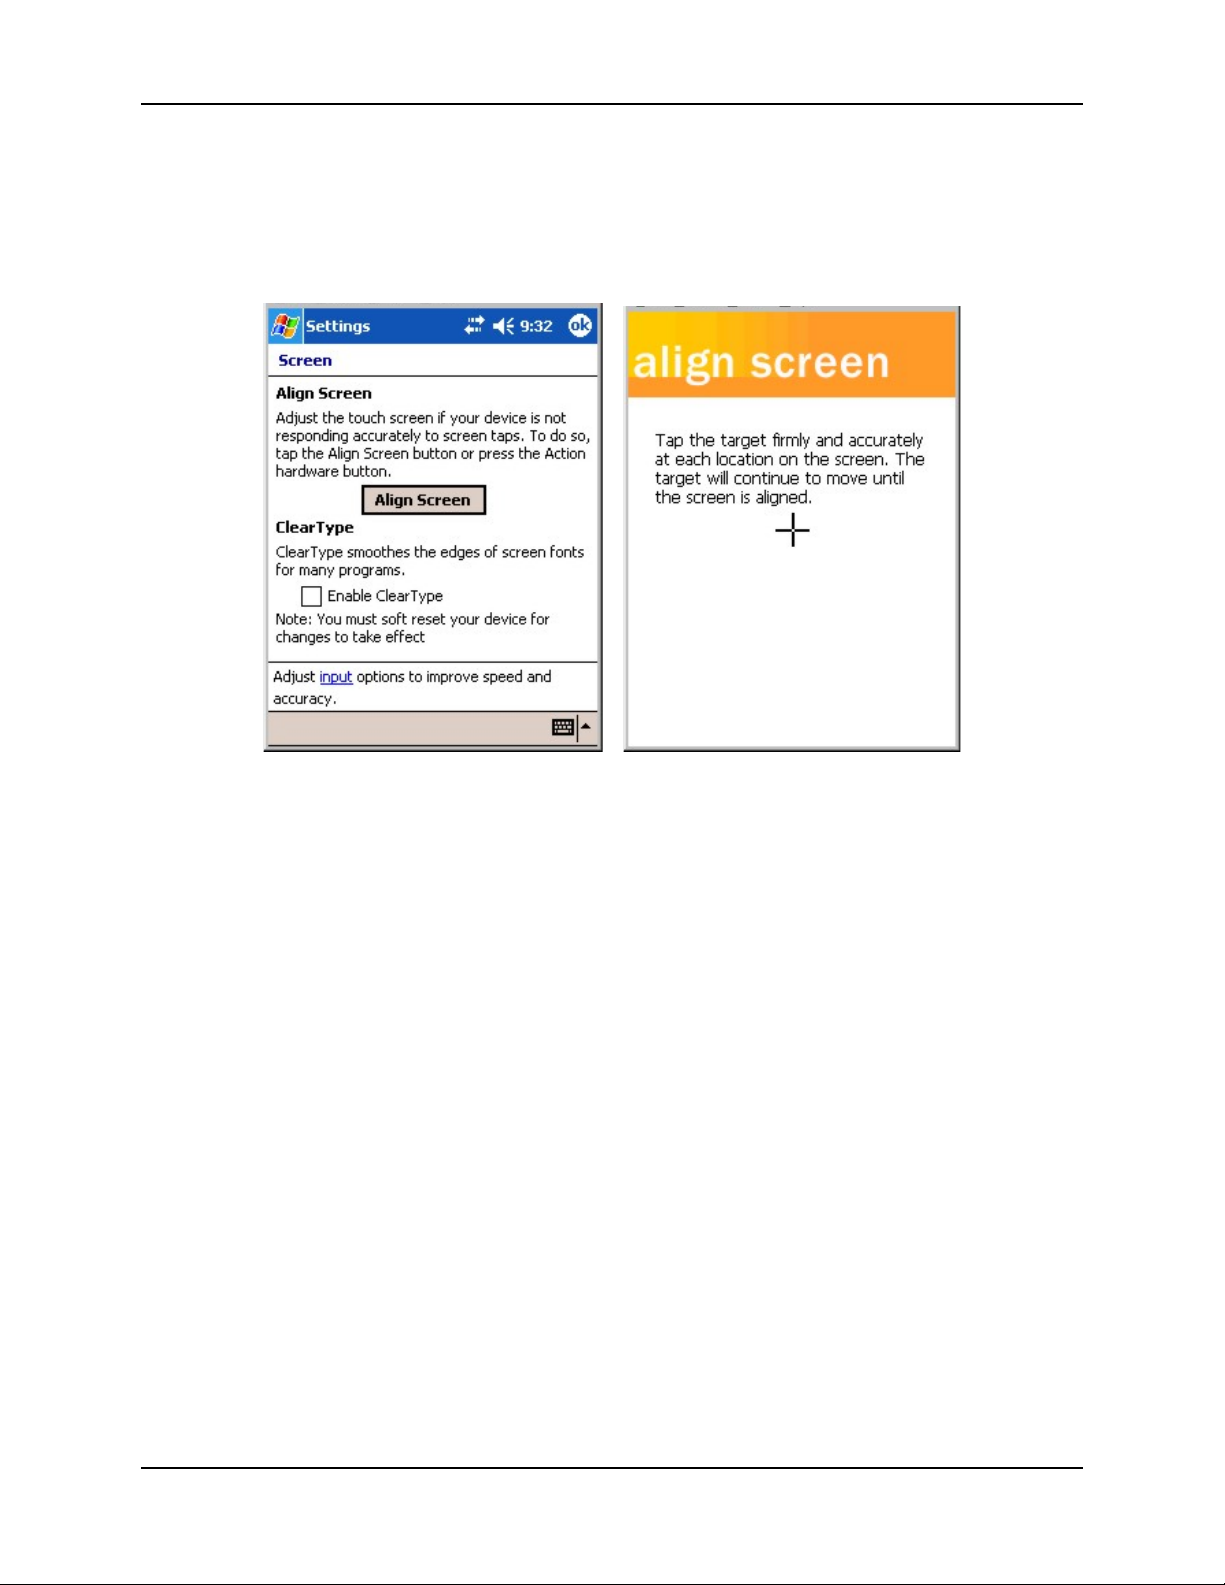
Access: Start | Settings | System tab | Screen | Align Screen
Figure 2-2 Align the Touchscreen
To start, tap the target ( + ) with the stylus.
Follow the instructions on the screen. Carefully press and briefly hold the stylus on the center of
the target (+) as the target moves around the screen.
When alignment is complete, press the Enter key (or tap the OK icon) to save the new alignment
settings. You can also press the Esc key sequence to cancel or quit.
MX6 PPC Reference Guide E-EQ-MX6PCRG-C-ARC
Page 27
Set the Date and Time 19
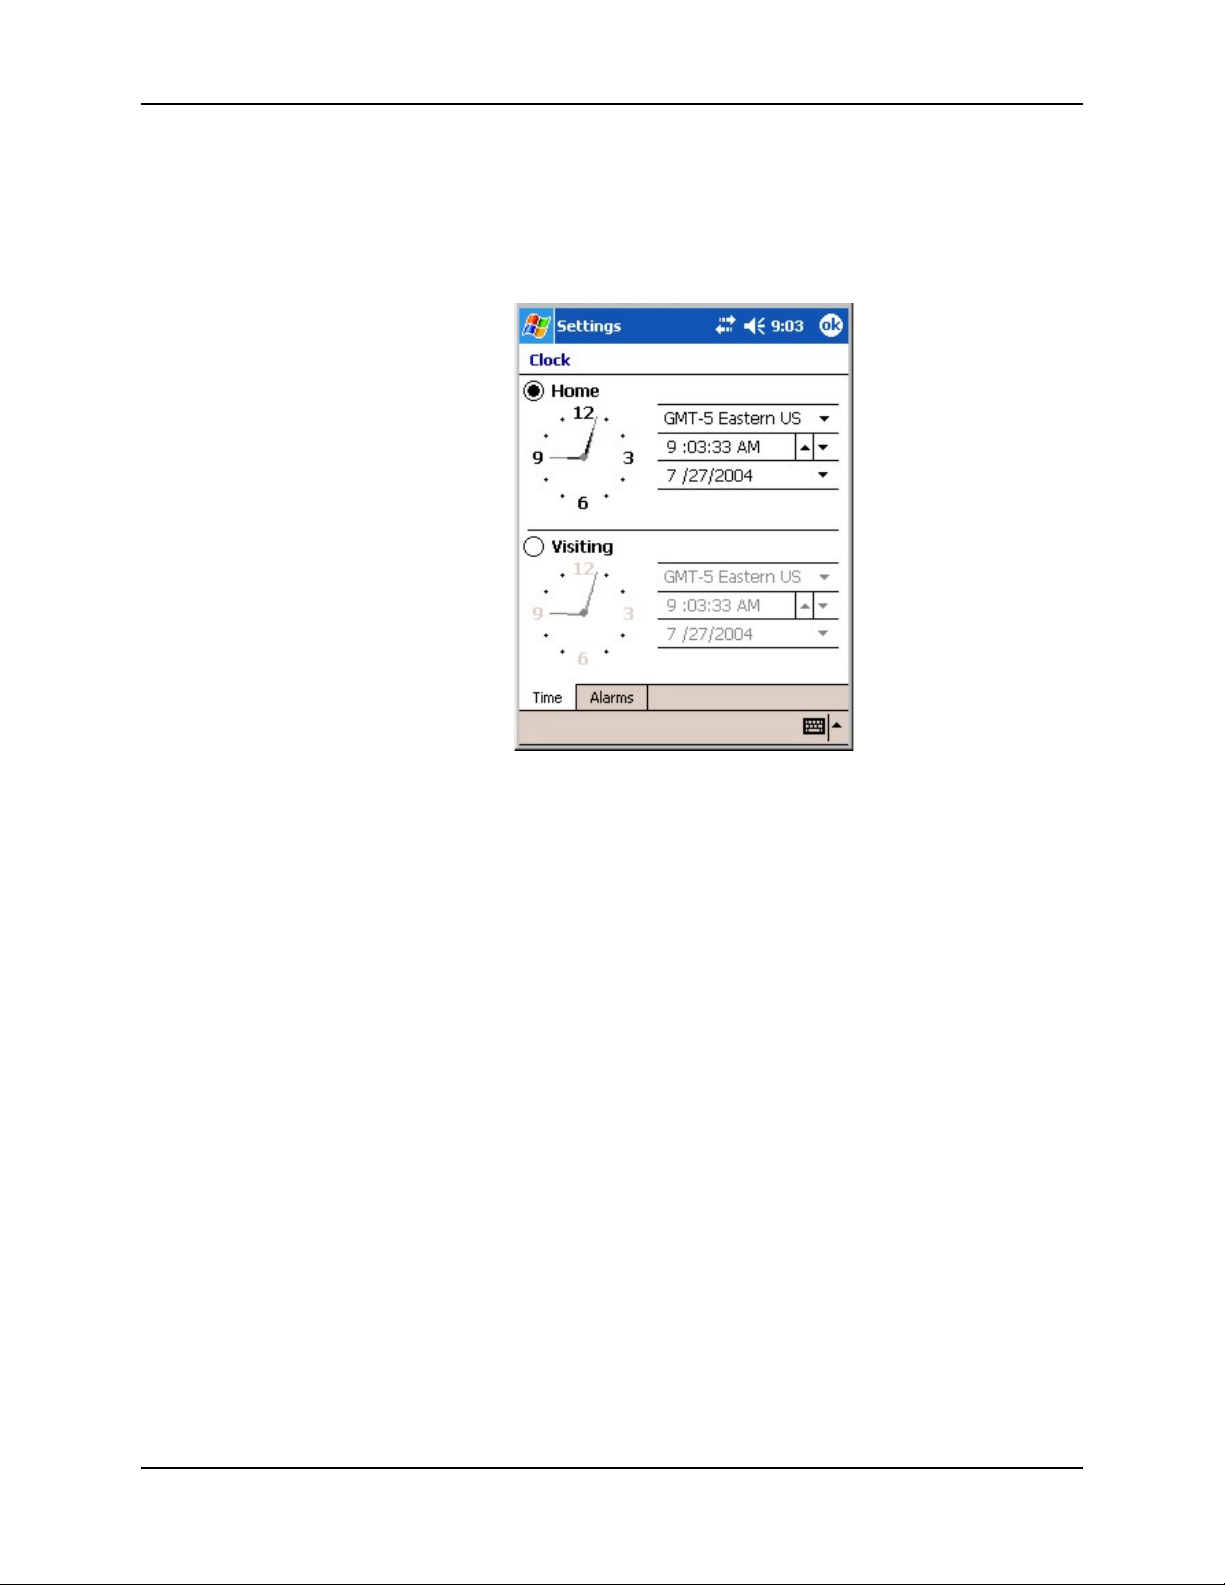
Set the Date and Time
Access: Start | Settings | Systems tab | Clock
Figure 2-3 Set the Date and Time
1. Select your correct time zone from the pull-down list.
2. To change the time, select the hour, minute, seconds, or AM/PM and select the up arrow
to increase the value; select/tap the down arrow to decrease the value. Or you can type a
new time value in the field.
3. To change the month, tap the month to open a calendar. Tap the month again and choose
from the drop down list. Or select the left and right arrows to select the month and year.
Or you can type a new month value in the field.
4. To change the year, tap the year to open a calendar. Tap the year again and select the up
arrow to increase the value; select/tap the down arrow to decrease the value. Or select the
left and right arrows to select the month and year. Or you can type a new year value in
the field.
• Select OK and select Yes to save your changes or select No to exit without saving
your changes and exit Clock.
• Select Cancel to return to Clock Properties.
E-EQ-MX6PCRG-C-ARC MX6 PPC Reference Guide
Page 28
20 Setting Display Backlight Action
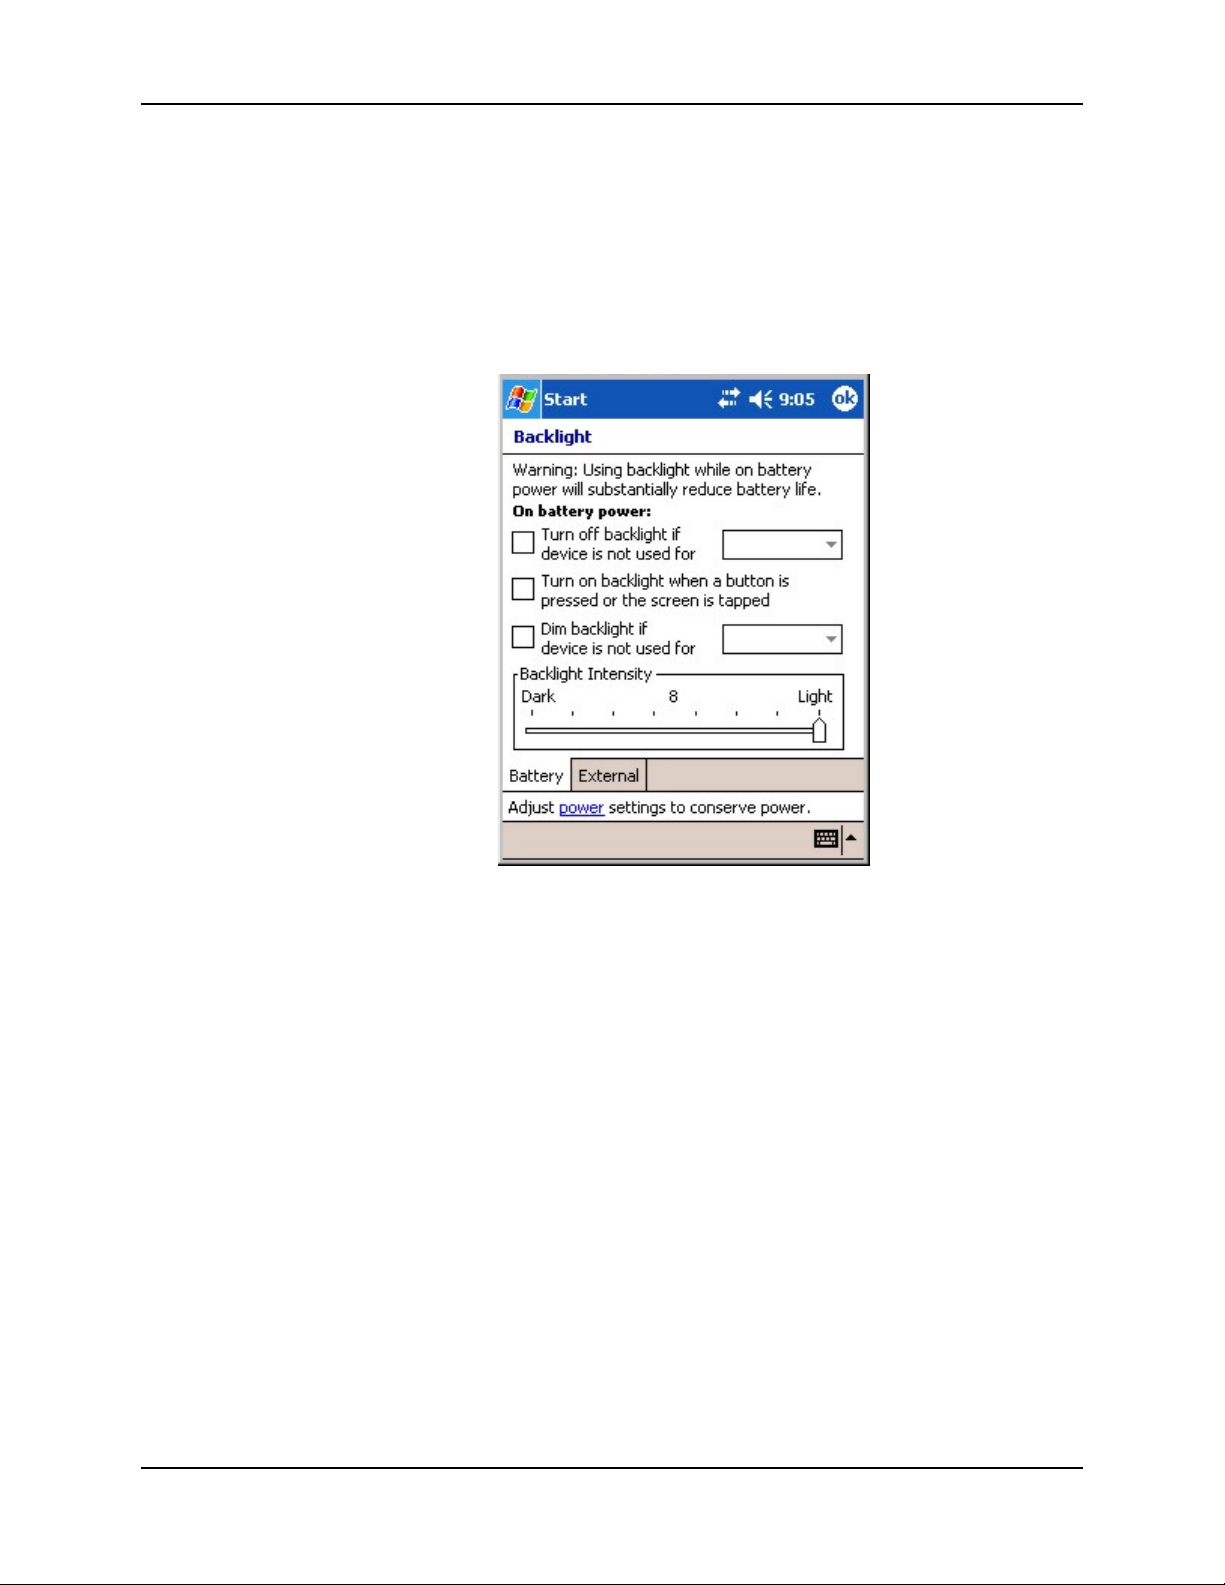
Setting Display Backlight Action
Access: Start | Settings | System | Backlight tab
Note: Refer to the section titled "Power Modes" later in this guide for information relating to
the power states of the MX6 PPC.
Figure 2-4 Set Backlight
The parameter settings in Start | Settings | System | Backlight tab establish when the display
backlight is turned on and off. The Keypad Backlight key (located at the lower right of the 35-key
keypad and below the Power key on the 56 key keypad) has no effect on display backlight
settings. The display backlight settings have no effect on the keypad Backlight setting.
Exit and save any changes by tapping OK on the command bar, or pressing Enter on the keypad.
When the MX6 PPC is not in the Suspend state, and the display backlight is off, the display
backlight is toggled on when any key, including the keypad backlight key, is tapped (if “Turn on
backlight when a button is pressed or the screen is tapped” is checked).
If the MX6 PPC is in Suspend, pressing the keypad backlight key has no effect – the MX6 PPC
remains in the Suspend state.
MX6 PPC Reference Guide E-EQ-MX6PCRG-C-ARC
Page 29

Setting Display Backlight Action 21
Dim Backlight if device is not used for:
When “Dim Backlight if device is not used for:” is checked and a time delay is set, the backlight
on the display dims to the minimum value in Backlight Intensity when the timer expires.
• Tapping the screen after the time delay timer expires, undims the screen backlight.
• Tapping any key after the time delay timer expires, turns the screen backlight on if “Turn
on backlight when a button is pressed or the screen is tapped” is checked.
When unchecked, the display backlight does not dim to the minimum level.
If the unit is in the Suspend state, pressing any key (other than the Power key) or tapping the
screen have no effect. Wake the MX6 PPC from Suspend by tapping the Power key, pressing the
trigger on the handle or by pressing the Scan button.
Turn off backlight if device is not used for:
When “Turn off backlight if device is not used for:” is checked and a time delay is set, the display
backlight turns off when the timer expires.
• Tapping the screen after the time delay timer expires, turns the screen backlight on.
• Tapping any key after the time delay timer expires, turns the screen backlight on if “Turn
on backlight when a button is pressed or the screen is tapped” is checked..
When unchecked, the display backlight does not turn off.
If the unit is in the Suspend state, pressing any key (other than the Power key) or tapping the
screen have no effect. Wake the MX6 PPC from Suspend by tapping the Power key, pressing the
trigger on the handle or by pressing the Scan button.
Turn on backlight when a button is pressed or the screen is tapped
When this option is unchecked, the MX6 PPC backlight utility ignores key taps and screen taps. If
the backlight is allowed to go off, the backlight remains off until the unit returns from the Suspend
state. If the backlight is not allowed to go off, the backlight remains on.
Backlight Intensity
You can set a different level for the intensity of the display backlight when the MX6 PPC is
running on battery power and a different level to use when the MX6 PPC is running on external
power.
Backlight intensity has no effect on the keypad backlight.
E-EQ-MX6PCRG-C-ARC MX6 PPC Reference Guide
Page 30

22 Set the Power Off Timer
Set the Power Off Timer
Note: Refer to the section titled "Power Modes" later in this guide for information relating to
the power states of the MX6 PPC.
Tap the Start | Settings | System | Power icon.
On battery power:
Turn off device if not used for
Change the parameter value and tap OK to save the change.
The default is 3 minutes. Selections are 1, 2, 3, 4, or 5 minutes.
On external power:
Turn off device if not used for
Change the parameter value and tap OK to save the change.
The default is 5 minutes. Selections are 1, 2, 5, 10, 15, or 30 minutes.
Note: When the Power Off timer expires, the computer enters Suspend Mode.
MX6 PPC Reference Guide E-EQ-MX6PCRG-C-ARC
Page 31

Accessing Files in Flash Memory 23
Accessing Files in Flash Memory
My Documents Folder
Access: Start | Programs | File Explorer | My Device | My Documents
Programs and files located in this folder are saved through a hard and soft reset if they had been
“saved” prior to resetting.
The IPSM Folder
Access: Start | Programs | File Explorer | My Device | IPSM
Programs and files located in the IPSM folder are saved through a hard reset. Backed up registry
settings are automatically restored after a hard reset.
• When adding a new CAB file to the IPSM/AutoInstall folder, first delete the RegBackup
file in the IPSM folder. Add the new CAB file, then press ESC + CTRL to perform a
hard reset. Reconfigure all settings, including the setting for the newly loaded CAB file.
Then tap Start | HHP Utils | RegBackup to save all settings.
CAB files stored in the AutoInstall folder within the IPSM folder are automatically unpacked
following a hard reset.
Restore default registry settings by deleting the RegBackup file in the IPSM folder and then
perform a hard reset.
E-EQ-MX6PCRG-C-ARC MX6 PPC Reference Guide
Page 32
24 Connect the Audio Jack (Optional)
Connect the Audio Jack (Optional)
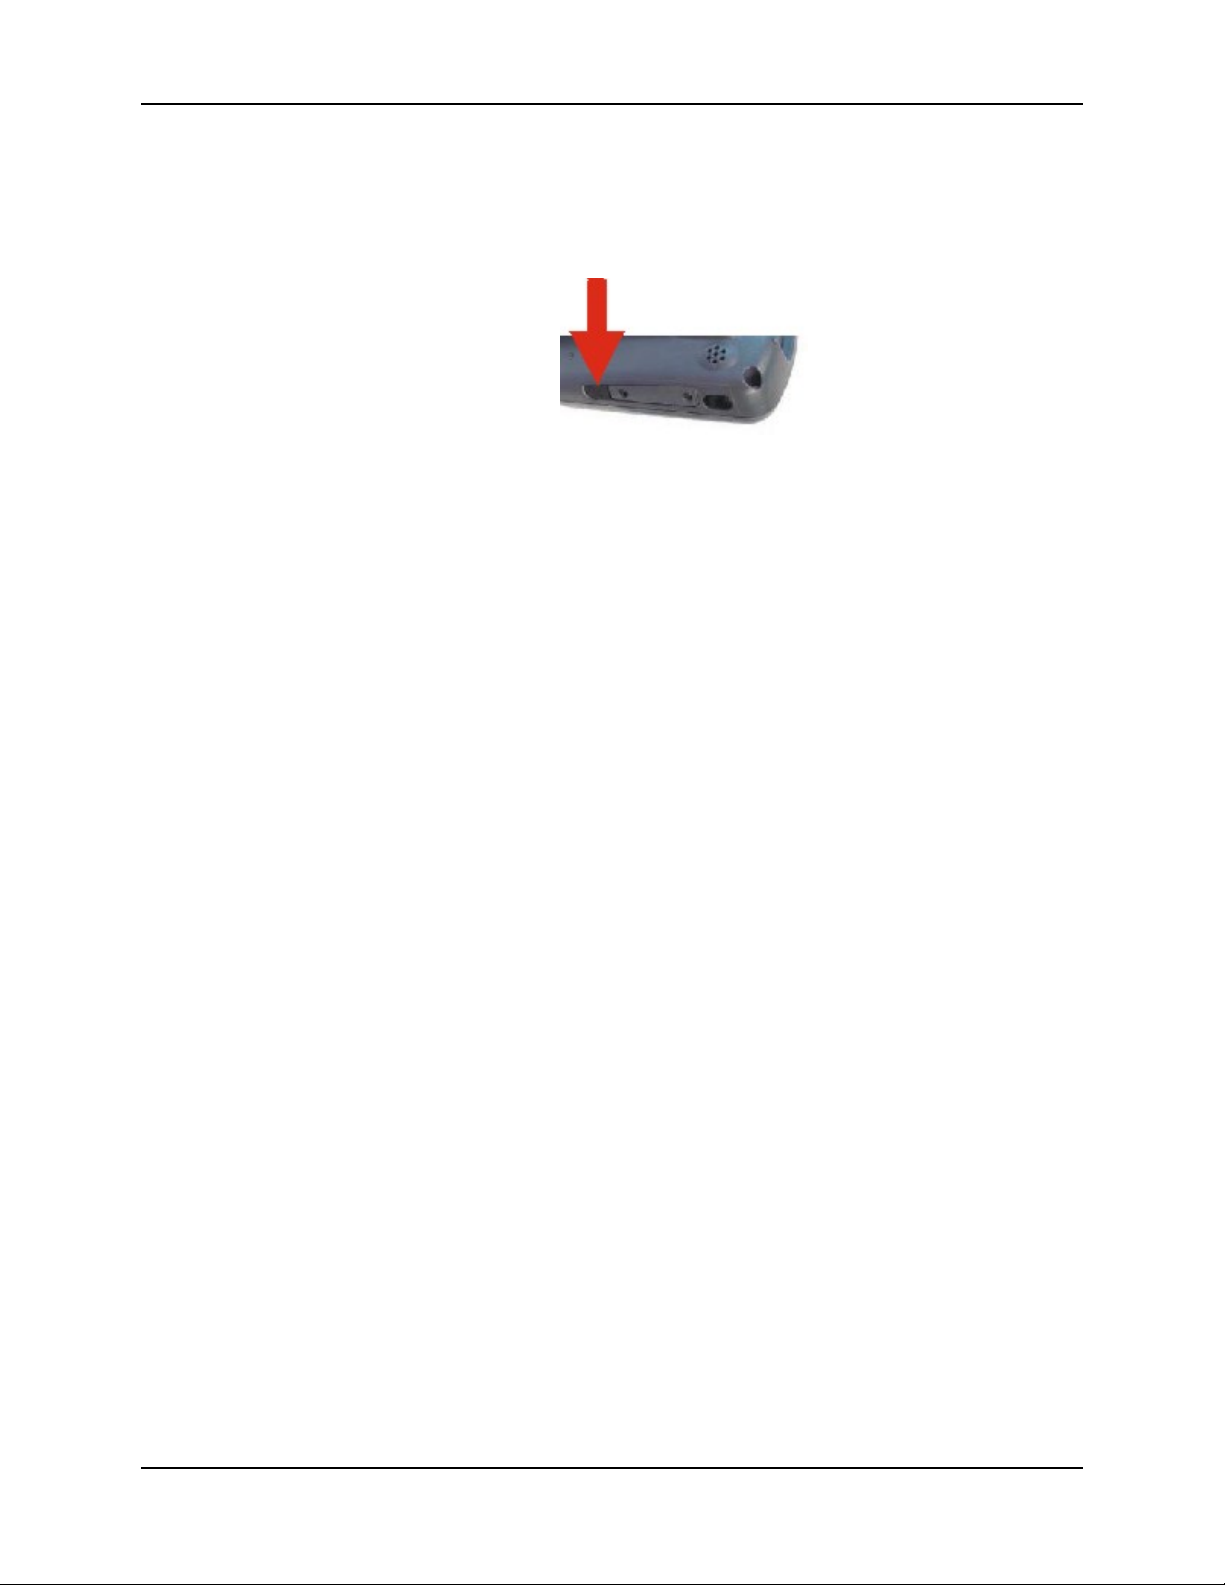
The MX6 PPC audio jack is located on the side of the unit next to the scan aperture and the SDA
door (Secure Digital Access). The internal speaker is disabled when the audio jack is connected.
Figure 2-5 Audio Jack Location
Lift up the protective audio jack cover and insert the barrel end of the connector into the MX6
PPC audio jack and push in firmly.
Note: The audio option draws power from the main battery pack.
Set The Audio Speaker Volume
Note: An application may override the control of the speaker volume. Turning off sounds saves
power and prolongs battery life.
The audio volume can be adjusted to a comfortable level for the user. The MX6 PPC has an
internal speaker and a jack for an external headset.
The volume is adjusted using Start | Settings | Personal tab | Sounds & Notifications icon then
select the Notifications tab.
Change the setting and tap OK to save the change. You can also select / deselect sounds for key
clicks and screen taps and whether each is loud or soft.
Sounds specific to primary events are selected using the options on the Sounds tab.
Reminder/Notifications tones are selected using the options on the
Reminders/Notifications tab.
As the volume scrollbar is moved between Loud and Silent, the computer beeps each time the
volume increases or decreases in decibel range.
Tap the Volume icon in the navigation bar to adjust system sound volume.
MX6 PPC Reference Guide E-EQ-MX6PCRG-C-ARC
Page 33
Adjust the Handstrap 25
Adjust the Handstrap
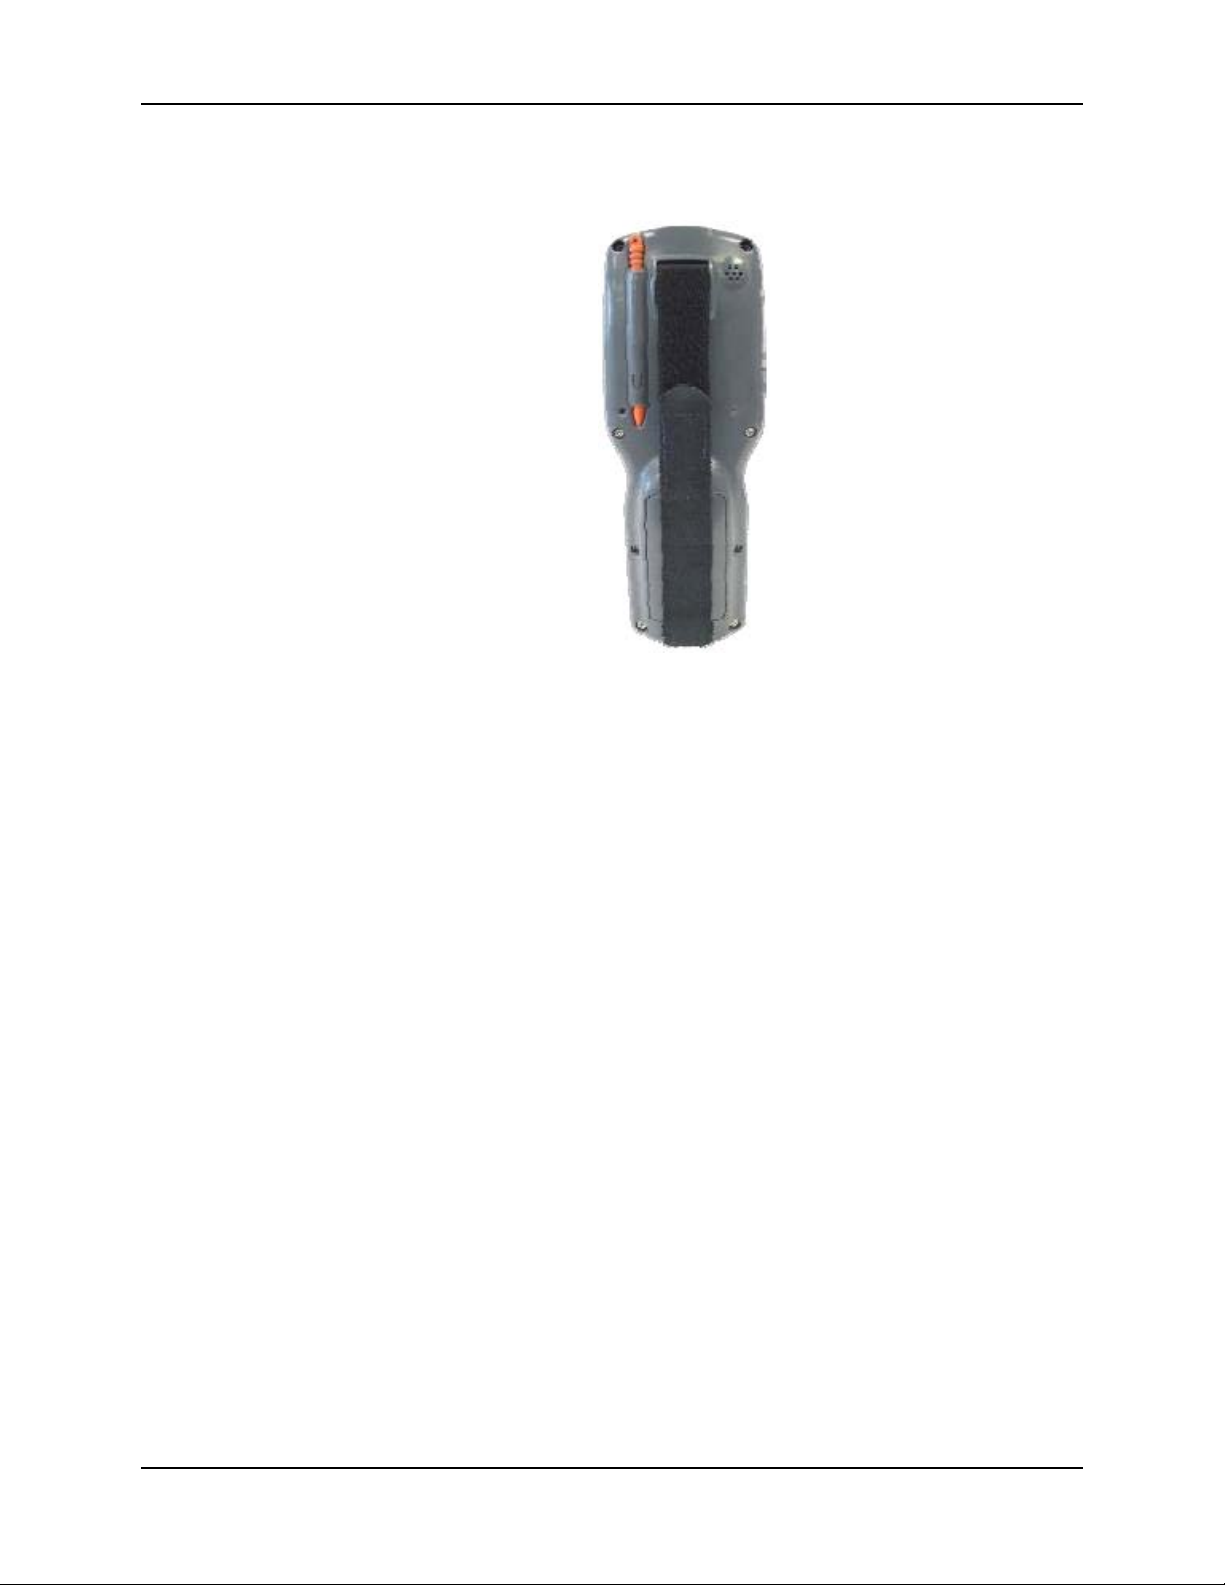
Figure 2-6 Handstrap
The MX6 PPC has an integrated elastic handstrap that provides a comfortable, secure grip on the
unit. It is attached to the MX6 PPC with a clip on the bottom panel. The handstrap should be
disconnected from the bottom clip when the main battery is to be removed or replaced. The
handstrap can be removed from the MX6 PPC if desired.
Prior to adjusting the handstrap, pull down on the handstrap and insert the bottom assembly into
the slot at the bottom of the MX6 PPC. Insure that both ends of the bottom assembly are secure.
Open the closed loop fastener tabs and adjust the handstrap for a comfortable, secure fit. Press the
closed loop fastener ends together.
E-EQ-MX6PCRG-C-ARC MX6 PPC Reference Guide
Page 34

26 Enter Data
Enter Data
You can enter data into the MX6 PPC through several different methods. The Scanner aperture
provides barcode data entry, the RS-232 or the IR port are used to input/output data, and the
keypad provides manual entry.
MX6 PPC's with a touch screen and Microsoft Pocket PC software can use a stylus to input data,
the COM ports and/or the keypad. A virtual keyboard is available in applications that expect
keyed input.
Keypad Entry
The keypad is used to manually input data that is not collected otherwise. Almost any function
that a full sized computer keyboard can provide is duplicated on the keypad but it may take a few
more keystrokes to accomplish a keyed task.
Almost every key has two or three different functions. The primary alpha or numeric character is
printed on the key.
nd
The Red or Blue keys are pressed when you want to use a 2
you press a Blue or Red key (the 2
key. The specific 2
nd
character is printed above the corresponding key in either Red or Blue.
nd
key), then press the key that has the desired second-function
key function. For example, when
Please refer to “Appendix A - Key Maps” for instruction on the specific keypresses to access all
keypad functions.
Stylus Data Entry
Note: Always use the point of the stylus for tapping or making strokes on the display. Never use
The stylus performs the same function as the mouse that is used to point to and click elements on
a desk top computer. The stylus is used in the same manner as a mouse – single tap or double tap
to select menu options, drag the stylus across text to select, hold the stylus down to activate slider
bars, etcetera.
Hold the stylus as if it were a pen or pencil. Touch an element on the screen with the tip of the
stylus then remove the stylus from the screen. The touch screen responds to an actuation force
(touch) of 4 oz. (or greater) of pressure.
The stylus can be used in conjunction with the keyboard, integrated imager and an input/output
device connected to one of the MX6 PPC's serial ports.
• Touch the stylus to the field of the data entry form to receive the next data feed.
• The cursor begins to flash in the field.
• The unit is ready to accept data from either the physical keypad, virtual keyboard, or
an actual pen, pencil or sharp object to write on the touch screen.
integrated imager.
MX6 PPC Reference Guide E-EQ-MX6PCRG-C-ARC
Page 35
The Integrated Imager 27
The Integrated Imager
Use the MX6 PPC imager to scan, decode, and store information from barcodes. The barcoded
data must be “read” into an application or field or the imaged data will be lost.
Do not pour, spray, or spill any liquid on the imager. The Integrated Imager contains the
circuitry, scanning motor and imager. Handle with appropriate care.
Read all cautions, warnings and labels before using the imager.
Preparation
Note: If you are NOT using LXE’s RFTerm application to manage barcode scanning, select
Start | Programs | HHP Utils | ScanWedge before scanning a barcode.
When the barcode reader program is active, an icon resembling a barcode is located in the
Toolbar.
Using the Imager
To use the imager, aim the top of the MX6 PPC at a barcode and press the Scan key or press the
trigger on the handle. The imager scans as long as the key or the trigger is held down before the
10 second timeout occurs.
• Scan LED is on the right. When illuminated red, the MX6 PPC is scanning a barcode.
• Decode LED is on the left When illuminated green, the MX6 PPC scan algorithm accepts
The imager turns off automatically when a barcode is read successfully.
Distance from Label
Large barcodes can be scanned at the maximum distance. Hold the imager closer to small
barcodes (or with bars that are very close together).
Successful Scan
When the scan is successful, the Scan LED turns green, then switches off, and the currently
running application may produce a distinctive audible tone.
Figure 2-7 Scan and Decode LEDs
the barcode as a “good scan”.
E-EQ-MX6PCRG-C-ARC MX6 PPC Reference Guide
Page 36
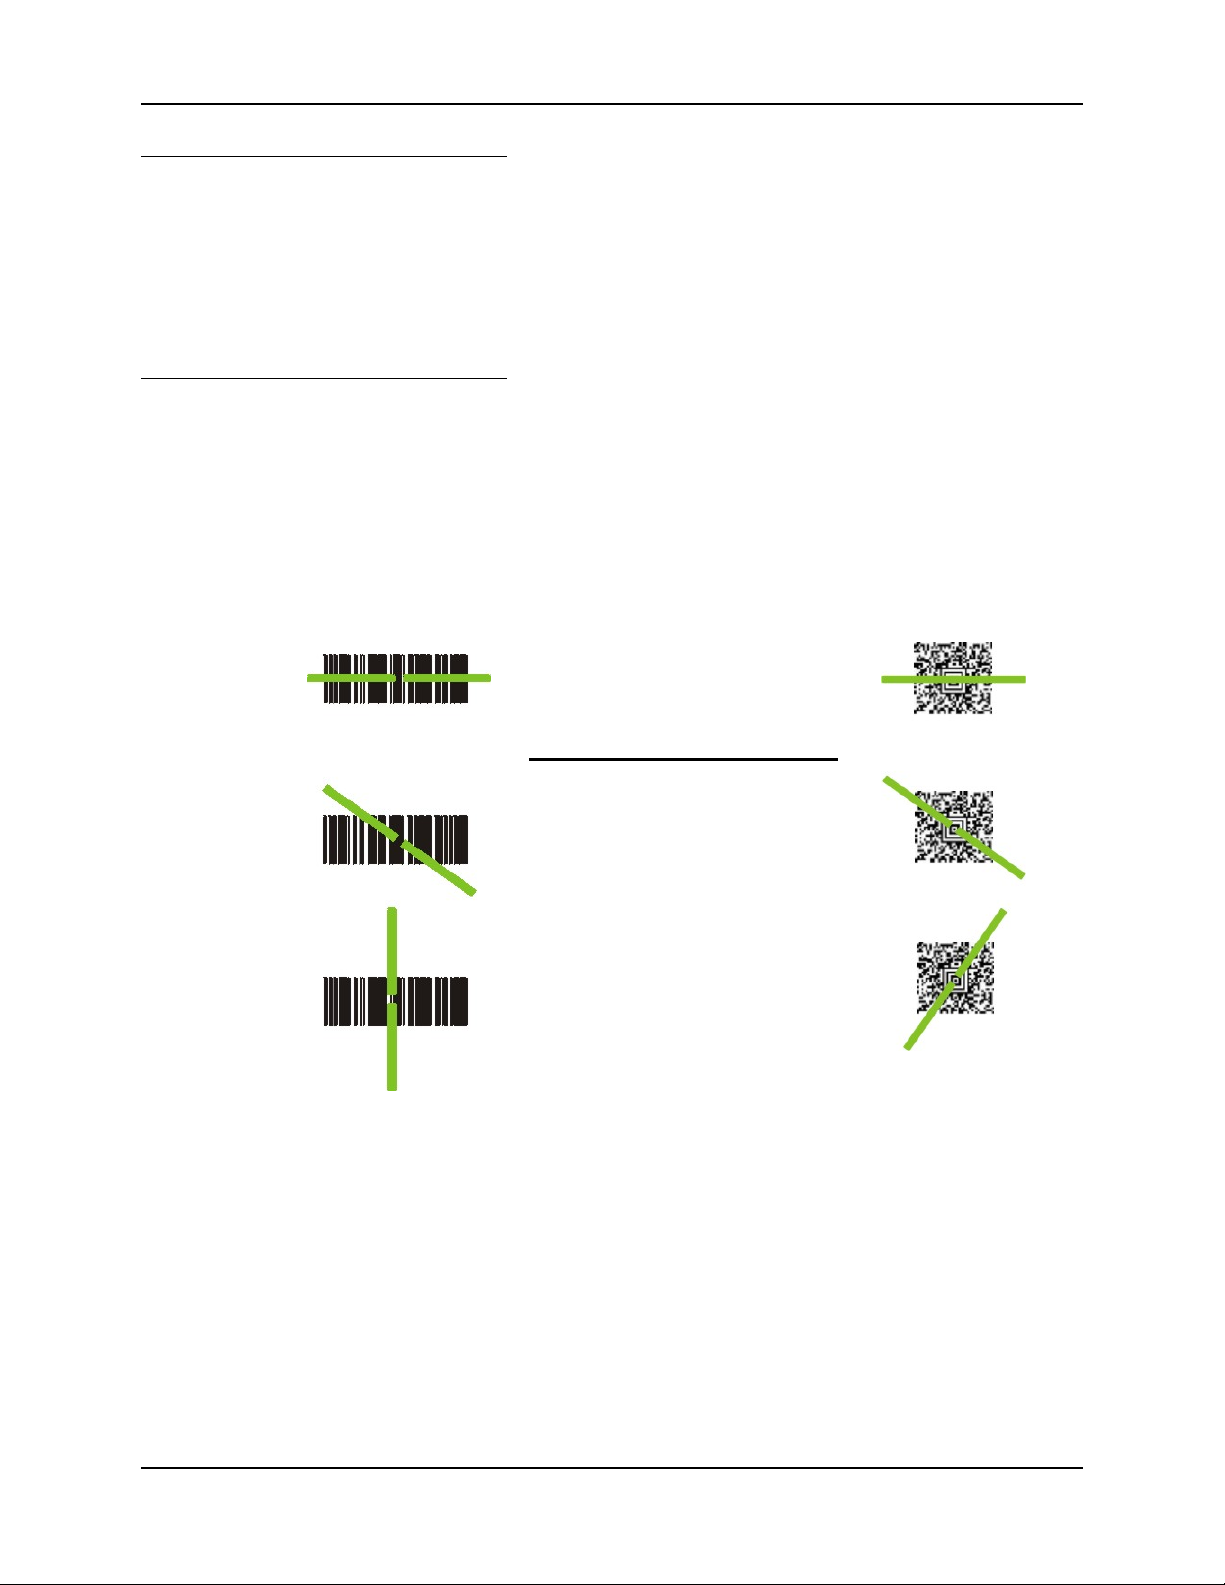
28 The Integrated Imager
Unsuccessful Scan
When the scan is unsuccessful, the Scan LED remains red until the 10 second timeout occurs or
the Scan key/trigger is released. The currently running application may produce distinctive
audible tones. Check the following:
• Check the barcode for marks or physical damage e.g. ripped label, missing section, etc.
• Try scanning test symbols of the same code type at different distances and angles.
• Is the imager aperture unscratched and unsoiled?
Aiming the Barcode Imager
Aim the imager away from you, direct it at the barcode and press the trigger or button (as
applicable) to scan. The Scan LED (scan indicators are located above the display) turns red to
indicate the imager is on.
Adjust the aim so that the green aiming beam is centered on the barcode.
The red light emitted from the imager must cover every bar and space on the barcode.
When scanning a 2D Matrix barcode, the scan beam must cover the entire barcode.
Linear Barcode
Correct Scan Angle
Incorrect Scan Angles
Figure 2-8 Scan Beam
Make sure the barcode is within the scanning range.
2D Matrix Barcode
The range of a imager is dependent upon many outside influences including size of the barcode,
quality of the barcode printing, material the barcode is printed on, and angle of the imager beam
relative to the barcode label. Any of these factors may result in having to re-scan the label from a
different distance or angle.
MX6 PPC Reference Guide E-EQ-MX6PCRG-C-ARC
Page 37
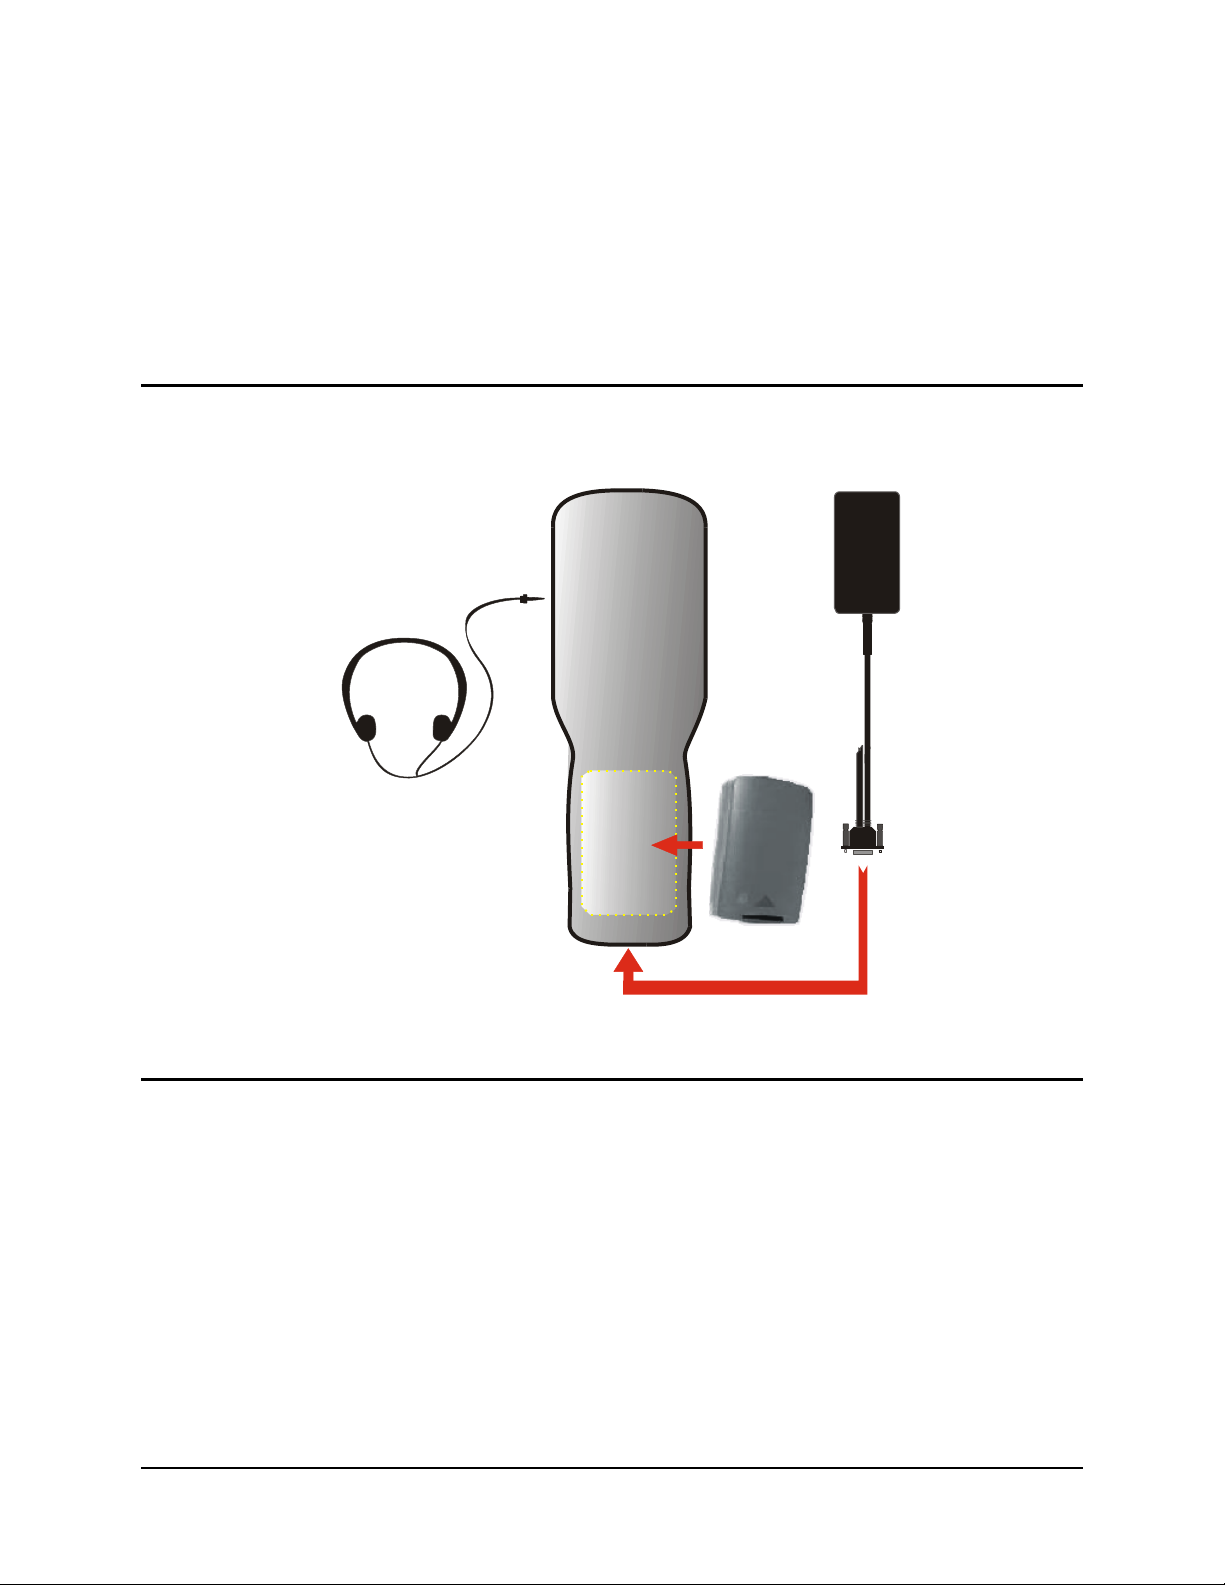
Chapter 3 Physical Description and Layout
Hardware Configuration
System Hardware
The MX6 PPC hardware configuration is shown in the following figure.
Figure 3-1 System Hardware
Central Processing Unit
The LXE MX6 PPC CPU is a Intel Xscale PXA255 Processor running at 400 MHz. The operating
system is Microsoft Pocket PC 2002 resident in flash memory.
E-EQ-MX6PCRG-C-ARC MX6 PPC Reference Guide
Page 38

30 Hardware Configuration
Core Logic
The MX6 PPC supports the following I/O components of the core logic:
• One user accessible Secure Digital (SD) memory expansion card slot.
• One InfraRed port.
• One serial/USB port.
• One Digitizer Input port (Touch screen).
System Memory
On-board 64 MB RAM and 32MB non-volatile Flash contain the Pocket PC operating system,
hardware-specific OEM Adaptation Layer, device drivers, standard Pocket PC applications and
utilities. The operating system supports MFC, ATL and Visual Basic programming languages,
TCP/IP and PPP network protocols. The Flash is configured as the primary boot device.
The computer has one Secure Digital card (SD) slot. The MX6 PPC supports and auto detects up
to 256MB of memory. SD cards are neither installed nor supported by LXE.
Video Subsystem
The touch screen is a 3/8” (9.65cm) ¼ VGA 320 by 240 pixel TFT Reflective Active Color LCD
or greyscale monochrome. Backlighting is available for the display (and keypad), and can be
turned on and off with a keypress. The turn-off timing is configured through Start | Settings |
System | Backlight icon. The display controller supports Microsoft Pocket PC graphics modes.
The touch screen allows mouse functions (pointing and tapping on the display or Signature
Capture) using an LXE approved stylus.
The color display is optimized for outdoor use but may also be used indoors. The color display
has a CCFL (Cold-Cathode Fluorescent Lighting) frontlight.
The transflective color display appears to have a greenish hue when the unit is in Suspend.
Power Supply
The LXE MX6 PPC uses two batteries for operation.
• A replaceable Lithium-Ion (Li-Ion) 2000mAh battery pack. The battery pack recharges
while in the MX6 PPC with the computer in a powered docking cradle. The main battery
pack can be removed from the MX6 PPC and inserted in a single charger or four-bay
multi-charger.
• An internal 450 mAh Lithium (Li) backup battery. The backup battery is recharged
directly by the main battery when it is installed. Full charging of the backup battery will
take seven hours. The recharging of the backup battery is automatically controlled by the
MX6 PPC. The backup battery must be replaced by qualified service personnel.
Audio Interface
An interface is available for headset/microphone operation. When the headset is plugged into the
port, the main speaker is disabled.
MX6 PPC Reference Guide E-EQ-MX6PCRG-C-ARC
Page 39
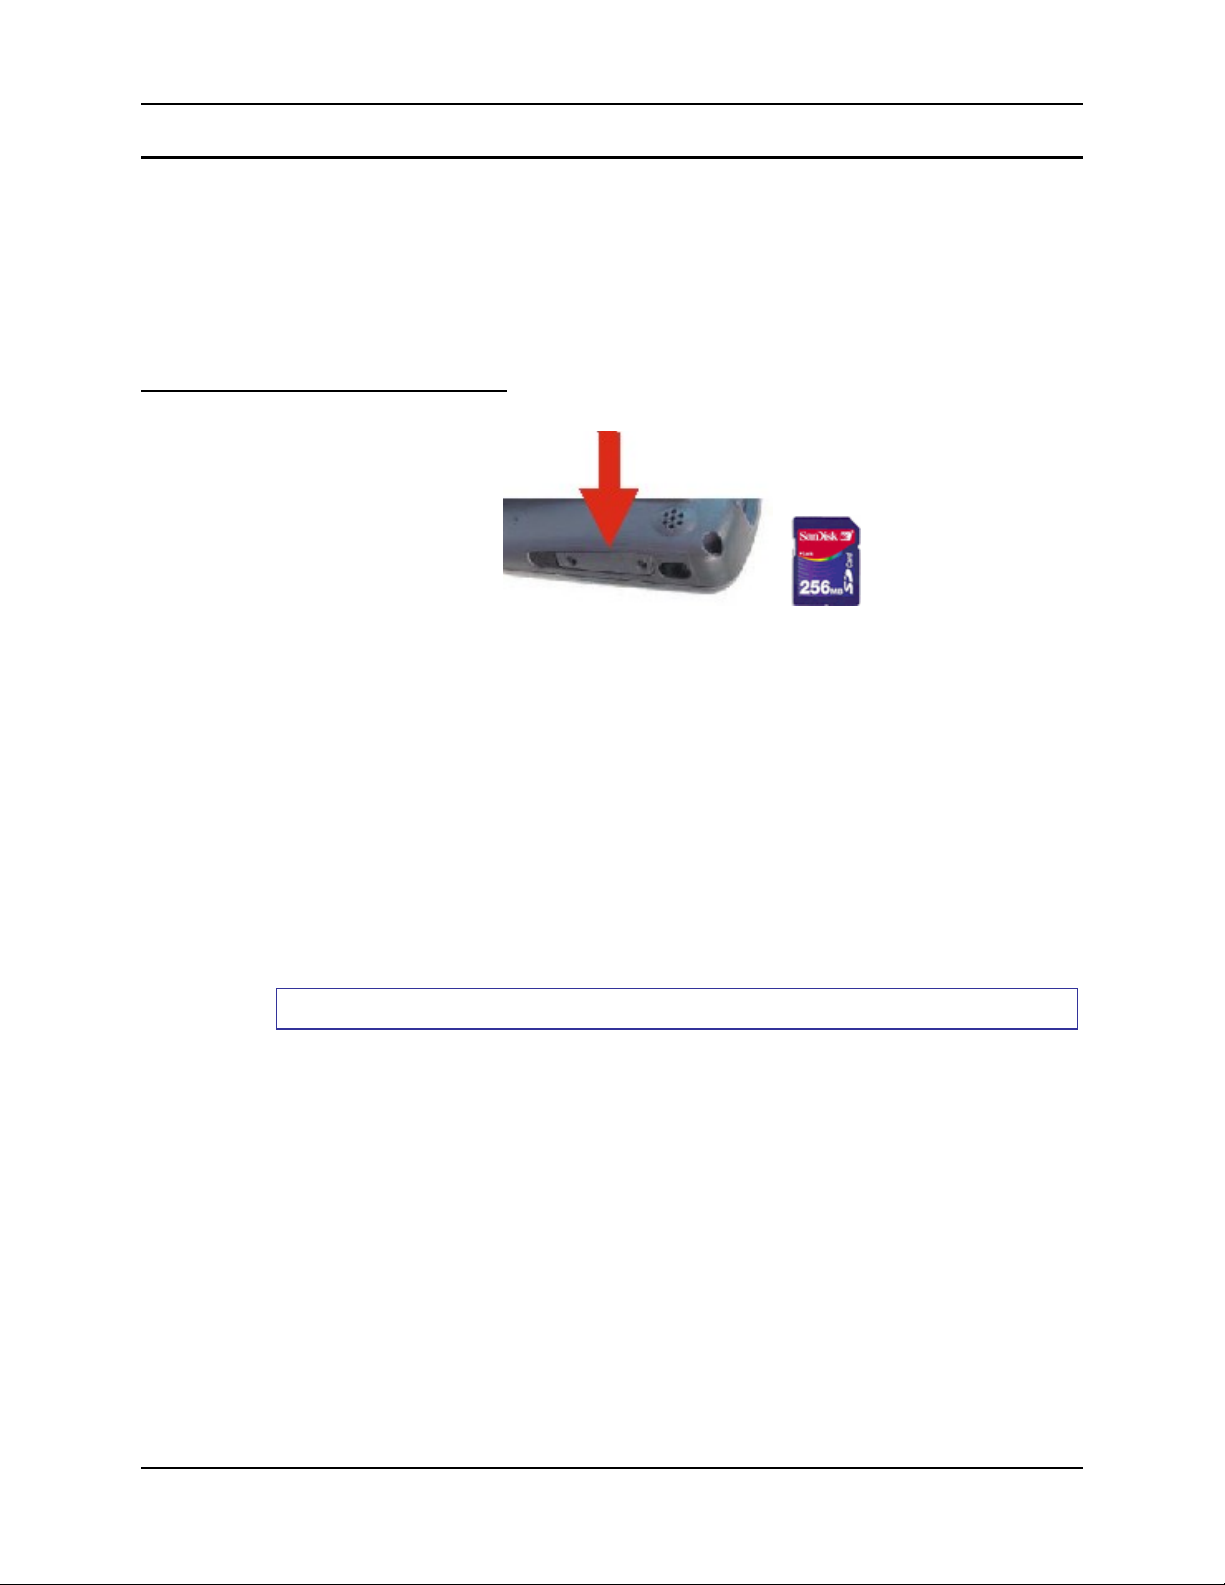
Hardware Configuration 31
Secure Digital Cards
Note: When removing or installing Secure Digital (SD) cards, protect the MX6 PPC internal
components from electrostatic discharge.
SD memory interface cards are used for expanded data storage. SD cards are neither installed nor
supported by LXE.
Note: LXE recommends purchasing preformatted SD cards.
SD Installation / Removal
Figure 3-2 Secure Digital Memory Interface Card Location
Equipment required: A phillips screwdriver (not supplied by LXE)
• LXE recommends that installation/removal of cards be performed on a clean, well-lit
surface.
• Anti-static protection is required when installing/removing cards. (Not supplied by LXE)
• If you anticipate keeping a card out of the MX6 PPC for a long period of time place it in
a static-free storage container. Store in an area that is protected from dirt, moisture, and
electrostatic contact.
Important The SD card is approximately the size of a postage stamp (32mm x
24mm). Make sure the work area is clean and uncluttered before
removing the card from it’s packaging.
Installation
1. Turn the MX6 PPC off and remove the main battery pack.
2. Using a screwdriver, loosen the SD Access Door on the left side of the MX6 PPC.
3. Remove the rectangular rubber protective seal over the SD card opening.
4. Set the door, protective seal and the screws aside.
5. Slide the Card, connector side first, into the slot until it seats. Use caution not to pull or snag
any cables that may be in the vicinity of the card.
6. If the card is difficult to seat in the slot, remove the card, turn it around and re-install.
7. Place the access door back in the opening and secure with the screws.
8. Replace the main battery pack and perform a Warm Reset.
E-EQ-MX6PCRG-C-ARC MX6 PPC Reference Guide
Page 40
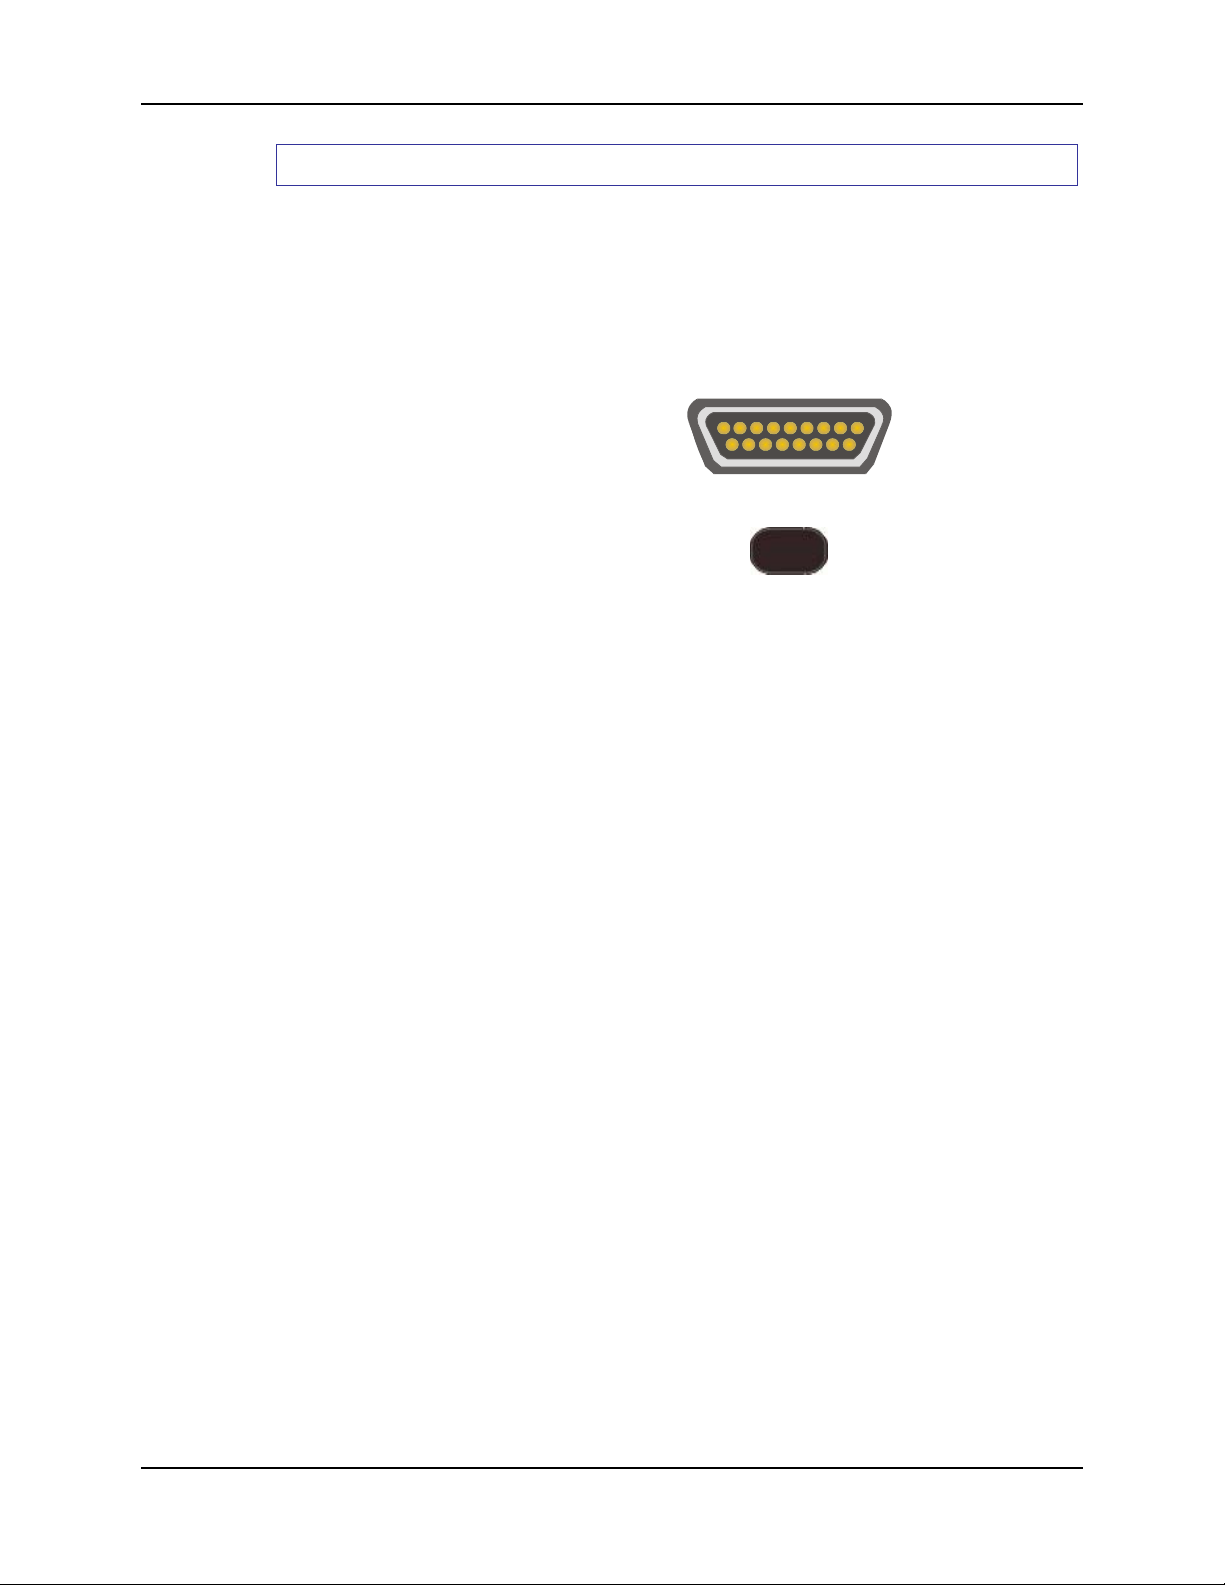
32 COM Ports
Removal
Grasp the top of the Card and pull it straight upward to remove.
Use caution not to pull or snag any cables that may be in the vicinity of the card.
COM Ports
The MX6 PPC supports two COM port options.
RS-232 Port, USB
and Power Connection
(COM 1)
IR Port (COM 3)
IrDA Port (COM 6)
Figure 3-3 COM Ports
COM 1 port is always the 17-pin port on the base of the MX6 PPC. COM 1 port accepts RS-232,
USB and AC power connectors.
The RS-232 port on the docking cradle is “connected’ to the MX6 PPC when the MX6 PPC is in
the docking cradle. The docking cradle must be powered by an alternate AC or DC power source
to enable communication.
The COM 3 / 6 port is always the IR port on the left side of the MX6 PPC. It is accessed as
COM3 for Raw Infrared communication and as COM 6 for Infrared communication using IrDA
protocol.
To use COM 3 for Raw IR communication, select Start | Settings | Connections | Beam and
uncheck “Receive all incoming beams …”. This action disables IrDA protocol.
MX6 PPC Reference Guide E-EQ-MX6PCRG-C-ARC
Page 41
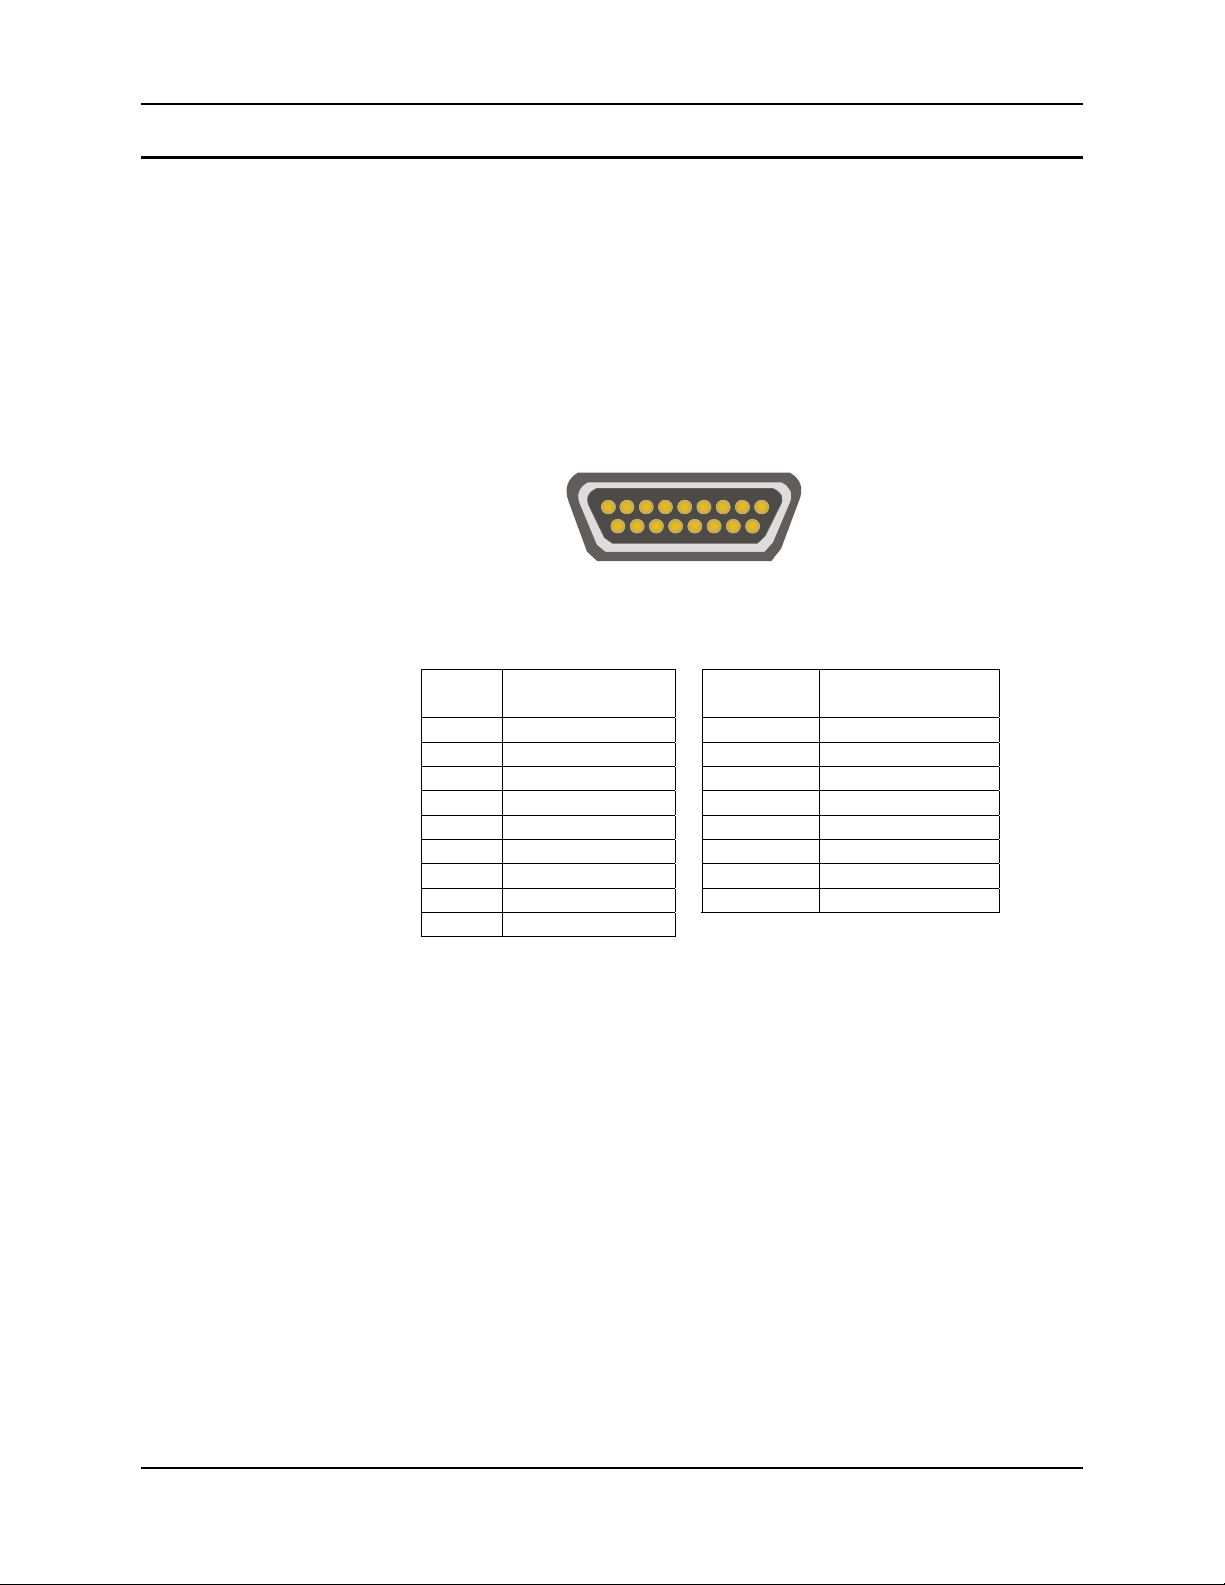
COM Ports 33
1
9
RS-232 Serial Port
Serial connection is made through an RS-232 Port designated as COM port 1. The connector is a
custom, industrial 17-pin male connector.
When seated in powered docking cradles, the MX6 PPC receives power through this connection
and the main battery is charged. If the docking cradle is connected to a desktop / laptop computer,
this connector also transmits data.
The connection to the peripheral can be RS-232 or USB. The maximum RS-232 speed is 115kbps
with seven baud rate settings. USB communication runs at 12 Mbps. This port also provides
power out (to peripheral devices with special cable) at 500mA at 5V.
10
Figure 3-4 MX6 PPC RS-232 Port
PIN SIGNAL PIN SIGNAL
1 + USB 10 - USB
2 PWR 11 USB DET
3 N / C 12 RI
4 N / C 13 DSR
5 N / C 14 RXD
6 N / C 15 RTS
7 GND 16 TXD
8 5V OUT 17 CTS
9 DTR
17
E-EQ-MX6PCRG-C-ARC MX6 PPC Reference Guide
Page 42
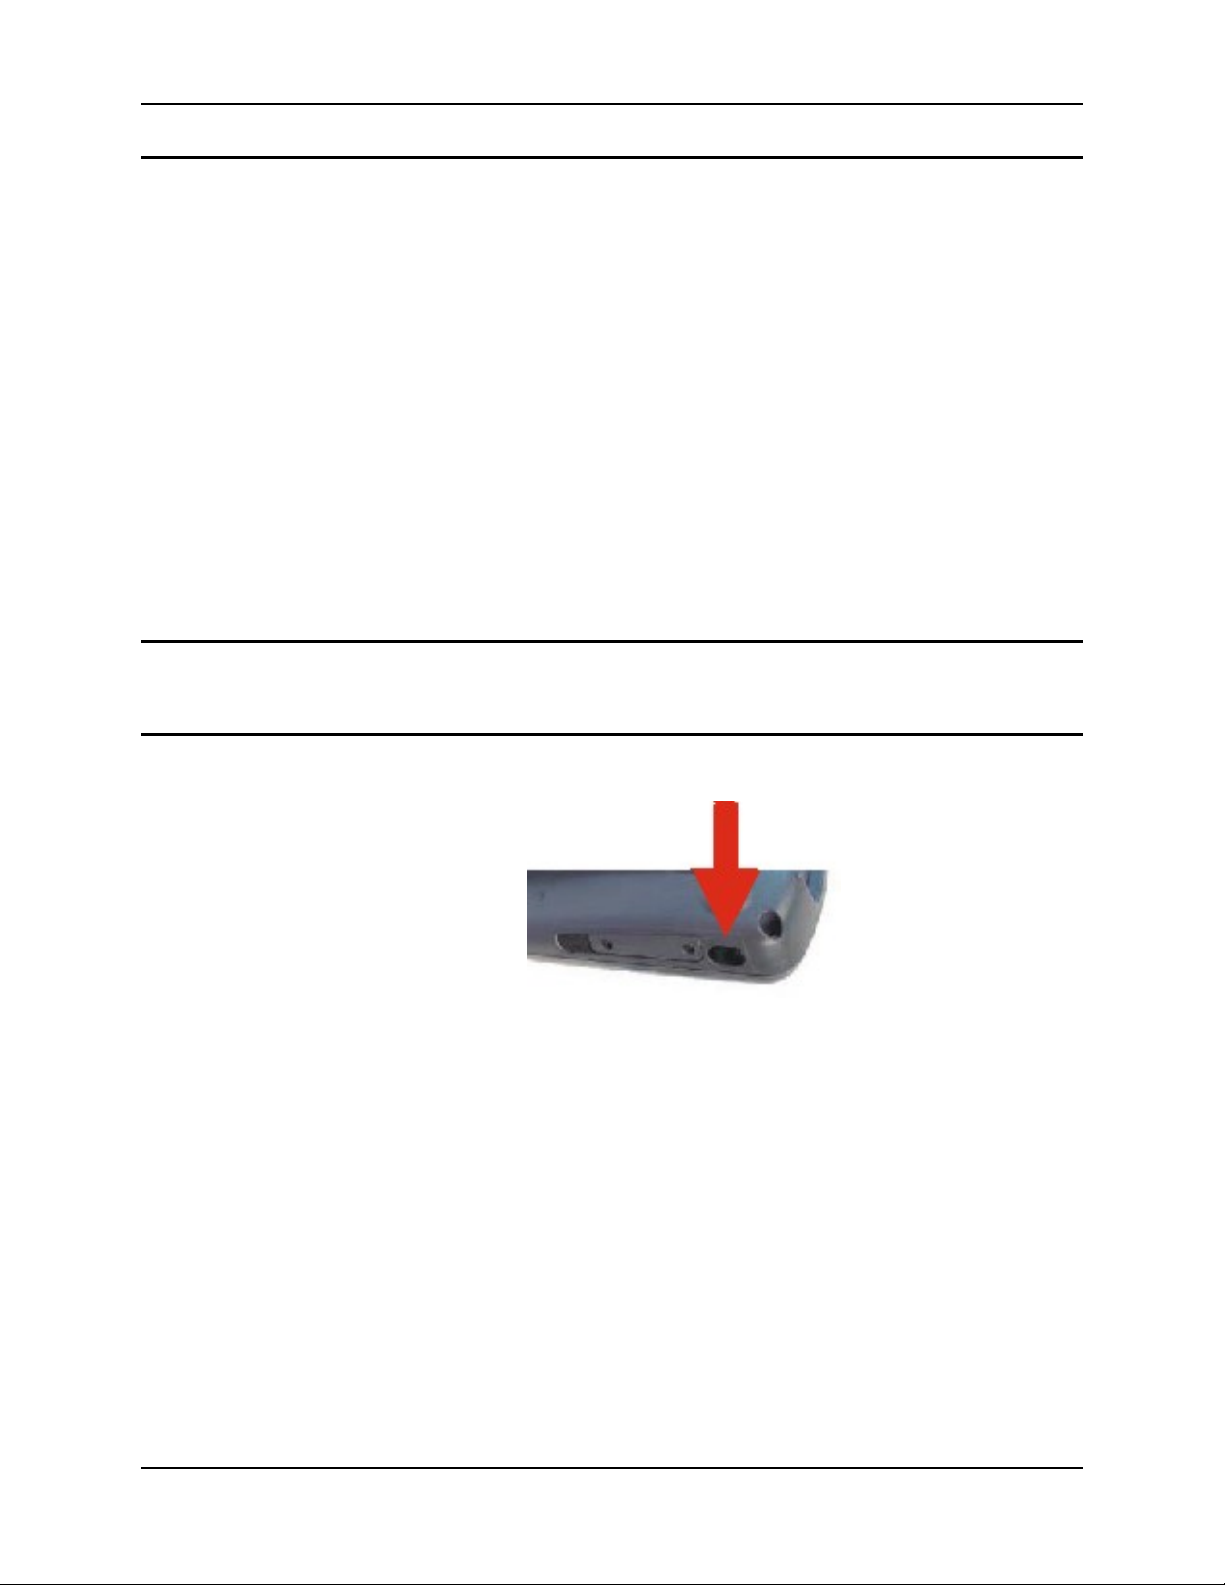
34 COM Ports
Integrated Imaging Port
The MX6 PPC Imager can be used to collect barcode data from any nearby compatible barcode
label. Depending on the size of the barcode, size of bars and spacing and quality of the barcode,
the imager reads barcodes between 3" and 30".
The imager reads UPC/EAN, Code 39, Code 93, I 2 of 5, Code 128, Codabar, Aztec, Code 11,
Code 49, Data Matrix, MaxiCode, MicroPDF, PDF417, QR Code and RSS Code symbologies.
Please contact your LXE representative for availability of barcode symbologies not included in
the previous list.
The integrated imager scans only when the Scan button is pressed or the scan trigger is pressed, if
installed. The Scan LED illuminates during any integrated imager activation.
A tethered scanner connected to the MX6 PPC is not supported by LXE.
Look on the label on the back of the MX6 PPC. The type of installed scan engine should be
clearly labeled and may be one of the following:
• LR
• ALR
• 2D, Integrated Area Imaging
Tethered Scanners
IR Port
LXE does not support tethered scanners connected to the MX6 PPC RS-232 port.
Figure 3-5 IR Port Location
The InfraRed (IR) port provides a means of transferring information to a device with a similar
port and the proper software. The IR port can be used to communicate with printers or a host
computer with the use of an adapter.
The IR Port is specified as COM 3 and as COM 6 (depending on the type of IrDA
communication) and is a bi-directional half-duplex infrared port. It supports the Slow IrDA
(Infrared Data Access) PHY Layer standard that allows communication speeds up to 115k baud.
To use COM 3 for Raw IR communication, select Start | Settings | Connections | Beam and
uncheck “Receive all incoming beams …”. This action disables IrDA protocol.
When sending data through the IR port to another MX6 PPC's IR port, make sure both units are in
close proximity to each other. The IR operating envelope has a distance range of 2 cm (.79 inches)
to 15 centimeters (6 inches) with a viewing angle of 30 degrees.
MX6 PPC Reference Guide E-EQ-MX6PCRG-C-ARC
Page 43

Reset or Reboot 35
Reset or Reboot
Soft Reset
Hard Reset
CAUTION
A soft reset closes all applications, clears the working RAM, and preserves the file system.
To initialize a soft reset press and hold the Control <CTRL> and Shift <SFT> keys for
approximately 10 seconds.
Release the keys and the MX6 resets. The red and green LEDs blink for approximately three
seconds.
After a Soft Reset
The Start screen appears. The custom settings in the registry are persistent. An installed RF
Network program connects to the wired/wireless network system.
A hard reset is a complete reset in which all applications are forcibly closed and working RAM
and files are cleared.
To perform a hard reset, press and hold the Control <CTRL> key and the Escape <ESC> key for
approximately 3 seconds.
LXE recommends that you always attempt a Soft Reset before initiating a Hard
Reset. Once you initiate a hard reset, all applications are forcibly closed and
working RAM and files are cleared. It is a good idea to store important data in
the MX6 PPC’s Flash memory for this reason.
Note: The Start Menu will repeatedly appear and disappear and the keys will click repeatedly.
This is intended to alert the user that a drastic action is about to occur. If the user
presses and holds the <ESC> key and then presses the <CTRL> key, the flashing and
clicking do not occur.
The red and green LEDs blink for approximately three seconds.
When the MX6 reboots, it will need to be configured once again. See the section titled “Quick
Start”.
Caution: A hard reset erases all the data stored in RAM memory and all RAM installed
applications.
See the section titled “The IPSM Folder”for a list of files that are saved over a hard reset.
Troubleshooting – Cold Boot/Hard Reset
After a Hard Reset (sometimes called Cold Boot) any programs that were not saved to the
IPSM folder are lost and need to be reinstalled.
LXE recommends that you always attempt a Soft Reset before initiating a Hard Reset. Once you
initiate a hard reset, all applications are forcibly closed and working RAM and files are cleared. It
is a good idea to store important data in Flash memory for this reason.
• The sequence of steps in “Getting Started” must be completed when the MX6 returns from
a Hard Reset and when a new OS version is loaded.
E-EQ-MX6PCRG-C-ARC MX6 PPC Reference Guide
Page 44

36 Reset or Reboot
• The radio, flash card, virtual keyboard and imager parameters may also need to be reset
after a hard reset.
• As soon as the Certificate Authority (CA) certificate and server authentication certificates
are downloaded to the expected location in the MX6, place a copy of the certificates in the
IPSM folder. The certificates must be re-installed using CertAdd each time a hard reset
occurs. When the current date has been set and the certificates installed, soft reset the MX6
to authenticate the supplicant (MX6 radio).
See Also: “Accessing Files in Flash Memory”.
Upgrading the Mobile Device OS
To ensure that changes you make that involve upgrading drivers, adding CAB files or service
packs or a new kernel are saved, follow the procedure below:
1. Delete REGBACKUP.HHP from the \IPSM folder.
2. Perform the appropriate Before-you-Proceed step in the table below:
Overwriting a CAB File
Loading a new UTILS File
Installing a Service Pack
Installing a new KERNEL
3. Install software.
4. Hard reset (cold boot) the mobile device to clear the registry.
5. Configure the mobile device.
• See “Getting Started”.
• The radio, flash card, virtual keyboard and scanner parameters need to be reconfigured
after a hard reset.
If you are overwriting a CAB file with a new version,
rename the existing CAB file or delete it.
If you are going to be loading a new UTILS_XX.CAB file
delete AUTOINSTALL.EXE, AUTORUN.INI, and
AUTORUN.EXE from the \IPSM directory. Failure to do
this may result in an AUTORUN.INI that does not match
the installed kernel.
If you are installing a service pack delete the older service
packs.
If you are installing an update file containing a new kernel,
delete the entire IPSM\AUTOINSTALL directory before
proceeding.
• Any programs that were not saved to the IPSM folder need to be reinstalled.
6. Soft reset the mobile device afterwards.
7. Verify the changes.
8. Tap Start | HHP Utils | RegBackup to permanently save the settings.
MX6 PPC Reference Guide E-EQ-MX6PCRG-C-ARC
Page 45
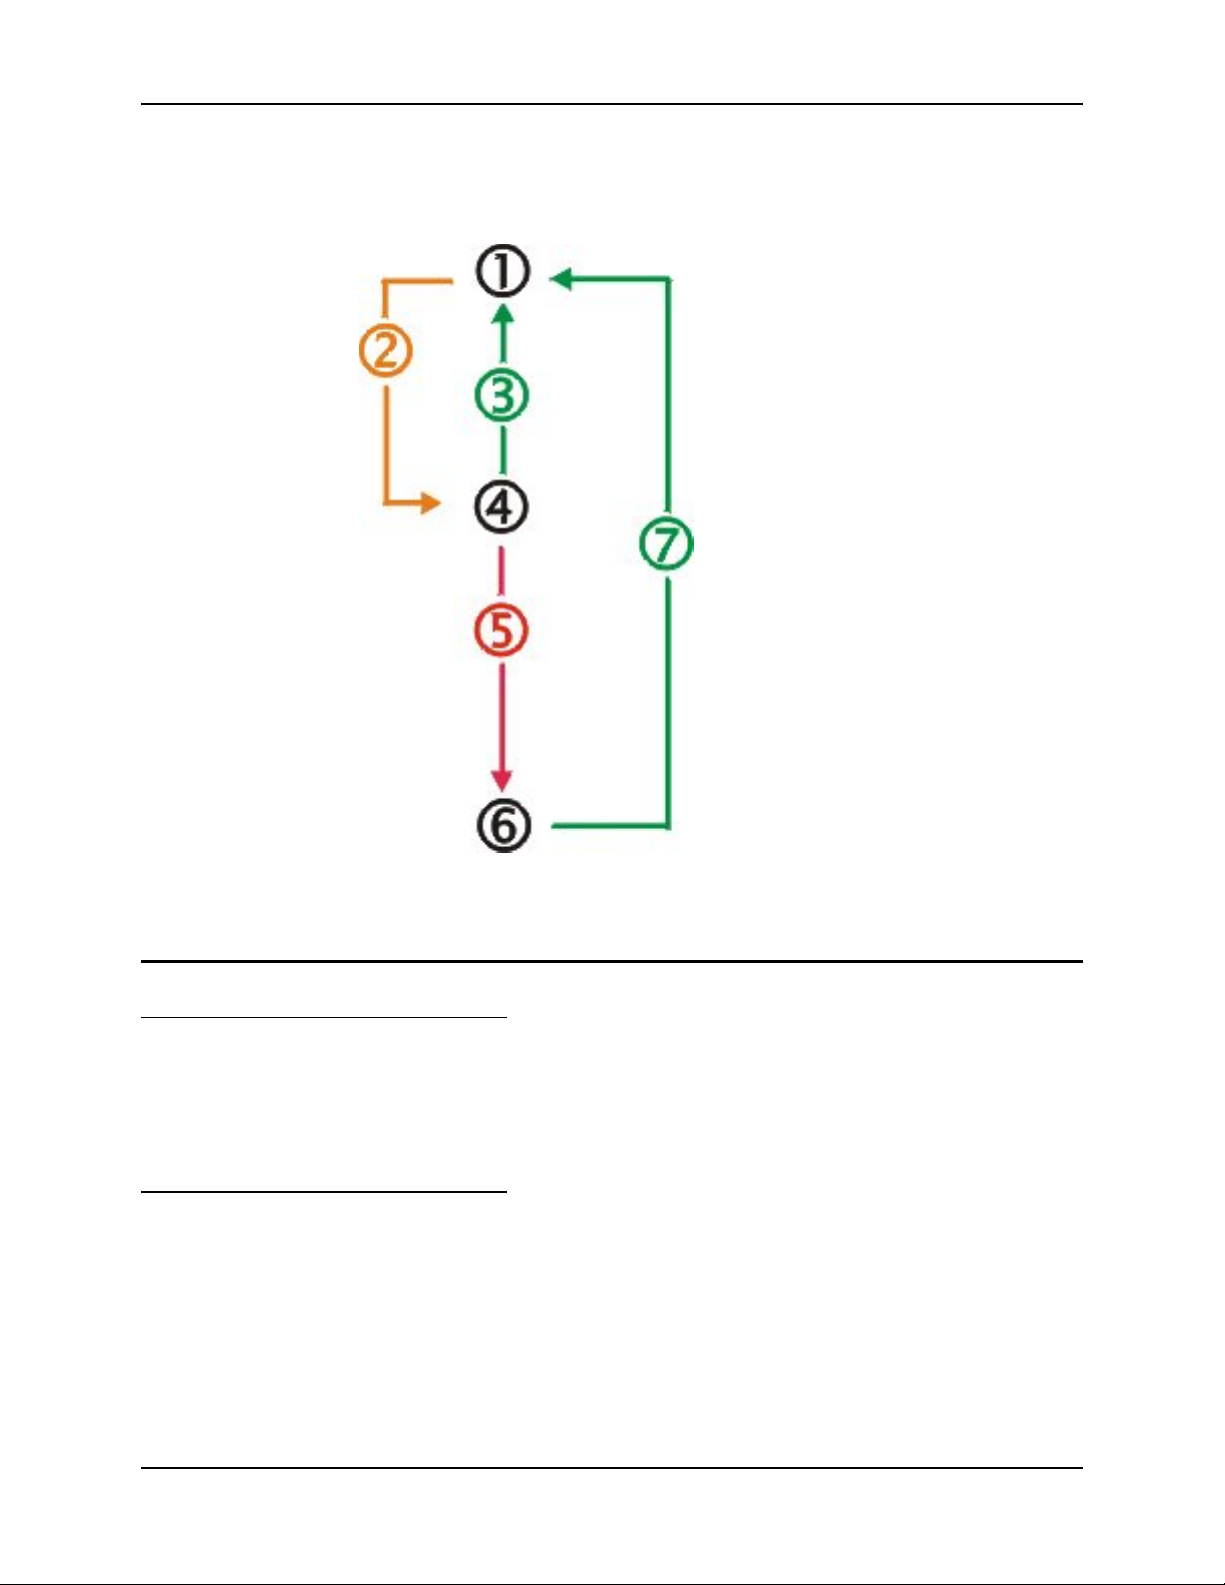
Power Modes 37
Power Modes
1. On
2. Tap Power key or the power
has failed
3. Power key, connect to AC
power supply, put into powered
docking cradle, Scan key tap or
trigger press.
4. Suspend
5. Backup battery and main
battery depleted
On Mode
The Display
The MX6 PPC
New Unit
6. Off
7. Power On
Figure 3-6 Power Modes – On, Suspend and Off
When the display is On:
• the keyboard, touchscreen and all peripherals function normally
• the display backlight is on until the Backlight timer expires
• when the main battery is hot-swapped, the display is turned Off.
After a new MX6 PPC has been received, a charged main battery inserted, and the Power key
tapped, the MX6 PPC is always On until both batteries are drained completely of power.
E-EQ-MX6PCRG-C-ARC MX6 PPC Reference Guide
Page 46

38 Power Modes
Both Batteries Dead
When the main battery and backup battery are drained completely, the unit is in the Off mode.
The unit transitions from the Off mode to the On mode when a charged main battery is inserted,
the MX6 PPC is placed in a powered docking cradle, or external power is applied to the MX6
PPC. The unit performs a Hard Reset upon receiving power from a charged main battery pack.
Main Battery Hot-swapped
The MX6 PPC automatically enters Suspend mode when the main battery is removed while the
backup battery has adequate power to maintain the MX6 PPC operating system. To wake the unit
after the main battery has been replaced, press the Power key or the Scan key.
Suspend Mode
The Suspend mode is entered when the unit is inactive for a predetermined period of time or the
user taps the Power key. The MX6 PPC does not enter Suspend when it is connected to AC power
or when it is connected via ActiveSync unless it has been configured to do so. When connected to
ActiveSync, the unit will enter Suspend if the Power key is tapped.
MX6 PPC Suspend timers are set using Start | Settings | System | Power tab.
A Power key tap wakes the unit and resets the display backlight timers.
Off Mode
A touch screen tap or any key tap wakes the unit and resets the display backlight timers.
Placing the MX6 PPC in a powered dock wakes the unit and resets the display backlight timers.
When the unit wakes up, the Display Backlight and the Power Off timers begin the countdown
again. When any one of the above events occurs prior to the Power Off timer expiring, the timer
starts the countdown again.
The unit is in Off Mode when the main battery and the backup battery are depleted. Insert a fully
charged main battery and press the Power key to turn the MX6 PPC On. The unit performs a Hard
Reset upon receiving power from a charged main battery pack.
MX6 PPC Reference Guide E-EQ-MX6PCRG-C-ARC
Page 47
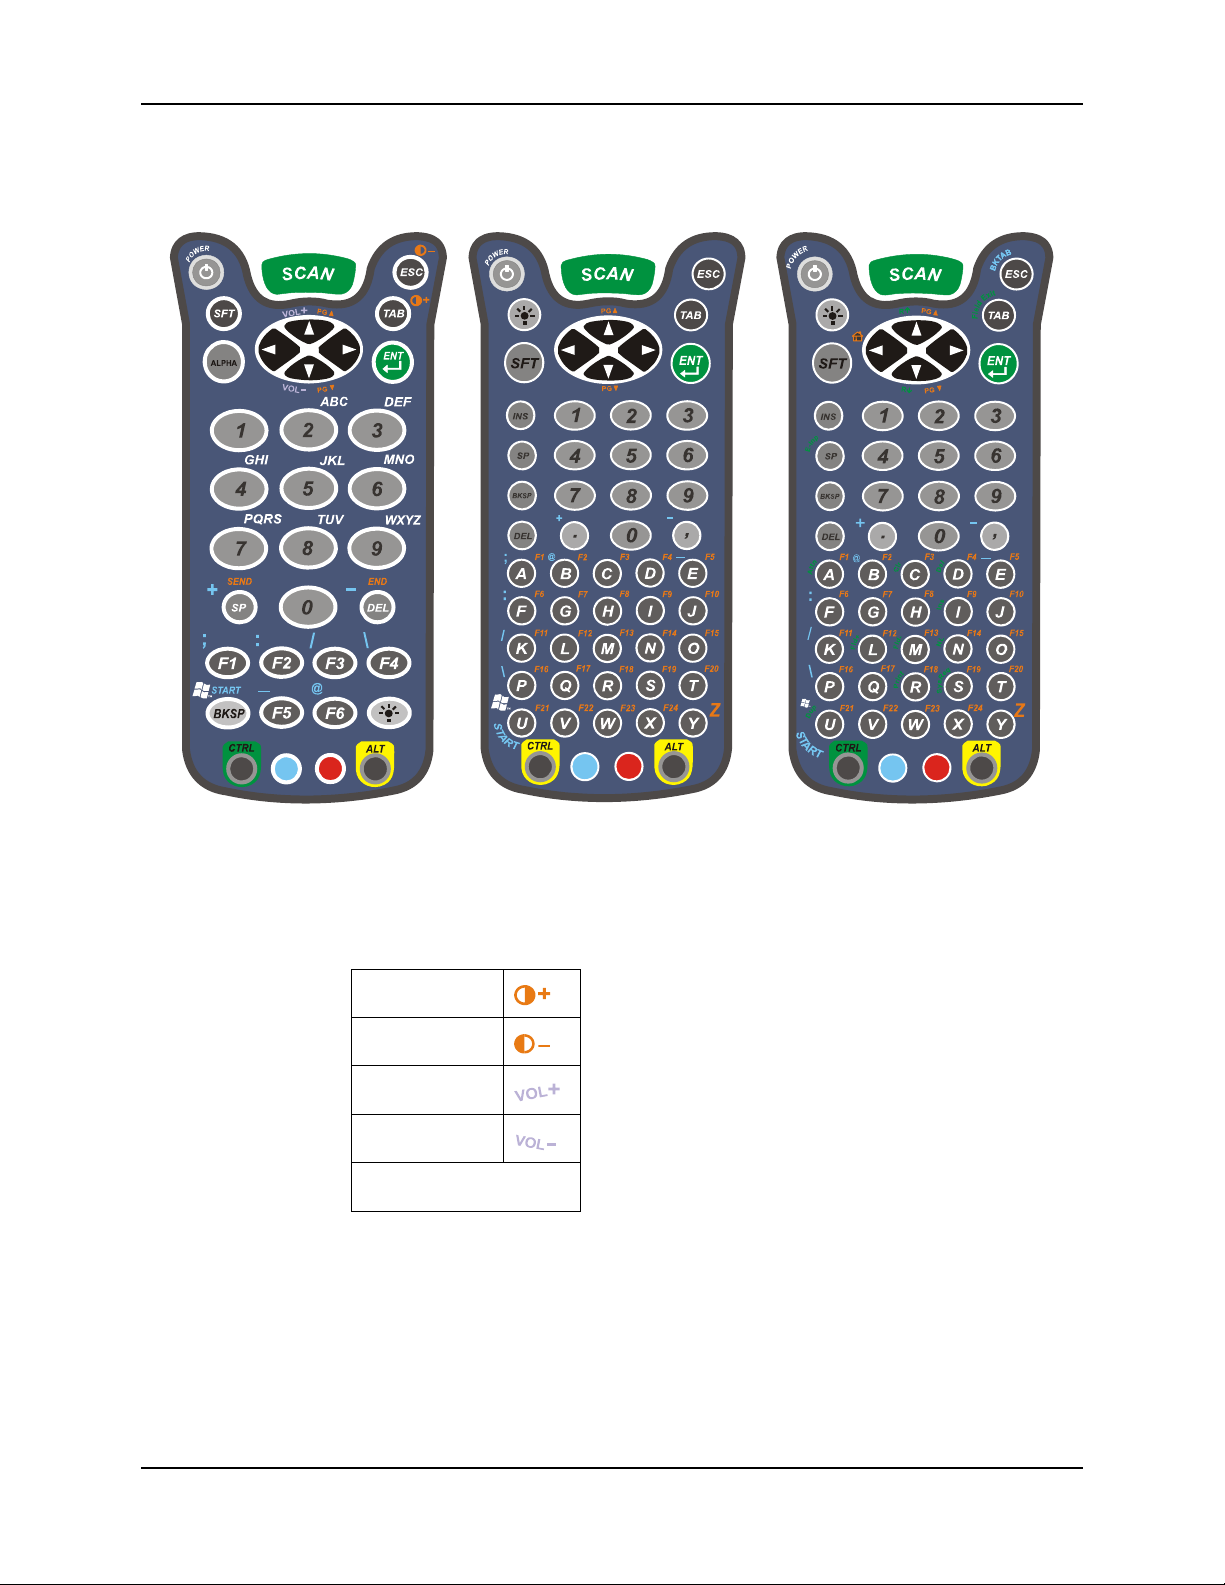
The Keypads 39
The Keypads
35-key Keypad 56-key Keypad 56-key 5250 Keypad
Figure 3-7 The 35-key and 56-key Keypads
See also: Appendix A Key Maps.
Keys shown on the 35-key keypad that are inactive:
Contrast Up
Contrast Down
Volume Up
Volume Down
Send and End
E-EQ-MX6PCRG-C-ARC MX6 PPC Reference Guide
Page 48

40 The Keypads
Special Keys
SCAN Key
The SCAN key activates the image-taking and/or barcode decoding scan engine. It also “wakes”
the MX6 PPC from sleep mode.
Power Key
The Power key puts the MX6 PPC into and wakes the MX6 PPC from Suspend mode.
Shift (SFT)
The Shift key toggles the keypad from upper case alphabet mode to lower case alphabet mode and
back. Caps Lock may also be toggled by pressing the red modifier key followed by the Shift key
or by double-tapping the Shift key. When Caps Lock is toggled on, the Shift key makes characters
upper case; when it is toggled off, the Shift key makes keys lower case.
Enter (ENT)
The Enter key confirms data entry.
Escape (ESC)
The Escape key performs a cancel action.
Tab
The Tab key moves the cursor to the next tab stop or the next control on a form.
Backlight
Alpha Lock (ALPHA)
This key is included only on the 35-key keypad. Alpha defaults to numeric mode. The Alpha key
toggles between the numeric and alphabetic modes.
Backspace (BKSP)
The Backspace key moves the cursor back one space for each time the key is pressed. To delete a
single character, press Red key + SP. To delete multiple characters, press Red key + SP and hold
down the SP key.
The Keypad Backlight key turns the keypad backlight on and off. The keypad
backlight turns off after 5 seconds if there is no keypad or touch screen activity. The
Backlight key is located at the lower right of the 35-key keypad. It is located below the
Power key on the 56 key keypad. The keypad backlight key is the only keypress used
to turn the keypad backlight on and off.
Delete (DEL)
The Delete key deletes one character for each time the key is pressed.
MX6 PPC Reference Guide E-EQ-MX6PCRG-C-ARC
Page 49

The Keypads 41
Arrow Keys
Press the arrow (or cursor key) to move the cursor or highlighted text entry
during a menu/list selection. In Normal mode:
• The Up arrow moves the cursor up one row or line.
• The Right arrow moves the cursor to the right one character.
• The Down arrow moves the cursor down one line or row.
• The Left arrow moves the cursor to the left one character.
Modifier Keys
Figure 3-8 Modifier Keys
The Ctrl and Alt keys are located on the bottom row of the keypad. Functions of the Ctrl and Alt
keys depend on the software application in use.
The blue and red keys (blue is to the left and red is to the right) are used in conjunction with other
keys to type the corresponding color-coded characters and functions. The Red and Blue keys
modify only the next key pressed; these keys must be pressed and released before each key to be
modified to the Blue or Red case.
Keypress Sequences
See Appendix A for key maps for all keypads.
Function Keys
Function keys F6, F7 and F11 do not produce the standard windows messaging sequence. Instead
they produce the following:
F6 WM_KEYDOWN wParam=0x60
WM_KEYUP wParam=0x60
F7 WM_KEYDOWN wParam=0x61
WM_KEYUP wParam=0x61
F11 WM_KEYDOWN wParam=0x62
WM_KEYUP wParam=0x62
In order to use these keys as function keys, applications must interpret the message sequences
above.
Note: Use <CTRL>+<F1> key sequence to get function key F7, <CTRL>+<F5> key
sequence to get function key F11. These “second key” functions bypass the standard
windows messaging sequence described above for F7 and F11.
E-EQ-MX6PCRG-C-ARC MX6 PPC Reference Guide
Page 50

42 Touch Screen
Touch Screen
The MX6 PPC Touch Screen Display is a color LCD unit capable of supporting VGA graphics
modes. Display size is 320 x 240 pixels in portrait orientation. The display covering is designed to
resist stains. The touch screen allows signature capture and touch input. A pen stylus is included.
The touch screen responds to an actuation force (touch) of 4 oz. of pressure (or greater).
When the color LCD unit is in Suspend mode, the reflective 256 color display appears to have a
greenish hue.
The display is automatically turned off when the MX6 PPC enters the Suspend state.
Display Backlight Timer
When the Backlight timer expires the display backlight is turned off. The default value for the
battery power and AC timer is 30 seconds.
When the display wakes up, the Backlight timers begin the countdown again.
Cleaning the Glass Display and Imager Aperture
Keep fingers and rough or sharp objects away from the scan aperture and display. If the glass
becomes soiled or smudged, clean only with a standard household cleaner such as Windex(R)
without vinegar or use Isopropyl Alcohol. Do not use paper towels or harsh-chemical-based
cleaning fluids since they may result in damage to the glass surface. Use a clean, damp, lint-free
cloth. Do not scrub optical surfaces. If possible, clean only those areas which are soiled.
Lint/particulates can be removed with clean, filtered canned air.
MX6 PPC Reference Guide E-EQ-MX6PCRG-C-ARC
Page 51

Speaker 43
Speaker
The speaker is located on the back of the MX6 PPC. The speaker has a loudness of at least 87 dB
(1500 Hz) at 10 cm measured from the back of the unit. The Speaker volume is adjustable via the
keypad or the Settings or by an application through the use of an API call. There are 5 distinct
volume levels. The minimum volume level is 0 (no sound) with a default setting of 3. The volume
sticks at maximum and minimum levels.
The speaker is disabled when a headset is plugged into the Audio Jack. The audio volume can be
adjusted to a comfortable level for the user. The volume is increased or decreased one step each
time the volume key sequence is pressed.
Speaker volume is first enabled and adjusted using the “Sounds & Reminders" icon. The default
value for Sounds and Reminders is midrange Volume and all sounds enabled. When volume and
sounds are enabled, speaker volume can be adjusted using the volume key sequence, if desired.
Note: An application may override the control of the speaker volume. Turning off sounds saves
power and prolongs battery life.
The volume is adjusted using Start | Settings | Personal tab | Sounds & Notifications icon then
select the Notifications tab.
Change the volume setting and tap OK to save the change. You can also select / deselect sounds
for key clicks and screen taps and whether each is loud or soft.
Sounds specific to primary events are selected using the options on the Sounds tab.
Reminder/Notification tones are selected using the options on the
Reminders/Notifications tab.
As the volume scrollbar is moved between Loud and Silent, the computer will emit a beep each
time the volume increases or decreases in decibel range. The Volume icon in the system bar can
also be used to adjust the system sound volume.
E-EQ-MX6PCRG-C-ARC MX6 PPC Reference Guide
Page 52
44 Battery
Battery
The MX6 PPC computer is designed to work with a rechargeable Lithium-Ion (Li-ion) battery
from LXE. Under normal conditions it should last approximately eight to ten hours before
requiring a recharge. The more you use the scanner or the RF transmitter, the shorter the time
required between battery recharges. The MX6 PPC keeps date and time valid for a minimum of
four days using a fully charged backup battery and a main battery that has reached the Low
Warning point.
When the main battery has lost most of its charge, an icon of an “empty” or “half-empty” battery
appears.
The MX6 PPC maintains the date and time for a minimum of two days using a main battery that
has reached the Low Warning point and a fully charged backup battery. The MX6 PPC retains
data, during a main battery hot swap, for at least 5 minutes.
Note: New main battery packs must be charged prior to use. This process takes up to four
hours in an LXE Multicharger and three hours when the MX6 PPC is connected to
external power through it's power jack.
See Also: Appendix C “MX6 Multicharger”.
Important: This symbol is placed on the product to remind users to dispose of Waste Electrical
and Electronic Equipment (WEEE) appropriately, per Directive 2002-96-EC. In most areas, this
product can be recycled, reclaimed and re-used when properly discarded. Do not discard labeled
units with trash. For information about proper disposal, contact LXE through your local sales
representative, or visit www lxe com.
Checking Battery Status
Tap the Start | Settings | System | Power icon. Main and backup battery level, status and timeout
setting options are displayed.
Handling Batteries Safely
• Never dispose of a battery in a fire. This may cause an explosion.
• Do not replace individual cells in a battery pack.
• Do not attempt to pry open the battery pack shell.
• Be careful when handling any battery. If a battery is broken or shows signs of leakage do
not attempt to charge it. Dispose of it using proper procedures.
Caution
Battery cells contain a chemical solution which burns skin, eyes, etc. Leakage
from cells is the only possible way for such exposure to occur. In this event,
rinse the affected area thoroughly with water. If the solution contacts the eyes,
get immediate medical attention.
Caution
Lithium and Li-Ion batteries are capable of delivering high currents when
accidentally shorted. Accidental shorting can occur when contact is made with
jewelry, metal surfaces, conductive tools, etc., making the objects very hot.
Never place a battery in a pocket or case with keys, coins, or other metal
objects.
MX6 PPC Reference Guide E-EQ-MX6PCRG-C-ARC
Page 53

Battery 45
Main Battery Pack
The main battery pack has a rugged plastic enclosure that is designed to withstand the ordinary
rigors of an industrial environment. The main battery pack is a modular device and is the battery
pack cover/case as well. It should never be disassembled. Exercise care when transporting the
battery pack making sure it does not come in contact with excessive heat or any power source
other than the LXE battery chargers, powered docking cradles or the MX6 PPC unit.
When the main battery pack is properly installed in the unit it provides up to eight hours of
operation depending upon operation and accessories installed. The battery pack is resistant to
impact damage and falls of up to four feet to a concrete surface.
Under normal conditions it should last approximately eight hours before requiring a recharge. The
more you use the scanner or the transmitter, the shorter the time required between battery
recharges.
Battery Hot-Swapping
When the main battery power level is low, the MX6 PPC will signal the user with a warning
dialog box on the display, a specific toolbar icon and a warning tone. The low battery warning
notice and tones continue until the main battery is replaced, the battery completely depletes, or the
MX6 PPC is placed in a powered docking cradle.
You can replace the main battery by simply removing the discharged battery and installing a
charged battery within a five minute time limit (or before the backup battery depletes).
When the Main Battery is removed, the MX6 PPC automatically suspends, the display is turned
off and the backup battery will continue to power the unit for at least five minutes. Though data is
retained, the MX6 PPC cannot be used until a new main battery pack is installed. After installing
the new battery, the MX6 PPC automatically transitions to the On state. Full operational recovery
from Suspend can take several seconds while the radio (if installed) is reestablishing an RF link.
If the backup battery depletes before a fully charged main battery can be inserted, the MX6 PPC
performs a hard reset. Programs and data in RAM is lost. Press the Power key to turn the MX6
PPC On after the hard reset.
Low Battery Warning
It is recommended that the main battery pack be removed and replaced when it's energy depletes.
When the Low Battery Warning appears do an orderly shut down, minimizing the operation of
any installed devices and insuring any information is saved that should be.
When the unit is in an ON state, a low battery warning dialog box appears on the display and a
warning tone is emitted.
Note: Once you receive the Low Battery Warning, you have approximately 5 minutes to
perform an orderly shutdown and replace the main battery pack before the unit powers
off. The Low Battery Warning will transition to Suspend before the computer powers off.
E-EQ-MX6PCRG-C-ARC MX6 PPC Reference Guide
Page 54

46 Battery
Backup Battery
The MX6 PPC has a backup battery that is designed to provide limited-duration electrical power
in the event of main battery pack failure. The backup battery is a 450 mAh Lithium (Li) battery
that is factory installed in the unit. The need for recharging of the backup battery is automatically
detected and controlled by the MX6 PPC. The energy needed to charge the backup battery comes
from the main battery.
It takes several hours of operation before the backup battery is capable of supporting the operation
of the computer. The duration of backup battery life is dependent upon operation of the MX6
PPC, it’s features and any operating applications.
The backup battery should be discharged completely once or twice a year. LXE recommends the
user save all programs and data in RAM to IPSM folder before completely discharging the backup
battery. The main battery pack will fully charge the backup battery. This process will allow longer
life for the backup battery. The backup battery is replaced by LXE.
Battery Maintenance Publication
The LXE publication “Getting the Most from Your Batteries” is available on the LXE Manuals
CD and is a single-source guide to battery management. The publication contains information
about battery recharging, conditioning, and other pertinent issues. It is also available on the LXE
website.
MX6 PPC Reference Guide E-EQ-MX6PCRG-C-ARC
Page 55
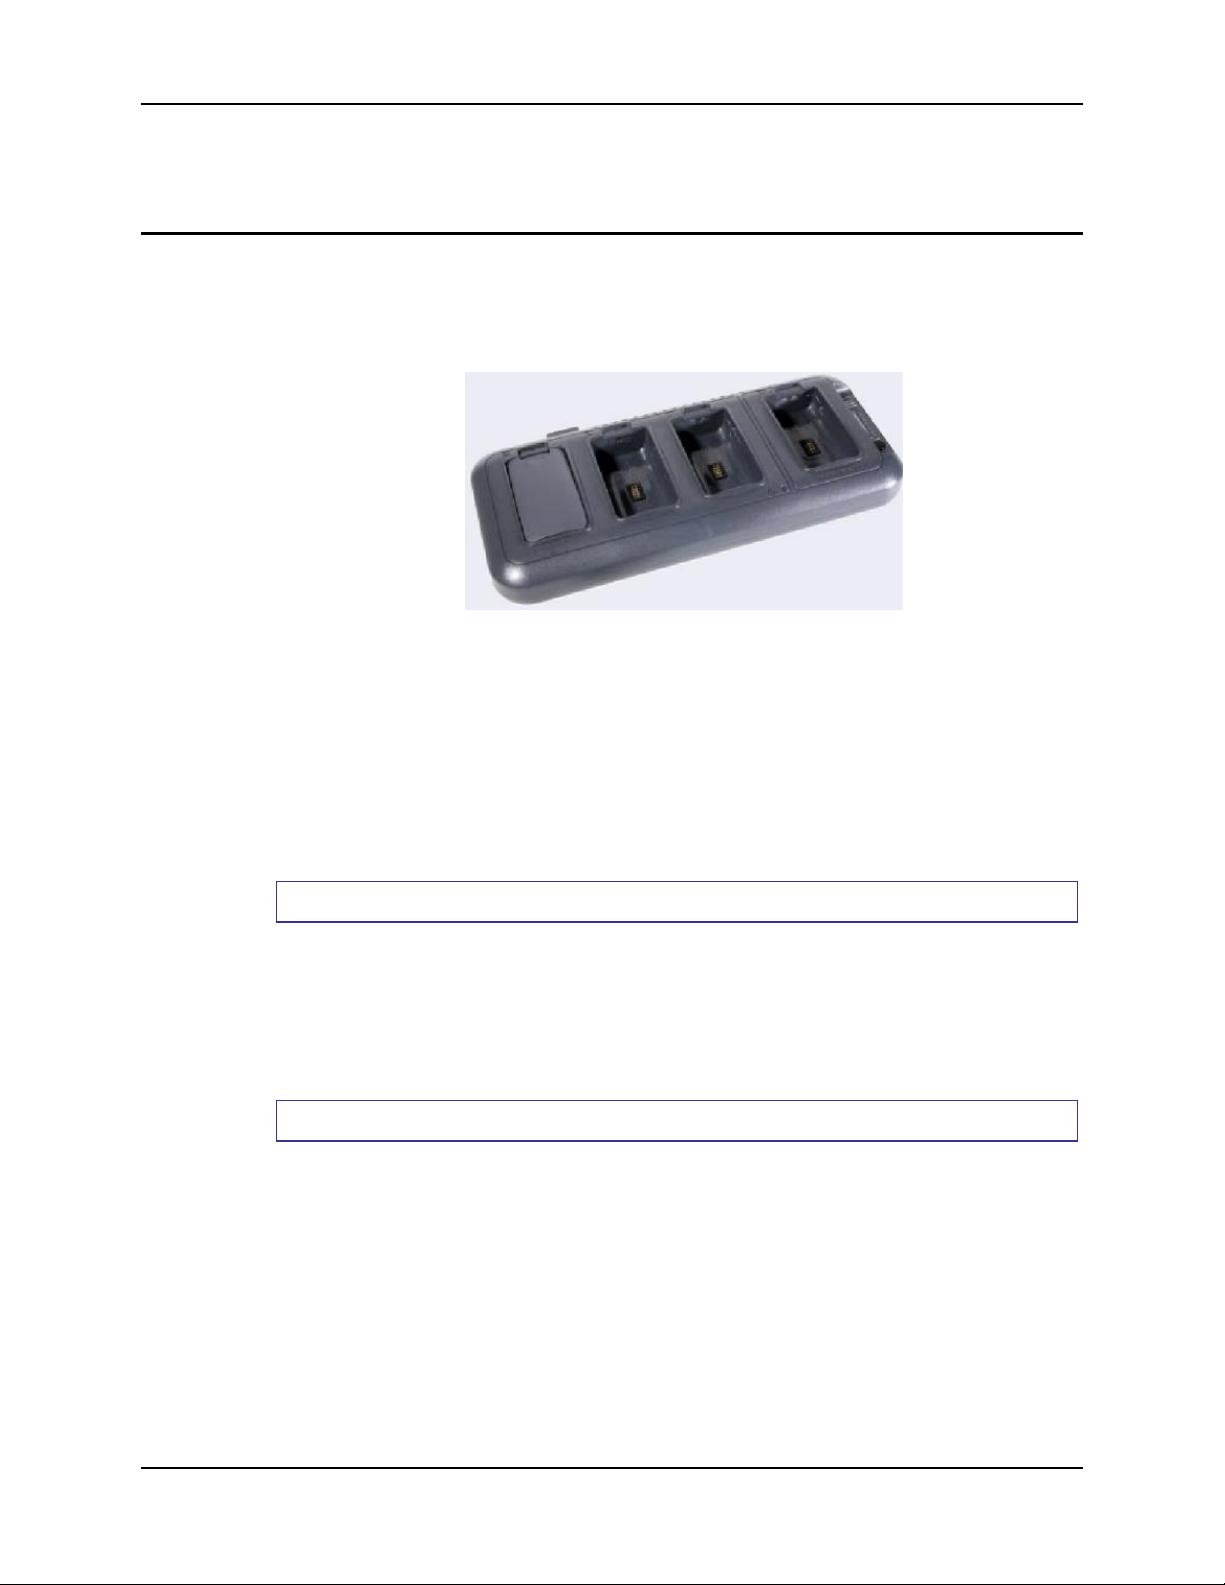
Charging the Main Battery Pack 47
Charging the Main Battery Pack
Using the Four Bay Charger/Analyzer (Optional)
Note: The Multicharger must be connected to an AC/DC power source before battery charging
can occur. The multicharger accepts main battery packs used by all MX6 mobile devices.
Figure 3-9 MX6 Multicharger
See Also: Appendix C “MX6 Multicharger”.
The four bay Multicharger has four slots that fully charge a main battery in four hours. The
charging slots work independently to control the charging of individual battery packs.
The last slot on the right also functions as a battery analyzer/charger. It resets and re-calibrates a
battery, then displays it’s resulting capacity. The process monitors changes in temperature,
current, and voltage. The slot senses when a battery pack is fully charged and automatically
switches to maintain the battery at full capacity indefinitely.
How To Charge a Spare Battery Pack
1. Insert the end of the battery without the locking tab into the charging slot.
2. Snap the battery into place with a hinging motion.
3. Once the battery is inserted, observe the Status LED to monitor the charging process.
The Status LED is orange while the battery is charging, and green when the charge cycle is
complete.
How To Charge/Analyze a Spare Battery Pack
1. Insert the end of the battery without the locking tab into the right hand charge/analyze slot.
2. Snap the battery into place with a hinging motion.
3. Once the battery is inserted, press the Analyze button. Observe the Indicator LEDs to monitor
the charge/analyze process.
The Status LED flashes orange during the analyze phase, illuminates solid green when the analyze
cycle has completed. When the cycle is complete, the Indicator LEDs display the current battery
capacity of the battery in the charge/analyze slot.
E-EQ-MX6PCRG-C-ARC MX6 PPC Reference Guide
Page 56

48 Docking Cradles
Charging a Battery Using the Desktop Docking Cradle
Note: The cradle must be connected to an AC/DC power source before battery charging can
occur.
The Desktop Cradle has an Auxiliary Battery Well that is used to charge a single Li-Ion battery in
the charged desk mount docking cradle while at the same time the cradle can charge the battery in
an MX6 PPC in the charging/communication slot .
The MX6 PPC unit does not have to be in the main charging well because each charger operates
independently of the other. The spare battery will charge in four hours.
The cradle senses when a battery pack is fully charged and automatically switches to maintain the
battery at full capacity indefinitely.
How To Charge a Spare Battery Pack
1. Insert the end of the battery without the locking tab into the bottom of the auxiliary well
opening.
2. Snap the battery into place with a hinging motion.
3. Once the battery is inserted, observe the Aux Battery LED to monitor the charging process.
See the “MX6 Cradle Reference Guide” for further information.
Docking Cradles
Note: The “MX6 Cradle Reference Guide” contains docking cradle installation and further
The docking cradles give the MX6 PPC the ability to communicate with a host computer and
other equipment. The MX6 PPC can be either On or in Suspend mode while in the cradles.
Using wall AC adapters or DC/DC converters, the docking cradle transfers power to the internal
charging circuitry of the MX6 PPC and, in turn, the MX6 PPC recharges the main battery. The
desktop docking cradle recharges both the MX6 PPC main battery and an Auxiliary Battery at the
same time.
The vehicle docking cradle uses a 12V cigarette lighter adapter or a bare wire 12-48V power
supply to transfer power to the internal charging circuitry of the MX6 PPC and, in turn, the MX6
PPC recharges the main battery. A powered docking cradle gives the MX6 PPC the ability to
communicate with a host computer and other equipment.
A complete battery charge of the main battery pack and an extra battery pack using the desktop
docking cradle takes less than four hours. The vehicle cradle completely charges the main battery
in the MX6 PPC is less than four hours.
The cradles require an external power source, before communications or battery charging is
available.
information.
When the desktop and vehicle cradles are receiving external power and the MX6 PPC is properly
seated in the charging bay, the DOCK LED is green. When the battery in the MX6 PPC is
charging the DOCK LED is green.
MX6 PPC Reference Guide E-EQ-MX6PCRG-C-ARC
Page 57

Docking Cradles 49
Indicators and LEDs
Powered Desktop Cradle
Label Color Explanation
DOCK
Solid Green
MX6 PPC is properly seated in the charging bay and
the main battery in the MX6 PPC is charging.
AUX Battery
Orange
Green
The spare battery is charging.
The spare battery has completed charging and is ready
for use.
COMM w/serial port
COMM w/USB port
Red
Green
Orange
Green
Serial data is being sent to the MX6 PPC from the host.
Serial data is being sent from the MX6 PPC to the host.
Serial data is being sent at high data rates.
USB connection is established with the host.
Powered Vehicle Cradle
Label Color Explanation
DOCK
Solid Green
MX6 PPC is properly seated in the charging bay and
the main battery in the MX6 PPC is charging.
COMM w/serial port
Red
Green
Orange
Serial data is being sent to the MX6 PPC from the host.
Serial data is being sent from the MX6 PPC to the host.
Serial data is being sent at high data rates.
Note: IrDA transmission from a handheld MX6 PPC to or from a docked MX6 PPC does not
require a powered cradle.
See Also: Chapter 4 – System Configuration, Sections titled “ActiveSync”, “Infrared
Receive” and “Beam”.
See Also: Chapter 4 – System Configuration, Section titled “Accessories” for LXE certified
cables.
E-EQ-MX6PCRG-C-ARC MX6 PPC Reference Guide
Page 58

50 Docking Cradles
MX6 PPC Reference Guide E-EQ-MX6PCRG-C-ARC
Page 59

Introduction
Chapter 4 System Configuration
There are several different aspects to the setup and configuration of the MX6 PPC running Pocket
PC 2002. Many of the setup and configuration settings are dependent upon the optional features
such as hardware and software installed on the unit. The examples found in this chapter are to be
used as examples only, the configuration of your specific MX6 PPC computer may vary. The
following sections provide a general reference for the configuration of the MX6 PPC and some of
it’s optional features.
Note: When a new battery is installed in the MX6 PPC for the first time (and when both
batteries have been completely depleted), steps in Chapter 2 “Getting Started” will need
to be performed. You can maintain an optimum charge level in the backup battery by
connecting an external power source to the MX6 PPC every day.
Windows for Pocket PC
Access: Start | Settings | System tab | About
For general use instruction, please refer to commercially availableWindows for Pocket PC
2002 user's guides or the on-line Help application installed with the MX6 PPC operating
system.
This chapter's contents assumes the system administrator is familiar with Microsoft Windows
options and capabilities loaded on most standard Pocket PC devices and/or desktop computers.
Therefore, the sections that follow describe only those Windows capabilities
that are unique to the LXE MX6 PPC and it's Pocket PC 2002 environment.
Installed Software
Note: Some standard Pocket PC options require an internal or external modem connection.
Modems are not available from LXE nor supported by LXE.
When you order an MX6 PPC you receive the software files required by the separate programs
needed for operation and wireless communication. The files are loaded by LXE and stored in
subdirectories in flash memory.
This section lists the contents of the subdirectories and the general function of the files. Files
installed in each MX6 PPC are specific to the intended function of the MX6 PPC.
E-EQ-MX6PCRG-C-ARC MX6 PPC Reference Guide
Page 60

52 System Configuration
Software Load
Note: Before setting WPA on an MX6 PPC using the Pocket PC 2002 operating system, an OS
upgrade to Windows Mobile 2003 is required.
The software loaded on the MX6 PPC computer consists of Windows for Pocket PC 2002,
hardware-specific OEM Adaptation Layer, device drivers, MS Pocket Internet Explorer browser
and utilities.
The wireless drivers are stored in flash memory. During the cold boot process, the wireless drivers
are loaded as well as any saved parameters.
The software supported by the MX6 PPC is summarized below:
Operating System
• Windows Pocket PC 2002 Professional.
Terminal Emulation
• RFTerm (VT220, TN5250, TN3270)
802.11 SyChip radio
Integrated Imager Driver
HHP Demo Programs
HHP Utility Programs
MX6 PPC Reference Guide E-EQ-MX6PCRG-C-ARC
Page 61

System Configuration 53
The Start Menu
For general use instruction, please refer to commercially available Pocket PC user's
guides or the on-line Help application installed with the MX6 PPC operating system.
The Start menu appearance is similar to that of a hand held Palm organizer. The default bootup
screen is Today.
Tap Start to display the Start menu. The Start menu is separated into sections:
• Start menu displaying Quick Start Applications
• Programs, which are Application specific e.g. Word, Inbox, etc.
• Settings which are split into Personal, System and Connection segments.
• Find capability
• Help
Factory Default Settings
Option Active Same as Desktop
Today Yes Yes
Calendar Yes Yes
Contacts Yes Yes
Inbox Yes Yes
Internet Explorer Yes Yes
Notes Yes Yes
Tasks Yes Yes
Edit Start Menu Item List
Access: Start | Settings | Personal | Menus
Select the applications to be displayed as Quick Start Applications in the Start Menu.
Create a new Menu by tapping the New Menu tab. Check the “Turn on New button menu”
checkbox. Make your selections from the list and tap OK or press Enter.
The new menu options appear when the New tab in the Taskbar is tapped.
E-EQ-MX6PCRG-C-ARC MX6 PPC Reference Guide
Page 62
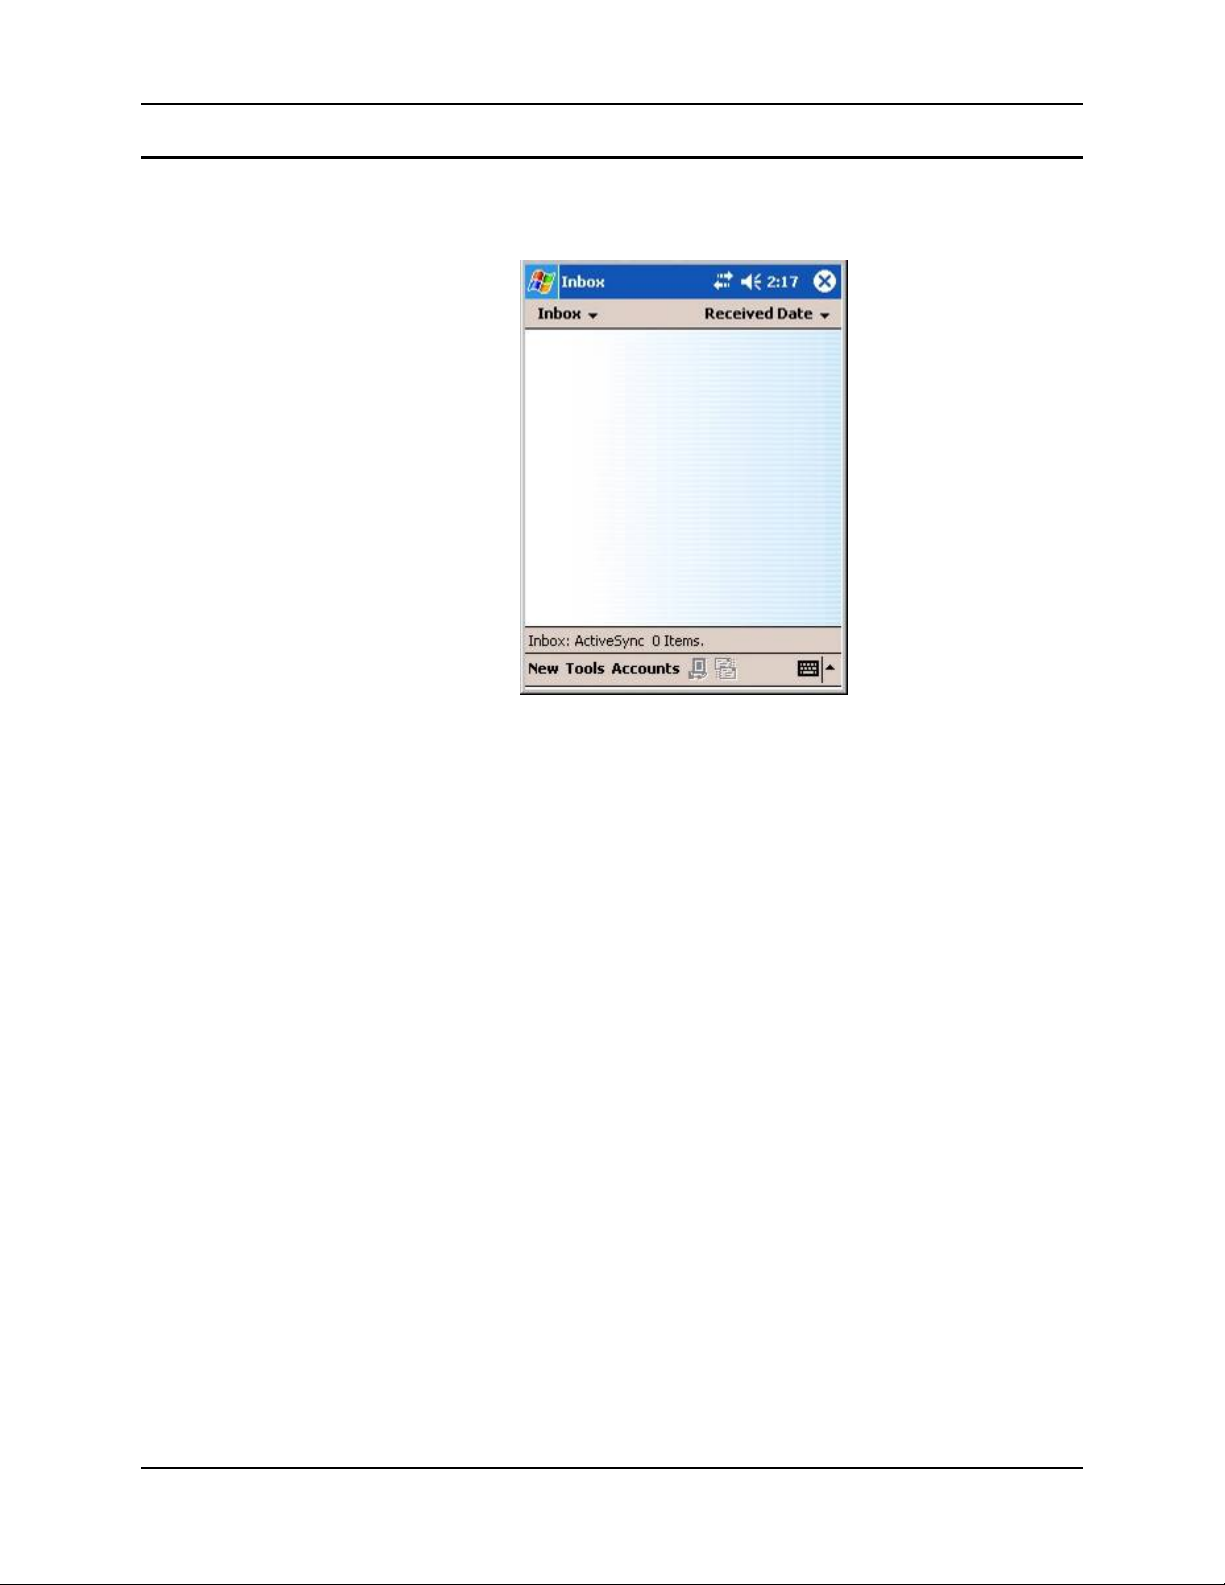
54 System Configuration
Inbox
This start menu option requires a connection to a mail server.
Figure 4-1 Inbox
There are few changes in the Pocket PC version of Inbox as it relates to the general desktop
Windows PC Microsoft Outlook Inbox options. Tap Start | Help to access Inbox Help.
ActiveSync® can be used to transfer messages between the MX6 PPC inbox and a desktop PC
inbox.
MX6 PPC Reference Guide E-EQ-MX6PCRG-C-ARC
Page 63

System Configuration 55
Programs Options
Access: Start | Programs
Help is always available at any stage – tap Start | Help for context-sensitive help. Tap OK to
close Help and return to the program or application.
HHP Demos
Access: Start | Programs | HHP Demos
Demo Setup Use this option to enable a specific IP Address, Decode Port
and Imaging Port for the Image Demo, IQImage Demo and
Scan Demo.
Image Demo Scan an image.
IQImage Demo Review an image.
Scan Demo Scan an image or barcode.
Signature Capture Establish signature patterns for handwriting data entry using
the stylus.
E-EQ-MX6PCRG-C-ARC MX6 PPC Reference Guide
Page 64

56 System Configuration
HHP Utils
Access: Start | Programs | HHP Utils
IPConfig
Access: Start | Programs | HHP Utils | IPConfig
Factory Default Settings
Input
Adapter 02 Pegas1
Output
Display Blank
About
Ipconfig Copyright
Online help is not available for this menu option. Tap X to close this window.
Release the IP address button
Pressing this button changes the MAC address, sets the IP address to 0.0.0.0 and sets the Subnet
mask to 0.0.0.0 as well as clearing out the Gateway data.
Renew the IP address button
Pressing this button renews the MAC address, IP address, Subnet Mask and Gateway data.
Display full configuration button
Pressing this button displays the Windows IP configuration for the 802.11 card and adapter.
MX6 PPC Reference Guide E-EQ-MX6PCRG-C-ARC
Page 65

System Configuration 57
Ping
Access: Start | Programs | HHP Utils | Ping
Factory Default Settings
Input
Destination Blank
Timeout (ms) 1000
Send buffer size 32
Send count 4
Infinite Disabled
TTL Blank
TOS Blank
Rec. route for count
hops
Timestamp route Blank
Don’t fragment Disabled
DNS address required Disabled
Output
Display Blank
About
Ping Copyright
Blank
Route
Tap X to close this menu option. Help is not available for this option.
Tap Execute on the Input tab to execute the IP address ping. Tap the Stop button to end the Ping
activity.
Access: Start | Programs | HHP Utils | Route
Tap X to close this menu option. Help is not available for this option.
Command Action
Print Execute the Print command to print the network routing tables. The result is
displayed in the Output tab file.
Add Enter the following data and then tap Execute to add to the routing table:
Destination, Netmask, Gateway, Metric and Interface.
Delete Enter a destination and tap Execute to delete routes with a given destination.
Clear Use this command to clear the routing table of all gateway entries.
E-EQ-MX6PCRG-C-ARC MX6 PPC Reference Guide
Page 66

58 System Configuration
RASMan
Access: Start | Programs | HHP Utils | RASMan
Help is not available for this option.
Reboot
Access: Start | Programs | HHP Utils | Reboot
Tap this icon to initiate a Warm or Cold Boot. Tap X to close the decision box.
Warm Boot (Soft Reset) A warm boot closes all applications, clears the
working RAM and preserves the file system.
Press the CTRL and SFT keys at the same time for approximately
10 seconds.
Cold Boot (Hard Reset) A cold boot forcibly closes all applications, working
RAM and files are cleared and the device’s parameters are reset to
factory defaults (or the last saved registry settings).
Press the CTRL and ESC keys at the same time for approximately
three seconds.
RegBackup
RegRestore
ScanWedge
Suspend
Access: Start | Programs | HHP Utils | RegBackup
Tap this icon to save the current registry settings to a file.
Access: Start | Programs | HHP Utils | RegRestore
Tap this icon to restore last saved registry settings to the in-use registry.
Access: Start | Programs | HHP Utils | ScanWedge
Note: If you are NOT using LXE’s RFTerm application to manage barcode scanning, select
Start | Programs | HHP Utils | ScanWedge before scanning a barcode.
Tap this icon before scanning a barcode. When the barcode reader program is active, an icon
resembling a barcode is located in the Toolbar.
Access: Start | Programs | HHP Utils | Suspend
Tapping this icon places the device in Suspend mode. Tap the Power key to wake the device.
MX6 PPC Reference Guide E-EQ-MX6PCRG-C-ARC
Page 67

System Configuration 59
SysInfo
Access: Start | Programs | HHP Utils | SysInfo
Tapping this icon displays a text file containing the current settings for the MX6 PPC, e.g.
hardware/software version numbers, etc.
Tap File | Save to File to create a separate file copy of the SysInfo listing.
Games
Access: Start | Programs | Games
Tap the game name icon to start a game. Tap X then tap OK to close the Games window and
return to the Programs window.
Calculator
Access: Start | Programs | Calculator
Exit the Calculator program by tapping the X at the top of the screen until the Today screen is
displayed.
ActiveSync
Access: Start | ActiveSync
Requirement: ActiveSync version 3.7 (or higher) must be on both the host (desktop/laptop)
computer and the MX6 PPC (client).
Using Microsoft ActiveSync version 3.7 or higher, you can synchronize information on your
desktop computer with the MX6 PPC and vice versa. Synchronization compares the data on your
MX6 PPC with your desktop computer and updates both with the most recent data.
For example, you can:
• Update the information in Pocket Outlook on your device by synchronizing it with
Microsoft Outlook on your desktop computer.
• Synchronize Microsoft Word and Microsoft Excel files between your device and desktop
computer. Your files are automatically converted to the correct format.
• Back up and restore your device data.
• Copy (rather than synchronize) files between your device and desktop computer.
• Control when synchronization occurs by selecting a synchronization mode. For example,
you can synchronize continually while connected to your desktop computer or only when
you choose the synchronize command.
• Select which information types are synchronized and control how much data is
synchronized. For example, you can choose how many weeks of past appointments you
want synchronized.
E-EQ-MX6PCRG-C-ARC MX6 PPC Reference Guide
Page 68

60 System Configuration
If the MX6 PPC is already in a docking cradle connected to a PC, remove and reinsert the MX6
PPC into the cradle.
If the MX6 PPC is connected to a PC by RS-232/USB cable, disconnect the cable from the MX6
PPC and reconnect.
Check that Start | ActiveSync | Tools | Option has the correct connection selected (Serial or
USB).
Note: By default, ActiveSync does not automatically synchronize all types of information. Use
ActiveSync Options to specify the types of information you want to synchronize. The
synchronization process makes the data (in the information types you select) identical on
both your desktop computer and your device.
When installation of ActiveSync is complete on your desktop computer, the ActiveSync Setup
Wizard begins and starts the following processes:
• connect your device to your desktop computer,
• set up a partnership so you can synchronize information between your device and your
desktop computer, and
• customize your synchronization settings.
Because ActiveSync is already installed on your device, your first synchronization process begins
automatically when you finish setting up your desktop computer in the ActiveSync wizard.
After your first synchronization, look at Calendar, Contacts, and Tasks on your device. Notice that
the same information from Microsoft Outlook on your desktop computer is now on your device,
and you didn’t have to type a word. Simply disconnect your device from your computer and
you’re ready to go!
For more information about using ActiveSync on your desktop computer, open ActiveSync, then
open ActiveSync Help .
MX6 PPC Reference Guide E-EQ-MX6PCRG-C-ARC
Page 69
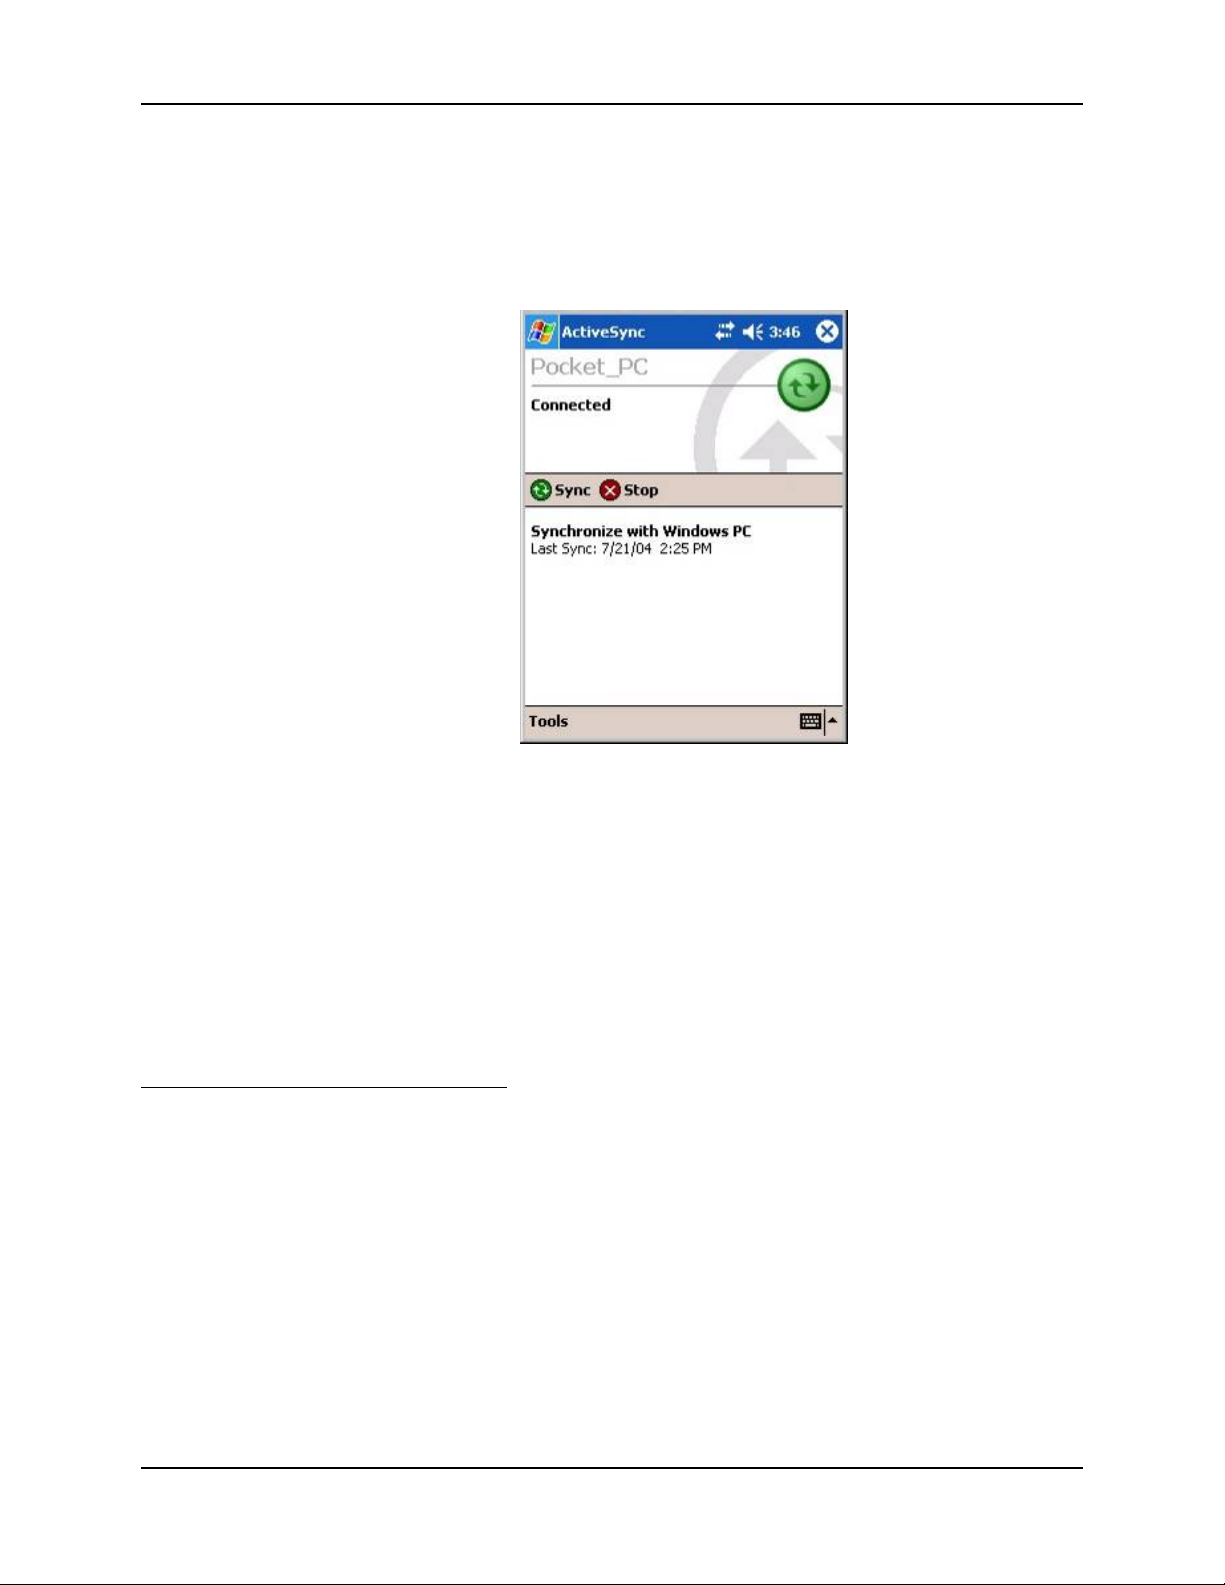
System Configuration 61
Synchronizing from the MX6 PPC
You must have set up ActiveSync on your desktop computer and completed the first
synchronization process before you initiate synchronization from your device.
To initiate synchronization from your device, tap Start, then ActiveSync to begin the process.
Tools
Figure 4-2 Start ActiveSync
Note: If you have a wireless LAN card, you can synchronize remotely from your device.
Tap to connect and synchronize.
View synchronization status.
Tap to synchronize via IR or change synchronization settings.
View connection status.
Tap to stop synchronization.
Tap Start | Help for context-sensitive help.
Use this option to select IR connection or configure the PC, Server and Schedule settings. Tap
Start | Help for context-sensitive help. Tap X to close.
E-EQ-MX6PCRG-C-ARC MX6 PPC Reference Guide
Page 70

62 System Configuration
File Explorer
Access: Start | Programs | File Explorer
Factory Default Settings
Business Folder Yes
Personal Folder Yes
Templates Yes
There are few changes in the Pocket PC version of File Explorer as it relates to the general
desktop PC Windows File Explorer options. Tap Start | Help to access File Explorer Help. To
exit, press the X in the upper right hand corner until the Start screen is displayed.
Infrared Receive
Access: Start | Programs | Infrared Receive
Tapping this menu icon begins a connection to a sending device. If no connection is made, the
program waits for a tap on the “Cancel” button.
Note: The IR Port is specified as COM 3 and as COM 6 (depending on the type of IrDA
Internet Explorer
Access: Start | Programs | Internet Explorer
This option requires an active wireless connection and an Internet Service Provider. There are few
changes in the Pocket PC version of Internet Explorer as it relates to the general desktop Windows
PC Internet Explorer options. Tap Start | Help for context-sensitive help..
Pocket Excel
Access: Start | Programs | Pocket Excel
There are few changes in the version of Pocket Excel as it relates to the general desktop PC
Windows Microsoft Excel application. Tap Start | Help for context-sensitive help.
communication) and is a bi-directional half-duplex infrared port. To use COM 3 for Raw
IR communication, select Start | Settings | Connections | Beam and uncheck “Receive all
incoming beams …”. This action disables IrDA protocol.
MX6 PPC Reference Guide E-EQ-MX6PCRG-C-ARC
Page 71

System Configuration 63
Pocket Word
Access: Start | Programs | Pocket Word
There are a few changes in the version of Microsoft Word as it relates to the general desktop
Windows PC Microsoft Word options.
PocketWord documents are saved with a .PWD extension instead of .DOC extension although
they can be saved as .RTF or .DOC files on the MX6 PPC.
Microsoft Word templates (.DOT files) are converted to Pocket Word templates (.PWT).
Tap Start | Help for context-sensitive help.
When ActiveSync transfers .PWD files to the desktop from the MX6 PPC, the file is converted to
.DOC files by ActiveSync.
Terminal Services Client
Terminal Services Client is available for download from a Microsoft web site:
http://www.microsoft.com/windowsmobile/resources/downloads/pocketpc/tsc.mspx
E-EQ-MX6PCRG-C-ARC MX6 PPC Reference Guide
Page 72

64 System Configuration
Settings Options
Access: Start | Settings
The following options represent the factory default Pocket PC installation. Your system may be
different based on the software and hardware options purchased.
Personal Tab
Help is always available at any stage – tap Start, tap Help and context-sensitive online help is
displayed. Tap OK to close Help and return to the program or application.
Buttons
Access: Start | Settings | Personal tab | Buttons
Up/Down Control
Set Delay before the first repeat and the repeat rate for the screen up / down arrow keys.
Screen Up Red plus Up Arrow key
Screen Down Red plus Down Arrow key
Input
Access: Start | Settings | Personal tab | Input
Factory Default Settings
Input Method Keyboard
Keys Small keys
Word Completion Suggest
Add Space after Yes
Voice Recording 8,000 Hz
Capitalize Yes
Scroll Yes
Use this option to select Character Recognition or the keypad (including the virtual keyboard)
when entering data.
MX6 PPC Reference Guide E-EQ-MX6PCRG-C-ARC
Page 73
System Configuration 65
Menus
Access: Start | Settings | Personal tab | Menu
Factory Default Settings
ActiveSync Yes
Calendar Yes
Contacts Yes
Inbox Yes
Internet Explorer Yes
Notes Yes
Tasks Yes
Edit the default Start menu or create a new one.
Owner Information
Access: Start | Settings | Personal tab | Owner Information
Factory Default Settings
Identification Blank
Notes Blank
Password
There is no change from general desktop PC Owner Properties display. Enter the information and
Tap the OK box to save the changes. The changes take effect immediately.
Access: Start | Settings | Personal tab | Password
Factory Default Settings
No password Default
Prompt timer 1 hour
Simple 4 Digit Password When selected, an online numeric only keypad is displayed.
Create a numeric password and follow the instructions on
the screen to save or discard the 4 digit password.
Strong alphanumeric Password Enabling this option opens the soft input panel. Enter the
password using the SIP or the keypad. Follow the
instructions on the screen to create, save and/or discard an
alphanumeric password.
Prompt timer Select how long the MX6 PPC must be in Suspend before
the password must be entered to continue using the MX6
PPC.
Once a password is assigned, and the timer set in “Prompt if device unused for …” expires, when
the MX6 PPC wakes from Suspend the user will need to enter the password before using the MX6
PPC. If you forget the password, it cannot be restored without performing a cold boot on the unit
(which erases all memory).
E-EQ-MX6PCRG-C-ARC MX6 PPC Reference Guide
Page 74

66 System Configuration
There is no change from general desktop PC Password Properties options. Enter the password,
then type it again to confirm it and Tap the OK box to save the changes. The password is
immediately in effect.
Sounds and Notifications
Access: Start | Settings | Personal tab | Sounds & Notifications.
Factory Default Settings
Volume
Events Enabled
Programs Enabled
Notifications Enabled
Volume Middle of Bar
Screen Tap Loud
Hardware Buttons Loud
Reminders
Display Message Enabled
Play Sound Enabled
Flash No limit
Today
Make changes and tap OK. The changes take effect immediately. There is no change from general
desktop PC Sounds and Notifications Properties options.
Access: Start | Settings | Personal tab | Today
Checked items appearing on the Today screen:
• Date
• Today title bar
• Owner info
• Calendar
• Inbox
• Tasks
The Move Up, Move Down and Options.. buttons are greyed out for those items that cannot be
edited.
Set the timer for displaying the Today screen when the device is idle. The default is 4 hours. Tap
the OK button when finished. Changes take effect immediately.
Themes may or may not be loaded on your device.
MX6 PPC Reference Guide E-EQ-MX6PCRG-C-ARC
Page 75

System Configuration 67
System Tab
Access: Start | Settings | System tab
Help is always available at any stage – tap Start, tap Help and context-sensitive online help is
displayed. Tap OK to close Help and return to the program or application.
About
Access: Start | Settings | System tab | About
Displays important device information. There are three tabs:
Backlight
Version
Device ID
Copyrights
Tap OK to close this menu option.
Access: Start | Settings | System tab | Backlight
Factory Default Settings
Battery Power
Dim Backlight Enabled / 20 seconds
Turn off Backlight Enabled / 1 minute
Turn on Backlight on button / key Enabled
Backlight Intensity Light
External Power
Dim Backlight Disabled
Turn off Backlight Disabled
Turn on Backlight on button / key Enabled
Backlight Intensity Light
Displays the Pocket PC version installed and the build number. Also
the type of processor, memory installed, whether the expansion slot is
in use and the current MX6 PPC owner name.
The default device name used to identify the MX6 PPC to other
computers is “Pocket_PC”. The description is blank. You can make
changes and tap the OK button. The changes take effect immediately.
This information may be changed when a newer version of Pocket PC
is loaded.
Using the backlight while on battery power substantially reduces battery power.
You can check the battery status by selecting Start | Settings | System tab | Power. On this
screen, the timeout for turning off the device if not used for 3 minutes (default value) while on
battery power, can be adjusted. The factory default setting for this parameter is Enabled.
E-EQ-MX6PCRG-C-ARC MX6 PPC Reference Guide
Page 76

68 System Configuration
Clock
Access: Start | Settings | System tab | Clock
Factory Default Settings
Time
Where Home
Visiting Time Zone GMT+1 Paris, Madrid
Home Time Zone GMT+8 Pacific US
Time 12:00:00 AM
Date 9/3/2001
Alarms
Four alarm settings Disabled
CPU Speed
Access: Start | Settings | System tab | CPU Speed
The default CPU speed is 400 MHz.
You can select the desired CPU speed by selecting either Low Speed (200 MHz) or High Speed
(400 MHz).
The CPU speed is immediately changed.
Note: Help is not available for this option.
MX6 PPC Reference Guide E-EQ-MX6PCRG-C-ARC
Page 77
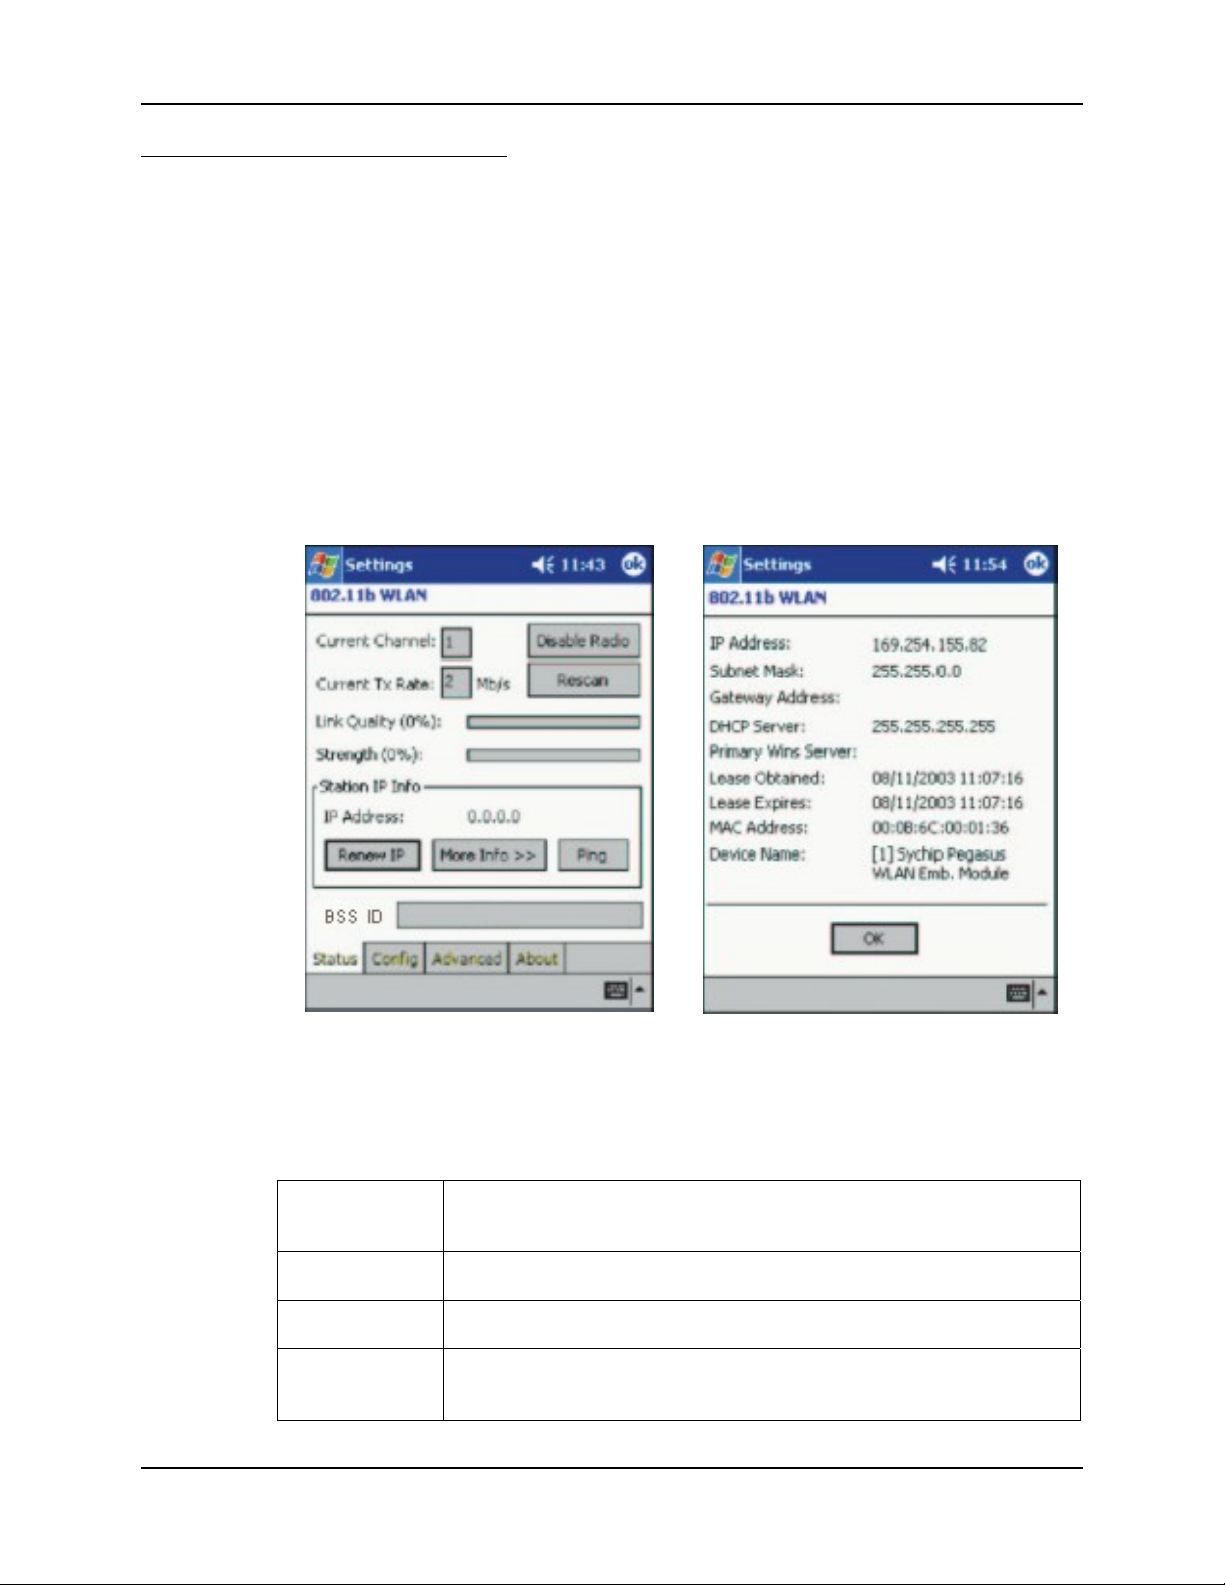
System Configuration 69
802.11b WLAN Settings
Access: Start | Settings | System tab | WLAN Settings
Prerequisites for a new system setup:
• Network SSID number of the Access Point for the MX6 PPC
• WEP or LEAP Authentication Protocol Keys (LEAP requires Meetinghouse Software
described later in this chapter.)
Status Tab
Access: Start | Settings | System tab | WLAN Settings | Status tab
Status Screen More Info Screen
Figure 4-3 WLAN Settings – Status Screen
Note: These parameters cannot be changed on the Status screen.
Disable Radio
Current Channel Shows the current RF channel being used by the radio for this session.
Current TX Rate This parameter displays the current transmit rate.
Link Quality
Click this button to enable or disable the radio link from the 802.11 radio
card. The radio is set to Enable by default.
Displays signal to noise ratio in both percentage and graphical display. This
value will fluctuate. The graphical display is refreshed every few seconds.
E-EQ-MX6PCRG-C-ARC MX6 PPC Reference Guide
Page 78

70 System Configuration
Displays signal strength of the receiver (radio) in both percentage and
Strength
Station IP Info Displays the current IP address of the radio link to the network.
graphical display. This value will fluctuate. The graphical display is
refreshed every few seconds.
Renew IP
More Info >>>
Ping Click this button to open the Ping Utility for WLAN.
BSS ID
Click this button to reapply the IP address from the DHCP server when
DHCP is enabled.
Click this button to view detailed TCP/IP information as shown in the
“More Info Screen” in the above figure.
Shows the network name and the MAC address of the access point the radio
card is associated with in the AP mode. This value cannot be changed by the
user.
MX6 PPC Reference Guide E-EQ-MX6PCRG-C-ARC
Page 79
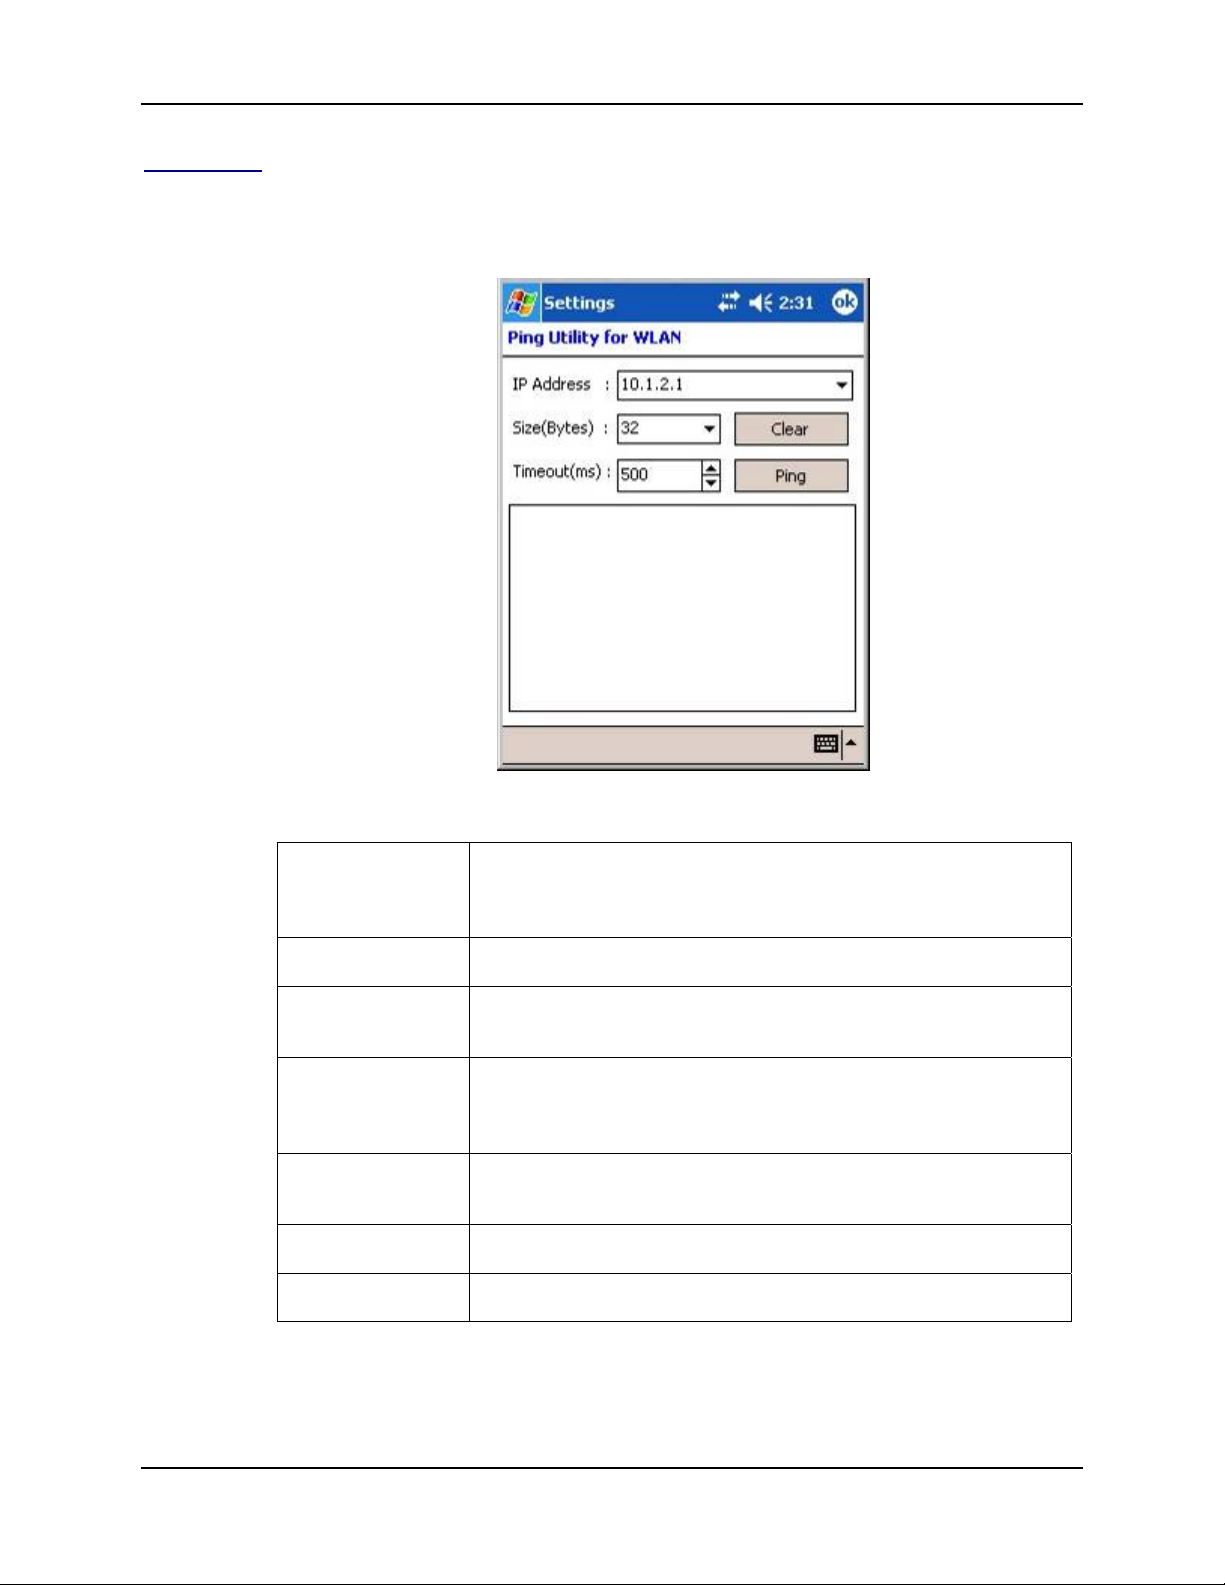
System Configuration 71
Ping Utility
Access: Start | Settings | System tab | WLAN Settings | Status tab | Ping
button
Figure 4-4 Ping Utility
IP Address Displays the current IP Address of the device that will be pinged. The
user can change the IP Address text to ping a different IP address or
device.
Ping Click this button to ping the IP address entered in the IP Address field.
Size (Bytes) Displays the current byte size: 32 is the default. The user can select up
to 8192 from the drop down box.
Timeout (ms) Displays the current timeout in milliseconds: 500 is the default. The
user can increase or decrease the timeout value by tapping the spin
buttons.
Routing Table Click this button to view the contents of the routing table in ASCII
format.
Ping Statistics field: Shows the pinging IP address and the pinging results.
Clear Click this button to clear IP Address input and the ping statistics field.
E-EQ-MX6PCRG-C-ARC MX6 PPC Reference Guide
Page 80
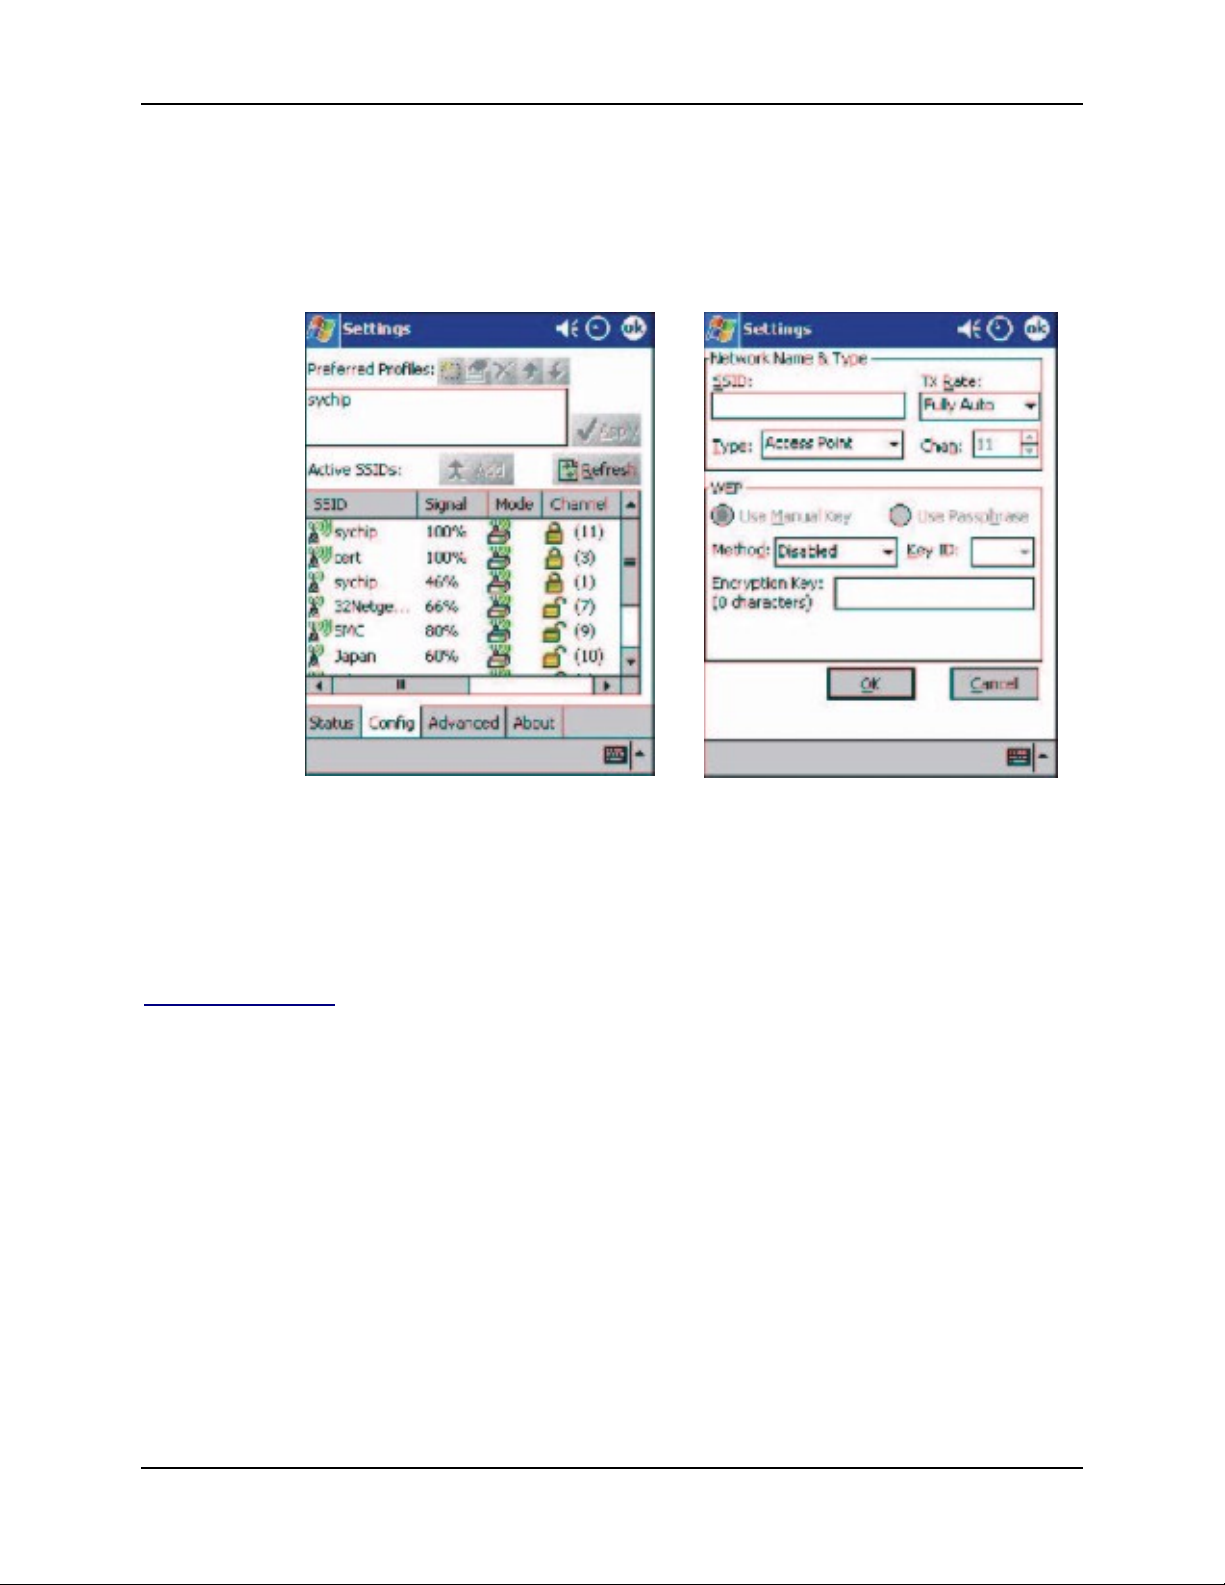
72 System Configuration
Config Tab
Access: Start | Settings | System tab | WLAN Settings | Config tab
Note: See the following section titled “Creating and Modifying Profiles” for instruction.
The Config tab provides a list of all access points and peer stations in range of the MX6 PPC
radio. This configuration tool is used to create and edit SSID profiles for access points that the
user wants their station to associate with.
Preferred Profiles
A list of preferred profiles for access points (AP) in the network created by the user, or added
from the Active SSIDs table is located at the top of the Config window.
When the radio is turned on, it searches for the APs with which to associate in the order of the
listed profiles. For each profile in the table, the user can make changes by using the icon tools at
the top of the table. Tap an icon (New, Edit, Delete, Up, Down) to create a new profile, edit an
existing profile, delete a profile and move the profiles in the Active SSID listing up and down to
adjust the automatic association priority for each profile.
Note: This table is blank after an initial MX6 PPC software installation. It can be kept blank
Config Screen Create a Profile Screen
Figure 4-5 WLAN Settings – Config Screen
with no automatic association preference.
MX6 PPC Reference Guide E-EQ-MX6PCRG-C-ARC
Page 81

System Configuration 73
Active SSIDs
The Active SSIDs table lists all access points or peer stations (creator of IBSS) in the vicinity of
the host. It displays only those SSIDs that accept broadcast associations. Each record displays
information for the following six fields (The table may not display all the fields on the screen. Use
the horizontal scroll bar to check all the fields.).
SSID Network Name of the access point or peer station. A link icon with signal
strength is also shown.
Signal Strength in percentage for that SSID.
Mode An icon shows whether it is an access point, or a peer station.
Channel The channel it uses and the WEP method it applies if any. The icon stands for
WEP Key-On, and for WEP Key-Off.
SupRate Supported data rate of the access point or the peer station.
BSSID BSSID or MAC Address of the access point or the peer station.
Operation Buttons
Apply
Refresh
Add
Note: See the following section titled “Creating and Modifying Profiles” for instruction.
Click the Apply button to associate a station with the selected SSID. This SSID can
be either from the Preferred Profile table or from the Active SSID’s list.
When applied, the Status tab window displays the status of the wireless connection.
If the association failed, a search for another AP in the Preferred Profile list
automatically takes place and the radio attempts to associate with the station, in
order of preference.
Click the Refresh button to start a new search for all available access points or peer
stations in the vicinity.
Add an Active SSID profile to the Preferred Profile table.
1. Select and highlight an SSID in the Active SSID list.
2. Click Add. If the SSID has WEP Key-On, the Settings window displays and
prompts the user to enter the WEP Method, Encryption Key, and Key ID.
3. Click OK in the Settings window after finishing the configuration. The SSID and
its profile are added into the Preferred Profiles window.
If adding an SSID with WEP Key Off, the Settings window does not display and the
SSID is added directly to the Preferred Profile table when the Add button is clicked.
E-EQ-MX6PCRG-C-ARC MX6 PPC Reference Guide
Page 82
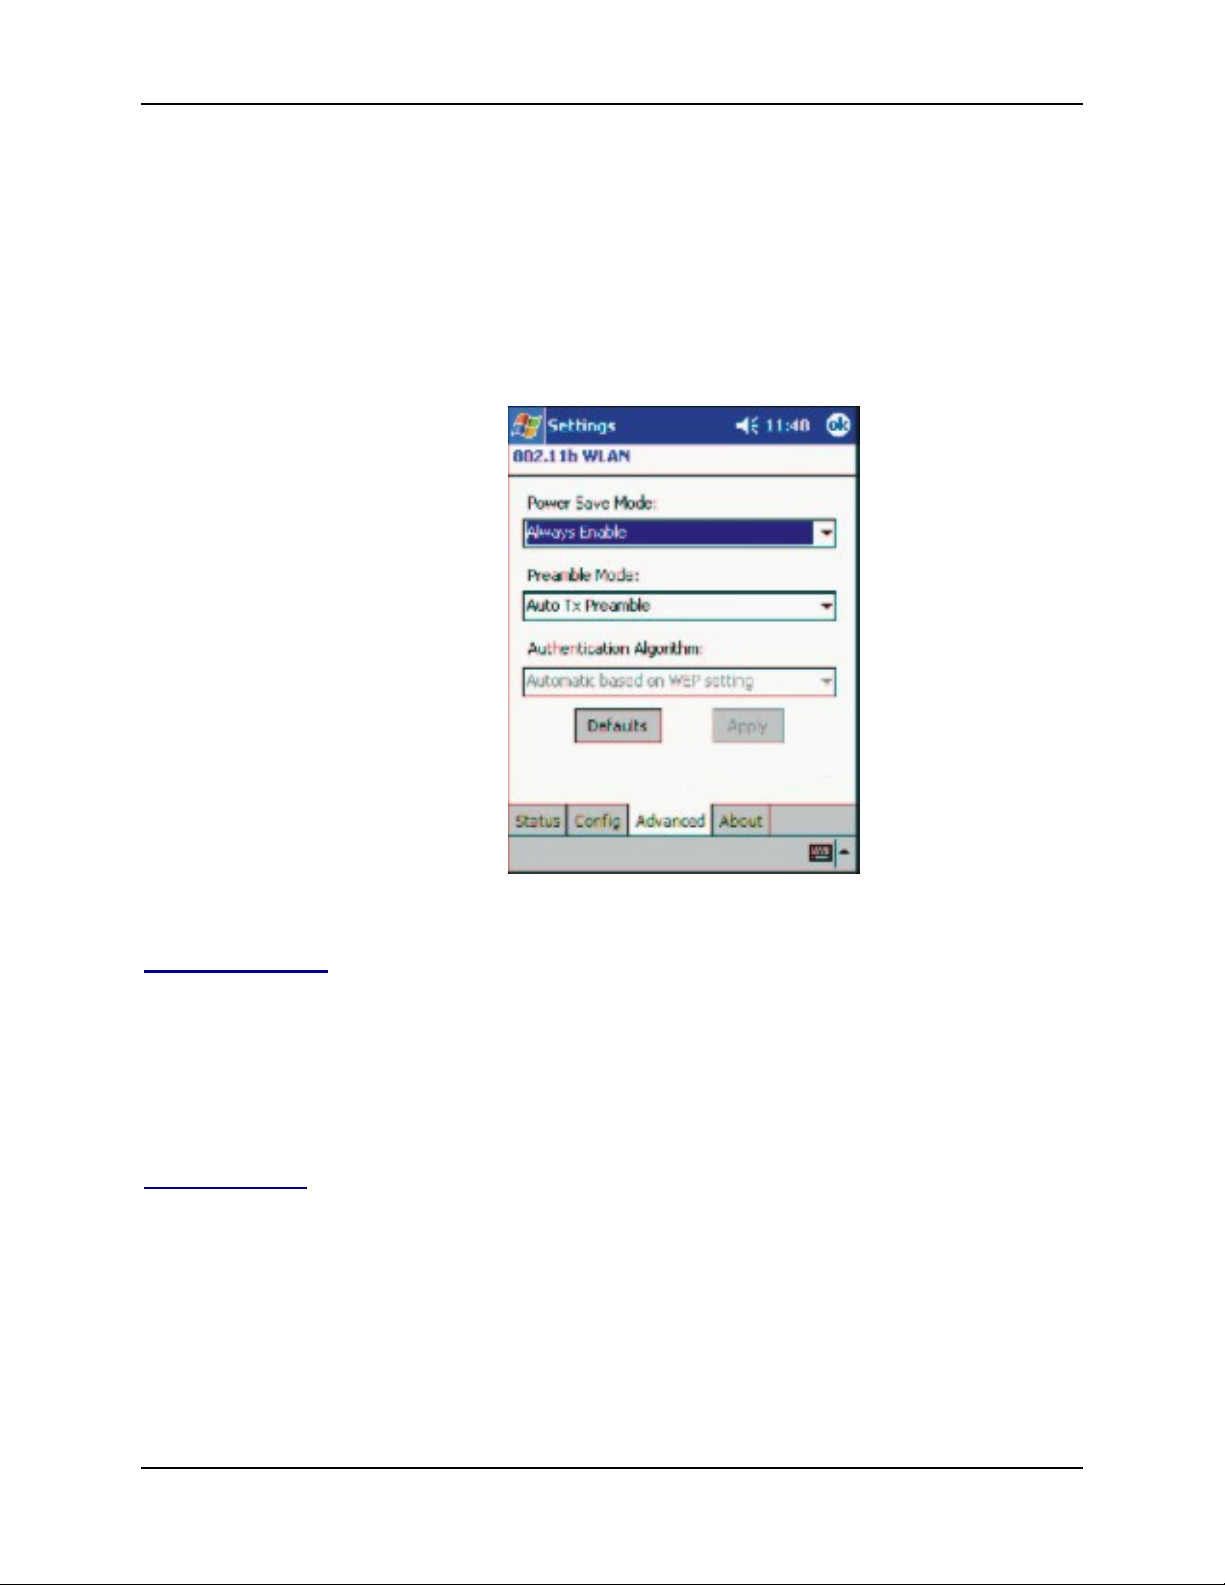
74 System Configuration
Advanced Tab
Access: Start | Settings | System tab | WLAN Settings | Advanced tab
The default values are:
Power Save Mode Always Enable
Preamble Mode Auto TX Preamble
Authentic Algorithm Automatic based on WEP setting.
Power Save Mode
Disable Choosing this option will disable the power save mode.
Always Enable Choosing this option will have the power save mode always enabled. This is
Auto Enable When internal battery is being used it will be in Power Save mode; when
Preamble Mode
A preamble consists of a Synchronization (Sync) field and a 16-bit Start Frame Delimiter (SFD)
field.
There are three options for this parameter. The default parameter is Auto Tx Preamble.
Long Tx Preamble Sync field consists of 128 bits.
Short Tx Preamble Sync field consists of 56 bits.
Auto Tx Preamble Automatically changes between long and short preamble mode
Figure 4-6 WLAN Settings – Advanced Screen
the default setting.
external power supply is being used the Power Save mode will be disabled
automatically.
transmission based on the access point configuration.
MX6 PPC Reference Guide E-EQ-MX6PCRG-C-ARC
Page 83
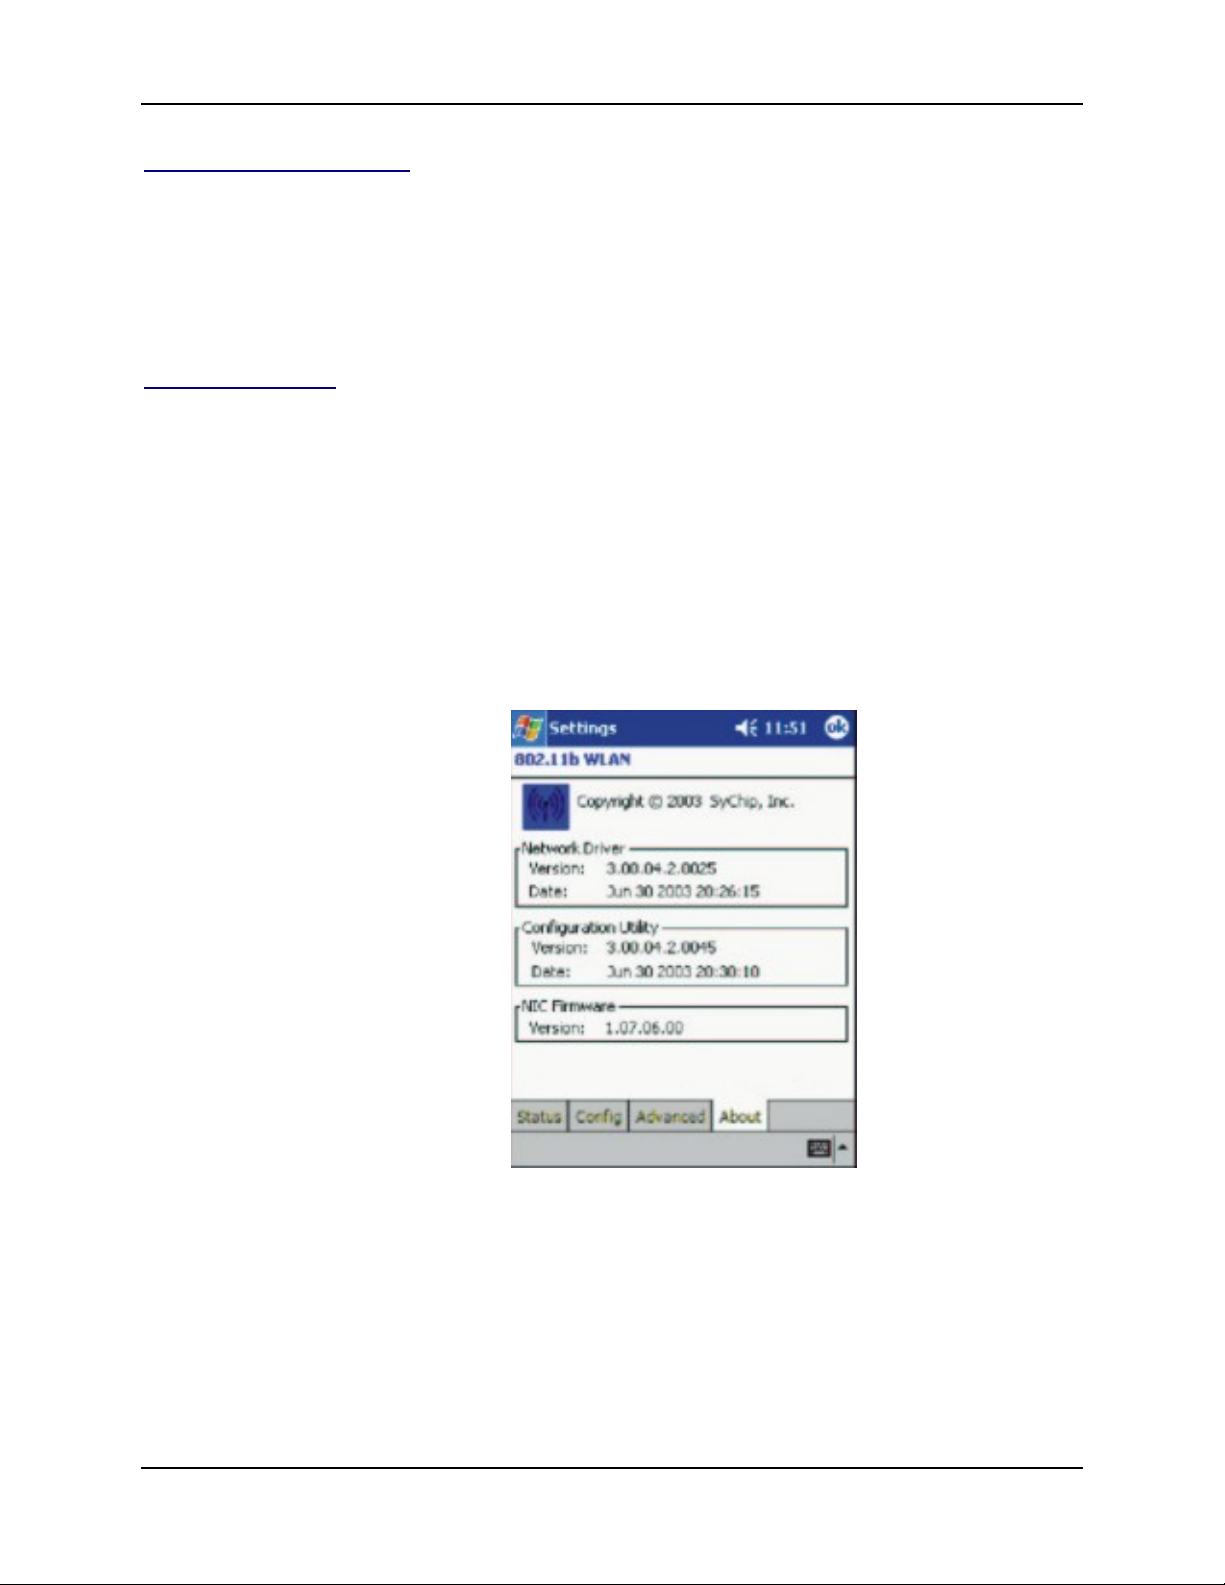
System Configuration 75
Authentication Algorithm
Note: Only configurable when the WEP Key is enabled for the SSID profile. See the following
section titled “Creating and Modifying Profiles” for WEP key instruction.
WECA Compliant (always use Open) Not available in this release.
Must use Shared with WEP AP must use WEP method.
Automatic based on WEP setting Default setting.
Operation Buttons
Defaults Returns all the settings to default values.
Apply Applies the change to the new card setting.
About Tab
Access: Start | Settings | System tab | WLAN Settings | About tab
This menu option displays the Version Number and time of build for the Network Driver,
Configuration Utility, and NIC Firmware. The information on this screen cannot be changed by
the user.
Figure 4-7 WLAN Settings – About Screen
E-EQ-MX6PCRG-C-ARC MX6 PPC Reference Guide
Page 84
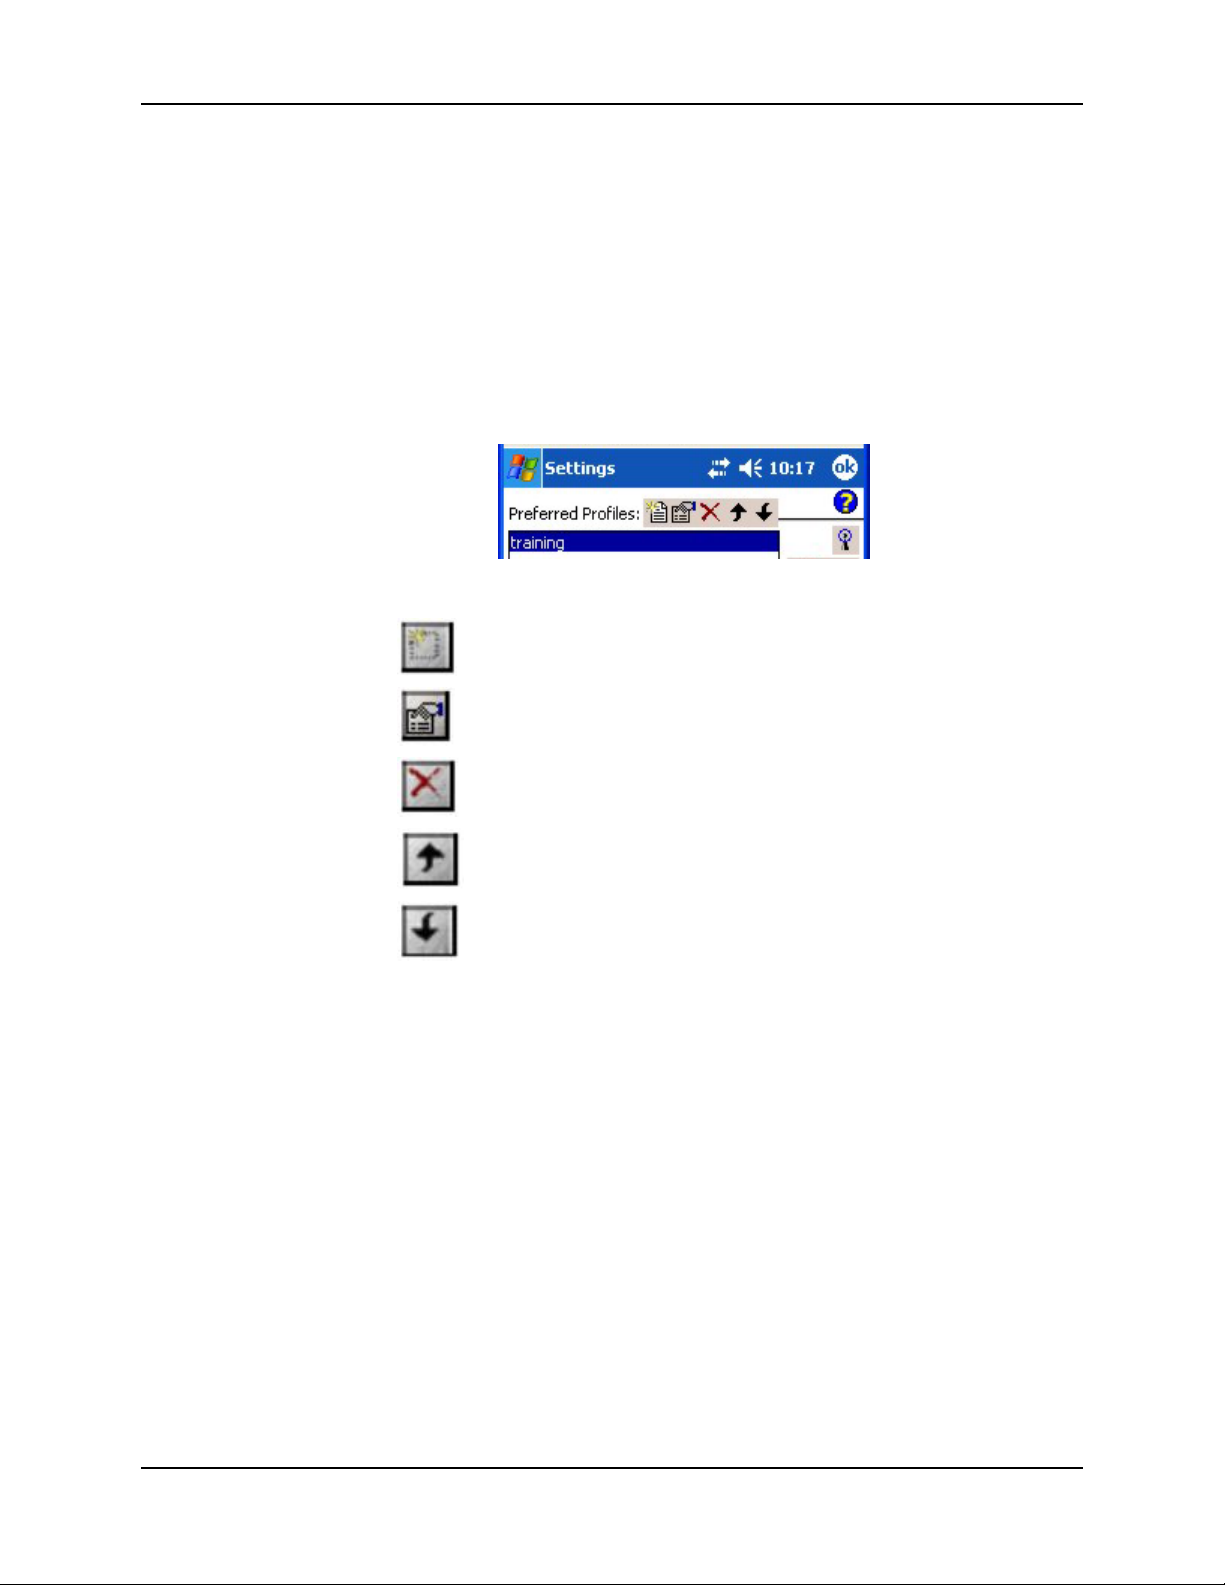
76 System Configuration
Creating and Modifying Profiles
Access: Start | Settings | System tab | WLAN Settings | Config tab
Prerequisites:
• Network SSID number of the Access Point for the MX6 PPC
• WEP or LEAP Authentication Protocol Keys (LEAP requires Meetinghouse software
described later in this chapter.)
Check with your network administrator for the security WEP Key and the Key ID you need to
use.
New. Create a profile.
Edit. Modify a profile.
Delete. Delete a selected profile.
Move the highlighted profile up to increase the automatic
association priority.
Move the highlighted profile down to decrease the automatic
association priority.
MX6 PPC Reference Guide E-EQ-MX6PCRG-C-ARC
Page 85
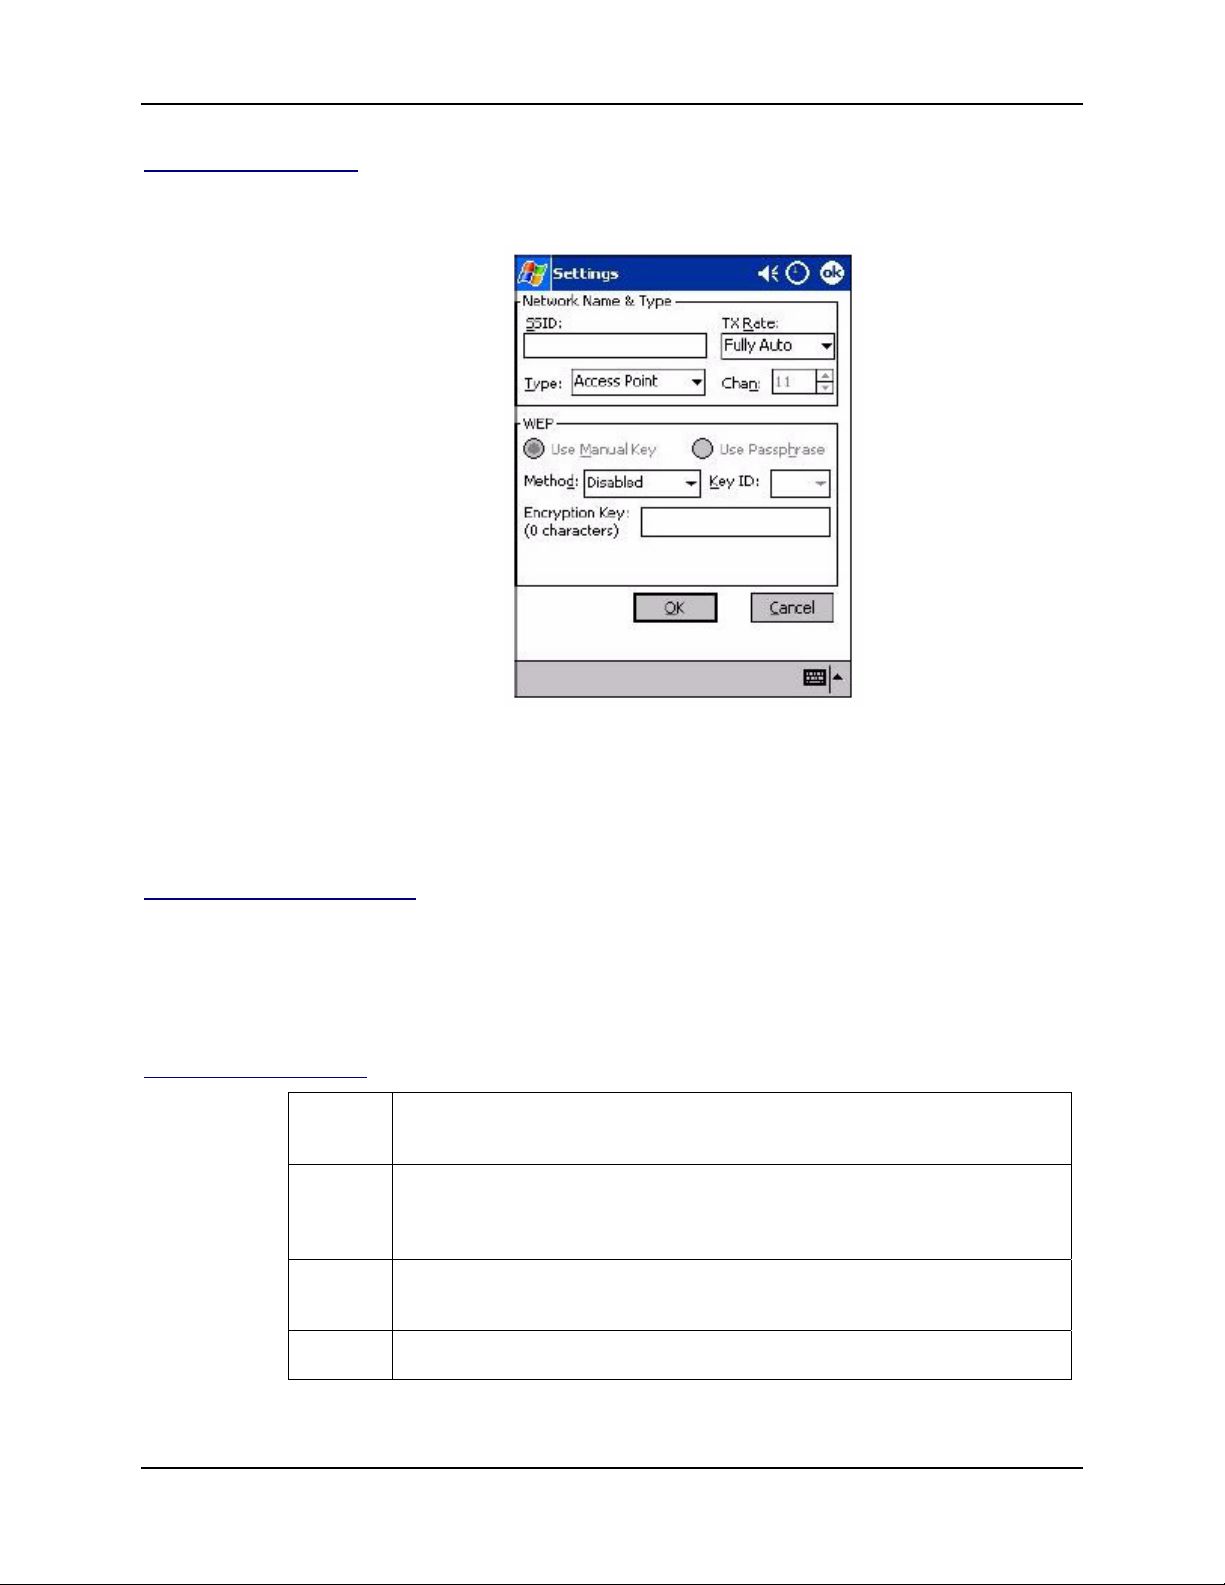
System Configuration 77
Create a New Profile
Click the New icon. The following screen is displayed:
Enter the values for the new profile .
Click Cancel to ignore all changes made on this screen. Click OK to make the changes, close this
screen and save the changes.
Modify an Existing Profile
When you need to modify an existing profile, select the profile to be modified from the Preferred
Profiles List on the Config tab screen. Click the Edit button.
Note: The SSID, Type, TX Rate, and Channel fields are unchangeable in AP mode, whereas TX
Rate and Channel fields can be changed in Peer-to-Peer mode.
Network Name and Type
SSID Enter an SSID, which is the Network Name. Check with your network
administrator for Network Name (SSID).
Type Choose from Peer-to-Peer or Access Point in the pull down menu. Access Point
mode is also called “Infrastructure” mode. Peer-to-Peer mode is used for
communication between two (or more) radios (cards) without an access point.
Figure 4-8 Add / Edit Network Profiles Display
TX Rate Choose 1Mb, 2 Mb, Auto 1/2 Mb, 5.5 Mb, 11 Mb, or Fully Auto from the menu.
The transmit rate is Fully Automatic by default.
Chan Channel. Scroll to select a channel for communication.
E-EQ-MX6PCRG-C-ARC MX6 PPC Reference Guide
Page 86

78 System Configuration
WEP
Configure the WEP Key for secure wireless communication.
Use Manual Key Manually input the encryption code for the WEP Key. This is the default
setting.
Use Passphrase Generates an encryption code based on the phrase entered in the window.
Not available in this release.
Method Select one of the five options from the pull down list:
Disabled WEP Key Off
64 bit (HEX) up to 10 characters configurable in Hexadecimal for
Encryption Key
64 bit (ASCII) up to 5 characters configurable in ASCII for
Encryption Key
128 bit (HEX) up to 26 characters configurable in Hexadecimal for
Encryption Key
128 bit (ASCII) up to 13 characters configurable in ASCII for
Encryption Key
Note: HEX, Hexadecimal number set of 16 digits from 0-9 and from
A(a)-F(f). ASCII: Any printable ASCII character.
Encryption Key Different character set depending on different WEP method and key
format.
Key ID Choose from the available options:
Key 1 (Default)
Key 2
Key 3
Key 4
Click OK to make the changes, close this screen and save the changes. Click Cancel to ignore all
changes made on this screen.
MX6 PPC Reference Guide E-EQ-MX6PCRG-C-ARC
Page 87
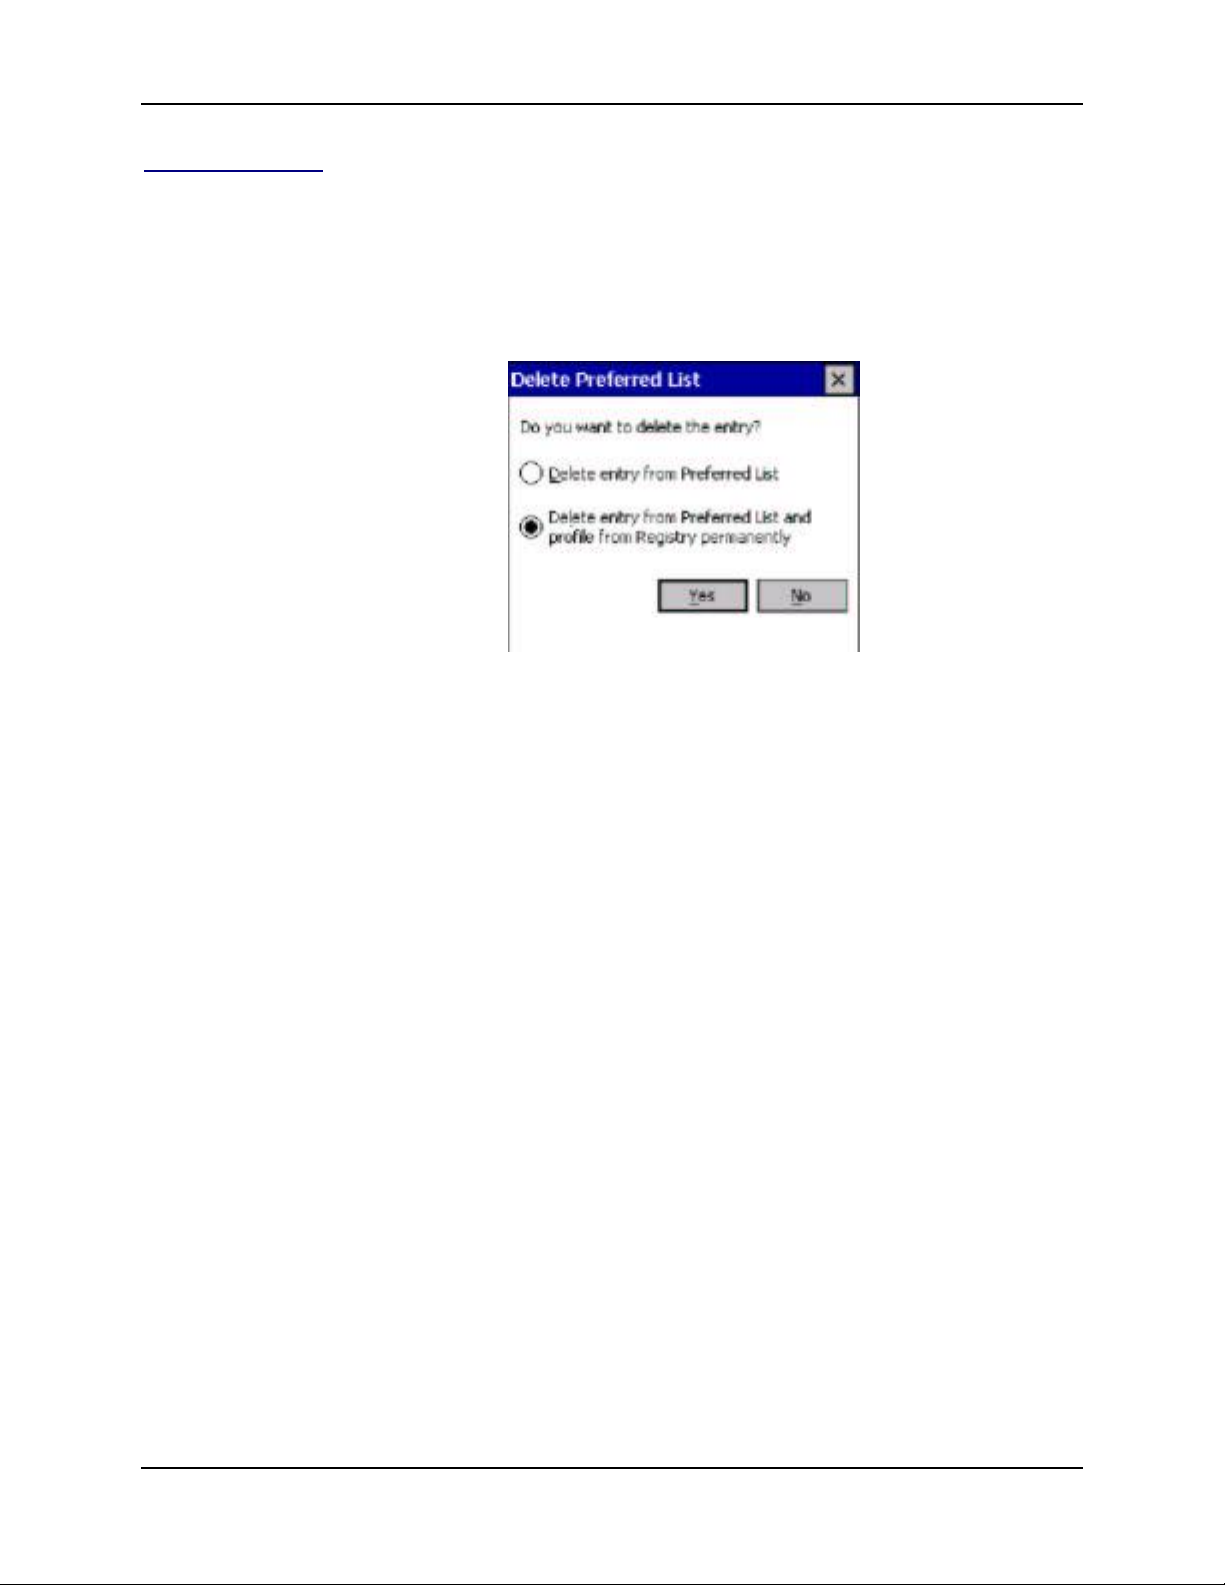
System Configuration 79
Deleting a Profile
Access: Start | Settings | System tab | WLAN Settings | Config tab | Delete
icon
Profiles may be deleted either from the Preferred List or from the Preferred List and Registry. To
delete a profile, select (highlight) a profile and click the Delete button and the following screen
displays:
Figure 4-9 Delete a Profile
From the pop-up window select the option of your choice and click Yes to confirm or No to
cancel.
E-EQ-MX6PCRG-C-ARC MX6 PPC Reference Guide
Page 88

80 System Configuration
Wireless Status Icon in Toolbar
Access this configuration utility by tapping and holding the stylus on the Status icon in the
toolbar. The following menu displays:
Wireless Radio On
Wireless Radio Off
Remove Status Icon . . .
Wireless Network Status . . .
Configuration . . .
Advanced Configuration . . .
Version Information . . .
Figure 4-10 WLAN Status Icon
The four menu entries at the bottom correspond to the four configuration settings tabs: the Status,
Config, Advanced, and About respectively. This side menu provides a shortcut to the
configuration settings.
Wireless Radio On Turns on the radio. LED is on and the Link Icon displays with
signal strength.
Wireless Radio Off Turns off the radio. A pop-up window will ask for your
confirmation.
If confirmed, the LED will be off and the Link Icon will change
color from green to red on the top without signal strength
displayed. The WLAN card/module will stop functioning.
Remove Status Icon Removes the Status Icon from the Windows Status Tray. A pop-
up window will ask for your confirmation.
If confirmed, the Status Icon will not display in the Windows
Status Tray.
By checking “Remove Status Icon Permanently” at the bottom of
the window you will not see the Status Icon even after your
system has been restarted. Otherwise it will re-appear next time
you turn on the system.
Wireless Network Status Opens the Status tab of the configuration utility.
If the Status Icon changes to a crossed lock , it warns you that
you may have entered a wrong key (WEP Key mismatch) for the
WEP-On AP or a station.
Note: You can also go to Start | Programs | WLAN Settings.
MX6 PPC Reference Guide E-EQ-MX6PCRG-C-ARC
Page 89

System Configuration 81
Meetinghouse AEGIS Client
Access: Start | Programs | Meetinghouse AEGIS Client icon
Note: When the Client is running, tap the Meetinghouse icon in the toolbar to make changes.
Use this menu option to set LEAP parameters for the 802.11 radio connection.
There are three menu options in the toolbar: Client, View and Help.
Select Client | Configure to make changes to the client configuration.
When configuration changes have been made, a message “Please restart client in order for
configuration changes to take effect” is displayed on the screen. Click OK to restart the client.
Getting Started
The AEGIS client is initially started from the start menu. Initially it will open on the Main screen.
When closed, the client runs in the background and it’s icon is present in the system tray. The
color of the icon indicates the state of the client authentication.
To use the client, a port must be configured and enabled. A protocol must be configured and
started. These are separate operations. Please see your network system administrator to obtain the
information necessary to configure the AEGIS client in order to provide network access.
Main Screen
The Client's Main screen contains a list of controlled ports (NICs). The colored port icon on the
left indicates the authentication state.
The Main screen contains menu bar buttons or tabs labeled Client, View,and Help. Selecting each
button will bring up a small menu. The Client button controls the run state and access to protocol
configuration. View controls the appearance of the main screen and access to the event log. Help
allows access to the registration dialog, help, and version information.
Selecting the port(interface) brings up a menu which allows the port to be controlled and
configured. The port can be enabled or disabled, and must be enabled to work. Port configuration
is covered in Port Configuration. Delete removes a port from the list.
Client Button Menu
Close Close the Client interface.
Start/Stop Start or Stop the configured authentication protocol on the selected port.
Restart Same as stop, then start.
Configure Brings up the Protocol Configuration Dialog, which contains the identity and
protocol values which apply to all the adapters used by the authentication
engine.
Install Protocol Bind the 802.1X protocol to any port (adapter) currently active.
Exit Exit the Client and terminates the authentication engine.
E-EQ-MX6PCRG-C-ARC MX6 PPC Reference Guide
Page 90
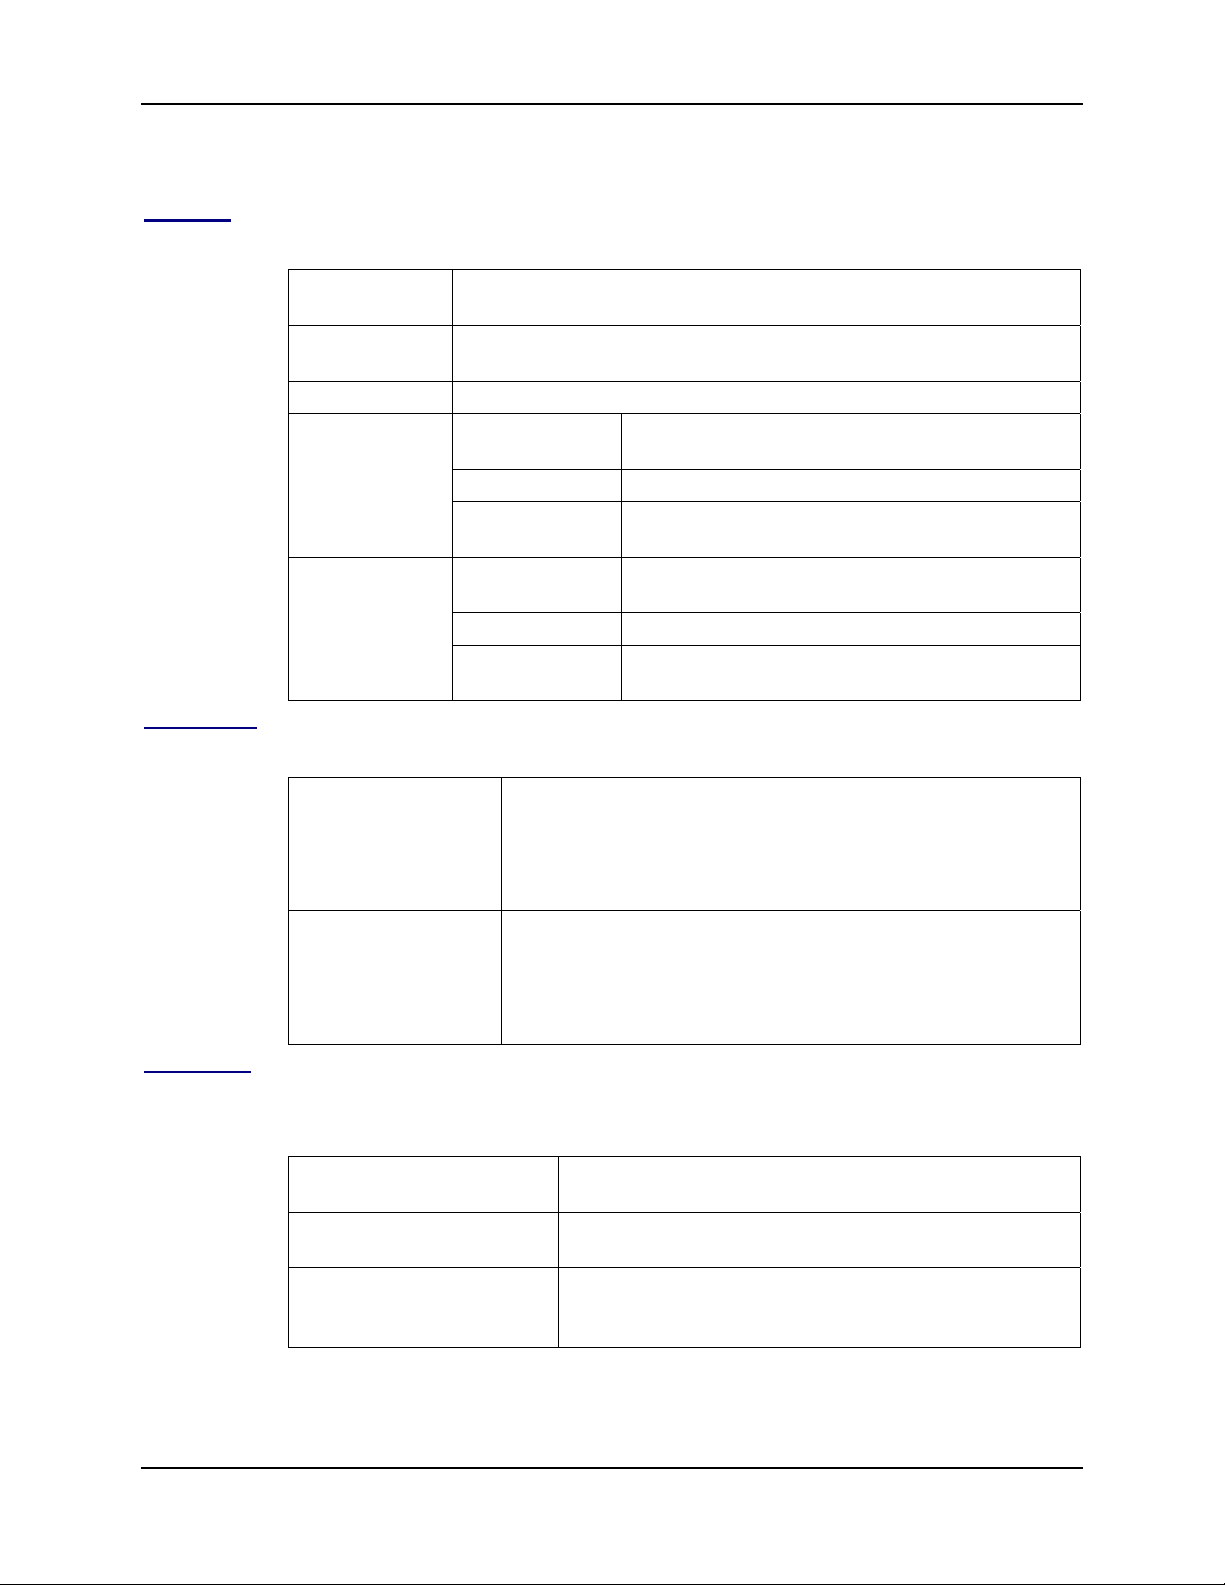
82 System Configuration
Protocol Configuration
User tab
Allows protocol selection and setting user credentials.
Identity The device ID supplied to the authenticator. It can be up to 63 characters
long and is case sensitive.
Authentication Select the protocol to be used from the drop down box: MD5-Challenge,
TLS/Smart Card, LEAP, TTLS, PEAP.
Password The password for MD5, Phase 1 TTLS, PEAP and LEAP.
Certificate
Tunneled
authentication
Use certificate When checked, it enables the use of the optional user
certificates in TTLS and PEAP. Default is unchecked.
Change button Press to bring up certificate change dialog.
Display field Shows the familiar name of the certificate selected in
the certification dialog.
Identity Identity for TTLS and PEAP phase 2. Default is Not
Used.
Password Password for TTLS and PEAP phase 2.
Protocol Protocol to be used in the secure tunnel, selected from
the drop down box.
System tab
Server tab
Contains parameters to set system level fields.
Log Level The level of detail in the log messages. Errors has the least detail,
debugging the most. Default is “Information”. The log file
“log8021X.TXT” is written to the Windows directory by default.
Clicking “View” on the AEGIS Client – Running screen opens a
menu where selecting “Event Log” opens the log file for viewing.
Port Manager Timeout The time for the radio to wait without activity before entering an
inactive state which will require a restart of the connection. Default
is 10 seconds.
When the Port Manager timeout has expired, a message is displayed
on the screen. Click OK to restart.
Information used to verify a server certificate in TOS, TTLS or PEAP. The default is “Not Used”.
Use the parameters on this screen when debugging or assigning server certificates.
Do not validate server
certificate chain
Certificate issuer must be Select the CA which signed the server certificate, or "Any
Allow intermediate certificates Allow unspecified certificates to be in the server certificate
If enabled, the server certificate will not be validated. For
debugging only.
Trusted CA".
chain between the server certificate and the specified
“Certificate issuer”.
MX6 PPC Reference Guide E-EQ-MX6PCRG-C-ARC
Page 91
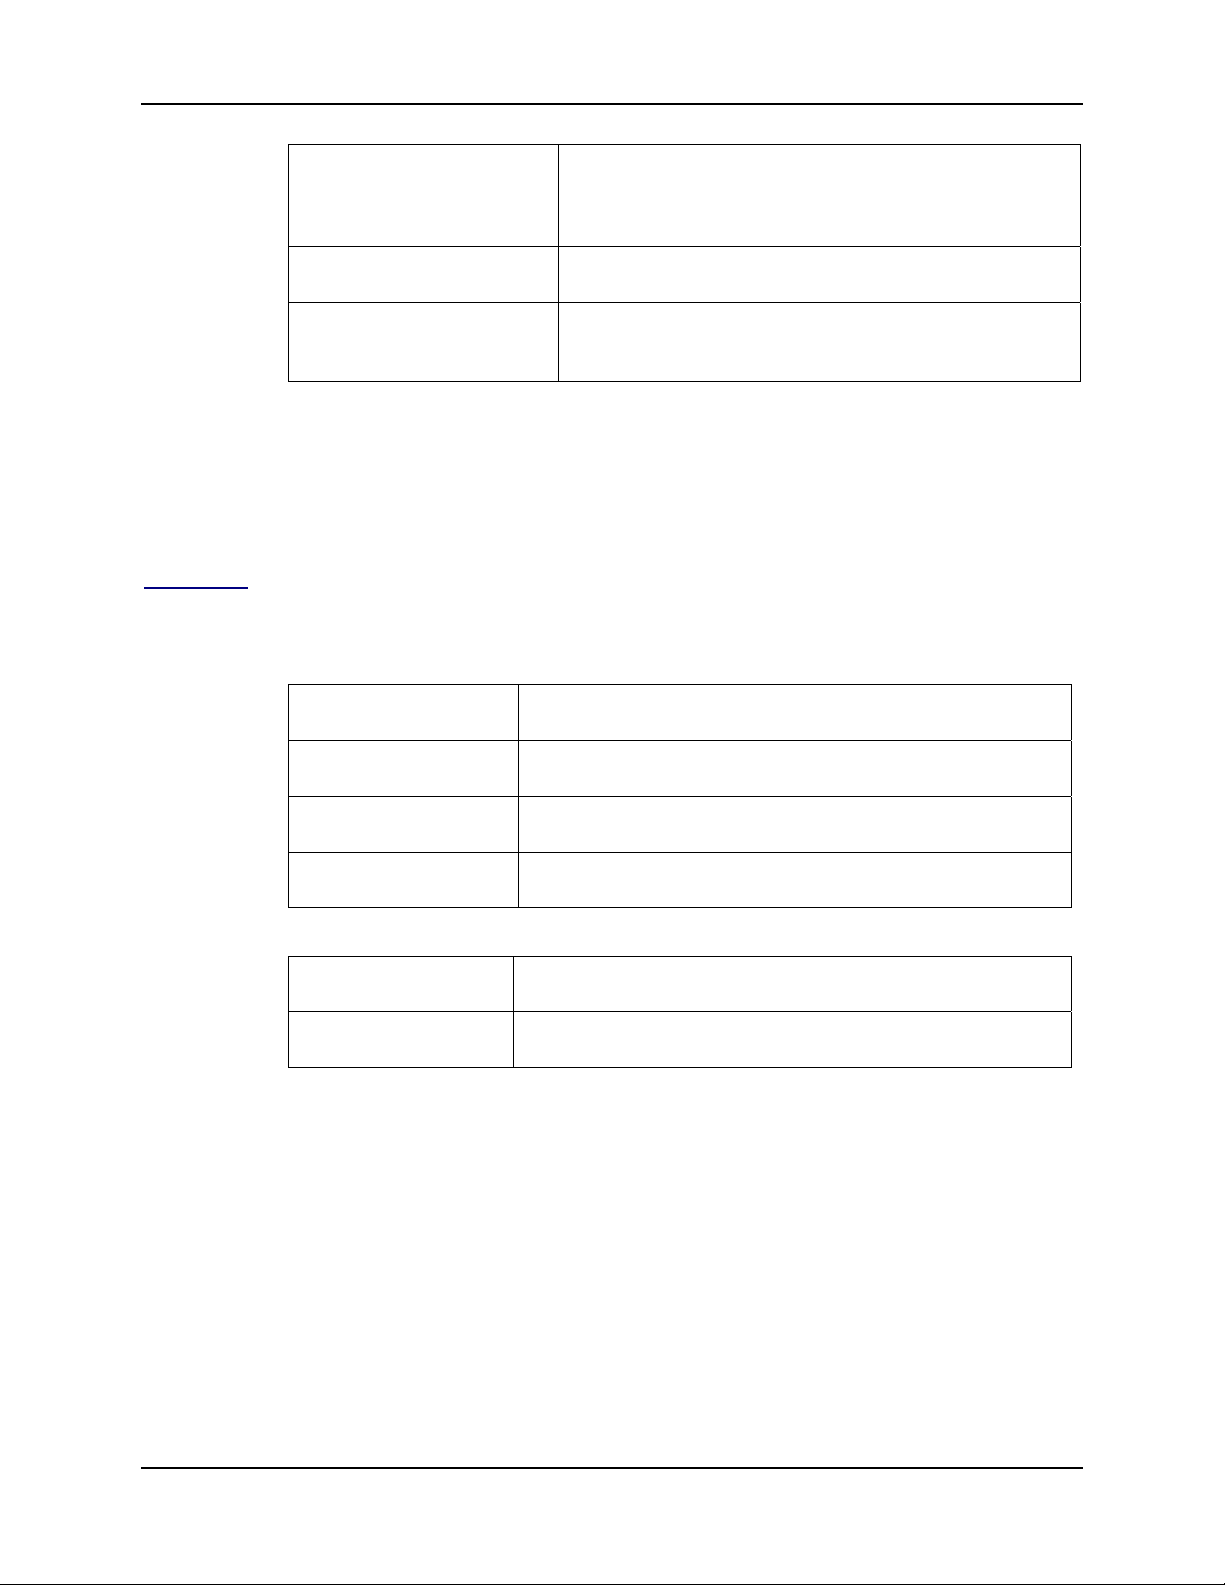
System Configuration 83
Server name must be The server name, or a domain to which the server belongs,
depending on which of the two fields below has been
checked. This will be compared to the server certificate's
Subject: CN field.
Server name must match
exactly
Domain name must end in
specified name
When selected, the server name entered must match exactly
the server name found on the certificate.
When selected, the server name field identifies a domain and
the certificate must have a server name belonging to this
domain or to one of its sub-domains
Port Configuration
The main menu contains the list of ports. Click a port to enable, disable, configure the parameters
or delete the port.
The parameters apply to all ports.
Configure
The Port Settings Dialog is displayed.
Protocol Options
Interface Options
Status Displays
Authentication status is indicated by the color of the tray and port icons.
Authentication Timeout The period the radio will wait to receive a response from the
access point. The default is 30 seconds.
Held timeout The length of time the client will remain in the held state after
failing authentication. The default is 60 seconds.
Start timeout The period of time the client will remain in the connecting state
before restarting from lack of response. The default is 30 seconds.
Number of start attempts Before the client gives up. It defaults to the authenticated state
although there is no network connectivity. The default is 3 tries.
Display EAP
Notifications
Renew IP Address Enabled. DHCP is used to obtain an IP address immediately after
Yellow Authentication has started.
Green Success.
Orange Associated but no response to radio packets.
Red Failure.
Blue No radio activity.
Gray Port is disabled.
Enabled. This option allows informational messages from the
access point to be displayed on the screen.
authentication.
E-EQ-MX6PCRG-C-ARC MX6 PPC Reference Guide
Page 92

84 System Configuration
Logging
The log is an ASCII text file named LOG8021X.TXT in the Windows directory. Selecting View
and then Log will open the log in the system text editor. The detail recorded in the log is set from
the System Settings dialog. Severity of each entry is indicated by the number of asterisks
preceeding the message:
• 1 = debugging
• 2 = information
• 3 = warning
• 4 = error
Registration
The Registration dialog is reached from the Main screen by selecting Help | Register. If a client is
not registered, it will typically expire in 2 weeks after which time it will not authenticate. After
Registration, the Client will again authenticate, and has an unlimited lifetime. This dialog is not
available if the client has been registered. There are two fields:
License ID A case sensitive field which contains a unique ID. Generally the "Personal
License ID" presented in the text of the Register dialog is entered into this
field.
License Key A case sensitive field obtained by registering the client.
When both fields contain proper values, selecting "OK" completes the licensing process.
MX6 PPC Reference Guide E-EQ-MX6PCRG-C-ARC
Page 93
System Configuration 85
Memory
Access: Start | Settings | System tab | Memory
Tap Start | Help at any time for context-sensitive help.
Factory Default Settings
Main
Total main memory 61.77 MB
Storage setting 25% of available memory
Program setting 75% of available memory
Storage Card
Total Memory 14.46 MB / IPSM directory
Running Program List
File Explorer None
If a program becomes unstable or stops running, use the Running Program List to highlight the
program name, the select Activate, Stop or Stop All programs.
Tap OK to close the menu.
Power
Access: Start | Settings | System tab | Power
Use this screen to determine the strength of the main battery and the backup battery as well as
setting the time delay for turning the device off if it is not being used.
Tap Start | Help at any time for context-sensitive help.
Radio Manager
Access: Start | Settings | System tab | Radio Manager
Use this screen to determine the status of Radio Modes or select a mode and tap the Apply button
on the screen. Tap OK when changes have been made or to close the window with no changes
made.
Context sensitive Help is not available for this option.
Factory Default Settings
Battery Power
Turn off device if not used for Enabled / 3 minutes
External Power
Turn off device if not used for Disabled / 5 minutes
E-EQ-MX6PCRG-C-ARC MX6 PPC Reference Guide
Page 94

86 System Configuration
Regional Settings
Access: Start | Settings | System tab | Regional Settings
No change from general desktop PC Regional Settings Properties options. Adjust the settings and
tap the OK box to save the changes. The changes take effect immediately.
Factory Default Settings
Regional Setting English (United States)
Number 123,456,789.00 / -123,456,789.00 neg
Currency $123,456,789.00 pos / ($123,456,789.00) neg
Time h:mm:ss tt (tt=AM or PM)
Date M/d/yy short / dddd,MMMM,dd,yyyy long
Remove Programs
Access: Start | Settings | System tab | Remove Programs
Tap the name of the program in storage memory, then tap Remove. Tap OK to close this option.
Changes take place immediately.
User installed device drivers, when removed, require a cold boot to completely remove the
program.
You can also adjust memory allocated for programs by tapping the “Adjust memory allocation”
link at the bottom of the screen.
MX6 PPC Reference Guide E-EQ-MX6PCRG-C-ARC
Page 95
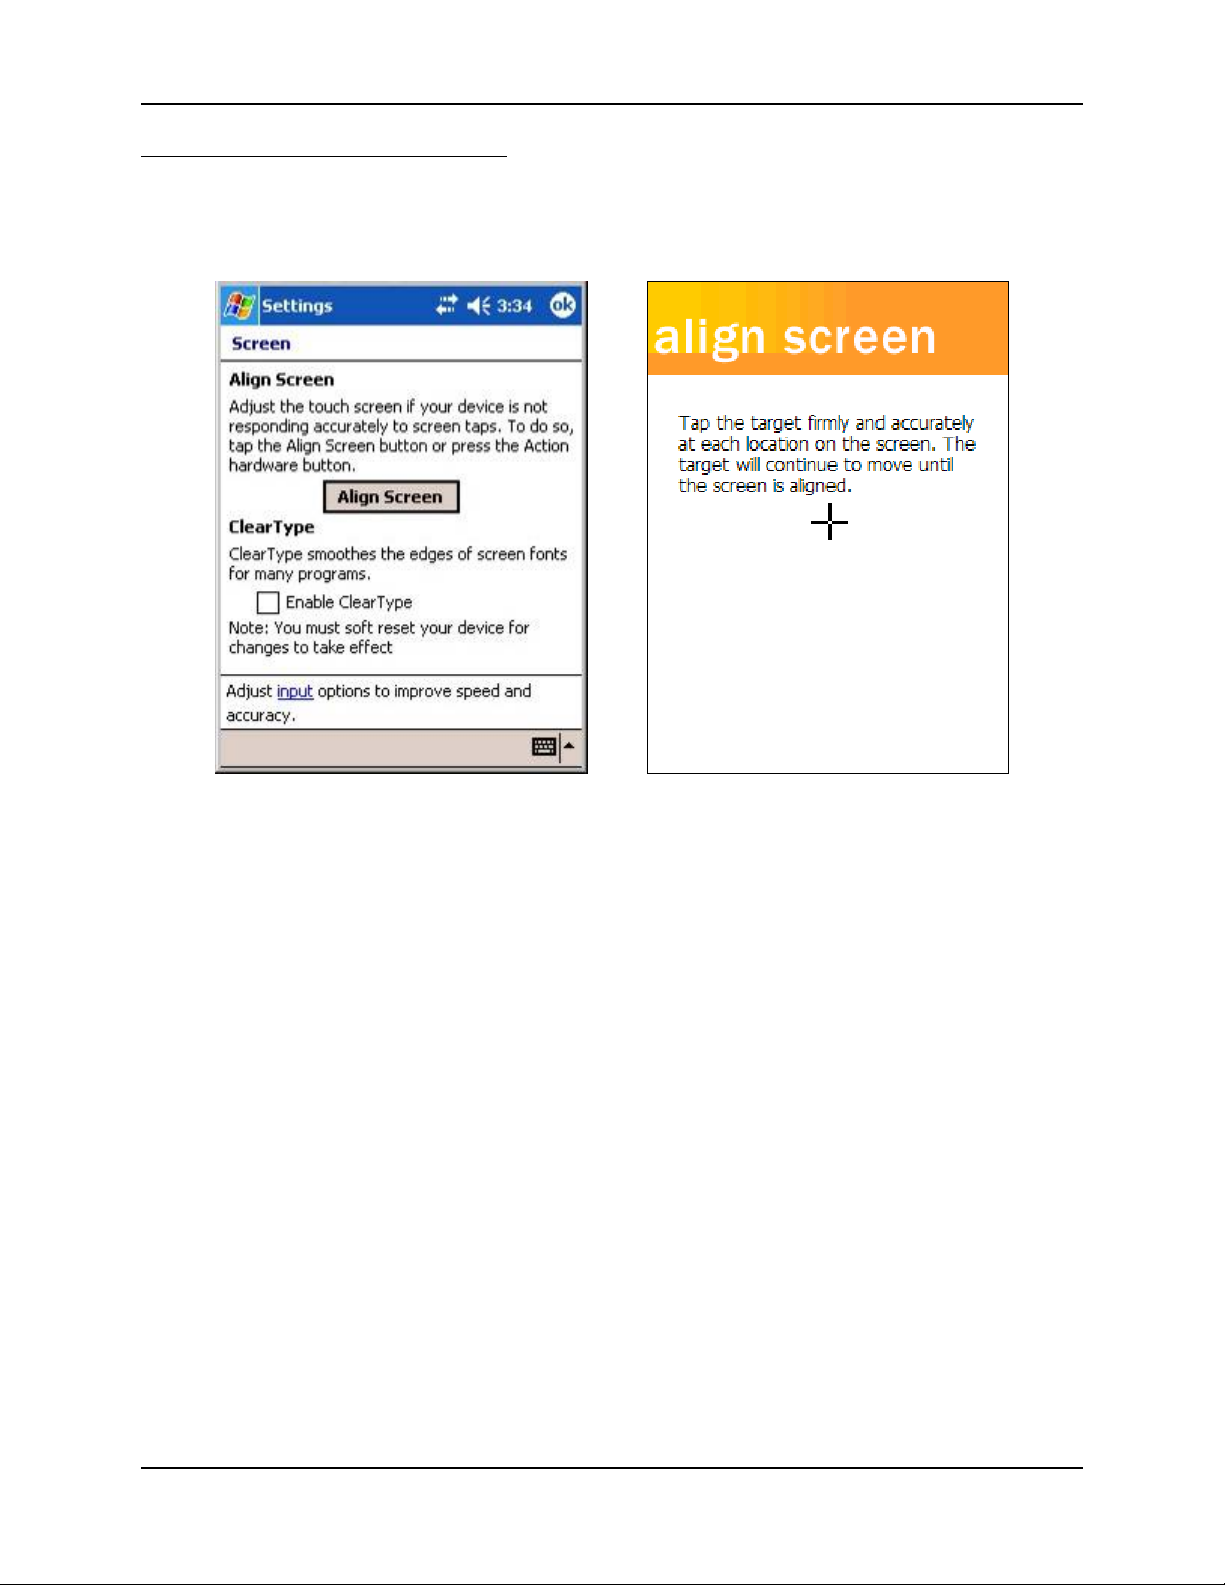
System Configuration 87
Screen
Access: Start | Settings | System tab | Screen
Figure 4-11 Align Screen
The screen can be aligned at any time. To start, tap the “Align Screen” button with the stylus.
Follow the instructions on the screen and press the Enter key (or tap the OK icon) to save the new
calibration settings. You can also press the Esc key sequence to cancel or quit.
Select “Enable ClearType” to smooth the edges of screen fonts displayed.
Select “Adjust input options … “ link to improve speed and accuracy when using the stylus.
E-EQ-MX6PCRG-C-ARC MX6 PPC Reference Guide
Page 96
88 System Configuration
Connections Tab
Help is always available at any stage – tap Start, tap Help and context-sensitive online help is
displayed. Tap OK to close Help and return to the program or application.
AvantGo Connect
Access: Start | Settings | Connections tab | AvantGo Connect
Factory Default Settings
Server AvantGo.com (sync.avantgo.com:80)
Hostname Sync.avantgo.com
Port 80
Username Blank
Password Blank
Connection Options
Connect to this server Enabled
Refresh all content at next sync Enabled
Connect securely Disabled
Use this option to assign server settings and synchronize with all servers using AvantGo. Tap OK
to close this menu option. Any changes made are in effect immediately.
Beam
Access: Start | Settings | Connections tab | Beam
Factory Default Settings
Receiving All Enabled
If the option to "Receive all incoming beams and select discoverable mode" is checked, the MX6
PPC will automatically receive all incoming InfraRed transmissions. InfraRed Receive must be
enabled on the receiving device, if sending IR from the MX6 PPC to another device.
To send a file using IR, first locate the file you want to send. Tap and hold the file, then tap Beam
Item on the pop-up menu. Individual files can be sent, but not folders.
Items are automatically received through IR as soon as the IR ports (and comm settings) match up.
See the section titled “Infrared Receive” for more information.
MX6 PPC Reference Guide E-EQ-MX6PCRG-C-ARC
Page 97
System Configuration 89
Connections
Access: Start | Settings | Connections tab | Connections tab
Factory Default Settings
Automatically Connect to Internet
Internet Settings Default (Persistent)
Automatically Connect to Work
Internet Settings Default (Persistent)
My Network Card Connects to
Work Default (Persistent)
Tap OK to close this menu option. Any changes made are in effect immediately.
Dialing Locations
Access: Start | Settings | Connections tab | Dialing Locations tab
Factory Default Settings
Location Work
Local Settings
Area Code 425
Country code 1
Dialing Patterns
Local calls 9,G
Long distance 9,1FG
International 9,011,EFG
Tap OK to close this menu option. Any changes made are in effect immediately.
E-EQ-MX6PCRG-C-ARC MX6 PPC Reference Guide
Page 98
90 System Configuration
Network Adapters
Access: Start | Settings | Connections tab | Network Adapters.
Tap an adapter to view or change the properties.
Factory Default Settings
NE2000 Compatible Ethernet Driver
Properties button
Use server-assigned IP address Enabled
Use specific IP address Disabled
Tap the OK button to close this menu option. Any changes made are in effect immediately.
Tap the Properties button.
Access: Start | Settings | Connections tab | Network Adapters | Properties
Factory Default Settings
IP Address
Use server-assigned IP address Default
Use specific IP address
IP Address Blank
Subnet Mask Blank
Default Gateway Blank
Name Servers
DNS Blank
Alt DNS Blank
WINS Blank
Alt WINS Blank
Tap OK to close this menu option. Any changes made are in effect the next time the adapter is
used.
MX6 PPC Reference Guide E-EQ-MX6PCRG-C-ARC
Page 99

System Configuration 91
Find
Access: Start | Find
There are few changes in the Pocket PC version of the Windows Find program as it relates to the
general desktop PC Windows Find function. Tap Start | Help to access context-specific help.
Help
Access: Start | Help
There are few changes in the Pocket PC version of the Windows Help program as it relates to the
general desktop PC Windows Help program. Tap OK to close Help.
E-EQ-MX6PCRG-C-ARC MX6 PPC Reference Guide
Page 100

92 System Configuration
MX6 PPC Reference Guide E-EQ-MX6PCRG-C-ARC
 Loading...