

Page 1
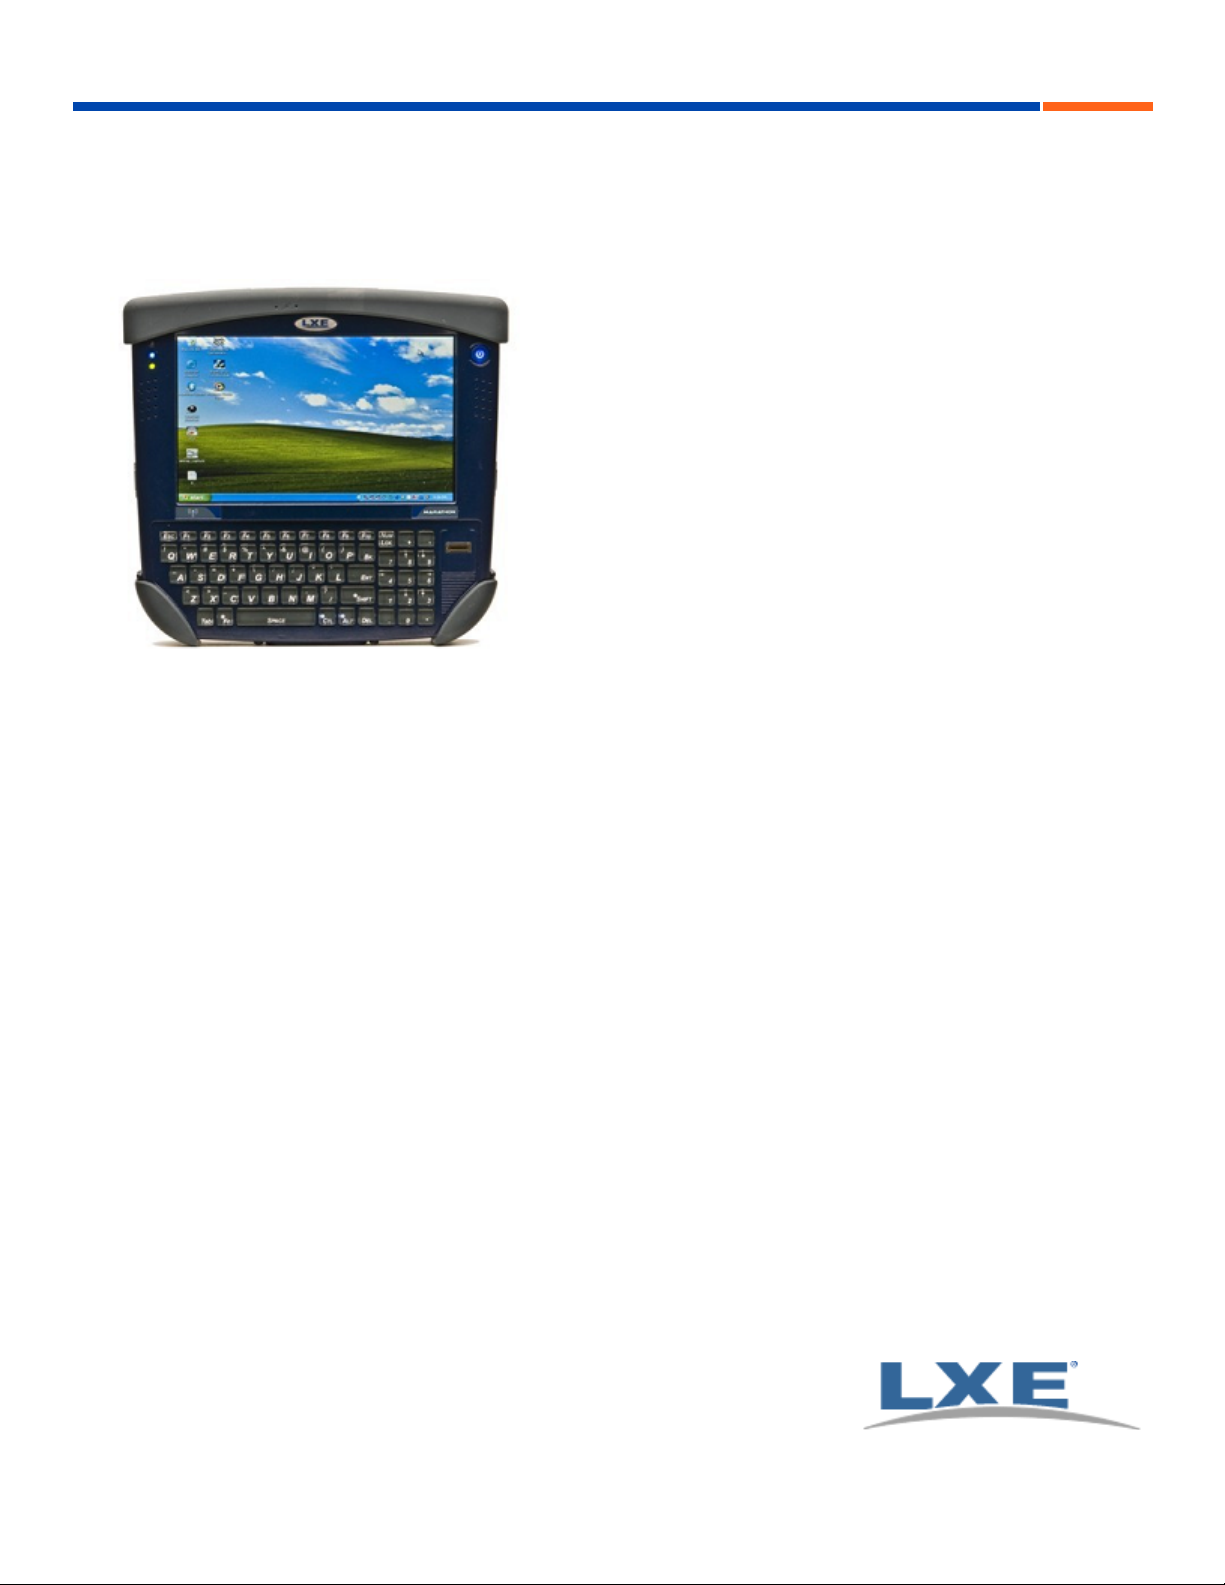
Marathon™ User Guide
Microsoft® Windows® XP® Operating System
LXE | WORX | Handheld Computer
E-EQ-MARATHONOGWW-A
Copyright © 2011 by LXE®, Inc., An EMS Technologies Company. All Rights Reserved.
Page 2

Notices
LXE Inc. reserves the right to make improvements or changes to published Marathon information at any time without notice.
While reasonable efforts have been made in the preparation of this publication to assure its accuracy, LXE assumes no liability
resulting from any errors or omissions in this publication, or from the use of the information contained herein. Further, LXE
Incorporated, reserves the right to revise this publication and to make changes to it from time to time without any obligation to
notify any person or organization of such revision or changes.
Trademarks
Copyright © 2011 by LXE Inc., An EMS Technologies Company, 125 Technology Parkway, Norcross, GA 30092 U.S.A. (770)
447-4224
LXE® and Spire® are registered trademarks of LXE Inc.
Microsoft®, ActiveSync®, MSN, Outlook®, Windows®, Windows Mobile®, the Windows logo, and Windows Media are
either registered trademarks or trademarks of Microsoft Corporation in the United States and/or other countries.
Intel and Intel Atom are trademarks or registered trademarks of Intel Corporation or its subsidiaries in the United States and
other countries.
Summit Data Communications, Inc. Summit Data Communications, the Summit logo, and “The Pinnacle of Performance” are
trademarks of Summit Data Communications, Inc.
The Bluetooth® word mark and logos are owned by the Bluetooth SIG, Inc. and any use of such marks by LXE, Inc. is under
license.
Symbol® is a registered trademark of Symbol Technologies. MOTOROLA® and the Stylized M Logo are registered
trademarks of Motorola®, Inc.
PowerScan is a registered trademark of Datalogic Scanning, Inc., located in Eugene, OR.
Qualcomm® is a registered trademark of Qualcomm Incorporated. Gobi is a trademark of Qualcomm Incorporated.
Freefloat WLinq, Freefloat LinkOne and Freefloat AccessOne are registered trademarks of Freefloat, Mölndalsvägen 30B, SE-
412 63 Gothenburg, Sweden.
PenMount, the PenMount logo are registered trademarks of Salt International Corporation, Taipei, Taiwan, R.O.C.
AuthenTec, (developed TruPrint Sensor used in Biometric Mouse) TouchChip and TrueSuite are registered trademarks and
QuickSec, SafeXcel, Fusion, SafeZone, Eikon, TrueNav, SteelCoat, TouchStone, DataDefender and KeepSafe are
trademarks of AuthenTec, Inc., Melbourne, FL.
When any part of this publication is in PDF format: “Acrobat ® Reader Copyright © 2011 Adobe Systems Incorporated. All
rights reserved. Adobe, the Adobe logo, Acrobat, and the Acrobat logo are trademarks of Adobe Systems Incorporated”
applies.
Other product names mentioned within this publication may be trademarks or registered trademarks of other companies.
Li-Ion Battery
When disposing of the lithium-ion battery, the following precautions should be observed: The battery should be disposed of
properly. The battery should not be disassembled or crushed. The battery should not be heated above 212°F (100°C) or
incinerated.
CAUTION - RISK OF EXPLOSION IF BATTERY IS REPLACED BY AN INCORRECT TYPE.
DISPOSE OF USED BATTERIES ACCORDING TO THE INSTRUCTIONS.
Page 3

Table of Contents
Set Up A New Marathon 1
Hardware Setup 1
Software Setup 1
Laser Warnings and Labels 2
Label Location 2
Label 2
Components 3
Front View 3
Rear View 4
Bottom View 5
Right Side View 5
Left Side View 6
Battery 7
Charge or Recharge the Main Battery 7
Charge or Recharge the Auxiliary Battery 7
Tapping the Touchscreen with a Stylus 8
Using the Biometric Mouse 9
LED Indicators 10
Power Button 10
Status LEDs 10
Keyboard Indicators 10
Adjust Display Brightness 10
Connecting Cables to the Marathon 11
Connecting USB Devices 11
Connecting an AC/DC Power Supply 12
Connecting an Audio Device 13
Connecting a USB Tethered Scanner 14
Connecting a Cigarette Lighter Power Adapter 15
Connect Power Supply to Vehicle Mounted Dock 15
Installing the Auxiliary Battery Pack 16
Attaching the Hand Strap 18
Attaching the Shoulder Strap 20
Marathon Configuration Options 22
Date and Time 22
Power Management 22
Speaker Volume 22
Connect Bluetooth Devices 22
E-EQ-MARATHONOGWW-A [ i ] Marathon™ User Guide
Page 4

Table of Contents
Restart/Shutdown 22
Calibrate Touchscreen 22
MarathonDesktop and Vehicle Dock 23
Using the Vehicle Dock 23
Place the Marathon in the Vehicle Dock 23
Removing the Marathon from the Vehicle Dock 23
Using the Desktop Dock 24
Place the Marathon in the Desktop Dock 24
Removing the Marathon from the Desktop Dock 24
Regulatory Notices and Safety Information 25
Class B Digital Device 25
RF Safety Notice 26
Laser Light Safety Statement 27
Vehicle Power Supply Connection Safety Statement 29
Revision History 29
Index 30
E-EQ-MARATHONOGWW-A [ ii ] Marathon™ User Guide
Page 5

Set Up A New Marathon
Note: LXE recommends that installation or removal of accessories be performed on a clean, well-lit surface. When
necessary, protect the work surface, the Marathon, and components from electrostatic discharge.
While the Marathon is in a Hazardous Location DO NOT:
l Connect an external power source to the Marathon.
l Connect a USB device or audio jack to the Marathon.
l Remove or install an auxiliary battery pack.
l Place the Marathon in a powered dock.
Hardware Setup
Install the hand strap and/or shoulder strap.
Provide a power source:
l Connect a power cable.
l Place the Marathon in a powered desktop or vehicle mount dock, or
l Install a fully charged auxiliary battery.
Press the Power key.
Note: If your Marathon is shipped with a Microsoft Windows operating system pre-installed, it may be necessary to
complete the Windows licensing/registration screens when starting the Marathon for the first time. To complete this
information, you may need the Microsoft Windows software/product key that is included with the Marathon. Please refer
to the Marathon Reference Guide for more instruction.
This Marathon™ User Guide has been developed for a Marathon with a Windows®XP Professional operating system.
Software Setup
Prerequisite: Hardware setup is complete.
1. Set Date and Time
2. Set Power Management
3. Adjust Speaker Volume
4. Pair Bluetooth devices
5. Setup Wireless client parameters - Please refer to the Marathon Reference Guide
For hardware and software setup instruction not listed here, please refer to the Marathon Reference Guide.
E-EQ-MARATHONOGWW-A [ 1 ] Marathon™ User Guide
Page 6
Laser Warnings and Labels
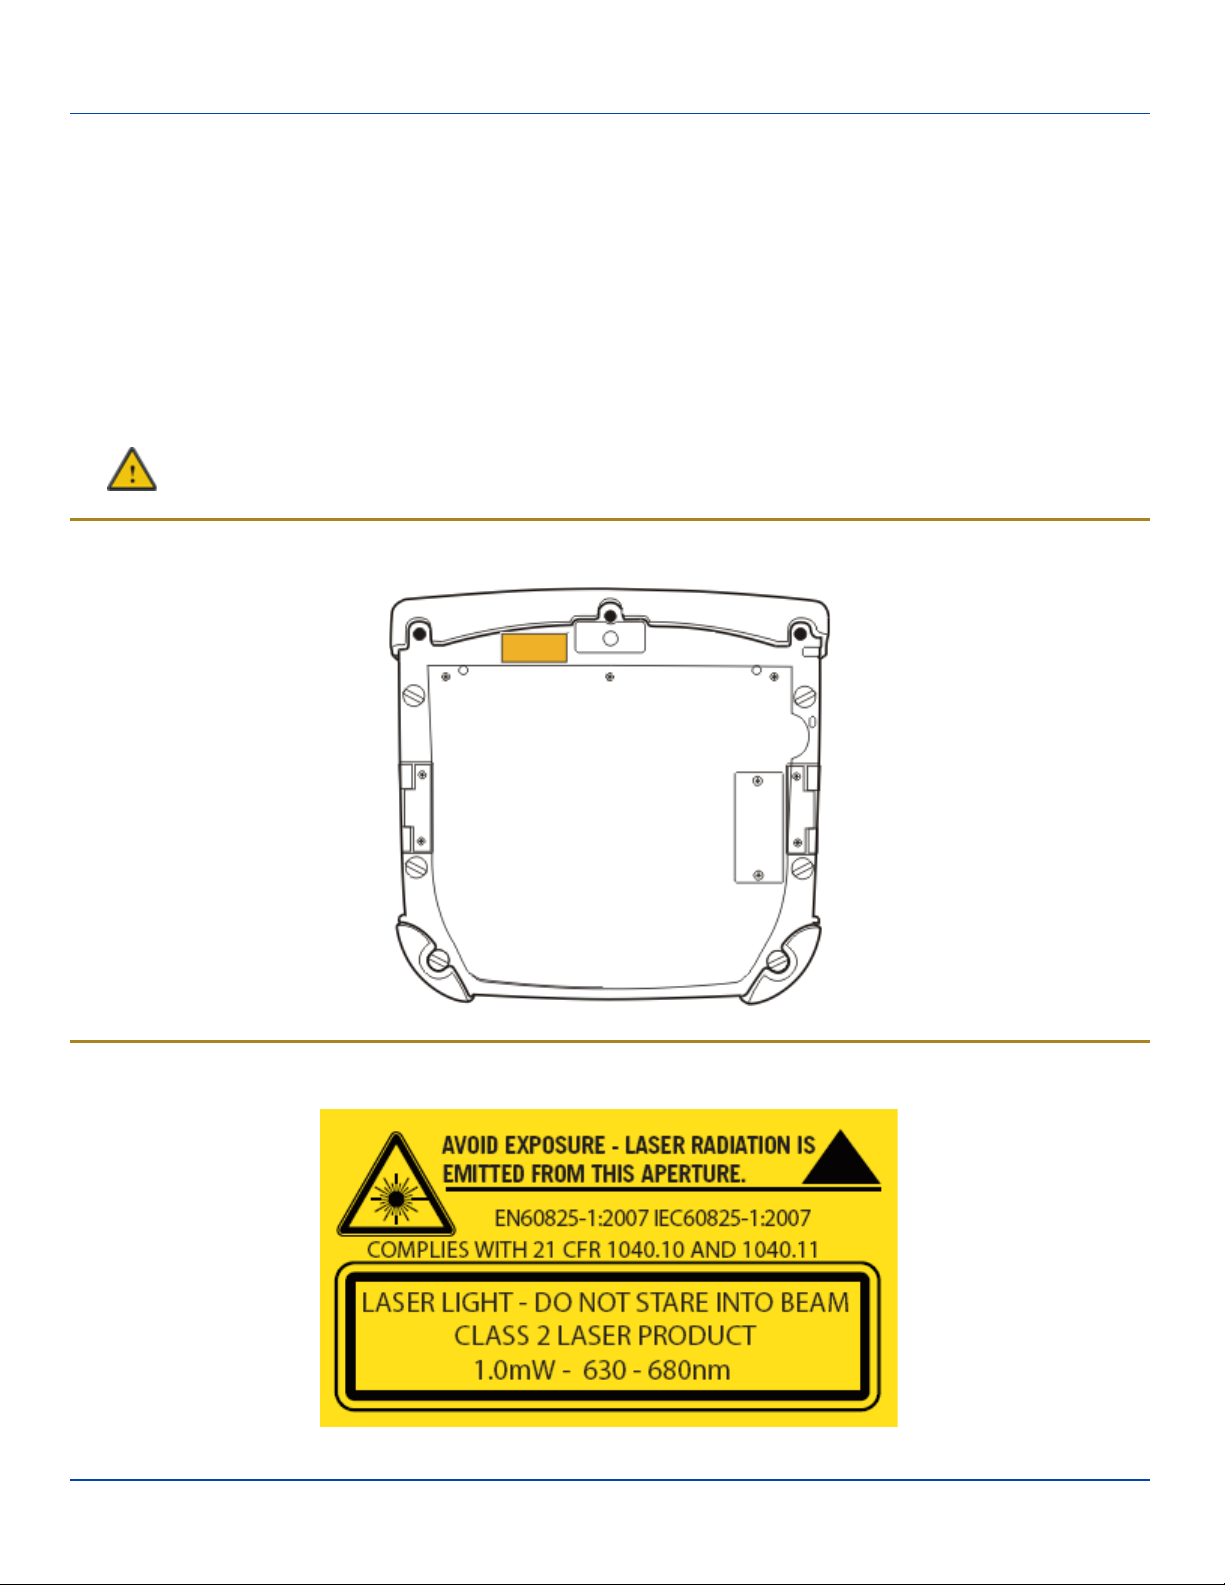
Laser Warnings and Labels
Note: A 2D Imager Add-on may be installed on the Marathon. Laser warnings and labels that follow are specifically for a
Marathon with a 2D Imager.
l Do not look into the laser’s lens.
l Do not stare directly into the laser beam.
l Do not remove the laser caution labels from the Marathon.
l Do not connect the laser barcode aperture to any other device. The laser barcode aperture is certified for use with the
Marathon only.
Caution
Laser radiation when open. Please read the caution labels. Use of controls, adjustments or performance of procedures other than those specified herein may result in hazardous radiation exposure.
Label Location
Label
E-EQ-MARATHONOGWW-A [ 2 ] Marathon™ User Guide
Page 7
Components
Components
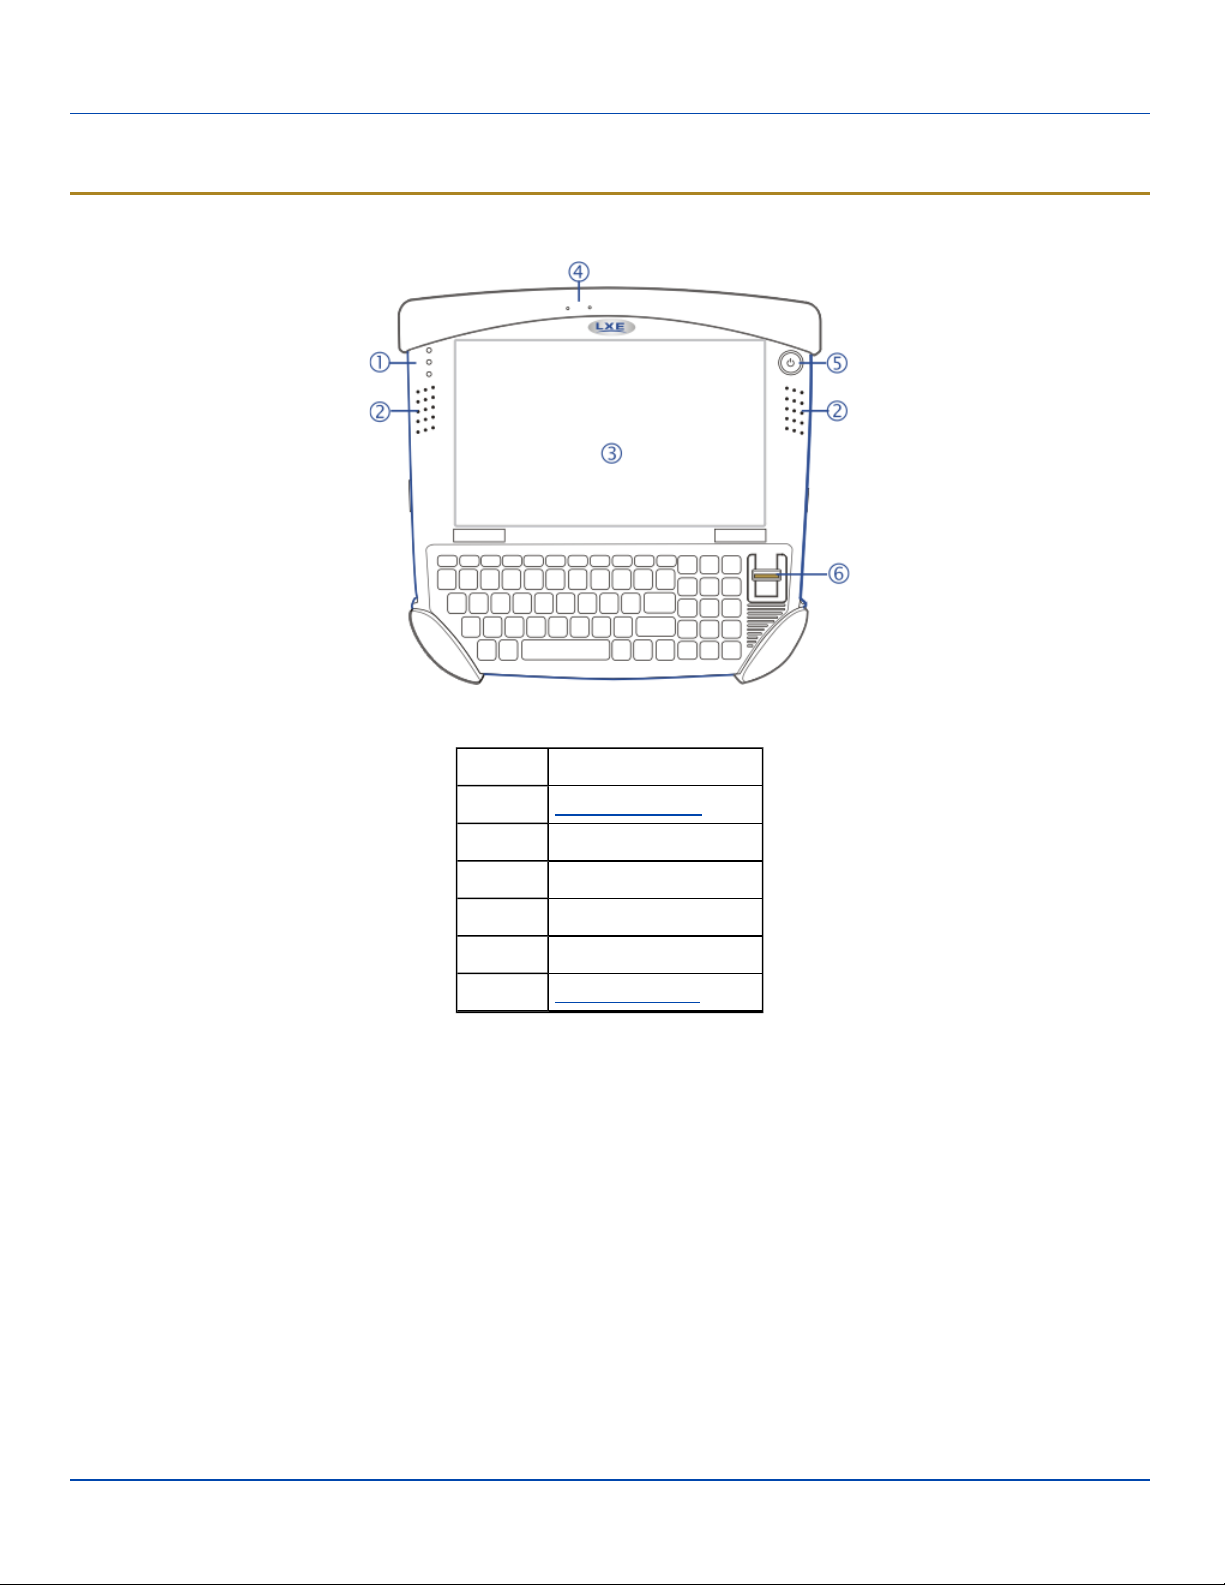
Front View
Marathon Components, Front
Position Function
1 Status Indicators
2 Speakers
3 Touch Screen / Display
4 Microphone
5 Power Button
6 Biometric Mouse
E-EQ-MARATHONOGWW-A [ 3 ] Marathon™ User Guide
Page 8
Rear View
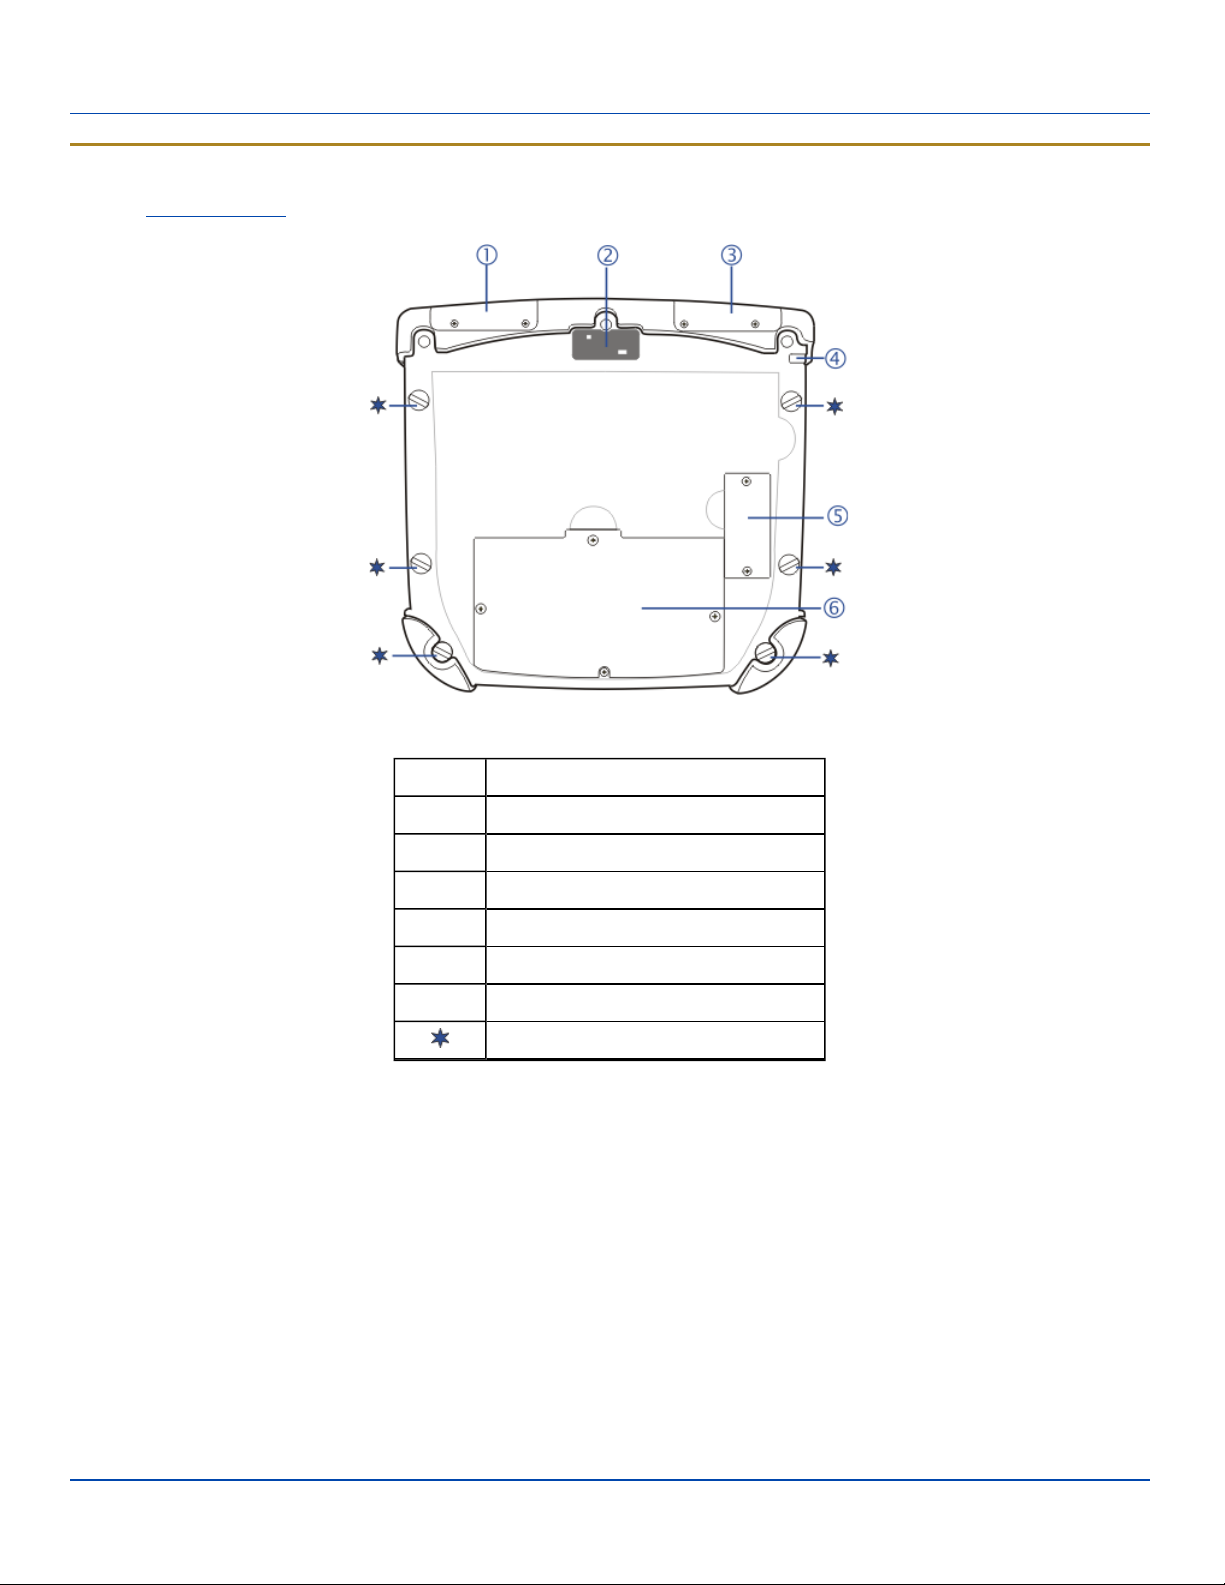
Rear View
Note: Auxiliary battery is not installed in this image.
Marathon Components, Rear
Position Function
1 Magnetic Stripe Reader Add-on Cover
2 Camera
3 Barcode Imager Add-on Cover
4 Tethered Stylus
5 Auxiliary Battery Connector Cover
6 Internal Battery / SIM Card Cover
Handstrap Connect Options
E-EQ-MARATHONOGWW-A [ 4 ] Marathon™ User Guide
Page 9
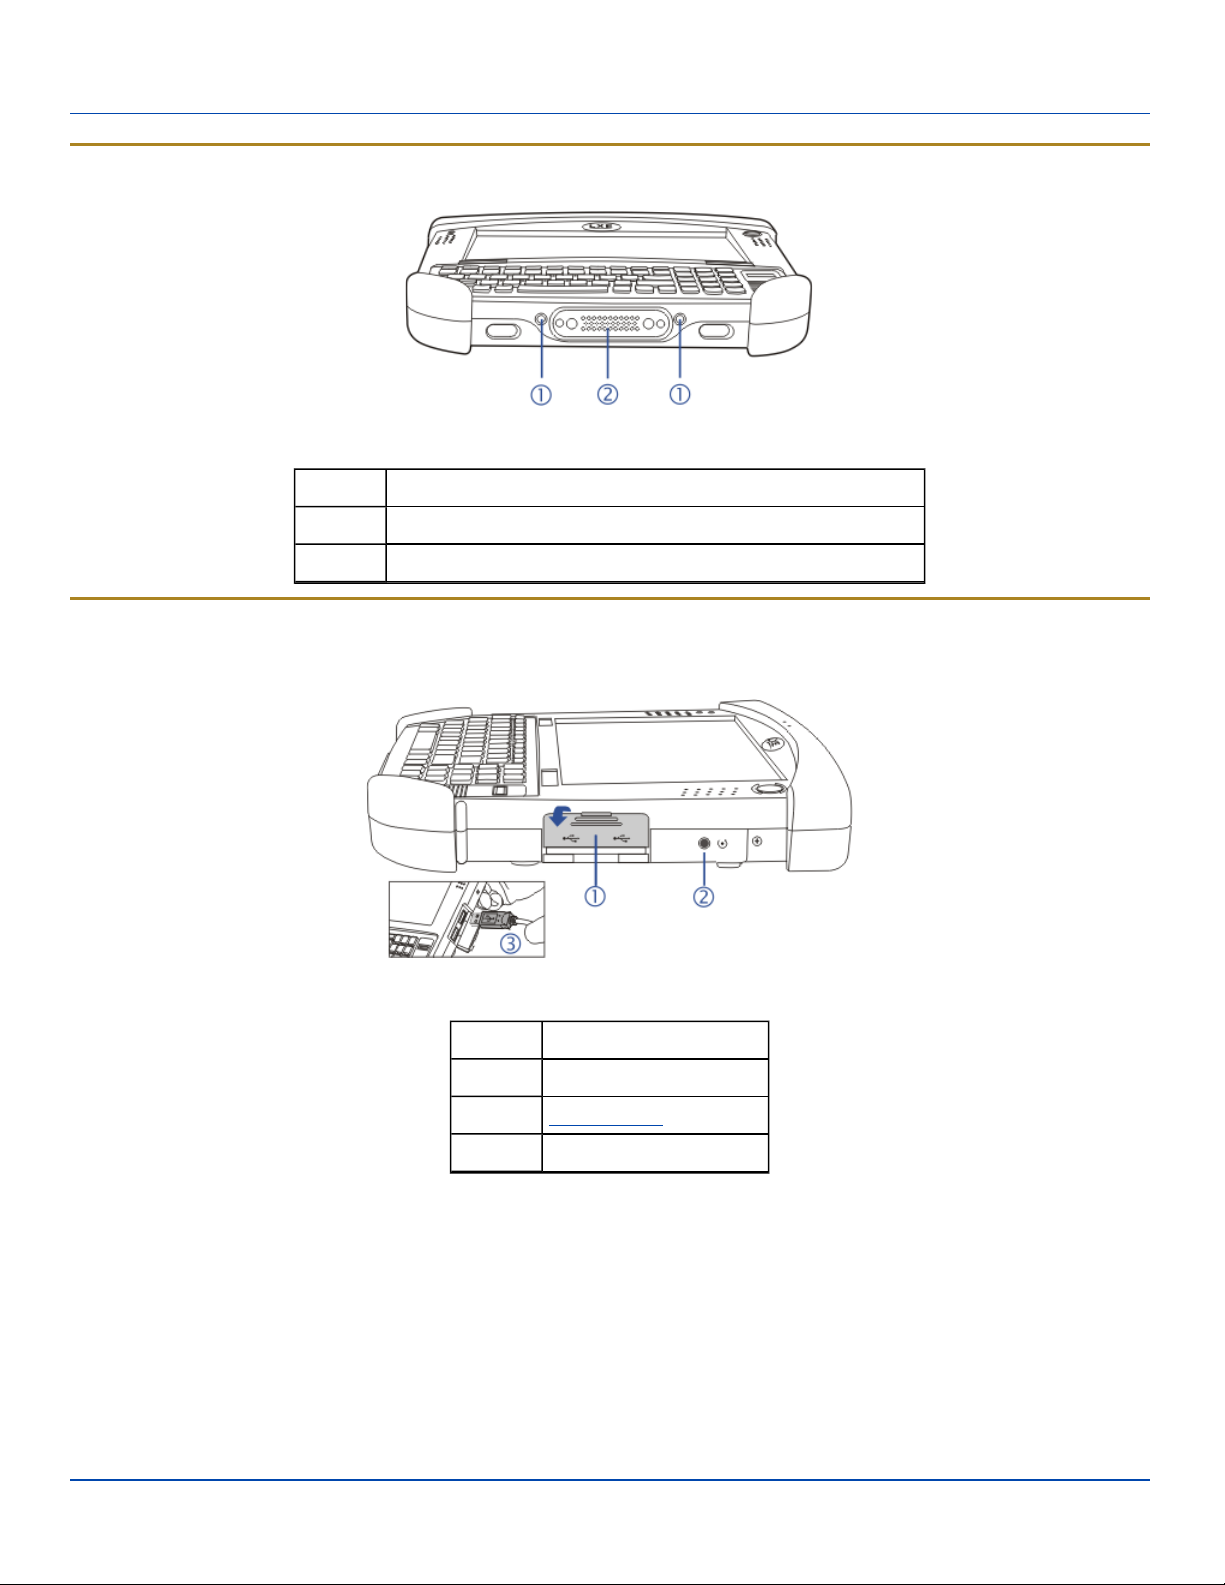
Bottom View
Bottom View
Marathon Components, Bottom
Position Function
1 External Antenna Connections (use in vehicle dock only)
2 Docking Connector (use in desktop and vehicle mount docks)
Right Side View
The components are on the right side of the Marathon when viewed from the front.
Marathon Components, Right
Position Function
1 USBPort Cover
2 Reset Button
3 Two USB2.0 Host Ports
Note: The Reset Button, when pressed in with the tip of the stylus, performs the same function as the Start | Shutdown |
Reset sequence.
E-EQ-MARATHONOGWW-A [ 5 ] Marathon™ User Guide
Page 10
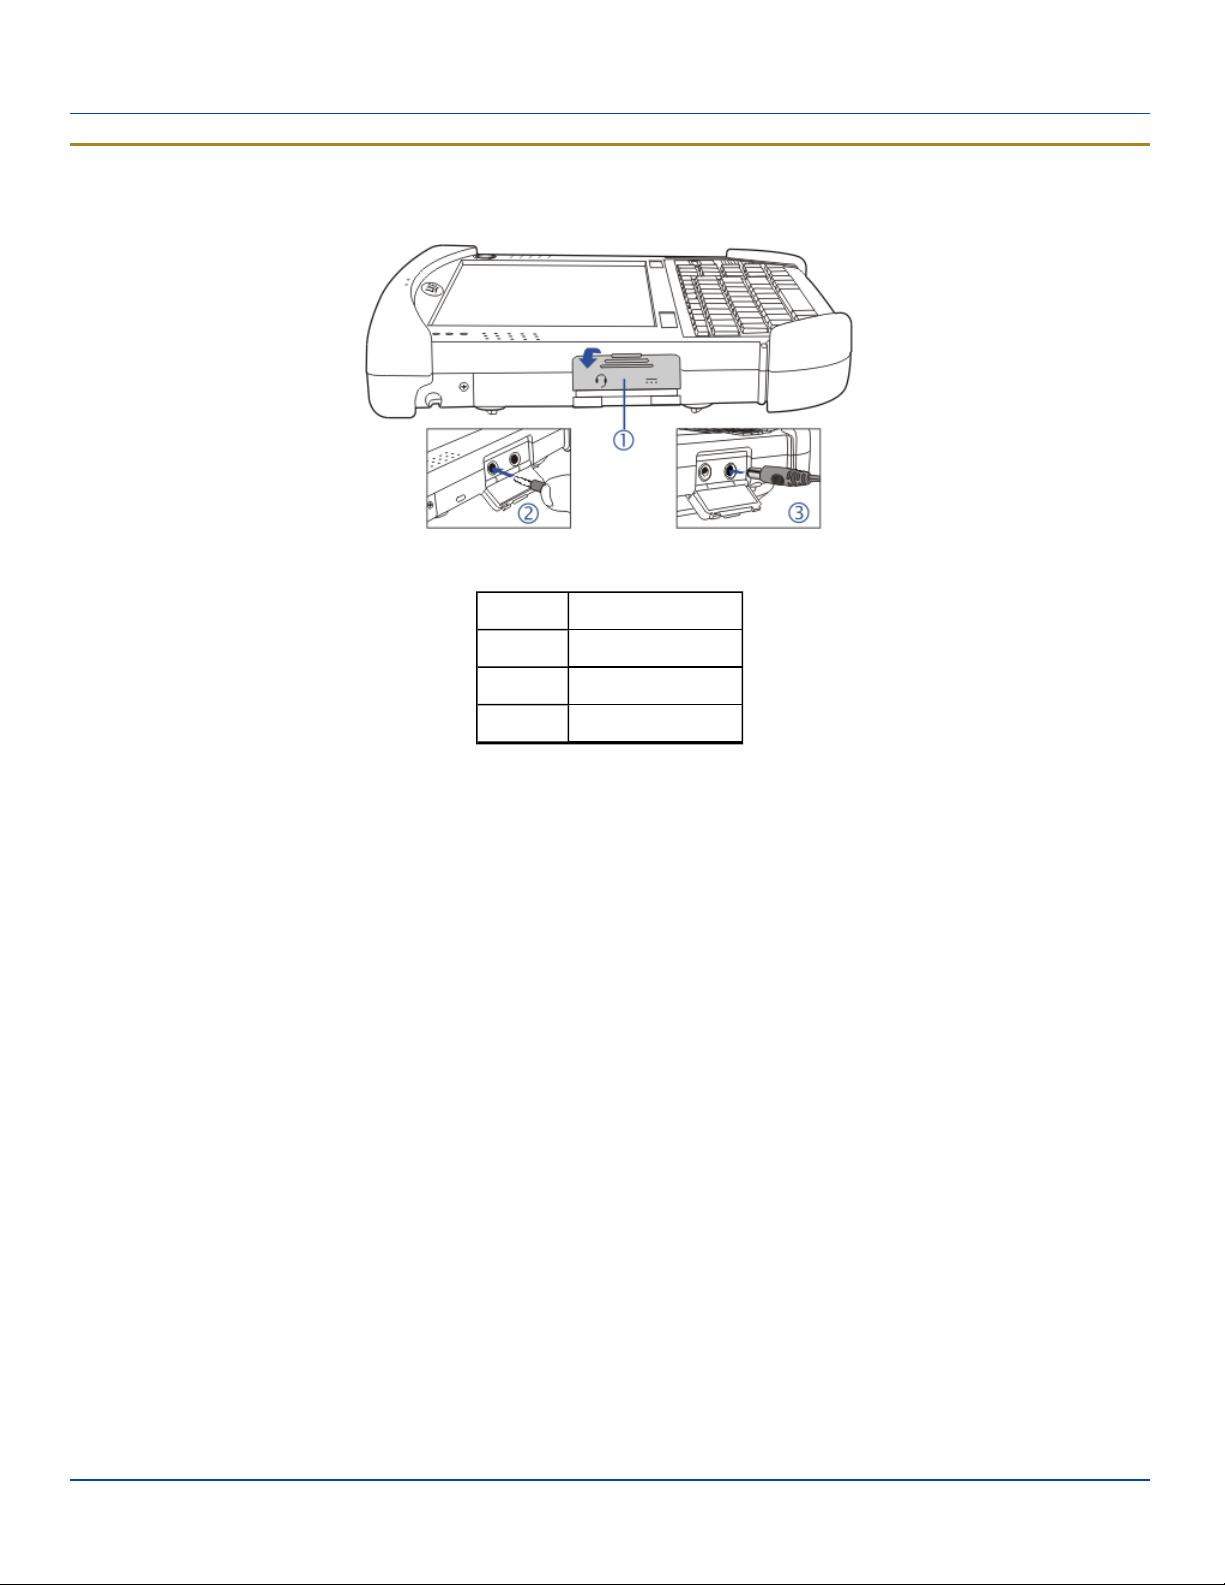
Left Side View
Left Side View
The components are on the left side of the Marathon when viewed from the front.
Marathon Components, Left
Position Function
1 Power/Jack Cover
2 Audio Jack
3 Power Connector
E-EQ-MARATHONOGWW-A [ 6 ] Marathon™ User Guide
Page 11
Battery
Battery
Charge or Recharge the Main Battery
Important: A new Marathon must be connected to an external power source to charge the main battery before first use.
The Marathon contains an internal LithiumIon battery that, once fully charged, powers the Marathon for a minimum of 3 hours
and 30 minutes (when the unit is not mounted in a powered dock or connected to an AC/DC adapter or auxiliary battery).
Note: An external power source is required before the main battery in the Marathon will recharge.
The main battery in the Marathon can be recharged using several different methods.
l by connecting the Marathon AC power adapter to the power jack on the Marathon.
l by docking the Marathon in a powered desktop dock.
l by docking the Marathon in a powered vehicle dock.
l or by attaching a fully charged auxiliary battery.
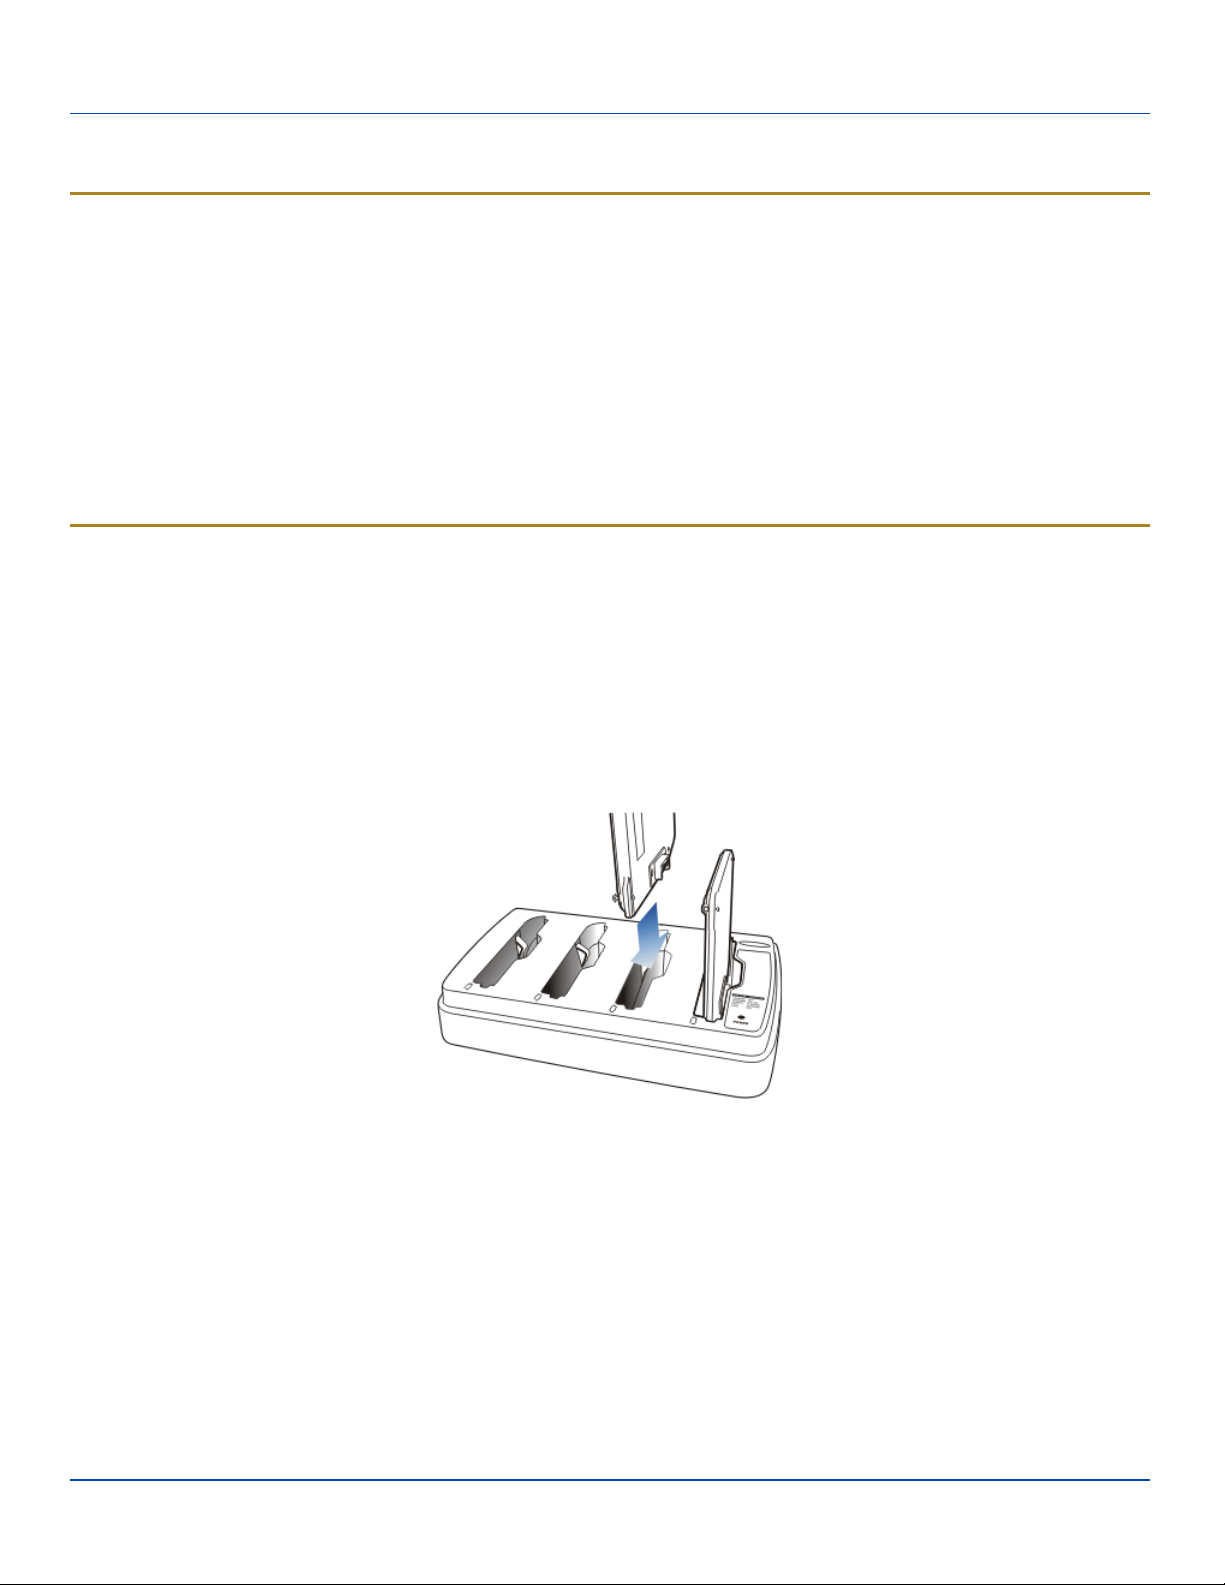
Charge or Recharge the Auxiliary Battery
Note: The Marathon Battery Charger is designed for an indoor, protected environment. It is not authorized for use in areas
designated as Hazardous Locations.
New auxiliary batteries must be fully charged prior to use.
The auxiliary battery can be recharged using two methods:
l By inserting the battery in a powered desktop dock spare battery charging bay.
l By inserting the battery in a Marathon Battery Charger charging bay.
Refer to the Marathon Battery Charger User Guide for instruction.
Marathon Battery Charger
E-EQ-MARATHONOGWW-A [ 7 ] Marathon™ User Guide
Page 12

Tapping the Touchscreen with a Stylus
Tapping the Touchscreen with a Stylus
Note: Always use the point of the stylus for tapping or making strokes on the touchscreen.
Never use an actual pen, pencil, or sharp/abrasive object to write on the touchscreen.
Hold the stylus as if it were a pen or pencil. Touch an element on the screen with the tip of the stylus then remove the stylus
from the screen.
Firmly press the stylus into the stylus holder when the stylus is not in use.
Using a stylus is similar to moving the mouse pointer then left-clicking icons on a desktop computer screen.
Using the stylus to tap icons on the touchscreen is the basic action that can:
l Open applications
l Choose menu commands
l Select options in dialog boxes or drop-down boxes
l Drag the slider in a scroll bar
l Select text by dragging the stylus across the text
l Place the cursor in a text box prior to typing in data
l Place the cursor in a text box prior to retrieving data using a scanner/imager or an input/output device connected to a
serial port.
A right-click can be simulated by touching the touchscreen with the stylus and holding it for a short time.
A right click is generated by tapping the mouse icon , usually located in the upper right hand corner of the screen.
After tapping, the mouse icon highlights the right button. The next touchscreen tap is treated as a right click. The
mouse icon returns to the left button highlighted so subsequent taps are treated as left clicks.
Note: If the mouse icon is not displayed, this feature can be enabled by tapping the PenMount icon in the System
Tray. From the menu that pops up, tap Right Button to enable the mouse icon. When this option is enabled, a
checkmark is displayed in the menu.
The Biometric Mouse can be used instead of the touchscreen.
A stylus replacement kit is available.
E-EQ-MARATHONOGWW-A [ 8 ] Marathon™ User Guide
Page 13
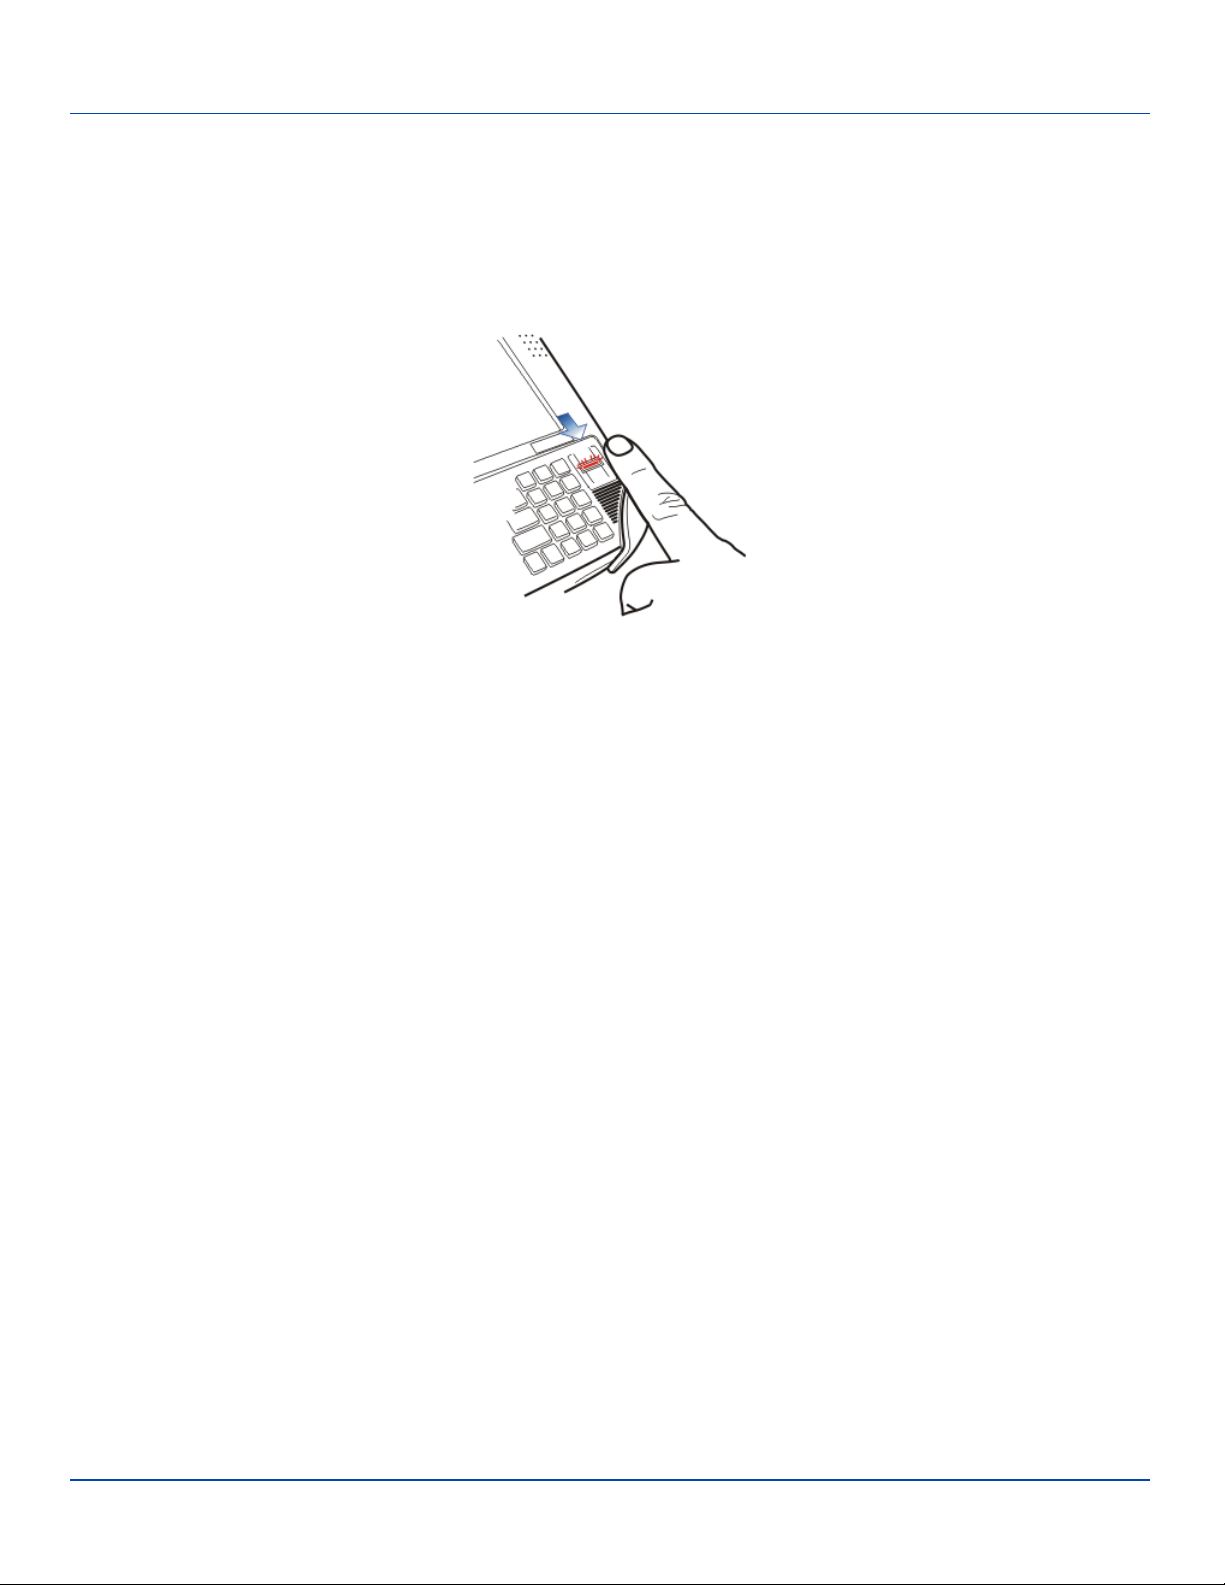
Using the Biometric Mouse
Using the Biometric Mouse
The biometric mouse is located to the right of the keypad. Slide a finger over the biometric mouse to move the cursor in the
direction the finger moves.
Tapping the biometric mouse once generates a left-click, tapping twice rapidly generates a double-click.
Tapping the biometric mouse and holding generates a right-click.
Using the Biometric Mouse
Note: If experiencing difficulties with the biometric mouse navigation, try varying the finger pressure on the biometric
mouse.
The system administrator can disable the biometric mouse navigation function.
E-EQ-MARATHONOGWW-A [ 9 ] Marathon™ User Guide
Page 14
LED Indicators
LED Indicators
Power Button
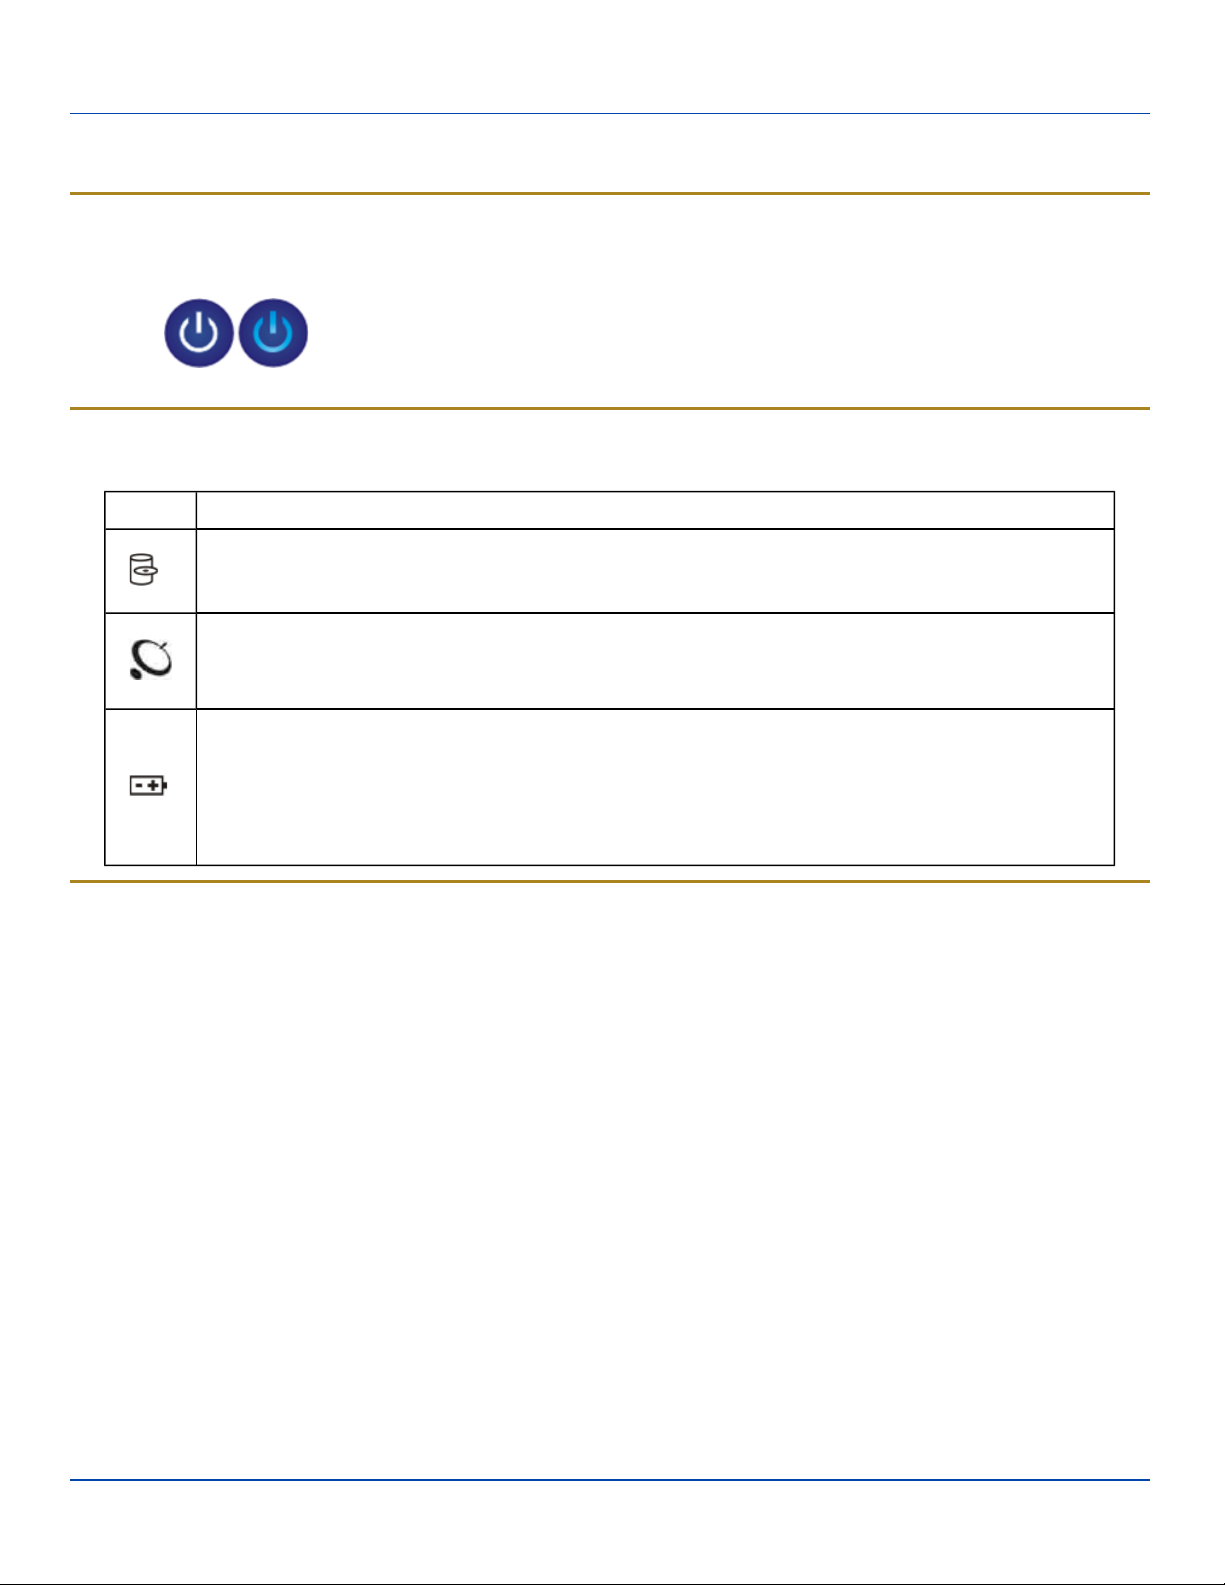
The power button is backlit as follows:
l Off when not activated, Marathon is Off
l Solid blue when activated, Marathon is On
l Flashes blue when Marathon is in standby
Status LEDs
Status LEDindicators are located next to the upper left hand corner of the display.
Symbol Function
Indicates the storage drive status:
l LED flashes green when drive is accessed
Indicates the wireless status:
l LED is solid blue when enabled, but not connected. Does not blink when connection/re-connection
occurs
Indicates the battery status:
l LED is Off when battery is fully charged.
l LED is solid green when battery is discharging.
l LED is solid orange when battery is charging.
l LED flashes orange when battery is low or has failed.
Keyboard Indicators
When the keyboard is not in use the keyboard backlight is off. Under normal conditions, the keys are backlit with white light
when the keyboard is in use.
The backlight for certain keys is blue when the modifier key is active. These keys include:
l Fn
l CTL
l ALT
l SHIFT
The backlight for the NUM LCK key is amber when Num Lock is active.
Adjust Display Brightness
The display can be lightened or darkened by using the Fn key and the keypad:
1. Hold the Fn key down for a few seconds until the Fn key remains illuminated (sticky).
2. Press the 9 (brightness up) key to brighten the display.
3. Press the 3 (brightness down) key to darken the display.
The display brightness and darkness have nine levels. The display levels are managed by the Windows operating system. The
Fn key active sticky mode takes precedence if the NumLck key is illuminated (sticky) during this process.
E-EQ-MARATHONOGWW-A [ 10 ] Marathon™ User Guide
Page 15
Connecting Cables to the Marathon
Connecting Cables to the Marathon
Note: Do not connect or disconnect cables in a Hazardous location.
Connecting USB Devices
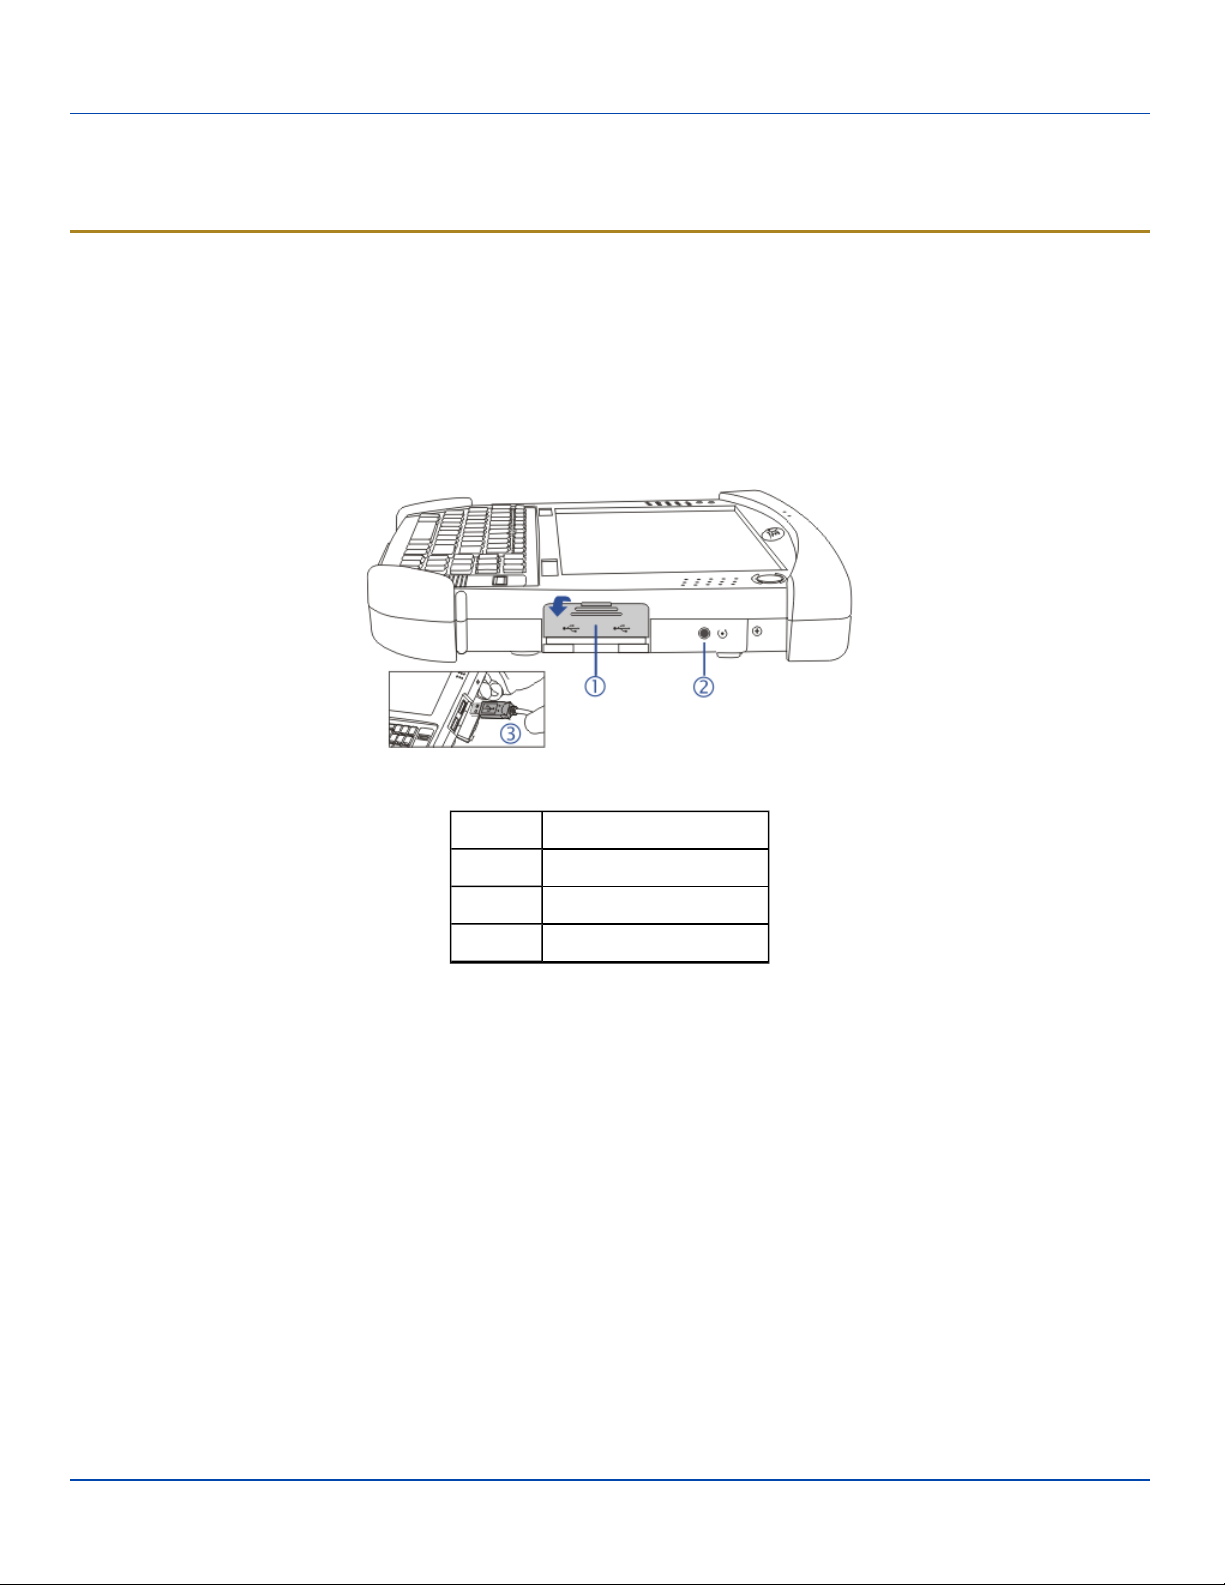
The Marathon provides two Type A USB ports behind the access door on the right side of the device.
Open the port cover on the right side of the Marathon.
Plug the desired device, such as a USB mouse or storage device, into the USB port. Refer to Start |Help and Support and
the documentation for your USB device for more information.
USB devices may be installed and removed or swapped without turning off the Marathon.
When the USB ports are not in use, LXE recommends keeping the port cover door closed.
Marathon Components, Right
Position Function
1 USBPort Cover
2 Reset Button
3 Two USB2.0 Host Ports
E-EQ-MARATHONOGWW-A [ 11 ] Marathon™ User Guide
Page 16
Connecting an AC/DC Power Supply
Connecting an AC/DC Power Supply
Note: The LXE-approved AC Power Supply and Adapter Cable are only intended for use in a 25ºC (77ºF) maximum
ambient temperature environment.
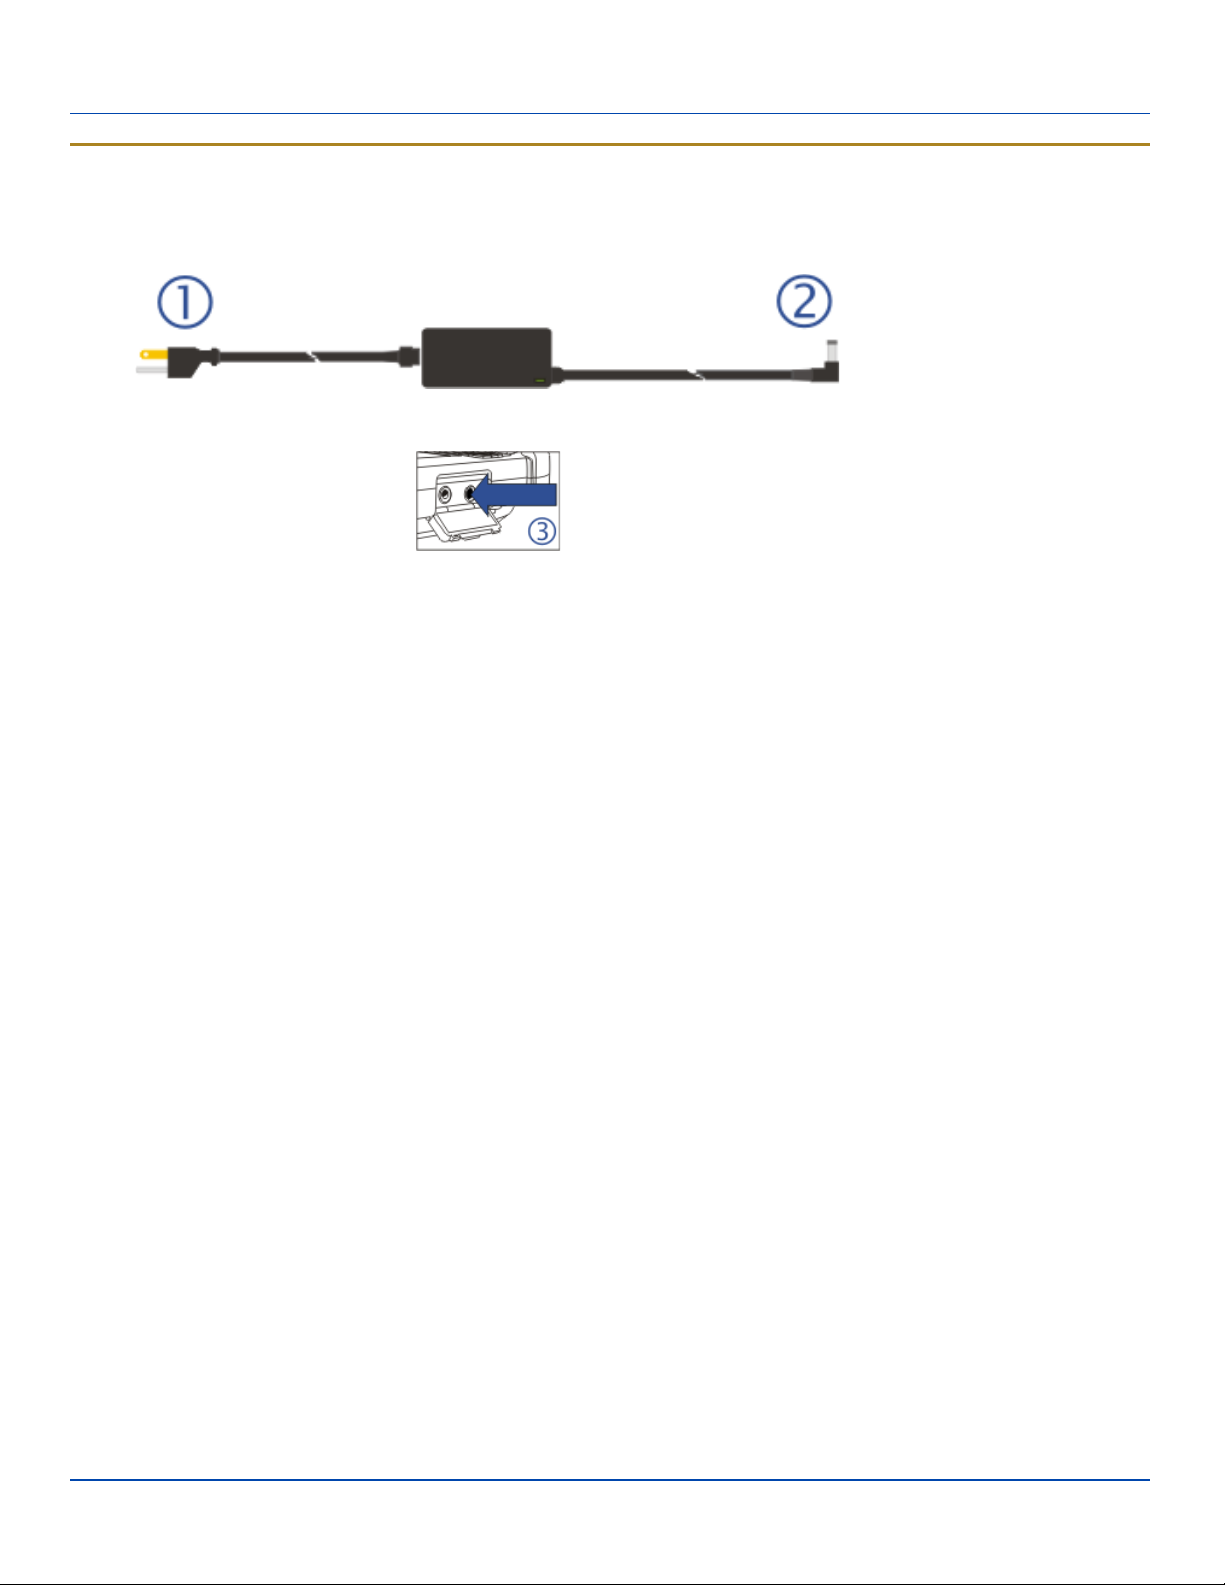
1. AC Input Cable (US
only)
2. DC Output Cable
3. Power connector
AC/DC Power Supply
In North America, this unit is intended for use with a UL Listed ITE power supply with output rated 12 – 80 VDC. Outside North
America, this unit is intended for use with an IEC certified ITE power supply with output rated 12 – 80 VDC.
The external power supply may be connected to either a 120V, 60Hz supply or, outside North America, to a 230V, 50Hz
supply, using the appropriate detachable cordset. In all cases, connect to a properly grounded source of supply provided with
maximum 15 Amp overcurrent protection (10 Amp for 230V circuits).
1. Turn the Marathon off.
2. Connect the detachable cordset provided by LXE (US only, all others must provide their own cable) to the external
power supply (IEC 320 connector).
3. Plug cordset into appropriate, grounded, electrical supply receptacle (AC mains).
4. The LED on the AC adapter illuminates.
5. Open the port cover on the left side of the Marathon. When the power connector is not used, LXE recommends keeping
the port cover door closed.
6. Plug the barrel end of the power cable into the Marathon.
7. The Marathon Battery Status LED at the upper left, next to the screen, illuminates orange to indicate the main battery is
recharging using power from the AC Adapter.
8. Turn the Marathon on.
E-EQ-MARATHONOGWW-A [ 12 ] Marathon™ User Guide
Page 17
Connecting an Audio Device
Connecting an Audio Device
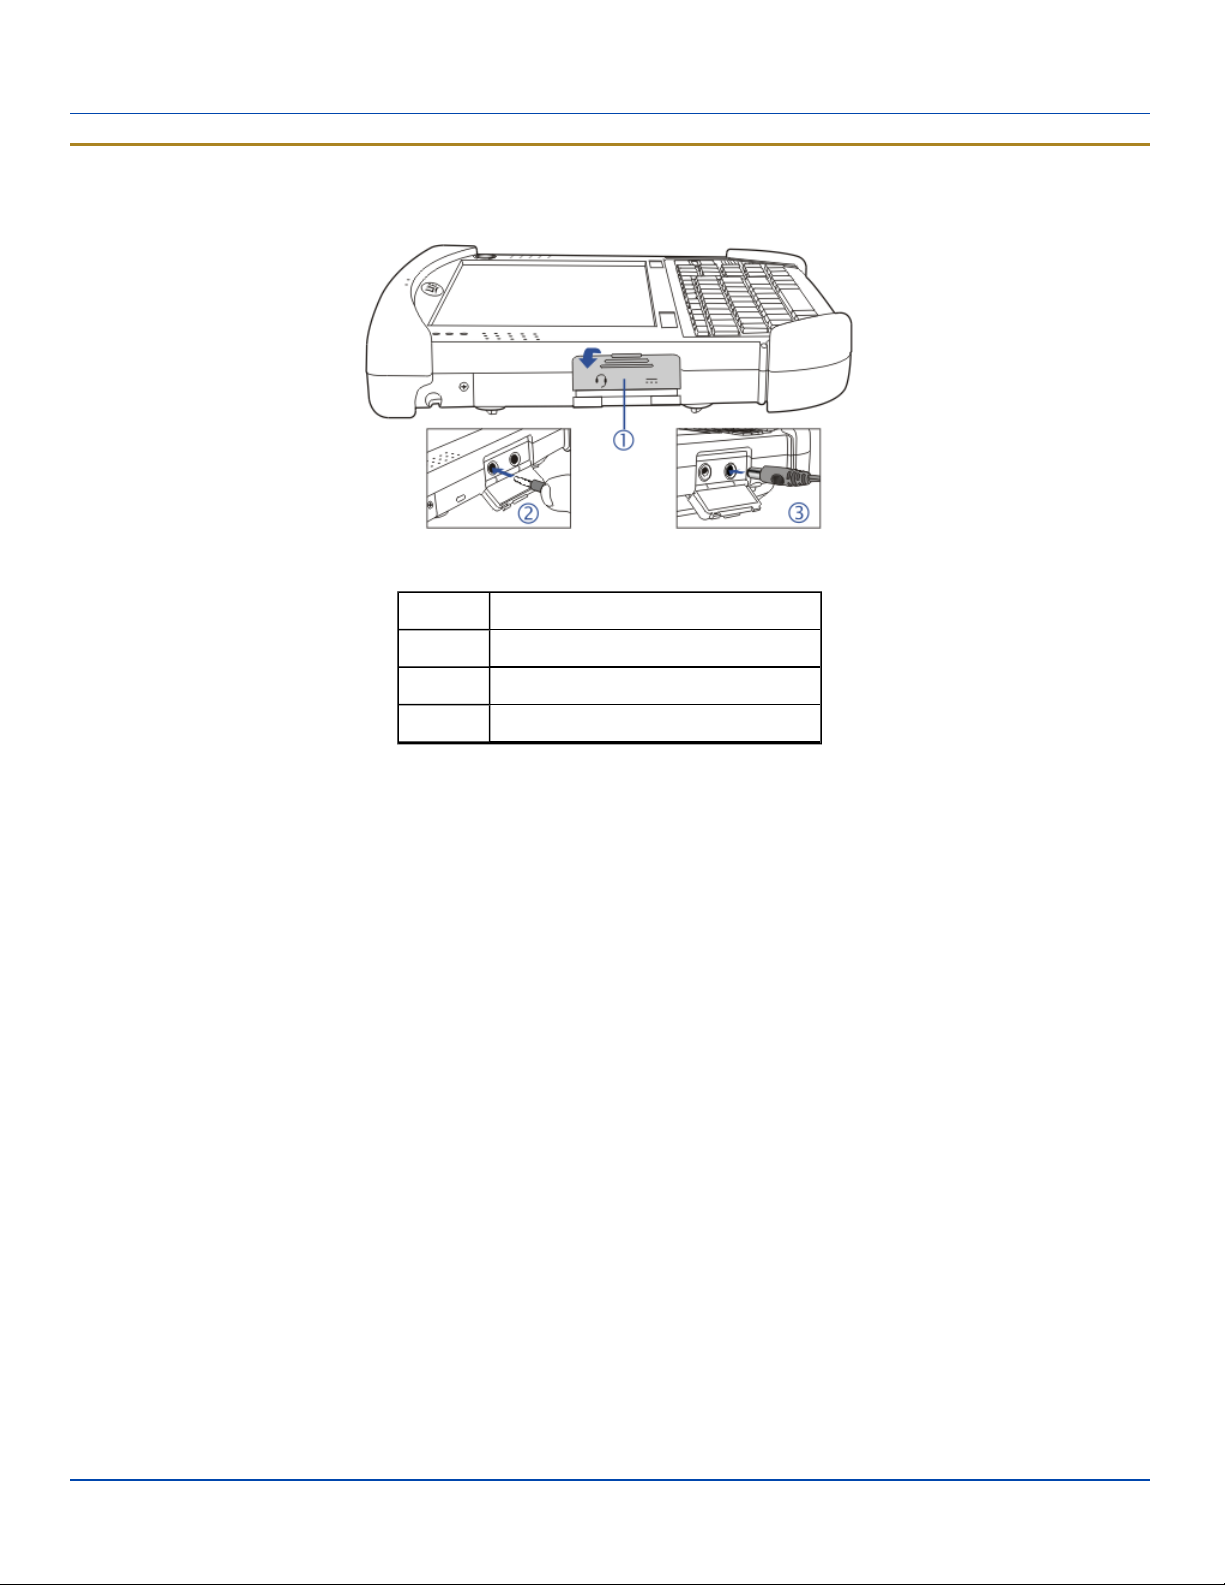
The Marathon provides an external headset connection via an audio jack connector under the left-hand port cover.
Marathon Components, Left
Position Function
1 Power Connector / Audio Jack Cover
2 Audio Jack
3 Power Connector
1. Open the left-hand port cover.
2. Insert the speaker or headphone plug into the audio connector; making sure the plug is firmly seated in the jack.
When the audio port is not in use, LXE recommends keeping the port cover door closed.
E-EQ-MARATHONOGWW-A [ 13 ] Marathon™ User Guide
Page 18
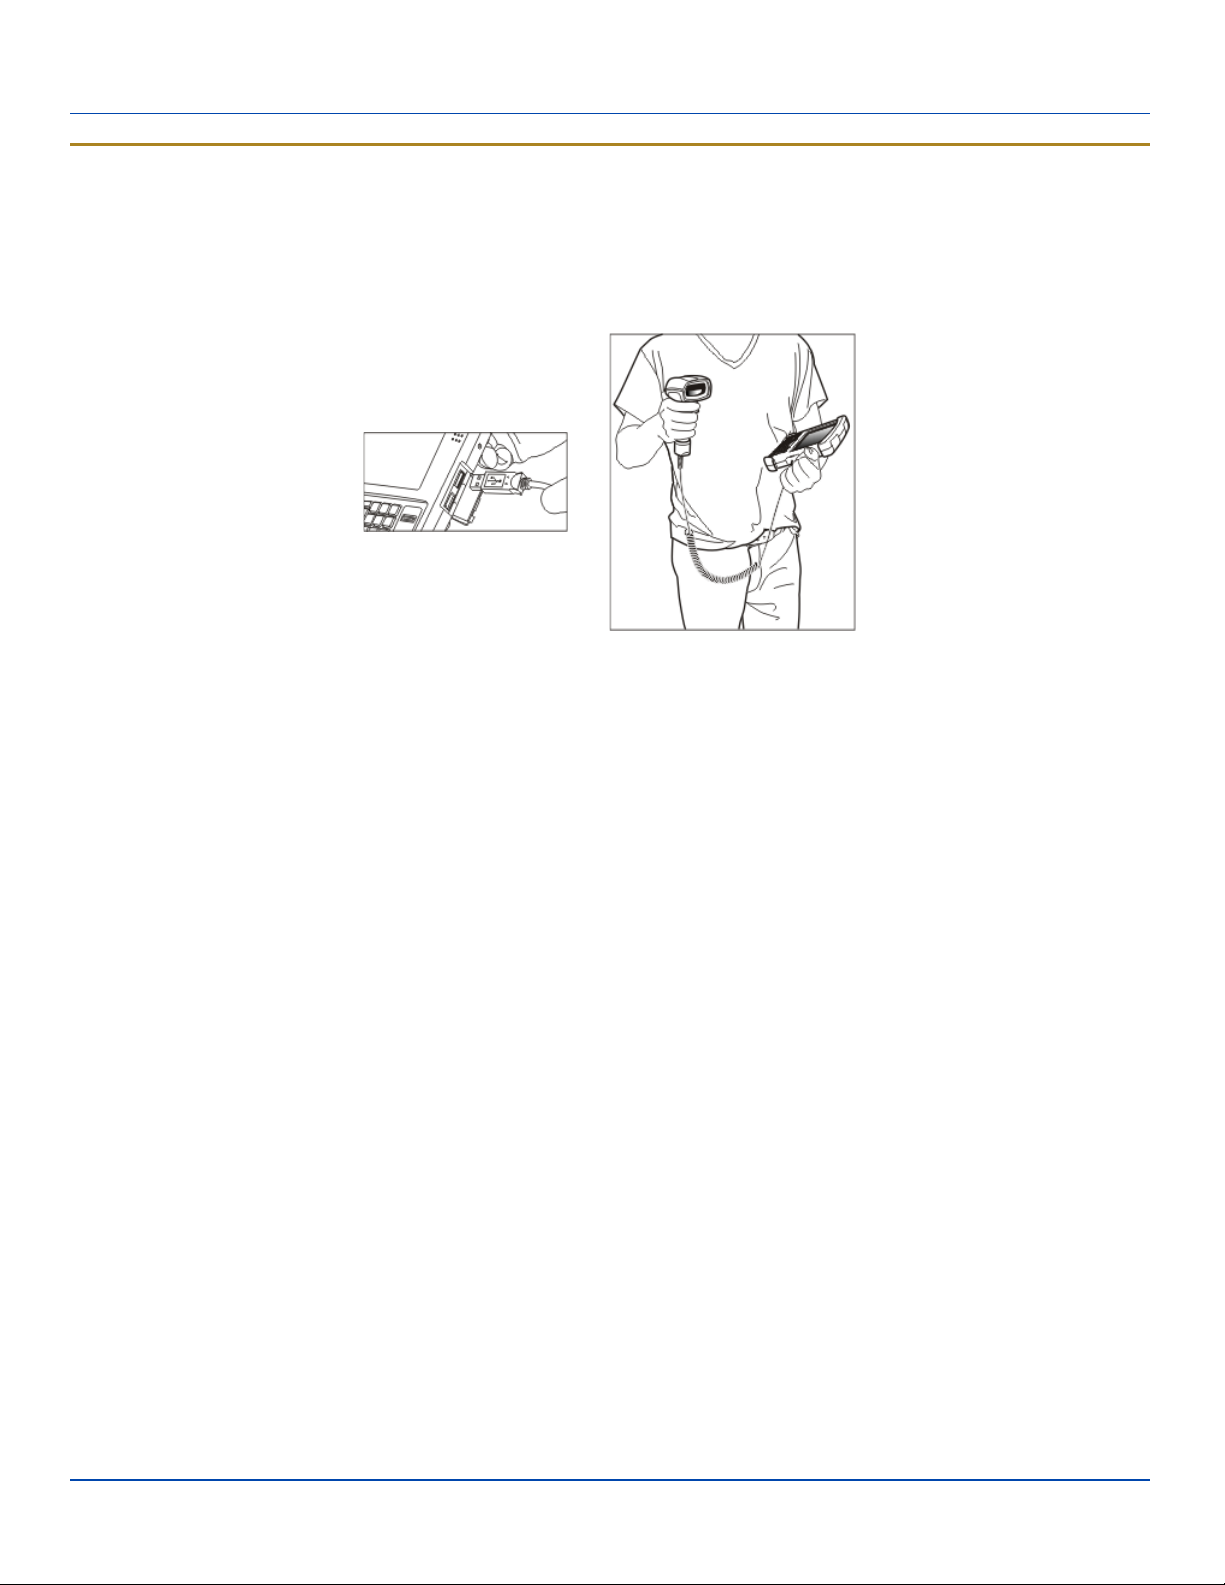
Connecting a USB Tethered Scanner
Connecting a USB Tethered Scanner
The Marathon accepts only USB tethered scanners. The scanner is connected to one of the USB ports on the right side of the
Marathon.
If the tethered scanner does not have it's own power supply, e.g. installed rechargeable battery, the tethered scanner draws
power from the Marathon battery.
Connecting a USB Tethered Scanner
E-EQ-MARATHONOGWW-A [ 14 ] Marathon™ User Guide
Page 19
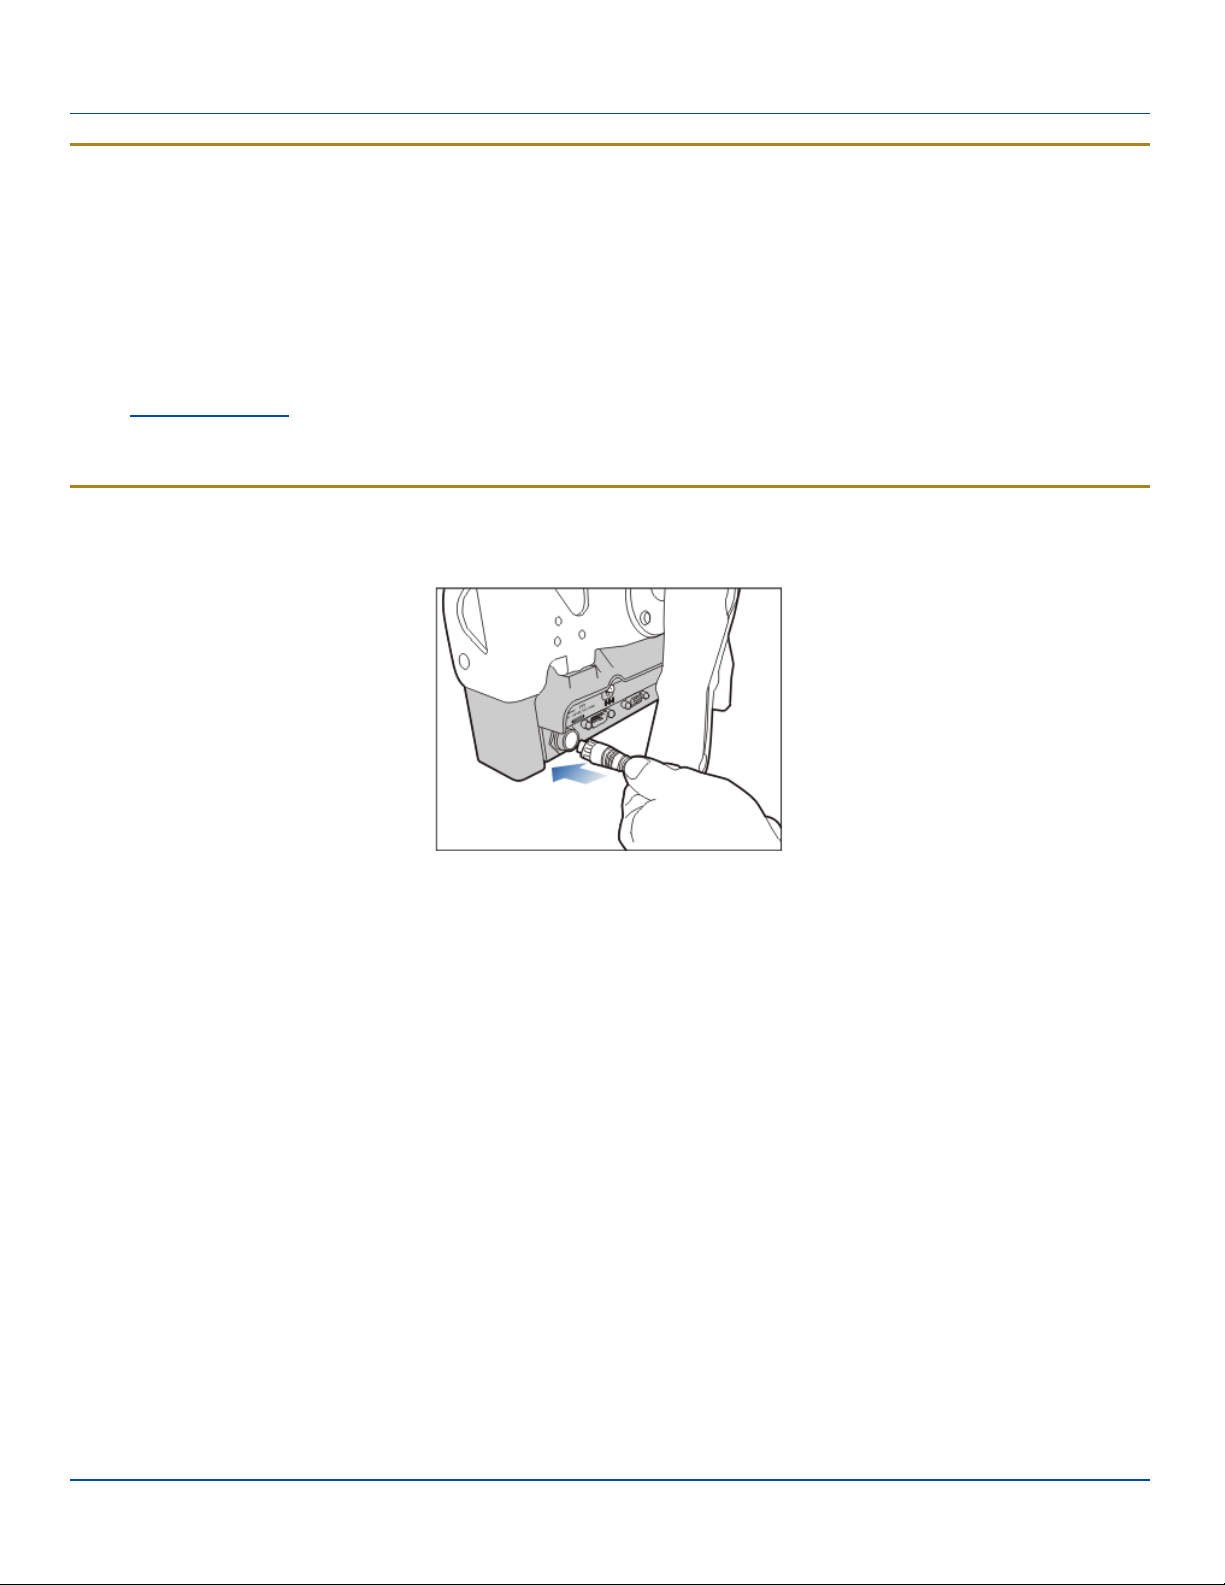
Connecting a Cigarette Lighter Power Adapter
Connecting a Cigarette Lighter Power Adapter
Note: The LXE-approved Cigarette Lighter cable is intended for use in 12VDC negative ground systems only.
To view the instructions when using a cigarette lighter power adapter with a vehicle dock, please see the Marathon Dock
Reference Guide.
1. Plug the lighter end of the cordset into an appropriate 12V DC automotive cigarette lighter receptacle. The LED on the
cigarette lighter Power Adapter illuminates to indicate it is drawing power from the vehicle.
2. Open the port cover on the left side of the Marathon. When the power connector is not used, LXE recommends keeping
the port cover door closed.
3. Plug the barrel end of the power cable into the Marathon.
4. The Marathon Battery Status LED at the upper left, next to the display, illuminates orange to indicate the main battery is
recharging by drawing vehicle power through the cigarette lighter adapter.
Connect Power Supply to Vehicle Mounted Dock
Note: The vehicle cradle is designed for nominal 12V and 24V, negatively gounded vehicles only.
Connect Vehicle Power
Align the connector pins to the vehicle dock Power port; firmly pushing the connector into the Power port.
Tighten the plug clockwise until the power cable is securely fastened.
Secure the cable to the dock with the LXE-installed strain relief cable clamp.
The Power LED on the front of the vehicle dock illuminates when the dock is connected to vehicle power.
The power LED on the Marathon illuminates when it is receiving external power from the vehicle dock.
Refer to the Marathon Dock Reference Guide for further information and instruction.
E-EQ-MARATHONOGWW-A [ 15 ] Marathon™ User Guide
Page 20
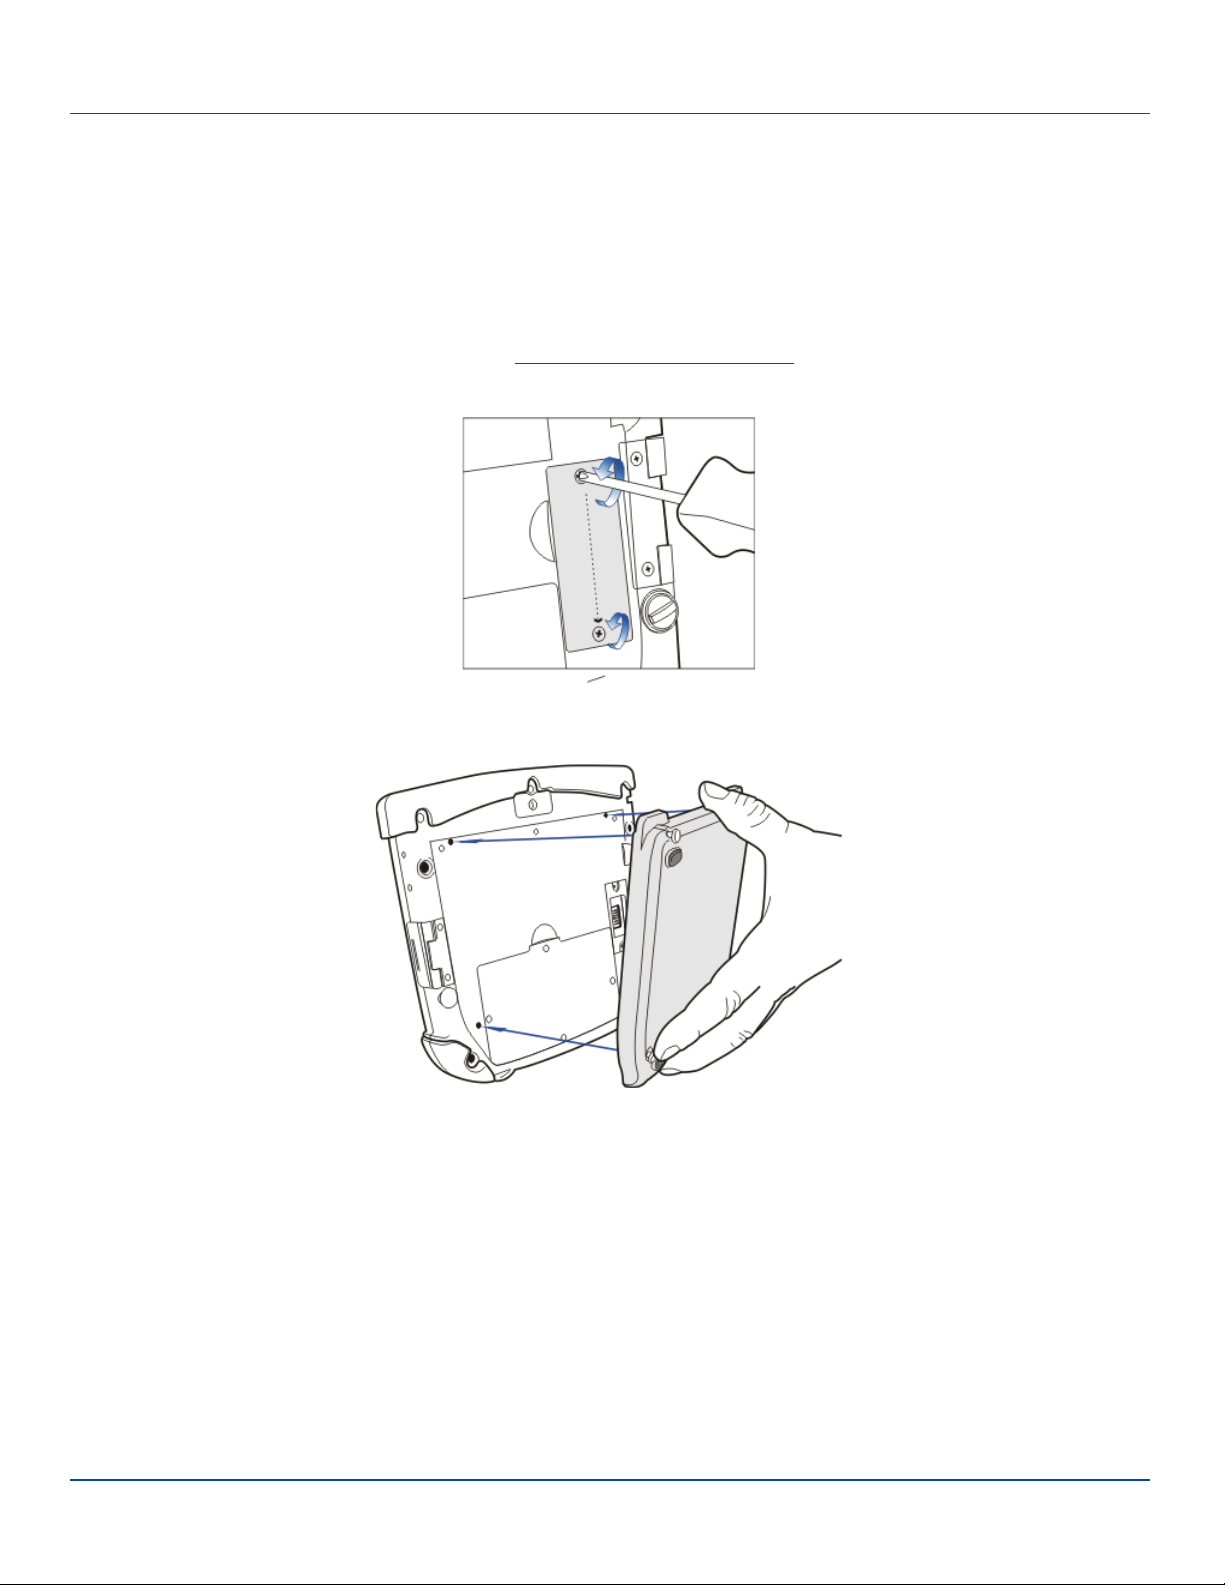
Installing the Auxiliary Battery Pack
Installing the Auxiliary Battery Pack
Note: LXE recommends that installation or removal of accessories be performed on a clean, well-lit surface. Protect the
work surface, the Marathon, and components from electrostatic discharge.
The instructions that follow are the same for the 38Whr auxiliary battery and the 63Whr auxiliary battery.
1. Turn the Marathon off. Remove any cables, straps or accessories.
2. Place the Marathon face down on a stable surface.
3. Remove the 2 mounting screws securing the auxiliary battery connector cover and then remove the cover to expose the
auxiliary battery pack connector. Put the screws and cover aside in a safe place.
4. Line up the charging pins on the auxiliary battery with the charging pins in the Marathon auxiliary battery connector bay.
E-EQ-MARATHONOGWW-A [ 16 ] Marathon™ User Guide
Page 21
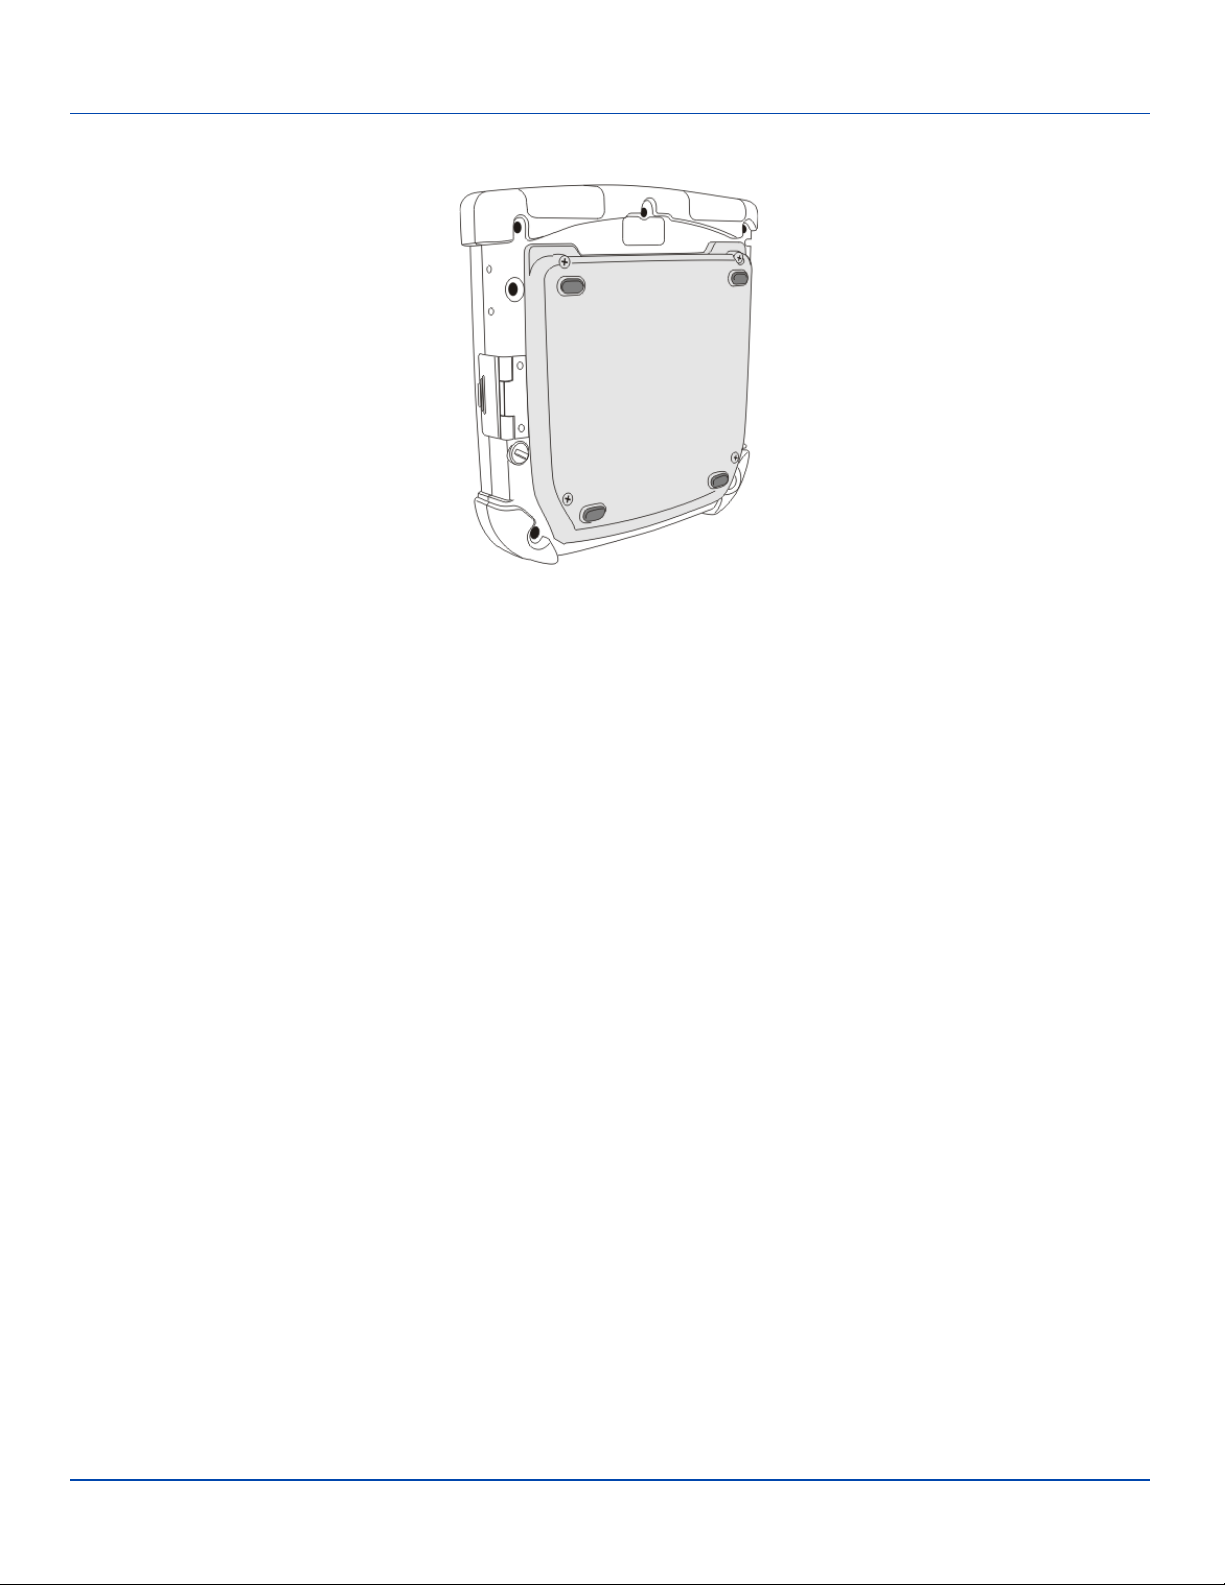
Installing the Auxiliary Battery Pack
5. Connect the auxiliary battery to the Marathon using the captive screws in the auxiliary battery.
6. Re-attach accessories, if any.
7. Turn the Marathon on.
One auxiliary battery can be recharged in a powered desktop dock (See Marathon Dock Reference Guide) and four auxiliary
batteries can be recharged in the Marathon Battery Charger (See Marathon Battery Charger User Guide).
An attached auxiliary battery will begin to recharge when the Marathon is placed in a powered desktop dock or powered vehicle
dock.
LXE recommends, when the Marathon does not have an auxiliary battery attached, that the auxiliary battery connector cover
be re-attached, protecting the Marathon auxiliary battery connector opening.
E-EQ-MARATHONOGWW-A [ 17 ] Marathon™ User Guide
Page 22
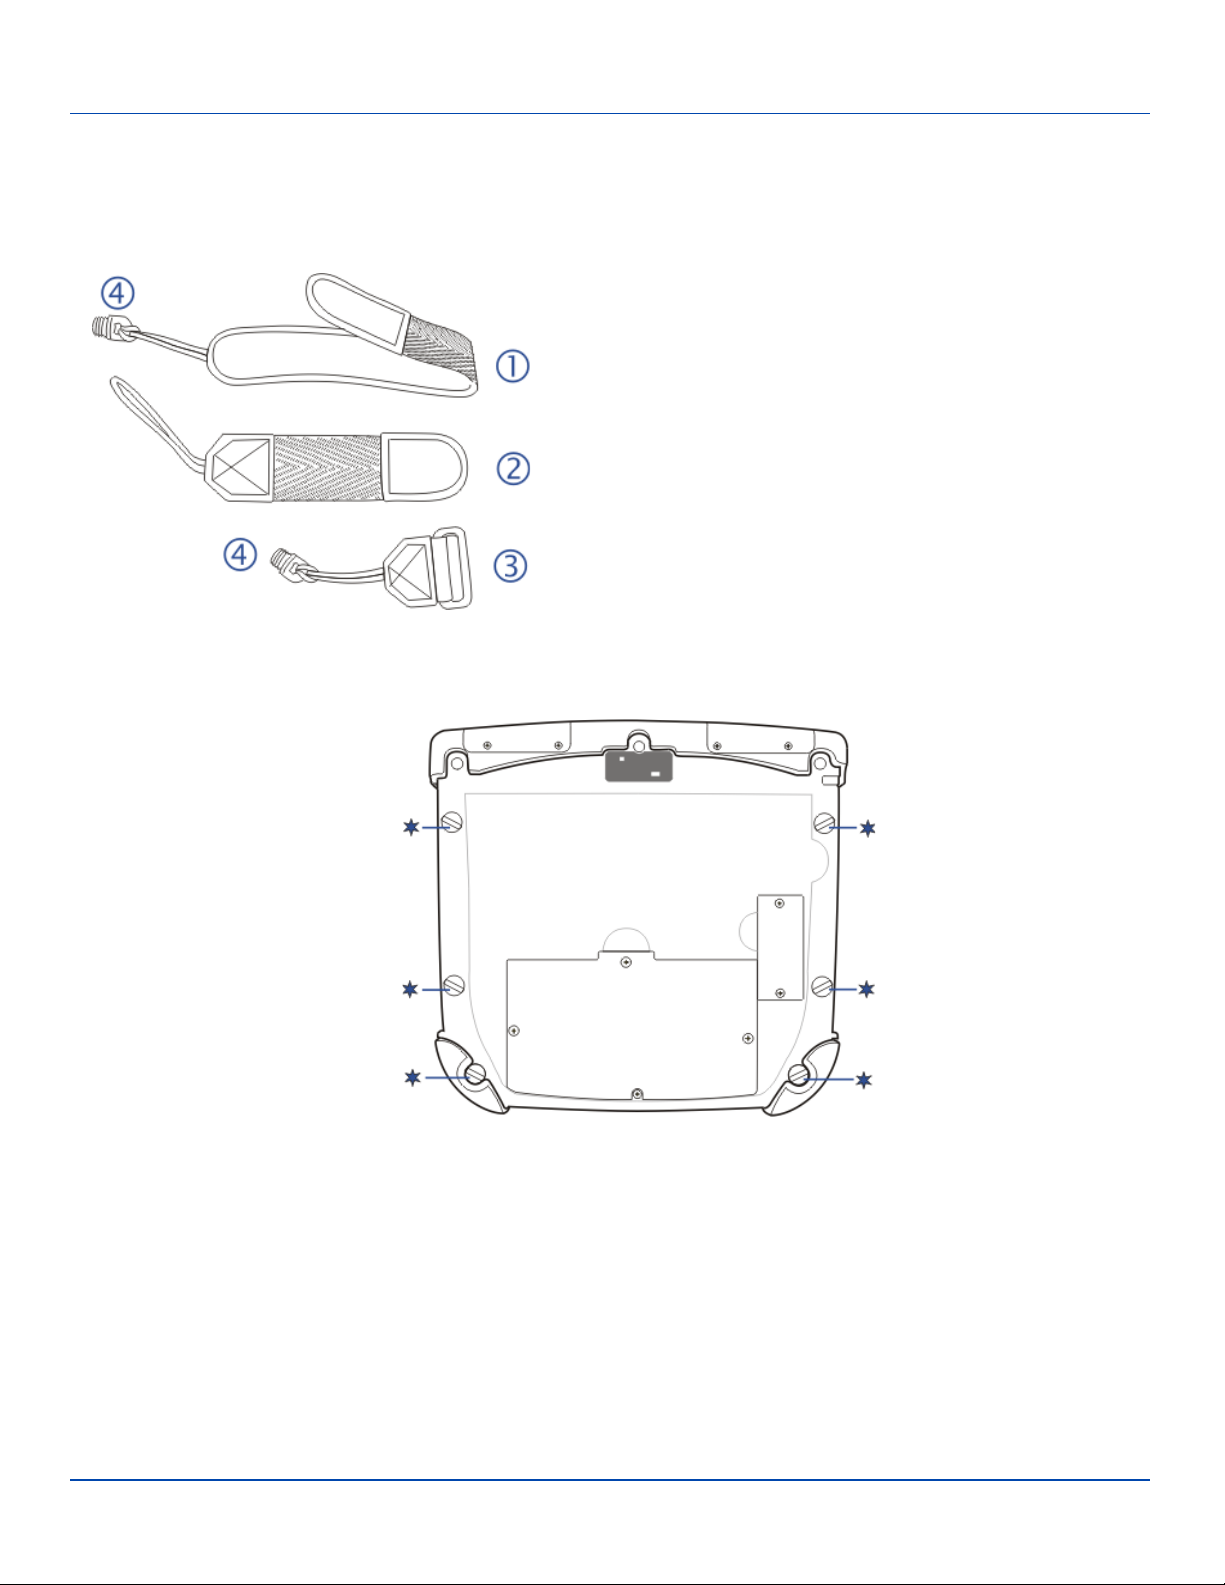
Attaching the Hand Strap
Attaching the Hand Strap
The hand strap is designed to be used with the Marathon with or without an auxiliary battery attached. The hand strap is
designed so the Marathon can be mounted in the desktop dock or the vehicle dock without removing the hand strap.
1. Long Hand Strap, approximately 7.4"/18.8 cm without
loop
2. Short Hand Strap, approximately 4.0"/10.2 cm without
loop
3. Strap Buckle
4. Screws, strap attaching
1. Place the Marathon with the screen facing down, on a flat stable surface.
2. There are six rubber plugs as illustrated below.
Rubber Plug Locations (Back)
E-EQ-MARATHONOGWW-A [ 18 ] Marathon™ User Guide
Page 23
Attaching the Hand Strap
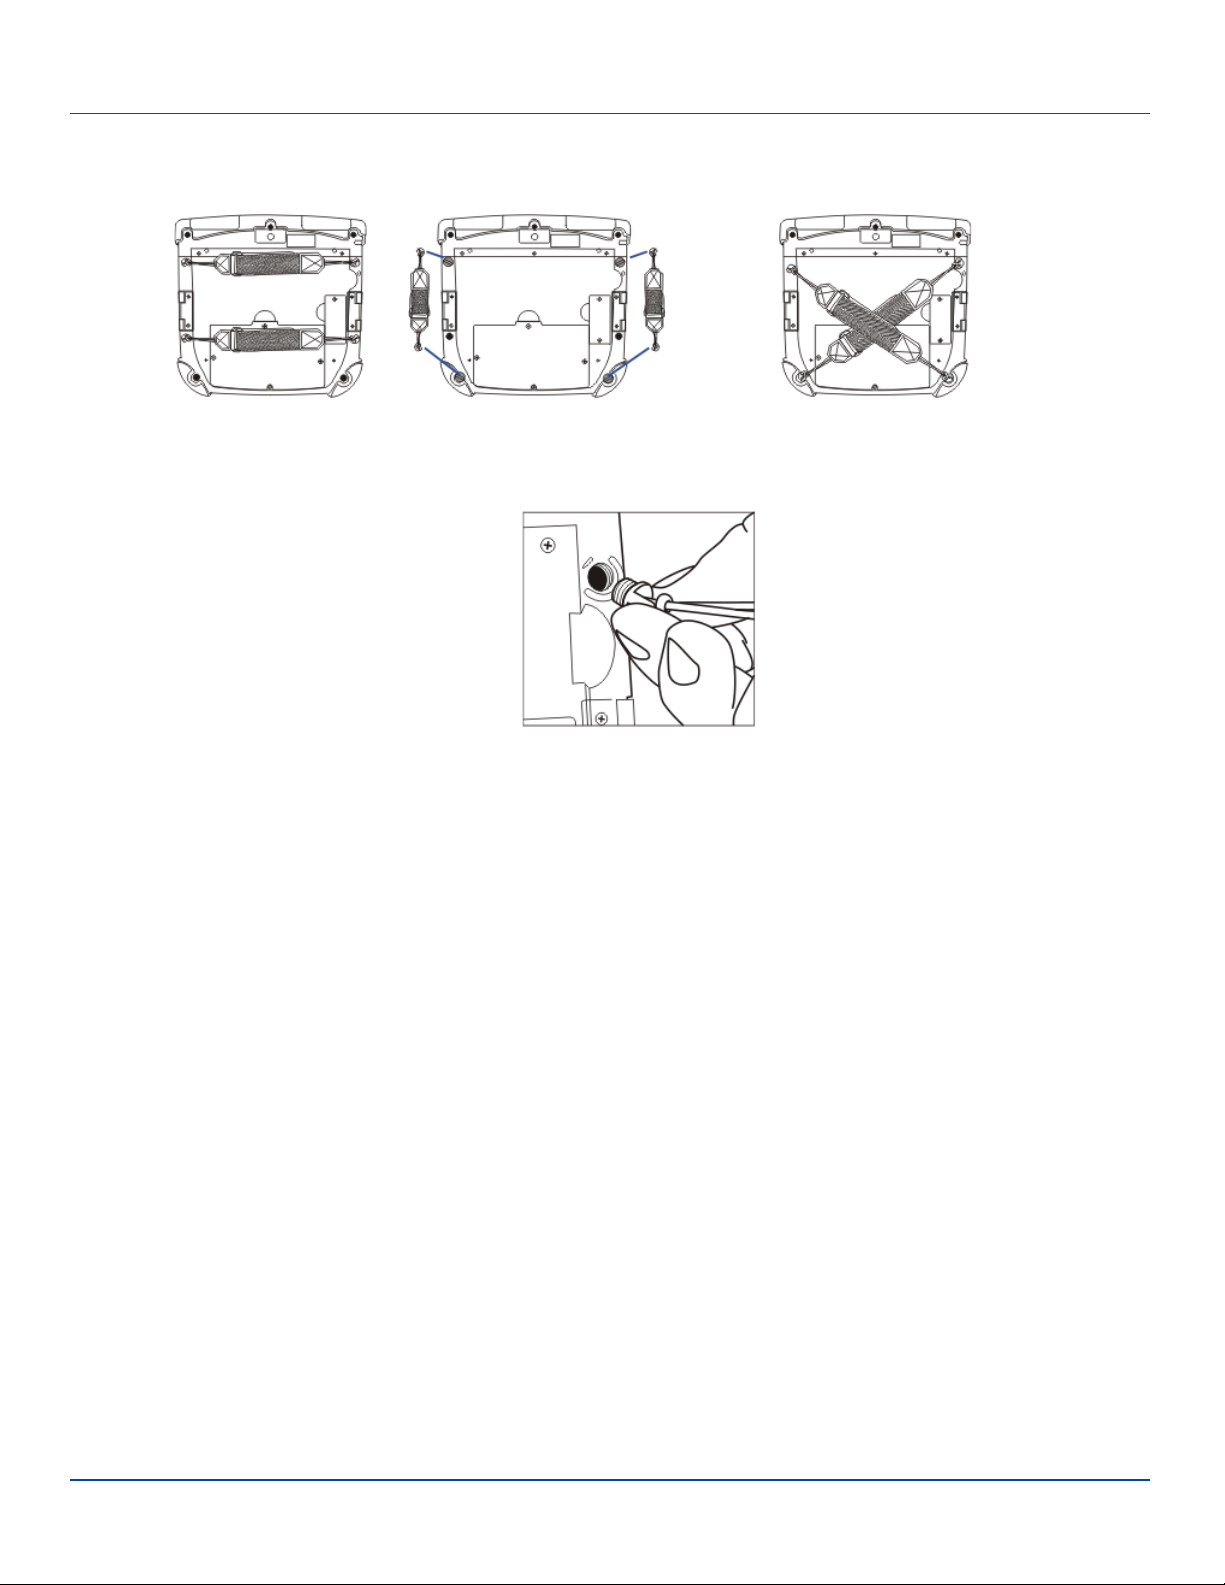
3. Remove any of the plugs by unscrewing them in a counter-clockwise direction. Remove only the plugs necessary to
mount the hand strap. See the illustration below for possible hand strap orientations:
Horizontal Vertical Diagonal
4. Insert the Strap Attaching Screws into the appropriate holes. These screws have an eye to attach the strap.
Insert Strap Attaching Screw
5. Thread the nylon loop of the Strap Buckle through one of the Strap Attaching Screws from the outside edge of the Marathon. Then thread the buckle end of the strap through the loop and pull tight.
6. The hand strap kit contains two straps. Use the longer strap for a horizontal or diagonal mount and use the shorter strap
for the vertical mount. Thread the nylon loop of the appropriate strap through the other Strap Attaching Screw. Then
thread the strap through the loop and pull tight.
7. Making sure the closed loop fastener surface on the hand strap is facing up, slide the strap through the latch in the top
clip.
8. Fold the end of the strap over so that the closed loop fastener surfaces mate evenly and the hand strap is secured to the
Marathon.
9. Test the strap's connection making sure the Marathon is securely connected to each end of the strap connectors.
Check the closed loop fastener and hand strap base connection frequently. If loose, they must be tightened or replaced before
the Marathon is placed into service again.
E-EQ-MARATHONOGWW-A [ 19 ] Marathon™ User Guide
Page 24
Attaching the Shoulder Strap
Attaching the Shoulder Strap
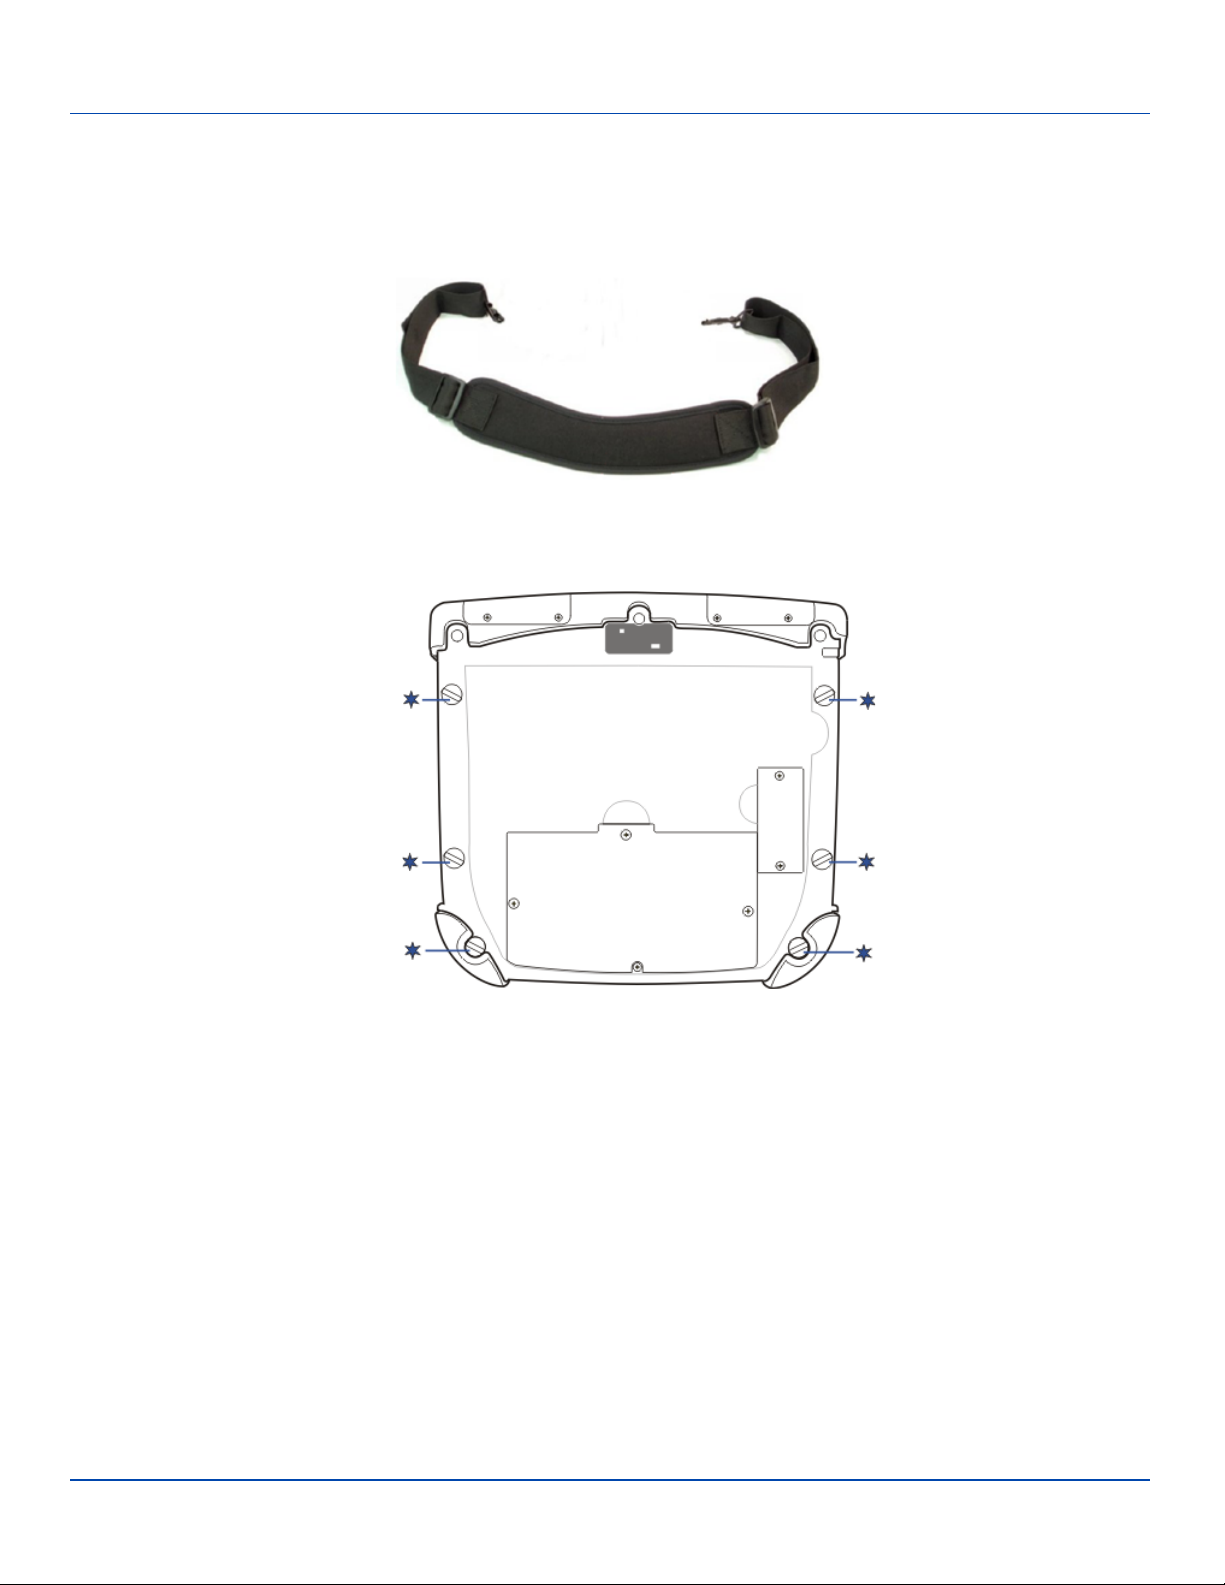
The shoulder strap is designed to be used with the Marathon with or without an auxiliary battery attached. The shoulder strap is
designed so the Marathon can be mounted in the desktop dock or the vehicle dock without removing the shoulder strap.
1. Place the Marathon with the screen facing down, on a flat stable surface.
2. There are six rubber plugs as illustrated below.
Rubber Plug Locations (Back)
3. Remove the upper two of these plugs by unscrewing them in a counter-clockwise direction. Remove only the plugs necessary to mount the strap.
E-EQ-MARATHONOGWW-A [ 20 ] Marathon™ User Guide
Page 25
Attaching the Shoulder Strap
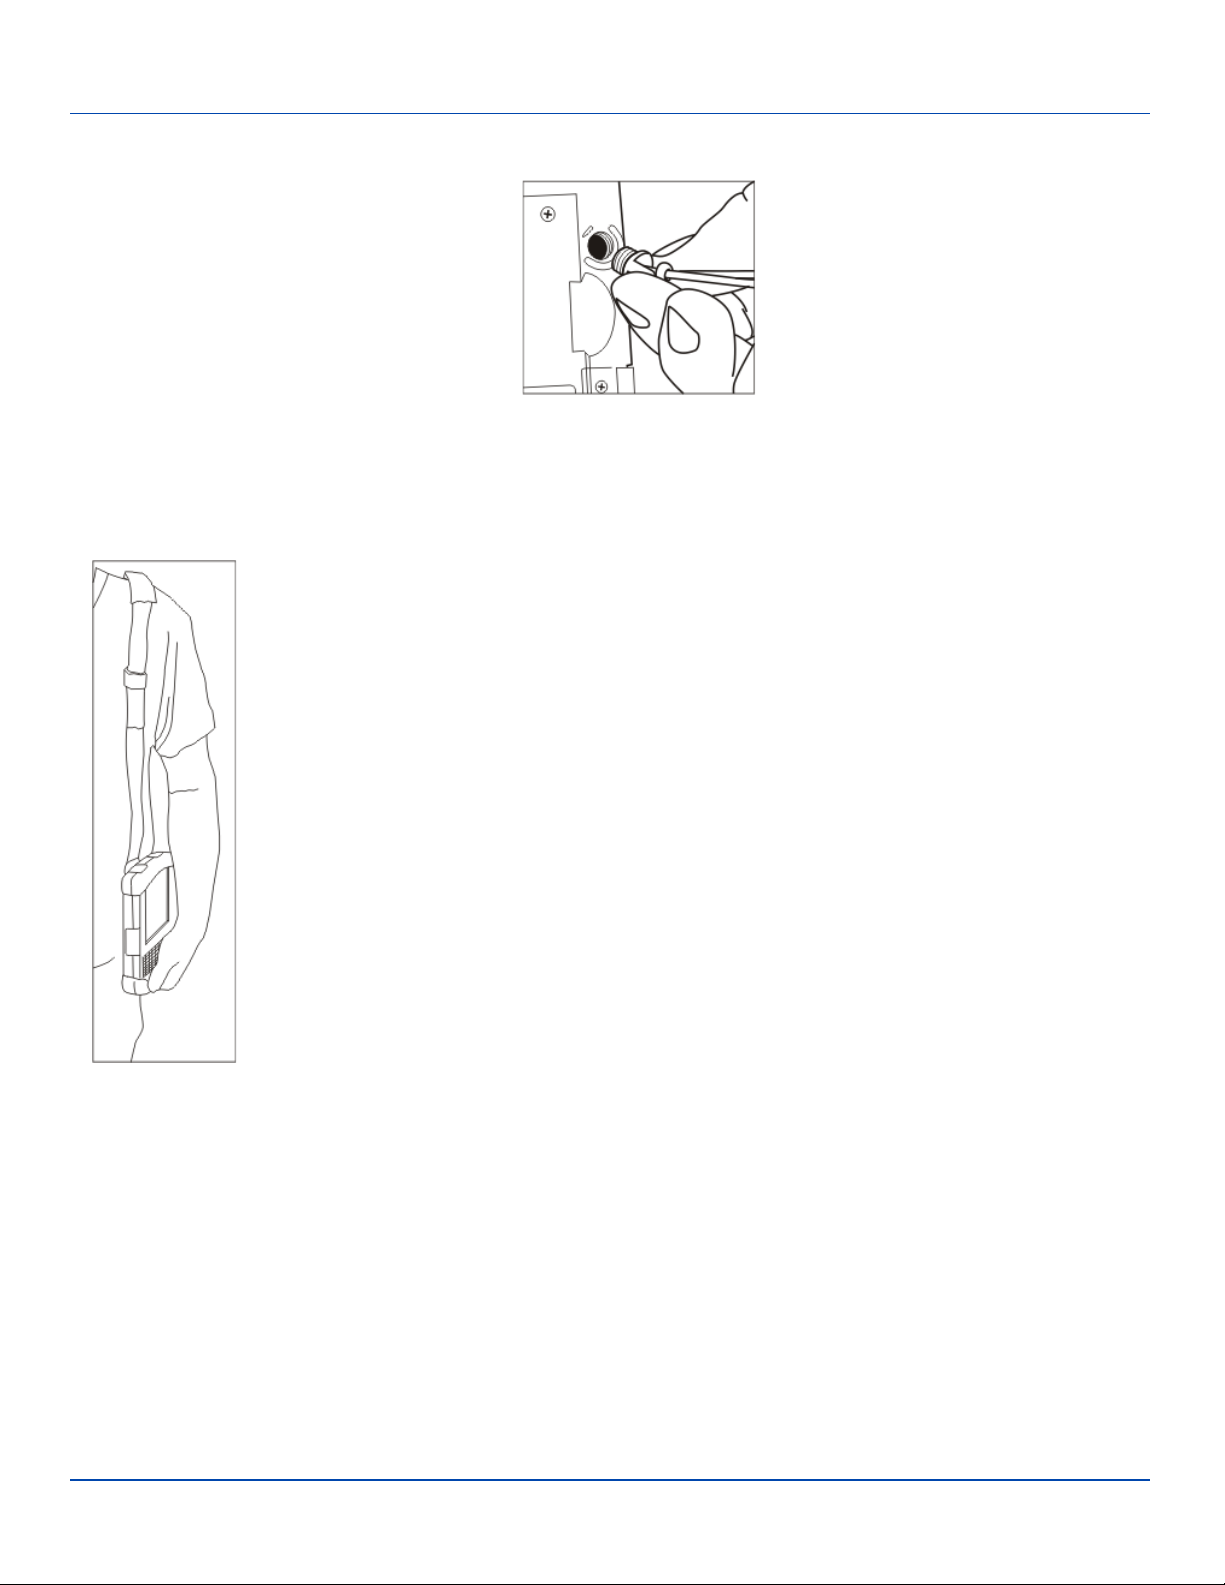
4. Insert the Strap Attaching Screws into the upper two holes. These screws have an eye to attach the strap.
5. Thread the longer nylon loop of one of the Shoulder Strap Adapters through one of the Strap Attaching Screws. Then
thread the other end of the Shoulder Strap Adapter through the longer loop and pull tight. Repeat for the other Shoulder
Strap Adapter using the other Strap Attaching Screw.
6. Hook the swivel hooks on each end of the Shoulder Strap to the short loops on the adapters.
Adjust the shoulder strap length as desired.
Adjust the pad on the shoulder strap so it rests comfortably on the shoulder.
E-EQ-MARATHONOGWW-A [ 21 ] Marathon™ User Guide
Page 26

Marathon Configuration Options
Marathon Configuration Options
Many configuration options are available via the Microsoft Windows Controlpanel. Refer to the Marathon Reference Guide or
for Help and Support on the Start menu for configuration details.
Date and Time
Use the Windows interface to set date, time and time zone.
l Double tap time display in System Tray
l Tap Start |Control Panel | Date and Time (Classic view)
l Tap Start |Control Panel | Date, Time, Language and Regional Options | Change the Date and Time (Category
view)
Power Management
Use the Windows interface to set power management options.
l Tap Start | Control Panel | Power Options (Classic view)
l Tap Start | Control Panel | Performance and Maintenance | Power Options (Category view)
Speaker Volume
Use the Windows interface to control speaker volume.
l Double tap speaker icon in System Tray
l Tap Start | Control Panel | Sound and Audio Devices (Classic view)
l Tap Start | Control Panel | Sounds, Speech and Audio Devices | Adjust the System Volume (Category view)
Connect Bluetooth Devices
Use the Windows interface to manage Bluetooth devices.
l Tap Start | Control Panel | Bluetooth Devices (Classic view)
l Tap Start | Control Panel |Printers and Other Hardware | Bluetooth Devices (Category view)
Restart/Shutdown
Use the Windows interface to restart or shut down the Marathon.
l Tap Start |Shut Down | Restart
l Tap Start |Shut Down | Shut down
The Reset Button, on the right side of the Marathon, when pressed with the tip of the stylus performs the same function as the
software key sequence Start | Shut Down | Restart.
Calibrate Touchscreen
To calibrate the touchscreen, tap Start | Programs | PenMount Universal Driver | Utility | PenMount Control Panel.
Select PenMount 6000 USB and then tap Configure. Select Standard Calibration or Advance Calibration.
Advanced Calibration allows the user to select the number of calibration points. With either option, follow the on screen
instructions to touch the red square, hold the touch and then lift the stylus to complete the calibration process.
E-EQ-MARATHONOGWW-A [ 22 ] Marathon™ User Guide
Page 27
MarathonDesktop and Vehicle Dock
MarathonDesktop and Vehicle Dock
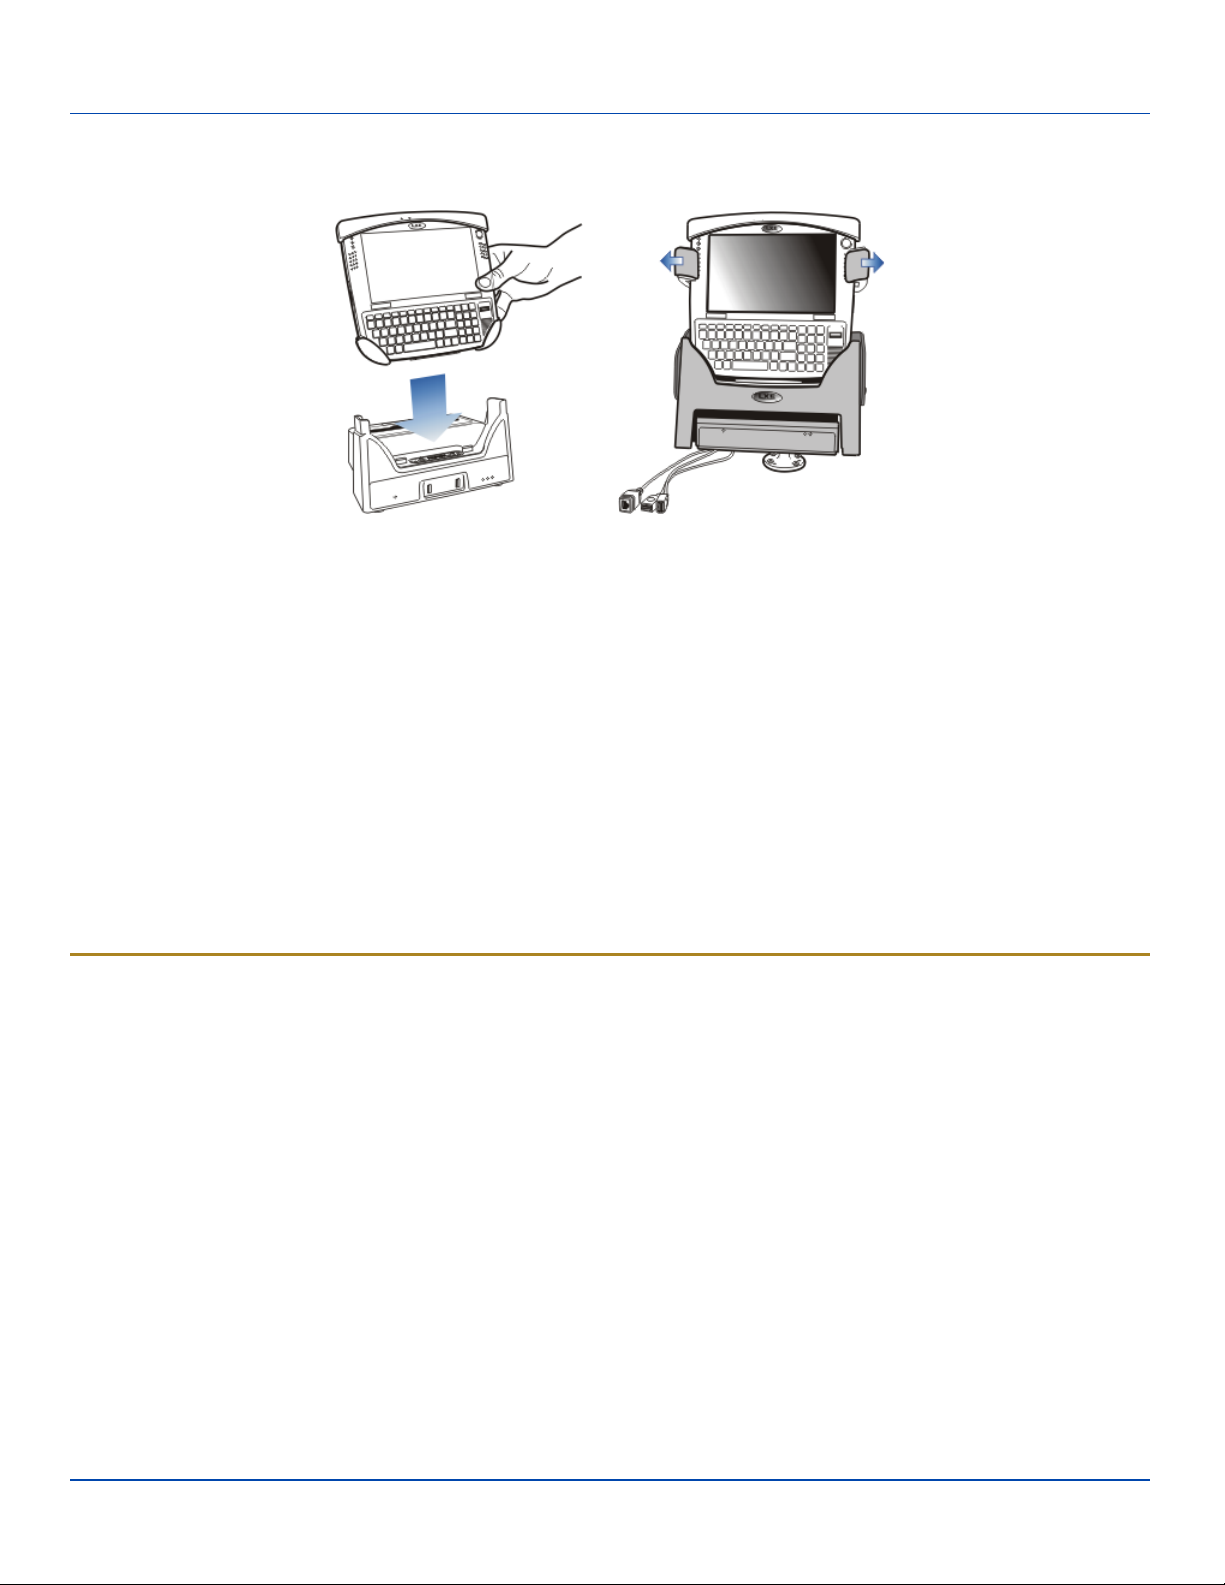
Desktop Dock and Vehicle Mounted Dock
The docks provide:
l A mount for the Marathon computer. The desktop dock is located in a protected environment. The vehicle dock attaches
to a vehicle via a RAM mount.
l Conditioned power for the Marathon. The docks accept 12-24 VDC power input.
l Connectors for an external monitor, four USB ports and an Ethernet connection are available when the Marathon is
mounted in a powered desktop dock. The desktop dock also offers spare auxiliary battery charging.
l A serial, monitor, Ethernet and USB connection are available when the Marathon is mounted in a powered vehicle dock.
l When a headset is not attached to the mobile device mounted in a dock, the microphone and speakers on the Marathon
are active.
l Six strain relief cable mounts are available on the back of the vehicle dock.
l Mobility of the Marathon, since the vehicle dock remains attached to the vehicle the computer can easily be moved from
one vehicle equipped with a dock to another.
GPS and Mobile Net antenna connectors are located on the back of the vehicle dock.
Using the Vehicle Dock
1. Attach RAM mount to vehicle (see Marathon Dock Guide).
2. Attachcabled accessories to dock.
3. Attach power cable.
4. Secure cables in the appropriate strain relief cable mounts.
Place the Marathon in the Vehicle Dock
Lower theMarathon into the docking bay until it is seated and then push it back into the dock. The release mechanisms will
slide out of the way, and then spring forward, securing theMarathon in the vehicle dock.
Removing the Marathon from the Vehicle Dock
To take the Marathon out of the dock, press down and out on the release mechanisms and the unit will spring forward out of the
dock. Pick the unit up and out of the dock.
E-EQ-MARATHONOGWW-A [ 23 ] Marathon™ User Guide
Page 28

Using the Desktop Dock
Using the Desktop Dock
1. Place the desktop dock on a stable surface ( see Marathon Cradle Guide).
2. Attach cabled accessories.
3. Attach power cable.
Place the Marathon in the Desktop Dock
Lower the Marathon straight down into the docking bay until it is seated and then let it fall back into the dock. If desired insert an
auxiliary battery in the spare battery charging bay.
Removing the Marathon from the Desktop Dock
To remove the Marathon from the dock, lift the Marathon straight up and out of the dock. The Marathon can be removed from
the desktop dock with one hand.
E-EQ-MARATHONOGWW-A [ 24 ] Marathon™ User Guide
Page 29
Regulatory Notices and Safety Information
Waste Electrical and Electronic Equipment (WEEE)
Important:
This symbol is placed on the product to remind users to dispose of Waste Electrical and Electronic Equipment
(WEEE) appropriately, per Directive 2002-96-EC. In most areas, this product can be recycled, reclaimed and reused when properly discarded. Do not discard labeled units with trash. For information about proper disposal,
Contact your LXE representative, or visit www lxe com.
Class B Digital Device
NOTICE
This device complies with Part 15 of the FCC Rules [and with RSS-210 of Industry Canada]. Operation is subject to the
following two conditions:
1. This device may not cause harmful interference, and
2. This device must accept any interference received, including interference that may cause undesired operation.
NOTE: This equipment has been tested and found to comply with the limits for a Class B digital device, pursuant to Part 15 of
the FCC Rules. These limits are designed to provide reasonable protection against harmful interference in a residential
installation. This equipment generates, uses and can radiate radio frequency energy and, if not installed and used in
accordance with the instructions, may cause harmful interference to radio communications. However, there is no guarantee
that interference will not occur in a particular installation. If this equipment does cause harmful interference to radio or television
reception, which can be determined by turning the equipment off and on, the user is encouraged to try to correct the
interference by one or more of the following measures:
l Reorient or relocate the receiving antenna.
l Increase the separation between the equipment and the receiver.
l Connect the equipment into an outlet on a circuit different from that to which the receiver is connected.
l Consult the dealer or an experienced radio/TV technician for help.
NOTICE
Changes or modifications made to this equipment not expressly approved by LXE, Inc., may void the FCC authorization to
operate this equipment.
EMC Directive Requirements
This is a Class B product. In a domestic environment this product may cause radio interference in which case the user may be
required to take adequate measures.
Industry Canada
This Class B digital apparatus meets all requirements of the Canadian Interference Causing Equipment Regulations. Operation
is subject to the following two conditions: (1) this device may not cause harmful interference, and (2) this device must accept
any interference received, including interference that may cause undesired operation.
Cet appareil numérique de la classe B respecte toutes les exigences du Règlement sur le matériel brouilleur du Canada. Le
présent appareil numérique n’émet pas de bruits radioélectriques dépassant les limites applicables aux appareils numériques
de Classe B prescrites dans le Règlement sur le brouillage radioélectrique édits par le ministère des Communications du
Canada.
E-EQ-MARATHONOGWW-A [ 25 ] Marathon™ User Guide
Page 30
RF Safety Notice
Li-Ion Battery
When disposing of the Marathon main battery, the following precautions should be observed: The battery should be disposed of
properly. The battery should not be disassembled or crushed. The battery should not be heated above 212°F (100°C) or
incinerated.
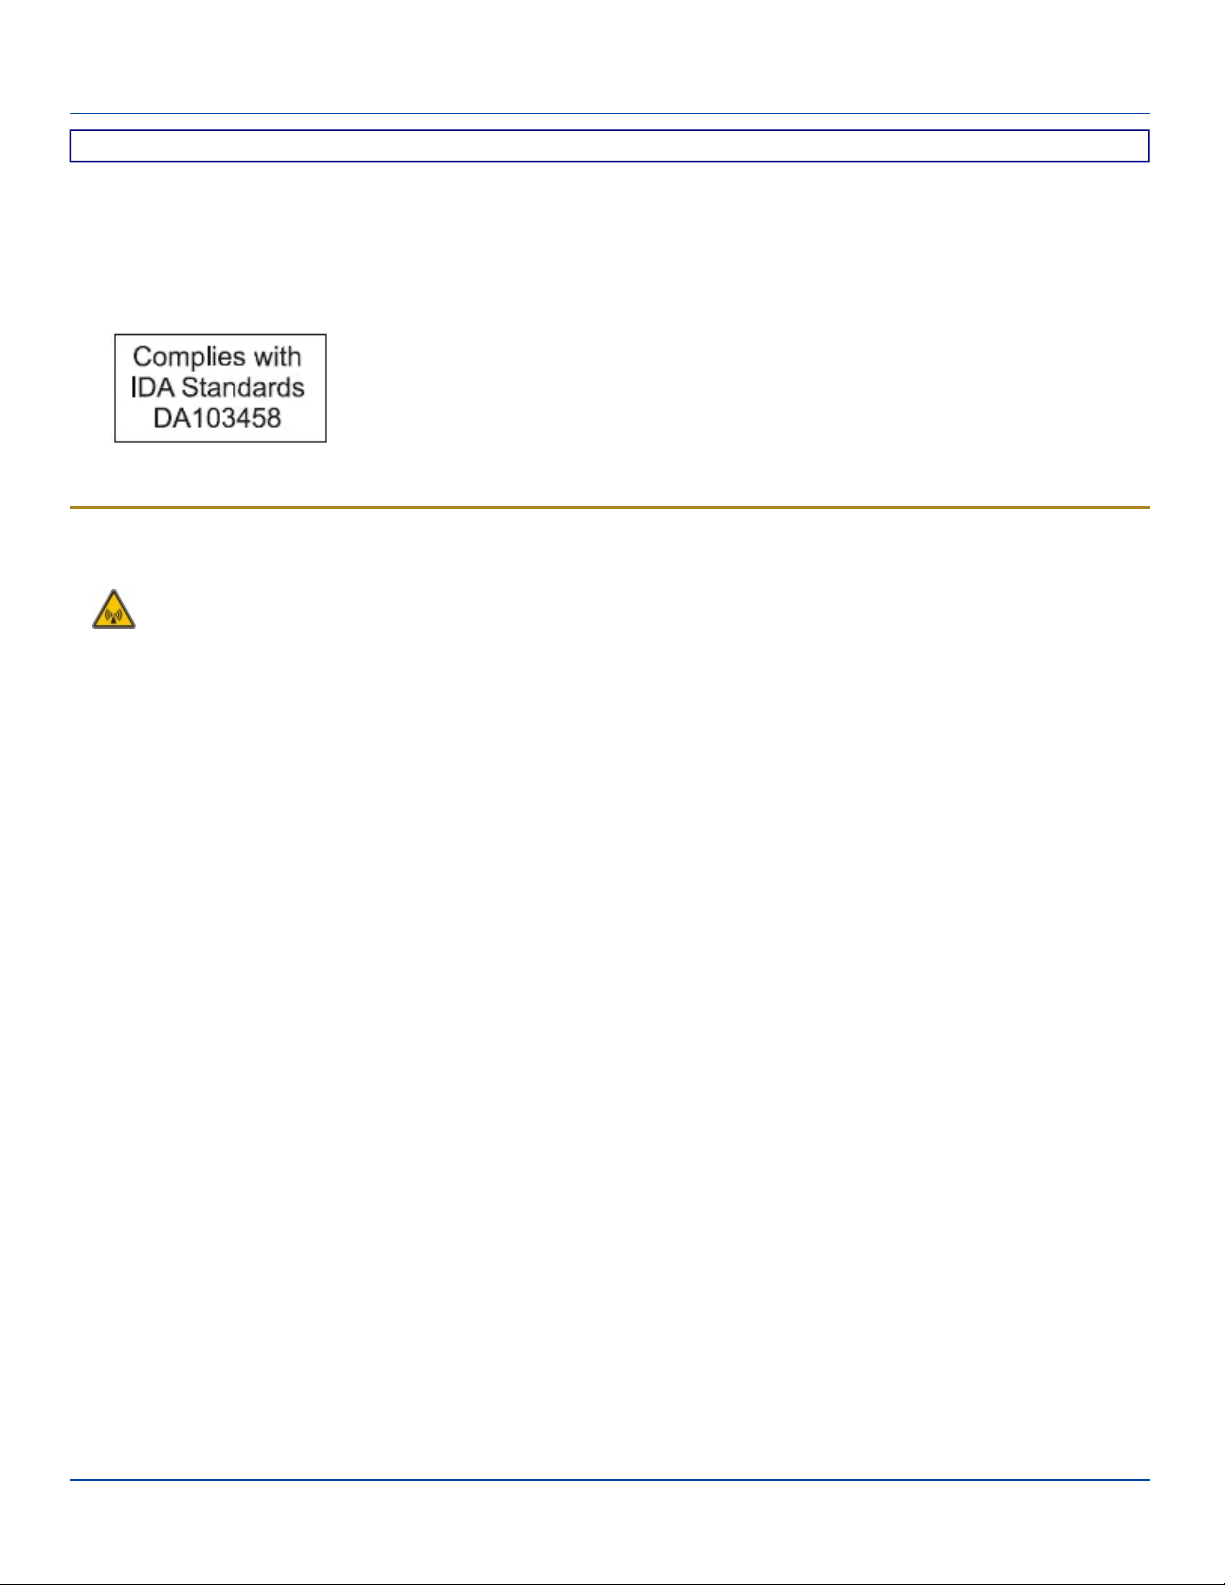
Republic of Singapore - LXE Dealer License Number DA103458 complies with IDA
Standards.
RF Safety Notice
This device is intended to transmit RF energy. For protection against RF exposure to humans and in accordance
with FCC rules and Industry Canada rules, this transmitter should be installed such that a minimum separation distance of at least 20 cm (7.8 in.) is maintained between the antenna and the general population. This device is not to
be co-located with other transmitters.
E-EQ-MARATHONOGWW-A [ 26 ] Marathon™ User Guide
Page 31
Laser Light Safety Statement
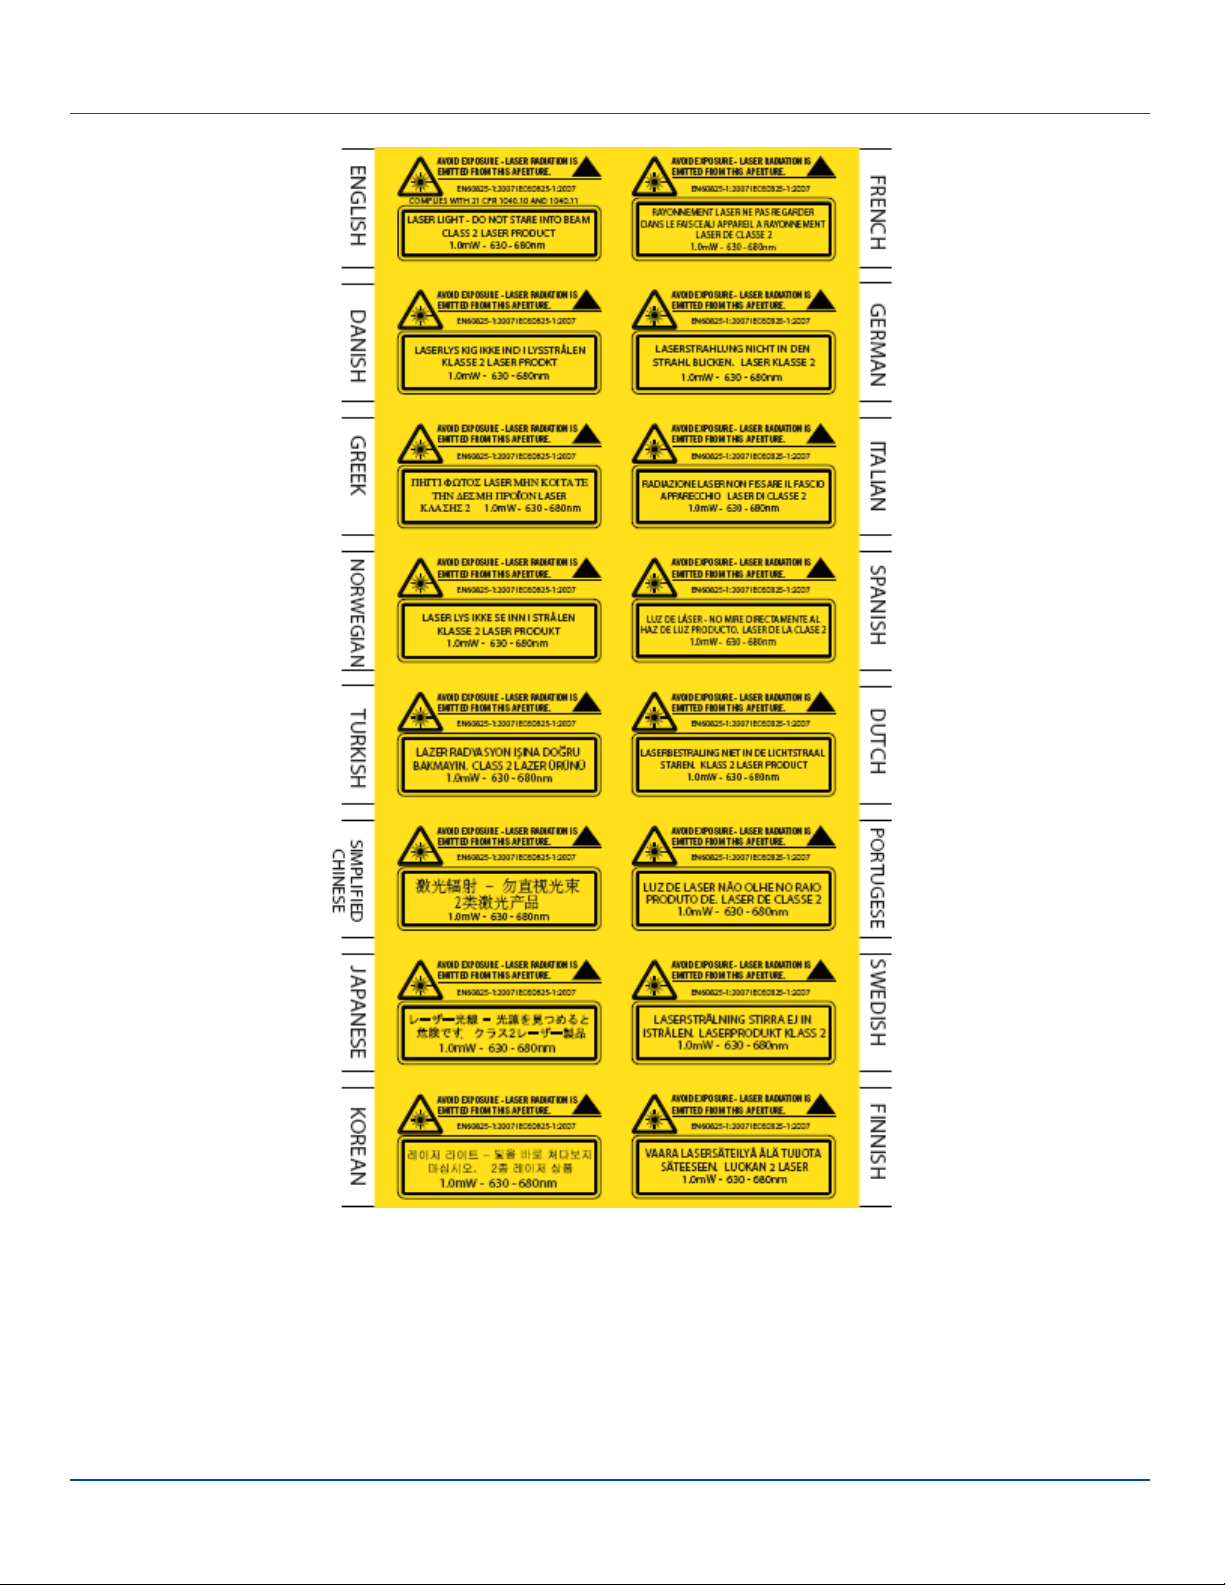
Laser Light Safety Statement
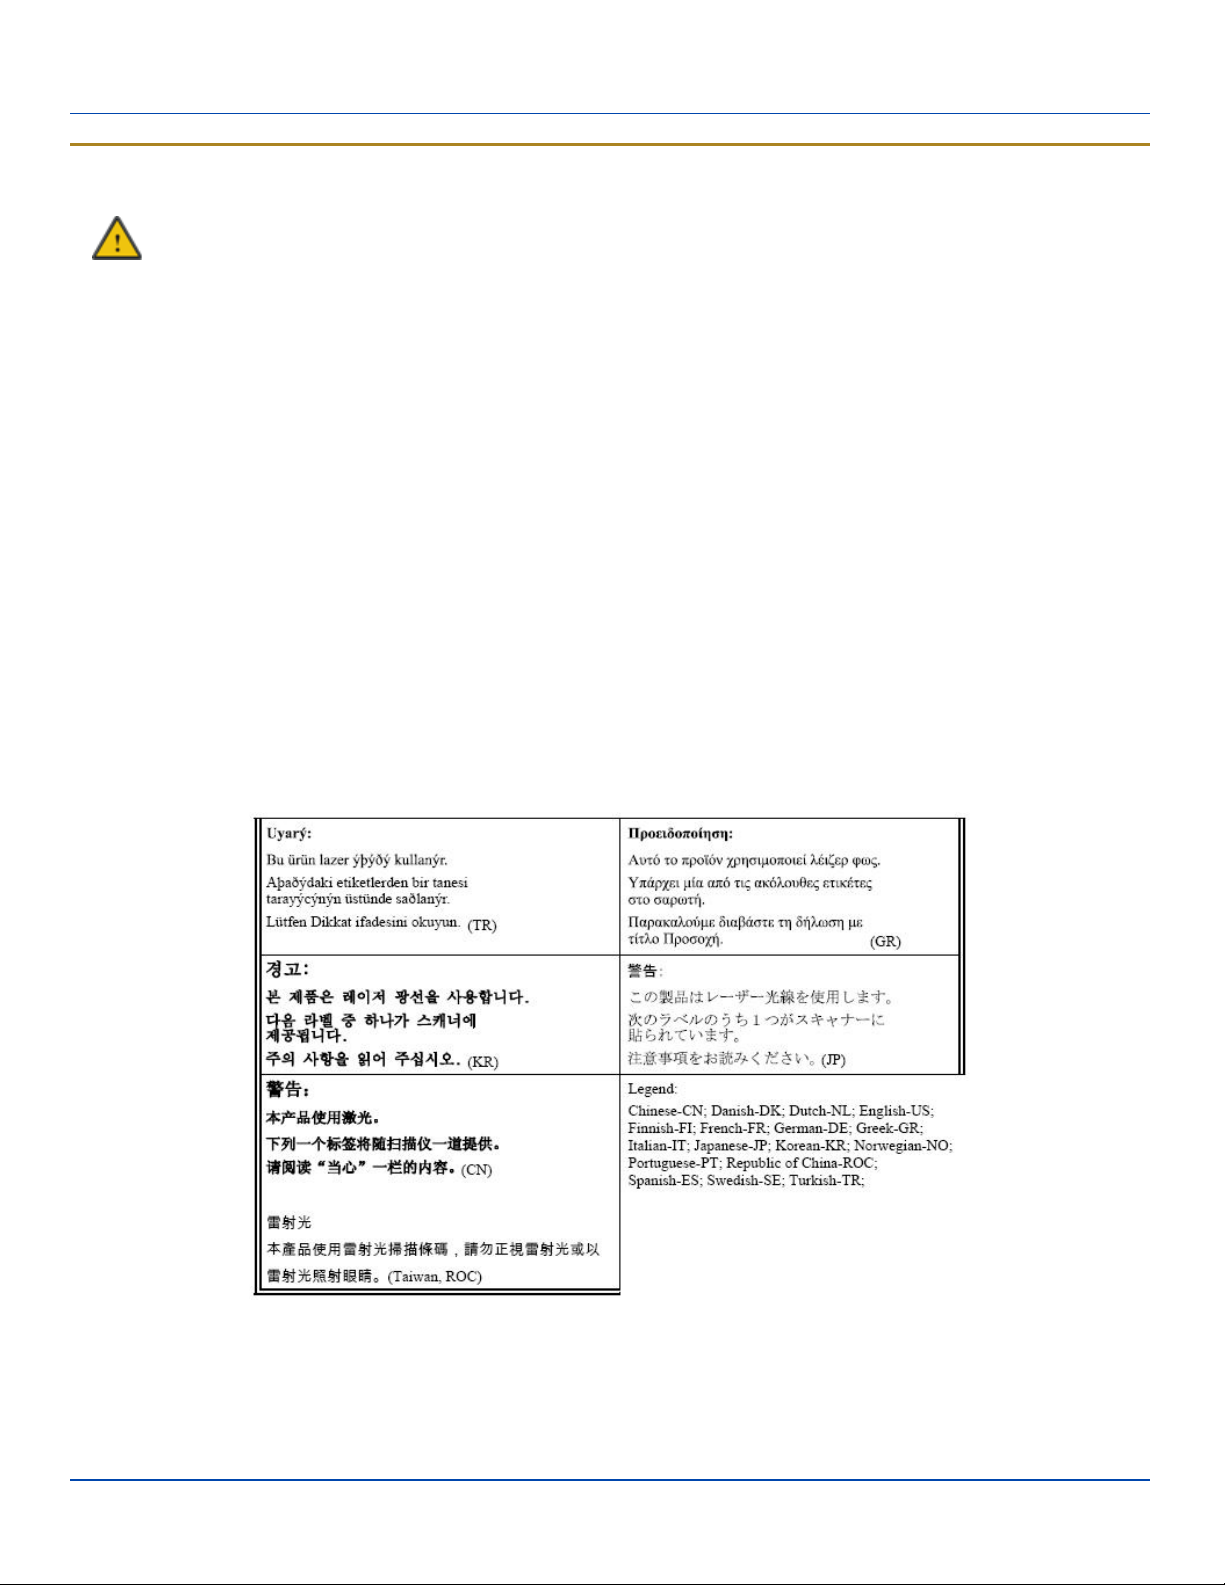
Warning: This product uses laser light. One of the following labels is provided on the scanner. Please read the
Caution statement. (US)
Mise én garde: Ce produit utilise un rayon laser. L’une des étiquettes suivantes est apposée sur le scanneur. Veuillez lire
l’avertissement qu’elle contient. (FR)
Advertência: Este produto usa luz de laser. O scanner contém um dos seguintes avisos. Favor ler o Aviso. (PT)
Varning: Denna produkt använder laserljus. En av de nedanstående etiketterna sitter på scannern. Var god läs varningstexten.
(SE)
Advarsel: Dette produkt anvender laserlys. En af følgende mærkater anvendes på scanneren. Læs venligst
sikkerhedsforanstaltningen. (DK)
Varoitus: Tämä tuote käyttää laservaloa. Skannerissa on jokin seuraavista tarroista. Lue Huomio-kohta. (FI)
Warnung: Dieses Produkt verwendet Laserlicht. Eines der folgenden Etiketten befindet sich auf dem Scanner. Bitte lesen Sie
den Gefahrenhinweis. (DE)
Attenzione: Questo prodotto utilizza luce laser. Una delle etichette seguenti c’ ubicata sullo scanner. Si raccomanda di leggere
con attenzione le avvertenze riportate. (IT)
Advarsel: Dette utstyret bruker laserlys. En av følgende etiketter er plassert på scanneren. Les advarselen på etiketten. (NO)
Advertencia: Este producto usa luz de láser. Las etiquetas se proveen en la máquina exploradora. Por favor, lea
detenidamente la explicación para las precauciones. (ES)
Waarschuwing: Dit product gebruikt laserlicht. Een van de volgende labels is op de scanner aangebracht. Lees a.u.b. de
waarschuwing onder Oppassen. (NL)
E-EQ-MARATHONOGWW-A [ 27 ] Marathon™ User Guide
Page 32
Laser Light Safety Statement
E-EQ-MARATHONOGWW-A [ 28 ] Marathon™ User Guide
Page 33

Vehicle Power Supply Connection Safety Statement
Vehicle Power Supply Connection Safety Statement
Vehicle Power Supply Connection: If the supply connection is made directly to the battery, a 10A slow-blow fuse should be
installed in the positive lead within 5 inches (12.7 cm.) of the battery positive (+) terminal. (US)
Raccordement de l’alimentation du véhicule Si l’alimentation est raccordée directement à la batterie, un fusible à action
retardée de 10A doit être installé sur le câble positif à moins de 12,7 cm de la borne positive (+) de la batterie. (FR)
EL forsyning af køretøjet. Er forsyningsforbindelsen direkte tilknyttet til batteriet og og tilsluttet til den positive part indenfor
12,7 cm (+ delen). vil der være en langsom tændelse af 10 ampere. (DK)
Kytkentä ajoneuvon virtalähteeseen Jos virtaa otetaan suoraan akusta, 10 ampeerin hidas sulake on asennettava
positiiviseen johtoon enintään 12 cm:n etäisyydelle akun positiivisesta (+) navasta. (FI)
Anschluss an Fahrzeugbatterie Bei direktem Anschluss an die Fahrzeugbatterie sollte eine träge 10A-Sicherung in die
positive Leitung zwischengeschaltet werden, und zwar nicht weiter als ca. 13 cm von der positiven (+) Batterieklemme
entfernt. (DE)
Σύνδεση Τροφοδοτικού Ισχύος Οχήματος Αν η σύνδεση του τροφοδοτικού γίνει κατευθείαν στη μπαταρία, μια ασφάλεια
βραδείας τήξης των 10A θα πρέπει να τοποθετηθεί στο θετικό καλώδιο εντός 5 ιντσών (12,7 εκ.) του θετικού (+) ακροδέκτη
της μπαταρίας. (GR)
Collegamento dell’alimentazione del veicolo Se il collegamento dell’alimentazione viene stabilito direttamente con la batteria, è
necessario installare un fusibile ad azione lenta da 10A nel conduttore positivo a meno di 5 in. (12,7 cm) dal terminale positivo
(+) della batteria. (IT)
Tilkople strømforsyningen til kjøretøyet Hvis strømforsyningen koples direkte til batteriet, skal det installeres en 10A treg
sikring i den positive ledningen innen 12,7 cm fra plusspolen (+) på batteriet. (NO)
Ligação do fornecimento de corrente do veículo Se a ligação de fornecimento de corrente for ligada directamente à bateria,
deve instalar-se um fusível de 10A no terminal positivo, a 12,7 cm. do terminal positivo (+) da bateria. (PT)
Conexión de suministro eléctrico para el vehículo Si el suministro eléctrico se proporciona directamente a la batería, se debe
instalar un fusible de retardo de 10A en el conductor positivo, como máximo a 12,7 cm (5 pulgadas) del terminal positivo (+).
(ES)
Fordonets strömförsörjningskoppling Om strömkopplingen görs direkt till batteriet, måste en 10A-säkring installeras i den
positivt laddade ledningen inom 12.7 cm från batteriets pluspol (+). (SE)
Taşıt Güç Kaynağı Bağlantısı Kaynak bağlantısı doğrudan aküye yapılırsa, pozitif bağlantı kablosu üzerinde akünün pozitif (+)
kutbuna 12.7 cm mesafede 10A’lık yavaş atan bir sigorta monte edilmelidir. (TR)
Legend: Danish – DK; English – US; Finnish – FI; French- - FR; German – DE; Greek – GR; Italian – IT; Norwegian – NO;
Portuguese – PT; Spanish – ES; Swedish – SE; Turkish – TR.
Revision History
Revision / Date Location / Change
A / Apr 2011 Initial Release
E-EQ-MARATHONOGWW-A [ 29 ] Marathon™ User Guide
Page 34

Index
A
AC/DC Power Supply 12
Adjust Display Brightness 10
Attaching the Hand Strap 18
Attaching the Shoulderstrap 20
Auxiliary Battery Install 16
B
Battery 7
C
Calibrate 22
Charge Main Battery 7
Class B 25
Components 3
Configuration Options 22
Connect Bluetooth Devices 22
Connect Power Supply to Vehicle Dock 15
Connecting a Tethered Scanner 14
Connecting an Audio Device 13
Connecting an External Power Supply 12
Connecting Cables 11
Connecting Cigarette Lighter Cable 15
Connecting USB Devices 11
Laser Warnings and Labels 2
Lithium Ion battery 7
Long Hand Strap 18
P
Power key 1
Power Management 22
R
Recharge Auxiliary Battery 7
Recharge the Main Battery 7
Reset Button 5, 22
Restart 22
Revision History 29
RF Safety Notice 26
S
Safety Statement
Vehicle Power Supply 29
Set Up A New Device 1
Short Hand Strap 18
Shutdown 22
Software Setup 1
Speaker Volume 22
Stylus
how to use 8
T
D
Date and Time 22
H
Hand Strap
assembly 19
Hardware Setup 1
L
Laser Light Safety Statement 27
E-EQ-MARATHONOGWW-A [ 30 ] Marathon™ User Guide
Touchscreen
and the stylus 8
W
WEEE 25
 Loading...