

Page 1
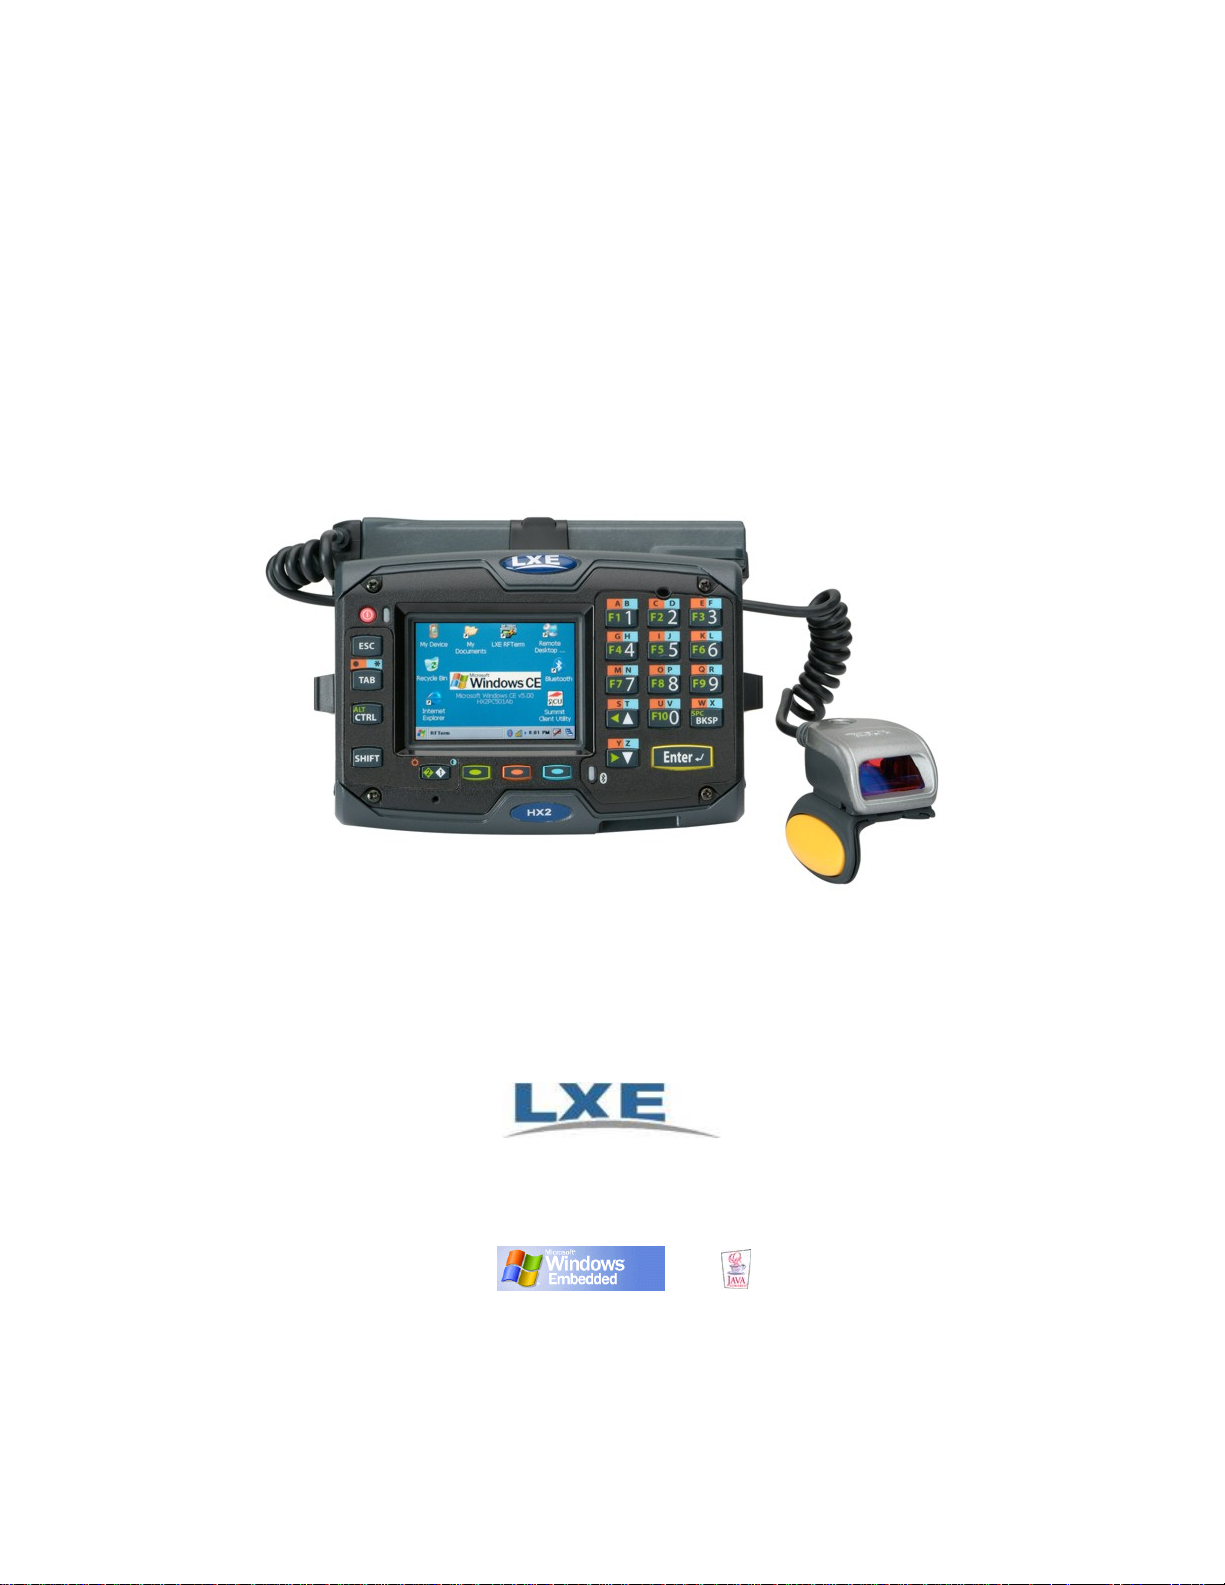
HX2 User’s Guide
(Microsoft® Windows® CE 5.0 Equipped)
Copyright © 2008 by LXE Inc.
All Rights Reserved
E-EQ-HX2OGWW-D
Page 2
Language: English
Notices
LXE Inc. reserves the right to make improvements or changes in the products described in this guide at any time without notice. While reasonable
efforts have been made in the preparation of this document to assure its accuracy, LXE assumes no liability resulting from any errors or
omissions in this document, or from the use of the information contained herein. Further, LXE Incorporated, reserves the right to revise this
publication and to make changes to it from time to time without any obligation to notify any person or organization of such revision or changes.
Copyright:
This document is copyrighted. All rights are reserved. This document may not, in whole or in part, be copied, photocopied, reproduced, translated
or reduced to any electronic medium or machine-readable form without prior consent, in writing, from LXE Inc.
Copyright © 2008 by LXE Inc. An EMS Technologies Company.
125 Technology Parkway, Norcross, GA 30092 U.S.A. (770) 447-4224
Trademarks:
LXE® and Spire® are registered trademarks of LXE Inc. RFTerm® is a registered trademark of EMS Technologies Company.
Summit Data Communications, the Summit logo, and “The Pinnacle of Performance” are trademarks of Summit Data Communications, Inc.
Microsoft®, Windows® and the Windows logo are registered trademarks of Microsoft Corporation in the United States and/or other countries.
Symbol® is a registered trademark of Symbol Technologies. MOTOROLA® and the Stylized M Logo are registered trademarks of Motorola®,
Inc.
Java® and Java-based trademarks and logos are trademarks or registered trademarks of Sun Micr osystems, Inc. in the U.S. or other countries,
and are used under license.
RAM® and RAM Mount™ are both trademarks of National Products Inc., 1205 S. Orr Street, Seattle, WA 98108.
Wavelink®, the Wavelink logo and tagline, Wavelink Studio™, Avalanche Management Console™, Mobile Manager™, and Mobile Manager
Enterprise™ are trademarks of Wavelink Corporation, Kirkland.
The Bluetooth® word mark and logos are owned by the Bluetooth SIG, Inc. and any use of such marks by LXE, Inc. is under license.
PowerScan® is a registered trademark of Datalogic Scanning, Inc., located in Eugene, OR.
All other brand or product names are trademarks or registered trademarks of their respective companies or organizations.
When this document is in PDF format: “Acrobat ® Reader Copyright © 2008 Adobe Systems Incorporated. All rights reserved. Adobe, the
Adobe logo, Acrobat, and the Acrobat logo are trademarks of Adobe Systems Incorporated” applies.
The user is strongly encouraged to read Appendix B – Regulatory Notices and
Safety Information. Important safety cautions, warnings and worldwide regulatory
agency information is contained in Appendix B.
Revision Notice
Introduction
Components Updated graphics.
Quick Start Added Keypad Icons and Keypads.
Appendix B – Regulatory Notices and Safety
Information
Updated graphics. Added Continuous Scan Mode.
Removed LXEbook – HX2 User’s Guide.
Added Summit 802.11a/b/g radio. Added Revision History.
Page 3

Table of Contents
INTRODUCTION 1
Overview.................................................................................................................................................1
Environmental Specifications ..............................................................................................................2
HX2.......................................................................................................................................................................2
Lithium Ion Battery Pack......................................................................................................................................2
Ring Scanner Warnings and Labels ....................................................................................................3
Important Battery Information.............................................................................................................. 4
Continuous Scan Mode.........................................................................................................................4
Document Conventions.........................................................................................................................5
Getting Help............................................................................................................................................5
Manuals.................................................................................................................................................................5
Accessories ...........................................................................................................................................................6
COMPONENTS 9
Front......................................................................................................................................................10
Back.......................................................................................................................................................11
Left Arm Use ......................................................................................................................................................11
Right Arm Use....................................................................................................................................................11
Connectors........................................................................................................................................... 12
Ring Scanner / Audio / Battery Connection........................................................................................................12
Cradle Connection...............................................................................................................................................12
Tethered Ring Scanner / Imager.........................................................................................................13
Cables ...................................................................................................................................................14
Li-Ion Battery........................................................................................................................................15
Standard Battery..................................................................................................................................................15
Extended Battery.................................................................................................................................................15
Mounting Bracket Clips....................................................................................................................... 16
Mounting Devices................................................................................................................................17
Armband .............................................................................................................................................................17
Straps................................................................................................................................................................17
Hip Flip...............................................................................................................................................................18
Low Profile Armband.........................................................................................................................................18
QUICK START 19
Getting Started..................................................................................................................................... 19
Prerequisites........................................................................................................................................................19
HX2 Quick Start .................................................................................................................................................19
HX2 Mobile Device – Quick Start Troubleshooting........................................................................................20
Wearable Device Assembly................................................................................................................................20
Armband...........................................................................................................................................................20
Hip Flip............................................................................................................................................................21
Ring Scanner Strap...........................................................................................................................................21
Connecting the Battery and Ring Scanner........................................................................................22
Ring Scanner on the Left Hand...........................................................................................................................22
Ring Scanner on the Right Hand.........................................................................................................................22
Checking Battery Status ..................................................................................................................... 22
Connecting the Audio Cable and a Headset..................................................................................... 23
Adjust Microphone and Secure the Cable...........................................................................................................23
Tapping the Power Key.......................................................................................................................24
Tapping the Touchscreen with a Stylus............................................................................................24
E-EQ-HX2OGWW-D HX2 User’s Guide
Page 4

ii Table of Contents
Calibrating the Touchscreen ..............................................................................................................24
Power Key Functions ..........................................................................................................................25
Hardware Reset...................................................................................................................................................25
Warm Boot..........................................................................................................................................................25
Cold Boot............................................................................................................................................................25
HX2 Keypads........................................................................................................................................26
Inserting Characters Using the Input Panel.........................................................................................................26
Using the Alpha Mode 3 Tap Keypad.................................................................................................................26
Using the Dual Alpha Keypad............................................................................................................................27
Keypad Icons and the Dual Alpha Keypad......................................................................................................27
Using the Triple Tap Keypad..............................................................................................................................28
Keypad Icons and the Triple Tap Keypad........................................................................................................28
System Status LEDS............................................................................................................................29
Entering Data........................................................................................................................................30
Keypad Entry......................................................................................................................................................30
Stylus Data Entry................................................................................................................................................30
Ring Scanner Data Entry.....................................................................................................................................31
Laser Scanner................................................................................................................................................... 31
2D Imager ........................................................................................................................................................31
Scan Status LED ..............................................................................................................................................32
Voice Data ..........................................................................................................................................................32
Input Panel / Virtual Keyboard...........................................................................................................................33
Bluetooth Devices................................................................................................................................34
Mobile Bluetooth Accessories ...........................................................................................................34
Entering the AppLock Activation Key ...............................................................................................35
Using a Stylus Tap..............................................................................................................................................35
Using the Keypad................................................................................................................................................35
Setting the Power Schemes Timers................................................................................................... 36
Battery Power Scheme........................................................................................................................................36
AC Power Scheme..............................................................................................................................................36
Setting The Audio Speaker Volume...................................................................................................37
Using the Keypad................................................................................................................................................37
Using the Touchscreen........................................................................................................................................37
Adjusting the Display Backlight Timer..............................................................................................38
Adjusting the Display Brightness......................................................................................................38
Turning the Keypad Backlight On or Off...........................................................................................39
Cleaning the Glass Display/Ring Scanner Aperture........................................................................39
OPTIONAL EQUIPMENT 41
HX2 Rubber Boot Assembly............................................................................................................... 41
Protective Film for the Screen Display..............................................................................................41
HX2 Voice Case Assembly..................................................................................................................42
Removing/Replacing the Armband Straps........................................................................................43
Connecting the ActiveSync Cable to the HX2...................................................................................44
HX2 Docking/Charging Cradle............................................................................................................45
Cradle LEDs........................................................................................................................................................46
Cradle PWR LED.............................................................................................................................................46
B1 and B2 LED................................................................................................................................................46
HX2 Multi-Charger................................................................................................................................47
Charging Pocket LED.........................................................................................................................................47
Charger/Analyzer LEDs......................................................................................................................................48
APPENDIX A KEY MAPS 49
23 Key Keypad .....................................................................................................................................49
Alpha Mode 3 Tap..............................................................................................................................................49
HX2 User’s Guide E-EQ-HX2OGWW-D
Page 5

Table of Contents iii
Dual Alpha Keypad.............................................................................................................................................53
Triple Tap Keypad..............................................................................................................................................57
APPENDIX B REGULATORY NOTICES AND SAFETY INFORMATION 61
HX2 Approvals/Standards................................................................................................................... 63
Revision History...................................................................................................................................65
INDEX 67
E-EQ-HX2OGWW-D HX2 User’s Guide
Page 6

iv Table of Contents
Illustrations
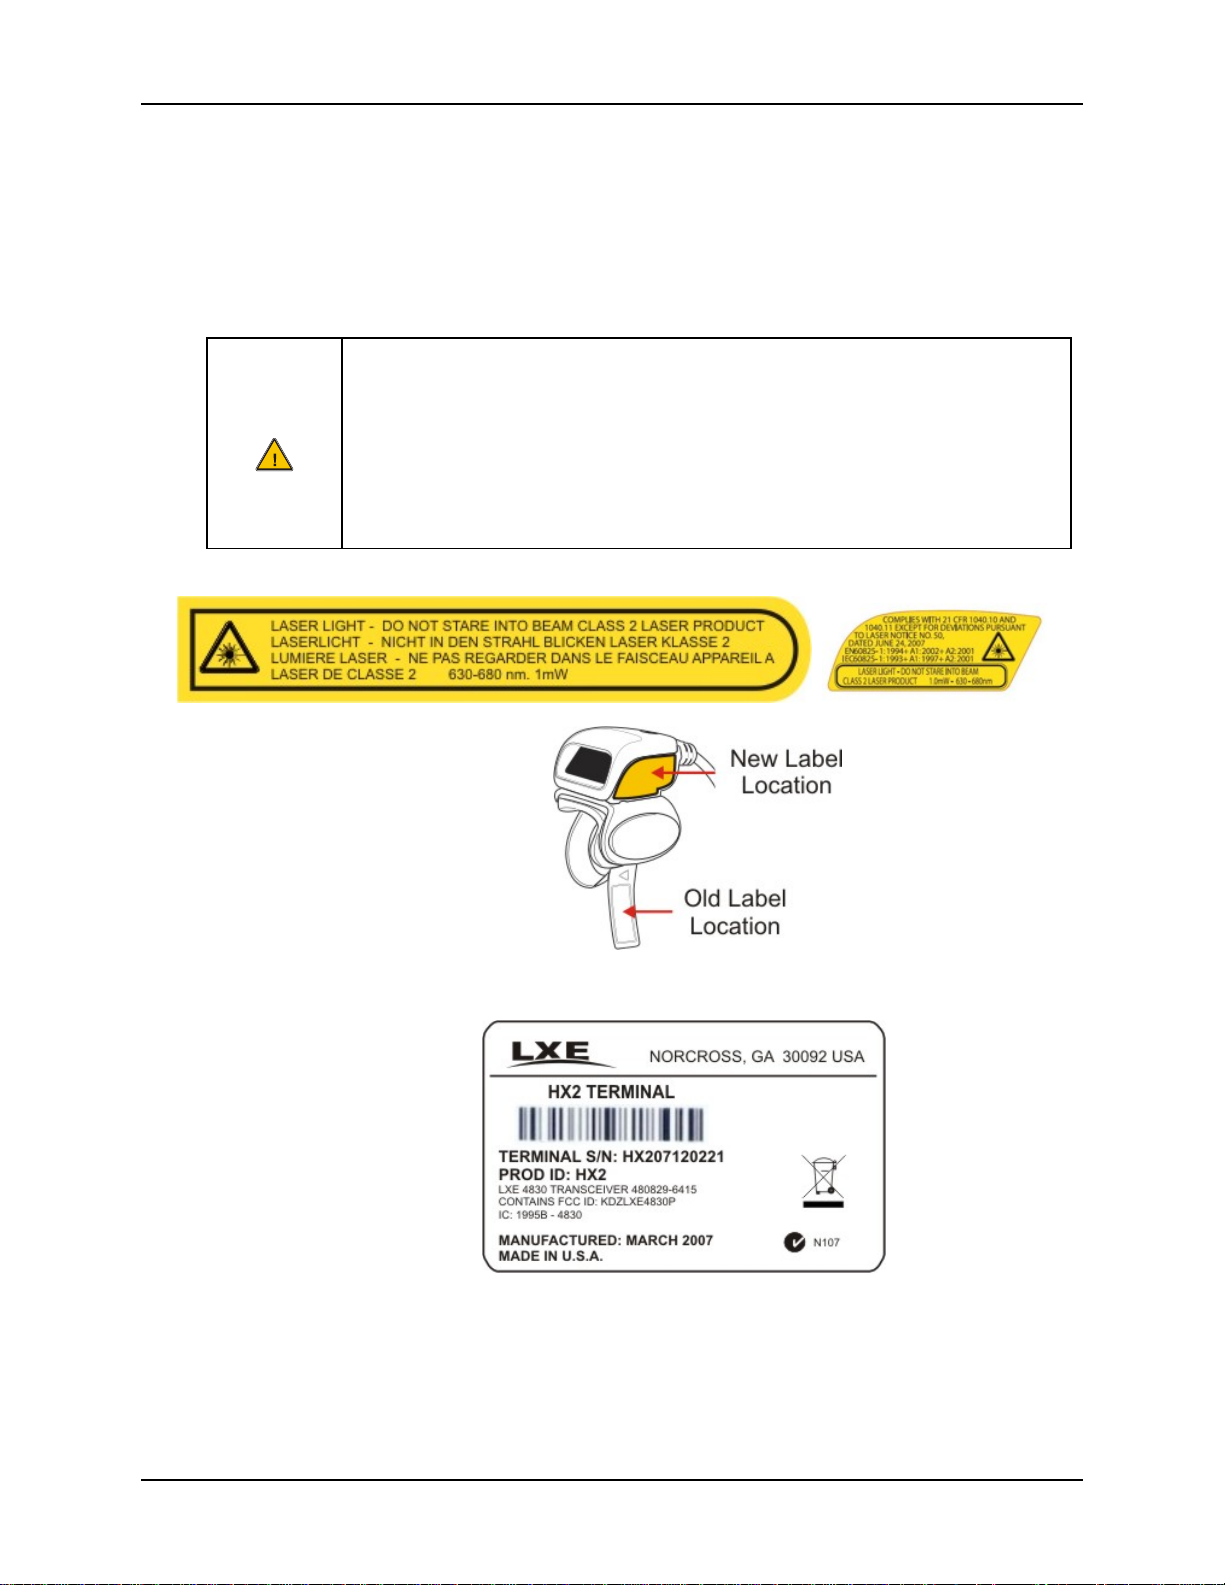
Figure 1 Ring Scanner Caution Label – Class 2 Laser Scanner...........................................................................3
Figure 2 HX2 Product Label................................................................................................................................3
Figure 3 Front ....................................................................................................................................................10
Figure 4 Back.....................................................................................................................................................11
Figure 5 Scanner / Audio / Battery Ports – Connector 1 and 2 ..........................................................................12
Figure 6 Cradle/Power Port – Connector 3 (Base).............................................................................................12
Figure 7 Laser Ring Scanner..............................................................................................................................13
Figure 8 Imager Ring Scanner...........................................................................................................................13
Figure 9 Ring Scanner and Ring Imager ............................................................................................................13
Figure 10 Cable – Battery and HX2 Connector.................................................................................................14
Figure 11 Cable – Audio, Battery and HX2 Connector.....................................................................................14
Figure 12 Cable – Laser Ring Scanner and HX2 Connector..............................................................................14
Figure 13 Cable – Imager Ring Scanner and HX2 Connector...........................................................................14
Figure 14 HX2 Standard and HX2 Extended Battery........................................................................................15
Figure 15 Mounting Brackets.............................................................................................................................16
Figure 16 Armband and Hip Flip Mount Assembly and Clips ..........................................................................16
Figure 17 Armband / Top and Bottom...............................................................................................................17
Figure 18 Armband Straps.................................................................................................................................17
Figure 19 Hip Flip and Belt ...............................................................................................................................18
Figure 20 HX2 Armband, Left Arm Orientation, Ring Scanner, Audio............................................................20
Figure 21 HX2 Hip Flip, Audio.........................................................................................................................21
Figure 22 Tether the Battery and Ring Scanner – Left / Right...........................................................................22
Figure 23 Audio/Battery Cable and Headset......................................................................................................23
Figure 24 The Alpha Mode 3 Tap Keypad ........................................................................................................26
Figure 25 Dual Alpha Keypad ...........................................................................................................................27
Figure 26 The Triple Tap Keypad......................................................................................................................28
Figure 27 System Status LEDs ..........................................................................................................................29
Figure 28 Laser Scan Beam on Linear Barcode.................................................................................................31
Figure 29 Imager Bracketed Crosshair Target on 2D Barcode..........................................................................31
Figure 30 Scan Status LED................................................................................................................................32
Figure 31 Input Panel / Virtual Keyboard..........................................................................................................33
Figure 32 Switchpad Menu................................................................................................................................35
Figure 33 Power Properties – Schemes Tab.......................................................................................................36
Figure 34 Volume & Sounds Properties ............................................................................................................37
Figure 35 Setting the Display Backlight Timer..................................................................................................38
Figure 36 Turning the Keypad Backlight On or Off..........................................................................................39
Figure 37 HX2 Rubber Boot..............................................................................................................................41
Figure 38 HX2 Voice Case................................................................................................................................42
Figure 39 Removing/Replacing the Armband Straps.........................................................................................43
Figure 40 Armband Straps.................................................................................................................................43
Figure 41 Connect ActiveSync Cable to HX2 Cradle Connector......................................................................44
Figure 42 Powered Cradle LEDs .......................................................................................................................45
Figure 43 HX2 Multi-Charger ...........................................................................................................................47
Figure 44 Multi-Charger Control Panel.............................................................................................................48
HX2 User’s Guide E-EQ-HX2OGWW-D
Page 7

Overview
Introduction
The LXE® HX2 is a small, lightweight mobile computer designed to be worn on a person’s arm
or waist. The HX2 is most useful for applications that require computational support while the
user’s hands are actively engaged with the physical environment, including piece picking to carts,
containers or conveyers; case picking; parcel moves; and broken case activities.
The armbands that secure both the unit and its battery keeps the HX2 in the ready position at all
times by preventing the unit from rotating around the wearer’s arm. The adaptable armbands can
be worn close to the elbow or near the wrist.
The primary data inputs are a keypad or a ring scanner. The HX2 is voice ready. Voice can also be
used as an input with 3
feedback generated by the mobile device and delivered through an internal speaker or audio
headset.
The HX2 is powered by a tethered low profile, light and unobtrusive battery. The entire HX2
wearable computer system features breakaway connections at multiple points and a low-prof ile,
smooth design to resist snagging on common warehouse fixtures and equipment.
The HX2 has a Microsoft® Windows® CE 5.0 operating
system with an Intel® XScale® PXA255 CPU. The HX2
supports an 802.11b/g WLAN radio and Bluetooth
radio. Connectors are available which interface with peripherals
such as a Ring Scanner (1D Laser and 2D Imager Ring
Scanner), an audio headset, a docking/charging cradle and a
tethered battery (see Components for port locations).
The QVGA color display with a touch panel has a diagonal
viewing area of 2.5” (6.3 cm) in landscape orientation. The
display backlight brightness can be adjusted using a series of
keypresses. The keypad backlight can be either on or off. The
keypad keys can be programmed to perform multi-key
functions.
The HX2 hip flip holster, voice case, rubber boot, powered
cradle, touchscreen stylus and protective film for the screen are
available from LXE as accessories (see Accessories).
rd
party software. Output is presented using the screen display or audio
®
2.0+EDR
Note: Until the tethered battery and backup battery are completely de pleted, the HX2 is always
drawing power from the batteries (On).
Note: If the mobile device has AppLock installed, please refer to the HX2 Reference Guide
setup and processing information before continuing.
Based on your installed software version and hardware options, your system may not be ex actly
the same as the system described in this manual. Contact your LXE representative for information
on the latest upgrades for your HX2.
for
E-EQ-HX2OGWW-D HX2 User’s Guide
Page 8
2 Environmental Specifications
Related Manuals
This guide takes you through an introduction to and operation of the HX2.
Ring Scanner Programming Guide – contains programming barcodes used when setting up
HX2 ring barcode reader engines.
HX2 Reference Guide – contains technical information and advanced instruction.
HX2 Multi-Charger User’s Guide – contains user, technical and troubleshooting information for
the HX2 battery multi-charger.
HX2 Cradle Reference Guide – contains user, technical and troubleshooting information for the
HX2 cradle.
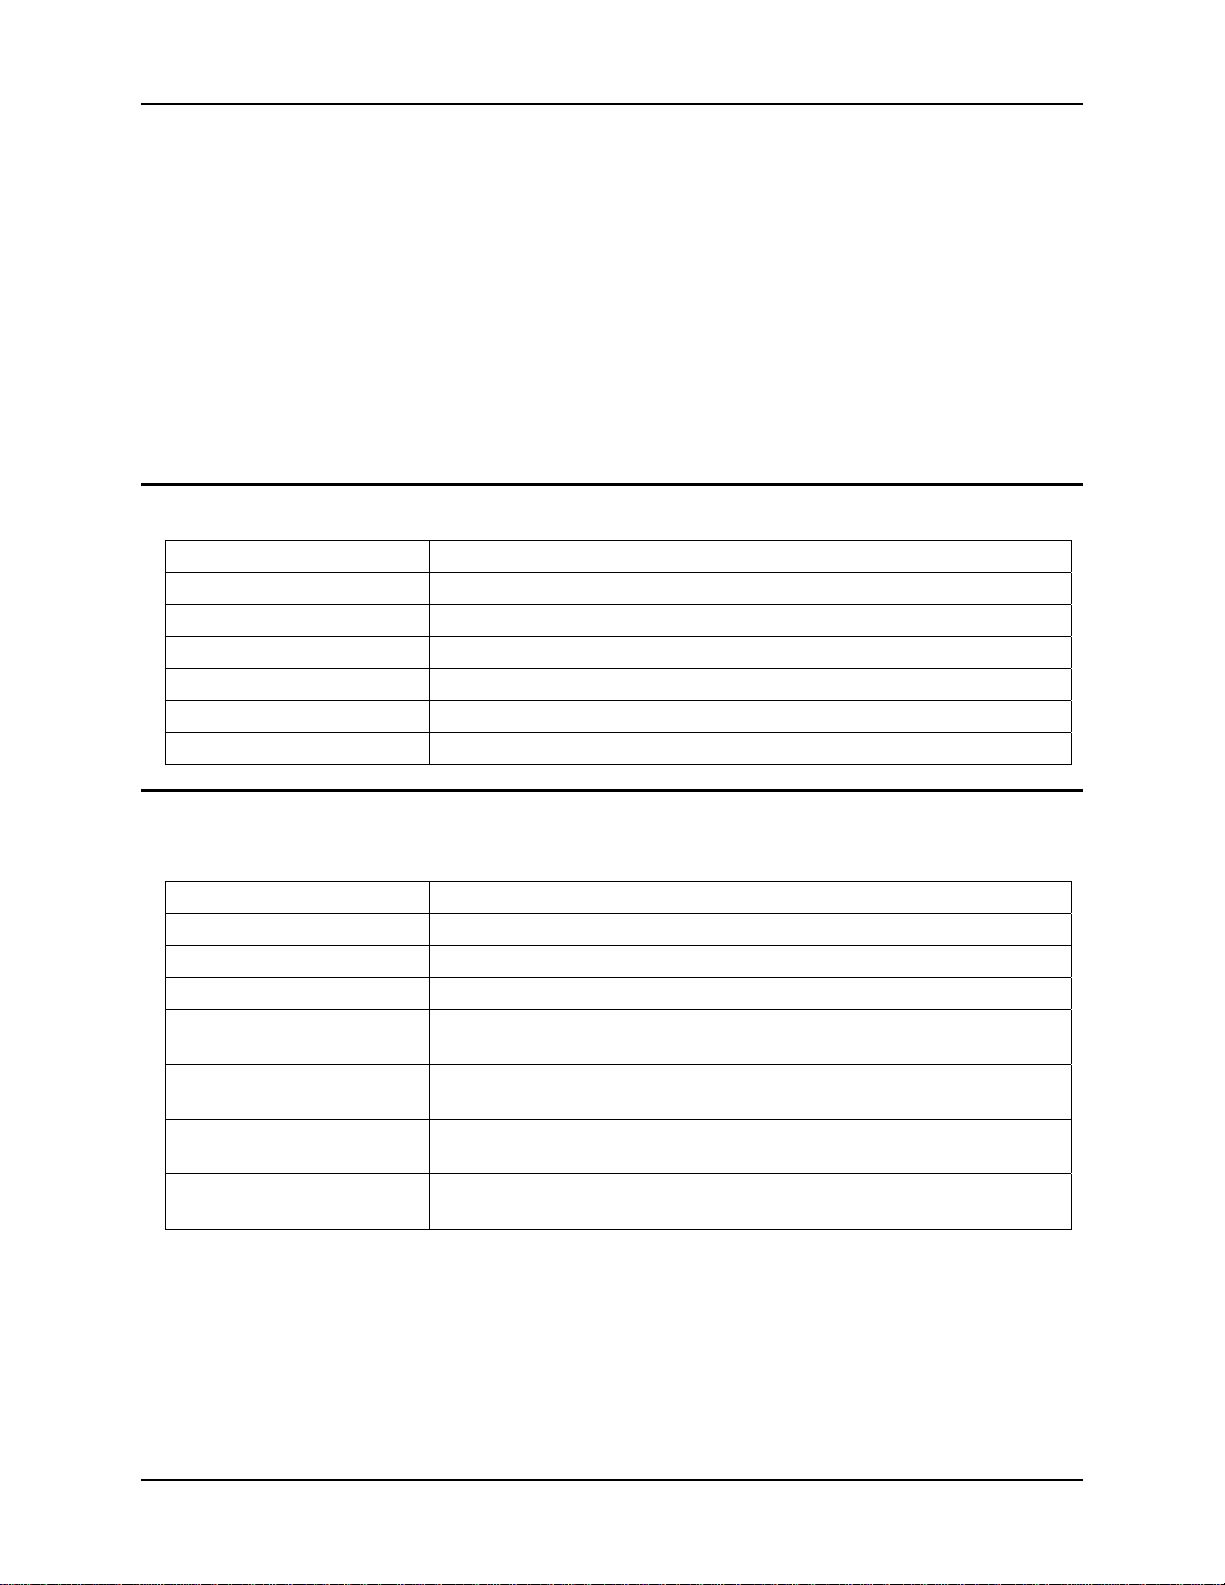
Environmental Specifications
HX2
Operating Temperature 14°F to 122°F (-10°C to 50°C) [non-condensing]
Storage Temperature -4°F to 158°F (-20°C to 60°C) [non-condensing]
Water and Dust IEC 60529 compliant to IP54
Operating Humidity 5% to 90% non-condensing at 104°F (40°C)
Display Readability Indoor readable
Wireless Compatibility WiFi, CCX, LXE-delivered/certified access points
Bluetooth Range 32.8 feet (10 meters) Direct line of sight only.
Lithium Ion Battery Pack
Note: Battery packs can only be charged when their temperature is between 50°F (10°C) and 113°F (45°C).
Operating Temperature
Storage Temperature -4°F to 160°F (-20°C to 70°C) [non-condensing]
Water and Dust IEC 60529 compliant to IP54
Operating Humidity 5% to 90% non-condensing at 104°F (40°C)
mAh
Charge Time
Discharge Time
Dimensions
-4°F to 120°F (-20°C to 50°C) [non-condensing]
Standard battery pack: 2000 mAh
Extended battery pack: 4000 mAh
Standard battery pack: 4 hours
Extended battery pack: 8 hours
Standard battery pack: 8 hours
Extended battery pack: 16 hours
Standard battery pack: 1.7” Width x 0.6” Height x 4.9” Length
Extended battery pack: 1.7” Width x 1.0” Height x 4.9” Length
HX2 User’s Guide E-EQ-HX2OGWW-D
Page 9
Ring Scanner Warnings and Labels 3
Ring Scanner Warnings and Labels
• Do not look into the ring scanner/imager aperture.
• Do not stare directly into the ring scanner/imager laser beam.
• Do not remove the laser caution labels from the ring scanner/imager.
• Do not connect the ring scanner aperture to any other device.
Laser radiation when open. Please read the caution labels.
Use of controls, adjustments or performance of procedures other than those
Caution:
specified herein may result in hazardous radiation exposure.
Class 2 laser scanners use a low power, visible light diode. As with any very
bright light source, such as the sun, the user should avoid staring directly into
the light beam. Momentary exposure to a Class 2 laser is not known to be
harmful.
Figure 1 Ring Scanner Caution Label – Class 2 Laser Scanner
Figure 2 HX2 Product Label
E-EQ-HX2OGWW-D HX2 User’s Guide
Page 10
4 Important Battery Information
Important Battery Information
Backup Battery – If the HX2 has been without a power source (connected to a fully charged
tethered battery or docked in a powered cradle) for an extended period of time or if HX2 external
power sources become completely discharged or dead, a fully charged HX2 backup battery will
last for up to 15 minutes. If the backup battery is fully disc harged, th e HX2 will reset as soon as it
is docked in a powered cradle, and the Power button is pressed, or connected to a fully charged
tethered battery. A reset will cause loss of data and custom programs in RAM. Always store
unused HX2s with a fully charged tethered battery. If possible, ensure the HX2 is periodically
docked in a powered cradle to maintain an optimu m backup battery charged status.
To check battery status tap
• Until the tethered battery and backup battery are completely depleted, the HX2 is always
drawing power from the batteries (On).
• New Standard / Extended batteries must be fully charged prior to use.
• Whenever possible, place the HX2 in a powered cradle to conserve tethered battery power
and recharge the backup battery.
• When a new battery is tethered to the HX2 for the first time (or after the backup battery has
been fully depleted), the Time and Date reverts to factory default values.
• Backup battery replacement is performed by LXE.
The HX2 cradle can charge two standard batteries in less than four hours or two extended batteries
in less than 8 hours in the battery wells behind the HX2 docking bay. The cradle requires an
external power source before battery charging can commence.
| Setting s | Control Pane l | Battery tab.
The HX2 Multi-Charger can charge up to six batteries at the same time. Each charging bay can
accept either battery. The Multi-Charger requires an external power source before
charging/analyzing can occur.
Li-Ion Battery
When disposing of the HX2 tethered batteries, the following precautions should be observed: The
battery should be disposed of properly. The battery should not be disassembled or crushed. The
battery should not be heated above 212°F (100°C) or incinerated.
RISK OF EXPLOSION IF BATTERY IS REPLACED BY AN INCORRECT
Caution
Attention
TYPE.
DISPOSE OF USED BATTERIES ACCORDING TO THE
INSTRUCTIONS.
II y a danger d’explosion s’il y a remplacement incorrect de la batterie.
Remplacer uniquement avec une batterie du même type ou d’un type
equivalent recommandé par le constructeur. Mettre au rebut les
batteries usagées conformément aux instructions du fabricant.
Continuous Scan Mode
If Continuous Scan Mode has been enabled (default is disabled), the laser is always on and
decoding. Refer to the HX2 Reference Guide. Caution: Laser beam is emitted continuously. Do
not stare into the laser beam.
HX2 User’s Guide E-EQ-HX2OGWW-D
Page 11
Document Conventions 5
Document Conventions
ALL CAPS All caps are used to represent disk directories, file names, and application names.
Menu | Choice
Italic Titles
< > Indicates a key on the keypad (for example, <Enter> ).
ATTENTION
Note: Keyword that indicates immediately relevant information.
Caution
Warning
Danger
Rather than use the phrase “choose the Save command from the File menu”, this guide uses
the convention “choose File | Save”.
Indicates the title of a book, chapter or a section within a chapter (for example, Document
Conventions).
Indicates a reference to other documentati on.
Keyword that indicates vital or pivotal information to follow.
Attention symbol that indicates vital or pivotal information to follow. Also, when marked
on product, means to refer to the user’s guide.
International fuse replacement symbol. When marked on the product, the label includes
fuse ratings in volts (v) and amperes (a) for the product.
Keyword that indicates a potentially hazardous situation which, if not avoided, may result
in minor or moderate injury.
Keyword that indicates a potentially hazardous situation which, if not avoided, could result
in death or serious injury.
Keyword that indicates a imminent hazardous situation which, if not avoided, will result in
death or serious injury.
Getting Help
Manuals
All LXE user guides are now available on one CD and they can also be viewed/downloaded from
the LXE ServicePass website. Contact your LXE representative to obtain the LXE Manuals CD.
You can also get help from LXE by calling the telephone numbers listed on the LXE Manuals CD,
in the file titled Contacting LXE. This information is also available on the LXE website.
Explanations of terms and acronyms used in this guide are located in the file titled LXE Technical
Glossary on the LXE Manuals CD and the LXE ServicePass website.
• HX2 User’s Guide – English
• HX2 User’s Guide – German
• HX2 Cradle Reference Guide
• HX2 Reference Guide
• HX2 Multi-Charger User’s Guide
• RFTerm Reference Guide
• LXE Security Primer
• CE API Programmers Guide
• Ring Scanner Programming Guide
Contact your LXE representative for user and reference guide availability and subs equent updates.
E-EQ-HX2OGWW-D HX2 User’s Guide
Page 12
6 Getting Help
Accessories
Note: Items with a Green letter R in the second column are ROHS-compliant. Please contact your LXE
representative when ordering ROHS-compliant items as the part number may have changed. Items
without the letter R may have received ROHS-compliance after this guide was published. E
designator means the accessory is RoHS Exempt.
Power
HX2 Standard Battery, Lithium Ion E HX2A301BATTSTD
HX2 Extended Battery, Lithium Ion E HX2A302BATTEXT
6 slot battery charger with universal power supply.
Includes analyzing capabilities on one slot. US power cord
included.
6 slot battery charger with universal power supply.
Includes analyzing capabilities on one slot. Power cord not
included.
Cradle
R HX2A310CHRG6US
R HX2A311CHRG6WW
HX2 Desk cradle with spare charging slot. Includes
universal power supply. US power cord included.
HX2 Desk cradle with spare charging slot. Includes
universal power supply. Power cord not included.
Mobility
Armband with standard wrist straps R HX2A201ARMBAND
Replacement Mesh Arm Cover for armband R HX2A204UNDERPAD
Strap kit for armband (includes different length straps to fit
all arm sizes).
Hip Flip (for belt mounting) R HX2A221HIPFLIP
Voice case (for belt mounting) R HX2A222VOICECASE
Belt for hip flip or voice case R 9200L67
Armband, complete kit R HX2A431ARMBAND
Armband Strap Kit (4 sizes) R HX2A432STRAPKIT
Armband Pad R HX2A433UNDERPAD
Battery Pouch R HX2A411BATTCASE
HX2 Pouch w/o Battery R HX2A407NOBATTVCECSE
Battery Ext Cable R HX2A053CBLBATTEXT
Battery/Audio Cable R HX2A054CBLBATTADOEXT
Quick Disconnect Cable R HX2A052CBLBATTADPTR
R HX2A312DESKCRADLEUS
R HX2A313DESKCRADLEWW
R HX2A205STRAPKIT
Ring Scanners
SR laser for armband (short cable) R 8610A101SRSLASER
2D Imager for armband (short cable) R 8620A101SRSIMAGER
HX2 User’s Guide E-EQ-HX2OGWW-D
Page 13

Getting Help 7
Mobile Bluetooth Barcode Readers
LXE Bluetooth Ring Scanner module with laser ring
scanner, battery, two hand/wrist straps (large and small)
LXE Bluetooth Ring Scanner module with 1D/2D imager
ring scanner, battery, two hand/wrist straps (large and
small)
Li-Ion Spare Battery for LXE Bluetooth Ring Scanner
Module
LXE Bluetooth Ring Scanner 8-bay battery charger with
US power cord
LXE Bluetooth Ring Scanner single-bay charger with US
wall plug
PowerScan 7000BT Scanner RS-232 with pointer R 8700A301SCNRBTSRI
PowerScan 7000BT Base Station, RS232, without
universal power supply.
PowerScan 7000BT Base Station Power Supply, Std US,
120V
PowerScan 7000BT, RS232 Cable for Base Station, DB9S,
Coil, 8’
PowerScan 7000BT Battery Charger with Power Supply,
Four Station, US Std
PowerScan 7000BT Battery Pack R 8700A504BATT
Bluetooth Standard Range Fuzzy Logic laser R 8810A326SCNRBTFZ
Bluetooth Auto Range LORAX laser R 8820A327SCNRBTER
Spare battery R 8800A376BATTERY
US AC Power Cord (use with 8800A301ACPS and
8800A379CHGRBASE)
Single Slot Universal Battery Charger adapter cup for 8800
Battery
Single slot battery charger with International power supply R 8800A378CHGR1SLOT
Universal Battery charger 4-Slot Base. Power Supply
included, no AC power cord.
LS3408 Scanner Holster for Belt R 8200A501HOLSTRBELT
Mounted Take Up Reel (Mounted applications) R 8000A501INDREEL
Auto Sense Intellistand, Hands Free Scanning R 8500A505STANDSMT
CBL ASSY, DA9F, 9ft (cradle to terminal) R 8500A051CBL9DA9F
Desk Cradle, Radio/Charging, Multi-Interface (requires
data cable and power supply)
Desk Cradle, Charge Only, Multi-Interface (requires data
cable and power supply)
Forklift Cradle, Radio/Charging, Multi-Interface (requires
data cable and power supply)
Forklift Cradle, Charge Only, Multi-Interface (requires
data cable and power supply)
US AC Power Cord (use with 8800A301ACPS and
8800A379CHGRBASE)
R 8651A100BTLASERKIT
R 8652A100BTIMAGERKIT
R 8650A376BTBOHBATTERY
R 8650A377BTBOHCHGRUS
R 8651A379SINGLECHGRUS
R 8700A501BASERS232
R 8700A502PSACUS
R 8700A001CBL8DA9F
R 8700A503CHGR4US
R 8800A051POWERCORD
R 8800A377CHGRADPTRCUP
R 8800A379CHGRBASE
R 8800A001CRADLERCMI
R 8800A002CRADLECMI
R 8800A003CRADLEVRCMI
R 8800A004CRADLEVCMI
R 8800A051POWERCORD
E-EQ-HX2OGWW-D HX2 User’s Guide
Page 14
8 Getting Help
Universal Desktop Power Supply 90-264VAC, 9VDC, 2A,
EPS
9-60VDC Forklift Power Supply (For Use with Forklift
Cradles)
Power Cable: Connects DC Power Supply to Forklift
Cradle
Forklift Rugged Scanner Holder with RAM mount (all
metal with cloth padding)
Cables
USB ActiveSync Cable (Type A to HX2 cradle connector) R HX2A001CBLACTVSYNC
Battery Cable R HX2A002CBLBATT
Battery Cable with Audio R HX2A003CBLBATTAUDIO
Battery Extension Cable R HX2A004CBLBATTEXT
Cable Connector Plug R HX2A008CBLCONPLUG
Miscellaneous
Rubber protective boot, gray R HX2A232BOOTGRAY
Replacement Stylus , 10-pack R 9000A507STYLUS
Ring Scanner Trigger Assembly, 20 pack R 8600A403TRIGGERKIT
Ring Scanner Replacement Strap Kit, 20 pack R 8600A401RINGSTRAP
CD with CE 5.0 API’s and LXE API’s with documentation
for custom application development
Touchscreen anti-glare anti-reflective protective film, 10
pack
R 8800A301ACPS
R 8800A302DCPS
R 8800A052DCPWRCABLE
R 8800A005STAND
R HX2A501CE50SDK
R HX2A502PROTFILM
Audio
Single ear, single headband, headset with noise canceling
microphone, includes 5 replacement windscreens
Single ear, dual headband, headset with noise canceling
microphone, includes 5 replacement windscreens
Dual ear, behind the head, headset with noise canceling
microphone, includes 5 replacement windscreens
Replacement foam block for 502 dual band headsets, qty 1 R HX1A504AHSBLOCKFOAM
Replacement head yoke for dual band 502 headset, qty 1 R HX1A505DUALYOKE
Replacement head yoke for single band 501 headset, qty 1 R HX1A506SINGLEYOKE
Replacement windscreen for all headset microphones,
10 Pack
Replacement windscreen for all headset microphones,
50 Pack
Replacement foam ear piece cover for 501 and 502
headsets, 10 pack
Replacement foam ear piece cover for 501 and 502
headsets, 50 pack
R HX1A501SNGBHEADSET
R HX1A502DUALBHEADSET
R HX1A503BTHHEADSET
R HX1A508WINDSCREEN10
R HX1A509WINDSCREEN50
R HX1A510FOAMEAR10
R HX1A511FOAMEAR50
HX2 User’s Guide E-EQ-HX2OGWW-D
Page 15
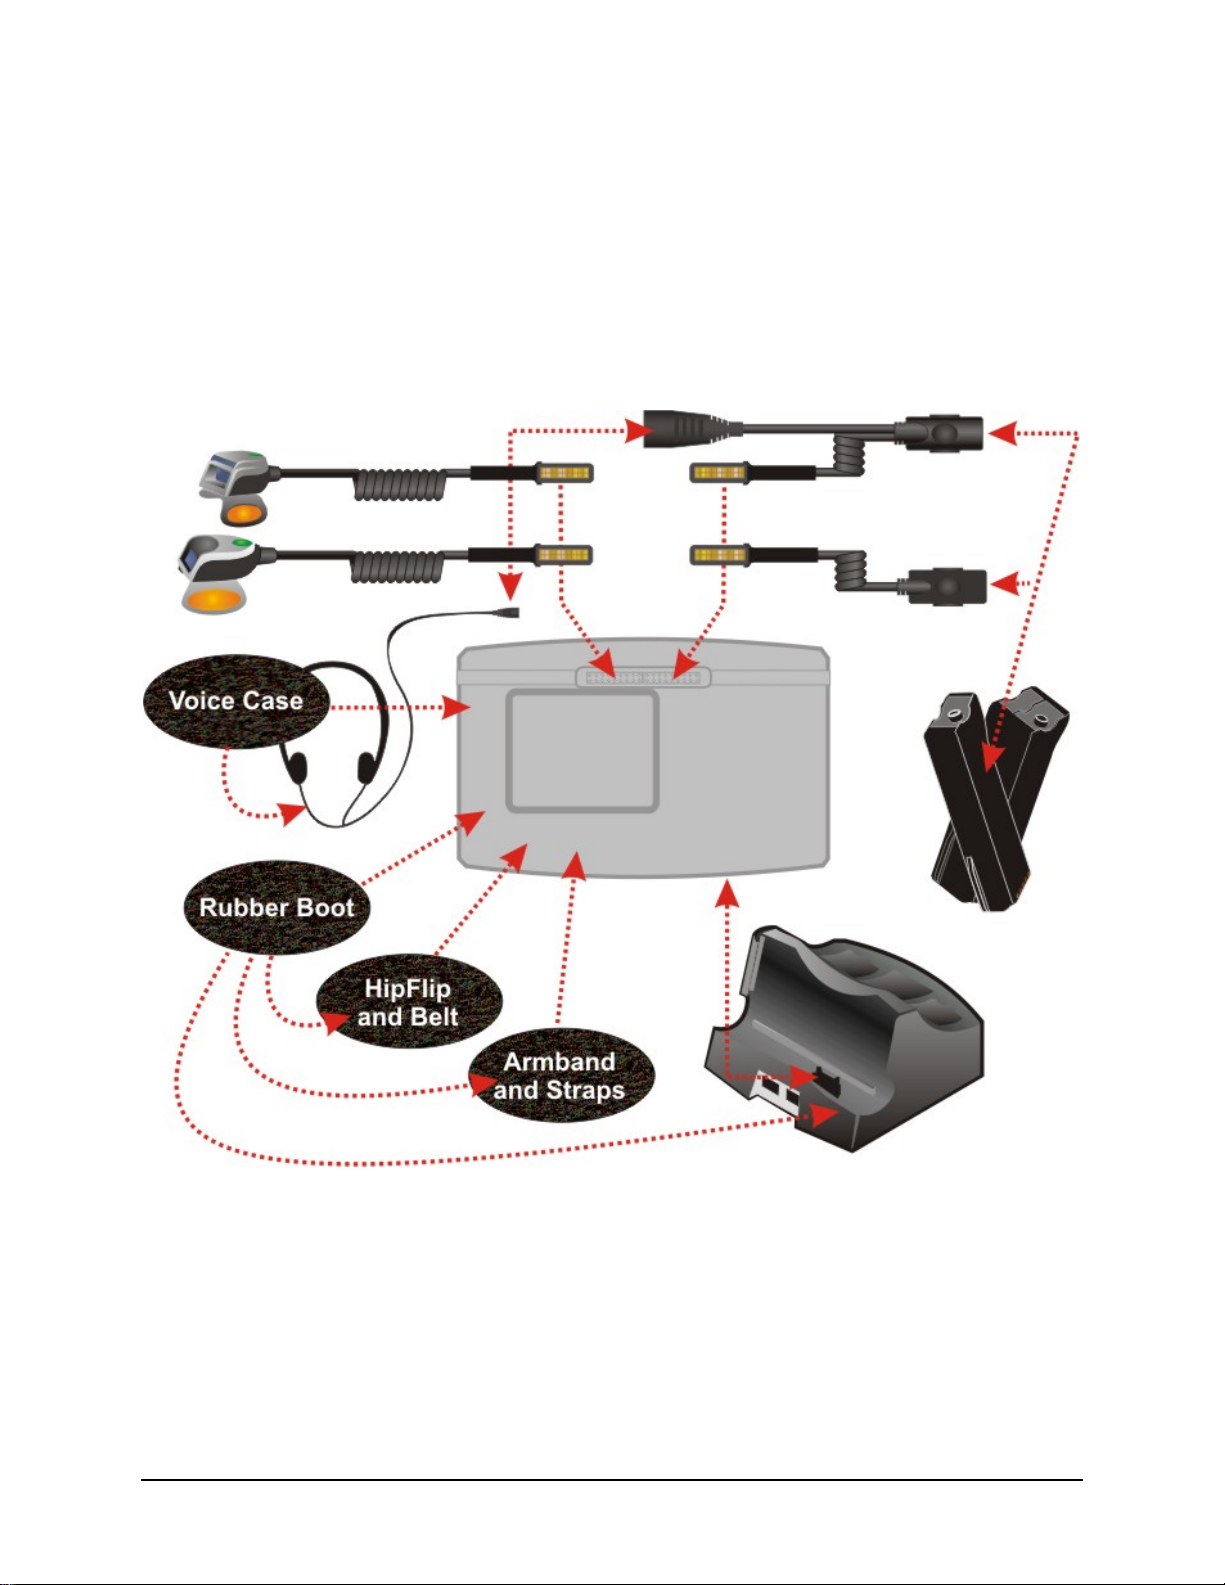
Components
Note: The figures on the next few pages assume a fully charged teth ered battery is in the battery
sleeve (on an armband or hip flip) and positioned at the top of the figure.
Please contact your System Administrator for assistance with HX2 accessories.
Note: New batteries must be charged prior to use. The backup battery is continually recharged
by the tethered battery.
E-EQ-HX2OGWW-D HX2 User’s Guide
Page 16
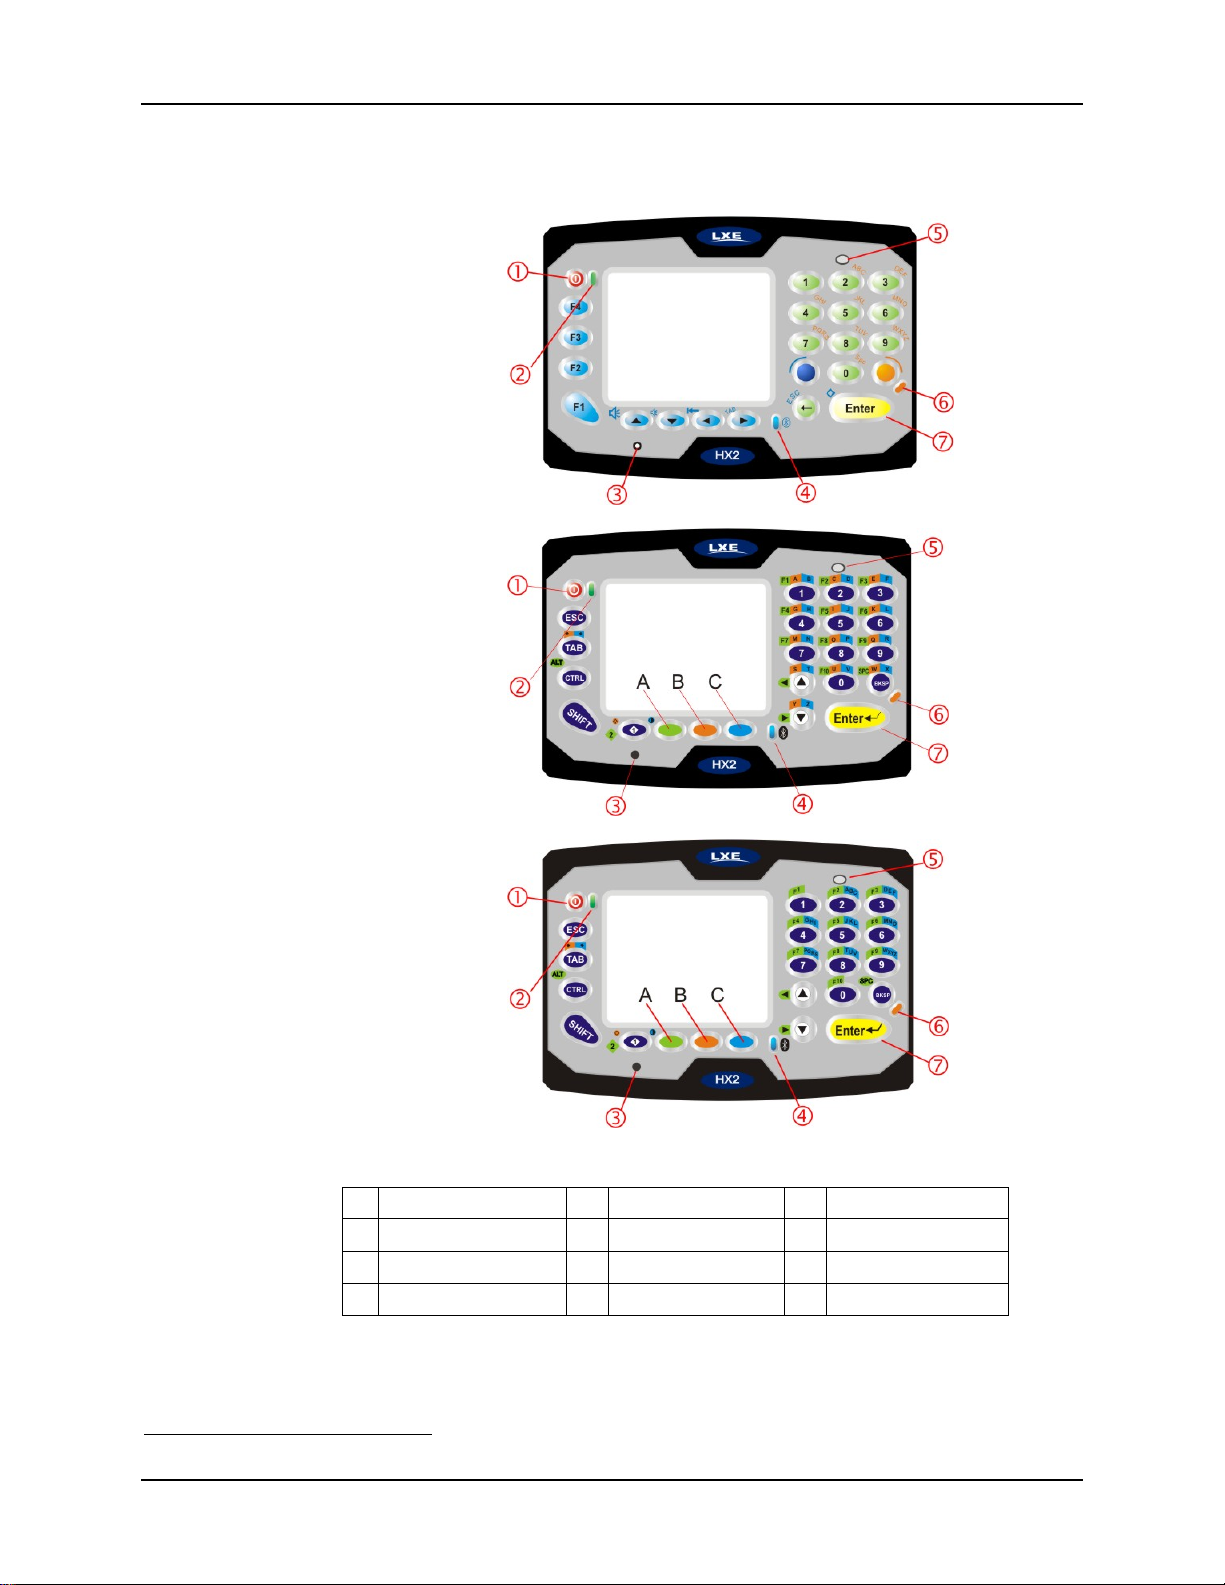
10 Front
Front
Alpha Mode 3
Tap Keypad
Dual Alpha
Keypad
Triple Tap
Keypad
Figure 3 Front
1 On / Off Button 5 Speaker A Green Button
2 System Status LED 6 Alpha Mode LED1 B Orange Button
3 Microphone 7 Enter Button C Blue Button
4 Bluetooth LED
1
Alpha Mode LED not used with the Dual Alpha Keypad and the Triple Tap Keypad.
HX2 User’s Guide E-EQ-HX2OGWW-D
Page 17
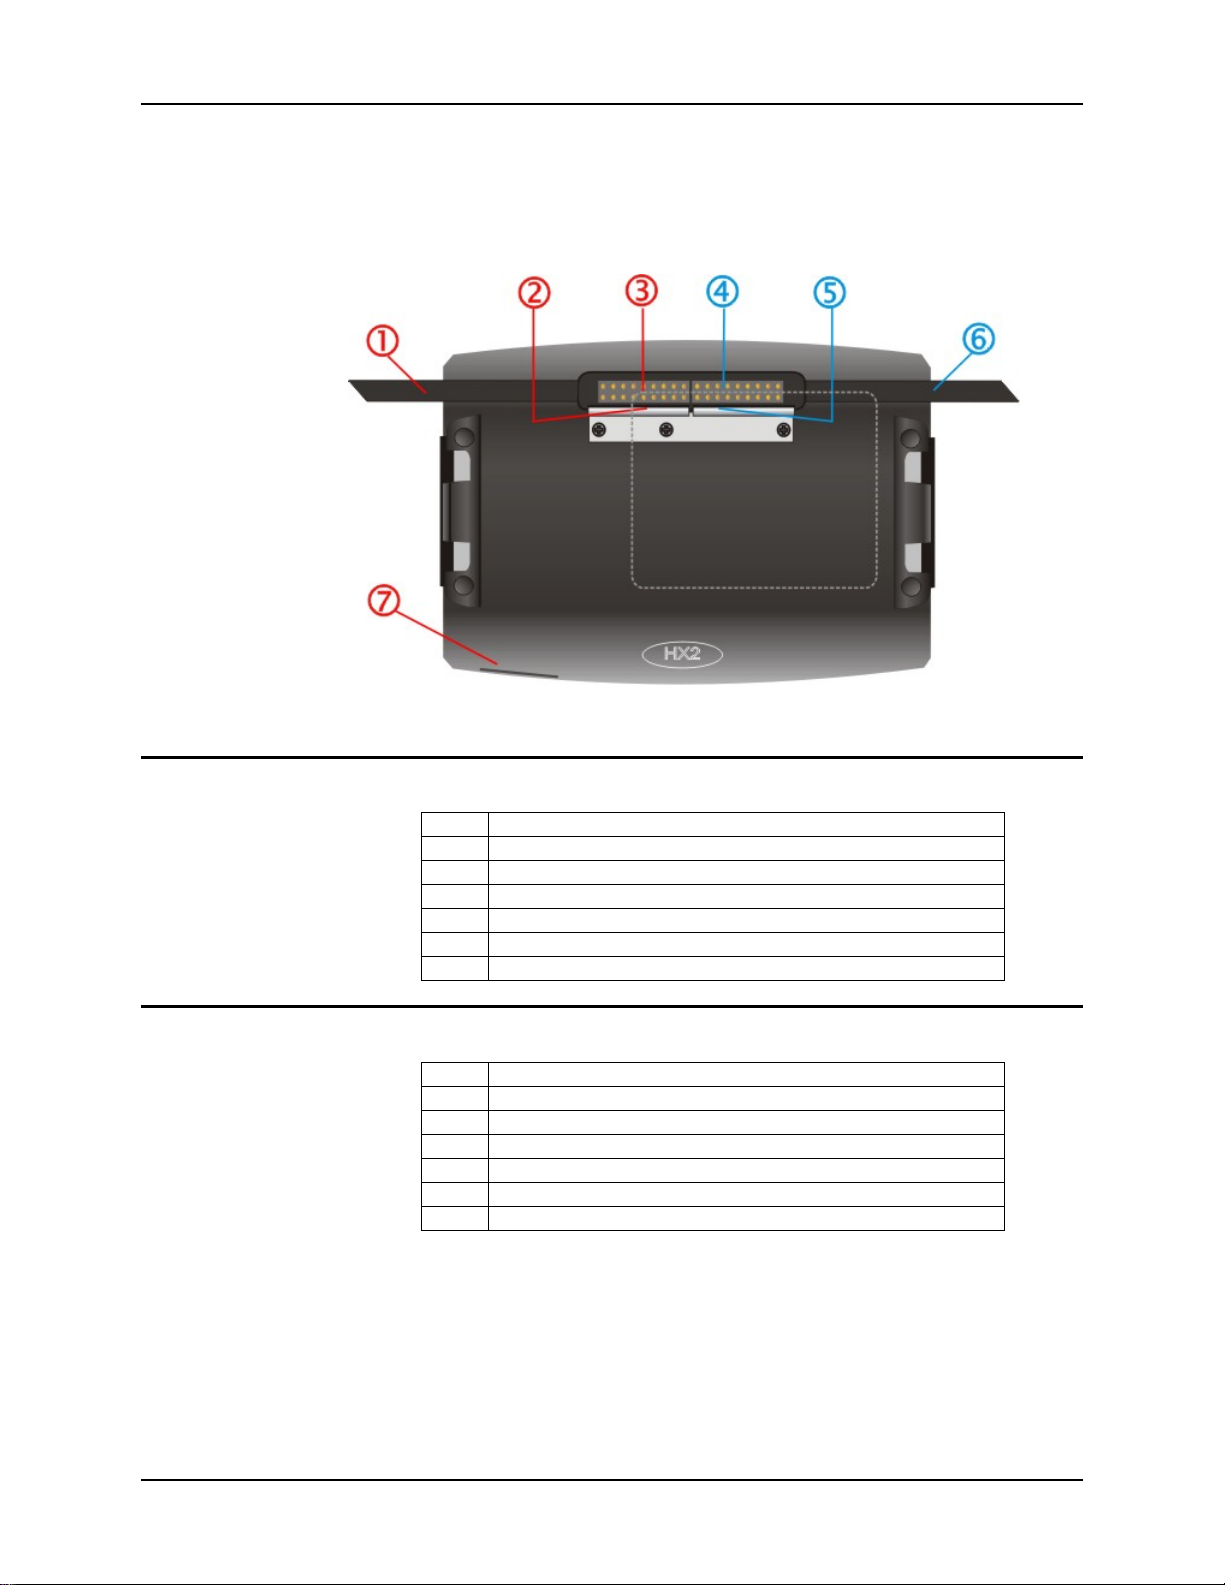
Back 11
Back
Note: Before connecting cables to the back, make sure the battery sleeve on the armband is
uppermost or the left arm / right arm directions won’t work.
Left Arm Use
Right Arm Use
Figure 4 Back
1 Ring Scanner Tether cable channel
2 Retaining Clip for Ring Scanner Tether Connector
3 Ring Scanner cable connector
4 Battery Cable connector
5 Retaining Clip for Tethered Battery Connector
6 Tethered Battery Cable channel
7 Cradle Connector
1 Tethered Battery Cable channel
2 Retaining Clip for Tethered Battery Connector
3 Battery Cable connector
4 Ring Scanner cable connector
5 Retaining Clip for Ring Scanner Tether Connector
6 Ring Scanner Tether Cable channel
7 Cradle Connector
E-EQ-HX2OGWW-D HX2 User’s Guide
Page 18
12 Connectors
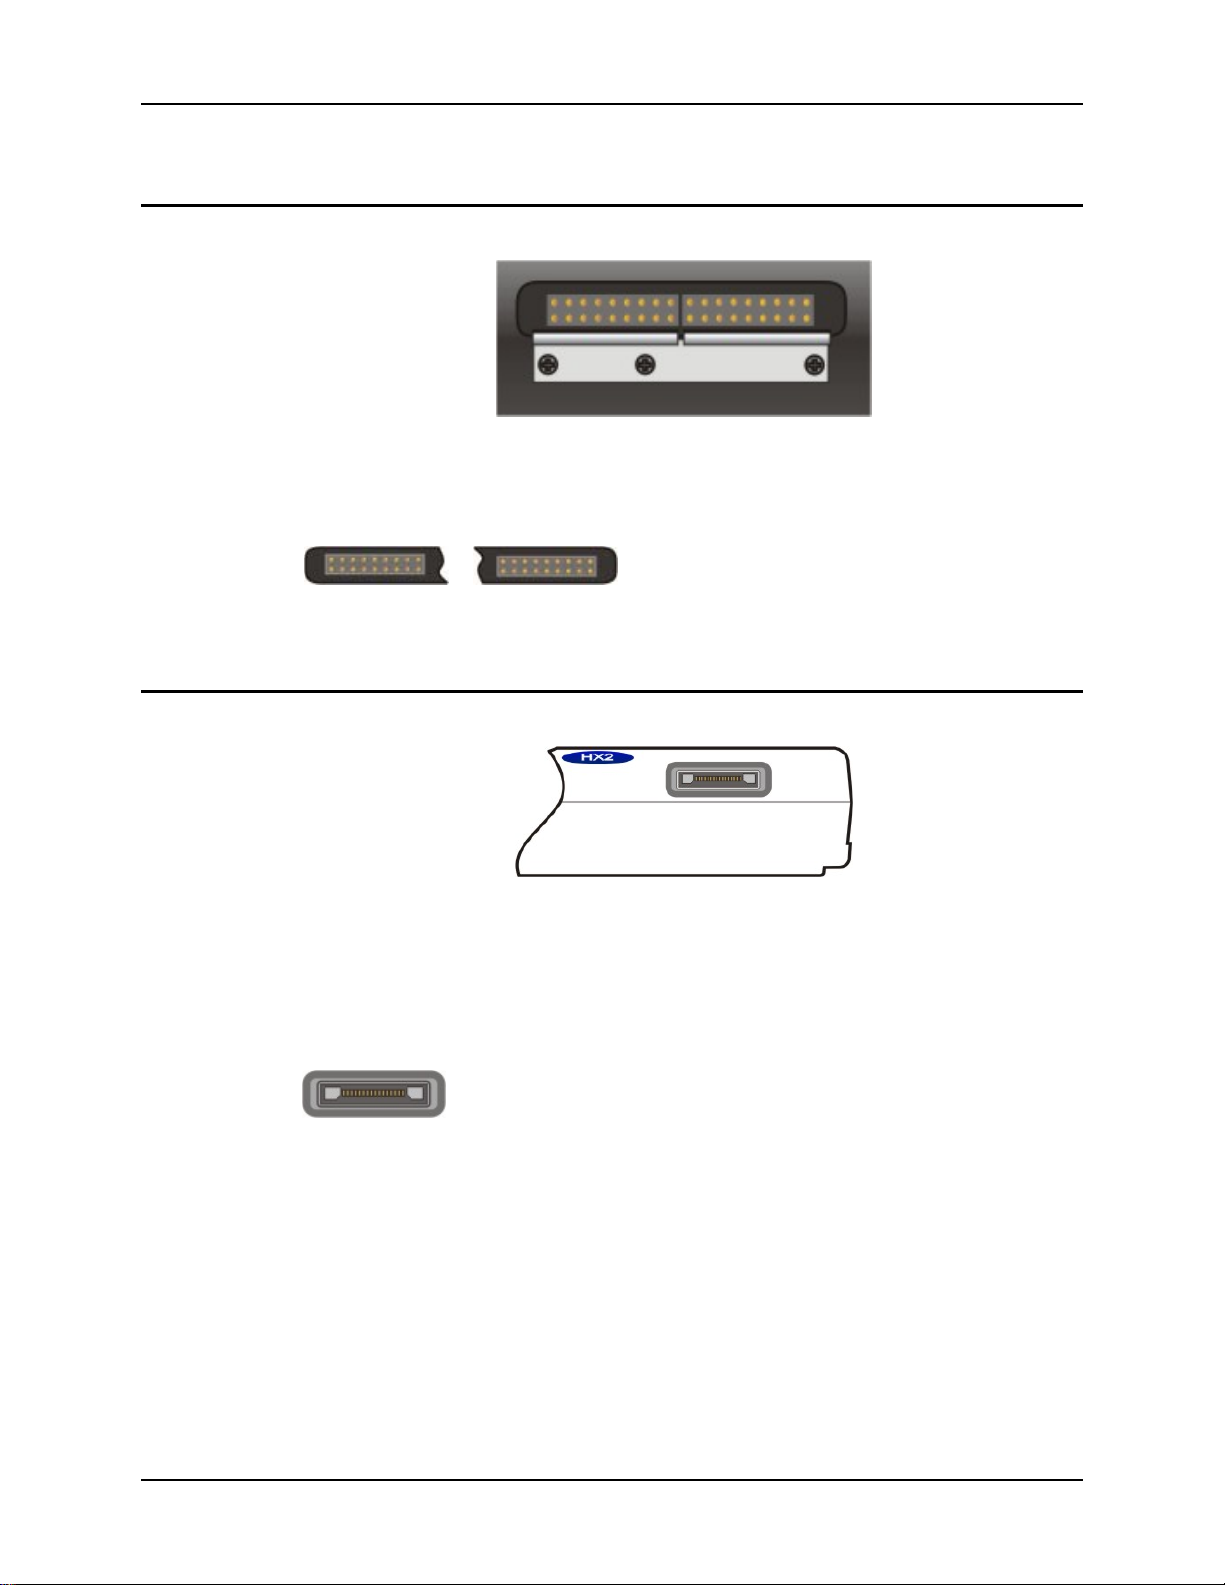
Connectors
Ring Scanner / Audio / Battery Connection
Figure 5 Scanner / Audio / Battery Ports – Connector 1 and 2
• Tethered Ring Scanner (Laser or Imager)
Connector 1
See Cables.
Cradle Connection
Connector 3 is at the base of the HX2. It connects to the Cradle. When the HX2 is in a powered
cradle, the HX2 receives external power through the Cradle connector. USB Keyboard or USB
Mouse input is received through the Cradle connector when the HX2 is in a cradle.
Connector 3
Connector 2
Figure 6 Cradle/Power Port – Connector 3 (Base)
• Cradle
• Cradle Power Input
• USB Keyboard or mouse through cradle ports
• Tethered Headset/Microphone and HX2
Battery
• Tethered Battery
See the HX2 Cradle Reference Guide f or ins t ructio n.
HX2 User’s Guide E-EQ-HX2OGWW-D
Page 19
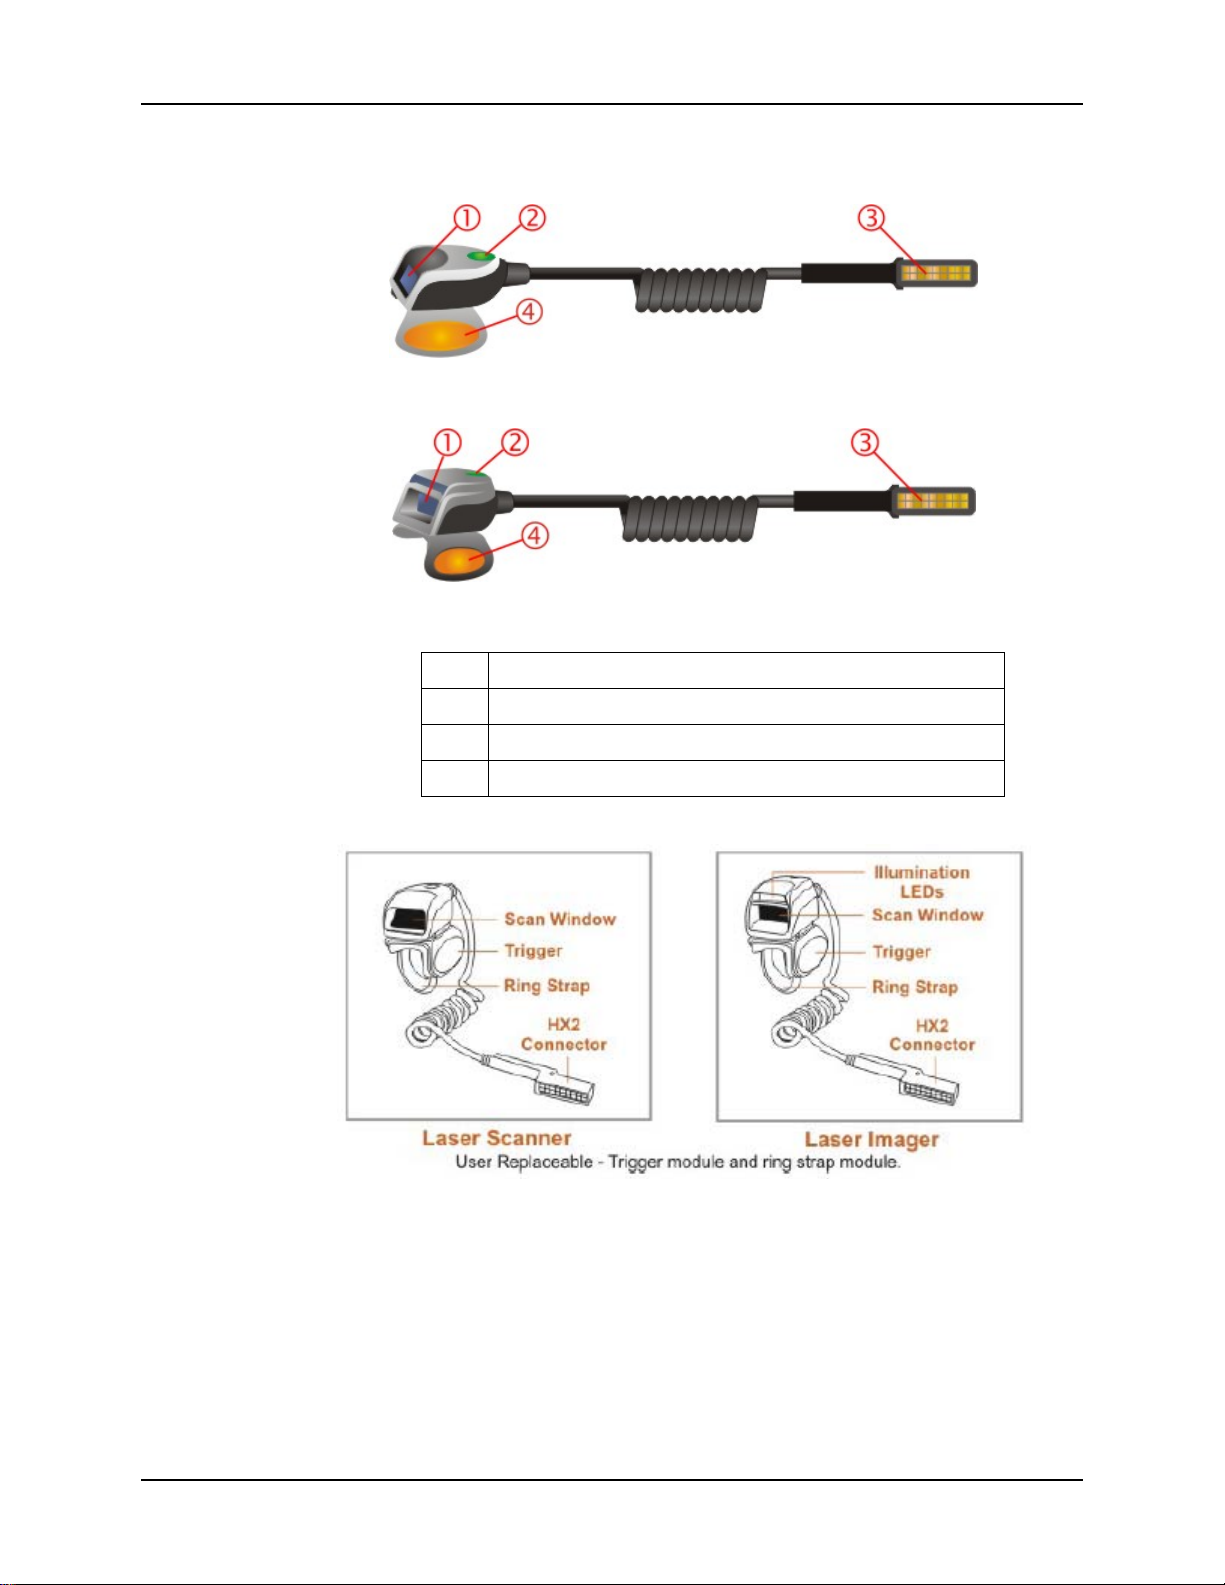
Tethered Ring Scanner / Imager 13
Tethered Ring Scanner / Imager
Figure 7 Laser Ring Scanner
Figure 8 Imager Ring Scanner
1 Laser /Imager Scan Aperture
2 Scan-in-Progress LED
3 HX2 Connector
4 Scan button (Trigger)
Figure 9 Ring Scanner and Ring Imager
E-EQ-HX2OGWW-D HX2 User’s Guide
Page 20
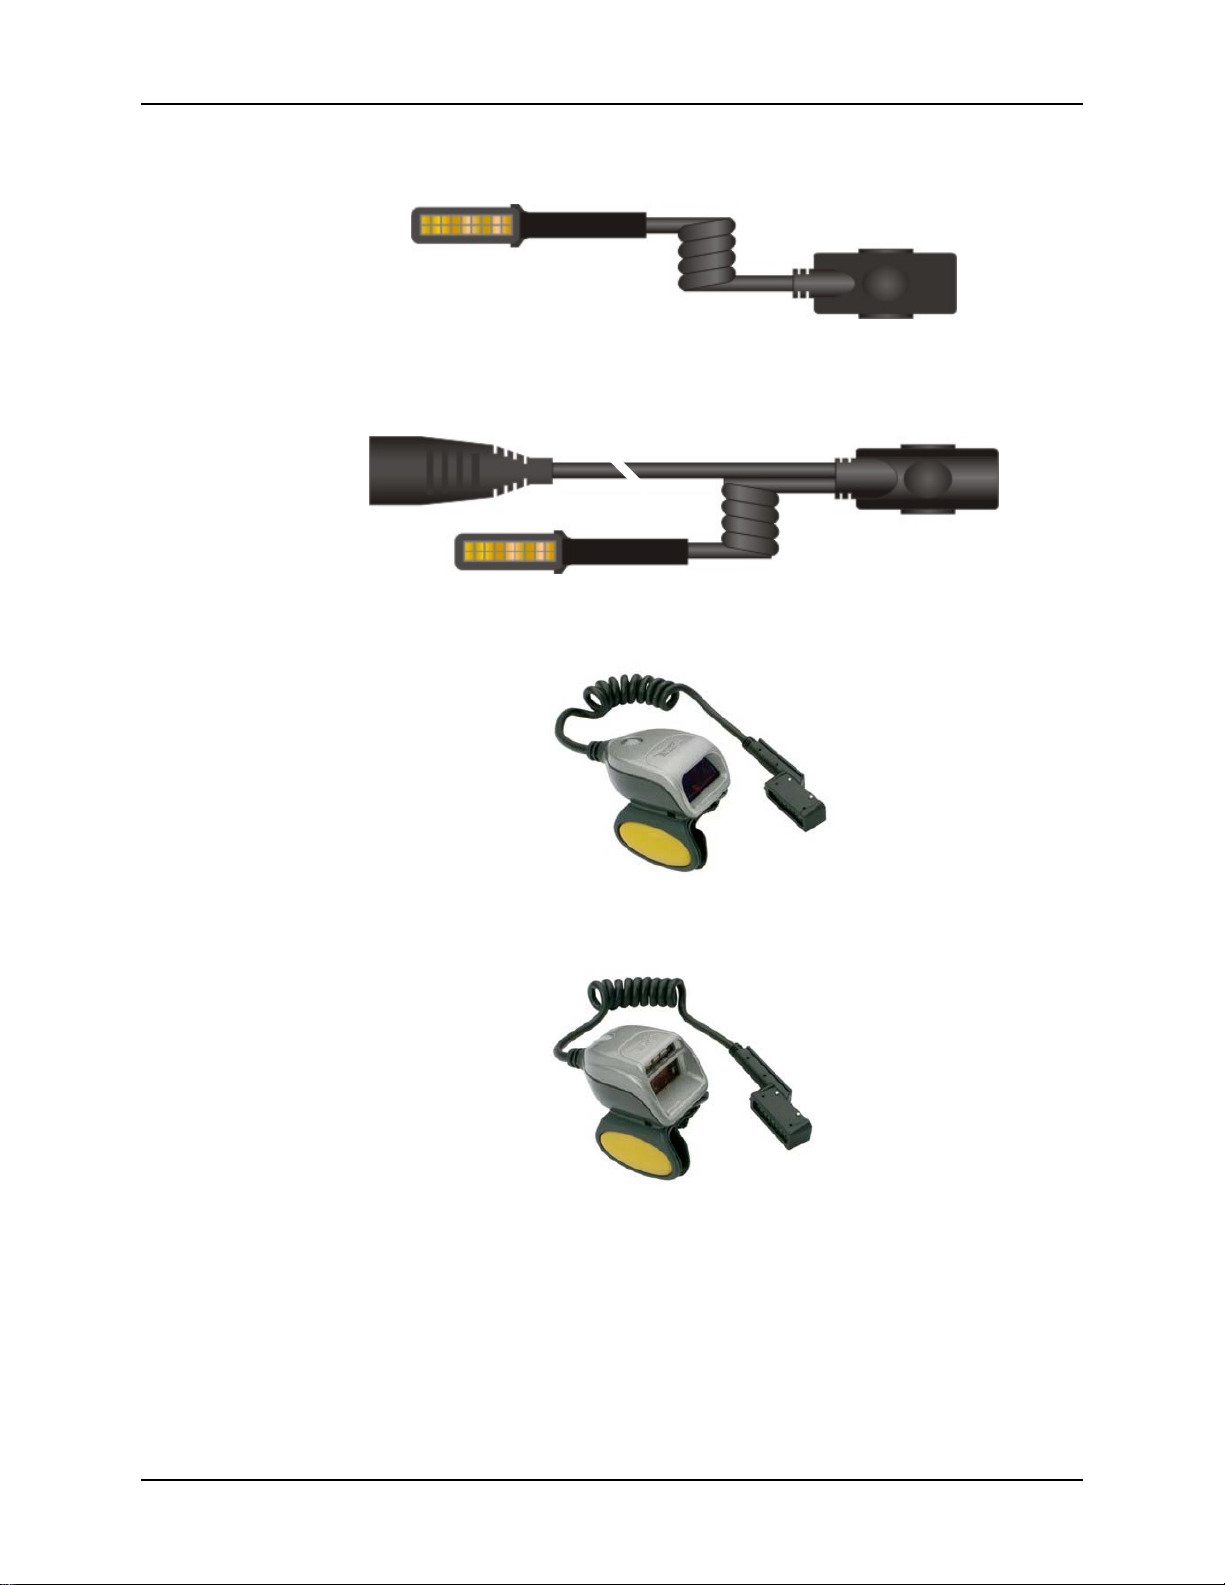
14 Cables
Cables
Figure 10 Cable – Battery and HX2 Connector
Figure 11 Cable – Audio, Battery and HX2 Connector
Figure 12 Cable – Laser Ring Scanner and HX2 Connector
Figure 13 Cable – Imager Ring Scanner and HX2 Connector
HX2 User’s Guide E-EQ-HX2OGWW-D
Page 21
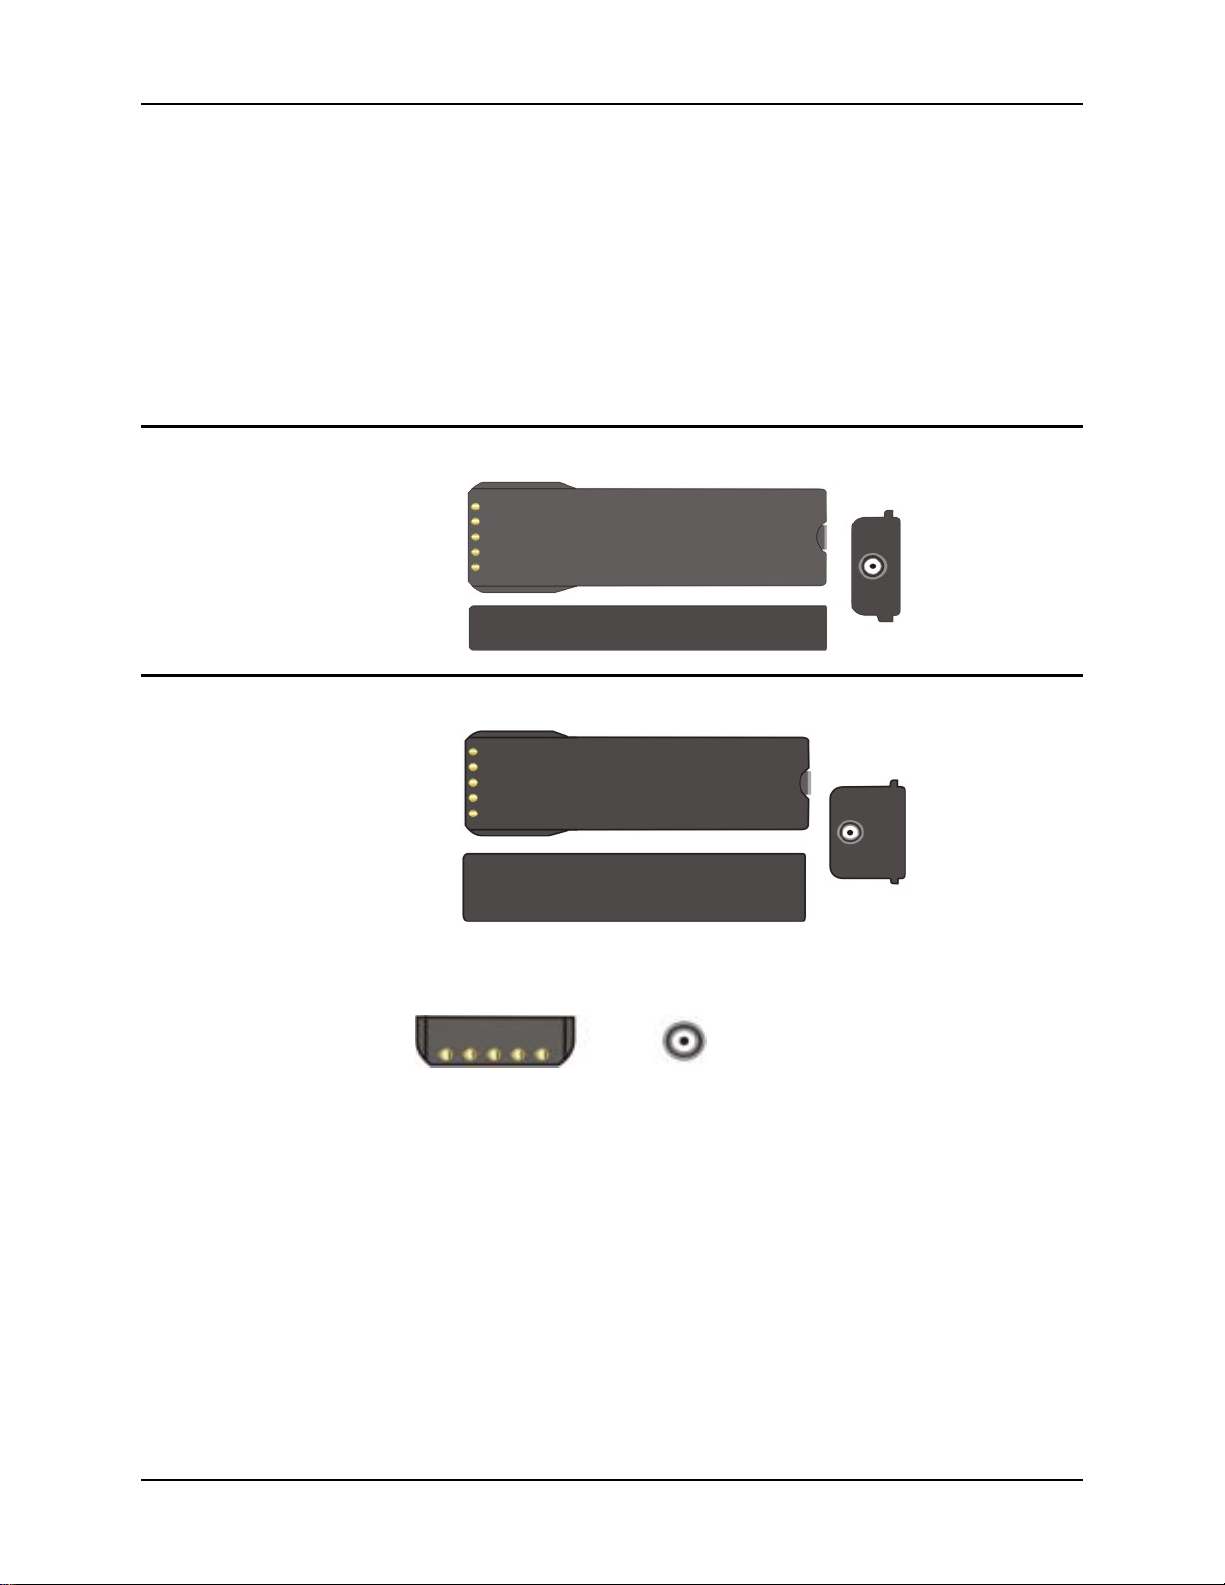
Li-Ion Battery 15
Li-Ion Battery
Main battery charging is handled exclusively by the HX2 Multi-Charger/analyzer and the battery
charger integrated into a powered HX2 cradle.
The Standard battery is much thinner than the Extended battery.
Each battery will fit in the battery sleeve on an armband, hip flip and the voice case.
Note: Do not allow water or chemical cleaning agents of any kind to come in contact with the
battery charging contacts or the battery cable connector; they may be damaged. If
necessary, clean them with a soft-bristle, dry brush or compressed air.
Standard Battery
Extended Battery
Note: When placing the tethered battery in an armband or hip flip battery sleeve, ensure the
Note: New batteries must be charged prior to use. The backup battery is continually recharged
Figure 14 HX2 Standard and HX2 Extended Battery
Battery Charge/Connect
Terminals
HX2 Battery Cable
Connector
Battery Charge/Connect terminals are protected from accidental damage by keeping
them covered by the sleeve fabric at all times.
by the tethered battery.
E-EQ-HX2OGWW-D HX2 User’s Guide
Page 22
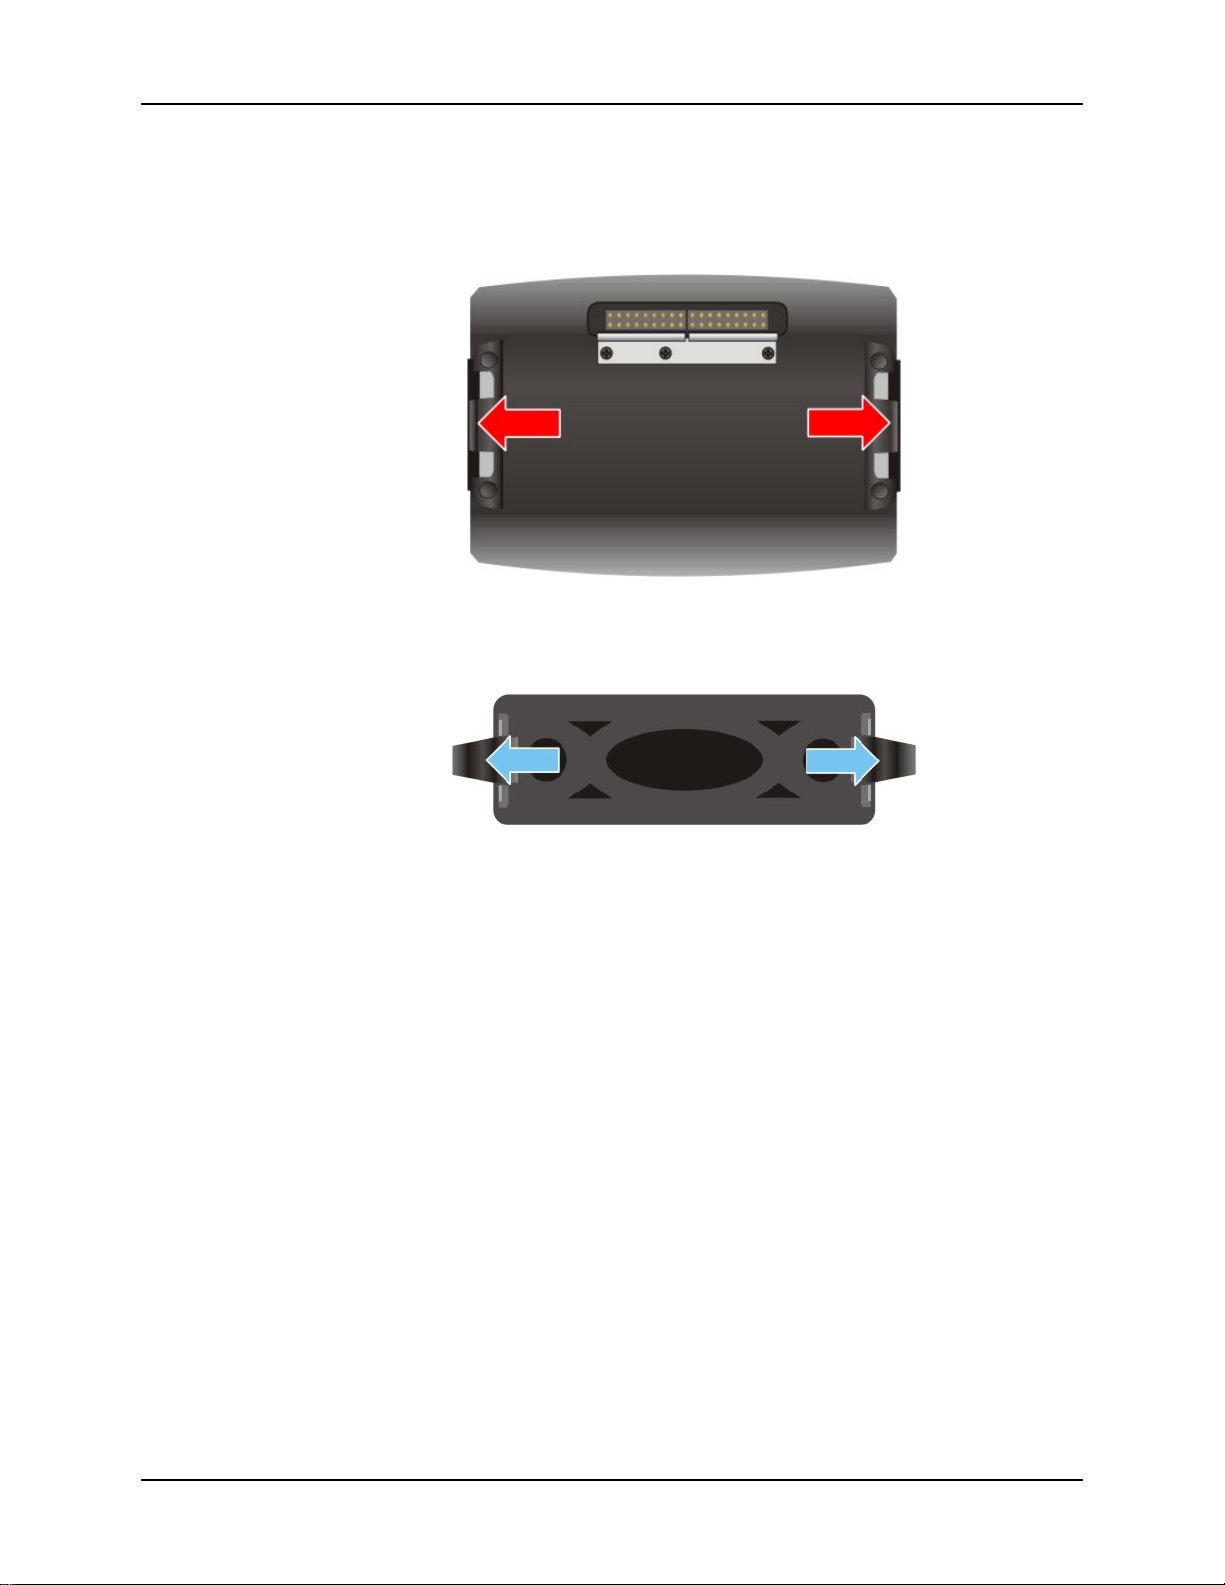
16 Mounting Bracket Clips
Mounting Bracket Clips
Mounting brackets are pre-installed to the back of the HX2. The brackets (one on each side)
secure the HX2 to the mounting bracket clips on a hip flip or the armband.
Figure 15 Mounting Brackets
The HX2 mount assembly is pre-installed to a hip flip or armband.
Figure 16 Armband and Hip Flip Mount Assembly and Clips
Connect
Center the HX2 over the mount assembly and gently push down until both bracket clips (indicated
by the arrows shown above) snap over the brackets on the HX2. Carefully test the connection to
make sure the HX2 is secured to the armband or hip flip.
Reset the connection by pressing down on either mounting clip to release the HX2 and try again.
Disconnect
Remove the HX2 from the mount assembly by pushing down on either mounting clip, or both,
until the HX2 mounting bracket disconnects.
Or you can disconnect one side, then lift the HX2 up at a 45 degree an gle until the other side
disconnects. Lift the HX2 up and away from the mount assembly.
HX2 User’s Guide E-EQ-HX2OGWW-D
Page 23
Mounting Devices 17
Mounting Devices
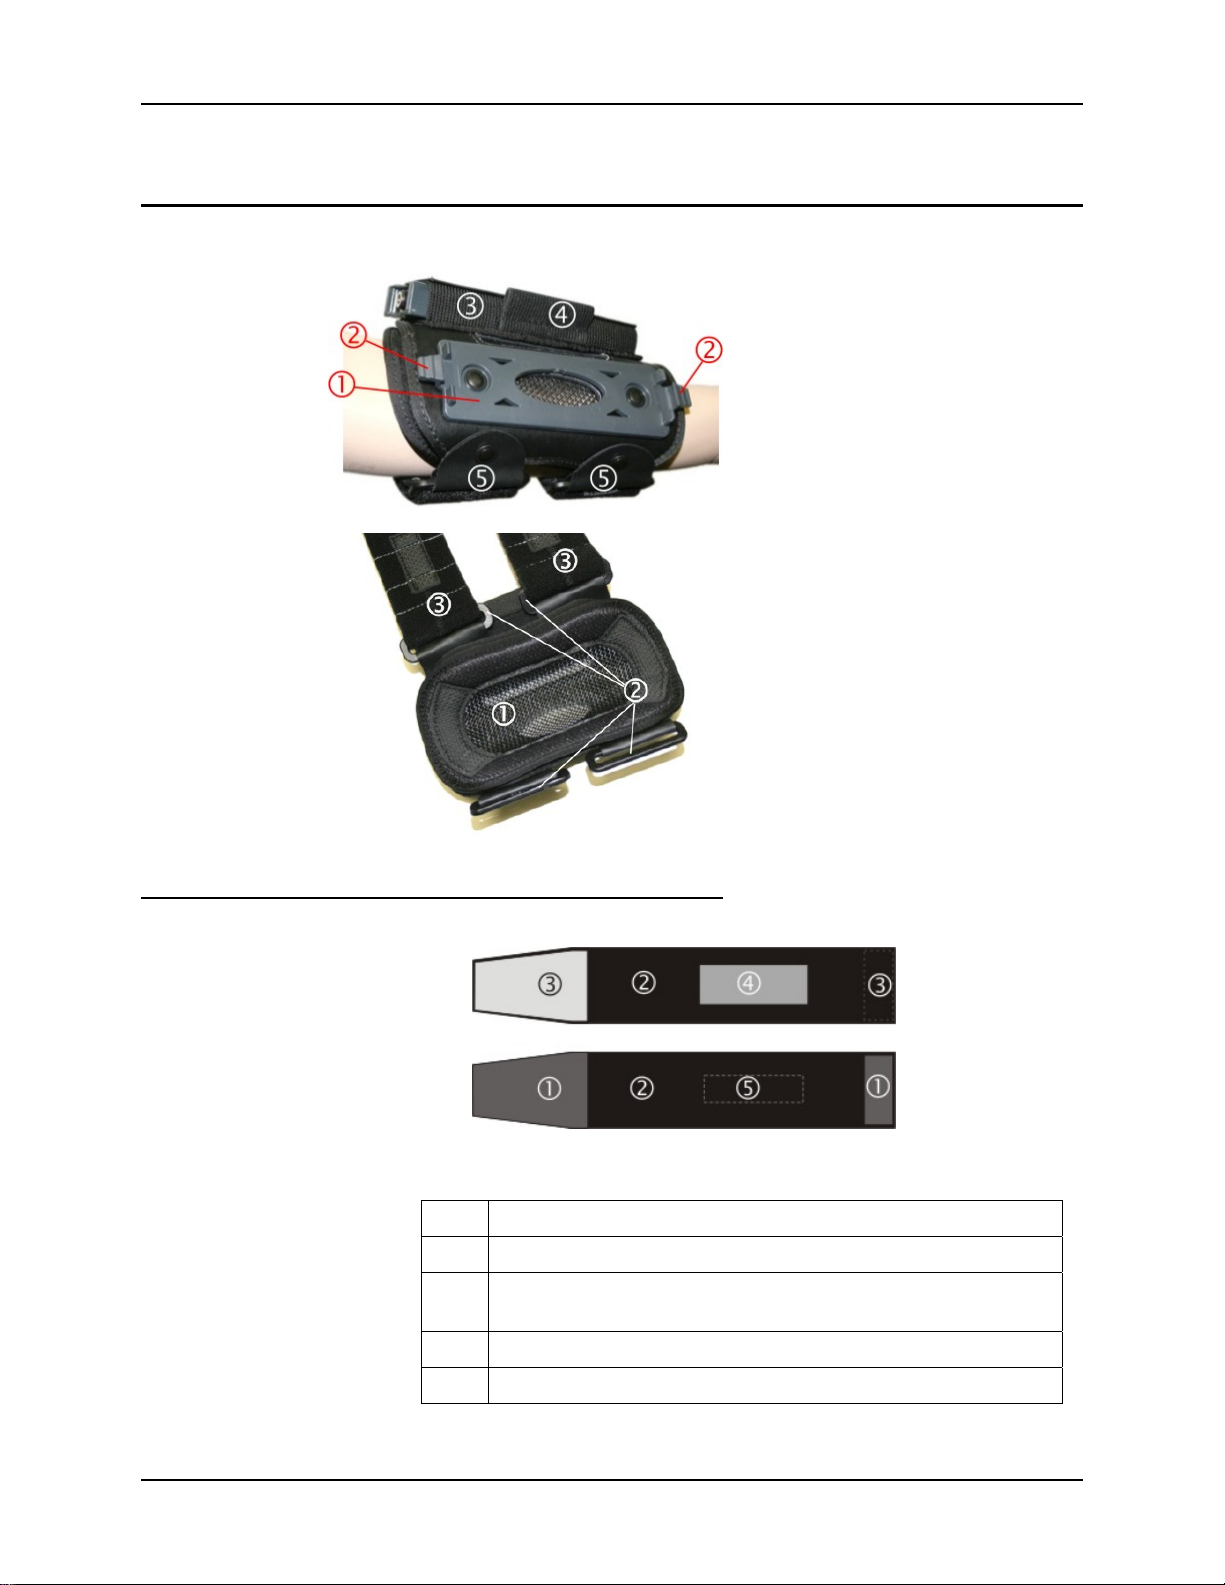
Armband
Armband – Top View
1 HX2 Mounting Bracket
2 Bracket Clips
3 Battery Sleeve
4 Stylus Holder
5 Arm Strap Brackets
Armband – Bottom View
1 Removable Mesh Arm Cover
2 Arm Strap Brackets
3 Adjustable Arm Straps
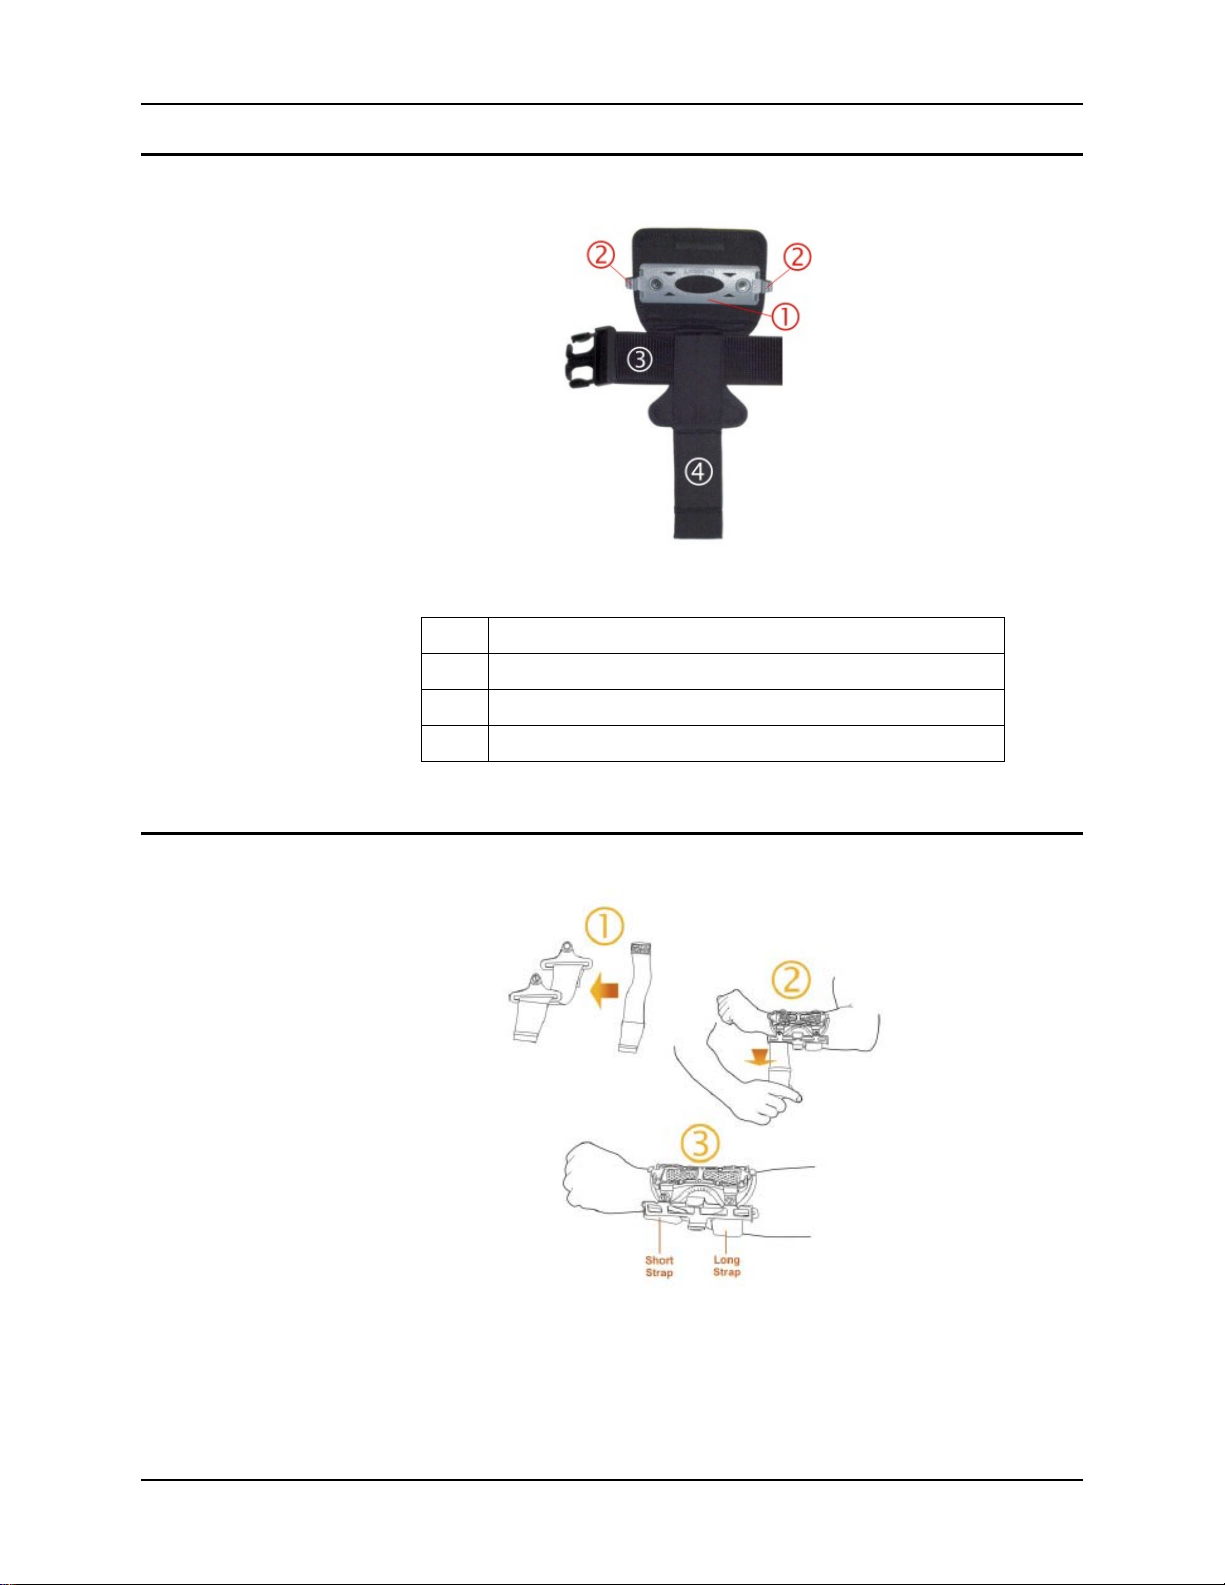
Straps
Figure 17 Armband / Top and Bottom
Figure 18 Armband Straps
1 Hook Fabric
2 Loop Fabric
Connection tabs. Slide through Arm Strap Brackets and press hook
3
and loop fabric together to secure strap to arm band.
4 Put this side of the strap on the inside, against the arm
5 Put this side of the strap on the outside
E-EQ-HX2OGWW-D HX2 User’s Guide
Page 24
18 Mounting Devices
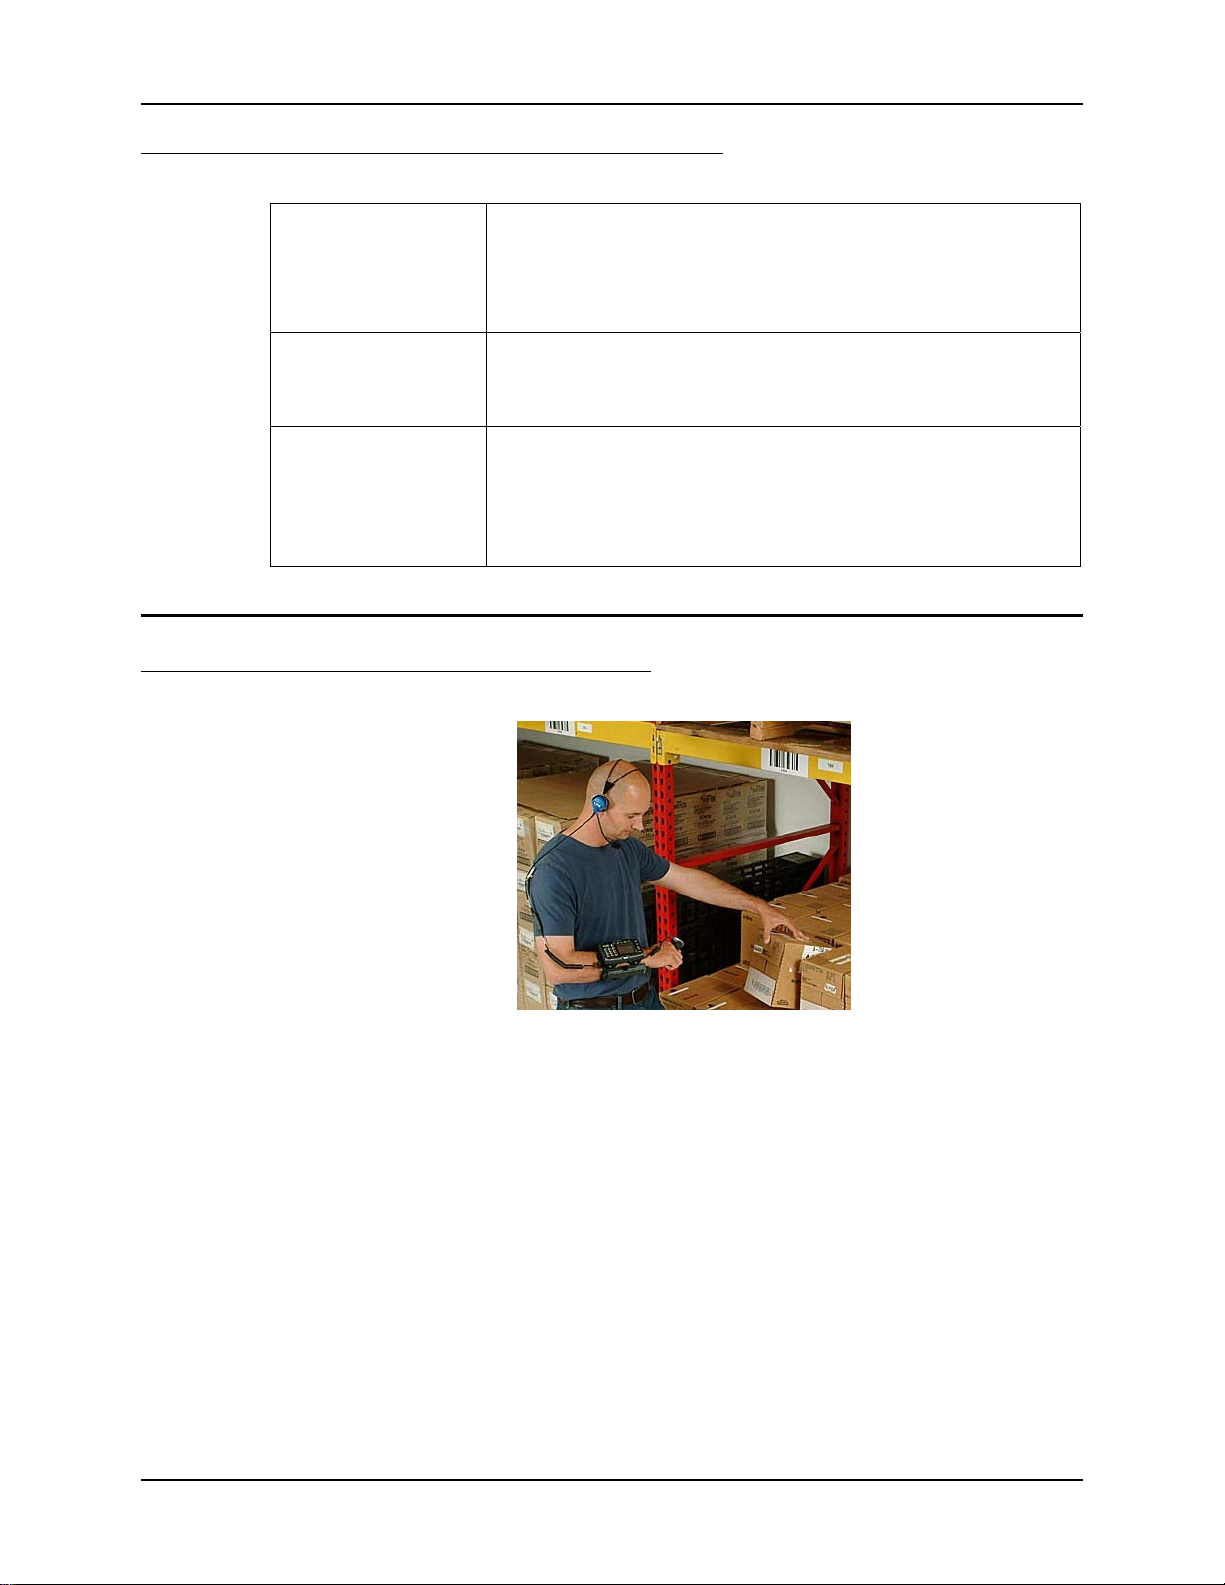
Hip Flip
Figure 19 Hip Flip and Belt
1 HX2 Mounting Bracket on Hip Flip
Low Profile Armband
2 Mounting Bracket Clips
3 A Belt inside the Belt Loop
4 Brace (Adjustable)
There is very little change to armband straps, assembly and mounting instructions when using the
Low Profile Armband.
HX2 User’s Guide E-EQ-HX2OGWW-D
Page 25

Getting Started
Note: The sequence of steps in Getting Started/Prerequisites must also be completed when the
This section’s instructions are based on the assumption that your new device is pre-configured and
requires only accessory installation (e.g. stylus, headset, ring scanner, etc.) and a battery. LXE
recommends that installation or removal of accessories be performed on a clean, well-lit surface.
When necessary, protect the work surface, the mobile device, and components from electrostatic
discharge.
Prerequisites
Quick Start
HX2 returns from a Cold Boot and when a new OS version is loaded. The wireless client,
flash card, virtual keyboard and scanner parameters may also need to be reset after a
cold reset.
• A fully charged battery is available.
• Optional add-on devices are available (e.g. styl us, headset , ri ng scan ner , hi p fl i p, voi ce
case, armband).
• Wireless Client configuration has been completed by the System Administrator.
• Required configured (mappable) keys have been assigned by the System Administrator.
For example, the Alpha Mode 3 Tap keypad (the original keypad) does not have a
Control, Shift, Alt or Del key (or the equivalent). Key mapping can be changed to map
those specific keys if needed. Refer to Components – Front.
• Optional software and LXE applications have been installed and setup by the System
Administrator.
,
HX2 Quick Start
First
Next
Then
Connect cabled devices to the HX2 See Connecting the Battery and Ring Scanner.
Power up the HX2 and set up personal
preferences
Setup wearable accessories See Wearable Device Assembly and Optional Equipment.
See Connecting the Audio Cable and a Headset.
See Tapping the Power Key.
Locate the stylus. Calibrate the touchscreen, if necessary.
See Tapping the Touchscreen with a Stylus and
Calibrating the Touchscreen.
A white screen will appear during the bootup process
until all drivers and applications are loaded and installed.
Setup screens may appear and disappear while files are
loading. After all files are loaded and the Desktop is
displayed, adjust audio volume and other parameters if
desired.
E-EQ-HX2OGWW-D HX2 User’s Guide
Page 26
20 Getting Started
HX2 Mobile Device – Quick Start Troubleshooting
Can’t calibrate the
touchscreen, change the
date/time or adjust the
volume.
RFterm® starts after
each cold reset and
warm reset.
HX2 seems to lockup
as soon as it is warm
booted.
Wearable Device Assembly
Armband
AppLock is installed and running on the mobile device. AppLock
restricts User access to running programs. Changes or modifications
require Administrator access.
Refer to HX2 Reference Guide for setup and processing information.
Tap File | Exit to close the RFTerm application. By default RFTerm
starts after each cold reset and warm reset.
There may be slight delays while the wireless client connects to the
network, authorization for voice-enabled applications complete,
Wavelink Avalanche management of the HX2 startup completes, and
Bluetooth relationships establ i s h or re-establish. When the desktop
appears or an application begins, the HX2 is ready for use.
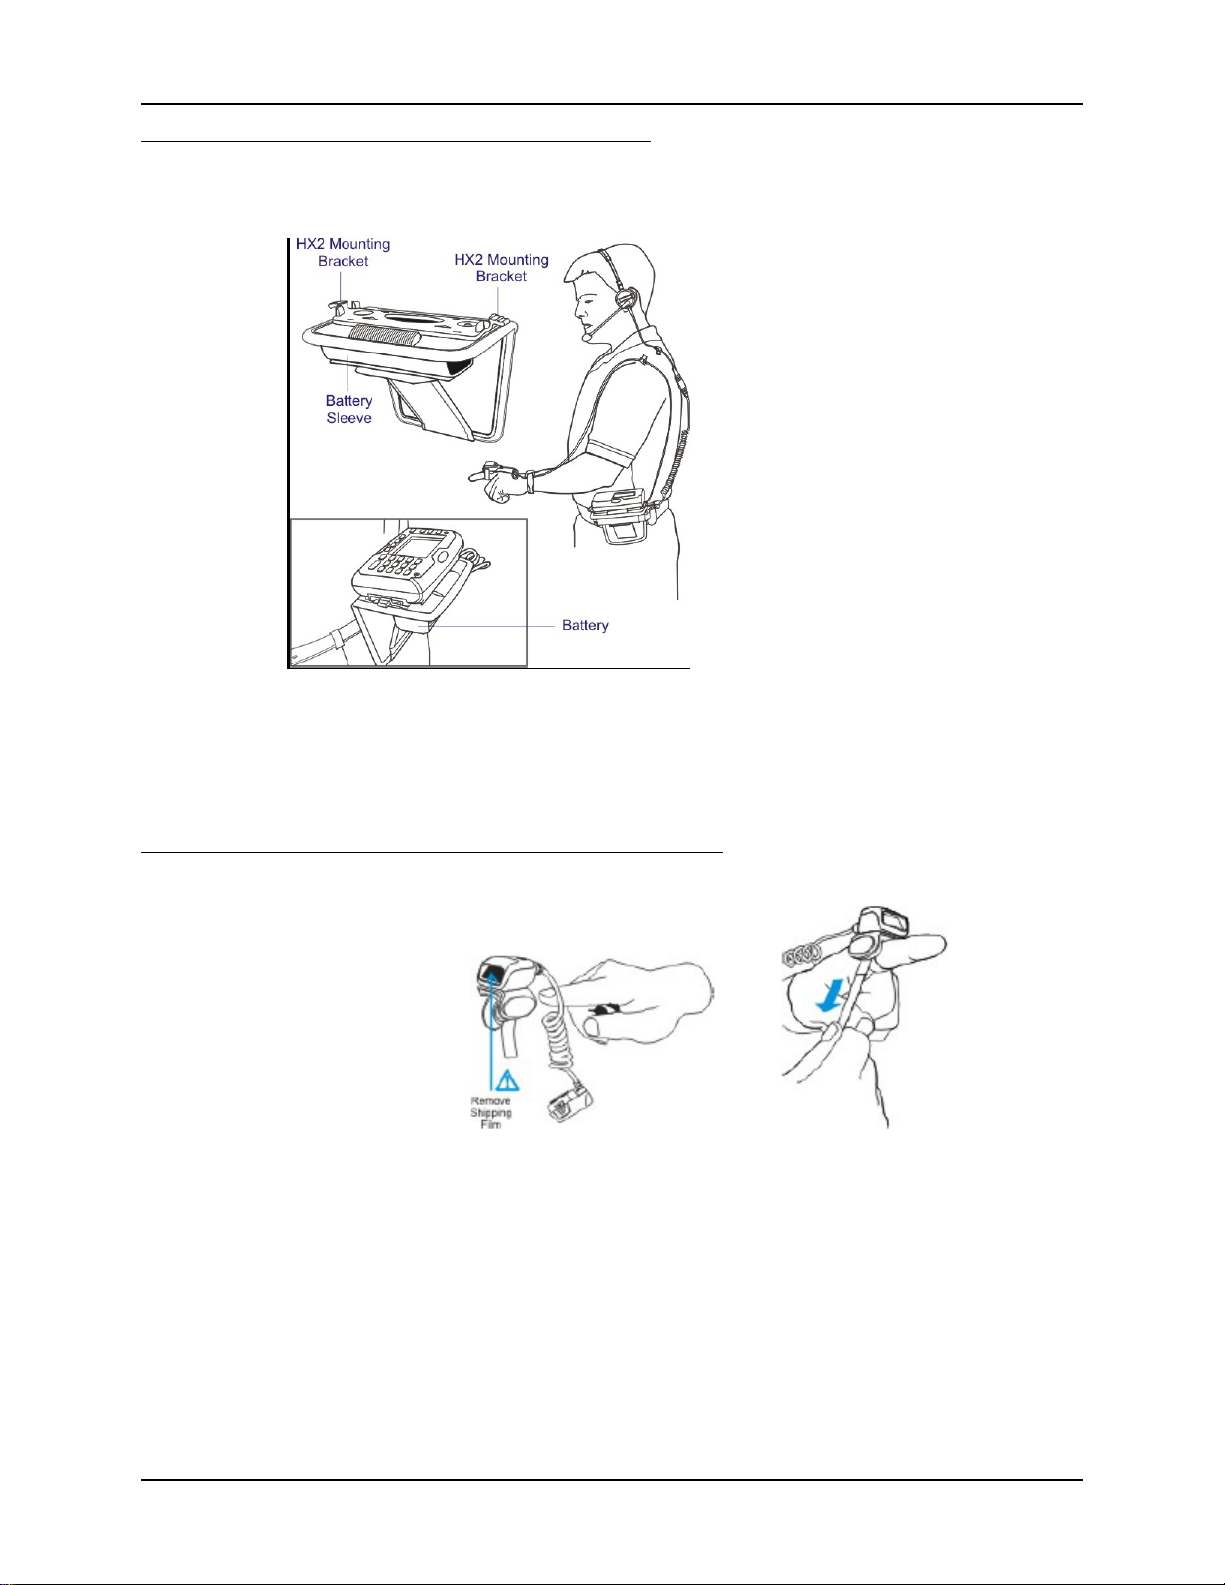
Figure 20 HX2 Armband, Left Arm Orientation, Ring Scanner, Audio
Prerequisite: Optional add-on devices are available.
• Fasten the armband to your left or right arm before continuing with these directions. See
Connecting the Battery and Ring Scanner.
• Slide the battery into the battery sleeve on the armband.
• Snap all tethered devices to the connectors at the back of the HX2. See Connecting the
Battery and Ring Scanner and Connecting the Audio Cable and a Headset.
• Snap the HX2 into the armband mounting bracket. See Mounting Bracket Clips.
• Attach the battery cable to the battery.
• Connect audio devices (see Connecting the Audio Cable and a Headset), if included.
• Slip the ring scanner (if included) over one of your fingers, making sure your thumb or
trigger finger can easily reach the Scan button. See Ring Scanner Strap.
• Adjust the HX2 arm assembly for comfort. Occasionally check all connectors for stability.
The wearable computer is ready for use.
HX2 User’s Guide E-EQ-HX2OGWW-D
Page 27
Getting Started 21
Hip Flip
Prerequisite: Optional add-on devices are available.
• Unpack the Hip Flip. Slide the belt
through the loops on the Hip Flip. Do
not put the hip flip on yet.
• Slide the battery into the battery sleeve
on the hip flip.
• Snap all tethered devices to the
connectors at the back of the HX2. See
Connecting the Battery and Ring
Scanner and Connecting the Audio
Cable and a Headset.
• Snap the HX2 into the hip flip mounting
bracket. See Mounting Bracket Clips.
• Attach the battery cable to the battery.
• Put the hip flip on.
• Slip the ring scanner (if included) over
one of your fingers, making sure your
thumb or trigger finger can easily reach
the scan button. See Ring Scanner Strap.
Ring Scanner Strap
The ring scanner finger loop is located under the ring scanner.
Pull gently on the end of the finger loop strap to separate the hook and loop fabric.
Slide your finger into the opened loop under the ring scanner .
Grasp the end of the finger loop strap and loosen, then tighten, the finger strap until the ring
scanner is comfortably snug and the scan aperture is secured in the desired location.
• Adjust the HX2 hip assembly for
comfort. Occasionally check all
connectors for stability.
Figure 21 HX2 Hip Flip, Audio
The ring scanner has a built-in quick disconnect designed for occasional safety hazards and is not
intended for daily removal of the ring scanner from the hand.
Note: Do not touch, push against or brace your finger on the scan aperture at any time.
E-EQ-HX2OGWW-D HX2 User’s Guide
Page 28
22 Connecting the Battery and Ring Scanner
Connecting the Battery and Ring Scanner
Note: The unit will not function unless a battery is securely tethered. Be sure to place the
mobile device in Suspend mode before disconnecting a battery, or all unsaved data may
be lost.
The battery and ring scanner cables should not be exchanged or replaced in a dirty, harsh or
hazardous environment. When the tethers are disconnected, any dust or moisture that adheres to
the tether connector can potentially cause damage upon cable connection.
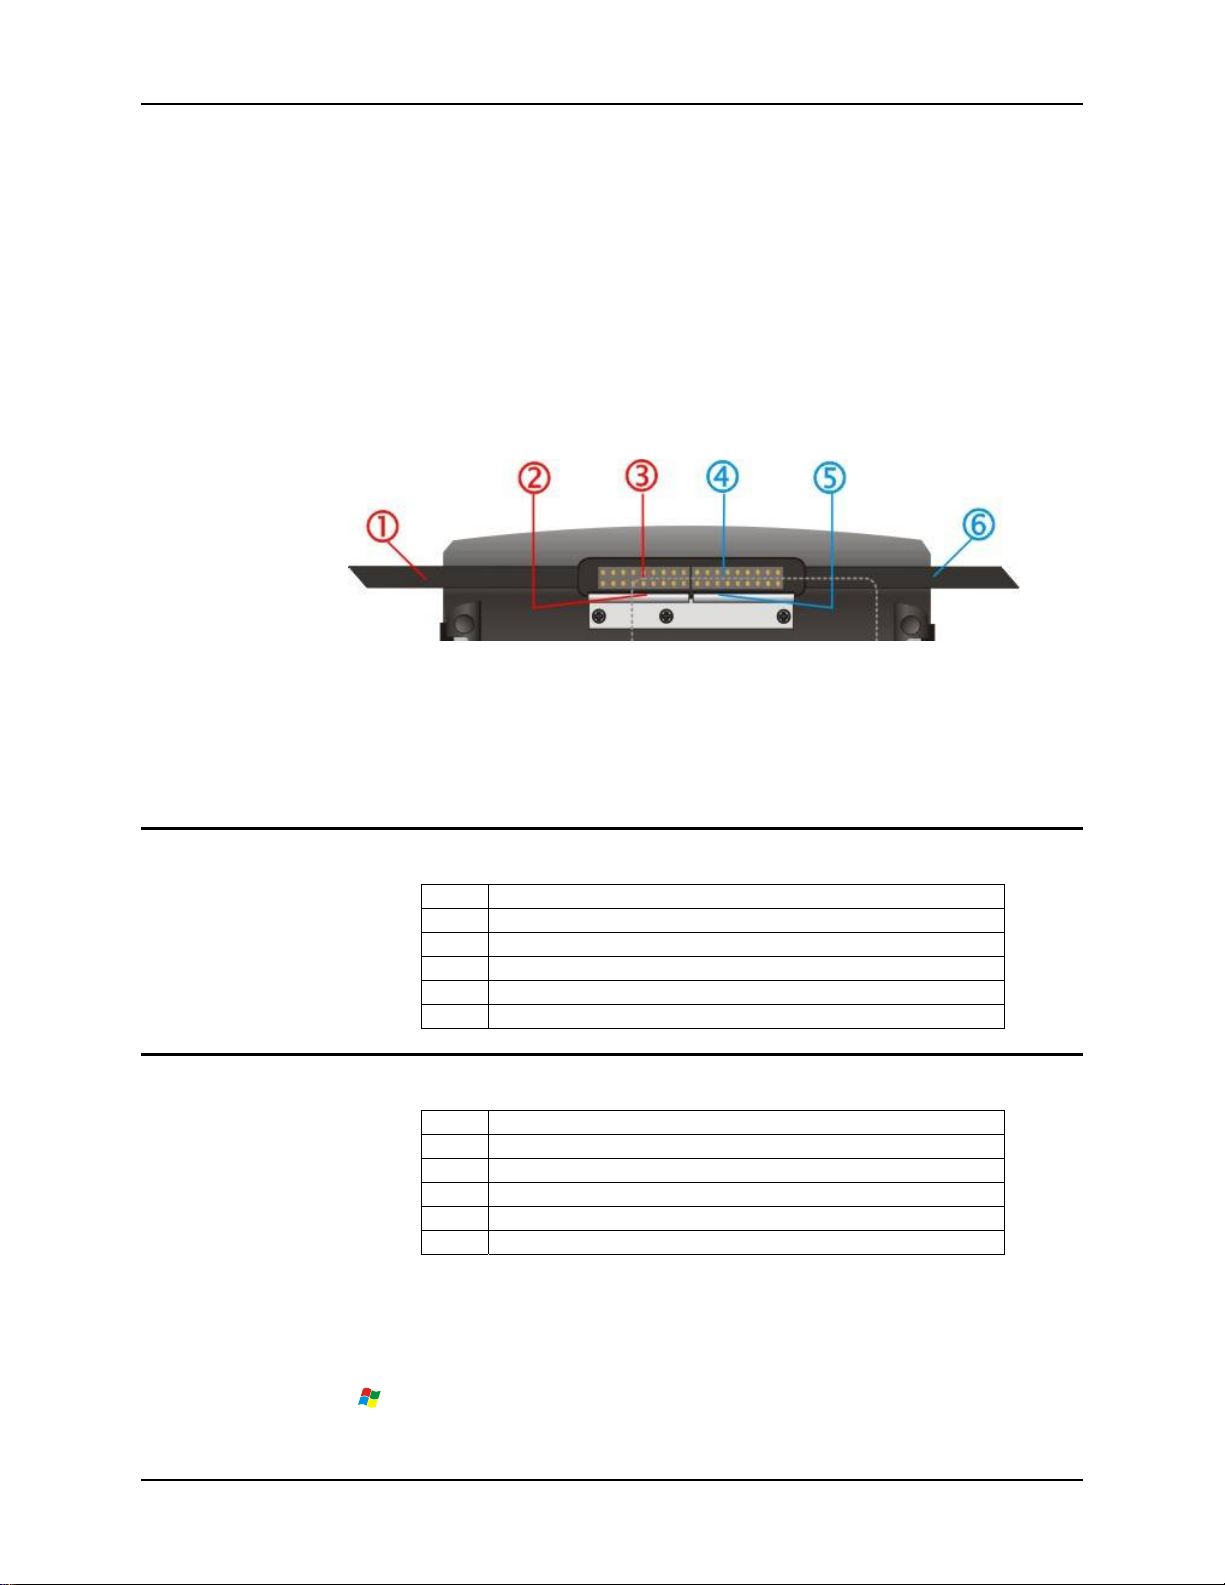
Follow the numbers in the following tables to connect the battery and ring scanner to the HX2.
Note: Before connecting cables to the back, make sure the battery sleeve on the armband is
uppermost or the following left/right directions won’t work.
Figure 22 Tether the Battery and Ring Scanner – Left / Right
When you want to switch connectors fro m left to right, or vice versa, first gently press downward
on the Retaining Clip, then pinch and pull the cable connector (not the cable!) straight up and
away from the HX2. Do not use a metal object, or extreme force, to remove the cable connector
from the HX2. Re-connect cables and reassemble the HX2 body-worn components.
Ring Scanner on the Left Hand
1 Ring Scanner Tether cable
2 Retaining Clip for Ring Scanner Tether Connector
3 Ring Scanner cable connector
4 Battery Cable connector
5 Retaining Clip for Tethered Battery Connector
6 Tethered Battery Cable
Ring Scanner on the Right Hand
1 Tethered Battery Cable
2 Retaining Clip for Tethered Battery Connector
3 Battery Cable connector
4 Ring Scanner cable connector
5 Retaining Clip for Ring Scanner Tether Connector
6 Ring Scanner Tether Cable
Checking Battery Status
Important: Until the tethered battery and backup battery are completely depleted, the HX2 is
always drawing power from the batteries (On).
Tap the
status and other details are displayed.
HX2 User’s Guide E-EQ-HX2OGWW-D
| Settings | Control Panel | Battery icon. Main battery level, backup battery level,
Page 29
Connecting the Audio Cable and a Headset 23
Connecting the Audio Cable and a Headset
Note: The audio option draws power from the tethered battery.The mobile device internal
speaker and internal microphone are disabled when a headset and microphone is
connected.
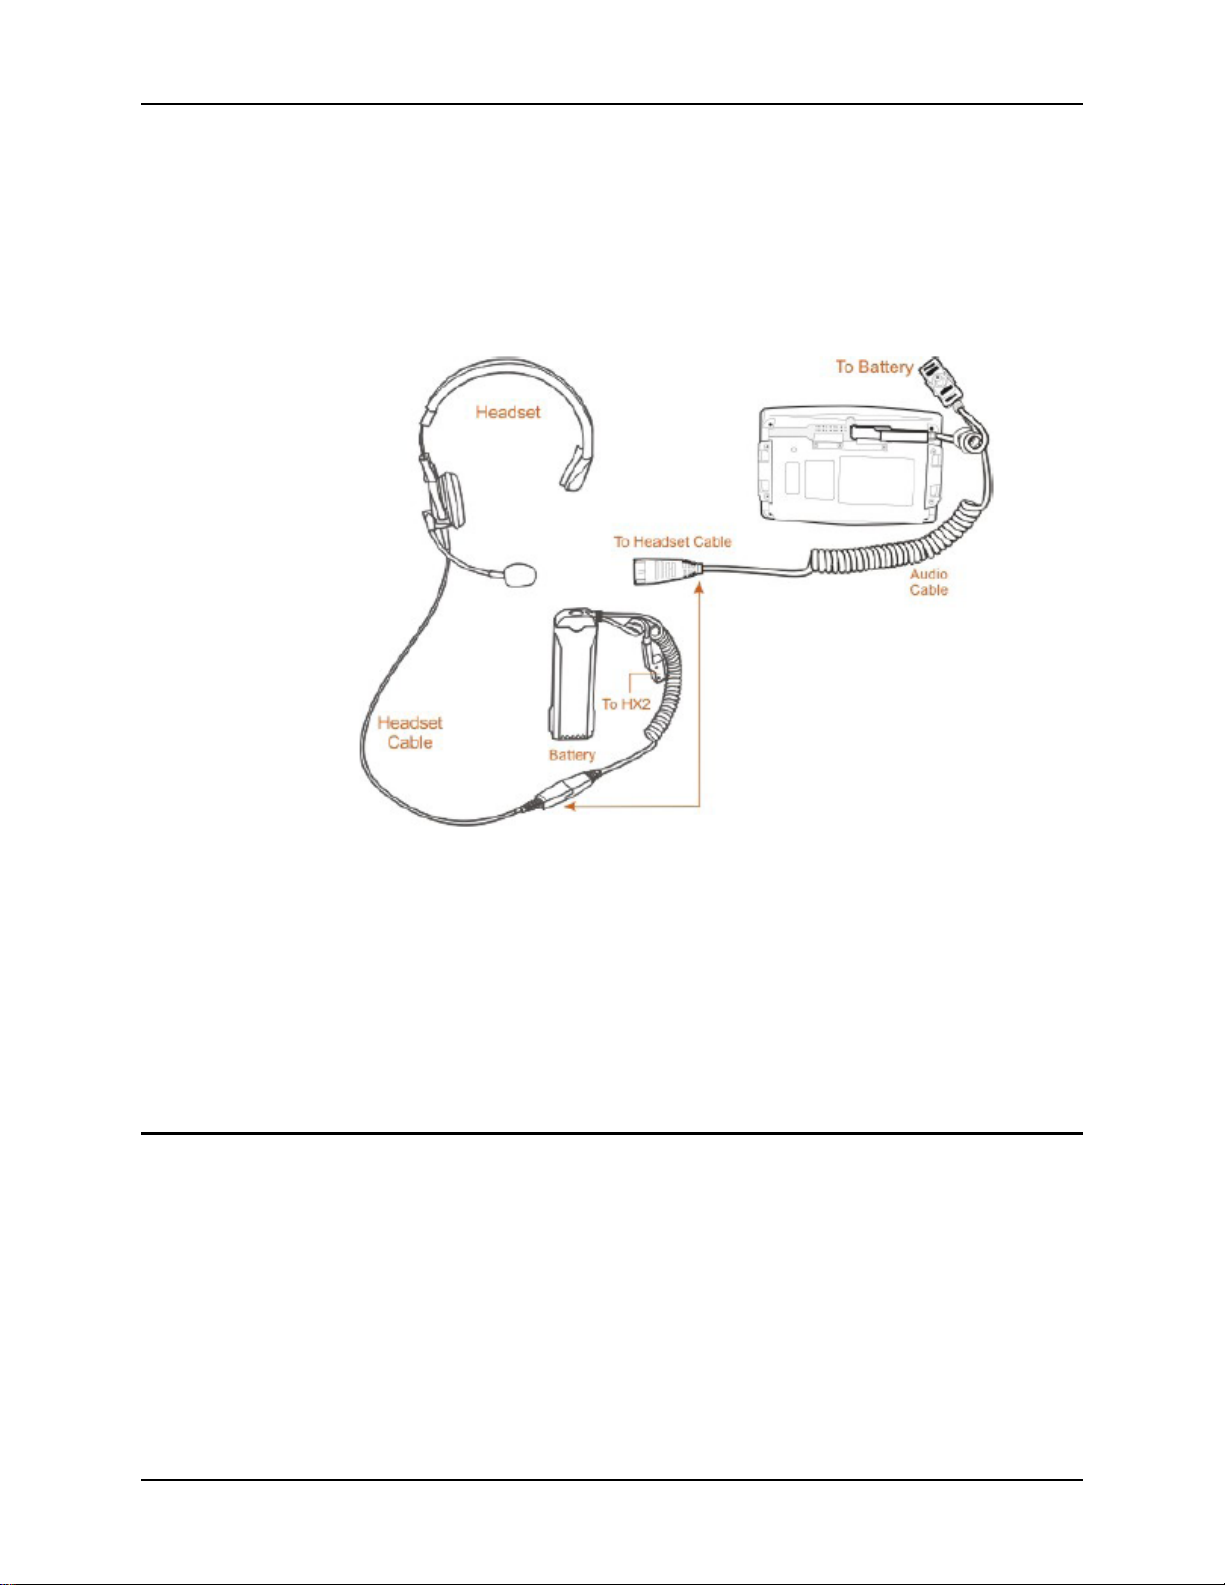
The headset consists of an earpiece, a microphone and an attached cable. The headset attaches to
the audio cable which attaches to the HX2.
Figure 23 Audio/Battery Cable and Headset
1. Align the audio connector and the headset quick connect cable end. Firmly push the cable
ends together until they click and lock in place.
2. Sn ap the battery plug into the battery cable connector at the top of the battery.
3. Press the battery/au dio connector into either left or right connector on the back of the HX2.
The retaining clip will snap into place and secure the cable connection. Place the cable in the
cable groove.
See section titled Set the Audio Speaker Volume.
Adjust Microphone and Secure the Cable
Do not twist the microphone boom when adjusting the microphone.
The microphone should be adjusted to be about two finger widths from your mouth.
Make sure the microphone is pointed at your mouth. Note the small “Talk” label near the
mouthpiece. Make sure the Talk label is in front of your mouth.
The microphone cable can be routed over or under clothing.
Under Clothing
• Leave the cable exposed only at the top of the collar.
• Be sure to leave a small loop of cable to allow movement of your head.
E-EQ-HX2OGWW-D HX2 User’s Guide
Page 30

24 Tapping the Power Key
Over Clothing
• Use clothing clips to hold the cable close to your body.
• Tuck the cable under the belt, but leave a small loop where it goes und er the belt.
• Do not wear the cable on the front of your body. It may get in your way or get caught on
protruding objects.
Tapping the Power Key
The Power key is a round button located above the F4 key.
When a battery is connected to the HX2 for the first time press the Power k ey. The mobile device
begins the startup process. Wait until the Windows CE desktop appears.
Suspend/Resume Mode – At other times, tapping the Power key places the HX2 immediately in
Suspend Mode. Tapping the Power key again immediately returns the HX2 from Suspend.
Tapping the Touchscreen with a Stylus
Note: Always use the point of the stylus for tapping or making strokes on the touchscreen.
Never use an actual pen, pencil, or sharp/abrasive object to write on the touchscreen.
Hold the stylus as if it were a pen or pencil. Touch an element on the screen with the tip of the
stylus then remove the stylus from the screen. Firmly press the stylus into the stylus holder when
the stylus is not in use.
Similar to using a mouse to left-click icons on a desktop computer screen, using the stylus to tap
icons on the touchscreen is the basic action that can:
• Open applications
• Choose menu commands
• Select options in dialog boxes or drop-do w n bo xes
• Drag the slider in a scroll bar
• Select text by dragging the stylus across the text
Place the cursor in a text box prior to typing in data or retrieving data using the ring scanner or an
input/output device connected to a serial port.
A stylus can be ordered from LXE. See the section titled Accessories.
Note: A “right mouse click” function must be programmed into the customer application to
accept a constant stream of left mouse click messages. An application can choose to
interpret this stream of messages as a right mouse click. LXE does not support non-LXE
application programmi ng.
Calibrating the Touchscreen
If the touchscreen is not responding properly to stylus taps, you may need to recalibrate the
touchscreen. Recalibration involves tapping the center of a target. If you miss the center, keep the
stylus on the screen, slide it over the target’s center, and then lift the stylus.
To recalibrate the screen, select
To begin, tap the Recalibrate button on the screen with the stylus.
| Settings | Control Panel | Stylus | Calibration tab.
Follow the instructions on the screen and press the Enter key to save the new calibration settings
or press Esc to cancel or quit.
HX2 User’s Guide E-EQ-HX2OGWW-D
Page 31
Power Key Functions 25
Power Key Functions
See Also: Sections titled LED Indicators and System Status LED later in this guide.
• If installed, RFTerm starts up automatically at the conclusion of each reboot.
• If installed and enabled, AppLock runs automatically at the conclusion of each reboot.
• If installed and pre-configured, the wireless client connects automatically during each
reboot.
• If installed and pre-configured, Bluetooth re-connects to nearby paired devices
automatically at the conclusion of each reboot.
• If installed and pre-configured, Wavelink Avalanche connects remotely and downloads
updates automatically during each reboot.
Hardware Reset
Press and hold the Power key for approximately 15 seconds until the display blanks, then release
the key. If user data was not saved before the Hardware Reset function started, data loss occurs
and unsaved registry settings are lost. User data is saved whenever a Suspend/Resume function is
complete.
Warm Boot
Cold Boot
Tap | Run and type warmboot. The virtual keypad (SIP) can be used, if necessary. Tap the
OK button. A warm boot does not affect the operating system, but programs and data in RAM are
lost, and registry changes, if any, are saved. Network and Bluetooth connections will need to be
re-established. There may be slight delays while the wireless client connects to the network, reauthorization for voice-enabled applications completes, Wavelink Avalanche management of the
HX2 startup completes, or Bluetooth relationships establish or re-establish.
Tap | Run and type coldboot. Tap the OK button. The virtual keypad (SIP) can be used, if
necessary. Factory default settings overwrite all previously saved user settings.
Wireless Client configuration will need to be completed by the System Administrator.
Required mappable keys will need to be configured. For example, there is no
, Control, Shift,
Alt or Del key (or their equivalent) available using the HX2 Alpha Mode 3 Tap keypad.
Optional software
2
and LXE application 3 parameters will need to be set up by the System
Administrator.
Important – Because of the extreme nature of the Cold Boot, LXE recommends that the Cold
Boot process be used only as an emergency procedure and Warm Boot or Suspend/Resume be
used whenever n ecessary.
Note: Refer to the section titled Power Modes
in the HX2 Reference Guide for more
information relating to the power states of the HX2.
2
Optional software setup may include Summit Wireless Client communication setup, Voice-Enabled software
connection to wireless link, Wavelink Avalanche management of the HX2 file structure at startup, and
Bluetooth device-pairing and re-con nect .
3
LXE application software setup may include Summit Wireless Client communication setup, RFTerm terminal
emulation configuration, and AppLock application-locking configuration.
E-EQ-HX2OGWW-D HX2 User’s Guide
Page 32
26 HX2 Keypads
HX2 Keypads
Inserting Characters Using the Input Panel
You can use the Input Panel to insert the following characters:
< > { } [ ] ( ) _ +
: ; “ ‘ ? / ~ ` ! @
# $ % ^ & |
See Input Panel later in this guide.
See Appendix A Key Maps for instruction on the specific keypresses to access all allowed keypad
functions.
Using the Alpha Mode 3 Tap Keypad
The Alpha and Blue keys do not auto-repeat.
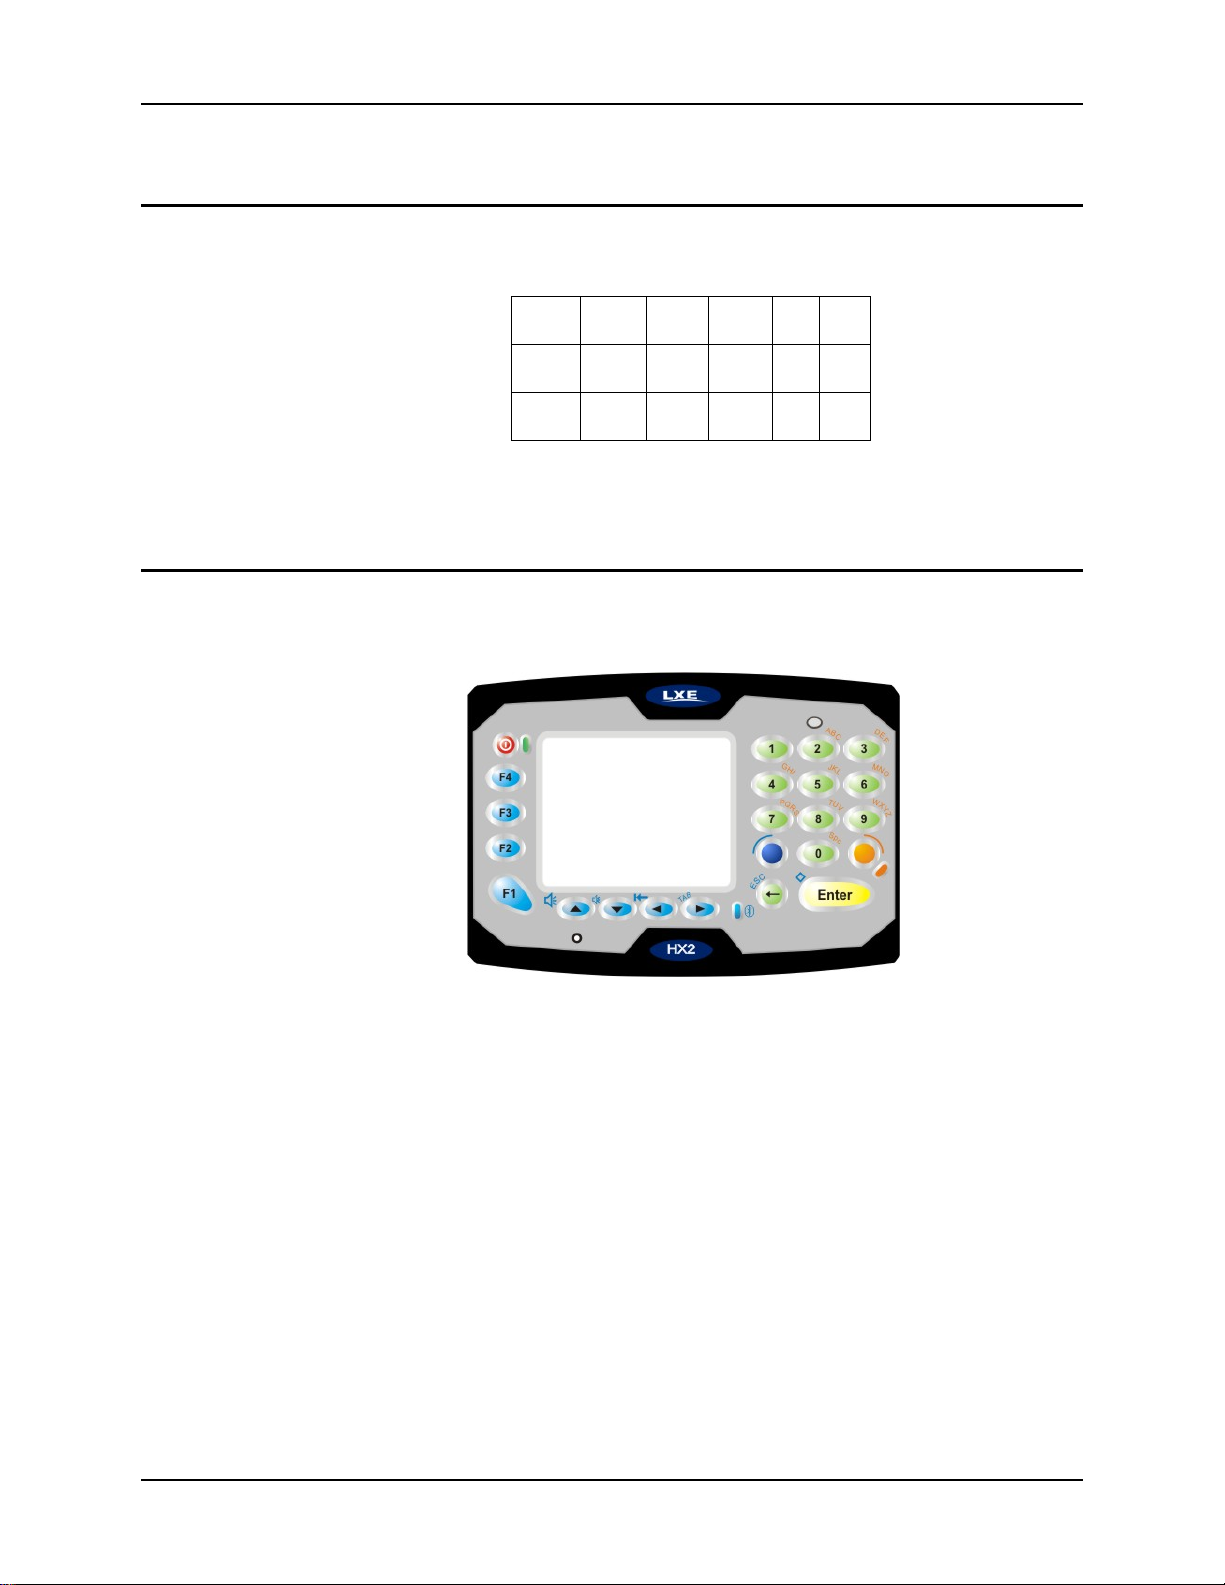
Figure 24 The Alpha Mode 3 Tap Keypad
• When using a sequence of keys that require an alphabet key, fir st press the Alpha key to
force Alpha mode on the numeric keys. See Alpha Modifier Key in the HX2 Reference
Guide.
• Double tap the Alpha key for upper case alphabetic characters (similar to CapsLock.
Single tap the Alpha key to exit CapsLock mode).
• Single tap the Alpha key to enter and exit Alpha mode.
• Default Alpha mode produces lower case alphabetic characters when numeric keys are
pressed.
• Pressing the Alpha key forces “Alpha” mode for all keys.
• To create a combination of numbers and letters before pressing Enter, remember to tap the
Alpha key to toggle between Alpha and Numeric mode.
• Use the Input Panel to enter characters that are not available using the 23-key keypad.
• When using a sequence of keys that do not include the Alpha key (Orange) but does
include a sticky key (Blue), press the Blue key in sequence.
HX2 User’s Guide E-EQ-HX2OGWW-D
Page 33
HX2 Keypads 27
Using the Dual Alpha Keypad
The Dual Alpha keypad modifier keys are the Green, Orange, Light Blue, Shift and Control keys.
The default timeout for any Alpha key in any mode is 0.15 second. See Appendix A – Key Maps
for all available keypress sequences.
or
Figure 25 Dual Alpha Keypad
• Any key press exits volume control mode. Any key press exits backlight control mode.
• Modifier keys are sticky keys. Any modifier key pressed after itself toggles the specific
modifier key off.
• Orange LED near the Backspace key has no function on this keypad.
• Use Start | Settings | Control Panel | Keypad | KeyMap tab to change the Diamond 1 and
Diamond 2 key keypress defaults.
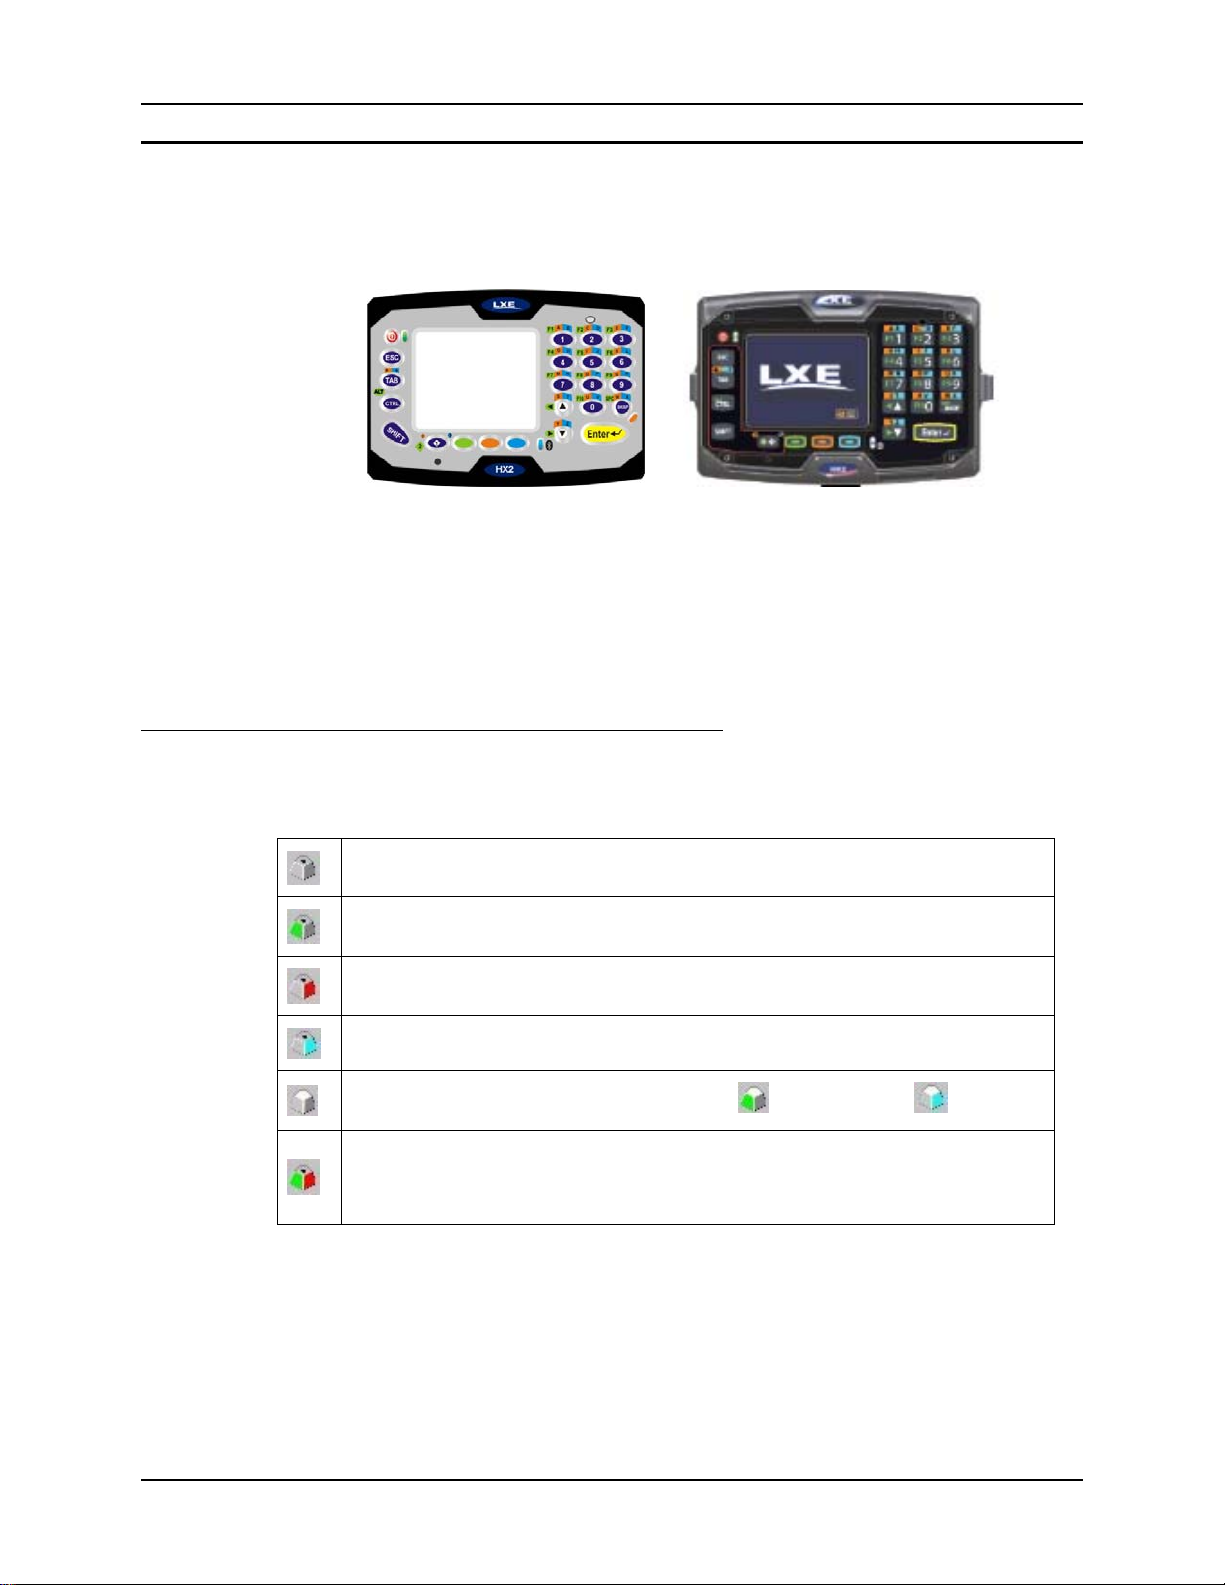
Keypad Icons and the Dual Alpha Keypad
When the HX2 has a Dual Alpha keypad, a modifier key icon is displayed in the taskbar. The icon
looks like a small cube. The sides of the icon change color when a modifier key is pressed.
No modifier in focus
Green modifier key
Orange modifier key
Blue modifier key
Shift modifier key. For example, Shift + Green
When multiple modifier keys are in focus, for example, Green + Orange + 1 to put a
double quote [ “ ] on the screen --- the modifier key icon will show an orange side and
a green side.
See Appendix A – Key Maps for all available keypress sequences.
and Shift + Blue
E-EQ-HX2OGWW-D HX2 User’s Guide
Page 34
28 HX2 Keypads
Using the Triple Tap Keypad
Assumption: The system administrator has enabled the HX2 Triple Tap keypad. Refer to
the HX2 Reference Guide for instruction.
The Triple Tap keypad modifier keys are the Green, Orange, Light Blue, Shift and Control keys.
The default timeout for any Alpha key in any mode is 0.15 second. See Appendix A – Key Maps
for all available keypress sequences.
or
Figure 26 The Triple Tap Keypad
• Any key press exits volume control mode. Any key press exits backlight control mode.
• Modifier keys are sticky keys. Any modifier key pressed after itself toggles the specific
modifier key off.
• Orange LED near the Backspace key has no function on this keypad.
• Use Start | Settings | Control Panel | Keypad | KeyMap tab to change the Diamond 1 and
Diamond 2 key keypress defaults.
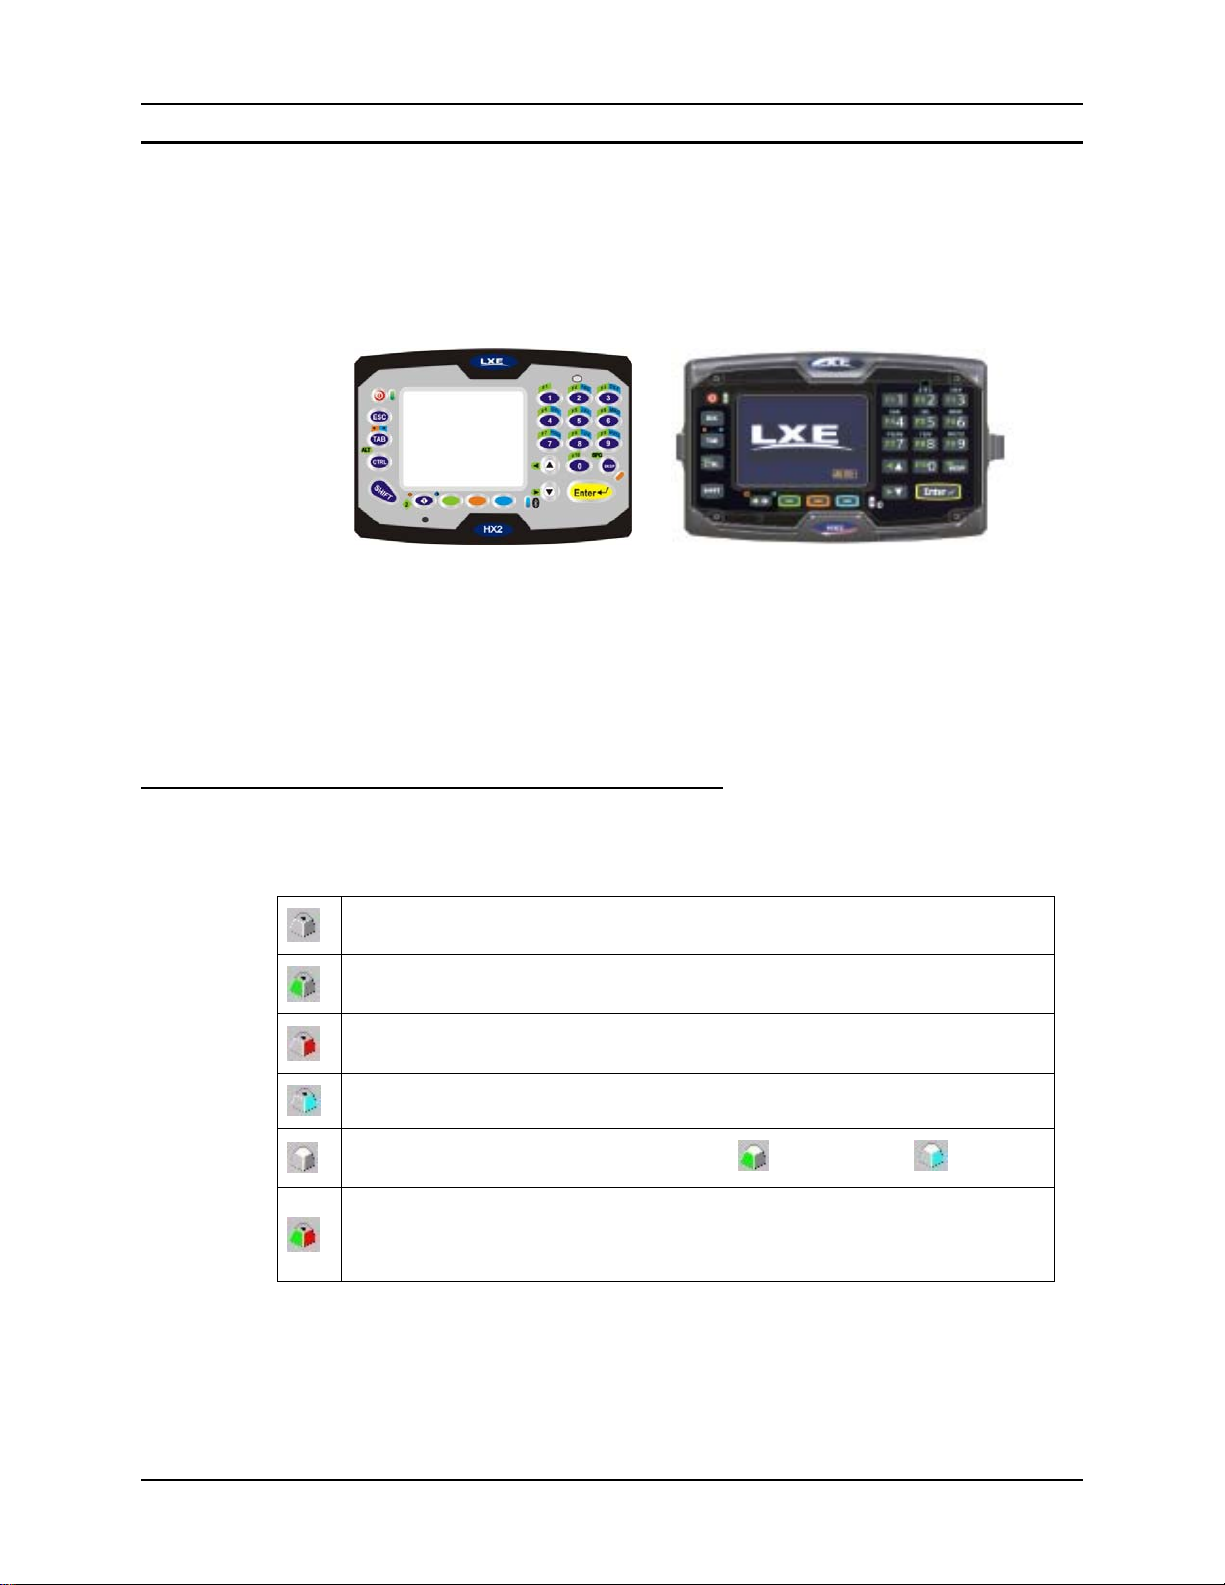
Keypad Icons and the Triple Tap Keypad
When the HX2 has a Triple Tap keypad, a modifier key icon is displayed in the taskbar. The icon
looks like a small cube. The sides of the icon change color when a modifier key is pressed.
No modifier in focus
Green modifier key
Orange modifier key
Blue modifier key
Shift modifier key. For example, Shift + Green
When multiple modifier keys are in focus, for example, Green + Orange + 1 to put a
double quote [ “ ] on the screen --- the modifier key icon will show an orange side and
a green side.
See Appendix A – Key Maps for all available keypress sequences.
and Shift + Blue
HX2 User’s Guide E-EQ-HX2OGWW-D
Page 35
System Status LEDS 29
System Status LEDS
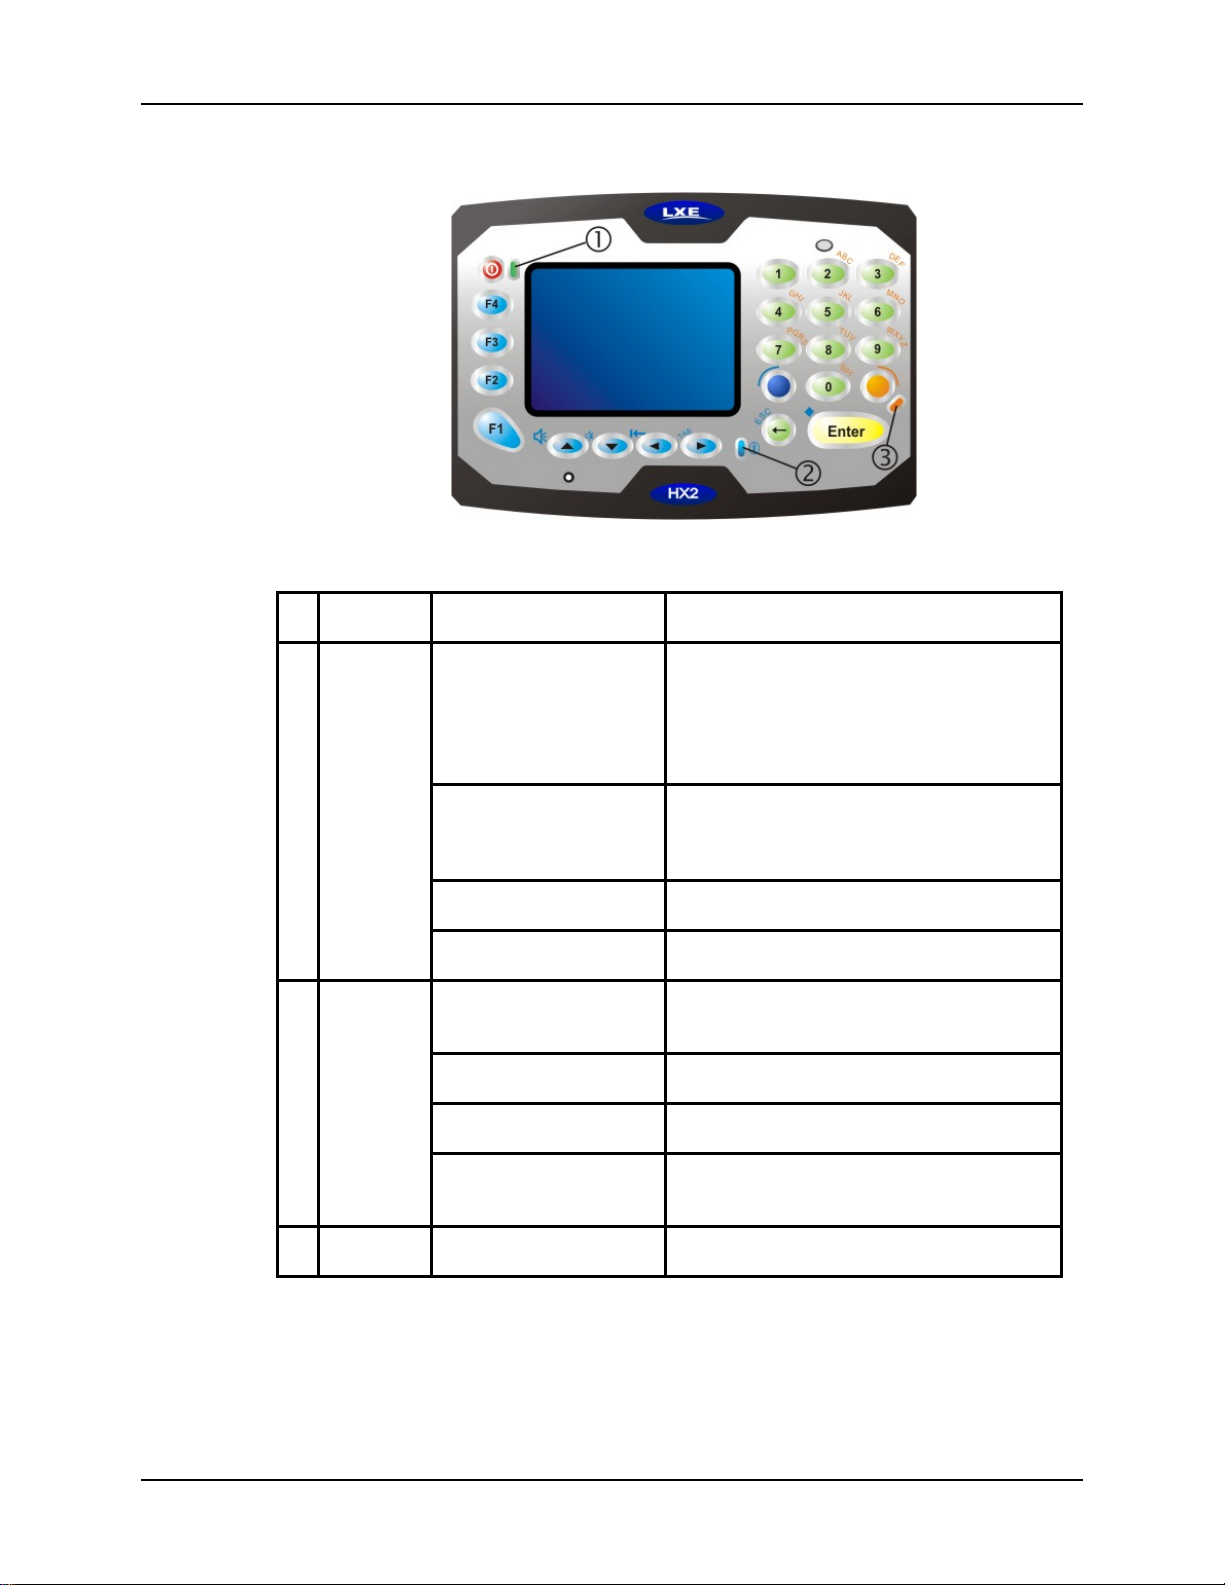
Figure 27 System Status LEDs
LED Color Indicates . . .
1 System
Status
2 Bluetooth
Green – Blinking Display turned off when timer expires. This
will help to conserve battery power. Tap the
screen or press any key (except the Power
button) to turn the display on again. The HX2
is not in Suspend Mode.
Red – Steady Main Battery Low. If the main battery is not
replaced with a fully charged battery before
the main battery fails, the HX2 is turned Off.
Red – Blinking Main Battery Power Fail
Off Suspend Mode.
Blue – Blinking Slowly Bluetooth is paired but not connected to a
device.
Blue – Blinking Medium Bluetooth is paired and connected to a device.
Blue – Blinking Fast Bluetooth is discovering Bluetooth devices.
Off Bluetooth hardware has been turned off or it
does not exist in the HX2.
3 Alpha
When multiple system status conditions are present, the most urgen t condition is indicated. The
conditions listed above are in increasing order of urgency by LED type.
Note: The Dual Alpha keypad and the Triple Tap keypad do not use the Alpha LED.
Amber – Steady
Alpha Mode enabled.
E-EQ-HX2OGWW-D HX2 User’s Guide
Page 36

30 Entering Data
Entering Data
You can enter data into the HX2 through several different methods. The Ring Scanner aperture
provides barcode data entry, the Input/Output (I/O) ports, the built-in microphone and speaker are
used to input/output data, and the physical and virtual keypads provide text entry.
Mobile devices with a touchscreen use a stylus to input data, devices connected to the I/O ports
and/or the keypad. An input panel (virtual keyboard) is available for applications that expect
keyed input.
Keypad Entry
The keypad is used to manually input data that is not collected otherwise. A subset of desktop PC
full keyboard functions are provided. Almost every key on the keypad has two or three different
functions. The primary function or numeric character is printed on the key.
Please refer to Appendix A – Key Maps for instruction on the unique keypresses to access the
available keyboard functions.
Stylus Data Entry
Note: Th is section is directed to the HX2 daily user. The assumption is that the mobile device
has been configured and the touch screen calibrated by the System Administrator prior to
releasing the HX2 for daily use. The touch screen should be calibrated before initial use.
The stylus performs the same function as the mouse that is used to point to and click elements on a
desktop computer. The stylus is used in the same manner as a mouse – sing le tap or double tap to
select menu options, drag the stylus across text to select, hold the stylus down to activate slider
bars, etcetera.
Hold the stylus as if it were a pen or pencil. Touch an element on the screen with the tip of the
stylus then remove the stylus from the screen. The touchscreen responds to an actuation force
(touch) of 4 oz. (or greater) of pressure.
The stylus can be used in conjunction with the keyboard and scanner and an input/output device
connected to a serial port.
Touch the stylus to the field of the data entry form to receive the next data feed.
The cursor begins to flash in the field.
The unit is ready to accept data from either the physical keypad, virtual keyboard, or the ring
scanner.
Note: Always use the point of the stylus for tapping or making strokes on the display. Never use
an actual pen, pencil or sharp/abrasive object to write on the touchscreen.
Place the stylus in the stylus holder when not in use. There is a built in stylus holder on the hip flip
and the armband.
HX2 User’s Guide E-EQ-HX2OGWW-D
Page 37
Entering Data 31
Ring Scanner Data Entry
Read all cautions, warnings and labels before using the ring scanner.
Do not look into the ring scanner/imager lens.
Do not stare directly into any beam emitted from the scanner/imager lens.
Laser Scanner
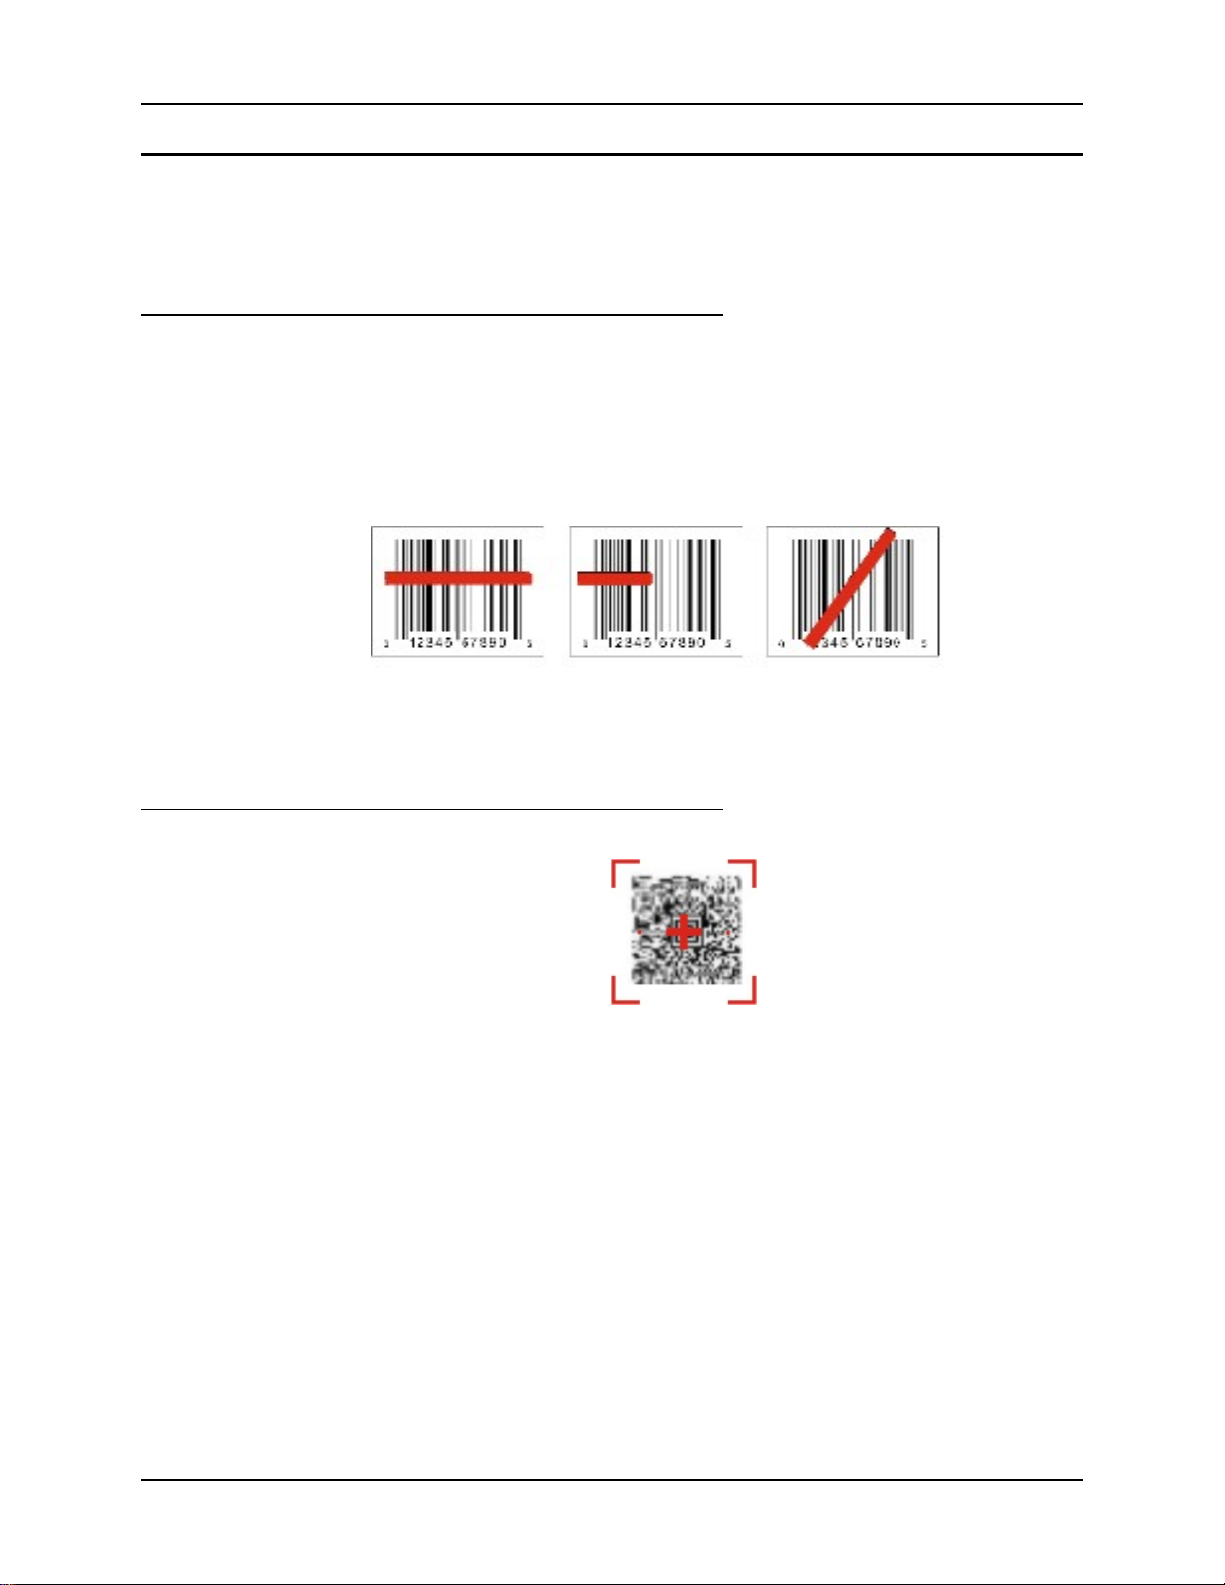
To scan with the laser barcode scanner, point the ring scanner laser aperture towards a barcode and
press the Scan button. You will see a red laser beam strike the barcode. Align the red beam so that
the barcode is centered within the beam. The laser beam must cross the entire barcode. Move the
ring scanner towards or away from the barcode so that the barcode takes up approximately twothirds the width of the beam.
There may be an audible response combined with the Scan function.
2D Imager
Correct Scan
Figure 28 Laser Scan Beam on Linear Barcode
See section titled Scan Status LED.
Figure 29 Imager Bracketed Crosshair Target on 2D Barcode
To scan with the Imager Ring Scanner, point the scan aperture towards a 2D barcode and press the
Scan button. You will see a bracketed crosshair strike the barcode. Align the brackets so that the
center of the barcode is covered by the crosshair.
Move the ring scanner towards or away from the barcode until a response is emitted by the HX2 (1
beep, 2 beeps, a WAV file, etc) or the bracketed crosshair times out and disappears.
The Imager LED may illuminate when the Scan button is pressed. There are three options that can
be set by the System Administrator using the Scanner control panel applet: Internal illumination ,
External illumination, or Both. If external illumination is chosen, there are three white LEDs
located above the imager aperture that will illuminate for the duration of the scan then turn off.
Incorrect Scan Incorrect Scan
See the previous section titled Tethered Ring Scanner / Imager figure titled Ring Scanner/Imager
Apertures.
E-EQ-HX2OGWW-D HX2 User’s Guide
Page 38
32 Entering Data
Scan Status LED
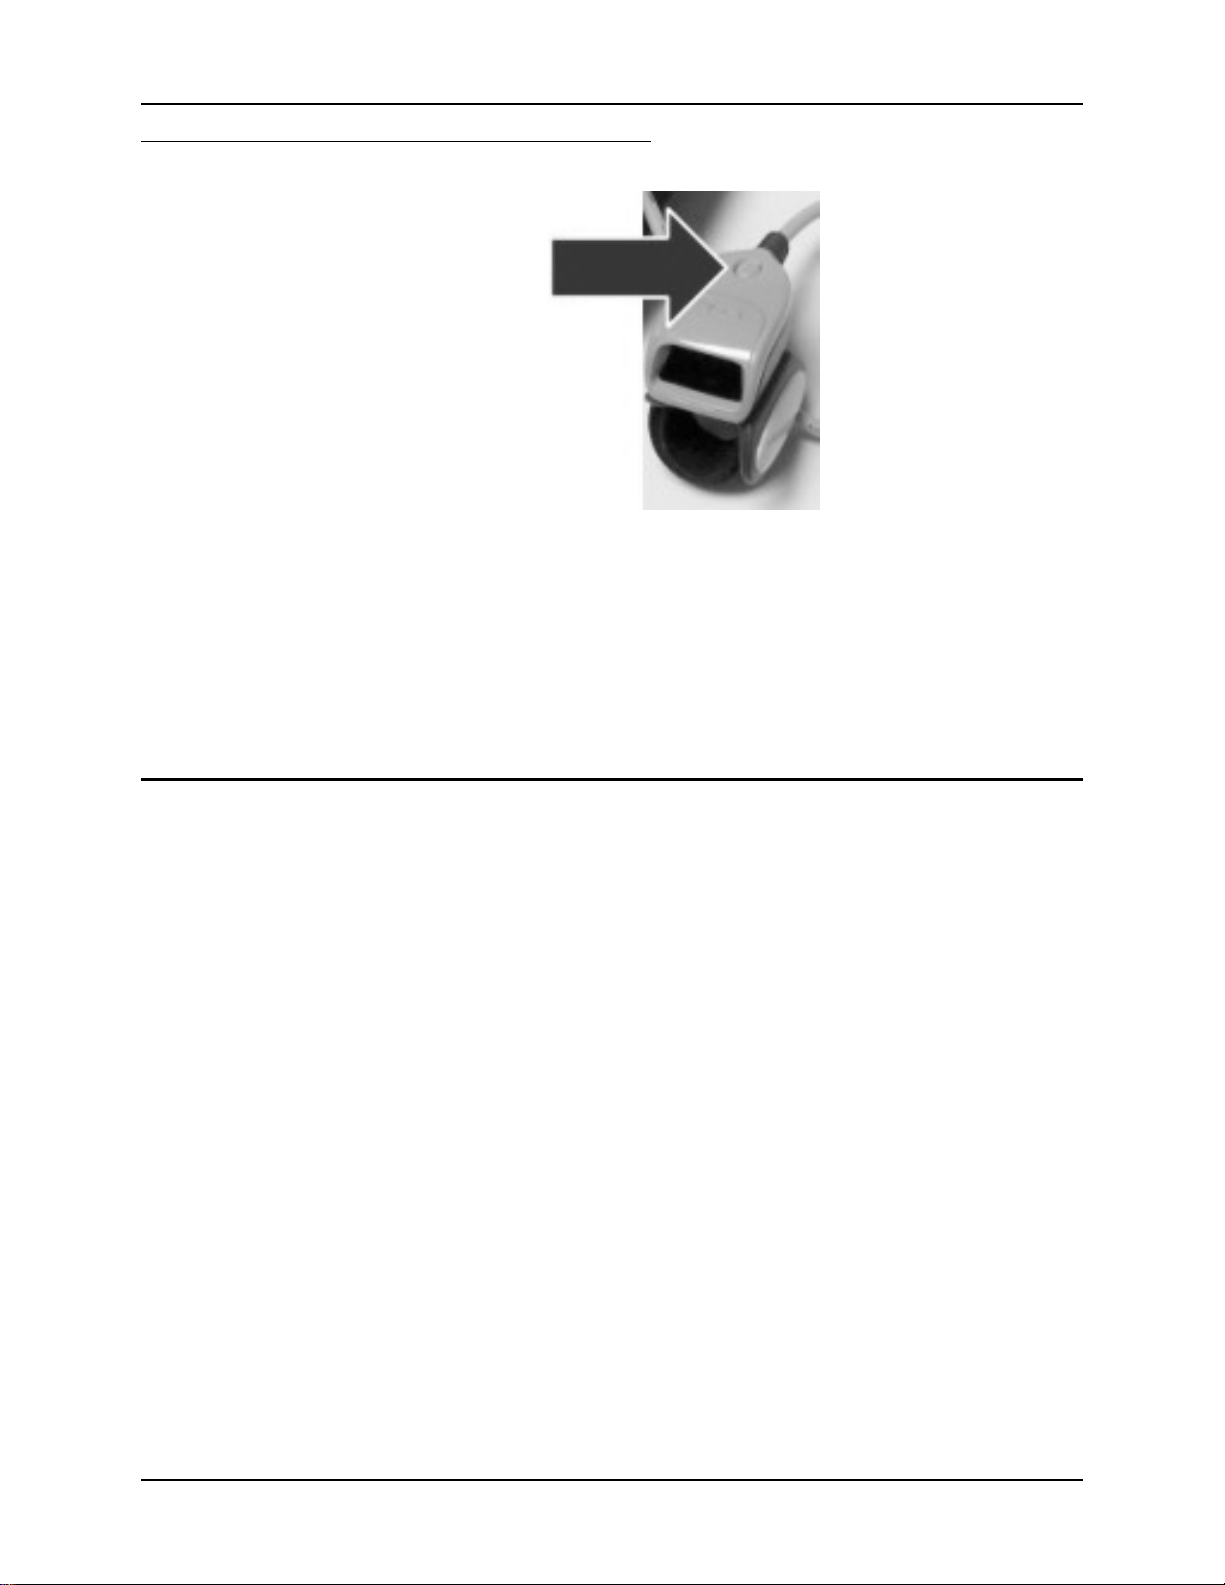
Figure 30 Scan Status LED
The Scan Status LED (oval shaped LED on the top of the ring scanner) turns red when the laser
beam is on. Following a barcode scan and read the Scan Status LED turns green for two seconds
and the HX2 may beep, indicating a successful scan. If the scan was unsuccessful, the Scan Status
LED turns off and a different beep sequence is heard.
Voice Data
The ring scanner engine and Scan Status LED automatically turn off after a successful or
unsuccessful read. The ring scanner is ready to scan again after the Scan button is released, or after
the Scan Status LED turns off following a successful scan.
Data is entered into the HX2 by speaking into the headset’s microphone (or the internal
microphone located below the Up Arrow) when prompted.
Please contact your System Administrator if assistance is needed with the voice software installed
on your HX2.
HX2 User’s Guide E-EQ-HX2OGWW-D
Page 39
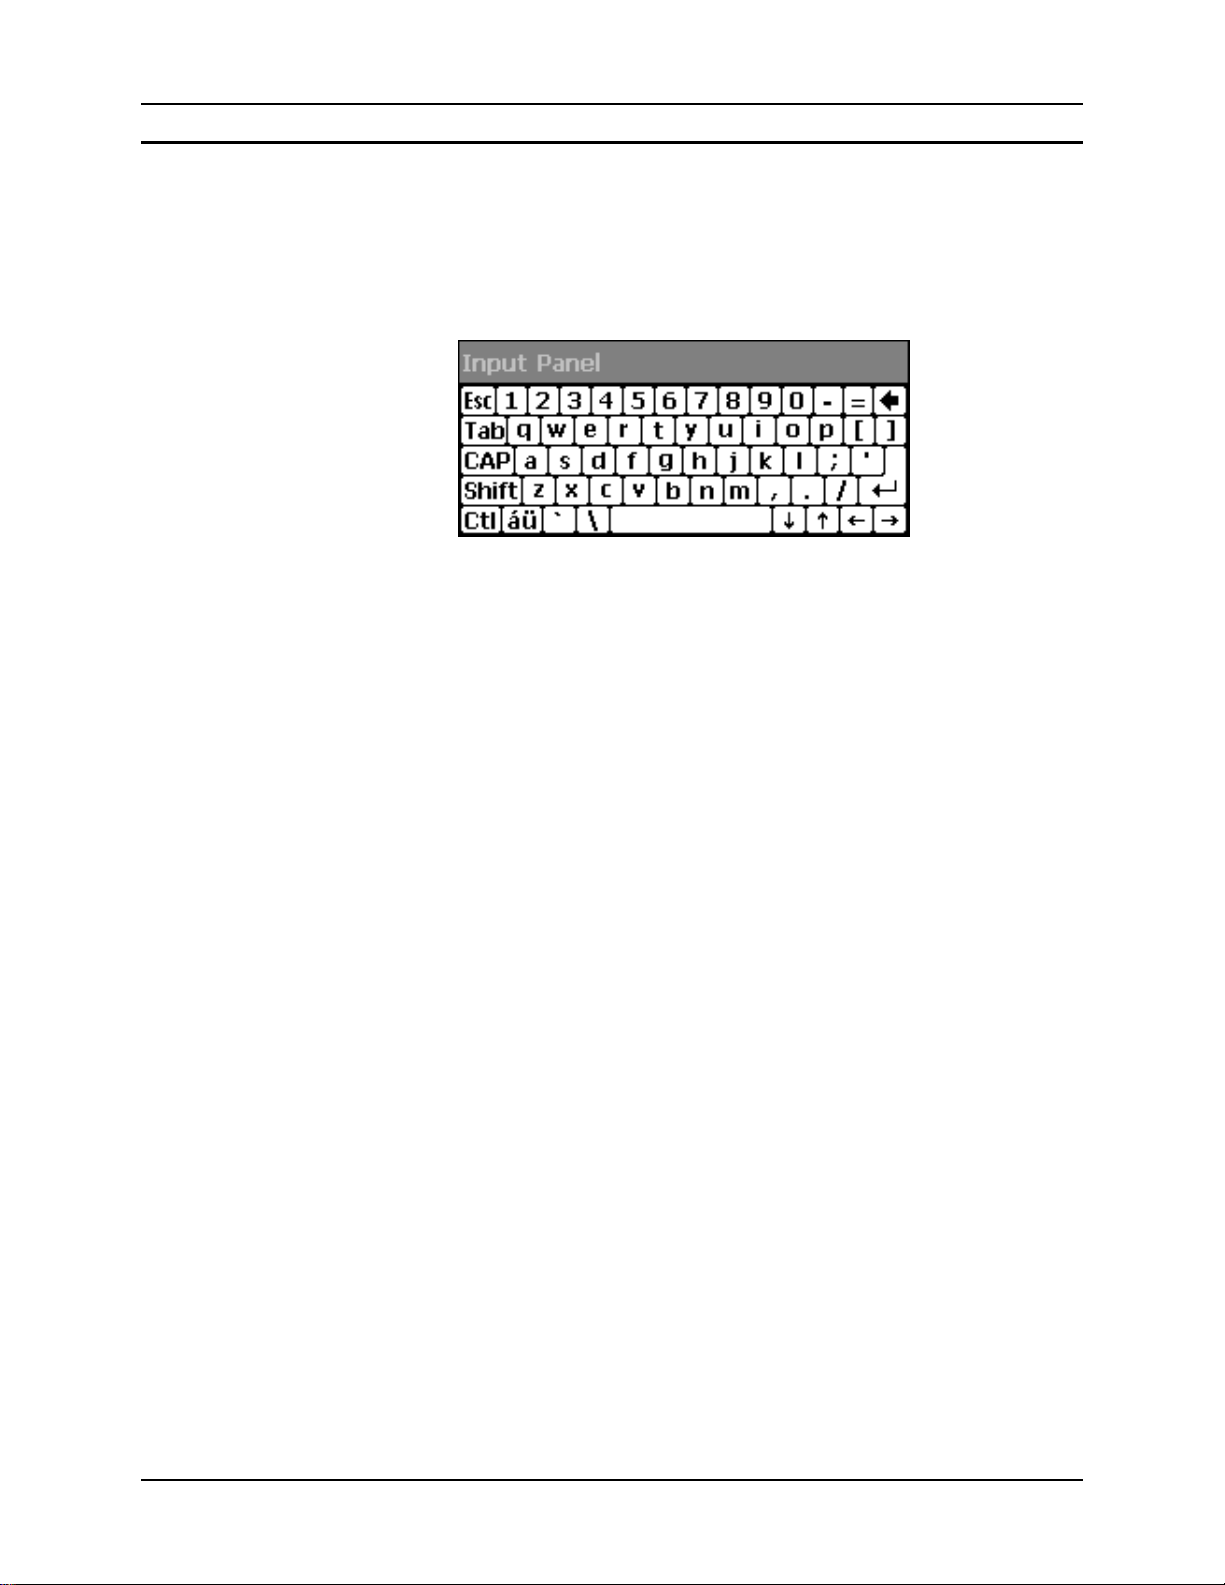
Entering Data 33
Input Panel / Virtual Keyboard
The virtual keyboard or input panel is always available when needed e.g. text field input. Tap the
Keyboard icon in the Taskbar to put the virtual keyboard on the display. Using the stylus:
• Tap the Shift key to type one capital letter.
• Tap the CAPS key to type all capital letters.
• Tap the au key to access symbols.
Figure 31 Input Panel / Virtual Keyboard
Some applications do not automatically display the Input Panel. In this case, do the following to
use the Input Panel:
1. Tap the Input Panel/Virtual Keyboard icon in the taskbar.
2. Select Keyboard from the menu.
3. Tap the data entry area on the display when you want to enter data using the Input Panel.
When finished entering data, tap the Keyboard icon in the Taskbar. Select Hide Input Panel.
E-EQ-HX2OGWW-D HX2 User’s Guide
Page 40
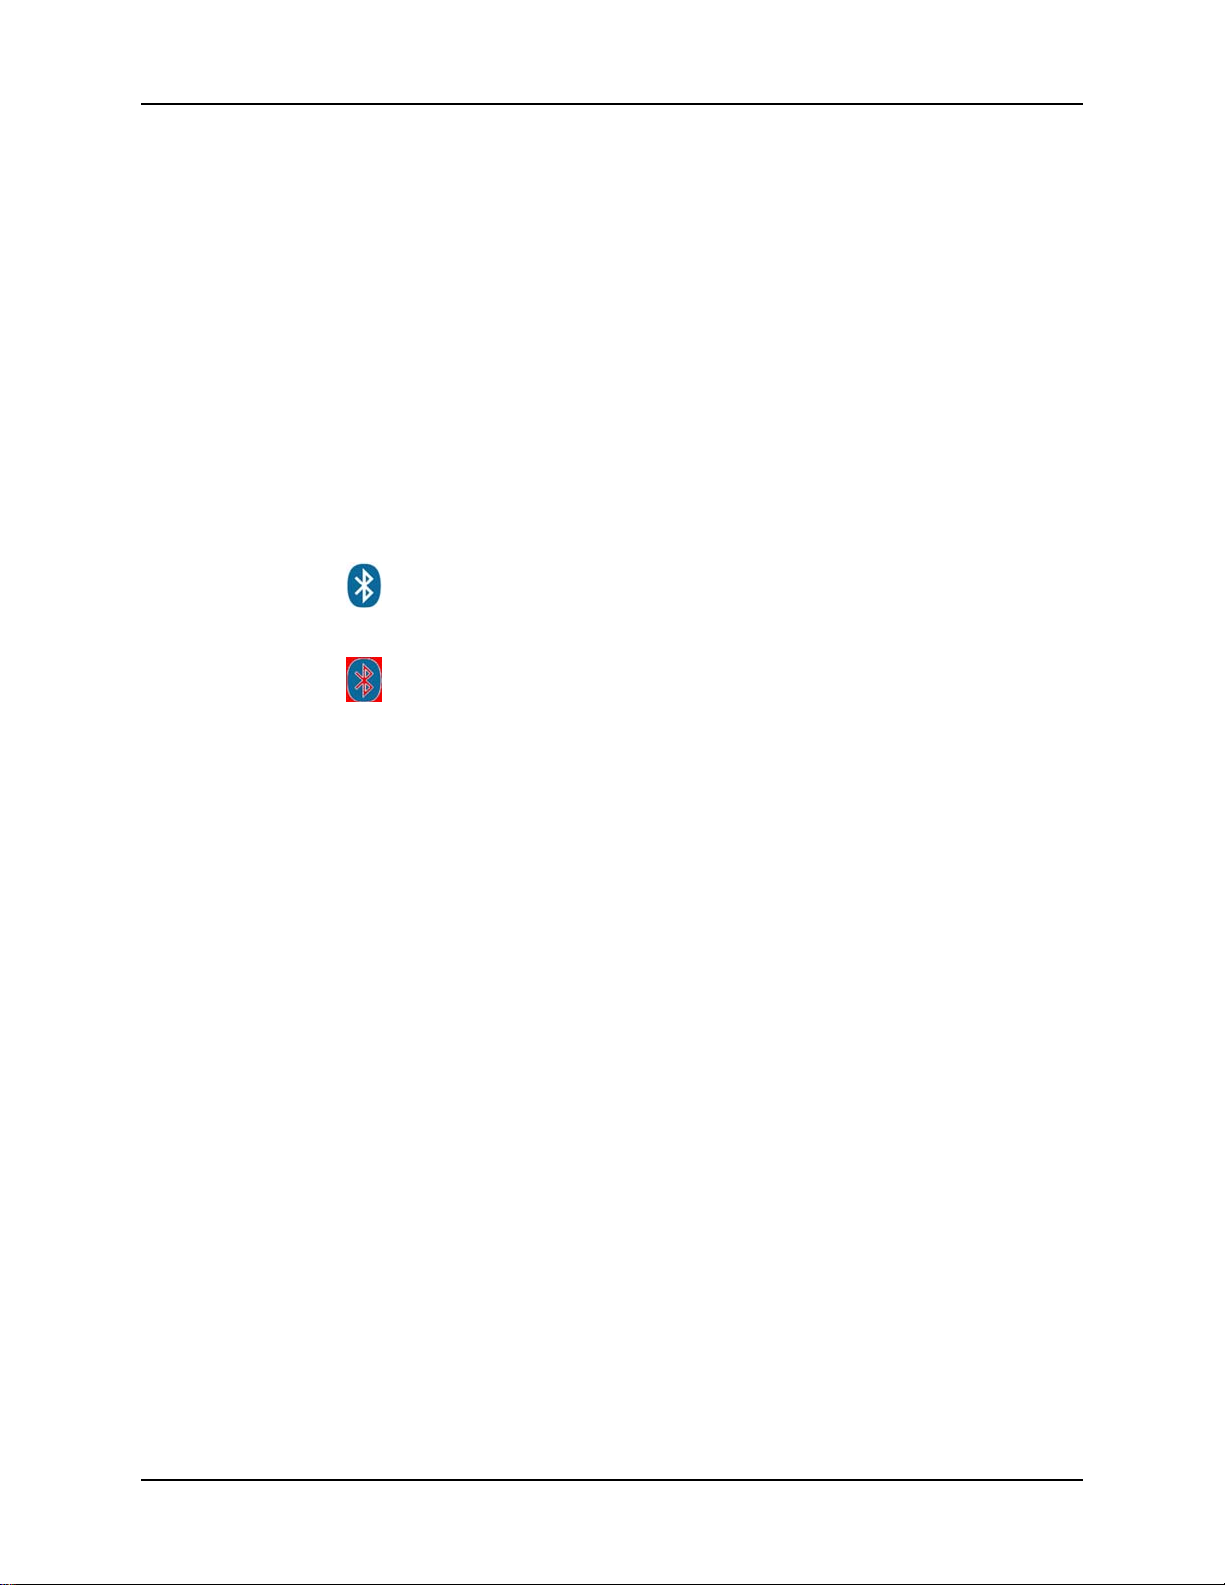
34 Bluetooth Devices
Bluetooth Devices
Assumption: The System Administrator has Discovered and Paired targeted Bluetooth devices
for each HX2. The System Administrator has also enabled / disabled Bluetooth
settings and assigned a Computer Friendly Name for each HX2. See the HX2
Reference Guide for information and instruction on the HX2, Bluetooth control
panel applet and supported Bluetooth printers and scanners.
The Bluetooth taskbar Icon state and Bluetooth LED states change as Bluetooth devices are
discovered, pair, connect, and disconnect. The Bluetooth LED is located next to the Right Arrow
key on the keypad.
The Bluetooth LED blinks slowly when it is idle. Blinks quickly when the HX2 is discovering
other Bluetooth devices. And blinks normally when it is connected. There may be audible or
visual signals from paired devices as they re-connect with the HX2. Only LXE printers or scanners
are recognized and displayed on the Bluetooth panel. All other Bluetooth devices are ignored (see
HX2 Reference Guide for details).
Taskbar Icon Legend
®
Bluetooth
Bluetooth
LED
Bluetooth device(s).
HX2 is not connected to any Bluetooth device.
HX2 is ready to connect with any Bluetooth device.
HX2 is out of range of all paired Bluetooth device(s). Connection is
inactive.
Blue – Blinking Slowly Bluetooth is paired but not connected to a device.
Blue – Blinking Medium Bluetooth is paired and connected to a device.
module is connected to one or more of the targeted
Blue – Blinking Fast Bluetooth is discovering other Bluetooth devices.
Off Bluetooth hardware has been turned off or it does
Note: When an active paired device, not the HX2, enters Suspend Mode, is turned Off or leaves
the HX2 Bluetooth range, the Bluetooth connection between the linked device and the
HX2 is lost. There may be audible or visual signals as paired devices disconnect from the
HX2. The Bluetooth remote device should be as close as possible, in direct line of sight,
with the HX2 during the pairing process.
See Accessories for supported Bluetooth printers and scanners.
AppLock, if installed, does not stop the end-user from using the Bluetooth application, nor does it
stop authorized Bluetooth-enabled devices from pairing with the HX2 while AppLock is in
control. See HX2 Reference Guide for more Bluetooth information.
Mobile Bluetooth Accessories
Using the Bluetooth Barcode reader, scan the (Lnk) pairing barcode located on the HX2 to pair the
mobile barcode reader with the HX2. See Bluetooth Devices in the Quick Start section for details.
Refer to the HX2 Reference Guide, Chapter 1 – Introduction, Bluetooth section for instruction
when Discovering nearby Bluetooth scanners and printers.
not exist in the HX2.
HX2 User’s Guide E-EQ-HX2OGWW-D
Page 41
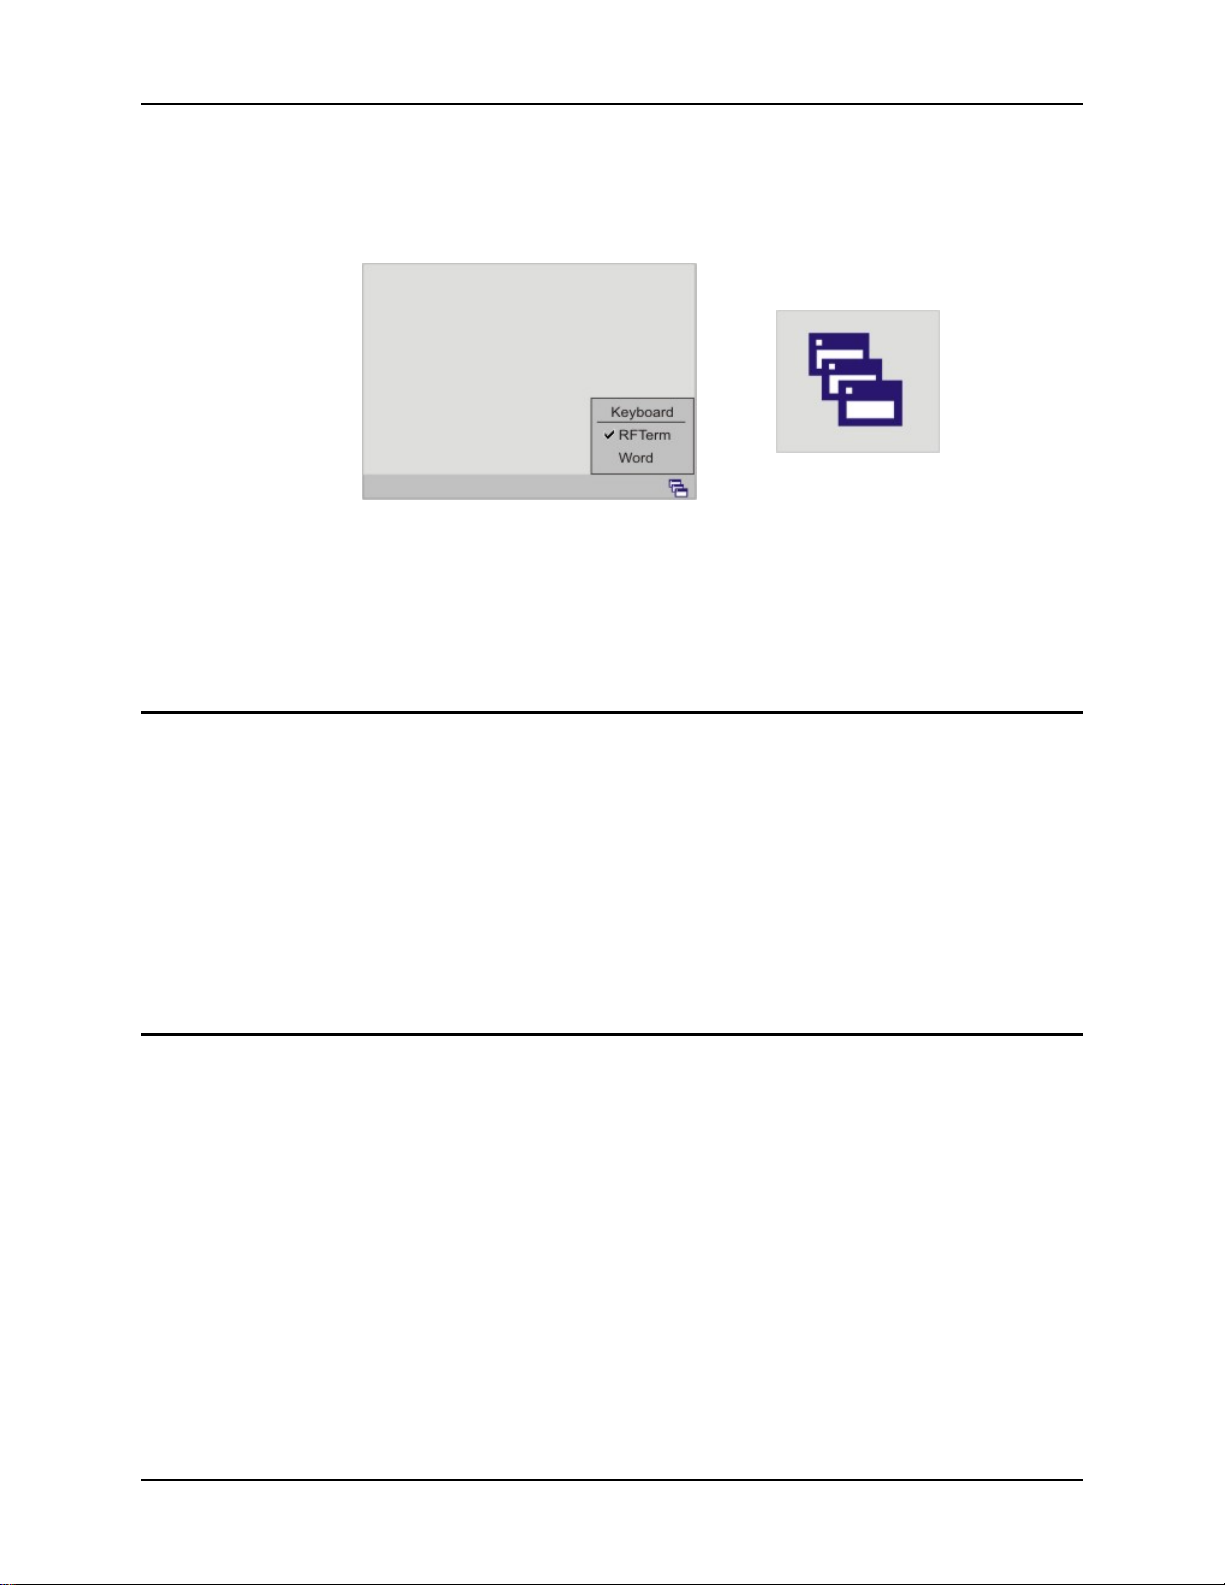
Entering the AppLock Activation Key 35
Entering the AppLock Activation Key
Note: The touch screen must be enabled.
Switchpad Menu Switchpad Icon in Taskbar
Figure 32 Switchpad Menu
A checkmark indicates applications currently active or available for Launching by the user. When
Keyboard is selected, the HX2 default input method (Input Panel, Transcriber, or custom input
method) is activated.
Using a Stylus Tap
When the mobile device enters end-user mode, a Switchpad icon (it looks like three tiny windows
one above the other) is displayed in the taskbar. The taskbar is always visible on top of the
application in focus.
When the user taps the Switchpad icon, a menu is displayed showing the applications available to
the user. The user can tap an application name in the popup menu and the selected application is
brought to the foreground. The previous applicatio n continues to run in the background. Stylus
taps affect the application in focus only. When the user needs to use the Input Panel, they tap the
Keyboard option. Input Panel taps affect the application in focus only.
The figure shown above is an example and is shown only to aid in describ ing how the user can
switch between applications using a stylus.
Using the Keypad
One switch key sequence (or hotkey) is defined by the administrator for the end-user to use when
switching between locked applications. This is known as the Activation key. When the switch key
sequence is pressed on the keypad, the next application in the AppLock configuration is moved to
the foreground and the previous application moves to the background. The previous application
continues to run in the background. End-user key presses affect the application in focus only.
See the HX2 Reference Guide, Chapter 6 AppLock for AppLock setup instruction.
E-EQ-HX2OGWW-D HX2 User’s Guide
Page 42
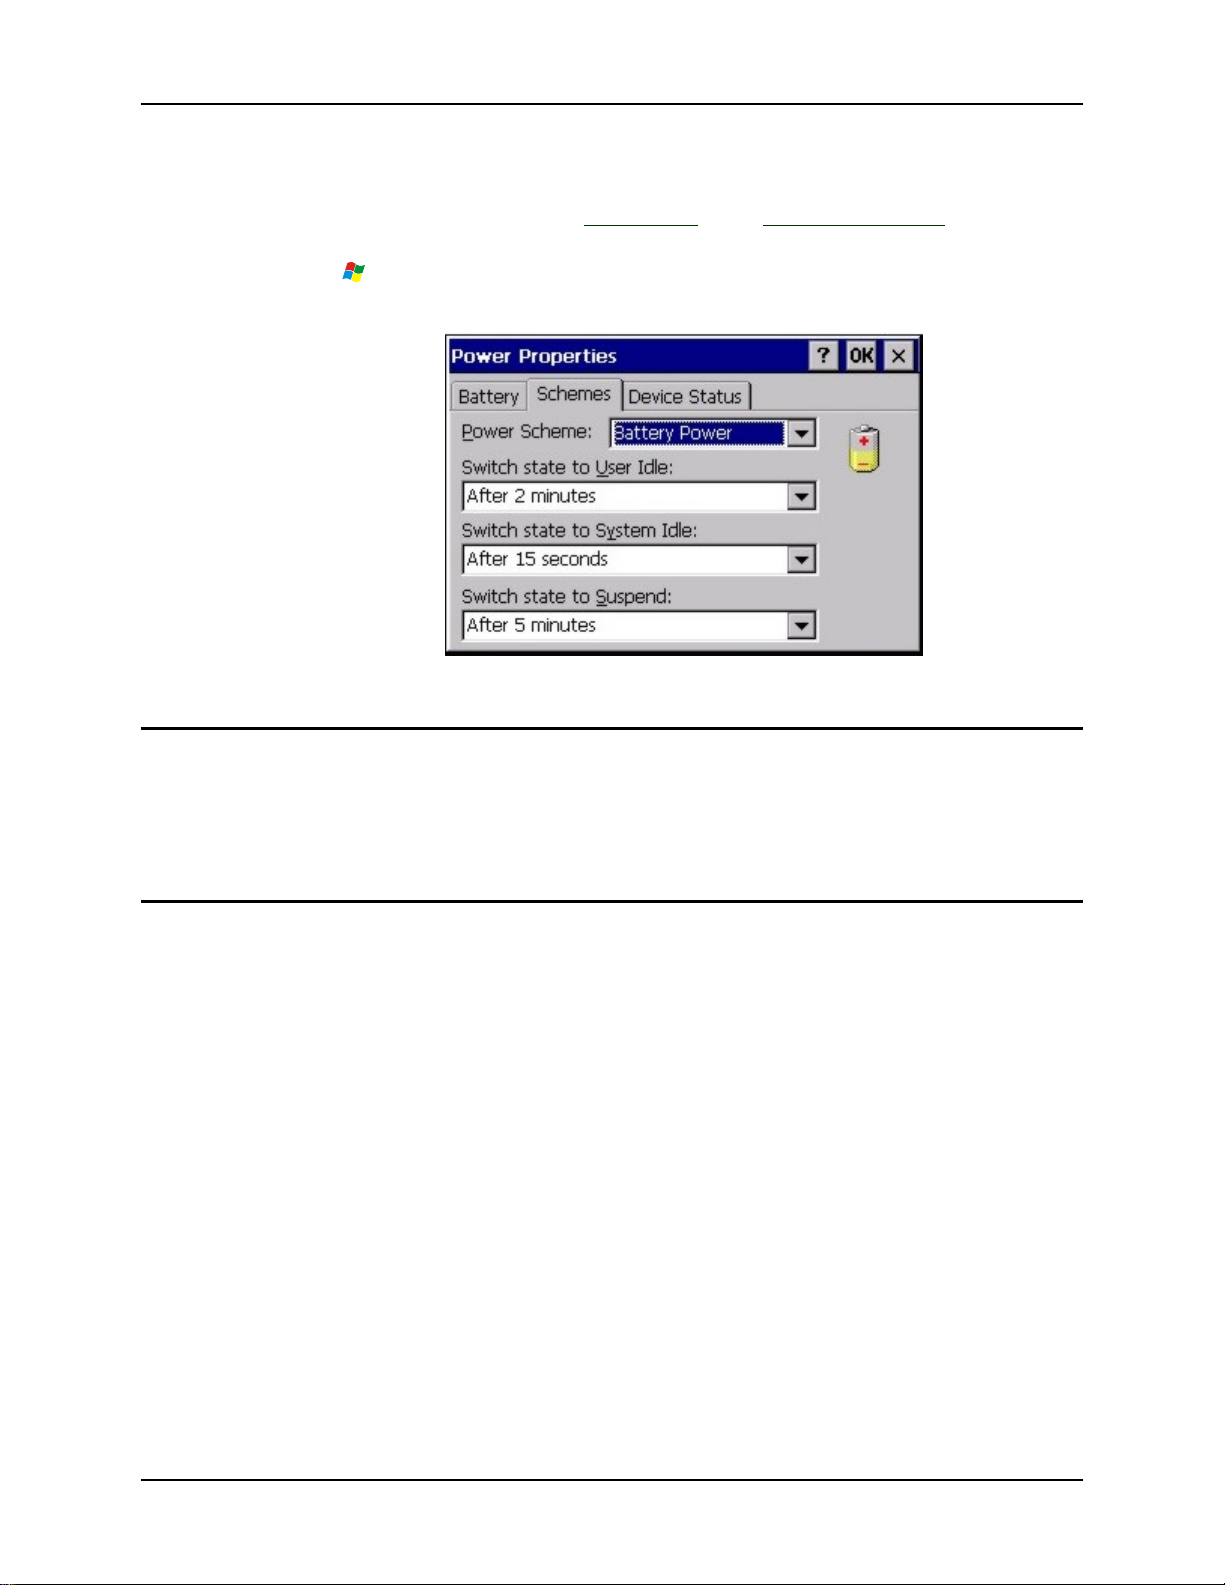
36 Setting the Power Schemes Timers
Setting the Power Schemes Timers
Note: Refer to the section titled Power Modes in the HX2 Reference Guide for information
relating to the power states of the mobile device.
Select
OK to save the changes.
| Settings | Control Panel | Power | Schemes tab. Change the parameter values and tap
Battery Power Scheme
Use this option when the mobile device will be running on battery power only.
Switch state to User Idle: Default is After 3 seconds
Switch state to System Idle: Default is After 15 seconds
Switch state to Suspend: Default is After 5 minutes
Figure 33 Power Properties – Schemes Tab
AC Power Scheme
Use this option when the mobile device will be running on external power (e.g. docked in a
powered cradle).
Switch state to User Idle: Default is After 2 minute
Switch state to System Idle: Default is After 2 minutes
Switch state to Suspend: Default is After 5 minutes
The mode timers are cumulative. The System Idle timer begins the countdown after the User Idle
timer has expired and the Suspend timer begins the countdown after the System Idle timer has
expired. When the User Idle timer is set to “Never”, the power scheme timers never place the
device in User Idle, System Idle or Suspend modes (even when the device is idle).
Because of the cumulative effect, and using the Battery Power Scheme Defaults listed above:
• The backlight turns off after 3 seconds of no activity,
• The display turns off after 18 seconds of no activity (15sec on ds + 3seco n ds) ,
• And the device enters Suspend after 5 minutes and 18 seconds of no activity.
HX2 User’s Guide E-EQ-HX2OGWW-D
Page 43
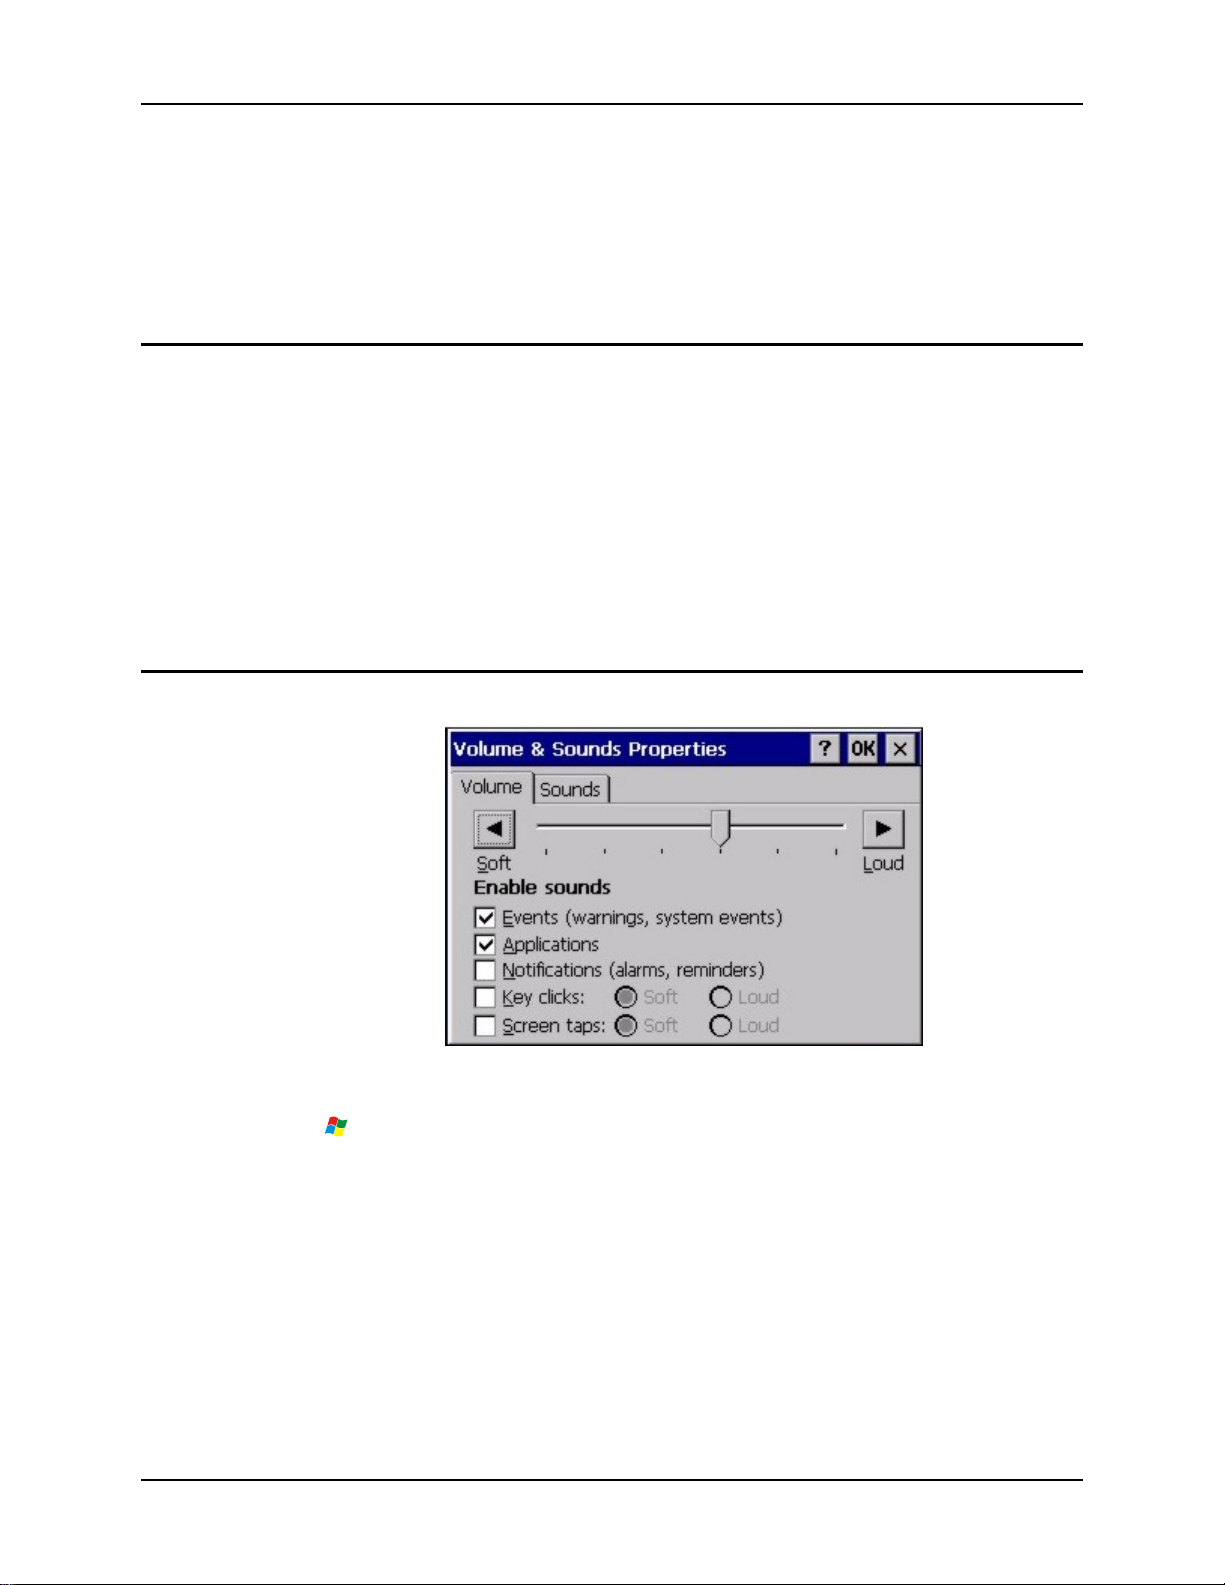
Setting The Audio Speaker Volume 37
Setting The Audio Speaker Volume
Note: An application may override the control of the speaker vo lume. Turning off sounds sa ves
power and prolongs battery life.
The internal speaker is located on the front of the device above the “2” key. The audio volume can
be adjusted to a comfortable level for the listener. Operational “beeps” are emitted from the
speaker. A Battery/Audio cable is available for headsets, see Accessories and Cables.
Using the Keypad
Note: Volume & Sounds (in Settings | Control Panel) must be enabled before the following
default key sequences will adjust the volume.
The volume is increased or decreased one step each time the adjust volume key sequence is
pressed.
To adjust speaker volume use the:
• Blue+Up Arrow and Blue+Down Arrow keys on the Alpha Mode 3 Tap keypad
• Orange+Diamond 1+Up Arrow and Orange+Diamond 1+Down Arrow keys on the
Dual Alpha and Triple Tap keypads
Until the speaker volume is satisfactory.
Using the Touchscreen
| Settings | Control Panel | Volume & Sounds | Volume tab. Change the volume setting
Tap
and tap OK to save the change. You can also select / deselect sounds for key clicks and screen taps
and whether each is loud or soft.
As the volume scrollbar is moved between Loud and Soft, the computer will emit a tone each time
the volume increases or decreases in decibel range.
Figure 34 Volume & Sounds Properties
E-EQ-HX2OGWW-D HX2 User’s Guide
Page 44
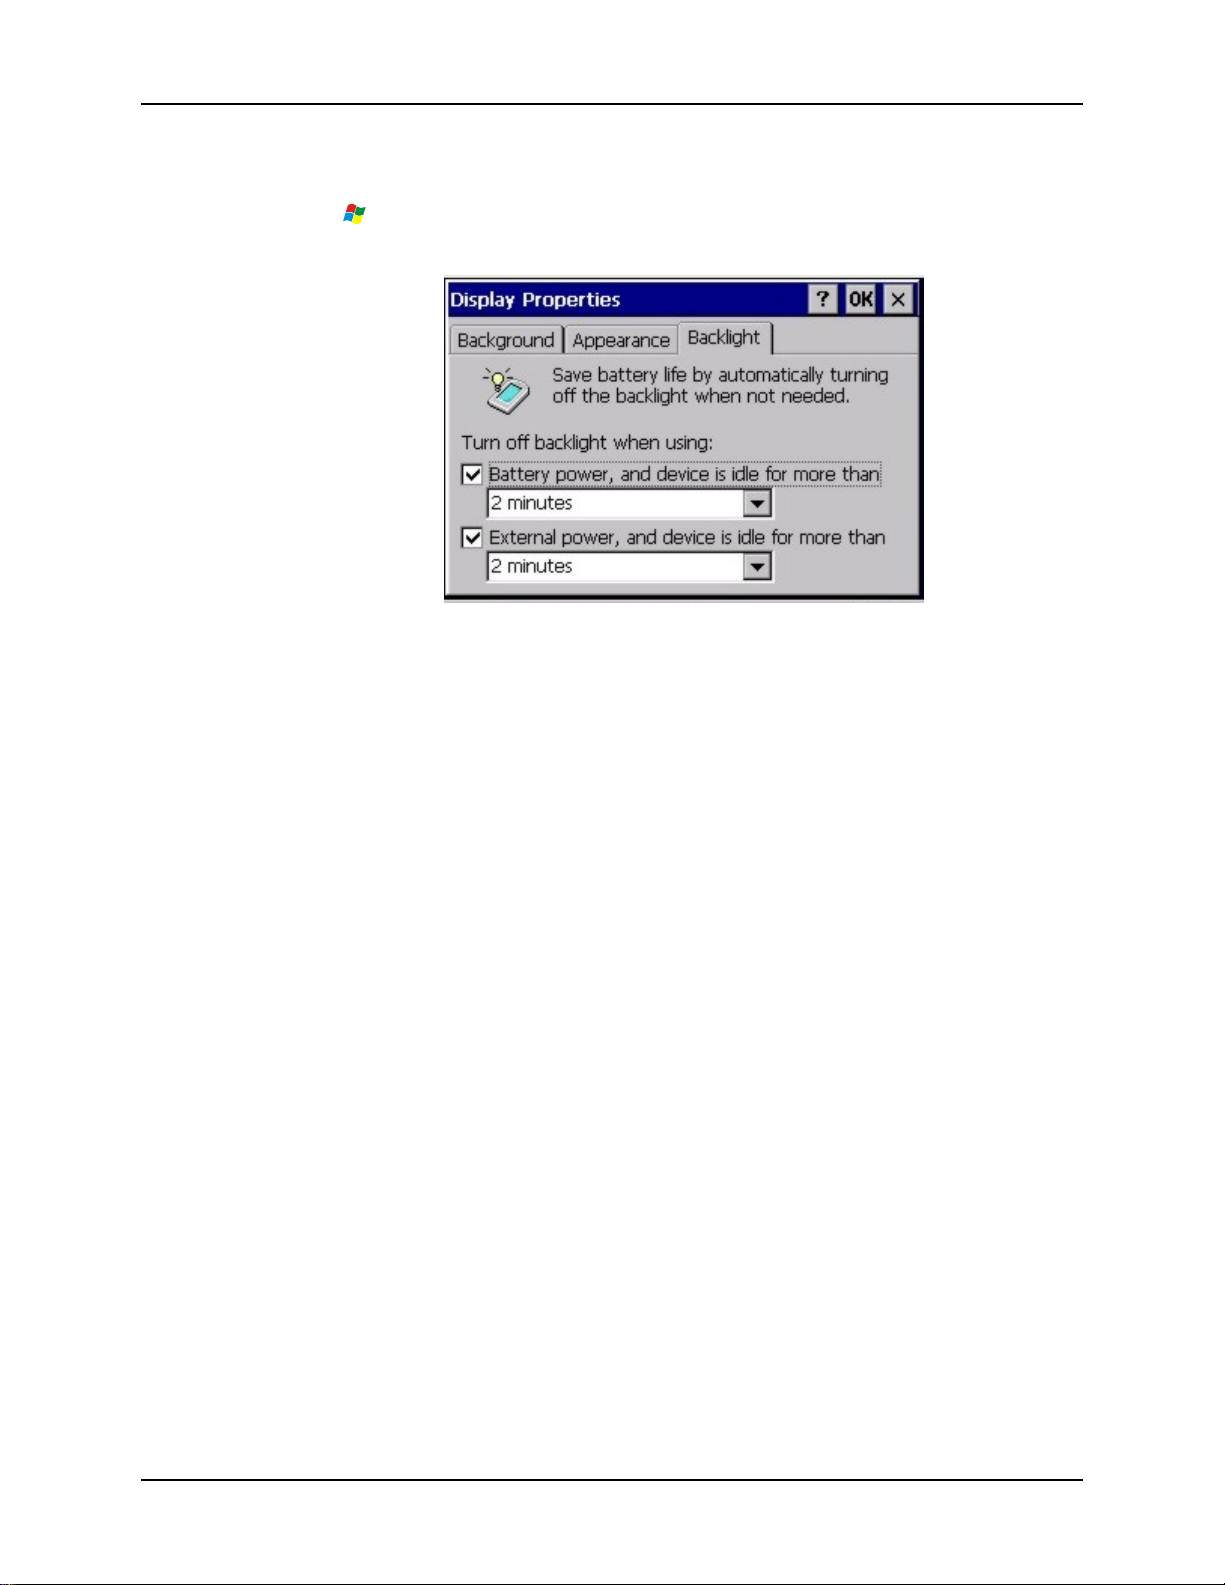
38 Adjusting the Display Backlight Timer
Adjusting the Display Backlight Timer
Select | Settings | Cont rol Panel | D isplay | Ba ckligh t tab. Change the parameter values and
tap OK to save the changes.
Figure 35 Setting the Display Backlight Timer
The first option affects the display when the HX2 is running on battery power only. The second
option affects the display when the HX2 is running on external power (e.g. docked in a powered
cradle).
The default value for the battery power timer is 3 seconds.
The default value for the external power timer is 2 minutes. The display backlight will remain
on all the time when both checkboxes are blank.
The display backlight timer dims the backlight at the end of the specified time.
When the Keypad Backlight is On, it responds to the settings of the Display Backlight Timer. See
next segment titled Turning the Keypad Backlight On or Off.
Adjusting the Display Brightness
The display brightness is increased or decreased one step each time the adjust brightness key
sequence is pressed.
To adjust display brightness:
• Alpha Mode 3 Tap keypad – Open the Keypad Control Panel | Keymap tab and map a key
to Brightness Up and Brightness Down. Tap OK. Tap the mapped keys to increase or
decrease display brightness. Please contact your System Administrator for assistance with
User Configured (Mapped) Keys.
• Dual Alpha Keypad and the Triple Tap Keypad -- Light Blue+Diamond 1+Up Arrow
and Light Blue+Diamond 1+Down Arrow keys.
Until the display brightness is satisfactory.
HX2 User’s Guide E-EQ-HX2OGWW-D
Page 45
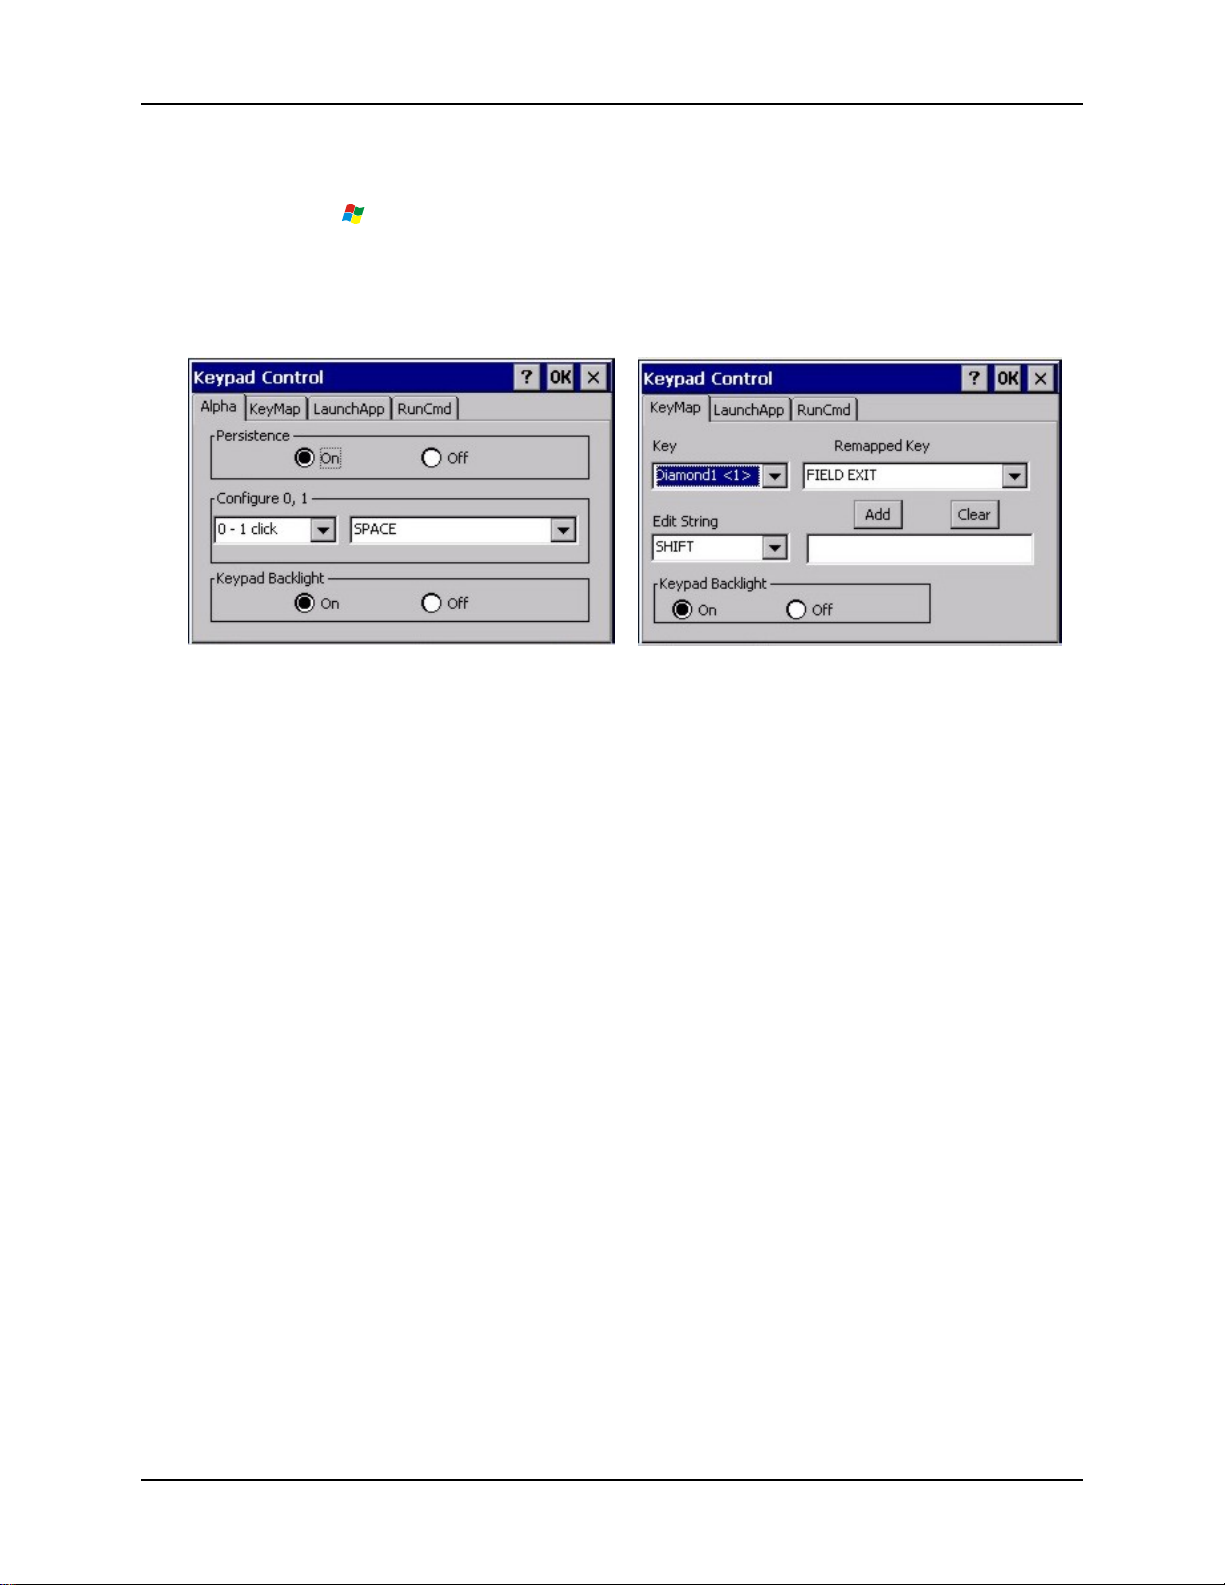
Turning the Keypad Backlight On or Off 39
Turning the Keypad Backlight On or Off
Select | Setti ngs | Control Panel | Display | K eypad
Note: Alpha tab in the Keypad control panel is not available when the HX2 has a Dual Alpha
or Triple Tap keypad.
Alpha Mode 3 Tap Keypad Dual Alpha Keypad or Triple Tap Keypad
Figure 36 Turning the Keypad Backlight On or Off
Tap the Off radio button when the keypad backlight is to remain Off regardless of the OS event in
process. The default is On. When On the keypad backlight responds to OS events as designed.
When On, the keypad backlight responds to the settings of the Display Backlight Timer. See
previous segment titled Adjusting the Display Backlight Timer.
Cleaning the Glass Display/Ring Scanner Aperture
Note: These instructions are for components made of glass. If there is a removable protective
film sheet on the display screen, remove the film sheet before cleaning the screen.
Keep fingers and rough or sharp objects away from the ring scanner aperture and the mobile
device display. If the glass becomes soiled or smudged, clean only with a standard household
cleaner such as Windex® without vinegar or u se Isopropyl Alcohol. Do not use paper towels or
harsh-chemical-based cleaning fluids since they may result in damage to the glass surface. Use a
clean, damp, lint-free cloth. Do not scrub optical surfaces. If possible, clean only those areas
which are soiled. Lint/particulates can be removed with clean, filtered canned air.
E-EQ-HX2OGWW-D HX2 User’s Guide
Page 46

40 Cleaning the Glass Display/Ring Scanner Aperture
HX2 User’s Guide E-EQ-HX2OGWW-D
Page 47
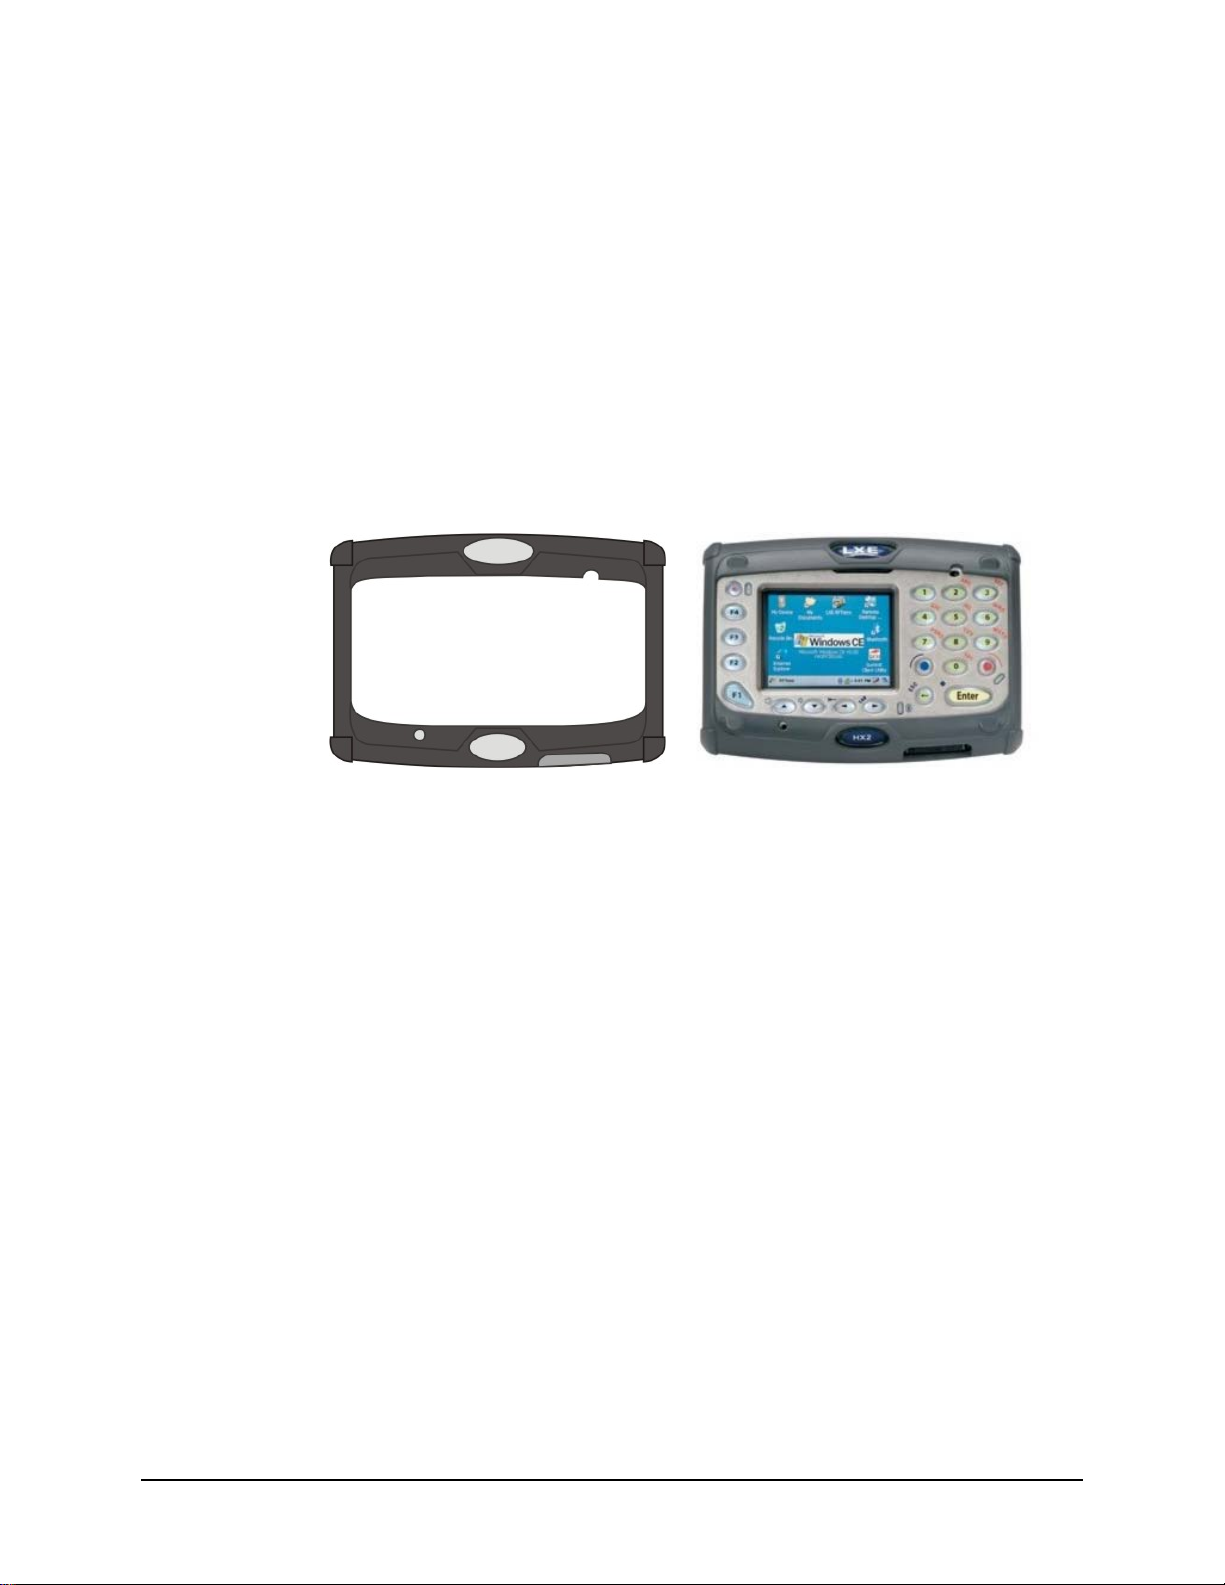
HX2 Rubber Boot Assembly
The rubber boot is a lightweight, flexible cov ering for the HX2 housing. The rubber boot cannot
protect the HX2 from destructive, excessive force. It is designed to protect the HX2 housing from
minor, trivial bumps or jostling. The rubber boot does not inhibit tethered devices, cradle docking,
Hip Flip assembly or Armband assembly.
Note: Remove the rubber boot when placing the HX2 in a voice case.
The rubber boot slips over the front edges and halfway down the sides of the HX2, leaving the
touch screen, keypad, LXE logo and the HX2 logo visible.
Optional Equipment
Figure 37 HX2 Rubber Boot
Gently stretch the rubber boot over each corner of the front housing until the rubber boot fits
snugly. It can be removed for cleaning, if necessary.
Smaller openings are available in the rubber boot to
• allow access to the cradle connector on the bottom of the HX2
• allow audible signals from the internal speaker to be heard
• and allow audible signals to be sent through the internal microphone.
Protective Film for the Screen Display
First, clean the display of fingerprints, lint particles, dust and smudges.
Remove the protective film from its container. Remove any protective backing from the film sheet
by lifting the backing from a corner of the film. Discard the backing.
Apply the film to the screen starting at one side and smoothing it across the display. If air bubbles
appear, raise the film slightly and continue smoothing the film across the display until it covers the
glass surface of the display.
If dust, lint or smudges are trapped between the protective film and the glass display, remove the
protective film, clean the display and apply the protective film again.
E-EQ-HX2OGWW-D HX2 User’s Guide
Page 48
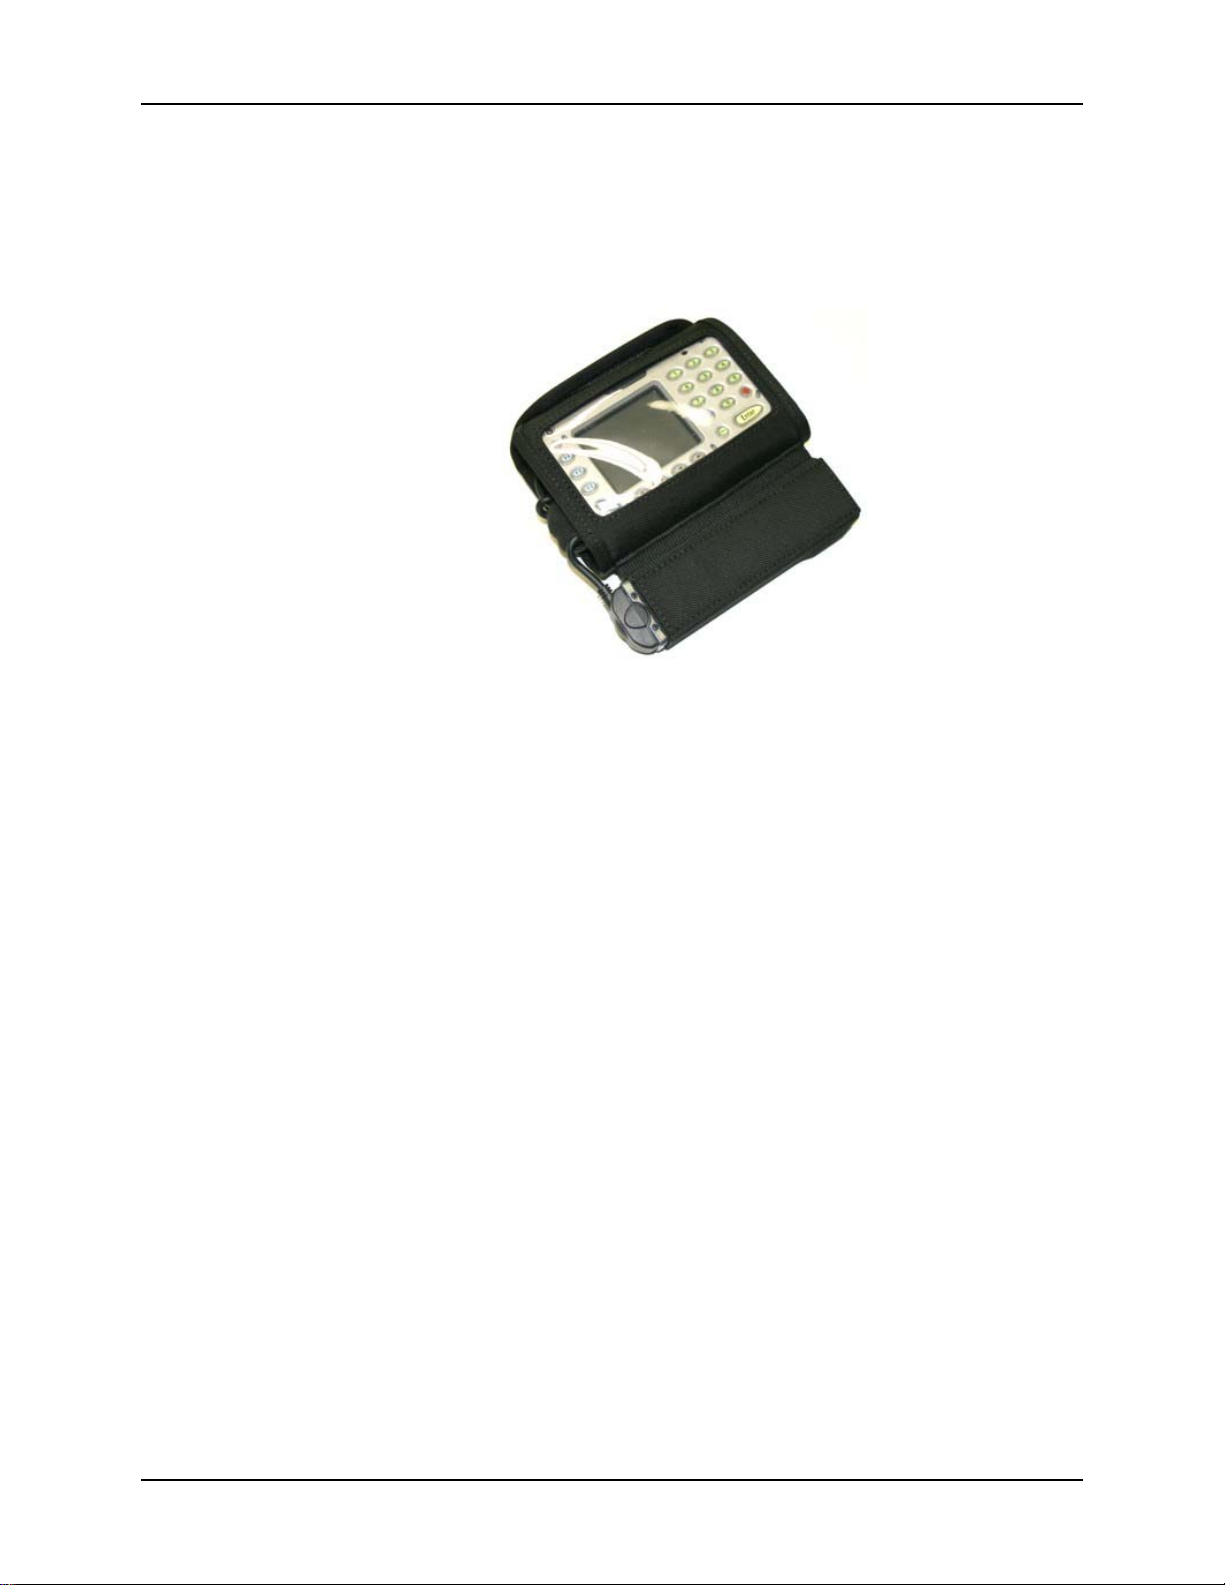
42 HX2 Voice Case Assembly
HX2 Voice Case Assembly
The voice case is a sturdy, lightweight covering for the HX2, tethered battery, and voice
accessories. The voice case cannot protect the HX2 from destructive, excessive force or a harsh or
wet environment. It is designed to protect the HX2 from dirt, dampness, and minor, trivial bumps
or jostling.
Figure 38 HX2 Voice Case
1. Slid e the belt through the belt loop on the voice case. Do not put the belt on yet.
2. Attach the battery cable, ring scanner and audio device to the HX2.
3. Slip the HX2 into the voice case. Be sure the screen and keypad are visible through the clear
window of the voice case.
4. Slid e the battery cable through the pro tective loop at the bottom of the voice case. Make su re
the tethered cable for the ring accessory is on the outside of the voice case.
5. Slip the battery in to the battery sleev e and conn ect th e battery to th e battery cab le. The battery
charge terminals (small metallic circles) should always be covered by the sleeve.
6. Press the hook and loop fabric at the top of the device together.
7. The HX2 in the Voice Case is ready for use.
8. Pu t the belt on. Adjust the belt and voice case for comfort.
Examine the tethers and the hook and loop fabric fastening periodically. If any are loose or
unfastened, tighten the tethers and the top fastener before placing the voice case back into service.
If the voice case is damaged, it should be removed from service.
Note: The HX2 with a voice case does not fit in the HX2 cradle. Remove the voice case before
placing the HX2 in a charged cradle.
HX2 User’s Guide E-EQ-HX2OGWW-D
Page 49
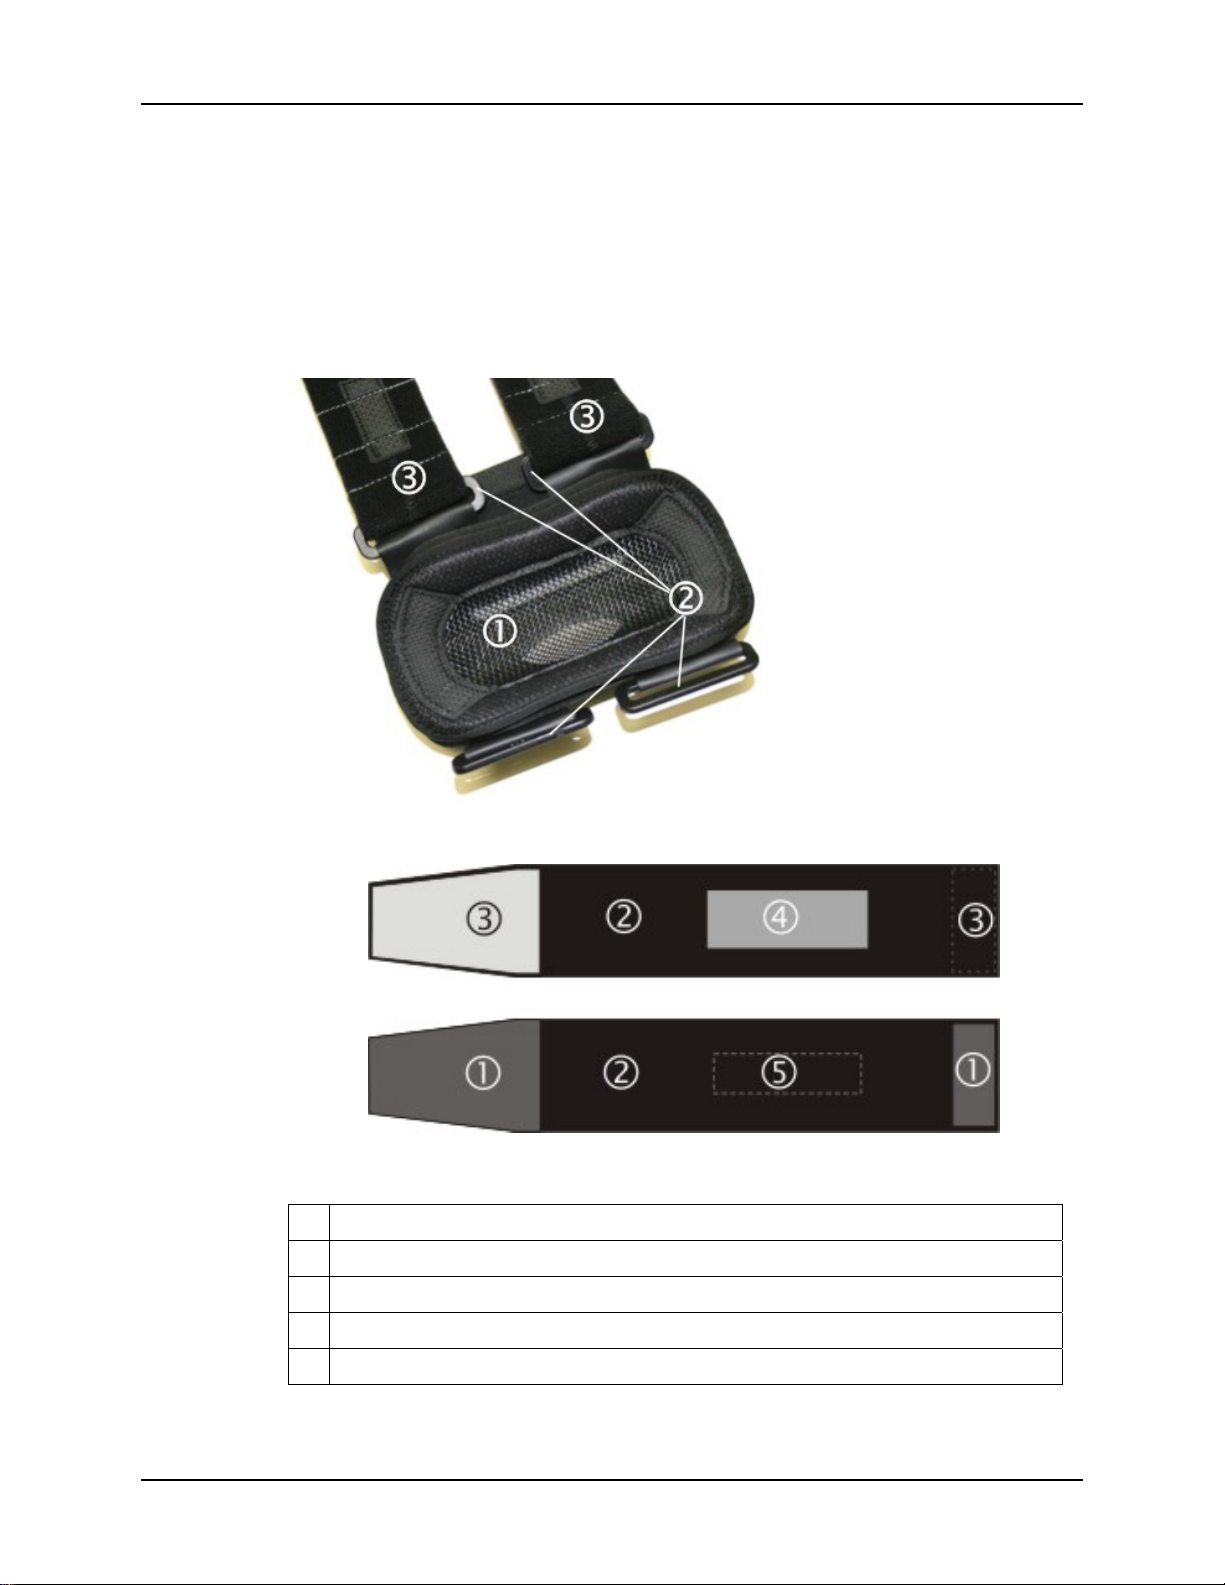
Removing/Replacing the Armband Straps 43
Removing/Replacing the Armband Straps
Note: Remove the HX2 and any of its tethered devices from the Armband before removing and
replacing the armband straps.
The armband is a lightweight, sturdy mounting platform for the HX2. There are two armband
straps. The shorter strap is used at the end-user wrist area and the longer strap is used at the enduser forearm area. See Accessories for replacement or different lengths of LXE HX2 armband
straps.
Armband – Bottom View
1 Removable Mesh Arm Cover
2 Arm Strap Brackets
3 Adjustable Arm Straps
Figure 39 Removing/Replacing the Armband Straps
1 Hook Fabric
2 Loop Fabric
3 Connection tabs.
4 Strap side for inside.
5 Strap side for outside.
Figure 40 Armband Straps
E-EQ-HX2OGWW-D HX2 User’s Guide
Page 50
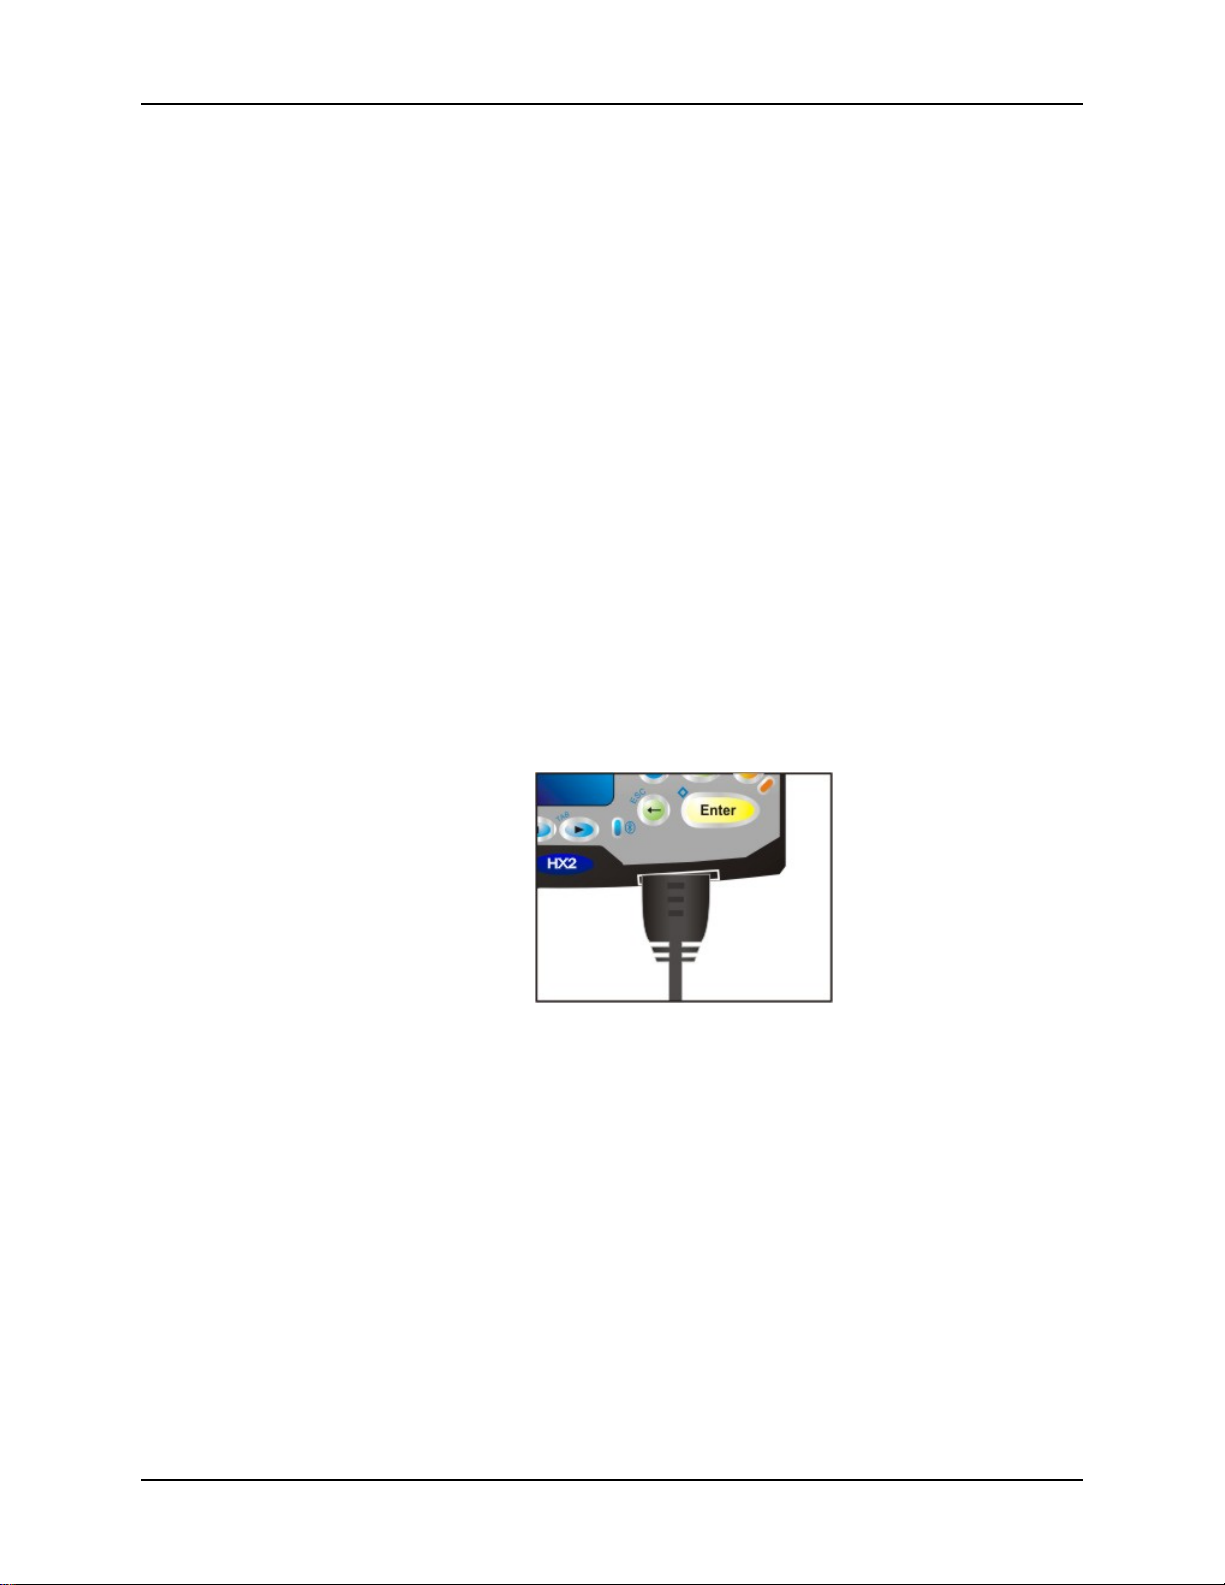
44 Connecting the ActiveSync Cable to the HX2
1. Slip each end of the arm strap through the arm strap brackets ensuring the hook and loop
fastening sections are on the outside of the armband.
2. Th e shorter strap is used for the wrist area and the longer strap is used for the forearm area.
3. Press th e straps hook end ag ainst the strap s loop fastener to secure each end of the strap to the
armband. After both straps are loosely fastened in this manner, snap the HX2 onto the
armband bracket.
4. Slip your hand through the armband straps until th e armband is in the desired location. Grasp
the tab at one end of the strap to loosen and then tighten each strap until the armband is
comfortably snug.
5. En sure the HX2 on the armband is stable and does not slide or slip around your arm.
6. Periodically check the straps, strap brackets and hook and loop fabric areas for damage. The
damaged parts should be replaced before the straps or strap brackets are used on an armband
again.
Note: The armband is washable, but only the mesh arm cover and straps are machine
washable.
Connecting the ActiveSync Cable to the HX2
Because ActiveSync is already installed on your mobile device, the synchronization process
begins automatically when, using the HX2 ActiveSync cable, connect your mobile device to a
laptop/desktop computer. See Accessories for cables.
Figure 41 Connect ActiveSync Cable to HX2 Cradle Connector
Insert the HX2 cable end into the cradle connector on the bottom of the HX2 until a click is heard.
Insert the USB-A end in a USB port on a desktop/laptop computer.
Note: The ActiveSync cable for the HX2 does not appear to fit tightly with the cradle connector
(see Figure). This is normal.
Refer to the HX2 Reference Guide, section titled ActiveSync / Get Connected Process for full
instruction.
HX2 User’s Guide E-EQ-HX2OGWW-D
Page 51
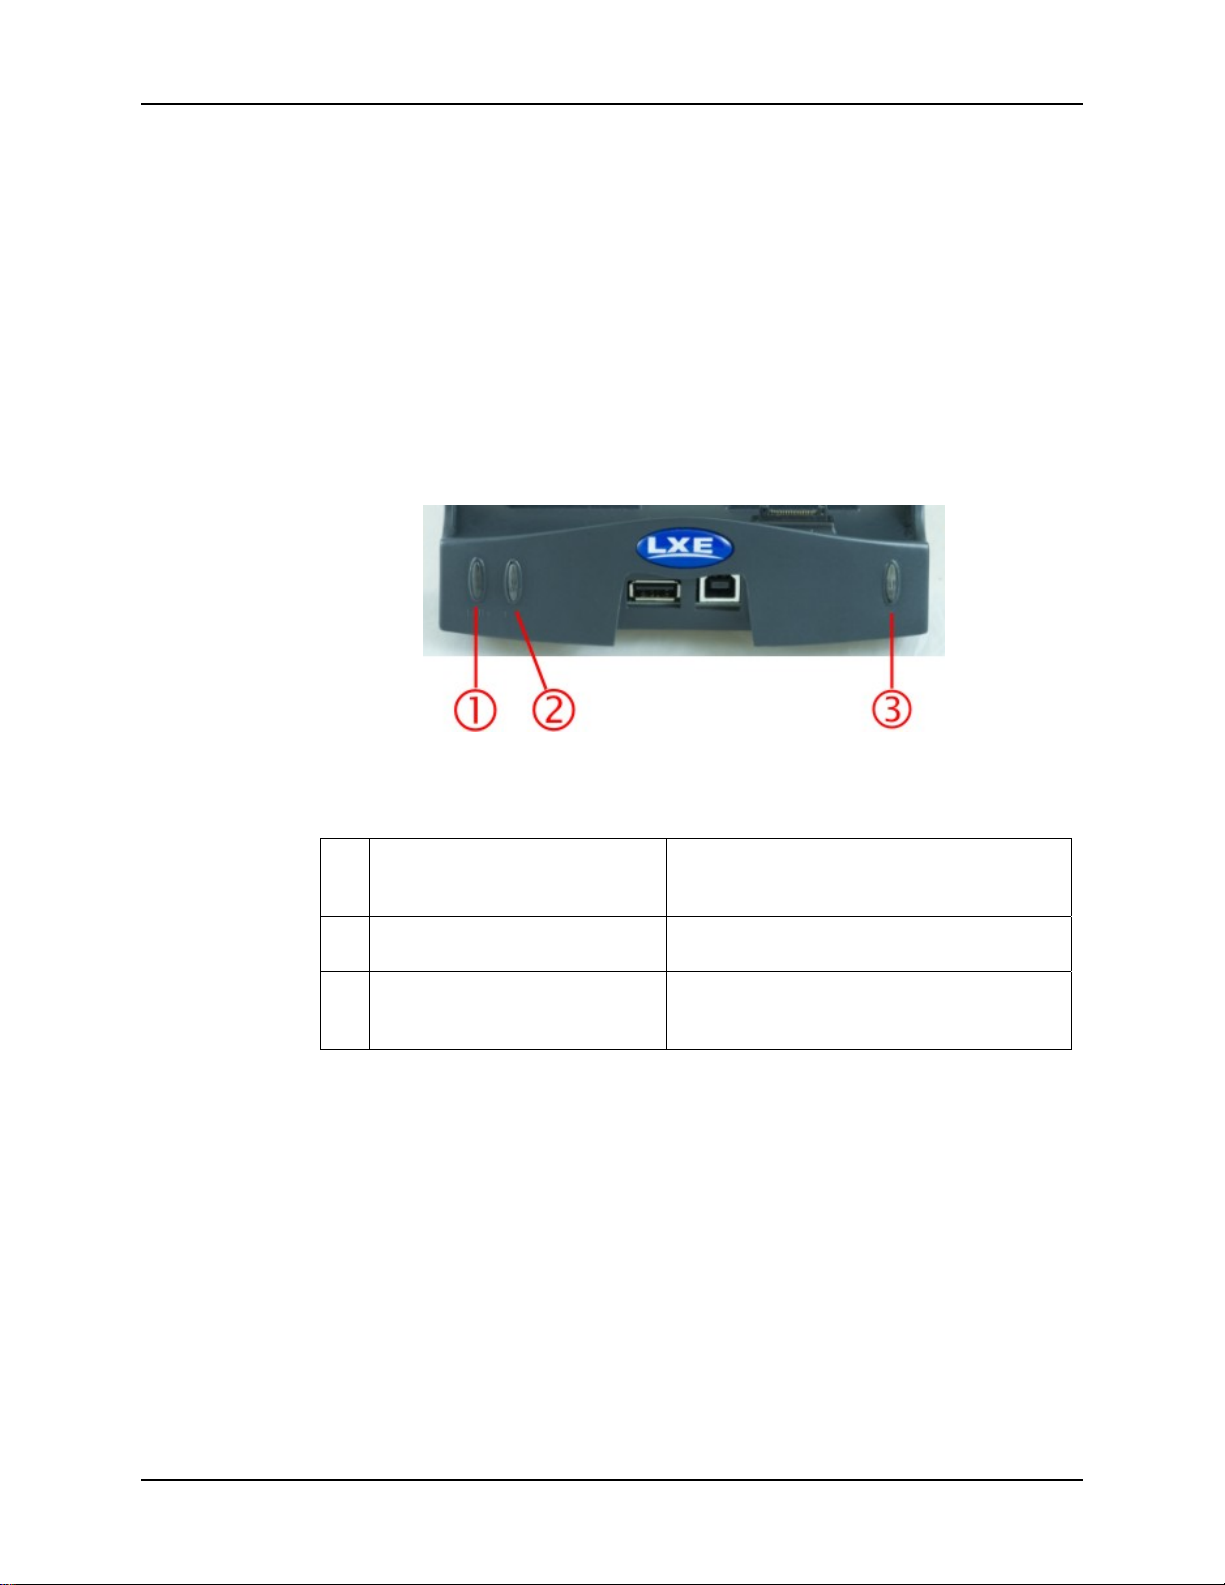
HX2 Docking/Charging Cradle 45
HX2 Docking/Charging Cradle
The HX2 desktop cradle secures the HX2 with or without a protective rubber boot, recharges the
tethered HX2 battery and a spare battery (Standard and Extended), has a protected storage bay for
the tethered Ring Scanner when the HX2 is docked, and enables serial communication with USB
devices (host, client, and other USB cabled devices).
HX2 keypad data entries can be mixed with ring scanner barcode data entries while the HX2 is
docked in a cradle.
Using an external power supply the HX2 cradle recharges Standard batteries in approximately 4
hours (8 hours for the Extended battery). The HX2 does not need to be docked during a spare
battery charging process. See Accessories.
Remove the voice case before placing the HX2 in the cradle. The HX2 cannot be docked in a
cradle while it is mounted in a hip flip or arm band.
Figure 42 Powered Cradle LEDs
The cradle LEDs are on the front of the cradle.
B1 LED – Back left battery
1
charging bay
PWR LED - HX2 docked / on /
2
receiving power bay
B2 LED – Back right battery
3
charging bay
IMPORTANT –
• Do not put the HX2 into Suspend Mode (using Start | Suspend or by tapping the Power
key) while the HX2 is connected to peripheral devices (or ActiveSync) through the
connectors on the cradle. The HX2 is unable to maintain the connection during Suspend
Mode.
• If the USB connections are interrupted due to a Suspend operation – then when the HX2
resumes, disconnect the cables and then reconnect the cables again to initiate USB and/or
ActiveSync connection again.
Normal State – Off. With battery and AC
power, normal state may be any state listed in
Cradle LEDs.
Normal State – Off. With HX2 in, turned On
and AC power, normal state is On.
Normal State – Off. With battery and AC
power, normal state may be any state listed in
Cradle LEDs.
E-EQ-HX2OGWW-D HX2 User’s Guide
Page 52
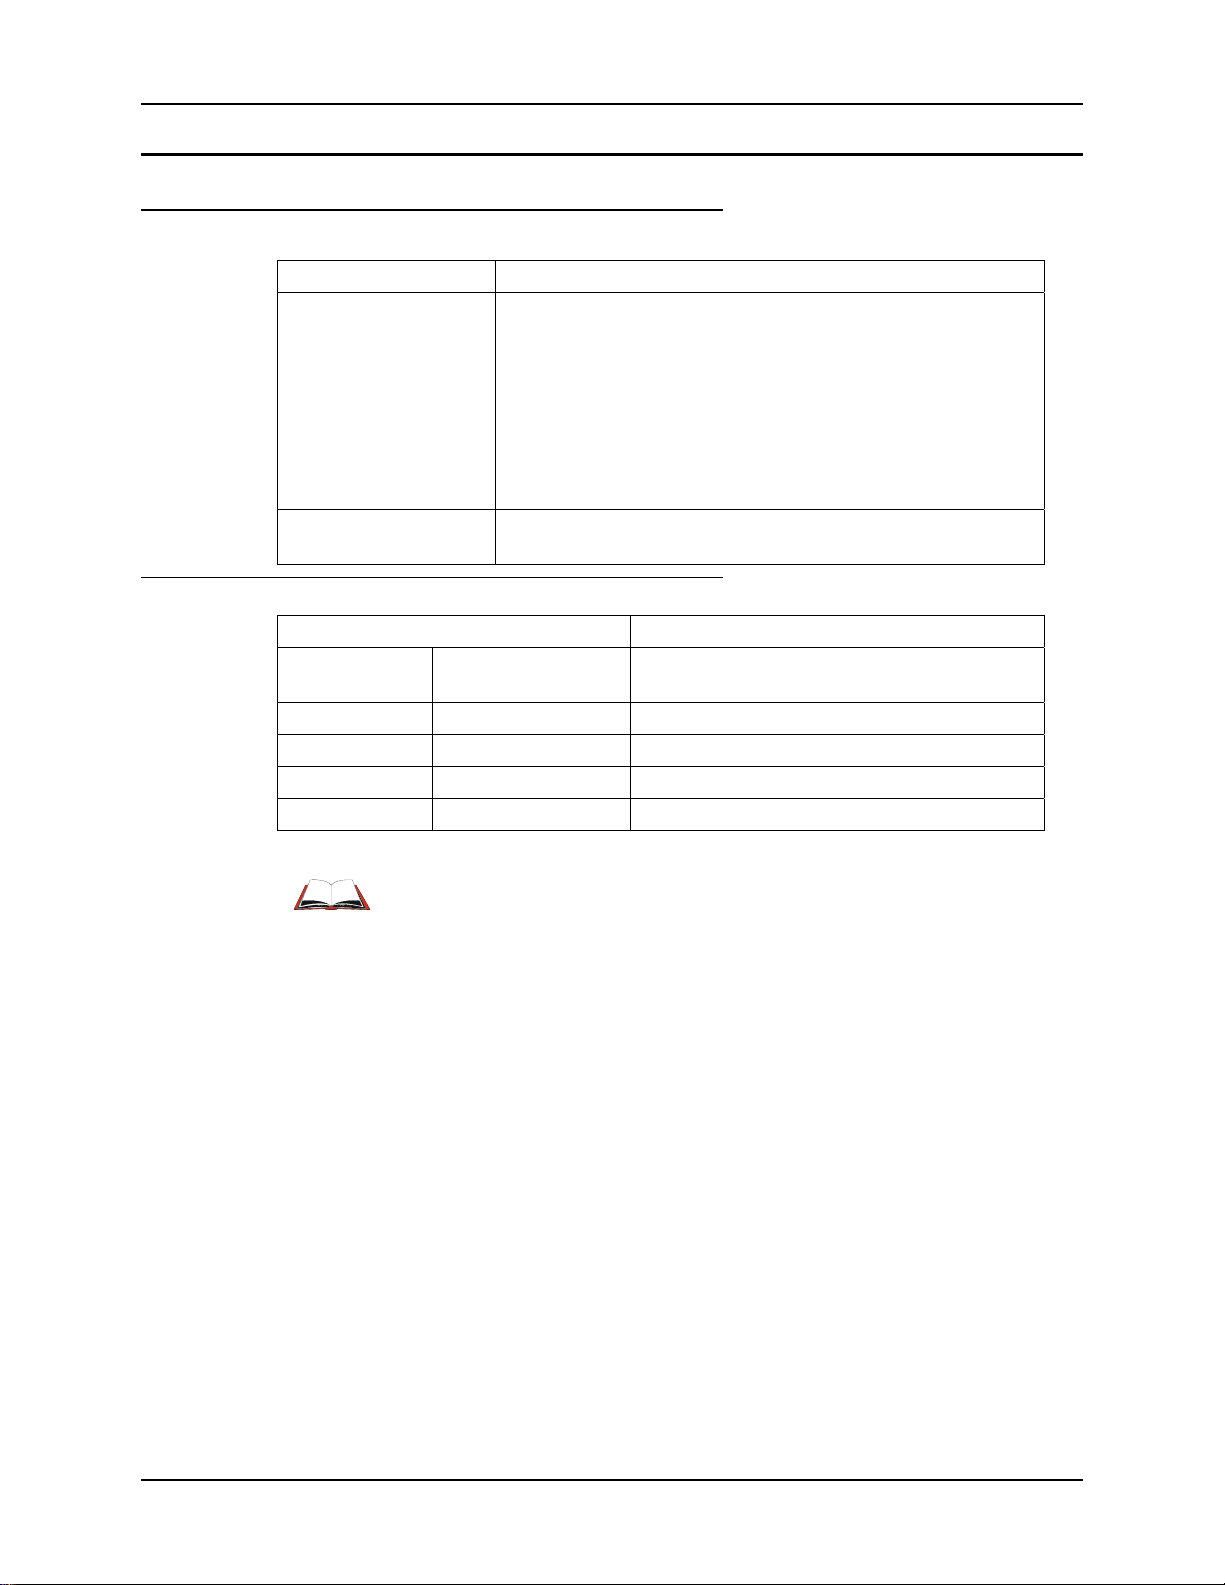
46 HX2 Docking/Charging Cradle
Cradle LEDs
Cradle PWR LED
When PWR LED is … It means ….
No AC/DC power supplied to the cradle
and/or
No HX2 in the charging bay
and/or
HX2 is not properly seated in charging bay
and/or
if this is the first time the HX2 has been inserted, the HX2 is
properly seated and has not been powered On.
HX2 is On, is properly seated in the charging bay and is
receiving external power through the cradle.
No spare battery in the battery bay(s) or no
AC/DC power is being applied to the cradle.
Spare battery pack fully charged.
Spare battery pack charging.
Spare battery pack temperature out of range.
Spare battery pack fault or failure.
B1 and B2 LED
Off
Green
When B1 and/or B2 LED is … It means ….
Off
Green Charged
Red Charging
Amber Standby
Flashing Red Fault
No battery or no AC
power
Refer to the HX2 Cradle Reference Guide for instruction in setting up the
cradle, inserting the battery packs, interpreting the LEDs, connecting cables
and using the cradle for powering the HX2 and communication.
HX2 User’s Guide E-EQ-HX2OGWW-D
Page 53
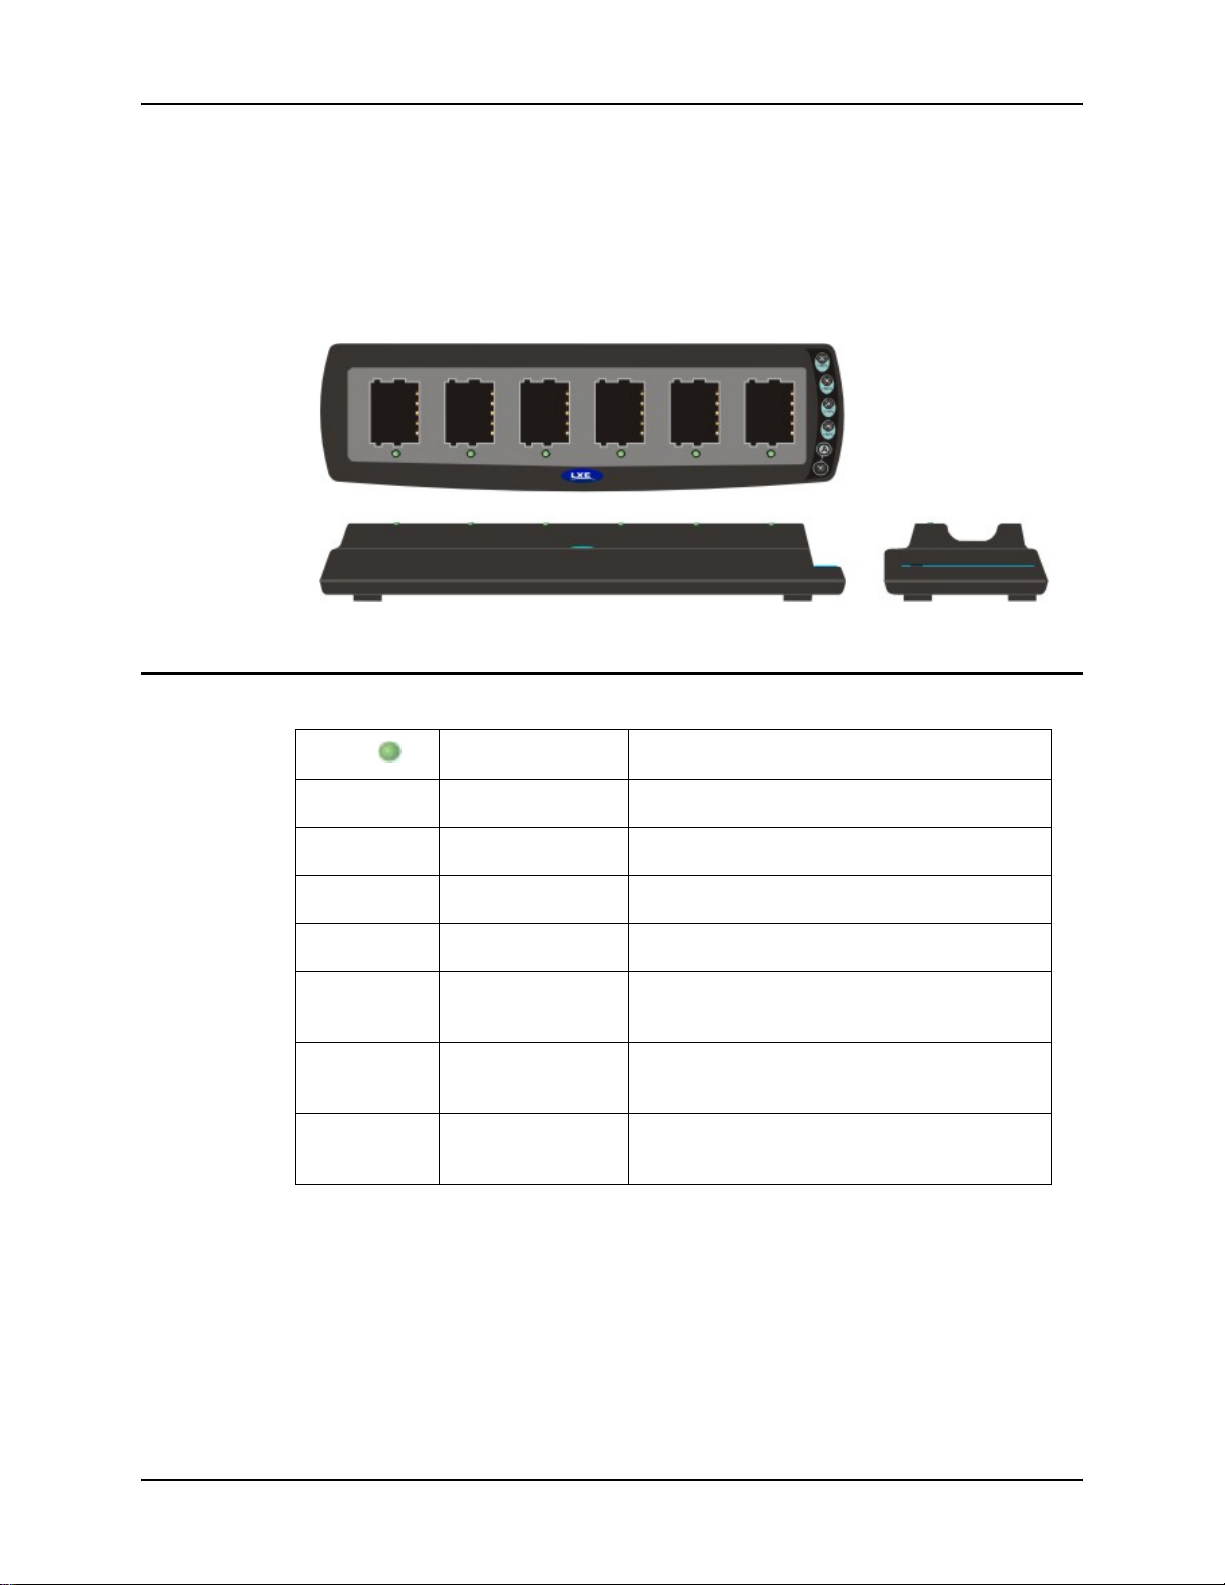
HX2 Multi-Charger 47
HX2 Multi-Charger
The LXE HX2 Multi-Charger is designed to simultaneously charge up to six HX2 Rechargeable
Lithium Ion Batteries at a time, in any combination of Standard or Extended batteries. The
Standard batteries require less than four hours and the Extended batteries require less than 8 hours.
Total charging time required depends upon battery pack temperature and conditions. There is one
bay that is used for Charging only when the Analyze button is not pressed.
Figure 43 HX2 Multi-Charger
Charging Pocket LED
LED
Off No Battery/power Battery pack not plugged in or no power applied.
Green Charged Battery pack fully charged.
Red Charging Battery pack charging.
Yellow Standby Battery pack temperature out of range.
Flashing Red
on any station
Flashing Red
on any station
Flashing Red
on all stations.
Indication Description
Fault Battery pack fault or failure.
Timeout Battery analyzer’s 4.5 hour timeout period
expired.
Charger/Analyzer
Failure
Battery analyzer fault or failure.
E-EQ-HX2OGWW-D HX2 User’s Guide
Page 54
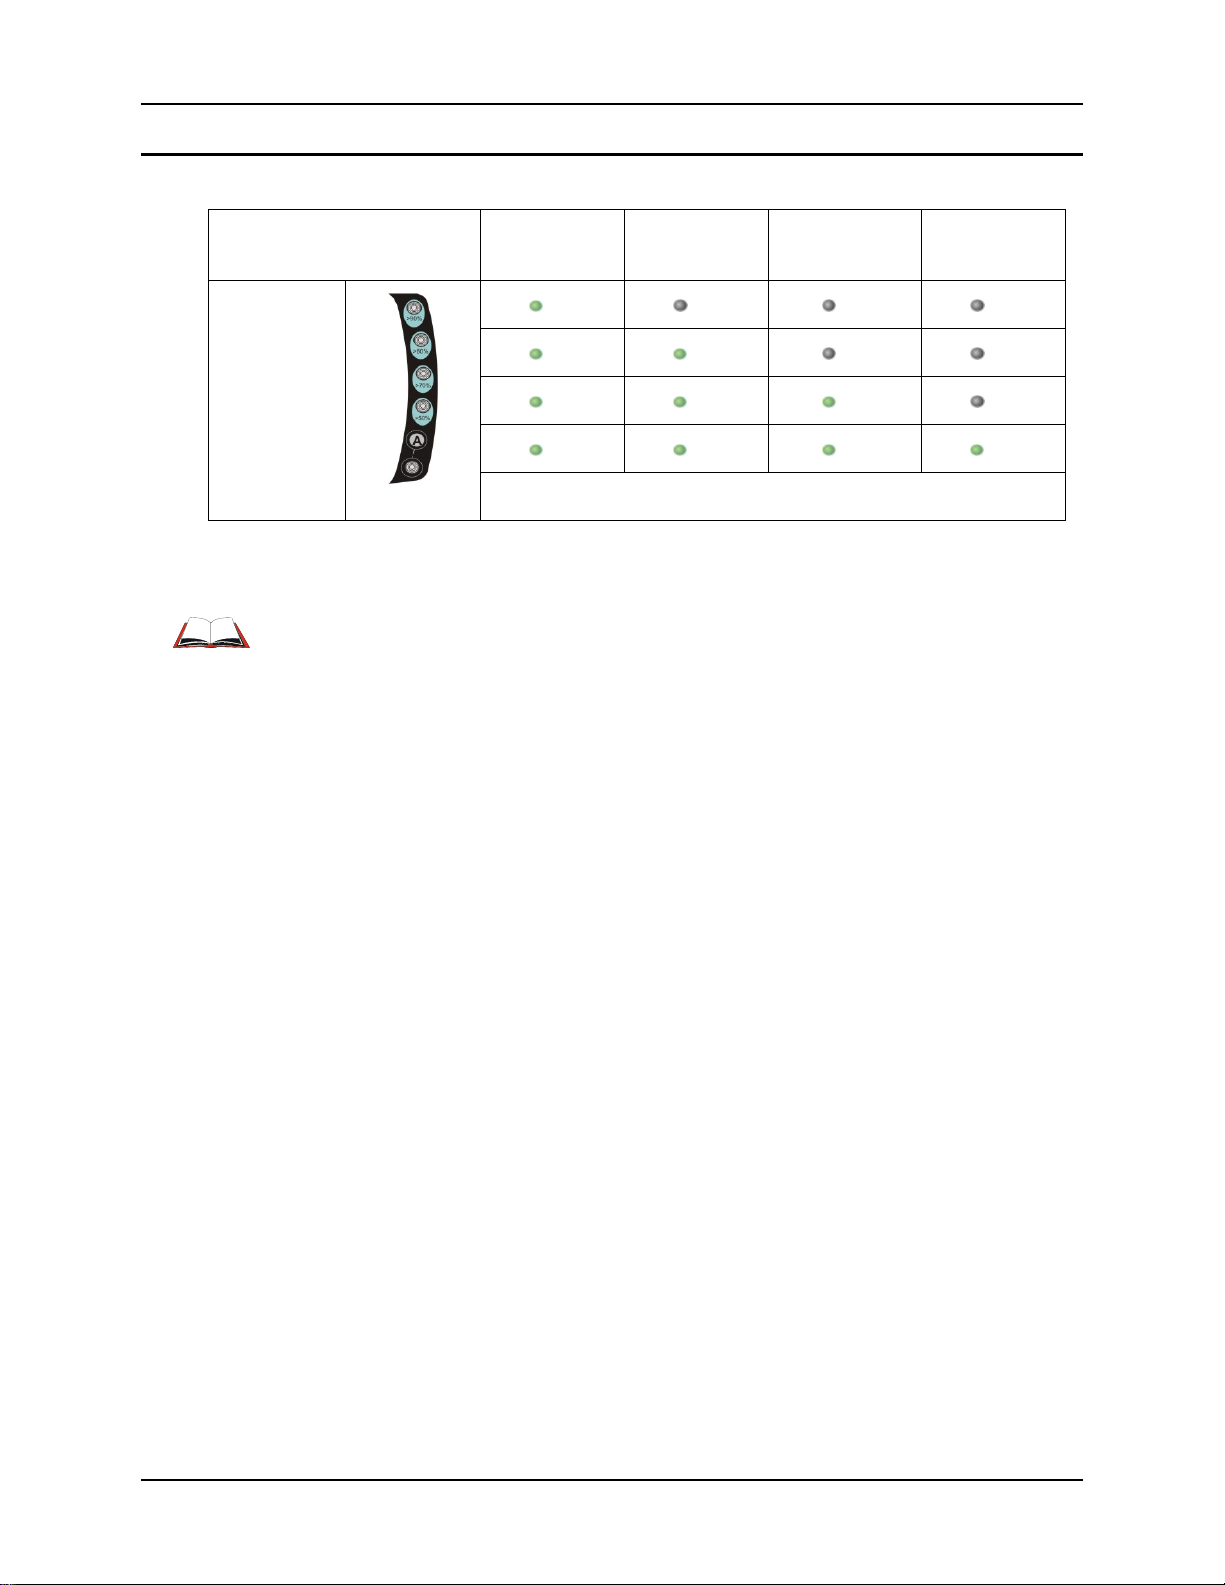
48 HX2 Multi-Charger
Charger/Analyzer LEDs
Percentage of Battery
Capacity
Analyze
Progress
LED Status
Refer to the HX2 Multi-Charger User’s Guide for instruction in setting up the charger, inserting
the battery packs into the charging bays, interpreting the LEDs and using the Charge/Analyze
Pocket.
Between 90%
and 100%
On Off Off Off
On On Off Off
On On On Off
On On On On
When all LEDs are off, the battery capacity is less than 50%.
Figure 44 Multi-Charger Control Panel
Between 80%
and 90 %
Between 70%
and 80%
Between 50%
and 70%
HX2 User’s Guide E-EQ-HX2OGWW-D
Page 55
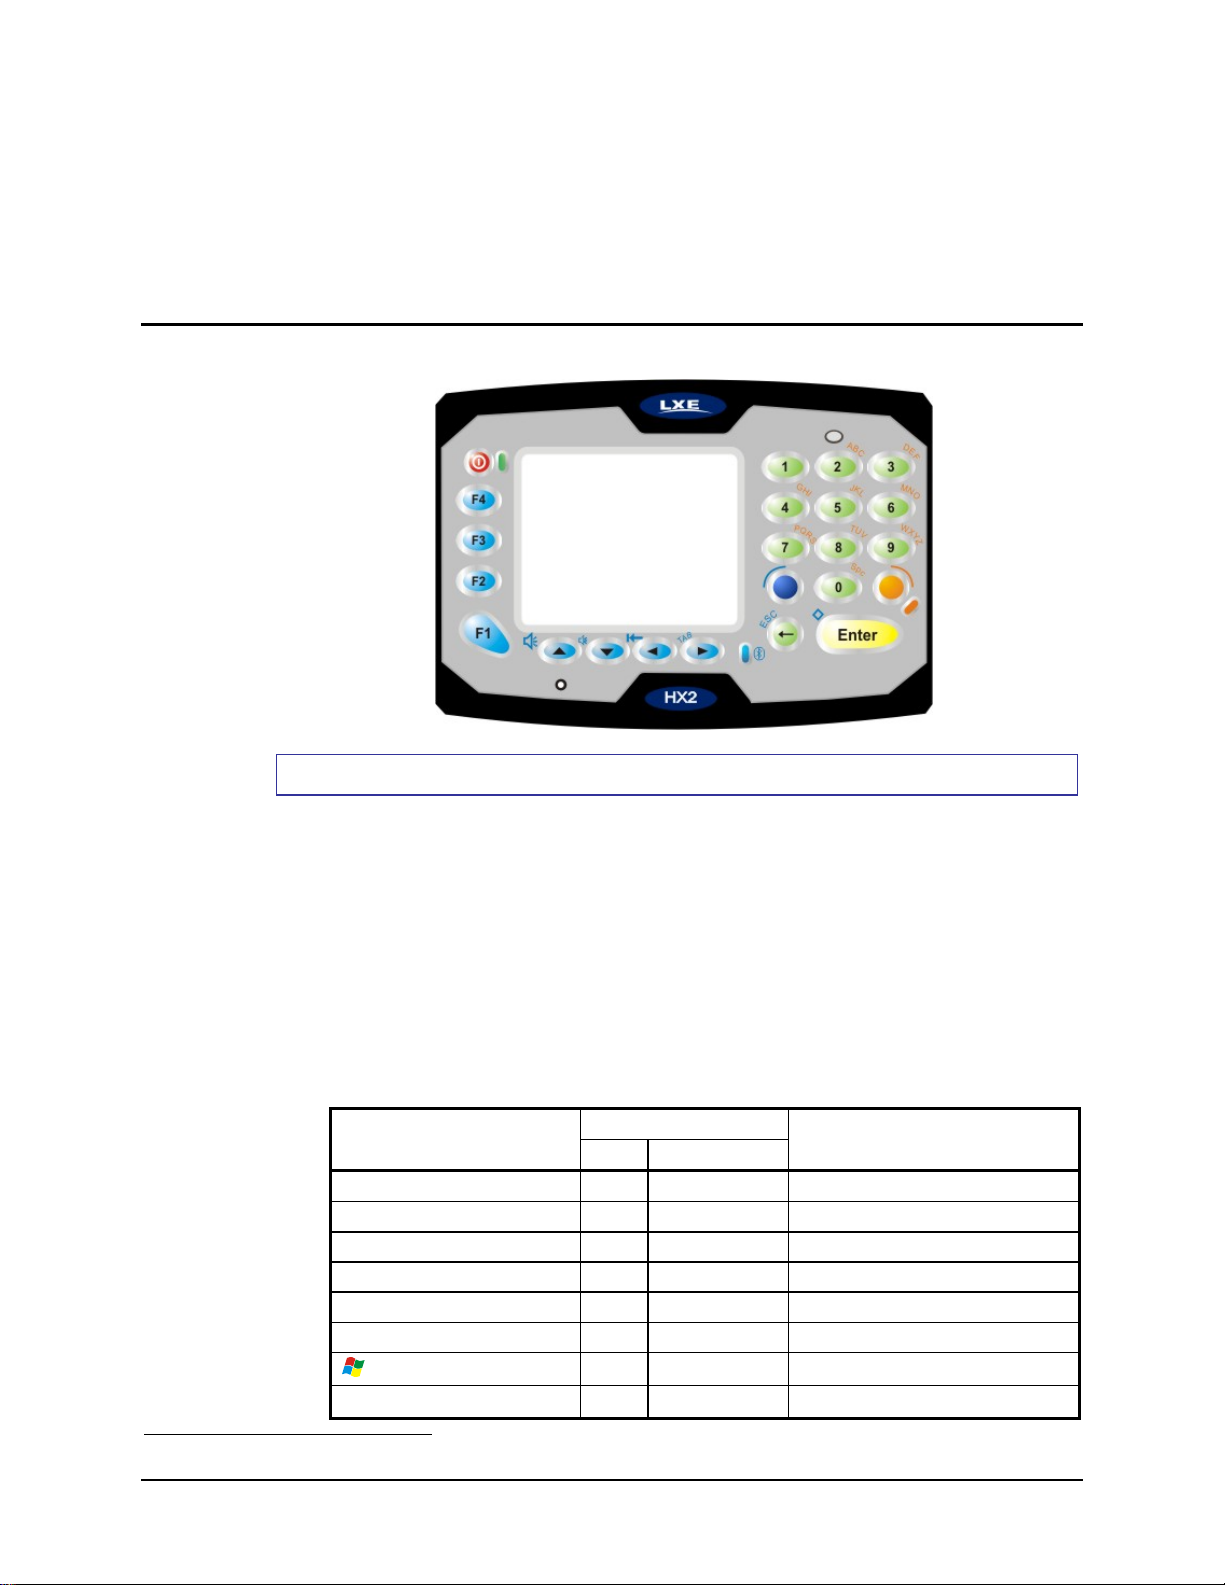
23 Key Keypad
Alpha Mode 3 Tap
Appendix A Key Maps
Hints
• When using a sequence of keys that require an alpha key, first press the Alpha key.
• Double tap the Alpha key for upper case alphabetic characters.
• Single tap the Alpha key to enter and exit Alpha mode.
• Default Alpha mode produces lower case alphabetic characters when numeric keys are
pressed.
• Pressing the Alpha key forces “Alpha” mode for all keys.
• To create a combination of numbers and letters before pressing Enter, remember to tap the
Alpha key to toggle between Alpha and Numeric mode.
• Use the Input Panel to enter characters that are not available using the 23-key keypad.
• When using a sequence of keys that do not include the Alpha key (Orange) but does
include a sticky key (Blue), press the Blue key first then the rest of the key sequence.
To Get This Key /
Function
Power / Suspend Power
Volume Up X Up Arrow
Volume Down X Down Arrow
Blue Mode (Toggle) Blue
Alpha Mode (Toggle) Alpha
Diamond Key X Enter
(Start Button)
Display Brightness Increase
4
Please contact your System Administrator for assistance with User Configured (Mapped) Keys.
First Press This Key
Blue Alpha
Then Press This Key
Only Available when Mapped
Only Available when Mapped
4
5
E-EQ-HX2OGWW-D HX2 User’s Guide
Page 56

50 23 Key Keypad
To Get This Key /
Function
First Press This Key
Blue Alpha
Then Press This Key
/ Decrease
Uppercase Alpha (Toggle) 6
Alpha key 4
Lowercase Alpha 4
Alpha Doubleclick
N/A (default)
Space Alpha 0
Enter Enter
CapsLock Mode 4
Alpha times 2 Alpha
Back Space Backspace
Escape X Backspace
Tab X Right Arrow
BackTab X Left Arrow
Up Arrow (Cursor Up) Up Arrow
Down Arrow (Cursor Down) Down Arrow
Right Arrow (Cursor Right) Right Arrow
Left Arrow (Cursor Left) Left Arrow
F1 F1
F2 F2
F3 F3
F4 F4
F5 X F1
F6 X F2
F7 X F3
F8 X F4
F9
Only Available when Mapped
F10 X 0
F11 X 1
F12 X 2
F13 X 3
F14 X 4
F15 X 5
F16 X 6
F17 X 7
F18 X 8
F19 X 9
F20 through F24
Only Available When Mapped
a Alpha 2
b Alpha 22
c Alpha 222
d Alpha 3
3
3
5
Please contact your System Administrator for assistance with User Configured (Mapped) Keys.
6
See Using the 23 Key Keypad for explanation.
HX2 User’s Guide E-EQ-HX2OGWW-D
Page 57

23 Key Keypad 51
To Get This Key /
Function
e Alpha 33
f Alpha 333
g Alpha 4
h Alpha 44
i Alpha 444
j Alpha 5
k Alpha 55
l Alpha 555
m Alpha 6
n Alpha 66
o Alpha 666
p Alpha 7
q Alpha 77
r Alpha 777
s Alpha 7777
t Alpha 8
u Alpha 88
v Alpha 888
w Alpha 9
x Alpha 99
y Alpha 999
z Alpha 9999
A Alpha times 2 2
B Alpha times 2 22
C Alpha times 2 222
D Alpha times 2 3
E Alpha times 2 33
F Alpha times 2 333
G Alpha times 2 4
H Alpha times 2 44
I Alpha times 2 444
J Alpha times 2 5
K Alpha times 2 55
L Alpha times 2 555
M Alpha times 2 6
N Alpha times 2 66
O Alpha times 2 666
P Alpha times 2 7
Q Alpha times 2 77
R Alpha times 2 777
S Alpha times 2 7777
T Alpha times 2 8
First Press This Key
Blue Alpha
Then Press This Key
E-EQ-HX2OGWW-D HX2 User’s Guide
Page 58

52 23 Key Keypad
To Get This Key /
Function
U Alpha times 2 88
V Alpha times 2 888
W Alpha times 2 9
X Alpha times 2 99
Y Alpha times 2 999
Z Alpha times 2 9999
1 1 and 11111 (Alpha Mode)
2 2 and 2222 (Alpha Mode)
3 3 and 3333 (Alpha Mode)
4 4 and 4444 (Alpha Mode)
5 5 and 5555 (Alpha Mode)
6 6 and 6666 (Alpha Mode)
7 7 and 77777 (Alpha Mode)
8 8 and 8888 (Alpha Mode)
9 9 and 99999 (Alpha Mode)
0 0 and 00 (Alpha Mode)
. (period) Alpha 1
\ Alpha 11
* (asterisk) Alpha 111
- (dash or minus sign) Alpha 1111
< > Use Input Panel
[ ] Use Input Panel
{ } Use Input Panel
( ) Use Input Panel
_ (underscore) Use Input Panel
+ (plus sign) Use Input Panel
: ; Use Input Panel
“ ‘ Use Input Panel
? / Use Input Panel
` ~ Use Input Panel
! Use Input Panel
@ Use Input Panel
# Use Input Panel
$ Use Input Panel
% Use Input Panel
^ Use Input Panel
& Use Input Panel
| Use Input Panel
First Press This Key
Blue Alpha
Then Press This Key
HX2 User’s Guide E-EQ-HX2OGWW-D
Page 59
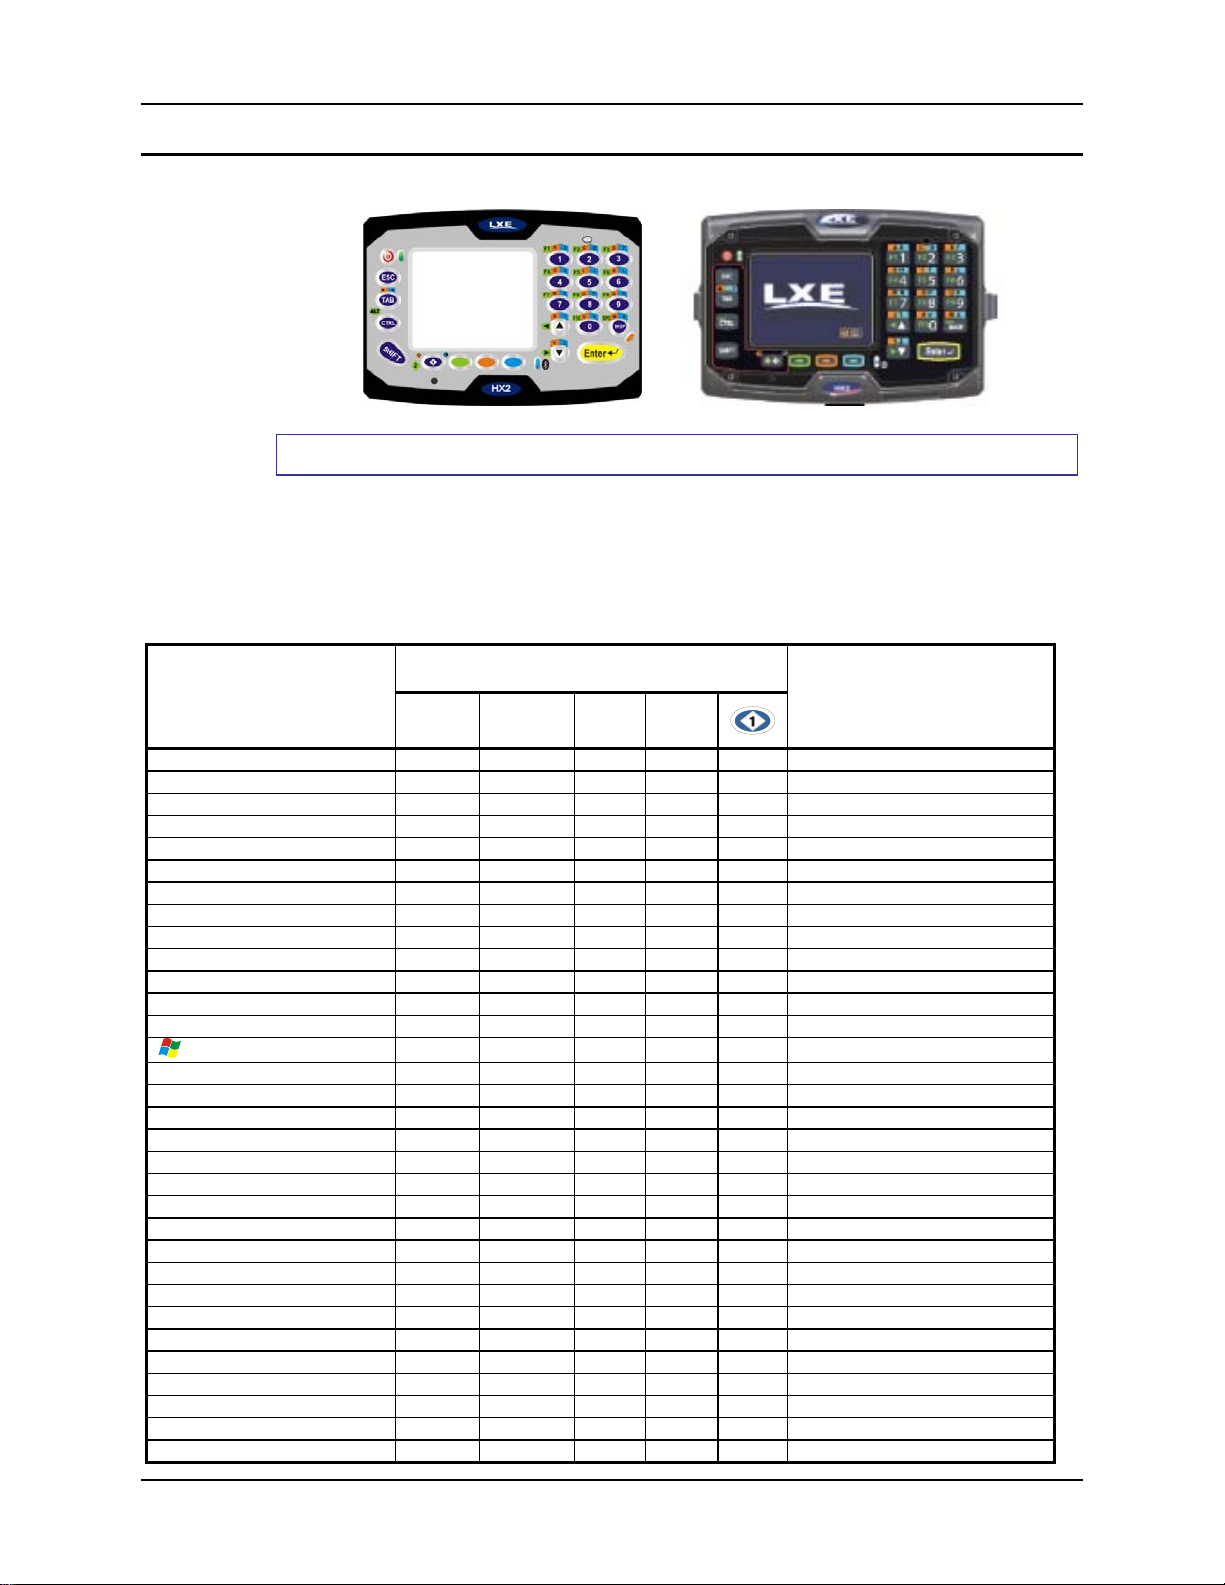
23 Key Keypad 53
Dual Alpha Keypad
or
Hints
• Any key press exits out of the volume and backli ght c o nt r ol modes.
• Modifier keys are sticky.
• A modifier key (Green, Orange, Blue, Shift and Control) pressed after itself toggles that
modifier key off.
• Any key other than a modifier key following any modifier key, unsticks the modifier keys.
To Get This Dual Alpha
Keypad Function
Power / Suspend
Volume Up
Volume Down
Display Backlight Increase
Display Backlight Decrease
Alt Mode
Ctrl Mode
Escape
Green Mode (Toggle)
Orange Mode (Toggle)
Blue Mode (Toggle)
Diamond 1 Mode
Diamond 2 Mode
(Start Button)
Uppercase Alpha (Toggle)
Lowercase Alpha
Space
Enter
Capslock (Toggle)
Back Space
Tab
BackTab
Up Arrow (Cursor Up)
Down Arrow (Cursor Down)
Right Arrow (Cursor Right)
Left Arrow (Cursor Left)
Insert
Delete
Home
End
Page Up
Page Down
First press these keys . . .
Green Orange Blue Shift
X X
X X
X X
X X
X
X
X
X
X
X X
X
X
X
X
X X
X X
X X
X X
X X
X X
Then press this key
Power/Suspend
Up Arrow
Down Arrow
Up Arrow
Down Arrow
Ctrl
Ctrl
ESC
Green
Orange
Blue
--
-CTRL + ESC
Shift
-- (alpha is the default setting)
BKSP (Backspace)
Enter
N/A
Backspace
Tab
Tab
Up Arrow
Down Arrow
Down Arrow
Up Arrow
5
1
7
3
0
BKSP (Backspace)
E-EQ-HX2OGWW-D HX2 User’s Guide
Page 60
54 23 Key Keypad
To Get This Dual Alpha
Keypad Function
F1
F2
F3
F4
F5
F6
F7
F8
F9
F10
F11
F12
F13
F14
F15
F16
F17
F18
F19
F20
F21
F22
F23
F24
a
b
c
d
e
f
g
h
i
j
k
l
m
n
o
p
q
r
s
t
u
v
w
x
y
z
A
B
C
D
E
First press these keys . . .
Green Orange Blue Shift
X
X
X
X
X
X
X
X
X
X
X X
X X
X X
X X
X X
X X
X X
X X
X X
X X
X X X
X X X
X X X
X X X
X
X
X
X
X
X
X
X
X
X
X
X
X
X
X
X
X
X
X
X
X
X
X
X
X
X
X X
X X
X X
X X
X X
Then press this key
1
2
3
4
5
6
7
8
9
0
1
2
3
4
5
6
7
8
9
0
1
2
3
4
1
1
2
2
3
3
4
4
5
5
6
6
7
7
8
8
9
9
Up Arrow
Up Arrow
0
0
BKSP
BKSP
Down Arrow
Down Arrow
1
1
2
2
3
HX2 User’s Guide E-EQ-HX2OGWW-D
Page 61
23 Key Keypad 55
To Get This Dual Alpha
Keypad Function
F
G
H
I
J
K
L
M
N
O
P
Q
R
S
T
U
V
W
X
Y
Z
1
2
3
4
5
6
7
8
9
0
. (period)
* (asterisk)
- (dash or minus sign)
/
‘ (single quote)
[
]
\
‘ (apostrophe)
, (comma)
` (accent)
; (semicolon)
= (equal sign)
!
@
#
$
%
^
&
* (asterisk)
(
)
“ (double quote)
First press these keys . . .
Green Orange Blue Shift
X X
X X
X X
X X
X X
X X
X X
X X
X X
X X
X X
X X
X X
X X
X X
X X
X X
X X
X X
X X
X X
X
X
X X
X X
X X
X X
X X
X X
X X
X X
X X
X X
X X
X
X
X
X
X
X
X
X
X
X
X X
Then press this key
3
4
4
5
5
6
6
7
7
8
8
9
9
Up Arrow
Up Arrow
0
0
BKSP
BKSP
Down Arrow
Down Arrow
1
2
3
4
5
6
7
8
9
0
Tab
Tab
Tab
0
1
2
3
4
5
6
7
8
9
1
2
3
4
5
6
7
8
9
0
1
E-EQ-HX2OGWW-D HX2 User’s Guide
Page 62
56 23 Key Keypad
To Get This Dual Alpha
Keypad Function
{
}
| (broken bar)
~ (tilde)
<
>
: (colon)
+ (plus sign)
?
_ (underscore)
First press these keys . . .
Green Orange Blue Shift
X X
X X
X X
X X
X X
X X
X X
X X
X X
X X
Then press this key
2
3
4
5
6
7
8
9
0
TAB
HX2 User’s Guide E-EQ-HX2OGWW-D
Page 63
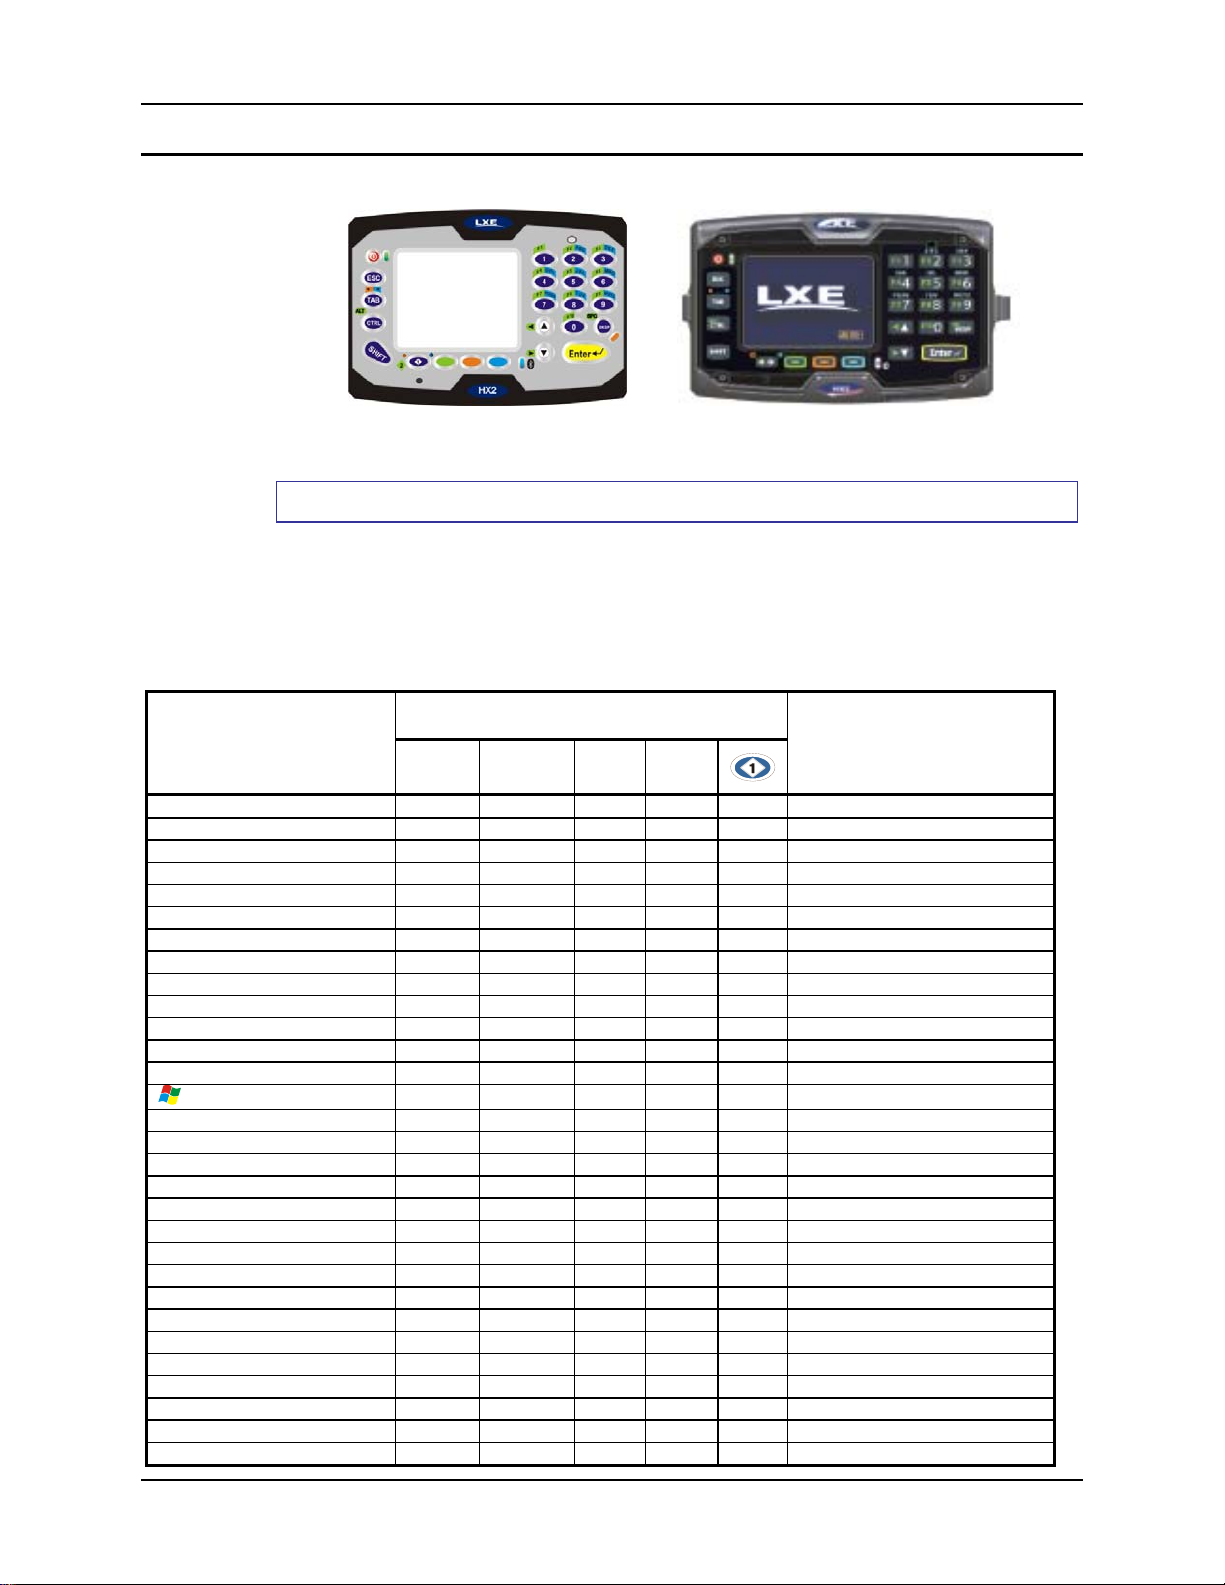
23 Key Keypad 57
Triple Tap Keypad
or
Hints
• Any key press exits out of the volume and backli ght c o nt r ol modes.
• Modifier keys are sticky.
• A modifier key (Green, Orange, Blue, Shift and Control) pressed after itself toggles that
modifier key off.
• Any key other than a modifier key following any modifier key, unsticks the modifier keys.
To Get This Triple Tap
Keypad Function
Power / Suspend
Volume Up
Volume Down
Display Backlight Increase
Display Backlight Decrease
Alt Mode
Ctrl Mode
Escape
Green Mode (Toggle)
Orange Mode (Toggle)
Blue Mode (Toggle)
Diamond 1 Mode
Diamond 2 Mode
(Start Button)
Uppercase Alpha (Toggle)
Lowercase Alpha
Space
Enter
Capslock (Toggle)
Back Space
Tab
BackTab
Up Arrow (Cursor Up)
Down Arrow (Cursor Down)
Right Arrow (Cursor Right)
Left Arrow (Cursor Left)
Insert
Delete
Home
End
First press these keys . . .
Green Orange Blue Shift
X X
X X
X X
X X
X
X
X
X
X
X X
X
X
X
X
X X
X X
X X
X X
Then press this key
Power/Suspend
Up Arrow
Down Arrow
Up Arrow
Down Arrow
Ctrl
Ctrl
ESC
Green
Orange
Blue
--
-CTRL + ESC
Shift
-- (alpha is the default setting)
BKSP (Backspace)
Enter
N/A
Backspace
Tab
Tab
Up Arrow
Down Arrow
Down Arrow
Up Arrow
5
1
7
3
E-EQ-HX2OGWW-D HX2 User’s Guide
Page 64
58 23 Key Keypad
To Get This Triple Tap
Keypad Function
Page Up
Page Down
F1
F2
F3
F4
F5
F6
F7
F8
F9
F10
F11
F12
F13
F14
F15
F16
F17
F18
F19
F20
F21
F22
F23
F24
a
b
c
d
e
f
g
h
i
j
k
l
m
n
o
p
q
r
s
t
u
v
w
x
y
z
A
B
C
First press these keys . . .
Green Orange Blue Shift
X X
X X
X
X
X
X
X
X
X
X
X
X
X X
X X
X X
X X
X X
X X
X X
X X
X X
X X
X X X
X X X
X X X
X X X
X
X
X
X
X
X
X
X
X
X
X
X
X
X
X
X
X
X
X
X
X
X
X
X
X
X
X X
X X
X X
Then press this key
0
BKSP (Backspace)
1
2
3
4
5
6
7
8
9
0
1
2
3
4
5
6
7
8
9
0
1
2
3
4
2
22
222
3
33
333
4
44
444
5
55
555
6
66
666
7
77
777
7777
8
88
888
9
99
999
9999
2
22
222
HX2 User’s Guide E-EQ-HX2OGWW-D
Page 65
23 Key Keypad 59
To Get This Triple Tap
Keypad Function
D
E
F
G
H
I
J
K
L
M
N
O
P
Q
R
S
T
U
V
W
X
Y
Z
1
2
3
4
5
6
7
8
9
0
. (period)
* (asterisk)
- (dash or minus sign)
/
‘ (single quote)
[
]
First press these keys . . .
Green Orange Blue Shift
X X
X X
X X
X X
X X
X X
X X
X X
X X
X X
X X
X X
X X
X X
X X
X X
X X
X X
X X
X X
X X
X X
X X
X
X
X X
X X
X X
X X
X X
X
X
X
X
X
X
X
X
Then press this key
3
33
333
4
44
444
5
55
555
6
66
666
7
77
777
7777
8
88
888
9
99
999
9999
1
2
or
2222
3
or
3333
4
or
4444
5
or
5555
6
or
6666
7
or
77777
8
or
8888
9
or
99999
0
Tab
Tab
Tab
0
1
2
3
E-EQ-HX2OGWW-D HX2 User’s Guide
Page 66
60 23 Key Keypad
To Get This Triple Tap
Keypad Function
\
‘ (apostrophe)
, (comma)
` (accent)
; (semicolon)
= (equal sign)
!
@
#
$
%
^
&
* (asterisk)
(
)
“ (double quote)
{
}
| (broken bar)
~ (tilde)
<
>
: (colon)
+ (plus sign)
?
_ (underscore)
First press these keys . . .
Green Orange Blue Shift
X X
X X
X X
X X
X X
X X
X
X
X
X
X
X
X
X
X
X
X X
X X
X X
X X
X X
X X
X X
X X
X X
X X
X X
Then press this key
4
5
6
7
8
9
1
2
3
4
5
6
7
8
9
0
1
2
3
4
5
6
7
8
9
0
TAB
HX2 User’s Guide E-EQ-HX2OGWW-D
Page 67

Appendix B Regulatory Notices and Safety Information
FCC Information:
This device complies with FCC Rules, part 15. Operation is subject to the following two conditions:
1. This device may not cause harmful interference,
and
2. This device must accept any interference received, including interference that may cause undesired operation.
Note: This equipment has been tested and found to comply with the limits for a Class B digital device, pursuant to part 15 of the
FCC rules. These limits are designed to provide reasonable protection against harmful interference when the equipment is
operated in a residential environment. This equipment generates, uses, and can radiate radio frequency energy and, if not installed
and used in accordance with the instruction manual, may cause harmful interference to radio communications. However, there is
no guarantee that the interference will not occur in a particular installation. If this equipment does cause harmful interference to
radio or television reception, which can be dete rmined by turning the equipment off and on, the user is encouraged to try to
correct the interference by one or more of the following measures:
• Reorient or relocate the receiving antenna.
• Increase the separation between the equipment and the receiver.
• Connect the equipment into an outlet on a circuit different from that to which the receiver is connected.
• Consult the dealer or an experienced radio/TV technician for help.
Warning: Changes or modifications to this device not expressly approved by LXE, Inc., could void the user’s authority to
operate this equipment.
Industry Canada:
This Class B digital apparatus meets all requirements of the Canadian Interference Causing Equipment Regulations. Operation is
subject to the following two conditions: (1) this device may not cause harmful interference, and (2) this device must accept any
interference received, including interference that may cause undesired operation.
Cet appareil numérique de la classe A respecte toutes les exigences du Règlement sur le matériel brouilleur du Canada.
Le présent appareil numérique n’émet pas de bruits radioélectriques dépassant les limites applicables aux appareils numériques
de Classe A prescrites dans le Règlement sur le brouillage radioélectrique édits par le ministère des Communications du Canada.
Notice:
The long term characteristics or the possible physiological effects of radio frequency electromagnetic fields have not been
investigated by UL.
Li-Ion Battery
When disposing of the HX2 main battery, the following precautions should be observed: The battery should be disposed of
promptly. The battery should not be disassembled or crushed. The battery should not be heated above 212°F (100°C) or
incinerated.
Caution
RISK OF EXPLOSION IF BATTERY IS REPLACED BY AN INCORRECT TYPE.
DISPOSE OF USED BATTERIES ACCORDING TO THE INSTRUCTIONS.
II y a danger d’explosion s’il y a remplacement incorrect de la batterie.
Attention
Remplacer uniquement avec une batterie du même type ou d’un type equivalent
recommandé par le constructeur. Mettre au rebut les batteries usagées
conformément aux instructions du fabricant.
E-EQ-HX2OGWW-D HX2 User’s Guide
Page 68
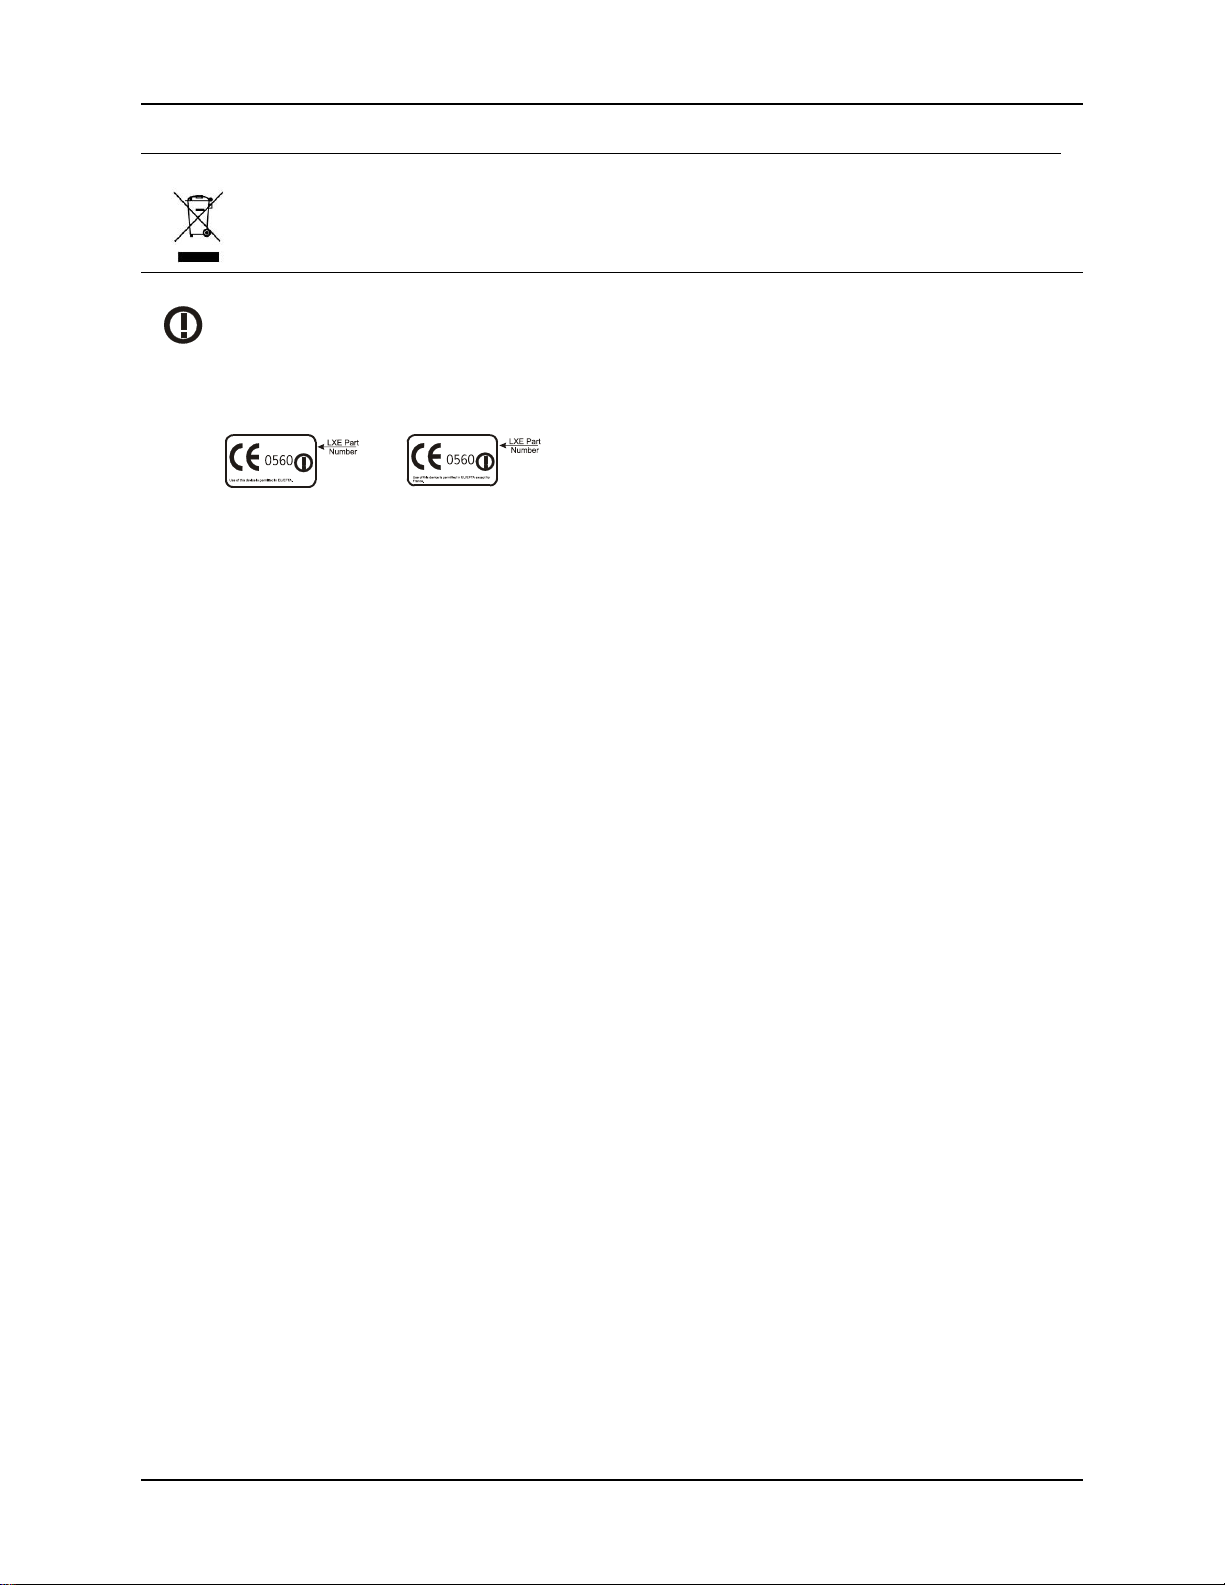
62 Appendix B Regulatory Notices and Safety Information
WEEE Statement
Important: This symbol is placed on the product to remind users to dispose of Waste Electrical and Electronic
Equipment (WEEE) appropriately, per Directive 2002-96-EC. In most areas, this product can be recycled,
reclaimed and re-used when properly discarded. Do not discard labeled units with trash. For information about
proper disposal, contact LXE through your local sales representative, or visit www lxe com.
R&TTE Directive Requirements (Applies only to equipment operated within the EU/EFTA)
Information to User
A label on the exterior of the device should resemble one of the labels shown below (the label contains the LXE
part number of the installed radio card). The labels shown below and affixed to the device, identify where the
device may be used and where its use is restricted. Use of a device is prohibited in countries not listed below or
otherwise identified by the label. (May or may not include the 0560 Notifed Body No. Substitute 4 digit Notified
Body No. may also be applied.)
HX2 User’s Guide E-EQ-HX2OGWW-D
Page 69
Appendix B Regulatory Notices and Safety Information 63
HX2 Approvals/Standards
Product EMI / EMC Standards Safety Standards
HX2 Wearable
Device
For HX2 with Ring
Scanner/Imager
Transceiver:
Transceiver RF standards RF Safety Standards
HX2 with 802.11 b/g
[Summit Client]
HX2 with 802.11 a/b/g
[Summit Client]
This device contains transmitter Mo dule FCC ID: KD ZLXE4830P
FCC Part 15 Subpart B, Class B
EN 55022 Class B (CISPR 22)
EN 55024:1998
AS/NZS 3548, Class B (CISPR 22)
FCC Part 15
FCC Bulletin OET-65
EN 300 328
IC-RSS 210
IC-RSS 102
FCC Part 15
FCC Bulletin OET-65
EN 300 328
EN 301 893
IC-RSS 210
IC-RSS 102
UL 60950-1 / CSA C22.2 No. 60950-1
IEC/EN 60950-1
Additionally complies with:
• 21CFR1040.10 and 1040.11 except for deviations
pursuant to Laser Notice No. 50, dated July 26,
2001.
• EN60825-1:1994+ A1:2002 +A2:2001
• IEC60825-1:1993+A1:1997+A2:2001
Unlicensed Operation
Unlicensed Operation
Requires License for Outdoor Use
Unlicensed Operation
Unlicensed Operation
Requires License for Outdoor Use
RF Safety Notice (Summit 802.11 b/g Client)
Caution
This portable device with its antenna complies with FCC’s and Industry Canada’s RF exposure
limits set for an uncontrolled environment. This equipment has shown compliance with FCC and
Industry Canada Specific Absorption Rate (SAR) limits. Highest reported SAR for the HX2 is
.641W/kg on body. Any accessories not provided by LXE should not be used with this device.
This device must not be co-located or operating in con j un ct i on wi th a ny other antenna or
transmitter.
This device contains transmitter Mo dule FCC ID: KD ZLXE4831P
RF Safety Notice (Summit 802.11 a/b/g Client)
Caution
This portable device with its antenna complies with FCC’s and Industry Canada’s RF exposure
limits set for an uncontrolled environment. This equipment has shown compliance with FCC and
Industry Canada Specific Absorption Rate (SAR) limits. Highest reported SAR for the HX2 is
.333W/kg on body. Any accessories not provided by LXE should not be used with this device.
This device must not be co-located or operating in con j un ct i on wi th a ny other antenna or
transmitter.
E-EQ-HX2OGWW-D HX2 User’s Guide
Page 70
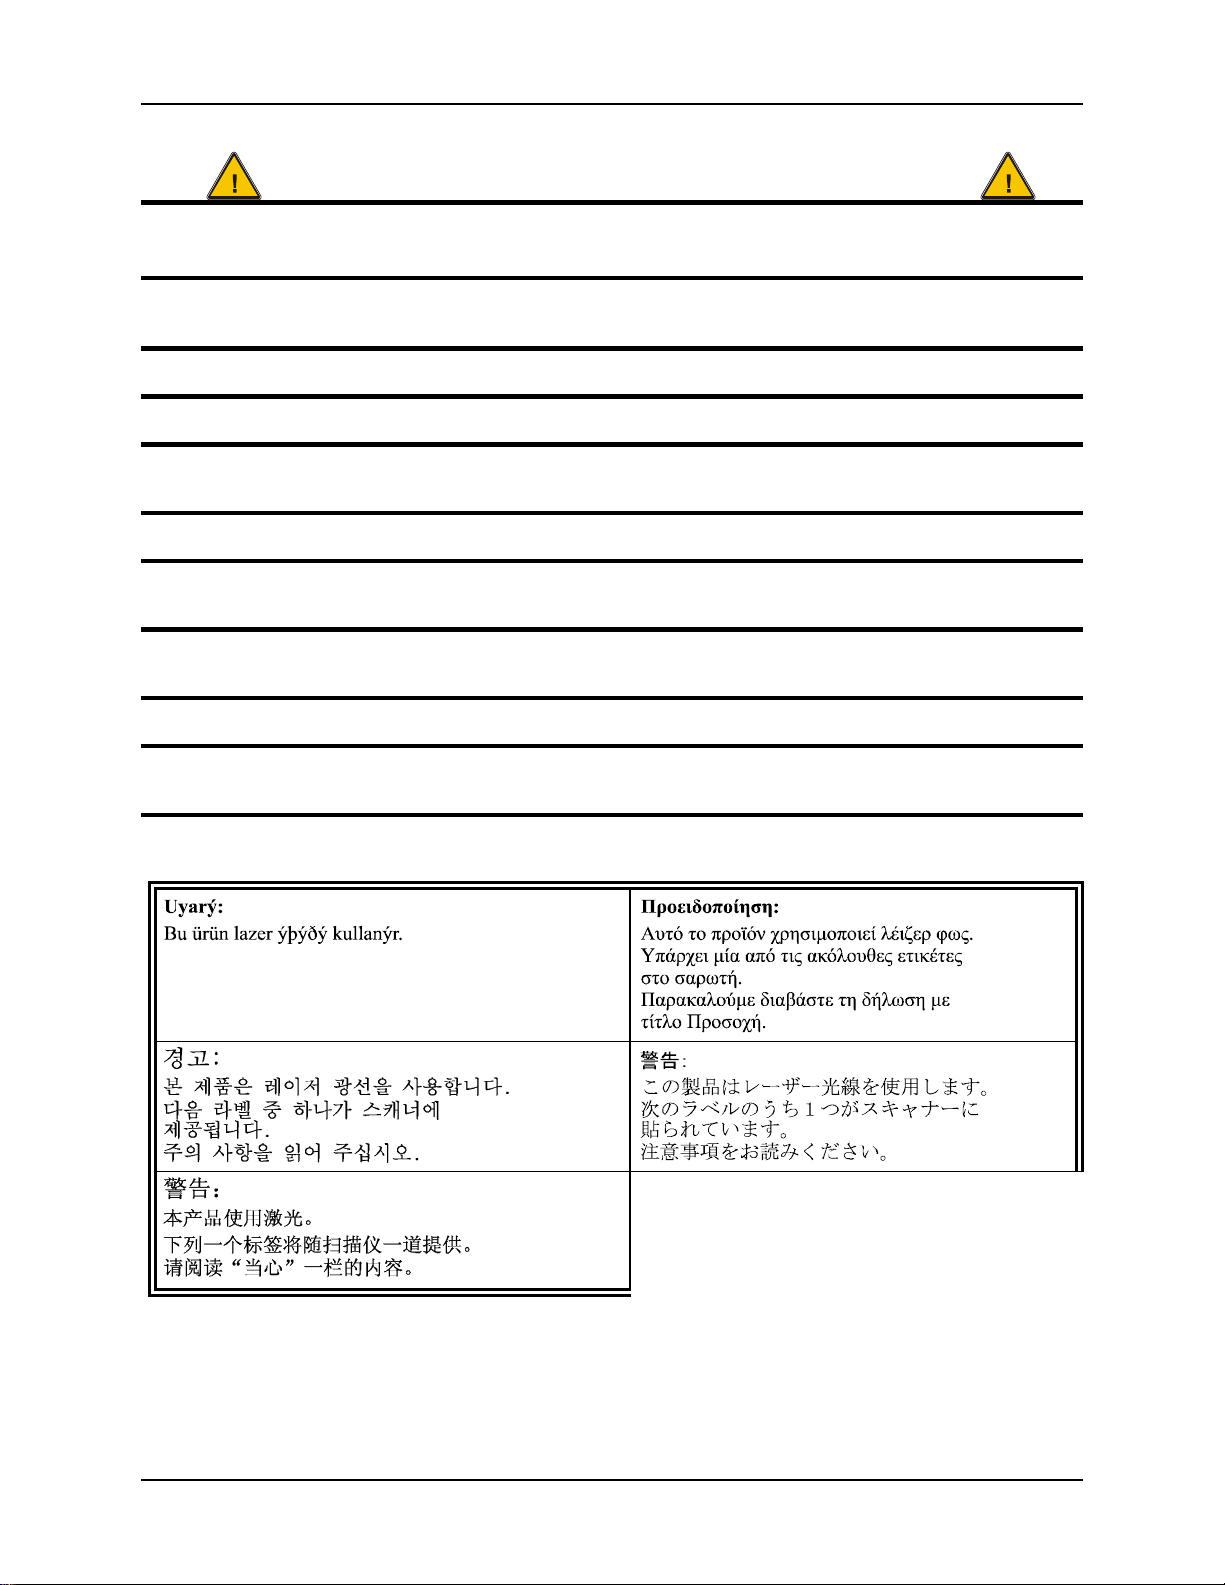
64 Appendix B Regulatory Notices and Safety Information
i
ikk
.
Laser Light Safety Statement
Warning:
This product uses laser light. One of the following labels is provided on the scanner. Please read the Caution
statement. (US)
Mise én garde:
Ce produit utilise un rayon laser. L’une des étiquettes suivantes est apposée sur le scanneur. Veuillez lire l’avertissement qu’elle
contient. (FR)
Advertência:
Este produto usa luz de laser. O scanner contém um dos seguintes avisos. Favor ler o Aviso. (PT)
Varning:
Denna produkt använder laserljus. En av de nedanstående etiketterna sitter på scannern. Var god läs varningstexten. (SE)
Advarsel:
Dette produkt anvender laserlys. En af følgende mærkater anvendes på scanneren. Læs venligst sikkerhedsforanstaltningen.
(DK)
Varoitus:
Tämä tuote käyttää laservaloa. Skannerissa on jokin seuraavista tarroista. Lue Huomio-kohta. (FI)
Warnung:
Dieses Produkt verwendet Laserlicht. Eines der folgenden Etiketten befindet sich auf dem Scanner. Bitte lesen Sie den
Gefahrenhinweis. (DE)
Attenzione:
Questo prodotto utilizza luce laser. Una delle etichette seguenti c’ ubicata sullo scanner. Si raccomanda di leggere con attenzione
le avvertenze riportate. (IT)
Advarsel:
Dette utstyret bruker laserlys. En av følgende etiketter er plassert på scanneren. Les advarselen på etiketten. (NO)
Advertencia:
Este producto usa luz de láser. Las etiquetas se proveen en la máquina exploradora. Por favor, lea detenidamente la explicación
para las precauciones. (ES)
Waarschuwing:
Dit product gebruikt laserlicht. Een van de volgende labels is op de scanner aangebracht. Lees a.u.b. de waarschuwing onder
Oppassen. (NL)
Aþaðýdaki etiketlerden bir tane s
tarayýcýnýn üstünde saðlanýr.
Lütfen D
at ifadesini okuyun
(TR)
(KR)
(CN)
(GR)
(JP)
Legend:
Chinese-CN; Danish-DK; Dutch-NL; English-US; Finnish-
FI; French-FR; German-DE; Greek-GR; Italian-IT;
Japanese-JP; Korean-KR; Norwegian-NO; Portuguese-PT;
Spanish-ES; Swedish-SE; Turkish-TR
HX2 User’s Guide E-EQ-HX2OGWW-D
Page 71

Appendix B Regulatory Notices and Safety Information 65
Revision History
May 2008, Revision C
• Added Bluetooth Ring Scanner to Accessories. Added HX2 Enhanced accessories to
Accessories.
• Added “Enable” statement to Triple Tap Keypad section.
• Added Mobile Bluetooth Accessories after Bluetooth section that includes brief pairing
instruction.
• Added drawings of HX2 enhancements where appropriate.
October 2007, Revision B
• Introduction -- Added Ring Sc anner with Warning Label. Added Ring Scanner Strap Kit
and Trigger Assembly 20 pack to Accessories. Added Bluetooth mobile barcode readers to
Accessories.
• Quick Start -- Replaced Using the 23 Key Keypad with HX2 Keypads. Added Adjusting the
Display Brightness.
• Appendix A – Key Maps -- Added Alpha Mode 3 Tap Keypad, Dual Alpha Keypad and
Triple Tap Keypad keymaps.
• Appendix B – Regulatory Notices and Safety Information -- Added Approvals and
Standards for Ring Scanner/Imager
Initial Release, May 2007
E-EQ-HX2OGWW-D HX2 User’s Guide
Page 72

66 Appendix B Regulatory Notices and Safety Information
HX2 User’s Guide E-EQ-HX2OGWW-D
Page 73

2
2D Imager ................................................................31
A
AC Power Scheme...................................................36
Accessories................................................................6
Electrostatic Discharge .......................................19
ActiveSync
Connection, serial or USB ..................................44
Alpha Mode 3 Tap keypad ......................................26
Alpha Mode LED....................................................29
AppLock..................................................................35
Armband..................................................................17
Armband assembly............................................20, 43
Assembly
armband ..............................................................43
Armband .............................................................20
Audio Cable, Headset and Battery......................23
Battery and Ring Scanner ...................................22
Cables..................................................................22
protective film.....................................................41
rubber boot..........................................................41
voice case............................................................42
Audio Cable, Headset and Battery assembly...........23
Audio Volume settings............................................37
Index
Back....................................................................11
Cables..................................................................14
Connectors ..........................................................12
Cradle connector.................................................12
Front....................................................................10
Hip Flip...............................................................18
Mounting brackets...............................................16
Ring Scanners .....................................................13
Tethered battery..................................................15
Contact LXE..............................................................5
Cradle
Features...............................................................45
D
Data entry
imager .................................................................31
keypad.................................................................30
laser scanner........................................................31
stylus...................................................................30
virtual keyboard..................................................33
Data entry ................................................................30
Data Loss
Backup Battery......................................................4
Display and scanner aperture cleaning....................39
Display backlight timer .....................................38, 39
Display Brightness...................................................38
Dual Alpha key maps ..............................................53
Dual Alpha keypad..................................................27
B
Backlight timer..................................................38, 39
Barcode reader aperture...........................................13
Battery
Check status........................................................22
Important...............................................................4
Battery and Ring Scanner........................................22
Battery Power Scheme.............................................36
Bluetooth .................................................................34
Bluetooth Status LED..............................................29
Bracket Clips...........................................................16
E
End user switching
Touch..................................................................35
Entering Data...........................................................30
F
Features .....................................................................1
Forms entry..............................................................30
G
C
Charge and connect contacts ...................................15
Cleaning...................................................................39
Coldboot..................................................................25
Color displays and backlight timers.........................38
Components ...............................................................9
Armband .............................................................17
E-EQ-HX2OGWW-D HX2 User’s Guide
Getting Started.........................................................19
Glossary.....................................................................5
H
Hardware Reset .......................................................25
Help...........................................................................5
Page 74

68 Index
Hints
Key Maps............................................................49
Keypads ..................................................26, 27, 28
Hip Flip....................................................................18
HX2 key maps.........................................................49
HX2 Quick Start......................................................19
I
Icons
Bluetooth.............................................................34
Important Battery Information...................................4
Input panel
virtual keyboard..................................................33
K
Keymaps
Alpha Mode 3 Tap..............................................49
Dual Alpha..........................................................53
Triple tap.............................................................57
Keypad and entering data........................................30
Keypad and Input Panel keys ..................................26
L
LEDs
HX2.....................................................................29
Multi-Charger .....................................................47
Li-ion battery...........................................................15
Lithium Ion battery warning......................................4
LXE Manuals CD......................................................5
Q
Quick Start
Prerequisites........................................................19
Quick Start Instructions...........................................19
R
Recalibrate...............................................................24
Regulatory Notices..................................................61
Related Manuals........................................................2
Resume Mode, How To...........................................24
Risk of explosion
Battery................................................................... 4
RoHS Accessories.....................................................6
Rubber boot assembly .............................................41
S
Safety Information...................................................61
Scanner status, LED ................................................32
Scanning and data entry...........................................31
Scheme ....................................................................36
Soft case..............................................See Voice Case
Sound Scheme.........................................................37
Stylus and data entry................................................30
Stylus, Using............................................................24
Suspend Mode, How To..........................................24
Suspend Timer.........................................................36
System Idle Timer ...................................................36
System Status LED..................................................29
T
M
Microphone on headset............................................23
Mode timers, Power.................................................36
Mounting brackets...................................................16
Multi-Charger
Features...............................................................47
Multifunction cables................................................14
O
Operating Temperature
Battery................................................................... 2
HX2.......................................................................2
Timer
User, System, Suspend........................................36
Touchscreen and data entry.....................................30
Touchscreen calibration...........................................24
Transcribing and data entry.....................................30
Triple Tap key maps................................................57
Triple Tap keypad....................................................28
Troubleshooting, Quick Start...................................20
U
User Idle Timer........................................................36
V
P
Power key................................................................24
Power Scheme.........................................................36
Prerequisites ............................................................19
Protective film.........................................................41
HX2 User’s Guide E-EQ-HX2OGWW-D
Virtual keyboard
Input panel .......................................................... 33
Voice case assembly................................................42
Voice data and data entry ........................................32
Volume
adjust audio volume............................................37
Page 75

Index 69
W
Warmboot................................................................25
Warnings and Labels
Ring Scanner.........................................................3
E-EQ-HX2OGWW-D HX2 User’s Guide
Page 76

70 Index
HX2 User’s Guide E-EQ-HX2OGWW-D
 Loading...