

Page 1
C5C5
Instruction Manual
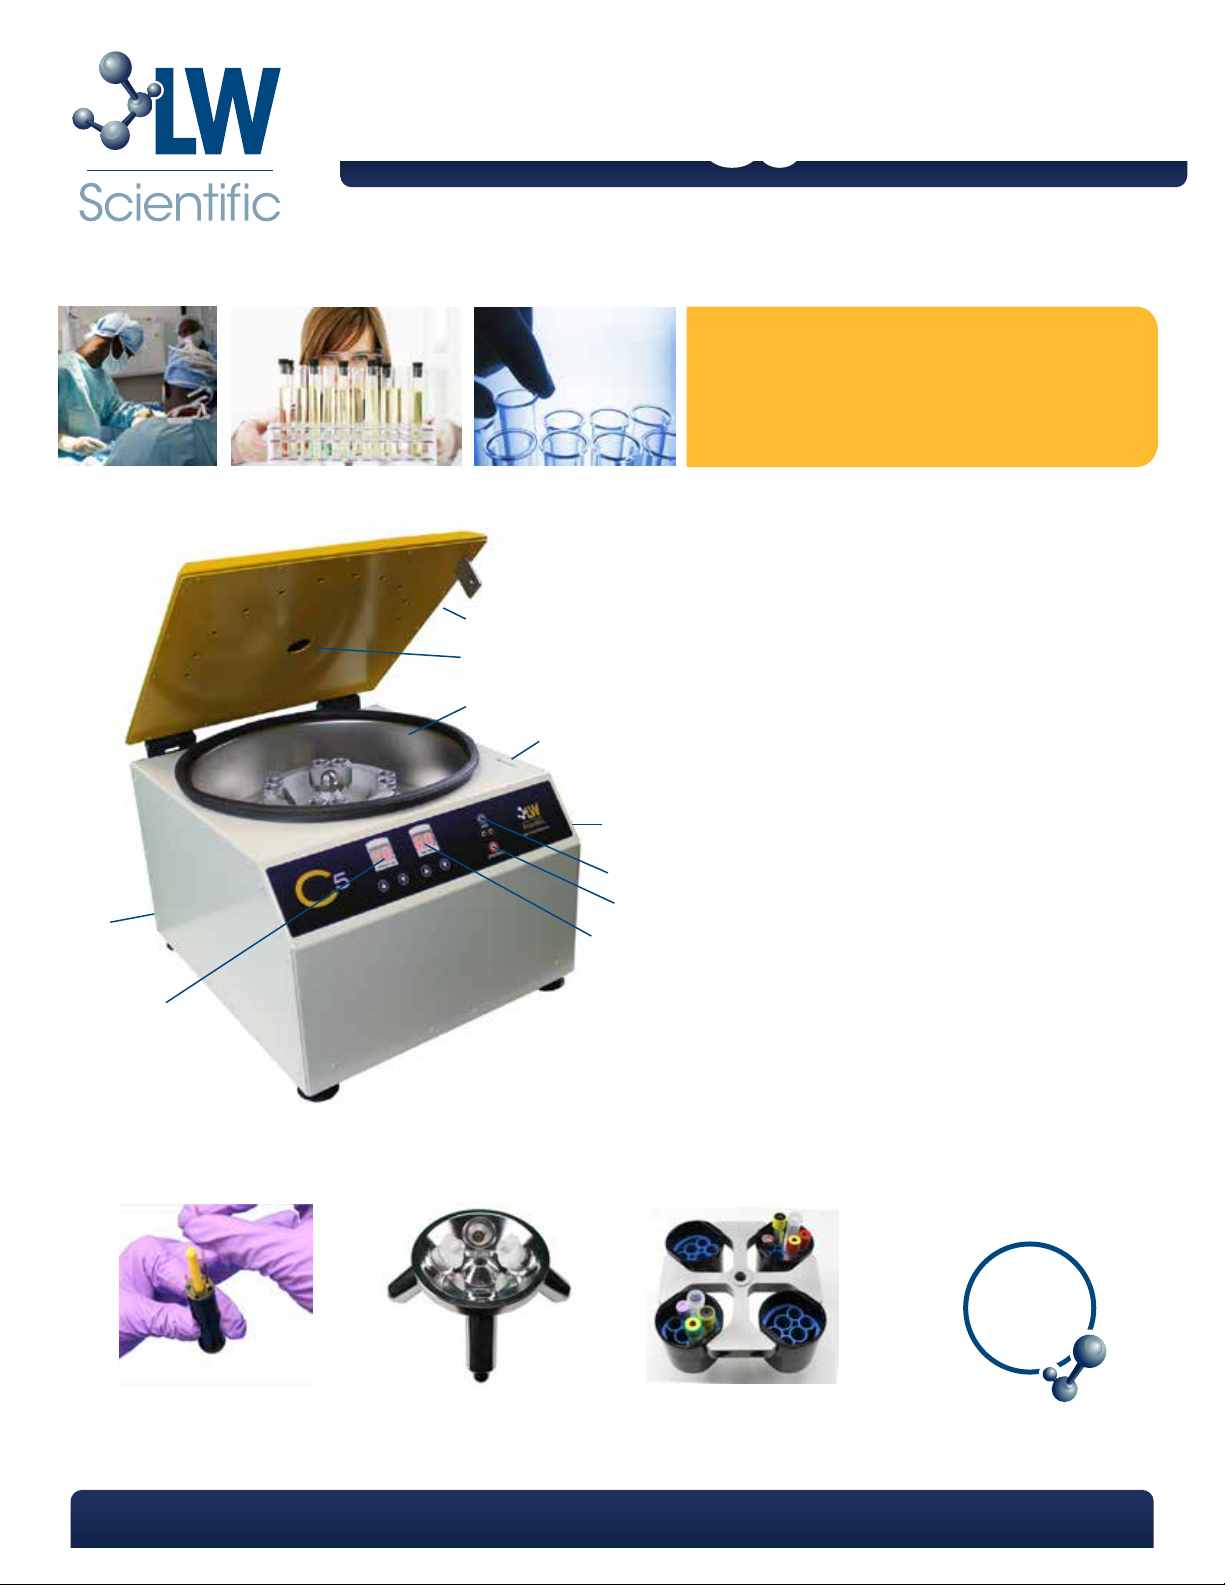
Model pictured:
C5 Centrifuge
Not all features available on all models see back page for model specifications.
A Lid
B Calibration Window
C Bowl
A
B
C
D
E
F
G
J
H
D Zero-rpm Lid Latch
Lid-Closed Safety Switch
E Manual Lid Latch Override
F Run Button
G Open-Lid Button
H Digital Timer
I Digital Tachometer
J On / Off Switch
5amp Fuse (both on rear)
I
Crit-Carrier
(For Vet Use Only)
P. 770.270.1394 F. 770.270.2389 865 Marathon Parkway Lawrenceville GA 30046
Irap Rotor
Recommended
Upgrades:
Ask your
authorized LWS
dealer about
additional
accessories
Bucket Rotor
Page 2

Introduction
The newly-redesigned C5 Centrifuge is now designed, engineered, and assembled in the United States. It is available
with multiple rotor configurations, including the standard 8-place 15ml horizontal swing-out rotor, a 24-place 10ml
horizontal bucket rotor, a 4-place horizontal 50ml bucket rotor, as well as many custom rotors for specialty devices. The
C5 features programmable, digital controls and variable speeds up to 5,000 rpm (4,250g) for the swing-out rotor and up
to 4,000 rpm for the bucket rotor, which produces platelet-poor-plasma in minutes. Select slower speeds for other
samples such as urine sediments, fecals, semen, etc. Simply program the time and speed, and touch the start button.
The C5 features double-walled metal construction and a lid that remains locked until the rotor has come to a complete
stop to meet the strictest safety standards in the lab. Maximum tube size for the standard 8-place 15ml rotor is 128mm
long by 17.5mm diameter.
Unpacking and Set up
What’s included:
•C5 Centrifuge •3-prong AC Power Cord •Manual Lid Release Tool
•Rotor Wrench •Two 5-amp 250v Spare Fuses •Motor Shaft Nut (holds rotor in place)
•8-place Rotor* •8 Tube shields* •8 Tube Sleeve Inserts (for small tubes)*
*Some customers may order a bucket rotor or specialty rotor, and will not receive the 8-place rotor. Bucket rotors
include 4-place rotor, 4-metal buckets, and 4 inserts to hold tubes.
LW Scientific packs each C5 centrifuge with utmost care. All units undergo a QC check prior to shipping from LW
1
Scientific headquarters in Lawrenceville, GA to ensure proper operation. Examine the outer and inner containers for
any visible damage, and retain the packing material. If there is visible damage, please contact the shipper or your
distributor, as our warranty does not cover shipping damage.
Remove the centrifuge from the shipping container and inspect for possible shipping damage. DO NOT OPERATE THE
2
CENTRIFUGE AT THIS POINT.
Please read and complete the warranty form online at LWScientific.com/warranty_form. The warranty form
3
documents your purchase. Failure to fill out the warranty form may void any warranty claims on the unit.
Place the centrifuge on a sturdy, level surface. Plug the power cord into the appropriate power outlet.
4
Turn the power on with the on/off switch on the back of the unit. The power light and digital display should light up.
5
DO NOT OPERATE THE CENTRIFUGE AT THIS POINT.
The lid on the C5 remains locked while at rest and while spinning. To open the lid while at rest push the STOP/OPEN
6
button, then press on the front right corner within 7 seconds to release the lid lock. After 7 seconds, the lid will relock. If
power fails, the lid can be manually opened by inserting the Manual Lid Release Tool (or a small screwdriver) into the
release hole on the front right side of the unit.
Inspect the chamber. Remove all packing material from the chamber, install the rotor (see insert instruction page),
7
and ensure that all the tube shields are in place. Make sure that no tube shields or tube cushions or other pieces have
fallen loose into the bowl. Make sure that the rotor nut is tight using the included Rotor Wrench. DO NOT OPERATE THE
CENTRIFUGE AT THIS POINT.
If you purchased the 8-place rotor, eight rubber tube cushions are included to accommodate smaller tubes. Make
8
sure that all shields and cushions are balanced on the rotor at all times. Proceed to “Operation”.
Troubleshooting
No power: Plug into another outlet. Check the 2 fuses (fuse filament should be visible).
Wobbles and shakes: Remove all tube shields and clean them out. Check for cushions or dried fluids
in tubes. Test run without tube shields or buckets in place.
Makes excessive noise: Tighten rotor nut.
Breaking tubes: Turn the speed down. Check your tube limits. Discard old tubes and try new
ones.
Lid won’t open: If power fails, you must override the lid-lock by pushing the supplied Manual
Lid Release Tool or a small screwdriver into the hole in the side of the unit to
manually disengage the lock while gently pressing downward on the lid.
Page 3

Operation
Do not insert test tubes at this time. Close the lid, and press down until you hear the lid lock click. Set the speed to
1
“10” (1,000 rpm) and the time to “5” minutes.
Start the unit by pressing the RUN button. The unit should come up to speed with a smooth sound and little or no
2
vibration. If there is excessive vibration or noise, shut off the unit immediately, check the troubleshooting tips, and
contact LW Scientific if not resolved.
Now turn the speed up to the highest setting of “50” for the swing-out rotor or “40” for the bucket rotor, and check
3
for smooth sound and little vibration. If there is excessive vibration or noise, shut off the unit immediately and contact
LW Scientific. The unit is now ready to be loaded.
ALWAYS BALANCE THE LOAD. Be certain to balance tubes of equal weight across from each other on the rotor. You
4
can only balance 2, 4, 6, or 8 tubes at a time on an 8-place rotor and similarly even increments in a 24-place bucket
rotor. If you need to spin only one tube, you must use another tube filled with similarly equal fluid (or water) to
balance the rotor. If spinning fecals, use the same fecal solution in the balance tube, because water is much lighter
than the dense fecal solutions (for Fecal Hints, please contact LW Scientific). Proper balancing will improve sample
separation and will extend the life of the centrifuge. Spinning out-of-balance loads may break tubes, and can cause
damage to the unit which will not be covered under warranty.
ALWAYS MAKE SURE TUBES ARE SUPPORTED FROM THE BOTTOM, using proper tube shields and/or rubber tube cushions.
5
Never allow a tube to hang by its cap on the rim of the tube shield, which can cause the stopper top to pop off and
the tube to break as it hits the bottom of the shield. The cap may also cause damage inside the bowl. Damage due
to improper loading will not be covered under warranty.
KNOW THE G-FORCE LIMITS OF YOUR TUBES. The C5 at full speed will produce enough g-force to break some low-cost
6
types of tubes. Be certain that you are not exceeding the recommended g-forces for the brand of tubes that you
are using.
NEVER FORCE A TUBE INTO THE SHIELDS. Tubes should fit easily into and out of the tube shield. Make sure the tubes do
7
not exceed the length limits listed in the “Introduction”, or the tubes may hit the top of the lid and break upon
start-up.
*Please see diagram for tube requirements of the 24-place bucket rotor.
2-9ml 2-9ml
10-15ml
Once loaded, select the desired speed and time and start the centrifuge. The C5 cannot be opened while the rotor
8
is turning. Note: The maximum speed for the bucket rotor is 4,000 rpm.
Once the unit has completed the cycle and come to a complete stop, an audible BEEP will sound. The lid lock will
9
disengage for 7 seconds, at which time you should push on the front right corner to release the lid. The lid will relock
after 7 seconds for safety. To unlock later, simply push the OPEN/OFF button and press the lid again.
IMPORTANT: Time and speed values from the previous 4 cycles are automatically saved into memory. To recall
previous values, press the STOP/OPEN button while the lid is open. This convenient feature will save time when
switching between processes.
With proper care and maintenance, your C5 centrifuge will provide years
Care and Maintenance
Use only high quality test tubes. Lower quality or inexpensive glass or plastic tubes may fracture and release their
1
contents into the tube chamber. Make sure you know the maximum force allowed for the tubes you are spinning.
Never force a tube into the tube shield. The tube shields and cushions were designed to accommodate most
2
common sizes of tubes.
of laboratory service. Please follow these guidelines:
Keep the tube shields clean. If a tube breaks inside a shield, clean all the debris from the shield and bowl and
3
disinfect.
Motor and electrical maintenance: The C5 uses a maintenance-free brushless motor and its bearings are
4
permanently lubricated. It should not need servicing for the life of the unit. Likewise, the electrical components
were designed for high reliability and should not need regular service. However, if repairs are needed, please
contact LW Scientific.
P. 770.270.1394 F. 770.270.2389 865 Marathon Parkway Lawrenceville GA 30046
Page 4

Care and Maintenance Continued
Because of the safety issues with high g-forces in a centrifuge, it is recommended that rotors, buckets, and tube shields
be inspected every 6 months for corrosion and fatigue. If there is any indication of wear, the rotor, buckets, and tube
shields should be removed from service. Contact LW Scientific for return instructions, so the rotor can be evaluated by an
LW Scientific technician for repair or replacement. It is also recommended that after 2 years of service rotors, buckets,
and tube shields be returned to LW Scientific for inspection. Following these procedures will ensure safety of lab personnel
as well as extend the life of the centrifuge.
*Please note the following procedures are for the 8-place rotor ONLY.
Radius with cushions
G-Force and Spin Time are the most
important considerations for proper
fluid separations. G-force is a function
of radius and speed, and varies with
different centrifuges and rotor
configurations. The following are
commonly recommended separation
settings. Please refer to your tube
manufacturer and/or medical
procedures manuals for the correct
G-force and spin times for each fluid,
tube type, and procedure.
Warning: Some types of tubes
cannot withstand the high G-forces
produced at full speed in the C5,
and tube breakage may result from
improper speed settings.
Blood can be separated at G-forces
between 1,200 and 4,250 G’s, and
at spin times between 2 minutes
and 15 minutes depending upon
tube type and procedure.
Common routine blood separations
are performed at 1,500-2,000 G’s
(3,000-4,000 rpm) for 8-10 minutes,
and platelet-poor-plasma
separations are done at 4,250 G’s
(5,000 rpm) in 6-8 minutes.
Motor
Radius with no cushions
RotorRotor Nut
Serum
Blood
Urine
Semen
3,000+ rpm 10 min.(1,500+ g)
1,600 rpm
1,600 rpm 10 min.(400 g)
Fecals 1,300 rpm 6 min.
G-Force = 1.118 (R) (N/1,000)
R: radius in millimeters N: rpm’s
Specifications
Speed Range: Swing-out: 500-5,000 rpm
Bucket: 500-4,000 rpm
Max Force: 4,250 G-force
Max Volume: 240 ml (24-place)
120 ml (8-place)
Fuse: 5 amp / 250 v
Motor: Brushless DC
Height: 12.63” (320 mm)
Length: 18.13” (460 mm)
Width: 15.5” (393 mm)
Weight: 39 lb (17.7 kg)
(Not including rotor)
Gel
Tube Cushion
Red Cells
(280 g)
Tube Shield
5 to 10 min.(400 g)
2
G-Forces:
RPM’s
1,000
1,300
1,600
1,800
2,000
2,500
3,000
3,500
4,000
4,500
5,000
Fecals
Urine / Semen
Blood
Large Tube Sleeve
(152mm radius)
G-Force
170
287
435
551
680
1,062
1,529
2,082
2,719
3,441
4,250
Small Tube Sleeve Insert
(117mm radius)
G-Force
131
221
335
424
523
818
1,177
1,602
2,093
2,649
3,270
The C5 Centrifuge is intended for use as a Class 1 Medical Device
MKT-7.5.3-L-170 | Rev 1
 Loading...