

Page 1
Student Scopes
Instruction Manual
A
A
A
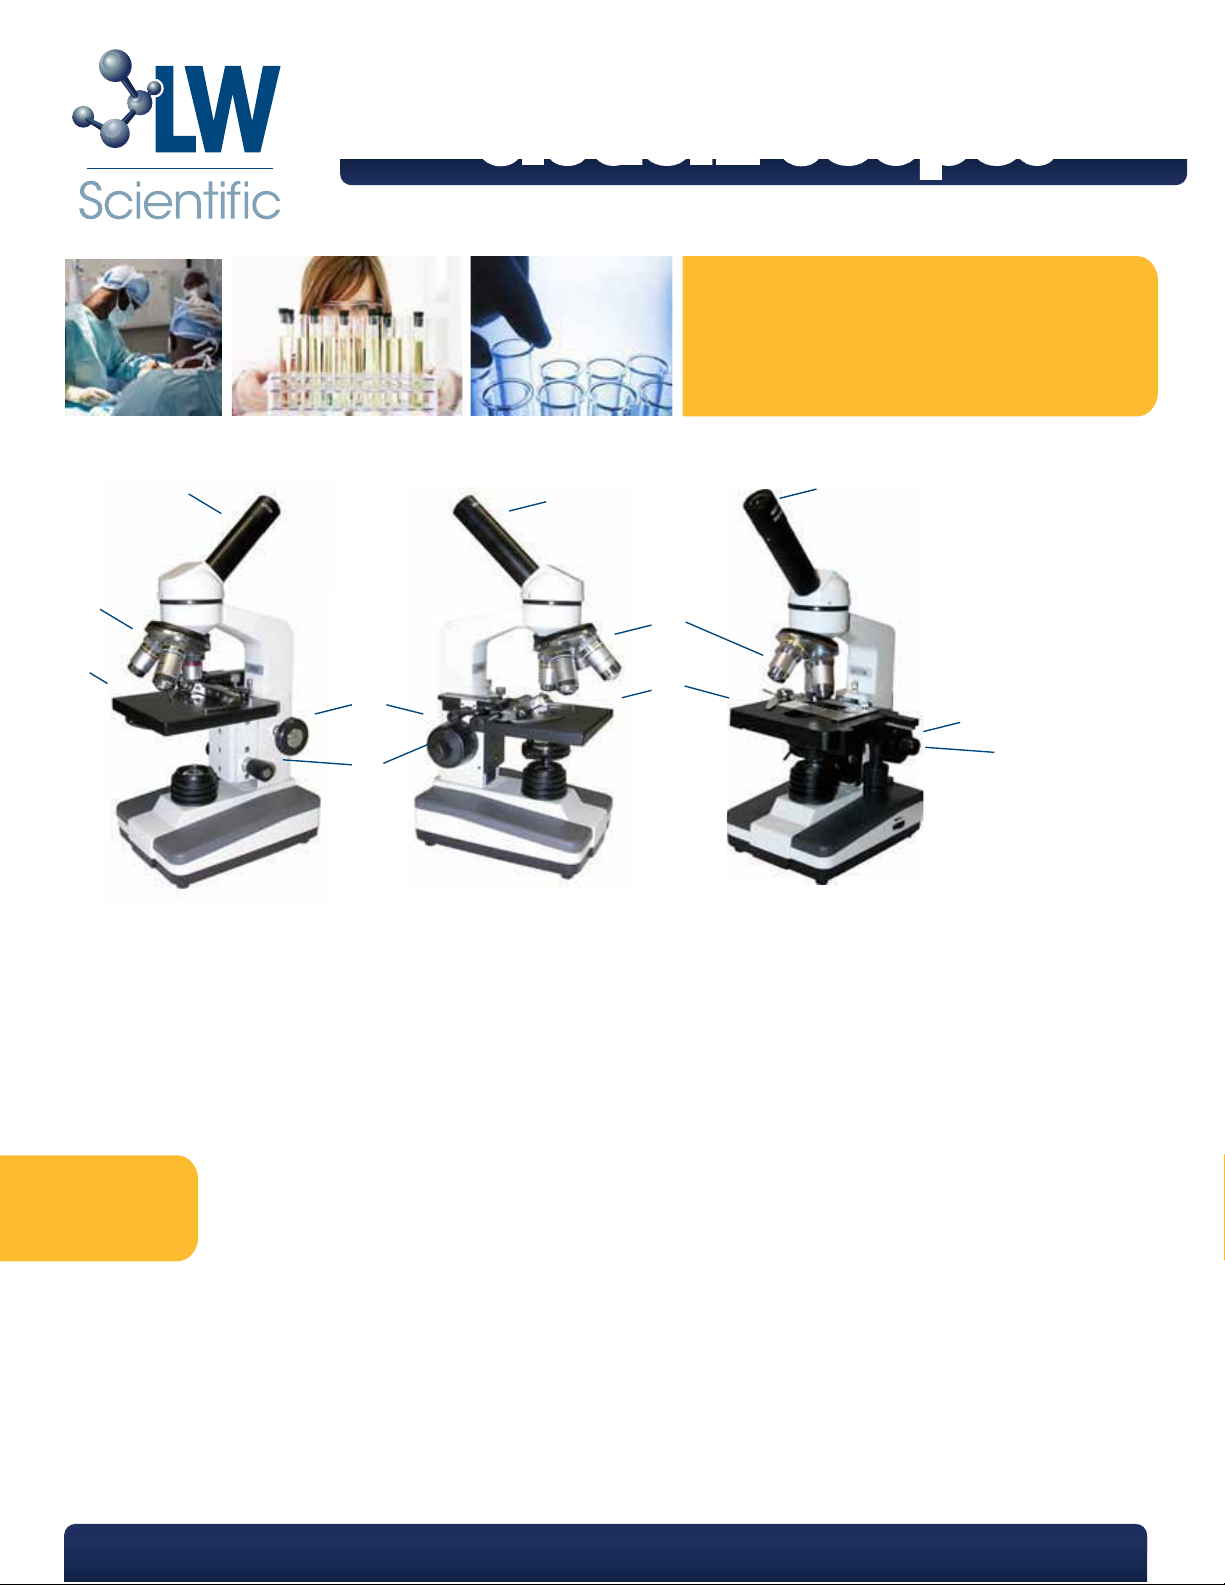
A Eyepiece
B Objectives
C Stage
D Coarse Focus
E Fine Focus
C
B
D
B
C
D
E
E
Standard Advanced Pro
Introduction
LW Scientific is an international manufacturer of quality microscopes and optical equipment. Thank you for your purchase of a Student
Series microscope.
Should you have any questions regarding your new purchase, we have factory-trained technical support staff available to take your call.
Feel free to contact us with any questions or comments you may have.
Your microscope is packaged in form-fitting molded Styrofoam for safe transportation to you. Please inspect the outer
Setup
Your microscope should include the following parts:
1-Microscope body 1-This Instruction Manual
1-10x eyepiece with pointer (Installed) 1-Dust Cover
3-Objectives 4x, 10x, 40x (Installed) 1-Warranty Card
*Models Advanced and Pro will also include a 100x oil objective and a vial of immersion oil.
If any parts are missing, contact your distributor or LW Scientific.
and inner cotnainers for any visual damage. If there is damage, please contact the shipping company to place a claim.
Remove the microscope from the packing material and set on a stable at surface. Remove any tissue or protective
plastic from the stage, eyepiece, and objectives.
P. 770.270.1394 F. 770.270.2389 865 Marathon Parkway Lawrenceville GA 30046
MKT-7.5.3-L-037 | Rev 0
Page 2
Mechanical Stage Installation (Only for Student Advanced model)
If you ordered a Mechanical Stage with your microscope, install it now. First, remove the stage clip on the stage with a Phillips
head screwdriver. Now, set the mechanical stage on top of the stage and align the posts on the mechanical stage with the appropriate holes on the stage. Once it is seated, tighten the thumb screw on the back of the mechanical stage.
For information on purchasing a mechanical stage, please contact your LW Scientific dealer.
*Student Pro will come with a “true built-in mechanical stage.”
Operation
Turn the light source on using the on/off switch on the back of the scope. If you have the fluorescent model, it will flicker several times
1
before illuminating. If the light does not come on, first check to ensure that the bulb is properly seated, then call LW Scientific technical
support.
2
Place a prepared slide onto the stage, under the stage clips or in the mechanical stage.
3
Position the slide so that the specimen is centered underneath the objective.
Turn the nosepiece to the 4x objective and look through the eyepiece.
4
Using the larger, coarse focus knob, bring the image into focus. To perfect the image, use the smaller, fine focus knob.
5
6
Now switch to the 10x then 40x objectives, adjusting the focus slightly.
To adjust the brightness and contrast, adjust the diaphragm located under the stage. Depending on which model you purchased, the
7
diaphragm may consist of a disk with different sized holes or an iris.
Using the 100x Oil Immersion Objective
If you purchased the model Student Advanced, then your scope includes a 100x oil objective. To focus clearly, this objective requires
use of immersion oil.
First, focus on the target spot using the 40x objective. Rotate the nosepiece between the 40x and 100x objective and place a drop of
the included immersion oil over the target. Rotate the 100x oil objective into place and focus carefully using the fine focus adjustment.
Do NOT use oil with any other objective.
When finished, clean the tip of the objective and your slide with lens paper and lens cleaning fluid available at camera supply stores or
contact your LW Scientific dealer for information on our Microscope Cleaning Kit.
Caution: Unplug the microscope before attempting to replace the lamp.
Lamp Replacement
After unplugging the microscope, turn the microscope on its side and remove the four screws inside the four rubber feet using a Phillips
head screwdriver. Then, gently remove the base.
Fluorescent Units: Being careful not to come in contact with the surrounding electrical components, grasp the base of the fluorescent
lamp and gently slide/wiggle it out. Insert the new lamp.
LED Units
- Unscrew the base condenser counter clockwise and remove it
- Unscrew the outermost screws using a 2 mm allen wrench
- Pull the LED with hear puck vertically out until the quick disconnect is exposed
- Disconnect the quick disconnect
- Reverse the procedure with your new LED assembly
Replace the base and return the microscope to the upright position. To purchase a replacement bulb, you may contact your local home
improvement or lighting store, your microscope dealer, or LW Scientific.
The bulb on your microscope will need to be replaced occasionally depending on
the amount of use.
P. 770.270.1394 F. 770.270.2389 865 Marathon Parkway Lawrenceville GA 30046
 Loading...