

Page 1
Revelation IIIRevelation III
Instruction Manual
Model pictured:
Not all features available on all models see back page for model specifications.
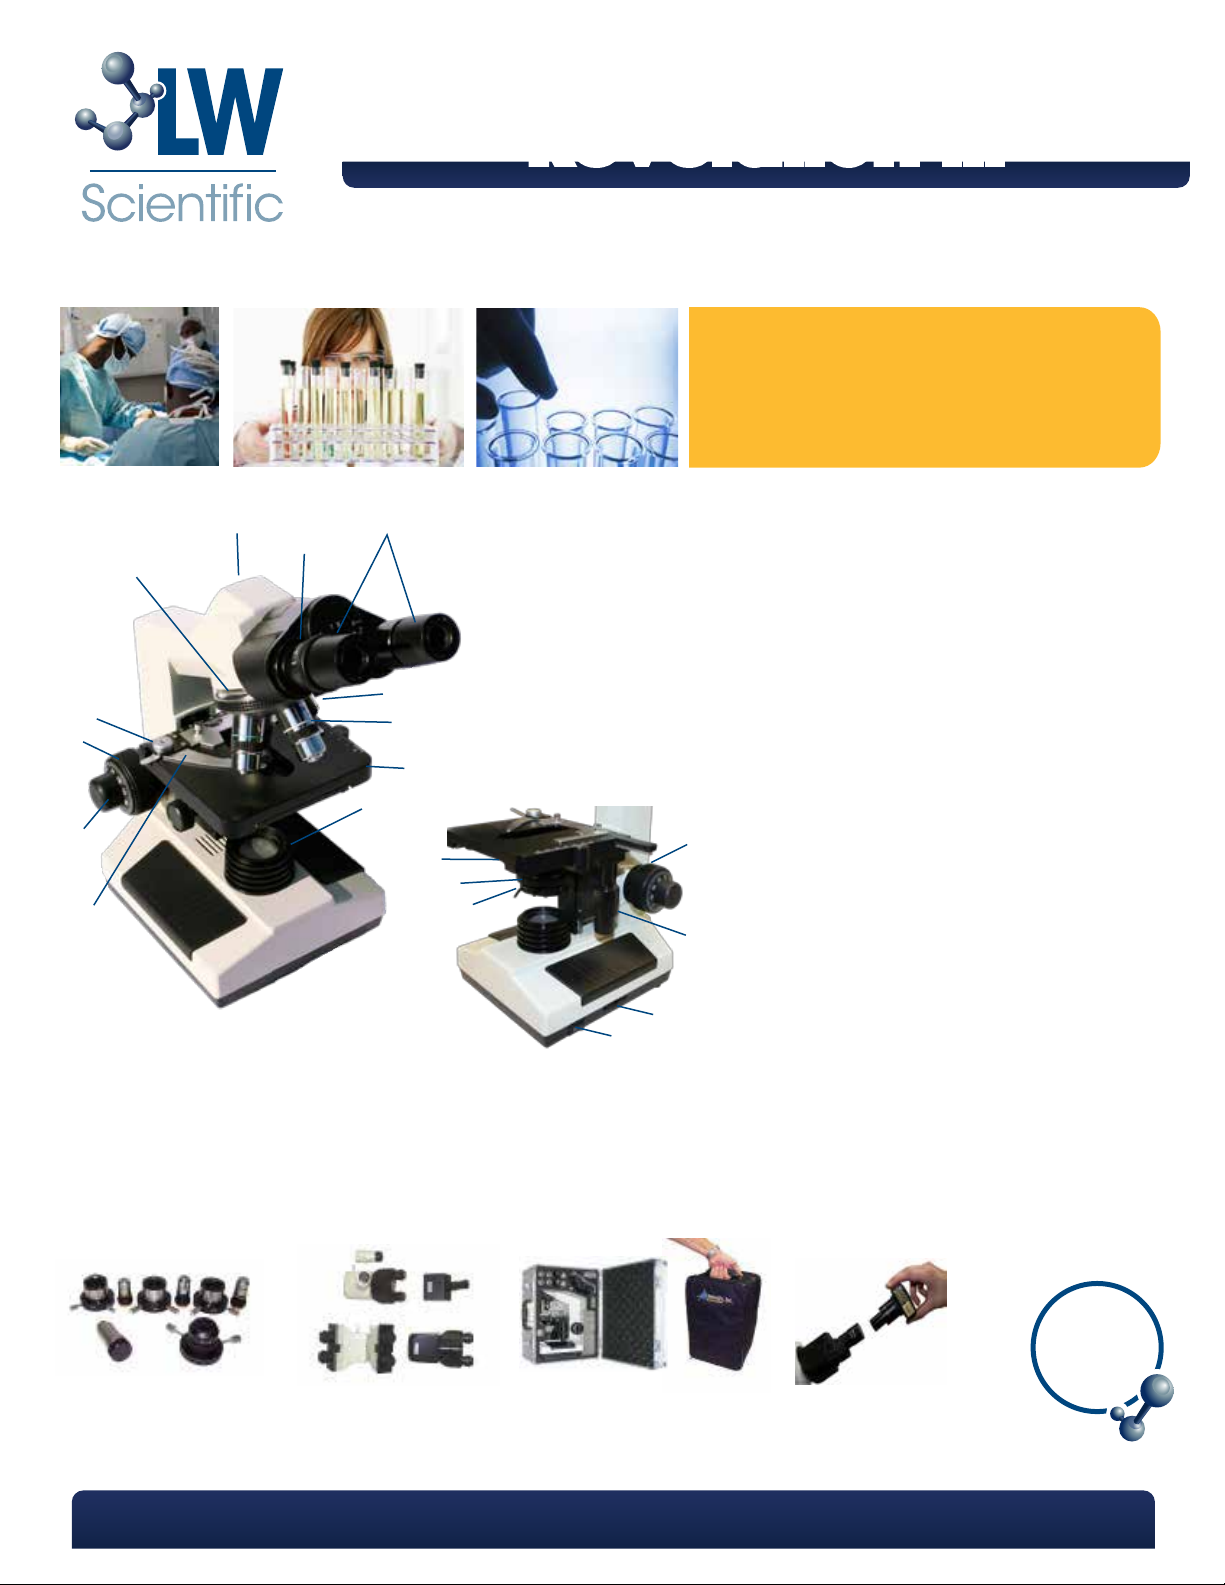
Revelation III
F
G
P
D
B
A
S
R
C
Q
O
K
E
L
M
N
H
I
J
A Single Diopter Adjustment
B Binocular Head
C Head Retention Screw (side)
D Stage Stop Lever
E Friction Adjustment
F Coarse Focus
G Fine Focus
H X/Y Axis Stage Controls
I Brightness Control
J On Switch
K Base Condenser
L Flip-out Filter Holder
M Substage Iris Diaphragm
N Substage Abbe Condenser
O Stage
P Slide Holder
Q Objectives
R Nose Piece
S Eyepieces
Introduction
The LW Scientific Revelation III microscope is our best-selling medical-grade compound microscope, popular in physician
and veterinary offices as well as universities and medical schools. Its crisp optics, sturdy design and proven track record
makes the Revelation III the best choice for superior performance at an economical price.
Recommended
Upgrades:
Ask your
authorized LWS
dealer about
additional
accessories
Phase and Dark Field
P. 770.270.1394 F. 770.270.2389 865 Marathon Parkway Lawrenceville GA 30046
Four Head Choices
Carry Cases Camera Attachments
Page 2

LW Scientific packs each Revelation III Microscope with utmost care. Examine
Unpacking and Setup
not cover shipping damage. If you are uncertain who the shipper is, contact the distributor where you purchased the
microscope. Please retain all packaging material for future use. Carefully unpack** your Revelation III Microscope using
the following checklist for all the parts and accessories:
the outer and inner containers for any visual damage. Retain all of the
packing material until you have examined and tested your new microscope. If
there is damage, please contact the shipping company, as our warranty does
1 - Microscope body with Abbe condenser
2 - 10x eyepieces
1 - Binocular head (Seidentopf style)
1 - Mirror and attachment device for field use
2 - Filters (blue & green)
4 - Objectives 4X, 10X, 40XR, 100XR (oil)
1 - 0.5 amp replacement fuses
1 - Spare 12v/20w Halogen Bulb (type G4-JC)
1 - Immersion oil
1 - Dust cover
**Note: Some parts may be packed in the
outer recesses of the Styrofoam blocks
Assembly
Remove the body of the microscope and place it on a sturdy, dust-free surface. Remove the plastic plugs in the nose
1
piece. Install the objectives in such a way that when you turn the nosepiece clockwise, you are moving from the 4x,
Remove the microscope head from the Styrofoam carton and pull off the protective covers from the
2
eyepiece tubes and head mount. Insert the head mount into the upper arm of the body. Using the
head retention screw, secure the head in place. Note: Do not over-tighten.
Insert the 10x eyepieces.
3
For protection during shipping your Rev III is shipped with the stage locked in low position. To disengage the lock,
4
pull the STAGE LOCK LEVER towards the rear and downward. The stage should now move upward freely.
Attach the power cord.
5
Caution: Unplug the microscope and let it cool down if recently in use before
Lamp Replacement
*Halogen only
Turn the scope on its side. (We recommend that you place a cushion or soft cloth under the microscope to protect
against damage.) Loosen the silver thumb screw located on the lamp compartment door until the door swings open.
Gently pull the old bulb out and discard.
Using a lint-free tissue or piece of cloth to hold the new lamp, install the bulb. Close and lock the bulb door, and plug the
microscope in to the appropriate AC outlet. Ensure that the new bulb is perfectly centered below the lens assembly by
turning the light on to the dimmest setting and looking upward through the vent holes in the bulb door.
The circuit board, in the base of the unit, contains all the electrical functions. There are no user
Power
INPUT: AC 110 or 220 / 50-60 HZ.
OUTPUT: 12v output supports from 20w quartz halogen G-4 bulb (LWS replacement part R3P-BLBH-1220)
FUSE: One 0.5-amp fuse protects the circuit board from electrical overload. The fuse is located on the bottom of the
scope. Spare fuses were included with your scope. When replacing the fuse, always install a new one of the same size
and amperage.
repairable parts on the circuit board. If you suspect a faulty board, call LW Scientific’s technical
service department at 800-726-7345.
opening the base of the microscope. When handling a new quartz lamp, be careful
not to touch the new lamp with your fingers. Oil and sweat on the bulb may cause it
to explode or shatter as it heats up.
Page 3

Operation
Once you have assembled all the parts and allowed your microscope to come to room temperature, plug the
1
power cord into the appopriate AC outlet. Note: Excess cold can fog lenses and cause lamp to fail.
Turn the light on using the black on/off switch on the right side of the base. Next adhust the light intensity using the
2
brightness control wheel located on the right side just behind the on/off switch. Note: Rapid, repeated changes in
light intensity will dramatically shorten the life of the quartz halogen lamp.
3
In order to become acquainted with the controls, choose a specimen slide with which you are familiar. For example, an old hematology slide or a commercially prepared slide. Place the slide into the slide holder by pushing back
on the thumb guard to open the slide finger. The slide finger closes slowly to eliminate the possibility of chipping the
corner of your slide when it closes.
4
Move the slide to the center of the stage, by turning the stage control knobs, located just below the stage. These
knobs allow you to move the slide on the X-Y axis (forward/backward and left/right).
5
The sub-stage iris should then be set to match the aperture of the objective for maximum resolution under each
objective power. You should begin with the 4x or 10x objective.
4x objective 1.0 N.A. (nearly closed) 40x objective - 0.65 N.A. (halfway closed)
10x objective - 0.25 N.A. (1/4 closed) 100x objective - 1.25 N.A. (wide open)
6
Insert the filter of your choice into the swing-out filter holder beneath the Abbe condenser. Note that many customers prefer to use the blue filter for routine use.
Once you are comfortably seated, look into the oculars and move the eyepiece tubes together or apart until you
7
see only one complete circle of light. You have now adjusted your interpupillary distance.
Using the 4x or 10x objectives and the coarse and fine adjustment knobs, bring the specimen into focus. Now,
8
move the 40x objective into place. You will feel a “clicking” action when the objective is seated properly. Again,
adjust focus for best image. You should also adjust the iris diaphragm (as listed above) for the best contrast and
resolution.
9
Diopter Adjustment: Since you are using a binocular microscope, you have to adjust the normal difference in vision
between your two eyes. This is a simple but critical adjustment! Close your left eye and look into the right ocular with
your right eye. Adjust the one focus to give you the best image. Now look at the ocular tube on the left. You will see
that the left ocular tube has a built-in adjustment ring. Now close your right eye and look with your left eye into the
left ocular. Using the diopter adjustment ring on the left ocular tube, adjust the focus until you see a clear, focused
field.
Friction Adjustment: With repeated use and wear, the stage may drift out of focus. If this happens, you need only to
10
tighten the tension control ring (located on the right side of the microscope between the coarse adjustment and
the body of the microscope). If the coarse focus is hard to turn, you may choose to loosen the friction adjustment.
11
Stage Stop Lever: To help prevent the stage from hitting the objectives, the Revelation III Microscope is equipped
with an adjustable stage stop. Rotate the 100x oil objective into place, and put a slide into the slide holder. Slowly
raise the stage, stopping when the slide makes contact with the objective. Now, turn the stage stop lever in a
clockwise direction toward you. The stage stop lever is located on the left side of the microscope between the
coarse adjustment and the body of the microscope.
12
Revelation III Microscope will be parfocal when the diopter adjustments are both set to center (see 9 above).
P. 770.270.1394 F. 770.270.2389 865 Marathon Parkway Lawrenceville GA 30046
Page 4

Maintenance
Always cover your microscope with the dust cover when not in use.
1
When cleaning the lenses, use lens paper or a cotton swab dipped in lens cleaning solution.
2
Excess oil should be cleaned off your 100x objective and stage at once. An alcohol pad is best for removing oil from
3
the stage and on the other metal parts, but is not recommended for use on the lenses. Use lens cleaning solution and
lens paper to clean off your objectives.
4
Dust in the nosepiece or ocular tubes should be blown out using filtered air. Canned air dusters work well for this job.
Whenever you remove an objective, we recommend that you place it back into the original plastic shipping vial until
5
ready to be placed back on the microscope. SCREW THE OBJECTIVE SECURELY INTO THE CAP OF THE HOLDER - DO NOT
DROP OBJECTIVE LOOSELY INTO CONTAINER.
6
To keep your microscope in top condition for years, LW Scientific recommends that you have the microscope
professionally serviced once a year. Warning: The 40x objective is not sealed for oil immersion. Damage to the 40x
objective due to oil immersion is not covered under warranty.
Specifications
Construction
Rugged alloy; acid and reagent resistant finish
Nosepiece
Quadruple hole multiple ball bearing
Head
Binocular (Seidentopf)
Inclined 30°, rotates 360°
Dual diopter adjustment
(Binocular or trinocular versions)
10X/18 wide-field eyepieces
Monocular or Trinocular
Illumination
Moveable Abbe Condenser (NA 1.25)
Iris Diaphragm
Swing-out filter holder with blue and green filters
20 watt quartz halogen light (12v 20w JC-G4 bulb)
Input 110 and 220V manual switching / 50-60Hz
Stage
Mechanical stage
(140 mm x 140 mm) – coaxial drive controls
Range of traverse is 73 mm x 43 mm
Dimensions and Weight
Weight: 14 lbs / 6.4 kg
Height: 15" / 380 mm
Length: 9" / 230 mm
Width: 7" / 178 mm
Shipping weight: 17 lbs/ 8kg
Objectives
DIN Achromatic,
DIN Semi-Plan or DIN Plan
4X N.A. 0.10
10X N.A. 0.25
40XR N.A. 0.65
100XR N.A. 1.25 (oil immersion)
20X, 50X oil Plan, and 60XR available
Objectives: The following numbers are
based on use with 10x/18 eyepieces.
Size N.A. Mag. Field of View
4X 0.10 40X 4.5 mm
10X 0.25 100X 1.8 mm
20X 0.40 200X 0.9 mm
40XR 0.65 400X 0.45 mm
50XR 0.95 500X 0.36 mm
60XR 0.85 600X 0.3 mm
100XR 1.25 1000X 0.18 mm
Adjustment Controls
Eyepiece: Interpupillary distance adjustment 55-75 mm
Stage Controls: Lateral and forward/reverse positioning;
Etched vernier scales
Coarse Adjustment: Range of 30 mm
Fine Adjustment: Graduation of 2µm
Variable Light Adjustment
Warranty
warranty. This warranty is not valid on normal wear and tear, cosmetic damages caused by chemicals, solvents, and/or
cleaning solutions, as well as acts of God.
Please register your product online at: www.lwscientific.com/warranty_form.
Important: Warranty information must be completed within 30 days of purchase.
When purchased from LW Scientific or from an authorized distributor, LW Scientific Professional
Stereoscopes and Laboratory Microscopes have a life time warranty against defects in materials
and workmanship and one (1) year warranty on electronic components. All other LW Scientific
instruments, including Student Microscopes and Stereoscopes, have a one (1) year limited
MKT-7.5.3-L-055 | Rev 1
P. 770.270.1394 F. 770.270.2389 865 Marathon Parkway Lawrenceville GA 30046
 Loading...