

Page 1

P. 770.270.1394 F. 770.270.2389 865 Marathon Parkway Lawrenceville GA 30046
P. 770.270.1394 F. 770.270.2389 865 Marathon Parkway Lawrenceville GA 30046
Page 2

Table of Contents
Chapter 1. Safety Precautions Notice...................................... 2
Chapter 2. Components and accessories................................. 4
Chapter 3. Camera components.............................................. 5
Chapter 4. Operation................................................................ 6
Chapter 5. Camera Mode Setting and Menu Options........... 9
Chapter 6. Cable Connection Operations............................. 15
Chapter 7. Operations with Software MicroCap V2.0 ........ 18
Specification ............................................................................ 25
Quick Start Guide....................................................................26
1
Page 3

Chapter 1. Safety Precautions Notice
Security Notice
To maintain high quality measurement, do not drop or disassemble
the microscope
Keep the objective lenses and the camera away from sharp objects
Do not twine the power cable or data cable around people’s body
Keep the small items like SD card and remote control away from
children
Precautions Notice
Before using the microscope with other equipments, make sure that
the equipments are properly installed
To prevent electric shocks and fire hazards, do NOT use any other
power source and ONLY use the power supply accessories provided
When the camera is not in use, unplug the power cable
Do not use the power cable provided for other purposes
The plastic bags and boxes protecting the microscope need to be
disposed properly if the protection is no longer required
The digital microscope has advanced technology and high levels of
functionality. To operate this instrument safely users should read the
instruction fully and be aware of the safety hazards.
Caution
Only operate the microscope under the temperature between 0°C
and 40°C
Do NOT expose the microscope to the following environment
high temperature or moisture
where it is close to heat source
places not steady
direct sunshine
The camera on this microscope is not waterproof, please keep it
away from water or rain. In cases when water is spilled on the
appliance, use dry water-absorbent cloth to clean the water
Saltwater or seawater may malfunction the camera
2
Page 4

Do NOT clean the camera with volatile fluid such as alcohol
Only use dry soft clothes to clean the spots on camera lens or LCD.
Do NOT tough any optical components directly with fingers.
Rain or moisture could cause faults to the camera, only keep the
camera in dry place
Do NOT use the microscope outdoor in rainy or snowing weather
If anything that may cause danger to the camera, such as water,
enters inside the camera, switch off the power source immediately
and unplug all the cables connected to the camera.
It is recommended to use a hard drive in a computer to store the
recorded images other than the SD card in the camera.
Notices when using the LCD
! To avoid scratching the LCD surface, keep the camera away
from sharp objects.
! The LCD may display some unexpected black or red spots, this
is a normal phenomenon for an LCD, even it is manufactured
with advanced technologies.
! The unexpected spots displayed on the LCD will not affect the
quality of the image stored in the memory card.
! The deformation of the surface may cause malfunction of the
LCD, so do NOT press or bend the LCD.
3
Page 5
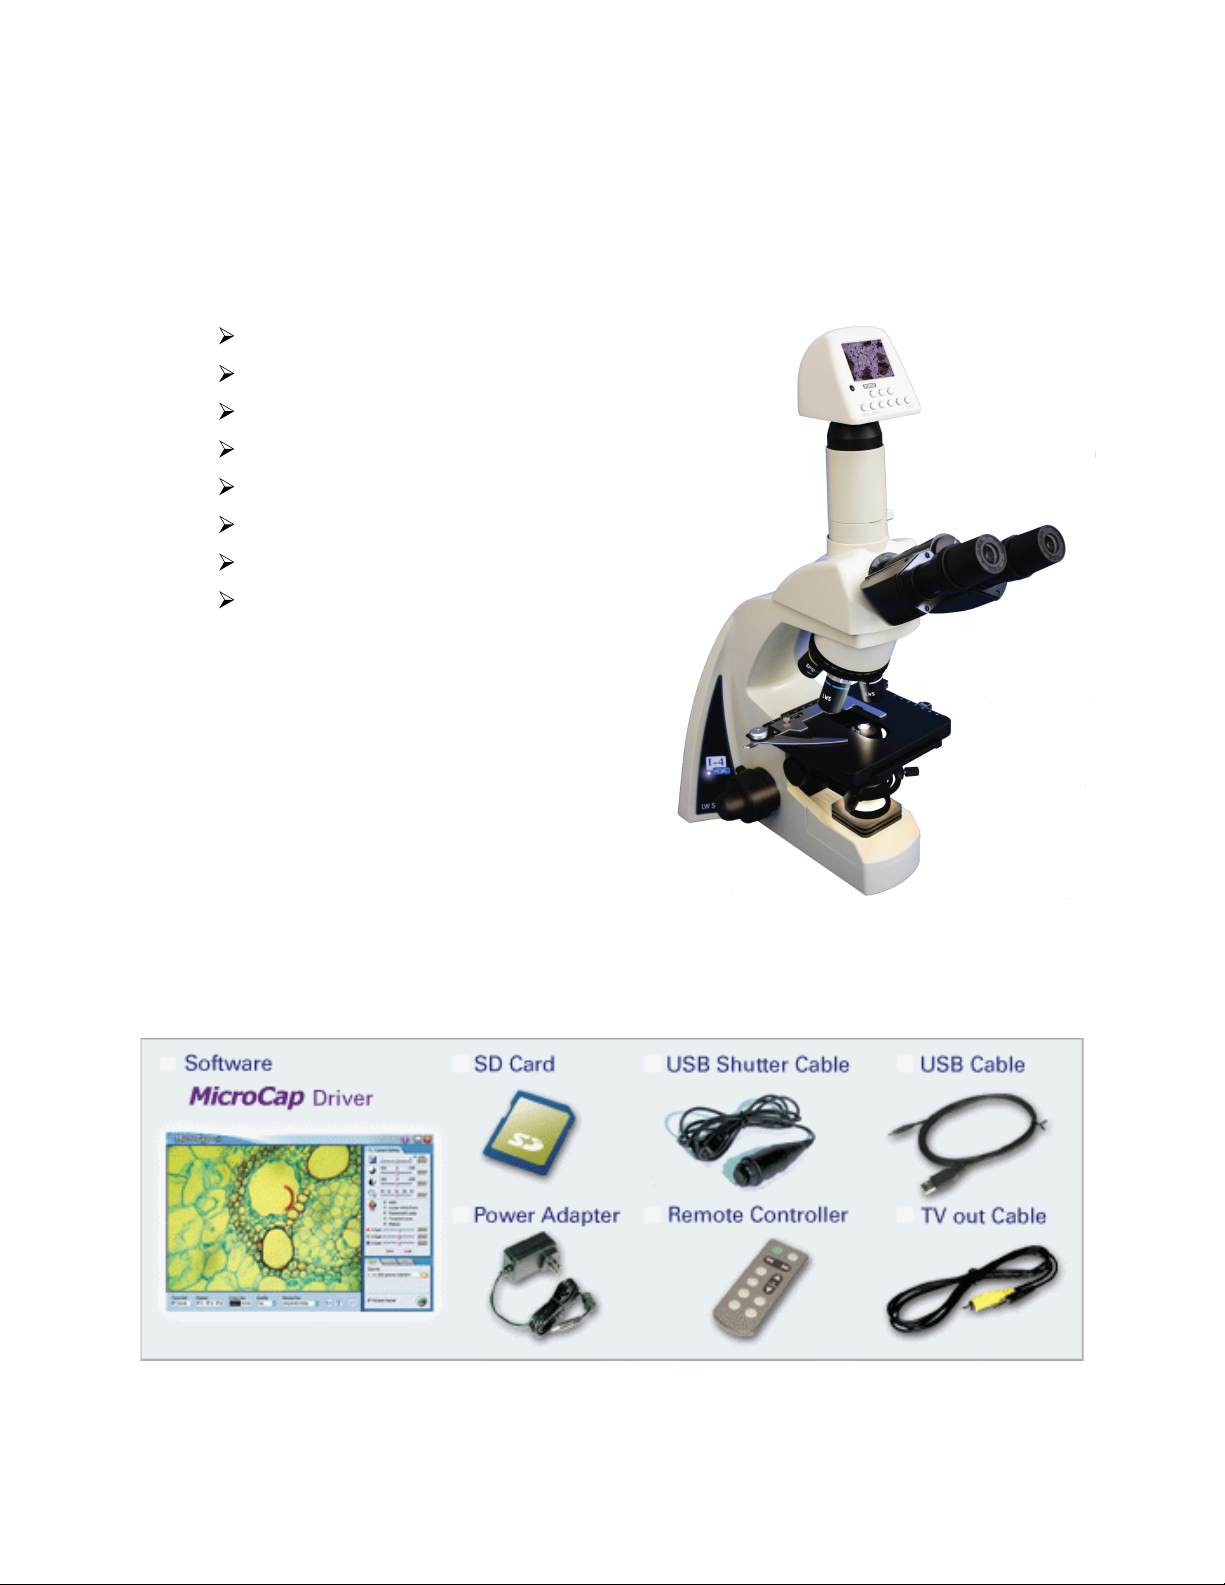
Chapter 2. Camera and accessories
Below is the list of accessories included with the product, please contact
the supplier if any one of them is missing.
OmniVid camera
Power Adaptor
MicroCap V2.0 CD
SD memory card
4
USB Cable
TV-out Cable
Remote Controller
USB Shuttle Cable
OmniVid shown on i4 Infinity microscope
Page 6
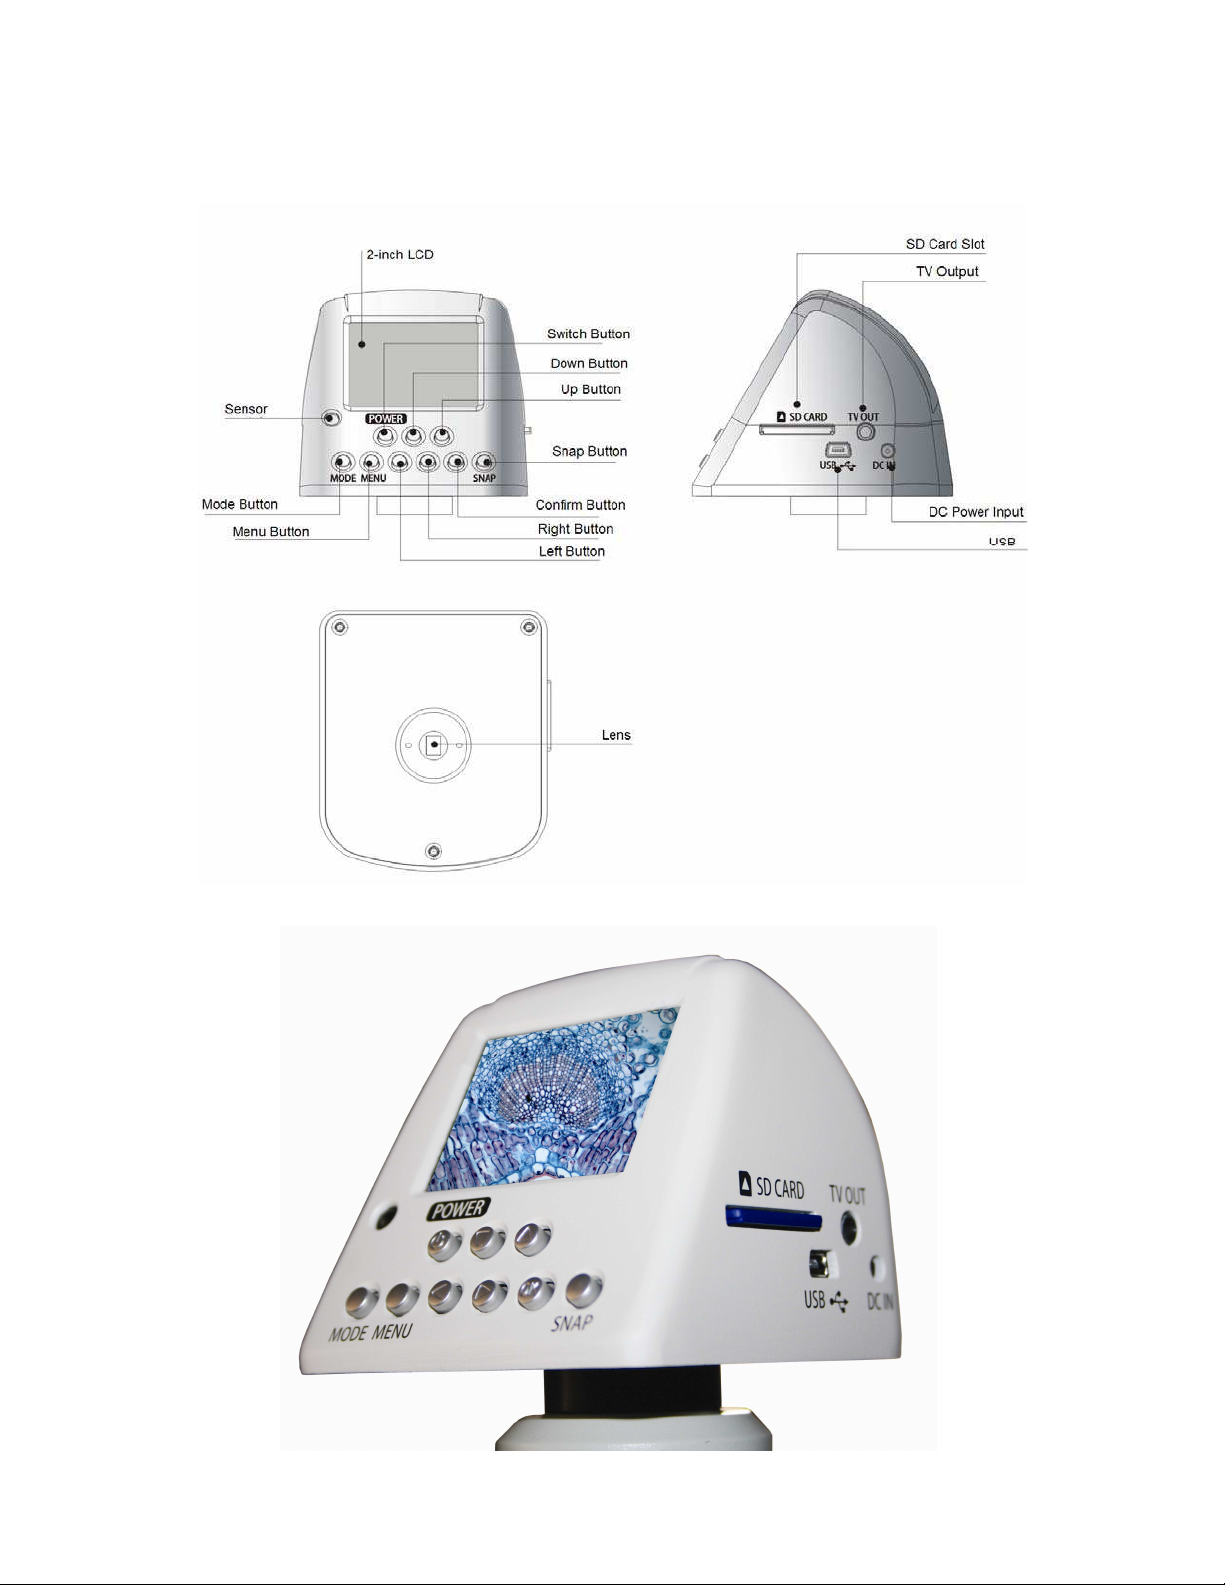
Chapter 3. Camera components
5
Page 7

Chapter 4. Operation
Precautions Notice
To avoid falling down, the microscope must be placed in safe and steady
place such as desk.
Check that the digital camera is properly connected to the microscope and
the connecting screws are installed properly.
Care must be taken when install the objectives, avoid dropping the
objectives or getting dust on the objectives
The digital microscope uses 2×AA batteries to power the light source, check
that the batteries are properly installed before using the microscope. The batteries
must be taken out of the microscope, if it is not in use for a long time.
The User of the microscope can take a snapshot image or video images
by following the operation procedures below
Starting procedures
Place the microscope on a stable table, attach the objectives onto the
microscope if they are not already fitted to it.
Attach the camera to the C-mount adaptor of the extension tube and
fit it onto the top of the microscope. Tighten the screws to fix the extension
tube to avoid dropping.
Place the specimen onto the stage
Set light dimmer control to lowest intensity and switch on the
power, increasing slowly to desired level.
Plug in the power cable into the DC IN on camera
Switch on the camera by pressing the「POWER」button for 1
second, and the LCD will display the starting interface.
Insert the SD memory card into the camera (the images taken must
be stored on the SD card)
Adjustment of Exposure and Colour
The LCD will display four lines, representing the brightness of the colors G,
B, R and W respectively after just switching on the camera. Use LEFT of
RIGHT buttons to adjust their brightness. Press OK button to choose
different color lines and turn off the control line displaying. In this way, the
observation can be adjusted to the optimum status.
6
Page 8

When the microscope is changed to a different magnification, the
observation setting will be changed and should be readjusted to
optimum.
The number in the rectangle located in the centre of the LCD is the
focusing parameter, the bigger value of this parameter represents a
better focusing quality.
Snapshot
Now the microscope is ready to take microscopic images. However, the
focus point and the brightness setting need to be adjusted according to
the sample under observation. When everything is ready, press「SNAP」
to record an image, and it will be stored on the SD card. To avoid
vibrations during recording, it is highly recommended to use the remote
control or USB control to take snapshot.
Camera Modes
Camera has three different operation modes, which are ‘Camera’, ‘Video’ and
‘Play’ mode respectively. The initial mode when the camera is just switched on
is ‘Camera’, and it can be changed to other modes by the following steps:
First of all, make sure that no menu function is selected
Press「MODE」button once and the LCD will display three mode
options. You can change to other modes by continuing to press
「MODE」. Press「OK」button to select the mode or wait for 2 seconds
to select the mode automatically.
Press「UP」to change to 「Camera」mode, and「OK」to select, or
wait for 2 seconds.
Press「LEFT」to change to 「VIDEO」mode, and「OK」to select, or
wait for 2 seconds.
Press「RIGHT」to change to 「PLAYBACK」mode, and「OK」to select,
or wait for 2 seconds.
Snapshot and Video
In「
VIDEO」mode, video images can be recorded on the SD card, but it is
7
Page 9

recommended to use a big memory SD card.
Play back images and video
In ψPLAYωmode, the recorded images and video can be displayed on the
LCD.
Switch off the camera
To switch off the camera, press the ψPOWERωbutton for 1second, and
the illumination should also be switched off.
Install and remove the SD memory card
! Install the SD card
" Insert the SD card into the slot along the arrow and ‘click’ into
position.
" The camera will sounds and displays an SD card picture,
showing that the SD card is installed properly.
! Remove the SD card
" Press the SD card into the slot until you hear a ‘click’ and release,
the SD card can now be removed from the camera.
" The camera will sounds a warning and the SD card shown on the
LCD will disappears.
Notice: SD memory card must be installed before recording. If no SD
card installed, the camera can still display live image, but cannot
record images or video.
8
Page 10

Chapter 5. Camera Mode Setting and Menu Options
Camera can work in three modes, ‘Camera’, ‘Video’, and ‘Play’
Taking snapshot image in ‘Camera’ mode
In ‘Camera’ mode the image can be recorded with different resolutions.
The lowest resolution is 0.35M-pixel VGA (604 x 48), the highest
resolution is 3M-pixel. After the digital processing, the highest output
resolution is 8M-pixel (3264x2448).
Recording video in ‘Video’ mode
In ‘Video’ mode the video can be recorded in MPEG4 format with the
resolutions of 640x48-pixel or 320x240-pixel optional.
Playing back the recorded data: Play mode
You can play back the recorded images or video, or delete the recorded
data.
The TV OUT cable included can be connected to TV, and play back the
recorded images or video on TV. You can also play back the recorded
data on a PC.
Camera setting and menu operations
Options in 「CAMERA」mode
Snapshot options
Delay shutter ==== setting the delayed shutter release time
Press MENU button to activate the snapshot option
Press DOWN button once, it will display ‘Time delay’
Press RIGHT button to go to the sub-menu
Use UP / DOWN buttons to set the time and press OK to
confirm
Press MENU button again to go back to 「CAMERA」mode
Auxiliary cable ==== Enable/Disable the screen auxiliary cable
Press MENU button to activate the snapshot option
Press DOWN button twice, it will display ‘Auxiliary cable’
Press RIGHT button to go to the sub-menu
Use UP / DOWN buttons to set the type of auxiliary cable
and press OK to confirm
9
Page 11

# Press MENU button again to go back to ψCAMERAωmode
" Image size ==== Setting the image size
# Press MENU button to activate the snapshot option
# Press DOWN button three times, it will display ‘Size’
# Press RIGHT button to go to the sub-menu
# Use UP / DOWN buttons to change the size and press OK to
confirm
# Press MENU button again to go back to ψCAMERAωmode
" Quality ==== Setting the image quality
# Press MENU button to activate the snapshot option
# Press DOWN button four times, it will display ‘Quality’
# Press RIGHT button to go to the sub-menu
# Use UP / DOWN buttons to change the quality and press
OK to confirm
# Press MENU button again to go back to ψCAMERAωmode
" Sharpness ==== Setting the image sharpness
# Press MENU button to activate the snapshot option
# Press DOWN button five times, it will display ‘Sharpness’
# Press RIGHT button to go to the sub-menu
# UseUP / DOWN buttons to set the sharpness and press OK
to confirm
# Press MENU button again to go back to ψCAMERAωmode
Setting options
" Exposure and balance ==== Setting auto or manual exposure
and white balance
# Press MENU button and then RIGHT button once to activate
the setting option
# Press DOWN button once, it will display ‘Exposure and
white balance’
# Press RIGHT button to go to the sub-menu
# Use UP / DOWN buttons to change to use auto or manual
mode and press OK to confirm
# Press MENU button again to go back to ψCAMERAωmode
" Text display ==== Setting the text display on and off
# Press MENU button and then RIGHT button once to activate
the setting option
# Press DOWN button twice, it will display ‘Text display’
10
Page 12

# Press RIGHT button to go to the sub-menu
# Use UP / DOWN buttons to set the text display on or off and
press OK to confirm
# Press MENU button again to go back to ψCAMERAωmode
" Brightness ==== Setting the LCD brightness
# Press MENU button and then RIGHT button once to activate
the setting option
# Press DOWN button three times, it will display ‘Brightness’
# Press RIGHT button to go to the sub-menu
# Use UP / DOWN buttons to change the brightness and press
OK to confirm
# Press MENU button again to go back to ψCAMERAωmode
" Camera voice ==== Setting the camera voice
# Press MENU button and then RIGHT button once to activate
the setting option
# Press DOWN button four times, it will display ‘Voice’
# Press RIGHT button to go to the sub-menu
# Use UP / DOWN buttons to set the voice on or off and press
OK to confirm
# Press MENU button again to go back to ψCAMERAωmode
" Video output ==== Setting the type of video output
# Press MENU button and then RIGHT button once to activate
the setting option
# Press DOWN button five times, it will display ‘Video output’
# Press RIGHT button to go to the sub-menu
# Use UP / DOWN buttons to choose the type of video output
and press OK to confirm
# Press MENU button again to go back to ψCAMERAωmode
" Formatting ==== Format the SD memory card
# Press MENU button and then RIGHT button once to activate
the setting option
# Press DOWN button six times, it will display ‘Formatting’
# Press RIGHT button to go to the sub-menu, the memory
card must be inserted into the slot
# Use UP / DOWN buttons to choose to format or not and
press OK to confirm
# Press MENU button again to go back to ψ
CAMERAωmode
" Reset ==== Reset the camera to the factory setting
11
Page 13

# Press MENU button and then RIGHT button once to activate
the setting option
# Press DOWN button seven times, it will display ‘Reset’
# Press RIGHT button to go to the sub-menu
# Use UP / DOWN buttons to choose to reset or not and press
OK to confirm
# Press MENU button again to go back to ψCAMERAωmode
" Language ==== Setting the interface language
# Press MENU button and then RIGHT button once to activate
the setting option
# Press DOWN button eight times, it will display ‘Language’
# Press RIGHT button to go to the sub-menu
# Use UP / DOWN buttons to choose to choose the language
and press OK to confirm, there are seven languages to
choose
# Press MENU button again to go back to ψCAMERAωmode
Reset number ==== Resetting the image number
! Press MENU button and then RIGHT button once to activate
the setting option
! Press DOWN button nine times, it will display ‘Numbering’
! Press RIGHT button to go to the sub-menu
! Use UP / DOWN buttons to choose to reset the image
number or not and press OK to confirm
! Press MENU button again to go back to ψCAMERAωmode
" Options in ψVideoωmode
Video options
Auxiliary cable ==== Enable/Disable the screen auxiliary cable
! Press MENU button to activate the snapshot option
! Press DOWN button once, it will display ‘Auxiliary cable’
! Press RIGHT button to go to the sub-menu
! Use UP / DOWN buttons to set the type of auxiliary cable
and press OK to confirm
! Press MENU button again to go back to ψCAMERAωmode
Video mode ==== choose the output format of the video
! Press MENU button to activate the menu
! Press DOWN button twice, it will display ‘Video mode’
12
Page 14

! Press RIGHT button to go to the sub-menu
! Use UP / DOWN buttons to choose the output video format
and press OK to confirm
! Press MENU button again to go back to ψCAMERAω mode
Resolution ==== Choose the video resolution
! Press MENU button to activate the menu
! Press DOWN button three times, it will display ‘Resolution’
! Press RIGHT button to go to the sub-menu
! Use UP / DOWN buttons to choose the output video
resolution and press OK to confirm
! Press MENU button again to go back to ψCAMERAω mode
Quality ==== Setting the recorded video quality
! Press MENU button to activate the menu
! Press DOWN button four times, it will display ‘Quality’
! Press RIGHT button to go to the sub-menu
! Use UP / DOWN buttons to choose the video quality and
press OK to confirm
! Press MENU button again to go back to ψCAMERAω mode
" ψPLAYBACKωmode
InψPLAYBACKωmode you can play one recorded video or maximum
nine videos continuously by pressing OK buttons. Use the UP /
DOWN buttons you can zoom in or out the video images
Play options
Delete ==== Deleting one or more video
! Press MENU button to activate the menu
! Press DOWN button once, it will display ‘Delete’
! Press RIGHT button to go to the sub-menu
! Use UP / DOWN buttons to choose to delete one or more or
all videos and press OK to confirm
# Delete one video ---- the screen displays the image and
confirmation options, you can confirm to delete or
cancel
# Delete several videos ---- the screen displays the
images in smaller size and highlights the selected video,
you can choose the video and press OK to confirm
13
Page 15

# Delete all ---- the screen displays confirmation options,
you can choose to confirm or cancel
! Press MENU button again to go back to ψCAMERAω mode
Auto playback ==== Setting the time interval between two
images during auto playback
! Press MENU button to activate the menu
! Press DOWN button twice, it will display ‘Auto playback’
! Press RIGHT button to go to the sub-menu
! Use UP / DOWN buttons to choose the time interval and
press OK to confirm, the camera will play back the recorded
images automatically
! During play back, press OK button to stop at the current
image
! Press MENU button again to go back to ψCAMERAω mode
Rotation ==== Setting the rotational orientation of the image
! Press MENU button to activate the menu
! Press DOWN button three times, it will display ‘Rotation’
! Press RIGHT button to go to the sub-menu, there are three
rotational angles to choose: 90°, 180°, and 270°
! Use UP / DOWN buttons to choose the orientation and press
OK to confirm, and it will display the confirmation options
asking whether to keep the rotated image or not, choose the
right option and press OK to confirm
! Press MENU button again to go back to ψCAMERAω mode
Printing ==== Choose to print the recorded images, this camera
supports DPOF format
! Press MENU button to activate the menu
! Press DOWN button four times, it will display ‘Print’
! Press RIGHT button to go to the sub-menu, you can choose
to print a single or all the images
! Use UP / DOWN buttons to choose the image and press OK
to confirm
! Press MENU button again to go back to ψCAMERAω mode
14
Page 16

Chapter 6. Cable Connection Operations
The digital camera can also be operated with a computer via a USB cable
connection. The image displayed on the LCD of the camera can also be shown
on the screen of a TV or projector by using the video output cable. One of the
interesting features of this camera is that it can be connected directly to a
printer to print out the recorded images without the need of a computer.
Three types of cable connection for the camera
Connection with computers via USB
Connection with TV or projectors via video output
Connection with printers supporting PictBridge
Operations when connected with a computer
When the camera is connected to a computer, the driver of the camera
must be installed, and the camera can be operated using the software
‘MicroCap’. The software can be found on the included CD.
Notice:
The system only supports Windows98, 2000, XP operating system,
but not Vista
When connected with a computer via USB, the camera can be
supported by the power from the USB cable and does not need the
DC power in
Connection operations with USB
Connect the camera and the computer with the USB cable
The LCD will display the two options:「MicroCap Link」and「Printer
Link」, wait for 3 seconds, the camera will select「MicroCap Link」
automatically and the connection is completed. You can also select
other options using UP / DOWN / OK buttons
Run the software MicroCap V2.0, you can do the setting, recording
images and videos et al. on the computer
Details about the software MicroCap V2.0 , please go to Chapter 7
Notice:
15
Page 17

Three are two sets of power source in microscope, one is for
the camera, and the other is for the illumination. The switches are at
the back of the microscope. To operate the microscope, both
switches must be on.
When USB cable is plugged into the camera, the LCD screen will be
switched off
When the camera is operated with a computer, the SD memory card
is not necessary and all the data will be stored on the computer
Remote control is not applicable when operating the camera with a
computer
Operations when connected with a TV
Live images can be seen on a TV screen if the camera is connected to a
TV
Connection operations with TV
Plug the TV cable into 「TV OUT」port of the camera and video input
port of the TV
At this moment, the preview image shown on the LCD will be
displayed on the TV screen, the LCD will be turned off
Use PLAY mode you can play back the recorded images and videos
on the TV
All other operations are the same as operating on the camera
Notice:
When the camera is connected with a TV, the remote control can still
be applicable
This camera supports both of the most popular TV formats, NTSC
and PAL
The connection operation with a projector is the same as the TV
Connection operations with Printer
Camera can be connected to a printer that supports PictBridge
function to print out the recorded images without the need of a computer
Connection operations
Switch on both the camera and the printer
SD card with the recorded images must be installed
Connect the camera with the print using the USB cable
16
Page 18

$ The LCD will display two options, use UP/ DOWN to chooseψPrinter
Linkωand press OK to confirm
$ The camera will display several options and images, user can choose
different printing mode to print a selected image
Notice
% The remote control is applicable when the camera is connected with a
printer
% This camera only supports the printers with PictBridge function
17
Page 19

Chapter 7. Operations with Software MicroCap V2.0
The camera can be operated using the software ‘MicroCap’ included with the digital microscope. The system only supports Windows 2000, XP, Vista, and 7
operating system, but not Mac OS. The interface of the software is shown below.
If the camera is not connected with the computer, the software displays
‘Camera off-line’ at the top left corner of the preview area, as shown below.
18
Page 20

Main Function of MicroCap V2.0
" Camera Setting
$ Exposure Adjustment
There are two ways to set the exposure time of the camera, which are
the Auto mode and the Manual mode
Left click the Auto rectangle to select the auto mode, and the software
will adjust the exposure and brightness, et al.
When Auto mode is not selected, the values of the exposure and
brightness et al. can be adjusted by using the sliding rod
$ Brightness Adjustment
When the image shown is too bright or too dark, slide the rod to the
left or right to adjust the brightness.
$ Contrast Adjustment
19
Page 21

Users can also adjust the contrast of the image by using the sliding
rod
Digital Zoom Adjustment
There are four types of zoom in options in MicroCap V2.0
White Balance Adjustment
MicroCap V2.0 can be used with several different illuminations. For
digital microscope, it is recommended to use White LED.
White balance is the balance among the RGB gains, there are three
types of adjustment:
Auto
Fixed
White LED
Fluorescent Lamp
Tungsten Lamp
When one of these three conditions is selected, the RGB grains
are fixed.
It is recommended to use White LED if you are using D34EB
digital microscope.
Manual
In manual mode, user can adjust the RGB grains manually by
using the sliding rod. When the RGB grains are set manually, the
setting can be stored for the use of next time.
20
Page 22

Storage Setting
When the digital microscope is connected with a computer, all the
data recorded will be stored on the hard drive of the computer. Therefore a
folder must be specified to keep your images and videos. The above
figure shows the dialogue box of MicroCap V2.0 for storing the data.
There are three tabs in this dialogue box, which are Signal Picture, Time
Interval and Video Recording respectively.
Signal Picture
Signal Picture is the default tab when MicroCap V2.0 is started. A
default folder is provided to store the recorded data. To record a
single picture, left click button and the image is recorded in this
folder. To change a different folder, left click button and choose
the folder, or create a new folder.
MicroCap V2.0 records the images in two available formats, which
are JPEG and BMP respectively. Images in JPEG format are stored
in compressed form while images in BMP format are uncompressed
raw file with detailed RGB data. To record an image in JPEG format,
click button, and to record an BMP image, click button.
In MicroCap V2.0, the image file names are specified by the software
21
Page 23

automatically according to the system date and time, which is in the
form of year month day-hour min second. During recording, click the
box
to preview the image recorded.
Time Interval
MicroCap V2.0 provides a useful function for long time automatic
recording of images, Time Interval. To record images automatically
with a certain time interval, go to the Time Interval tab, specify a
folder to store the images, input the time interval and the number of
pictures, and click button to start recording. You can stop the
recording by clicking button.
Video Recording
To record a video, go to the Video Recording tab and specify a folder
to keep the recorded data. The video is recorded in MPEG4 format
which is supported by most of the operating systems. The naming of
the recorded file is the same as recording a single picture, which is in
the form of year month day-hour min second. Since MPEG4 is a high
quality format, the video file recorded may take too much space of
your hard drive, users are recommended to limit the recording time.
22
Page 24

! Operation Setting
Focus Reference
Focus reference provides a reference number showing how much the
central area of the field of view is in-focused. The bigger value of
focus reference means a better focus. To enable the focus reference
function, click the box under Focus Ref. as shown in the above
figure.
Channel of Color
You can select to enable or disable one or more colors of RGB by
clicking the boxes corresponding to Red, Green, and Blue in
Channel.
Cross line
MicroCap V2.0 provides black and white cross lines respectively,
showing the centre of the previewed field of view.
Quality
You can choose the quality of the recorded images or videos by
pulling down the list and select:
" Best
" Fine
" Normal
Resolution
" To choose the resolution of the recorded images, pull down the
list in Resolution and select the right one. The lowest resolution
is VGA(640x480) pixels and the highest is 10M(3712x2784)
pixels.
" 10M(3712x2784)
" 8M(3264x2448)
" 6M(2816x2112)
" 5M(2592x1944)
" 4M(2304x1728)
" 3M(2048x1536)
23
Page 25

" 2M(1600x1200)
" 1M(1280x920)
" VGA(640x480)
Screen Control
You can adjust the size and position of the preview area or preview in
full screen by using the buttons in Screen Control. When previewing
in full screen, press Esc key on the keyboard or right click the mouse
to cancel full screen preview.
! Measure Function
MicroCap V2.0 provides measurement function to measure the size of
the samples in real time. Click button on the top right corner of the
screen to open the measure function dialogue. As shown in the figure
below, there are three main functions in this dialogue.
Define Scale
In order to achieve a precise measurement, a calibration is required
to define the scale. The calibration can be accomplished by imaging a
graticule with the microscope. First of all, put the graticule under the
microscope, focus the image properly, open the Measure Function
dialogue, and then click button. Select two points on the
preview screen and input the distance of the two points to finish the
24
Page 26

calibration. The scale on the bottom left corner will be changed accordingly.
The three circles rights next to the three buttons of the Measure Function dialogue
box are used to select the color of the measurement tools during calibration. You
can choose a different color according to the image background by clicking the
circles.
The calibration with a certain objective can only be used for the measurement with
the same objective. When a different objective is used, a new calibration must be
done for measurement.
Line:
When the calibration is done, you can measure the distance between two points on
the preview screen by clicking Line button. Use mouse click to select two points on
the screen, and the real distance will be
shown in the dialogue automatically.
Circle:
You can also measure the circumference and radius of a circle on the screen if the
measurement is properly calibrated. Use mouse click to select three points on the
screen, and the dialogue will show the circumference and radius of the circle
defined by these three points.
The lines and circles drawn on the screen for measurement will not be recorded in
the image.
Specifications
Camera
tnuoM-CtnuoM
Sensor resolution : 3.1 Mega Pixel
Maximum resolution : 8 Mega Pixel
LCD screen size 2 inch LTPS
Memory card SD/MMC card
USB interface Yes
TV output NTSC/PAL
Controller Remote and USB shutter
Power supply DC 12V 1.5A
Picture format JPEG
Video format MPEG4
Printer support PictBridge and DPOF
PC Software
MicroCap V2.0
25
Page 27

Quick Start Guide
for Windows 98/XP
1 Open CD tray and insert the OmniVID 98/XP installation CD.
2 Either auto-run the OmniVID installation CD or go to My
Computer and select the CD.
3 From the main CD menu select Micro Driver V 1.0 and complete
the installation.
4 After installation is complete, select Microcap V 2.0 from the main
CD menu and complete the installation.
5 After both Micro Driver V 1.0 and Microcap V 2.0 are installed,
plug the included USB cable into the OmniVID camera and plug it
into an available USB port on the computer. Wait for Windows XP to
install the OmniVID camera drivers.
6 After the camera is plugged into computer, start up Micro Cap V
2.0 from either the desktop or by going to the start menu and
selecting Micro Cap V 2.0 from the All Programs list.
7 If all instructions have been followed, the camera should be up
and running.
Quick Start Guide
for Windows Vista
1 Open CD Tray and insert the OmniVID Vista installation CD.
2 Either auto-run the OmniVID installation CD or go to My
Computer and select the CD.
3 From the main CD Menu select Micro Driver V 1.0 and complete
the installation.
4 After installation is complete, from the main CD menu select
Microcap V 2.0. and complete installation.
5 After both Micro Driver V 1.0 and Microcap V 2.0 are installed,
plug the included USB Cable into the OmniVID camera and plug it
into an available USB port on the computer. Wait for Windows Vista
to install the OmniVID camera drivers.
6 After the camera is plugged into the computer, start up Micro Cap
V 2.0 from either the Desktop or by going to the start menu and
selecting Micro Cap V 2.0 from the All programs list.
7 If all instructions have been followed, the camera should be up
and running.
MKT-7.5.3-L-051 | Rev 0
 Loading...