

Page 1

DVD PLAYER
DVP2000
INSTRUCTION MANUAL
SVENSKA | ENGLISH
Page 2

Page 3

INNEHÅLL | CONTENT
SVENSKA
Säkerhetsinstruktioner ............................................... 4-5
Överblick .............................................................. 6-7
Användning ..........................................................8-12
Felsökning .............................................................. 12
Specifikationer ........................................................ 13
Övrigt ...............................................................14-15
ENGLISH
Safety Instructions ................................................16 -17
Overview ..........................................................18-19
Operation ......................................................... 20-24
Troubleshooting ....................................................... 24
Specifications .........................................................25
Other ............................................................... 26 -27
Page 4
SÄKERHETSINSTRUKTIONER
värmekällor så som element och spisar.
•
Placera enheten på en plan yta och med
plats för ventilation. Se till att inte täcka över
ventilationsöppningarna, det kan leda till
• Varning:
Ta inte bort kåpan (eller bakpanelen).
Risk för elektriska stötar. Apparathöljet döljer
inga komponenter som kräver underhåll från
användarens sida. Låt behörig personal sköta
all service.
• Varning:
Apparaten får inte exponeras för regn
eller fukt - risk för kortslutningsbrand och elektrisk
stöt.
• Varning:
Använd endast tillbehör som specificerats
eller tillverkats av tillverkaren.
• Varning:
När enheten används av barn måste
föräldrar säkerställa att barnet förstår allt innehåll i
bruksanvisningen.
•
Innan du kopplar in AC-adaptern: Kontrollera att
ditt vägguttags spänning motsvarar den spänning
som anges på produktens typskylt (placerad på
baksidan av apparaten).
•
Spelaren och strömadaptern får inte utsättas för
dropp eller stänk. Vattenfyllda kärl, exempelvis
blomvaser, får inte ställas på den.
•
Håll enheten borta från direkt solljus och
överhettning och dålig funktion. Placera därför inte
din DVD-spelare på en soffa eller annat liknande
underlag.
•
Placera inte apparaten på instabil vagn, ställ,
stativ, konsol eller bord. Instabilt underlag kan
leda till att apparaten ramlar i golvet och går
sönder.
•
Placera aldrig tunga eller vassa objekt på
produkten.
•
Använd endast den inkluderade AC-adaptern.
Att använda någon annan adapter medför att
garantin upphör att gälla.
•
Reparation får endast utföras av behörig tekniker.
Felaktig reparation kan utsätta användaren och/
eller utrustningen för allvarlig fara.
•
Den här utrustningen är endast avsedd för
hushållsbruk, inte för kommersiell eller industriell
användning.
•
Produkten får inte användas om den tappats eller
är skadad. Den får inte heller användas
om stickproppen eller nätsladden är skadade.
4 | SVENSKA
Page 5
SÄKERHETSINSTRUKTIONER
• Om strömkabeln eller kontakten skadats ska
den ersättas av tillverkaren, dess serviceagent
eller liknande kvalificerad servicepersonal för att
undvika fara.
• Utrustningen får inte användas till annat än det
den är avsedd för.
• Tryck inte in några föremål i öppningar på
utrustningen, eftersom skada då kan uppstå och
du riskerar att få elektriska stötar.
• Symbol för produkt med lasersystem: Symbolen
som sitter på enhetens baksida visar att spelaren
är en laserprodukt av klass 1. Endast svaga
lasersignaler används och ingen farlig strålning
alstras utanför spelaren.
• Varning: DVD-spelaren arbetar med laser.
Inställningar eller användning som inte
överensstämmer med denna bruksanvisning kan
leda till exponering för farlig strålning.
• Varning: Apparathöljet ska hållas slutet, för att
förhindra direkt exponering för laserstrålen. Titta
aldrig rakt in i en laserstråle.
SVENSKA | 5
Page 6
ÖVERBLICK
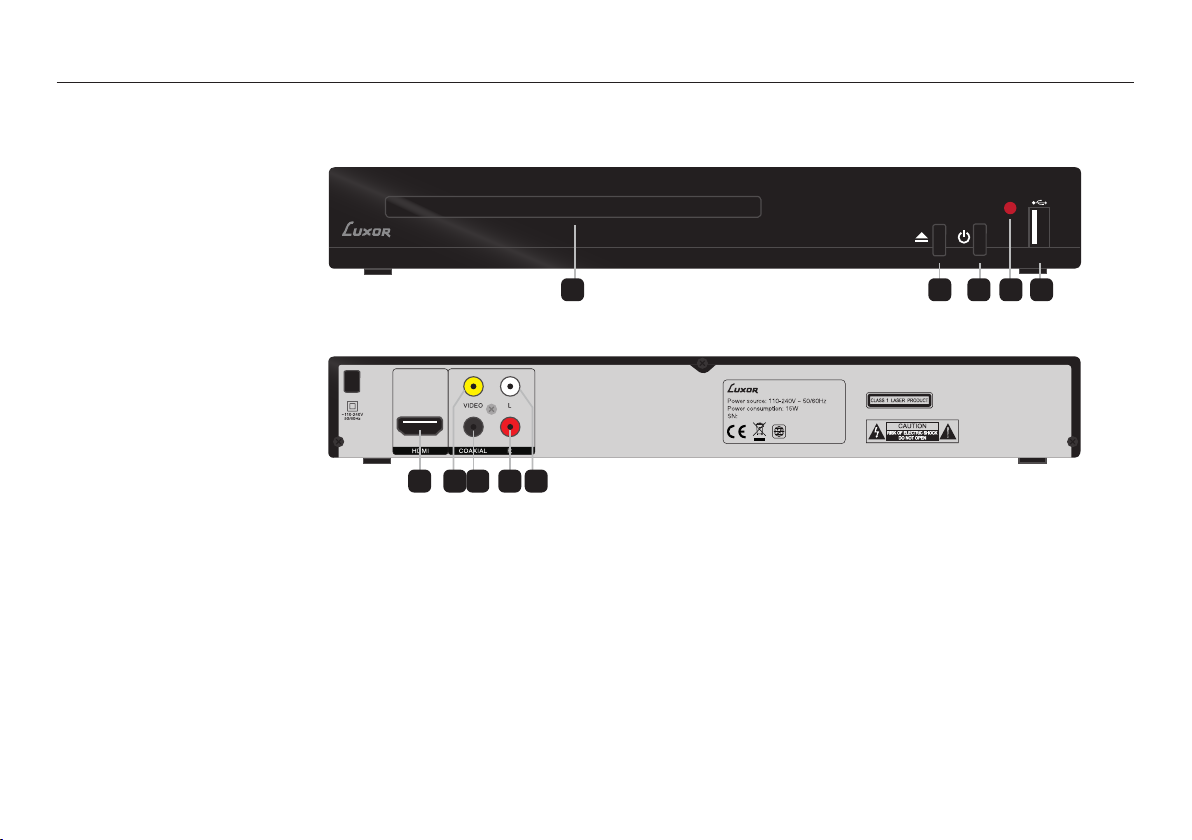
FRONTPANEL:
A. Skivfack
B. Öppna/Stäng
C. På/Standby
D. Strömindikator
E. USB-port
A
BAKPANEL:
F. HDMI-utgång
G. Video-utgång
H. Koaxial-utgång
I. Höger utgång
J. Vänster utgång
F G H I J
DVD PLAYER DVP2000
Model: DVP2000
Made in P.R.C
Imported by 556520-4137
C D
B
E
6 | SVENSKA
Page 7
ÖVERBLICK
181
2
3
4
5 22
6
7
8
9
10
11
12
13
14
15
16
17
19
20
21
23
24
25
26
27
28
29
30
31
32
33
34
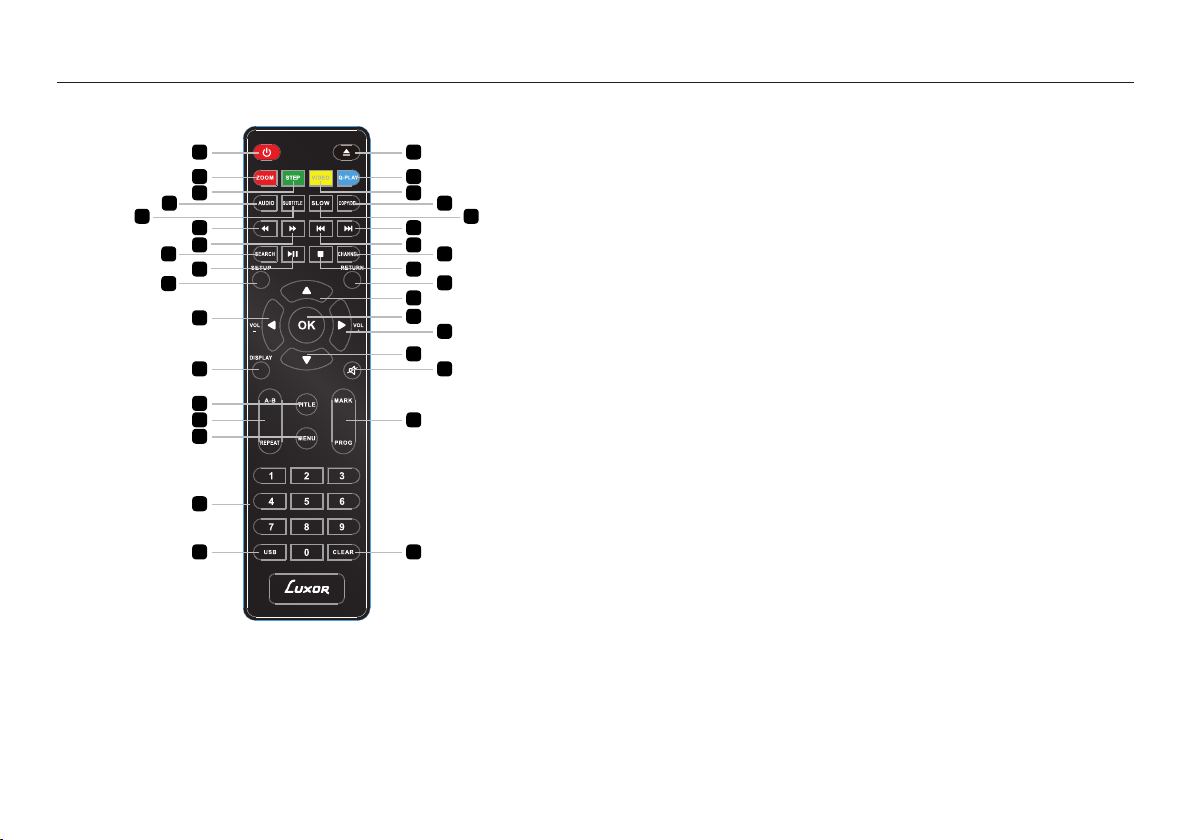
1. På/Standby: Stäng av/starta DVD-spelaren.
2. Zoom: Förstora/förminska uppspelningsbilden.
3. Step: Stega igenom uppspelningen, bild för bild.
4. Audio: Välj ett ljudspråk för DVD-skivan.
5. Subtitle: Välj ett undertextspråk för uppspelningen.
6. 7 : Snabbspola bakåt.
7. 8 : Snabbspola framåt.
8. Search: Sök direkt efter en viss del av uppspelningen.
9. Spela/Pausa: Starta eller pausa uppspelningen.
10. Setup: Öppna inställningarna för DVD-spelaren.
11. Volym -/Navigation: Sänk volymen/navigera.
12. Display: Visa uppspelningsinformation (tid/titel/kapitel).
13. Title: Återgå till menyn på DVD-skivan.
14. A-B: Upprepa ett visst segment av uppspelningen.
Repeat: Upprepa det nuvarande kapitlet.
15. Menu: Öppna uppspelningsmenyn.
16. 0-9: Nummerknappar 0-9.
17. USB: Välj USB-ingången.
18. Öppna/Stäng: Öppna/stäng skivfacket.
19. Q-Play: Hoppa till början av uppspelningen.
20. Video: Välj en upplösning.
21. Copy/Del: Kopiera och/eller radera filer på en USB-enhet.
22. Slow: Sätt uppspelningen i slow motion.
23. : : Hoppa framåt bland kapitlen.
24. 9 : Hoppa bakåt bland kapitlen.
25. Channel: Skifta utgångskanal.
26. Stop: Stoppa uppspelningen.
27. Return: Gå tillbaka i menyn.
28. Navigation: Navigera.
29. OK: Bekräfta.
30. Volym +/Navigation: Öka volymen/navigera.
31. Navigation: Navigera.
32. Mute: Aktivera/avaktivera uppspelningsljudet.
33. Mark: Sätt en återvändspunkt i uppspelningen.
Program: Skapa ett uppspelningsprogram av olika filer.
34. Clear: Radera innehållet i ett program eller en punkt.
SVENSKA | 7
Page 8

ANVÄNDNING
KOM IGÅNG:
1. Anslut DVD-spelarens strömkontakt till ett eluttag.
Strömindikatorn på frontpanelen kommer att lysa rött.
2. Tryck in på/standby-knappen på frontpanelen eller
fjärrkontrollen för att starta DVD-spelaren. Strömindikatorn
kommer att lysa grönt.
3. Gör rätt kabelanslutningar för DVD-spelaren genom att följa
instruktionerna i stycket ’Kabelanslutningar’.
4a. Om du vill spela upp en DVD-skiva med DVD-
spelaren, följ instruktionerna i stycket ’DVDanvändning’.
4b. Vill du ansluta en USB-enhet till DVD-spelaren,
följ instruktionerna i stycket ’USB-användning’.
5. Om du vill justera systeminställningarna för
DVD-spelaren följer du instruktionerna i stycket
’Systeminställningar’.
6. När du är klar med användningen, tryck in på/standbyknappen på panelen eller fjärrkontrollen för att stänga av
DVD-spelaren. Strömindikatorn på frontpanelen kommer att
lysa rött.
DVD
8 | SVENSKA
Page 9
ANVÄNDNING
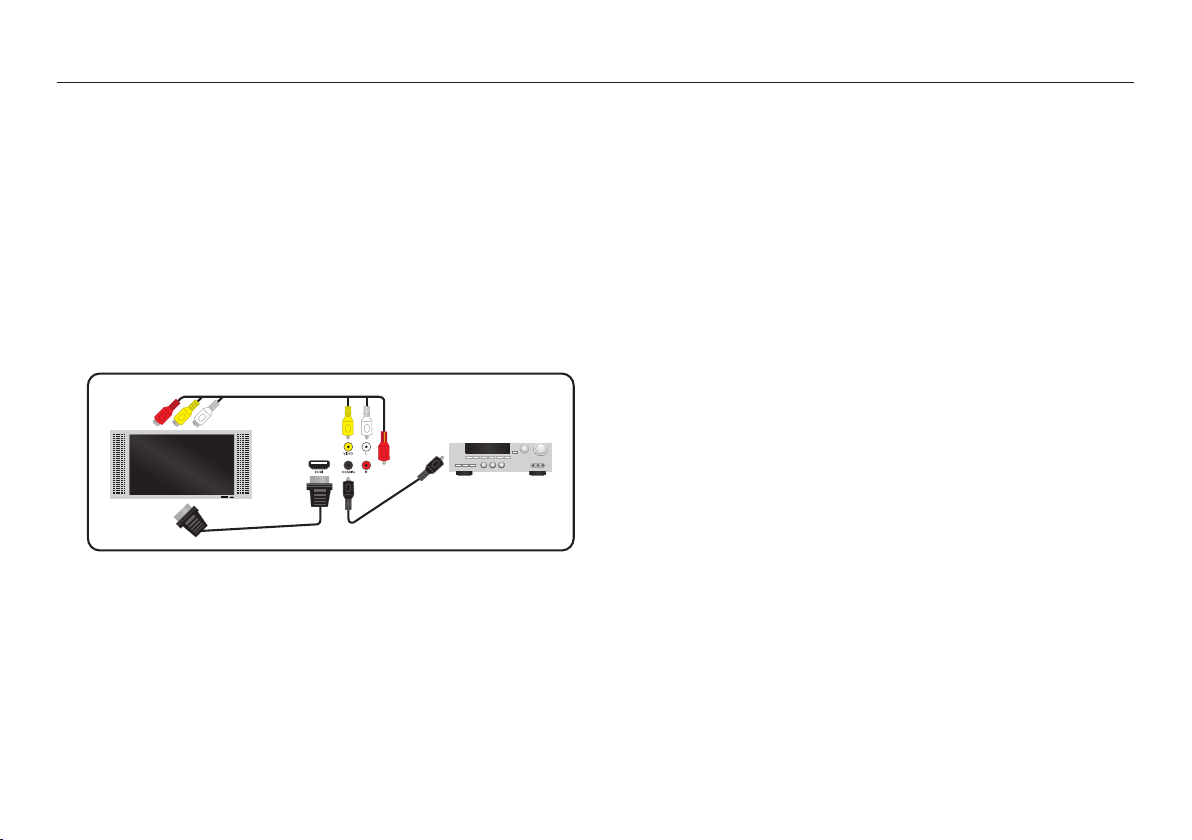
KABELANSLUTNINGAR:
1a. Anslut en RCA-kabel mellan video, vänster och
höger utgång på bakpanelen av DVD-spelaren till RCA-
ingången på din TV.
1b. Anslut en HDMI-kabel mellan HDMI-utgången på bak-
panelen av DVD-spelaren till HDMI-ingången på din TV.
2. Om du har en stereoförstärkare, anslut en koaxial-kabel
mellan koaxial-utgången på bakpanelen till koaxialingången på din stereoförstärkare.
3. Kontrollera uppspelningen via fjärrkontrollen.
1a.
Stereo
TV
1b. 2.
DVD-ANVÄNDNING:
1. Tryck in öppna/stäng-knappen på frontpanelen eller
fjärrkontrollen och sätt en DVD-skiva i skivfacket.
2. Tryck in öppna/stäng-knappen igen för att stänga.
3. DVD-spelaren kommer att läsa av DVD-skivan och starta
uppspelningen.
4. Kontrollera uppspelningen via fjärrkontrollen.
USB-ANVÄNDNING:
1. Anslut en USB-enhet till USB-porten på frontpanelen av DVDspelaren.
2. Tryck in USB-knappen på fjärrkontrollen för att öppna USBkällan. DVD-spelaren kommer att läsa och visa USB-enhetens
fillista.
3. Bläddra i fillistan genom att trycka in 5/6/3/4 -knapparna
på fjärrkontrollen. Välj en fil genom att trycka in OK-knappen
på fjärrkontrollen.
SYSTEMINSTÄLLNINGAR:
1. Tryck in setup-knappen på fjärrkontrollen för att öppna
systeminställningarna för DVD-spelaren.
2. Det finns fyra menyer i systeminställningarna, Allmänna
inställningar, Ljudinställningar, Videoinställningar och Egna
inställningar. Följ instruktionerna för de individuella styckena
‘Allmänna inställningar‘, ‘Ljudinställningar‘, ‘Videoinställningar‘
och ‘Egna inställningar’.
3. För att stänga systeminställningarna för DVD-spelaren, tryck
in setup-knappen på fjärrkontrollen.
SVENSKA | 9
Page 10

ANVÄNDNING
ALLMÄNNA INSTÄLLNINGAR:
1. Tryck på 5/6/3/4
-knapparna på
fjärrkontrollen för att
öppna ‘Allmänna
inställningar‘.
2. Åtta undermenyer kommer
-- General Setup Page --
TV Shape
OSD Lang
Caption
Screen Saver
HDCD
Last Memory
MP3 Lyric
LINK/CEC Sync
Go To General Setup Page
Wide
Eng
On
On
1X
On
On
O
PreferencesGeneral Audio Video
att visas (läs
mer om undermenyerna senare i detta stycke), tryck in
5/6 -knapparna på fjärrkontrollen för att cirkulera bland
undermenyerna.
3. Tryck in 3/4 -knapparna för att öppna/stänga en
undermeny.
4. När du öppnar en undermeny kommer ett antal alternativ för
varje undermeny att visas.
5. För att lämna den öppnade menyn, tryck på 3 -knappen
två gånger.
• TV-format - Ställ in bildförhållandet för DVD-spelaren.
• Menyspråk - Välj ett menyspråk.
• Textning - Visa textning (om tillgängligt).
• Skärmsläckare - Välj en skärmsläckare för TV:ns viloläge.
• HDCD - Välj ett utgångsljud.
• Senaste Minne - Återuppta minne för senaste uppspelning.
• LINK/CEC Sync - Aktivera/avaktivera synkning och
kontrollering av flera HDMI-enheter via protocol.
LJUDINSTÄLLNINGAR:
1. Tryck på 5/6/3/4
-knapparna på
fjärrkontrollen för
-- Audio Setup Page --
Speaker Setup
Digital Audio Setup
PreferencesGeneral Audio Video
att öppna ‘Ljudinställningar’.
2. Två undermenyer
kommer att
Go To Audio Setup Page
visas (läs mer
om undermenyerna senare i detta stycke), tryck in 5/6
-knapparna på fjärrkontrollen för att cirkulera bland
undermenyerna.
3. Tryck in 3/4 -knapparna för att öppna/stänga en
undermeny.
4. När du öppnar en undermeny kommer ett antal alternativ för
varje undermeny att visas.
5. För att lämna den öppnade menyn, tryck på 3 -knappen
två gånger.
• Ljudinställningar - Välj en stereoutgång.
V/H: Välj mellan vänster/höger ljudkanal.
Stereo: Välj att spela upp ljudet via de två fronthögtalarna på
TV:n.
• Digitala ljudinställningar - Välj HDMI som ljudutgång.
10 | SVENSKA
Page 11

ANVÄNDNING
VIDEOINSTÄLLNINGAR:
1. Tryck på 5/6/3/4
-knapparna på
fjärrkontrollen för
att öppna ‘Videoinställningar‘.
-- Video Setup Page --
Sharpness
Brightness
Contrast
Gamma
Hue
Saturation
Medium
00
00
None
00
00
PreferencesGeneral Audio Video
2. Sex undermenyer
kommer att
Go To Video Setup Page
visas (läs mer
om undermenyerna senare i detta stycke), tryck in 5/6
-knapparna på fjärrkontrollen för att cirkulera bland
undermenyerna.
3. Tryck in 3/4 -knapparna för att öppna/stänga en
undermeny.
4. När du öppnar en undermeny kommer ett antal alternativ för
varje undermeny att visas.
5. För att lämna den öppnade menyn, tryck på 3 -knappen
två gånger.
• Skärpa - Ställ in skärpan av videobilden.
• Ljusstyrka - Ställ in ljusstyrkan av videobilden.
• Kontrast - Ställ in kontrasten av videobilden.
• Gamma - Ställ in gamman av videobilden.
• Nyans - Ställ in nyansen av videobilden.
• Mättnad - Ställ in mättnaden för videobilden.
EGNA INSTÄLLNINGAR:
1. Tryck på 5/6/3/4
-knapparna på
fjärrkontrollen för
att öppna ‘Egna
inställningar’.
2. Åtta undermenyer kommer
-- Preference Page --
TV Type
PBC
Audio
Subtitle
Disc Menu
Parental
Password
Default
Go To Preference Page
PAL
On
Eng
Eng
Eng
PreferencesGeneral Audio Video
att visas (läs
mer om undermenyerna senare i detta stycke), tryck in
5/6 -knapparna på fjärrkontrollen för att cirkulera bland
undermenyerna.
3. Tryck in 3/4 -knapparna för att öppna/stänga en
undermeny.
4. När du öppnar en undermeny kommer ett antal alternativ för
varje undermeny att visas.
5. För att lämna den öppnade menyn, tryck på 3 -knappen
två gånger.
• TV-format - Välj din TV:s format (PAL/NTSC/Auto).
• PBC - Välj om skivan ska spelas upp direkt eller gå in i
skivans meny vid uppspelning av en VCD-skiva.
• Ljud - Välj ett ljudspråk (om tillgängligt).
à
SVENSKA | 11
Page 12

ANVÄNDNING FELSÖKNING
• Undertext - Välj ett språk för undertexten (om tillgängligt).
• Skivmeny - Ställ in menyspråket för DVD-skivan (om
tillgängligt).
• Föräldrainställningar - Ställ in åldersgränsen för en DVD-skiva
(om tillgängligt).
• Lösenord - Öppna undermenyn för lösenordsinställningarna.
Anmärkning: Fabrikslösenordet är ‘8806’.
• Standard - Återställ alla inställningar till fabriksinställningarna.
Problem Lösning
Ingen ström Kontrollera att strömkontakten är korrekt
ansluten till eluttaget.
Ingen video
Inget ljud
Förvrängd bild Rengör DVD-skivan från smuts.
Går inte att spela Sätt in en DVD-skiva i skivfacket.
Fjärrkontrollen
fungerar inte
Kontrollera att videokablarna är anslutna.
Återställ DVD-spelarens inställningar.
Kontrollera att ljudkablarna är anslutna.
Kontrollera att stereoenheten som den
koaxiala kabeln är ansluten till är startad.
Återställ DVD-spelarens inställningar.
Uppspelningen är satt i snabb spolning
bakåt/framåt.
Sätt in DVD-skivan med rätt sida upp.
Rengör DVD-skivan från smuts.
Stäng inställningsmenyn.
Rikta fjärrkontrollen mot DVD-spelarens
frontpanel.
Kontrollera batterinivån.
12 | SVENSKA
Använd fjärrkontrollen närmare
DVD-spelaren.
Page 13

SPECIFIKATIONER
Produktnamn DVP2000
Strömförsörjning AC 110-240 V, 50/60 Hz
Strömförbrukning < 15 W
Signalsystem NTSC/PAL
Frekvensrespons 50 - 60 Hz
Signalförhållande > 80 dB
Media som stöds CD/CD-R/CD-RW/DVD+R/DVD+RW
Format som stöds MPEG4, VCD/SVCD, MP3, WMA och JPEG
Användningsmiljö Temperatur: 0~ 40 °C
Fukt: 65 + 20 %
Förvaringsmiljö Temperatur: -20~50 °C
Fukt: 65 + 20 %
Fjärrkontrollsbatterier 2 x AAA
Ingår i förpackningen - DVD-spelare
- Scart AV-kabel
- Fjärrkontroll
- Batterier
Mått 190 x 43 x 260 mm
Vikt 900 gr
SVENSKA | 13
Page 14

ÖVRIGT
UPPHOVSRÄTT:
• Det är enligt lag förbjudet att utan tillstånd kopiera,
överföra, visa, sända via kabel, visa inför allmänhet eller
hyra ut upphovsrättsskyddat material.
• Den här produkten innehåller ett kopieringsskydd utvecklat
av Macrovision. På vissa skivor finns det inlagda
kopieringsskyddssignaler. Vid uppspelning av inspelningar
från sådana skivor blir bilden full med störningar. Den
här produkten innehåller kopieringsskydd som är skyddat
av vissa USA-patent och annan immaterialrätt som ägs
av Macrovision Corporation och andra. Användning av
denna upphovsrättsskyddade teknik måste föregås av
godkännande från Macrovision Corporation och får endast
ske i hemmet och för viss annan begränsad användning,
med mindre Macrovision Corporation godkänner annan
användning. Kopiering och demontering är förbjuden.
LJUDFÖRBÄTTRINGSTEKNOLOGI:
• Denna produkt är tillverkad under licens från Dolby
Laboratories. ”Dolby” och dubbel-D-symbolen är varumärken
som tillhör Dolby Laboratories. Confidential Unpublished
Works. 1992-1997 Dolby Laboratories.Inc. All rights
reserved.
14 | SVENSKA
Page 15

ÖVRIGT
UPPHOVSRÄTT:
Org.nr 556520-4137 äger upphovsrätten till den här
handboken. Inga delar av handboken får ändras, kopieras eller
överföras utan skriftligt tillstånd från org. nr 556520-4137.
ÅTERVINNING:
Kartonger och packmaterial till denna produkt är
återvinningsbart och kan återanvändas. Denna
produkt och alla tillbehör förutom batterier följer
WEEE-direktivet om återvinning. Vänligen släng allt
eventuellt material från produkten enligt de lokala
regler som råder där du bor. När du kasserar din produkt,
följ då dina lokala lagar om återvinning.
Batterier får aldrig slängas eller eldas utan ska istället
tas hand om enligt dina lokala regler om kemiskt avfall.
LAG OCH SÄKERHET:
CE-märket finns på produkten och i manualen för att
visa att den uppfyller de europeiska säkerhets- och
elektromagnetiska kraven. Denna produkt är tillverkad
enligt gällande regler för elektromagnetiska fält, vilket
innebär att den är säker att använda så länge säkerhetsanvisningarna följs. Produkten är tillverkad enligt gällande
EU-lagstiftning, som begränsar användning av skadliga ämnen i
elektriska och elektroniska produkter.
MEDDELANDE:
Den här handboken innehåller inga garantier eller andra
typer av utfästelser. All information i handboken, inklusive
tekniska data, bilder och texter, är endast exempel och
används i referenssyfte. Org.nr 556520-4137 förbehåller sig
rätten att uppdatera innehållet i handboken utan föregående
meddelande.
SVENSKA | 15
Page 16

SAFETY INSTRUCTIONS
• Do not block the ventilation openings. Slots and
openings on the unit are provided for ventilation.
The openings should never be blocked by
placing your DVD on a cushion, sofa or other
• Warning: To reduce the risk of electric shock,
do not remove cover or back. There are no
user-serviceable parts inside. Refer servicing to
qualified personnel.
• Warning: To prevent fire or electric shock hazard,
do not expose the unit to rain or moisture.
• Warning: Only use attachments/accessories
specified or provided by the manufacturer.
• Warning: When the unit is used by children,
parents must make sure to let the children
understand all contents in the instruction manual.
• Before you connect the AC adapter: Ensure the
voltage rating on the type plate corresponds to
your mains voltage (type plate is located on the
back of the unit).
• Do not expose the adapter or player to water
(dripping or splashing) and no objects filled with
liquids, such as vases, should be placed on the
unit.
• Keep the DVD player away from direct sunlight
and heat source such as radiators or stoves.
similar surface.
• Do not place the DVD on an unstable cart,
stand, tripod, bracket or table. The unit may fall,
resulting in possible damage or injury.
• Never place heavy or sharp objects on the DVD
player.
• Only use the AC adapter included with the DVD.
Using any other adapter will void your warranty.
• Repairs to electrical appliances should only be
performed by qualified personnel.
• Improper repairs may place the user and/
or equipment at serious risk. This equipment is
intended for household use only and should not
be used for industrial or commercial purposes.
• Do not operate this appliance with a damaged
plug or cord, after a malfunction or after being
dropped or damaged in any way.
• If the supply cord is damaged, it must be
replaced by the manufacturer, its service agent
or similarly qualified people in order to avoid a
hazard.
16 | ENGLISH
Page 17

SAFETY INSTRUCTIONS
• Do not use this equipment for anything other than
its intended use.
• Do not push objects into any openings as
damage to the equipment and/or electric shock
may occur.
• Laser product symbol: Indicates this player is a
Class 1 Laser Product. It means it only uses weak
laser and no hazardous radiation outside of the
unit.
• Warning: This player employs a laser system. Use
of controls, adjustments, or the performance of
procedures other than those specified herein may
result in hazardous radiation exposure.
• Warning: To prevent direct exposure to laser
beam, do not open the enclosure. There is visible
laser radiation when lid is open. Never stare
directly into the laser beam.
ENGLISH | 17
Page 18

OVERVIEW
FRONT PANEL:
A. Disc Tray
B. Open/Close
C. On/Standby
D. Power Indicator
E. USB Port
A
BACK PANEL:
F. HDMI Output
G. Video Output
H. Coaxial Output
I. Right Output
J. Left Output
F G H I J
DVD PLAYER DVP2000
Model: DVP2000
Made in P.R.C
Imported by 556520-4137
C D
B
E
18 | ENGLISH
Page 19

OVERVIEW
181
2
3
4
5 22
6
7
8
9
10
11
12
13
14
15
16
17
19
20
21
23
24
25
26
27
28
29
30
31
32
33
34
1. On/Standby: Turn on/off the DVD Player.
2. Zoom: Increase/decrease the playback picture.
3. Step: Go through the playback, frame by frame.
4. Audio: Choose an audio language of the DVD disc.
5. Subtitle: Select a subtitle language of the playback.
6. 7 : Fast wind backward within chapters.
7. 8 : Fast wind forward within chapters.
8. Search: Search directly for a segment of the playback.
9. Play/Pause: Play or pause the playback.
10. Setup: Open the setup of the DVD Player.
11. Volume -/Navigation: Decrease the volume/Navigate.
12. Display: Show playback information (time/title/chapter).
13. Title: Return to the menu of the DVD disc.
14. A-B: Set a segment of the playback on repeat.
Repeat: Repeat the current chapter.
15. Menu: Open the menu for the playback.
16. 0-9: Number buttons 0-9.
17. USB: Select the USB input.
18. Open/Close: Open/close the disc tray.
19. Q-Play: Skip to the beginning of the playback.
20. Video: Select a resolution.
21. Copy/Delete: Copy and/or delete files on a USB unit.
22. Slow: Set the playback in slow motion.
23. : : Skip forward between chapters.
24. 9 : Skip backward between chapters.
25. Channel: Switch channel output.
26. Stop: Stop the playback.
27. Return: Go back in the menu.
28. Navigation: Navigate.
29. OK: Confirmation button.
30. Volume +/Navigation: Increase the volume/Navigate.
31. Navigation: Navigate.
32. Mute: Activate/deactivate the audio.
33. Mark: Setup a returning point in the playback.
Program: Create a playback program of different files.
34. Clear: Clear the content of a program or mark.
ENGLISH | 19
Page 20

OPERATION
GET STARTED:
1. Connect the power plug of the DVD Player to a wall outlet.
The power indicator on the front panel will illuminate in red.
2. Press the On/Standby button on the front panel or the
Remote Control to start the DVD Player. The power indicator
on the front panel will illuminate in green.
3. Make all the right cable connections to your DVD Player
by following the instructions in the paragraph ‘Cable
Connections‘.
4a. If you want to play a DVD disc in the DVD
Player, follow the instructions in the paragraph
‘DVD Op erat io n‘.
4b. To connect a USB unit to the DVD Player.
Follow the instructions in the paragraph ‘USB
Op eratio n‘.
5. To adjust the system setup of the DVD Player,
follow the instructions in the paragraph
‘System Setup‘.
6. When you are done using your DVD Player, press the On/
Standby
button on the front panel or the Remote Control to
turn off the DVD Player. The power indicator on the front
panel will illuminate in red.
DVD
20 | ENGLISH
Page 21

OPERATION
CABLE CONNECTIONS:
1a. Connect an RCA cable between the Video, Left and
Right Output on the back panel of the DVD Player to the
RCA input on your TV.
1b. Connect an HDMI cable between the HDMI Output on the
back panel of the DVD Player to the HDMI input on your TV.
2. If you have a stereo amplifier, connect a coaxial cable
between the Coaxial Output on the back panel of the DVD
Player to the coaxial input on your stereo.
3. Control the playback via the Remote Control.
1a.
Stereo
TV
1b. 2.
DVD OPERATION:
1. Press the Open/Close button on the front panel or the
Remote Control and place a DVD disc on the Disc Tray.
2. Press the Open/Close button again to close.
3. The DVD will read the DVD disc and begin the playback.
4. Control the playback via the Remote Control.
USB OPERATION:
1. Insert a USB unit into the USB Port on the front panel of the
DVD Player.
2. Press the USB button on the Remote Control to enter the USB
source. The DVD Player will read and display the file list of
the USB unit.
3. Browse the file list by pressing the 5/6/3/4 buttons on the
Remote Control. Select a file by pressing the OK button on
the Remote Control.
SYSTEM SETUP:
1. Press the Setup button on the Remote Control to open the
setup of the DVD Player.
2. There are four different menus in the setup, General,
Audio, Video and Preference. Follow the instructions in the
paragraphs ‘General Setup‘, ‘Audio Setup‘, ‘Video Setup‘
and ‘Preference Setup‘.
3. To close the setup of the DVD Player, press the Setup button
on the Remote Control.
ENGLISH | 21
Page 22

OPERATION
GENERAL SETUP:
1. Press the 5/6/3/4
buttons on the
Remote Control to
open the ‘General’
menu.
2. Eight submenus will
appear (read more
-- General Setup Page --
TV Shape
OSD Lang
Caption
Screen Saver
HDCD
Last Memory
MP3 Lyric
LINK/CEC Sync
Go To General Setup Page
Wide
Eng
On
On
1X
On
On
O
PreferencesGeneral Audio Video
about the submenus later in this paragraph), press the 5/6 buttons on the
Remote Control to circle between the sub-menus.
3. Press the 3/4 buttons to leave/enter a sub-menu.
4. When you enter a sub-menu, a number of options will
appear for the entered sub-menu.
5. To leave the opened menu, press the 3 button twice.
• TV Shape - Set the aspect ratio of the DVD Player.
• OSD Language - Select a language for the OSD menu.
• Caption - Display closed captions (if available).
• Screen Saver - Select a screen saver for when the TV display
goes into standby.
• HDCD - Select an output audio signal.
• Last Memory - Resume the memorized playback.
• LINK/CEC Sync - Activate/deactivate syncing and control of
several devices via HDMI protocol.
AUDIO SETUP:
1. Press the 5/6/3/4
buttons on the
Remote Control to
-- Audio Setup Page --
Speaker Setup
Digital Audio Setup
PreferencesGeneral Audio Video
open the ‘Audio’
menu.
2. Two submenus will
appear (read more
Go To Audio Setup Page
about the submenus later in this paragraph), press the 5/6 buttons on the
Remote Control to circle between the sub-menus.
3. Press the 3/4 buttons to leave/enter a sub-menu.
4. When you enter a sub-menu, a number of options will
appear for the entered sub-menu.
5. To leave the opened menu, press the 3 button twice.
• Speaker Setup - Select the stereo output.
LT/RT: Switch between left/right audio channel.
Stereo: Select to play the audio via the two front speakers of
the TV.
• Digital Audio Setup - Set HDMI as the audio output.
22 | ENGLISH
Page 23

OPERATION
VIDEO SETUP:
1. Press the 5/6/3/4
buttons on the
Remote Control to
open the ‘Video’
menu.
-- Video Setup Page --
Sharpness
Brightness
Contrast
Gamma
Hue
Saturation
Medium
00
00
None
00
00
PreferencesGeneral Audio Video
2. Six submenus will
appear (read more
Go To Video Setup Page
about the submenus later in this paragraph), press the 5/6 buttons on the
Remote Control to circle between the sub-menus.
3. Press the 3/4 buttons to leave/enter a sub-menu
4. When you enter a sub-menu, a number of options will
appear for the entered sub-menu.
5. To leave the opened menu, press the 3 button twice.
• Sharpness - Set the sharpness of the video picture.
• Brightness - Set the brightness of the video picture.
• Contrast - Set the contrast of the video picture.
• Gamma - Set the gamma of the video picture.
• Hue - Set the hue of the video picture.
• Saturation - Set the saturation of the video picture.
PREFERENCE SETUP:
1. Press the 5/6/3/4
buttons on the
Remote Control
to open the
‘Preference’ menu.
2. Eight submenus will
appear (read more
-- Preference Page --
TV Type
PBC
Audio
Subtitle
Disc Menu
Parental
Password
Default
Go To Preference Page
PAL
On
Eng
Eng
Eng
PreferencesGeneral Audio Video
about the submenus later in this paragraph), press the 5/6 buttons on the
Remote Control to circle between the sub-menus.
3. Press the 3/4 buttons to leave/enter a sub-menu
4. When you enter a sub-menu, a number of options will
appear for the entered sub-menu.
5. To leave the opened menu, press the 3 button twice.
• TV Type - Select the colour system (PAL/NTSC/Auto) of your
TV.
• PBC - Select if the playback of the disc starts directly or to
enter the disc menu when playing a VCD disc.
• Audio - Select a language of the audio (if available).
à
ENGLISH | 23
Page 24

OPERATION TROUBLESHOOTING
• Subtitle - Select a subtitle language (if available).
• Disc Menu - Set the language for the menu of the DVD disc
(if available).
• Parental - Set the parental level of the DVD disc (if available).
• Password - Open the sub menu for the password settings.
Note: The default password is ‘8806’.
• Default - Reset the settings to the factory settings.
24 | ENGLISH
Problem Solution
No power Make sure that the power plug is
connected correctly to the wall outlet.
No video
No audio
Distorted video Clean DVD disc from dust/dirt.
Unable to play Place a DVD disc in the Disc Tray.
Remote control
does not work
Make sure that the video cables are
connected correctly.
Reset the setups of the DVD Player.
Make sure that the audio cables are
connected correctly.
Make sure that the coaxial connected stereo
is powered on.
Reset the setups of the DVD Player.
The playback is fast winding backward/
forward.
Place the disc with the correct side up.
Clean DVD disc from dust/dirt.
Close the setup of the DVD Player.
Aim the Remote Control towards the front
panel of the DVD Player.
Use the Remote Control closer to the DVD
Player.
Check the battery level.
Page 25

SPECIFICATIONS
Product name DVP2000
Power supply AC 110-240 V, 50/60 Hz
Power consumption < 15 W
Signal system NTSC/PAL
Frequency response 50-60 Hz
Signal ratio > 80 dB
Supported media CD/CD-R/CD-RW/DVD+R/DVD+RW
Supported file formats MPEG4, VCD/SVCD, MP3, WMA and JPEG
Operating environment Temperature: 0~40 °C
Humidity: 65 + 20 %
Storage environment Temperature: -20~50 °C
Humidity: 65 + 20 %
Remote control batteries 2 x AAA
Included in the package - DVD player
- Scart AV cable
- Remote control
- Batteries
Dimensions 190 x 43 x 260 mm
Weight 900 g
ENGLISH | 25
Page 26

OTHER
NOTES ON COPYRIGHT:
• It is forbidden by law to copy, broadcast, show, broadcast
via cable, play in public, or rent copyrighted material
without permission.
• This product features the copy protection function
developed by Macrovision. Copy protection signals are
recorded on some discs. When recording and playing
the pictures of these discs picture noise will appear. This
product incorporates copyright protection technology that
is protected by method claims of certain U.S. Patents and
other intellectual property rights owned by Macrovision
Corporation and other rights owners. Use of this copyright
protection technology must be authorized by Macrovision
Corporation, and is intended for home and other
limited viewing uses only unless otherwise authorized
by Macrovision Corporation. Reverse engineering or
disassembly is prohibited.
SOUND ENHANCEMENT TECHNOLOGY:
• This product is manufactured under license from Dolby
Laboratories. ”Dolby” and the double-D symbol are
trademarks of Dolby Laboratories. Confidential Unpublished
Works. 1992-1997 Dolby Laboratories.Inc. All rights
reserved.
26 | ENGLISH
Page 27

OTHER
COPYRIGHT:
This manual is the copyright of CI no 556520-4137. No part
of this manual may be revised, copied or transmitted in any
way without written permission from CI no 556520-4137.
RECYCLING:
This product’s packaging materials are recyclable and
can be reused. This product and the accessories packed
together are the applicable product to the
WEEE directive except batteries. Please dispose of
any materials in accordance with your local recycling
regulations. When discarding the unit, comply with
your local rules or regulations. Batteries should never be thrown
away or incinerated but disposed of in accordance with your
local regulations concerning chemical wastes.
LAW AND SAFETY:
The CE mark indicates that this product has been
manufactured according to current regulations
for electromagnetic fields, which means that it is safe
to use if used according to safety instructions. The product is
manufactured according to current regulations within the EU
legislation, limiting the use of hazardous substances in electrical
and electronic equipment.
STATEMENT:
This manual does not provide any warranty or related
declarations. All information in this manual including the product
specification, pictures and literatures is just for reference, CI no
556520-4137 reserves the rights to
update contents of this manual without further notice.
ENGLISH | 27
Page 28

 Loading...