


Thank you for choosing this high quality camera, before attempting to
connect or operate this product, please read these instructions completely
EXTREME LOW LUX 10~40M IR IP66
CAMERA
540 TVL
AC24V/12VDC Model
OPERATING MANUAL

-2 -
General
The extending ni-vision Digital Noise Reduction IR camera offers a complete
IR distance range from 10M~40M. The camera comes in 540TVL, DNR
function and built in IR LEDs with ICR D/N vari-focal lens. Its sophisticated
mechanical design enhanc ed the accessibility and conveniency in terms of
installation. Sturdy and IP66 enclosure ensures the camera to stay in best
condition even under most crit ic al env i r onme nt
The outsta ndi ng ho us ing created for exter nal vari-focal zoom focus adjustment
is convenient for adjusti ng focus fro m rear side. Plus the high torque bracket
for easy 3 axis dir ect ion for installation.
This color CCD video camera employs a 1/3 inch charge coupled device
solid-state imaging device with 470/410 k picture elements , The unit is
equipped with a newly developed DNR DSP (Digital Signal Processor) for
processing the video signal.
The DNR function is a newly developed technology which suppressed all
significant noise while AGC is activated. So the camera is able to deliver
smooth and more even noise picture that enhanced readability and saved
video signal transmission traffic
Features
* 540TV Lines resolution, providing fine, crisp and vivid high-resolution image
* Advanced digital noise reduction deliver low noise image under low lux
environment
* Revolutionary external adjustable and selectable IR projecting distance
design
* External A.I. VR adjustment
* External lens focus adjustment
* Smart Optical Low Pass Filter (OLPF) switching mechanism allows changing
between color and monochr o me
* D/N OLPF mode to work correctly with daytime (visible light) and nighttime
(invisible light)
* IR accuracy: vivid color performance in the daytime and sharp B/W image
with no focus shift in the nighttime
* Infrared light sensing responses wavelength from 700 to 1100nm
Warning: To prevent fire or electric shock hazard, do not expose
the appliance to rain or moisture

-3 -
* Outstanding signal to noise ratio better than 50dB
* Advanced wide range Auto Tracing White Balance (ATW), automatically
adjusts the white balance according to the color temperature in the
environment
* Smart digital control Auto Back Light Compensation (BLC)
* Simple & quick combination providing user-friendly installation &
maintenance
* Heavy-duty, weather & vandal proof housing, IP66
* Excellent waterproof housing design even with external adjustments
Name of Parts and Functions
A. Sunshield
B. Bracket
C. X-Axis screw
D. Y-Axis screw
E. R-Axis screw
F. Zoom adjusting ring
G. Focus adjusting ring
H. A.I auto iris level
I. IR distance adjustment
J. 5¢LED
K. 8¢LED
L. Light sensor
M. Mounting screw
N. Sunshield screw
A
B
C
D E
G F
H
I
N
N N
O
J
K
L M

Installation Pro cedure
Step 1: Securing camera
Place mounting plate at position which the camera will be
installed. Then fix the screw holder and then 4 ¢4*26mm
screws
Step 2: Cable arrangement
The whole instal l ati o n and connection process
should only be made by qualified service person or system installers
It is necessary to make sure that the cable hole has been protected with
waterproof installation process when the cable is connected from the side
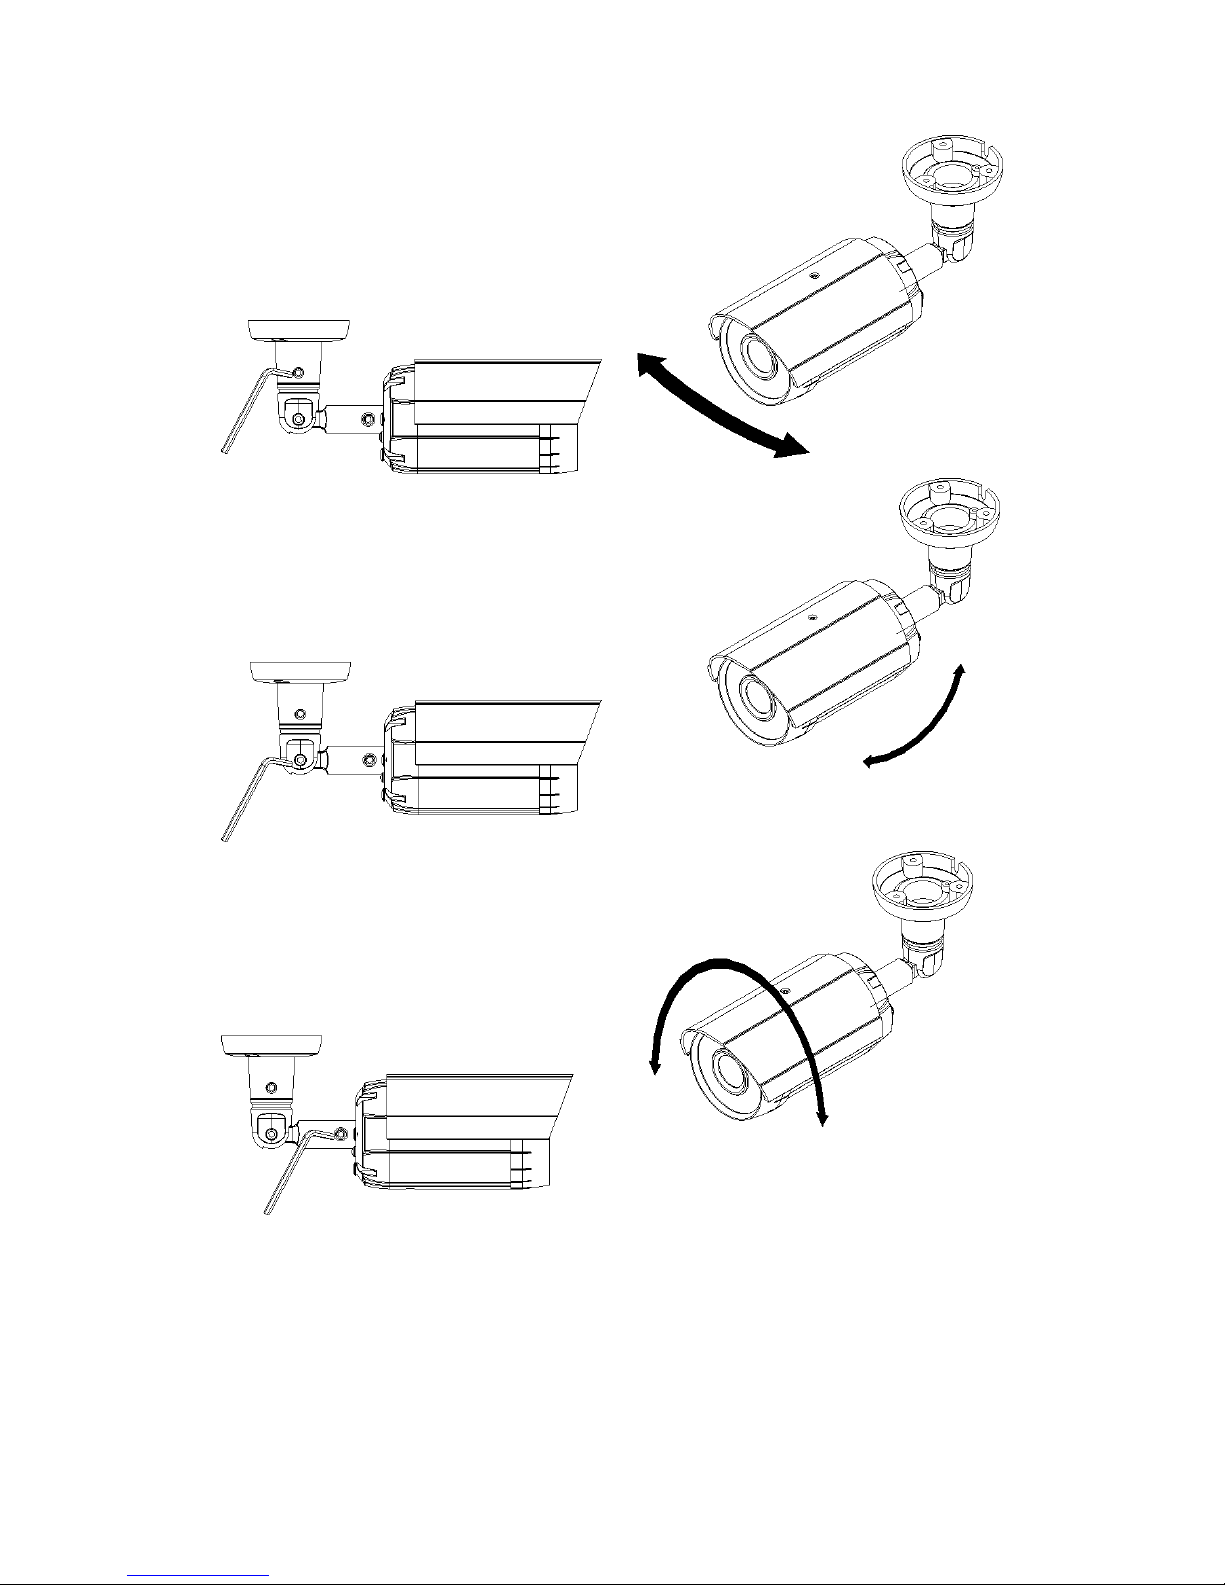
Step 2: Adjust 3 Axes bracket while checking view angle from monitor
Loosen the X-Y-R screws and then adjust the 3 Axis bracket (X-Y-R Axis) to
get the viewing angle
-5 -
Three axes mechanical design allows 90° side views for wall mount and
furthest angle for ceiling mount when guarding a hall way.
Horizontal angle adjustment – by turning the platform to adjust the horizontal
angle180 degrees:360 degrees
X-AXIS Adjustment
Y-AXIS Adjustment
R-AXIS Adjustment

-6 -
Vertical angle adjustment – by turning the platforms to adjust the vertical
angle: 90 degrees
Step 3: Focus adjustment
Focus adjustment should be done with zoom focus at the same time
The default setting for zoom position is WIDE
Take the hexangular driver to adjust the zoom ratio (counterclockwise
= from wide to tele)
Turn the zoom ring to set to the desired zoom
Take the hexangular driver to adjust the focus ratio (clockwise = from
near to far)
Turn the focus ring to set to the desir ed focus
Step 4: Auto iris level adjustment
With built in DC type auto-iris lens,
installer needs to adjust the DC level
especially for conditions described
below.
If the camera is facing a window
but is placed in a relatively dark
room
If the subject background is
extremely bright or dark
If the brightness of the picture
on the monitor is not correct

-7 -
L (counterclockwise): To decrease the contrast
H (clockwise): To increase the contrast
Step 5: IR distance adjustment
Installer may use IR adjustment function according to installation conditions. It
is suggested that the view angle should be checked before setting up the IR
distance. Below is the view angle and IR distance t a bl e suggested
Focal Length(mm) 3 4 5 6 7 8 9 10 11 12
Horizontal Angle
78 63 52 44 38 34 30 27 26 25
Vertical Angle
63 49 40 32 29 26 23 21 20 18
Distance(meter)
10 10 20 20 20,30 30 30 30,40 40 40
LED indicator
(Flashed Time)
4 4 3 3 3,1 1 1 1,2 2 2
***Above chart is a reference for general conditions. For best result, please make adjustments according
to installation site condition.
How do I know how many times to push for the distance I need?
The blue IR LED indicator will be flashed once the IR adjustment button is
pushed, the differe nt fl as hi ng time stands for different distance selected
1 Time: IR distance 30 Meter
2 Time: IR distance 40 Meter
3 Time: IR distance 20 Meter
4 Time: IR distance 10 Meter
***When power on for 15 mins without any further adjustment, the IR
IR distance indicator

-8 -
adjustment button will go into sleep mode. If a reactivate is needed,
please push and hold the IR adjustment button for 20sec.
Auto Iris
This camera is built in with auto iris lens, the s hutt er s pee d i s fixed to 1/60 sec.
for NTSC and 1/50 sec. for PAL.
Super AGC
When install the camera for low lux environment, AGC will increase the
camera sensitivity.
White Balance Adjusting
ATW mode—Advanced white balance
This mode limits color temperature from 2500°K-9500°K
Auto Back-light Compensation
This intelligent aut o BLC is a newly dev el oped di g i t al l ight level control system.
It is activated automatically by screen histogram (contrast) and 225 area
window weighting integration to control iris gain and white balance
simultaneous, so that the clear object with adequate light level can always be
optimized.
Central window weighted average backlight compensation
This method is suited for cases where the main subject is fixed within the
screen.
Histogram backlight compensation
This method is suited for c ases w here the mai n subject mov es abo ut w ithin the
screen.
The combination of two types backlight makes it easier to arrange
backlight compensation operation to match the imaging conditions and
installation location.

-9 -
Specification
Model No. LE307N LE307P
Image device
Signal system NTSC PAL
Picture Elements 768 (H) × 494 (V) 752 (H) × 582 (V)
Scanning system 525 lines. 2:1 interlace 625 lines, 2:1 Interlace
Sync system Internal Lock/Line Lock
Horizontal resolution 540 TV lines
Minimum Illumination
0.1 lux at F1.2 (30 IRE, AGC on)
0.001lux at F1.2 (B/W mode, AGC on, sense up on)
0 lux under infrared illumination
Infrared wavelength from 780 to 1100nm
D/N OLPF switch delay time Sync
Color / Mono switching Chain reaction with D/N filter
Frame integration 4x factory default (2x~32x customization)
Infrared LED
¢5mm-18pcs / ¢8mm-12pcs
IR distance range 35M ( IR distance adjustable via rear push bottom)
AGC Auto Gain 36 dB
S/N ratio Better than 50dB
White balance control ATW (2500°K-9000°K)/AWB
Digital Noise Reduction Automatic
Gamma 0. 45
Function Tact switch board at the rear of camera
ATW/AWB ATW(2500°K-9000°K)/AWB
BLC ON/OFF
FL ON/OFF
IP ratio IP66
A.I. VR adjustment External
TELE/WIDE , FAR/NEAR
adjustment
External
Video output signal Composite: 1.0 V p-p at 75Ω load
Lens selection 3.0-12mm F1.4 A.I lens(default)
Operating temperature -10°C to 50°C
Power source DC 12V / AC 24V
Power consumption max. average 700mA
Dimension
¢88x288(L)mm ( with bracket )

-10 -
Standard Accessories
Camera mounting screw*4
Hexangular driver *1 User Manual
 Loading...