

Page 1

www.lupine.de
MANUEL D’UTILISATION/OWNERS MANUAL Piko R
PIKO R
Page 2

2
Piko R
Lire d'abord, allumer ensuite ! 3
Fonctionnement 4-5
Programmation 6
Niveaux et durées d'éclairage 7
Bluetooth 8-9
Fixation 10-14
Batteries SmartCore 15
Maintenance, stockage et charge 16
Diagnostic des pannes 17
Données techniques 18
Notes récentes 35
Sommaire/Index
Français
English
Read this manual before using 19
Operation 20-21
Programming 22
Dim Levels & Runtimes 23
Bluetooth Remote 24-25
Mounting 26-30
Operation SmartCore Batteries 31
Care and Storage an Charging 32
Troubleshooting 33
Technical data 34
Miscellaneous 35
Page 3

3
Piko R
Français
Consignes de sécurité:
Avertissement!
Ne jamais diriger intentionnellement le faisceau de lumière en direction de vos yeux ou de ceux d'une
autre personne. Si votre regard croise un faisceau lumineux, fermez les yeux et détournez la tête du
faisceau. N'utilisez pas de dispositif optique à forte focalisation pour observer le faisceau lumineux.
Veuillez informer l'utilisateur des règles de prévention des accidents relatives aux rayonnement laser
dans le cas d'un usage commercial ou dans le secteur public.
(Re)chargez la batterie avant la première utilisation..
Ce projecteur peut s'éteindre à tout moment. Il est donc utile, d'avoir toujours une petite lampe de
secours à portée de main.
Coupure automatique du BLUETOOTH:
Si la tête de la lampe est connectée à la batterie, sans que la lumière soit allumée, le module Bluetooth
se désactive- ra automatiquement après 2 heures. A ce moment-là vous ne pouvez plus allumer la lumière via la télécommande Bluetooth. Pour redémarrer le module Bluetooth ou l’éclairage appuyez sur
l’interrupteur ou reconnectez la batterie.
Réaction exothermique:
Le boîtier du Piko peut devenir chaud, veillez donc toujours à le conserver à une distance su sante des
maté- riaux in ammables. L'utilisation à l'abri (sans refroidissement, par exemple par le vent) est toujours
possible, elle n'endommage pas le projecteur. Lors de l'utilisation à l'arrêt, la lumière s'a aiblit après
quelques minutes. Ceci est normal et réduit la température de la lampe. Le fonctionnement permanent
à 15 W est seulement possible avec le mouvement de l'air!
Toujours séparer le batterie de la tête de la lampe pendant le transport.
Étanche?
Tous les composants de la Piko sont étanches et peuvent être utilisés même dans les circonstances les
plus défa- vorables. La lampe est conforme à l'indice de protection IP 68, cependant, ce n'est pas une
lampe de plongée et elle NE convient PAS à une utilisation sous l'eau
D’abord lire, ensuite allumer!
Page 4

4
Piko R
Après le raccordement du projecteur à la batterie rechargeable, le logiciel commencera un auto-test,
le projecteur et les LED rouges, vertes et bleues du commutateur s'allument une fois brièvement. Par
la suite, la tension de la batterie est a ché sur les LED bleu et rouge. Cela se produit comme suit:
Tout d'abord, la LED bleue clignote une fois par volt,
puis la LED la LED rouge clignote une fois par dixième de volt.
Exemple : le bouton clignote 7 fois bleu et 5 fois rouge
= la tension mesurée sous charge est de 7,5 V.
Initialisation et a chage de la tension:
Le niveau de tension de la batterie
Au delà de 8,0 V Batterie chargée
Entre 7,1 et 7,9 V Rechargez la batterie ou la batteri est vieille
Entre 6,5 et 7 V Batterie inutilisable
Fonctionnement
Une brève pression permet de passer d'un niveau de luminosité à l'autre.
Commuter/feux de croisement:
Mise sous tension:
À la première pression, le projecteur s'allumera à puissance maximale. La LED bleu clignote.
Mise hors tension:
Une longue pression permet d'éteindre la lampe.
Remarque:
en fonction de la température extérieure, la puissance maximale ne sera atteinte qu'à condition
d'espérimenter un vent de déplacement su sant. En l'absence de refroidissement, la puissance est
progressivement réduite.
Page 5
5
Piko R
Français
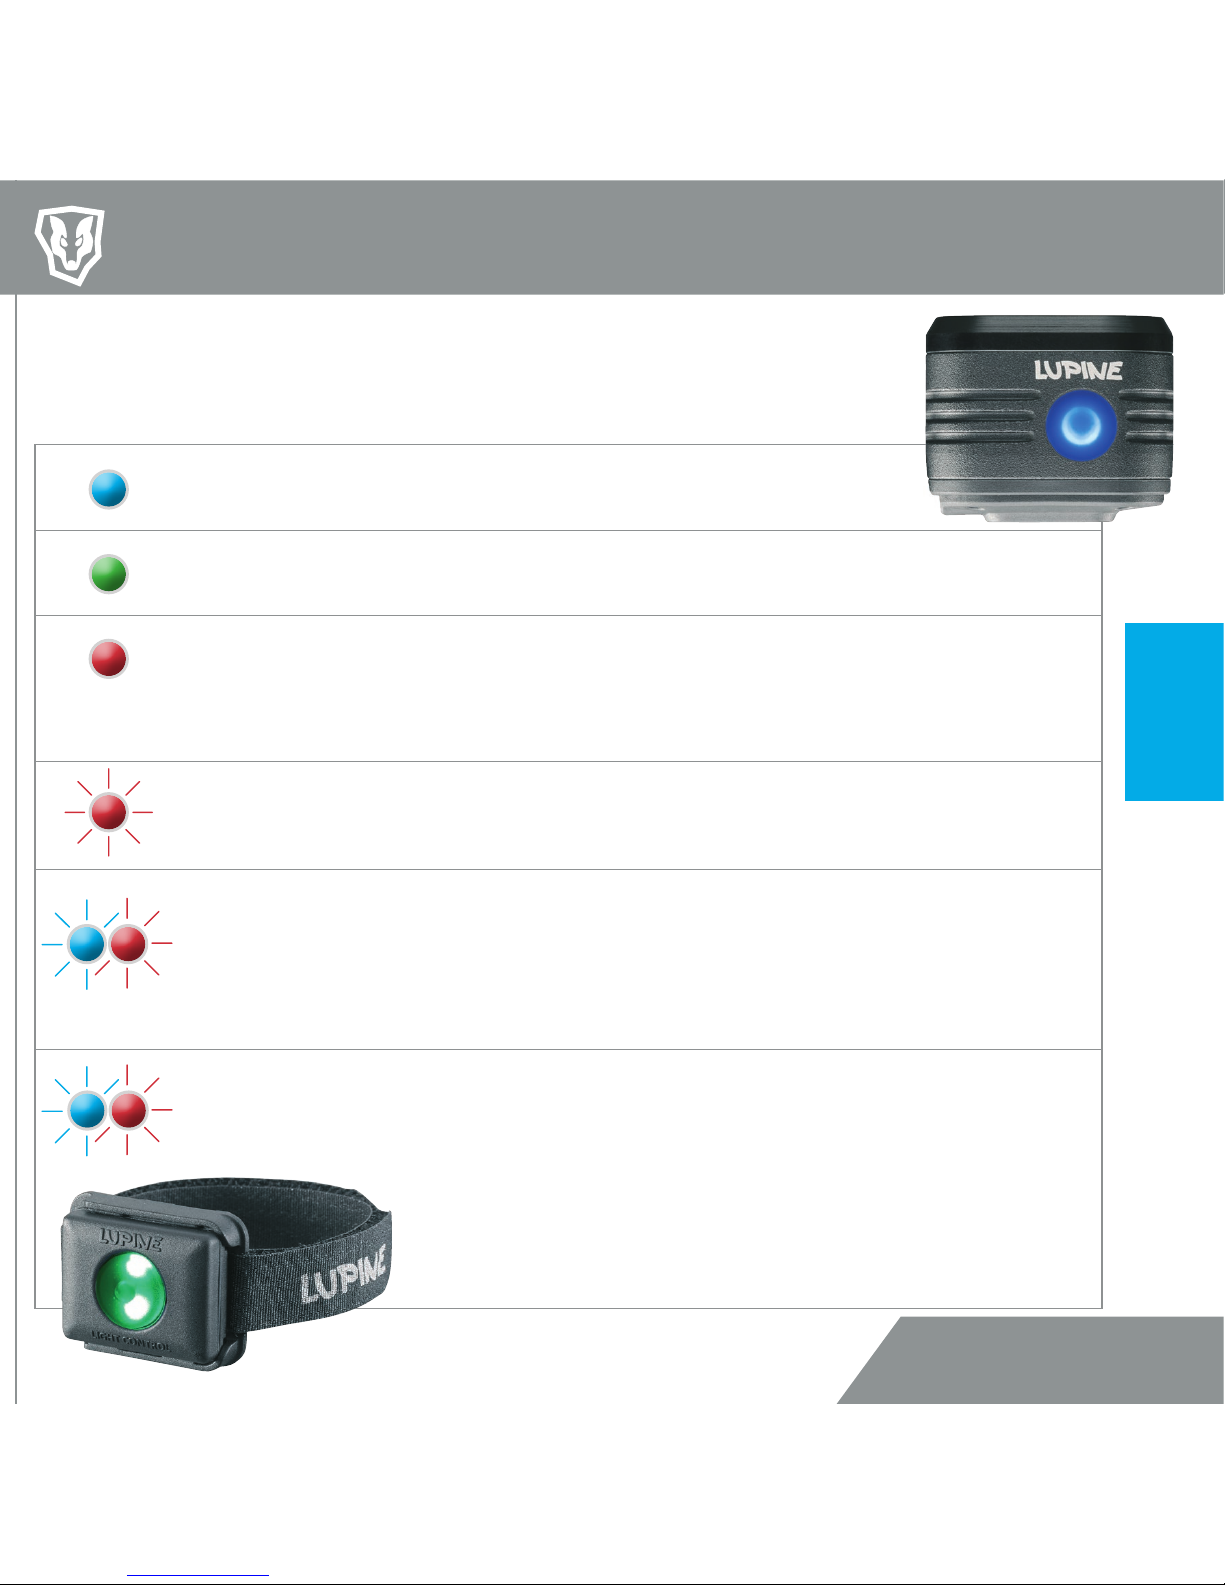
Signication de la couleur des LED
La lampe éclaire à puissance maximale.
La lampe éclaire à un niveau faible.
1. Avertissement de batterie, faible capacité résiduelle.
Le bouton est allumé en rouge. Remarque: le moment de
l'avertissement de batterie peut être in uencé par la programmation (Avertissement de batterie vide).
2. Avertissement de batterie, très faible capacité residuelle
Avertissement!
La LED rouge clignote pendant quelques minutes avant que
la batterie ne soit épuisée, puis les LES rouge et bleu commencent à clignoter alternance, et en n le projecteur éclaire
plusieurs fois par bref instants.
Arrêtez immédiatement ! La lampe va s'éteindre!
Après une nouvelle mise en marche une Réserve (Niveaux
les plus bas seulement) est encore disponible quelques minutes en fonction de l'âge de la batterie. Une fois la batterie
complètement déchargée, le projecteur est contraint de
s'éteindre, alors : attention! Remarque: pour une utilisation
exclusive avec 2 W ou moins, il n'y a pas de réserve disponible.
La LED bleue est allumée:
La LED verte est allumée :
La LED rouge est allumée :
La LED rouge clignote +
la lampe clignote 1x:
LED bleu et rouge
s'allument
alternativement
+ la lampe clignote:
LED bleu et rouge
s'allument
alternativement:
Le bouton sur la tête de la lampe est équipée d'un ensemble de LED RBG a
n de vous indiquer le niveau d'éclairage actuel ainsi que le pourcentage de
batterie restant.
Page 6

6
Piko R
Niveaux d'éclairage et programmation
Réglage usine
Pour passer au mode en 4 niveaux, maintenez le bouton jusqu'à ce que la
LED rouge clignote trois fois, puis relâchez le bouton.
Exemple:
Paramètres
disponibles
2 - niveaux
3 - niveaux
4 - niveaux
3 - niveaux (RVLR)
3 - niveaux (ECO)
Commence par le niveaule
plus bas
Commence par le plus haut
niveau
"Avertissement de batterie
vide" précoce
"Avertissement de batterie
vide" tardif
SOS Alpin
SOS
Bluetooth Connect Modus
Maintenez le bouton en- foncé
jusqu'à ce qu'il ...
clignote 1x rouge (ca 3 sec)
clignote 2x rouge (ca 4 sec)
clignote 3x rouge (ca 5 sec)
clignote 4x rouge (ca 6 sec)
clignote 5x rouge (ca 7 sec)
clignote 1x bleu (ca 8 sec)
clignote 2x bleu (ca 9 sec)
clignote 3x bleu (ca 10 sec)
clignote 4x bleu (ca 11 sec)
clignote 5x bleu (ca 12 sec)
clignote 6x bleu (ca 13 sec)
clignote 1x verde (ca 14 sec)
Programmes
Fonctions supplémentaires
Selon sa con guration d'usine la Piko est en mode 3 niveaux mais d'autres programmes sont disponibles.
Pour cela, appuyez simplement sur le bouton jusqu'à ce que le bouton devienne rouge ou bleu conformément au tableau ci-dessous.
Si le doigt est enlevé le bouton, le réglage sélectionné est sauvegardé.
Niveaux d'éclairage:
Page 7

7
Piko R
Français
7 W
2.5 W
0.3 W
750 lm
300 lm
40 lm
15 W
5 W
1500 lm
550 lm
RVLR
15 W
1.2 W
1500 lm
150 lm
Autonomie
Piko R 4/X 4
Autonomie
1500 lm
750 lm
300 lm
40 lm
1500 lm
550 lm
40 lm
15 W
7 W
2.5 W
0.3 W
15 W
5 W
0.3 W
Autonomie
Piko R 7/X 7
Autonomie
Piko RX Duo
2-niveaux
4-niveaux
3-niveaux
3-niveaux
avec RVLR
3-niveaux
Eco
1:45 h
5 h
80 h
3:30 h
10 h
160 h
2 h
5:30 h
95 h
1:45 h
3:30 h
10 h
80 h
3:30 h
7 h
20 h
160 h
2 h
4 h
11 h
95 h
1:45 h
20 h
3:30 h
40 h
2 h
25 h
1:45 h
5 h
3:30 h
10 h
2 h
5:30 h
3:30 h
10 h
80 h
7 h
20 h
160 h
4 h
11 h
95 h
RVLR
RVLR RVLR
RVLR: dans ce mode un mode de clignotement plus lent est disponible en supplément.
L'autonomie d'éclairage peut varier selon l'ancienneté, l'état et les uctuations
de température de la batterie.
Niveaux et durées d'éclairage
Page 8

8
Piko R
Pour la connexion, la tête de lampe doit être mise en mode de réception.
Appuyer sur les touches de la lampe jusqu’à ce que 5 LED verts s’illuminent simultanément et alors le
laisser en route. Le récepteur est maintenant prêt pour la réception pour environ 30 deuxième. Pendant cette durée, on tient les touches de la télécommande appuyées aussi longtemps que la lumière
verte jusqu’à ce que Stouches lumineuses vertes s’allument.
Plusieurs têtes et un émetteur:
Jusqu’à 5 têtes de lampes peuvent être reliées à un émetteur.
Plusieurs émetteurs et une tête de lampe:
Avec la tête de lampe, jusqu’à quatre émetteurs radio peuvent être connectés.
Les émetteurs sont enregistrés par ordre dans la tête de la lampe puis à nouveau e acés.
Si on veut brancher sa tête de lampe à nouveau exclusivement sur un émetteur, il peut alors être nécessaire de relier un émetteur jusqu’à 3 fois avec la tête de lampe.
Bluetooth
Dés l’atelier, votre lampe est déjà connectée à votre émetteur radio.
Lier l’émetteur avec la lampe:
L’émetteur radio est livré avec le support de guidon Peppi V5 (lampes de casque) ou support pour guidon
à mains (lampes frontales). Pour les vélos, le lieu de xation idéal de l’émetteur se trouve juste à côté
de la poignée, a n d’avoir un contrôle complet et de ne pas lâcher la main du guidon. Le support pour
guidon à main peut aussi être monté sur bâton de ski.
Page 9
9
Piko R
Français
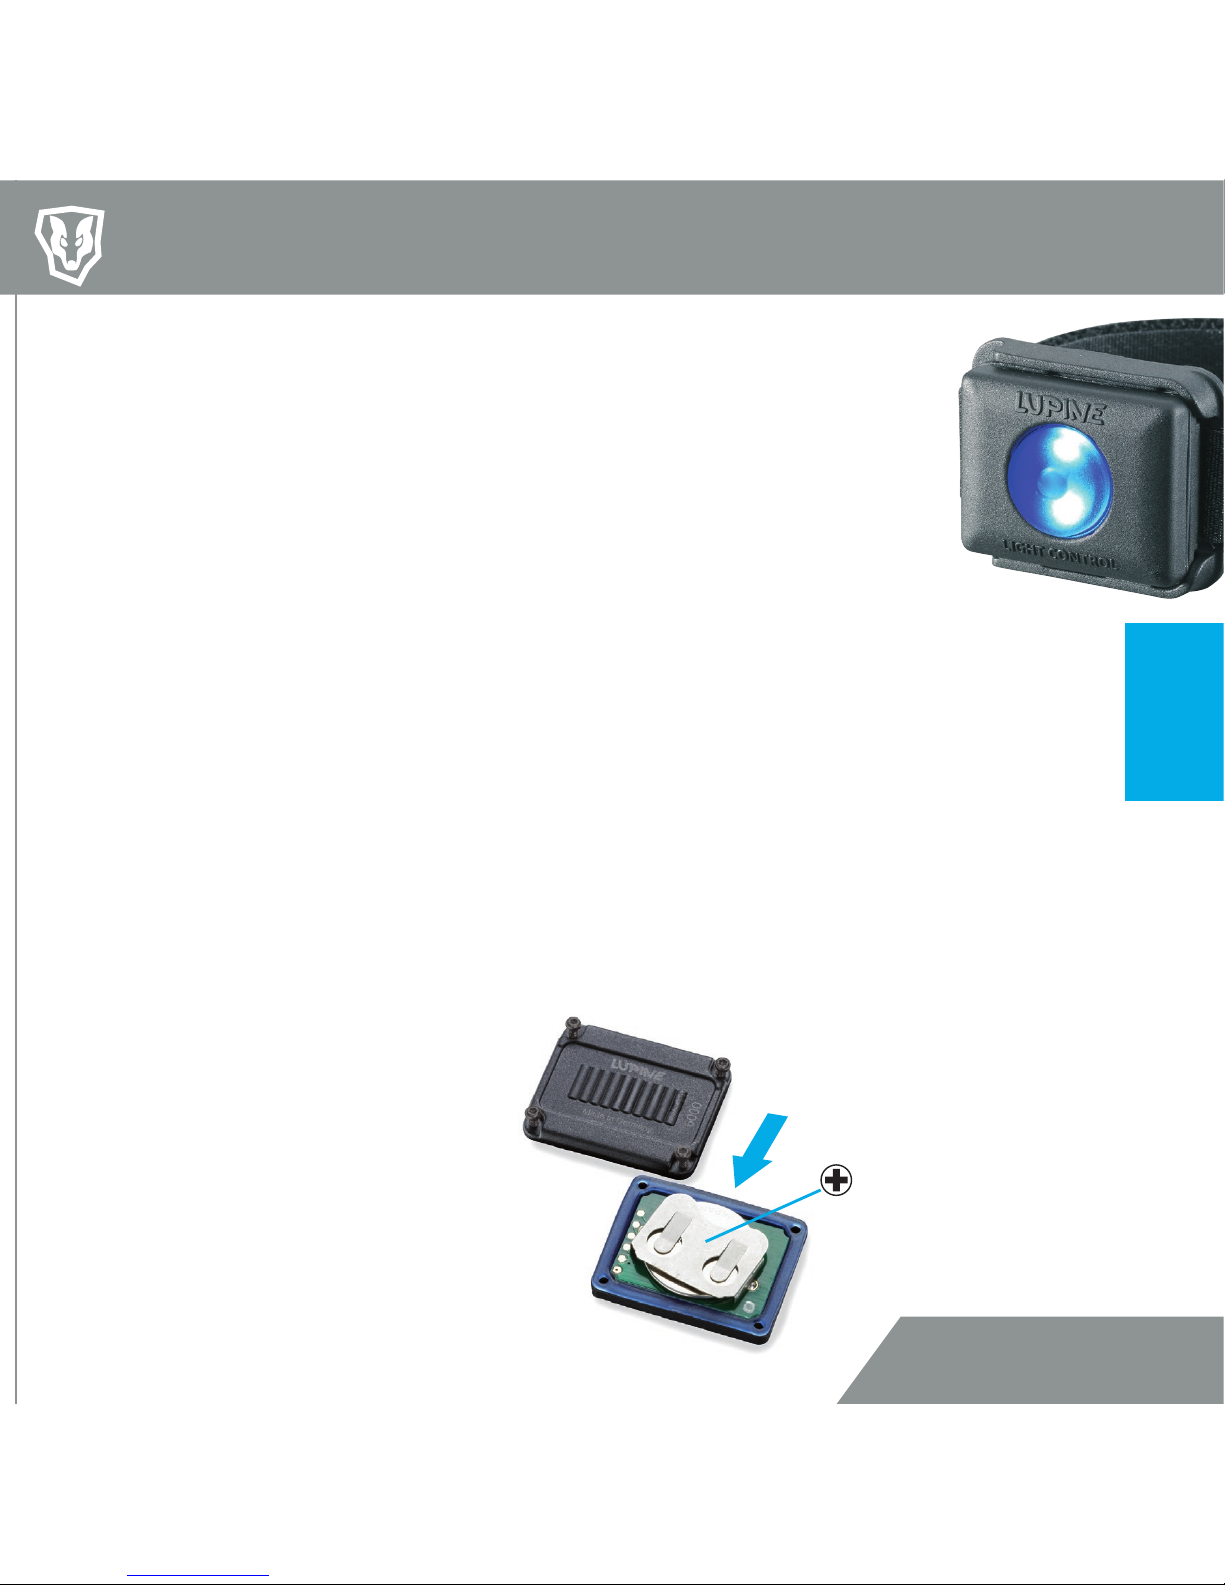
Avec des cellules de bouton pleines, les LED brillent fortement sur l’émetteur, avec tension moindre, les lumières deviennent plus faible jusqu’à ce que l’émetteur radio ne fonctionne plus Un froid
extrême peut ainsi induire une diminution de la tensi on de la batterie. est la pile bouton est vide,
ceci est représenté par une lueur rouge.
Changement de batterie sur l‘émetteur:
Pour changer la batterie, ouvrir toutes les 4 vis sur le côté inféri eur de l’émetteur avec un tournevis T5 pour vis Torx. Mettre le nouveau bouton de cellule CR 2032 comme sur l’image et fer mer à
nouveau le boîtier. Resserrer les vis pour que la jointure bleue visible soit comprimée.
Tourne-vis T5 Torx: (article nr. 137)
Emetteur d’avertissement:
Pour activer ou désactiver, appuyer sur le bouton radio : les deux LED sur
le bouton radio doivent d’abord devenir vertes puis bleues. Laisser mar-
cher le bouton radio.
Activer/désactiver durablement la lumière LED sur le bouton
L’a chage LED sur le bouton radio suit l’a chage de la tête de la lampe. Details: voir
page 5.
L’avertissement n’a pas lieu si la cellule du bouton de l’émetteur est vide.
Avertissement de batterie vide de la tête
de lampe/ de la radio:
Bluetooth
Page 10
10
Piko R
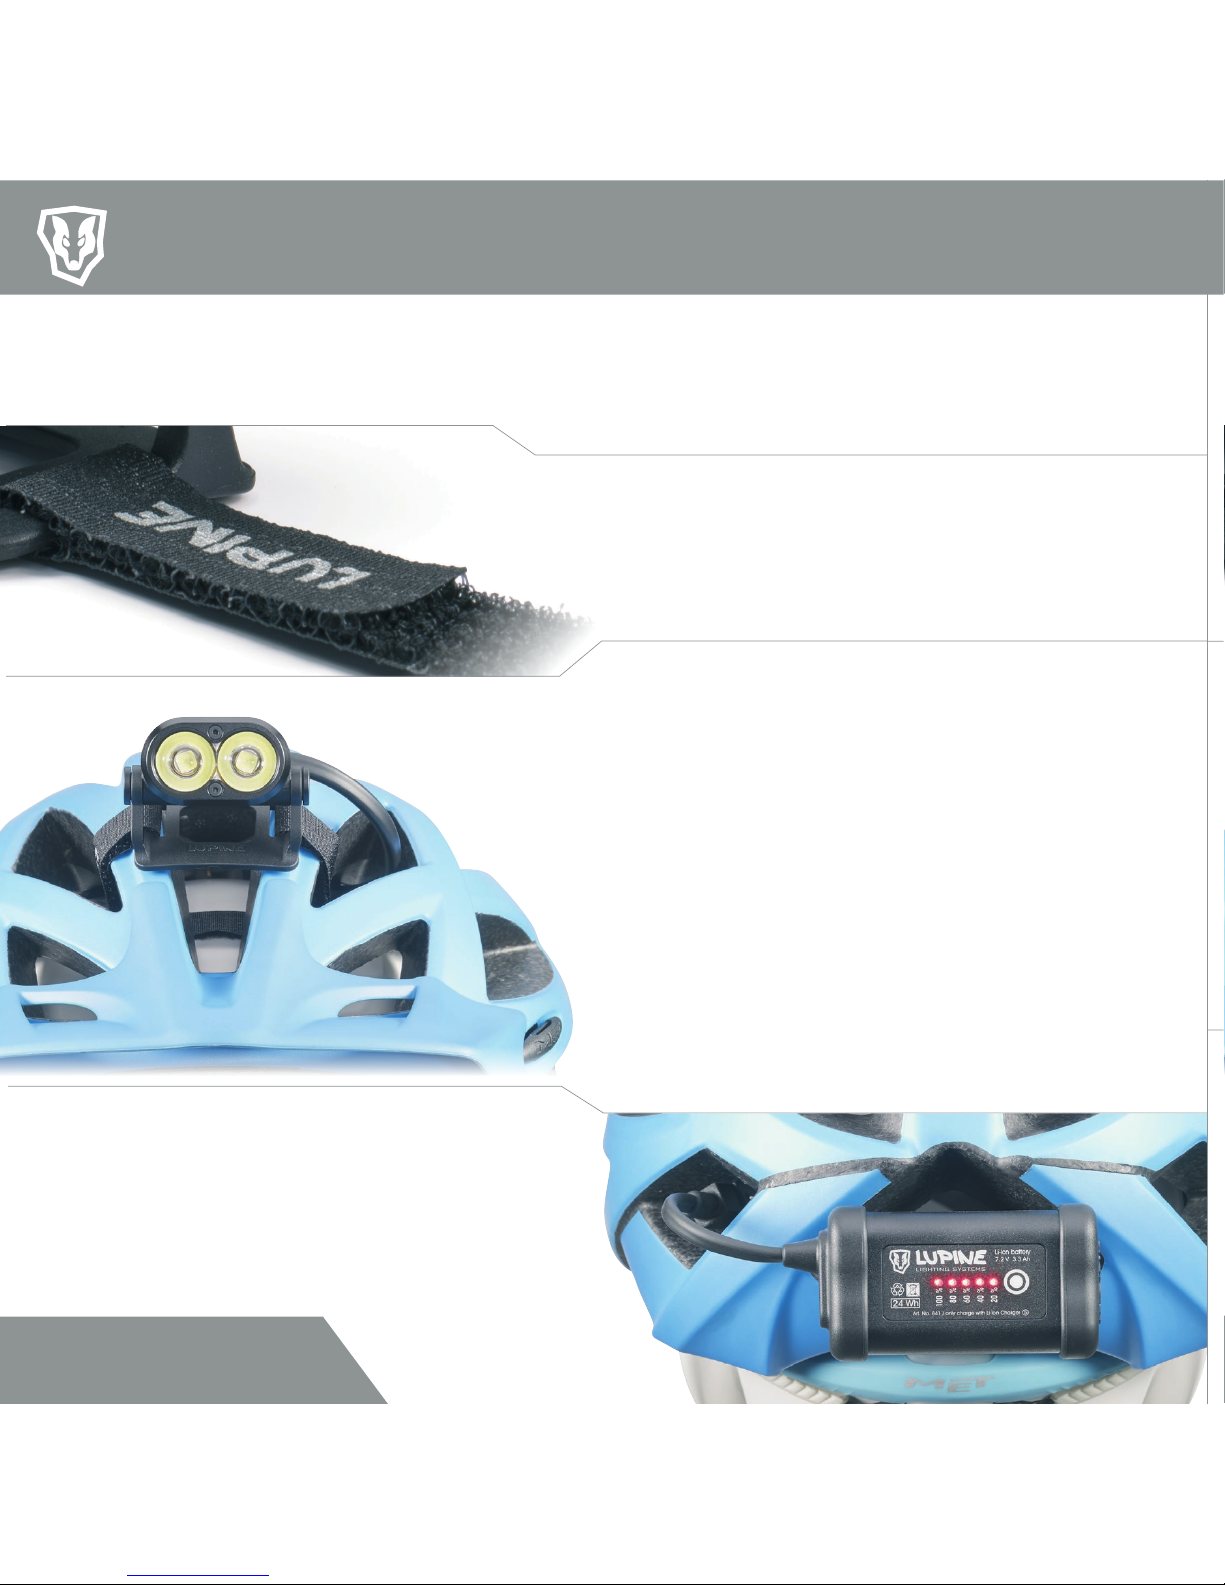
Fixation de la lampe de casque
Grâce à l'extension fournie, la batterie peut
être portée dans votre gilet ou votre sac à
dos. La bande Velcro exible permet également de xer directement la batterie sur le
casque.
Aucun outil n'est nécessaire à la xation de cette lampe. La lampe de casque est compatible avec tous les
casques de vélo présentant des aérations. Fixation alternative : voir page 7.
Faite ensuite passer l'autre extrémité à travers les
bouches d'aération du casque et la seconde ouverture du porte casque.
Maintenez en n la lampe dans la bonne position,
serrez la bande Velcro autant que possible
et xez là.
En lez la ne bande Velcro sur le côté de l'inscription
Lupine d'environ 4 cm par le côté gauche du porte
lampe avant de la plier et de la xer.
Page 11
11
Piko R
Français
Le positionnement de la batterie FastClick se
fait par insertion du câble dans le bas du boîtier
FastClick xé sur le bandeau jusqu'au déclic.
Batteries adaptées:
Art.N ° 884 2,0 Ah
Art.N ° 881 2,0 Ah SmartCore
Art.N ° 835 3,3 Ah
Art.N ° 842 3,3 Ah SmartCore
Pour son bon fonctionnement, il est nécessaire que les deux vis noires soient correctement serrées. La position verticale de la tête
de la lampe peut être réglée très précisément
jusqu'à un angle de 60 °.
Fixation de la lampe frontale Piko
Câble d'extension
Avec un câble d'extension, il est possible
de transporter la batterie dans une poche
de veste ou un sac à dos.
Le câblage correspondant peut être
remplacé par un boîtier pour batterie
FastClick sur la bande frontale
11
Piko
Page 12

12
Piko R
3M Dual Lock:
Le système 3M Dual Lock permet une installation sur pratiquement n'importe quel
casque. Il disponible à la fois pour la tête de
la lampe Piko, ainsi que pour le système de
batterie FastClick.
Détails: www.lupine.de
Support GoPro:
Notre Piko peut être xée sur un logement standard GoPro grâce à un
support en CNC que nous avons spécialement développé.
Article N ° 1070
Options de Fixation supplémentaires
Page 13

13
Piko R
Français
Fixation attache rapide
Plusieurs attaches rapides en aluminium CNC destinées
à la xation sur la barre sont disponibles en accessoires.
voir: www.lupine.de
Fixation:
1. Insérez la vis avec le joint torique à travers le trou du support
de barre.
2. Faites ensuite glisser le deuxième joint torique noir sur
l'extrémité de la vis. Il est nécessaire de bien respecter la séquence joint torique, vis, joint torique, support de barre, lampe a
n de garantir le bon fonctionnement de.
3. Resserrez doucement, puis fermement la vis. Comblez le trou
taraudé avec le bouchon d'obturation fourni.
4. La tête de la lampe et le support peuvent maintenant .
Avant la xation, veuillez veiller à bien desserrer les vis sur le
support de casque / bandeau.
Une des vis et les deux joints toriques sont nécessaires à la
xation sur la barre.
Page 14

14
Piko R
Choisissez la bande Velcro longue
ou courte selon la circonférence du
tuyau.
Placez la bande Velcro autour du
tuyau de sorte que le revêtement
anti-dérapant intérieur puisse assurer une stabilité supplémentaire.
Fixation de la batterie:
Types de batterie:
La batterie Lupine commune dispose
d'une sangle sur sa face arrière per-
mettant de la xer avec une bande
Velcro.
En outre, les batteries appelées SmartScore disposent d'un témoin de niveau de
charge.
13.2Ah 6.6Ah 3.3Ah 3.3Ah
Les batteries Fastclick ne peuvent pas
être xées avec du Velcro. Cependant, elles
peuvent être directement xées sur la bande
frontale grâce au système de clic ou encore
avec le système 3M.
3.3Ah 3.3Ah 2.0Ah 2.0Ah
Fixation batteries
Page 15

15
Piko R
Français
Fonctionnement de la batterie
Signale sonore:
Une courte pression sur l'écran tactile su t pour a cher le témoin de charge. Vous entendrez tout d'abord un
signal sonore qui permet d'indiquer
par tranche de 20 % la capacité restante de votre lampe utilisée sur un
casque ou sur un bandeau frontal.
Témoin de charge
Fonction lumière arrière
Pour activer la lumière arrière, e ectuez 2 pressions rapides sur le
bouton. Les 5 LED s'allument alors de manière permanence. Ap-
puyez de nouveau sur le bouton pour éteindre la lumière arrière.
Fonction chenillard
Permis par l'éclairage successif de chaque LED en continu. Pour
éteindre,appuyez sur le bouton à nouveau.
Par exemple: 3 LEDs (20%, 40%, 60%) allumées
1 LED (80%) clignote
Optique:
L'a chage optique LED se compose de 5 indicateurs LED rouges. Les LED
ont alors deux états de fonctionnement : elles peuvent clignoter ou rester
allumées de manière constante. Ces états peuvent être compris comme
suit: une LED allumée de manière constante représente un pallier de 20% ,
une LED clignotante, un pallier de 10%.
5 x = 100%
4 x = 80%
3 x = 60%
2 x = 40%
1 x = 20%
= 70% de capacité restant
Remarque: le témoin de charge s'éteint seul au bout de quelques secon-
des. Si ce n'est pas le cas, il est possible que la lumière arrière soit activée.
Page 16

16
Piko R
Maintenance, stockage et chargement
1. Branchez le chargeur Wiesel fourni dans votre prise électrique
2. Branchez le chargeur à la batterie
3. Le processus de charge démarre automatiquement - le voyant est alors rouge
4. Lorsque la charge est terminée et que la batterie est pleine, le voyant passe au vert
Charge de la batterie:
Avertissement! Ce chargeur ne doit être utilisé que pour des batteries lithium-
ion rechargeables. Il NE convient PAS au chargement des batteries Ni-MH!
Ne pas utiliser de piles sèches! - Risque d'explosion!
Ce chargeur peut être ouvert UNIQUEMENT par son fabricant
Avant une longue période de non-utilisation, chargez complètement la batterie et stockez la
dans un endroit le plus frais et sec possible, par exemple au sous-sol etc.
Lampe:
En cas d'encrassement, nettoyez l'extérieur des phares et du faisceau de câbles avec de l'eau tiède et un
peu de détergent.
Attention! La tête de la lampe Piko ne doit pas être ouverte sous peine de nuire à l'étanchéité de la lampe et de perdre la garantie conditionnée par cette étanchéité. Avant de tenter de réparer vous même
une panne, veuillez contacter notre. Service client.
Entretien et stockage
Batterie:
Page 17

17
Piko R
Français
Panne
La lampe ne s'allume pas et
les LED du du commutateur ne
clignotent pas lors du branchement.
Les LED de puissance ne
s'allument pas, les LED sur le
commutateur s'allument au
branchement.
Les durées d'éclairage sont trop
courtes.
La batterie SmartScore a che
toujours
La lampe ne réagit pas à
l‘émetteur.
L’émetteur ne s’allume pas
paspader
Cause
Batterie fortement déchar-
gée
Batterie non ou mal rac-
cordée au phare
Fonctionnement LED défec-
tueux.
La batterie est vide.
La batterie est vieille.
Températures très basses.
Le chargeur est défectueux
L’a chage a été réinitialisé.
Le bouton de lampe et
l’émetteur ne sont pas connectés l’un avec l‘autre.
Bouton de cellule vide ou
mal installé.
Solution
Charger la batterie
Véri er les contacts de prise.
Remplacer.
Charger.
Remplacer.
Tenir la batterie au chaud.
Changer de chargeur.
Vider entièrement la batterie
avec la lampe et recharger à nouveau.
Voir chapitre Bluetooth.
Voir chapitre Bluetooth.
Page 18

18
Piko R
Tete de la lampe Piko: 55 g
Piko R 4 complet avec batterie: 180 g
Piko R 7 complet avec batterie: 300 g
Piko RX 4 complet avec batterie: 210 g
Piko X 7 complet avec batterie: 330 g
Piko RX Duo avec (une) batterie: 180 g
Poids:
Tension d'entrée: 100 – 240 V~, 50 – 60 Hz
Courant de charge: 1.2 A max.
Batteries adaptées: Li-Ion 7.2 V
Chargeur Wiesel:
15 W 1500 Lumen
7 W 750 Lumen
5 W 550 Lumen
2.5 W 300 Lumen
1.2 W 150 Lumen
0.3 W 40 Lumen
Puissance lumineuse: Autonomie d'éclairage:
Piko R 7 / X 7:
3 h 30 Min
7 h
10 h
20 h
40 h
160 h
Piko R 4 / X 4:
1 h 45 Min
3 h 30 Min
5 h
10 h
20 h
80 h
Piko RX Duo (deux batteries):
2 h
4 h
5 h 30 Min
11 h
25 h
95 h
Angle de faisceau de la lentille:
22 °
Plage d'utilisation:
-25 °C bis +70 °C
Piko R 4/X 4: 3.3 Ah / 7.2 V Li-Ion
Piko R 7/X 7: 6.6 Ah / 7.2 V Li-Ion
Piko RX Duo: 2 x 2.0 Ah / 7.2 V Li-Ion
Capacité de la batterie / tension
nominale:
Piko R 4/X 4: 3 h
Piko R 7/X 7: 5:30 h
Piko RX Duo: 2 h (par batterie)
Temps de charge:
IP68
Indice de protection:
Données
FCC ID: QDS-BRCM1078
IC: 4324A-BRCM1078
Comprend:
DECLARATION DE CONFORMITY DE LA CE:
www.lupine.de/CE
Page 19

DeutschEnglish
19
Piko R
Read this manual before using
Safety instructions:
Warning!
Avoid looking directly into the light emitted by the light or shining the light into your own eyes or the eyes
of another person. If the light accidentally shines into your eyes, close your eyes and move your head out
of the light beam. Do not use any strongly focusing optical device to look at the light beam.
In cases where the light is used in a public or commercial setting, users should be provided with training
concerning the safety measures for laser light.
Re-charge you battery before you using the light.
Carry a spare light with you at all times, as the product can potentially fail unexpectedly at any
time.
Automatic cuto BLUETOOTH:
If the lamphead is connected to the battery, without switching the light on, the Bluetooth module will
automatically deactivate after 2 hours. You now can NOT turn on the light via the Bluetooth remote. Either
press the lampheads switch, or reconnect the battery to start the Bluetooth module or light.
Heat generation:
The housing of Piko R may heat up; so make sure that you always keep the light at a safe distance to any
combustible or ammable materials. Could cause re or death! However, quiescent operation (without
cooling the light housing via airow or the like) is possible at any time and will not damage the product.
When the light is being used in a stationary state, the light will be dimmed after a few minutes to redu-
ce the light's temperature. Continuous operation at 15 watts is only possible with air owing over the
housing!
Important! Always disconnect the battery from the light at transport or storage!
Otherwise the small amount of power used by the electronics will discharge the battery, and the lamp may
be switched on accidentally.
Water resistance:
All Piko R components are waterproof and can of course be used under extremely severe conditions.
The lamp complies with IP protection class 68 but is NOT a diving lamp and is NOT suitable for use under
water.
Page 20

20
Piko R
After connecting the lamp to the battery, the software runs a selftest. The lamp itself as well as the
red and blue LEDs in the switch light up once. The battery voltage is indicated by the blue and red
LEDs, as follows:
The blue LED ashes once for each volt; and then
the red LED ashes once for each 1/10 of a volt.
Example: The LED ashes seven times blue and ve times red = battery voltage is 7.5 V.
Initialization & voltage display:
more than 8.0 V battery is fully charged:
7.1 to 7.8 V battery needs charging or is old
6.5 to 7 V battery is not ready for use
Interpreting the voltage display:
Operation
Each quick push of the button switches through the dim levels.
Turn on:
Switching:
Turn o:
The rst press of the button switches on the light with maximum power. The blue LED is illuminated.
To turn o the lamp, keep the button pressed.
Note: The light outputs the maximum amount of light only if airow lowers the temperature of the
light suciently. If the light is not cooled by airow, its power is reduced incrementally to prevent the
LEDs and electronic elements from overheating.
Page 21

DeutschEnglish
21
Piko R
Meaning of LED colors
Lamp is on high beam (15W).
Lamp is on a lower beam.
1. Battery Warning, low capacity remaining.
The red LED is lighting.
You can adjust the timing of the battery warning,
see progamming on next page.
2. Battery Warning, very low capacity remaining.
The red LED is ashing and Piko ashing ones, too.
Warning!
The red and blue LED ashing in turn, the lamp ashes 30
times. Stop immediately! The light will be switched o.
After switching the light on again, reserve power at a low
beam is available. Depending on the age of the battery, some
more minutes of light are provided. When reserve power is
completely discharged, the light will be switched o automatically. So slow down!
Note: The burn time remaining after the red LED is illuminated
depends on the total battery capacity, the ambient temperature and the battery's age.
blue LED lighting:
green LED lighting:
red LED lighting:
red LED ashing +
light ashing ones:
blue + red LED
ashing in turn +
light ashing 5 times:
blue + red LED
ashing in turn:
The switch on the lamphead as well as the Bluetooth remote are equipped with a
RGB-LED to show information about the dim level and the remaining battery capacity.
Page 22

22
Piko R
Programming
Default setting
To get into 4-step mode, hold the button until the red LED ashed 3 times,
then release the button.
Example:
Available
Adjustments
2 - Step
3 - Step
4 - Step
3 - Step (RVLR)
3 - Step (ECO)
start in lowest beam
start with highest beam
early "battery low warning"
late "battery low warning"
Alpine SOS
SOS
Bluetooth Connecting Mode
Press the button
until it lights
1x red (after 3 sec)
2x red (after 4 sec)
3x red (after 5 sec)
4x red (after 6 sec)
5x red (after 7 sec)
1x blue (after 8 sec)
2x blue (after 9 sec)
3x blue (after 10 sec)
4x blue (after 11 sec)
5x blue (after 12 sec)
6x blue (after 13 sec)
1x green (after 14 sec)
Light SettingsExtra Settings
By default, the Piko R operates in the 3-step mode, several other light programs are available.
They are very easy to select by simply keeping the button pressed until the button's red LED (blue LED)
ashes once, twice, etc. When taking your nger o the button accordingly, the setting will be saved.
Light Levels:
Page 23

DeutschEnglish
23
Piko R
7 W
2.5 W
0.3 W
750 lm
300 lm
40 lm
15 W
5 W
1500 lm
550 lm
RVLR
15 W
1.2 W
1500 lm
150 lm
Runtime
Piko R 4/X 4
Output
1500 lm
750 lm
300 lm
40 lm
1500 lm
550 lm
40 lm
15 W
7 W
2.5 W
0.3 W
15 W
5 W
0.3 W
Runtime
Piko R 7/X 7
Runtime
Piko RX Duo
2-Step
4-Step
3-Step
3-Step
with RVLR
3-Step
Eco
1:45 h
5 h
80 h
3:30 h
10 h
160 h
2 h
5:30 h
95 h
1:45 h
3:30 h
10 h
80 h
3:30 h
7 h
20 h
160 h
2 h
4 h
11 h
95 h
1:45 h
20 h
3:30 h
40 h
2 h
25 h
1:45 h
5 h
3:30 h
10 h
2 h
5:30 h
3:30 h
10 h
80 h
7 h
20 h
160 h
4 h
11 h
95 h
RVLR
RVLR RVLR
RVLR: This mode includes an additional slow ash mode.
SOS /ALPINE SOS: If one of these modes is activated the switch will glow pink and the light will
continue with SOS until the battery is empty.
Note: The SOS sign is an emergency signal! Misuse may be prosecuted!
Runtime varies according to battery age, and condition, as well as ambient temperature.
Dim Levels and Runtimes
Page 24

24
Piko R
For establishing a connection, the receiving mode in the lamp has to be activated.
Keep the lamp’s button depressed the switch turns up green (after 15 sec) and let the button go.
The receiving mode is active for 30 seconds. During this time, press the remote control’s button until the
remote does light up green, too. release the button.
Several lamps and one transmitter:
It is possible to connect up to ve lampheads to a single remote switch.
Several transmitters and one lamp:
Up to 4 transmitters may be connected to one lamp. The transmitter are stored in the lamp in turn. If you
want to use only one transmitter again to control your lamp, it might be necessary to connect this transmitter up to 4 times with the lamp.
Bluetooth Remote
By default, your lamp has already been connected to the transmitter.
Connecting the transmitter to the light:
The Bluetooth Remote comes together with the Peppi V5 barmount (helmet & bikelights) or a bracelet
(Headlamps). On the bike, the best way to mount the remote is directly next to your grips so you have
full control an don't need to take o your hands while riding. The bracelet can be attached to a lot of
other things like ski poles, too.
Page 25

DeutschEnglish
25
Piko R
Enable/Disable the remotes permanent LED light:
Keep the remote button depressed: The LEDs must turn green then blue again.
release the button.
Low battery warning from lamphead:
The remote mirrors the lamphead's low battery warning.
A fully charged or partly discharged battery will be shown by a red LED light.
Details see page 36.
There will be no warning if the remotes button cell itself is empty.
Low button cell:
With decreasing voltage, the remotes LEDs will also become weaker, to the point
the remote does not work anymore. Also cold temperature does reduce the
battery voltage.
Transmitter battery change:
For changing the battery, loosen all 4 screws at the bottom
of the transmitter using a T5 torx screw driver.
Insert the new CR 2016 button cell as shown and close
the transmitter again.
Tighten the screws until the blue sealing is visibly squeezed.
T5 torx screw driver: (Art.No. 137)
Bluetooth Remote
Page 26

26
Piko R
Helmet Mount
With the provided extension, the battery may
be carried in your jersey or backpack. The velcro
strap also provides the possibility to mount the
battery directly on the helmet.
No tools are required for mounting this lamp. The helmet mount is already mounted to the lighthead.
You can attach this helmet light to almost any kind of helmet with ventilation openings.
Then pull the other end of the velcro through the
ventilation openings available on your helmet and x
it on the other side of the helmetmount.
Direct the light into a straight forward position and
tighten the velcro to avoid slipping of the lighthead
during use.
First attach the thin velcro with the Lupine logo
to one site of the helmetmount.
Page 27

DeutschEnglish
27
Piko R
To ensure awless functionality, both screws must
be tightened sturdy. The lamphead can be adjusted
stepless 60° in vertical.
The FastClick battery have to be attached
to the FastClick mount on the headband
with the cable looking downwards
Matching Batteries:
Art.No. 884 2.0 Ah
Art.No. 881 2.0 Ah Smartcore
Art.No. 835 3.3 Ah
Art.No. 842 3.3 Ah Smartcore
Headband Mount
With the provided extension, the battery
may be carried in your backpack, a pocket
etc.
The FastClick backpart of Piko RX 4 can be
replaced by a cable guide backpart.
27
Piko
Page 28

28
Piko R
3M Dual Lock:
Our 3M Dual Lock allows the Piko R to
mount to virtually any helmet.
It is available for the lamphead and the
FastClick-system to put a battery on the
helmet.
Details: www.lupine.de
By help of our CNC machined mount, you can put the Piko R on the
standard mount for GoPro. Art. No. 1070
GoPro mount:
More Mounting Options
Page 29

DeutschEnglish
29
Piko R
Mounting Quick Release
For mounting the Piko R on a handlebar dierent
CNC Quick Release mounts are available.
Have a look at www.lupine.de
For mounting, please rst loosen the screws on the helmet
mount/headband. Only one screw but both o-rings are required for mounting the Piko R on the bar.
Mounting:
1. Put the screw with o-ring through the hole of the handlebar
mount.
2. Put the second black o-ring onto the tip of the screw. The
order of o-ring, screw, o-ring, handlebar mount, lamp must be
strictly adhered to as shown in the picture in order to ensure
awless functionality.
3. Tighten the screw slightly rst, then securely. Cover the open
thread with the included plug.
4. Put the clamp around the handle bar and close it.
Page 30

30
Piko R
Your battery is supplied
with a velcro strap, coated
with an anti-slip material
to ensure a secure mount.
Use the strap which most
closely matches your tube
size.
Battery mounting:
Battery type:
The regular battery is mounted
with a velcro as shown here and
on page 24. So called Smartcore
batteries also come with a capacity indictaor as explained on the
next page.
FastClick batteries dont have a loop for a
velcro.
However they can be directly put into the
clicksystem of the FastClick headbelt or 3M
clicksystem.
13.2Ah 6.6Ah 3.3Ah 3.3Ah
Mounting Batteries
Page 31

DeutschEnglish
31
Piko R
Operation SmartCore battery
Audible:
To check the capacity, simply press the
touch-pad once. At rst an audible signal
will sound, which is especially useful
while using the battery mounted on a
helmet or headband, to give a quick
reading in 20% steps.
Capacity Indicator
Taillight
To run the taillight simply press the touch pad two times and the 5 LEDs will
operate continuously. To switch o the taillight, simply press the pad again.
Moving light:
Press the touch pad three times to activate the moving light. To switch it o
press the button another time.
Example: 3 LEDs steady glow (20 %, 40 %, 60 %)
1 LED blinking (80 %)
Visible:
The visible indicator uses 5 red LEDs. The LEDs can operate in two
dierent operating states: blinking and continuous. LED meanings:
A blinking LED is indicating a 10% step and a continuously glowing
LED a 20% step.
= 70 % remaining capacity
5 x = 100%
4 x = 80%
3 x = 60%
2 x = 40%
1 x = 20%
Page 32

32
Piko R
1. Plug the included Wiesel charger into an outlet
2. Connect the charger to the battery, charging starts automatically the LED turns red (Wiesel V3 = green)
3. The battery can be left plugged into the charger for an indenite period. Although this will not damage
the battery, it is not advisable for Li-Ion batteries since they do not require conservation charging.
4. When the battery is fully charged the LED on Charger turns green (Wiesel V3 = turns o)
Charging Batteries
Warning! This charger is to be used to charge rechargeable Li-Ion batteries only.
It is NOT suitable for charging NiMH batteries!
Do NOT use non-rechargeable batteries. – Risk of explosion!
This charger may be opened ONLY by the manufacturer!
Battery:
If you intend not to use the lamp for a longer period of time, fully charge and store it at
a cold and dry place. When kept in a cool place, the annual self-discharging rate for such
batteries is 15 %.
Product Care and Storage
Light:
After use in dirty areas, clean the lamp and the cables externally with warm water and some mild
detergent.
Important!
Because of the delicate sealings, we do not recommend to open the lamp.
A leakage in consequence of opening the light is excluded from warranty! Before you try to repair
something on your own get in touch with our helpful Service Team.
Productcare, Storage and Charging
Page 33

DeutschEnglish
33
Piko R
Problem
The light does not come on
and the power LEDs do not
ash when the battery is
plugged into the lamp.
With the battery plugged in,
the power LEDs do not come
on, but the PCS LEDs ash.
The runtime is too short.
Even after charging only
the 20% LED will light up
at the Smartcore battery.
Cause
Extremely discharged battery.
Battery not plugged into the
light or not plugged in
properly.
Faulty LED unit.
Discharged battery.
Old battery.
Very low ambient
temperature.
Faulty charger.
Unsuitable battery.
The indicator was reseted
Solution
Charge the battery.
Check all plug contacts.
LED unit needs replacement.
Get in touch with Lupine.
Charge battery.
Replace battery.
Keep battery warm.
Replace charger.
Use original Lupine battery.
Discharge the battery with
your light and fully charge it
afterwards.
The lamp does not recognize the transmitter.
Lamphead and transmitter
are not linked.
See chapter operation
remote control.
The transmitter does not light
up while pressing the button
and the lamp does not react.
Button cell empty or wrong
side up.
See chapter operation
remote control.
Page 34

34
Piko R
Piko R lamphead: 55 g
Piko R 4 with battery: 180 g
Piko R 7 with battery: 300 g
Piko RX 4 with battery: 210 g
Piko X 7 with battery: 330 g
Piko RX Duo with (single) battery: 180 g
Weight:
Input voltage: 100 – 240 V~, 50 – 60 Hz
Charging current: up to 1.2 A
Compatible batteries: Li-Ion 7.2 V
Charger Wiesel:
Lens beam angle:
Operating temperature:
22 °
Piko R 4/X 4: 3.3 Ah / 7.2 V Li-Ion
Piko R 7/X 7: 6.6 Ah / 7.2 V Li-Ion
Piko RX Duo: 2 x 2.0 Ah / 7.2 V Li-Ion
-25 °C to +70 °C
Piko R 4/X 4: 3 hours
Piko R 7/X 7: 5:30 hours
Piko RX Duo: 2 hours (per battery)
Battery capacity/nominal voltage:
Charging time:
IP68
Protection class:
Technical data
15 W 1500 Lumens
7 W 750 Lumens
5 W 550 Lumens
2.5 W 300 Lumens
1.2 W 150 Lumens
0.3 W 40 Lumens
Light Output: Runtime:
Piko R 7 / X 7:
3 h 30 min
7 h
10 h
20 h
40 h
160 h
Piko R 4 / X 4:
1 h 45 min
3 h 30 min
5 h
10 h
20 h
80 h
Piko RX Duo (two batteries):
2 h
4 h
5 h 30 min
11 h
25 h
95 h
FCC ID: QDS-BRCM1078
IC: 4324A-BRCM1078
Contains:
Page 35

DeutschEnglish
35
Piko R
Miscellaneous
Réglementation/Regulations:
L’utilisation d’un système d’éclairage pour certaines nalités peut être régulé di éremment en Europe d’un pays à l‘autre. Informez-vous des décrets en vigueur dans votre pays.
The laws governing the allowable application domain for this lighting system may vary from one
country to another. We recommend that you inform yourself about the relevant laws in this domain in your country.
Modications/Changes:
Sous réserve de modi cations techniques de nos développements ultérieurs de nos produits.
Rights for improvements and modications of our products reserved.
Garantie/Warranty:
Endéans la durée de la garantie de 24 mois, la garantie prend en compte tous les composants et
couvre les dé ciences conditionnées par la fabrication. La batterie fait néanmoins exception. Par ailleurs, les droits de garantie perdent leur validité en cas d’utilisation non conforme aux dispositions
en vigueur ou de modi cation de tout type.
The product's two year warranty applies to all components, as well as any manufacturing defect.
The warranty does not include the battery, however. In addition, any modication or improper use
of the product will void the warranty.
Kaufdatum/Händlerstempel
Purchase date/Dealer stamp
Page 36

36
Piko R
Lupine Lighting Systems GmbH
Winnberger Weg 11
92318 Neumarkt
Germany
Phone: +49 (0) 91 81 - 50 94 90
Fax: +49 (0) 91 81 - 50 94 915
E-mail: info@lupine.de
www.lupine.de
 Loading...