

Page 1
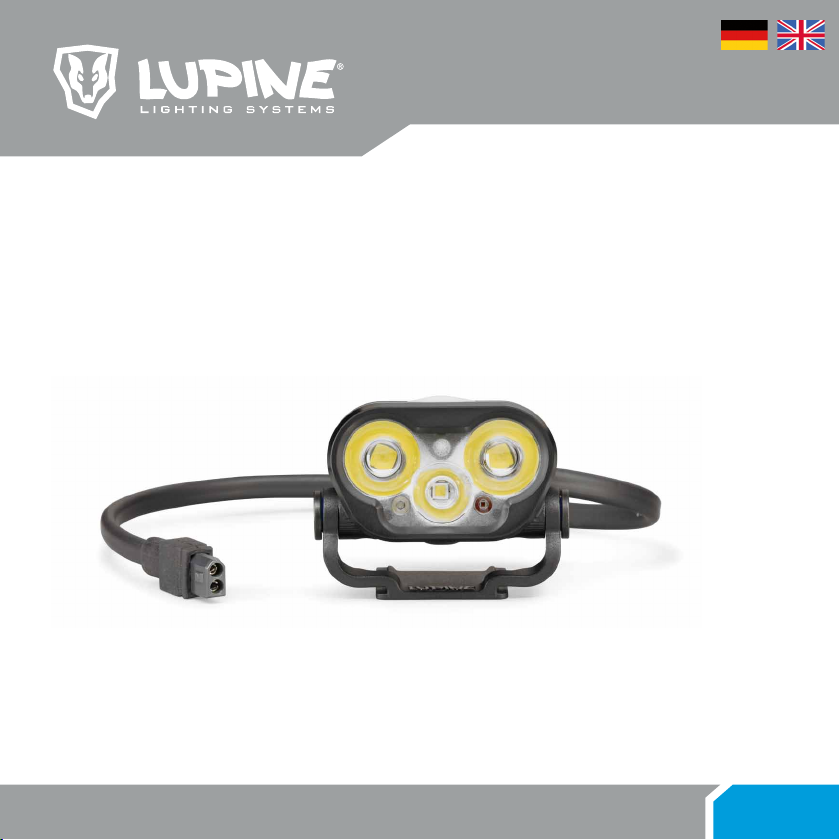
BLIKA
2100 lm
BEDIENUNGSANLEITUNG / OWNERS MANUAL Blika
Page 2

Inhaltsverzeichnis/Index
Deutsch
Erst lesen, dann leuchten! 3
Bedienung 4-5
Bedeutung LED Farben 6
Leuchtstufen & Leuchtzeiten 7
Programmierung 8-9
Montage 10-11
Bedienung SmartCore Akkus 12-13
Zubehör 14-15
Pege, Lagerung, Laden 16
Fehlerbehebung 17
Technische Daten 18
Letzte Hinweise 35
Erst lesen, dann leuchten!
Sicherheitshinweise:
Warnung!
Niemals absichtlich den Lichtstrahl in die eigenen oder in die Augen anderer Personen richten. Falls ein
Lichtstrahl in die Augen trit, sind die Augen bewusst zu schließen und der Kopf aus dem Lichtstrahl
zu bewegen. Es dürfen keine optisch stark bündelnden Instrumente zur Betrachtung des Lichtstrahls
verwendet werden.
Bei gewerblicher Nutzung oder bei Nutzung im Bereich der öentlichen Hand ist der Benutzer entsprechend der Unfallverhütungsvorschrift für Laserstrahlung zu unterweisen.
Akku vor der ersten Benutzung (nach)laden.
Dieser Scheinwerfer könnte jederzeit ausfallen. Deshalb ist es hilfreich, immer eine kleine Notlampe
bereitzuhalten.
Im Falle einer äußeren Beschädigung des Akkus, oder eines internen Defektes, nicht selbst reparieren!
Deutsch
English
Read this manual before using 19
Operation 20-21
Meaning LED Colours 22
Dim Levels & Runtimes 23
Programming 24-25
Mounting 26-27
Wärmeentwicklung:
Das Gehäuse der Blika kann heiß werden, achten Sie deshalb immer auf ausreichenden Abstand zu
brennbaren Materialien. Der ruhende Betrieb (also ohne Kühlung durch z. B. Fahrtwind) ist jederzeit
möglich, er schadet dem Scheinwerfer nicht. Beim Betrieb im Stillstand wird das Licht nach einigen
Minuten gedrosselt. Dies ist normal und reduziert die Temperatur der Lampe. Der dauerhafte Betrieb
mit 22 W ist nur bei Luftbewegung möglich!
Akku und Lampenkopf beim Transport immer voneinander trennen.
Operation SmartCore Batteries 28-29
Accessories 30-31
Care, Storage and Charging 32
Troubleshooting 33
Technical data 34
Wasserdicht?
Alle Komponenten der Blika sind wasserfest und können auch unter den widrigsten Umständen eingesetzt werden. Die Lampe erfüllt die IP Schutzklasse 68, ist jedoch keine Taucherlampe und für die
Benutzung unter Wasser NICHT geeignet.
Miscellaneous 35
2 3Blika Blika
Page 3

Bedienung Lampe
Initialisierung & Spannungsanzeige:
Nach dem Anstecken des Scheinwerfers an den Akku durchläuft die Software einen Selbsttest, der
Scheinwerfer sowie die rote, grüne und blaue LED im Schalter leuchten einmal kurz auf.
Anschließend wird die Akku-Spannung über die blaue und rote LED angezeigt.
Dies geschieht wie folgt:
Zuerst blinkt die blaue LED 1-mal pro Volt,
dann blinkt die rote LED 1-mal pro 1/10 Volt.
Beispiel: Der Taster blinkt 7-mal blau und 5-mal rot
= die gemessene Spannung unter Last liegt bei 7.5 V.
Spannungslage des Akkus
Über 8.0 V Akku voll
Zwischen 7.1 und 7.9 V Akku nachladen
Zwischen 6.5 und 7 V Akku nicht einsatzbereit
Bedienung über die Taster des Lampenkopfes:
Oberer Taster: Bedienung der Hauptprogramme (siehe S. 9)
Unterer Taster: Bedienung der Spezial-LEDs (Rotlicht, Grünlicht, Spotlicht, Diuslicht)
Einschalten:
Durch den ersten Tastendruck startet der Scheinwerfer mit maximaler Leistung, die blaue LED leuchtet.
Umschalten / Abblendlicht:
Mit einem kurzen Tastendruck werden die verschiedenen Helligkeitsstufen durchgeschaltet.
Ausschalten:
Durch einen langen Tastendruck schalten Sie die Lampe aus.
Hinweis: Abhängig von der Außentemperatur wird die Maximalleistung nur bei entsprechendem
Fahrtwind realisiert. Ohne Kühlung wird die Leistung stufenlos reduziert.
Deutsch
4 5Blika Blika
Page 4
Bedeutung der LED Farben
Der Taster am Lampenkopf ist mit einer RBG-LED ausgestattet um Informationen
zur aktuellen Leuchtstufe und Restkapazität des Akkus anzuzeigen.
Leuchtstufen & Leuchtzeiten
Blaue LED leuchtet:
Grüne LED leuchtet:
Rote LED leuchtet:
Rote LED blinkt +
Scheinwerfer blinkt 1x:
Rote und blaue LED
blinken abwechselnd
+ Scheinwerfer blinkt:
Blaue + rote LED
leuchten abwechselnd:
Lampe leuchtet mit Maximalleistung.
Lampe leuchtet in einer Dimmstufe.
1. Akkuwarnung, geringe Restkapazität.
Der Taster leuchtet rot.
Hinweis: Der Zeitpunkt der Akkuwarnung kann über die Pro-
grammierung beein usst werden (Akku-Leer-Warnung).
2. Akkuwarnung, sehr geringe Restkapazität.
Taster blinkt rot, der Scheinwerfer blinkt 1x auf.
Warnung!
Wenn der Akku leer ist, die rote LED blinkt seit einigen Minuten, beginnt die rote und blaue LED abwechselnd zu blinken,
zudem leuchtet auch der Scheinwerfer mehrere Male auf .
Sofort anhalten! Die Lampe wird abgeschaltet!
Nach erneutem Anschalten steht der Reservetank
(nur niedrige Stufe) abhängig vom Alter des Akkus noch
einige Minuten zur Verfügung. Bei dann vollständig entleertem Akku wird der Scheinwerfer zwangsweise abgeschaltet,
deshalb: Vorsicht!
Hinweis: Bei der ausschließlichen Nutzung mit 2W oder
weniger, steht kein Reservetank zur Verfügung.
2-Stufen
3-Stufen
3-Stufen
4-Stufen
3-Stufen
Leistung
22 W
1.5 W
22 W
0.3 W
22 W
10 W
1.5 W
22 W
10 W
1.5 W
22 W
1.5 W
Die Leuchtzeiten können abhängig von Alter, P egezustand und Temperatur
des Akkus Schwankungen unterliegen.
3 W
3 W
rot
2100 lm
180 lm
2100 lm
55 lm
300 lm
2100 lm
1100 lm
180 lm
2100 lm
1100 lm
180 lm
300 lm
2100 lm
180 lm
50 lm
Leuchtdauer
Blika 4/X 4
1:05 h
15 h
1:05 h
80 h
8 h
1:05 h
2:15 h
15 h
1:05 h
2:15 h
15 h
8 h
1:05 h
15 h
80 h
Leuchtdauer
Blika 7/X 7
2:10 h
32 h
2:10 h
160 h
16 h
2:10 h
4:30 h
32 h
2:10 h
4:30 h
32 h
16 h
2:10 h
32 h
160 h
Deutsch
6 Blika 7Blika
Page 5
Leuchtstufen & Programmierung
Programmieren über die Taster am Lampenkopf:
Hierzu wird einfach der Taster so lange gedrückt gehalten, bis der Taster des Lampenkopfes entprechend
der Tabelle rechts erst blau, rot bzw. grün aueuchtet. Wird der Finger vom Taster genommen, ist die
gewählte Einstellung gespeichert.
Beispiel:
Um in den 4-Stufen Modus zu gelangen, den Taster solange gedrückt halten bis die blaue
LED viermal aueuchtet, dann den Taster loslassen.
Helligkeit der LEDs des unteren Tasters anpassen:
Die Helligkeit des Spot-, Dius-, Rot-, und Grünlichts kann über den unteren Taster in 5 Stufen
eingestellt werden.
Gewünschte
LED einschalten
Den unteren Taster
kräftig gedrückt
halten
Die Helligkeit wird
in 5 Stufen erhöht
Loslassen sobald
die gewünschte
Helligkeit erreicht ist
bis dieser...
1x rot leuchtet Taster loslassen, SOS leuchtet
1x blau leuchtet
2x blau leuchtet
3x blau leuchtet
4x blau leuchtet
Programme
5x blau leuchtet
1x rot leuchtet an / aus
2x rot leuchtet an / aus
3x rot leuchtet an / aus
4x rot leuchtet an / aus
5x rot leuchtet
6x rot leuchtet
7x rot leuchtet
8x rot leuchtet
Zusatzfunktionen
9x rot leuchtet
10x rot leuchtet
11x rot leuchtet
12x rot leuchtet
Verfügbare EinstellungenTaster gedrückt halten
2 - stug
3 - stug
3 - stug
4 - stug
3 - stug
Rot
Grün
Weiß
Dius
Start mit höchster Stufe (Werk) / niedrigste Stufe
Frühe Akkuwarnung (Werk)
Späte Akkuwarnung
Alpines SOS / SOS (Werk)
Doppelklick an / aus (Werk)
Stealth an / aus (Werk)
Die LEDs des unteren Tasters werden denen des oberen
Tasters zugeschaltet / Die LEDs der beiden Taster werden
unabhängig voneinander bedient. (Werk)
Reset
Werkseinstellung
Deutsch
8 Blika 9Blika
Page 6
Montage Blika Helmlampe
Zur Befestigung dieser Lampe ist keinerlei Werkzeug notwendig. Die Helmlampe ist an allen Helmen mit
Lüftungsschlitzen montierbar. Alternative Befestigung: siehe Seite 7.
Das schmale Klettband mit der Seite des Lupine
Schriftzuges ca. 4 cm durch die linke Seite des
Lampenhalters fädeln, umschlagen und festkletten.
Montage Blika Stirnlampe
Die Lampe in das FrontClick System des Stirn-
bandes einklicken. (Anleitung siehe YouTube
"LupineLights")
Dank der beigefügten Verlängerung kann
der Akku entweder im Trikot oder Rucksack
getragen werden. Mit Hilfe des exiblen
Klettbandes kann der Akku auch direkt am
Helm montiert werden.
10 Blika
Dann das andere Ende durch die Lüftungsschlitze des
Helms führen und durch die zweite Ö nung des Lampenhalters fädeln. Das Klettband so weit wie möglich
spannen und festkletten.
Die Lampe kann nun in das FrontClick System eingeklickt werden. (Anleitung siehe YouTube "LupineLights")
Kabel Umlenkung
Mit einem Verängerungskabel ist es
möglich den Akku im Rucksack oder einer
Jackentasche zu transportieren.
Die entsprechende Kabelführung kann
gegen den FastClick Akkuhalter am Stirnband ausgetauscht werden.
Der FastClick Akku wird mit dem Kabel nach
unten in den FastClick Akkuhalter am Stirnband
geschoben bis dieser einklickt.
Geeignete Akkus:
Art.Nr. 884 2.0 Ah
Art.Nr. 881 2.0 Ah Smartcore
Art.Nr. 835 3.3 Ah
Art.Nr. 842 3.3 Ah Smartcore
Deutsch
11Blika
11Blika
Page 7

Montage Akkus
Bedienung Smartcore Akku
Akkumontage:
Je nach Rohrumfang ist zur
Montage entweder das kurze
oder das lange Klettband geeignet.
Das Klettband so um das Rohr legen,
dass die Antirutschbeschichtung auf
der Innenseite für zusätzlichen Halt
sorgt.
Akkutypen:
Der reguläre Lupine Akku verfügt auf
seiner Rückseite über eine Lasche und
wird mit einem Klettband befestigt.
Darüber hinaus verfügen so genannte
Smartcore Akkus über eine Kapazitätsanzeige.
13.2Ah 6.6Ah 3.3Ah 3.3Ah
FastClick-Akkus können nicht mit Klettband
montiert werden. Allerdings lassen sie sich
direkt in das Akkuklick-System schieben oder
auch mit dem 3M System befestigen.
Kapazitätsanzeige
Akustisch:
Zum Ablesen der Kapazität genügt
ein kurzer Druck auf das Tastfeld.
Zunächst erfolgt ein akustisches Signal, welches bei der Verwendung am
Helm- oder Stirnband eine schnelle,
in 20-%-Stufen genaue Überprüfung
der Restkapazität ermöglicht.
Optisch:
Die optische LED-Anzeige erfolgt durch 5 rote Kontroll-LEDs. Die
LEDs kennen dabei zwei Betriebszustände: blinkend und dauerhaft leuchtend. Dabei gilt: eine dauerhaft leuchtende LED steht für
einen 20-%-Schritt, eine blinkende LED für einen 10-%-Schritt.
Beispiel: 3 LEDs (20%, 40%, 60%) leuchten
1 LED (80%) blinkt
= 70% Restkapazität
Rücklicht-Funktion
Zum Aktivieren des Rücklichts den Taster 2 Mal kurz hintereinander
drücken. Im Anschluss leuchten alle 5 LEDs dauerhaft. Zum Ausschal-
ten des Rücklichts den Taster erneut drücken.
Lau icht-Funktion
Durch 3 kurze Tastenklicks wird ein Lau icht aktiviert, bei dem durch-
laufend jeweils eine LED abwechselnd leuchtet. Zum Ausschalten den
Taster erneut drücken.
Hinweis: Die Kapazitätsanzeige erlischt nach wenigen Sekunden wieder
von alleine. Ist dies nicht der Fall, wurde eventuell das Rücklicht aktiviert.
5 x = 100%
4 x = 80%
3 x = 60%
2 x = 40%
1 x = 20%
Deutsch
12 Blika
3.3Ah 3.3Ah 2.0Ah 2.0Ah
13Blika
Page 8

Zubehör und weitere Infos zu FrontClick
FrontClick mit 3M Halterung:
Die ultra- ache Aufnahmeplatte wird mit
einem speziellen 3M-Klebepad auf deinem
Helm xiert, die Lampe einfach eingeklickt.
Lampenkopf wie im Bild mittig in die Halterung einsetzen und
anschließend in Pfeilrichtung einschieben, bis dieser einrastet.
Drücken zum Entriegeln der Lampe.
USB One
Der USB One verwandelt deinen Lupine-Akku in eine mobile Powerbank. Nahezu jedes USB-Gerät
lässt sich damit innerhalb kürzester Zeit au aden. (Artikel Nr. 444)
Lupine Akku Smartphone Tablet GPS-Navigation
3.3 Ah 3 - 4 x 0.5 x 4 - 6 x
6.6 Ah 6 - 8 x 1 x 8 - 12 x
13.2 Ah 12 - 16 x 2 x 16 - 24 x
USB Charger
Mit dem USB Charger lädst du deine Lupine-Akkus ganz einfach über ein Handy-Netzteil, Solar Panel
oder den USB-Port deines PCs. (Artikel Nr. 1444)
Deutsch
14 Blika
GoPro-Halter:
Unsere Blika kann mit einem speziell von uns gefertigten CNC Halter,
an der Standardaufnahme von GoPro montiert werden.
15Blika
Page 9

Pege, Lagerung und Laden
Fehlerbehebung
Pege und Lagerung
Lampe:
Bei Verschmutzung, reinigen Sie den Scheinwerfer und den Kabelbaum äußerlich mit warmen Wasser
und etwas Spülmittel.
Achtung! Der Blika Lampenkopf darf nicht geönet werden, da die Wasserdichtigkeit und jeglicher Garantieanspruch verloren geht. Bevor sie einen Fehler selbst beheben nehmen sie Kontakt mit unserem
Service auf.
Akku:
Vor längerem Nichtgebrauch laden Sie den Akku voll und lagern Sie diesen an einem möglichst
kühlen, trockenen Ort, wie z.B. Keller etc.
Laden des Akkus:
1. Stecken Sie das beiliegende Ladegerät Wiesel in Ihre Steckdose
2. Verbinden Sie das Ladegerät mit dem Akku
3. Der Ladevorgang startet automatisch - die LED leuchtet rot
4. Ist der Ladevorgang beendet und der Akku voll leuchtet die LED grün
Warnung! Mit diesem Ladegerät dürfen nur wiederauadbare Li-Ionen-Akkus
aufgeladen werden. Es ist NICHT zum Laden von Ni-MH-Akkus geeignet!
Keine Trockenbatterien verwenden! – Explosionsgefahr!
Dieses Ladegerät darf NUR vom Hersteller geönet werden!
Fehler
Lampe lässt sich nicht ein-
schalten und die LEDs des
Schalters blinken beim
Anstecken nicht auf.
Power LEDs leuchten nicht,
LEDs am Schalter blinken
beim Anstecken auf.
Die Leuchtzeiten sind zu gering.
Der Smartcore Akku zeigt auch
nach dem Laden nur 20% an.
Ursache
Tiefentladener Akku
Akku nicht oder fehlerhaft
am Scheinwerfer angesteckt
LED-Einsatz ist defekt
Der Akku ist leer
Der Akku ist alt
Sehr tiefe Temperaturen
Das Ladegerät ist defekt
Der Anzeige wurde zurück
gesetzt
Behebung
Akku laden
Alle Steckerkontakte
überprüfen
Austauschen bzw. Lupine
kontaktieren
Laden
Austauschen
Akku warm halten
Ladegerät austauschen
Deutsch
Akku mit der Lampe
vollständig entleeren und
wieder auaden
16 Blika
17Blika
Page 10

Technische Daten
Read this manual before using
Lichtleistung:
(Haupt LEDs + Spotlicht)
22 W 2100 Lumen
10 W 1100 Lumen
6 W 690 Lumen
3 W 350 Lumen
1.5 W 180 Lumen
0.3 W 55 Lumen
Leuchtzeiten:
Blika 4 / X 4:
1 Std 05 Min
2 Std 15 Min
4 Std
8 Std
15 Std
80 Std
Gewicht:
Blika Lampenkopf: 85 g
Blika 4 komplett mit Akku: 220 g
Blika 7 komplett mit Akku: 335 g
Blika X 4 komplett mit Akku: 250 g
Blika X 7 komplett mit Akku: 370 g
Ladezeiten:
Blika 4/X 4: 3 Stunden
Blika 7/X 7: 5 h 30 Min
Abstrahlwinkel des Linseneinsatzes:
22 ° / 12° / 180°
Ladegerät Wiesel:
Eingangsspannung: 100 – 240 V~, 50 – 60 Hz
Ladestrom: 1.2 A max.
Geeignete Akkus: Li-Ion 7.2 V
Blika 7 / X 7:
2 Std 10 Min
4 Std 30 Min
8 Std
16 Std
32 Std
160 Std
Akku-Kapazität/Nennspannung:
Blika 4/X 4: 3.3 Ah / 7.2 V Li-Ion
Blika 7/X 7: 6.6 Ah / 7.2 V Li-Ion
Einsatzbereich:
-25 °C bis +70 °C
Schutzklasse:
IP68
Mehr Informationen unter www.lupine.de
EC Konformitätserklärung: www.lupine.de/ce/
Safety instructions:
Warning!
Avoid looking directly into the light emitted by the light or shining the light into your own eyes or the eyes
of another person. If the light accidentally shines into your eyes, close your eyes and move your head out
of the light beam. Do not use any strongly focusing optical device to look at the light beam.
In cases where the light is used in a public or commercial setting, users should be provided with training
concerning the safety measures for laser light.
Re-charge you battery before you using the light.
Carry a spare light with you at all times, as the product can potentially fail unexpectedly at any
time.
In the event of any physical or internal battery failure, do not attempt to repair.
No user-servicable parts!
Heat generation:
The housing of Blika may heat up; so make sure that you always keep the light at a safe distance to any
combustible or ammable materials. Could cause re or death!
However, quiescent operation (without cooling the light housing via airow or the like) is possible at any
time and will not damage the product.
When the light is being used in a stationary state, the light will be dimmed after a few minutes to reduce the light's temperature. Continuous operation at 22 watts is only possible with air owing over the
housing!
Important! Always disconnect the battery from the light at transport or storage!
Otherwise the small amount of power used by the electronics will discharge the battery, and the lamp
may be switched on accidentally.
Water resistance:
All Blika components are waterproof and can of course be used under extremely severe conditions. The
lamp complies with IP protection class 68 but is NOT a diving lamp and is NOT suitable for use under
water.
Deutsch
English
18 Blika
19Blika
Page 11

Operation
Meaning of LED colors
Initialization & voltage display:
After connecting the lamp to the battery, the software runs a selftest; the lamp itself as well as the
red and blue LEDs in the switch light up once. The battery voltage is indicated by the blue and red
LEDs, as follows:
The blue LED ashes once for each volt; and then
The red LED ashes once for each 1/10 of a volt.
Example: The LED ashes seven times blue and ve times red = battery voltage is 7.5 V.
Interpreting the voltage display:
more than 8.0 V battery is fully charged
7.1 to 7.8 V battery needs charging
6.5 to 7 V battery is not ready for use
Control concept:
Operation via the buttons of the lamphead:
Top button: Operation of the main programs (see page 9)
Lower button: Operation of the special LEDs (Redlight, Greenlight, Spotlight, Diuselight)
Turn on:
The rst press of the button switches on the light with maximum power. The blue LED is illuminated.
Switching:
Each quick push of the button switches through the dim levels.
English
Turn o:
To turn o the lamp, keep the button pressed.
Note: The light outputs the maximum amount of light only if airow lowers the temperature of
the light suciently. If the light is not cooled by airow, its power is reduced incrementally to
prevent the LEDs and electronic elements from overheating.
20 Blika
21Blika
Page 12

Meaning of LED colors
The switch on the lamphead is equipped with a RGB-LED to show informations
about the dim level and the remaining battery capacity.
blue LED lighting:
green LED lighting:
red LED lighting:
red LED ashing +
light ashing once:
blue + red LED
ashing in turn +
light ashing 5 times:
Lamp is on high beam.
Lamp is on a lower beam.
1. Battery Warning, low capacity remaining.
The red LED is lighting.
You can adjust the timing of the battery warning,
see progamming on next page.
2. Battery Warning, very low capacity remaining.
The red LED is ashing and Blika ashing once, too.
Warning!
The red and blue LED ashing in turn, the lamp ashes 30
times. Stop immediately! The light will be switched o .
2-Step
3-Step
3-Step
4-Step
Dim Levels and Runtimes
Output Runtime
22 W
1.5 W
22 W
0.3 W
22 W
10 W
1.5 W
22 W
10 W
1.5 W
3 W
3 W
2100 lm
180 lm
2100 lm
55 lm
300 lm
2100 lm
1100 lm
180 lm
2100 lm
1100 lm
180 lm
300 lm
Runtime
Blika R 4/X 4
1:05 h
15 h
1:05 h
80 h
8 h
1:05 h
2:15 h
15 h
1:05 h
2:15 h
15 h
8 h
Blika R 7/X 7
2:10 h
32 h
2:10 h
160 h
16 h
2:10 h
4:30 h
32 h
2:10 h
4:30 h
32 h
16 h
Deutsch
English
22 Blika
blue + red LED
ashing in turn:
After switching the light on again, reserve power at a low beam
is available. Depending on the age of the battery, some more
minutes of light are provided. When reserve power is comple-
tely discharged, the light will be switched o automatically. So
slow down!
Note: The burn time remaining after the red LED is illuminated
depends on the total battery capacity, the ambient temperature and the battery's age.
3-Step
Runtime varies according to battery age, and condition, as well as ambient temperature.
22 W
1.5 W
rot
2100 lm
180 lm
50 lm
1:05 h
15 h
80 h
2:10 h
32 h
160 h
23Blika
Page 13

Programming
Programming:
For this purpose, simply press and hold the lampheads button until it turns blue, red or green as shown
in the table on the right side. If the nger is removed from the button, the mode is selected.
Example:
To get into 4-step mode, hold the button until the blue LED ashed 4 times, then release the button.
Adjusting the brightness of the lower button LEDs:
The brightness of the spot, diuse, red and green light can be adjusted in 5 steps through the
lower button.
Switch on the
wanted LED
Press and hold the
lower button
The Output is
increased in 5
steps
Release as soon as
the desired level is
reached
until it lights
1x red Release the button, SOS activated
1x blue
2x blue
3x blue
4x blue
Light Settings
5x blue
1x red on / o
2x red on / o
3x red on / o
4x red on / o
5x red
6x red
7x red
8x red
9x red
Extra Settings
10x red
11x red
12x red
Available adjustmentsPress the top button
2 - step
3 - step
3 - step
4 - step
3 - step
Red
Green
White
Dius
Start with highest beam (Default) / lowest beam
Early "battery low warning" (Default)
Late "battery low warning"
Alpine SOS / SOS (Default)
Doubleclick on / o (Default)
Stealth on / o (Default)
The LEDs of the lower button get cut in the top button /
The LEDs of both buttons work independently (Default)
Reset
Default setting
DeutschEnglish
24 25Blika Blika
Page 14

Helmet Mount
No tools are required for mounting this lamp. The helmet mount is already mounted to the lighthead.
You can attach this helmet light to almost any kind of helmet with ventilation openings.
First attach the thin velcro with the Lupine logo
to one side of the helmet mount.
Then pull the other end of the velcro through the
ventilation openings available on your helmet and x
it on the other side of the helmetmount. Tighten the
velcro to avoid slipping of the lamphead during use.
Insert the lamphead into the FrontClick mount.
(Video support YouTube channel "LupineLights")
Insert the lamphead into the FrontClick mount of
the headband.
(Video support YouTube channel "LupineLights")
Headband Mount
The FastClick battery have to be attached
to the FastClick mount on the headband
with the cable looking downwards.
Matching Batteries:
Art.No. 884 2.0 Ah
Art.No. 881 2.0 Ah Smartcore
Art.No. 835 3.3 Ah
Art.No. 842 3.3 Ah Smartcore
Deutsch
English
With the provided extension, the battery may
be carried in your jersey or backpack. The velcro
strap also provides the possibility to mount the
battery directly on the helmet.
26 Blika
With the provided extension, the battery
may be carried in your backpack, a pocket
etc.
The FastClick backpart of Blika X 4 can be
replaced by a cable guide backpart.
27Blika
27Blika
Page 15

Mounting Batteries
Battery mounting:
Your battery is supplied
with a velcro strap, coated
with an anti-slip material
to ensure a secure mount.
Use the strap which most
closely matches your tube
size.
Operation SmartCore battery
Capacity Indicator
Audible:
To check the capacity, simply press the
touch-pad once. At rst an audible signal
will sound, which is especially useful
while using the battery mounted on a
helmet or headband, to give a quick
reading in 20% steps.
5 x = 100%
4 x = 80%
3 x = 60%
2 x = 40%
1 x = 20%
Deutsch
Battery type:
The regular battery is mounted
with a velcro as shown here and
on page 24. So called Smartcore
batteries also come with a capacity
indictator as explained on the next
page.
13.2Ah 6.6Ah 3.3Ah 3.3Ah
FastClick batteries dont have a loop for a
velcro.
However they can be directly put into the
clicksystem of the FastClick headbelt or 3M
clicksystem.
28 Blika
Visible:
The visible indicator uses 5 red LEDs. The LEDs can operate in two
di erent operating states: blinking and continuous. LED meanings:
A blinking LED is indicating a 10% step and a continuously glowing
LED a 20% step.
Example: 3 LEDs steady glow (20 %, 40 %, 60 %)
1 LED blinking (80 %)
= 70 % remaining capacity
Taillight
To run the taillight simply press the touch pad two times and the 5 LEDs will
operate continuously. To switch o the taillight, simply press the pad again.
Moving light:
Press the touch pad three times to activate the moving light. To switch it o
press the button another time.
English
29Blika
Page 16

Accessories & more info about FrontClick
FrontClick with 3M mount:
The ultra- at mounting plate is xed to
your helmet with a special 3M adhesive
pad, the lamp simply clicks into place.
Insert the lamp head as shown in the gure and move it in the
direction of the arrow until it locks into place.
GoPro mount:
By help of our CNC machined mount, you can put the Blika on the
standard mount for GoPro.
Press to unlock the lamp.
USB One
The USB One turns your Lupine battery into a mobile power bank. Nearly every USB device can be
recharged within a very short time. (Art. No. 444)
Lupine battery Smartphone Tablet GPS-Navigation
3.3 Ah 3 - 4 x 0.5 x 4 - 6 x
6.6 Ah 6 - 8 x 1 x 8 - 12 x
13.2 Ah 12 - 16 x 2 x 16 - 24 x
USB Charger
With the USB Charger, you can charge your Lupine batteries easily via a mobile phone power supply,
solar panel, or the USB port of your PC. (Art. No. 1444)
Deutsch
English
30 Blika
31Blika
Page 17

Productcare, Storage and Charging
Troubleshooting
Product Care and Storage
Light:
After use in dirty areas clean the lamp and the cables externally with warm water and some mild
detergent.
Important!
Because of the delicate sealings, we do not recommend to open the lamp.
A leakage in consequence of opening the light is excluded from warranty! Before you try to repair
something on your own get in touch with our helpful Service Team.
Battery:
If you intend not to use the lamp for a longer period of time, fully charge and store it at a cold and dry
place. When kept in a cool place, the annual self-discharging rate for such batteries is 15 %.
Charging Batteries
1. Plug the included Wiesel charger into an outlet.
2. Connect the charger to the battery, charging starts automatically the LED turns red.
3. The battery can be left plugged into the charger for an indenite period. Although this will not damage
the battery, it is not advisable for Li-Ion batteries since they do not require conservation charging.
4. When the battery is fully charged the LED on Charger turns green.
Warning! This charger is to be used to charge rechargeable Li-Ion batteries only.
It is NOT suitable for charging NiMH batteries!
Do NOT use non-rechargeable batteries. – Risk of explosion!
This charger may be opened ONLY by the manufacturer!
Problem
The light does not come on
and the power LEDs do not
ash when the battery is
plugged into the lamp.
With the battery plugged in,
the power LEDs do not come
on, but the PCS LEDs ash.
The runtime is too short.
Even after charging only
the 20% LED will light up
at the Smartcore battery.
Cause
Extremely discharged battery
Battery not plugged into the
light or not plugged in
properly
Faulty LED unit
Discharged battery
Old battery
Very low ambient
temperature
Faulty charger
Unsuitable battery
The indicator was reseted
Solution
Charge the battery
Check all plug contacts
LED unit needs replacement.
Get in touch with Lupine
English
Charge battery
Replace battery
Keep battery warm
Replace charger
Use original Lupine battery
Discharge the battery with
your light and fully charge it
afterwards
32 Blika
33Blika
Page 18

Technical data
Light Output:
(Mainlight + Spotlight)
22 W 2100 Lumen
10 W 1100 Lumen
6 W 690 Lumen
3 W 350 Lumen
1.5 W 180 Lumen
0.3 W 55 Lumen
Weight:
Blika lamp: 55 g
Blika 4 with battery: 180 g
Blika 7 with battery: 300 g
Charging time:
Blika 4/X 4: 3 hours
Blika 7/X 7: 5 h 30 min
Lens beam angle: Operating temperature:
22 ° / 12° / 180°
Runtime:
Blika 4 / X 4:
1 h 05 min
2 h 15 min
4 h
8 h
15 h
80 h
Blika X 4 with battery: 210 g
Blika X 7 with battery: 330 g
Blika 7 / X 7:
2 h 10 min
4 h 30 min
8 h
16 h
32 h
160 h
Battery capacity/nominal voltage:
Blika 4/X 4: 3.3 Ah / 7.2 V Li-Ion
Blika 7/X 7: 6.6 Ah / 7.2 V Li-Ion
-25 °C to +70 °C
Letzte Hinweise/Miscellaneous
Regelungen/Regulations:
Die Verwendung dieses Beleuchtungssystems für bestimmte Zwecke kann in Europa von Land zu
Land unterschiedlich geregelt sein. Informieren Sie sich über die in Ihrem Land gültigen Bestim-
mungen.
The laws governing the allowable application domain for this lighting system may vary from one
country to another. We recommend that you inform yourself about the relevant laws in this domain in your country.
Deutsch
Änderungen/Changes:
Weiterentwicklungen unserer Produkte und technische Änderungen vorbehalten.
Rights for improvements and modications of our products reserved.
Garantie/Warranty:
Innerhalb der Garantiezeit von 24 Monaten umfasst die Gewährleistung alle Komponenten
und deckt fertigungsbedingte Mängel ab. Ausgenommen ist jedoch der Akku. Des Weiteren
erlöschen die Garantieansprüche bei nicht bestimmungsgemäßer Benutzung oder
Veränderungen jeglicher Art.
The product's two year warranty applies to all components, as well as any manufacturing defect.
The warranty does not include the battery, however. In addition, any modication or improper use
of the product will void the warranty.
Charger Wiesel:
Input voltage: 100 – 240 V~, 50 – 60 Hz
Charging current: up to 1.2 A
Compatible batteries: Li-Ion 7.2 V
34 Blika
Protection class:
IP68
More informations at www.lupine.de
EC Declaration of Conformity: www.lupine.de/ce/
35Blika
Page 19

Lupine Lighting Systems GmbH
Winnberger Weg 11
92318 Neumarkt
Germany
Phone: +49 (0) 91 81 - 50 94 90
Fax: +49 (0) 91 81 - 50 94 915
E-mail: info@lupine.de
36
www.lupine.de
 Loading...