

LUNA OPTICS LN-G3-M Instruction Manual
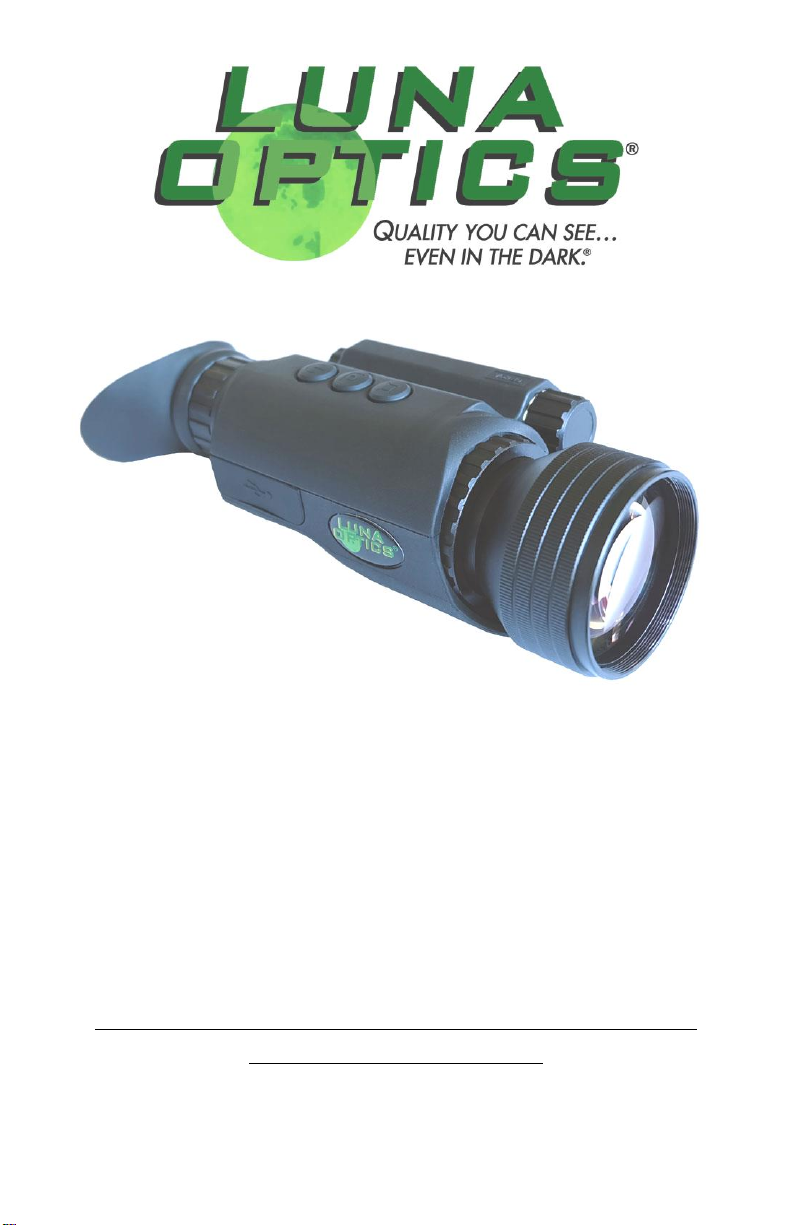
LN-G3-M
HIGH DEFINITION DIGITAL DAY &
NIGHT VIEWER
INSTRUCTION MANUAL
IMPORTANT: Please read this manual in its entirety
prior to using this device!
1

DIGITAL NIGHT VISION TECHNOLOGY:
1. Your night vision viewer operates with batteries. Unlike a daylight
binocular, where you see the image due to light traveling through the
glass and the prisms, the digital night vision device works by
projecting the image onto an OLED display screen. While the
CCD/CMOS sensor and the OLED display are the crucial components
of your viewer, the optical parts of the unit are also very important, as
they gather the light into the CCD/CMOS sensor and then bring the
projected image from the OLED screen to your eye. Since the image is
projected on the display screen, just like any TV, it has certain limited
resolution, so your digital night viewer cannot provide the same
crystal clear image, as you see through your daylight binoculars.
2. Another important point – your digital night vision viewer has
option of full-color, night vision green and black & white image –
why? Because, while full-color image is an excellent choice during
daylight, it sometimes washes out the details in the dark and will not
be as effective as monochrome image during nighttime conditions.
The night vision green color was chosen because green color shows
more details than any other color in the palette and black & white
image is especially useful when reading text or building signs or car
plates during nighttime.
3. Your digital viewer is safe to operate during daylight and
nighttime hours. IT IS NOT SAFE FOR YOUR EYES TO LOOK DIRECTLY
AT THE SUN THROUGH THIS PRODUCT! Please note that during
daylight you will have to reduce the brightness level of the unit to
prevent the image from becoming totally washed out. You should
also utilize Color Enhancing Filter, supplied with the unit for daylight
operation in order to view more vibrant colors. (Filter is attached to
the front lens and also acts as a protective lens cover)
4. For more details on how to operate your viewer, please read this
manual completely to ensure proper operation.
YOUR SYSTEM INCLUDES THE FOLLOWING:
1. LN-G3-M High Definition Viewer
2. 8GB Micro SD-card (installed into the SD-card slot)
3. Color Enhancing Filter (installed onto the front lens – daylight
use only – remove in the dark)
4. Carry case & Wrist Strap (strap is installed on the monocular)
5. USB Cable & Micro-SD Card USB Adapter
6. 2xCR123A batteries (optional – NON-RECHARGEABLE!)
2
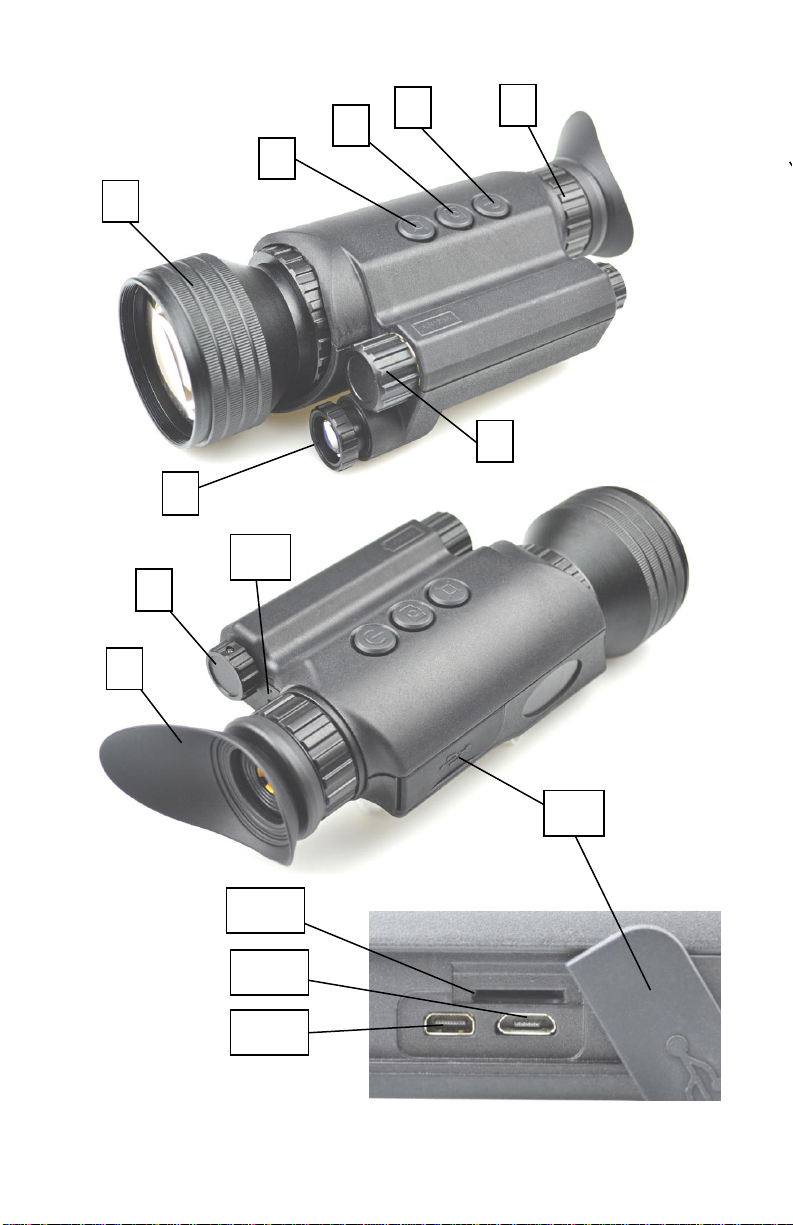
Please identify all the parts of the device PRIOR to operation!
4
2
5 3 8
9
5
1
8
6
3
4
7
10
11
11-c
11-b
11-a
3

GLOSSARY:
1 – Objective Lens Focusing Wheel 8 – Folding Eyecup
2 – IMAGE Button 9 – Menu Super Controller
3 – CAMERA Button 10 – Power / IR Indicator Lights
4 – POWER & IR Button 11 – Connection Area:
5 – Ocular Focusing Wheel 11-a) Micro-SD Card Slot
6 – Battery Compartment Cover 11-b) Micro-USB Connector
7 – Infrared Illuminator 11-c) Micro-HDMI Output
INSTALLING THE BATTERIES:
Your device operates on two 3V Lithium type batteries, known as
CR123A type commonly available in Electronics/Camera/Convenience
stores. NOTE: it is possible to use rechargeable batteries (CR123R) but
please make sure each battery peak voltage is equal to or less than
4.2V
WARNING: batteries supplied with the unit are not
rechargeable – do not charge or recharge these
batteries!
WARNING: it is prohibited to charge any batteries
inside the unit! Use only approved CR123 battery
chargers for this operation.
To install the batteries, unscrew the battery compartment cover (6), and
install two CR123A batteries into compartment inserting the positive (+)
end first. Once the batteries are inside, replace the cover by rotating it
all the way to the end until the stop (do not use force or over-tighten!).
DAYLIGHT COLOR ENHANCING FILTER:
Your monocular is equipped with a unique daytime
color enhancing filter, which provides vibrant and
accurate colors rendition (digital image sensors are
known to distort colors and provide an unnatural
color image during daytime. The filter comes
attached to the objective lens and we strongly recommend keeping it
on during daytime use. During nighttime you will need to remove the
filter (by unscrewing it counter-clockwise). Please keep the filter in the
carrying case when removed from monocular to prevent accidental loss.
4

TURNING THE UNIT ON AND OFF:
Your night vision unit has one-touch push-buttons. To turn the unit ON,
press the POWER Button (4) momentarily once. The LED Power
Indicator (10) located on the back of the unit should light up in green
color. Look through the eyecup (8) – you should see the Welcome
screen for a few seconds, followed by image. Even if the image is not
yet sharp, the unit is operating. To turn the unit OFF, press and hold the
POWER Button for 2 seconds. The image will disappear if you turn the
unit off correctly. We suggest to always replace the daytime color filter
/ protective lens cover after the unit is turned off and no longer in use.
IMPORTANT: When turning the unit ON or when switching between
various modes (Video, Photo etc.) or when operating the unit with Wi-Fi
stream activated, it is normal to see some image flickering in the
display. This is normal and does not affect the unit. If the flickering
does not disappear once the affecting functions are no longer active,
please re-start the unit. If conditions persist, please contact us at:
info@lunaoptics.com for assistance.
OPERATING FROM A USB POWER BANK:
Your digital viewer can also operate from the commonly available 5V
USB Power Bank chargers. Please make sure the output of the Power
Bank is at least 2A, as less powerful output may fail to power the unit
especially when the IR illuminator is activated. To connect the Power
Bank, open the Connection Area (11) rubber cover by gently pulling it
outward and then swing it counter-clockwise to the right and locate the
Micro-USB connector (11-b). Connect the small end of the USB cable
(included) to the connector and then connect the large end of the cable
into Power Bank output. You may need to activate the power bank first,
prior to turning the viewer on.
FOCUSING THE UNIT:
To obtain the sharp image, you must first rotate the Objective Lens
Focusing Wheel (1) in either direction, until you notice in which position
the image is at its best. After that, rotate the Ocular (Eyepiece)
Focusing Ring (5) also until the image is at its best. You may have to
repeat the process again, until the image is sharp and clear. Once the
clear image is obtained, you will no longer need to adjust the eyepiece,
just rotate the front objective lens to adjust the distance to the object
you are viewing.
5
 Loading...