

Page 1
INSTRUCTION MANUAL
IMPORTANT: Please read this manual in its entirety
prior to using this device!
Page 2

INTRODUCTION
Thank you for purchasing a quality LUNA OPTICS
product. With proper care and maintenance your
device will provide many hours of operation and
outstanding reliability. Please read this manual – it is
your key to enjoying this exciting and hi-tech product!
NIGHT VISION
Without getting too technical and confusing, let’s try to
understand how this device works and what it can and
cannot do:
1. Your night vision device works on the principle
of amplifying (intensifying) available light. The
process is called light amplification. A special tube
inside the device does the job – all you have to do
is to power the device on and the tube starts
amplifying whatever the light is available at the
moment – therefore it is important to understand
that this device is not suitable for daylight
operation, since there is already enough light
available during daytime to see without any
additional help. Therefore, the first and most
important rule of any night vision device is –
never use it during daylight, or in any bright
light condition, which allows you to see well
with your naked eye!
2. Your night vision device operates with
batteries. Unlike a daylight binocular, where you
see the image due to light traveling through the
glass and the prisms, the night vision device works
by projecting the amplified image onto a screen.
While the tube is the crucial component of any
night vision device, the optical parts of the unit are
also very important, as they gather the light into
the tube and bring the projected image to your
eye. Since the image is projected on the screen,
just like any TV, it has certain limited
resolution…so please do not expect your night
vision device to provide the same crystal clear
image, as you see through your daylight binoculars
Page 3

– after all, you are using this device in the dark
environment, where normally your vision would be
very limited…oh, and another important point – all
night vision devices have green monochrome
image – why green? Because human eye can
distinct most details of the viewing image when
presented in green color…other colors do not show
you everything…
3. Another very important notice – since your night
vision device amplifies available light hundreds of
times – please be sure not to turn the unit on during
daylight or in a well-lit room – the image will be way
too bright for your comfortable viewing and it also
may permanently burn the tube inside the unit and
will surely void your warranty. Please note that for
the safety of this device it has lens covers with a
little pinhole – to test the unit during daytime when
you bring your newly bought unit home, or in the
shop before you buy it. Please keep these lens
covers on during daytime – even if the unit is turned
off. In addition to the lens covers, we have equipped
this unit with a light protection sensor, located near
the front lens, which detects great amount of light
and prevents the unit from being accidentally turned
on during bright light conditions.
OPERATION:
Now that we’ve covered some of the basics of the
technology behind the night vision, let’s learn how to
operate your new device:
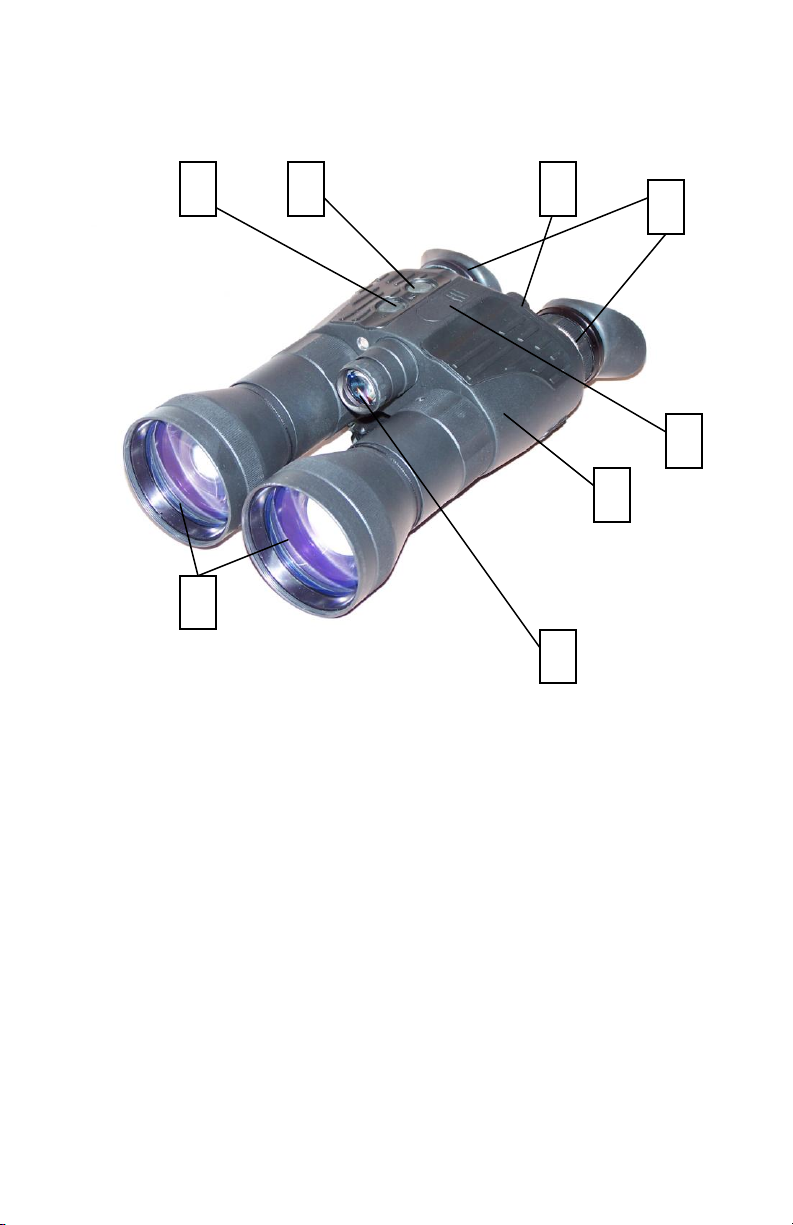
Please look at the next page to identify all the parts of
the unit.
Page 4
LN-PB5, PREMIUM NIGHT VISION BINOCULAR
4
1 2 5 3 7 6 8
Glossary:
1 – Body
2 – Infrared Illuminator
3 – Objective Lens
4 – Infrared illuminator button
5 – Power button
6 – Battery compartment
7 – Oculars
8 – Sliding Bracket for Extended Range
IR Illuminator
Page 5

INSTALLING THE BATTERIES:
Your night vision unit operates on two 1.5V N-size
batteries, also known as LR1 type.
To install the batteries, remove the battery
compartment cover (6), located in the back of the unit
by turning it counter-clockwise. Install the batteries
according to the polarity diagram indicated next to the
compartment. Once the batteries are inside, replace
the cover.
TURNING THE UNIT ON AND OFF:
Your night vision unit has one-touch push-buttons. To
turn the unit ON, first remove the objective lens
covers (ONLY IN THE DARK!) and press the power
button (5) until the little red light indicator located
next to the battery compartment lights up. Look
through the oculars (7) – you should see the green
glow. Even if the image is not yet sharp, the unit is
operating. To turn the unit OFF, press the power
button again and make sure the red light indicator is
off. The green glow will continue for up to several
minutes, depending on the outside light conditions.
This is normal. Always replace the objective lens
covers after the unit is turned off and no longer is in
use.
FOCUSING THE UNIT:
To obtain the sharp image, you must first rotate each
ocular (7) in either direction, until you notice in which
position the image is at its best. After that, rotate
each objective lens (3) also until the image is at its
best. We recommend adjusting one eye at a time,
while closing the second eye. You may have to repeat
the process again, until the image is sharp and clear.
Once the clear image is obtained, you no longer need
to adjust the oculars, just rotate the front objective
lenses to adjust the distance to the object you are
viewing.
Page 6

USING INFRARED ILLUMINATOR:
Your night vision binocular is equipped with a built-in
Infrared illuminator light (2). This light operates in a
spectrum, which is normally invisible to a human eye,
however with the help of the tube, located inside the
unit, you will see a beam of light when looking though
the ocular lens. This Infrared light is here to assist
you in especially dark conditions, where there is not
enough light for the tube to amplify.
To turn the Infrared illuminator ON, press the Infrared
illuminator button (4). To turn the infrared light off,
press the same button again.
When using the infrared illuminator it is important to
remember that like a flashlight, it is brightest when
used in short distances. As the distance increases, the
intensity of the infrared light fades away.
Please note that the infrared illuminator has a focusing
feature, which allows you to either spread the infrared
light beam for better viewing in the short distances, or
focus the beam in the center, which increases the
effective viewing distance. For viewing in the
distances over 50m you may purchase an extended
range illuminator (LN-EIR1, or LN-ELIR1) by asking
your dealer, or e-mailing us at: [email protected]
(please indicate the model number of the binocular
(LN-PB5)). The extended range IR illuminator is
installed on top of the unit by removing the Sliding
Bracket (8).
TROUBLESHOOTING:
1. Unit does not turn on and the light indicator is
off:
a) please check if the batteries are inserted
according to the instruction
b) please make sure the batteries are fresh
2. The light indicator is working, but you cannot see
the image:
Page 7

a) you may be turning the unit on in a dark
area with the lens covers still on the unit
b) You may need to turn on the infrared light
c) please make sure the batteries are fresh –
it takes a lot less power to turn on the
light indicator, than the entire unit
3. Unable to obtain sharp and clear image:
a) you may need to repeat the process of
rotating the oculars and objective lenses
several times until you get a good feel of
it – adjust one eye at a time
b) You may be viewing an object that it too
close – the minimum focusing distance is
approximately 5m or 16.4 feet
c) You may have dirty objective or ocular
lens – you may clean them with soft lens
cleaning cloth
4. The unit is turned off, but the green glow is still
on:
THIS IS NORMAL – THE GREEN GLOW
WILL FADE OUT WITHIN FEW MINUTES
5. There are black dots (specs) in the field of
view:
THIS IS NORMAL –
BLACK DOTS ARE
MICROSCOPIC
PARTICLES INSIDE THE
TUBE AND RESULT
FROM THE TUBE
MANUFACTURING
PROCESS, WHICH IS NEVER
COMPLETELY SPEC-FREE
IMPORTANT INFORMATION:
NEVER:
1. Turn on the unit without lens covers during
daylight or in a well-lit area
2. Try to disassemble the unit by yourself or by
anyone who is not our authorized technician.
Doing so may result in injury and will void any
warranty claims
Page 8

3. Leave the batteries inside the unit for a long
period of time – the batteries may overheat
and leak, which will render the unit inoperable
and will void the warranty
4. Submerse the unit into water or operate the
unit during heavy rain
TECHNICAL SPECIFICATIONS:
Technology -----------------------High Resolution Gen-1
Magnification ------------------------------------------ 5x
Objective Lens ------------------------------------ 80mm
Field Of View --------------------------------- 10 degrees
Focusing Distance ---------------- 5m (16.4ft) – infinity
Viewing Distance ----------------------- 325m (1,060ft)
Dimensions ------------------197mm x 122mm x 63mm
(7.8”x4.8”x2.5”)
Weight ------------------------------------- 910g (2.0lbs)
Power ------------------------------ 2x1.5V LR1 (N-type)
Operating Time ------------------------------------ 30hrs
WARRANTY INFORMATION:
Your night vision binocular is guaranteed to be free of
manufacturing defects for a period of one (1) year
from the date of purchase. Please refer to the
enclosed warranty card for complete warranty details.
-------------------------------------------------------------
LUNA OPTICS, INC. 54 Columbus Ave., Staten Island, NY 10304 (USA)
Tel: +1-718-556-LUNA; Fax: +1-718-556-5869;
E-mail: [email protected] Web: www.lunaoptics.com © 2008
 Loading...