

Page 1
Owner’s Manual
Digital Camera
Model No. DC-BGH1
Please read these instructions carefully before using this product, and save this manual for future use.
A firmware update has been made available to improve camera capabilities and to add functionality.
●
For information about functions that have been added or modified, refer to the pages for “Firmware Update”.
DVQP2276ZB
M1020KZ1031
Page 2

Information for Your Safety
Dear Customer,
Thank you for choosing Panasonic!
You have purchased one of the most sophisticated and reliable products on the market today. Used properly, we’re sure it will
bring you and your family years of enjoyment. Please take time to fill in the information below. The serial number is on the tag
located on the underside of your camera. Be sure to retain this manual as your convenient camera information source.
Date of Purchase
Dealer Purchased From
Dealer Address
Dealer Phone No.
Model No.
Serial No.
Please note that the actual controls and components, menu items, etc. of your Digital Camera may look somewhat different from
those shown in the illustrations in this Owner’s Manual.
Carefully observe copyright laws.
Recording of pre-recorded tapes or discs or other published or broadcast material for purposes other than your own private use
may infringe copyright laws. Even for the purpose of private use, recording of certain material may be restricted.
WARNING:
To reduce the risk of fire, electric shock or product damage,
●
Do not expose this unit to rain, moisture, dripping or splashing.
●
Use the recommended accessories.
●
Do not remove covers.
●
Do not repair this unit by yourself. Refer servicing to qualified service personnel.
The socket outlet shall be installed near the equipment and shall be easily accessible.
Product identification marking
■
Product Location
Digital Camera Rear (Battery installing place)
AC adaptor Bottom
- 2 -
Page 3
Information for Your Safety
THE FOLLOWING APPLIES ONLY IN THE U.S.A.
FCC Note:
This equipment has been tested and found to comply with the limits for a Class B digital device, pursuant to Part 15 of the
FCC Rules.
These limits are designed to provide reasonable protection against harmful interference in a residential installation. This
equipment generates, uses, and can radiate radio frequency energy and, if not installed and used in accordance with the
instructions, may cause harmful interference to radio communications.
However, there is no guarantee that interference will not occur in a particular installation. If this equipment does cause
harmful interference to radio or television reception, which can be determined by turning the equipment off and on, the user is
encouraged to try to correct the interference by one or more of the following measures:
●
Reorient or relocate the receiving antenna.
●
Increase the separation between the equipment and receiver.
●
Connect the equipment into an outlet on a circuit different from that to which the receiver is connected.
●
Consult the dealer or an experienced radio/TV technician for help.
FCC Caution:
●
Any unauthorized changes or modifications to this equipment would void the user’s authority to operate this device.
●
To assure continued compliance, follow the attached installation instructions and use only shielded interface cables with
ferrite core when connecting to computer or peripheral devices.
This device complies with Part 15 of the FCC Rules. Operation is subject to the following two conditions: (1) This device may
not cause harmful interference, and (2) this device must accept any interference received, including interference that may
cause undesired operation.
Supplier’s Declaration of Conformity
Trade name: Panasonic
Model No.: DC-BGH1
Responsible Party:
Panasonic Corporation of North America
Two Riverfront Plaza, Newark, NJ 07102-5490
Support Contact: http://shop.panasonic.com/support
THE FOLLOWING APPLIES ONLY IN THE U.S.A.
Contains FCC ID: VPYLB1JS955
This transmitter must not be co-located or operated in conjunction with any other antenna or transmitter.
This equipment complies with FCC radiation exposure limits set forth for an uncontrolled environment and meets the FCC
radio frequency (RF) Exposure Guidelines as this equipment has very low levels of RF energy.
THE FOLLOWING APPLIES ONLY IN CANADA.
CAN ICES-3(B)/NMB-3(B)
Contains IC: 772C-LB1JS955
This device contains licence-exempt transmitter(s)/receiver(s) that comply with Innovation, Science and Economic
Development Canada’s licence-exempt RSS(s). Operation is subject to the following two conditions:
(1) This device may not cause interference.
(2) This device must accept any interference, including interference that may cause undesired operation of the device.
The available scientific evidence does not show that any health problems are associated with using low power wireless
devices. There is no proof, however, that these low power wireless devices are absolutely safe. Low power Wireless devices
emit low levels of radio frequency energy (RF) in the microwave range while being used. Whereas high levels of RF can
produce health effects (by heating tissue), exposure of low-level RF that does not produce heating effects causes no known
adverse health effects. Many studies of low-level RF exposures have not found any biological effects. Some studies have
suggested that some biological effects might occur, but such findings have not been confirmed by additional research.
DC-BGH1 (HMN is 1JS2005) has been tested and found to comply with ISED radiation exposure limits set forth for an
uncontrolled environment and meets RSS-102 of the ISED radio frequency (RF) Exposure rules.
- 3 -- 3 -
Page 4
Information for Your Safety
About the battery pack
■
●
Always use genuine Panasonic batteries (AG-VBR59, AG-VBR89, AG-VBR118).
●
If you use other batteries, we cannot guarantee the quality of this product.
CAUTION
Battery pack (Lithium ion battery pack)
●
Use the specified unit to recharge the battery pack.
●
Do not use the battery pack with equipment other than the specified unit.
●
Do not get dirt, sand, liquids, or other foreign matter on the terminals.
●
Do not touch the plug terminals (+ and –) with metal objects.
●
Do not disassemble, remodel, heat or throw into fire.
If any electrolyte should come into contact with your hands or clothes, wash it off thoroughly with water.
If any electrolyte should come into contact with your eyes, never rub the eyes.
Rinse eyes thoroughly with water, and then consult a doctor.
CAUTION
●
Danger of explosion if battery is incorrectly replaced. Replace only with the type recommended by the manufacturer.
●
When disposing of the batteries, please contact your local authorities or dealer and ask for the correct method of
disposal.
●
Do not heat or expose to flame.
●
Do not leave the battery(ies) in a car exposed to direct sunlight for a long period of time with doors and windows closed.
●
Do not expose to low air pressure at high altitudes.
●
Do not expose to extremely low air pressure, as this may result in explosions or leakage of flammable liquids and gases.
Warning
Risk of fire, explosion and burns. Do not disassemble, heat above 60 °C (140 °F) or incinerate.
About the AC adaptor (supplied)
■
CAUTION!
To reduce the risk of fire, electric shock or product damage,
●
Do not install or place this unit in a bookcase, built-in cabinet or in another confined space. Ensure this unit is
well ventilated.
AC adaptor
This AC adaptor operates on AC between 100 V and 240 V.
But
●
In the U.S.A. and Canada, the AC adaptor must be connected to a 120 V AC power supply only.
●
When connecting to an AC supply outside of the U.S.A. or Canada, use a plug adaptor to suit the AC outlet configuration.
●
When connecting to a supply of greater than AC 125 V, ensure the cord you use is suited to the voltage of the AC supply
and the rated current of the AC adaptor.
●
Contact an electrical parts distributor for assistance in selecting a suitable AC plug adaptor or AC cord set.
- 4 -- 4 -
Page 5

Information for Your Safety
Cautions for Use
●
Do not use any other AC cables except the supplied one.
●
Use a high speed HDMI cable (Type A - Type A plug) that is compatible with 4K and has an HDMI logo.
●
For the USB connection cable, use one that is a shielded product with a ferrite core compliant to USB Type C (USB3.1) that
is less than 1.5 m (4.9 feet).
●
When connecting a BNC cable to the [GENLOCK IN] terminal or [TC IN/OUT] terminal, use one that is less than 2.8 m (9.1
feet). It is recommended to use a double shielded BNC cable equivalent to 5C-FB.
●
For the cable that connects to the LAN terminal, use the one below.
LAN cable (STP (Shielded Twisted Pair), category 5e or above, maximum 100 m (328 feet))
●
Do not use the Headphone cables with the length of 3 m (9.8 feet) or more.
●
Do not use the Stereo microphone cables with the length of 3 m (9.8 feet) or more.
Keep this unit as far away as possible from electromagnetic equipment (such as microwave ovens, TVs, video games
etc.).
●
If you use this unit on top of or near a TV, the pictures and/or sound on this unit may be disrupted by electromagnetic wave
radiation.
●
Do not use this unit near cell phones because doing so may result in noise adversely affecting the pictures and/or sound.
●
Recorded data may be damaged, or pictures may be distorted, by strong magnetic fields created by speakers or large
motors.
●
Electromagnetic wave radiation may adversely affect this unit, disturbing the pictures and/or sound.
●
If this unit is adversely affected by electromagnetic equipment and stops functioning properly, turn this unit off and remove
the battery or disconnect AC adaptor. Then reinsert the battery or reconnect AC adaptor and turn this unit on.
Do not use this unit near radio transmitters or high-voltage lines.
●
If you record near radio transmitters or high-voltage lines, the recorded pictures and/or sound may be adversely affected.
●
To clean your camera, remove the battery or a card, or disconnect the power plug from the outlet, and wipe with a
soft, dry cloth.
●
Do not press the lens with excessive force.
●
Do not allow camera to come into contact with pesticides or volatile substances (can cause surface damage or
coating to peel).
●
Do not keep rubber or plastic products in contact with the camera for a long period of time.
●
Do not use solvents such as benzine, thinner, alcohol, kitchen detergents, etc., to clean the camera, since it may
deteriorate the external case or the coating may peel off.
●
Do not leave the camera with the lens facing the sun, as rays of light from the sun may cause it to malfunction.
●
Always use the supplied cords and cables.
●
Do not extend the supplied cord or cable.
●
The data on the card may be damaged or lost due to electromagnetic waves, static electricity or breakdown of the camera
or the card. We recommend storing important data on a PC etc.
●
Do not leave any metal items (such as clips) near the contact areas of the power plug or near the batteries.
- 5 -- 5 -
Page 6
About Operating Instructions
A
B
About Operating Instructions
Symbols Used in This Document
■
Operating symbols
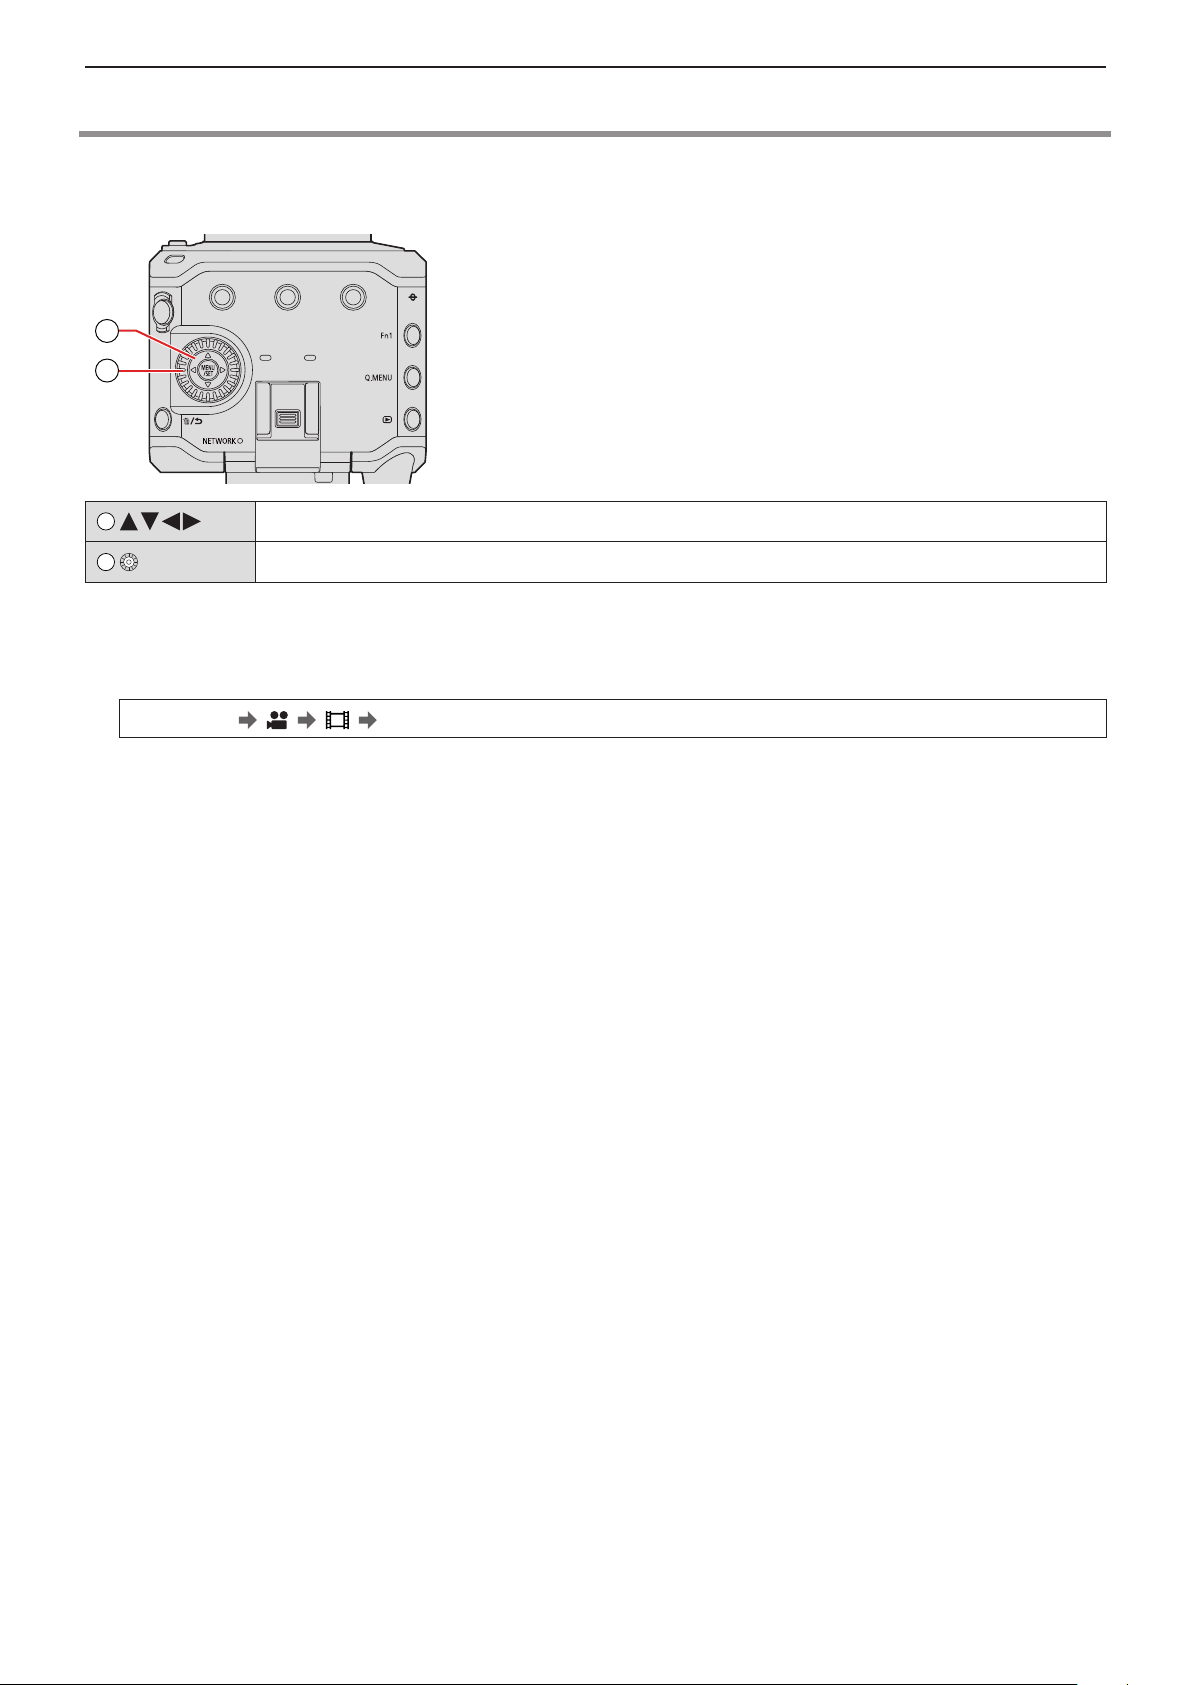
A
B
●
Other symbols, such as icons shown on the screen of the output destination, are also used in explanations.
●
This document describes the procedure for selecting menu items as follows:
Example: Set the [Rec Quality] of the [Video] ([Image Quality]) menu
[MENU/SET] [ ] [ ] Select [Rec Quality]
●
The images and drawings of this document are an illustration to explain the functions.
●
This document uses illustrations with an optional battery (AG-VBR59) attached.
●
Description in these operating instructions is based on the interchangeable lens (H-ES12060).
Cursor button up/down/left/right
Control dial
- 6 -- 6 -
Page 7

Contents
Contents
Information for Your Safety 2
About Operating Instructions ............................................6
1. Introduction 10
Before Use.........................................................................10
Standard Accessories ...................................................... 12
Lenses That Can Be Used ...............................................15
Memory Cards That Can Be Used ................................... 16
Names of Parts .................................................................17
2. Getting Started 21
Power supply ....................................................................21
Supplying power with an AC adaptor ..............................21
Supplying power from a PoE+ power supply ..................22
Turning the camera on ....................................................23
Turning the camera off ....................................................23
Power Indications ............................................................ 24
Attaching a Lens ...............................................................25
Connecting the external monitor ....................................27
Connecting to the external monitor ................................. 27
Attaching the Cable Lock Band ....................................... 28
Inserting Cards (Optional) ...............................................30
Inserting / removing the card...........................................30
Formatting Cards (Initialization) ...................................... 32
[Folder / File Settings] .....................................................33
[Double Card Slot Function] ............................................ 34
Setting the Clock
(When Turning On for the First Time) ............................. 35
Clock Set ......................................................................... 35
Time zone .......................................................................37
4. Recording Videos 51
Recording Videos .............................................................51
Recording Videos ............................................................51
[Exposure Mode] ............................................................. 53
Recording Settings For Video .........................................55
[System Frequency] ........................................................55
[Rec. File Format]............................................................55
[Rec Quality]....................................................................56
[Image Area of Video] ......................................................61
Time Code .........................................................................62
Setting the Time Code.....................................................62
Synchronizing the Time Code
with an External Device ...................................................64
Preparations for Time Code Synchronization..................64
Synchronize the Time Code of the External Device
with That of the Camera (TC OUT) .................................65
Synchronize the Time Code of the Camera
with That of the External Device (TC IN) ......................... 66
Genlock settings...............................................................67
Input a sync signal ..........................................................67
Horizontal phase adjustment...........................................69
3. Basic Operations 38
Camera Setting Operations .............................................38
Display Settings................................................................39
Information Display (HDMI/SDI) ...................................... 39
Output destination screen display ................................... 40
Switching the Display Information ................................... 41
Control Panel ....................................................................43
Quick Menu .......................................................................44
Menu Operation Methods ................................................46
Menu operation ............................................................... 46
[Reset] ............................................................................. 50
- 7 -- 7 -
Page 8

Contents
5. Recording settings 70
Focus / Zoom ....................................................................70
Selecting the Focus Mode...............................................70
Using AF..........................................................................71
Selecting the AF Mode ....................................................73
[Continuous AF]...............................................................78
[AF Custom Setting(Video)] ............................................78
Record Using MF ............................................................79
Recording with Zoom ...................................................... 83
Metering / Exposure / ISO Sensitivity ............................. 85
[Metering Mode] ..............................................................85
Exposure Compensation ................................................. 86
Locking Focus and Exposure (AF/AE Lock) ...................87
ISO Sensitivity ................................................................. 88
[ISO Sensitivity (video)] ................................................... 90
[Dual Native ISO Setting] ................................................ 90
[Luminance Level] ........................................................... 90
White Balance / Image Quality ........................................91
White Balance (WB) ........................................................ 91
[Master Pedestal Level]...................................................95
[Photo Style] .................................................................... 96
Recording While Controlling Overexposure (Knee) ...... 100
[Filter Settings] ..............................................................101
Audio Settings ................................................................105
[Sound Rec Level Disp.]................................................105
[Mute Sound Input] ........................................................ 105
[Sound Rec Gain Level] ................................................ 105
[Sound Rec Level Adj.] ..................................................106
[Sound Rec Level Limiter] ............................................. 106
[Wind Noise Canceller]..................................................106
[Lens Noise Cut]............................................................106
Main Assist Functions ................................................... 107
[Image Stabilizer] ..........................................................107
[SS/Gain Operation] ...................................................... 108
[Luminance Spot Meter] ................................................ 109
[Zebra Pattern] .............................................................. 110
[Frame Marker] .............................................................. 111
Color bars / Test Tone ................................................... 111
6. Special Video Recording 112
[Variable Frame Rate] ..................................................... 112
[Focus Transition] ..........................................................114
[Live Cropping] ............................................................... 117
Log Recording ................................................................120
[V-Log L] Settings ..........................................................120
[V-LogL View Assist] ......................................................121
HLG Videos .....................................................................122
[Hybrid Log Gamma] settings........................................122
[HLG View Assist] ..........................................................123
Anamorphic Recording .................................................. 124
Anamorphic (4:3) video ................................................. 124
[Anamorphic Desqueeze Display] ................................. 125
[Synchro Scan] ...............................................................126
[Loop Recording (video)] ............................................... 127
[Segmented File Recording] .......................................... 128
List of Recording Qualities That Enable
Special Videos to be Recorded .....................................129
7. Output image 133
Images Output via HDMI ................................................133
HDMI Output Image Quality
(Resolution / Frame Rate) .............................................. 134
Settings for Down-Converting ....................................... 134
HDMI Output Settings ....................................................137
Outputting Control Information to
an External Recorder .................................................... 137
Outputting Down-converted Audio to
an HDMI Device ............................................................ 137
Outputting Audio via HDMI ............................................137
Output the enlarged display of MF assist via HDMI ...... 137
SDI output settings .........................................................138
Set the resolution during recording when output
via SDI...........................................................................138
Output control information to the external recorder.......139
Output audio via SDI ..................................................... 139
Set the gain of the audio signal that is output via SDI...139
Output the enlarged display of MF assist via SDI ......... 139
8. Connections with External Devices 140
External Microphones (Optional) .................................. 140
XLR Microphone Adaptor (Optional) ............................142
Headphones .................................................................... 144
Using a remote control unit ........................................... 145
Importing Images to a PC ..............................................146
9. Playback 148
Playing Back Videos ......................................................148
Switching the Display Mode .......................................... 151
Thumbnail Display.........................................................151
Group Images ...............................................................152
Deleting Images .............................................................. 153
10. Camera Customization 154
Fn Buttons .......................................................................154
Fn Button Default Settings ............................................ 154
Register Functions to the Fn Buttons ............................ 155
Use the Fn Buttons .......................................................160
Quick Menu Customization ...........................................161
Register to the Quick Menu...........................................161
Custom Mode .................................................................. 165
Register in Custom Mode..............................................165
Using Custom Mode......................................................167
Calling Up Settings........................................................168
My Menu ..........................................................................169
Registration in My Menu ...............................................169
Edit My Menu ................................................................170
[Save/Restore Camera Setting] ..................................... 171
- 8 -- 8 -
Page 9

Contents
11. Menu Guide 172
List of Menu ....................................................................172
[Rec Mode] menu ............................................................176
[Rec Mode] menu (Recording mode) ............................ 176
[Video] menu ...................................................................176
[Video] menu ([Image Quality]) .....................................176
[Video] menu ([Image Format]) .....................................179
[Video] menu ([Focus]) ..................................................180
[Video] menu ([Audio]) ..................................................181
[Video] menu ([Others]) .................................................183
[Custom] menu ...............................................................185
[Custom] menu ([Image Quality]) .................................. 185
[Custom] menu ([Focus/Shutter]) .................................. 186
[Custom] menu ([Operation]).........................................187
[Custom] menu ([Monitor / Display])..............................188
[Custom] menu ([IN/OUT]) ............................................191
[Custom] menu ([Lens / Others]) ................................... 192
[Setup] menu ...................................................................193
[Setup] menu ([Card/File]) ............................................. 193
[Setup] menu ([Monitor / Display]).................................194
[Setup] menu ([IN/OUT]) ...............................................194
[Setup] menu ([Setting]) ................................................ 196
[Setup] menu ([Others]).................................................197
[Playback] menu ............................................................. 199
How to Select an Image(s) in the [Playback] menu ......199
[Playback] menu ([Playback Mode])..............................200
[Playback] menu ([Add/Delete Info.]) ............................200
[Playback] menu ([Edit Image]) ..................................... 201
[Playback] menu ([Others]) ...........................................202
Entering Characters .......................................................203
12. Remote Operations 204
About Remote Operation ............................................... 204
Tethered Recording ........................................................ 207
Installing “LUMIX Tether” ...............................................207
Operating the Camera from a PC .................................208
Connecting to a Smartphone ........................................213
Flow of connecting a smartphone ................................. 213
Installing “LUMIX Sync”.................................................214
Connecting to a Smartphone (Bluetooth Connection)...215
Connecting to a Smartphone (Wi-Fi connection) .......... 218
Connecting to a Smartphone
(Wired LAN connection) ................................................ 223
Operating the Camera with a Smartphone ................... 225
Getting started...............................................................225
[Remote shooting] ......................................................... 226
[Shutter Remote Control] ..............................................226
[Import images] .............................................................227
[Location Logging] ......................................................... 228
[Remote Wakeup] .........................................................229
[Auto Clock Set] ............................................................230
[Camera settings copy] .................................................230
Wi-Fi Connections .......................................................... 231
[Via Network] .................................................................231
[Direct] ........................................................................... 234
Connect to Wi-Fi Using Previously Saved Settings ......235
[LAN / Wi-Fi Setup] menu ..............................................237
13. Materials 238
Optional Accessories ..................................................... 238
External Monitor Displays .............................................239
Recording Screen .........................................................239
Playback Screen ...........................................................244
Lamp / Indicator Display ................................................ 248
Message Displays...........................................................249
Troubleshooting .............................................................251
Power ............................................................................ 251
External device..............................................................251
Recording ...................................................................... 252
Playback........................................................................254
Wi-Fi Function ............................................................... 254
Others ...........................................................................255
Cautions for Use ............................................................. 256
Available Recording Time with the Battery ..................260
Video Recording Time with Cards ................................263
List of Default Settings / Custom Saving / Settings
Available for Copying .....................................................266
Specifications .................................................................276
Trademarks and Licenses..............................................282
Useful Information
(Only For Latin American Countries) ............................284
Firmware Update F-1
Before Use........................................................................F-3
Firmware Ver. 2.0 .............................................................F-4
Support for Output of RAW Video Data..........................F-4
Streaming Function ........................................................F-8
Genlock Synchronization Notification...........................F-11
[Vertical Position Info (Video)] ......................................F-11
Added Menus .............................................................. F-12
- 9 -- 9 -
Page 10
1. Introduction - Before Use
1. Introduction
Before Use
Firmware of Your Camera/Lens
■
Firmware updates may be provided in order to improve camera capabilities or to add functionality. For smoother recording, we
recommend updating the firmware of the camera/lens to the latest version.
●
For the latest information on the firmware or to download/update the firmware, visit the following support site:
https://panasonic.jp/support/global/cs/dsc/
(English only)
●
To check the firmware version of the camera/lens, attach the lens to the camera and select [Firmware Version] in the [Setup]
([Others]) menu. You can also update the firmware in [Firmware Version]. (
●
This document provides explanations for camera firmware version 1.0.
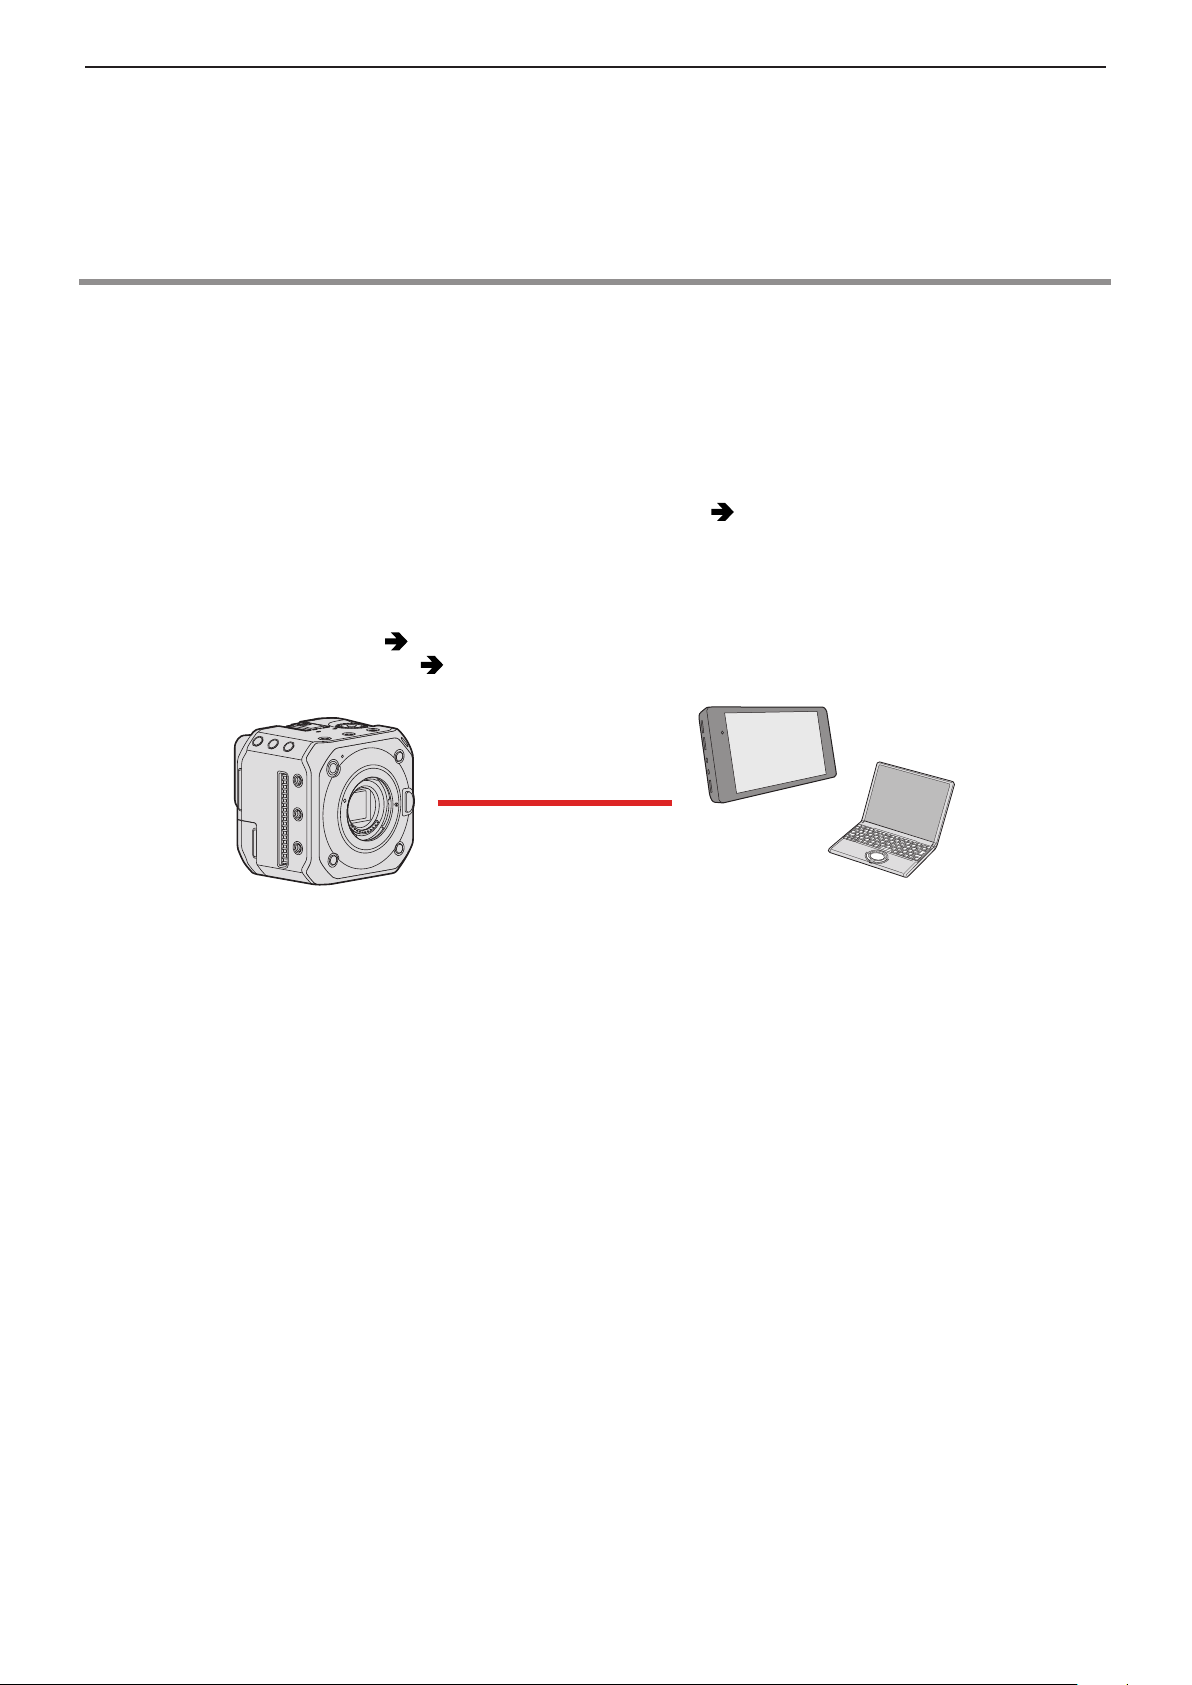
This camera does not have a monitor.
■
Display the recording screen or menu with one of the following methods below.
●
Connecting the external monitor ( 27 / Connecting the external monitor)
●
Using a PC software “LUMIX Tether” ( 207 / Tethered Recording)
– You can take pictures (Still images) when you use “LUMIX Tether”.
198 / [Firmware Version])
Handling of the Camera
■
When using the camera, take care not to drop it, bump it, or apply undue force. These may cause malfunction or
damage to the camera and lens.
The camera is not dust resistant, splash resistant, or waterproof. Avoid using the camera in places with excessive dust
or sand, or where water can come into contact with the camera.
If sand, dust, or liquid gets on wipe it off with a dry soft cloth.
When using in low temperatures (-10 °C to 0 °C (14 °F to 32 °F))
Before use, attach a Panasonic lens with a minimum recommended operating temperature of -10 °C (14 °F).
Do not place a hand inside the camera mount.
This may cause a failure or damage because the sensor is a precision device.
- 10 -- 10 -
Page 11

1. Introduction - Before Use
Condensation (When the lens is fogged up)
■
●
Condensation occurs when there are temperature or humidity differences. Take care as this may lead to soiling, mold, and
malfunctions in the lens.
●
If condensation occurs, turn off the camera and leave it for approx. 2 hours. The fog will disappear naturally when the
temperature of the camera becomes close to the ambient temperature.
Be Sure to Perform Trial Recording in Advance
■
Perform trial recording in advance of an important event (wedding, etc.) to check that recording can be performed normally.
No Compensation Regarding Recording
■
Please note that compensation cannot be provided in the event that recording could not be performed due to a problem with the
camera or a card.
Be Careful with Regard to Copyrights
■
Under copyright law, you may not use the images and audio you have recorded without the permission of the copyright holder.
Also Read “Cautions for Use” ( 256 / Cautions for Use)
■
- 11 -- 11 -
Page 12
1. Introduction - Standard Accessories
Standard Accessories
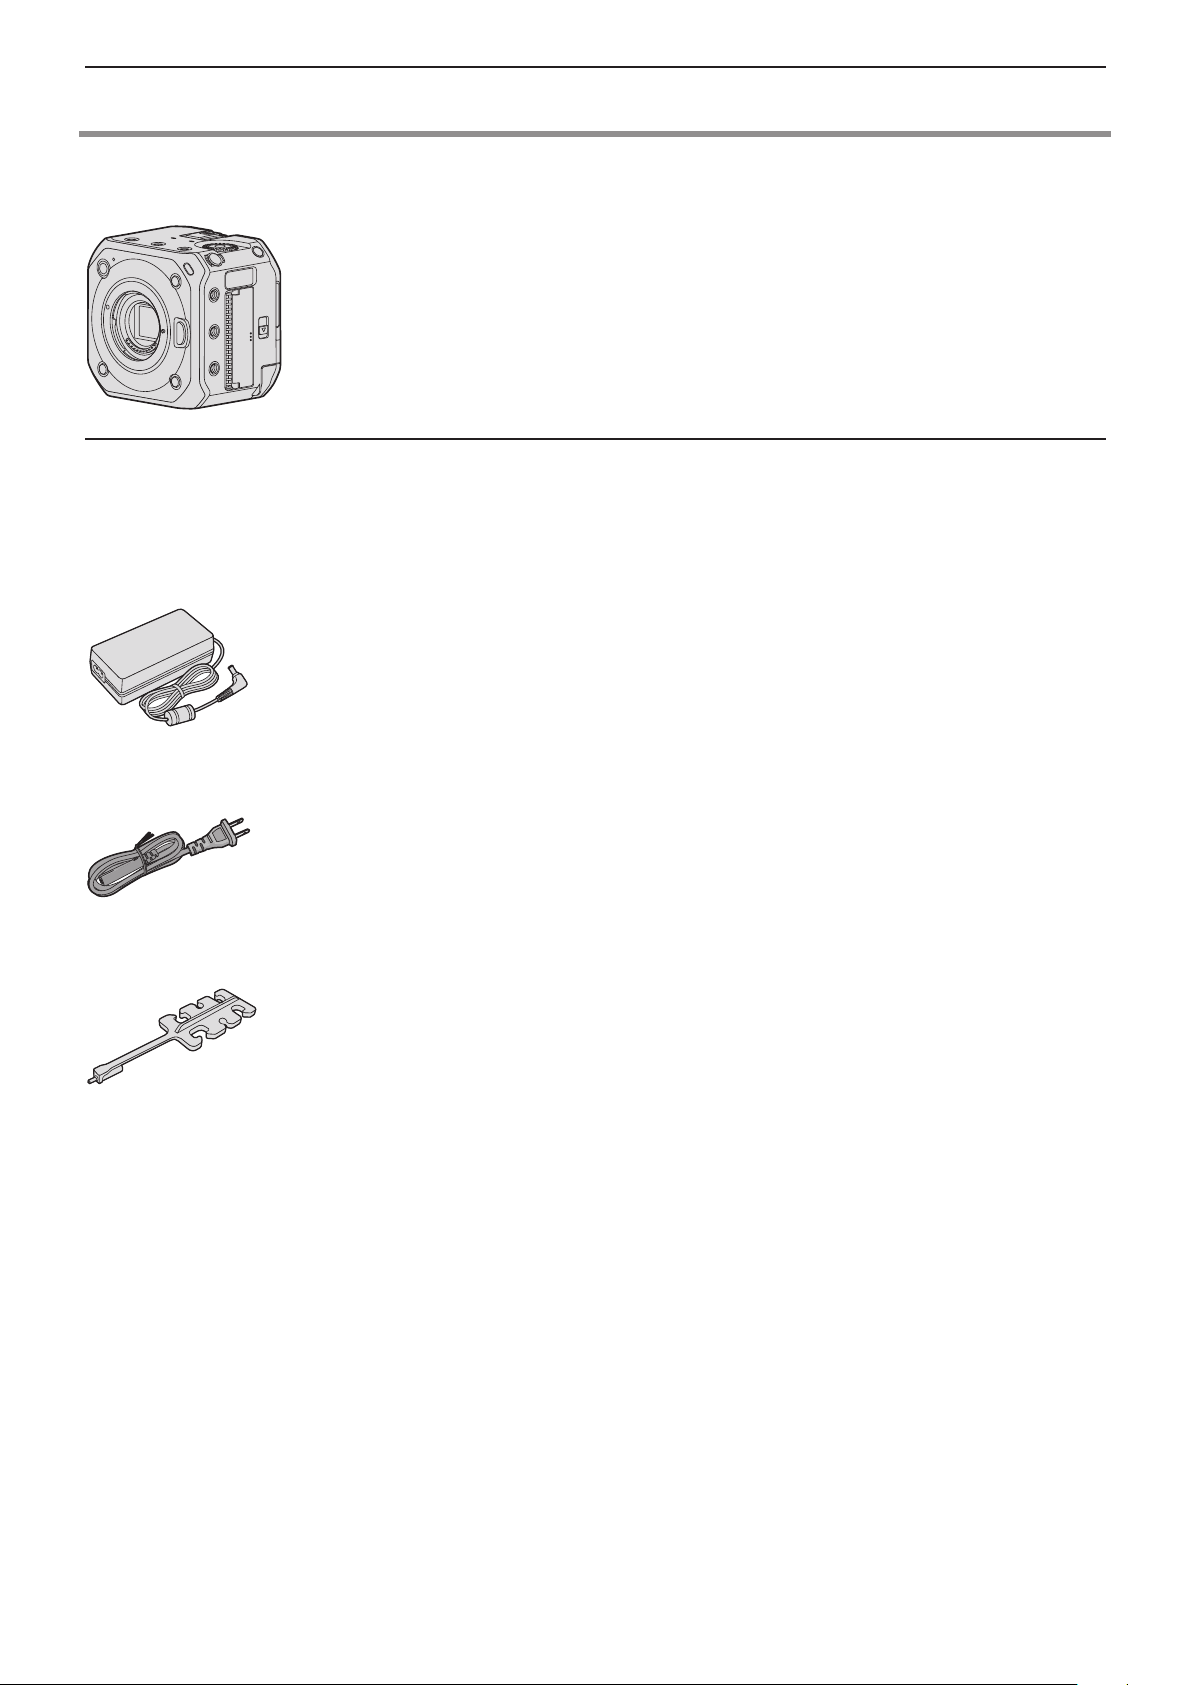
Digital camera body
(Digital camera body is referred to as camera in this document.)
Check that all the accessories are supplied before using the camera.
(Product numbers correct as of October 2020.)
AC adaptor
SAE0011A
●
This is used for power supply.
AC cable
K2CA2CA00025
Cable lock band
1AC1MC551Z
- 12 -- 12 -
Page 13
1. Introduction - Standard Accessories
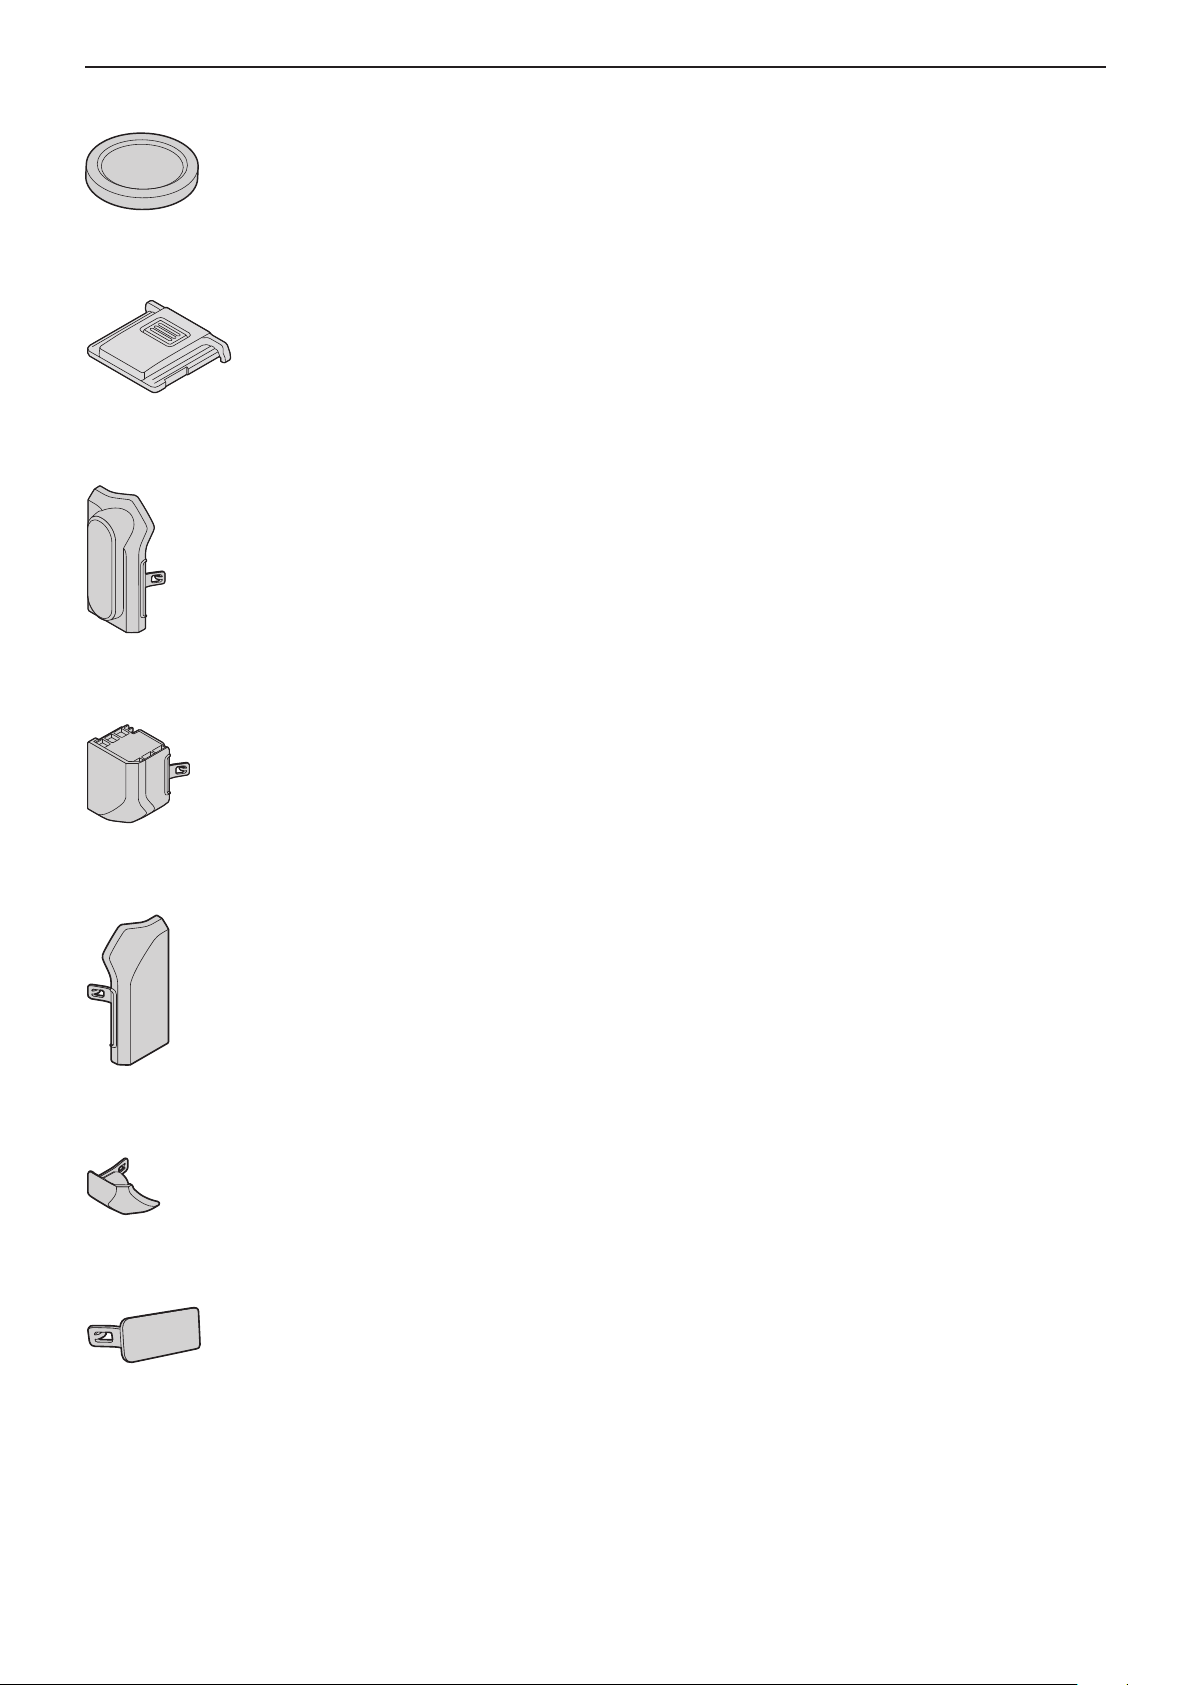
Body cap*
1
VKF4971
Hot shoe cover*
1
DVYE1121Z
BNC terminal cover*
DVKJ1044Z/K
1
HDMI terminal cover*
DVKJ1045Z/K
AUDIO terminal cover*
DVKJ1046Z/K
DC IN terminal cover*
DVKJ1047Y/K
1
1
1
REMOTE terminal cover*
1
DVKJ1048Z/K
*1 This is attached to the camera at the time of purchase but it’s removable.
- 13 -- 13 -
Page 14

1. Introduction - Standard Accessories
●
The accessories and their shape will differ depending on the country or area where the camera was purchased.
●
The battery pack is optional.
(Battery pack is indicated as battery pack or battery in the text.)
●
The memory card is optional.
(Memory card is indicated as card in the text.)
●
The Interchangeable lens is optional.
(Interchangeable lens is indicated as lens in this text.)
●
Always use the supplied cords and cables. Do not extend the supplied cord or cable.
●
Please dispose of all packaging appropriately.
●
Keep small parts in a safe place out of the reach of children.
(For U.S.A. only)
●
If accessories are lost, customers can visit us at http://shop.panasonic.com/support for further information about obtaining
replacement parts.
(For Canada only)
●
If any accessories are lost, customers in Canada should visit our support page at www.panasonic.ca/english/support for
further information about obtaining replacement parts.
- 14 -- 14 -
Page 15
1. Introduction - Lenses That Can Be Used
Lenses That Can Be Used
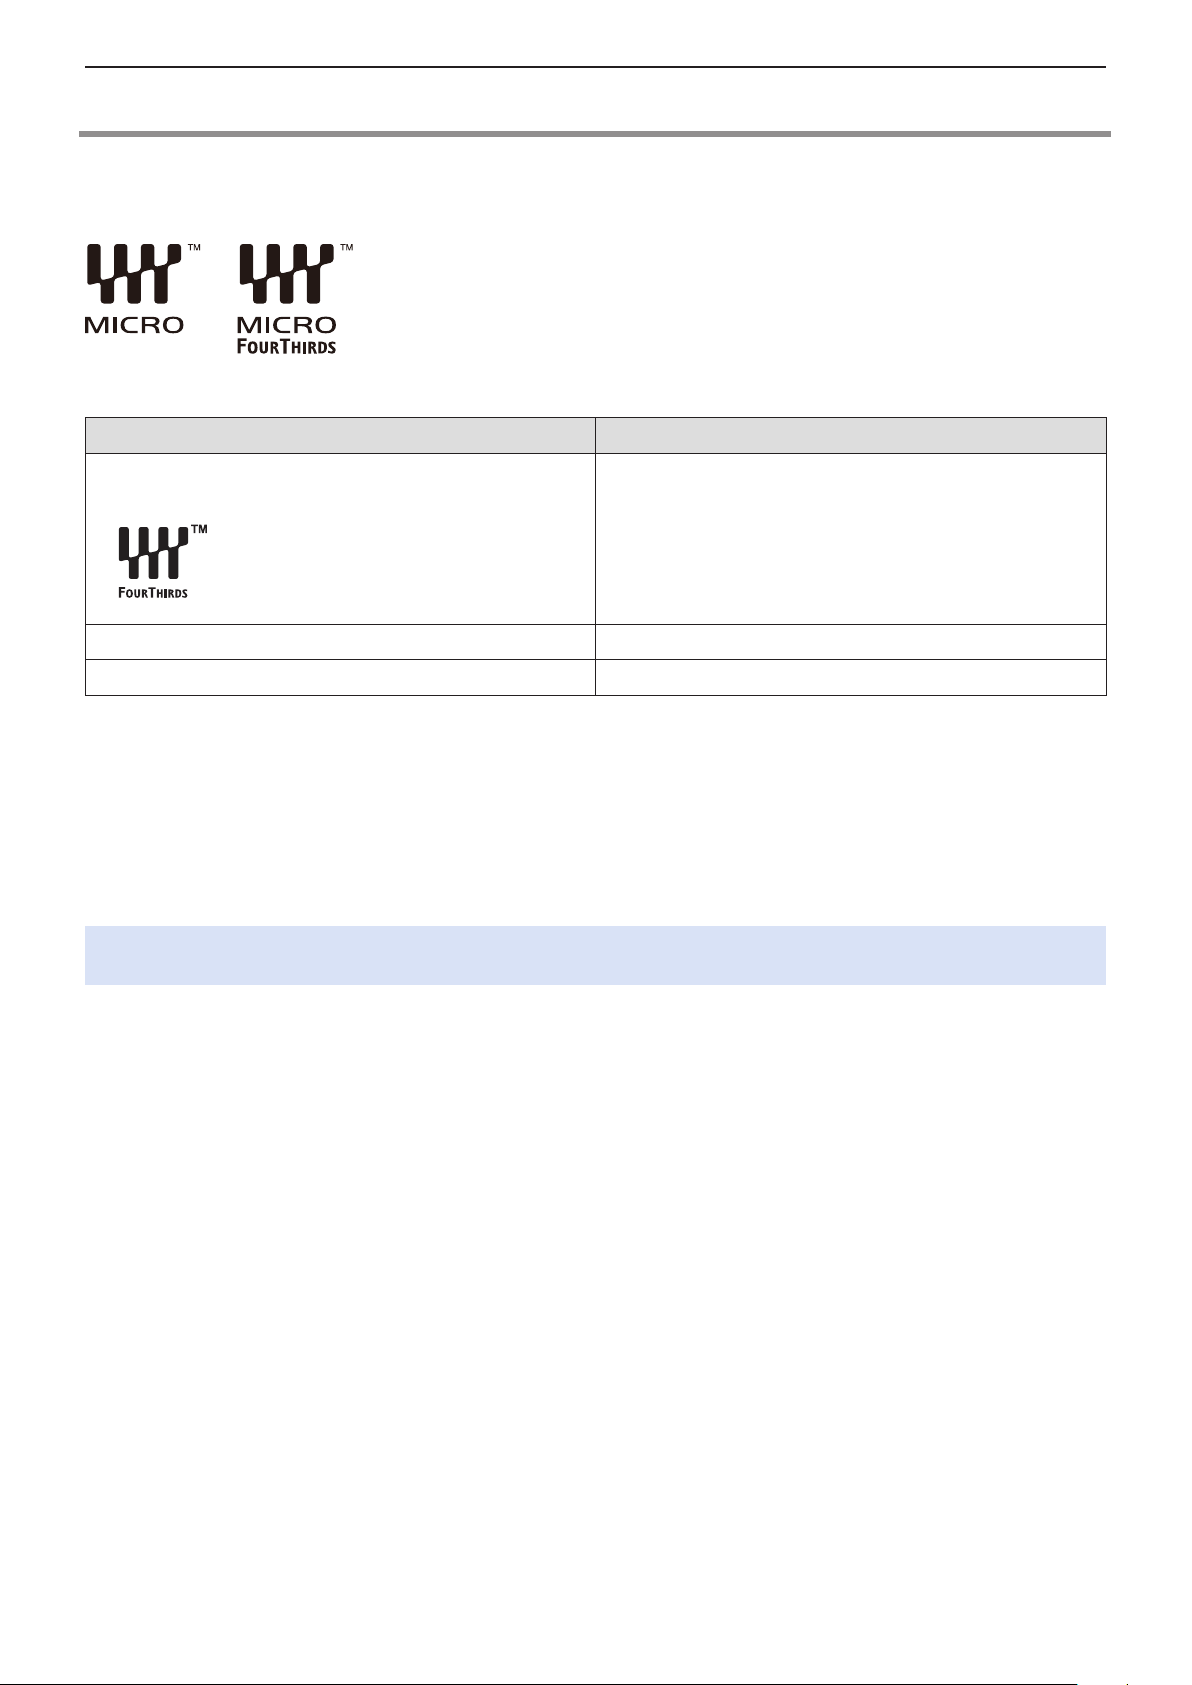
This unit can use the dedicated lenses compatible with the Micro Four Thirds™ System lens mount specification (Micro Four
Thirds mount).
You can also use a lens of any of the following standards by attaching a mount adaptor.
Lens Mount adaptor
Four Thirds™ mount specification lens
Mount Adaptor (DMW-MA1: optional)
Leica M Mount interchangeable lens M Mount Adaptor (DMW-MA2M: optional)
Leica R Mount interchangeable lens R Mount Adaptor (DMW-MA3R: optional)
About the lens and functions
■
Depending on the lens used, certain functions, such as Auto Focus, Image Stabilizer, and zoom functions, may be disabled or
operate differently.
●
Refer to catalogues/websites for most current information regarding supported lenses.
https://panasonic.jp/support/global/cs/dsc/
(English only)
●
The focal length noted on the Micro Four Thirds lens is equivalent to double when converted to the 35 mm film camera.
(It will be equivalent to 100 mm lens when a 50 mm lens is used.)
- 15 -- 15 -
Page 16
1. Introduction - Memory Cards That Can Be Used
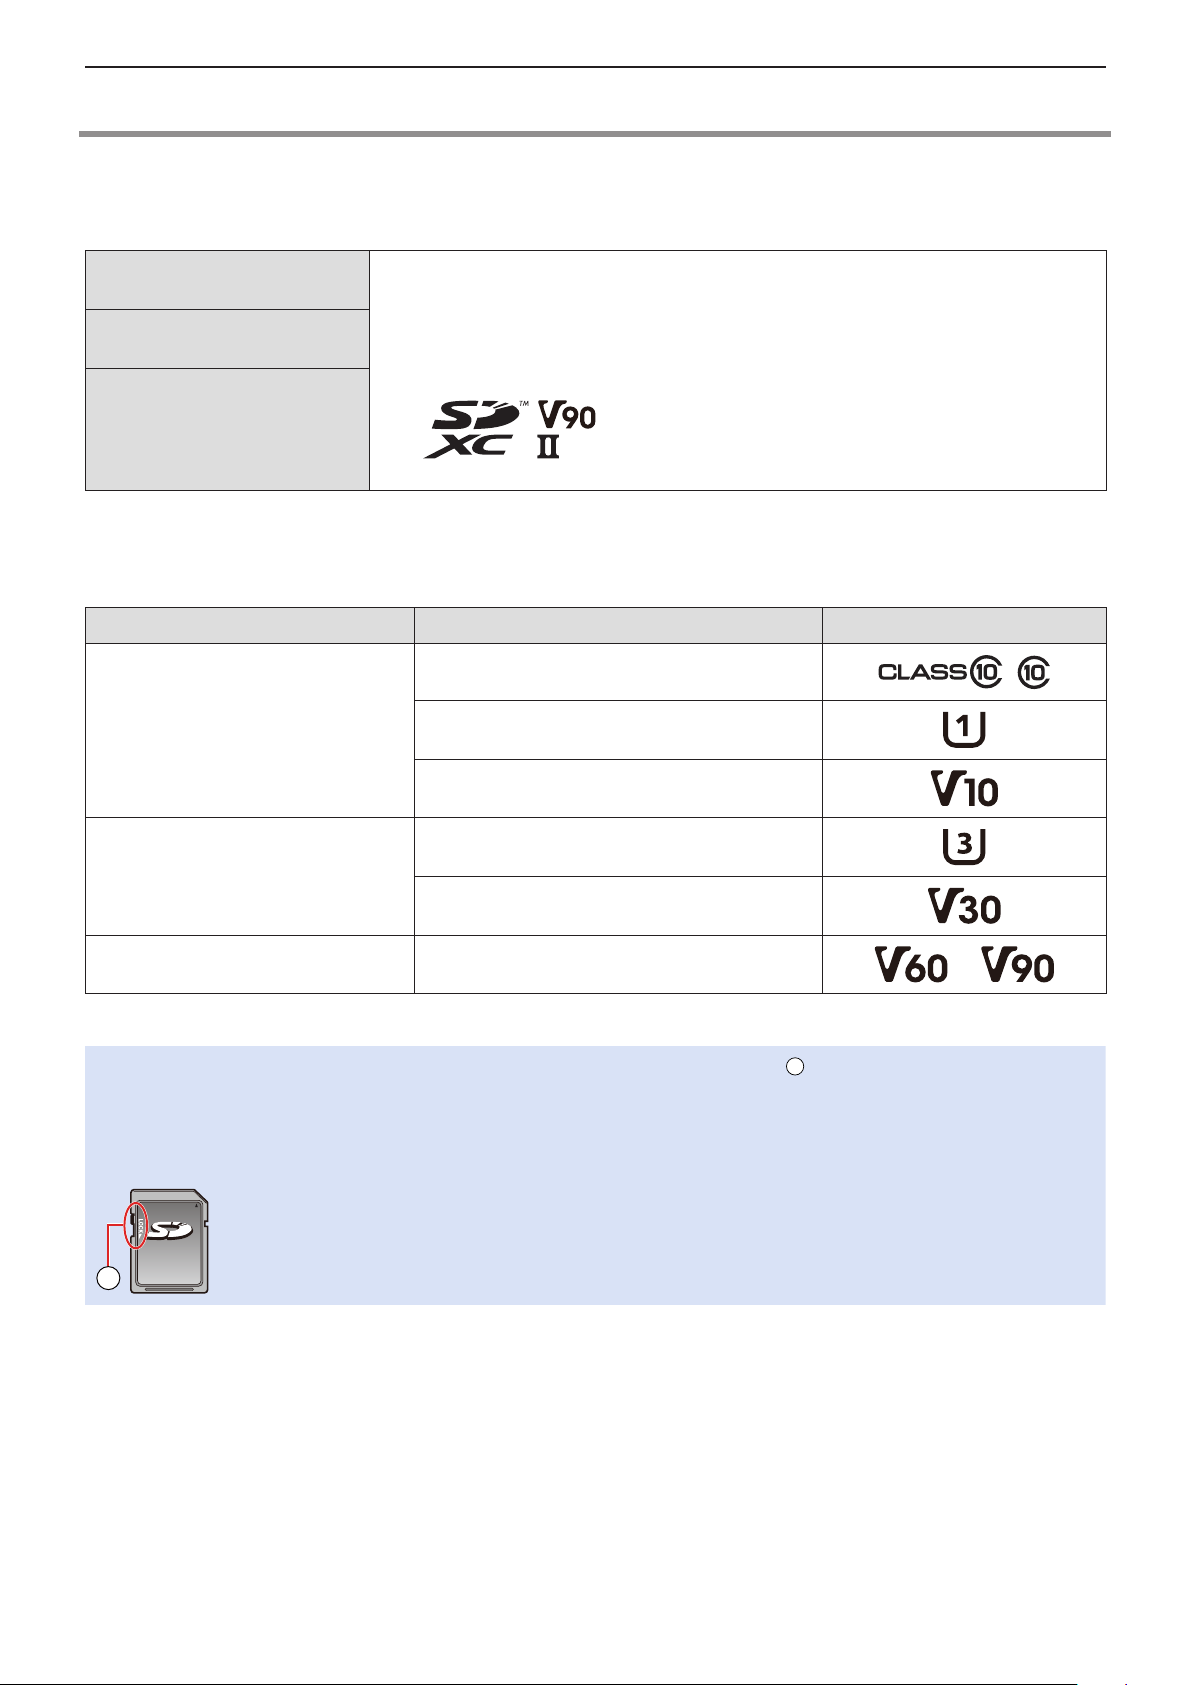
A
Memory Cards That Can Be Used
You can use the following memory cards with this camera.
●
SD memory card, SDHC memory card, and SDXC memory card are referred to by the generic name of card in this
document.
SD memory card
(512 MB to 2 GB)
SDHC memory card
(4 GB to 32 GB)
SDXC memory card
(48 GB to 128 GB)
Use cards that have the compatible SD Speed Class, UHS Speed Class, and Video Speed Class according to the bit rate of the
recording quality.
●
Speed classes are standards to guarantee the minimum speed necessary for continuous writing.
Bit rate of the recording quality Speed Class Example of indication
72 Mbps
●
The camera supports SDHC/SDXC memory cards compliant with UHS Speed Class
3 of the UHS-I/UHS-II standard.
●
The camera supports SDHC/SDXC memory cards compliant with Video Speed Class
90 of the UHS-II standard.
Class 10
UHS Speed Class 1 or higher
Video Speed Class 10 or higher
UHS Speed Class 3
100 Mbps to 200 Mbps
Video Speed Class 30 or higher
400 Mbps Video Speed Class 60 or higher
●
You can prevent the writing and deleting of data by setting the write-protect switch A on the card to “LOCK”.
●
The data stored on a card may be damaged due to electromagnetic waves, static electricity or a failure of the camera or
card. We recommend backing up important data.
●
Keep the memory card out of reach of children to prevent swallowing.
- 16 -- 16 -
Page 17
Names of Parts
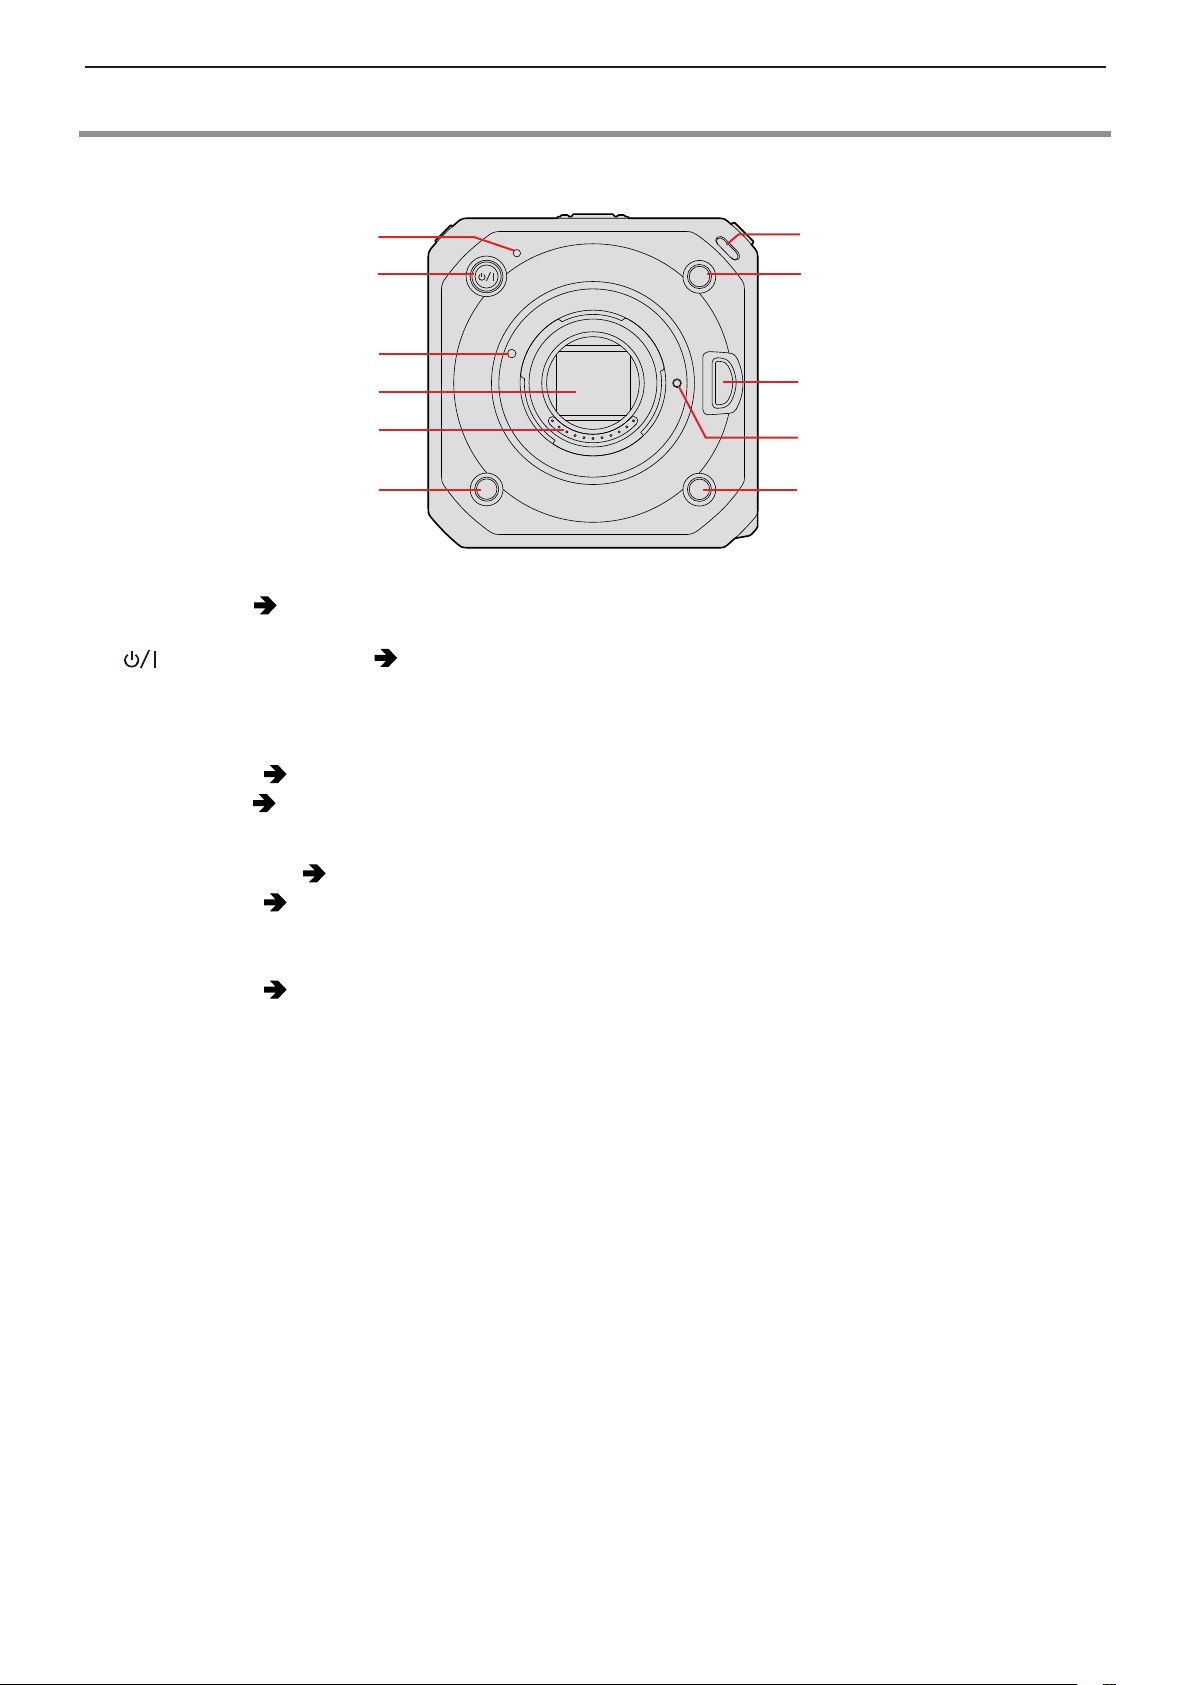
Front
■
1. Introduction - Names of Parts
1
2
3
4
5
6
1 Status indicator ( 248 / Lamp / Indicator Display)
●
This displays the power status.
2 [
3 Lens fitting mark
4 Sensor
5 Contact points
6 Fn button ([Fn4]) (
7 Front tally lamp (
8 Fn button ([Fn2]) (
9 Lens release button
10 Lens lock pin
11 Fn button ([Fn3]) (
] Camera ON/OFF button ( 23 / Turning the camera on)
154 / Fn Buttons)
248 / Lamp / Indicator Display)
●
This will light when recording begins. It will also blink when the available recording time of the recording medium
becomes short. When you do not want the lamp to light or when you want to change the brightness, you can set it on
the menu screen. ( 192 / [Tally Lamp])
154 / Fn Buttons)
154 / Fn Buttons)
7
8
9
10
11
- 17 -- 17 -
Page 18
1. Introduction - Names of Parts
12
19
13
14
15
16
17
18
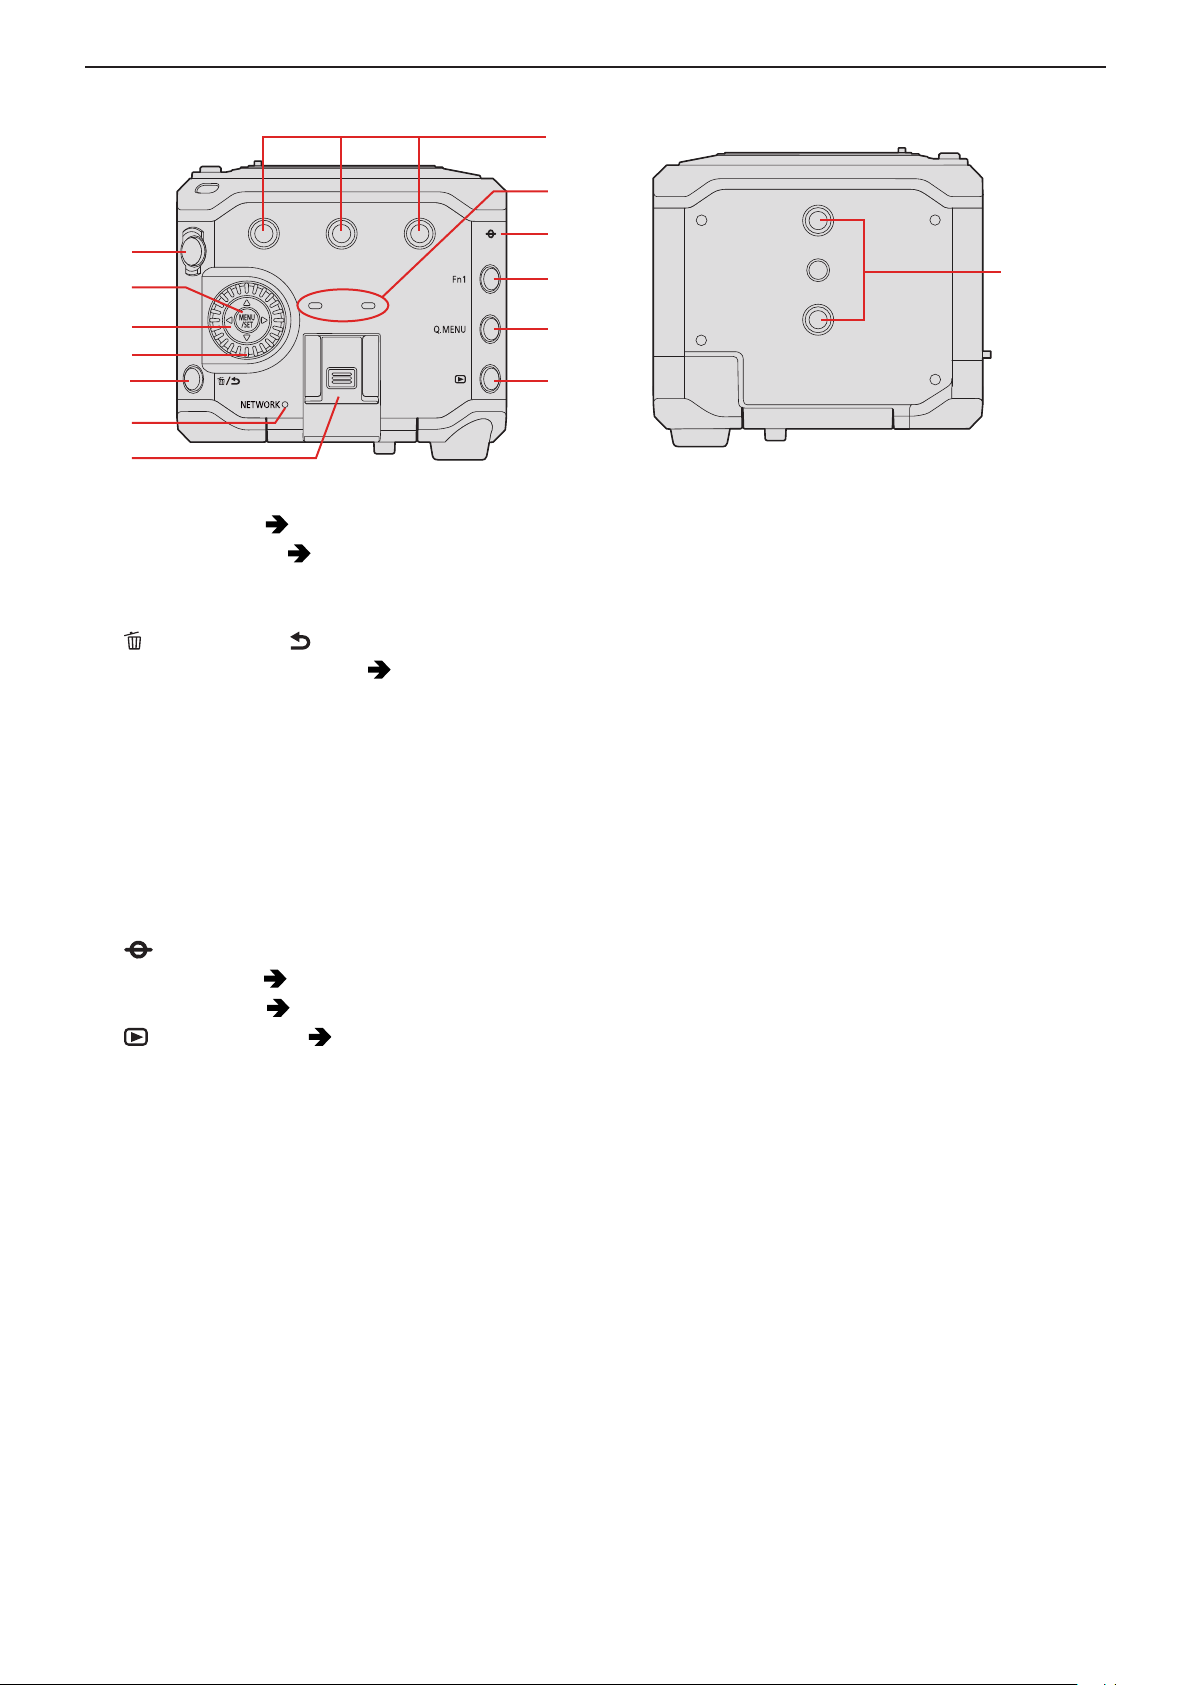
Top
■
12 Video rec. button ( 51 / Recording Videos)
13 [MENU/SET] button (
14 Cursor buttons
15 Control dial
] (Delete) button / [ ] (Cancel) button
16 [
17 [NETWORK] connection lamp (
●
Displays the network status.
18 Hot shoe (hot shoe cover)
●
Keep the hot shoe cover out of reach of children to prevent swallowing.
19 Tripod mount
●
You can attach a tripod, platform or camera cage etc.
●
The size of the mounting screw is 1/4-20 UNC (Screw length is 5.5 mm (0.22 inch) or less)
●
If you attempt to attach a screw longer than 5.5 mm (0.22 inch), you may not be able to securely fix it in place or it may
damage the camera.
20 Stereo microphone
●
Do not block the microphone with a finger. Audio will be difficult to record.
21 [
22 Fn button ([Fn1]) (
23 [Q.MENU] button (
24 [
] (Recording distance reference mark)
] (Playback) button ( 148 / Playing Back Videos)
46 / Menu Operation Methods)
248 / Lamp / Indicator Display)
154 / Fn Buttons)
44 / Quick Menu)
20
21
22
23
24
Bottom
■
19
- 18 -- 18 -
Page 19
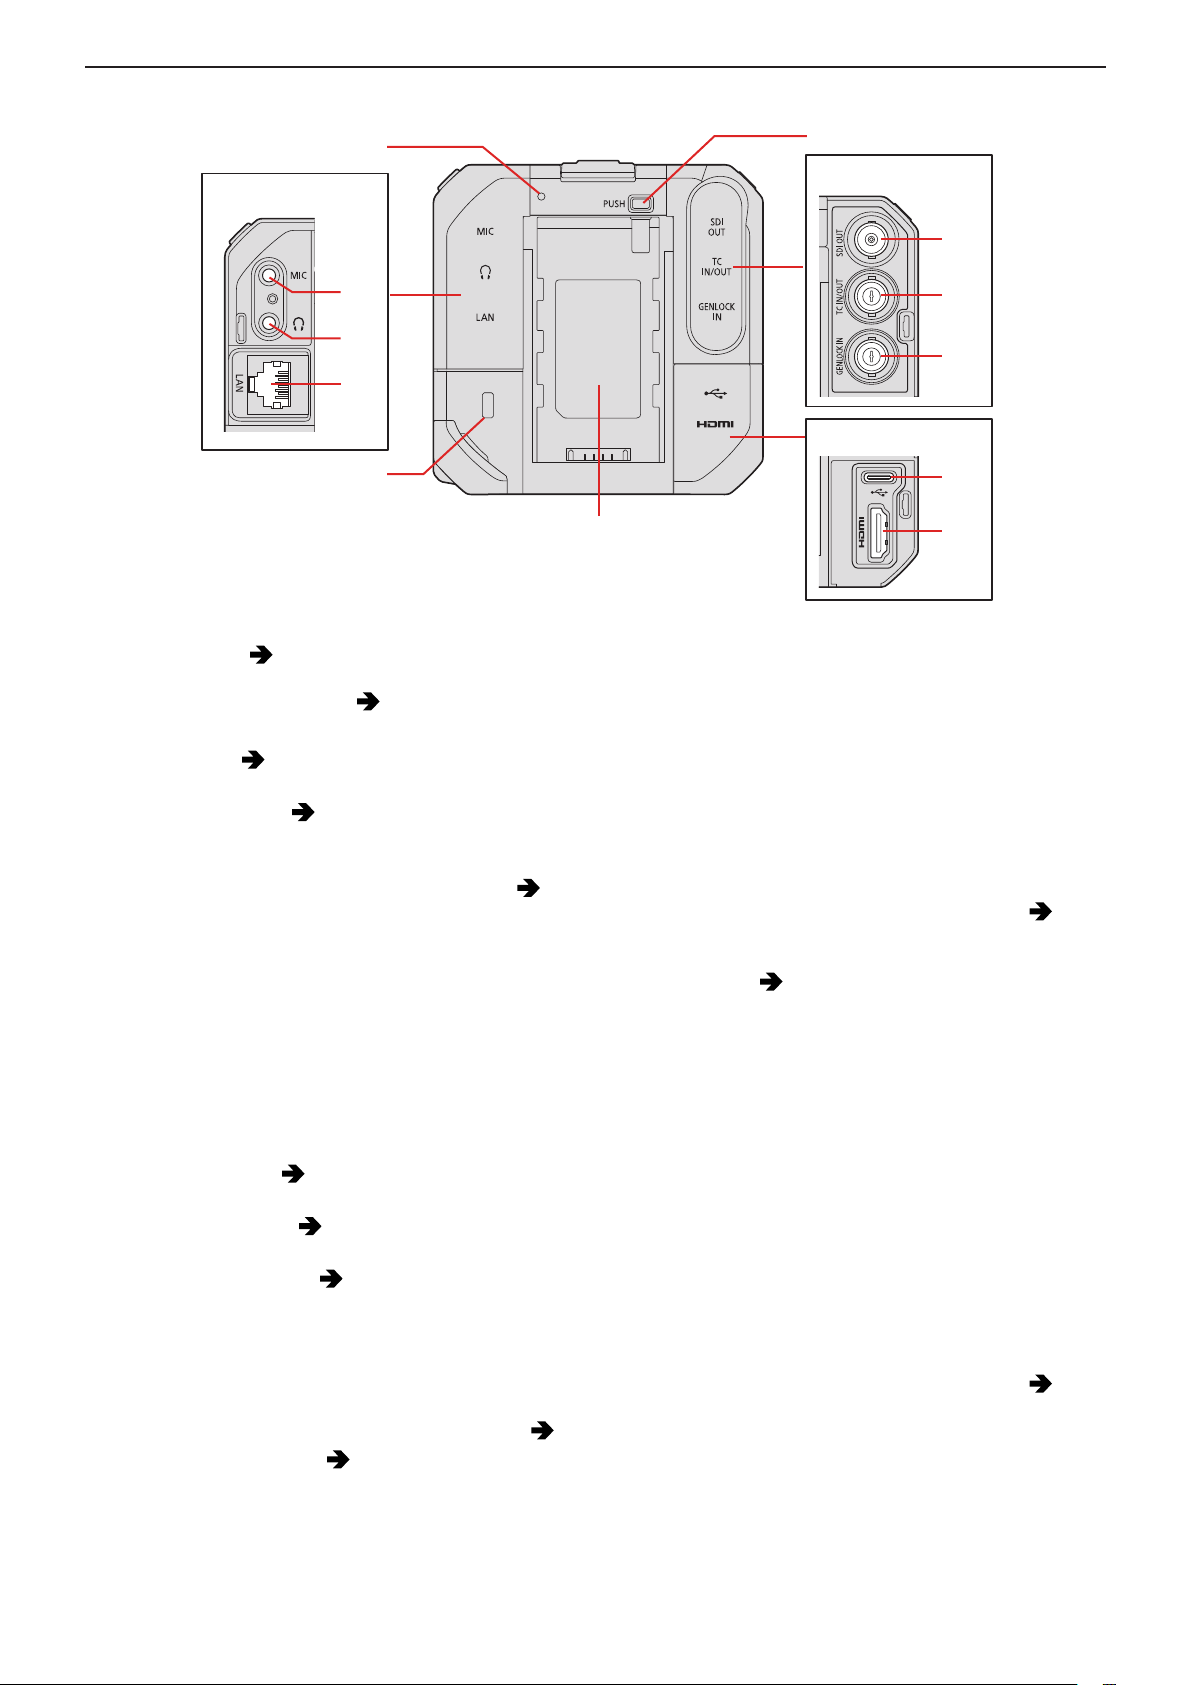
Back
32
25
■
1. Introduction - Names of Parts
26
27
28
29
30
25 Rear tally lamp ( 248 / Lamp / Indicator Display)
●
This works the same as the front tally lamp. You can set whether to make the lamp light at the menu screen separately
from the front tally lamp. ( 192 / [Tally Lamp])
26 AUDIO terminal cover
27 [MIC] terminal (
●
This connects the external microphone.
28 Headphone terminal (
●
This connects the headphones for the audio monitor.
29 [LAN] terminal
●
Supplying power from a PoE+ power supply. ( 22 / Supplying power from a PoE+ power supply)
●
You can control the camera remotely by connecting with a PC that has the “LUMIX Tether” software installed. ( 207 /
Tethered Recording)
●
You can remotely operate the camera by connecting it with a LAN cable to the wireless access point to which the
smartphone that has the “LUMIX Tether” software installed is connected to. ( 223 / Connecting to a Smartphone
(Wired LAN connection))
30 Security Slot
●
Attaching anti-theft equipment can prevent theft. We are not liable for damages that may occur resulting from theft.
31 Battery attachment part
32 Battery release button
33 BNC terminal cover
34 [SDI OUT] terminal (
●
This connects external monitors etc. and outputs an SDI signal.
35 [TC IN/OUT] terminal (
36 [GENLOCK IN] terminal (
37 HDMI terminal cover
38 [USB] terminal
39 [HDMI] terminal (Type A) (
●
This connects with an external device and inputs/outputs a time code.
●
This connects with an external device and inputs a sync signal.
●
You can control the camera remotely by connecting with a PC that has the “LUMIX Tether” software installed. ( 207 /
Tethered Recording)
●
Import shooting data by connecting with a PC. ( 146 / Importing Images to a PC)
●
This connects with an external monitor etc. and outputs a video signal.
140 / External Microphones (Optional))
144 / Headphones)
27 / Connecting the external monitor)
64 / Synchronizing the Time Code with an External Device)
67 / Genlock settings)
27 / Connecting the external monitor)
31
33
34
35
36
37
38
39
- 19 -- 19 -
Page 20
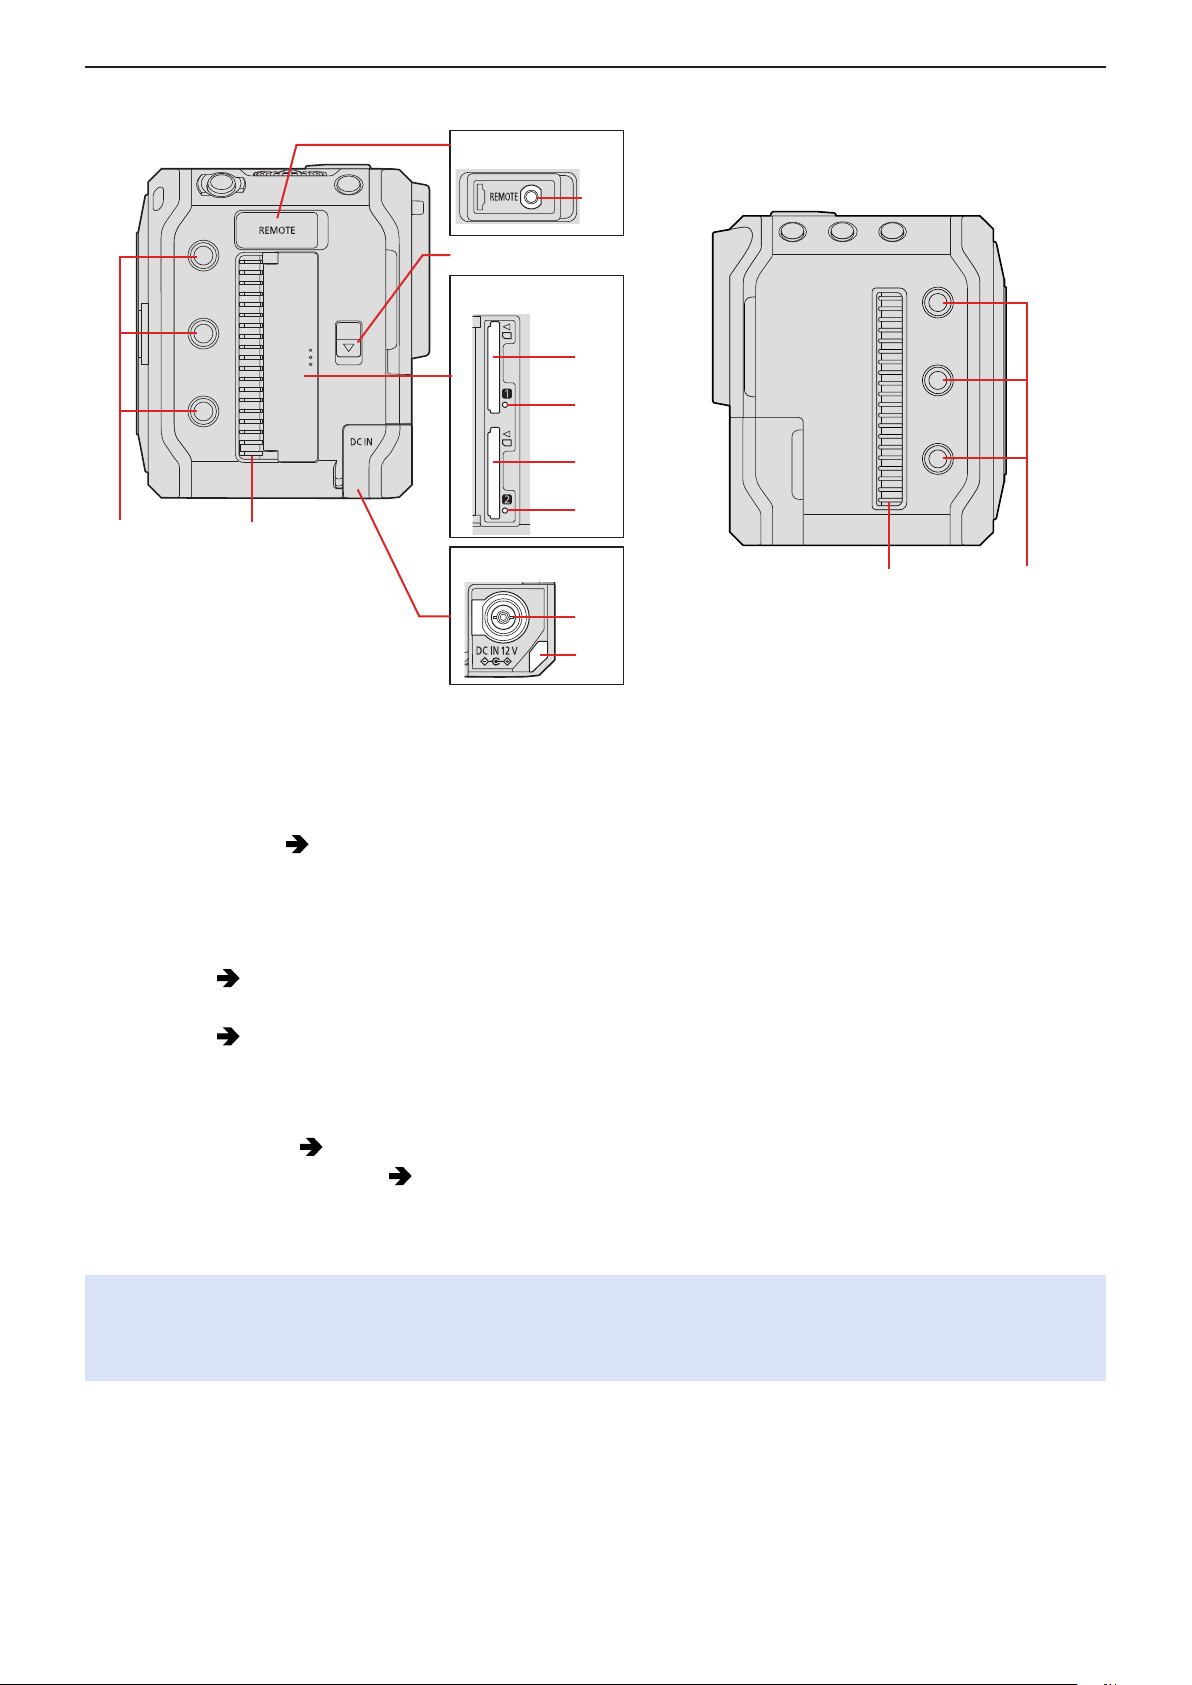
1. Introduction - Names of Parts
52
19
Right side
■
Left side
■
41
42
43
44
45
46
47
48
4019
49
50
51
40 Fan outlet
●
The fan outlet for the cooling fan. Do not block it when using this camera.
41 REMOTE terminal cover
●
Keep the REMOTE terminal cover out of reach of children to prevent swallowing.
42 [REMOTE] terminal (
●
You can control a part of the function remotely by connecting the remote control unit (commercially available) to the
camera. (A Panasonic shutter remote control (DMW-RS2) cannot be used.)
43 Card door release lever
44 Card door
45 Card slot 1 (
46 Card access light 1
47 Card slot 2 (
48 Card access light 2
49 DC IN terminal cover
●
Keep the DC IN terminal cover out of reach of children to prevent swallowing.
50 [DC IN 12 V] terminal (
51 Cable lock band attachment part (
52 Fan Inlet
●
The fan inlet for the cooling fan. Do not block it when using this camera.
●
The terminal cover is attached to the camera upon purchase. You can remove the terminal cover from the camera.
●
When connecting a BNC cable to the [GENLOCK IN] terminal or [TC IN/OUT] terminal, use one that is less than 2.8 m
(9.1 feet).
It is recommended to use a double shielded BNC cable equivalent to 5C-FB.
30 / Inserting Cards (Optional))
30 / Inserting Cards (Optional))
145 / Using a remote control unit)
21 / Supplying power with an AC adaptor)
28 / Attaching the Cable Lock Band)
- 20 -- 20 -
Page 21
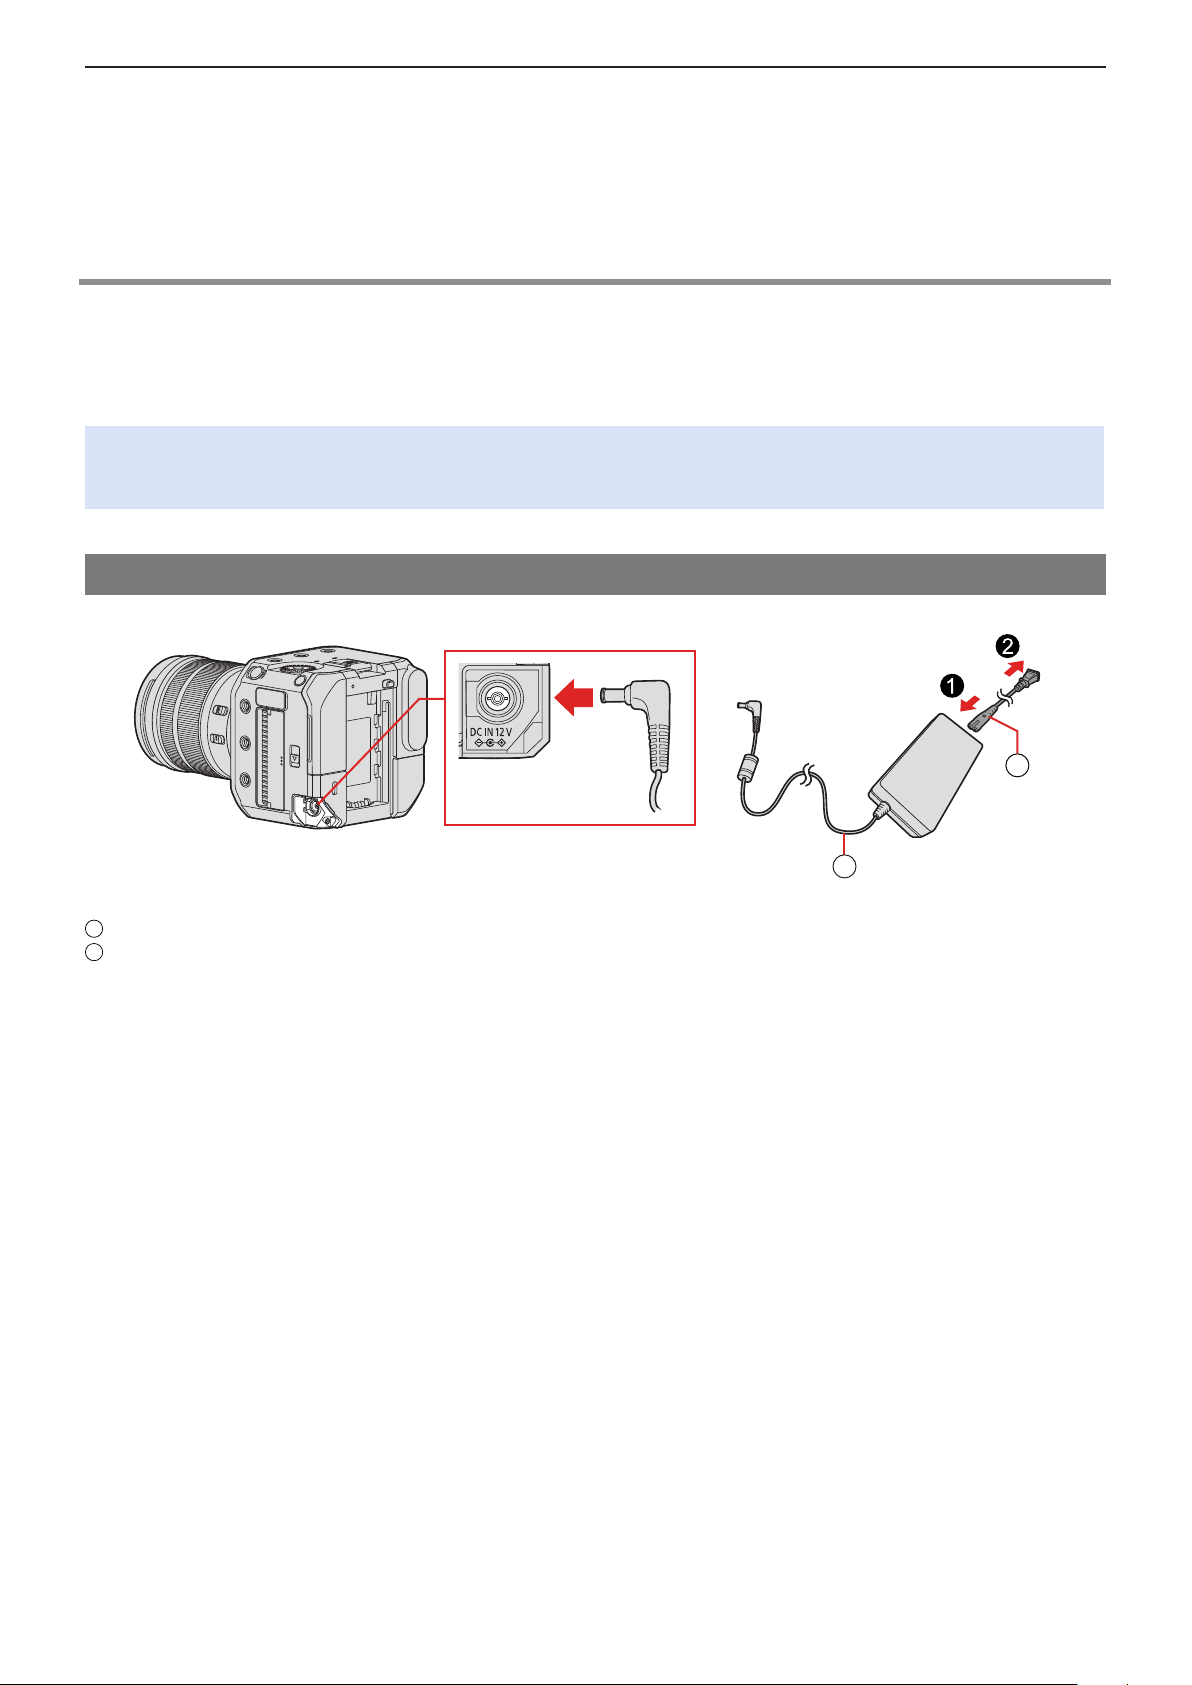
2. Getting Started - Power supply
A
A
B
2. Getting Started
Power supply
You can supply power to the camera using an AC adaptor (supplied), a PoE+*1 compatible switching hub or PoE+ compatible
injector (commercially available), and a battery pack (optional)*2.
1
*
PoE+ is an abbreviation of Power Over Ethernet Plus.
*2 This will be referred to as “battery pack” or “battery” onwards.
●
When several power supplies are connected at the same time, it will be prioritized in the order of AC adaptor, PoE+
power supply and then battery.
●
The battery that can be used with the camera is AG-VBR59/AG-VBR89/AG-VBR118. (As of October 2020)
Supplying power with an AC adaptor
Connect the supplied AC adaptor and AC cable to the camera to supply power (power supply).
AC adaptor (supplied)
AC cable (supplied)
1 Connect the AC adaptor to the [DC IN 12 V] terminal of the camera.
2 Connect the AC cable to the AC adaptor, then plug it into the power outlet.
●
The AC cable is for this camera only, so do not use it with other devices. Additionally, do not use the AC cable of other
devices with this camera.
B
- 21 -- 21 -
Page 22
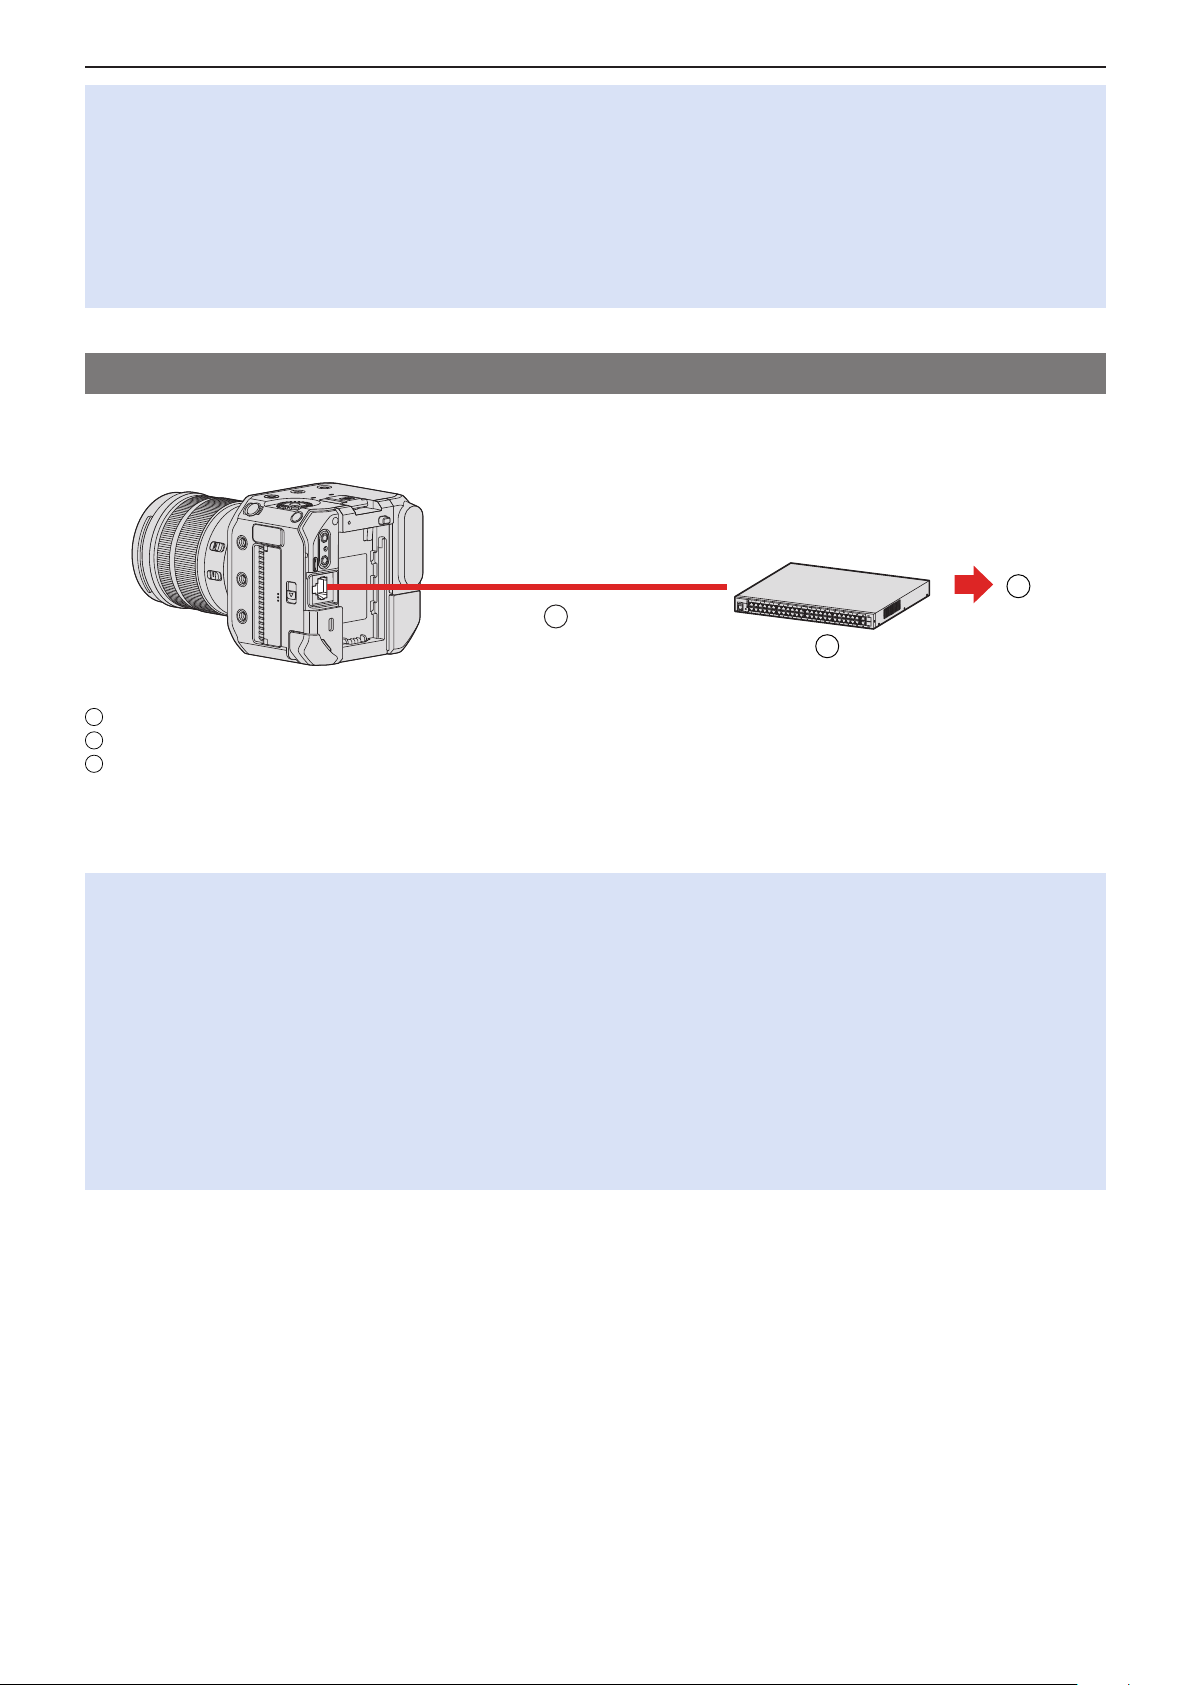
2. Getting Started - Power supply
A
B
C
●
Do not use any other AC adaptors except the supplied one. This may cause malfunction.
●
Do not use any other AC cables except the supplied one. This may cause malfunction.
●
Turn off the camera before connecting or disconnecting the power plug.
●
Do not leave any metal items (such as clips) near the contact areas of the power plug. Otherwise, a fire and/or electric
shocks may be caused by short-circuiting or the resulting heat generated.
●
Do not use the AC adaptor and AC cable with other devices. This may cause malfunction.
●
If there is a power outage or other problems with the electrical outlet, please reconnect the power plug.
●
Power is being consumed even if the camera is turned off. When the camera will not be used for a long time, remove the
power plug from the electrical outlet in order to save power.
Supplying power from a PoE+ power supply
This camera is PoE+ (IEEE 802.3at compliant) compatible. Connect the camera to a PoE+ compatible switching hub or PoE+
compatible injector to supply power (power supply).
C
A
B
PoE+ compatible LAN cable (commercially available)
PoE+ compatible switching hub (commercially available)
Power plug
1 Connect the [LAN] terminal of the camera and the PoE+ compatible switching hub
with a PoE+ compatible LAN cable.
●
For the cable that connects to the LAN terminal, use the one below.
– LAN cable (STP (Shielded Twisted Pair), category 5e or above, maximum 100 m (328 feet))
●
Use a PoE+ (IEEE 802.3at compliant) compatible switching hub or power supplying device. *
(Not all PoE+ (IEEE 802.3at compliant) compatible device operations are guaranteed.)
*1 Make sure it complies with the safety standards IEC 60950-1 or IEC 62368-1. If you are uncertain on whether or not it
complies with the safety standards, please contact the manufacturer of the switching hub or power supplying device.
●
You cannot use a PoE (IEEE 802.3af compliant) switching hub or power supplying device.
●
After turning the camera on, when the device or cable used is determined PoE+ incompatible by the camera, the camera
automatically turns off. (Determining may take approximately 3 minutes.)
●
The camera’s Wi-Fi connection, Bluetooth connection, and USB connection cannot be used while supplying power with
PoE+.
●
If you connect a PC to a switching hub that supplies power to the camera with PoE+ via a LAN cable, you can remotely
control the camera with the software “LUMIX Tether” while supplying power to the camera with PoE+.
1
- 22 -- 22 -
Page 23
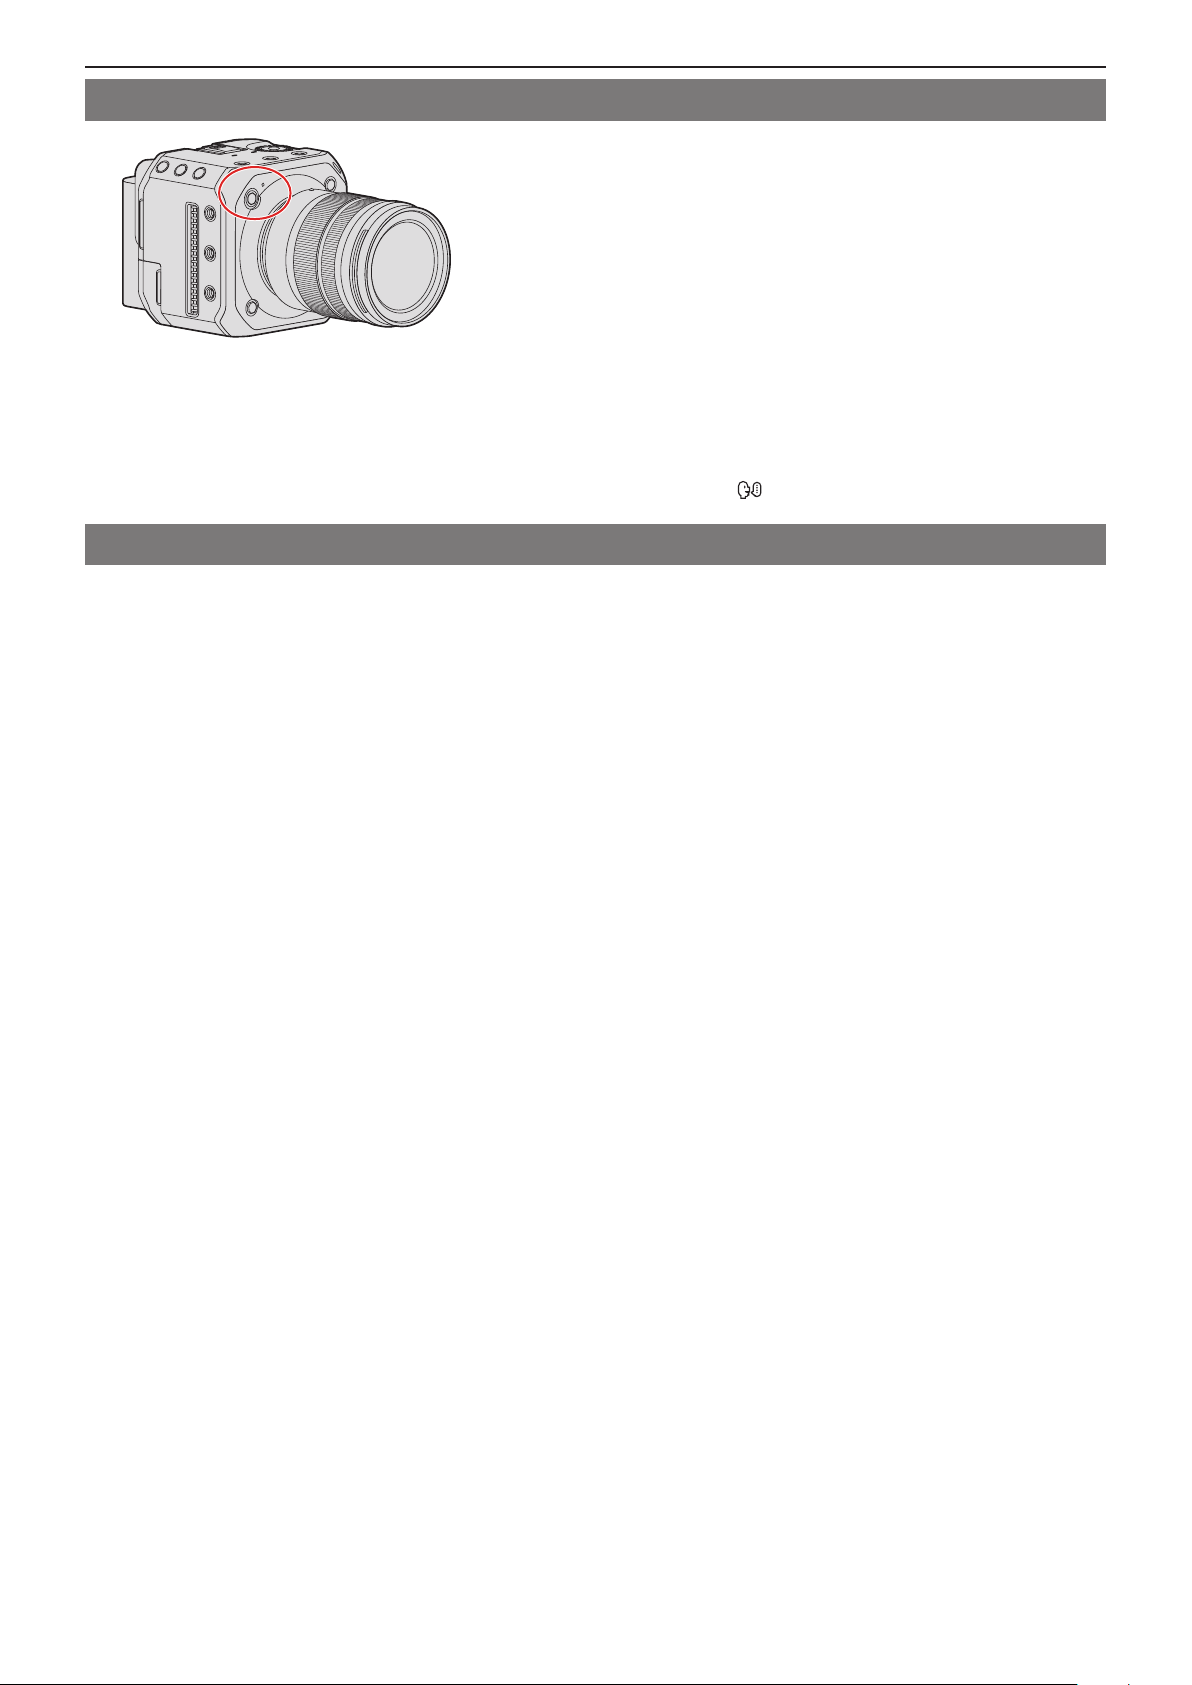
Turning the camera on
1 Turning the camera on.
●
Press and hold the camera ON/OFF button for more than one second.
● The status indicator will light up.
●
You can change the language displayed on the screen from [Language] ([ ]) in the [Setup] ([Others]) menu.
Turning the camera off
1 Turning the camera off.
●
Press and hold the camera ON/OFF button for more than two seconds.
● The status indicator will go off.
2. Getting Started - Power supply
- 23 -- 23 -
Page 24
2. Getting Started - Power supply
A
B
C
Power Indications
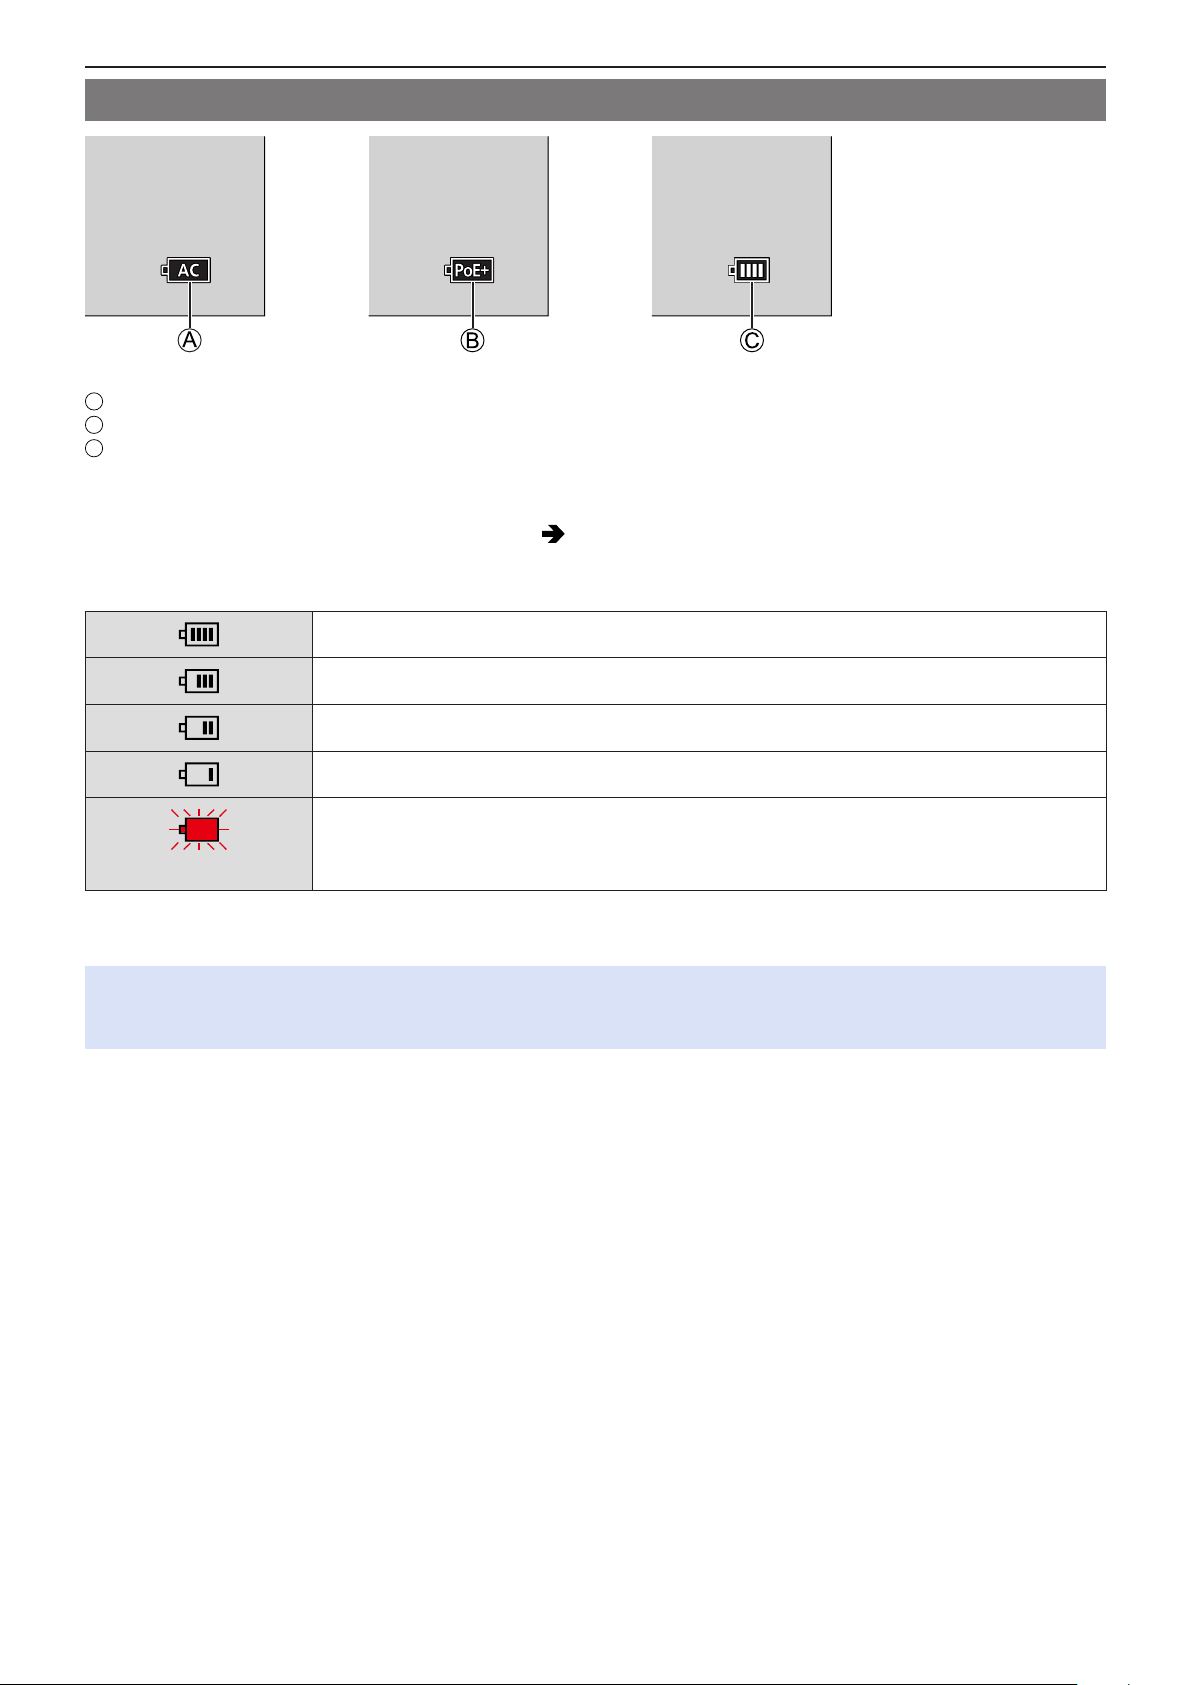
When supplying power with an AC adapter
When supplying power by connecting to a PoE+ compatible switching hub
Battery indication
Status indicator
■
This informs you about the camera status with the lamp. ( 248 / Lamp / Indicator Display)
Battery indication
■
75% or higher
74% to 50%
49% to 25%
24% or below
Low battery
●
Blinking in red
●
The battery level indicated on the screen is an approximate. The exact level varies depending on the environment and the
operating conditions. The actual battery level may differ from the battery level displayed in the indication.
●
To ensure that safe products are used, we recommend that a genuine Panasonic battery pack is used. There is a
possibility that other battery packs may lead to fire or explosion. Please be advised that we are not liable for any accident
or failure occurring as a result of use of a counterfeit battery pack.
Charge or replace the battery.
- 24 -- 24 -
Page 25
2. Getting Started - Attaching a Lens
A
Attaching a Lens
●
Change the lens in a location where there is not a lot of dirt and dust. If dirt or dust gets on the lens ( 257 / Dirt on the
image sensor)
●
Change the lens while the lens cap is attached.
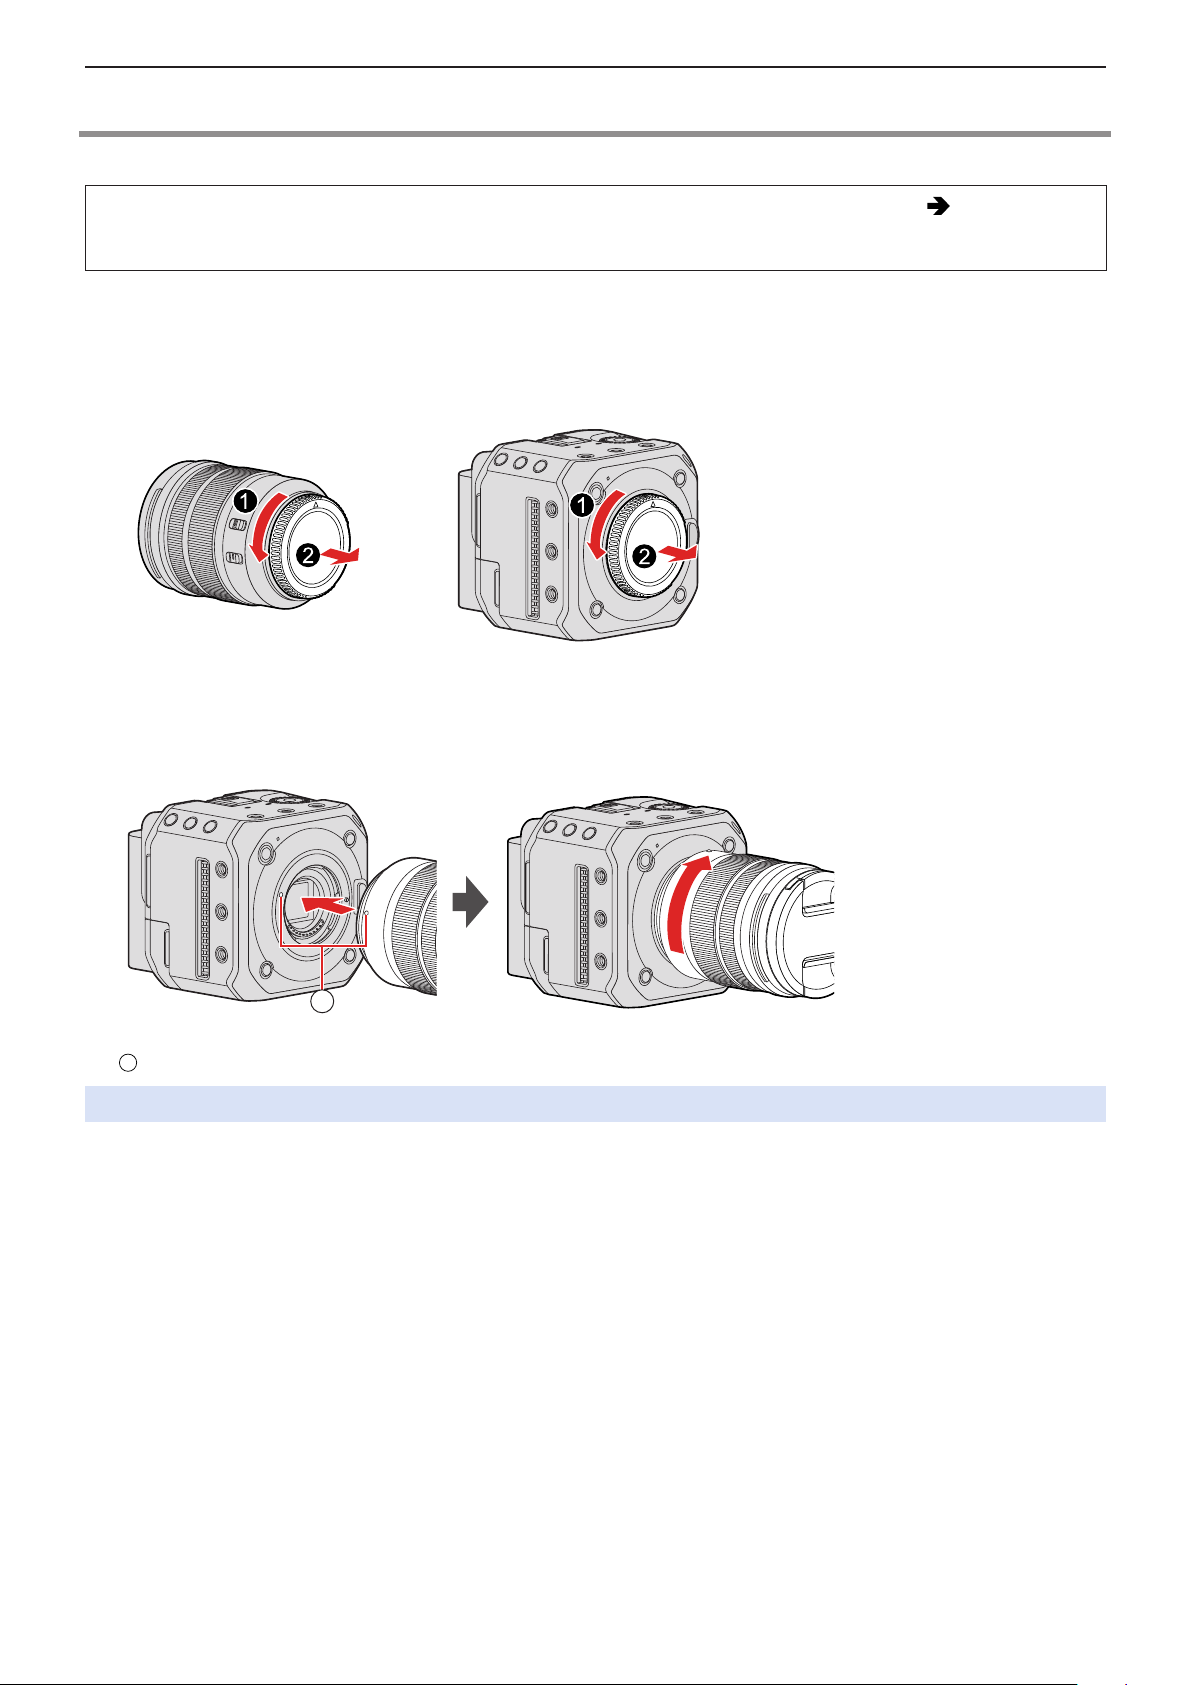
1 Turn the camera off.
●
Press and hold the camera ON/OFF button for more than two seconds.
2 Turn the lens rear cap and the body cap in the direction of the arrow to remove them.
3 Align the lens fitting marks on the lens and camera and then rotate the lens in the
direction of the arrow.
●
Attach the lens by rotating it until it clicks.
A
Lens fitting mark
●
Insert the lens straight in. Inserting this at an angle to attach it may damage the camera lens mount.
- 25 -- 25 -
Page 26
2. Getting Started - Attaching a Lens
B
Removing a Lens
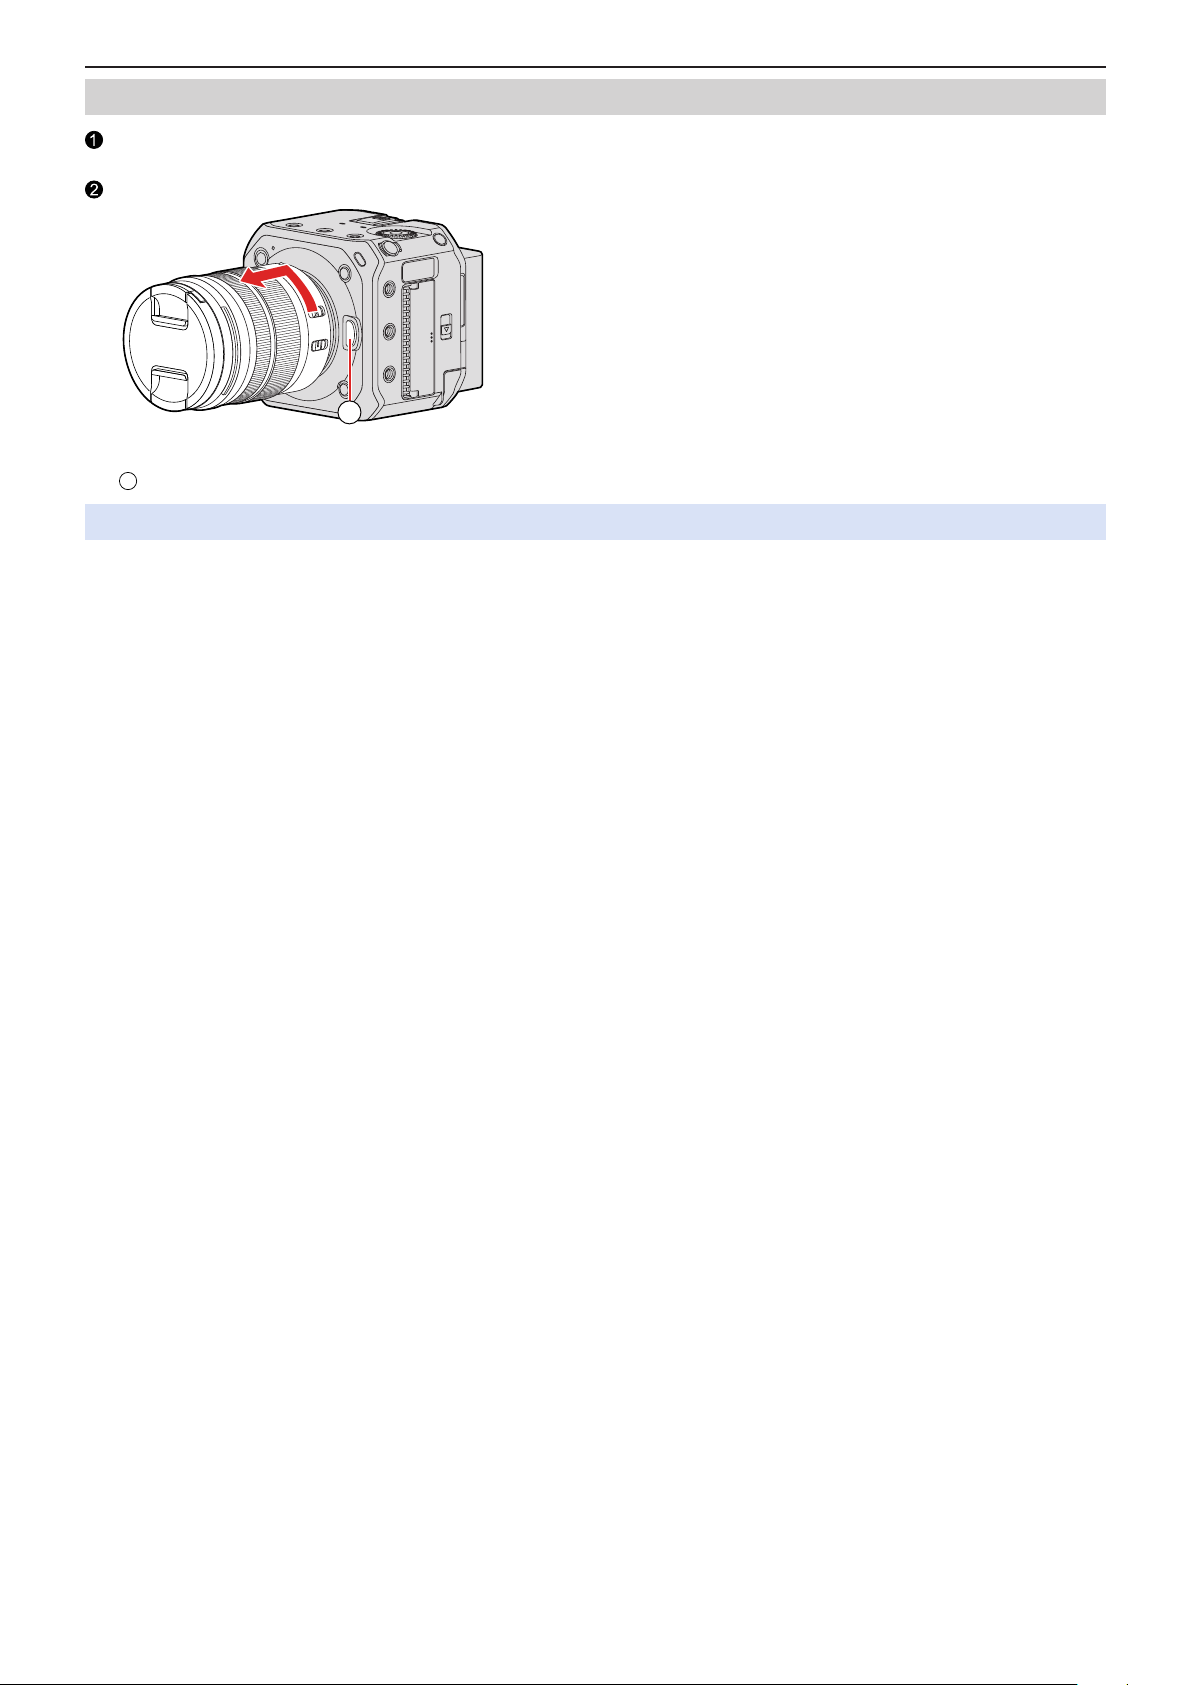
Turn the camera off.
● Press and hold the camera ON/OFF button for more than two seconds.
While pressing the lens release button, rotate the lens in the direction of the arrow until it stops and then remove it.
B
Lens release button
●
After removing the lens, be sure to attach the body cap and the lens rear cap.
- 26 -- 26 -
Page 27
2. Getting Started - Connecting the external monitor
A
B
A
B
C
D
E
Connecting the external monitor
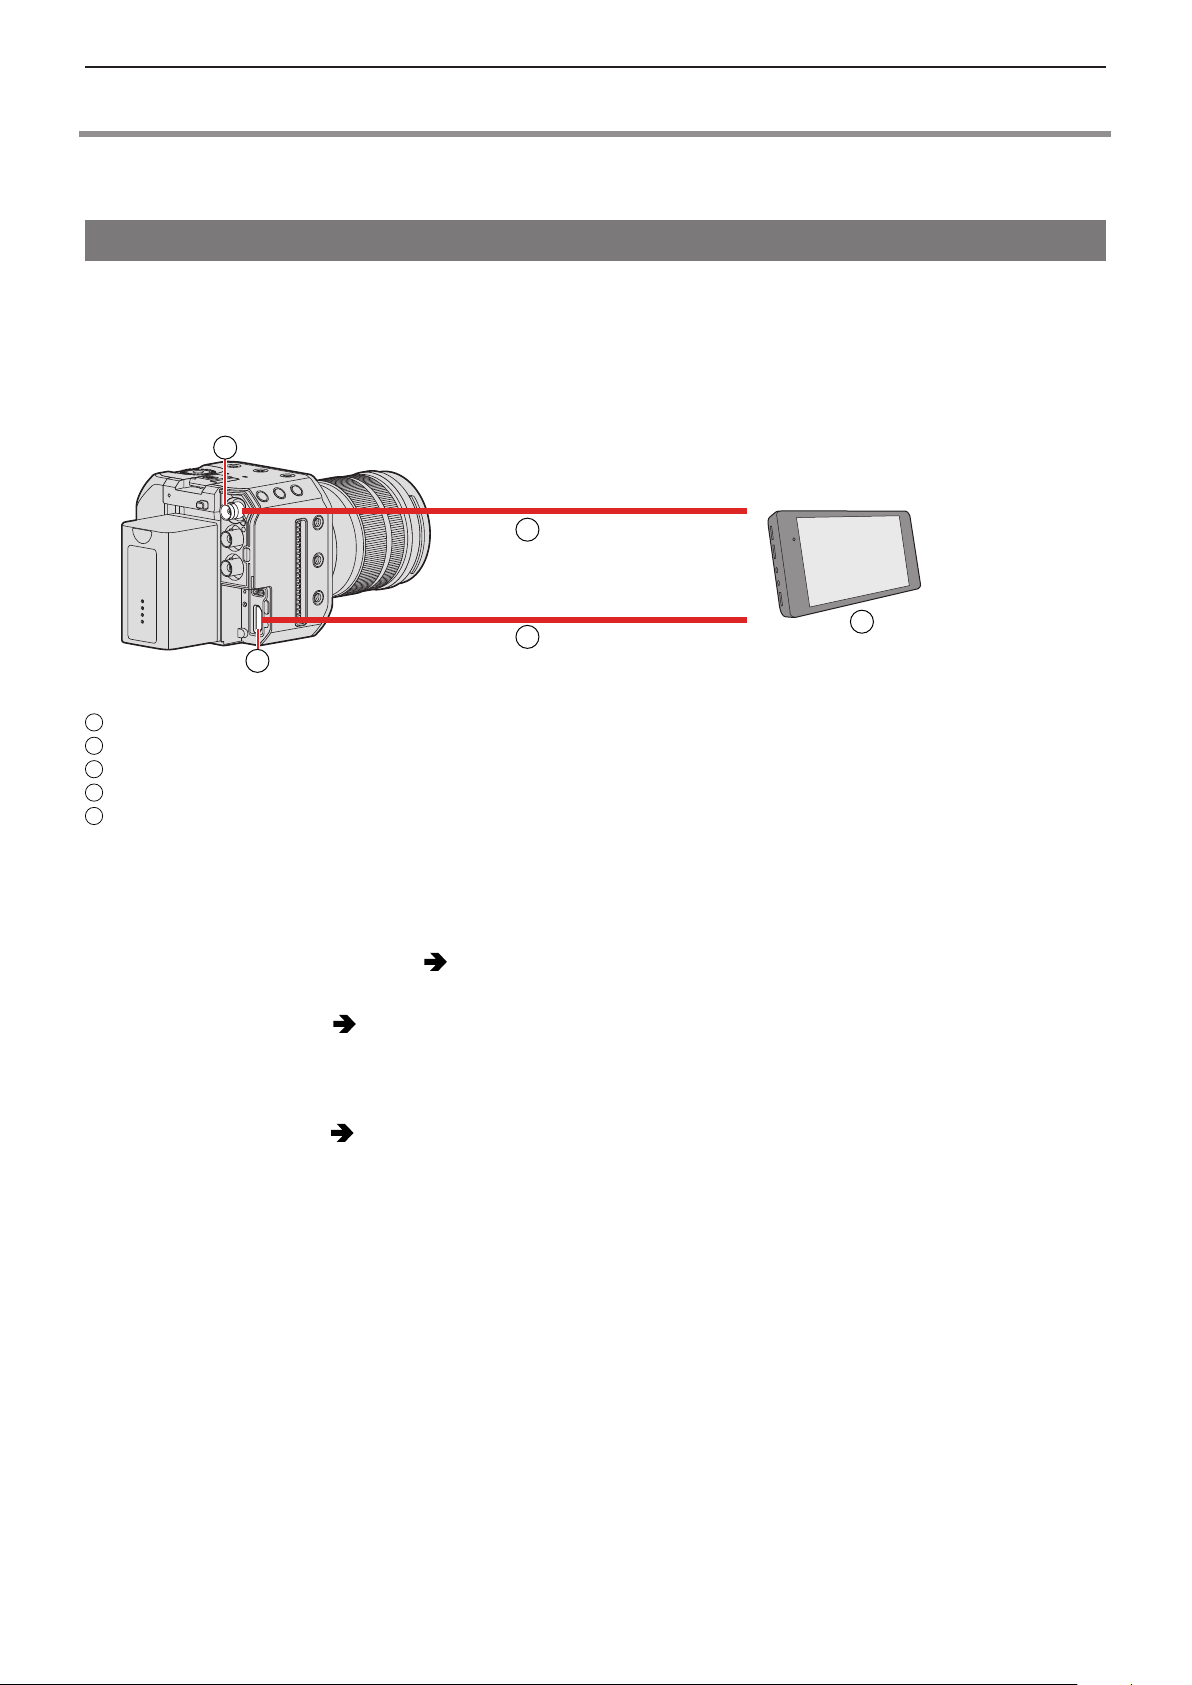
Connect the camera to an external monitor or external recorder etc. to output video and audio.
Connecting to the external monitor
Preparation:
●
Turn off the camera, external monitor, or external recorder etc.
1 Connect the camera and external monitor or external recorder with an HDMI cable or
BNC cable.
C
D
[SDI OUT] terminal
[HDMI] terminal
BNC cable (commercially available)
HDMI cable (commercially available)
External monitor or external recorder (commercially available)
●
Check the direction of the terminals and plug in/out straight holding onto the plug. (Inserting at an angle can deform the
terminal and cause malfunction.)
●
Do not connect the cable to the wrong terminals. This may cause a malfunction.
When the images are not output ( 251 / External device)
■
Settings of the display ( 39 / Display Settings)
■
●
The recording information or menu screen will only be output to either the HDMI output destination or SDI output
destination. You can set where to display it in [Display Information].
Output image settings ( 133 / 7. Output image)
■
●
Sets the resolution etc. of the footage to be output to the external device during recording.
E
- 27 -- 27 -
Page 28
2. Getting Started - Connecting the external monitor
●
It is recommended to use a double shielded BNC cable equivalent to 5C-FB.
●
Use a high speed HDMI cable (Type A - Type A plug) that is compatible with 4K and has an HDMI logo.
●
You can output via HDMI and SDI at the same time. You can also connect to either “LUMIX Tether” or “LUMIX Sync” at
the same time.
●
If you do not have an external monitor or external recorder, you can watch the live view while remotely controlling the
camera by connecting a PC that has the “LUMIX Tether” software installed to the camera. ( 207 / Tethered Recording)
Attaching the Cable Lock Band
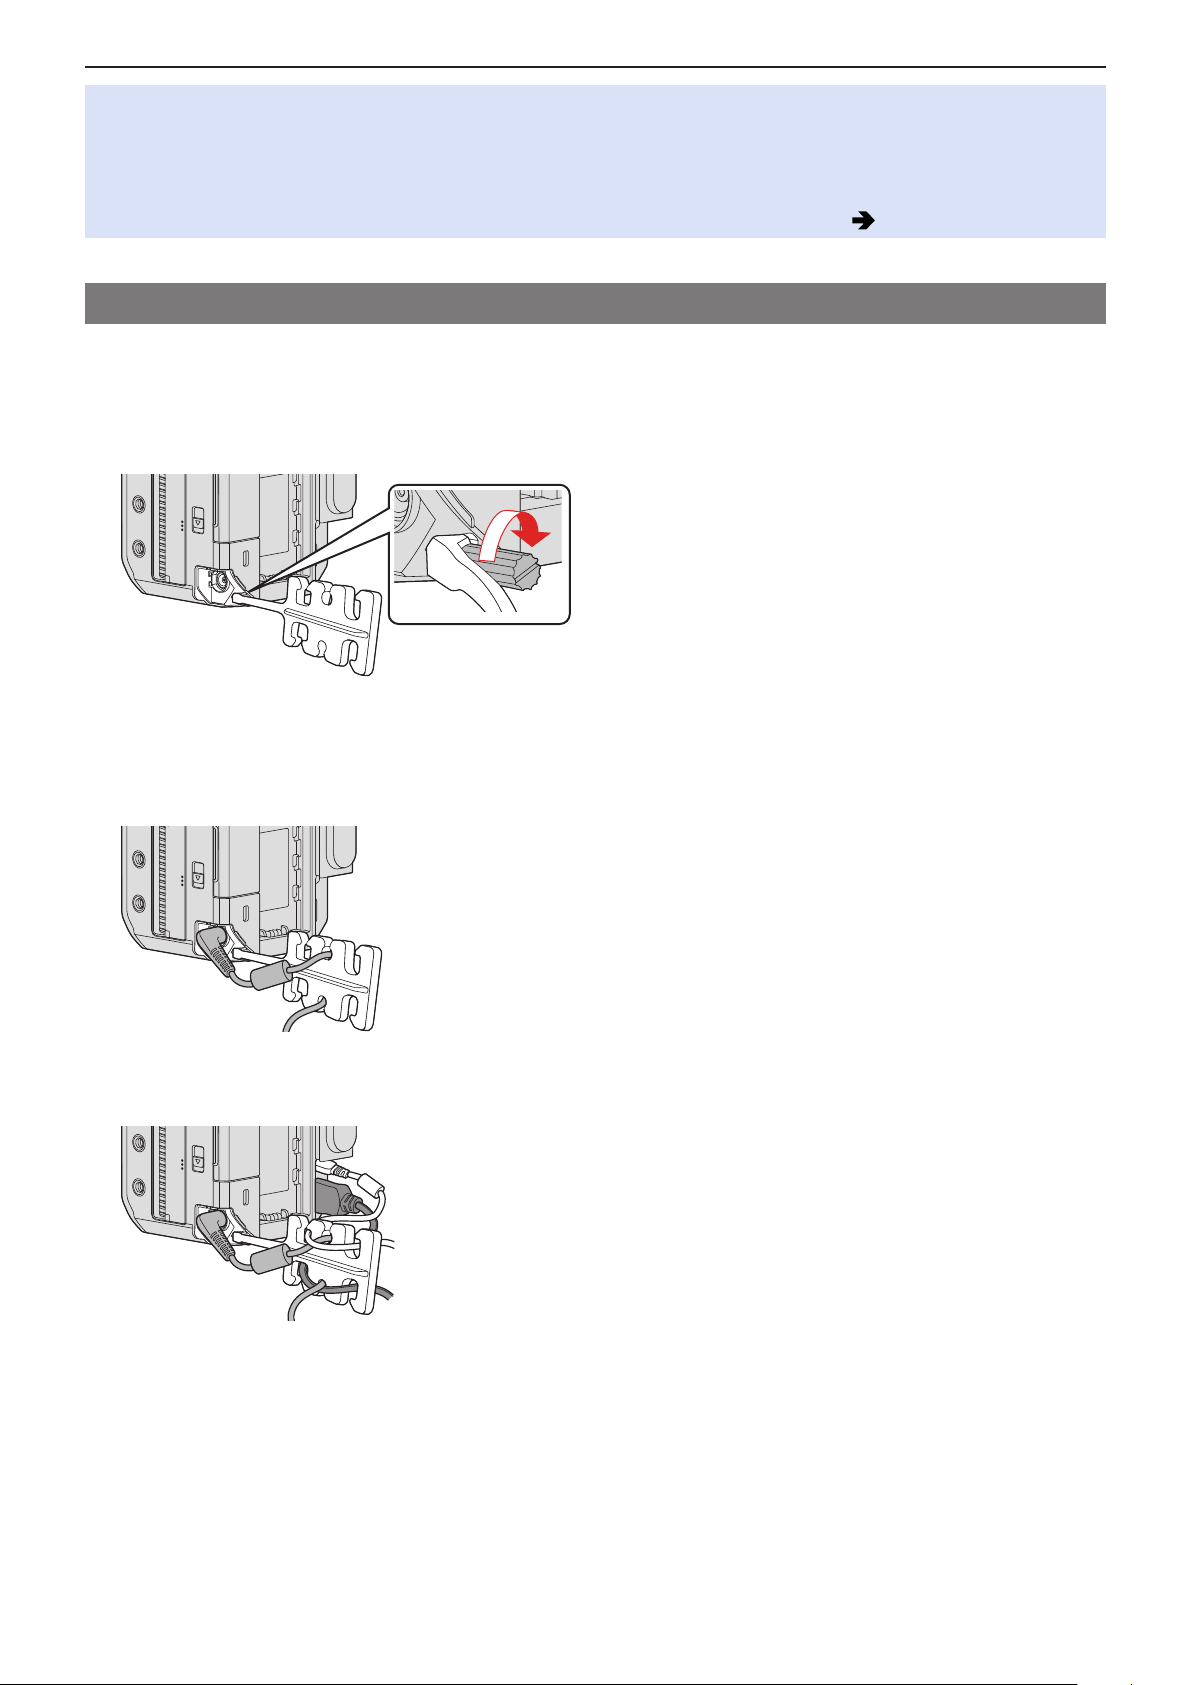
Use of the supplied cable lock band prevents detachment of the cable and damage to the terminals.
●
Put the camera on a stable surface to perform this task.
1 Loosely mount the cable lock band to the cable lock band mount on the camera, and
then rotate the screws in the direction of the arrows to secure the cable lock band.
2 Connect the AC adaptor, the HDMI cable and the USB connection cable to the camera.
3 Fit the AC cable to the clamp.
4 Fit the HDMI cable and USB connection cable to the clamp.
- 28 -- 28 -
Page 29

2. Getting Started - Connecting the external monitor
Removing the cable lock band
■
●
To remove the cable lock band, follow the steps for attaching it in the reverse order.
●
It may not be possible to attach HDMI cables or USB connection cables depending on the shape.
- 29 -- 29 -
Page 30
2. Getting Started - Inserting Cards (Optional)
A
B
Inserting Cards (Optional)
This camera supports the double card slot function. When two cards are used, relay recording and backup recording are
available.
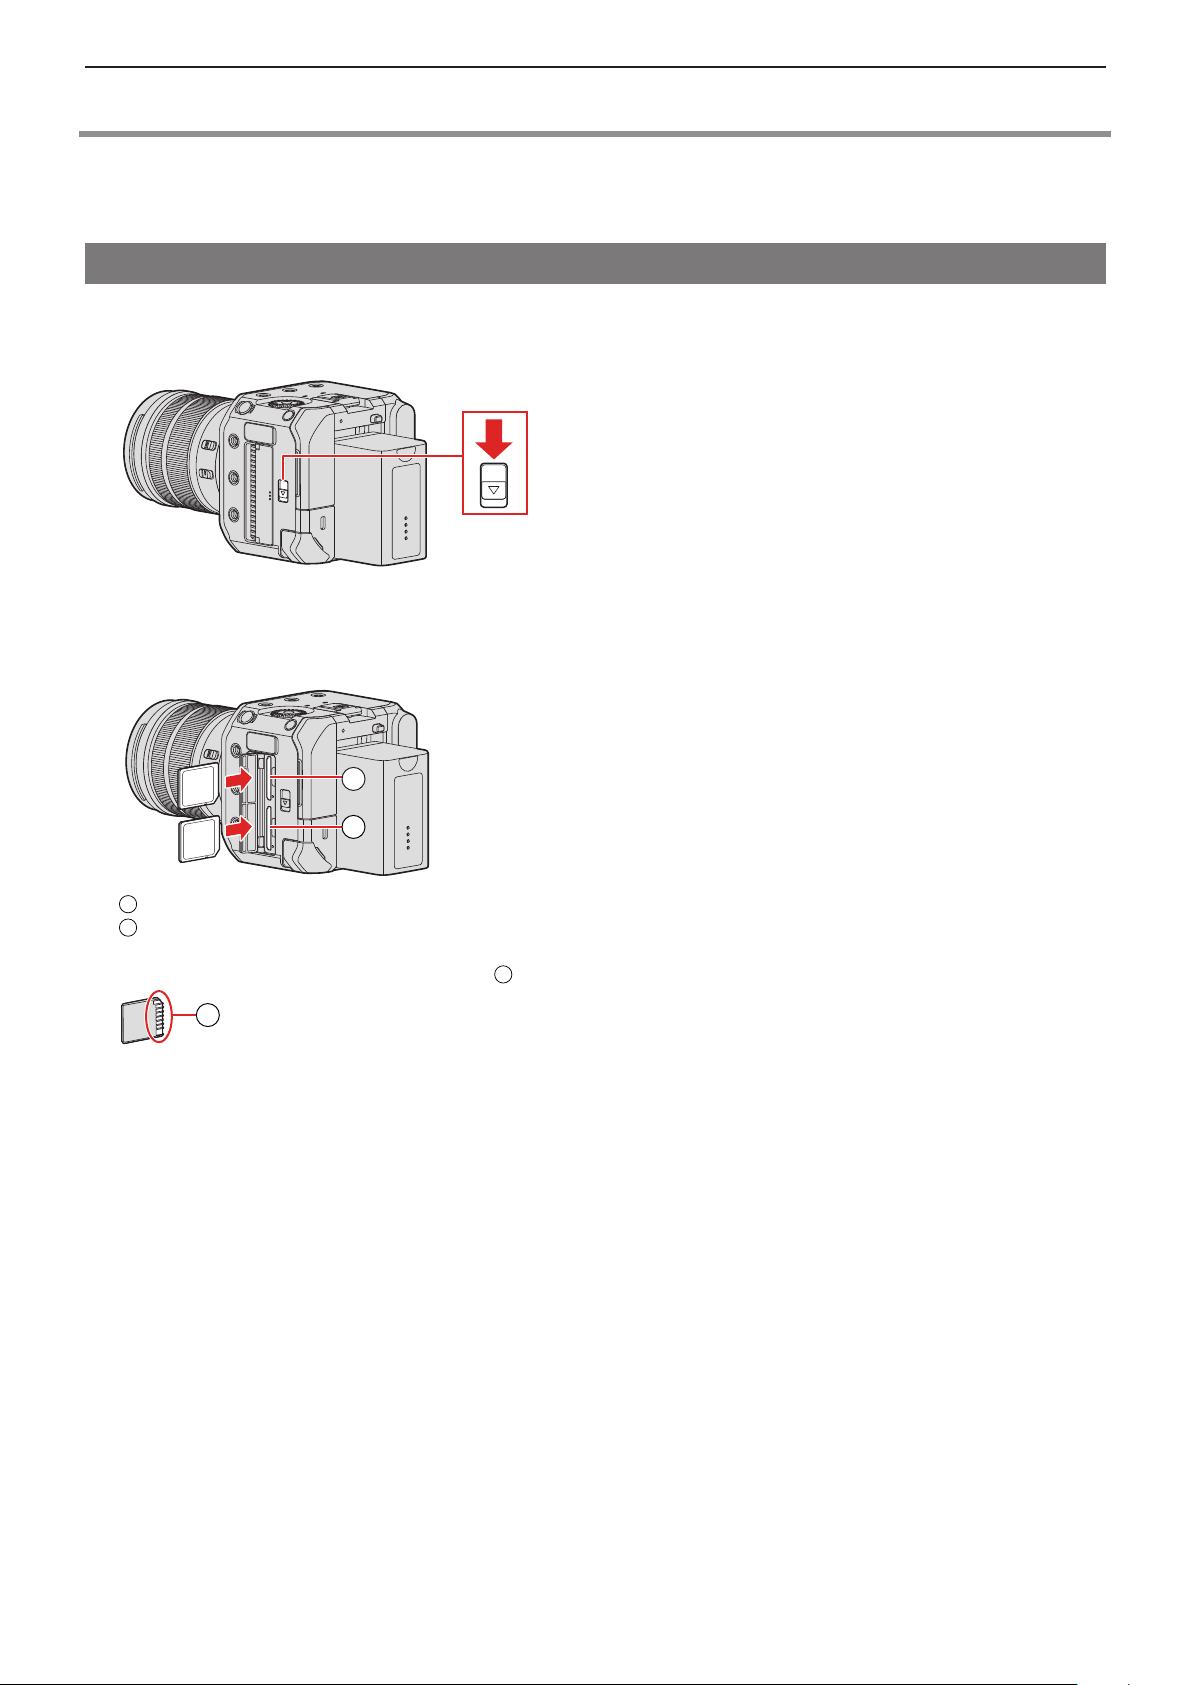
Inserting / removing the card
1 Open the card door.
●
Slide the card door release lever to the direction of the arrow.
2 Insert the cards.
●
Match the orientation of the cards as shown in the figure and then insert them firmly until they click.
Card slot 1
Card slot 2
●
Do not touch the card connection contacts C.
C
A
B
- 30 -- 30 -
Page 31
2. Getting Started - Inserting Cards (Optional)
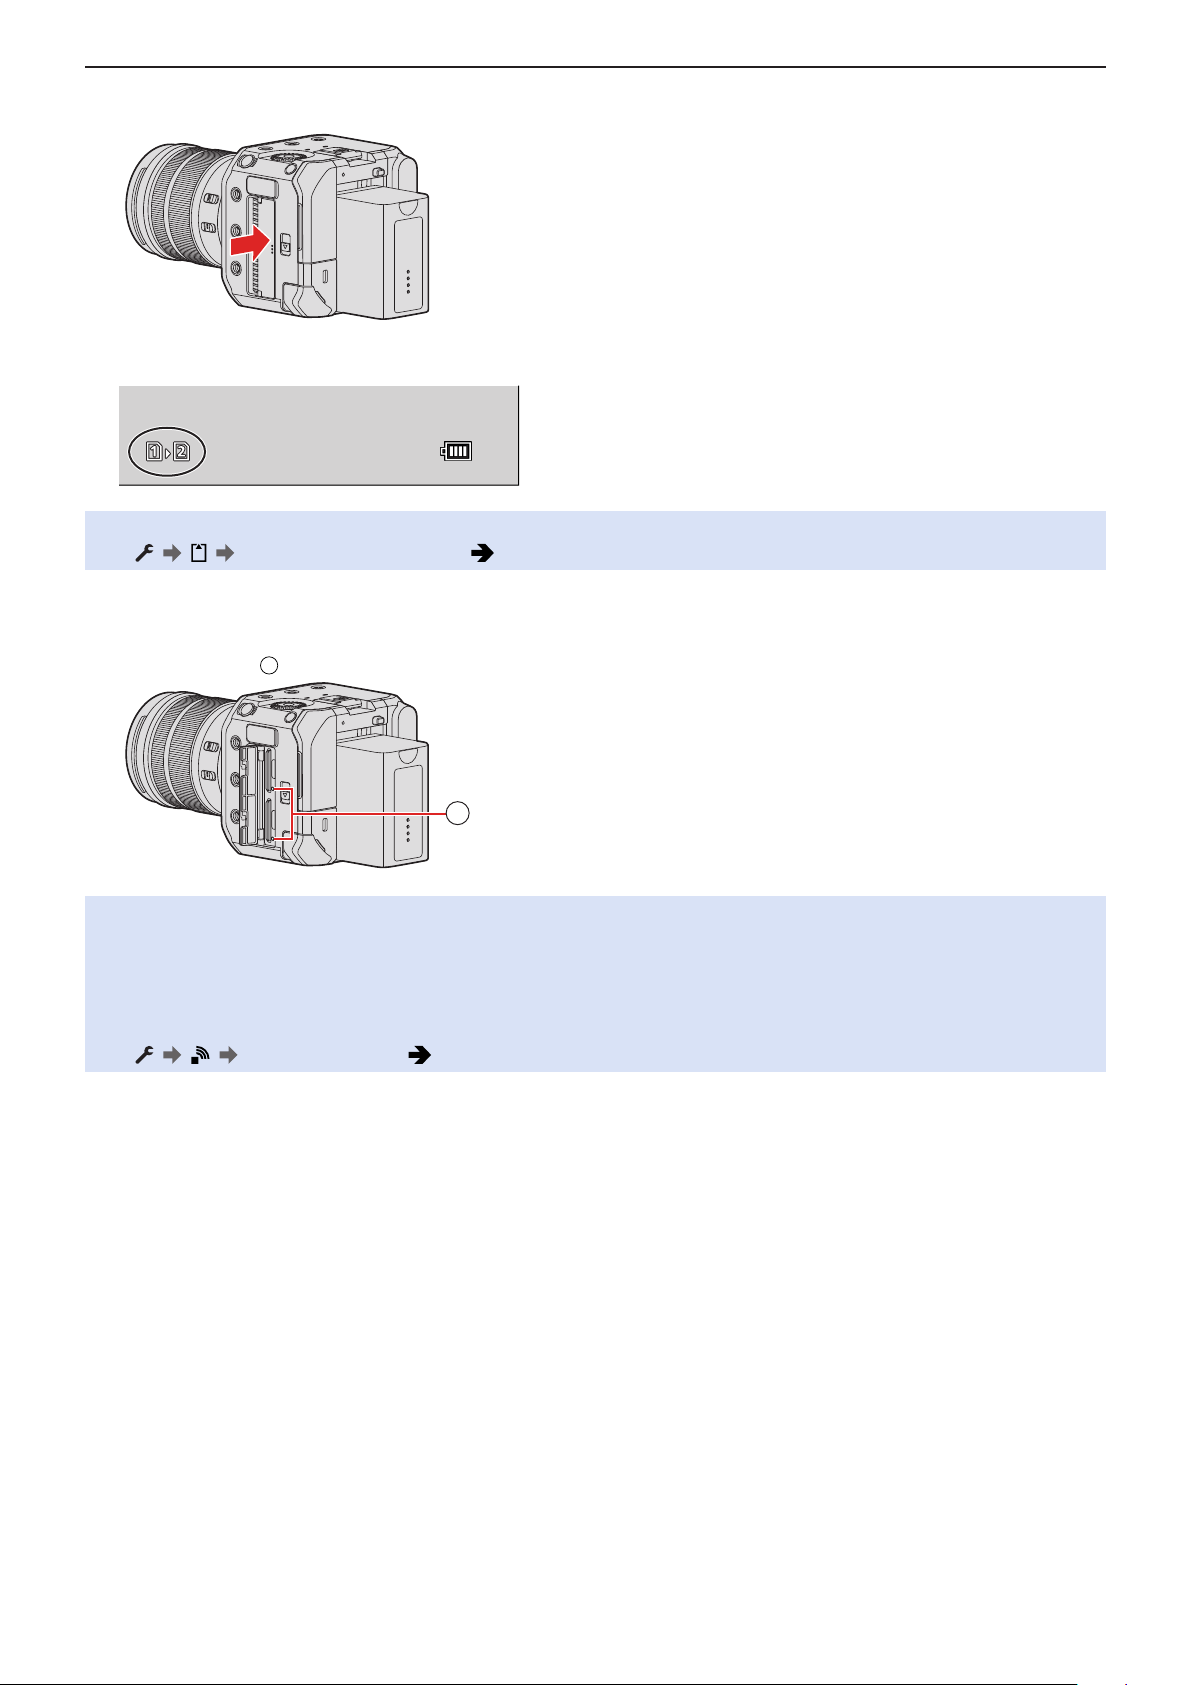
3 Close the card door.
●
The card will be displayed onto the screen of the output destination.
●
You can set the way to record to card slots 1 and 2:
[ ] [ ] [Double Card Slot Function] ( 34 / [Double Card Slot Function])
Indications during card access
■
The card access light A turns on while the card is being accessed.
A
●
Do not perform the following operations during access. The camera may operate incorrectly or the card and
recorded images may be damaged.
– Turn off the camera. (Pressing the camera ON/OFF button, stopping power supply, or removing the battery.)
– Remove the card
– Subject the camera to vibration, impacts, or static electricity.
●
You can set so that the card access light does not turn on:
[ ] [ ] [Card Access Light] ( 196 / [Card Access Light])
- 31 -- 31 -
Page 32
2. Getting Started - Inserting Cards (Optional)
Removing a Card
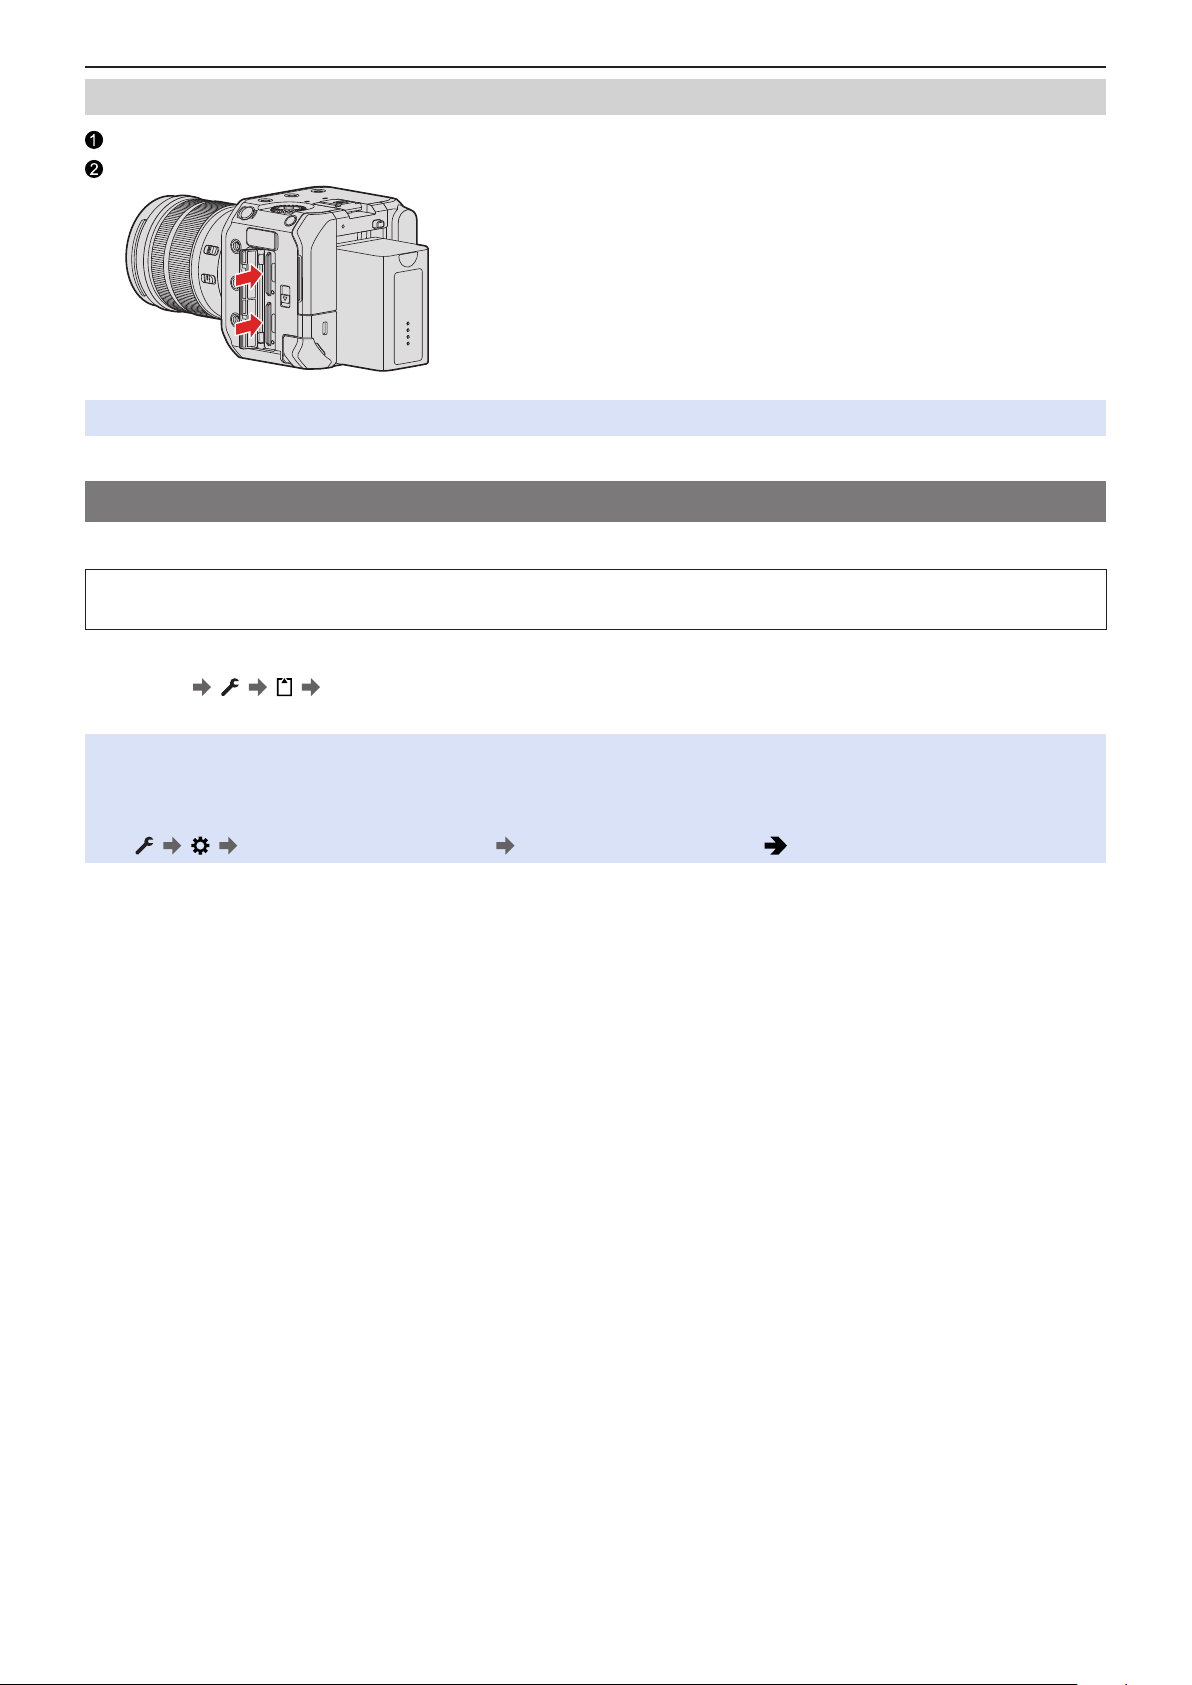
Open the card door.
Push the card until it clicks and then pull the card out straight.
●
The card may be warm just after the camera has been used.
Formatting Cards (Initialization)
Format the cards with the camera before use in order to ensure optimal card performance.
●
When a card is formatted, all of the data stored in the card is erased and cannot be restored. Save a backup of
necessary data before formatting the card.
[MENU/SET]
Settings: [Card Slot 1] / [Card Slot 2]
●
Do not turn off the camera or perform another operation during formatting.
●
Take care not to turn off the camera while formatting is in progress.
●
If the card has been formatted with a PC or other device, format it again with the camera.
●
You can format the card while keeping the camera settings information stored on the card:
[ ] [ ] [Save/Restore Camera Setting] [Keep Settings While Format] ( 171 / [Save/Restore Camera Setting])
[ ] [ ] Select [Card Format]
- 32 -- 32 -
Page 33
2. Getting Started - Inserting Cards (Optional)
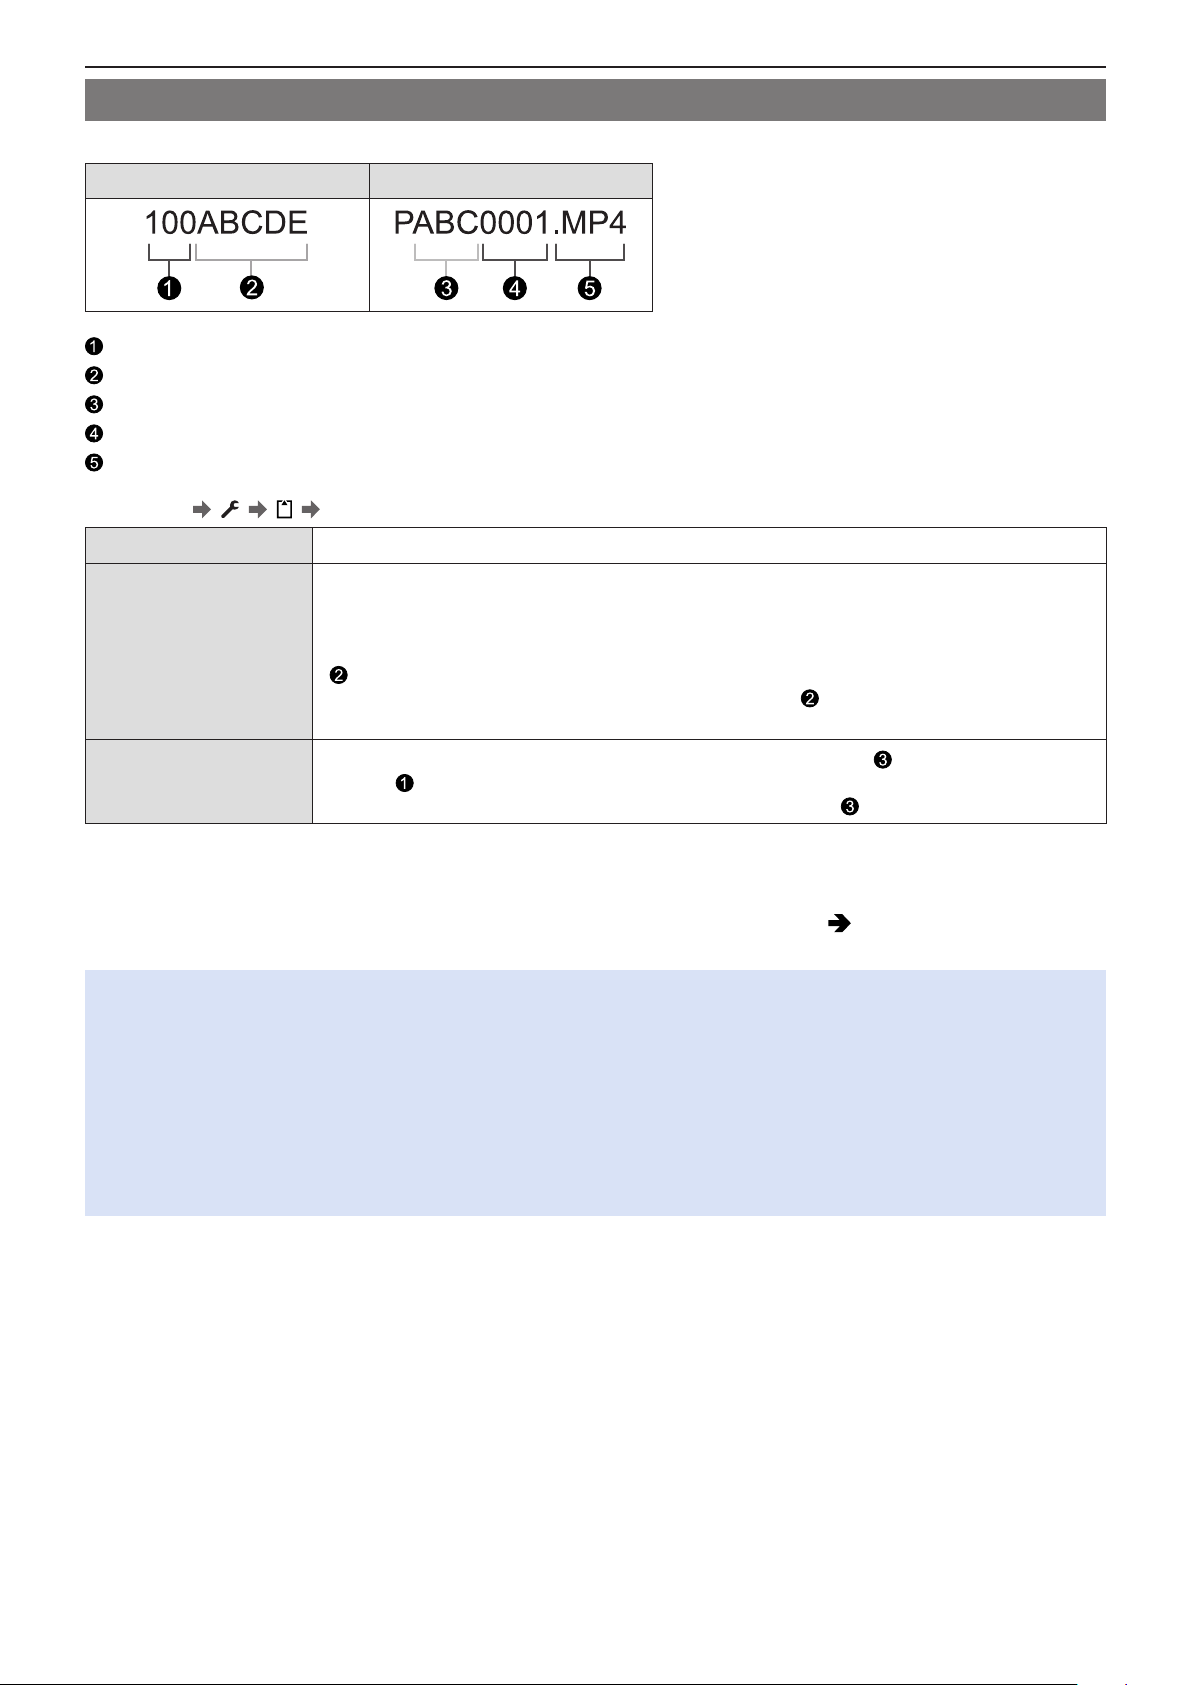
[Folder / File Settings]
Set the folder and file name where to save the images.
Folder name File name
Folder number (3 digits, 100 to 999)
5-character user-defined segment
3-character user-defined segment
File number (4 digits, 0001 to 9999)
Extension
[MENU/SET] [ ] [ ] Select [Folder / File Settings]
[Select Folder]*
[Create a New Folder]
1
Selects a folder for storing images.
Creates a new folder with an incremented folder number.
●
If there are no recordable folders in the card, a screen for resetting the folder number is
displayed.
[OK]: Increments the folder number without changing the 5-character user-defined segment
( above).
[Change]: Changes the 5-character user-defined segment ( above). This will also increment
the folder number.
[File Name Setting]
[Folder Number Link]: Uses the 3-character user-defined segment (
number ( above).
above) to set the folder
[User Setting]: Changes the 3-character user-defined segment ( above).
1
When [Double Card Slot Function] is set to [Allocation Rec], [Select Folder (Slot 1)] and [Select Folder (Slot 2)] will be
*
displayed.
●
Follow the steps on “Entering Characters” when the character entry screen is displayed. ( 203 / Entering Characters)
Available characters: alphabetic characters (upper-case), numerals, [ _ ]
●
Each folder can store up to 1000 files.
●
File numbers are assigned sequentially from 0001 to 9999 in the order of recording. If you change the storage folder, a
number continuing on from the last file number will be assigned.
●
In the following cases, a new folder with an incremented folder number will be created automatically when the next file is
saved:
– The number of files in the current folder reaches 1000.
– The file number reaches 9999.
●
New folders cannot be created when there are folders numbered from 100 all the way up to 999. We recommend backing
up your data and formatting the card.
●
[Select Folder] is not available when [Backup Rec] in [Double Card Slot Function] is being used.
- 33 -- 33 -
Page 34
2. Getting Started - Inserting Cards (Optional)
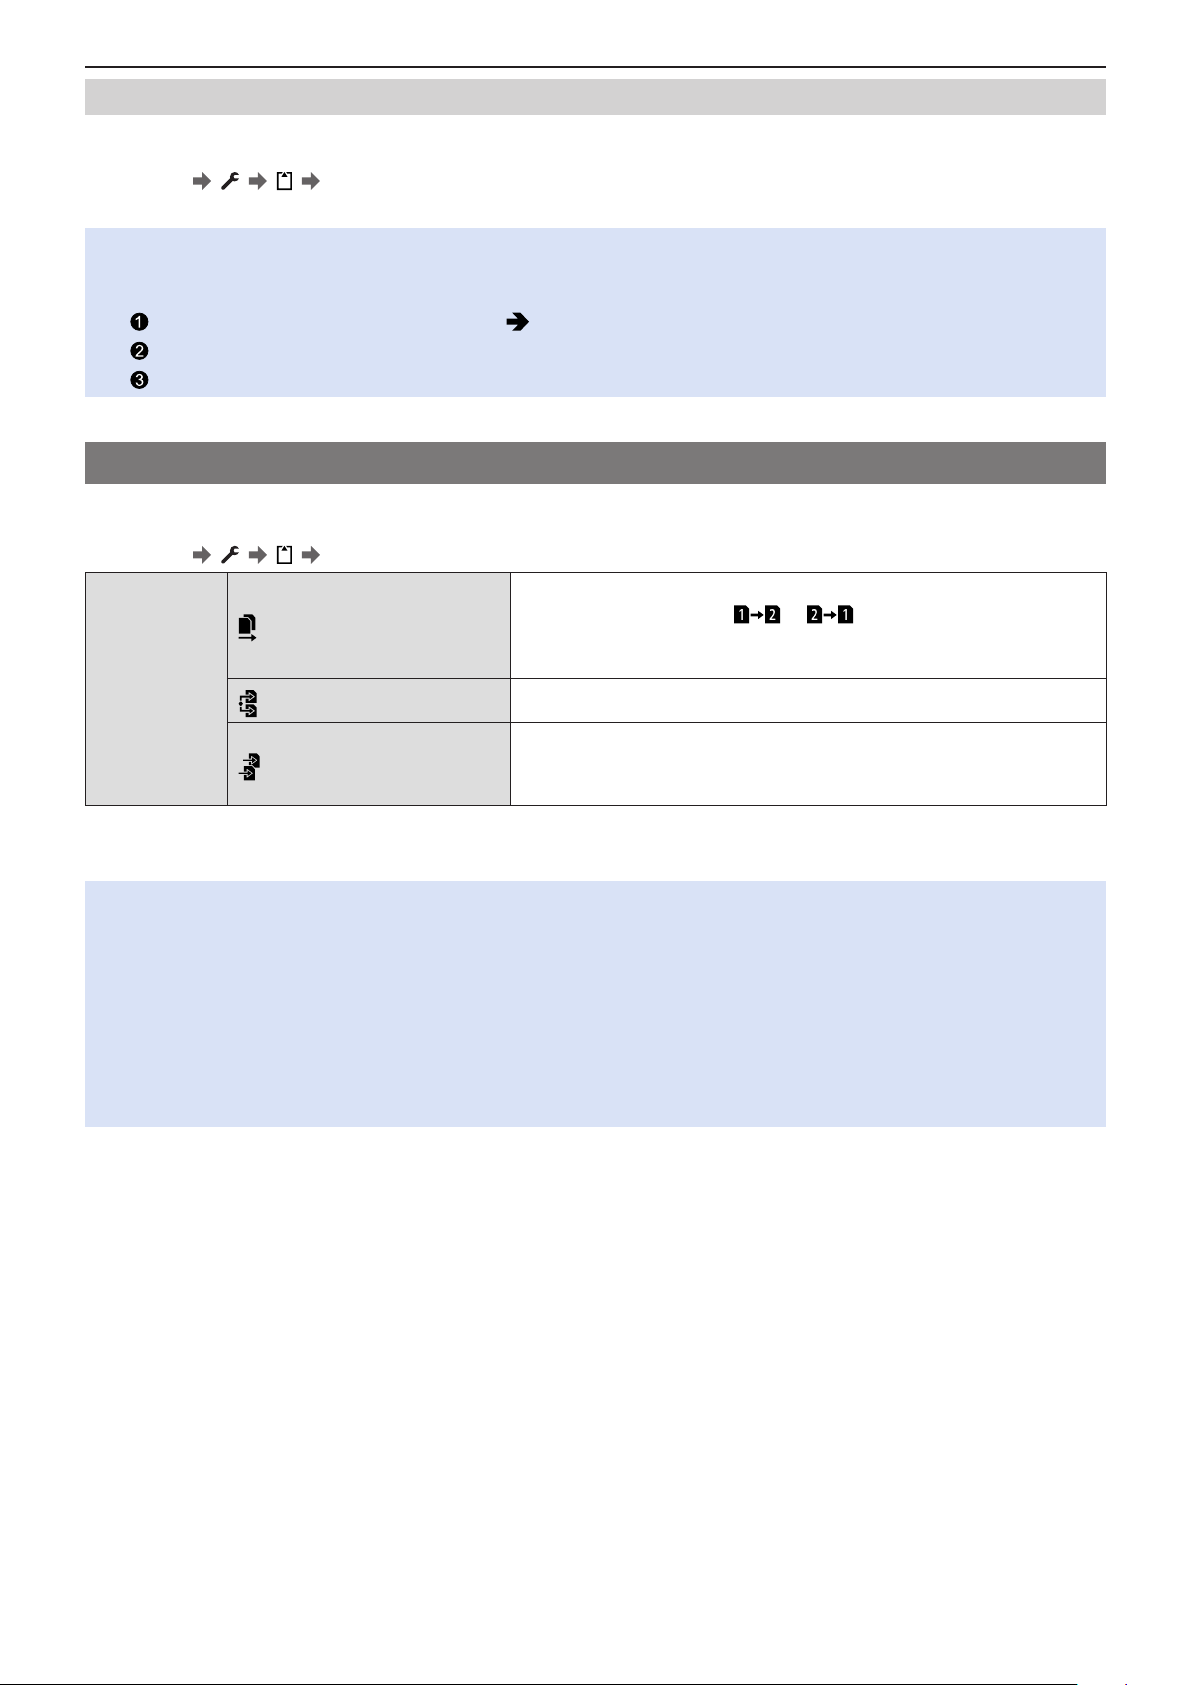
[File Number Reset]
Refresh the folder number to reset the file number to 0001.
[MENU/SET] [ ] [ ] Select [File Number Reset]
Settings: [Card Slot 1] / [Card Slot 2]
●
When the folder number reaches 999, the file number cannot be reset. We recommend backing up your data and
formatting the card.
●
To reset the folder number to 100:
Perform [Card Format] to format the card. ( 32 / Formatting Cards (Initialization))
Perform [File Number Reset] to reset the file number.
Select [Yes] on the folder number reset screen.
[Double Card Slot Function]
This sets the way recording to the card slots 1 and 2 is performed.
[MENU/SET] [ ] [ ] Select [Double Card Slot Function]
Selects the priority of card slots for recording.
[Recording
Method]
([Relay Rec])
([Backup Rec])
[Destination Card Slot]: [
Relays recording to the card in the other card slot after the first card
runs out of free space.
Records the same images to both cards simultaneously.
] / [ ]
Allows you to specify the card slot to be used for recording for different
([Allocation Rec])
1
You can use it when recording still images using the “LUMIX Tether” software.
*
image formats.
[JPEG Destination]*
1
/ [Video Destination]
Notes about relay recording
●
The following video cannot be continued to be recorded on another card:
– [Loop Recording (video)]
Notes about Backup Recording
●
We recommend using cards with the same Speed Class rating and capacity.
If the card Speed Class or capacity is insufficient when video recording, recording to both cards stops.
●
Backup recording is not available with the following video. They can only be recorded on a single card:
– [Loop Recording (video)]
●
Video cannot be recorded when the following card combination is used.
– SD memory card or SDHC memory card, and SDXC memory card
- 34 -- 34 -
Page 35
2. Getting Started - Setting the Clock (When Turning On for the First Time)
Setting the Clock (When Turning On for the First Time)
When turning the camera on for the first time, to record the information of the correct time and date, make sure to set the clock
and time zone before using. The clock will automatically advance from January 1, 2020 0:00:00 at the point the camera is turned
on for the first time.
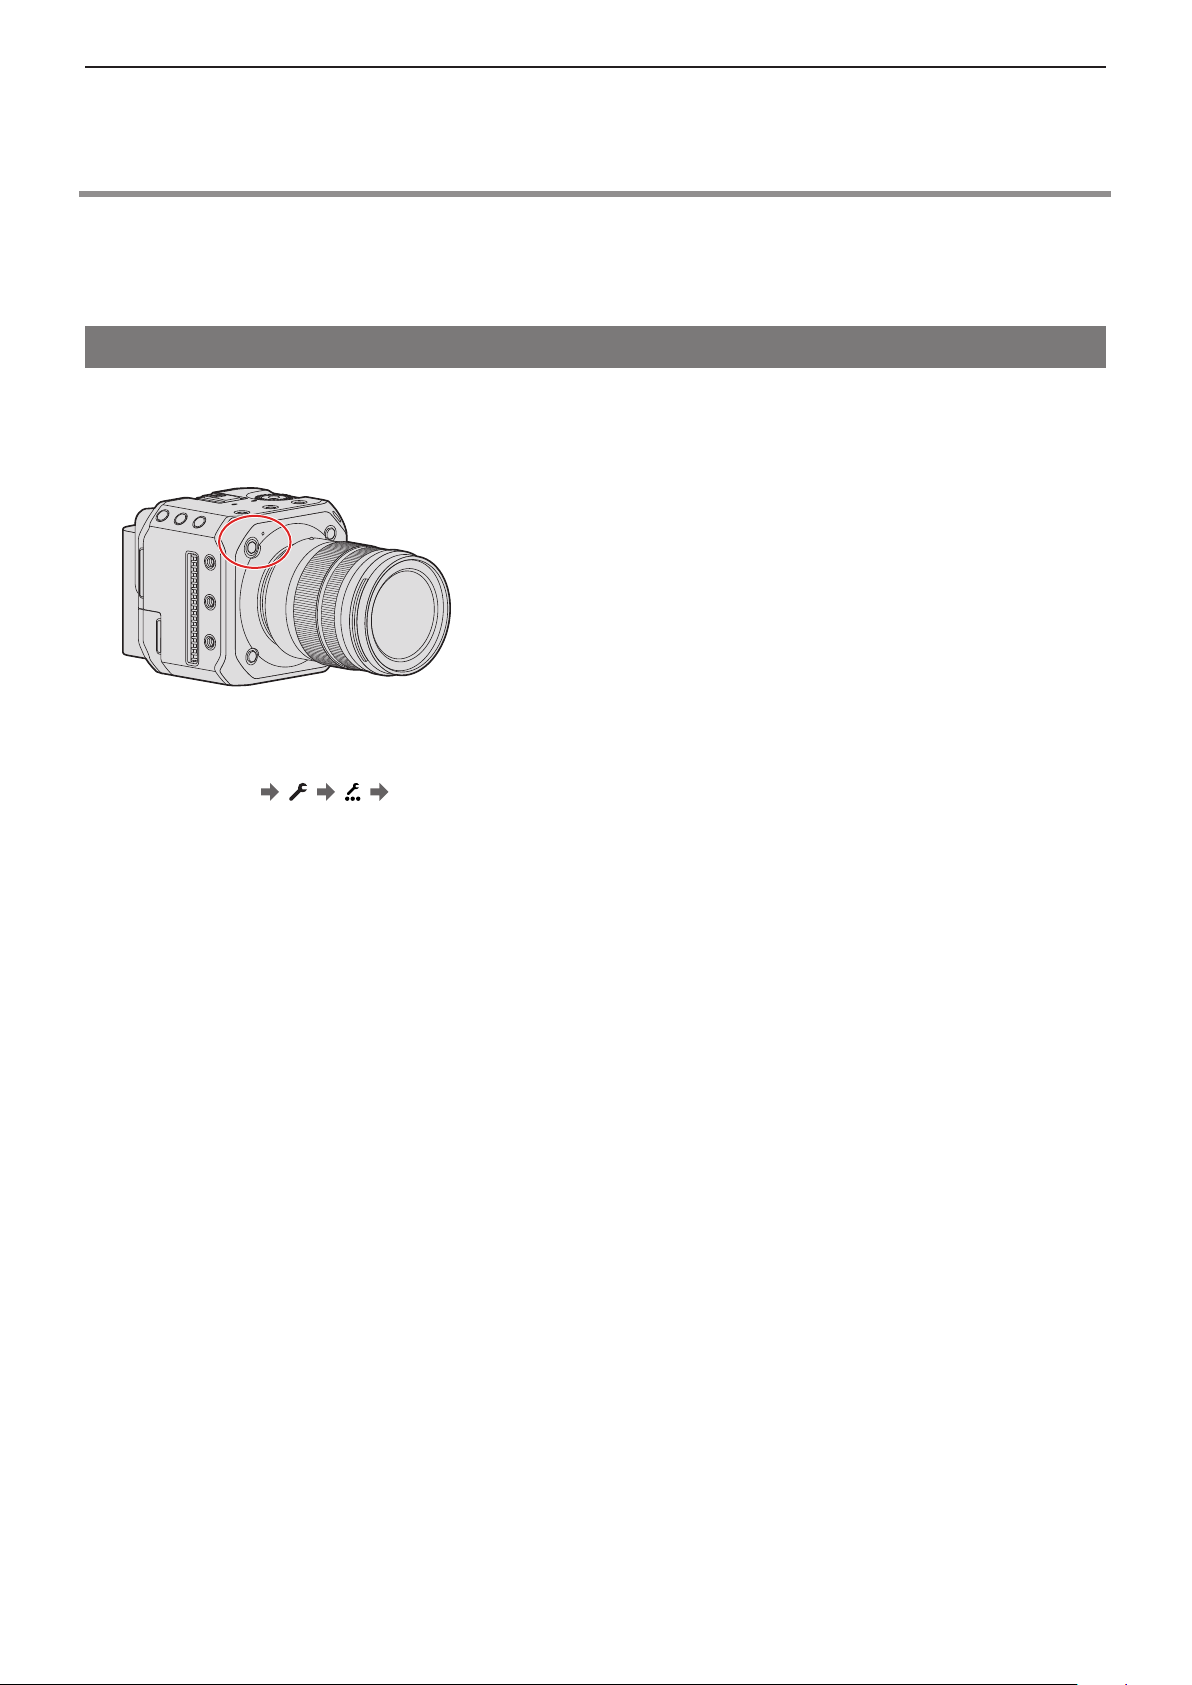
Clock Set
1 Turn the camera on.
●
Press and hold the camera ON/OFF button for more than one second.
● The status indicator will light up.
2 Select [Clock Set].
●
[MENU/SET] [ ] [ ] [Clock Set]
- 35 -- 35 -
Page 36
2. Getting Started - Setting the Clock (When Turning On for the First Time)
A
B
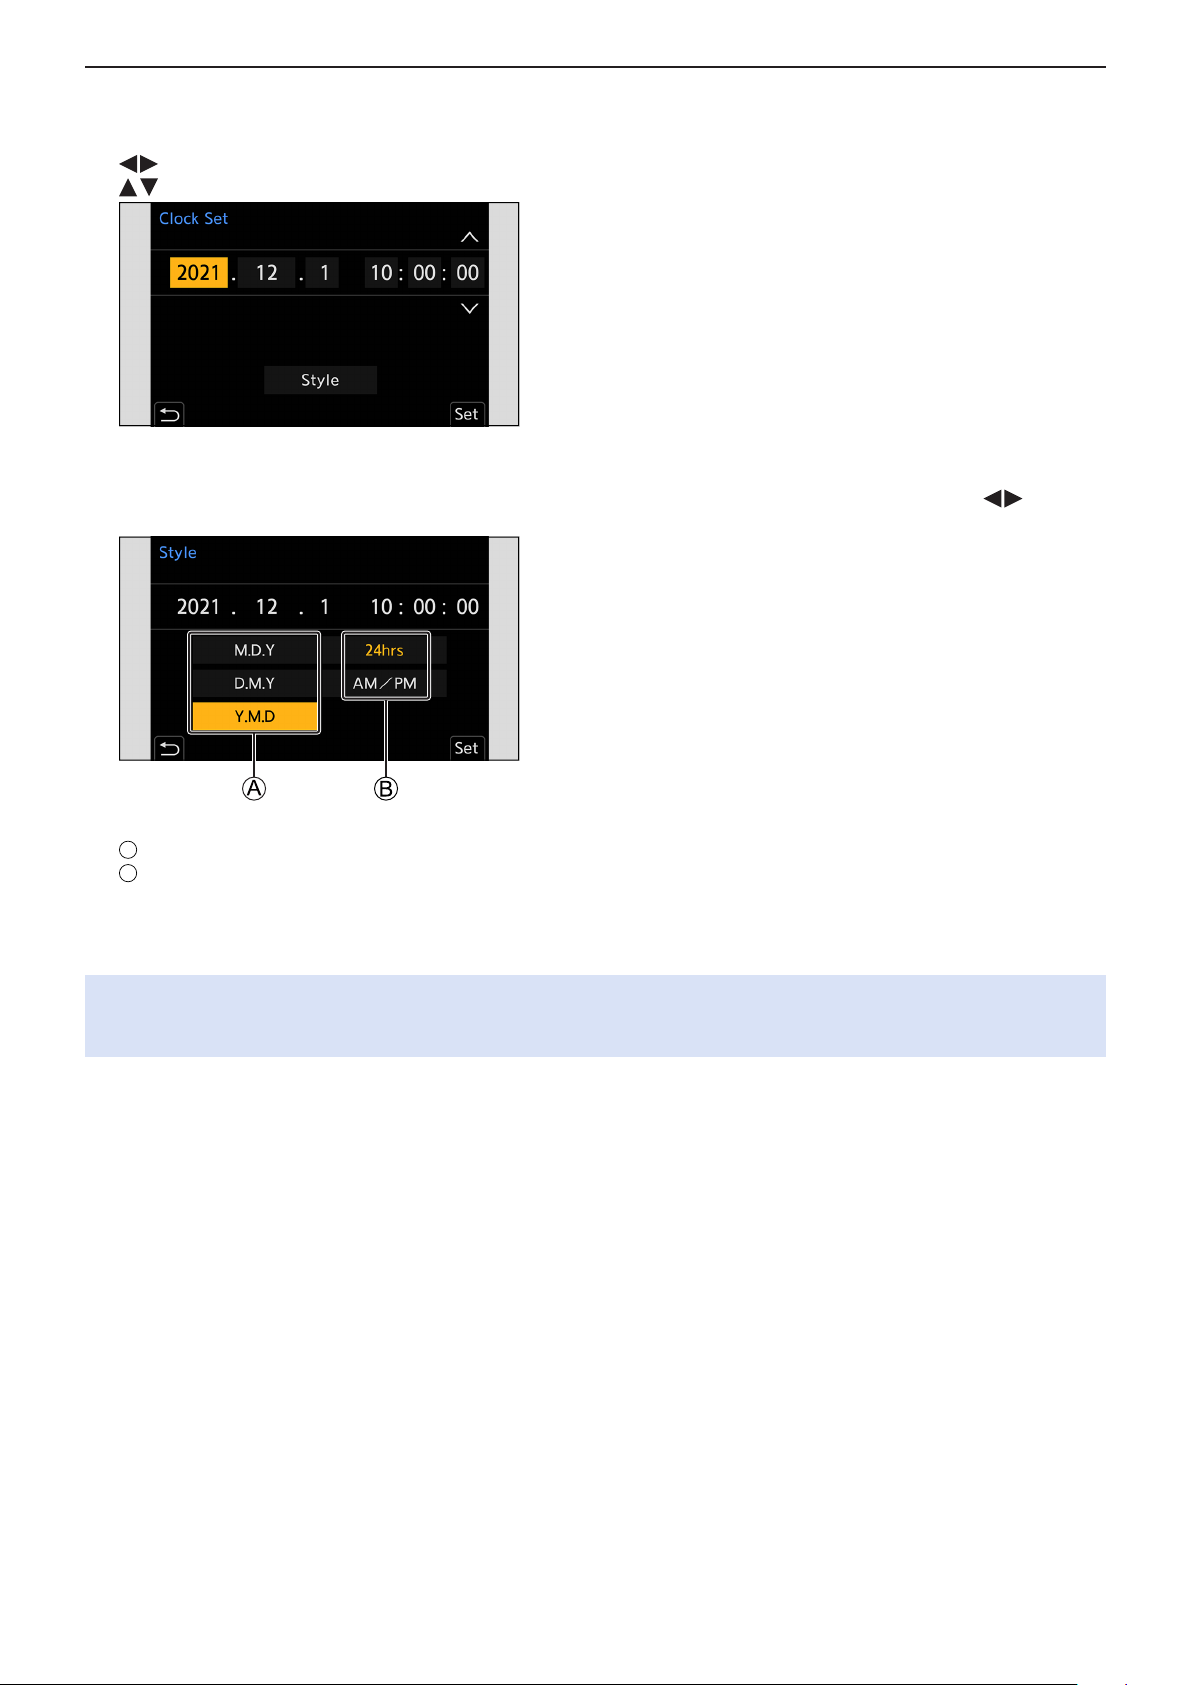
3 Set the clock.
: Select an item (year, month, day, hour, minute, or second).
: Select a value.
To set the display order and time display format
●
The setting screen of the display order and time display format will be displayed if you select [Style] with and
press [MENU/SET].
Display order
Time display format
4 Confirm your selection.
●
Press [MENU/SET].
●
The clock settings are maintained for approx. 3 months even without supplying power by using the built-in clock battery.
(To charge the built-in battery, connect the AC adaptor (supplied) to the camera for more than approx. 24 hours while
keeping the camera turned off.)
- 36 -- 36 -
Page 37
2. Getting Started - Setting the Clock (When Turning On for the First Time)
A
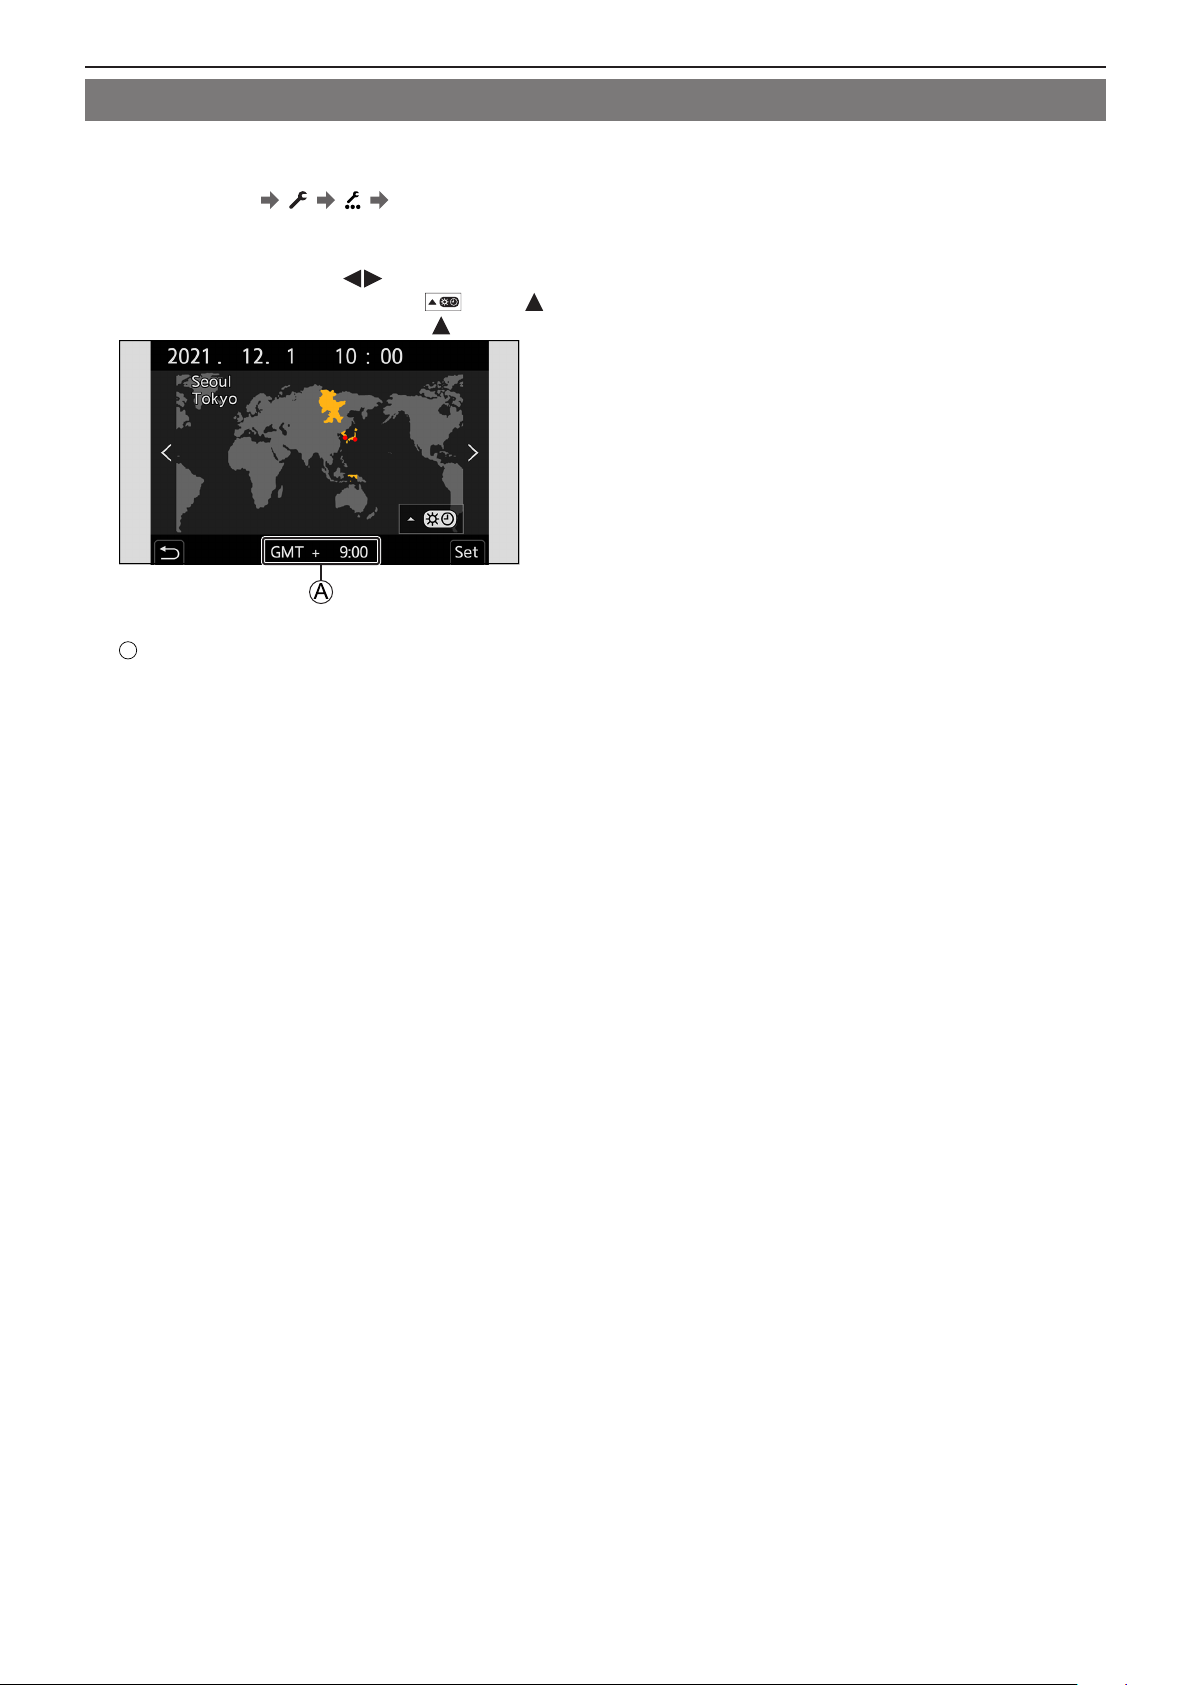
Time zone
1 Display the setting screen of the [Time Zone].
●
[MENU/SET] [ ] [ ] [Time Zone]
2 Set the time zone.
●
Select a time zone with , and press [MENU/SET].
●
If you are using Daylight Savings [ ], press . (The time will move forward by 1 hour.)
To return to the normal time, press again.
Time difference from GMT (Greenwich Mean Time)
- 37 -- 37 -
Page 38
3. Basic Operations - Camera Setting Operations
A
B
C
3. Basic Operations
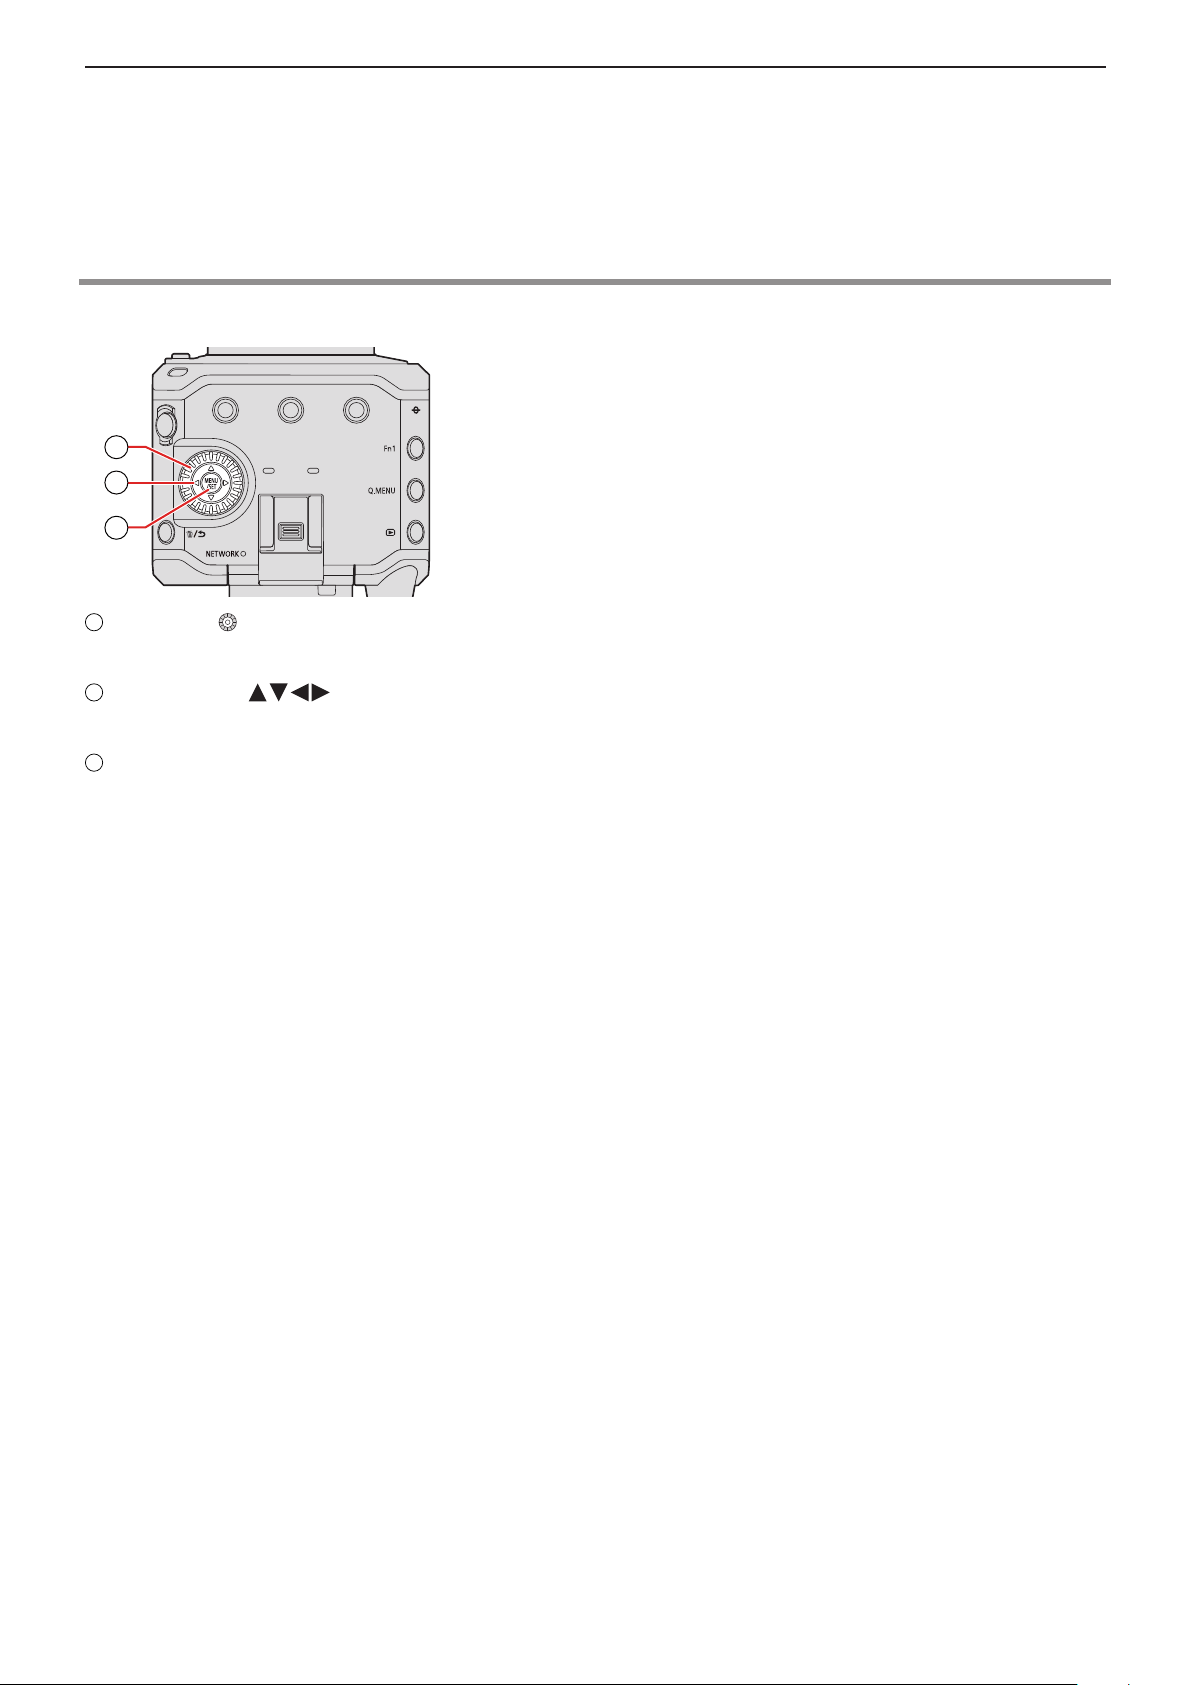
Camera Setting Operations
When changing the camera settings, operate the camera using the following operation parts.
A
B
C
Control dial ( )
Rotate: Selects an item or numeric value.
Cursor buttons ( )
Press: Selects an item or numeric value.
[MENU/SET] button
Press: Confirms a setting.
●
Displays the menu during recording and playback.
- 38 -- 38 -
Page 39
3. Basic Operations - Display Settings
Display Settings
The recording information or menu screen will only be output to either the HDMI output destination or SDI output destination.
Information Display (HDMI/SDI)
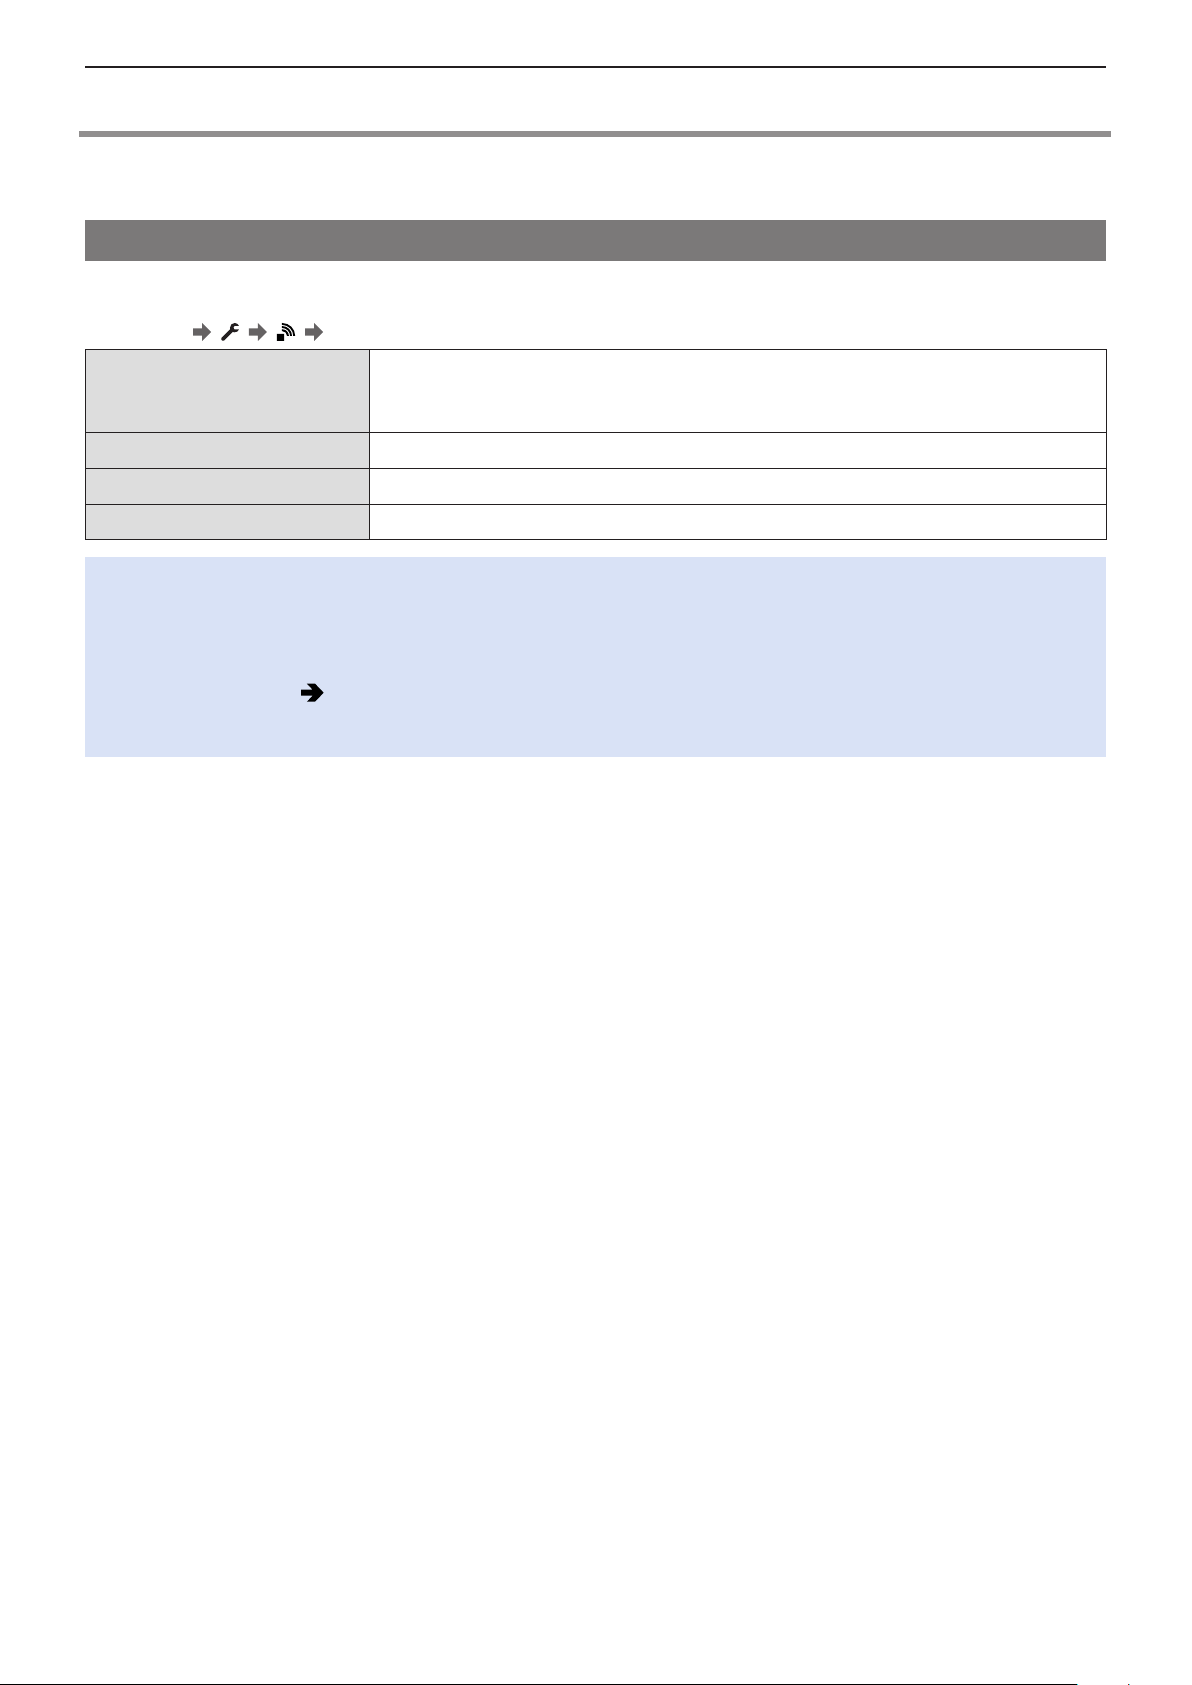
You can set the output destination of recording information or menu screen. The default setting is set to [AUTO].
[MENU/SET] [ ] [ ] Select [Info Display (HDMI/SDI)]
Only displays to the external device connected via HDMI. When it is not connected via
[AUTO]
[HDMI] Only displays to the external device connected via HDMI.
[SDI] Only displays to the external device connected via SDI. (when [SDI Output] is [ON]).
[OFF] Neither will be displayed.
●
For external devices not set in the output destination of the information, the whole screen or part of the screen will be
displayed in black depending on the setting screen.
●
By pressing [Fn1], you can switch the settings of [Info Display (HDMI/SDI)] in the order of [AUTO], [HDMI], [SDI], and
[OFF].
– [Info Display (HDMI/SDI)] is assigned to the [Fn1] at default setting.
– About Fn buttons ( 154 / Fn Buttons)
●
When the menu screen is not output to the external monitor, you can reset the [Info Display (HDMI/SDI)] settings to
[AUTO] by pressing [MENU/SET], [Q.MENU], and [Fn3] at the same time.
HDMI, it will be displayed on the external device connected via SDI. (when [SDI Output] is
[ON]).
- 39 -- 39 -
Page 40
3. Basic Operations - Display Settings
Output destination screen display
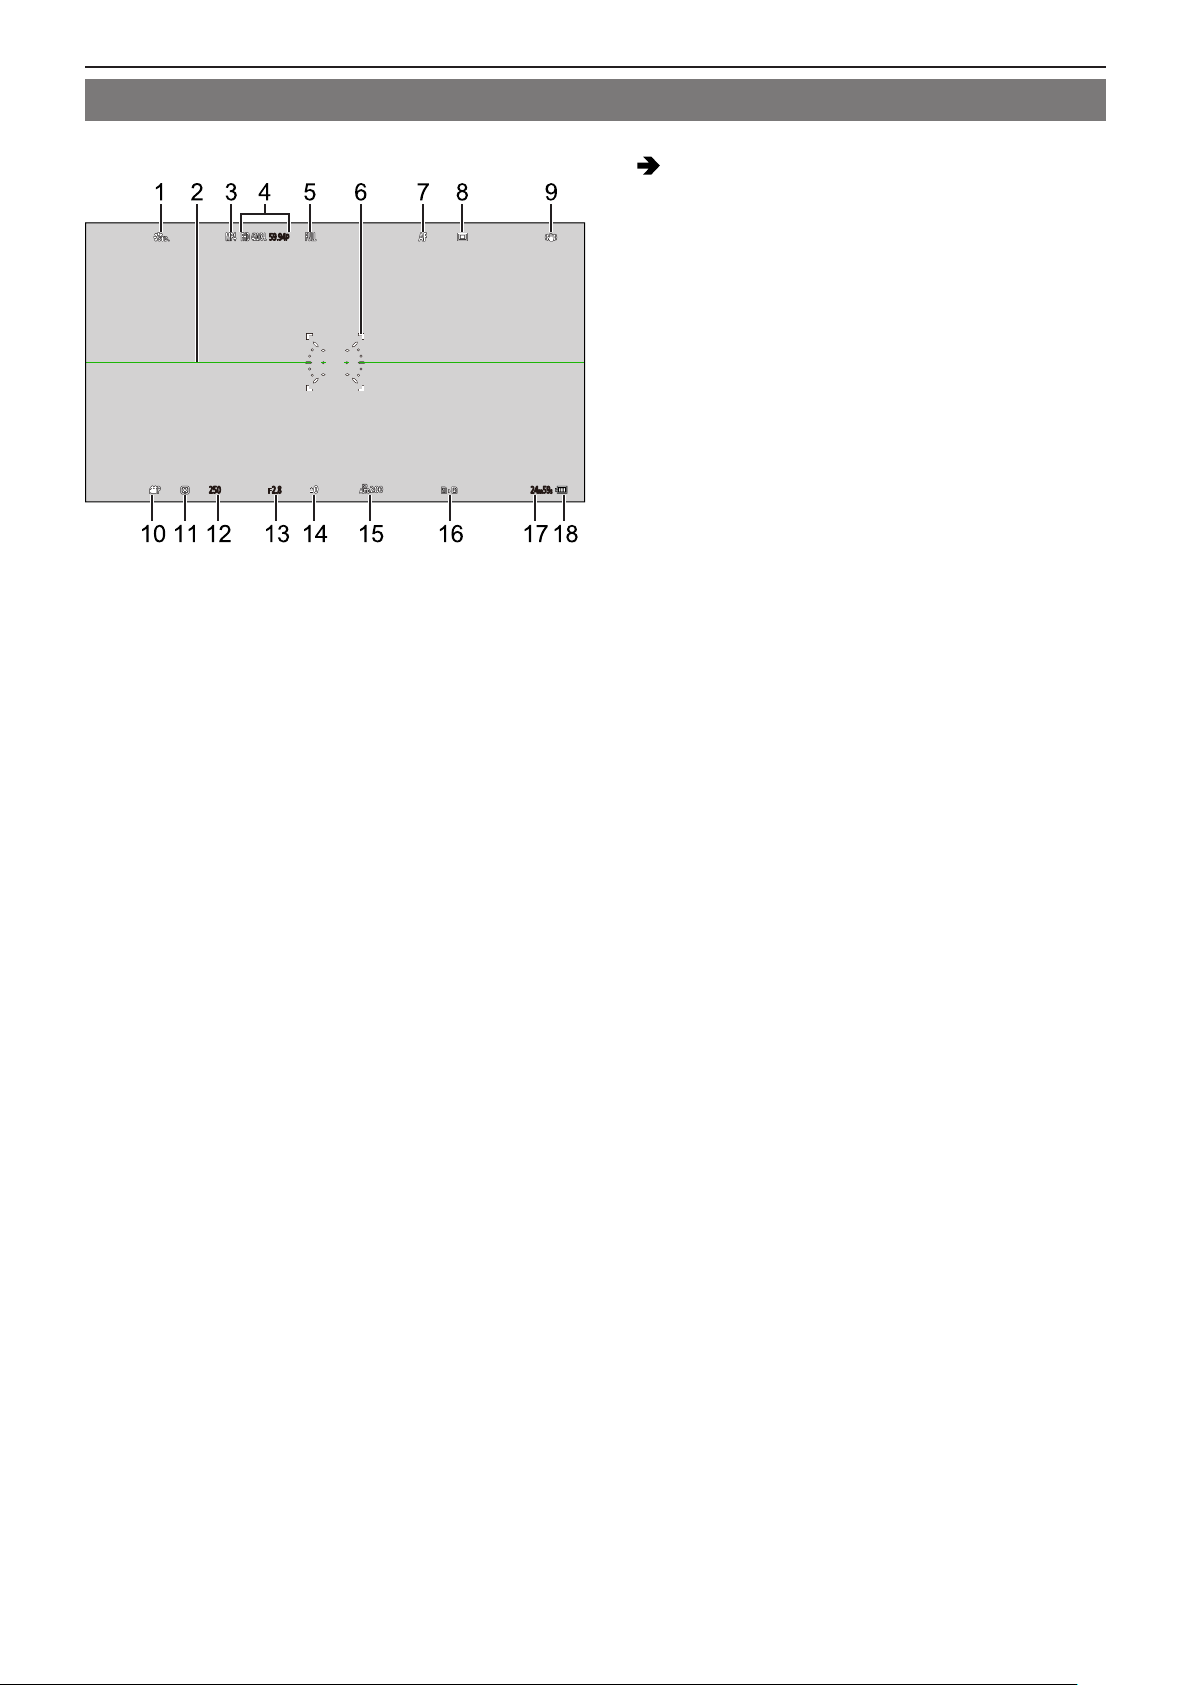
The following icons will be displayed on the output destination screen upon purchase.
●
For information about the icons other than those described here ( 239 / External Monitor Displays)
p
59.94p59.94
250250 2.82.8 24m59s24m59
FF
1 [Photo Style]
2 Level gauge
3 [Rec. File Format]
4 [Rec Quality]
5 [Image Area of Video]
6 AF area
7 [Focus Mode]
8 [AF Mode]
9 [Image Stabilizer]
10 [Exposure Mode]
11 [ Metering Mode]
12 Shutter speed
13 Aperture value
14 Exposure compensation value
15 [Sensitivity]
16 Card slot / [Double Card Slot Function]
17 Video recording time
18 Power supply
s
- 40 -- 40 -
Page 41
3. Basic Operations - Display Settings
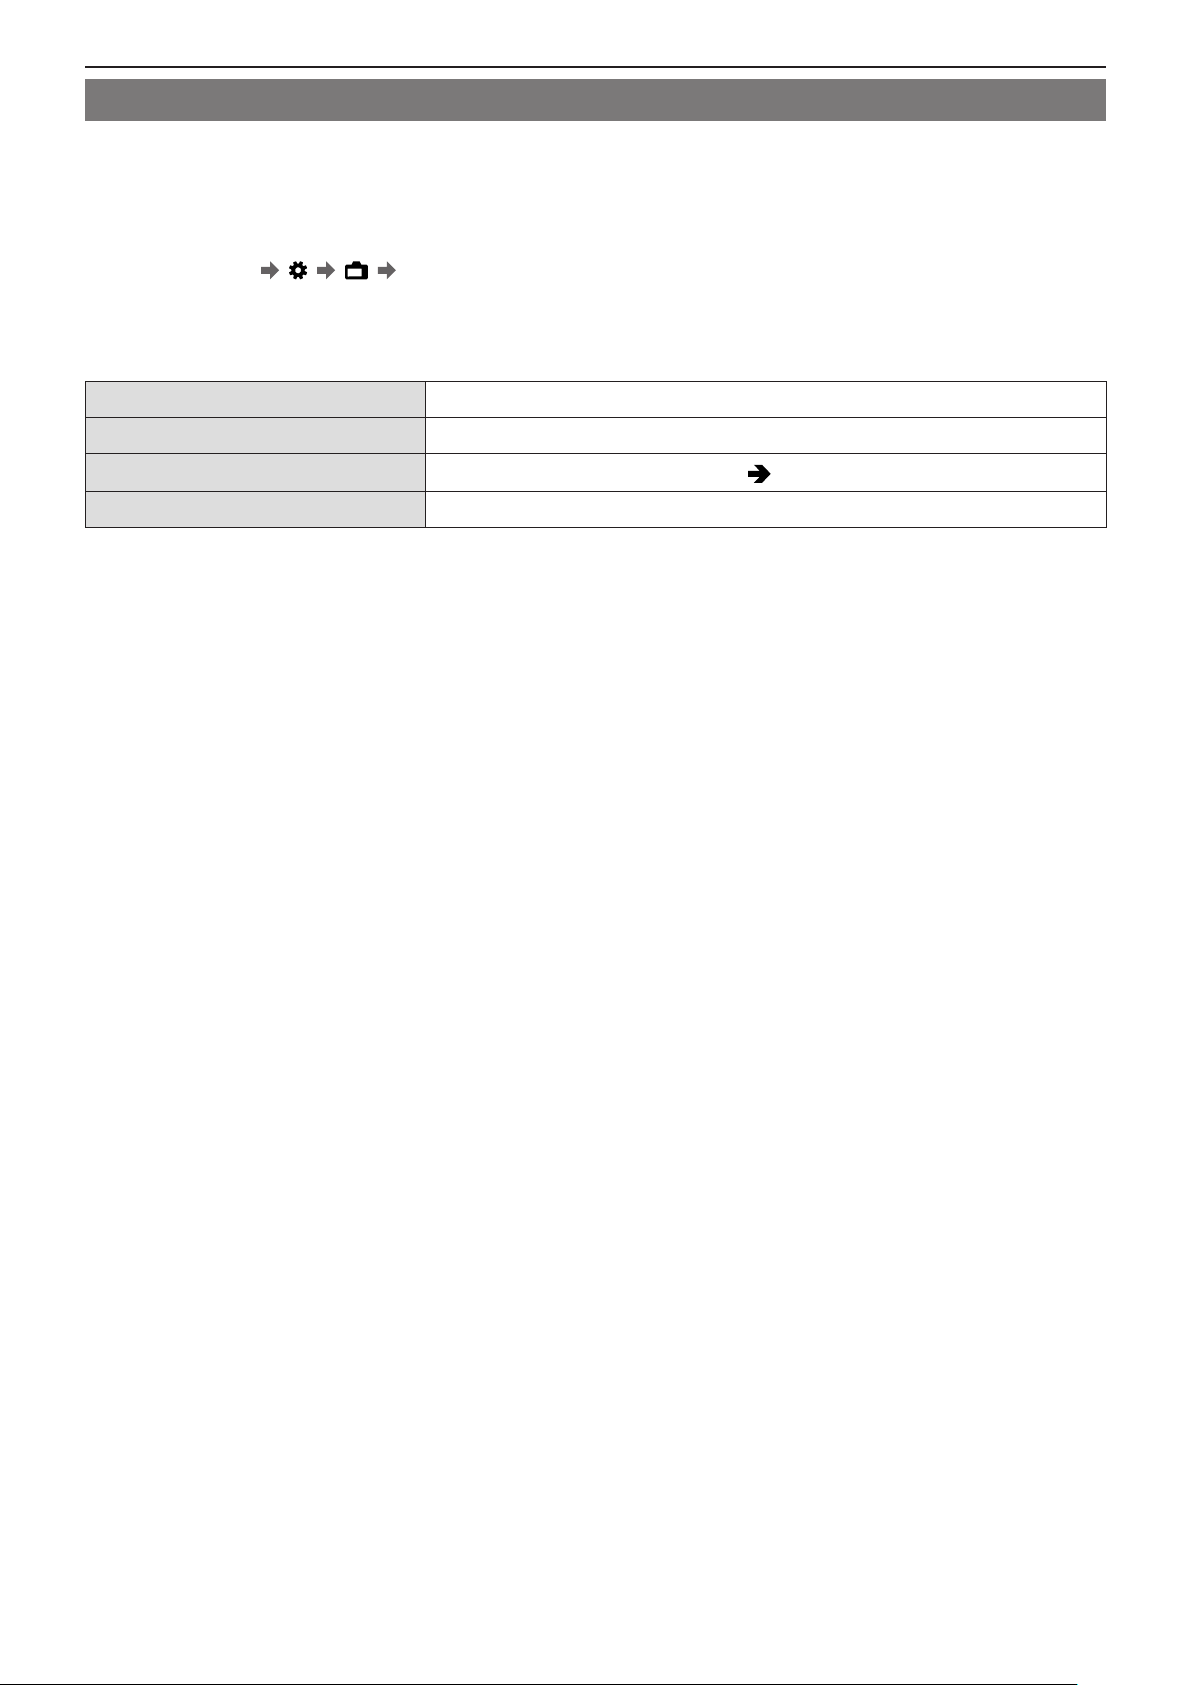
Switching the Display Information
The recording information (icons) on the recording screen and playback screen can be hidden. You can also display the control
panel.
1 Set [Display Information].
●
[MENU/SET] [ ] [ ] [Display Information]
Settings:
[Display Info in Rec Mode]: [WITH INFO] / [WITHOUT INFO] / [CTRL PANEL]
[Display Info in Playback]: [WITH INFO] / [DETAILED INFO DISP] / [WITHOUT INFO]
[WITH INFO] Display information (icons) to the recording screen/playback screen.
[WITHOUT INFO] Do not display information (icons) to the recording screen/playback screen.
[CTRL PANEL]
[DETAILED INFO DISP] Display detailed information to the playback screen.
Display control panel when recording. (
43 / Control Panel)
- 41 -- 41 -
Page 42
3. Basic Operations - Display Settings
A
B
C
D
E
F
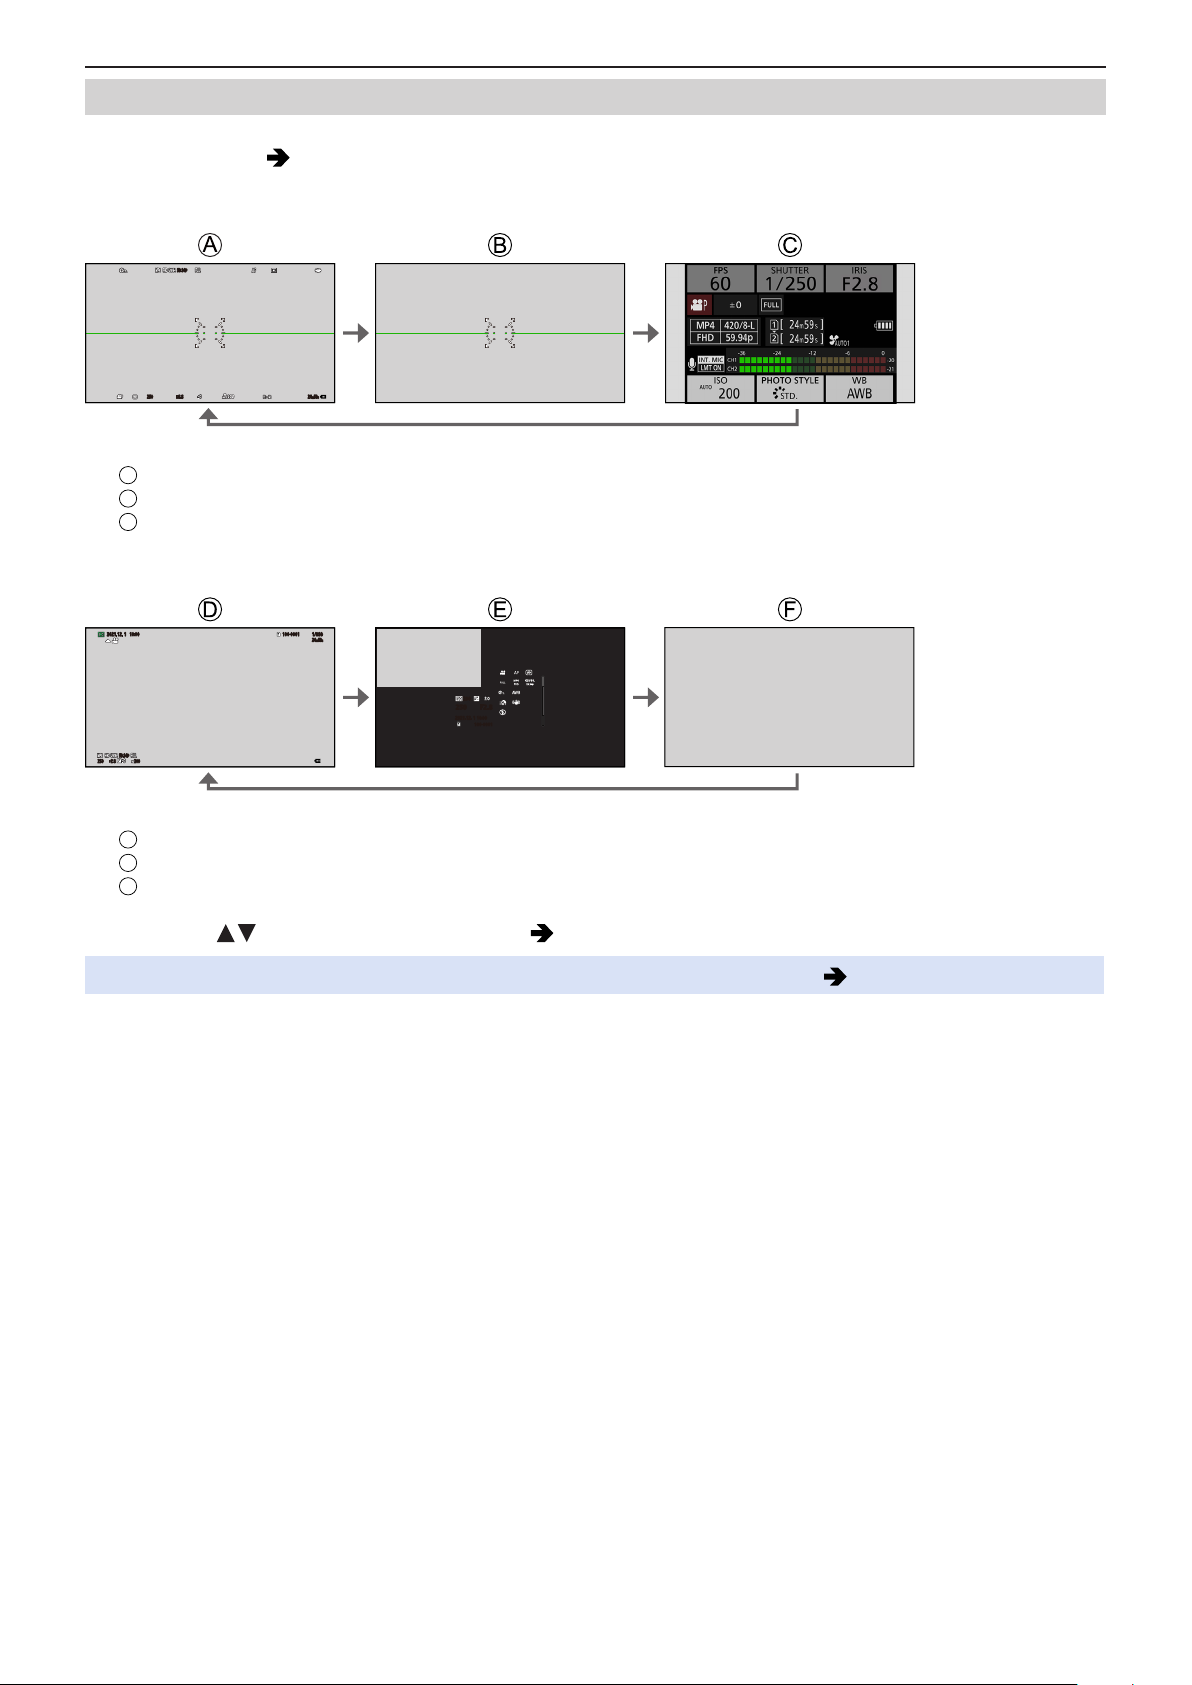
Switch the information display with a Fn button
If you register the [Display Information] to a Fn button, the display switches every time you press that Fn button.
●
About Fn buttons ( 155 / Register Functions to the Fn Buttons)
Recording Screen
■
p
59.94p59.94
250250 2.82.8 24m59s24m59
FF
[WITH INFO]
[WITHOUT INFO]
[CTRL PANEL]
Playback Screen
■
s
2021.12. 1 10:002021.12. 1 10:00
59.94p59.94
2.82.8 200200250250
FF
p
100-0001
100-0001 1/9991/999
24m59s24m59
s
1/5
200200
250250 F2.8F2.8
2021.12. 1 10:002021.12. 1 10:00
100-0001100-0001
[WITH INFO]
[DETAILED INFO DISP]*
1
[WITHOUT INFO]
1
Pressing switches the display information. ( 246 / Detailed information display screen)
*
●
You can switch between displaying or not displaying the level gauge at [Level Gauge]. ( 189 / [Level Gauge])
- 42 -- 42 -
Page 43
3. Basic Operations - Control Panel
Control Panel
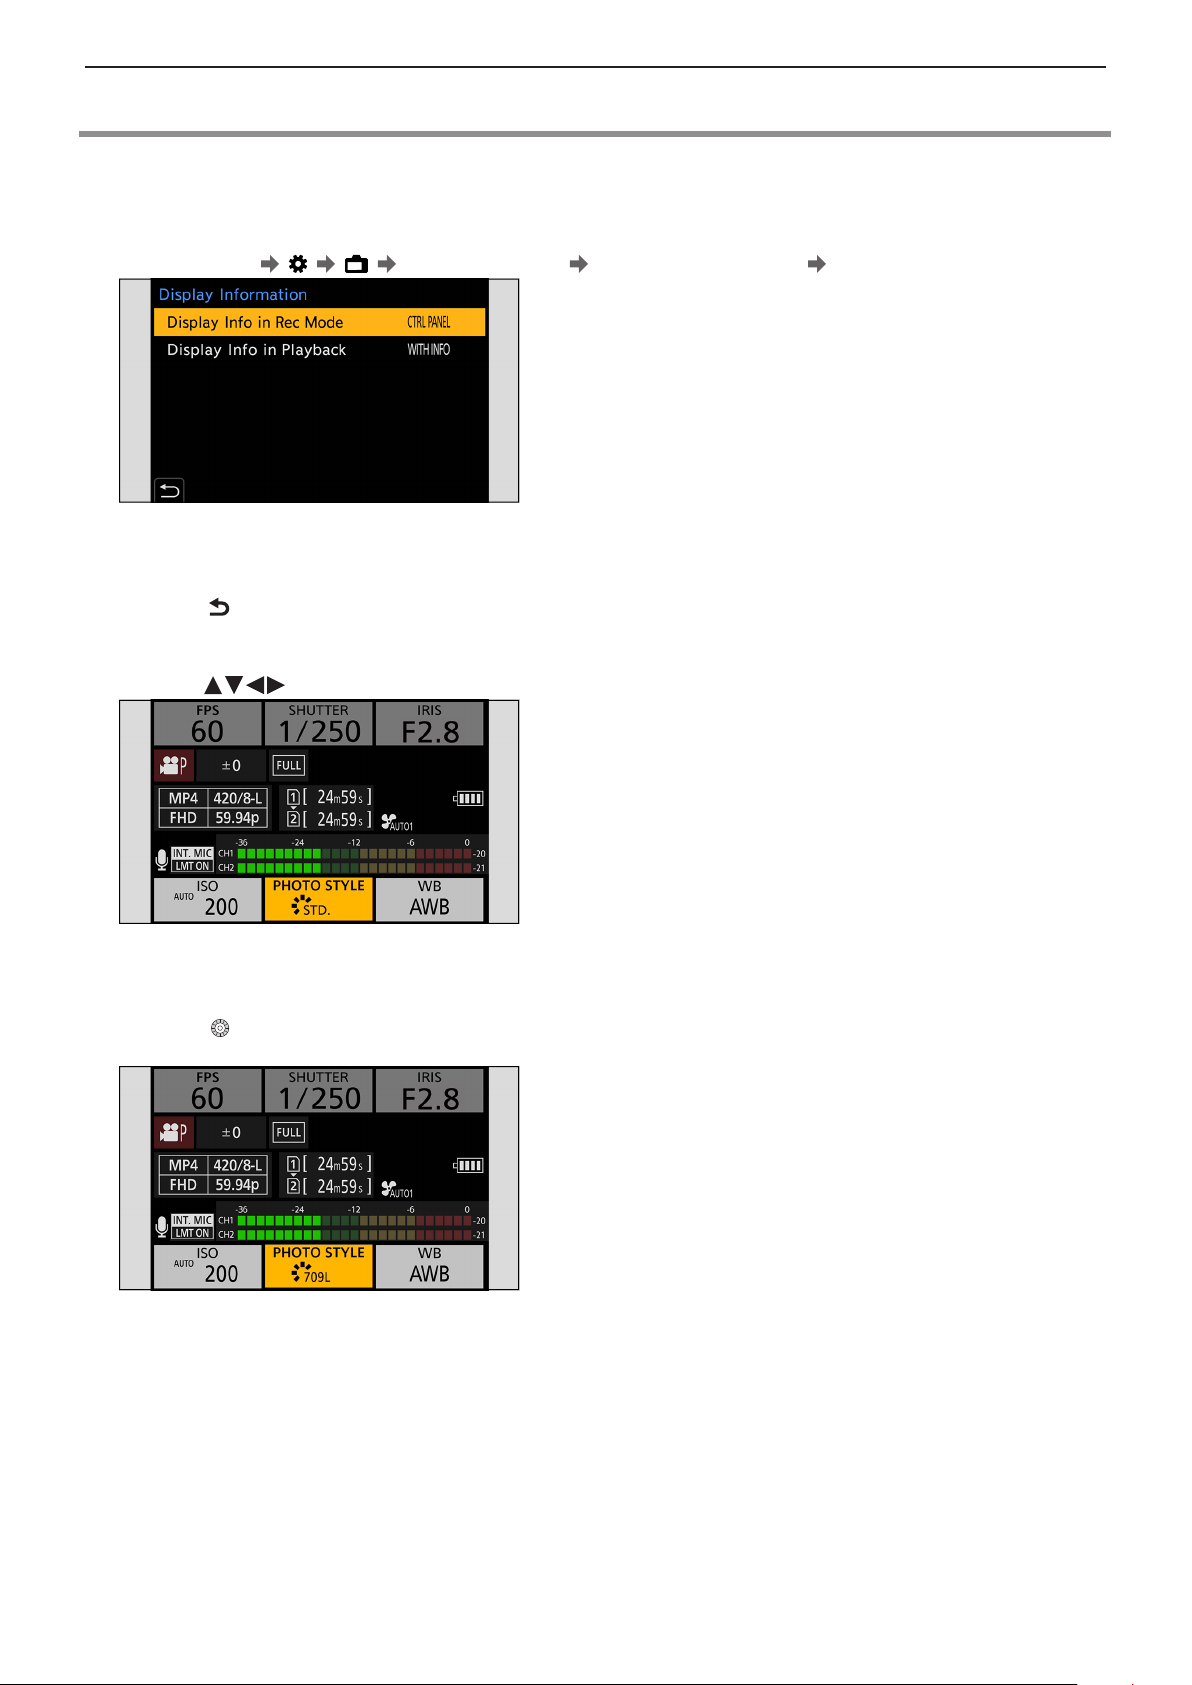
This screen allows you to view the current recording settings on the monitor.
1 Display the control panel.
●
[MENU/SET] [ ] [ ] [Display Information] [Display Info in Rec Mode] [CTRL PANEL]
2 Close the menu.
●
Press [ ] several times.
3 Select a menu item.
●
Press .
4 Change the setting.
●
Rotate to select a setting.
●
Refer to the pages explaining each item for information on how to change the settings.
- 43 -- 43 -
Page 44
3. Basic Operations - Quick Menu
Quick Menu
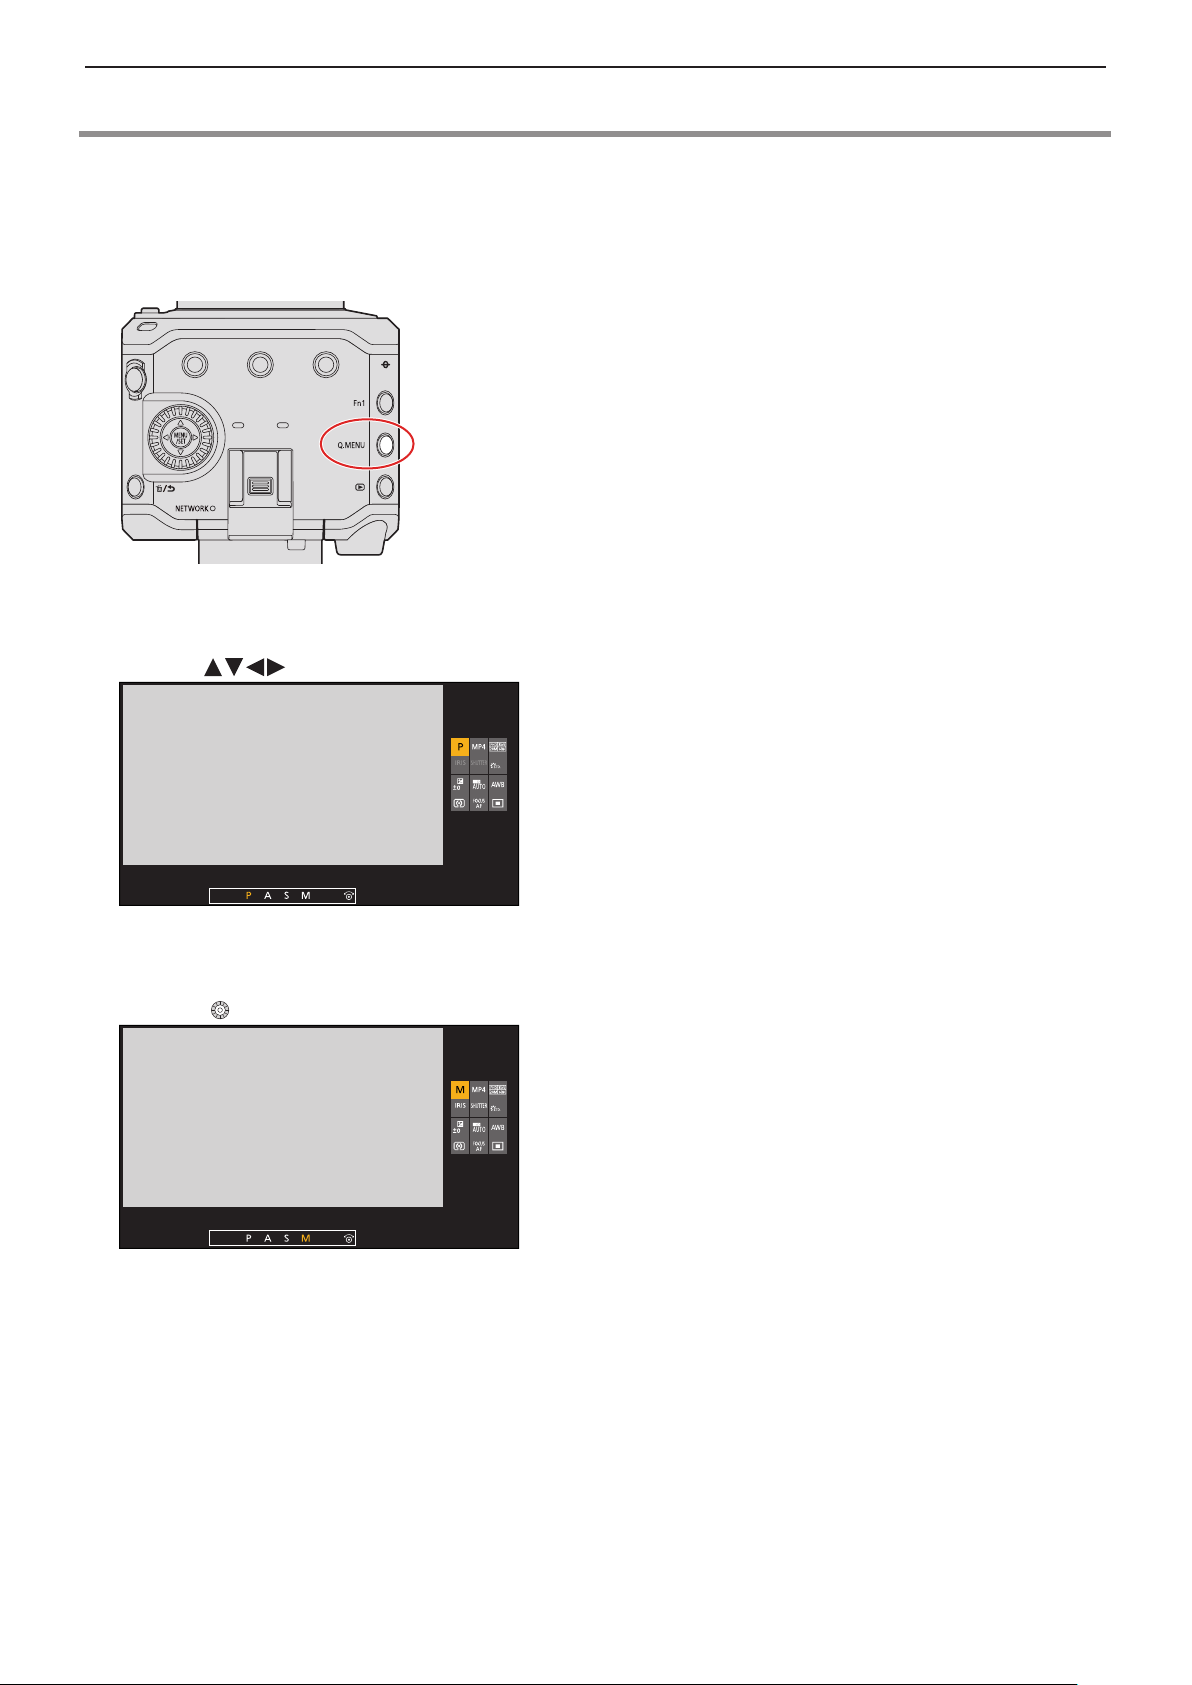
This menu enables you to quickly set functions that are frequently used during recording without calling up the menu screen.
You can also change the Quick menu display method and the items to display.
1 Display the Quick menu.
●
Press [Q.MENU].
2 Select a menu item.
●
Press .
3 Select a setting item.
●
Rotate .
F2.8F2.8 1/2501/250
- 44 -- 44 -
Page 45

3. Basic Operations - Quick Menu
4 Close the Quick menu.
●
Press [Q.MENU].
●
Some items cannot be set depending on the recording mode or camera settings.
●
The Quick menu can be customized:
[ ] [ ] [Q.MENU Settings] ( 161 / Quick Menu Customization)
- 45 -- 45 -
Page 46
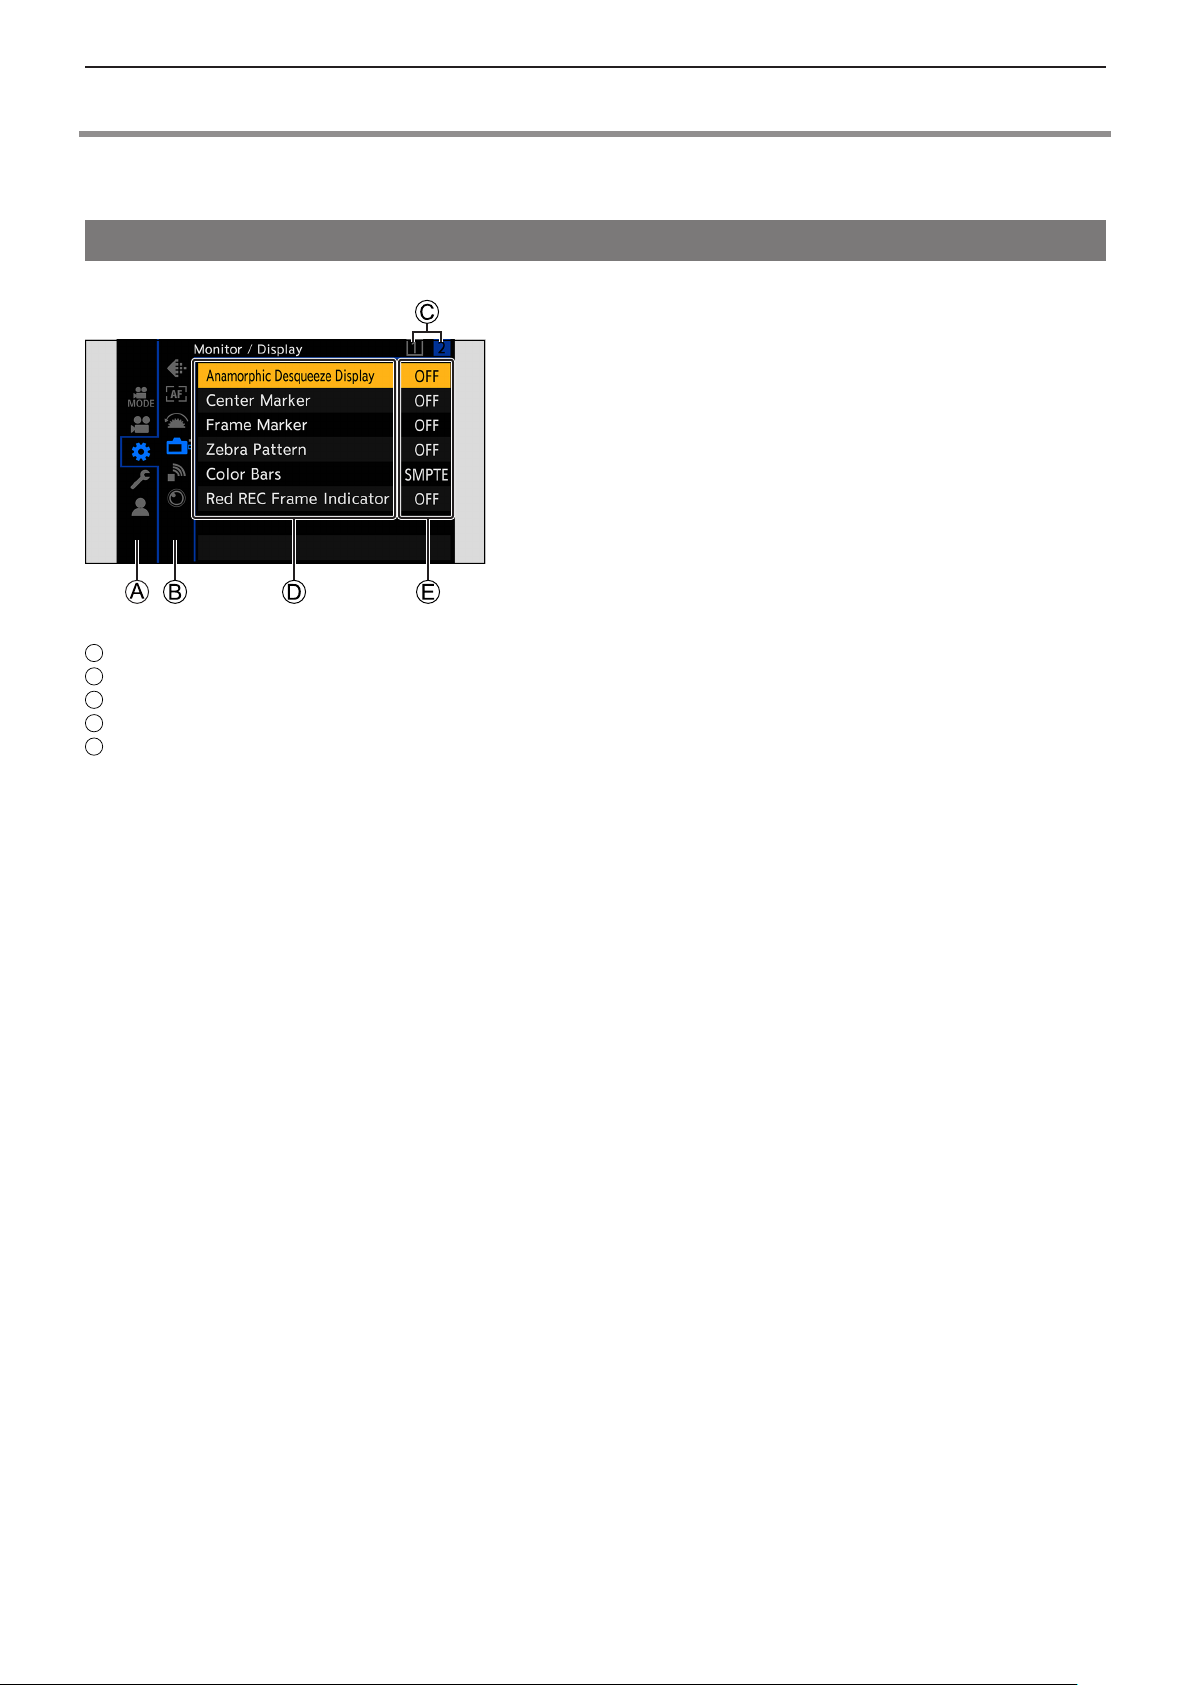
3. Basic Operations - Menu Operation Methods
A
B
C
D
E
Menu Operation Methods
In this camera, the menu is used for setting a wide variety of functions and performing camera customizations.
Menu operation
Configuration of the menu
Main tab
Sub tab
Page tab
Menu item
Setting item
- 46 -- 46 -
Page 47
3. Basic Operations - Menu Operation Methods
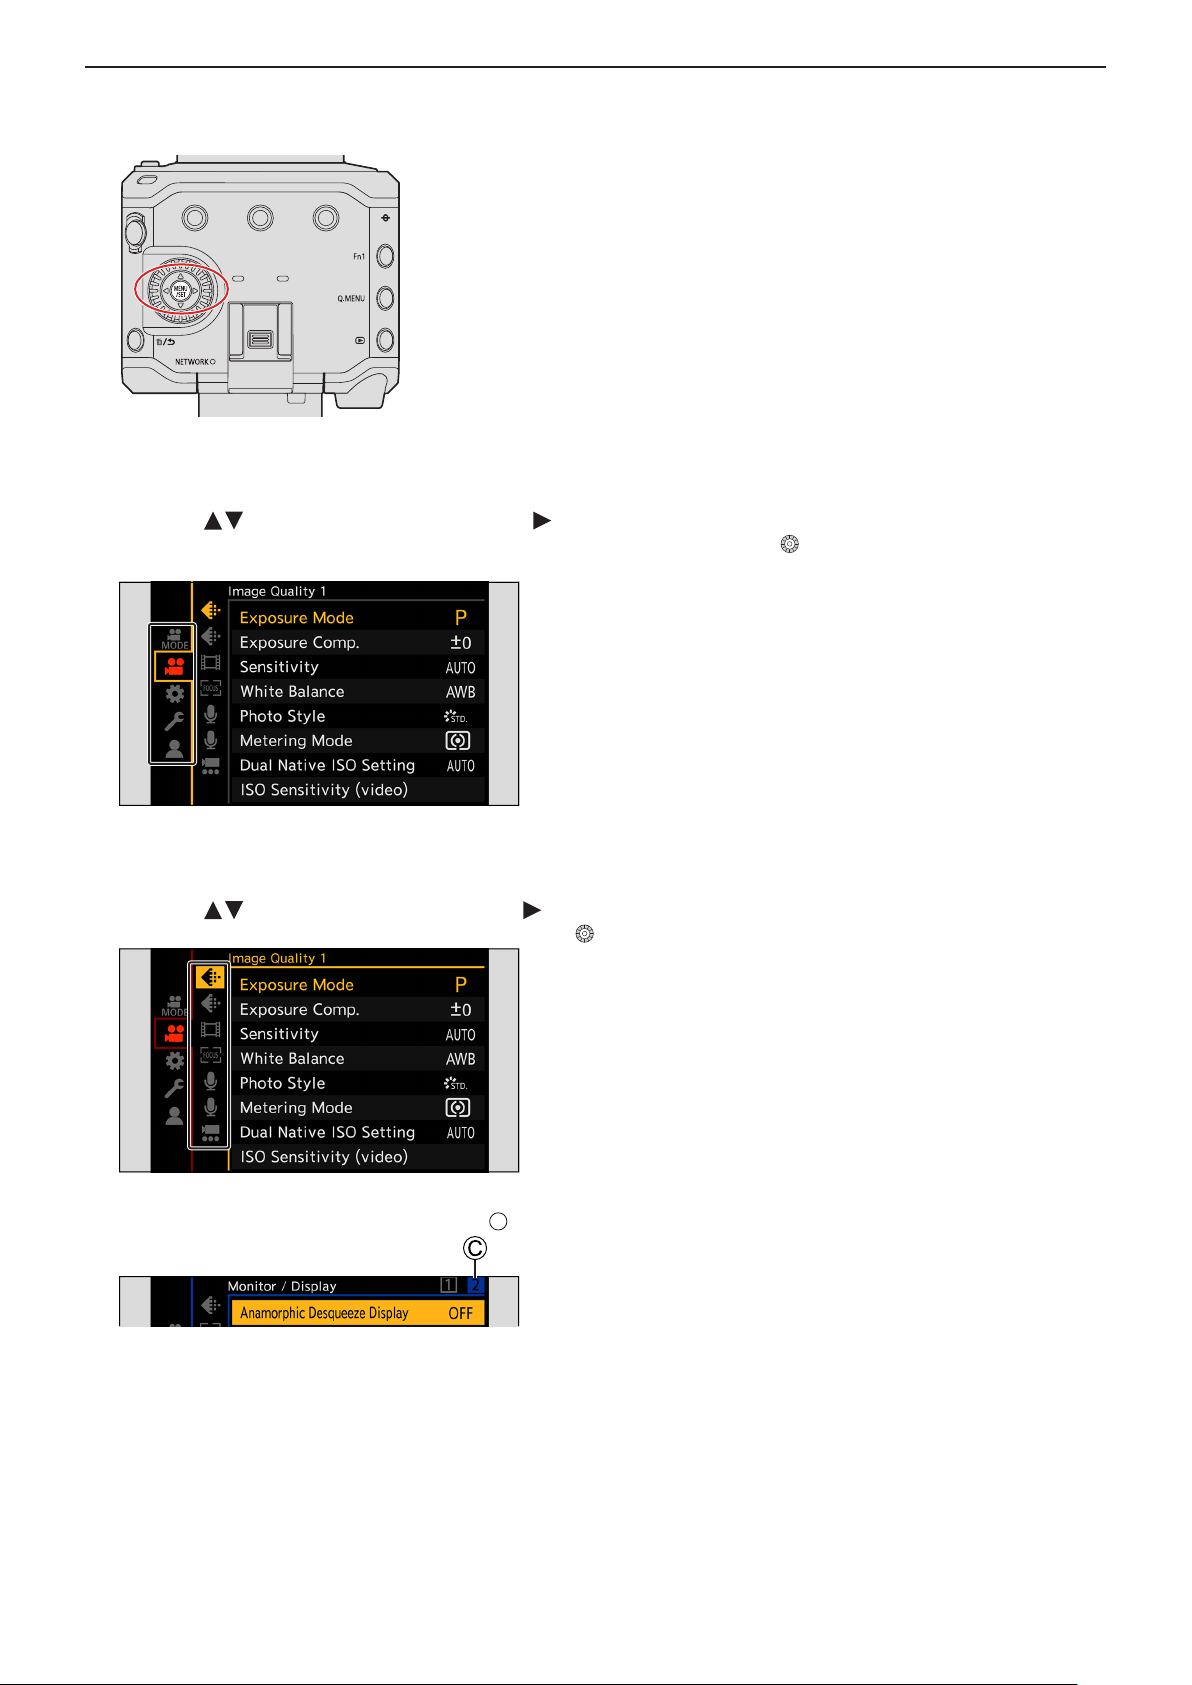
1 Display the menu.
●
Press [MENU/SET].
2 Select a main tab.
●
Press to select a main tab and then press .
● You can also perform the same operation by pressing [Q.MENU] or by rotating to select a main tab, then pressing
[MENU/SET].
3 Select a sub tab.
●
Press to select a sub tab and then press .
● You can also perform the same operation by rotating to select a sub tab, then pressing [MENU/SET].
●
If there are page tabs, after the page tabs C have finished switching, it is switched to the next sub tab.
- 47 -- 47 -
Page 48
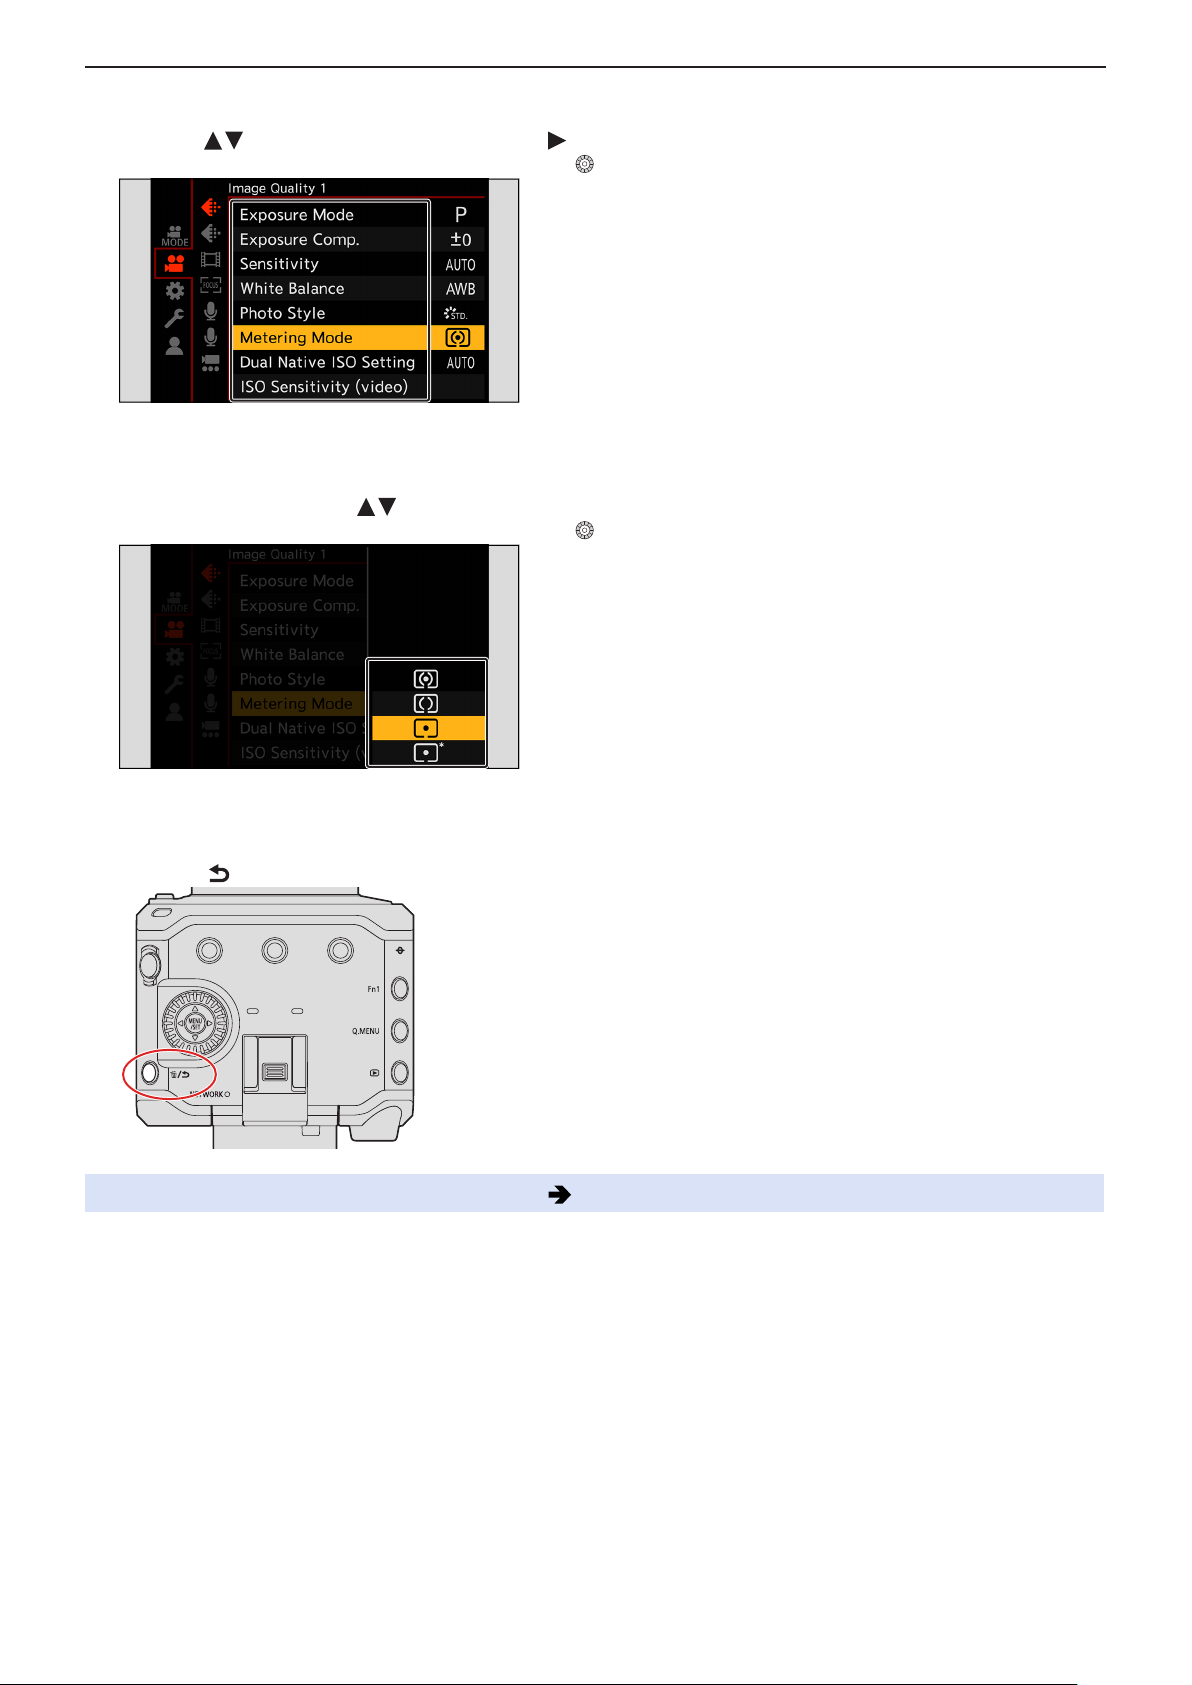
3. Basic Operations - Menu Operation Methods
4 Select a menu item.
●
Press to select a menu item and then press .
● You can also perform the same operation by rotating to select a sub tab, then pressing [MENU/SET].
5 Select a setting item and then confirm your selection.
●
Select a setting item with , then press [MENU/SET].
● You can also perform the same operation by rotating to select a setting item, then pressing [MENU/SET].
6 Close the menu.
●
Press [ ] several times.
●
For details about menu items, refer to Menu Guide. ( 172 / 11. Menu Guide)
- 48 -- 48 -
Page 49
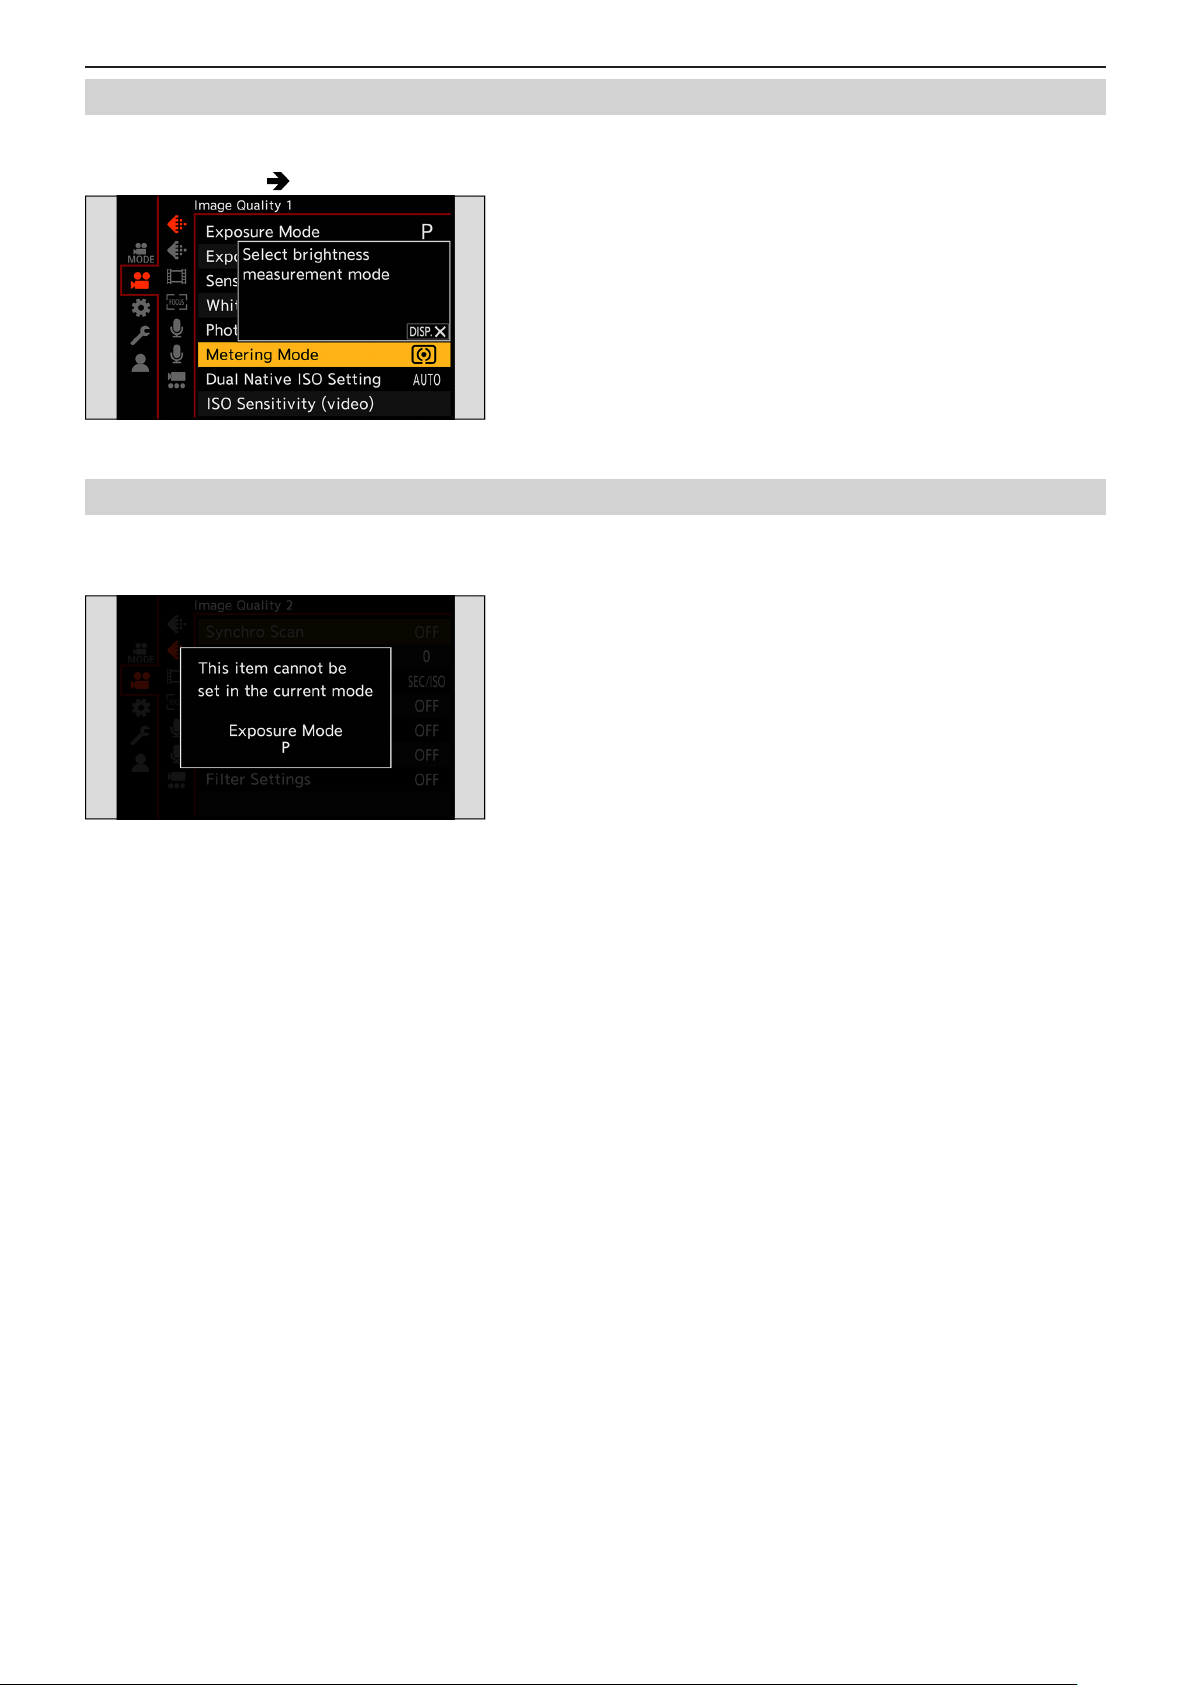
3. Basic Operations - Menu Operation Methods
Displaying Descriptions About Menu Items and Settings
When you press a Fn button that has the [Display Information] function registered while a menu item or setting item is selected,
the details of that menu will be displayed on the screen.
●
About Fn buttons ( 155 / Register Functions to the Fn Buttons)
Grayed Out Menu Items
Menu items that cannot be set are displayed grayed out.
When you press [MENU/SET] while a grayed out menu item is selected, the reason why it cannot be set will be displayed.
The reason why a menu item cannot be set may not be displayed depending on the menu item.
- 49 -- 49 -
Page 50
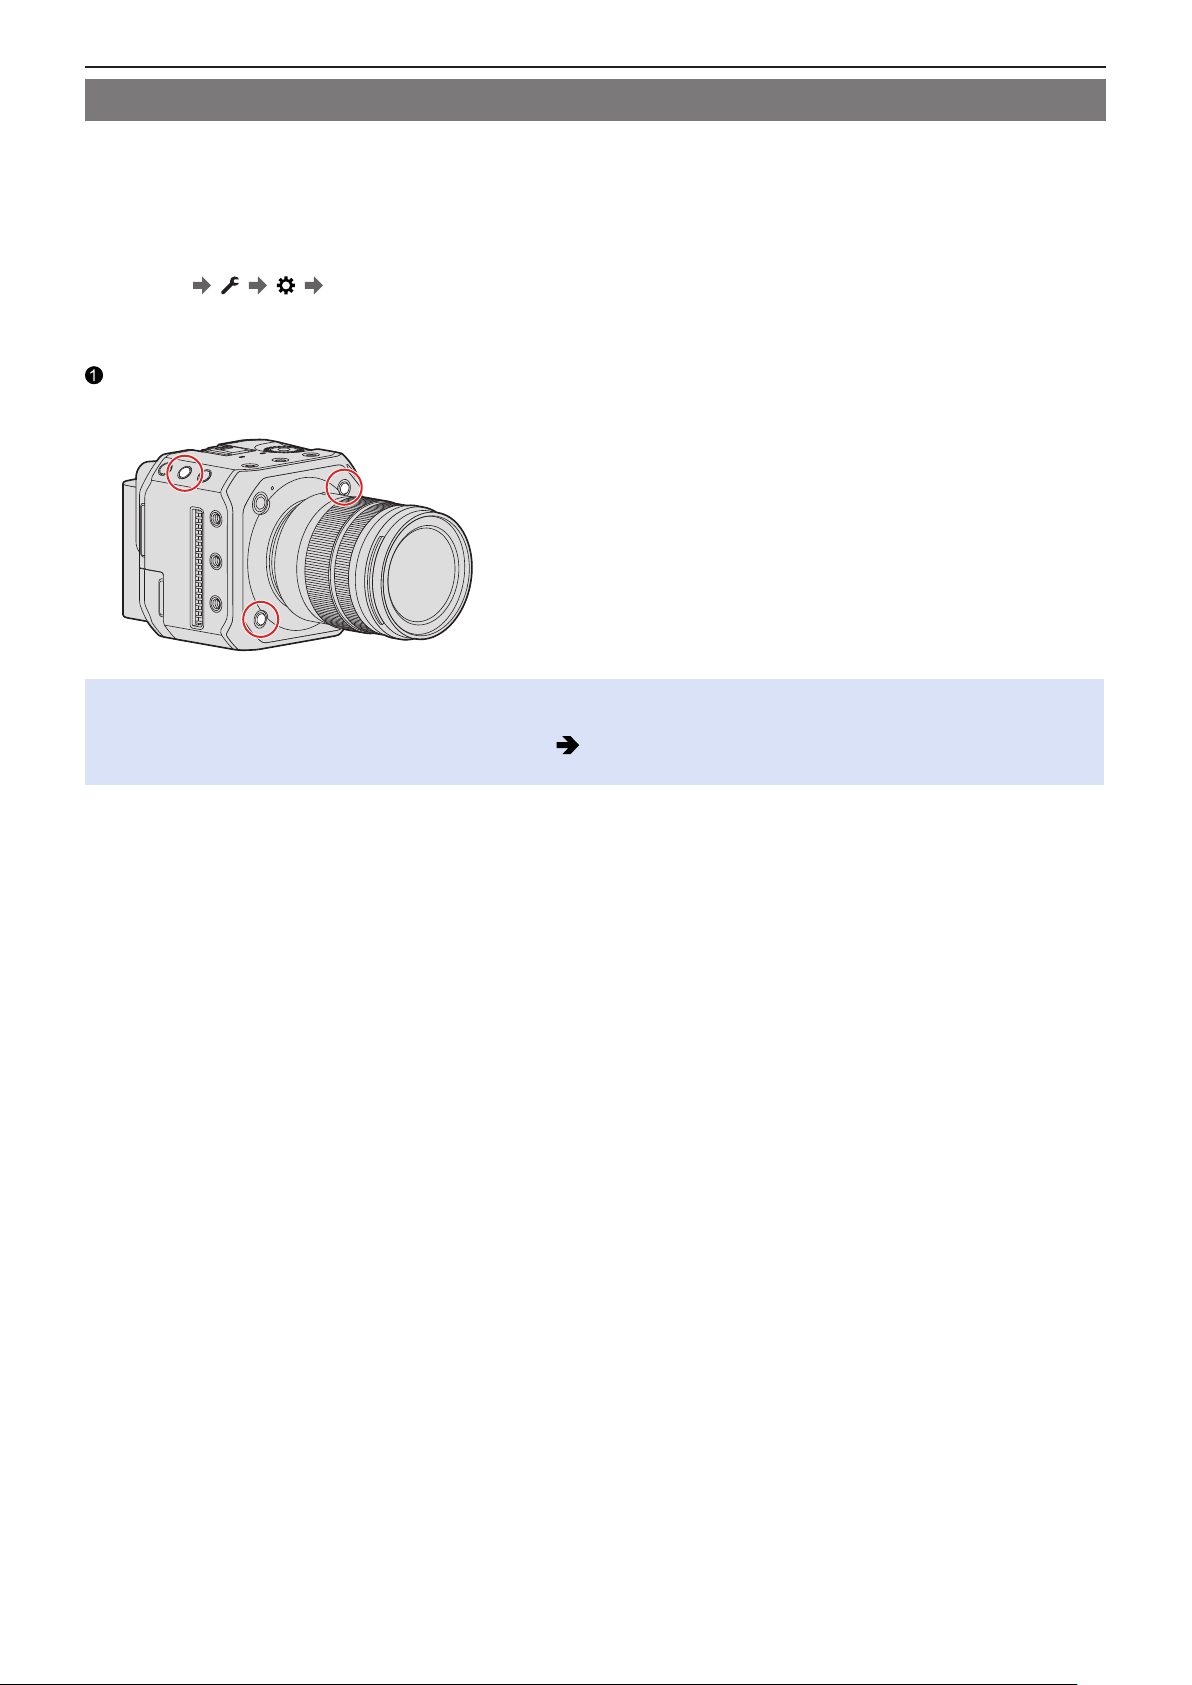
3. Basic Operations - Menu Operation Methods
[Reset]
Return each of the following settings to the default setting:
– Recording settings
– Network settings (Settings of [LAN / Wi-Fi] and [Bluetooth], password when connected to the camera with the “LUMIX Tether”
software.)
– Setup and custom settings (Anything other than [LAN / Wi-Fi] and [Bluetooth].)
[MENU/SET] [ ] [ ] Select [Reset]
When the menu screen does not display to the external device
■
Press [Q.MENU], [Fn2], and [Fn4] at the same time.
●
After all the lamps blink for approx. 5 seconds, the camera automatically shuts off and then turns on again.
●
The recording setting, network setting, and set up/custom setting returns to the default setting.
●
If the setup and custom settings are reset, the [Playback] menu is also reset.
●
The folder numbers and clock settings are not reset.
●
List of default settings and settings that can be reset ( 266 / List of Default Settings / Custom Saving / Settings
Available for Copying)
- 50 -- 50 -
Page 51
4. Recording Videos - Recording Videos
4. Recording Videos
Recording Videos
It is possible to record video with a maximum resolution of C4K (4096x2160) on this camera. It also supports switching of the
system frequency and 2 types of recording file format; MP4 and MOV.
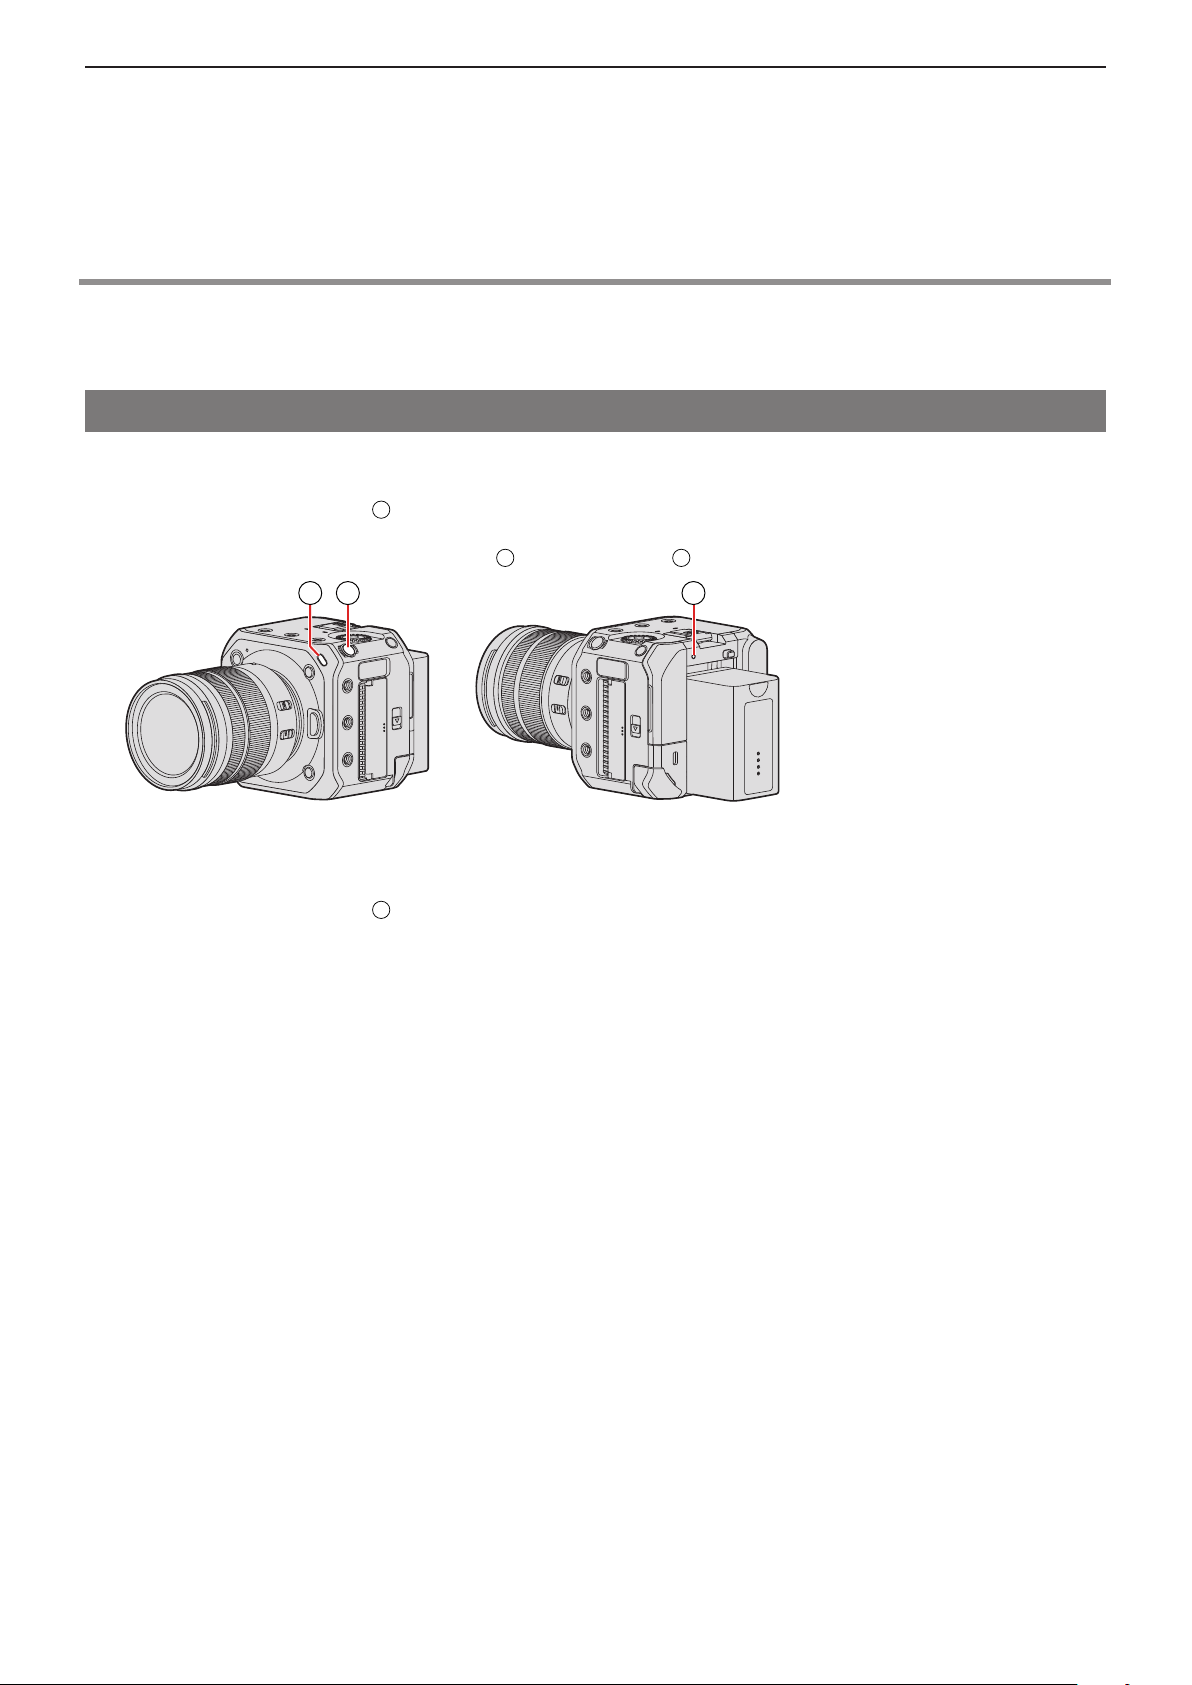
Recording Videos
1 Start recording.
●
Press the video rec. button A.
●
Release the video rec. button right after you press it.
●
During video recording, the front tally lamp B and rear tally lamp C light.
A
B C
2 Stop recording.
●
Press the video rec. button A again.
- 51 -- 51 -
Page 52
4. Recording Videos - Recording Videos
Screen Displays While Video Recording
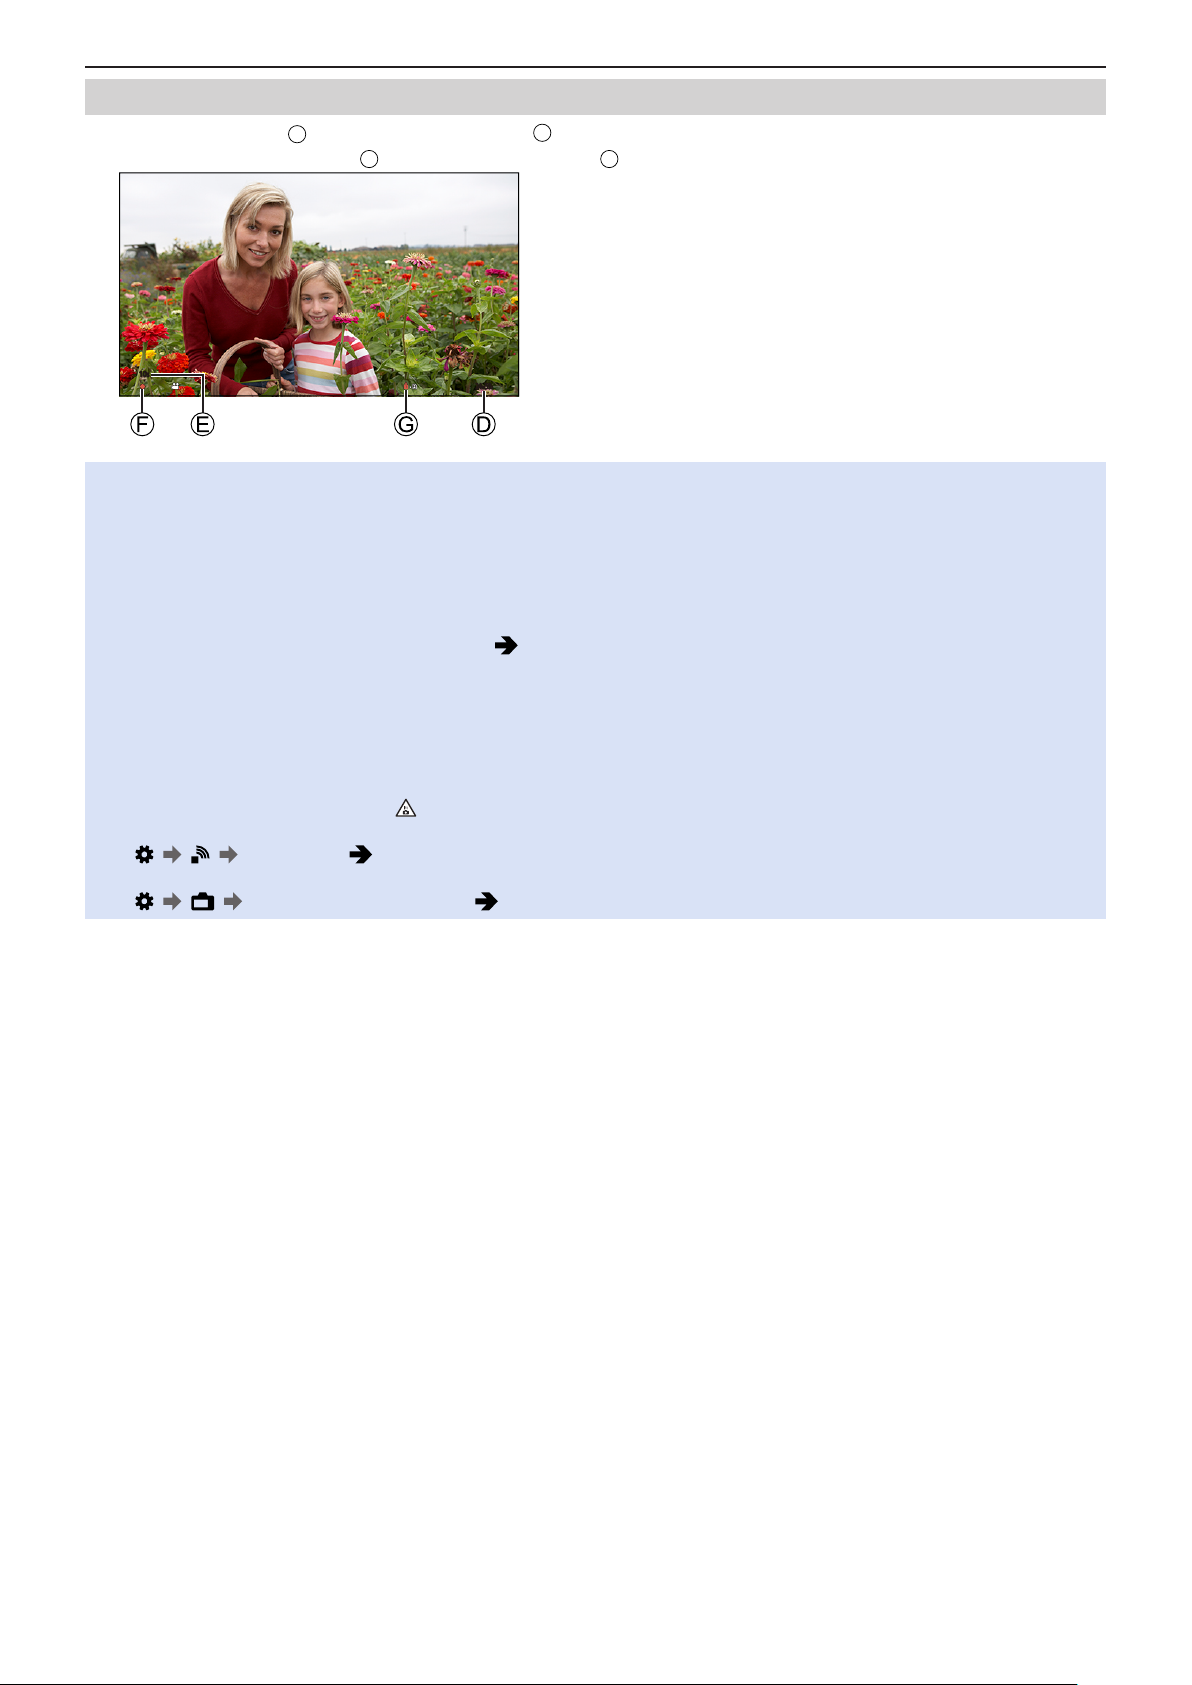
The video recording time D and elapsed recording time E will be displayed.
●
The recording state indication F and card access indication G turn red while videos are being recorded.
10S10
S
●
When the remaining capacity of the battery or card gets low during video recording, the tally lamps blink at long intervals.
When there is no remaining capacity in the battery or card, video recording is stopped and the tally lamps blink at short
intervals.
●
If an operation such as a zoom or button operation is performed during video recording, that operation sound may be
recorded.
●
The lens operation sound (AF and image stabilizer) may be recorded to video.
●
If the operation sound of pressing the video rec. button to end recording bothers you, try the following:
– Record by remotely operating the camera ( 204 / 12. Remote Operations)
– Connect a remote control unit (commercially available) that is compatible with the camera to the [REMOTE] terminal
to record.
●
Depending on the type of card, the card access indication may appear for a while after video recording. This is not a
malfunction.
●
Depending on the external device, during playback, situations such as image or sound quality being poor, recording
information not being displayed correctly, or playback not being possible may occur.
●
If the camera temperature rises, [ ] may be displayed and recording may stop. Wait until the camera cools down.
●
You can change the tally lamp that turns on. You can also change the settings so the tally lamps do not turn on:
[ ] [ ] [Tally Lamp] ( 192 / [Tally Lamp])
●
You can display a red frame on the recording screen that indicates that video is being recorded:
[ ] [ ] [Red REC Frame Indicator] ( 191 / [Red REC Frame Indicator])
24m59s24m59
s
- 52 -- 52 -
Page 53
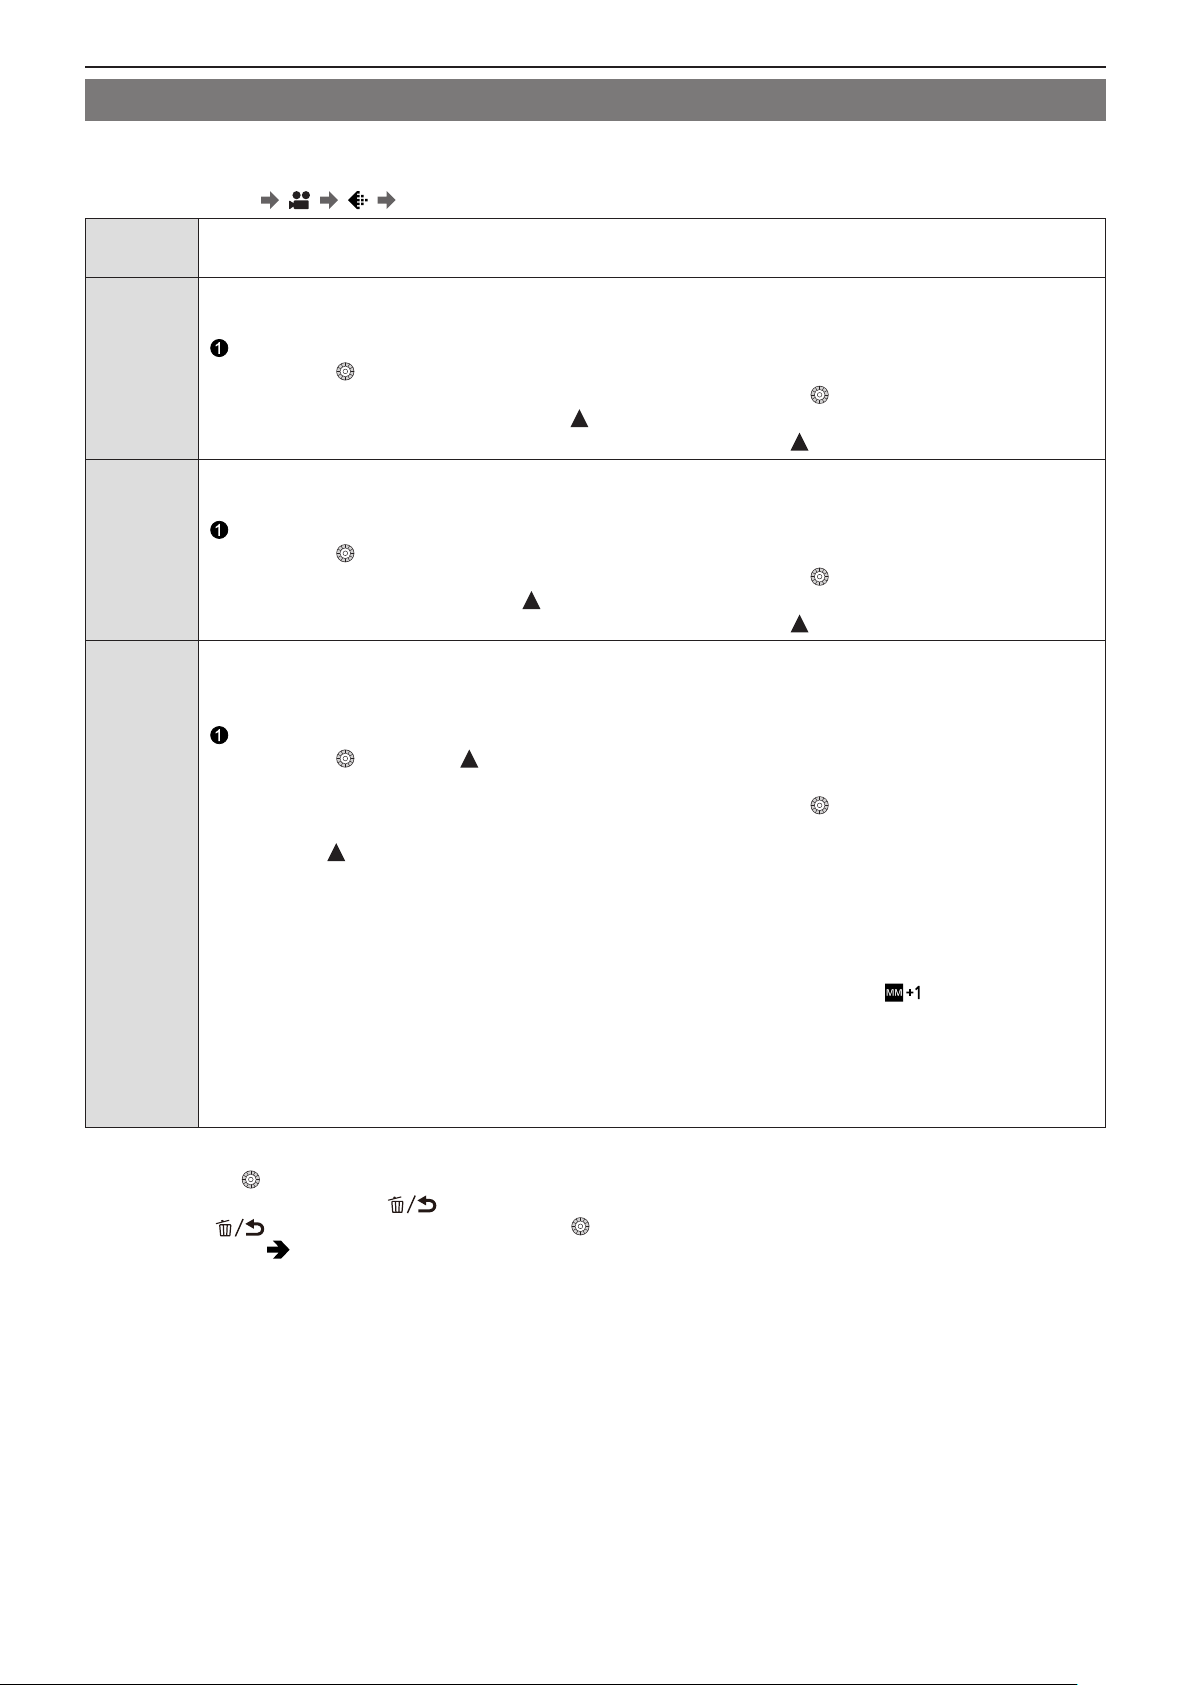
[Exposure Mode]
1 Set the exposure mode.
●
[MENU/SET] [ ] [ ] [Exposure Mode]
4. Recording Videos - Recording Videos
P
A
With [P] mode (Program AE mode), the camera automatically sets the shutter speed and aperture value
according to the subject’s brightness.
With [A] mode (Aperture-Priority AE Mode), you can set the aperture value and record.
Set the aperture value.*
1
● Rotate .
● When wearing headphones, you can adjust the volume by rotating . You can switch to aperture
value setting operations by pressing .
(The operation switches back to volume adjustment if you press again.)
With [S] mode (Shutter-Priority AE mode), you can adjust the shutter speed and record.
Set the shutter speed.*
S
● Rotate .
2
● When wearing headphones, you can adjust the volume by rotating . You can switch to shutter speed
setting operations by pressing .
(The operation switches back to volume adjustment if you press
With [M] mode (Manual exposure mode) you can adjust the aperture value and shutter speed manually and
record.
Set the shutter speed and aperture value.*
1, *2
again.)
● Rotate . (Every time is pressed, the shutter speed setting operation and aperture value setting
operation is switched.)
● When wearing headphones, you can adjust the volume by rotating . You can switch to shutter speed
setting operation, aperture value setting operation, and volume adjustment operations each time you
press .
●
M
The ISO sensitivity is set to [AUTO] in the default setting. For that reason, the ISO sensitivity will
be set according to the aperture value and shutter speed. When ISO sensitivity is set to [AUTO],
exposure compensation can also be used.
Manual Exposure Assist
When ISO sensitivity is set to other than [AUTO], Manual Exposure Assist (example: ) will be displayed on
the recording screen.
You can check the difference between the current exposure value and the correct exposure (±0) measured by
the camera.
●
Use Manual Exposure Assist as a guide. We recommend checking the images on the playback screen
when recording.
1
At default setting, [Aperture Value] is assigned to [Fn2]. You can press [Fn2] to display the setting screen of the aperture
*
value and rotate
*2 [Shutter Speed] is assigned to the [ ] at default setting. You can display the setting screen of the shutter speed by
pressing the [
●
About Fn buttons ( 154 / Fn Buttons)
to set the aperture value.
] and set the shutter speed by rotating .
- 53 -- 53 -
Page 54

4. Recording Videos - Recording Videos
●
The brightness of the recording screen and of actual recorded images may differ. Check the images on the playback
screen.
●
When using a lens with an aperture ring, set the position of the aperture ring to other than [A] to use the aperture value of
the lens.
- 54 -- 54 -
Page 55
4. Recording Videos - Recording Settings For Video
Recording Settings For Video
This section describes the settings used when video recording.
[System Frequency]
This changes the system frequency of videos that are recorded and played back.
The default setting is for the system frequency to be set to the TV broadcast system for the region where the camera was
bought.
[MENU/SET] [ ] [ ] Select [System Frequency]
[59.94Hz (NTSC)] System frequency for regions using the NTSC broadcasting system
[50.00Hz (PAL)] System frequency for regions using the PAL broadcasting system
[24.00Hz (CINEMA)] System frequency for producing cinema film
●
After changing the setting, turn the camera off and on.
●
If you record using a system frequency that differs from the broadcasting system of your region, it may not be possible
for you to properly playback videos on your TV.
●
A video recorded with a system frequency different from the setting of [System Frequency] cannot be played back in the
camera.
[Rec. File Format]
Sets the recording file format of videos to be recorded.
[MENU/SET] [ ] [ ] Select [Rec. File Format]
[MP4] This file format is suitable for playback on PCs.
[MOV] This file format is suitable for image editing.
●
When [System Frequency] is set to [24.00Hz (CINEMA)], it is fixed to [MOV].
- 55 -- 55 -
Page 56
4. Recording Videos - Recording Settings For Video
A
B
C
D
A
D
A
D
[Rec Quality]
Sets the image quality of videos to be recorded. The image qualities you can select depend on the [System Frequency] and
[Rec. File Format] settings.
[Rec Quality] settings can also be made using [Filtering] ( 60 / [Filtering]) to display only items that meet your conditions and
[add to list] ( 60 / [add to list]) to register recording qualities you use often.
[MENU/SET] [ ] [ ] Select [Rec Quality]
●
To record video with a bit rate of 72 Mbps or more, it requires a card with the corresponding Speed Class. ( 16 / Memory
Cards That Can Be Used)
[Rec. File Format]: [MP4]
●
Image compression: Long GOP
●
Audio format: AAC (2ch)
Recording frame rate
Bit rate
YUV/bit
Video compression format
– HEVC: H.265/HEVC
– AVC: H.264/MPEG-4 AVC
[System Frequency]: [59.94Hz (NTSC)]
■
[Rec Quality]
[4K/10bit/100M/60p]
[4K/8bit/100M/30p] 29.97p / 100 Mbps / 4:2:0/8 bit / AVC
[4K/10bit/72M/30p] 29.97p / 72 Mbps / 4:2:0/10 bit / HEVC
[4K/8bit/100M/24p] 23.98p / 100 Mbps / 4:2:0/8 bit / AVC
[4K/10bit/72M/24p] 23.98p / 72 Mbps / 4:2:0/10 bit / HEVC
[FHD/8bit/28M/60p]
[FHD/8bit/20M/30p] 29.97p / 20 Mbps / 4:2:0/8 bit / AVC
[FHD/8bit/24M/24p] 23.98p / 24 Mbps / 4:2:0/8 bit / AVC
[System Frequency]: [50.00Hz (PAL)]
■
[Rec Quality]
[4K/10bit/100M/50p]
[4K/8bit/100M/25p] 25.00p / 100 Mbps / 4:2:0/8 bit / AVC
[4K/10bit/72M/25p] 25.00p / 72 Mbps / 4:2:0/10 bit / HEVC
Resolution
(Aspect ratio)
3840x2160
(16:9)
1920x1080
(16:9)
Resolution
(Aspect ratio)
3840x2160
(16:9)
/ B / C /
59.94p / 100 Mbps / 4:2:0/10 bit / HEVC
59.94p / 28 Mbps / 4:2:0/8 bit / AVC
/ B / C /
50.00p / 100 Mbps / 4:2:0/10 bit / HEVC
[FHD/8bit/28M/50p]
[FHD/8bit/20M/25p] 25.00p / 20 Mbps / 4:2:0/8 bit / AVC
1920x1080
(16:9)
50.00p / 28 Mbps / 4:2:0/8 bit / AVC
- 56 -- 56 -
Page 57
4. Recording Videos - Recording Settings For Video
A
B
C
D
E
A
E
[Rec. File Format]: [MOV]
●
Audio format: LPCM (2ch)
Recording frame rate
Bit rate
YUV/bit
Video compression format
– HEVC: H.265/HEVC
– AVC: H.264/MPEG-4 AVC
Image compression
[System Frequency]: [59.94Hz (NTSC)]
■
[Rec Quality]
[4K-A/60p/420/8-L]
[4K-A/30p/422/10-I] 29.97p / 400 Mbps / 4:2:2/10 bit / AVC / ALL-Intra
[4K-A/30p/422/10-L] 29.97p / 150 Mbps / 4:2:2/10 bit / AVC / Long GOP
[4K-A/30p/420/8-L] 29.97p / 100 Mbps / 4:2:0/8 bit / AVC / Long GOP
[4K-A/24p/422/10-I] 23.98p / 400 Mbps / 4:2:2/10 bit / AVC / ALL-Intra
[4K-A/24p/422/10-L] 23.98p / 150 Mbps / 4:2:2/10 bit / AVC / Long GOP
[4K-A/24p/420/8-L] 23.98p / 100 Mbps / 4:2:0/8 bit / AVC / Long GOP
[C4K/60p/420/10-L]
[C4K/60p/420/8-L] 59.94p / 150 Mbps / 4:2:0/8 bit / AVC / Long GOP
[C4K/30p/422/10-I] 29.97p / 400 Mbps / 4:2:2/10 bit / AVC / ALL-Intra
[C4K/30p/422/10-L] 29.97p / 150 Mbps / 4:2:2/10 bit / AVC / Long GOP
[C4K/30p/420/8-L] 29.97p / 100 Mbps / 4:2:0/8 bit / AVC / Long GOP
[C4K/24p/422/10-I] 23.98p / 400 Mbps / 4:2:2/10 bit / AVC / ALL-Intra
[C4K/24p/422/10-L] 23.98p / 150 Mbps / 4:2:2/10 bit / AVC / Long GOP
[C4K/24p/420/8-L] 23.98p / 100 Mbps / 4:2:0/8 bit / AVC / Long GOP
Resolution
(Aspect ratio)
3328x2496
(4:3)
4096x2160
(17:9)
/ B / C / D /
59.94p / 150 Mbps / 4:2:0/8 bit / AVC / Long GOP
59.94p / 200 Mbps / 4:2:0/10 bit / HEVC / Long GOP
[4K/60p/420/10-L]
[4K/60p/420/8-L] 59.94p / 150 Mbps / 4:2:0/8 bit / AVC / Long GOP
[4K/30p/422/10-I] 29.97p / 400 Mbps / 4:2:2/10 bit / AVC / ALL-Intra
[4K/30p/422/10-L] 29.97p / 150 Mbps / 4:2:2/10 bit / AVC / Long GOP
[4K/30p/420/8-L] 29.97p / 100 Mbps / 4:2:0/8 bit / AVC / Long GOP
[4K/24p/422/10-I] 23.98p / 400 Mbps / 4:2:2/10 bit / AVC / ALL-Intra
[4K/24p/422/10-L] 23.98p / 150 Mbps / 4:2:2/10 bit / AVC / Long GOP
[4K/24p/420/8-L] 23.98p / 100 Mbps / 4:2:0/8 bit / AVC / Long GOP
3840x2160
(16:9)
59.94p / 200 Mbps / 4:2:0/10 bit / HEVC / Long GOP
- 57 -- 57 -
Page 58
4. Recording Videos - Recording Settings For Video
A
B
C
D
E
A
E
[FHD/60p/422/10-I]
[FHD/60p/422/10-L] 59.94p / 100 Mbps / 4:2:2/10 bit / AVC / Long GOP
[FHD/60p/420/8-L] 59.94p / 100 Mbps / 4:2:0/8 bit / AVC / Long GOP
[FHD/30p/422/10-I] 29.97p / 200 Mbps / 4:2:2/10 bit / AVC / ALL-Intra
[FHD/30p/422/10-L] 29.97p / 100 Mbps / 4:2:2/10 bit / AVC / Long GOP
[FHD/30p/420/8-L] 29.97p / 100 Mbps / 4:2:0/8 bit / AVC / Long GOP
[FHD/24p/422/10-I] 23.98p / 200 Mbps / 4:2:2/10 bit / AVC / ALL-Intra
[FHD/24p/422/10-L] 23.98p / 100 Mbps / 4:2:2/10 bit / AVC / Long GOP
[FHD/24p/420/8-L] 23.98p / 100 Mbps / 4:2:0/8 bit / AVC / Long GOP
Recording frame rate
Bit rate
YUV/bit
Video compression format
– HEVC: H.265/HEVC
– AVC: H.264/MPEG-4 AVC
Image compression
[System Frequency]: [50.00Hz (PAL)]
■
1920x1080
(16:9)
59.94p / 200 Mbps / 4:2:2/10 bit / AVC / ALL-Intra
[Rec Quality]
[4K-A/50p/420/10-L]
[4K-A/50p/420/8-L] 50.00p / 150 Mbps / 4:2:0/8 bit / AVC / Long GOP
[4K-A/25p/422/10-I] 25.00p / 400 Mbps / 4:2:2/10 bit / AVC / ALL-Intra
[4K-A/25p/422/10-L] 25.00p / 150 Mbps / 4:2:2/10 bit / AVC / Long GOP
[4K-A/25p/420/8-L] 25.00p / 100 Mbps / 4:2:0/8 bit / AVC / Long GOP
[C4K/50p/420/10-L]
[C4K/50p/420/8-L] 50.00p / 150 Mbps / 4:2:0/8 bit / AVC / Long GOP
[C4K/25p/422/10-I] 25.00p / 400 Mbps / 4:2:2/10 bit / AVC / ALL-Intra
[C4K/25p/422/10-L] 25.00p / 150 Mbps / 4:2:2/10 bit / AVC / Long GOP
[C4K/25p/420/8-L] 25.00p / 100 Mbps / 4:2:0/8 bit / AVC / Long GOP
[4K/50p/420/10-L]
[4K/50p/420/8-L] 50.00p / 150 Mbps / 4:2:0/8 bit / AVC / Long GOP
[4K/25p/422/10-I] 25.00p / 400 Mbps / 4:2:2/10 bit / AVC / ALL-Intra
[4K/25p/422/10-L] 25.00p / 150 Mbps / 4:2:2/10 bit / AVC / Long GOP
[4K/25p/420/8-L] 25.00p / 100 Mbps / 4:2:0/8 bit / AVC / Long GOP
Resolution
(Aspect ratio)
3328x2496
(4:3)
4096x2160
(17:9)
3840x2160
(16:9)
/ B / C / D /
50.00p / 200 Mbps / 4:2:0/10 bit / HEVC / Long GOP
50.00p / 200 Mbps / 4:2:0/10 bit / HEVC / Long GOP
50.00p / 200 Mbps / 4:2:0/10 bit / HEVC / Long GOP
[FHD/50p/422/10-I]
[FHD/50p/422/10-L] 50.00p / 100 Mbps / 4:2:2/10 bit / AVC / Long GOP
[FHD/50p/420/8-L] 50.00p / 100 Mbps / 4:2:0/8 bit / AVC / Long GOP
[FHD/25p/422/10-I] 25.00p / 200 Mbps / 4:2:2/10 bit / AVC / ALL-Intra
[FHD/25p/422/10-L] 25.00p / 100 Mbps / 4:2:2/10 bit / AVC / Long GOP
[FHD/25p/420/8-L] 25.00p / 100 Mbps / 4:2:0/8 bit / AVC / Long GOP
1920x1080
(16:9)
50.00p / 200 Mbps / 4:2:2/10 bit / AVC / ALL-Intra
- 58 -- 58 -
Page 59
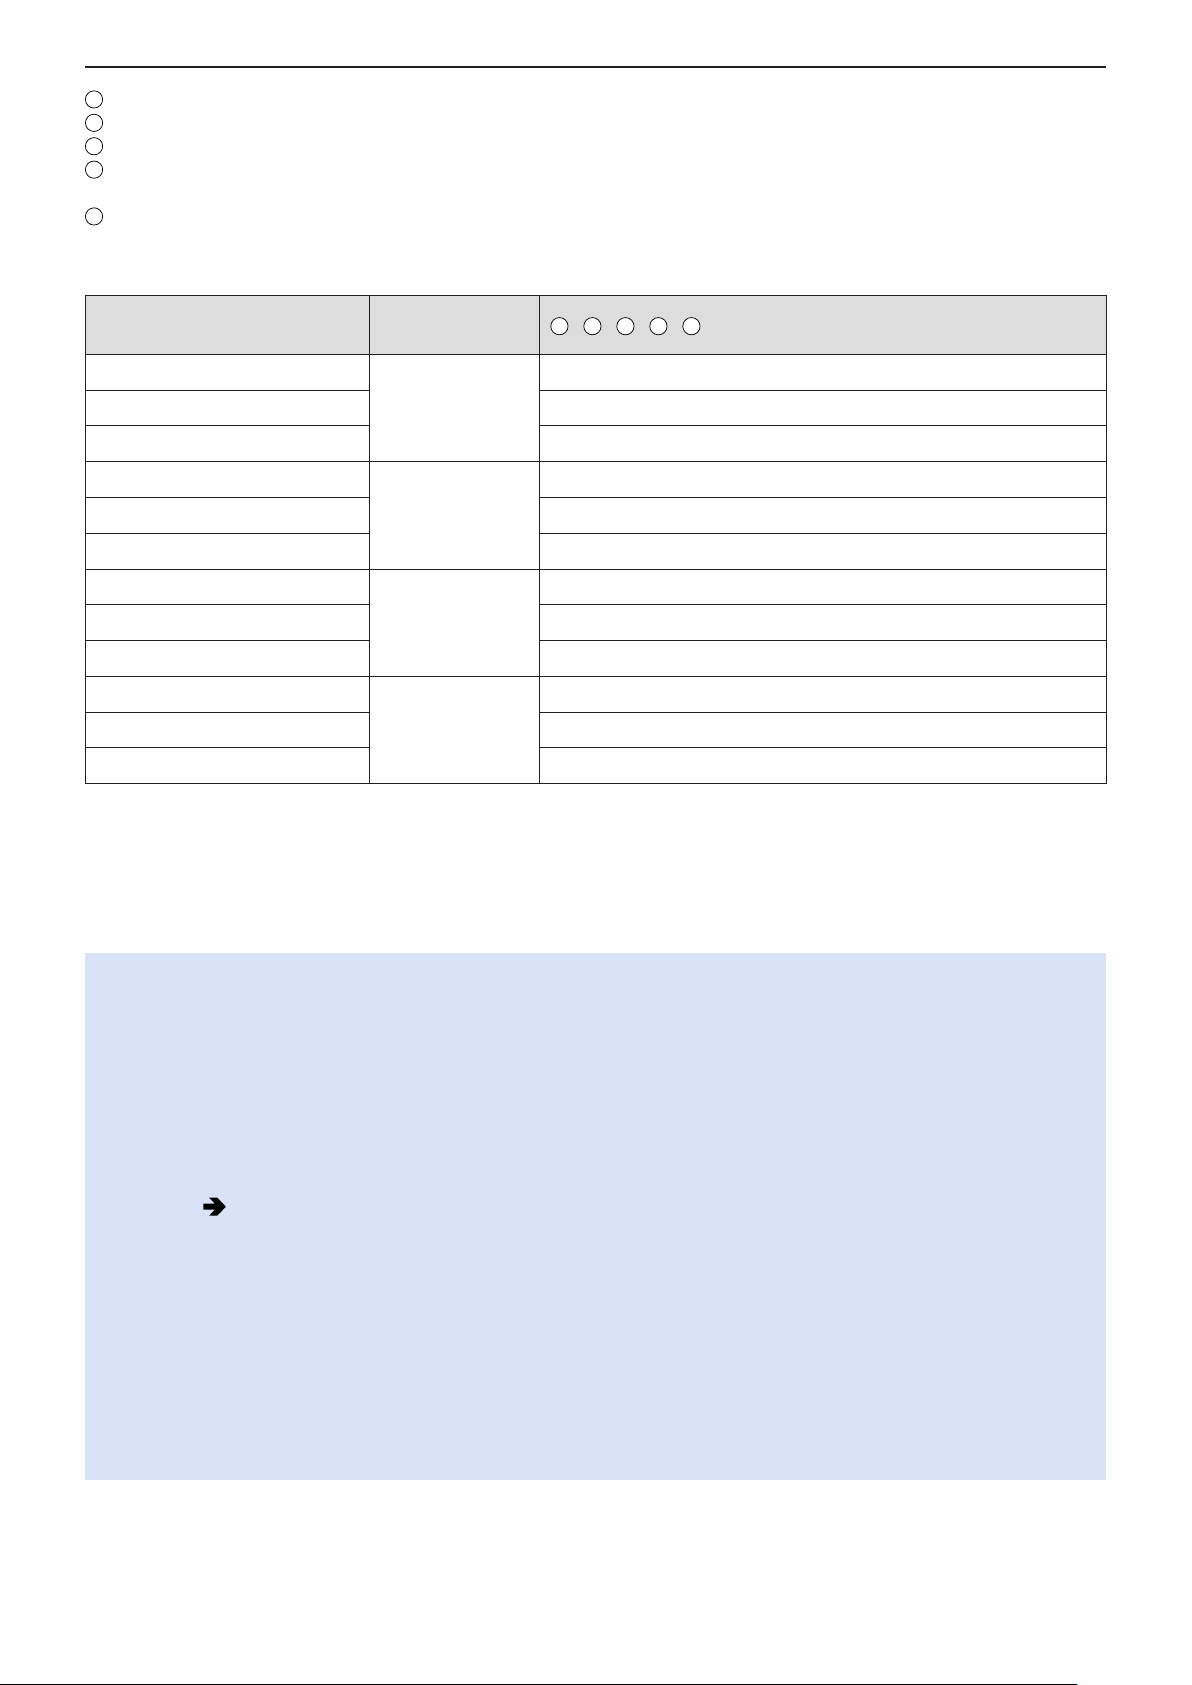
4. Recording Videos - Recording Settings For Video
A
B
C
D
E
A
E
Recording frame rate
Bit rate
YUV/bit
Video compression format
– AVC: H.264/MPEG-4 AVC
Image compression
[System Frequency]: [24.00Hz (CINEMA)]
■
[Rec Quality]
[4K-A/24p/422/10-I]
[4K-A/24p/422/10-L] 24.00p / 150 Mbps / 4:2:2/10 bit / AVC / Long GOP
Resolution
(Aspect ratio)
3328x2496
(4:3)
/ B / C / D /
24.00p / 400 Mbps / 4:2:2/10 bit / AVC / ALL-Intra
[4K-A/24p/420/8-L] 24.00p / 100 Mbps / 4:2:0/8 bit / AVC / Long GOP
[C4K/24p/422/10-I]
[C4K/24p/422/10-L] 24.00p / 150 Mbps / 4:2:2/10 bit / AVC / Long GOP
4096x2160
(17:9)
24.00p / 400 Mbps / 4:2:2/10 bit / AVC / ALL-Intra
[C4K/24p/420/8-L] 24.00p / 100 Mbps / 4:2:0/8 bit / AVC / Long GOP
[4K/24p/422/10-I]
[4K/24p/422/10-L] 24.00p / 150 Mbps / 4:2:2/10 bit / AVC / Long GOP
3840x2160
(16:9)
24.00p / 400 Mbps / 4:2:2/10 bit / AVC / ALL-Intra
[4K/24p/420/8-L] 24.00p / 100 Mbps / 4:2:0/8 bit / AVC / Long GOP
[FHD/24p/422/10-I]
[FHD/24p/422/10-L] 24.00p / 100 Mbps / 4:2:2/10 bit / AVC / Long GOP
1920x1080
(16:9)
24.00p / 200 Mbps / 4:2:2/10 bit / AVC / ALL-Intra
[FHD/24p/420/8-L] 24.00p / 100 Mbps / 4:2:0/8 bit / AVC / Long GOP
●
In this document, videos are indicated as follows according to their resolution:
– 4K-A (3328x2496) video: Anamorphic (4:3) video
– C4K (4096x2160) video: C4K video
– 4K (3840x2160) video: 4K video
– Full High Definition (1920x1080) video: FHD video
●
Since the camera employs the VBR recording format, the bit rate is changed automatically depending on the subject to
record. As a result, video recording time is shortened when a fast-moving subject is recorded.
●
Videos in ALL-Intra and 4:2:2/10-bit formats are intended for editing on a PC used for video production.
●
When the following functions are being used, [Image Area of Video] is fixed to [FULL].
– Anamorphic (4:3) video
– C4K video
– 4K video
●
When using the following function, you can only select 8-bit FHD video:
– [Filter Settings]: [Miniature Effect]
●
You can register a combination of [System Frequency], [Rec. File Format], [Image Area of Video], and [Rec Quality] to
My List. ( 60 / [add to list])
●
Size Interval for Dividing Files
– FHD (MP4)
A new file will be created to continue recording if the continuous recording time exceeds 30 minutes or the file size
exceeds 4 GB.
– 4K (MP4) / MOV
When using an SDHC memory card:
A new file will be created to continue recording if the continuous recording time exceeds 30 minutes or the file size
exceeds 4 GB.
When using an SDXC memory card:
A new file will be created to continue recording if the continuous recording time exceeds 3 hours and 4 minutes or the
file size exceeds 96 GB.
- 59 -- 59 -
Page 60
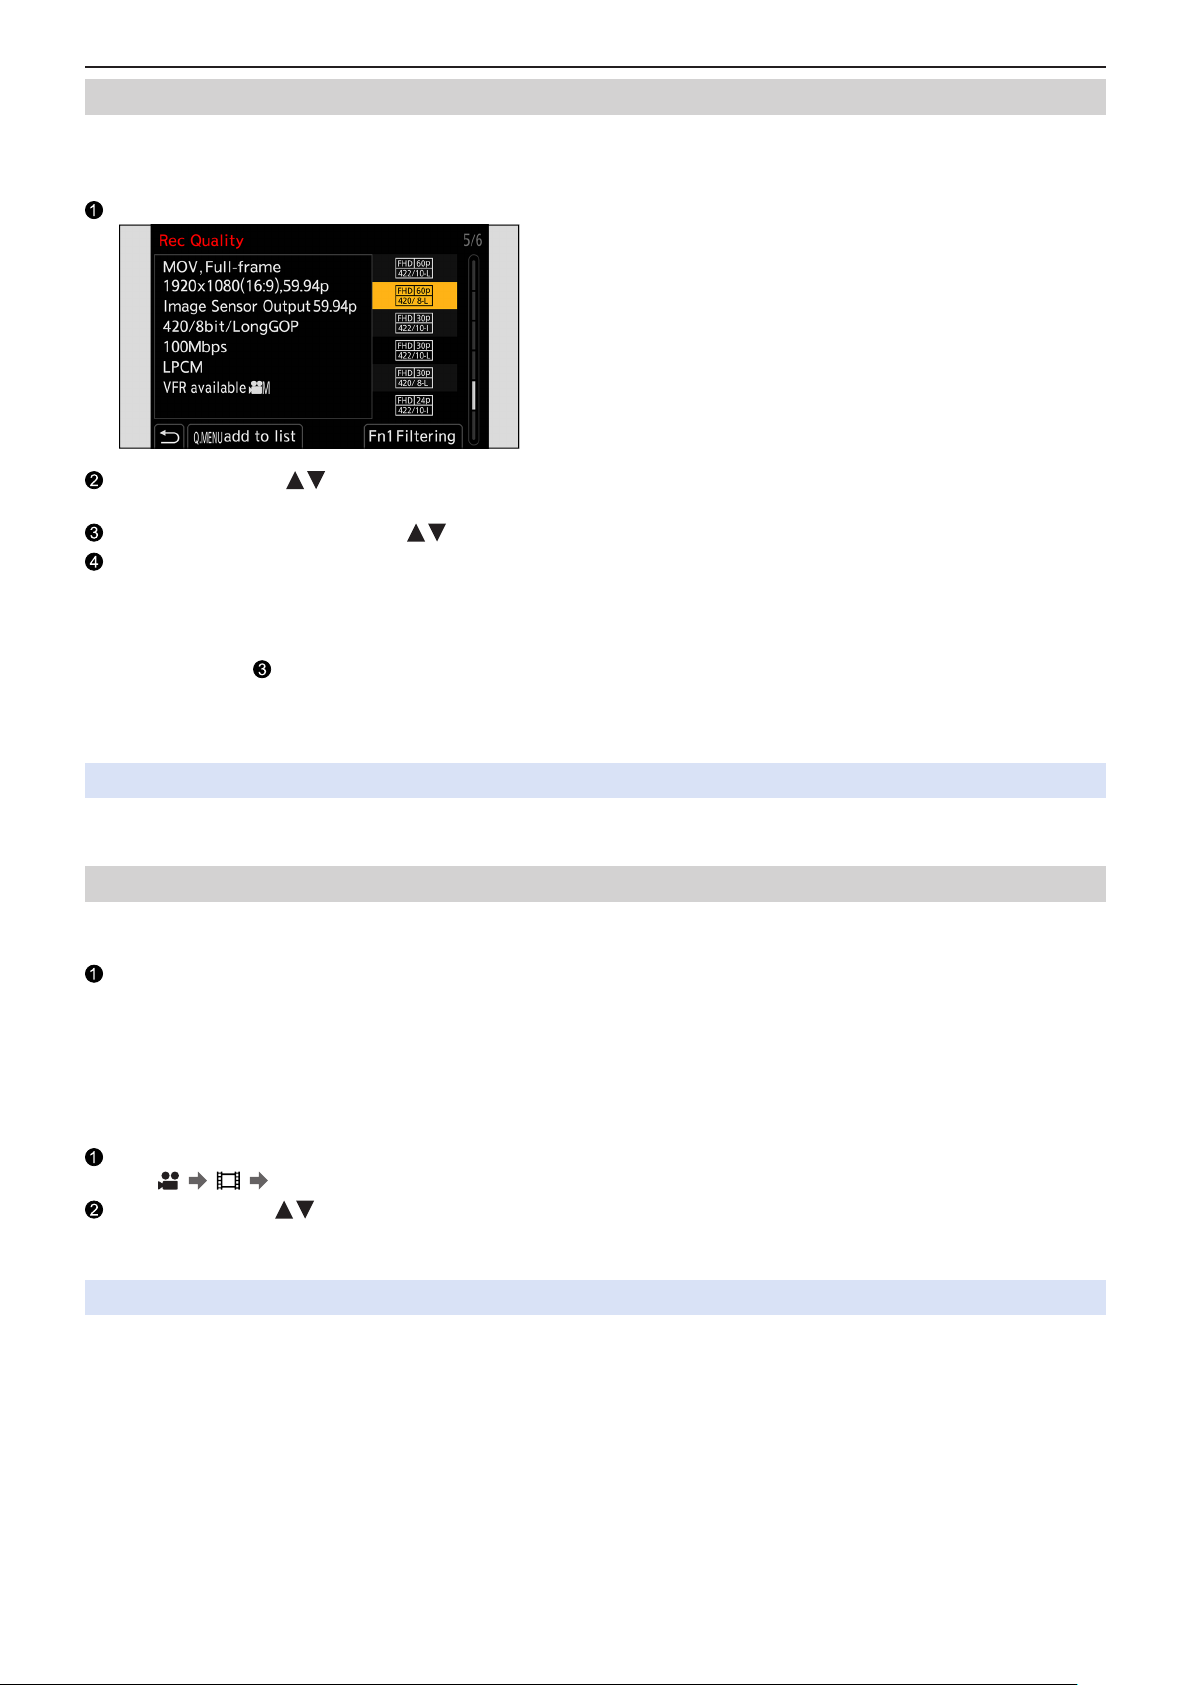
4. Recording Videos - Recording Settings For Video
[Filtering]
When the [Rec. File Format] is set to [MOV], you can specify items such as frame rate, number of pixels (resolution), and codec
(YUV, Bit value, Image compression), and only display recording quality that meets those conditions.
In the [Rec Quality] setting screen, press [Fn1].
Select an item with and press [MENU/SET].
●
Settings: [Frame Rate] / [Resolution] / [Codec] / [Variable Frame Rate] / [Hybrid Log Gamma]
Select the filtering condition with then press [MENU/SET].
Press [Fn1] to confirm the setting.
●
You are returned to the [Rec Quality] setting screen.
Clearing the filtering conditions
■
Select [ANY] in Step .
●
The filtering conditions are also cleared when you do the following:
– Change the [System Frequency]
– Select a recording quality from [Rec Quality (My List)]
●
When you change recording quality using a filter, the current filtering conditions are stored.
[add to list]
Select a recording quality and register it in My List. The recording quality you register can be set in [Rec Quality (My List)].
In the [Rec Quality] setting screen, press [Q.MENU].
●
The following settings are also registered at the same time:
– [System Frequency]
– [Rec. File Format]
– [Image Area of Video]
Setting or deleting in My List
■
Select [Rec Quality (My List)].
●
[ ] [ ] [Rec Quality (My List)]
Select an item with and press [MENU/SET].
●
You cannot select setting items that have different system frequencies.
●
To delete from My List, select the item and press [Q.MENU].
●
Up to 12 types of recording quality can be registered.
- 60 -- 60 -
Page 61
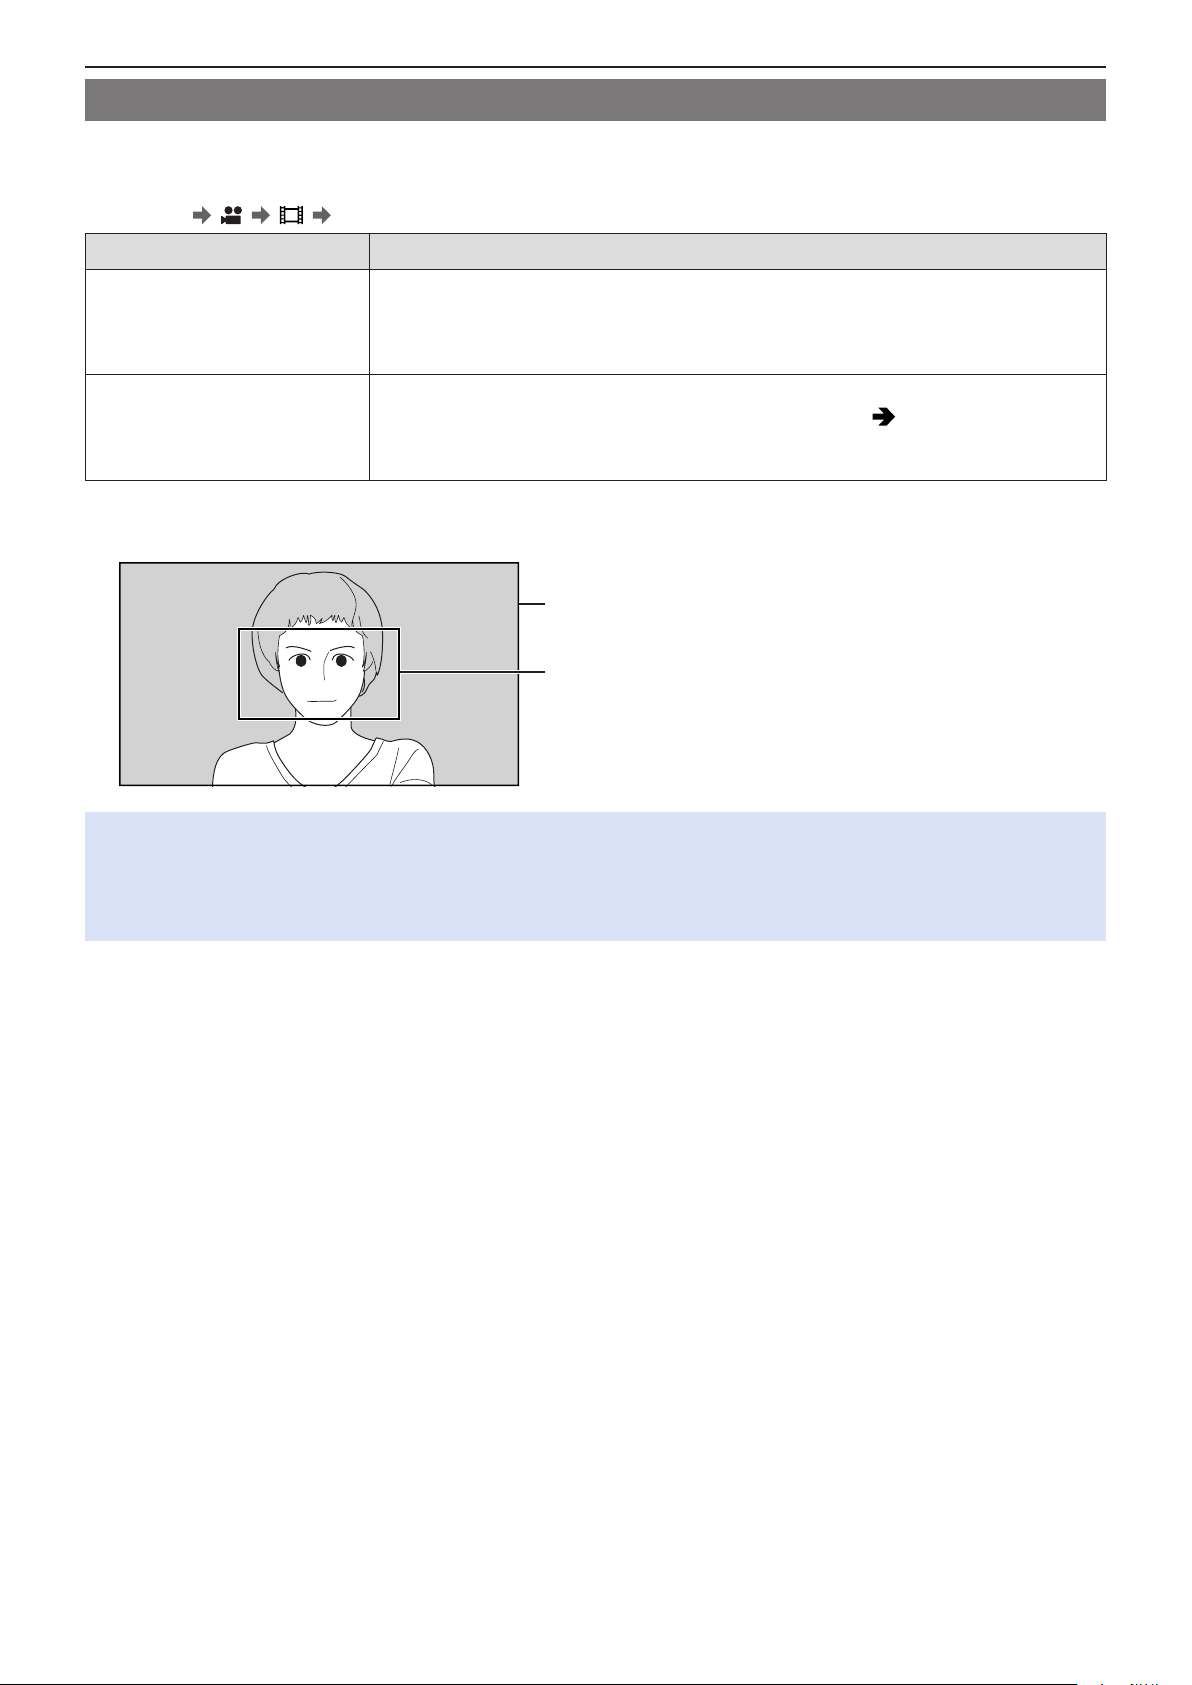
4. Recording Videos - Recording Settings For Video
PIXEL/PIXEL
[Image Area of Video]
Set the image area during video recording. The angle of view differs depending on the image area. Narrowing the image area
allows you to achieve a telescopic effect without image deterioration.
[MENU/SET] [ ] [ ] Select [Image Area of Video]
Item Settings details
Records according to the range that corresponds to the image circle of the lens that is for
[FULL]
[PIXEL/PIXEL]
Image area (Ex.: FHD video)
■
Micro four thirds.
Angle of view: Wide
Telescopic effect: Not possible
Records with one pixel on the sensor, which is equal to one pixel of the video. Records a
range corresponding to the resolution range in [Rec Quality]. (
Angle of view: Narrow
Telescopic effect: Possible
56 / [Rec Quality])
FULL
●
When the following functions are being used, [Image Area of Video] is fixed to [FULL].
– [Live Cropping]
– Anamorphic (4:3) video
– C4K video
– 4K video
- 61 -- 61 -
Page 62
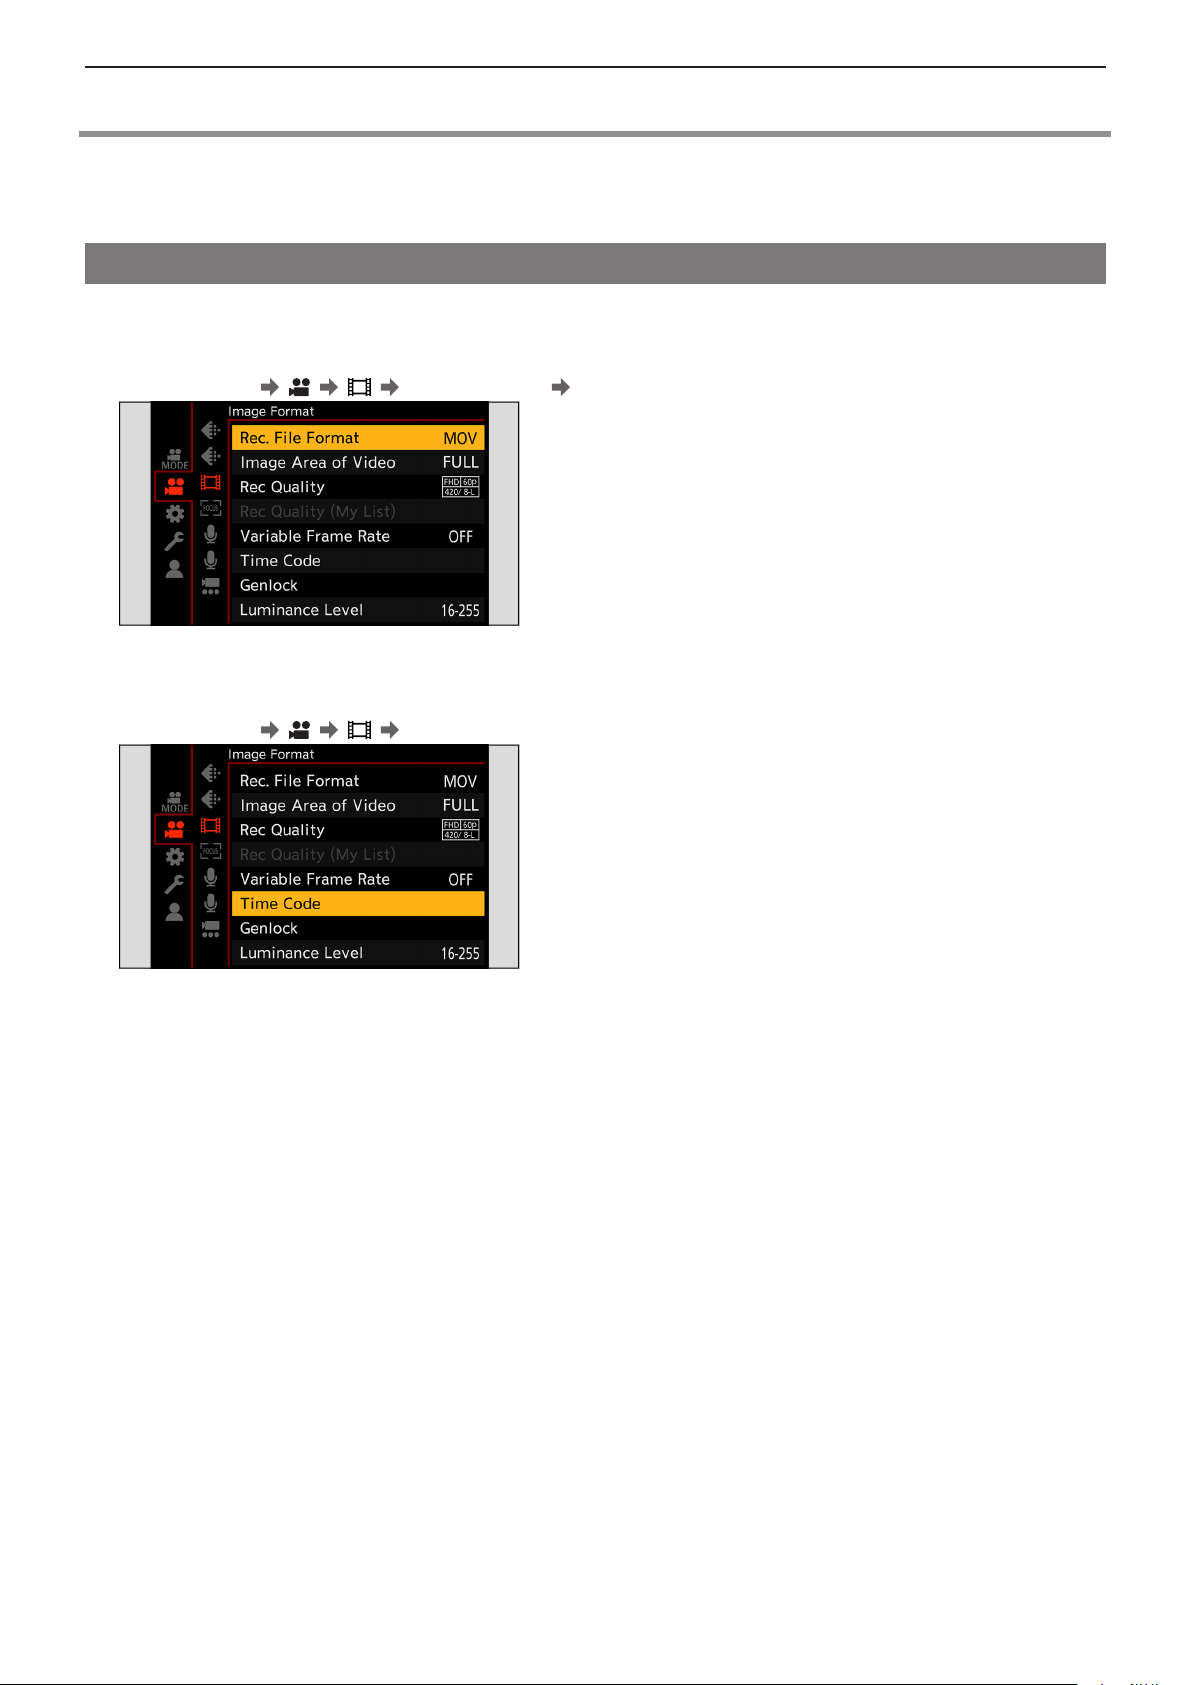
4. Recording Videos - Time Code
Time Code
When [Rec. File Format] is set to [MOV], the time code is automatically recorded during video recording. If [MP4], the time code
is not recorded.
Setting the Time Code
Sets the recording, display, and output of the time code.
1 Set [Rec. File Format] to [MOV].
●
[MENU/SET] [ ] [ ] [Rec. File Format] [MOV]
2 Select [Time Code].
●
[MENU/SET] [ ] [ ] [Time Code]
- 62 -- 62 -
Page 63
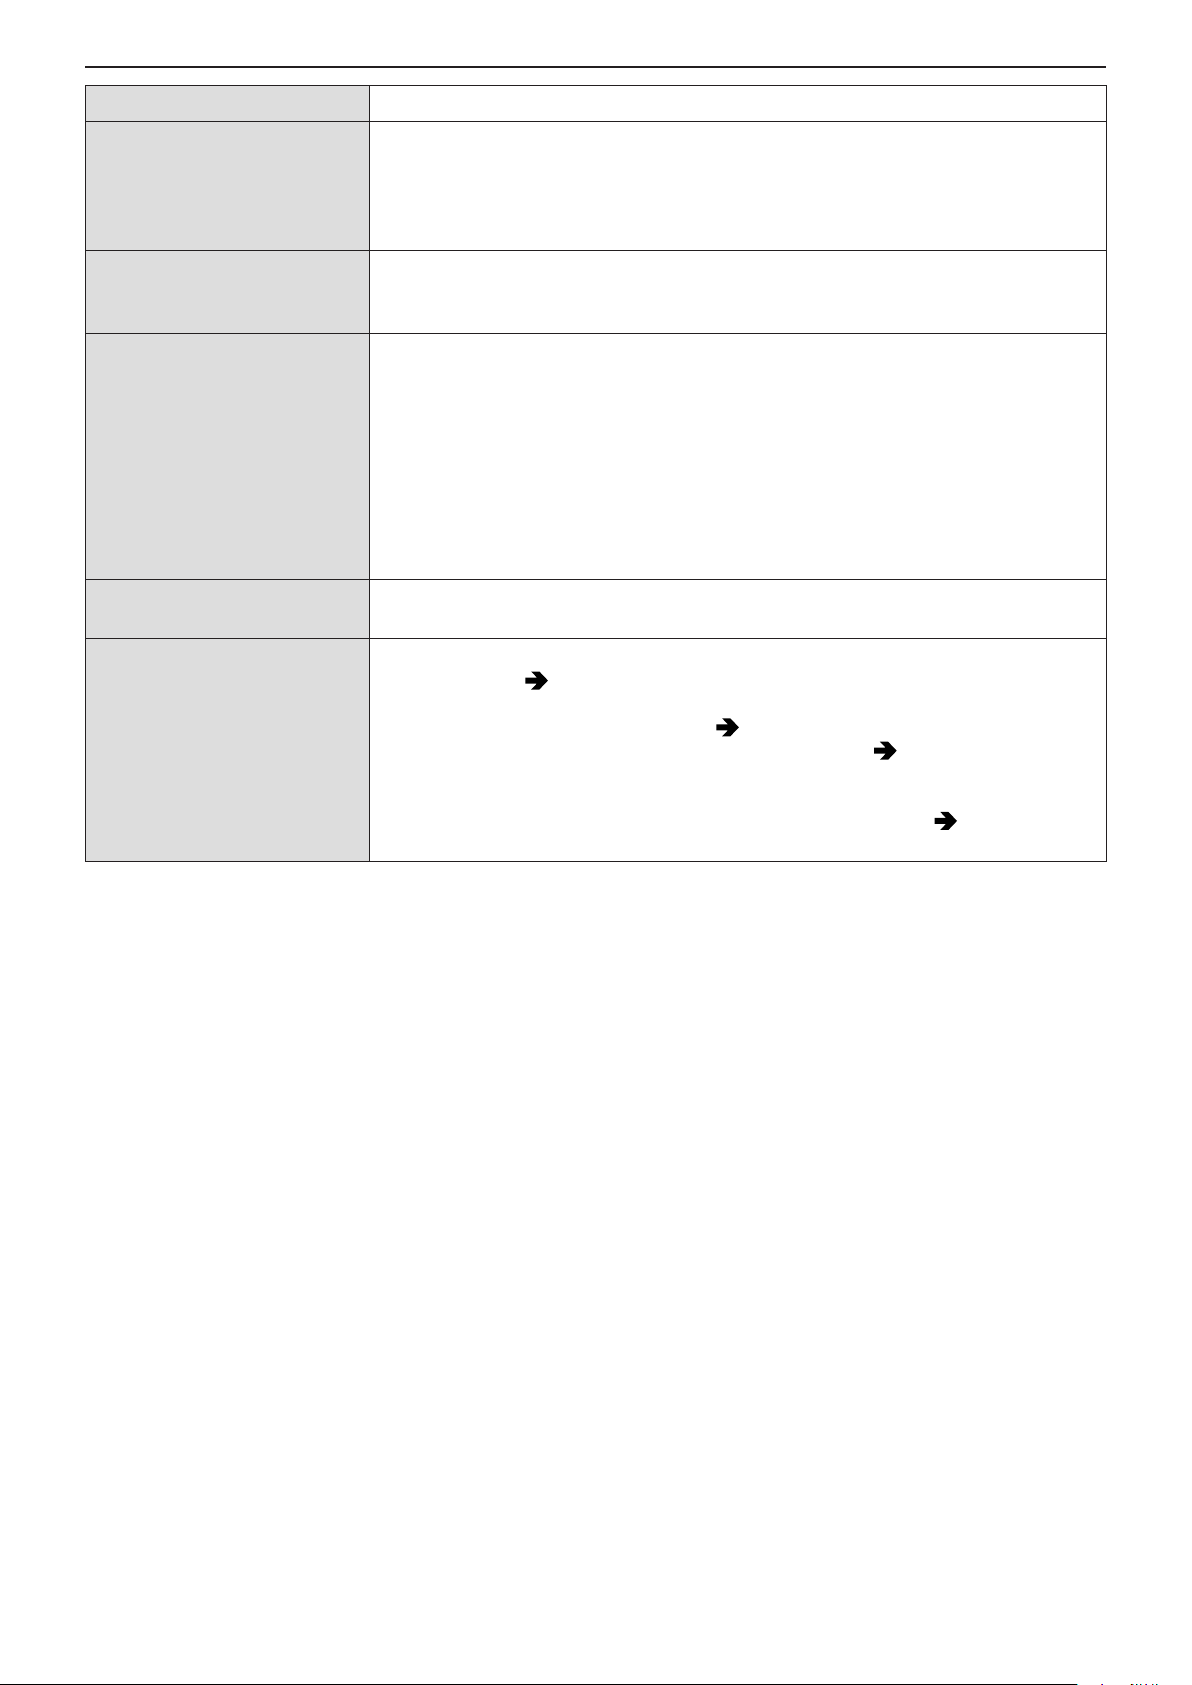
4. Recording Videos - Time Code
[Time Code Display] Displays the time code on the recording screen.
[REC RUN]: Counts the time code only when recording videos.
[FREE RUN]: Counts the time code also when video recording is stopped and when the
[Count Up]
camera is turned off.
●
When the following function is being used, [Count Up] is fixed to [REC RUN]:
– [Variable Frame Rate]
[Reset]: Sets to 00:00:00:00 (hour: minute: second: frame)
[Time Code Value]
[Manual Input]: Manually input hour, minute, second and frame.
[Current Time]: Sets hour, minute and second to current time and sets frame to 00.
[DF]: Drop Frame. The camera modifies the difference between recorded time and time
code.
●
Seconds and frames are separated by “.”.
Example: 00:00:00.00
[Time Code Mode]
[NDF]: Non-Drop Frame. Records the time code without drop frame.
●
Seconds and frames are separated by “:”.
Example: 00:00:00:00
●
When the following functions are being used, [Time Code Mode] is fixed to [NDF]:
– [50.00Hz (PAL)] / [24.00Hz (CINEMA)] ([System Frequency])
– 23.98p [Rec Quality]
[HDMI Time Code Output] /
[SDI Time Code Output]
[External TC Setting]
Images to be output via HDMI/SDI will be added with time code information then output.
●
The device screen may go dark depending on the connected device.
Synchronize the time code default value with an external device that supports time code
input and output. (
64 / Synchronizing the Time Code with an External Device)
[TC Synchronization]: Selects the input ( 66 / Synchronize the Time Code of the
Camera with That of the External Device (TC IN)) and output (
65 / Synchronize the
Time Code of the External Device with That of the Camera (TC OUT)) for time code
signals. (LTC signal)
[TC Output Reference]: Sets the timing for time code signal output. ( 65 /
Synchronize the Time Code of the External Device with That of the Camera (TC OUT))
- 63 -- 63 -
Page 64
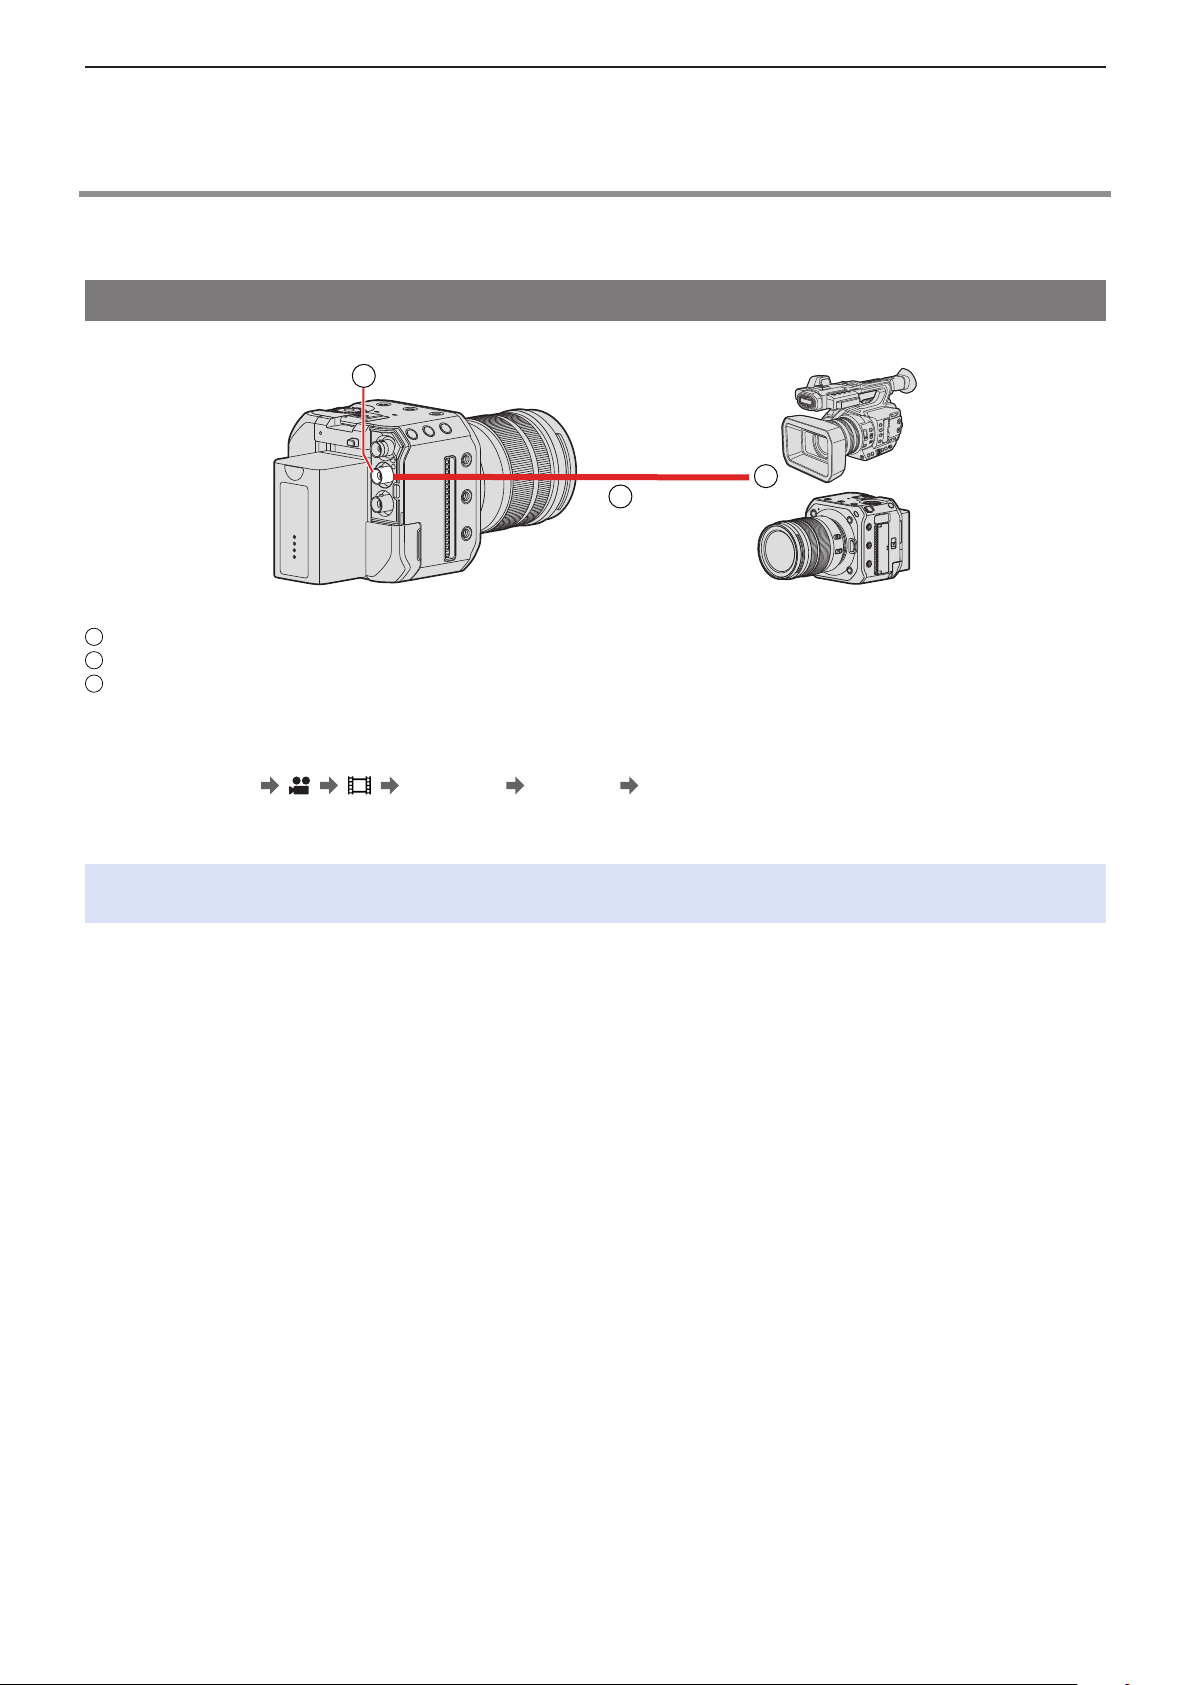
4. Recording Videos - Synchronizing the Time Code with an External Device
A
A
B
C
Synchronizing the Time Code with an External Device
Synchronize the time code default value with an external device that supports time code signal input and output.
Preparations for Time Code Synchronization
When [Count Up] is set to [FREE RUN], you can synchronize the initial value of the time code with an external device.
C
B
[TC IN/OUT] terminal
BNC cable (commercially available)
External devices
1 Set [Count Up] to [FREE RUN].
●
[MENU/SET] [ ] [ ] [Time Code] [Count Up] [FREE RUN]
2 Connect the camera and external device with a BNC cable.
●
When connecting a BNC cable to the [TC IN/OUT] terminal, use one that is less than 2.8 m (9.1 feet).
It is recommended to use a double shielded BNC cable equivalent to 5C-FB.
- 64 -- 64 -
Page 65
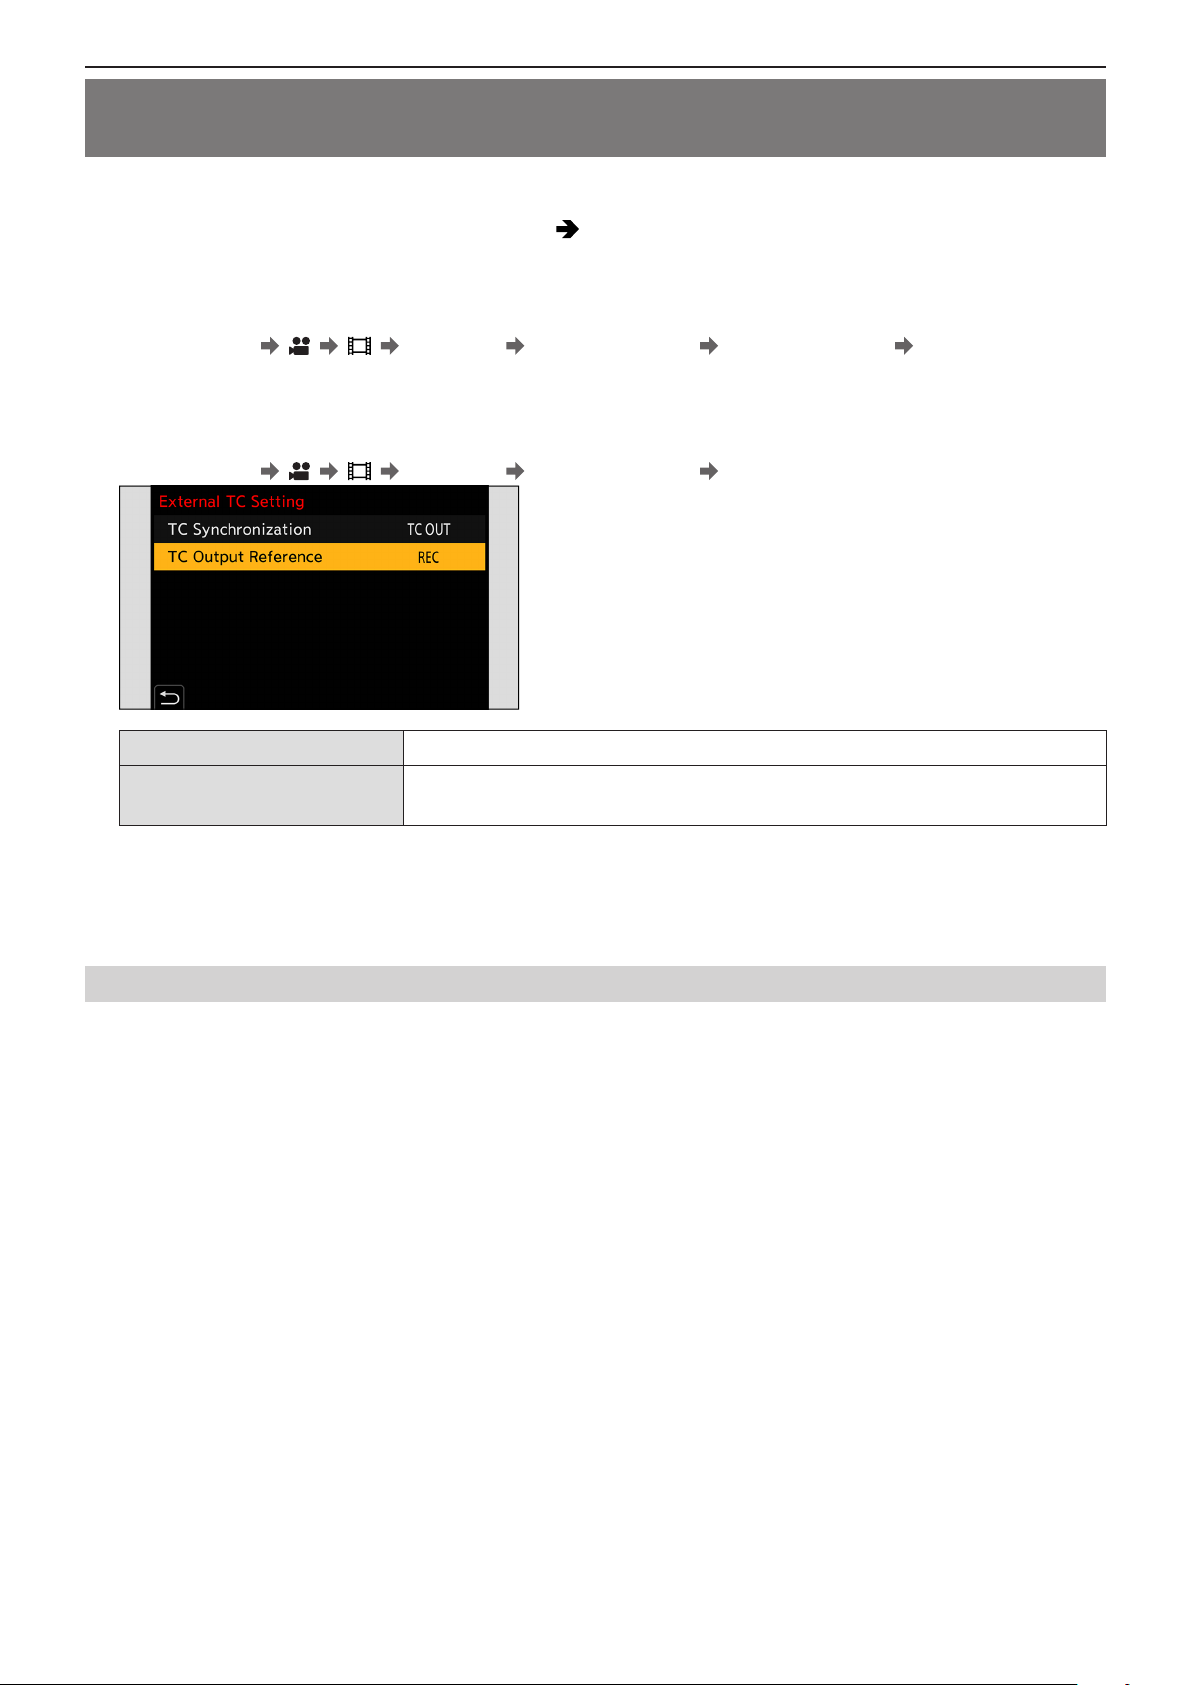
4. Recording Videos - Synchronizing the Time Code with an External Device
Synchronize the Time Code of the External Device with That of the Camera (TC OUT)
The initial time code value of the external device is synchronized according to the time code signal of the camera.
1 Prepare for time code synchronizing. ( 64 / Preparations for Time Code
Synchronization)
2 Set [TC Synchronization] to [TC OUT].
●
[MENU/SET] [ ] [ ] [Time Code] [External TC Setting] [TC Synchronization] [TC OUT]
● The time code signal is output according to the recording frame rate of the [Rec Quality] and the [Time Code Mode]
([DF]/[NDF]) setting.
3 Select [TC Output Reference].
●
[MENU/SET] [ ] [ ] [Time Code] [External TC Setting] [TC Output Reference]
[REC] Outputs the time code signal for the images that you record.
[HDMI] / [SDI]
When connected with an external device (external recorder, etc.) via HDMI/SDI, the
time code signal output is delayed slightly to match the HDMI/SDI images.
4 Operate the external device to synchronize the time code.
Outputting the Time Code Signal Again
By setting as follows, the time code signal can be output just by connecting with the external device with the BNC cable:
– [Count Up] ([Time Code]): [FREE RUN]
– [TC Synchronization] ([External TC Setting] in [Time Code]): [TC OUT]
- 65 -- 65 -
Page 66
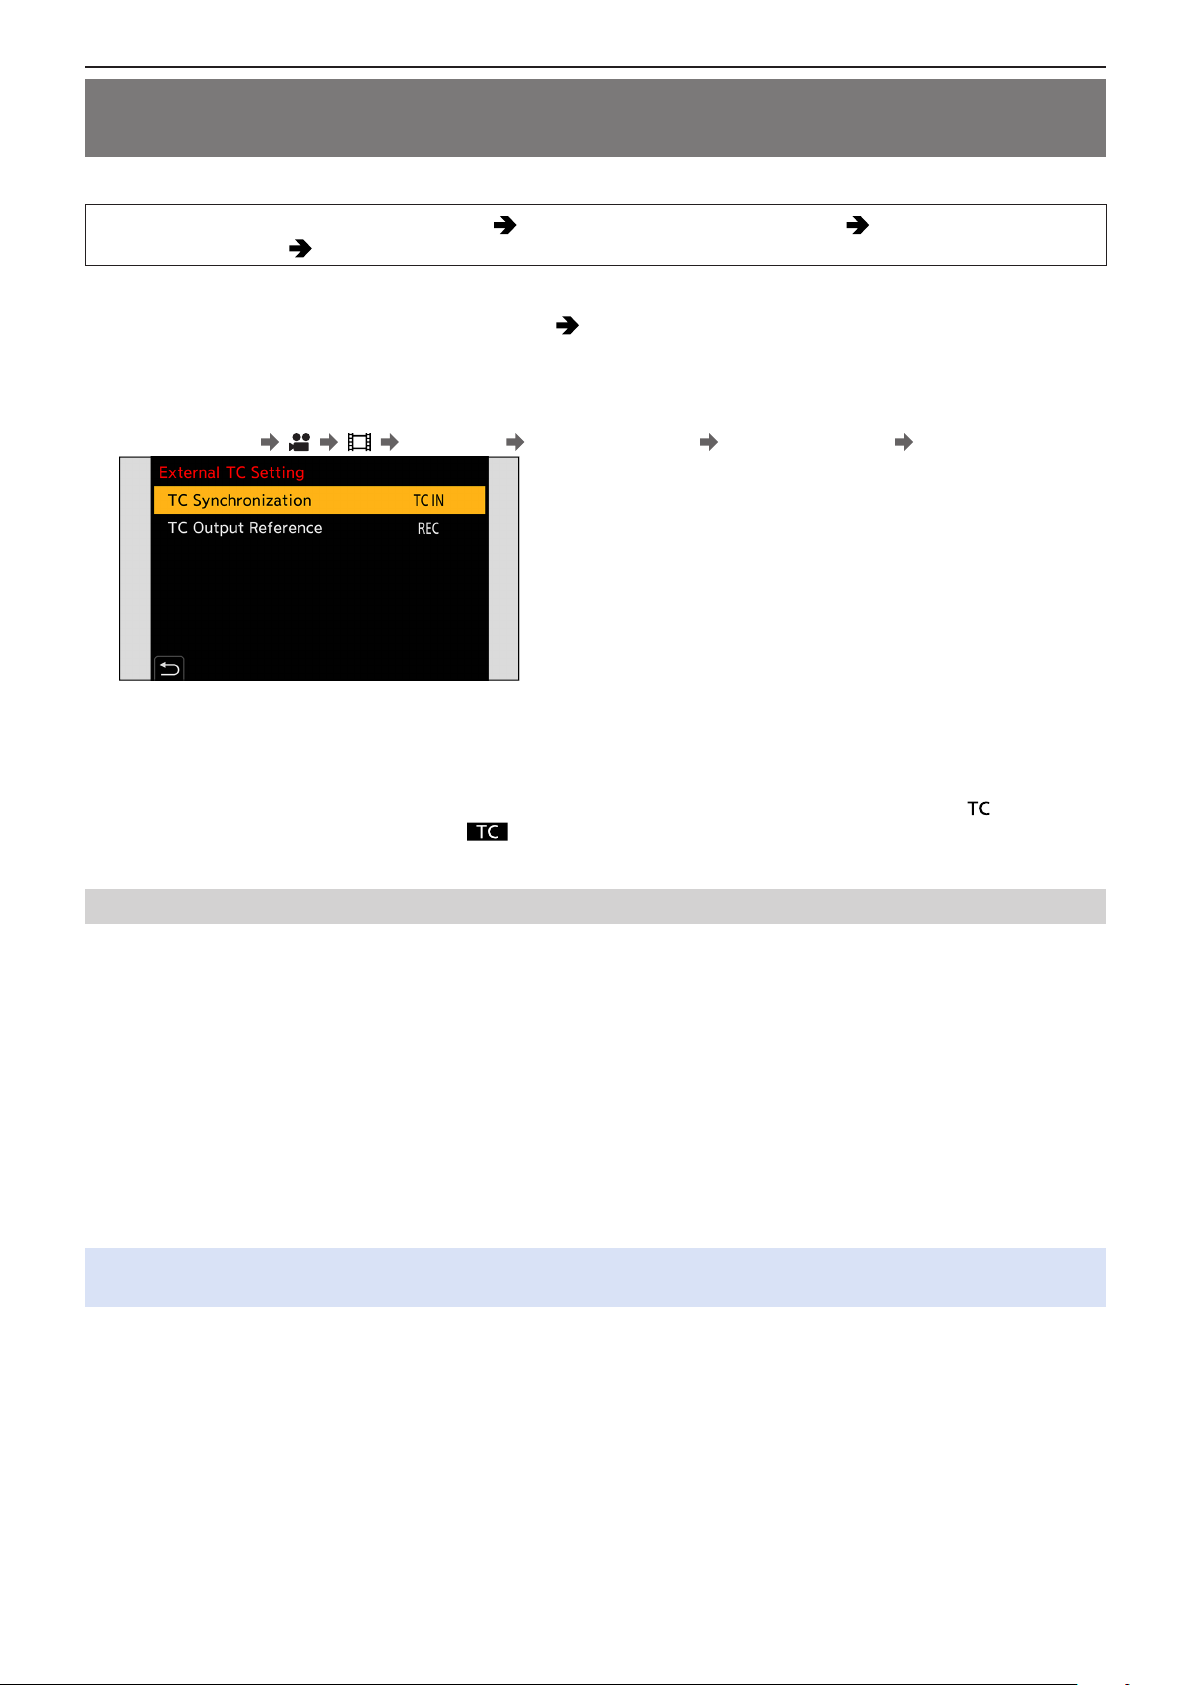
4. Recording Videos - Synchronizing the Time Code with an External Device
Synchronize the Time Code of the Camera with That of the External Device (TC IN)
The initial time code value of the camera is synchronized according to the time code signal of the external device.
●
In advance, change the [System Frequency] ( 55 / [System Frequency]), [Rec Quality] ( 56 / [Rec Quality]), and
[Time Code Mode] ( 63 / [Time Code Mode]) to match the external device.
1 Prepare for time code synchronizing. ( 64 / Preparations for Time Code
Synchronization)
2 Set [TC Synchronization] to [TC IN].
●
[MENU/SET] [ ] [ ] [Time Code] [External TC Setting] [TC Synchronization] [TC IN]
3 Operate the external device to output the time code signal.
●
Set the time code count method of the external device to free run, and output the signal.
● When synchronized with the time code of an external device, this camera is in a slave state, and the [ ] of the time
code shown on the screen switches to [
Maintaining, Releasing, and Restoring the Slave State
Even if you disconnect the BNC cable, the camera will remain in slave state.
●
Perform one of the following operations to release the camera from the slave state.
– Operate the camera ON/OFF button
– Switch the recording mode
– Change the [System Frequency]
– Set the [Variable Frame Rate]
– Switch the [Rec Quality] between 23.98p and a different recording frame rate
– Change the following [Time Code] setting items
[Count Up], [Time Code Value], [Time Code Mode], [TC Synchronization]
●
To restore the slave state, reconnect the BNC cable to the external device while set as follows.
The time code signal can be input just by connecting.
– [Count Up] ([Time Code]): [FREE RUN]
– [TC Synchronization] ([External TC Setting] in [Time Code]): [TC IN]
●
Even when the system frequency differs between the camera and the external device, their initial time code values may
be synchronized. Bear in mind, however, that the time codes lose sync as they count up.
].
- 66 -- 66 -
Page 67
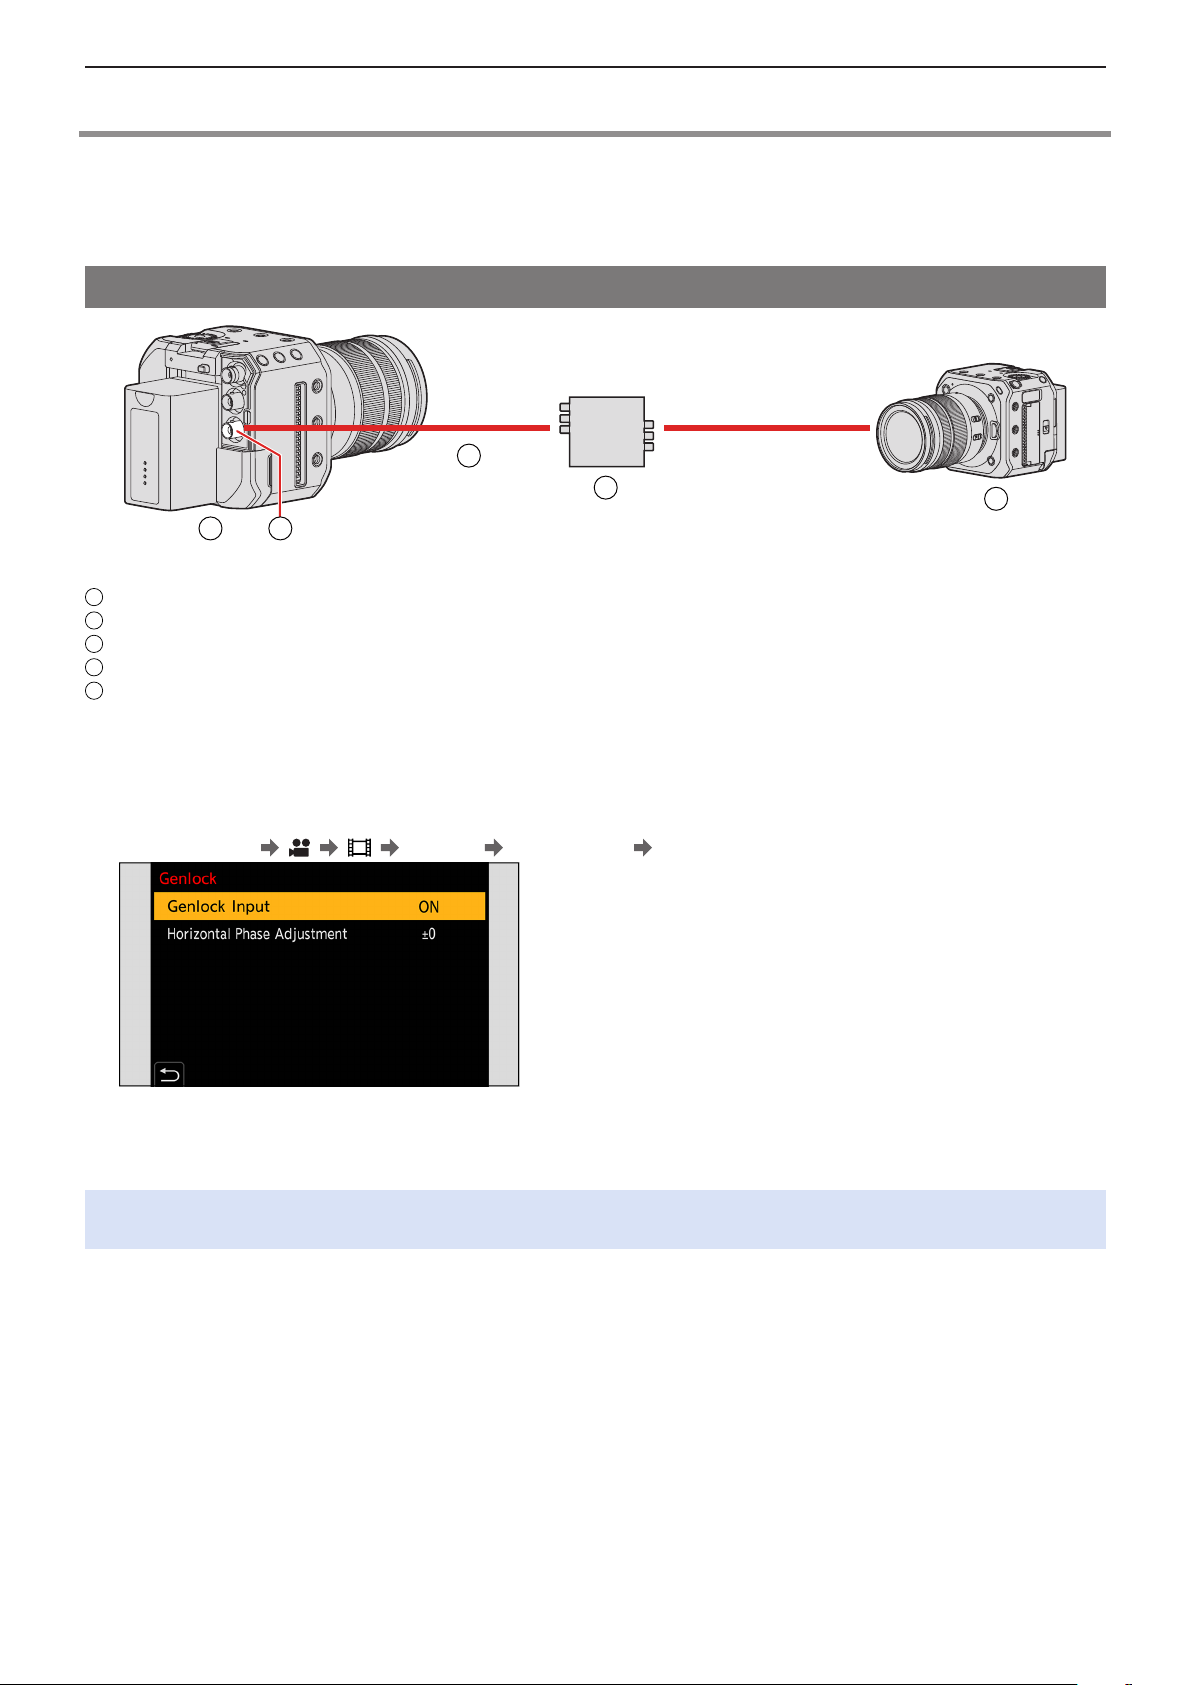
4. Recording Videos - Genlock settings
A
B
C
D
E
Genlock settings
When using several units of this camera or recording in combination with other recording devices, input the external sync signal
from the [GENLOCK IN] terminal to synchronize the cameras.
The camera is compatible with BBS (Black Burst Sync) and tri-level sync.
Input a sync signal
C
A
Camera (Slave)
[GENLOCK IN] terminal
BNC cable (commercially available)
Sync signal generator (Master)
External device (Slave)
B
D
E
1 Connect the sync signal generator and camera with a BNC cable.
2 Set [Genlock Input] to [ON].
●
[MENU/SET] [ ] [ ] [Genlock] [Genlock Input] [ON]
3 Output a sync signal with the sync signal generator.
●
When connecting a BNC cable to the [GENLOCK IN] terminal, use one that is less than 2.8 m (9.1 feet).
It is recommended to use a double shielded BNC cable equivalent to 5C-FB.
- 67 -- 67 -
Page 68
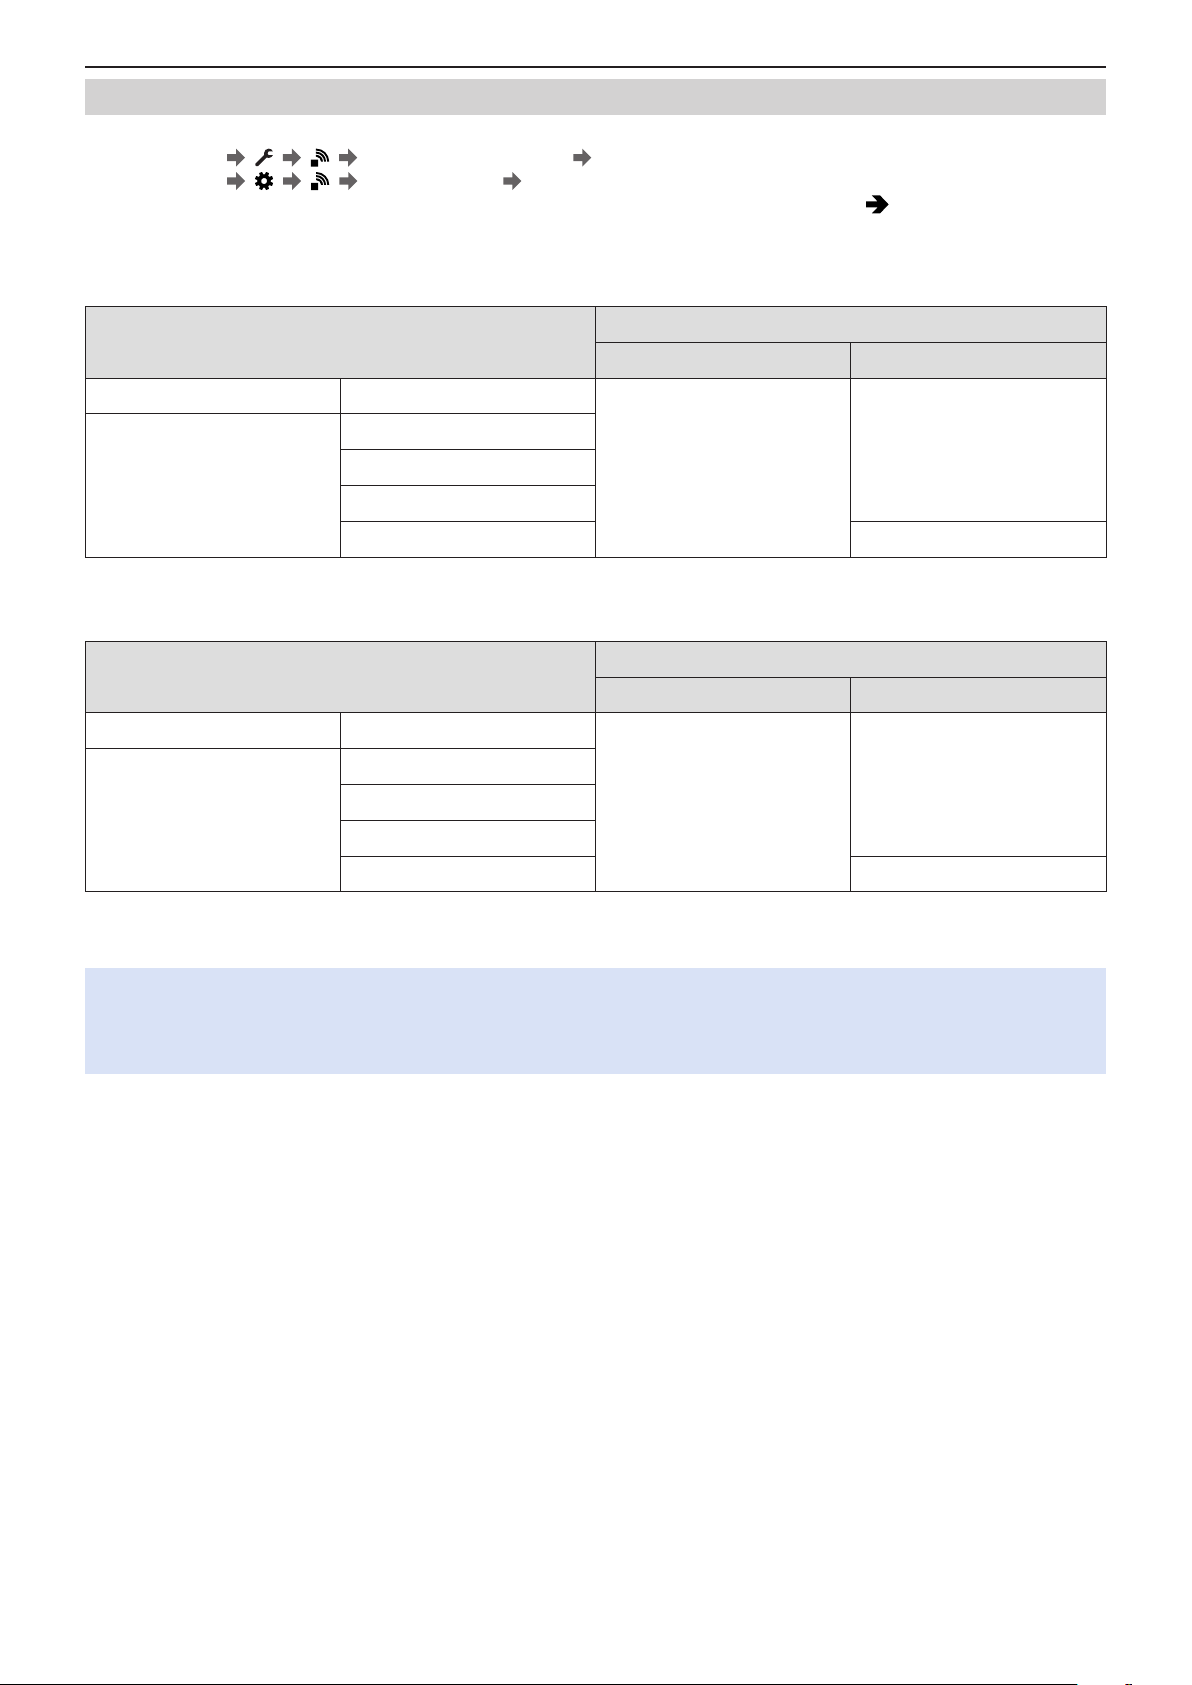
4. Recording Videos - Genlock settings
Compatible reference signal
The compatible reference signal differs depending on the following camera settings.
●
[MENU/SET] [ ] [ ] [HDMI / SDI Connections] [SDI Output]
●
[MENU/SET] [ ] [ ] [SDI Rec Output] [SDI Output Resolution]
(The items that can be set differs depending on the recording frame rate of the [Rec Quality]. ( 138 / Set the resolution
during recording when output via SDI))
[System Frequency]: [59.94Hz (NTSC)]
■
Camera setting
[SDI Output] OFF
1080p*
[SDI Output Resolution]
([SDI Output]: [ON])
[System Frequency]: [50.00Hz (PAL)]
■
Camera setting
[SDI Output] OFF
[SDI Output Resolution]
([SDI Output]: [ON])
1080PsF
1080p*
1080PsF
Compatible sync signal
BBS Tri-level sync
1
1080i
720p 720/59.94p
2
1080i
720p 720/50.00p
480/59.94i
Compatible sync signal
BBS Tri-level sync
576/50.00i
1080/59.94i
1080/50.00i
1
When the recording frame rate is set to 29.97p of [Rec Quality], there is no compatible tri-level sync signal.
*
2
When the recording frame rate is set to 25.00p of [Rec Quality], there is no compatible tri-level sync signal.
*
●
Even when a sync signal is detected, the icon will not be displayed on the recording screen.
●
Input a sync signal before starting to record. (The syncing cannot be started when the sync signal is input while
recording.)
●
The [Genlock] does not work when the recording frame rate is set to a [Rec Quality] of 23.98 or 24.00.
- 68 -- 68 -
Page 69
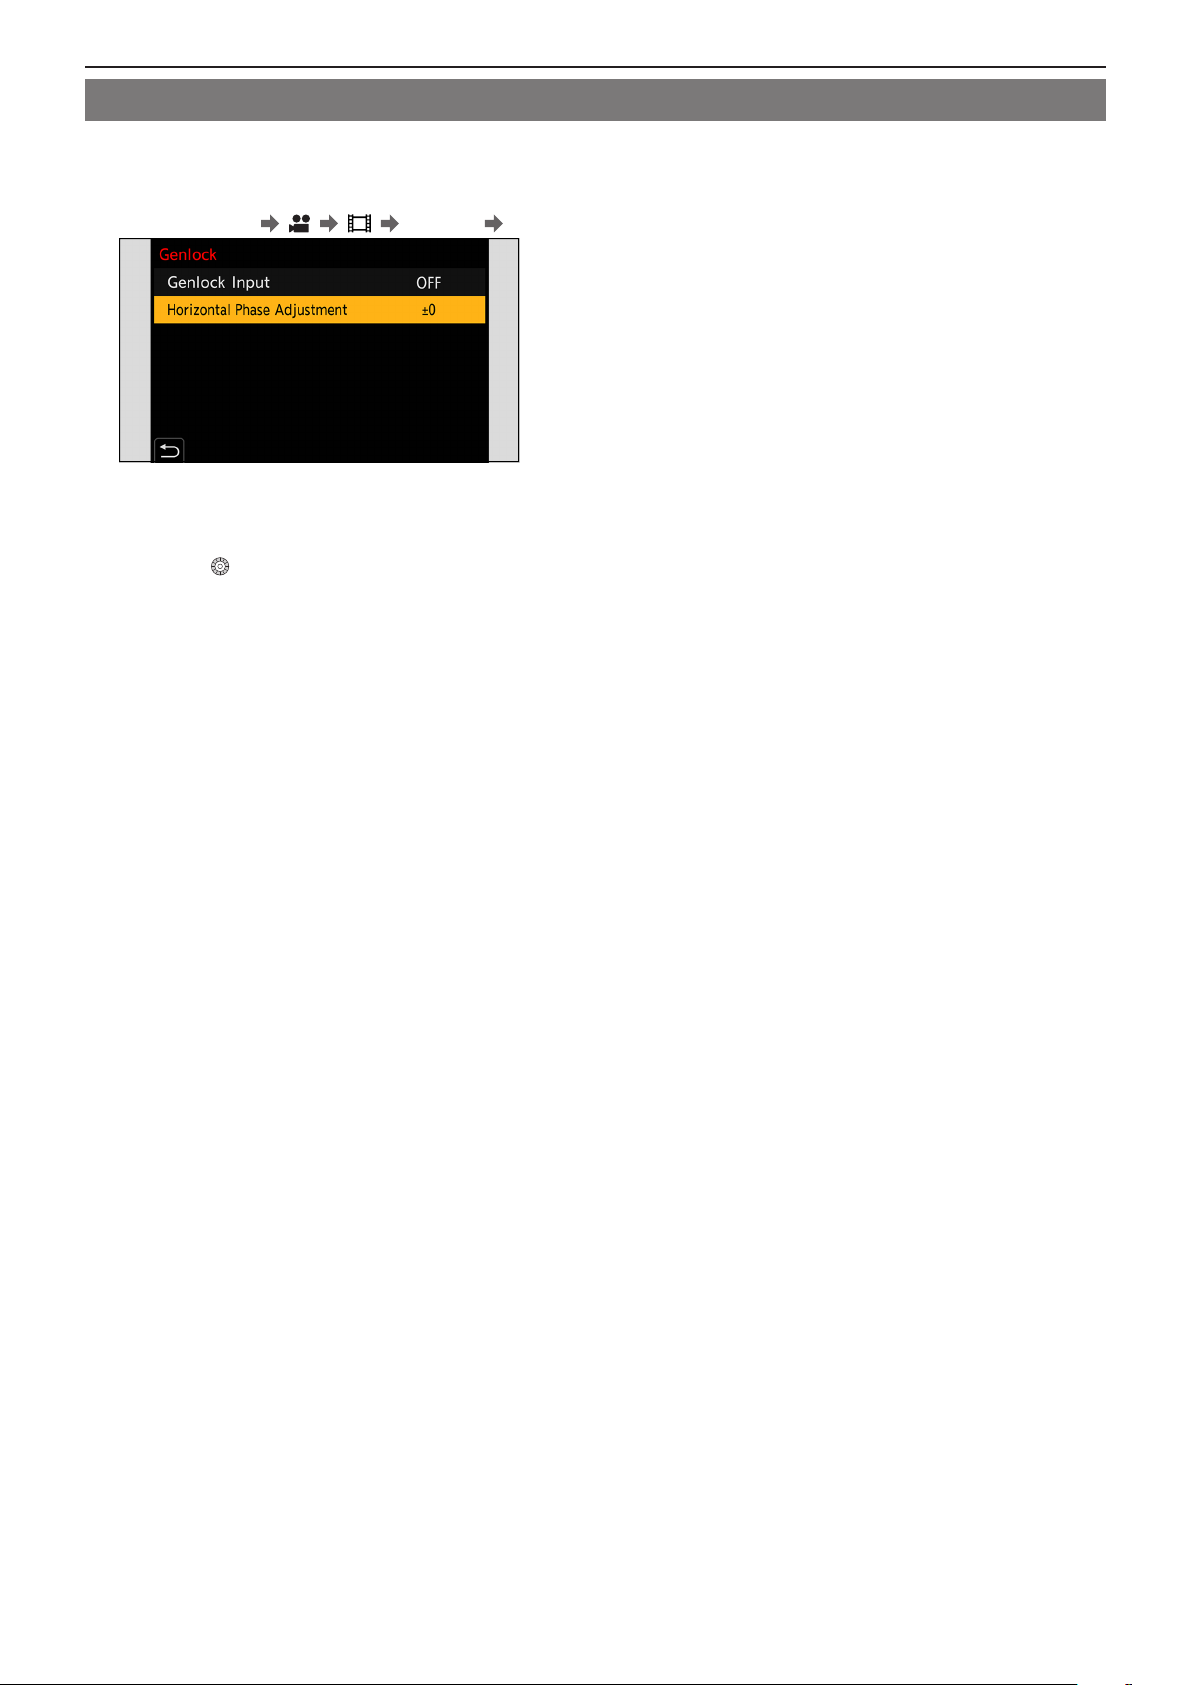
4. Recording Videos - Genlock settings
Horizontal phase adjustment
Adjusts the horizontal phase.
1 Select [Horizontal Phase Adjustment].
●
[MENU/SET] [ ] [ ] [Genlock] [Horizontal Phase Adjustment]
2 Set the horizontal phase.
●
Rotate to adjust the value, then press [MENU/SET].
●
It can be set with the range of -206 to +49.
- 69 -- 69 -
Page 70
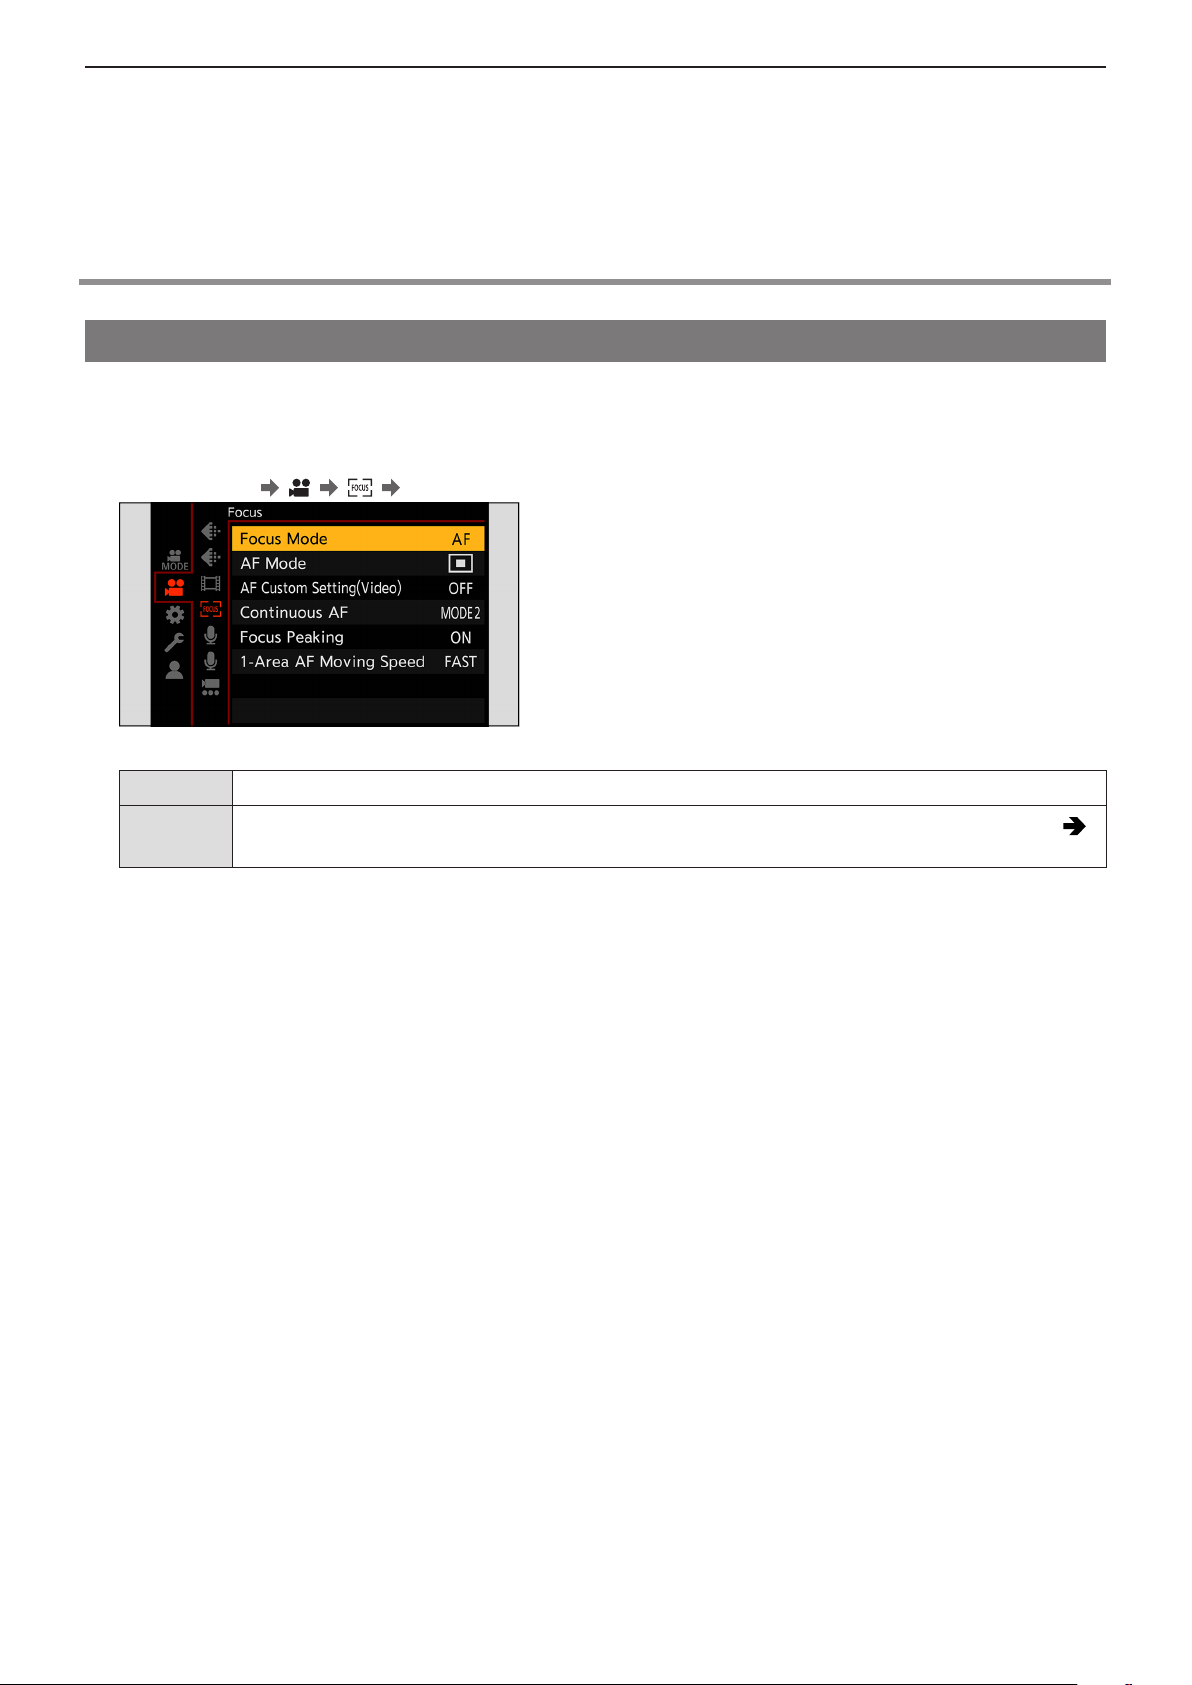
5. Recording settings - Focus / Zoom
5. Recording settings
Focus / Zoom
Selecting the Focus Mode
Select the focusing method ([Focus Mode]) to match subject movement.
1 Set the Focus Mode.
●
[MENU/SET] [ ] [ ] [Focus Mode]
1
[AF]*
[MF]
1
When recording video: Operates according to the settings of [Continuous AF].
*
When recording still images: When you turn the AF/AE button (half-press shutter button) of the “LUMIX Tether” software
to ON, it performs focusing and fixes the focus.
Automatically adjusts the focus.
Manually adjusts the focus. This is used when you want to fix the focus or do not want the AF to work. (
79 / Record Using MF)
- 70 -- 70 -
Page 71
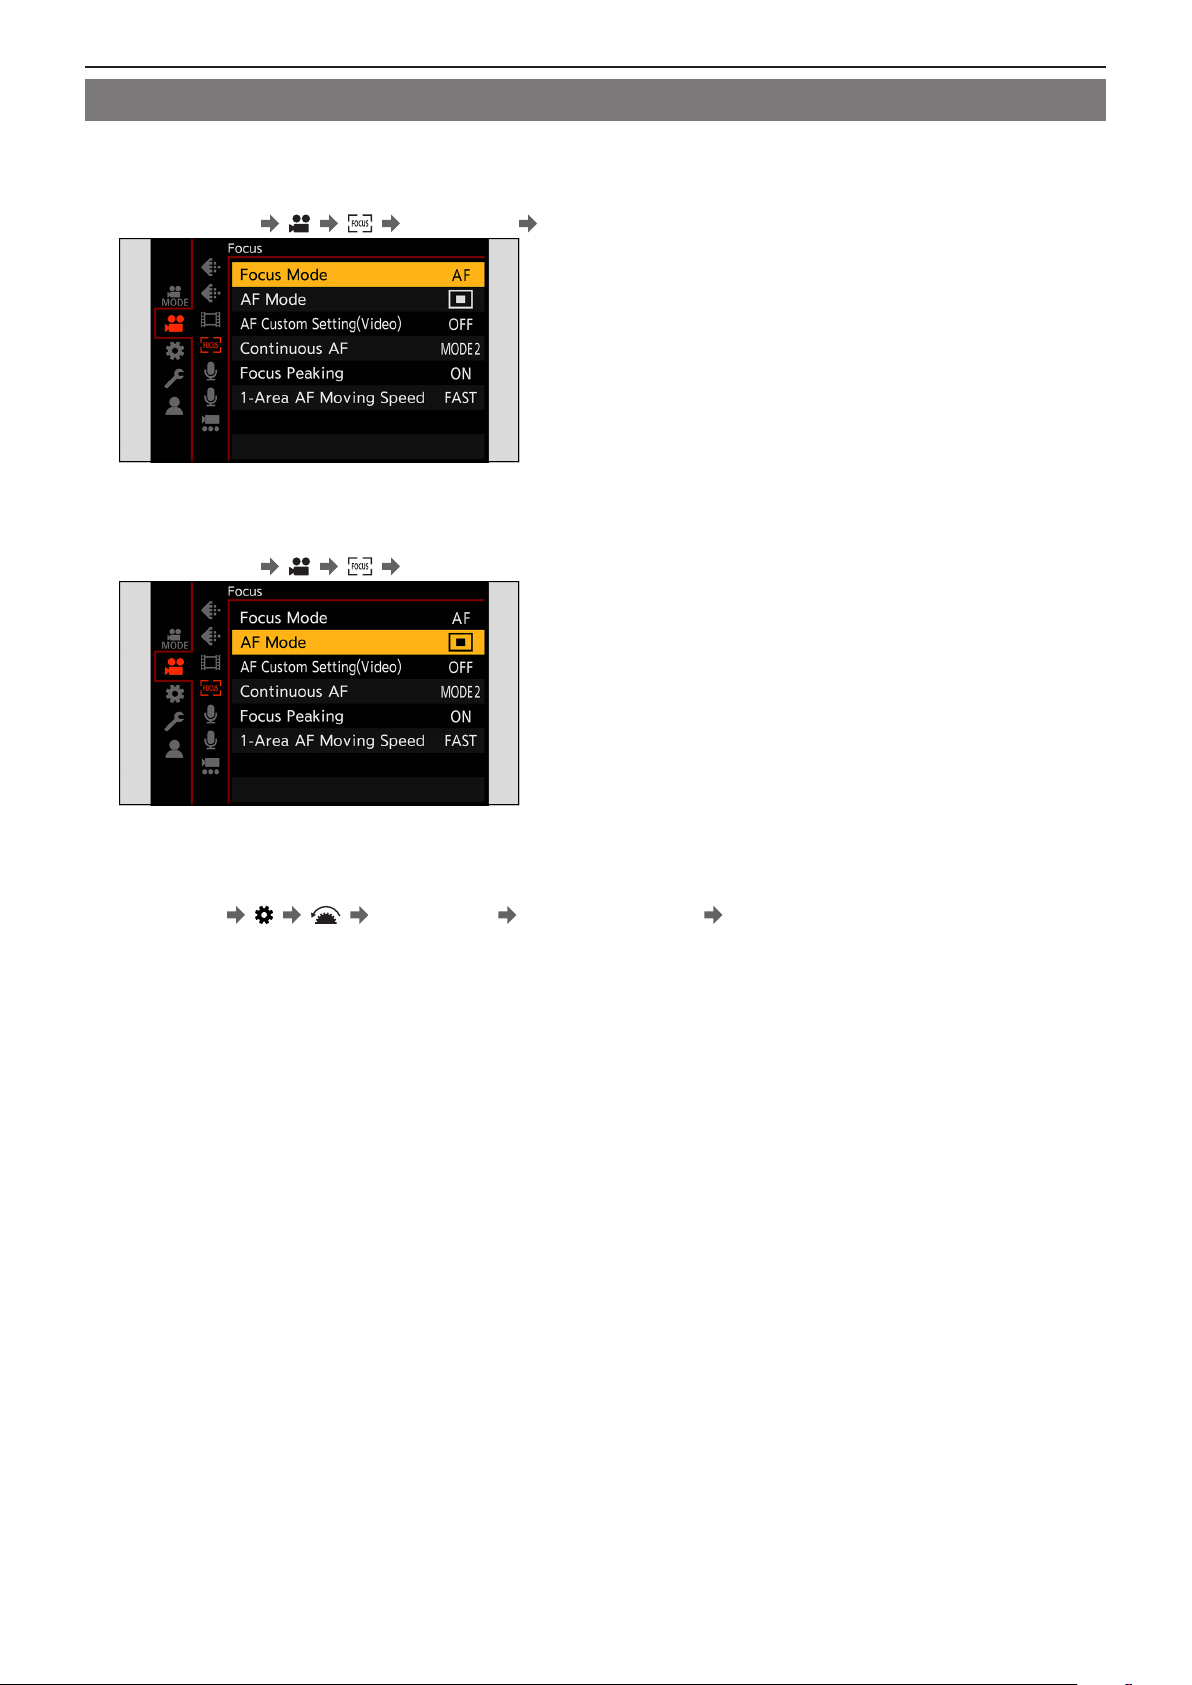
5. Recording settings - Focus / Zoom
Using AF
Select the focus mode and the AF mode appropriate for the subject and scene.
1 Set the focus mode to [AF].
●
[MENU/SET] [ ] [ ] [Focus Mode] [AF]
2 Select [AF Mode].
●
[MENU/SET] [ ] [ ] [AF Mode]
[AF-ON]
■
The AF also works when you press a Fn button that has [AF-ON] registered.
●
[MENU/SET] [ ] [ ] [Fn Button Set] [Setting in REC mode] [AF-ON]
- 71 -- 71 -
Page 72
5. Recording settings - Focus / Zoom
Subjects and recording conditions that make focusing difficult with AF mode
– Fast-moving subjects
– Extremely bright subjects
– Subjects without contrast
– Subjects recorded through windows
– Subjects near shiny objects
– Subjects in very dark locations
– When recording subjects both distant and near
●
You can change the operation of AF-ON so that AF prioritizes subjects close by.
This function is useful when the camera mistakenly focuses on the background:
[ ] [ ] [Fn Button Set] [Setting in REC mode] [AF-ON : Near Shift] ( 155 / Register Functions to the Fn
Buttons)
●
You can change the operation of AF-ON so that AF prioritizes subjects far away.
This function is useful when taking pictures through fences or nets:
] [ ] [Fn Button Set] [Setting in REC mode] [AF-ON : Far Shift] ( 155 / Register Functions to the Fn
[
Buttons)
●
When the following operations are performed while recording, it may take some time for the camera to focus.
– When zooming from the wide-angle end to the telephoto end
– When the subject is suddenly changed from one far away to one close by
●
If using the zoom after achieving focus, the focus may be erroneous. In that case, re-adjust the focus.
- 72 -- 72 -
Page 73
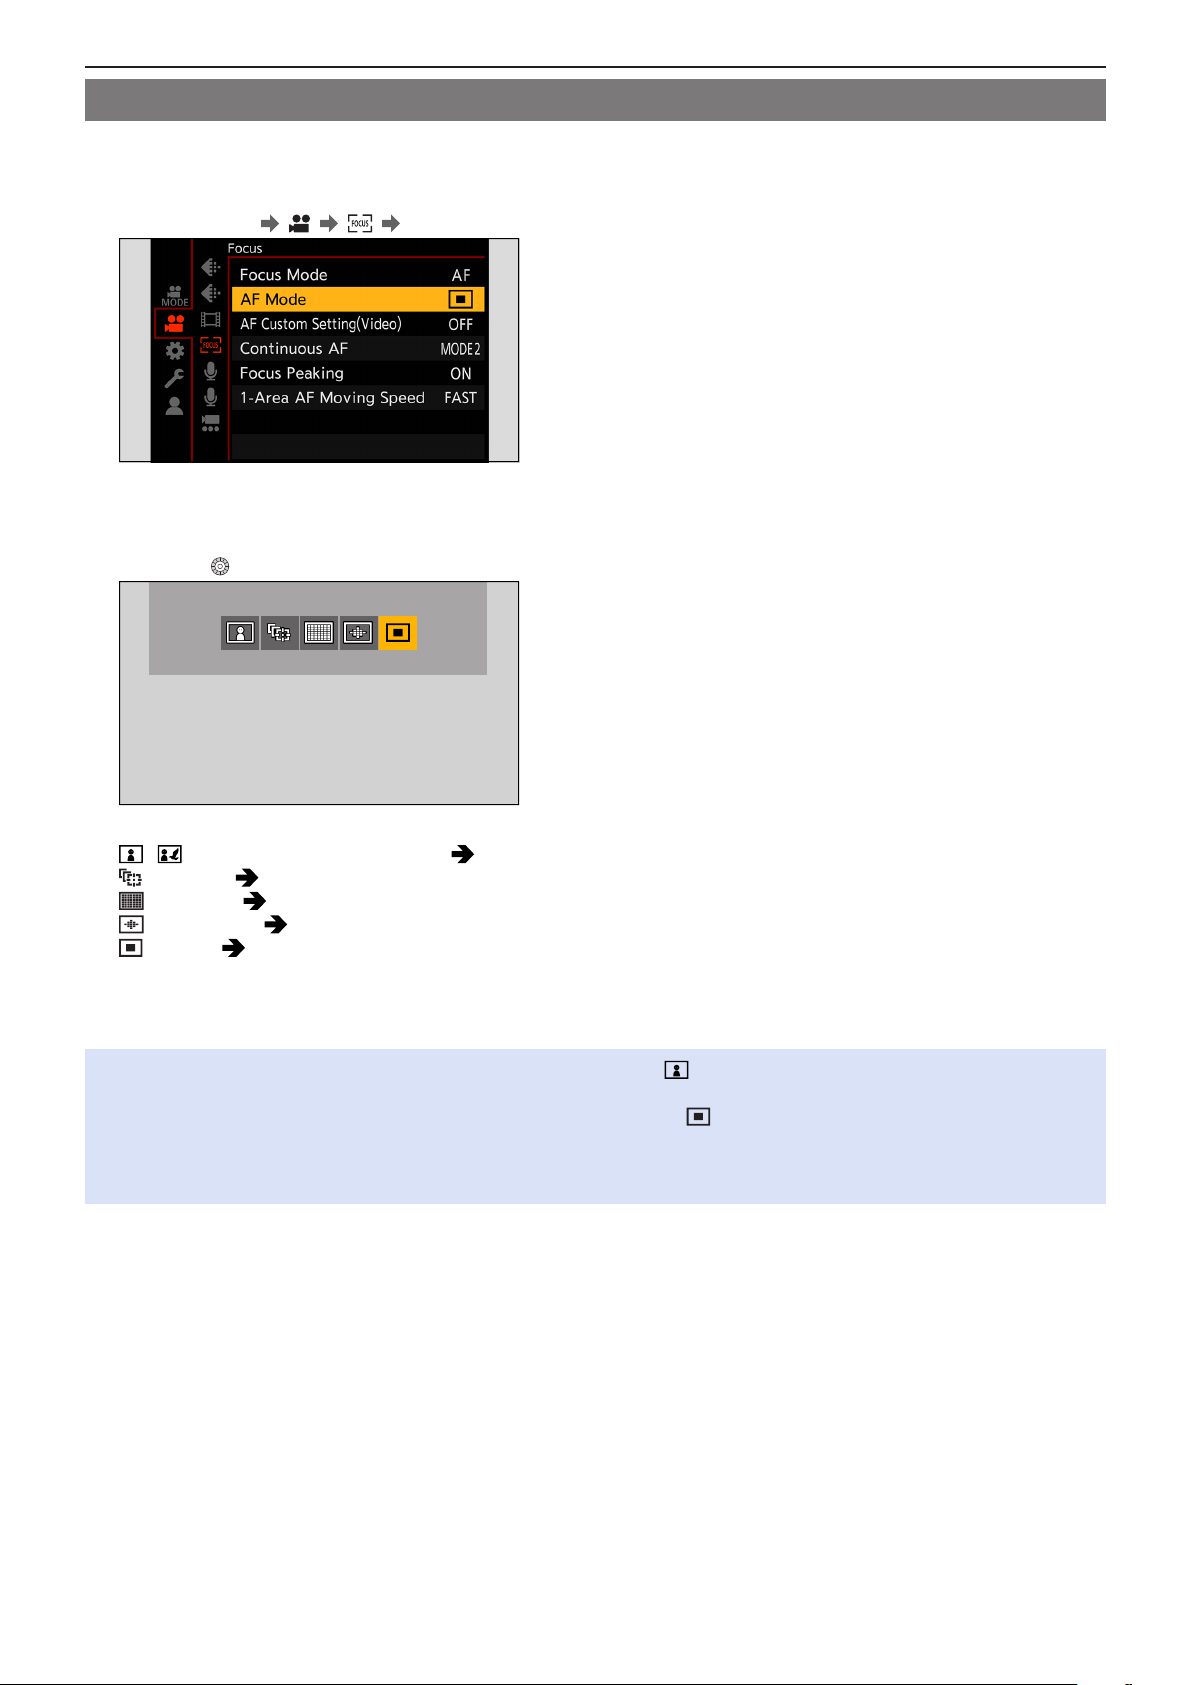
5. Recording settings - Focus / Zoom
Selecting the AF Mode
Select the focusing method to match the position and number of subjects.
1 Select [AF Mode].
●
[MENU/SET] [ ] [ ] [AF Mode]
2 Select the AF mode.
●
Rotate .
/ [Face/Eye/Body/Animal Detect.] ( 74 / [Face/Eye/Body/Animal Detect.])
[Tracking] ( 75 / [Tracking])
[225-Area] ( 76 / [225-Area])
[Zone (Oval)] ( 76 / [Zone (Oval)])
[1-Area] ( 77 / [1-Area])
3 Confirm your selection.
●
Press [MENU/SET].
●
When the following function is being used, the AF mode is fixed to [ ] (face detection):
– [Live Cropping]
●
When the following functions are being used, the AF mode is fixed to [ ] (1-Area) (It is not possible to move the AF area
or change its size.):
– [Digital Zoom]
– [Miniature Effect] ([Filter Settings])
- 73 -- 73 -
Page 74
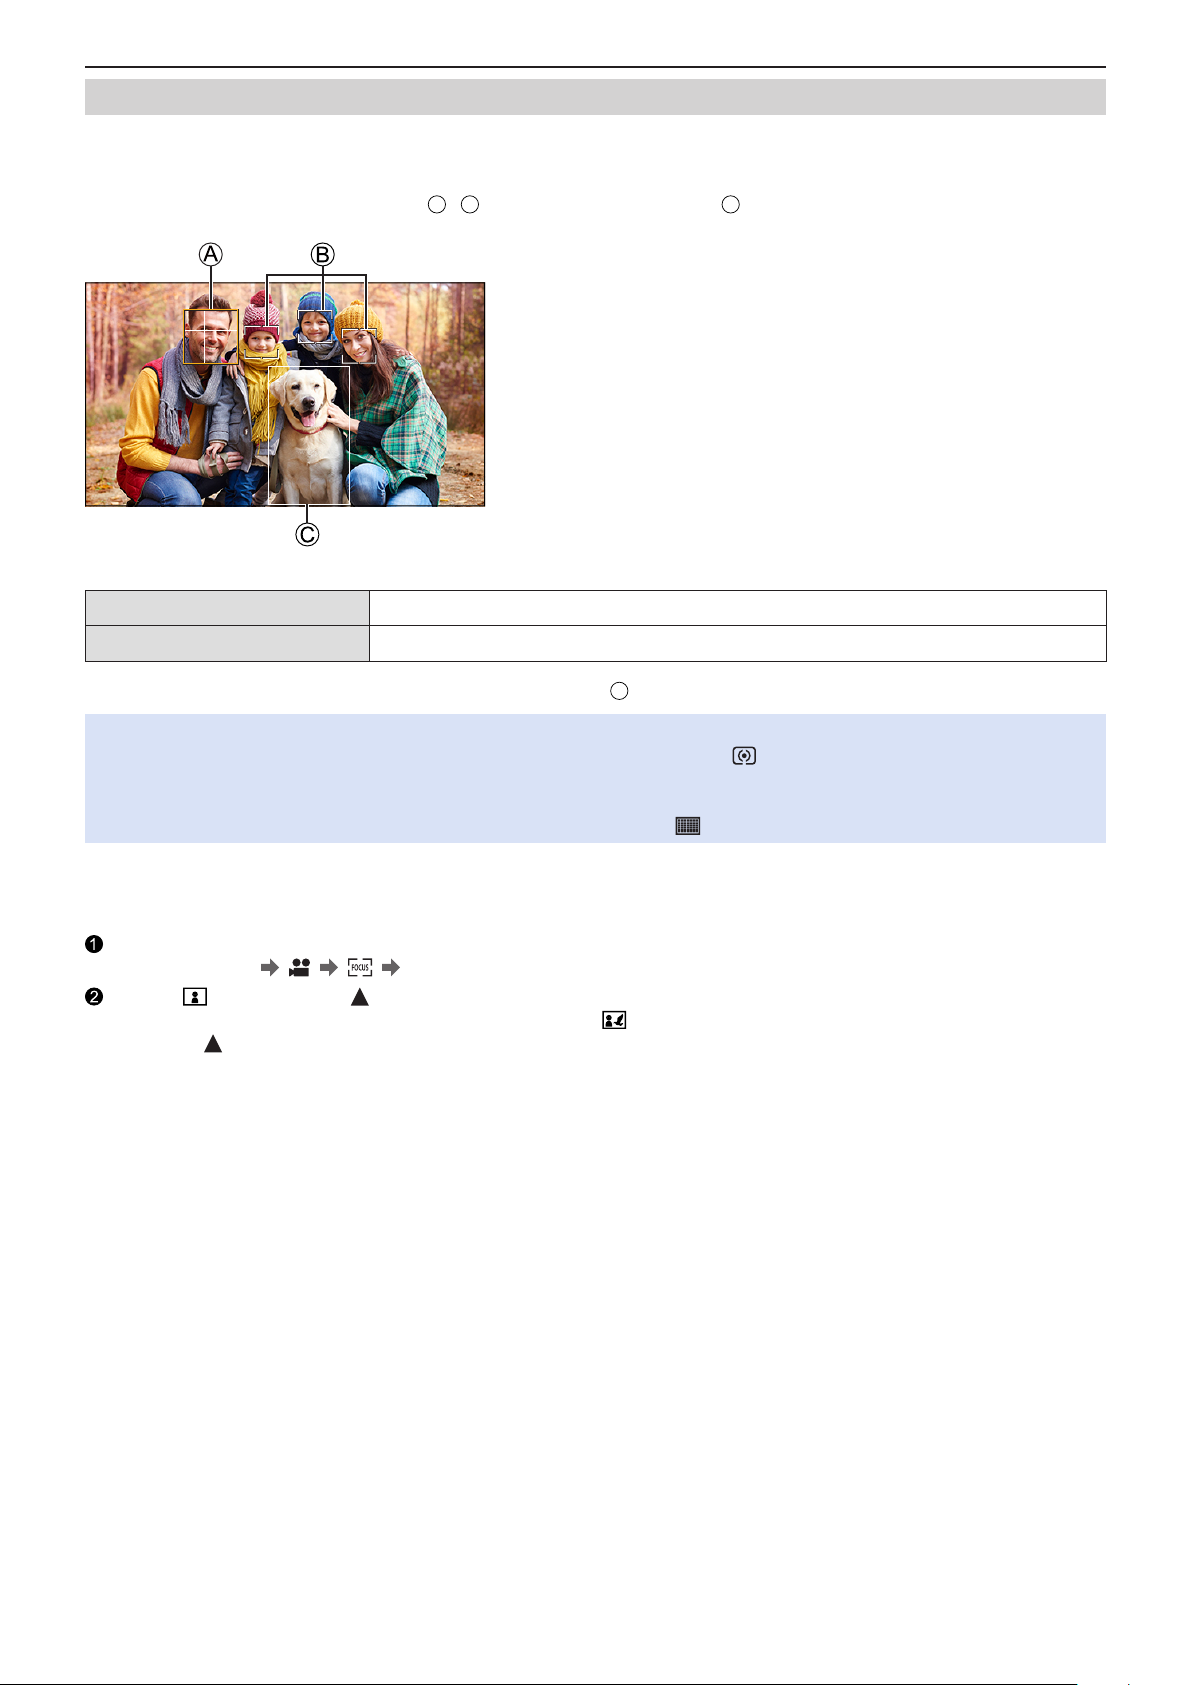
5. Recording settings - Focus / Zoom
[Face/Eye/Body/Animal Detect.]
The camera detects a person’s face, eyes, and body (entire body or upper half of the body) and adjusts the focus. With animal
detection enabled, the camera will also detect animals, such as birds, canines (including wolves), and felines (including lions).
When the camera detects a person’s face (A / B) or body or an animal’s body (C)*1, an AF area is displayed.
*1 When the animal detection is enabled.
Yellow AF area to be brought into focus. The camera selects this automatically.
White Displayed when multiple subjects are detected.
●
Eye detection works only for the eyes inside the yellow frame A.
●
When a person’s eyes are detected, the eye closer to the camera will be brought into focus.
The exposure will be adjusted to the face. (When [Metering Mode] is set to [ ])
●
The camera can detect the faces of up to 15 people.
●
The camera can detect a combined total of up to 3 human and animal bodies.
●
If any humans or animals are not detected, the camera operates as [ ].
Enable / Disable Animal Detection
■
Display the AF mode selection screen.
●
[MENU/SET] [ ] [ ] [AF Mode]
Select [ ] and then press .
●
This enables animal detection, and the icon changes to [ ].
●
Press again to disable animal detection.
- 74 -- 74 -
Page 75
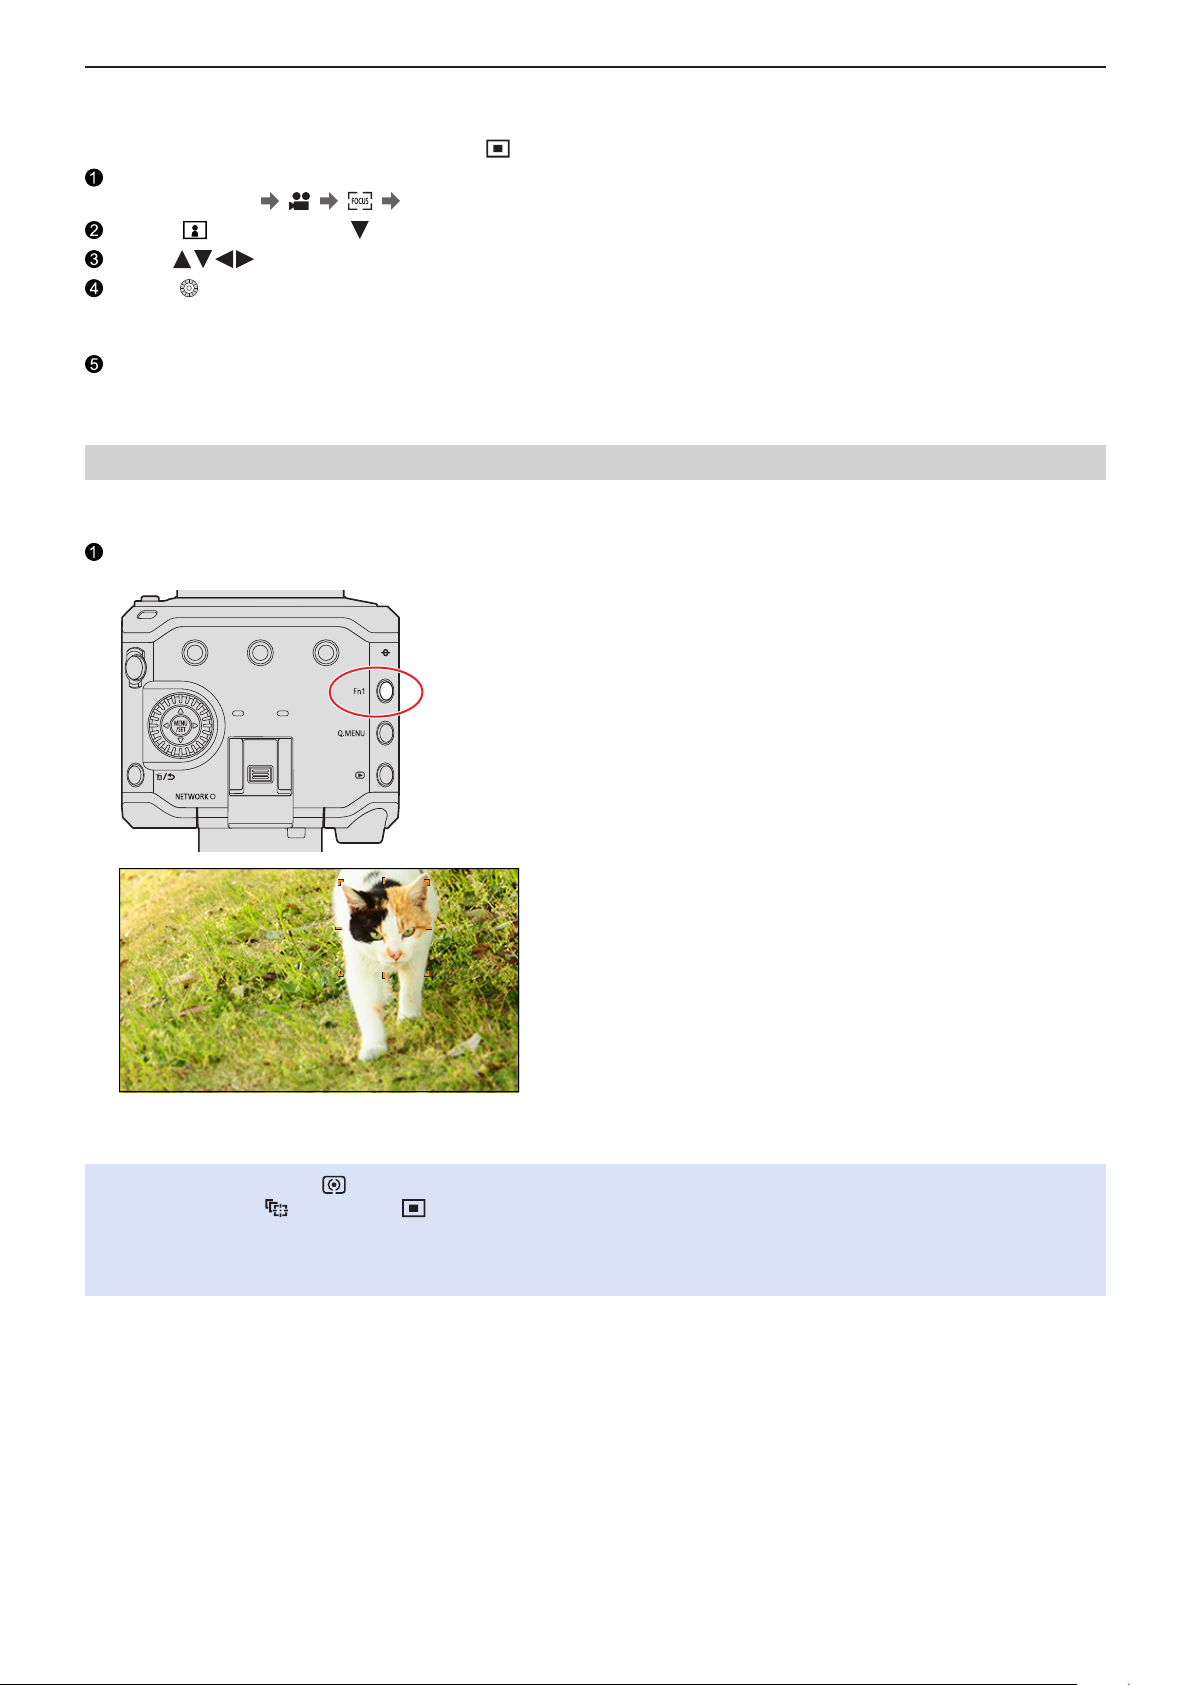
5. Recording settings - Focus / Zoom
Move and Change the Size of the Yellow AF Area
■
You can move the yellow AF area to the position of the white AF area and replace the white AF area with the yellow AF area. If
moving to a position outside an AF area, then the [
Display the AF mode selection screen.
●
[MENU/SET] [ ] [ ] [AF Mode]
Select [ ] and then press .
Press to move the position of the AF area.
Rotate to change the size of the AF area.
●
The first press of [Fn1] returns the AF area position to the center. The second press returns the size of the AF area to
the default.
Press [MENU/SET].
●
On the recording screen, press [MENU/SET] to cancel the AF area setting.
] AF area will be set.
[Tracking]
The AF area follows the movement of the subject, maintaining focusing.
Start tracking.
●
Aim the AF area over the subject, and press [Fn1].
●
To release AF Tracking → Press [Fn1] again.
●
Set [Metering Mode] to [ ] to continue to adjust the exposure as well.
●
In the following, [ ] operates as [ ]:
– [Monochrome] / [L.Monochrome] / [L.Monochrome D] ([Photo Style])
– [Sepia] / [Monochrome] / [Dynamic Monochrome] ([Filter Settings])
– When the subject is small
- 75 -- 75 -
Page 76
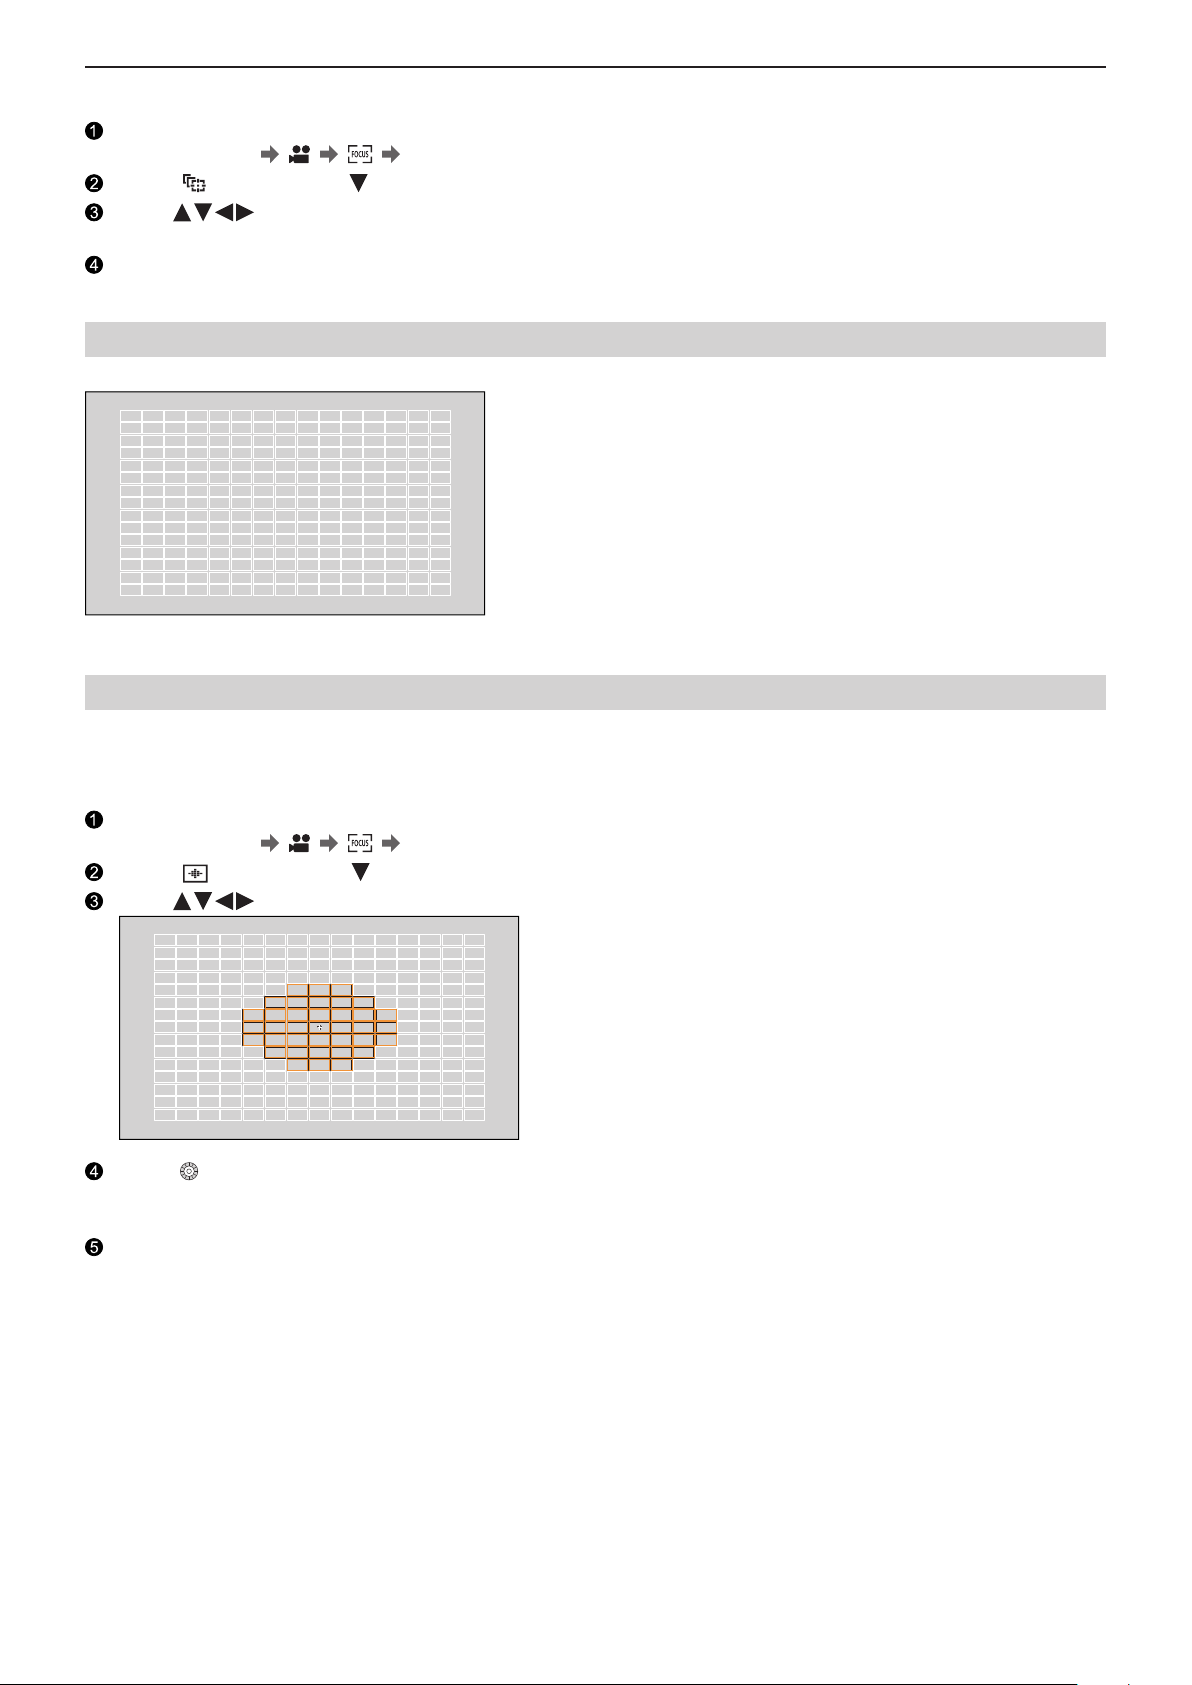
5. Recording settings - Focus / Zoom
Move the Position of the AF Area
■
Display the AF mode selection screen.
●
[MENU/SET] [ ] [ ] [AF Mode]
Select [ ] and then press .
Press to move the position of the AF area.
●
To return the position back to the center, press [Fn1].
Press [MENU/SET].
[225-Area]
The camera selects the most optimal AF area to focus from 225 areas.
[Zone (Oval)]
Within the 225 AF areas, a central oval zone can be focused.
Move and Change the Size of the AF Area
■
Display the AF mode selection screen.
●
[MENU/SET] [ ] [ ] [AF Mode]
Select [ ] and then press .
Press to move the position of the AF area.
Rotate to change the size of the AF area.
●
The first press of [Fn1] returns the AF area position to the center. The second press returns the size of the AF area to
the default.
Press [MENU/SET].
- 76 -- 76 -
Page 77
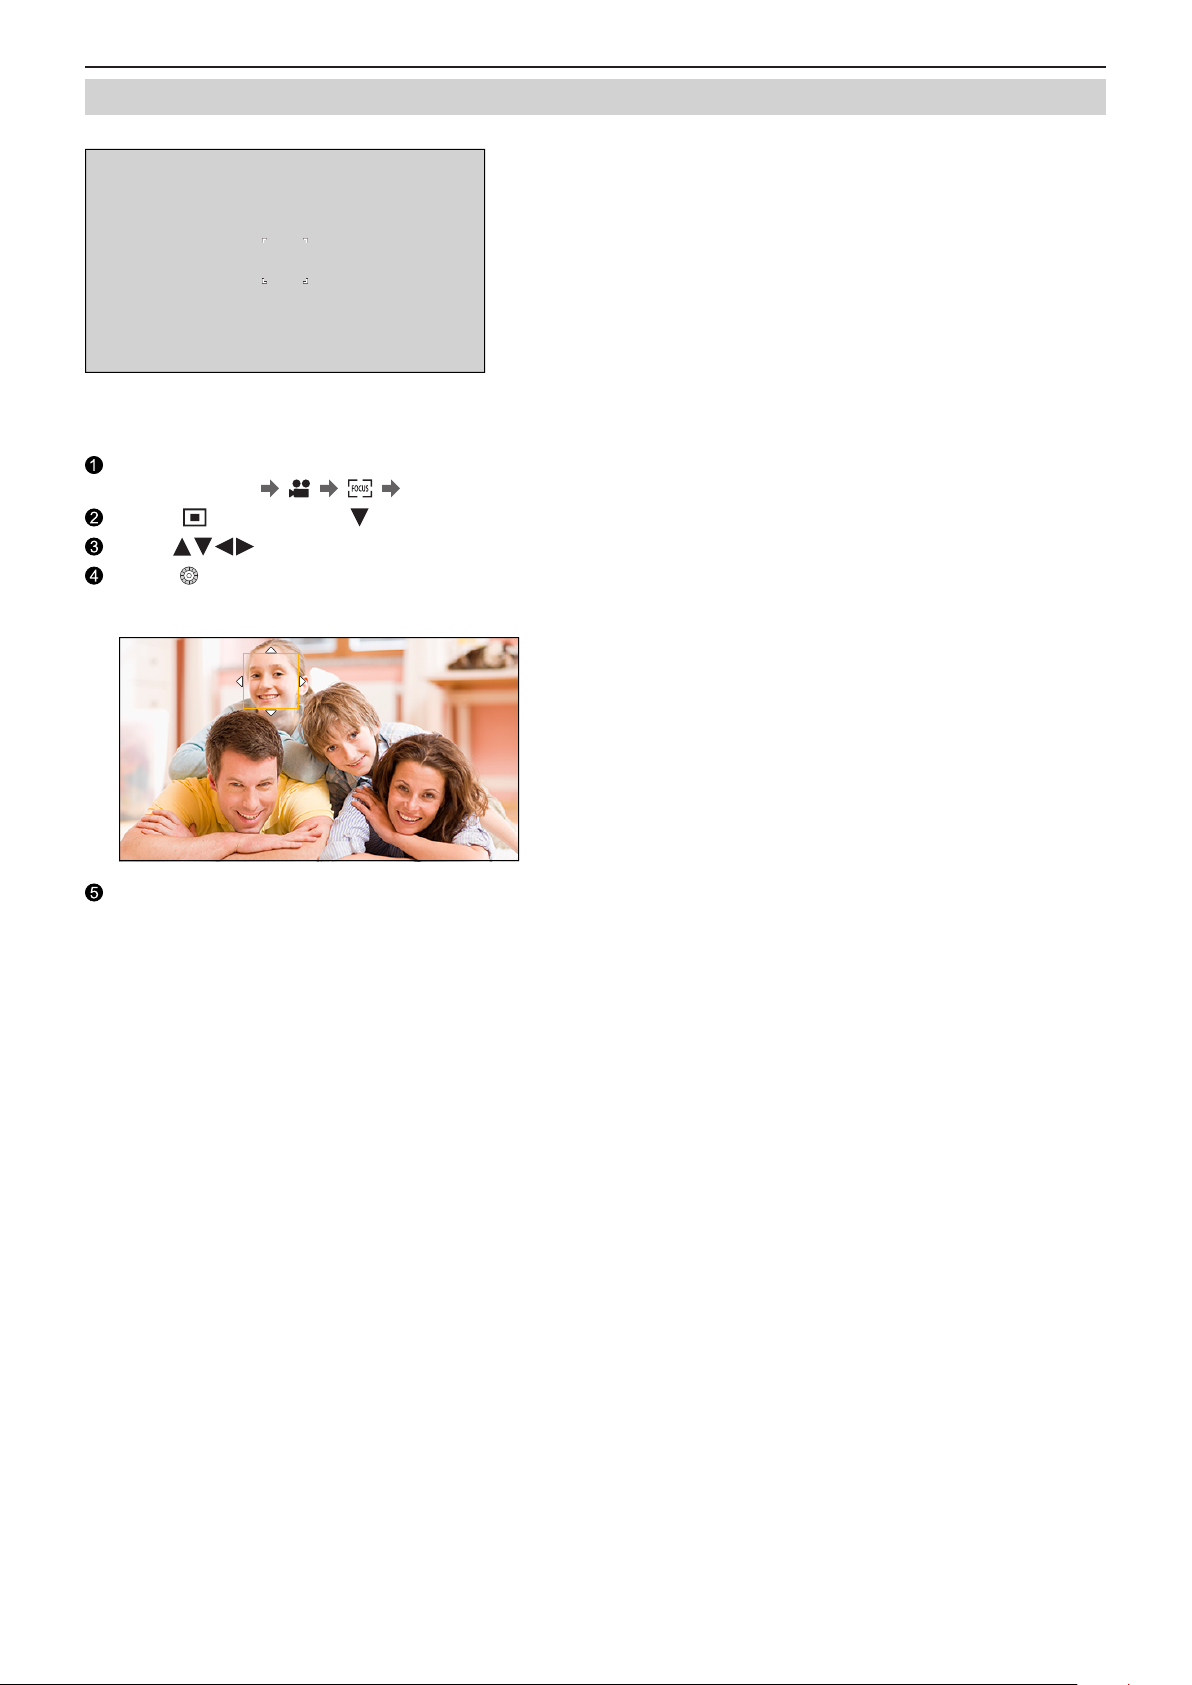
5. Recording settings - Focus / Zoom
[1-Area]
Specify the point to be brought into focus.
Move and Change the Size of the AF Area
■
Display the AF mode selection screen.
●
[MENU/SET] [ ] [ ] [AF Mode]
Select [ ] and then press .
Press to move the position of the AF area.
Rotate to change the size of the AF area.
●
The first press of [Fn1] returns the AF area position to the center. The second press returns the size of the AF area to
the default.
Press [MENU/SET].
- 77 -- 77 -
Page 78
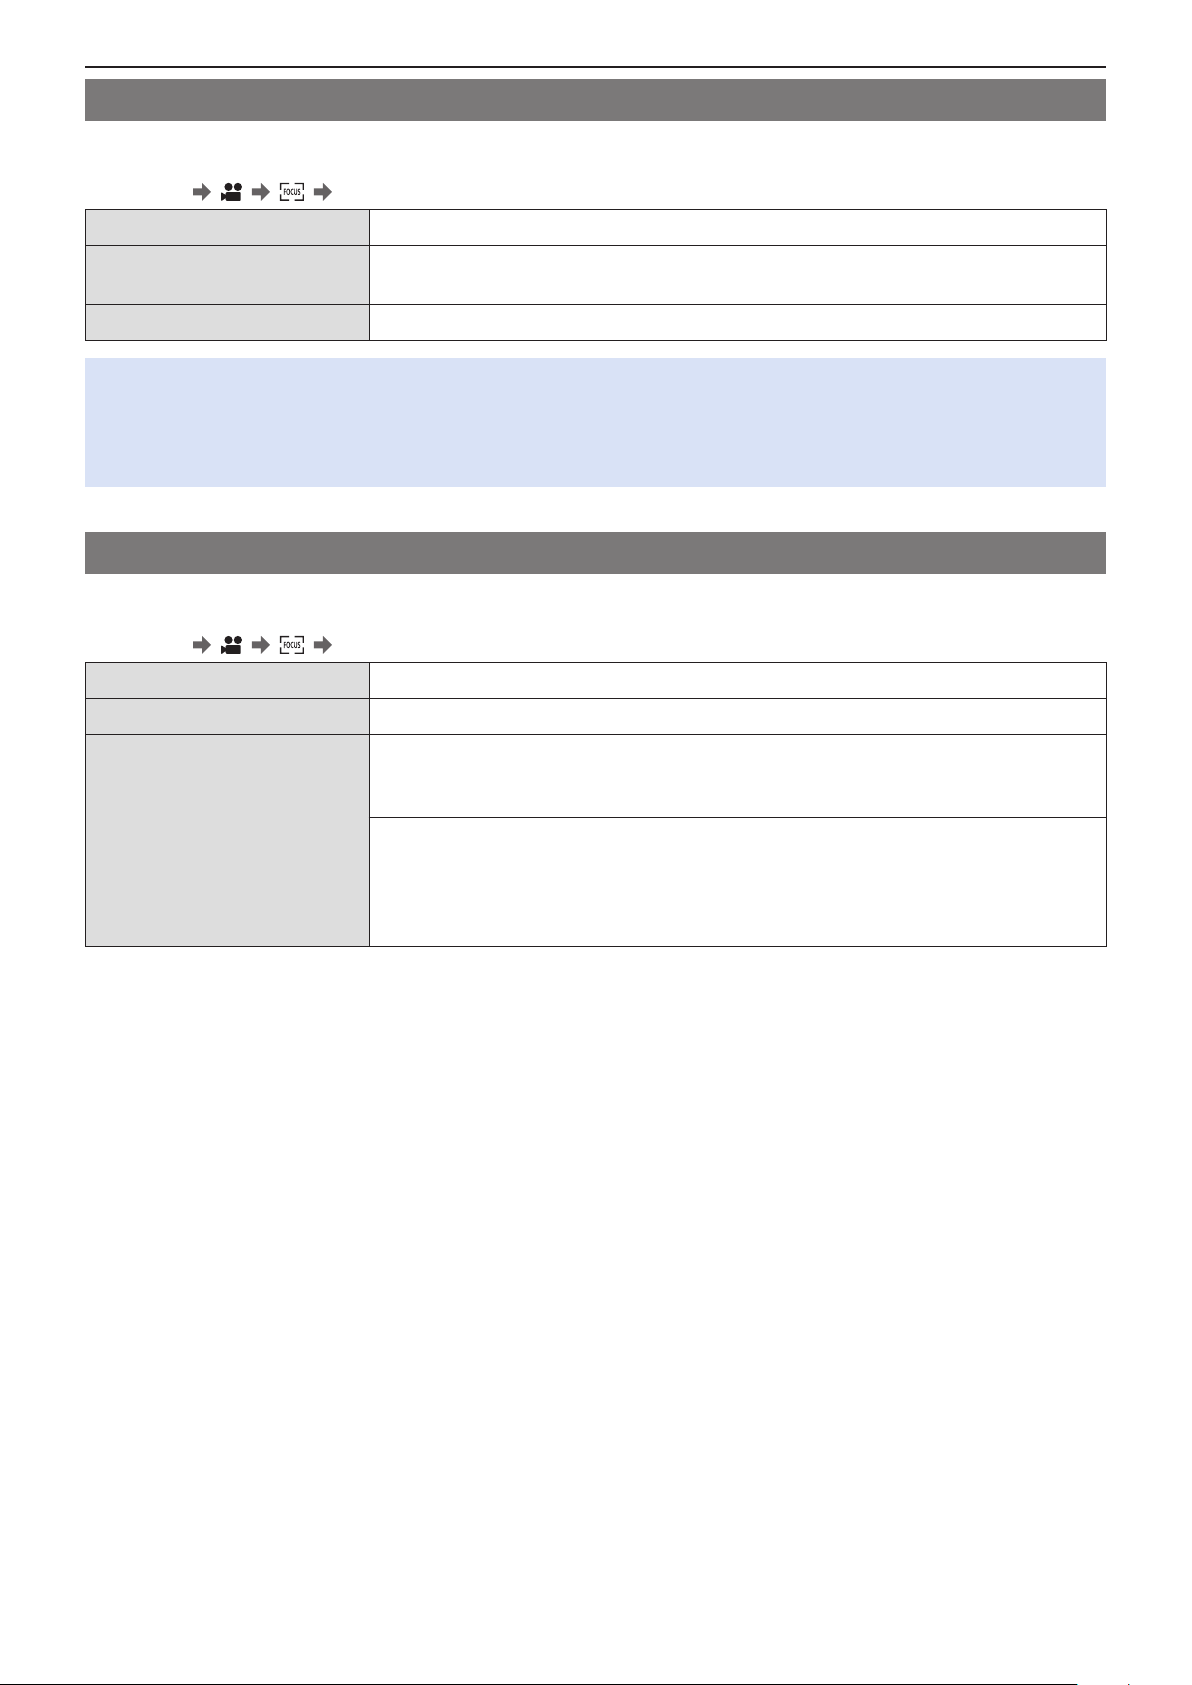
5. Recording settings - Focus / Zoom
[Continuous AF]
You can select how to set the focus in AF when recording videos.
[MENU/SET] [ ] [ ] Select [Continuous AF]
[MODE1] The camera continues to automatically focus only during recording.
[MODE2]
[OFF] The camera maintains the focus point at the start of recording.
●
Depending on the recording conditions or lens used, the AF operation sound may be recorded during video recording. If
the operation sound bothers you, we recommend recording with [Continuous AF] set to [OFF].
●
If the zoom is operated while recording videos, the subject may take a while to come into focus.
●
[MODE2] does not work during recording standby in the following cases:
– In low light situations
The camera automatically keeps focusing on subjects during recording standby and
during recording.
[AF Custom Setting(Video)]
You can fine-adjust the focusing method for video recording using [Continuous AF].
[MENU/SET] [ ] [ ] Select [AF Custom Setting(Video)]
[ON] Enables the following settings.
[OFF] Disables the following settings.
[AF Speed]
[+] side: Focus moves at a faster speed.
[–] side: Focus moves at a slower speed.
[SET]
[AF Sensitivity]
[+] side: When the distance to the subject changes significantly, the camera immediately
readjusts the focus.
[–] side: When the distance to the subject changes significantly, the camera waits for a
little before readjusting the focus.
- 78 -- 78 -
Page 79
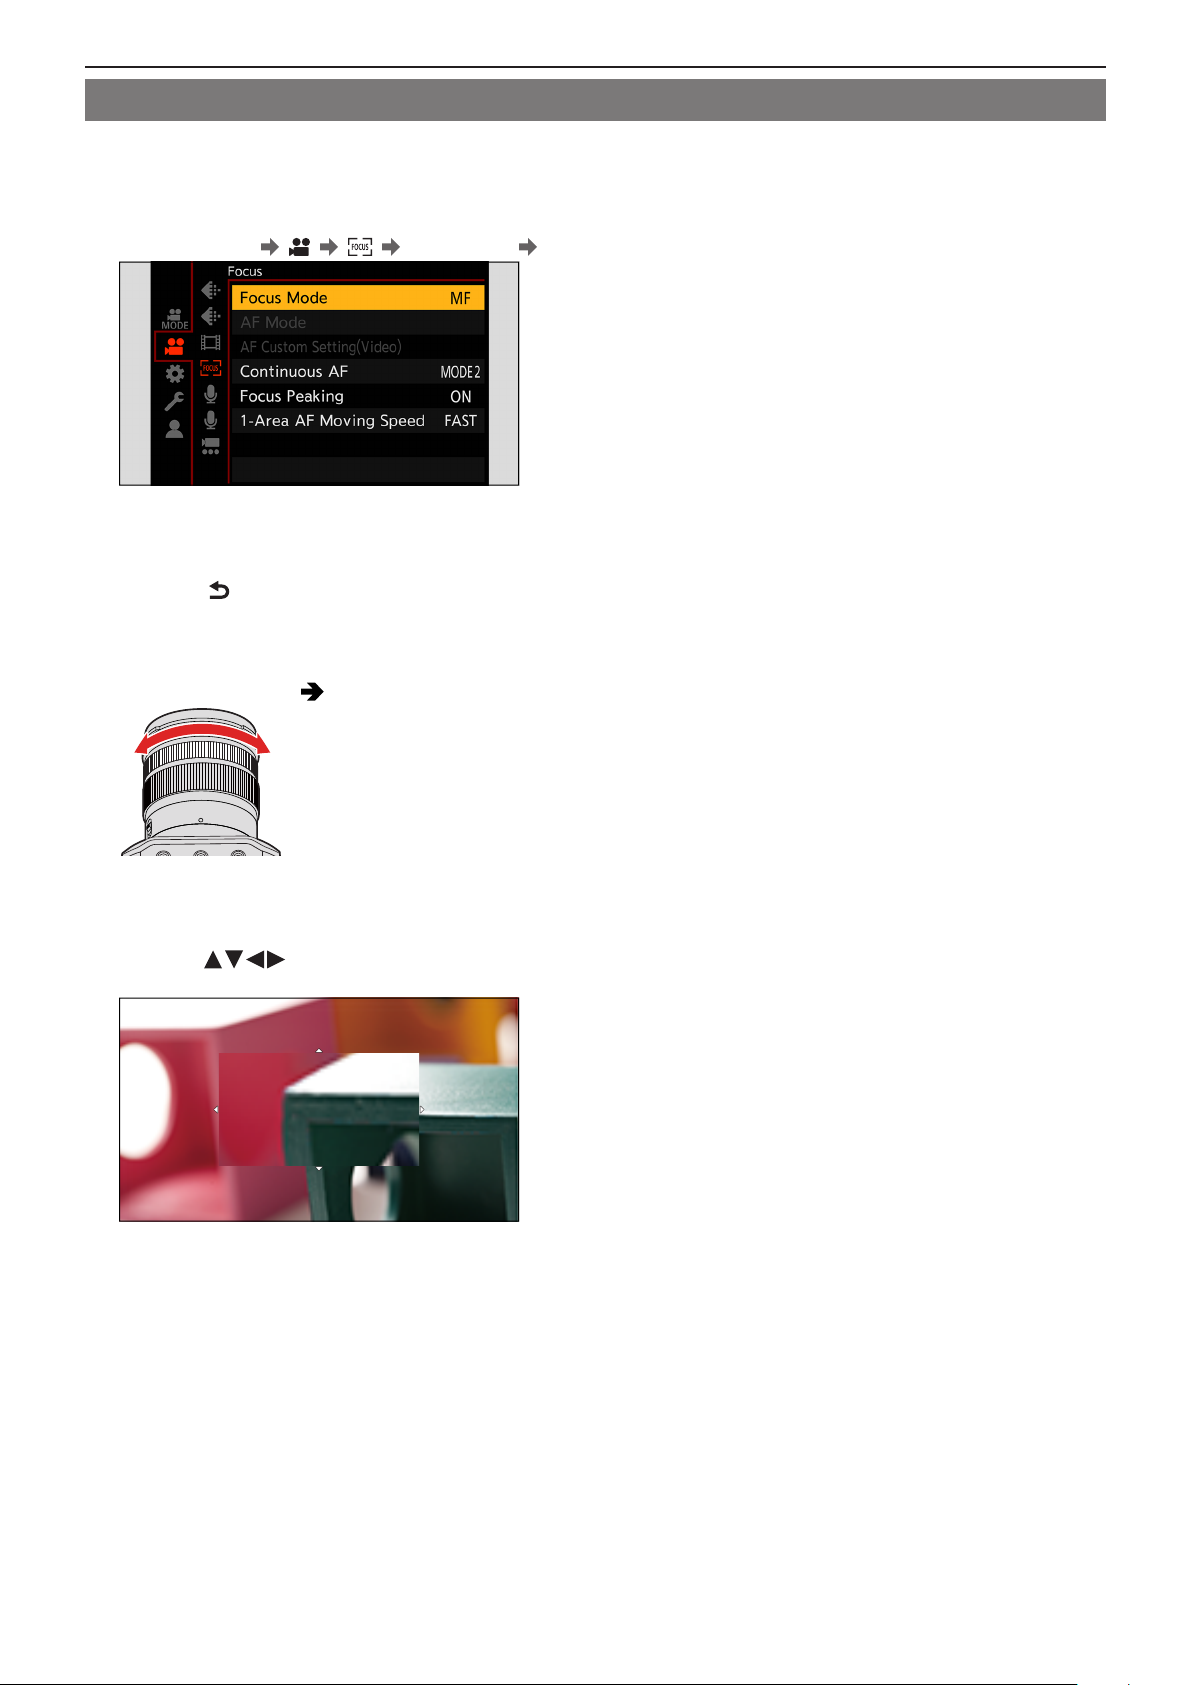
5. Recording settings - Focus / Zoom
Record Using MF
Use this function when you want to fix the focus or when the distance between the lens and the subject is determined and you
do not want to activate AF.
1 Set the focus mode to [MF].
●
[MENU/SET] [ ] [ ] [Focus Mode] [MF]
2 Close the menu.
●
Press [ ].
3 Rotate the focus ring.
●
When an interchangeable lens without a focus ring is being used, press a Fn button that has [AF Mode] registered.
●
About Fn buttons ( 155 / Register Functions to the Fn Buttons)
4 Select the focus point.
●
Press to select the focus point.
● To return the point to be brought into focus to the center, press [Fn1].
- 79 -- 79 -
Page 80
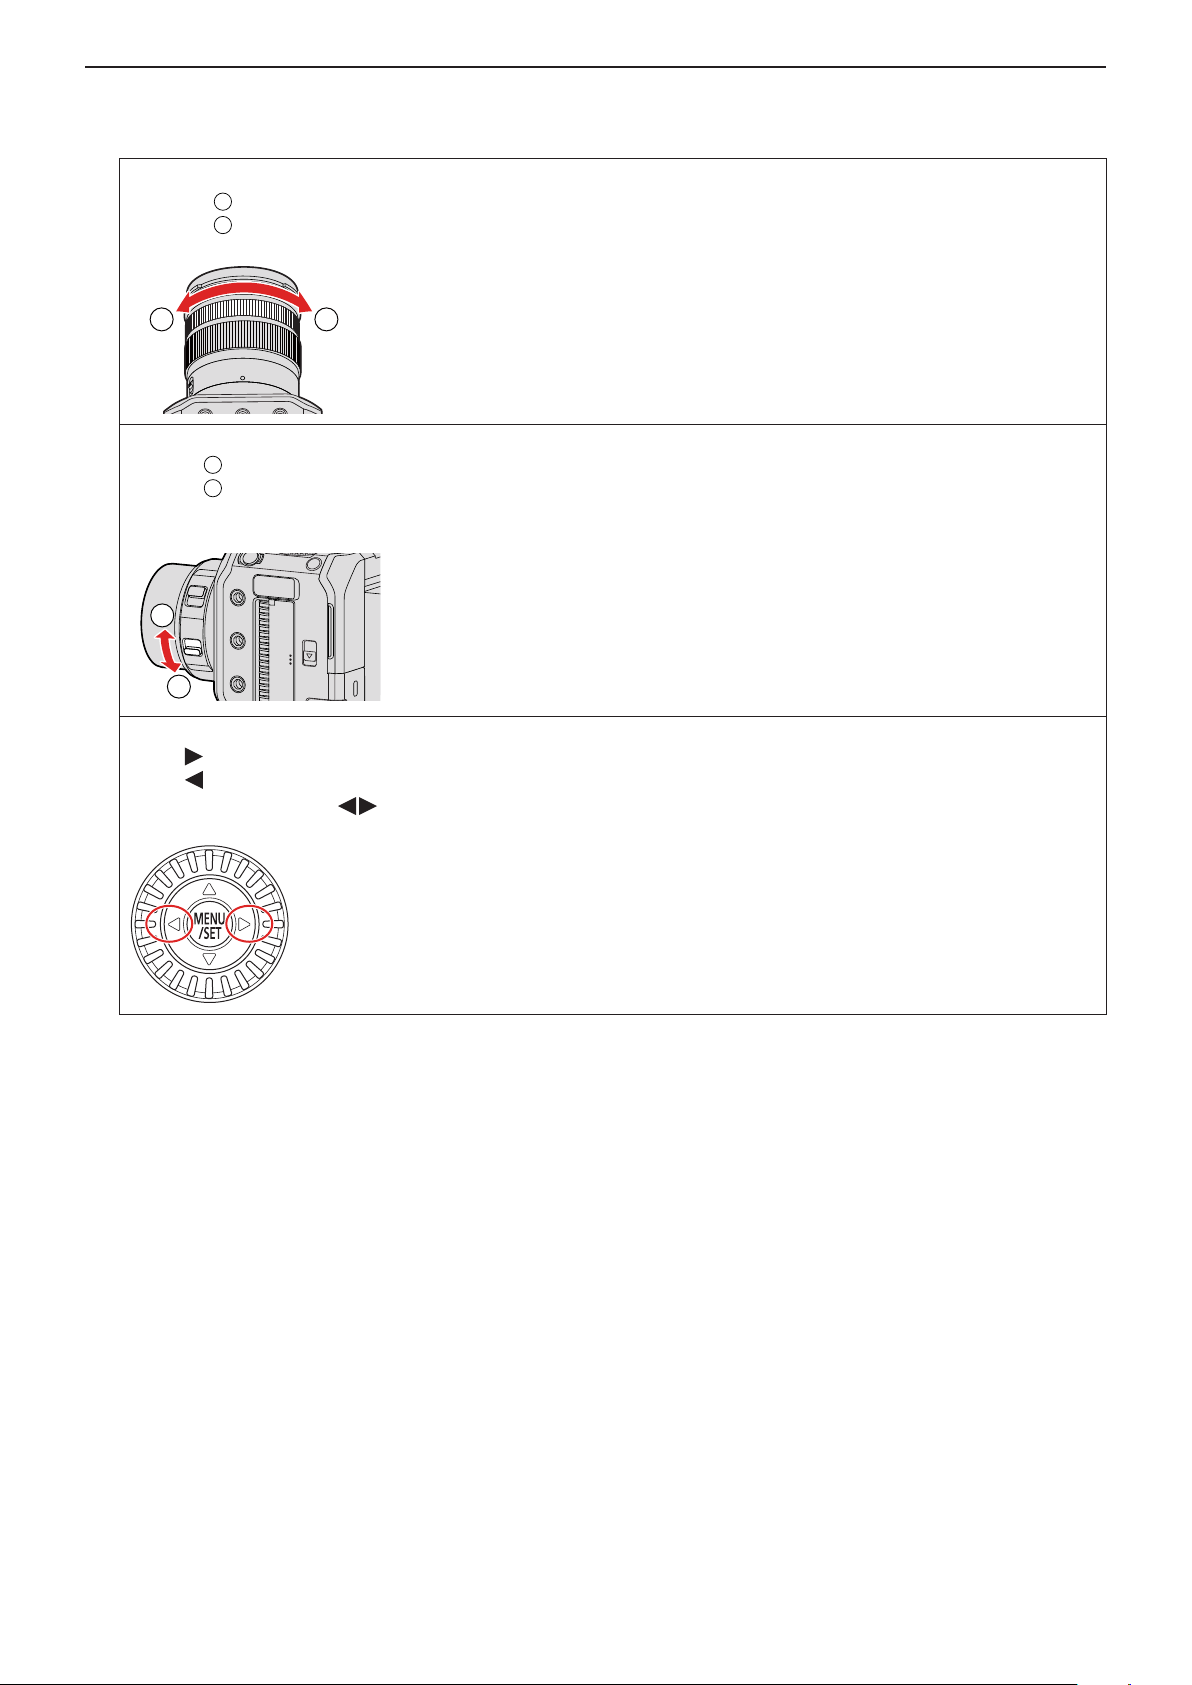
5. Recording settings - Focus / Zoom
5 Adjust the focus.
The operations used to focus differ depending on the lens.
When using an interchangeable lens with a focus ring
Rotate to A side: Focuses on nearby subject
Rotate to B side: Focuses on distant subject
B
When using an interchangeable lens with a focus lever
Move to C side: Focuses on nearby subject
Move to D side: Focuses on distant subject
●
The focusing speed varies depending on how far you move the focus lever.
A
C
D
When using an interchangeable lens with no focus ring
Press : Focuses on nearby subject
Press : Focuses on distant subject
●
Pressing and holding will increase the focus speed.
- 80 -- 80 -
Page 81
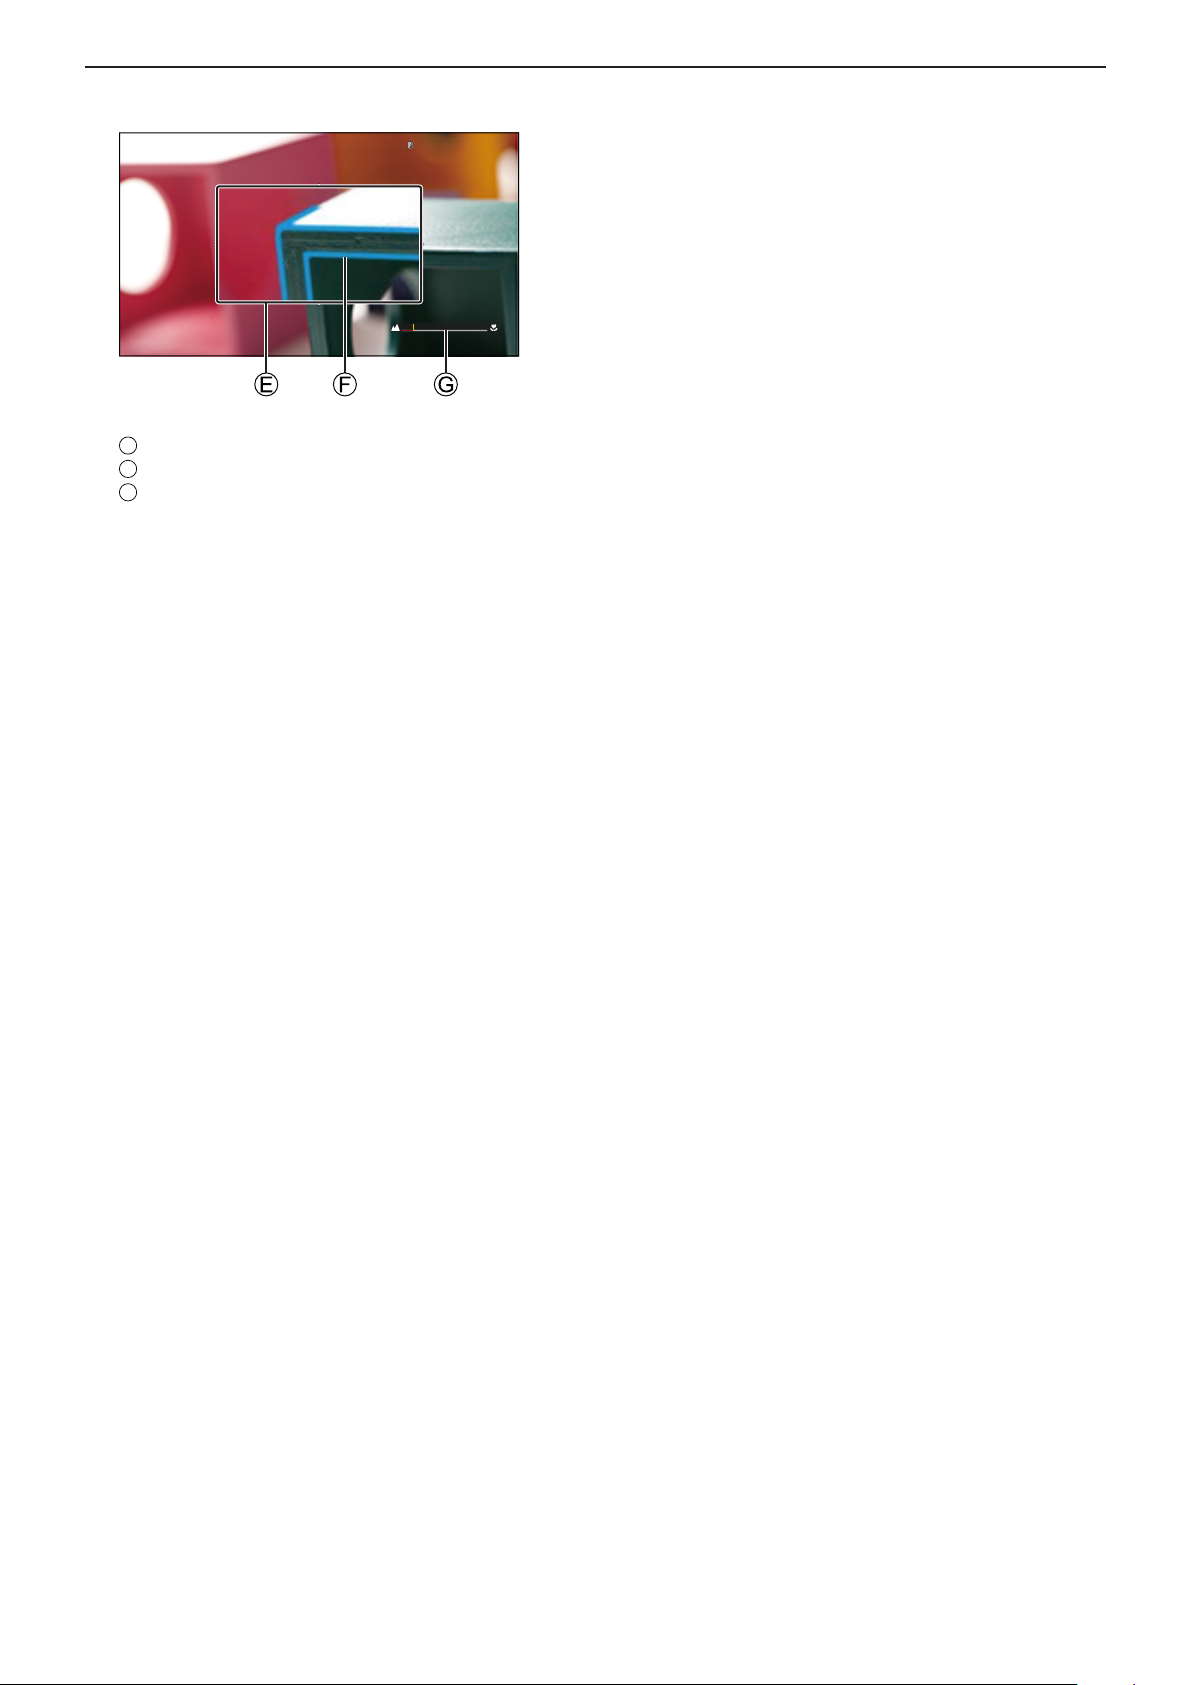
●
E
F
G
This will display the in-focus portion highlighted with color. (Focus Peaking)
●
A recording distance guideline is displayed. (MF Guide)
MF Assist (enlarged screen)
Focus Peaking
MF Guide
6 Close the MF Assist screen.
●
Press [MENU/SET].
7 Start recording.
●
Press the video rec. button fully.
5. Recording settings - Focus / Zoom
8 Stop recording.
●
Press the video rec. button again.
- 81 -- 81 -
Page 82
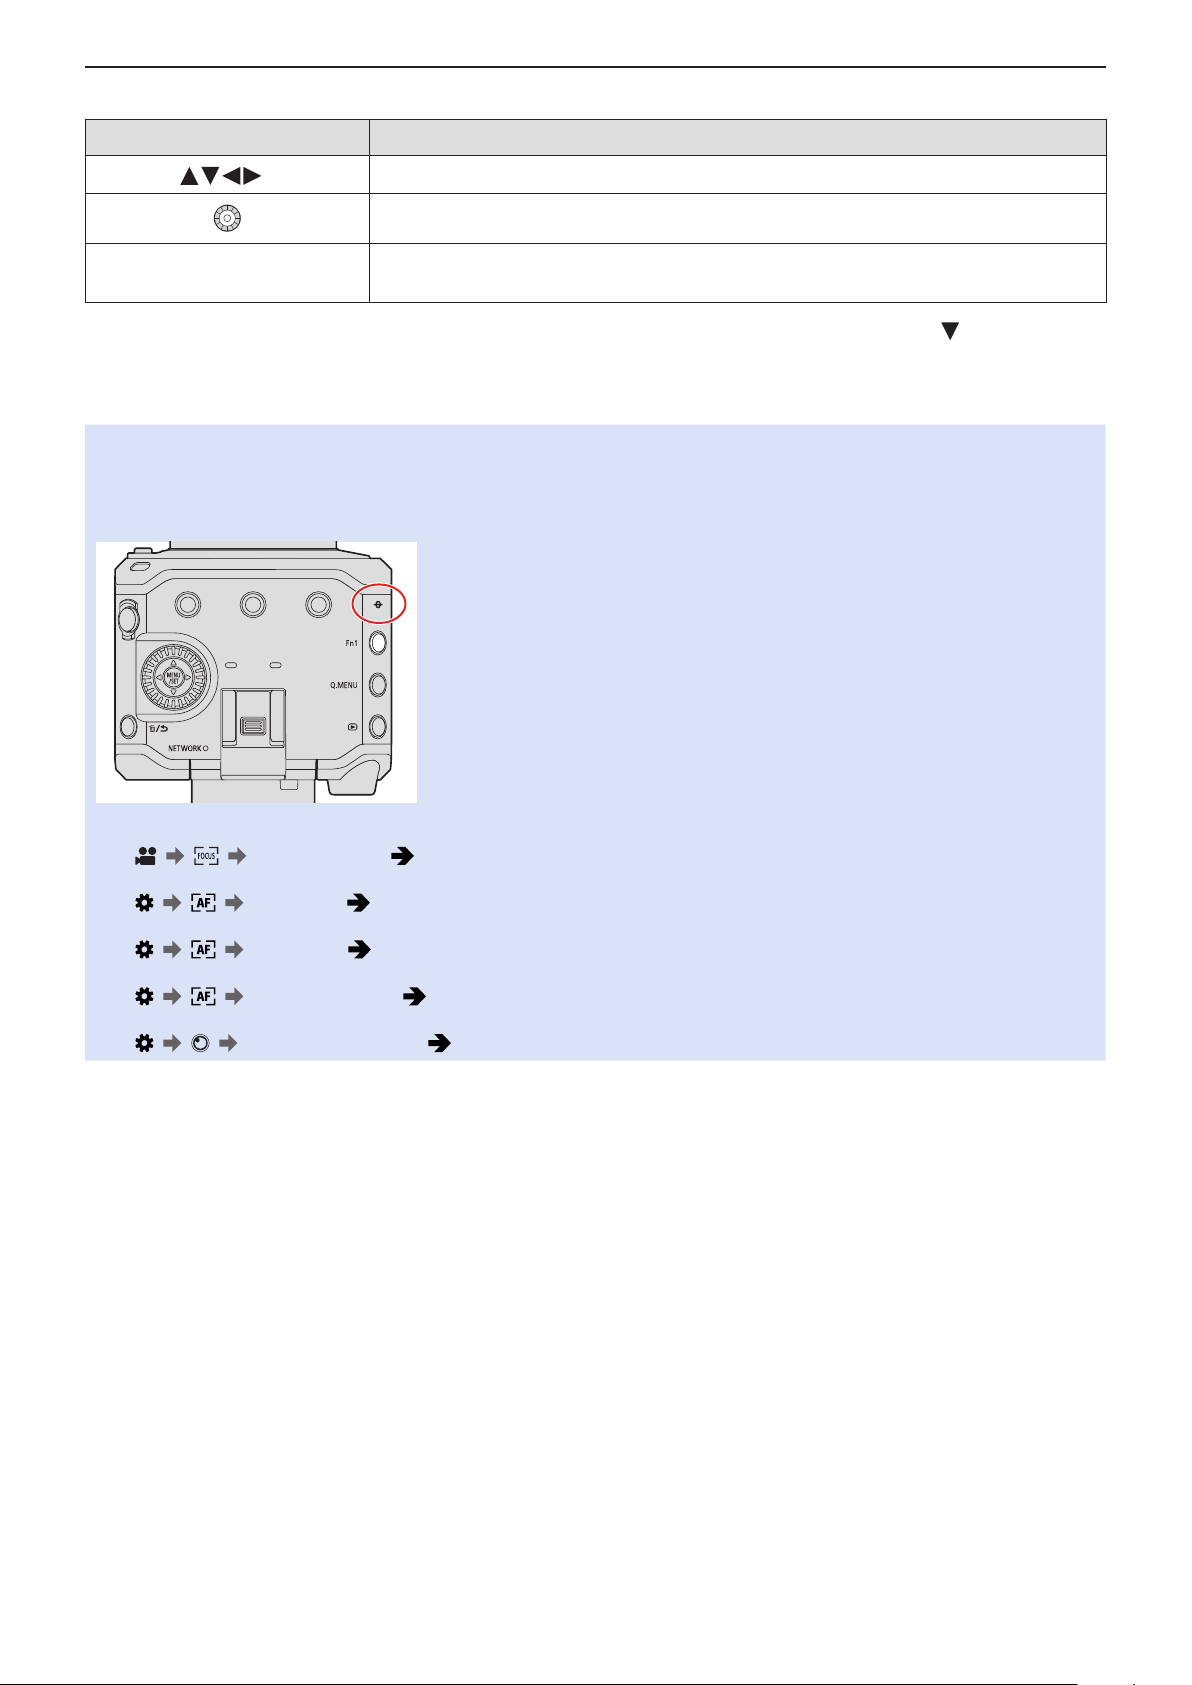
5. Recording settings - Focus / Zoom
Operations on the MF Assist Screen
■
Button operation Description of operation
1
*
Moves the enlarged display position.
Enlarges*2 / reduces the screen.
1
[Fn1]*
1
When using an interchangeable lens with no focus ring, you can perform these operations after pressing to display the
*
First time: Returns the MF Assist position to the center.
Second time: Returns the MF Assist magnification to the default setting.
screen that lets you set the area to be enlarged.
*2 When the [MF Assist Display] is set to [PIP] from the [MF Assist] of the [Custom] ([Focus/Shutter]) menu, you can enlarge it to
approx. 3x to 6x, and when it is set to [FULL] it can be enlarged to approx. 3x to 20x.
●
MF Assist and MF Guide may not display depending on the lens used.
●
During MF, pressing [AF-ON] will activate AF.
●
The recording distance reference mark is a mark used to measure the recording distance. Use this when taking pictures
with MF or taking close-up pictures.
●
You can change the Focus Peaking sensitivity and the display method:
[ ] [ ] [Focus Peaking] ( 181 / [Focus Peaking])
●
You can change the display method of the magnified screen:
[ ] [ ] [MF Assist] ( 186 / [MF Assist])
●
You can change the MF Guide display units:
[ ] [ ] [MF Guide] ( 187 / [MF Guide])
●
You can disable focus ring operation:
[ ] [ ] [Focus Ring Lock] ( 187 / [Focus Ring Lock])
●
The camera memorizes the focus point when you turn it off:
[ ] [ ] [Lens Focus Resume] ( 192 / [Lens Focus Resume])
- 82 -- 82 -
Page 83
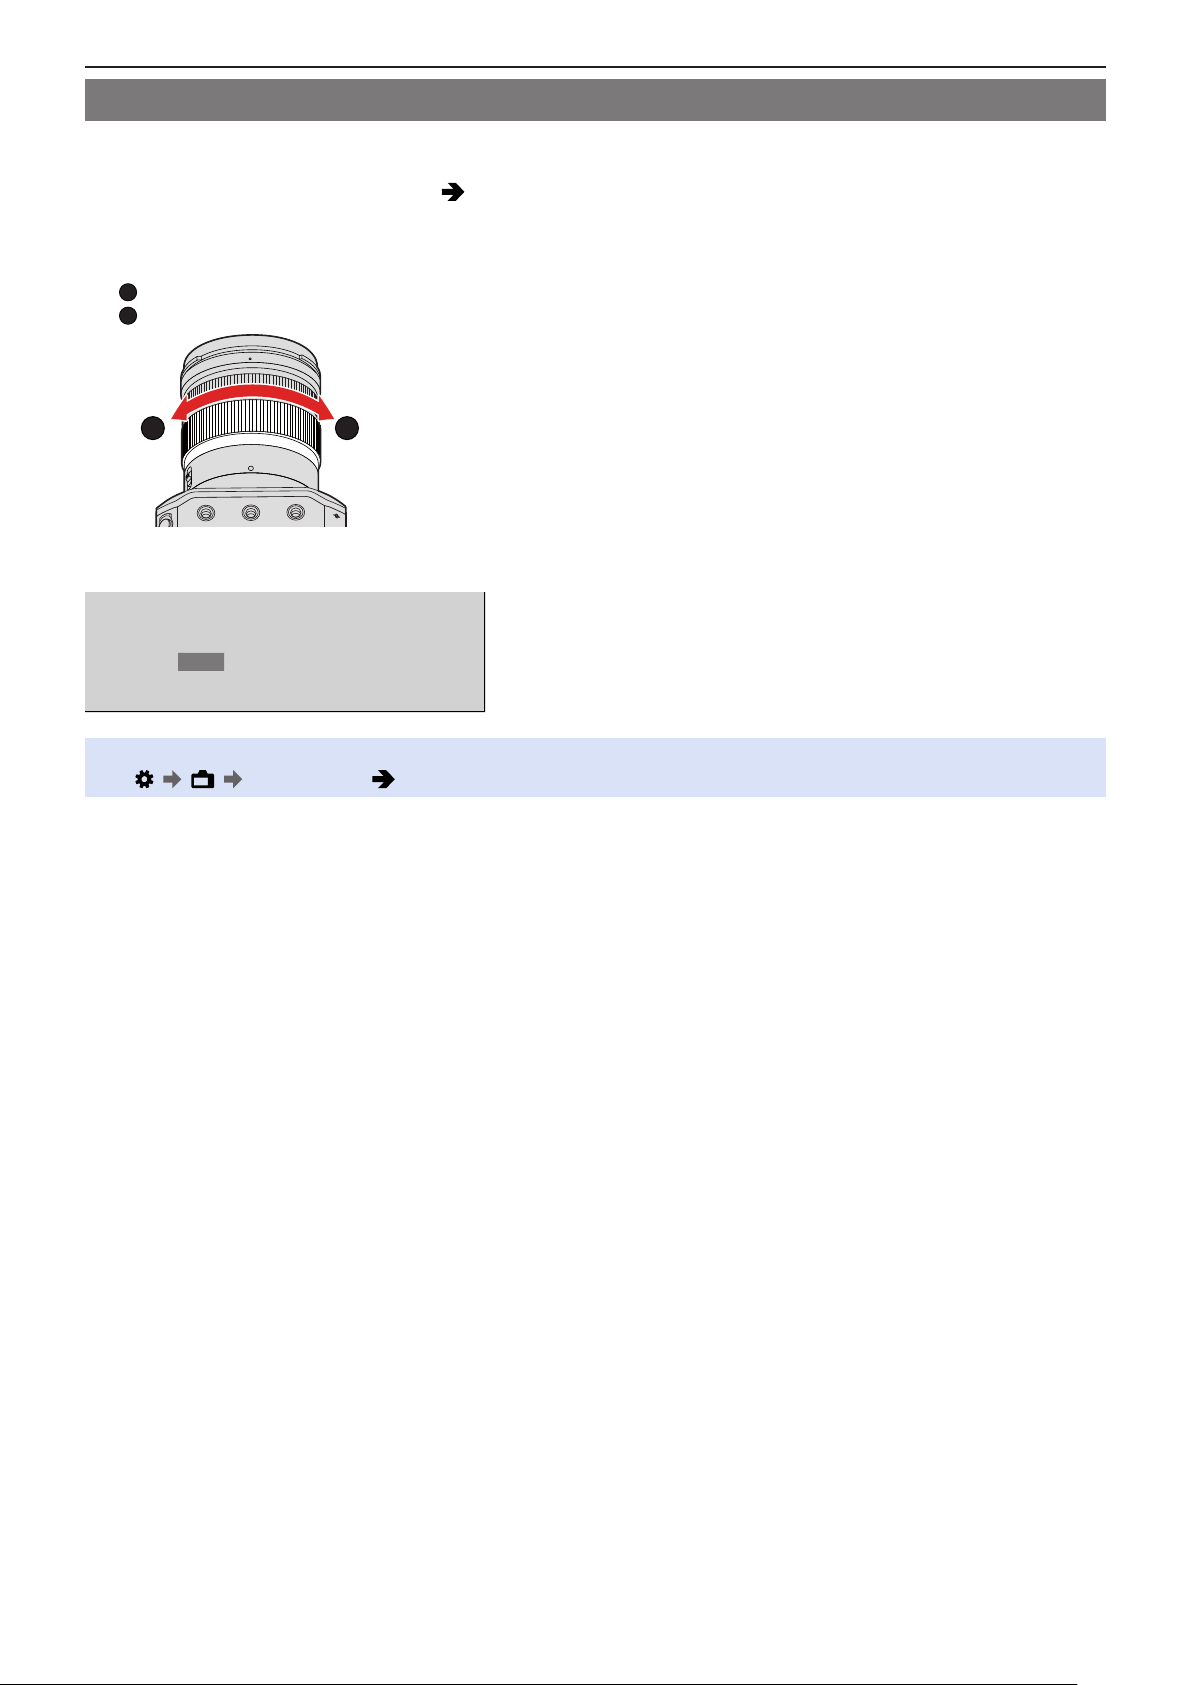
5. Recording settings - Focus / Zoom
T
W
Recording with Zoom
Use the optical zoom of the lens to zoom to telephoto or wide-angle.
By using [Image Area of Video], you can increase the telephoto effect without deteriorating the image quality.
●
For details about [Image Area of Video] ( 61 / [Image Area of Video])
1 Rotate the zoom ring.
: Telephoto
: Wide-angle
W
●
Rotating the zoom ring displays the focal length on the recording screen.
40mm
●
The focal length display can be hidden:
[ ] [ ] [Focal Length] ( 188 / [Focal Length])
T
- 83 -- 83 -
Page 84
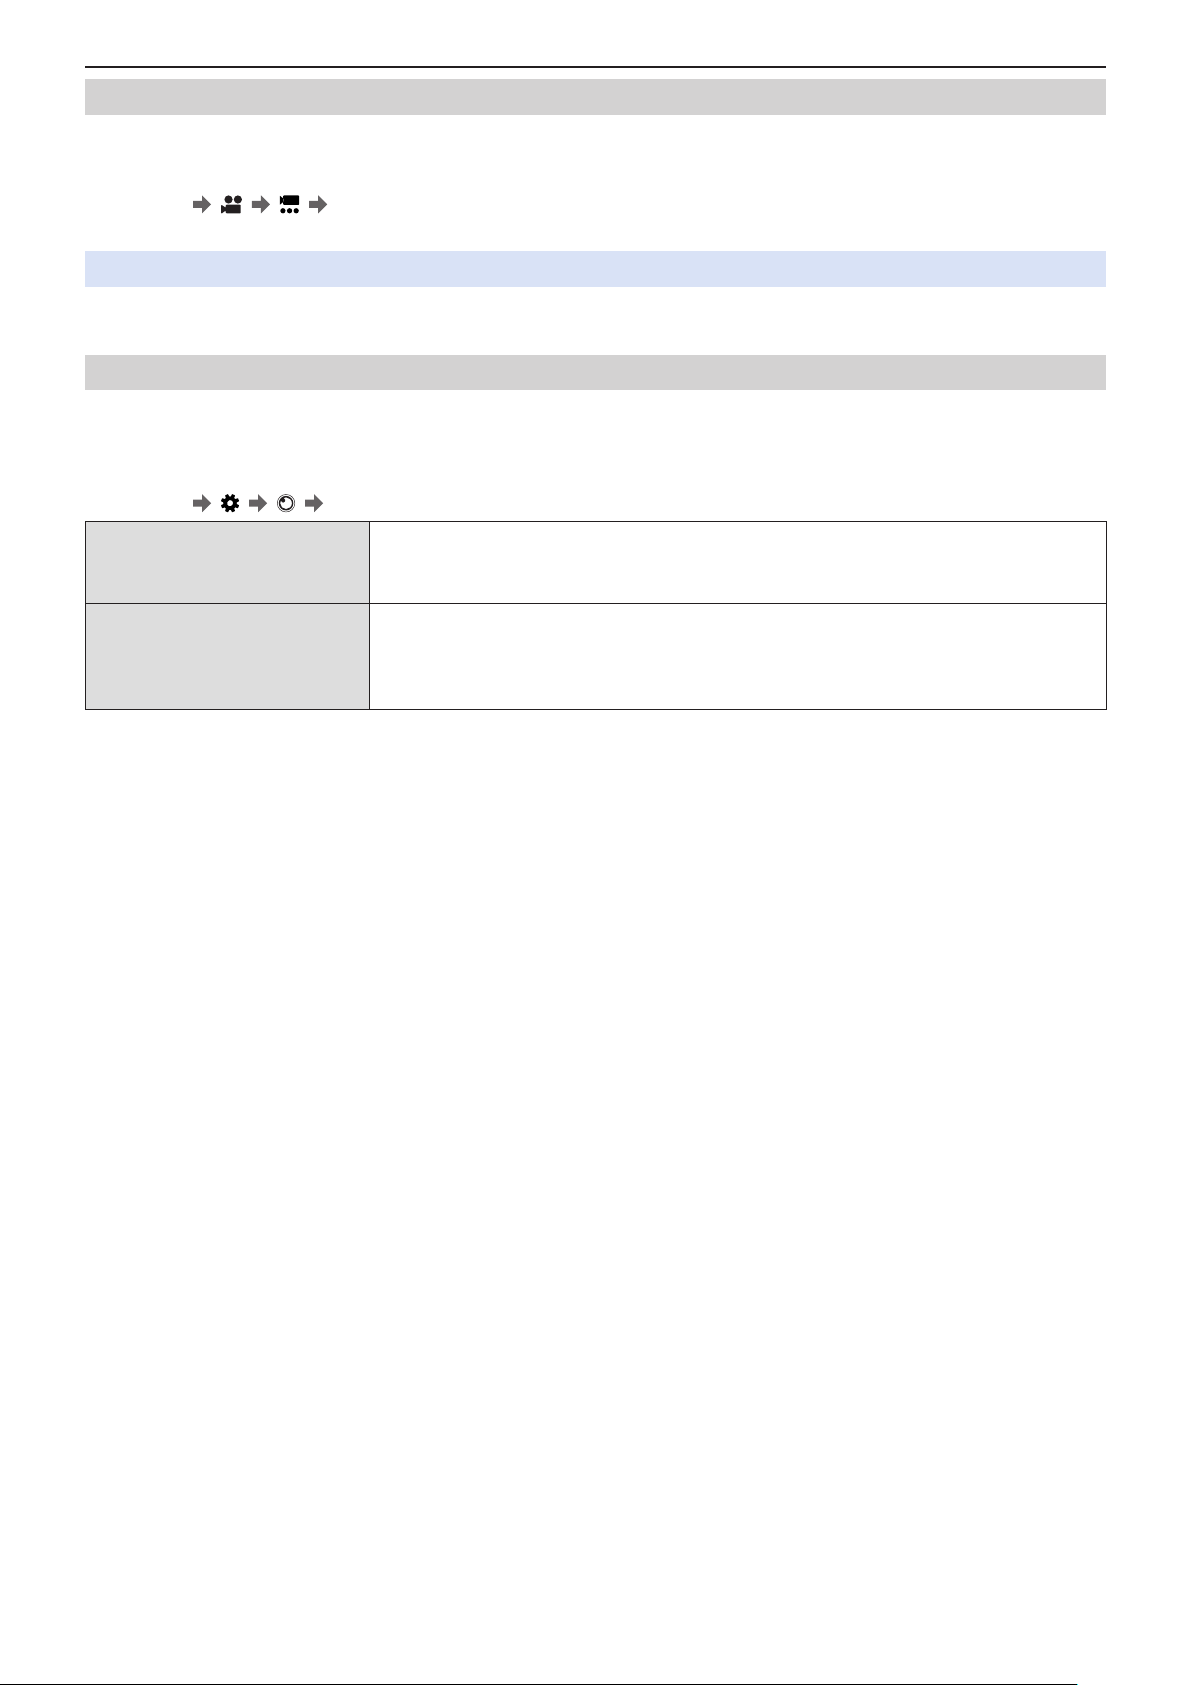
5. Recording settings - Focus / Zoom
[Digital Zoom]
You can increase the zoom ratio 4x higher than the original zoom ratio. Note that, with Digital Zoom, enlarging will decrease
picture quality.
[MENU/SET] [ ] [ ] Select [Digital Zoom]
Settings: [4x] / [2x] / [OFF]
●
When using [Digital Zoom], it is recommended to fix the camera so that it does not move.
[Power Zoom Lens]
Sets the screen display and operations when using an interchangeable lens that is compatible with power zoom (electrically
operated zoom).
●
This may only be selected when using a lens that is compatible.
[MENU/SET]
[Step Zoom]
[Zoom Ring]
[ ] [ ] Select [Power Zoom Lens]
When it is set to [ON] and a zoom operation is performed, zooming stops at each decided
focal point position.
This does not work during video recording.
This may only be selected when a power zoom-compatible lens with a zoom lever and
zoom ring is attached.
When set to [OFF], the operations controlled by the zoom ring are disabled to prevent
accidental operation.
- 84 -- 84 -
Page 85
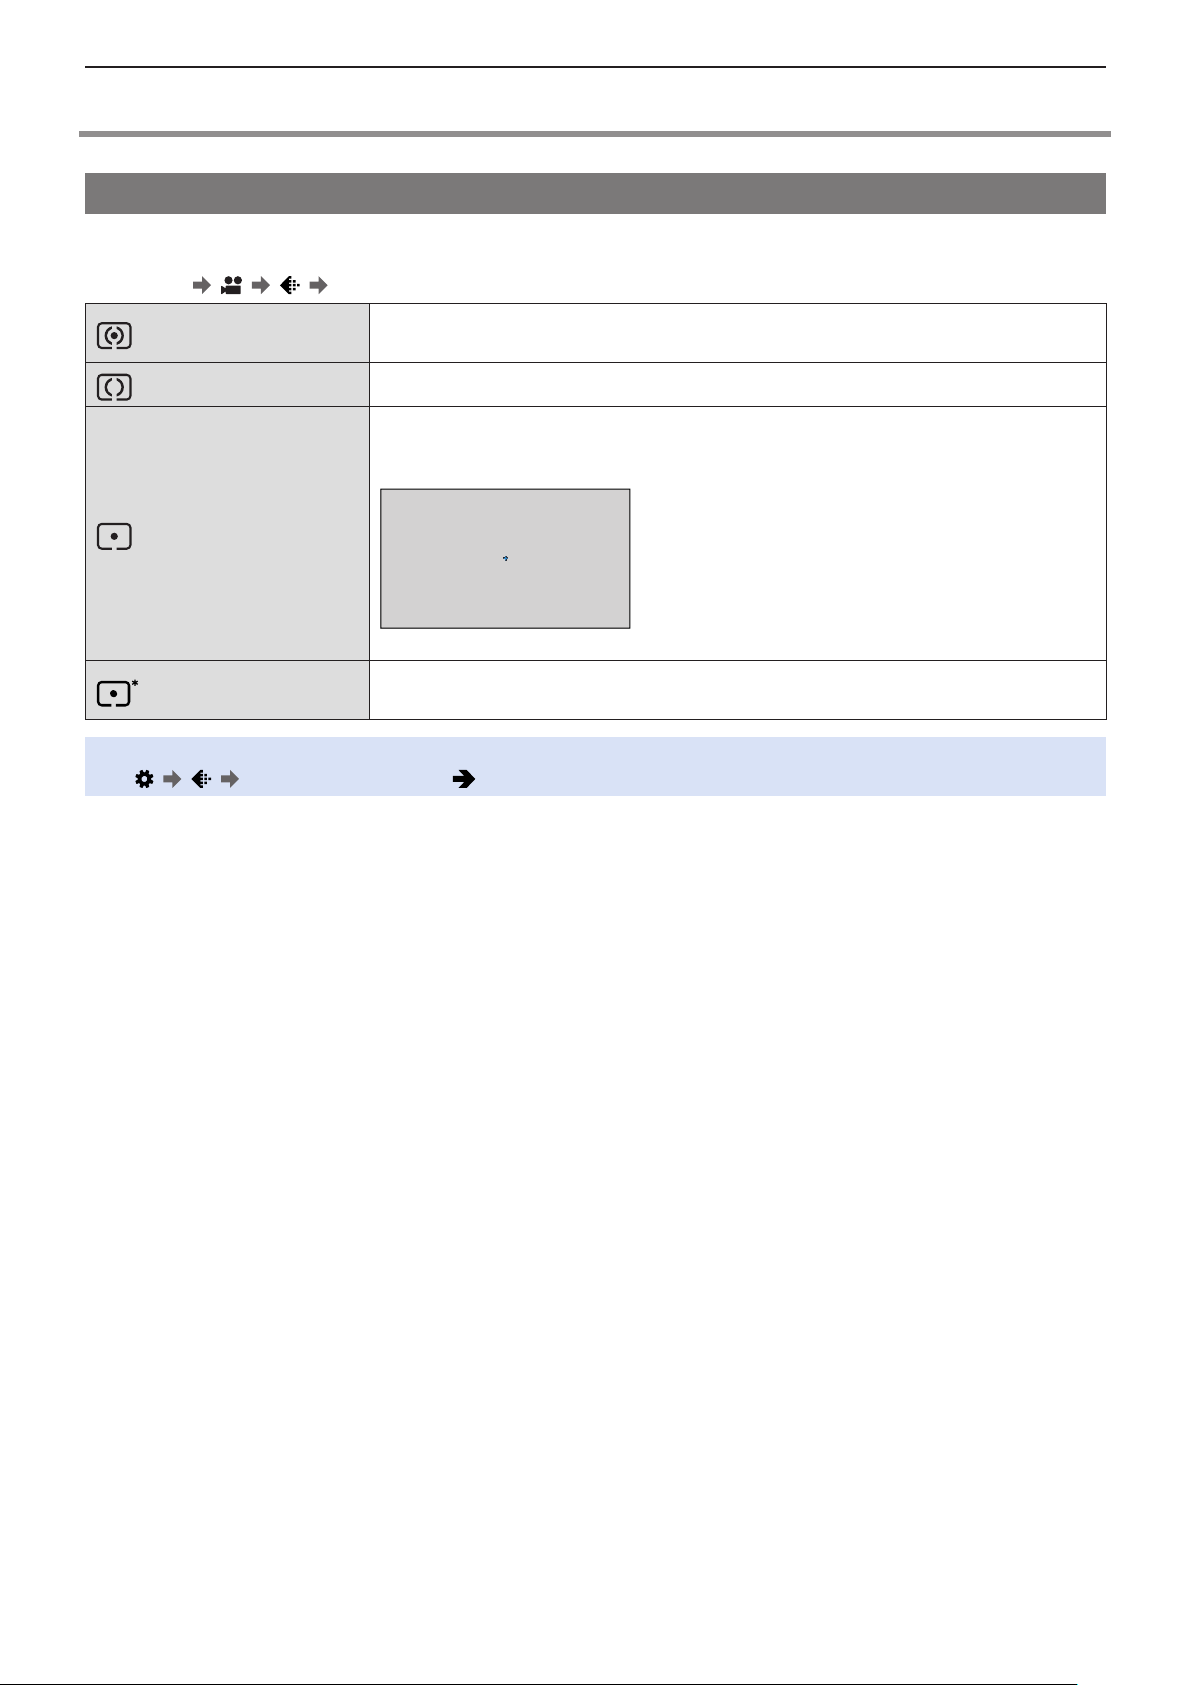
5. Recording settings - Metering / Exposure / ISO Sensitivity
Metering / Exposure / ISO Sensitivity
[Metering Mode]
The type of optical measurement to measure brightness can be changed.
[MENU/SET] [ ] [ ] Select [Metering Mode]
(Multi-metering)
(Center-weighted)
(Spot)
(Highlight-weighted)
●
The standard value for correct exposure can be adjusted:
[ ] [ ] [Exposure Offset Adjust.] ( 186 / [Exposure Offset Adjust.])
Method in which the most suitable exposure is measured by judging the allocation of
brightness on the whole screen.
Method used to perform measuring which focuses on the center of the screen.
Method used to measure the extremely small part around the spot-metering target.
●
When you move the AF area, the spot metering target also moves to match.
Spot-metering target
Method used to perform measuring which focuses on the highlighted parts of the screen
to prevent overexposure. This is suitable for theater photography, etc.
- 85 -- 85 -
Page 86
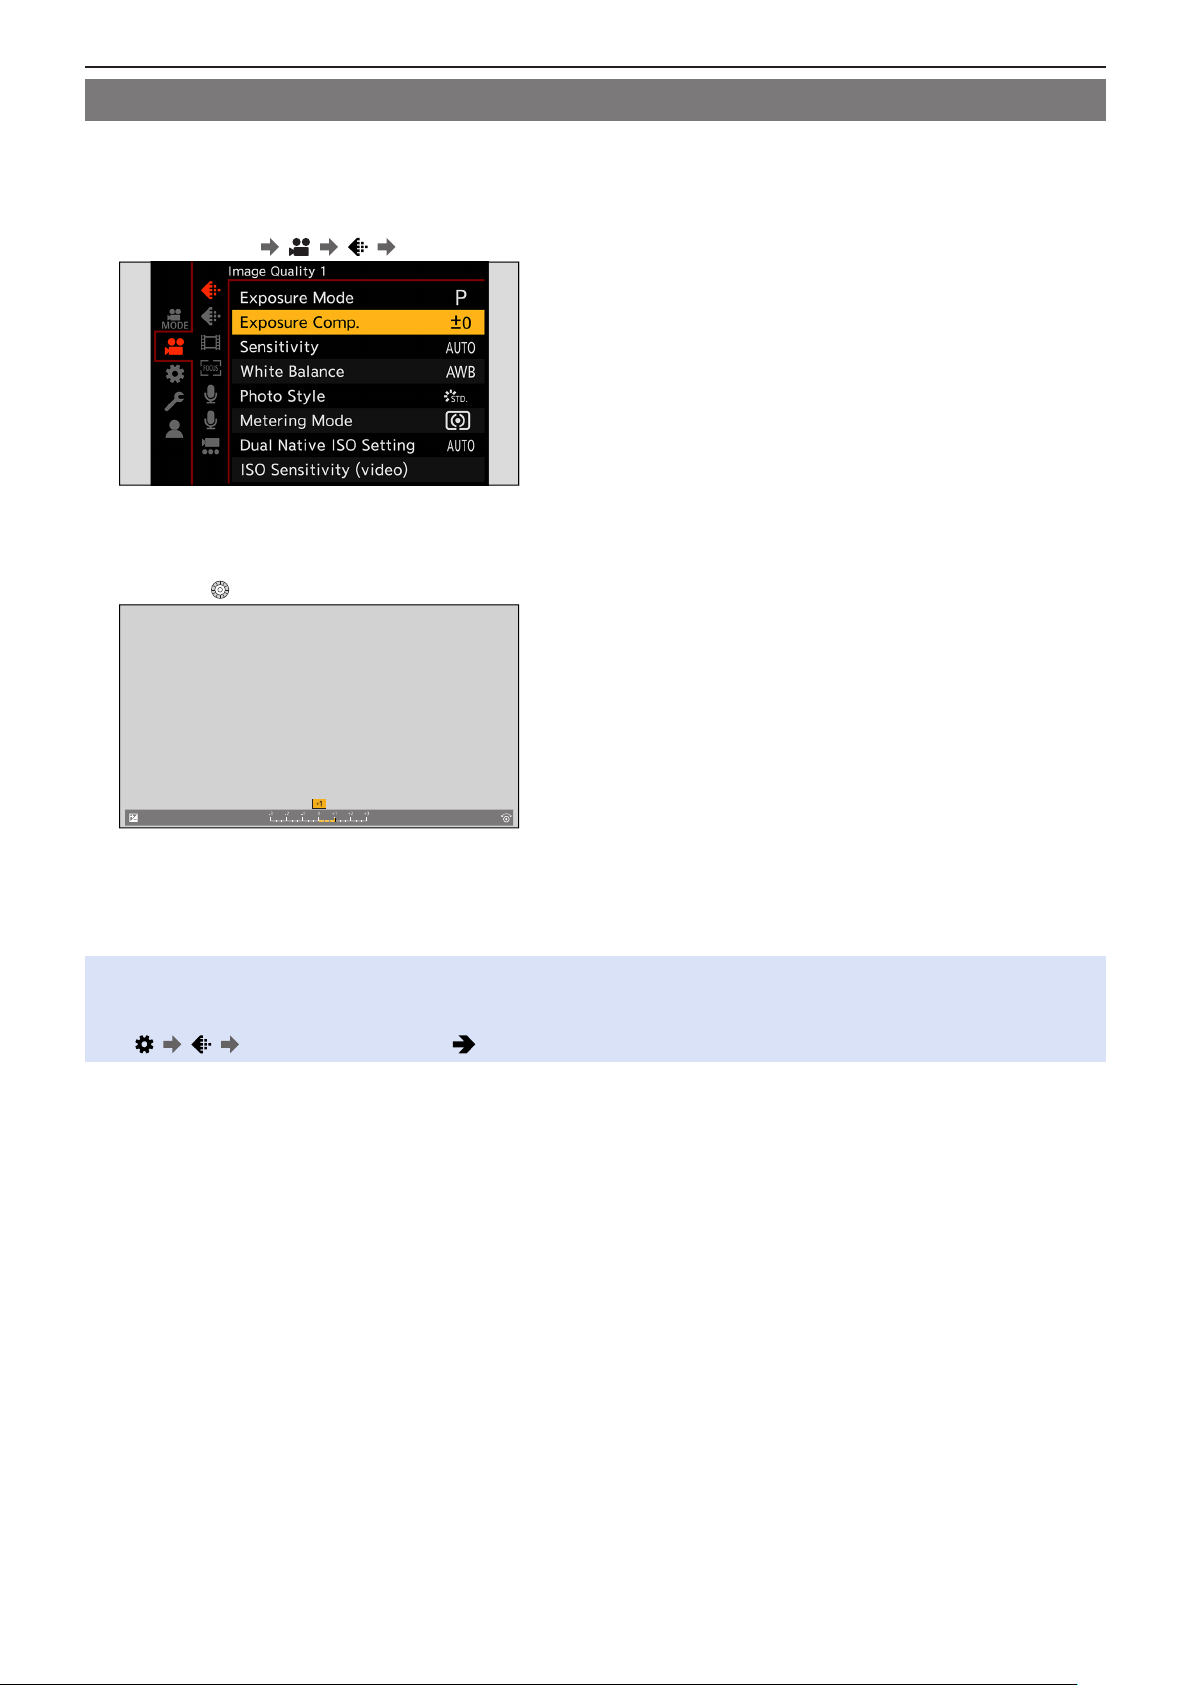
5. Recording settings - Metering / Exposure / ISO Sensitivity
Exposure Compensation
You can compensate the exposure when the correct exposure determined by the camera is too bright or too dark.
You can adjust the exposure in 1/3 EV steps in a range of ±3 EV.
1 Display the exposure compensation screen.
●
[MENU/SET] [ ] [ ] [Exposure Comp.]
2 Compensate the exposure.
●
Rotate .
3 Confirm your selection.
●
Press [MENU/SET].
●
If you set the ISO sensitivity to [AUTO] when [Exposure Mode] is set to [M], you can compensate the exposure.
●
The set exposure compensation value is stored even if you turn off the camera.
●
The standard value for correct exposure can be adjusted:
[
] [ ] [Exposure Offset Adjust.] ( 186 / [Exposure Offset Adjust.])
- 86 -- 86 -
Page 87
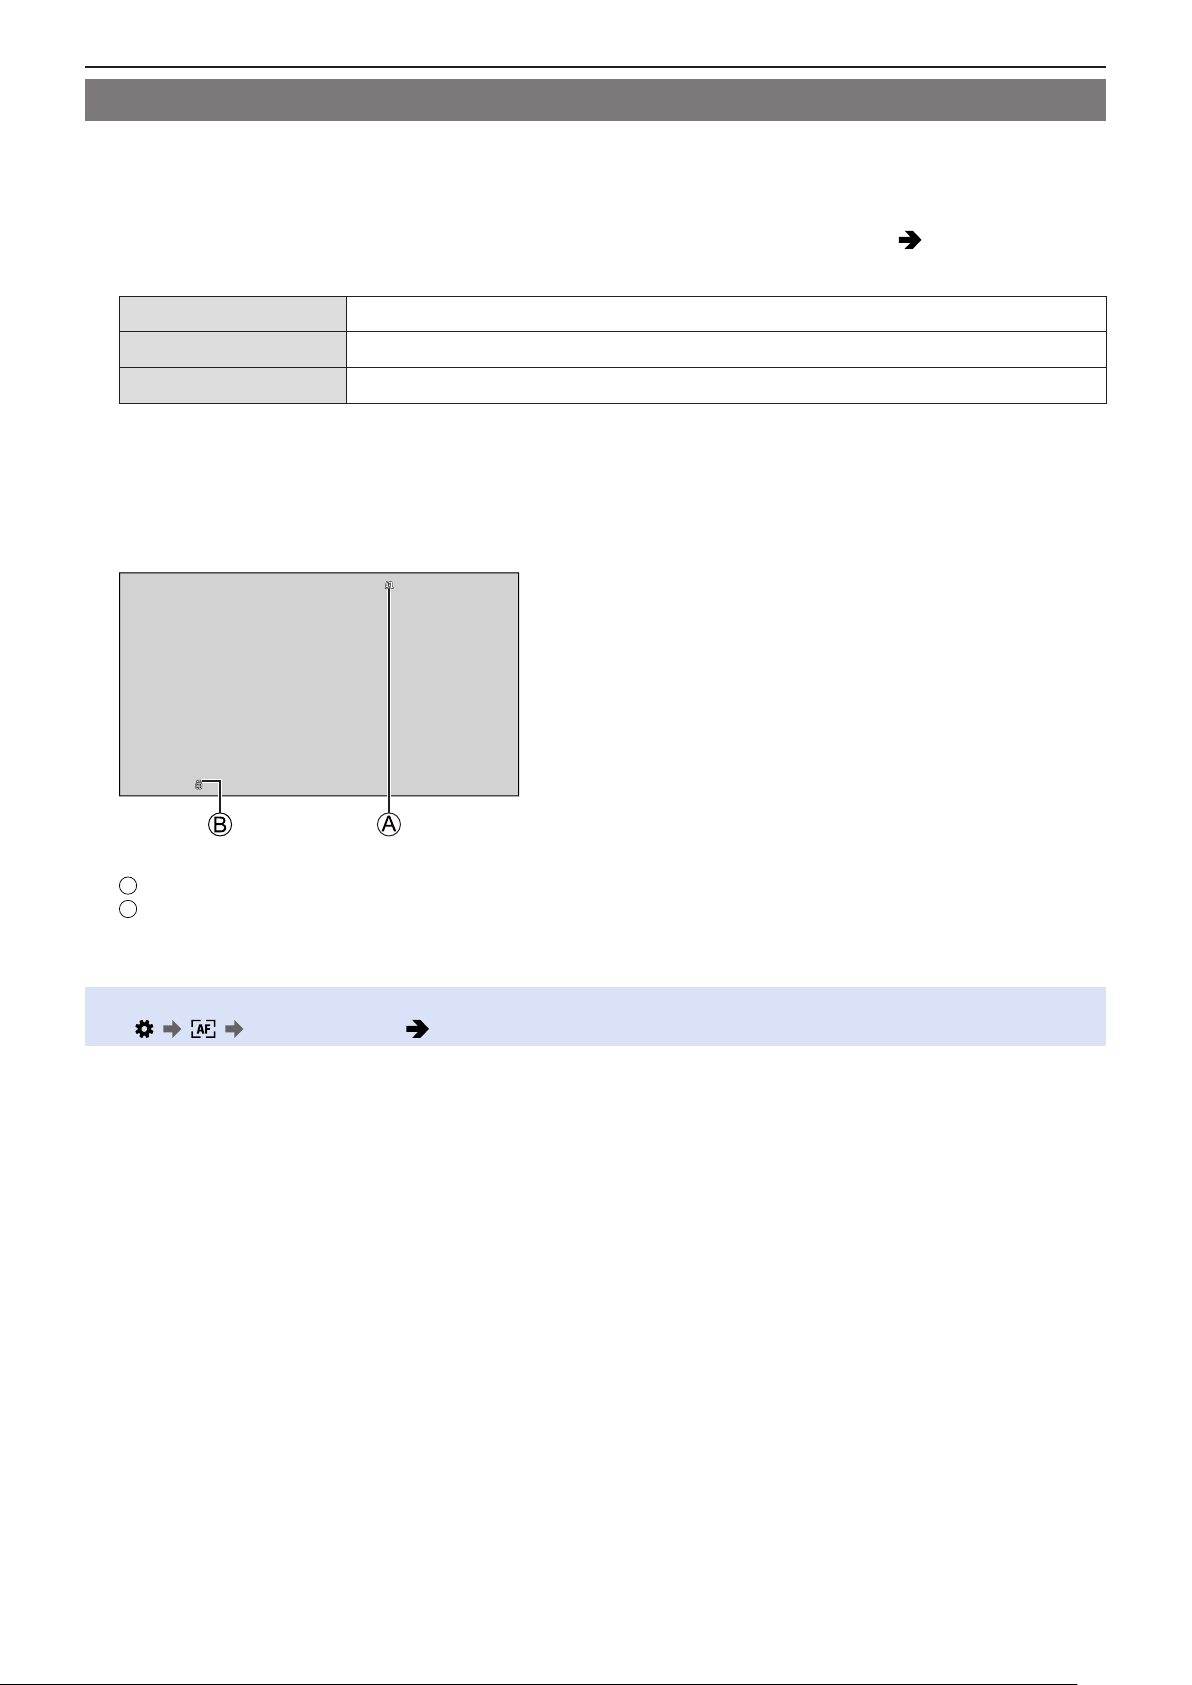
5. Recording settings - Metering / Exposure / ISO Sensitivity
A
B
Locking Focus and Exposure (AF/AE Lock)
Lock the focus and exposure in advance to take pictures with the same focus and exposure settings while changing the
composition.
This is useful when you want to bring an edge of the screen into focus or there is a backlight, for example.
1 Register [AE LOCK], [AF LOCK], or [AF/AE LOCK] to the Fn button. ( 155 / Register
Functions to the Fn Buttons)
[AE LOCK] The exposure is locked.
[AF LOCK] The focus is locked.
[AF/AE LOCK] Both focus and exposure are locked.
2 Lock focus and exposure.
●
Press and hold the Fn button.
● If focus is locked, then the AF lock icon will be displayed.
● If exposure is locked, then the AE lock icon will be displayed.
AF lock icon (AFL)
AE lock icon (AEL)
3 Hold the Fn button to decide on the composition and then perform recording.
●
The lock can be maintained even without pressing and holding the Fn button:
[ ] [ ] [AF/AE Lock Hold] ( 186 / [AF/AE Lock Hold])
- 87 -- 87 -
Page 88
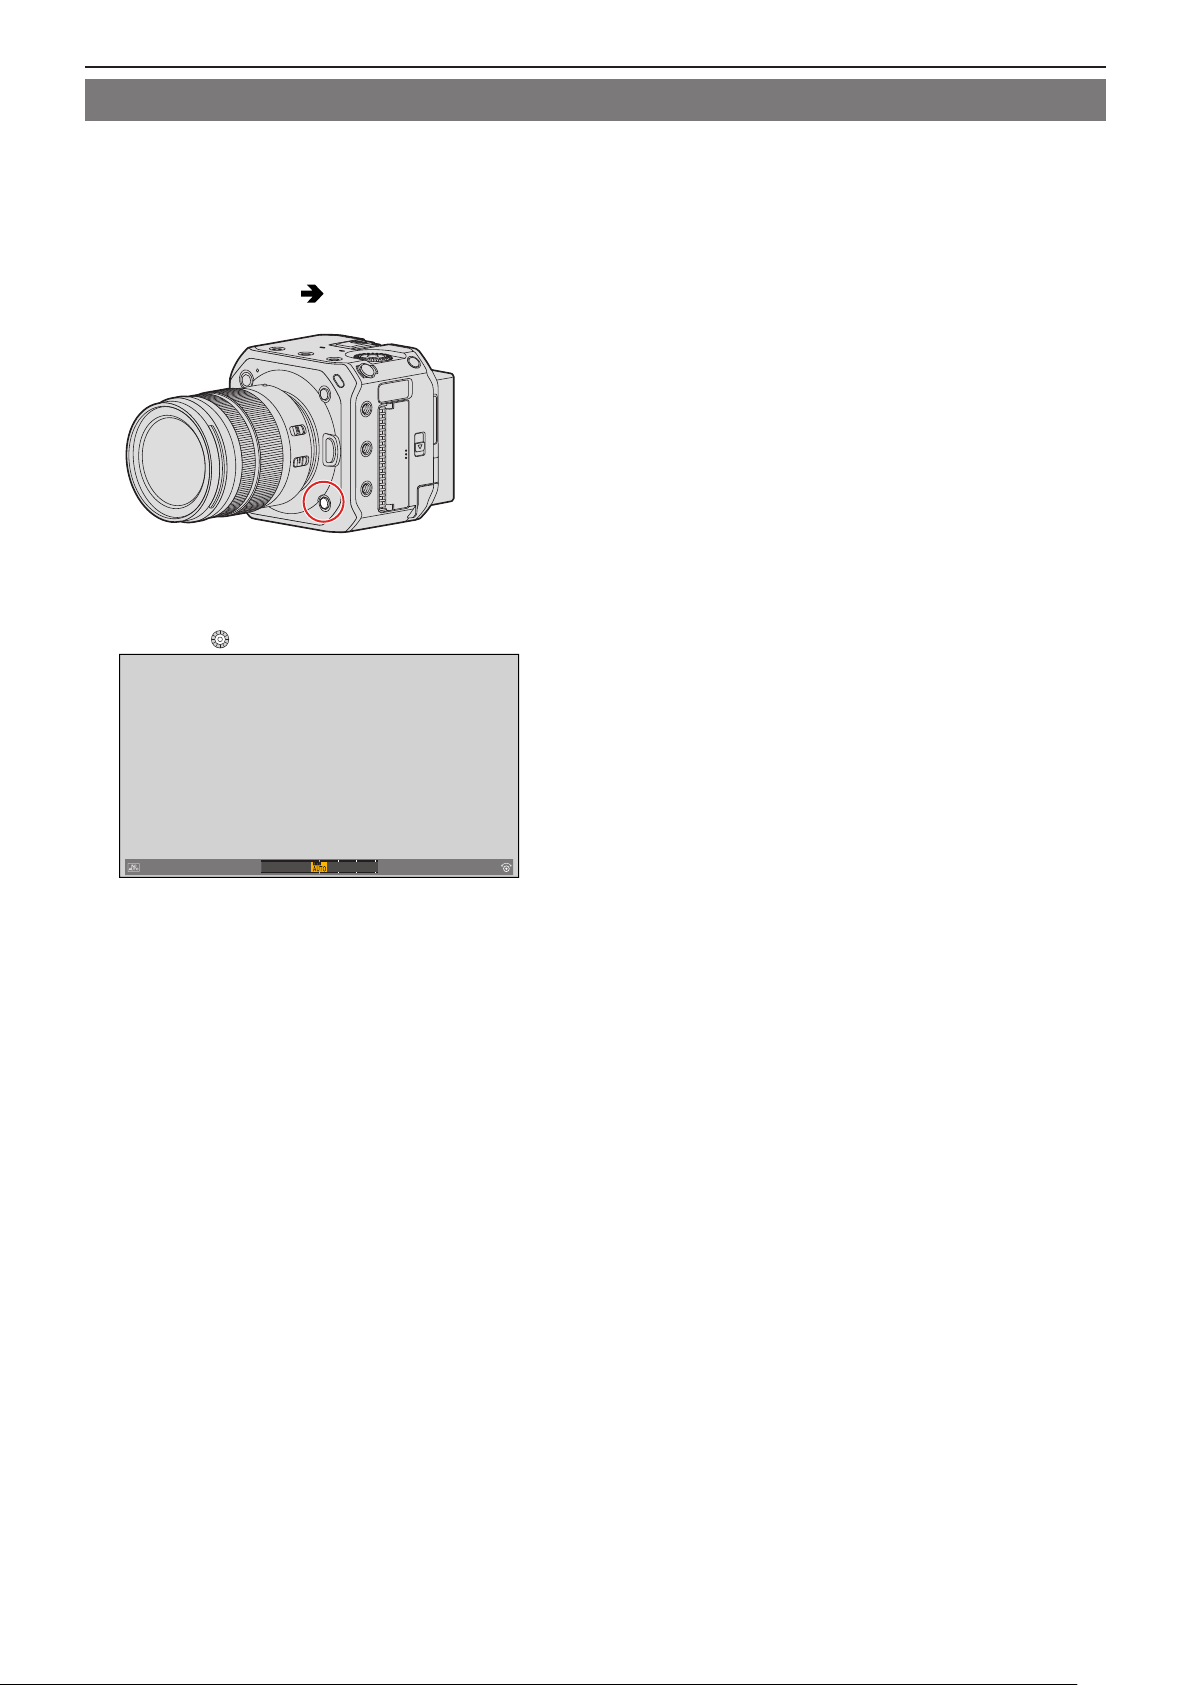
5. Recording settings - Metering / Exposure / ISO Sensitivity
ISO Sensitivity
You can set light sensitivity (ISO sensitivity). With the default settings, you can set 160 to 51200 in 1/3 EV increments. This
camera supports Dual Native ISO which enables recording at high sensitivity with reduced noise by switching the base
sensitivity. The base sensitivity can also be fixed as necessary.
1 Press [Fn3].
●
At default setting, [Sensitivity] is assigned to [Fn3].
●
About Fn buttons ( 154 / Fn Buttons)
● You can also set it in the [Sensitivity] of the [Video] ([Image Quality]) menu
2 Select ISO sensitivity.
●
Rotate .
2001604
3 Confirm your selection.
●
Press [MENU/SET].
0
- 88 -- 88 -
Page 89
5. Recording settings - Metering / Exposure / ISO Sensitivity
Setting Items (ISO Sensitivity)
■
[AUTO]
The ISO sensitivity is automatically adjusted according to the brightness.
Maximum [6400]*
1
The ISO sensitivity is fixed at the selected value.
●
[160] to [51200]
You can extend the ISO sensitivity range in between a lower limit of [80] and an
upper limit of [204800] by setting [Extended ISO] ( 185 / [Extended ISO]) to [ON] in
the [Custom] ([Image Quality]) menu.
1
Default setting. The upper limit can be changed with [ISO Sensitivity (video)].
*
●
When the following functions are being used, the ISO sensitivity that can be set is restricted.
– [High Dynamic] ([Filter Settings]): Fixed to [AUTO]
– Other than [High Dynamic] ([Filter Settings]): Up to an upper limit of [6400]
– [Like709] ([Photo Style]): Down to a lower limit of [160]
– [V-Log L] ([Photo Style]): Down to a lower limit of [400], up to an upper limit of [25600]
– [Hybrid Log Gamma] ([Photo Style]): Down to a lower limit of [320].
●
You can change the intervals between ISO sensitivity settings values:
[ ] [ ] [ISO Increments] ( 185 / [ISO Increments])
●
The setting range of ISO sensitivity can be extended:
] [ ] [Extended ISO] ( 185 / [Extended ISO])
[
●
You can change the units for sensitivity to dB when recording video:
[
] [ ] [SS/Gain Operation] ( 108 / [SS/Gain Operation])
- 89 -- 89 -
Page 90
5. Recording settings - Metering / Exposure / ISO Sensitivity
[ISO Sensitivity (video)]
Sets the lower and upper limits for ISO sensitivity when ISO sensitivity is set to [AUTO].
[MENU/SET] [ ] [ ] Select [ISO Sensitivity (video)]
[ISO Auto Lower Limit Setting]
[ISO Auto Upper Limit Setting]
●
When [Filter Settings] is set to [High Dynamic], [ISO Sensitivity (video)] cannot be used.
Sets the lower limit for ISO sensitivity when ISO sensitivity is [AUTO].
●
Set in the range between [160] and [25600].
Sets the upper limit for ISO sensitivity when ISO sensitivity is [AUTO].
●
Set to [AUTO] or in the range between [200] and [51200].
[Dual Native ISO Setting]
You can set whether to switch the base sensitivity automatically or to fix it.
[MENU/SET]
[AUTO]
[LOW]
[HIGH]
[ ] [ ] Select [Dual Native ISO Setting]
The base sensitivity is automatically switched according to the brightness.
ISO sensitivity that can be set:
[AUTO] / [160] to [51200].
(When [Extended ISO] is set: [AUTO] / [80] to [204800].)
Sets the base sensitivity for low sensitivity.
ISO sensitivity that can be set:
[AUTO] / [160] to [800].
(When [Extended ISO] is set: [AUTO] / [80] to [800].)
Sets the base sensitivity for high sensitivity.
ISO sensitivity that can be set:
[AUTO] / [800] to [51200].
(When [Extended ISO] is set: [AUTO] / [800] to [204800].)
●
When [Filter Settings] is set to [High Dynamic], [Dual Native ISO Setting] is fixed to [AUTO].
[Luminance Level]
You can set the luminance range to suit the purpose of video recording.
[MENU/SET] [ ] [ ] Select [Luminance Level]
Settings: [0-255] / [16-235] / [16-255]
●
When set to a 10-bit [Rec Quality], the setting items change to [0-1023], [64-940], and [64-1023].
●
When [Photo Style] is set to [V-Log L], this is fixed to [0-255] ([0-1023]).
- 90 -- 90 -
Page 91
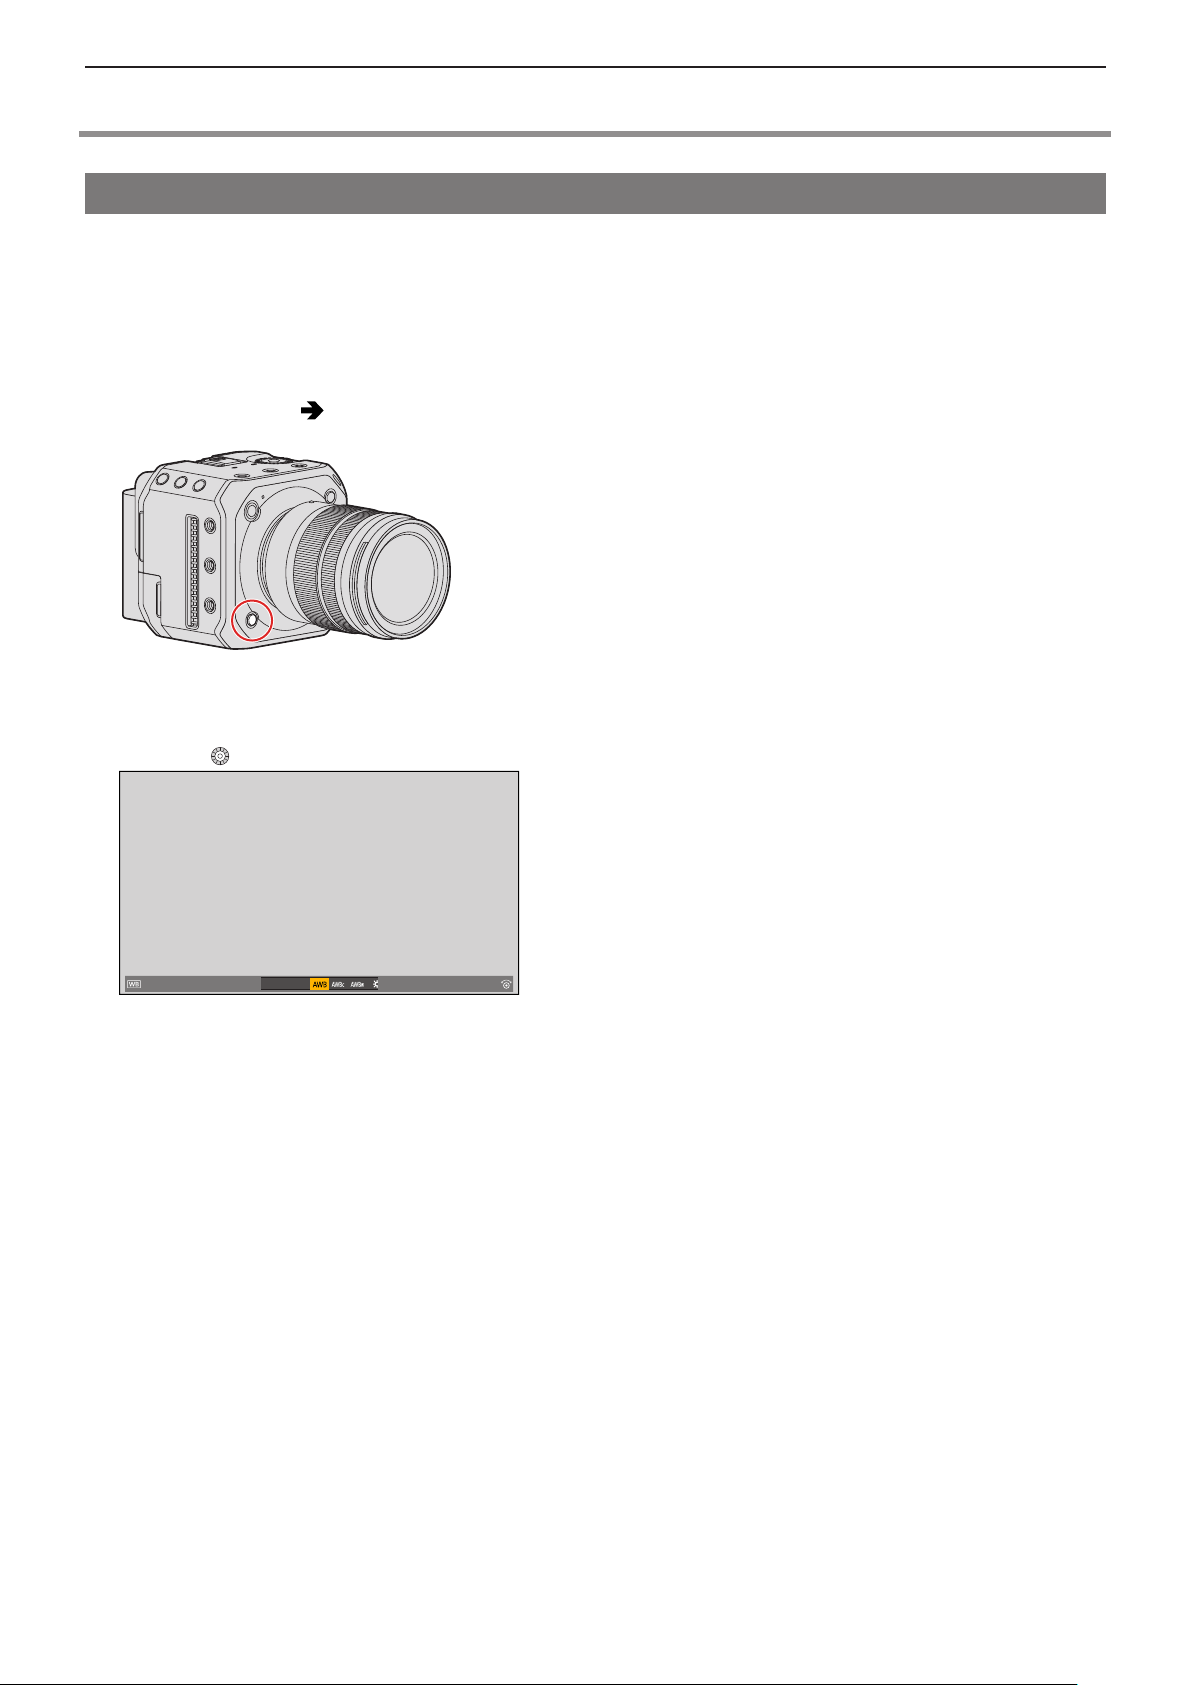
5. Recording settings - White Balance / Image Quality
White Balance / Image Quality
White Balance (WB)
White balance (WB) is a function that corrects the color cast produced by the light illuminating the subject. It corrects the colors
so that white objects appear in white to make the overall color closer to what is seen by the eye.
Normally, you can use auto ([AWB], [AWBc] or [AWBw]) to obtain the optimal white balance. Set this function when the coloring
of the image is different from what you expected, or you want to change the coloring to capture the ambience.
1 Press [Fn4].
●
At default setting, [White Balance] is assigned to [Fn4].
●
About Fn buttons ( 154 / Fn Buttons)
● You can also set it from the [White Balance] of the [Video] ([Image Quality]) menu.
2 Select the white balance.
●
Rotate .
3 Confirm your selection.
●
Press [MENU/SET].
- 91 -- 91 -
Page 92
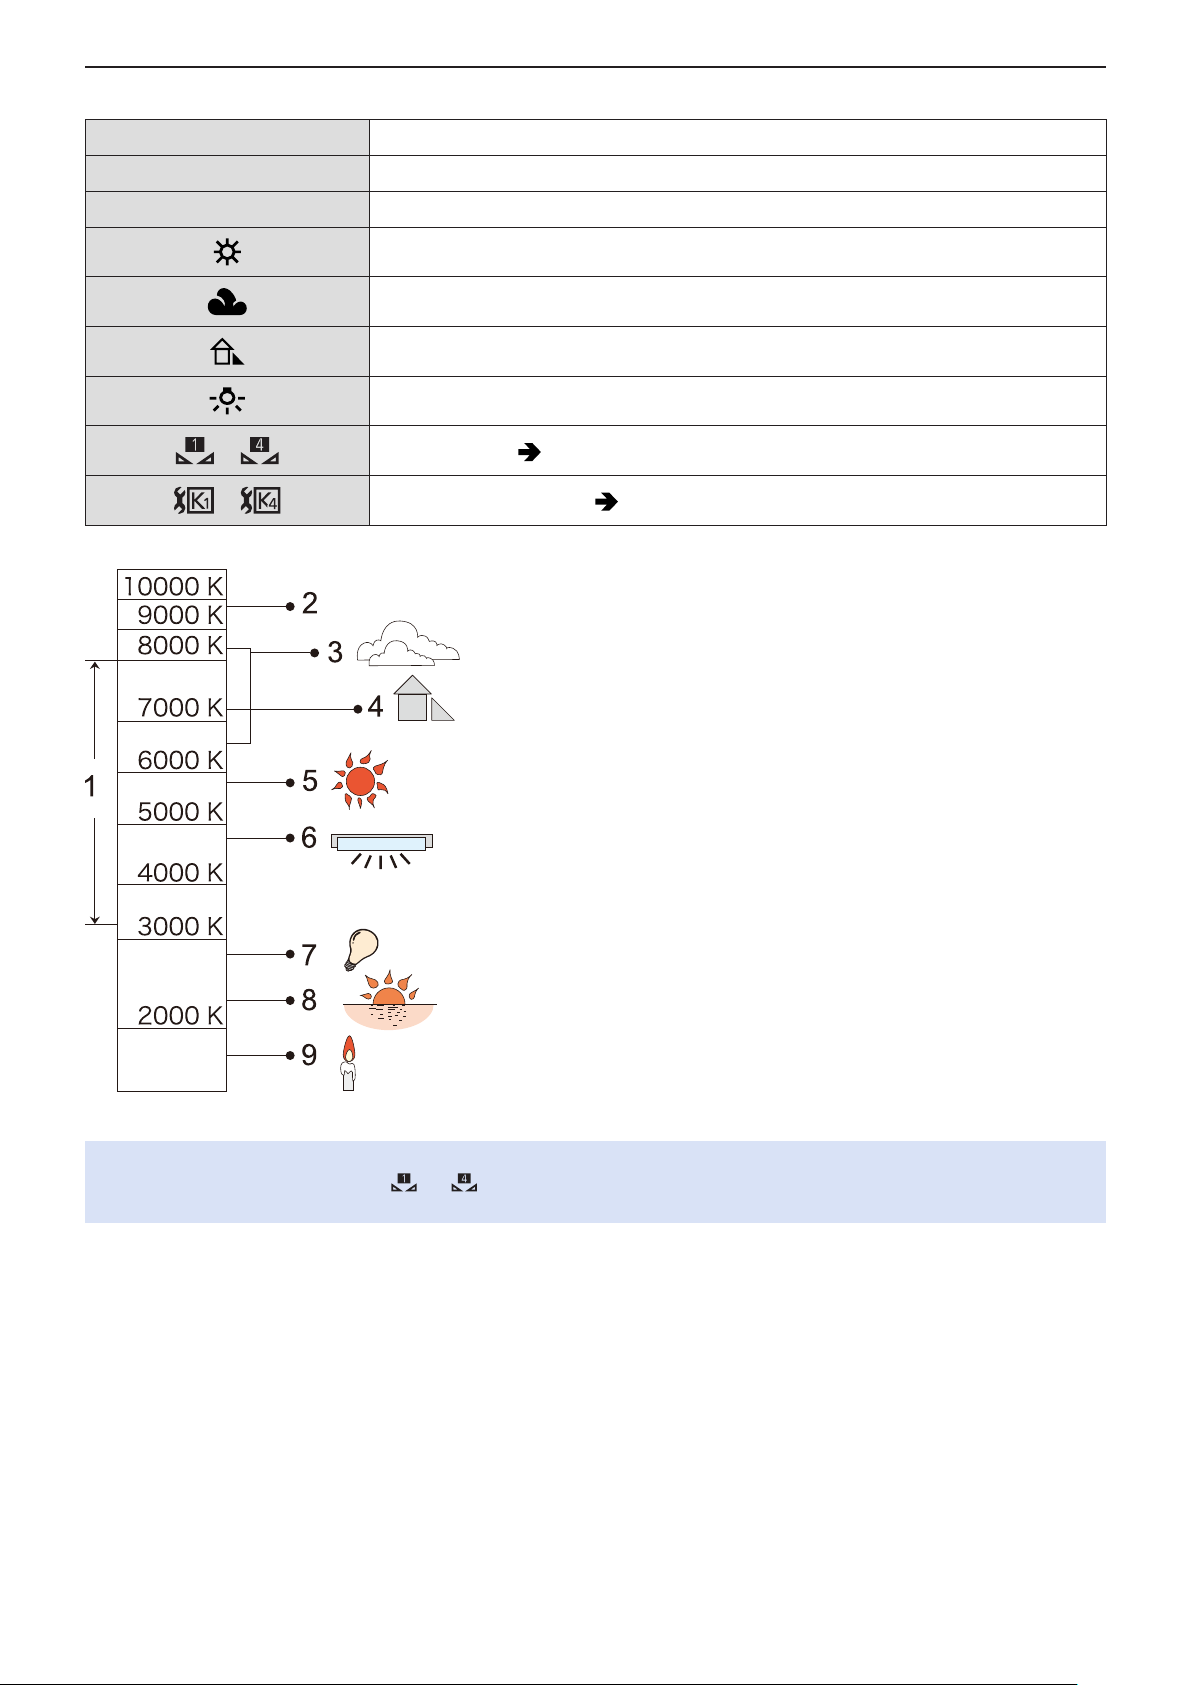
Setting Items (White Balance)
■
[AWB] Auto
[AWBc] Auto (Reduces the reddish hue under an incandescent light source)
[AWBw] Auto (Leaves the reddish hue under an incandescent light source)
5. Recording settings - White Balance / Image Quality
Clear sky
Cloudy sky
Shade under a clear sky
Incandescent light
to
to
Set mode 1 to 4 ( 93 / Registering the White Set)
Color temperatures 1 to 4 ( 93 / Color Temperature Setting)
1 [AWB] will work within this range.
2 Blue sky
3 Cloudy sky (Rain)
4 Shade
5 Sunlight
6 White fluorescent light
7 Incandescent light bulb
8 Sunrise and sunset
9 Candlelight
K=Kelvin Color Temperature
●
Under lighting such as fluorescent or LED lighting, the appropriate white balance will vary depending on the lighting type.
Use [AWB], [AWBc], [AWBw] or [ ] to [ ].
●
The white balance is fixed to [AWB] while [Filter Settings] is being used.
- 92 -- 92 -
Page 93
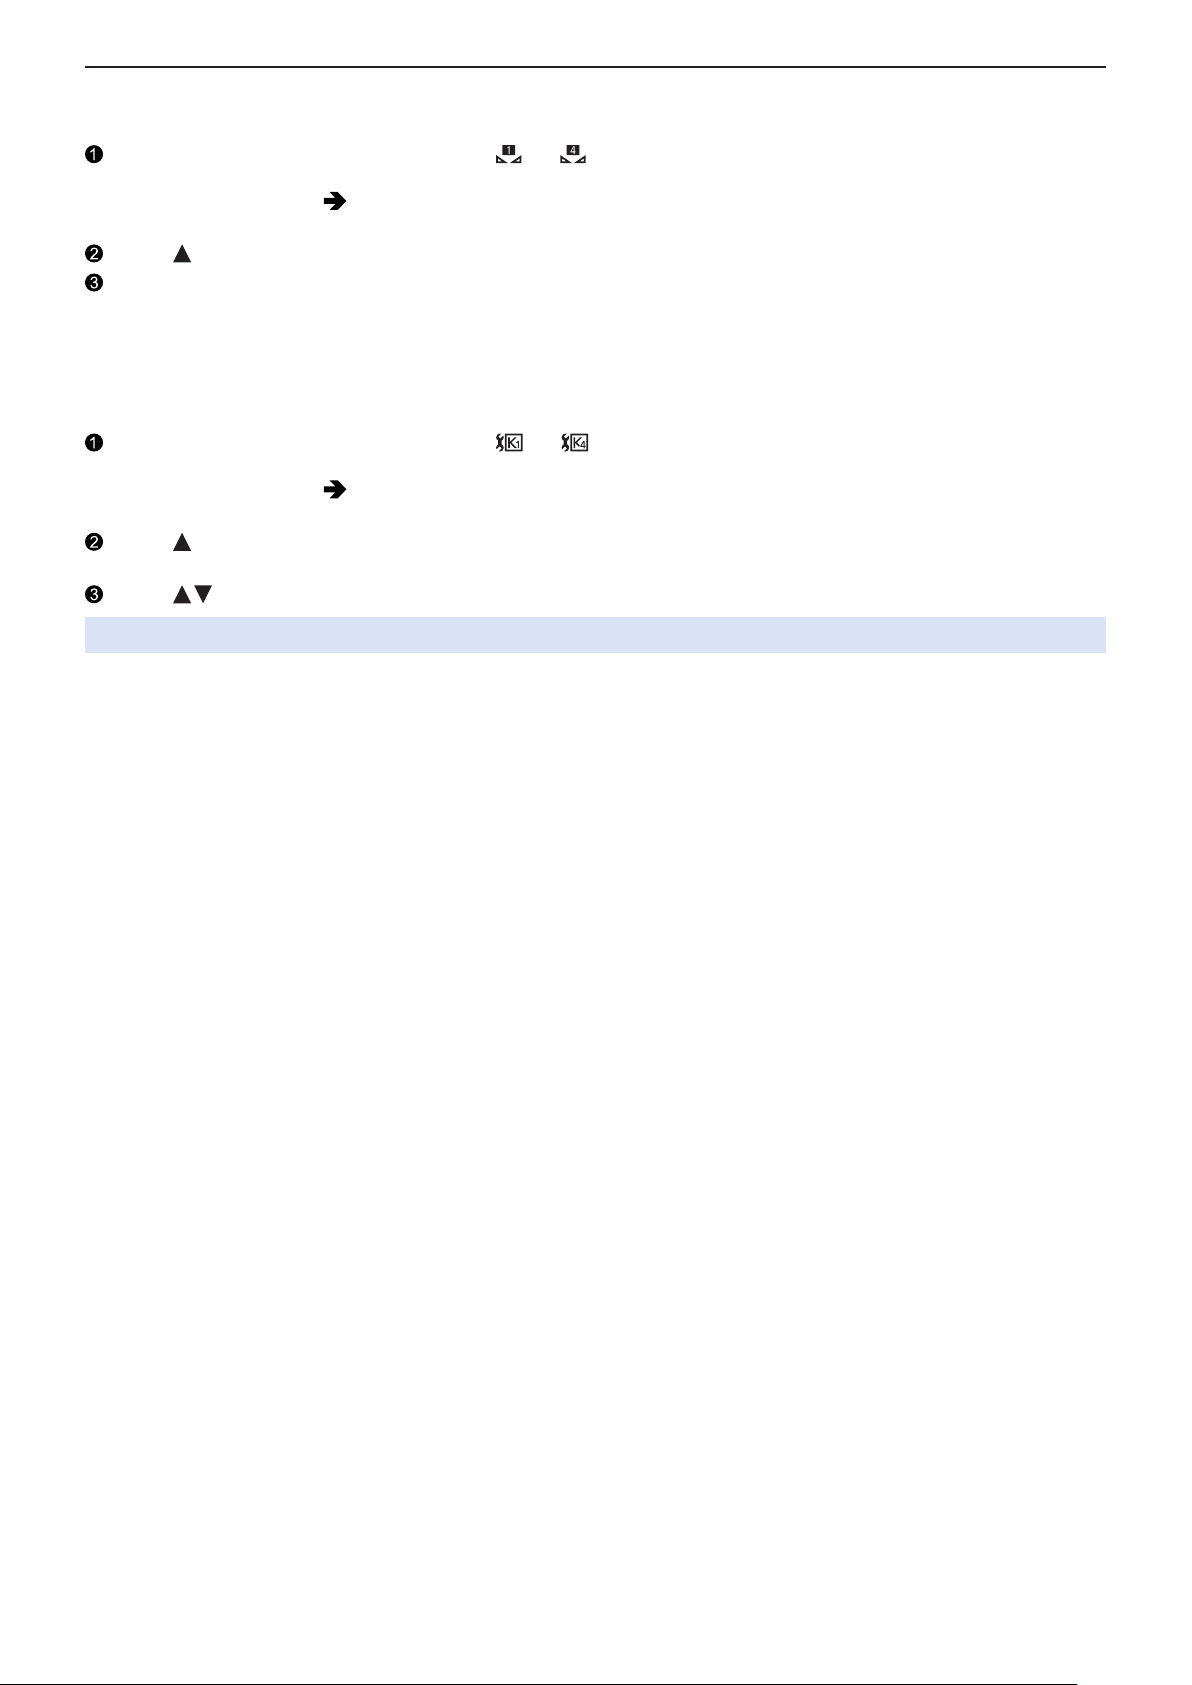
5. Recording settings - White Balance / Image Quality
Registering the White Set
■
Take pictures of a white object under the light source of the recording location to adjust the white balance until it appears white.
Press [Fn4] and then select any value from [ ] to [ ].
●
At default setting, [White Balance] is assigned to [Fn4].
– About Fn buttons ( 154 / Fn Buttons)
●
You can also set it from the [White Balance] of the [Video] ([Image Quality]) menu.
Press .
Aim the camera at a white object so that it appears inside the frame at the center of the screen and then press
[MENU/SET].
●
This will set the white balance and return you to the recording screen.
Color Temperature Setting
■
Set the numeric value for the white balance color temperature.
Press [Fn4] and then select any value from [ ] to [ ].
●
At default setting, [White Balance] is assigned to [Fn4].
– About Fn buttons ( 154 / Fn Buttons)
●
You can also set it from the [White Balance] of the [Video] ([Image Quality]) menu.
Press .
●
The color temperature setting screen is displayed.
Press to select the color temperature and then press [MENU/SET].
●
You can set a color temperature from [2500K] to [10000K].
- 93 -- 93 -
Page 94
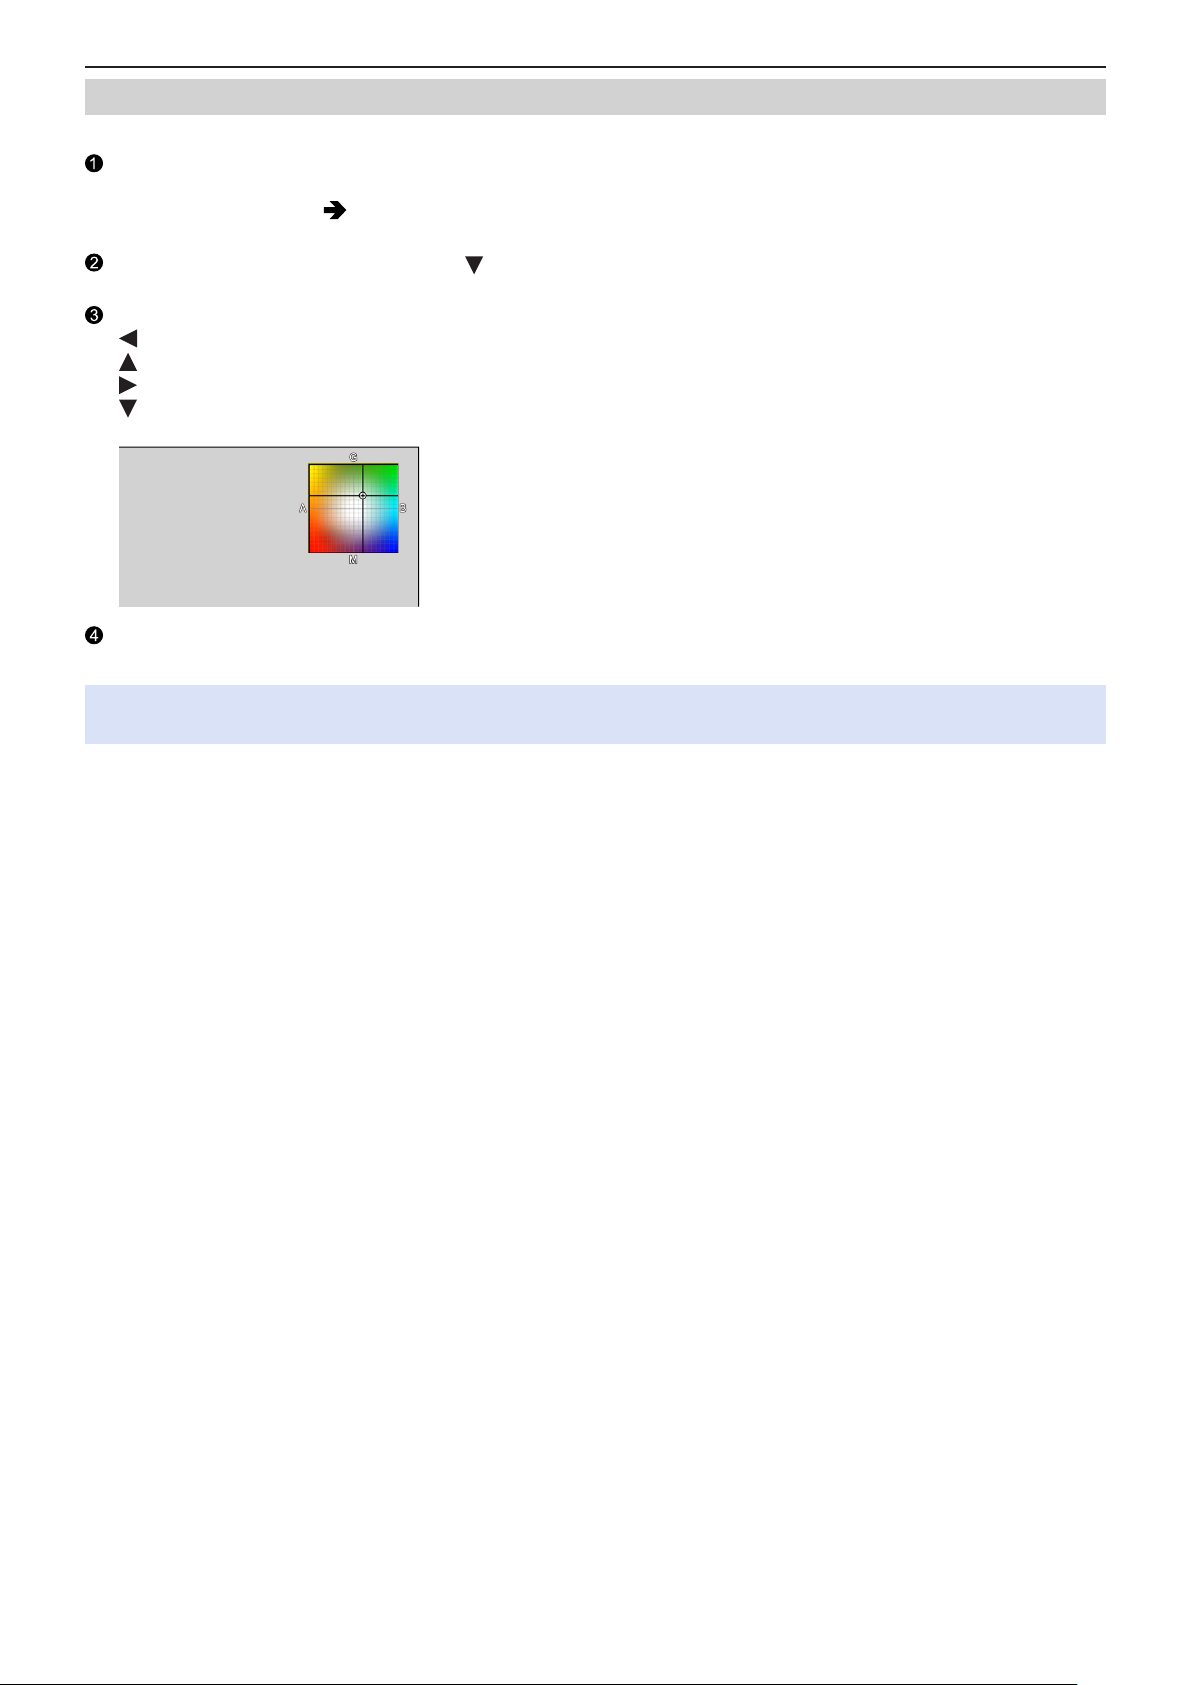
5. Recording settings - White Balance / Image Quality
Adjusting the White Balance
You can adjust the coloring when the coloring you want is not produced by the set white balance.
Press [Fn4].
●
At default setting, [White Balance] is assigned to [Fn4].
– About Fn buttons (
●
You can also set it from the [White Balance] of the [Video] ([Image Quality]) menu.
Select the white balance and then press .
●
The adjustment screen is displayed.
Adjust the coloring.
: [A] (AMBER: ORANGE)
: [G] (GREEN: GREENISH)
: [B] (BLUE: BLUISH)
: [M] (MAGENTA: REDDISH)
●
Press [Fn1] to return to the unadjusted state.
154 / Fn Buttons)
Confirm your selection.
●
Press [MENU/SET].
●
When the white balance is adjusted, the color of its recording screen icon changes to the adjusted color. Adjusting toward
the [G] side will display [+], while adjusting toward the [M] side will display [–].
- 94 -- 94 -
Page 95
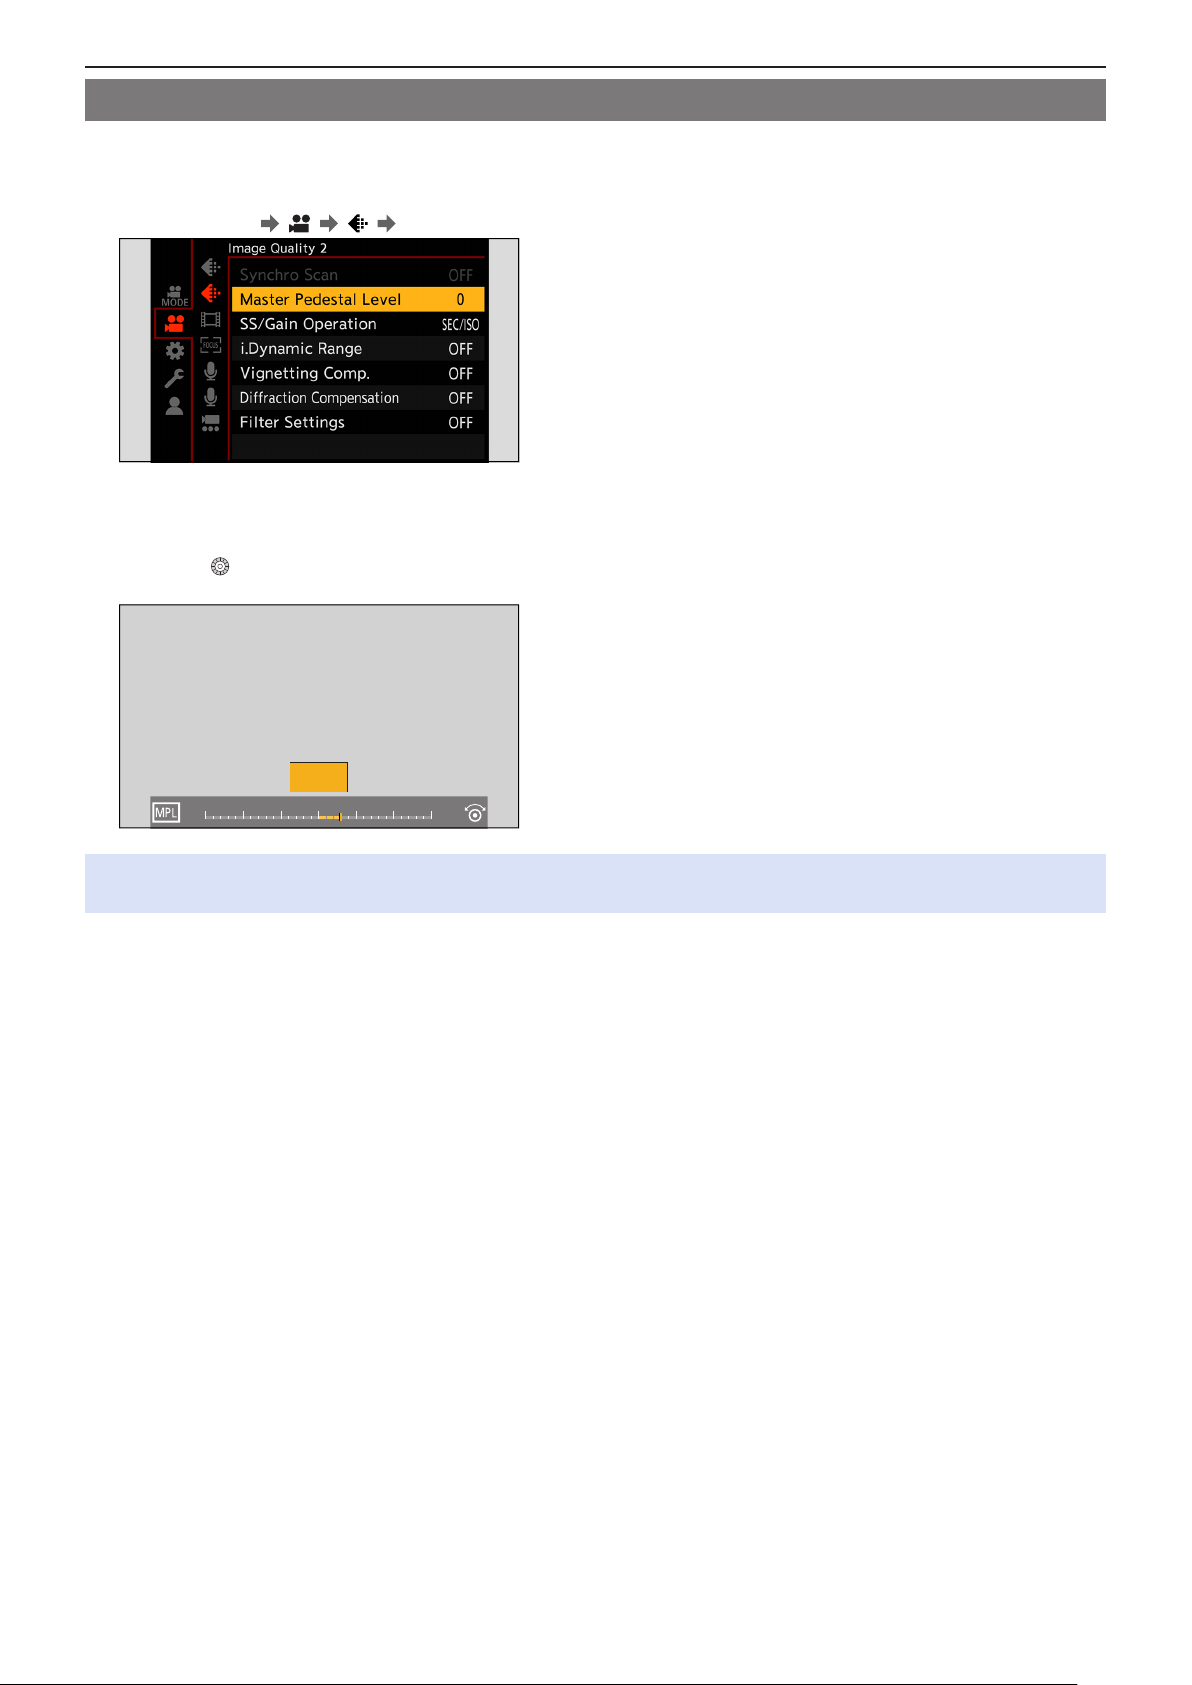
5. Recording settings - White Balance / Image Quality
[Master Pedestal Level]
You can adjust the black level, which serves as the reference for images.
1 Select [Master Pedestal Level].
●
[MENU/SET] [ ] [ ] [Master Pedestal Level]
2 Adjust master pedestal.
●
Rotate .
●
Set in the range between –15 and +15.
3
+
-5 5 10 150-10-15
●
[Master Pedestal Level] is not available when using the following function:
– [V-Log L] ([Photo Style])
- 95 -- 95 -
Page 96
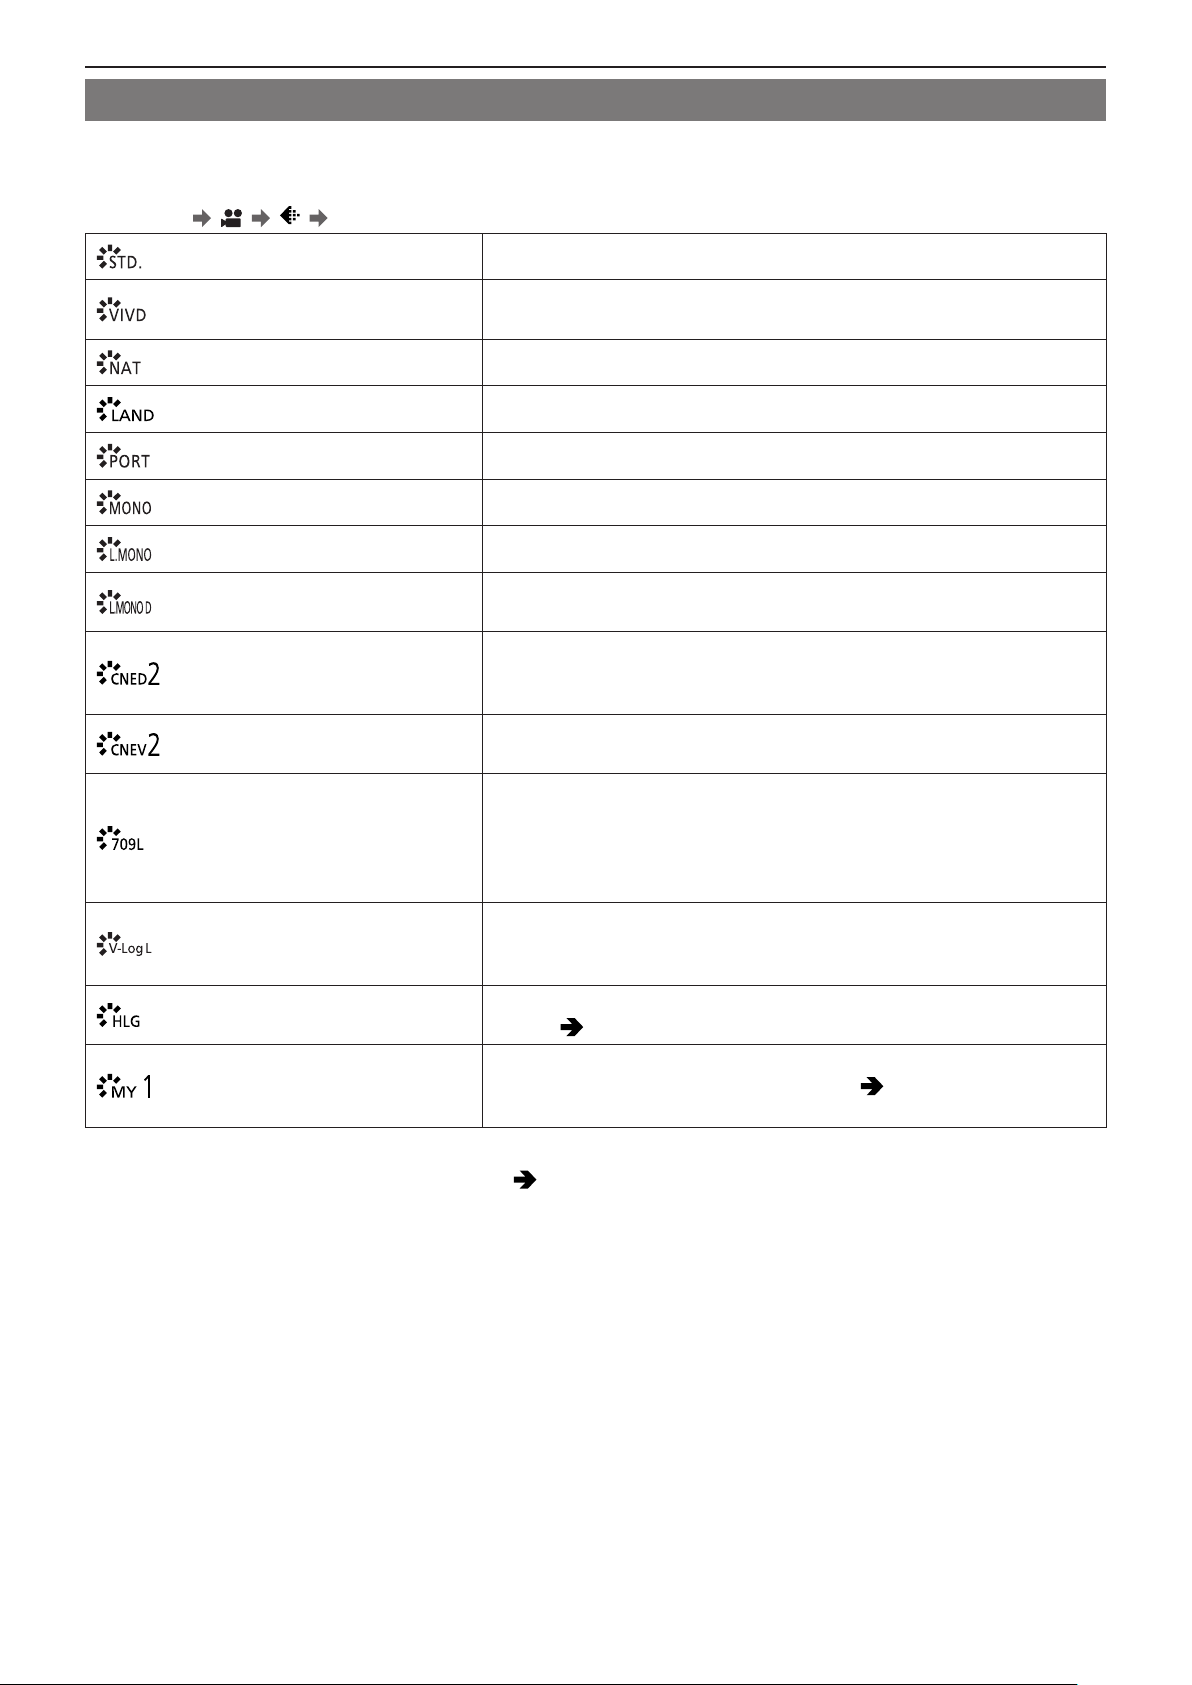
5. Recording settings - White Balance / Image Quality
[Photo Style]
You can select the finishing settings of images to suit your subjects and expression styles. The image quality can be adjusted for
each Photo Style.
[MENU/SET] [ ] [ ] Select [Photo Style]
[Standard] The standard setting.
[Vivid]
A setting that produces a more vivid quality with higher saturation and
contrast.
[Natural] A setting that produces a softer quality with lower contrast.
[Landscape] A setting suited for sceneries with vivid blue skies and greens.
[Portrait] A setting suited for portraits with a healthy and beautiful skin tone.
[Monochrome] A monochrome setting with no color shades.
[L.Monochrome] A black-and-white setting with rich gradation and crisp black accents.
[L.Monochrome D]
A monochrome setting that creates a dynamic impression with enhanced
highlights and shadows.
A setting that creates a film-like finishing touch using a gamma curve and
[Cinelike D2]
[Cinelike V2]
gives priority to the dynamic range.
●
This function is suitable for video editing processes.
A setting that creates a film-like finishing touch using a gamma curve that
gives priority to the contrast.
A setting that minimizes overexposure by applying a gamma curve
correction equivalent to Rec.709 to perform compression (knee adjustment)
[Like709]
of high-luminance areas.
●
Rec.709 is an abbreviation of “ITU-R Recommendation BT.709”, a
standard for high definition broadcasting.
Gamma curve setting intended for post production processing.
[V-Log L]
●
It allows you to add rich gradation to images during post production
editing.
[Hybrid Log Gamma]
[MY PHOTO STYLE 1]*1 to
[MY PHOTO STYLE 10]*
1
Effects up to [MY PHOTO STYLE 4] are displayed with the default settings. You can set the items to display in the menu with
*
1
A setting for recording motion pictures with a wide dynamic range in HLG
format. ( 122 / HLG Videos)
Adjusts the image quality of Photo Style items to your preferred settings
and registers these as My Photo Style items. ( 99 / Registering Settings
in My Photo Style)
[Show/Hide Photo Style] in [Photo Style Settings]. ( 185 / [Show/Hide Photo Style])
- 96 -- 96 -
Page 97
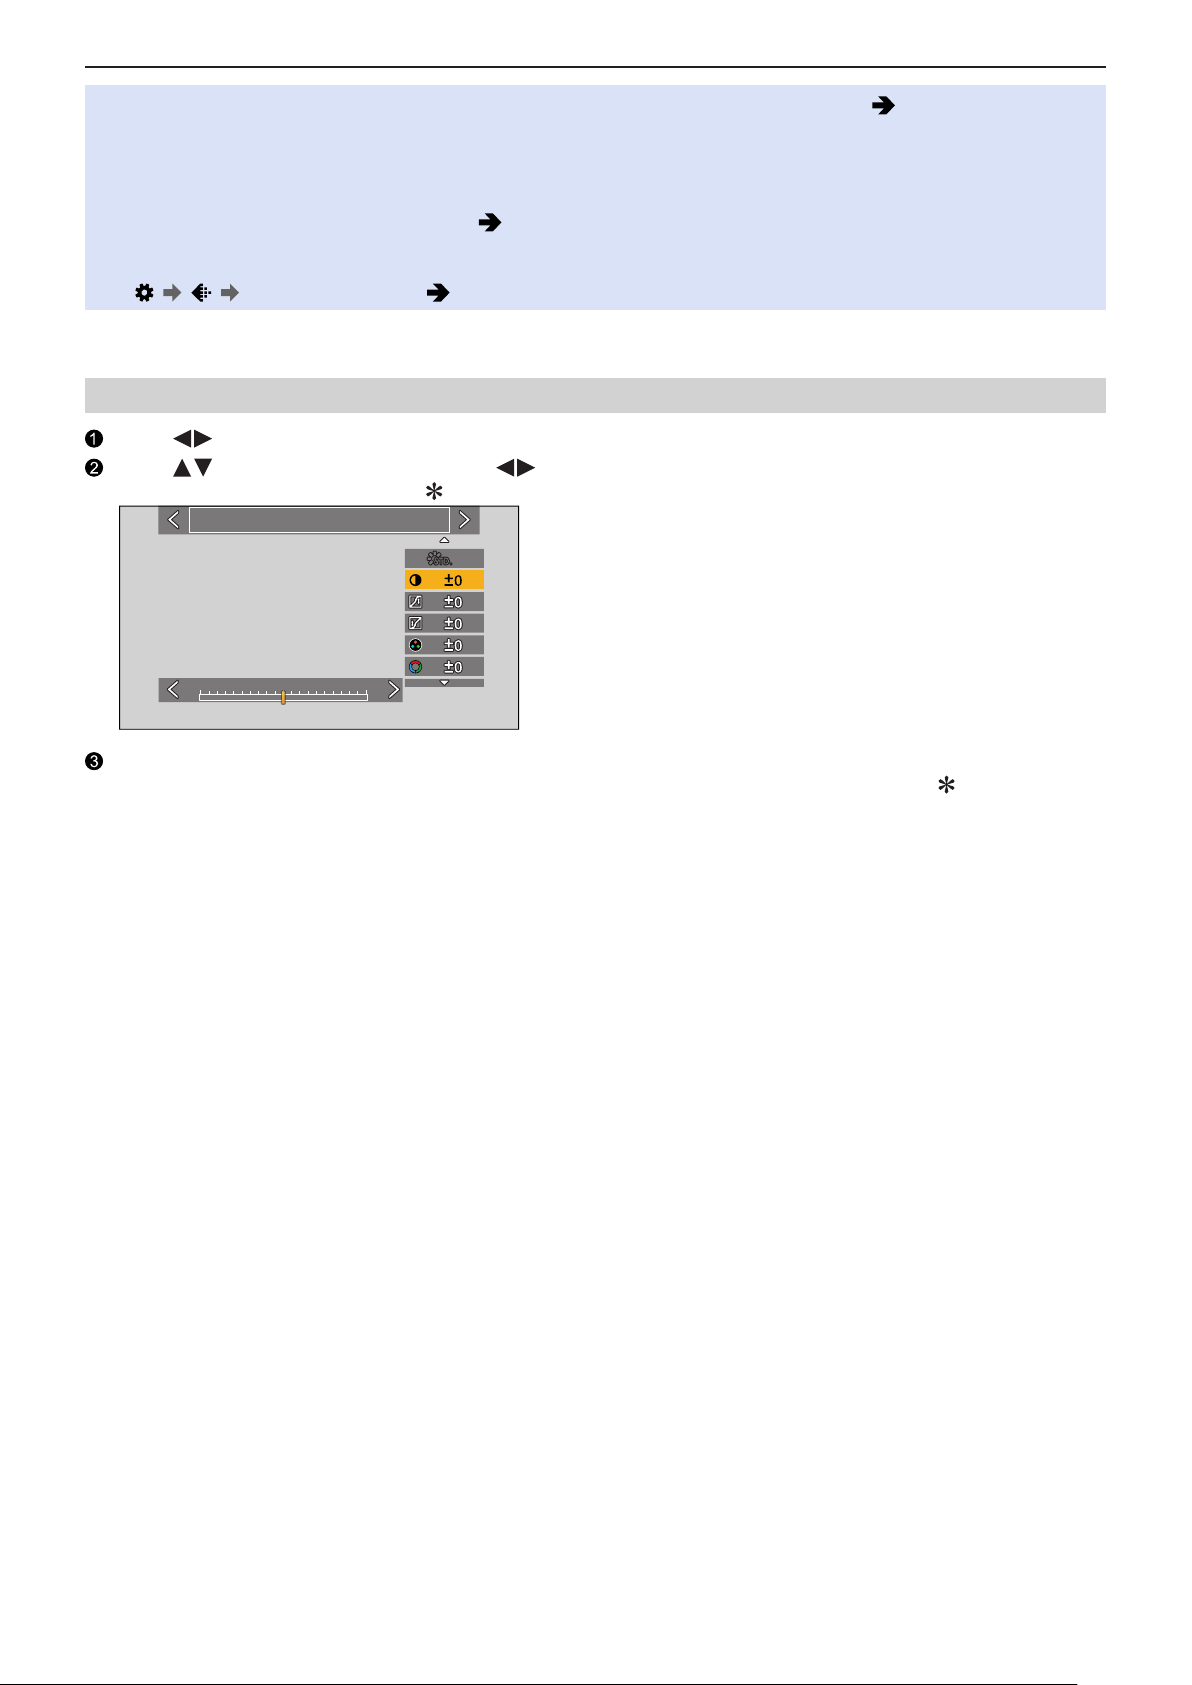
5. Recording settings - White Balance / Image Quality
●
The range of available ISO sensitivities is different when [Photo Style] is set to the following: ( 89 / Setting Items (ISO
Sensitivity))
– [Like709], [V-Log L], [Hybrid Log Gamma]
The range of available ISO sensitivities is also different for [LOW] and [HIGH] in [Dual Native ISO Setting]. Reset the
exposure if necessary when ISO sensitivity changes.
●
You can set the knee mode with [Like709]. ( 100 / Recording While Controlling Overexposure (Knee))
●
When [Filter Settings] is being used, [Photo Style] is not available.
●
You can make detailed Photo Style settings:
[ ] [ ] [Photo Style Settings] ( 185 / [Photo Style Settings])
Adjusting Image Quality
Press to select the type of Photo Style.
Press to select an item and then press to adjust.
●
Adjusted items are indicated with [ ].
Standard
-5 +50
Press [MENU/SET].
●
When the image quality is adjusted, the Photo Style icon on the recording screen is indicated with [ ].
- 97 -- 97 -
Page 98
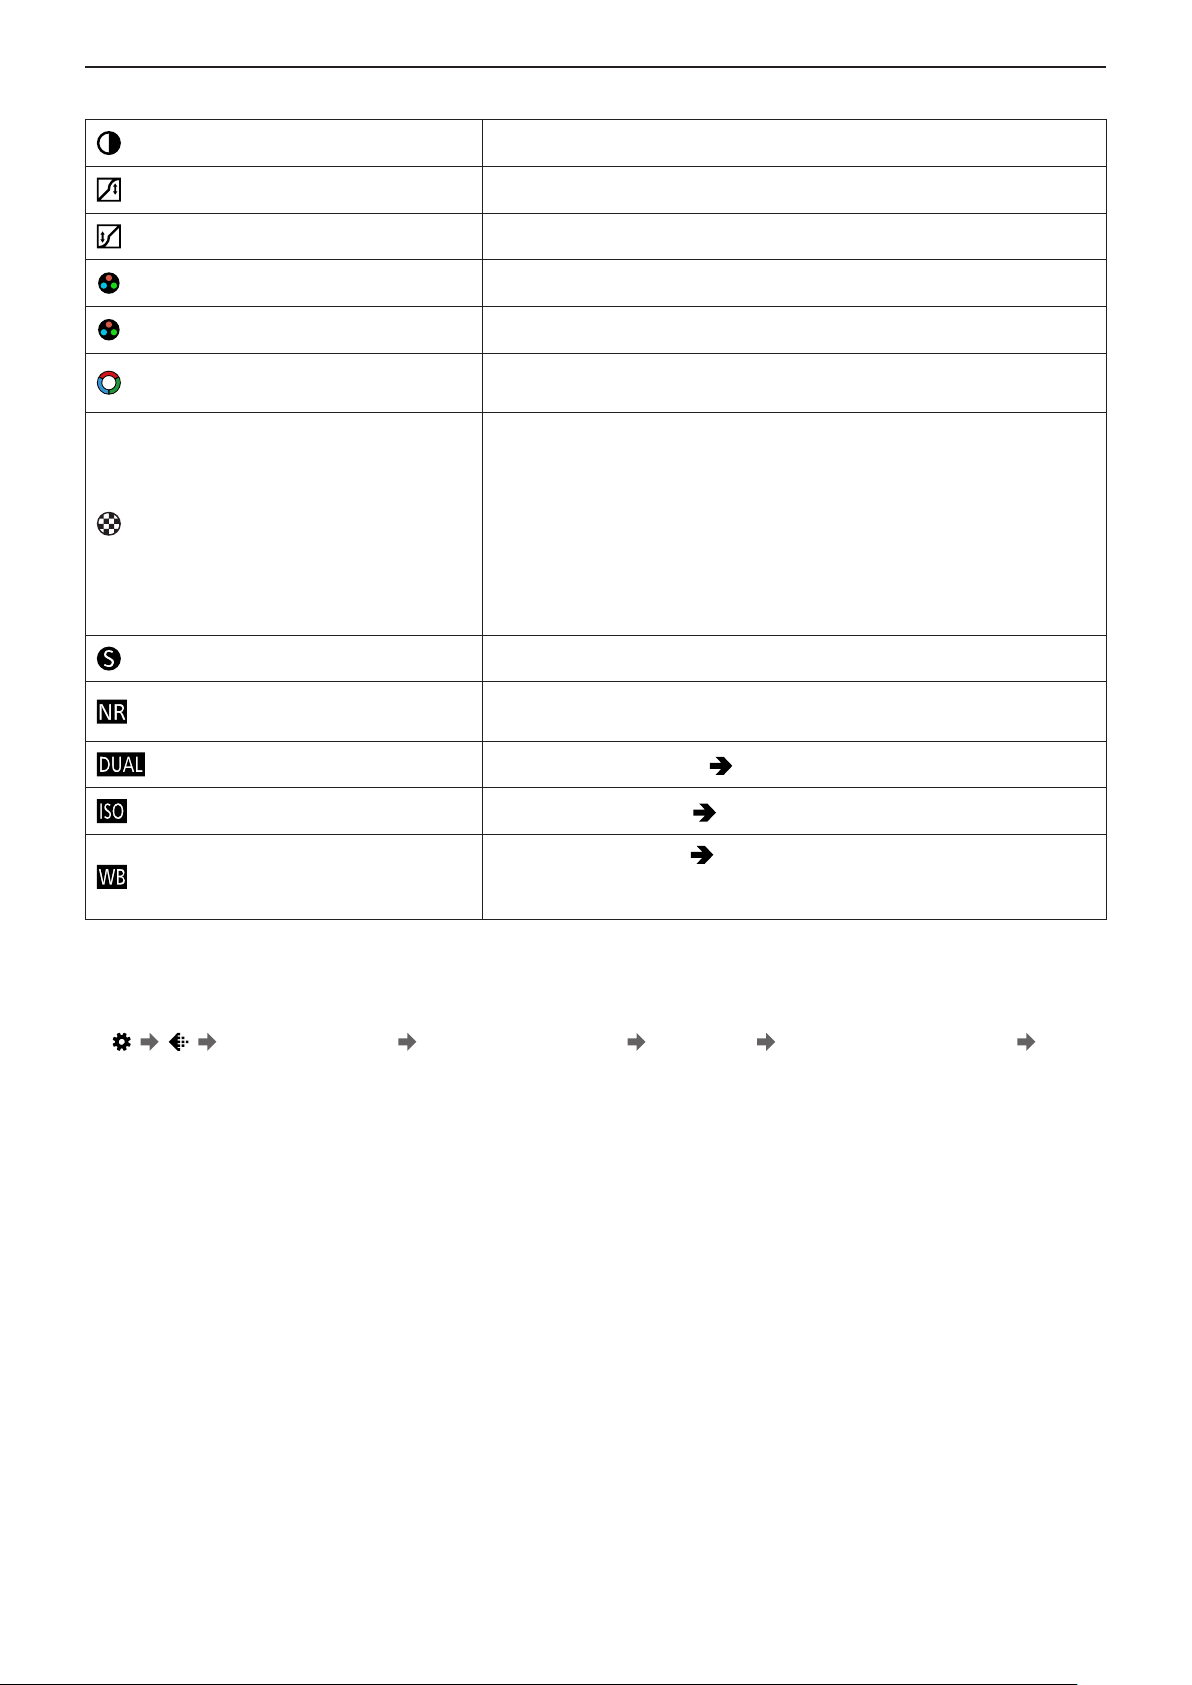
5. Recording settings - White Balance / Image Quality
Settings Items (Image Quality Adjustment)
■
[Contrast]*
[Highlight]*
[Shadow]*
[Saturation]*
[Color Tone]*
[Hue]*
1
1
1
2
3
2
Adjusts the contrast in the image.
Adjusts the brightness of bright areas.
Adjusts the brightness of dark areas.
Adjusts the vividness of colors.
Adjusts blue and yellow tints.
Assuming that the reference point is red, this rotates the hue toward violet/
magenta or yellow/green to adjust the coloring of the entire image.
[Yellow]: Enhances the contrast. (Effect: weak)
Records the sky with a clear blue.
[Orange]: Enhances the contrast. (Effect: medium)
Records the sky with a darker blue.
[Filter Effect]*
3
[Red]: Enhances the contrast. (Effect: strong)
Records the sky with a much darker blue.
[Green]: Skin and lips of people appear in natural tones.
Green leaves appear brighter and more enhanced.
[OFF]: ―
[Sharpness] Adjusts the outlines in the image.
[Noise Reduction]
Adjusts the noise reduction effect.
●
Increasing the effect may cause a slight drop in picture resolution.
[Dual Native ISO Setting]*
[Sensitivity]*
4
4
Sets the Dual Native ISO. ( 90 / [Dual Native ISO Setting])
Sets the ISO sensitivity. ( 88 / ISO Sensitivity)
Sets the white balance. ( 91 / White Balance (WB))
[White Balance]*
4
●
While [WB] is selected, press [Fn2] to display the white balance setting
screen. Press [Fn2] again to return to the original screen.
1
Cannot be adjusted when [Like709], [V-Log L] or [Hybrid Log Gamma] is selected.
*
*2 Available when anything other than [Monochrome], [L.Monochrome], [L.Monochrome D] or [V-Log L] is selected.
*3 Available when [Monochrome], [L.Monochrome] or [L.Monochrome D] is selected.
*4 Available when the following is set while [MY PHOTO STYLE 1] to [MY PHOTO STYLE 10] are selected:
[ ] [ ] [Photo Style Settings] [My Photo Style Settings] [Add Effects] [Sensitivity] / [White Balance] [ON]
- 98 -- 98 -
Page 99

5. Recording settings - White Balance / Image Quality
Registering Settings in My Photo Style
Press to select the type of Photo Style.
Adjust the image quality.
●
My Photo Style displays the types of Photo Style at the top of image quality adjustment. Select the base Photo Style.
Press [Fn1].
(When [MY PHOTO STYLE 1] to [MY PHOTO STYLE 10] is selected)
Press to select [Save Current Setting] and then press [MENU/SET].
Press to select the registration destination number and then press [MENU/SET].
●
A confirmation screen will be displayed.
On the confirmation screen, press [Fn1] to change the My Photo Style name.
Up to 22 characters may be entered. Double-byte characters are treated as 2 characters.
For information on how to enter characters ( 203 / Entering Characters)
Changing the Registered Contents of My Photo Style
Select any value from [MY PHOTO STYLE 1] to [MY PHOTO STYLE 10].
Press [Fn1] and then set the item.
●
[Load Preset Setting]
●
[Save Current Setting]
●
[Edit Title]
●
[Restore to Default]
- 99 -- 99 -
Page 100
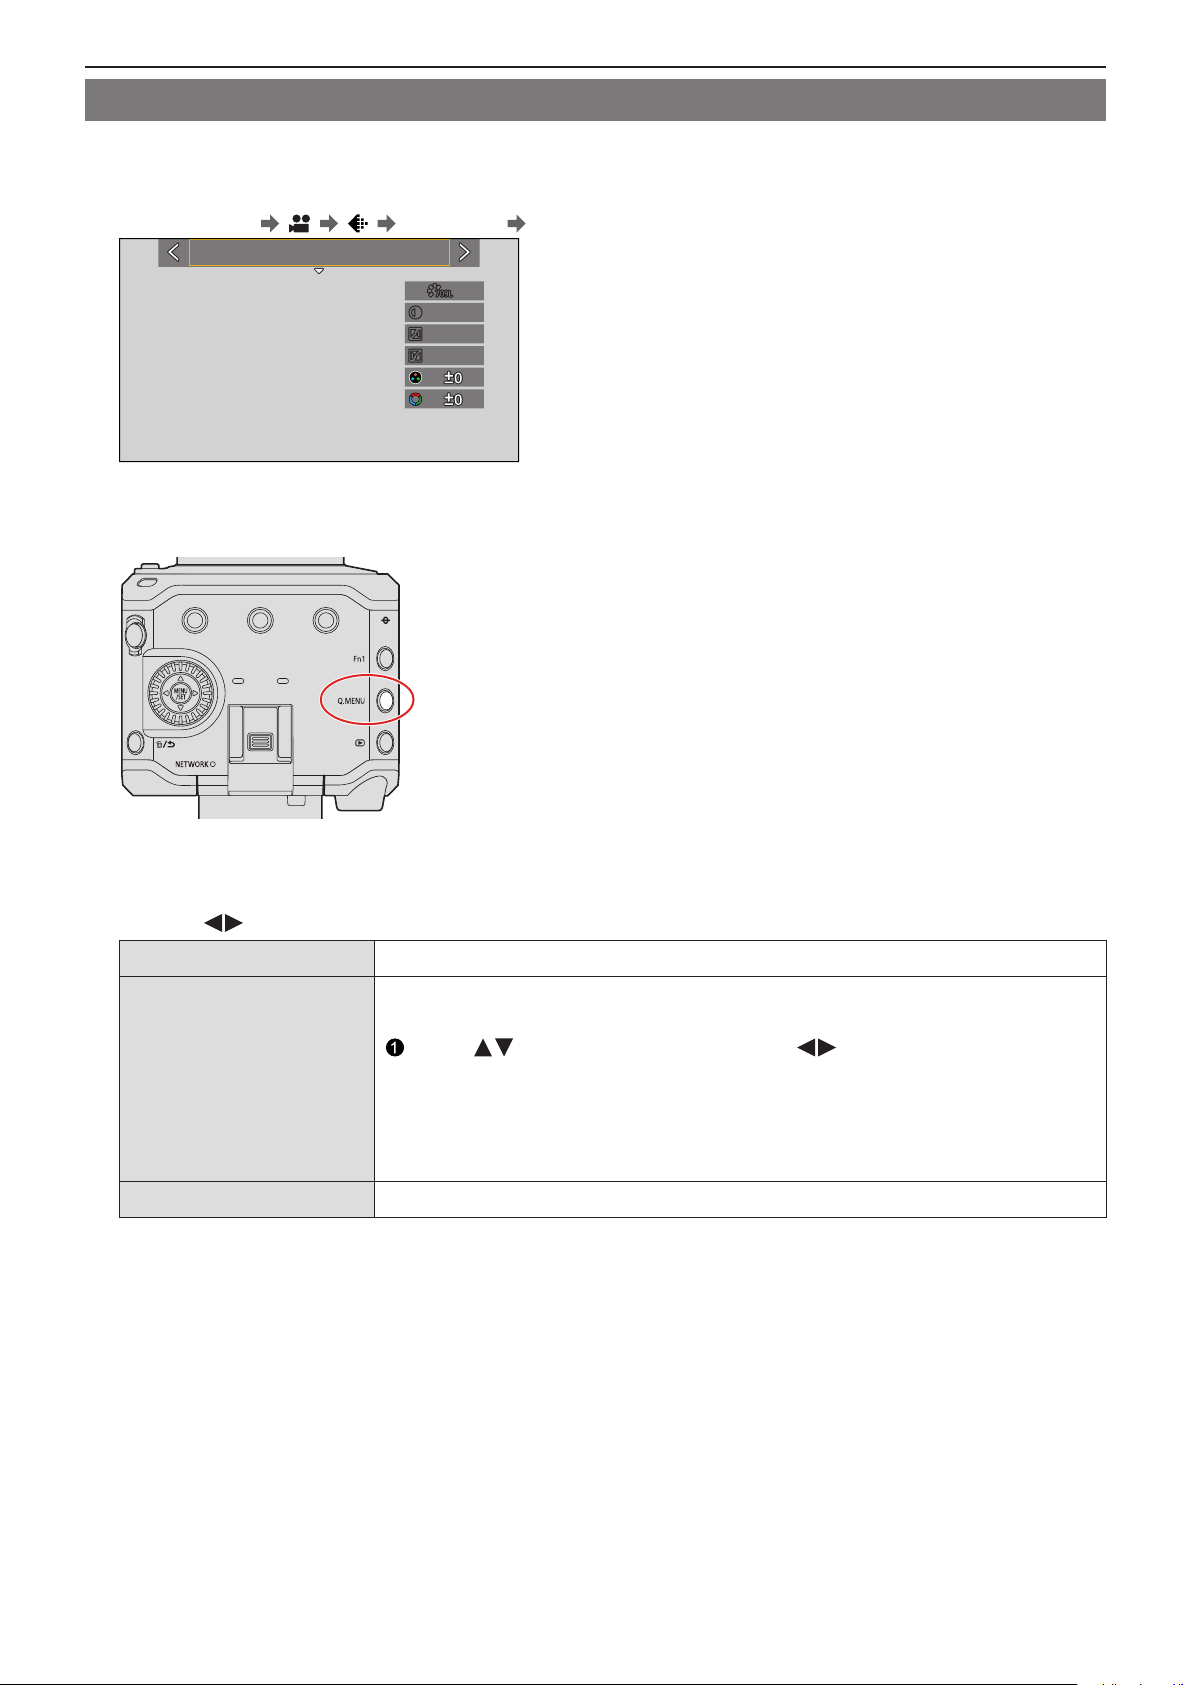
5. Recording settings - White Balance / Image Quality
Recording While Controlling Overexposure (Knee)
When [Photo Style] is set to [Like709], you can adjust the knee so that recording can be performed with minimal overexposure.
1 Set [Photo Style] to [Like709].
●
[MENU/SET] [ ] [ ] [Photo Style] [Like709]
Like709
2 Press [Q.MENU].
3 Select a knee setting.
●
Press to select a setting item.
[AUTO] Adjusts the compression levels of high-luminance areas automatically.
[MANUAL]
[Off] ―
4 Confirm your selection.
●
Press [MENU/SET].
Allows you to adjust the master knee point and master knee slope manually.
Press to select an item and then press to adjust.
[POINT]: Master knee point
[SLOPE]: Master knee slope
●
Values within the following ranges can be set:
– Master knee point: 80.0 to 107.0
– Master knee slope: 0 to 99
- 100 -- 100 -
 Loading...