


www.luminox.com
GGM.L003 Ed. 09.12
CHRONOGRAPH ALARM
INSTRUCTION MANUAL BEDIENUNGSANLEITUNG MANUAL DE USO

|
|
|
|
|
|
|
|
|
|
|
|
|
|
|
|
|
|
|
|
|
|
|
|
|
|
|
|
|
|
|
|
|
|
|
|
|
|
|
|
|
|
|
|
|
|
|
|
|
|
|
|
|
|
|
|
|
|
|
|
|
|
|
|
|
|
|
|
|
|
|
|
|
|
|
|
|
|
|
|
|
|
|
|
Push button |
Crown |
Hour hand |
Minute hand |
|
|
Second hand |
Chrono: Seconds |
||||||||||
|
|
|
|
|
|
|
|
|
|
|
|
|
|
|
|
||||||||||||||||||
|
|
|
|
|
|
|
|
|
|
|
|
|
|
|
|
Drücker |
Krone |
Stundenzeiger |
Minutenzeiger |
|
|
Sekundenzeiger |
Chrono: Sekunden |
||||||||||
|
|
|
|
|
|
|
|
|
|
|
|
|
|
|
|
Pulsador |
Corona |
Manecilla de |
Manecilla de |
|
|
Manecilla de los |
Cronógrafo: |
||||||||||
|
|
|
|
|
|
|
|
|
|
|
|
|
|
|
|
|
|
||||||||||||||||
|
|
|
|
|
|
|
|
|
|
|
|
|
|
|
|
|
|
||||||||||||||||
|
|
|
|
|
|
|
|
|
|
|
|
|
|
|
|
|
|
|
|
|
|
|
|
|
|
las horas |
los minutos |
|
|
segundos |
Segundos |
||
|
|
|
|
|
|
|
|
|
|
|
|
|
|
|
|
|
|
|
|
|
|
|
|
|
|
||||||||
12
6 |
Alarm + reference time
Alarm + Referenzzeit
Hora de despertador + hora de referencia
30
Chrono: Minutes and |
Date |
hours |
|
Chrono: Minuten |
Datum |
und Stunden |
|
Cronógrafo: Minutos |
Fecha |
y horas |
|
Hour counter
|
|
2 |
|
|
|
30 |
|
|
|
|
12 |
|
|
|
|
9 |
|
|
|
2 |
6 |
|
|
|
|
|
12 |
1 |
|
|
|
11 |
2 |
|
|
10 |
|
||
|
9 |
|
|
3 |
|
8 |
7 6 |
5 |
4 |
|
|
|
||
Center stop-second
15 |
|
|
|
30 |
|
|
|
21 |
I |
II |
III |
|
|
|
Minute counter
|
|
2 |
|
|
|
30 |
|
|
|
|
12 |
|
|
|
9 |
|
|
|
|
20 |
6 |
|
|
|
|
|
12 |
1 |
|
|
|
11 |
2 |
|
|
10 |
|
||
|
9 |
|
|
3 |
|
8 |
7 6 |
5 |
4 |
|
|
|
||
Push-button A
0 |
|
15 |
|
30 |
|
21 |
III |
|
Push-button B
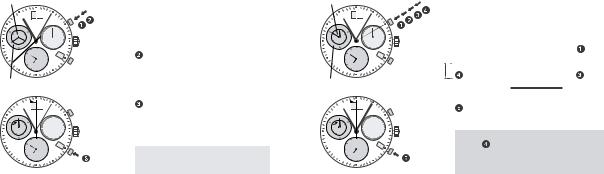
Adjusting the chronograph hands to zero position
Example:
One or several chronograph hands are not in their correct zero positions and have to be adjusted (e.g. following a battery change).
Pull out the crown to position III (all 3 chronograph hands are in their correct or incorrect zero position.The display changes from alarm time to reference time.)
Keep push-buttons A and B depressed simultaneously for at least 2 seconds (the center stop-second rotates by
360° corrective mode is activated).
 A
A
 B
B
 A
A
I |
II |
III |
Adjusting the center stop-second
Single step |
|
|
|
A |
|
1 x short |
|
Continuous |
A |
|
long |
Adjusting the next hand B 
Adjusting the minute counter hand and the hour counter hand
(mechanically coupled)
Single step |
|
|
1 x short |
A |
|||
Continuous |
A |
|
long |
 Returning the crown to position I
Termination of the chronograph hands adjustment (can be carried out at any time). The display changes from reference to alarm time.

Hour counter Push-button A
2

30 12
15
20 30
|
|
2 |
21 |
|
|
3 |
|
7 6 |
5 |
4 |
|
|
|
Minute counter
|
|
2 |
|
30 |
0 |
|
12 |
|
|
|
|
9 |
|
15 |
2 |
6 |
30 |
|
|
|
12 |
1 |
|
|
|
11 |
|
21 |
|
10 |
|
2 |
||
9 |
|
|
3 |
|
8 |
7 6 |
5 |
4 |
|
|
|
|
||
Push-button B
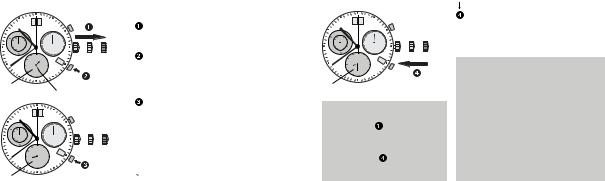
Chronograph: Basic function
(Start / Stop / Reset)
Example:
 Start: Press push-button A.
Stop: to stop the timing, press pushbutton A once more and read the 3 chronograph counters:
4h / 20 min / 38 sec
Zero positioning: 
Press push-button B.
(The 3 chronograph hands will be reset to their zero positions).
Note
The alarm cannot be used as long as the chronograph is in operation.
Hour counter Push-button A
2

|
30 |
|
|
|
|
|
12 |
|
|
|
|
|
9 |
|
|
|
|
2 |
6 |
|
|
|
|
|
|
12 |
1 |
|
|
|
|
11 |
|
21 |
|
|
10 |
|
2 |
||
|
9 |
|
|
3 |
|
|
8 |
7 6 |
5 |
4 |
|
|
|
|
|
||
Minute counter
|
|
2 |
|
30 |
0 |
|
12 |
|
|
|
|
9 |
|
15 |
20 |
6 |
30 |
|
|
|
12 |
1 |
|
|
|
11 |
|
21 |
|
10 |
|
2 |
||
9 |
|
|
3 |
|
8 |
7 6 |
5 |
4 |
|
|
|
|
||
Push-button B
Chronograph:
Accumulated timing
Example: |
|
|
|
Start: |
(start timing) |
|
|
Stop: |
(e.g. 15min |
5 sec following |
) |
Restart: (timing is resumed) |
|
||
*Stop: |
(e.g. 10 min |
5 sec following |
) |
|
=25 min 10 sec |
|
|
(The accumulated measured time is shown)
Reset:
The three chronograph hands are returned to their zero positions.
Please note:
* Following , the accumulation of the timing can be continued by pressing push-button A
(Restart / Stop, Restart / Stop, …)

Push-button A
2

|
30 |
|
|
|
|
|
12 |
|
|
|
|
|
9 |
|
|
|
|
2 |
6 |
|
|
|
|
|
|
12 |
1 |
|
|
|
|
11 |
2 |
2 |
|
|
10 |
|
|||
|
9 |
|
|
3 |
1 |
|
8 |
7 6 |
5 |
4 |
|
|
|
|
|
||
Minute counter |
Push-button B |
||||
|
|
2 |
|
30 |
0 |
|
12 |
|
|
|
|
9 |
|
15 |
20 |
6 |
30 |
|
|
|
12 |
1 |
|
|
|
11 |
|
21 |
|
10 |
|
2 |
||
9 |
|
|
3 |
|
8 |
7 6 |
5 |
4 |
|
|
|
|
||
Push-button B
Chronograph:
Intermediate or interval timing
Example:
Start:(start timing)
Display interval:
e.g. 10 minutes 10 seconds(timing continues in the background)
*Making up the measured time:
(the 3 chronograph hands are quickly advanced to the ongoing measured time). Stop: (Final time is displayed)
Reset:
The 3 chronograph hands are returned to their zero position
Please note:
* Following , further intervals or intermediates can be displayed by pressing push-button B (display interval / make up measured time, ...)
Date 5130.B
|
|
3 1 |
|
|
|
|
|
|
30 |
|
|
|
|
|
|
|
9 |
|
|
|
|
|
|
2 |
6 |
|
|
|
30 |
|
|
|
|
12 |
|
|
I |
II |
|
|
|
1 |
2 |
|
|||
|
10 |
|
|||||
|
|
11 |
|
31 |
|
|
|
|
9 |
|
|
3 |
|
|
|
|
8 |
7 6 |
5 |
4 |
|
|
|
|
|
|
|
|
|
||
Date 5130.D
|
|
0 1 |
|
|
|
|
|
|
30 |
|
|
|
|
|
|
9 |
|
|
|
|
|
|
|
20 |
6 |
|
|
|
30 |
|
|
|
|
12 |
|
|
I |
II |
|
|
|
1 |
2 |
|
|||
|
10 |
|
|||||
|
|
11 |
|
01 |
|
|
|
|
9 |
|
|
3 |
|
|
|
|
8 |
7 6 |
5 |
4 |
|
|
|
|
|
|
|
|
|
||
Setting the date (quick mode)
Pull out the crown to position II (the watch continues to run).
Turn the crown until the correct date 01 appears.
 Push the crown back into position I.
Please note:
The date of the following day must be set in the calendar changing phase between 9 PM and midnight.
Setting the date too quickly in quick mode can result in the incorrect date being displayed. Switching the date between
01 and 31 (position II) restores the synchronization.
|
0 4 |
|
|
|
|
|
|
|
|
|
|
60 |
|
|
|
9 |
|
|
45 |
15 |
|
|
|
2 |
|
|
|
30 |
|
|
|
|
|
|
2 |
I |
II |
III |
|
|
|
1 |
04 |
||||
|
|
|
3 |
|
|
|
|
|
|
|
|
|
|
|
|
8 |
7 6 |
5 |
4 |
|
|
|
|
|
|
|
|
|
|
||
Reference time |
|
Small |
|
|
|
||
|
|
|
|
minute hand |
|
||
|
0 4 |
|
|
|
|
|
|
|
|
|
|
60 |
|
|
|
9 |
|
|
45 |
15 |
|
|
|
2 |
|
|
|
30 |
|
|
|
|
|
|
2 |
I |
II |
III |
|
|
|
1 |
04 |
||||
|
|
|
3 |
|
|
|
|
|
|
|
|
|
|
|
|
8 |
7 6 |
5 |
4 |
|
|
|
|
|
|
|
|
|
|
||
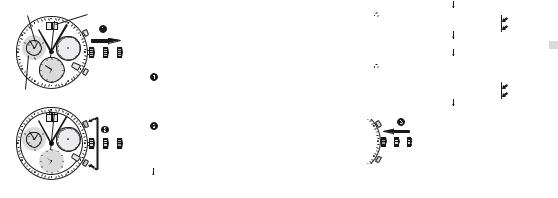
Reference time
Setting the reference time
*Pull out the crown to position III
(second hand stops. The display changes from alarm time to reference time.)
Activating the setting mode. Press the push-button for at least
2 seconds. As soon as the small minute hand jumps forward one minute, this mode is active.
Short pressing (less than 1 second): the reference time is moved forward by the minute.
Medium pressing: (1–2 seconds): the reference time is moved forward by the hour.
Long pressing (longer than 2 seconds): the reference time is moved forward until the push-button is released.
|
0 4 |
|
|
|
|
|
|
|
|
|
|
60 |
|
|
|
9 |
|
|
45 |
15 |
|
|
|
|
|
|
2 |
30 |
I |
II |
III |
|
|
1 |
04 |
||||
|
|
|
3 |
|
|
|
|
|
|
|
|
|
|
|
|
8 |
7 6 |
5 |
4 |
|
|
|
|
|
|
|
|
|
|
||
Alarm time
Please note:
* In order to set the time to the exact second, must be pulled out when the second hand is in
position «60» (III ).
Once the hour and minute hands have been set, must be pushed back into position I at the exact
second.
*Push the crown back into position I
(the display changes from reference time to alarm time).
A signal indicates that the alarm is switched off.
What is the reference time?
The current time is displayed by means of the hour and minute hand.
Parallel to the current time, the reference time runs in the background: the alarm time refers itself to this reference time. Therefore, resetting the time also requires the identical correction of the reference time.
If the reference time is not synchronized with the current time, this results in the alarm signal being emitted at a different
time to the set alarm time.

|
|
3 1 |
|
|
|
|
|
30 |
|
|
|
|
|
9 |
|
|
|
|
|
|
20 |
6 |
|
|
|
30 |
|
|
|
12 |
|
|
I |
|
|
|
1 |
|
|
||
|
|
11 |
|
31 |
||
|
10 |
|
2 |
|||
|
9 |
|
|
3 |
|
|
|
8 |
7 6 |
5 |
4 |
|
|
|
|
|
|
|
||
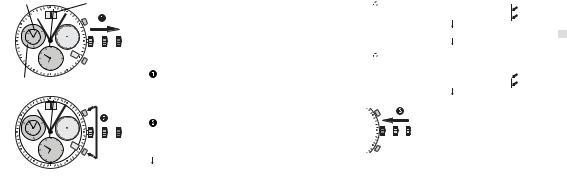
Alarm time |
|
|
|
Push-button |
||
Note
The alarm cannot be used as long as the chronograph is in operation.
Setting the alarm time
Activate the setting mode
Press the push-button for at least
2 seconds. As soon as the small minute hand jumps forward one minute, this mode is active.
Setting
Short pressing (less than 1 second): the alarm time is moved forward by the minute.
Long pressing (longer than 2 seconds): the alarm time is moved forward until the push-button is released.
Please note:
If the push-button is not activated for
10 seconds, the setting mode of the alarm time deactivates itself. At the same time, two beeps are emitted to indicate that the alarm is switched on.
|
|
3 1 |
|
|
|
|
|
30 |
|
|
|
|
|
9 |
|
|
|
|
|
|
20 |
6 |
|
|
|
30 |
|
|
|
12 |
|
|
I |
|
|
|
1 |
|
|
||
|
|
11 |
2 |
31 |
||
|
10 |
|
||||
|
9 |
|
|
3 |
|
|
|
8 |
7 6 |
5 |
4 |
|
|
|
|
|
|
|
||
Alarm time |
|
|
Push-button |
|||
Switching the alarm on / off
The alarm is switched on / off by briefly pressing the push-button:
2 beeps  alarm switched on
1 beep  alarm switched off
Please note:
The alarm can be set a maximum of 12 hours before the desired alarm time.
Once the set alarm time has been reached, a signal is emitted for 20 seconds.
This signal is repeated after two minutes. Following brief pressing of the push-button, the signal is immediately switched off.
Stundenzähler
|
|
2 |
|
|
|
30 |
|
|
|
|
12 |
|
|
|
|
9 |
|
|
|
2 |
6 |
|
|
|
|
|
12 |
1 |
|
|
|
11 |
2 |
|
|
10 |
|
||
|
9 |
|
|
3 |
|
8 |
7 6 |
5 |
4 |
|
|
|
||
Zentrumstoppsekunde
15 |
|
|
|
30 |
|
|
|
21 |
I |
II |
III |
|
|
|
Minutenzähler
|
|
|
|
|
Drücker A |
|
|
|
2 |
|
|
|
|
|
30 |
|
|
|
0 |
|
|
12 |
|
|
|
|
|
|
|
|
|
|
|
|
|
9 |
|
|
|
15 |
|
2 |
6 |
|
|
|
30 |
|
|
|
12 |
|
|
III |
|
|
|
1 |
2 |
|
||
|
10 |
|
||||
|
|
11 |
|
21 |
|
|
|
9 |
|
|
3 |
|
|
|
8 |
7 6 |
5 |
4 |
|
|
|
|
|
|
|
||
Ausrichtung der Chronographzeiger auf Nullposition
Beispiel:
Einer oder mehrere Chronographzeiger sind nicht in ihren korrekten Nullpositionen und müssen ausgerichtet werden (z.B. nach Batteriewechsel)
Krone in Position III herausziehen.
(Alle 3 Chronographenzeiger stellen sich in ihre korrekte bzw. nicht korrekte Nullposition. Anzeige wechselt von Alarmzeit zur Referenzzeit.)
Drücker A und B gleichzeitig während mindestens 2 Sekunden drücken.
(Der Zentrumstoppsekundenzeiger dreht um 360°  Korrekturmodus ist aktiviert)
 A
A
 B
B
 A
A
I |
II |
III |
 Ausrichtung der Zentrumstoppsekunde
Einzelschritt: |
|
|
1 x kurz |
A |
|||
Kontinuierlich: |
A |
|
lang |
|
|
Nächsten Zeiger ausrichten B 
Ausrichtung des Minutenzählerzeigers und des Stundenzählerzeigers
(sind mechanisch gekoppelt)
Einzelschritt: |
|
|
1 x kurz |
A |
|||
Kontinuierlich: |
A |
|
lang |
 Krone in Position I zurückdrücken
Abschluss der Chronographzeiger-Ausrichtung. (dies ist jederzeit möglich. Anzeige wechselt von Referenzzur Alarmzeit.)
Drücker B
Stundenzähler Drücker A
2

30 12
15
2 30
|
|
|
2 |
21 |
|
|
|
3 |
|
7 |
6 |
5 |
4 |
|
|
|
Minutenzähler
 2
2


|
30 |
|
12 |
|
9 |
2 |
6 |
|
11 |
12 |
1 |
2 |
10 |
|
|
||
9 |
|
|
|
3 |
8 |
7 |
6 |
5 |
4 |
|
|
|||
 15
15 30 21
30 21
Drücker B
Chronograph: Grundfunktion
(Start / Stopp / Nullstellung)
Beispiel:
 Start: Drücker A drücken
Stopp:Um die Zeitmessung abzubrechen, Drücker A nochmals drücken und die
3 Chronographenzähler ablesen:
4h / 20 Min. / 38 Sek.
Nullstellung: 
Drücker B drücken.
(Die 3 Chronographenzeiger werden in ihre Nullstellungen zurückgestellt).
Hinweis
Solange der Chronograph in Betrieb ist, kann der Alarm nicht bedient werden.
Stundenzähler Drücker A
2

|
30 |
|
|
|
|
|
|
12 |
|
|
|
|
|
|
9 |
|
|
|
|
|
2 |
6 |
|
|
|
|
|
|
|
11 |
12 |
1 |
2 |
21 |
|
10 |
|
|
|||
|
9 |
|
|
|
3 |
|
|
8 |
7 |
6 |
5 |
4 |
|
|
|
|
|
|||
Minutenzähler
 2
2


|
30 |
|
12 |
9 |
|
20 |
6 |
|
11 |
12 |
1 |
2 |
10 |
|
|
||
9 |
|
|
|
3 |
8 |
7 |
6 |
5 |
4 |
|
|
|||
 15
15 30 21
30 21
Drücker B
Chronograph: Aufaddierte Zeitmessung
Beispiel:
 Start: (Zeitmessung starten)
 Stopp: (z.B. 15 Min. 5 Sek. nach )

 Restart:(Zeitmessung wieder freigeben)
*Stopp: (z.B. 10 Min. 5 Sek nach ) = 25 Min. 10 Sek.
(Aufaddierte Messzeit wird angezeigt)
Nullstellung: 
Die 3 Chronographenzeiger werden in ihre Nullpositionen zurückgestellt.
Hinweise
* Nach kann die Aufaddierung der Zeitmessung fortgesetzt werden. Dies über
Drücker A
(Restart / Stopp, Restart / Stopp, …)
 Loading...