

Page 1
Tutorial for MasterPlex® CT v1.0
© 2006 Hitachi Software Engineering America, Ltd. All Rights Reserved.
Page 2

http://www.miraibio.com
Master
2
Plex CT
Page 3

In this tutorial, we will be highlighting 8 powerful features of the MasterPlex CT v1.0
software:
1) Probe Height Adjustment
2) Wizard Interface
3) Action List Manager
4) Three Step Acquisition
5) Kit Manager
6) Seamless Integration
7) Fail Safe Acquisition
8) Remote Monitor
http://www.miraibio.com
Master
3
Plex CT
Page 4

http://www.miraibio.com
Master
4
Plex CT
Page 5
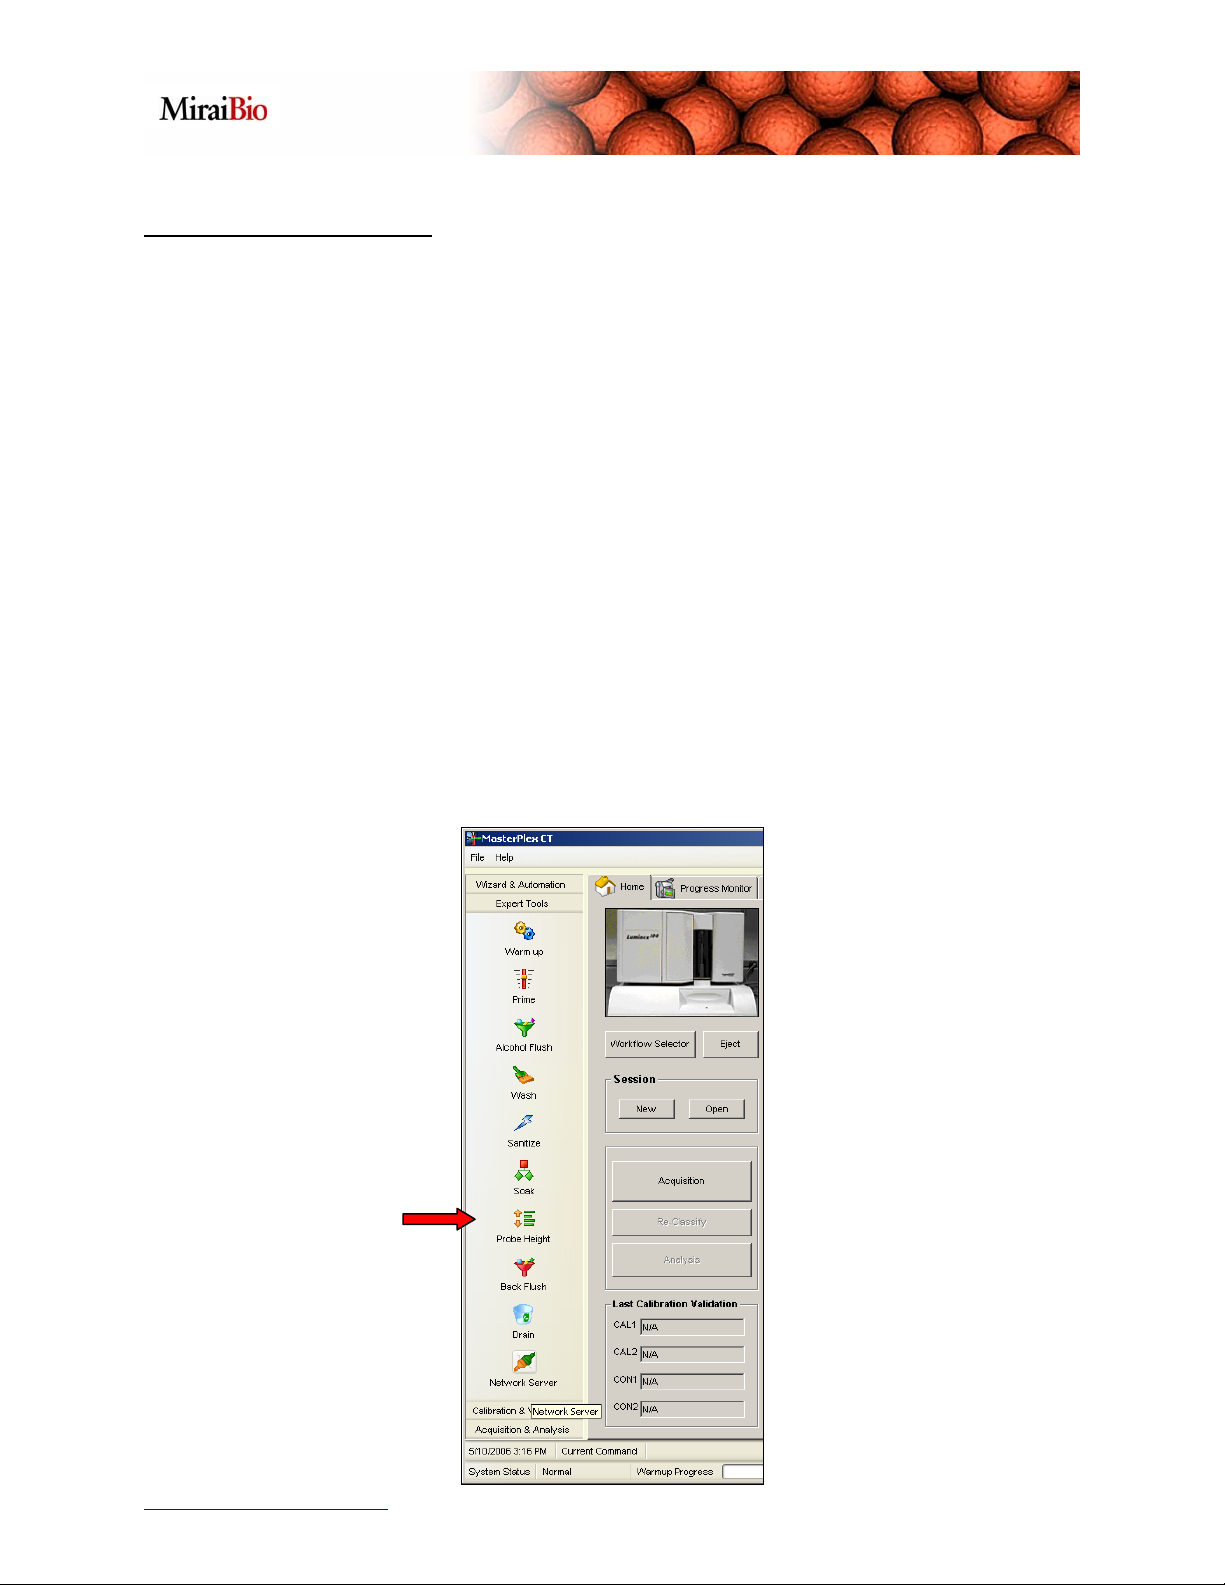
Probe Height Adjustment
Being able to adjust the probe height is crucial for any Luminex user as it is the cause
for many known issues such as:
Sample empty errors
Slow event rates
Air in the system
Probes being stuck in the down position
Actuator errors in the software
Adjusting the probe height must also be performed after any of the following events:
A new type of plate is being used
Probe has been removed (ex. For the declogging procedure)
Luminex system has been moved
You can find the Probe
Height launch button in
the left task bar under the
Expert Tools menu.
http://www.miraibio.com
Master
5
Plex CT
Page 6

Thumbwheel
Bolt
The initial Adjust Probe window gives detailed instructions on adjusting the probe
height. To adjust the vertical height of the sample probe:
1. Remove the clear plastic shield that covers the sample probe area.
2. Press the Eject button and place a plate in the plate holder.
3. Place the appropriate alignment tool in the plate:
For a standard plate with flat-bottom wells – stack two of the larger
(5.08 mm diameter) alignment discs together and place them into a
selected well
For a filter bottom plate – stack three of the larger (5.08 mm diameter)
alignment discs together and place them into a selected well
For a half-volume plate with flat-bottom wells – stack two of the
smaller (3.35 mm diameter) alignment discs together and place them into
the selected well
For a round-bottom (U-bottom) plate – stack two of the smaller (3.35
mm diameter) alignment discs and place them into a selected well
For a plate with conical wells – place one alignment sphere into a
selected well
http://www.miraibio.com
Master
6
Plex CT
Page 7

4. After you have placed the appropriate alignment tools into the well, press the
Location button and specify the well where you have placed them.
5. Now loosen the bolt that holds the probe (refer to the picture in the Adjust Probe
window) with the hex driver that is provided within the left panel of the Luminex
system where the heater block is stored.
6. Click on the Probe Down button to lower the probe arm. The probe height will
get adjusted by the spacers in the well.
7. Using the thumb wheel, lower the sample probe until it rests on, but does not
apply pressure to, the top of the alignment disk or sphere.
8. Tighten the bolt back up with the hex driver.
9. Click the Probe Up button to raise the sample probe.
10. Manually open the XYP door, and click on the Probe Down button again.
11. Watch the black XYP tray to see if it moves. If it moves, repeat this process until
no movement is observed.
12. Click the Probe Up button to raise the sample probe.
13. Replace the plastic shield that covers the sample probe area.
http://www.miraibio.com
Master
7
Plex CT
Page 8

http://www.miraibio.com
Master
8
Plex CT
Page 9
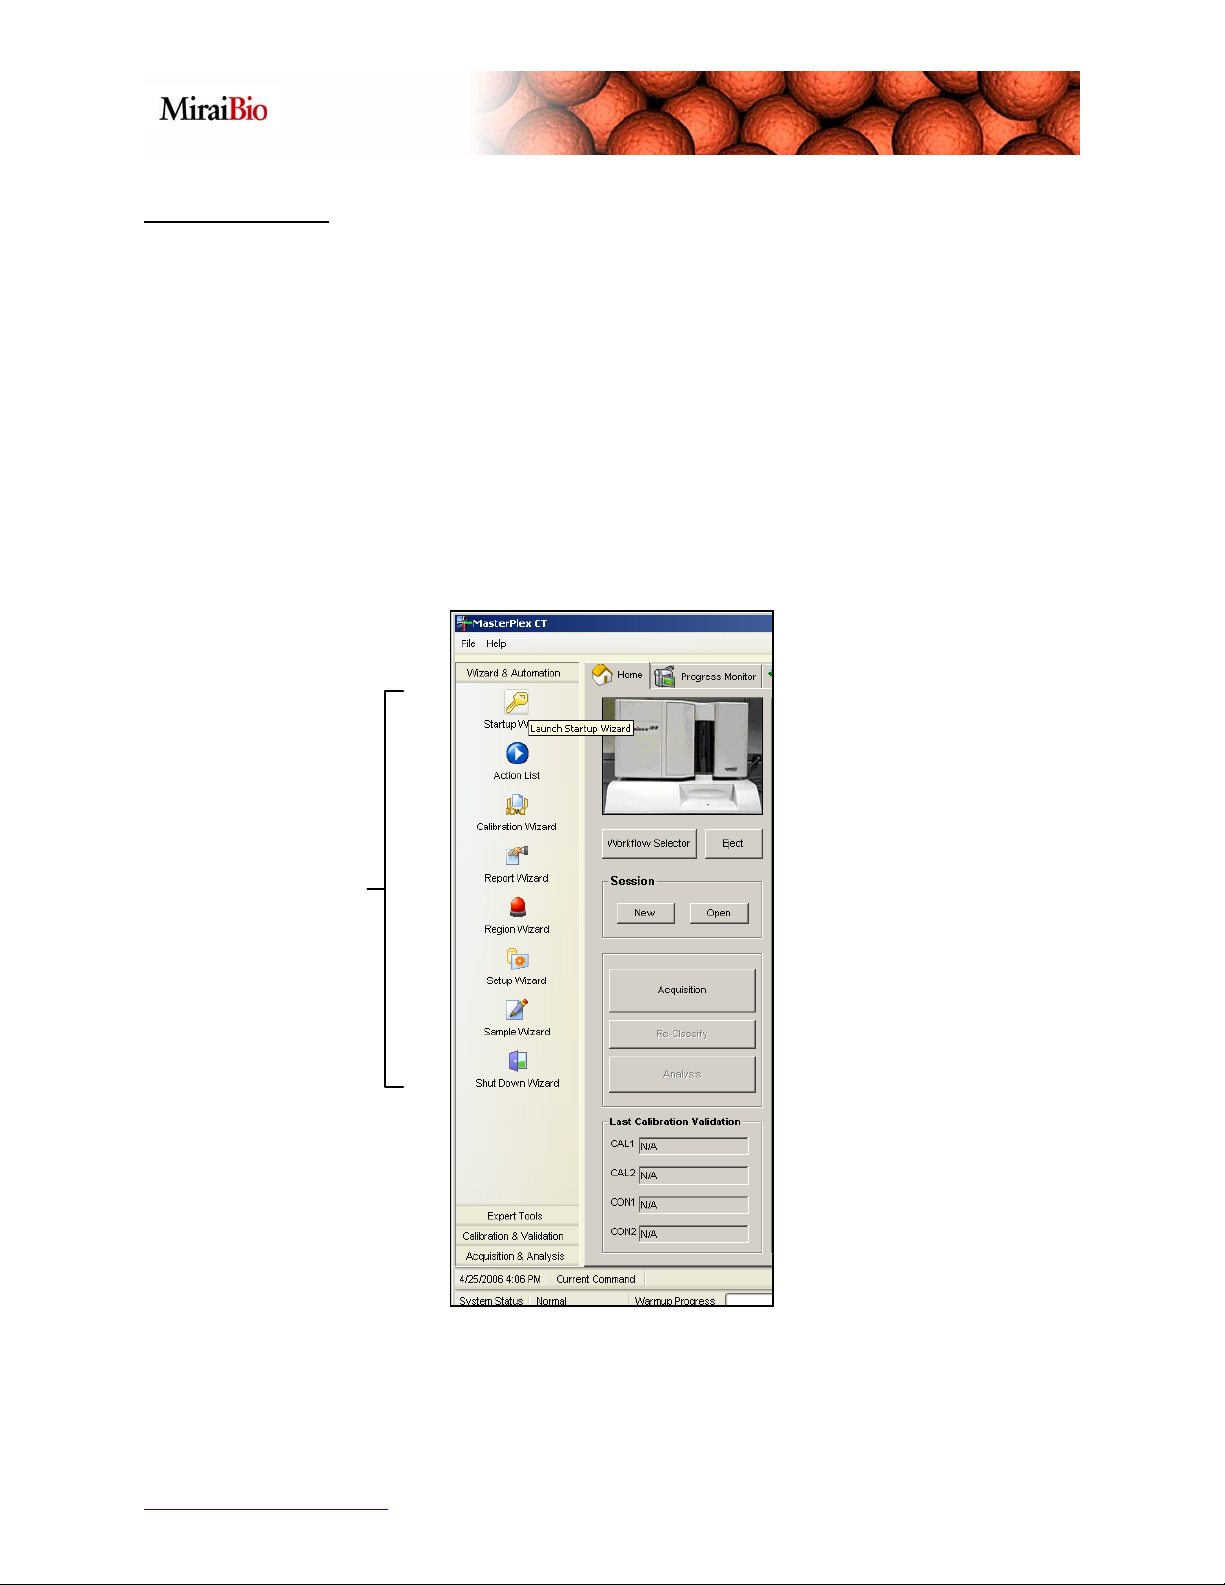
Wizard Interface
MasterPlex CT provides a set of wizard driven interfaces to help familiarize new users
with the software. Whether you are new to MasterPlex CT or new to the Luminex 100
platform in general, wizards will guide you through every step of the way.
There are a total of 8 wizards that will automate everything you will have to do from
starting up the Luminex system to shutting it down. You can find the wizard launch
buttons under the Home tab in the left task bar under Wizard & Automation.
http://www.miraibio.com
Master
9
Plex CT
Page 10

Here is the breakdown and a brief summary of the wizards:
The Startup Wizard walks you through the warm up and startup preparation
sequence.
The Calibration & Control Wizard walks you through using the calibration and
control beads.
The Region Activation Wizard guides you through selecting the bead regions
used in the multiplex assay.
The Acquisition Wizard guides you through preparing the configuration settings
of the Luminex system with clear explanations of the various options that are
available.
The Sample Configuration Wizard walks you through specifying the location of
your samples on the 96-well plate.
The Report Wizard walks you through generating reports related to the Luminex
system such as Calibration History and System Log Messages.
The Shut Down Wizard guides you through shutting down the Luminex system.
As an example, we will go through the Startup Wizard. Let’s start by clicking on the
Startup Wizard launch button. The initial window provides an outline of the steps to be
performed. Go ahead and click on Next to proceed.
http://www.miraibio.com
Master
10
Plex CT
Page 11

Please note that there are
detailed instructions
provided at each step. The
next window checks to
make sure that all the
devices are connected
properly. If there are any
red flags, please check to
make sure that all the
connections are secured
properly and then click the
Connect button to try again. Once all the connections are marked by green checks,
click on Next to proceed.
The next screen gives a
status of the laser warmup period. While the
lasers are warming up,
you can accomplish
other tasks. Click on
Proceed to move on to
other tasks.
http://www.miraibio.com
Master
11
Plex CT
Page 12

In the next step of the Startup Wizard, you can perform the Prime procedure. Priming
removes air bubbles from the fluidics sub-system of the Luminex device. You can
specify the number of cycles for priming by clicking on the Up or Down arrow under
Number of Cycles.
Once you have set the Number of Cycles, simply click on the Prime button and
priming will automatically begin by the Luminex system. The status bar shows you the
progress of the current action. Once the Prime is done, click Next to proceed.
http://www.miraibio.com
Master
12
Plex CT
Page 13

The next step takes you through the
Alcohol Flush, which removes air
bubbles from the cuvette. In this
step, you can specify the location of
your reagent, in this case 70%
isopropanol. To do this, click on the
Location button, which in this case
is currently labeled Reservoir. The
plate window will pop up allowing
you to specify the plate type and well location of your reagent. Specify the Number of
Cycles for the Alcohol Flush and click on the Alcohol Flush button to execute the
command. Once the Alcohol Flush is done, click on Next proceed.
The last step of the Startup Wizard
takes you through the Wash step,
which clears out debris and dust
particles from the system. You can
specify the Location of your reagent,
which in this case is distilled water,
and the Number of Cycles to repeat.
Press the Wash button after you
have made your settings and the
Wash procedure will begin. When
you are done with the wash step,
press the Next button to proceed.
http://www.miraibio.com
Master
13
Plex CT
Page 14
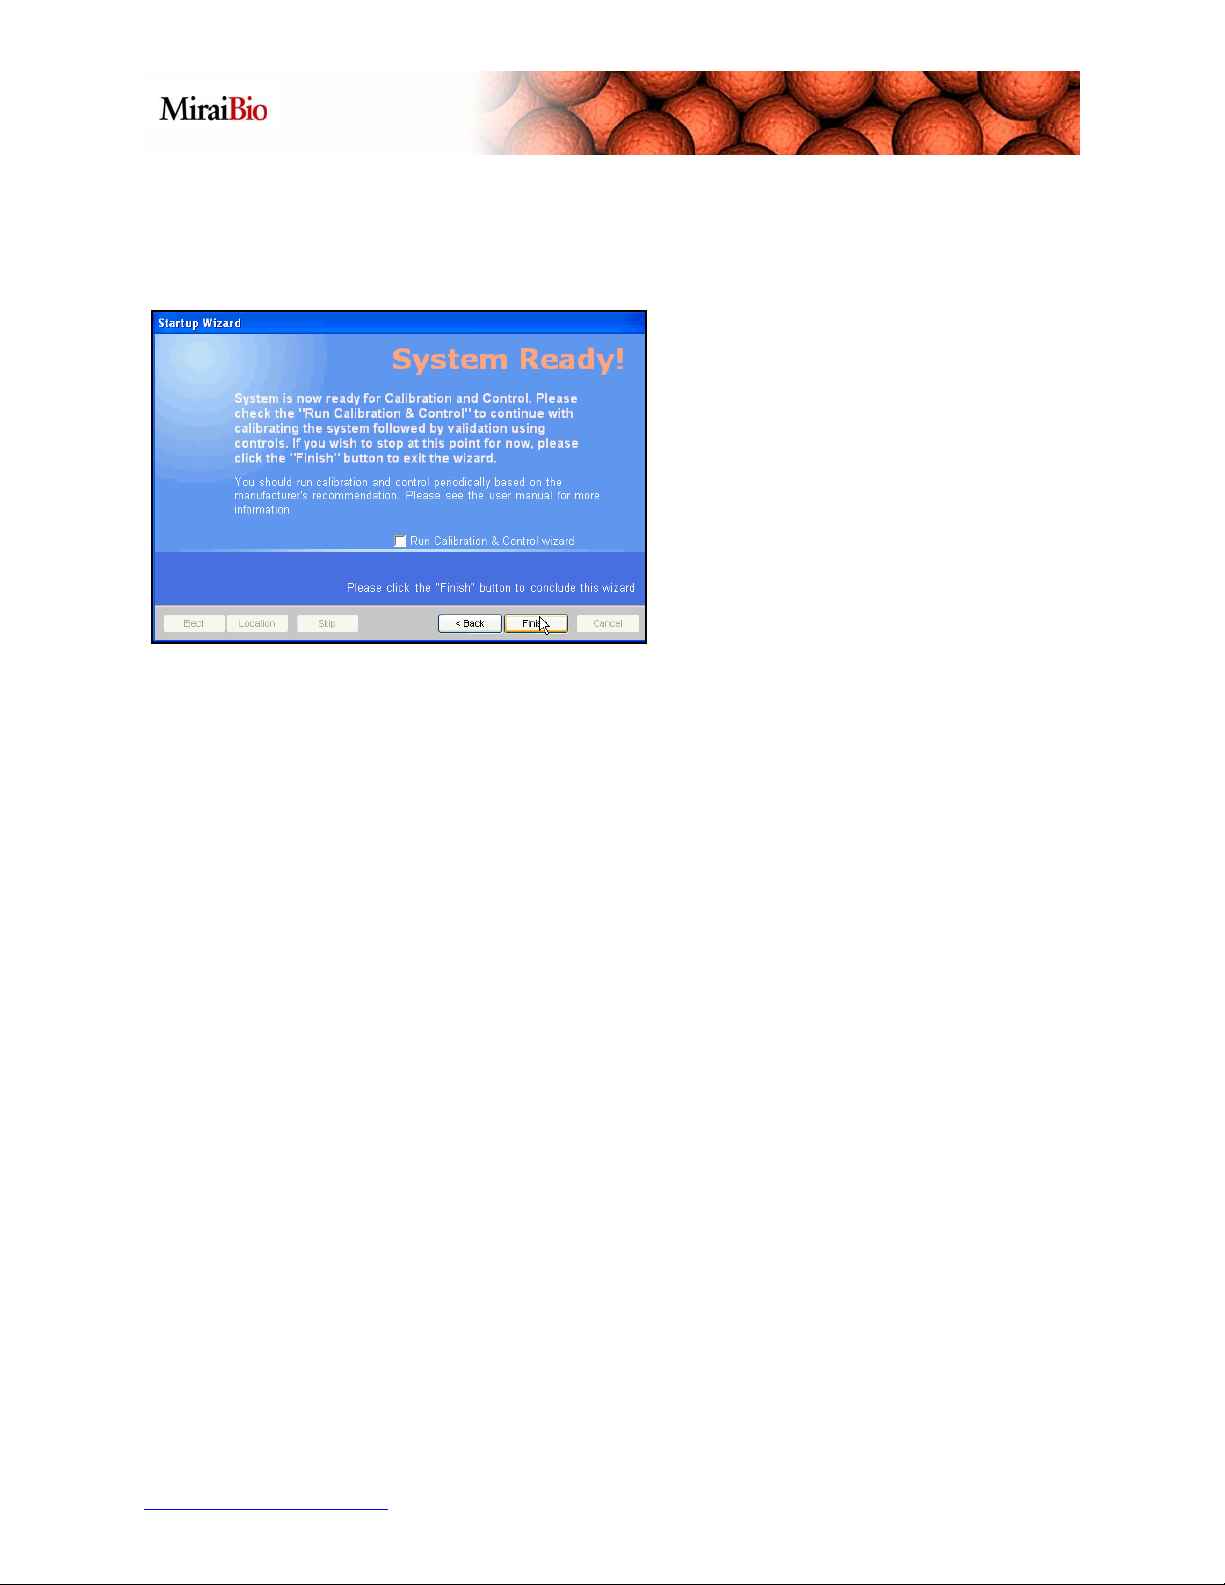
You are now done with the Startup
Wizard and your Luminex system is
ready for use. After finishing one
wizard, you will have the option to
move on to the next wizard in the
setup process.
http://www.miraibio.com
Master
14
Plex CT
Page 15
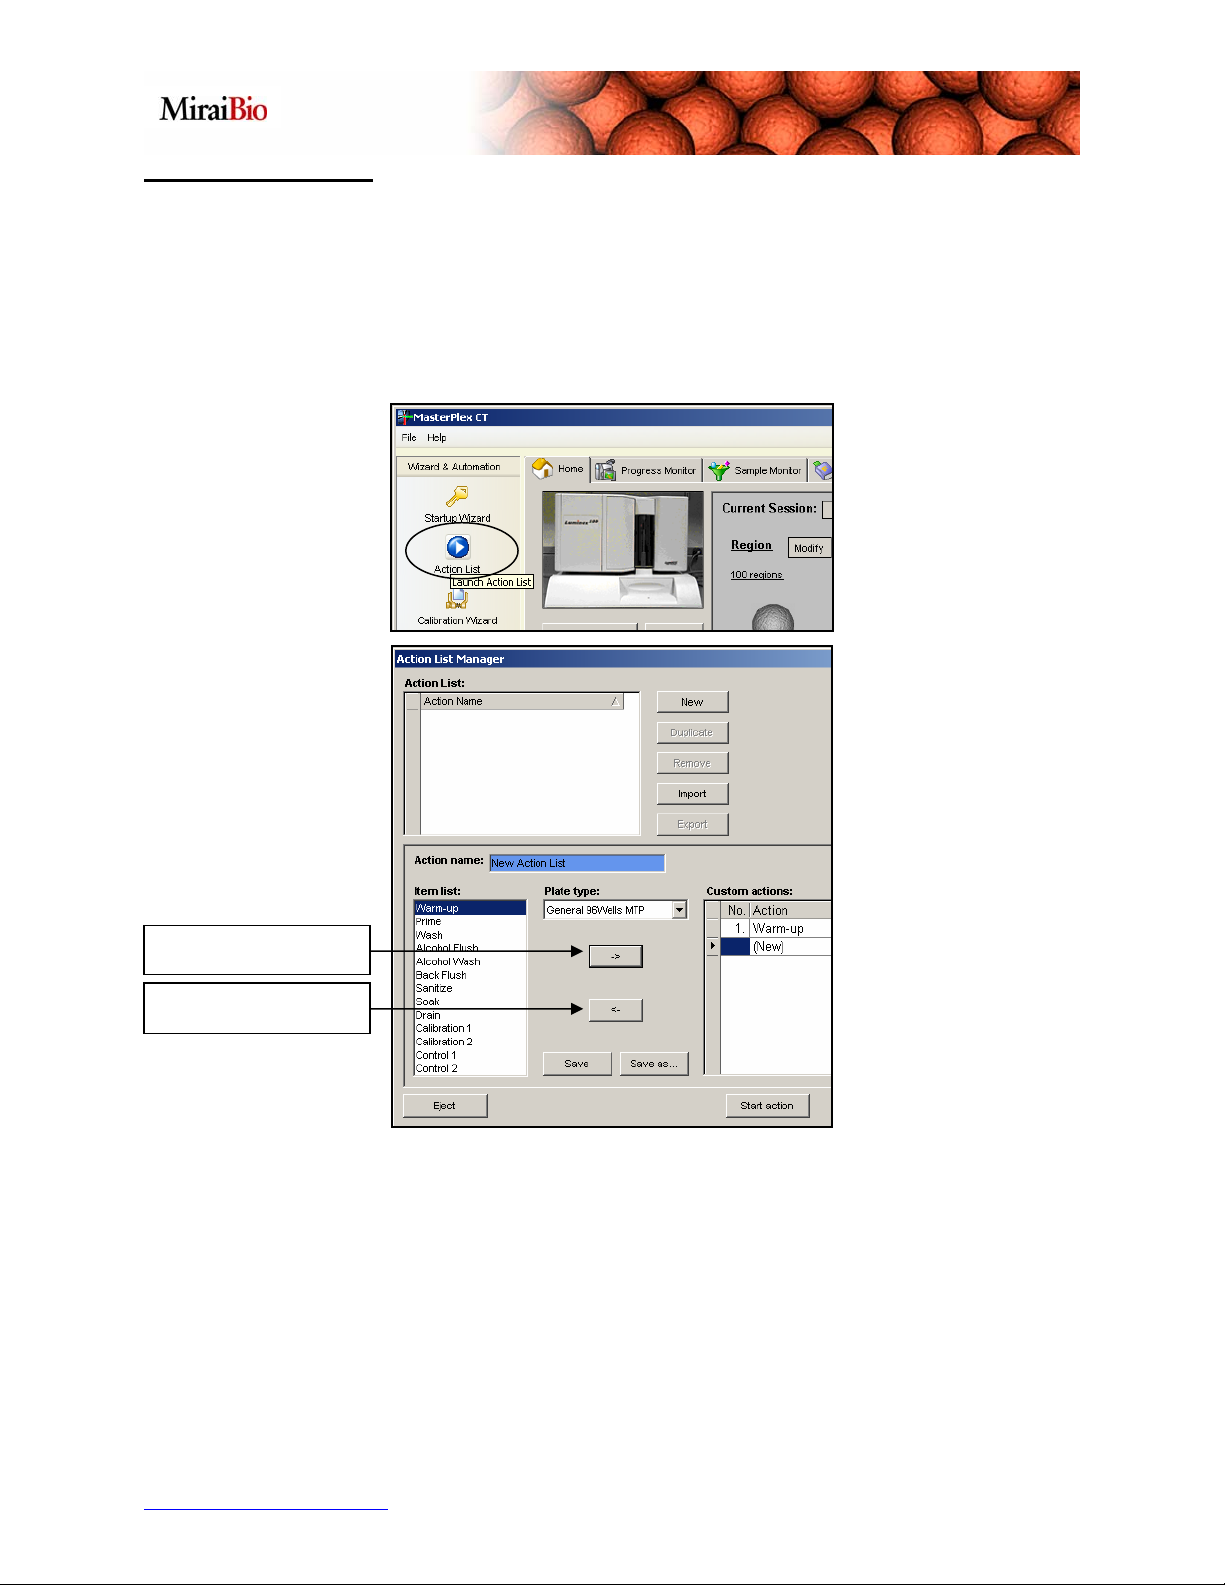
Action List Manager
The Action List Manager lets you customize and automate routine procedures such as
Startup, Maintenance, and Daily Shutdown. You can find the Action List launch
button under the Home tab in the left task bar under Wizard & Automation
Add Item button
Remove Item button
As an example, let’s create a Startup action list. Let’s begin by highlighting Warm-up
from the bottom-left Item List and then adding it to our Custom Actions list on the
lower-right by pressing the Right Arrow button located between the two lists. You can
use the Left Arrow button to remove steps from our custom action list. Using the same
process, add Prime, Alcohol Flush, and Wash steps to our action list.
http://www.miraibio.com
Master
15
Plex CT
Page 16

Next, we want to specify the number of times a step is to be repeated and the well
location for the operation. Let’s change the Wash step so that it will perform two
washes. To do this, simply double-click on the Cycle column next to the Wash step.
Then click on the up-arrow to increase the number of Cycles to 2. The Wash step will
now be performed twice in our Action List.
Next, we want to specify the
location of the well for an
operation. Let’s say we are
using the MasterPlex plate
for our operation. Change
the Plate Type drop-down
menu to MasterPlex plate.
Next, click on the Location
button for the Alcohol
Flush and the MasterPlex
Plate window will pop up.
To choose the Alcohol well, simply click on the Alcohol well and press the OK button.
http://www.miraibio.com
Master
16
Plex CT
Page 17

Lastly, we will name our
newly created Action
List to “Startup
Procedure” in the
Action Name form and
press the Save button to
save it. You should now
see it saved in the
Action List.
To execute a previously saved Action List, just select the procedure from the Action
List Manager and press the
Start Action button on the
bottom. A Progress Monitor
will appear showing you the
progress of each step of the
Action List.
http://www.miraibio.com
Master
17
Plex CT
Page 18

http://www.miraibio.com
Master
18
Plex CT
Page 19

Three Step Acquisition
MasterPlex CT v1.0 allows just three simple steps to run an acquisition:
1) What – Specify the regions you are trying to detect.
2) How – Set the way you want an acquisition to run such as gate settings,
sample volume, time out values, output file and folder name.
3) Where – Specify where the samples are on the plate.
Tell MasterPlex CT what you are trying to detect by
activating bead regions.
Tell MasterPlex CT how you would like to run the
acquisition
Tell MasterPlex CT where the samples are
To modify the settings or parameters for each step, just click on the Modify button
associated with Region, Setup or Sample.
http://www.miraibio.com
Master
19
Plex CT
Page 20

Let’s begin with the Region settings. First click the Region Modify button to activate
appropriate regions. The Bead Regions window should pop up.
Next, activate regions by clicking on the check box to the right of the region number.
Once a region is activated, it will be displayed with a red highlighted background.
http://www.miraibio.com
Master
20
Plex CT
Page 21

To define bead region names, click on the Properties tab. Next, double-click the
default name under User defined name and edit it. You can also edit the Minimum
and Maximum number of events to acquire for each region.
Tips:
- Leave the Region Map Type at the default 100 regions since it contains all of the
bead regions that you can select from.
- The copy and paste functions will work if you copy a column of values from a
spreadsheet and paste it into the User Defined Names column. Just right-click, and
choose whether you want to copy or paste.
http://www.miraibio.com
Master
21
Plex CT
Page 22

Now, let’s enter our parameters that will determine how the machine will run by clicking
the Setup Modify button. The Acquisition Setup window should pop up.
In the Auto Stop tab, you can specify how
you would like to stop counting the type of
events.
http://www.miraibio.com
Master
22
Plex CT
Page 23

In the Setup tab, you can specify the Double
Discriminator gate values, the direction of
which the acquisition will be carried out, and
the output file settings.
The last thing to do before starting the acquisition is telling MasterPlex CT where your
samples are located in your 96-well plate. To do this, click on the Sample Modify
button to open the Sample Manager window.
http://www.miraibio.com
Master
23
Plex CT
Page 24

To mark your sample wells, you can
simply drag and click to highlight wells or
hold down the CTRL key to select
discontiguous wells. After selecting your
samples, press the Mark As Sample
button.
You can now edit your sample names
under the Sample Editor tab. Please
note that the copy and paste features
are also available here. You can copy a
column of names from a spreadsheet
and paste them directly into the Sample
Names column.
http://www.miraibio.com
Master
24
Plex CT
Page 25

Congratulations!
You have now completed the 3 steps needed to begin data acquisition. You have
entered your:
1) bead region information
2) setup configuration
3) sample location
You are now ready to begin data acquisition. Click the Acquisition button to run the
plate.
http://www.miraibio.com
Master
25
Plex CT
Page 26

http://www.miraibio.com
Master
26
Plex CT
Page 27

Kit Manager
MasterPlex CT has built-in capabilities to recognize predefined kit configurations so that
you will not have to spend time creating them. Kit configurations contain instructions on
running the acquisition as well as instructions for analyzing the results. Many kit
configurations are available right from the MiraiBio website. To take advantage of this
powerful feature, follow these three simple steps:
Download the desired kit configuration
Apply it to the current acquisition session
Run the plate and analyze it automatically
Let’s begin by downloading a kit configuration file from the MiraiBio website:
http://www.miraibio.com/php/manufacturer.php
Select and download any kit to a known location on your computer.
Next, open the Kit Manager by clicking
on the Kit Configuration icon under the
Acquisition & Analysis toolbar.
http://www.miraibio.com
Master
27
Plex CT
Page 28

You can use this Kit Manager to:
Import new kit files
View general information about a kit
Duplicate a kit file to produce
alternate parameters
Delete kit files
Export kit files for use on other
computers
To import our file, press the Import
button and browse to the file you just
downloaded and press the Open
button.
To view specific information
about a kit file, select the file
and press the Update Lot
button.
http://www.miraibio.com
Master
28
Plex CT
Page 29

The Plate Map tab displays
background, standard, and
control sample locations.
The Regions tab displays the
analyte panel names.
http://www.miraibio.com
Master
29
Plex CT
Page 30

The Samples tab displays the
information regarding the
standards, negative controls
and quality control samples.
The Standards tab displays
the preconfigured standard
values eliminating perhaps
the most time consuming step
of creating an assay template.
http://www.miraibio.com
Master
30
Plex CT
Page 31

Click on the Cancel
button to close the Lot
Information window
and then press the
Apply button to use
the kit configuration
file.
Next, you will be prompted to select your unknown sample wells. To do so, simply
highlight the unknown sample wells and click the Add button. Alternatively, you can
select discontiguous wells by holding down the CTRL button and left-clicking the
unknown sample wells with your mouse. After adding your unknown sample wells, click
on the Apply button. You are now ready to acquire data.
http://www.miraibio.com
Master
31
Plex CT
Page 32

http://www.miraibio.com
Master
32
Plex CT
Page 33

Seamless Integration
MasterPlex CT seamlessly integrates with other MasterPlex analysis packages such as
MasterPlex QT (quantitative analysis software for protein assays), and MasterPlex GT
(genotyping analysis software). Once the acquisition is complete, results can be sent to
the analysis application for immediate analysis.
To begin analysis after an acquisition is complete, click the Analysis button and select
the downstream analysis program you would like to transfer your data to.
http://www.miraibio.com
Master
33
Plex CT
Page 34

The analysis program you have chosen automatically launches. If you have used a kit
configuration file, all the template information and properties for the analysis program
are sent with the data and the calculations are performed automatically.
http://www.miraibio.com
Master
34
Plex CT
Page 35

Select the data type pull menu and view the Concentration data.
All the unknown concentrations for each analyte region will be displayed.
http://www.miraibio.com
Master
35
Plex CT
Page 36

To view the Standard Curve graph, click on the Standard Curve button.
To view the x-axis in log
scale, right-click on the
graph and select Set X-
Axis to Log Scale.
http://www.miraibio.com
Master
36
Plex CT
Page 37

To view multiple standard curves in the same graph, hold down the CTRL key and
select the regions you are interested in.
http://www.miraibio.com
Master
37
Plex CT
Page 38

MasterPlex CT has many different options to view data. For example, to view a graph
in 3-D, click on the 3D button in the top icon menu.
http://www.miraibio.com
Master
38
Plex CT
Page 39

Fail Safe Acquisition
With MasterPlex CT, your data acquisition need not be “all or nothing.” The Fail Safe
Acquisition feature in MasterPlex CT allows you to recover from various common user
errors. For example, if you run your assay and then discover that one of your bead
regions was not correctly activated, you can activate the correct bead regions and then
classify the data without the need to rerun the assay. During the assay acquisition run,
MasterPlex CT saves the entire acquisition data including those regions you may have
accidentally left inactivated.
After you have corrected the settings at the end of a run, push the Re-Classify button.
Your data will be processed again with the new settings.
http://www.miraibio.com
Master
39
Plex CT
Page 40

While the data is
being reprocessed,
the data is
presented in the
same view as if it
was being acquired
in real-time.
You can view
scatter plot and
histogram
information for the
reprocessed data
under the Sample
Monitor tab.
http://www.miraibio.com
Master
40
Plex CT
Page 41

If you discover that you are not using optimal settings during the run, click the Stop
button. Change the configuration settings and then press the Continue button. The
previously collected data will be reclassified according to the new configuration
settings.
http://www.miraibio.com
Master
41
Plex CT
Page 42

http://www.miraibio.com
Master
42
Plex CT
Page 43

Remote Monitor
Free yourself from the instrument. MasterPlex CT includes a remote client program that
allows you to monitor your Luminex instrument from another computer within the same
local area network (LAN).
Whether you are running a plate, waiting for the warm-up to complete or just want to
know when the lasers are going offline, the remote monitor client will let you monitor the
instrument from the comfort of your own desk.
With the remote monitor
feature, you can also
monitor multiple
Luminex instruments
from a single computer.
http://www.miraibio.com
Master
43
Plex CT
Page 44

In case of an
emergency, the
Luminex instrument
can be remotely
paused by just simply
clicking on the Pause
button.
In the Plate tab, you
can monitor sample
acquisition well-bywell in real-time.
http://www.miraibio.com
Master
44
Plex CT
Page 45

In the Data tab, you
can view MFI data as
it is being acquired
well-by-well in realtime.
In the Count tab, you can view
the real-time bead count in the
form of bar graphs.
http://www.miraibio.com
Master
45
Plex CT
Page 46

In the Device tab, you can monitor the status of the Luminex instrument. In the above
screenshot, the progress of a Prime operation is being monitored remotely in real-time.
As you can see, this powerful MasterPlex CT feature allows you to walk away from the
instrument during time-consuming operations.
http://www.miraibio.com
Master
46
Plex CT
Page 47

You can also contact MiraiBio with any questions you have at (510) 337-2000 (USA
phone number) or by sending an email to
MiraiBio
A division of Hitachi Software
1201 Harbor Bay Parkway
Suite 150
Alameda, CA 94502
Telephone
1.800.624.6176
1.510.337.2000
Facsimile
1.510.337.2099
Trademark Acknowledgments
MasterPlex is a trademark of Hitachi Software Engineering Co., Ltd. Luminex® is a
registered trademark of the Luminex Corporation. All other company and product names
mentioned in this manual are trademarks or registered trademarks of their owners.
© 2005 Hitachi Software Engineering America, Ltd. All Rights Reserved.
support@miraibio.com.
http://www.miraibio.com
Master
47
Plex CT
 Loading...