

Luma LUM-500-NVR Series Quick Start Manual

LUM-500-NVR Series
NVR Surveillance Recorder
Web Interface
Quick Start
Guide
Luma NVR QSG pilot.indd 1 7/10/2015 11:13:24 AM
2
NVR Quick Start Guide
Read this page before you go to the job site!
For maximum control and convenience, your system should be connected to the Internet via a local network
router. For installation, you must be able to access this network through a personal computer.
Internet connectivity allows you to use OvrC, a powerful remote maintenance service. See OvrC.com for details.
If your surveillance system is isolated from the Internet, go to SnapAV.com and download the technical reference
manual for this product, which has a chapter that steps you through installation without using the web interface.
Required Equipment
} The NVR and all cameras to be installed
} Network connection for the NVR
} Admin rights to a network computer that can access the surveillance system
} Phillips screwdriver
} Two AAA batteries for the remote control
Additional Resources
You can acquire a PDF of the full NVR technical reference manual, hard drive installation guide, and other
materials from the product page at SnapAV.com.
If you are going to install extra hard drives in the recorder, do so now before beginning installation.
Luma NVR QSG pilot.indd 2 7/10/2015 11:13:24 AM
3
NVR Quick Start Guide
Safety Tips
} Handle this device with care.
} Do not strike or shake this device.
} Do not operate this device beyond its specified
power source ratings.
} Protect the power cord from being stepped on or
pinched, particularly where it connects to the
device and to the power outlet.
} Do not drop items through the ventilation slots.
If something falls inside the device, turn off
the power immediately and contact qualified
personnel for service.
} Do not expose this device to water or moisture.
Moisture may damage the device and cause
electric shock.
} Take immediate action if the device becomes
wet: turn the power off and contact qualified
personnel for service.
} Do not use this device in humidity above 85%.
} Do not use this device near any heat sources
such as radiators, heat registers, stoves, or other
such heat-generating equipment.
} If mounting in a closed space, include adequate
ventilation. Do not block ventilation openings.
} The performance and lifespan of the hard drive
is affected by temperature. Use this device in
temperatures ranging from 14–131 °F.
} Handle the hard drive with care.
} You can damage the hard drive if this device
is moved while the hard drive is still spinning.
If you must move the device, even just to
reposition it, follow the shutdown procedure in
the technical reference manual (available online)
and wait at least 30 seconds before moving it.
} If servicing or exchanging the hard drive, protect
it from static electricity. Use a grounded static
wrist guard and mat to properly ground yourself
and the hard drive.
} Do not use an electric screwdriver to remove or
install a hard drive.
} Clean this device with a dry cloth. Do not use
strong or abrasive detergents when cleaning the
device chassis. If dirt is hard to remove, use a
mild detergent and wipe gently.
} Make a note of the system settings and save
them. This helps when changing the system
configuration or with recovery if unexpected
failure or trouble occurs.
Luma NVR QSG pilot.indd 3 7/10/2015 11:13:24 AM
4
NVR Quick Start Guide
Box Contents
The following materials are included in your package:
} This quick-start guide
} The Luma NVR
} Extra screws for mounting an additional internal hard drive into your NVR
} SATA cables for connecting an additional internal hard drive in your NVR
} Rack ears for installing your NVR into a rack
} Screws for attaching the rack ears to the NVR
} USB mouse
} Remote control
} Power cord
} Stick-on rubber feet for the unit if you will not be installing it in a rack
Please note that distributing, copying, disassembling, reverse compiling, reverse engineering, or exporting the
software provided for this product is expressly prohibited and in violation of international copyright law.
Luma NVR QSG pilot.indd 4 7/10/2015 11:13:24 AM
5
NVR Quick Start Guide
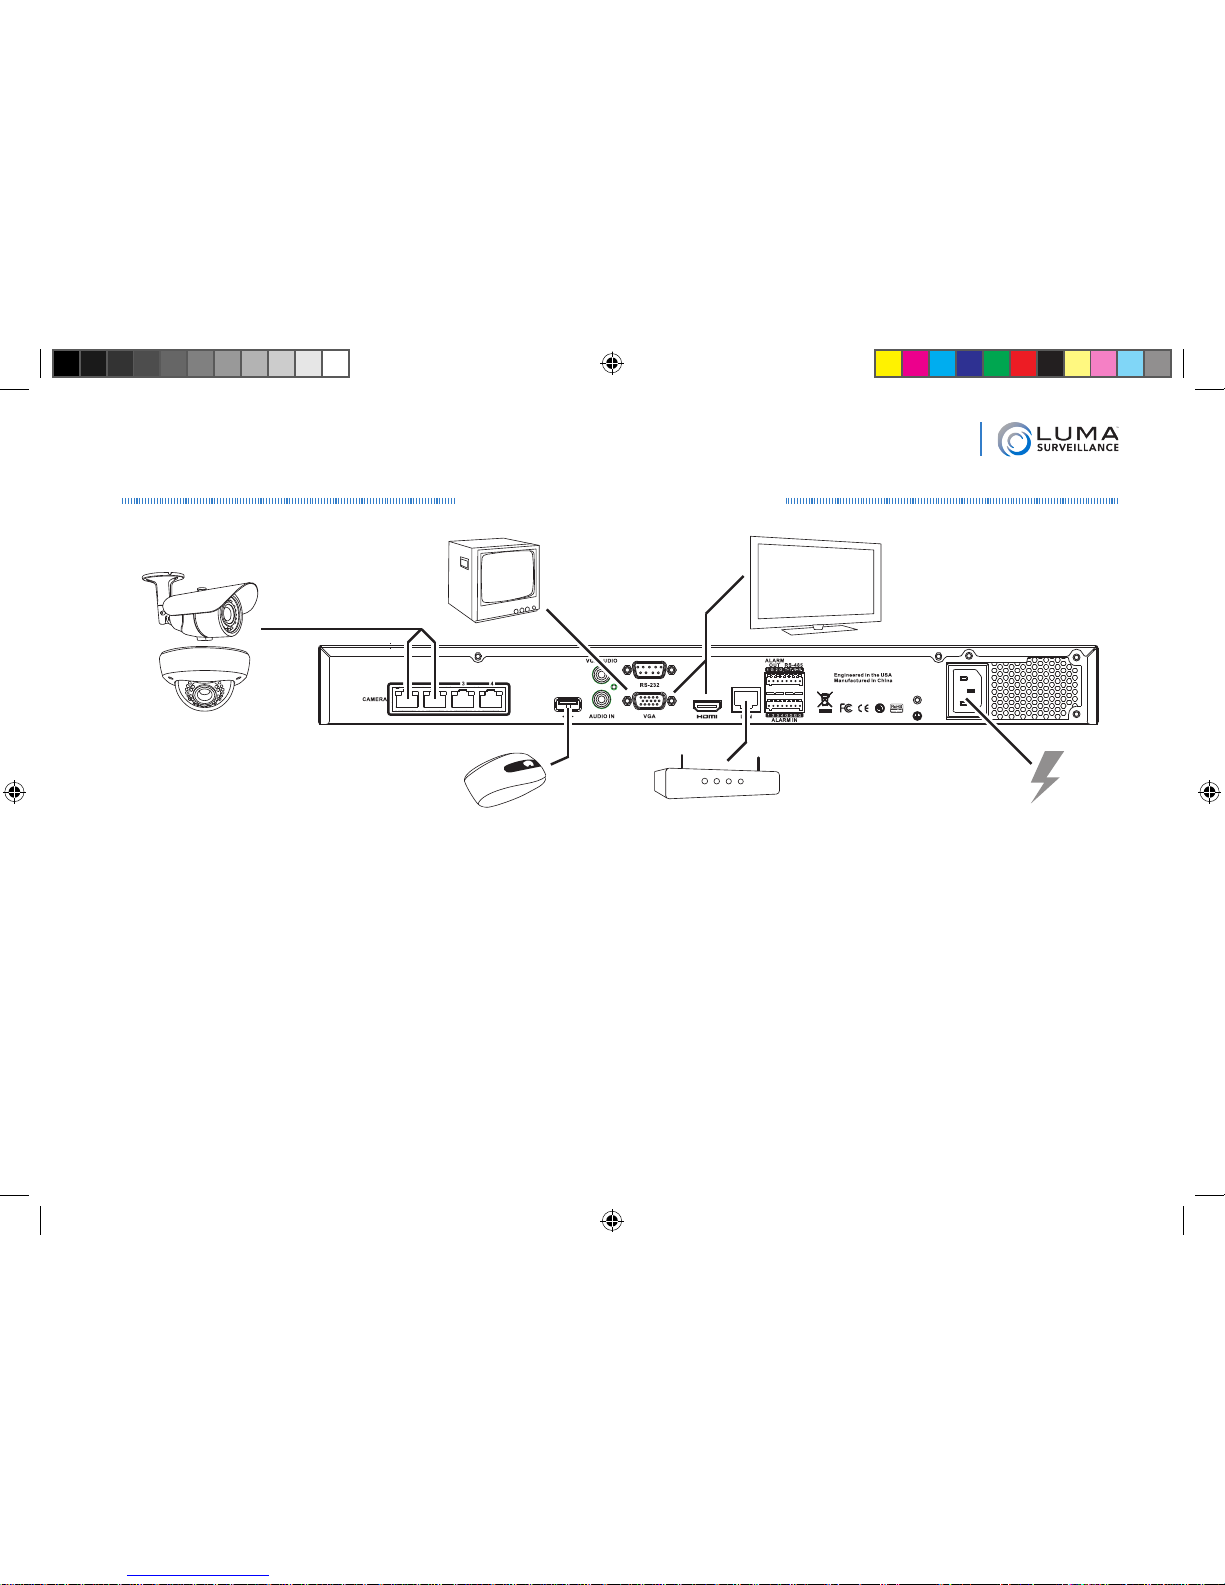
Set Up the Hardware
Caution: Do not power up the NVR until these steps are complete.
1. If desired, install the NVR in the rack. If not, attach the rubber feet to the bottom corners of the unit.
2. Connect the mouse to the USB port on the rear panel. We suggest that you leave the front USB unused and
accessible for later use.
3. If desired, connect a local monitor to the VGA, HDMI, or video out port.
4. Connect your IP surveillance cameras to the camera ports. To connect your cameras through your local
network, consult the technical reference manual (available online) for additional setup.
5. Connect your network cable to the Ethernet port.
6. Connect the power cord and turn on the power switch.
Camera(s)
Optional
USB Mouse
Network Gateway
AC Power
ß or à
Optional local
video monitor
Luma NVR QSG pilot.indd 5 7/10/2015 11:13:24 AM
 Loading...