

Page 1
R
v
w
u
A
n
s
o
o
N
a
s
y
m
n
W
T
t
n
o
M
e
n
n
g
c
n
e
o
e
d
a
e
n
m
IMPO
before
with all
to pre
To vie
www.l
TANT S
attempti
safety in
ent pers
the full l
macomf
FETY I
g to inst
truction
nal injur
ine of Lu
rt.com.
Ow
MF18
FORMA
ll or use
and war
or prope
a Comf
er’s
18”
ION: Pl
his misti
ings co
rty dama
rt produ
Ma
isting
ase car
g fan. F
tained in
e.
ts, pleas
ual
Fan
fully rea
r your s
this own
visit
this ma
fety, co
r’s manu
ual
ply
al
Page 2

Contents
Introduction ..................................................................................................................... 1
Product Benefits .............................................................................................................. 1
Important Safety Information ........................................................................................... 1
Parts List ......................................................................................................................... 2
Assembly Instructions ..................................................................................................... 3
Step 1: Assembling the Stand Pole & Fan Base ...................................................... 3
Step 2: Assembling the Fan Head ............................................................................ 3
Operating Instructions ..................................................................................................... 3
Maintenance .................................................................................................................... 4
Cleaning the Misting Nozzles ................................................................................... 4
Troubleshooting .............................................................................................................. 4
Technical Support ........................................................................................................... 5
Product Specifications ..................................................................................................... 5
Warranty .......................................................................................................................... 6
Page 3

Introduction
Thank you for purchasing this misting fan from Luma Comfort, the world leader in home appliances and
home comfort products.
This owner’s manual provides specific operating instructions for your misting fan. Use the misting fan
only as instructed in this owner’s manual.
Product Benefits
Designed to cool areas such as patios, decks, back yards, greenhouses and more
Constructed of heavy-gauge, anticorrosive metal for safety and durability
Certified for outdoor use with GFCI plug
Quiet, high-efficiency fan motor
Fan head tilts for directional cooling
Connects to any standard spigot or garden hose for continuous operation
Adds moisture to dry environments and eliminates airborne dust particles
Important Safety Information
These instructions are not meant to cover every possible condition and situation that may occur. Please
read all instructions before using this misting fan. Failure to carefully read all instructions may result in
possible electric shock or fire hazard, and will void the manufacturer’s warranty.
1. Use this misting fan only as instructed in this owner’s manual. This fan is not designed for
commercial use. Other uses may cause electric shock, injury or fire.
2. This fan is intended for outdoor use but can be used indoors without the misting feature.
3. Close supervision is required if this fan is used near children or pets.
4. To protect against electric shock, do not immerse this fan or its plug and cord in water.
5. For your safety, turn off the electrical supply before installing, moving or servicing your misting
fan. Never make adjustments to the fan when the fan is in operation and always unplug the fan
when it is not in use.
6. Do not use this misting fan with any solid state speed control devices.
7. To disconnect the fan from the power supply, tightly grip the fan’s plug and pull it from the power
outlet. Do not disconnect the power supply by pulling on the fan’s power cord.
8. Avoid contact with any of the misting fan’s moving parts.
9. Place the misting fan on a level surface.
10. This misting fan is intended to fit into a matching receptacle. Under no circumstances should the
grounded plug be altered in any way. An improper connection can result in electric shock.
11. If possible, avoid using extension cords with this misting fan.
12. Do not insert objects or allow fingers to enter into the fan head, as this may cause electric shock
or bodily injury. Do not block or tamper with the misting fan while it is in operation.
13. Do not place the fan near curtains, drapes, or any other materials that can get caught in the
misting fan’s grills.
14. Do not run the power cord under mats or carpeting, and do not cover the power cord with
runners. Arrange the power cord away from room traffic and where it can be tripped over.
15. Do not operate this misting fan in the presence of flammable substances or explosives.
16. Do not place the fan near an open flame or cooking/heating appliances.
17. If the fan’s plug or power cord is damaged, do not attempt to repair the components yourself.
Please contact Luma Comfort’s customer service hotline at 1-866-737-6390 or have the fan
examined by an authorized service provider.
SAVE THESE INSTRUCTIONS
1
Page 4
i
W
M
n
H
e
7
891
1
b
e
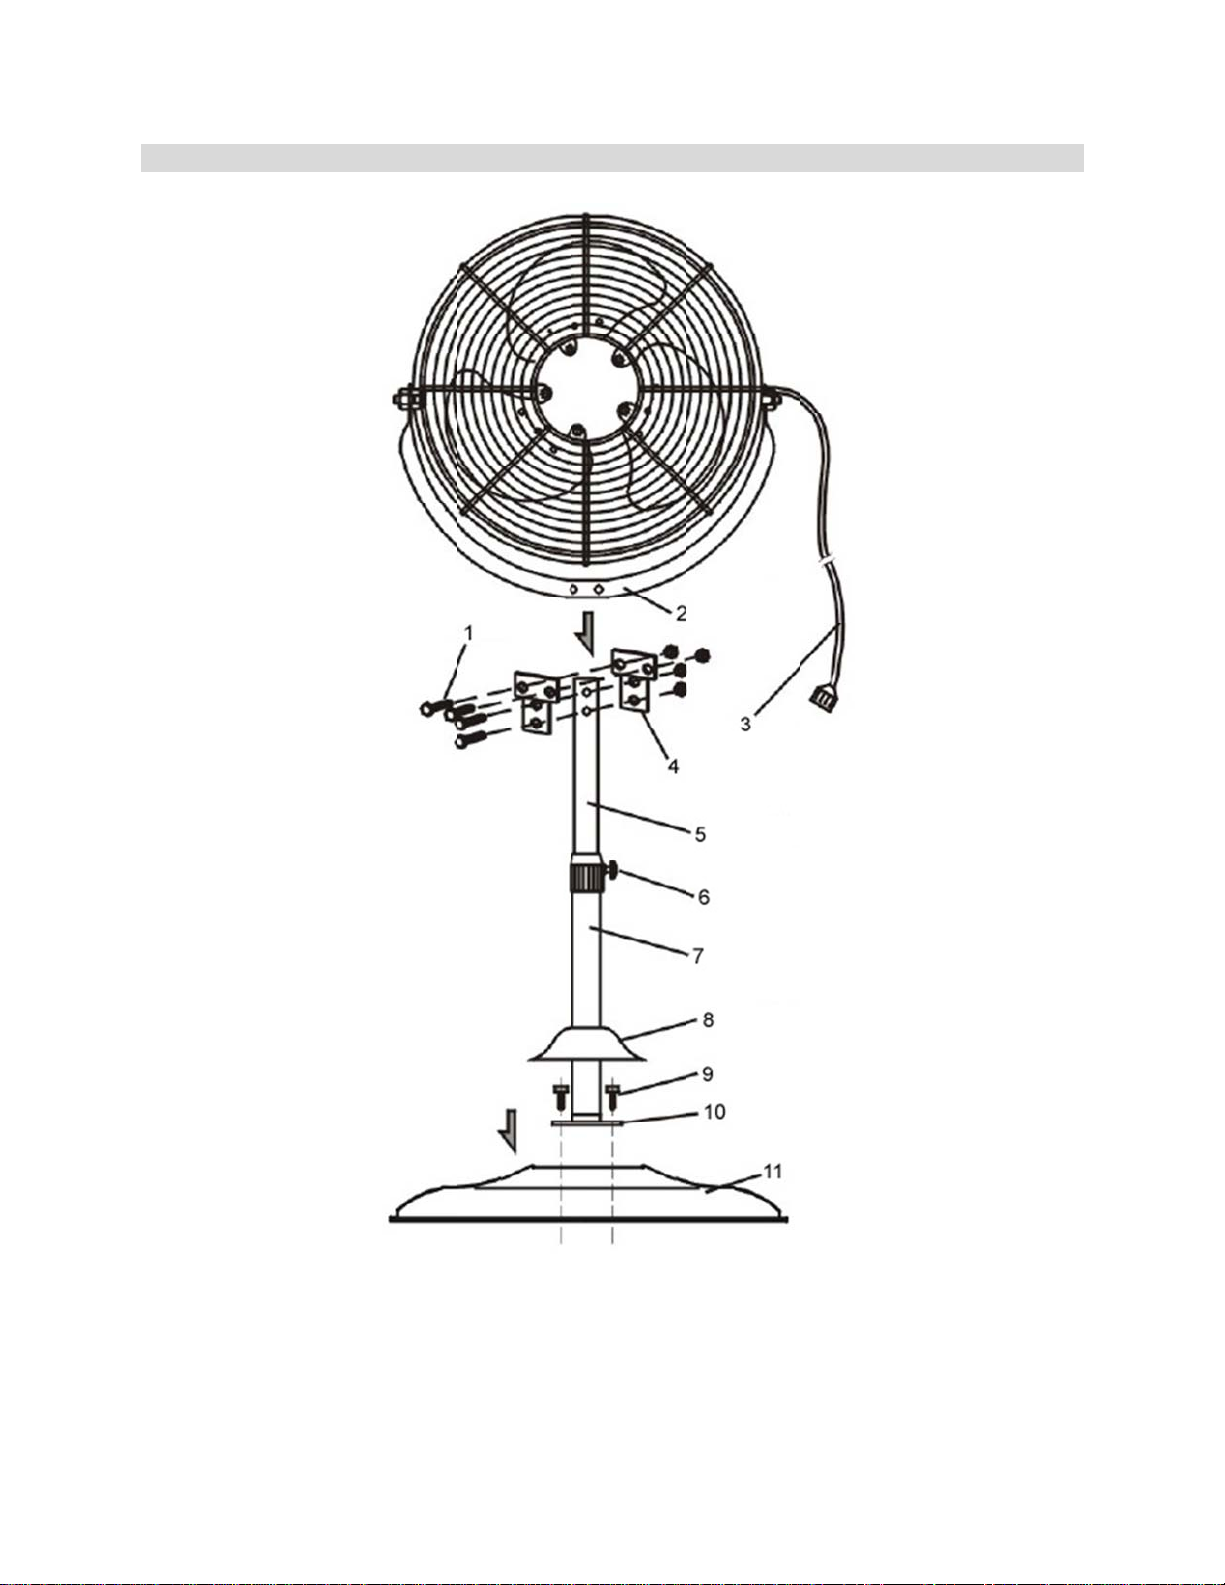
Parts L
st
1. S
2. S
3.
4.
5. I
6.
crews
upport tube
ater hose
ounting plat
ner tube
eight knob
. Outer tu
. Cover rin
. Screws
0. Coupling
1. Fan bas
e
g
2
Page 5
b
s
A
A
o
M
A
o
uco
r
a
a
t
m
M
C
mun
p
o
D
e
c
n
r
h
r
h
s
h
t
c
F
t
e
e
i
m
b
a
a
m
e
a
a
t
w
d
e
a
s
t
u
w
s
f
w
b
w
e
a
W
u
m
s
g
a
u
n
e
t
e
a
s
h
t
a
t
y
h
h
r
s
a
o
h
p
p
e
u
w
a
e
e
r
a
u
f
g
n
t
e
c
e
a
r
m
c
p
h
a
t
r
d
n
e
s
e
e
k
n
v
z
e
o
b
a
r
u
F
h
y
t
t
s
T
h
i
a
s
Y
g
u
s
t
.
Assem
DO NOT
storage/u
required t
Step 1:
a.
b. L
c. S
d.
Step 2:
a. L
b. T
c. F
Operati
The Lum
misting f
pressure
resulting i
Keep in
with high
1.
2. P
3.
4. P
5. T
6. T
7.
8. T
ly Instru
lug in the fa
e. Make su
o assemble t
ssembling t
ttach the cou
osen the he
lide the cove
ake sure the
ssembling t
cate the fan
ake the front
s
pport tube.
nnection is
irmly attach t
p
ovided with
ng Instru
Comfort M
n has a spec
o tiny drople
n a cooling e
ind that the
humidity lev
ake sure the
lace the mist
onnect the
ay need to a
it to a water
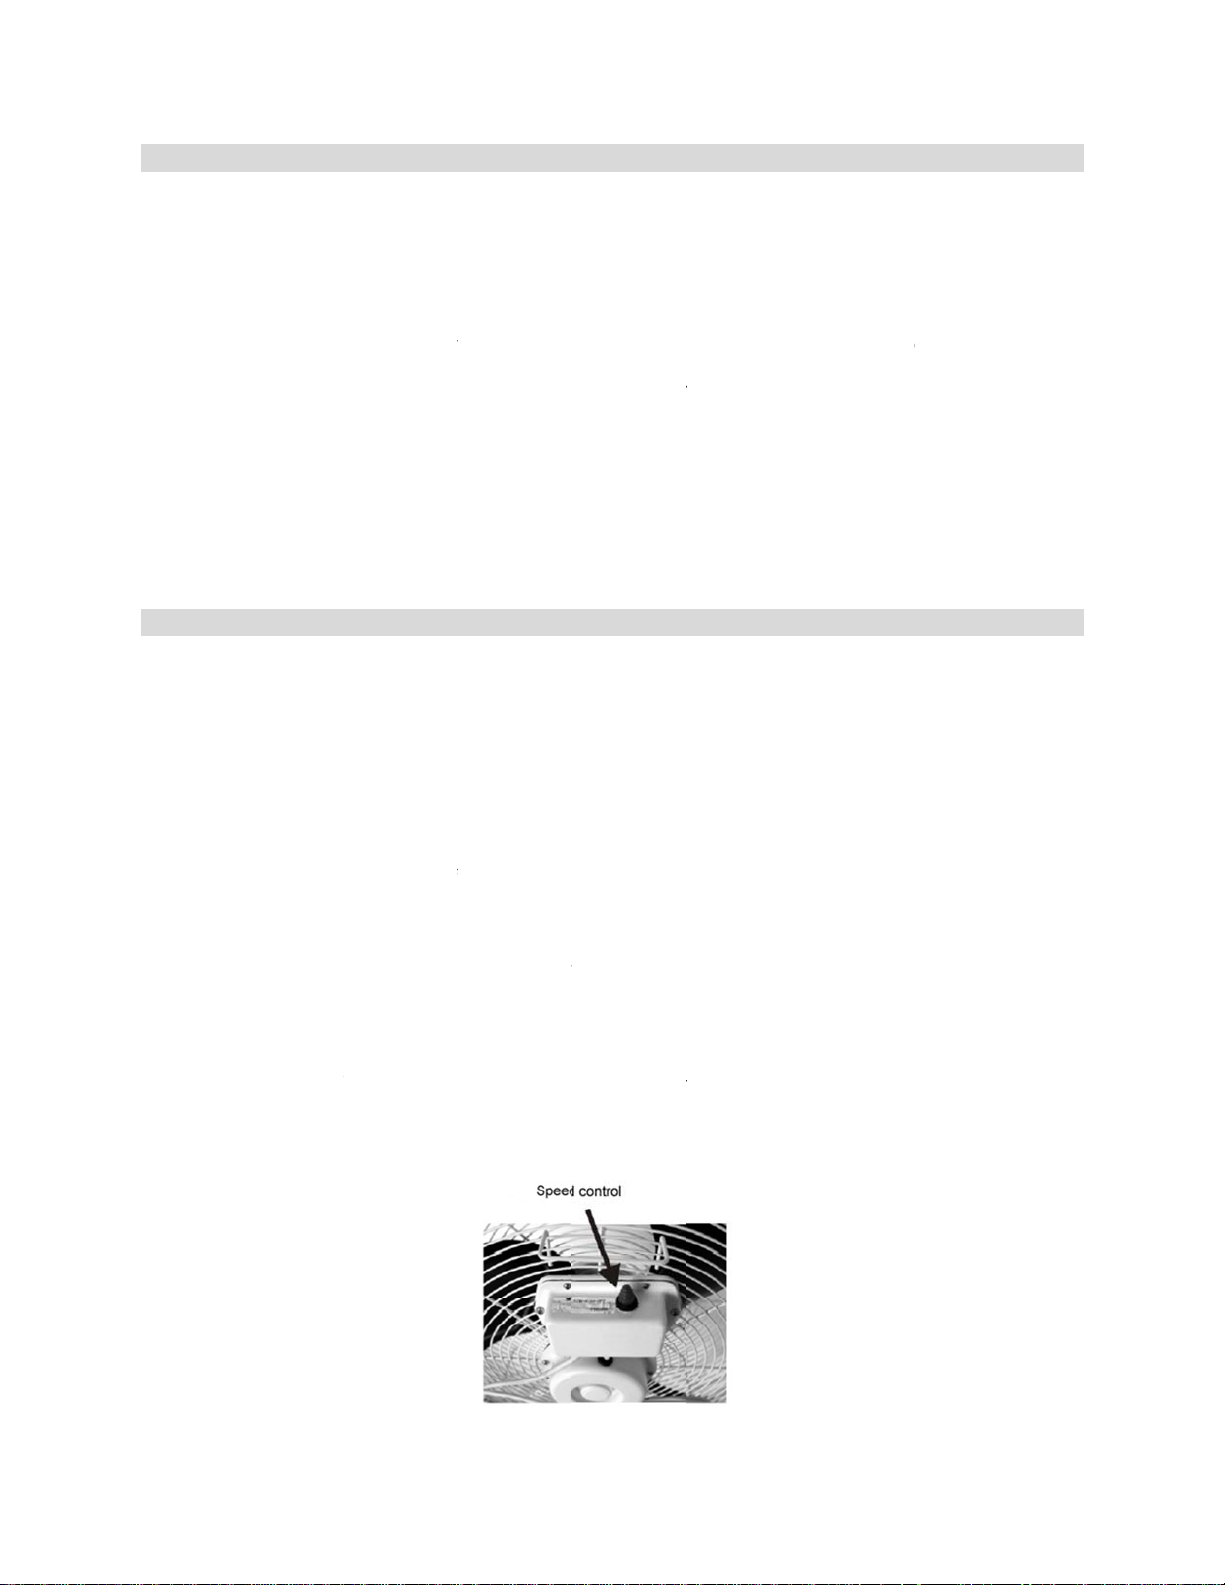
ress the red
s
eed.
urn on the w
o adjust the
d
wn.
o not turn off
r
sult in water
he Luma Co
he spray ang
T
tions
before ass
e there is no
is misting f
e Stand Po
pling to the f
ight knob on
ring the do
height knob
e Fan Hea
head and th
mounting pl
Use the prov
ecure.
e support tu
he misting fa
tions
18W misting
ial high pres
s. This crea
fect of as m
ffectiveness
ls, you may
misting fan i
ng fan on a
isting fan’s
tach one or
supply.
utton to po
ter supply.
irflow, tilt th
the misting f
leaking from
fort MF18
le and water
mbly. Caref
residual foa
n.
le & Fan Ba
n base usin
he coupling
n the outer t
is fully tighte
support tub
te and the re
ided screws
be to the inn
n.
fan provides
ure pump th
es a fine mi
ch as 20 – 3
of this mistin
ant to use t
not connec
lat, level surf
ater hose to
oth of the pr
er on the uni
fan head to
n until you
the front of t
will use app
droplet size i
lly remove
left in any
the 4 provid
nd extend t
be so that it
ed before pr
. These 2
ar mounting
o connect th
r tube using
cooling thro
t generates
t that evapor
0°F!
g fan improv
e fan with th
ed to a wate
ce.
a compatible
ovided hose
, and contin
our desired
ave turned o
e fan.
oximately 9
determined
ll packaging
f the compo
ed screws.
e inner tube
rests on top
oceeding on
arts will com
late and pla
pieces tog
the 2 mounti
gh the natur
ater pressu
ates upon co
s as the te
misting fun
supply until
threaded ta
adapters to t
e pressing it
angle. The f
ff the water s
allons of wa
by the wate
materials an
ents. A wre
to your desir
of the fan ba
o the next st
fully assem
e them in th
ther and ma
ng screws a
l power of e
re while noz
ntact with th
perature rise
tion turned
the fan has
, spigot or g
e hose befo
to select yo
n head can
upply first.
er for each
pressure at
retain for fu
ch will be
d fan heigh
e.
p.
bled.
center of th
e sure the
d spring wa
aporation.
les reduce t
air and sunl
s, but in are
ff for best re
een turned o
rden hose.
e connectin
r desired fan
be adjusted
ailure to do
our of opera
our location
ure
.
e
hers
his
is
ght,
s
ults.
n.
ou
the
p or
o will
ion.
3
Page 6
Maintenance
Regular cleaning and maintenance is an essential step in maintaining the longevity of your misting fan
and ensuring that it operates free of defects. Maintain your misting fan by following these steps:
Always unplug the misting fan from the power supply before servicing or cleaning.
Use a soft cloth and a mild soap and warm water solution to clean the fan’s exterior. Do not use
harsh cleaners, gasoline, paint thinner, benzene, etc., as these substances can damage the
misting fan.
Thoroughly dry all of the fan’s parts with a soft cloth before reconnecting the unit to a power
supply.
If the misting fan will not be in use for an extended period of time, cover the unit and keep it
stored in a clean, dry place.
Cleaning the Misting Nozzles
If the fan is not producing enough mist, check the nozzles to see if they are clogged with any sediment. If
the nozzles are clogged, follow these steps to clean the nozzles:
Turn off the fan and the water supply. Using a screwdriver, gently tap the nozzles to loosen any
accumulated sediment.
Remove the nozzles and soak them in a small container with vinegar or household lime and scale
remover for 30 minutes. Heavier deposits may require longer soaking times and additional
scrubbing with a stiff brush.
DO NOT attempt to clear the misting nozzles with sharp objects such as pins or nails, as these
can damage the nozzles.
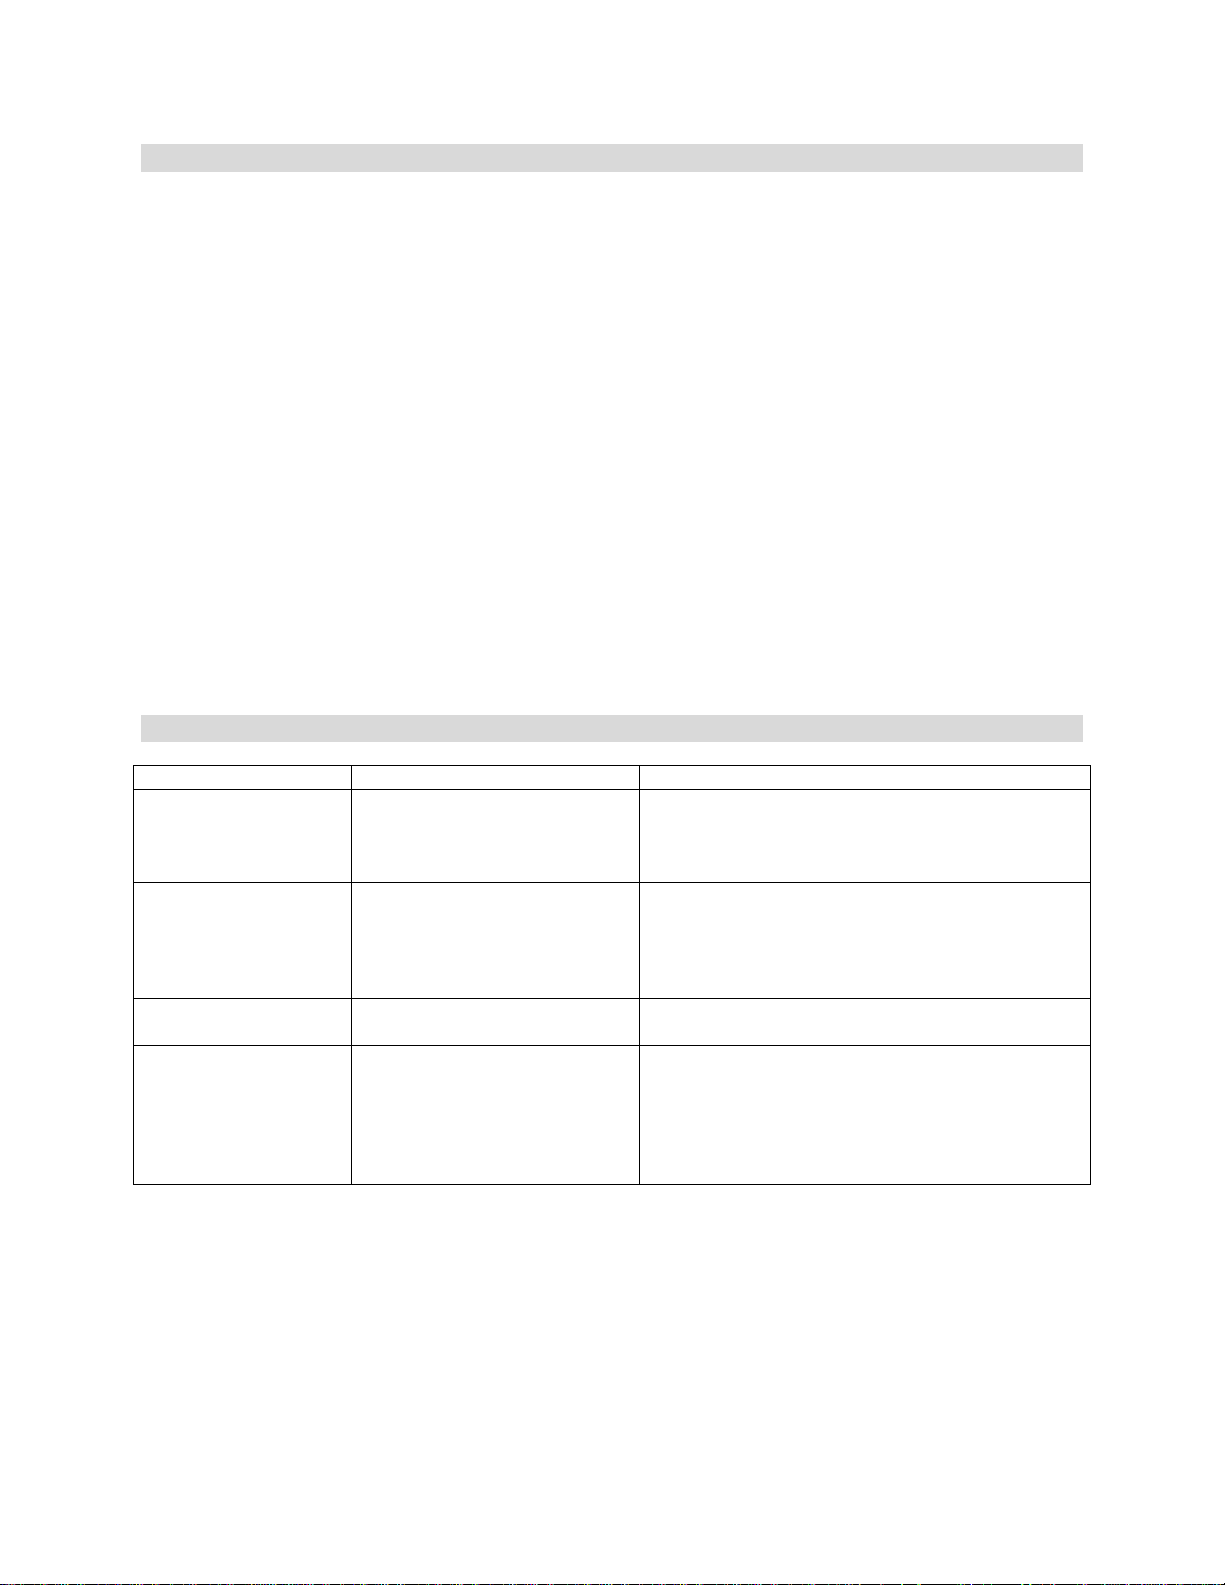
Troubleshooting
Problem Possible Cause(s) Possible Solution
The fan does not turn
on.
No mist is coming out
of the unit.
Water is leaking out
of the water hose.
The fan produces
uneven mist.
The power cord is not
plugged in.
The water hose is not
connected to a water supply.
The misting nozzles may be
clogged with sediment.
The connections are not
tightly secured.
There may be insufficient
water flow.
There is a leak in the water
hose.
Check to make sure the plug is plugged into an
outlet.
Press the reset button on the GFCI plug.
Make sure the water hose on the misting fan is
correctly connected to a spigot or garden hose.
Clean the misting nozzles as directed in the
maintenance section of this owner’s manual.
Check to make sure all of the fan’s components
are securely connected together.
Adjust the water flow on your spigot or garden
hose.
Turn off the misting function and see if there are
any air leaks in the hose. If the problem
persists, contact customer service.
4
Page 7
Technical Support
Luma Comfort is committed to providing a premier service experience. If you are experiencing any
technical issues with your product related to either setup or operation, please contact our product support
team at 1-866-737-6390 or [email protected].
Product Specifications
Model:
Product Dimensions:
Product Weight:
Voltage:
Wattage:
Fan Head Size:
Fan Speeds:
Maximum RPMs:
Maximum Inlet Water Pressure:
Minimum Inlet Water Pressure:
Temperature Drop:
Adjustable Tilt:
Warranty:
MF18W
20.75” (D) x 20” (W) x 59.4” (H)
33.4 pounds
110~120V
160W
18”
3
1600
0.6 Mpa
0.2 Mpa
20 - 30° F
Yes
1 year manufacturer’s warranty
5
Page 8

Warranty
Luma Comfort products are warranted to be free from defects in workmanship or materials for one (1)
year from the date of purchase. If the product is found to be defective within this period, Luma Comfort,
at its sole option, will repair or replace any components that fail during normal operation. The repairs or
replacement will be made at no charge to the customer for parts and labor, assuming that the customer
shall be responsible for all transportation costs to and from Luma Comfort.
Luma Comfort retains the right to repair or replace (with a new or newly-refurbished replacement product)
the appliance at its sole discretion.
This warranty does NOT apply to the following:
Products without a proof of purchase
Products purchased from a source other than an authorized Luma Comfort de aler
Cosmetic damage such as scratches or dents
Damage caused by service performed by anyone who is not an authorized service provider of
Luma Comfort
Damage in transit
Damage caused by accident, abuse, misuse, water, flood, fire, improper installation, maintenance
negligence, commercial use for a non-commercial unit, acts of God or any other acts of nature or
external causes
Damage to a product caused by modifications or alterations without the written permission of
Luma Comfort
Normal wear and tear of parts that are designed to be replaced, such as filters or batteries
Power failure and improper power supply such as low voltage, defective wiring or inadequate
fuses
Use of force or damage caused by external influences
Complete or partially dismantled appliances
THE WARRANTIES AND REMEDIES CONTAINED HEREIN ARE EXCLUSIVE AND IN LIEU OF ALL
OTHER WARRANTIES EXPRESS, IMPLIED, OR STATUTORY, INCLUDING ANY LIABILITY ARISING
UNDER ANY WARRANTY OF MERCHANTABILITY OR FITNESS FOR A PARTICULAR PURPOSE,
STATUTORY OR OTHERWISE. THIS WARRANTY GIVES YOU SPECIFIC LEGAL RIGHTS, WHICH
MAY VARY FROM STATE TO STATE.
IN NO EVENT SHALL LUMA COMFORT BE LIABLE FOR ANY INCIDENTAL, SPECIAL, INDIRECT, OR
CONSEQUENTIAL DAMAGES, WHETHER RESULTING FROM THE USE, MISUSE, OR INABILITY TO
USE THIS PRODUCT OR FROM DEFECTS IN THE PRODUCT. SOME STATES DO NOT ALLOW THE
EXCLUSION OF INCIDENTAL OR CONSEQUENTIAL DAMAGES, SO THE ABOVE LIMITATIONS MAY
NOT APPLY TO YOU.
If you believe your product is defective, contact Luma Comfort for warranty service at 1-866-737-6390 or
[email protected]. In your correspondence with Luma Comfort, please describe the problem
and request a return material authorization (RMA) number. You will also need to provide the proof of
purchase, return shipping address and a daytime phone number.
After a Luma Comfort representative confirms that your product is defective and is still under warranty,
you will receive an RMA and return shipping instructions. Products sent to our headquarters without an
RMA will be refused.
6
 Loading...