

Page 1
LUCOM GmbH * Ansbacher Str. 2a * 90513 Zirndorf * Tel. 09127/59 460-10 * Fax. 09127/59 460-20 * www.lucom.de
www.lucom.de info@lucom.de
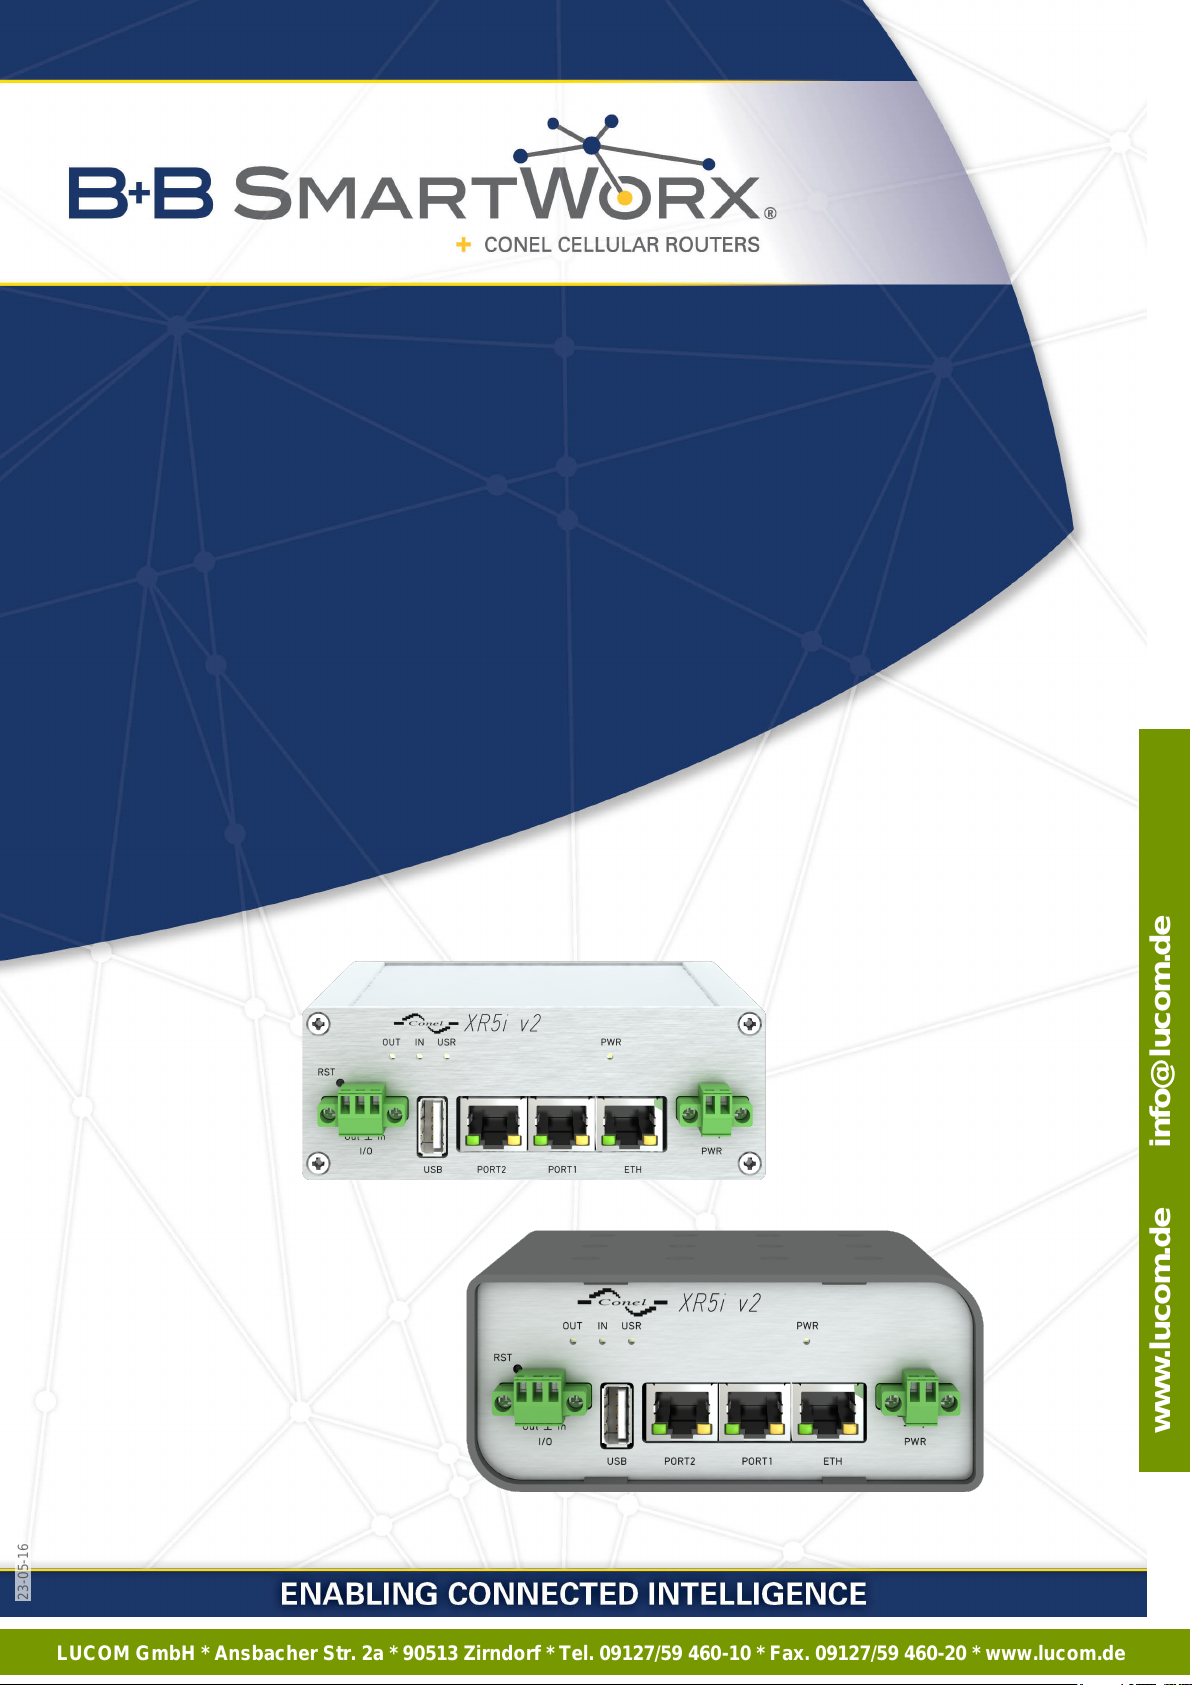
Ethernet Industrial Router
XR5i v2
USER’S MANUAL
23-05-16
Page 2
LUCOM GmbH * Ansbacher Str. 2a * 90513 Zirndorf * Tel. 09127/59 460-10 * Fax. 09127/59 460-20 * www.lucom.de
www.lucom.de info@lucom.de
USED SYMBOLS
Used symbols
Danger – Information regarding user safety or potential damage to the router.
Attention – Problems that can arise in specific situations.
Information, notice – Useful tips or information of special interest.
GPL licence
Source codes under GPL licence are available free of charge by sending an email to:
Conel s.r.o., Sokolska 71, 562 04 Usti nad Orlici, Czech Republic
Manual Rev. 1 released in CZ, February 2, 2016
i
23-05-16
Page 3
LUCOM GmbH * Ansbacher Str. 2a * 90513 Zirndorf * Tel. 09127/59 460-10 * Fax. 09127/59 460-20 * www.lucom.de
www.lucom.de info@lucom.de
23-05-16
CONTENTS
Contents
1 Safety Instruction 2
2 Product Disposal Instructions 3
3 Router Description 4
4 Contents of Package 5
5 Router Design 6
5.1 Router versions . . . . . . . . . . . . . . . . . . . . . . . . . . . . . . . . . . . . 6
5.2 Delivery identification . . . . . . . . . . . . . . . . . . . . . . . . . . . . . . . . 7
5.3 Order codes . . . . . . . . . . . . . . . . . . . . . . . . . . . . . . . . . . . . . . 8
5.4 Basic dimensions of the router box . . . . . . . . . . . . . . . . . . . . . . . . . 9
5.4.1 Plastic box . . . . . . . . . . . . . . . . . . . . . . . . . . . . . . . . . . 9
5.4.2 Metal box . . . . . . . . . . . . . . . . . . . . . . . . . . . . . . . . . . . 9
5.5 Mounting recommendations . . . . . . . . . . . . . . . . . . . . . . . . . . . . . 10
5.6 Removing from the DIN rail . . . . . . . . . . . . . . . . . . . . . . . . . . . . . 12
5.7 Description of the front panel . . . . . . . . . . . . . . . . . . . . . . . . . . . . 13
5.7.1 Status indication . . . . . . . . . . . . . . . . . . . . . . . . . . . . . . . 14
5.7.2 Power connector PWR . . . . . . . . . . . . . . . . . . . . . . . . . . . . 15
5.7.3 Ethernet Port ETH . . . . . . . . . . . . . . . . . . . . . . . . . . . . . . 16
5.7.4 PORT1 . . . . . . . . . . . . . . . . . . . . . . . . . . . . . . . . . . . . 17
5.7.5 PORT2 . . . . . . . . . . . . . . . . . . . . . . . . . . . . . . . . . . . . 17
5.7.6 USB Port . . . . . . . . . . . . . . . . . . . . . . . . . . . . . . . . . . . 18
5.7.7 I/O Port . . . . . . . . . . . . . . . . . . . . . . . . . . . . . . . . . . . . 18
5.7.8 Reset . . . . . . . . . . . . . . . . . . . . . . . . . . . . . . . . . . . . . 20
6 First Use 21
6.1 Connecting the router before first use . . . . . . . . . . . . . . . . . . . . . . . 21
6.2 Start . . . . . . . . . . . . . . . . . . . . . . . . . . . . . . . . . . . . . . . . . . 22
6.3 Configuration . . . . . . . . . . . . . . . . . . . . . . . . . . . . . . . . . . . . . 22
6.3.1 Configuration over web browser . . . . . . . . . . . . . . . . . . . . . . . 22
6.3.2 Configuration over Telnet . . . . . . . . . . . . . . . . . . . . . . . . . . 23
7 Technical Parameters 24
7.1 Basic parameters . . . . . . . . . . . . . . . . . . . . . . . . . . . . . . . . . . . 24
7.2 Standards and regulations . . . . . . . . . . . . . . . . . . . . . . . . . . . . . . 24
7.3 Technical parameters of processor . . . . . . . . . . . . . . . . . . . . . . . . . 25
ii
Page 4
LUCOM GmbH * Ansbacher Str. 2a * 90513 Zirndorf * Tel. 09127/59 460-10 * Fax. 09127/59 460-20 * www.lucom.de
www.lucom.de info@lucom.de
CONTENTS
7.4 Technical parameters of I/O port . . . . . . . . . . . . . . . . . . . . . . . . . . 25
7.5 Technical parameters of expansion port . . . . . . . . . . . . . . . . . . . . . . 25
8 Recommended Literature 26
9 Troubleshooting 27
9.1 FAQ . . . . . . . . . . . . . . . . . . . . . . . . . . . . . . . . . . . . . . . . . . 27
10 Customers Support 29
iii
23-05-16
Page 5
LUCOM GmbH * Ansbacher Str. 2a * 90513 Zirndorf * Tel. 09127/59 460-10 * Fax. 09127/59 460-20 * www.lucom.de
www.lucom.de info@lucom.de
23-05-16
LIST OF FIGURES
List of Figures
1 Contents of package . . . . . . . . . . . . . . . . . . . . . . . . . . . . . . . . . 5
2 Front panel XR5i v2F . . . . . . . . . . . . . . . . . . . . . . . . . . . . . . . . . 6
3 Front panel XR5i v2F with WiFi . . . . . . . . . . . . . . . . . . . . . . . . . . . 6
4 Front panel XR5i v2F SL . . . . . . . . . . . . . . . . . . . . . . . . . . . . . . . 6
5 Front panel XR5i v2F SL with WiFi . . . . . . . . . . . . . . . . . . . . . . . . . 6
6 Label XR5i v2F . . . . . . . . . . . . . . . . . . . . . . . . . . . . . . . . . . . . 7
7 Label XR5i v2F SL . . . . . . . . . . . . . . . . . . . . . . . . . . . . . . . . . . 7
8 Basic dimensions of plastic box . . . . . . . . . . . . . . . . . . . . . . . . . . . 9
9 Basic dimensions of metal box . . . . . . . . . . . . . . . . . . . . . . . . . . . 9
10 Cable routing (plastic) . . . . . . . . . . . . . . . . . . . . . . . . . . . . . . . . 10
11 Cable routing (metal) . . . . . . . . . . . . . . . . . . . . . . . . . . . . . . . . . 10
12 Space in front of connectors (plastic) . . . . . . . . . . . . . . . . . . . . . . . . 11
13 Space in front of connectors (metal) . . . . . . . . . . . . . . . . . . . . . . . . 11
14 Default position of DIN holder . . . . . . . . . . . . . . . . . . . . . . . . . . . . 12
15 Removing from the DIN rail . . . . . . . . . . . . . . . . . . . . . . . . . . . . . 12
16 Front panel XR5i v2F . . . . . . . . . . . . . . . . . . . . . . . . . . . . . . . . . 13
17 Power connector . . . . . . . . . . . . . . . . . . . . . . . . . . . . . . . . . . . 15
18 Connection of power supply . . . . . . . . . . . . . . . . . . . . . . . . . . . . . 15
19 Ethernet connector . . . . . . . . . . . . . . . . . . . . . . . . . . . . . . . . . . 16
20 Connection of ethernet cable . . . . . . . . . . . . . . . . . . . . . . . . . . . . 16
21 PORT1 cable connection . . . . . . . . . . . . . . . . . . . . . . . . . . . . . . 17
22 PORT2 cable connection . . . . . . . . . . . . . . . . . . . . . . . . . . . . . . 18
23 USB connector . . . . . . . . . . . . . . . . . . . . . . . . . . . . . . . . . . . . 18
24 I/O connector . . . . . . . . . . . . . . . . . . . . . . . . . . . . . . . . . . . . . 19
25 Connection of I/O cable . . . . . . . . . . . . . . . . . . . . . . . . . . . . . . . 19
26 Connection of input and output to the router . . . . . . . . . . . . . . . . . . . . 19
27 Router reset . . . . . . . . . . . . . . . . . . . . . . . . . . . . . . . . . . . . . . 20
28 Router connection . . . . . . . . . . . . . . . . . . . . . . . . . . . . . . . . . . 21
29 Entering the IP address of the router . . . . . . . . . . . . . . . . . . . . . . . . 22
30 Entering login information . . . . . . . . . . . . . . . . . . . . . . . . . . . . . . 22
31 Router web interface . . . . . . . . . . . . . . . . . . . . . . . . . . . . . . . . . 23
iv
Page 6
LUCOM GmbH * Ansbacher Str. 2a * 90513 Zirndorf * Tel. 09127/59 460-10 * Fax. 09127/59 460-20 * www.lucom.de
www.lucom.de info@lucom.de
LIST OF TABLES
List of Tables
1 Router versions . . . . . . . . . . . . . . . . . . . . . . . . . . . . . . . . . . . . 6
2 Delivery identification . . . . . . . . . . . . . . . . . . . . . . . . . . . . . . . . 7
3 Ordering codes . . . . . . . . . . . . . . . . . . . . . . . . . . . . . . . . . . . . 8
4 Front panel description . . . . . . . . . . . . . . . . . . . . . . . . . . . . . . . . 13
5 Status indication . . . . . . . . . . . . . . . . . . . . . . . . . . . . . . . . . . . 14
6 Connection of power connector . . . . . . . . . . . . . . . . . . . . . . . . . . . 15
7 Connection of Ethernet connector . . . . . . . . . . . . . . . . . . . . . . . . . . 16
8 Connection of USB connector . . . . . . . . . . . . . . . . . . . . . . . . . . . . 18
9 Connection of I/O port . . . . . . . . . . . . . . . . . . . . . . . . . . . . . . . . 18
10 Description of reset and restart router . . . . . . . . . . . . . . . . . . . . . . . 20
11 Basic parameters . . . . . . . . . . . . . . . . . . . . . . . . . . . . . . . . . . . 24
12 Standards and regulations . . . . . . . . . . . . . . . . . . . . . . . . . . . . . . 24
13 Technical parameters of processor . . . . . . . . . . . . . . . . . . . . . . . . . 25
14 Technical parameters of I/O port . . . . . . . . . . . . . . . . . . . . . . . . . . 25
1
23-05-16
Page 7
LUCOM GmbH * Ansbacher Str. 2a * 90513 Zirndorf * Tel. 09127/59 460-10 * Fax. 09127/59 460-20 * www.lucom.de
www.lucom.de info@lucom.de
23-05-16
1. SAFETY INSTRUCTION
1. Safety Instruction
Please, observe the following instructions:
• The router must be used in compliance with all applicable international and national laws
and in compliance with any special restrictions regulating the utilization of the router in
prescribed applications and environments.
• To prevent possible injury to health and damage to appliances and to ensure that all the
relevant provisions have been complied with, use only the original accessories. Unauthorised modifications or utilization of accessories that have not been approved may
result in damage to the router and in a breach of applicable regulations. Unauthorized
modifications or utilization of accessories that have not been approved may result in the
termination of the validity of the guarantee.
• The router can not be opened.
• It must not be exceeded by the maximum voltage 36 V DC power connector on the router.
• Do not expose the router to extreme ambient conditions. Protect the router against dust,
moisture and high temperature.
• The router should not be used at petrol stations of flammable and explosive materials.
We remind the users of the duty to observe the restrictions concerning the utilization of
radio devices at petrol stations, in chemical plants, or in the course of blasting works in
which explosives are used.
• When using the router in the close proximity of personal medical devices, such as cardiac
pacemakers or hearing aids, you must proceed with heightened caution.
• If it is in the proximity of TV sets, radio receivers and personal computers, the telephone
may cause interference.
• It is recommended that you should create an appropriate copy or backup of all the important settings that are stored in the memory of the device.
2
Page 8
LUCOM GmbH * Ansbacher Str. 2a * 90513 Zirndorf * Tel. 09127/59 460-10 * Fax. 09127/59 460-20 * www.lucom.de
www.lucom.de info@lucom.de
2. PRODUCT DISPOSAL INSTRUCTIONS
2. Product Disposal Instructions
The WEEE (Waste Electrical and Electronic Equipment: 2002/96/EC) directive has been
introduced to ensure that electrical/electronic products are recycled using the best available
recovery techniques to minimize the impact on the environment. This product contains high
quality materials and components which can be recycled. At the end of it’s life this product
MUST NOT be mixed with other commercial waste for disposal. Check the terms and conditions of your supplier for disposal information.
3
23-05-16
Page 9
LUCOM GmbH * Ansbacher Str. 2a * 90513 Zirndorf * Tel. 09127/59 460-10 * Fax. 09127/59 460-20 * www.lucom.de
www.lucom.de info@lucom.de
23-05-16
3. ROUTER DESCRIPTION
3. Router Description
Industrial router XR5i v2 is used to a secure connection between two local area networks
(LANs) via two ETHERNET interfaces 10/100 and secured tunnel (IPSec, OpenVPN or L2TP).
The second option is to use this router for connecting two devices with different serial interface
(RS232, RS485, MBUS) alternatively I/O to the local network (LAN). In this configuration, the
communication device has an EHTERNET 10/100 and two interfaces that are equipped on
the user’s request.
XR5i v2 router is standardly equipped with one ETHERNET 10/100 port, one USB A (host)
port, one I/O port and two expansion ports. Users can select a second ETHERNET 10/100
port, serial interface RS232, RS485, RS422, MBUS, expansion port with SD card (SDH) or
other inputs/outputs (I/O). Industrial XR5i v2 router is supplied either in a plastic or metal
casing, based on the requirements of the customer.
Configuration is performed via web interface and protected by password. The router supports creation of VPN tunnels using technologies IPsec, OpenVPN and L2TP to ensure safe
communication. Web interface provides detail statistics about the router activities.
Other diagnostic functions ensuring continuous communication include automatic functionality inspection, or hardware Watchdog which monitors the status of the router. With the help
of a special window (start up script window) you may insert Linux scripts for various actions.
For some applications the key option to create several different configurations for one wireless router, the so-called profiles (maximum of 4), and the option to switch between them (for
example via binary input status, web interface, etc.) is essential.
The industrial router XR5i v2 has implemented SNMP protocol for remote management.
It is also possible to configure the network in bulk and use any additional software – VPN
SmartCluster configurator to easily configure a VPN or a program for monitoring routers in
the network R-SeeNet. Industrial XR5i v2 router is enhanced by the ability to create custom
functions easy integration of custom software modules.
Examples of possible applications
• security system
• monitoring
• vending and dispatcher machines
4
Page 10
LUCOM GmbH * Ansbacher Str. 2a * 90513 Zirndorf * Tel. 09127/59 460-10 * Fax. 09127/59 460-20 * www.lucom.de
www.lucom.de info@lucom.de
23-05-16
4. CONTENTS OF PACKAGE
4. Contents of Package
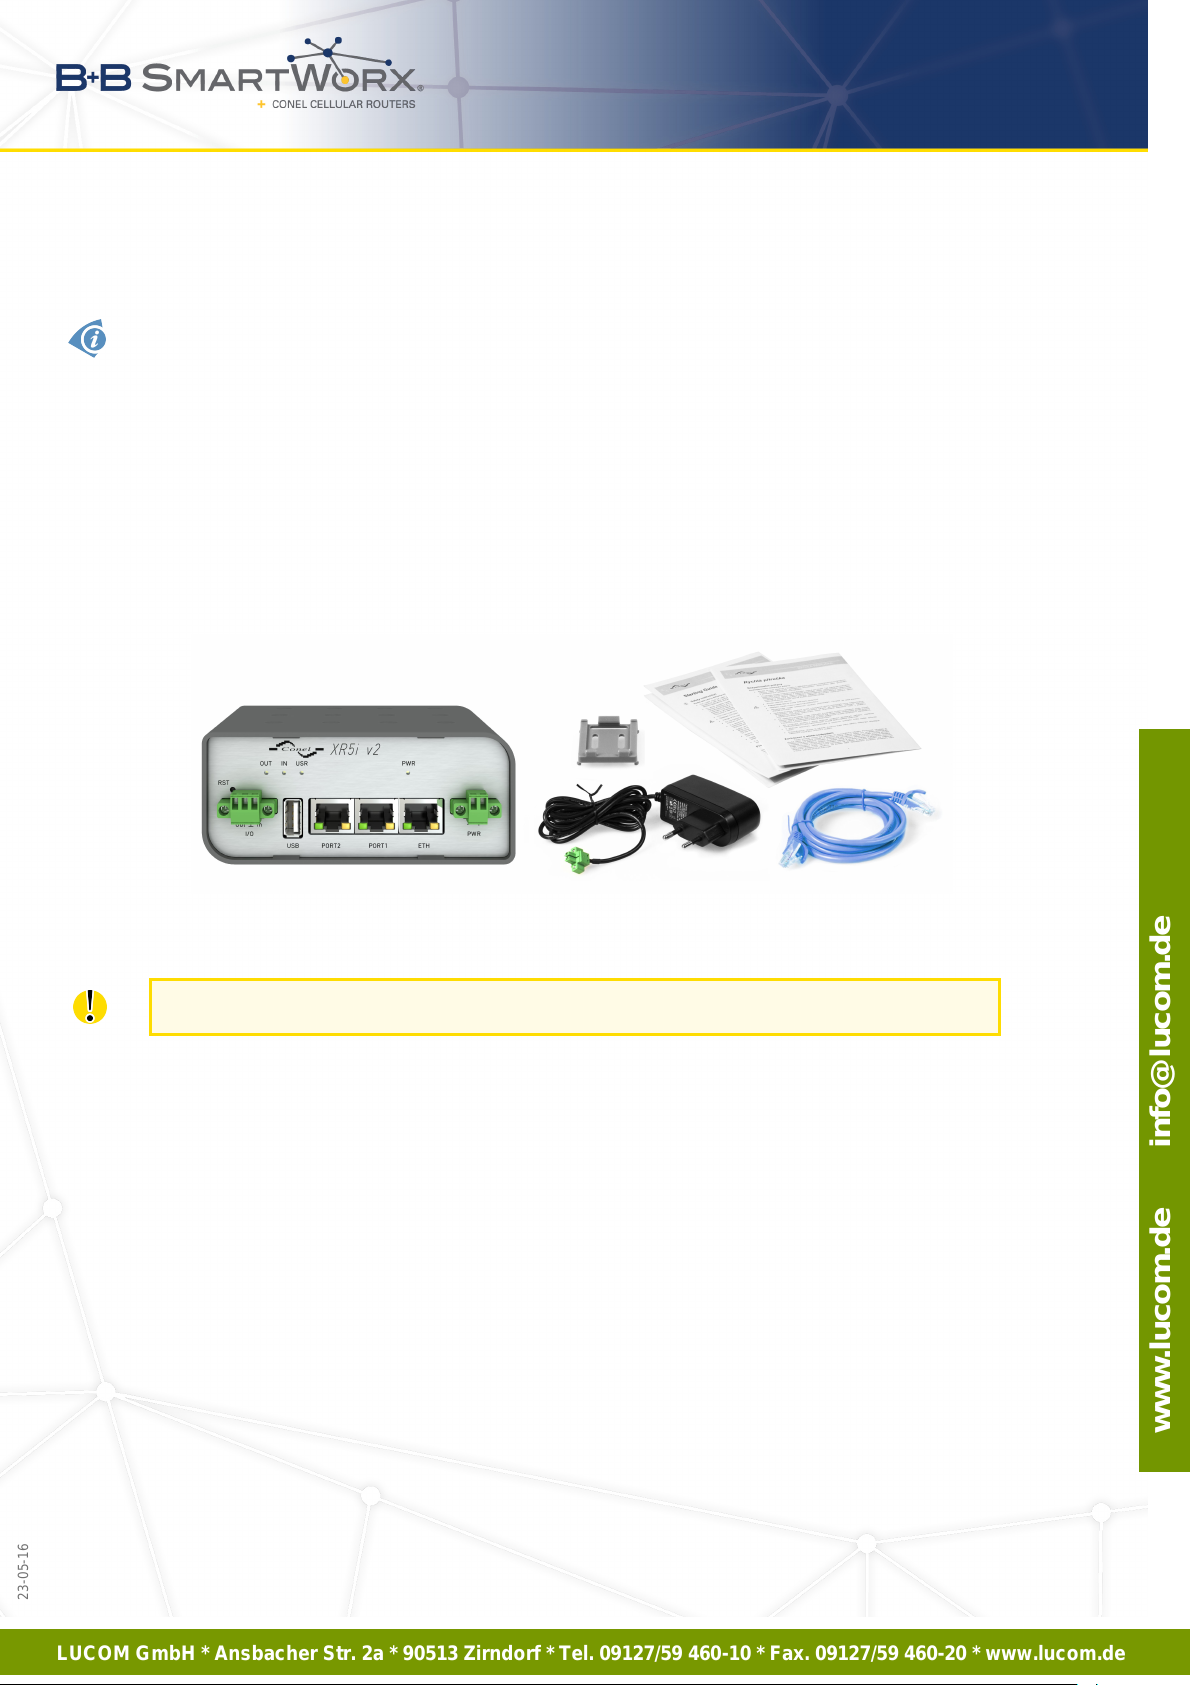
Basic delivered set of router includes:
• router,
• power supply,
• crossover UTP cable,
• up to one external antenna,
• clip for the DIN rail,
• paper start guide.
Figure 1: Contents of package
Temperature range for power supply is reduced to 0◦C to +40◦C!
As optional accessories can also be supplied the following expansion ports (two boards for
Full version):
• RS232, RS485/422, MBUS, ETHERNET, CNT, SWITCH, WIFI, WMBUS or SDH.
• Separation columns for mounting expansion boards are included.
5
Page 11
LUCOM GmbH * Ansbacher Str. 2a * 90513 Zirndorf * Tel. 09127/59 460-10 * Fax. 09127/59 460-20 * www.lucom.de
www.lucom.de info@lucom.de
23-05-16
5. ROUTER DESIGN
5. Router Design
5.1 Router versions
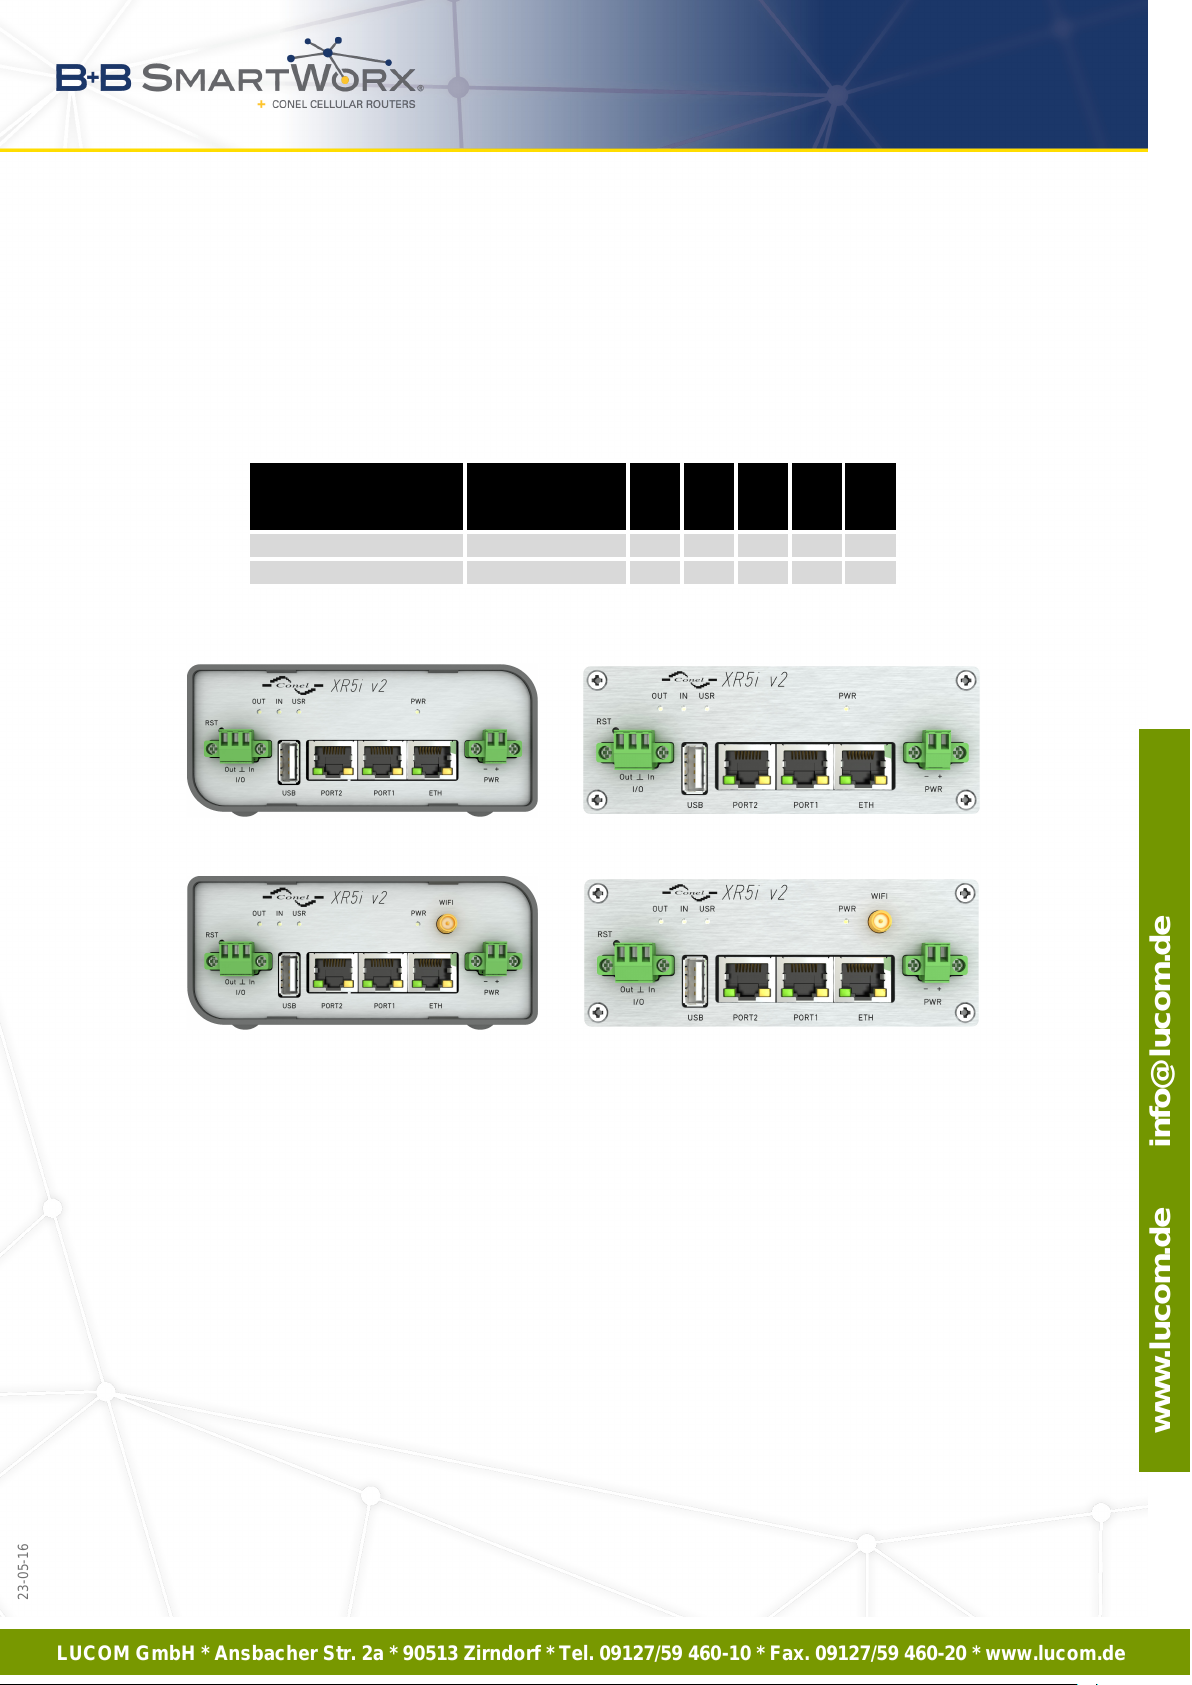
XR5i v2 router is supplied in the following versions (see table below). All versions are
available in plastic or metal box according to customer requirements.
Router versions Router Box
XR5i v2F Plastic 1 x 1 x 1 x 1 x 1 x
XR5i v2F SL Metal 1 x 1 x 1 x 1 x 1 x
Table 1: Router versions
Figure 2: Front panel XR5i v2F
Figure 3: Front panel XR5i v2F with WiFi
Figure 5: Front panel XR5i v2F SL with WiFi
6
I/O
USB
PORT1
Figure 4: Front panel XR5i v2F SL
PORT2
ETH
Page 12
LUCOM GmbH * Ansbacher Str. 2a * 90513 Zirndorf * Tel. 09127/59 460-10 * Fax. 09127/59 460-20 * www.lucom.de
www.lucom.de info@lucom.de
23-05-16
5. ROUTER DESIGN
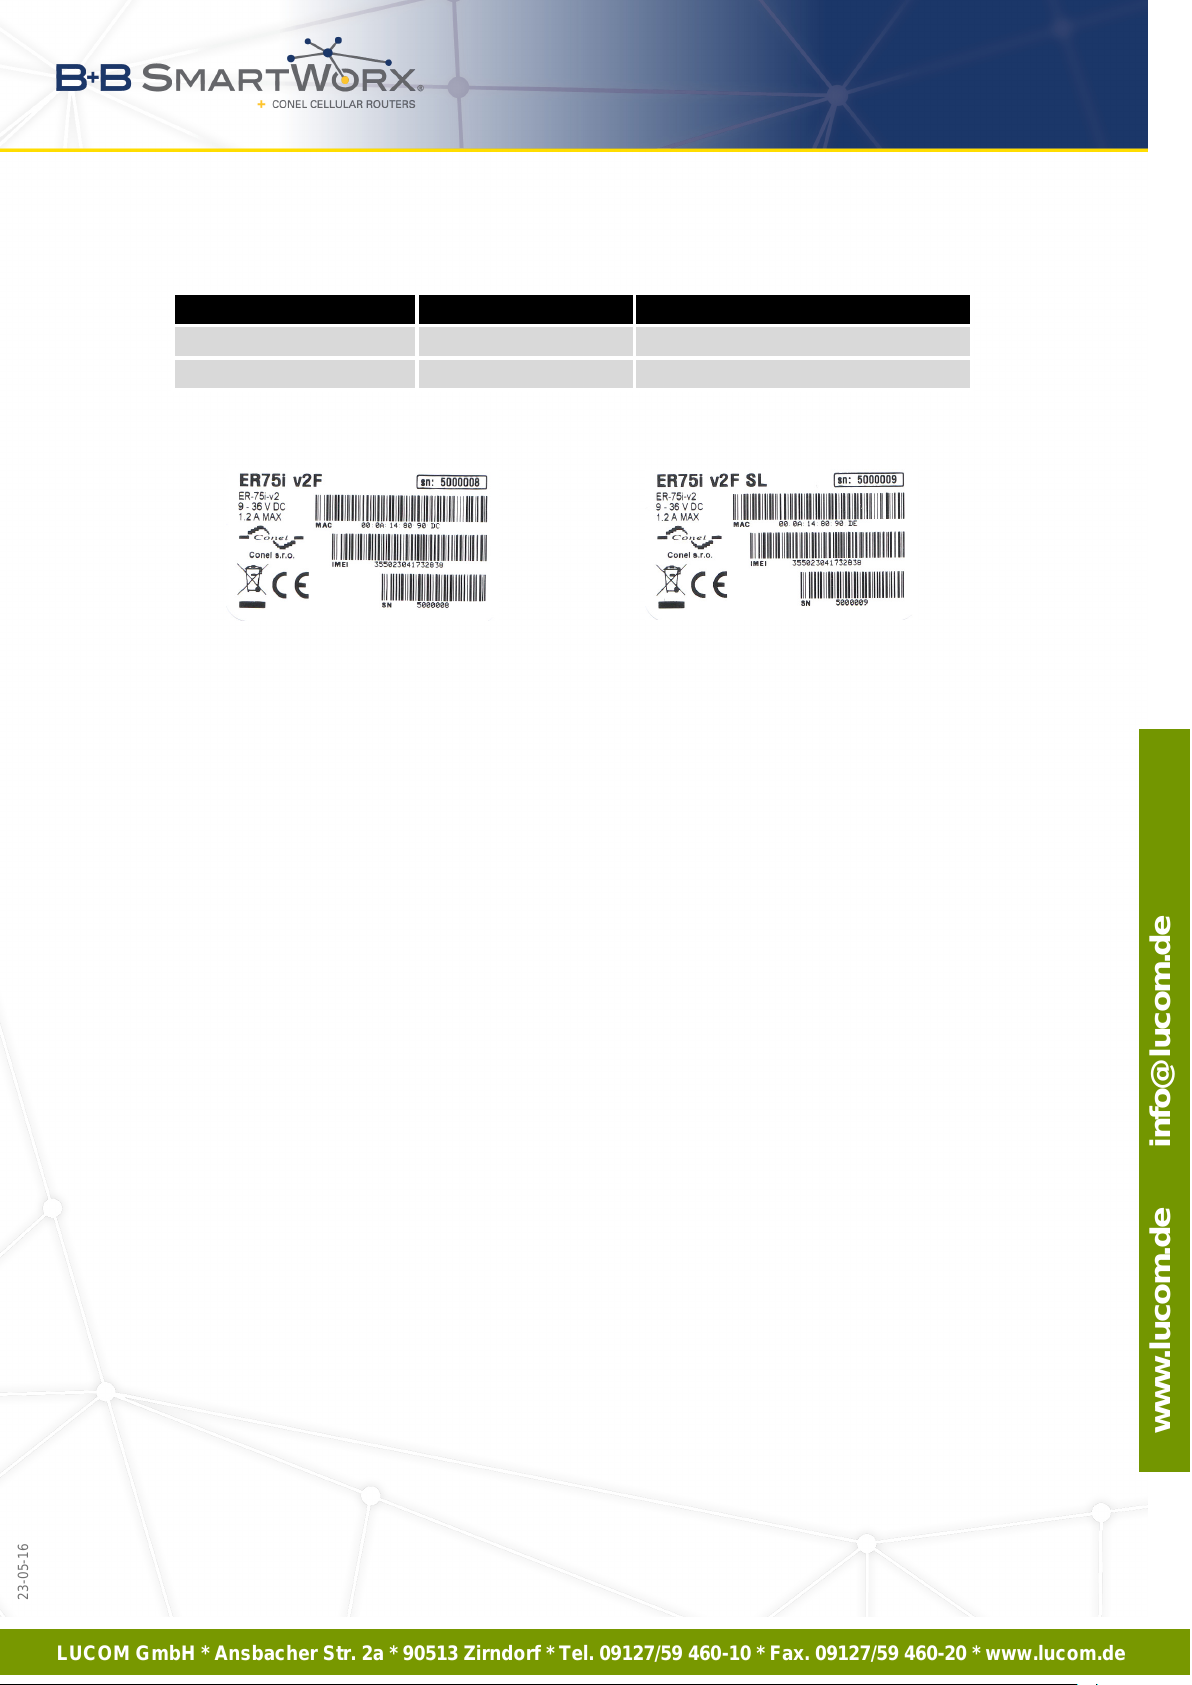
5.2 Delivery identification
Trade name Type name Other
XR5i v2F XR-5i-v2 Full version in the plastic box
XR5i v2F SL XR-5i-v2 Full version in the metal box
Table 2: Delivery identification
Figure 6: Label XR5i v2F
7
Figure 7: Label XR5i v2F SL
Page 13
LUCOM GmbH * Ansbacher Str. 2a * 90513 Zirndorf * Tel. 09127/59 460-10 * Fax. 09127/59 460-20 * www.lucom.de
www.lucom.de info@lucom.de
5. ROUTER DESIGN
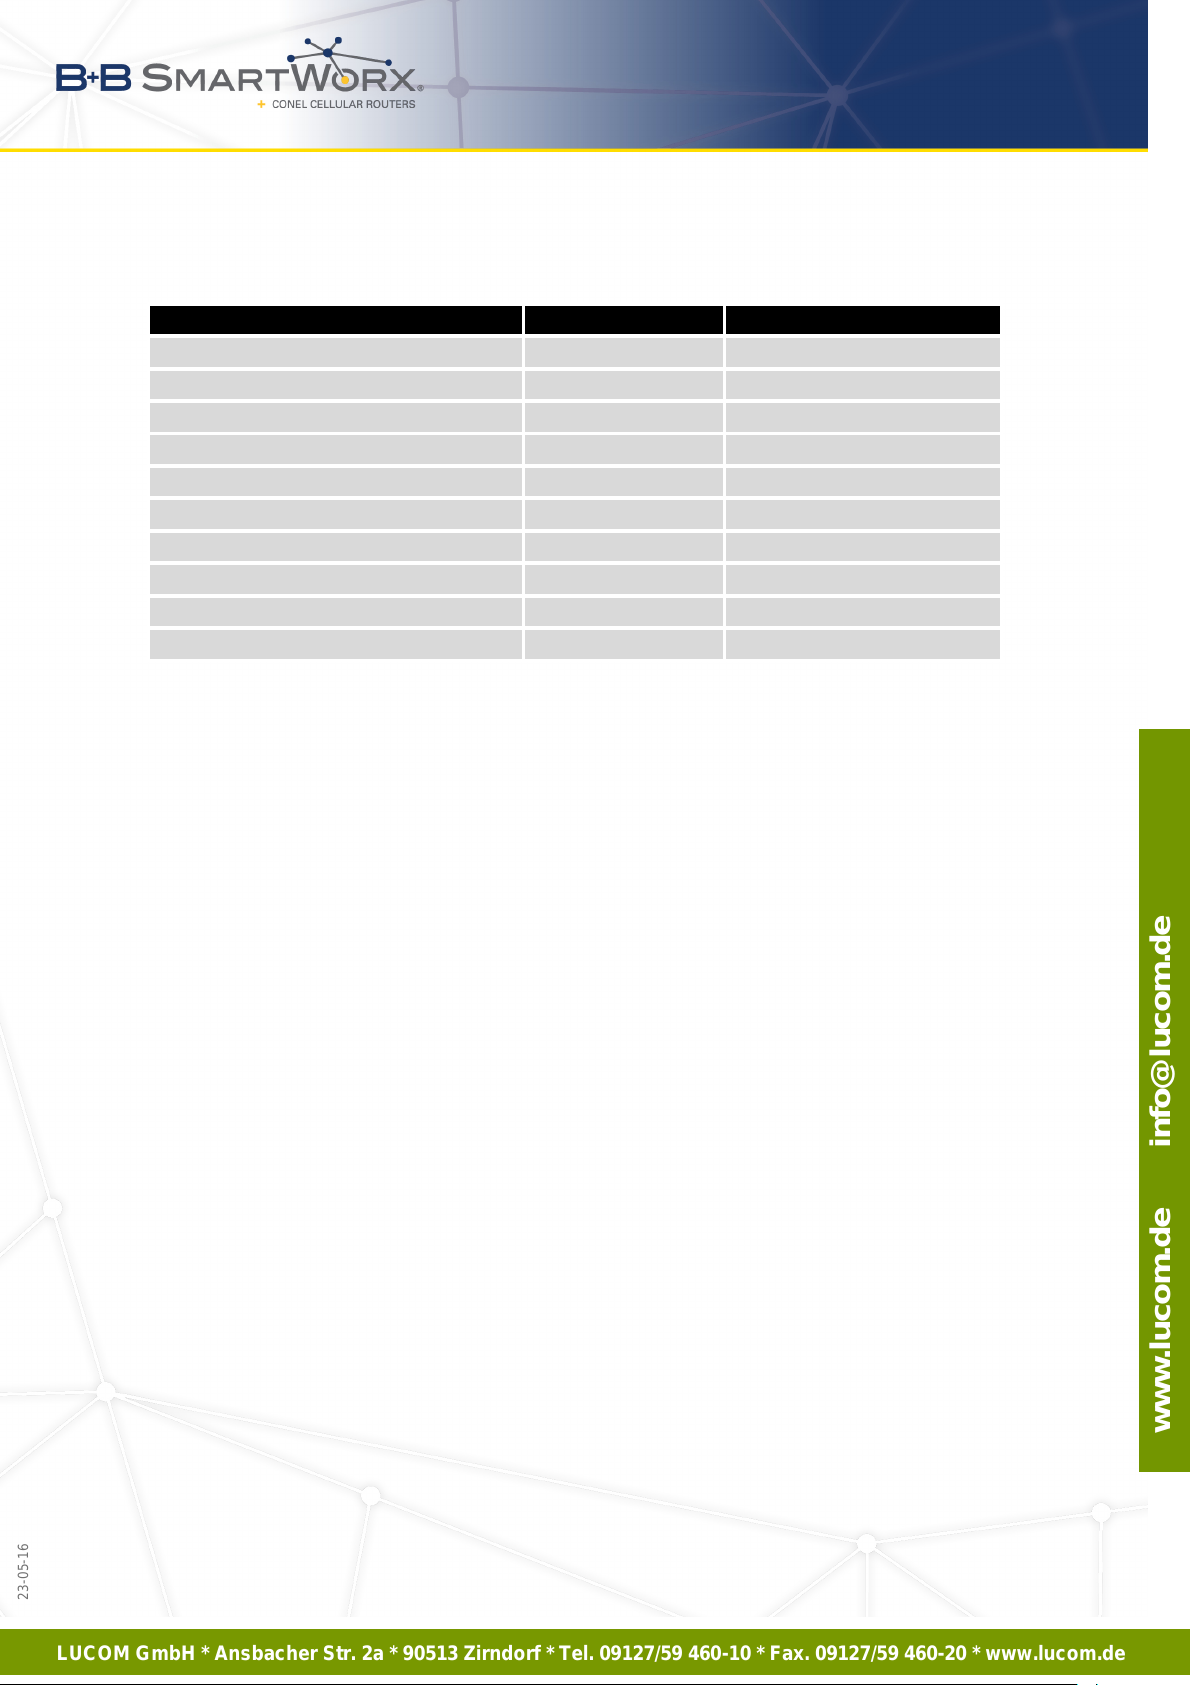
5.3 Order codes
Expansion port Participation Ordering code
Version without expansion port XR5i v2F set
Version with Ethernet expansion port PORT1 XR5i v2F ETH set
Version with RS232 expansion port PORT1 or PORT2 XR5i v2F RS232 set
Version with RS485 expansion port PORT1 or PORT2 XR5i v2F RS458 set
Version with MBUS expansion port PORT1 or PORT2 XR5i v2F MBUS set
Version with CNT expansion port PORT1 XR5i v2F CNT set
Version with SWITCH expansion port PORT1 + PORT2 XR5i v2F SWITCH set
Version with WIFI expansion port PORT2 XR5i v2F WIFI set
Version with WMBUS expansion port PORT2 XR5i v2F WMBUS set
Version with SDH expansion port PORT2 XR5i v2F SDH set
Table 3: Ordering codes
Code for the second expansion port must be written after the first port. See example below:
• Full version with RS485 port in plastic box: XR5i v2F RS485 set.
• Full version with Ethernet and RS232 port in metal cover:
XR5i v2F ETH RS232 SL set.
8
23-05-16
Page 14
LUCOM GmbH * Ansbacher Str. 2a * 90513 Zirndorf * Tel. 09127/59 460-10 * Fax. 09127/59 460-20 * www.lucom.de
www.lucom.de info@lucom.de
5. ROUTER DESIGN
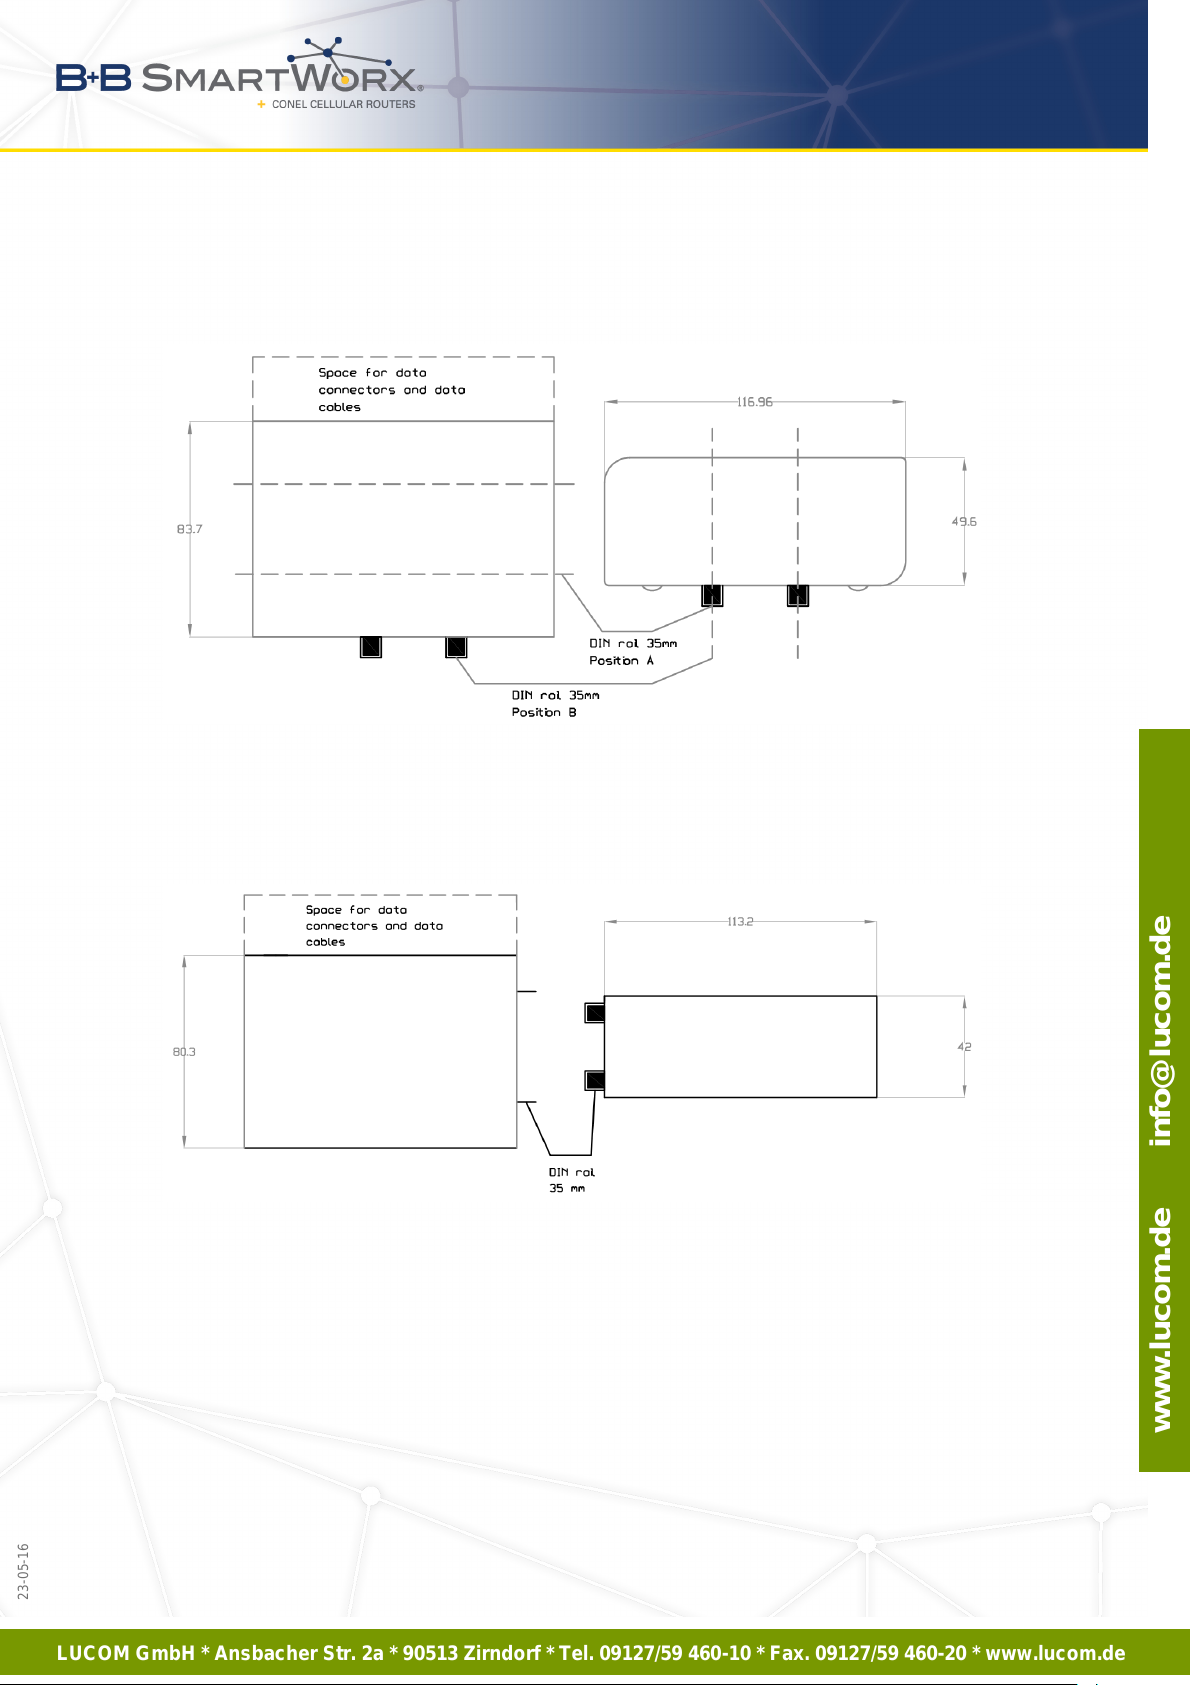
5.4 Basic dimensions of the router box
5.4.1 Plastic box
Figure 8: Basic dimensions of plastic box
5.4.2 Metal box
Figure 9: Basic dimensions of metal box
9
23-05-16
Page 15
LUCOM GmbH * Ansbacher Str. 2a * 90513 Zirndorf * Tel. 09127/59 460-10 * Fax. 09127/59 460-20 * www.lucom.de
www.lucom.de info@lucom.de
23-05-16
5. ROUTER DESIGN
5.5 Mounting recommendations
• possibility to be put on a work surface,
• DIN rail EN 60715 with included clip CPD2 (or CKD2 for metal version).
For the most of applications with a built-in router in a switch board it is possible to recognize
two kinds of environments:
• no public and industry environment of low voltage with high interference,
• public environment of low voltage without high interference.
For both of these environments it is possible to mount router to a switch board, the following
there is no need to have examination immunity or issues in connection with EMC according to
EN 60439-1 ed.2:00 + A1:04.
Compliance of EN 60439-1 ed.2:00 + A1:04 specification it is necessary to observe next
assembly of the router to the switch – board:
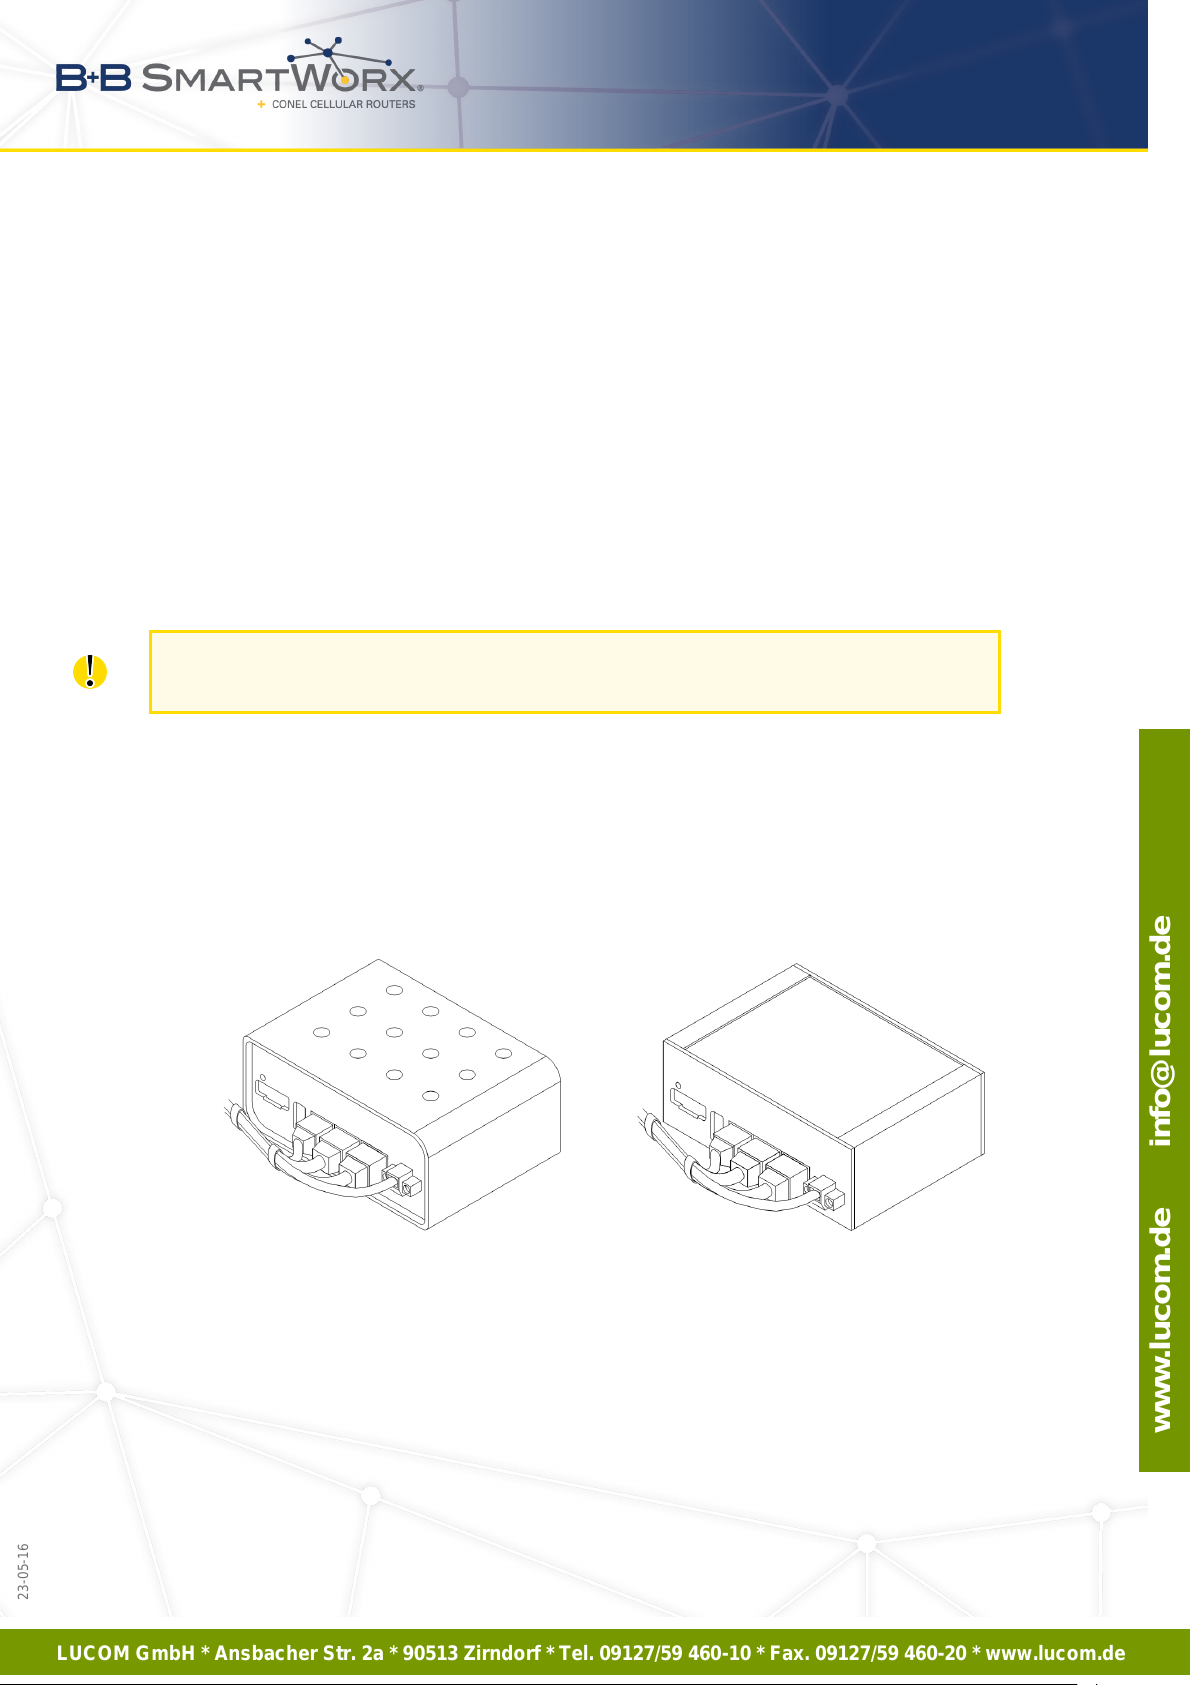
• For every cables we recommend to bind the bunch, we recommend for this use:
– Length of the bunch (combination of power supply and data cables) can be maxi-
mum 1.5 m. If the length of data cables exceeds 1.5 m or in the event of, the cable
leads towards the switch – board. We recommend installing over – voltage protectors (surge suppressors).
– With data cables they mustn’t carry cables with reticular tension ∼ 230 V/50 Hz.
Figure 10: Cable routing (plastic) Figure 11: Cable routing (metal)
10
Page 16
LUCOM GmbH * Ansbacher Str. 2a * 90513 Zirndorf * Tel. 09127/59 460-10 * Fax. 09127/59 460-20 * www.lucom.de
www.lucom.de info@lucom.de
5. ROUTER DESIGN
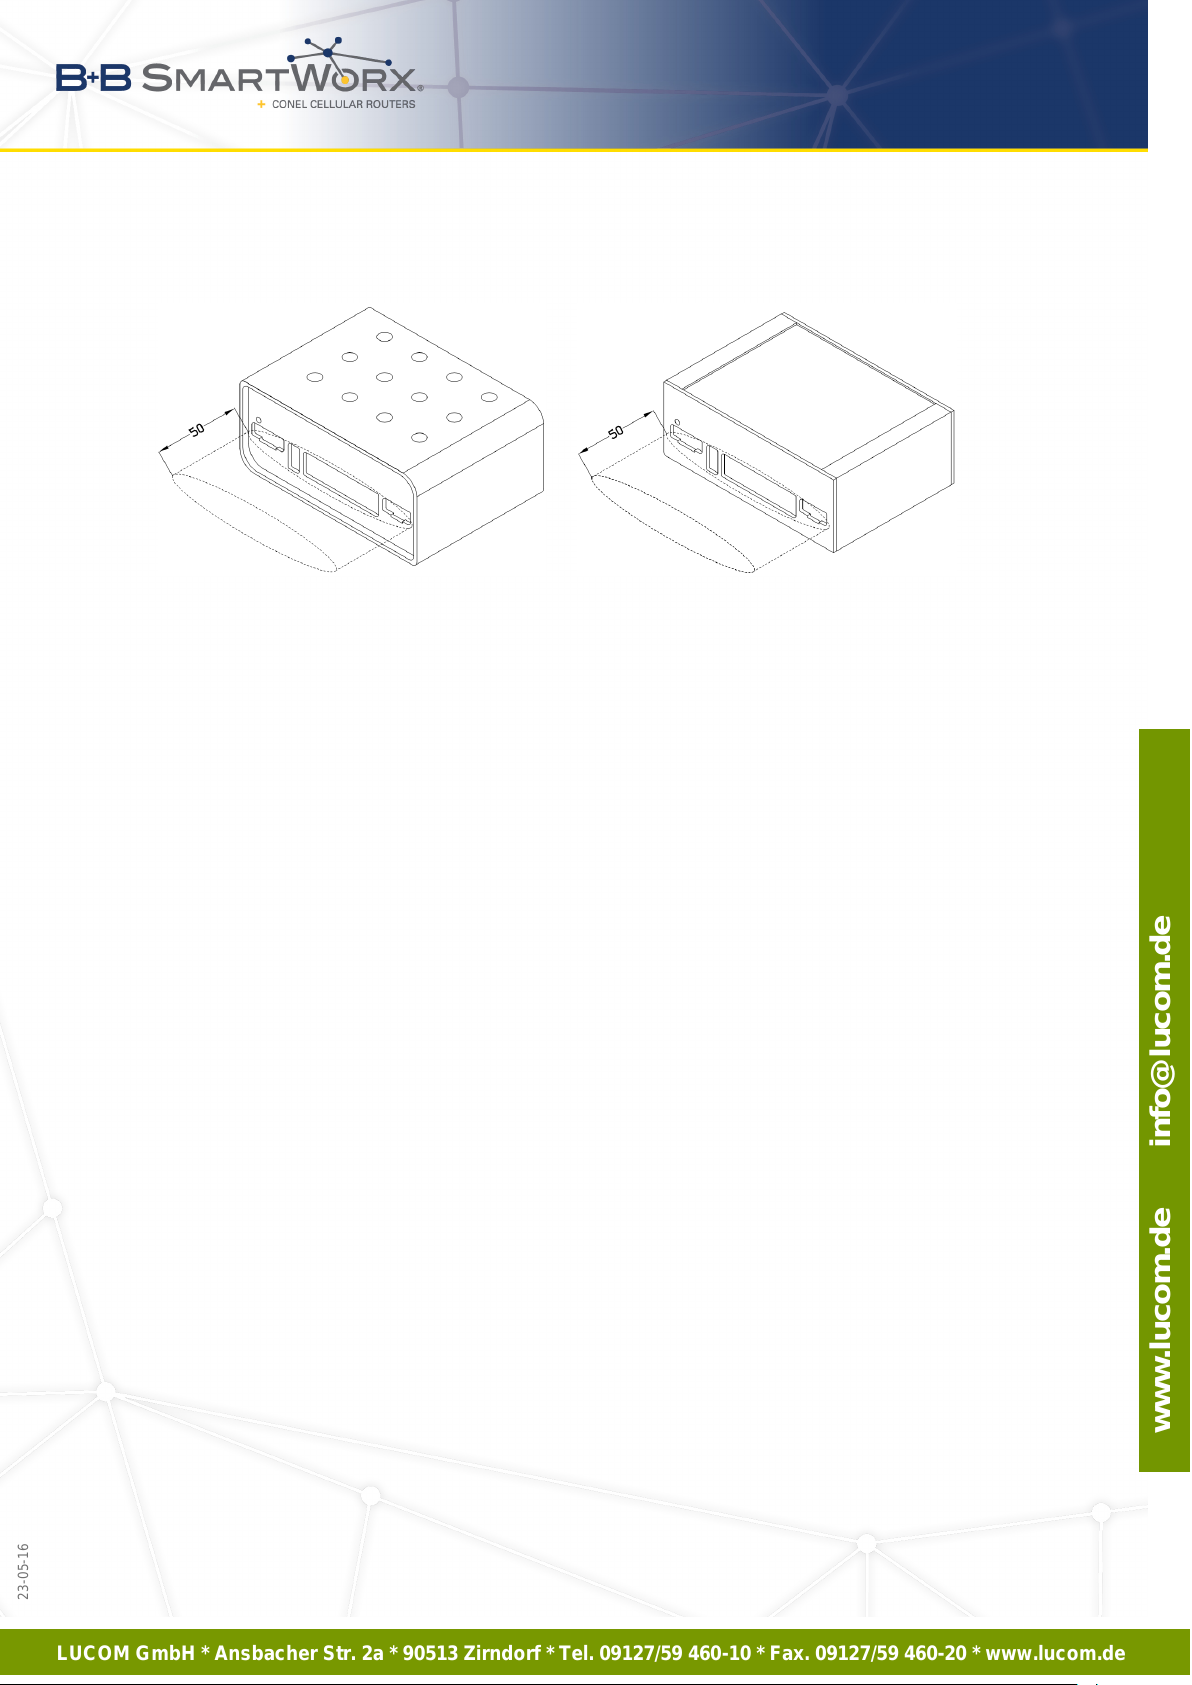
• Sufficient space must be left in front of individual connectors for handling of cables,
Figure 12: Space in front of connectors (plastic) Figure 13: Space in front of connectors (metal)
• For correct function of the router we recommend to use in the switch-board earth-bonding
distribution frame for grounding of power supply of router, data cables and antenna.
11
23-05-16
Page 17
LUCOM GmbH * Ansbacher Str. 2a * 90513 Zirndorf * Tel. 09127/59 460-10 * Fax. 09127/59 460-20 * www.lucom.de
www.lucom.de info@lucom.de
5. ROUTER DESIGN
5.6 Removing from the DIN rail
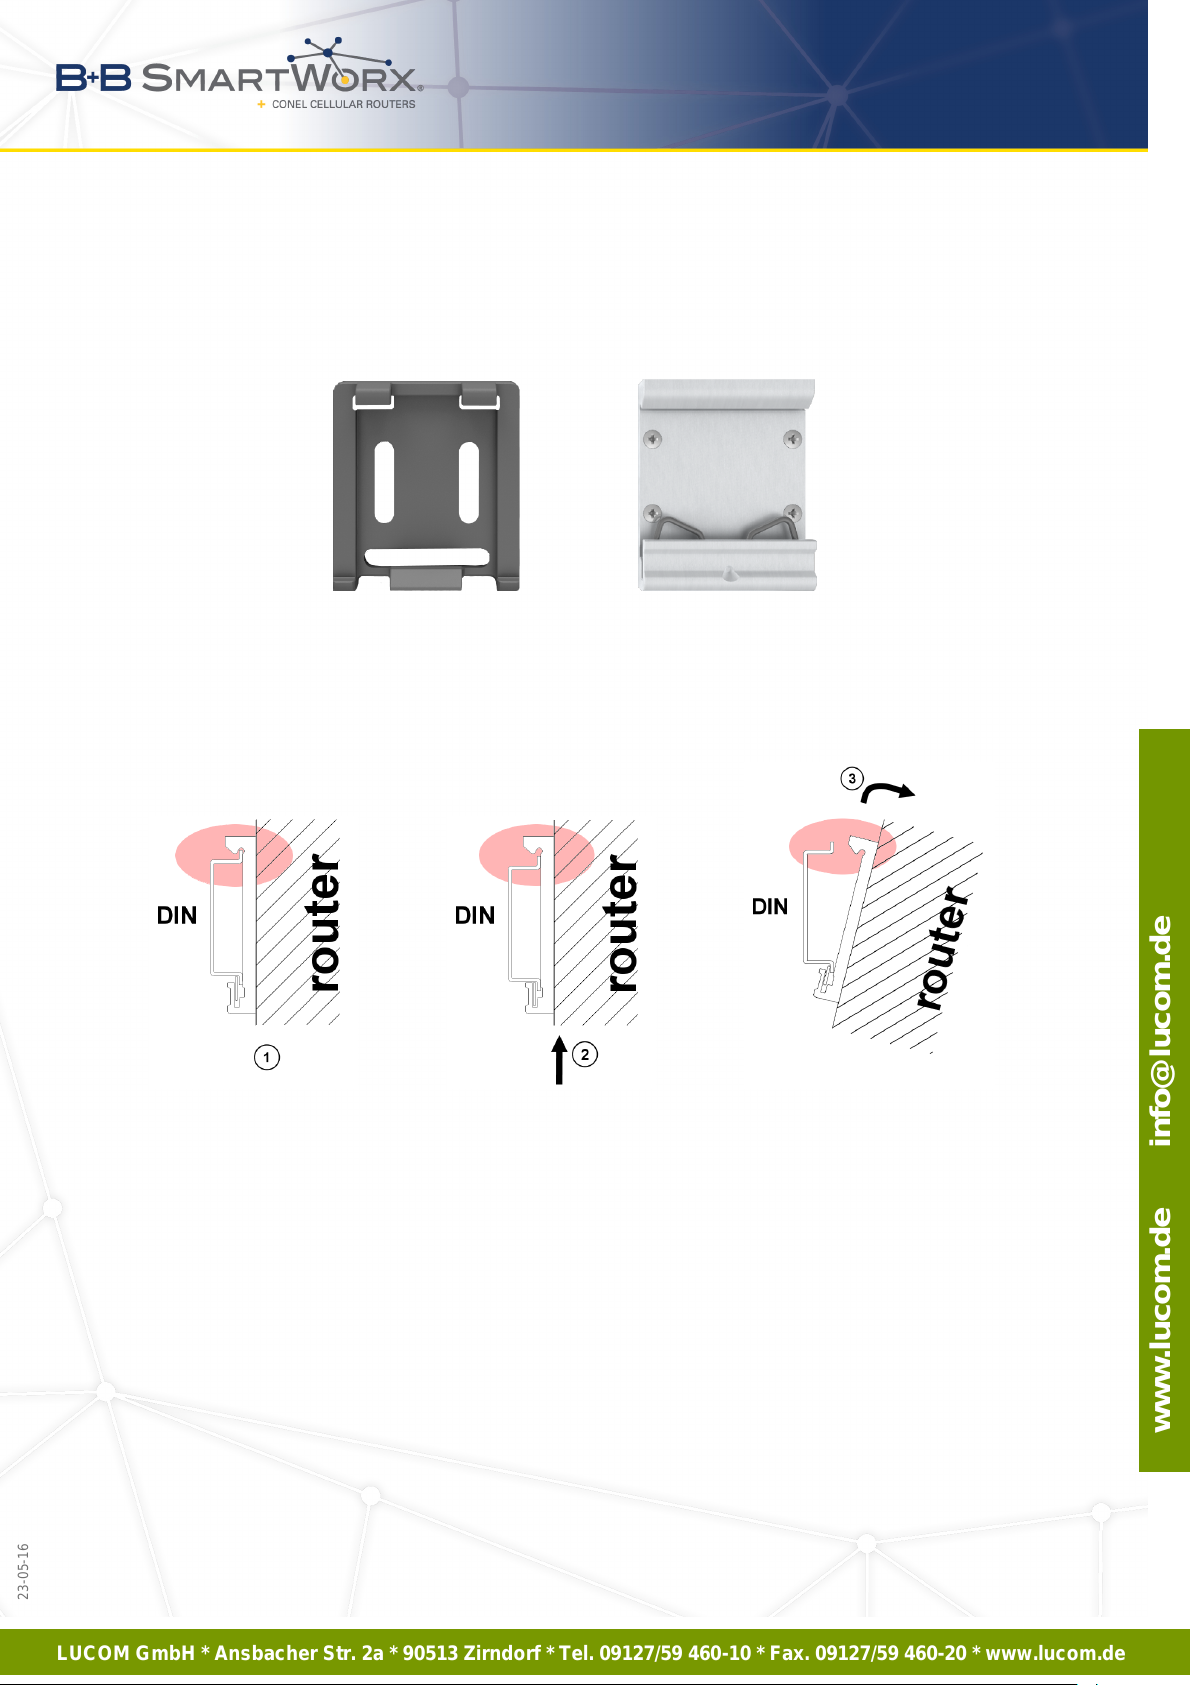
DIN holder is suitable for DIN rail according to EN 60715 standard only. Default position of
CPD2 holder (or CKD2 for metal version), which is used for mounting the router on a DIN rail,
is shown in the following figure:
Figure 14: Default position of DIN holder
For removing from the DIN rail it is necessary to lightly push upward the router so that the
top part of the CPD2 holder (or CKD2 for metal version) hitched to the DIN rail get out of this
rail and then fold out the top part of the router away from the DIN rail.
Figure 15: Removing from the DIN rail
12
23-05-16
Page 18
LUCOM GmbH * Ansbacher Str. 2a * 90513 Zirndorf * Tel. 09127/59 460-10 * Fax. 09127/59 460-20 * www.lucom.de
www.lucom.de info@lucom.de
5. ROUTER DESIGN
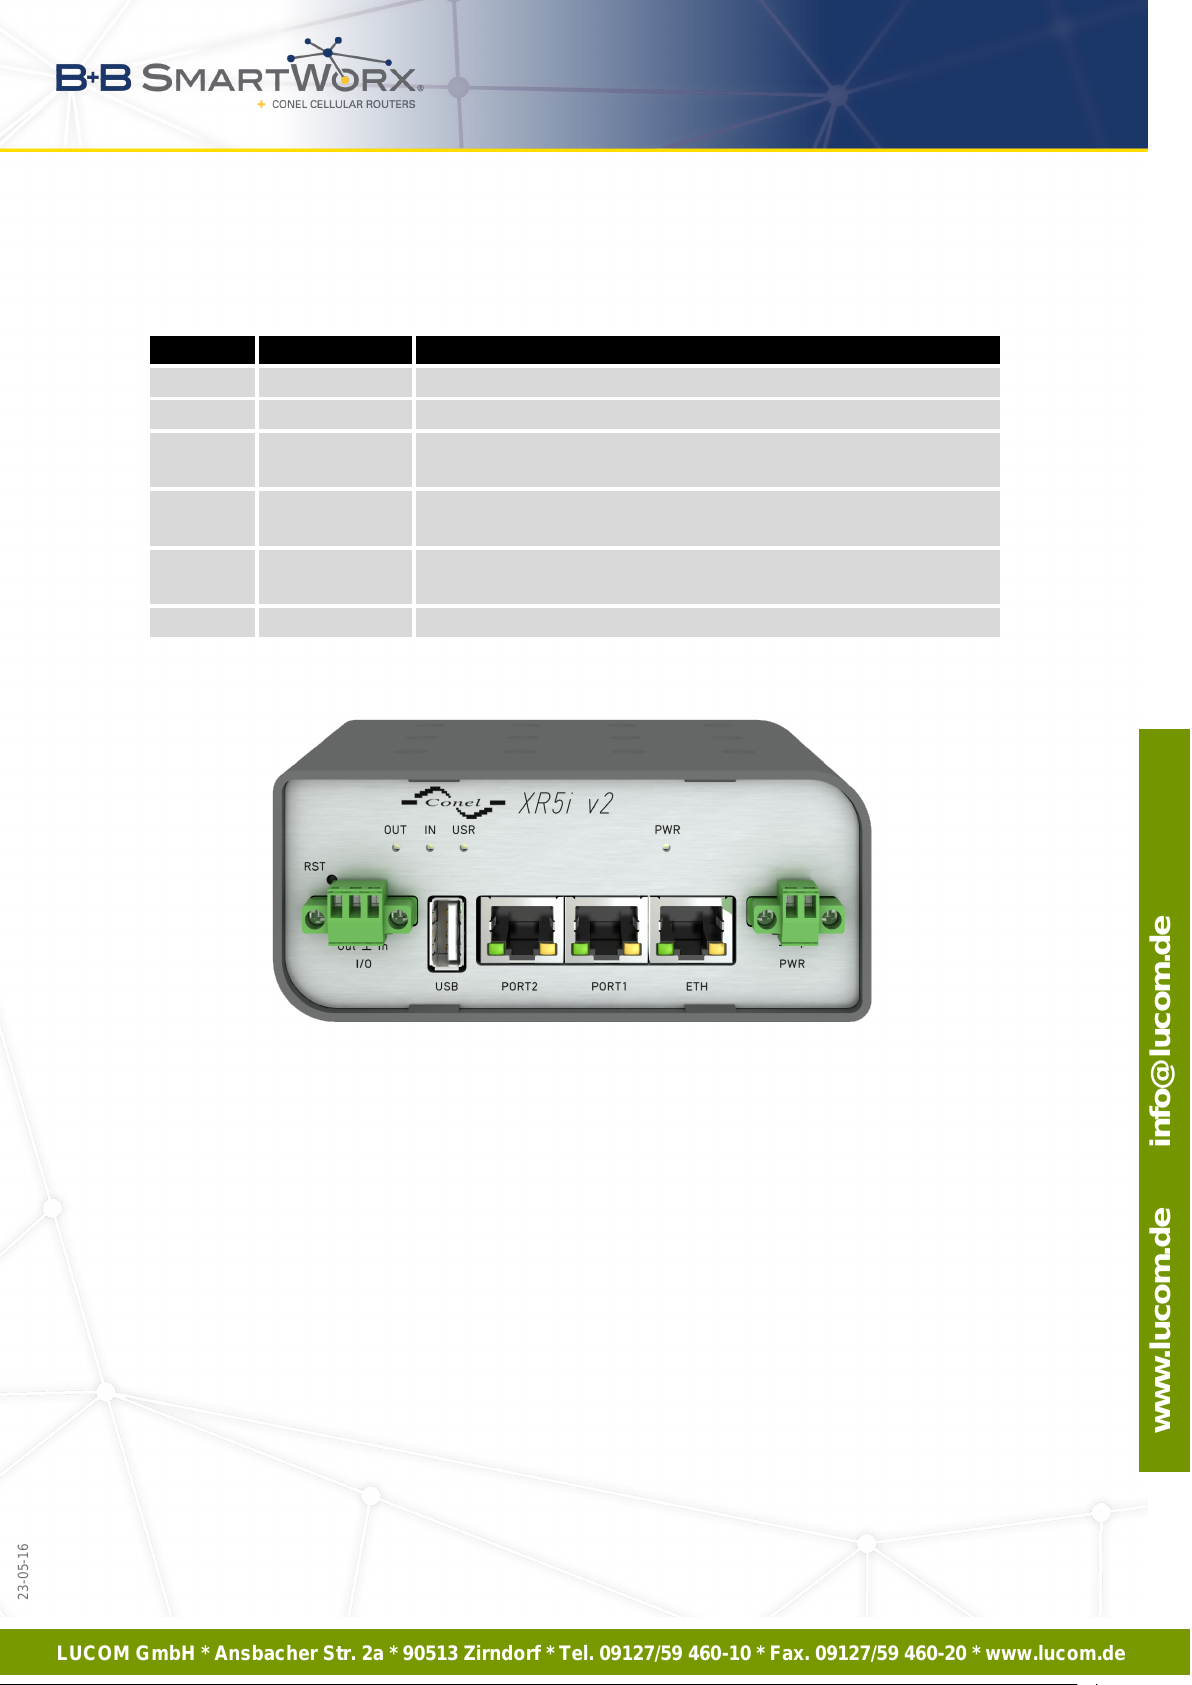
5.7 Description of the front panel
On the front panel is the following:
Caption Connector Description
PWR 2-pin Connector for the power supply.
ETH RJ45 Connector for connection into the local computer network.
PORT1 RJ45 Connector for expansion port RS232, RS458/422, MBUS,
ETHERNET, CNT or SWITCH.
PORT2 RJ45 Connector for expansion port RS232, RS485/422, MBUS,
SWITCH, WIFI, WMBUS or SDH.
USB USB-A Host Connector for connection of USB devices to the router. Sup-
ports devices with PL-2303 and FTDI USB/RS232 converters.
I/O 3-pin Connector for connection of the binary input and output.
Table 4: Front panel description
Figure 16: Front panel XR5i v2F
13
23-05-16
Page 19
LUCOM GmbH * Ansbacher Str. 2a * 90513 Zirndorf * Tel. 09127/59 460-10 * Fax. 09127/59 460-20 * www.lucom.de
www.lucom.de info@lucom.de
23-05-16
5. ROUTER DESIGN
5.7.1 Status indication
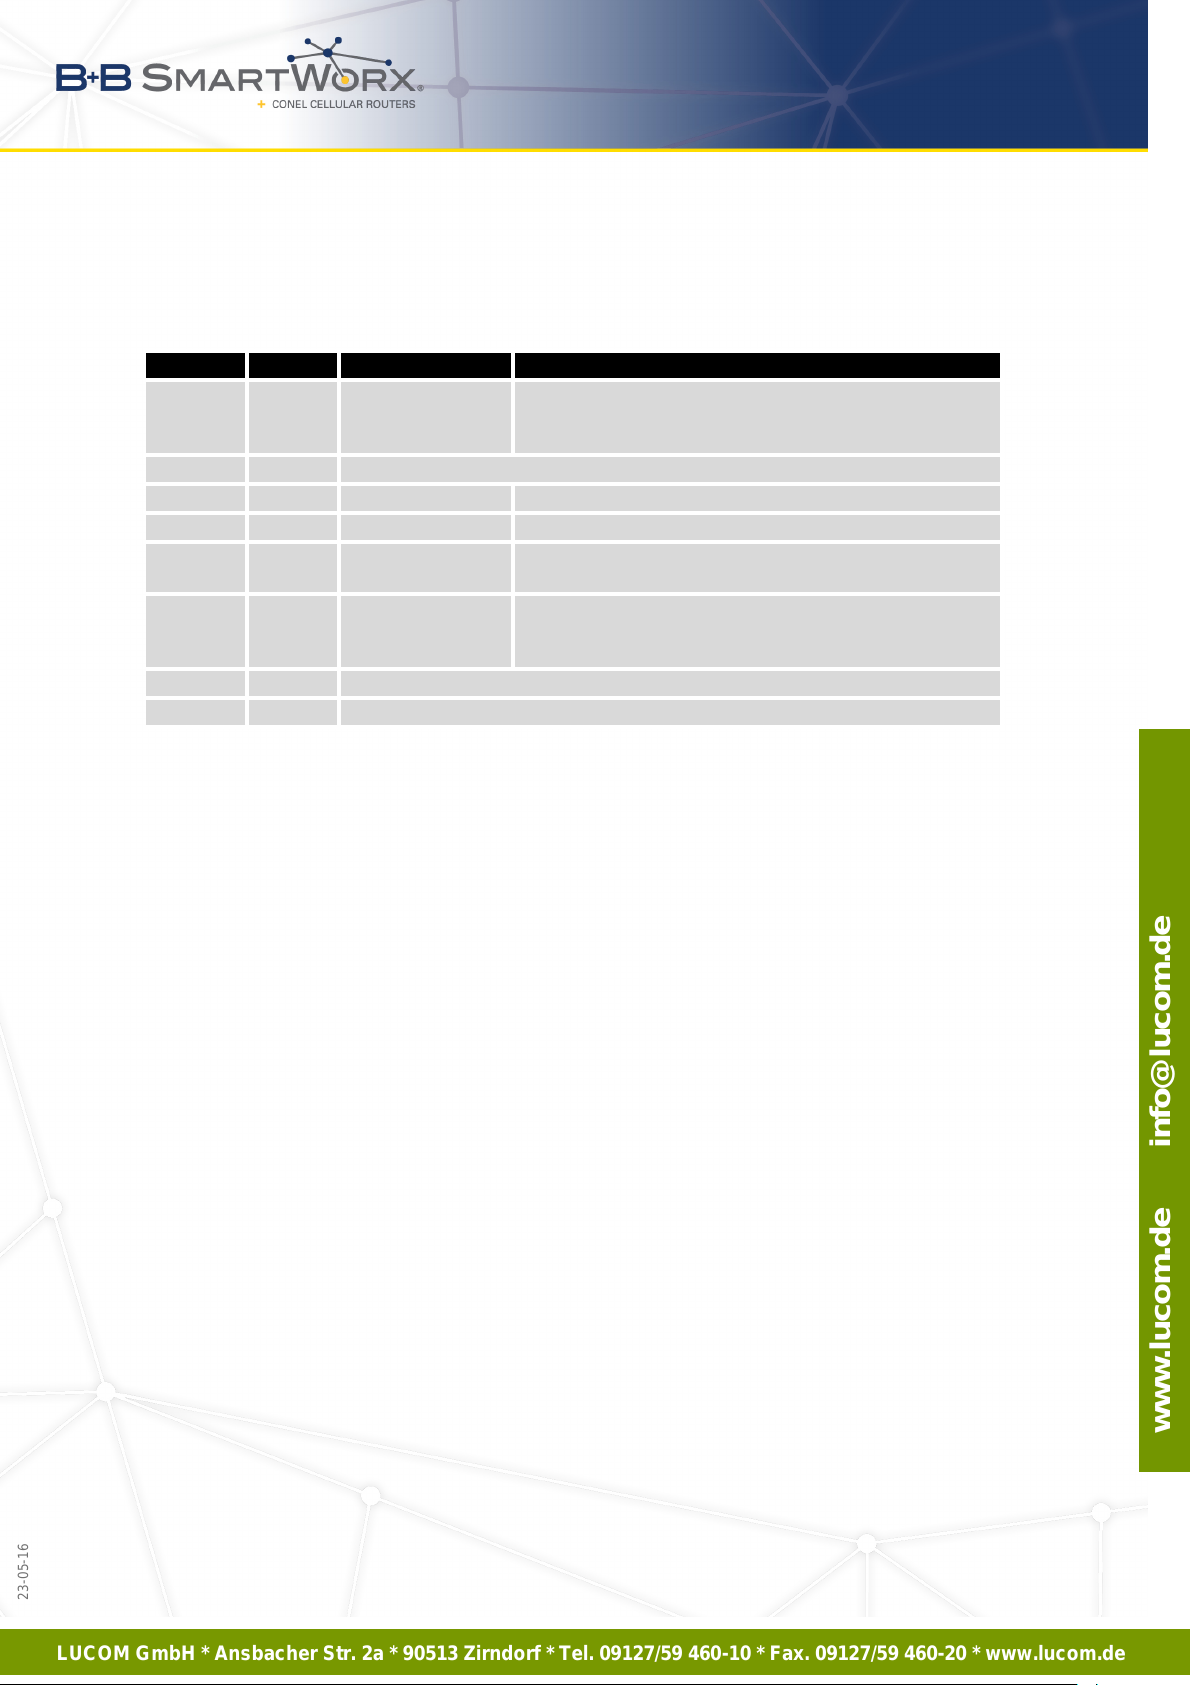
About router status inform four LED indicators on the front panel. ETH port, PORT1 and
PORT2 have two additional LEDs that provide information about port status.
Caption Color State Description
PWR Green Blinking
On
Fast blinking
USR Yellow Function of this LED diode can be selected by user
OUT Green On Binary output active
IN Green On Binary input active
ETH Green On
Off
ETH Yellow On
Blinking
Off
PORT Green Depends on the expansion port (see user’s manual for used port)
PORT Yellow Depends on the expansion port (see user’s manual for used port)
Table 5: Status indication
Router is ready
Starting of the router
Updating firmware
Selected 100 Mbit/s
Selected 10 Mbit/s
The network cable is connected
Data transmission
The network cable is not connected
14
Page 20
LUCOM GmbH * Ansbacher Str. 2a * 90513 Zirndorf * Tel. 09127/59 460-10 * Fax. 09127/59 460-20 * www.lucom.de
www.lucom.de info@lucom.de
5. ROUTER DESIGN
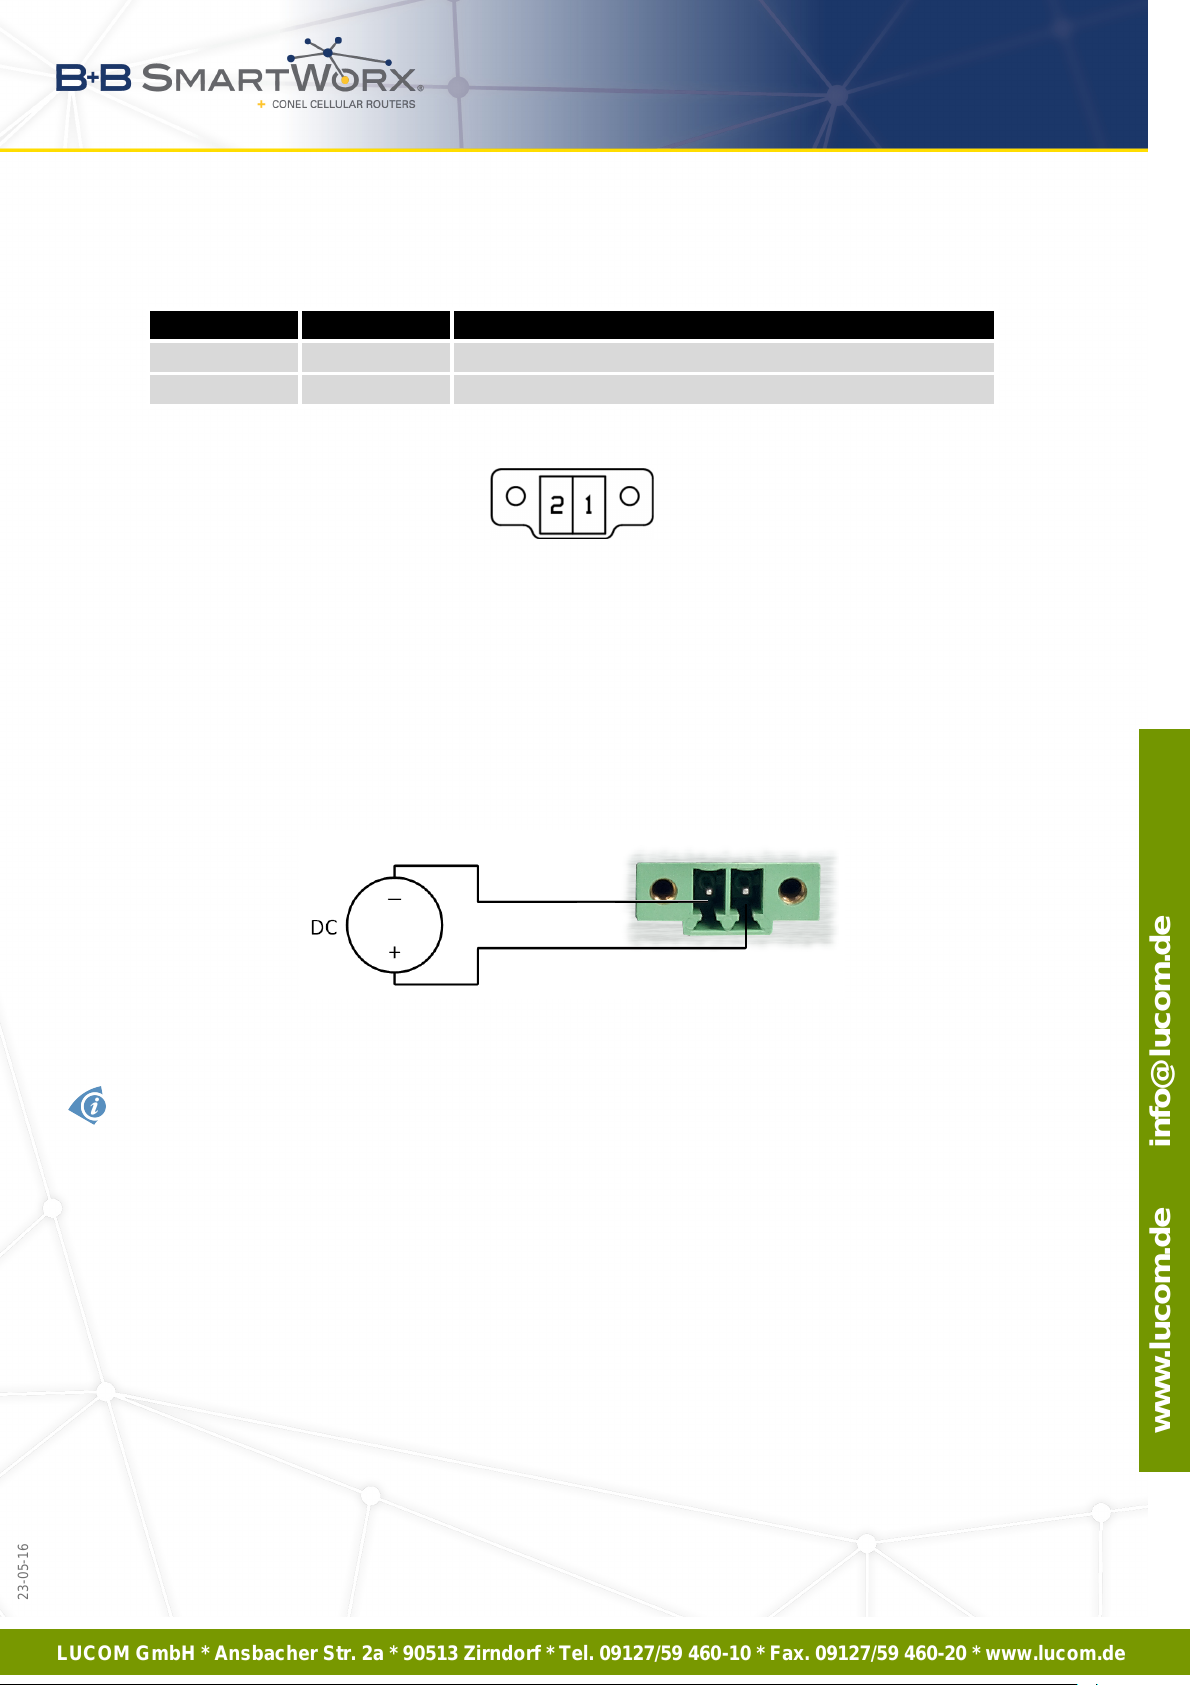
5.7.2 Power connector PWR
Panel socket 2-pin.
Pin number Signal mark Description
1 VCC(+) Positive pole of DC supply voltage (+9 to +36 V DC)
2 GND(-) Negative pole of DC supply voltage
Table 6: Connection of power connector
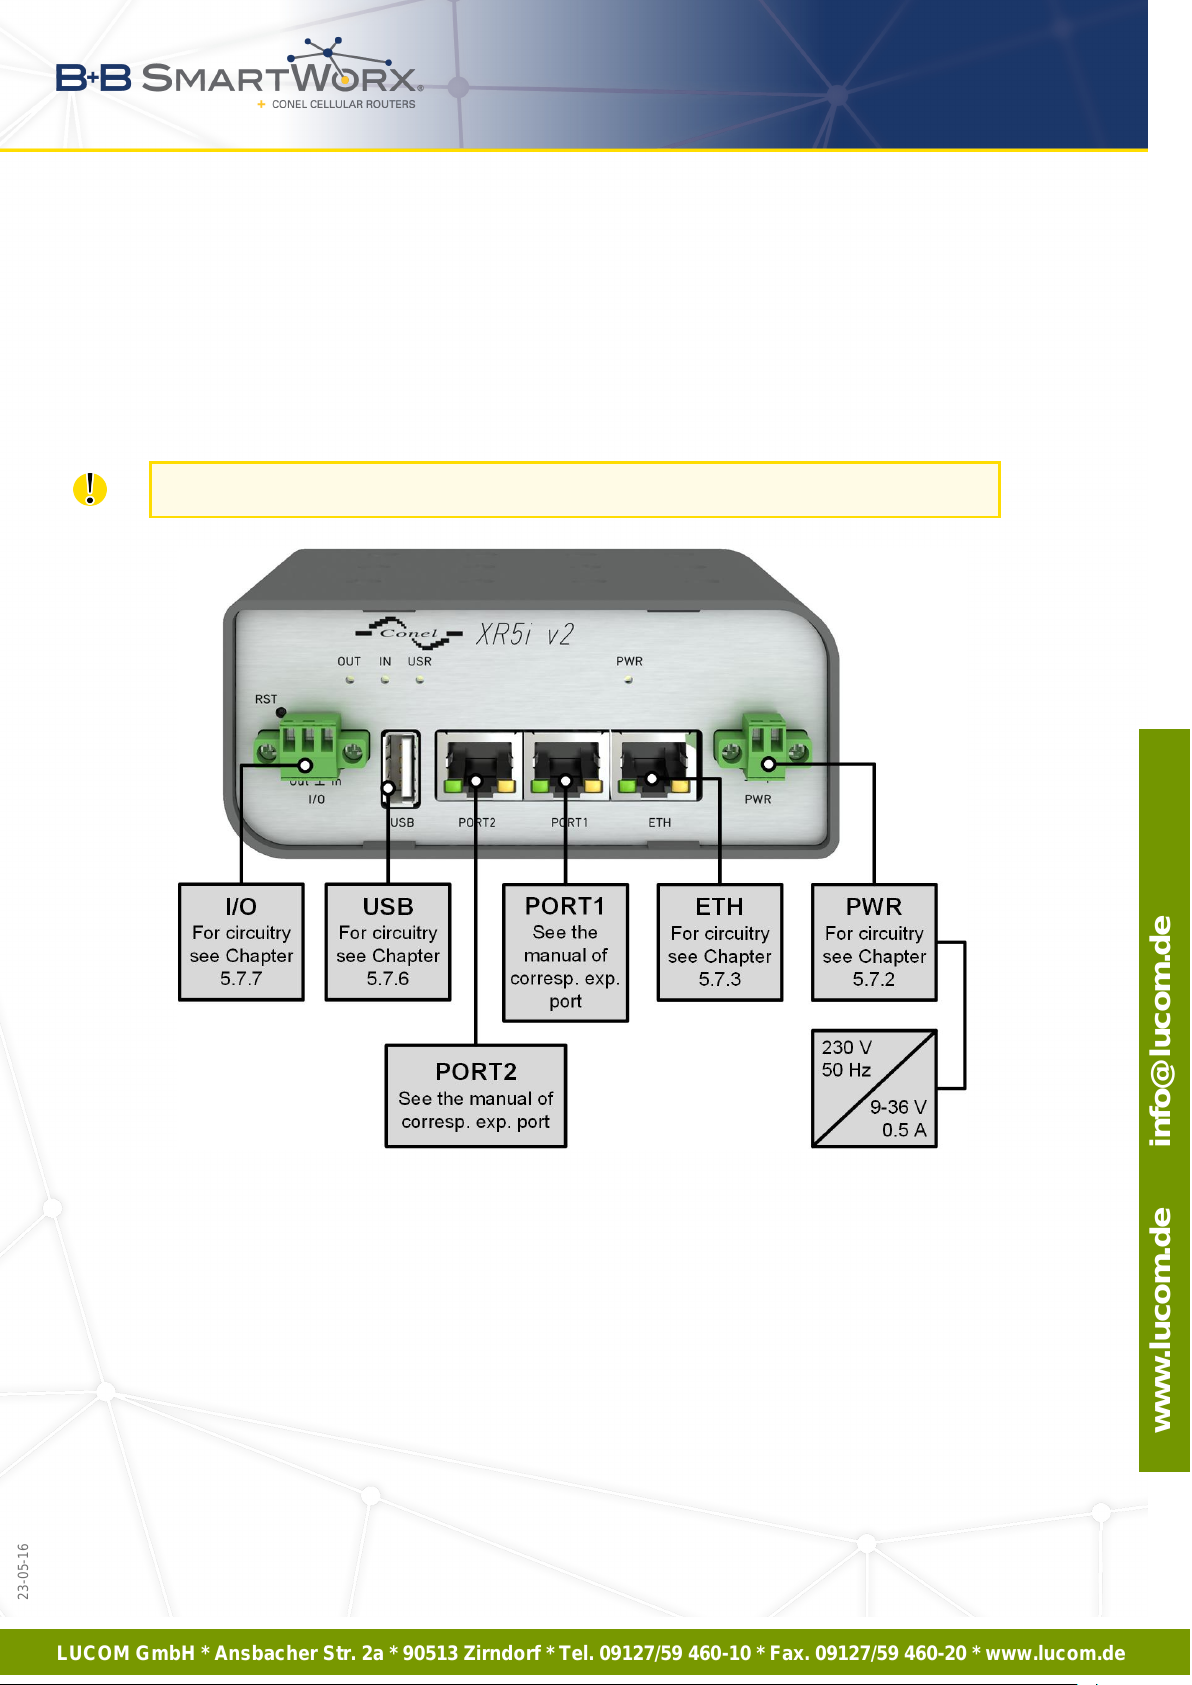
Figure 17: Power connector
Power supply for router is required between +9 V to +36 V DC supply. Protection against
reversed polarity without signaling is built into the router.
The power consumption during receiving is 1.6 W. The power consumption when using
WiFi is 1.9 W. The peak power consupmtion during data sending is 2.5 W. However, values of
consumption can be increased, if some expansion port is eqquipped. For correct operation it
is necessary that the power source is able to supply a peak current of 0.5 A.
Circuit example:
Figure 18: Connection of power supply
The positive pole VCC is marked by a red socket on the power.
15
23-05-16
Page 21
LUCOM GmbH * Ansbacher Str. 2a * 90513 Zirndorf * Tel. 09127/59 460-10 * Fax. 09127/59 460-20 * www.lucom.de
www.lucom.de info@lucom.de
5. ROUTER DESIGN
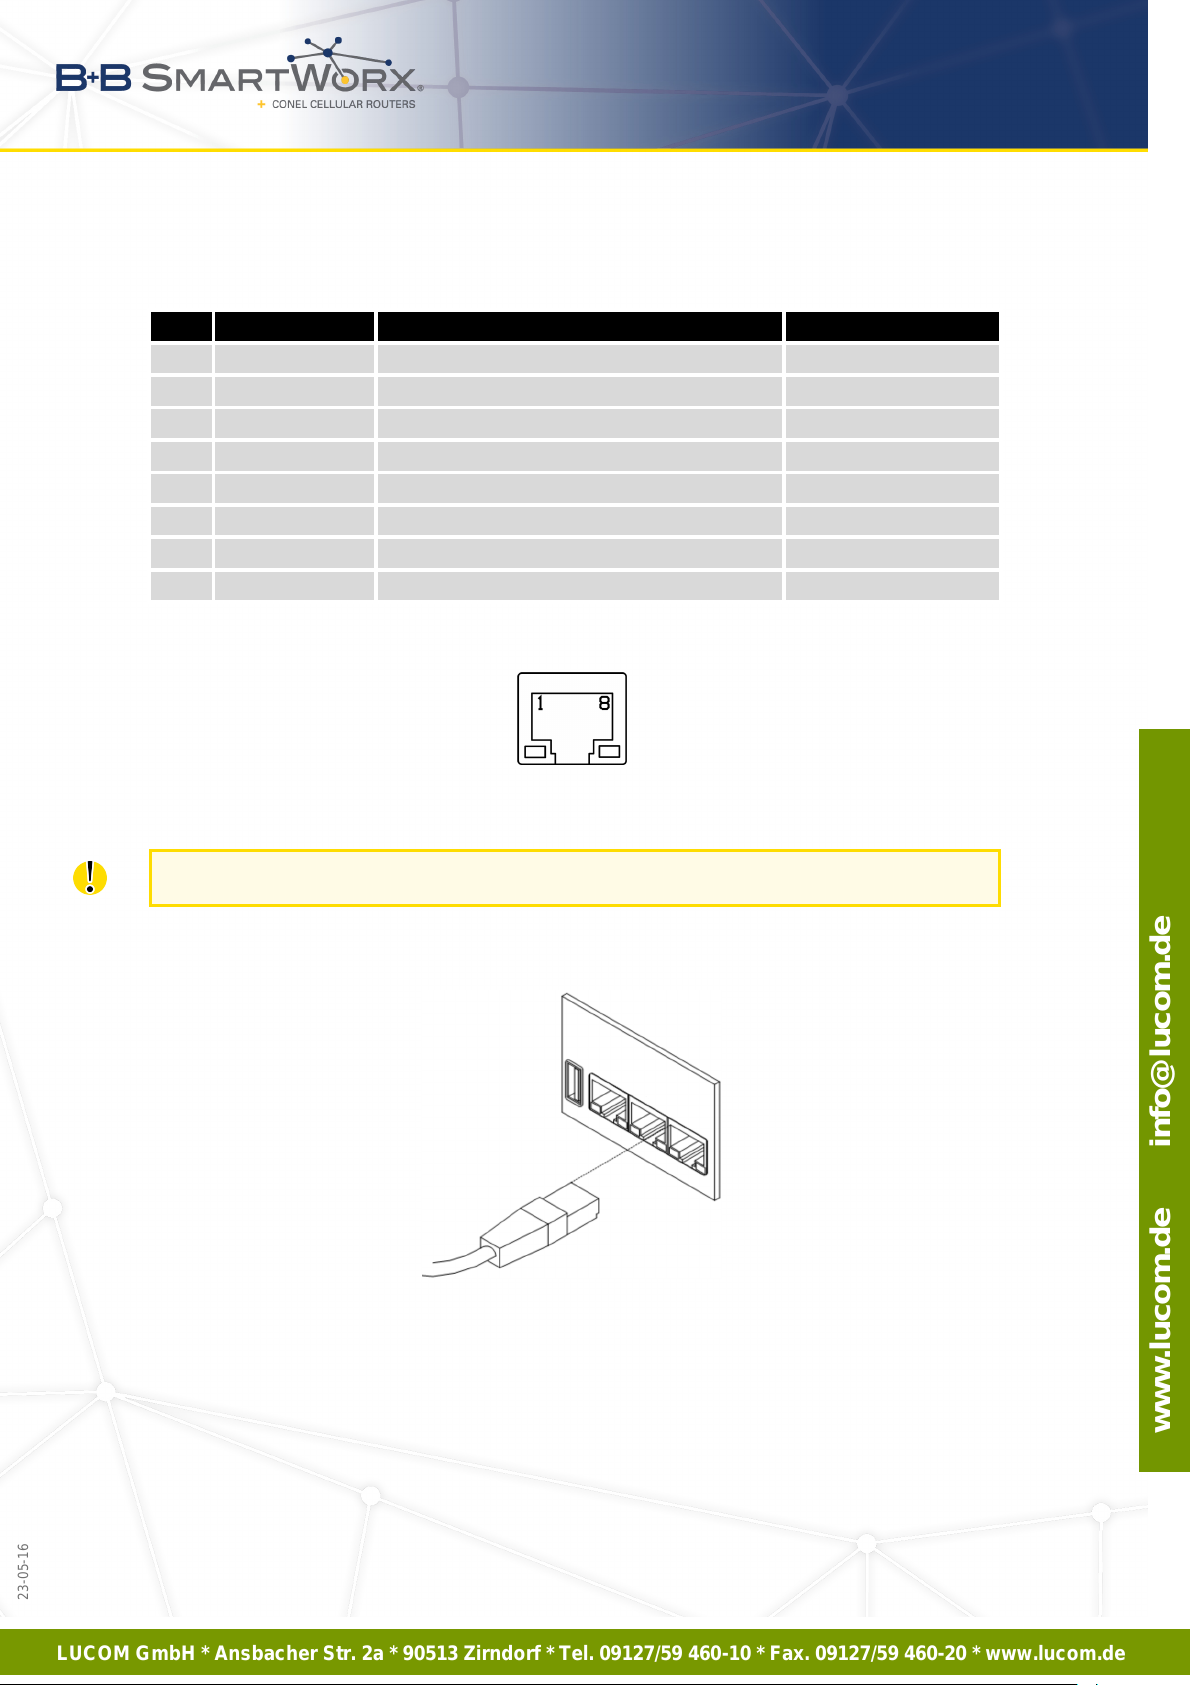
5.7.3 Ethernet Port ETH
Panel socket RJ45.
Pin Signal mark Description Data flow direction
1 TXD+ Transmit Data – positive pole Input/Output
2 TXD- Transmit Data – negative pole Input/Output
3 RXD+ Receive Data – positive pole Input/Output
4 — —
5 — —
6 RXD- Receive Data – negative pole Input/Output
7 — —
8 — —
Table 7: Connection of Ethernet connector
Figure 19: Ethernet connector
ATTENTION! ETH port is not POE (Power Over Ethernet) compatible!
Plug Ethernet cable into the RJ45 connector labeled as ETH (see figure below).
Figure 20: Connection of ethernet cable
16
23-05-16
Page 22
LUCOM GmbH * Ansbacher Str. 2a * 90513 Zirndorf * Tel. 09127/59 460-10 * Fax. 09127/59 460-20 * www.lucom.de
www.lucom.de info@lucom.de
23-05-16
5. ROUTER DESIGN
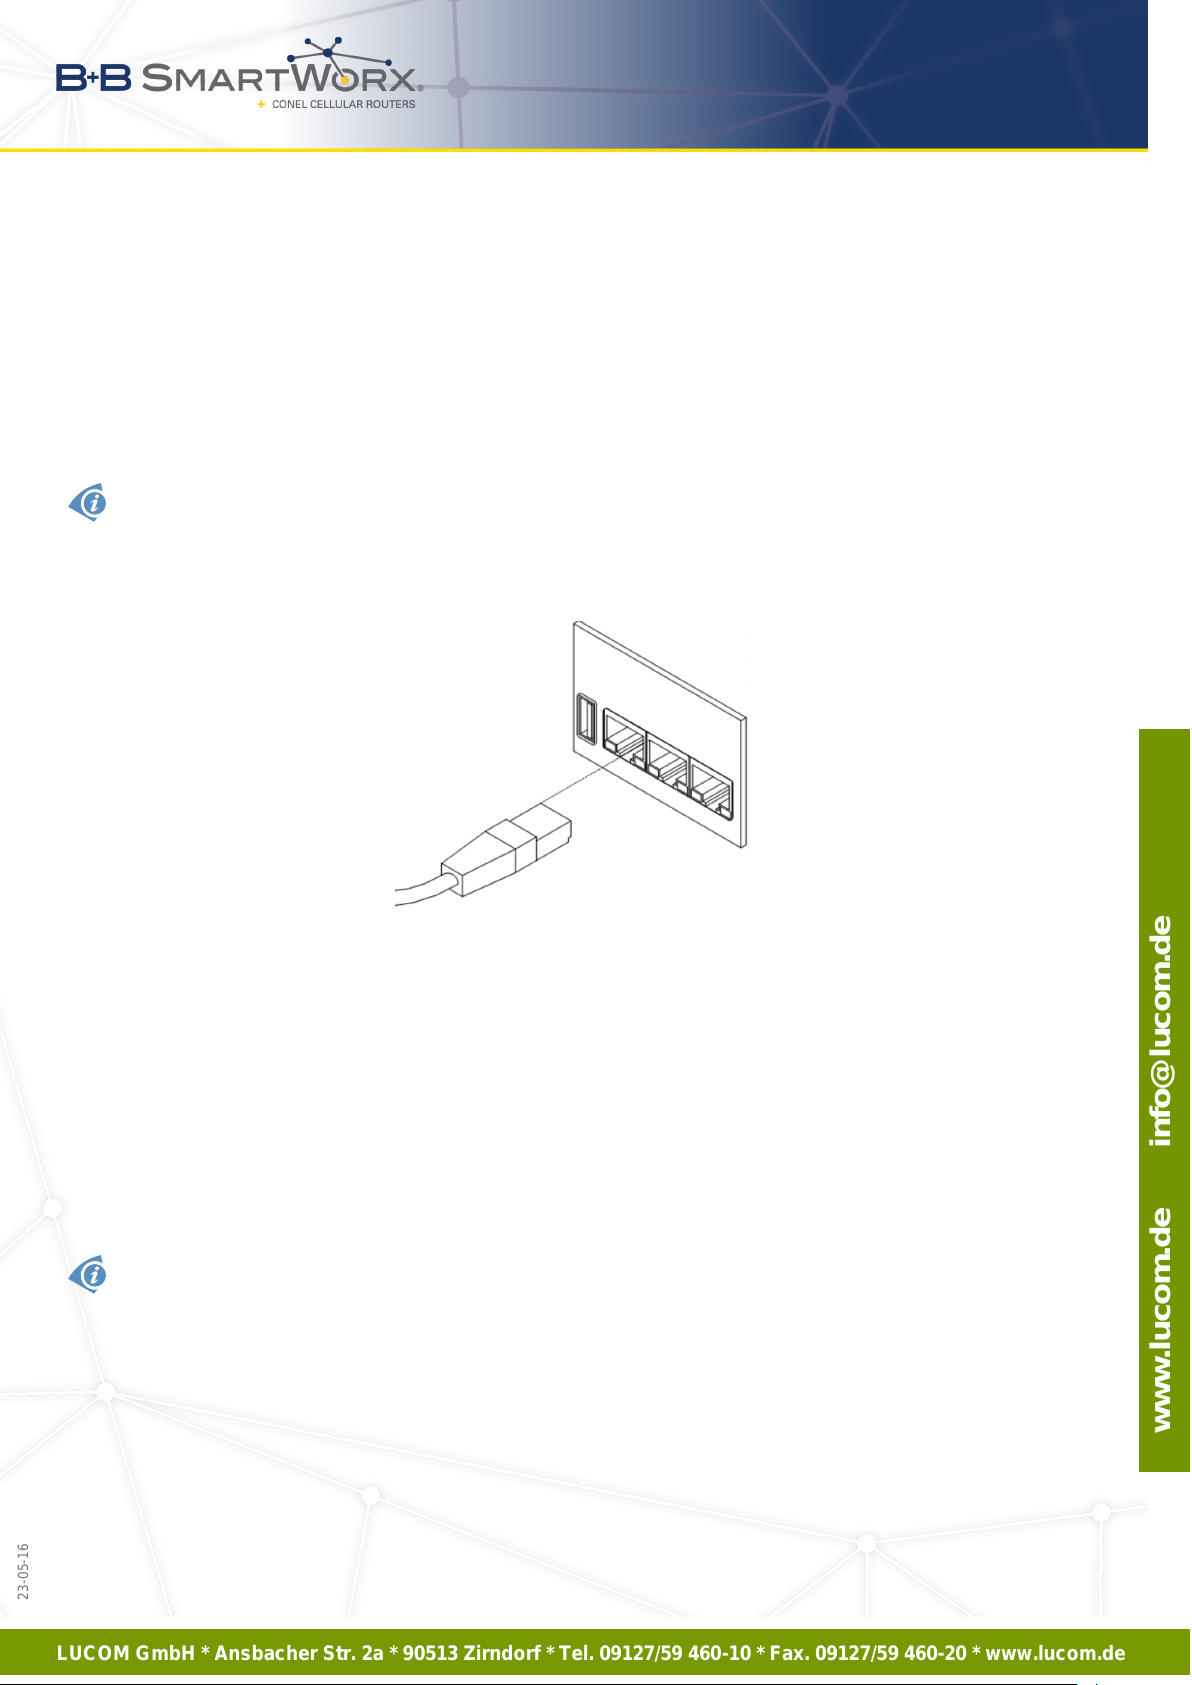
5.7.4 PORT1
The PORT1 is equipped on customer’s request with one of the offered expansion ports:
• RS232
• RS485
• RS422
• ETHERNET
Description and examples of expansion ports connection can be found in user’s guide for
corresponding expansion port.
Plug cable for the first expansion port into the RJ45 connector labeled as PORT1 (see
figure below).
Figure 21: PORT1 cable connection
5.7.5 PORT2
The PORT2 is equipped on customer’s request with one of the offered expansion ports:
• RS232
• RS485
• RS422
• MBUS
Description and examples of expansion ports connection can be found in user’s guide for
corresponding expansion port.
• MBUS
• CNT
• SWITCH (together with PORT2)
• SDH
• SWITCH (together with PORT1)
• WIFI
• WMBUS
17
Page 23
LUCOM GmbH * Ansbacher Str. 2a * 90513 Zirndorf * Tel. 09127/59 460-10 * Fax. 09127/59 460-20 * www.lucom.de
www.lucom.de info@lucom.de
23-05-16
5. ROUTER DESIGN
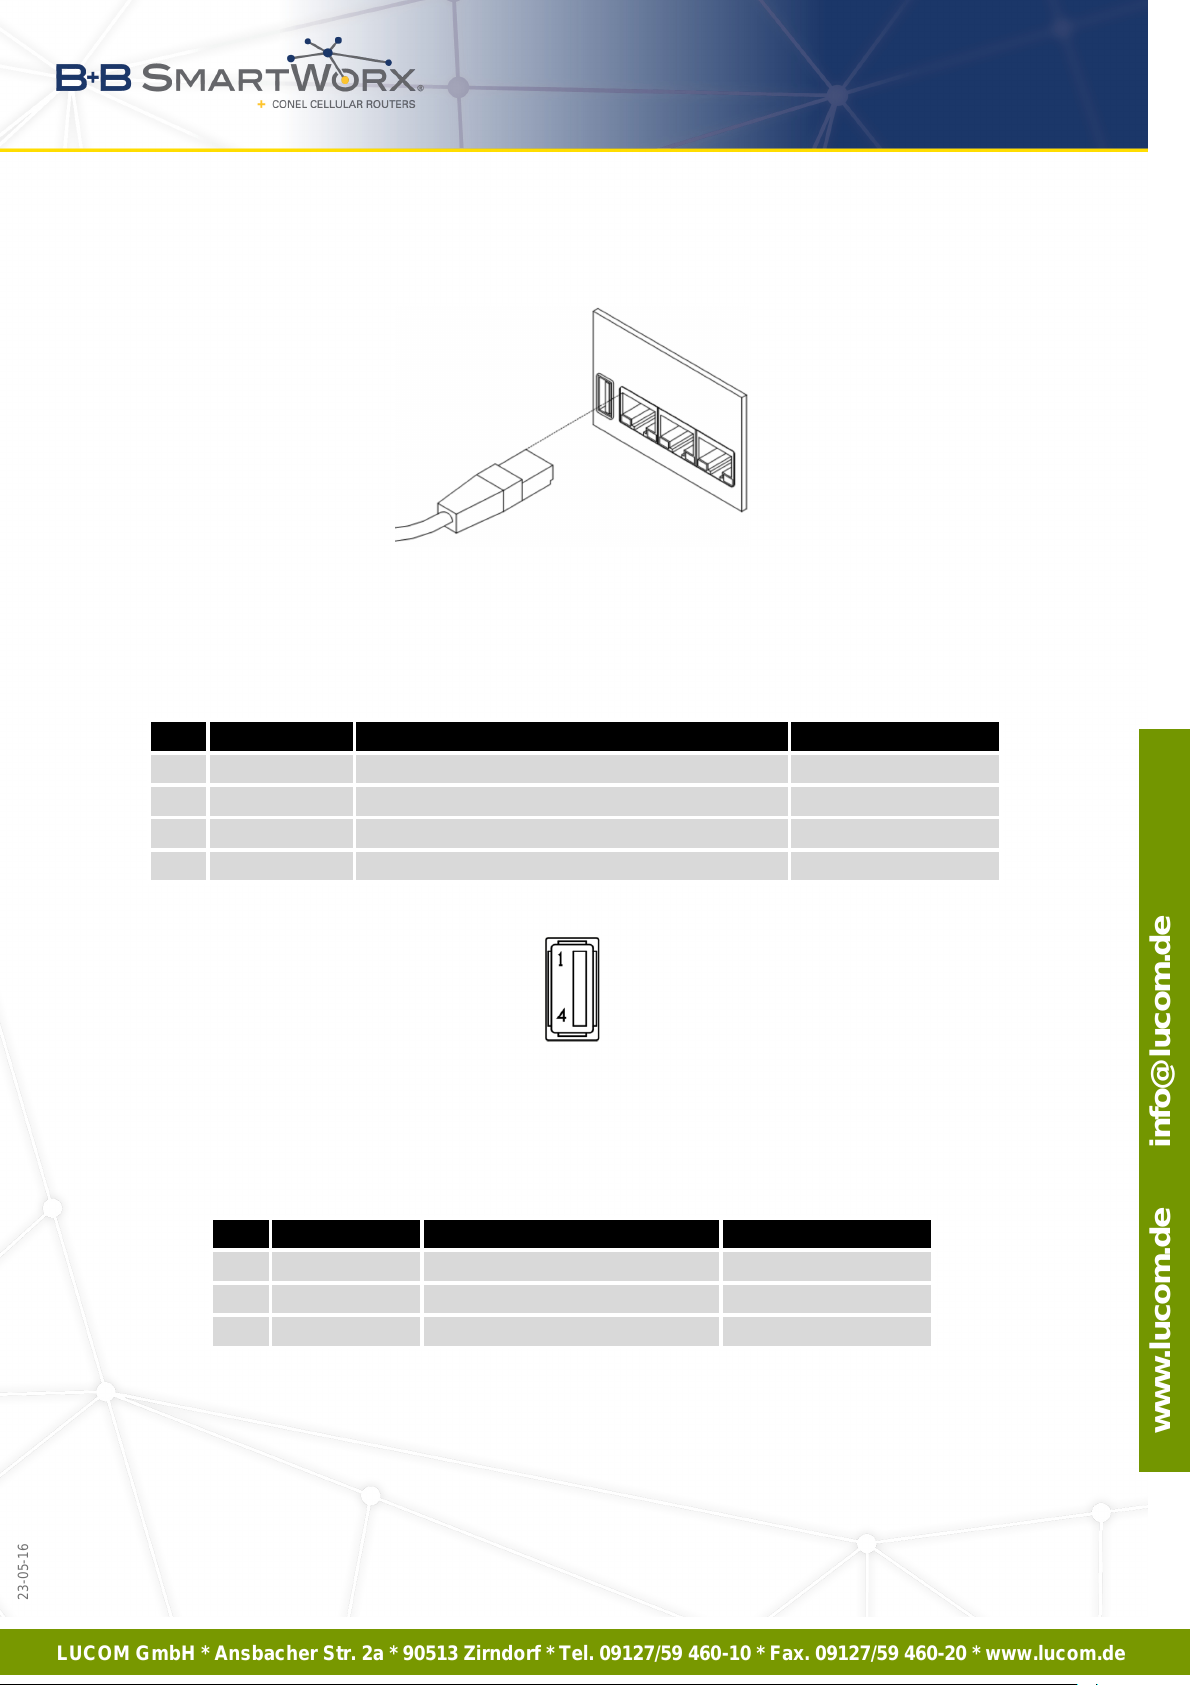
Plug cable for the second expansion port into the RJ45 connector labeled as PORT2 (see
figure below).
Figure 22: PORT2 cable connection
5.7.6 USB Port
Panel socket USB-A.
Pin Signal mark Description Data flow direction
1 +5 V Positive pole of 5 V DC supply voltage, 0.5 A
2 USB data - USB data signal – negative pole Input/Output
3 USB data + USB data signal – positive pole Input/Output
4 GND Negative pole of DC supply voltage
Table 8: Connection of USB connector
Figure 23: USB connector
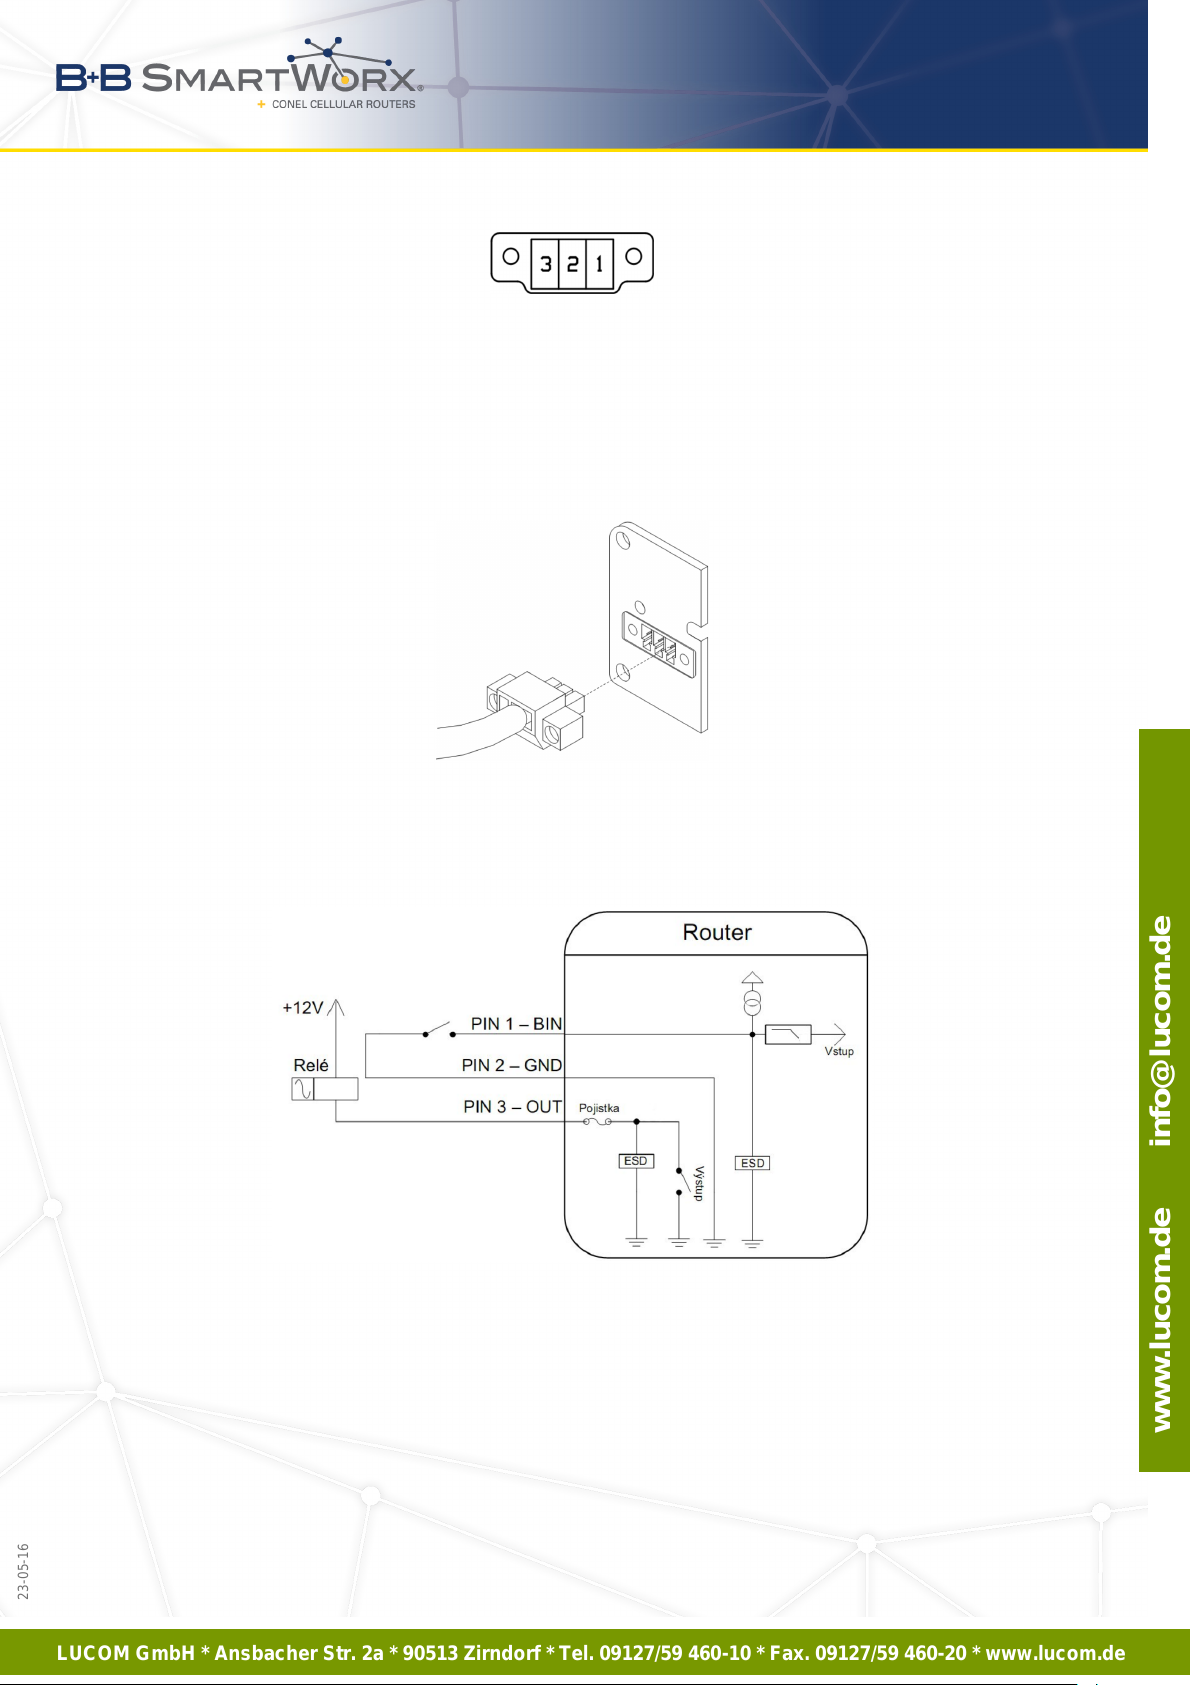
5.7.7 I/O Port
Panel socket 3-pin.
Pin Signal mark Description Data flow direction
1 BIN0 Binary input Input
2 GND Signal ground
3 OUT0 Binary output Output
Table 9: Connection of I/O port
18
Page 24
LUCOM GmbH * Ansbacher Str. 2a * 90513 Zirndorf * Tel. 09127/59 460-10 * Fax. 09127/59 460-20 * www.lucom.de
www.lucom.de info@lucom.de
5. ROUTER DESIGN
Figure 24: I/O connector
I/O user interface is designed for processing of binary input and control (setting) binary
output. Binary output is not switched to ground in the default configuration. Maximum load
binary output is 30 V / 100 mA. The constant current supplied by the binary input is 3 mA.
Connect I/O cable into the I/O connector on the front panel of the router and tighten locking
screws (see figure below).
Figure 25: Connection of I/O cable
Example of a circuit describing connection of binary input and output to the router:
Figure 26: Connection of input and output to the router
19
23-05-16
Page 25
LUCOM GmbH * Ansbacher Str. 2a * 90513 Zirndorf * Tel. 09127/59 460-10 * Fax. 09127/59 460-20 * www.lucom.de
www.lucom.de info@lucom.de
23-05-16
5. ROUTER DESIGN
5.7.8 Reset
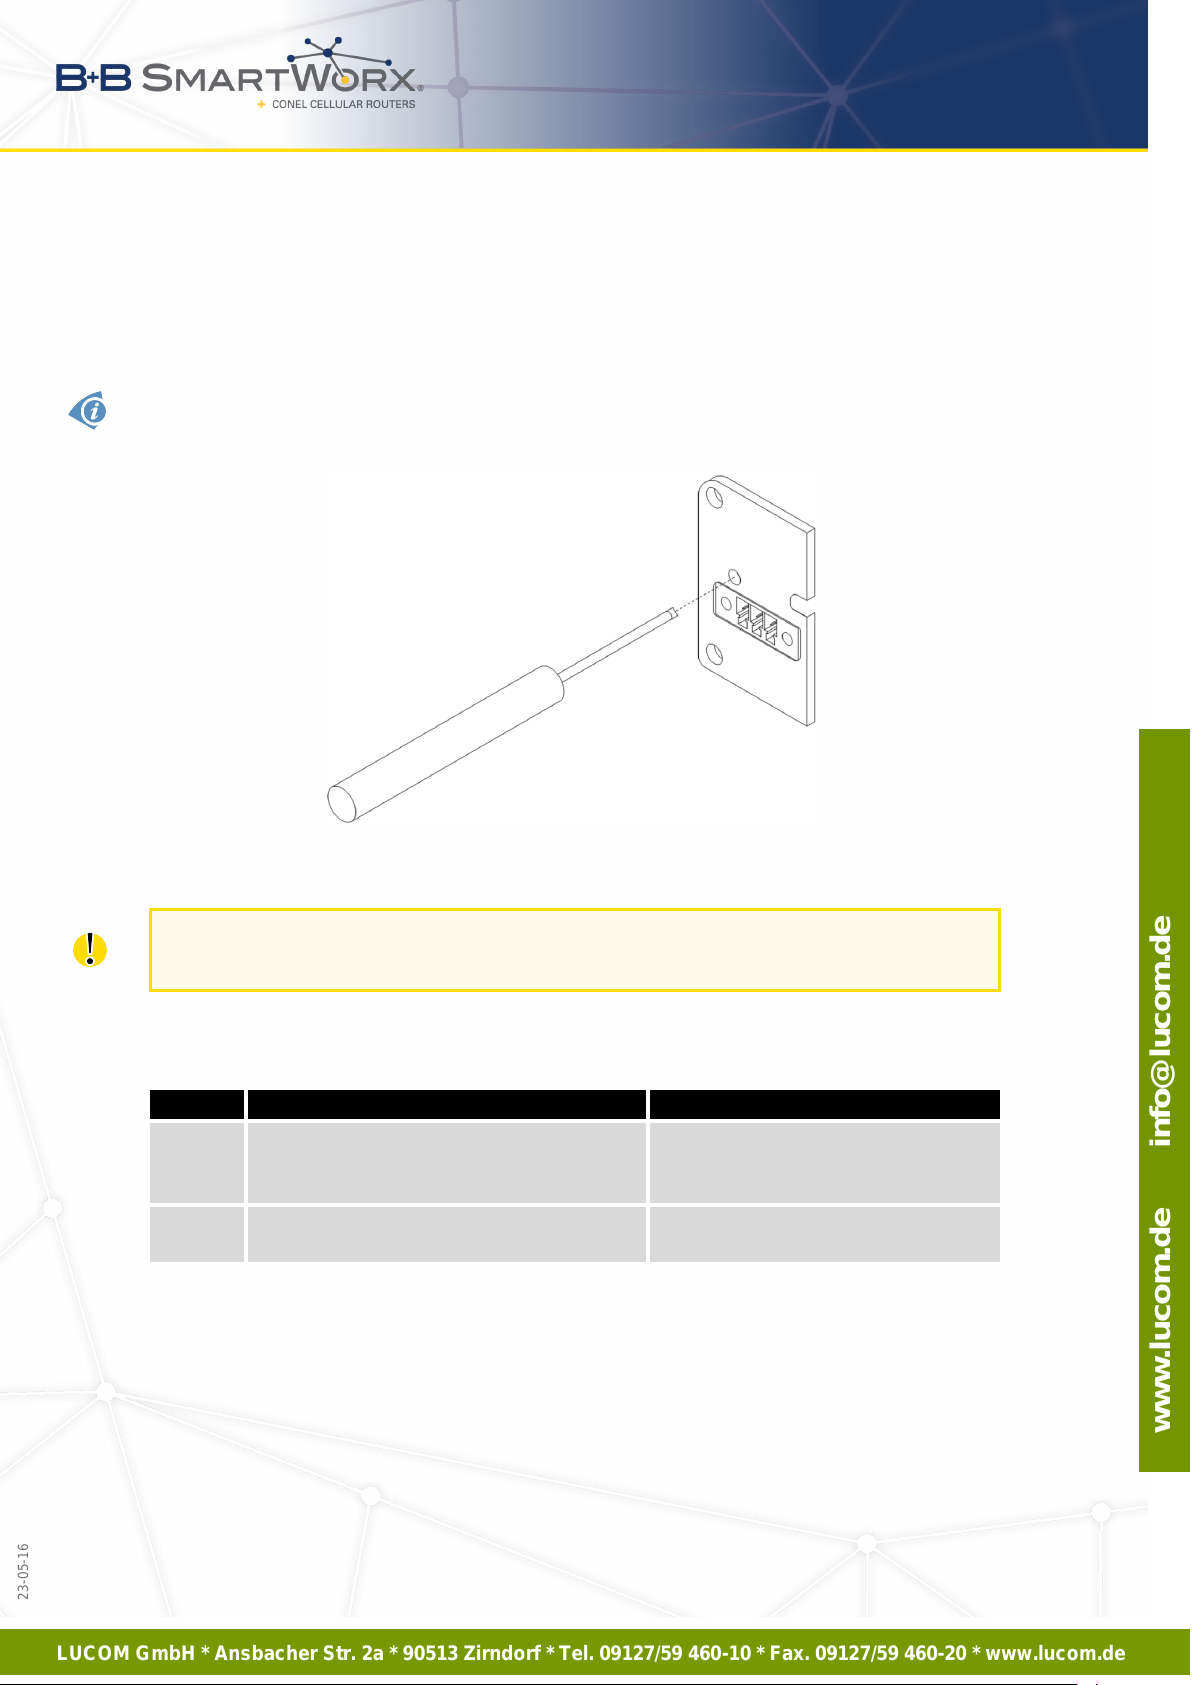
When PWR LED starts flashing on the front panel, it is possible to restore the default configuration of the router by pressing the RST button on the front panel. After pressing this button
the default configuration is restored and then router reboots (green LED will be on).
For pressing the RST button could be used a narrow screwdriver.
Figure 27: Router reset
We recommend backing up configuration of the router (see Configuration manual for v2
routers) because reset of the router sets the configuration to the default state.
It is important to distinguish between reset and reboot the router.
Action Router behavior Invoking events
Reboot Turn off and then turn on router Disconnect and connect the power,
Press the Reboot button in the web
configuration
Reset Restore default configuration and reboot
the router
Table 10: Description of reset and restart router
20
Press RST button
Page 26
LUCOM GmbH * Ansbacher Str. 2a * 90513 Zirndorf * Tel. 09127/59 460-10 * Fax. 09127/59 460-20 * www.lucom.de
www.lucom.de info@lucom.de
6. FIRST USE
6. First Use
6.1 Connecting the router before first use
Before putting the router into operation it is necessary to connect all components which
are required to run your applications.
The router can not operate without connected power supply.
Figure 28: Router connection
21
23-05-16
Page 27
LUCOM GmbH * Ansbacher Str. 2a * 90513 Zirndorf * Tel. 09127/59 460-10 * Fax. 09127/59 460-20 * www.lucom.de
www.lucom.de info@lucom.de
23-05-16
6. FIRST USE
6.2 Start
The router is put into operation when the power supply is connected to this router. By
default, the router will automatically start to log on to the default APN. DHCP server will start
to assign addresses for devices on the Ethernet port ETH0. Router behavior can be changed
via the web interface. This is described in detail in the Configuration manual for v2 routers.
The power consumption during receiving is 1.6 W. The power consumption when using
WiFi is 1.9 W. The peak power consupmtion during data sending is 2.5 W. However, values of
consumption can be increased, if some expansion port is eqquipped. For correct operation it
is necessary that the power source is able to supply a peak current of 0.5 A.
6.3 Configuration
6.3.1 Configuration over web browser
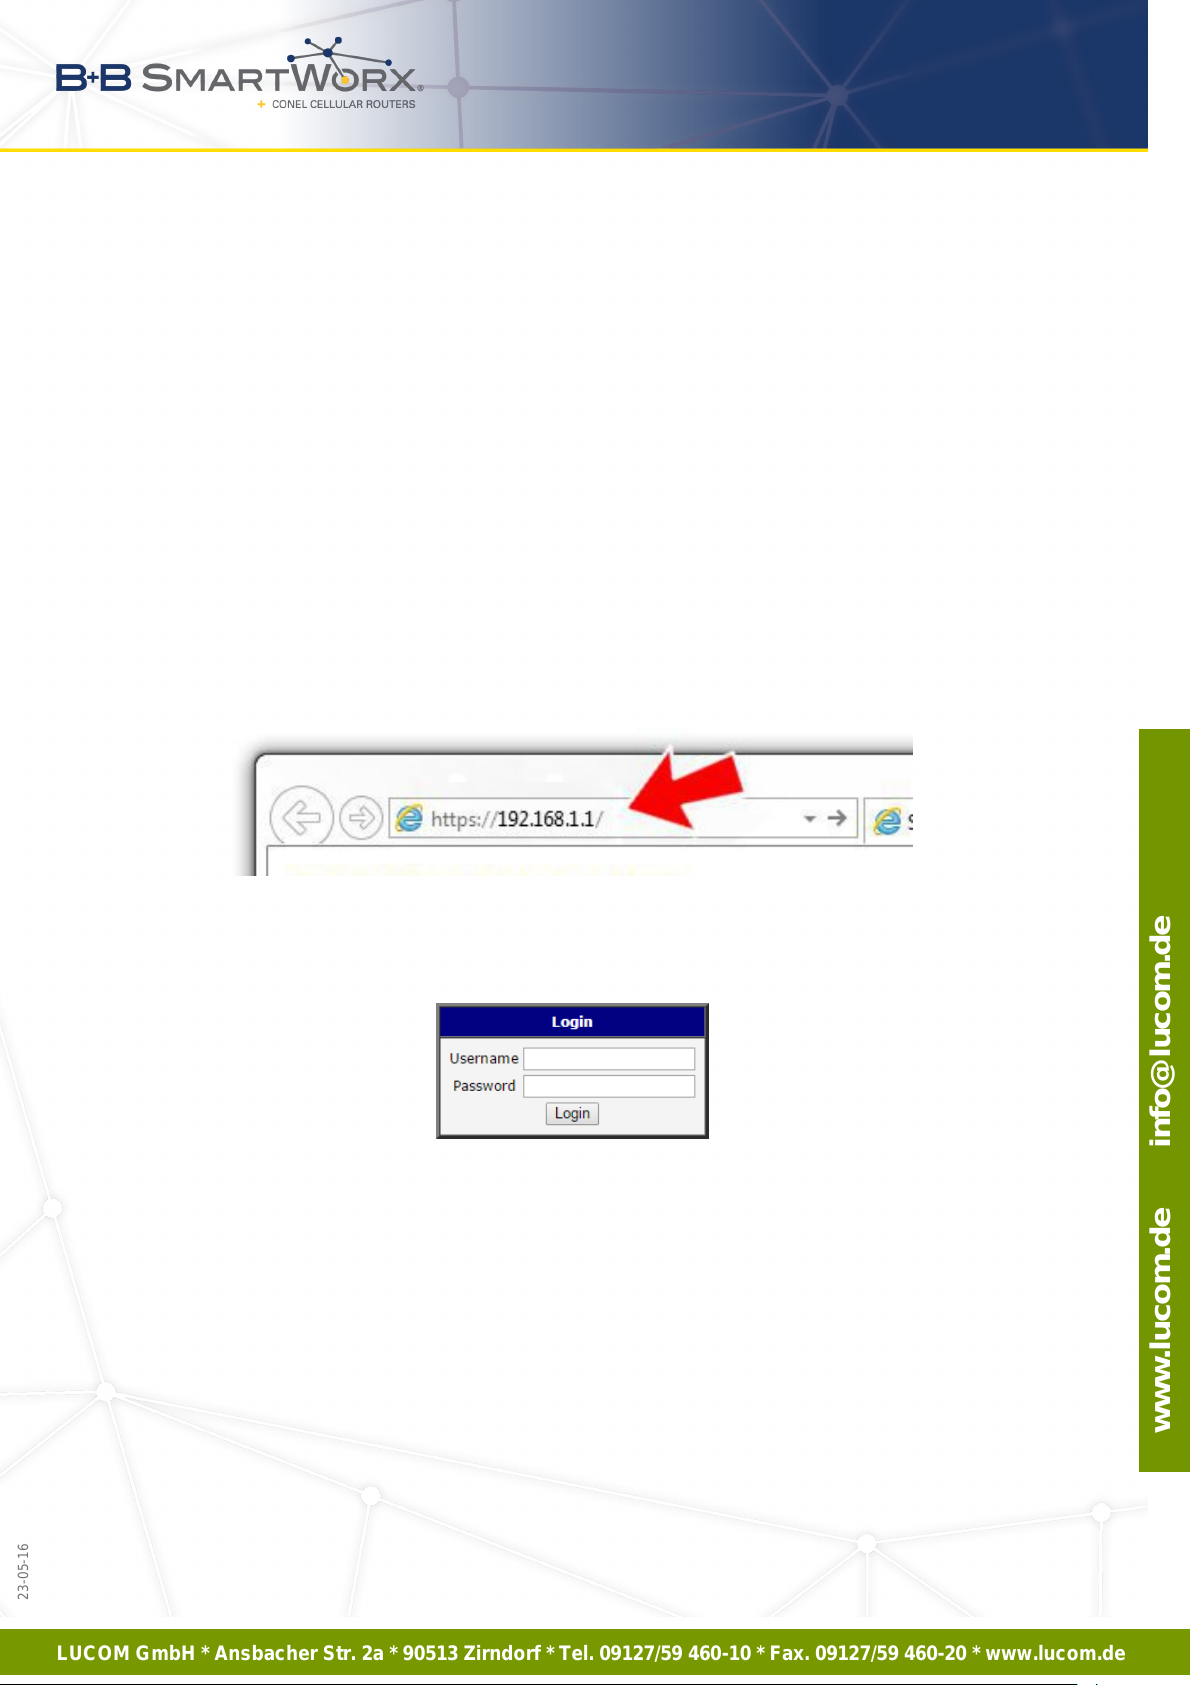
For status monitoring, configuration and administration of the router is available a web
interface which can be accessed by entering the IP address of the router into the web browser.
The default IP address of the router is 192.168.1.1.
Figure 29: Entering the IP address of the router
Configuration may be performed only by the user "root" with default password "root".
Figure 30: Entering login information
22
Page 28
LUCOM GmbH * Ansbacher Str. 2a * 90513 Zirndorf * Tel. 09127/59 460-10 * Fax. 09127/59 460-20 * www.lucom.de
www.lucom.de info@lucom.de
6. FIRST USE
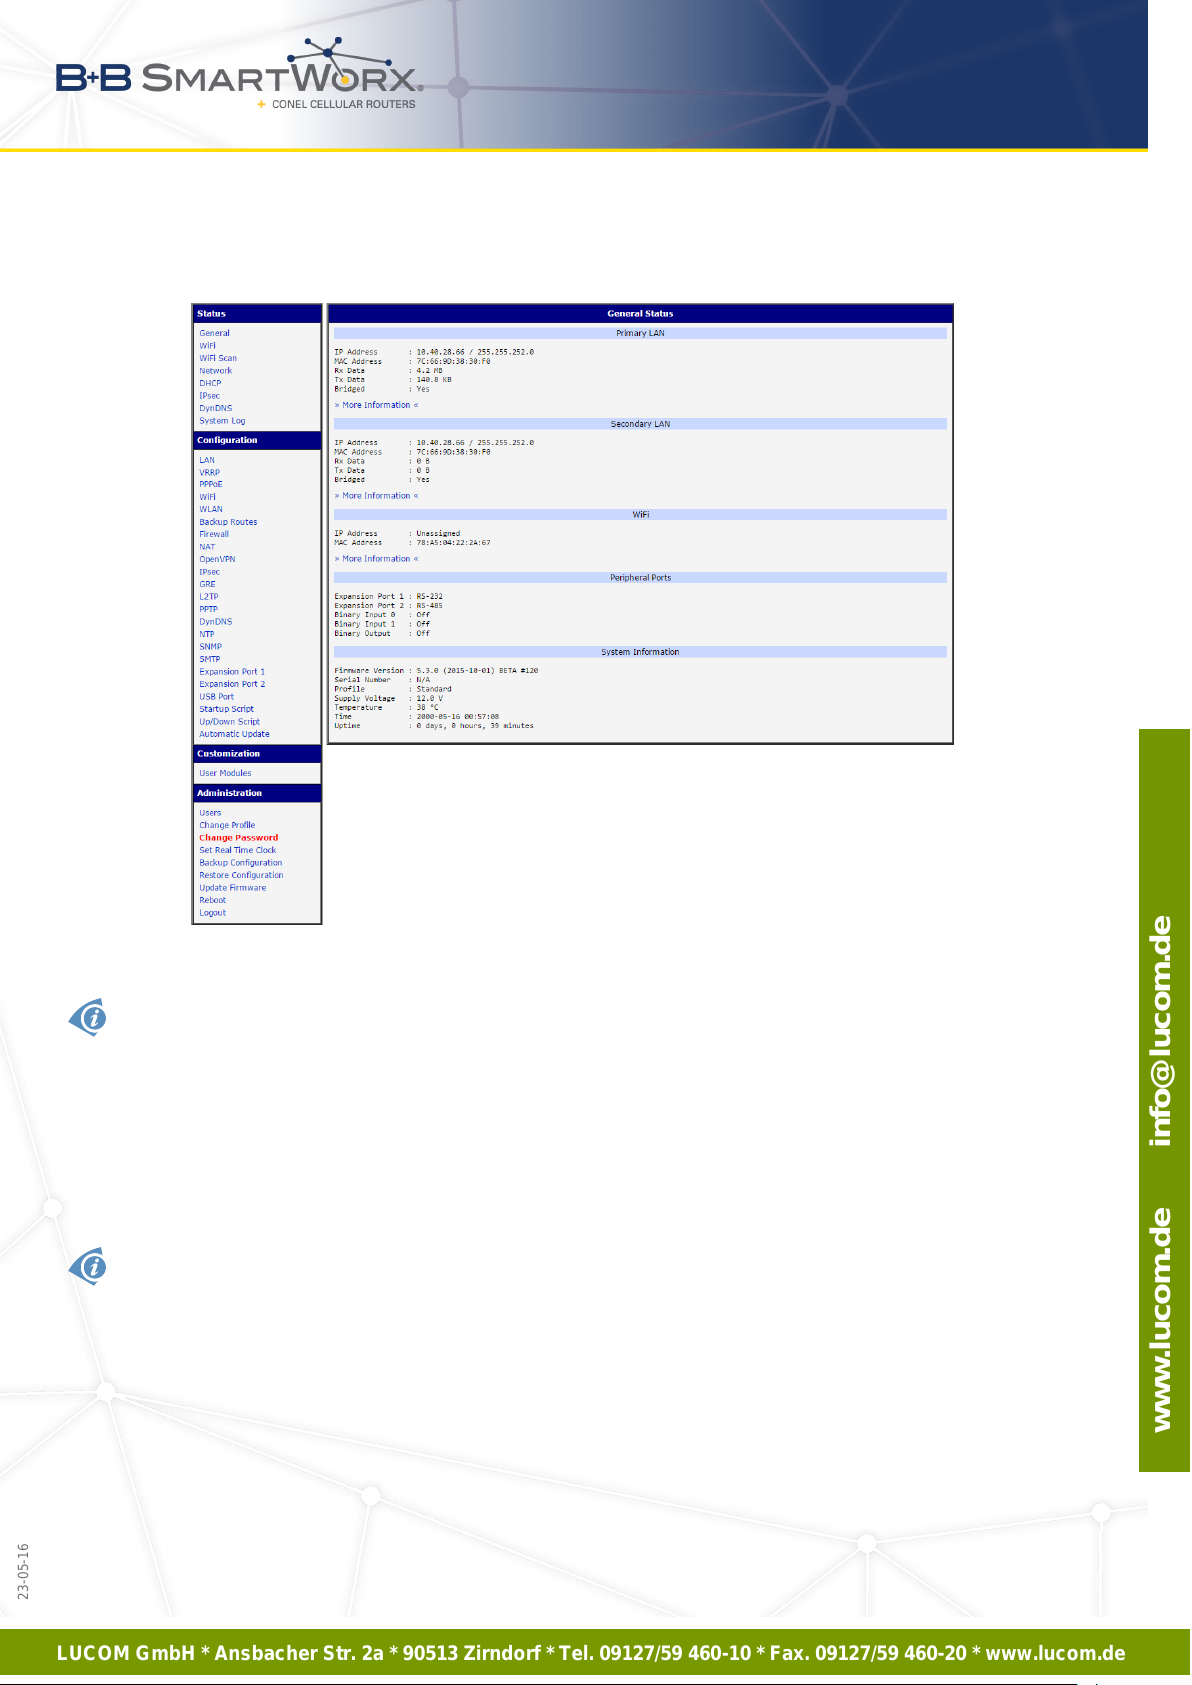
After successfully entering login information user gains access to the router via his internet
browser.
Figure 31: Router web interface
A detailed description of the router settings via the Web interface can be found in the document
Configuration manual for v2 routers.
6.3.2 Configuration over Telnet
For status monitoring, configuration and administration of the router can be also used
Telnet. After entering the IP address of the router you will be allowed to configure the router
using commands. The default IP address of the router is 192.168.1.1. Configuration may be
performed only by the user "root" with default password "root".
A detailed description of the router settings via the Telnet can be found in the document Con-
figuration manual for v2 routers.
23
23-05-16
Page 29
LUCOM GmbH * Ansbacher Str. 2a * 90513 Zirndorf * Tel. 09127/59 460-10 * Fax. 09127/59 460-20 * www.lucom.de
www.lucom.de info@lucom.de
23-05-16
7. TECHNICAL PARAMETERS
7. Technical Parameters
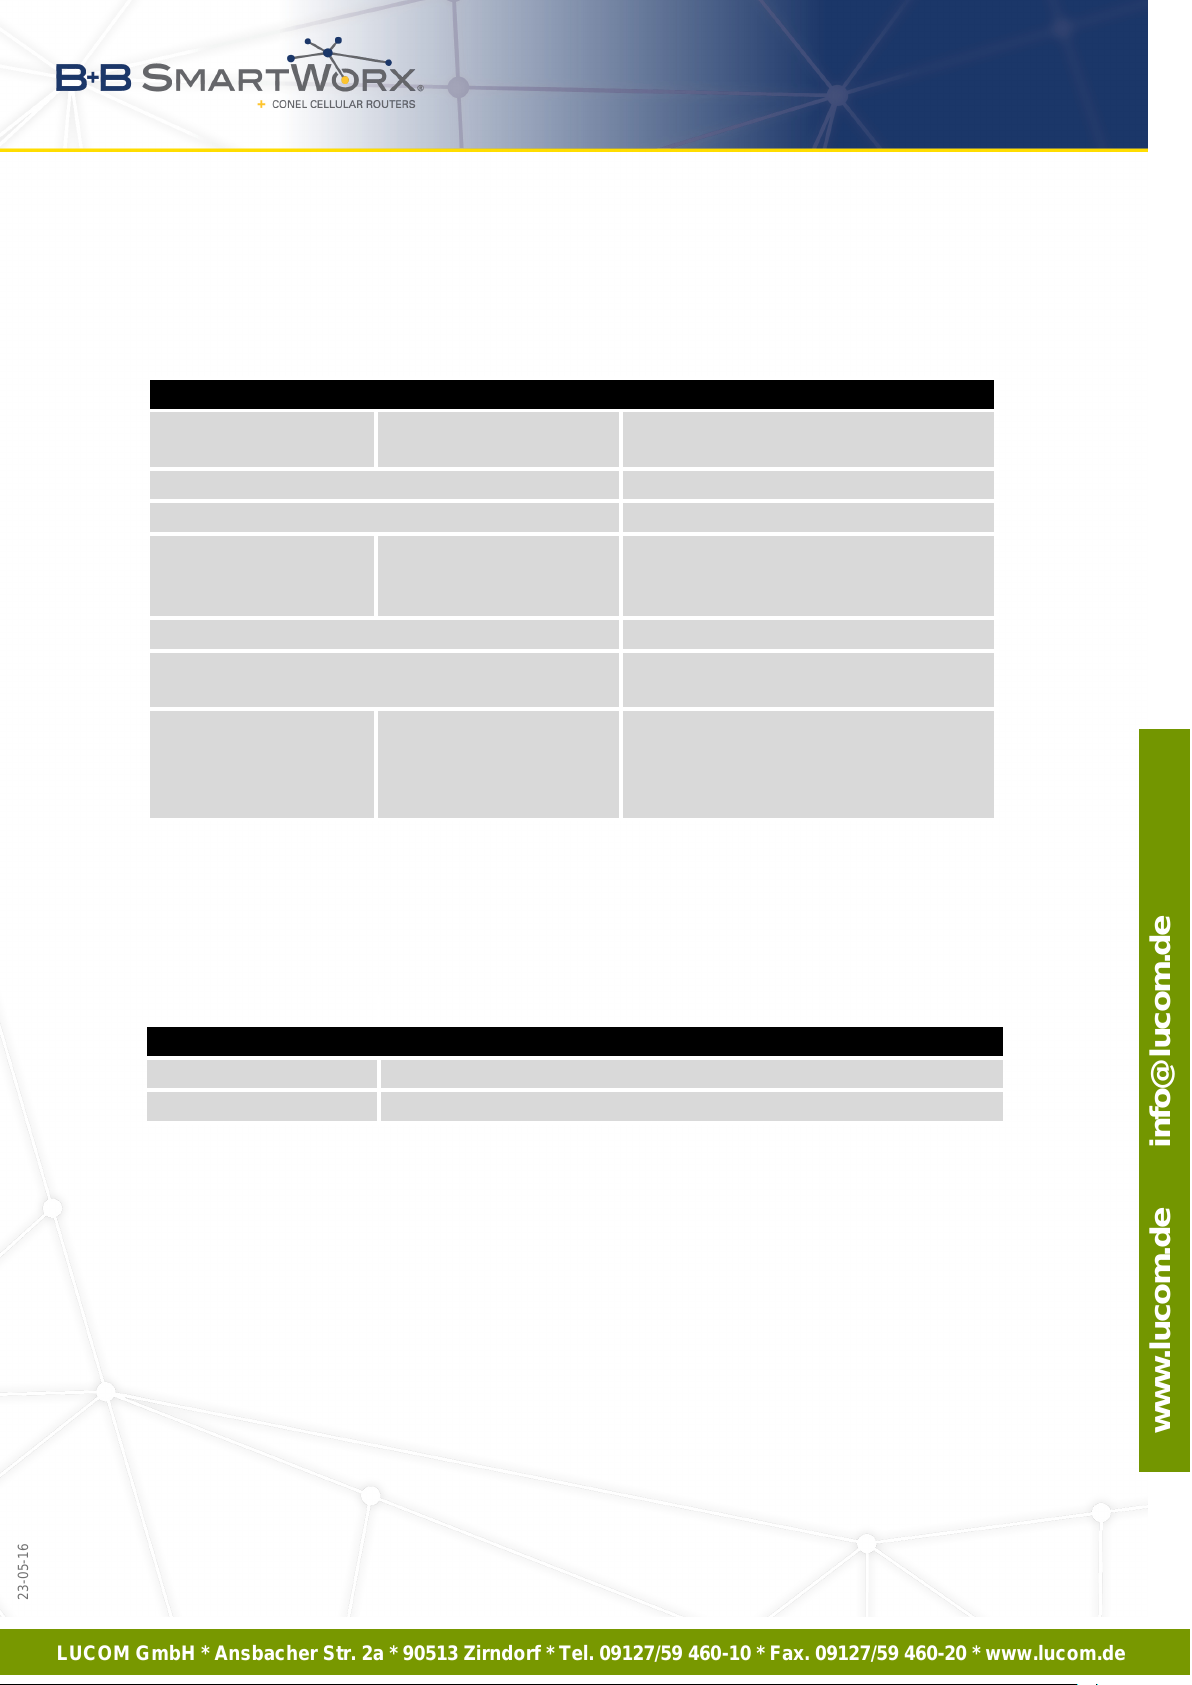
7.1 Basic parameters
XR5i v2
Temperature range Function
Storage
Protection IP20
Supply voltage 9 to 36 V DC
Consumption Without communication
WiFi Communication
Full Communication
Dimensions 42 x 76 x 113 mm (DIN lišta 35 mm)
Weight XR5i v2 – 150 g
User interface ETH
USB
PORT1
PORT2
Table 11: Basic parameters
7.2 Standards and regulations
The router complies with the following standards and regulations.
Standards and regulations
EMC ETSI EN 301 489-1 v1.9.2
Safety EN 60950-1:2006 + A11:2009 + A1:2010 + A12:2011 + A2:2013
Table 12: Standards and regulations
24
-40◦C to +75◦C
-40◦C to +85◦C
1.6 W
1.9 W
to 2.5 W
XR5i v2 SL – 280 g
Ethernet (10/100 Mbit/s)
USB 2.0
Ethernet (10/100 Mbit/s)
On customer’s request
Page 30
LUCOM GmbH * Ansbacher Str. 2a * 90513 Zirndorf * Tel. 09127/59 460-10 * Fax. 09127/59 460-20 * www.lucom.de
www.lucom.de info@lucom.de
23-05-16
7. TECHNICAL PARAMETERS
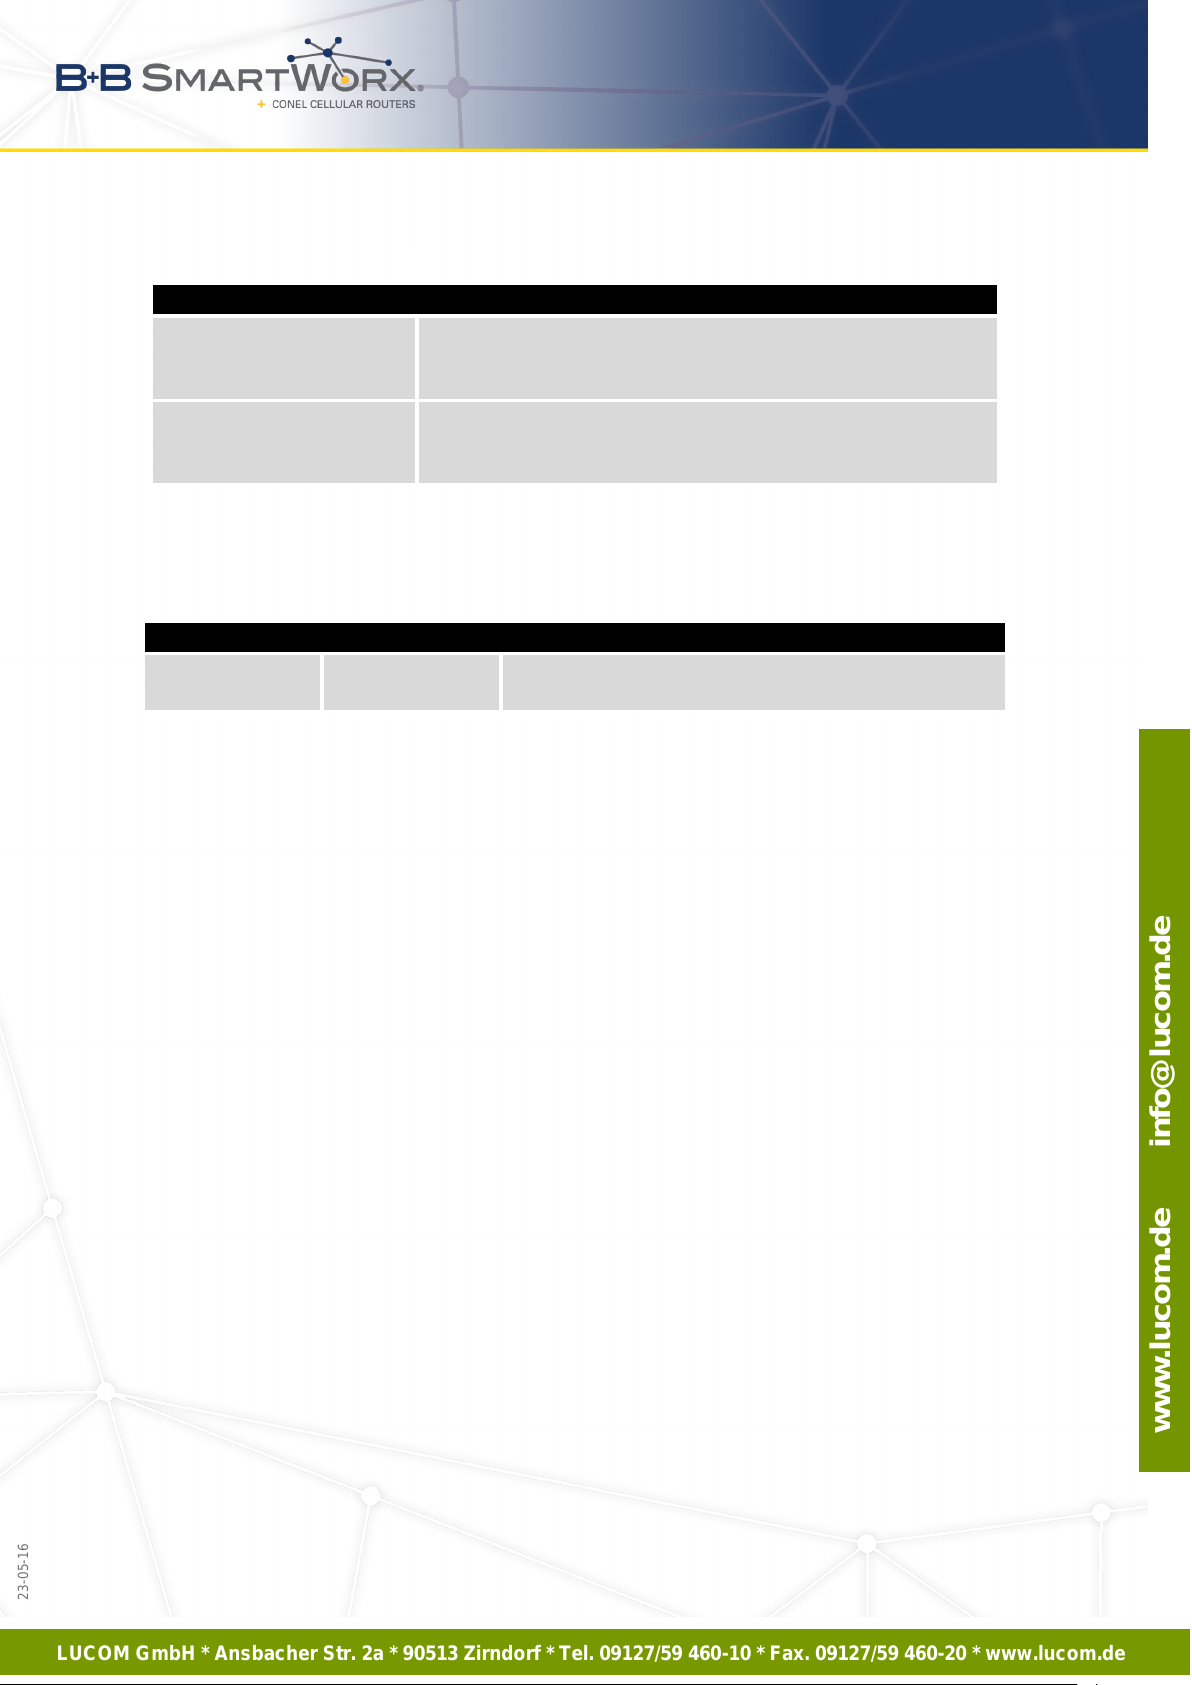
7.3 Technical parameters of processor
32b ARM microprocessor
Memory 512 Mb DDR SDRAM
128 Mb FLASH
1 Mb MRAM
Interface Serial interface RS232
Ethernet interface 10/100 Mbit/s
USB 2.0 interface
Table 13: Technical parameters of processor
7.4 Technical parameters of I/O port
Binary input and output
Input/Output Binary input
Binary output
Table 14: Technical parameters of I/O port
Reed contact with trigger level 1.3 up to 1.4 V
100 mA / max. 30 V
7.5 Technical parameters of expansion port
Technical parameters of expansion ports are provided in separate manuals.
25
Page 31
LUCOM GmbH * Ansbacher Str. 2a * 90513 Zirndorf * Tel. 09127/59 460-10 * Fax. 09127/59 460-20 * www.lucom.de
www.lucom.de info@lucom.de
8. RECOMMENDED LITERATURE
8. Recommended Literature
[1] Conel: Start guide,
[2] Conel: Configuration manual for v2 routers,
[3] Conel: User’s manual – Expansion port RS232,
[4] Conel: User’s manual – Expansion port RS485/RS422,
[5] Conel: User’s manual – Expansion port MBUS,
[6] Conel: User’s manual – Expansion port CNT,
[7] Conel: User’s manual – Expansion port ETH,
[8] Conel: User’s manual – Expansion port SWITCH,
[9] Conel: User’s manual – Expansion port WIFI,
[10] Conel: User’s manual – Expansion port WMBUS,
[11] Conel: User’s manual – Expansion port SD,
[12] Conel: Application note – Expansion port mounting,
[13] Conel: Application note – Programmer guide.
26
23-05-16
Page 32
LUCOM GmbH * Ansbacher Str. 2a * 90513 Zirndorf * Tel. 09127/59 460-10 * Fax. 09127/59 460-20 * www.lucom.de
www.lucom.de info@lucom.de
23-05-16
9. TROUBLESHOOTING
9. Troubleshooting
If you can not connect to the router from your PC, your network card may be configured
the way it is not possible to connect to the router. Take one or more of the following steps
to solve the problem:
• Select the communication rate 10 MB/s in the properties of your network card.
• Connect the router to the PC via Switch.
• Connect the router to the PC, start the router first and then start the PC after the
router’s initialization.
9.1 FAQ
- I have NAT enabled. My equipment is not connecting to the network.
• The device’s gateway has to be configured as the router.
- The router resets itself and the Ethernet connection fails.
• The router will not function without an antenna. Keep the antenna as far as possible
from the power supply.
- I can’t access the Web server over NAT.
• The remote HTTP access of the router has to be disabled, the default ser ver address has to be your web server and the gateway of the web server has to be the
IP of the router.
- Ethernet connection fails or isn’t establishing.
• It is possible to turn auto negotiation off and set a rate and duplex manually on the
Ethernet interface of the router.
- DynDNS doesn’t function.
• With private APN this is not functional.
• If the same IP address is recorded in your canonic name as dynamically assigned
address, it means that the operator is using NAT or firewall.
• Verify NAT using ping to the static server address.
• Verify Firewall accessing remotely to the router’s Web interface.
27
Page 33
LUCOM GmbH * Ansbacher Str. 2a * 90513 Zirndorf * Tel. 09127/59 460-10 * Fax. 09127/59 460-20 * www.lucom.de
www.lucom.de info@lucom.de
9. TROUBLESHOOTING
• The operator may not provide the address of DNS server and without DNS server’s
adress it is impossible to connect to the dyndns.org server. There will be these
messages in the system log:
– DynDNS daemon started
– Error resolving hostname: no such file or directory
– Connect to DynDNS server failed
- L2TP or IPSec isn’t establishing.
• Chec k the system log for error messages.
- I switched the router to offline mode by SMS message, but the router is in online
mode after restart.
• SMS messages do not change the router configuration. They remain in effect only
until the router is restarted.
- FTP doesn’t function.
• Router doesn’t support active FTP mode. It supports passive mode only.
28
23-05-16
Page 34
LUCOM GmbH * Ansbacher Str. 2a * 90513 Zirndorf * Tel. 09127/59 460-10 * Fax. 09127/59 460-20 * www.lucom.de
www.lucom.de info@lucom.de
23-05-16
10. CUSTOMERS SUPPORT
10. Customers Support
You can find current information about this product on our website:
www.conel.com
Upkeep-advices:
• The SIM-card must be handled carefully as with a credit card. Don’t bend, don’t scratch
on this and do not expose to static electricity.
• During cleaning of the router do not use aggressive chemicals, solvents and abrasive
cleaners!
Conel Company hereby declares that the router narrated in this user’s guide fits all basic
demands of directive 1999/5/EC (R&TTE).
Router fits values of coefficient SAR defined by association ICNIRP and values of "About
protection of health before non-ionized radiation".
Declaration of Conformity was issued and it is possible to find it on the Conel
website (http://www.conel.com/download)1or at producer.
1
Please, use the following login information: Username – ConelFreeDownload, Password – coneldownload.
29
 Loading...