

Page 1
Easy Start Guide
FWD
REV
RUN STOP/RST
min max
LS Industrial Systems
Starvert SV-iC5 Frequency Inverter
available from LS.InverterDrive.com
This guide is intended to compliment the user manual provided by the manufacturer.
It is provided as a basic introduction to the product for Inverter Drive Supermarket customers.
It should not be used as a replacement for the manual issued by the manufacturer.
This product is not a safety device. All safety considerations including but not
limited to Emergency Stop provision should be assessed separately and are
outside the scope of this guide.
v1.2
20110316
Page 2

Easy Start Guide
LS Industrial Systems SV-iC5 Inverter
Contents
Page 1
Page 2
Page 3
Page 4
Page 5
Page 6
Page 8
Page 9
Page 10
Page 11
Contents
Power and Motor Connections
Motor Connections - Star and Delta
Parameters - Overview
Parameters to set before use
How to set “Motor no-load current” - H34
How to set a Parameter value
How to Operate the Inverter
How to enable Sensorless Vector Mode
How to connect and configure a
Potentiometer for remote speed control
How to connect and configure a Run/Stop
switch
Page 12
Page 13
This guide has been produced by The Inverter Drive Supermarket Ltd.
All content, including but not limited to graphics, text and procedures copyright The Inverter
Drive Supermarket and must not be reproduced or altered without prior written permission.
How to connect and configure a Fwd/Rev
switch
How to Reset the Inverter to Factory Defaults
©
Page 1
Page 3
Easy Start Guide
LS Industrial Systems SV-iC5
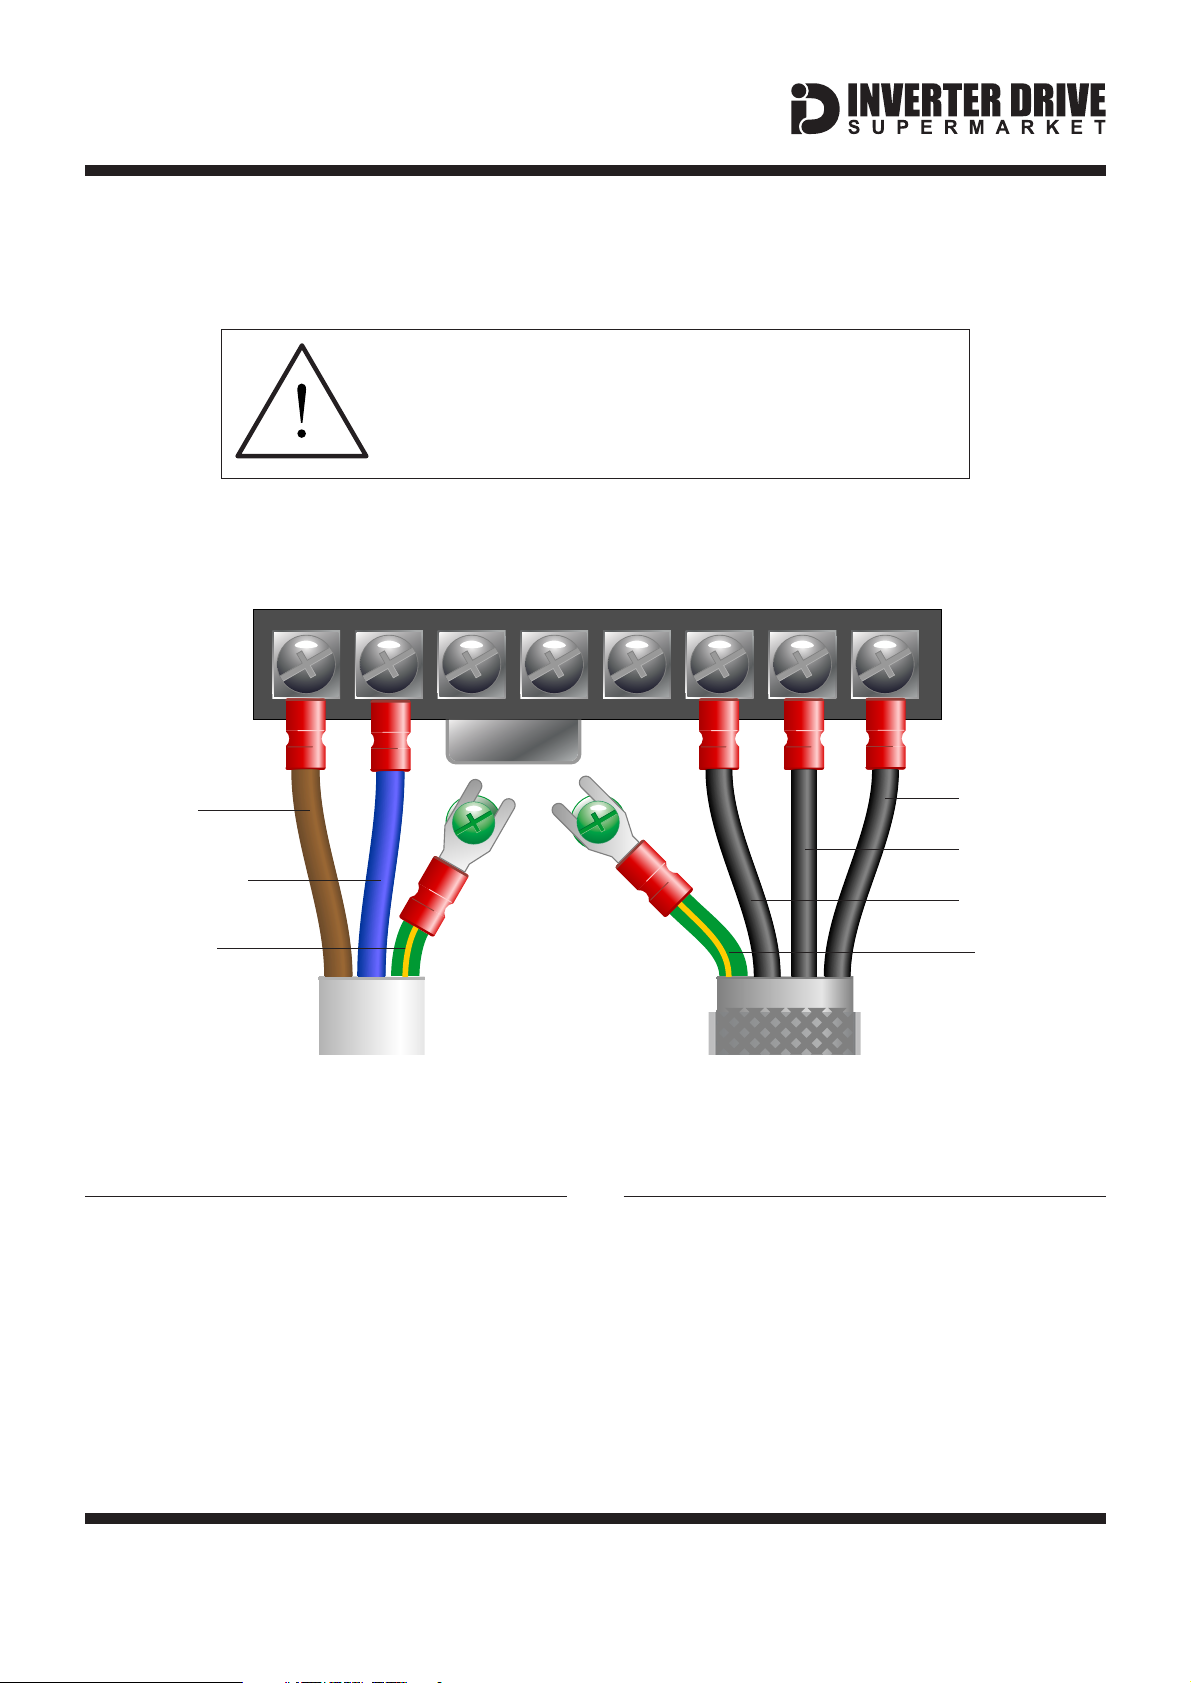
1. Power and Motor Connections
Before commencing, confirm that the iC5 and all
cables are completely isolated from the power
supply, have been isolated for at least 5 minutes
and that the motor is not turning.
L1 L2 NPP1 U V W
Live
Neutral
Earth
Notes:
The illustration above is based on 1.5kW and
2.2kW models. The terminal layout for 0.37kW
and 0.75kW models is slightly different.
The order of the three phases determines the
direction the motor turns.
Phase
Phase
Phase
Earth
MotorPower
Important:
Do NOT connect Neutral to the terminal
marked N.
Use screened SY cable between the Inverter
and Motor to minimise electromagnetic
interference.
The smaller green earth terminals are not part
of the main termal block.
This guide has been produced by The Inverter Drive Supermarket Ltd.
All content, including but not limited to graphics, text and procedures copyright The Inverter
Drive Supermarket and must not be reproduced or altered without prior written permission.
Ensure the motor cable screen is earthed at
the motor end.
©
Page 2
Page 4
Easy Start Guide
LS Industrial Systems SV-iC5
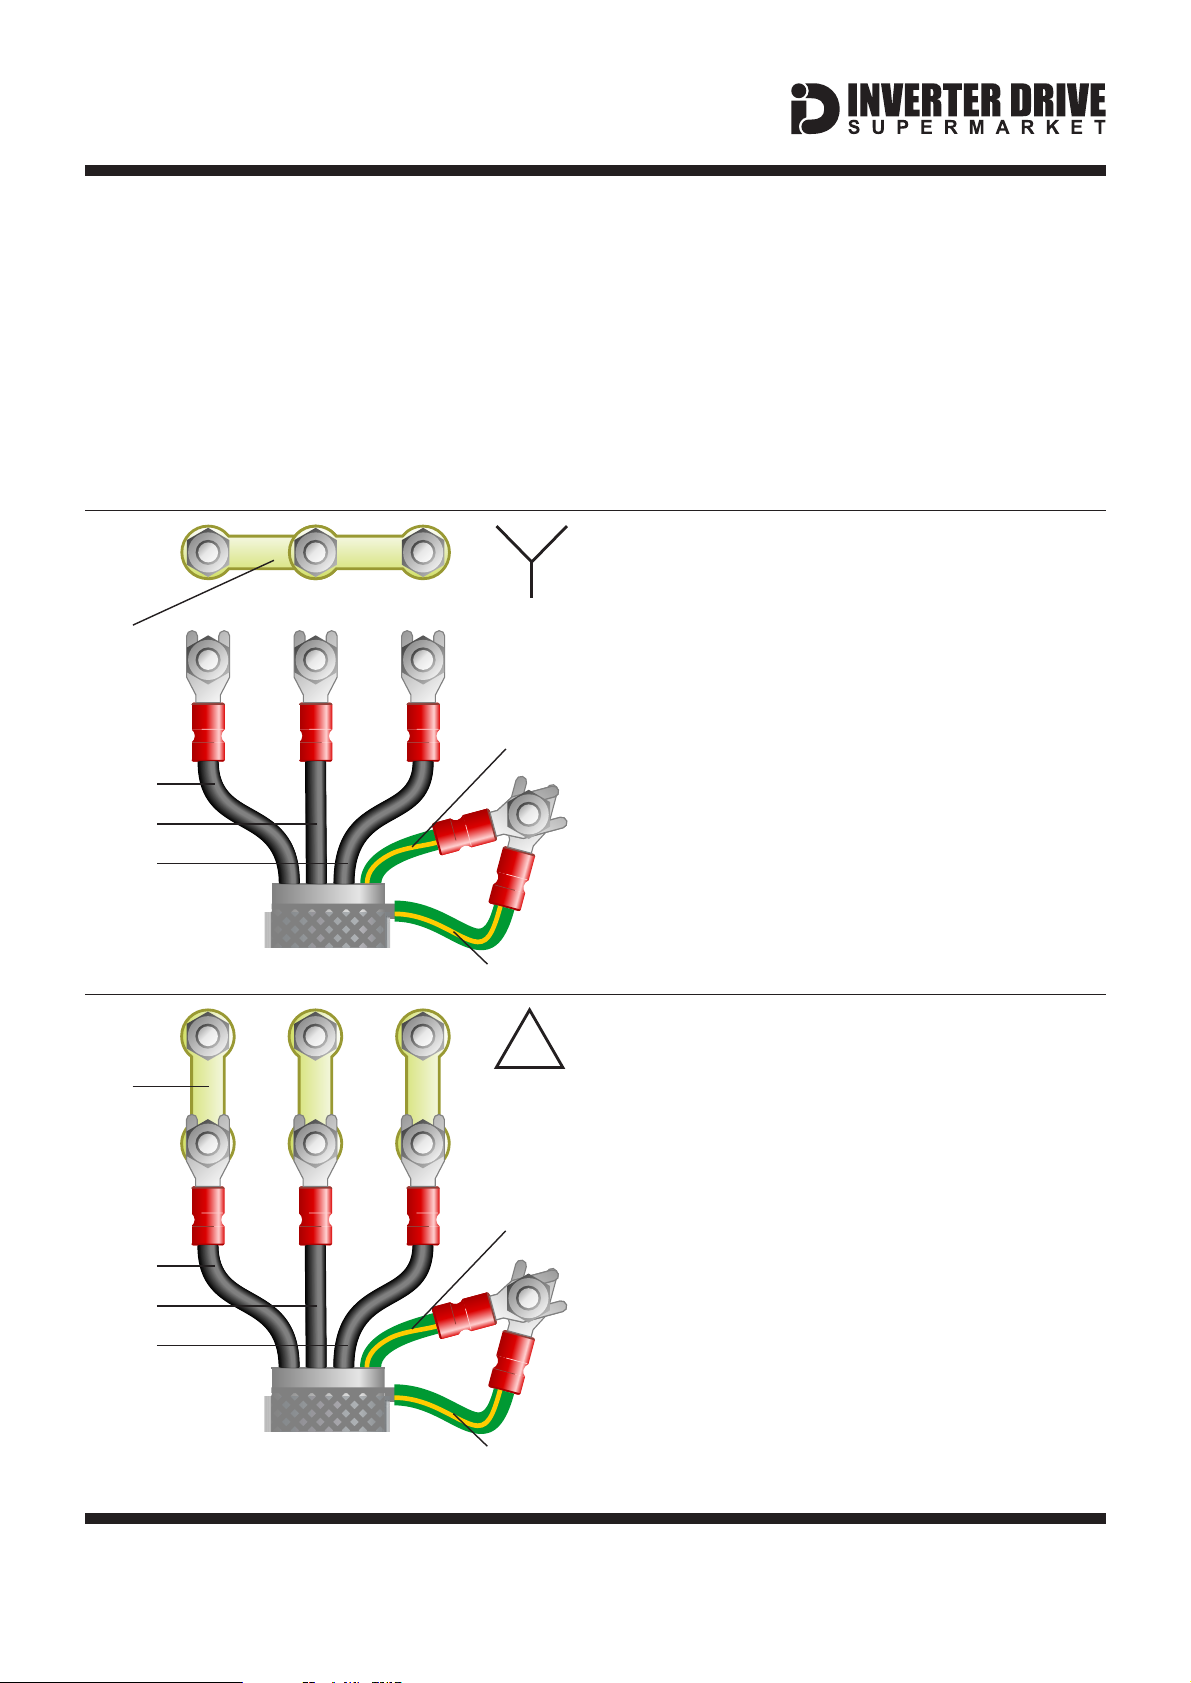
2. Motor Connections - Star and Delta
Dual voltage induction motors typically include
terminal boxes with six points. The points can
be connected together with links in one of two
ways to suit one of the two rated voltages.
The two ways of connecting the links are
shown below. These are known as “Star” (the
higher voltage) or “Delta” (the lower voltage).
Link
Phase
Phase
Phase
STAR
Earth
The selection of Star or Delta is not optional
and must match the supply voltage.
Dual voltage motor nameplates include
symbols to represent voltage and full load
current in each configuration.
Delta is represented by a triangle and star by a
Y (Wye).
2.1 Motor connected in STAR (or Wye):
For safety purposes, Star (shown opposite) is
the default configuration for new motors and is
sometimes known as “two at one side”.
Only two links are required for Star. Double-up
the links if changing from Delta to allow the
motor to be changed to back in future.
The order of the three phases determines the
direction the motor turns.
Note that the cable screen and earth are
connected together at the earth terminal.
Screen
2.2 Motor connected in DELTA:
Link
Phase
Phase
Phase
This guide has been produced by The Inverter Drive Supermarket Ltd.
All content, including but not limited to graphics, text and procedures copyright The Inverter
Drive Supermarket and must not be reproduced or altered without prior written permission.
DELTA
Earth
Screen
The link configuration is shown in the
illustration opposite and is sometimes referred
to a “three-a-breast”.
The LS SV-iC5 converts Single Phase 230V
to Three Phase 230V so a 230/400V Motor
should be connected in Delta.
The order of the three phases determines the
direction the motor turns.
Note that the cable screen and earth are
connected together at the earth terminal.
©
Page 3
Page 5
Easy Start Guide
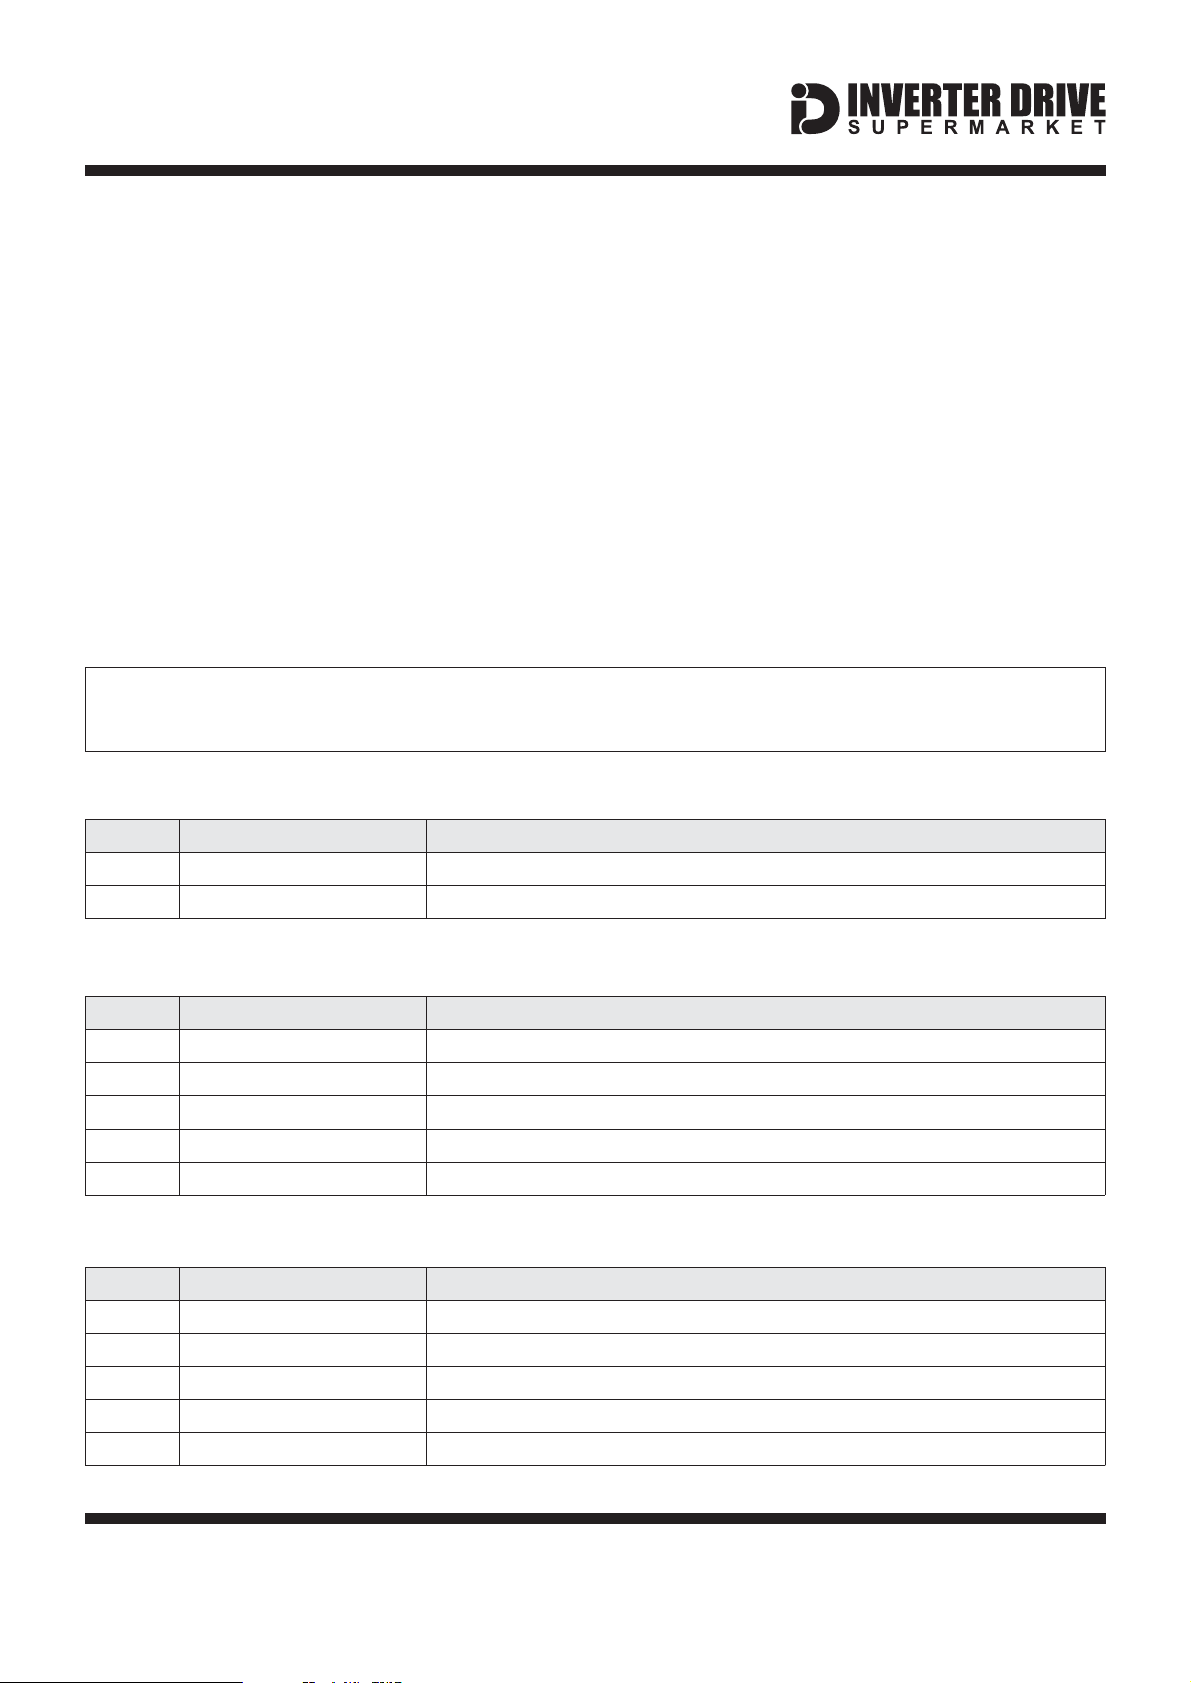
Parameter
Description
How to set
H30
Motor Power in kW
Set to match motor nameplate - eg. 0.75 for 0.75kW, 1.5 for 1.5kW etc.
H31
Number of Motor Poles
Set to match motor nameplate - eg. 2700-3000RPM = 2, 1350-1500RPM = 4 etc.
H32
Motor Slip in Hz
Calculate: (Motor Frequency - ((Motor RPM x Poles) / 120))
H33
Motor Full Load Current in Amps
Set to match motor nameplate - eg. 4.7
H34
Motor No-Load Current in Amps
See section 5 for details of how to correctly set this value.
Parameter
Description
How to set
drv
Run/Stop Command Source
Set to for Run/Stop buttons on the iC5.0
Frq
Speed Command Source
Set to to use the dial on the iC5.2
Parameter
Description
How to set
F21
Max Output Frequency in Hz
Default is 60. Change to 50 for 50Hz motor.
F22
Base Frequency
Default is 60. Change to 50 for 50Hz motor.
F24
Enable Max/Min Frequency
Default is 0 (off). Set to 1 to enable parameters F25 and F26 for future use.
F27
Torque Boost
Default is 0 (off). Set to 1 to improve starting Torque.
F50
Thermal Overload
Default is 0 (off). Set to 1 to enable Thermal Overload Protection.
LS Industrial Systems SV-iC5
3. Parameters - overview
The iC5 contains a number of settings which
can be changed to tailor it for use in a wide
range of applications. These settings are
known as parameters.
Parameters are typically referred to by code or
number (eg. H21 = Max Output Frequency)
with a description available in the manual.
The parameters contain critical information
essential to the correct operation of the iC5.
Therefore, they should at least be checked by
the user before it is operated for the first time.
The parameters listed in section 4 are intended
to provide a starting point to allow for basic
operation of the iC5 Inverter.
4. Parameters to set before use
Set the following parameters to allow the iC5 to
run in standard mode with Run, Stop and
Speed Control from the integral keypad.
See section 6 for an explanation of Parameter Groups
and to learn how to set a parameter value.
4.1 Parameters in the Drive Group
Press left/right to find 0.0 then up/down to find parameter number
If any of the parameters have been changed
previously, follow the procedure in section 12
to reset the iC5 to Factory Defaults.
4.2 Parameters in Function Group 1 - “F”
Press left/right to find F0 then up/down to find parameter number
4.3 Parameters in Function Group 2 - “H”
Press left/right to find H0 then up/down to find parameter number
This guide has been produced by The Inverter Drive Supermarket Ltd.
All content, including but not limited to graphics, text and procedures copyright The Inverter
Drive Supermarket and must not be reproduced or altered without prior written permission.
©
Page 4
Page 6
Easy Start Guide
LS Industrial Systems SV-iC5
5. How to set “Motor no-load current” - H34
Motor no load current is an important
parameter to set to get the best possible motor
performance.
The procedure involves running the motor offload at it’s rated speed and making a note of
output current. This value is then set in
parameter H34.
Correctly set, it allows the Inverter to maintain
the precise output current to suit the motor and
significantly improves torque at lower speeds.
Once set, this can be confirmed by running the
motor off-load at 50Hz and 5Hz and noting that
the output current is the same in both cases.
5.1 How to determine “Motor no-load current” by operating the iC5.
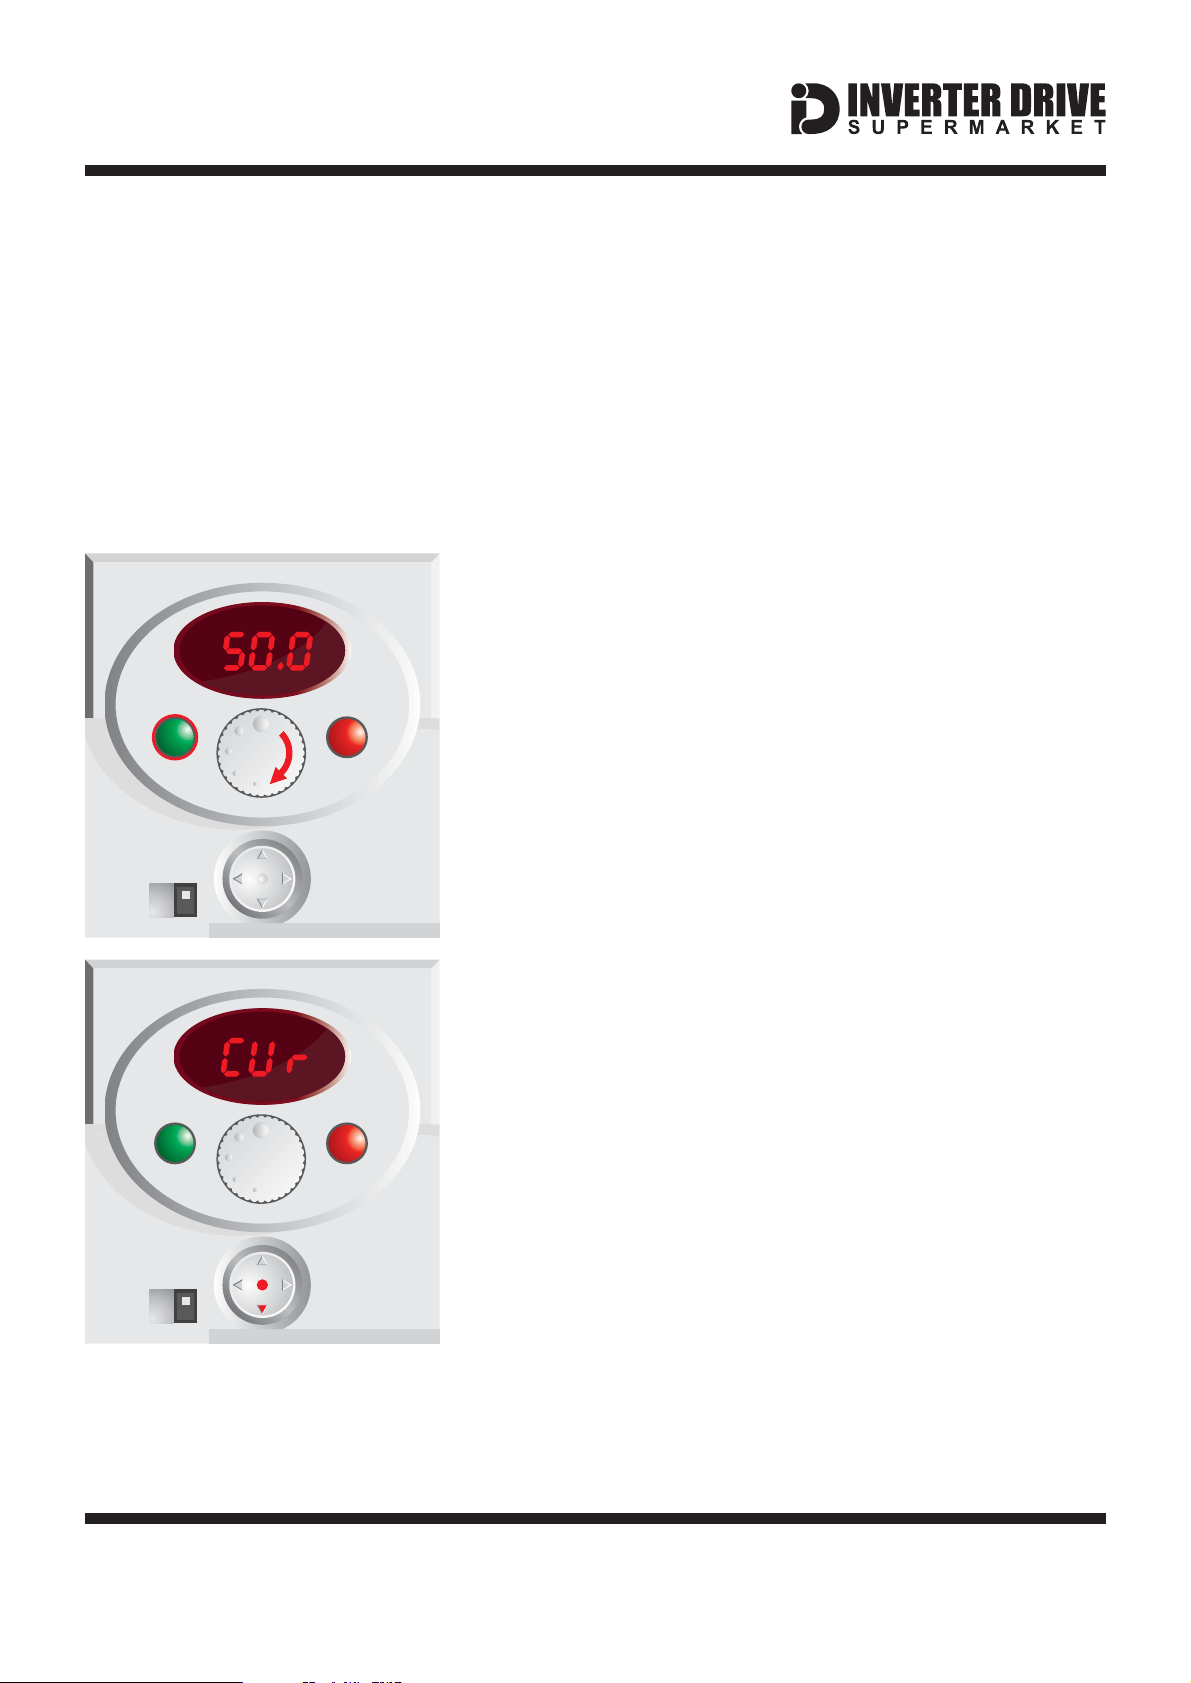
5.1.1 Use the dial to set the frequency to 50Hz and start
the motor.
FWD
REV
Motor no-load current can only be determined with the
motor running off-load. Decouple the motor from the
RUN STOP/RST
machine before beginning!
Turn the dial clockwise until the display shows 50.0 as
min max
illustrated opposite. Then press the green “Run” button to
start the motor. As the motor accelerates the display will
track frequency from 0.0 to 50.0.
NPN
PNP
FWD
REV
RUN STOP/RST
min max
NPN
PNP
Once the Inverter has reached 50.0Hz proceed to the step
below.
5.1.2 Use the navigation pad to locate the “CUr”
parameter.
Press the down arrow on the navigation pad until “CUr” is
displayed (as shown opposite). “CUr” is a read-only
parameter which displays output current in Amps.
Press the navigation pad to select “Cur”. The output current
will be displayed.
Make a note of this value. It is “Motor no-load current”
in Amps and must be set in parameter H34.
This guide has been produced by The Inverter Drive Supermarket Ltd.
All content, including but not limited to graphics, text and procedures copyright The Inverter
Drive Supermarket and must not be reproduced or altered without prior written permission.
©
Page 5
Page 7
Easy Start Guide
LS Industrial Systems SV-iC5
6. How to set a Parameter value
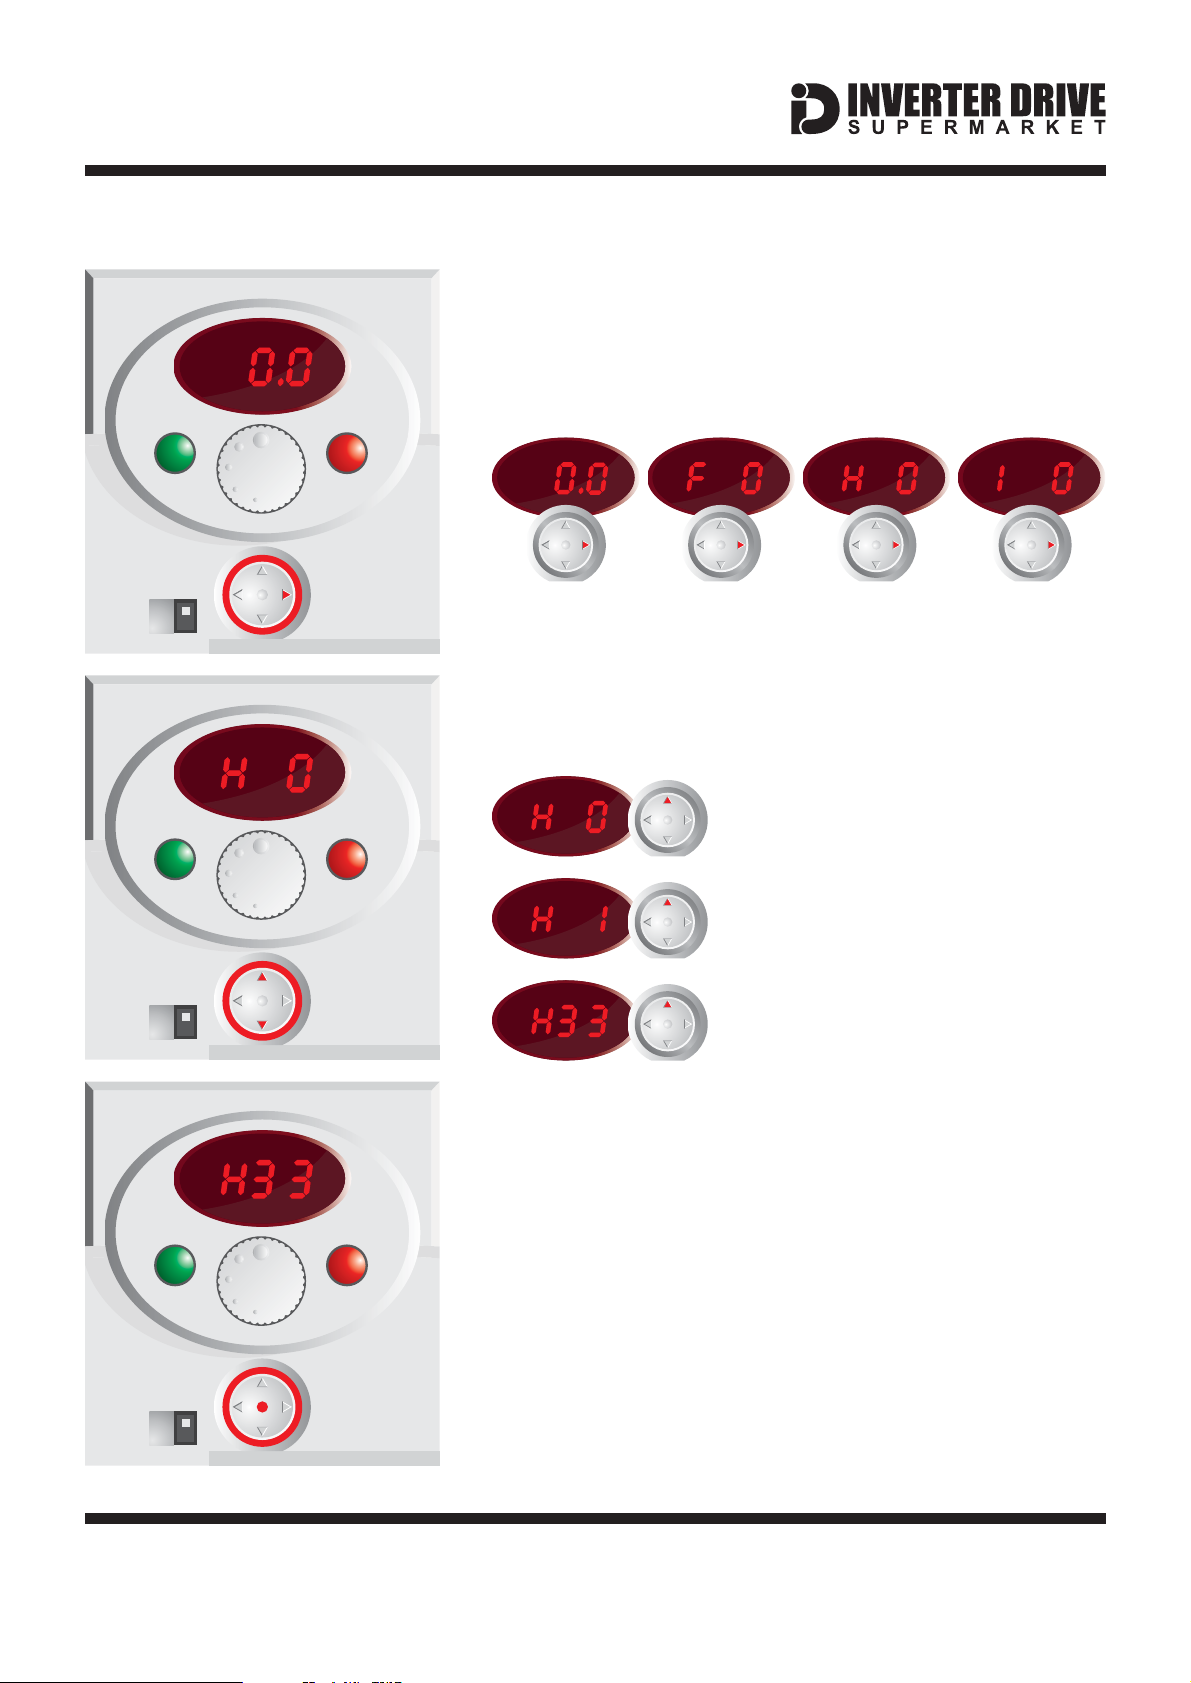
6.1 Use the left and right arrows on the navigation pad
to move between parameter groups.
FWD
REV
RUN STOP/RST
min max
NPN
PNP
FWD
REV
RUN STOP/RST
min max
NPN
From the initial screen (shown opposite), press the right
arrow on the navigation pad to move between each of the
four parameter groups. Select “H0".
Drive
Group
Function
Group 1 “F”
Function
Group 2 “H”
I/O
Group
6.2 Use the up and down arrows on the navigation pad
to move between parameters within the selected
parameter group.
In this example, we will set
Parameter H33 (Function Group 2
“H”, Parameter number 33) which is
motor rated current.
Presstheuparrowonthe
navigation pad repeatedly to move
from H0 to H1, H2, H3 etc. until you
reach H33.
PNP
6.3 Press the navigation pad to edit a parameter.
Once the desired parameter is shown on the display, in this
FWD
REV
RUN STOP/RST
case H33, press the navigation pad to select it.
In some cases, it is possible to accidentally press an arrow
key instead of the navigation pad. In this case, ensure you
re-select parameter H33 before attempting to press the
min max
NPN
PNP
This guide has been produced by The Inverter Drive Supermarket Ltd.
All content, including but not limited to graphics, text and procedures copyright The Inverter
Drive Supermarket and must not be reproduced or altered without prior written permission.
navigation pad again.
©
Page 6
Page 8
Easy Start Guide
LS Industrial Systems SV-iC5
FWD
REV
RUN STOP/RST
min max
NPN
PNP
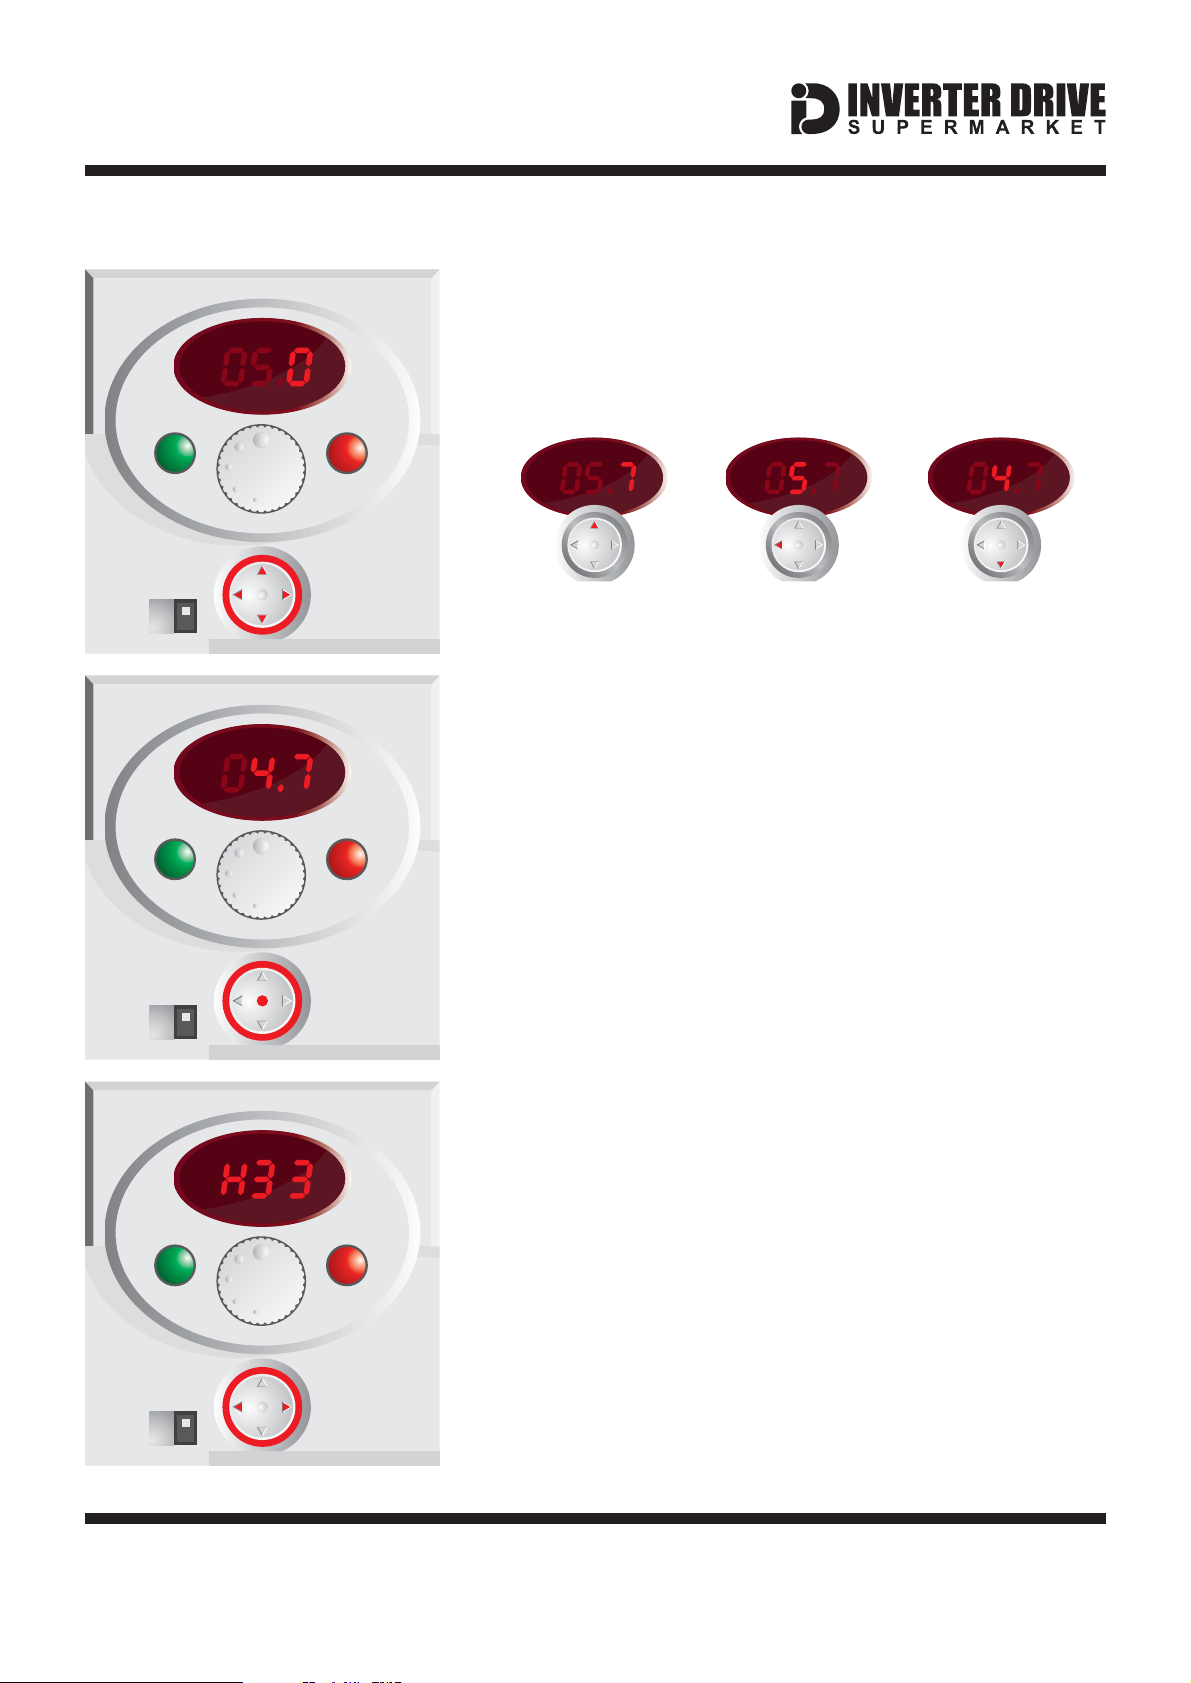
6.4 Use the left and right arrows on the navigation pad
to move between digits. Use the up and down arrows to
increase or decrease the digit value.
In this example, the motor nameplate states 4.7A at 230V
so we will change the default value from 5.0 to 4.7.
Press up to
change to 0 to 7
Press left to
change digit
Press down to
change 5 to to 4
6.5 Press the navigation pad to save changes. Press
the navigation pad again to confirm.
FWD
REV
RUN STOP/RST
min max
NPN
PNP
FWD
REV
RUN STOP/RST
min max
Once the value of H33 has been changed to 4.7 press the
navigation pad to save changes.
The display will then flash indicating that the change needs
to be confirmed.
Press the navigation pad again to confirm the change or
wait to cancel the change and return to the edit screen in the
previous step.
6.6 Parameter value is set.
Now H33 has been successfully set. The screen will return
to the parameter list.
Repeat the steps above to set the value of other
parameters. See section 4 for recommended settings.
Press the left or right keys on the navigation pad to return to
the Drive Group (ie. the group which does not start with F, H
or I).
NPN
PNP
This guide has been produced by The Inverter Drive Supermarket Ltd.
All content, including but not limited to graphics, text and procedures copyright The Inverter
Drive Supermarket and must not be reproduced or altered without prior written permission.
©
Page 7
Page 9
Easy Start Guide
LS Industrial Systems SV-iC5
7. How to operate the Inverter
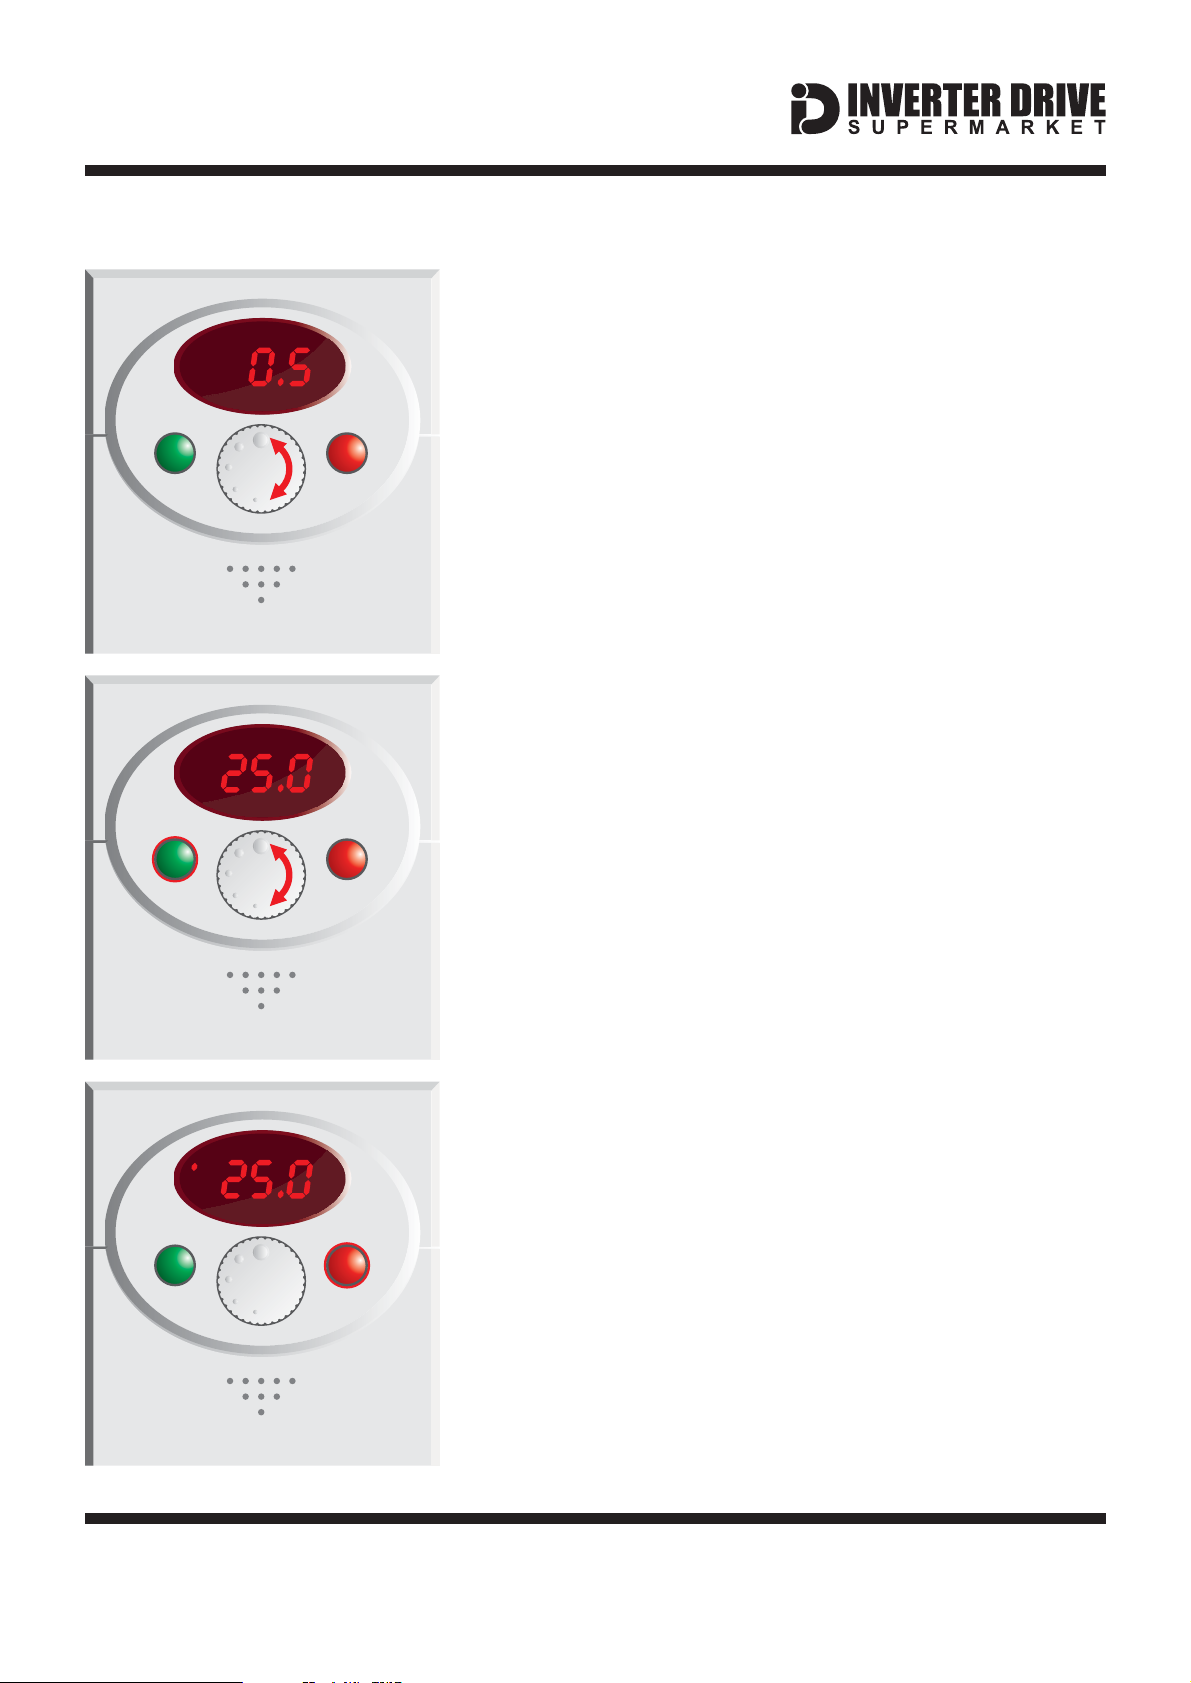
7.1 Use the dial to set the required speed.
Turn the dial clockwise to increase speed and anti-
FWD
REV
clockwise to decrease speed.
RUN STOP/RST
min max
FWD
REV
RUN STOP/RST
min max
The display will change to show the current speed
frequency reference in Hz.
7.2 Press the green “Run” button to start the motor.
The green “Run” button will start the motor. The motor will
accelerate to the speed set by the dial (see step 1 above) in
the time defined by the “ACC” parameter found in the
“Drive” parameter group.
Motor speed can be changed whilst the motor is running by
turning the dial clockwise (faster) or anti-clockwise (slower).
When the motor is running, the “FWD” light will be
displayed.
7.3 Press the red “Stop/Rst” button to stop the motor.
The red “Stop/Rst” button will stop the motor.
FWD
REV
The time taken (in seconds) to stop the motor is determined
RUN STOP/RST
by the “dEC” parameter which can be found in the “Drive”
parameter group.
min max
This guide has been produced by The Inverter Drive Supermarket Ltd.
All content, including but not limited to graphics, text and procedures copyright The Inverter
Drive Supermarket and must not be reproduced or altered without prior written permission.
©
Page 8
Page 10
Easy Start Guide
Parameter
Description
How to set
H40
Control Mode
Default is 0. Change to 3 to enable Sensorless Vector Mode.
H41
Auto-tuning
Default is 0. Ensure motor is off-load before changing to 1 to begin ID run.
LS Industrial Systems SV-iC5
8. How to enable Sensorless Vector Mode
The standard operating mode of the iC5
Inverter is VxF. This is the simplest form of
operation and controls Volts and Frequency to
vary the speed of a standard Induction Motor.
Sensorless Vector mode operates in the same
way as VxF but performs a number of
calculations to improve low speed torque.
This requires an “ID” run during which the
Inverter runs the motor for approx. 1 minute at
The iC5 can also operate in Sensorless Vector
mode. This can improve motor performance
without requiring a separate feedback device.
various speeds to gather the necessary data.
Decouple the motor from the machine
before starting an ID run.
8.1 Parameters in Function Group 2 - “H”
Press left/right to find H0 then up/down to find parameter number
This guide has been produced by The Inverter Drive Supermarket Ltd.
All content, including but not limited to graphics, text and procedures copyright The Inverter
Drive Supermarket and must not be reproduced or altered without prior written permission.
©
Page 9
Page 11
Easy Start Guide
Parameter
Description
How to set
Frq
Speed Command Source
Set to to enable 0-10V via 10kOhm Potentiometer3
LS Industrial Systems SV-iC5
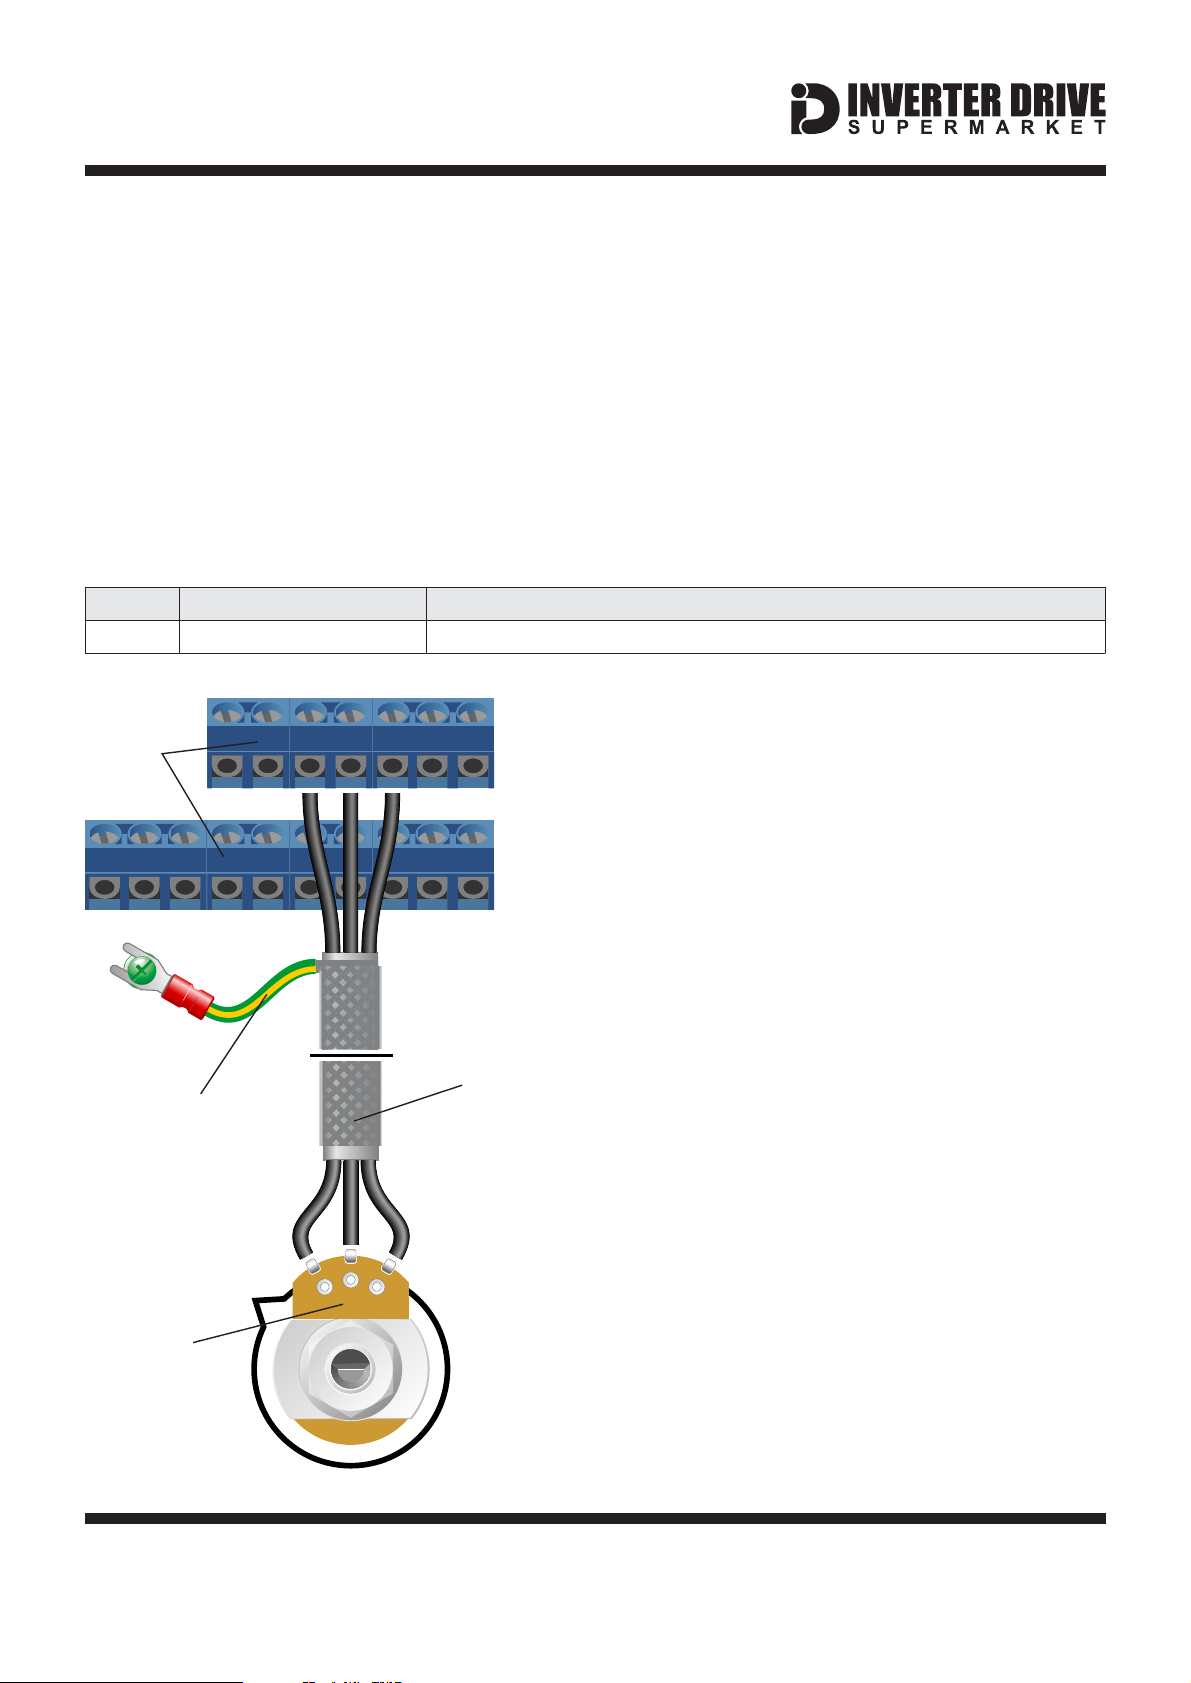
9. How to connect and configure a Potentiometer for remote speed control
If the integrated speed control dial is
unsuitable for the application, a remote
Potentiometer can be used instead.
This provides the benefit of allowing motor
speed to be controlled from a more convenient
location such as a cabinet door (if the iC5 is
cabinet-mounted) or on the machine itself.
9.1 Parameters to change in the Drive Group
Press left/right to find 0.0 then up/down to find parameter number
VR V1 CM
iC5 I/O
Terminal
Blocks
213
A Potentiometer of rating should be
used.
The number of turns depends on the
application but both single turn and ten turn
Potentiometers are available from The Inverter
Drive Supermarket at InverterDrive.com.
9.2 Connecting the Potentiometer
A wiring diagram is shown in the illustration
opposite. The most important connection at
the Potentiometer end is the centre terminal or
“wiper”.
The wiper will output a variable voltage
between 0 and 10 volts and should be
connected to the V1 terminal at the Inverter
end. It is this voltage which provides the speed
signal with 0V being slowest and 10V fastest.
10kOhm
The default output frequency at 0V is 0.5Hz. To
change this, edit Parameter F25.
Screen to
Earth Terminal
2
1
10kOhm
Potentiometer
This guide has been produced by The Inverter Drive Supermarket Ltd.
All content, including but not limited to graphics, text and procedures copyright The Inverter
Drive Supermarket and must not be reproduced or altered without prior written permission.
3
SY Cable
The default output frequency at 10V is 50Hz.
To change this, edit Parameter F26.
If the rotation of the Potentiometer is the
opposite to that required (ie. turn anti-
clockwise to increase speed instead of
clockwise) reverse connections VR and CM.
Use shielded SY cable between Potentiometer
and Inverter and ensure that the cable screen
is earthed at the green earth terminal on the
Inverter.
©
Page 10
Page 12
Easy Start Guide
Parameter
Description
How to set
drv
Run/Stop Command Source
Set to for Programmable Input 1 “P1".1
LS Industrial Systems SV-iC5
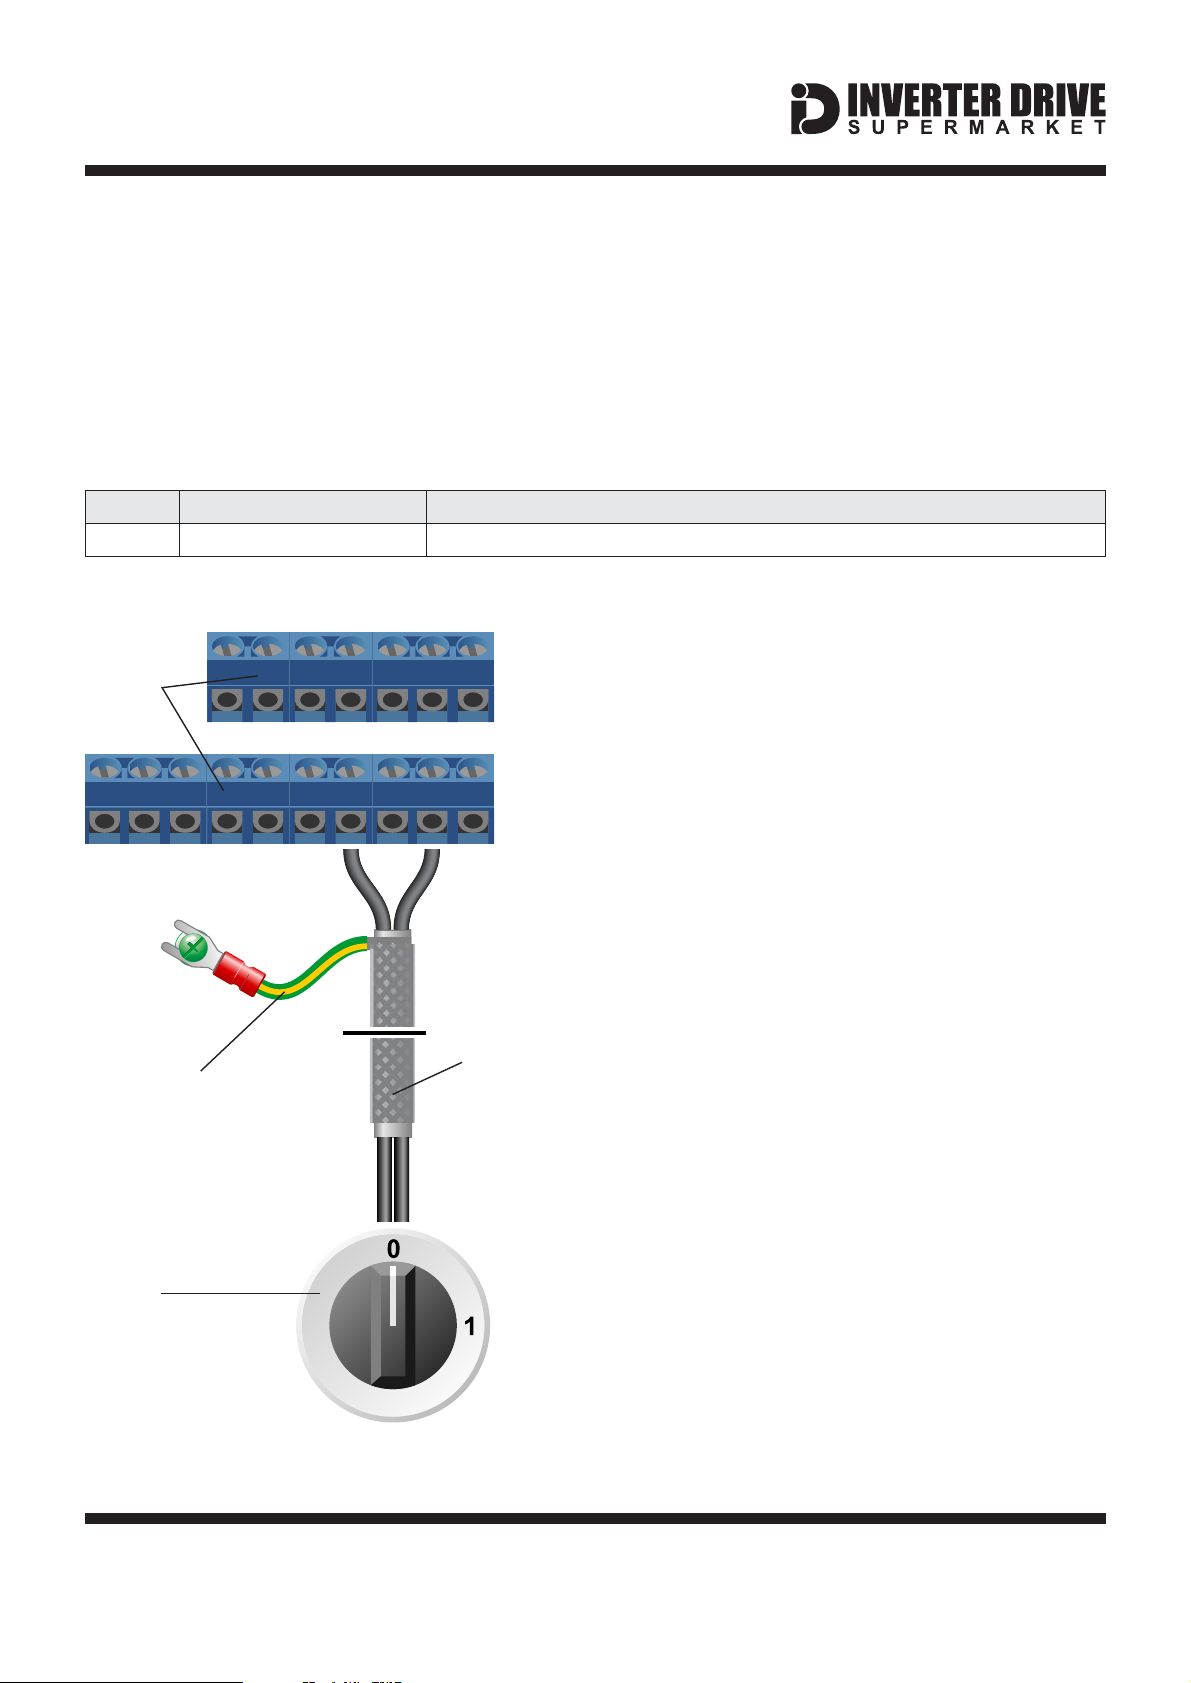
10. How to connect and configure a Run/Stop switch
The parameters described in Section 4 enable
Run/Stop operation via the red and green
buttons on the Inverter.
If this is unsuitable for the application, a remote
Run/Stop switch can be used instead.
Note that once this procedure is complete, the
Run/Stop buttons on the Inverter can no longer
be used.
Important: P1 refers to the P1 I/O terminal
and NOT the P1 power terminal.
10.1 Parameters to change in the Drive Group
Press left/right to find 0.0 then up/down to find parameter number
10.2 Connecting the Switch
iC5 I/O
Terminal
A wiring diagram is shown in the illustration
opposite.
Blocks
P1
CM
The CM terminal output is 24V DC when the
Inverter is connected to a power supply. This is
provided as a 24V output only and has no other
function.
12
When the P1 terminal receives 24V (ie. when
the circuit with CM is complete), Run is
enabled and motor will turn. Conversely, when
it receives 0V (ie. when the circuit with CM is
broken), Run is disabled and the motor will
stop.
This behaviour is known as a .
Digital Input
Screen to
Earth Terminal
SY Cable
Any 24V DC signal connected to P1 will cause
the Inverter to run. This can be useful if an
external source such as a PLC is controlling
the Inverter. If the 24V DC signal is external, a
connection to CM is not required.
1
2
Use shielded SYcable between the switch and
Inverter and ensure that the cable screen is
Switch
earthed at the green earth terminal on the
Inverter.
Note that although 2 core SY cable is shown in
the illustration opposite, multi-core SY cable
can be used if several digital inputs are to be
used.
This guide has been produced by The Inverter Drive Supermarket Ltd.
All content, including but not limited to graphics, text and procedures copyright The Inverter
Drive Supermarket and must not be reproduced or altered without prior written permission.
©
Page 11
Page 13
Easy Start Guide
Parameter
Description
How to set
drv
Run/Stop Command Source
Set to for Programmable Input 1 “P1".1
LS Industrial Systems SV-iC5
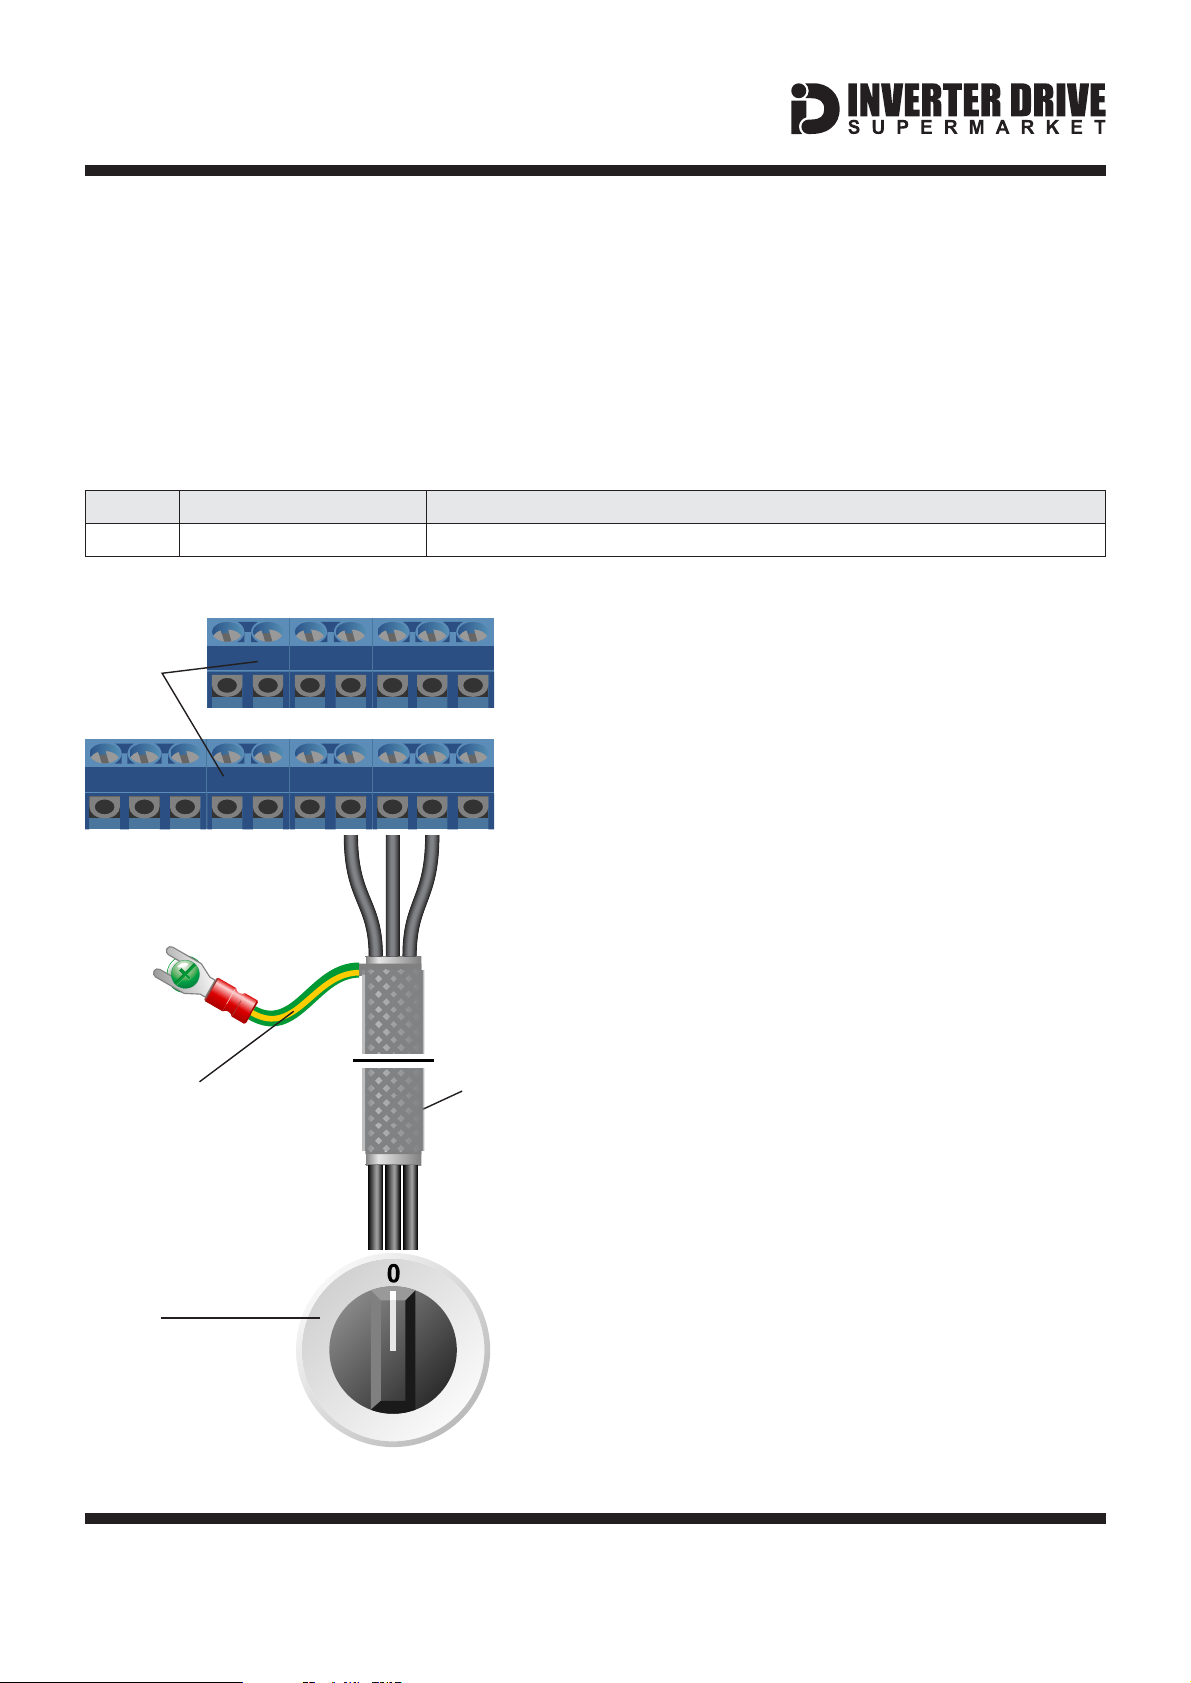
11. How to connect and configure a Fwd/Rev switch
The parameters described in Section 4 enable
Run/Stop operation via the red and green
buttons on the Inverter.
Section 10 explains how to enable remote
Run/Stop via a switch instead.
This section extends the functionality added in
section 10 to include Run Forward/ Reverse as
well as Stop.
Important: P1 and P2 refer to the P1 / P2 I/O
terminals NOT P1 / P2 power terminals.
11.1 Parameters to change in the Drive Group (skip if section 10 completed)
Press left/right to find 0.0 then up/down to find parameter number
11.2Connecting the Switch
iC5 I/O
Terminal
Blocks
A wiring diagram is shown in the illustration
opposite. The switch used is a DPDT centre off
type.
P2
CM
P1
The CM terminal provides a 24V DC output as
described in section 10.
123
When the switch is moved to the “F” (Forward)
position, the circuit between P1 and CM is
completed and the motor will turn forwards as
described in section 10.
In addition, when the switch is moved to the “R”
(Reverse) position, the circuit between P2 and
CM is completed and the motor will turn in
reverse.
Returning the switch to position “0" (off) will
Screen to
Earth Terminal
SY Cable
stop the motor.
This behaviour uses two .
Digital Inputs
DPDT Centre-off
Switch
This guide has been produced by The Inverter Drive Supermarket Ltd.
All content, including but not limited to graphics, text and procedures copyright The Inverter
Drive Supermarket and must not be reproduced or altered without prior written permission.
21 3
If both P1 and P2 receive 24V signals, the
motor will stop.
Any 24V DC signal from an external source
such as a PLC connected to P1 or P2 will
cause the Inverter to run forwards or
backwards.
FR
Use shielded SYcable between the switch and
Inverter and ensure that the cable screen is
earthed as described in section 10.
©
Page 12
Page 14
Easy Start Guide
LS Industrial Systems SV-iC5
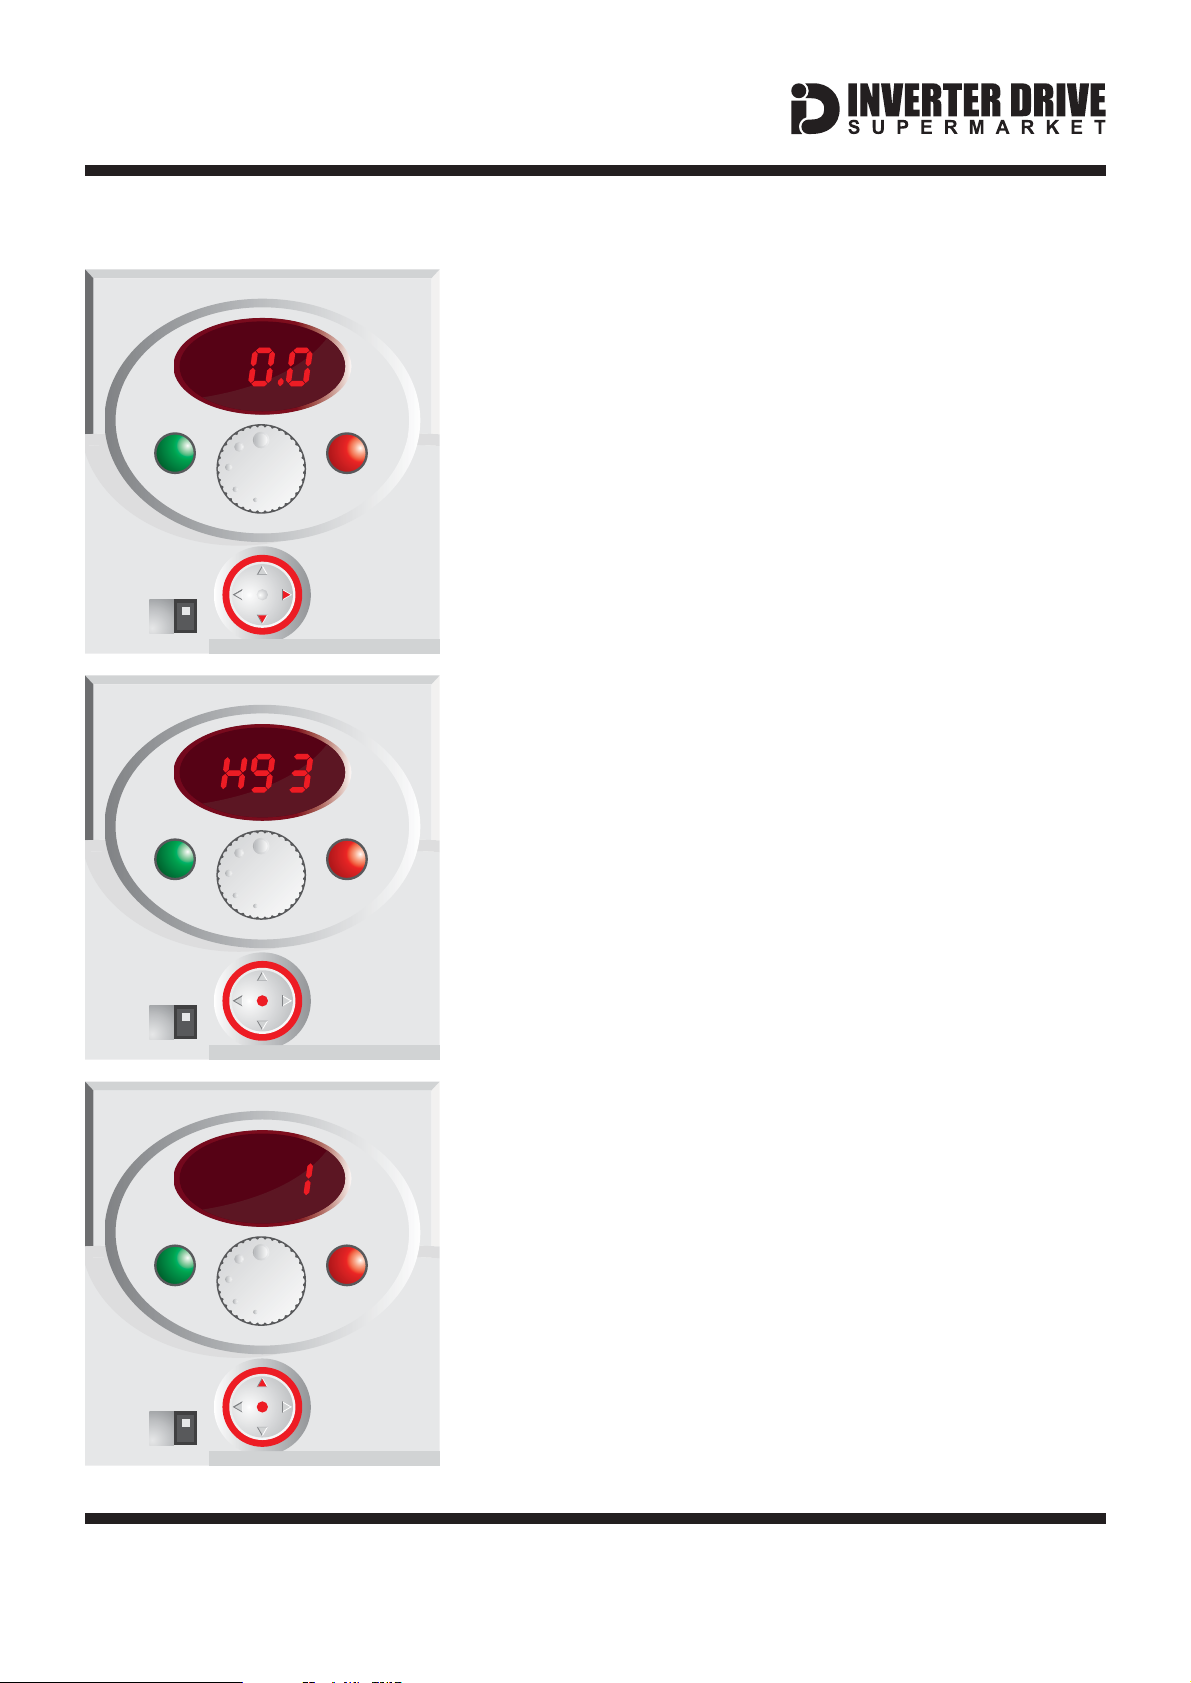
12. How to reset the Inverter to Factory Defaults
12.1 Use the navigation pad to navigate to parameter
H93.
FWD
REV
RUN STOP/RST
min max
NPN
PNP
FWD
REV
RUN STOP/RST
min max
From the home screen, press the right arrow on the
navigation pad twice to move to Parameter function group 2
“H”.
Then, press the down arrow three times to navigate to
“H93".
Note: If you are unsure if the display is showing the home
screen, power-off the iC5 for 60 seconds before switching
back on.
12.2 Press the navigation pad to change the value of
parameter H93.
Once the display shows “H93", press the navigation pad to
select the parameter and edit it’s value.
The display will show the default value of “0".
NPN
PNP
12.3 Press the up arrow on the navigation pad to
change the value from 0 to 1.
FWD
REV
Press the up arrow on the navigation pad once to change
the value of H93 from 0 to 1.
RUN STOP/RST
Press the navigation pad to save the changes. The display
will flash to indicate that the change needs to be confirmed.
min max
Press the navigation pad again to confirm the change. The
display will return to H93.
NPN
All parameters have now been reset to factory defaults.
PNP
This guide has been produced by The Inverter Drive Supermarket Ltd.
All content, including but not limited to graphics, text and procedures copyright The Inverter
Drive Supermarket and must not be reproduced or altered without prior written permission.
©
Page 13
Page 15

Easy Start Guide
LS Industrial Systems SV-iC5
13. Notes
This guide has been produced by The Inverter Drive Supermarket Ltd.
All content, including but not limited to graphics, text and procedures copyright The Inverter
Drive Supermarket and must not be reproduced or altered without prior written permission.
©
Page 14
 Loading...