

Page 1
Pub. 988-0160-461
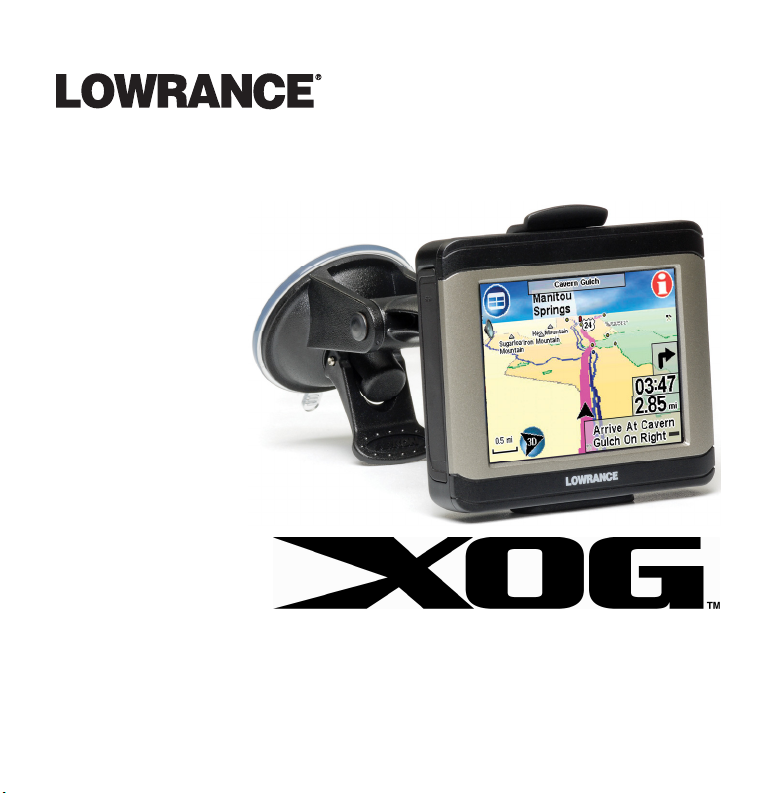
Mapping GPS and Multimedia Player
Quick Start Guide
1
Page 2

Power Cable
The Lowrance XOG™ GPS operates on an internal rechargeable battery. Battery charge is probably low at time of purchase. The first time you use
XOG you should connect it to power. XOG can be powered in several ways:
• Cigarette lighter cable, using
12-volt vehicle power. Shown
at right.
• USB-PC cable, using power
supplied by personal computer.
• Optional AC adaptor, using
120-volt AC household power.
Battery charge status is displayed
on the Main Menu. See page 6.
Power On and Off
Power
button
To turn XOG on, press the power button on
the top of the unit. To turn off, press and hold
the button for three seconds.
To acknowledge the warning messages that
appear during startup, press the on-screen X
button that appears in the top right corner of
the display. Follow the on-screen instructions
to select your country and language.
2
Page 3
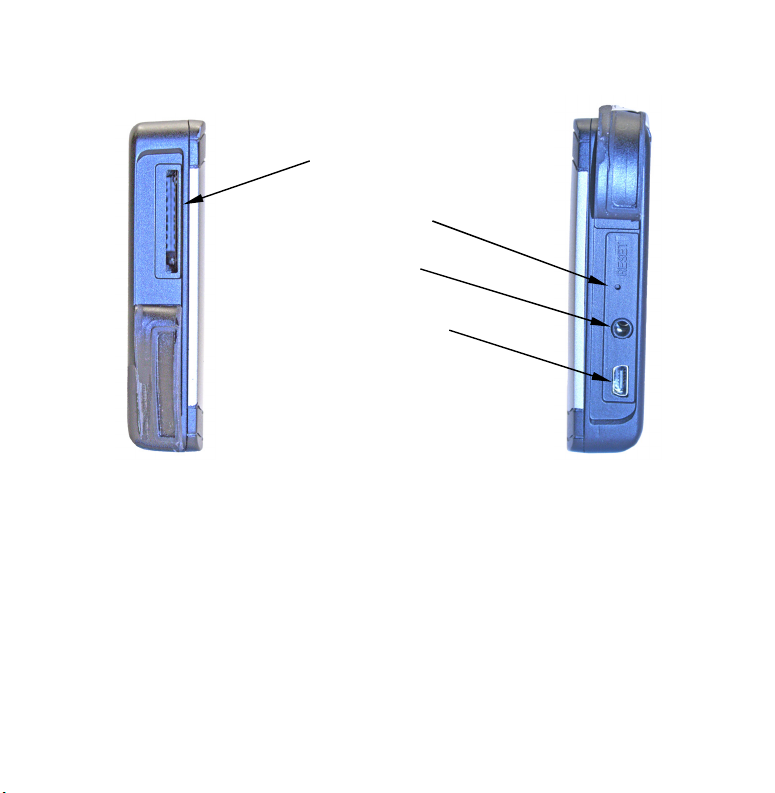
Left side
SD card slot
Reset button
Headphone
socket
USB-to-PC/External
power socket
(mini-USB)
Right side
Lowrance XOG GPS, side views. Protective rubber covers are pulled
back to show details.
Registering XOG
When you connect XOG to a computer the first time, you can register
the unit at the on-line MapSelect store in order to purchase and
download additional maps.
XOG comes pre-loaded with turn-by-turn road maps to guide you while
driving. The MapSelect store provides additional content for your out-
3
Page 4
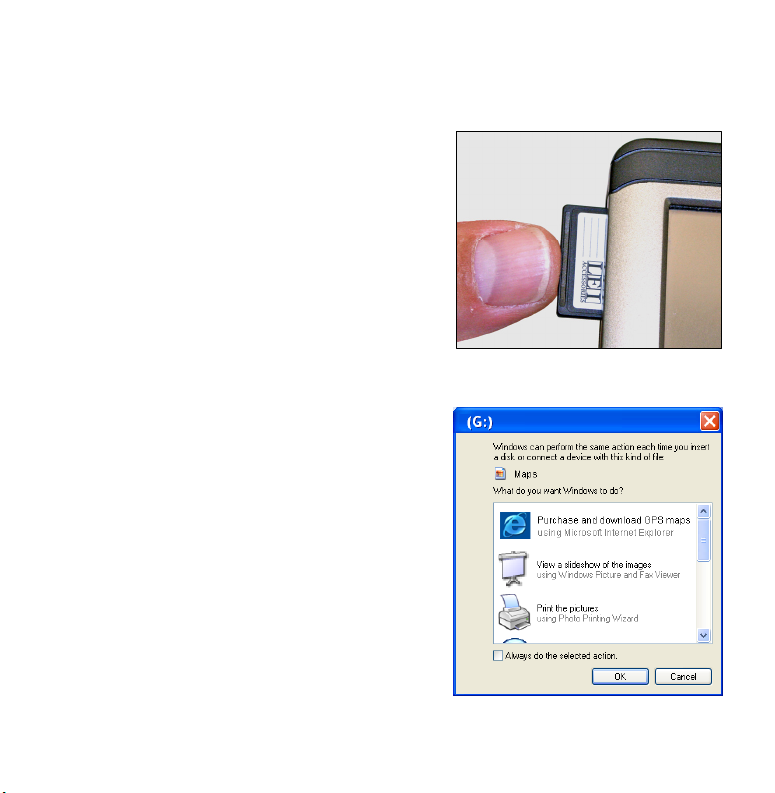
door travels. You can also purchase pre-programmed maps on an SD
card from your Lowrance dealer.
To access the MapSelect store, you must
first insert an SD card in XOG's card
slot. When connected to a PC, XOG adds
a file to the card that automatically
sends your web browser to the MapSelect
store. If you prefer, you can manually
log-on at
www.mapselect.com. You can also
log on manually after you register.
To connect XOG to a PC and register
online:
1. Insert an SD card in XOG's card slot.
2. Connect the USB-to-PC cable to a
USB port on your PC.
3. Connect the other end of this cable to
the mini-USB port on XOG.
4. Power XOG on as described above.
When using Microsoft
®
Windows®,
your PC will recognize XOG and assign it a drive letter.
5. A Windows dialog box will ask if you
want to connect to the internet and
4
Page 5

visit the Lowrance online map store. Click on this link to access the
MapSelect store and registration site.
6. Follow the on-screen prompts to register your XOG and set up a
MapSelect account. More information about the MapSelect store can
be found on-line using the Help function.
Menus and Main Functions
You can tap on-screen buttons or other menu items on XOG to quickly
access features. Most features are accessed from XOG's Main Menu.
To access the Main Menu, tap the on-screen
Main Menu button
Speak button
Auto Zoom button
Overlay Data Hide
button
MAIN MENU button.
Location-POI
Information button
Map Display Toolbar
Cursor
Map Orientation
button
XOG's map page control tools.
To access the cursor and Map Display Toolbar, tap anywhere on the
map page. With the cursor displayed, you can press and "drag" to pan
the map.
5
Page 6
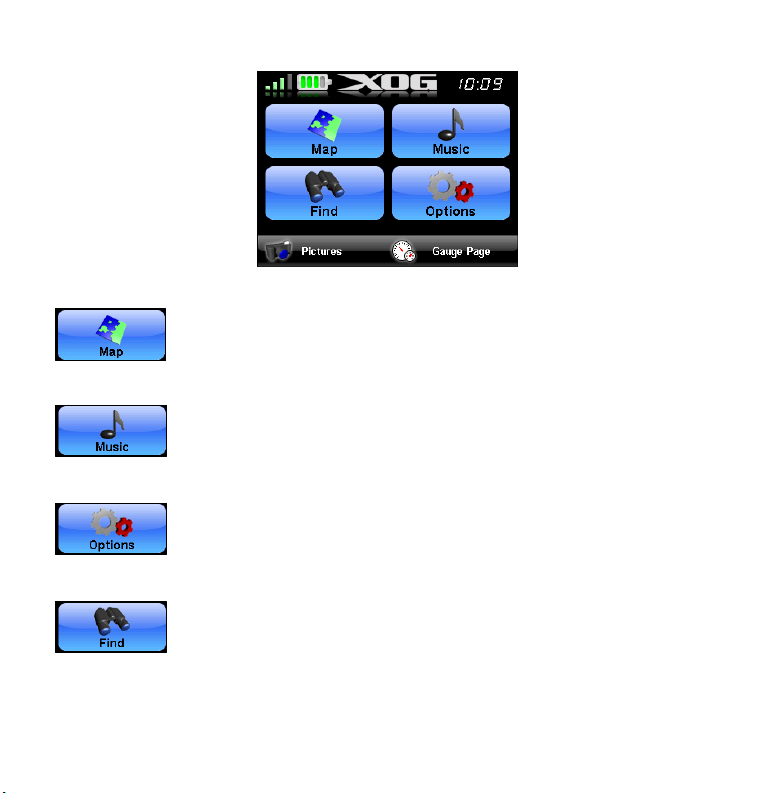
Main Menu.
Map button displays your current position on a moving
map, including information on your current route.
Music button lets you to choose the audio play list, adjust volume and set various music play controls.
Options button has three pages with settings that control operations and provide additional information.
Find button has three pages of search options designed
to help you find destinations quickly and easily.
Main Menu also contains power and battery indicators.
6
Page 7

A power plug symbol appears when external power is connected. It
flashes while the battery charges. Charging is complete when flashing
stops. Disconnect external power and a battery symbol appears. Four
green cells show a full battery. A single red cell warns that the battery
is low.
Mounting Instructions
The mount secures the unit to
glass or other smooth surfaces.
To attach the mount:
1. Press the suction cup against a
clean surface.
2. Push the locking lever toward the base of the mount.
3. To remove it, disengage the
locking lever and pull on
the suction release tab.
4. To dismount XOG, push the release tab at top of unit up slightly.
Then, lift the unit forward and out of the bracket.
To attach unit, engage bottom edge to
bottom of mount. Push back on unit
until it snaps into place.
7
Page 8

!
CAUTION
Do not leave the unit unattended on an automobile dashboard.
When the GPS is not in use, protect it from theft and heat by
storing it in an unobtrusive location away from direct sunlight.
In warm seasons the temperature can become hot enough to prevent the GPS unit from operating. When the GPS is not in use
for an extended period of time we recommend bringing it indoors
and storing it at room temperature.
!
WARNING
When mounting a GPS unit in an automobile you must avoid
any installation that obscures instruments and controls or restricts the driver's view through the windows. Avoid placing
the GPS where it could be propelled by an airbag. Some areas
may restrict mounting any electronic device in any location on
an automobile dash or windshield. Check local laws before using these mounts. Check the suction mount for adhesion each
time you use the unit and reinstall it. This is a portable mounting device and the normal heating and cooling cycle of a car's
interior can loosen the seal. A loose seal could allow the unit to
fall or come loose during vehicle operations.
Determine Your Position Before Traveling
XOG must lock-on to multiple GPS satellites to determine your current
position and navigate. This requires a clear view of the sky, unobstructed by structures or heavy foliage.
8
Page 9

When you begin a trip, make sure XOG can "see" the sky and wait for it
to determine a position before you start driving or walking. A question
mark flashes over the current position arrow to indicate the unit has
not calculated its position.
XOG usually has good satellite reception through automobile windows.
Some windshields have heat reflective properties or defrosters that
block GPS signal reception. Consult your vehicle manufacturer to determine if your car has this special glass installed. If so, you may need
to mount the unit near another window.
Map Page
The unit’s map page displays where you are as well as your surroundings.
Speak button
Black arrow icon
Overlay data
Map Orientation
button
Auto Zoom
button
A black arrow icon indicates your position on the map page. The map
displays the route with a magenta line, with colored dots at each turn.
boxes
9
Page 10

Use the Speak button to control the volume level of spoken, turn-by-
p
turn instructions.
A black arrow icon represents your position on-screen. The arrow
always points in the direction you are traveling.
Use the Map Orientation button to toggle between three different
map views:
North Up
Track U
North Up always shows the map with North at the top of the screen.
Track Up rotates the map so that the direction you are traveling is always at the top of the screen. In Track Up, the button rotates to show
which way is North. 3D View displays the map from a position above
and slightly behind the black arrow icon.
Overlay Data boxes provide information about your route. Overlay
data appears in semi-transparent boxes on the map screen. The transparency level of overlay data boxes can be controlled from the Interface
Options screen on Menu 2 in the Options feature.
Use the Auto Zoom button to toggle automatic zoom on and off. As
the map screen moves to track your position, Auto Zoom will enlarge
the map based on your speed and the distance to the next turn. For
manual zoom control, turn off Auto Zoom and launch the Map Display
Toolbar.
10
3D View
Page 11

The Map Display Toolbar controls the map screen. To bring up the
Map Display Toolbar tap anywhere on the map screen. The toolbar buttons are, from top to bottom:
X clears the cursor and Map Display Toolbar from screen.
The Map View button toggles between
three different map screen views.
Zoom In to show less area but more detail.
Zoom Out to show less detail but a larger area.
Navigation Instructions
XOG is designed to generate a route from your current position to a selected destination. If you miss a turn or are forced to detour, it automatically generates a new route based on your new position.
You can view a list of route directions by selecting
DIRECTIONS LIST from
Options Page 1. Select any turn from the list and another screen appears, showing a close-up of the area around the turn.
11
Page 12

The Directions list (left) shows every turn you will make while navi-
gating to a destination. The Turn Preview screen (right) will show you
a map view of the turn. A preview like this automatically appears
whenever you are close to a turn.
Location Information button
The Location Information button is shown at right. Tap this
button to bring up the Location Information or POI
Information screen, depending on whether the cursor is onscreen.
The Location Information button has four major functions:
1. Look up the latitude and longitude of your current position or some
other location you select with the cursor.
2. Look up a variety of other information for selected Points of Interest
and map landmarks. This varies by the item selected and ranges
12
Page 13

from addresses and telephone numbers to available services and dis-
r
tance to the selected item.
3. Add the current position or a selected item to the Addressbook. (Use
the
ADD TO ADDRESSBOOK command.)
4. Navigate to the selected item. (Use the
Highlighted
location
Curso
GO TO command.)
A business location (left) highlighted with the cursor. The POI Infor-
mation screen for the highlighted location is shown, at right. You can
use the cursor and the Location Information button like this to look up
information on many other map symbols as well as POIs.
Find Address or Point Of Interest (POI)
The most common navigation method is to look up a destination with
the Find feature, then use the Go To command to direct you there. The
XOG manual discusses these functions in more detail, but here is an
outline of how they work:
13
Page 14

To find an address:
1. From the
MAIN MENU, select the FIND button and press ADDRESS.
2. XOG questions you about which state/province and which city. Follow the on-screen prompts and the virtual keyboard appears so you
can fill in the answers. When entering street names, DO NOT use
modifiers such as "North" or "Avenue."
3. After you enter city, state, address and street name, XOG searches
it's database and gives you a list of possible addresses. Select the address you want.
4. XOG gives you the option to add the address to your Addressbook,
Find it on the map or go to it. Press
GO TO to begin navigation.
To find a POI:
1. From the
MAIN MENU, select the FIND button.
2. Select one of the 18 categories on the 3 Find pages.
3. Narrow your search by selecting a subcategory, or tap in the Name
Filter box to spell out what you're looking for.
4. XOG displays a list of the items nearest to you. Select the item and
from its information screen you can go to it, find it on the map or
add it to the Address Book.
Switch between Navigation Modes
XOG is a dual-purpose navigator. In addition to providing verbal turnby-turn navigation instructions for the road, it also displays plot trails
14
Page 15

and performs traditional straight-line (or point-to-point) navigation in
off-road situations.
To change to Point-to-Point mode, press MAIN MENU. Now select OPTIONS,
PAGE 1. Press the NAVIGATION MODE button and the Navigation Mode
screen will appear.
Options Page 1, left, and Navigation Mode screen, right.
Turn-by-Turn (car image) is selected as the default setting. Choose
Point-to-Point (A to B image) and a warning message appears asking if
you are sure you want to change modes. Choose
YES and close the Navi-
gation Mode screen.
15
Page 16

Lowrance Pub. 988-0160-461 © Copyright 2007
All Rights Reserved
Printed in USA 101207 Navico
16
 Loading...