

Page 1
TM
StructureScan HD
Sonar Imaging
Operation Manual
Page 2

Copyright © 2012 Navico
All Right Reserved.
No part of this manual may be copied, reproduced, republished, transmitted or distributed for any purpose, without prior written consent of Navico.
StructureScan™ is a trademark and Lowrance ® and Navico ® are registered trademarks of
Navico, Inc.
Navico may nd it necessary to change or end our policies, regulations and
special oers at any time. We reserve the right to do so without notice. All
features and specications subject to change without notice.
For user manuals and the most current information on this product, its operation
and accessories, visit our web site:
www.lowrance.com
Page 3

Disclaimer
As Navico is continuously improving this product, we retain the right to make
changes to the product at any time which may not be reected in this version
of the manual. Please contact your nearest distributor if you require any further
assistance.
It is the owner’s sole responsibility to install and use the instrument and transducers in a manner that will not cause accidents, personal injury or property damage.
The user of this product is solely responsible for observing safe boating practices.
NAVICO HOLDING AS. AND ITS SUBSIDIARIES, BRANCHES AND AFFILIATES DISCLAIM ALL LIABILITY FOR ANY USE OF THIS PRODUCT IN A WAY THAT MAY CAUSE
ACCIDENTS, DAMAGE OR THAT MAY VIOLATE THE LAW.
Governing Language: This statement, any instruction manuals, user guides and
other information relating to the product (Documentation) may be translated to,
or has been translated from, another language (Translation). In the event of any
conict between any Translation of the Documentation, the English language
version of the Documentation will be the ocial version of the Documentation.
This manual represents the product as at the time of printing. Navico Holding AS.
and its subsidiaries, branches and aliates reserve the right to make changes to
specications without notice.
Copyright © 2012 Navico Holding AS.
Page 4

Contents
StructureScan ........................................................................ 3
Sidescan ......................................................................................................3
Downscan ....................................................................................................4
Displaying Sidescan and Downscan ............................................6
Screen Congurations ................................................................... 6
Overlay Downscan ......................................................................................7
Overlay Transparency .................................................................................8
StructureScan Menu.......................................................................9
Contrast .......................................................................................................9
Range ..........................................................................................................9
View ...........................................................................................................10
Structure Options ......................................................................... 11
Structure Surface Clarity ........................................................................... 11
Structure Noise Rejection ......................................................................... 11
Stop Sonar.................................................................................................13
Log sonar...................................................................................................13
Viewing Structure History ............................................................14
Save Waypoints .........................................................................................15
StructureMap ................................................................................16
Turning on Structure overlay .....................................................................17
Selecting Structure Source .........................................................17
Live mode ..................................................................................................17
Saved mode ..............................................................................................18
Recording Structure data...........................................................................19
Scanning Fishing areas ...............................................................20
Sharing les ...............................................................................................20
Structure options .......................................................................................22
2
Page 5
Softkeys
Instructions in this manual are based on HDS unit menus, not
softkeys. If you have an HDS-8 or HDS-10, you can get the same
results using the softkeys.
To use softkeys:
1. Touch the desired softkey to change settings, view a softkey menu
or adjustment scrollbar.
2. Use the keypad to select menu items and make adjustments to
scrollbars. Press EXIT to close softkey menus.
NOTE: After making adjustments to options or settings, use the EXIT
key to resume normal operation.
StructureScan
Consists of two powerful sonar views: Sidescan and Downscan. Used in
conjunction with the built-in broadband sounder, StructureScan gives you an
underwater panoramic view.
Sidescan
Sidescan
Broadcasts a sonar beam to each side of your boat allowing you to view structure,
and terrain without having to drive your boat over the top of it.
3
Page 6
You can use Sidescan to:
• Save waypoints at objects/locations off to side of the boat
• Review history
• Measure the size of underwater objects and the distance from one
object/location to another object/location using live Sidescan returns
or Sidescan history
• Create sonar logs
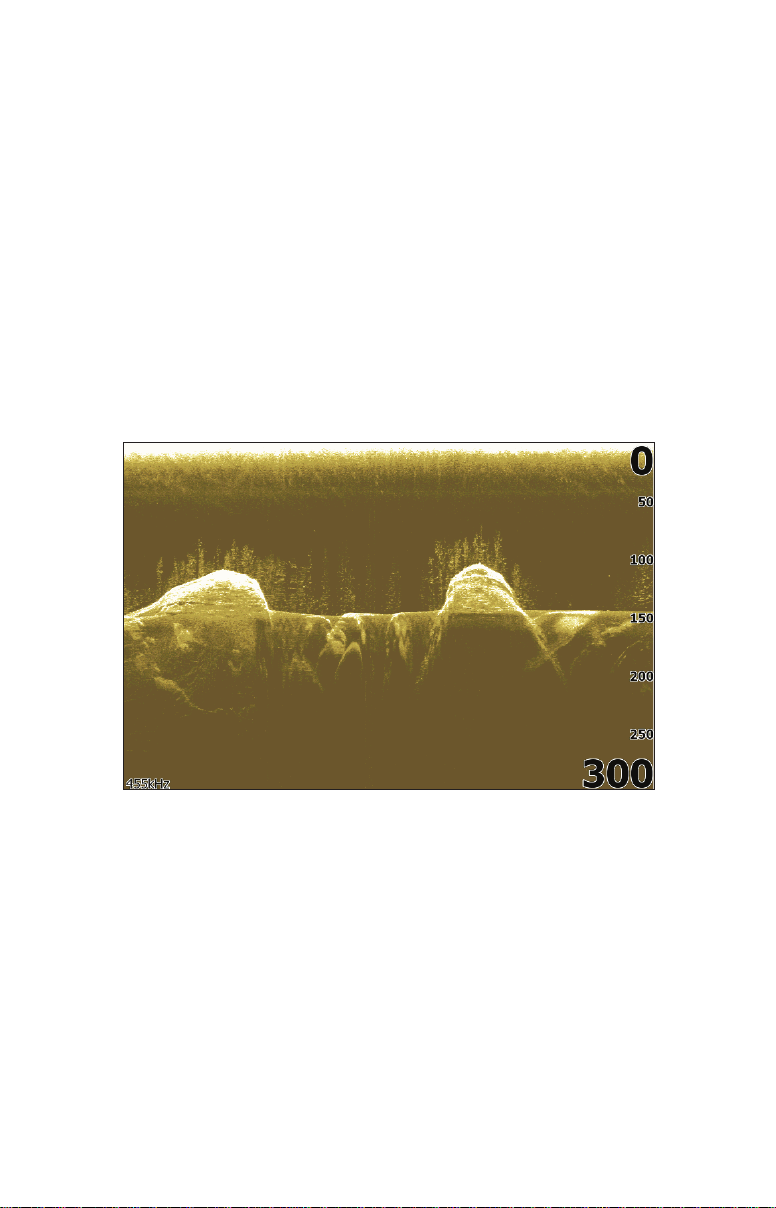
Downscan
Uses the same technology as sidescan, but broadcasts the beam downward, giving you the same high resolution in a familiar right to left display.
Downscan
You can use Downscan to:
• See different view of objects/locations selected with cursor on
Sidescan panel
• Save waypoints
• Review history and create sonar logs
• Overlay Downscan imaging on the sonar page
4
Page 7
Underwater
terrain
with the bottom
Transmit Burst
Transducer
sidescan signal
makes contact
Water column
between boat
and where
Trees
Sidescan
Trees
Built-in Broadband sounder
5
Downscan
Page 8
Displaying Sidescan and Downscan
Sidescan and Downscan can be shown on the display individually or together in
dierent split screen congurations.
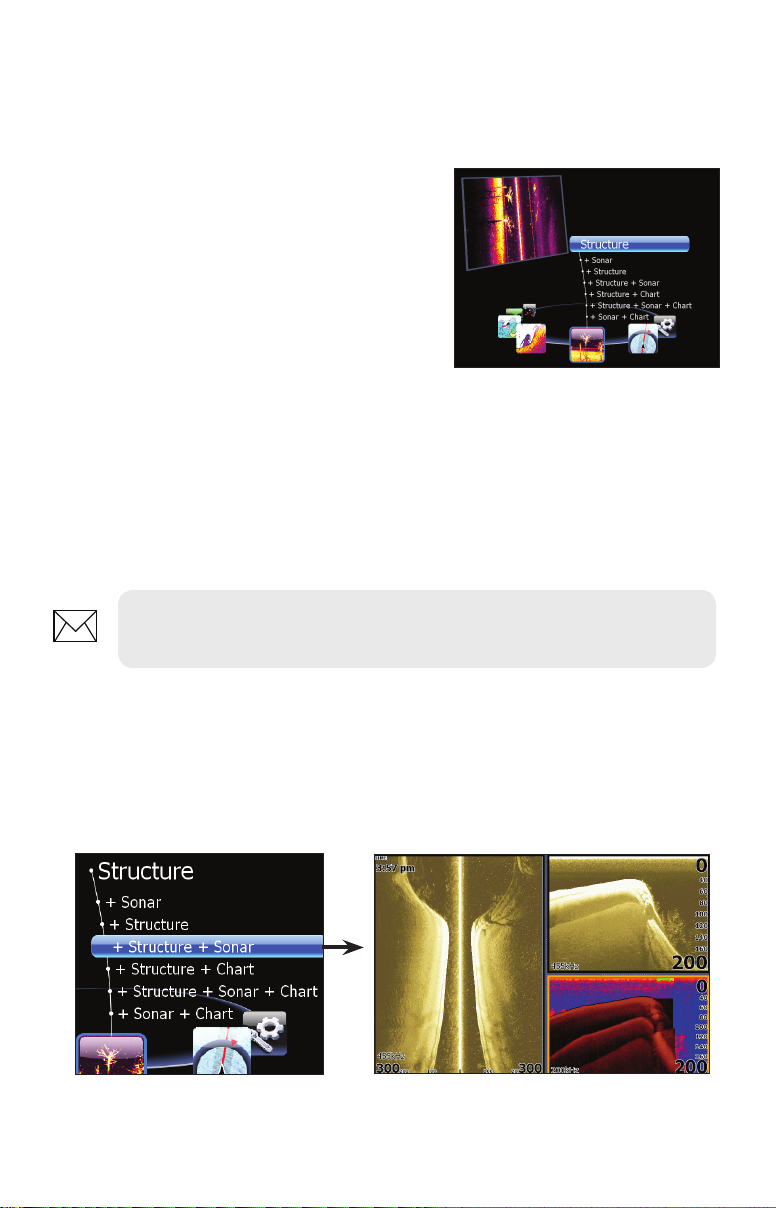
To display Sidescan:
1. Press the PAGES key.
2. Use the keypad to rotate the
carousel menu until Structure is
selected.
3. Press ENTER.
To display Downscan:
1. From the Sidescan onscreen display, press MENU.
2. Select Structure Options and press ENTER.
3. Highlight View and press ENTER.
4. Select Down and press ENTER.
NOTE: To access the StructureScan menu, press MENU from a
StructureScan page or from an active StructureScan panel.
Pages screen for HDS-8 /10 units.
Screen Congurations
StructureScan can be shown with other pages in various screen congurations
including: splitscreen, tri-screen and quad screen (HDS-8/10 only).
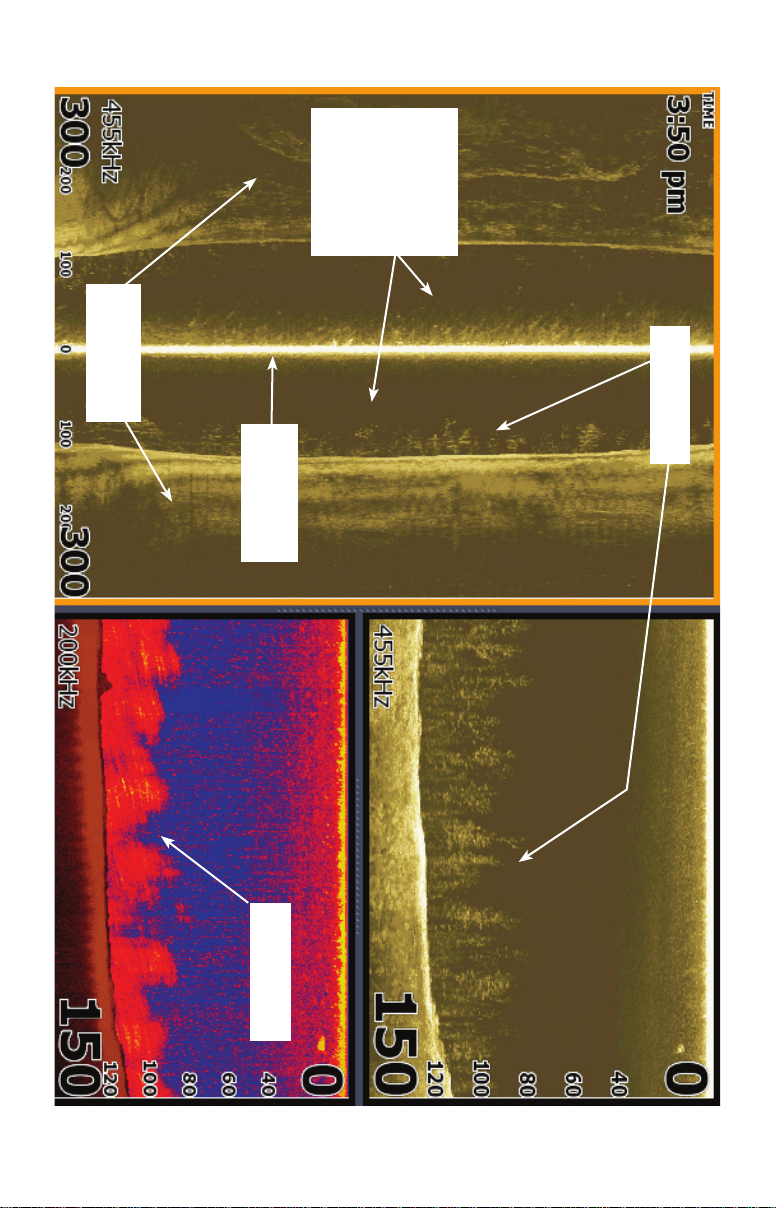
Selecting Structure + Sonar from the Structure menu displays a tri-screen
with two StructureScan panels and a sonar panel.
6
Page 9
To display a split, tri or quad screen:
1. Press the PAGES key.
2. Press the keypad left/right to rotate the carousel menu until Structure
is selected.
3. Press the keypad up/down to select the desired combination of
panels and press ENTER.
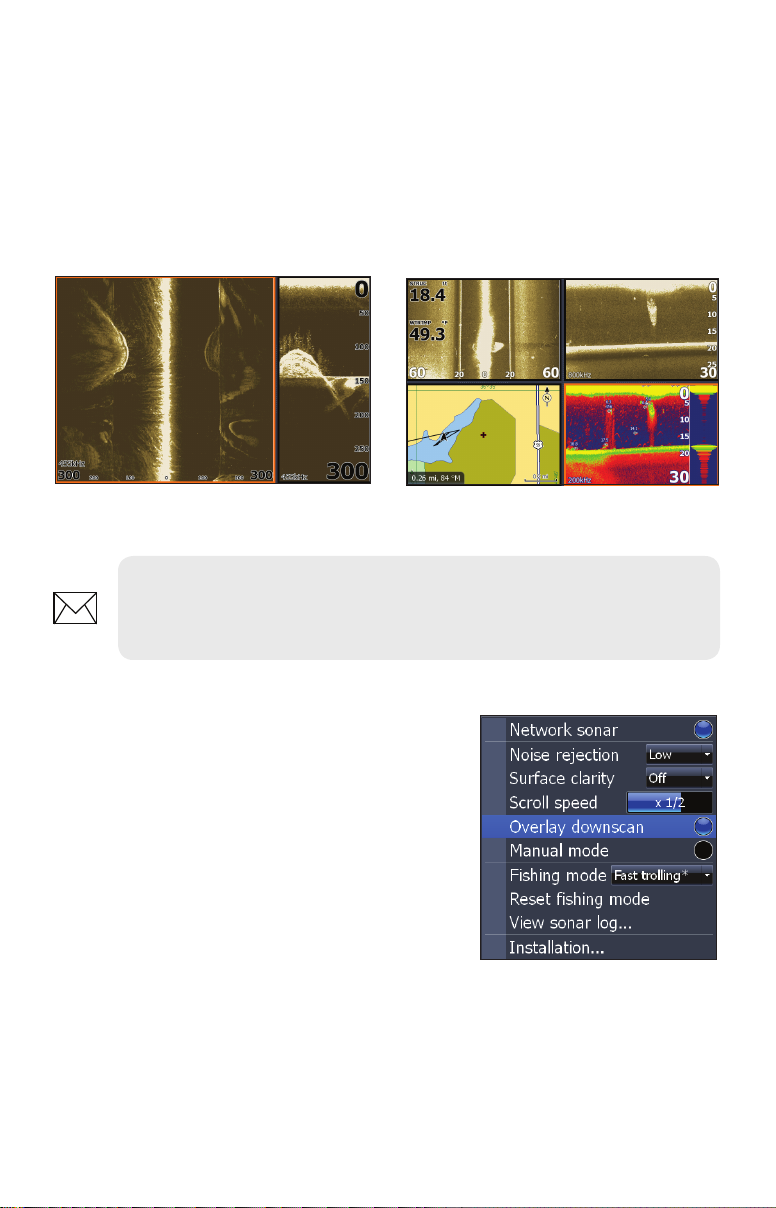
Structure + Structure Splitscreen
Structure + Structure + Sonar + Chart
Quadscreen (HDS -8/10 only).
NOTE: To switch the active panel on a multi-screen display, hold down
the Pages key until the orange border switches to the next panel. Repeat
this step to rotate active status to the next panel.
Overlay Downscan
Places downscan data on top of sonar data,
making it easier to separate sh from structure.
To turn on Downscan Overlay:
1. Press MENU twice.
2. Select Sonar and press ENTER.
3. Highlight Overlay Downscan and press
ENTER.
7
Page 10

Downscan overlay set to 0%.
Overlay Transparency
Controls the transparency of Downscan overlay on the sonar page, allowing you
to select an overlay level best suited for current water conditions.
To make adjustments to Overlay:
1. Make sure the sonar panel is the active panel.
Press MENU.
2. Select Adjust and press ENTER.
3. Use the keypad to highlight Overlay.
4. Press the keypad left/right to decrease/increase
overlay transparency.
StructureScan Options Softkey
If you have an HDS-8 or HDS-10, you will notice the
Stop Sonar softkey is replaced with the Structure
Options softkey when Overlay Downscan is turned
on.
That gives you one-touch access to StructureScan
display options and settings, including the Overlay
adjustment scrollbar.
Downscan overlay set to 85%
8
Page 11

StructureScan Menu
Provides access to StructureScan features, settings and the
Structure Options menu.
To access the StructureScan menu, press MENU from the
StructureScan page.
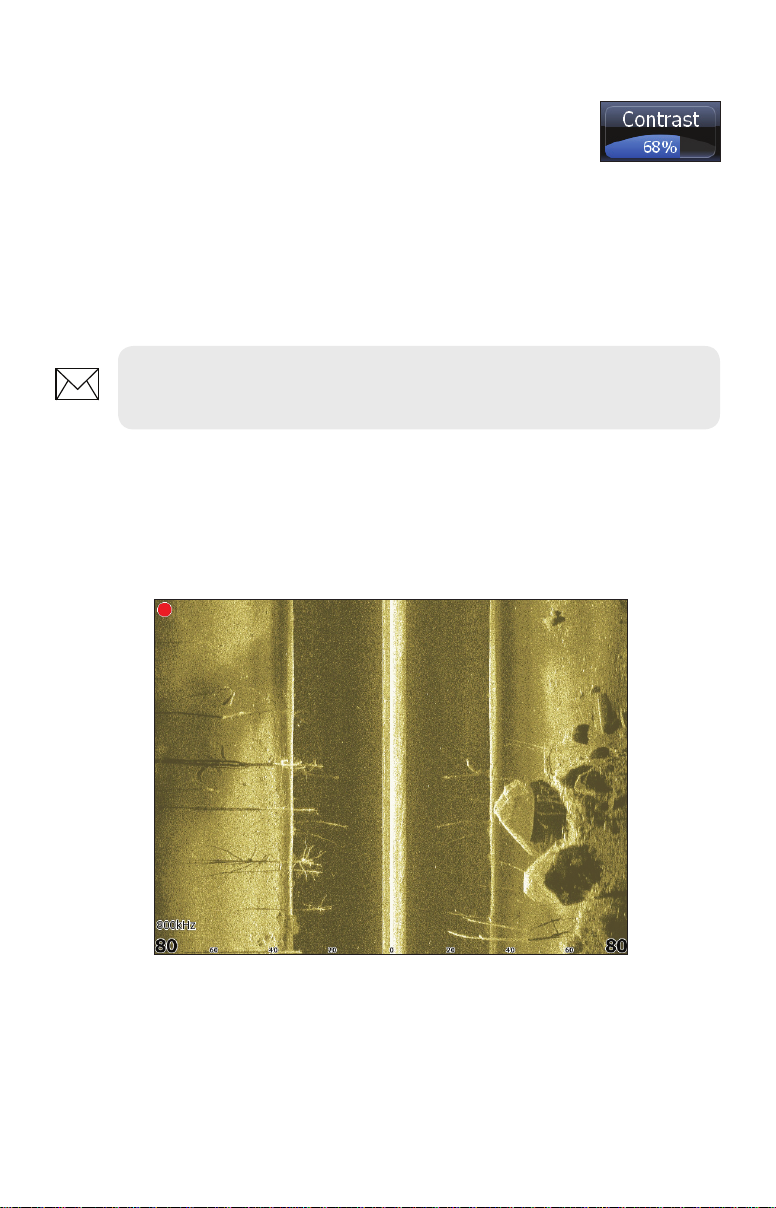
Contrast
Controls the level of contrast used on the display.
To make adjustments, highlight Contrast on the StructureScan menu and press
the keypad left/right to decrease/increase the contrast level.
Range
Used to adjust the width of a sidescan image and controls
the section of the water column shown when downscan is
the selected view.
To select Range:
1. Select Range from the Structure menu and press
ENTER.
2. Use the keypad to select the desired range and
press ENTER.
Structure menu
9
Page 12

View
Controls the view your unit will use when displaying
StructureScan data. In a multi-panel display, you can select
dierent views for each StructureScan panel.
To select a View:
View menu
1. Select View from the StructureScan menu and press ENTER.
2. Highlight the desired option and press ENTER.
Left Only
Left and Right selected on View menu.
Right Only
Palette
Gives you control of the overall look and feel of the display by allowing you to
select a palette with color and brightness levels geared toward your viewing
preferences.
Palette No. 1 Palette No. 2
To select a Palette:
1. Select Palette from the StructureScan menu and press ENTER.
2. Use the keypad to select the desired palette and press ENTER.
10
Page 13

Structure Options
To make adjustments to StructureScan display
settings, highlight Structure Options on the
StructureScan menu and press ENTER.
Structure Options menu
Structure Surface Clarity
Adjusts sensitivity near the surface of the water to reduce or eliminate onscreen
clutter caused by wave action, boat wakes, temperature inversion, etc.
Structure Surface Clarity turned off.
To adjust Surface Clarity:
1. Select Structure Surface Clarity from the Structure Options menu
and press ENTER.
2. Use the keypad to select the desired setting and press ENTER.
Structure Noise Rejection
Reduces onscreen clutter caused by bilge pumps, engine vibration, air bubbles or
other transducers on your boat.
To turn Structure Noise Rejection On/O, highlight Structure Noise Rejection on the Structure Options menu and press ENTER.
Flip Left/Right
Controls the orientation of the sidescan/downscan onscreen display.
If the transducer is installed with the cabled end pointing away from the back of
your boat (Direct Step Mount) or pointing away from the front of your trolling
motor, you must turn on Flip Left/Right.
Structure Surface Clarity on High.
11
Page 14

That will ensure that what is on the left or right
Cabled end of transducer
side of your boat underwater, will be shown on the
corresponding side of the screen on your display unit.
To turn on/o Flip Left/Right, highlight Flip Left/Right
on the Structure Options menu and press ENTER.
Back of the boat
Range Lines
Onscreen lines that make it easier to estimate
depth of sonar targets (Downscan) or
distance from sonar targets (Sidescan).
To turn on/o Range Lines, select Range
Lines on the Structure Options menu and
press ENTER.
Range Lines shown in Sidescan
Measure Distance
view.
Measures the size of underwater objects and the distance from one object/location to another object/location.
The
selected
locations
are 40.5
feet apart.
To Measure Distance:
1. Press MENU from a StructureScan page.
2. Highlight Measure Distance and press ENTER.
3. Use the keypad to move the cursor into the desired position.
4. To measure the distance from the selected location to another object
or location press ENTER and move the cursor.
5. Press EXIT to return to normal operation.
12
Page 15

Stop Sonar
Stops Sidescan and Downscan sonar from the scrolling, allowing you to get a
closer look at onscreen objects or locations.
To pause/restart the chart, highlight Stop Sonar on the Structure menu and press
ENTER.
Log sonar
Records sonar logs, allowing you to review
StructureScan and broadband sonar data later
via an MMC or SD card.
To access the Log Sonar menu, select Log
Sonar Data from the Structure menu and press
ENTER.
Log Sonar Menu
Filename
Save to
Bytes
Input the desired name for the sonar log le
Selects location where sonar log will be saved/stored; to
save data to MMC/SD card, select Memory Card
Controls number of bytes per sounding. More bytes yields
better resolution/shorter logging time; conversely, fewer
bytes produces longer sonar logs/lower resolution
Logs StructureScan data and conventional sonar data
Log All Channels
Time Remaining
To input a lename:
1. Highlight the Filename text box and
press ENTER. A keyboard will appear
on the screen.
2. Use the keypad to input the desired
lename.
3. Select OK and press ENTER.
simultaneously. When logging all channels, logs are saved
in.Sl2 format instead of .slg format. The .Sl2 le format is
not compatible with non-HDS units.
Recording time left until memory storage runs out
13
Page 16

To adjust Save to or Bytes per Sounding:
1. Highlight Save to or Bytes per Sounding from the Sounder Logging
menu and press ENTER.
2. Use the keypad to select the desired option and press ENTER.
To turn on/off Log All Channels:
1. Highlight Log All Channels on the Log Sonar menu.
2. Press ENTER.
Record
To record a sonar log, highlight the Record button and press ENTER.
To stop logging:
1. Select Stop from the Sounder
Logging menu and press
ENTER.
2. Highlight the Stop Logging
button and press ENTER.
Red circle indicates sonar log is being recorded;
Source
All Channels are being logged in this example
Selects the transducer data that will be shown by a your display unit when there
is more than one StructureScan transducer connected to an ethernet network.
To select a source:
1. Select Source from the Structure menu and press ENTER.
2. Highlight the desired option and press ENTER.
Settings
Opens the Sonar Settings menu.
Viewing Structure History
You can view Sidescan or Downscan history individually — by displaying them
full screen — or simultaneously by adding them to a multi-panel screen.
14
Page 17

Blue history tracking bars
To view history:
1. From a StructureScan page, press the keypad down (Sidescan)
or to the left (Downscan). The blue history tracking bar will appear
helping you keep tabs on where you are in the history log.
2. To return to normal operation, press EXIT.
Save Waypoints
You can save waypoints using both Sidescan and Downscan views, allowing you
to mark a desired object/location so you can revisit it later.
To save a waypoint:
1. Press the keypad to activate the
cursor.
2. Move the cursor over the desired
object/location and press MENU.
3. Select New Waypoint at Cursor
and press ENTER.
NOTE: You can save a waypoint by moving the cursor into the desired
position and pressing Enter or the Wpt key from the StructureScan or
Sonar pages.
15
Page 18

StructureMap
StructureMap is a tool that allows you to overlay SideScan sonar returns on
top of the chart, giving you a birds-eye view of underwater structure below
and beside your boat. StructureMap makes it easier for you to visualize the
underwater environment in relation to your position and aids the user in
interpreting sidescan sonar images.
Same structure shown in each panel
StructureMap
SideScan
Viewing StructureMap data
You can view StructureMap data by turning on Structure overlay from the
Chart menu, or by using the Overlay softkey (HDS-8/10). StructureMap data
will start to appear on the Chart screen as soon as Structure overlay is enabled. The Structure Source setting determines whether the StructureMap
information you want to view is live or previously recorded.
16
Page 19

Turning on Structure overlay
Selecting Structure Source
StructureMap can be used in Live mode or
Saved mode. Live mode allows you to view
real-time StructureMap data on the screen.
Saved mode is used to display StructureMap
data previously saved to a SD card or the unit’s
internal memory.
Live mode
Displays the last few minutes of the Side Imaging history as a trail behind the
vessel icon. The length of this trail will vary depending on the Side Imaging
and Down Imaging range settings. The higher the range settings the longer
Vessel icon
Structure
17
History trail
Page 20

the history length that will show up behind the vessel icon. Typically it will
display the last 4-5 minutes of recording. Live mode allows the user to quickly identify interesting areas of the lake and how they relate to vessel position.
It also allows the user to scroll back and zoom in on a recently scanned areas
of the lake to look at additional details of what was scanned. Live mode does
not save any data. If the unit is turned o, all recent sonar history is lost. You
must have Structurescan installed on your boat to use Live mode.
Saved mode
Displays StructureMap (.smf) les that have been created from structure
sonar log (.sl2) les. Saved mode is used to view a map of the underwater
environment that can be reviewed and examined either on or o of the
Navigating a StructureMap in saved mode
water. It can be used when revisiting an area that has already been scanned
in order to assist the user in positioning the vessel or locating specic points
of interest.
NOTE: If there is more than one StructureMap of the same area on
the same SD card, the maps will overlap on your screen. If you want to
have more than one map of the same area, you should put the maps
on separate SD cards.
18
Page 21

Accessing StructureMap les on SD card
All StructureMap les on your SD card or in the unit’s internal memory will
automatically appear on the screen when Saved mode is selected.
Recording Structure data
To record structure data, steer your boat
over an area and select Log Sonar data from
the Structure Options menu. Refer to your
operation manual for more information about
sonar log options.
NOTE: For best results, we recommend turning o Auto Range when
recording a structure sonar log (.sl2).
Converting les
To create a StructureMap le you must convert a structure sonar log (.sl2)
le to StructureMap format (.smf). This can be done automatically from
the Sonar Log menu, or manually by converting logs from the Files menu.
We recommend using an SD card for recording when possible, due to the
Converts sonar log
les to structuremap format
Automatic conversion
Manual conversion
NOTE: Keep the size of your sonar logs to 100MB or less to allow for
faster le conversion. Current le size is occasionally ashed on the
screen during the recording process. You will not be able to use any of
the unit’s other functions while a le is being converted.
limited size of the HDS internal memory. To have structure sonar log (.sl2)
les automatically converted to StructureMap le format (.smf), turn on
Convert to map when complete on the Sonar Log menu. The (.sl2) le will be
converted to a (.smf) le when recording is stopped.
19
Page 22

Sharing les
After structure sonar log (.sl2) les are converted to StructureMap (.smf)
les, they can be saved to a SD card and used on other GPS capable HDS
Gen 2 units without the need for the StructureScan module.
Scanning Fishing areas
With the Structure Source set to the default Live mode, steer the boat over
the desired location to scan the area. When conducting a side-by-side scan
of an area, you will get a cleaner scan if you do not overlap history trails and
you turn o auto ranging on the sidescan.
Side-by-side scan
Scanning tips
• To get a picture of taller structure (a wreck, etc) — don’t drive over
it. Steer the boat so the structure will be on the left or right side
of your boat.
• Set your structure range to a signicantly greater level (two-to-
three times) than the water depth to ensure a complete scan and
to maximize conversion accuracy.
NOTE: Optimal speed for viewing or logging StructureMap data is
between 2-8 mph (3-12 kmh). Live mode is disabled for speeds greater than 10 mph.
20
Page 23

Using StructureMaps with mapping cards
StructureMap allows you to maintain full chart capability and can be used
with embedded cartography as well as Navionics, Insight and other thirdparty charting cards compatible with HDS units. To view StructureMap data
with other mapping card data on an HDS-8 or HDS-10, place the mapping
card in one card slot and the SD card with the StructureMap le in the other
slot.
If you have an HDS-5 or HDS-7, copy the StructureMap (.smf ) les to the
units internal memory to view StructureMap data with data from another
mapping card. We recommend only adding StructureMap (.smf) les of one
lake at a time to the internal memory due to limited space. You should keep
copies of StructureMap (.smf ) les on an external SD card.
Copying StructureMap (.smf) les from SD to internal memory
Access les Copy StructureMap
(.smf ) le from card
Place le into sonar logs
Refer to your operation manual for more information about copying les.
Show StructureMap (.smf) les
You can view StructureMap (.smf) les from the Files menu, which allows you
to quickly see what area each StructureMap le covers.
Viewing StructureMap (.smf) les
Select StructureMap
(.smf) le
Select Show StructureMap appears
on the screen
21
Page 24

Accessing Structure Options
Structure options:
• Range — Adjusts the width of the sidescan history trail. The greater
the range setting, the wider the StructureMap history trail; Lower
range settings reduce the width of the history trail.
• Transparency — Increases/decreases the visibility of Structure
overlay on top of the map. This is helpful when using marine mapping cards.
•
Minimum Transparency Maximum Transparency
As you increase Structure overlay Transparency, you will be able to
see more marine card map data through the Structure overlay.
• Palette — Used to select a color scheme that allows the Structuremap detail to appear more clearly on the underlying chart.
• Contrast — Adjusts the brightness ratio between light and dark areas
on the screen, making it easier to distinguish suspended objects from
the background.
• Noise Rejection — Monitors the eects noise (boat pumps, water
conditions, engine ignition systems, etc.) has on your display, and
then lters out undesired signals.
• Source — Selects StructureMap Source, Live mode or Saved mode
22
Page 25

23
Page 26

24
Page 27

Accessory Ordering Information
store.navico.com/lowrance is the accessory source for sonar and GPS products
manufactured by Lowrance Electronics. To order Lowrance accessories, please contact:
1) Your local marine dealer or consumer electronics store. To locate a Lowrance dealer,
visit the web site, www.lowrance.com, and look for the Dealer Locator. To locate an Eagle
dealer, visit the web site, www.eaglesonar.com, and look for the Dealer Locator. Or, consult
your telephone directory for listings.
2) U.S. customers visit store.navico.com/lowrance.
3) Canadian customers: Lowrance/Eagle Canada, 919 Matheson Blvd. E. Mississauga, On-
tario L4W2R7 or fax 905-629-3118.
Call toll free in Canada, 800-661-3983, or dial 905 629-1614 (not toll free), 8 a.m. to 5 p.m.
Eastern Standard Time, M-F.
Page 28

*988-10289-001*
© Copyright 2012
All Rights Reserved
Navico Holding AS
 Loading...