

Page 1

StructureScan HD
Transom mount
Installation Guide
ENGLISH
www.bandg.com | www.simrad-yachting.com | www.lowrance.com
Page 2

Warning: It is your sole
responsibility to install and use the
instrument and transducer(s) in a
manner that will not cause accidents,
personal injury or property damage.
Always observe safe boating practices.
The choice, location, and installation
of transducers and other components
of the system are critical to the
performance of the system as intended.
If in doubt, consult your Navman dealer.
To reduce the risk of misusing or
misinterpreting this instrument, you
must read and understand all aspects
of this Installation and Operation
Manual. We also recommend that you
practice all operations using the built-in
simulator before using this instrument
on the water.
Sonar performance: The accuracy of
the sonar depth display can be affected
by many factors, including the type and
location of the transducer and water
conditions. Never use this instrument
to gauge depth or other conditions for
swimming or diving.
The choice, location, and installation
of transducers and other components
of the system are critical to the
performance of the system as intended.
If in doubt, consult your Navman dealer.
To reduce the risk of misusing or
misinterpreting this instrument, you
must read and understand all aspects
of this Installation and Operation
Manual. We also recommend that you
practice all operations using the built-in
simulator before using this instrument
on the water.
Page 3
1
Installation preparation
Accessories
If you received this manual with a StructureScan accessory, you will
notice that some information in the document does not apply to
the accessory. This manual has installation instructions for your accessory, and accessory pack content tables on the back cover.
Contents
Your StructureScan box is packed with the StructureScan HD module, a Power cable, fuse and fuse holder, StructureScan transducer,
mounting bracket, 15 foot (4.5m) ethernet cable and a hardware kit.
The transducer has a 20 foot (6m) cable attached.
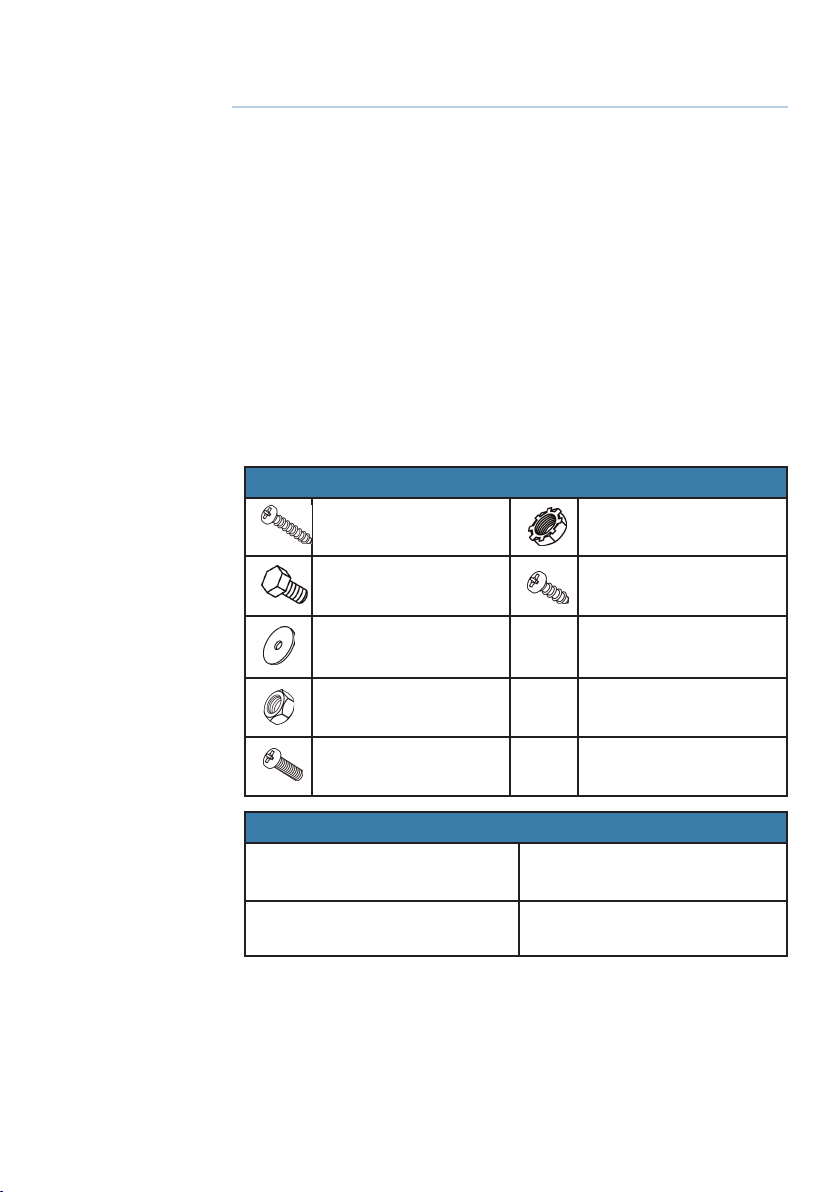
Hardware Mounting Kit (included)
Transom mount
screws (2)
Transducer attachment
lock nuts (6)
Bracket assembly
bolts (2)
Bracket assembly
washers (4)
Bracket assembly
nuts (2)
Transducer
attachment screws (6)
Required tools and supplies (not included)
Drill
Drill bits
StructureScan HD | Installation preparation
StructureScan HD
mounting screws (4)
Closed end crimp
connector (1)
Zip ties (2)
Phillips (slotted-head
screwdriver)
Marine grade above-or-below
waterline sealant
| 3
Page 4
Mounting options
The StructureScan transducer can be mounted on the transom,
jackplate, step or directly to your boat’s hull.
When mounting it directly to the hull, you must purchase a highquality, marine grade above- or below-waterline sealant/adhesive
compound.
Use the following table to determine which mounting option is best
suited to your boat/installation preferences.
¼ Note: When mounting the StructureScan transducer, make sure
there is nothing around the mounting location that could interfere
with StructureScan transducer sonar beams.
4 |
Jackplate mount
Transom mount
StructureScan HD | Installation preparation
Step mount
Page 5

StructureScan HD transducer mounting options
Transom mount
(Page 8)
Jackplate mount
(Page 9)
Step mount
(Page 10)
Direct mount/Step
(Page 11)
Trolling motor
mount (sold
separately)
Keeps transducer in the water when the boat
is on plane, allowing you to track bottom at
high speeds
Transducer angle can be adjusted so it is
parallel with the water
Transducer more likely to collide with
obstructions in the water and adds drag to
the boat
Transducer is not in the water when boat is on
plane; protects transducer and prevents drag from
transducer
Transducer angle can be adjusted so it is parallel
with the water
Allows you to mount transducer without drilling
holes in your boat
Does not track bottom when boat is on plane
Transducer is not in the water when boat is on
plane; protects transducer and prevents drag from
transducer
Transducer angle can be adjusted so it is parallel
with the water
Does not track bottom when boat is on plane
Transducer is not in the water when boat is on
plane
Protects transducer and prevents drag from
transducer
Transducer angle can not be adjusted so it is
parallel with the water
Does not track bottom when boat is on plane
Visit www.transducershieldandsaver.com
StructureScan HD | Installation preparation
| 5
Page 6

2
Installation
Bracket and transducer assembly
The StructureScan bracket comes with four washers, two bolts and
two nuts.
If you plan to mount the StructureScan transducer directly to the
step (Step Mount) or on the trolling motor, you do not need to assemble the bracket.
6 |
OR
StructureScan HD | Installation
Page 7

Transducer angle
After mounting the StructureScan transducer, make sure the
transducer is adjusted so it will be parallel with the waterline when
moving at trolling speed.
Downscan Overlay
The StructureScan transducer should be installed within approximately 1 foot of the broadband sounder transducer to get optimum
performance from the Downscan Overlay feature.
It is recommended you turn off Downscan Overlay when using
your trolling motor as the sonar source, unless the StructureScan
transducer and broadband sounder transducer both are installed on
the trolling motor.
Downscan overlay performance could be degraded if the StructureScan transducer is too far away from the broadband sounder
transducer installed on the trolling motor.
< 0.3m (1ft)
StructureScan HD | Installation
| 7
Page 8

Transom mount
The StructureScan transducer can be mounted just like a skimmer
transducer, where it is in the water when you are on plane or can be
mounted so it is only in the water, when you are moving at trolling
speed.
Transom Mount Supplies (not included)
1/8” Drill bit (Transom mount
pilot holes)
Transom Mount (Aluminum Hull) Supplies (not included)
M4 Machine Screws
Starboard (prevents corrosion between bracket and aluminum
hull)
To Mount StructureScan transducer on Transom:
1. Choose a transducer location and then route the transducer cable to the
location where the StructureScan module will be installed.
2. Place the transducer bracket against the transom and then align the bot-
tom of the transducer with the bottom of boat. Use a pencil to mark the
pilot holes through the slots in the transducer bracket.
3. Drill the pilot holes into the boat’s transom.
4. Apply a high-grade above- or below-waterline sealant to the pilot holes.
5. Align the bracket slots over the pilot holes and fasten the bracket to the
transom using your drill and the supplied screws.
6. To make adjustments to transducer position, loosen the screws and slide
bracket up or down.
7. Connect the transducer cable to the StructureScan module sonar port.
Marine grade above- or belowwaterline sealant
Marine grade above- or belowwaterline sealant
8 |
StructureScan HD | Installation
Page 9

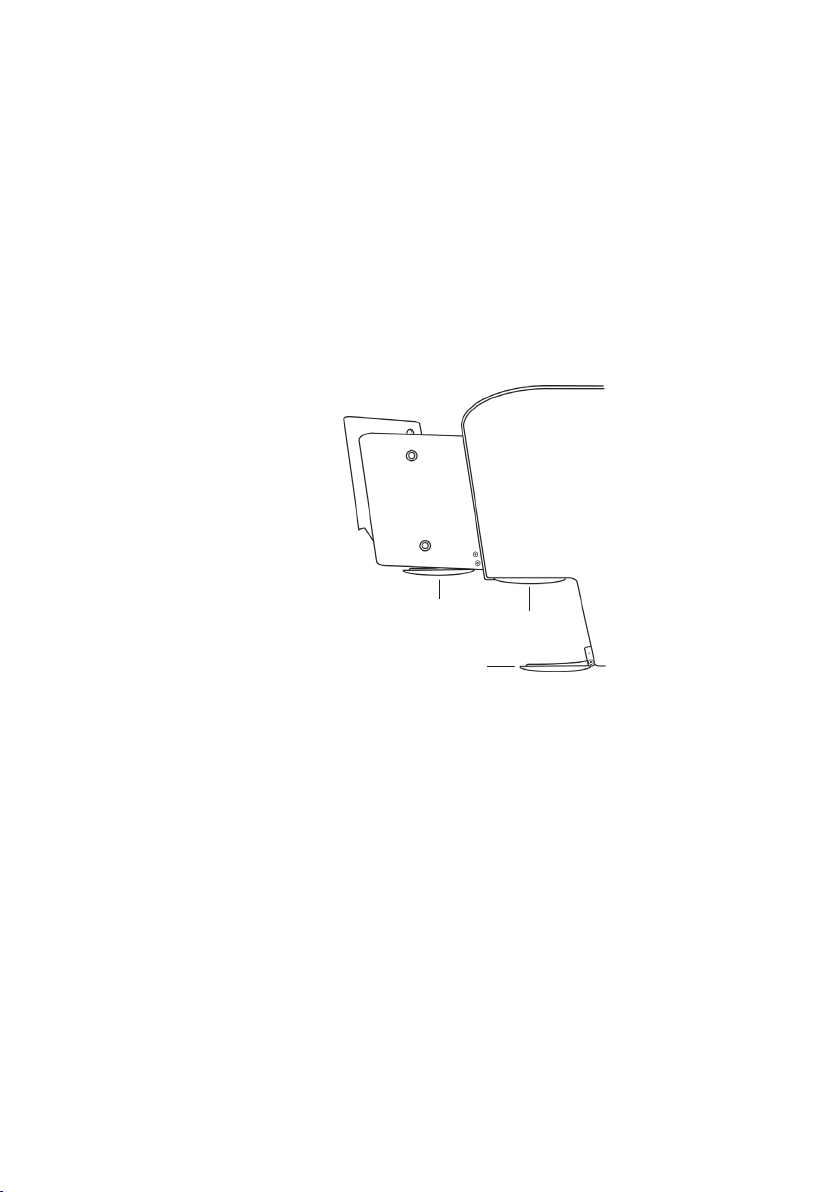
Jackplate Mount
The StructureScan transducer can be mounted inside or outside of
the jackplate by drilling through the jackplate and then running bolts
though the hinge hole in the side of the bracket into the jackplate.
Jackplate Mount Supplies (not included)
M6 or 1/4” Drill bit (Jackplate
Mount) pilot holes
Warning: Before installing the StructureScan HD transducer
on the jackplate, lower the jackplate to its lowest setting to make
sure there is enough clearance between the jack plate/engine
and the transducer. Lack of clearance could damage the transducer when the engine is all the way down.
To Mount StructureScan on Jackplate:
1. Choose a transducer location on the inside or outside of the jackplate.
2. Adjust the jackplate up and down to make sure the transducer will not ob-
struct jackplate movement.
3. Make sure nothing blocks the sonar beam on either side of the transducer.
4. Route the transducer cable to the location where the module will be
installed.
5. Move the transducer bracket into the desired position and use a pencil to
mark the holes through the hinge hole and hole in the side of the bracket.
6. Using a M6 or equivalent drill bit, drill the holes into the jackplate.
7. Slide the bracket inside the jackplate and align the bracket holes with holes
you drilled in the jackplate.
8. Slide M6 bolts with washers into each hole on the side of jackplate.
9. Guide the bolts through the StructureScan bracket holes.
10. Place a washer over the end of the bolts and tighten the nuts.
11. Connect the transducer cable to the StructureScan module sonar port.
1/4” (M6) jackplate mount bolts
Jackplate
StructureScan bracket mounted
inside the jackplate. The bracket can
also be installed on the outside of
the jackplate.
StructureScan HD | Installation
| 9
Page 10

Step Mount
Mounting the StructureScan transducer under the step not only
protects the transducer from hitting objects in the water, but does
not cause any drag on your boat when it is on plane.
Step Mount Supplies (not included)
1/8” Drill bit (Transom mount
pilot holes)
To use Step Mount:
1. Choose a transducer location.
2. Route the transducer cable to the location where the StructureScan mod-
ule will be installed.
3. Move the transducer bracket into the desired position and then use a pencil
to mark the pilot holes through the slots in the bracket.
4. Drill the pilot holes.
5. Apply a high-grade above- or below-waterline sealant to the pilot holes.
6. Align the bracket slots over the pilot holes and fasten the bracket to the
transom using your drill and the supplied screws.
7. To make adjustments to transducer position, loosen the screws and slide
bracket up or down.
8. Connect the transducer cable to the StructureScan module sonar port.
Marine grade above- or belowwaterline sealant
10 |
Step
StructureScan HD | Installation
Page 11

Direct/Step Mount (No Bracket)
When using the direct mount installation shown below, you MUST
turn on the Flip Left/Right feature. Refer to your Operation manual
for more information..
Direct Step Mount Supplies (not included)
3/32 Drill bit (Direct/Step
mount pilot holes)
To use Direct Mount:
1. Make sure the boat’s step is the same length or longer than the StructureS-
can transducer.
2. After selecting a mounting location, route the transducer cable to the loca-
tion where the StructureScan module will be installed.
3. Hold the transducer in the desired position and then use a pencil to mark
pilot holes through the mounting holes on the transducer.
4. Drill the pilot holes.
5. Apply a high-grade above- or below-waterline sealant to the pilot holes.
6. Align the transducer mounting holes over the pilot holes and mount the
transducer to the step using self-tapping metal screws (not supplied). Do
NOT overtighten the screws; otherwise you could strip out the fiberglass
pilot holes or crack the mounting holes on the StructureScan transducer.
7. Connect the transducer cable to the StructureScan module and then turn
on the Flip Left/Right feature on your display unit.
Marine grade above- or belowwaterline sealant
Do not install
under boat hull!
Direct mount
(without bracket)
¼ NOTE: When using a Direct Step Mount, you must turn on the Flip
Left/Right feature in your display unit to ensure what is shown on
the left/right side on your display, corresponds with what is on the
left/right side of your boat.
StructureScan HD | Installation
| 11
Page 12

2.1”(55.5mm)
10.8”(274.3mm)
2.8”
(72.7mm)
10.1”(257.3mm)
Parts and accessories
StructureScan Module (000-10801-001)
StructureScan module
mounting screws (4)
Fuse and fuse holder
StructureScan Skimmer Bracket (000-10874-001)
Transom mount screws (2) Bracket assembly nuts (2)
Transducer attachment lock nuts (6)
Bracket assembly bolts (2) Zip ties (2)
Bracket assembly washers (4)
Closed-end crimp connector
Transducer attachment
screws (6)
12 |
StructureScan Skimmer Transducer (000-10802-001)
Transom mount screws (2) Bracket assembly nuts (2)
Transducer attachment lock nuts (6)
Transducer attachment
screws (6)
Bracket assembly bolts (2) Zip ties (2)
Bracket assembly washers (4)
StructureScan HD | Installation
Page 13

StructureScan Specifications
Power
Requirement
Voltage Input 10V - 17V
Transmit Power
Current Drain Max: .75A Typical: .60A
Fuse Type External: 3A Fast Acting Automotive Blade
Transducer Cable 20 feet (6m)
Target Separation
Transducer
Frequency
Communication Ethernet
Shared devices
supported
Weight
12 Volts
WRMS: 500W
WPK: 4000W
Inrush: 4.7A pk
1.5” (38.1mm)
455kHz
3
StructureScan module (1.8lbs)
Transducer (1.9lbs)
Transducer with bracket (2.55lbs)
Sidescan Specications
Max Range 455kHz (500ft — 250 per side)
Max Speed 35 mph (56 kmh)
Mark objects 15 mph (24 kmh)
Optimum speed 10 mph (16 kmh) or less
Downscan Specications
Max Depth 300 ft (455kHz)
Max Speed 55 mph (88 kmh)
Mark objects 35 mph (56 kmh)
Optimum speed 10 mph (16 kmh) or less
| 13
Page 14

StructureScan LED Guide
Indicator LED Status Definition
Transducer
LED
Transducer
LED
Transducer
LED
Power LED Off No power or not switched on
Power LED Red/stays on Product in booting process
Power LED
Power LED
Power LED
Ethernet
LED
Ethernet
LED
Off
Green/ stays onTransducer detected/locked on to
Green/
flashing
Green/stays
on
Red/Green/
slow flashing
Red/Green
fast flashing
Off
Yellow/
Flashing
Transducer not connected or
cable/transducer is broken
bottom
Transducer detected/not locked
on to bottom
Product has power/operating
Product in factory mode; ethernet
communication working
Product in factory mode; no
ethernet communication (cable
unplugged or bad cable)
No ethernet communication
(cable unplugged, bad cable or
remote unit not powered)
Ethernet communication is
working (link/active light)
14 |
Page 15

StructureScan Troubleshooting Tips
• Make sure StructureScan HD is pow-
ered
StructureScan not
displayed
No Data Check range or turn on auto range
Data washed out/
same color
Left/right data
swapped on screen
No Source is
displayed
• Check unit software; must have at least
version 2.5
• Make sure yellow wire is connected to
switched power source
• Check fuse
Turn down contrast; try different palettes
Toggle the Flip Left/Right feature
• Make sure HDS unit and StructureScan
are powered and connected to ethernet network
• Make sure all switches are powered
• Check link/active light to see which
units are not communicating
| 15
Page 16

*988-10284-001*
www.bandg.com
www.simrad-yachting.com
www.lowrance.com
 Loading...