

Page 1
StructureScan Installation
Contents
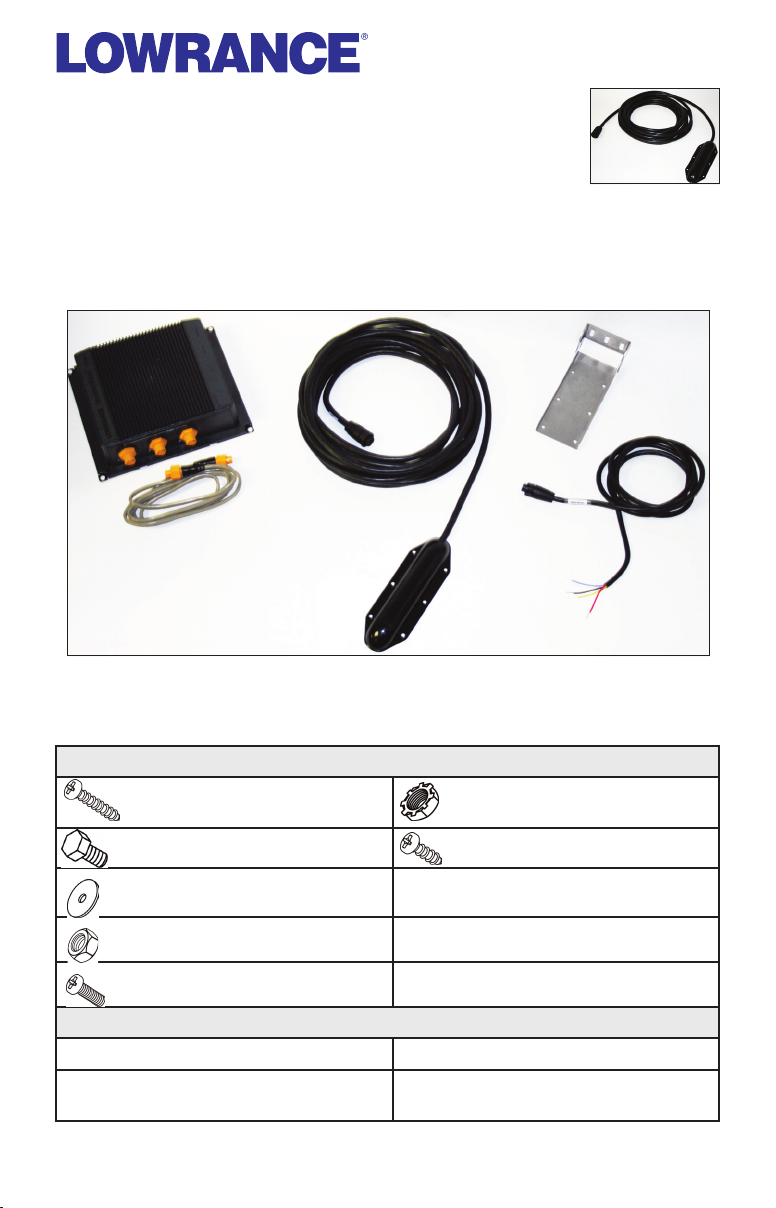
Your StructureScan box is packed with the LSS-1 black box, a Power cable,
StructureScan transducer, mounting bracket, 15 foot (4.5m) ethernet cable and a
hardware kit. The transducer has a 20 foot (6m) cable attached.
LSS-1 module, ethernet cable, StructureScan transducer, transducer
mounting bracket and power cable.
Hardware Mounting Kit (Included)
Transom mount screws (2)
Bracket Assembly bolts (2) LSS-1 Mounting screws (4)
Bracket Assembly washers (4) Closed end crimp connector (1)
Bracket Assembly nuts (2) Zip ties (2)
Transducer attachment bolts (6)
Required Tools and Supplies (Not Included)
Drill Phillips (slotted-head) screwdriver
Drill bits
Transducer attachment lock
nuts (6)
Marine grade above- or belowwaterline sealant
1
Page 2
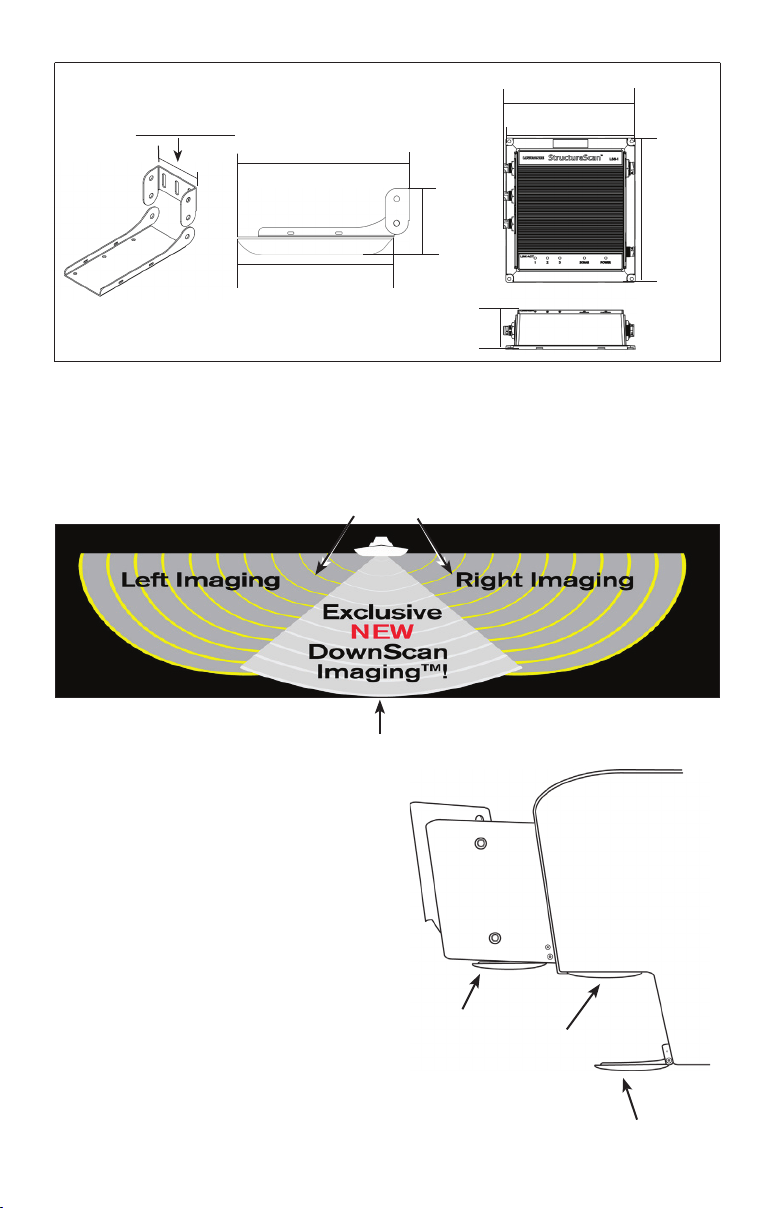
2.1”(55.5mm)
7.5”(191.mm)
7.4”(188mm)
7.5”(190.7mm)
2.8”
(72.7mm)
6.8”(173.4mm)
2.27”
(57.6mm)
8.26”
(210mm)
Installation
When mounting the StructureScan transducer, make sure the there is nothing around
the mounting location that could interfere with the StructureScan transducer sonar
beams.
Sidescan
Downscan Sonar
Mounting Options
The StructureScan transducer can be
mounted on the transom, jackplate, step,
trolling motor or directly to your boat’s
hull.
When mounting it directly to the hull,
you must purchase a high-quality,
marine grade above- or below-waterline
sealant/adhesive compound.
Use the following table to determine
which mounting option is best suited to
your boat/installation preferences.
Jackplate
Mount
2
Step mount/
Direct mount
Transom mount
Page 3

Transom Mount
(Page 6)
Jackplate Mount
(Page 7)
Step Mount
(Page 8)
StructureScan Transducer Mounts
Keeps transducer in the water when the boat is •
on plane, allowing you to track bottom at high
speeds
Transducer angle can be adjusted so it is parallel •
with the water
Transducer more likely to collide with obstructions •
in the water and adds drag to the boat
Transducer is not in the water when boat is on •
plane; protects transducer and prevents drag
from transducer
Transducer angle can be adjusted so it is parallel •
with the water
Allows you to mount transducer without drilling •
holes in your boat
Does not track bottom when boat is on plane•
Transducer is not in the water when boat is on •
plane; protects transducer and prevents drag
from transducer
Transducer angle can be adjusted so it is parallel •
with the water
Does not track bottom when boat is on plane•
Direct Mount/Step
(Page 9)
Trolling Motor Mount
(Sold separately)
(Page 10)
Transducer is not in the water when boat is on •
plane
Protects transducer and prevents drag from •
transducer
Transducer angle can not be adjusted so it •
is parallel with the water
Does not track bottom when boat is on plane•
Allows you to scan areas by moving trolling •
motor left/’right
Can only be used when trolling motor is in the •
water
Rotating trolling motor quickly will impact sonar •
images
3
Page 4
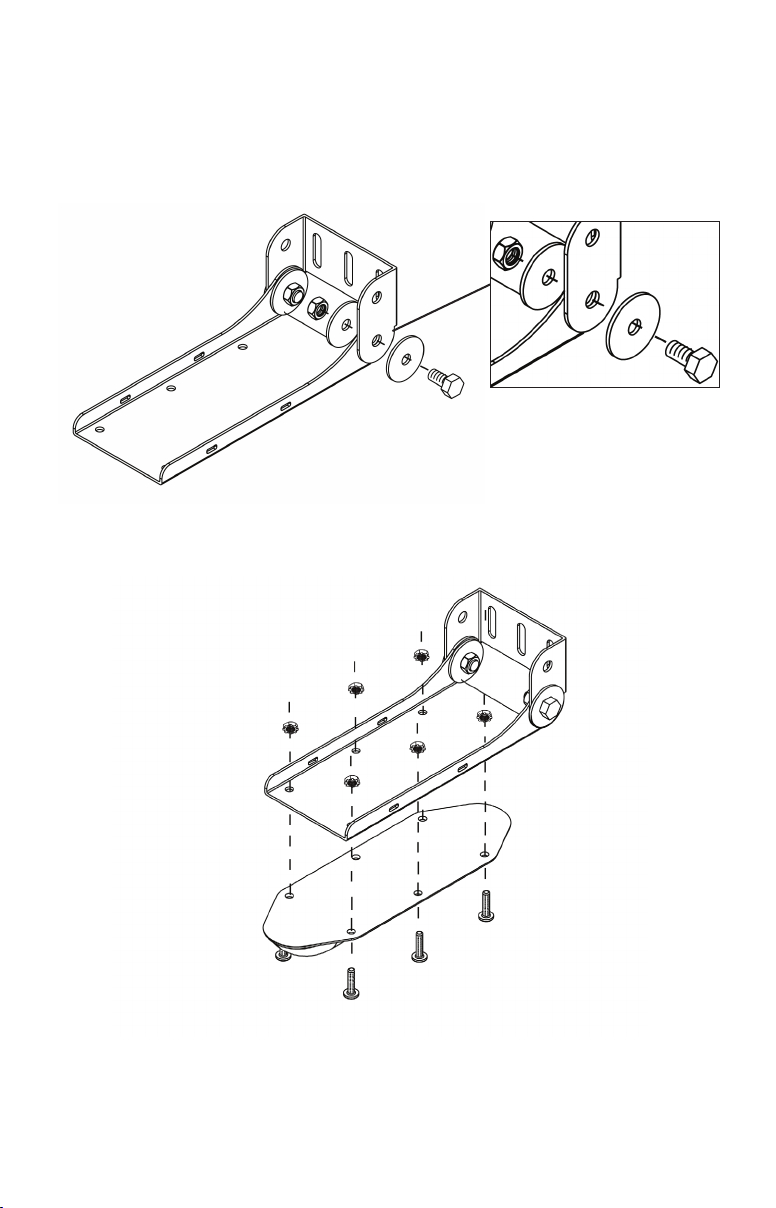
Bracket and Transducer assembly
The StructureScan bracket comes with four washers, two bolts and two nuts.
If you plan to mount the StructureScan transducer directly to the step (Step Mount)
or on the trolling motor, you do not need to assemble the bracket.
Assembling StructureScan transducer bracket
Attaching StructureScan transducer to bracket
4
Page 5

Mounting the LSS-1
The LSS-1 can be mounted under the dash, in the rod locker or in the battery
compartment. Select a mounting location that will protect the LSS-1 from standing
water.
To mount the LSS-1:
Make sure the transducer cable is long enough to connect to the 1.
LSS-1 from the desired transducer
mounting location. If the 20’
transducer cable is not long enough,
a 10’ extension cable is available (part
number: 99-006).
Place the LSS-1 into the desired 2.
mounting location where the
connectors will be easily accessible.
Use a pencil to mark the LSS-1 mount-3.
ing holes.
Drill the pilot holes. 4.
Use the supplied No. 8 self-tapping screws to mount the LSS-1 to 5.
the location.
Transducer angle
After mounting the StructureScan transducer, make
sure the transducer is adjusted so it will be parallel
with the waterline when moving at trolling speed.
Downscan Overlay
The StructureScan transducer should be installed within approximately 1 foot of
the broadband sounder transducer to get optimum performance from the Downscan
Overlay feature.
It is recommended you turn off Downscan Overlay when using your trolling motor
as the sonar source, unless the StructureScan transducer and broadband sounder
transducer both are installed on the trolling motor.
Downscan overlay performance could be degraded if the StructureScan transducer
is too far away from the broadband sounder transducer installed on the trolling
motor.
5
Page 6

Transom Mount
!
The StructureScan transducer can be mounted just like a skimmer transducer, where
it is in the water when you are on plane or can be mounted so it is only in the water,
when you are moving at trolling speed.
Transom Mount Supplies (not included)
1/8” Drill bit (Transom mount pilot holes)
Transom Mount (Aluminum Hull) Supplies (not included)
M4 Machine Screws
Starboard (prevents corrosion between bracket and aluminum hull)
To Mount StructureScan on Transom:
Choose a transducer location and then route the transducer cable to 1.
the location where the LSS-1 will be installed.
Place the transducer bracket against the transom and then align 2.
the bottom of the transducer
with the bottom of boat. Use
a pencil to mark the pilot
holes through the slots in
the transducer bracket.
Drill the pilot holes into the 3.
boat’s transom.
Apply a high-grade above- 4.
or below-waterline sealant
to the pilot holes.
Align the bracket slots over 5.
the pilot holes and fasten
the bracket to the transom
using your drill and the
supplied screws.
To make adjustments to transducer position, loosen the screws and 6.
slide bracket up or down.
Connect the transducer cable to the LSS-1 sonar port. 7.
Marine grade above- or belowwaterline sealant
Marine grade above- or belowwaterline sealant
StructureScan transducer mounted on
transom.
CAUTION: If you have an aluminum boat, install a piece of marine
starboard between the stainless steel StructureScan transducer bracket
and the transom to prevent corrosion.
6
Page 7

Jackplate Mount
You can mount the StructureScan transducer inside or outside of the jackplate by
drilling through the jackplate, then inserting bolts though hinge hole in the side of
the bracket mount into the jackplate.
Jackplate Mount Supplies (not included)
M6 or 1/4” Drill bit (Jackplate Mount) pilot holes 1/4” (M6) jackplate mount bolts
To Mount StructureScan on Jackplate:
Choose a transducer location on the inside or outside of the 1.
jackplate.
Adjust the jackplate up and down to make sure the transducer will 2.
not obstruct jackplate movement.
Make sure nothing blocks the 3.
sonar beam on either side of
the StructureScan transducer.
Route the transducer cable to 4.
the location where the LSS-1
will be installed.
Move the transducer bracket 5.
into the desired position and
then use a pencil to mark the
holes through the hinge hole
and hole in the bracket mount
on the side of the bracket.
Using a M6 or equivalent drill 6.
bit, drill the holes into the
jackplate.
Slide the bracket inside the 7.
jackplate and align the bracket
holes with holes you drilled in
the jackplate.
Slide M6 bolts with washers 8.
into each hole on the side of
jackplate.
Jackplate
StructureScan bracket
mounted inside the
jackplate. The bracket
can also be installed
on the outside of the
jackplate.
Guide the bolts through the StructureScan bracket holes.9.
Place a washer over the end of the bolts and tighten the nuts. 10.
Connect the transducer cable to the LSS-1 sonar port. 11.
7
Page 8

Step Mount
Mounting the StructureScan transducer under the step not only protects the
transducer from hitting objects in the water, but does not cause any drag on your
boat when it is on plane.
Step Mount Supplies (not included)
1/8” Drill bit (Transom mount pilot holes)
To use Step Mount:
Choose a transducer location.1.
Route the transducer cable to the location where the LSS-1 will be 2.
installed.
Move the transducer bracket into the desired position and then use 3.
a pencil to mark the pilot
holes through the slots in
the bracket.
Drill the pilot holes. 4.
Apply a high-grade above- 5.
or below-waterline sealant
to the pilot holes.
Marine grade above- or belowwaterline sealant
Align the bracket slots over 6.
the pilot holes and fasten
the bracket to the transom
using your drill and the
supplied screws.
To make adjustments to 7.
transducer position, loosen
the screws and slide
bracket up or down.
Connect the transducer cable to the LSS-1 sonar port. 8.
Step
StructureScan transducer mounted
under the step.
8
Page 9

Direct/Step Mount (No Bracket)
When using the direct mount installation shown below, you MUST turn on the Flip
Left/Right feature. Refer to your Operation manual for more information.
Direct Step Mount Supplies (not included)
3/32 Drill bit (Direct/Step mount pilot holes)
To use Direct Mount:
Make sure the boat’s step is the same length or longer than the 1.
StructureScan transducer.
After selecting a mounting location, route the transducer cable to 2.
the location where the LSS-1 will be installed.
Hold the transducer 3.
in the desired
position and then use
a pencil to mark pilot
holes through the
mounting holes on
the transducer.
Drill the pilot holes. 4.
Apply a high-grade 5.
above- or belowwaterline sealant to
the pilot holes.
Align the transducer 6.
mounting holes over
the pilot holes and
mount the transducer
View underneath the step
to the step using self-tapping metal screws (not supplied). Do NOT
overtighten the screws; otherwise you could strip out the berglass
pilot holes or crack the mounting holes on the StructureScan
transducer.
Connect the transducer cable to the LSS-1 and then turn on the Flip 7.
Left/Right feature in your display unit.
Marine grade above- or belowwaterline sealant
Do not install
under boat hull!
NOTE: When using a Direct Step Mount, you must turn on the Flip
Left/Right feature in your display unit to ensure what is shown on the
left/right side on your display, corresponds with what is on the left/right
side of your boat.
9
Page 10

Trolling Motor/Towsh Mount
The StructureScan transducer can be mounted on a trolling motor or towsh with
the purchase of a trolling motor mount accessory kit.
Trolling Motor Mount (sold separately — p/n: 000-00099-004)
Trolling motor bracket Hose Clamps (2)
No 8. Transducer attachment bolts (6) Zip ties (4)
Transducer attachment lock washers (6)
To mount transducer on trolling motor or towsh:
Make sure the transducer cable can be routed to the LSS-1.1.
Place the trolling motor bracket into a desired position on the trolling 2.
motorortowsh.
Routeeachbracketclamparoundthetrollingmotorortowshand3.
through the slots on the other end of the
bracket.
Use a screwdriver to tighten the clamps 4.
until each bracket is mounted securely.
Align the holes on the transducer with 5.
the holes on the bracket.
Use the supplied transducer mounting 6.
screws to attach the transducer to the
bracket.
Trolling motor mount.
Use zip ties to secure the transducer 7.
cable and then connect the cable to the
LSS-1 sonar port.
If necessary, turn on the Flip Left/Right 8.
feature in your display unit. Refer to your
StructureScan Operation manual for
Towsh mount.
more information.
NOTE: When mounting the trolling motor, you must turn on the Flip
Left/Right feature in your display unit to ensure what is shown on the
left/right side on your display, corresponds with what is on the left/
right side of your boat.
10
Page 11

Powering the LSS-1
The LSS-1 power cable has four wires; red (+), black (–), yellow and blue. The
red wire is positive, the black wire is the ground and the yellow wire connects to a
switch. The blue wire will not be used. Cut it ush and cover the end with a wire nut
or electrical tape.
Black wire
(to negative)
Blue wire
(not used)
Red wire, fused
(to positive)
LSS-1
Power Cable
12 Volt battery
LSS-1 Power Cable connections
Yellow wire
(to positive)
Switch (at console)
Fuse and
fuse holder
Connecting LSS-1 to display unit/ethernet network
The LSS-1 has three ethernet ports allowing you to connect it to up to three HDS
units. It can also be connected to an ethernet hub, like the NEP -1.
The LSS-1 comes with a 15 feet ethernet cable, but cable lengths of 6, 15, 25 and 50
feet may be purchased separately.
11
Page 12

www.lowrance.com
*988-0179-01A*
Visit our website:
© Copyright 2009
All Rights Reserved
Navico Holding AS
12
 Loading...