

Page 1

OWNER'S MANUAL
1
Page 2

LGC-12S
GPS Module
Installation Instructions
The LGC-12S GPS module contains a12 parallel channel GPS receiver .
This unit attaches directly to select Lowrance® products capable of displaying GPS position information. P ower f or the LGC-12S is supplied from
that equipment. It has a g ray connector on the end of the cable.
The GPS module can be mounted on any flat surface, provided there is
access behind the mounting surface for the scre ws. A pole mount adapter
lets you mount the antenna on a pole or swiv el mount that uses standard
marine 1" - 14 threads.
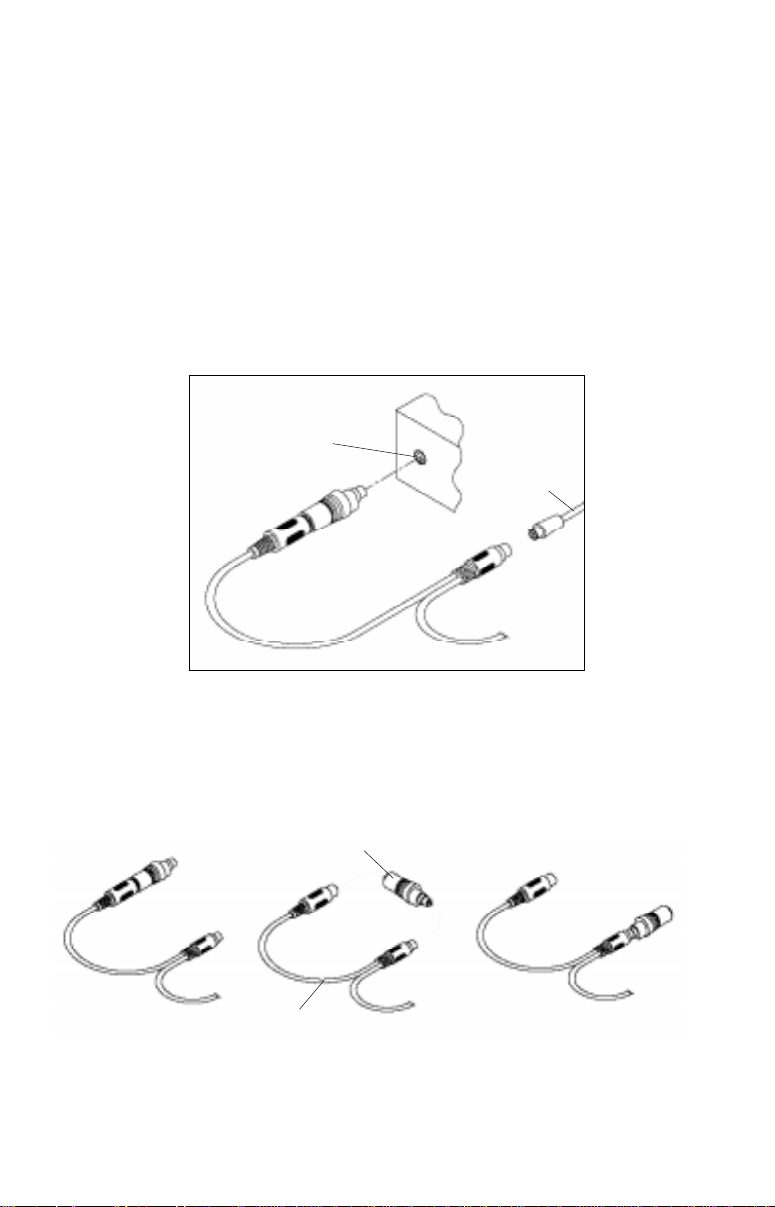
The LGC-12 has a short cable with an gray connector on the end. A 25foot extension cable is supplied with this module with a male connector
on one end and a female connector on the other. Make certain to install
the cable with the female connector at the antenna.
GPS MODULE INST ALLATION
Surface Mount
The GPS module can be easily installed on any flat surface that is at least
90 mm (3 1/2”) wide. Make certain that a clear view of the sky is availab le
at the selected location. Since the GPS signals tr avel “line-of-sight”, nearly
anything blocking the antenna can potentially obstruct the unit from finding a satellite. Do not mount in line with a radar antenna. Radar radiates
high energy that can interfere with the GPS signal.
Once you’ve determined the mounting location, use the template on this
page to drill the holes for the screws. The screws, supplied with this unit,
2
Page 3

are 4mm x 30mm. (about 1 1/8” long). Drill 4.75 mm (3/16”) holes for the
mounting screws. If you're installing the LGC-12S, and need to route the
cable through the mounting surface, y ou’ll need to drill a 25 mm (1”) hole
for the cable's connector. There is a notch in the antenna housing that
allows the cable to pass through to the outside, if desired, instead of routing it through the mounting surface.
After drilling the holes, pass the o-ring over the cable and press it into the
groove on the bottom of the antenna housing. No w attach the antenna to
the mounting surface, using 4mm screws and the supplied loc k washers.
Route the cable and the GPS module installation is finished.
4.75MM (3/16”)
4 PLACES
GPS MODULE TEMPLATE
3
25MM (1”)
(If Necessary)
Page 4

Pole Mount
The GPS module attaches to the pole mount
adapter with the supplied 4 mm screws. You
can route the cable through the slot in the
side of the module and down the side of the
pole. Alternatively, you can pass it down
through the pole mount adapter and run the
cable inside the pole. The 1"-14 threads on
the pole mount adapter accept a standard
marine antenna mount.
POLE MOUNT
ADAPTER
4
Page 5
MMC Interface
The MMC Interface lets you transf er maps and other data from the computer to the MMC. It connects to the PC's parallel port to transfer data and
to the keyboard for po w er.
Connections
First, turn the computer off.
The keyboard "Y" cable on the MMC interf ace has an adapter plug on one
end. If your keyboard uses the small connectors, attach the keyboard to
the "Y" adapter cable and plug the other end of the "Y" cable into the
keyboard connector on the PC as shown belo w.
KEYBOARD CONNECTOR
ON PC
KEYBOARD
CABLE
TO MMC
INTERFACE
If your keyboard uses the large connectors , unplug the adapter from the
"Y" cable, turn it over and plug it into the small connector on the other end
of the "Y" cable. Plug the k eyboard into one end of the "Y" cable and plug
the other end of the "Y" cable into the PC.
KEYBOARD CONNECTOR
ADAPTER
MMC KEYBOARD
ADAPTER CABLE
Plug the large, 25-pin connector into the parallel port of your PC.
The MMC interface is now ready f or use.
5
Page 6

MapCreate™ Installation Instructions
1. Insert the USA-EAST CD-ROM into the computer's drive .
2. Clic k the Start button, then Run
3. Type D:\setup.exe (where D: is the drive letter f or y our CD-ROM)
4. Clic k OK to begin the installation.
Follow the on-screen instructions.
Types of installations
There are three types of installations:
Typical - Installs an overlay data (nav aids) and the small de-
tail (background map) and medium detail maps. T akes
approximately 70 mb .
Compact - Installs the MapCreate program with Help only
Custom - Defaults to typical. Allows the installation of all maps
on the hard drive. This tak es approximately 1 gigabyte
of hard disk space.
Hints:
Make certain your sonar or mapping unit's software is version 1.1.0 or
greater. If it isn't, then run the Update program. Make certain the MMC
Interface is connected to the computer's parallel port and an MMC cartridge is in the interface before running the Update program. After running
the program, insert the MMC into the sonar or mapping unit, then turn the
unit on. It will automatically update the system softw are, if needed.
Use the Typical or Compact installation if you are not making maps of the
United States.
The more maps that you install on the hard drive, the faster the prog ram
will run because it takes less time to read maps from the hard drive than
from the CD-ROM.
If speed is a problem, don’t run MapCreate with the large scale data loaded
(don’t put in the CD for your area) until y ou go to build the map. Then put
it in (wait 30 sec) and build the map.
These maps take a lot of RAM to build - if your system is low on RAM,
then make several small maps and send them one by one to the MMC
card. (All MMC cards can hold up to 30 files regardless of their siz e)
6
Page 7

Starting MapCreate™
If you installed the Typical or Compact version of MapCreate™, make
certain the CD-ROM for the area you intend to use is in the CD-ROM
drive. Note: The detailed map data is split down the middle of the United
States. If you need a map from the eastern half of the United States, use
the USA-EAST CD. Use the USA-WEST CD if you are making a map
from the western half of the US.
Double-click the MapCreate icon in the MapCreate5 program group . The
opening screen appears while the program is loading. It will take some
time for the program to load the map detail.
Once it's finished loading, you'll see a screen that looks like this:
7
Page 8

Navigating the Map
Center Map
To center the map, click on the crosshair button at the top left of
the screen. Now click on the part of the map that you want centered in the map window .
Zoom
You can zoom on any portion of the map using the crosshair button. To do
this, place the crosshair cursor on the map near the location that you
want zoomed. No w click and dr ag the cursor . A box appears on the map.
Drag the box until it cov ers the desired zoom area. Now release the mouse
key. The program will zoom in on the selected area.
The zoom-in and zoom-out buttons are located at
the bottom right corner of the map. Click on the
zoom-in button to enlarge the centered area of the map; the zoom-out
buttom works the opposite. The current scale sho ws in the window next to
the zoom-in button. You can change the scale two ways. The first is to
click on the down arrow at the right of the box, then select a preset scale .
The other method is to click inside the box, then enter the desired scale.
Creating a Map
T o create a map to download to an MMC cartridge, first center the
map on the desired area, then adjust the zoom so that you can
see the entire area that you wish to cut the map from. Next, select
the "Create Border" button.
Click and Drag
There are two methods
of selecting a map. The
first is to click and drag
the Create Border tool as
shown at right. This creates a box. Release the
mouse button when the
box is at the desired size.
The selected map is inside the green box. This
is the area that will be
transferred to the MMC.
To erase the box and
start over, simply hold
8
Page 9

the Create Border tool on a corner of the box and click the right mouse
button. The box is immediately erased.
Draw Line
Selecting an area of the map using the line draw feature giv es you
much more versatility than simply
drawing a box.
To use the line drawing feature,
simply click on the "Create Border"
button, then click on the map for
the beginning of the line. Now
move the pointer to the location for
the ending of the line and click the
left mouse button again.
To continue the line in another direction, move the pointer to the
next location and click the left
mouse button.
9
Page 10

Continue moving the mouse along the
chosen area and clicking the left
mouse button each time you need to
change direction.
When you get to the end, click the right
mouse button. This erases the last
area. This map is now ready to be
saved.
You can combine selections and save
them together as shown here.
10
Page 11

Saving a Map
Once you've finished selecting a map, you will
need to save it. Click on the
"Build Map" button. The screen at
right appears.
Enter a file name and click the
"Save" button.
A new window appears that shows the progress
of the map construction.
When the computer has finished building the map,
the total size of the finished map shows in a new
window. Click the OK button and you're finished
with the map build.
T ransf erring a map to the MMC
The final step in building a map is transferring it to a MMC. Insert
a MMC into the MMC Interface. Next, click on the "Connect to
MMC" button. MapCreate will recognise the
MMC and show its status in a window near
the bottom left corner of the screen.
Note: If the label name and b ytes free does
not appear in the "Available MMC Cards"
window, then the MMC will need to be formatted by selecting
mat Card
. This will take a few seconds.
Communications - For-
11
Page 12

Now click on the Transfer Map button. A
window similar to the one at right
appears.
When the map has finished downloading
to the MMC, its filename appears in the
"Files Stored on Card" box at the bottom
of the screen.
The MMC card can now be removed from the MMC Interf ace and placed
into the mapping unit.
If you need further assistance with the software, please click on Help.
There are extensive help files a vailab le. If this does not resolve the problem, call our customer service depar tment at 1-800-324-1356. A representative will be happy to help y ou.
12
Page 13

LOWRANCE D AT AB ASES LICENSE AGREEMENT
THIS IS A LEGAL AGREEMENT BETWEEN THE END-USER WHO
FIRST PURCHASES THIS PRODUCT AS A CONSUMER ITEM FOR
PERSONAL, F AMILY , OR HOUSEHOLD USE (“Y OU”) AND LO WRANCE
ELECTRONICS, INC., THE MANUFACTURER OF THIS PRODUCT.
(“WE”, “OUR”, OR “US”). USING THE PRODUCT ACCOMPANIED BY
THIS LICENSE AGREEMENT CONSTITUTES ACCEPTANCE OF
THESE TERMS AND CONDITIONS. IF YOU DO NOT ACCEPT ALL
TERMS AND CONDITIONS, PROMPTLY RETURN THE PRODUCT
WITHIN 30 DAYS OF PURCHASE. PLEASE RETURN USING THE ENCLOSED UPS SHIPPING LABEL AND INCLUDE: PROOF OF PURCHASE, NAME, ADDRESS, AND PHONE NUMBER. YOUR PURCHASE
PRICE AND ANY APPLICABLE TAXES WILL BE REFUNDED. PLEASE
ALLOW 4-6 WEEKS TO PROCESS YOUR REFUND .
1. This License Agreement applies to the one or more databases that
your product may contain. We refer to these singly as a “Database”
and together as the “Databases.” Your product may thus include the
“WBS Database” which contains worldwide background surf ace mapping data, the “SmartMap Database” which contains inland mapping
data, or other Databases.
2. The Databases that your product may contain are licensed, not sold.
We grant to you the nonexclusive, nonassignable right to use these
Databases for supplemental navigation reference purposes, but only
as long as you comply with the terms and conditions of this License
Agreement. W e reserve the right to terminate this license if you violate
any aspect of this License Agreement. You are responsible for using
official government charts and prudent navigation for safe trav el.
3. The Databases housed in your product are protected by the cop yright
notices appearing on the product or its screen(s). You ma y NOT modify ,
adapt, translate, rev erse engineer, decompile, disassemb le, rent, lease,
or resell any Database, and you may NOT create derivative works
based upon any Database or its contents.. Any unauthorized reproduction, use, or transfer of a Database ma y be a crime and may subject you to damages and attorney fees.
4. This License Agreement will terminate immediately without prior no-
tice from us if you fail to comply with or violate any of the pro visions of
this Agreement. Upon termination, you will promptly return all products containing one or more Databases to us.
5. Prices and programs are subject to change without notice.
6. This License Agreement shall be governed by the la ws of the State of
Oklahoma and comprises the complete and exclusive understanding
between you and us concerning the above subject matter.
13
Page 14

DATAB ASES LIMITED WARRANTY
“We”, “our”, or “us” refers to Lowrance Electronics, Inc., the manufacturer of this product.
“You” or “your” ref ers to the first person who purchases the product as a consumer item f or
personal, family, or household use. The Databases Limited Warranty applies to the one or
more databases that your product may contain. We refer to each of these as a “Database”
or together as the “Databases.” Your product may thus include the “WBS Database” which
contains worldwide background surface mapping data, the “SmartMap Database” which
contains inland mapping data, or other Databases.
We warrant to you that we have accurately compiled, processed, and reproduced the
portions of the source material on which the Databases are based. Howev er, we are under
no obligation to provide updates to the Databases, and the data contained in the Databases may be incomplete when compared to the source material. WE MAKE NO EXPRESS OR IMPLIED WARRANTY OF ANY KIND ABOUT THE ACCURACY OF THE
SOURCE MATERIAL ITSELF, INCLUDING BUT NOT LIMITED TO IMPLIED WARRANTIES OF MERCHANTABILITY OR FITNESS FOR A PARTICULAR PURPOSE.
If there is a defect in any Database, y our exclusive remedy shall be, at our option, either a
refund of the price you paid for the product containing the defective Database or a replacement of such product. WE WILL NOT UNDER ANY CIRCUMSTANCES BE LIABLE TO
ANYONE FOR ANY SPECIAL, CONSEQ UENTIAL, INCIDENTAL, OR OTHER INDIRECT
DAMAGE OF ANY KIND.
Some states do not allow the exclusion or limitation of incidental or consequential damages, so the above limitations or exclusions may not apply to you.
This warranty does NOT apply in the following circumstances: (1) when the product has
been serviced or repaired by anyone other than us, (2) when the product has been connected, installed, combined, altered, adjusted, or handled in a manner other than according to the instructions furnished with the product, (3) when any serial number has been
effaced, altered, or removed, or (4) when any defect, problem, loss, or damage has resulted from any accident, misuse, negligence, or carelessness, or from any failure to provide reasonable and necessary maintenance in accordance with the instructions of the
owner’s manual for the product.
We reserve the right to make changes or improvements in our products from time to time
without incurring the obligation to install such improvements or changes on equipment or
items previously manufactured.
This warranty gives you specific legal rights and you ma y also hav e other rights which may
vary from state to state.
Your remedies under this warranty will be available so long as you can show in a reasonable manner that the defect occurred within one (1) year from the date of your original
purchase, and we must receive your warranty claim no later than 30 da ys after such 1-year
period expires. Your claim must be substantiated by a dated sales receipt or sales slip.
14
Page 15

LOWRANCE ELECTRONICS
FULL ONE-YEAR WARRANTY
“We", “our”, or “us” refers to LOWRANCE ELECTRONICS,INC., the manufacturer of this
product. “You” or “your” refers to the first person who purchases this product as a consumer item for personal, family, or household use.
We warrant this product against defects or malfunctions in materials and workmanship,
and against failure to conform to this product’s written specifications, all for one year (1)
from the date of original purchase by you. WE MAKE NO OTHER EXPRESS WARRANTY
OR REPRESENTATION OF ANY KIND WHATSOEVER CONCERNING THIS PRODUCT.
Your remedies under this warranty will be available so long as you can show in a reasonable manner that any defect or malfunction in materials or workmanship, or any nonconformity with the product’s written specifications, occurred within one year from the date
of your original purchase, which must be substantiated by a dated sales receipt or sales
slip. Any such defect, malfunction, or non-conformity which occurs within one year from
your original purchase date will either be repaired without charge or be replaced with a
new product identical or reasonably equivalent to this product, at our option, within a reasonable time after our receipt of the product. If such def ect, malfunction, or non-conf ormity
remains after a reasonable number of attempts to repair by us, you may elect to obtain
without charge a replacement of the product or a refund for the product. THIS REPAIR,
REPLACEMENT, OR REFUND (AS JUST DESCRIBED) IS THE EXCLUSIVE REMEDY
AVAILABLE TO YOU AGAINST US FOR ANY DEFECT, MALFUNCTION, OR NON-CONFORMITY CONCERNING THE PRODUCT OR FOR ANY LOSS OR DAMAGE RESULTING FROM ANY OTHER CAUSE WHATSOEVER. WE WILL NOT UNDER ANY CIRCUMSTANCES BE LIABLE TO ANYONE FOR ANY SPECIAL, CONSEQUENTIAL, INCIDENTAL, OR OTHER INDIRECT DAMAGE OF ANY KIND.
Some states do not allow the exclusion or limitation of incidental or consequential damages, so the above limitations or exclusions may not apply to you.
This warranty does NOT apply in the following circumstances: (1) when the product has
been serviced or repaired by anyone other than us, (2) when the product has been connected, installed, combined, altered, adjusted, or handled in a manner other than according to the instructions furnished with the product, (3) when any serial number has been
effaced, altered, or removed, or (4) when any defect, problem, loss, or damage has resulted from any accident, misuse, negligence, or carelessness, or from any failure to provide reasonable and necessary maintenance in accordance with the instructions of the
owner’s manual for the product.
We reserve the right to make changes or improvements in our products from time to time
without incurring the obligation to install such improvements or changes on equipment or
items previously manufactured.
This warranty gives you specific legal rights and you ma y also hav e other rights which may
vary from state to state.
REMINDER: You must retain the sales slip or sales receipt proving the date of your original purchase in case warranty service is ever required.
LOWRANCE ELECTR ONICS, INC
12000 E SKELLY DR TULSA, OK 74128
(800) 324-1356
www.lowrance.com
15
Page 16

How to Obtain Service - U.S.A. Only
We back your investment in quality products with quick, expert service
and genuine Lowrance® replacement parts. If you're in the United States
and you have questions, please contact the Factory Customer Service
Department using our toll-free number listed below. You must send the
unit to the factory for warranty service or repair. Please call the factory
before sending the unit. You will be asked for your unit's serial number.
Use the following toll-free number:
800-324-1356
Your unit is covered by a full one-year warranty. (See inside this manual
for complete warranty details.) If your unit fails and the f ailure is not co vered by the original warranty, Lowrance has a flat-rate repair policy that
covers your unit and accessories pac ked with the unit at the factory . There
is a 180-day warranty on all non-w arranty repairs from the f actory, which
is similar to the original warranty , but is f or 180 days r ather than one year .
For further details, please call us at the above n umber.
Remember, non-warr anty repairs are subject to Lowrance's published flatrate charges and 180-day warr anty.
Lowrance Electronics may find it necessary to change or end our shipping policies, regulations, and special offers at an y time . We reserve the
right to do so without notice.
LITHO IN U.S.A. 988-0147-11
16
 Loading...