

Lowrance HDS Live, ELITE Ti2 Operator's Manual
HDS Live
Operator Manual
ENGLISH
www.lowrance.com


Preface
Disclaimer
As Navico is continuously improving this product, we retain the
right to make changes to the product at any time which may not be
reflected in this version of the manual. Please contact your nearest
distributor if you require any further assistance.
It is the owner’s sole responsibility to install and use the equipment
in a manner that will not cause accidents, personal injury or
property damage. The user of this product is solely responsible for
observing maritime safety practices.
NAVICO HOLDING AS AND ITS SUBSIDIARIES, BRANCHES AND
AFFILIATES DISCLAIM ALL LIABILITY FOR ANY USE OF THIS PRODUCT
IN A WAY THAT MAY CAUSE ACCIDENTS, DAMAGE OR THAT MAY
VIOLATE THE LAW.
This manual represents the product as at the time of printing.
Navico Holding AS and its subsidiaries, branches and affiliates
reserve the right to make changes to specifications without notice.
Governing language
This statement, any instruction manuals, user guides and other
information relating to the product (Documentation) may be
translated to, or has been translated from, another language
(Translation). In the event of any conflict between any Translation of
the Documentation, the English language version of the
Documentation will be the official version of the Documentation.
Trademarks
Navico® is a registered trademark of Navico Holding AS.
Lowrance® is a registered trademark of Navico Holding AS.
Bluetooth® is a registered trademark of Bluetooth SIG, Inc.
C-MAP® is a registered trademark of Navico Holding AS.
C-Monster™ is a trademark of JL Marine Systems, Inc.
CZone™ is a trademark of Power Products LLC.
Evinrude® is a registered trademark of BRP US, Inc.
FUSION-Link™ Marine Entertainment Standard™ is a registered
trademark of FUSION Electronics Ltd.
Mercury® is a registered trademark of Mercury.
Preface | HDS Live Operator Manual
3

Navionics® is a registered trademark of Navionics, Inc.
NMEA® and NMEA 2000® are registered trademarks of the National
Marine Electronics Association.
Power-Pole® is a registered trademark of JL Marine Systems, Inc.
SD™ and microSD™ are trademarks or registered trademarks of
SD-3C, LLC in the United States, other countries or both.
SiriusXM® is a registered trademark of Sirius XM Radio Inc.
SmartCraft VesselView® is a registered trademark of Mercury.
Suzuki® is a registered trademark of Suzuki.
Yamaha® is a registered trademark of Yamaha.
Navico product references
This manual refers to the following Navico products:
• Active Imaging™ (Active Imaging)
• Broadband Radar™ (Broadband Radar)
• Broadband 3G™ (Broadband 3G Radar)
• Broadband 4G™ (Broadband 4G Radar)
• Broadband Sounder™ (Broadband Sounder)
• DownScan Imaging™ (DownScan)
• DownScan Overlay™ (Overlay)
• FishReveal™ (FishReveal)
• GoFree™ (GoFree)
• Genesis® (Genesis)
• Halo™ Pulse Compression Radar (Halo Radar)
• LiveSight™ (LiveSight)
• SmartSteer™ (SmartSteer)
• SonicHub® (SonicHub)
• StructureMap™ (StructureMap)
Copyright
Copyright © 2018 Navico Holding AS.
Warranty
The warranty card is supplied as a separate document. In case of any
queries, refer to the brand website of your unit or system:
www.lowrance.com
4
Preface | HDS Live Operator Manual

Compliance statements
Europe
Navico declare under our sole responsibility that the product
conforms with the requirements of:
• CE under RED 2014/53/EU
The relevant declaration of conformity is available in the product's
section at the following website:
• www.lowrance.com
Countries of intended use in the EU
AT - Austria
BE - Belgium
BG - Bulgaria
CY - Cyprus
CZ - Czech Republic
DK - Denmark
EE - Estonia
FI - Finland
FR - France
DE - Germany
GR - Greece
HU - Hungary
IS - Iceland
IE - Ireland
IT - Italy
LV - Latvia
LI - Liechtenstein
LT - Lithuania
LU - Luxembourg
MT - Malta
NL - Netherlands
NO - Norway
PL - Poland
PT - Portugal
RO - Romania
SK - Slovak Republic
SI - Slovenia
ES - Spain
SE - Sweden
CH - Switzerland
TR - Turkey
UK - United Kingdom
United States of America
Navico declare under our sole responsibility that the product
conforms with the requirements of:
• Part 15 of the FCC Rules. Operation is subject to the following
two conditions: (1) this device may not cause harmful
interference, and (2) this device must accept any interference
received, including interference that may cause undesired
operation
Preface | HDS Live Operator Manual
5

Warning: The user is cautioned that any changes or
modifications not expressly approved by the party
responsible for compliance could void the user’s
authority to operate the equipment.
Note: This equipment generates, uses and can radiate radio
Ú
frequency energy and, if not installed and used in accordance
with the instructions, may cause harmful interference to radio
communications. However, there is no guarantee that the
interference will not occur in a particular installation. If this
equipment does cause harmful interference to radio or
television reception, which can be determined by turning the
equipment off and on, the user is encouraged to try to correct
the interference by one or more of the following measures:
• Reorient or relocate the receiving antenna
• Increase the separation between the equipment and receiver
• Connect the equipment into an outlet on a circuit different from
that of the receiver is connected
• Consult the dealer or an experienced technician for help
Industry Canada
This device complies with Industry Canada’s license-exempt RSSs.
Operation is subject to the following two conditions: (1) This device
may not cause interference; and (2) This device must accept any
interference, including interference that may cause undesired
operation of the device.
Le présent appareil est conforme aux CNR d’Industrie Canada
applicables aux appareils radio exempts de licence. L’exploitation
est autorisée aux deux conditions suivantes: (1) l’appareil ne doit pas
produire de brouillage, et. (2) l’utilisateur de l’appareil doit accepter
tout brouillage radioélectrique subi, même si le brouillage est
susceptible d’en compromettre le fonctionnemen.
Industry Canada Statement: Under Industry Canada regulations, this
radio transmitter may only operate using an antenna of a type and
maximum (or lesser) gain approved for the transmitter by Industry
Canada. To reduce potential radio interference to other users, the
antenna type and its gain should be so chosen that the equivalent
isotropically radiated power (e.i.r.p.) is not more than that necessary
for successful communication.
6
Preface | HDS Live Operator Manual

Conformément à la réglementation d’Industrie Canada, le présent
émetteur radio peut fonctionner avec une antenne d’un type et
d’un gain maximal (ou inférieur) approuvé pour l’émetteur par
Industrie Canada. Dans le but de réduire les risques de brouillage
radioélectrique à l’intention des autres utilisateurs, il faut choisir le
type d’antenne et son gain de sorte que la puissance isotrope
rayonnée quivalente (p.i.r.e.) ne dépassepas l’intensité nécessaire à
l’établissement d’une communication satisfaisante.
Australia and New Zealand
Navico declare under our sole responsibility that the product
conforms with the requirements of:
• level 2 devices of the Radiocommunications (Electromagnetic
Compatibility) standard 2017
• radiocommunications (Short Range Devices) Standards 2014
Internet usage
Some features in this product use an internet connection to
perform data downloads and uploads. Internet usage via a
connected mobile/cell phone internet connection or a pay-per-MB
type internet connection may require large data usage. Your service
provider may charge you based on the amount of data you transfer.
If you are unsure, contact your service provider to confirm rates and
restrictions.
About this manual
This manual is a reference guide for operating the unit. It assumes
that all equipment is installed and configured, and that the system
is ready to use.
Some features may not be activated or available for screenshots in
the manual. As a result, screenshots of menus and dialogs may not
match the look of your unit.
Important text that requires special attention from the reader is
emphasized as follows:
Note: Used to draw the reader’s attention to a comment or
Ú
some important information.
Preface | HDS Live Operator Manual
7
Warning: Used when it is necessary to warn
personnel that they should proceed carefully to
prevent risk of injury and/or damage to equipment/
personnel.
Manual version
This manual is written for software version 1.0. The manual is
continually updated to match new software releases. The latest
available manual version can be downloaded from the product's
support section at the following website:
• www.lowrance.com
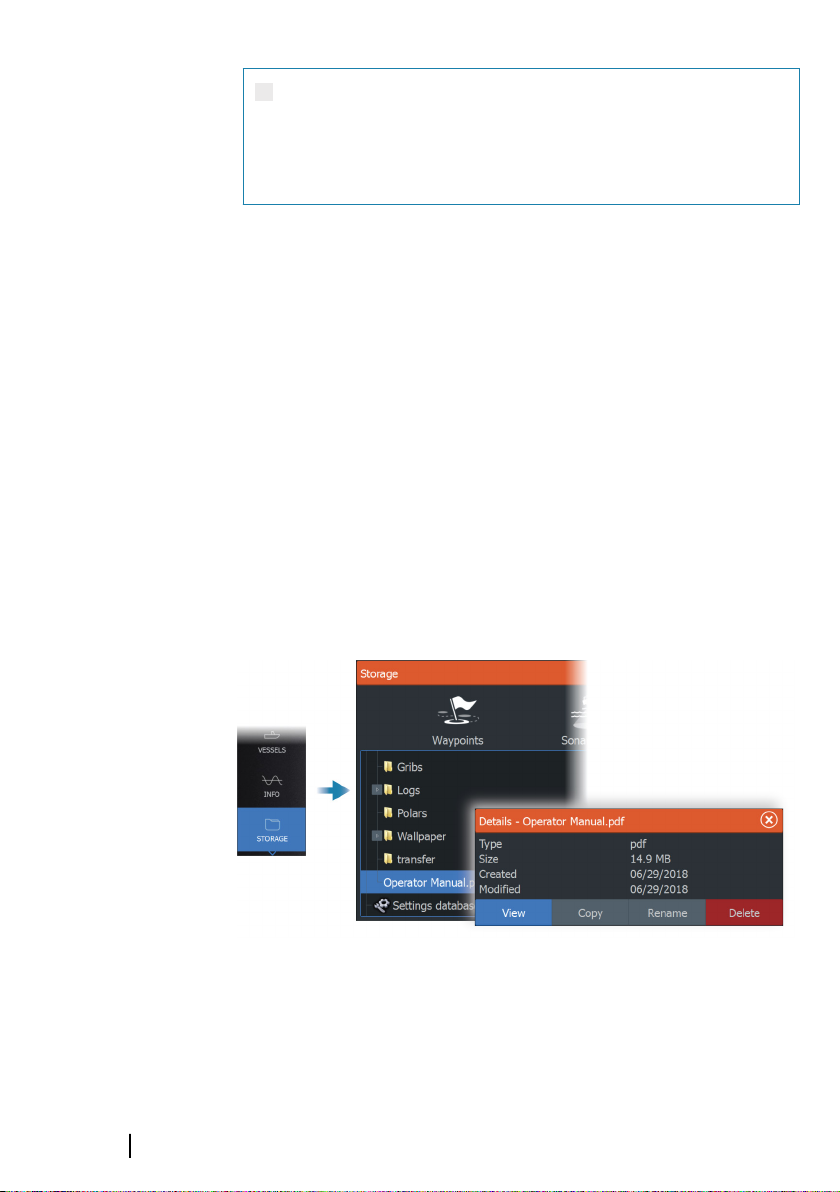
Viewing the manual on the screen
The PDF viewer included in the unit makes it possible to read the
manuals and other PDF files on the screen. Manuals can be
downloaded from the product's support section at the following
website:
• www.lowrance.com
The manuals can be read from a storage device connected to the
unit or copied to the unit’s internal memory.
8
Preface | HDS Live Operator Manual

Contents
17 Introduction
The front panel keys
17
18 Card reader
19 Feature unlock
19 Device registration
20 The user interface
20 The Home page
21 Multiple panel pages
21 Application pages
22 System controls dialog
24 Basic operation
24 Turning the system on and off
24 Display illumination
25 Pages and panels
25 Menus
25 Man Overboard waypoint
26 Locking the touchscreen
26 Screen capture
27 Customizing your system
27 Customizing the Home page wallpaper
27 Adjusting the split on multiple panel pages
28 Data overlay
28 Favorite pages
29 Configuring the quick access keys
30 Enabling or disabling features
31 Charts
31 The Chart panel
31 Chart data
32 Selecting chart source
32 Vessel symbol
32 Zooming the chart
32 Panning the chart
33 Chart orientation
33 Look ahead
Contents | HDS Live Operator Manual
9

33 Displaying information about chart items
34
Using the cursor on the chart panel
35 Find objects on chart panels
36 Color trails
36 3D charts
37 Chart overlay
39 C-MAP charts
44 Navionics charts
49 Chart settings
51 Waypoints, routes, and trails
51 Waypoints, routes and trail dialogs
51 Waypoints
53 Routes
57 About trails
60 Navigating
60 About navigating
60 Steer panel
61 Navigate to cursor position
61 Navigate a route
62 Navigating with the autopilot
63 Navigation settings
10
65 Sonar
65 The image
66 Multiple sources
66 Zooming the image
66 Using the cursor on the image
67 Viewing history
67 Recording log data
70 Setting up the image
72 Advanced options
73 More options
76 Sonar settings
79 SideScan
79 About SideScan
79 The SideScan panel
79 Zooming the image
Contents | HDS Live Operator Manual

79 Using the cursor on the panel
80
Viewing history
80 Recording SideScan data
80 Setting up the image
81 Advanced options
82 More options
83 DownScan
83 About DownScan
83 The DownScan panel
83 Zooming the image
83 Using the cursor on the panel
83 Viewing DownScan history
84 Recording DownScan data
84 Setting up the DownScan image
85 Advanced options
85 More options
87 3D Sonar
87 About 3D Sonar
87 The 3D panel
88 Zooming the image
88 Using the cursor on a 3D image
88 Saving waypoints
89 3D mode options
89 Fish renderings
90 Viewing image history
90 Setting up the image
91 Advanced options
92 More options
93 SpotlightScan
93 The SpotlightScan image
94 Zooming the image
94 SpotlightScan setup
95 Setting up the image
96 Advanced options
96 More options
97 SpotlightScan operation tips
Contents | HDS Live Operator Manual
11

98 StructureMap
98
About StructureMap
98 The StructureMap image
98 StructureMap sources
99 StructureMap tips
100 Using StructureMap with mapping cards
100 Structure options
102 Info panels
102 Info panels
102 Dashboards
102 Customizing the panel
103 Video
103 The Video panel
103 Setting up the video panel
105 Trolling motor autopilot
105 Safe operation with the autopilot
105 Selecting active autopilot
106 The autopilot controller for trolling motor
106 Engaging and disengaging the autopilot
107 Autopilot indication
107 Autopilot modes
111 Trolling motor speed control
111 Recording and saving a trail
112 Autopilot settings
12
114 Outboard autopilot
114 Safe operation with the autopilot
114 Selecting active autopilot
115 The autopilot controller for outboard motors
115 Engaging and disengaging the autopilot
116 Autopilot indication
116 Autopilot modes
122 Autopilot settings
Contents | HDS Live Operator Manual

124 Simulator
124
About
124 Retail mode
124 Simulator source files
125 Advanced simulator settings
126 Radar
126 About radar
126 The Radar panel
127 Dual radar
127 Radar operational modes
128 Radar sector blanking
129 Radar range
129 Using the cursor on a radar panel
130 Adjusting the radar image
134 Advanced radar options
135 Radar view options
141 EBL/VRM markers
142 Setting a guard zone around your vessel
143 MARPA targets
145 Recording radar data
146 Radar settings
148 Audio
148 About the audio function
148 The audio controller
149 Setting up the audio system
149 Selecting audio source
150 Using an AM/FM radio
150 Sirius radio
151 Viewing DVD video
153 AIS
153 About AIS
153 Selecting an AIS target
153 Searching for AIS vessels
153 Displaying target information
155 Calling an AIS vessel
155 AIS SART
Contents | HDS Live Operator Manual
13

156 Vessel alarms
157
AIS target symbols
158 Vessel settings
160 SiriusXM weather
160 About SiriusXM weather
160 Sirius status panel
160 Sirius weather panel
161 Showing weather details
162 Local weather
162 Weather options
165 Weather alarms
167 Remote control of the MFD
167 Remote control options
167 Smartphones and tablets
169 LR-1 Remote control
171 Using your phone with the MFD
171 About phone integration
171 Connecting and pairing a phone
172 Phone notifications
173 Phone troubleshooting
175 Managing Bluetooth devices
14
176 Tools and settings
176 The toolbar
177 Settings
182 Alarms
182 About the alarm system
182 Type of messages
182 Alarm indication
183 Acknowledging a message
183 Alarm settings
184 Alarm dialogs
185 Maintenance
185 Preventive maintenance
Contents | HDS Live Operator Manual

185 Checking the connectors
185
Cleaning the display unit
185 Touchscreen calibration
186 NMEA Data logging
186 Software updates
188 Service report
189 Backing up your system data
192 Integration of 3rd party devices
192 SmartCraft VesselView integration
192 Suzuki engine integration
193 Yamaha engine integration
193 Evinrude engine integration
194 FUSION-Link integration
194 BEP CZone integration
194 Power-Pole anchors
Contents | HDS Live Operator Manual
15

16
Contents | HDS Live Operator Manual
MOB
B
C
E
H
I
A
D
F
G
1
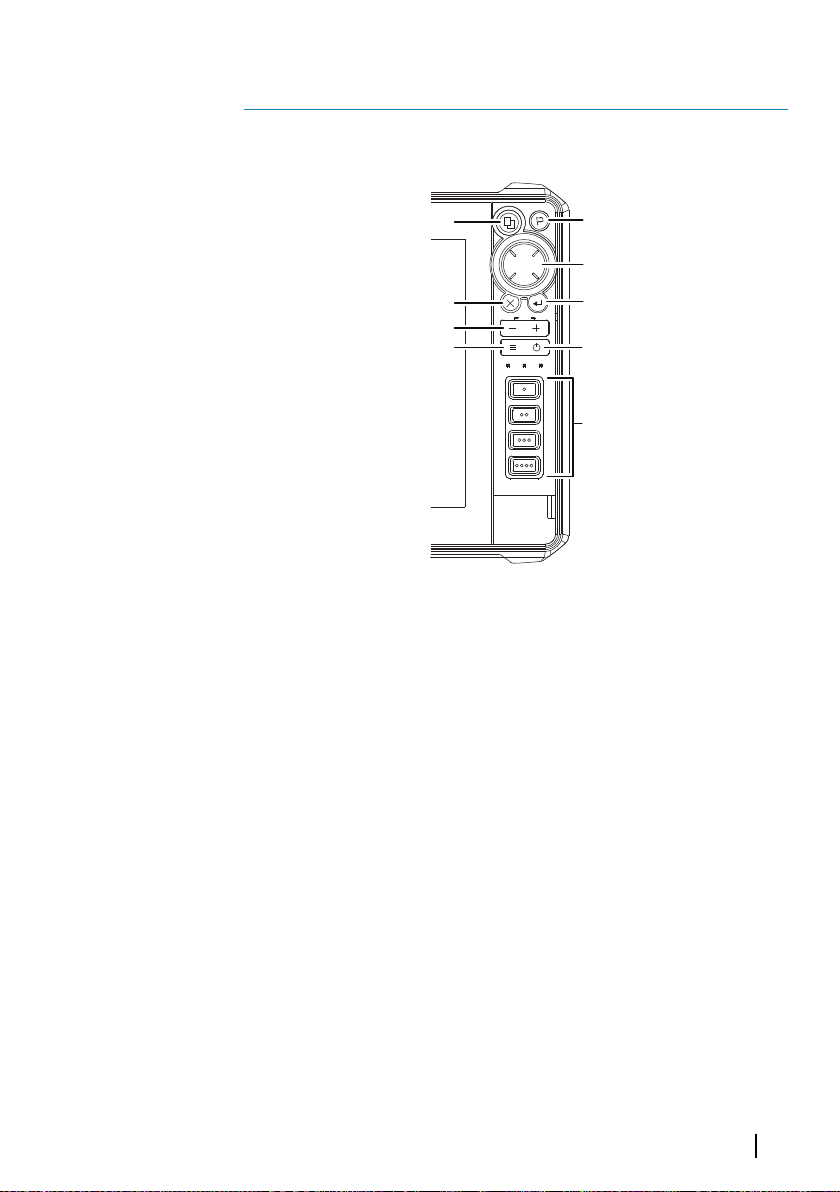
Introduction
The front panel keys
A Pages key
• Press once to activate the Home page. Repeat short
presses to cycle the favorite buttons
• Press and hold is configurable. Refer to "Configuring the quick
access keys" on page 29
B Waypoint key
• Press to open the new waypoint dialog
• Press twice to save a waypoint
• Press and hold to access the find dialog
C Arrow keys
• Press arrows to move through menu items, to adjust a
value, and to move the cursor on a panel
D Exit (X) key
• Press to exit a dialog, to return to previous menu level, to
remove the cursor from the panel or to restore the cursor
on the panel
Introduction | HDS Live Operator Manual
17

E Enter key
• Press to select or save your settings
F Zoom keys and MOB key
• Zoom keys for panels and images
• Simultaneous pressing both keys saves a Man Overboard
(MOB) waypoint at the current vessel position
G Menu key
• Press to display the menu for the active panel/overlay
• Press twice to display the settings dialog
• Press and hold to hide or show the menu
H Power key
• Press to turn the unit ON
• Press and hold to turn the unit OFF
• When ON, press once to display the System Controls
dialog. Repeat short presses to cycle the backlight
brightness
I Quick access keys (HDS-12 Live and HDS-16 Live units
only)
• Configurable keys. Refer to "Configuring the quick access keys" on
page 29.
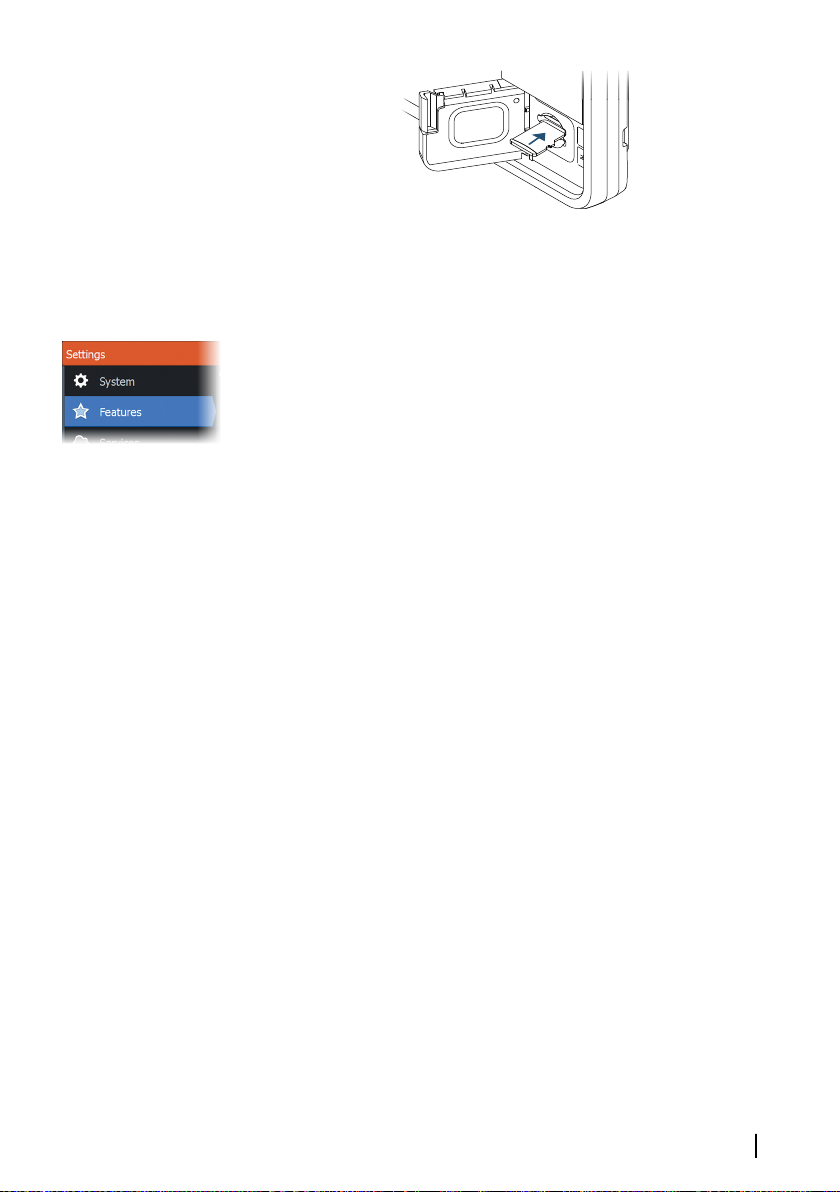
18
Card reader
A memory card can be used for:
• Chart data
• Software updates
• Transfer of user data
• System backup
Note: Do not download, transfer or copy files to a chart card.
Ú
Doing so can damage chart information on the chart card.
The protective door should always be securely shut immediately
after inserting or removing a card, in order to prevent possible water
ingress.
Introduction | HDS Live Operator Manual
Feature unlock
Some additional features are sold separately. These features can be
unlocked by entering an unlock code.
Select the feature you want to unlock. Follow the instructions to
purchase and enter the feature unlock code.
After a feature unlock code is entered in the unit, the feature is
available for use.
Note: The feature unlock option is only available if your unit
Ú
supports a locked feature.
Device registration
You are prompted to register your device during startup. You can
also register by selecting the register option in the System settings
dialog. Registration can be done:
• From the device if it is connected to the internet
• From a smart device with internet access
• Over the phone
Introduction | HDS Live Operator Manual
19
2
The user interface
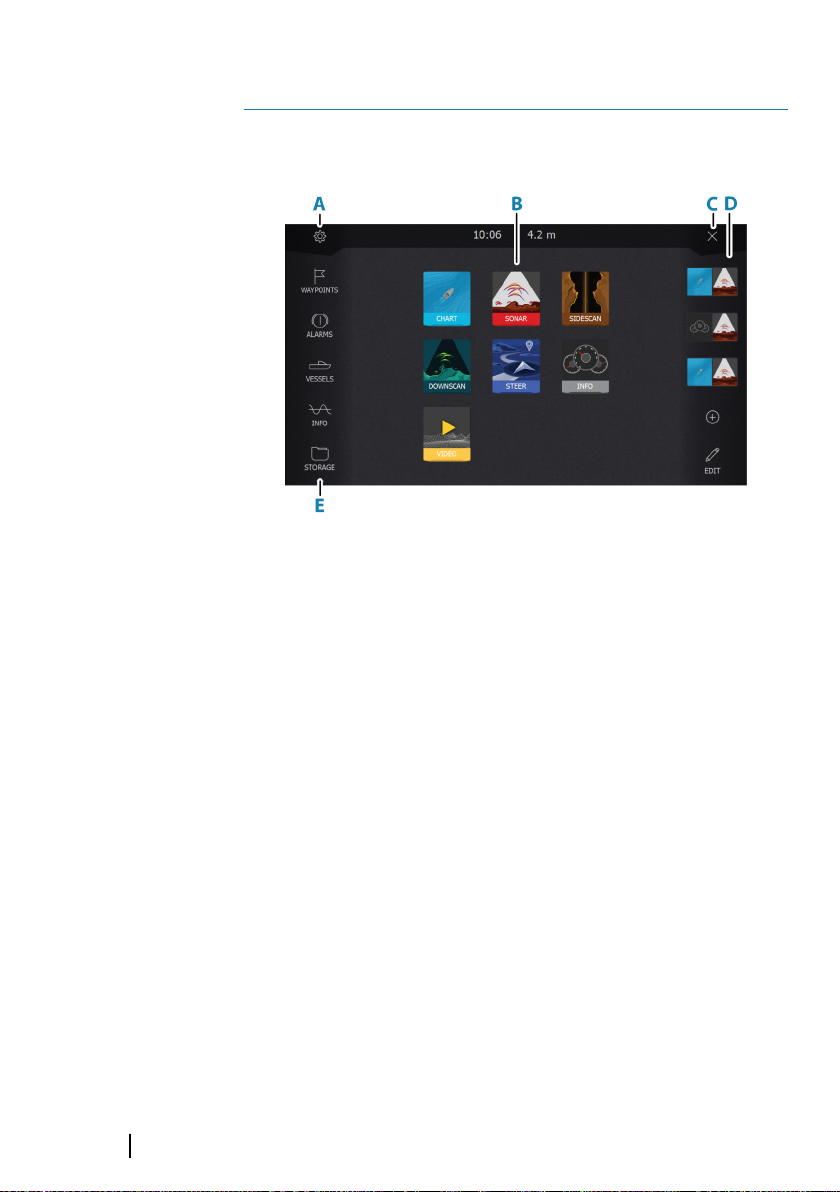
The Home page
The Home page is accessed from any operation by a short press on
the home key.
A Settings button
Opens the settings dialog. Use it to configure the system.
B Applications
Select a button to display the application as a full page
panel.
Press and hold a button to display pre-defined quick split
pages for the application.
C Close button
Select to exit the Home page and return to the previous
active page.
D Favorites
Select a button to display the panel combination.
Press and hold a favorite button to enter edit mode for the
Favorites panel.
E Toolbar
Select a button to access dialogs used for carrying out a
task, or for browsing stored information.
20
The user interface | HDS Live Operator Manual

Multiple panel pages
You can have several panels on a page. The number of panels on a
page depends on the size of your unit.
Panel sizes in a multiple panel page can be adjusted from the
system controls dialog. Refer to "Adjusting the split on multiple panel pages" on
page 27.
In a multiple panel page, only one panel can be active at a time. The
active panel is outlined with a border.
You can only access the page menu of an active panel.
To activate a panel:
• Press the panel key to toggle between panels
• Tap the panel you want to activate
2 panels page 3 panels page
Application pages
A Control bar
The user interface | HDS Live Operator Manual
21
B Application panel
C Menu
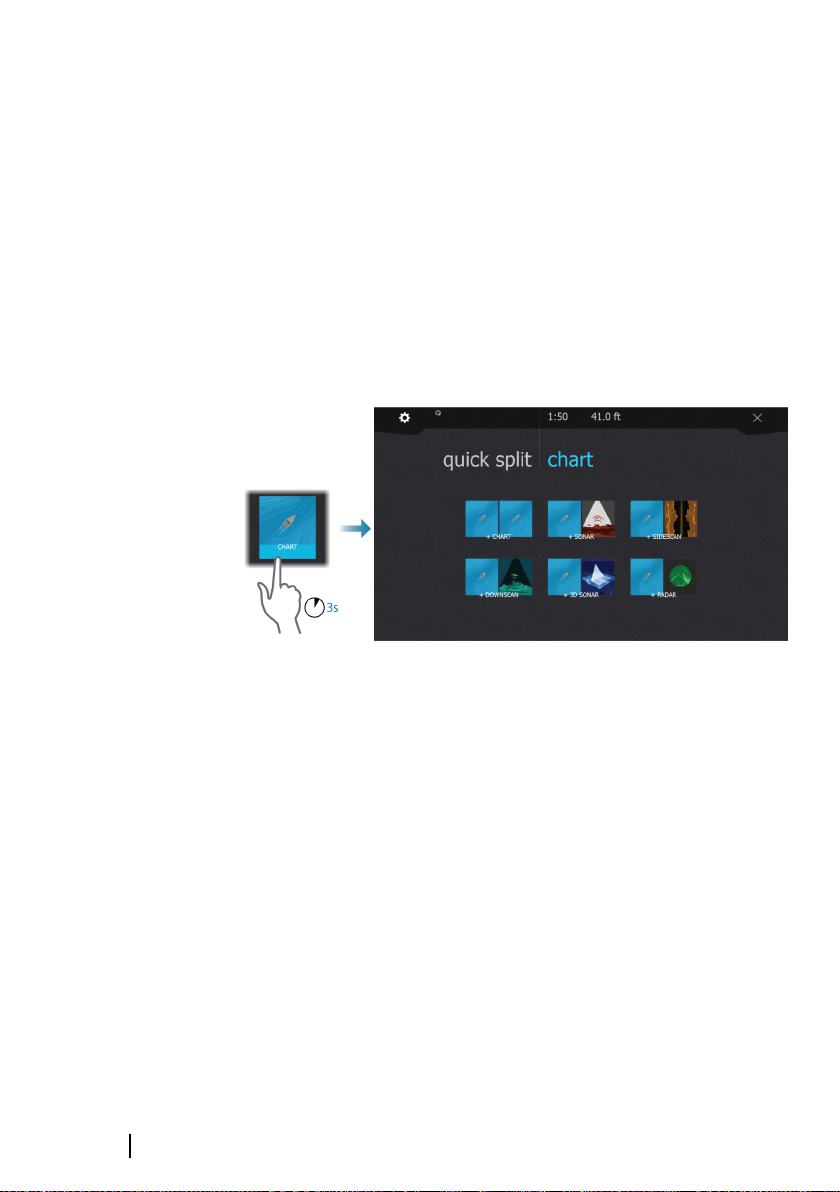
Quick split pages
Each full screen application has several pre-configured quick split
pages. They show the selected application combined with one of
the other panels.
Note: The number of quick split pages cannot be changed, and
Ú
the pages cannot be customized or deleted.
Access a quick split page by pressing and holding the application
button on the home page.
22
Favorite pages
The system is delivered with preconfigured favorite pages. The
preconfigured pages can be modified and you can add your own
favorite pages. Refer to "Adding new favorite pages" on page 28.
The unit display size determines the number of application panels
that can be included on a favorite page.
System controls dialog
The System Controls dialog provides quick access to basic system
settings.
The icons displayed on the dialog vary with operational mode and
connected equipment.
For those functions that toggle on and off, an orange bar across the
top of the icon indicates the function is activated.
Display the dialog by:
The user interface | HDS Live Operator Manual

• pressing the power key
The user interface | HDS Live Operator Manual
23

3
Basic operation
Turning the system on and off
The system is turned on by pressing the Power key.
Press and hold the Power key to turn the unit off.
You can also turn the unit off from the System Controls dialog.
If the Power key is released before the shut-down is completed, the
power off process is cancelled.
First time startup
When the unit is started for the first time, or after a factory default,
the unit displays a series of dialogs. Respond to the dialog prompts
to make fundamental settings.
You can perform further setup and later change settings using the
system settings dialogs.
Standby mode
In Standby mode, the Sonar and the backlight for screen and keys
are turned off to save power. The system continues to run in the
background.
You select Standby mode from the System Controls dialog.
Switch from Standby mode to normal operation by a short press on
the Power key.
24
Display illumination
Brightness
You can cycle the preset backlight levels by short presses on the
Power key.
The display backlighting can also be adjusted from the System
Controls dialog.
Night mode
The night mode can be activated from the System Controls dialog.
The night mode option optimizes the color palette and backlight for
low light conditions.
Basic operation | HDS Live Operator Manual

Pages and panels
Pages are selected from the Home page.
Full page panels:
• Select the relevant application button
Favorite pages:
• Select the relevant favorite button
Predefined quick split pages:
• Press and hold the relevant application button
In a multiple panel page, only one panel can be active at a time. The
active panel is outlined with a border. You can only access the page
menu of an active panel.
To active a panel in a multiple panel page:
• Tap the panel
• Press the Panel key
Menus
To display a panel menu:
• Select the menu button
• Press the menu key
To return to previous menu level:
• Select the back menu option
• Press the exit key
To hide a panel menu:
• Swipe the menu to the right
• On menu level one press the exit key
Man Overboard waypoint
If an emergency situation should occur, you can save a Man
Overboard (MOB) waypoint at the vessel’s current position.
Create a MOB
To create a Man Overboard (MOB) waypoint:
Basic operation | HDS Live Operator Manual
25
• Simultaneously press the Zoom In (+) and Zoom out (-) keys
• Press the MOB key on a remote controller
When you activate the MOB function the following actions are
automatically performed:
• A MOB waypoint is created at the vessel’s position
• The display switches to a zoomed chart panel, centered on the
vessel's position
• The system displays navigation information back to the MOB
waypoint
Multiple MOB waypoints can be created. The vessel continues to
show navigation information to the initial MOB waypoint.
Navigation to subsequent MOB waypoints needs to be done
manually.
Delete a MOB
A MOB waypoint can be deleted from the menu when the MOB is
activated.
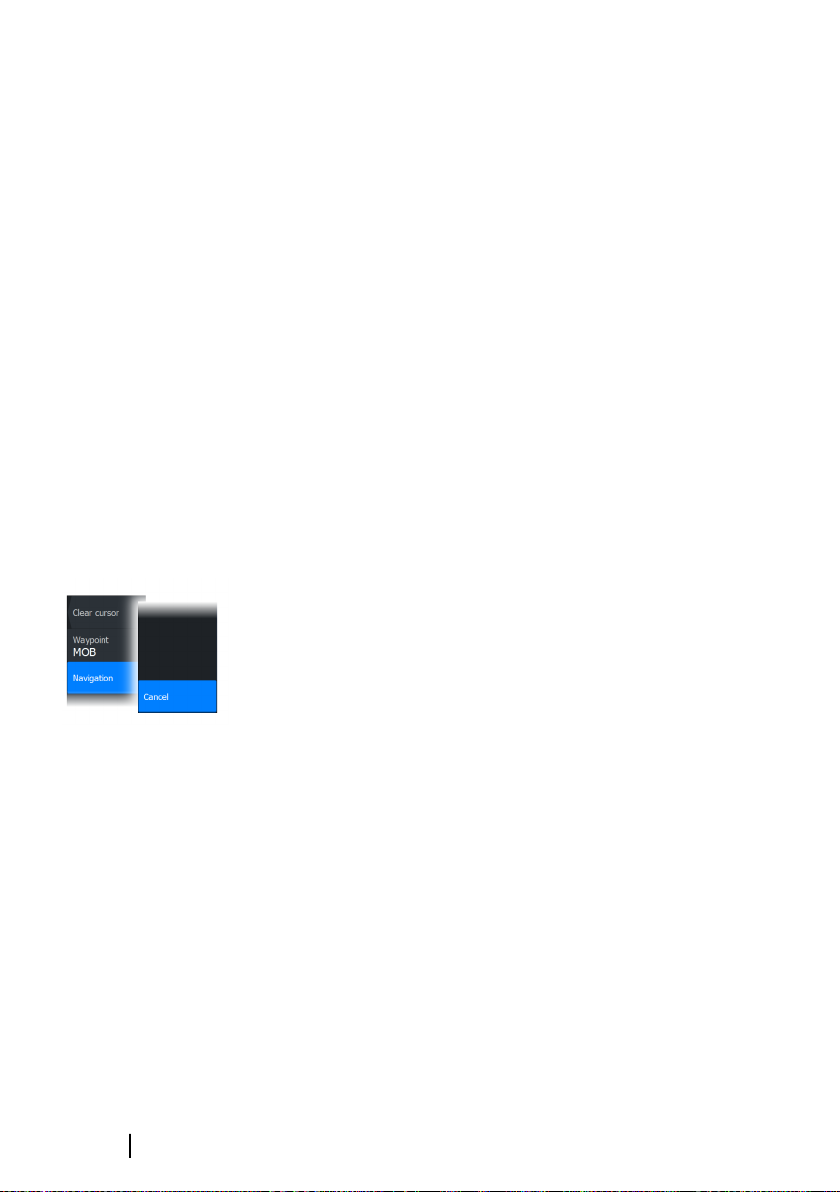
Stop navigating to MOB
The system continues to display navigational information towards
the MOB waypoint until you cancel the navigation from the menu.
26
Locking the touchscreen
You can temporarily lock a touch screen to prevent accidental
operation of the system.
You lock the touch screen from the system controls dialog.
When the touch lock is active, you can still operate the unit from the
keys or from a remote controller.
You remove the lock function by pressing on the power key.
Screen capture
To take a screen capture:
• Simultaneously press the home key and the power key
Screen captures are saved to internal memory.
Basic operation | HDS Live Operator Manual
4
Customizing your system
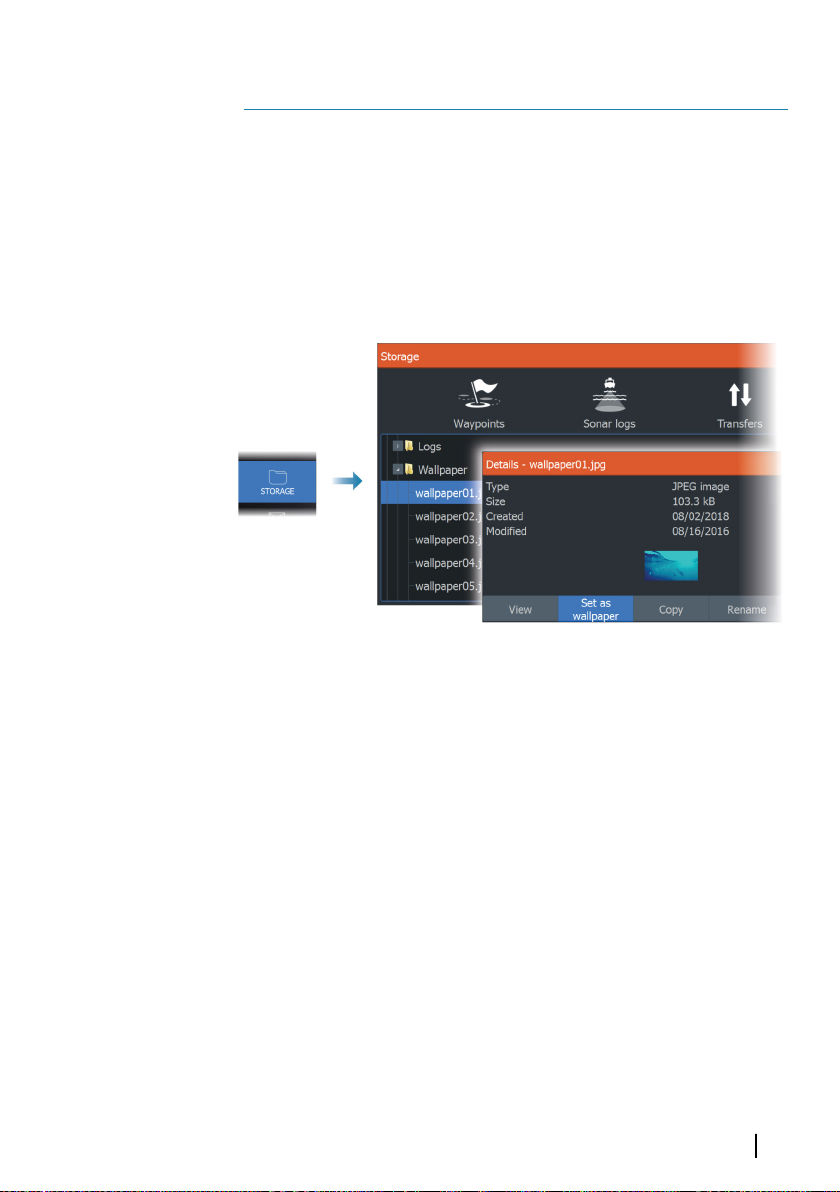
Customizing the Home page wallpaper
The Home page's wallpaper can be customized. You can select one
of the pictures included with the system, or you can use your own
picture in .jpg or .png format.
The images can be available on any location that can be seen in the
files browser. When a picture is chosen as the wallpaper, it is
automatically copied to the Wallpaper folder.
Adjusting the split on multiple panel pages
1. Open the multiple panel page
2. Open the System Controls dialog
3. Select the adjust splits option. The adjustment icon appears on
the multiple panel page.
4. Select the adjustment icon and move the split to the desired
position
5. Use menu options to save or discard your changes.
Customizing your system | HDS Live Operator Manual
27
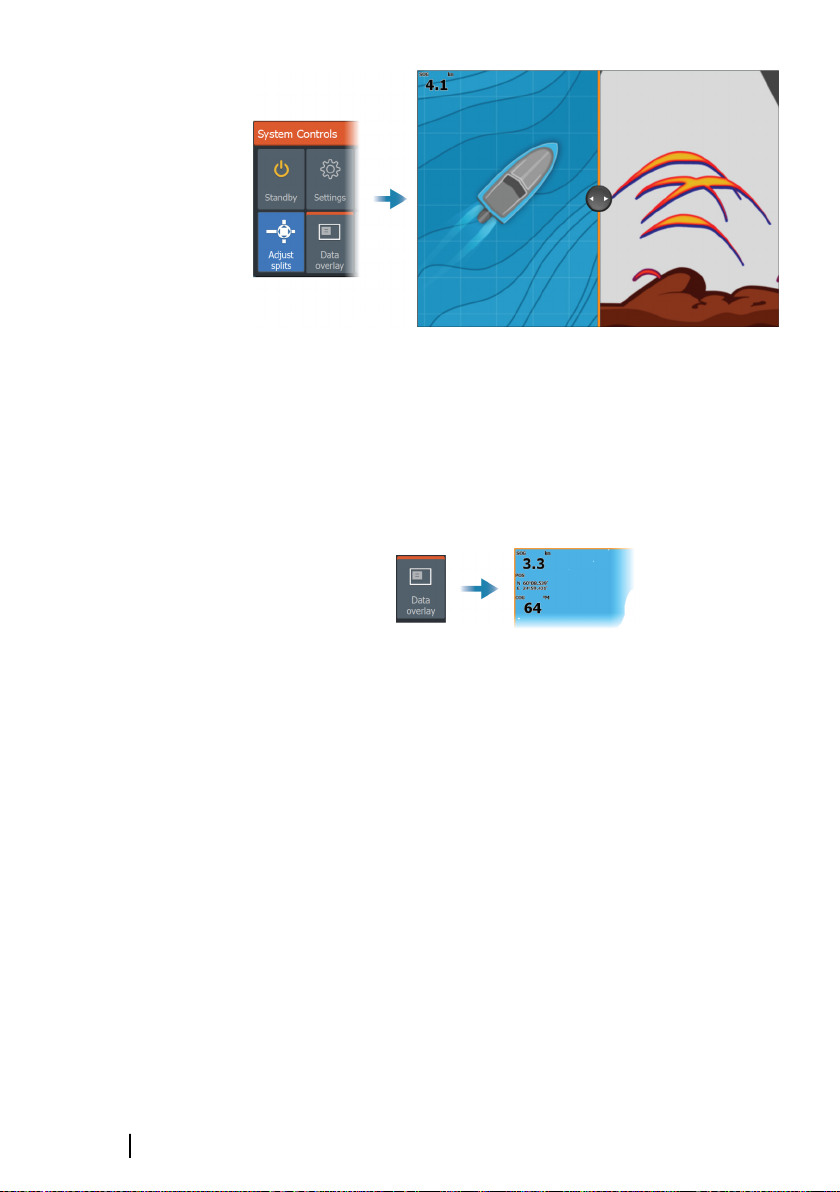
Data overlay
You can have data information as overlay on chart and sonar pages.
The data overlay is set individually for each default page, favorite
pages and for the predefined split pages.
The information can be any data available on the network.
You turn overlay data on or off from the system controls dialog.
Edit overlay data
Use the edit overlay button on the system controls dialog to edit
the overlay data.
When in edit mode, select the data overlay to be edited, then:
• use the menu option to change or configure the data
• drag the overlay data box to reposition the overlay
Favorite pages
Adding new favorite pages
1. Select the New icon in the favorite panel on the Home page to
open the page editor dialog
2. Drag and drop page icons to set up a new page
3. (Optional) Change the panel arrangement (only possible when
2 or more panels)
28
Customizing your system | HDS Live Operator Manual
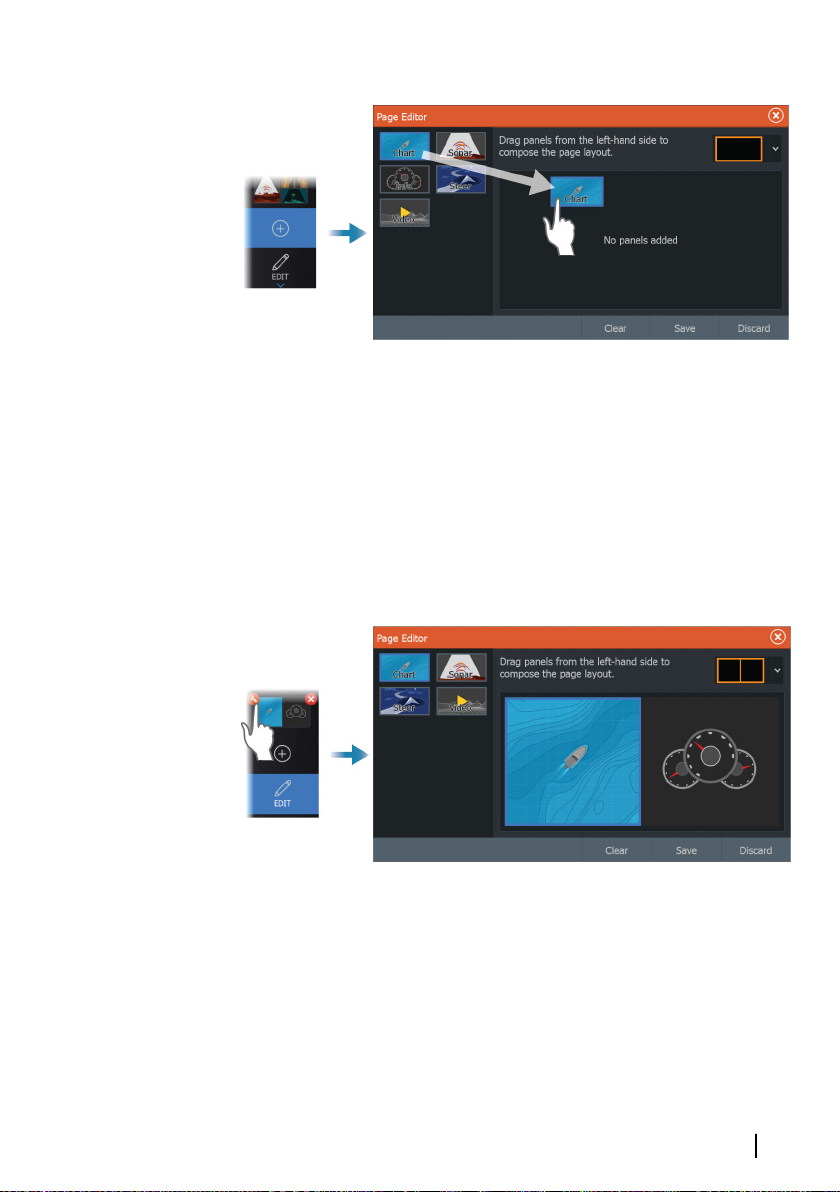
4. Save the page layout.
The system displays the new favorite page, and the new page is
included in the list of favorite pages on the Home page.
Edit favorite pages
1. Select the edit icon in the favorite panel:
-
Select the X icon on a favorite icon to remove the page
- Select the tool icon on a favorite icon to display the page
editor dialog
2. Add or remove panels in the page editor dialog
3. Save or discard your changes to leave the favorite edit mode.
Configuring the quick access keys
The key presses for the quick access keys and the home key can be
configured.
Note: The number of configurable keys depends on the size of
Ú
your unit.
Customizing your system | HDS Live Operator Manual
29
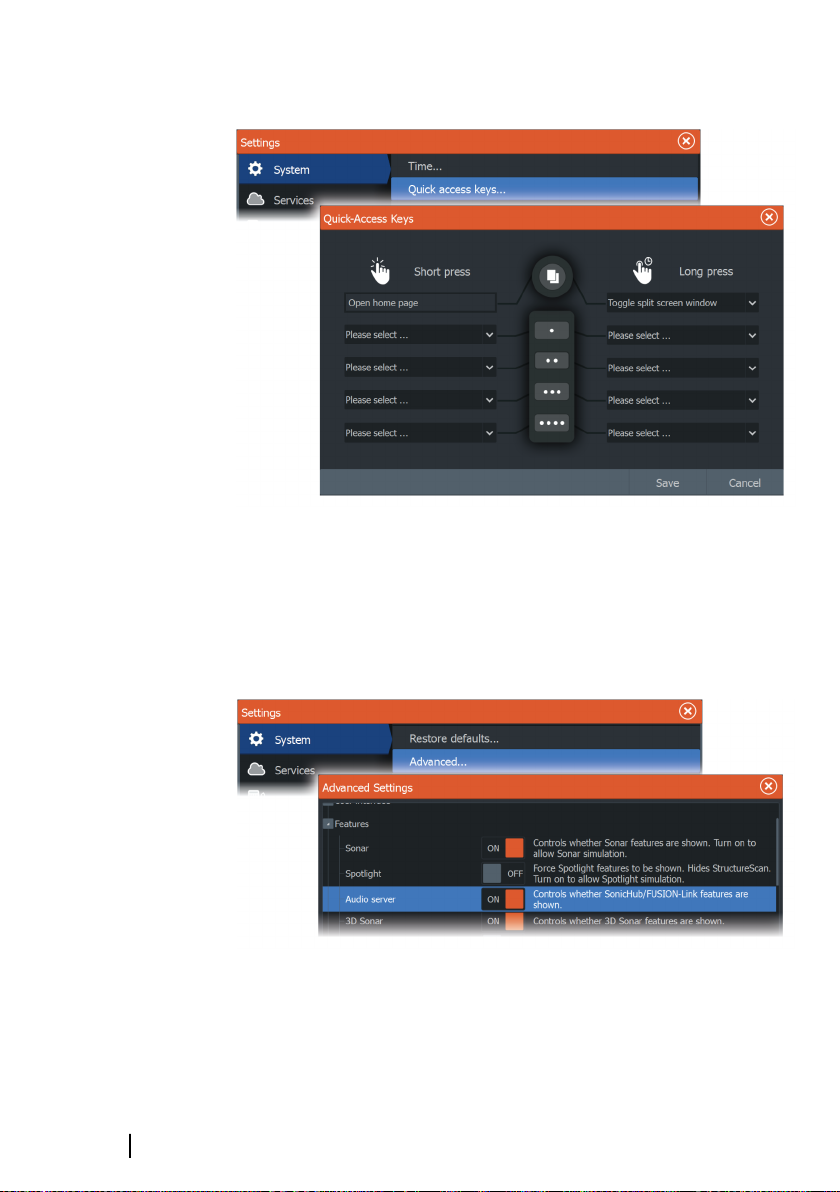
Select a configuration from the drop-down list for each of the keys
you want to configure.
Enabling or disabling features
A compatible device connected to the NMEA 2000 network should
automatically be identified by the system. If not, enable the feature
from the advanced settings dialog.
Features can also be disabled using this dialog.
30
Customizing your system | HDS Live Operator Manual
 Loading...