

Lorex LW3400 Series, LIVE SD 4.2 Series User Manual

www.lorextechnology.com
ENGLISH
FRANÇAIS
ESPAÑOL
LIVE SD 4.3 SERIES
WIRELESS HOME MONITOR
LW3400 Series
Version 1.0
USER’S GUIDE
Safety Precautions
• Adult assembly is required. Keep small parts away
from children when assembling.
• This product is not a toy. Do not allow children or
infants to play with it.
• This video monitor is not a substitute for responsible
adult supervision.
• Test the video monitor before use. Become familiar with
its functions.
• Keep the cords out of reach from children and infants.
• Never use extension cords with power adapters.
• Only use the chargers and power adapters provided.
Do not use other chargers or power adapters as this
may damage the device and battery pack.
• Only insert batteries/battery pack of the same type.
• Insert batteries with the correct polarity.
• Do not mix new and used batteries.
• Do not mix alkaline, standard, and rechargeable
batteries.
• Remove exhausted batteries from the product.
• Keep all batteries away from children and infants.
• Dispose or recycle batteries in accordance with local
laws, which may vary by location.
• Do not cover the video monitor with a towel or blanket.
• Do not use the video monitor near water.
• Do not install the video monitor near a heat source.
• Do not touch the plug contacts with sharp or metal
objects.
• Keep this user’s guide for future reference.
To Avoid Injury to
Children & Infants:
• MAKE SURE to keep the camera and all power
cords are at least 3ft / 1m away from cribs and out
of reach of children.
• Use the included cable clips to help keep power
cords away from children.
3ft / 1m

Product Includes ..............................3
Monitor Overview ...........................3
Camera Overview ...........................4
Getting Started ...............................6
Optional - Mounting the Camera ...............7
Using the Cable Clips .............................. 9
Using Your Handheld Monitor .......10
Reading the LED Indicators ..................... 10
Adjusting Volume .................................. 11
Changing Channels ...............................11
Using the Talk Function ........................... 11
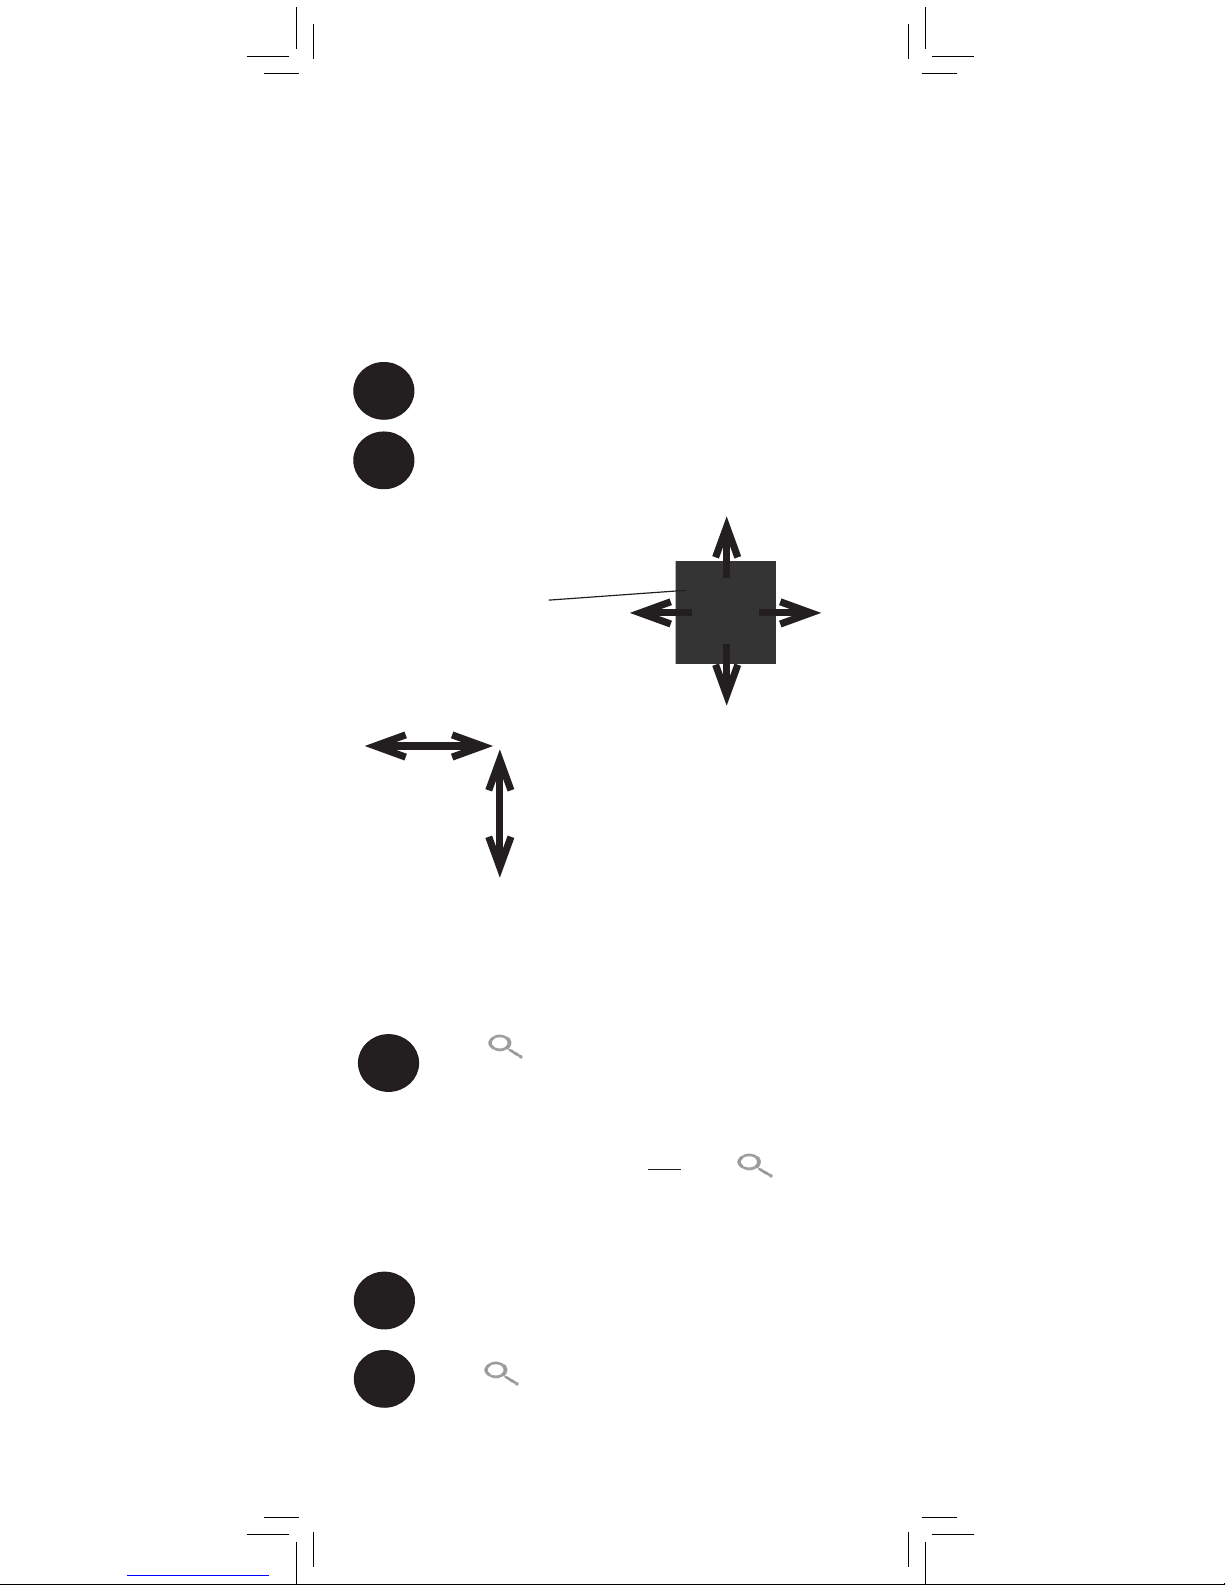
Pan / Tilt Control ..................................12
Using Digital Zoom................................12
Locking the Touch Buttons ....................... 13
Using the Night-Light .............................13
Using Scan Mode .................................13
Using Quad and Sequence Mode ........... 14
Using the Main Menu ....................15
Setting the Date and Time .......................15
Adjusting Camera Brightness .................. 16
Using File Overwrite .............................. 17
Changing Languages .............................17
Configuring Beeping Volume .................. 18
Using Motion Tracking (P/T Camera Only) 19
Video Recording ...........................20
Inserting a microSD Card ....................... 20
Recording Modes .................................. 20
Manual Recording .................................21
Auto Recording ..................................... 21
Auto Recording Modes .........................23
Scheduled Recording ............................. 24
Configuring Video Quality .....................26
Configuring Motion Recording Duration ... 26
ENGLISH
1
Table of Contents:

Selecting Quad or Single-Channel Motion
Recording Mode ................................... 28
Configuring Motion Detection Sensitivity ..29
Using Playback Mode ...................30
Formatting Memory Card ....................... 33
Restoring Default Settings .............34
Remotely Connecting to Your
Cameras .......................................35
Using Audio / Video Out ...............36
Pairing Additional Cameras ..........38
Disabling Channels (On / Off) ................40
Technical Specifications .................41
Fixed Camera ......................................41
P/T Camera .........................................41
Monitor ................................................41
Dimensions ...................................42
Troubleshooting ............................43
Need Help? ...................................43
2

ENGLISH
3
Product Includes
x1*
x1
Fixed Camera
Monitor
Power Adapter
x1*
*Contents may vary by model. See product packaging for exact
contents.
x1*
Mounting Kit
Power Adapter
x1
Monitor Overview
Cable Clips
x3*
Enter / exit menu
Switch
channel
Talk
Zoom
Stand
Battery compartment
Speaker
*For details, see “Reading the LED Indicators” on page 10.
x1*
Pan/Tilt (P/T)
Camera
Reset button
OR
P/T Mounting
Plate
(for P/T camera only)
x1*
Joystick
Indicator LEDs*
Microphone
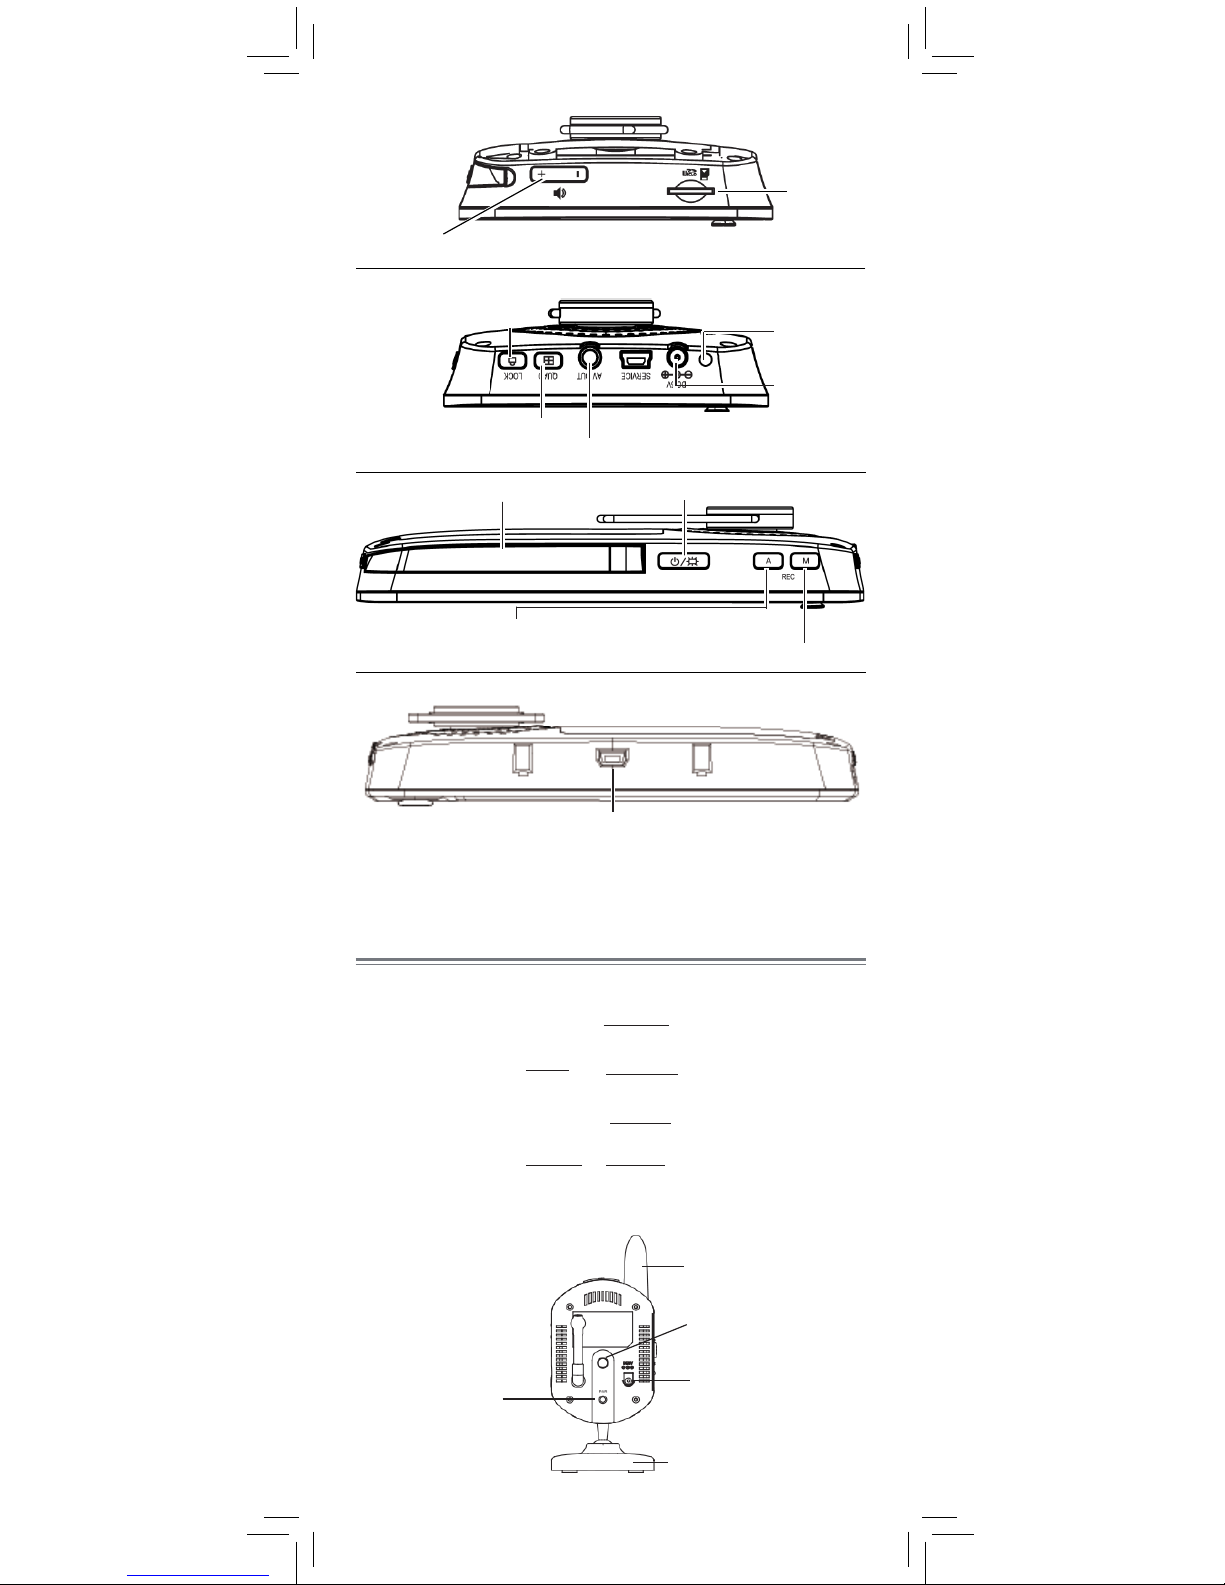
Light
sensor
Microphone
Speaker
Lens
Infrared LED’s
Stand
Power port
Pairing button
Night light button
Fixed Camera
Antenna
Camera Overview
Volume
controls
microSD
slot
Charging
indicator
Power port
AV out port
Lock touch buttons
Quad / Sequence Mode
Antenna
Power / Scan Mode
Auto Recording on / off
Manual Recording on /off
Wi-Fi Cradle connector*
Wall Mounting
thread
*Wi-Fi Cradle optional. See product packaging for exact
contents. For details, see “Remotely Connecting to Your
Cameras” on page 35.
LEFT
RIGHT
TOP
BOTTOM
4
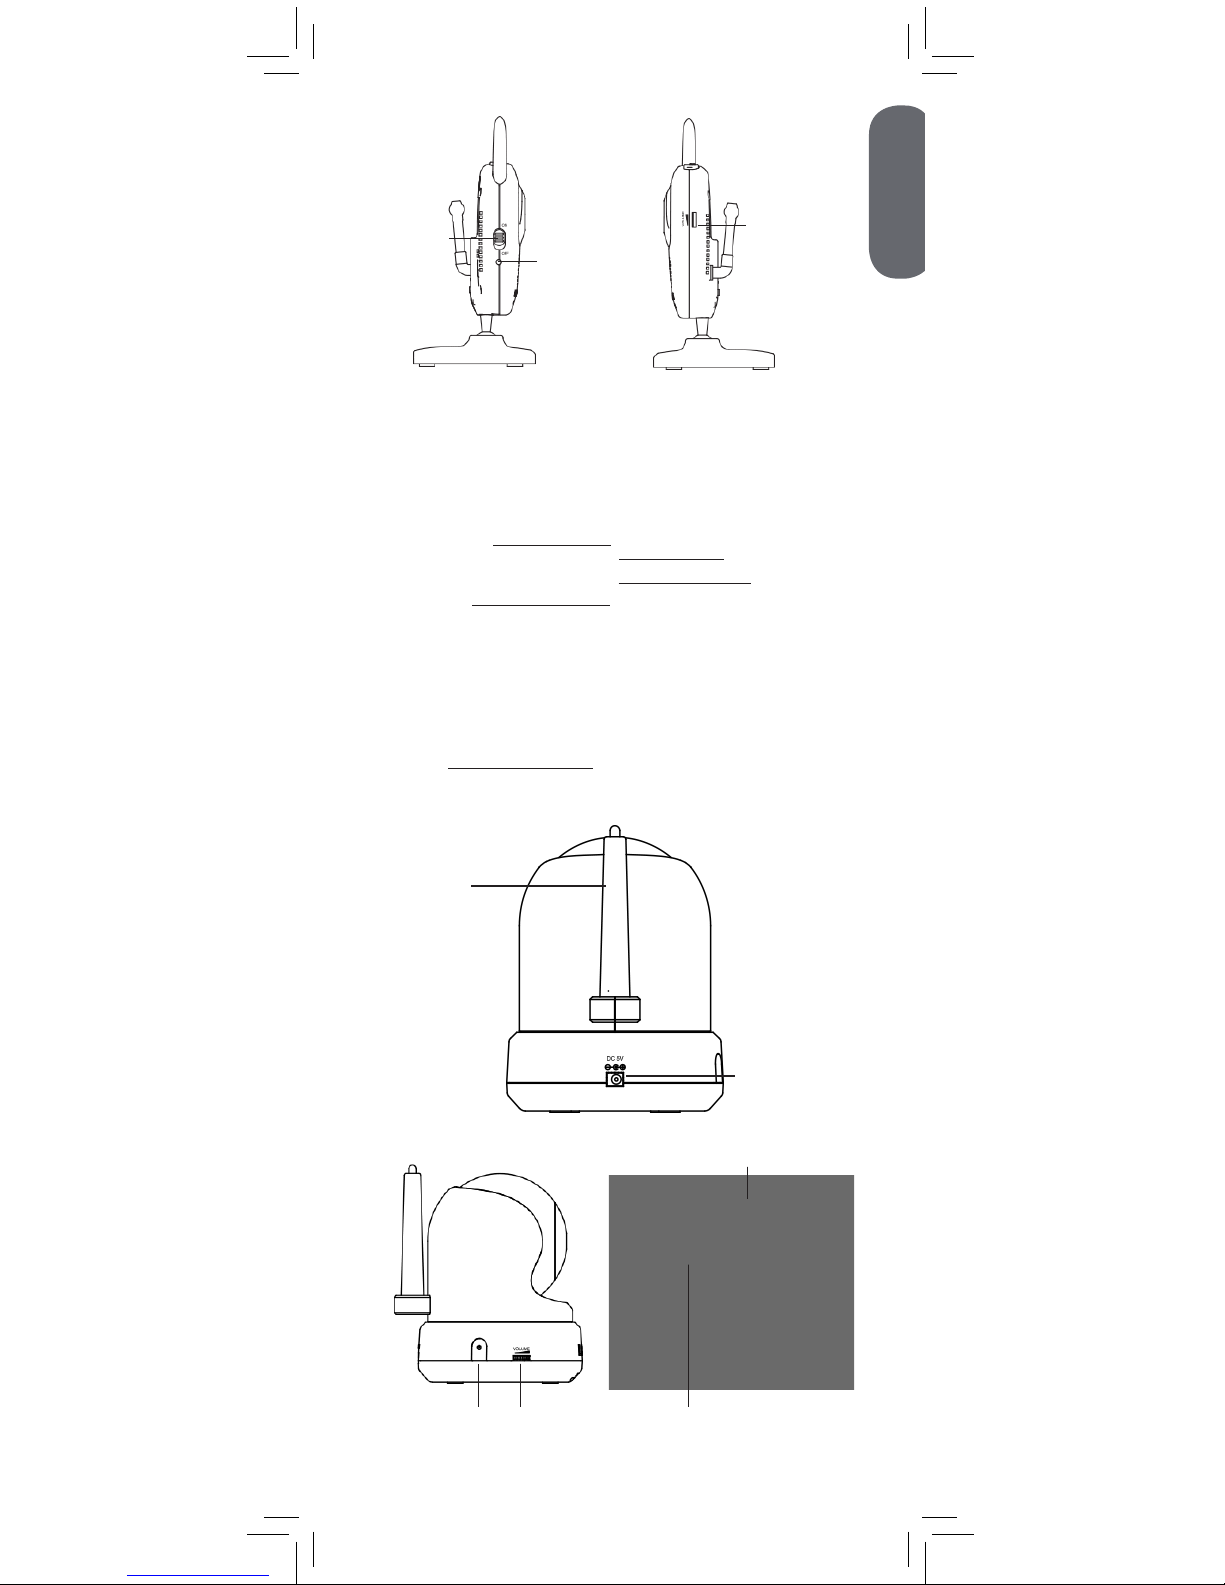
Power
switch
Power
indicator
Volume dial
P/T Camera
Power port
Antenna
Speaker
Lens
Light sensor
Pairing buttonPower button Volume dial
Ceiling mount switch
Microphone
Infrared LED’s
ENGLISH
5
Make sure all power cables are at
least 3ft / 1m away from children.
Use the included cable clips to help
keep power cords neat and away
from children.
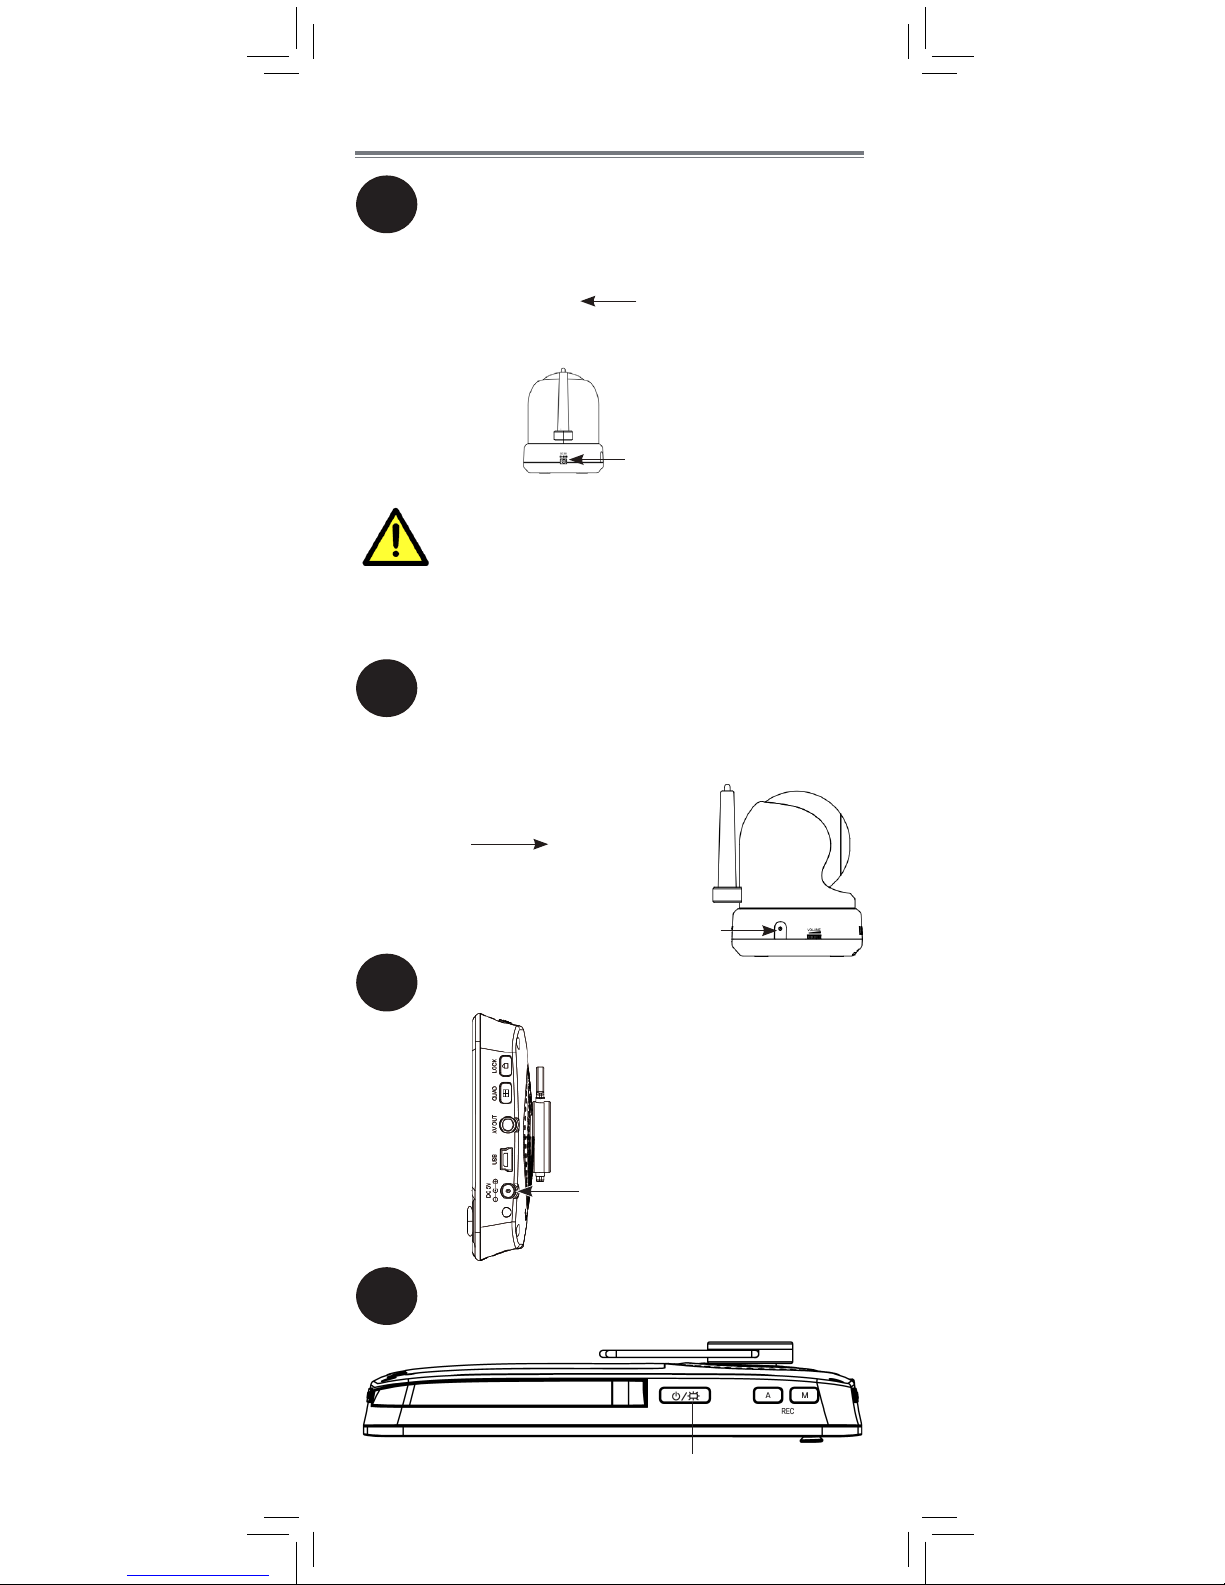
Connect the power adapter to the monitor.
Power button
Getting Started
1
2
Connect the power adapter to the
camera.
Slide the power switch (fixed camera) to
ON or press and hold the power button
(pan / tilt camera).
Power switch
3
Fixed camera
P/T camera
Press and hold the power button on top
of the monitor for 3 seconds. The display
turns on.
4
Power button
6
Make sure all power cables are at
least 3ft / 1m away from children.
Use the included cable clips to help
keep power cords neat and away
from children. See “Using the Cable
Clips” on page 9 for installation
details.
38mm
Fixed Camera
Reattach the
camera base
here
ENGLISH
7
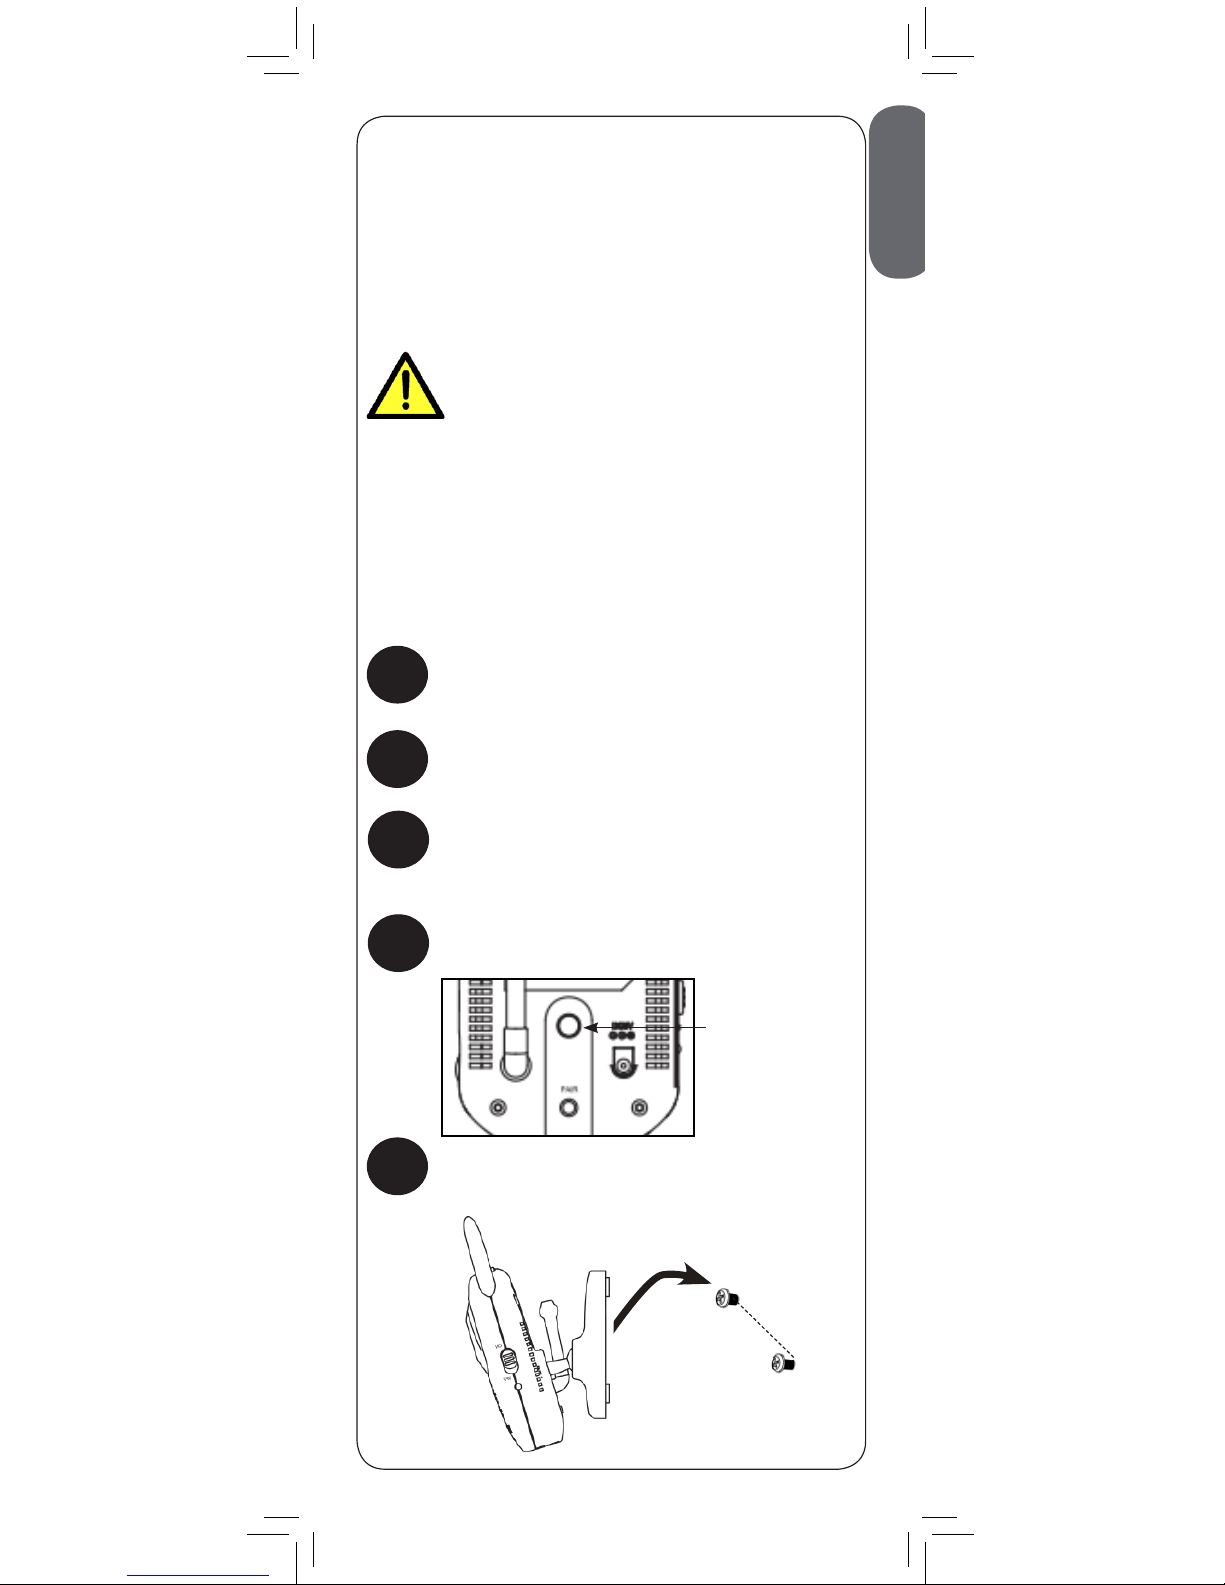
Optional - Mounting the Camera
Tap anchors into holes with a hammer. Insert
screws 2/3 of the way.
Before permanently mounting the camera:
•Determine where you will get the best view of the
area you wish to monitor.
•Ensure the power cable is long enough to power
the camera.
•Test your camera(s) before mounting permanently.
1
Drill 2 holes in the wall with centers exactly
38mm apart.
2
5
Align the mounting points with the screws
and push the camera down.
To mount your camera:
3
While holding the camera base firmly in
place, twist the camera counterclockwise to
remove it from the base.
4
Reattach the base to the mounting thread on
the back of the camera.

8
P/T Camera
26mm
Ceiling mounting
switch
1
Hold the included P/T mouting plate against
the wall. Use a pencil to mark 2 holes in the
wall with centers exactly 26mm apart. Drill
holes where you have marked.
Hold the included P/T mounting plate
against the ceiling. Use a pencil to mark the
centers of the 3 mounting slots. Drill holes
where you have marked.
NOTE: Make sure that the lone mounting
slot points toward the viewing area.
Tap anchors into holes with a hammer. Insert
screws 2/3 of the way.
2
OR
94mm
34mm
Place the camera on the mounting plate and
twist clockwise to lock in place.
5
NOTE: For ceiling mounting, use the ceiling mounting
switch on the bottom of the P/T camera to flip the video
image.
Option 2
Option 3
Option 1
If wall mounting:
If ceiling mounting:
Align the slots on the mounting plate with the
screws and push down to lock in place.
3
Tighten the screws to secure the mounting
plate in place.
4
Viewing area
Lone mounting slot
ENGLISH
9
Pull up to extend
antenna
• It is recommended to charge the battery for 6 hours
before use.
• The charge LED glows red while the monitor is
charging and glows green when charging is complete.
• For overnight monitoring, it is recommended to connect
the power adapter. When fully charged, the monitor
will stay on up to 3.5 hours in normal mode or 5 hours
in Scan Mode.
• Use Scan Mode to conserve battery power.
• The power LED blinks twice per second when the
battery is low.
• For better reception, pull up the antenna on the
monitor.
Tips
Option 2
Option 3
Option 1
Thread the extra cable through the cable clip notches.
Thread the extra cable through the cable clip notches.
Wrap the excess cable around the clip.
Wrap the excess cable around the clip.
Using the Cable Clips
Using Your Handheld Monitor
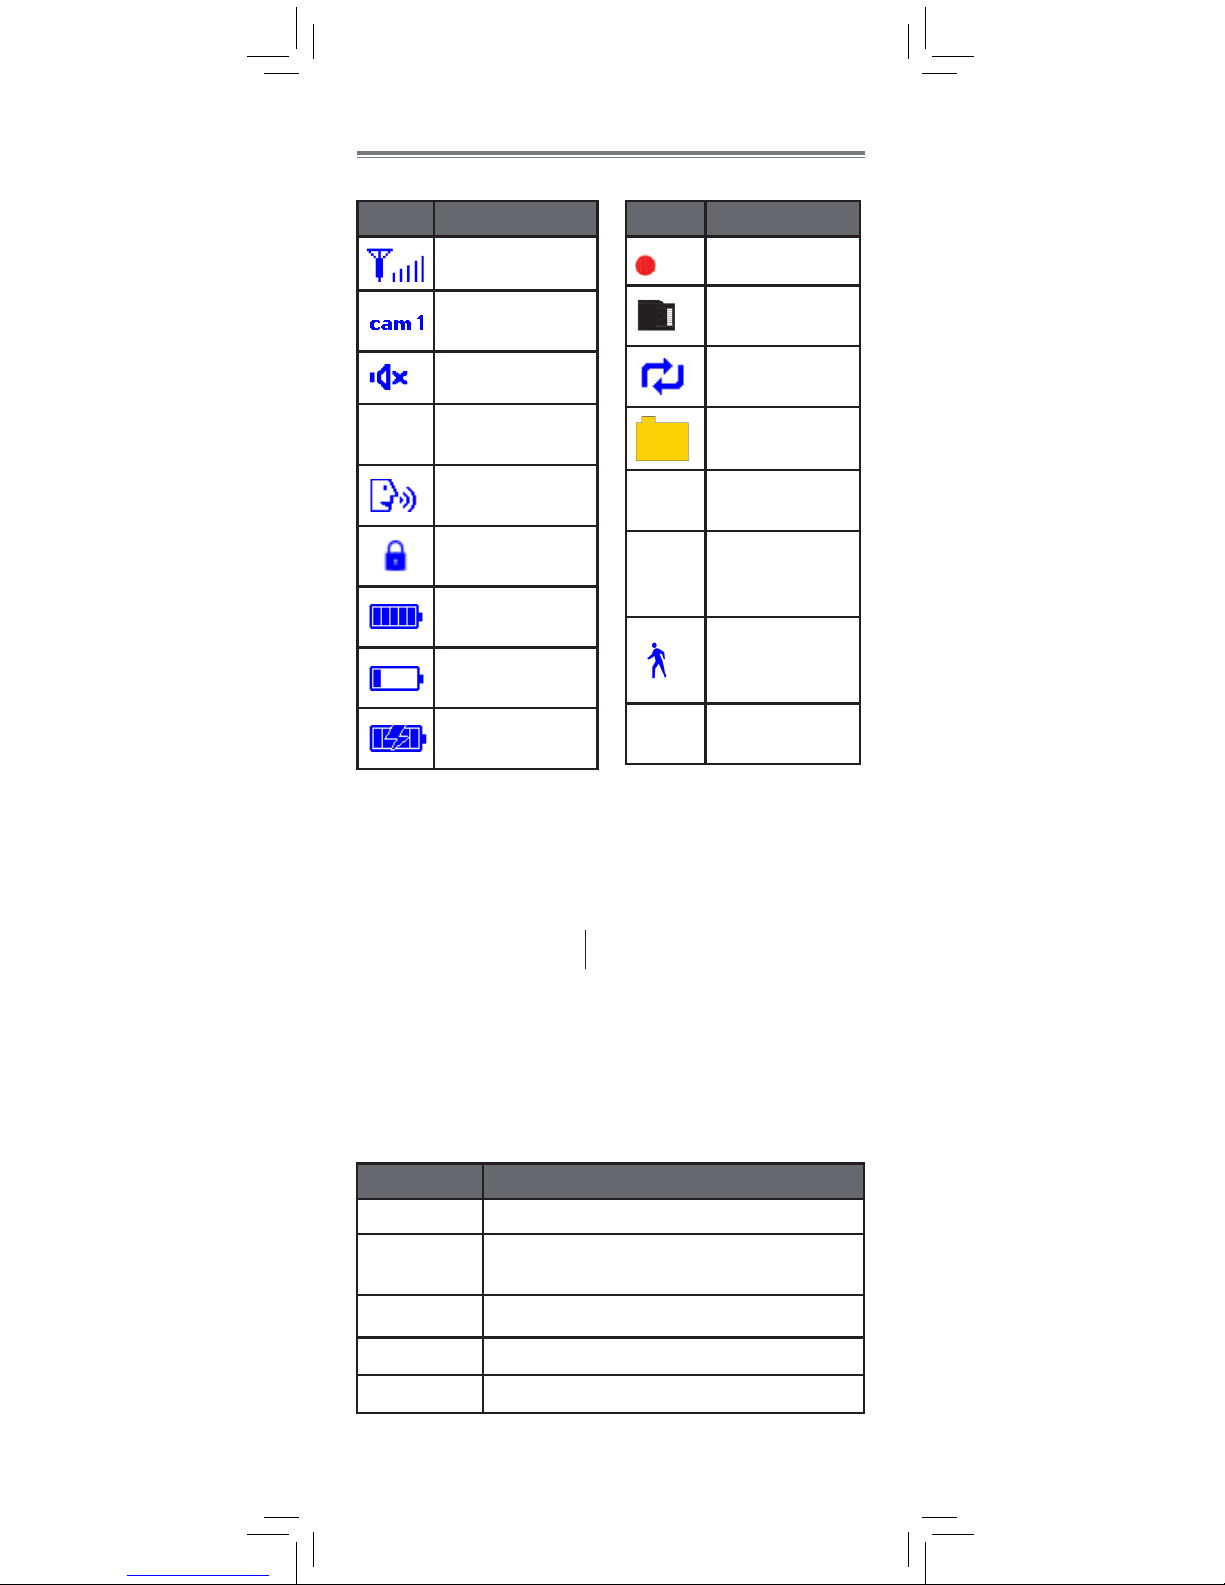
The monitor shows the following icons during use:
Icon Meaning
Signal strength
Selected
channel
Volume muted
X2
Digital zoom
activated
Talk feature
activated
Touch buttons
locked
Battery full
Battery low
Battery
charging
Icon Meaning
REC
Recording
microSD card
inserted
File overwrite
enabled
New pictures
or videos
Sequence
Mode enabled
Auto
Recording
enabled
Motion
tracking
activated
Out of
range
Camera out of
range or off
Reading the LED Indicators
LED Meaning
POWER Monitor is powered on.
NEW
A new video file has been saved on
the microSD card.
FULL The microSD card is full.
SCAN Scan Mode is activated.
AUTO Auto Recording is activated.
Fixed Camera
Monitor
10
LED indicators
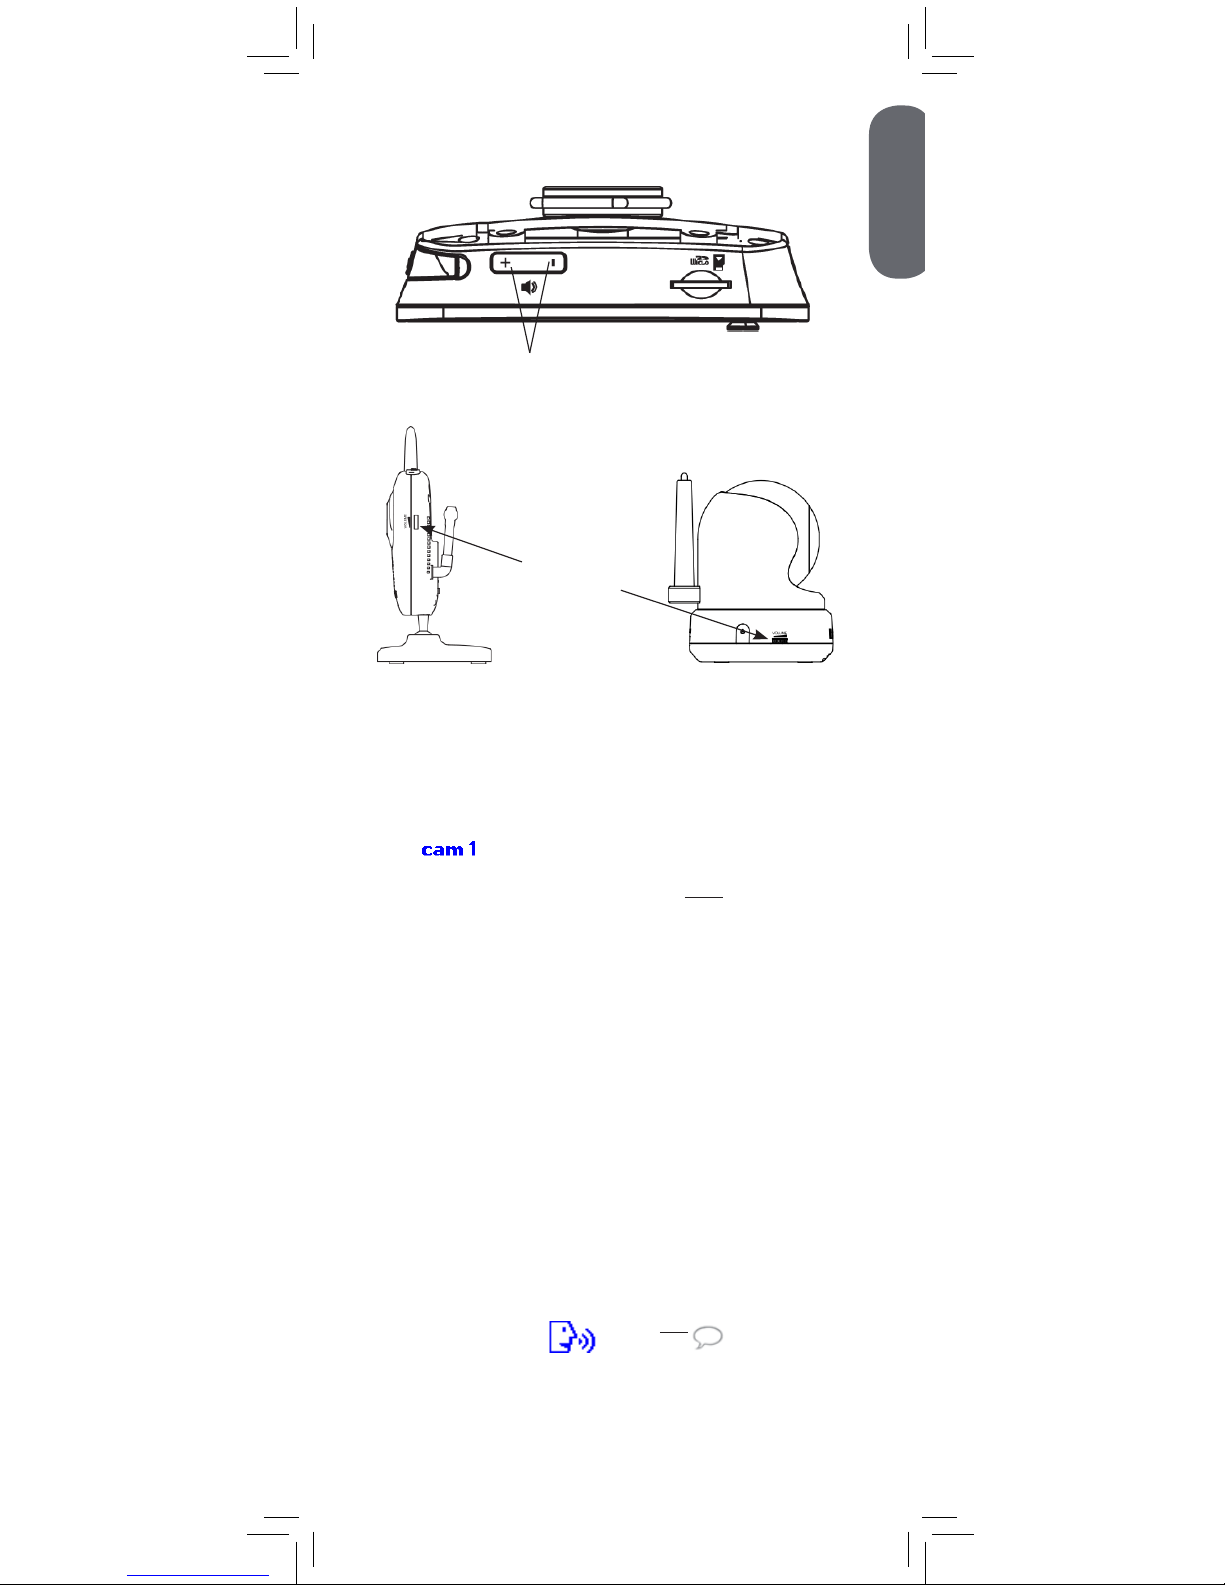
Press + and - to adjust monitor volume
Adjusting Volume
Fixed Camera
P/T Camera
Use the volume dial to adjust the volume of the
camera speaker for two-way-talk.
Monitor
Press to
cycle through
connected
cameras.
The currently
selected
camera is
shown on
screen.
To connect additional cameras to the
monitor, see “Pairing Additional Cameras”
on page 38.
The monitor only plays sound from the
camera that is currently being viewed.
Changing Channels
Press and hold
to talk to the
selected camera
Using the Talk Function
Volume dial
ENGLISH
11
1
Press on the monitor to zoom in. A X2
icon appears on the screen.
2
Move the joystick to adjust the zoom area.
3
Press again to return to normal
viewing mode.
Using Digital Zoom
Press
X2
Pan / Tilt Control
Pan / Tilt Camera Only
You can manually control the pan / tilt camera
using the monitor joystick. The pan / tilt camera
can also automatically track moving objects (see
“Using Motion Tracking (P/T Camera Only)” on
page 19).
To manually control pan / tilt:
1
Select the channel the pan / tilt camera is
connected to. Press
to switch channels.
2
Use the monitor joystick to control the camera.
NOTE: Pan /tilt controls are not available when digital
zoom is activated.
Pan left
Pan right
Tilt down
Tilt up
Pan left / right
Tilt up / down
Fixed Camera Only
12
Press to activate Scan Mode. The
monitor display and speaker will turn off.
The SCAN LED turns on.
Using Scan Mode
Press any button to turn the screen back on.
Press to disable Scan Mode.
1
2
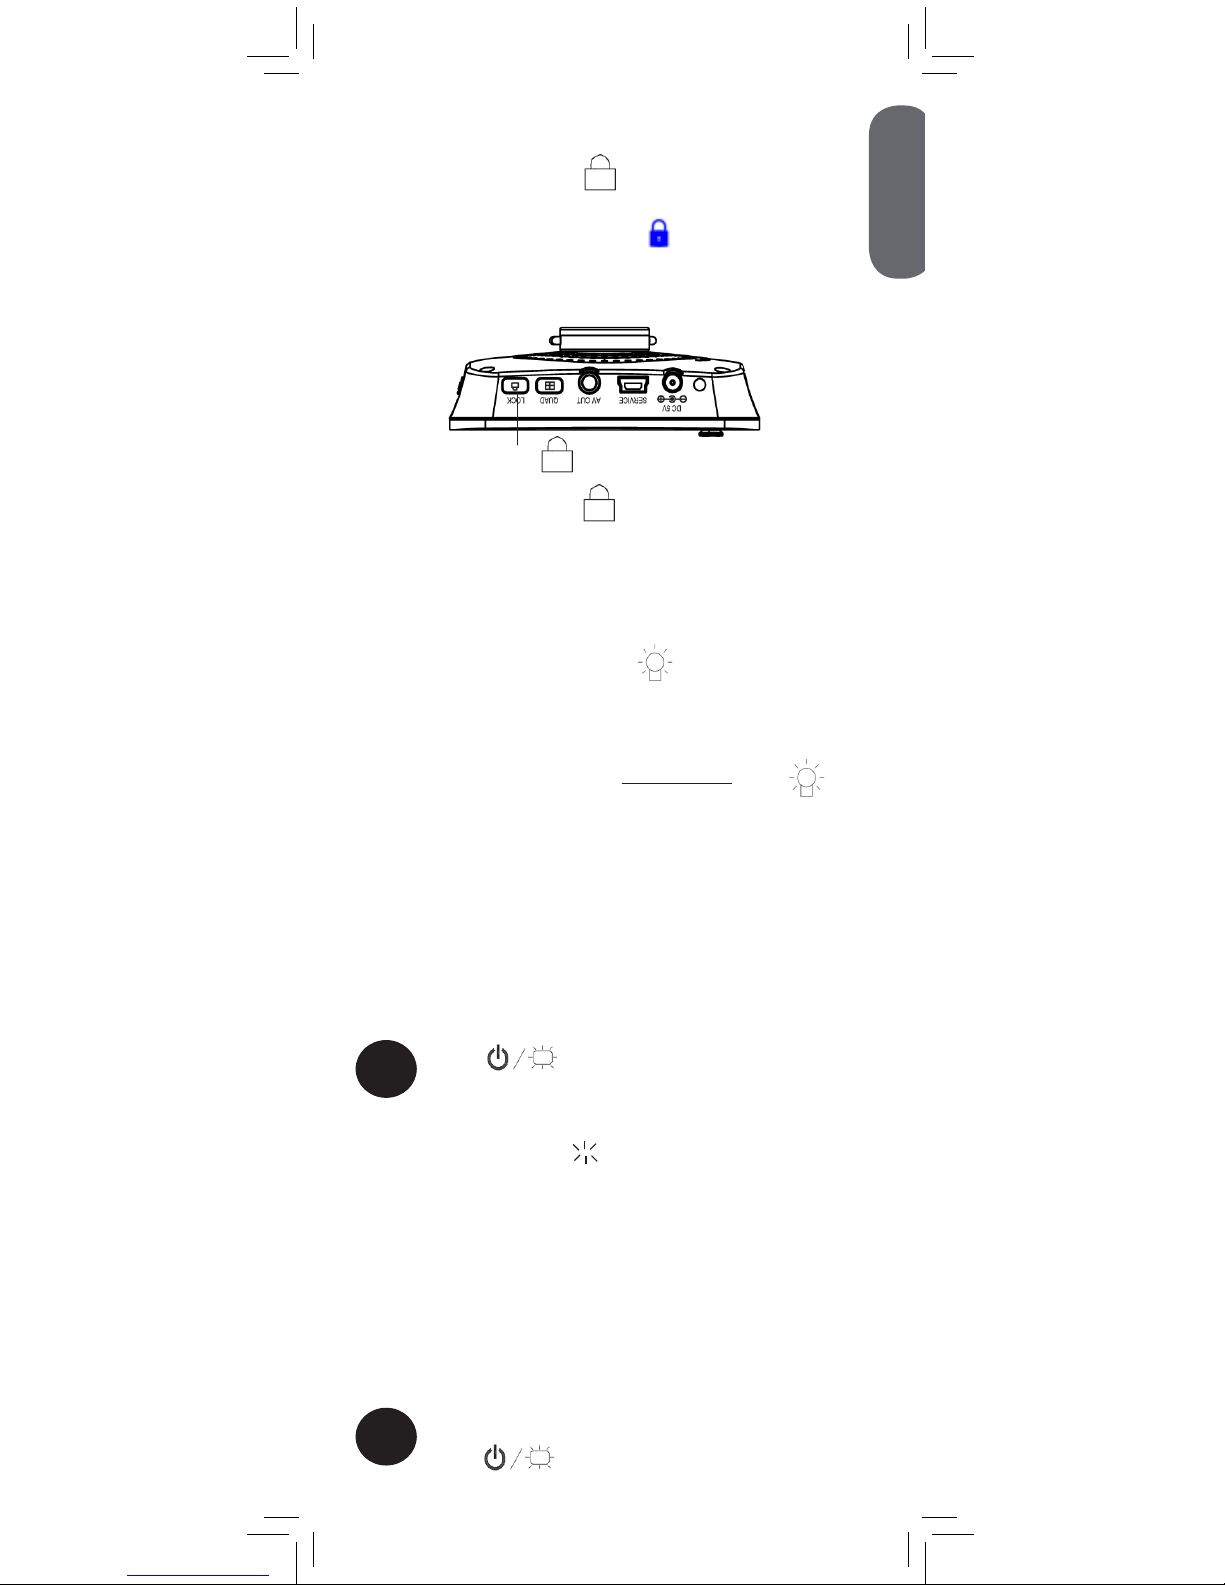
Locking the Touch Buttons
Press the Lock button ( ) on the side of the
monitor to disable the touch buttons on the front
of the monitor. A lock icon ( ) appears on the
monitor. Use this function to keep from pressing
touch buttons by accident.
Press
Press the Lock button ( ) again to re-enable
touch buttons.
When one of the cameras detects
motion, it is shown on the display. If Auto
Recording is enabled, the monitor starts
recording that channel in full screen.
Scan Mode is a power saving mode that will turn
off the monitor display and speaker until a camera
detects motion.
Press the night light button (
) on top of the
camera where light is needed.
Using the Night-Light
Press
Fixed Camera Only
ENGLISH
13
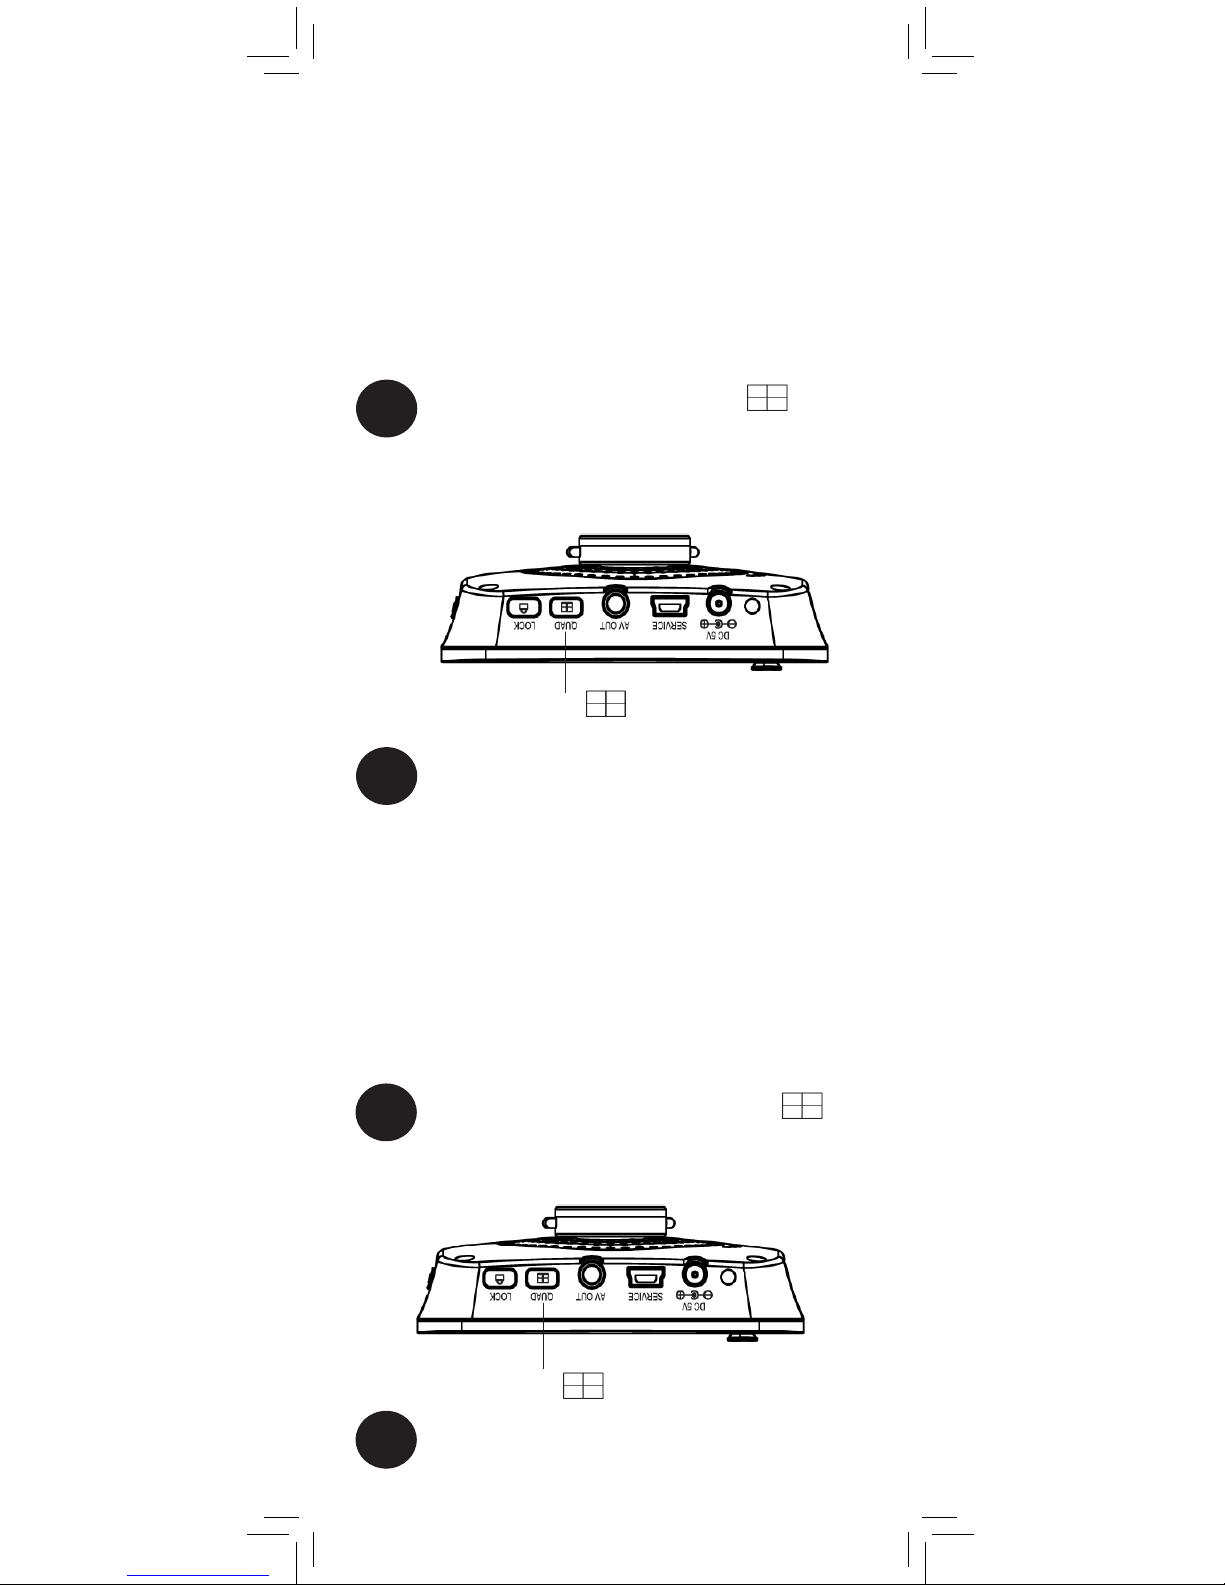
If you have multiple cameras, Quad Mode and
Sequence Mode help you keep an eye on them.
Sequence Mode
Quad Mode
Use Sequence Mode to display video from each
camera connected to your system in full-screen for
6 seconds before switching to the next camera.
1
From normal viewing mode, press once
to activate Sequence Mode. The monitor will
begin automatically switching cameras, and a
icon is shown on screen.
2
Press to return to normal viewing
mode.
Press once
Use Quad Mode to display video from all 4
camera channels in split-screen (viewing area
appears black for channels that do not have a
camera connected).
NOTE: You will not hear sound from the cameras
in Quad mode.
1
From normal viewing mode, press
twice to activate Quad Mode. The monitor
will display all 4 channels in split-screen.
2
Press to return to normal viewing
mode.
Press twice
Using Quad and Sequence Mode
14

1
Press
2
Move joystick to
adjust menu options.
Press to make a
selection.
Press to launch the main menu.
Move the joystick to adjust menu options.
Press the joystick to make a selection.
Press
again to exit the main menu.
Press again
to exit menus
Using the Main Menu
Setting the Date and Time
1
Press , then select Settings.
Select
Settings
2
Select Date
& Time
ENGLISH
15

3
Move the joystick left and right to switch
between fields. Move the joystick up and
down to adjust the date and time.
4
Push the joystick in to save changes.
2
Select Setup
Select
Brightness
3
Move the joystick up and down to select
the camera. Adjust the brightness level by
moving the joystick left and right.
Adjust camera
brightness
1
Press , then select Setup.
Adjusting Camera Brightness
NOTE: Video monitor uses 24-hour time.
5
Press repeatedly to get back to normal
viewing mode.
4
Push on the joystick to save changes.
16

You can configure your system to delete the
oldest saved video files to make way for new
recordings. This allows you to record new video
when your microSD card (not included) is full.
Using File Overwrite
Changing Languages
1
Press , then select Settings.
Select
Settings
This video monitor supports 3 languages: English,
French, and Spanish.
To change languages:
ENGLISH
17
1
Press , then select Recording.
Select
Recording
To configure file overwriting:
2
3
Select Yes to enable file overwriting or
No to disable.
Select File
Overwrite

3
Move the joystick up and down to switch
between languages. Press on the joystick
to select a language.
1
Press , then select Alarm.
Select Alarm
Configuring Beeping Volume
The Alarm Volume setting allows you to set the
volume of the motion activated alarm beep. This
setting also controls the volume of the beep that
occurs when buttons are pushed.
2
Move the joystick left and right to adjust
the volume of the alarm. To disable the
alarm beep, turn the volume all the way
down.
Adjust alarm
volume
3
Press down on the joystick to save
changes.
2
Select
Language
18

Using Motion Tracking (P/T
Camera Only)
P/T cameras with motion tracking enabled will
follow any movement the camera detects.
Move the joystick up and down to change
the channel you are configuring. Move
the joystick right or left to toggle motion
tracking on and off.
Push on the joystick to save changes.
3
Choose channel
2
1
Press , then select Setup.
Select Setup
Select
Motion
Tracking
On/Off
To enable motion tracking:
Select On
or Off
NOTES:
•This feature is useful only for tracking single objects.
•You may use the joystick to override the automatic
movement of your P/T camera when motion tracking
is activated.
•Motion tracking does not work if the camera is not
selected or if the monitor is in digital zoom mode.
ENGLISH
19
You can save recorded video from a single
camera or all cameras connected to your system.
Video files are saved to the microSD card (not
included).
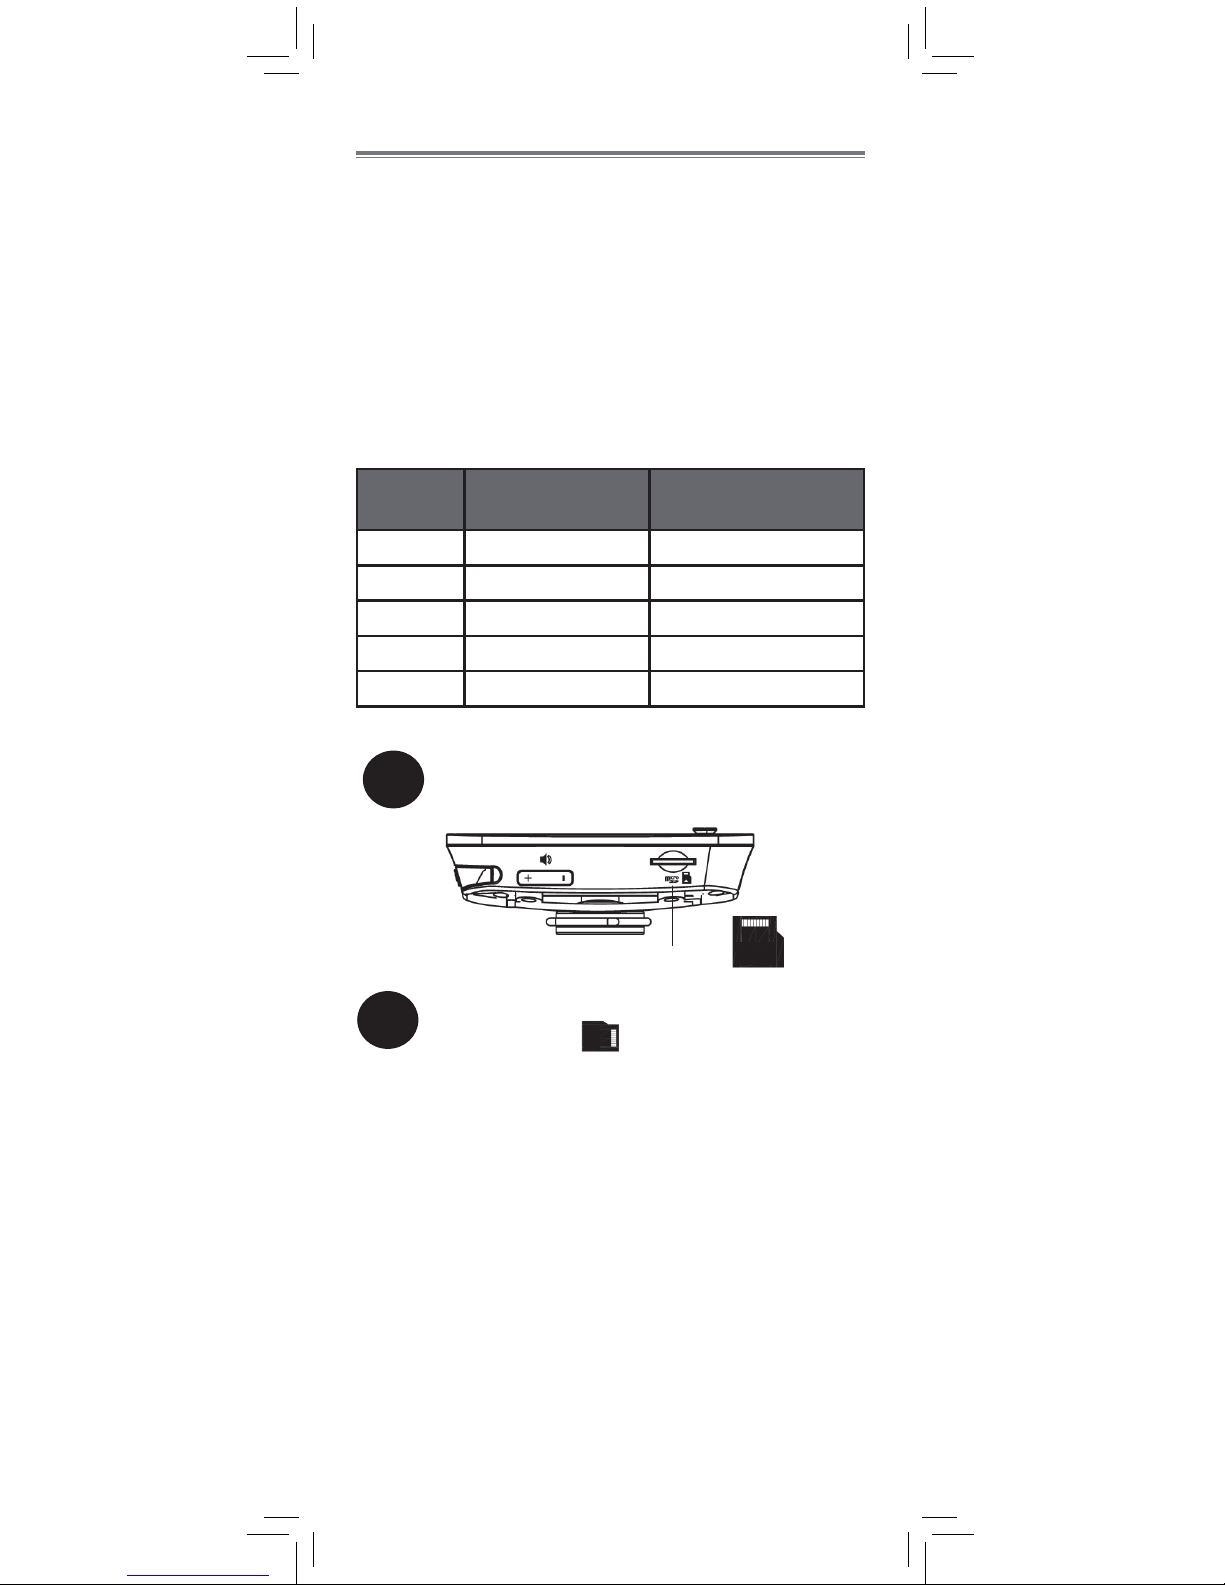
To insert a microSD card:
1
Orient the microSD card as shown below
and insert it into the microSD slot.
microSD card slot
You can now save recorded video from your
camera(s) on your monitor. See “Using Playback
Mode” on page 30 for details on viewing and
managing video files.
Inserting a microSD Card
You must use a microSD card (not included) with
your video monitor to store video files from your
camera(s). The video monitor supports microSD
cards up to 32GB (gigabytes).
Recording Modes
The system supports the following recording
modes:
•Manual Recording: Manually start / stop
recording on a single camera or the entire screen in
Quad Mode.
•Auto Recording: The monitor will automatically
start recording video when motion is detected.
•Scheduled Recording: The monitor will record
continuously during the scheduled times.
Estimated microSD recording times (hh:mm):
20
Video Recording
2
Push the microSD card in until it clicks
into place. An icon appears on the
monitor.
Capacity Single Channel
Recording
Quad Channel
Recording
2GB 03:52 01:58
4GB 08:04 04:05
8GB 15:36 07:54
16GB 30:48 15:34
32GB 62:56 31:51
Manual Recording
Manual Recording button
For details on viewing and managing videos, see
“Using Playback Mode” on page 30.
To use Manual Recording:
Manual Recording allows you to manually start /
stop recording on a single camera or the entire
screen in Quad Mode.
Auto Recording
When Auto Recording is enabled, The monitor
will automatically start recording video when
motion is detected.
Auto Recording behaves differently depending on
the viewing mode you are in when it is activated.
If you want to use motion detection on multiple
cameras, it is recommended to use Quad or Scan
Mode. For details, see “Auto Recording Modes”
on page 23.
To activate Auto Recording:
ENGLISH
21
1
Use the monitor to view the channel(s) you
wish to record video from.
You can record video from one channel by
using normal viewing mode, or all channels
using Quad Mode (see “Using Quad and
Sequence Mode” on page 14).
2
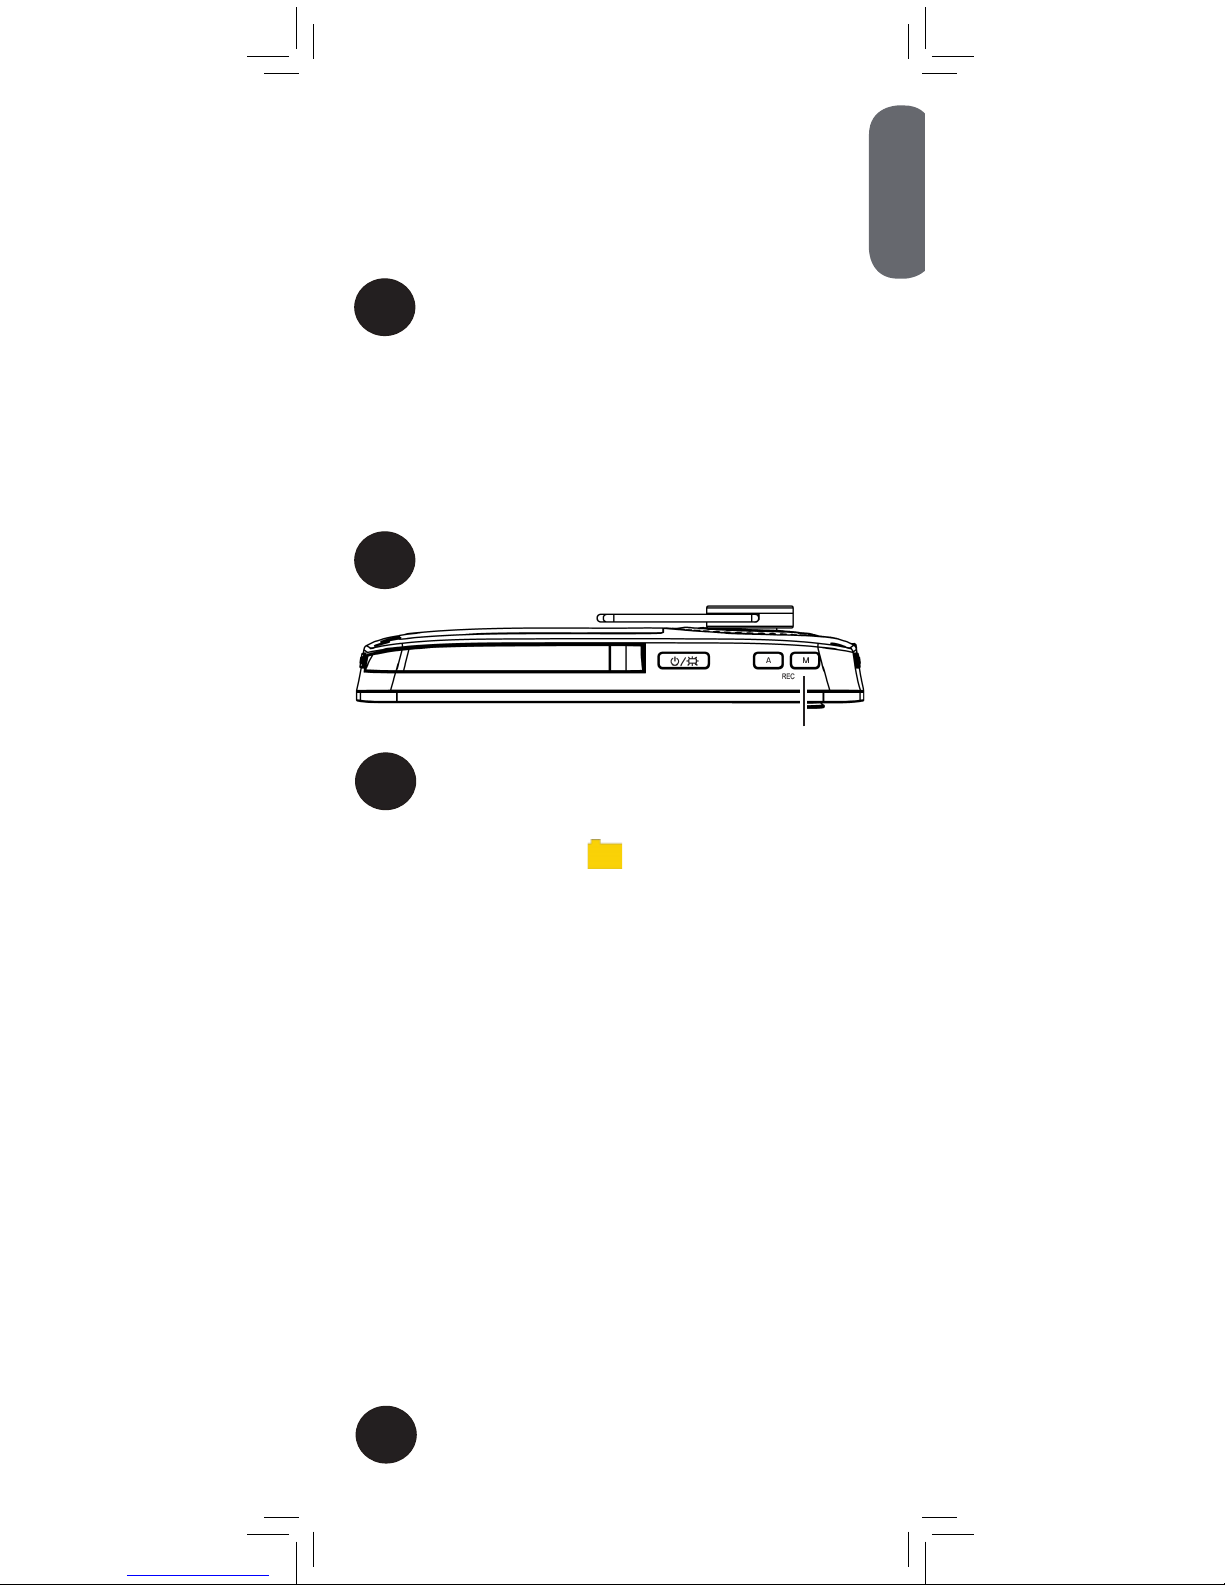
Press the Manual Recording button (M) on
top of the monitor to begin recording.
3
Press the Manual Recording button (M)
again to stop recording.
A new file icon ( ) appears on the
screen.
1
Use the monitor to select the channel or
mode you wish to record video from.

Auto Recording button
2
Press the Auto Recording button (A) on top
of the monitor to start Auto Recording.
When Auto Recording is enabled, an
icon
appears on the screen.
When motion is detected, the monitor starts
recording according to the selected mode.
By default, the monitor records for the entire time
the camera is detects motion and then records
for 5 more seconds. You can increase the length
of time the monitor will record after motion stops
(see “Configuring Motion Recording Duration” on
page 26).
Auto Recording button
3
To stop Auto Recording, press the Auto
Recording button (A) again.
NOTE: If recording is taking place, the current
recording will be stopped, but Auto Recording
will still be activated. Press A again to de-activate
Auto Recording.
22
Viewing Mode To Enter Viewing Mode Auto Record Behavior
Full-screen (Single camera
selected)
Press
to open Full-
screen / switch camera
When motion is detected on selected camera, the camera is recorded in Full-
screen.
Sequence (Cameras
automatically switch every
6 seconds;
icon
on screen)
Press
once
When the camera that is currently on the screen detects motion, that camera is
recorded in Full-screen. Motion detection is disabled on channels that
are not currently on-screen.
Scan Mode (Display is
off when motion is not
detected; SCAN LED is on)
Press
When motion is detected on any connected camera, that camera will be opened
on the monitor and recorded in Full-screen. After recording is finished, the display
will turn off.
Quad Mode (4-way split-
screen shows multiple
cameras)
Press
twice
In Quad Mode, recording starts when motion is detected on any camera. If the
Recording Mode is set to Single Channel, it will record the triggered camera in
full-screen and then return to Quad Mode. If the Recording Mode is set to Quad
Channel, it will record the entire screen in Quad Mode.
To select the Recording Mode, see “Selecting Quad or Single-Channel Motion
Recording Mode” on page 28.
Auto Recording Modes
ENGLISH
23

Scheduled Recording
Scheduled recording allows you to set up to 5
recording schedules. The monitor will record
continuously during the scheduled times.
If only one camera is connected to the monitor,
Scheduled Recording records that camera in full
screen. If more than one camera is connected,
Scheduled Recording records the entire screen in
Quad Mode.
Before using Scheduled Recording, it is
recommended to set the date and time
on the handheld monitor. See “Setting the
Date and Time” on page 15.
To use Scheduled Recording:
1
Press , then select Recording.
Select
Recording
2
Select
Schedule
Recording
3
Select the schedule you would like to
configure.
24

4
Set the schedule times:
•Move the joystick left and right to switch
between fields.
•Move the joystick up and down to adjust the
recording start and end time (monitor uses
24-hour time).
Start time End time
5
Move all the way right to and then press
up and down to select which days the
schedule will be used: Everyday,
Weekends, or Weekdays. Press on the
joystick to confirm.
Select days the schedule will be used
6
Select On to enable the schedule and
press on the joystick to save the schedule.
Press
repeatedly to return to live view.
When the start time occurs, the monitor
will start recording. It will record
continuously until the end time.
NOTE: During Scheduled Recording, you
cannot use the menu or monitor functions. To
stop Scheduled Recording before the end time, press
M. If you do this, Scheduled Recording will not resume
until the next time the schedule starts.
ENGLISH
25

Configuring Video Quality
1
Press , then select Recording.
Select
Recording
2
Select Video
Quality
3
Select High for clearer video or Low for
smaller file size.
You may choose to record video at a low or high
quality depending on your recording needs.
To adjust video quality:
Configuring Motion Recording
Duration
When Auto Recording is enabled, the Motion
Recording Duration determines how long the
monitor will record video after the triggered
camera stops detecting motion.
For example, if the Motion Recording Duration is
set to 5 seconds, the monitor will start recording
when motion starts and keep recording until 5
seconds after motion stops.
By default, the monitor is set to High quality.
26

To configure the Motion Recording
Duration:
1
Press , then select Recording.
Select
Recording
Select
Motion
Recording
Settings
2
Select
Duration
3
4
Select the desired duration and press on the
joystick to save changes.
ENGLISH
27

Selecting Quad or Single-Channel
Motion Recording Mode
Setting the Motion Recording Mode determines
how the handheld monitor will record during
Auto Recording.
NOTE: This setting is only used when the monitor
is in Quad Mode.
To select Motion Recording Mode:
1
Press , then select Recording.
Select
Recording
Select Motion
Recording
Settings
2
Select Mode
3
4
Select Quad Channel or Single
Channel and press on the joystick to
confirm.
Select Quad Channel for the monitor to
record the whole screen when motion
recording starts in Quad Mode.
28
 Loading...