

Lorex LW2700 SERIES, LW2900 Series Quick Start Manual
www.lorextechnology.com
LW2700/LW2900 Series Quick Start Guide_R1 Page 1
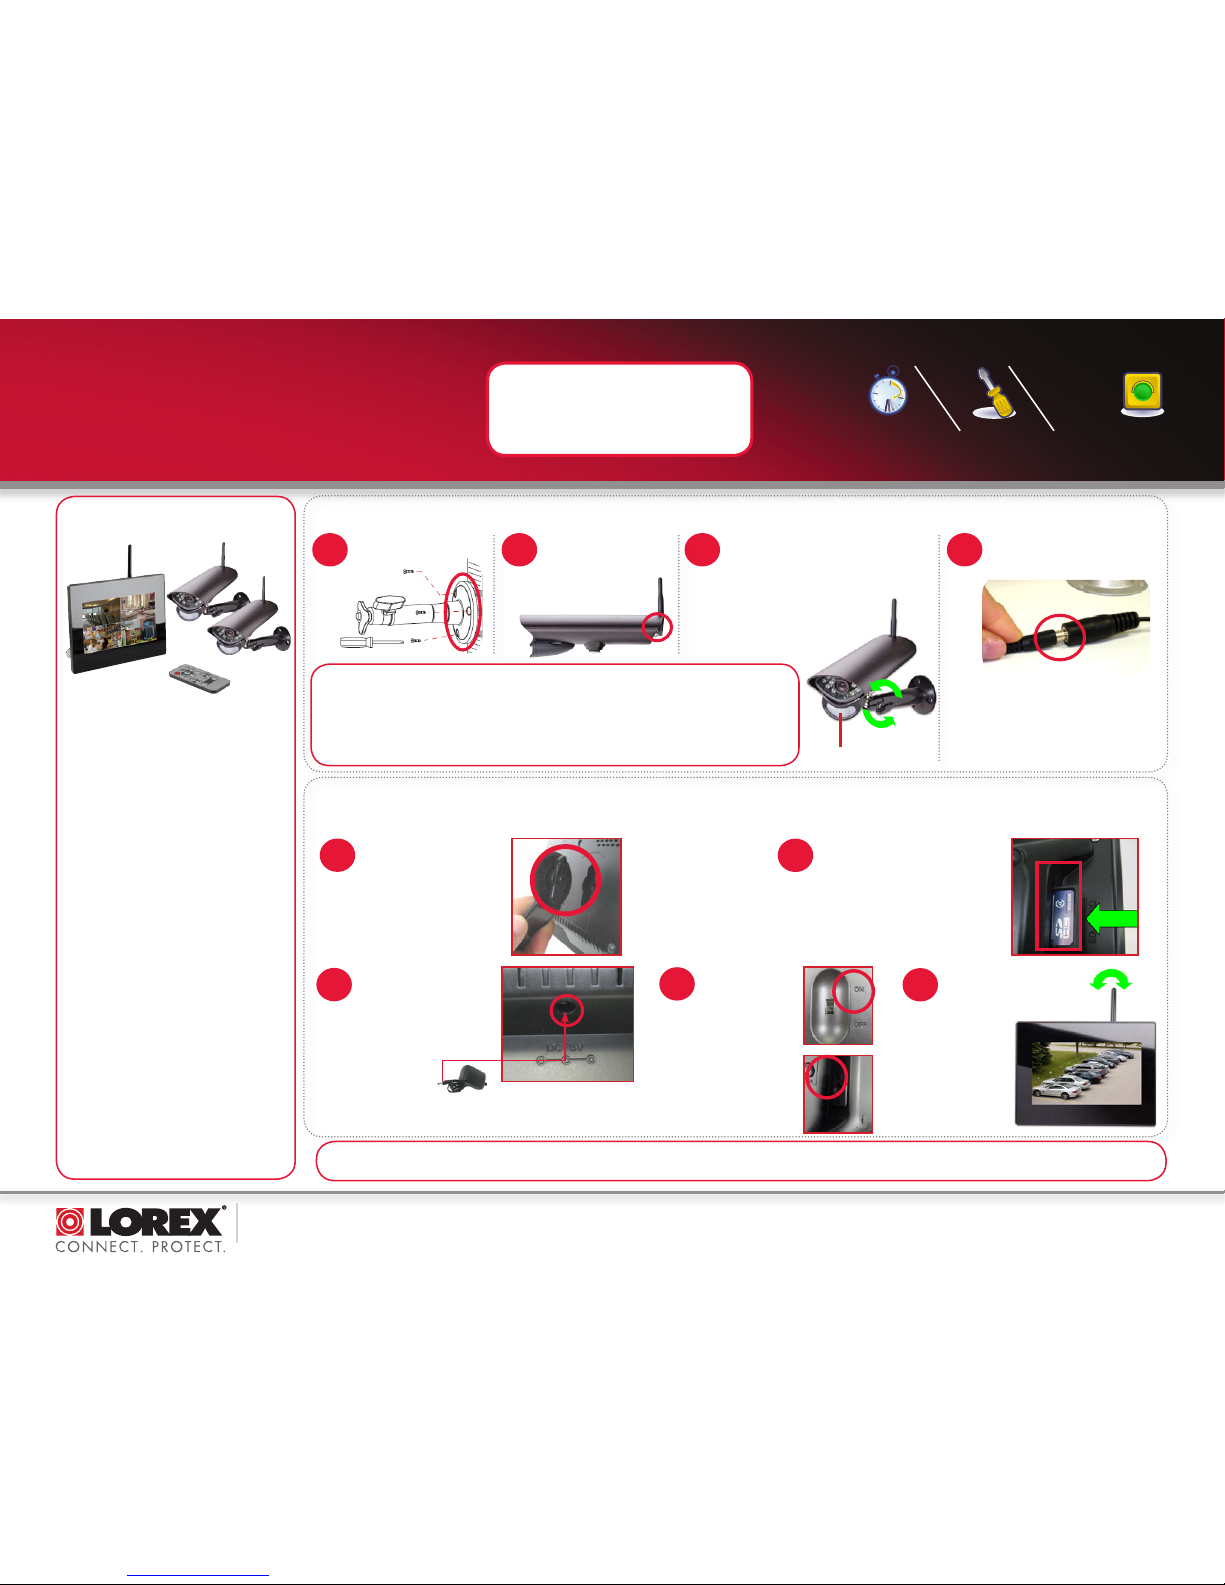
Mount camera stand to
the wall.
NOTE: Wireless cameras require a power
source to operate.
NOTE: Before you install a camera, carefully plan where
and how it will be positioned, and where you will route the
cable that connects the camera to the power adaptor.
Before starting permanent installation, verify its
performance by observing the image on a monitor when
the camera is positioned where it will be permanently
installed.
under 30 minutesunder 15 minutes under 60 minutes
Hand Tools Hardware
Router
Hi Speed
over 60 minutes
Skill Level
Time
under 30 minutesunder 15 minutes under 60 minutes
Hand Tools Hardware
Router
Hi Speed
over 60 minutes
Time Tools Skills - Easy
Under 20 Minutes*
Hand Tools Plug & Play connections,
On screen set up
* Installation time may vary
based on application and
camera location
WIRELESS DIGITAL SECURITY SYSTEM
LW2700 / LW2900 SERIES
QUICK START GUIDE
NOTE: AVOID INSTALLING IN A LOCATION
WHICH REQUIRES THE WIRELESS SIGNAL
TO PASS THROUGH CEMENT, CONCRETE
AND METAL STRUCTURES. THIS WILL
REDUCE THE TRANSMISSION RANGE.
Getting Started
This Wireless Digital Security
System comes with the following
components:
• Color Two-way Audio Outdoor†
Cameras*
• Camera Stand(s)*
• LCD Monitor/Wireless Receiver
• SD Memory Card
• Audio/Video Cable
• Remote Control
• Tabletop Stand
• Mounting Hardware Kit(s)*
• Wireless Antennas (for camera [s])*
• Power Adapters (for receiver &
camera[s])*
• Instruction Manual
*
*
Number of cameras may vary by
model. Check your package for specific
content information.
† Not intended for direct exposure to rain or
snow.
A. Camera Setup
Connect power adaptor to local
120V AC power outlet.
IMPORTANT: The motion detection
range is up to 24ft (7m) to minimize
false alarms. Keep this in mind when
selecting suitable installation location.
PIR motion sensor
4
Connect one end of the camera
Power Adapter to the camera and
the other end to an electrical outlet.
3
Secure Camera to the mounting
stand. Adjust the angle of the camera
until the desired view is set. Tighten
the thumbscrews to secure the
desired camera position.
1
B. LCD Receiver Setup
Attach the included
Antenna to the camera
by screwing it on to the
back as shown
below.
2
NOTE: When adding cameras that were not
included in the original box, you will need
to pair up the camera with the receiver.
Please refer to the Camera Pairing
Section of the User Manual.
The LCD Receiver can be setup for use on a tabletop, or mounted to a wall or underneath a counter or cupboard. See Receiver Mounting Options section below for more details.
2
Insert the included SD card into
the SD Card slot on the LCD
receiver until you hear a “click.”
The card will not be flush when
completely inserted.
NOTE: The receiver is compatible
with most major brands of SD
card up to 16 GB.
Connect one end of the
Receiver Power Adaptor
to the receiver and the
other end to an electrical
outlet.
ATTENTION: Make sure to first connect and power on the
camera(s) before powering on the receiver; this will ensure
a proper connection.
3
4
LW2700 Series:
Slide the power
switch on the
rear panel to the
“ON” position.
LW2900 Series:
Slide the power
switch on the
side panel to the
“ON” position.
1
5
Adjust the antenna on the
receiver as necessary to
provide the clearest
reception.
Plug the included stand
into the slot as shown
below. Turn the stand
counter-clockwise until
it clicks into place. For
different viewing angles,
rotate the stand further.
NOTE: If one or more of the cameras do not appear when selected (i.e. Camera 2 is turned on but does not appear on channel 2),
follow the Pairing process as described on Page 44 and 45 of the instruction manual.
NOTE: The LCD receiver
can also be wall, ceiling
or under-counter
mounted. See page 16 of
the Instruction Manual
for details.
www.lorextechnology.com
LW2700/LW2900 Series Quick Start Guide_R1 Page 2
C. Basic System Setup (using remote control)
Navigating Menu Screens:
Follow these steps to access the Menu screen and make
updates / changes to settings:
1. Press the MENU button to enter the Menu screen
2. Use the directional buttons to highlight a menu item
3. Press ENTER to enter the highlighted menu item
4. Use the directional buttons to change highlighted setting
5. Press ENTER to save a setting change (If you press MENU
instead, the setting change will NOT be saved)
6. Press MENU to go back to the previous menu. Press MENU
repeatedly to go back to camera view mode.
Setting Date/Time:
Set the date and time to ensure that they are properly
captured on recordings
1. Press MENU. Highlight SETTING menu and press ENTER
2. Highlight DATE & TIME and press ENTER
3. Press RIGHT / LEFT to move the cursor and UP / DOWN to
change the value for the date and time
4. Press ENTER to save setting. Press MENU to return to
previous menu
Changing Camera View Mode
View a single camera at a time, single cameras in sequence
(Auto Sequence) or all cameras at the same time (Quad).
Follow these steps to access each of the viewing modes:
Single Channel View: Press CHANNEL-M repeatedly to manually
scroll through available camera channels (turn unused channels
off in CAMERA ON/OFF menu)
Auto Sequence View (default setting): Press CHANNEL-A
to automatically scroll through every available channel at 5
second intervals. Press CHANNEL-M to return back to manually
switching camera channels
Quad View: Press the QUAD button once to enter 4-channel
quad view. Press again to return to the previous camera view. To
quickly go to a specific channel while in Quad view, simply press
the corresponding directional button (1-4). Once you have exited
Quad view, return to using MANUAL-M to manually scroll to
specific channel
©2010 Lorex Technology Inc.
As our product is subject to continuous improvement, Lorex Technology &
subsidiaries reserve the right to modify product design, specifications, prices &
warranty without notice and without incurring any obligation. E&OE
Three recording modes are available on the system: Manual Recording, Schedule Recording, and Motion
Recording.
NOTE: The system can record video to an SD card one channel at a time. You should always format the SD
card prior to initial recording. For details refer to the owner’s manual section “Format”.
NOTE: Recording overrides other actions on the receiver. You must stop recording on the system in order
to perform other actions, such as opening the Main Menu, Quad Mode, etc.
D. How to begin Recording?
MODE DESCRIPTION HOW TO OPERATE
MANUAL RECORDING • Continuous recording from one camera
• Cannot record while in Quad mode
• Cannot record while in Auto Sequence
Viewing Mode
• Press the RECORD—M button on the
remote control to start/stop manual
recording
SCHEDULE RECORDING • Continuous recording from one camera or
from Auto Sequence
Viewing Mode (system will record from one
camera at a time)
• IMPORTANT: Turn off Manual
Recording and Motion Recording to
enable Schedule Recording
• Enter a Start and Stop Time from Main
Menu > Record > Schedule Record
• Cannot record while in Quad mode
MOTION RECORDING
(AUTO)
• System only records when motion is detected
by a camera
• Compatible with Quad Mode (recommended) –
enable Quad Mode
BEFORE turning on Motion Recording
• Compatible with Auto Sequence Viewing Mode
• Press the Motion button to start/stop
Motion recording
SCREEN SAVER +
MOTION RECORDING
• Enable Screen Saver for LCD receiver to
simulate a picture frame
• System only records when motion is detected
by a camera
• Press the Motion button to start Motion
Recording
• Press the Scan/Del button to enable
Screen Saver mode
It’s all on the Web
For detailed setup information, please refer to your
User’s Manual. For additional information and accessory
purchases, please visit our website
www.lorextechnology.com/support
EXTENDING YOUR WIRELESS SIGNAL
Even with a clear line-of-sight between your camera(s) and your receiver, you may experience a lower
frame rate simply due to the distance between your wireless devices. Accessory antennas are available
that can help extend the range of your wireless signal. Visit www.lorextechnology.com for more details.
The LW2700/LW2900 series product is EXPANDABLE UP TO 4
CAMERAS. To order additional cameras, please visit our
website at www.lorextechnology.com
For information on viewing recordings, refer to the instruction manual section “Viewing Recorded Video”
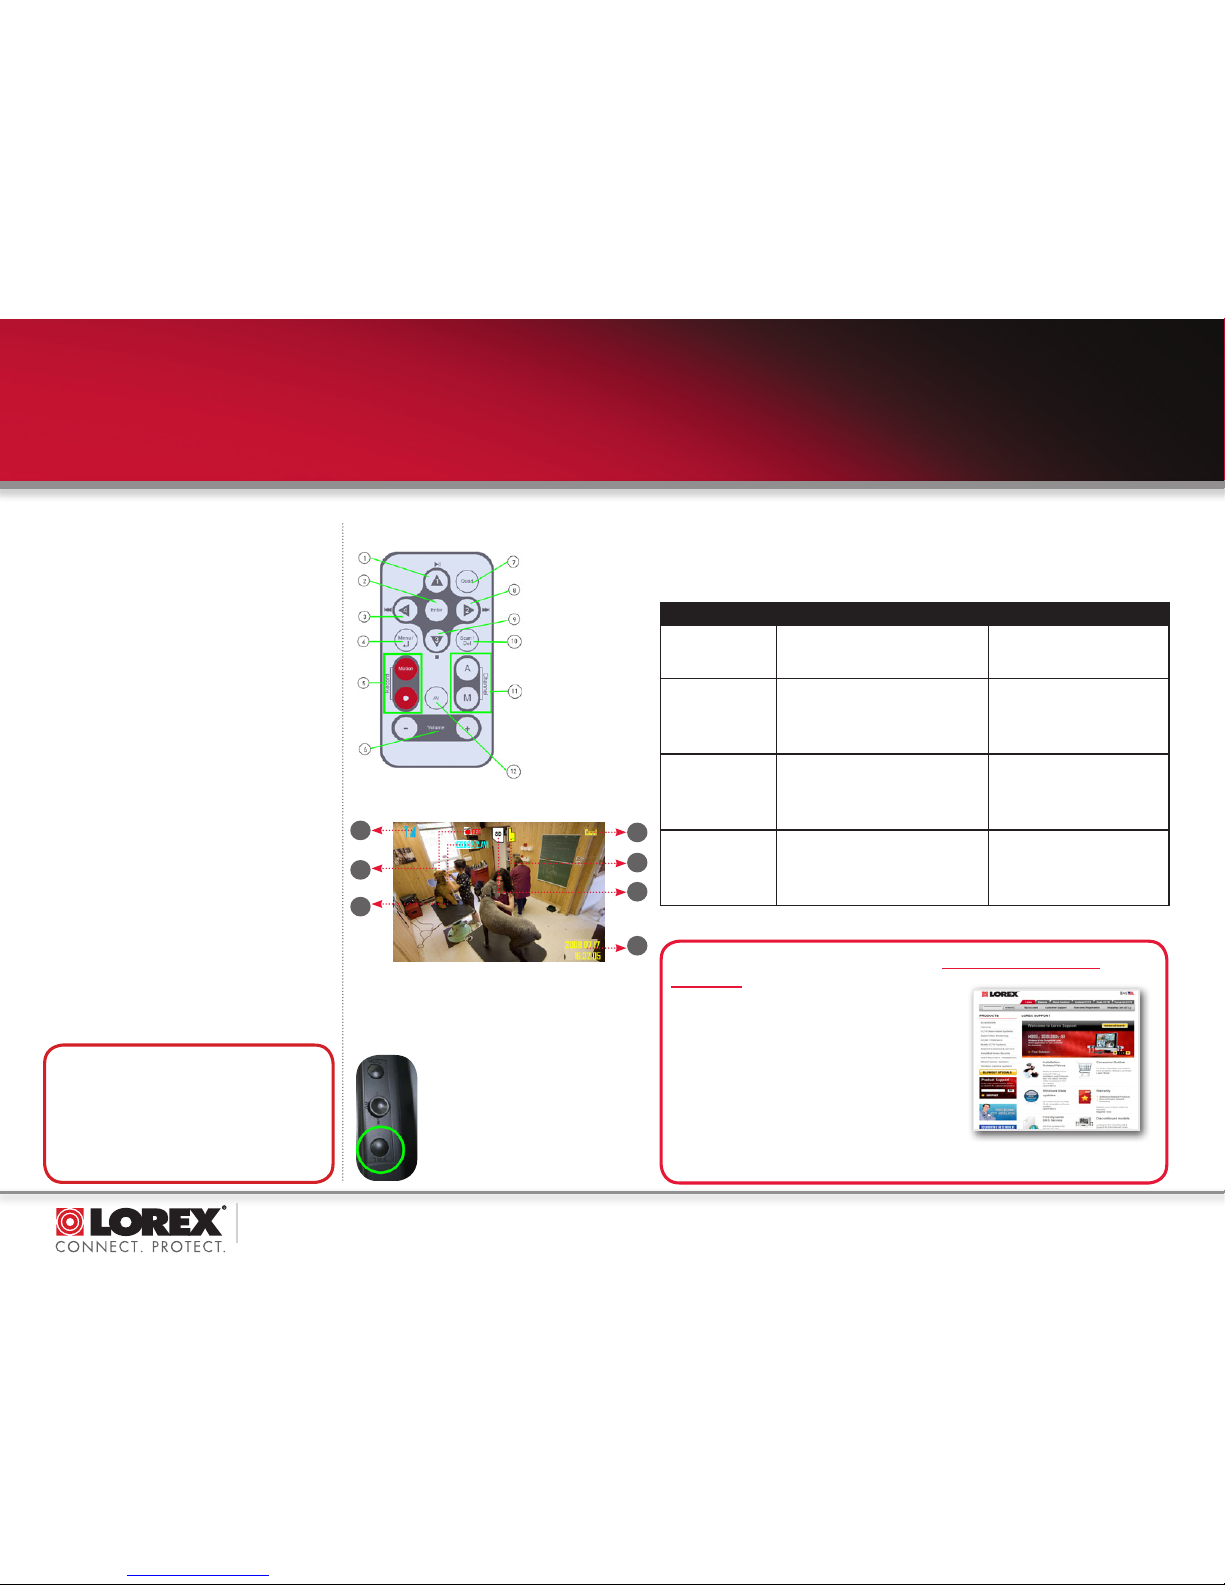
On-Screen Display
1. Signal Indicator
2. Recording Status Indicator
3. File Name
4. Camera indicator
1
2
3
4
5
6
7
5. New Recording/
Memory Full indicator
6. SD card status indicator
7. Current Time/
Date Indicator
(see page 19 and 20 of Instruction
manual for further details)
1. 1/Play/Pause
2. Confirm Setting
3. 4/Rewind
4. MENU/ Back
5. Record Motion/
Start/Stop
6. Volume
7. Quad View
8. 2/Fast Forward
9. 3/Stop
10. Scan/Delete
11. Channel
Autoscan/Manual
12. AV Output
Remote Control
Intercom Feature
Use the Intercom feature for two-way
communication between the LCD receiver and
the camera. Talk to the person at the camera
from behind closed doors for added security.
Refer to the user’s manual, section “Using the
Intercom”
NOTE: Please make sure the camera(s) is
properly connected prior to using the Intercom.
WIRELESS DIGITAL SECURITY SYSTEM
LW2700 / LW2900 SERIES
QUICK START GUIDE
By default, the system is set to beep when motion is
detected by the camera(s). To turn the beeping off, follow
these steps:
1. Press MENU. Highlight SETTING menu and press ENTER
2. Highlight ALARM VOLUME and press ENTER
3. Press LEFT directional button repeatedly to move
volume to the lowest setting (1 bar)
4. Press ENTER to save setting
TIP: Beeping Sound
 Loading...