

Lorex LW2770 SERIES Quick Start Manual
www.lorextechnology.com
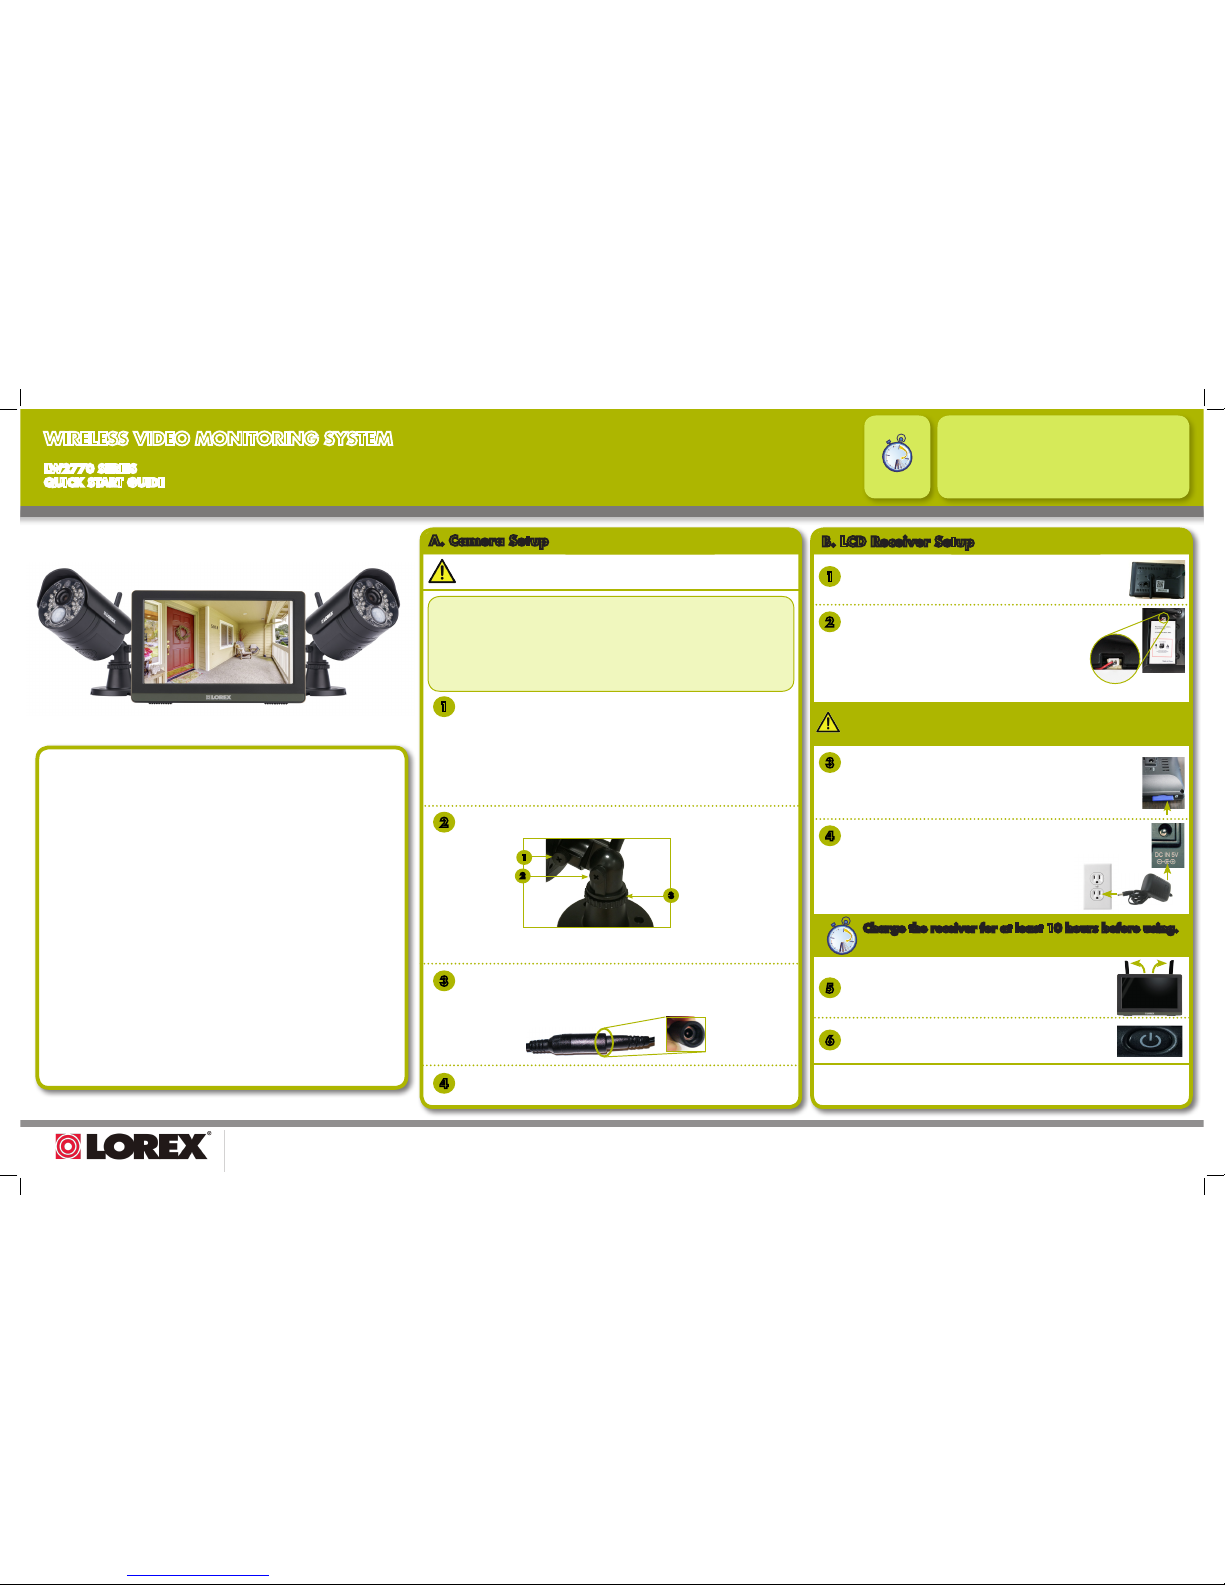
B. LCD Receiver Setup
Insert the included SD card into the SD card slot on the LCD
receiver until you hear a “click.”
NOTE: The receiver is compatible with most major brands of
SD card up to 64 GB.
3
Connect one end of the receiver’s power adapter to the back of the
receiver. Connect the other end to an electrical outlet.
NOTE: Make sure to first connect the camera(s)
to an electrical outlet before powering on the
receiver. This will ensure a proper connection.
4
5
Pull up the antennas on the back of the LCD receiver.
6
Press and hold the power button on top of the LCD receiver.
NOTE: If one or more cameras do not appear when selected (e.g, Camera 2 is
plugged in but does not appear on channel 2), follow the pairing process
described in the user’s guide.
*Number of cameras, and SD card capacity may vary
by model. Check your package for specific content information.
Time
Under 20
minutes*
NOTE: AVOID INSTALLING IN A LOCATION
THAT REQUIRES THE WIRELESS SIGNAL TO
PASS THROUGH CEMENT, CONCRETE, OR
METAL STRUCTURES. THIS WILL REDUCE THE
TRANSMISSION RANGE.
WIRELESS VIDEO MONITORING SYSTEM
LW2770 SERIES
QUICK START GUIDE
Charge the receiver for at least 10 hours before using.
The receiver has a rechargeable battery for up to 2.5 hours of portable use.
This system comes with the following
components:
• 7” wireless touch panel LCD color
monitor
• Indoor / outdoor color camera(s)*
• Battery
• SD memory card*
• Mounting hardware kit(s)*
• Power adapters*
• Ethernet cable
Loosen the thumbscrews (1, 2) and the adjustment ring (3) by turning
them counter clockwise.
2
1
Use the included mounting screws to attach the camera(s) to the
mounting surface:
a. Mark the positions of the screw holes on the mounting surface.
b. Drill holes and insert the drywall anchors (included) as needed.
c. Firmly attach camera(s) to the sur face using the included screws.
2
1
3
Adjust the angle of the camera(s) as needed, then tighten the
thumbscrews and the adjustment ring.
A. Camera Setup
Before installing camera(s), carefully plan where and how it will be positioned,
and where you will route the cable that connects the camera to the power adapter.
3
Connect one end of the camera’s power adapter to the camera and the
other end to an electrical outlet. Make sure the power connector is fully
inserted to avoid water getting in the plug.
4
Remove the protective film from the front of the camera(s). If the film is
not removed, it will block the microphone and will affect picture quality.
• Cameras are rated for indoor/outdoor installation, but are not intended for direct
exposure to rain or snow. For outdoor applications install under shelter protected
from the elements.
• Wireless cameras require a power source to operate.
• Ensure power outlets are sheltered from the elements.
Installation Tips
NOTE: If you run the power cable through the mounting surface,
connect power before attaching the camera to the wall.
Use a Phillips screwdriver (not included) to open the battery
compartment on the back panel.
1
Connect the battery cable to the terminals in the monitor. When
finished, close the battery compartment and replace
the screws.
2
NOTE: The battery cable only connects one way.
Do not force the battery cable.
If you do not plan to use the unit for a prolonged period of
time, disconnect the battery or ensure you charge it at least
once every 6 months.
*
LW2770_SERIES_QSG_EN_R1
www.lorextechnology.com
©2015 Lorex Technology Inc.
As our product is subject to continuous improvement, Lorex Technology &
subsidiaries reserve the right to modify product design, specifications, prices &
warranty without notice and without incurring any obligation. E&OE
Side Panel Buttons:
WIRELESS VIDEO MONITORING SYSTEM
LW2770 SERIES
QUICK START GUIDE
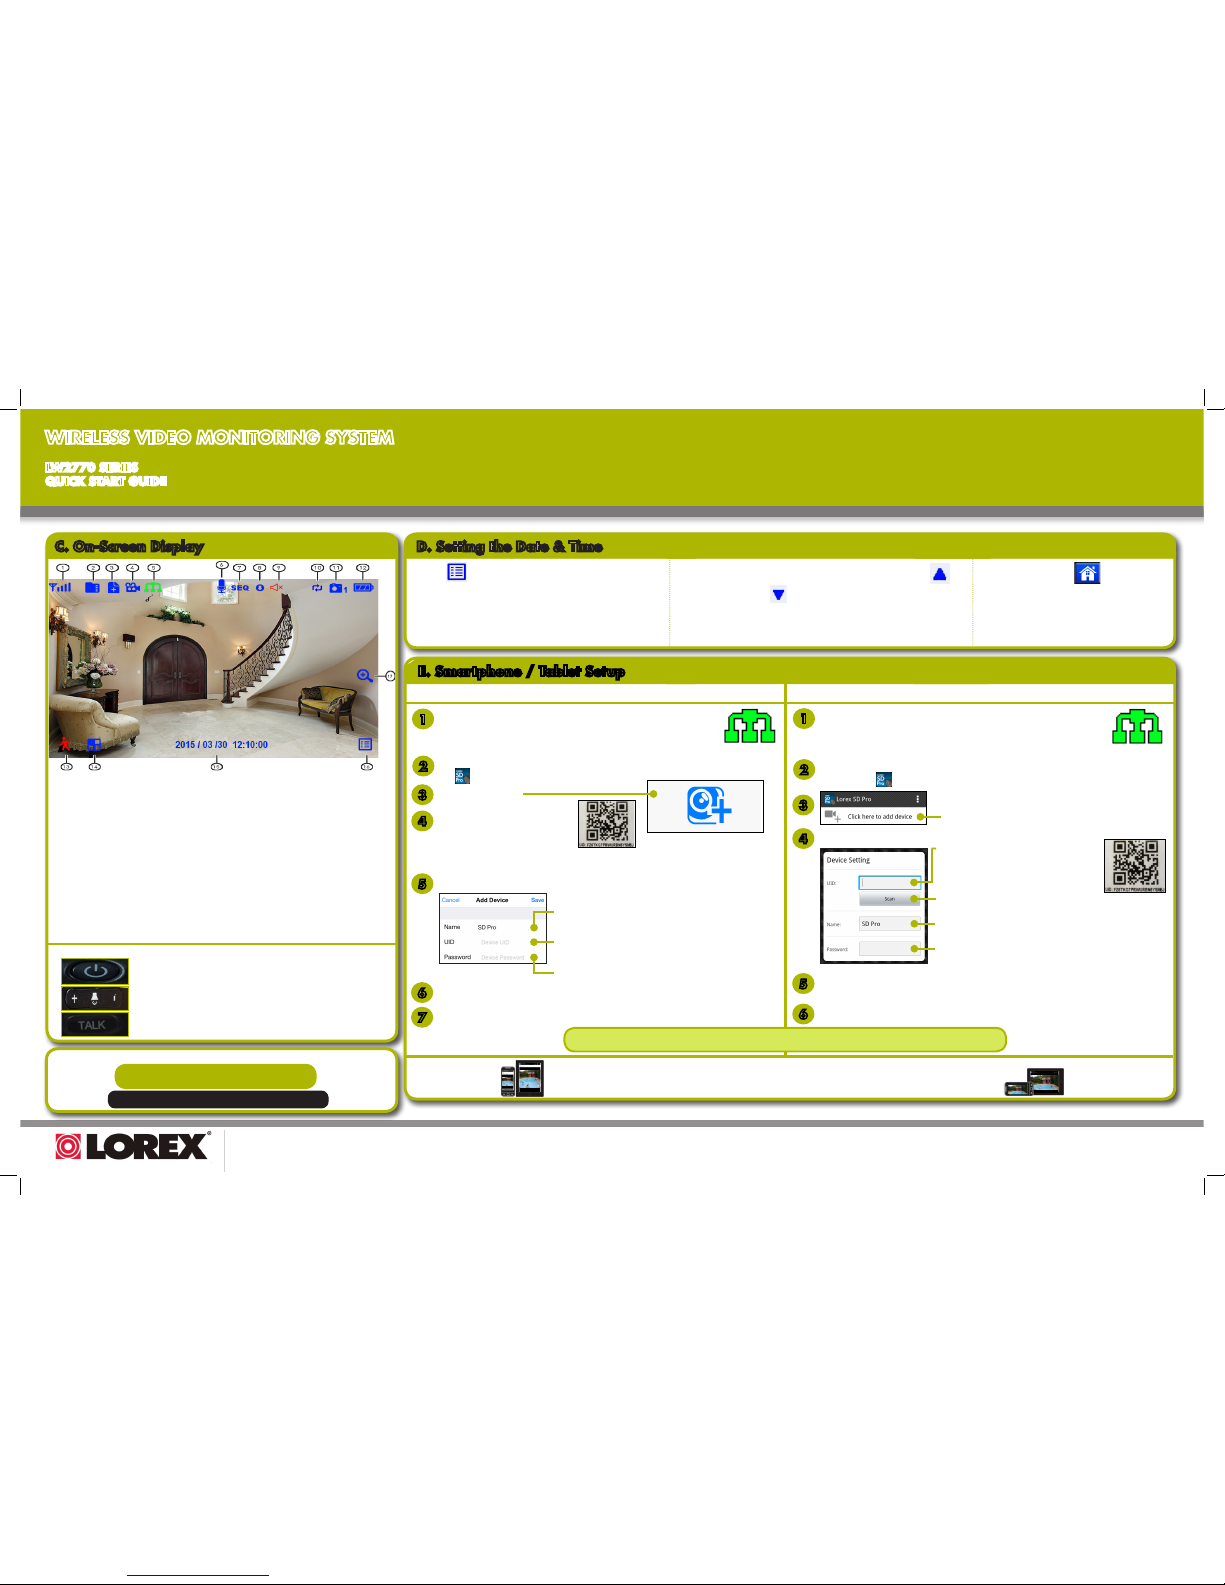
1. Tap on the lower right corner of the screen to open
the main menu.
2. Go to General Settings > System Settings >
Date & Time.
3. Tap each value to move the cursor; tap the up arrow icon or
the down arrow icon to change the year, month, day, hour, and
minutes.
NOTE: The system uses a 24-hour clock.
4. Tap the Home icon to save your
settings.
NOTE: See the user’s guide for details on
configuring Daylight Savings Time and
Network Time Protocol.
D. Setting the Date & Time
NOTE: It is important to set the date and time to ensure that they are properly captured on recordings.
1
Connect the included Ethernet cable from the Ethernet port on the
LCD receiver to your wireless router. The network icon turns green.
2
Download the free Lorex SD Pro app from the App Store. Once installed,
tap to launch the app.
Tap QRCode to scan the QR
code on the back of the receiver.
OR
Tap Add to enter the UID manually.
iPhone® / iPad® Android™
4
5
Enter the following:
Enter the password (default: 000000).
Enter a personalized name for the system.
Enter the UID printed below the QR code on the back
of the receiver. If you tapped QRCode in Step 4, this
field populates automatically.
6
Tap Save. The system will show in your device list with an Online status.
7
Tap the name of the system. You will be asked to enter a new, secure password.
Congratulations! You are now connected to your surveillance system over the Internet.
View live video from your camera(s) in portrait or landscape mode.
3
Tap Click here to add device.
4
Enter the following:
Enter the password (default: 000000).
Enter a personalized name for the system.
Enter the UID printed below the QR code.
OR
Tap Scan to scan the QR code on the
back of the receiver.
7
Tap OK. The system will show in your device list with an Online status.
8
Tap the name of the system. You will be asked to enter a new, secure password.
5
Tap OK. The system will show in your device list with an Online status.
6
E. Smartphone / Tablet Setup
3
Tap Add Device.
1
Connect the included Ethernet cable from the Ethernet port on the
LCD receiver to your wireless router. The network icon turns green.
2
Download the free Lorex SD Pro app from the Google Play Store. Once
installed, tap to launch the app.
NOTE: You may need to turn the receiver off and on again.
NOTE: You may need to turn the receiver off and on again.
Write your password down for future reference: __________________________________________
It’s all on the Web
NOTE: Be sure to leave the receiver connected to a power outlet to ensure remote connectivity.
Power button / Enter Scan mode (display turns on only when
motion is detected).
Raise or lower the volume.
LW2770_SERIES_QSG_EN_R1
Press and hold to activate intercom (two-way audio).
C. On-Screen Display
1. Signal Indicator: Indicates the strength of the
signal being received from the camera.
2. SD Card Icon: Indicates that an SD card is
inserted. Tap the icon to playback recorded videos.
3. New File Icon: Indicates that there are new
recordings saved to the SD card.
4. Manual Recording: Activate / deactivate
manual recording.
5. Network Status Indicator: Indicates the
network status of the receiver.
6. Microphone Icon: Indicates that the talk
function has been enabled on the receiver.
7. SEQ Icon: Indicates the monitor is on Auto
Sequence viewing mode.
8. Download Icon: Indicates that a new firmware
is available in the server to download.
9. Mute Icon: Indicates audio is off on the monitor.
10. Overwrite Icon: Indicates Overwrite mode is
on, the system will overwrite the oldest recordings
when the memory card is full.
11. Channel Indicator: Indicates the camera you
are presently viewing.
12. Battery Indicator: Indicates remaining battery
life.
13. Motion Recording: Activate / deactivate
motion recording.
14. Quad / Sequence Viewing: Switch between
Quad mode (up to 4 channels) and Auto Sequence
mode (automatically cycles through channels).
15. Time Stamp: Displays the current date and time
on the system.
16. Main Menu: Open main menu.
17. Zoom: Activate / deactivate 2x digital zoom.
Tap the zoom icon and then tap the desired
viewing area on the screen (must be in single channel view).
FOR SUPPORT AND INFORMATION,
VISIT WWW.LOREXTECHNOLOGY.COM
Need to extend the wireless range?
Visit www.lorextechnology.com
for further details.
 Loading...