

Lorex Live SD3.5, LW2401 Series, LW241 Series Instruction Manual

WIRELESS VIDEO HOME MONITOR
INSTRUCTION MANUAL
ENGLISH VERSION 2.0
SD3.5
LW2401/LW241 SERIES
www.lorextechnology.com


Welcome!
Thank you for purchasing the Lorex LIVE wireless video monitor.
Before you start, make sure you have the contents listed below.
Contents
• 1x Video Monitor
• 1x Camera
• 1x Charging cradle for the video monitor
• 1x Power adapter for the camera
• 1x Power adapter for the video monitor
• 1x microSD memory card
• 1x microSD to SD adapter card
• 1X micro USB cable
• 1x User’s guide
• 1x Quick start guide
• 1X Driver CD
• Mounting screws for the camera
• 3x Cable Clips
i

Safety Instructions
WARNING
This video monitor is compliant with all relevant standards
regarding electromagnetic fields and is, when handled as
described in the User’s Guide, safe to use. Therefore, always read
the instructions in this User’s Guide carefully before using the
device.
• Adult assembly is required. Keep small parts away fr
assembling.
• This product is not a toy. Do not allow children to play with it.
• This video monitor is not a substitute for responsible adult supervision.
• Keep this user’s guide for future reference.
• Keep the cords out of reach from children.
• Do not cover the video monitor with a towel or blanket.
• Never use extension cords with power adapters.
• Only use the power adapters provided.
• Test the video monitor before use. Become familiar with its functions.
• Do not use the video monitor near water.
• Do not install the video monitor near a heat source.
• Only insert batteries/battery pack of the same type.
• Do not touch the plug contacts with sharp or metal objects.
• Only use the chargers and power adapters provided. Do not use other
chargers or power adapters as this may damage the device and
battery pack.
om children when
CAUTION
Risk of explosion if battery is replaced by an incorrect type.
• DISPOSE OF OR RECYCLE BATTERIES PROPERLY IN ACCORDANCE WITH
APPLIC
• Insert batteries with the correct polarity.
• Do not mix new and used batteries.
• Remove exhausted batteries from the product.
• Keep all batteries away from children.
ii
ABLE LAWS, which may vary by location.
Using this product as a baby monitor
3 ft.
Option 1:
Thread the extra cable through
the cable clip notches.
Option 2:
Thread the extra cable through
the cable clip notches. Wrap the
excess cable around the clip.
Option 3:
Wrap the excess cable around the
clip.
If you intend to use this wireless video monitor as a baby monitor, we advise you to take the
following precautions to avoid possible injury to infants:
• DO NO
T place baby audio and video camera monitors too close to cribs,
bassinets, play yards and other safe sleep environments for infants.
• MAKE SURE all power adapter cords are out of arms reach of your infant.
Keep them at least 3ft/1m away
• MAKE SURE baby audio and video camera monitors are on a stable footing
so they cannot be easily knocked over
• Use the included cable clips to keep the power cord out of reach from infants and young
children.
NOTE: These pr
ecautions are important even if your infant is not yet standing
or mobile.
Using the Cable Clips
iii

iv

Table of Contents
Overview . . . . . . . . . . . . . . . . . . . . . . . . . . . . . . . . . . . . . . . . . . . . . . . . . . . . . . 1
Video Monitor Overview . . . . . . . . . . . . . . . . . . . . . . . . . . . . . . . . . . . . . . . . . . . . . . . . . . . 1
Using the joystick to navigate menus . . . . . . . . . . . . . . . . . . . . . . . . . . . . . . . . . . . . . . . . 2
Camera Overview . . . . . . . . . . . . . . . . . . . . . . . . . . . . . . . . . . . . . . . . . . . . . . . . . . . . . . . . 3
OSD overview . . . . . . . . . . . . . . . . . . . . . . . . . . . . . . . . . . . . . . . . . . . . . . . . . . . . . . . . . . . 4
Basic Setup . . . . . . . . . . . . . . . . . . . . . . . . . . . . . . . . . . . . . . . . . . . . . . . . . . . . 5
Testing your setup . . . . . . . . . . . . . . . . . . . . . . . . . . . . . . . . . . . . . . . . . . . . . . . . . . . . . . .6
Wall mounting your camera . . . . . . . . . . . . . . . . . . . . . . . . . . . . . . . . . . . . . . . . . . . . . . . 6
Adjusting camera view . . . . . . . . . . . . . . . . . . . . . . . . . . . . . . . . . . . . . . . . . . . . . . . . . . . . 7
Camera Setup . . . . . . . . . . . . . . . . . . . . . . . . . . . . . . . . . . . . . . . . . . . . . . . . . . . . . . . . . . . 8
Video Monitor Setup . . . . . . . . . . . . . . . . . . . . . . . . . . . . . . . . . . . . . . . . . . . . . . . . . . . . . . 9
Pairing Cameras . . . . . . . . . . . . . . . . . . . . . . . . . . . . . . . . . . . . . . . . . . . . . . . . . . . . . . . . 10
Sequence View . . . . . . . . . . . . . . . . . . . . . . . . . . . . . . . . . . . . . . . . . . . . . . . . . . . . . . . . .11
Viewing Multiple Cameras (Quad View) . . . . . . . . . . . . . . . . . . . . . . . . . . . . . . . . . . . . . 11
Using the talk function . . . . . . . . . . . . . . . . . . . . . . . . . . . . . . . . . . . . . . . . . . . . . . . . . . . 12
Music . . . . . . . . . . . . . . . . . . . . . . . . . . . . . . . . . . . . . . . . . . . . . . . . . . . . . . . . . . . . . . . . . 12
Turning the video monitor screen on/off . . . . . . . . . . . . . . . . . . . . . . . . . . . . . . . . . . . . 13
Recording. . . . . . . . . . . . . . . . . . . . . . . . . . . . . . . . . . . . . . . . . . . . . . . . . . . . . 14
Manual Recording & Auto Recording . . . . . . . . . . . . . . . . . . . . . . . . . . . . . . . . . . . . . . . 14
Viewing recorded files on the video monitor . . . . . . . . . . . . . . . . . . . . . . . . . . . . . . . . . 16
Configuring your video monitor . . . . . . . . . . . . . . . . . . . . . . . . . . . . . . . . . . 18
Enabling the Auto Mute feature . . . . . . . . . . . . . . . . . . . . . . . . . . . . . . . . . . . . . . . . . . . 18
Configuring the Overwrite feature . . . . . . . . . . . . . . . . . . . . . . . . . . . . . . . . . . . . . . . . . 18
Changing the date and time . . . . . . . . . . . . . . . . . . . . . . . . . . . . . . . . . . . . . . . . . . . . . . 19
Adjusting the alarm volume . . . . . . . . . . . . . . . . . . . . . . . . . . . . . . . . . . . . . . . . . . . . . . 19
Adjusting the screen brightness . . . . . . . . . . . . . . . . . . . . . . . . . . . . . . . . . . . . . . . . . . . 20
Adjusting the Timer settings . . . . . . . . . . . . . . . . . . . . . . . . . . . . . . . . . . . . . . . . . . . . . . 20
Adjusting the temperature unit of measurement . . . . . . . . . . . . . . . . . . . . . . . . . . . . . 21
Configuring the temperature alert range . . . . . . . . . . . . . . . . . . . . . . . . . . . . . . . . . . . 21
Erasing the memory card . . . . . . . . . . . . . . . . . . . . . . . . . . . . . . . . . . . . . . . . . . . . . . . . 22
Restoring default settings . . . . . . . . . . . . . . . . . . . . . . . . . . . . . . . . . . . . . . . . . . . . . . . . 22
Viewing your camera remotely using Skype. . . . . . . . . . . . . . . . . . . . . . . . 23
Requirements . . . . . . . . . . . . . . . . . . . . . . . . . . . . . . . . . . . . . . . . . . . . . . . . . . . . . . . . . . . . . . . . . . . . . . . . . . . . . . 23
Connecting to Skype on a PC . . . . . . . . . . . . . . . . . . . . . . . . . . . . . . . . . . . . . . . . . . . . . . 24
Changing the camera view on Skype . . . . . . . . . . . . . . . . . . . . . . . . . . . . . . . . . . . . . . . 31
Viewing a camera on your mobile device . . . . . . . . . . . . . . . . . . . . . . . . . . . . . . . . . . . . 32
Troubleshooting . . . . . . . . . . . . . . . . . . . . . . . . . . . . . . . . . . . . . . . . . . . . . . . 33
v

Appendix A: Installing Camera Batteries . . . . . . . . . . . . . . . . . . . . . . . . . . 35
Tech Specs. . . . . . . . . . . . . . . . . . . . . . . . . . . . . . . . . . . . . . . . . . . . . . . . . . . . 36
Mounting Template. . . . . . . . . . . . . . . . . . . . . . . . . . . . . . . . . . . . . . . . . . . . . 37
Notices . . . . . . . . . . . . . . . . . . . . . . . . . . . . . . . . . . . . . . . . . . . . . . . . . . . . . . . 39
vi

Overview
Video Button
Press the Video button to
turn off the screen. The
speaker will remain on.
Press to access the monitor menu
options. Press Menu again to exit.
Joystick
Use to navigate monitor
menus. Press down on the
joystick to confirm a
selection.
Volume Control
Press + / - to control the
volume level.
Audio Level Indicator
Displays the level of sound
detected by the camera.
Menu Button
Talk Button
Hold the talk button to
enable two-way audio
between the video monitor
and camera.
AUTO LED
Glows blue when
auto-record is enabled.
Blinks when monitor is in
Scan mode.
ON/OFF Switch
Slide the power switch to the
ON position to turn the video
monitor on.
Music Buttons
Press the button once to
begin playing a tune. Press
the button again to stop
the tune.
Press the button to skip to
the next tune.
microSD Card Slot
Insert a microSD card to
record video.
Power LED
Glows green to indicate unit
is powered on. Blinks when
the battery is low.
Microphone
Allows you to speak to the
person on the camera side
when you press the Talk
button.
Charging Cradle
Charges the video monitor’s
battery.
Press to start manual
recording.
Manual Record Button
Press to enable auto recording.
Auto Record Button
Slide the switch to release the
receiver antenna.
Antenna unlock switch
Video Monitor Overview
Overview
1
Overview
Sequence/ Quad Button
Press the Sequence/Quad button
to view video in quad mode (4
screen split view), or in sequence
view.
Scan Button
Turns off the video monitor,
and waits for a camera to
detect a sound to t rigger the
monitor to turn back on.
Charging LED Indicator
Glows red to indicate video
monitor is charging.
Glows green to indicate
video monitor is finished
charging.
Cam Button
Press the Cam button to
switch between channels 1-4.
Power Port
Connect the power adapter
into the power port.
Mini USB
Connect a mini USB cable
(included) between the video
monitor and a computer to
view video from your PC or
remotely (setup required)
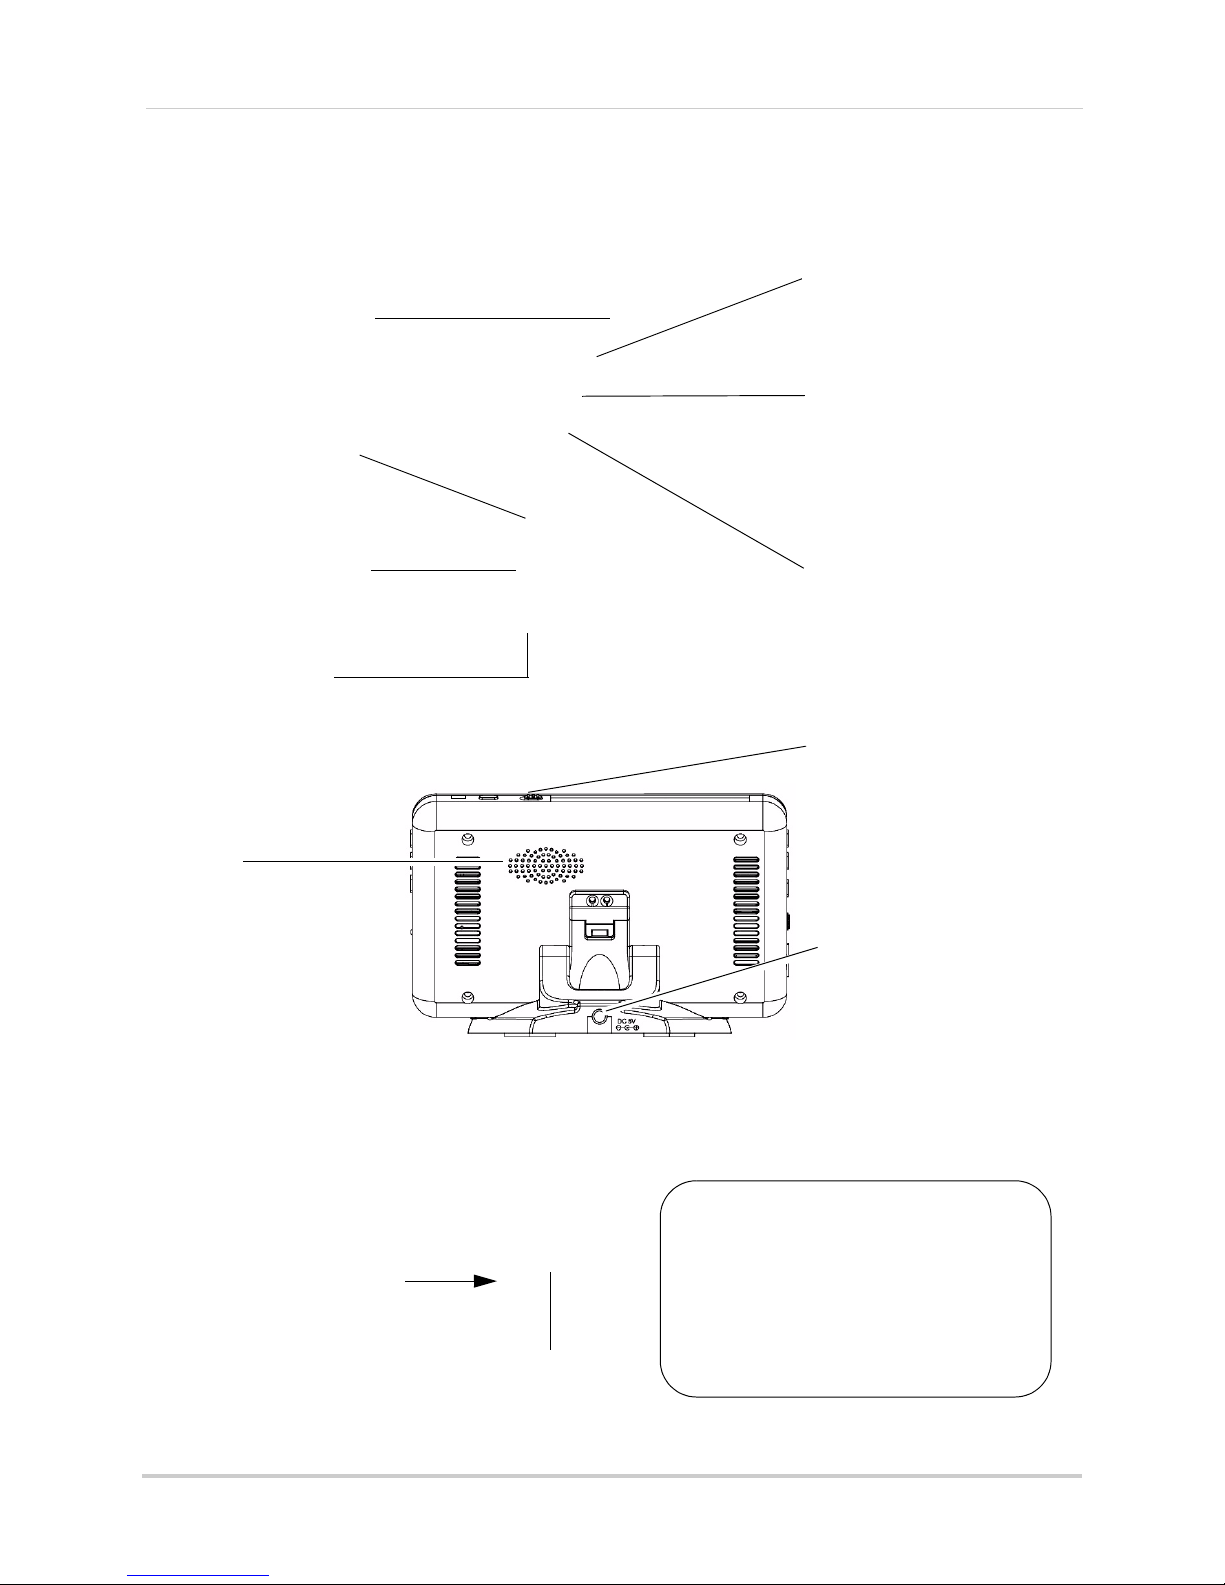
Speaker
Outputs sound received
from the camera.
Power Port (DC5V)
Connect the power adapter
to the charging cradle.
Antenna Switch
Slide the Antenna Switch
towards the unlock position
to reveal the antenna.
Charging Terminals
Located underneath the monitor, and
on the charging cradle, are metal
contact points. These contact points
must align to charge the monitor using
the cradle.
OK Button
Step 1: Press the Menu button on the video
monitor.
Step 2: Move the joystick up, down, left, or right to
navigate through the menus.
Step 3: Press down on the OK button to confirm
a selection.
Menu Navigation
Using the joystick to navigate menus
The joystick allows you to navigate through the video monitor menus.
2

Camera Overview
LEDS
Infrared (IR) LEDs that allow
you to see in the dark.
Sensitivity Dial
Adjust the audio level that
will trigger an alert on the
video monitor.
Volume Dial
Adjusts the speaker volume.
Battery Charging Indicator
Glows to indicate battery is charging.
This requires a rechargeable battery
pack. For details, see “Appendix A:
Installing Camera Batteries” on
page 35).
Power Switch
Turns the camera on and off.
Speaker
The speaker allows you to
hear the person speaking
into the video monitor.
Power Port (DC5V)
Connect a power adapter
to the Power Port.
Microphone
Pair Button
Press the Pair button
during the pairing
process with the video
monitor.
Temperature Sensor
Detects the room’s ambient
temperature*.
*Avoid placing the camera in direct sunlight, as this will
cause the temperature sensor to detect inaccurate room
temperature.
IR Light Sensor
Night Light button
Press to activate the
camera’s night light.
Power LED
Glows to indicate camera is
on. Blinks during low battery.
Overview
3
Overview
SD
cam1
REC
OW
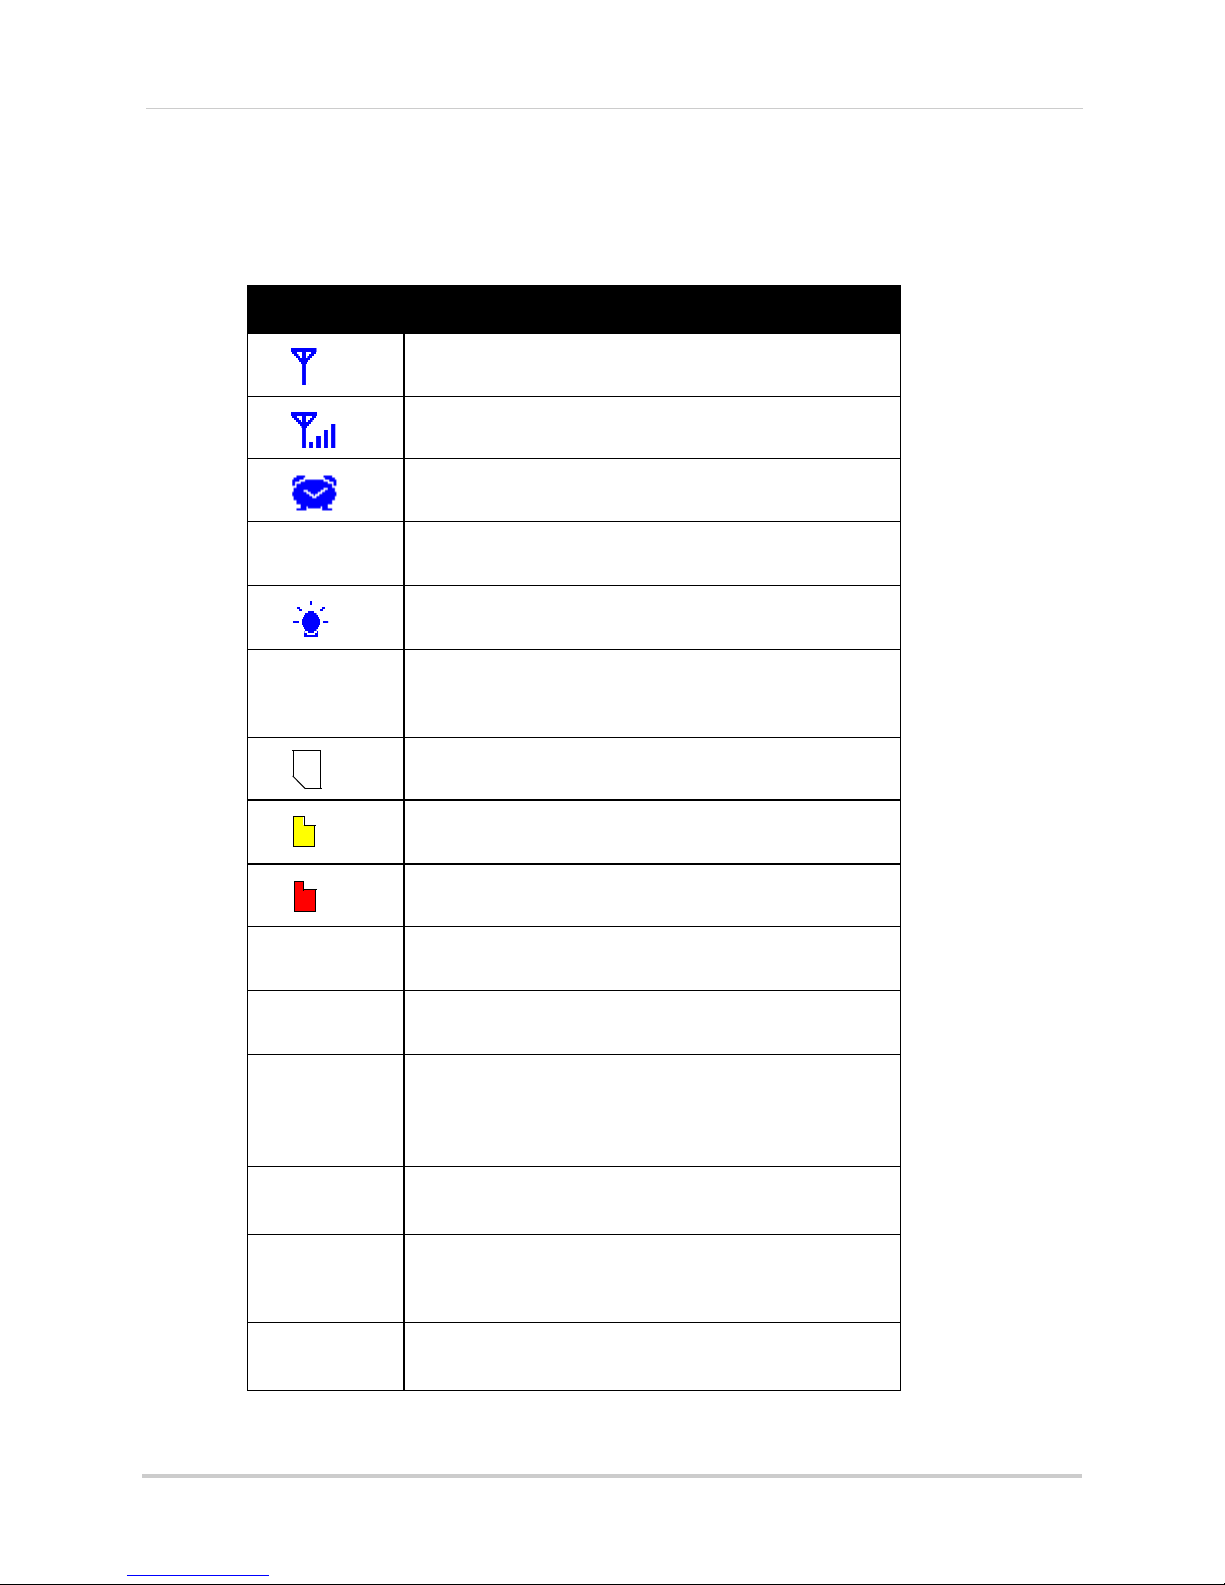
OSD overview
The video monitor displays the following icons during normal use. The table below
summarizes the video monitor icons, and what they mean.
Icon Meaning
No signal between the camera and video monitor.
Full signal between the camera and video monitor.
Timer is enabled.
The video monitor audio is muted.
The camera night light is currently on.
Two-way talk is enabled. You can now speak into the
video monitor. Release the Talk button on the video
monitor to listen to the camera side.
Charge
Battery
Charge
Camera
An SD card is inserted in the video monitor.
A new file has been recorded onto the microSD card.
Note that this icon is yellow.
The memory card is full. Note that this icon is red.
Indicates what channel the video monitor is on.
Indicates that the video monitor is recording video.
The file name appears beside the REC icon.
Overwrite is enabled. This means the video monitor
will overwrite old video files once the card is full. For
details, see “Configuring the Overwrite feature” on
page 18.
The video monitor battery is low.
The camera batteries are low. For details on installing
batteries in the camera, see “Troubleshooting (continued)” on page 34.
OUT OF
RANGE
4
The camera is out of range. Move the camera closer
to the video monitor.
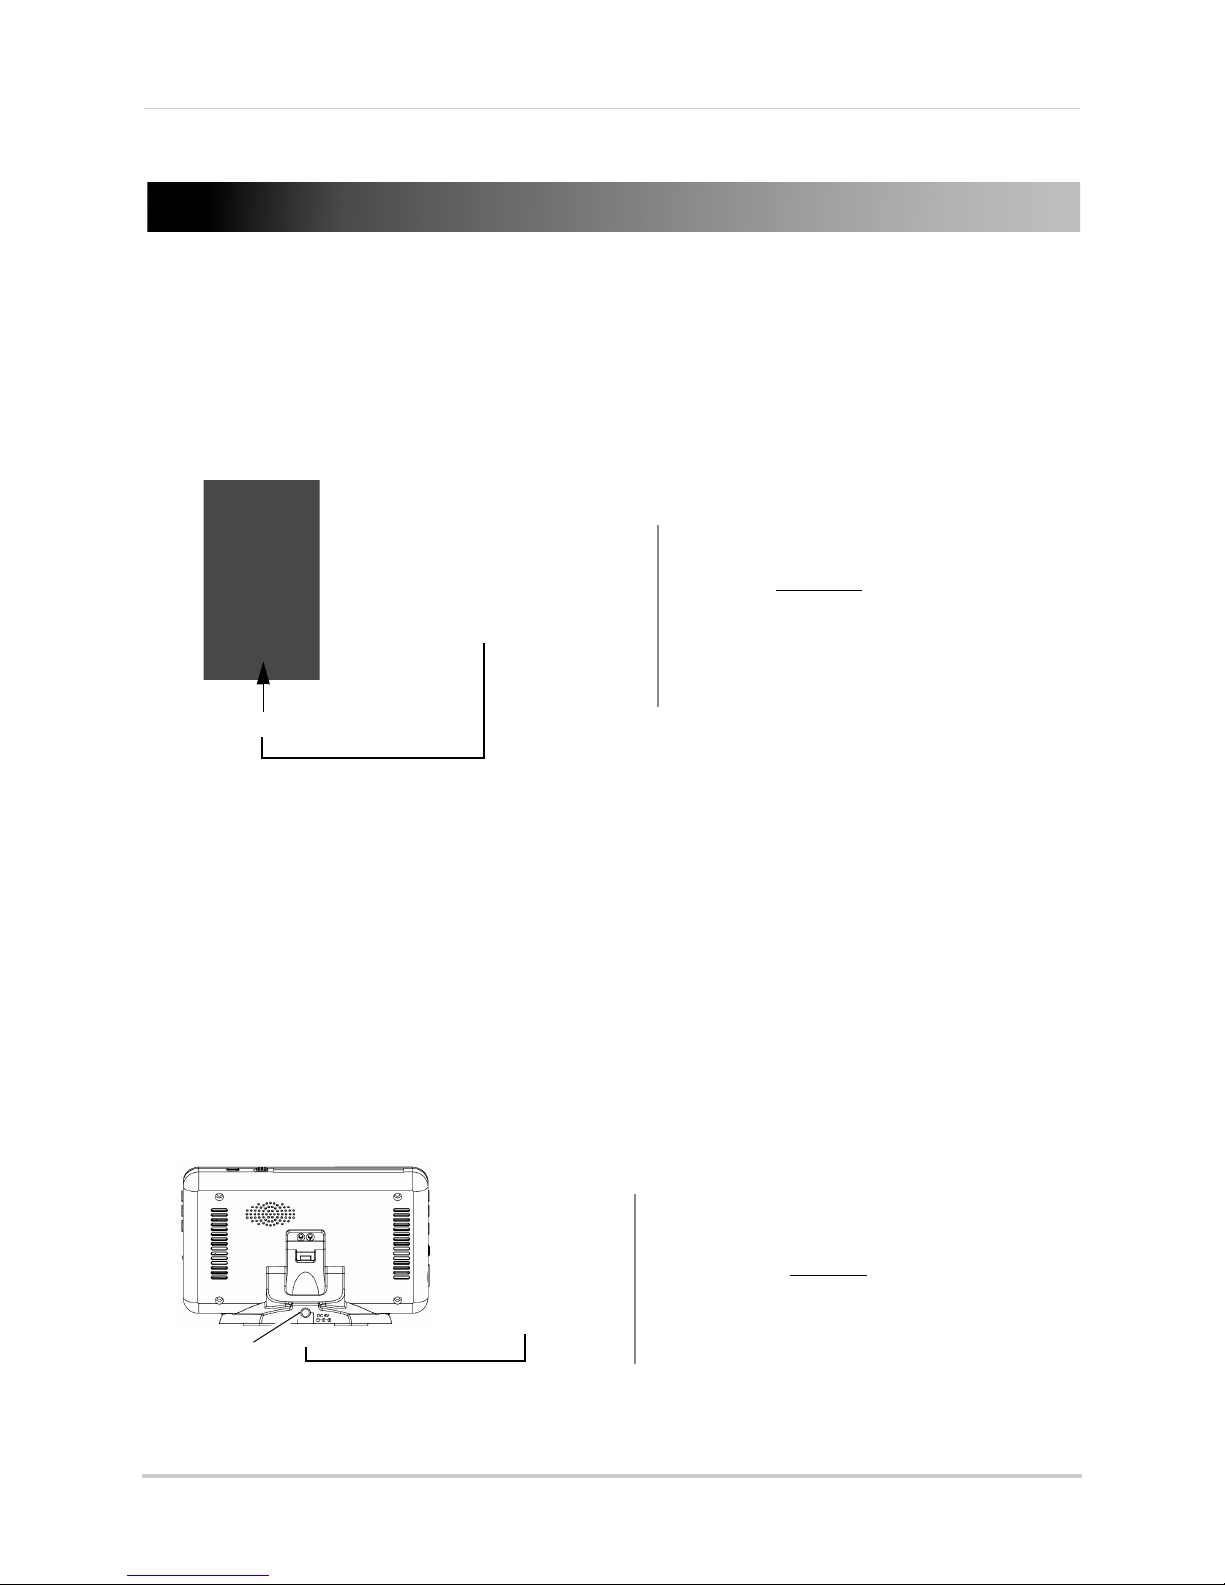
Basic Setup
Slide the power
switch to the ON
position
OPTIONAL: To install batteries in the camera, see “Appendix A:
Installing Camera Batteries” on page 35.
DC5V port
Slide the power
switch to the ON
position
Using the charging cradle
Step 1 of 2: Powering on the camera
1 Connect the power adapter to a power outlet, and to the camera.
Basic Setup
2 Slide the po
wer switch to the ON position.
Step 2 of 2: Powering on the Video Monitor
1 Connect the power adapter to a power outlet, and to the video monitor directly or charging
cradle (ensure the video monitor firmly rests on the cradle). The video monitor’s charging
LED indicator glows red to indicate charging is in progress.
NOTE: It
2 Slide
requires 6 hours to fully charge the rechargable batteries.
the power switch to ON.The video monitor will automatically scan for cameras in range.
5

Basic Setup
Use the cable clips to secure and manage the
cables. You can wrap the excess cab le around the
security clip to reduce the cable length.
Testing your setup
It is recommended that you test your camera setup before permanent installation so that
you get the best picture and sound quality from your video monitor.
Test the camera and video monitor reception:
1 Plac
2 Have one person monitor the signal strength on the video monitor.
e the camera and video monitor in two different rooms.
3 If t
he signal strength is low, have a second person move the camera to different locations of
the room to find the optimal placement location.
Test the camera volume level:
1 Hav
e a person with the video monitor press and hold the TALK button to confirm the volume
level from the camera. Have the other person adjust the volume dial on the camera as
required.
2 The
person holding the video monitor can determine if the camera needs to move to a
different location of the room for better sound clarity.
Wall mounting your camera
• Determine the camera position that will give you the best view before permanently wall
mounting the camera. Ensure the power cable is long enough to power the camera.
• Keep cables and wires at least 3 feet (1 meter) away from infants or young children.
• Use the cable clips to keep the power cords out of reach from young children and infants.
To wall mount your camera:
1 Mark
2 Pr
the screw holes using the template on
page 37.
e-drill the holes in the wall using a drill bit.
3 Insert th
e screw anchors (included) into the hole.
Lightly tap the anchor into the hole with the
hammer until the anchor is flush with the wall.
4 Tight
en the screw into the anchor, leaving 1/4" of
the screw exposed.
5 Rot
ate the base of the camera as shown on
page 7.
6 Slide the back of the c
amera onto the screws and
pull down to secure the camera in place.
7 Con
8 Use
6
nect the power adapter to the camera.
the cable clips to keep the cables out of reach from infants and young children.

Adjusting camera view
Table top adjustment
Wall mount Adjustment
Step 1: Rotate Camera
Rotate the camera to the
right.
Step 2: Fold camera base
Fold the camera base
towards the back of the
camera.
Adjust the camera to achieve the optimal viewing position.
Basic Setup
7
 Loading...