

Page 1
www.lorextechnology.com
LW2400 Quick Start Guide_R1 Page 1
WIRELESS VIDEO MONITOR
LW2400
QUICK START GUIDE
NOTE: AVOID INSTALLING IN A LOCATION WHICH REQUIRES THE
WIRELESS SIGNAL TO PASS THROUGH CEMENT, CONCRETE AND METAL
STRUCTURES. THIS WILL REDUCE THE TRANSMISSION RANGE.
Getting Started
This wireless video monitor comes with the
following components:
• 1x Video Monitor
• 1x Camera*
• 1x Camera Power Adapter*
• 1x Video Monitor Power Adapter
• 1x mini-USB Cable
• 1x User’s Guide
• 1x Quick Start Guide
• 1x Driver CD
• 3x Cable Clips*
*
Number of cameras, camera type, power
adaptors may vary by model.
NOTE: Before you install a camera, carefully plan where
and how it will be positioned, and where you will route
the cable that connects the camera to the power adaptor.
Before starting permanent installation, verify its performance
by observing the image on a monitor when the camera is
positioned where it will be permanently installed. Cameras
are rated for indoor installation only.
NOTE: When adding cameras that were not included in
the original box, you will need to pair up the camera with
the receiver. Please refer to the camera pairing section of the
User’s Guide.
under 30 minutesunder 15 minutes under 60 minutes
Hand Tools Hardware
Router
Hi Speed
over 60 minutes
Skill Level
Time
under 30 minutesunder 15 minutes under 60 minutes
Hand Tools Hardware
Router
Hi Speed
over 60 minutes
Time Tools Skills - Easy
Under 10 Minutes*
Hand Tools Plug & Play connections,
On screen set up
* Installation time may vary
based on application and
camera location
SIMPLY AWARE
™
*
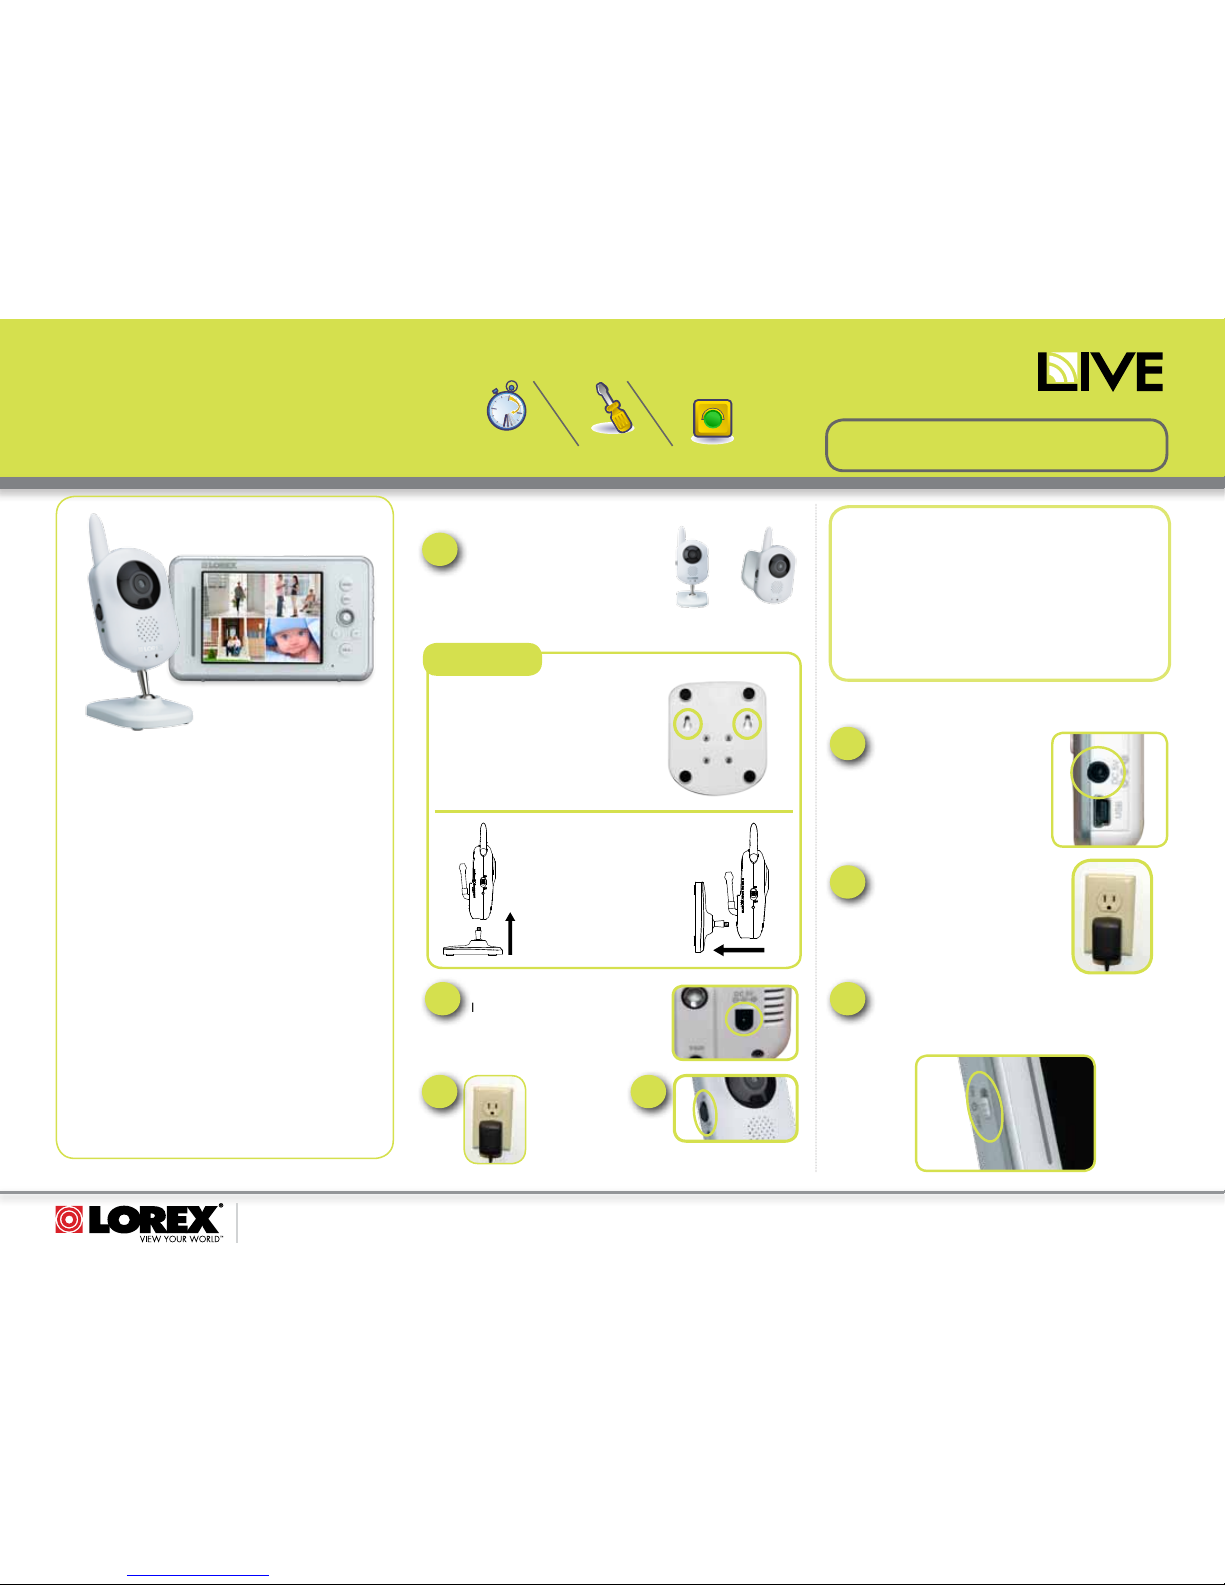
A. Camera Setup
1
The Camera can be placed on a flat
surface, or wall mounted.
Determine where you want to locate
the camera.
Desk/Counter
Mount
Wall Mount
OPTIONAL
The camera features mounting holes
on the bottom of the base and can be
mounted to a wall if desired.
Determine the camera position that
will give you the best view before
permanently wall mounting the
camera. Ensure the power cable is
long enough to power the camera.
Connect the Power Adaptor to the 5V
Input on the back of the camera.
2
NOTE: Keep cables and wires at least
3 feet (1 meter) away from infants or
young children. Use the included cable
clips as necessary.
Slide the power switch
up, to the ON position.
4
Connect the
power adapter to
a power outlet.
3
Check the “Inside the Box” panel on the product
package for configuration.
B. Video Monitor Setup
2
The video monitor’s charging
LED indicator glows red to
indicate charging is in progress.
NOTE: It takes 6 hours to fully
charge the video monitor.
1
Connect the power adapter to
the video monitor.
3
Slide the power switch up to the ON position. The video
monitor will automatically scan for cameras in range.
NOTE: Make sure the camera is powered up before
turning on the video monitor.
Plug the power adapter into a
power outlet.
Please refer to the User’s
Guide for full mounting
instructions.
To wall-mount the camera,
you must unscrew the camera
from the mounting stand and
reattach it to the back of the
camera, as shown.
Page 2

www.lorextechnology.com
LW2400 Quick Start Guide_R1 Page 2
©2012 Lorex Technology Inc.
As our product is subject to continuous improvement, Lorex Technology & subsidiaries reserve the right to modify product design, specifications, prices & warranty without notice and without incurring any obligation. E&OE.
1-17072012
It’s all on the Web
For detailed setup information, please refer to your
User’s Manual. For additional information and
accessory purchases, please visit our website
www.lorextechnology.com/support
This product is
EXPANDABLE UP TO 4 CAMERAS.
To order additional cameras, please visit our
website at www.lorextechnology.com
SIMPLY AWARE
™
NOTE: This system supports a USB connection to
your PC/Mac to enable remote monitoring using
Skype™. Refer to the User’s Guide for detailed
set-up instructions.
WIRELESS VIDEO MONITOR
LW2400
QUICK START GUIDE
C. Video Monitor Overview
SCAN
Menu Button
Press to access the monitor menu
options. Press Menu again to exit.
Audio Level
Indicator
Displays the level
of sound detected
by the camera.
Scan Indicator
Indicates whether
the monitor is in
scan mode.
Power LED
Glows green
to indicate unit
is powered on.
Blinks when the
battery is low.
Video Button
Press the Video button
to turn off the screen.
The speaker will
remain on.
Joystick
Use to navigate monitor
menus or move the angle
of the camera (Pan/Tilt
camera only). Press down
on the joystick to confirm a
selection.
Volume Control
Press + / - to control
the volume level.
Talk Button
Hold the talk button to
enable two-way audio
be
tween the video
monitor and camera.
Microphone
Allows you to speak to the person on the
camera side when you press the Talk button.
Music Buttons
Press the
button once to begin playing a tune.
Press the
button again to stop the tune.
Press the
button to skip to the next tune.
ON/OFF Switch
Slide the power switch to
the ON position to turn
the video monitor on.
ON OFF
Cam Button
Press the Cam button
to switch between
channels 1-4.*
Sequence/ Quad Button
Press the Sequence/Quad button to view video in quad mode
(4 screen split view), or in sequence view.*
Scan Button
Turns off the video monitor, and waits for a camera to detect
sound to trigger the monitor to turn back on.
Charging LED Indicator
Glows red to indicate video monitor is charging. Glows green
to indicate video monitor is finished charging.
Power Port
Connect the power adapter into the power port.
Mini USB
Connect a mini USB cable (included) between the video
monitor and a computer to view video from your PC or
remotely (setup required).
*Requires multiple cameras. Accessory cameras sold separately
(model # LW2401AC1, LW2401AC2, LW2451AC1)
Speaker
Outputs sound received from the camera.
Antenna Switch
Slide the Antenna Switch
towards the unlock position to
reveal the antenna.
 Loading...