

Page 1
www.lorextechnology.com
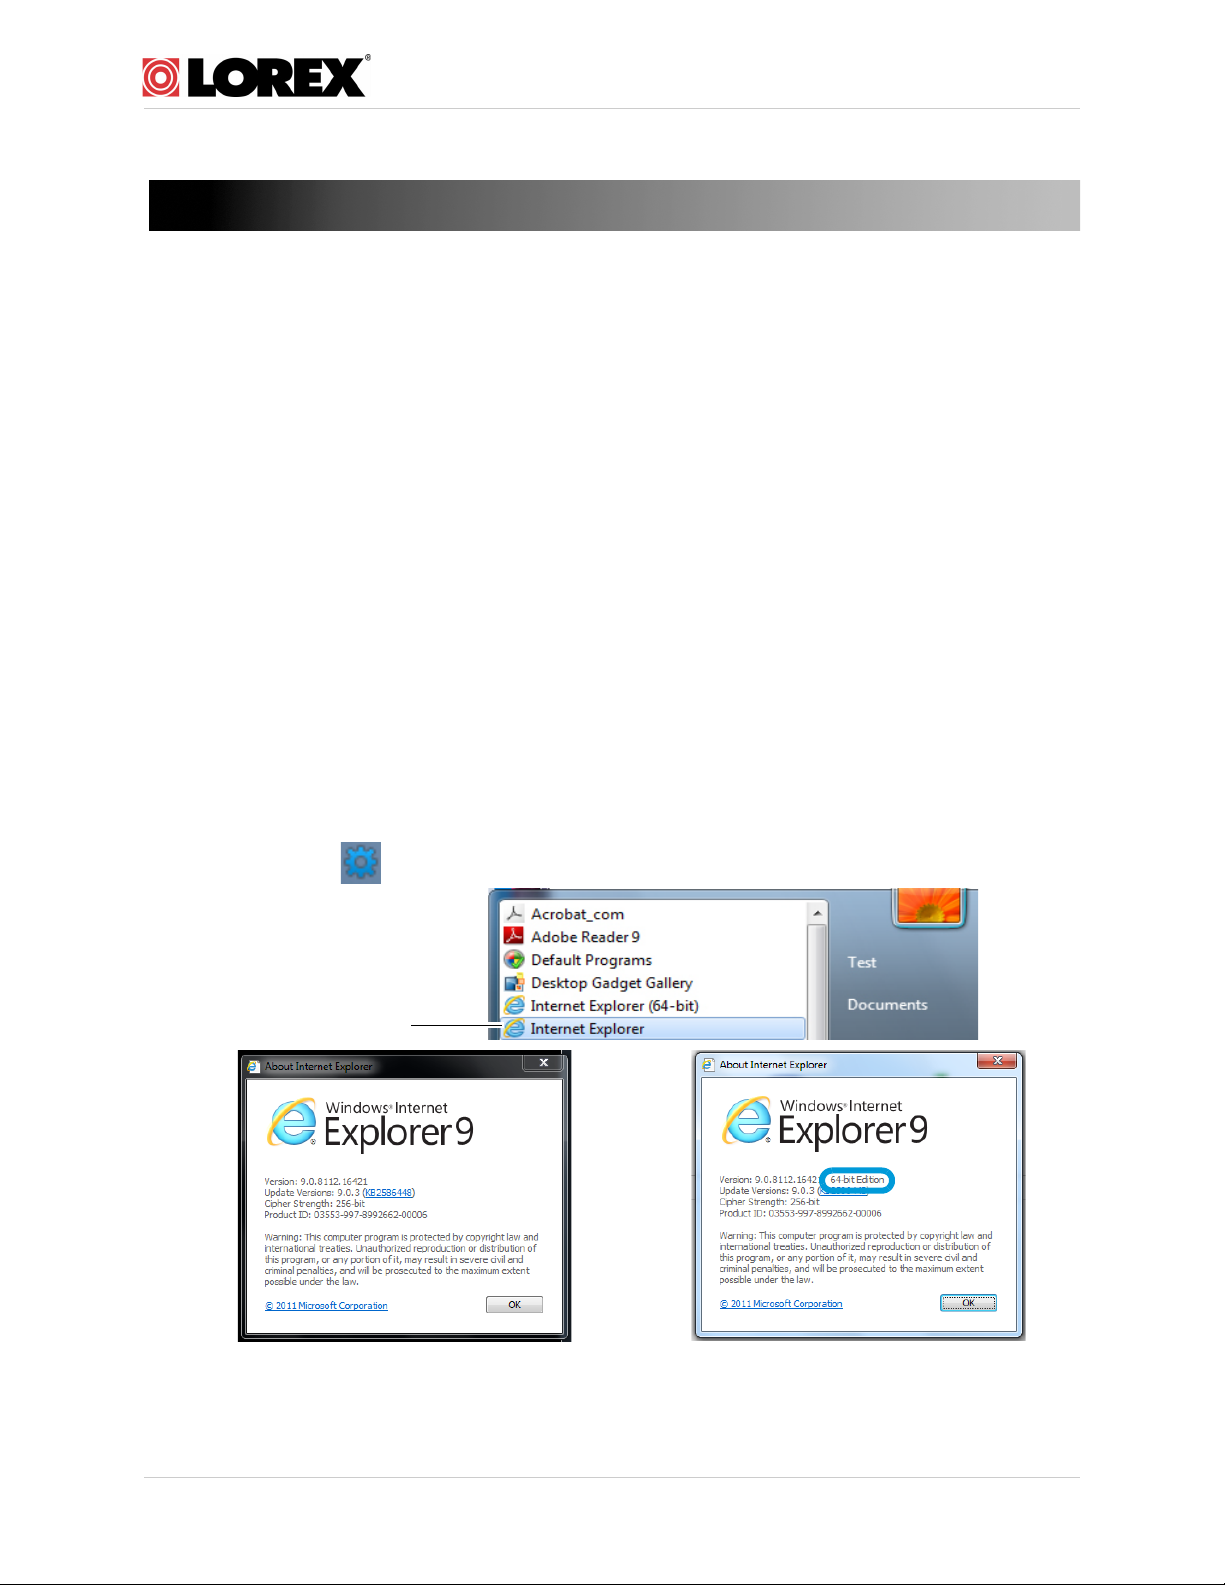
32-bit Internet Explorer
32-bit Internet Explorer About screen 64-bit Internet Explorer About screen
LH110 Series DVR: Frequently Asked Questions
Q: Can I remotely access the DVR using Apple Safari® on Mac?
A: Remote viewing using Apple Safari on Mac is only available on 4-channel and 8-channel
models running the latest firmware.
The latest firmware version can be found at www.lorextechnology.com.
the correct firmware for your DVR model and read the instructions included in the zip file
before updating
In addition, remote viewing is only supported on
which version of Safari you have, click Safari and select About Safari.
your system’s firmware.
Q: Can I remotely access the DVR using Internet Explorer 9®?
A: Remote viewing using Internet Explorer 9 is only available on 4-channel and 8-channel
models running the latest firmware. At this time, it
The latest firmware version can
download the correct firmware for your DVR model and read the instructions included in
the zip file
Additionally, you must use the 32-bit version of Internet Explorer 9 to remotely access your
DVR. To ensur
re-launch it from the Start menu, making sure to select the version that does not have
64-bit on the end. You can check which Internet Explorer version you are using by clicking
on the gear icon
before updating your system’s firmware.
e that you are using the correct version, close Internet Explorer and
and selecting About Internet Explorer.
At this time, it is not supported on 16-channel models.
Make sure to download
Apple Safari v. 5.05 and below. To determine
is not supported on 16-channel models.
be found at www.lorextechnology.com. Make sure to
If you are still unable to connect to the DVR, you can use the Lorex Client software provided
on the CD (and as a free download from www.lorextechnology.com)
on a PC. For installation instructions, see "Lorex Client 10" in the
Copyright 2013 Lorex Technology
to connect to your DVR
Instruction Manual.
1
Page 2
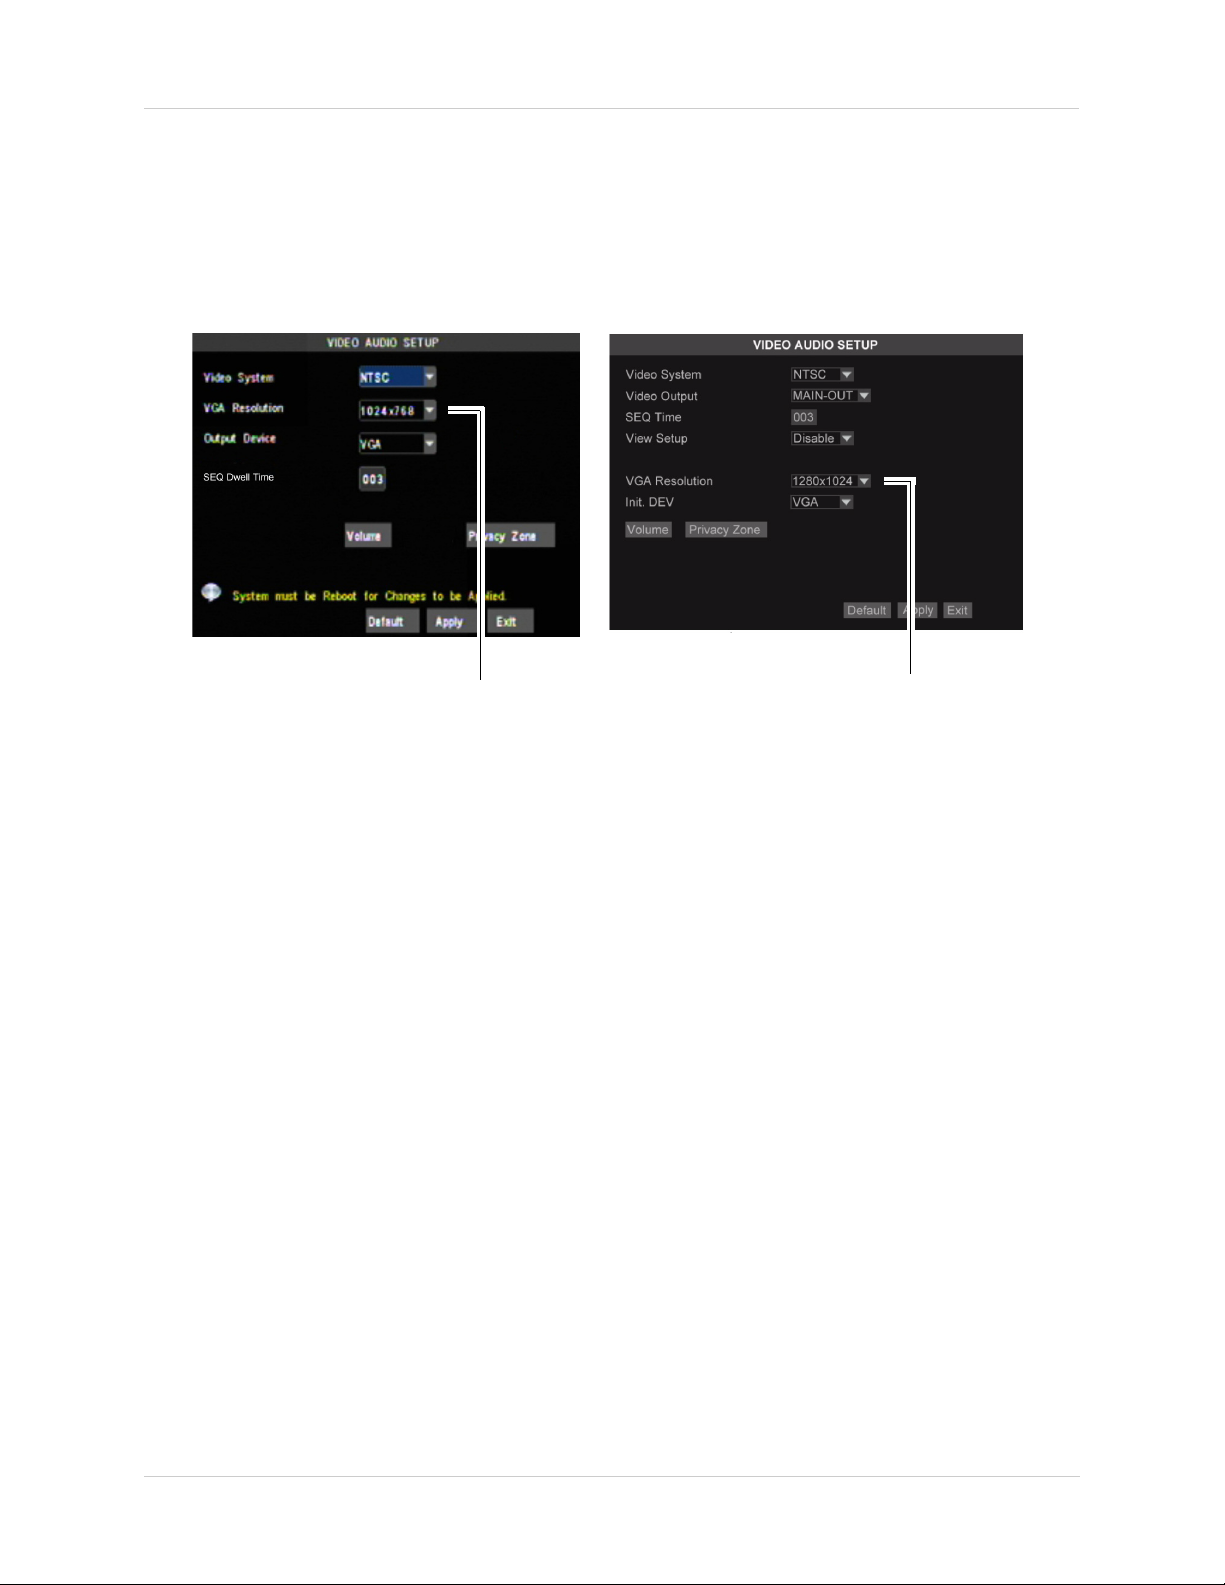
4/8 channel A/V menu.
16 channel A/V menu.
VGA Resolution
VGA Resolution
Q: How do I change the DVR’s output resolution?
A: Perform the following:
1 F
rom live view, right-click, and click Main Menu>Advance >A/V Setup.
2 Under V
1024, 1440 x 900
GA Resolution, Select from the following resolutions: 800 x 600,1024 x 768, 1280 x
3 Click Apply to save your settings.
4 Rig
The system will prompt you to restart the system. Click the OK
ht-click to exit the A/V setup menu.
button to restart.
Q: When connected to a VGA monitor, why can’t I see a mouse cursor, or access the system menus by using the front panel controls of the DVR?
Solution 1
You may have accidently switched the system output by pressing the 0 button on the
remote; or the DVR did not properly detect the VGA monitor.
To switch back to VGA mode:
1 T
urn on the DVR. Wait for it to boot into the main window.
ess the 0 (zero) button on the remote.
2 Pr
NOTE: Pr
Solution 2
The DVR may not have correctly detected your VGA monitor because of a loose connection.
essing the 0 (zero) button on the remote changes the DVR from SPOT OUT mode
to VGA mode. After the DVR is in VGA mode, you will be able to see your mouse and
access to the menu.
Perform the following:
1 P
2 P
Copyright 2013 Lorex Technology Inc.
ower off the DVR.
ower down and re-connect the VGA monitor to the DVR. Ensure that the connection is firm.
2
Page 3
3 Power on the monitor.
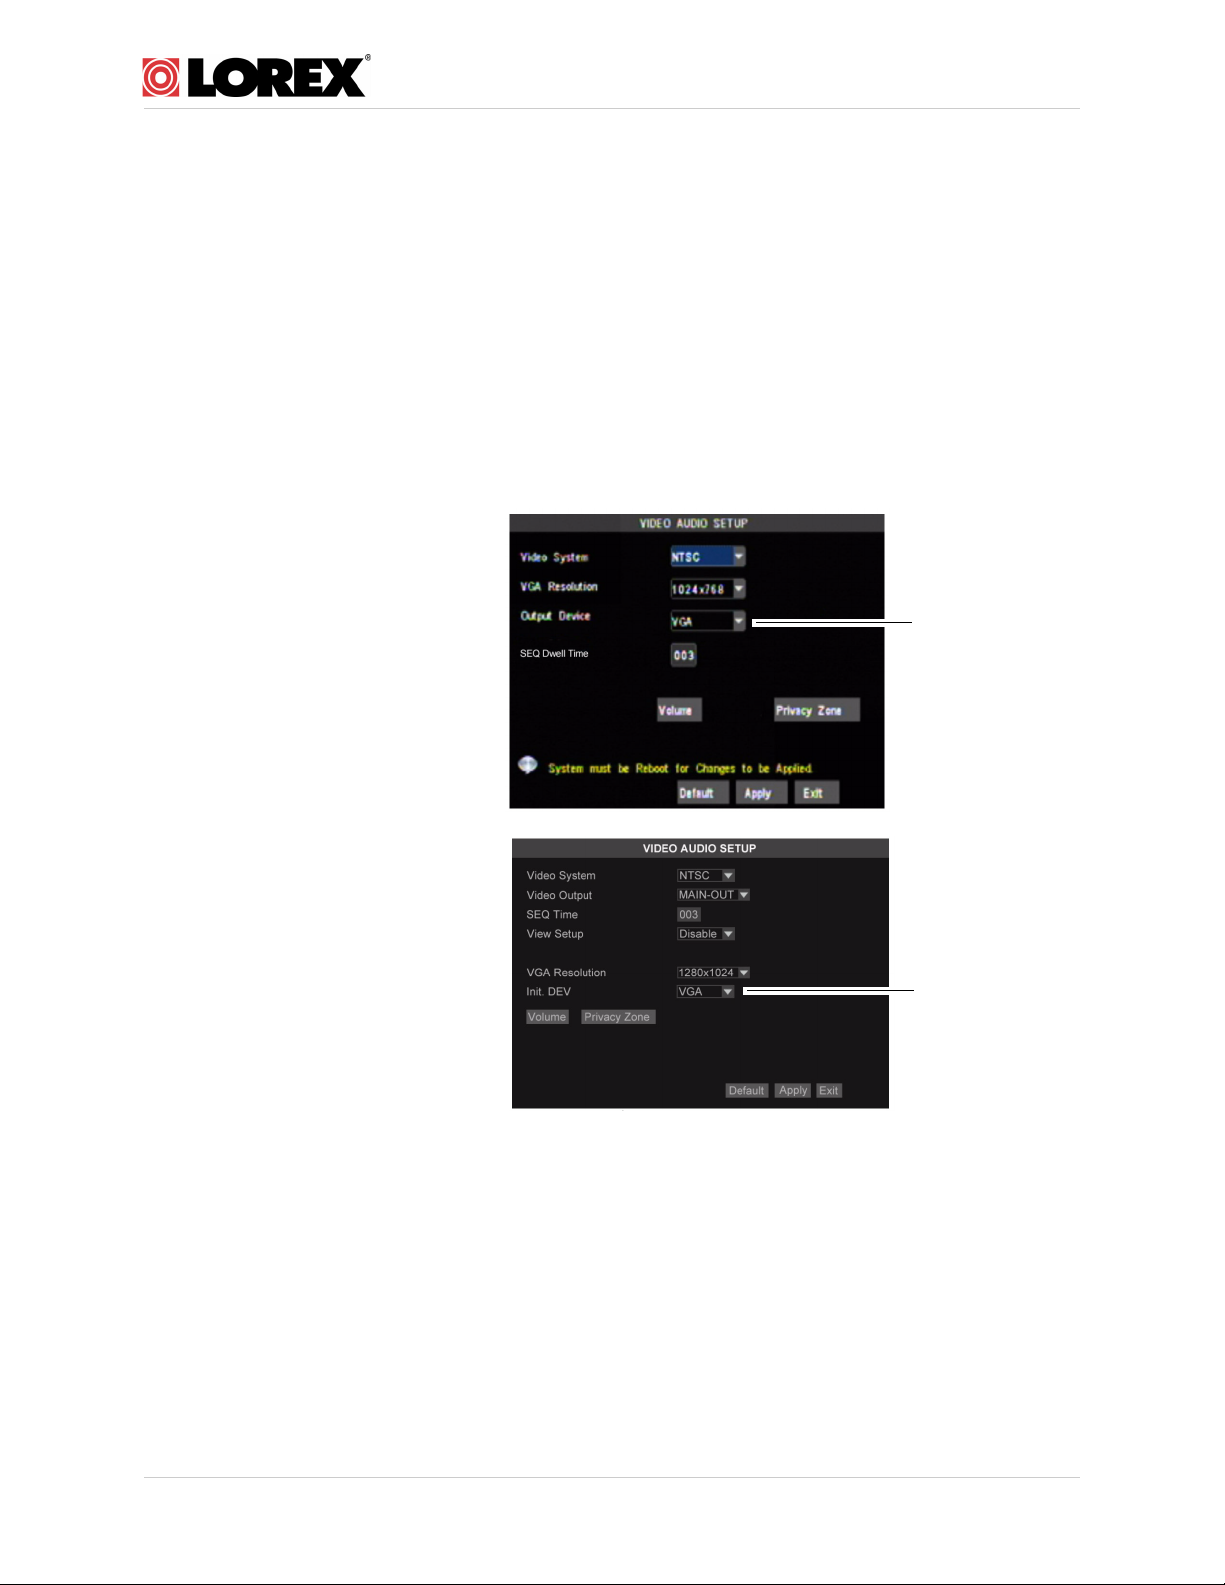
Select VGA
4/8 Channel
Select VGA
16 Channel
4 P
ower on the DVR. Wait for it to boot into the main window.
www.lorextechnology.com
NOTE: Aft
NOTE: If y
er you re-connect the VGA cable between the monitor and DVR, ensure that you
first turn on the monitor, and then turn on the DVR. This allows the DVR to auto-detect
the connected VGA monitor.
ou still cannot see the mouse cursor or access the menu, press the 0 (zero) button
on the remote control.
Manually setting the DVR output mode
You can set the DVR to always output to the VGA port by manually configuring the output
settings.
To manually adjust the output
settings:
1 Right-click and click Main
Menu.
2 Click Adv
3 In the
menu, select VGA.
NOTE: In the
4 Click Appl
settings.
anced>A/V Setup.
Output Device drop-down
16-channel model,
select VGA in the Init DEV
drop-down menu.
y to save your
Q: How do I set up the DVR to record only when there is motion detected?
A: To set up the DVR to record only when motion is detected, you will need to configure a
recording schedule that will record events only (events include motion, video loss from a
camera, hard drive loss, or hard drive nearing capacity), copy the schedule to all channels,
and configure your cameras for motion detection.
To configure an event-only recording schedule:
1 Right-click and s
2 Click Rec
Copyright 2013 Lorex Technology
ord.
elect Main Menu.
3
Page 4
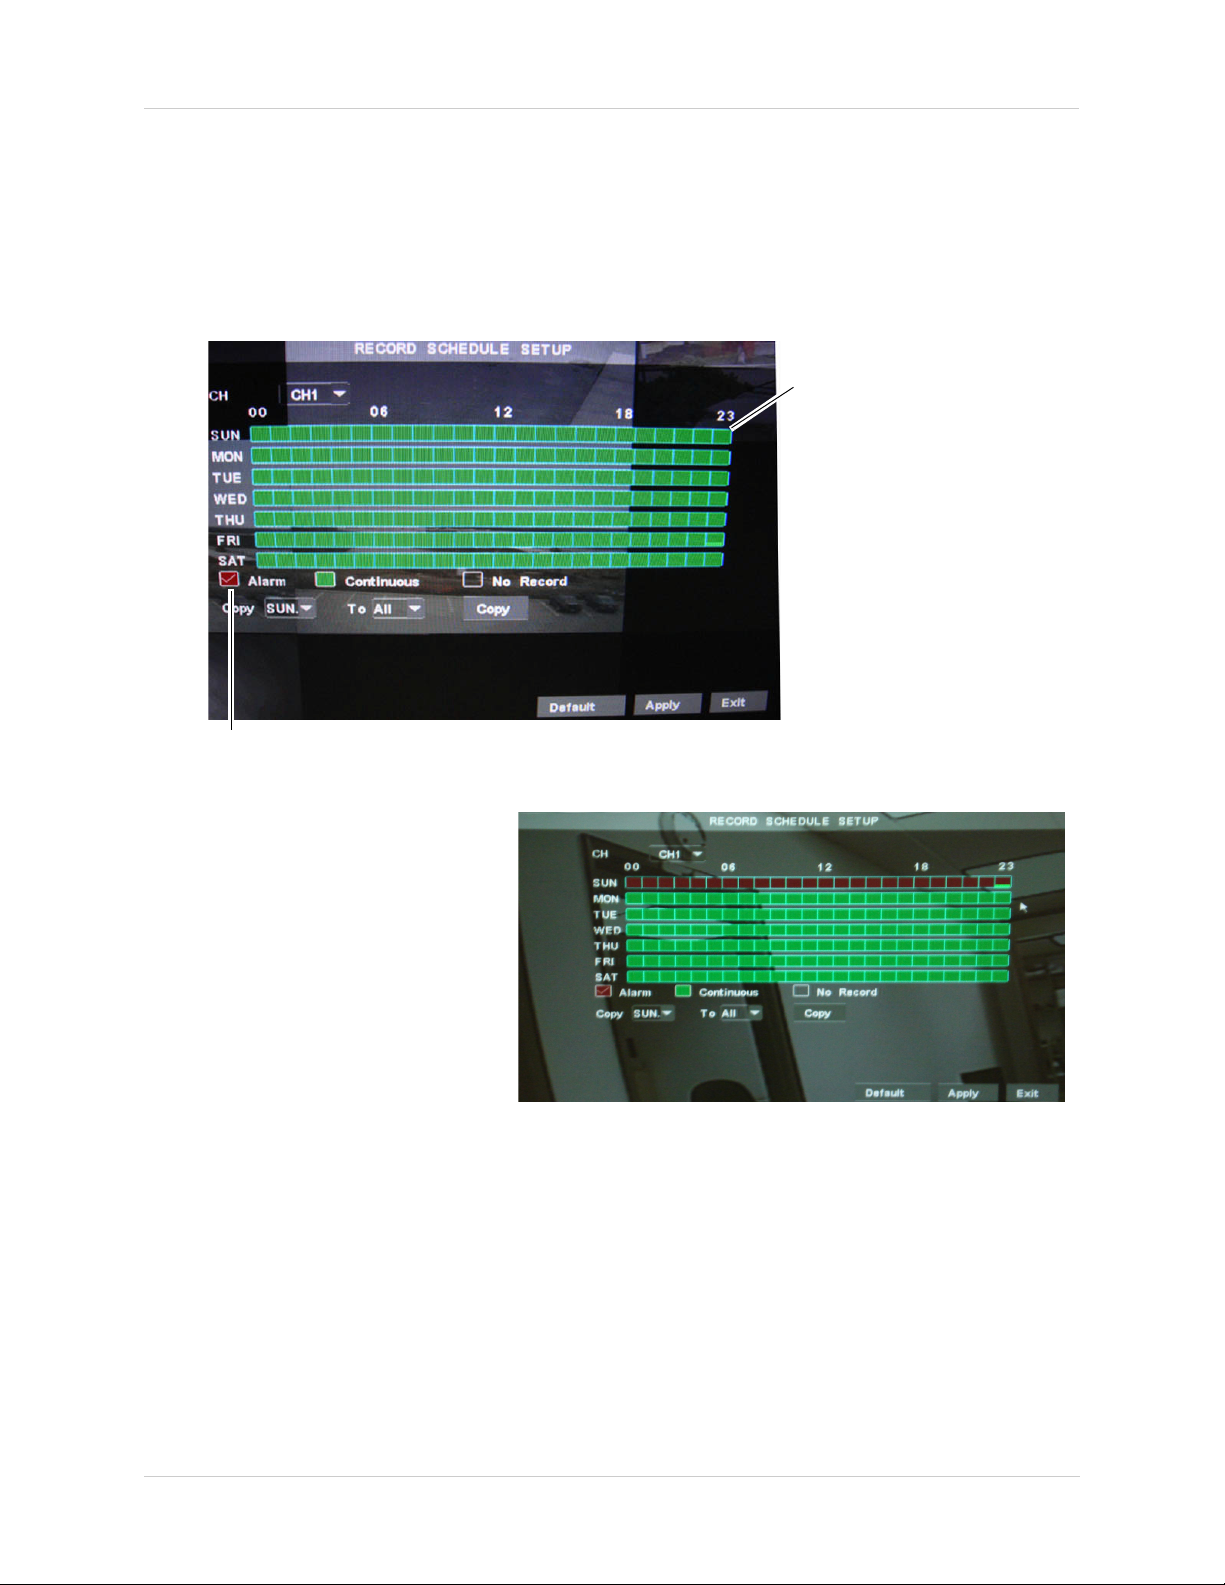
Select recording type: Alarm, Continuous or No Record
Schedule shows recording
type for each hour:
• Alarm (Red):
Record alarms only
• Continuous (Green):
Record all video data
• No Record (Blank):
Do not record
3 Under Channel, select the channel you wish to configure.
4 Beside th
e Record Mode drop-down menu, select Schedule.
NOTE: If y
5 Cl
ick the Schedule button. The Record Schedule Setup window opens.
ou select Continuous, the DVR will record all video from this channel on a 24/7 basis.
6 Click in the box next to Alarm.
7 Click on
every hour in the SUN
(Sunday) row. The row turns red
to show that the DVR will only
record events on Sundays.
NOTE: You can also configure a
custom schedule. For
example, you might want
to create a schedule to
record all data during
business hours and
record events only
outside of business
hours.
8 Set
9 Cl
10 Cl
the Copy drop-down to SUN. and the To drop-down to All.
ick Copy; then click Ok. The entire schedule turns red to show that the DVR will only record
when there is an event.
ick Apply to save your changes. Then, click Exit to return to the Record menu.
To copy a recording schedule to all channels:
1 F
rom the Record menu, under Channel, select the channel with the schedule you wish to
copy.
2 Under Copy T
ick Copy; then click Ok.
3 Cl
4 Cl
ick Apply to save your changes. Click Exit to return to the Main Menu.
o, select All.
Copyright 2013 Lorex Technology Inc.
4
Page 5

www.lorextechnology.com
Email Setup
Default
To configure motion detection on all channels:
rom the Main Menu, click Device; then click Alarm.
1 F
2 Ensur
3 Click Appl
4 Click Mo
5 Un
6 Un
7 Un
8 Click Copy; then cli
9 Click Appl
e that MD Alarm is checked.
y to save your changes. Then, click Exit to return to the Device menu.
tion.
der Channel, select CH1.
der Motion Detect, select Enable.
der Copy To, select All.
ck Ok.
y to save your changes. Then, right-click until you have exited all menus.
Q: How do I set up email notifications?
A: The system can send e-mail notifications when it detects motion, or when an alarm
parameter triggers. The 16 channel model can also send e-mail notifications if an alarm
block device triggers (for example, if the motion sensor detects movement).
To set up e-mail notification:
1 Right-click and select Main Menu.
2 Click De
3 Click the Em
4 Click the Em
rom the drop-down menu, select from:
5 F
• Enabl
settings.
• Disable: Disables e-mail notification.
• Default: Uses the Lorex e-mail server to
send out alarm notifications. This is the
recommended selection.
vice; then click Alarm.
ail checkbox.
ail button.
e: Uses custom e-mail server
If you want to use Lorex’s e-mail server:
1 In the Email
drop-down menu, select
Default.
2 In the Sender field, enter the e-mail address
of the sender. This can be any e-mail address
of your choice.
3 In
the Receiver field, enter the e-mail
address you want the DVR to send alarm
notifications to.
4 In the Interv
al drop-down menu, enter the
duration the DVR must wait before sending
out a new notification.
5 Click Appl
6 Click the TEST
y to save your settings.
button to send out a test
e-mail.
Copyright 2013 Lorex Technology
5
Page 6

4/8 Channel
16 Channel
If you select "Enable", and want to use your own e-mail server:
1 Co
nfigure the following:
• SS
L: Select ON/OFF to enable/disable Secure Socket Layer protocol
• SMTP Port: Enter your SMTP port.
• SMTP Server: Enter your SMTP Server.
• Sender: Enter the sender e-mail address. This can be any address of your choice.
• Password: Enter your e-mail server’s password.
• Receiver: Enter the recipient’s e-mail address.
• Interval: Enter the interval the DVR waits before sending a new e-mail notification. For
example, if you select a 3 minute interval, the DVR will send out e-mail notifications every 3
minutes until the DVR stops detecting motion/alarm. The DVR will only send out notifications
when it detects motion/alarm triggers.
ick Apply to save your settings.
2 Cl
Q: How do I enable and configure sequence mode?
A: In sequence (SEQ) mode, the display automatically switches between a full-screen view
of each of your cameras every few seconds.
To enable Sequence mode:
• Right-click and select Start SEQ.
To disable Sequence mode:
• Right-click and select Stop S
EQ.
To change the time each channel will display in sequence mode (Sequence Dwell Time):
1 Right-click and
ick Advance; then click A/V Setup. The Audio Video Setup window appears.
2 Cl
select Main Menu.
3 Under SEQ Dwell Time (4 or 8 channel) or SEQ Time (16 channel), enter the number of
seconds you would like each camera to display for before switching.
4 Cl
ick Apply to save your changes. Then, click right-click until you have exited all menus.
Copyright 2013 Lorex Technology Inc.
6
Page 7

www.lorextechnology.com
Open
Open
Q: How do I convert backed up video footage to AVI?
A: The DVR saves its backup files as proprietary video files. To share these files, you must
convert them into AVI files. Note that the AVI generator can also back up audio in
audio-enabled cameras.
To install the AVI converter:
1 Insert the software disc in your computer’s CD/DVD rom drive or download the AVI Generator
software from this location: http://lorexstore.lorextechnology.com/pdfs/
AVIGenerator-V1.8.0.0.exe
2 Ru
3 F
n the AVI Generator software from the CD installation wizard or download location.
ollow the on-screen instructions to install AVI Generator.
To start the AVI Generator:
1 Doub
2 Click Open
3 Select the desired file and then click Open.
le-click the AVI Generator shortcut on the desktop ( ).
and then locate the backed up video file on your hard drive.
Copyright 2013 Lorex Technology
7
Page 8

Save As
Enter file name
Save
Start
4 Click Save As.
5 Select the video folder where you want to save the AVI file. In the filename field, enter the
desired file name.
Click Save.
Click Start to begin the file conversion.
6
ick OK once the file conversion is complete.
7 Cl
Copyright 2013 Lorex Technology Inc.
8
Page 9

www.lorextechnology.com
USER
SETTING
Advance
Q: What is the default user name and password for the system?
A: By default, passwords are disabled on the system. You will not need a password access
menus locally or to access the system using the browser-based remote software. A
separate user name and password is required to access the system using a mobile device
(such as a smartphone or tablet).
System user name/password (used for local
access and remote connectivity)
• User Name: admin
assword: none (left blank)
• P
Mobile user name/passwo
rd (i.e iPhone)
• User Name: admin
assword: 0000
• P
It is essential to enable passwords on your
system and create your own passwords to
ensure that unauthorized people cannot gain access to your system. You must create a
custom system and mobile access password. See below for details on creating and
enabling custom passwords for your system.
To enable and change the system password:
1 R
ight-click anywhere onscreen to open the Sub-Menu and select MAIN MENU.
2 Click Advance >
USER SETTING.
Copyright 2013 Lorex Technology
9
Page 10

Select checkbox
Edit
3 Beside admin, select the checkbox under SEL.
4 Click the Edit button. The User Password Setup window opens.
5 Co
nfigure the following:
• Beside the PASSWORD ENABLE drop-down menu, select ENABLE.
• Beside P
ASSWORD, enter your desired 6-digit password using the mouse.
• Beside CONFIRM, re-enter the 6-digit password.
ick APPLY to save your settings and then click EXIT. Click EXIT in each menu until all
6 Cl
windows are closed. Use your new password to log in to the system and access system
menus.
Copyright 2013 Lorex Technology Inc.
10
Page 11

To change the mobile access password:
Mobile
ight-click anywhere onscreen to open the Sub-Menu and select MAIN MENU.
1 R
2 Click DEVICE>MOBILE.
www.lorextechnology.com
3 Beside USER NAME, enter a new user name to connect using a mobile device.
4 Beside
5 Click APPLY to save your settings and then click EXIT. Click EXIT in each menu until all
windows are closed.
PASSWORD, enter a new password to connect using a mobile device.
Copyright 2013 Lorex Technology
11
 Loading...