

Lorell 59606, 59635, 59634, 99551, 59605 Assembly Instructions Manual
...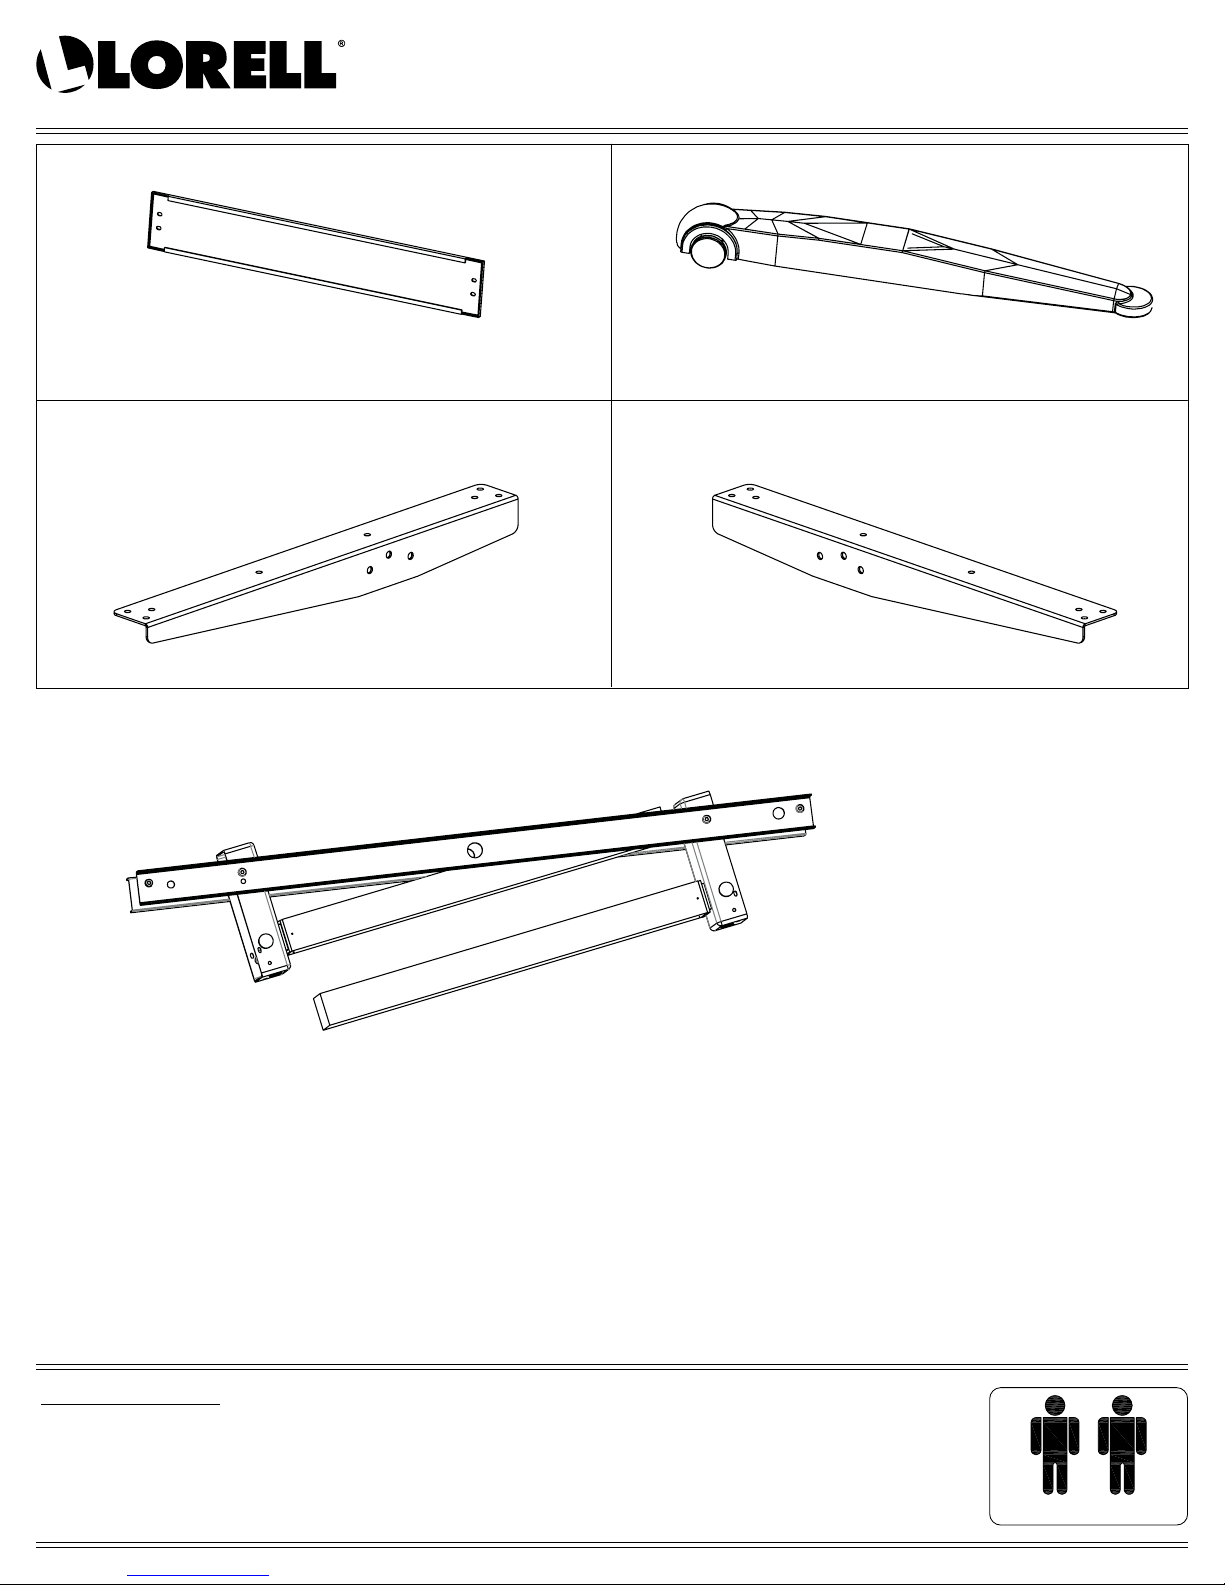
Assembly Instructions
60" Pneumatic
Height Adjustable Desk
99551/59605/59606/59634/59635/59636/16202/59611/59612
1Pc
1Pc
2Pcs
1Pc
1Pc
Two people required to remove frame to avoid damage
IMPORTANT NOTE:
• Place all laminated parts on a clean and smooth surface such as a rug or carpet to avoid the parts from being scratched.
• Check to be sure that you have all parts and hardware.
• Remove all wrapping materials, including staples and packing straps before you start to assemble.
• Don’t tighten all screws/bolts until all completely assembled.
• Keep all hardware parts out of reach of children.
• It is recommended for 2 persons to complete this assembly.
Two people are required to
assemble and move this model.
60" Pneumatic
Height Adjustable Desk
Assembly Instructions
A EB FC GD H I J
99551/59605/59606/59634/59635/59636/16202/59611/59612
M4.8 x 22
16 Pcs
+ 1 extra Pc
M5 x 16
3 Pcs
+ 1 extra Pc
STEP 1
Carefully remove frame
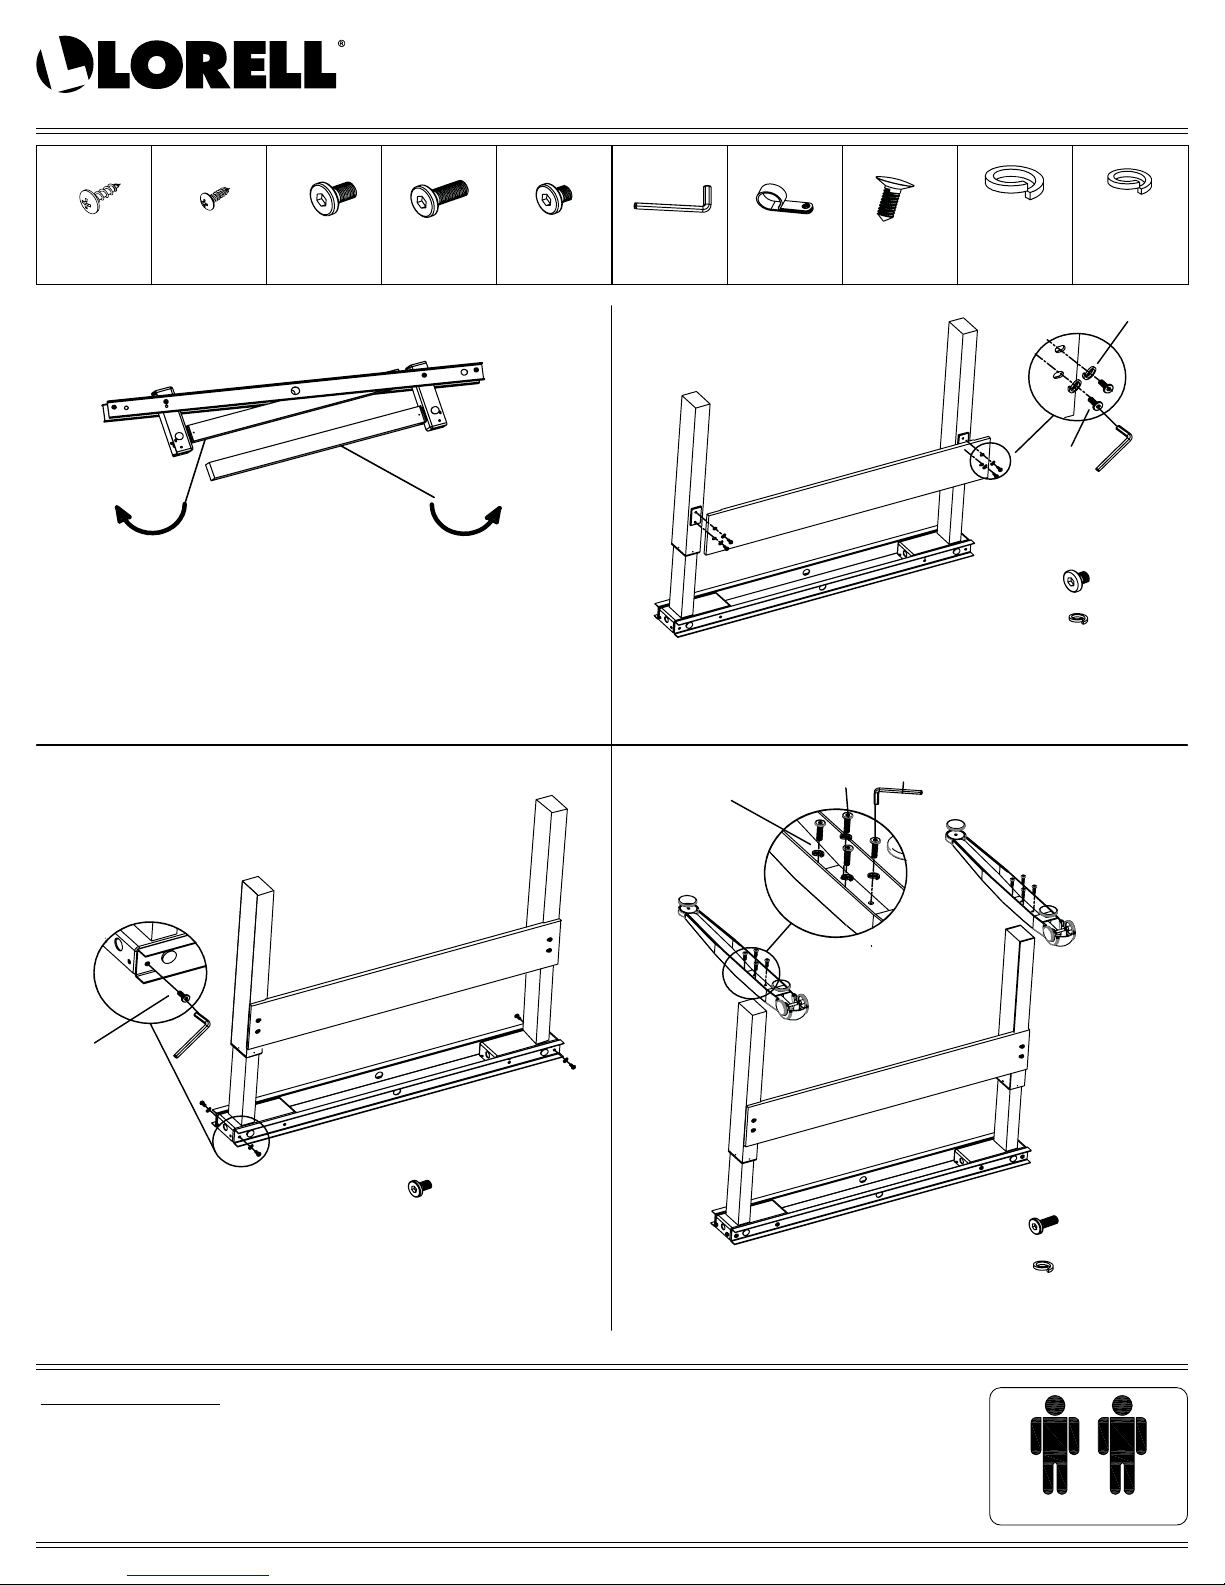
Open two legs (see picture).
STEP 3
M6 x 12
10 Pcs
+ 1 extra Pc 3 Pcs
M6 x 25
8 Pcs
+ 1 extra Pc
M8 x 10
4 Pcs
+ 1 extra Pc
4mm
1 Pc
STEP 2
Assemble bracket and two legs with 4pcs "E"
screws and 4pcs "I" spring washers (do not tighten).
STEP 4
J
D
M4 x 13
3 Pcs
F
M8x10
Spring Washer
4 Pcs
+ 1 extra Pc
E X 4
I X 4
M6x25
Spring Washer
8 Pcs
+ 1 extra Pc
I
E
F
C
F
C X 4
Assemble 2pcs "C" screws on one side. Do not tighten.
Then assemble 2 pcs "C" screws on the other side.
Pay attention to the direction of the legs.
(Do not tighten).
IMPORTANT NOTE:
• Place all laminated parts on a clean and smooth surface such as a rug or carpet to avoid the parts from being scratched.
• Check to be sure that you have all parts and hardware.
• Remove all wrapping materials, including staples and packing straps before you start to assemble.
• Don’t tighten all screws/bolts until all completely assembled.
• Keep all hardware parts out of reach of children.
• It is recommended for 2 persons to complete this assembly.
D
J
Two people are required to
assemble and move this model.
X 8
X 8
Assembly Instructions
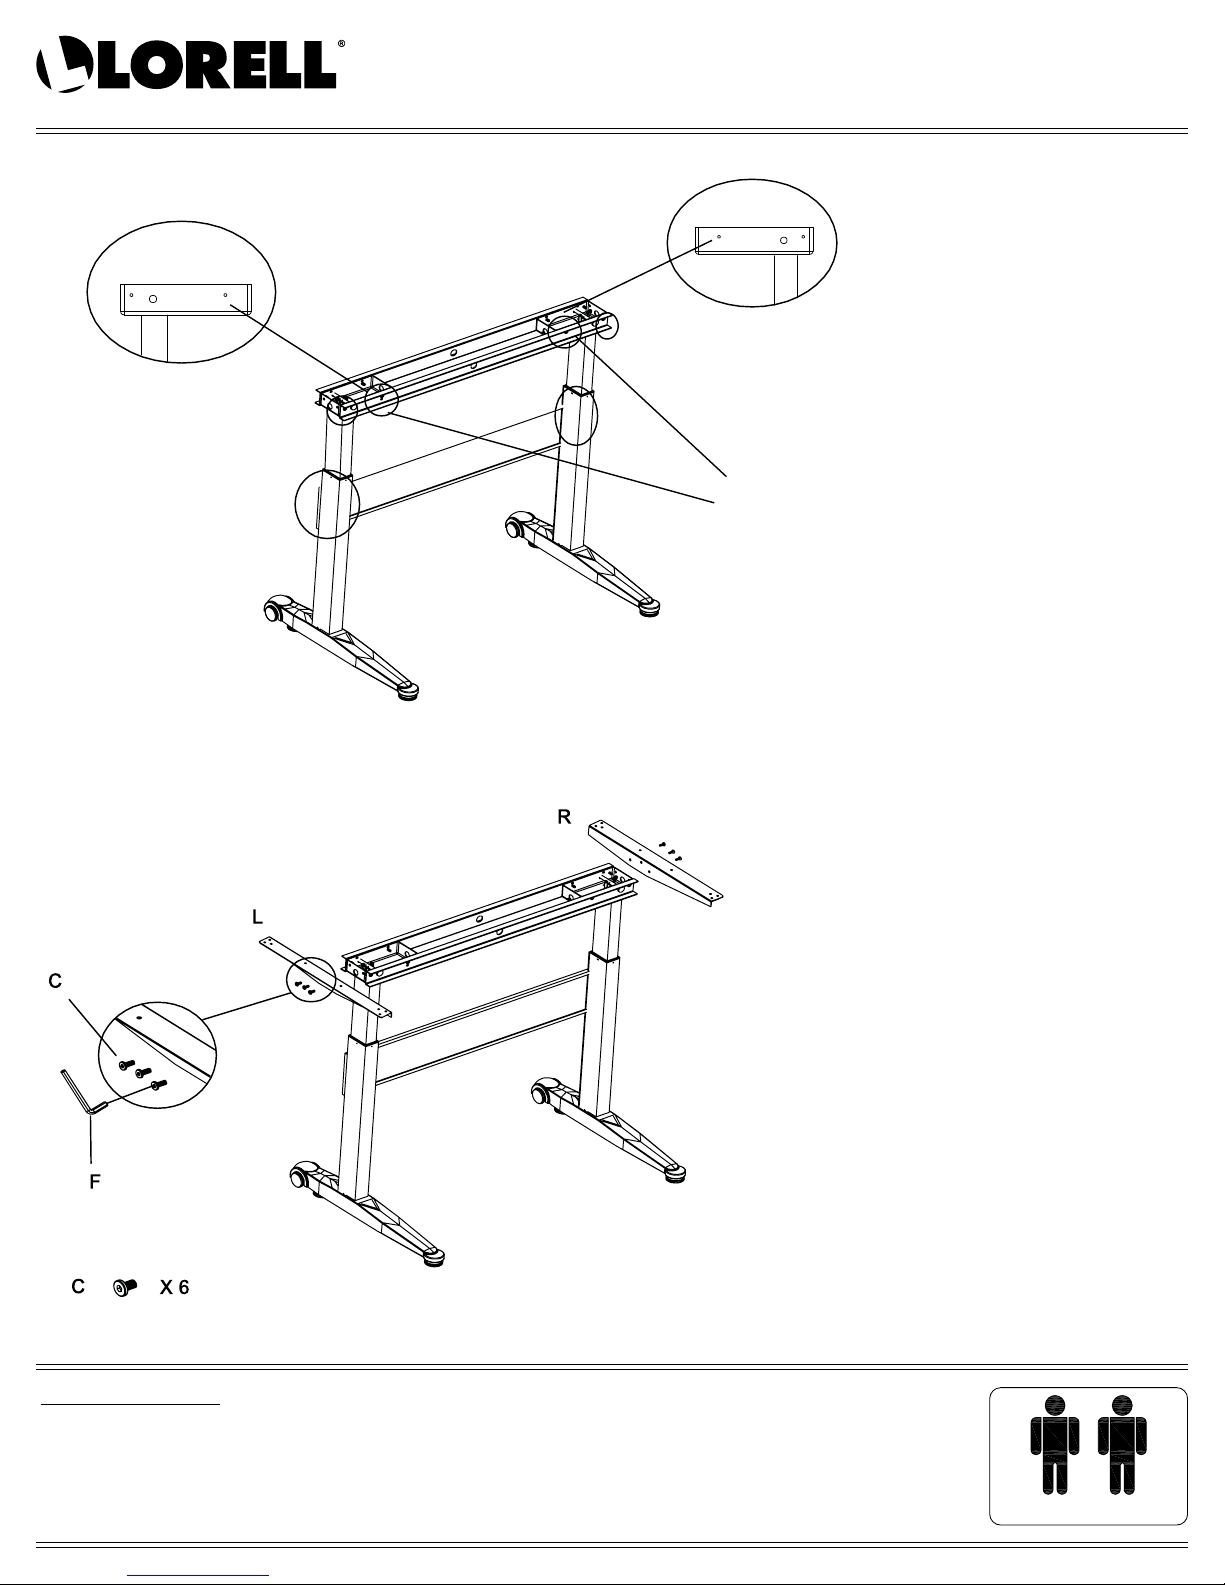
STEP 5
60" Pneumatic
Height Adjustable Desk
99551/59605/59606/59634/59635/59636/16202/59611/59612
Tighten the screws.
Tighten all 8 pcs screws from steps 2 and 3,
4 pcs for each side.
STEP 6
Assemble L and R with 6 pcs "C"
screws. Pay attention to the direction of
the legs.
IMPORTANT NOTE:
• Place all laminated parts on a clean and smooth surface such as a rug or carpet to avoid the parts from being scratched.
• Check to be sure that you have all parts and hardware.
• Remove all wrapping materials, including staples and packing straps before you start to assemble.
• Don’t tighten all screws/bolts until all completely assembled.
• Keep all hardware parts out of reach of children.
• It is recommended for 2 persons to complete this assembly.
Two people are required to
assemble and move this model.
Assembly Instructions
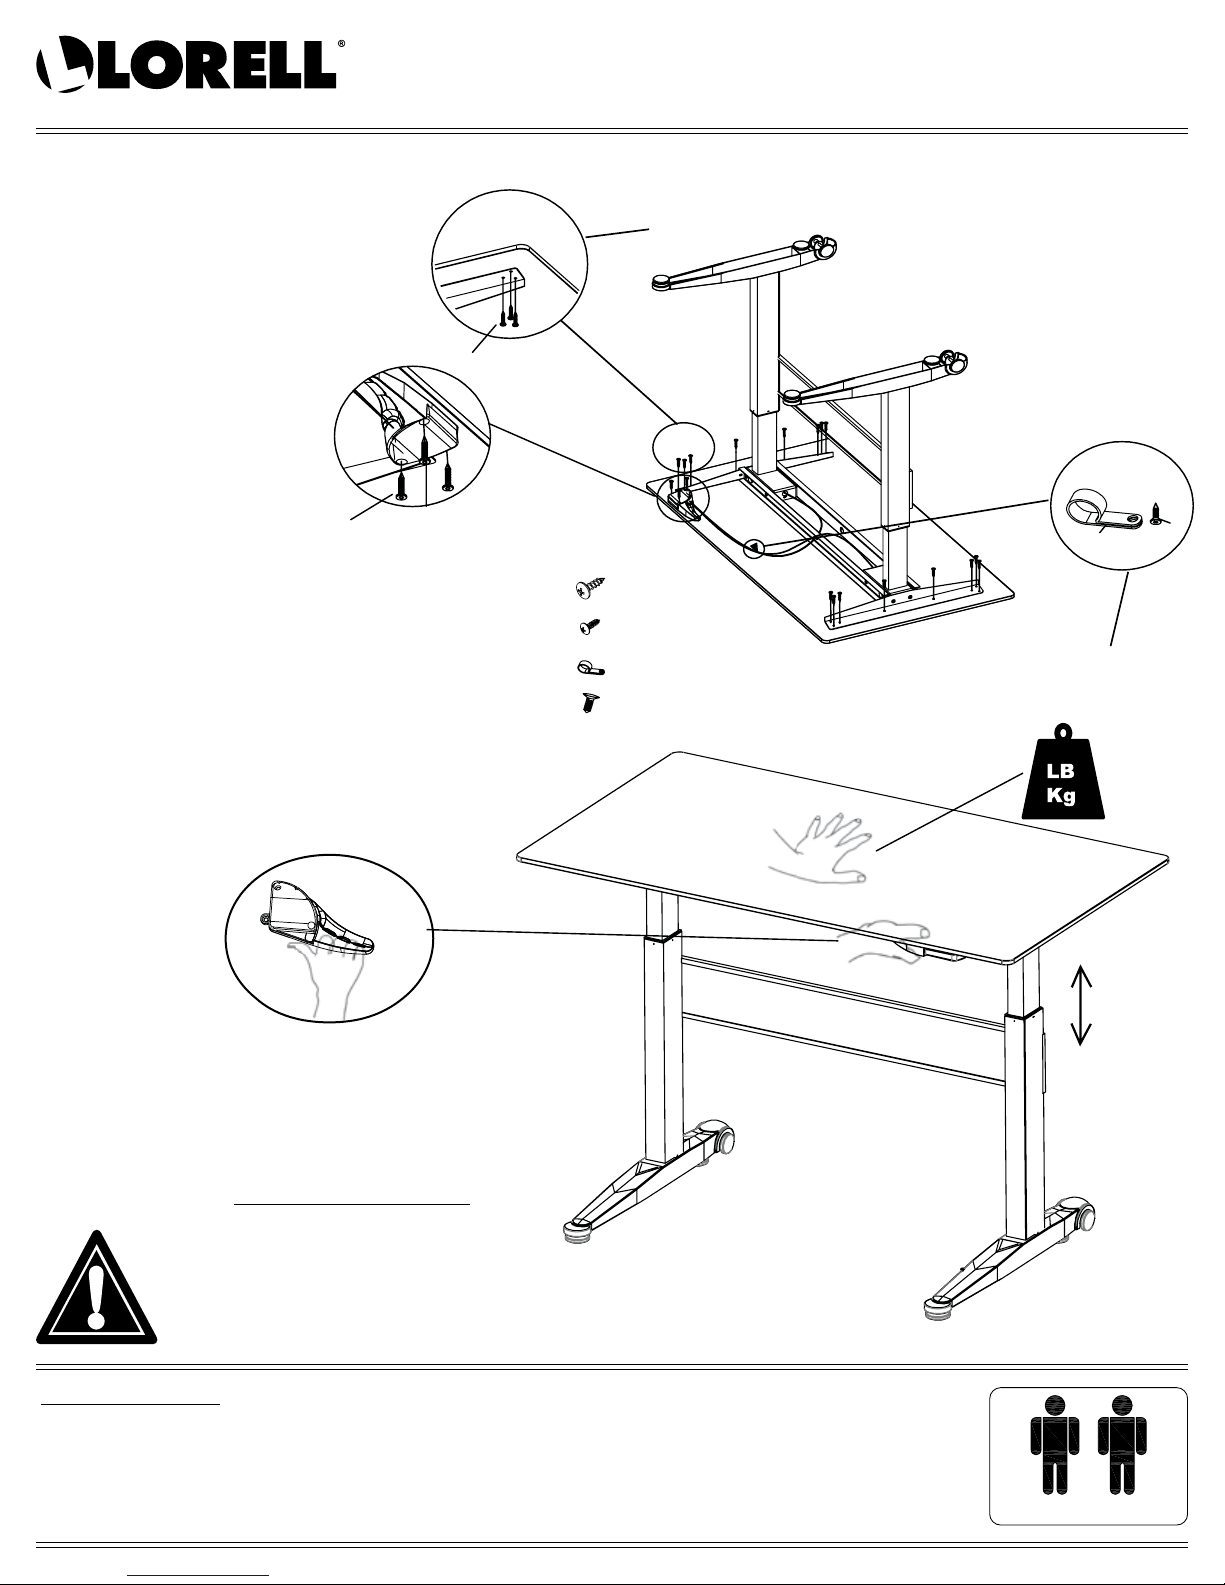
STEP 7
60" Pneumatic
Height Adjustable Desk
99551/59605/59606/59634/59635/59636/16202/59611/59612
Make sure the distances from
metal frame to all top panel edges
are distributed evenly.
B
Use "B" to connect the top panel.
STEP 8
Connect the frame to top panel by 16pcs "A" screws.
A
H
G
A
B
G
H
X 16
X 3
X 3
X 3
Use "H" to connect the wire
to the top panel through "G".
( ≤ 33 lbs
≤15kg)
Pull the lever to adjust the height up or down.
To lower height, pull the lever while pushing the
center of table top down to desired height.
COMPLETED ASSEMBLY
CAUTION: DO NOT EXCEED MAXIMUM LISTED WEIGHT CAPACITY.
SERIOUS INJURY OR PROPERTY DAMAGE MAY OCCUR!
IMPORTANT NOTE:
• Place all laminated parts on a clean and smooth surface such as a rug or carpet to avoid the parts from being scratched.
• Check to be sure that you have all parts and hardware.
• Remove all wrapping materials, including staples and packing straps before you start to assemble.
• Don’t tighten all screws/bolts until all completely assembled.
• Keep all hardware parts out of reach of children.
• It is recommended for 2 persons to complete this assembly.
Two people are required to
assemble and move this model.
 Loading...