

Page 1
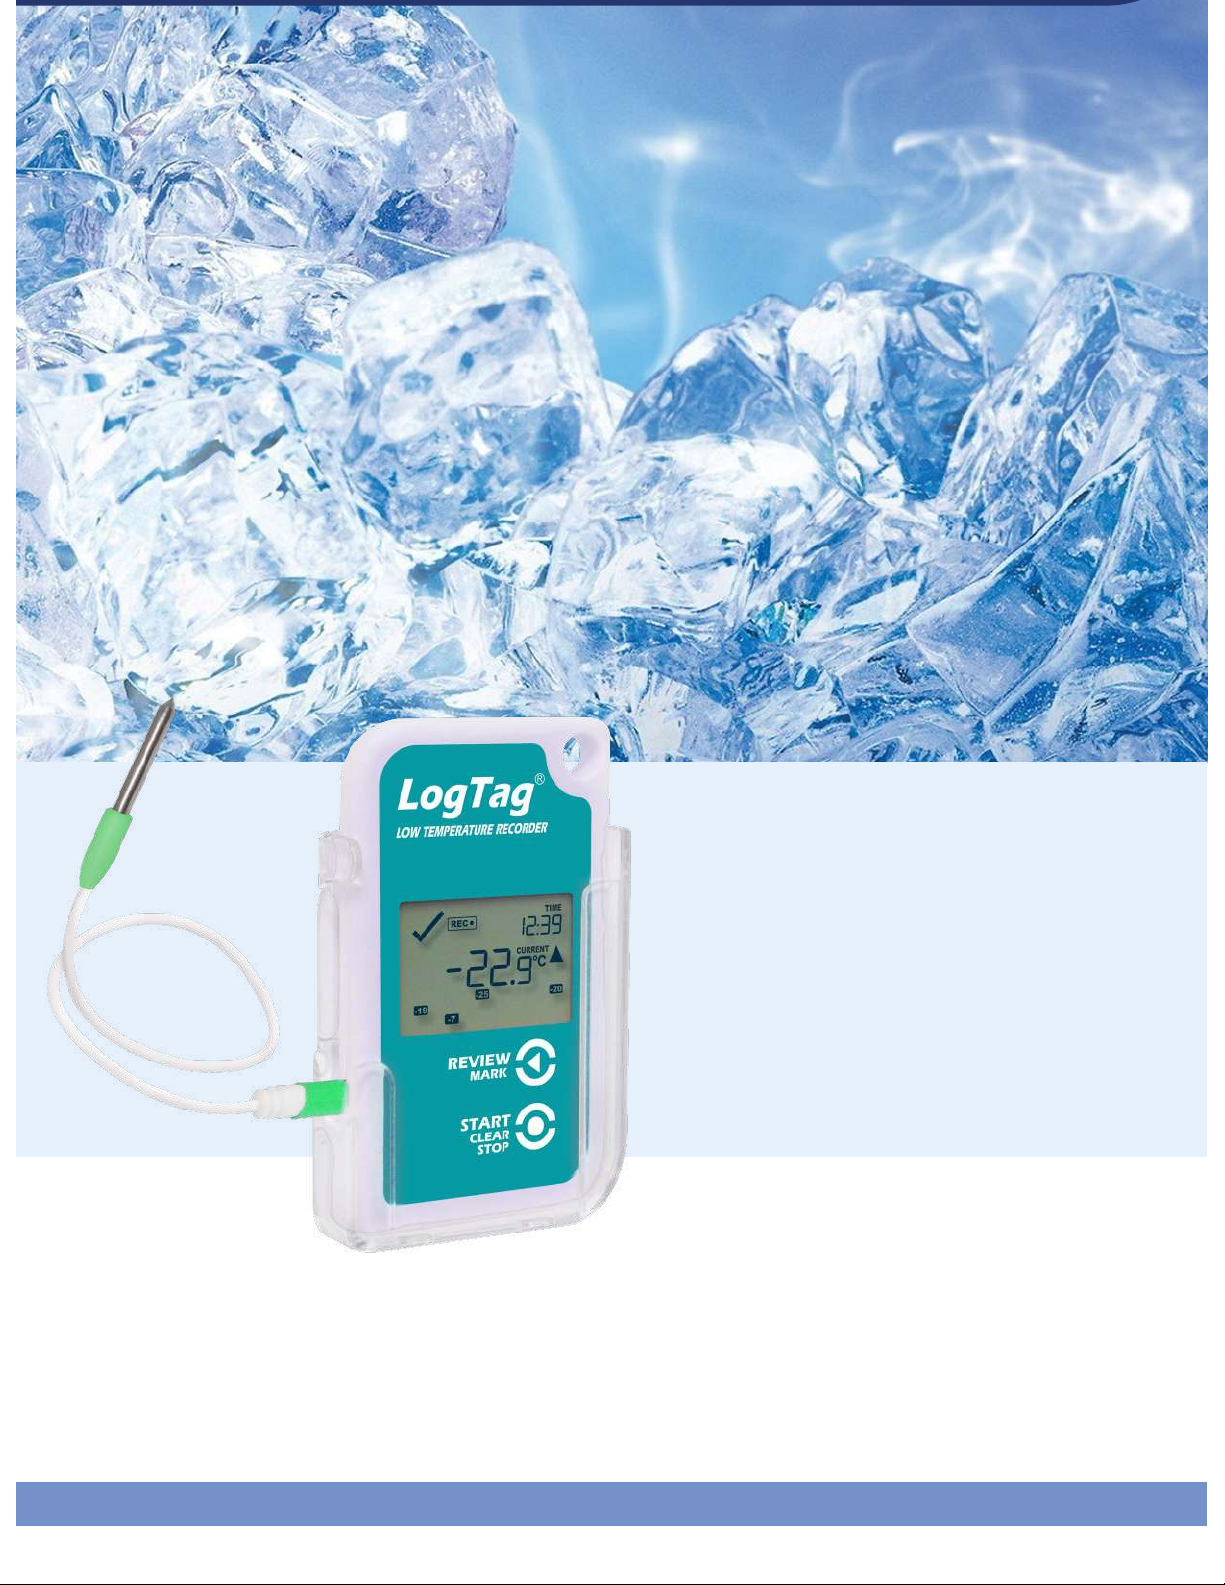
TREL30-16
Ultra-Low
Temperature
Recorder with
Display
Product User Guide
Document Release Version: 1.1
Published 22. November 2020
Copyright © LogTag Recorders, 2004-2020
Find Quality Products Online at: [email protected]
www.GlobalTestSupply.com
Page 2
TREL30-16 User Guide 4
Safety Information
The TREL30-16 temperature logger contains a Lithium Battery.
When the battery indicates “LOW”, you can replace it as per the
instructions in Battery Replacement on page42.
The empty battery should be recycled or disposed of according to
your local regulations.
Do not expose the logger to extreme temperatures as it may lead to
the destruction of the battery and may cause injuries.
Keep out of the reach of children.
Liability
LogTag Recorders’ standard warranty terms apply. A copy can be requested by emailing
In addition, LogTag Recorders shall not be held liable:-
l if the device was used beyond LogTag Recorders’ stated limitations
l for any claims due to the improper storage and use of the device
l for any problems with refrigeration units
l for the bad quality of the monitored goods, if any
l for incorrect readings if the device was used with a low battery
l for consequential loss
Battery Life
The main battery in the TREL30-16 is designed to power the device for up to 12 months of
operation, provided:-
l the device was not stored for more than 12 months prior to activation
l a fresh battery from a reputable manufacturer is used
l the device is not downloaded excessively to a PC (more than once a week)
l the recording interval is not shorter than 5 minutes
l the acoustic alarm is not active over long periods
l the device is stored and operated according to LogTag Recorders’ recommendations
Disclaimer
The TREL30-16 monitors temperature exposure and not the quality of the goods it
accompanies. Its purpose is to signal if product quality evaluation/testing is required.
Find Quality Products Online at: [email protected]
www.GlobalTestSupply.com
Page 3
TREL30-16 User Guide 5
Typographical Conventions
Text in this font refers to buttons on the TREL30-16.
Text in this font refers to option settings, dialogue boxes or actions to be taken in
LogTag® Analyzer.
Text in this font describes features of the product.
This text describes certain aspects of the product, where incorrect use of a feature
may lead to inadvertent loss of data.
This text contains important information for the correct operation of
your TREL30-16.
This text contains information that explains some aspects of a feature in more
detail.
This text contains tips that help you get the best out of your TREL30-16 logger
Find Quality Products Online at: [email protected]
www.GlobalTestSupply.com
Page 4
Introduction TREL30-16 User Guide 6
Introduction
The LogTag® TREL30-16 low temperature logger features a data logging memory storing
up to 15,905 temperature readings and a separate statistical memory, storing maximum
and minimum reading as well as alarm duration for each of the last 30 days.
During recording the display shows the temperature of the most recent reading, whether
or not this is within or outside the acceptance range, an alarm trigger summary of the last
30 days (today and 29 days previous), the current time and battery status.
Alarm events can be triggered when a number of readings are outside preset Alarm
thresholds and a “day alarm indicator” appears on the display.
Logged temperature data can be downloaded via a standard LogTag® Interface to the free
companion software LogTag® Analyzer, where you can display data in chart, list or
summary formats. The software also allows electronic archiving and exporting or
transmitting data in support of sophisticated data management systems, including
LogTag®Online.
Features
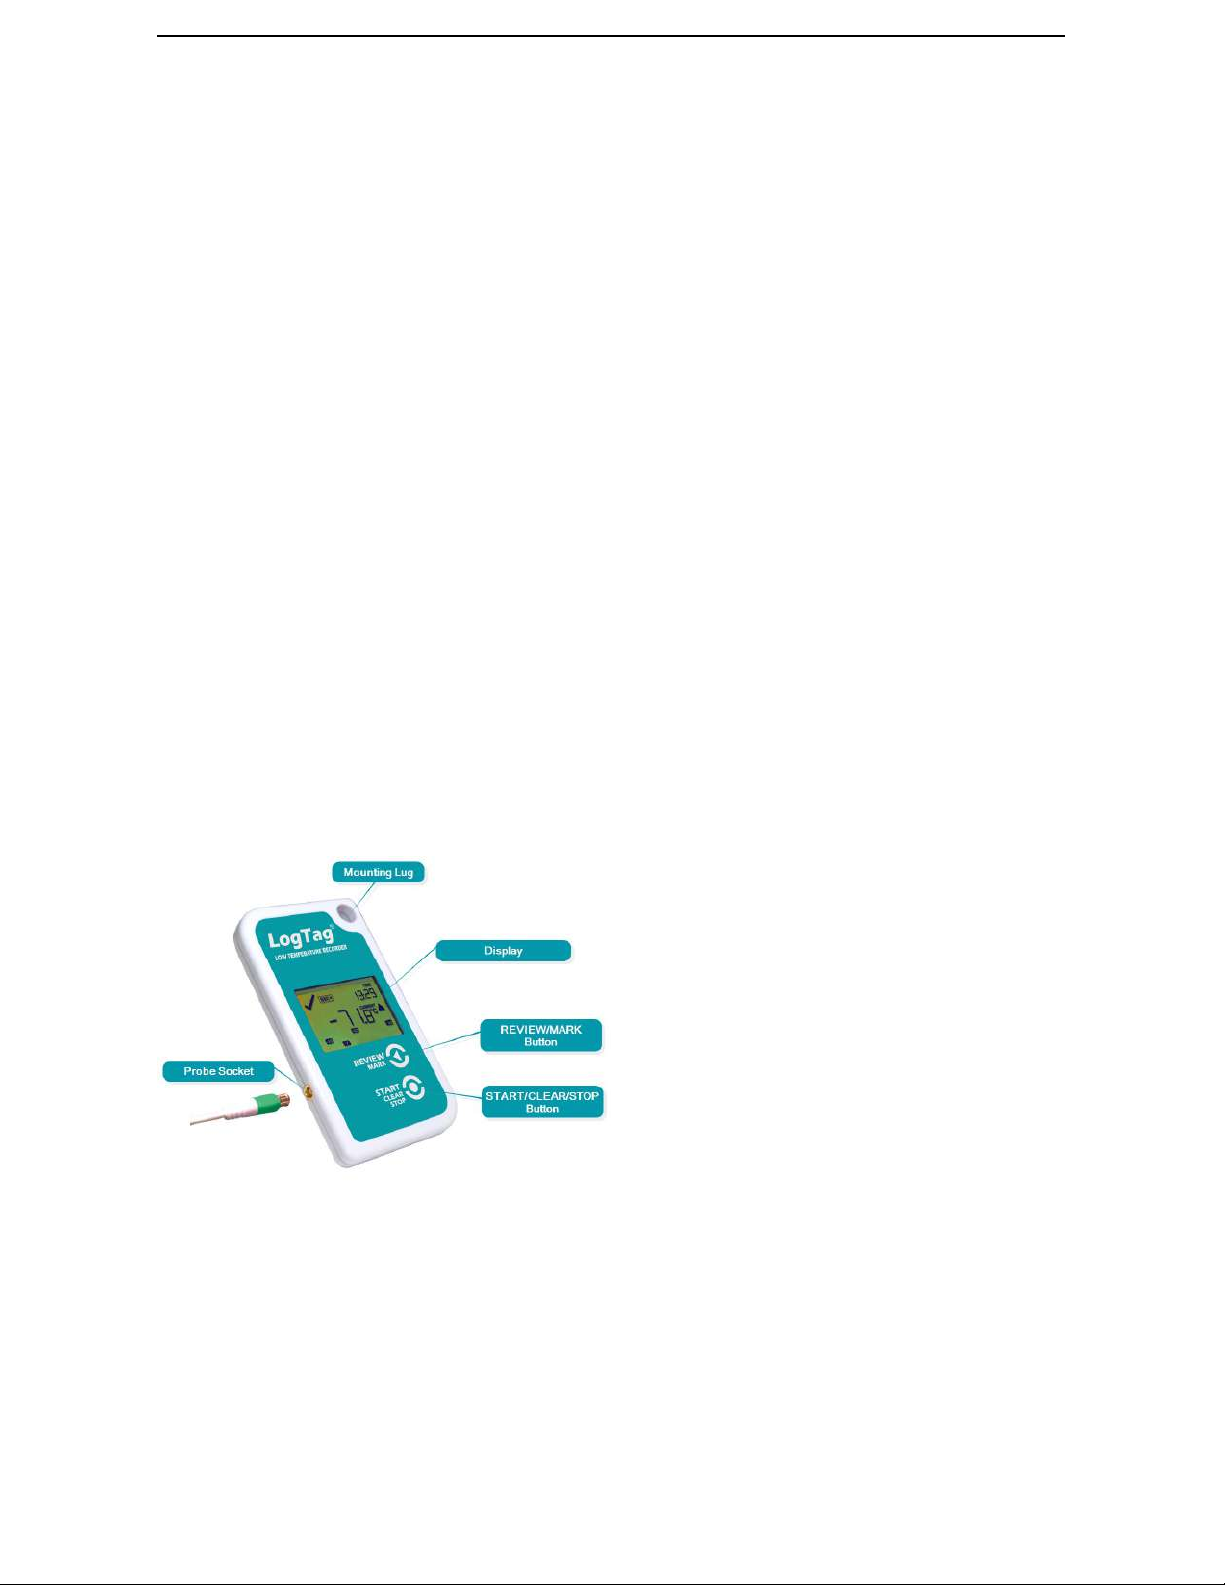
The TREL30-16 temperature logger features the familiar LogTag® case layout.
Figure 1: TREL30-16 features
Case
l Mounting lug for secure fastening of logger to fixtures
l Gold-plated, high-quality temperature external probe socket
l Robust polycarbonate case, IP61
l Durable communications contacts
Find Quality Products Online at: [email protected]
www.GlobalTestSupply.com
Page 5

Features TREL30-16 User Guide 7
Buttons
l START/CLEAR/STOP button; can be used to start and stop the unit or to clear an alarm. It
is also used to exit the statistics review.
l REVIEW/MARK button; can be used to enter the statistics review and to scroll through
the statistical data directly on the display. It is also used to place an inspection mark
in the data listing.
Display
The display shows ‘at a glance’ if alarm events have occurred for both the current day and
up to 29 days in the past. Details of any alarm event can be checked directly on the unit by
inspecting the statistics history on the logger's display or in more detail by downloading
the logged data.
External Probes
The TREL30-16 will accept any external probe from the ST10 product range.
Find Quality Products Online at: [email protected]
www.GlobalTestSupply.com
Page 6
What You Need TREL30-16 User Guide 8
What You Need
Required Equipment
In addition to your LogTag® TREL30-16 temperature logger you will need the following
items:
l A USB interface for communication to the PC
l An external probe of the ST10 series
l For configuration - a PC running Windows 7 or later and LogTag® Analyzer installed
Optional Items
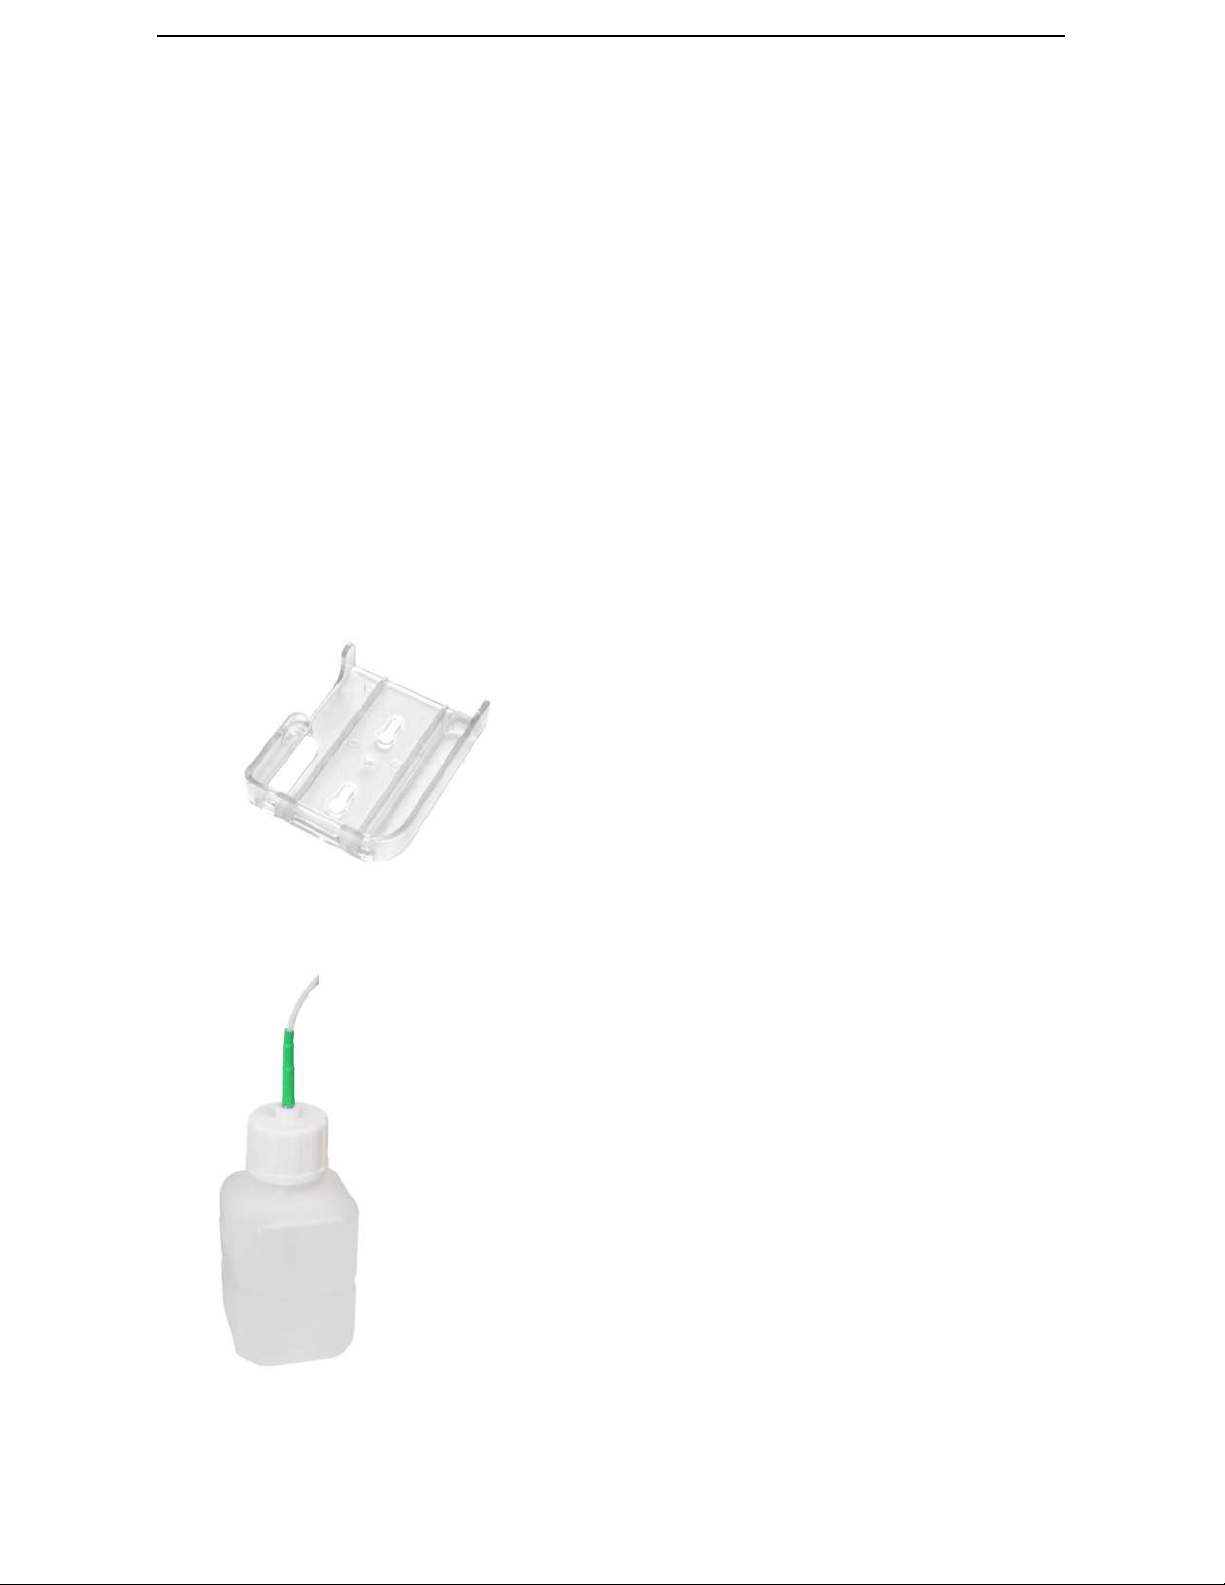
In addition to the above, following items are useful accessories:
l A wallmount bracket, which can be used, for example, to attach the TREL30-16 to
the side of a cabinet
l A silica sand temperature buffer, which simulates environmental behaviour of a
vaccine vial
Find Quality Products Online at: [email protected]
www.GlobalTestSupply.com
Page 7
Configuring the TREL30-16 for logging TREL30-16 User Guide 9
Configuring the TREL30-16 for logging
Before a TREL30-16 logger can be deployed, it must be configured with the parameters
required for starting and recording temperature values.
Loggers can be purchased unconfigured, or pre-configured, ready to be started, using one
of a number of different profiles that are available.
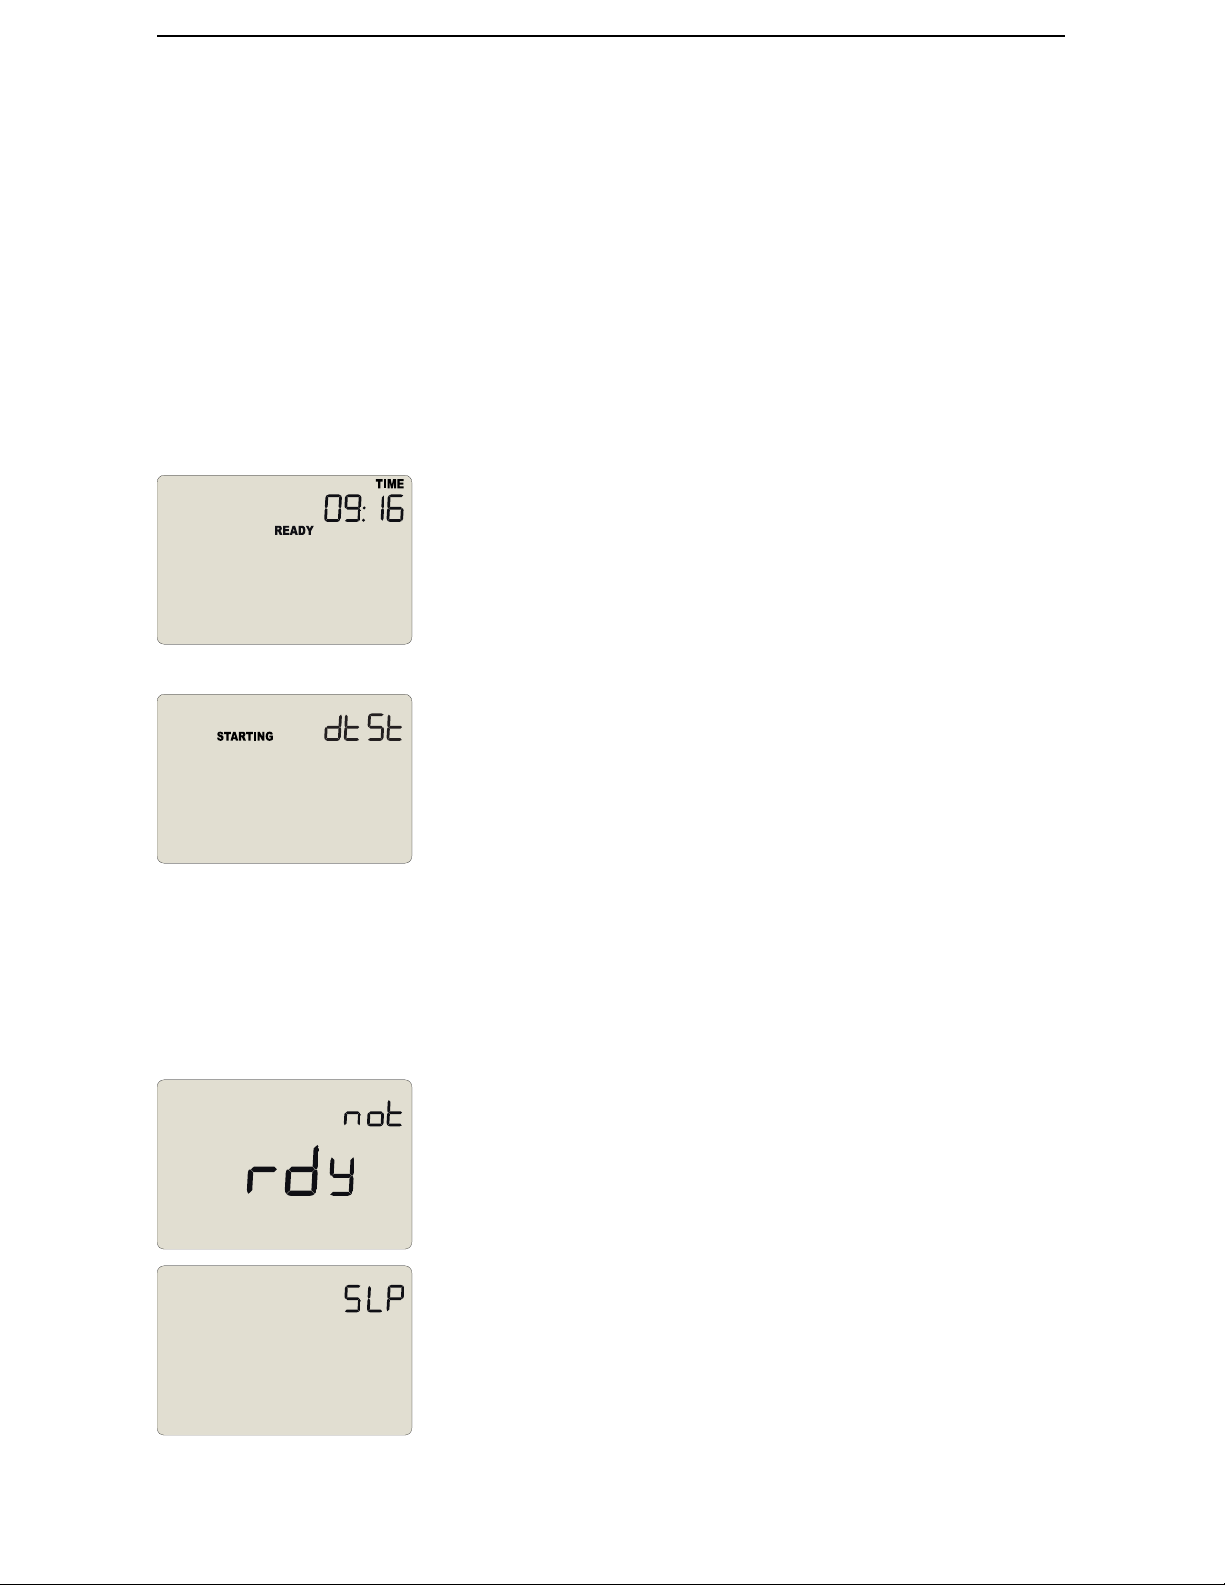
You can check if your logger is already configured or not by briefly pressing the
REVIEW/MAR K button.
The logger is already configured to start
If your logger is configured to start it will show either
if the logger was pre-configured for a push-button start, or
if the logger was pre-configured for a Date/Time start.
If your logger shows one of these screens you may skip the configuration process.
The logger is unconfigured
An unconfigured TREL30-16 logger is delivered to you hibernated (i.e. in a state of low
power consumption), and pressing the REVIEW/MARK shows:
and then
Find Quality Products Online at: [email protected]
www.GlobalTestSupply.com
Page 8
Standard Configuration Options TREL30-16 User Guide 10
If your logger is unconfigured you must set it up with the parameters required for:
l starting and recording temperature values
l triggering alarms
This is done using LogTag® Analyzer software, which can also be used for downloading and
analyzing data.
Standard Configuration Options
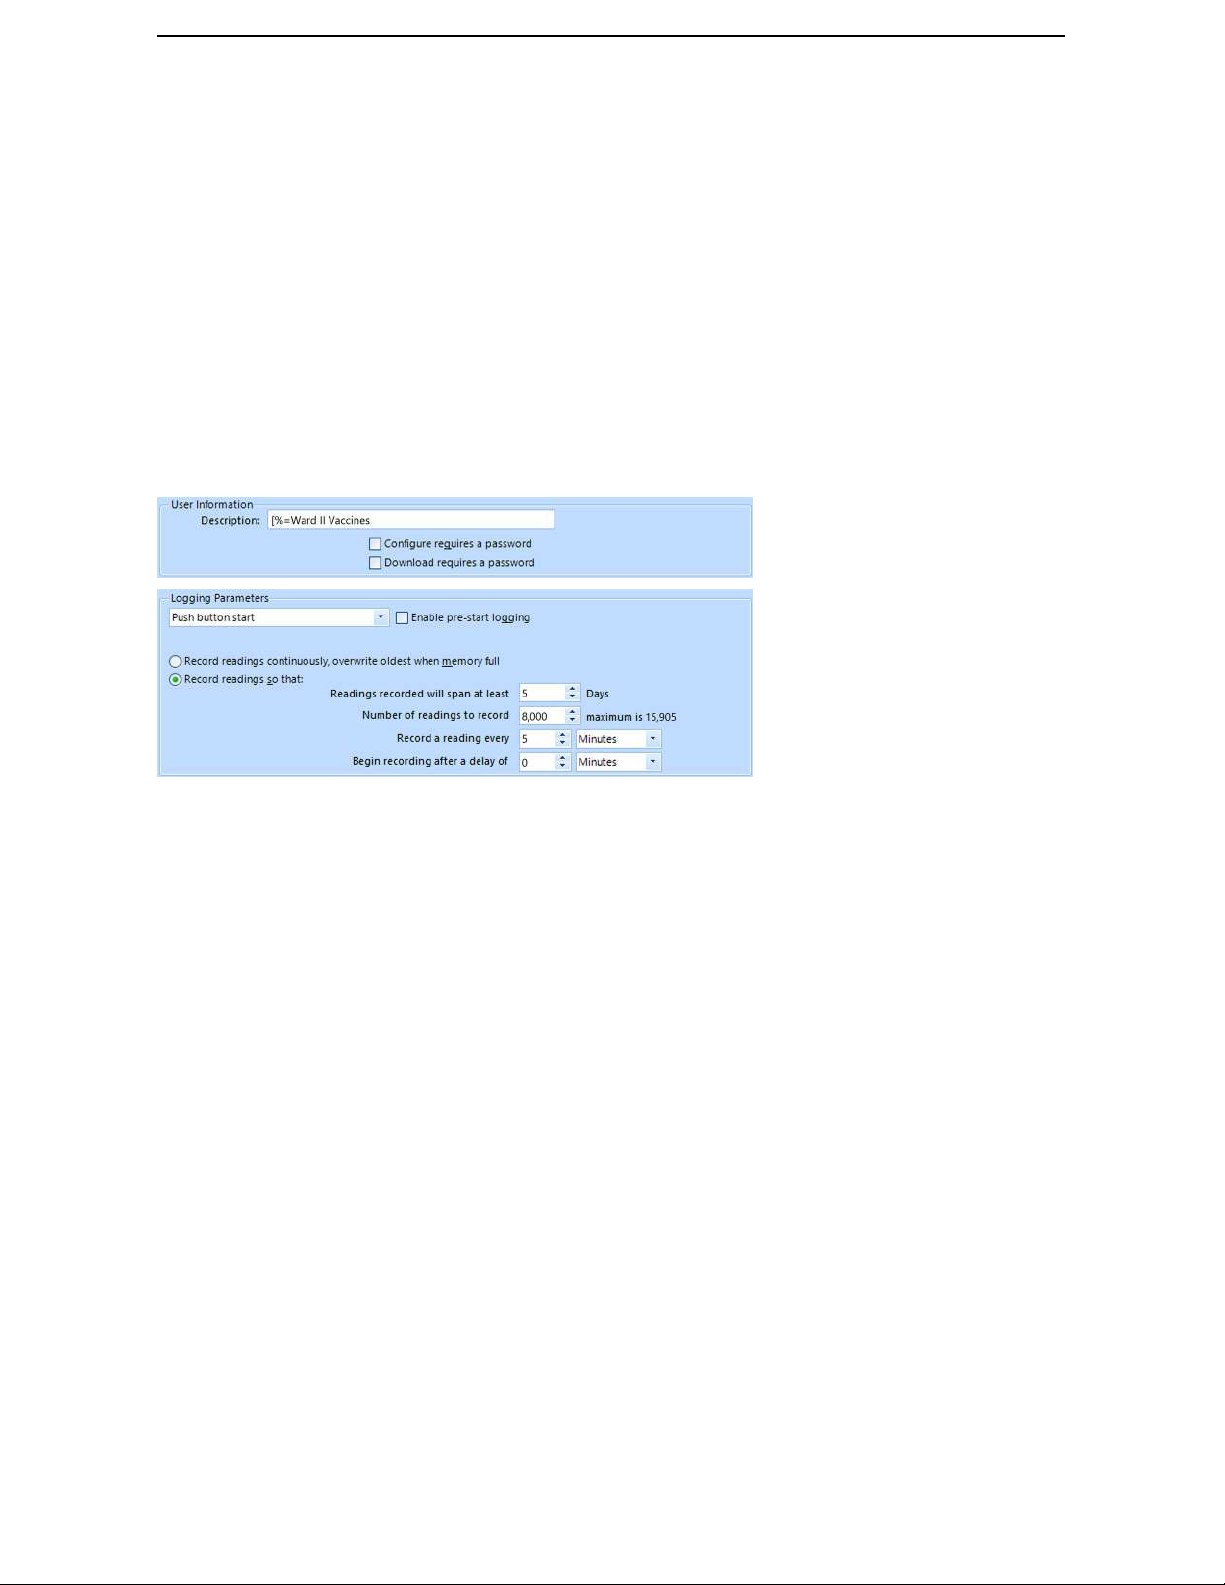
The standard configuration options include settings such as User ID, start method, pre-
start recording, logging interval and duration, start delay, and password.
For detailed information about each parameter please read the section about Configuring a
LogTag® for logging in LogTag® Analyzer’s User Guide or press F1 for help.
Find Quality Products Online at: [email protected]
www.GlobalTestSupply.com
Page 9
Standard Configuration Options TREL30-16 User Guide 11
TREL30-16 Start Options
During configuration with LogTag® Analyzer you can decide when the TREL30-16 starts
taking temperature readings:
Push button start
The logger will start taking temperature readings as soon as you have pressed the
START/CLEAR/STOP button (see Starting the Logger on page19).
When you choose the push button start option, you can Enable pre-start logging (or
disable it) and also Begin recording after a delay.
Pre-start readings
If you enable pre-start readings, the TREL30-16 starts recording as soon as it is configured
and will continue to do so until you start the unit via the button. No alarms are processed
while pre-start readings are being taken. Using pre-start readings is a good way to avoid
data loss if you forget to start the unit, as you can still access the data using LogTag®
Analyzer.
Start delay
If you configure the TREL30-16 to start after a delay period, the logger will not
immediately record temperature readings after you have pressed START/CLEAR/STOP, but
start a countdown timer instead, and record readings only after the timer has ended. The
value for the timer is set during configuration. If pre-start readings are enabled, these will
continue to be recorded during the delay period.
Date/Time start
The logger will start taking temperature readings at the date and time you enter during
configuration (local time). You cannot combine a date/time start with pre-start readings or
the start delay function.
Audible Alarm
The TREL30-16 is fitted with a buzzer. You can choose to activate the buzzer when an
alarm event has been triggered to provide extra feedback. This is enabled or disabled in the
Advanced Settings when configuring the logger with LogTag® Analyzer.
Please note, that continual activation of the audible alarm will reduce the working
life of the battery. When an alarm event is triggered, the alarm should be cleared
as soon as possible.
Find Quality Products Online at: [email protected]
www.GlobalTestSupply.com
Page 10
Standard Configuration Options TREL30-16 User Guide 12
The alarm will sound once every four seconds for the first 24 hours, then sound less
frequently to preserve battery life1 until the alarm is cleared, the unit stops or is reconfigured.
Note: The interval will increase, even if the alarm is re-triggered!
Please see more information about re-triggering alarms in
The buzzer will temporarily turn off when you are reviewing data.
1 The interval at which the alarm sounds will increase to 8 seconds when the clock passes midnight for a second time (i.e. the
alarm will sound every 4 seconds between 24 and 48 hours, depending on when during the day the alarm was first triggered).
When the clock passes midnight a third time, the interval changes to 12 seconds until the alarm is cleared.
Find Quality Products Online at: [email protected]
www.GlobalTestSupply.com
Page 11
Standard Configuration Options TREL30-16 User Guide 13
Alarm Configuration Options
The TREL30-16 can display an alarm if either of the configured alarm trigger conditions
have been met. This is indicated on the display by showing the Alarm Indicator ( ) and the
Day Alarm Marker for
today ( ).
Each alarm trigger condition consists of a threshold temperature value, an activation type
(which can be instant, consecutive or accumulative2) and a delay time, if it is not an
instant alarm.
If an alarm trigger condition requires readings to exceed an upper threshold temperature it
is called an
lower threshold it is called a
upper alarm
. If an alarm trigger condition requires readings to go below a
lower alarm
.
All alarm trigger conditions are configured in the Alarm Settings tab during configuration
of the logger with LogTag® Analyzer.
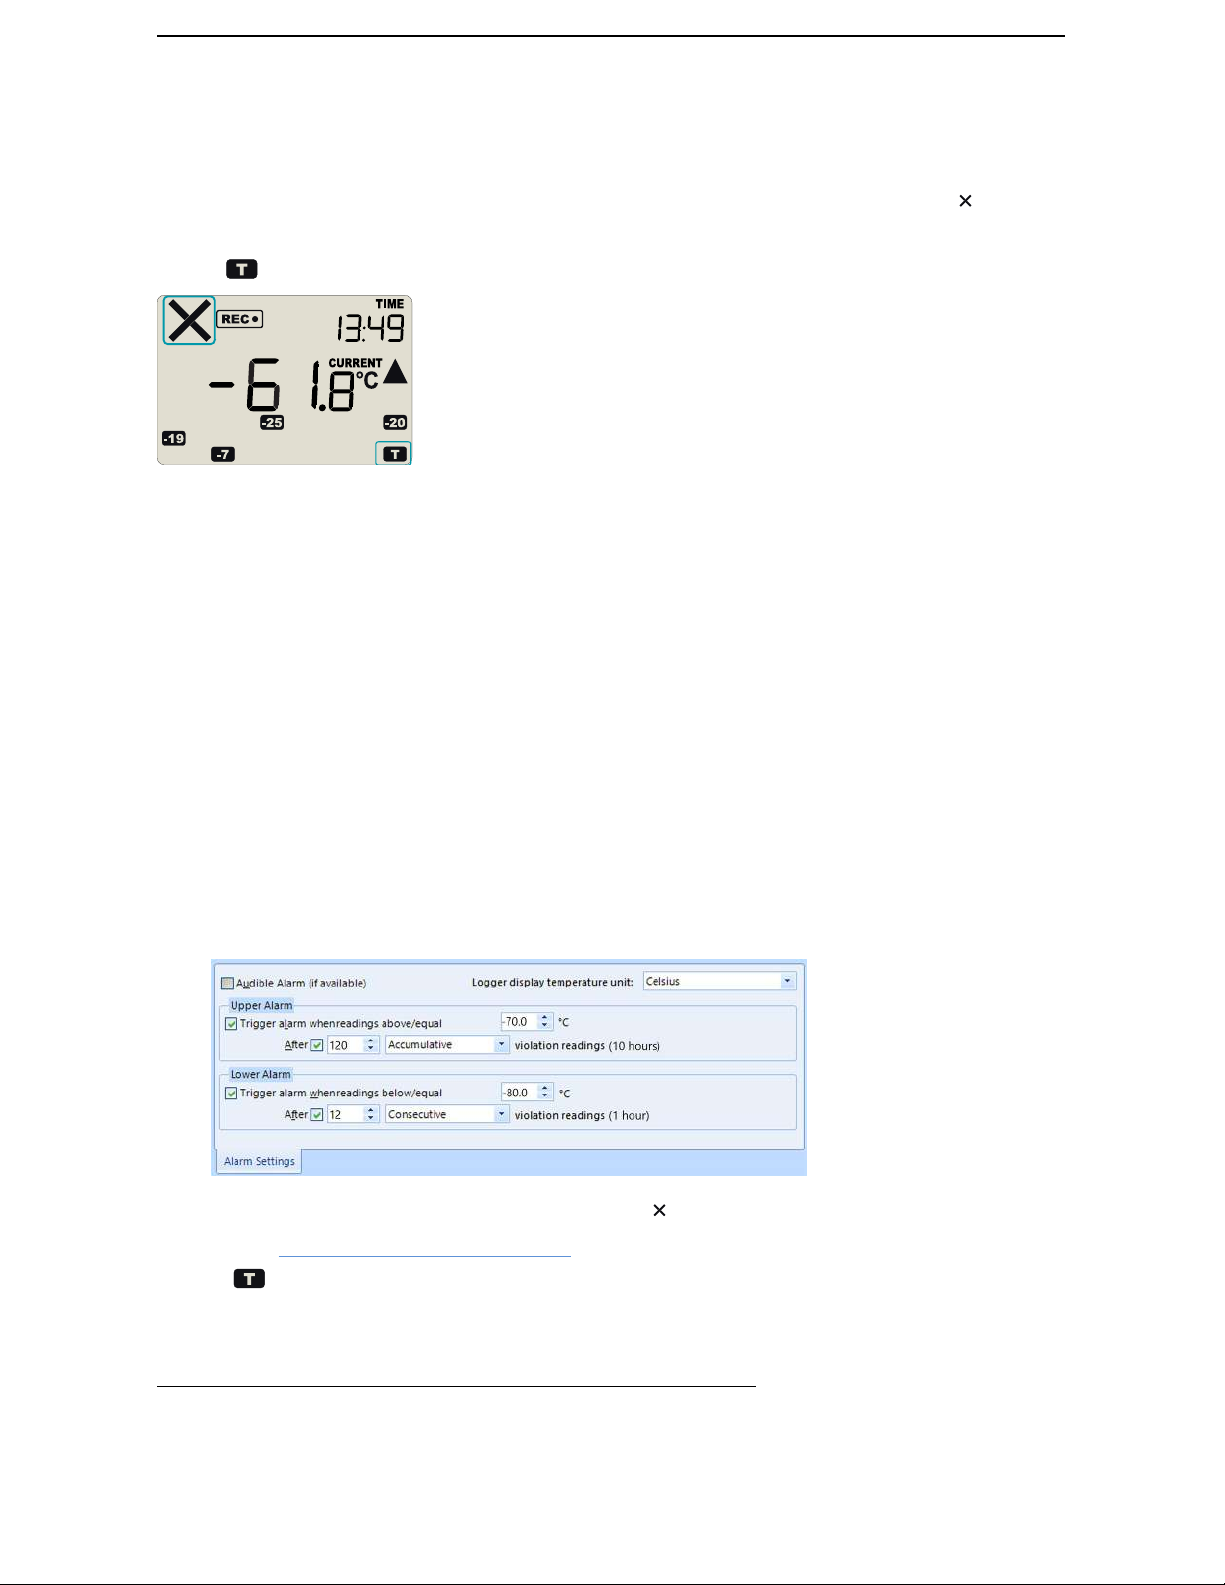
The screen shows an example where:
l the upper alarm is triggered when the temperature is -70.0°C or above for an
accumulative time of 10 hours.
l the lower alarm is triggered when the temperature is -80.0°C or below continuously
for 1 hour.
Once an alarm has triggered, the alarm indicator ( ) remains shown until the alarm is
cleared (see Clearing an Alarm on page25) or the unit is reconfigured. The day alarm
marker remains shown until midnight, then it turns off and the marker for the
2
l
Instant = one temperature reading is above (below) the threshold
l
Consecutive = temperature readings are above (below) the threshold for the time defined in the activation delay without
interruption
l
Accumulative = temperature readings are above (below) the threshold for the total time defined in the activation delay
time, but may not necessarily be sequential
Find Quality Products Online at: [email protected]
www.GlobalTestSupply.com
Page 12
Standard Configuration Options TREL30-16 User Guide 14
previous day is shown ( ) to indicate the alarm was registered against what is now the
previous day. When midnight passes next, this marker will move to and so on.
Alarm Re-triggering
A note on alarm re-triggering: As soon as an alarm is triggered, the corresponding
delay time (but not any others) resets to zero and alarm processing starts again.
The alarm processing for all other alarm delays is not affected. Therefore,
accumulative or consecutive alarms will re-trigger, if the alarm conditions are met
again, and the Alarm Indicator ( ) and the Day Alarm Marker ( ) will be shown,
even if any previous alarm was cleared. Clearing an Alarm does not reset any of
the delay values.
Advanced Configuration Settings
Select Advanced Settings for additional configuration settings. These settings decide how
some of the elements are displayed on the unit's own display and set certain options
specific to the TREL30-16.
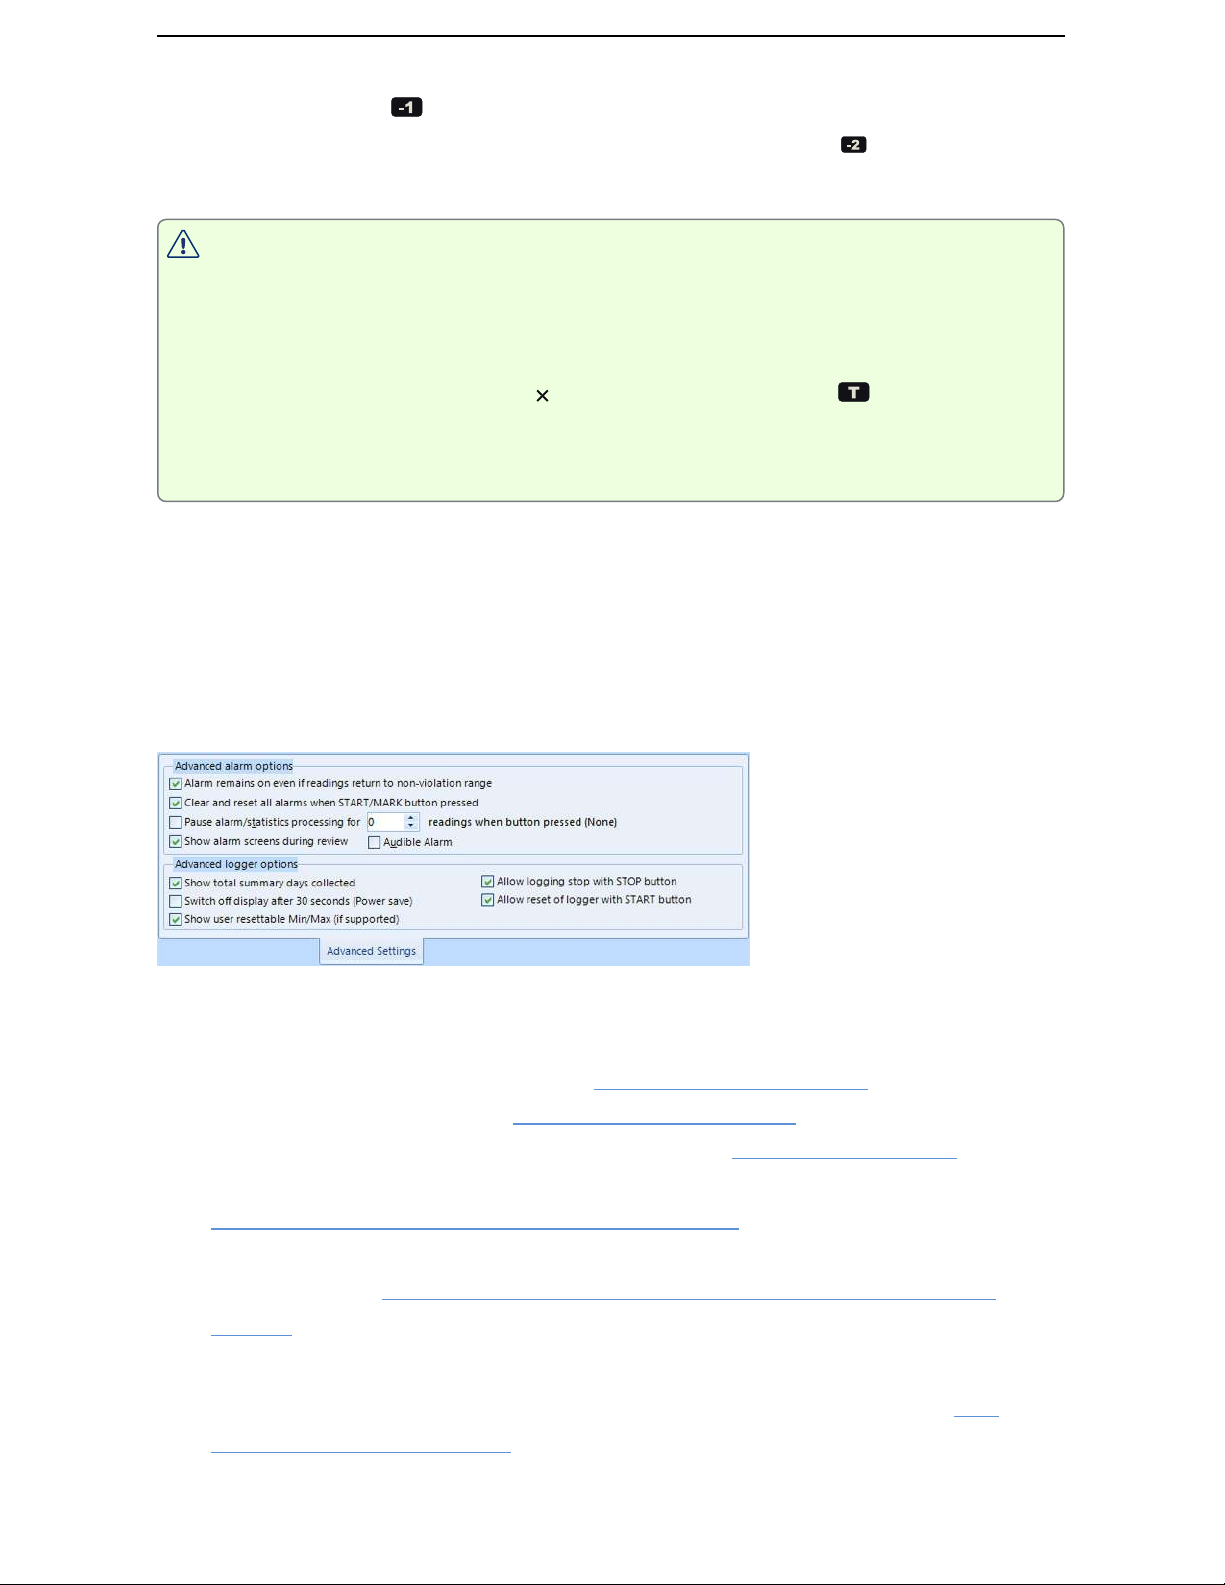
Figure 2: TREL30-16 advanced configuration screen in LogTag® Analyzer 3
Parameters that influence the appearance of the display are:
l Pause alarm/statistics processing (see Paused Readings on page25)
l Temperature display unit (see Display Overview on page16)
l Switch off display after 30 seconds (Power save, see Power Save on page27)
l showing the number of days on the display, for which statistics were collected (see
Total Number of Days Statistics Collected on page28)
l allowing a user to reset the trip's minimum and maximum values on the display
during recording (see Resetting the Trip Minimum/Maximum Temperatures on
page33)
Parameters influencing specific behavior of the TREL30-16 are:
l clearing and resetting alarms when the START/CLEAR/STOP button is pressed (see
Clearing an Alarm on page25)
Find Quality Products Online at: [email protected]
www.GlobalTestSupply.com
Page 13

Standard Configuration Options TREL30-16 User Guide 15
l leaving the alarm turned on, even if readings return to the normal temperature range
again
l allowing the user to stop the logger with the REVIEW/MARK button
l allowing the user to reset the logger with the START/CLEAR/STOP button
l enabling the buzzer for the audible alarm
For detailed information about each parameter please read the section about Configuring a
LogTag® for logging in LogTag® Analyzer’s User Guide or press F1 for help.
Find Quality Products Online at: [email protected]
www.GlobalTestSupply.com
Page 14
Display Overview TREL30-16 User Guide 16
Display Overview
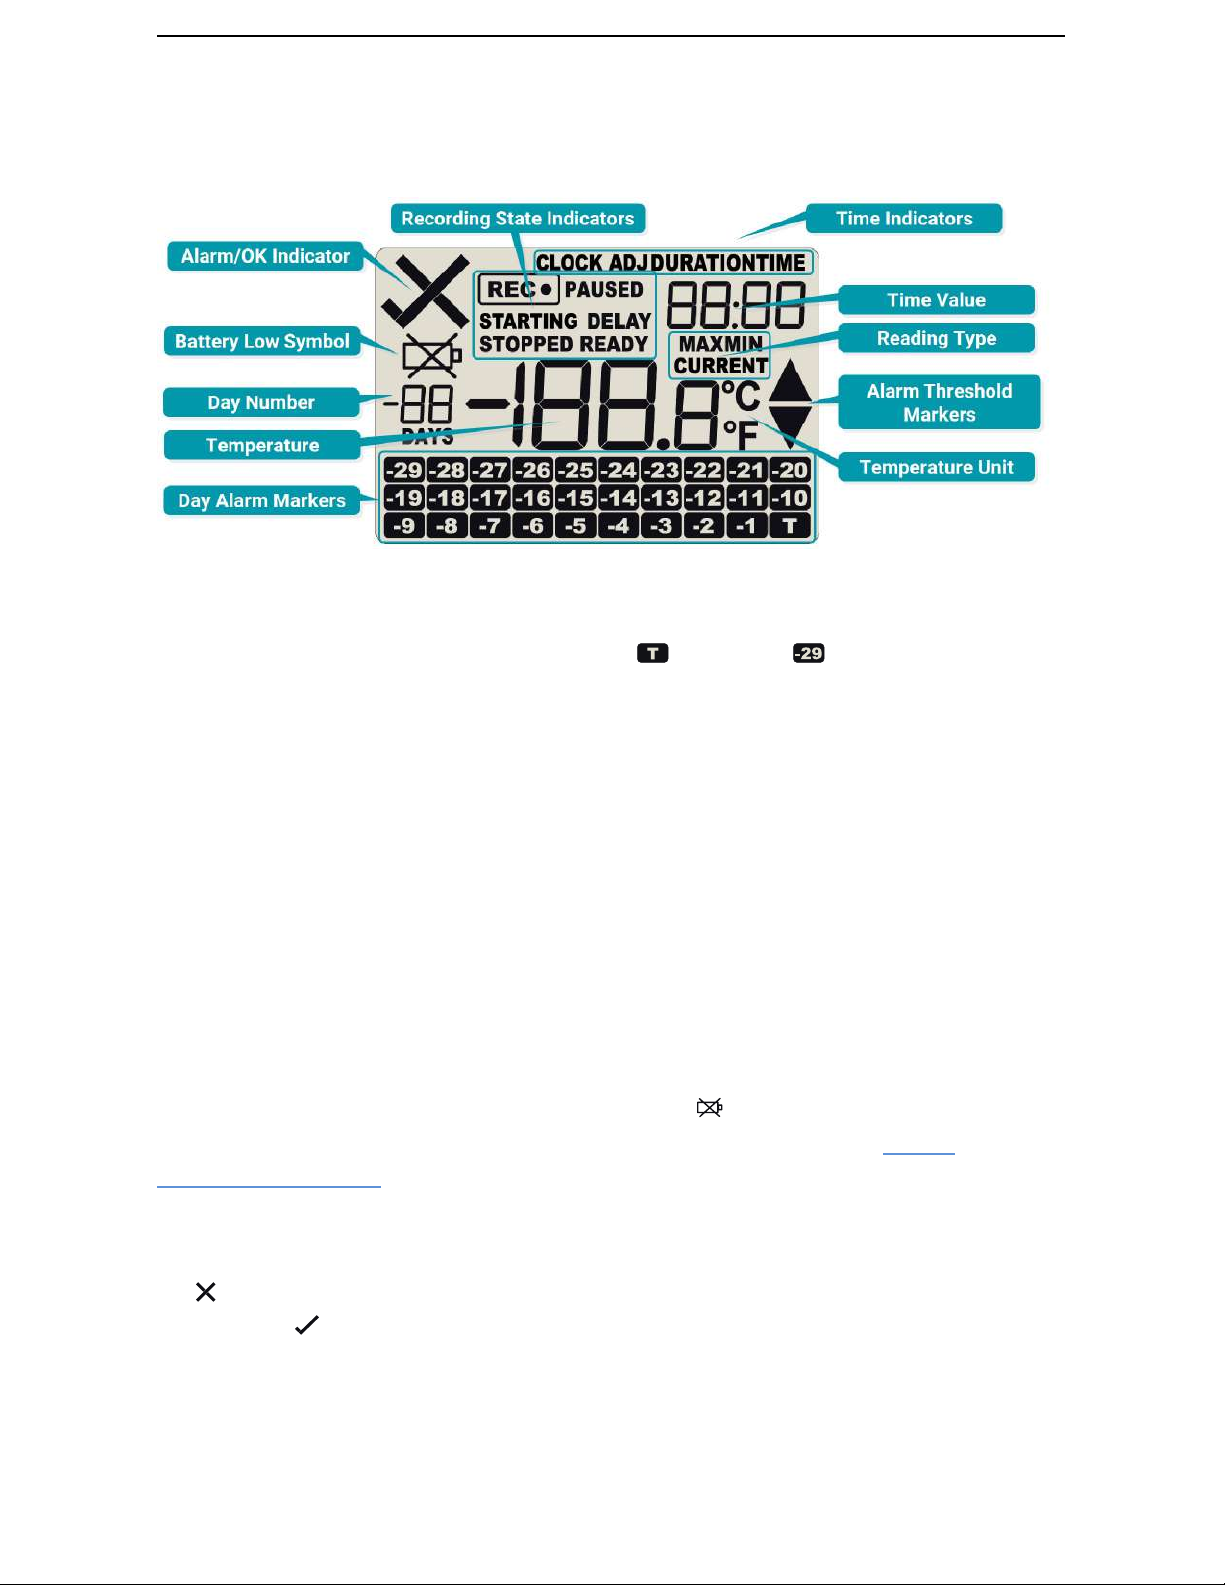
Figure 3: Display Overview with all segments turned on
Day Alarm Markers
This grid shows 3 rows of 10 markers, named
when an alarm event occurred on that day.
Today
( ) to
Day -29
( ), which are switched on
Temperature Value
This shows the most recently recorded temperature while the TREL30-16 is recording. Once the
logger has stopped, nothing will be displayed. During review, this will show minimum or maximum
temperatures.
Day Number
During Review, this shows the day number of the currently displayed day statistic. Today is 0 0
DAYS, days in the past are represented between yesterday -01 DAYS and - 29 DAYS. During
configuration of the logger in LogTag® Analyzer you can also enable this to show the total number
of days for which statistics are available.
Battery Low
A battery test is performed hourly. The battery low symbol will appear if the TREL30-16's
battery is low and requires changing. Please follow the instructions provided in Battery
Replacement on page42. If the symbol is not shown while the display is turned on, the battery is
still OK.
ALARM/OK indicator
The symbol is shown as soon as the TREL30-16 has registered an alarm event.While there are
no alarms, the symbol is shown.
Recording indicators
The recording indicators show what the TREL30-16 is currently recording.
Find Quality Products Online at: [email protected]
www.GlobalTestSupply.com
Page 15
Display Overview TREL30-16 User Guide 17
l If READY is shown, the TREL30-16 is ready to be started with the START/CLEAR/STOP button.
Depending on the configuration it may already record pre-start readings.
l If STARTING is shown, the logger has been started, and a start delay is active. The word
DELAY is also shown, together with the time in hours and minutes until the start.
l If is shown, the TREL30-16 is recording temperature at the sample interval defined
during configuration.
l If is shown together with the word PAUSED, the product is also recording, but the
recorded values are not taken into account when calculating alarm events and durations.
l If the word STOPPED is shown, the TREL30-16 has finished recording temperature data.
Time Value and Time Indicators
The time value display is used to show one of the following:
l The current time
l The time remaining until the logger starts recording (for a delayed start)
l A duration, for example of an alarm
The time indicators identify which of those is displayed as follows:
l If TIME is shown, the time value represents the current time in hours and minutes (24- hour
format).
l If DELAY is shown, the time value represents a start delay, or the time remaining until a
date/time start will occur.
l If DURATION is shown, the time value represents the duration, for example the time above
the upper alarm limit.
The word boo t appears in place of the clock if new firmware is being uploaded to the TREL30-16.
The word USb appears when the unit is plugged into a USB port.
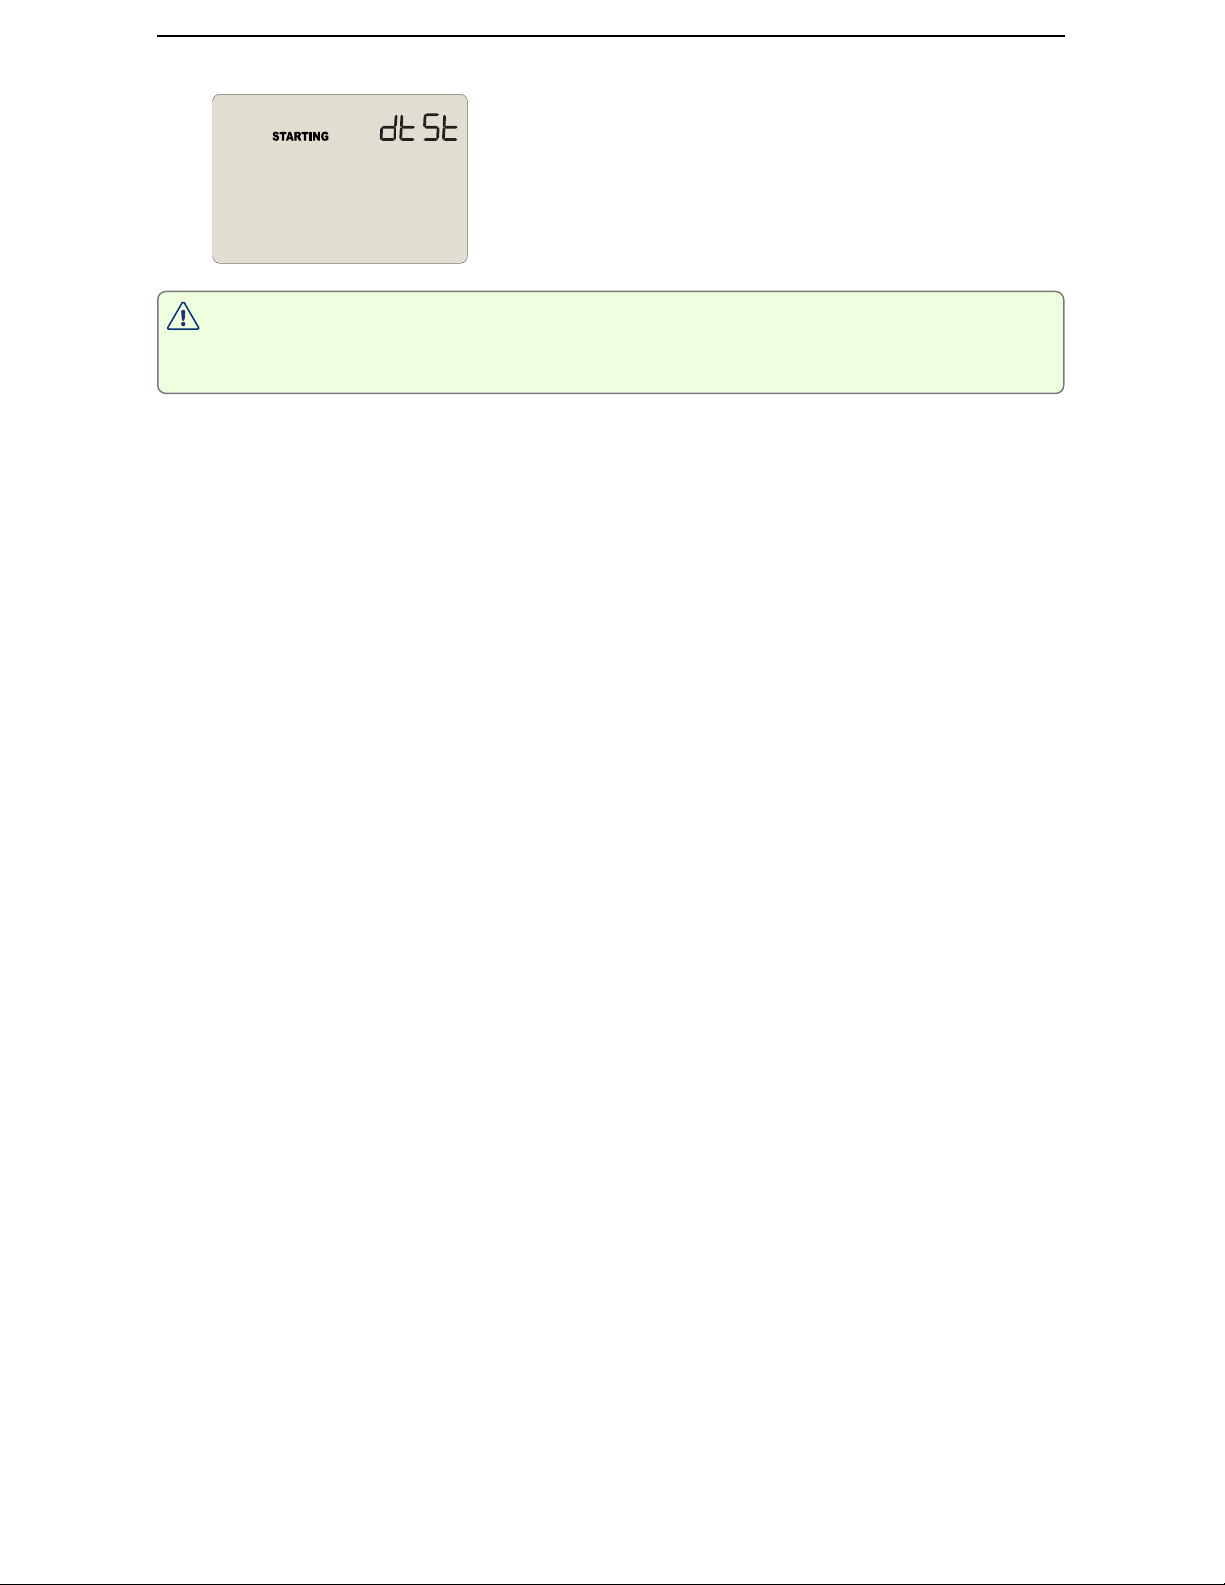
The word dts tappears in place of a time value if the logger is configured for a date/time start, and
the start time has not yet passed.
Reading Type
The word CURRENT is shown when the temperature on the display represents the last recorded
temperature.
The word MAX is shown in Review mode, when the temperature on the display represents the
maximum recorded temperature for the day displayed.
The word MIN is shown in Review mode, when the temperature on the display represents the
minimum recorded temperature for the day displayed.
Above/Below Threshold Arrows
The up-arrow is shown when the temperature displayed (i.e. last recorded) is above the
specified upper temperature threshold. The down-arrow is shown when the temperature
displayed is below the specified lower temperature threshold.
Temperature Units
Depending on the selected PDF temperature units, this shows either°F or°C.
Find Quality Products Online at: [email protected]
www.GlobalTestSupply.com
Page 16
Real Time Clock TREL30-16 User Guide 18
Real Time Clock
The time shown on the recording display is linked to the logger’s internal real time clock.
A day change occurs when the display time rolls through midnight (i.e. 00:00), which
triggers the statistical data to be finalized for the day, and a new day to be started when
the next reading is taken.
Each time the logger is configured with LogTag® Analyzer the display clock value is set to
the PC's current local time (or timezone).
Note that the logger’s internal real time clock value is only updated when the
recorder is configured with LogTag® Analyzer. This prevents the data logging
becoming discontinuous, which would be the case if the real time clock were to be
changed together with the display clock.
LogTag® Analyzer can display the logged readings in a number of different time zones,
regardless of where it was configured.
Adjusting the Display Clock
The display clock of the logger can be set to the current local time, either by using
LogTag® Analyzer software or directly on the unit, using the buttons.
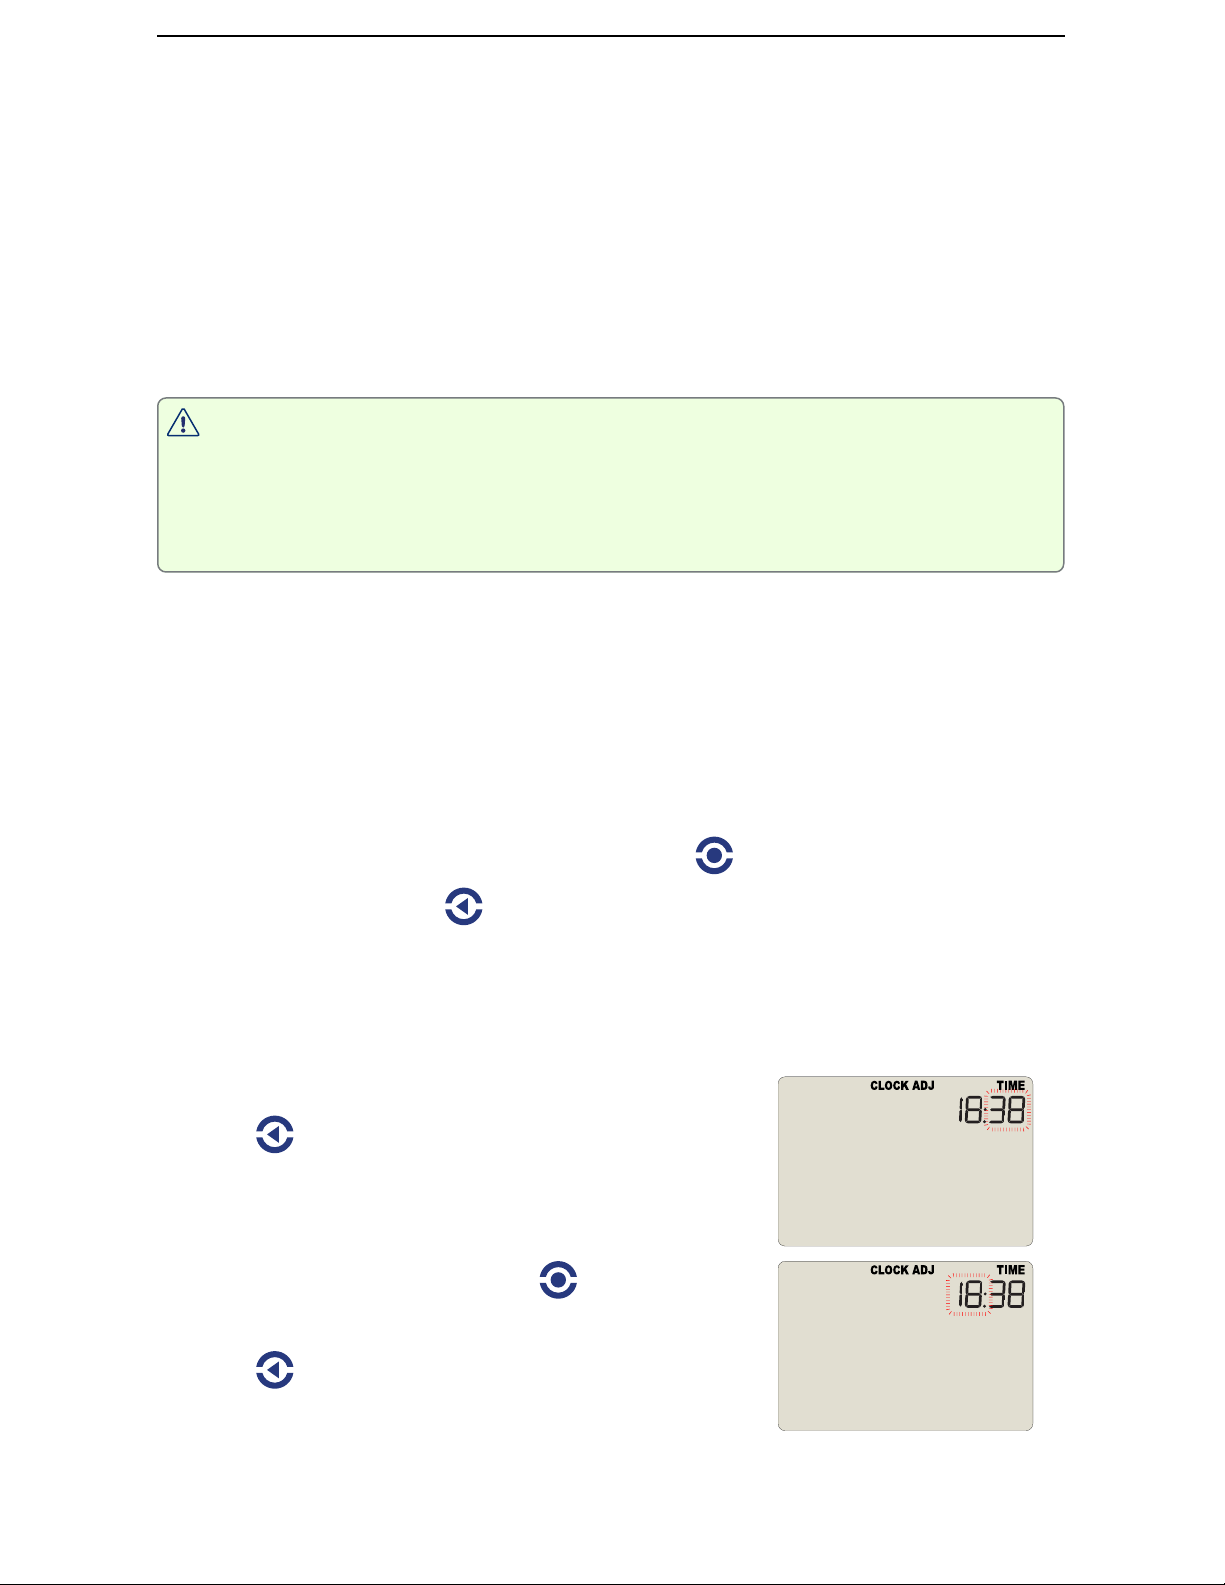
To set the clock, press and hold the START/CLEAR/STOP ( ) button, then immediately press
and hold the REVIEW/MAR K ( ) button. Keep holding both buttons together
continuously for a period of 8 seconds.
During this period the CLOCKADJ icon flashes. Release the buttons when the flashing
stops. The clock can now be adjusted.
Initially, the minutes digits flash.
Press the button to increment the minutes digit (once
it reaches 59 it rolls back to 00 on the next press).
Press the buttons firmly!
Accept the minutes value by pressing . The hours
value now flashes.
Press the button to increment the hours digits (once
it reaches 23 it rolls back to 00 on the next press).
Find Quality Products Online at: [email protected]
www.GlobalTestSupply.com
Page 17
Starting the Logger TREL30-16 User Guide 19
Accept the hours value by pressing . The new clock
value is now stored, and the display shows the normal
screen.
NOTE: It is advised that the real time clock is only adjusted when the product is
not recording (STOPPED or READY) to avoid large shifts in day boundary data.
If a display clock adjustment is made while recording data, the next log taken will
be identified in the downloaded data with a time change mark.
Changes to the display clock do not affect the internal real time clock value, so the logged
data does not show time gaps.
Starting the Logger
Push button start
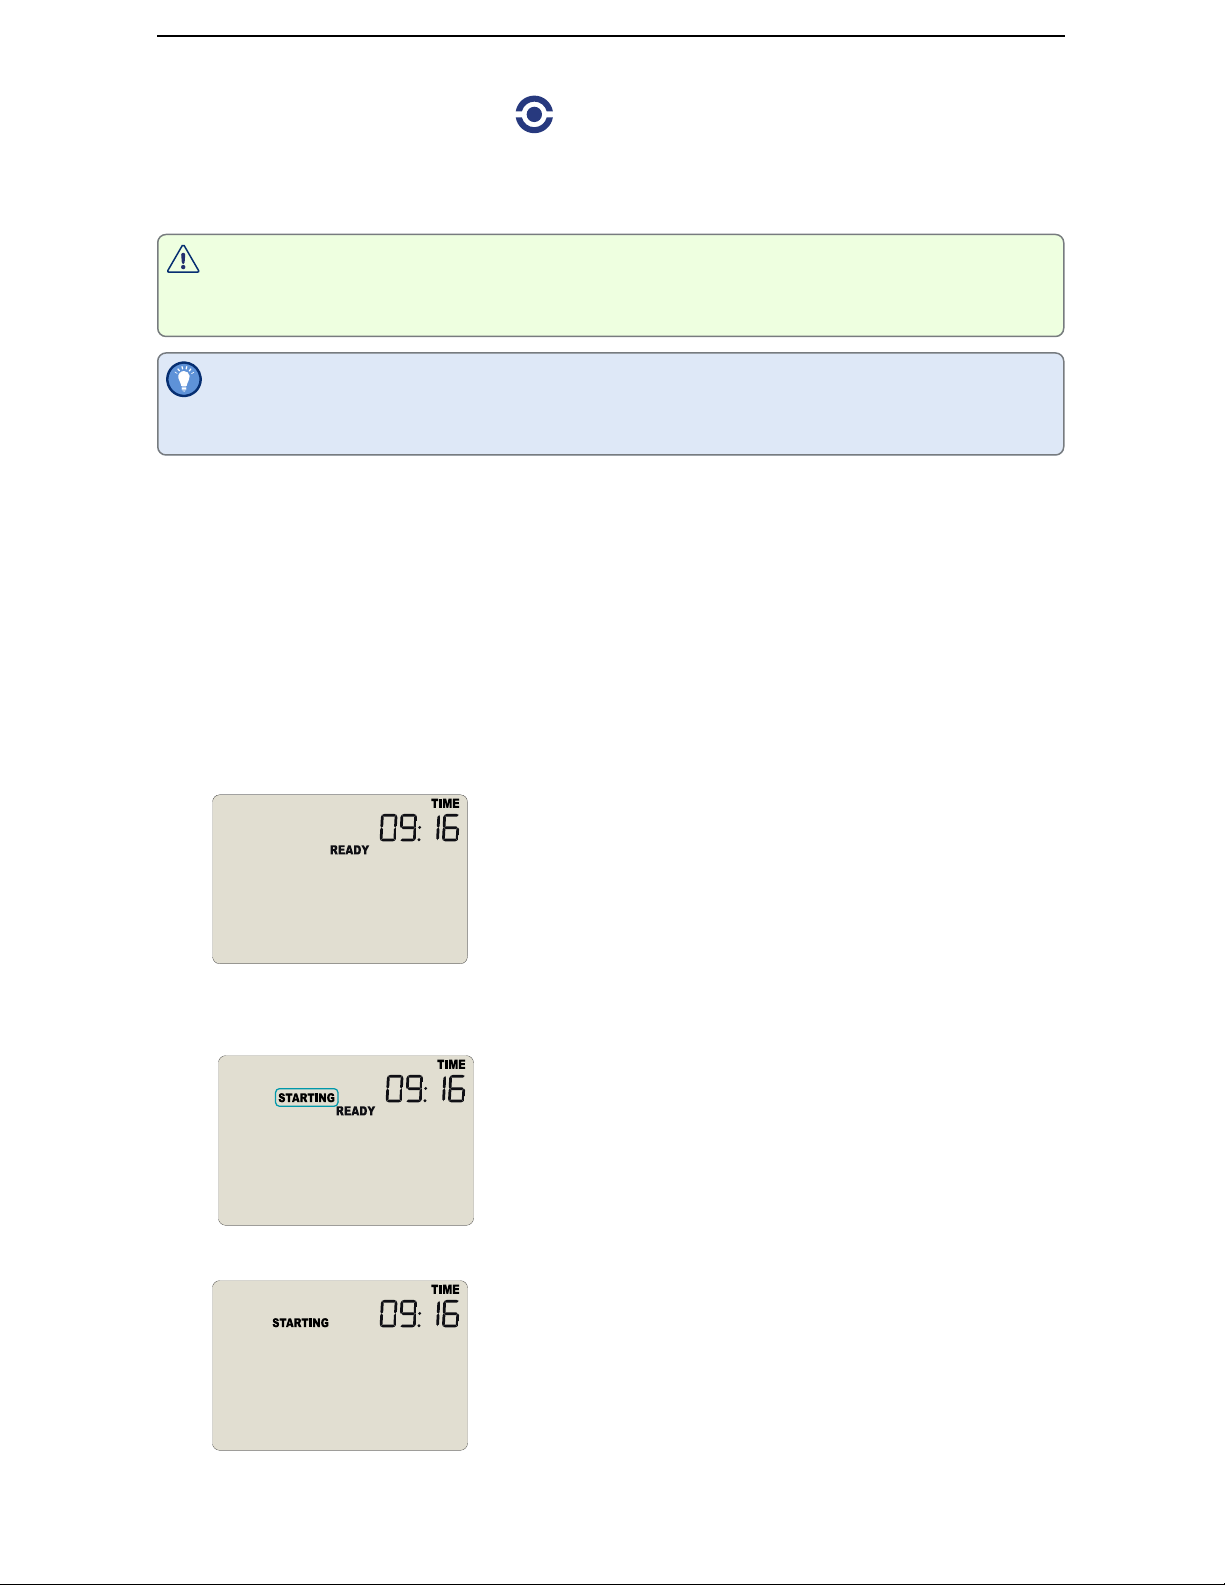
The logger's display must show READY for it to be started. The current time is also shown.
Press and hold the START/CLEAR/STOP button. First, STARTING is shown in addition to
READY:
Then READY disappears:
Find Quality Products Online at: [email protected]
www.GlobalTestSupply.com
Page 18
Starting the Logger TREL30-16 User Guide 20
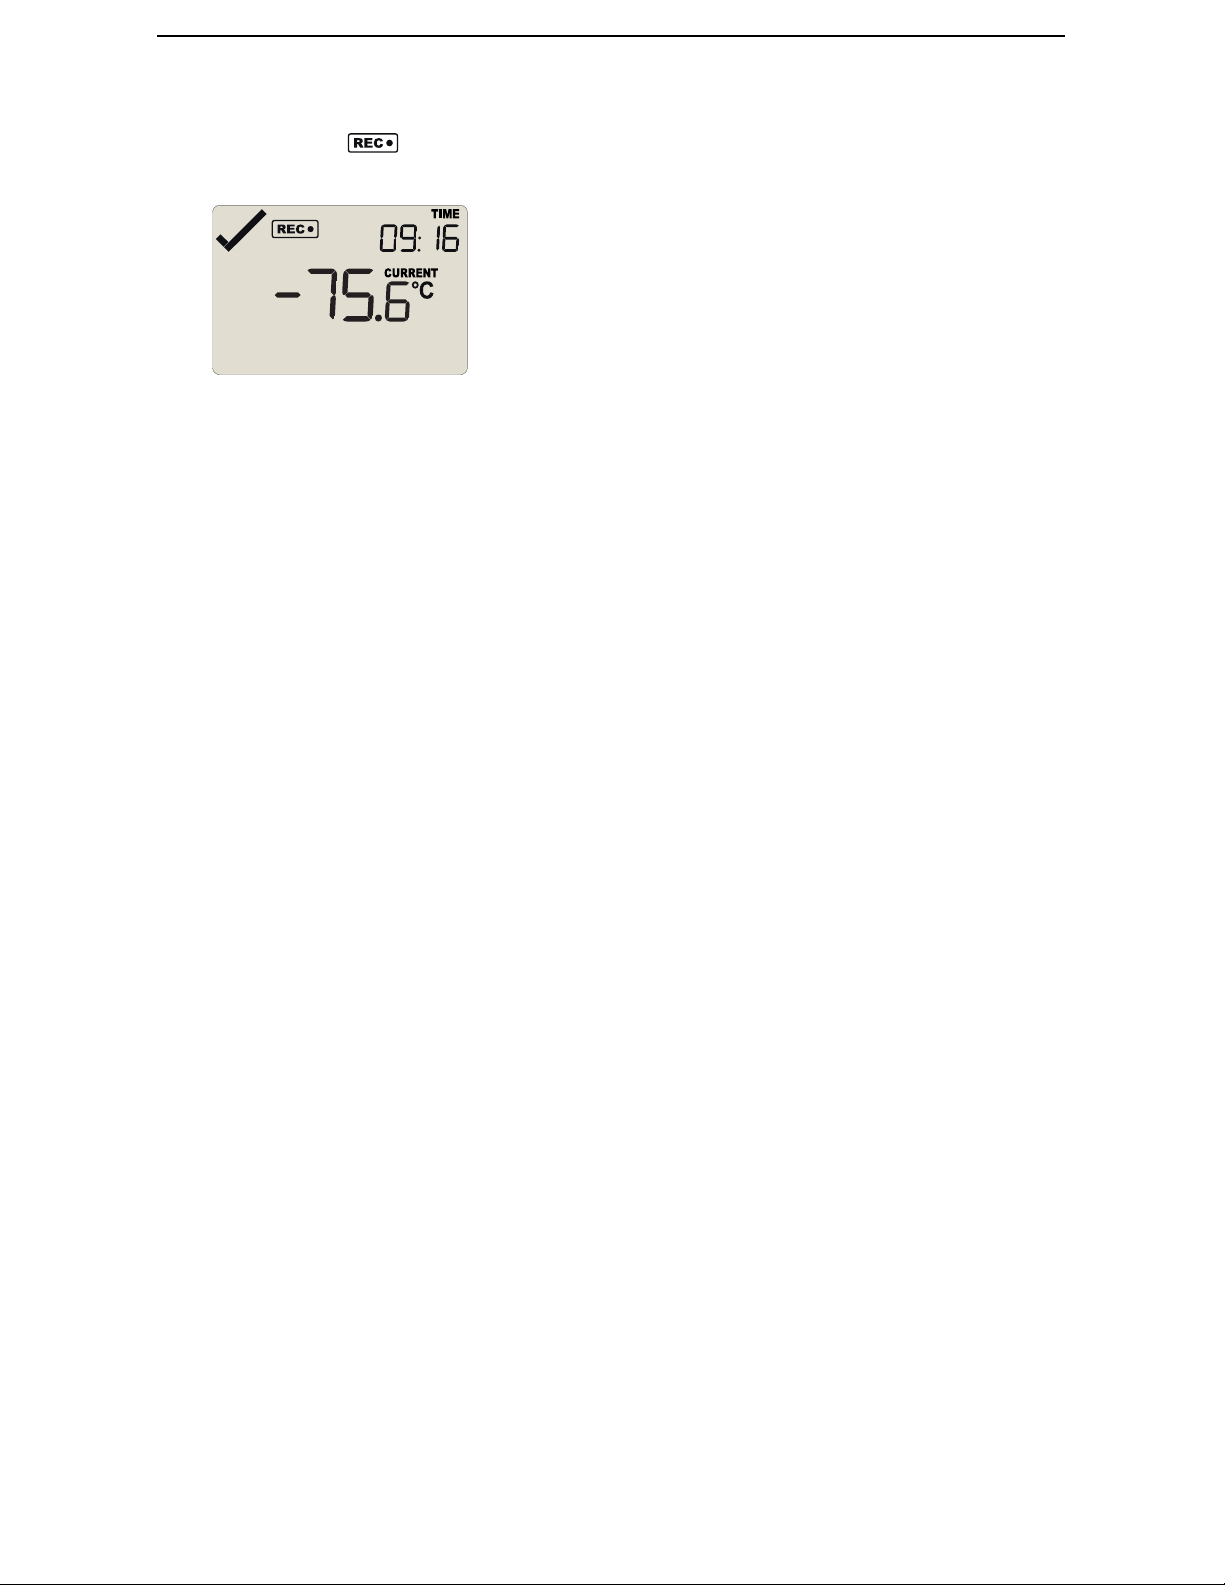
Once READY disappears, release the button within two seconds. STARTING will also
disappear, and the symbol will be shown. The TREL30-16 now records temperature
data.
The logger will
l Release the button before READY disappears
l Keep holding the button for more than 2 seconds after READY disappears
not
start if you:
Find Quality Products Online at: [email protected]
www.GlobalTestSupply.com
Page 19
Starting the Logger TREL30-16 User Guide 21
Push Button Start with Start Delay
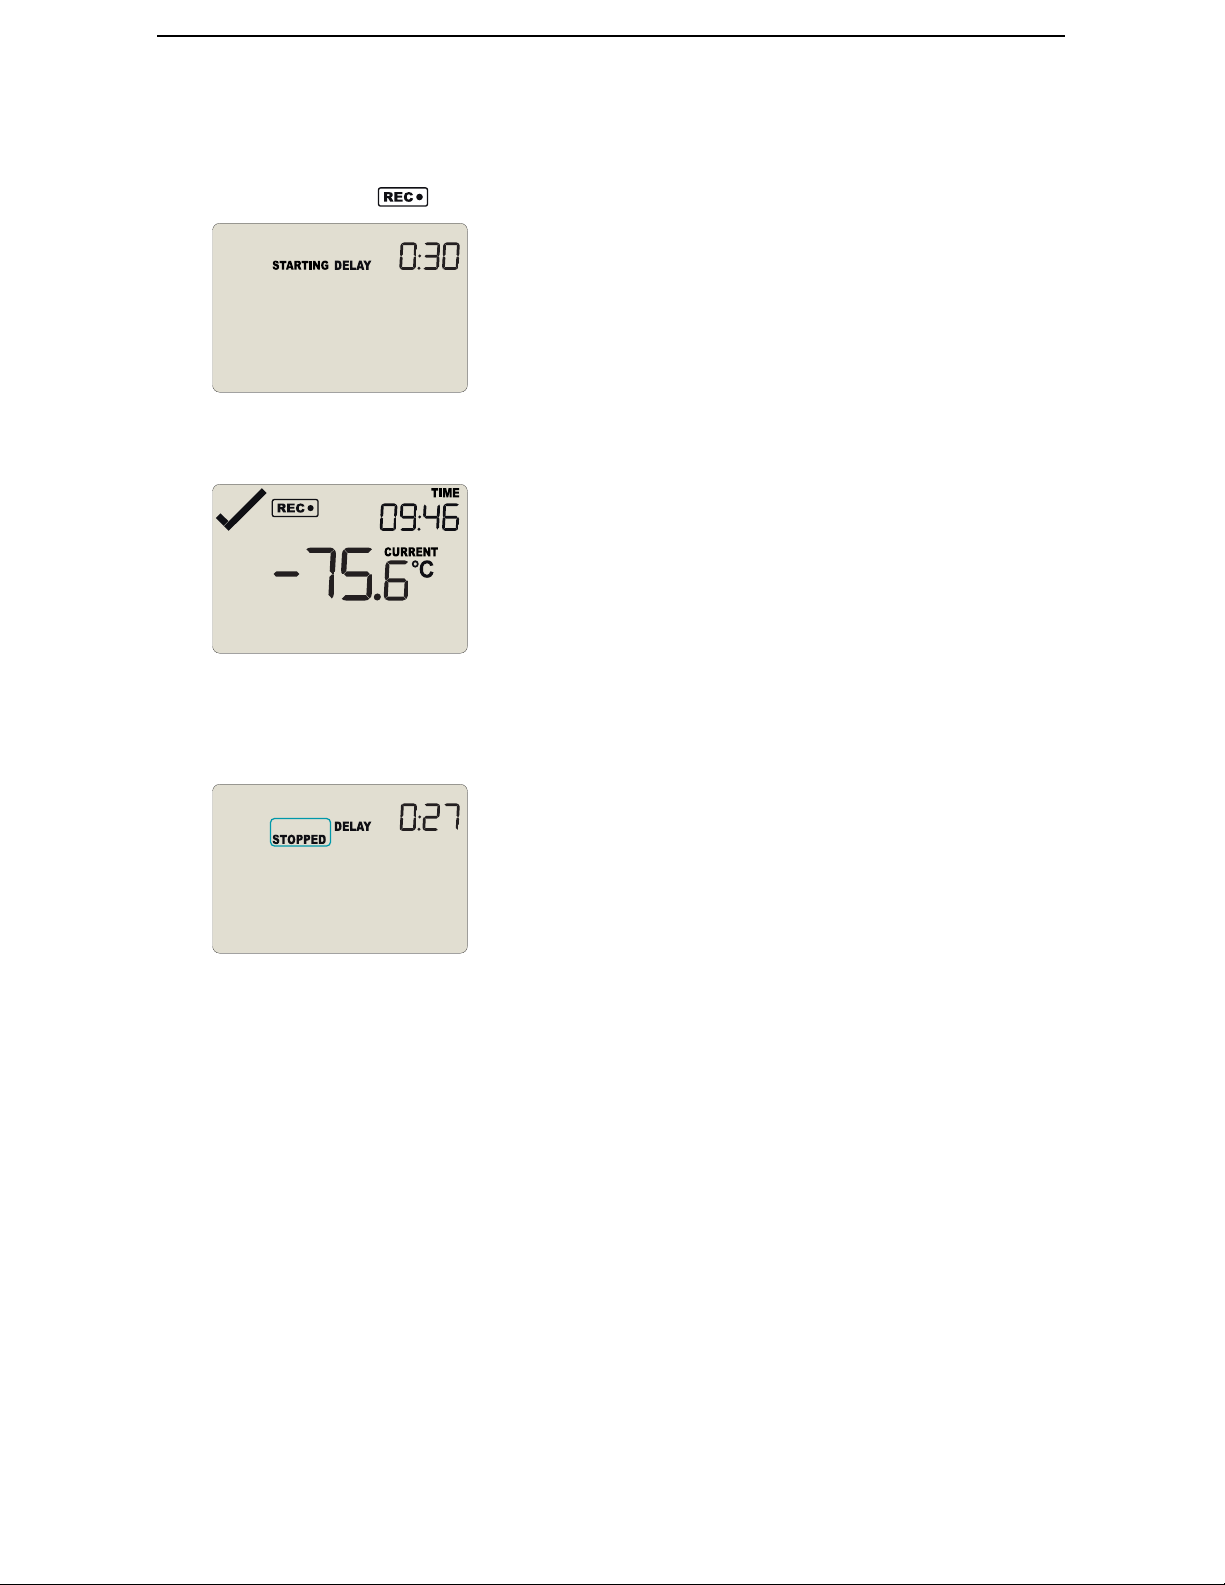
If the logger was configured for a push button start with a start delay , the word DELAY is
shown instead of the symbol once the start procedure has been completed.
The delay time is shown in hours and minutes. The time counts down and the TREL30-16
starts recording when it reaches 0:00.
The timer can be cancelled and the logger reset to READY.
While STARTING and DELAY are shown, press and hold the START/CLEAR/STOP button.
STOPPED will now show. Release the button when STARTING disappears.
STOPPED and DELAY will both disappear, and READY will show, together with the current
time, and the logger can now be started again as normal.
The TREL30-16 will
l Release the button before STARTING disappears
l Keep holding the button until STOPPE D disappears
not
be reset if you:
Automatic date/time start
If you configured the TREL30-16 for a date/time start, it will start recording temperature
values as soon as the entered start time is reached. The logger will display the following if
a Date/Time Start has been chosen:
Find Quality Products Online at: [email protected]
www.GlobalTestSupply.com
Page 20
Starting the Logger TREL30-16 User Guide 22
Hibernating the logger using LogTag® Analyzer will abort any previously
configured Date/Time start.
Find Quality Products Online at: [email protected]
www.GlobalTestSupply.com
Page 21
During Recording TREL30-16 User Guide 23
During Recording
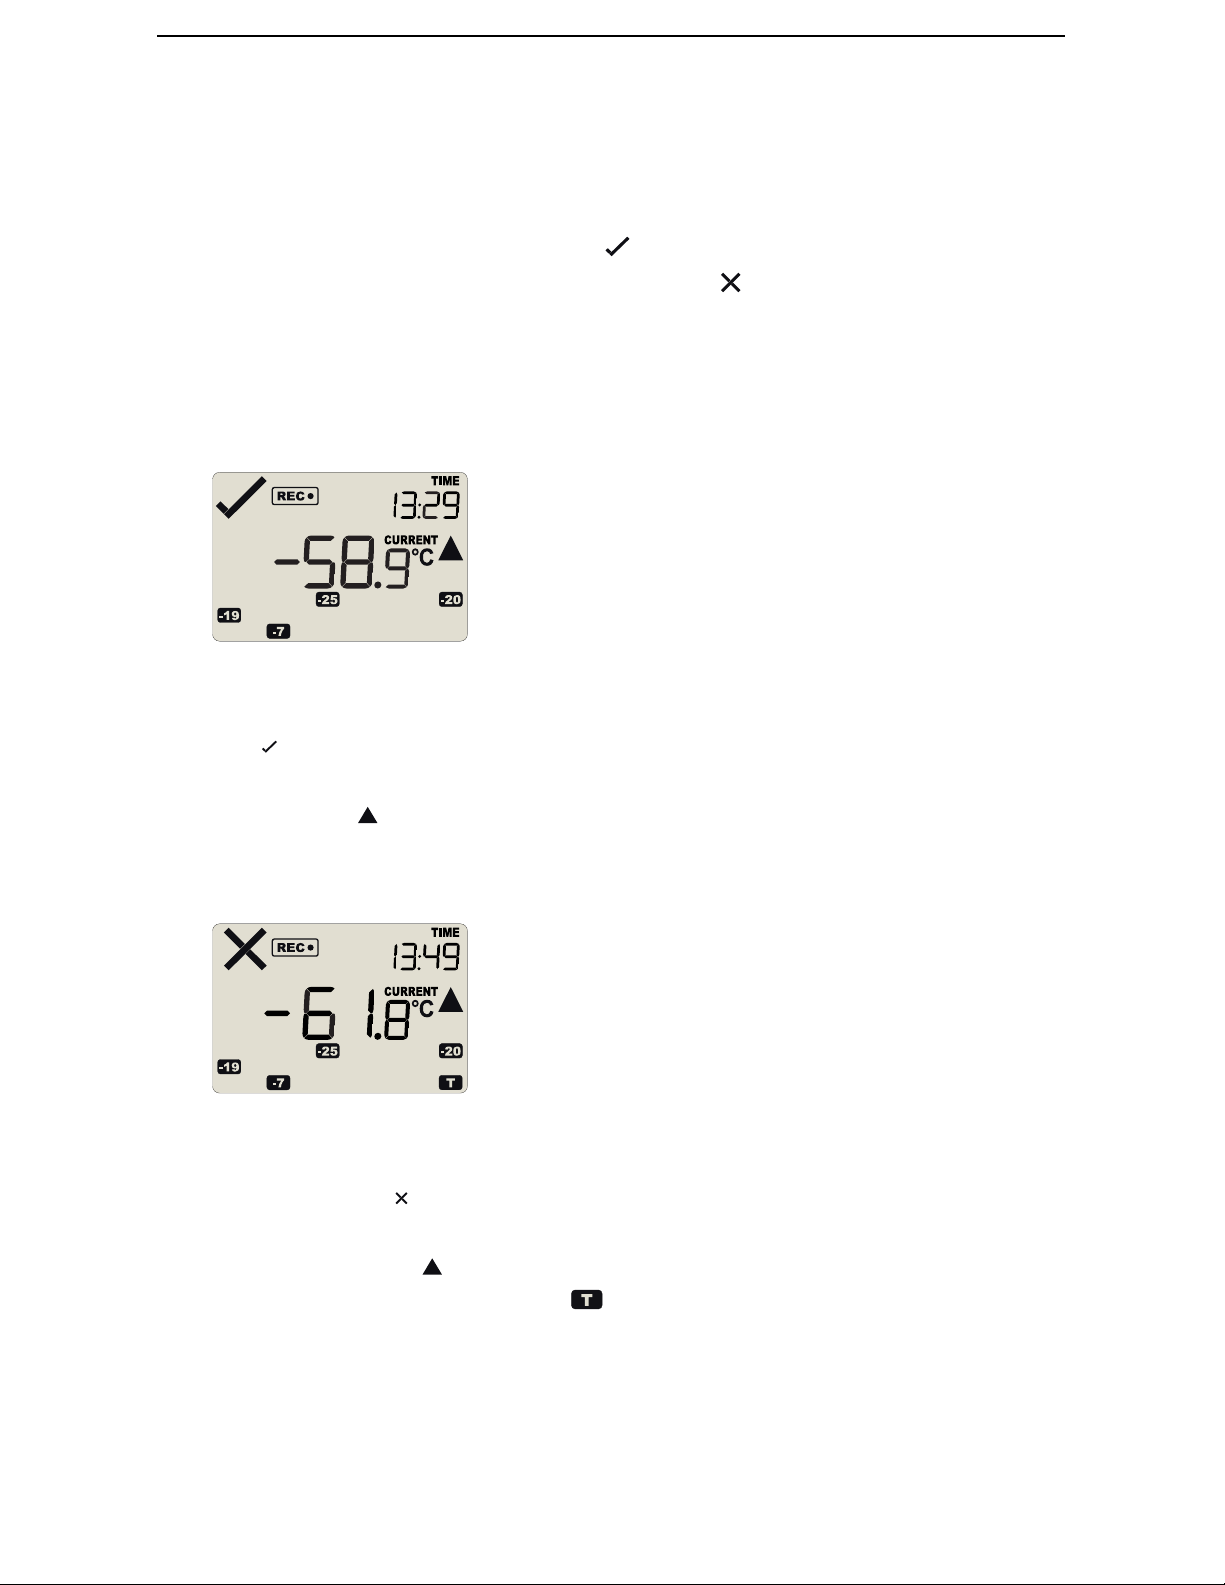
During normal operation the display shows the most recently recorded temperature. This
temperature is updated each time the logger records a reading. The current time is also
displayed (in 24 hour format). A tick symbol is shown as long as no alarm event has
occurred. If an alarm event is registered, a cross symbol is shown instead of the tick.
At the bottom of the display you can see an alarm day summary, where any days on which
an alarm was recorded are highlighted.
Following are some sample display screens:
At 1:29 pm the display shows the following:
l Alarm events were recorded 7, 19, 20 & 25 days ago.
l These alarms were cleared by an inspector, as the display currently shows the OK
tick ( ).
l The current temperature is over the upper alarm threshold, as indicated by the upper
alarm marker ( ).
l The duration, however, of this temperature excursion has not yet triggered an alarm.
At 1:49pm (20 minutes later) the display shows the following:
l The temperature has remained above the upper alarm threshold and has now
triggered an alarm event.
l The alarm symbol is shown to indicate an alarm event occurred.
l The current temperature is still over the upper alarm threshold, as indicated by the
upper alarm marker ( ).
l The day marker for the current day ( ) is shown.
Find Quality Products Online at: [email protected]
www.GlobalTestSupply.com
Page 22
During Recording TREL30-16 User Guide 24
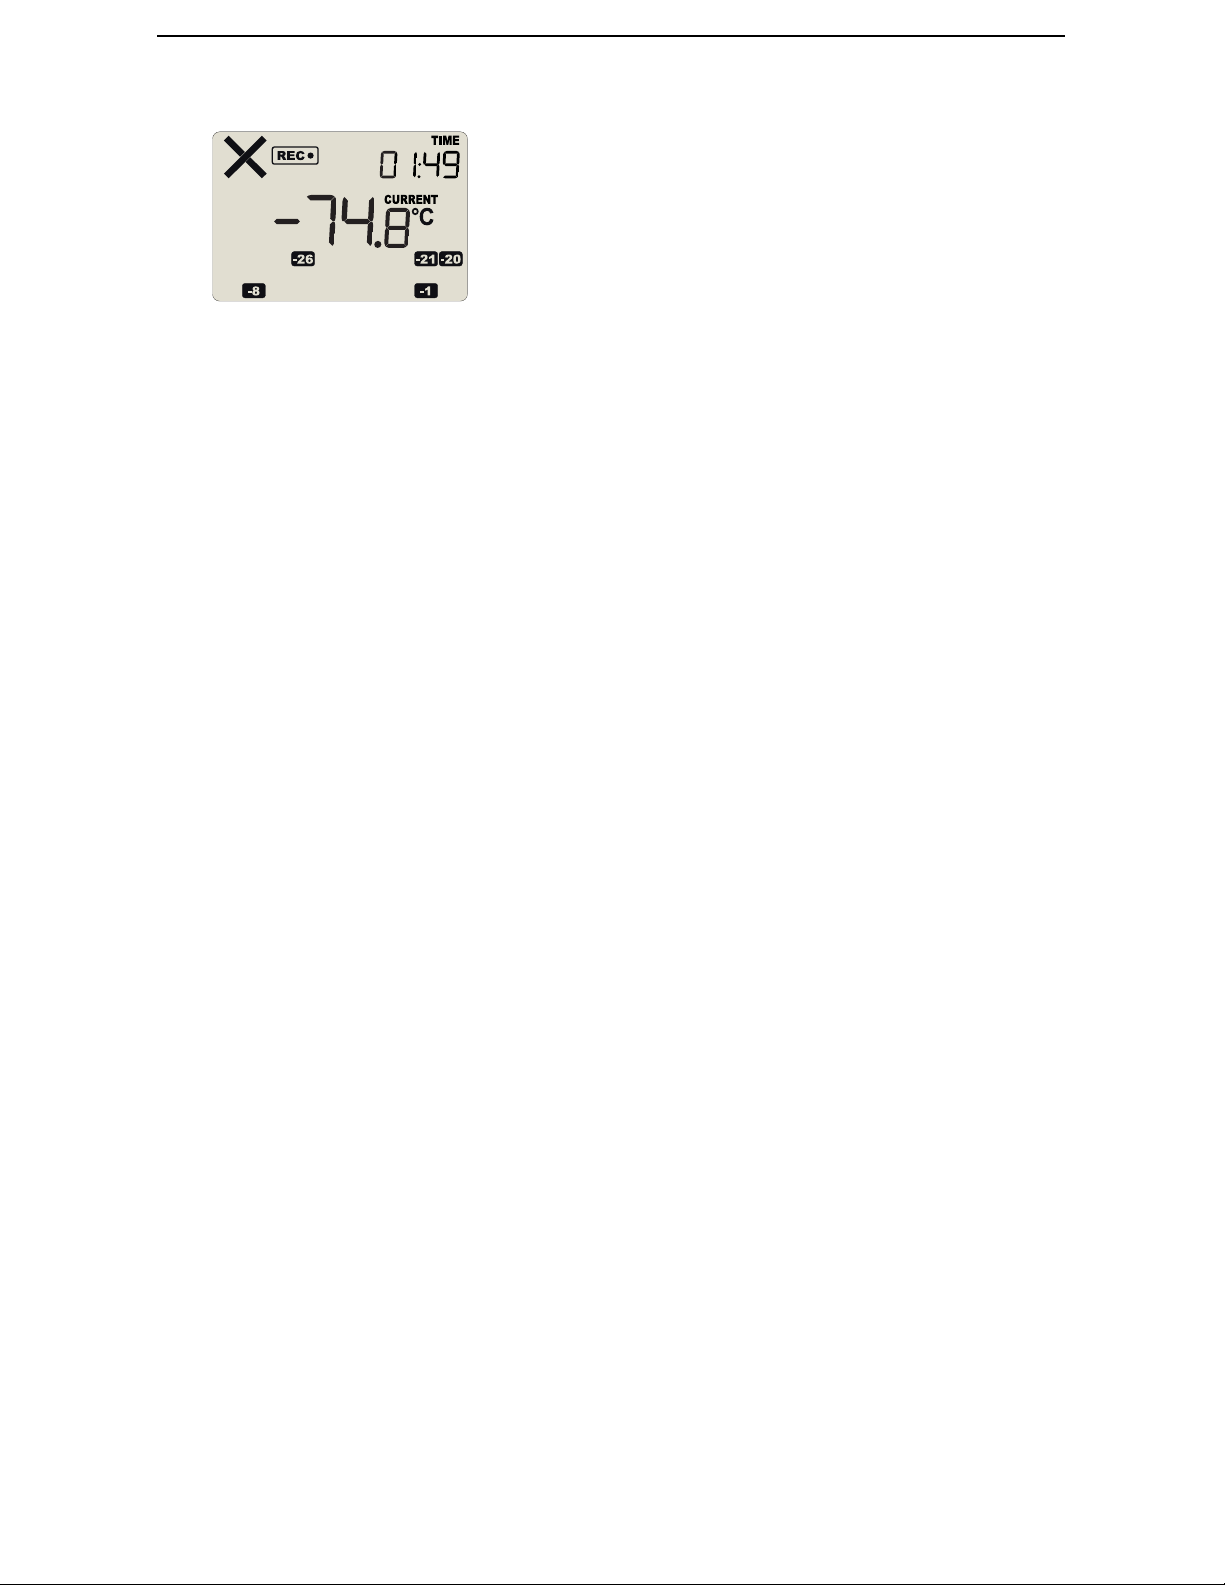
At 1:49am on the next day the display shows the following:
l The temperature has returned to within the accepted range (none of the alarm
threshold markers are visible), but the alarm remains present, as it has not been
inspected and cleared.
l The day summary has shifted by 1 day as the display time has passed through
midnight (00:00).
Marking a reading with an inspection mark
When you press the REVIEW/MARK button while the TREL30-16 is recording, the next
reading taken will be identified in the downloaded data with an inspection mark.
If the Allow stopping with the Stop button feature is enabled, a mark will also be
registered when you press the REVIEW/MAR K button, but do not complete the process of
stopping the logger. An inspection mark will also be recorded if you clear an alarm.
Find Quality Products Online at: [email protected]
www.GlobalTestSupply.com
Page 23
During Recording TREL30-16 User Guide 25
Clearing an Alarm
During configuration with LogTag® Analyzer you can allow users to clear an alarm on the
display. This is a useful function for an inspector, so repeated alarms can be recognized
easier.
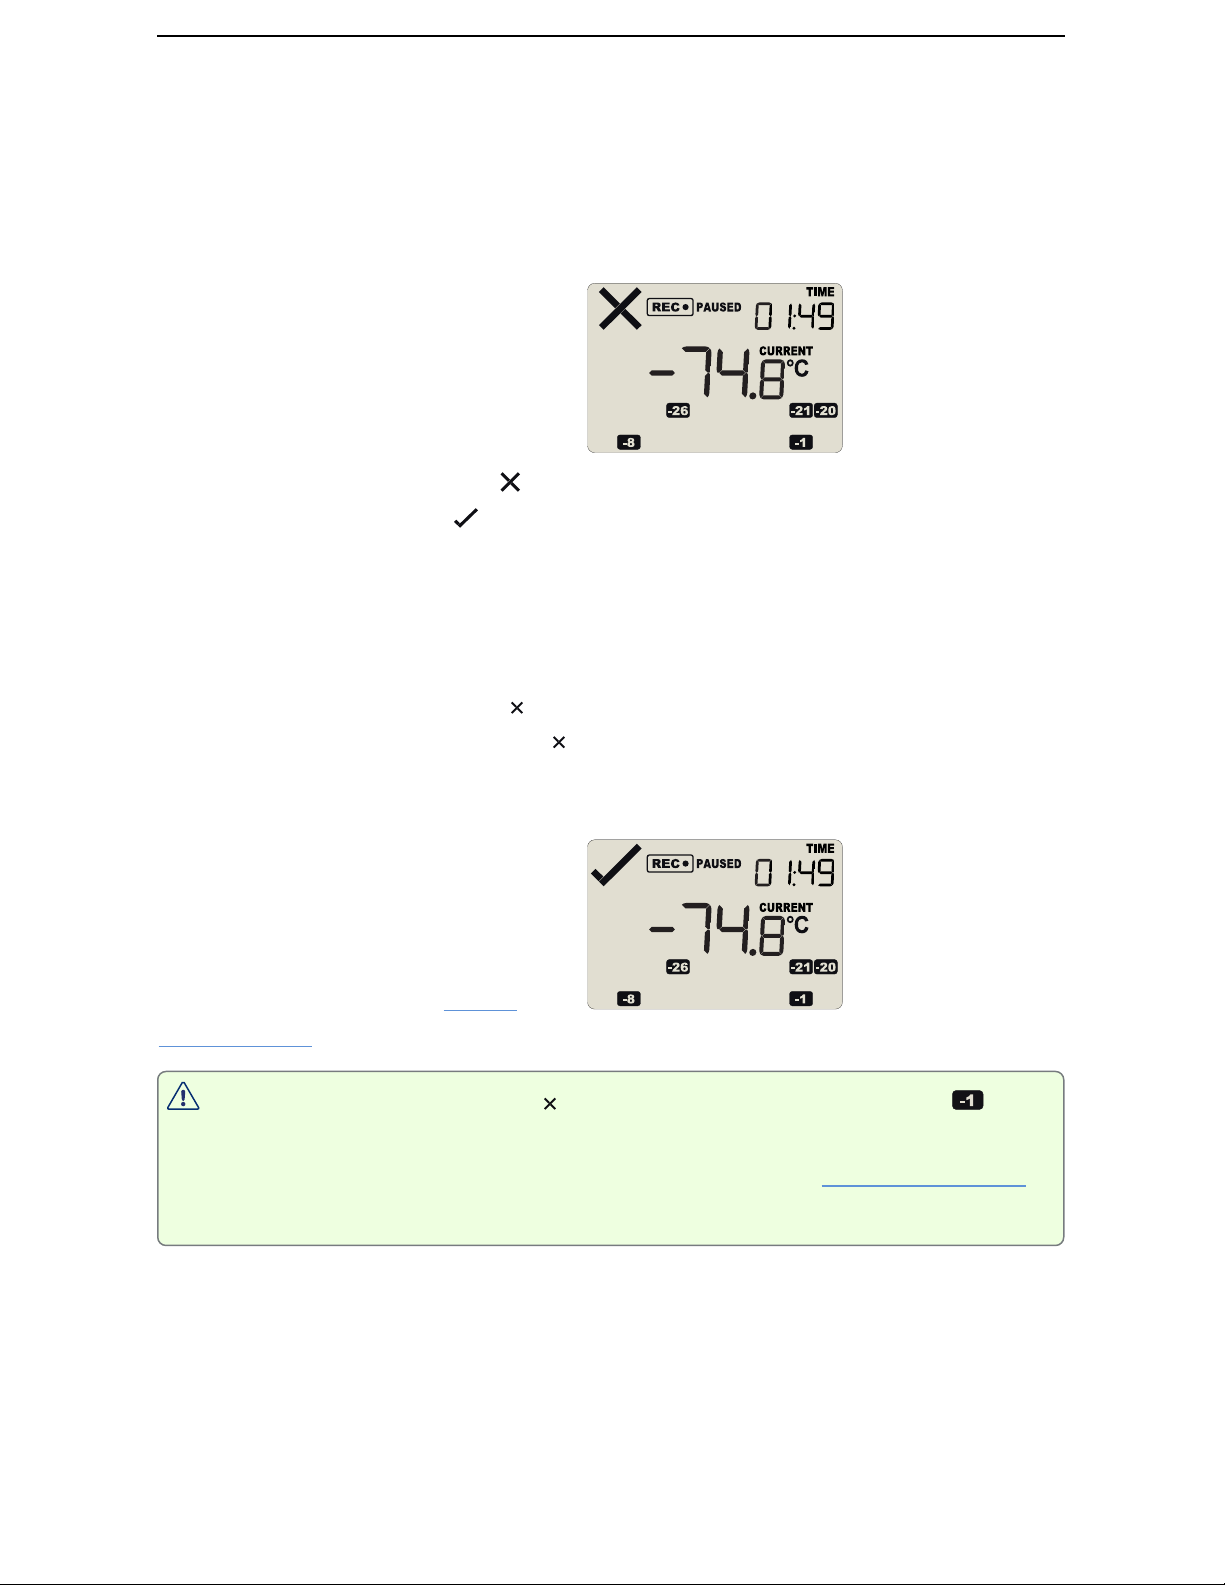
This display screen shows an existing
alarm that occurred yesterday, but has
not yet been cleared.
To clear an alarm, press and hold the
REVIEW/MAR K button.
After approx. 2 seconds the cross
will be replaced with the tick .
Release the button when the tick
appears. The normal recording display
is shown.
The alarm will
l Release the button before the symbol remains permanently on
l Keep holding the button after the symbol remains permanently on for more
than 2 seconds
In this example the paused function
was activated, and the paused symbol
is shown on the display. For more
information about paused readings
please see the section about Paused
Readings below.
Note: Only the Alarm Indicator ( ) can be cleared! The day alarm marker ( in the
above example) remains shown, as it is part of the statistic summary. Clearing an
alarm also does not reset any of the delay values. Please see Alarm Configuration
not
be cleared if you:
for additional information.
Paused Readings
During configuration of the TREL30-16 you can set the option to ignore up to 15 readings
for alarm and statistics calculations after either button is pressed. The readings are still
shown on the graph and in the data listing, but they are labelled as paused, and their
Find Quality Products Online at: [email protected]
www.GlobalTestSupply.com
Page 24
During Recording TREL30-16 User Guide 26
value is ignored when determining alarm trigger conditions, minimum/maximum values
and other statistical calculations.
The Paused Readings feature is useful, for example, when you need to temporarily
remove the probe from the monitored location to inspect goods, but you do not
wish to trigger an alarm as a result of you handling the probe.
It allows the logger to acclimatize to the environment
again, before further readings are processed.
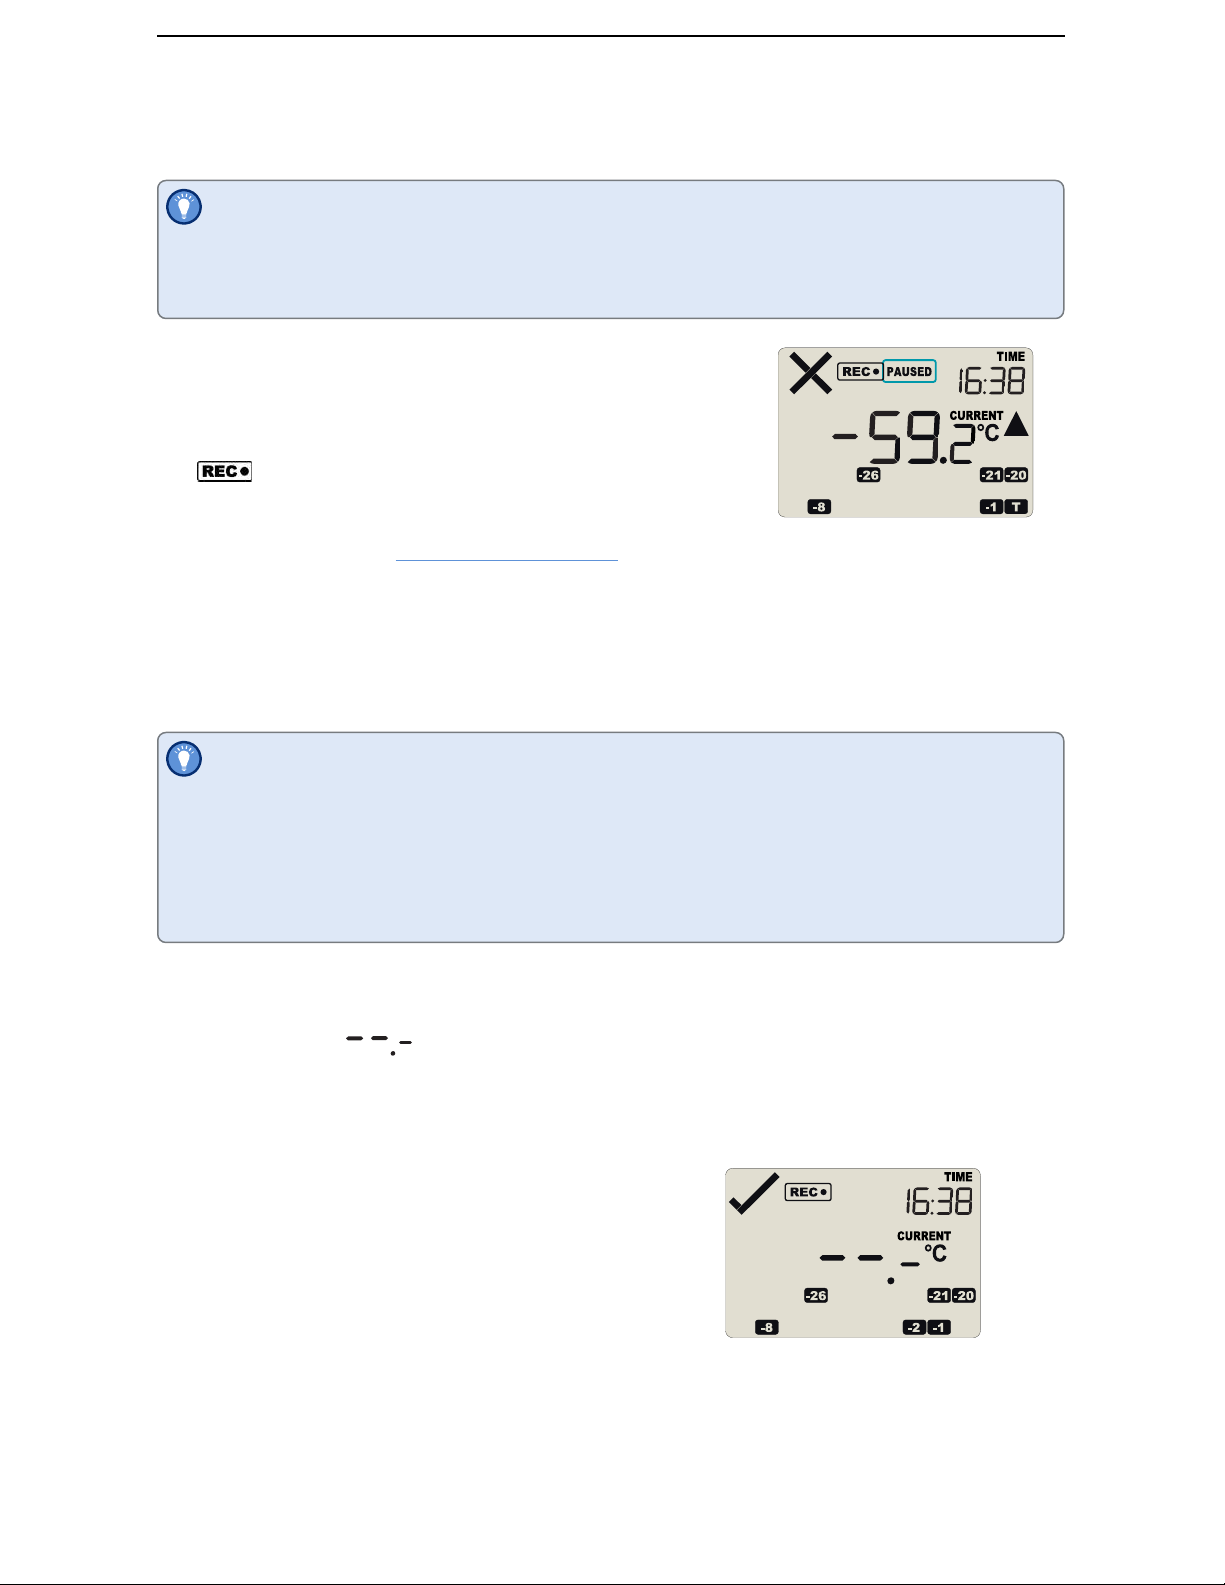
After a button press the display shows PAUSED next to
the symbol. PAUSED will turn off as soon as the last
ignored reading has been recorded.
The option is set in the Advanced Settings tab during
configuration with LogTag® Analyzer and is expressed in
number of readings after the last button press.
Paused readings are specially marked in the graph and data
listings.
How long PAUSE D is displayed depends on when between readings you press the
button. It will show longer, if the button is pressed just after the logger takes a
reading, but shorter if you press the button just before. For example, if you
configure a logging interval of 10 minutes and 2 paused readings, the time P AUSED
is shown could be as short as 10 minutes, but as long as 20 minutes.
Probe is disconnected
The display shows instead of a temperature value if the logger's remote
temperature probe is disconnected. This function is useful if the probe is permanently
mounted, but you wish to take the TREL30-16 to a computer for downloading its data.
Any values recorded during this time will not be
taken into account when calculating statistics values
or alarms.
If, for example, the temperature was above 0°C for
12 hours (which would normally trigger an alarm
event), but the probe was disconnected for 3 hours
during this time, no alarm would be generated.
Find Quality Products Online at: [email protected]
www.GlobalTestSupply.com
Page 25

During Recording TREL30-16 User Guide 27
After downloading the TREL30-16 with LogTag® Analyzer, any readings taken while the
probe is disconnected are shown as --.- in the data list. The chart in LogTag® Analyzer
will show a gap during this period.
If the probe was disconnected for a complete day, the minimum and maximum statistics
for that day will show on the display and --.- in the list.
Power Save
When Power Save is enabled, the display will automatically switch off if none of the
buttons have been pressed for 30 seconds.
This function is appropriate in applications where you don't need to look at the display
frequently, such as in transit monitoring applications, as the logger uses less battery
power when the display is not turned on.
Pressing any button will re-activate the display.
Power save is enabled or disabled when configuring the TREL30-16 via LogTag® Analyzer
in the Advanced Settings tab.
Find Quality Products Online at: [email protected]
www.GlobalTestSupply.com
Page 26
During Recording TREL30-16 User Guide 28
Total Number of Days Statistics Collected
The logger can be configured to show the total number of days for which statistics were
collected. This feature is enabled when configuring the TREL30-16 via LogTag® Analyzer
and can be located in the Advanced Options dialogue (see Advanced Configuration
Settings on page14).
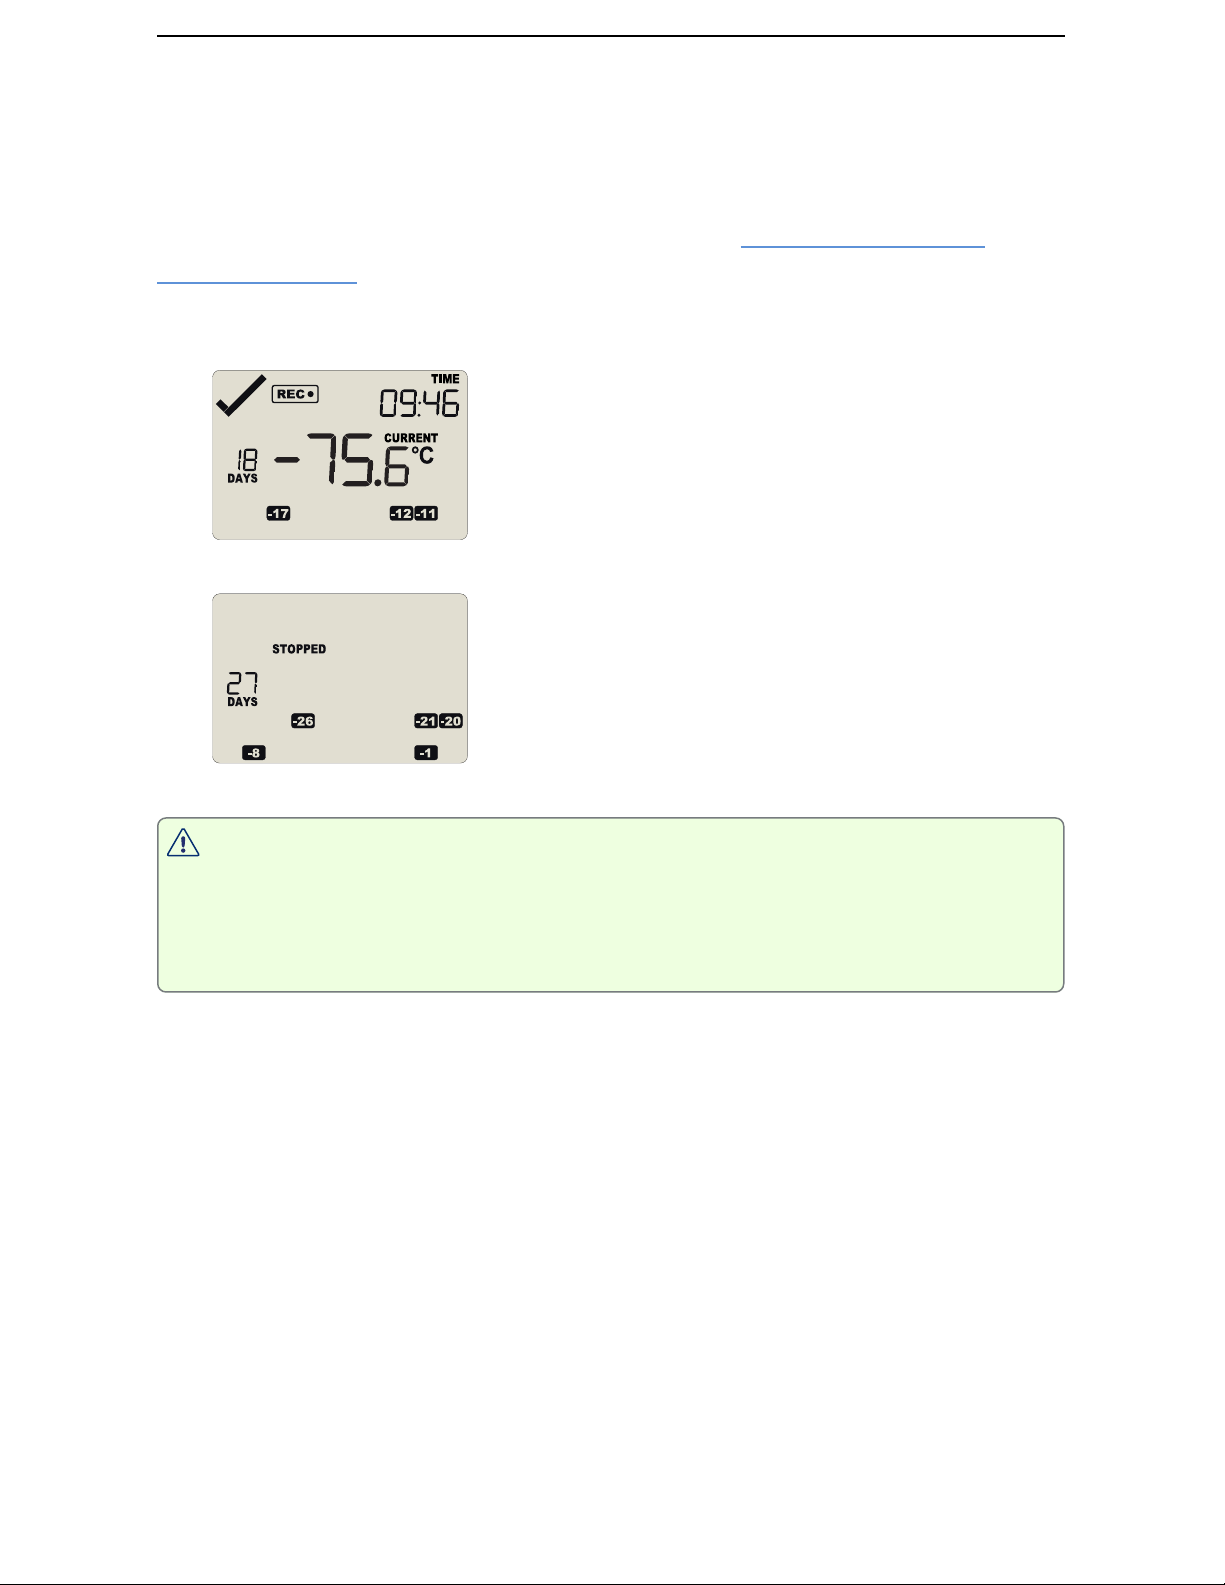
When enabled, the total number of days for which statistics were collected are shown on
both the Recording Display and the Stopped Display.
Figure 4: TREL30-16 recording, showing ‘18’ days of data has been collected.
Figure 5: TREL30-16 stopped, showing ‘27’ days of data has been collected.
Note, this is not always the number of days the logger has collected data.
Depending on the sampling interval the logger can hold more than 30 days of
temperature readings, but since the maximum number of days for which statistics
can be collected is 30, the highest number that can be shown here is 30.
Find Quality Products Online at: [email protected]
www.GlobalTestSupply.com
Page 27
Reviewing Day Statistics directly on the
TREL30-16
TREL30-16 User Guide 29
Reviewing Day Statistics directly on the TREL30-16
Historic statistics data can be accessed by pressing the REVIEW/MAR K button .
You can review the data regardless of whether the logger is still recording, or has already
stopped.
Following are some sample display screens you might see during a statistics review. All
display screens are based on the alarm settings made in Alarm Configuration Options on
page13:
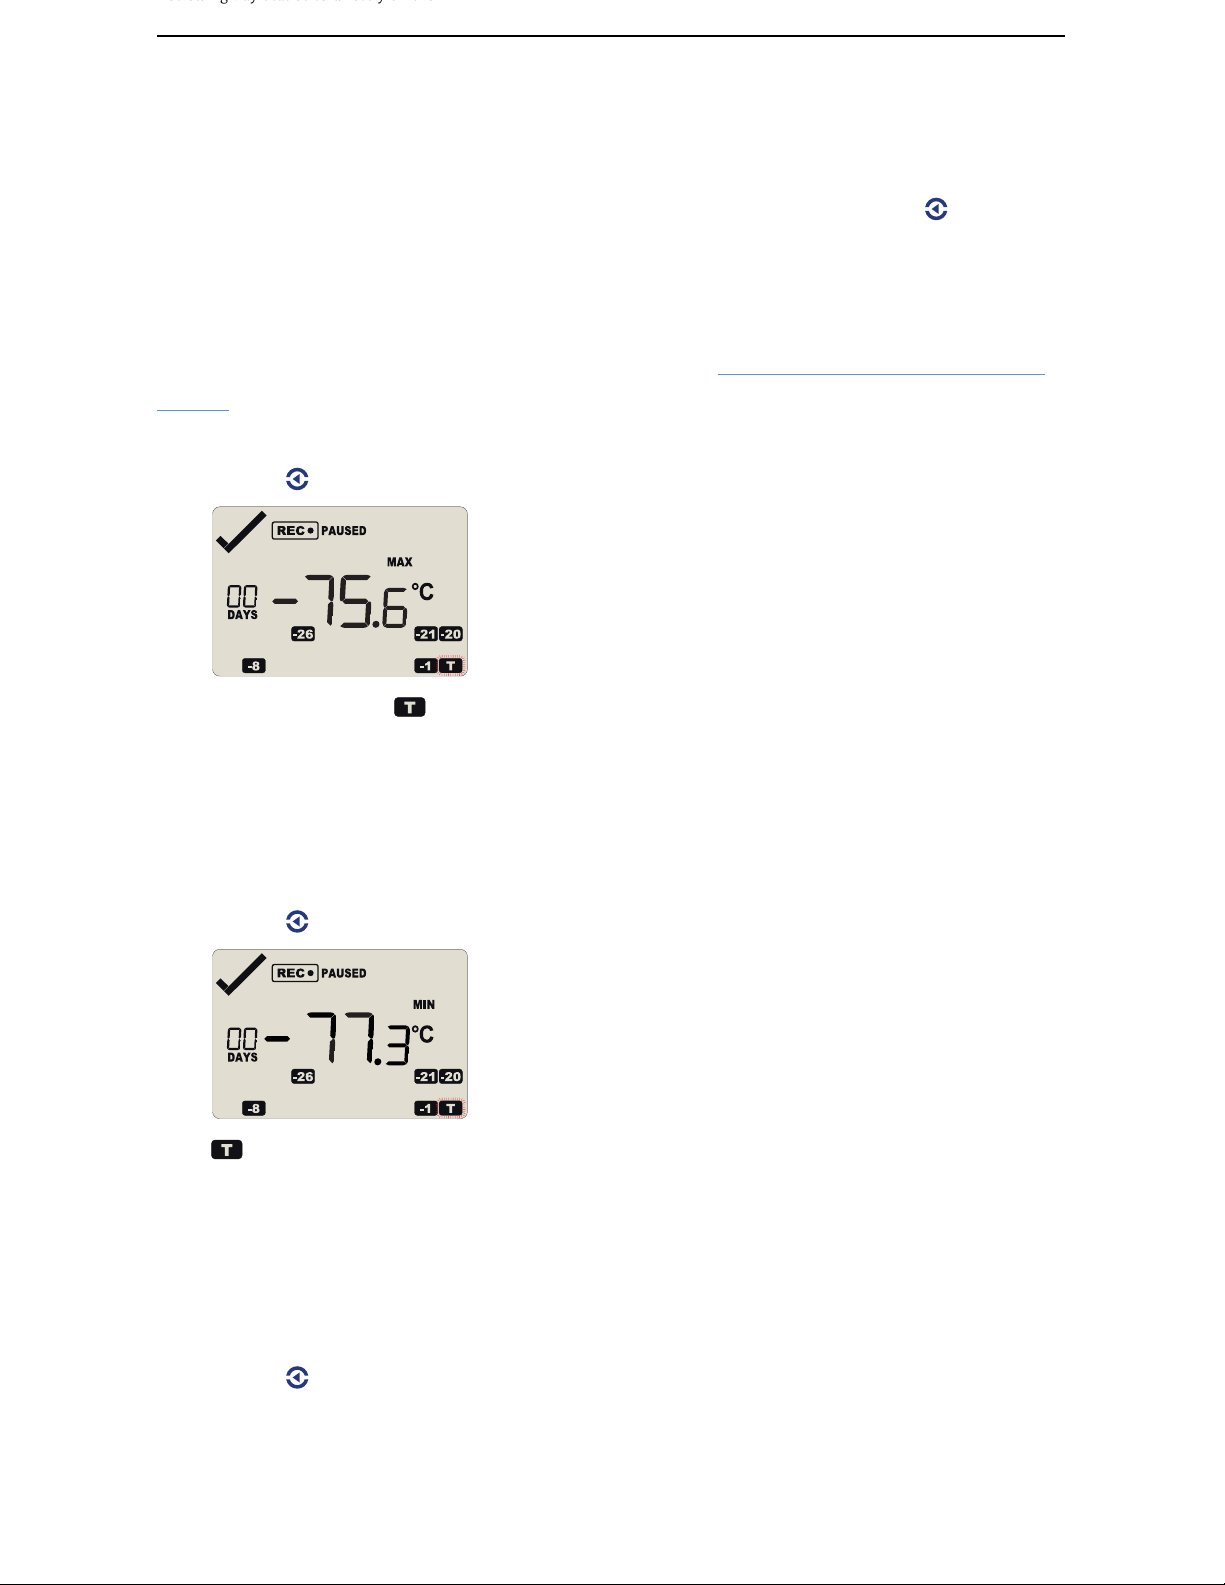
Today's data
Pressing the button displays the current day’s maximum statistic:
l The Today marker flashes and 00 DAYS is shown to indicate that today's data is
being displayed.
l Today, no temperature values were recorded above the upper alarm threshold, and no
alarm event was generated.
l The maximum temperature recorded today was -75.6°C.
l The paused function is enabled.
Pressing the button again displays the current day’s minimum statistic:
l still flashes and 00 DAYS is still shown, as the same day's data (today) is being
displayed.
l Today, no temperature values were recorded below the lower alarm threshold, and no
alarm event was generated.
l The minimum temperature recorded today was -77.3°C.
Yesterday's data
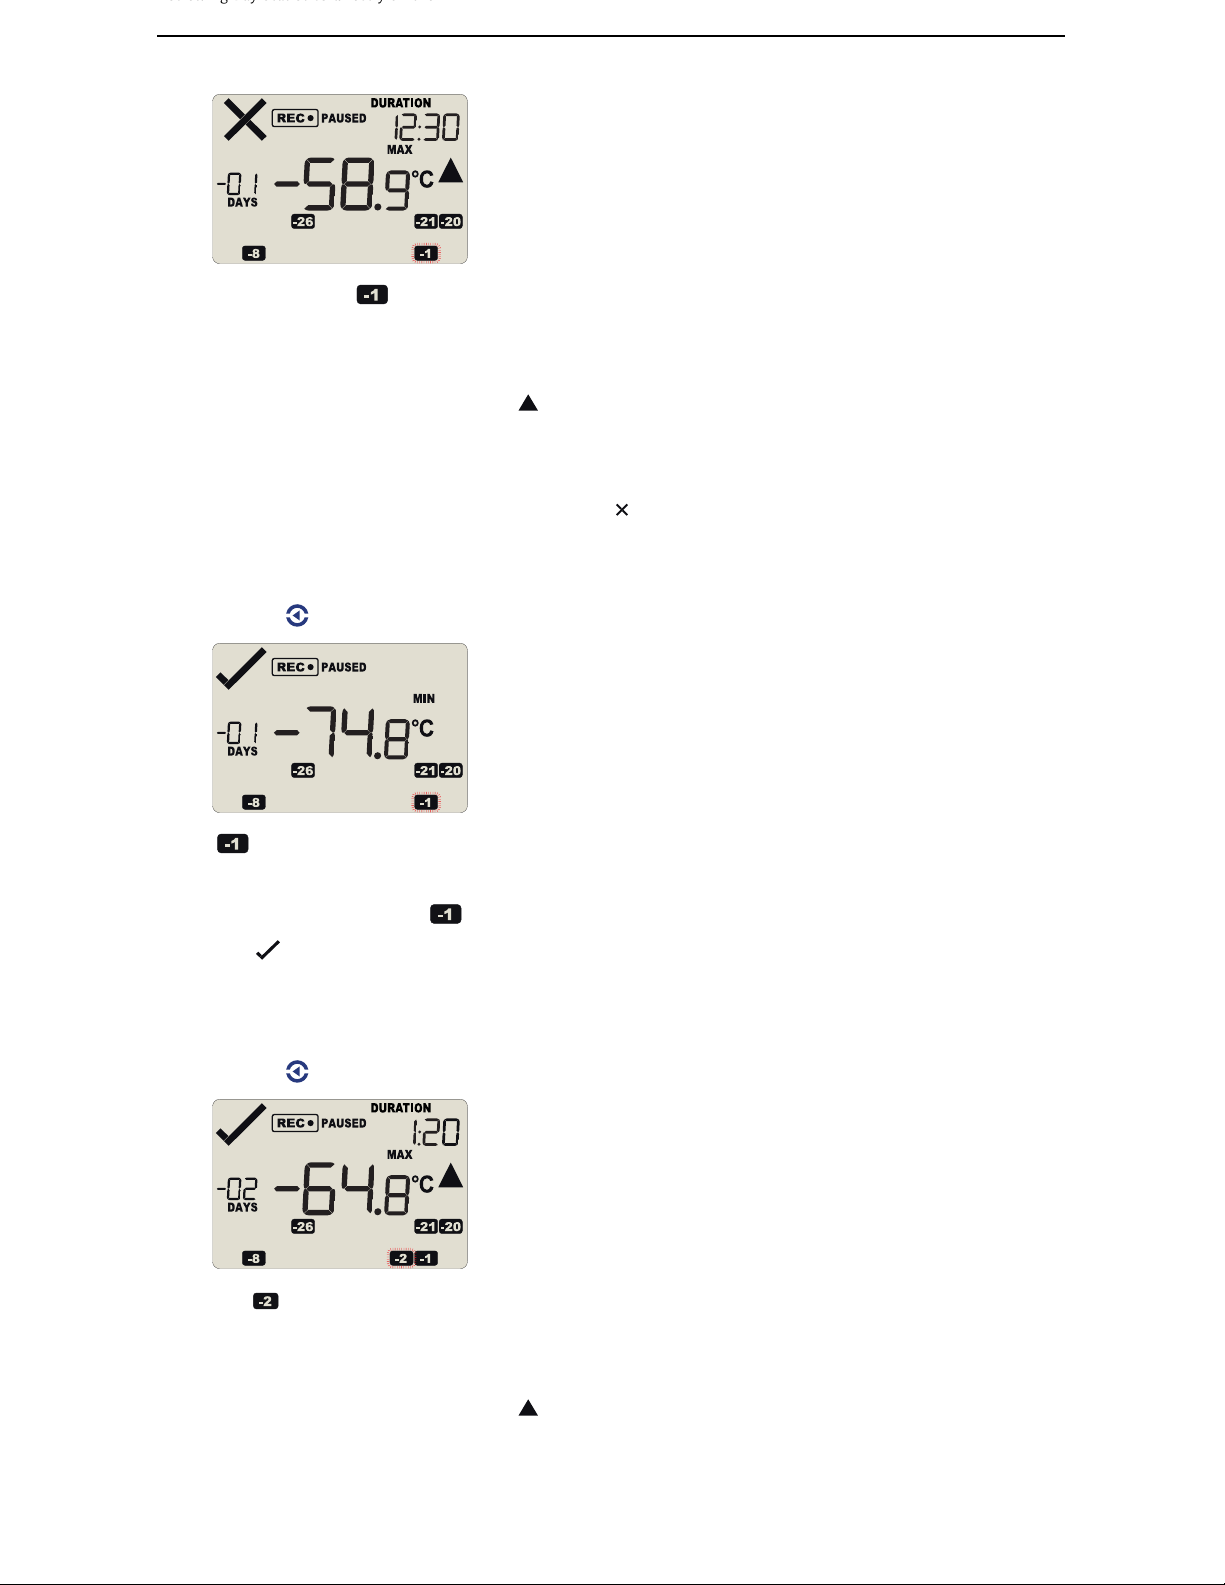
Pressing the button now displays yesterday’s maximum statistic:
Find Quality Products Online at: [email protected]
www.GlobalTestSupply.com
Page 28
Reviewing Day Statistics directly on the
TREL30-16
TREL30-16 User Guide 30
l The -1 marker flashes and -01 DAYS is shown to indicate that yesterday's data is
being displayed.
l Yesterday, recordings above the upper threshold were recorded, indicated by the
upper alarm threshold marker .
l the duration value shows the amount of time recorded above the limit yesterday,
which was 12 hours 30 minutes.
l an alarm was triggered, indicated by the , as this duration was longer than the
allowed time above the threshold.
l The maximum temperature recorded yesterday was -58.9°C.
Pressing the button now displays yesterday’s minimum statistic:
l still flashes and -01 DAYS still shows, as we are still looking at yesterday's data.
l Yesterday, no temperature values were recorded below the lower alarm threshold.
The alarm for the day was generated by the upper alarm, not by the lower alarm,
so a is displayed in the minimum statistics.
l The minimum temperature recorded yesterday was -74.8°C.
Data from the day before yesterday
Pressing the button now displays the maximum statistic from two days ago:
l The flashes and -02 DAYS is shown to indicate that the data being displayed is
from two days ago.
l Two days ago recordings above the upper threshold were recorded, indicated by the
upper alarm threshold marker .
Find Quality Products Online at: [email protected]
www.GlobalTestSupply.com
Page 29
Reviewing Day Statistics directly on the
TREL30-16
TREL30-16 User Guide 31
l The duration was 1 hour 20 minutes, which was shorter than the allowed period, so
no alarm event was generated.
l The maximum temperature recorded on the day before yesterday was -64.8°C.
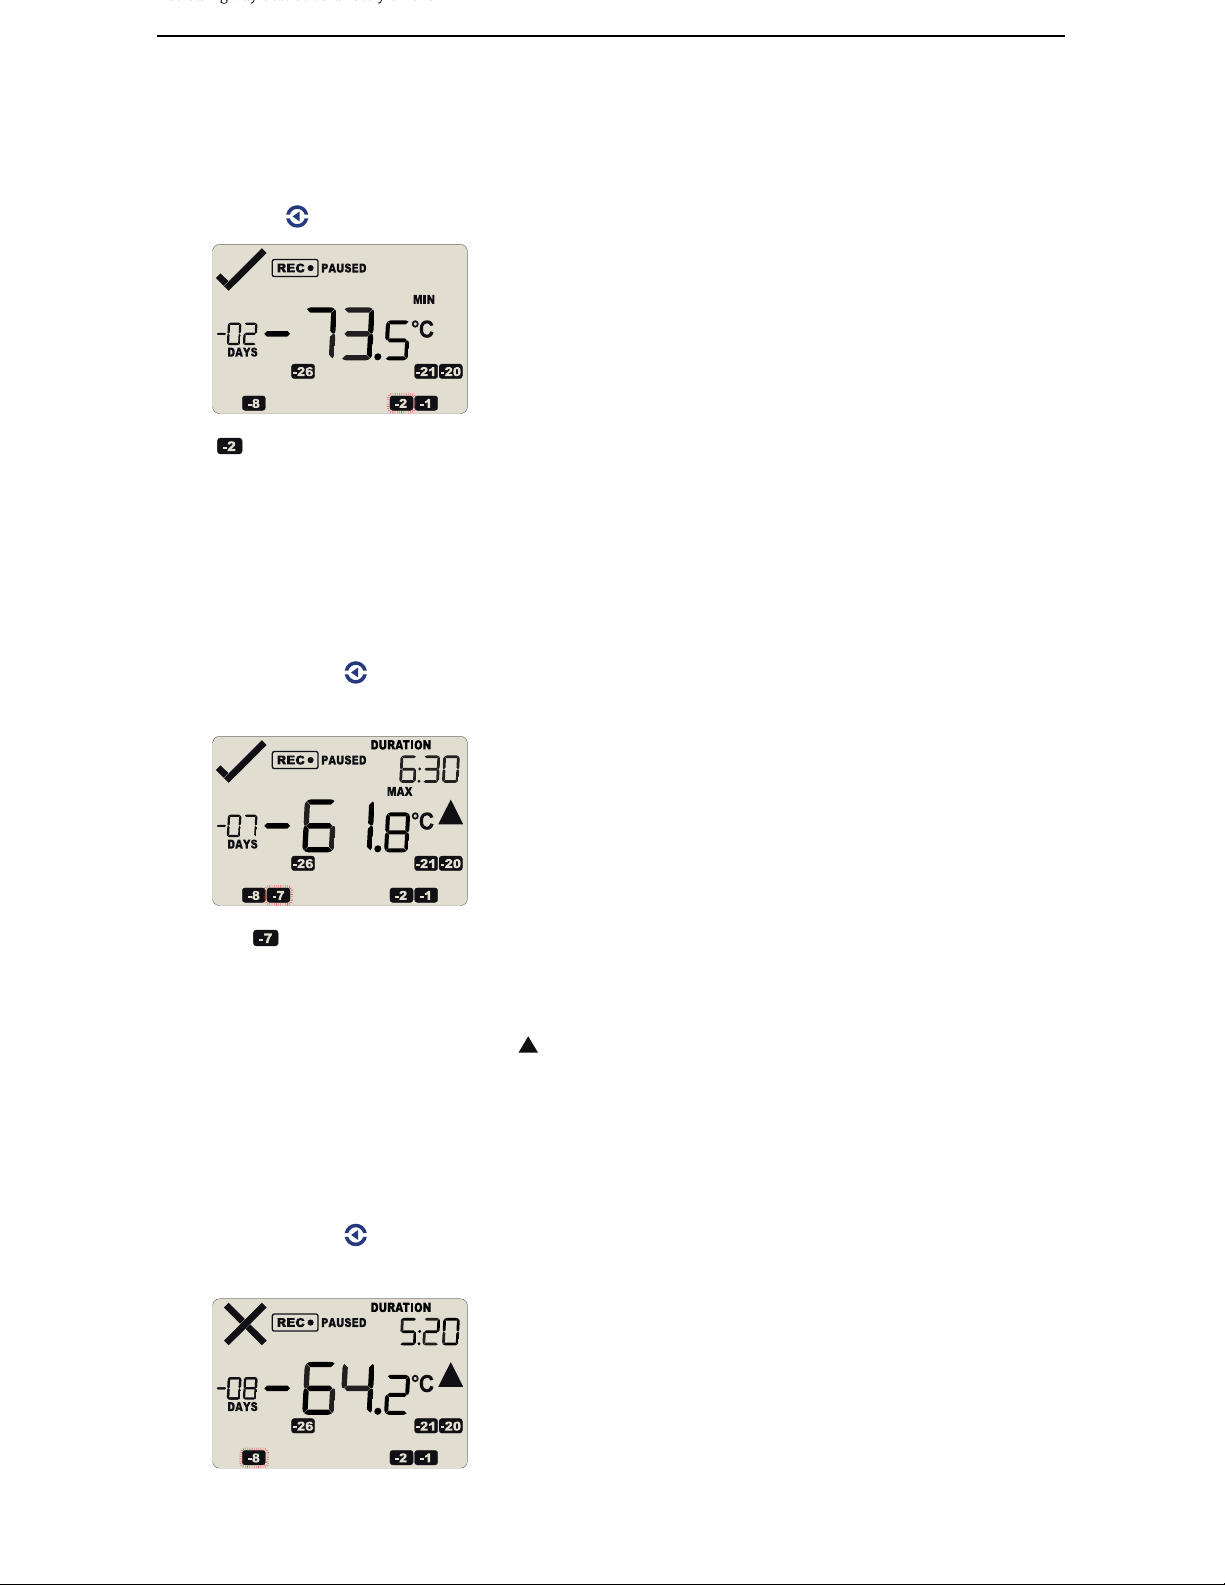
Pressing the button now displays the minimum statistic from two days ago:
l still flashes and -02 DAYS still shows, as we are still looking at the data from 2
days ago.
l Yesterday, no temperature values were recorded below the lower alarm threshold,
and no alarm event was generated.
l The minimum temperature recorded on the day before yesterday was -73.5°C.
Data from 7 days ago
After pressing the button for a few times (skipping days -3 to -6) the maximum
statistic from seven days ago is displayed:
l The flashes and -07 DAYS is shown to indicate that the data being displayed is
from seven days ago.
l Seven days ago recordings above the upper threshold were recorded, indicated by the
upper alarm threshold marker .
l The duration was 6 hour 30 minutes, which was shorter than the allowed period, so
no alarm event was generated.
l The maximum temperature recorded seven days ago was -61.8°C.
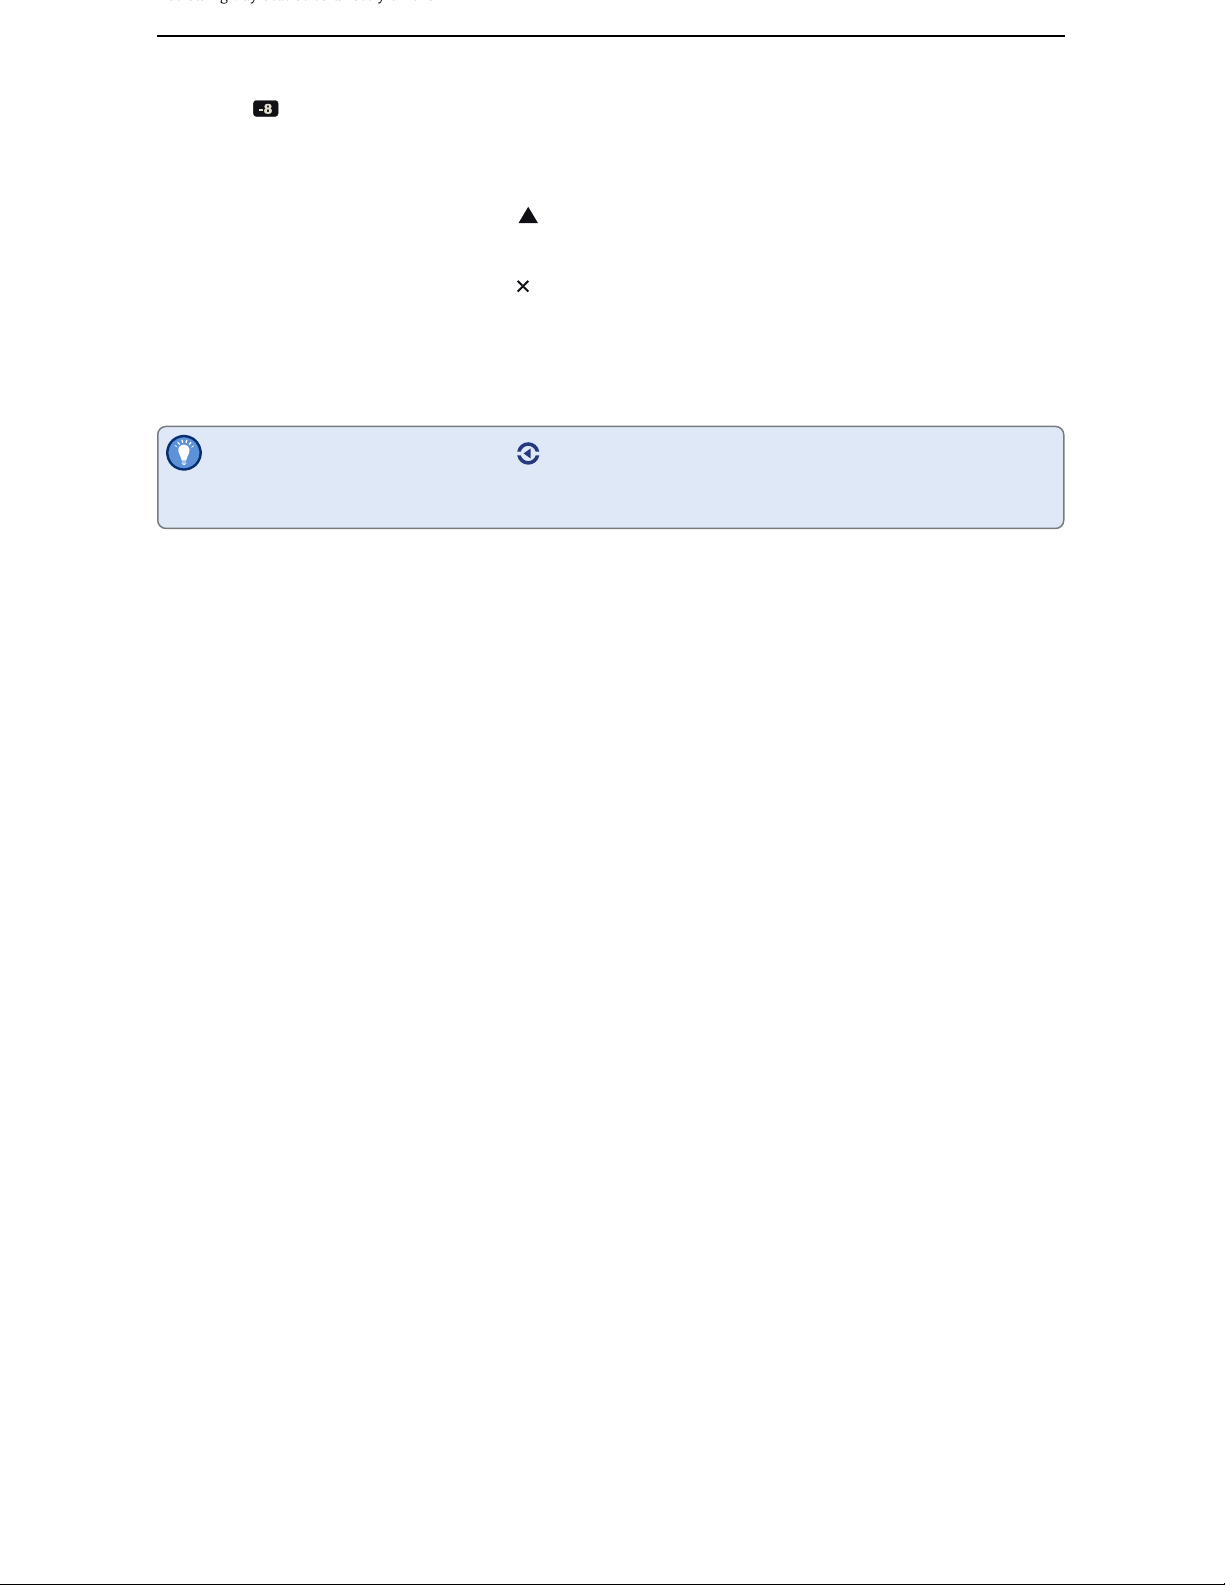
Data from 8 days ago
After pressing the button twice (skipping the minimum statistics for day -7) the
maximum statistic from eight days ago is displayed:
Find Quality Products Online at: [email protected]
www.GlobalTestSupply.com
Page 30
Reviewing Day Statistics directly on the
TREL30-16
TREL30-16 User Guide 32
l The flashes and -08 DAYS is shown to indicate that the data being displayed is
from eight days ago.
l Eight days ago recordings above the upper threshold were recorded, indicated by the
upper alarm threshold marker .
l The duration was 5 hour 30 minutes.
l An alarm event was generated . Neither duration from day -7 or -8 by itself would
cause an alarm event, however the combined duration is 10 hours 50 minutes, which
is more than the allowed 10 accumulative hours.
l The maximum temperature recorded eight days ago was -64.2°C.
Tip: Pressing and holding the button will get you back to the previous screen,
rather than advancing one screen.
Find Quality Products Online at: [email protected]
www.GlobalTestSupply.com
Page 31
Reviewing Day Statistics directly on the
TREL30-16
TREL30-16 User Guide 33
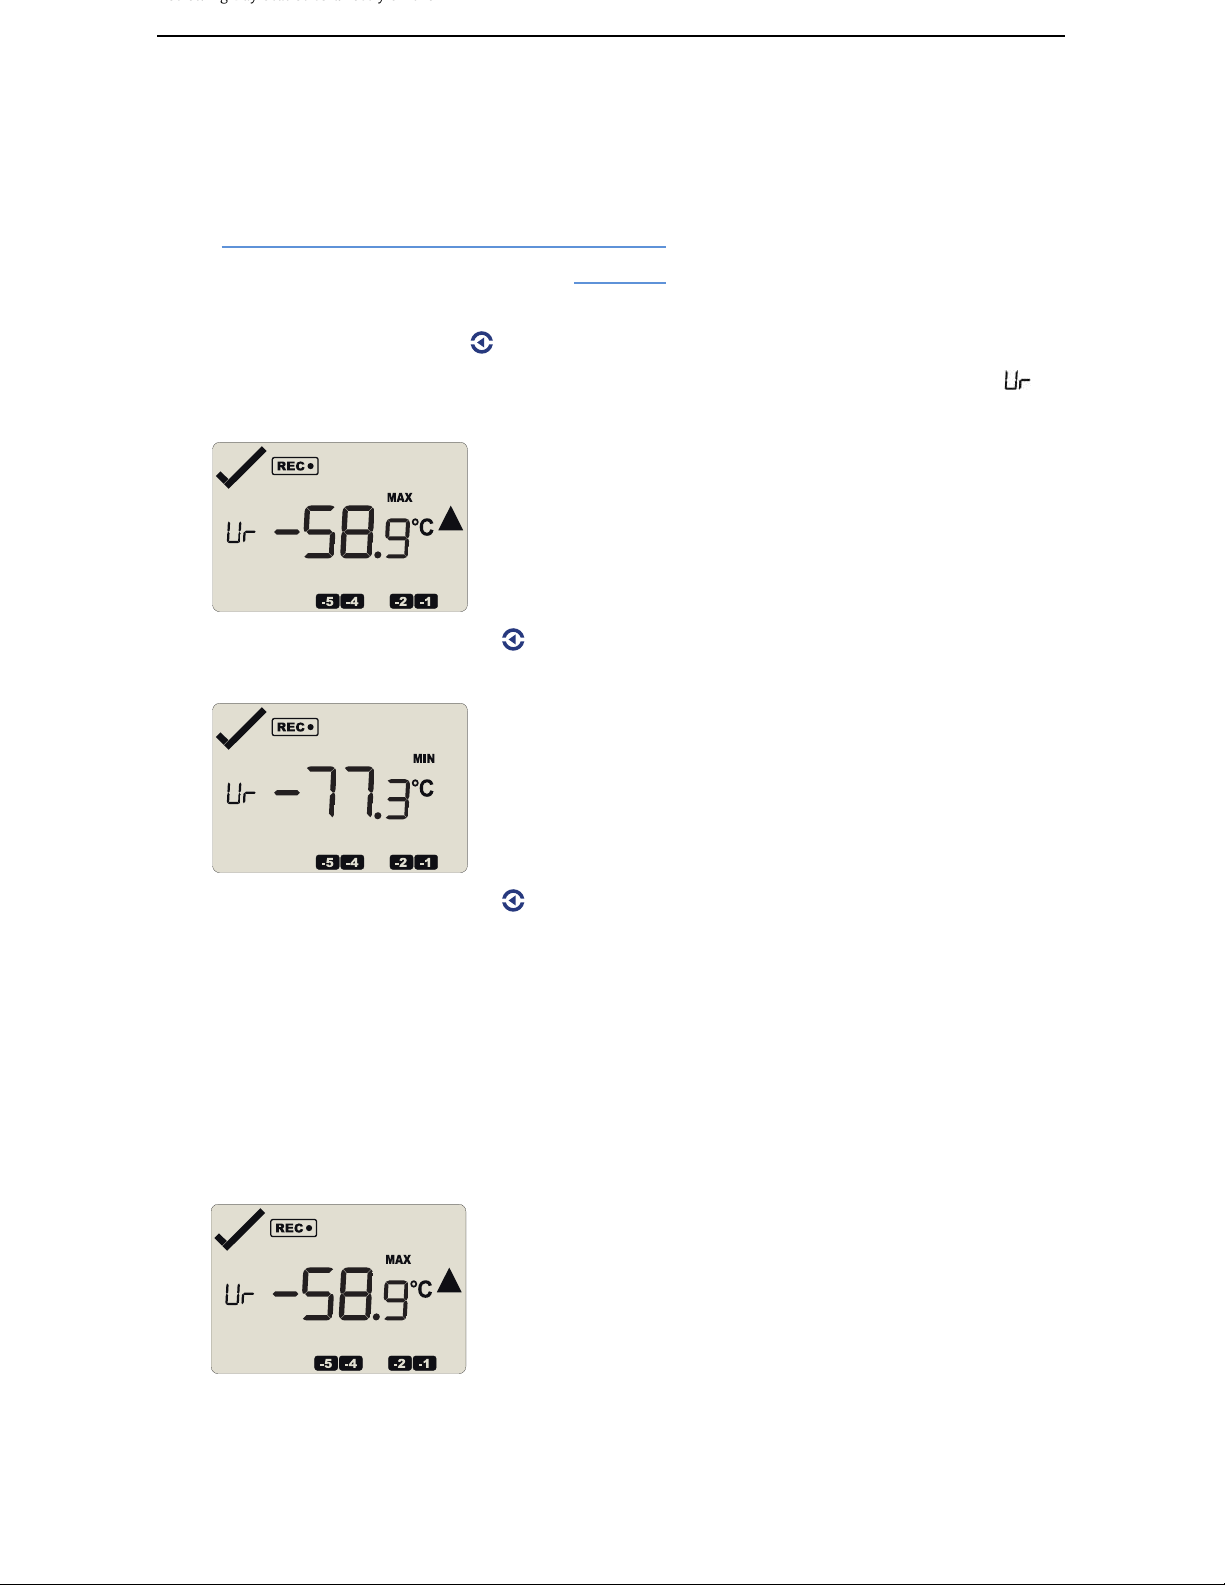
Trip Minimum/Maximum Temperatures
You can configure the TREL30-16 so it tracks the minimum and maximum temperatures
since it started logging. This feature needs to be enabled during configuration of the logger
in the Advanced Configuration Settings on page14. Once enabled, the minimum and
maximum values will be shown when the statistics are reviewed on the display, before any
of the day statistic are shown.
Press the REVIEW/MARK button . Instead of today's statistic data, the first screen shows
the maximum temperature recorded during the trip to date, identified by the symbol
(User resettable):
Pressing the REVIEW/MARK button again shows a screen with the minimum temperature
recorded during the trip to date.
Pressing the REVIEW/MARK button again will then show the first day summary screen,
and you can continue to review the remaining screens.
Resetting the Trip Minimum/Maximum Temperatures
The currently stored Min/Max temperature values can be reset at any time while the unit is
recording, but not once the unit has been stopped.
To reset the values, follow this procedure:
l Press REVIEW/MAR K to display the trip maximum temperature value.
Find Quality Products Online at: [email protected]
www.GlobalTestSupply.com
Page 32
Reviewing Day Statistics directly on the
TREL30-16
TREL30-16 User Guide 34
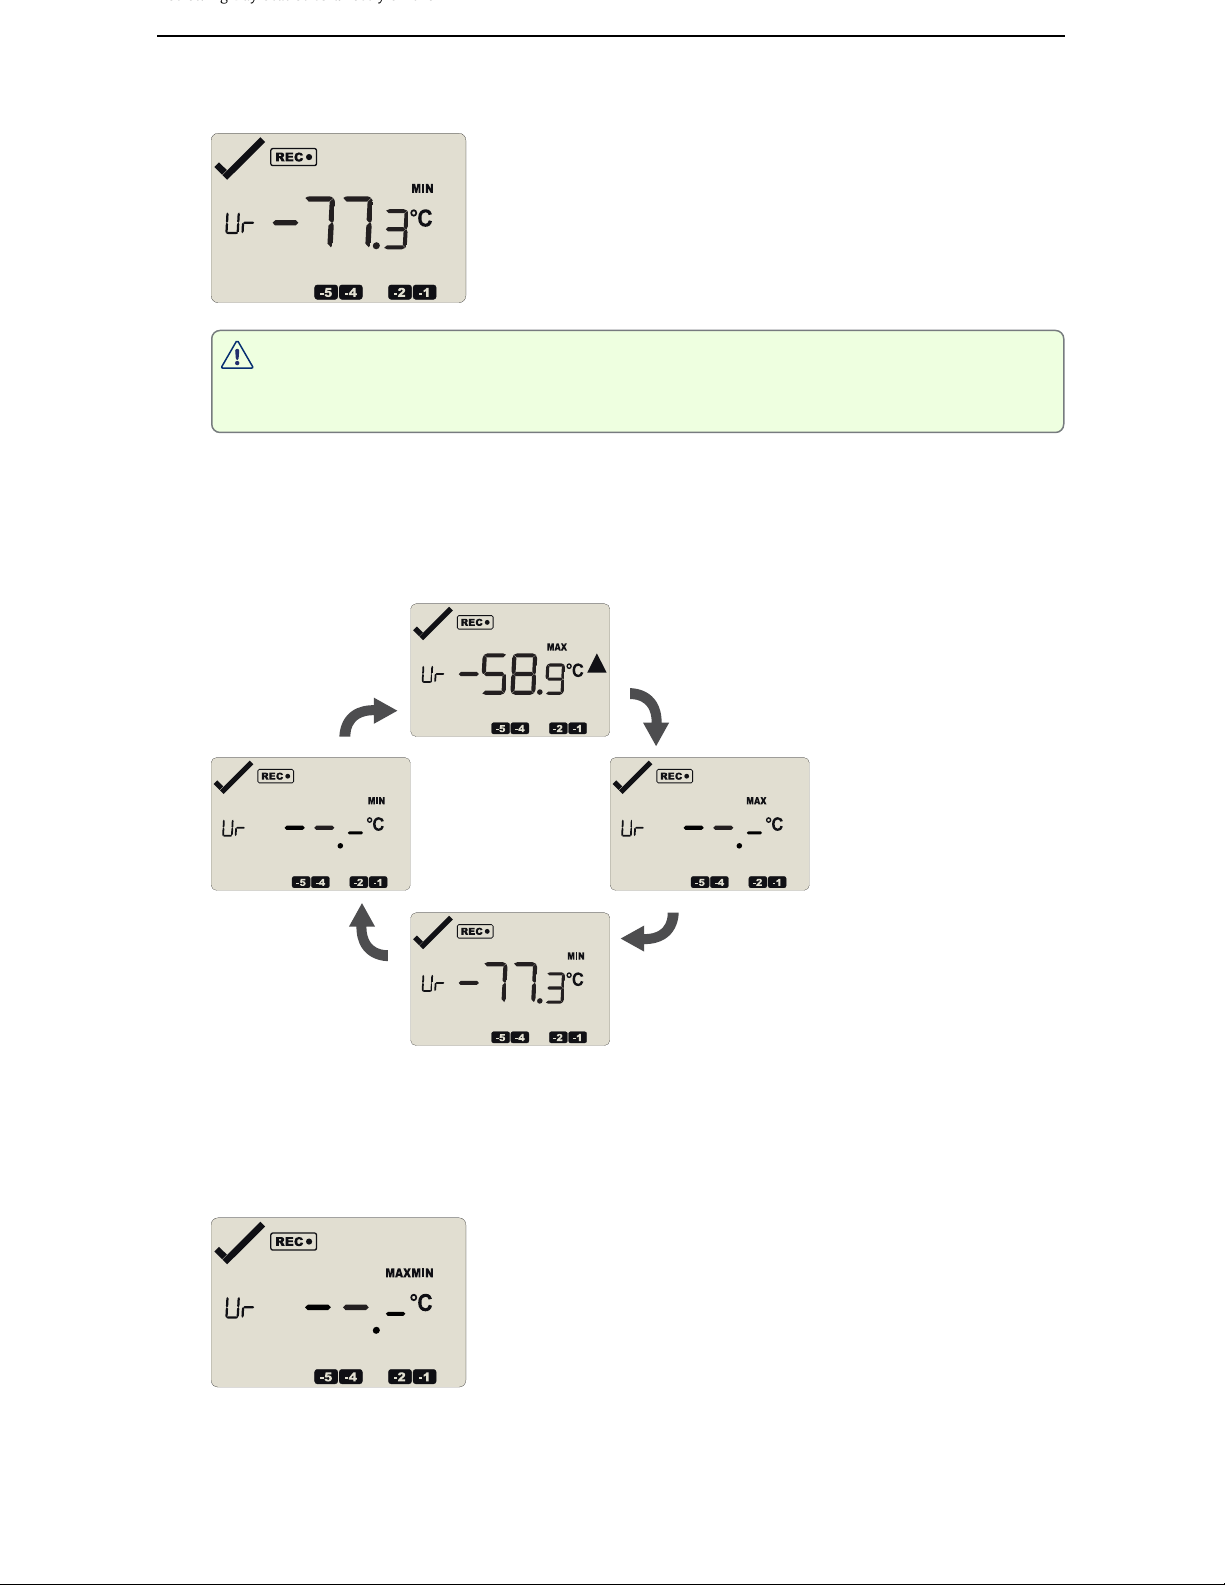
l Press REVIEW/MAR K again to display the trip minimum temperature value.
You can only complete the next steps if you are viewing the Minimum
temperature screen!
l Press and hold REVIEW/MAR K. After 1 second the following screen sequence will
show, and then repeat once:
During the cycle, the buzzer will sound a series of short beeps.
l After approx. 6 seconds, following screen will show:
Release the REVIEW/MARK button when the screens no longer alternate. The values
will be reset, and the normal recording screen will be shown.
Find Quality Products Online at: [email protected]
www.GlobalTestSupply.com
Page 33
Stopping the TREL30-16 TREL30-16 User Guide 35
l If you keep holding the REVIEW/MAR K button, the currently stored min/max values
will be retained.
l Releasing the button within the 6-second period after the initial press switches to
the first review screen.
A min/max reset mark will be recorded in the logged data. The logger will now track new
min/max values, with the first update shown as soon as the next reading is taken.
You will be able to see in the chart in LogTag® Analyzer when the min/max values were
cleared, but you will not be able to review previous min/max values on screen once they
have been cleared.
Stopping the TREL30-16
Automatically
The TREL30-16 automatically stops recording temperature when the maximum number of
readings specified during configuration has been reached. Your unit can also be set up to
stop automatically when it is downloaded. This option needs to be set up at the factory
and cannot be changed during configuration with LogTag® Analyzer. Your distributor can
supply more information about this option.
Push-button stop
You can configure a TREL30-16 so it can be stopped with the REVIEW/MARK button. This
feature is useful when you take the logger out of a shipment and don’t want to falsify the
statistics with readings taken after the shipment completion. The stop function is enabled
in the Advanced Options dialogue during configuration. When enabled, following will
stop the unit:
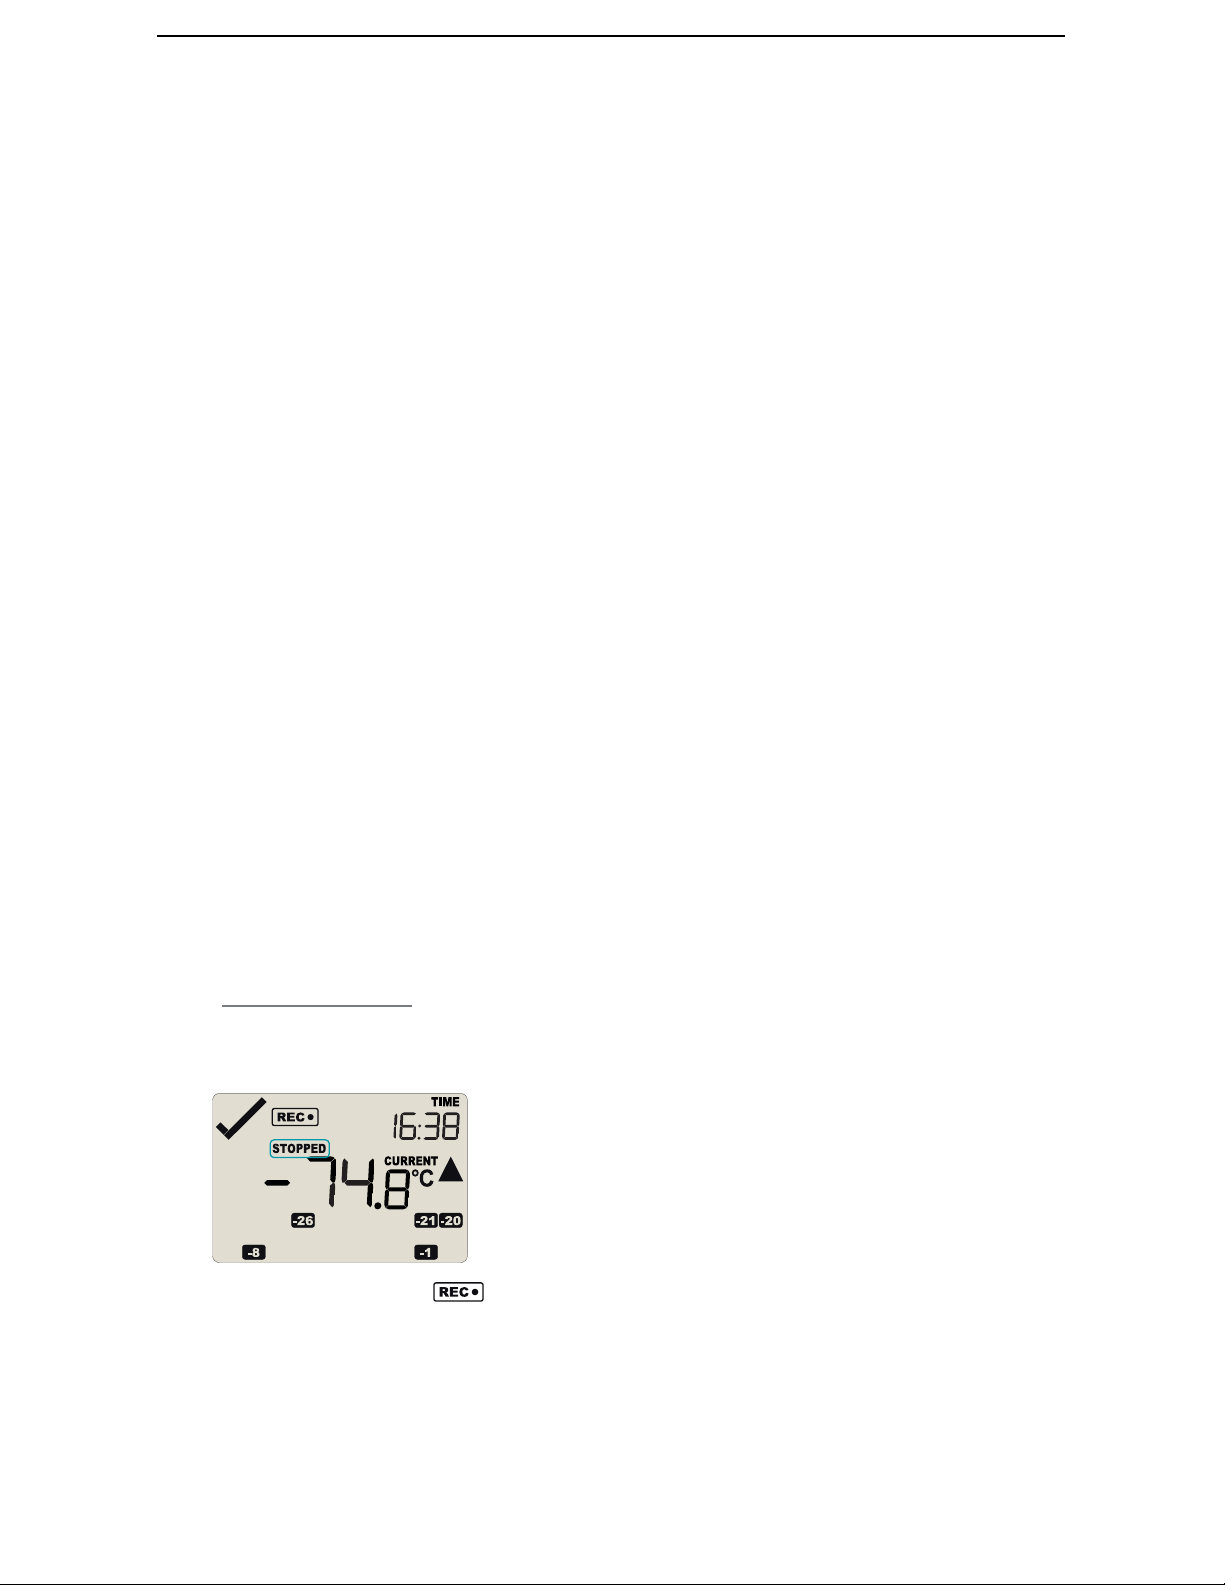
Press and hold the REVIEW/MARK button. The S TOPPED symbol shows.
After approx 2 seconds the symbol turns off.
Find Quality Products Online at: [email protected]
www.GlobalTestSupply.com
Page 34
Stopping the TREL30-16 TREL30-16 User Guide 36
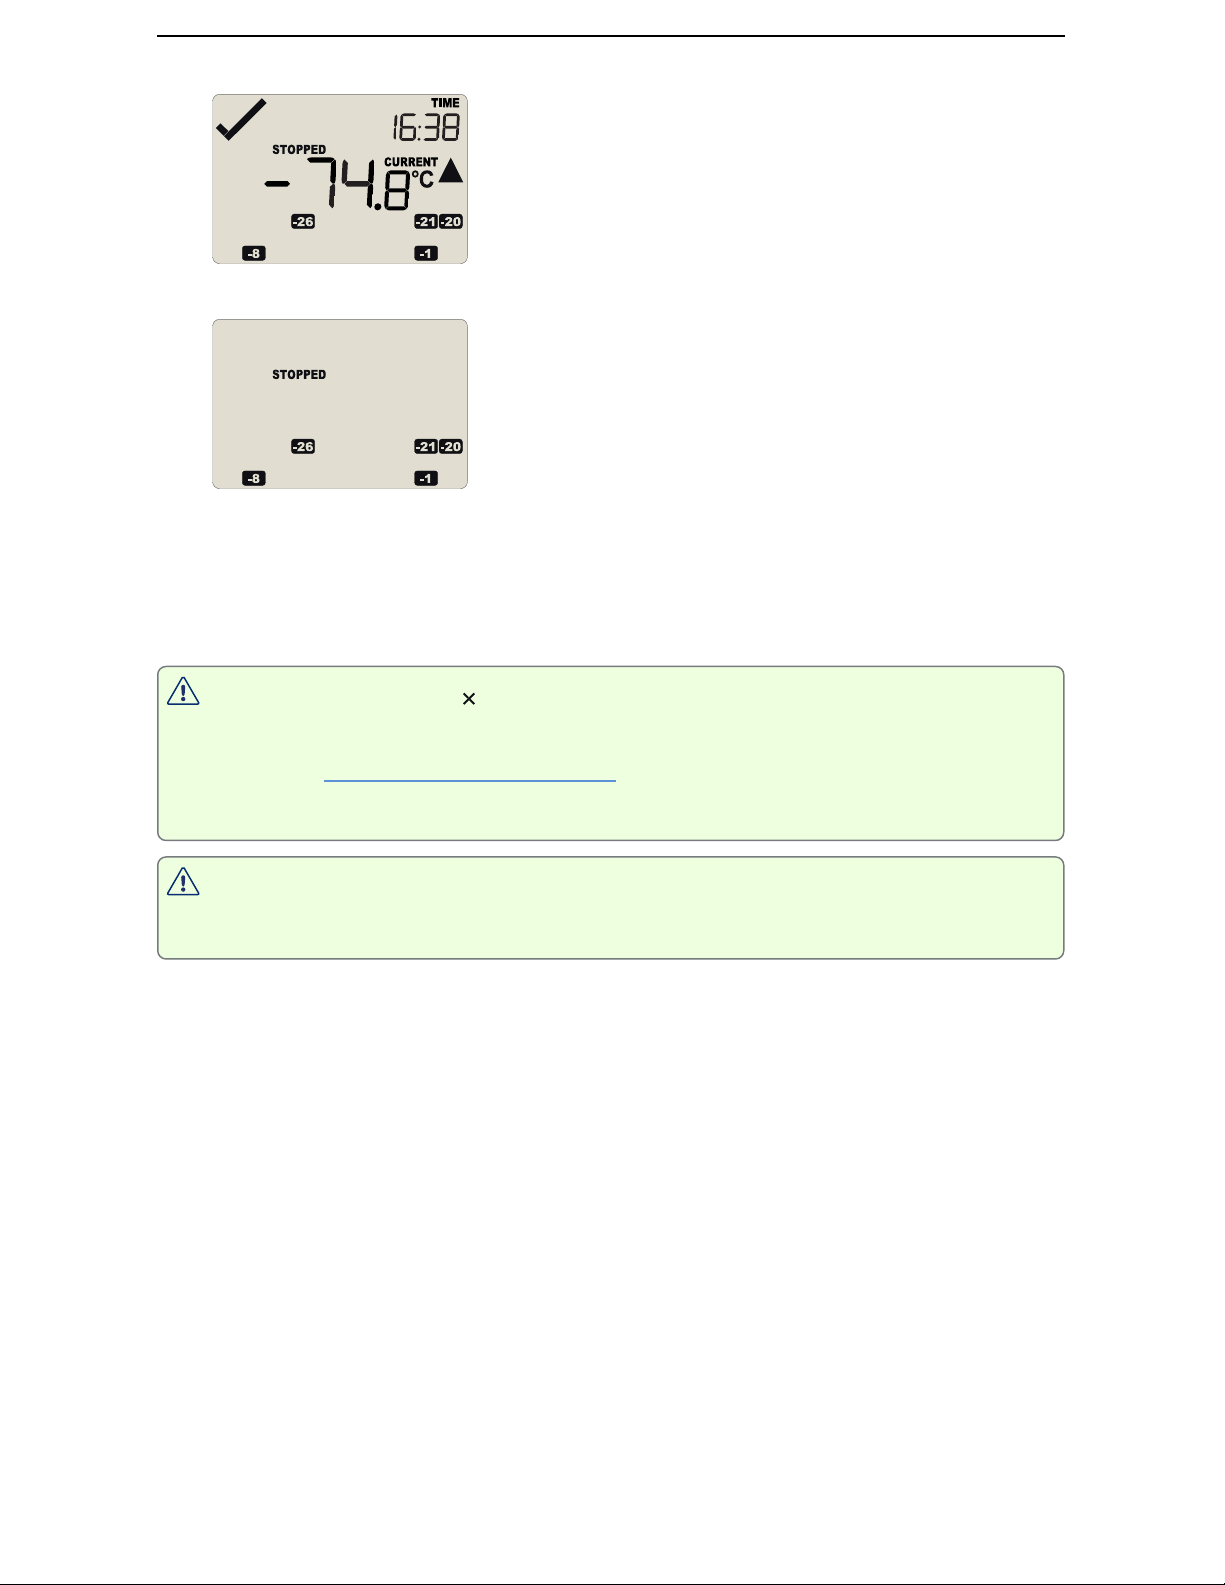
Release the button within 2 seconds. The logger will now stop taking readings.
The logger will
l Release the button before the STOPPED symbol remains permanently on
l Keep holding the button for more than 2 seconds after the STOPPED symbol remains
permanently on
If an ALARM is present ( ) and the Clear alarm by pressing STOP button function
is enabled, you will need to clear the alarm first before you can stop the logger.
Please see Clearing an Alarm on page25 for more information on how to clear an
alarm.
Once the logger has stopped, the alarm status will no longer be indicated with a
cross or a tick symbol, and the audible alarm will turn off.
not
stop if you:
Find Quality Products Online at: [email protected]
www.GlobalTestSupply.com
Page 35
Resetting the Logger TREL30-16 User Guide 37
Resetting the Logger
You can reset a TREL30-16 back to its original READY state. Once reset, recording can be
started again.
When performing this procedure all recordings and statistics stored in the logger
are irrevocably deleted and cannot be recovered. Please ensure your data has been
saved!
All settings in the logger are retained.
For this process to work, the logger must be
STOPPED.
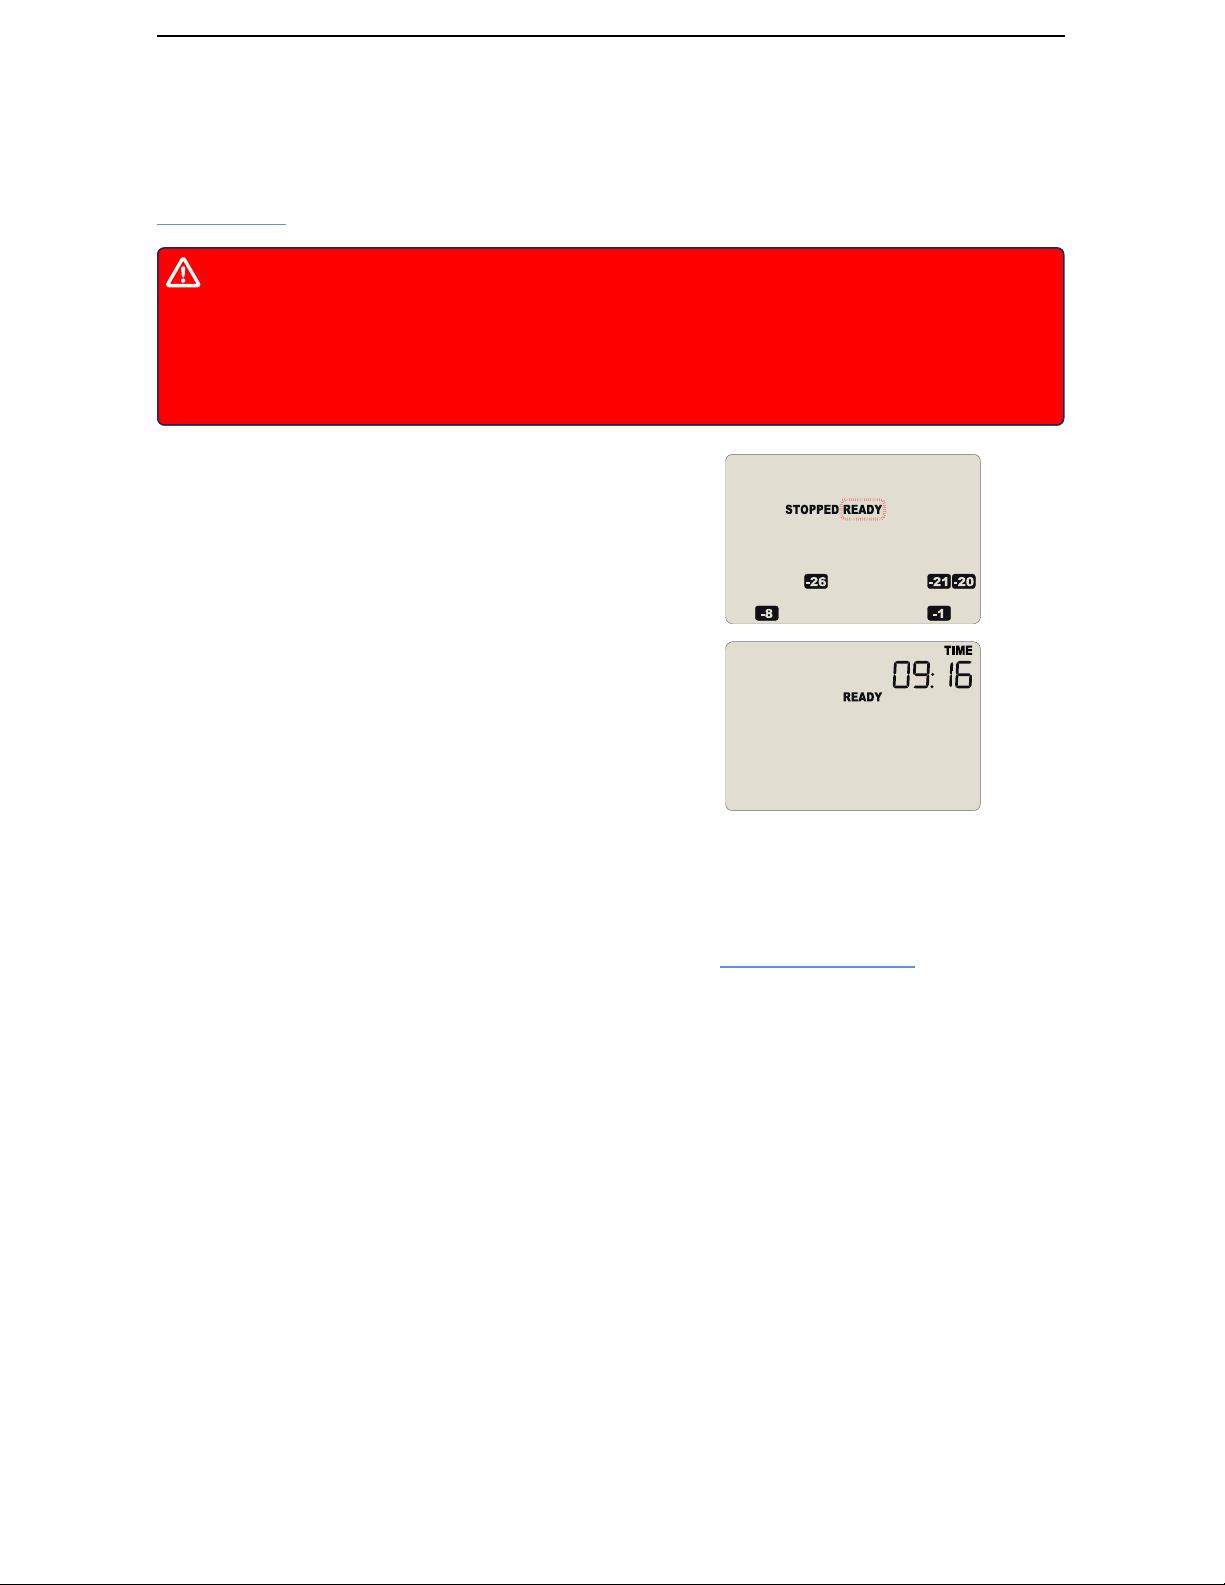
Press and hold the START/CLEAR/STOP button. The
READY symbol will flash.
When the READY symbol remains permanently on,
release the button within 2 seconds. The logger is
now ready to be started again.
If the button is released while STOPPED is still blinking, or you wait until the READY
symbol disappears, the display shows STOPPED again, and the logger remains stopped.
This means, the data from the previous trip is still accessible.
The ability to reset a logger is enabled or disabled in the Advanced Settings tab when
configuring the TREL30-16 via LogTag® Analyzer.
Hibernating a TREL30-16
When hibernated, the logger’s power consumption is near zero and the life of the battery
is greatly extended.
This is useful for conserving battery life when the logger is not used for extended periods.
TREL30-16 loggers are placed into Hibernation using LogTag® Analyzer by clicking
Hibernate on the LogTag menu.
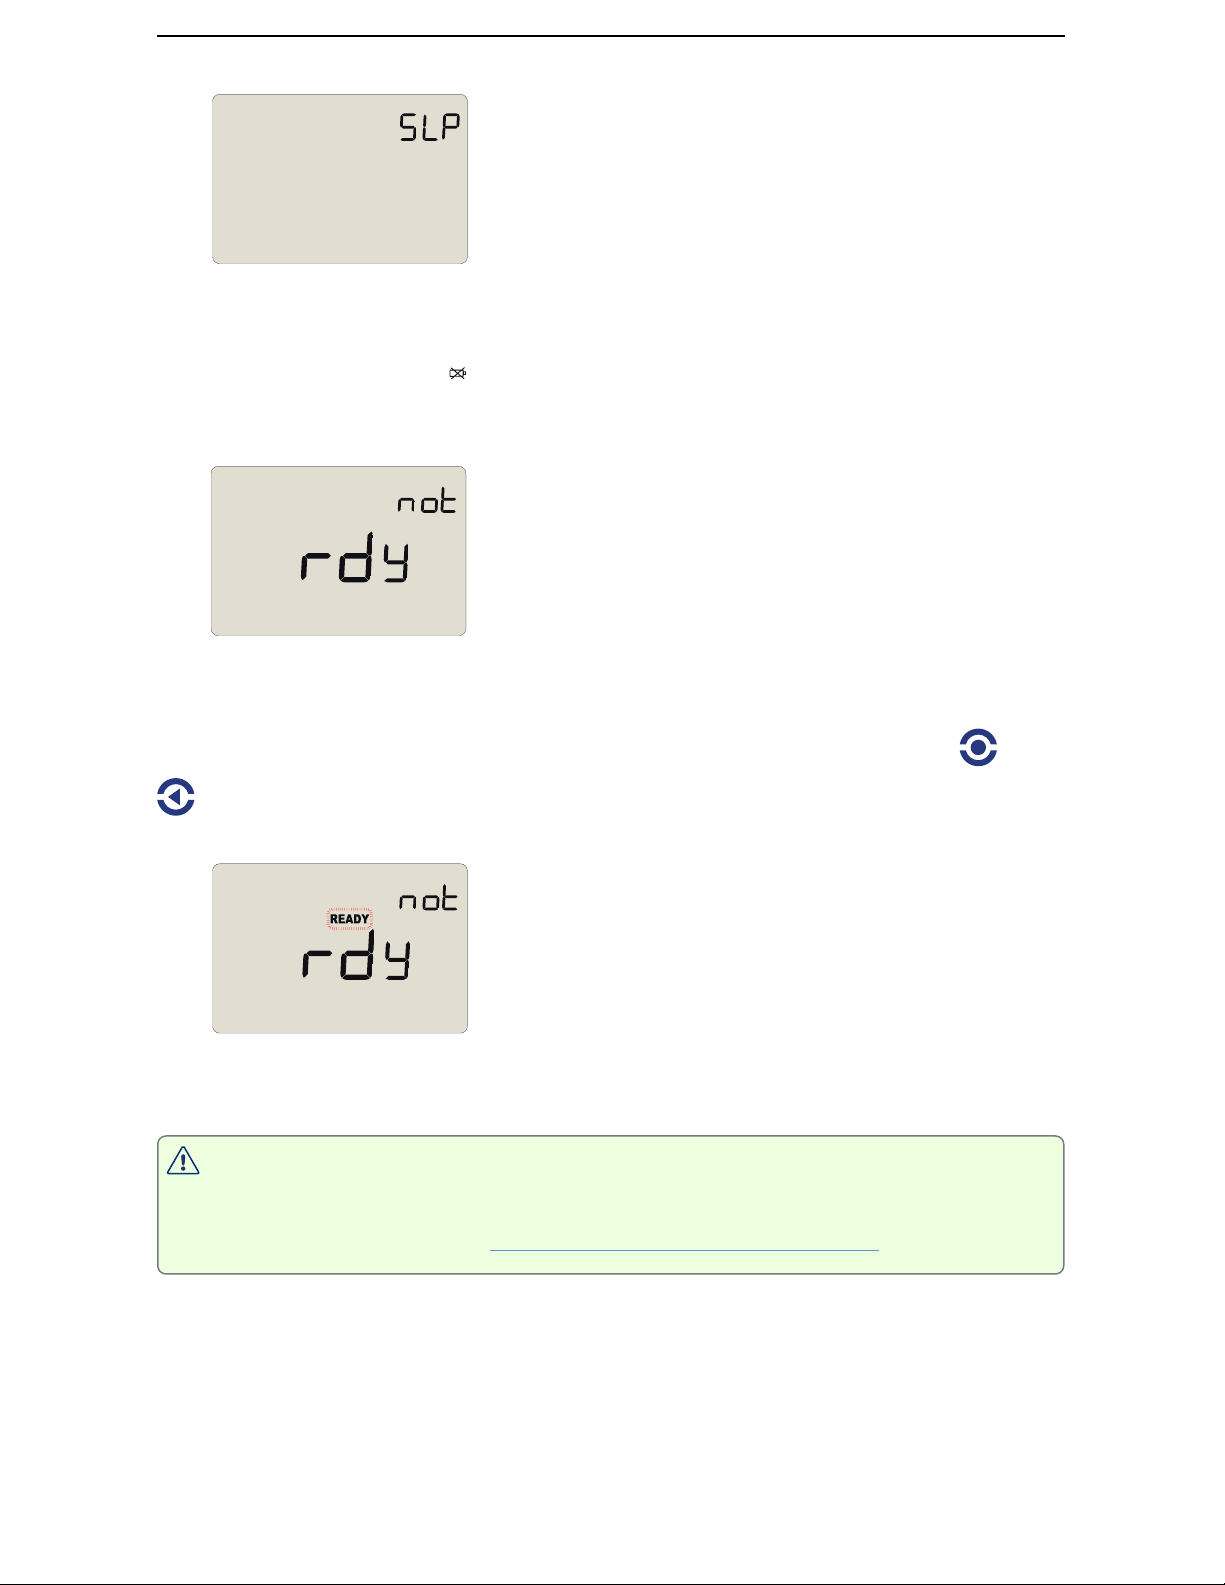
The display shows SLP for a few seconds, before turning itself off.
Find Quality Products Online at: [email protected]
www.GlobalTestSupply.com
Page 36
Hibernating a TREL30-16 TREL30-16 User Guide 38
A hibernated logger has no active display; however, a button press will wake the logger up
briefly. The display will show:
l the low battery symbol if the battery requires replacing
l the text not rdY if the battery is OK, and the logger can be re-activated at a later
point
To use the logger again for recording data, it must be re-configured with LogTag®
Analyzer.
A hibernated TREL30-16 can also be activated again by pressing and holding the and
buttons together for a period of 6 seconds. During this time the text not rdY appears
and the READY symbol flashes. Release the buttons when the flashing stops.
You can re-activate a logger with a low battery, however it is not recommended to
commence another trip.
Note: The real time clock is not running in a hibernated logger and must be set up
if the logger is manually activated. Therefore, the CLOCKADJ procedure is
automatically invoked (see Adjusting the Display Clock on page18).
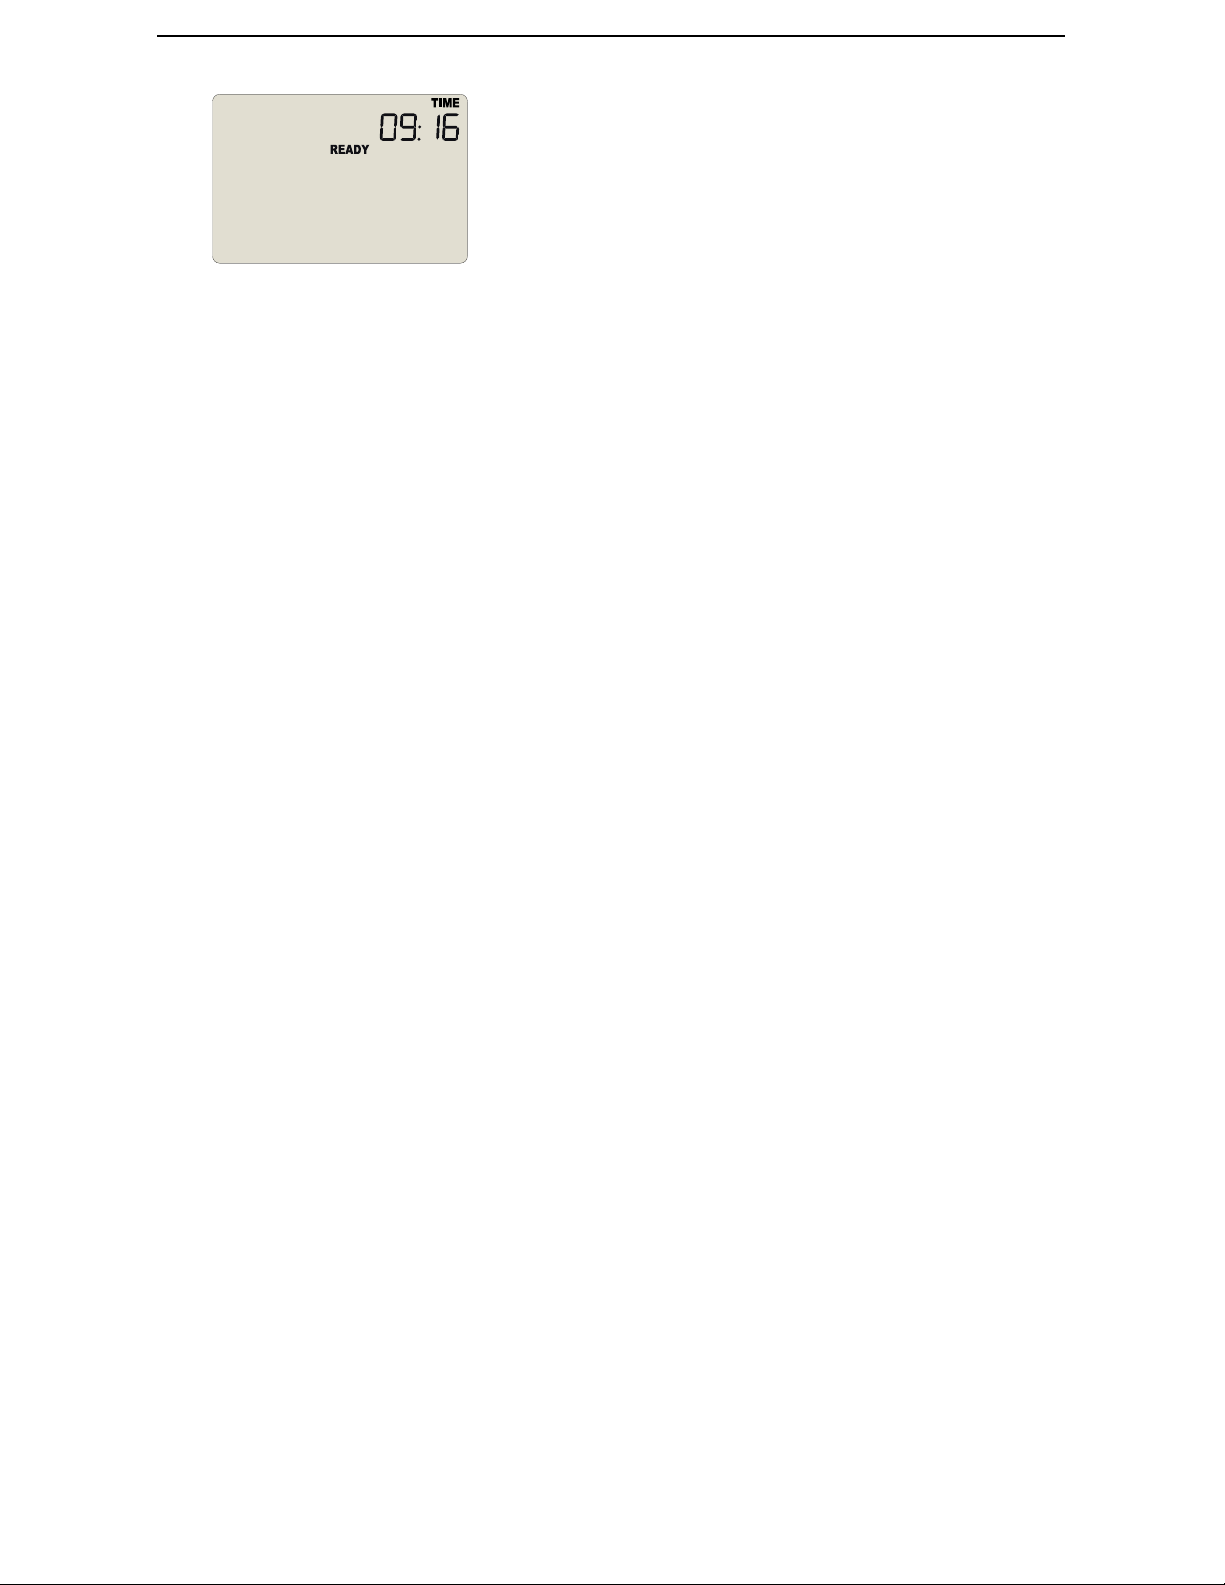
Once the clock has been set, the logger is ready to be started again.
Find Quality Products Online at: [email protected]
www.GlobalTestSupply.com
Page 37
Hibernating a TREL30-16 TREL30-16 User Guide 39
Find Quality Products Online at: [email protected]
www.GlobalTestSupply.com
Page 38
Technical Specifications TREL30-16 User Guide 40
Technical Specifications
Model Number TREL30-16
Tempera ture sensor measure men t r ange -90 °C to +40° C (-1 30 °F to +104 °F)
Operatin g temper ature ran ge -30°C to +60°C (-22° F to +140 °F)
Ambient temperature ran ge during transport
and storage
Ambient humidity ran ge durin g tra nsport an d
use
Rated temperature re solution
Rated temperature accura cy
Sen sor type Precision electronic thermistor
Probe Compatibili ty
Sen sor rea ction time
Clock accuracy
Recor ding capacity
Statistics memory
Memory type Non volatile
Samplin g in terv al Configurable fro m 30 seconds to 18 hours
Start options
Alar m functions
Vibr ation l Withstands vibration specification as detailed i n EN12830:2018
Shock
EMC compliance
-10 °C to +40 °C (14 °F to +104 °F)
0 to 95 %RH
0.1 °C (0.2 °F) for measurements fro m -90°C to 0° C (-1 30 °F to 32 °F)
0.2 °C (0.4° F) for measurements from 0° C to+1 8°C (32 °F to 64. 4°F)
0.3 °C (0.5 °F) for measurements fro m +18 °C to +30 °C (64.4°F to 86° F)
0.5 °C (0.9 °F) for measurements fro m +30 °C to +40°C (86 °F to 1 04 °F)
Better than ±0.5 °C (±0.9 °F) for -20 °C to +10°C (-4 °F to +50°F)
Better than ±0.7°C (±1. 4°F) for -50°C to -20 °C (-40°F to -4° F) and +1 0 °C to +30 °C
(50°F to 86° F)
Better than ±1 .0°C (±1. 8°F) for -80 °C to -50°C (-11 2° F to -58° F) and +30 °C to +40 °C
(86 °F to 104° F)
Better than ±1 .8° C (±3.2 °F) for -90° C to -80 °C (-130°F to -112 °F)
For more detailed information please refer to the published accuracy charts
All ST10 precision thermistor remote probes can be interchangeably connected. Please
refer to the dedicated page for external probes on the Log Tag Recorders website.
Typically less than 2 minutes (T90) i n moving air (1m/s), method as detailed in
EN12830:2018
Quartz cry stal-locked r eal time clock, rated accuracy ±25ppm @ 25°C (equiv to 2.5
seconds/day)
Rated temperature coefficient i s -0.034±0.006ppm/°C (i.e. typically +/-
0.00294seconds/day/°C)
15,905real time temperature v alues
l 33 days @ 6 min logging or
l 55 days @ 10 min logging or
l 82 days @ 15 min loggi ng
Supports continuous log ging ("wrap-around") or specific r ecording period.
For displaying statistics on LCD
l Mi n/Max temperature v alues for the past 30 days
l Alarm duration v alues for the past 30 days
l Display of Min/Max trip temperature
l Push button start with o ptional configurable start delay from 1 mi nute to 72 hours
l Date/time start (up to 180 days in the future)
l one configur able upper alarm threshold
l one configur able l ower alarm threshold
l OK tick and Alarm cross on display, li nked to alarms
l threshold indicators, linked to alarms
l Audible alarm
l Withstands shock specification as detailed i n EN12830:2 018
l Withstands 5 drops fr om 1 m onto smoo th concrete floor wi thout loss of function o r
calibration
l EC EMC directives (EN 61000-6-1 :2005 & EN 61000-6-3:2006)
l Includes electrostatic discharge as prescribed in EN 61000-4-2
l Co mplies with FCC Part 15 Subparts A and B
Find Quality Products Online at: [email protected]
www.GlobalTestSupply.com
Page 39

Technical Specifications TREL30-16 User Guide 41
Envir onmental IEC 60529: IP61
Case mater ial Poly carbonate
Power source CR2 032 3V Li -MnO2 coin cell, user-replaceable, non-rechargeable
Typically 1 year of storage, followed by 1 y ear o f operation
Battery life based on:
l 6 minute l ogging
l statistics reviewed on the display no mo re than once dail y, for no l onger than 30
seconds each time
Battery li fe
Size 93mm(H) x 54.5mm (W) x 8.6mm (T)
Weight 43 g excluding probe
Cal ibration
Downloa d time
Software requi rements
USB compatibili ty USB 2.0, type A plug
Warra nty 12 months
Serv iceability, disposal an d recyclin g
Accessories
l display activation no more than once a day for battery check
l data download no more than once a month
l keeping the log ger w ithin the storage temperature range when not i n use
Battery low indicator
Continual activation of the audible alarm will reduce the working life of the battery. When
an alarm is triggered, the alarm should be cleared and reset as soon as possible.
Factory calibr ation using instruments traceable to an ISO/IEC 17025 accredited testing
laboratory
Typically wi th full memory (15,905 r eadings) less than 10 seconds from time of insertion
into i nterface to availability of LTD file in LogTag® Analyzer (if configured)
l Log Tag® Analyzer version 3.1 r10 o r l ater to configure and do wnload
l PDF reader software to access onboard PDF fil es
This device contains no serviceable parts, please r ecycle or dispose according to lo cal
regulations
l Wall holder 200-000010
l LTI/USB Interface Cradle
l Temperature B uffer B ottle
Find Quality Products Online at: [email protected]
www.GlobalTestSupply.com
Page 40
Appendix 1 - Battery Replacement TREL30-16 User Guide 42
Appendix 1 - Battery Replacement
Prepare the Logger
l Download the unit in LogTag®
Analyzer to save any stored data.
l Hibernate the unit.
Failing to hibernate the logger may
result in serious memory
corruption. As a result you may no
longer be able to use this product.
Remove the old battery
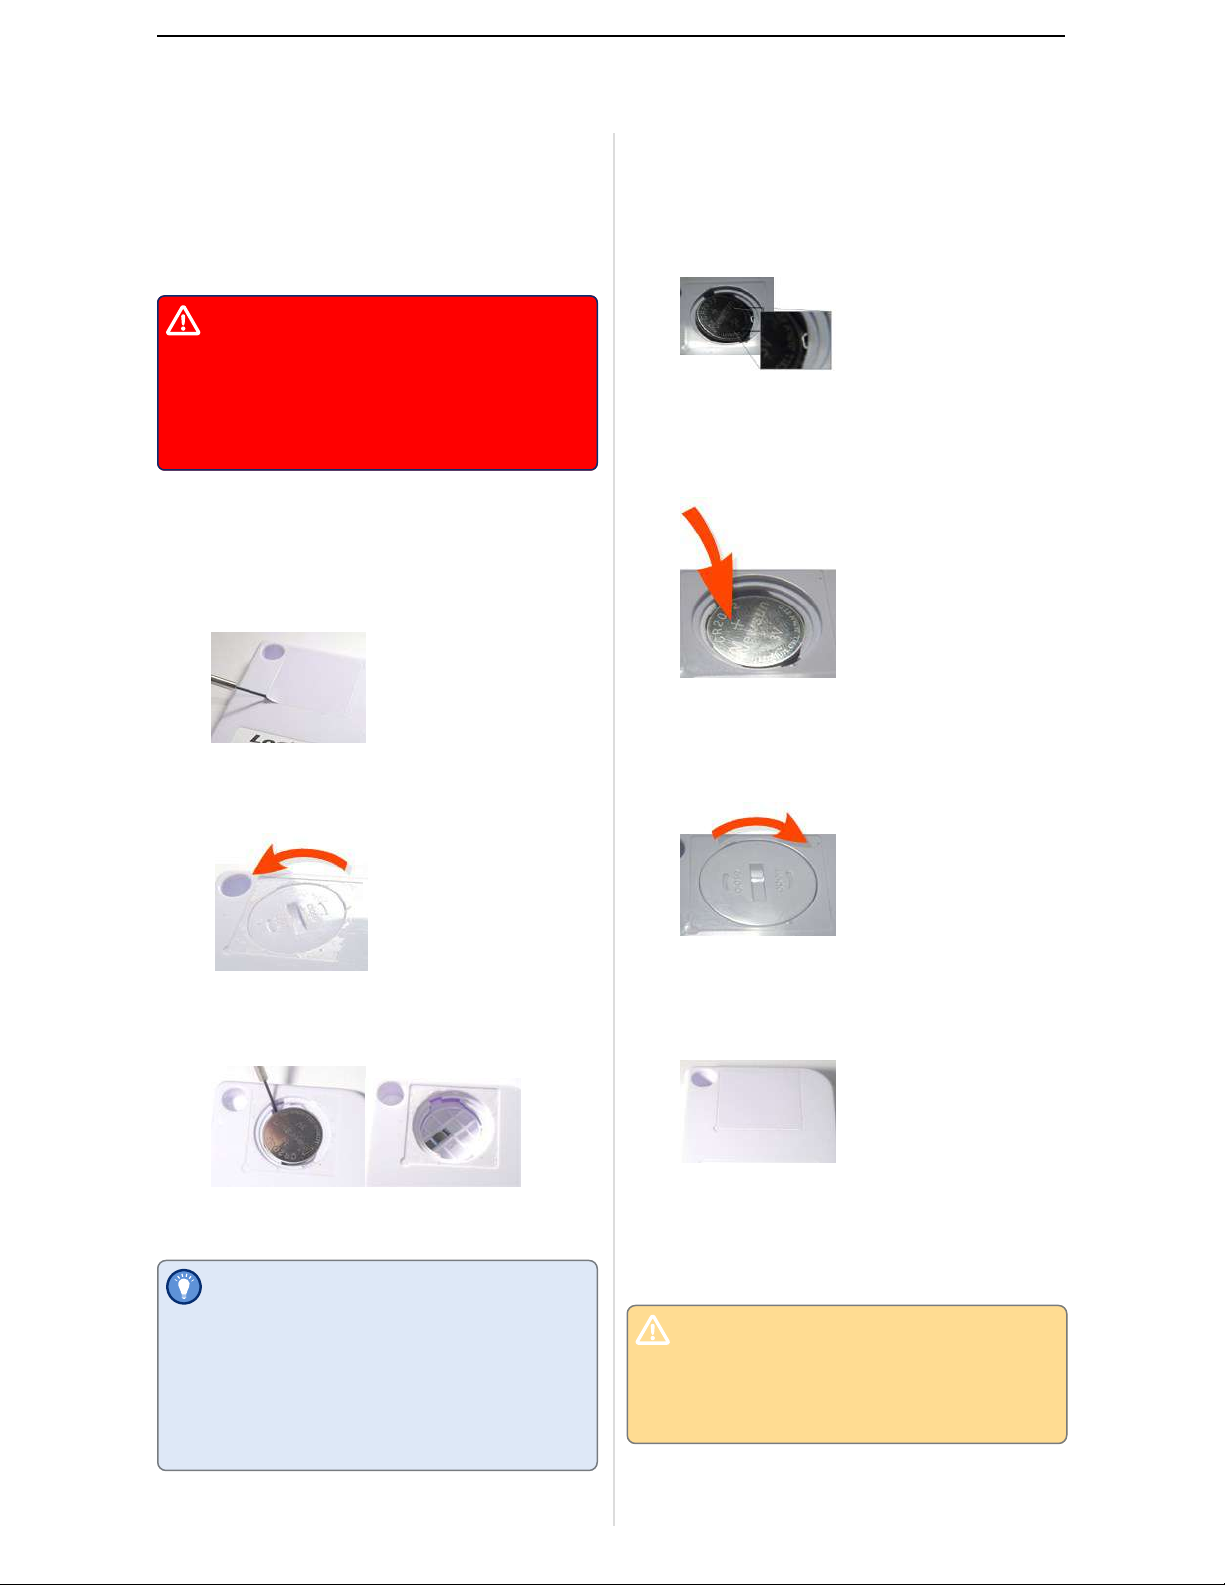
l Carefully remove the rear label
covering the battery door using a
small-bladed screwdriver or knife:
l Place a new CR2032 cell into the
battery compartment as shown; the
right-hand edge of the battery is
inserted first against the contact:
l Press firmly down on the left-hand
side of the battery to click the battery
into place:
l Replace the battery door; turn
l Turn the battery door anti-clockwise
and remove it from the case:
You can use the
new battery for
this, as it will fit
into the slot
l Remove the battery using a small-
bladed screwdriver, as shown:
Insert the new battery
Only use batteries from a reputable
clockwise to lock it into place (using
the old battery).
l Cover the battery door with either a
new label (Part # 100-000502) or
reuse the old one.
l Re-configure the logger with LogTag®
Analyzer.
manufacturer! Check the
temperature range of the battery
and make sure it covers the range of
the TREL30-16.
Find Quality Products Online at: [email protected]
www.GlobalTestSupply.com
Please recycle or dispose of the old
battery according to your local
environmental regulations.
Page 41

Appendix 2 - Glossary TREL30-16 User Guide 43
Appendix 2 - Glossary
A
Accumulative Alarm
Temperature or humidity readings are
above or below the configured
threshold for the total of time defined,
but readings may not necessarily be
sequential.
Alarm
An alarm typically means
environmental conditions are
unacceptable for the monitored
location. Alarms are typically
configured with several alarm trigger
conditions, such as thresholds,
direction and delay. If one of the alarm
trigger conditions has been met, the
device displays an alert and the
software reports an alarm event has
taken place.
Alarm Activation Delay
This value is used for consecutive and
accumulative alarms and defines the
number of recorded values that need to
be alarm readings for the trigger
condition to be met
Alarm Event
Single occurrence of an alarm
Alarm Trigger Condition
Combination of recorded temperature
or humidity conditions that causes an
alarm. This requires a threshold value,
an activation type and a delay value.
alarm triggered
One of the alarm trigger conditions has
been met, the device displays an alert
and the software reports an alarm
event has taken place
Alert
Visual or audible representation of an
alarm on a device
C
Consecutive Alarm
Temperature or Humidity readings are
above or below the configured
threshold for the time defined without
interruption.
Cumulative Alarm
Temperature or humidity readings are
above or below the configured
threshold for the total of time defined,
but readings may not necessarily be
sequential.
Alarm Reading
I
Temperature or Humidity value that
lies above the upper or below the lower
alarm threshold value
Alarm Threshold Value
The temperature or humidity value at
which a reading is regarded as an alarm
reading. This can be an upper threshold
or a lower threshold
Find Quality Products Online at: [email protected]
www.GlobalTestSupply.com
Inspection
Pressing the Mark button on a logging
device
Inspection Event
Pressing the Mark button on a logging
device
Page 42

Appendix 2 - Glossary TREL30-16 User Guide 44
Instant Alarm
One single temperature or humidity
reading is above or below the
configured threshold
L
Latched Alert
Alert that remains active even if the
alarm trigger conditions are no longer
met.
Lower Alarm
An alarm is called a Lower Alarm if the
alarm trigger condition requires
readings to go below a low threshold
temperature
N
T
Tertiary Alarm
The alarm threshold third closest to the
non-alarm range
U
Upper Alarm
An alarm is called an Upper Alarm if
the alarm trigger condition requires
readings to exceed an upper threshold
temperature/humidity
Upper Alarm Threshold
If a recorded temperature or humidiy
value is equal to or above this value it
is regarded to be an alarm reading
Non-Alarm Range
Target temperature/humidity range
where the readings are regarded as
acceptable
Non-Alert Range
Target temperature/humidity range
where the device does not trigger an
alert
P
Primary Alarm
The alarm threshold closest to the nonalarm range in a multi-alarm device
S
Secondary Alarm
The alarm threshold second closest to
the non-alarm range
Find Quality Products Online at: [email protected]
www.GlobalTestSupply.com
 Loading...