

Page 1

51
English
Colour Television Operating Instructions
Page 2

52
English
Page 3

53
English
Table of Contents
page
Nederlands
FrançaisEspañol
Introduction 54
Positioning and connecting the set 55
Safety Instructions 55
Remote control 56
Operating for the first time 57
Switching on/off – dialog language – features 59
Automatic programming 60
Program table – changing program names 63
Sorting programs 65
Searching for and storing station 67
Entering frequency range/channels 67
Station search/TV norm 68
Fine tuning/program name/storing 69
Daily operation of the set – programs 70
Adjusting the picture 71
Adjusting the colour 72
Freeze/DLC 73
Adjusting the sound 74
Listening with headphones 76
TV setup – normal picture and sound
/factory setup 77
TV setup – additional functions 78
Parental lock 79
Timer functions 80
Setting timer functions and on-screen displays 81
On-screen displays – TV guide/subtitles 82
Teletext 83
Connecting other equipment 89
Loudspeakers/HiFi system 89
Videorecorders/camcorders/decoders 90
Photo CD/Laser Disk/receivers 92
Pay TV decoder 93
Timer recording 94
Operating video recorders 96
Copying 97
Cleaning 101
Channel designations and displays with various
standards and countries 198
Loewe Service 199
Page 4

54
English
Introduction
• Sets with a satellite tuner can be
expanded to 200 program memories.
• The latest picture tube technology for a
brilliant, high-contrast picture.
• 8-bit digital technique for signal
processing: guarantee for consistently
excellent picture quality.
• The Sharpness Control System (SCS) for
a greatly improved picture sharpness.
• Improved picture quality due to digital
comb filter (S PAL).
✳ Multistandard, i.e. all important TV norms
are receivable.
• 8 MHz Hyperband Tuner for TV
broadcasts in PAL norm.
• Sound amplifier output stages with an
output of 2 x 40 Watts.
• Two Audio-Video sockets (EURO-AV).
✳ Two Video in sockets on the front of the
set for connecting a camcorder.
• Cinch sockets for a HiFi amplifier.
• TV set for retrofitting with satellite tuner.
✳ TV model with NICAM sound.
Accessories
• A video rack with a compartment for a
video recorder in the same design as this
colour TV is available.
• A wide range of Loewe video recorders,
whereby it is possible to operate the TV
and the recorder with a single remote
control.
✳ Depending on the model and version of
TV set. The TV equipment is displayed
on the screen when you call „Information“ (→ page 59).
• Possible integration of a satellite receiver
in your TV. This means a satellite antenna
can be connected directly to your TV set
and you need only one remote control to
select both terrestrial and satellite
stations.
Notes on these operating instructions
Do not just throw these instructions aside.
Even if you are long familiar with the
operation of a TV set: this set will show
you a few things you have never seen.
The foldout pages at the
beginning show you the remote control,
the local operating panel on the set and
the connections on the back of the TV.
Leave these pages folded out when you
are „studying“ the instructions.
The operating instructions have
been printed in three columns. The lefthand column is for the reader in a hurry,
e.g. if you are already vaguely familiar
with the set. The centre column describes
the necessary operating steps in detail.
The right-hand column provides additional
information on the respective topic.
The operating instructions should
help you to get to know all your TV’s
functions.
We wish you a lot of fun and good
viewing with your Loewe.
Thank you and congratulations. You have
chosen a Loewe TV set which gives you the
latest state-of-the-art in design and
technology. It has some features which
distinguish it as a TV of extraordinary
quality.
Operating comfort
• All the TV’s functions can be controlled
comfortably and easily with the remote
control.
• The well-contrived on-screen dialog
display. The respective buttons of the
remote control required for the next
operating step are displayed on screen.
• Automatic station programming; all
receivable TV stations are stored
automatically and the order of programs
sorted country-specifically. Even the
program abbreviations of stations which
broadcast teletext or VPS, e.g. ARD or
ZDF, etc. are displayed. This automatic
programming system also works for
satellite programs.
• Teletext Plus; enables immediate access
to more than 100 teletext pages. You
can „page“ through the teletext as quickly
and easily as reading a newspaper.
The teletext decoder decodes the TOP
and FLOF teletext systems. If the set is
fitted with a PIP unit or a satellite tuner,
you can even look at what other station
teletexts have to offer without changing
the current TV program.
State-of-the-art technology
• 100 hertz frame repetition rate for
flicker-free pictures (large area flicker)
• activatable freeze frame
• DNC digital noise control
• The set only consumes about 1 W of
power in standby mode.
Page 5
55
English
5 cm
5 cm
5 cm
Positioning and Connecting the Set
Positioning
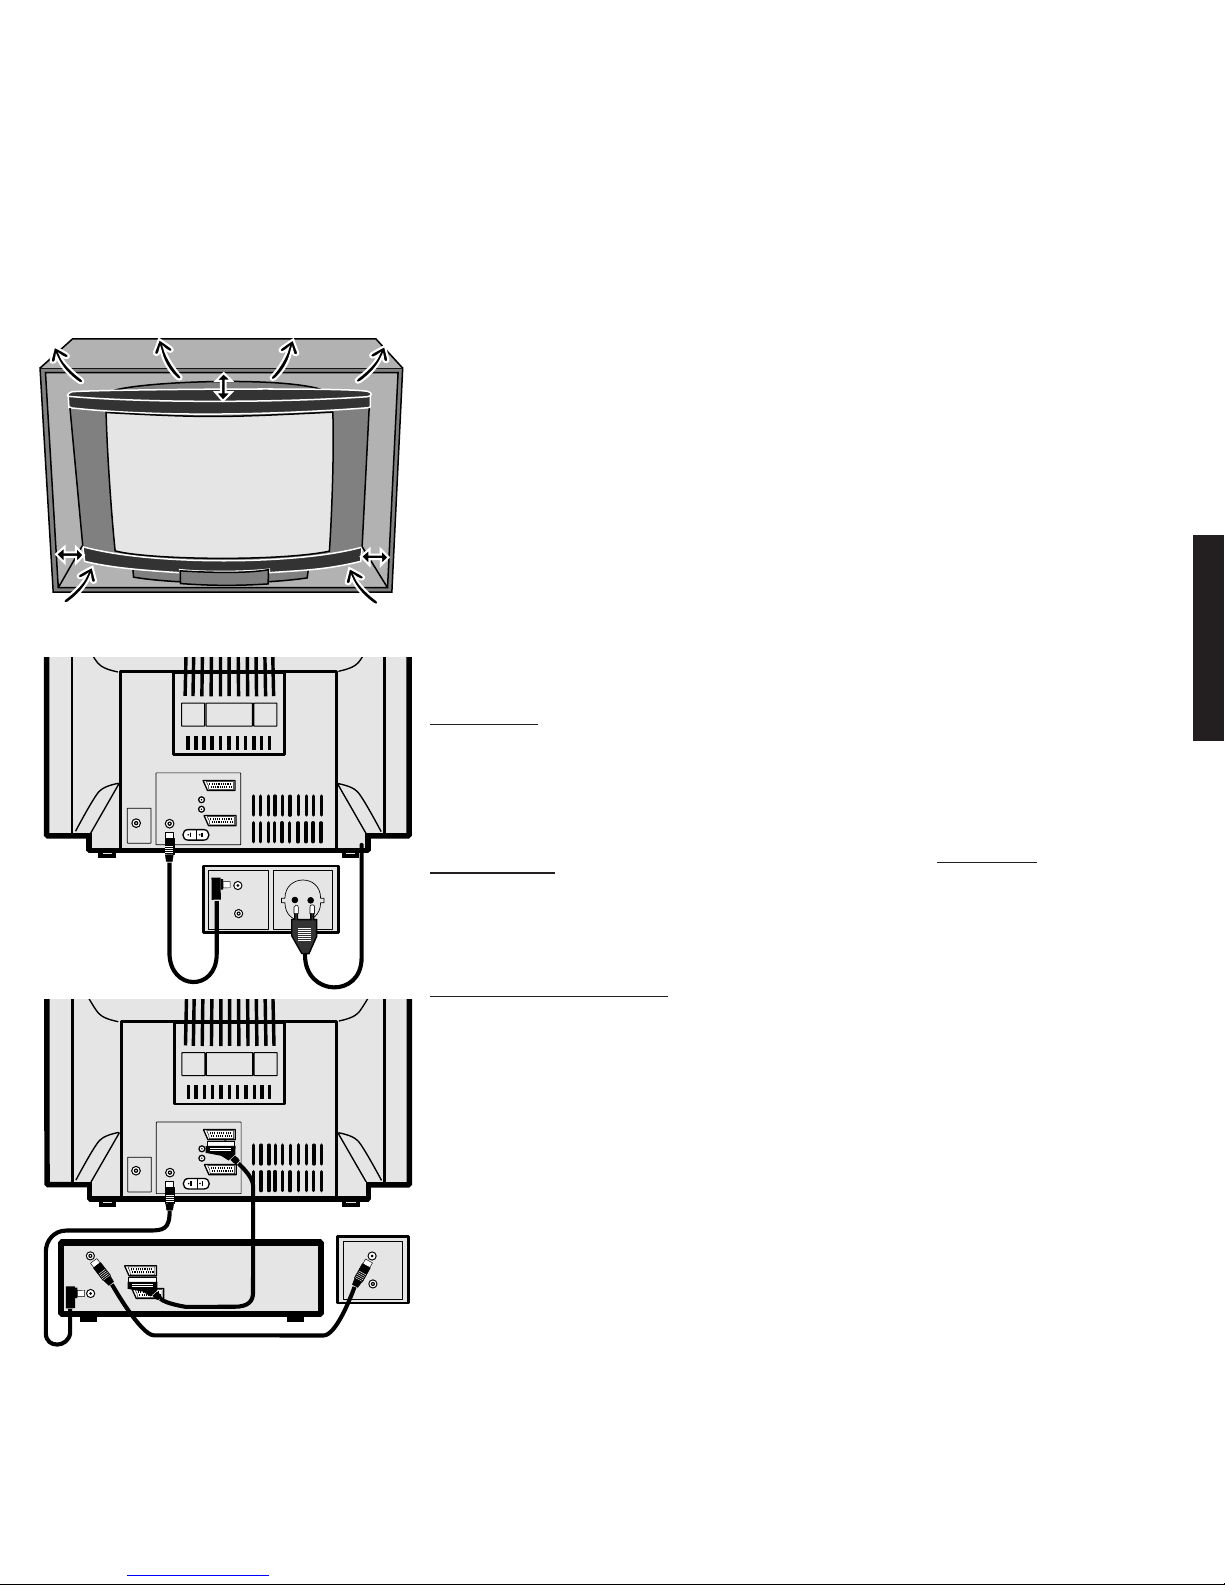
Position your set so that no bright light or
sunlight falls directly onto the screen.
Otherwise the brilliance of the picture will
be affected by reflections.
The air vents on the back of the set
must be kept clear at all times to allow the
set to cool. Leave enough room at the back
if you stand your set on a shelf or in a
cabinet.
The Planus models are fitted with a
revolving base to allow the set to be turned
to the ideal viewing angle.
Connecting
To the mains
Plug the TV’s mains plug into a socket. The
set will operate on 195 to 260 volts AC, 50
or 60 hertz.
To the antenna
Connect your set to the antenna as shown
opposite with a coaxial antenna cable (75
ohms).
Connecting a video recorder
Connect the coaxial antenna cable to the
antenna socket (aerial) of the recorder.
Connect the output of the video recorder
(RF-Out) to the TV’s antenna input (VHF/
UHF) with a second antenna cable.
Further antenna connections are
necessary if the set is fitted with a satellite
receiver (Sat tuner): these are described in
more detail in the separate operating
instructions „Satellite Receivers“.
Safety Instructions
• If the set is moved from a cool environment to a warm room, do not switch it
on until it has been given reasonable
time (about 1 hour) to warm up.
• The set is designed for the home and
office and may not be used in rooms
with a high humidity or concentration of
dust.
• Make sure the set stands firmly when
placed on a shelf, a table or in a cabinet.
• Position the set so that it is not exposed
to direct sunlight and additional heat
from radiators.
• The slits in the rear panel are for cooling
of the set and should never be covered
up with mats or curtains.
• Make sure no metal parts, pins, paper
clips, liquids or wax are dropped or spilt
through the ventilation slits in the back of
the set. If this should happen, switch off
the the set immediately with the On/Off
switch and pull out the mains plug.
• Never remove the rear panel from the
set. Only have the set repaired by the
service technician.
• In case of imminent thunderstorms, pull
out the mains plug and the antenna plug
from the socket to protect your set.
1
2
RL
1
2
RL
ARIAL
RF–OUT
Page 6
56
English
▲
+
▲
▼
–
▼
X
?
MEN
00:00
–
+
➜
?
00:00
General information on your TV set
The dialog between you and your TV set
takes place on screen with an operator
menu. The buttons on the remote control
required for the operating steps are also
displayed.
First choose „your language“. All onscreen displays then appear in this
language.
Remote control functions
All operating functions and basic
adjustments can be controlled with the
remote control.
The remote control transmits your
commands to the TV set by means of
infrared light; always point the remote
control towards the TV set for operation.
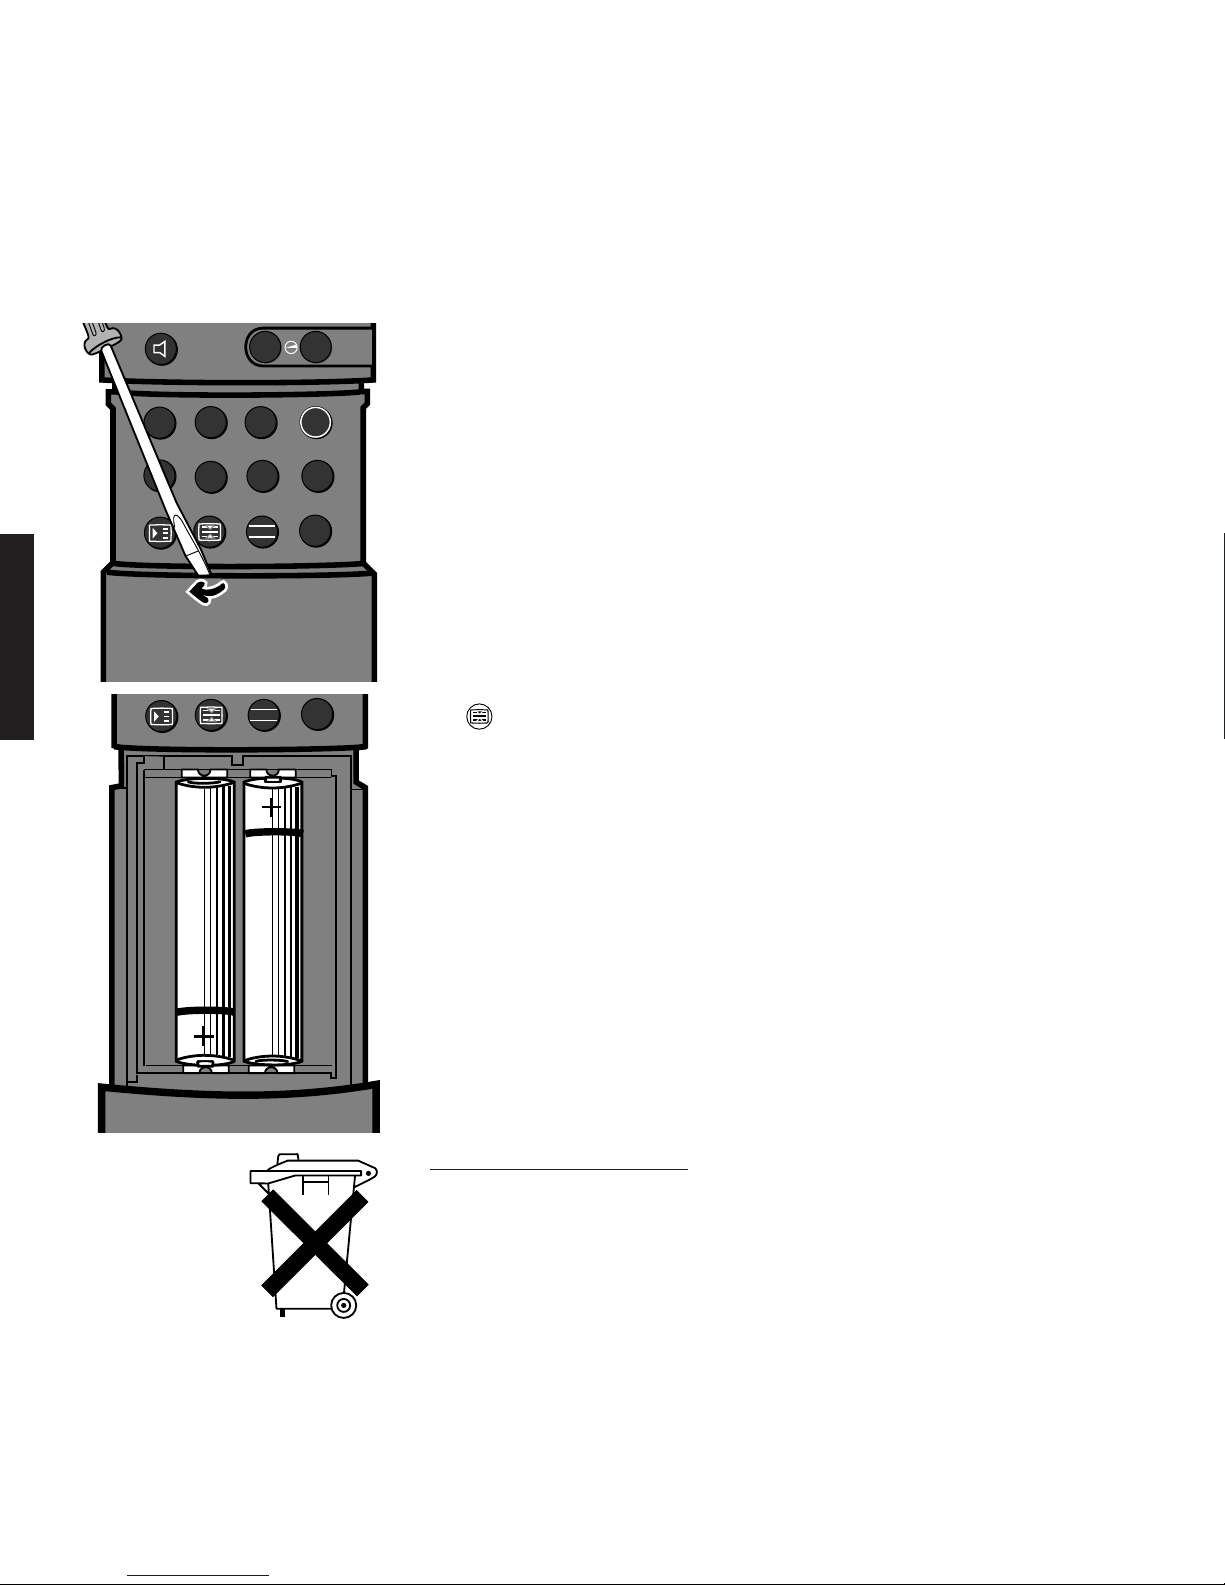
Inserting the batteries
Slide back the cover as far as it will go.
Take a screwdriver or ballpoint pen; push
the screwdriver blade or tip of the ballpoint
pen into the small opening directly behind
the button. Lift the cover a little way
past the detent position. The cover can
now be removed completely.
Insert the two batteries the right way
round, the correct polarity is embossed on
the floor of the battery compartment,
replace the cover and slide it back until the
battery compartment is closed.
The batteries will last more than
1 year. Check the batteries for leakage
after 1 year and change used batteries in
good time. This will avoid the contact
springs being destroyed.
Use only microcells of the IEC LR 03
alkali-manganese type.
Information on battery disposal:
• Do not throw used batteries in household
waste.
• Hand them in at a collection point for old
batteries (e.g. battery collection box at
the dealers) or at the special waste
depot.
Remote Control – inserting the batteries
Page 7

57
English
Please note!
This chapter deals only with the operating procedures necessary for first time operation.
If your dealer has already taken care of searching and storing the TV stations
for you, the menu described below no longer appears!
If you want to search for and store TV stations, e.g. if you move house, consult the
chapter “Automatic programming“ which begins on page 58.
Operating for the first time
We want to make the station search and storing as easy as possible for you. A language
list appears automatically the first time you switch on the set. From this you can
1. choose the „Language“ for further operation of the set
2. select the transmission range for TV stations, e.g. Antenna/cable = VHF/UHF and
cable channels or a satellite range providing your set is fitted with a satellite receiver
3. choose the country from which you want to receive TV stations.
Switching on the TV set:
Press the on/off button
Switching on the TV set
Press the on/off button on the TV set,
marked , gently as far as it will go. The
green On lamp lights up on the local control
panel.
Choosing the language
You have two choices:
1. You can accept the „Language“
marked in blue, press theXbutton to
„Continue“.
2. Choose another „Language“ with the
blue buttons
▼
▲
in the remote
control.
3. Then press the
X
button.
Note
The on/off switch for Modus and Planus is
located behind the flap of the local control
panel.
Operating for the first time – switching on/setting the dialog language
▼
▲
X
Choose language
Continue
Sprache D
Langue F
Lingua I
Idioma E
Taal NL
Sprog DK
Språk S
▲
▼
X
Language GB
Continue
X
Menu off
TV
Page 8
58
English
▲
▼
Selecting the range:
Only possible with an integrated satellite
tuner
X
▼
▲
▲
X
to the TV program
▼
Operating for the first time – choosing the country/norm/automatic programming
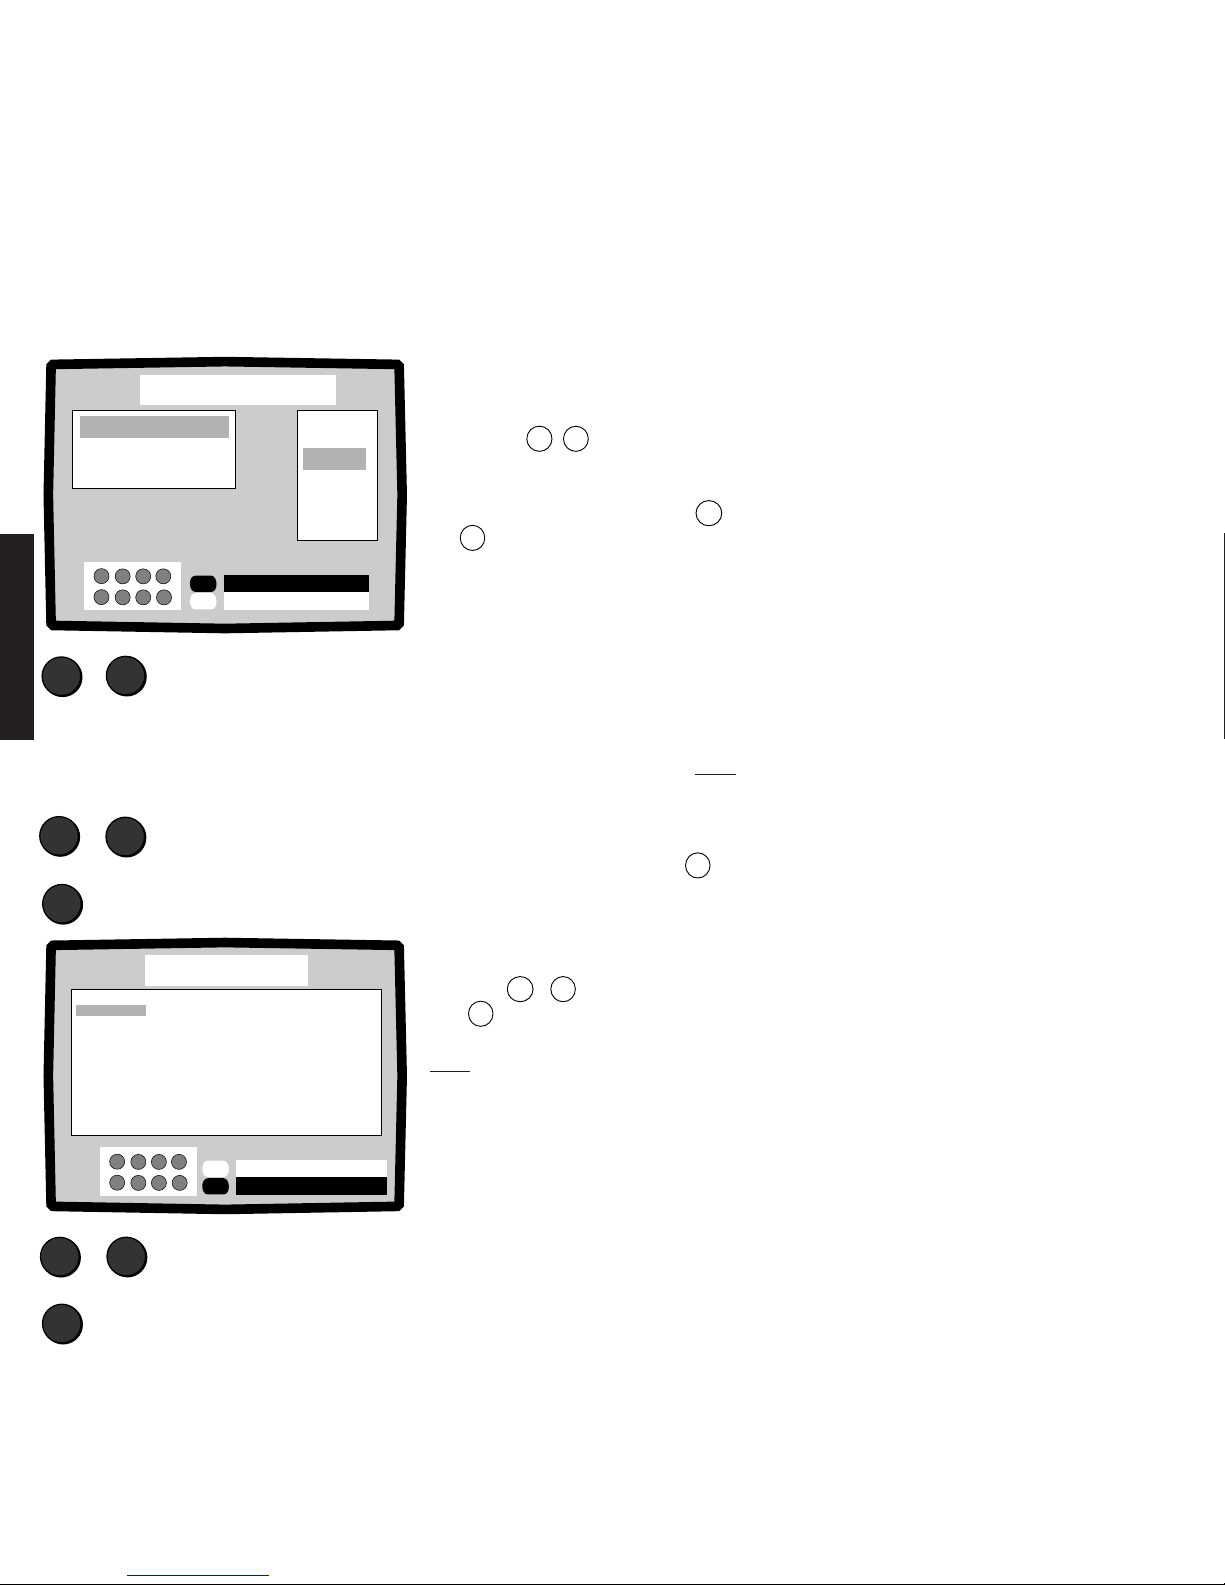
Choosing the country: Choosing the country/norm
Mark the country in which you live and
want to receive TV stations.
1. Choose the „Country“ with the yellow
buttons
▼
▲
.
2. If the TV set is fitted with a satellite
receiver and you choose „Antenna/
cable“ with the blue button
▼
or
▲
, all receivable stations in the VHF/
UHF and cable channel frequency range
and in the frequency range of the Astra
satellite will be searched for after
starting the „automatic station search“.
Starting automatic programming
This function is only carried out once!
All receivable stations in the selected
receiving range are searched for, stored
and sorted after pressing the X button.
Then a program table appears which shows
you the assignment of the program slots.
You can choose a TV program from the
program table immediately with the blue
buttons
▼
▲
and watch it by pressing
the Xbutton.
Note:
If you discover that stations have been
stored more than once or with a poor
quality picture, you can delete these
stations from the program memories.
See the chapter „Deleting programs“ on
page 66.
ASTRA
TELECOM
Other satellites
▲
▼
Auto programming
Antenna/cable
A
CH
F
I
E
NL
B
DK
▲
▼
Country
X
Start
Menu off
TV
X
GB
Program table
3SAT
PREMI
TV 5
NTV
VOX
RTL 2
ARTE
SUPER
CC O5
CH O7
CH O9
▲
▼
X
CH 36
ARD
ZDF
HR 3
BR 3
N 3
SAT 1
RTL
PRO 7
Kabel
MDR
1PLUS
X
-P+
Paging
Program change
12
13
14
15
16
17
18
19
2O
21
22
23
24
25
26
27
28
29
3O
31
32
33
34
35
O
1
2
3
4
5
6
7
8
9
1O
11
Select program
Choose country
Start auto-programming
Select range
On choosing the country, the TV norm
common to this country (in the United
Kingdom=PAL-I, in Germany = PAL-BG, in
France = SECAM-L etc.) and a countryspecific program sorting are called
automatically.
For Germany, for example, the ARD
program is stored on program slot 01, ZDF
on program slot 02, a regional program on
slot 03 and so on.
TV stations broadcast their programs
in different frequency ranges and on different channels. For instance, in the VHF/UHF
range (terrestrial), in cable TV systems also
in the special channel range or via satellite in
the satellite range.
If you choose the ASTRA satellite,
the set searches for stations with the PAL
norm in the 910 to 2050 MHz frequency
range. Both polarization levels are searched
one after the other. On condition that the
antenna system is suitable for a polarization
switching with 13/18 volts.
If you choose the Telecom satellite,
the set searches for stations with the
SECAM-L norm.
If stations with teletext or VPS identification
are found, an abbreviation for the program
name is stored as well.
If you want to store the TV programs in a
different order, see the chapter „Sorting
programs“ on page 65.
Page 9

59
English
Switching on the TV set
Press the on/off button on the TV set
gently as far as it will go. The green On
lamp lights up on the local control panel.
You can normally leave the on/off
button pressed.
Switching off
You can switch off the „TV“ with the „Off“
button on the remote control. The set
is then on standby and the red standby
lamp is alight.
To turn on the „TV“, press one of the
buttons 0 to 9 on the remote control
if you want to watch a certain program.
Press TV if you want to switch on the
program you were watching last.
Menu/dialog language
You can call the menu by pressing the
MEN
button.
Changing the dialog language
Choose the line „D GB F I E NL DK“ with
the blue button▲.
Set „your language“ with the yellow buttons
▼
▲
. The dialog language is now
stored.
Exit the menu by pressing the TVbutton.
Display equipment features
Select „Information“ with the
▼
▲
buttons an press
MEN
. The equipment
features of your TV are displayed.
Press the on/off button on the set:
Switching on/off – changing the dialog language
Note
The on/off switch for Modus and Planus is
located behind the flap of the local control
panel.
The set consumes only 1 Watt of power in
standby mode.
Switch off the set at the on/off button if you
are not going to be using it for a long time.
The set is then disconnected from the
mains.
We recommend you to pull out the
mains plug and the antenna plug
during thunderstorms.
The menu can be displayed on the screen
in German, English, French, Italian, Spanish,
Dutch, Danish or Swedish.
Switching off, to standby:
remote control
Switching on „TV“:
0
to or
9
TV
Menu/dialog language
MEN
▲
Mark language
selection
Press briefly
Station
Video
Timer functions
Child Lock
TV setup
Information
Language GB
GB F I E NL DK S
Sprache D
Langue F
Lingua I
Idioma E
Taal NL
Sprog DK
Språk S
▼
▲
TV
Choose language End
Display equipment
▼
mark
"Information"
Information
Features
4:3
Multinorm
Nicam
press briefly
MEN
Retrofitted components are also displayed
(e.g. SAT 3 or SAT 4 for a satellite tuner).
Page 10
60
English
Automatic programming – choosing the country and r eception range
Calling the „Station“ menu:
MEN
„Station“ menu
The „Station“ menu contains two possibilities for station search and storage.
1. „Auto-programming“; with this function, stations can be searched for and stored
automatically in a preselected receiving range, e.g. Antenna/cable = VHF/UHF and
special channel range. The TV norm is also set on choosing a „Country“.
Even the station abbreviations are stored for stations with teletext or VPS identification.
Use the „Auto-programming“ function when you move house if TV stations are received
on other channels or the range of programs offered by a cable TV system or satellite
has been extended.
2. Station „Search and store“: This menu enables you to set different TV norms, choose
the TV reception range, enter the station channels directly, change program names,
allocate the AV sockets to certain programs and set the video recorder „station“
(channel 36...37).
Press briefly
MEN
Video
Timer functions
Child lock
TV setup
GB F I E NL DK S
Information
▲
▲
▼
▼
M
Station
Search and store
Change name
Sort
Auto programming
Menu off
TV
▼
Select range
▲
▼
Choose country
▲
▼
Set „Station“
▲
▼
Set „Auto-programming“
▲
ASTRA
TELECOM
Other satellites
▲
▼
Auto programming
Antenna/cable
D
A
CH
F
I
E
NL
B
DK
▲
▼
M
Menu off
TV
Country
GB
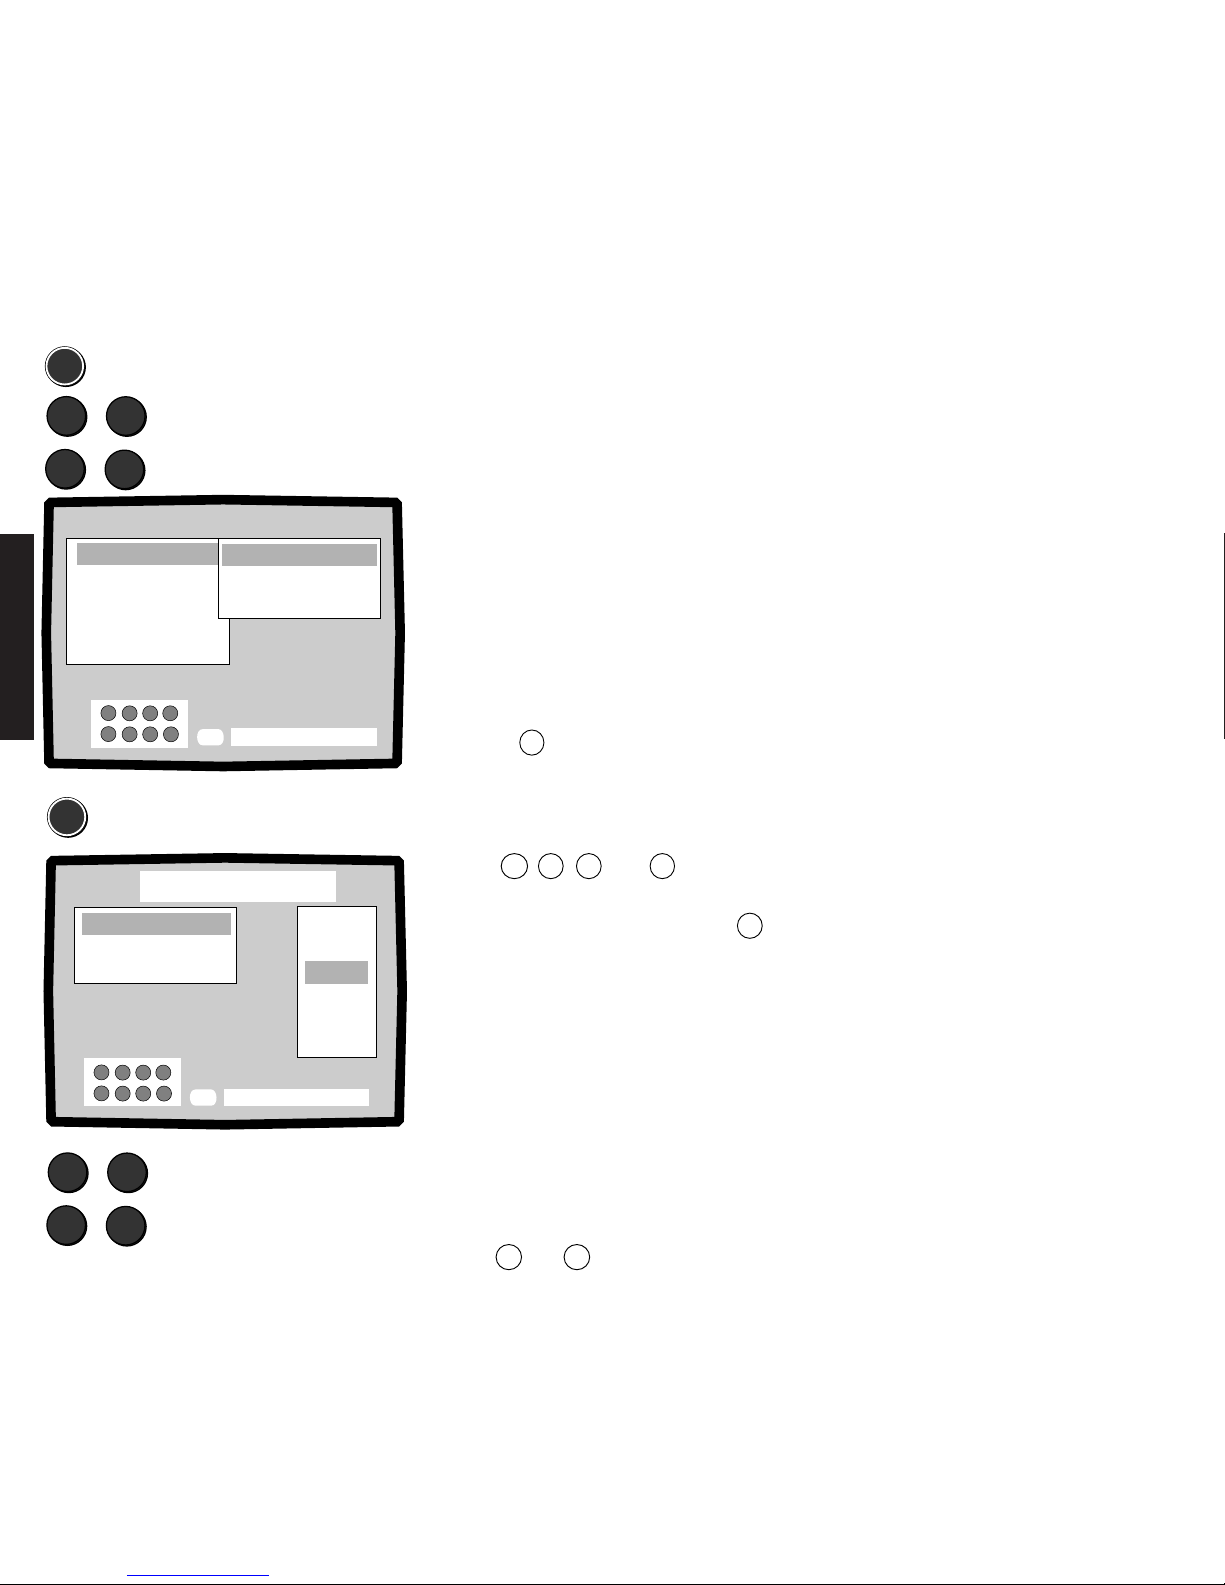
Calling the „Station“ menu
A
Press the
MEN
button on the remote
control.
The „Station“ line must be marked in blue
and the „Auto-programming“ line in
yellow, mark these if necessary with the
buttons ▼,▲,▼ and ▲.
B
Call „Auto-programming“ with the
MEN
button.
„Antenna/cable“ must be marked in blue
if TV stations from a cable TV system or an
antenna are to be searched for.
C
Select the country code for the country in
which you live and want to receive TV
stations. Stations with the country’s
common TV norm are then sought and
stored in the appropriate order in the
automatic station search.
Select the country code with the yellow
button
▼
or ▲.
„Antenna/cable“ corresponds to the TV
range VHF, UHF and special channel range
for cable systems.
If your set is fitted with a satellite
tuner, you can also search for stations in
the receiving range of the satellites ASTRA,
TELECOM etc. Then the line for the satellite
must be marked in blue. See the satellite
operating instructions for further details.
TV stations broadcast TV programs
with different TV norms depending on the
country. On choosing a country, stations
with the following norm are searched for:
Country Norm
D PAL-BG
A PAL-BG
CH PAL-BG and SECAM-L
GB PAL-I
F SECAM-L
I PAL-BG
E PAL-BG
NL PAL-BG
B SECAM-L and PAL-BG
DK PAL-BG
S PAL-BG
Page 11
61
English
D
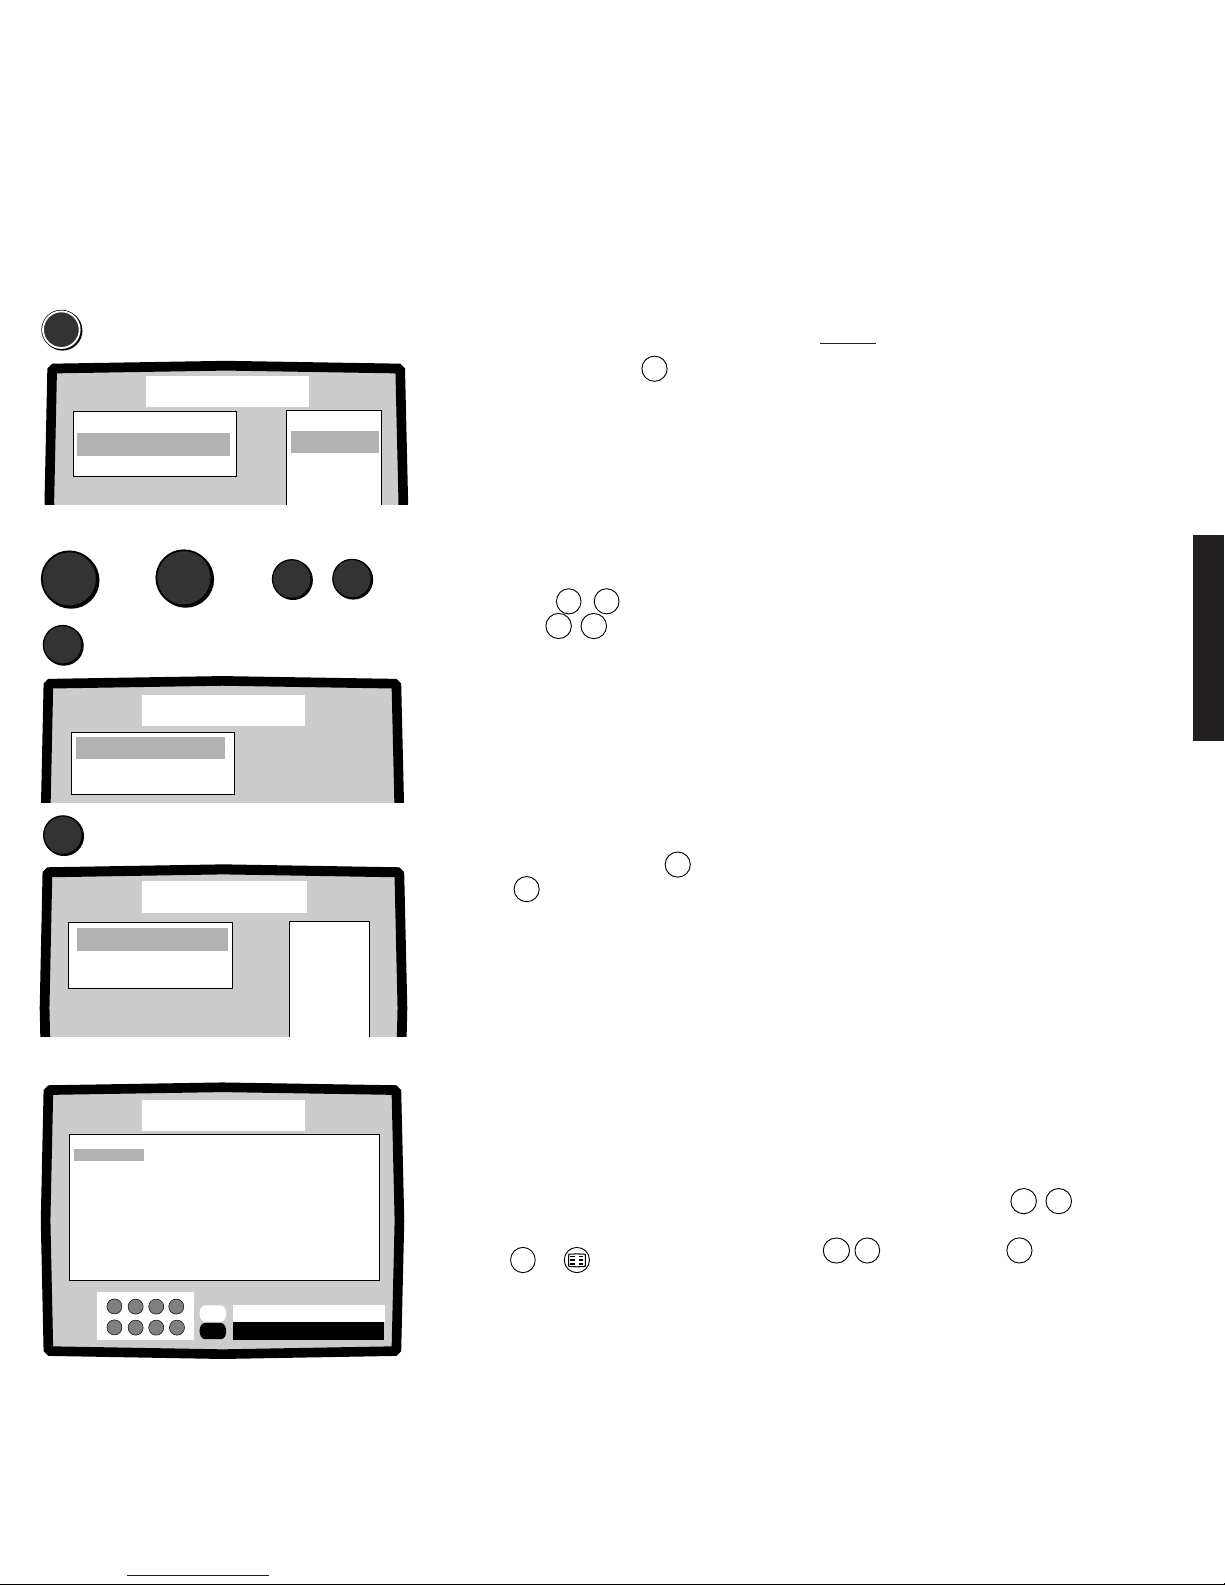
Continue by pressing the
MEN
button.
The „Storage from“ line is marked in blue.
E
Enter here from which program place
onwards the stations are to be stored.
Enter a number with the numeric buttons on
the remote control or select a program
number from the table next to it with the
yellow buttons
▼
▲
. Page through the
table with the
P+
P–
buttons.
F
Start Auto-programming
Only carry out this step when you are sure
you do not want to change the TV norm. If
you want to set a different TV norm,
carry out step G on page 62 first. Then
start the automatic programming. Set to
„Start“ with the blue button▲.
Press theXbutton to start.
All the receivable stations are stored. For
stations which broadcast teletext or VPS,
the program name is also stored. At the
end of the automatic programming, the
stored stations are sorted automatically
according to the selected country.
Then the program table with all the
found and stored TV stations and the
assigned program place numbers is
displayed.
If the program place assignment is
to your satisfaction, the automatic
programming is ended.
You can clear the program table by
pressing
TV
or .
Automatic programming – storage fr om/start pr ogramming
MEN
Antenna/cable
Start
Norm Auto.-BG
Storage from OO1
CH 36
ZDF
BR 3
HR 3
O1: ARD
OO:
O2:
O3:
O4:
Program table
3SAT
PREMI
TV 5
NTV
VOX
RTL 2
ARTE
SUPER
CC O5
CH O7
CH O9
▲
▼
X
CH 36
ARD
ZDF
HR 3
BR 3
N 3
SAT 1
RTL
PRO 7
Kabel
MDR
1PLUS
X
-P+
Paging
Program change
12
13
14
15
16
17
18
19
2O
21
22
23
24
25
26
27
28
29
3O
31
32
33
34
35
O
1
2
3
4
5
6
7
8
9
1O
11
Enter „Store from“:
9
▼
▲
1
▲
to or
Storage from OO1
Norm Auto.-BG
Antenna/cable
Start X
X
Antenna/cable
ARD 1
ZDF 2
RTL 3
TELE1
MTV
ARTE
TV5
Storage from O1
Norm PAL-I
Channel V/UHF 12
Stations are searched for and stored
Start „Auto-programming“
Select „Start“
Press
Notes:
1. If stations have already been stored after
the entered number, these will be
cleared and replaced by new ones in the
automatic programming.
2. If your TV is equipped with a satellite
tuner, program numbers 21 to 39 and
50 to 99 are pre-programmed with
satellite programs which you should only
clear if possible when the satellite
antenna has been adjusted. These
satellite programs simplify adjustment of
the satellite antenna.
3. If program place 99 is exceeded in the
automatic programming of a set with a
satellite tuner, the program places are
extended to 200.
The automatic station search takes place
over the whole TV range VHF/UHF channel
CH 01 to 12 and CH 21 to 69 and in the
special channel range CC 01 to CC 47.
If no program name can be assigned to a
station, the channel number is displayed
and stored. For example, a station in the
VHF range on channel 7 is represented by
CH 07 and a station in the special channel
range on channel 12 by CC 12. Stations in
the satellite range are identified by S.
See page 63 to find out how to program
the correct program name.
You can then call TV programs with the
numerical buttons, the
P+ P–
buttons or
mark the program in the program table with
▼
▲
and call it withX.
Page 12
62
English
Automatic programming – set other norm
G
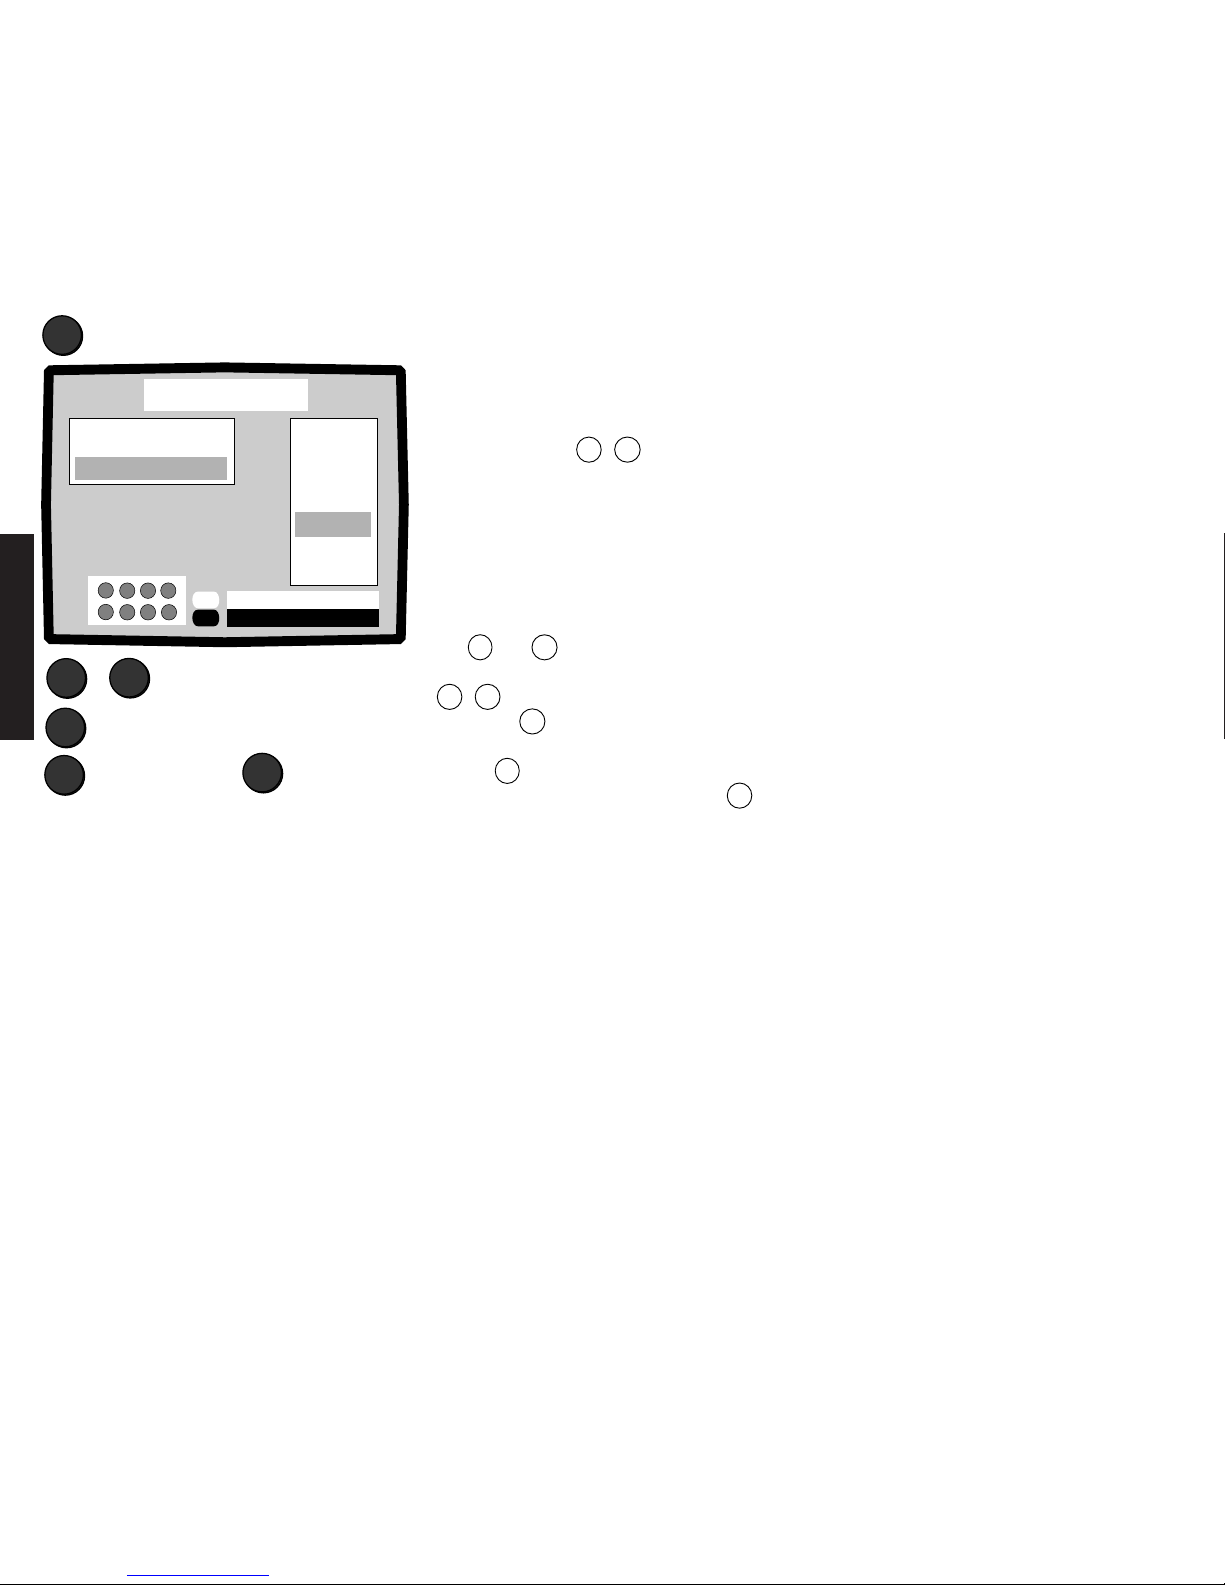
Selecting the TV norm
If you want to search for stations with
different norms, mark the line „Norm“ with
the blue buttons
▼
▲
. A list of available
TV norms will appear on the right. If you
choose the „Auto.-BG“ norm, all stations
with the BG norm, e.g. PAL-BG, SECAM-BG
etc., will be searched for automatically.
However, if you set PAL-I, only stations with
this norm will be searched for. You can turn
to the second page of the norms list with
the P+ or P–button.
Select a TV norm with the yellow buttons
▼
▲
.
Press the X button to execute.
Then mark the „Start“ line with the blue
button ▼.
Start „Auto-programming“ with the
X
button. The program table is then displayed
on screen.
▼
▼
▲
X
▼
Start
Storage from O41
▲
▼
M
Antenna/cable
X
Auto.-BG
Auto.-I
Auto.-L
Auto.-DK
Auto.-M
PAL-BG
PAL-L
PAL-DK
SECAM-BG
▲
▼
PAL-I
Execute
X
-P+
Paging
Norm PAL-BG
X
Enter norm
Select „Norm“
TV norms
The TV norm is set when a country is
selected. Set the appropriate norm if you
want to search for TV stations from other
countries.
Norm Country
Auto.-BG all norms with the suffix BG
Auto.-I all norms with the suffix I
Auto.-L all norms with the suffix L
Auto.-DK all norms with the suffix DK
Auto.-M all norms with the suffix M
PAL-BG D, DK, S, NL, A, I, E, P, N, B etc.
PAL-I Great Britain, Northern Ireland
PAL-L Special norm for camcorders in France
PAL-DK China
SECAM-BG Greece, Lebanon, Tunisia
SECAM-L France
SECAM-DK Poland, CR, SR, Hungary, Russia
NTSC Japan, USA,US military stations in Europe
NTSCV special norm for NTSC video recorders
and for PAL video recorders which can
play cassettes recorded with NTSC (PAL/
60 Hz), e.g. Loewe OC 985.
Mark „Start“ Start
Select Norm
Page 13
63
English
Press
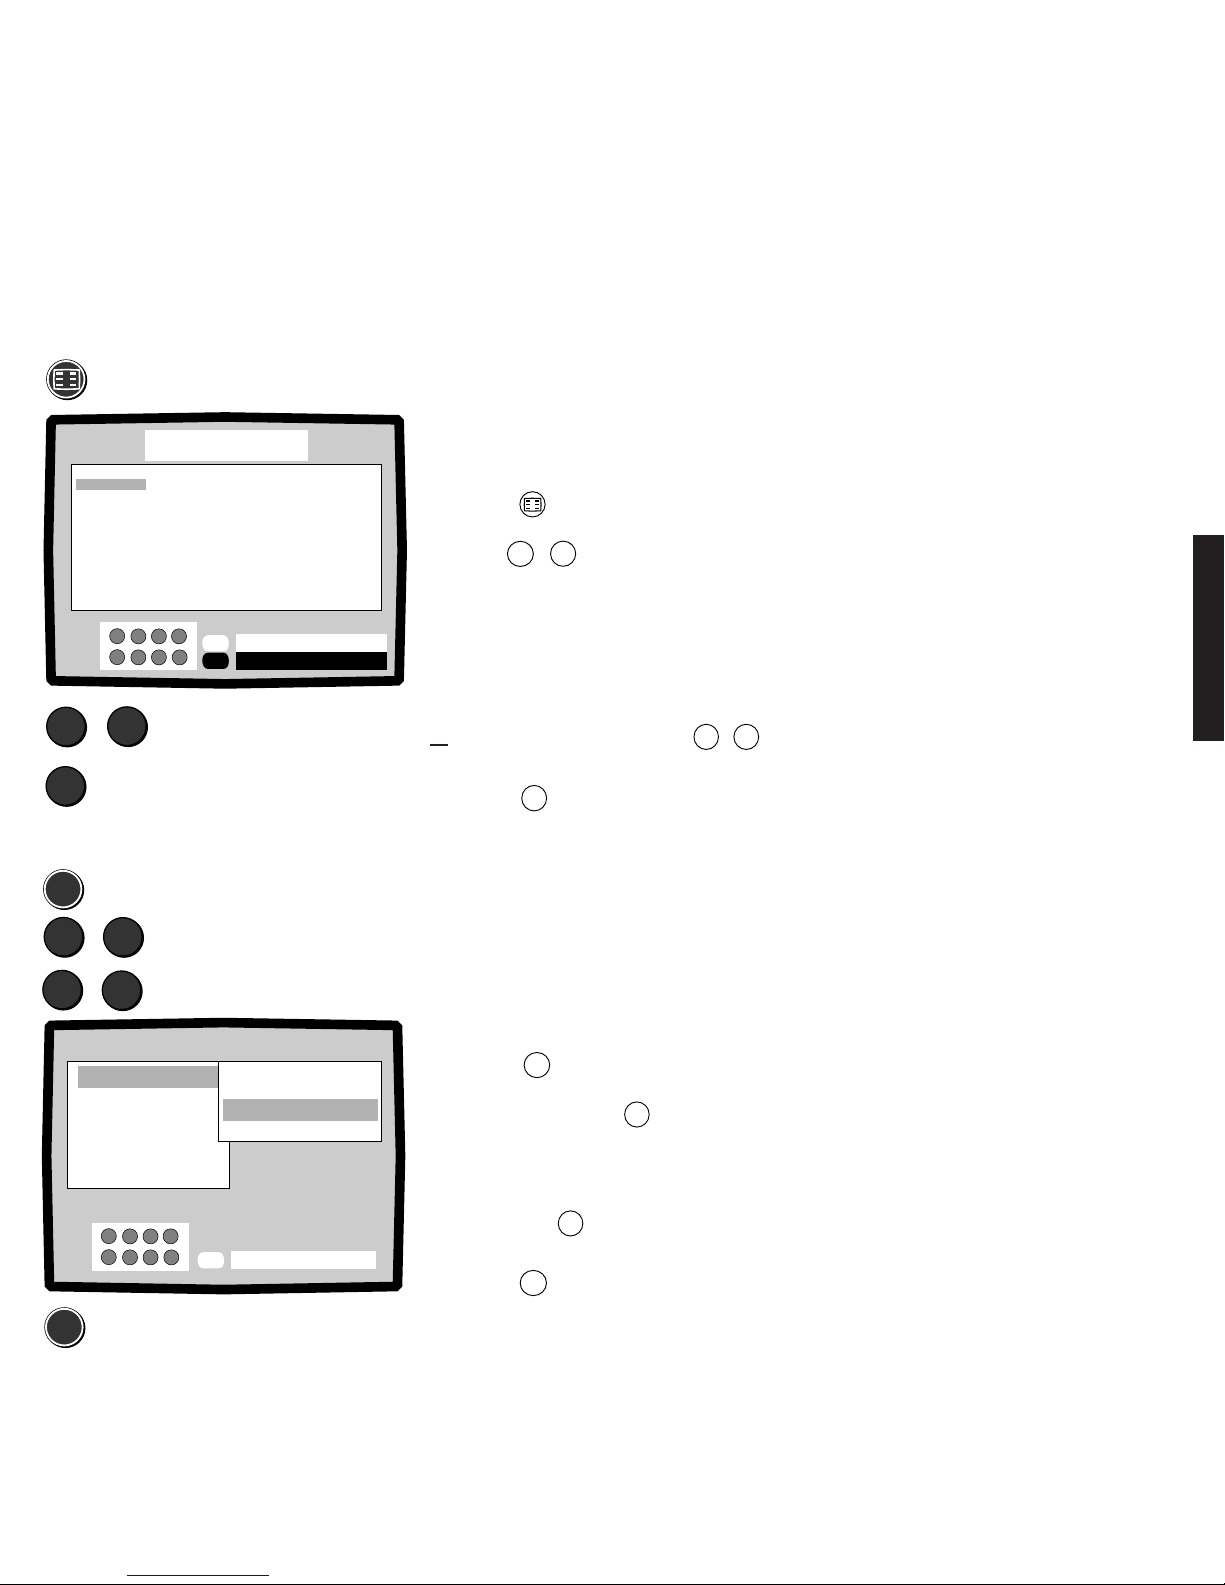
The program table gives you an at-a-glance view of the stored stations.
The program number is displayed on the left and the program name on the right. If a
program name is displayed in red, this means the program is locked (parental lock
active).
▼
▲
X
Calling the program table
A
Press the button on the remote
control. Page through the program table
with the P+ P– buttons up to 99 or 199
respectively.
B
You can choose a TV program directly from
this table with the number buttons on the
remote control, the program table then
disappears immediately;
or select with the blue buttons
▼
▲
.
C
Press the X button to switch to the
desired TV program.
Do you need more than 100 program
places? You can easily extend the set to
200 program places. This is described on
page 69.
Additional information after a
program name or the program number,
e.g. the number 1; 2; or 1!; 2! or an S!
indicates an audio/video function. Read the
Audio/Video chapter for more details.
R stands for a satellite radio program.
On the right you will see a table listing
familiar program names of stations which
do not broadcast teletext or VPS identification. Only the first program name is the
name of the currently set TV program. You
can select a program name from this table
and transfer it to a program slot at which a
station has been stored without a name.
Calling the program table:
Program table / Changing pr ogram names
Program table
3SAT
PREMI
TV 5
NTV
VOX
RTL 2
ARTE
SUPER
CC O5
CH O7
CH O9
▲
▼
X
CH 36
ARD
ZDF
HR 3
BR 3
N 3
SAT 1
RTL
PRO 7
Kabel
MDR
1PLUS
X
-P+
Paging
Program change
12
13
14
15
16
17
18
19
2O
21
22
23
24
25
26
27
28
29
3O
31
32
33
34
35
O
1
2
3
4
5
6
7
8
9
1O
11
Select The Program
Switch to TV program
Calling the menu:
MEN
Press
▼
Set „Station“
▲
▼
Set „Auto-programming“
▲
MEN
Press
With the „Change name“ menu, you can enter a program name or select a station name
from a table. This is useful, for example, in the case of stored stations without station
names. These stations are entered in the program table, for example, with CH, CC or in
the satellite range S and the channel number.
Changing the program name
Calling the „Change name“ menu
A
Press the
MEN
button briefly.
The „Station“ line must be marked in
blue. Mark it with the
▼
button if
necessary.
B
Select the „Change name“ line with the
yellow button
▼
.
C
Press the
MEN
button.
The name of the currently set TV program
is displayed on the left.
▲
▲
▼
▼
M
Change name
TV
Video
Timer functions
Child lock
TV setup
GB F I E NL DK S
Information
Station
Auto programming
Search and store
Sort
Menu off
Page 14
64
English
Selecting a program slot:
Allocating a program name
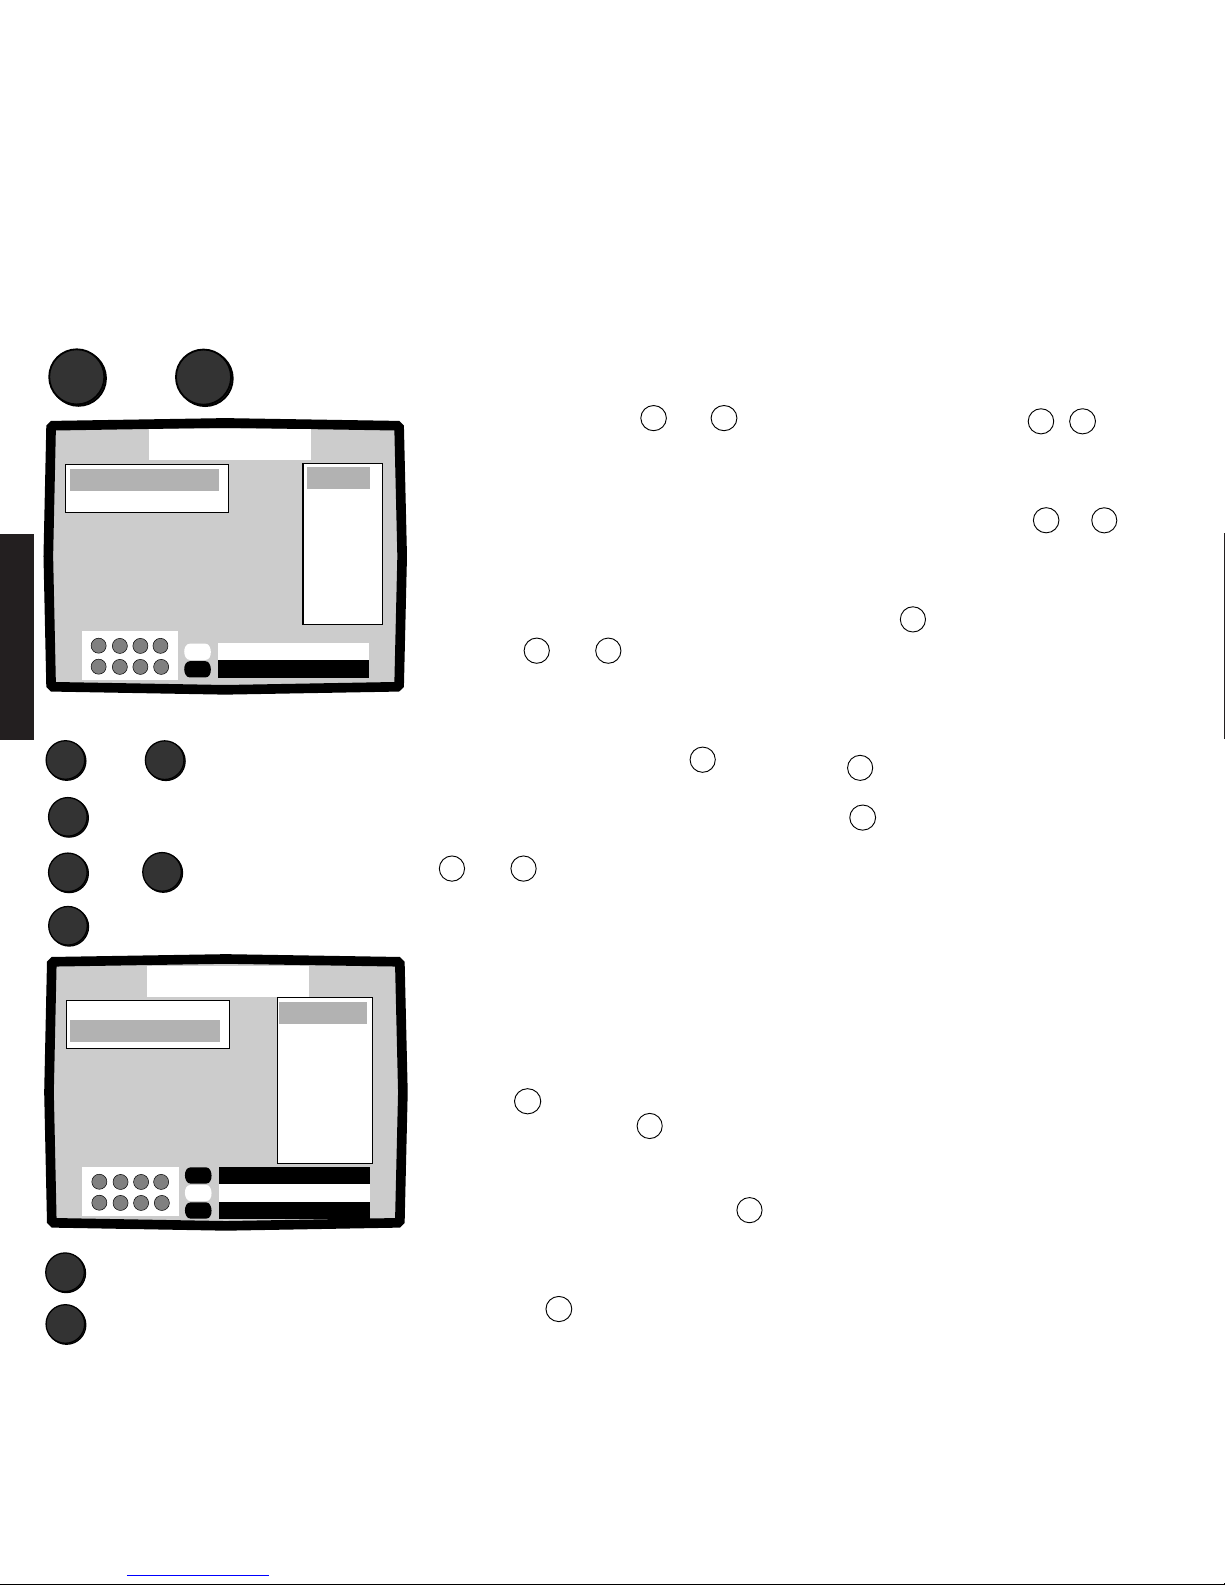
If you find a station without a name when
paging through with the
P+
P–
buttons,
find out which station this is, e.g. with a TV
guide or a logo displayed on screen.
1. Select a suitable name from the table
with the yellow button ▼or ▲. The
program name is entered immediately
under „Name“.
2. Select the „Store“ line with the blue
button▼. The currently set program
number flashes. You can now store the
program name at this program slot or
choose another program slot with the
number buttons.
3. Store the program name, press the
X
button.
4. You can exit the menu by pressing the
TV
button.
Changing the program name
D
Select the program slot at which you want
to enter or change a name, e.g. program
slot 00 or 000, with the
P+
or
P–
button.
You can enter the name VCR for video
recorder at program slot 00 or 000 instead
of CH36 for example.
E
The letters A to Z, numbers 0 to 9 and
symbols +, -, . or blank can be used.
Press the
+
or
–
button until the V
appears.
F
Call the next position with the
X
button.
G
Select the next letter, e.g. the C, with the
+
or
–
button.
Repeat steps F and G accordingly for
further positions.
In this way you can enter a program
abbreviation with up to 5 positions. When
the abbreviation, e.g. VCR, has been
entered completely, store the "Name".
H
Press the
MEN
button or mark the „Store“
line with the blue button ▼.
J
Store the program name, press the
X
button.
If you do not want to change or
enter any other names, exit the menu by
pressing the
TV
button.
X
Press to store
P+
or
P–
Entering the program name:
or Call letter, number
or symbol
–
X
second position
+
–
or second letter and so on
▼
+
TV
▲
▼
M
Change name
X
▲
▼
Position
X
RTL 2
N-TV
TELEC
TRT
PRO 7
ARTE
ANT 2
CPLUS
FR3
CH 36
-P+
Program change
Storage OOO
Name CH 36
+
–
Exit menu
Mark „Store“ line in blue
▲
▼
M
X
▲
▼
Store
X
-P+
Paging
Name VCR
Storage OOO
O–9
Entry
RAI 1
RAI 2
RAI 3
CAN 5
ITALI
RETE4
TMC
RETEA
MUSIC
OO: VCR
O1:
O2:
O3:
O4:
O5:
O6:
O7:
O8:
O9:
Change name
Page 15
65
English
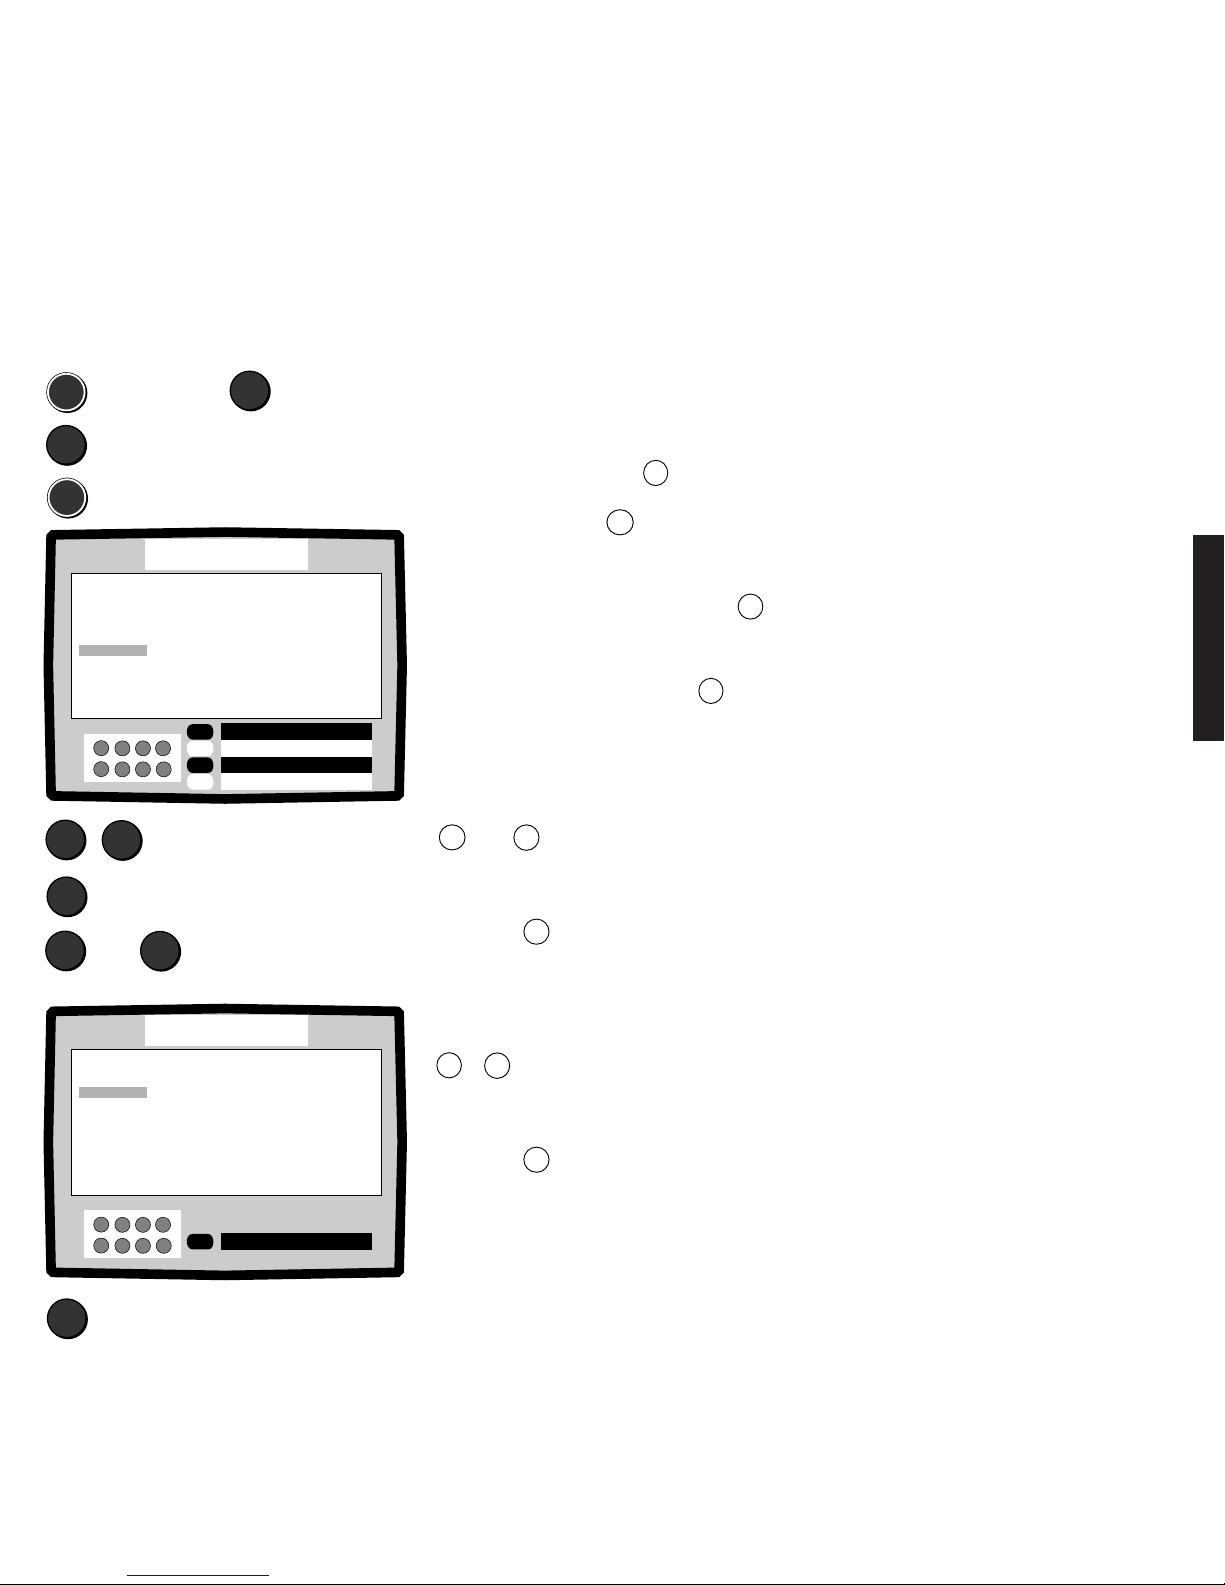
Changing the program assignment
The „Sort“ menu enables you to sort stored programs or delete programs as you
wish. You can also insert programs, the program name is deleted. You can store other
stations at these program slots without changing the order of programs.
Sorting programs
Call the menu
Press
▼
MEN
MEN
▼
▲
X
▼
▲
or Move name to desired
program slot
▲
▼
M
Sort
X
3SAT
PREMI
TV 5
NTV
VOX
RTL 2
ARTE
SUPER
CC O5
CH O7
CH O9
+
–
VCR
ARD
ZDF
HR 3
BR 5
N 3
SAT 1
RTL
PRO 7
Kabel
MDR
1PLUS
Paging
-P+
Insert
+
Delete
–
Move ON/Off
X
12
13
14
15
16
17
18
19
2O
21
22
23
24
25
26
27
28
29
3O
31
32
33
34
35
O
1
2
3
4
5
6
7
8
9
1O
11
▲
▼
M
Sort
X
3SAT
PREMI
TV 5
NTV
VOX
RTL 2
ARTE
SUPER
CC O5
CH O7
CH O9
+
–
VCR
ARD
ZDF
SAT 1
HR 3
BR 5
N 3
RTL
PRO 7
Kabel
MDR
1PLUS
Move On/Off
X
12
13
14
15
16
17
18
19
2O
21
22
23
24
25
26
27
28
29
3O
31
32
33
34
35
O
1
2
3
4
5
6
7
8
9
1O
11
X
Sorting programs – moving
Press, move ended
A
Call the menu, press the
MEN
button. The
„Station“ line must be marked in blue,
mark it with the blue ▼ button if
necessary.
B
Mark the „Sort“ line with the yellow
▼
button.
C
Call the „Sort“ table, press the
MEN
button.
D
Select the program name which is to be
moved, e.g. SAT 1, with the blue button
▼
or
▲
.
E
Press the
X
button, the program name
flashes.
F
Move the program name to the desired
program slot with the blue buttons
▼
,
▲
.
G
Press the
X
button. The program
names and data are moved. Repeat steps
D to G if you want to resort other
programs.
▼
Select the
„Station“ line
Select the „Sort“ line
Press
Mark the program name
Press , program name flashes
You can move every program to any
program slot.
Program slot 0 should not be
assigned to a TV program.
This program slot is reserved for video
recorder playback (short time constant) and
is pre-programmed with channel 36.
If you move a program name to
another program slot, all the appropriate
program data are moved with it.
Page 16
66
English
Sorting programs – deleting and inserting
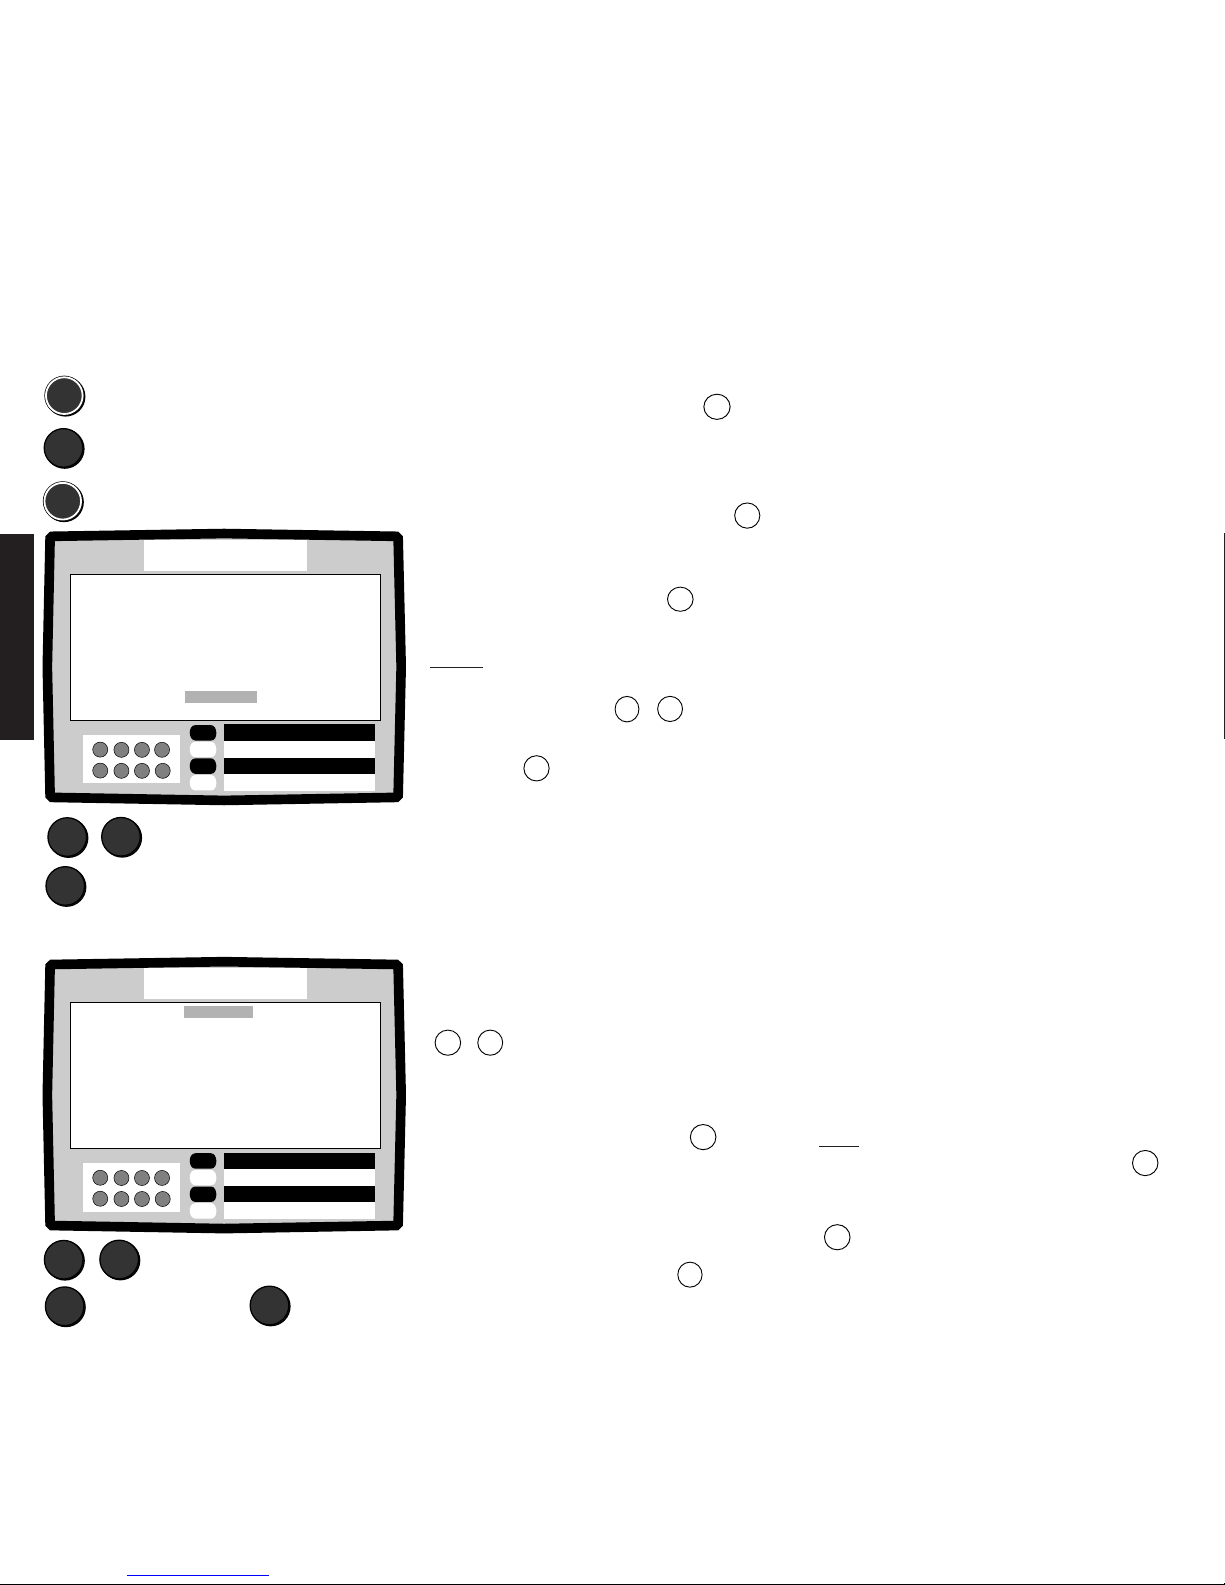
Delete name and program data
Inserting a free program slot
This function enables you to insert programs later. A program memory is only displayed
with the program number in the program table. New station data can be stored in this
program memory with the „Station - Search and Store“ menu.
The names move one place up after
deletion.
C
Exit the menu by pressing th
TV
button.
A
Call the „Sort“ menu, press the
MEN
button.
The „Station“ line must be marked in blue,
mark it if necessary.
B
Mark the „Sort“ line with the yellow
▼
button.
C
Call „Sort“ table, press the
MEN
button.
D
Delete:
Select the program name to be deleted
with the blue buttons ▼,▲.
E
Press the
–
button briefly once. The
name disappears after 1 or 2 seconds.
A
Select a program slot for insertion in the
„Sort“ menu with the blue buttons
▼
,▲, e.g. program slot 12.
B
Insert program slot, press the + button.
All the following program names are moved
one place to the next free program slot.
Delete programs:
Call the „Sort“ menu
▼
▲
Mark the „Sort“ line in yellow
Press
Press; the „Station“ line must be
marked in blue
▼
▲
Delete the program name
–
▲
▼
M
Sort
X
+
–
CH 36
ARD
ZDF
HR 3
BR 3
N 3
SAT 1
RTL
PRO 7
Kabel
MDR
1PLUS
Paging
-P+
Entry
+
Delete
–
Move On/Off
X
3SAT
PREMI
TV 5
NTV
VOX
RTL 2
ARTE
SUPER
CC O5
CH O7
CH O9
12
13
14
15
16
17
18
19
2O
21
22
23
24
25
26
27
28
29
3O
31
32
33
34
35
O
1
2
3
4
5
6
7
8
9
1O
11
▲
▼
M
Sort
X
+
–
CH 36
ARD
ZDF
HR 3
BR 3
N 3
SAT 1
RTL
PRO 7
Kabel
MDR
1PLUS
Paging
-P+
Insert
+
Delete
–
Move On/Off
X
3SAT
PREMI
TV 5
NTV
VOX
RTL 2
ARTE
SUPER
CC O5
CH O7
12
13
14
15
16
17
18
19
2O
21
22
23
24
25
26
27
28
29
3O
31
32
33
34
35
O
1
2
3
4
5
6
7
8
9
1O
11
Inserting a free program slot:
+
➪
TV
Select the name to be
deleted
Select program slot
Insert End
▼
MEN
MEN
Note: If data are stored in the last program
place (99 or 199) and you press the
+
button to insert, the message „Last
program is lost“ appears. Then press the
+
button again to insert a program.
Page 17
67
English
Calling the the „Station - search and
store“ menu:
Searching for and storing station
MEN
MEN
▼
▲
0
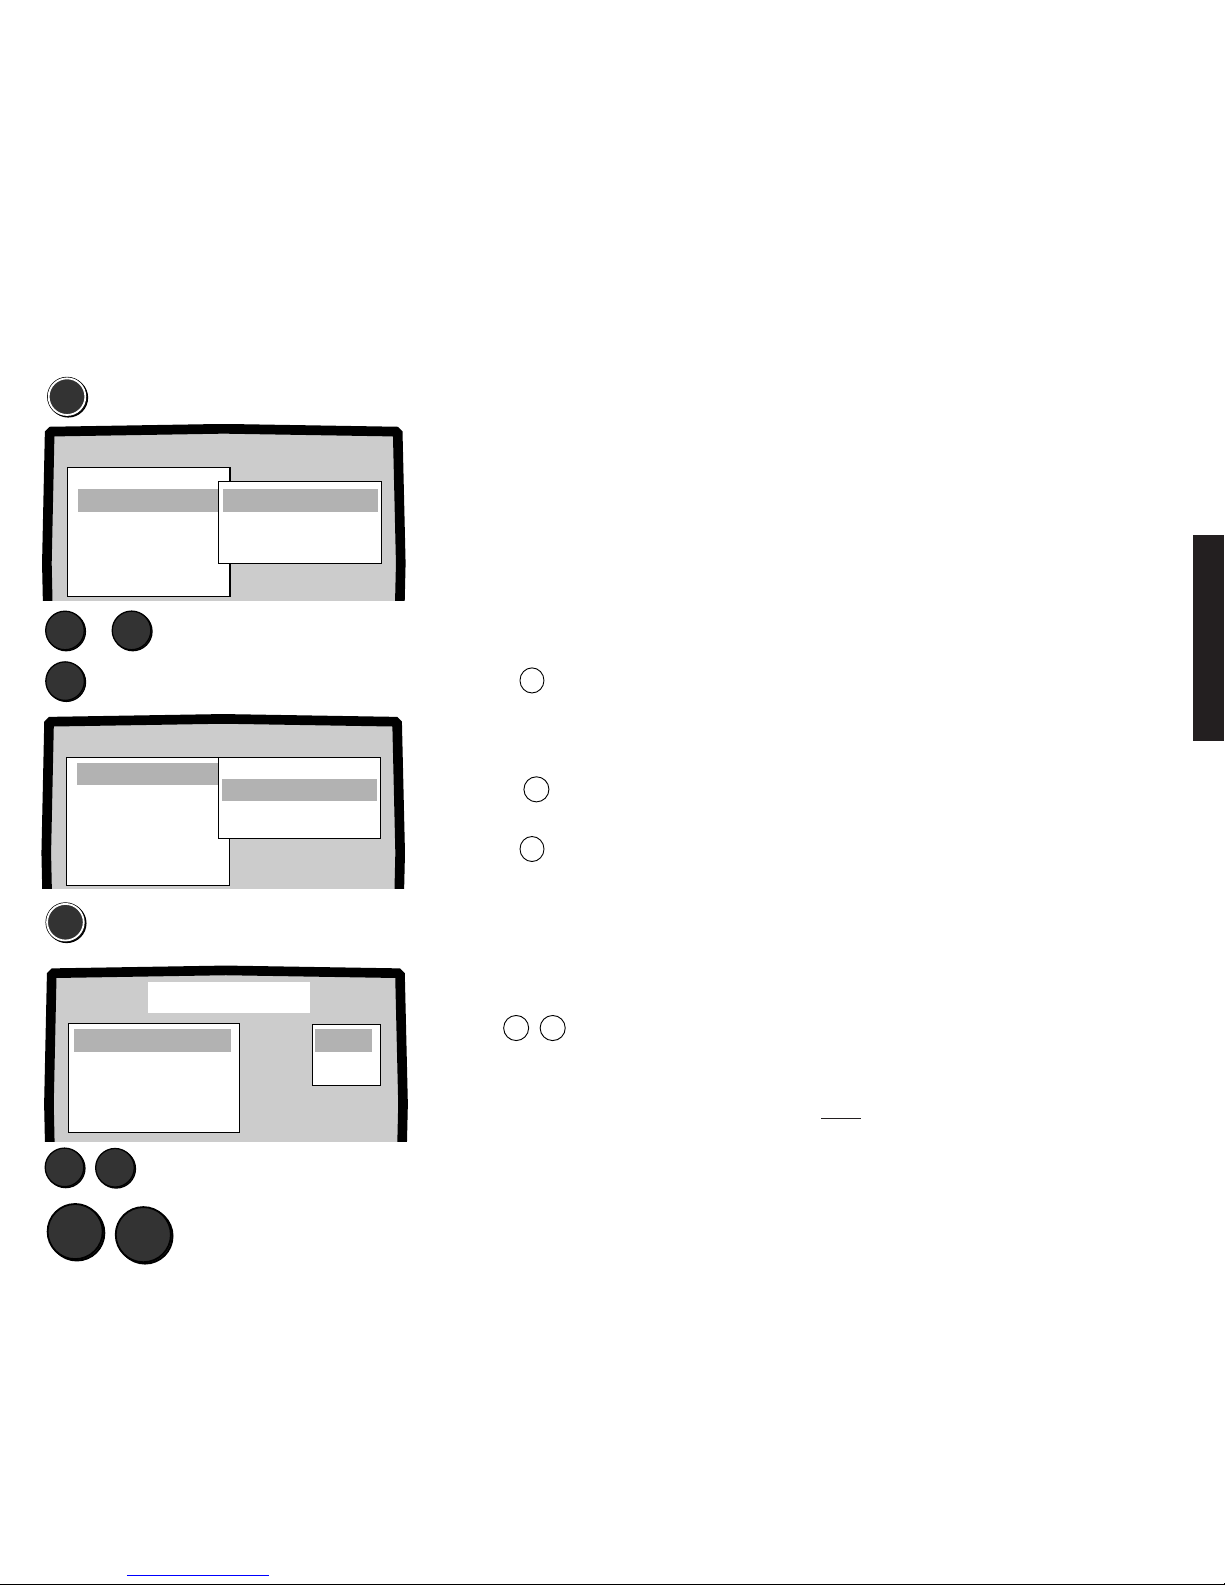
The „Station - search and store“ menu enables you to store further stations later in
addition to those already stored. The following functions can be executed:
1. Select the TV frequency range.
2. Enter the channel number or, in the case of satellite reception, the frequency for a station.
3. You can expand the number of selectable programs from 100 to 200 in a set with a
satellite tuner.
4. Assign an AV source to the program slot (see also page 91).
5. Carry out station fine tuning if reception conditions are difficult.
6. Set the TV norm.
7. Enter or select a program name.
8
Station
Timer functions
Child lock
TV setup
GB F I E NL DK S
Information
Video
VCR programming
Copy functions
Installation
Record/Playback
Search and store
Channel V/UHF O5
Cable
SAT
V/UHF
Storage O24
AV Source --Name CH O5
Fine O
Norm Auto.-BG
Enter channel directly,
e.g. 08 for channel 8
Press briefly
Press
Select the frequency range
Calling the „Station - search and store“
menu
A
Press the
MEN
button. The „Station“ line
must be marked, mark it if necessary.
B
Select the „Search and store“ line with
the yellow ▼ button.
C
Press the
MEN
button.
Selecting the reception range
You can choose between the ranges
„VHF/UHF“ and the special channel range
„Cable“ for cable TV systems.
Select the frequency range with the yellow
buttons
▼
▲
.
Entering the station channel directly
If you are familiar with the local channel
numbers of the TV stations, you can enter
the channel number directly with the
number buttons.
If the „Channel“ line is marked in blue, the
channel number can be entered. Channel
number are entered in two digits, e.g. 08
for channel 8.
The channel number must be entered in
three digits in the satellite range.
Note
Before you enter a channel number or
search for a station, the preset TV norm
„Norm Auto.-BG“ may have to be changed.
See the chapter TV norms on page 68.
Also consult the table „Channels and norms
of some countries“ at the end of these
operating instructions.
▼
Select line „Search and store“
▼
▲
Select line „Station“
Video
Timer functions
Child lock
TV setup
GB F I E NL DK S
Information
Station
Auto programming
Change name
Sort
Search and store
Page 18
68
English
Station search and store
Searching for the station channel
manually
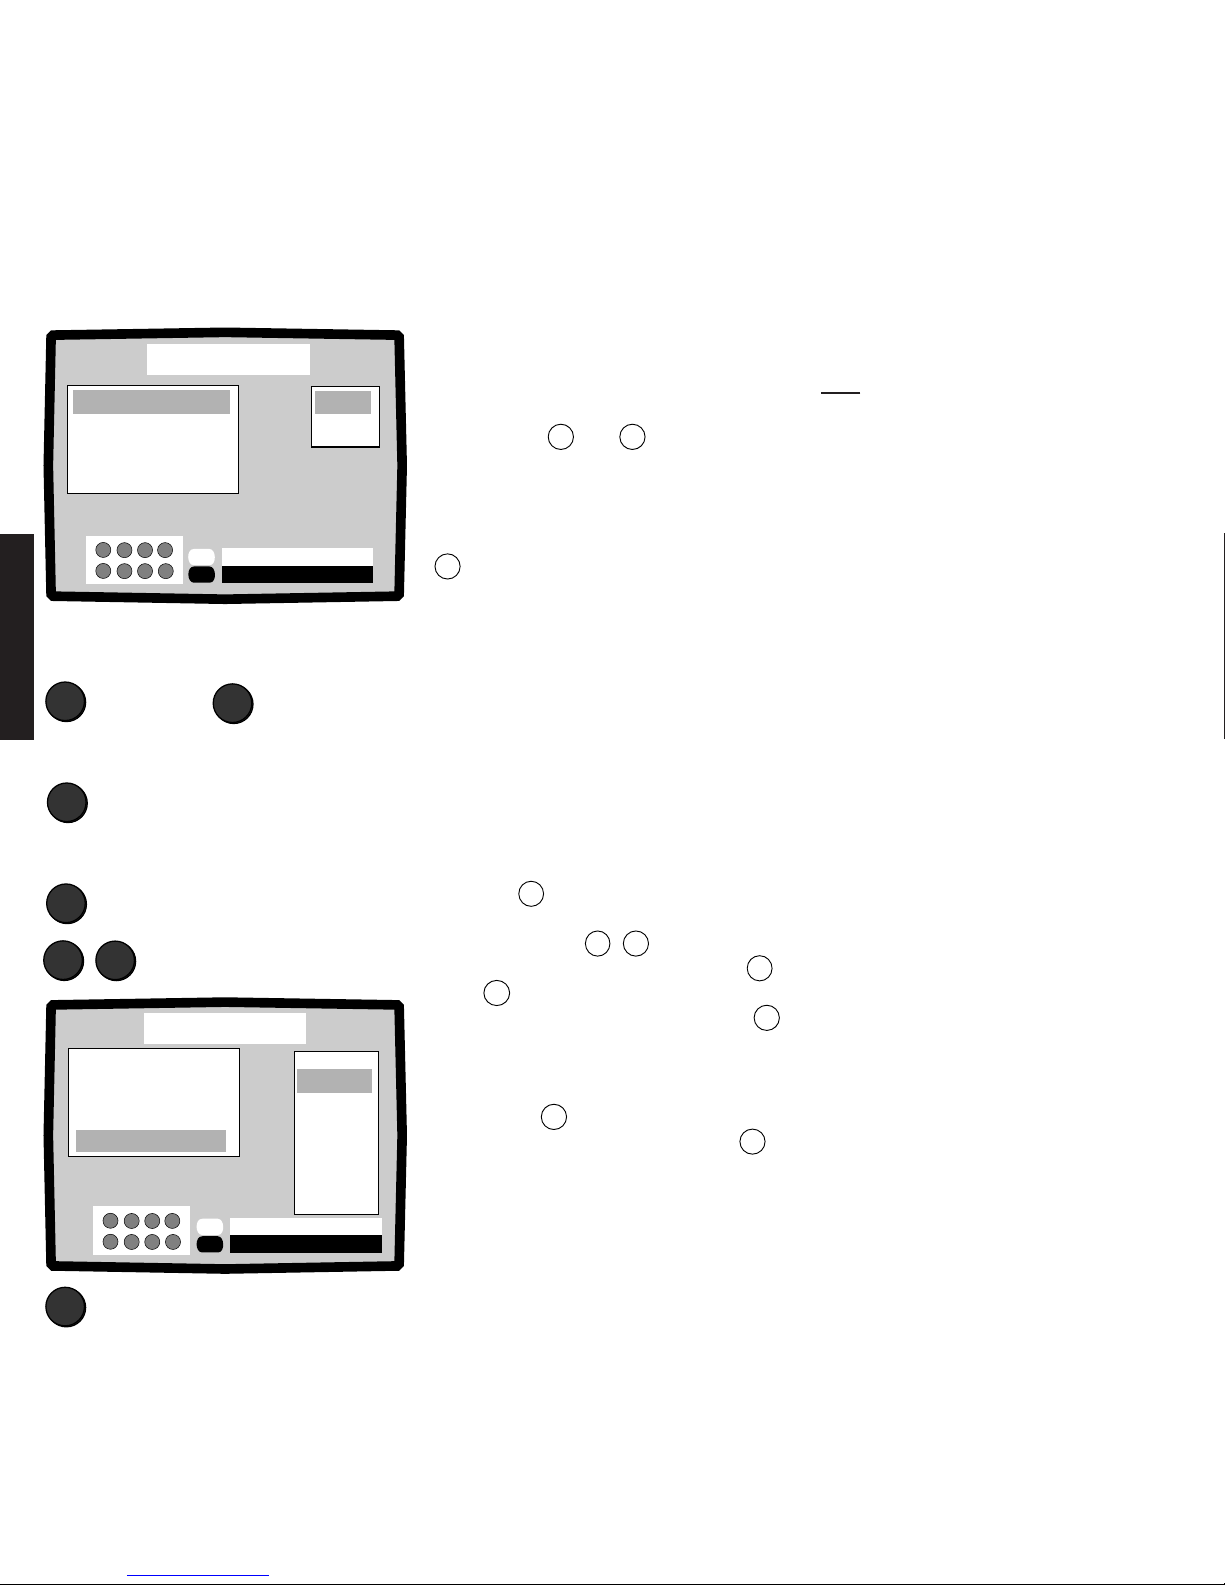
You can search for stations in the
previously selected frequency range by
pressing the
+
or
–
button briefly
and thus switching from channel to channel.
Station search
Start the station search by pressing the
X
button briefly.
The channel numbers change. The search
stops when a station has been found. If the
picture and sound are not perfect or you
want another station, restart the search.
Setting the TV norm
If you want to receive TV stations from
other countries, you may have to set the
correct TV norm before you can set the
channel number or start the station search.
1. Mark the „Norm“ line with the blue
button ▼.
2. Select the appropriate TV norm with the
yellow buttons
▼
▲
. Other norms
are displayed when you press the
P+
or P–button.
3. Enter the selected norm, press the
X
button.
Now you can set a station channel or
search for a station as described above.
4. Press the
MEN
button, the „Store“ line is
selected automatically. Press the
X
button if the program number is OK.
+
Searching for stations manually:
Switch from channel to channel
up down
Starting station search:
–
X
▼
X
▼
▲
Setting the TV norm:
▲
▼
M
Search and store
Channel V/UHF O8
X
Search
X
Cable
SAT
V/UHF
O–9
Entry
+
–
▲
▼
Storage O24
AV Source --Name RTL 2
Fine O
Norm Auto.-BG
▲
▼
M
X
Channel V/UHF O8
Storage O24
AV Source --Name RTL 2
Fine O
Norm Auto.-I
▲
▼
Search and store
Auto.-BG
Auto.-L
Auto.-DK
Auto.-M
PAL-BG
PAL-I
PAL-L
PAL-DK
SECAM-BG
Auto.-I
-P+
Paging
Execute
X
Execute norm
Select norm
Mark the „Norm“ line
Press briefly
Note:
The exact station frequencies for every
channel are stored in this set and are
observed exactly when entering a channel
number or during the search. Under
unfavourable reception conditions, e.g. nonstandard transposers of community
antenna systems, transposers of a satellite
antenna (LNC, LNB) or in the video recorder
station, it may be necessary to carry out
fine tuning for best picture and sound
quality. See the chapter „Station fine
tuning“.
Ask your dealer which norm needs to be
set for specific stations or video recorders.
As described here, you can store all the
following entries in this chapter. In all cases
you can enter another program number
first if you want to store at a different
program slot to the one called.
Norm Country
Auto.-BG all norms with the suffix BG
Auto.-I all norms with the suffix I
Auto.-L all norms with the suffix L
Auto.-DK all norms with the suffix DK
Auto.-M all norms with the suffix M
PAL-BG D, DK, S, NL, A, I, E, P, N, B etc.
PAL-I Great Britain, Northern Ireland
PAL-L Special norm for camcorders in France
PAL-DK China
SECAM-BG Greece, Lebanon, Tunisia
SECAM-L France
SECAM-DK Poland, CR, SR, Hungary, Russia
NTSC Japan, USA,US military stations in Europe
NTSCV special norm for NTSC video recorders
and for PAL video recorders which can
play cassettes recorded with NTSC (PAL/
60 Hz), e.g. Loewe OC 985.
Page 19
69
English
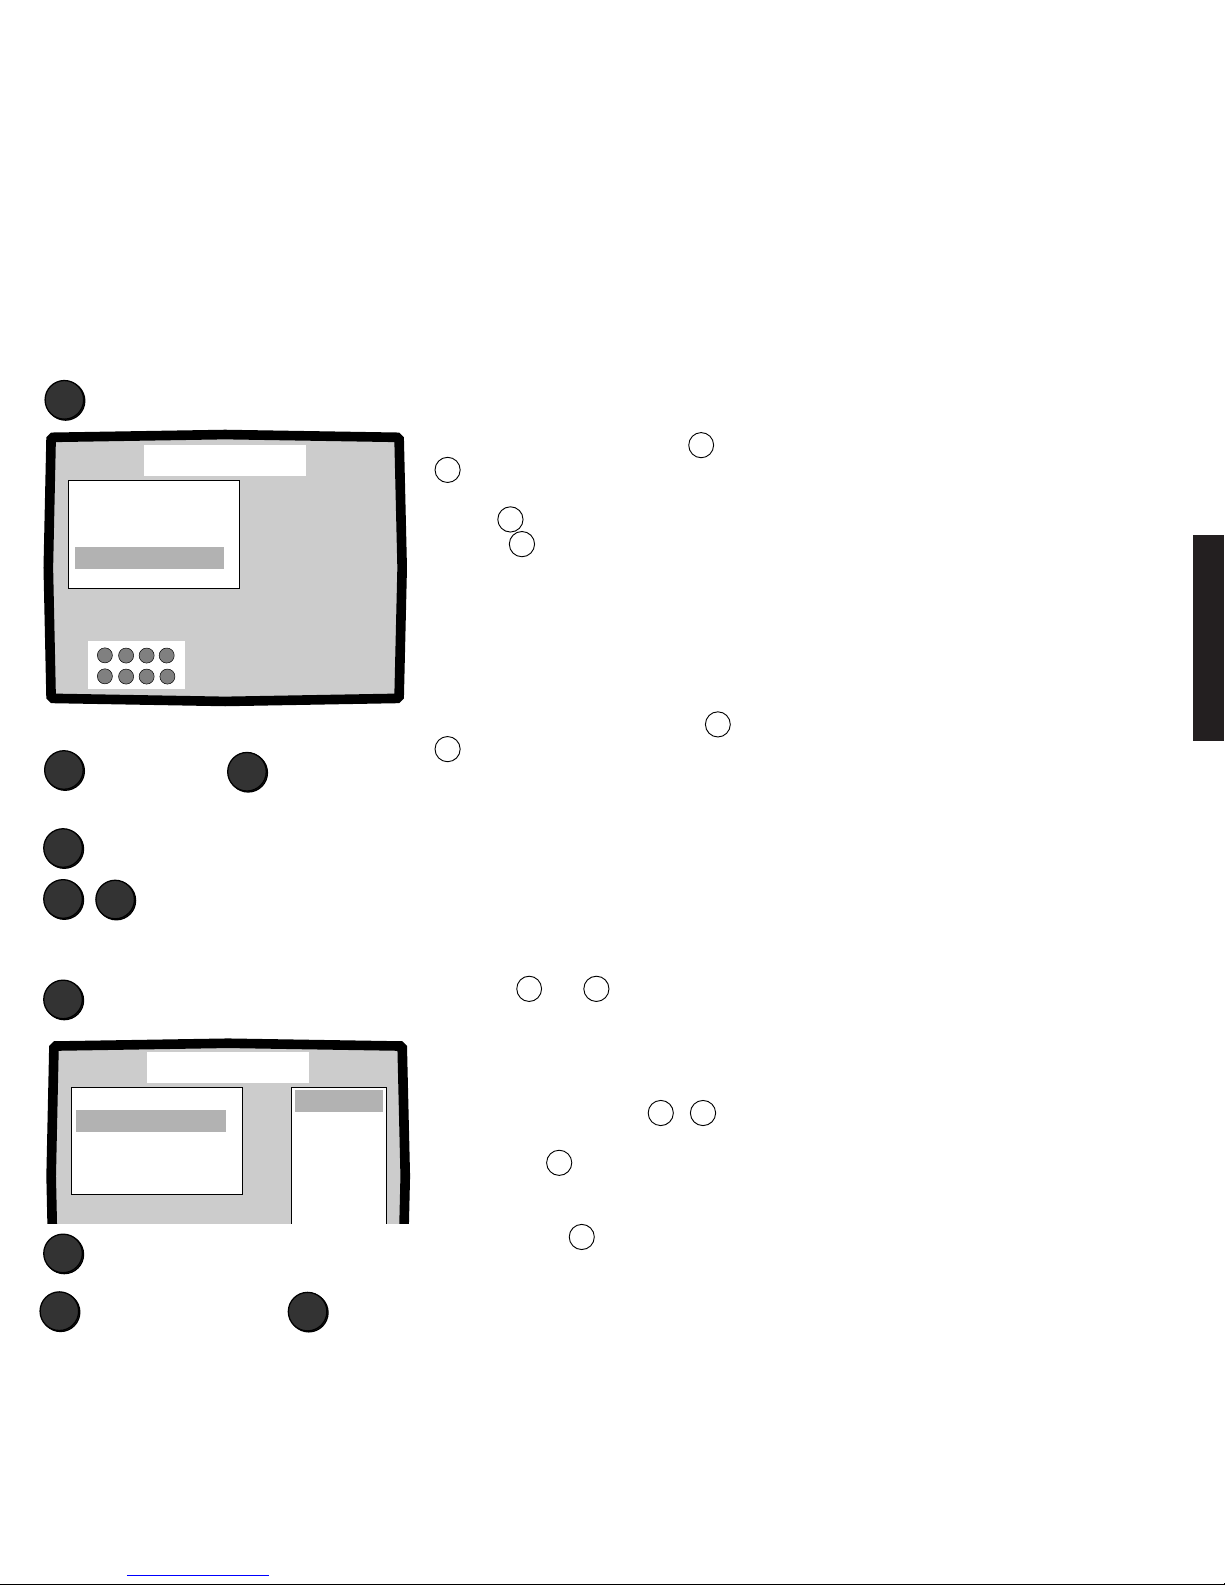
Calling the „Fine tuning“ menu:
▼
Select the „Fine“ line
Fine tuning of the station:
+
The TV sets itself automatically to the best picture quality (AFC). In the unlikely event that
the picture needs to be adjusted, e.g. for the video recorder station, you can change the
station adjustment with the fine tuning.
Select „Name“ line
Program name:
▼
▲
▲
Select program name
Selecting the memory slot:
Station search and store
▲
Select „Storage“ line
▼
X
Select memory slot or enter with the
number buttons
Store End
TV
Fine tuning of the station
▲
▼
M
ChannelV/UHF O8
Storage O24
AV Source --Name RTL 2
Norm Auto.-I
Fine -12
Search and store
+
–
AV Source --Name RTL 2
Fine O
Norm Auto.-I
Channel V/UHF O8
25:
26:
27:
28:
29:
3O:
31:
24:
Storage O24
Search and store
picture sharper picture unsharp
–
Select the „Fine“ line with the▲ or
▼
button.
Tune to an „oversharp picture“ with the
button
+
and to an „unsharp picture“
with the
–
button. Pay attention to the
channel number when tuning, the fine tuning
may overlap the channels.
You can fine tune a stored station later.
First select the program slot. Then call the
„Station search and store“ menu. Select the
„Fine“ line and set the optimum picture.
The AFC is switched off by changing the
fine tuning!
Program name
If no name is entered under „Name“ for the set station, you can enter a name or choose
one from the name list.
Select the „Name“ line with the ▲ or
▼
button.
Carry out steps E, F and G described on
page 64 or select a name from the name
list.
1. Select the „Storage“ line with the blue
button ▲ or ▼.
2. Enter the memory slot in three digits
with the numerical buttons (004 =
program 4) or select the program slot
with the yellow buttons▼ ▲.
3. Press the
X
button to store. All the
set program data are now stored in this
program memory. Exit the menu by
pressing the TV button.
Expanding to 200 programs in sets
with a satellite tuner:
Once the program number 100 has been
entered, you will be able to select
programs up to 199 in future and the
program table shows programs up to 199.
If you want to limit your set to 100
programs again, erase all programs from
100 onwards as described on page 66.
Audi/Video source
Using the „Search and store“ menu, it is
also possible to select a socket and assign
a program slot for audio/video equipment.
This function is described in detail in the
chapter „Audio/video connections“ on
page 91.
Selecting the program slot
Any program slot can be selected. It is, however, advisable to select a free program slot,
i.e. one with no program name or channel number.
Page 20
70
English
This part of the operating instructions deals essentially with the program selection,
adjustment of contrast, brightness, colour, sound functions and useful additional functions.
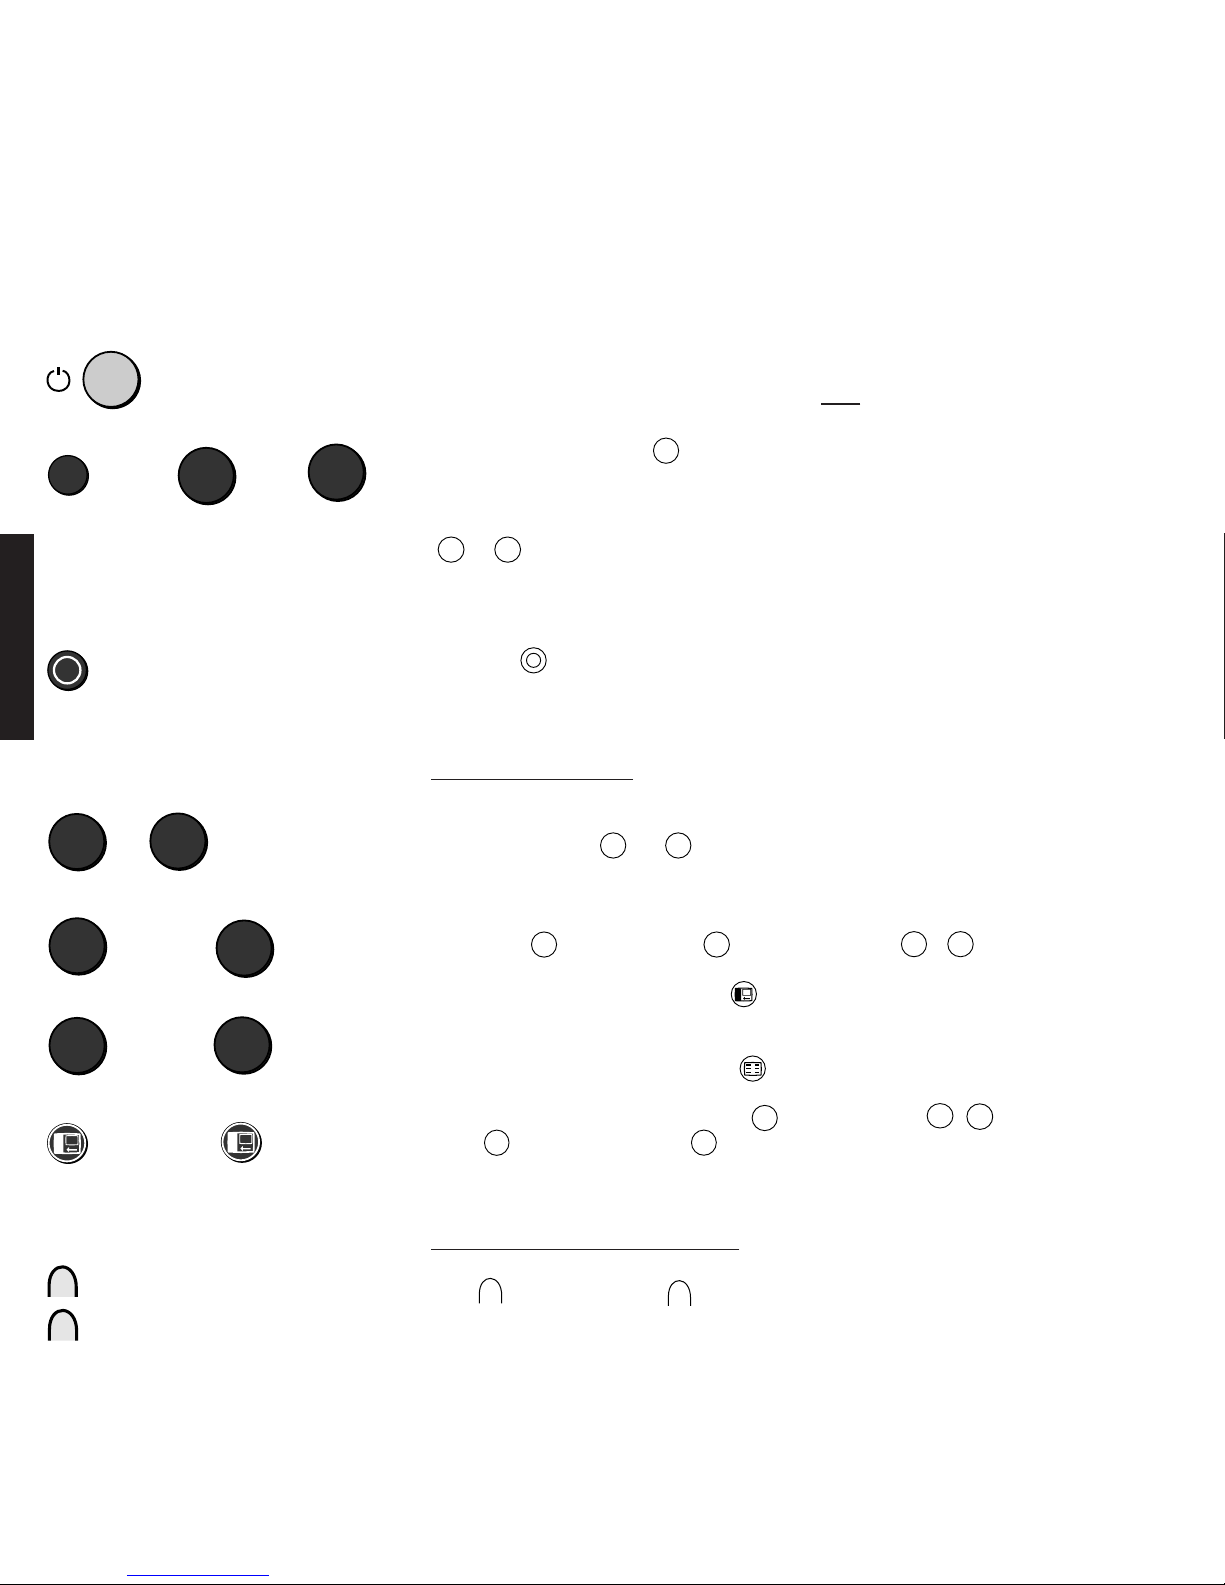
Switching on the set:
Switching on with the remote control:
TV
or to
9
0
Switching off with the remote control:
Note:
If neither the red nor the green lamp is
alight on the set, the set has been switched
off with the on/off button. To switch the set
on, press this switch gently as far as it will
go.
If both lamps are alight, the set is on
„Timer recording“ for video recording.
Selecting TV programs:
With the remote control
A 1-digit program
0
9
Two-digit program, e.g. 25
2
and
With the program buttons
P+
P–
5
Selecting the TV program on the set:
switch program forwards
switch program backwards
to Press (about 2 Sec.)
forewards backwards
+
–
Daily operation of the set – switching on/off – changing programs
Switching on, switching off
If the red standby lamp on the set is alight,
switch on the set with the TV button on
the remote control. The program you were
watching last then appears. You can also
switch the set on with the number buttons
0
...9, this selects a one-digit pro-
gram directly.
Switching off to standby
Press the button on the remote
control.
Selecting a TV program
With the remote control:
1. A one-digit program by prolonged
pressing (about 2 seconds) of one of the
number buttons
0
to
9
. A twodigit program by pressing the two
numbers one after the other.
2. Program selection with the program
buttons
P+
"forwards" and
P–
"backwards".
3. The button with the yellow circle
allows you to switch directly from the
current program to a preset program.
4. Call the program table, press the
button briefly. Select a program in the
program table with the blue button
▼
or
▲
and then press the X button.
The desired program appears on the
screen.
Selecting the TV program on the set:
Switch from program to program, forwards
with
+
, backwards with –.
Select last viewed program:
... and back
Inserted program slots can be selected
with the
P+,P–
buttons.
If you have extended to 200 programs,
enter 0–19 in three digits and 20–99 in two
digits.
You can jump from column to column in the
program table and scroll in the table with
the buttons
P+
P–
.
Page 21
71
English
Daily operation of the set – adjusting the picture/contrast, brightness, sharpness
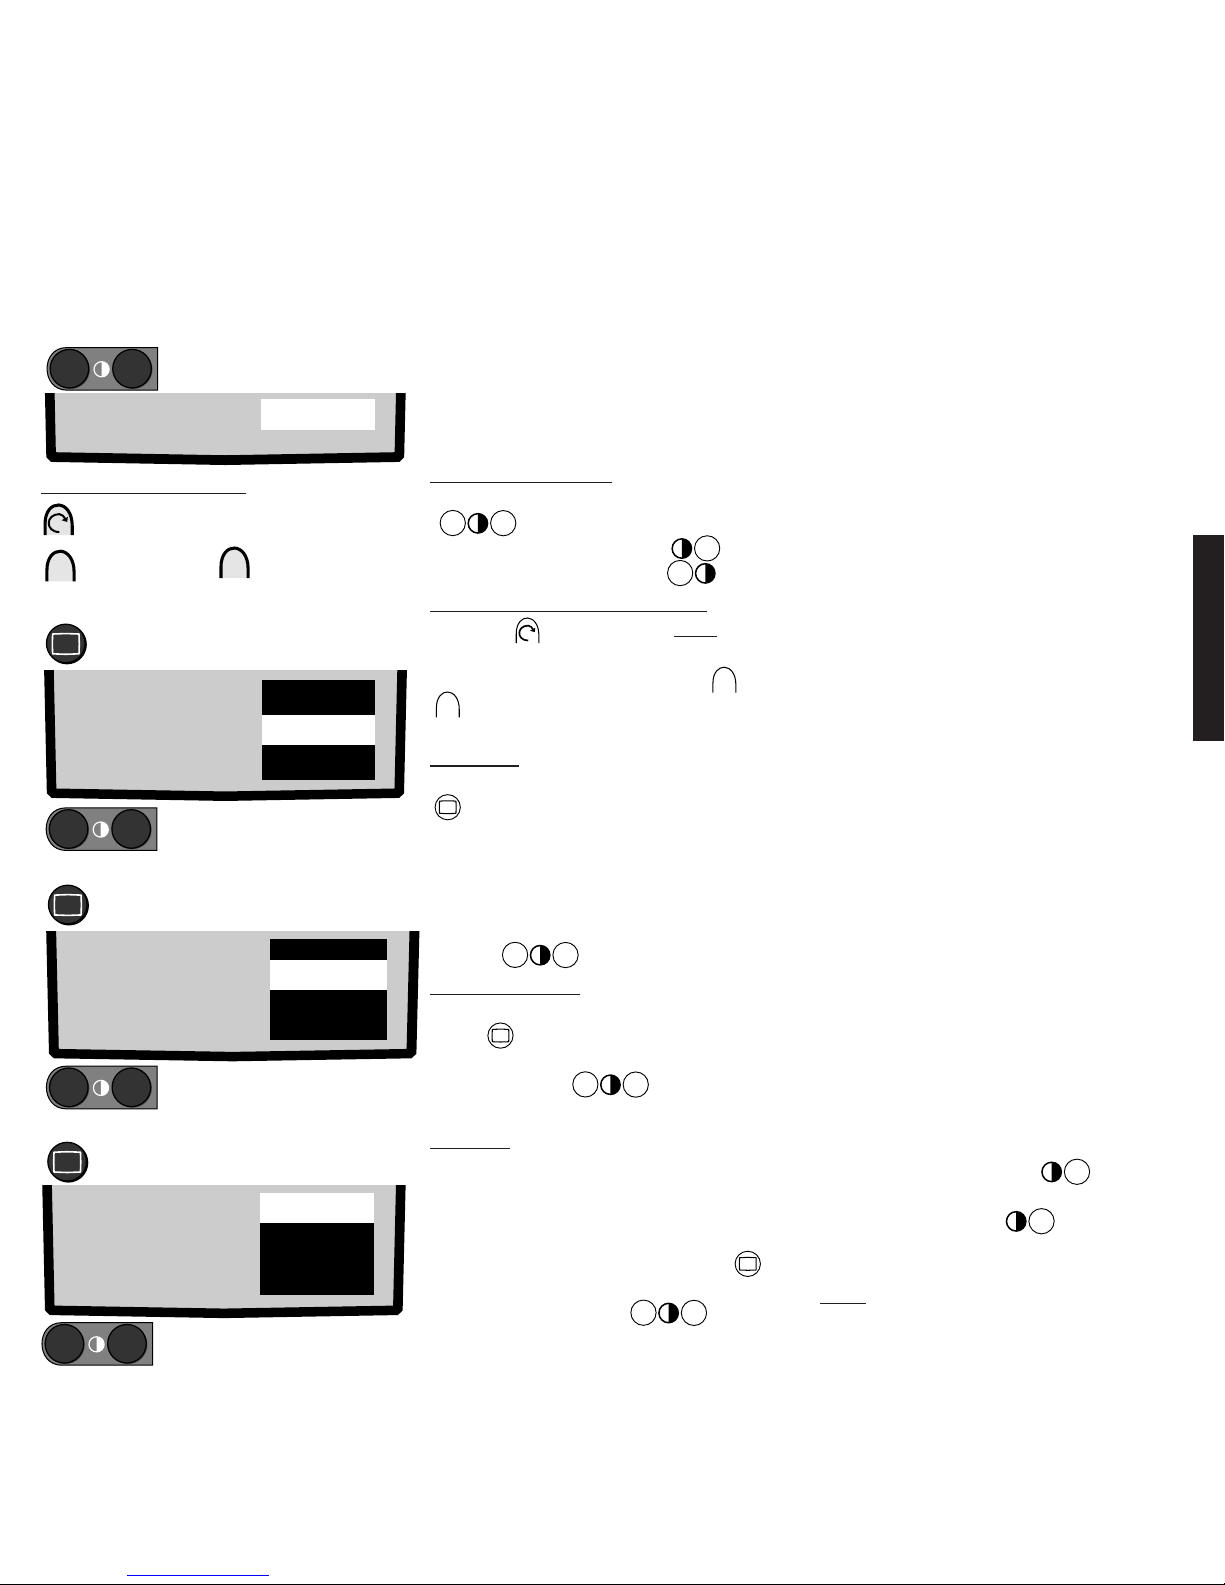
Adjusting the picture
You may want to adjust the contrast, brightness or intensity of colour occasionally
depending on the light conditions in the room. The remote control can be used for making
all these adjustments. Only the volume, contrast and intensity of colour can be adjusted on
the set’s local control panel.
Adjusting the contrast
Adjust contrast: Press Contrast buttons
–
+
.
Increase contrast: Press the
+
button
Reduce contrast: Press the
–
button
Adjusting the contrast on the set:
Press the function button twice.
<Contrast> appears on the screen, the
contrast can be adjusted with the+or
–
button as long as <Contrast> is visible
on the screen.
Brightness
Press the Picture functions button
briefly. The picture functions are
displayed on the screen for about 10
seconds.
During this time, press the Picture
functions button until <Bright> is marked
in white. Adjust the brightness with the
buttons
–
+
.
Picture sharpness
Press the Picture functions
button until <Peaking> is marked. The
picture sharpness can be adjusted slightly
with the buttons
–
+
Value 5 is the
highest picture sharpness.
Photo CD
If a Photo CD is connected and set (see
page 92), the <PhotoCD On> function is
set automatically when playing back. This
improves the playback quality. Switch off:
Press the Picture functions button
until <PhotoCD On> is marked. Switch off
with one of the buttons
–
+
.
The value for the contrast adjustment
depends on the brightness of the room.
Rule of thumb: The brighter the
environment, the higher the contrast must
be set.
A numeric value is displayed as a
guide when adjusting the contrast or
brightness and so on.
Adjusting the contrast:
–
+
with the remote control
Contrast 52
On the local contol panel:
+
Press function button twice
Set greater
contrast
–
Reduce contrast
Adjusting brightness:
Press several times
Bright 46
4:3
Contrast 52
PhotoCD off
Peaking 3
–
+
Adjusting brightness
Adjusting the picture sharpness:
Press several times
PhotoCD off
Bright 33
4:3
Contrast 52
Peaking 3
–
+
Adjust picture sharpness,
from 0 ... 5
Photo CD
Press several times
Peaking 3
Bright 33
4:3
Contrast 52
PhotoCD on
–
+
Switch Photo CD off/on
We also recommend you to select the
<S-Contrast> function for Photo-CD-Show;
keep the Contrast button
+
pressed
until the value 62 is displayed, release
briefly and then press
+
again. <S-
Contrast> is displayed on the screen. This
will give you the best picture quality!
Note: You should not set <S-Contrast> for
freeze frames because this could cause
burn marks on the picture tube.
Page 22
72
English
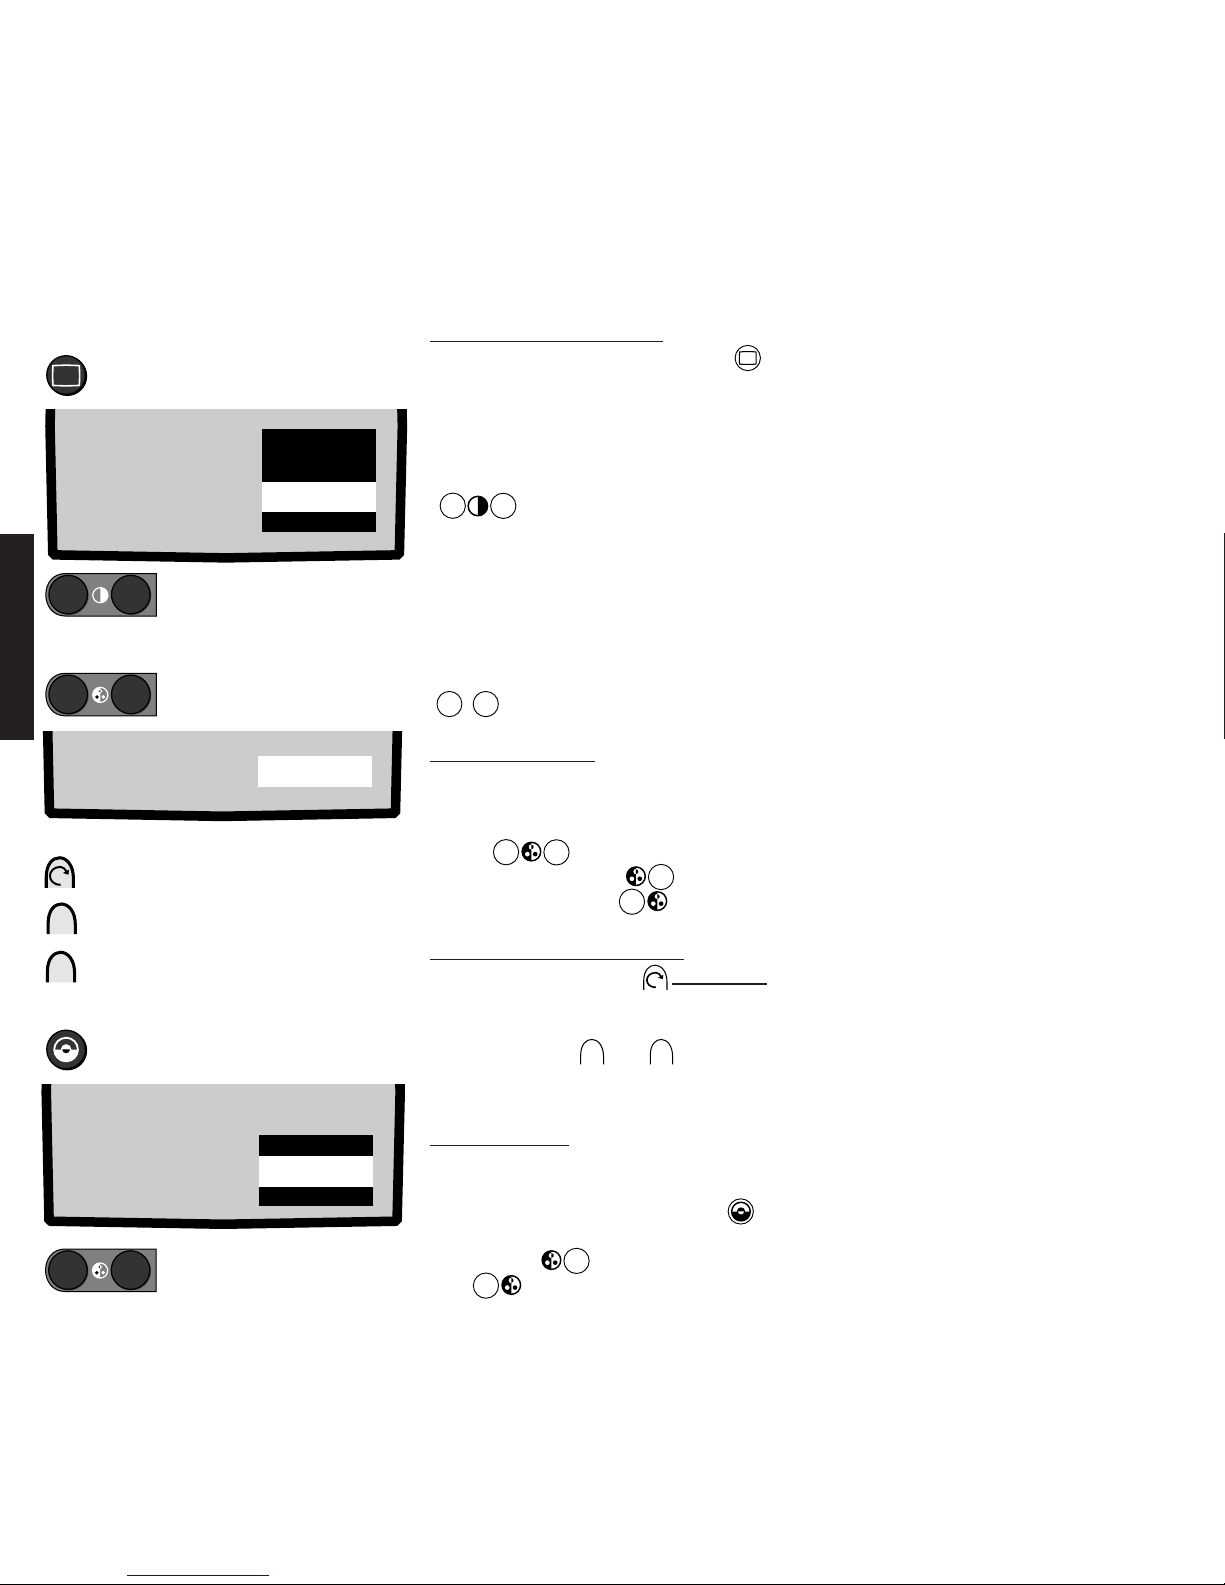
Most TV productions are broadcast in 4:3
picture format at present. This matches the
picture format of most TV sets. However,
productions are also broadcast in 16:9
format. There are then black bands at the
top and bottom of the screen. In TV sets
with 16:9 picture format it is possible to
get this broadcast to fill up the whole
screen. You can adapt your TV picture to
various transmission formats. Pay attention
to the correct picture geometry.
Selecting the picture format
Press the Picture functions button
until the last but one line of the picture
functions is marked in grey.
You can switch to format 4:3, Cinema 1,
Cinema 2, Zoom, 16:9 or ext. 16:9 picture
format with the Contrast buttons
–
+
. You can set "Cinema" for super
cinemascope films for example, the black
bands at the top and bottom of the picture
then disappear.
Subtitles on the film displayed in 4:3 format
may no longer be visible in Zoom or
Cinema. In this case you can move the
picture up or down with the blue buttons
▲
▼
.
Adjusting the colour
It is best to use peoples’ faces as a basis
for adjusting the colour.
Adjust the colour intensity with the Colour
button
–
+
.
Colour stronger: Press
+
button
Colour weaker: Press
–
button
Adjusting the colour on the set
Press the function button three times.
<Colour> is marked in white on the
screen. The colour intensity can be
adjusted with the
+
or
–
button as
long as <Colour> is displayed on the
screen.
Daily operation of the set – picture format 4:3, 16:9, Cinema, Zoom/adjusting the colour
Selecting the picture format:
–
+
Switch the picture format
Adjusting the colour:
–
+
with the remote control
On the set’s local control panel:
Adjusting the tint:
Press until <Tint> is marked in white
+
–
Press function key three times
Colour stronger
Colour weaker
–
+
PhotoCD off
Peaking 3
Bright 33
Contrast 52
4:3
Colour 32
Press several times until a picture
format is displayed
Adjust tint
Adjusting the tint
This fucntion can be used to adjust the
tinting slightly to red or blue.
Press the Colour functions button until
<Tint> is marked in white.
Blue tint with
+
button, red tint
with
–
button.
This colour adjustment is particularly
effective when receiving a station with the
NTSC norm.
DNC 1
Colour 32
Tint O
Page 23
73
English
Daily Operation of the Set – Freeze/DNC
Switch on freeze
continue, moving picture
Switch freeze on/off
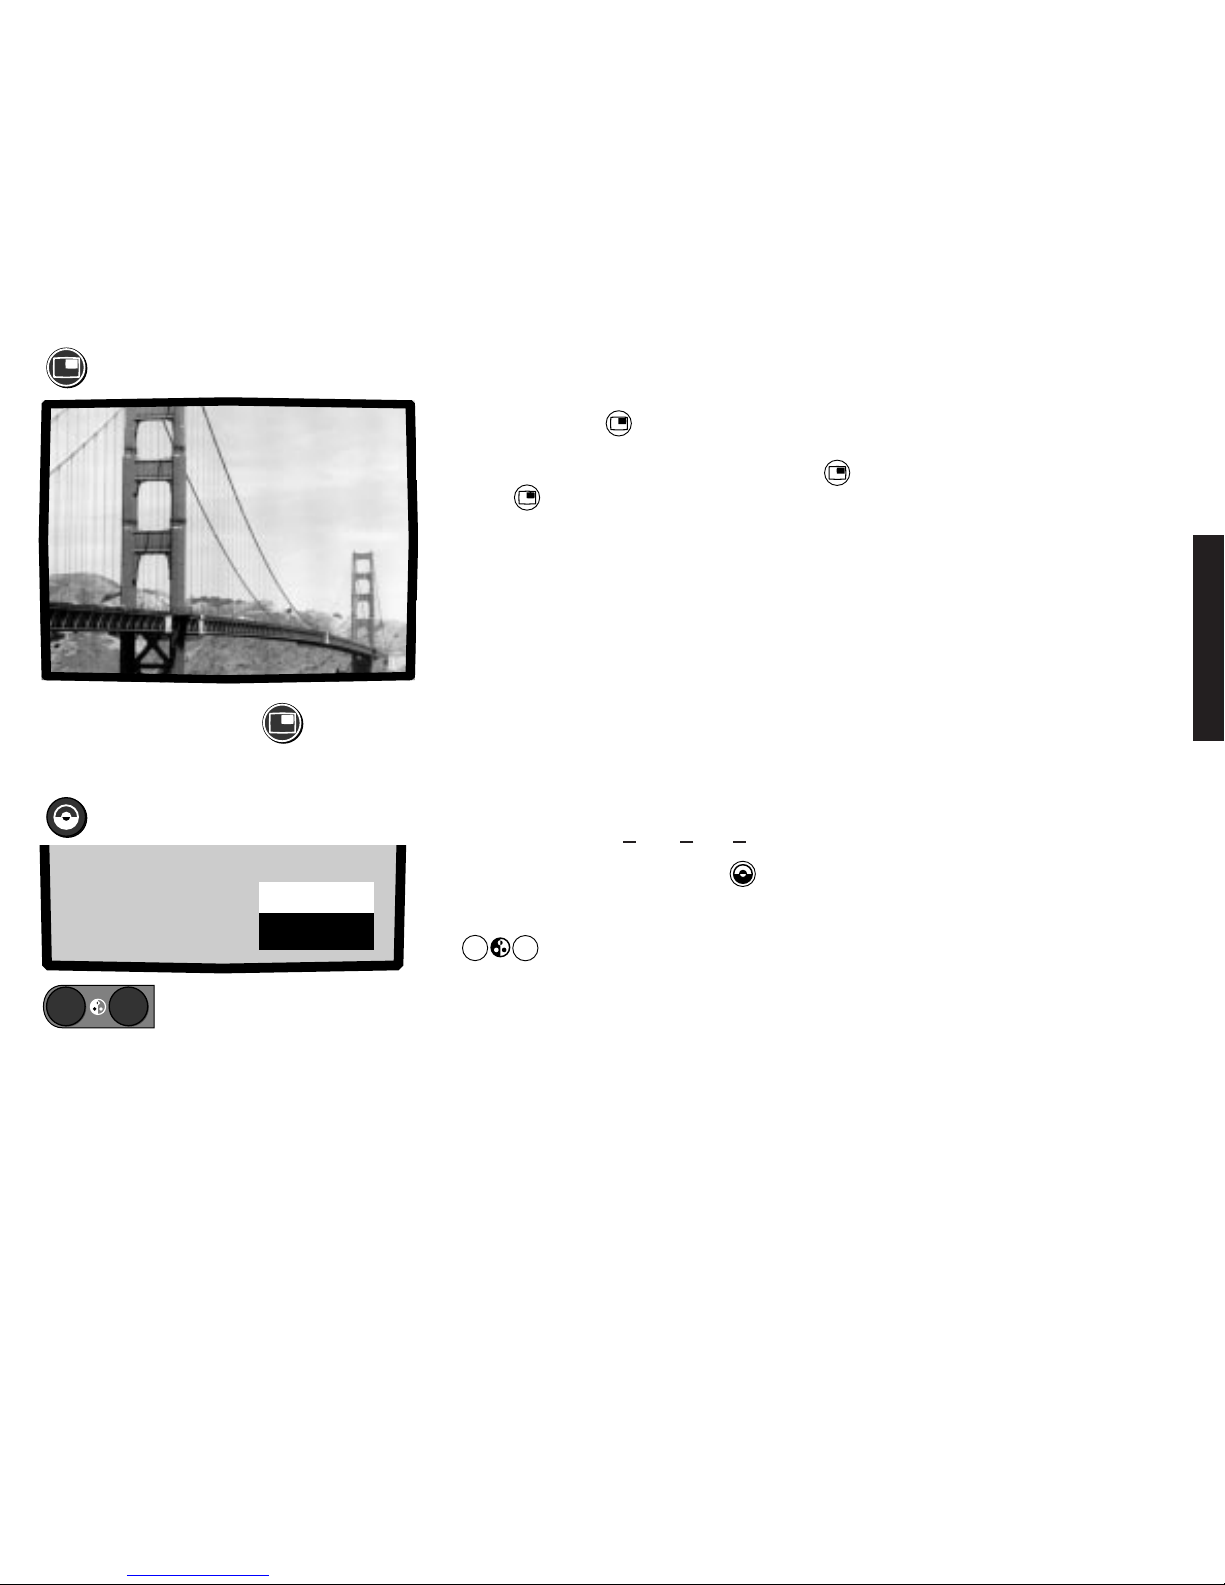
The freeze function is particularly practical when you want to note something down, e.g. a
telephone number. You can switch on the freeze function and go and get paper and pen.
Set DNC
Set Digital Noise Control
Colour noise in the TV picture e.g. due to bad reception, can be eliminated or considerably
reduced with the DNC (Digital Noise Control).
press until <DNC>
is marked in white
–
+
Set DNC
Tint O
Colour 32
DNC 1
Press the red button . The picture
freezes. The sound continues in the
background.
Press the button again to continue
watching the program.
If PIP is switched on, the small picture
window is faded out first, then press the
button again.
You will get a moving picture if you change
channels.
Press the Colour functions button until
<DNC> is marked in white.
Switch noise control off (0) and on (1) with
the
–
+
buttons.
Your TV set is swiched on (1) at the factory
which generally guarantees optimum
picture quality.
Page 24
74
English
Daily operation of the set – adjusting the sound/volume/treble-bass
Adjusting the sound
All the sound functions can be adjusted with the remote control. Only the volume can be
adjusted on the set.
Volume
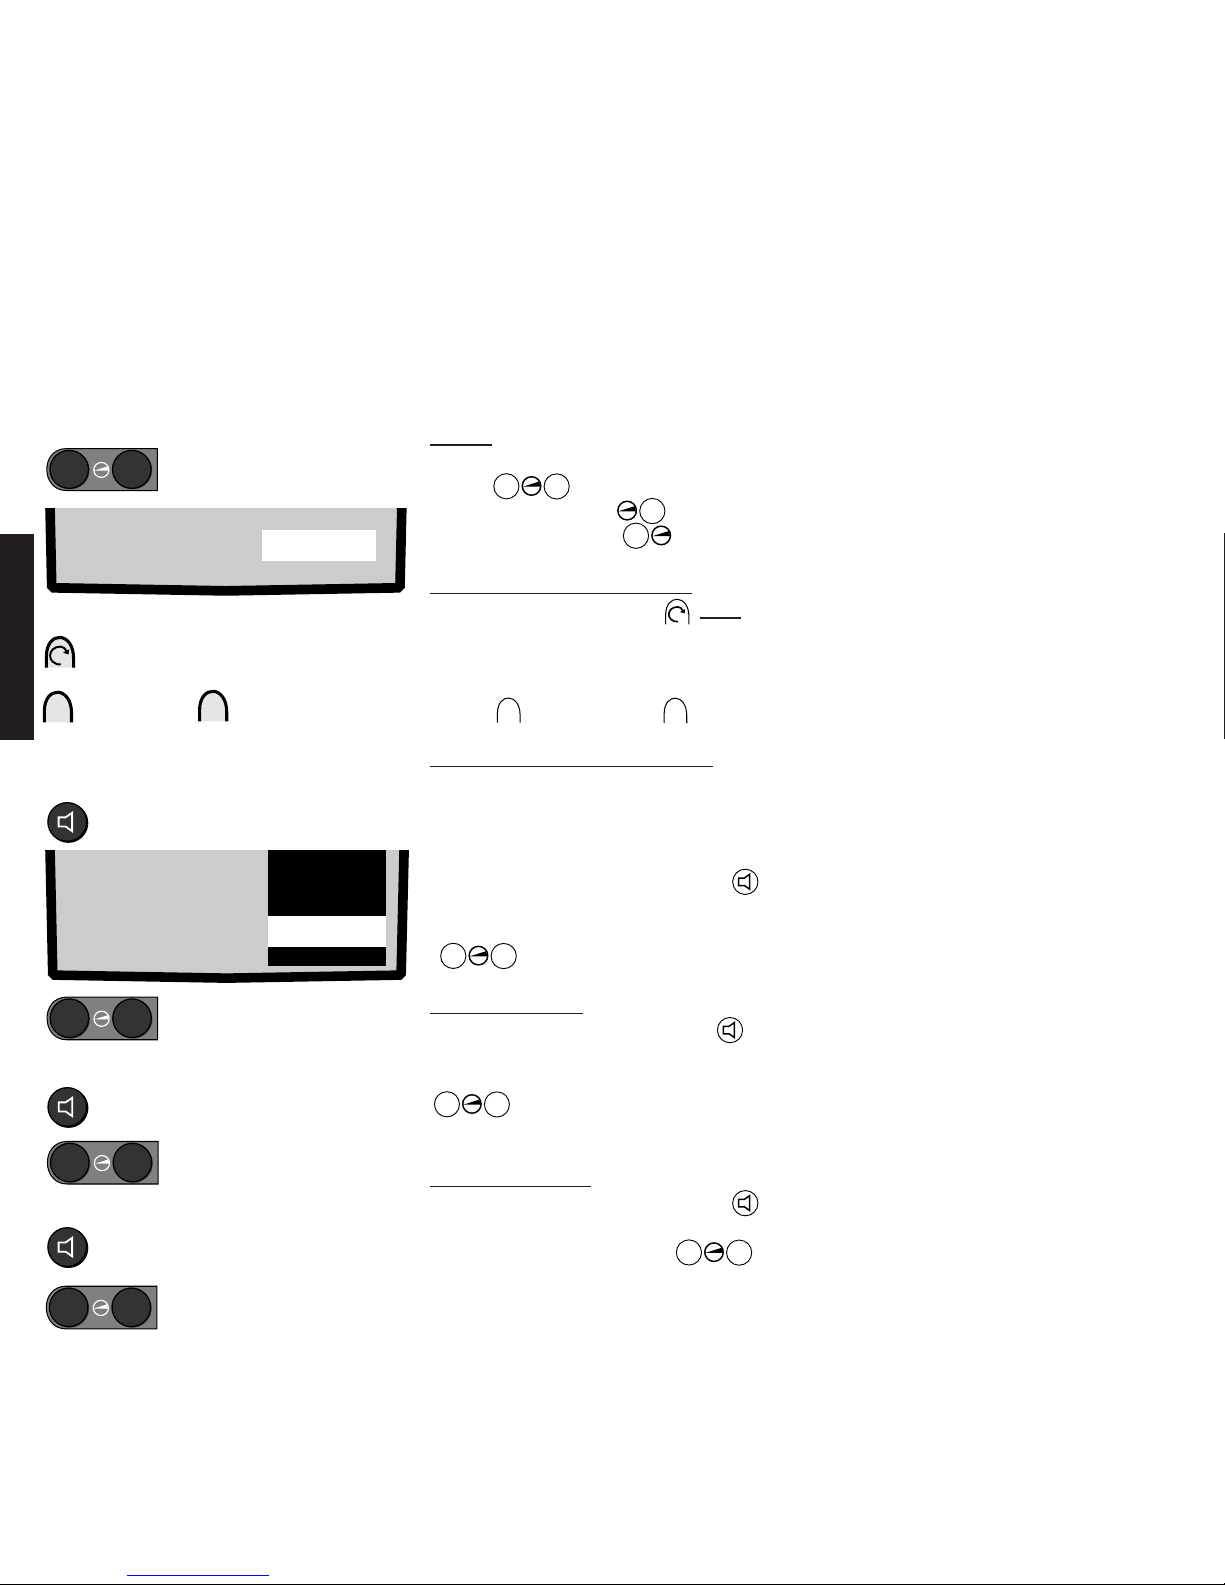
Adjust the volume, Volume button
Press
–
+
on the remote control.
Louder: Press button
+
.
Quieter: Press button
–
.
Adjusting the volume on the set
Press the function button once.
<Volume> appears in grey on the screen.
You can adjust the volume as long as this is
displayed on the screen.
Button + louder; button
–
quieter.
Switching sound to music/speech
<Music> is always set after switching on. If
you switch to <Speech>, the bass and
treble tones will be reduced to make
speech clearer.
Press the Sound functions button
until <Music> is marked white. Switch to
<Speech> or <Music> with the
–
+
buttons.
Adjusting the bass
Press the Sound functions button
several times until <Bass> is marked in
white. You can adjust the bass with the
–
+
buttons as long as this is
displayed on the screen.
Adjusting the treble
Press the Sound functions button
several times to mark <Treble>. Increase
or reduce the treble with the
–
+
buttons.
Adjusting the volume:
With the remote control
➜
➜
quieter louder
–
+
Adjusting the volume on the set
Setting speech or music:
Mark the „Music“ line
–
+
speech or music
Adjusting bass:
Mark the „Bass“ line
–
+
Adjust
Adjusting treble:
–
+
Adjust
Mark the „Treble“ line
quieter louder
–
Press once
+
Volume 24
Treble 6
Bass -3
Balance O
Stereo
Volume 23
Music
Numeric values are displayed as a guide
when adjusting the sound. If no station is
being received, the set mutes the sound.
You can still set a volume. The sound is
then audible at this volume when you
receive a station.
Page 25
75
English
Daily operation of the set – adjusting the sound/mono/stereo/balance, 2 sound
Wide or depth of sound < >
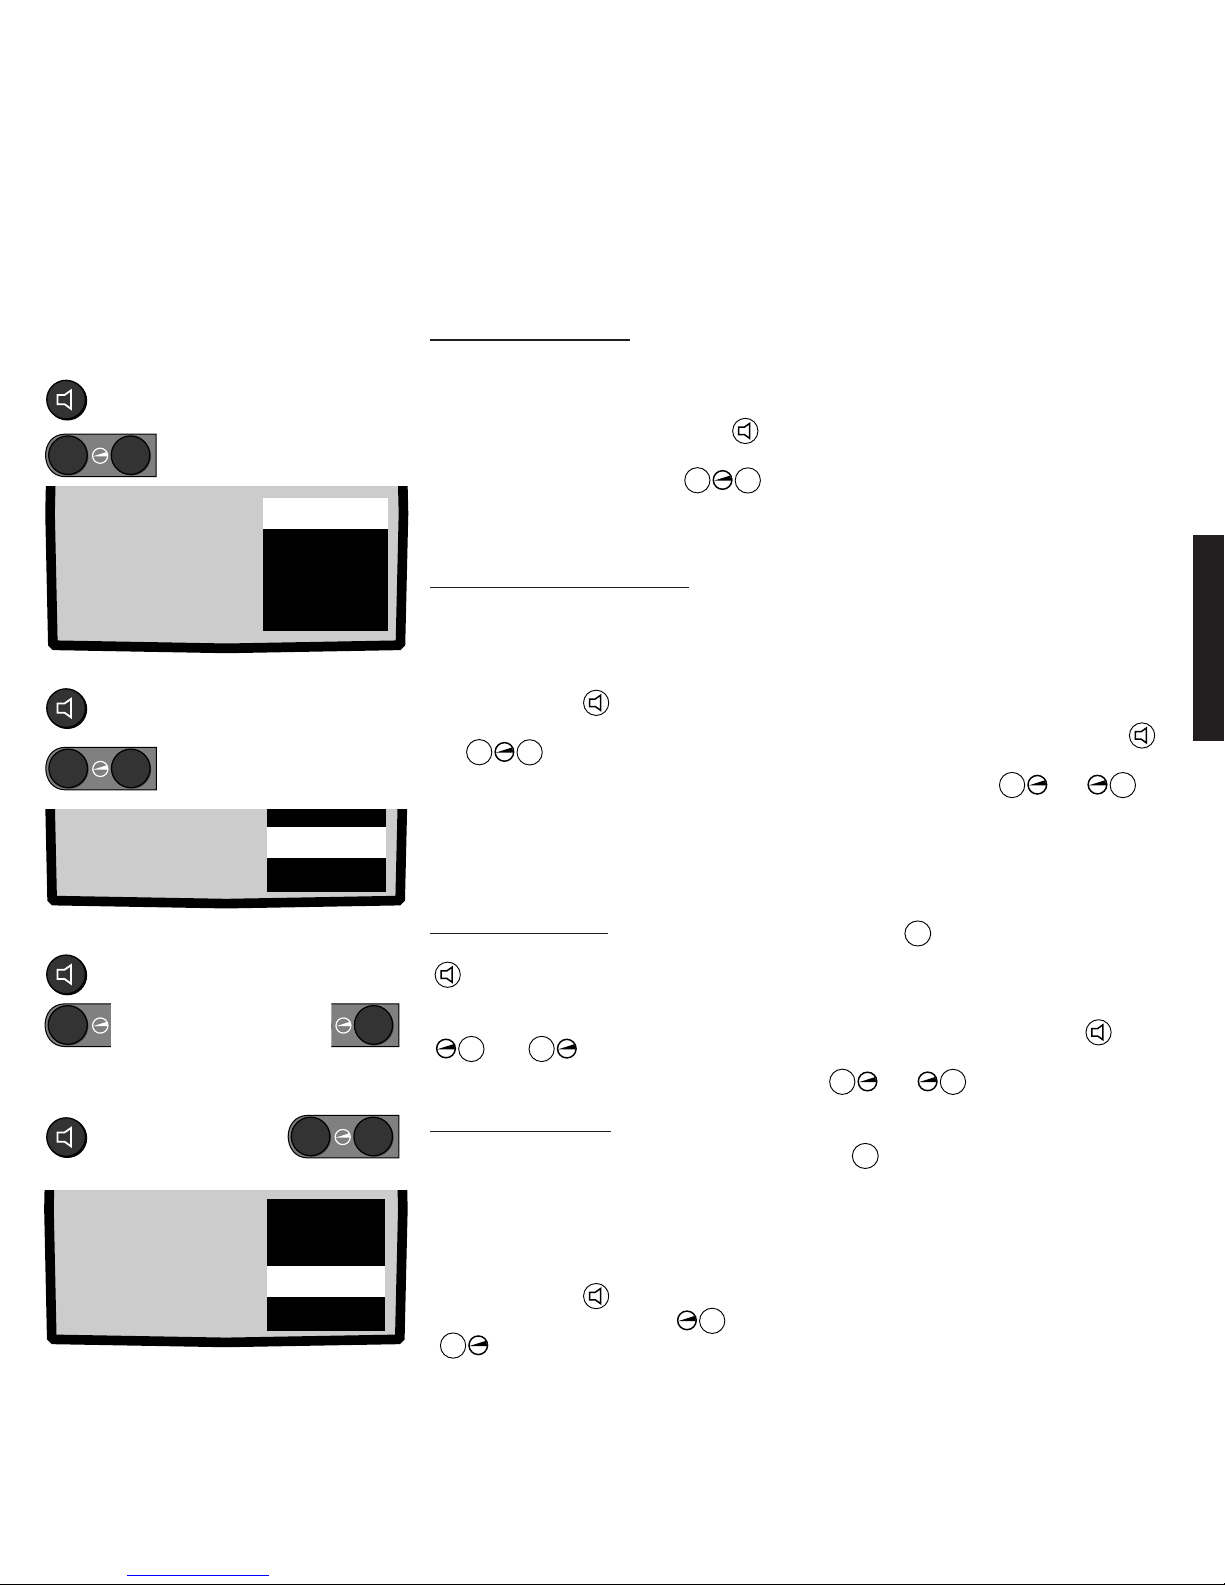
The function < > (wide/depth of sound) can
be switched on or off.
Switch wide/depth of sound:
Press the Sound functions button
several times to mark „< > Off“. You can
switch to „< > On“ with the
–
+
buttons as long as this is displayed on the
screen.
Switching from stereo to mono
The set switches automatically to stereo
when it receives a station with stereo
sound. However, if you still want to listen to
the sound in mono: Press the Sound
functions button until <Stereo> is
marked. You can switch to <Mono!> with
the
–
+
buttons.
In stereo reception, the „Wide on“ gives the
impression that the loudspeakers are
farther apart. The considerably increases
the stereo effect. In mono reception the
depth of sound is improved.
Adjusting the balance
Press the Sound functions button
several times until <Balance> is
marked. Adjust the volume of the right-hand
or left-hand loudspeaker with the
+
or
–
buttons to achieve
optimum stereo reproduction.
Two sound broadcast
If you switch to a program with two-sound
transmission, <2 Sound> is displayed in
addition to the program name. You can
choose between the main language Sound
1 and the foreign language Sound 2.
Select <Sound 1> by pressing the Sound
functions button several times, switch
over to <Sound 2> with the
+
or
–
buttons.
Selecting stereo wide or depth of
sound for mono:
Select < > Off line
–
+
Switch to < > On
Switching from stereo to mono:
Select „Stereo“ line
–
+
Switch to „Mono!“
Adjusting the balance
Select "Balance" line
–
+
Adjust balance
Two sound broadcast, Sound 1 or
Sound 2
–
+
Select language
Balance O
Music
Volume 23
Mono!
< > off
Treble 6
Bass -3
Balance O
Music
Volume 23
Sound 2
„Nicam“ sound norm
The TV set must be equipped with a Nicam
decoder in order to receive the Nicam
sound norm.
Stations with the „Nicam“ sound norm can
be received in Belgium, England, Spain,
Sweden and France. The set switches
automatically to the Nicam norm for Nicam
sound broadcasts.
If the station broadcasts stereo sound, the
display <Stereo> appears, <Nicam>
appears for a mono broadcast.
If you want to listen to a stereo broadcast
in mono, e.g. because there is some
interference, switch the sound function
from <Stereo> to <Mono!>.
1. Press the Sound functions button
until <Stereo> is marked in white.
2. Press the buttons
–
or
+
briefly, display <Mono!>. This adjustment is retained until you switch back
over to <Stereo>.
If you want to know whether the station is
broadcasting in Stereo, Mono or 2 Sound,
press theTVbutton briefly. Stereo, Nicam
or 2 Sound appears on the screen next to
the program name. For 2 Sound broadcasts you can mark the <Sound1> or
<Sound2> line by pressing the button
and select the desired sound with the
–
or
+
buttons. The displayed
sound functions disappear again
automatically after a few seconds or press
theTV button again.
< > on
Treble 6
Bass -3
Balance O
Stereo
Music
Volume 23
Page 26
76
English
Daily operation of the set – switching off sound/headphones
Switching off the loudspeaker sound:
Switching sound back on:
or
Switching sound off, on
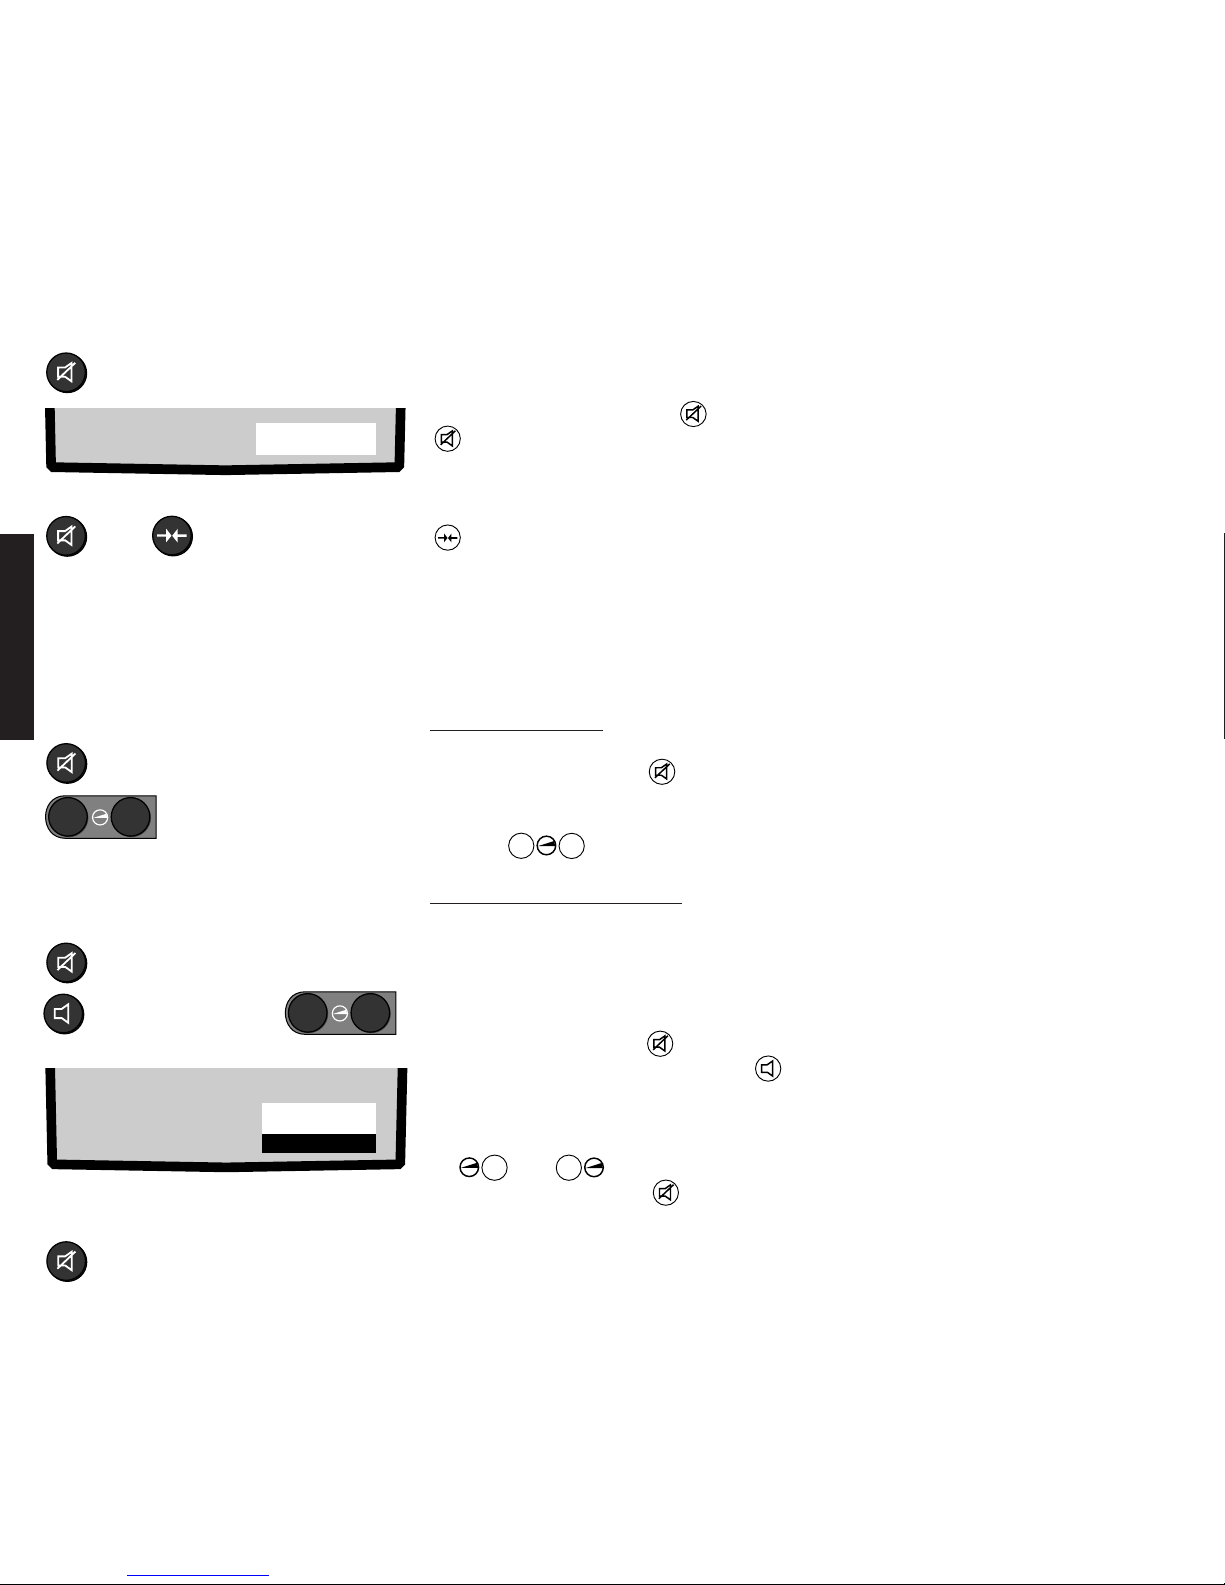
The loudspeaker sound is switched off and
<Mute> displayed in red for a few seconds
on pressing the Mute button . Press the
button again to switch the sound back
on.
The sound can also be switched back on
with the Picture/sound normal button
.
Mute
Adjusting the volume
First switch off the loudspeaker sound by
pressing the Mute button .
Display: <Mute>
Then set the volume with the volume
buttons
–
+
.
Selecting Sound 1 or Sound 2
The sound channel can be selected
separately for headphones and
loudspeakers for 2 Sound broadcasts.
Select the sound channel for the
headphones:
1. Press the Mute button .
2. Press the Sound functions button
until Sound 1 or Sound 2 is marked
white.
3. Switch over the sound channel with the
+
or
–
button.
4. Press the Mute button again., the
loudspeaker sound is switched back on.
Depending on the selection, it is now
possible for different sounds to be listened
to on headphones and loudspeakers, e.g.
the main sound 1 on the loudspeakers and
the foreign language sound 2 on the
headphones.
Listening with headphones
The headphones jack is designed for 6.3 mm stereo jack plugs and is on the set’s local
control panel. Use headphones with an impedance of 32 ohms or higher. You can adjust
the headphones volume independently of the loudspeaker volume.
HP vol 3O
Sound 2
–
+
Adjusting the headphones volume:
Selecting Sound 1 or Sound 2 for the
headphones:
Switching the loudspeaker sound back
on:
Mute
Adjust volume
Mute
Select language
–
+
Page 27
77
English
TV setup - picture/sound – normal picture and sound/factory setup
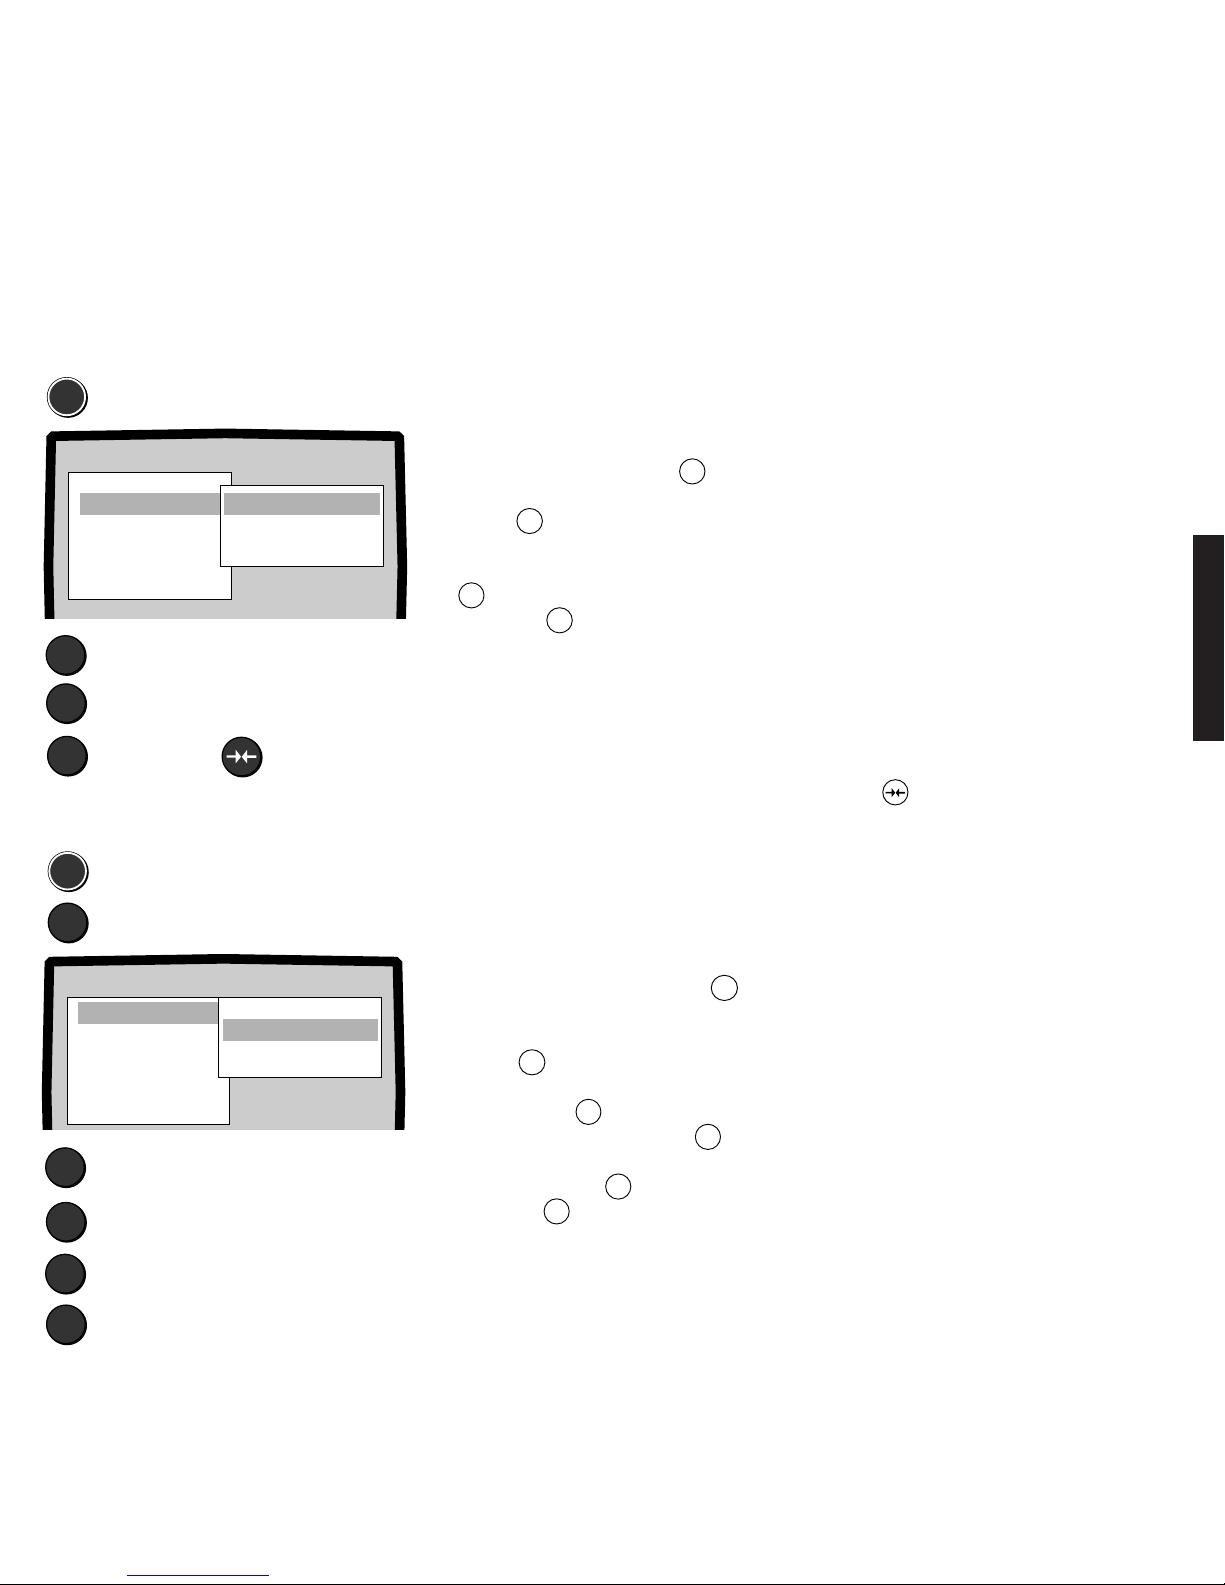
Normal values for picture and sound
You can set the values for contrast, brightness, sharpness, colour intensity, DNC, volume,
treble, bass, balance and headphones volume to meet your own requirements and store
them as your own personal „Setup values“.
Adjust the picture and sound first. Then store the set values with the „TV setup“ menu.
Storing normal setup values for picture
and sound:
MEN
▼
▲
X
1. Call the menu by pressing
MEN
.
2. Select the „TV setup“ line with the blue
button ▼.
3. The „Normal settings“ line must be
marked in yellow, mark with the yellow
▲
button if necessary.
4. Press the
X
button to store.
Your setup values for picture and sound are
now stored and remain your personal
„normal values“ until you store different
values with this menu.
Station
Timer functions
Child lock
TV setup
GB F I E NL DK S
Information
Video
VCR programming
Copy functions
Installation
Record/Playback
Call the menu
Select "TV setup"
Select "Normal settings"
Store Normal values
The set and stored values apply for all
programs. If you detect great differences in
volume or colour for various programs, you
can alter the volume and colour for
individual programs. How to do this is
described on the next page.
The „Normal values“ are retained even
when the set is switched off at the on/off
switch. The „normal values“ are called
automatically when the set is switched back
on.
You can call „your normal values“ again and
again with the Picture/sound normal
button .
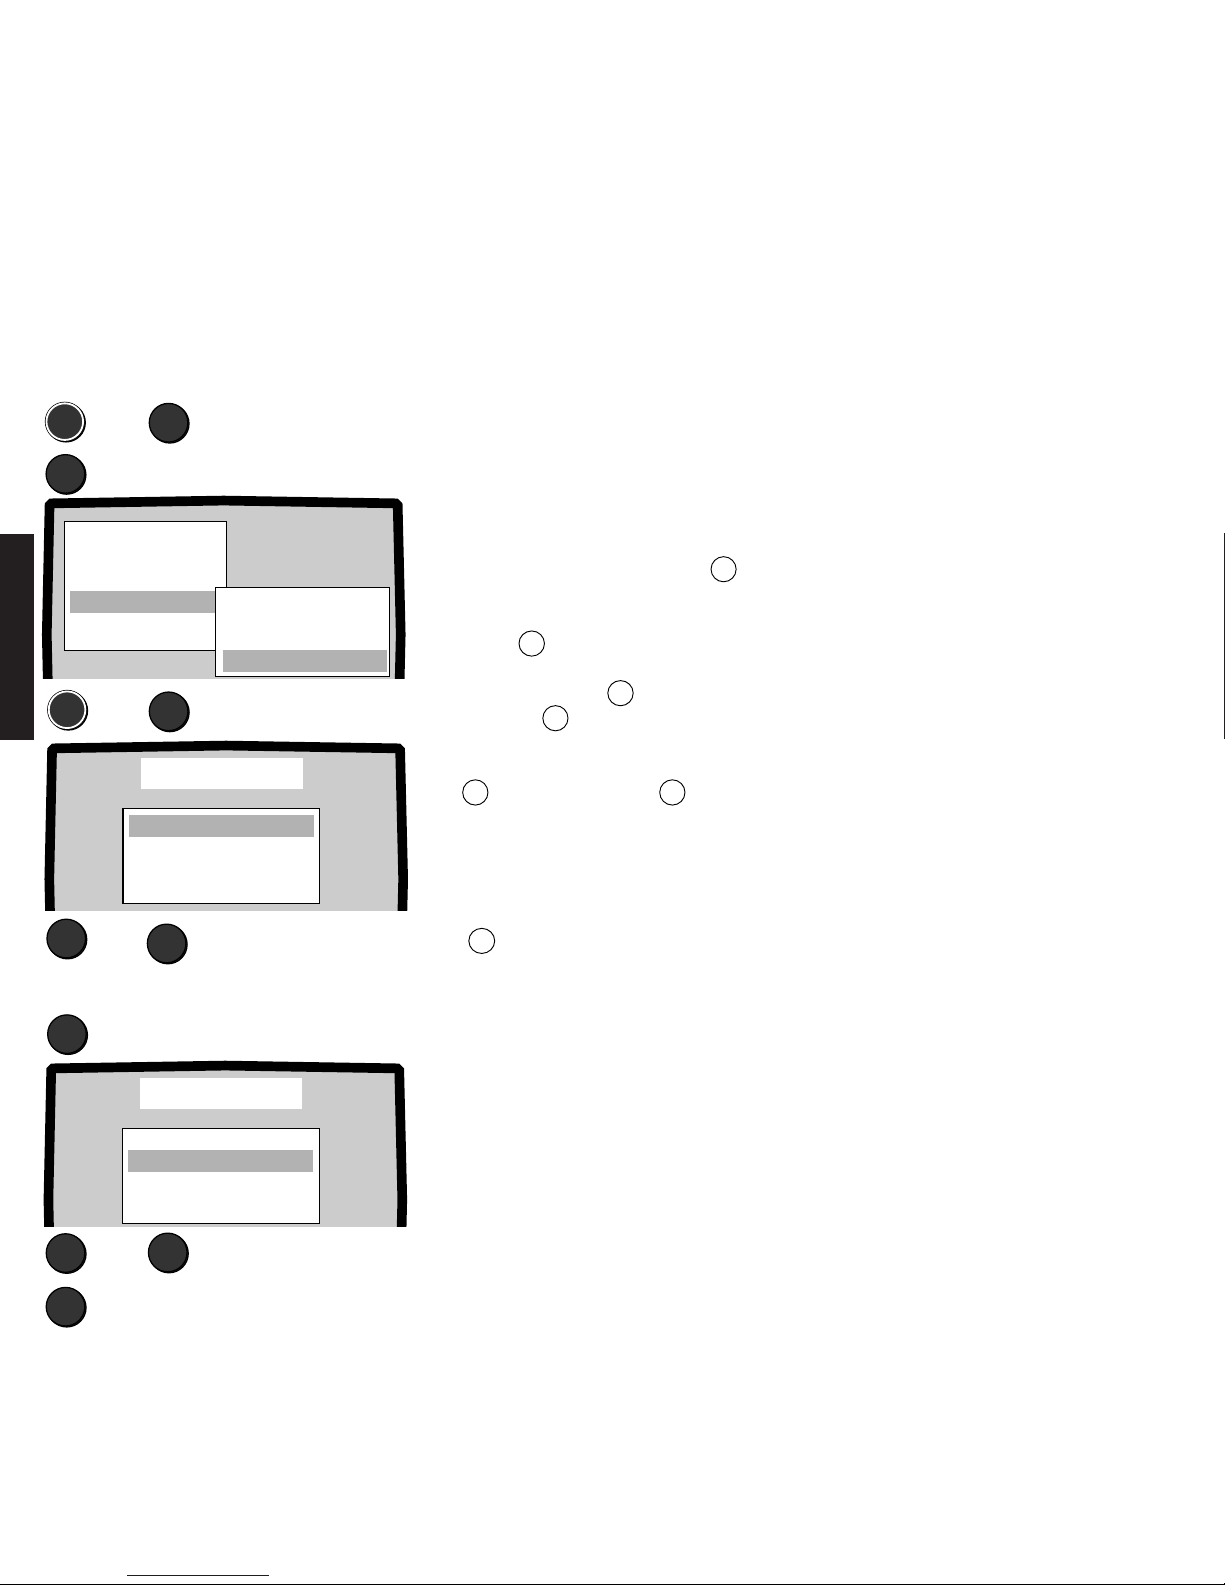
Picture/sound factory setup
MEN
▼
Picture/sound factory setup
The factory setting gives you a suggestion
for the optimum settings of picture and
sound. You can adopt the factory setting as
the normal TV setup.
Call factory setup:
1. Call the menu by pressing the
MEN
button.
2. Select the „TV setup“ line with the blue
button ▼.
3. Select the „Factory setup“ line with the
yellow button ▼.
4. Call factory setup, press the
X
button.
5. Mark the „Normal settings“ line with
the yellow button ▲.
6. Store with
X
as „normal setting“.
Call the menu
Select the "TV setup" line
▼
X
Select „Factory setup“
Call factory setup
▲
Select "Normal settings"
X
Store as normal setting
The factory setup values are fixed values
for good picture and sound reproduction.
The following are set: contrast, brightness,
colour, DNC, volume, treble, bass, balance
and headphones volume.
Video
Timer functions
Child lock
TV setup
GB F I E NL DK S
Information
Station
Auto programming
Change name
Sort
Search and store
Page 28
78
English
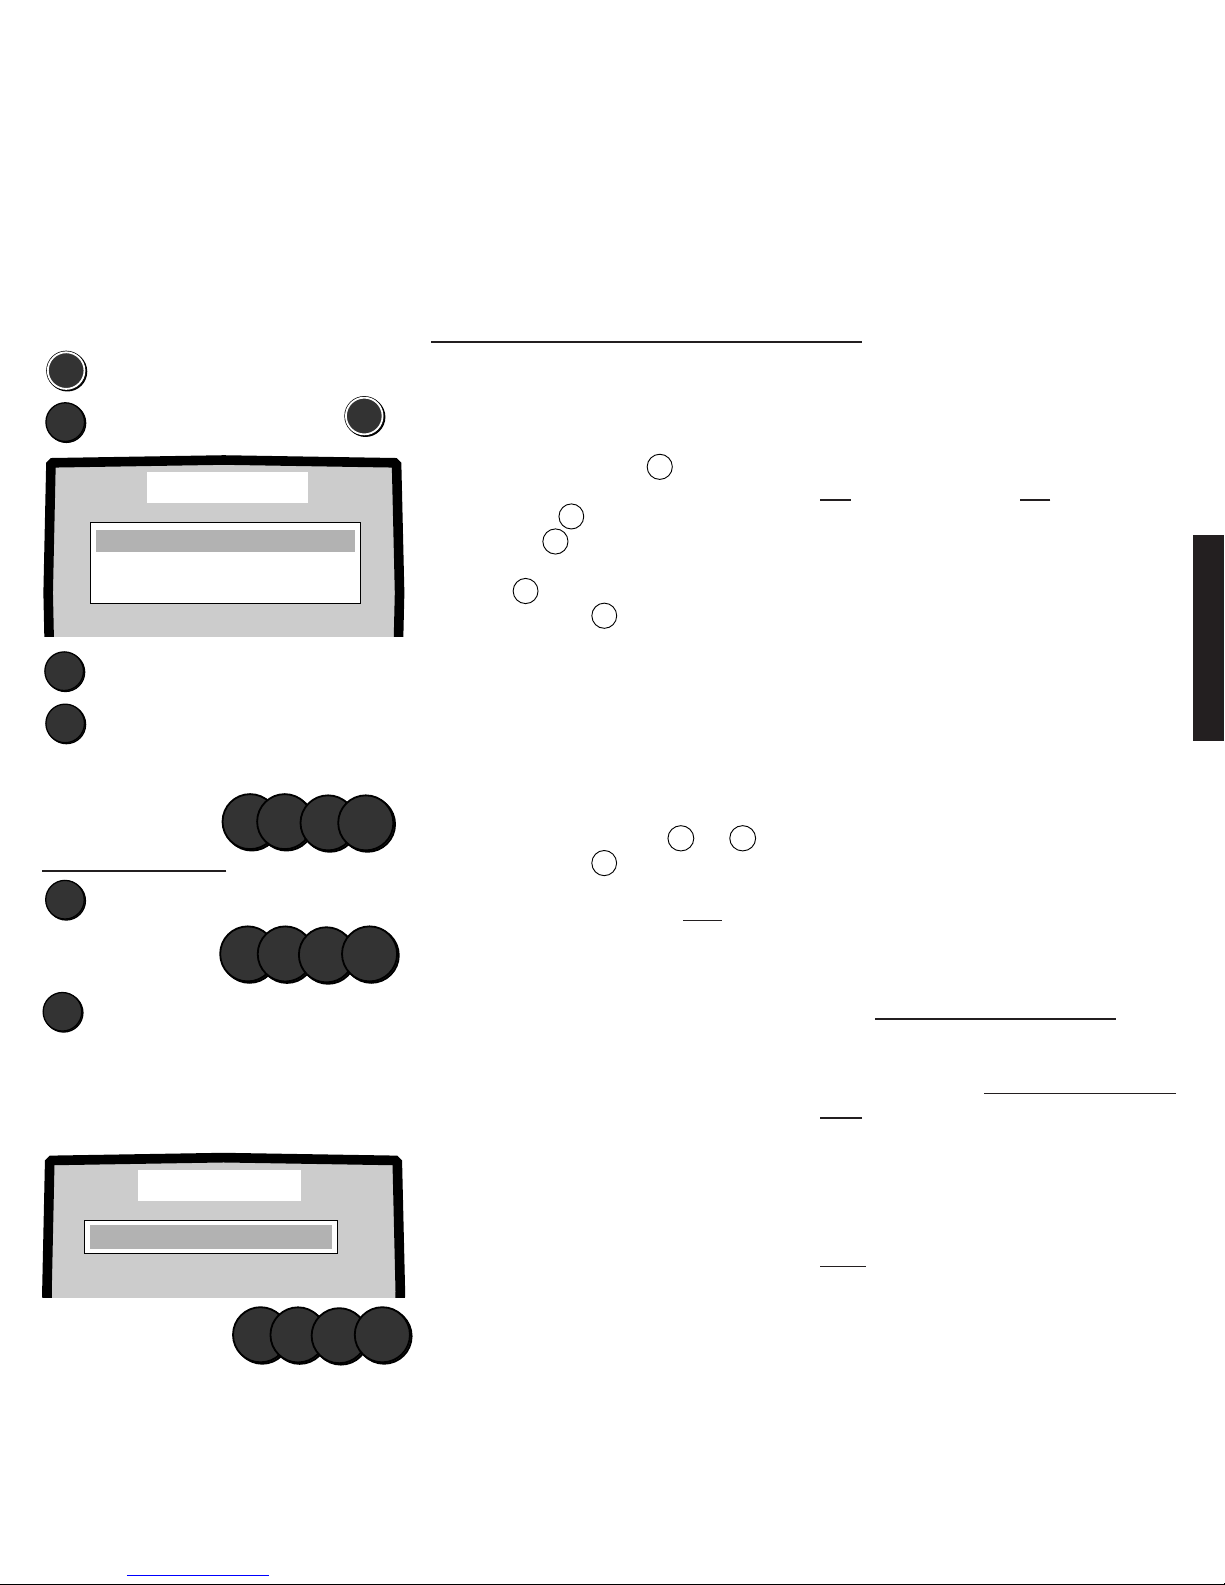
Volume and colour correction
The user menu „TV setup - Special functions“ allows a program-related volume and colour
correction as well as settings for cinch sockets, the used video recorders and the AV
sound.
If, for example, you receive TV stations with different norms or satellite stations, differences
in volume or colour intensity may occur when switching from one program to another.
1. First select the program slot at which
you want to store the corrected values
for volume or colour intensity.
2. Call the menu by pressing the
MEN
button.
3. Select the „TV setup“ line with the blue
button
▼
.
4. Select the „Special functions“ line with
the yellow button
▼
.
5. Press the
MEN
button.
6. If the „Volume corr.“ line is marked in
blue, the volume can be increased with
+
and reduced with
–
. The colour
corrections can be made in the same
way after marking the „Colour corr.“
line in blue.
The setup values for this program slot are
stored when you exit the menu by pressing
the TV button.
Set the volume and the colour intensity so
that they are no different to the other
programs.
Volume and colour correction:
TV setup – Additional functions – Volume and colour corr ection
+
or Adjust colour
–
TV
1. Select program slot
2. Select menu
MEN
➪
▼
Select „TV setup“
▼
Select „Special functions“
➪
▼
MEN
Colour corr. O
Signal Cinch fixed
VTR Stereo
AV Sound Sound 1
Volume corr.o
Special functions
–
or Adjust volume
+
▼
Adjusting colour intensity:
Select the „Colour corr.“ line
Volume corr. O
Signal Cinch fixed
VTR Stereo
AV Sound Sound1
Colour corr. O
Special functions
"Volume corr."
End TV setup
Station
Video
Timer functions
Child lock
GB F I E NL DK S
Information
Normal settings
Factory setup
On-screen display
Teletext
Special functions
TV setup
Page 29
79
English
Parental Lock
You can lock access to the TV set in different ways:
1. Lock adult films which the station provides with a code.
2 Lock individual programs which you choose yourself.
3. Lock all programs and lock all programs after a certain time.
Set and activate the parental lock
Call the menu
▼
MEN
Select „Parental lock“
MEN
➪
Child lock
Lock out adult films No
Lock out this programme No
Lock out all programmes No
Change access code OOOO
Select kind of lock
Switch lock on/off
▼
X
Enter time, e.g. 22.00 h, for „Lock all
programs from“
2 2
0 0
▼
Select „Change secret code“
Enter/change
secret code:
1
2
3
4
Activate parental lock:
TV
End TV setup
Request the secret code:
Access code
✶✶✶✶
Child lock
Enter the secret code
1
2
3
4
Set and activate the parental lock
1. Call the menu with the
MEN
button.
2. Select the „Parental lock“ line with the
blue button ▼.
3. Press the
MEN
button.
4. Select the type of lock with the blue
button▼. Switch the lock on (Yes) or
off (No) with theXbutton.
„Lock adult films“
Only those programs are locked which the
station broadcasts with an appropriate
identification.
„Lock this program“
The program you have just selected is
locked. If you want to lock other individual
programs, select these withP+andP–and
lock each one withX.
In addition to the possibility of locking all
programs, you can set a time from which all
programs are to be locked. Set the time.
„Change the secret code“
Secret code 0000 is the basic setting. This
means the parental lock is not activated.
Enter your own secret code to activate it.
Operation with the parental lock
activated
After switching on, on reaching the „Lock
time“, on receiving „adult films“ or on
selecting a locked program, the picture
disappears and the secret code is
requested. If you want to carry on watching
the TV, enter the secret code. If the secret
code is unknown, e.g. to children, the set
switches off after 20 seconds.
You can set several locks: e.g. „Adult films“
and „certain programs“ and „all programs
from“
If „Access code ✶✶✶✶“ appears,
a code number has already been stored,
you must enter this first or cancel the
secret code.
On the inside back cover of this
manual you will find a code number with
which you can erase a secret code you
have forgotten. Remove the card
immediately and keep it in a safe place.
This code number resets to 0000.
At present, the identification „Adult
film“ (VPS) is only used by a few stations
(e.g. RTL). Information on which films are
broadcast with a code can be found in the
teletext of the appropriate station.
Locked programs are displayed in
red in the program table if the parental lock
is activated with the secret code.
In „Lock all programs from“, the lock is
active until 6.00 h the next morning.
If you want to clear the set locks, enter
secret code 0000. Remember your secret
code. For safety, you only see four
asterisks on the screen instead of the
secret code.
If you enter the wrong code, a message is
displayed first.
Note: Once the secret code has been
entered, it is not asked for again until
switching off.
Page 30
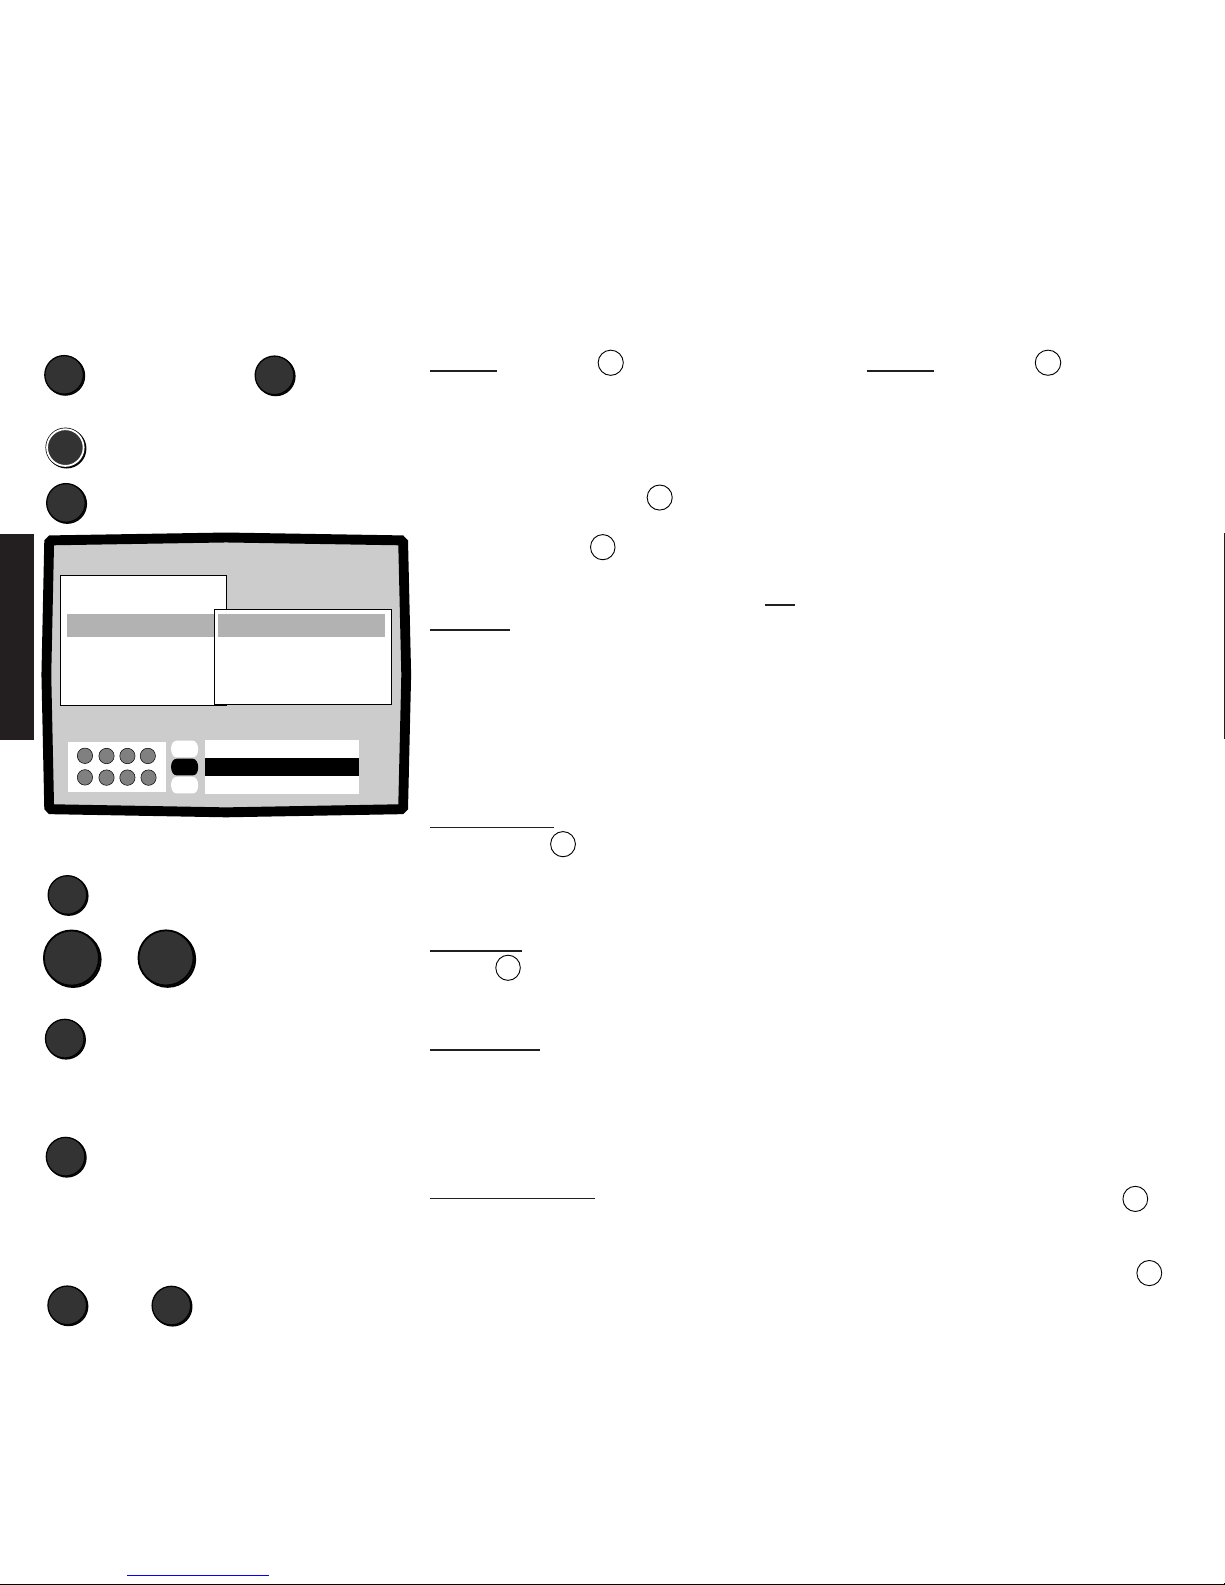
80
English
Timer functions
To ensure that the time and date can be
read clearly, we recommend that you store
the local main station with teletext at
program slot 1, 2 or 3.
In stations with a simple teletext
system it may be that only the date or the
time can be seen. In this case, enter the
time or date yourself. Your entries always
have priority, i.e. the date and time will not
change even if you then switch to a station
with teletext and a different time zone.
Take the time zone into account for
foreign stations, especially when video
recording with the timer!
The programmed functions „Switch off at“,
„Alarm at“ and „Alarm signal tone“ are
repeated daily. The functions can, however,
be deactivated without erasing the
programmed times.
Select the „Switch off at“ or „Alarm at“ line,
deactivate the function by pressing X ,
this is displayed by - - : - -.
Switch the function back on: Select
the appropriate function and call with X.
Display - clear time display
Time on: Press the i Display - clear time display. Time on: Press the i button again.
If the time is not correct, set the time as described below.
Timer functions
If you want to be reminded of an appointment at a certain time or you want the set to
switch itself off at a certain time, you can set this function in the „Timer functions“ menu.
1. Call the menu with the
MEN
button.
2. Select the „Timer functions“ line with
the blue button
▼
.
3. Set the date and the time:
If the set has been switched on with the on/
off button, the time display begins at zero
hours. The time and date will be set
automatically if you are reciving a station
with TOP teletext such as ARD, ZDF or one
of their regional programs. If you are only
receiving stations without teletext, you will
have to set the time and the date yourself.
Enter the date: Select „Date“ with the
yellow button ▼ and enter the day,
month and year in two digits with the
number buttons.
Enter time: Select „Time“ with the yellow
button ▼ and enter the hours and
minutes with the number buttons.
Senseless entries are not accepted.
Switch off at: The set switches to standby
and the red lamp lights up on reaching the
set time. Enter the switch off time, select
the „Switch off at“ line, enter the hours
and minutes with the number buttons.
Alarm time - volume
If these functions are activated, the time
appears on the screen and a continuous
alarm tone is emitted at the set time if the
set is switched on.
Alarm time - Volume:
▼
or Select "Alarm at"
Setting timer functions:
Time:
On Off
i
Call the menu
MEN
▲
i
Entering date - time:
Select "Date":
▼
Select "Time"
Enter time
▼
0
9
Enter switch off time:
▲
Select „Timer functions“
▼
Station
Video
Child lock
TV setup
GB F I E NL DK S
Information
▲
▲
▼
▼
X
Alarm at ––:––
Alarm volume O
Date ––.––.––
Time OO:O1
Switch off at ––:––Timer functions
Menu off
TV
On/Off
X
O-9
Entry
... Day,Month,Year
Select "Switch off time"
Enter time
Enter alarm time
Page 31
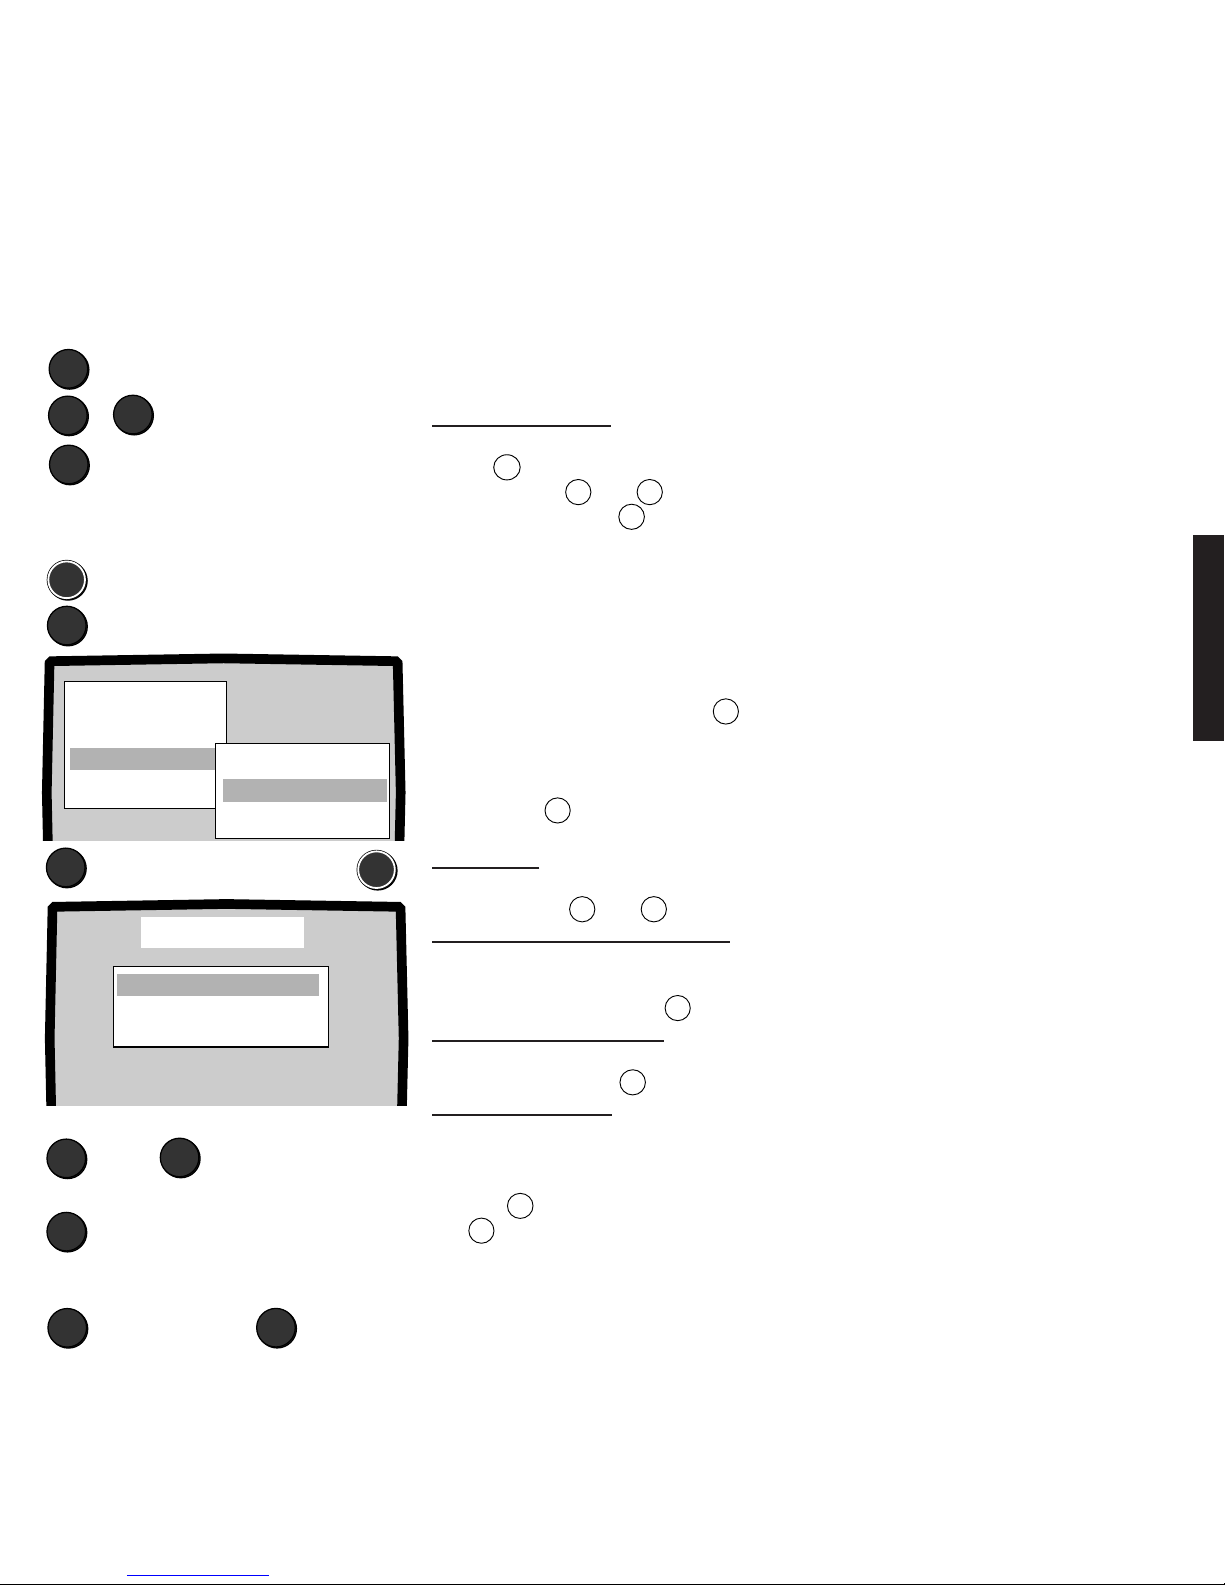
81
English
Timer functions and setting on-screen displays
Station
Video
Timer functions
Child lock
GB F I E NL DK S
Information
Normal settings
Factory setup
Teletext
Special functions
On-screen display
TV setup
Volume - alarm signal tone
If this function is activated, you will be reminded of „your“ appointment by a continuous
alarm signal in addition to the time being displayed.
If you do not want an alarm signal to remind
you of your appointment, set the volume
to 0.
▼
Select „Alarm volume“
Adjust alarm volume
TV
Setting end
Volume - alarm signal tone:
If you adjust the volume or contrast, for
example, with „Picture/sound off“, there will
be no on-screen display of which function is
being adjusted.
With „Sound info off“ you will not get any
automatic displays of whether the station is
broadcasting in Stereo, Mono or 2 Sound.
Setting on-screen displays
You can make the following settings with the „TV setup - On-screen displays“ menu:
• Determine the duration of the on-screen displays, 1 to 10 seconds.
• Switch the display of all picture and sound functions on or off.
• Switch the information on the station, e.g. stereo, mono, 2-sound or Nicam on or off.
• Select the position of the on-screen displays, bottom or top.
1. Call the menu by pressing the
MEN
button.
2. Select the „TV setup“ line.
3. Select the „On-screen display“ line.
4. Press the
MEN
button.
Display time: Select the „Display time“
line, a time between 1 and 10 seconds can
be set with the
+
or
–
button.
Switching picture/sound on and off:
Select the „Picture/sound“ line.
Switch the display of the sound or picture
functions off or on with the X button.
Switching Sound info on-off:
Select the „Sound info“ line. Switch sound
info on or off with the X button.
Position bottom - top:
Select the „Position“ line. Determine
whether you want the on-screen displays to
appear at the bottom or top of the screen
with the X button. End setup by pressing
the TV button.
Switching on-screen display on or off:
MEN
▼
Select „TV setup“
Call the menu
▼
Set display time:
+
or 1 to 10 seconds
–
Sound info on - off:
X
Position of on-screen displays bottom
or top:
X
➪
Select
End
TV
Select
„On-screen display“
➪
MEN
+
–
Adjusting the volume:
Select „Alarm volume“ with the yellow
button X. Adjust the volume of the alarm
signal with the
+
or
–
button.
End Setup: Press the TV button.
Picture/Sound on
Sound info on
Position bottom
Display time 1O s
On-screen display
Page 32
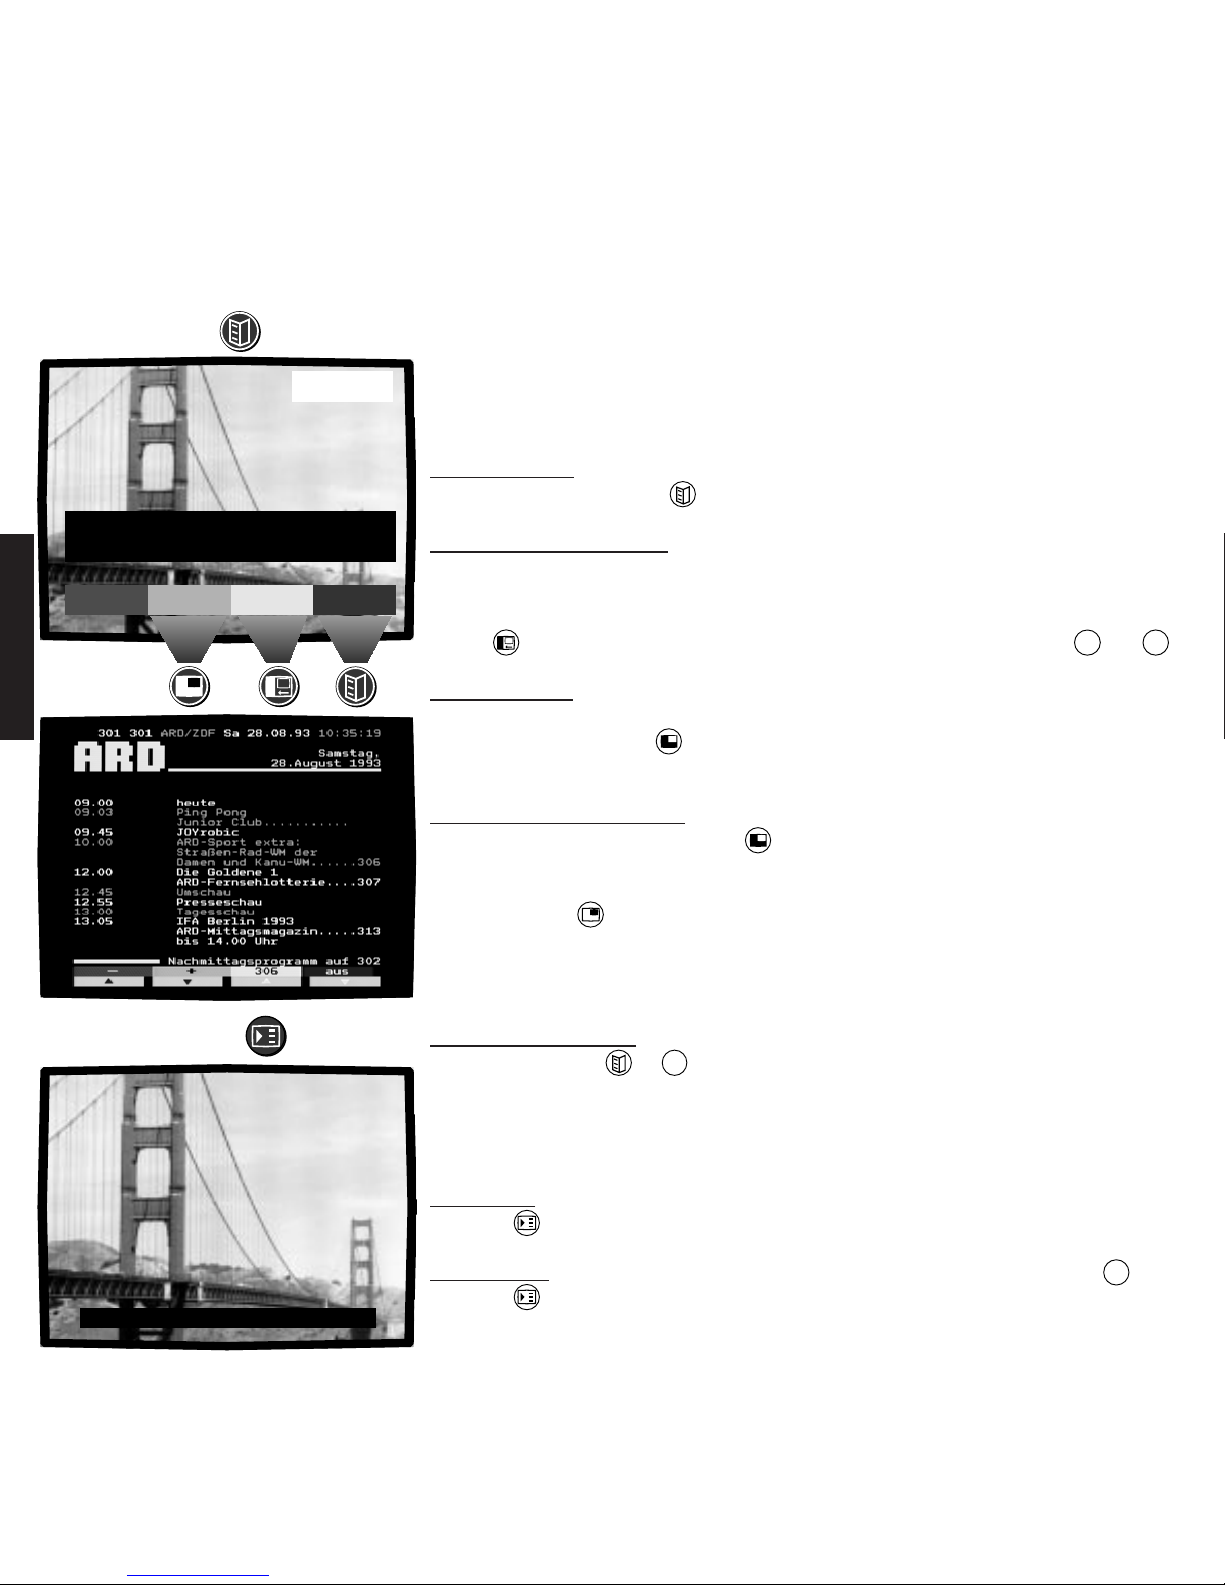
82
English
On-screen displays - TV guide / Subtitles
TV guide
If the set station broadcasts TOP teletext, e.g. ARD or ZDF, or there is a program preview
on a teletext page which you can set (page 301 is preset) for teletext without TOP, you
can ask for the title and starting time of the TV broadcast to be displayed. The current
time is also displayed.
Display TV guide:
Displaying Subtitles
A large number of stations broadcast programs with teletext subtitles for the deaf and
partially deaf. Foreign language programs may also be broadcast with teletext subtitles.
17.O5 Durch die Staaten
Amerikas
off
Program
preview
312
17:12:42
Display TV guide:
Press the „TV guide“ button briefly.
Calling program information:
If a page number appears in the yellow
field, you can obtain further information on
the current program by pressing the yellow
button .
Program preview
You can call the program preview page by
pressing the green button as long as
the on-screen display is visible.
Turn to the next preview page:
With the green button „TT: forwards“
you can turn to the next page of the
preview, with the red button
„TT: backwards“ to the previous page.
If the message „Page not available“
appears when turning back, press the red
button until a page is finally found.
Back to the TV program:
Press the „TV guide“ or
TV
briefly.
If a station does not broadcast teletext, the
message <No information available>
appears. <Searching for program info> is
displayed if you call „TV guide“ shortly after
changing programs.
If your set is fitted with a satellite tuner, you
can use the program buttons P+ or
P–
to view the preview pages of other stations.
The program name and number are
displayed in the bottom right. The page
numbers in the header line change until the
new preview page is found.
Once you can see the preview pages, you
are already directly in teletext mode and
can call other information as well (see the
next chapter).
Call subtitles:
Press the button.
Clear subtitles:
Press the button again.
The subtitles are only displayed in the case
of TOP teletext or teletext with subtitles on
page 150. If the subtitles are on another
page, switch on the teletext with
VT
and
then select the page with the numeric
buttons on the remote control.
... das Wahrzeichen des Westens
Displaying Subtitles:
Page 33
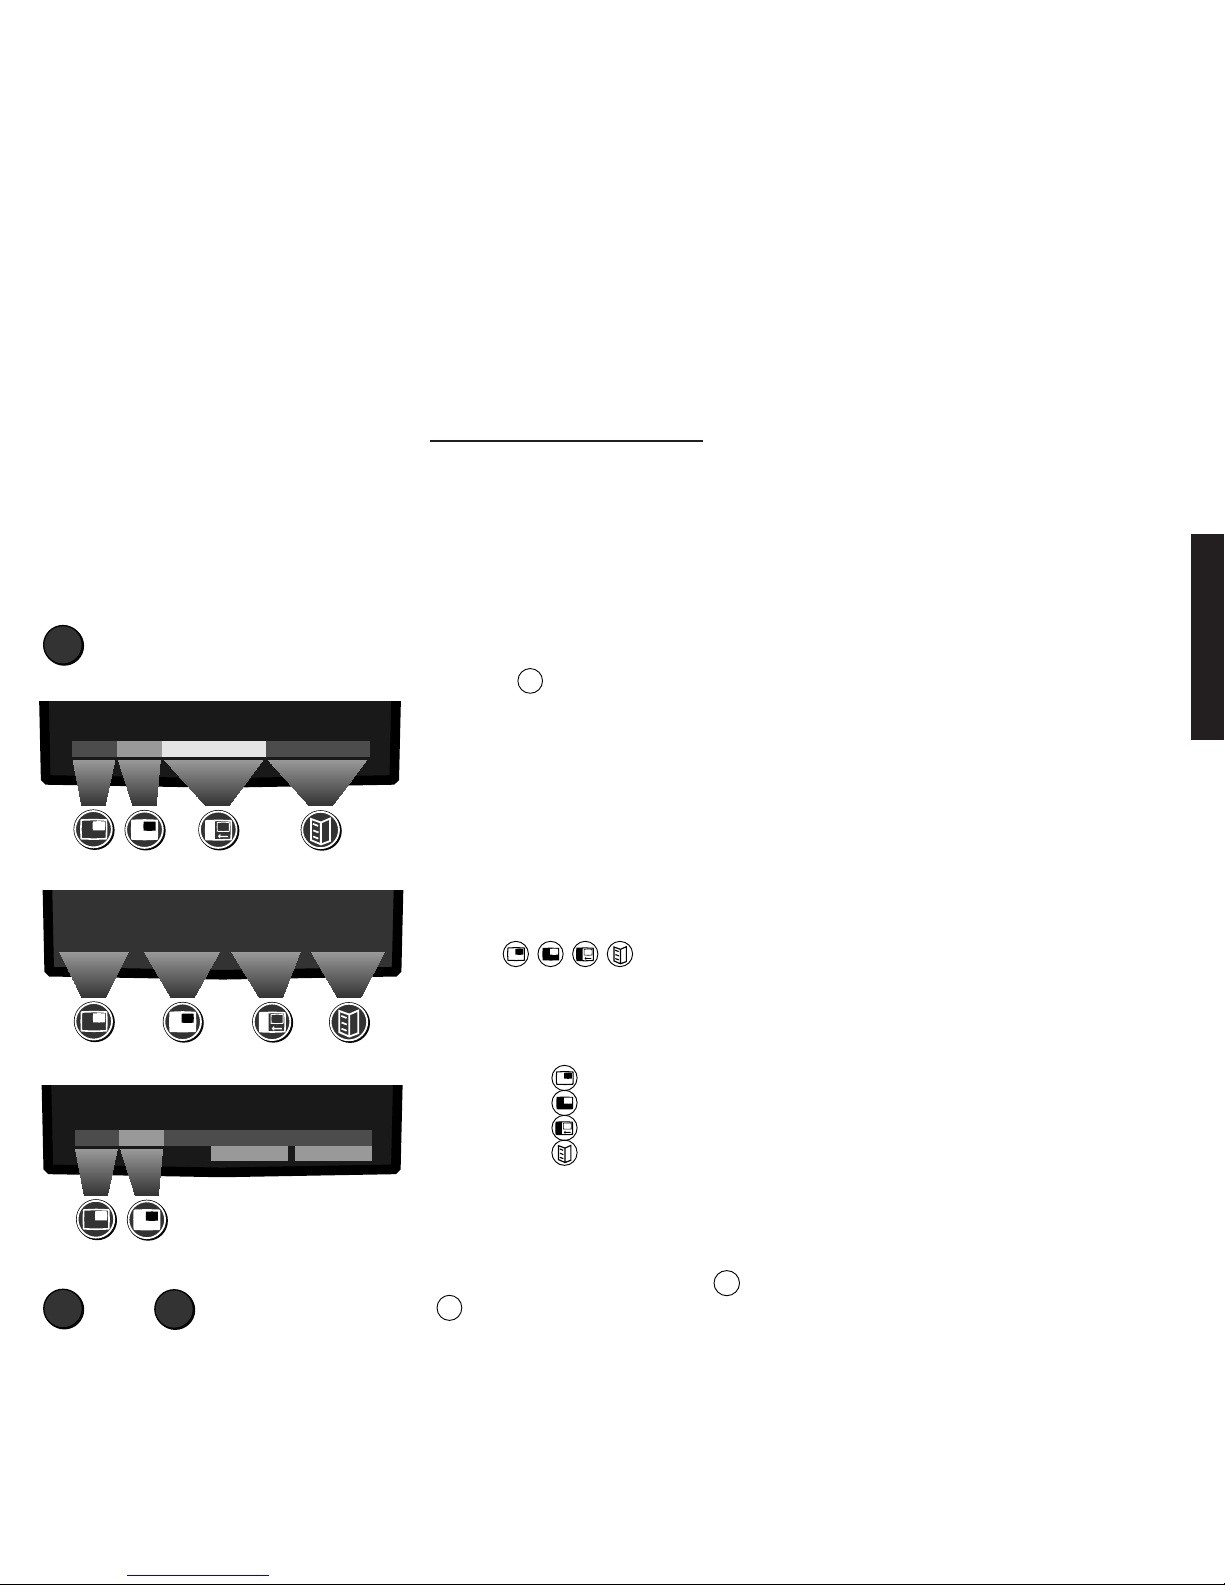
83
English
Teletext – systems/switching teletext on/off
Listings Previews Films Features
VT
TOP operating system
FLOF operating system
Loewe operating system if no TOP/FLOF
- + Index Aktuelles
- + no TOP/FLOF
▲
▼
Teletext signals are broadcast together with the TV signal. Teletext transmits information in
word and graphics, e.g. news, weather, sport, program previews and subtitles. The
teletext pages are sorted according to subjects, topics and pages. You can select from
different subjects and topics and leaf through the pages.
Good reception is a precondition; i.e. little „ghosting“ and no „noise“ in the TV picture.
Sometimes the standard frequencies are not kept exactly in satellite receptions and
community antenna systems. Fine tuning is necessary in this case.
If picture errors still persist on certain programs, ask your dealer to have a look at your
antenna system.
Teletext is broadcast in most programs in the TOP operating system (or the FLOF system
abroad). Your Loewe TV set supports both these systems.
Teletext without these systems are also easy to operate with your Loewe TV.
Switch back to TV mode:
TV
VT
or
Switch on teletext:
Switching on the teletext
Press the VT button. You will normally get
the overview page 100.
If you switch to teletext mode immediately
after switching on the set or changing
programs, <TOP/FLOF identification
working> will be visible for a short time in
the menu line.
If TOP is recognized, you will see
four coloured fields in the menu line which
have a specific relationship to the buttons
of your remote control. These are the
buttons below the number
block. These buttons have coloured circles
which are arranged in the same order and
have the same colours as on the screen.
These have the functions:
with red – turn back page
with green + turn forward page
with yellow go to next topic
with blue go to next subject.
Switching back to TV
Switch back to TV mode with the TV or
VT
button.
If you switch back to TV mode from teletext
and you have not changed the program or
switched off the set, the page last displayed
is shown when you switch back to teletext.
If the FLOF operating system is
recognized, you will usually get the index
page, e.g. page 200, instead of page 100.
The possible selections are entered in a
coloured script or on a coloured background
in the menu line.
Not all pages need necessarily be FLOF
pages so that <no TOP/FLOF> may appear
when you are leafing through the pages.
If no operating system is recognized,
the LOEWE operating system is activated.
<no TOP/FLOF> appears in the menu line.
If no teletext is broadcast, <no text>
flashes in the menu line.
Page 34
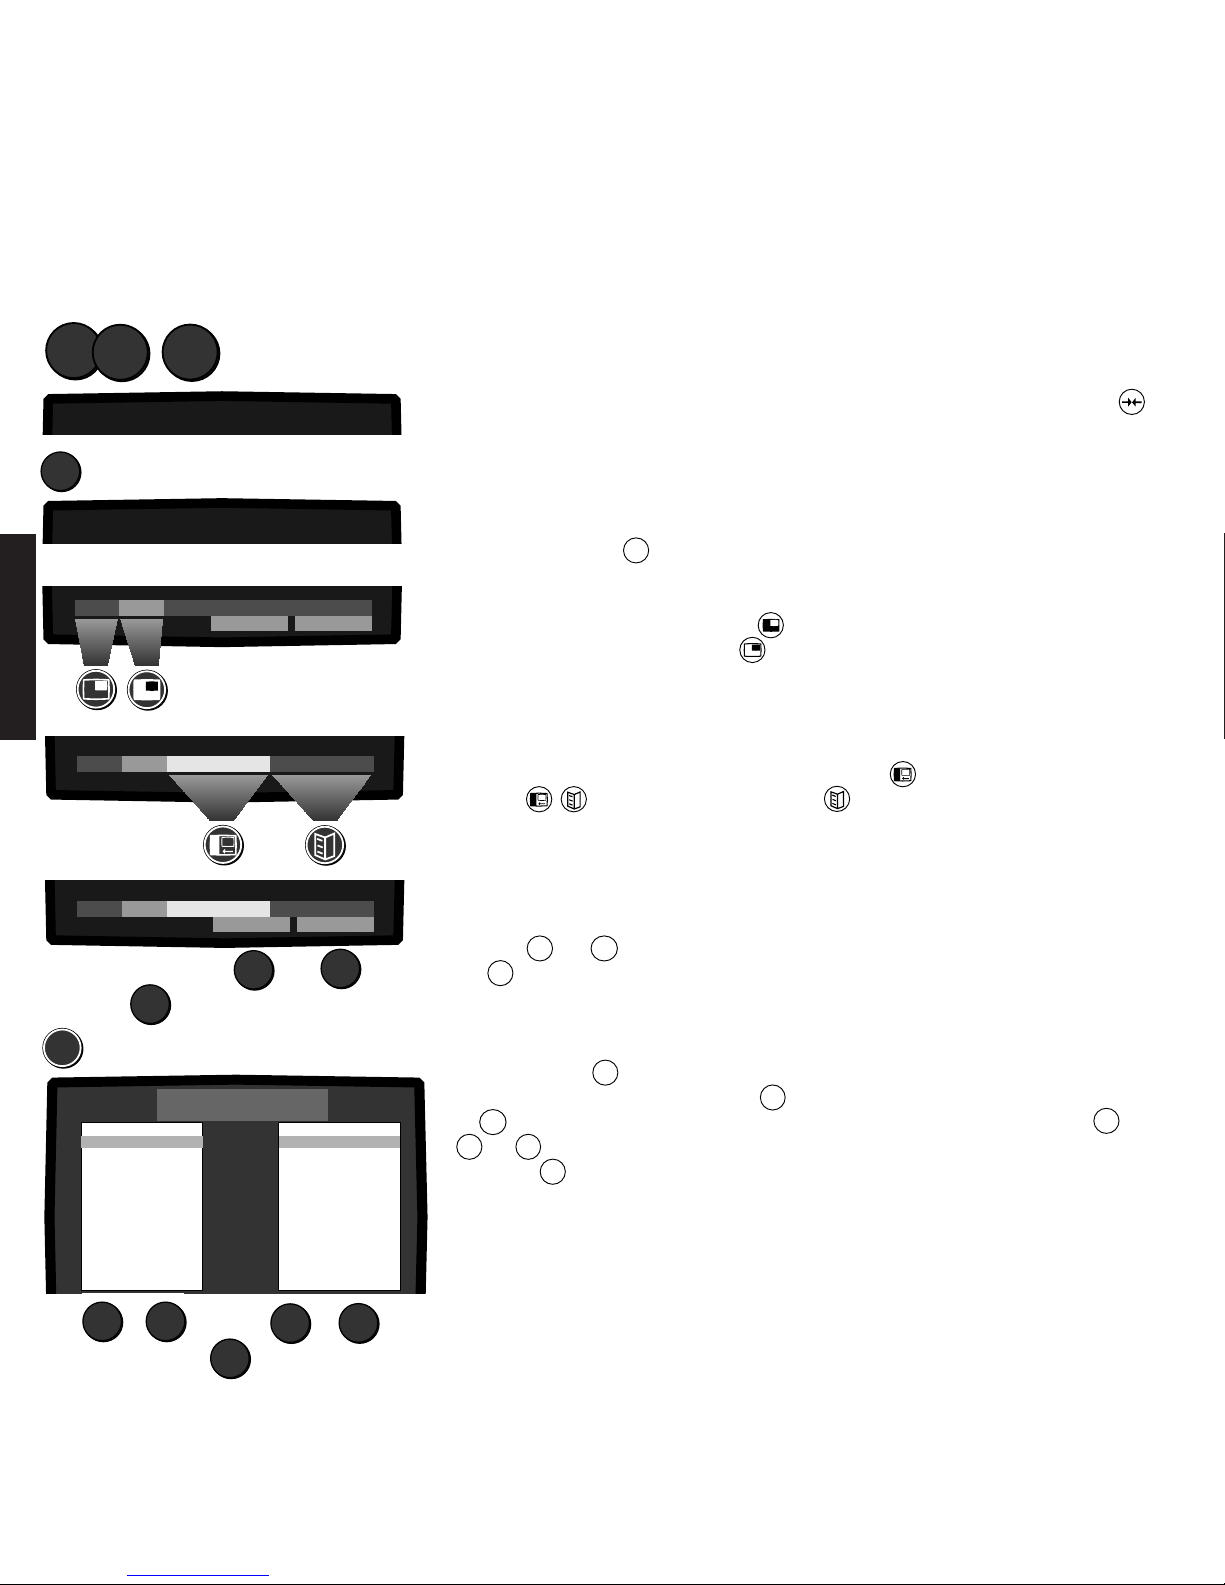
84
English
Selecting teletext pages
There are various ways of finding what interests you in the teletext:
1
2
▲
▼
▼
▲
X
View:
12? 1OO ARD/ZDF Fr 2O.O8.93 14:3O:42
1OO 1OO ARD/ZDF Fr 2O.O8.93 14:3O:42
0
i
- + Index Aktuelles
View:
- + Index Aktuelles
▲
▼
▲
▼
X
- + no TOP/FLOF
▲
▼
MEN
TOP View
Übersicht
Aktuelles
Sport
Fußball
ARD-Programm
Wetter
Börse
Service
Kulturtips 1
Gewinnzahlen
Verkehr
Spaß+Spiel
Kochnische
Aktuelles
Das Neueste
Übersicht 1
Übersicht 2
Übersicht 3
Übersicht 4
Nachrichten
Wirtschaft
Kirche
Kultur
1. Enter the page number with the number
buttons on the remote control. Always
enter three numbers. A question mark
represents a number which has not yet
been entered.
2. Call the overview, page 100, or in FLOF
the index page with i or
3. Page forward with the green button
or backwards with the red button or
4. For TOP and FLOF additionally with the
buttons , or
5. On overview and index pages or pages
with references, mark the page numbers
with the ▲ or ▼ button. Then press
the X button to view or
6. Call the TOP view in the TOP operating
system with the
MEN
button, make your
selection from the list of topics with
▼
or ▲ , then from the list of subjects with
▼
or ▲ .
Press the X button to view.
In the case of an input error, press
and start again. Whilst the search is in
progress the 2nd number indicates the
incoming pages; an arrow > is visible in
front of the first number in the meantime. If
the page does not exist <Page not found>
appears briefly in the menu line.
The next available page is turned to
automatically in all operating systems.
To turn back, the set „remembers“ the last
20 page numbers and goes back to these.
In TOP, turns to the next topic and
to the next subject. In FLOF to the
specified subjects.
Your TV set searches every teletext page
for a page number and then displays the
possible selections underneath the menu
line. Because this search includes all threedigit numbers, other numbers (e.g. an
exchange rate or an amount of an
ingredient in a recipe) may occasionally be
interpreted as a page number. After
marking the page number, you have 5
seconds to select the page with X. If you
wait any longer, the mark on the selected
page disappears and you will have to mark
the page again.
Teletext – selecting pages
Page 35
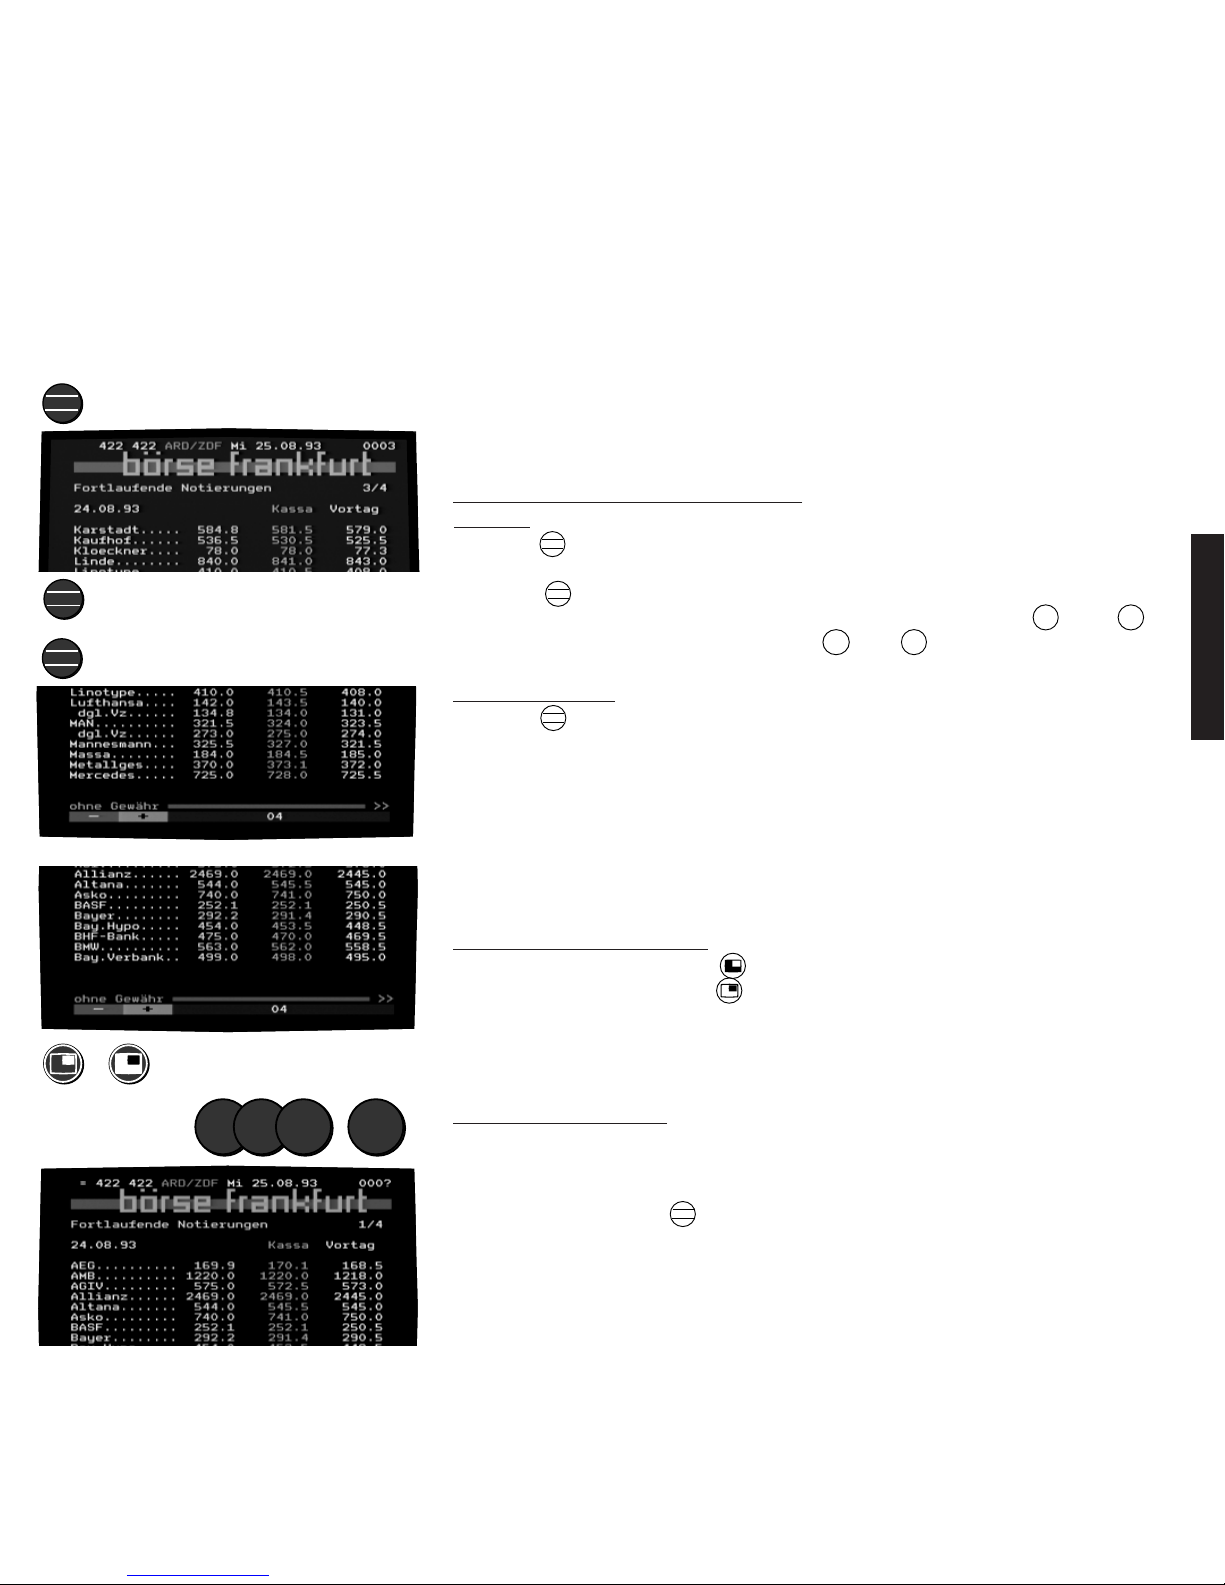
85
English
Selecting subpages/multiple pages
Multiple pages are pages which are changed without your intervention. Multiple pages
usually consist of several subpages which are identified by a four-digit subpage number in
addition to the three-digit page number. Multiple pages are often recognizable by a
reference on the page such as 04/12; which means page 4 of a total 12 pages is
currently on the screen.
00:00
00:00
Hold page change
Store subpages
Leaf through subpages
00:00
40
0
0
Enter subpage
number directly:
Continue page change
The page number of the subpage is
displayed at the top right instead of the
time.
The hold page uncti n is also ended if you
select another page with i resp. ▲ or
▼
and X.
Not all self-turning pages are subpages. If
0000 is displayed in place of the time, this
is a multiple page which can be transmitted
one after the other without subpage
numbers. These pages cannot be stored
and called one after the other.
You can already start paging during the
storing procedure. If, however, you want to
look at subpages which have not yet been
stored, a search is started. The page is then
displayed as soon as it is received.
Teletext – selecting subpages/multiple pages
1. Hold page to be able to read the contents
in peace:
Press the
00:00
button if you do not want a
multiple page to change.
Press the
00:00
button again if you want to
continue the page change.
2. Store all subpages:
Press the
00:00
button again to hold the
page. 01 appears at first in the menu line,
this stands for „one subpage stored“.
When all the subpages have been stored,
you will see an equals sign „=“ at the
extreme right of the header line. This
means all subpages have been stored.
3. Leafing through the subpages:
forwards with the green button ,
backwards with the red button .
4. Calling subpages directly:
If you want to have a look at a certain
subpage, enter the number of the
subpage with the number buttons (four
digits) after pressing the
00:00
button. You
will see your entry on the extreme right of
the header line.
Page 36
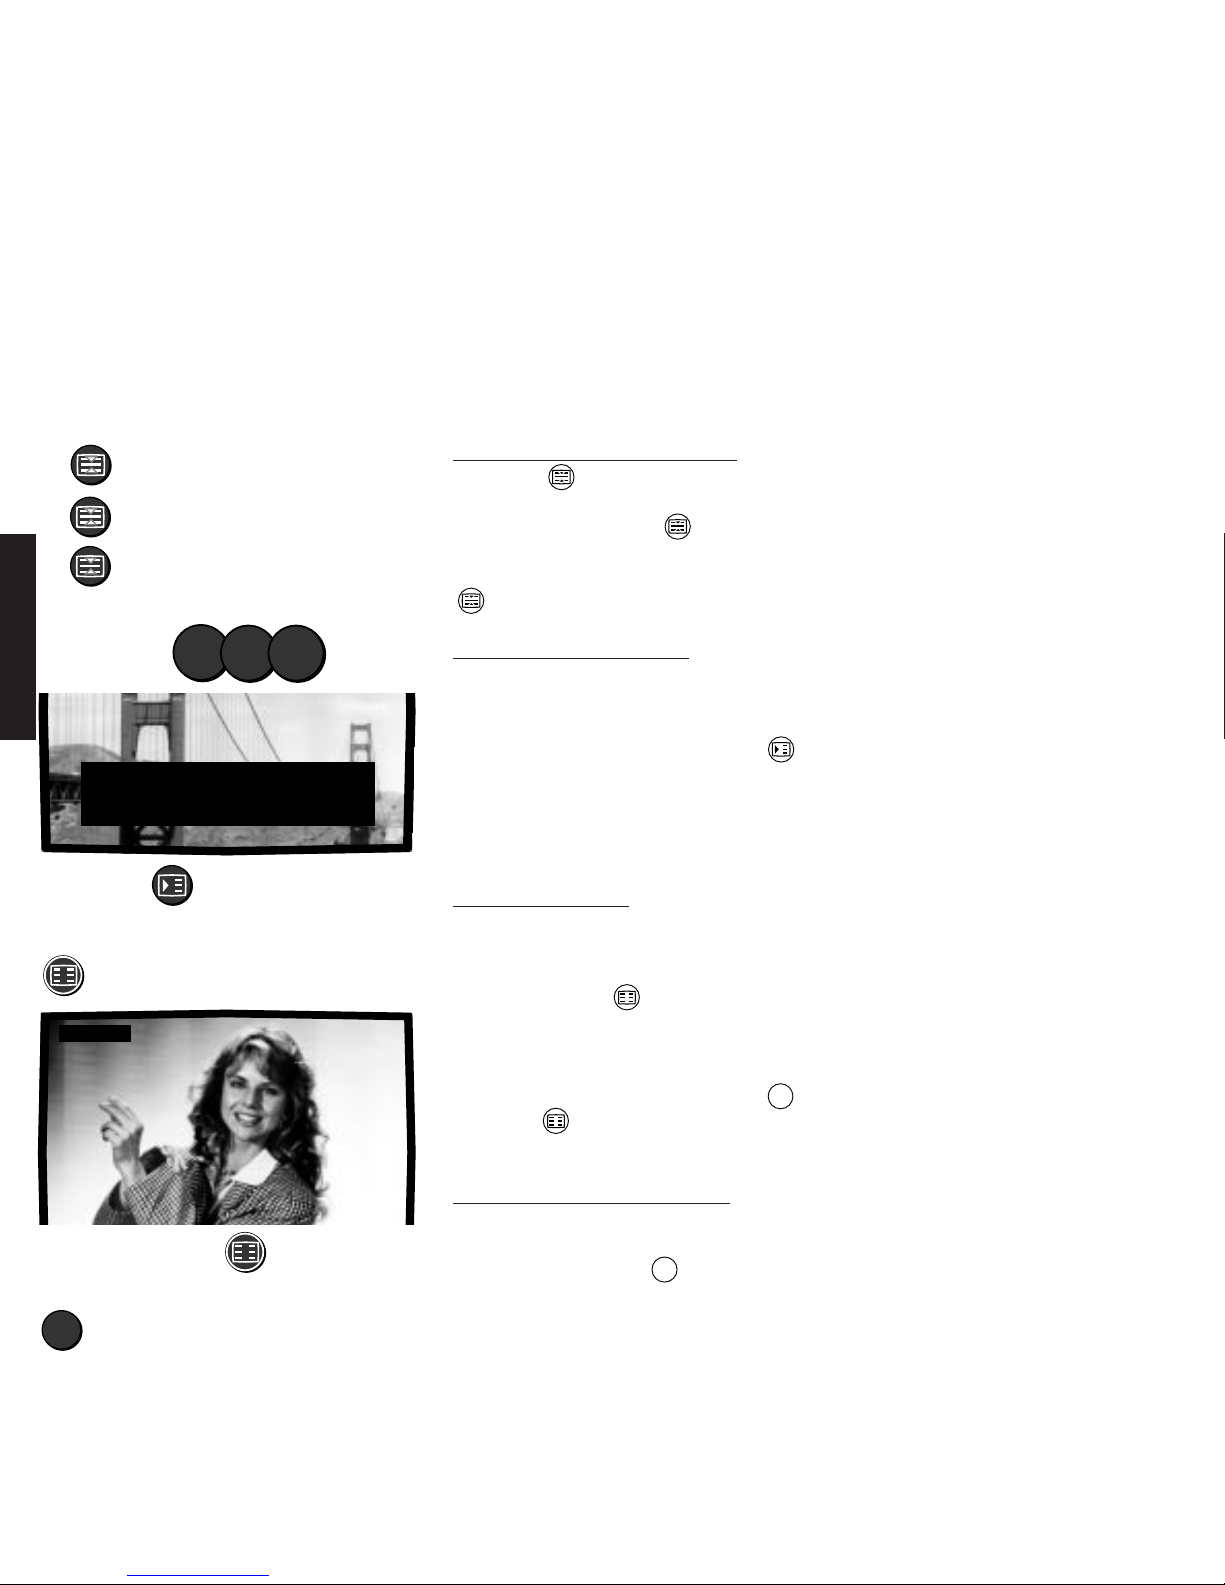
86
English
Teletext display modes
If teletext is switched on, you can switch to TV picture without leaving the teletext. Or you
can display an enlarged teletext page, uncover hidden texts and display and clear
newsflashes.
These special teletext applications also
include the subtitles and „Program guide“
which can be called in TV mode as well as
the program preview pages in the teletext,
you will find the descriptions of these
functions elsewhere in these operating
instructions.
You will find newsflashes, for example, in
many stations on pages 111 and 222. In
ARD and ZDF, these are news and sports
flashes.
You will see an arrow > in front of the page
number as long as the search is going on.
The arrow disappears as soon as the page
has been found. You can switch back to
teletext.
Hidden texts are used, for example, as
answers to quiz questions or as VPS pages
in the program previews in the teletext.
Teletext – display modes
1. Set character height large/normal
Press the button. The top half of the
picture is displayed first with double
magnification. Press the button again
- the bottom half of the picture is
displayed. Back to normal size: press
again.
2. Display and clear newsflash:
If you select a newsflash page, the
newsflash appears at the bottom of the
TV picture. If you only want to see the
current newsflash, clear this with the
button. As soon as the station sends a
new newsflash, this appears automatically
on the screen.
3. TV picture in teletext:
This function is useful if it takes a long
time to reach the page you want. You can
switch to the TV picture out of teletext
mode by pressing .
All you can see of the teletext is then the
page number in the top left hand corner.
You can then choose another page, for
example, with the number buttons or i.
Press the button again to return to
the teletext.
4. Uncovering hidden text/graphics:
Texts are „hidden“ on some pages, i.e.
they are not immediately visible. You can
uncover these with the ? button.
Double character height:
1x zoom top half
2x zoom bottom half
3x normal size
12O
back to teletext:
TV picture in teletext:
Select
newsflash, e.g.
.
1
1 1
Newsflash:
LETZTE MELDUNG: Dollar-Bananen werden
wegen EG-Richtlinie teurer. VerbraucherVerbände protestieren. Mehr dazu 117
Nachrichten-Übersichten. . . . . . 112-115
Clear:
?
Uncover:
Page 37
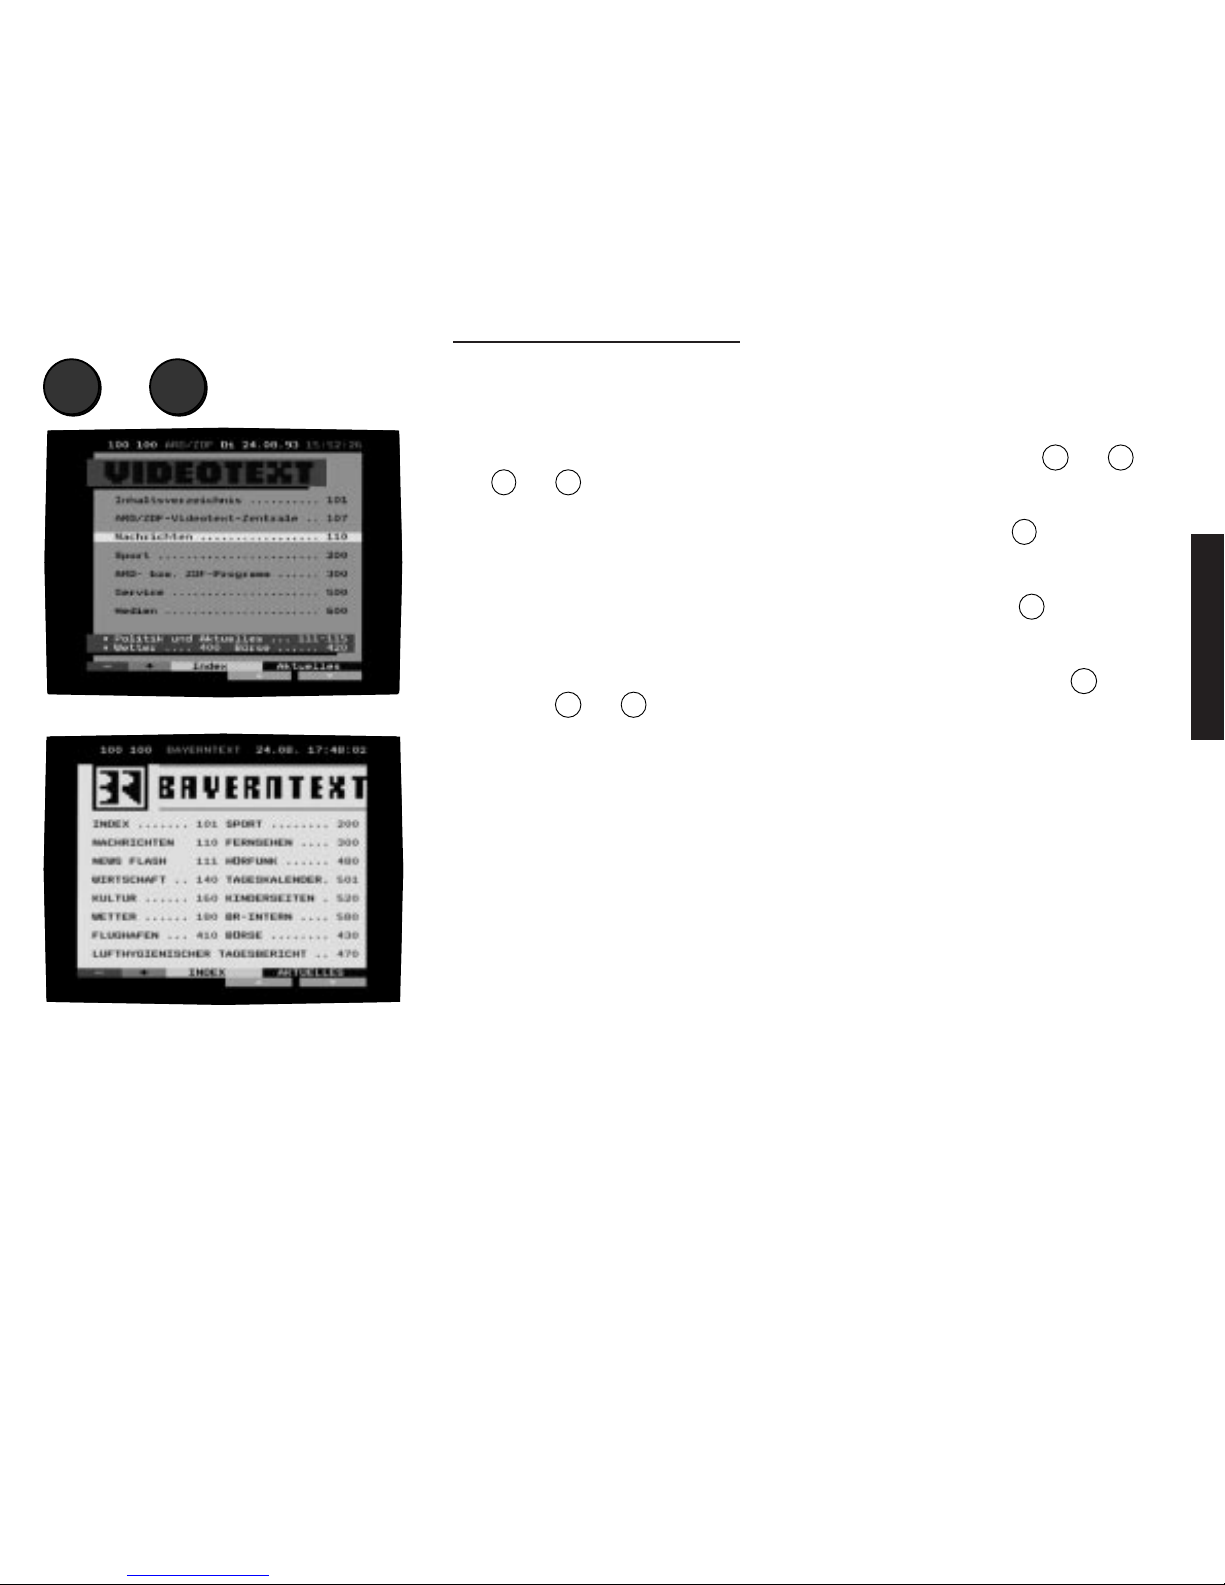
87
English
Teletext – viewing other teletext programs
P+
or
P–
Switch to other teletext programs: 5. Switch to other teletext programs:
When teletext is switched on, this can
only be done with TV sets equipped with a
satellite tuner on terrestrial or cable
reception. You can switch to the
programs which these tuners receive with
the P+ or P– buttons. The program
names and numbers are displayed in the
menu line. The page set last is now
searched for in the selected program and
displayed if it exists.
Nothing is changed in the TV setup.
You can hear this from the TV sound, it is
still from the same TV program which
was set previously. If you switch back to
TV with the TV or VTbutton, you will
see the TV program which was originally
set.
You can also switch to other teletext
programs whilst playing back through one
of the AV sockets.
If your TV set has no satellite tuner, switch
back to TV mode with the TV or
VT
button.
Now choose another TV program and
switch to teletext with VT.
If you switch back with VT, the teletext
program of the other station is displayed
immediately when called.
If teletext is switched off with TV, the
teletext program of the selected TV program will be displayed when teletext is
called again.
Page 38
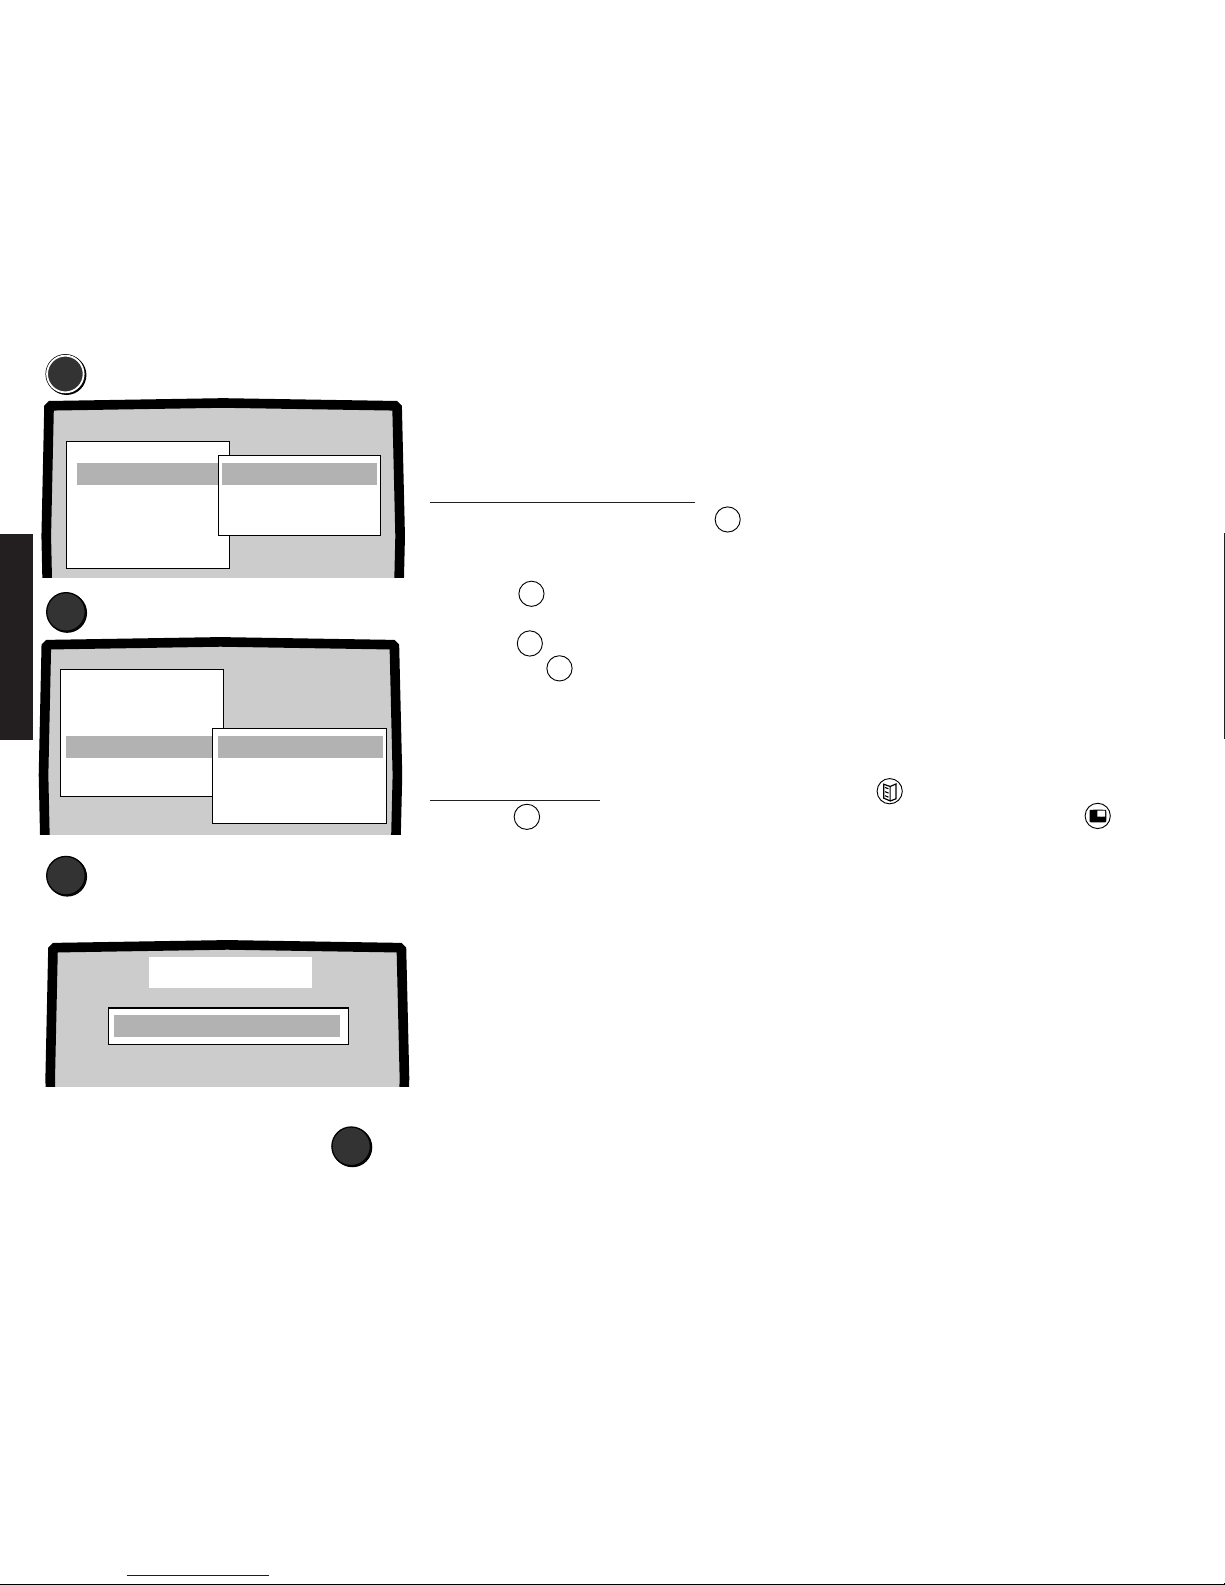
88
English
Teletext – program pr eview settings
Where do you get the teletext page number
from?
Switch to teletext and have a look at what
the teletext has to offer. Look for the
program preview. The page number is
displayed in the header line of the teletext
page. Take the first page which contains a
program preview and not a page which
merely gives an overview.
After this set up, the title of the current
broadcast can be called with the TV guide
button and the program preview
displayed with the green button for
stations without TOP teletext system as
well.
MEN
Call the menu
▼
Select „TV setup“
Enter program preview page
If you are receiving TV programs without TOP teletext system in which the program
preview begins at a different page to 301, enter the number of the first page of the
program preview in the „TV setup - Teletext“ menu.
First select the program in which this setting is to be activated. Programs 1 to 46 are
allowed.
Creating program preview page:
Creating program preview page:
1. Call the menu by pressing the
MEN
button.
2. Select the „TV setup“ line with the blue
button ▼ .
3. Select the „Teletext“ line with the yellow
button ▼.
4. Press the
MEN
button.
If the „Program preview“ line is marked in
blue, you can enter the page number with
the number buttons.
Delete page number:
Press the–button.
Station
Timer functions
Child lock
TV setup
GB F I E NL DK S
Information
Video
VCR programming
Copy functions
Installation
Record/Playback
Station
Video
Timer functions
Child lock
GB F I E NL DK S
Information
Factory setup
On-screen display
Teletext
Special functions
Normal settings X
TV setup
▼
Select „Teletext“
Entering the preview page number:
Enter page number: e.g. 401
Deleting the preview page:
Teletext
Program preview 3O1
–
Page 39
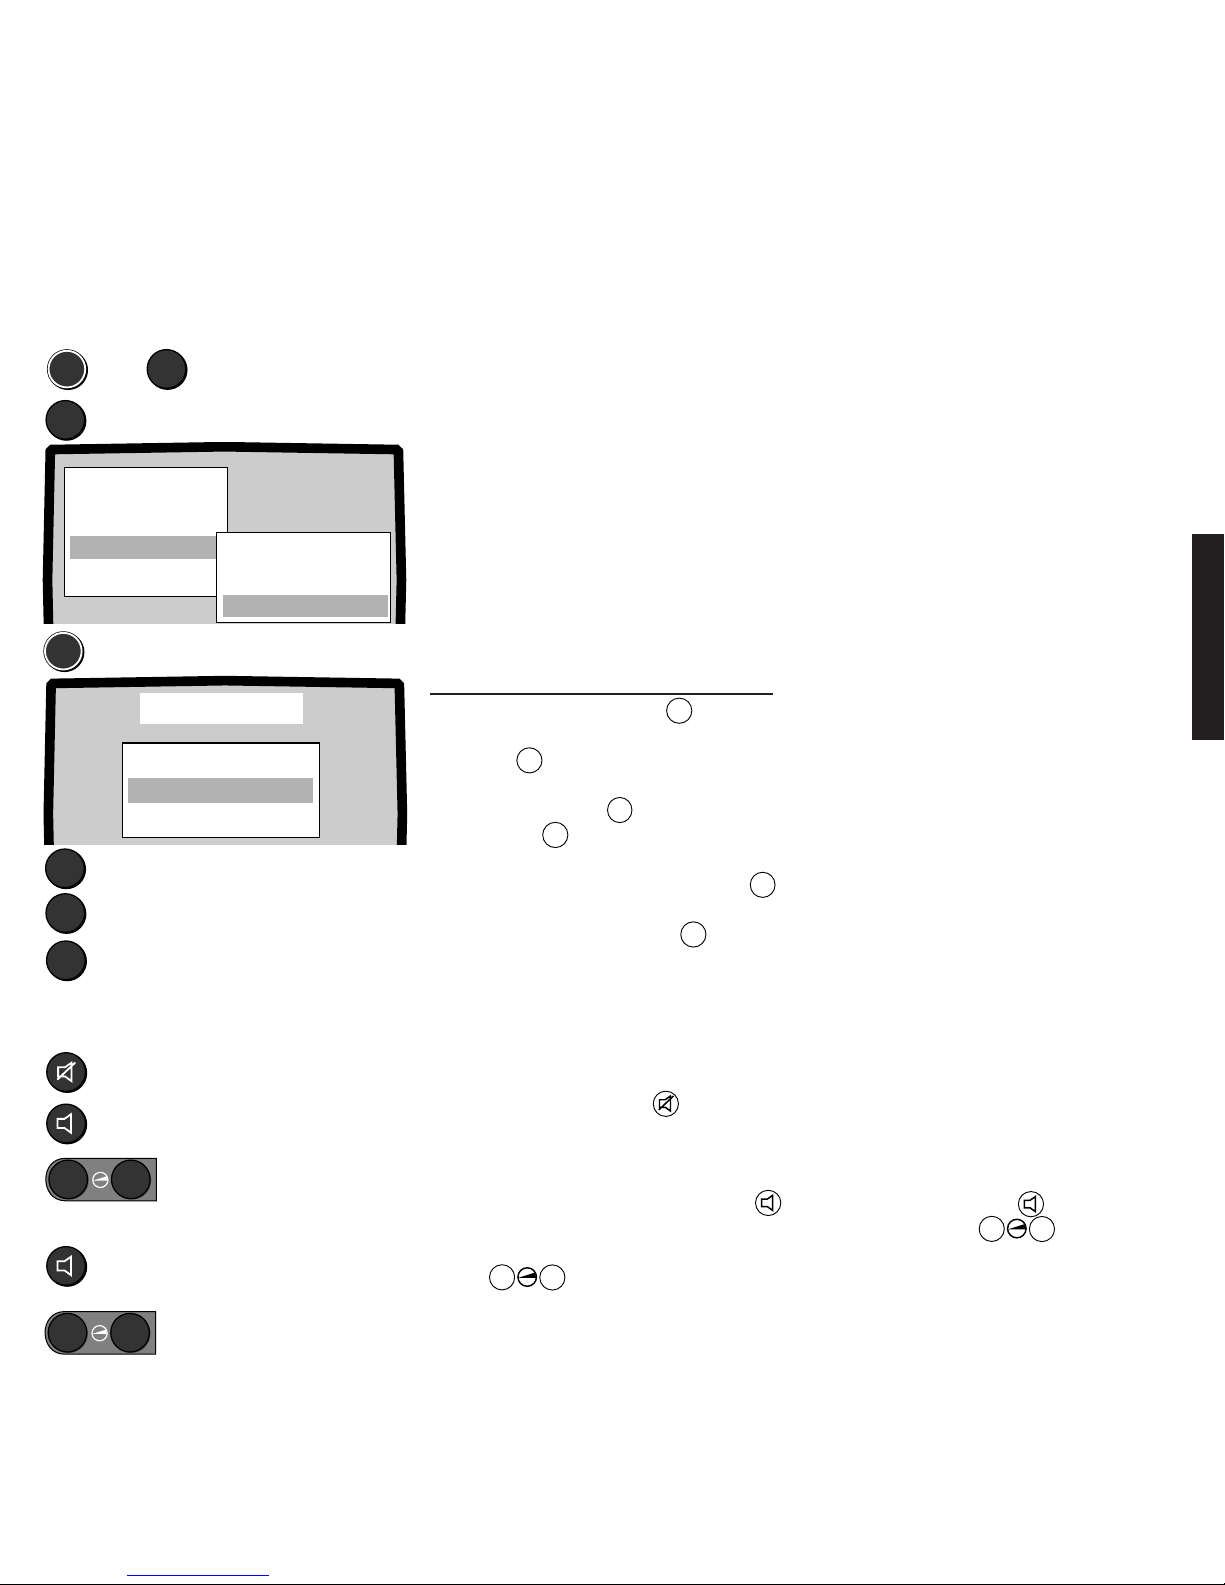
89
English
Connecting other equipment – loudspeakers/HiFi system
Connecting the loudspeakers
The sockets for the loudspeakers are on the back of the set; L = left sound channel,
R = right sound channel. Connecting values of the loudspeakers: 4 ohms/40 watts.
The TV’s speakers are cut off when other loudspeakers are connected.
Connecting a HiFi amplifier system
The sockets (Cinch) for a HiFi amplifier system are on the back of the TV set.
Red socket = right sound channel, white socket = left sound channel. If you connect an
amplifier system, you can play the TV sound through the stereo amplifier system.
You can select the following functions for the cinch sockets:
1. Fixed sound signal: all sound functions are adjusted on your HiFi amplifier system.
2. Variable sound signal: you can adjust the volume of the HiFi system with your TV
remote control. Set a basic volume of the HiFi system first.
Press, display: <Mute>
Select <HP vol>
–
+
Adjust volume
Select line <Stereo> or <Sound 1>
–
+
Sound selection for the cinch sockets:
Stereo - Mono! or Sound 1 - Sound 2:
Adjusting the volume of the HiFi
amplifier:
Set <Mono!> or <Sound 2>
MEN
➪
▼
Select „TV setup“
▼
Select „Special functions“
MEN
Volume corr. O
Colour corr. O
VTR Stereo
AV Sound Sound1
Signal Cinch variable
Special functions
▼
X
TV
Select sound signal fixed or variable
End setup
Select the „Signal Cinch“ line
Station
Video
Timer functions
Child lock
GB F I E NL DK S
Information
Normal settings
Factory setup
On-screen display
Teletext
Special functions
TV setup
Adjusting the volume of the HiFi amplifier system
If you have selected „Signal Cinch variable“, you can adjust the volume of your HiFi
system with your TV remote control.
1. Press the Mute button .
<Mute> is displayed briefly on the
screen in red, the sound of the TV set’s
loudspeakers is switched off.
2. Press the Sound functions button .
3. If <HP vol> is marked in white, you can
adjust the volume of the HiFi system with
the
–
+
buttons.
If you had set to „fixed“, adjust the volume
only on the HiFi system.
For stereo broadcasts, you can select the
<Stereo> line with the button and
<Mono!> with the
–
+
buttons.
In 2 Sound broadcasts, you can switch
from <Sound 1> to <Sound 2> and vice
versa.
Selecting the signal to the cinch sockets:
1. Call the menu, press the
MEN
button.
2. Select the „TV setup“ line with the blue
button ▼.
3. Select the „Special functions“ line with
the yellow button ▼.
4. Press the
MEN
button.
5. Select the „Signal Cinch“ line.
6. Set „fixed“ or „variable“ with the
X
button.
7. End setup by pressing the TV button.
If you select „fixed“, there is a fixed signal
level at the cinch sockets.
If you select „variable“ you can set the
sound signal at the cinch sockets by
adjusting the headphones volume.
Page 40
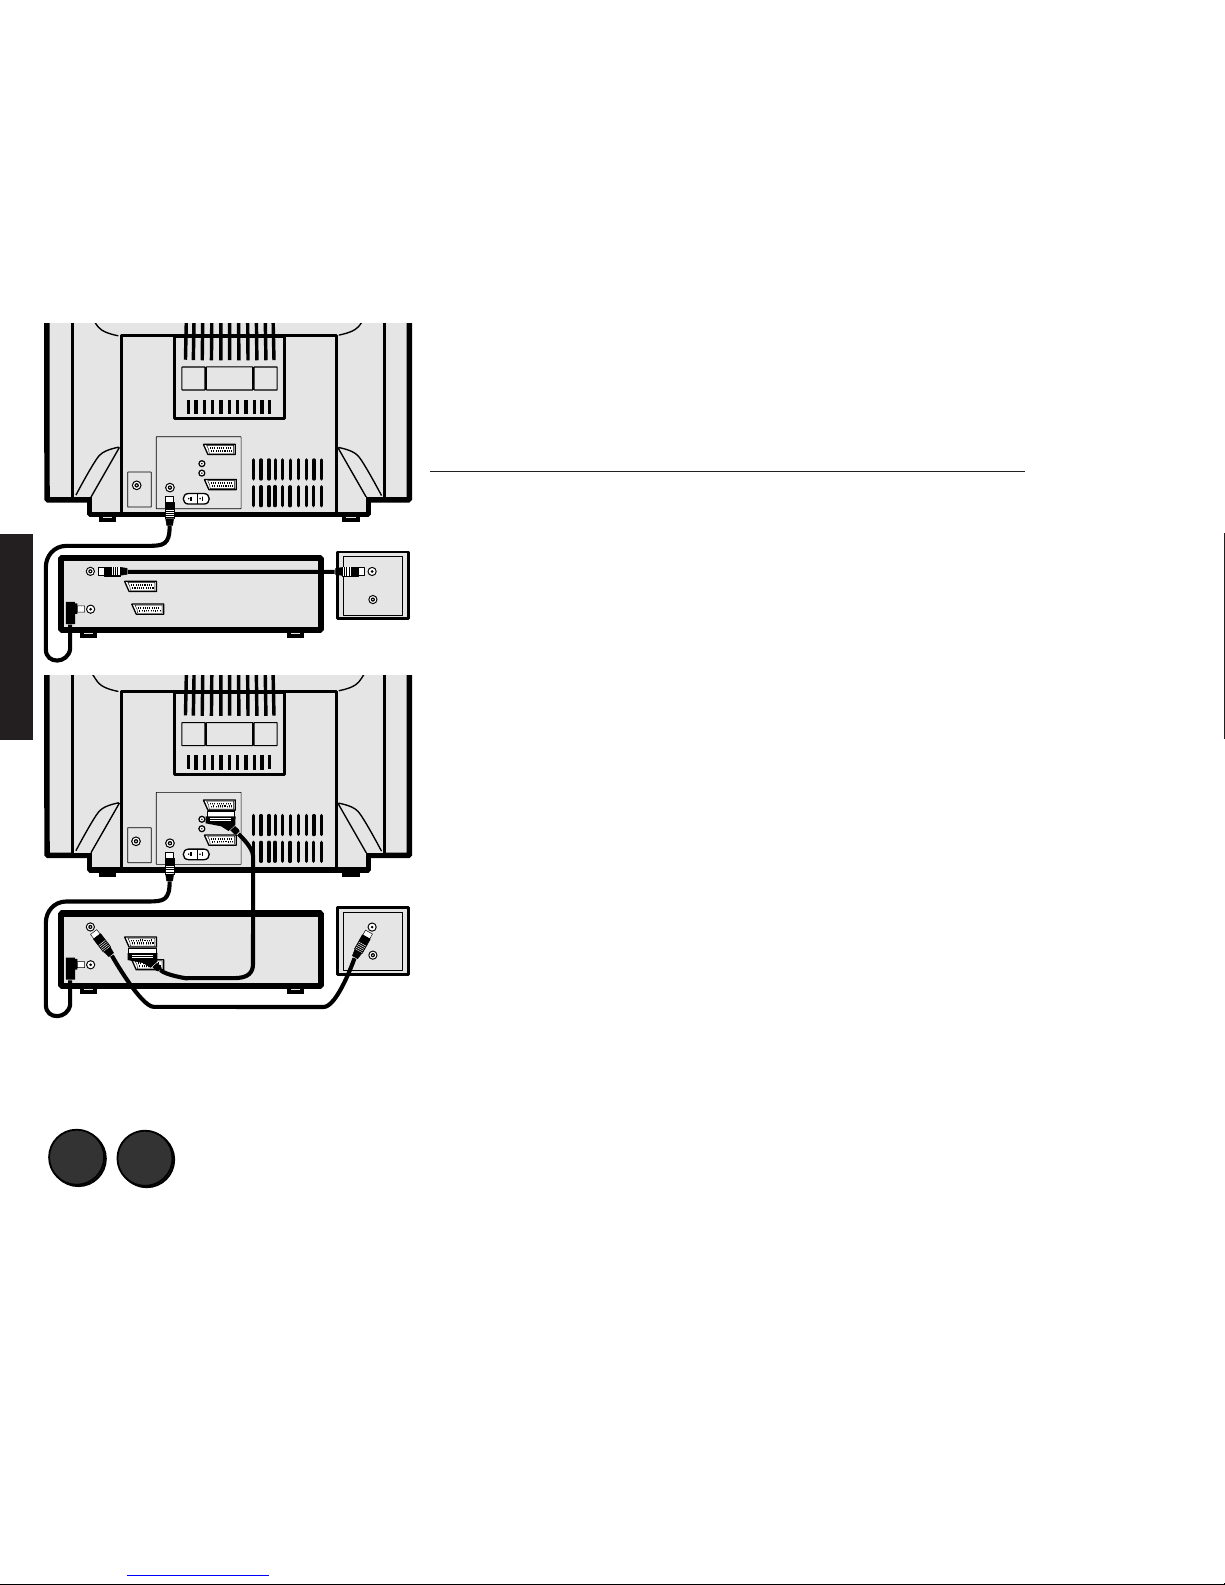
90
English
Connecting other equipment – videorecor ders/camcor ders
Connecting video recorders or camcorders
You can connect any VCR to your TV. Loewe VCRs, however, are specially adapted to
these TVs. This has the advantage that you can control the important functions of the VCR
with the TV remote control. You can record both terrestrial and satellite programs
(providing a satellite tuner is fitted) with the „VCR programming“ function.
There are several ways of connecting your video recorder to the TV set:
1. An antenna - video recorder - TV connection, this allows you to tape a TV program with
the video recorder and watch another program on the TV at the same time. The
disadvantages of this type of connection are:
• Poorer picture and sound quality in reproduction.
• Reproduction in stereo sound not possible.
• You cannot use the TV timer functions.
2. A connection by means of an AV cable from the video recorder to one of the EURO-AV
sockets on the TV set. The advantages of this type of connection are:
• Better picture and sound quality.
• Stereo sound reproduction is possible.
• You can select Sound 1 or Sound 2 when playing back a 2 Sound recording.
• A concealed Loewe video recorder can be operated with the TV remote control.
• The possibility of recording programmes with the videorecorder with the timer and
the TV set receiver units.
• The possibility of recording programs with the video recorder with the timer and the
receiving points of the TV.
We recommend both types of connection, in this way you can use all the functions of
your video recorder and TV set without restrictions.
3. You can connect camcorders for playback or copying either to the front socket
„S-TERMINAL“/“AVS“ (for S-VHS, Hi8) or to the cinch socket „Video in“ (for VHS, 8 mm
video). Only connect one camcorder, never two at once! Feed the sound into the two
cinch sockets „L AUDIO R“. Use one of the EURO-AV sockets for Profil 2570Z.
Video playback through the antenna socket
Program slot 00 is preprogrammed specially (short time constant) for good reception of
the video recorder channel (CH 36). Select this program slot on the TV set. Most video
recorders are set to channel 36 or 37. You can check this by switching on the video
recorder’s „test signal“ or switching the video recorder to play. If you do not get perfect
picture and sound reproduction or no reproduction at all, you can set the video recorder’s
transmitter to another channel. Channels 30 to 39 are normally used. There is an adjustor
„RF CHANNEL ADJ“ on the back of the video recorder. Set the video recorder’s
transmitter so that the picture and sound are reproduced perfectly. Of course you can
also use the „Station search and store“ menu to find and fine tune the video recorder
transmitter.
0
0
Select program slot 00 for AV
playback through the antenna socket:
1
2
RL
ARIAL
RF–OUT
1
2
RL
ARIAL
RF–OUT
Page 41
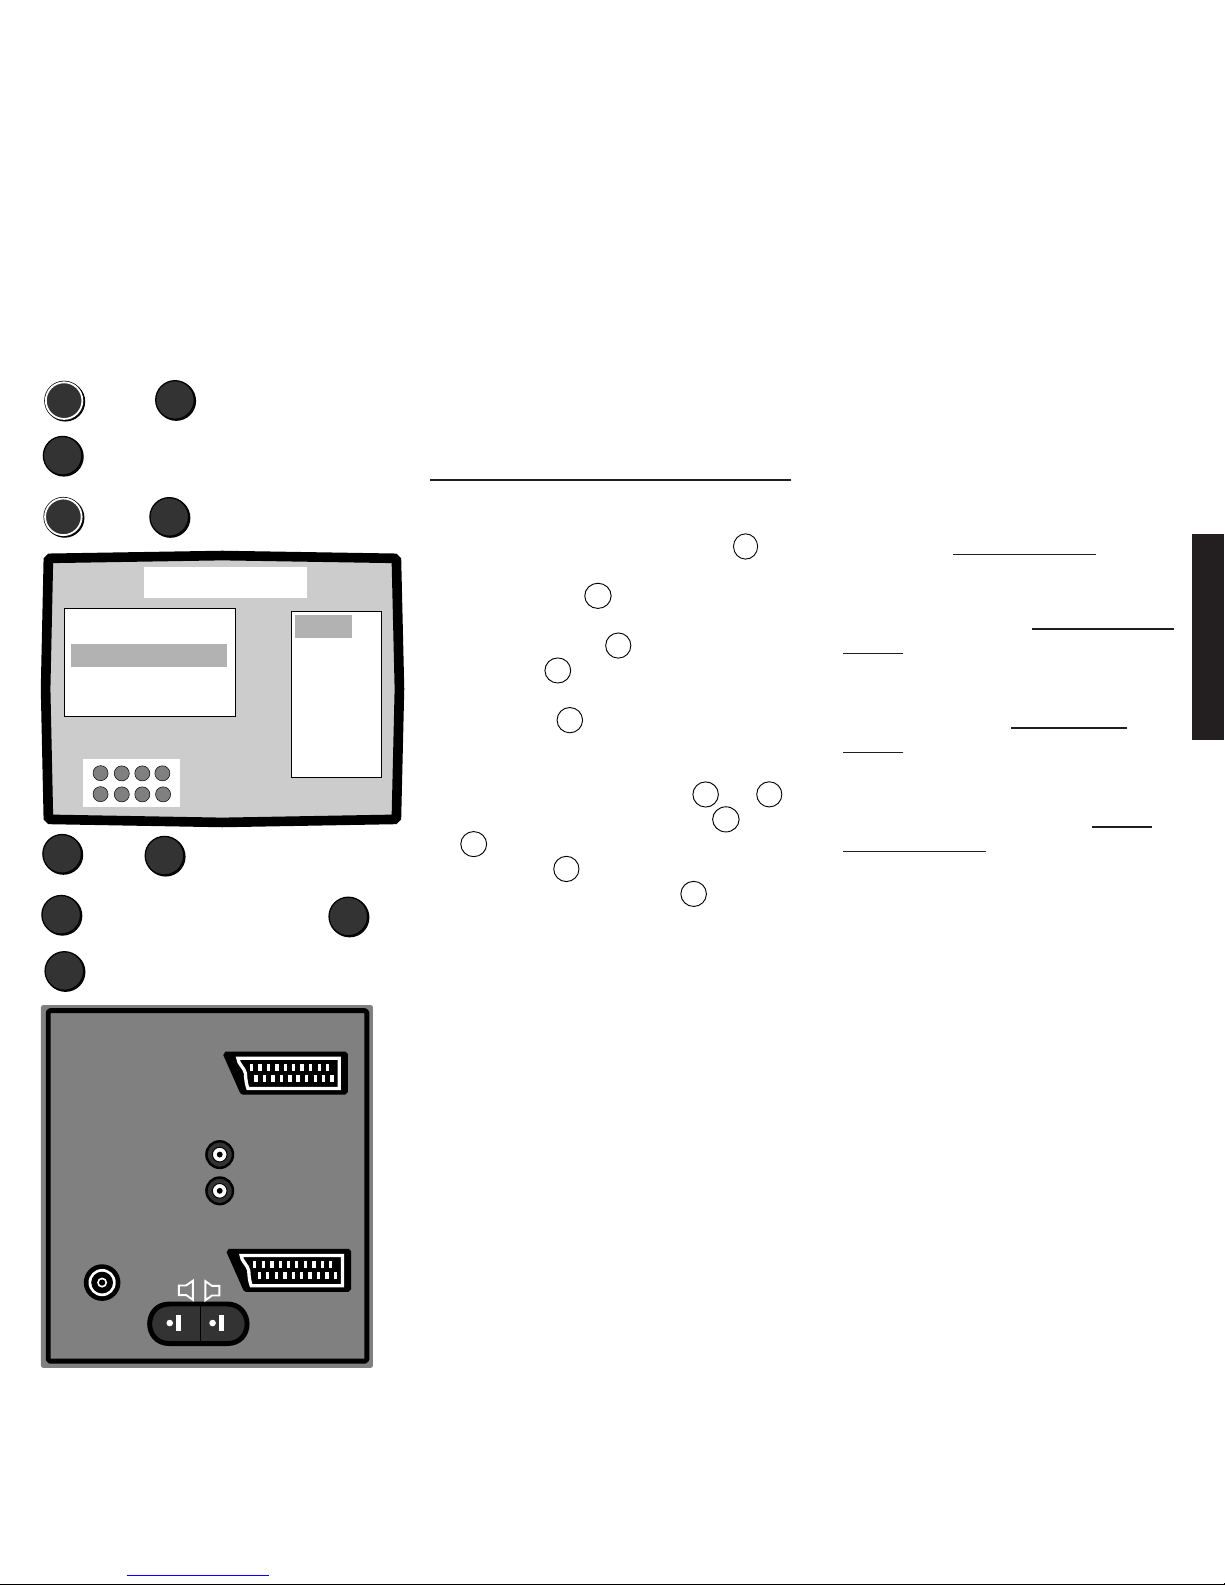
91
English
Connecting other equipment – videorecor ders/camcor ders
Audio/video playback through the EURO-AV sockets
Use a commercially available AV cable to connect the TV set to the video recorder. You
can play back on the video recorder or record a TV program through the EURO-AV
sockets 1 and 2. You can use any program slot for audio/video playback.
For example connect the video recorder to the EURO-AV 1 socket.
Select program slot for AV playback
through the EURO-AV socket:
MEN
➪
▲
Select „Station“
▼
MEN
➪
▼
Select „AV source“
▼
▲
Select „Search and store“
line
▲
▼
M
Search and store
AV Source ---
▲
▼
Channel V/UHF O8
Storage O24
Name RTL 2
Fine O
Norm Auto.-BG
AV1
AV2
AV1!
AV2!
AV1/Dec.
AV2/Dec.
AV1/Dec.!
AV2/Dec.!
AVS!
---
or Select EURO-AV socket
e.g. AV 1
▲
Select „Storage“ line
X
➪
TV
End setup
For setup:
• „AV1“ or „AV 2“, AV-playback through
EURO-AV socket 1 or 2 possible for units
which emit a switching voltage, e.g. video
recorders.
• „AV1!“ or „AV2!“ AV playback possible
through socket 1 or 2 without switching
voltage e.g. camcorders.
• „AV1/Dec.“ or „AV2/Dec.“ AV playback
with connection of an SVHS recorder with
connected decoder with switching
voltage.
• „AV1/Dec.!“ or „AV2/Dec.!“ AV playback
with connection of an SVHS recorder with
connected Première decoder without
switching voltage. We recommend this
setup if the coded signal is to be
recorded by the video recorder.
• „AVS!“ AV playback through the front
socket „S-TERMINAL“/“AVS“ or the cinch
socket „Video in“ (AVS not available in
Profil 2570Z).
Whether the connected video recorder or
decoder supplies a switching voltage during
playback can be found out from the
operating manuals which accompany this
equipment.
The exclamation mark indicates that this
program place cannot be used for TV but
only for AV, i.e. as a monitor.
The video recorder outputs a switching
voltage if it is switched to playback. You can
now watch your recordings instead of the
TV.
Preparing the EURO-AV socket for AV-mode
1. Select the program slot at which you
want to set the AV function.
2. Call the „Station“ menu with the
MEN
button. The „Station“ line must be
marked in blue ▲ if necessary.
3. Select the „Search and store“ line with
the yellow button ▼.
4. Press the
MEN
button briefly.
5. Select the „AV source ---“ line with the
blue button ▼.
6. Select the EURO-AV socket to which you
have connected the video recorder, e.g.
AV1, with the yellow button ▼ or ▲.
7. Select the „Storage“ line with ▲ or
MEN
.
8. Store with
X
button.
9. End setup by pressing the TV button.
EURO-AV1
VHF/UHF
L
R
AUDIO-OUT
RGB
S-VHS-OUT
RL
EURO-AV2
Page 42
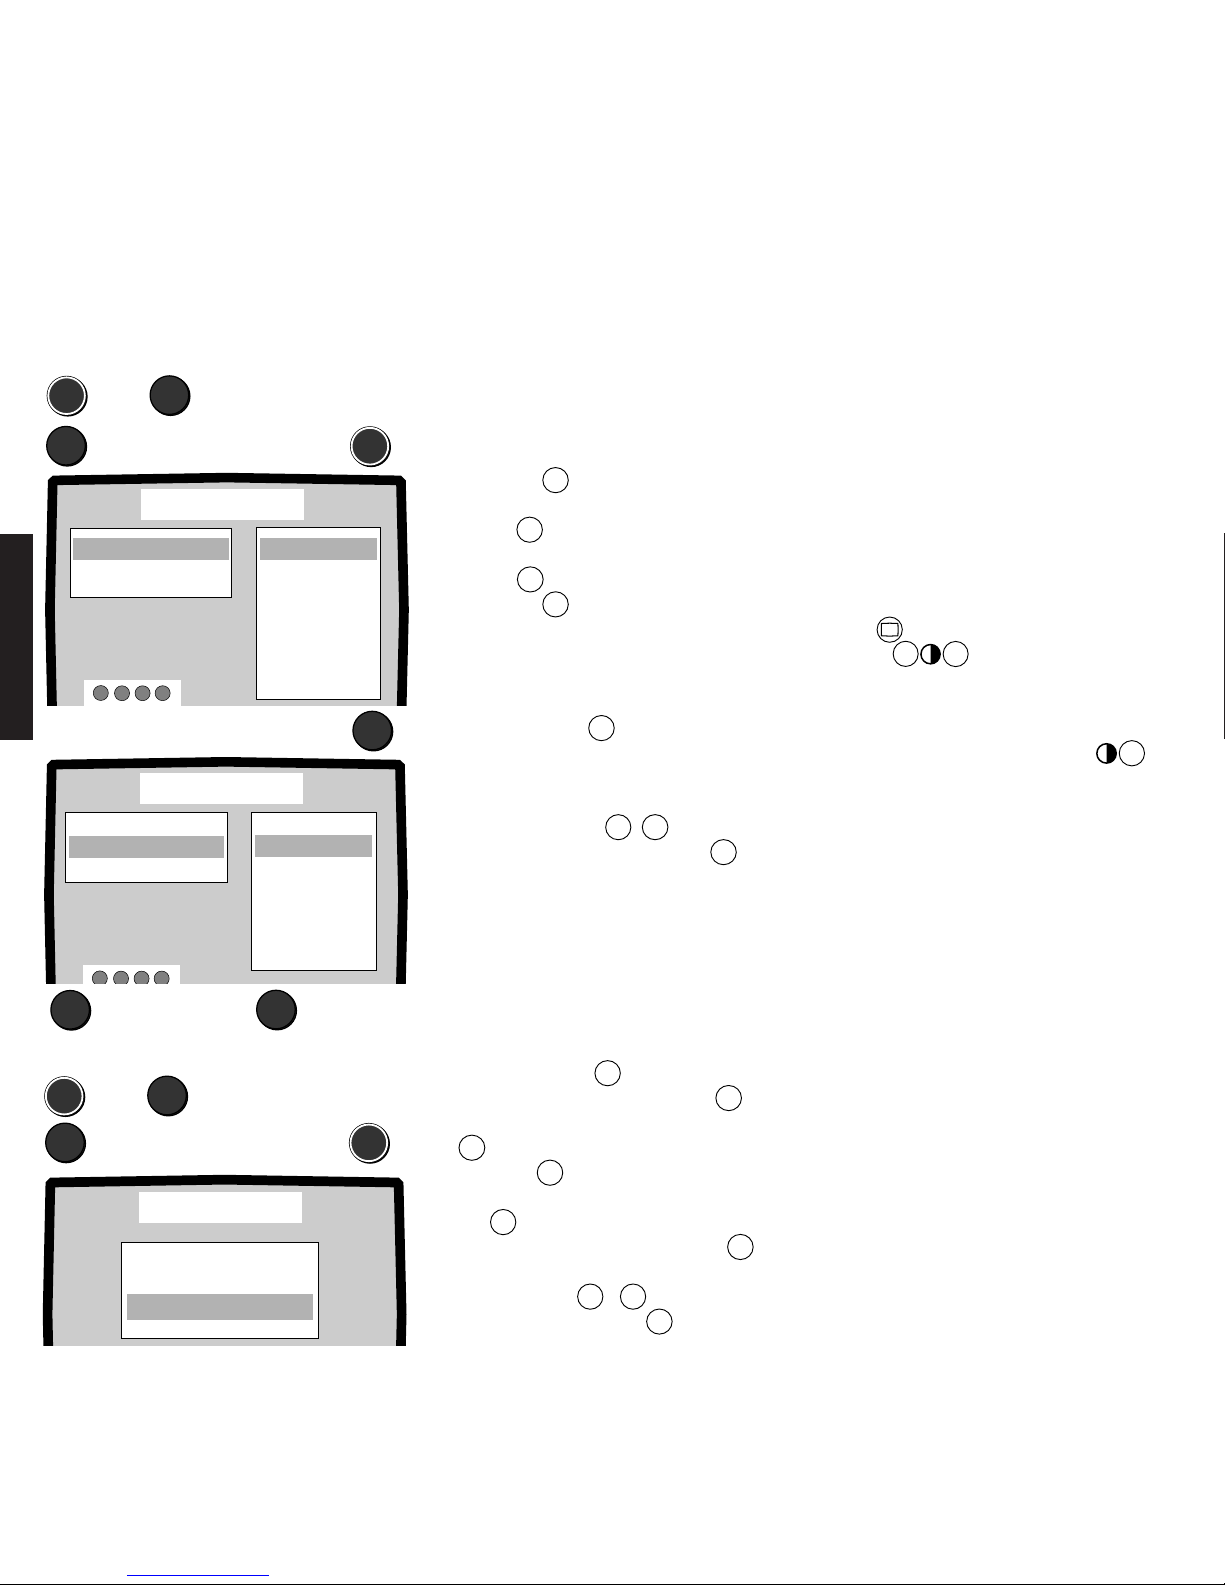
92
English
Connecting other equipment – selecting video equipment
Which audio/video equipment can you connect to the EURO-AV sockets or the
S-Video socket?
Call the „Video - Installation“ menu. You will be given a view of the connectable
equipment or signal types for every video connecting socket.
You can connect up to three audio/video units for the three AV connections.
Selecting socket and signal type:
Call the menu:
1. Press the
MEN
button.
2. Select the „Video“ line with the blue
button ▼.
3. Select „Installation“ with the yellow
button ▼.
4. Press the
MEN
button.
If „AV 1“ is marked in blue, you can view
the list of connectable equipment.
5. Select the EURO-AV socket to which you
want to connect an audio/video unit with
the blue button ▼.
6. Select the signal type, e.g. for SVHS
video recorders signal type Y/C or for
VHS recorders signal type FBAS, with
the yellow button
▼
▲
.
7. Exit the menu by pressing the
TV
button, the settings are then stored.
The additional „S“ means these units have a
Y/C output and transmit the signal in SVideo. When connecting a Photo CD unit
simply select the signal type „Photo CD S“
to obtain the best picture quality. Select
<Photo CD> with the Picture functions
button . Set <Photo CD on> with the
buttons
–
+
. You can also increase
the sharpness of the picture. We also recommend that you select the <S-Contrast>
setting especially for freezes, this is how you
do it: Keep the Contrast button
+
pressed until <S-Contrast> is displayed.
The RGB signal type, i.e. the signals red,
green and blue, can only be selected for the
EURO-AV socket 1 (AV1).
A Pay-TV decoder, e.g. for the Première
program, can be connected to the EURO-AV
socket 1 or 2.
MEN
➪
▼
Select „Video“
▼
Select „Installation“
➪
MEN
Installation
▲
M
▲
AV2: VHS / 8 mm
AVS: VHS / 8 mm
AV1: VHS / 8 mm
SVHS / Hi 8
Photo CD
Photo CD S
Laser Disk
Laser Disk S
Receiver
Receiver S
Decoder
RGB
VHS / 8 mm
or: EURO-AV socket 2, AV 2:
▼
Installation
▲
M
▲
AV1: VHS / 8 mm
AVS: SVHS / Hi 8
AV2: SVHS / Hi 8
VHS / 8 mm
Photo CD
Photo CD S
Laser Disk
Laser Disk S
Receiver
Receiver S
Decoder
SVHS / Hi 8
▼
TV
Setting mono/stereo VTR and AV sound:
MEN
➪
▼
Select „TV setup“
▼
MEN
Volume corr. O
Colour corr. O
Signal Cinch variable
AV Sound Sound 1
VTR Stereo
Special functions
Select „Special functions“
Setting mono or stereo video recorders and selecting sound for 2 Sound
To record the TV sound, select whether a mono or stereo video recorder is connected
and which sound you want to record in the case of 2 Sound broadcasts.
1. Call the „TV setup - Special functions“
menu. Press the
MEN
button.
2. Select the „TV setup“ line with▼.
3. Select the „Special functions“ line with
▼
.
4. Press the
MEN
button, select the „VTR“
line and set „Mono“ or „Stereo“ with
the
X
button.
5. Select the „AV sound“ line with▼.
6. Set „Sound 1“, „Sound 2“ or „Sound
1+2“ with the
+ –
buttons.
7. End programming withTV.
Select signal type End
For Sound 1+2, sound 1 is on the left and
sound 2 on the right cinch socket. Both
sounds are transmitted through the EUROAV socket.
It is advisable to set sound 1 (main sound)
or sound 2 (foreign language) for a mono
recorder because both languages will be
recorded simultaneously with sound 1+2.
Page 43
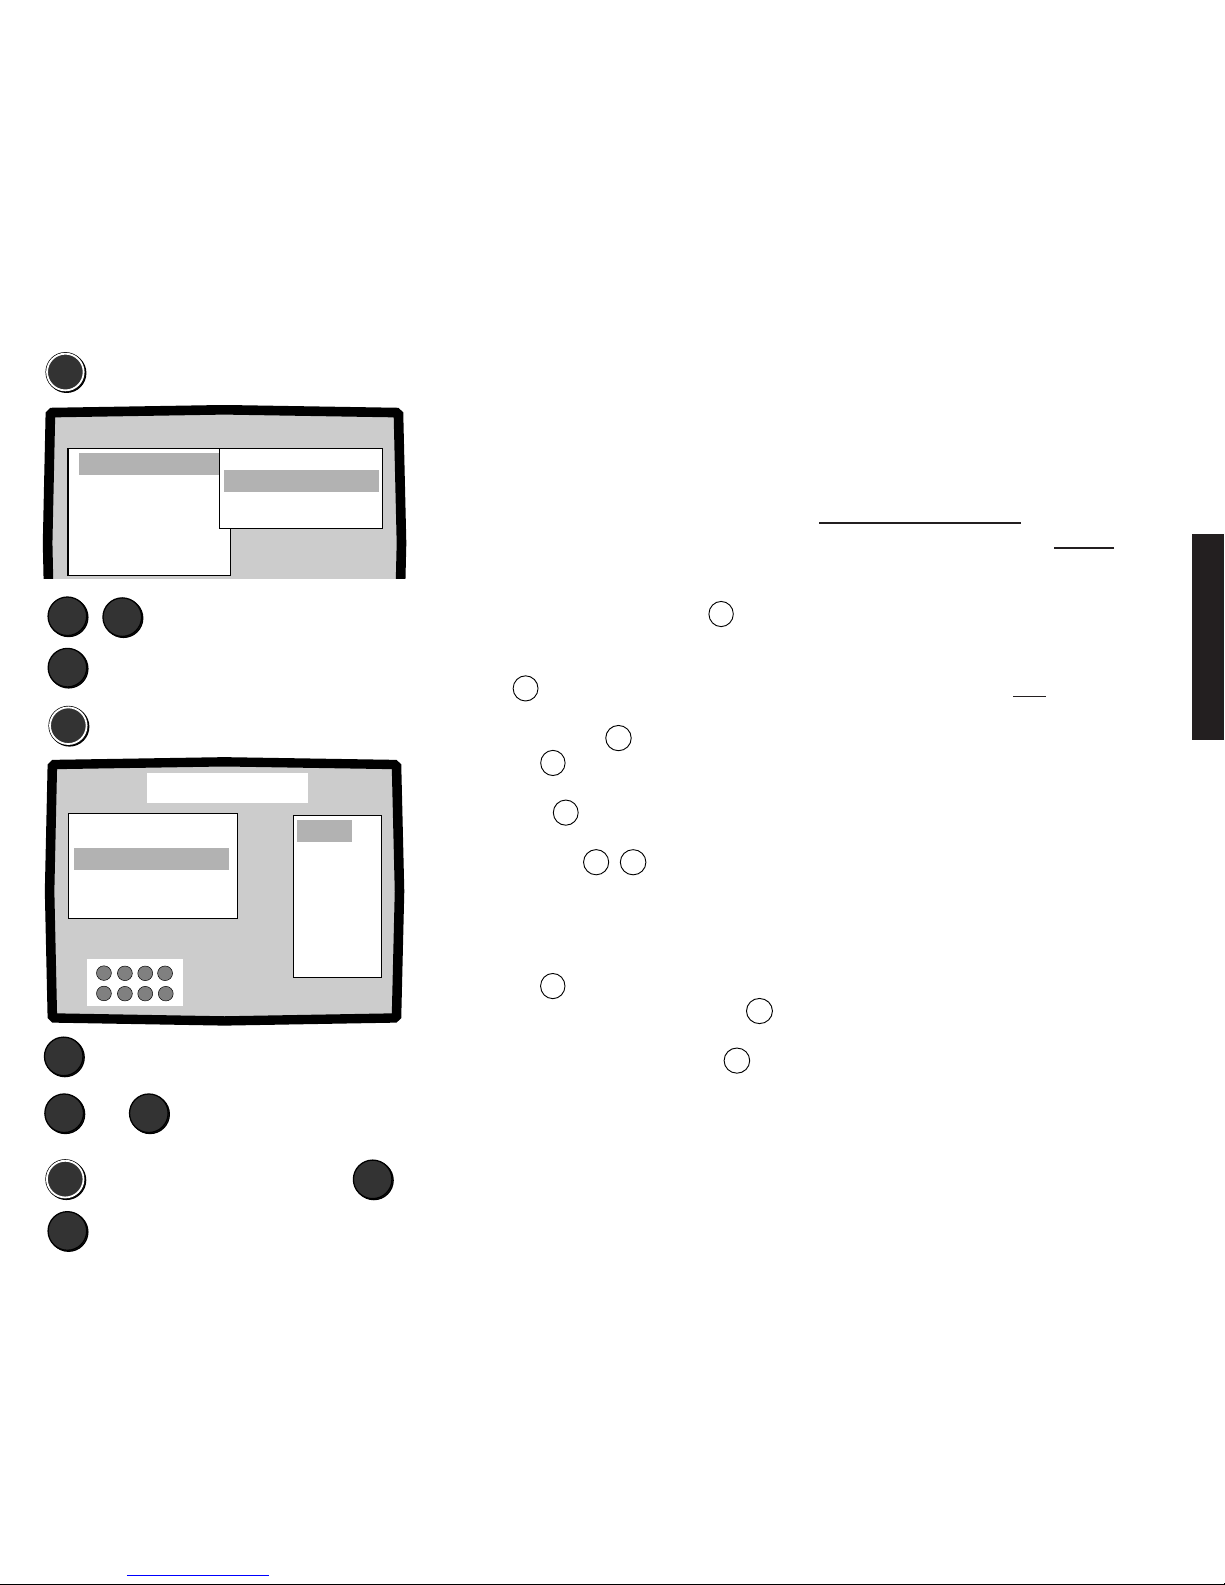
93
English
Connecting other equipment – Pay-TV decoder
Press briefly
MEN
▲
▼
Select „Search and store“ line
Select „Station“ line
▼
MEN
Press
Video
Timer functions
Child lock
TV setup
GB F I E NL DK S
Information
Station
Auto programming
Change name
Sort
Search and store
▲
▼
M
Search and store
AV Source ---
▲
▼
Channel V/UHF O8
Storage O24
Name RTL 2
Fine O
Norm Auto.-BG
AV1
AV2
AV1!
AV2!
AV1/Dec.
AV2/Dec.
AV1/Dec.!
AV2/Dec.!
AVS!
---
TV
MEN
End setting
X
To „Storage“
➪
▼
or Select AV1/Dec or
AV1/Dec!
▲
Select „AV Source“
Connecting possibilities:
1. Connect video recorders without
decoder AV socket to EURO-AV socket
2, the Pay TV decoder to EURO-AV
socket 1 of the TV set. This has the
advantage that you can also play back
recordings through this socket.
2. For video recorders with decoder AV
socket, connect the Pay TV decoder to
this socket. Connect the other AV socket
of the video recorder to the EURO-AV
socket 1 of the TV set.
Connecting and setting Pay TV decoder
To set up and connect a Pay-TV decoder, e.g. for Premiere, please see the decoders
instructions for use. Connect the connecting cable (AV/Scart cable) to the EURO-AV
socket 1 on the back of the TV set. The Pay-TV decoder can also display the subscription
information (RGB signals) through this socket.
Make sure that the decoder is switched on (green pilot lamp on the Premiere decoder)
and the decoder key is inserted.
Settings for Pay TV decoder:
Select the number of the program on the
TV set at which the Premiere station is
stored. If you can only see a coded picture,
proceed as follows.
1. Call the menu by pressing the
MEN
button.
2. Mark the Station line with the blue
button▲.
3. Select the Search and store line with
the yellow button ▼.
4. Press the
MEN
button.
5. Mark the line AV source —- with the
blue button▼.
6. Select the line „AV1/Dec“ with the
yellow buttons
▼
▲
if the Premiere
decoder applies a 12 V switching
voltage to the EURO-AV socket. For a
decoder without switching voltage,
select „AV1/Dec.!“.
7. Press the
MEN
key, Store is marked blue.
8. Store the settings by pressing the
X
button.
9. Clear the menu by pressing the
TV
button.
The settings are now stored for this
program place, even when you switch the
set off and back on with the on/off switch.
▼
Page 44
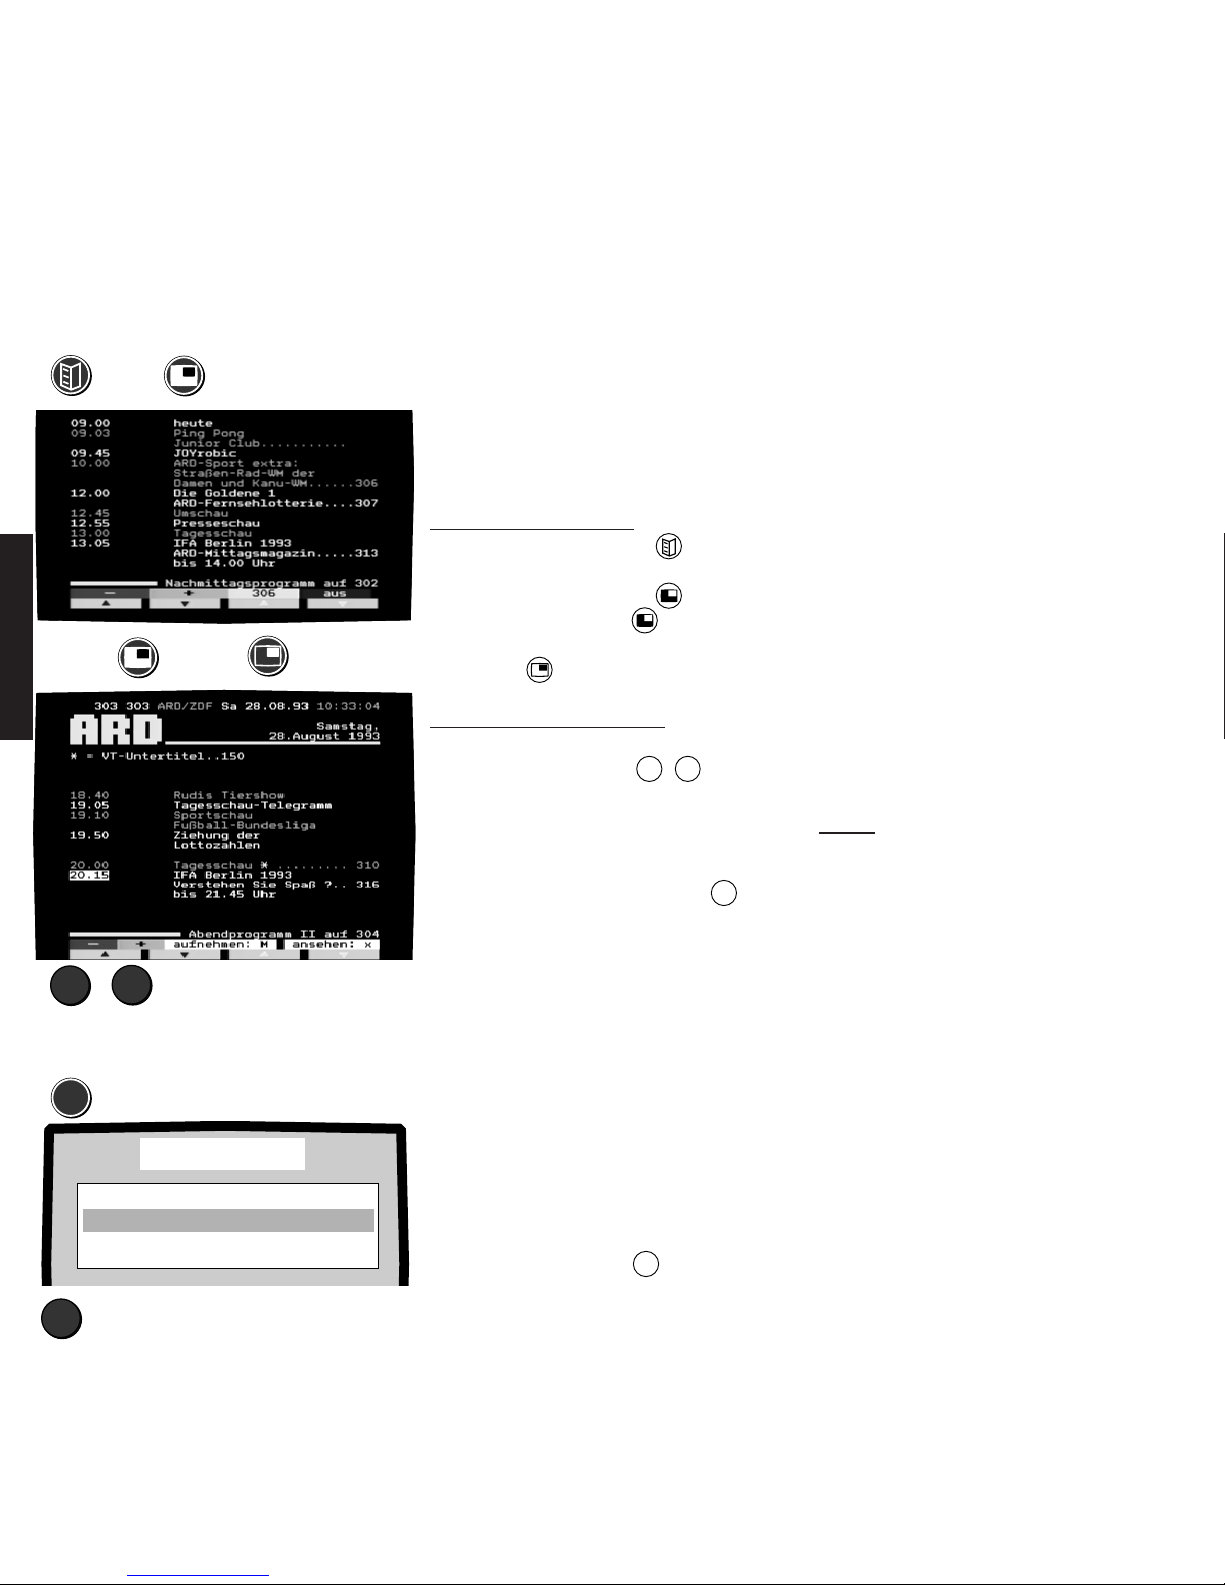
94
English
Connecting other equipment – Timer recording
Calling the program preview:
➪
Page forwards backwards
▲
Transfer recording data to the VCR
programming:
MEN
Select recording time
▼
VCR programming
Program
Start Stop Date
VPS
AV
--- --:-- --:-- --.-- --- -
--- --:-- --:-- --.-- --- -
1 ARD 2O:15 21:45 28.O8 on 1
VCR programming
From the program preview pages, you can select the data: program, date, start time and
stop time for a certain broadcast and transfer these data into a „VCR programming“ table.
Three VCR programming tables are available. A Loewe video recorder connected to the
EURO-AV socket can then record this broadcast on timer control. In this way you can also
record satellite programs comfortably from the satellite receiver unit of the TV with your
Loewe video recorder.
Calling the preview page
Press the TV guide button .
The current program preview appears on
pressing the green button .
Press the green button again to turn to
the next preview page. Turn back with the
red button .
Transferring recording data:
1. Select the start time of the broadcast
with the blue buttons
▼
▲
.
<record: M>
appears at the bottom of the picture.
2. As long as this display is visible, you can
transfer the data to the VCR
programming by pressing the
MEN
button. Note: If you have chosen a
station without TOP teletext
transmission, it may not be possible to
read the time or date or both. If you try
to transfer timer data in this case,
„Timing functions - date or time“
appears. Enter the missing data
otherwise no accurate timer recording is
possible! Take any time differences into
account for foreign stations and correct
the start time, e.g. in the recording
timer.
3. Depending on which EURO-AV socket the
video recorder is connected to, set 1 or
2 for <AV> with the
–
button.
Preparing the video recorder for
recording
Check that the video recorder is connected
to the TV set with an AV cable.
1. Insert a blank tape.
2. Set the video recorder to AV mode
(AUX).
3. Set the „Remote“ switch on the video
recorder to TV so that the recorder can
be operated with the TV remote control.
4. Switch the recorder to standby.
Notes:
1. This can only be controlled in a Loewe
video recorder which has a „Remote
VTR-TV“ circuit.
2. Make sure the timer times do not
overlap. You can only make one timer
recording at a time, never several
simultaneously.
–
Select EURO-AV socket AV 1 or
AV 2
Page 45

95
English
Connecting other equipment - Timer recording
4. The VCR programming is not stored as
long as data are flashing!
If you have connected two video
recorders to the EURO-AV sockets, you
can set AV 1 for one timer and AV 2 for
the next timer. In this way you can
decide which recorder is to record.
5. Store the timer data by pressing the
X
button and select the next timer
line with the blue buttons
▼
▲
or
fade out the timer with the TV button.
Timer data - change, enter manually
or delete
When you press the + button, the
program name and program number start
flashing. If you press this button several
times you come to start and stop time,
date, VPS or AV connection. You can set
each position as it flashes. Enter the date,
time or program number with the number
buttons.
Set VPS to „VPS on“ or „VPS off“ with the
–
button. When you have entered all the
desired data, store these by pressing the
X
button. Select the next timer with the
blue button ▼ and enter the recording
data etc.
Entering timer data manually:
Select the blank timer with the blue arrow
buttons. The „Program no.“ position
flashes, enter the appropriate program
number. When you have entered all the
data, store them by pressing the
X
button. Shift the position for input or
correction within a timer line with
the+button.
Store timer data
X
Attention!
If timer recordings are programmed, the TV
set may on no account be switched off at
the on/off button, otherwise the timer data
will be lost. If you switch your TV set to
standby with the remote control. This is
signalled by the red and green lamps on
the TV set’s local operating panel for VPS
search (approx. 1 hour before recording)
and during recording.
Note: On „VPS On“, your video recorder
will be controlled by the VPS times
transmitted by the station. If you set „VPS
Off“, the video recorder will record with the
data set in your VCR programming.
Make sure you have set the correct date
and time on your TV set! You can get the
VPS times from the program preview by
pressing the?button.
Broadcasts with VPS may start earlier or
later, the TV set therefore searches for the
VPS information before the start time. If you
are watching a TV program, the TV set
switches over to the program to be
recorded about 10 minutes before
recording is due to begin. The message
„Video recording“ is displayed. It is now
no longer possible to switch over to
another program unless your TV is fitted
with a satellite tuner. For example you can
watch a terrestrial program while recording
a satellite program.
Programming for recording series:
Enter the program number, start and stop
time as usual. Enter the day of the week (1
= Monday - 7 = Sunday) instead of the date
and always 00 for the month.
Examples:
Daily series = 17.00,
sundays only = 77.00
saturdays and sundays only = 67.00,
daily monday to friday = 15.00.
▲
▼
M
Position
+
Entry
O-9
VCR programming
X
+
–
Store
X
Program
Start Stop Date
VPS
AV
--- --:-- --:-- --.-- --- -
--- --:-- --:-- --.-- --- -
1 ARD 2O:15 21:45 28.O8 on 1
On/Off
-
Selecting the VCR programming:
MEN
➪
▼
Select „Video“
▼
Select „VCR programming“
+
Select input position
Enter data with the number buttons
VPS or AV with button
MEN
–
select
X
store
▼
Select timer
➪
VCR programming
Program
Start Stop Date
VPS
AV
1 ARD 2O:15 21:45 28.O8 on 1
--- --:-- --:-- --.-- --- -
3 BR 3 21:15 22:OO 29.O8 on 2
Page 46

96
English
Deleting the VCR programming:
1. Select the programming to be deleted
with the blue button ▼.
2. Press the + button, the program
name and program number flash.
3. Press the
–
button, the timer data
are deleted.
▼
+
➪
–
Connecting other equipment – deleting timer/operating the video recor der
Operating the video recorder:
Call the menu
MEN
▼
➪
▼
Operating the video recorder
Loewe video recorders connected to the EURO AV socket 1 or 2 can be operated with the
TV remote control. Use the coloured buttons and the row of buttons underneath them with
the user menu ‘Video recording/Play’ set. You can select any video recorder and operate
the most important functions. The following functions are possible: Switch video recorder
on/off (On/Off), Record or Play, FF (>>) or Rewind (<<), Stop, Pause and AUX.
In this way you can control copying from the recorder at socket 1 to the recorder at
socket 2 for example (see also the information on the copying path on the next page).
Program
Start Stop Date
VPS
AV
--- --:-- --:-- --.-- --- -
--- --:-- --:-- --.-- --- -
--- --:-- --:-- --.-- --- -
VCR Programming
AV2: Stop
AV1: Stop
<< Stop Play >>
On/Off
Record
Pause AUX
i
▲
▼
Select timer
Delete timer
Select „Video“
Select „Record/playback“
Set recorder to AV 1 or AV 2
The timer data are deleted automatically if
the timer time has already expired.
1. Call the menu by pressing the
MEN
button.
2. Select „Video“ with the blue button
▼
.
3. The „Record/playback“ line must be
marked in yellow, mark it with the yellow
button if necessary.
4. Press the
MEN
button, the menu
appears.
Select the EURO-AV socket and thus the
video recorder which you want to control,
with the blue buttons
▼
▲
.
If you switch the recorder at AV 1 for
example to play with the button and
the recorder at AV 2 to record with the
button, you will copy from AV 1 to AV 2.
Exit the menu by pressing the
TV
button.
Note:
If you have a Loewe VCR, set the ”Remote”
switch, if available, to TV to enable the VCR
to be controlled with the TV remote control.
Set the video recorder to AV mode (AUX).
You can now control the video recorder
with the coloured buttons and the buttons
below them.
Please note: The buttons should only be
pressed briefly.
You can use the TV as a monitor during
copying or you can watch a TV program.
Page 47
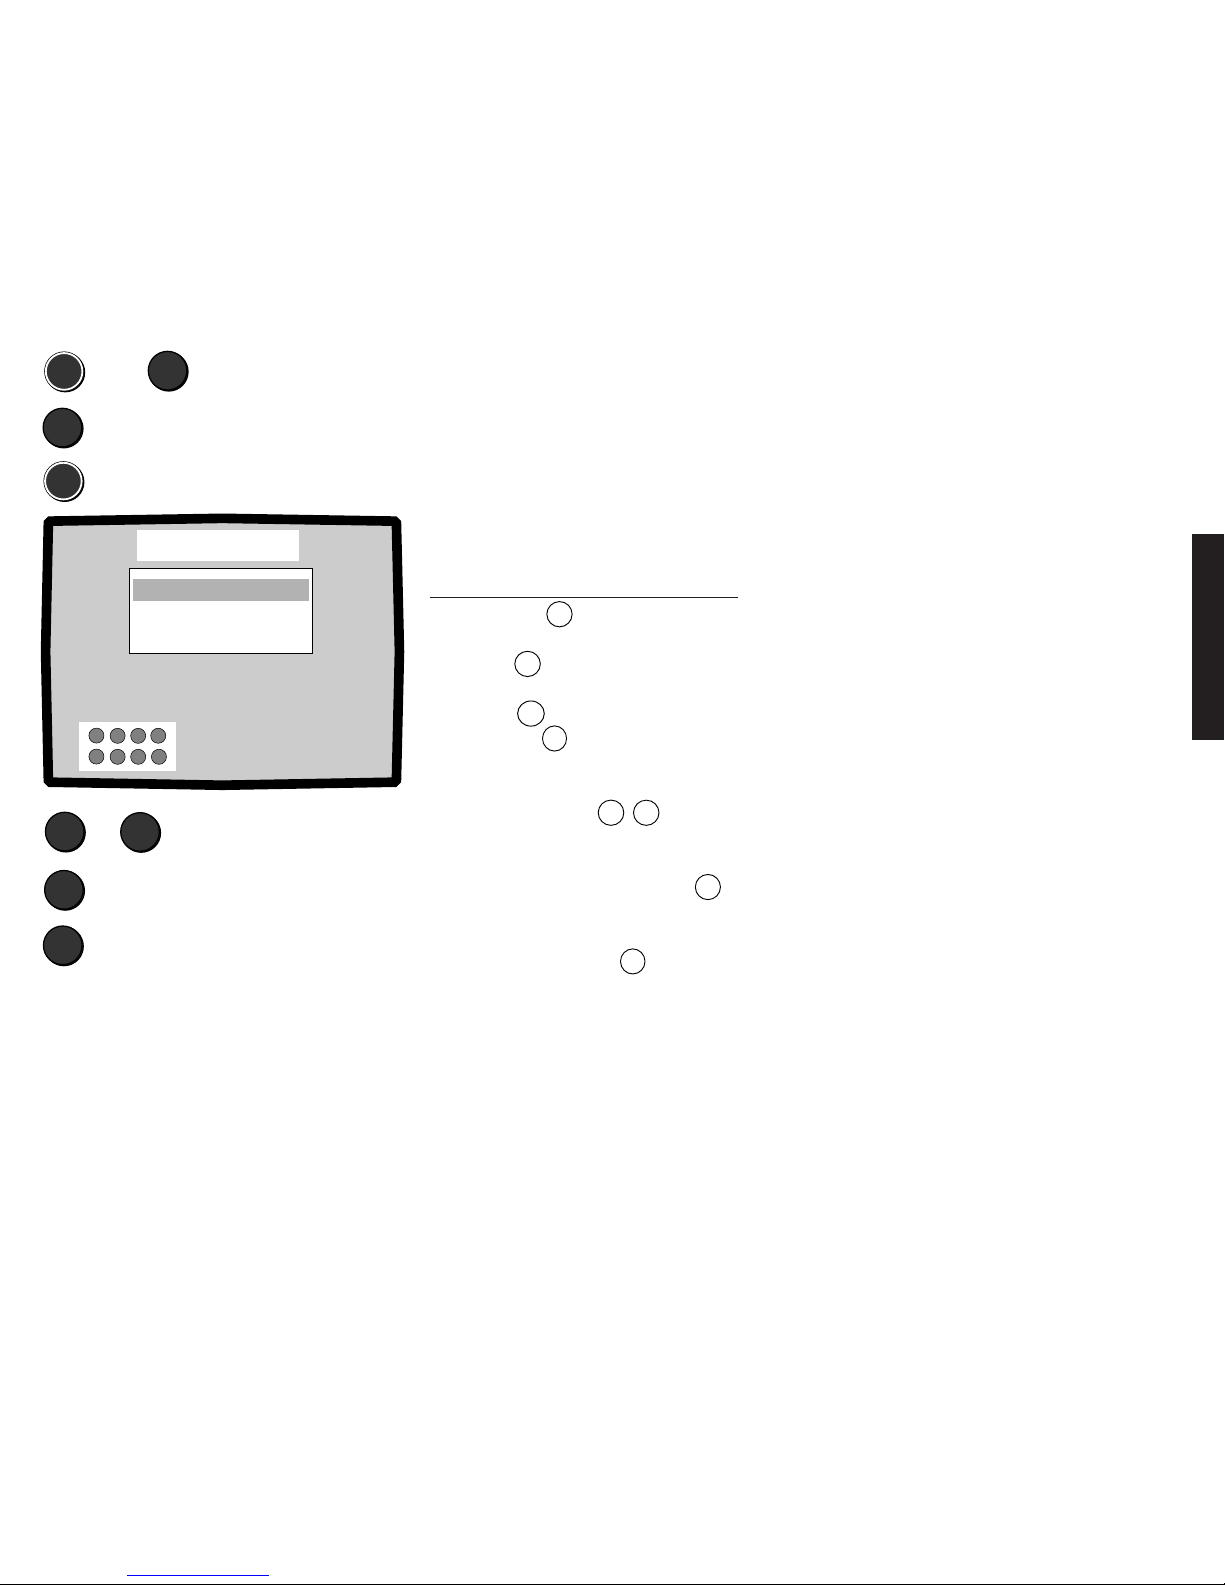
97
English
Connecting other equipment – copying
Copying functions
The „Copy functions“ menu allows you to set up the copying direction. This saves you
changing over the plugs on the connected equipment.
For example: Copying from the EURO-AV socket 1 to EURO-AV socket 2 or from the front
socket „S-TERMINAL“/„AVS“ or the cinch socket „Video in“ to AV 1 etc.(AVS not available
in model Profil 2570Z).
Calling the „Copy functions“ menu:
MEN
▼
▼
MEN
▲
▼
X
TV
AV2 -> AV1 off
AVS -> AV1 off
AVS -> AV2 off
AV1 -> AV2 Off
Copy functions
▲
▼
M
X
Select copy direction
Copy On or Off
Exit menu
➪
Select „Video“
Select „Copy functions“
Copying possibilities
VHS recorders and 8 mm camcorders transmit CVBS
signals through the video out socket (EURO-AV or
cinch). SVHS or Hi8 video recorders transmit Y/C
signals or CVBS signals depending on the setting.
The following copying modes are possible depending
on the equipment available:
From EURO-AV socket 1 to 2:
1. SVHS/Hi8 recorder → SVHS/Hi8 recorder (e.g. if
there is no ”S-TERMINAL”/”AVS” front socket!)
2. SVHS/Hi8 recorder → VHS/8mm recorder (signal
is converted)
3. VHS/8mm recorder → VHS/8mm recorder
From EURO-AV socket 2 to 1:
1. VHS/8mm recorder → VHS/8mm recorder
2. SVHS/Hi8 recorder → VHS/8mm recorder (signal
is converted)
The following copying modes are possible from the
front socket (S-TERMINAL/AVS):
1. SVHS/Hi8 recorder → EURO-AV socket 2
→ SVHS/Hi8 recorder
2. SVHS/Hi8 recorder → EURO-AV socket 1
→ VHS/8 mm recorder (signal is converted)
3. VHS/8mm recorder → EURO-AV socket 2
→ VHS/8mm recorder
4. SVHS/Hi8 recorder → EURO-AV socket 1
→ VHS/8mm recorder (signal is converted)
5. VHS/8mm recorder → EURO-AV socket 1
→ VHS/8mm recorder
The following copying modes are possible from the
cinch socket ”Video In”:
1. VHS/8mm recorder → EURO-AV socket 1
→ VHS/8mm recorder
2. VHS/8mm recorder → EURO-AV socket 2
→ VHS/8mm recorder
First set the equipment connected to the
sockets as described on page 92 to
determine whether and how the signal is to
be converted.
Call the „Copying functions“ menu:
1. Press the
MEN
button.
2. Select the „Video“ line with the blue
button ▼.
3. Select „Copy functions“ with the yellow
button ▼.
4. Press the
MEN
button.
5. Select the copying direction, e.g. EUROAV socket 1 to EURO-AV socket 2 with
the blue buttons
▲
▼
.
6. Switch on the copying direction, e.g.
„AV 1 > AV 2 On“ or off with the setting
„AV 1 > AV 2 Off“ with the X button.
You can watch what you are copying as
long as the menu is visible. If you exit the
menu by pressing the TV button, copying
continues and you can watch a TV program
of your choice.
Copying to EURO-AV 1 or EURO AV
2 or both sockets is possible from the front
socket AVS.
Page 48

98
English
Cleaning
It is best to clean the housing of the TV set
and the remote control with a cloth soaked
in a little plastic cleaner.
Clean the screen with a window cleaning
fluid. Sets with a contrast filter on the inside
too from time to time.
Cleaning petrol, furniture polish or cleaners
containing abrasives should not be used as
these may damage the varnish and printing.
 Loading...