

Page 1
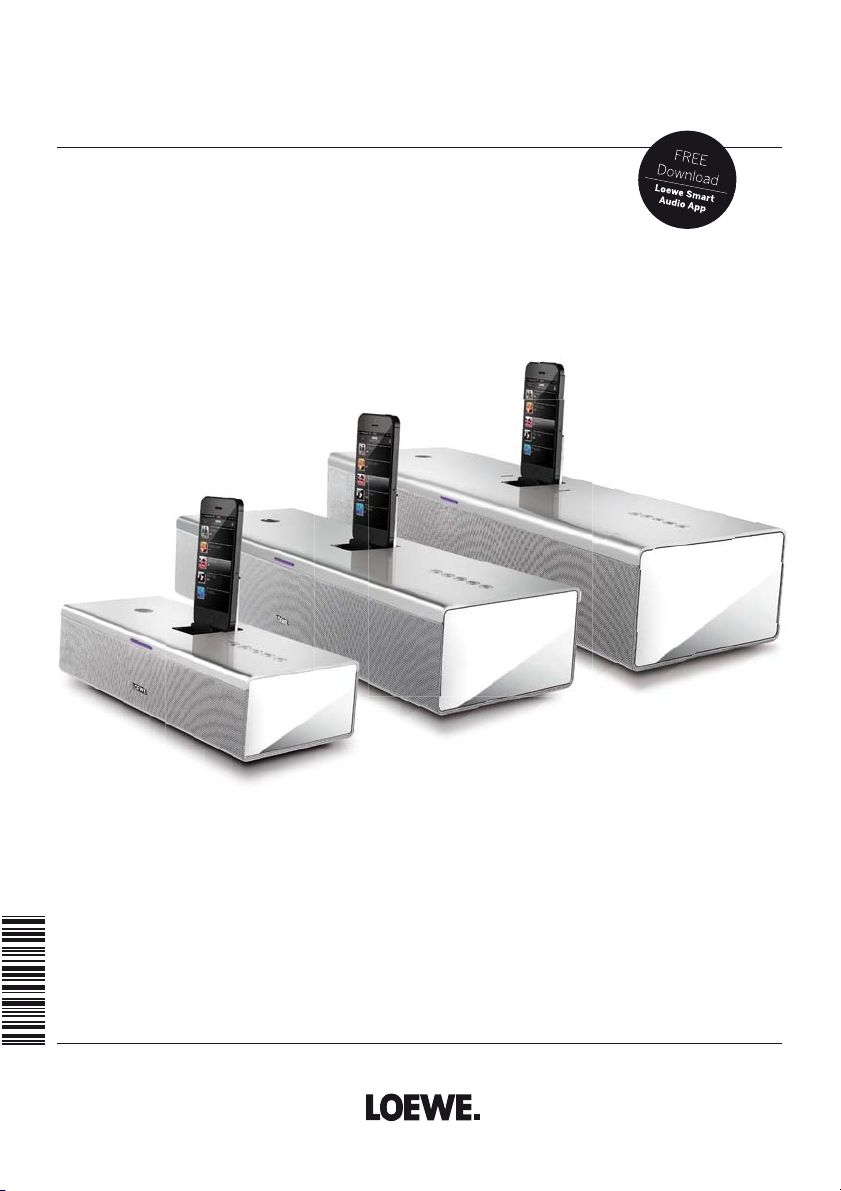
Audiodesign
SoundPort
SoundPort Compact
SoundPort Mini
35246002
Bedienungsanleitung, Operating instructions, Mode d‘emploi,
Istruzioni per l‘uso, Instrucciones de manejo, Gebruiksaanwijzing,
Betjeningsvejledning, Käyttöohje, Bruksanvisning
Page 2
Page 3

SoundPort / SoundPort Compact / SoundPort Mini
Bedienungsanleitung
Inhaltsverzeichnis
Herzlich willkommen .......................................................................................................................................4
Zu Ihrer Sicherheit ...........................................................................................................................................5
Bedienelemente ............................................................................................................................................... 7
Anschlüsse ......................................................................................................................................................8
Inbetriebnahme ...............................................................................................................................................9
Einschalten / Ausschalten ............................................................................................................................ 10
Audio-Quelle laden ........................................................................................................................................ 10
Quellenwahl .....................................................................................................................................................11
Klangeinstellungen ........................................................................................................................................ 12
Kabelverbindung.............................................................................................................................................13
Lightning Connector .......................................................................................................................................14
Bluetooth-Kopplung ...................................................................................................................................... 16
USB-Audio ...................................................................................................................................................... 18
PC-Audio ......................................................................................................................................................... 19
Sync ................................................................................................................................................................20
Audio-Wiedergabe / Einstellen der Lautstärke ........................................................................................... 21
Freisprech-Funktion ....................................................................................................................................... 22
Smart Standby-Modus und Standby-Modus ..............................................................................................23
Deutsch
Zubehör ..........................................................................................................................................................24
Unterstützte iDevices ....................................................................................................................................26
Verwendbare Fernbedienungsvarianten ......................................................................................................26
Technische Daten ..........................................................................................................................................27
Schutz der Umwelt ........................................................................................................................................ 28
Konformitätserklärung ..................................................................................................................................28
Rechtliche Hinweise ......................................................................................................................................29
Impressum .....................................................................................................................................................29
3
Page 4

SoundPort / SoundPort Compact / SoundPort Mini
Bedienungsanleitung
Herzlich willkommen
Vielen Dank,
dass Sie sich für ein Loewe Produkt entschieden haben!
Deutsch
Mit Loewe verbinden wir höchste Ansprüche an Technik, Design und Bedienerfreundlichkeit. Dies gilt
für TV, Video, Audio und Zubehör gleichermaßen. Dabei sollen weder die Technik noch das Design einen
Selbstzweck erfüllen, sondern unseren Kunden einen höchstmöglichen Seh- und Hörgenuss vermitteln.
Auch beim Design haben wir uns nicht von kurzfristigen, modischen Trends leiten lassen. Denn schließlich
haben Sie ein hochqualitatives Gerät erworben, an dem Sie sich auch morgen und übermorgen nicht
sattsehen sollen.
Lieferumfang
• SoundPort bzw. SoundPort Compact bzw. SoundPort Mini
• Netzkabel
• Audiokabel, 3,5mm Klinke
• USB-Kabel (Typ A–B)
• Diese Bedienungsanleitung
Leistungsmerkmale
Anschlussmöglichkeiten
Bluetooth 2.1 + EDR
Connectivity Easy Pairing (zur Verbindung mit NFC-fähigen Geräten)
Apple Lightning Connector
AUDIO IN (3,5 mm Stereo Audio-Eingang)
USB A (USB Streaming / Laden angeschlossener Audio-Quellen)
USB B (USB Speaker / Sync)
Kopfhörer-Anschlussbuche (3,5 mm Stereo Audio-Ausgang)
Wiedergabefunktionen
Unterstützung der Audio-Codecs (aptX, SBC)
Bluetooth-Freisprecheinrichtung
Zu dieser Bedienungsanleitung
Die Informationen in dieser Anleitung beziehen sich auf die Loewe Produkte SoundPort (Art.Nr.
52227x00), SoundPort Compact (Art.Nr. 52228x00), SoundPort Mini (Art.Nr. 52229x00).
In der Bedienungsanleitung wird der Begriff SoundPort als Sammelbegriff für alle drei SoundPort-Geräte-
varianten verwendet. Für den Fall, dass Unterschiede in der Verwendung / Bedienung der Gerätevarianten
vorliegen, wird jede SoundPort-Gerätevariante gesondert beschrieben.
In der Bedienungsanleitung wird der Begriff iDevices als Sammelbegriff für die Apple Geräte iPhone,
iPad, iPad mini und iPod verwendet.
Im Interesse einer sicheren und langfristig störungsfreien Benutzung des Gerätes lesen Sie bitte vor
Inbetriebnahme das Kapitel Zu Ihrer Sicherheit (siehe Seite 5).
4
Page 5
SoundPort / SoundPort Compact / SoundPort Mini
Bedienungsanleitung
Zu Ihrer Sicherheit
Zu Ihrer eigenen Sicherheit und um unnötigen Schaden von Ihrem Gerät abzuwenden, lesen
und beachten Sie die nachfolgenden Sicherheitshinweise:
Bestimmungsgemäßer Gebrauch und Umgebungsbedingungen
Dieses Gerät ist ausschließlich für die Wiedergabe von Tonsignalen bestimmt. Es darf nicht in Räumen
mit hoher Luftfeuchtigkeit (z.B. Bad, Sauna) oder hoher Staubkonzentration betrieben werden. Die
Garantie wird nur für den Gebrauch in der genannten zulässigen Umgebung gewährt.
Wird das Gerät im Freien benutzt, sorgen Sie dafür, dass es vor Feuchtigkeit (Regen, Tropf- und Spritzwasser oder Betauung) geschützt ist. Hohe Feuchtigkeit und Staubkonzentrationen führen zu Kriechströmen
im Gerät. Dies kann zu Berührungsgefahr mit Spannungen oder einem Brand führen.
Haben Sie das Gerät aus der Kälte in eine warme Umgebung
gebracht, lassen Sie es wegen der möglichen Bildung von
Kondensfeuchtigkeit ca. eine Stunde ausgeschaltet stehen.
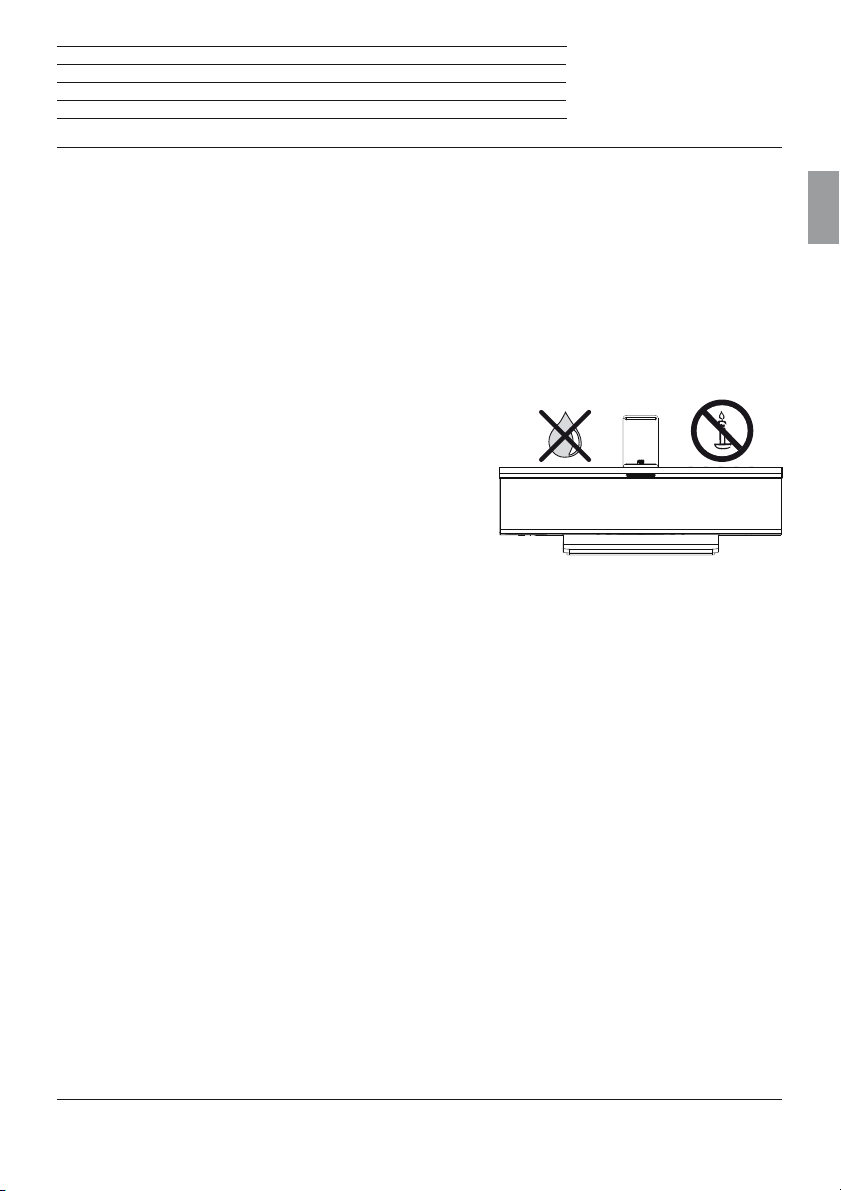
Stellen Sie keine mit Flüssigkeit gefüllten Gegenstände auf
das Gerät. Schützen Sie das Gerät vor Tropf- und Spritzwasser.
Kerzen und andere offene Flammen müssen zu jeder Zeit
vom Gerät ferngehalten werden, um das Ausbreiten von Feuer
zu verhindern.
Stellen Sie das Gerät nicht an einen Ort, an dem es zu Erschütterungen kommen kann. Dies kann zu
Materialüberlastung führen.
Deutsch
Stromversorgung
Falsche Spannungen können das Gerät beschädigen. Dieses Gerät darf nur an ein Stromversorgungs-
netz mit der auf dem Typenschild angegebenen Spannung und Frequenz mittels beigefügtem Netzkabel
angeschlossen werden. Der Netzstecker des Gerätes muss leicht erreichbar sein, damit das Gerät je-
derzeit vom Netz getrennt werden kann. Wenn Sie den Netzstecker abziehen, nicht am Kabel ziehen,
sondern am Steckergehäuse.
Verlegen Sie das Netzkabel so, dass es nicht beschädigt werden kann. Das Anschlusskabel darf nicht
geknickt oder über scharfe Kanten verlegt, nicht begangen und keinen Chemikalien ausgesetzt werden;
Letzteres gilt für das gesamte Gerät. Ein Netzkabel mit beschädigter Isolation kann zu Stromschlägen
führen und stellt eine Brandgefahr dar.
Beaufsichtigung
Lassen Sie Kinder nicht unbeaufsichtigt am Gerät hantieren und nicht im unmittelbaren Umfeld des
Gerätes spielen. Das Gerät könnte umgestoßen, verschoben oder von der Standfläche heruntergezogen
werden und Personen verletzen. Lassen Sie das eingeschaltete Gerät nicht unbeaufsichtigt laufen.
5
Page 6

SoundPort / SoundPort Compact / SoundPort Mini
Bedienungsanleitung
Zu Ihrer Sicherheit
Luftzirkulation und hohe Temperaturen
Seitlich und oben müssen mindestens je 3 cm freier Raum für die Luftzirkulation sichergestellt werden, wenn
das Gerät in einen Schrank oder ein Regal gestellt wird.
Deutsch
Wie jedes elektronische Gerät benötigt Ihr Gerät Luft zur Kühlung. Wird die Luftzirkulation behindert,
kann es zu Bränden kommen.
Vermeiden Sie, dass Metallteile, Nadeln, Büroklammern, Flüssigkeiten, Wachs oder Ähnliches durch
die Öffnungen der Geräteabdeckungen ins Geräteinnere gelangen. Das führt zu Kurzschlüssen im
Gerät und damit möglicherweise zu einem Brand.
Sollte doch einmal etwas ins Geräteinnere gelangen, sofort den Netzstecker des Gerätes abziehen und
zur Überprüfung den Kundendienst verständigen.
Aufstellung
Stellen Sie das Gerät nur auf eine ebene, standfeste, waagrechte Unterlage. Das Gerät sollte insbe-
sondere bei Aufstellung in oder auf Möbeln vorne und seitlich nicht herausragen.
Stellen Sie das Gerät so auf, dass es keiner direkten Sonneneinstrahlung und keiner zusätzlichen Er-
wärmung durch Heizkörper ausgesetzt ist.
Lautstärke
Laute Musik kann zu Gehörschäden führen. Vermeiden Sie extreme Lautstärken, insbesondere über längere Zeiträume.
Stellen Sie sicher, dass die Lautstärke am Gerät heruntergeregelt oder das Gerät ausgeschaltet ist, bevor Sie den Raum verlassen.
Gewitter
Bei Gewitter ziehen Sie den Netzstecker und alle angeschlossenen Leitungen am Gerät ab. Überspan-
nungen durch Blitzeinschlag können das Gerät über das Stromnetz beschädigen. Auch bei längerer
Abwesenheit sollten der Netzstecker und alle angeschlossenen Leitungen am Gerät abgezogen werden.
Reparaturen und Zubehör
Achtung: Öffnen oder entfernen Sie unter keinen Umständen die Gehäuseabdeckungen,
da Sie andernfalls mit gefährlichen elektrischen Spannungen in Berührung kommen oder
anderen Gefahren ausgesetzt sein könnten. Im Gehäuse befinden sich keine Teile, die
vom Benutzer repariert werden können. Überlassen Sie Reparatur- und Service-Arbeiten
an Ihrem Gerät ausschließlich autorisierten Technikern.
Verwenden Sie möglichst nur Original-Zubehörteile.
Reinigung und Pflege
Schalten Sie vor dem Reinigen das Gerät aus.
Reinigen Sie die Aluminium Oberfläche nur mit einem leicht angefeuchtetem, weichen, sauberen und
farbneutralen Tuch ohne jedes scharfe oder scheuernde Reinigungsmittel.
Staub auf dem Lautsprechergewebe können Sie bei Bedarf mit einem Staubsauger vorsichtig absaugen.
6
Page 7
SoundPort / SoundPort Compact / SoundPort Mini
4
Bedienungsanleitung
Bedienelemente
7
Deutsch
6
4
5
3
2
1
8
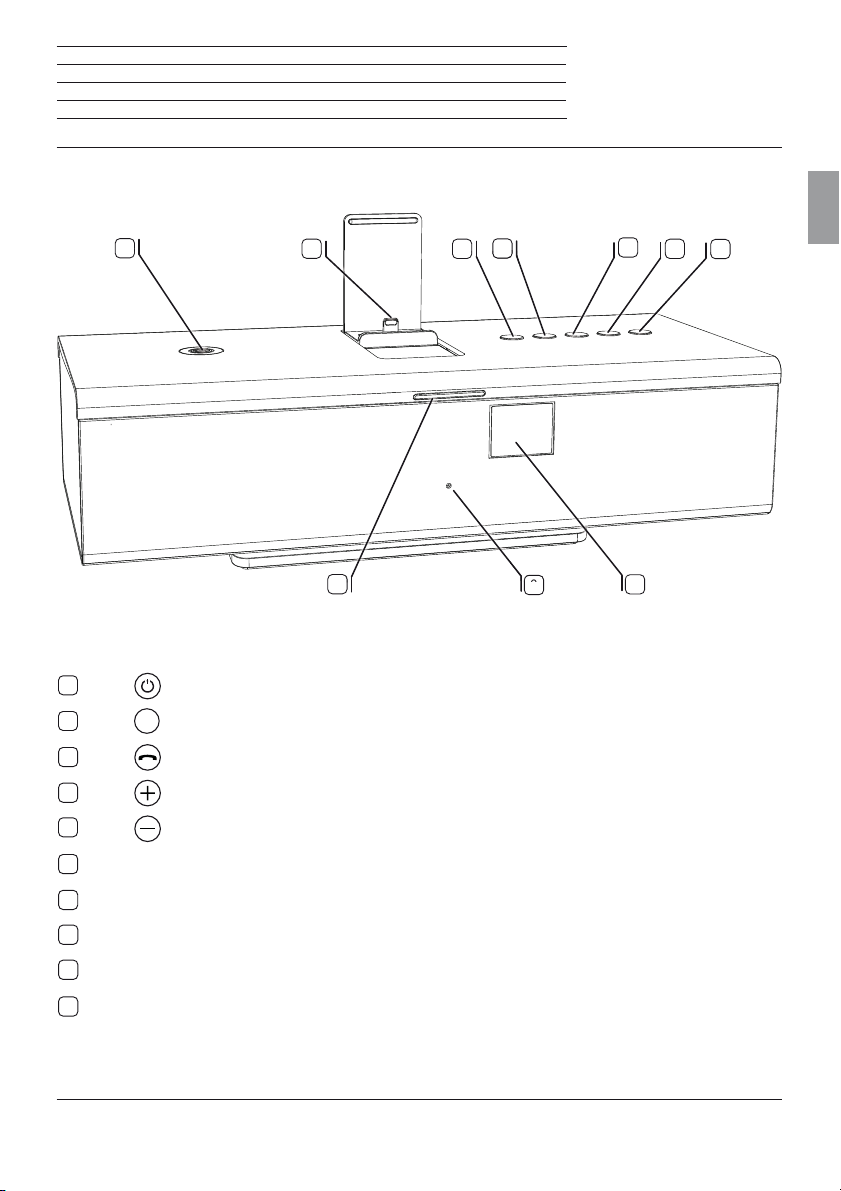
1
Ta s t e (Einschalten / Ausschalten)
2
3
4
5
6
7
8
9
10
SRC
Taste
(Quellenwahl / Klangeinstellungen)
Taste (Freisprechen / Bluetooth-Kopplung)
Taste (Lautstärke +)
Taste (Lautstärke –)
Apple Lightning Connector (max. 2.1A)
Connectivity Easy Pairing-Antenne (zur Verbindung mit NFC-fähigen Geräten)
LED-Anzeige
Mikrofon für Freisprechen (verdeckt hinter Lautsprecherabdeckung)
Infrarotempfänger (verdeckt hinter Lautsprecherabdeckung)
9
10
7
Page 8
SoundPort / SoundPort Compact / SoundPort Mini
Bedienungsanleitung
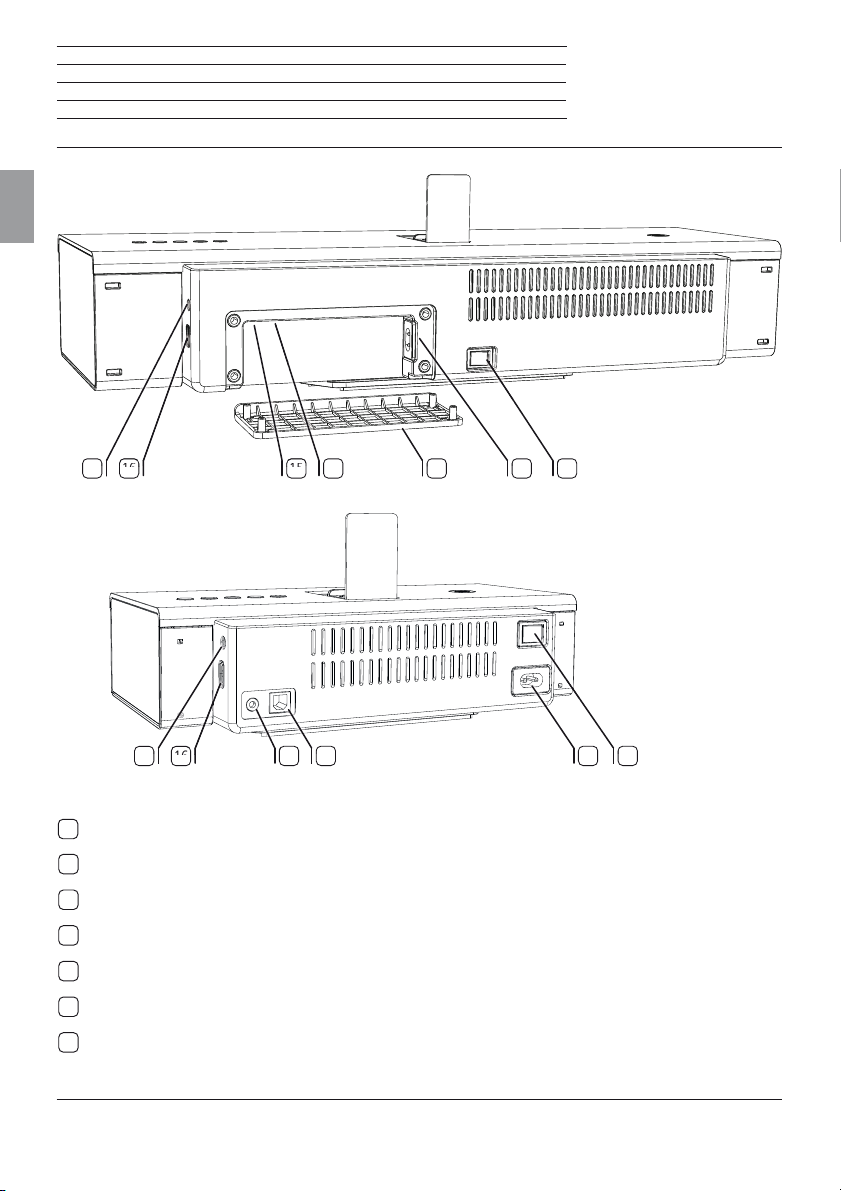
Anschlüsse
SoundPort / SoundPort Compact
Deutsch
1617
SoundPort Mini
1617
11
Netzschalter
12
AC-IN (Netzbuchse)
13
Kabelabdeckung (abnehmbar)
14
AUDIO IN (Stereo-Audioeingang, 3,5 mm Klinke)
15
USB B-Anschluss
16
USB A-Anschluss
17
Kopfhörerausgang (3,5 mm Klinke)
1112131415
11121514
8
Page 9
SoundPort / SoundPort Compact / SoundPort Mini
Bedienungsanleitung
Inbetriebnahme
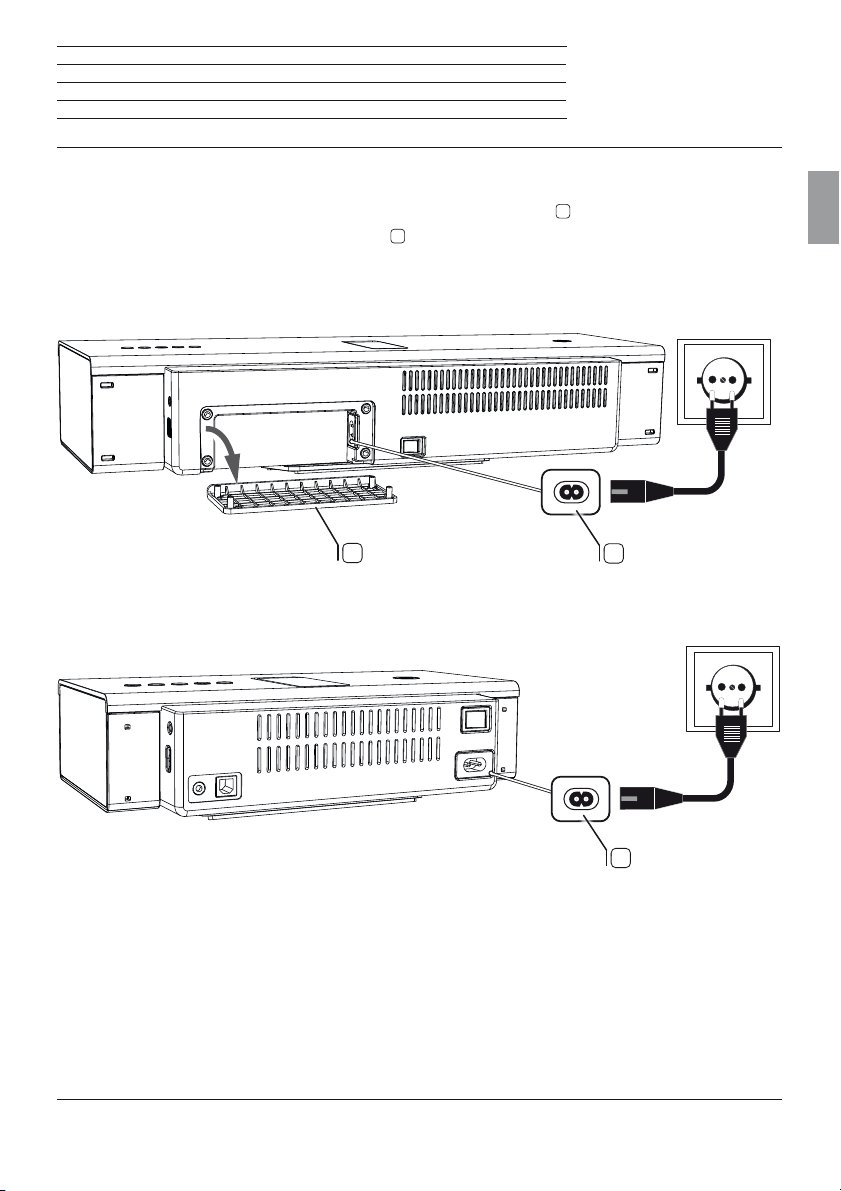
An das Stromnetz anschließen
Entfernen Sie bei SoundPort / SoundPort Compact die Kabelabdeckung 13 auf der Rückseite des Gerätes.
Stecken Sie das Netzkabel in die Netzbuchse
Steckdose.
SoundPort / SoundPort Compact
12
und verbinden Sie es mit einer 220-240V 50/60Hz
Deutsch
SoundPort Mini
13
12
12
9
Page 10
SoundPort / SoundPort Compact / SoundPort Mini
Bedienungsanleitung
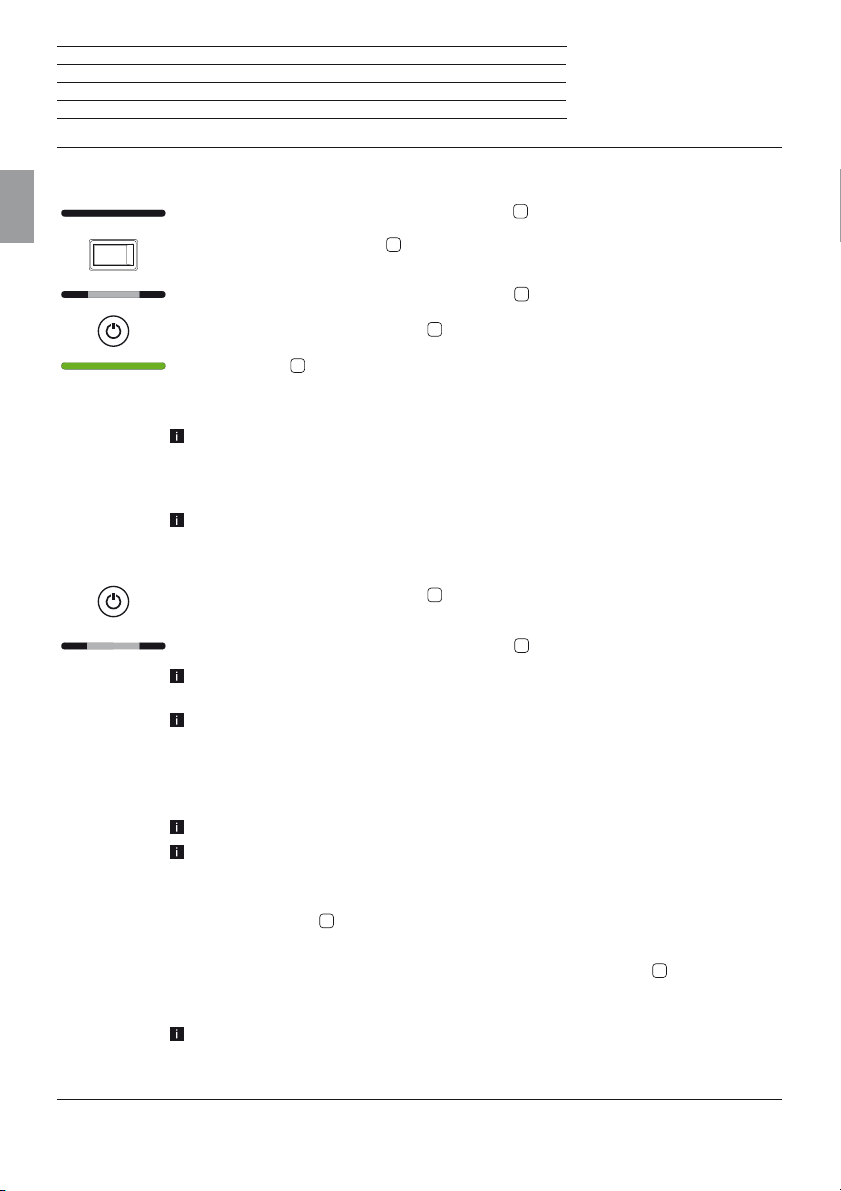
Einschalten / Ausschalten
Audio-Quelle laden
Einschalten
Deutsch
Im ausgeschalteten Zustand ist die LED-Anzeige 8 dunkel.
Schalten Sie den Netzschalter
Der SoundPort befindet sich im Standby-Modus.
Die mittleren beiden Segmente der LED-Anzeige
Drücken Sie die Ein-/Ausschalttaste
Die LED-Anzeige
Beim späteren Einschalten bleibt die zuletzt gewählte Quelle aktiv.
Die Farben der LED-Anzeige für die einzelnen Quellen finden Sie auf Seite 11.
Wenn 10 Minuten lang keine Musik wiedergegeben wird, kein Anruf eingeht oder aus-
geht, keine Taste am SoundPort oder auf der Fernbedienung Assist (siehe Seite 24)
gedrückt wird, kein Gerät verbunden oder getrennt wird und kein Sync-Vorgang läuft
schaltet sich der SoundPort automatisch in den Smart Standby-Modus.
Weitere Informationen zu den Energiemodi siehe Seite 23.
Ausschalten
Drücken Sie die Ein-/Ausschalttaste 1 am Gerät.
Der SoundPort schaltet sich in den Standby-Modus.
Die mittleren beiden Segmente der LED-Anzeige
Nach 4 Stunden im Smart Standby-Modus schaltet sich der SoundPort automatisch
in den Standby-Modus.
Weitere Informationen zu den Energiemodi siehe Seite 23.
11
in Stellung ON.
8
leuchten gedimmt.
1
am Gerät.
8
leuchtet beim allerersten Start grün (Quelle AUDIO IN).
8
leuchten gedimmt.
Audio-Quelle laden
Sie können Ihre Audio-Quelle, z.B. ein Mobiltelefon, iPad etc. über Ihren SoundPort laden.
Der Netzschalter des SoundPort muss eingeschaltet sein.
Es sollte zeitgleich nur ein Gerät geladen werden.
Aufladen von iDevices am Lightning Connector:
Stecken Sie Ihr iDevice mit Lightning Connector auf den im SoundPort eingebauten
Lightning Connector
Aufladen von Audio-Quellen an USB:
Stecken Sie den Typ A-Stecker des USB-Kabels in die USB-Buchse
Verwenden Sie dazu ein für Ihre Audio-Quelle geeignetes USB-Kabel mit Typ A-Stecker
(im Fachhandel erhältlich).
Das angeschlossene Gerät (Lightning/USB) wird sowohl im Betrieb als auch im Smart
Standby-Modus des SoundPort geladen. Im Standby-Modus erfolgt keine Aufladung
derAudio-Quelle.
10
6
(siehe Seiten 14 und 15).
16
des SoundPort.
Page 11
SoundPort / SoundPort Compact / SoundPort Mini
Bedienungsanleitung
Quellenwahl
Quellenwahl
Der SoundPort bietet mehrere Möglichkeiten Audio-Quellen mit dem Gerät zu verbinden und auszuwählen.
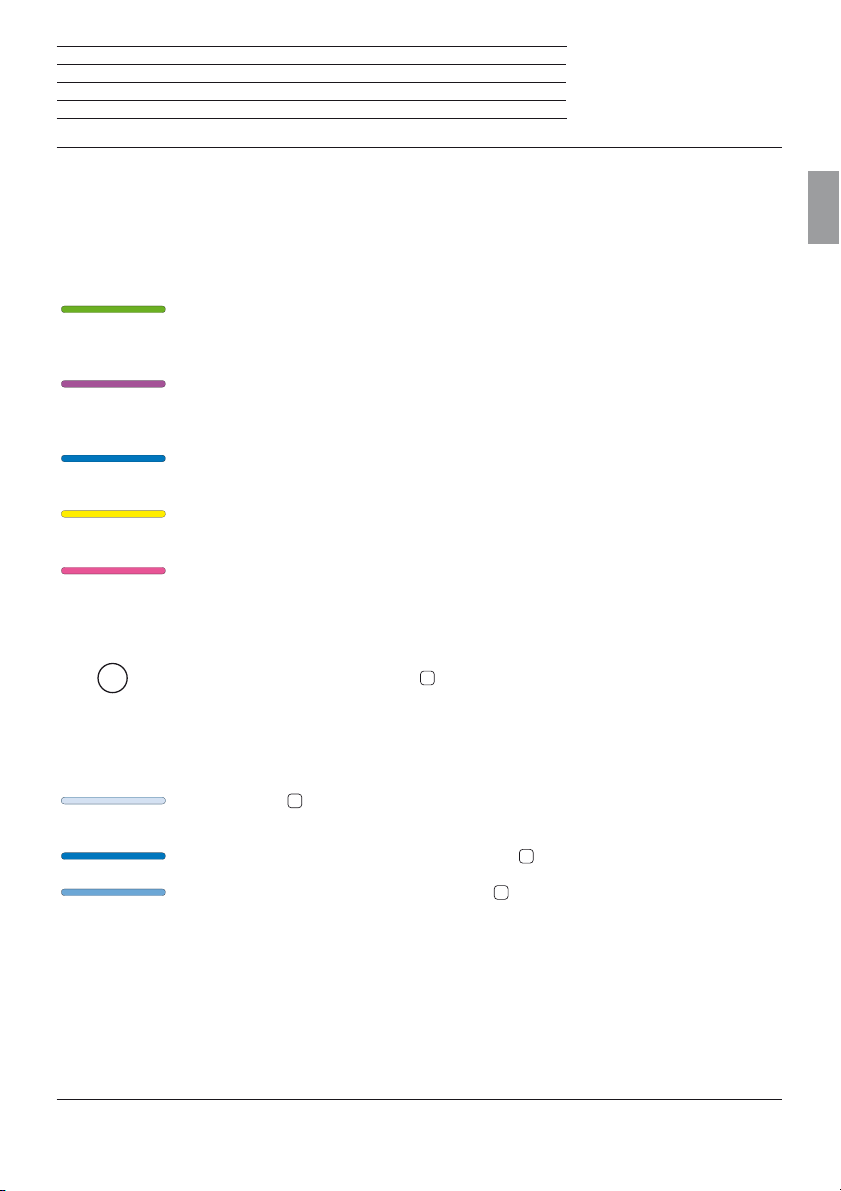
Jeder Quelle ist eine Farbe auf der LED-Anzeige zugeordnet.
LED-Farben der einzelnen Quellen
AUDIO IN (grün)
Wie Sie eine Audio-Quelle über ein 3,5mm Stereo-Kabel an die AUDIO IN-Schnittstelle
des SoundPort anschließen, finden Sie auf Seite 13.
Apple Lightning Connector (violett)
Wie Sie iDevices am Lightning Connector anschließen, finden Sie auf den Seiten
14/15.
Bluetooth (blau)
Wie Sie Audio-Quellen über Bluetooth / NFC koppeln, finden Sie auf den Seiten 16/17.
USB-Audio (gelb)
Wie Sie Audio-Quellen an USB anschließen, finden Sie auf Seite 18.
PC-Audio (rosa)
Wie Sie den SoundPort als USB-Device anschließen, finden Sie auf Seite 19.
Deutsch
Auswahl der Quelle
SRC
Bei jedem Druck auf die Taste SRC
Die Reihenfolge der Quellen entspricht der oben beschriebenen Reihenfolge der LED-Far-
ben.
Der SoundPort versucht nach Auswahl der Quelle über den gewählten Anschluss eine
Verbindung zur Audio-Quelle herzustellen.
Die LED-Anzeige
Suchzeit 30s).
Bei erfolgreicher Suche leuchtet die LED-Anzeige
Bei erfolgloser Suche leuchtet die LED-Anzeige
(60% Helligkeit).
2
wird auf die nächste Quelle gewechselt.
8
pulsiert während der Suche in der gewählten Quellenfarbe (maximale
8
in der gewählten Quellenfarbe.
8
in der gewählten Quellenfarbe gedimmt
11
Page 12
SoundPort / SoundPort Compact / SoundPort Mini
Bedienungsanleitung
Klangeinstellungen
Klangeinstellungen
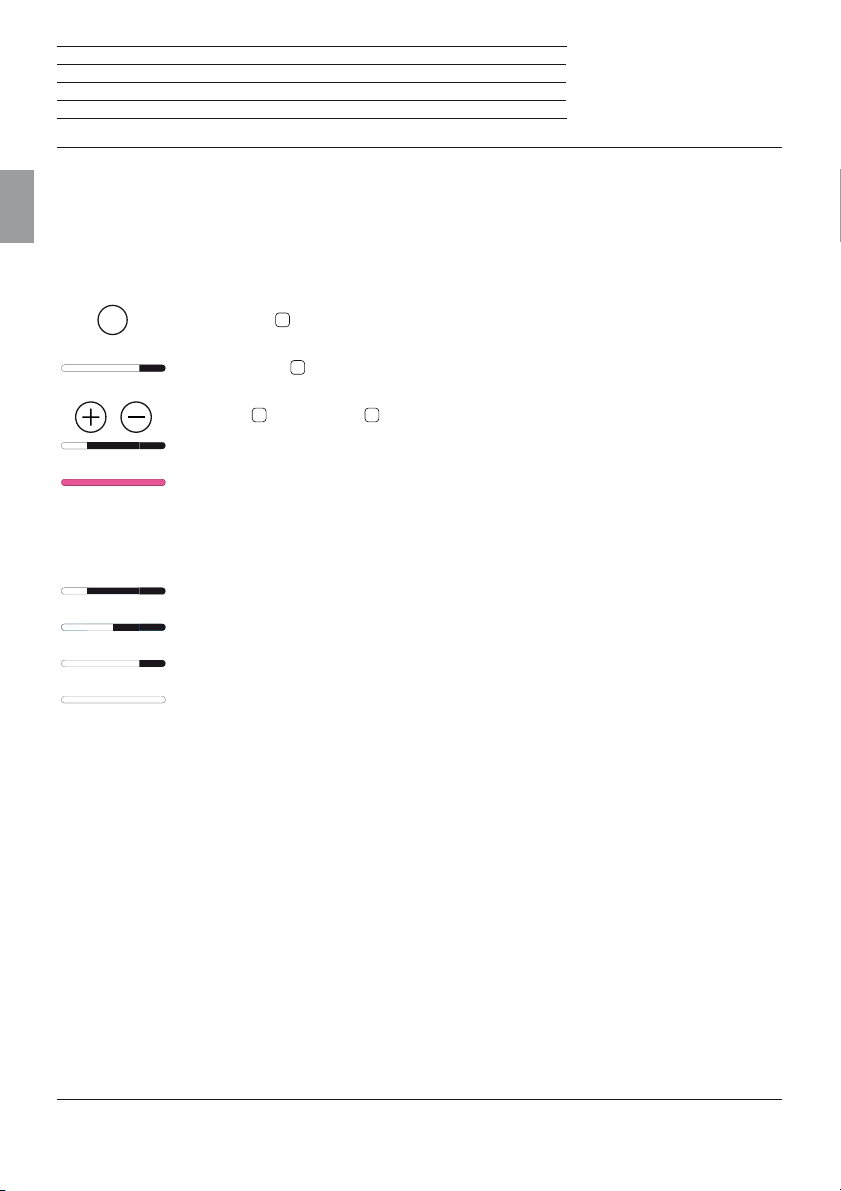
Sie haben bei Ihrem SoundPort die Möglichkeit, für die Audio-Wiedergabe vordefinierte Klangeinstellun-
Deutsch
gen aufzurufen.
Auswahl der Klangeinstellungen
SRC
Die Taste SRC
Die LED-Anzeige
Die Taste +
2
am SoundPort lang drücken (ca. 2 Sekunden).
8
zeigt die letzte gewählte Klangeinstellung (Beispiel: classic).
4
bzw. Taste – 5 so oft drücken, bis die gewünschte Klangeinstellung aus-
gewählt wurde (Beispiel: flat).
Wenn für einige Sekunden kein Tastendruck erfolgt, wird die vorher gewählte Quelle
wieder angezeigt.
LED-Anzeige der Klangeinstellungen
1 LED-Anzeige: Voreinstellung flat
2 LED-Anzeigen: Voreinstellung voice
3 LED-Anzeigen: Voreinstellung classic
4 LED-Anzeigen: Voreinstellung pop
12
Page 13
SoundPort / SoundPort Compact / SoundPort Mini
Bedienungsanleitung
Kabelverbindung
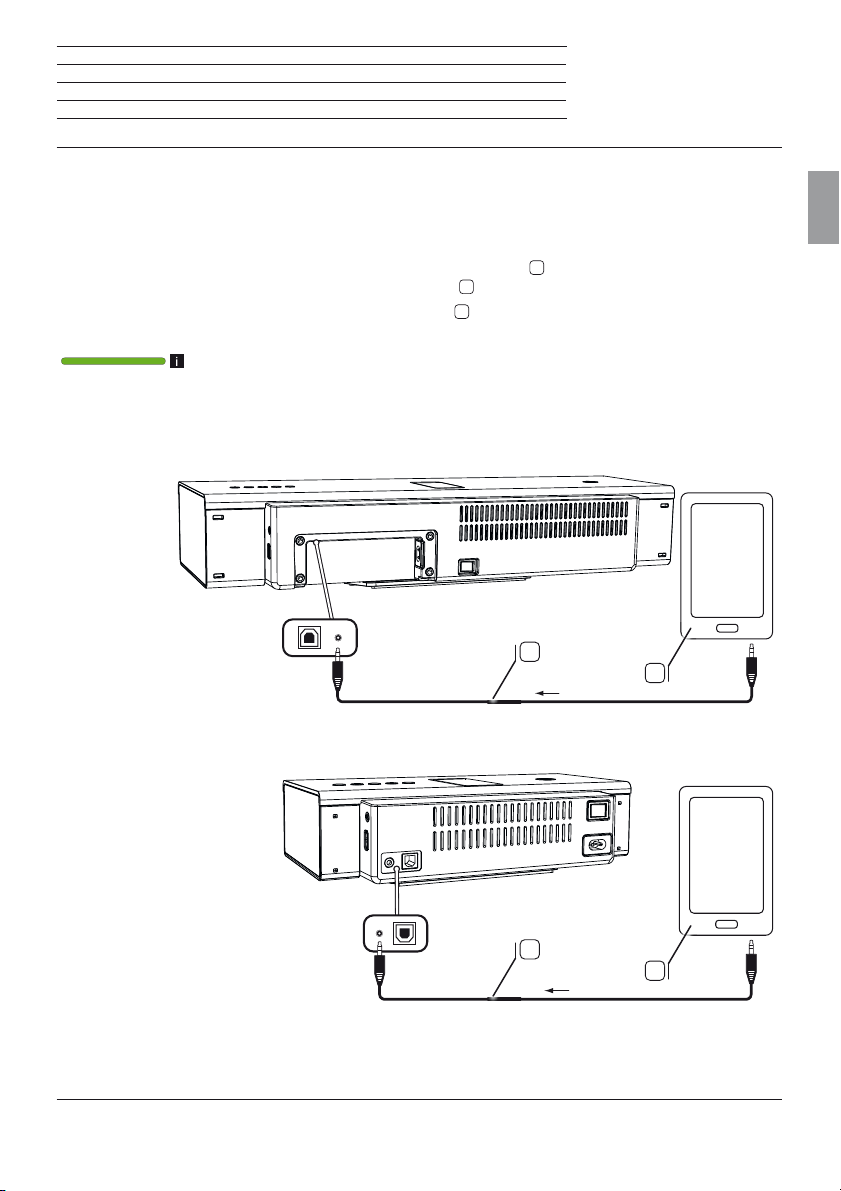
Audio-Quelle an AUDIO IN anschließen
Sie können Ihren SoundPort über ein Audio-Kabel (3,5 mm Klinkenstecker) mit Ihrer Audio-Quelle, z.B.
Mobiltelefon, Musik-Player etc. koppeln.
Deutsch
Verbinden Sie den Stereo-Audioeingang AUDIO IN
Stereo-Audioausgang Ihrer Audio-Quelle
Verwenden Sie hierfür das Audio-Kabel
A
S
mit 3,5 mm Klinkenstecker aus dem Liefer-
14
des SoundPort mit dem analogen
.
umfang.
Als Quelle ist AUDIO IN gewählt (siehe Seite 11).
Die Audio-Wiedergabe (siehe Seite 21) erfolgt nun über das Audio-Kabel.
SoundPort / SoundPort Compact
S
A
SoundPort Mini
S
A
13
Page 14
SoundPort / SoundPort Compact / SoundPort Mini
Bedienungsanleitung
Lightning Connector
Lightning Connector
Ihr SoundPort ist mit einem Apple Lightning Connector für iDevices (1 ausgerüstet. Somit können Sie jede
Deutsch
Klangquelle (Musik, Video, Internet-Radio, Podcasts) von Ihrem iDevice mit Lightning Connector über die
Lautsprecher des SoundPort wiedergeben.
Das am Lightning Connector anschlossene iDevice wird im Betrieb und auch im Smart Standby-Modus
des SoundPort geladen (siehe Seite 10).
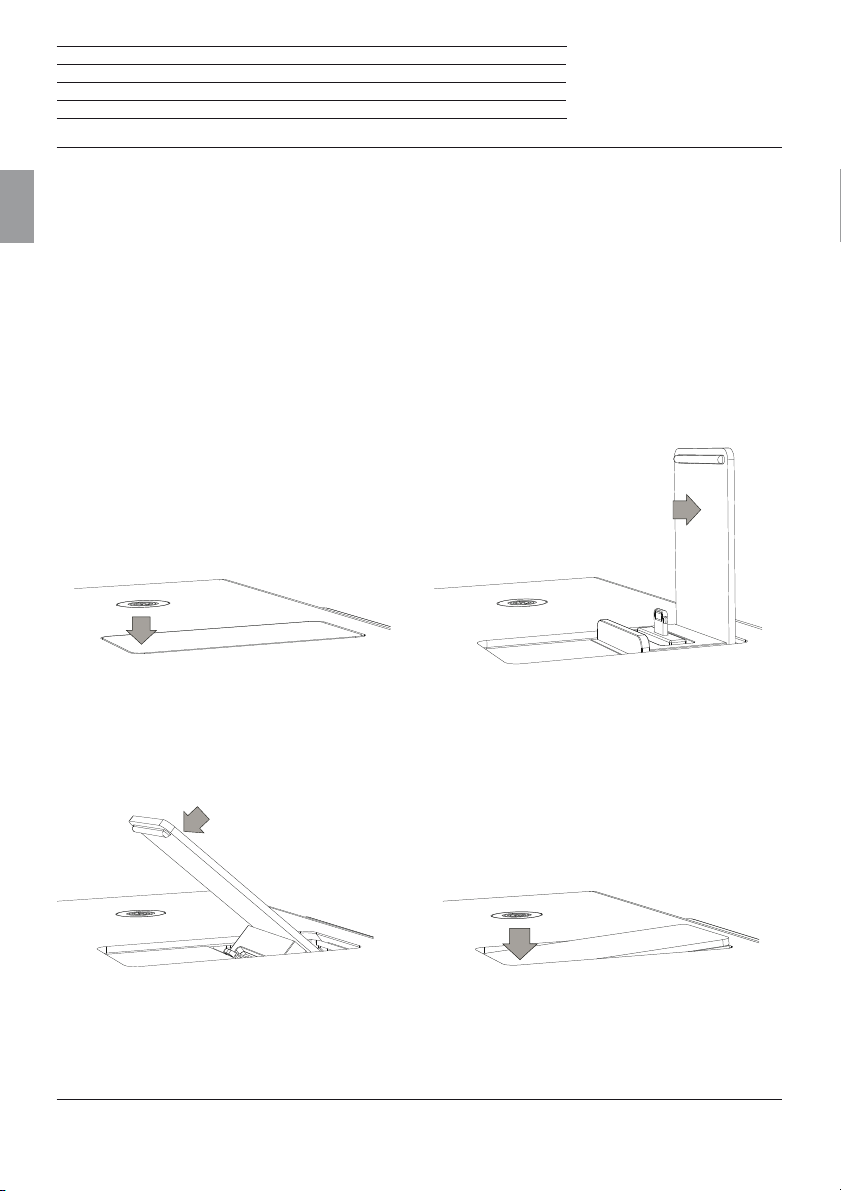
Öffnen des Lightning Connectors
Im geschlossenen Zustand vorne leicht auf die Oberseite der Abdeckklappe drücken. Der Lightning
Connector öffnet sich automatisch, sobald die Verriegelung überwunden ist.
Zum Fixieren der Halterung die geöffnete Abdeckklappe nach hinten in die Rastposition drücken. Jetzt
können Sie den Lightning Connector für iDevices nutzen (siehe Seite 15).
Schließen des Lightning Connectors
Die geöffnete Abdeckklappe aus der Rastpostion nach vorne drücken. Schließen Sie die Abdeckklappe,
indem Sie diese über die geschlossene Endposition hinaus nach unten drücken. Ein Einrasten der Abdeckklappe ist zu hören.
(1
Unterstützte iDevices siehe Seite 26.
14
Page 15
SoundPort / SoundPort Compact / SoundPort Mini
Bedienungsanleitung
Lightning Connector
Audio-Quelle an Lightning Connector
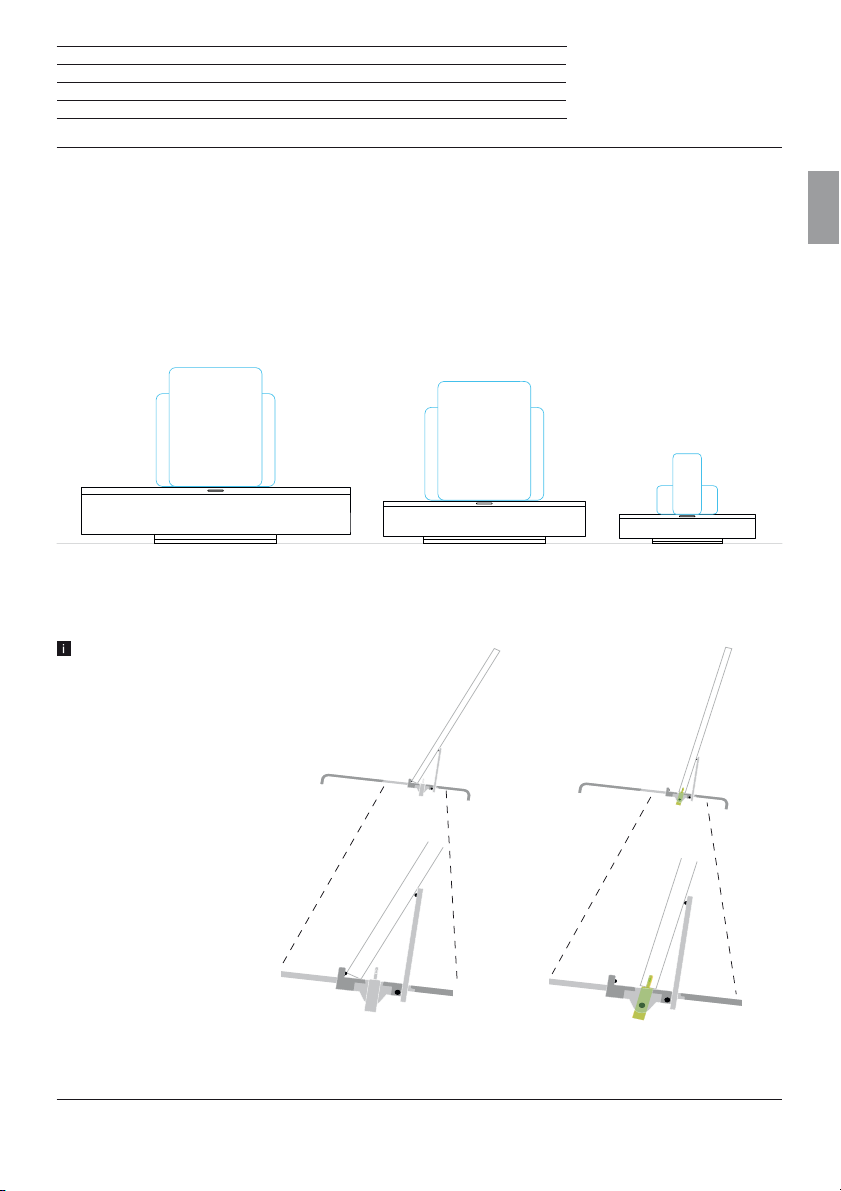
Sie können iDevices mit Lightning Connector in vertikaler Ausrichtung mit dem eingebauten Lightning
Connector
in diesem Fall über Bluetooth (siehe Seite 16) oder über USB-Kabelverbindung
Wenn das iDevice am Lightning Connector des SoundPort gesteckt wurde, ist es zur Audio-Wiedergabe
(siehe Seite 21) oder zum Sync mit dem PC/Laptop (siehe Seite 20) bereit.
Nachfolgend sehen Sie, welches iDevice auf den SoundPort-Gerätevarianten maximal (bzgl. Gerätegröße)
verwendet werden kann.
(1
verbinden. Die iDevices können auch horizontal positioniert werden. Die Verbindung erfolgt
(1
(siehe Seite 18).
SoundPort SoundPort Compact SoundPort Mini
iPad vertikal/horizontal iPad vertikal/horizontal iPhone 5 / iPod touch
vertikal/horizontal
Deutsch
Bitte entfernen Sie eine evtl. vorhandene
Schutzhülle von Ihrem iDevice damit eine
zuverlässige Verbindung zum Lightning
Connector sichergestellt werden kann.
iDevice in der Abdeckklappe des
Lightning Connectors abgelegt
(1
Unterstützte iDevices siehe Seite 26.
iDevice am Lightning Connector
gesteckt
15
Page 16
SoundPort / SoundPort Compact / SoundPort Mini
Bedienungsanleitung
Bluetooth-Kopplung
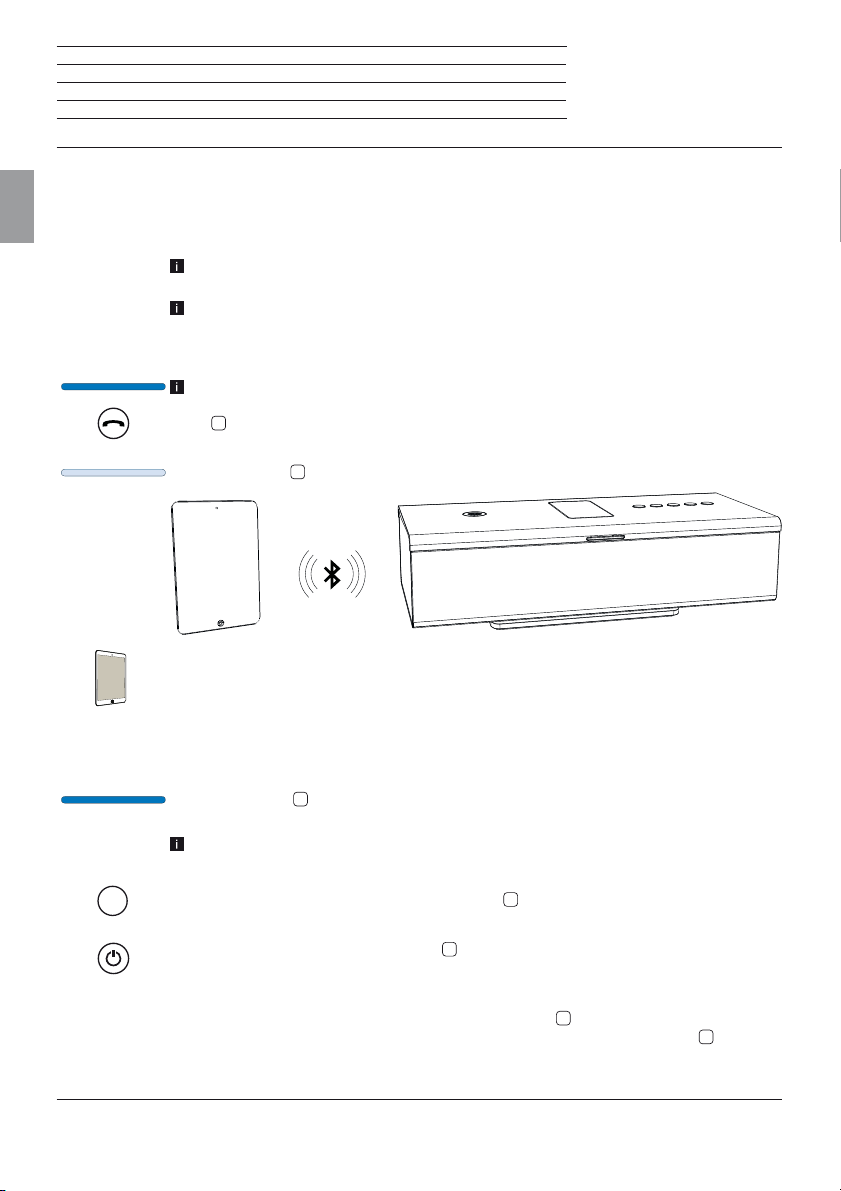
Audio-Quelle via Bluetooth koppeln
Sie können Ihren SoundPort kabellos über Bluetooth mit einer Audio-Quelle, z.B. Smartphone, Tablet PC
Deutsch
etc. koppeln. Die Audio-Quellen müssen das Bluetooth Protokoll A2DP unterstützen.
Der Abstand zwischen Ihrem SoundPort und der Audio-Quelle darf nicht mehr als 10m
(Sichtverbindung) betragen.
Der SoundPort speichert die letzten 5 via Bluetooth gekoppelten Audio-Quellen. Bei
einer erneuten Kopplung wird so die Verbindung schneller aufgebaut. Es ist jedoch nur
eine aktive Verbindung gleichzeitig möglich. Kommt eine neue Audio-Quelle hinzu, wird
die „älteste“ gespeicherte Audio-Quelle aus der Verbindungsliste gelöscht.
Als Quelle ist Bluetooth ausgewählt (siehe Seite 11).
3
Ta s t e
am SoundPort lang drücken (ca. 3 Sekunden).
Sie hören einen Signalton.
8
Die LED-Anzeige
pulsiert.
Aktivieren Sie die Bluetooth-Funktion Ihrer Audio-Quelle. Ziehen Sie ggf. die Bedie-
nungsanleitung Ihrer Audio-Quelle zu Rate.
Betätigen Sie ggf. die Bluetooth Suchen-Funktion der Audio-Quelle.
Es werden nun Bluetooth-Geräte in der näheren Umgebung der Audio-Quelle gesucht.
Wählen Sie SoundPort_xx
(1
aus. Falls ein Code abgefragt wird, geben Sie 0000 ein.
Zum Abschluss der Kopplung hören Sie einen Signalton.
Die LED-Anzeige
8
leuchtet dauerhaft, der SoundPort ist jetzt zur Audio-Wiedergabe
(siehe Seite 21) bereit.
Bei einigen Audio-Quellen muss die Verbindung explizit aktiviert werden, bevor die
Musik-Wiedergabe auf dem SoundPort erfolgt.
SRC
Beim Umschalten der Quelle mit der Taste SRC
pausiert/gestoppt, die Kopplung der Audio-Quelle bleibt aber erhalten.
1
Ein Druck auf die Ein-/Ausschalttaste
setzt den SoundPort in den Standby-Modus.
Eine laufende Musik-Wiedergabe wird pausiert/gestoppt, die Kopplung der Audio-Quelle
getrennt.
Nach Wiedereinschalten mit der Ein-/Ausschalttaste
Audio-Quelle erneut zu koppeln. In diesem Status pulsiert die LED-Anzeige
Nach erfolgreicher Kopplung leuchtet die LED-Anzeige dauerhaft.
(1
xx steht für die letzten zwei Stellen der MAC-Adresse des SoundPort.
16
2
wird eine laufende Musik-Wiedergabe
1
versucht der SoundPort, die
8
.
Page 17
SoundPort / SoundPort Compact / SoundPort Mini
Bedienungsanleitung
Connectivity Easy Pairing-Kopplung
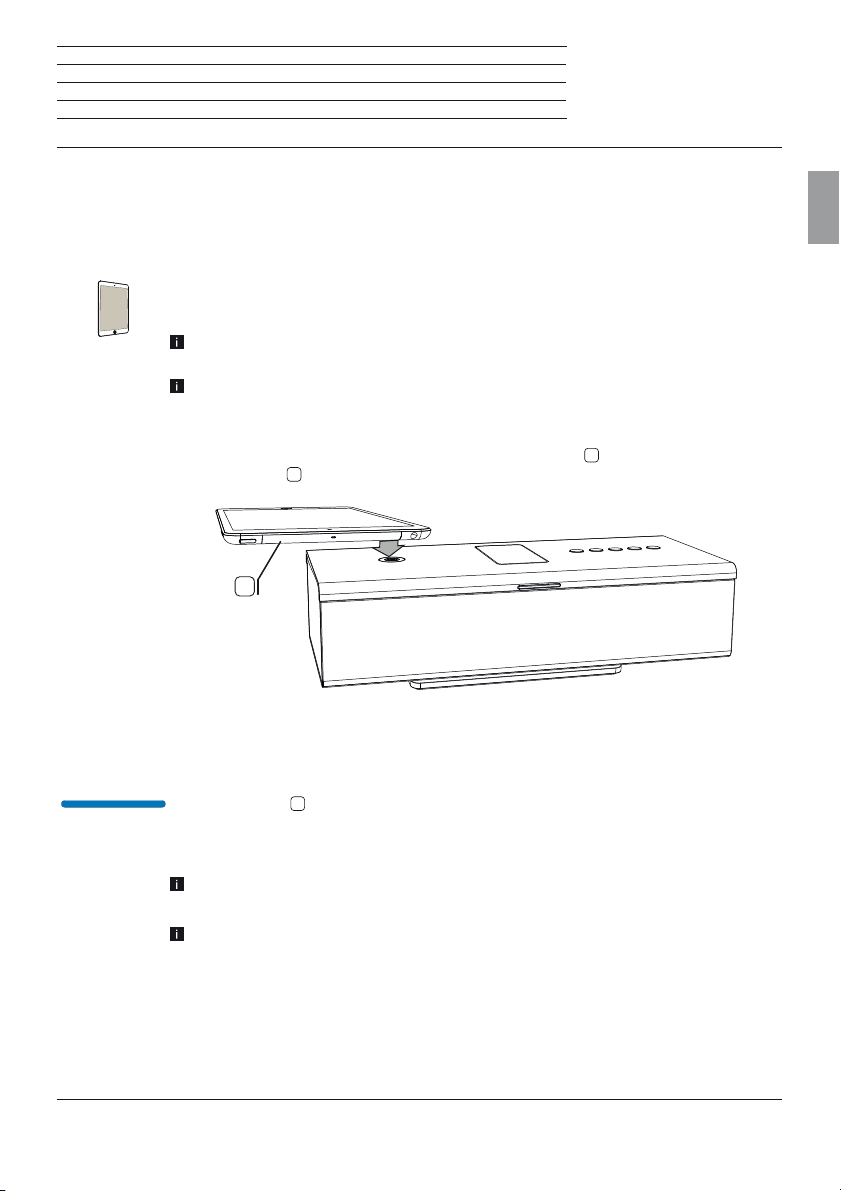
Audio-Quelle via Connectivity Easy Pairing koppeln
Besonders einfach können Sie Ihren SoundPort über die Connectivity Easy Pairing-Funktion (
bindung mit NFC-fähigen Geräten)
Audio-Quelle muss dazu die NFC-Funktion unterstützen.
Aktivieren Sie die NFC-Funktion und die Bluetooth-Funktion Ihrer Audio-Quelle. Ziehen
Sie ggf. die Bedienungsanleitung Ihrer Audio-Quelle zu Rate.
Informieren Sie sich in der Bedienungsanleitung Ihrer Audio-Quelle über den genauen
NFC-Erfassungsbereich.
Die Kopplung über die Connectivity Easy Pairing-Funktion ist beim SoundPort
dauerhaft aktiv (Ausnahme: Standby-Modus). Es muss daher nicht manuell auf die
Quelle Bluetooth gewechselt werden.
Halten Sie den NFC-Erfassungsbereich Ihrer Audio-Quelle
Pairing-Antenne
mit Ihrer Audio-Quelle, z.B. Smartphone, Tablet PC etc., koppeln. Die
A
7
des SoundPort.
auf die Connectivity Easy
A
Ver -
Deutsch
Bestätigen Sie gegebenenfalls die Anfrage Ihrer Audio-Quelle zur Kopplung mit dem
SoundPort positiv. Zum Abschluss der Kopplung hören Sie einen Signalton.
8
Die LED-Anzeige
leuchtet dauerhaft.
Nun ist der SoundPort mit Ihrer Audio-Quelle via Bluetooth gekoppelt und zur Audio-Wiedergabe (siehe Seite 21) bereit.
Bei einigen Audio-Quellen muss die Verbindung explizit aktiviert werden, bevor die
Musik-Wiedergabe auf dem SoundPort erfolgt.
Kommt eine weitere NFC-fähige Audio-Quelle in den Kopplungsbereich des Sound-
Port, wird diese mit dem SoundPort gekoppelt. Die bestehende Verbindung mit der
vorherigen Audio-Quelle wird getrennt.
17
Page 18
SoundPort / SoundPort Compact / SoundPort Mini
Bedienungsanleitung
USB-Audio
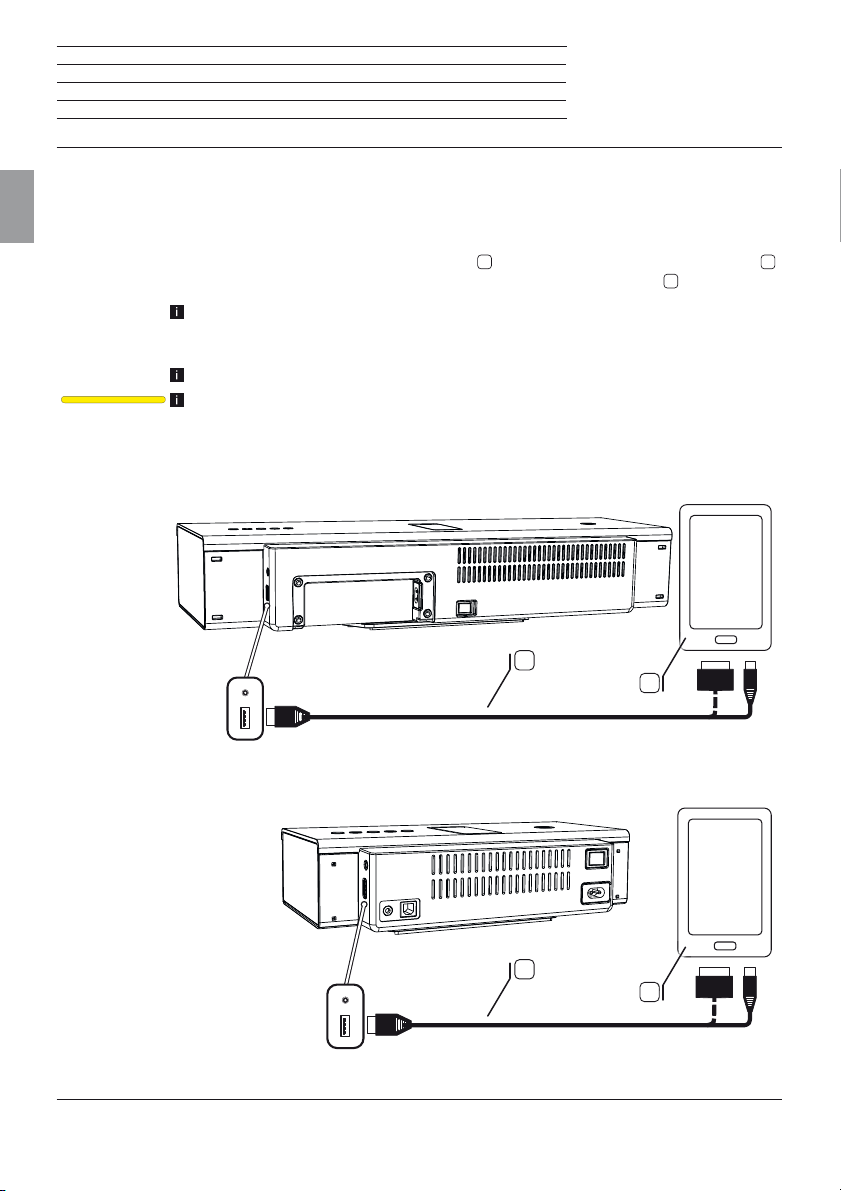
Audio-Quelle an USB anschließen
Sie können Ihren SoundPort über ein USB-Kabel mit Ihrer Audio-Quelle, z.B. Mobiltelefon, Musik-Player
Deutsch
etc. koppeln.
16
Verbinden Sie den USB-Anschluss (Typ A)
Verwenden Sie hierfür je nach Audio-Quelle das passende USB-Kabel
Bestimmte Audio-Quellen, z.B. Android-Smartphones, besitzen einen Micro-USB-An-
schluss, iDevices ohne Lightning Connector
am USB-Anschluss des SoundPort angeschlossen.
Die Audio-Quelle muss die Audio-Wiedergabe über USB unterstützen (USB-Streaming).
Als Quelle ist USB-Audio angewählt (siehe Seite 11).
Die Audio-Wiedergabe (siehe Seite 21) erfolgt nun über USB.
SoundPort / SoundPort Compact
des SoundPort mit der Audio-Quelle A.
U
.
(1
werden über einen 30-poligen Anschluss
SoundPort Mini
(1
Unterstützte iDevices siehe Seite 26.
18
U
A
U
A
Page 19
SoundPort / SoundPort Compact / SoundPort Mini
Bedienungsanleitung
PC-Audio
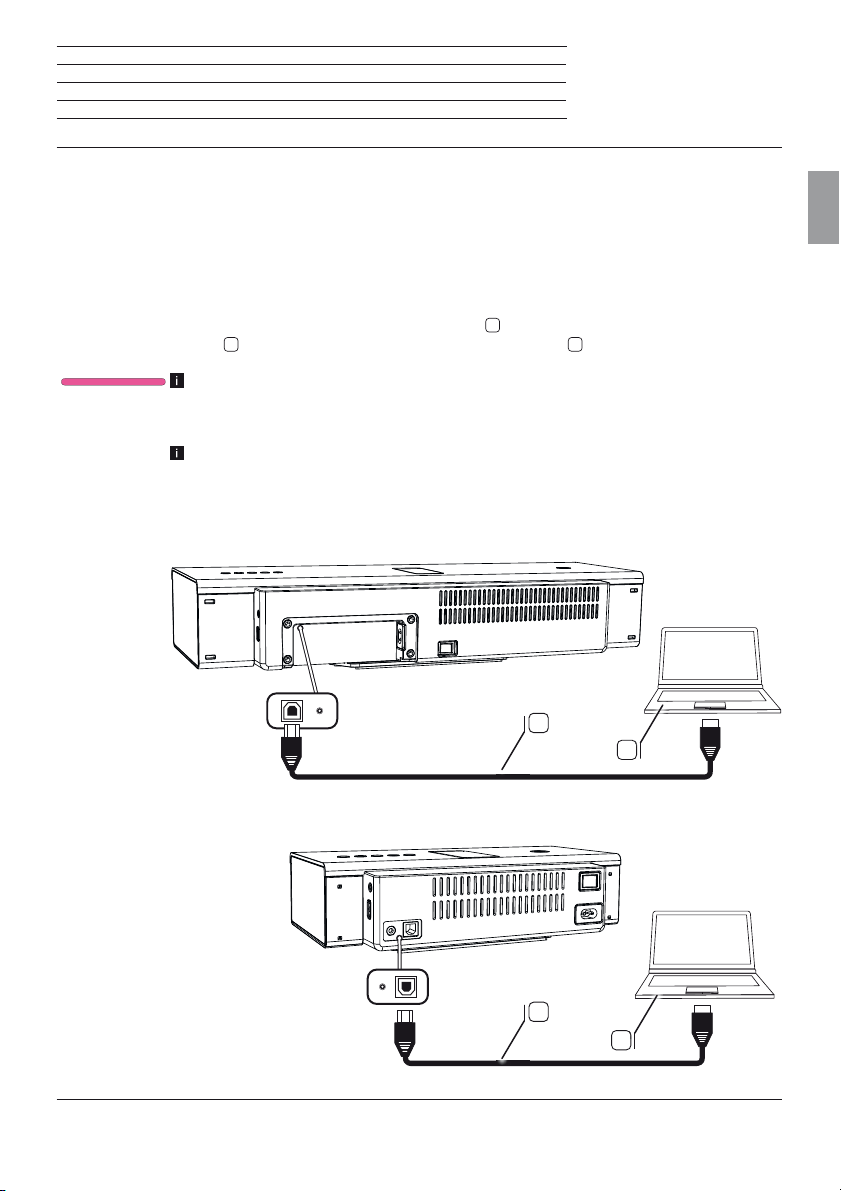
SoundPort als USB-Device anschließen (PC-Audio)
Sie können Ihren SoundPort über ein USB-Kabel mit einem PC/Laptop koppeln. Der SoundPort meldet
sich am PC/Laptop als USB Speaker an und kann anschließend als Wiedergabegerät am PC/Laptop
verwendet werden.
Am SoundPort über Lightning Connector angeschlossene Audio-Geräte können über den SoundPort
mit dem PC/Laptop synchronisiert werden (siehe Seite 20).
15
Verbinden Sie den USB-Anschluss (B-Type)
P
Laptop
. Verwenden Sie hierzu ein USB-Kabel Typ A-B U.
Als Quelle ist PC-Audio angewählt (siehe Seite 11).
Die Audio-Wiedergabe (siehe Seite 21) erfolgt nun über USB.
Die Funktion ist abhängig von der Hardware- und Software-Ausstattung der ange-
schlossenen Quelle, z.B. Anschluss-Konfiguration, verwendete Treiber, Codecs und
Formate. Bitte sehen Sie auch in der Dokumentation Ihres Quell-Gerätes nach und
aktualisieren Sie gegebenenfalls dessen Treiber oder Firmware.
SoundPort / SoundPort Compact
mit einer freien USB-Buchse Ihres PC/
Deutsch
SoundPort Mini
U
P
U
P
19
Page 20
SoundPort / SoundPort Compact / SoundPort Mini
Bedienungsanleitung
Sync
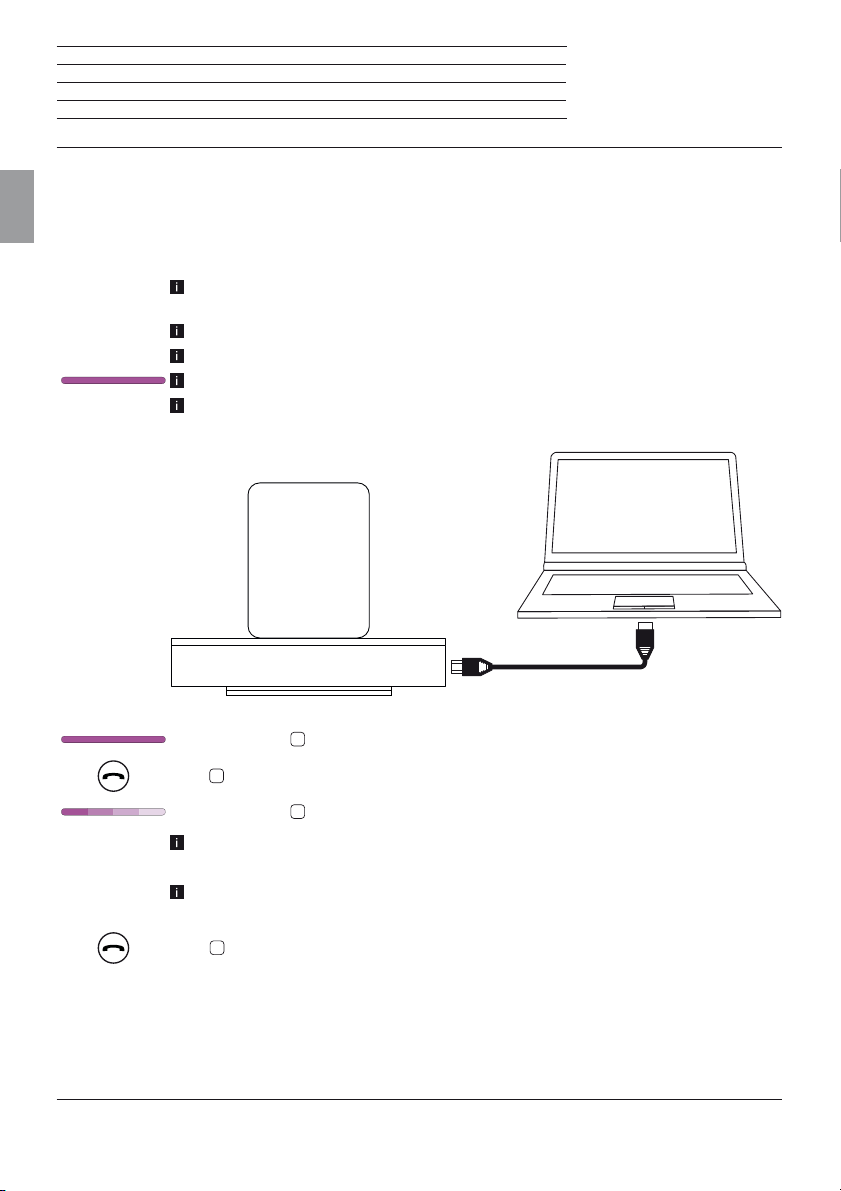
SoundPort – iTunes Sync
Ein am Lightning Connector des SoundPort angeschlossenes iDevice (1 kann über den SoundPort mit
Deutsch
iTunes auf dem PC/Laptop synchronisiert werden. Der SoundPort dient hierbei als Verbindungsbrücke
zwischen iDevice und PC/Laptop.
Die Funktionalität dieser Anwendung ist abhängig vom verwendeten PC, Notebook, Be-
triebssystem, iTunes, Apple iOS und iDevice sowie den jeweiligen Software-Versionen.
Der SoundPort ist als USB-Device am PC angeschlossen (siehe Seite 19).
Ein iDevice ist am Lightning Connector des SoundPort kontaktiert (siehe Seite 15).
Als Quelle ist Apple Lightning Connector gewählt (siehe Seite 11).
Auf dem PC/Notebook ist iTunes installiert und die automatische Synchronisation
aktiviert (iTunes-Einstellungen siehe Dokumentation der Software).
iTunes
Die LED-Anzeige
3
am SoundPort lang drücken (ca. 3 Sekunden) um den Sync-Modus zu aktivieren.
Ta s t e
Die LED-Anzeige
Beachten Sie auch eventuell auftretende Anzeigen und Meldungen des Betriebssystems
bzw. von iTunes am PC/Notebook.
Während des Sync-Vorgangs sind keine anderen Funktionen (Ausschalten, Quellenwahl,
Freisprechen, Lautstärkeänderung usw.) am SoundPort möglich.
3
am SoundPort lang drücken (ca. 3 Sekunden) um den Sync-Modus zu beenden.
Ta s t e
(1
Unterstützte iDevices siehe Seite 26.
20
8
zeigt als gewählte Quelle Apple Lightning Connector an.
8
pulsiert während des Sync-Vorgangs von links nach rechts.
Page 21
SoundPort / SoundPort Compact / SoundPort Mini
Bedienungsanleitung
Audio-Wiedergabe / Einstellen der Lautstärke
Audio-Wiedergabe
Eine Audio-Quelle muss mit dem SoundPort verbunden bzw. gekoppelt sein.
In der Quellenauswahl muss diese Audio-Quelle ausgewählt sein (siehe Seite 11).
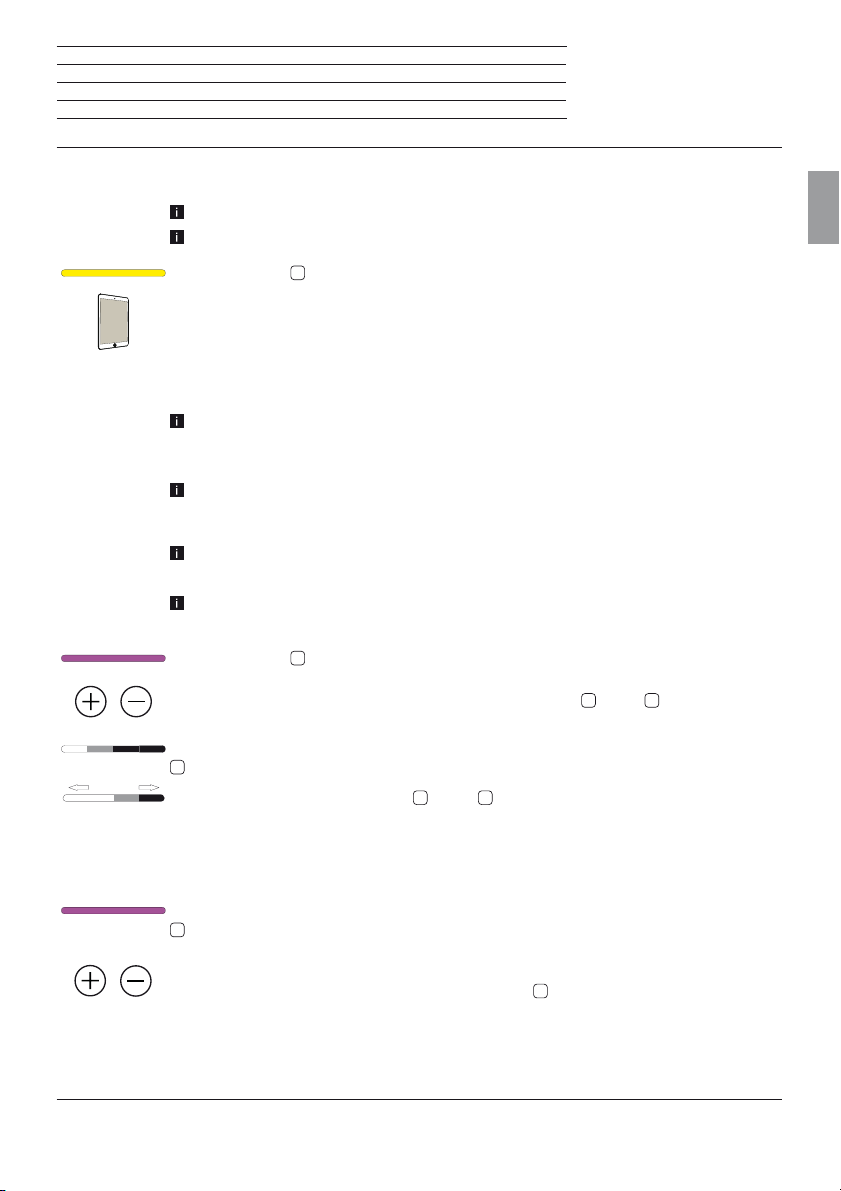
Die LED-Anzeige
Starten Sie die Audio-Wiedergabe an Ihrer Audio-Quelle. Die Steuerung der Wiedergabe
(Titelauswahl, Spulen, usw.) erfolgt über den Player / App der Audio-Quelle.
Einstellen der Lautstärke
Bei der Verbindung über ein Audio-Kabel (siehe Seite 13) stellen Sie die Lautstärke
Ihrer Audio-Quelle auf einen hohen Wert ein, um Störgeräusche zu vermeiden. Wählen
Sie dann am SoundPort die gewünschte Lautstärke.
Bei der Verbindung von iDevices über Bluetooth (siehe Seite 16) ist die Lautstär-
keeinstellung zwischen iDevice und SoundPort gekoppelt, d.h. die Änderung der
Lautstärke an einem der beiden Geräte ändert auch die Lautstärke des jeweils anderen.
Laute Musik kann zu Gehörschäden führen. Vermeiden Sie extreme Lautstärken,
insbesondere über längere Zeiträume.
Wenn 10 Minuten lang weder Musik wiedergegeben noch eine Taste gedrückt wird,
schaltet sich der SoundPort automatisch in den Smart Standby-Modus.
Die LED-Anzeige
8
zeigt die gewählte Quelle an z.B., USB-Audio.
8
zeigt die gewählte Quelle an, z.B. Apple Lightning Connector.
Deutsch
Stellen Sie die Lautstärke am SoundPort mit den Tasten +
Die Lautstärke ist in mehreren Schritten
8
Vol +
Vol -
MIN MAX
optisch dargestellt werden.
Jeder kurze Druck auf die Taste +
einen Schritt.
Halten Sie die Taste + bzw. – gedrückt, wird der Lautstärkebereich durchfahren.
Die maximale Lautstärke wird durch zweimaliges Blinken aller LEDs mit voller Helligkeit
angezeigt.
Erfolgt innerhalb von drei Sekunden keine Lautstärkeänderung, zeigt die LED-Anzeige
8
wieder die Farbe der gewählten Quelle.
Schalten Sie die Lautstärke am SoundPort auf Stumm, indem Sie die Tasten + und –
gleichzeitig drücken. Alle vier LEDs der LED-Anzeige
Mit Drücken der Taste + oder – wird die Stummschaltung aufgehoben. Die LED-Anzeige
zeigt wieder die ursprüngliche gewählte Quelle an.
(1
siehe Technische Daten auf Seite 27.
4
und – 5 ein.
(1
einstellbar, die über vier LEDs der LED-Anzeige
4
und – 5 erhöht bzw. reduziert die Lautstärke um
8
pulsieren mit voller Leuchtstärke.
21
Page 22
SoundPort / SoundPort Compact / SoundPort Mini
Bedienungsanleitung
Freisprech-Funktion
Freisprech-Funktion
Deutsch
Der SoundPort muss via Bluetooth (siehe Seite 16) bzw. Connectivity Easy Pairing
(siehe Seite 17) mit Ihrem Mobiltelefon gekoppelt und verbunden sein.
Laute Umgebungsgeräusche beeinträchtigen die Qualität der Freisprechfunktion.
Sorgen Sie für eine ruhige Umgebung oder verzichten Sie auf die Freisprechfunktion,
falls die Umgebung dafür ungeeignet ist.
Um eine gute Sprachverständlichkeit zwischen den Gesprächspartnern zu erzielen,
sprechen Sie möglichst nur abwechselnd. Die Entfernung zwischen Sprecher und
SoundPort sollte zwischen 0,3 m und 1,2 m liegen.
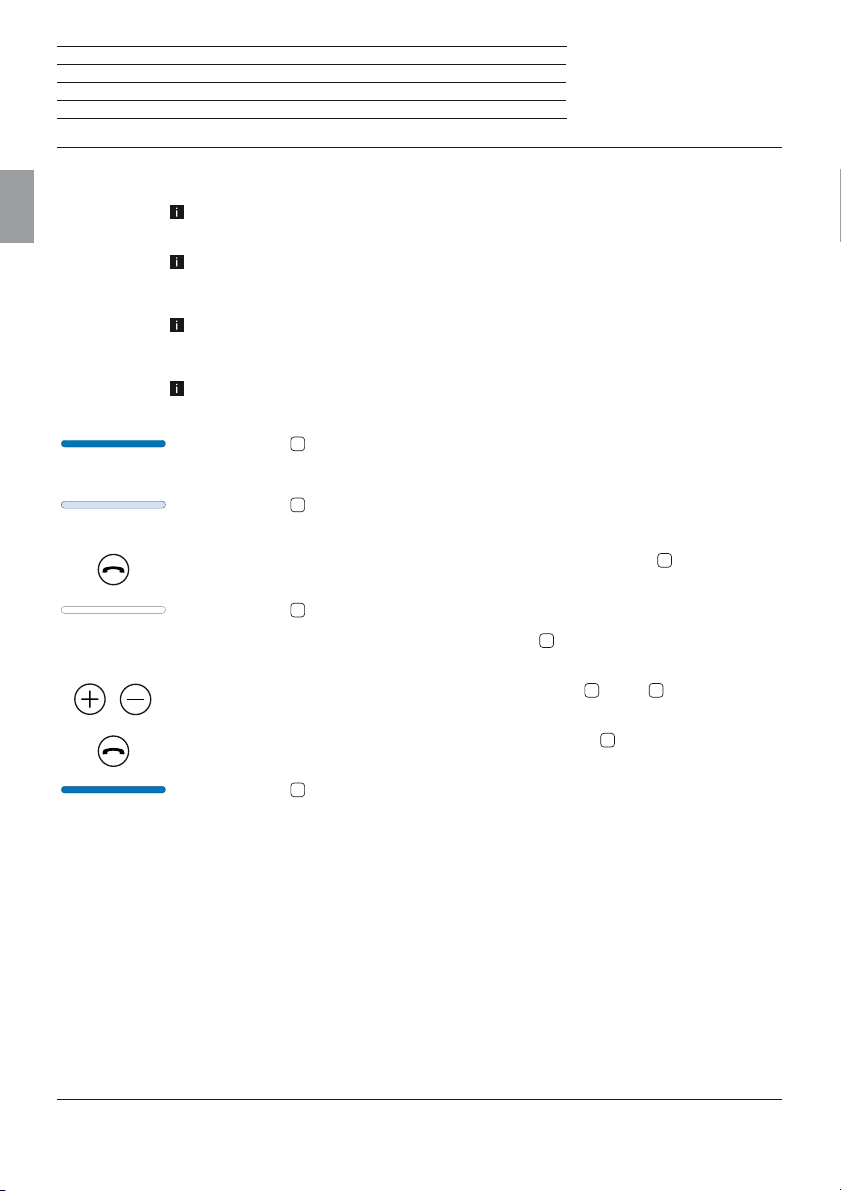
Um eine ankommenden Anruf anzunehmen, muss der SoundPort eingeschaltet (siehe
Seite 10) und als Quelle Bluetooth angewählt sein (siehe Seite 11).
Die LED-Anzeige
8
zeigt als Quelle Bluetooth an.
Bei einem ankommenden Gespräch ertönt ein Klingelton.
8
Die LED-Anzeige
pulsiert schnell in weiß.
Im Falle einer laufenden Audio-Wiedergabe wird diese pausiert.
Nehmen Sie das ankommende Gespräch durch Drücken der Taste
oder der entsprechenden Taste Ihres Mobiltelefons an.
8
Die LED-Anzeige
Wenn Sie sprechen, wenden Sie sich der Vorderseite
leuchtet weiß.
9
des SoundPort zu. Das Mikrofon
sitzt mittig unter der Lautsprecherabdeckung (siehe Seite 7).
4
Stellen Sie die Lautstärke am SoundPort mit den Tasten +
und – 5 auf eine mittlere
Lautstärke ein (siehe auch Seite 21).
3
Beenden Sie das Gespräch durch erneutes Drücken der Taste
am SoundPort oder der
entsprechenden Taste an Ihrem Mobiltelefon.
8
Die LED-Anzeige
zeigt wieder die Farbe der zuletzt gewählten Quelle.
3
am SoundPort
22
Page 23

SoundPort / SoundPort Compact / SoundPort Mini
Bedienungsanleitung
Smart Standby-Modus und Standby-Modus
Smart Standby-Modus
Der Smart Standby-Modus wird automatisch aktiv, wenn am SoundPort für die Dauer von 10 Minuten
- keine Musik wiedergegeben wird,
- kein Anruf eingeht oder ausgeht,
- keine Taste am SoundPort oder auf der Fernbedienung Assist (siehe Seite 24) gedrückt wird,
- kein Gerät verbunden oder getrennt wird und
- kein Sync-Vorgang läuft.
Im Smart Standby-Modus werden einzelne Schaltungsteile (DSP / Verstärker usw.) im SoundPort abgeschaltet um Energie zu sparen.
Aus dem Smart Standby-Modus heraus kann der SoundPort auf verschiedene Arten aufgeweckt werden:
- Ein iDevice wird am Lightning Connector angeschlossen.
- Ein mobiles Gerät wird über Connectivity Easy Pairing (NFC) gekoppelt.
- Die Wiedergabe an einem gekoppelten Bluetooth-Gerät wird fortgesetzt (nur, wenn Bluetooth als letzte
Quelle vor dem Smart Standby-Modus aktiv war).
- Die Wiedergabe an einem Gerät an AUDIO IN wird fortgesetzt (nur, wenn AUDIO IN als letzte Quelle
vor dem Smart Standby-Modus aktiv war).
- Eine der vier Gerätetasten SRC
- Ein gekoppeltes Bluetooth-Gerät wird abgemeldet.
- Eine Taste der Fernbedienung Assist (siehe Seite 24) wird gedrückt.
Angeschlossene Geräte an Lightning / USB werden auch im Smart Standby-Modus des SoundPort
geladen.
Ein Druck auf die Ein-/Ausschalttaste 1 schaltet den SoundPort in den Standby-Modus (siehe unten).
Nach 4 Stunden im Smart Standby-Modus schaltet sich der SoundPort automatisch in den Stand-
by-Modus.
Der Energieverbrauch ist im Smart Standby-Modus höher als im Standby-Modus (siehe Technische
Daten auf Seite 27).
2
, Freisprechen 3, + 4 oder – 5 wird gedrückt.
Deutsch
Standby-Modus
Drücken Sie die Ein-/Ausschalttaste 1, um den SoundPort in den Standby-Modus auszuschalten.
Im Standby-Modus kann das Gerät nur über die Ein-/Ausschalttaste
/ Aus der Fernbedienung Assist (siehe Seite 24) wieder eingeschaltet werden.
Im Standby-Modus erfolgt keine Aufladung angeschlossener Geräte an Lightning / USB.
Der Energieverbrauch ist im Standby-Modus niedriger als im Smart Standby-Modus (siehe Technische
Daten auf Seite 27).
1
am SoundPort oder die Taste Ein
23
Page 24
SoundPort / SoundPort Compact / SoundPort Mini
Bedienungsanleitung
Zubehör
Zubehör
Intarsien
Deutsch
Mit den als Zubehör erhältlichen Intarsien können Sie Ihren SoundPort nach Ihren Bedürfnissen individualisieren. Fragen Sie Ihren Fachhändler nach passenden Intarsien für Ihren SoundPort, SoundPort
Compact und SoundPort Mini.
Fernbedienung - Assist
Mit der als Zubehör erhältlichen System Fernbedienung Assist können Sie die Funktionen Ihres SoundPort
steuern. Wenn Ihr Loewe Gerät mit einer aktuellen Assist ausgeliefert wurde können Sie die vorhandene
Fernbedienung verwenden (siehe Liste der Fernbedienungsvarianten auf Seite 26).
Die Fernbedienung muss zunächst für die Bedienung Ihres SoundPort eingestellt werden. Die Gerätetasten
(je nach Fernbedienungsvariante) STB – VIDEO – AUDIO – DVD– REC– RADIO– SP können für die
Bedienung Ihres SoundPort eingestellt werden.
Gewünschte Gerätetaste und gleichzeitig STOP-Taste für 5 Sekunden drücken, bis die
zugehörige LED-Anzeige der gewählten Gerätetaste zweimal blinkt.
Dann den zweistelligen Geräte-Code 31 für Soundport eingeben. Die LED über der gewählten Gerätetaste blinkt zweimal.
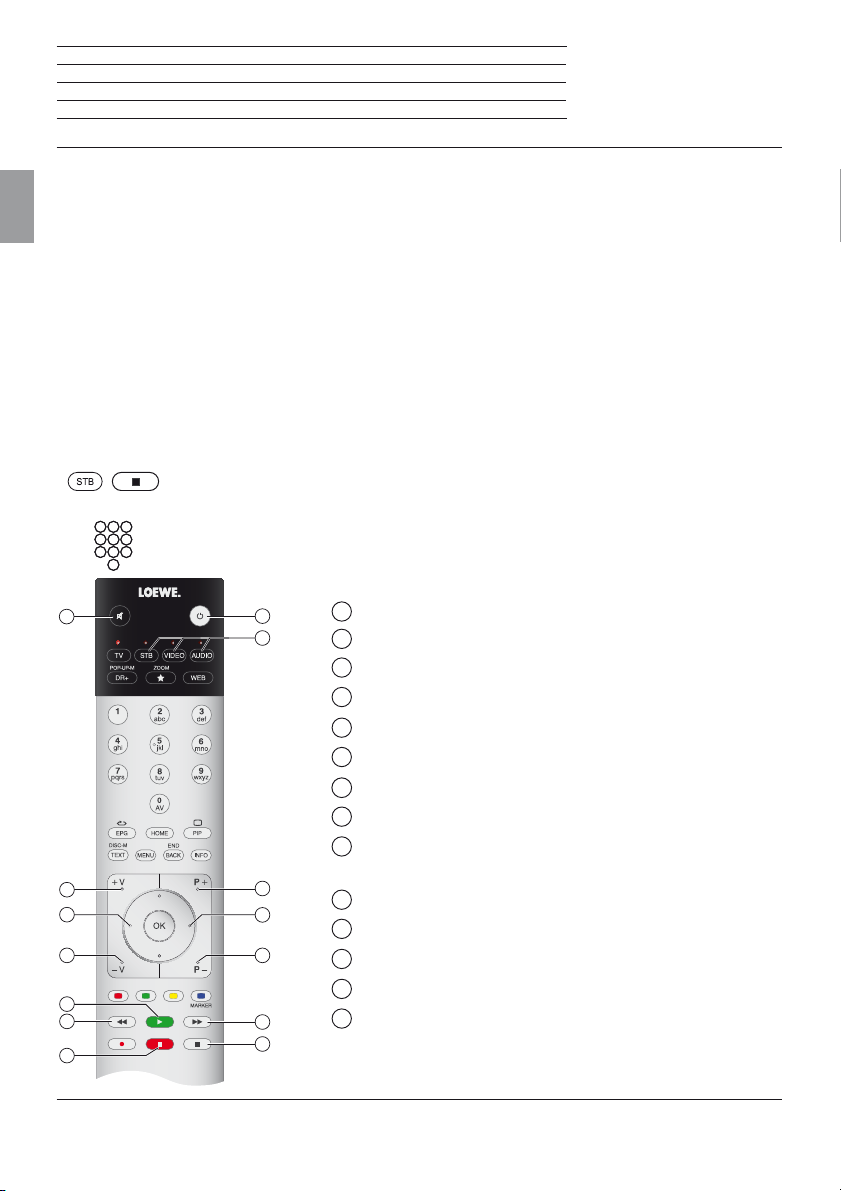
Tastenbelegung
1
1
2
3
4
5
6
7
8
9
10
11
12
13
14
Ton ein/aus
2
Lautstärke+
3
Klangeinstellung – (vorherige Klangeinstellung)
4
Lautstärke–
5
Wiedergabe
6
Vorheriger Titel
Pause
7
8
Ein / Aus
9
Gerätetaste für SoundPort einstellen (siehe oben) /
(1
(1
(1
Umschalten auf SoundPort-Bedienung
10
Quellenwahl + (nächste Audio-Quelle)
11
Klangeinstellung + (nächste Klangeinstellung)
12
Quellenwahl – (vorherige Audio-Quelle)
13
Nächster Titel
Stop
(1
14
(1
(1
Funktion nur bei Audio-Quellen über Lightning Connector, Bluetooth und USB-Audio verfügbar.
24
Page 25
SoundPort / SoundPort Compact / SoundPort Mini
Bedienungsanleitung
Zubehör
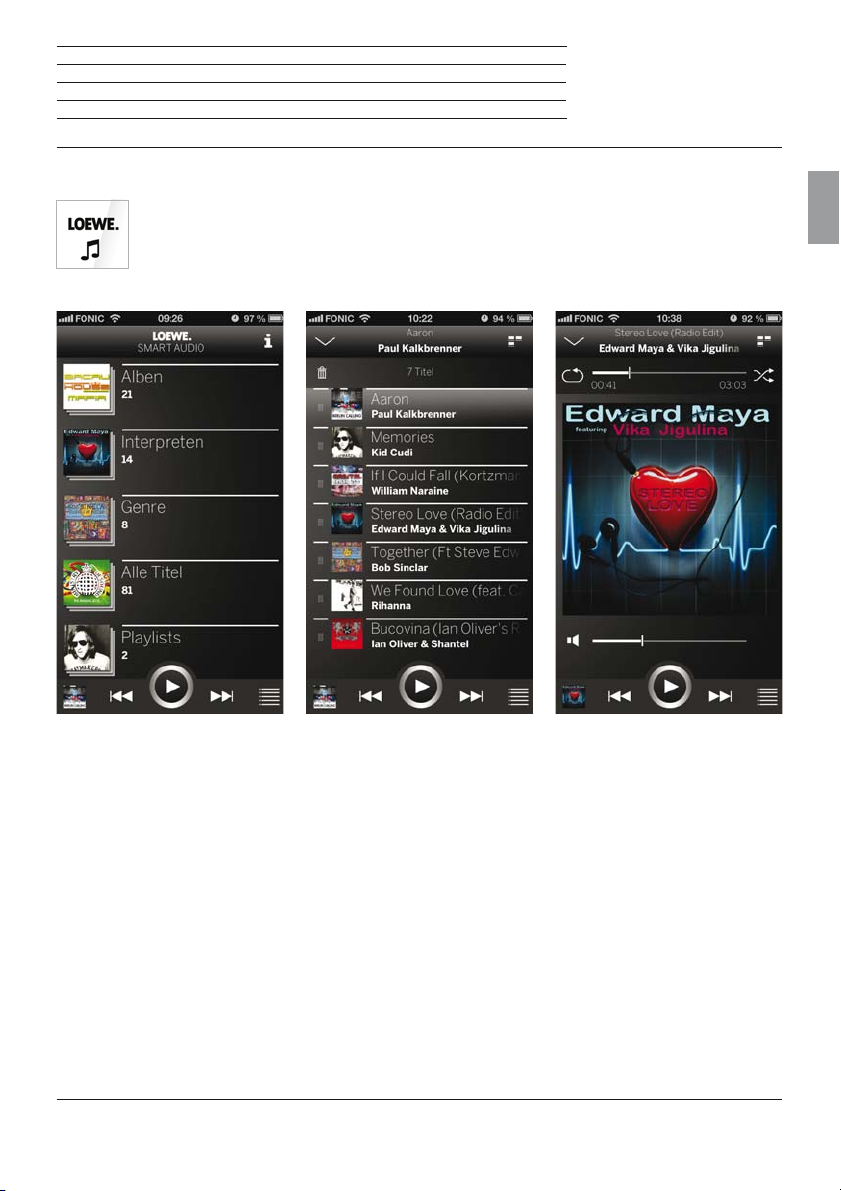
Smart Audio App
Durch und durch smart: Die Loewe Smart Audio App. Erleben Sie Musik, die Sie auf Ihrem
Smartphone gespeichert haben, jetzt mit dem intuitiven und hochwertigen Loewe Audioplayer.
Kostenfrei erhältlich im Apple App Store oder Google Play Store.
Der Startbildschirm bietet einen
strukturierten Überblick der
lokal gespeicherten Musik. Auf
einen Blick lassen sich die Inhalte
erfassen und mit nur wenigen
Bedienschritten gelangt man zu
seinem Wunschtitel.
Ganz automatisch werden
alle zuletzt angehörten Titel
der aktuellen Wiedergabeliste
hinzugefügt. Diese ist immer und
überall durch das Listen-Symbol
unten rechts zu erreichen. In dieser
Liste können Titel gelöscht oder
verschoben werden. Hierzu dient
das Papierkorb-Symbol oder der
linke Bereich jedes Listeneintrags.
Die aktiven Ecken bieten nicht nur
den Sprung in die Wiedergabeliste,
sondern man gelangt auch mit nur
einem Klick zum Startbildschirm
oder zum Player.
Deutsch
Der Player zeigt immer das aktuell
laufende Lied mit all seinen
Steuerungs-möglichkeiten. Mit
dem AirPlay-Symbol lassen sich
ganz leicht alle verfügbaren
Lautsprecher auswählen.
25
Page 26

SoundPort / SoundPort Compact / SoundPort Mini
Bedienungsanleitung
Unterstützte iDevices
Verwendbare Fernbedienungsvarianten
Unterstützte iDevices
Stand 18. Februar 2014.
Deutsch
Sound Port – Lightning Connector:
iPhone 5, iPhone 5c, iPhone 5s
iPad (4. Generation), iPad mini, iPad mini mit Retina Display, iPad Air
iPod touch (5. Generation), iPod nano (7. Generation)
Sound Port – USB:
iPhone, iPod touch, iPod nano
Sound Port Compact – Lightning Connector:
iPhone 5, iPhone 5c, iPhone 5s
iPad (4. Generation), iPad mini, iPad mini mit Retina Display, iPad Air
iPod touch (5. Generation), iPod nano (7. Generation)
Sound Port Compact – USB:
iPhone, iPod touch, iPod nano
Sound Port Mini – Lightning Connector:
iPhone 5, iPhone 5c, iPhone 5s
iPod touch (5. Generation), iPod nano (7. Generation)
Sound Port Mini – USB:
iPhone, iPod touch, iPod nano
Verwendbare Fernbedienungsvarianten
In der Liste sind die Fernbedienungsvarianten aufgeführt, mit denen die Funktionen des Soundports
gesteuert werden können.
Wie Sie die Fernbedienung auf die Bedienung des SoundPort einstellen finden Sie auf Seite 24.
Die Verfügbarkeit des Geräte-Codes 31 ist von der Variante der Fernbedienung abhängig. Die Artikel-
nummer/Variante können Sie im Batteriefach der Fernbedienung ablesen.
Assist 1 (TV) 89900A13 / 89900A14
Assist 1 (MediaVision) 89900A11
Assist 1 (HomeCinema) 89900A12
Assist 1 (SoundVision) 89900A10
Assist 1 (MultiContr. II) 89900A09
Assist 2 (TV) 89950A23
Assist 2 (SoundBox) 89950A20
Assist 2 (AirSpeaker) 89950A22
26
Page 27
SoundPort / SoundPort Compact / SoundPort Mini
Bedienungsanleitung
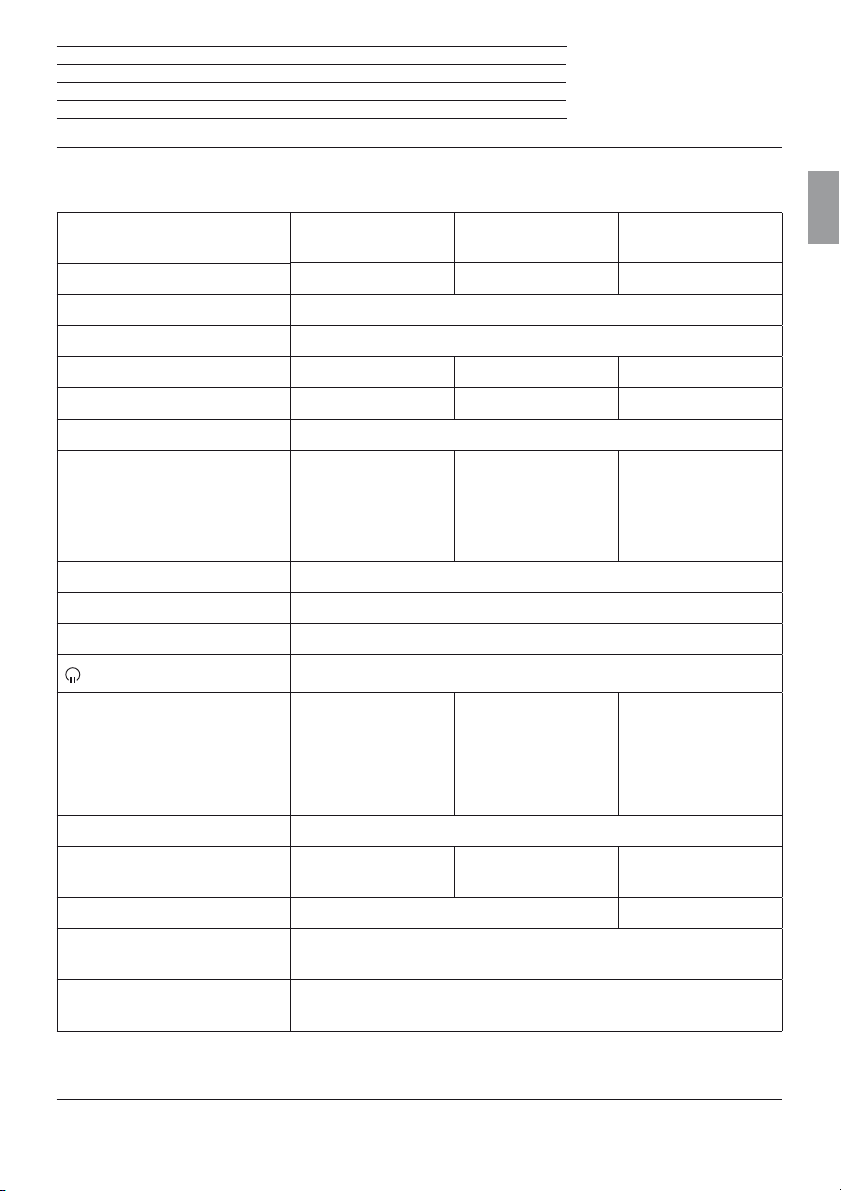
Technische Daten
Technische Daten
SoundPort SoundPort
Compact
SoundPort
Mini
Artikelnummer 52227x00 52228x00 52229x00
Betriebstemperatur 5 °C ... 35 °C
Feuchtigkeit 30 % ... 85 % (keine Kondensation)
Abmessungen (B x H x T) (ca.) 550 x 126 x 201 mm 415 x 109 x 178 mm 280 x 91 x 153 mm
Gewicht 5,5 kg 3,6 kg 1,9 kg
AC-IN (Netzspannung) 220 - 240 Volt, 50/60 Hz
Leistungsaufnahme:
On-Mode
(max. Audioleistung)
On-Mode (1/8 Audioleistung)
Smart Standby-Modus
Standby-Modus
103 W
51 W
2,1 W
< = 0,5 W
62 W
40 W
2,1 W
< = 0,5 W
48 W
35 W
0,8 W
< = 0,5 W
USB A 2.0, Typ A, Ladefunktion, maximal 2,1 A
USB B PC Audio, iTunes Lightning Sync
AUDIO IN Buchse 3,5 mm Klinke, 1.0 Vrms, 10 kOhm
Kopfhörer, 32-200 Ohm
Lautsprecher 2 Hochton-
Lautsprecher, je 15 W
2 Breitband-
Lautsprecher, je 20 W
2 Woofer, je 60 W
2 Breitband-
Lautsprecher, je 20 W
1 Woofer, 60 W
2 Breitband-
Lautsprecher, je 8 W
1 Woofer, 20 W
Übertragungsbereich 65 Hz - 20 kHz
Ausgangsleistung
(Sinus / Musik)
2 x 17 W + 1 x 50 W /
2 x 34 W + 1 x 100 W
2 x 10 W + 1 x 20 W /
2 x 20 W + 1x 40 W
2 x 6 W + 1 x 10 W /
2 x 12 W + 1 x 20 W
Lautstärkestufen 48 24
Drahtlose Übertragung Bluetooth 2,4 GHz, 10 m Reichweite
NFC
Bluetooth-Protokolle A2DP, 2.1+EDR, AVRCP 1.4, HS, HFP 1.6 (Wideband Speech),
aptX-Decoder, AEC
Deutsch
27
Page 28
SoundPort / SoundPort Compact / SoundPort Mini
Bedienungsanleitung
Schutz der Umwelt
Konformitätserklärung
Schutz der Umwelt
Verpackung und Karton
Deutsch
Für die Entsorgung der Verpackung haben wir entsprechend den nationalen Verordnungen ein Entgelt
an beauftragte Verwerter entrichtet, die die Verpackung vom Fachhändler abholen. Dennoch empfehlen
wir, den Originalkarton und das Verpackungsmaterial gut aufzubewahren, damit das Gerät im Bedarfsfall
optimal geschützt transportiert werden kann.
Das Gerät
Achtung: Die EU-Richtlinie 2002/96/EG regelt die ordnungsgemäße Rücknahme, Be-
handlung und Verwertung von gebrauchten Elektronikgeräten. Elektronische Altgeräte
müssen deshalb getrennt entsorgt werden. Werfen Sie dieses Gerät zur Entsorgung
bitte nicht in den normalen Hausmüll! Sie können Ihr Altgerät kostenlos an ausgewiesene
Rücknahmestellen oder ggf. bei Ihrem Fachhändler abgeben, wenn Sie ein vergleichbares
Weitere Einzelheiten über die Rücknahme (auch für Nicht-EU-Länder) erhalten Sie von Ihrer örtlichen
Verwaltung.
Batterien
neues Gerät kaufen.
Verbrauchte Batterien dürfen nach der Batterieverordnung nicht mehr in den Hausmüll
entsorgt werden. Werfen Sie verbrauchte Batterien unentgeltlich in die beim Handel aufgestellten Sammelbehälter. Auch bei Ihrem Fachhändler finden Sie einen Sammelbehälter
für verbrauchte Batterien.
Konformitätserklärung
Das Gerät trägt das CE-Zeichen und erfüllt die geforderten EU-Richtlinien. Die vollständige Konformitätserklärung können Sie von unserer Homepage herunterladen.
28
Page 29
SoundPort / SoundPort Compact / SoundPort Mini
Bedienungsanleitung
Rechtliche Hinweise
Impressum
Rechtliche Hinweise
“© 2012 CSR plc and its group companies.
The aptX® mark and the aptX logo are trade marks of CSR plc or one of its group companies and may
be registered in one or more jurisdictions.”
„Made for iPod“, „Made for iPhone“ und „Made for iPad“ bedeuten, dass ein elektronisches Zusatzgerät
speziell für den Anschluss an den iPod, iPhone bzw. das iPad konstruiert ist und vom Entwickler dahingehend zertifiziert wurde, dass es den Apple-Leistungsnormen entspricht. Apple übernimmt keine
Gewähr im Hinblick auf die Verwendbarkeit dieses Gerätes oder dessen Konformität mit den Standards
für Sicherheit und Funkentstörung.
iPod, iPhone, iPad, iPad mini und iTunes sind in den USA und anderen Ländern eingetragene Marken
von Apple Inc.
SoundPort / SoundPort Compact:
Deutsch
SoundPort Mini:
Impressum
Loewe Technologies GmbH
Industriestraße 11
D-96317 Kronach
Alle Rechte, auch die der Übersetzung, Technische Änderungen sowie Irrtümer vorbehalten.
Redaktionsdatum 05/14-4.0 TB
© Loewe Technologies GmbH, Kronach
29
Page 30

SoundPort / SoundPort Compact / SoundPort Mini
Bedienungsanleitung
Deutsch
30
Page 31

SoundPort / SoundPort Compact / SoundPort Mini
Operating instructions
Table of Contents
WELCOME! ...................................................................................................................................................32
For your safety .............................................................................................................................................33
Operating controls .......................................................................................................................................35
Connections ................................................................................................................................................36
Start-up ........................................................................................................................................................ 37
Switching ON/OFF.......................................................................................................................................38
Charging the audio source ..........................................................................................................................38
Source selection ..........................................................................................................................................39
Sound settings ............................................................................................................................................. 40
Cable connection ..........................................................................................................................................41
Lightning Connector ....................................................................................................................................42
Bluetooth link ...............................................................................................................................................44
USB Audio ....................................................................................................................................................46
PC Audio ....................................................................................................................................................... 47
English
Sync ..............................................................................................................................................................48
Audio playback / Adjusting the volume ..................................................................................................... 49
Handsfree function ......................................................................................................................................50
Smart Standby mode and Standby mode ..................................................................................................51
Accessories .................................................................................................................................................. 52
Supported iDevices .....................................................................................................................................54
Applicable remote control versions ............................................................................................................ 54
Technical Data ..............................................................................................................................................55
Environmental protection ...........................................................................................................................56
Declaration of conformity............................................................................................................................56
Legal information ......................................................................................................................................... 57
Legal details ................................................................................................................................................. 57
31
Page 32

SoundPort / SoundPort Compact / SoundPort Mini
Operating instructions
WELCOME!
Thank you
for choosing a Loewe product!
Loewe stands for the highest standards of technology, design and ease of operation. This applies equally
for TV, video, audio and accessories. Neither technology nor design is an end in itself, but both are intended
to provide our customers with the best possible audio and visual experience. Our design is not influenced
by short-term, fashionable trends. You have, after all, purchased a high-quality piece of equipment that
you do not want to be tired of tomorrow or the day after.
English
Delivery specifications
• SoundPort or SoundPort Compact or SoundPort Mini
• Mains cable
• Audio cable, 3.5 mm jack
• USB cable (type A–B)
• This instruction manual
Performance
Connection options
Bluetooth 2.1 + EDR
Connectivity Easy Pairing (for connection with NFC-enabled devices)
Apple Lightning Connector
AUDIO IN (stereo audio input 3.5 mm jack)
USB A (USB streaming / charging of connected audio sources)
USB B (USB Speaker / Sync)
Headphone jack (3.5 mm stereo audio output)
Replay functions
Support of audio codecs (aptX, SBC)
Bluetooth handsfree equipment
About this instruction manual
The information in this manual refers to the Loewe products SoundPort (item no. 52227x00), SoundPort
Compact (item no. 52228x00), SoundPort Mini (item no. 52229x00).
In the instruction manual the term SoundPort is used as a collective term for all three SoundPort device
versions. In the event that differences in the use / operation of the device versions occur, each SoundPort
device type is described separately.
In the instruction manual the term iDevices is used as a collective term for the Apple devices iPhone,
iPad, iPad mini and iPod.
For best results regarding safety and the longevity of the set, we recommend you read the chapter "For
your safety” (see page 33 before switching it on for the first time).
32
Page 33
SoundPort / SoundPort Compact / SoundPort Mini
Operating instructions
For your safety
For your safety, and to avoid unnecessary damage to your unit, please read and follow the
safety instructions below:
Intended use and ambient conditions
This unit is intended exclusively for playback of audio signals. It must not be used in rooms with a high
level of humidity (e.g. bathroom, sauna) or a high dust concentration. The manufacturer‘s warranty
is only valid for use in the specified permissible environment.
If the unit is used outdoors, make sure that it is protected from moisture (rain, dripping water and splash-
ing water or dew). High humidity and dust concentrations lead to leakage currents in the device. This can
result in a shock hazard by touching it or even fire.
If you have moved the unit out of the cold into a warm environment, leave it switched off for about an hour because of a
possible formation of condensation.
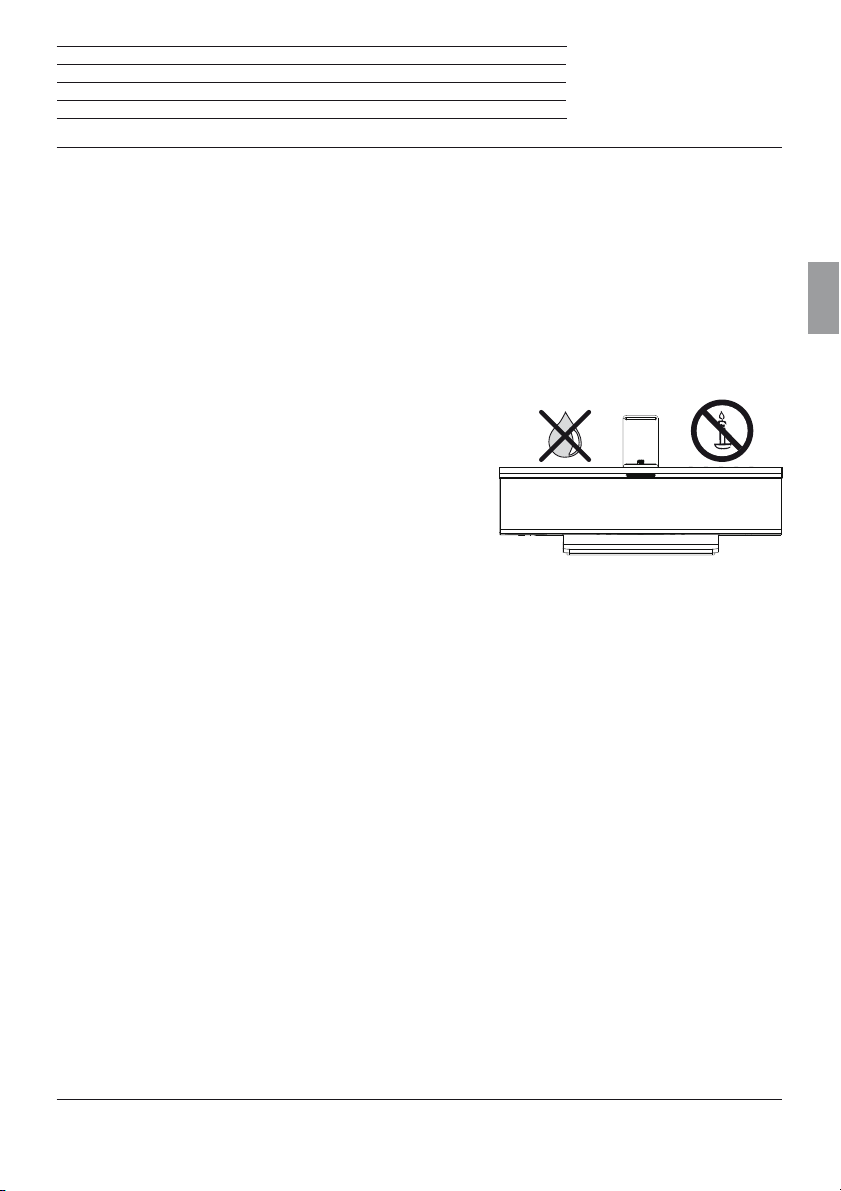
Do not place objects containing liquids on top of the unit.
Protect the device against dripping and splashing water.
Candles or naked flames must be kept away from the unit at
all times to prevent it from catching fire.
Never place the device in a location where it is exposed to vi-
brations. This can lead to material overload.
English
Power supply
Incorrect voltages can damage the unit. This device may only be connected to a power supply with the
voltage and frequency indicated on the type plate using the supplied mains cable. The mains plug of the
unit must be easily accessible so that the device can be disconnected from the mains at any time. When
unplugging the unit from the mains, pull at the connector body and not at the cable.
Lay the mains cable so that it cannot be damaged. The connecting cable may not be kinked or laid over
sharp edges, stood on or exposed to chemicals; the latter also applies to the unit as a whole. A mains
cable with damaged insulation can cause electric shocks and poses a fire risk.
Supervision
Do not allow children to use the device without supervision or to play in the immediate vicinity of the
device. The device could tip over, be pushed off or pulled down from the stand surface and injure someone. Do not allow the switched-on device to run unattended.
33
Page 34

SoundPort / SoundPort Compact / SoundPort Mini
Operating instructions
For your safety
Air circulation and high temperatures
Ensure that there is at least 3 cm free space on the sides and above the set for air circulation, if the set is
placed in a cabinet or on a shelf.
Like any electronic device, your unit requires air for cooling. Obstruction of the air circulation can cause
fires.
Prevent metal items, needles, paper clips, liquids, wax, or similar items, from getting into the interior of
English
the device through the openings of the device covers. Such objects can cause short circuits in the unit,
which could possibly cause a fire.
If something should get into the interior of the set then immediately unplug the mains plug of the device
and contact the field service for more information.
Set-up
Place the unit on an even, firm, horizontal surface. Particularly make sure that the set does not protrude
to the front and laterally when placed in or on pieces of furniture.
Set up the device where it is not exposed to direct sunlight and where it is not exposed to additional
heating by radiators.
Volume
Loud music can lead to ear damage. Avoid extreme volume especially over long periods.
Make sure that the volume is turned down on the TV set or the TV set is turned off before
you leave the room.
Thunder storms
In the event of a thunderstorm, pull out the mains plug and all connected cables from the device. A
voltage surge caused by lightning conducted through the mains could damage the unit. The mains plug
and all connected cables should also be pulled out during long periods of absence.
Repairs and accessories
Warning: Under no circumstances, do not open or remove the housing cover, otherwise
you will come into contact with dangerous voltages or be exposed to other hazards. There
are no parts inside the unit that can be repaired by the user. Have your device repaired
or serviced by authorised technicians only.
Only use original accessories, if possible.
Cleaning and care
Switch off the device with the main switch prior to cleaning.
Clean the aluminium surface with a soft, slightly damp, clean and colour-neutral cloth only, without any
aggressive or scouring cleaning agents.
You can remove any dust on the speaker surface by carefully using a vacuum cleaner if needs be.
34
Page 35
SoundPort / SoundPort Compact / SoundPort Mini
Operating instructions
Operating controls
7
6
8
1
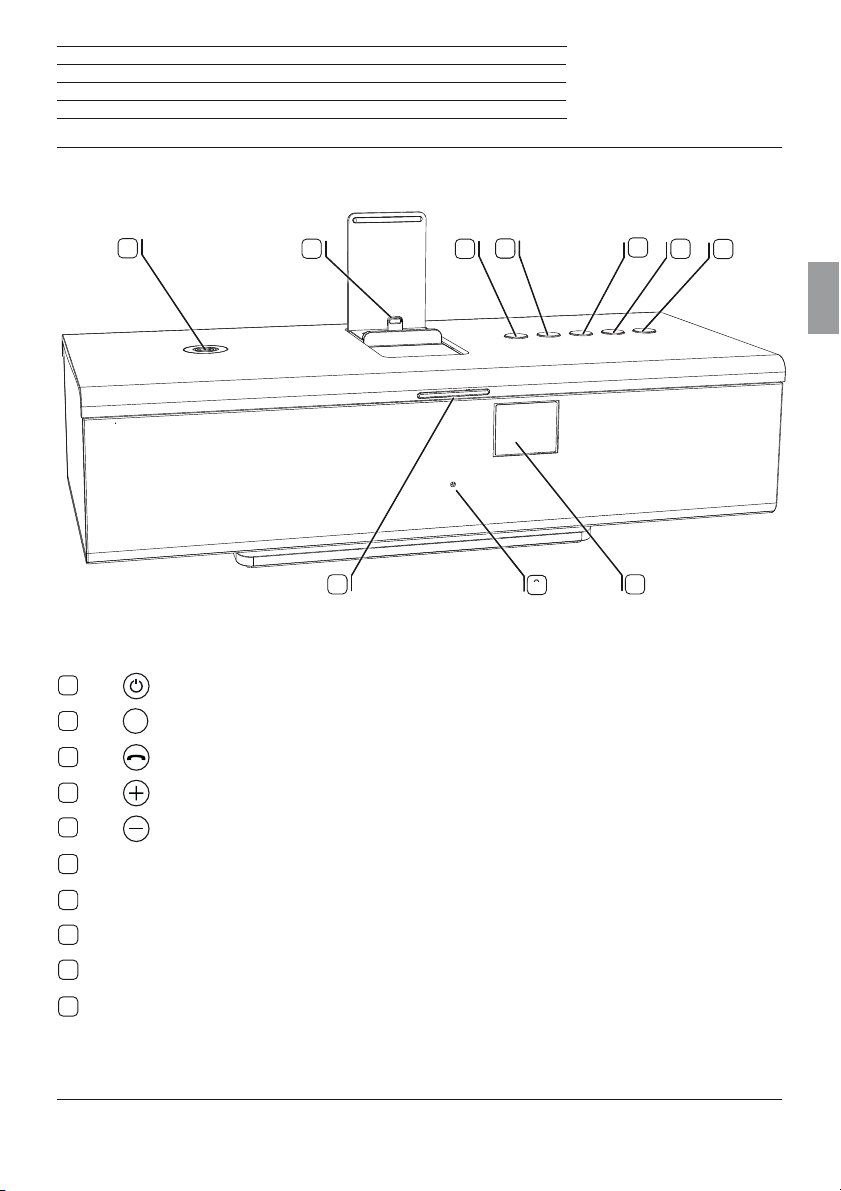
Key (Switching ON/OFF)
2
3
4
5
SRC
Key
(Source selection / Sound settings)
Key (Handsfree talking / Bluetooth link)
Key (Volume +)
Key (Volume –)
4
5
9
3
2
1
English
10
6
Apple Lightning Connector (max. 2.1A)
7
Connectivity Easy Pairing Antenna (for connection with NFC-enabled devices)
8
LED display
9
Microphone for handsfree talking (hidden behind the speaker cover)
10
Infrared receiver (hidden behind the speaker cover)
35
Page 36
SoundPort / SoundPort Compact / SoundPort Mini
Operating instructions
Connections
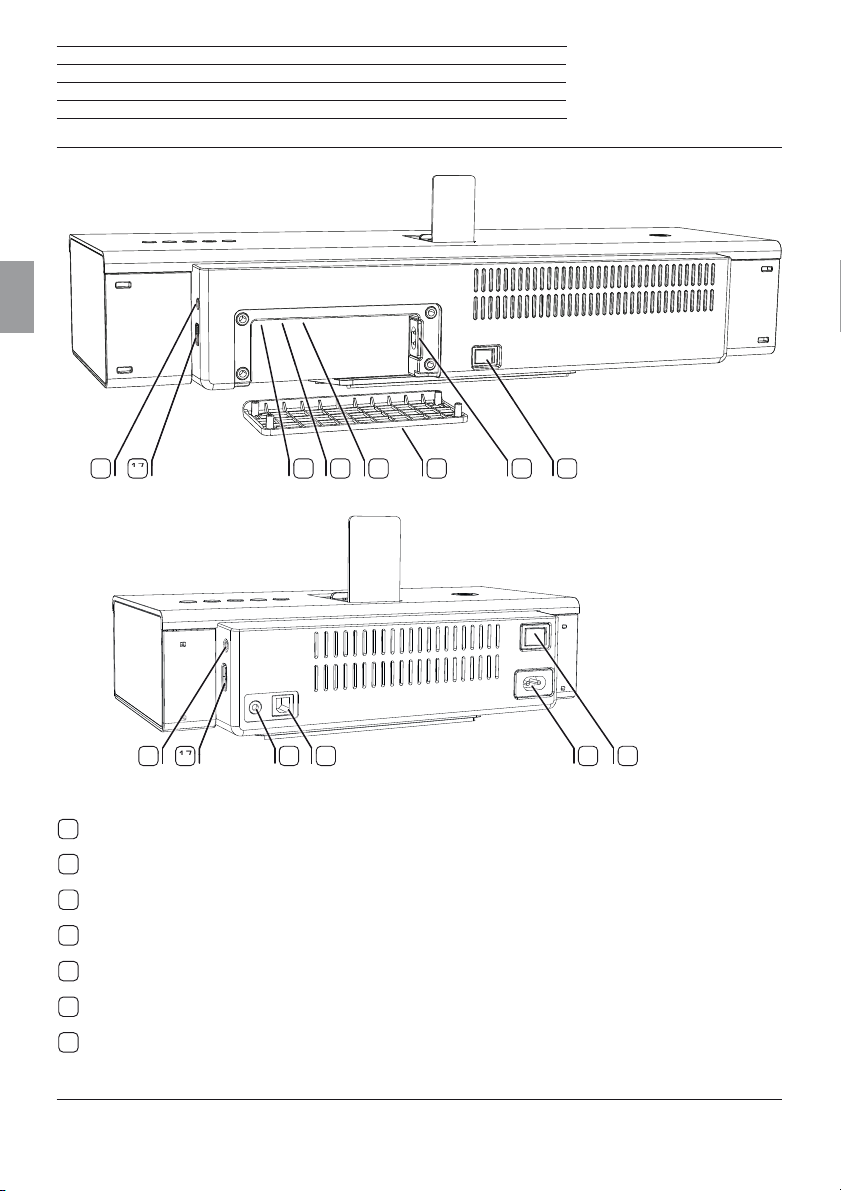
SoundPort / SoundPort Compact
English
SoundPort Mini
1112131415161718
1718
11
Power switch
12
AC-IN (mains socket)
13
Cable cover (removable)
14
AUDIO IN (stereo audio input, 3.5 mm jack)
15
USB B connection
16
USB A connection
17
Headphone output (3.5 mm jack)
36
11121615
Page 37
SoundPort / SoundPort Compact / SoundPort Mini
Operating instructions
Start-up
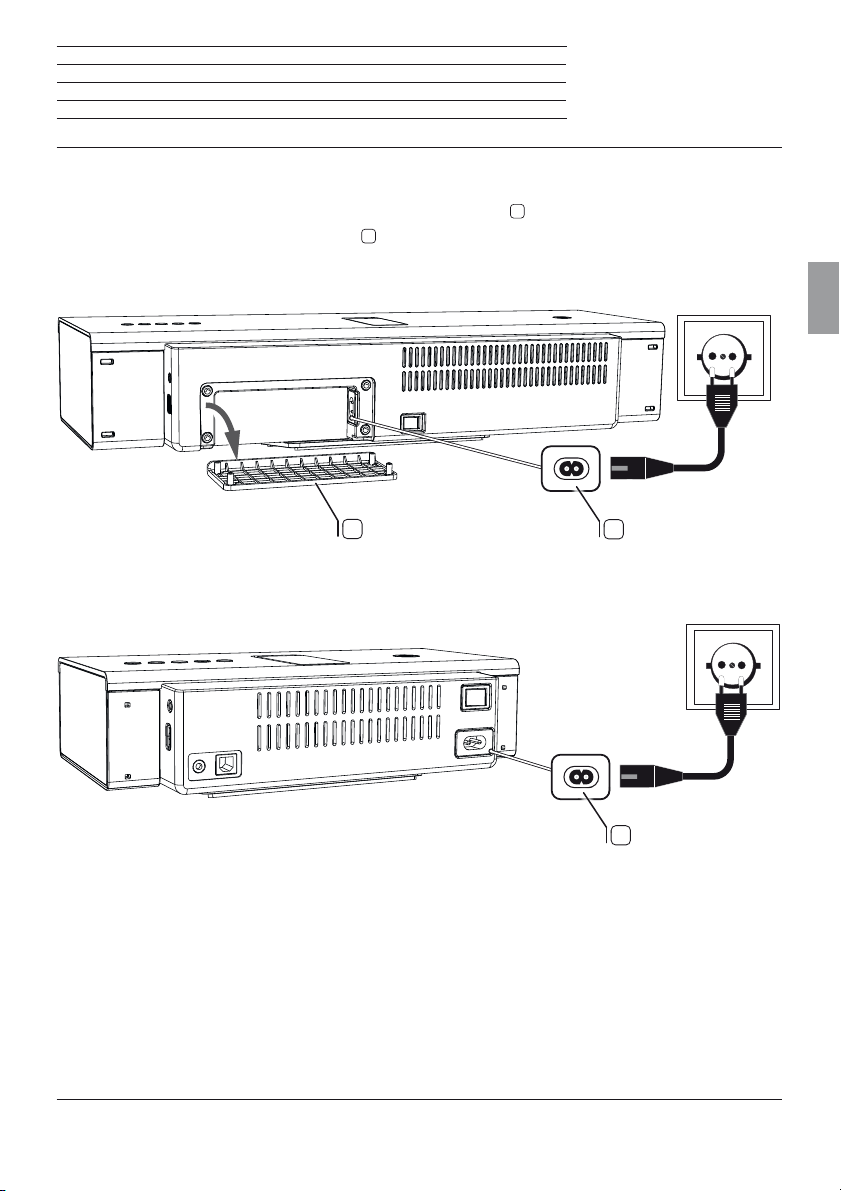
Connecting to the mains supply
Remove from SoundPort / SoundPort Compact the cable cover 13 on the rear side of the device.
Plug the mains cable into the mains socket
SoundPort / SoundPort Compact
12
and connect it to a 220-240 V 50/60 Hz socket.
English
SoundPort Mini
13
12
12
37
Page 38
SoundPort / SoundPort Compact / SoundPort Mini
Operating instructions
Switching ON/OFF
Charging the audio source
Switching on
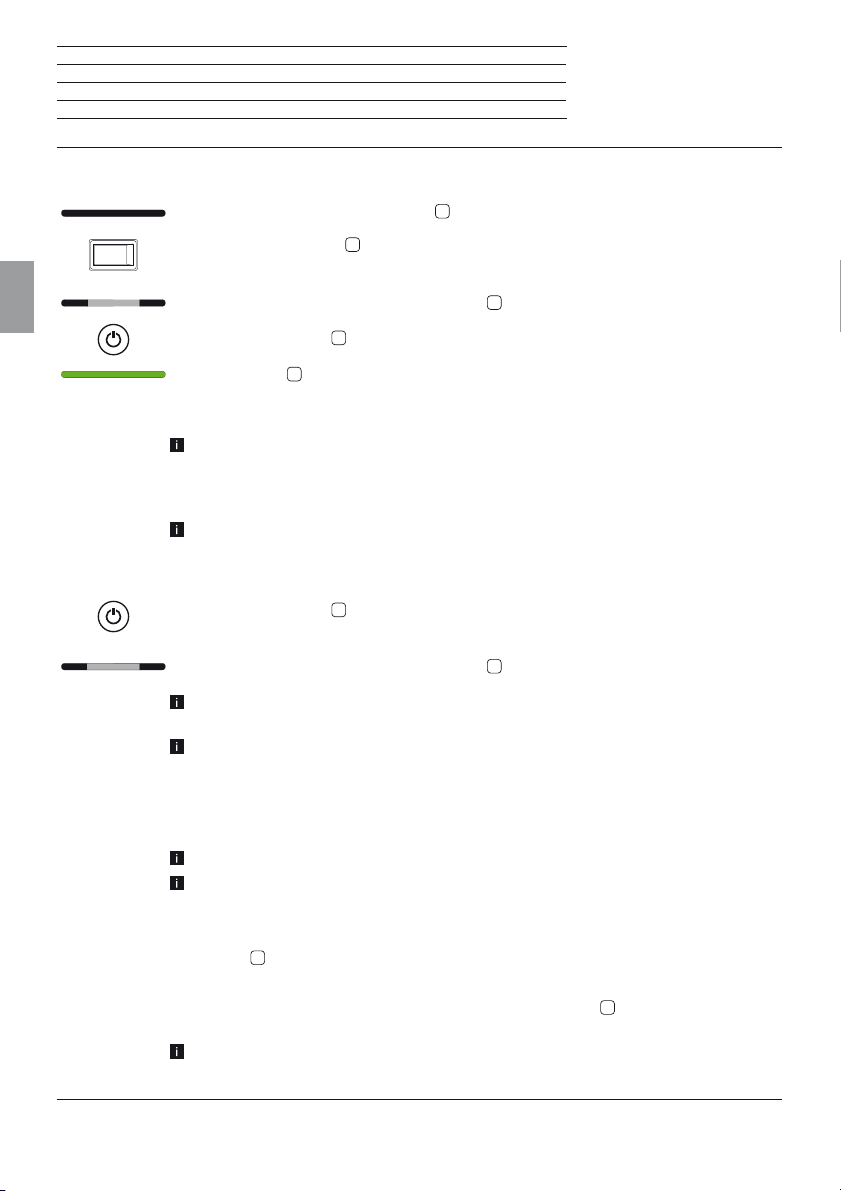
When switched off, the LED display is 8 dark.
Switch the power switch
The SoundPort is in the Standby mode.
English
The middle two segments of the LED display
Press the ON/OFF key
The LED display
When switching on later, the last selected source remains active.
For the colours of the LED display for each source, see page 39.
After 10 minutes without music playback, receiving or sending a call, pressing a key
on the SoundPort or on the Assist remote control (see page 52), connecting or
disconnecting a device and running a sync process, the SoundPort will automatically
switch to Smart Standby mode.
For further information on the energy modes see page 51.
Switching off
Press the ON/OFF key 1 on the unit.
The SoundPort switches to the Standby mode.
11
to position ON.
8
light dimmed.
1
on the unit.
8
lights up green on the very first start (AUDIO IN source).
The middle two segments of the LED display
8
light dimmed.
After 4 hours in Smart Standby mode, the SoundPort automatically switches to the
Standby mode.
For further information on the energy modes see page 51.
Charging the audio source
You may charge the battery of your audio source, e.g., a mobile phone, iPad, etc. via your SoundPort.
The power switch of the SoundPort must be switched on.
Only one device should be charged at the same time.
Charging of iDevices at the Lightning Connector:
Plug your iDevice with Lightning Connector on the Lightning Connector built-in in the
SoundPort
Charging of USB audio sources:
Connect the type A plug of the USB cable into the USB socket
this, use a USB cable with type A plug suitable for your audio source (commercially available).
The connected device (Lightning / USB) is charged in both the operating and the Smart
Standby mode of the SoundPort. The audio source will not be charged in Standby mode.
38
6
(see pages 42 and 43).
16
of the SoundPort. To do
Page 39
SoundPort / SoundPort Compact / SoundPort Mini
Operating instructions
Source selection
Source selection
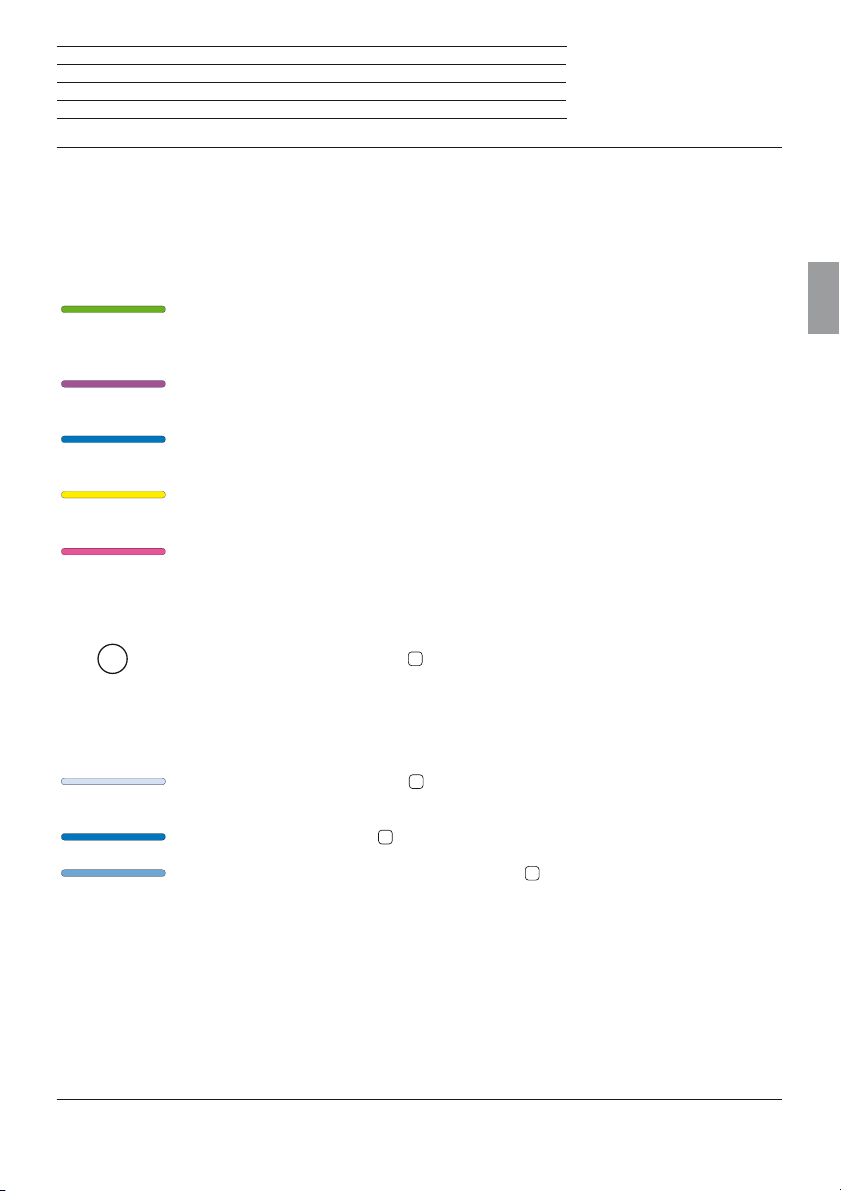
The SoundPort offers several ways to connect and select audio sources. Each source is assigned a different colour on the LED display.
LED colours of the individual sources
AUDIO IN (green)
How to connect an audio source via a 3.5 mm stereo cable to the AUDIO IN port of the
Soundport is described on page 41.
Apple Lightning Connector (violet)
How to connect iDevices to the Lightning Connector is described on page 42/43.
Bluetooth (blue)
How to link audio sources via Blutooth / NFC is described on pages 44/45.
USB Audio (yellow)
How to connect audio sources to USB is described on page 46.
PC Audio (pink)
How to connect the SoundPort as a USB device is described on page 47.
Selection of the source
SRC
Each time you press the SRC key
The sequence of the sources corresponds to the sequence of the LED colours described
above.
Having selected the source, the SoundPort tries to establish a connection to the audio
source via the selected port.
During the search, the LED display
search time is 30 sec).
If successful, the LED display
If the search was not successful the LED display
source colour (60% brightness).
2
you go to the next source.
8
flashes in the selected source colour (the maximum
8
lights up in the selected source colour.
8
lights up dimmed in the selected
English
39
Page 40
SoundPort / SoundPort Compact / SoundPort Mini
Operating instructions
Sound settings
Sound settings
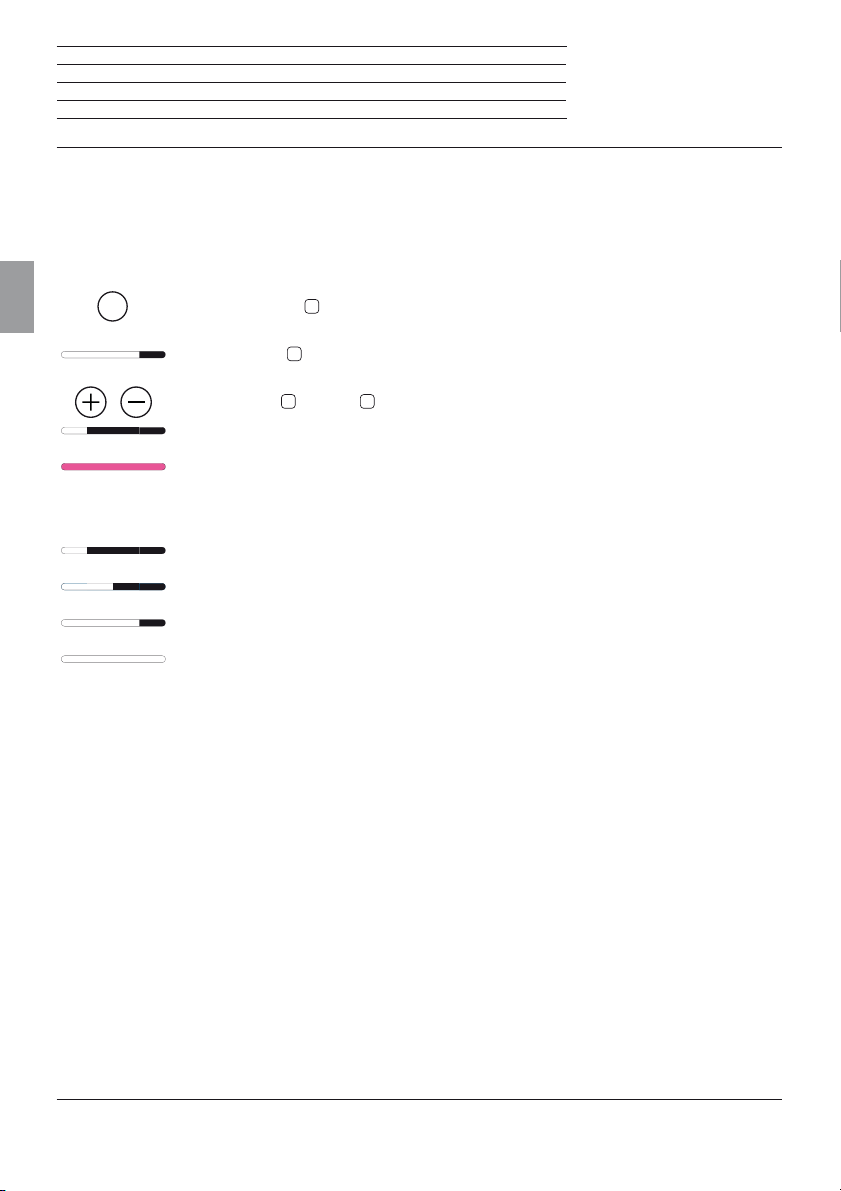
With your SoundPort you have the possibility to select predefined sound settings for audio playback.
Selecting the sound settings
English
SRC
Press the SRC key
The LED display
Press the + key
If no key is pressed for a few seconds, the previously selected source will be indicated again.
LED display of the sound settings
1 LED display: presetting flat
2 LED displays: presetting voice
3 LED displays: presetting classic
4 LED displays: presetting pop
2
on the SoundPort for a longer period (approx. 2 sec).
8
shows the last selected sound setting (e.g. classic).
4
or – key 5 repeatedly until the desired sound is selected (e.g. flat).
40
Page 41
SoundPort / SoundPort Compact / SoundPort Mini
Operating instructions
Cable connection
Connecting the audio source to AUDIO IN
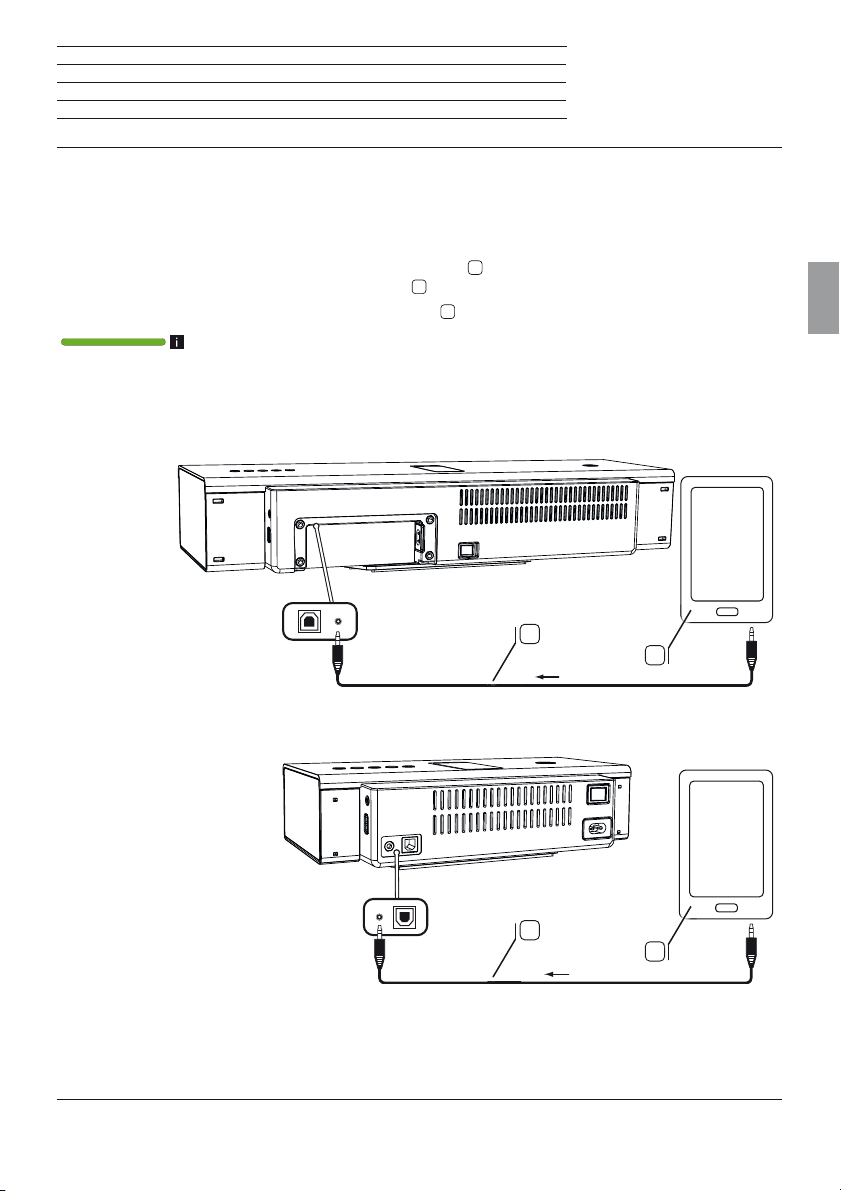
You can connect your SoundPort to your audio source, e.g., mobile phone, music player, etc., using an
audio cable (3.5 mm jack plug).
Connect the stereo audio input AUDIO IN
audio output of your audio source
To do so, use the supplied audio cable
14
A
of the SoundPort with the analogue stereo
.
S
with 3.5 mm jack plug.
AUDIO IN has been selected as source (see page 39).
The audio signal (see page 49) is now replayed via the audio cable.
SoundPort / SoundPort Compact
S
SoundPort Mini
English
A
S
A
41
Page 42
SoundPort / SoundPort Compact / SoundPort Mini
Operating instructions
Lightning Connector
Lightning Connector
Your SoundPort is equipped with an Apple Lightning Connector for iDevices (1. Thus, you can replay any
sound source (music, video, internet radio) from your iDevice with Lightning Connector via the speakers
of the SoundPort.
The iDevice connected to the Lightning connector is charged during operation and also in the Smart
Standby mode of the SoundPort (see page 38).
English
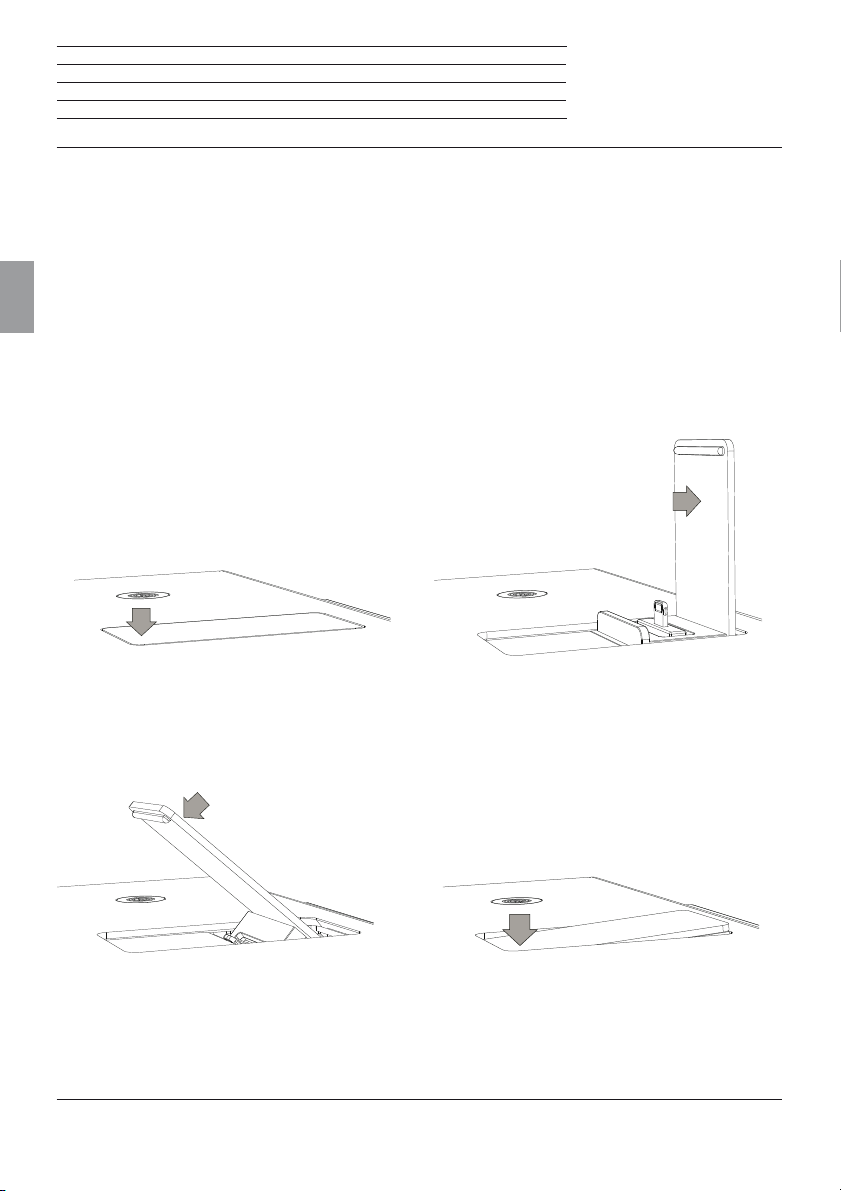
Opening the Lightning Connector
Press slightly on the top of the closed cover flap at its front. The Lightning Connector opens automatically
when the lock is released.
To fix the holder push the opened cover flap to the rear in its locking position. Now you can use the Lightning Connector for iDevices (see page 43).
Closing the Lightning Connector
Press the opened cover flap from the locking position to the front. Close the cover by pushing it down
beyond the closed end position. You will hear the engagement of the cover flap.
(1
Supported iDevices see page 54.
42
Page 43
SoundPort / SoundPort Compact / SoundPort Mini
Operating instructions
Lightning Connector
Connecting the audio source to the Lightning Connector
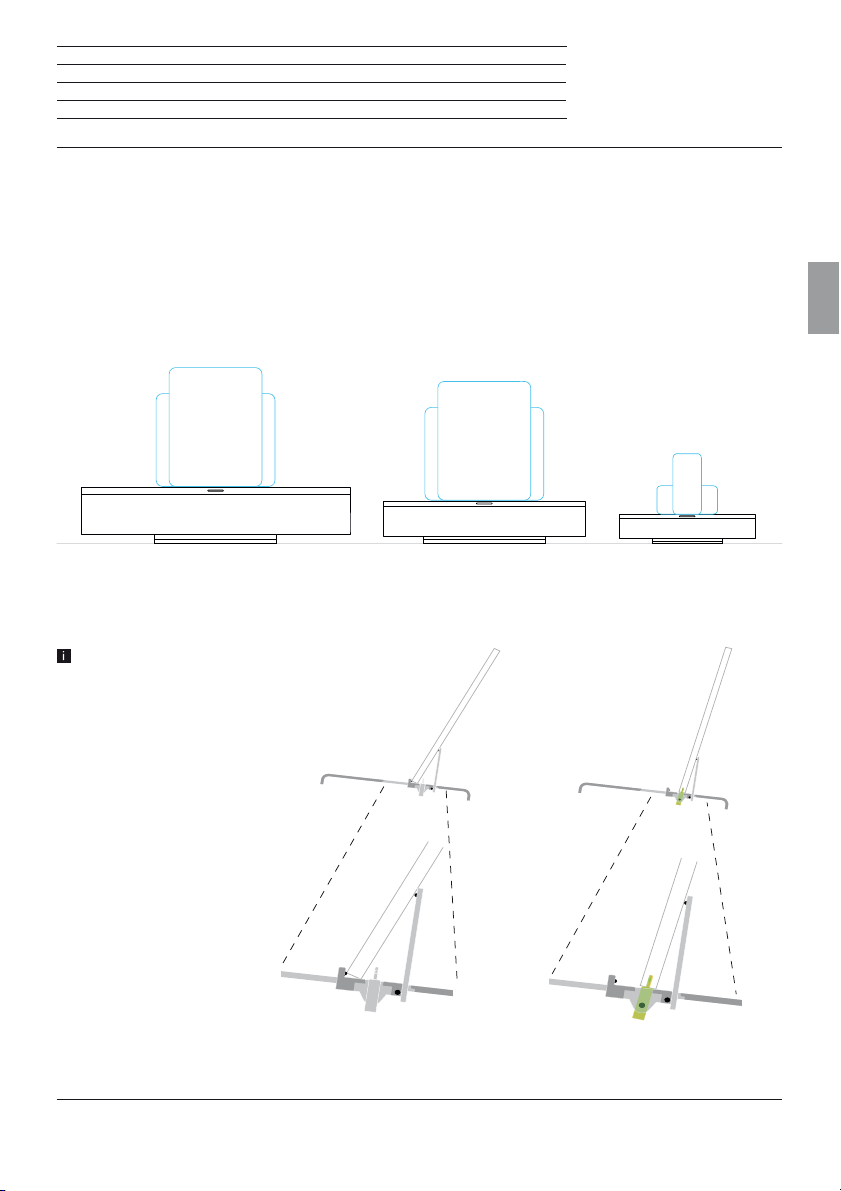
You can connect iDevices with Lightning Connector in vertical alignment with the built-in Lightning Connec-
(1
tor
. The iDevices can also be positioned horizontally. In this case, the connection is made via Bluetooth
(see page 44) or via USB cable connection
If the iDevice is plugged into the Lightning Connector of the SoundPort, it is ready for audio playback (see
page 49) or to sync with the PC / laptop (see page 48).
Below you will see which iDevice can be used on the SoundPort device variants (maximally with respect
to size).
SoundPort SoundPort Compact SoundPort Mini
iPad vertical/horizontal iPad vertical/horizontal iPhone 5 / iPod touch
(1
(see page 46).
vertical/horizontal
English
Please remove any protective cover from
your iDevice to ensure a reliable connection
to the lightning connector.
iDevice stored in the cover flap of the
Lightning Connector
(1
Supported iDevices see page 54.
iDevice plugged at the Lightning
Connector
43
Page 44
SoundPort / SoundPort Compact / SoundPort Mini
Operating instructions
Bluetooth link
Linking the audio source via Bluetooth
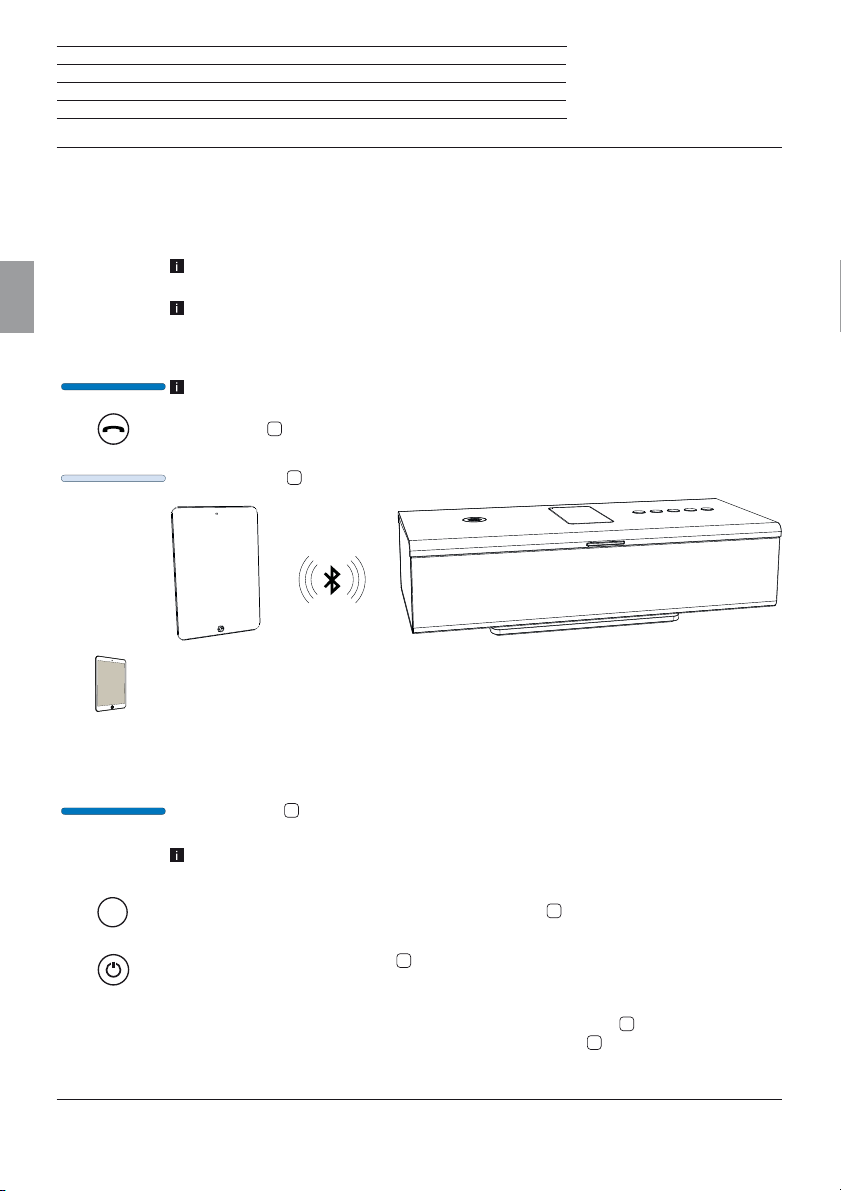
You can link your SoundPort to an audio source, e.g., smartphone, tablet PC, etc. using a wireless Bluetooth
connection. The audio sources must support the Bluetooth A2DP protocol.
The distance between your SoundPort and the audio source must be no more than
10 m (line of sight).
English
The SoundPort stores the last 5 audio sources linked via Bluetooth. In this way, the
link will be established more quickly when linking again. However, only one active link
is possible at the same time. If a new audio source is added, the "oldest" stored audio
source is deleted from the list of links.
Bluetooth has been selected as source (see page 39).
SRC
Press the key
3
on the SoundPort for a longer period (approx. 3 sec).
You hear a signal tone.
8
The LED display
flashes.
Enable the Bluetooth function of your audio source. If necessary, get help from the
instruction manual of your audio source.
If necessary, confirm the Bluetooth Search function of the audio source.
Now, Bluetooth devices will be searched near the audio source.
Select SoundPort_xx
(1
. If a code is requested, enter 0000.
After the linking is completed you hear a signal tone.
The LED display
8
lights up continuously, the SoundPort is now ready for audio playback
(see page 49).
For some audio sources, the link must be explicitly enabled before music playback can
be heard from the SoundPort.
2
When changing the source by pressing the SRC key
the ongoing music playback is
paused / stopped, but the link to the audio source remains.
1
When pressing the ON/OFF key
the SoundPort will be switched to the Standby mode.
An ongoing music playback is paused / stopped, the link with the audio source is interrupted.
After switching the SoundPort on again using the ON/OFF key
to relink to the audio source. In this state, the LED indicator
1
, the SoundPort tries
8
flashes.
After successful linking the LED will light up permanently.
(1
xx represents the last two positions of the MAC address of the SoundPort.
44
Page 45
SoundPort / SoundPort Compact / SoundPort Mini
Operating instructions
Connectivity Easy Pairing Link
Linking the audio source via Connectivity Easy Pairing
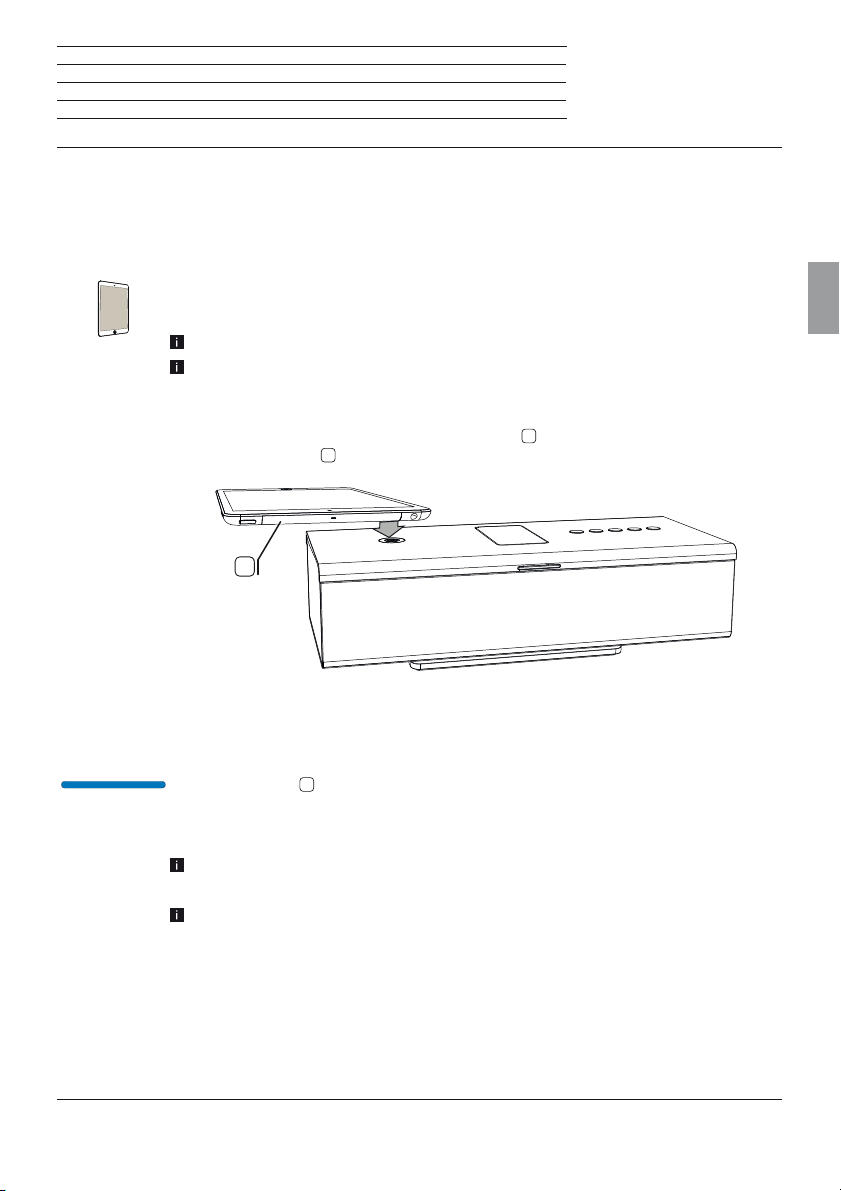
It is especially simple to link your SoundPort to your audio source, e.g., smartphone, tablet PC, etc., when
using the Connectivity Easy Pairing function (linking with NFC-enabled devices). For this purpose,
the audio source must support the NFC function.
Enable the NFC function and the Bluetooth function of your audio source. If necessary,
get help from the instruction manual of your audio source.
Find out the exact NFC detection area in the manual of your audio source.
The link via the Connectivity Easy Pairing function is permanently active for the
SoundPort (exception: Standby mode). Therefore, you do not have to change manually
to the Bluetooth source.
A
Hold the NFC detection area of your audio source
Easy Pairing antenna
7
of the SoundPort.
A
in the direction of the Connectivity
English
If necessary, confirm the inquiry of your audio source that it can be coupled to the SoundPort. After the linking is completed you hear a signal tone.
8
The LED indicator
lights up permanently.
Now, the SoundPort is linked to your audio source via Bluetooth and is ready for audio
playback (see page 49).
For some audio sources, the link must be explicitly enabled before music playback can
be heard from the SoundPort.
If another NFC-enabled audio source appears in the coupling area of the SoundPort,
this is linked with the SoundPort. The existing link to the previous audio source is
disconnected.
45
Page 46
SoundPort / SoundPort Compact / SoundPort Mini
Operating instructions
USB Audio
Connecting the audio source with USB cable
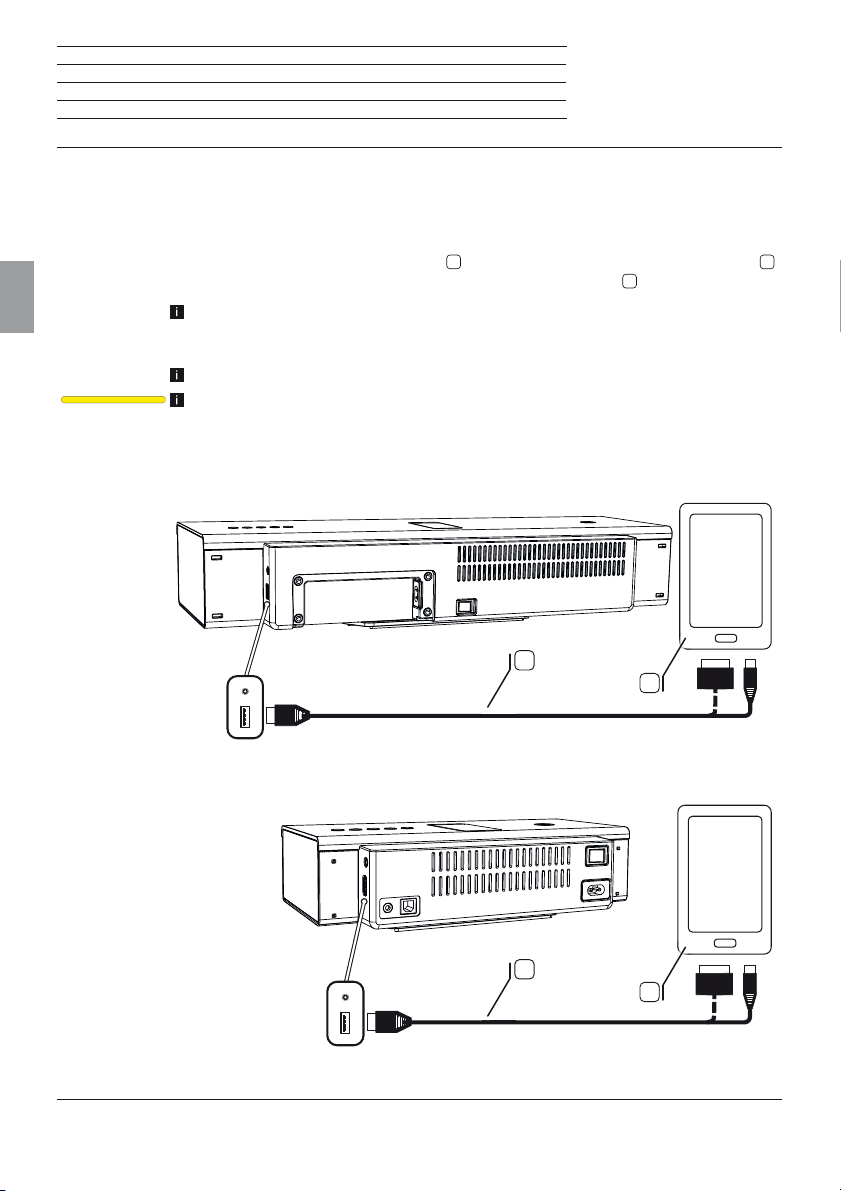
You can connect your SoundPort to your audio source, e.g., mobile phone, music player, etc., using a
USB cable.
16
of the SoundPort with the audio source A.
U
.
are connected via a 30-pin connector to the USB port
English
Connect the USB connector (type A)
Depending on your audio source use the appropriate USB cable
Certain audio sources, e.g., Android smartphones have a micro-USB port; iDevices
without Lightning Connector
(1
of the SoundPort.
The audio source must support audio playback via USB (USB streaming).
USB Audio is selected as a source (see page 39).
The audio signal (see page 49) is now replayed via USB.
SoundPort / SoundPort Compact
SoundPort Mini
(1
Supported iDevices see page 54.
46
U
A
U
A
Page 47
SoundPort / SoundPort Compact / SoundPort Mini
Operating instructions
PC Audio
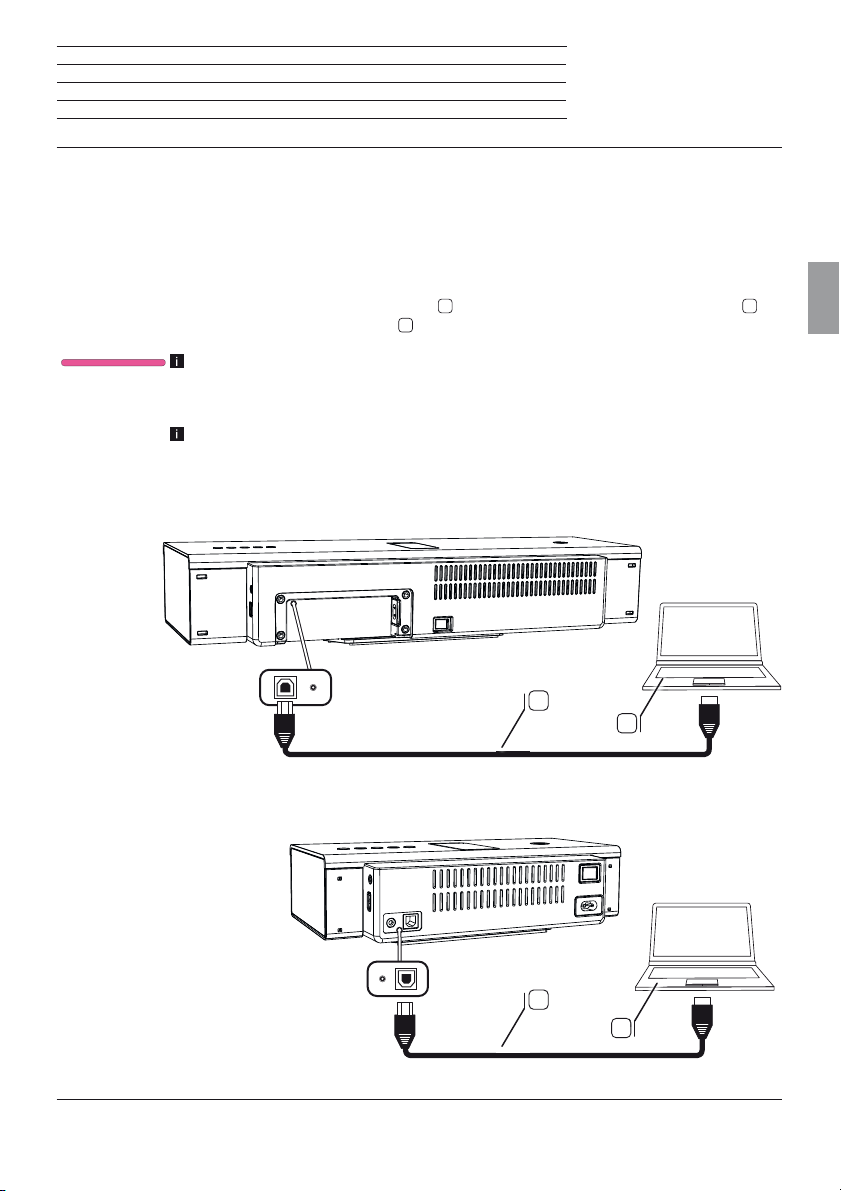
Connecting the SoundPort as USB device (PC Audio)
You can connect a PC/laptop to your SoundPort via a USB cable. The SoundPort logs on to the PC/laptop
as a USB speaker and can then be used as a playback device to the PC/laptop.
Audio devices connected to the SoundPort via Lightning Connector can be synchronised with the PC/
laptop via the SoundPort (see page 48).
Connect the USB connector (B type)
do so, use a USB cable type A-B
15
with a free USB port on your PC/laptop P. To
U
.
PC Audio is selected as a source (see page 39).
The audio signal (see page 49) is now replayed via USB.
The function depends on the hardware and software package of the connected source,
e.g. connection configuration, used driver, codecs and formats. Please refer also to the
documentation for your source device and if necessary, update the driver or firmware.
SoundPort / SoundPort Compact
U
P
SoundPort Mini
English
U
P
47
Page 48
SoundPort / SoundPort Compact / SoundPort Mini
Operating instructions
Sync
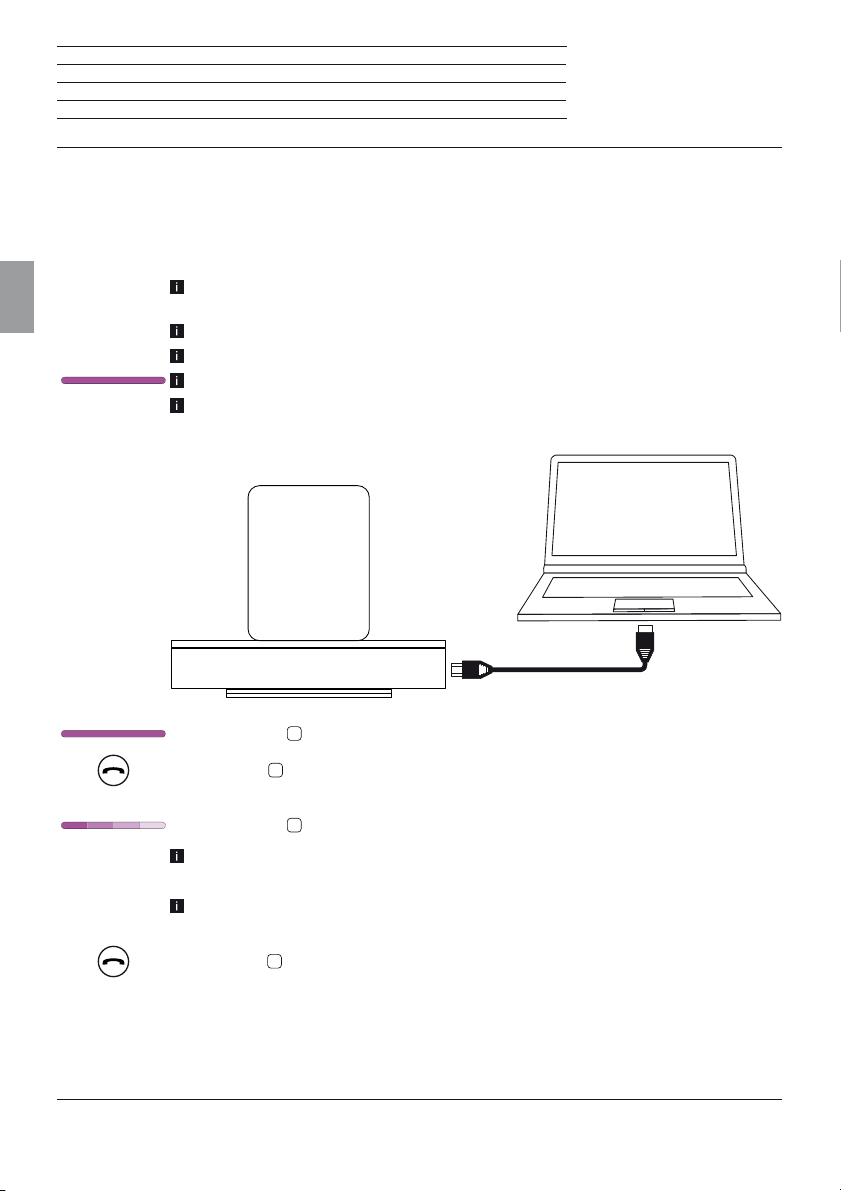
SoundPort – iTunes Sync
An iDevice (1 device connected to the Lightning Connector of the SoundPort can be synchronised via the
SoundPort with iTunes on your PC/laptop. The SoundPort serves as a connecting link between iDevice
and PC/Laptop.
The functionality of this application depends on the PC, notebook, operating system,
English
iTunes, Apple iOS and iDevice as well as on the respective software versions used.
The SoundPort is connected to the PC as a USB device (see page 47).
An iDevice is contacted on the Lightning Connector of the SoundPort (see page 43).
Apple Lightning Connector is selected as source (see page 39).
iTunes is installed on the PC/notebook and the automatic synchronisation is enabled
(for iTunes settings see the software documentation).
iTunes
The LED display
Press the key
Sync mode.
The LED display
Also note any possible notifications and messages of the operating system or from
iTunes on your PC/notebook.
During the sync process, no other functions (switching off, source selection, handsfree
talking, volume change etc.) are possible with the SoundPort.
Press the key
mode.
(1
Supported iDevices see page 54.
48
8
indicates the Apple Lightning Connector as selected source.
3
on the SoundPort for a longer period (approx. 3 sec). to activate the
8
flashes during the sync process from left to right.
3
on the SoundPort for a longer period (approx. 3 sec) to end the Sync
Page 49
SoundPort / SoundPort Compact / SoundPort Mini
Operating instructions
Audio playback / Adjusting the volume
Audio playback
An audio source must be connected or linked with the SoundPort.
In the source selection this audio source must be selected (see page 39).
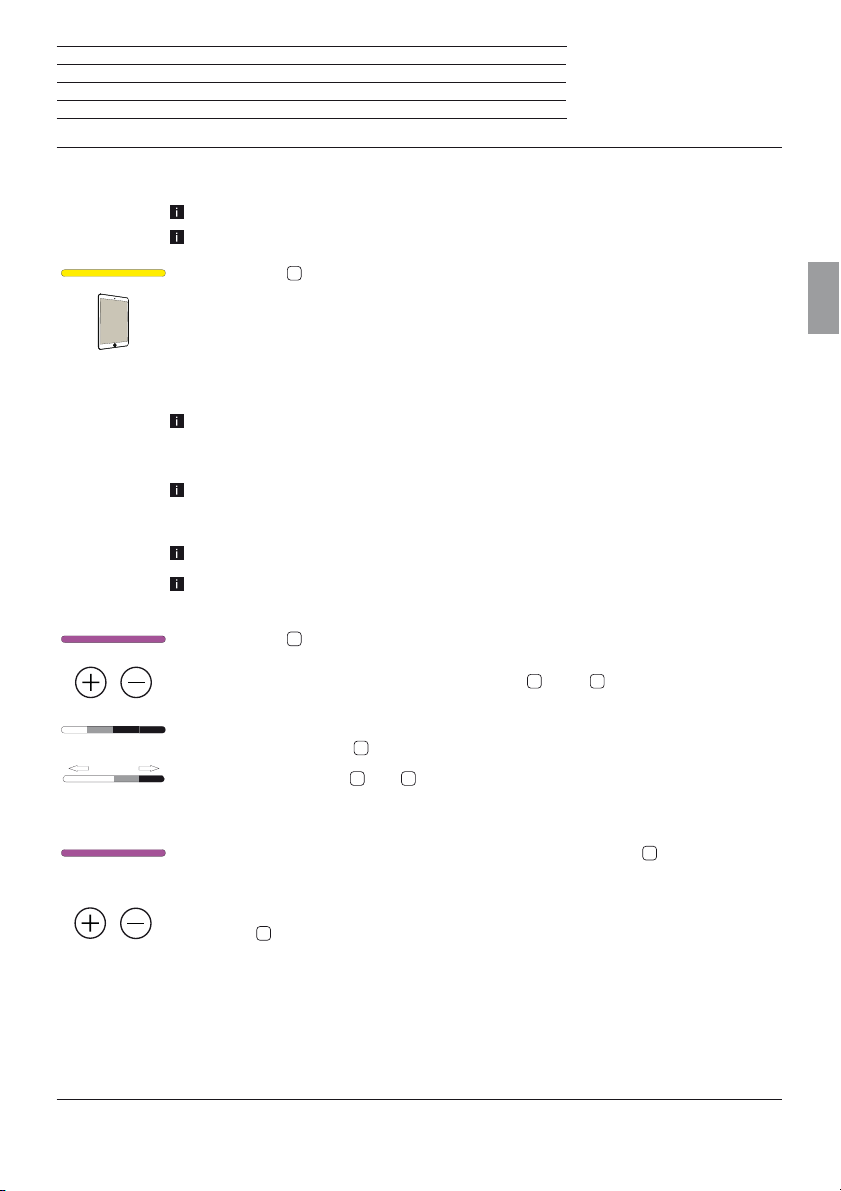
The LED display
8
shows the selected source, e.g., USB Audio.
Start the audio playback on your audio source. The playback control (title selection,
winding, etc.) is done via the player/app of the audio source.
Adjusting the volume
When using an audio cable connection (see page 41) adjust the volume of your
audio source to a high level to avoid interfering noise. Adjust the desired volume on
the SoundPort.
When connecting iDevices via Bluetooth (see page 44) the volume adjustment
between iDevice and SoundPort is coupled, i.e. change in the volume of one of the
devices alters the volume of the other one.
Loud music can lead to ear damage. Avoid extreme volume especially over long periods.
After 10 minutes without audio playback or key operation, SoundPort automatically
switches to Smart Standby mode.
The LED display
Set the volume on the SoundPort using the keys +
The volume can be adjusted in several steps
LEDs of the LED indicator
Vol +
Vol -
MIN MAX
Pressing briefly the key +
When keeping the + or - key depressed you traverse the whole volume range.
The maximum volume is indicated by two flashes of all LEDs with full brightness.
If there is no volume change within three seconds, the LED display
of the selected source again.
8
indicates the selected source, e.g., Apple Lightning Connector.
4
and – 5.
(1
8
.
4
or – 5 increases or decreases the volume by one step.
which are represented visually by four
8
shows the colour
English
Mute the SoundPort by pressing the + and - keys simultaneously. All four LEDs of the
LED display
By pressing the + or - key the muting is cancelled. The LED display shows the previously
selected source again.
(1
see Technical data on page 55.
8
flash with full luminous intensity.
49
Page 50
SoundPort / SoundPort Compact / SoundPort Mini
Operating instructions
Handsfree function
Handsfree function
The SoundPort must be coupled and linked via Bluetooth (see page 44) or Con-
nectivity Easy Pairing (see page 45) with your mobile phone.
Loud ambient noise impairs the quality of the handsfree function. Make sure that
there is a quiet environment or abstain from using the handsfree function if there is
English
no proper environment.
To achieve a high level of intelligibility between callers, speak only alternately. The
distance between the caller and the SoundPort should be between 0.3 m and 1.2 m.
To accept an incoming call, the SoundPort must be switched on (see page 38) and
Bluetooth must be selected as the source (see page 39).
The LED display
In case of an incoming call, a ring tone sounds.
The LED display
An audio playback will be paused in this case.
Answer the incoming call by pressing the key
key on your mobile phone.
The LED display
When speaking turn your face to the front
in the centre of the speaker cover (see page 35).
Set the volume on the SoundPort to a medium level using the keys +
also page 49).
8
indicates Bluetooth as source.
8
flashes quickly in white.
8
lights up in white.
9
of the SoundPort. The microphone is located
3
on the SoundPort or the corresponding
4
and – 5 (see
3
Finish the telephone conversation by pressing again the key
on the SoundPort or the
corresponding key on your mobile phone.
8
The LED display
50
resumes to the colour of the last selected source again.
Page 51

SoundPort / SoundPort Compact / SoundPort Mini
Operating instructions
Smart Standby mode and Standby mode
Smart Standby mode
The Smart Standby mode is automatically activated if the following happens at the SoundPort for the
duration of 10 minutes:
- no music is played back,
- there is no incoming or outgoing call,
- no key is pressed at the SoundPort or on the Assist remote control (see page 52),
- no device is connected or disconnected and
- no sync is in progress.
In the Smart Standby mode, some circuit parts (DSP / amplifier, etc.) are switched off in order to save
power in the SoundPort.
The sound port can be aroused from the Smart Standby mode in different ways:
- An iDevice is being connected to the Lightning Connector.
- A mobile device is being linked via Connectivity Easy pairing (NFC).
- Playback with a paired Bluetooth device continues (only if Bluetooth was active as a last source before
the Smart Standby mode).
- Playback with a device at AUDIO IN is continued (only if AUDIO IN was active as a last source before
the Smart Standby mode).
- One of the four SRC device keys
- A linked Bluetooth device is logged off.
- A key of the Assist remote control unit (see page 52) is pressed.
Devices connected to Lightning / USB are also charged in Smart Standby mode of the SoundPort.
Pressing the ON/OFF key 1 switches the SoundPort to the Standby mode (see below).
After 4 hours in Smart Standby mode, the SoundPort automatically switches to the Standby mode.
The power consumption in Smart Standby mode is higher than in the Standby mode (see Technical
data on page 55).
2
, Handsfree 3, + 4 oder – 5 is pressed.
English
Standby mode
Press the ON/Off key 1 to switch the SoundPort to the Standby mode.
In Standby mode, the device can only be switched on again by the ON/OFF key
by the ON/OFF key on the Assist remote control (see page 52)
In the Standby mode, no devices connected to Lightning / USB are charged.
The power consumption in Standby mode is lower than in Smart Standby mode (see Technical data
on page 55).
1
on the SoundPort or
51
Page 52
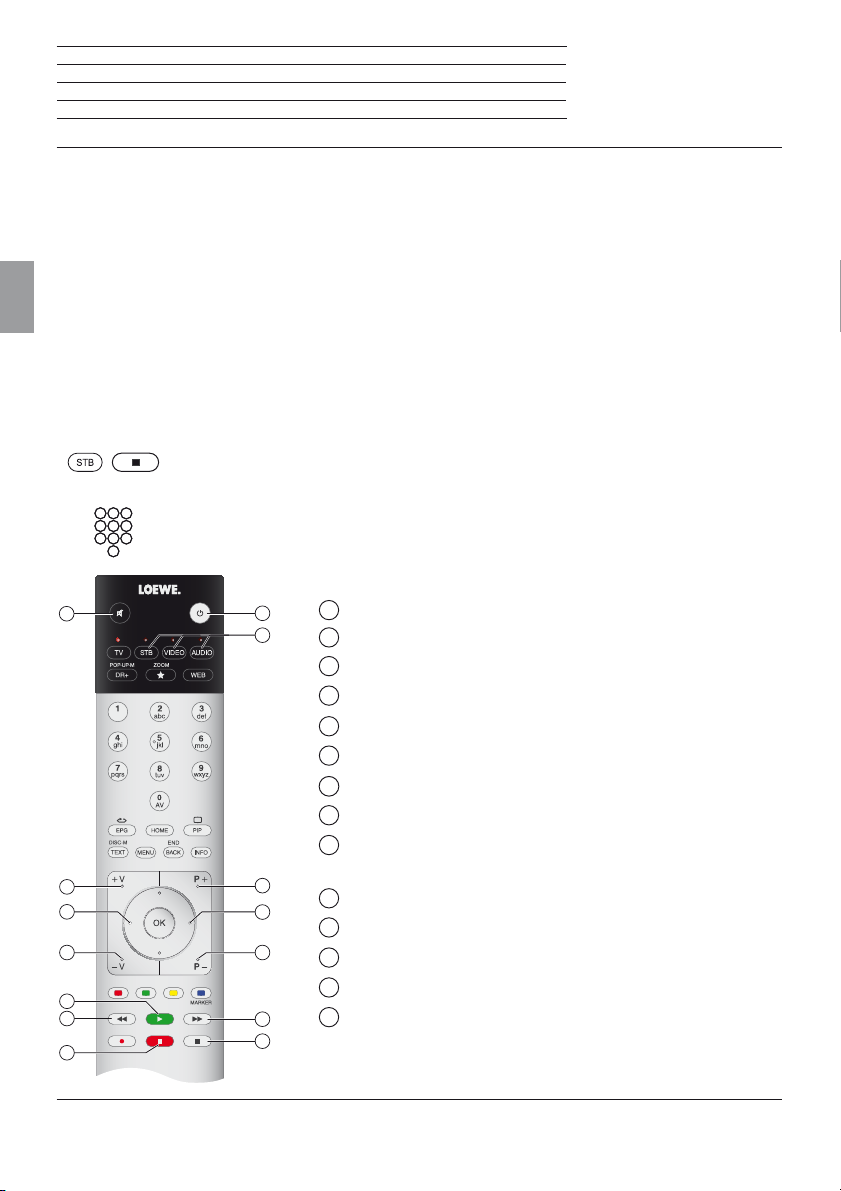
SoundPort / SoundPort Compact / SoundPort Mini
Operating instructions
Accessories
Accessories
Inlays
With inlays available as accessories, you can customise your SoundPort to your needs. Ask your dealer for
appropriate inlays for your SoundPort, SoundPort Compact and SoundPort Mini.
Remote control - Assist
English
With the optional accessory Assist system remote control you can control the functions of your SoundPort.
If your Loewe device is supplied with the latest Assist, you can use your existing remote control (see list
of different remote control units page 54).
The remote control must first be set for the operation of your SoundPort. The device keys (depending
on remote control version) STB – VIDEO – AUDIO – DVD– REC– RADIO– SP can be set to control
your SoundPort.
Press the required device key and the Stop key simultaneously for 5 sec until the corresponding LED display of the selected device key flashes twice.
Then enter the two-digit device code 31 for Soundport. The LED above the selected
button flashes twice.
Key assignment
1
1
2
3
4
5
6
7
8
9
10
11
12
13
14
Sound on/off
2
Volume +
3
Sound setting – (previous preset)
4
Volume –
5
Playback
6
Previous title
Pause
7
8
On / Off
9
Setting of the device key for SoundPort (see above) /
(1
(1
(1
Switching to SoundPort operation
10
Source selection + (next audio device)
11
Sound setting + (next preset)
12
Source selection – (previous audio device)
13
Next title
14
Stop
(1
(1
(1
The function is only available for audio sources via Lightning connector, Bluetooth and USB audio.
52
Page 53
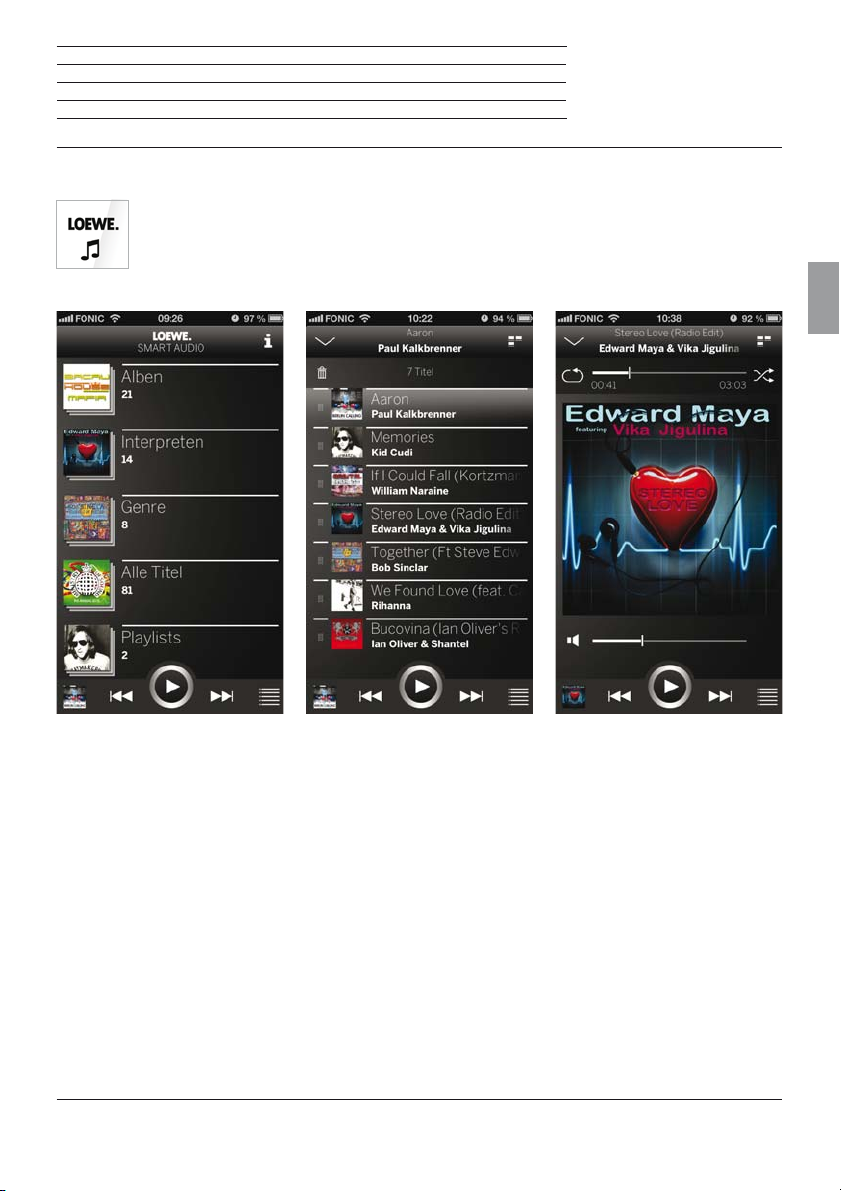
SoundPort / SoundPort Compact / SoundPort Mini
Operating instructions
Accessories
Smart Audio App
Completely smart: The Loewe Smart Audio app. Experience music you have stored on your smartphone, now with the intuitive and high-end Loewe audio player. Available free of charge from the
Apple App Store or Google Play Store.
English
The home screen provides a
structured overview of the locally
stored music. At a glance, you
can capture the content and with
only a few operating steps it takes
you to your favorite title.
Automatically, all recently
heard titles will be added to the
playlist. This list can always and
everywhere be reached by the list
icon at the bottom right. In this list,
titles can be deleted or moved. For
this purpose, the trash icon or the
left part of each list item is used.
The active areas do not only enable
a jump into the playlist - with just
one click you go to the home
screen or the player.
The player always shows the
currently playing song with all
its control possibilities. With the
AirPlay icon you can easily select
all available speakers.
53
Page 54

SoundPort / SoundPort Compact / SoundPort Mini
Operating instructions
Supported iDevices
Applicable remote control versions
Supported iDevices
As of 18 February, 2014.
Sound Port – Lightning Connector:
iPhone 5, iPhone 5c, iPhone 5s
iPad (4th generation), iPad mini, iPad mini with Retina display, iPad Air
English
iPod touch (5th generation), iPod nano (7th generation)
Sound Port – USB:
iPhone, iPod touch, iPod nano
Sound Port Compact – Lightning Connector:
iPhone 5, iPhone 5c, iPhone 5s
iPad (4th generation), iPad mini, iPad mini with Retina display, iPad Air
iPod touch (5th generation), iPod nano (7th generation)
Sound Port Compact – USB:
iPhone, iPod touch, iPod nano
Sound Port Mini – Lightning Connector:
iPhone 5, iPhone 5c, iPhone 5s
iPod touch (5th generation), iPod nano (7th generation)
Sound Port Mini – USB:
iPhone, iPod touch, iPod nano
Applicable remote control versions
The list includes the remote control versions that can be used to control the functions of the SoundPort.
How to set the remote control to operate the SoundPort, see page 52.
The availability of the device code 31 depends on the version of the remote control unit. The item number
/ version you can read in the battery compartment of the remote control.
Assist 1 (TV) 89900A13 / 89900A14
Assist 1 (MediaVision) 89900A11
Assist 1 (HomeCinema) 89900A12
Assist 1 (SoundVision) 89900A10
Assist 1 (MultiContr. II) 89900A09
Assist 2 (TV) 89950A23
Assist 2 (SoundBox) 89950A20
Assist 2 (AirSpeaker) 89950A22
54
Page 55
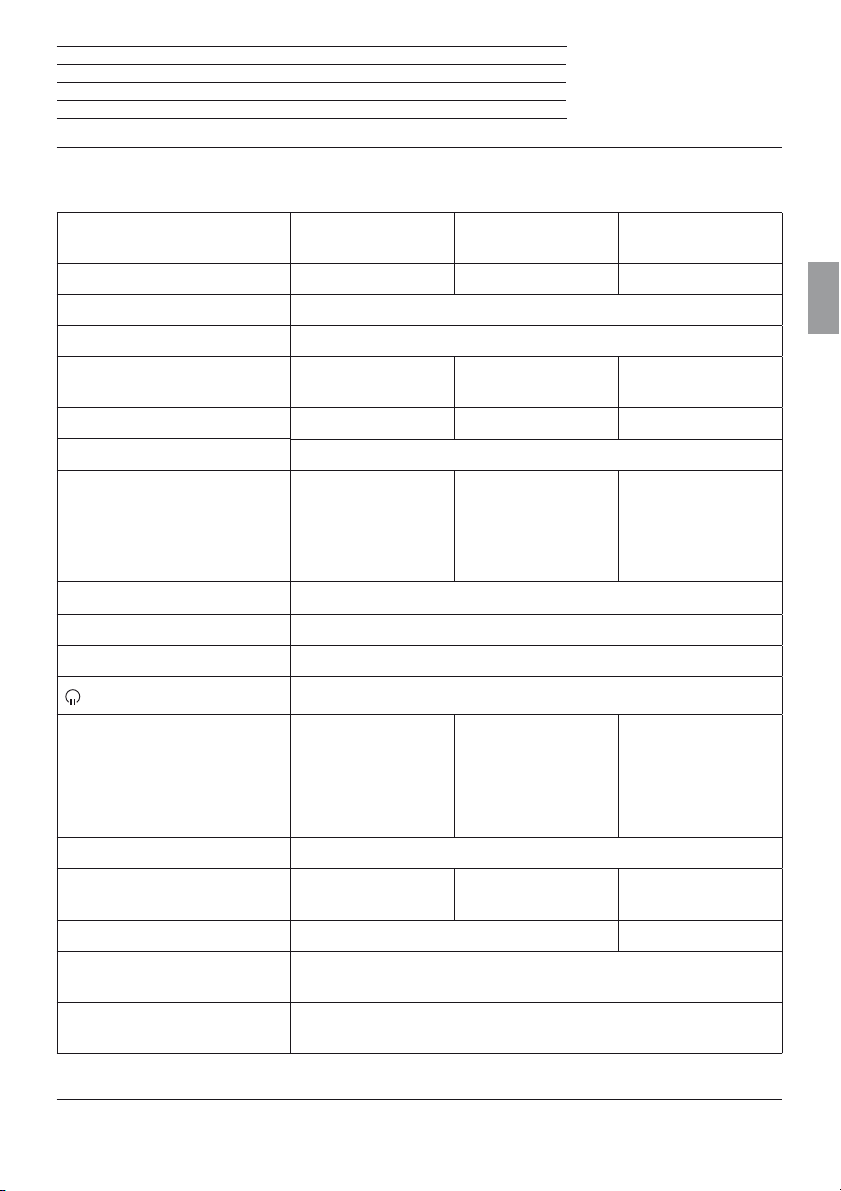
SoundPort / SoundPort Compact / SoundPort Mini
Operating instructions
Technical Data
Technical Data
SoundPort SoundPort
Compact
SoundPort
Mini
Item number 52227x00 52228x00 52229x00
Operating temperature 5 °C ... 35 °C
Humidity 30 % ... 85 % (no condensation)
Dimensions (approx.)
(W x H x D) 550 x 126 x 201 mm 415 x 109 x 178 mm 280 x 91 x 153 mm
Weight 5.5 kg 3.6 kg 1.9 kg
Mains voltage 220 - 240 V, 50/60 Hz
Power consumption:
On mode (max. Audio output)
On mode (1/8 Audio output)
Smart Standby mode
Standby mode
103 W
51 W
2,1 W
< = 0,5 W
62 W
40 W
2,1 W
< = 0,5 W
48 W
35 W
0,8 W
< = 0,5 W
USB A 2.0, type A, charging function, maximum 2.1 A
USB B PC Audio, iTunes Lightning Sync
Audio IN 3.5mm jack, 1.0 Vrms, 10k Ohm
Headphone, 32–200 Ohm
Speakers 2 tweeters,
15 W each
2 broadband
speakers, 20 W each
2 woofers, 60 W each
2 broadband
speakers, 20 W each
1 woofer, 60 W
2 broadband
speakers, 8 W each
1 woofer, 20 W
Transmission range 65 Hz to 20 kHz
Output power (sine / music): 2 x 17 W + 1 x 50 W /
2 x 34 W + 1 x 100 W
2 x 10 W + 1 x 20 W /
2 x 20 W + 1x 40 W
2 x 6 W + 1 x 10 W /
2 x 12 W + 1 x 20 W
Volume levels 48 24
Wireless transmission Bluetooth 2.4 GHz, 10 m transmission range
NFC
Bluetooth protocols A2DP, 2.1+EDR, AVRCP 1.4, HS, HFP 1.6 (wideband speech),
aptX-Decoder, AEC
English
55
Page 56
SoundPort / SoundPort Compact / SoundPort Mini
Operating instructions
Environmental protection
Declaration of conformity
Environmental protection
Cardboard box and packaging
In line with national regulations regarding the disposal of packaging materials, we pay a fee to authorised
recyclers who collect packaging from dealers. Nevertheless, we recommend that you keep the original
cardboard box and the rest of the packaging materials so that the device can, if necessary, be transported
under the safest possible conditions.
English
The device
Attention: The EU Directive 2002/96/EC governs the proper return, handling and recy-
cling of used electronic appliances. Old electronic devices must therefore be disposed of
separately. Never dispose of this device in normal domestic waste! You can hand in your
old unit free of charge at identified collection points or to your dealer if you buy a similar
new unit.
Additional details about return (also for non EU countries) are available from your local
municipal authorities.
Batteries
In accordance with the Battery Directive, used batteries should no longer be disposed of
in the domestic waste. You can dispose of used batteries free of charge at the collection
points in retail outlets. Your dealer will also have a collection point for used batteries.
Declaration of conformity
The set is CE marked and complies with EU directives. The complete Declaration of
conformity can be downloaded from our website.
56
Page 57
SoundPort / SoundPort Compact / SoundPort Mini
Operating instructions
Legal information
Legal details
Legal information
“© 2012 CSR plc and its group companies.
The aptX® mark and the aptX logo are trade marks of CSR plc or one of its group companies and may
be registered in one or more jurisdictions.”
“Made for iPod”, “Made for iPhone” and “Made for iPad” mean that an electronic accessory has been
designed to connect specifically to iPod, iPhone or iPad, respectively, and has been certified by the developer to meet Apple performance standards. Apple is not responsible for the operation of this device
or its compliance with safety and regulatory standards. Please note that the use of this accessory with
iPod or iPhone may affect wireless performance.
iPod, iPhone, iPad, iPad mini and iTunes are registered trademarks of Apple Inc. in the USA and other
countries.
SoundPort / SoundPort Compact:
English
SoundPort Mini:
Legal details
Loewe Technologies GmbH
Industriestraße 11
D-96317 Kronach
All rights including translation, technical modifications and errors reserved.
Editorial date 05/14-4.0 TB
© Loewe Technologies GmbH, Kronach
57
Page 58

SoundPort / SoundPort Compact / SoundPort Mini
Operating instructions
English
58
Page 59

SoundPort / SoundPort Compact / SoundPort Mini
Notice d'utilisation
Sommaire
Bienvenue. ......................................................................................................................................................60
Pour votre sécurité ........................................................................................................................................ 61
Éléments de commande ............................................................................................................................... 63
Branchements ..............................................................................................................................................64
Mise en service ..............................................................................................................................................65
Mise en marche / Arrêt .................................................................................................................................66
Charger la source audio ................................................................................................................................66
Sélection de la source ...................................................................................................................................67
Réglages du son .............................................................................................................................................68
Raccordement par câble ...............................................................................................................................69
Connecteur Lightning....................................................................................................................................70
Couplage Bluetooth ....................................................................................................................................... 72
USB-Audio ...................................................................................................................................................... 74
PC-Audio .........................................................................................................................................................75
Français
Sync ................................................................................................................................................................76
Lecture audio / Réglage du volume .............................................................................................................77
Fonction mains libres ..................................................................................................................................... 78
Mode Smart Standby et mode Standby ...................................................................................................... 79
Accessoires ....................................................................................................................................................80
iDevices supportés ........................................................................................................................................82
Variantes de télécommandes pouvant être utilisées ..................................................................................82
Caractéristiques techniques .........................................................................................................................83
Protection de l'environnement .....................................................................................................................84
Déclaration de conformité ............................................................................................................................84
Informations juridiques .................................................................................................................................85
Mentions légales ............................................................................................................................................85
59
Page 60

SoundPort / SoundPort Compact / SoundPort Mini
Notice d'utilisation
Bienvenue.
Merci beaucoup
d’avoir choisi un produit Loewe.
Sous le nom Loewe, nous allions les plus hautes exigences en matière de technique, d'esthétique et de
convivialité. Ceci est valable aussi bien pour les téléviseurs, lecteurs vidéo et audio que pour les accessoires. Pourtant, ni la technique ni l‘esthétique ne sont des buts en soi, mais doivent au contraire offrir à
nos clients le plaisir maximum pour l‘oeil et pour l‘oreille. En ce qui concerne l'esthétique, nous ne nous
sommes pas non plus laissés guider par les tendances éphémères de la mode. En effet, vous avez acquis
un appareil de haute qualité dont vous souhaitez certainement profiter pendant de longues années.
Contenu de la livraison
• SoundPort ou SoundPort Compact ou SoundPort Mini
Français
• Câble secteur
• Câble audio, fiche jack 3,5mm
• Câble USB (type A–B)
• La présente notice d'utilisation
Caractéristiques
Possibilités de branchement
Bluetooth2.1+EDR
Connectivity Easy Pairing (pour connecter des dispositifs NFC)
Connecteur Lightning Apple
AUDIO IN (entrée audio stéréo 3,5 mm)
USB A (USB Streaming / Charger les sources audio connectées)
USB B (USB Speaker / Sync)
Prise de raccordement casque stéréo (sortie audio stéréo 3,5mm)
Fonctions de lecture
Soutien de codecs audio (aptX, SBC)
Kit mains libres Bluetooth
À propos de cette notice d'utilisation
Les informations contenues dans cette notice concernent les produits Loewe SoundPort (Réf.52227x00),
SoundPort Compact (Réf.52228x00), SoundPort Mini (Réf.52229x00).
Dans la notice d'utilisation, le terme SoundPort est utilisé comme terme générique pour les trois modèles
de dispositifs SoundPort. En cas de différences dans l'utilisation / les commandes des différentes variantes,
chaque variante de dispositif SoundPort sera décrite séparément.
Dans la notice d'utilisation, le terme iDevices est utilisé comme terme générique pour les dispositifs
Apple iPhone, iPad, iPad mini et iPod.
En vue d’une utilisation sûre et correcte à long terme de l’appareil, veuillez lire le chapitre Pour votre
sécurité (voir page 61) avant sa mise en service.
60
Page 61
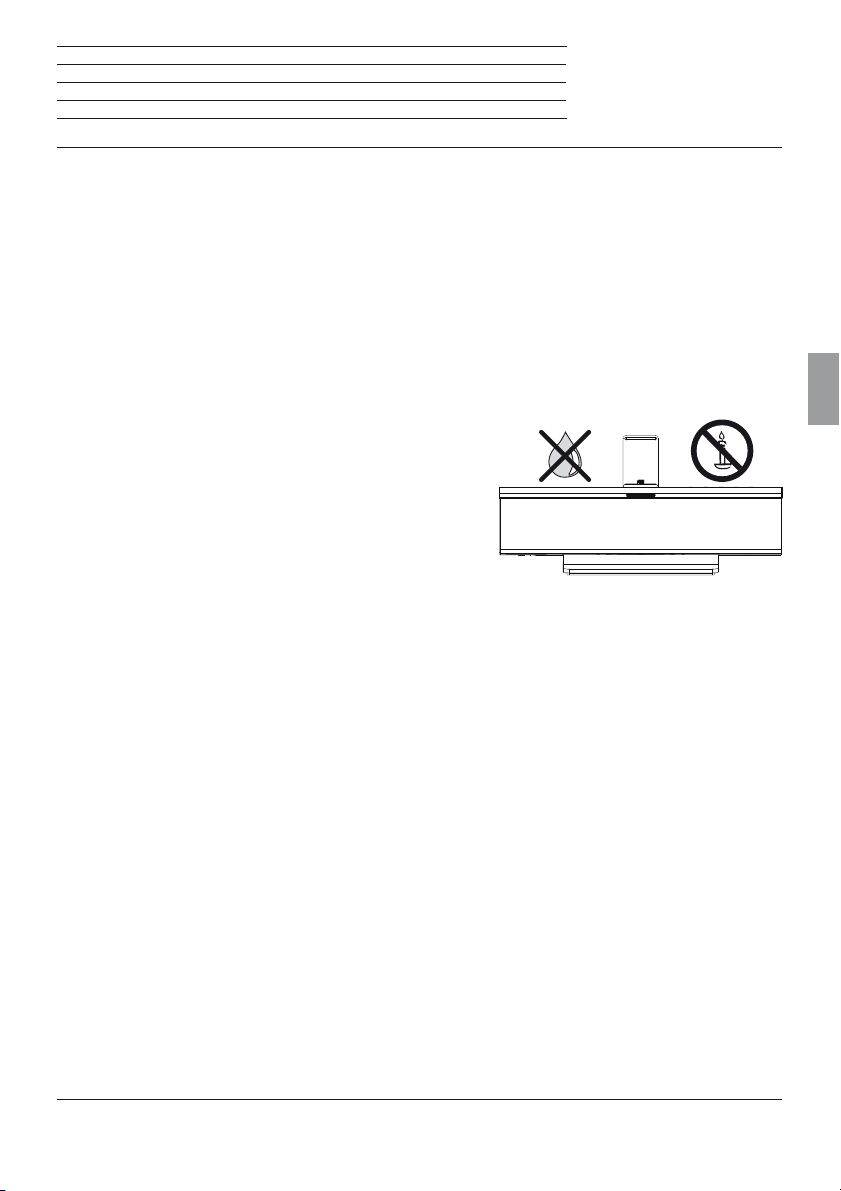
SoundPort / SoundPort Compact / SoundPort Mini
Notice d'utilisation
Pour votre sécurité
Pour votre sécurité et afin de prévenir tout endommagement inutile de l'appareil, veuillez lire
et respecter les instructions de sécurité suivantes.
Utilisation conforme et conditions environnementales
Cet appareil est exclusivement destiné à la lecture de signaux sonores. Il ne doit pas être utilisé dans des
pièces présentant un fort taux d'humidité (par ex. salle de bain, sauna) ou à forte concentration de
poussière. La garantie n‘est valable que pour une utilisation dans les environnements autorisés indiqués
plus haut.
Si l'appareil est utilisé à l'air libre, assurez-vous qu'il est protégé de l'humidité (pluie, projections d'eau
ou condensati on). Un taux d'humidité élevé et de fortes concentrations de poussière entraînent des courants
de fuite dans l'appareil. Ceci peut entraîner un risque d'électrocution ou causer un incendie.
Si vous déplacez l'appareil d'un endroit froid à un endroit
chaud, éteignez-le pendant environ une heure en raison de
l'éventuelle formation de condensation.
Ne placez pas d‘objets remplis de liquide sur l‘appareil. Pro-
tégez l’appareil des gouttes d’eau et des éclaboussures.
Les bougies et autres flammes doivent à tout moment être
tenues à l’écart de l’appareil afin d’éviter que le feu ne se propage.
Ne placez pas l'appareil à un endroit où des vibrations peuvent avoir lieu. Cela peut avoir pour conséquence des surcharges du matériel.
Français
Alimentation électrique
Une tension incorrecte peut endommager l'appareil. Cet appareil doit uniquement être raccordé avec
le câble de secteur à un réseau électrique présentant une tension et une fréquence identiques à celles
indiquées sur la plaque signalétique de l'appareil. La fiche de secteur de l'appareil doit être accessible
facilement afin de pouvoir à tout moment débrancher l’appareil du réseau. Lorsque vous débranchez la
fiche de secteur, ne tirez pas sur le câble mais sur le boîtier de la fiche.
Posez le câble de secteur de façon à ce qu'il ne puisse pas être endommagé. Le câble de raccordement
ne doit pas être plié ni posé sur une arrête vive, ni être piétiné, ni exposé à des substances chimiques;
cette dernière instruction vaut pour l’ensemble de l’installation. Un câble de secteur présentant un défaut
d’isolation peut provoquer une électrocution et représente un risque d’incendie.
Surveillance
Ne laissez pas les enfants sans surveillance manipuler l'appareil ou jouer à proximité de l'appareil.
L’appareil pourrait être renversé, déplacé ou retiré du support et blesser des personnes. Ne jamais laisser
fonctionner l'appareil sans surveillance.
61
Page 62

SoundPort / SoundPort Compact / SoundPort Mini
Notice d'utilisation
Pour votre sécurité
Circulation de l’air et hautes températures
Sur les côtés et le dessus, il convient de conserver un espace libre de 3 cm au moins pour la circulation de
l’air quand l’appareil est installé dans une armoire ou sur une étagère.
Comme tous les appareils électroniques, votre appareil a besoin d'air pour refroidir. L’obstruction de
la circulation de l’air peut causer des incendies.
Veillez à ce qu’aucun corps étranger, tels que des pièces métalliques, clous, agrafes de bureau, liquides,
cire ou autres substances ne pénètre à travers les fentes du boîtier de l’appareil. Ils risquent de provoquer
des court-circuits dans l‘appareil, qui peuvent donner lieu à un incendie.
Si toutefois quelque chose s‘était introduit dans l‘appareil, débranchez immédiatement la fiche de
secteur de l‘appareil et appelez le service après-vente pour une vérification.
Français
Installation
Placez votre appareil uniquement sur une surface plane, stable et horizontale. L’appareil ne doit pas
dépasser à l‘avant et sur les côtés, en particulier en cas d’installation dans ou sur des meubles.
Placez l'appareil de façon à ce qu’il ne soit pas directement exposé aux rayons du soleil ou à une source
de chaleur comme des radiateurs.
Volume
La musique forte peut provoquer la surdité. Évitez les volumes extrêmes, en particulier
pour des périodes prolongées. Assurez-vous que le volume de l’appareil soit bas ou que
l’appareil soit éteint avant de quitter la pièce.
Orage
En cas d'orage, débranchez la fiche de secteur et tous les câbles connectés à l'appareil. Les surtensions
causées par les impacts de foudre peuvent endommager l'appareil. En cas d'absence prolongée, la
fiche de secteur et tous les câbles connectés à l'appareil doivent être débranchés.
Réparations et accessoires
Attention: en aucun cas vous ne devez ouvrir ou retirer le couvercle du boîtier; vous
seriez alors exposé à des tensions électriques ou autres dangers. Aucun composant du
boîtier n'est susceptible d'être réparé par l'utilisateur. Faites toujours effectuer les travaux
de réparation et d'entretien sur votre appareil par un technicien agréé.
Utilisez si possible exclusivement des accessoires d’origine.
Nettoyage et entretien
Éteignez l'appareil avant de le nettoyer.
Nettoyez la surface en aluminium uniquement avec un tissu légèrement humide, doux, propre et de
couleur neutre sans le moindre produit détergent ni abrasif.
Si nécessaire, vous pouvez aspirer avec précaution la poussière qui se trouve sur la toile du haut-parleur
à l'aide d'un aspirateur.
62
Page 63
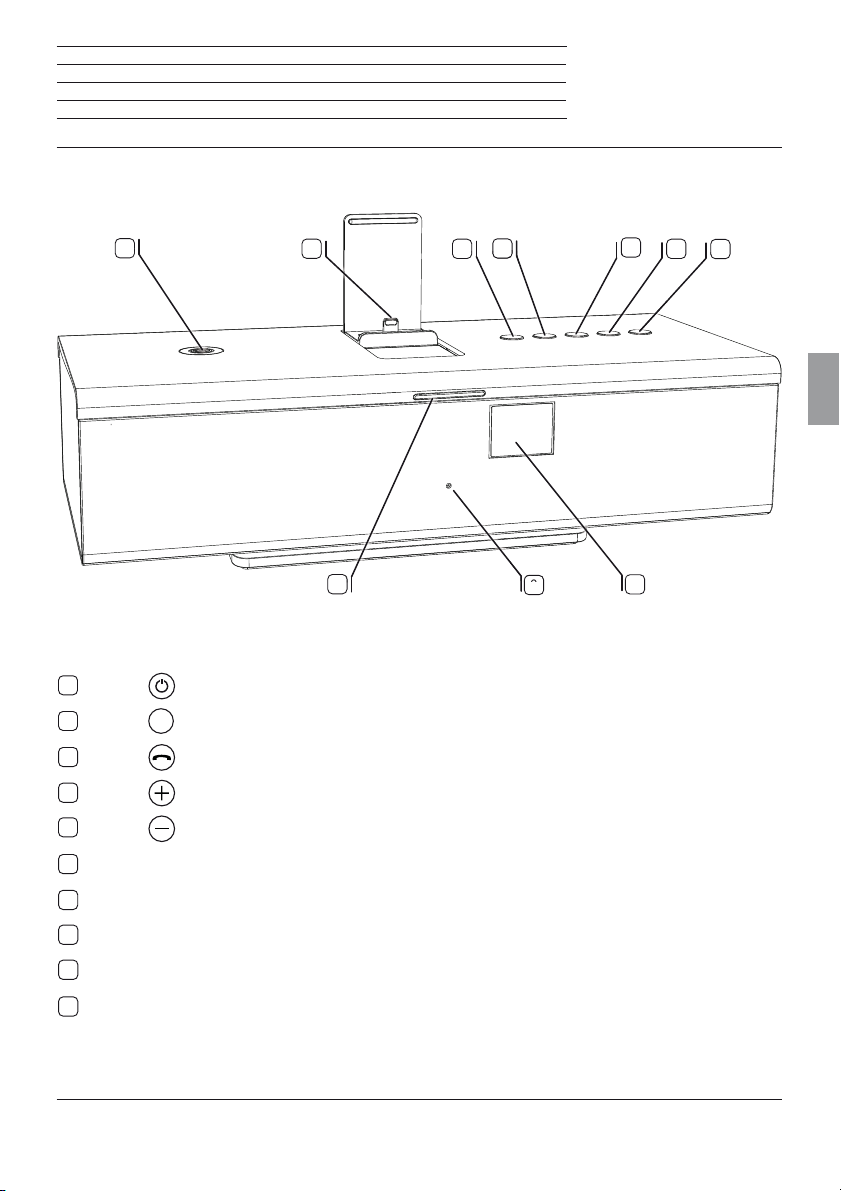
SoundPort / SoundPort Compact / SoundPort Mini
Notice d'utilisation
Éléments de commande
7
6
5
8
1
Touche (Mise en marche / Arrêt)
2
Touche
3
Touche (Fonction mains libres / Couplage Bluetooth)
4
Touche (Volume +)
5
Touche (Volume –)
SRC
(Sélection de la source / Réglages du son)
4
9
3
2
1
Français
10
6
Connecteur Apple Lightning (max 2.1A)
7
Antenne Connectivity Easy Pairing (pour connecter des dispositifs NFC)
8
Témoin lumineux
9
Microphone pour mains libres (caché derrière le couvercle du haut-parleur)
10
Récepteur infrarouge (caché derrière le couvercle du haut-parleur)
63
Page 64
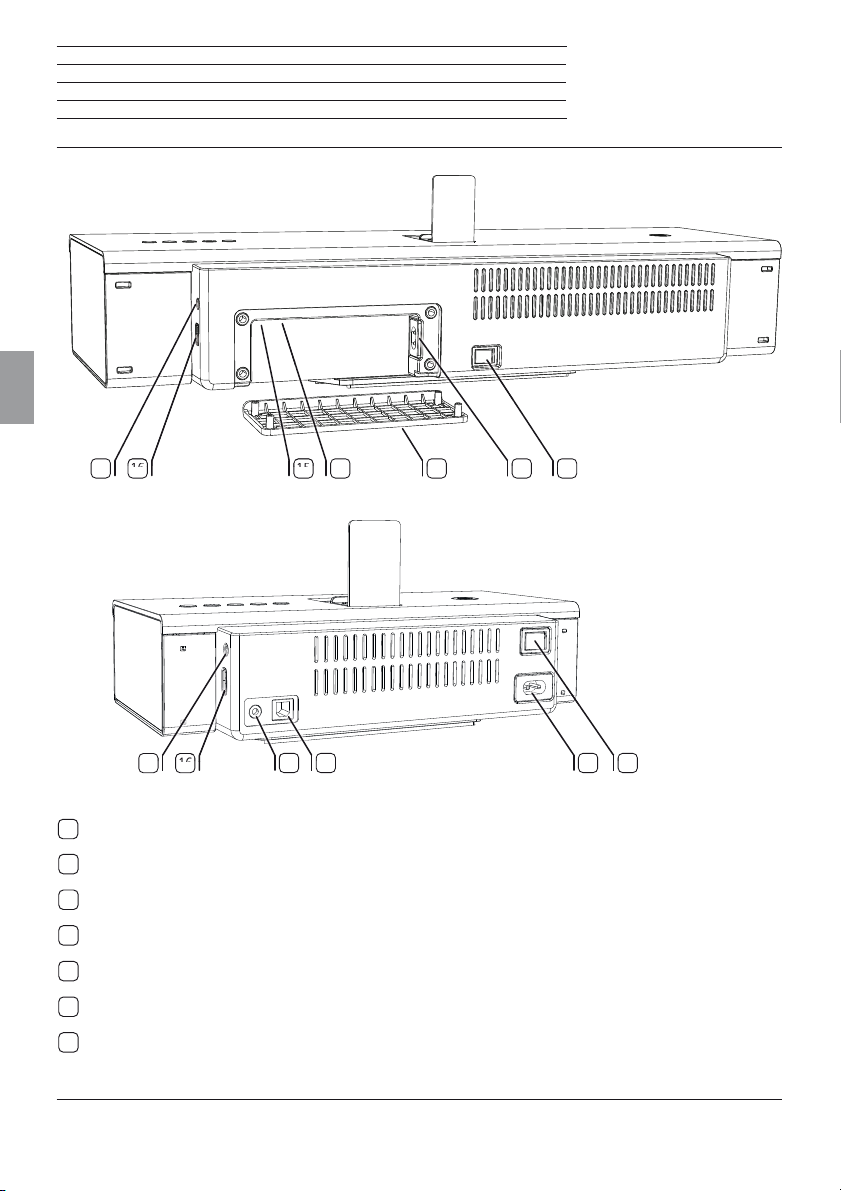
SoundPort / SoundPort Compact / SoundPort Mini
Notice d'utilisation
Branchements
SoundPort / SoundPort Compact
Français
1617
SoundPort Mini
1617
11
Interrupteur d'alimentation
12
AC-IN (prise réseau)
13
Cache-câble (amovible)
14
AUDIO IN (entrée audio stéréo jack 3,5mm)
15
USB prise B
16
USB prise A
17
Sortie casque (jack 3,5mm)
1112131415
11121514
64
Page 65
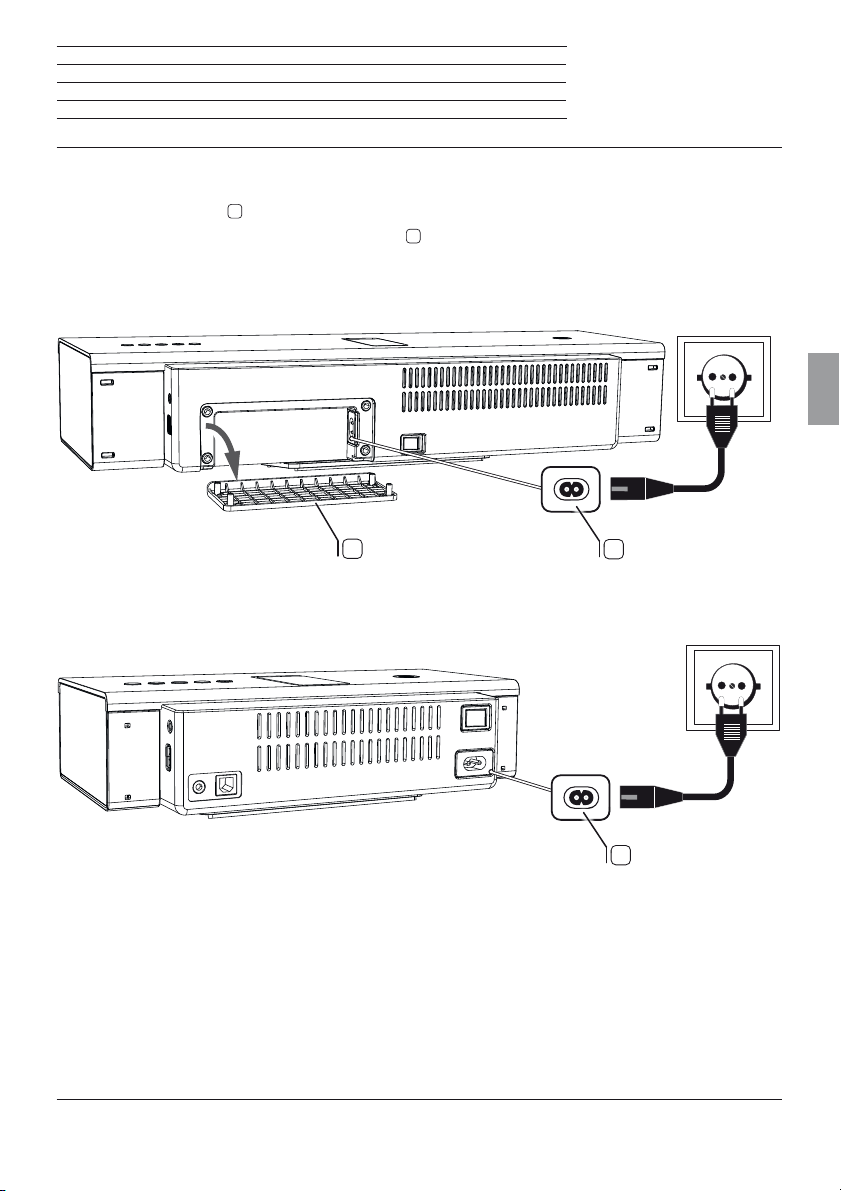
SoundPort / SoundPort Compact / SoundPort Mini
Notice d'utilisation
Mise en service
Raccordement au réseau électrique
Retirez le protège-câble 13 du SoundPort / SoundPort Compact situé sur la paroi arrière de l'appareil.
Branchez le câble secteur dans la prise réseau
50/60Hz.
SoundPort / SoundPort Compact
12
et raccordez-le à une prise électrique 220-240V
Français
SoundPort Mini
13
12
12
65
Page 66
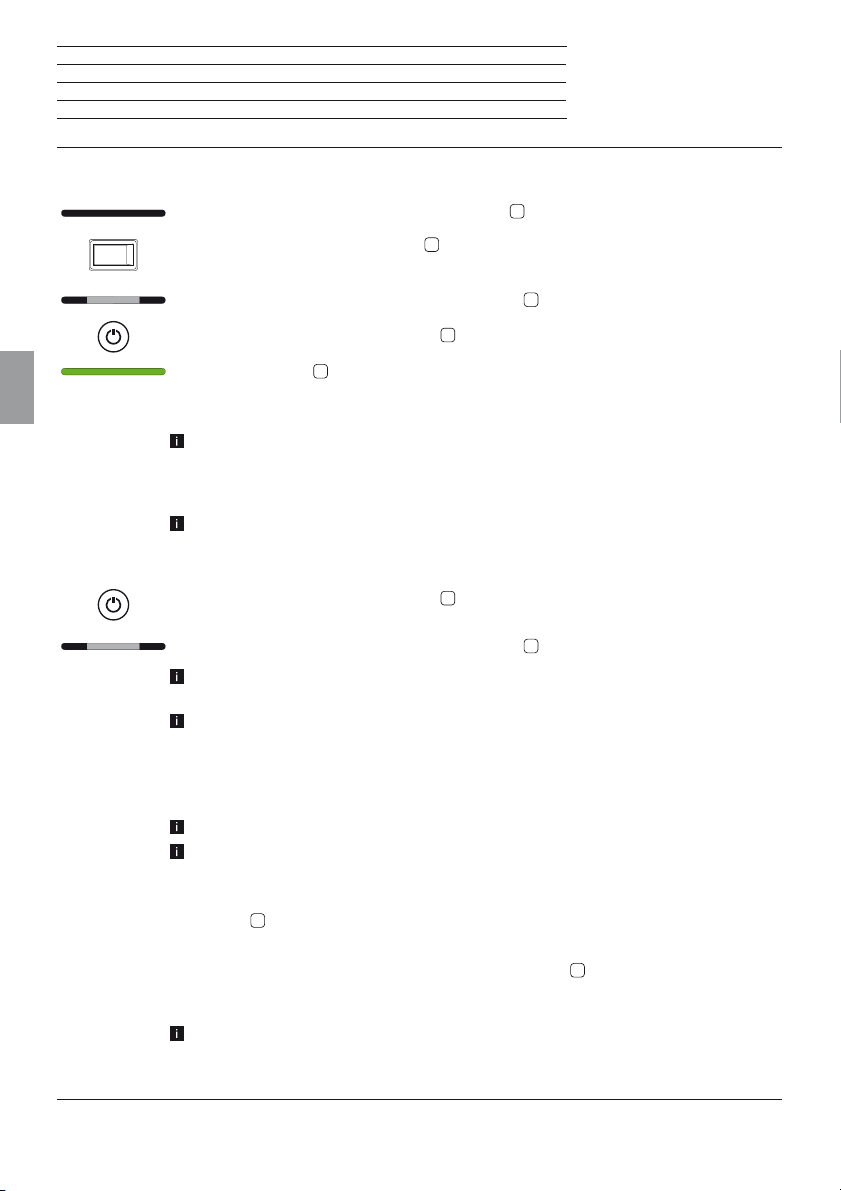
SoundPort / SoundPort Compact / SoundPort Mini
Notice d'utilisation
Mise en marche / Arrêt
Charger la source audio
Mise en marche
Lorsque l'appareil est éteint, le témoin lumineux 8 est sombre.
Mettez l’interrupteur d'alimentation
Le SoundPort se trouve en mode Standby.
Les deux segments du milieu du témoin lumineux
Appuyez sur la touche Marche / Arrêt
Le témoin lumineux
Français
La dernière source sélectionnée reste active lors de la mise en marche.
Vous pouvez consulter les couleurs du témoin lumineux de chaque source sur la page 67.
Si durant 10minutes aucune musique n‘est lue, aucun appel n‘est reçu ou passé, aucune
touche du SoundPort ou de la télécommande Assist (voir page 80) n‘est activée, aucun
appareil n‘est connecté ou déconnecté et aucune procédure de synchronisation n‘est
lancée, le SoundPort commute automatiquement en mode Smart Standby.
Pour de plus amples informations sur les modes d’énergie, voir page 79.
Mise hors tension
Appuyez sur la touche Marche / Arrêt 1 de l'appareil.
Le SoundPort se trouve en mode Standby.
Les deux segments du milieu du témoin lumineux
Après 4heures en mode Smart Standby, le SoundPort commute commute automa-
tiquement en mode Standby.
Pour de plus amples informations sur les modes d'énergie, voir page 79.
11
sur la position ON (Marche).
8
s‘atténuent.
1
de l'appareil.
8
s'allume en vert lors du premier démarrage (source AUDIO IN).
8
s'atténuent.
Charger la source audio
Vous pouvez charger la source audio, par exemple un téléphone portable, iPad etc. via le SoundPort.
L’interrupteur général du SoundPort doit être allumé.
Un seul périphérique doit être chargé à la fois.
Chargement de iDevices via le connecteur Lightning:
Branchez votre iDevice avec le connecteur Lightning au connecteur Lightning intégré du
SoundPort
Chargement de sources audio via USB:
Raccordez la fiche de type A du câble USB à la prise USB
cela un câble USB compatible avec la source audio et équipé d'une fiche de type A (disponible dans le commerce).
Le périphérique raccordé (Lightning/USB) est chargé, peu importe si le SoundPort se
trouve en mode Standby ou en mode Smart Standby. La source audio n‘est pas chargée
en mode Standby.
66
6
(voir pages 70 et 71).
16
du SoundPort. Utilisez pour
Page 67
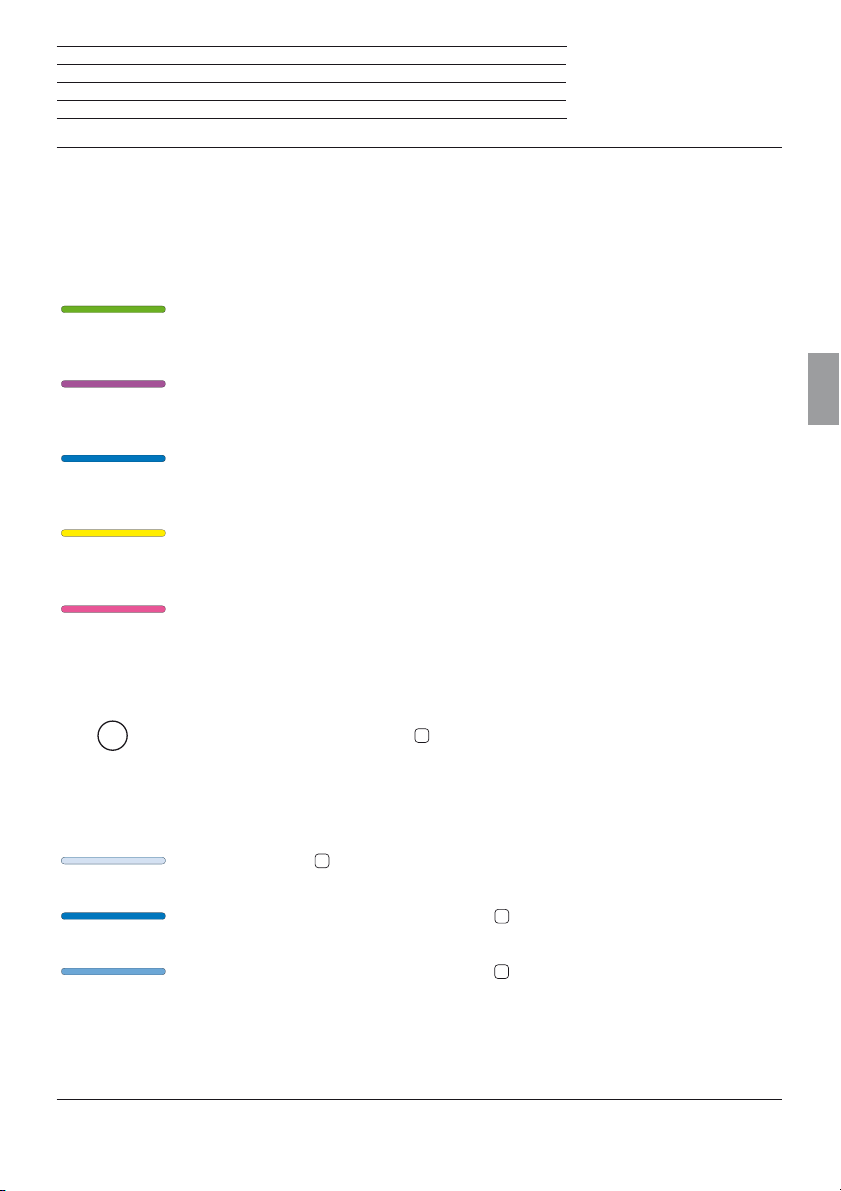
SoundPort / SoundPort Compact / SoundPort Mini
Notice d'utilisation
Sélection de la source
Sélection de la source
Le SoundPort offre plusieurs possibilités de connexion et chargement de sources audio à l'appareil.
Chaque source dispose d'un code de couleur sur le témoin lumineux.
Couleurs des témoins lumineux des sources individuelles
AUDIO IN (vert)
Pour de plus amples informations sur la connexion d'une source audio via un câble stéréo
3,5 mm à l'interface AUDIO IN du SoundPort, voir page 69.
Connecteur Lightning Apple (violet)
Pour de plus amples informations sur la connexion de iDevices au connecteur Lightning,
voir les pages 70/71.
Bluetooth (bleu)
Pour de plus amples informations sur le couplage de sources audio via Bluetooth / NFC,
voir les pages 72/73.
USB-Audio (jaune)
Pour de plus amples informations sur la connexion de sources audio au USB, voir la
page 74.
PC-Audio (rose)
Pour de plus amples informations sur la connexion du SoundPort comme périphérique
USB, voir la page 75.
Français
Sélection de la source
SRC
Chaque pression de la touche SRC
L'ordre des sources correspond à l'ordre des couleurs du témoin lumineux décrit ci-
dessus.
Après la sélection de la source, le SoundPort tente d'établir une connexion avec la source
audio via la connectique sélectionnée.
Le témoin lumineux
tionnée (temps de recherche maximal de 30secondes).
Si la recherche a réussi, le témoin lumineux
sélectionnée.
Si la recherche a échoué, le témoin lumineux
source sélectionnée (60% de luminosité).
2
entraîne une commutation vers la source suivante.
8
clignote lors de la recherche dans la couleur de la source sélec-
8
clignote dans la couleur de la source
8
s'allume atténué dans la couleur de la
67
Page 68
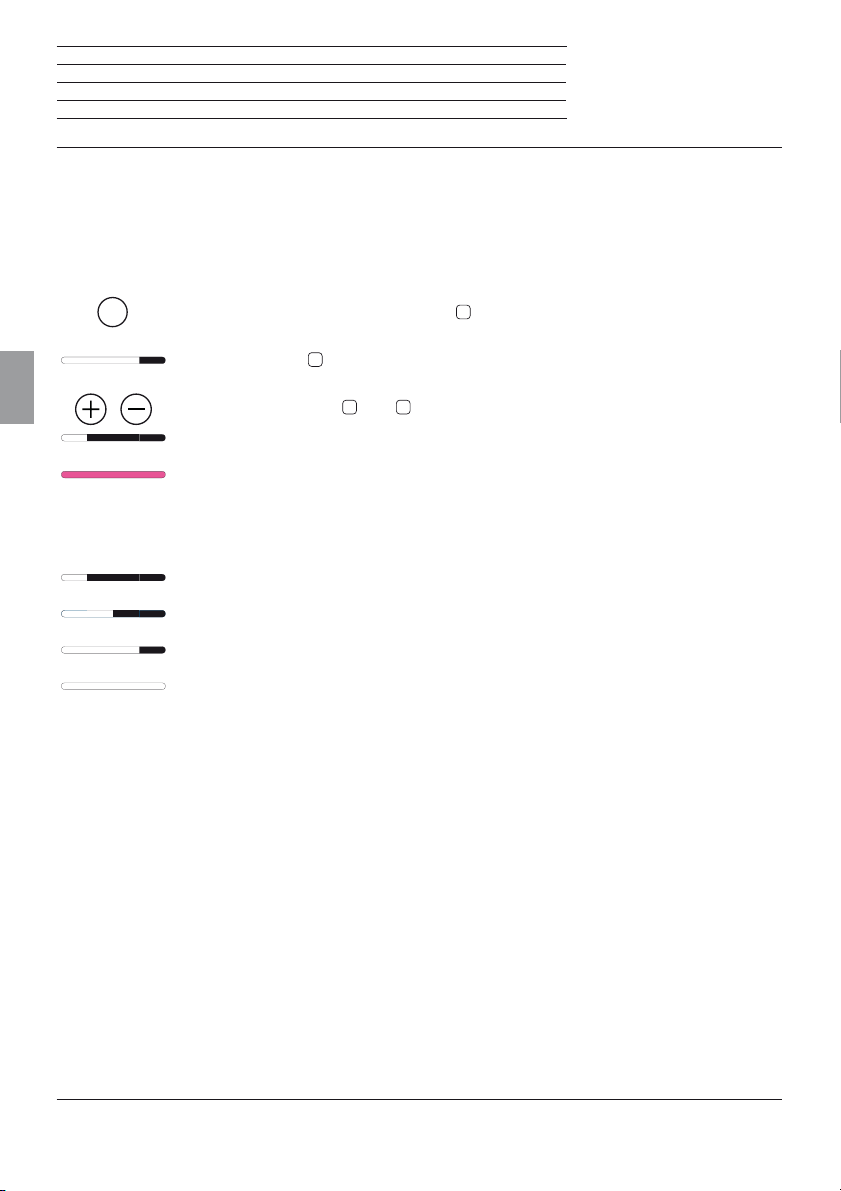
SoundPort / SoundPort Compact / SoundPort Mini
Notice d'utilisation
Réglages du son
Réglages du son
Il est possible d‘ouvrir des réglages du son prédéfinis pour la lecture audio sur votre SoundPort.
Sélection des réglages du son
SRC
Appuyez longtemps sur la touche SRC
Le témoin lumineux
Français
Appuyez sur la touche+
souhaité (par exemple: flat).
Si vous n'appuyez sur aucune touche durant quelques secondes, la source précédemment
sélectionnée s'affiche à nouveau.
Témoins lumineux des réglages du son
1 Témoin lumineux: préréglage flat
2 Témoins lumineux: pré-réglage voice
3 Témoins lumineux: pré-réglage classic
4 Témoins lumineux: préréglage pop
2
du SoundPort (environ 2 secondes).
8
affiche le dernier réglage du son sélectionné (par exemple: classic).
4
ou – 5 à plusieurs reprises jusqu'à obtenir le réglage du son
68
Page 69
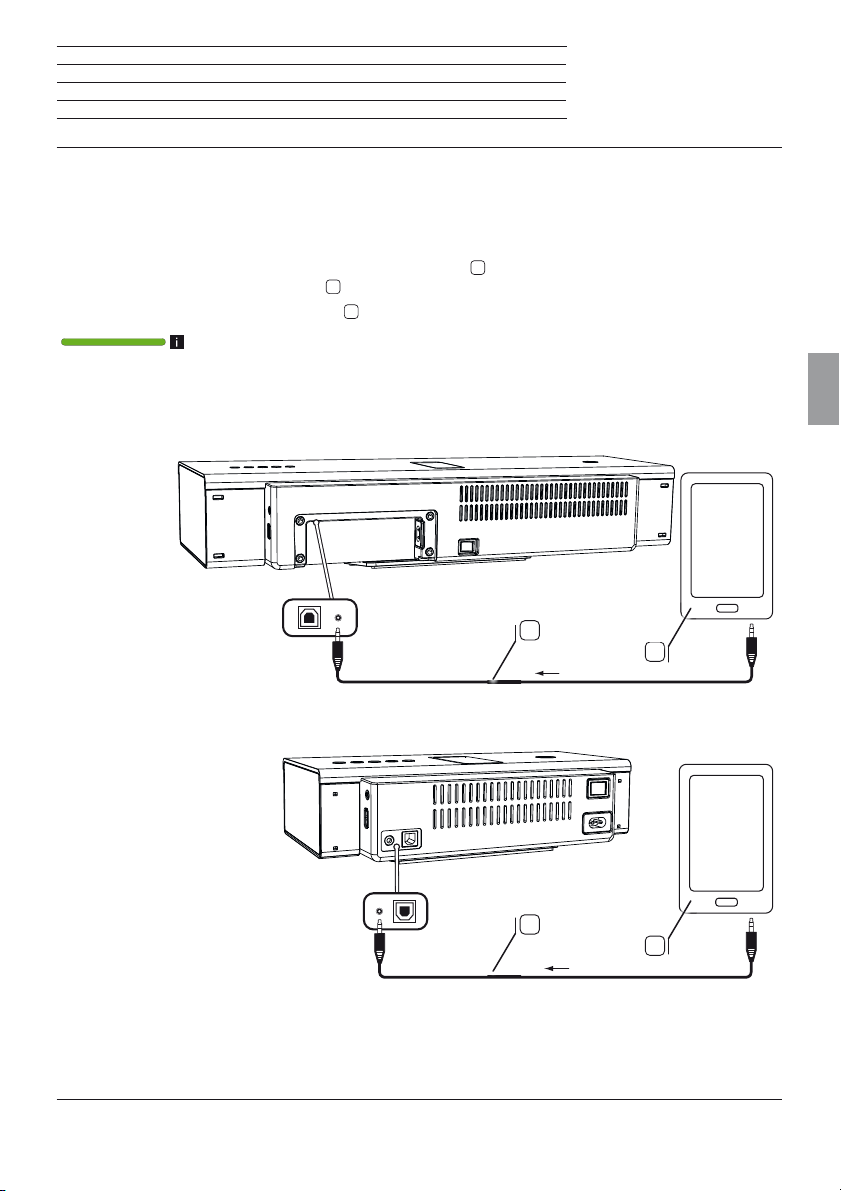
SoundPort / SoundPort Compact / SoundPort Mini
Notice d'utilisation
Raccordement par câble
Raccorder la source audio à AUDIO IN
Vous pouvez raccorder votre SoundPort à votre source audio, par ex. un téléphone portable, lecteur audio
ou mp3, etc., à l'aide d'un câble audio équipé d'une fiche jack 3,5 mm.
Raccordez la sortie audio stéréo AUDIO IN
de votre source audio
Utilisez ici le câble audio
A
.
S
équipé d'une fiche jack 3,5 mm inclus à la livraison.
14
du SoundPort à la sortie stéréo analogique
AUDIO IN est sélectionnée comme source (voir page 67).
La lecture audio (voir page 77) fonctionne à présent via le câble audio.
SoundPort / SoundPort Compact
S
SoundPort Mini
Français
A
S
A
69
Page 70
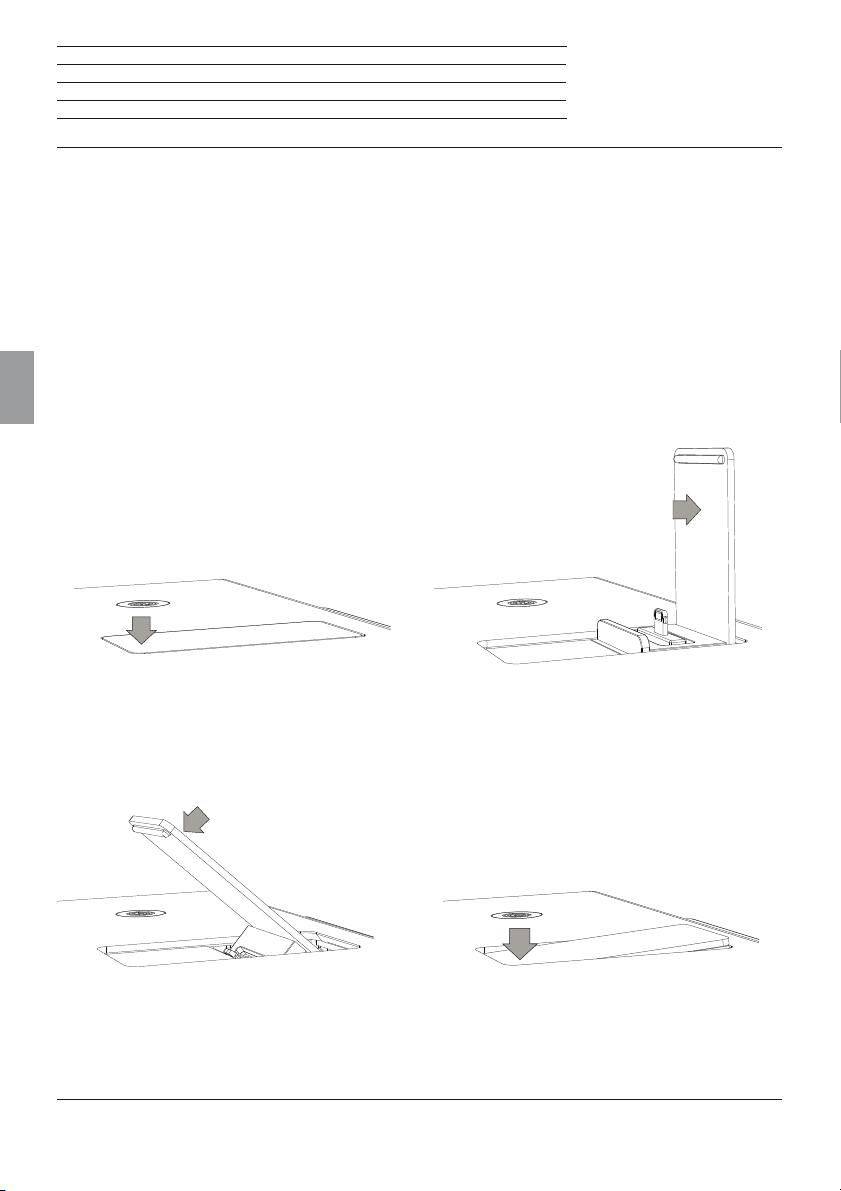
SoundPort / SoundPort Compact / SoundPort Mini
Notice d'utilisation
Connecteur Lightning
Connecteur Lightning
Votre SoundPort est est équipé d'un connecteur Lightning Apple pour iDevices (1. Ainsi, vous pouvez
écouter n'importe quelle source audio (musique, vidéo, radio Internet, podcasts) depuis votre iDevice
avec connecteur Lightning sur les hauts-parleurs du SoundPort.
Le iDevice raccordé au connecteur Lightning est chargé, que le SoundPort se trouve en mode marche
ou en mode Smart Standby (voir page 66).
Ouverture du connecteur Lightning
En état fermé, appuyer légèrement à l‘avant sur la surface du couvercle. Le connecteur Lightning s'ouvre
automatiquement lorsque le verrouillage est débloqué.
Français
Pour fixer le support, veuillez presser le couvercle ouvert vers l'arrière, dans la position de verrouillage.
Vous pouvez maintenant utiliser le connecteur Lightning pour iDevices (voir page 71).
Fermeture du connecteur Lightning
Appuyer sur le couvercle vers l'avant afin de le déverrouiller. Pour fermer le couvercle, positionnez-le dans
sa position finale et appuyez vers le bas. Vous devez entendre l'enclenchement du couvercle.
(1
iDevices supportés, voir page 82.
70
Page 71
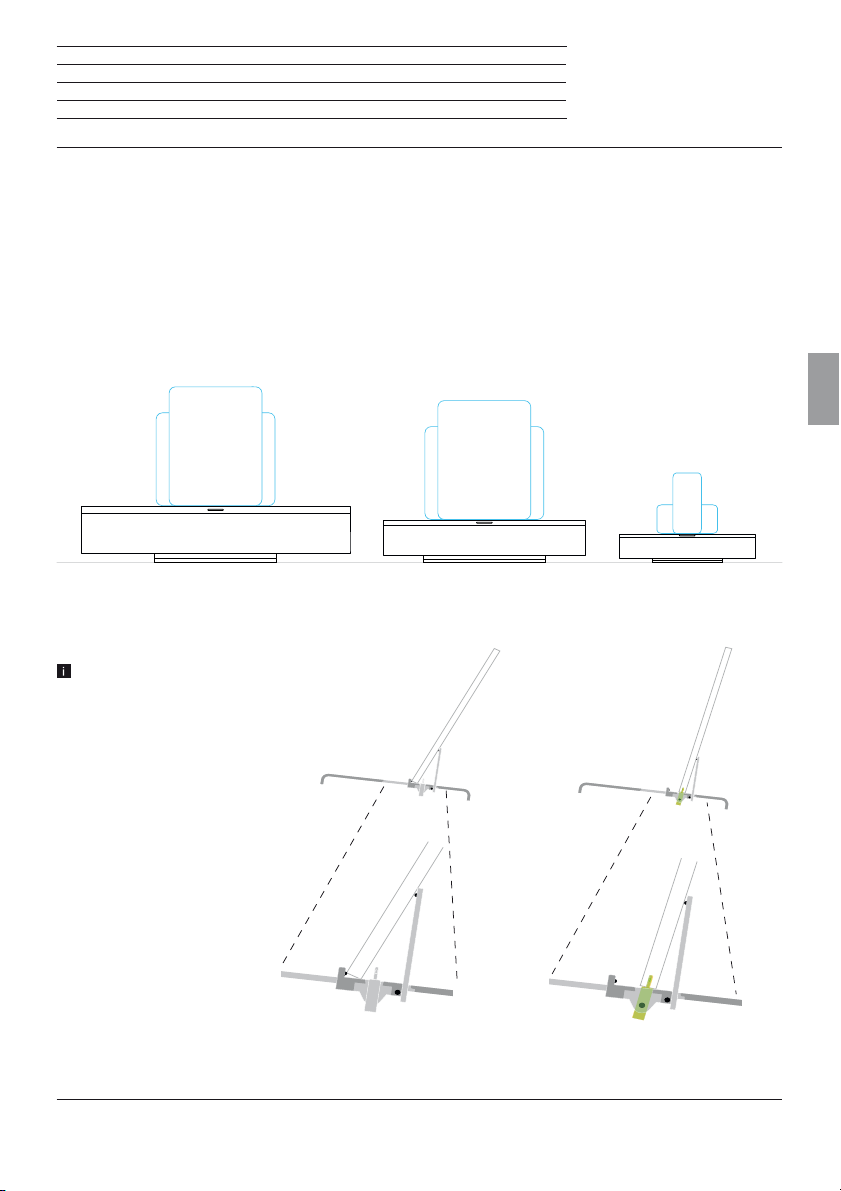
SoundPort / SoundPort Compact / SoundPort Mini
Notice d'utilisation
connecteur Lightning
La source audio au connecteur Lightning
Vous pouvez raccorder des iDevices avec connecteur Lightning en alignement vertical au connecteur Lightning intégré
dans ce cas via Bluetooth (voir page 72) ou via le raccordement câblé USB
Lorsque le iDevice est connecté au connecteur Lightning du SoundPort (voir page 77), la lecture audio
peut démarrer ou la synchronisation avec votre ordinateur / ordinateur portable peut être effectuée (voir
page 76).
Vous pouvez voir ci-dessous quelle version maximale de iDevice (taille de l'appareil) vous pouvez utiliser
sur le SoundPort.
(1
. Les iDevices peuvent également être positionnés horizontalement. La connexion s'effectue
(1
(voir page 74).
SoundPort SoundPort Compact SoundPort Mini
iPad vertical / horizontal iPad vertical / horizontal iPhone 5 / iPod touch
vertical / horizontal
Français
Veuillez retirer le film protecteur de votre
iDevice le cas échéant afin de ne pas entraver
la connexion avec le connecteur Lightning.
iDevice dans le couvercle du
connecteur Lightning
(1
iDevices supportés, voir page 82.
iDevice raccordé au connecteur
Lightning
71
Page 72
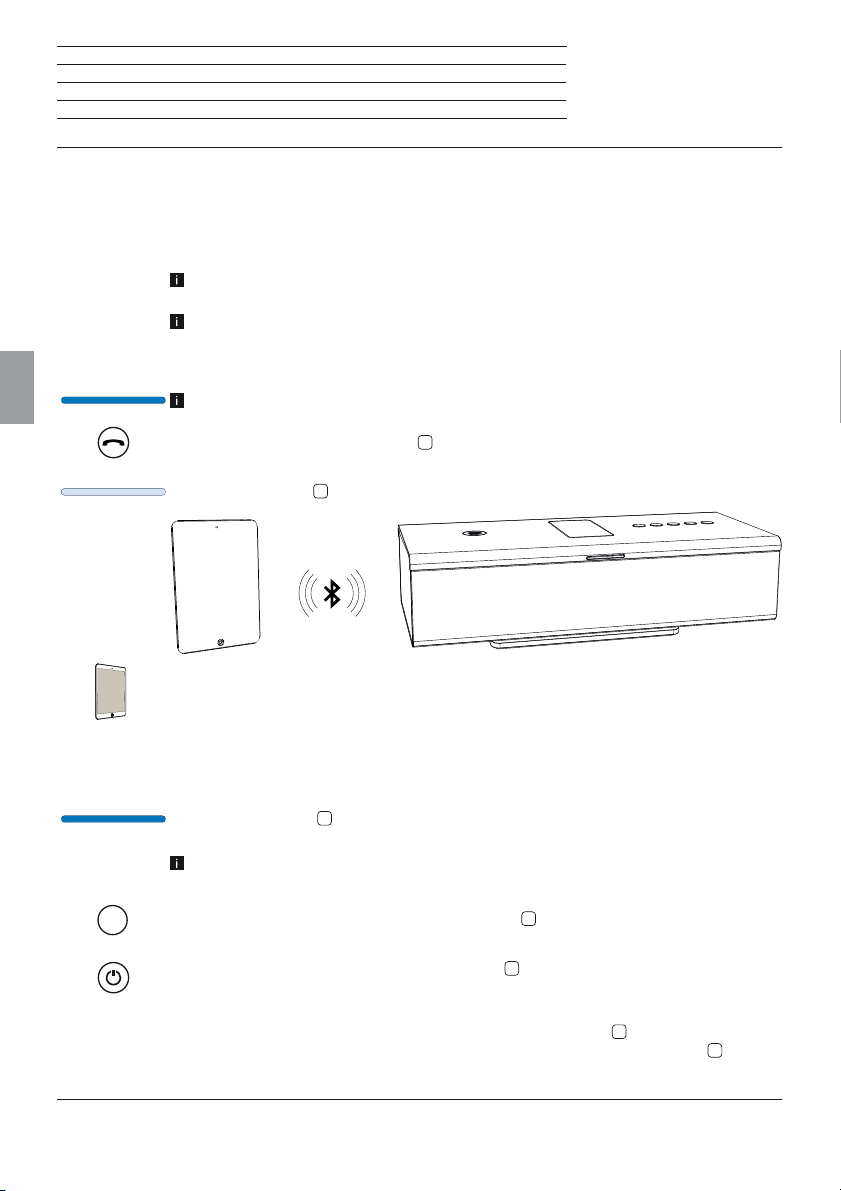
SoundPort / SoundPort Compact / SoundPort Mini
Notice d'utilisation
Couplage Bluetooth
Couplage de la source audio via Bluetooth
Vous pouvez coupler le SoundPort sans fil via Bluetooth avec une source audio, par exemple, un
smartphone, une tablette, un ordinateur, etc. Les sources audio doivent prendre en charge le protocole
Bluetooth A2DP.
La distance entre votre SoundPort et la source audio ne doit pas dépasser 10m (ligne
de visibilité).
Le SoundPort enregistre les 5 dernières sources audio Bluetooth couplées. Ainsi la
connexion sera établie plus rapidement lors du prochain couplage. Cependant, une
seule connexion active simultanée est possible. Si une nouvelle source audio est ajoutée, la source audio précédente enregistrée est supprimée de la liste de connexion.
Français
La fonction Bluetooth est sélectionnée comme source (voir page 67).
SRC
Appuyez longtemps sur la touche
3
du SoundPort (environ 3secondes).
Vous entendez un signal sonore.
8
Le témoin lumineux
clignote.
Activez la fonction Bluetooth de votre source audio. Pour obtenir de plus amples informations, veuillez vous référer à la notice d'utilisation de la source audio.
Actionnez si nécessaire la fonction de recherche Bluetooth de la source audio.
À présent, la recherche se concentre sur les appareils Bluetooth dans les alentours de
la source audio. Sélectionnez SoundPort_xx
(1
. Si un code est demandé, entrez 0000.
Une fois le couplage effectué, vous entendrez un signal sonore.
8
Le témoin lumineux
est allumé en permanence; le SoundPort est maintenant prêt
pour la lecture audio (voir page 77).
Pour certaines sources audio, la connexion doit être explicitement activée avant la
lecture de la musique sur le SoundPort.
2
En commutant la source à l'aide de la touche SRC
, la lecture de musique en cours est
mise en pause / arrêtée mais le couplage avec la source audio est maintenu.
1
Une simple pression sur la touche Marche / Arrêt
active le mode Standby du SoundPort.
La lecture de musique en cours est mise en pause / arrêtée et le couplage avec la source
audio est coupé.
Lorsque vous rallumez le SoundPort avec latouche Marche / Arrêt 1, ce dernier tente à nouveau d'établir le couplage avec la source audio. Dans cet état, le témoin lumineux
8
clignote.
Une fois le couplage réussi, le témoin lumineux est allumé en permanence.
(1
xx correspond aux deux derniers caractères de l‘adresse MAC du SoundPort.
72
Page 73
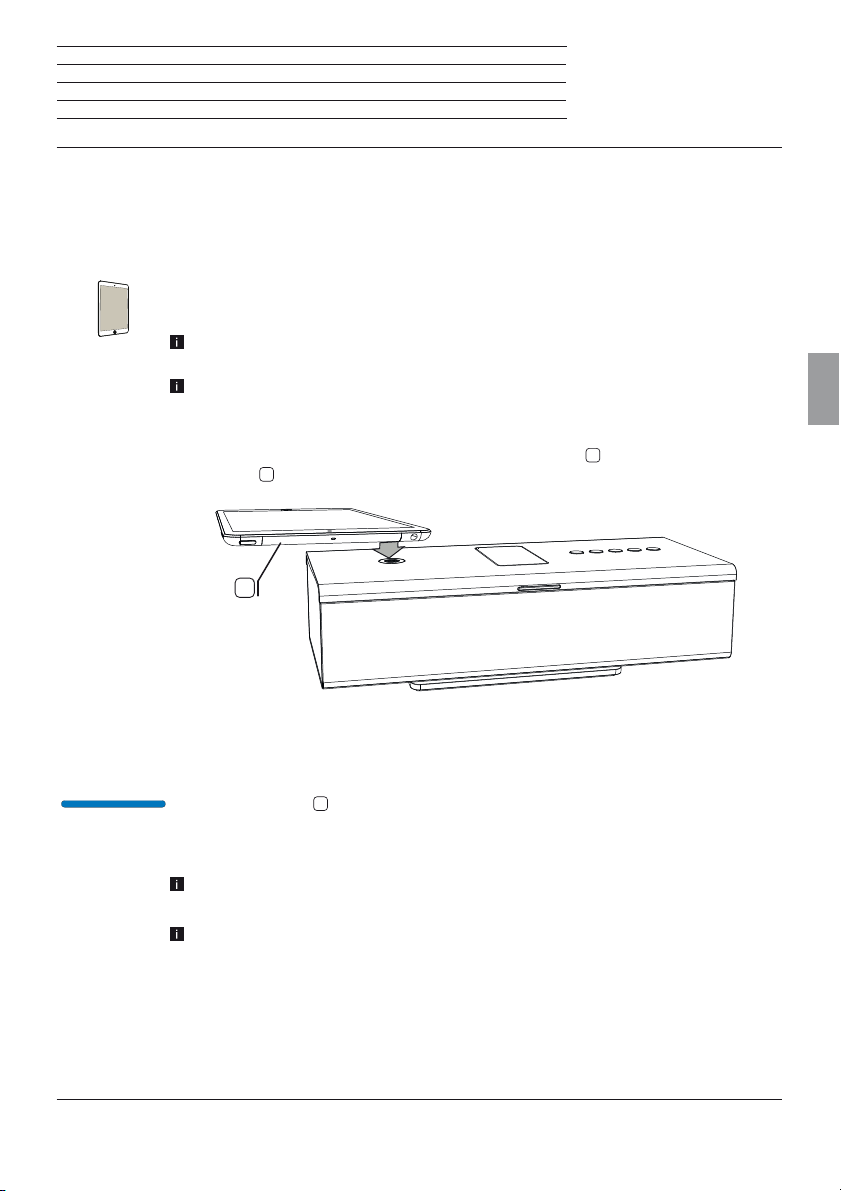
SoundPort / SoundPort Compact / SoundPort Mini
Notice d'utilisation
Couplage Connectivity Easy Pairing
Couplage de la source audio via Connectivity Easy Pairing
Vous pouvez très facilement coupler votre SoundPort via la fonction Connectivity Easy Pairing (pour
connecter des dispositifs NFC
un ordinateur, etc. La source audio doit prendre en charge la fonction NFC.
Activez la fonction NFC et la fonction Bluetooth de votre source audio. Pour obtenir de
plus amples informations, veuillez vous référer à la notice d'utilisation de la source audio.
Veuillez consulter le champ d'application NFC exact dans la notice d'utilisation de
votre source audio.
Le couplage de la fonction Connectivity Easy Pairing est actif en permanence à partir
du SoundPort (exception: mode Standby). Il n'est donc pas nécessaire de commuter
manuellement vers la source Bluetooth.
Maintenez le champ d'application NFC de votre source audio
Easy Pairing
)
avec votre source audio, comme par exemple un Smartphone, une tablette,
A
7
du SoundPort.
sur l'antenne Connectivity
A
Français
Confirmez le cas échéant la demande de couplage de votre source audio avec le SoundPort. Une fois le couplage effectué, vous entendrez un signal sonore.
8
Le témoin lumineux
est allumé en permanence.
À présent, le SoundPort est couplé avec votre source audio via Bluetooth et la lecture
audio peut démarrer (page 77).
Pour certaines sources audio, la connexion doit être explicitement activée avant la
lecture de la musique sur le SoundPort.
Si une autre source audio compatible NFC se trouve dans le domaine de couplage du
SoundPort, elle sera couplée au SoundPort. La connexion existante à la source audio
précédente est déconnectée.
73
Page 74
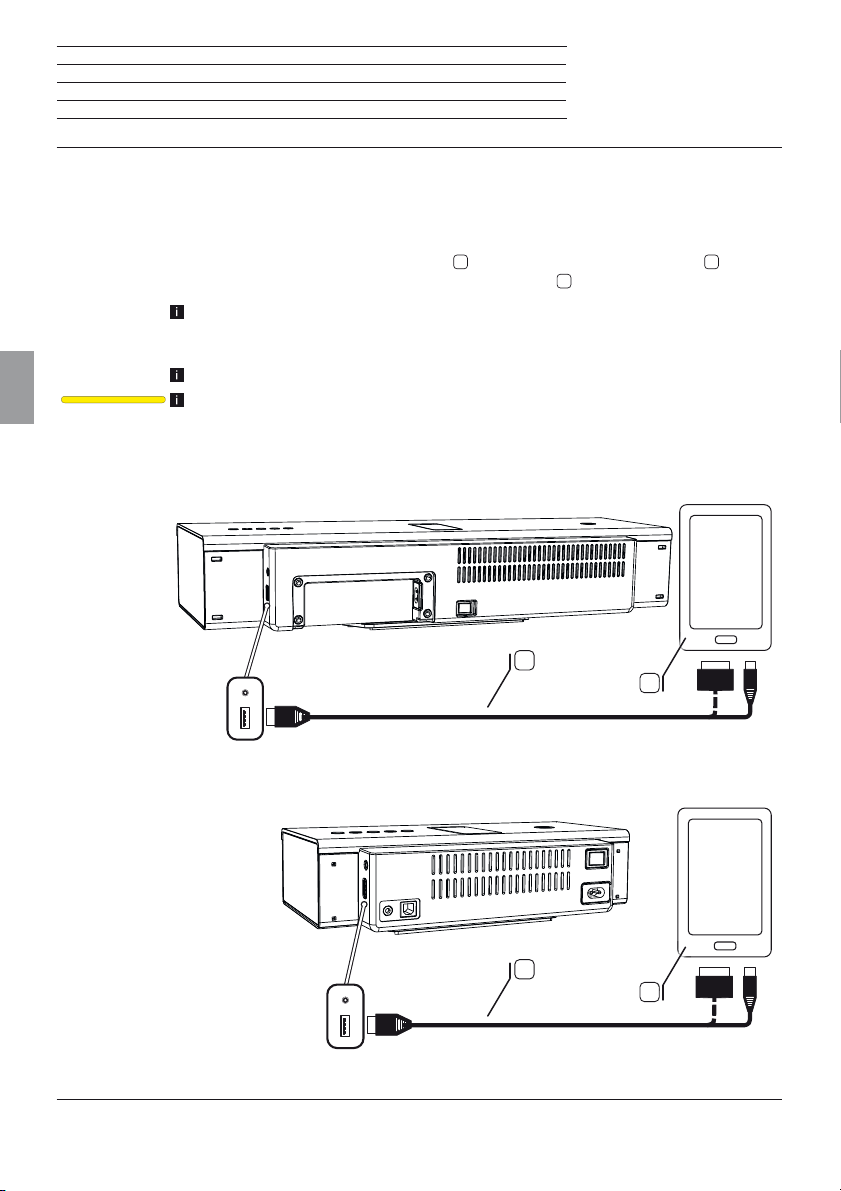
SoundPort / SoundPort Compact / SoundPort Mini
Notice d'utilisation
USB-Audio
Raccorder la source audio par USB
Vous pouvez coupler votre SoundPort via un câble USB à votre source audio, comme par ex. un téléphone
portable, un lecteur de musique, etc.
16
du SoundPort à la source audio A. Utilisez
U
.
(1
sont connectés
Français
Raccordez le connecteur USB (type A)
pour cela le câble USB approprié selon la source audio
Certaines sources audio, par exemple les smartphones Android, sont équipées d'un
raccordement Micro USB, les iDevices sans connecteur Lightning
au raccordement USB du SoundPort via un raccordement à 30 broches.
La source audio doit prendre en charge la lecture audio via USB (streaming USB).
USB-Audio est sélectionnée comme source (voir page 67).
La lecture audio (voir page 77) fonctionne à présent via USB.
SoundPort / SoundPort Compact
SoundPort Mini
(1
iDevices supportés, voir page 82.
74
U
A
U
A
Page 75
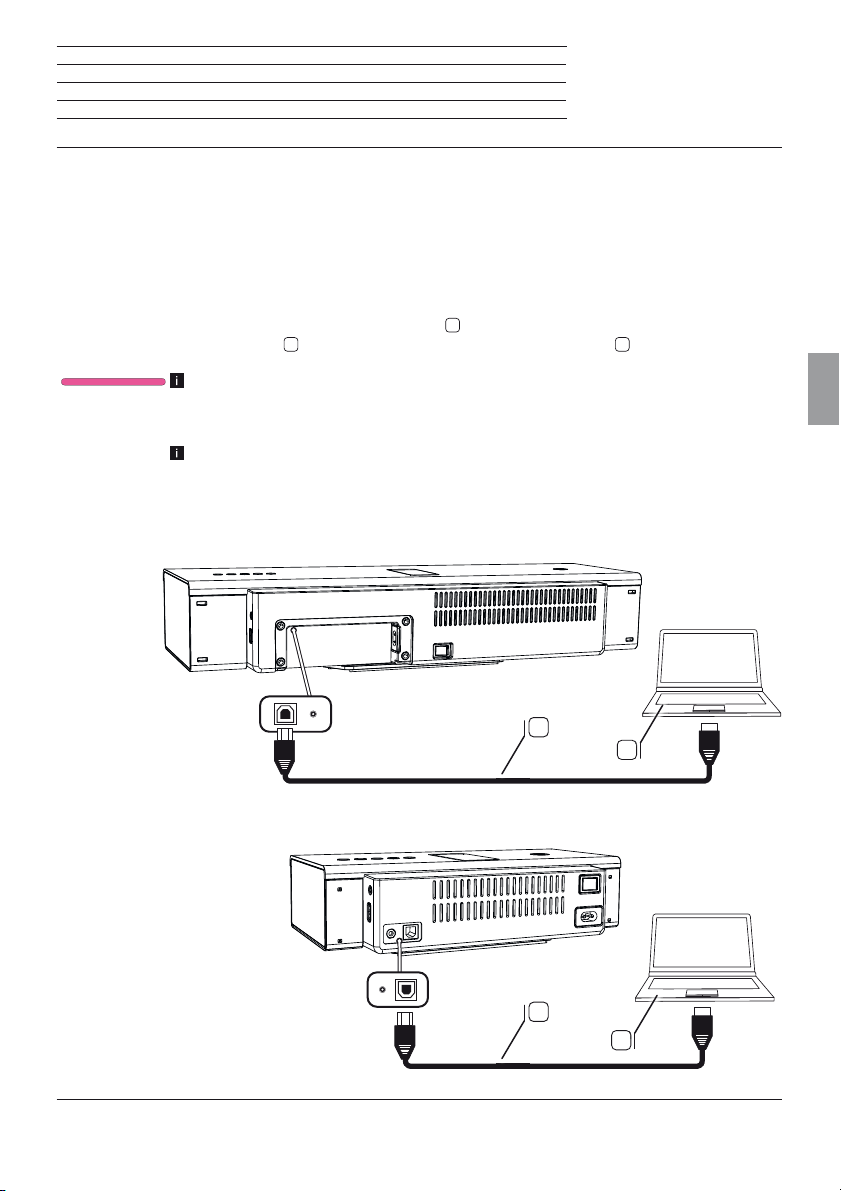
SoundPort / SoundPort Compact / SoundPort Mini
Notice d'utilisation
PC-Audio
Raccordez le SoundPort comme périphérique USB (PC-Audio)
Vous pouvez à l'aide d'un câble USB coupler votre SoundPort à un ordinateur / ordinateur portable. Le
SoundPort se connecte à l'ordinateur / ordinateur portable comme un haut-parleur USB et peut alors
être utilisé comme un dispositif de lecture sur l'ordinateur / ordinateur portable.
Les appareils audio raccordés au SoundPort via le connecteur Lightning peuvent être synchronisés avec
un ordinateur / ordinateur portable via le SoundPort (voir page 76).
15
Raccordez le connecteur USB (type B)
nateur portable
P
. Utilisez pour cela un câble USB de type A-B U.
PC-Audio est sélectionnée comme source (voir page 67).
La lecture audio (voir page 77) fonctionne à présent via USB.
La fonction dépend de la configuration matérielle et logicielle de la source connectée,
par exemple, la configuration de connexion, les pilotes, les codecs et les formats uti-
lisés. Veuillez consulter la documentation de votre dispositif source et, si nécessaire,
effectuez une mise à jour des pilotes ou du firmware.
SoundPort / SoundPort Compact
à un port USB libre de votre ordinateur / ordi-
Français
SoundPort Mini
U
P
U
P
75
Page 76
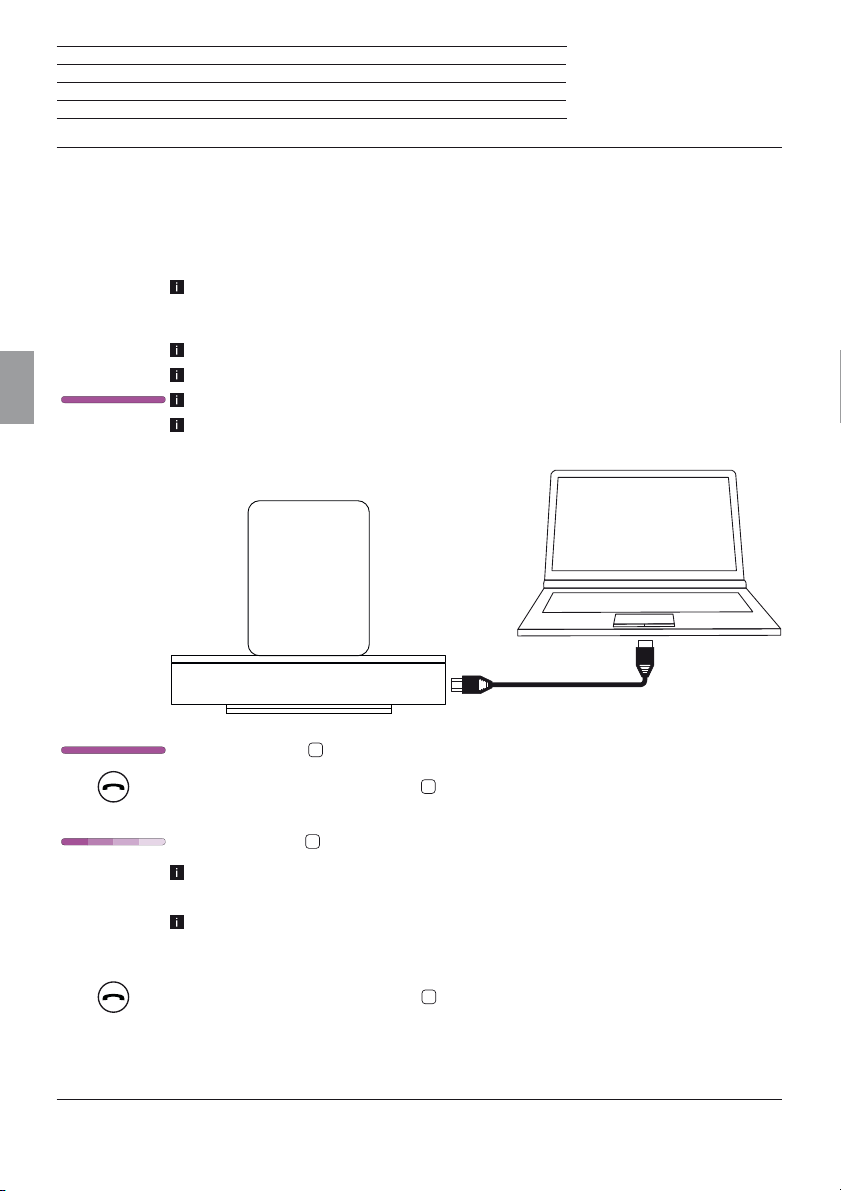
SoundPort / SoundPort Compact / SoundPort Mini
Notice d'utilisation
Sync
Synchronisation SoundPort – iTunes
Il est possible de synchroniser un iDevice (1 raccordé au connecteur Lightning du SoundPort avec iTunes
via le SoundPort sur l'ordinateur/l'ordinateur portable. Le SoundPort sert de pont de connexion entre
iDevice et l'ordinateur / l'ordinateur portable.
La fonctionnalité de cette application dépend de l'ordinateur, l'ordinateur portable, le
système d'exploitation, iTunes, Apple iOS et iDevice, ainsi que des versions logicielles
respectives utilisées.
Le SoundPort a été raccordé à l'ordinateur comme dispositif USB (voir page 75).
Un iDevice a contacté le connecteur Lightning du SoundPort (voir page 71).
Français
Le connecteur Lightning Apple est sélectionné comme source (voir page 67).
iTunes est installé sur l'ordinateur / ordinateur portable et la synchronisation automa-
tique est activée (pour les paramètres iTunes, consulter la documentation du logiciel).
iTunes
Le témoin lumineux
Appuyez longtemps sur la touche
le mode synchronisation.
Le témoin lumineux
Veuillez noter les possibles annonces et les messages du système d'exploitation ou
d'iTunes affichés sur votre ordinateur / ordinateur portable.
Pendant le processus de synchronisation, aucune autre fonction ne peut être utilisée
(mise en hors tension, sélection de source, fonction mains libres, changement de
volume) sur le SoundPort.
Appuyez longtemps sur la touche
le mode synchronisation.
(1
iDevices supportés, voir page 82.
76
8
affiche le connecteur Lightning Apple comme source sélectionnée.
3
du SoundPort (environ 3 secondes) pour activer
8
clignote de gauche à droite pendant le processus de synchronisation.
3
du SoundPort (environ 3 secondes) pour quitter
Page 77
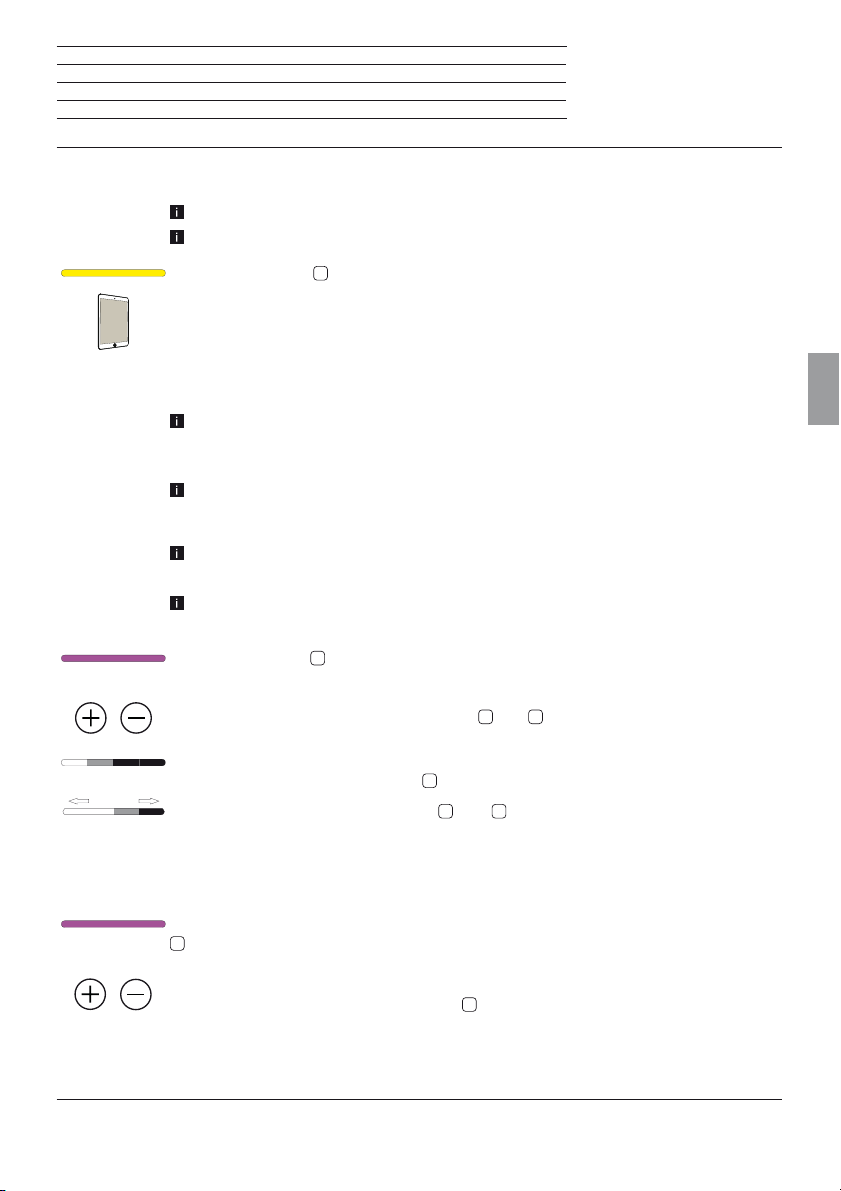
SoundPort / SoundPort Compact / SoundPort Mini
Notice d'utilisation
Lecture audio / Réglage du volume
Lecture audio
Une source sonore doit être connectée ou couplée au SoundPort.
Dans la sélection de la source, cette source audio doit être sélectionnée (voir page 67).
Le témoin lumineux
Démarrez la lecture audio de votre source audio. Les commandes de la lecture (sélection
du titre, retour en arrière, etc.) s'effectuent via le lecteur / l'app de la source audio.
8
indique la source sélectionnée, comme par ex. USB-Audio.
Réglage du volume
Lors de la connexion par un câble audio (page 69), réglez le volume de votre source
audio sur un niveau élevé afin d'éviter les interférences. Sélectionnez ensuite le volume
désiré sur le SoundPort.
Lors de la connexion de iDevices via Bluetooth (voir page 72), le réglage du volume
entre iDevice et SoundPort est couplé, c'est-à-dire que la modification du volume sur
l'un des dispositifs affecte le volume de l'autre.
La musique forte peut provoquer la surdité. Évitez les volumes extrêmes, en particulier
pour des périodes prolongées.
Si aucune musique n'est lue ni aucune touche activée durant 10 minutes, le SoundPort
commute automatiquement en mode Smart Standby.
Le témoin lumineux
Lightning Apple.
Pour régler le volume, utilisez les touches +
Le réglage du volume comporte plusieurs niveaux
DEL situées sur le témoin lumineux
Vol +
Vol -
MIN MAX
En appuyant brièvement le bouton +
niveau.
En maintenant la touche + ou – appuyée, vous parcourez la plage de volume.
Le volume maximal est indiqué par deux clignotements des témoins lumineux à luminosité maximale.
Si aucun changement de volume est effectué durant trois secondes, le témoin lumineux
8
affiche à nouveau la couleur de la source audio sélectionnée.
8
affiche la source sélectionnée, comme par exemple le connecteur
4
et – 5 du SoundPort.
(1
8
.
4
et – 5, le volume augmente ou diminue d'un
représentés visuellement par quatre
Français
Placez le SoundPort en mode silencieux en appuyant simultanément sur les touches +
et –. Les quatre DEL du témoin lumineux
Pour rétablir le son, appuyez sur la touche + ou – . Le témoin lumineux affiche à nouveau
la source originale sélectionnée.
(1
consulter les caractéristiques techniques à la page 83.
8
s'allument et palpitent en pleine puissance.
77
Page 78
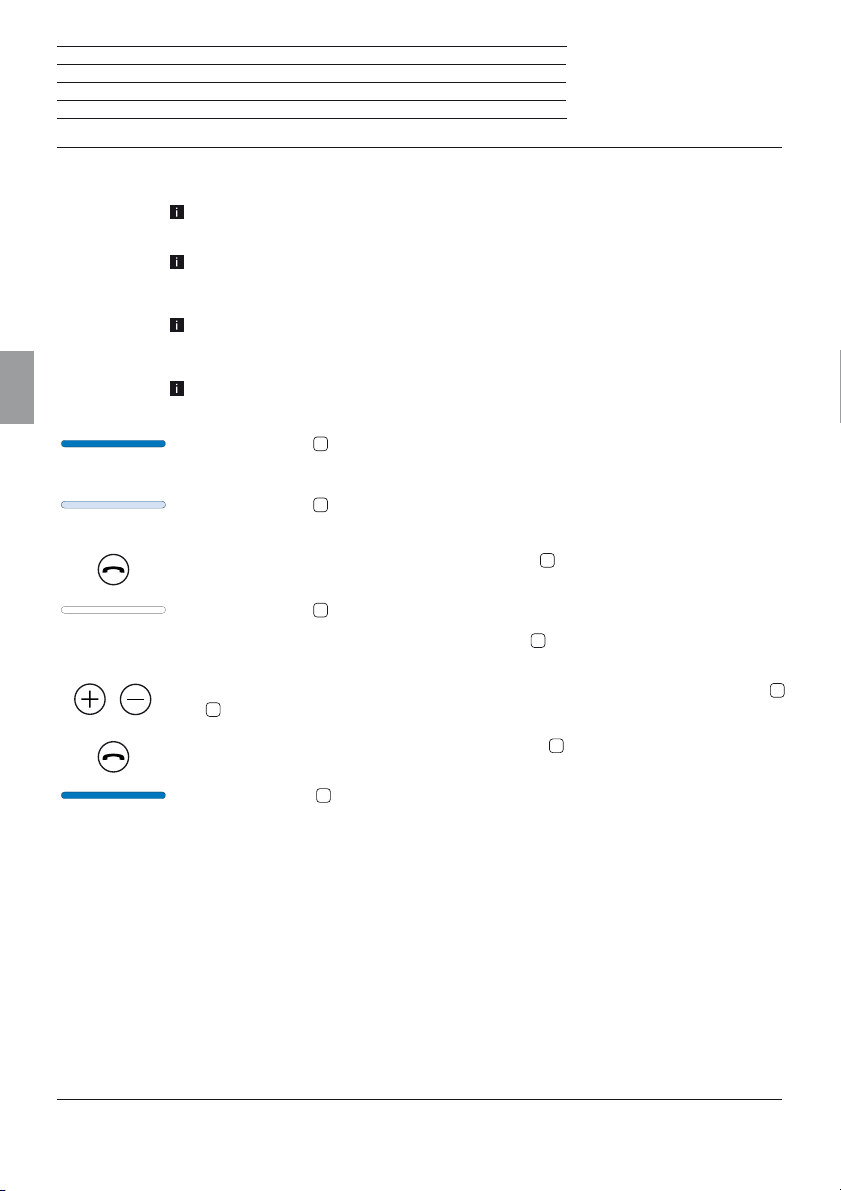
SoundPort / SoundPort Compact / SoundPort Mini
Notice d'utilisation
Fonction mains libres
Fonction mains libres
Le SoundPort doit être allumé et couplé via Bluetooth (voir page 72) ou Connectivity
Easy Pairing (voir page 73) et connecté à votre téléphone portable.
Les bruits environnants intenses nuisent à la qualité de la fonction mains libres. Assurez-
vous de vous placer dans un environnement calme ou renoncez à la fonction mains
libres si l'environnement ne s'y prête pas.
Afin de garantir une bonne compréhension entre les interlocuteurs, veillez à ne pas
parler en même temps. La distance entre la personne et le SoundPort devrait idéale-
ment être comprise entre 0,3 m et 1,2 m.
Français
Pour accepter un appel entrant, le SoundPort doit être allumé (voir page 66) et la
source Bluetooth activée (voir page 67).
Le témoin lumineux
8
affiche Bluetooth comme source.
Lors d'un appel entrant une sonnerie retentit.
8
Le témoin lumineux
clignote rapidement en blanc.
Le clignotement s'arrête lors de la lecture audio.
Acceptez l'appel entrant en appuyant sur la touche
3
du SoundPort ou sur le bouton
correspondant de votre téléphone portable.
8
Le témoin lumineux
Lorsque vous parlez, adressez-vous à la face avant
s'allume en blanc.
9
du SoundPort. Le microphone se
trouve au centre du couvercle du haut-parleur (voir page 63).
Pour atteindre un niveau de volume moyen sur le SoundPort, utilisez les touches +
5
ou –
(voir aussi page 77).
3
Terminez l'appel en appuyant à nouveau sur la touche
du SoundPort ou sur le bouton
correspondant de votre téléphone portable.
8
Le témoin lumineux
affiche à nouveau la couleur de la dernière source audio sélec-
tionnée.
4
78
Page 79

SoundPort / SoundPort Compact / SoundPort Mini
Notice d'utilisation
Mode Smart Standby et mode Standby
Mode Smart Standby
Le mode Smart Standby est activé automatiquement lorsque sur le SoundPort durant 10minutes au
moins:
- aucune musique est lue,
- aucun appel entrant ou sortant est effectué,
- aucune touche du SoundPort ou de la télécommande Assist (voir page 80) n‘est activée
- aucun appareil est connecté ou déconnecté et
- aucune synchronisation est en cours.
En mode Smart Standby, les différents éléments du circuit (DSP / amplificateur, etc.) du SoundPort sont
éteints à des fins d‘économie d‘énergie.
Il existe différentes manières de sortir le SoundPort du mode Smart Standby:
- un iDevice est raccordé au connecteur Lightning.
- un dispositif mobile est couplé via Connectivity Easy Pairing (NFC).
- la lecture sur un dispositif Bluetooth couplé est poursuivie (uniquement si Bluetooth était la dernière
source active avant le mode Smart Standby).
- la lecture sur un dispositif sur AUDIO IN est poursuivie (uniquement si AUDIO IN était la dernière source
active avant le mode Smart Standby).
- une des quatre touches SRC
- un dispositif Bluetooth couplé est déconnecté.
- une touche de la télécommande Assist (voir page 80) est appuyée.
Les appareils raccordés via Lightning / USB peuvent aussi être chargés lorsque le SoundPort se trouve
en mode Smart Standby.
Avec une pression sur la touche la touche marche/arrêt 1 le SoundPort passe au en mode Standby
(voir plus bas).
Après 4heures en mode Smart Standby, le SoundPort commute automatiquement en mode Standby.
La consommation énergétique en mode Smart Standby est plus élevée qu‘en mode Standby (voir les
caractéristiques techniques à la page 83).
2
, mains libres 3, + 4 ou – 5 est appuyée.
Français
Mode Standby
Pour éteindre le SoundPort en mode Standby, appuyez sur la touche marche / arrêt 1.
En mode Standby, les appareils peuvent être rallumés uniquement avec la touche marche/arrêt
SoundPort ou à l‘aide de la touche marche/arrêt de la télécommande Assist (voir page 80)
En mode Standby, aucun périphérique raccordé à Lightning/USB ne peut être chargé.
La consommation énergétique en mode Standby est plus faible qu‘en mode Smart Standby (voir les
caractéristiques techniques à la page 83).
1
du
79
Page 80
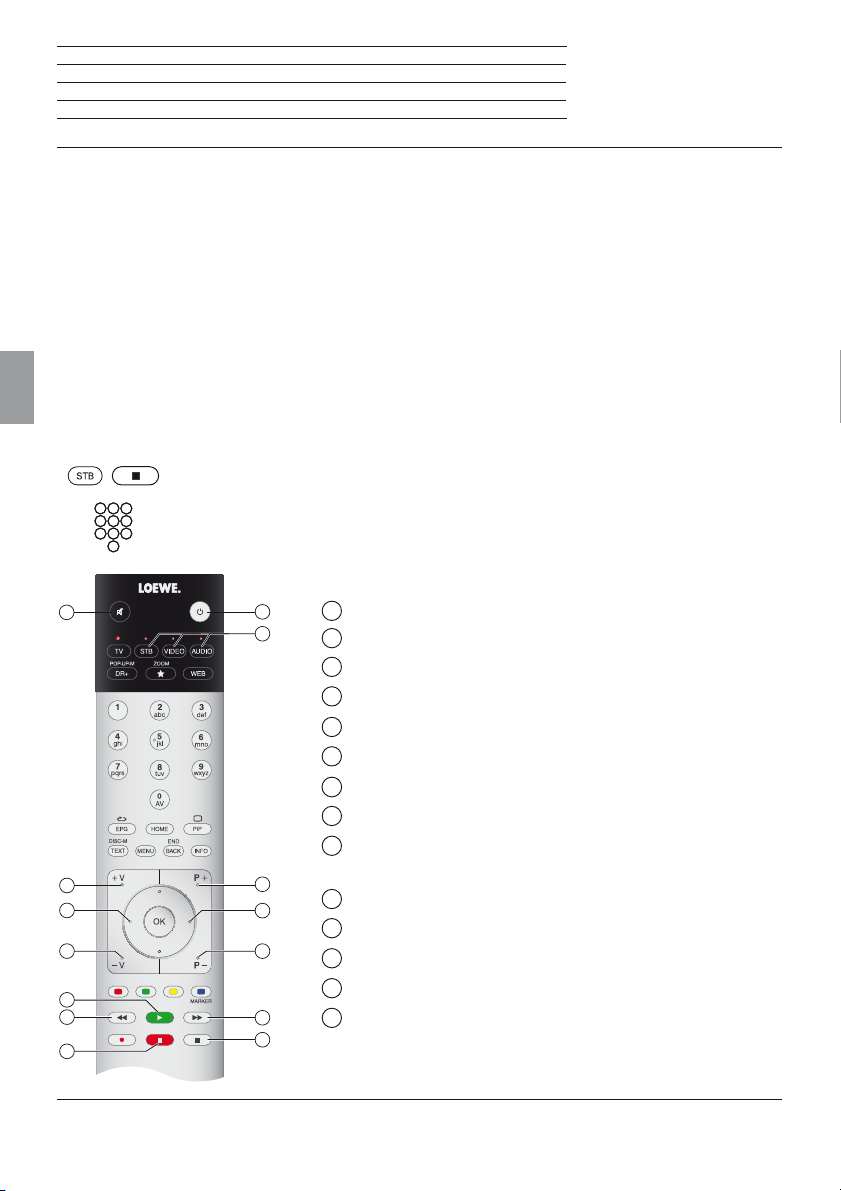
SoundPort / SoundPort Compact / SoundPort Mini
Notice d'utilisation
Accessoires
Accessoires
Eléments d’habillage encastrables:
Les éléments d'habillage encastrables disponibles comme accessoires permettent de personnaliser votre
SoundPort à vos besoins. Consultez votre revendeur spécialisé pour découvrir les éléments d'habillage encastrables correspondants à votre SoundPort, SoundPort Compact et SoundPort Mini.
Télécommande - Assist
Le système de télécommande Assist fourni comme accessoire vous permet de commander les fonctions
de votre SoundPort. Si votre périphérique Loewe est livré avec une télécommande Assist actuelle, vous
pouvez utiliser la télécommande disponible (voir liste des variantes de télécommandes à la page 82).
Dans un premier temps, la télécommande doit être configurée pour la commande de votre SoundPort.
Français
Les quatre touches de l‘appareil (selon la variante de commande à distance) STB – VIDEO – AUDIO –
DVD– REC– RADIO– SP peuvent être configurées pour la commande de votre SoundPort.
Appuyez simultanément sur la touche de l’appareil de votre choix et sur la touche STOP pendant
5 secondes, jusqu’à ce que le voyant lumineux de la touche sélectionnée clignote deux fois.
Ensuite, saisissez le code à deux chiffres 31 pour le SoundPort. Le témoin lumineux audessus de la touche de l‘appareil sélectionnée clignote deux fois.
Affectation des touches
1
2
3
4
5
6
7
8
9
10
11
12
13
14
1
Activation / Coupure du son
2
Volume+
3
Réglage de son – (précédent réglage de son)
4
Volume–
5
Lecture
6
Titre précédent
Pause
7
8
Marche / Arrêt
9
Réglage de la touche de l’appareil pour SoundPort (voir
(1
(1
(1
ci-dessus) /Commuter vers les commandes SoundPort
10
Sélection de la source + (le plus proche source audio)
11
Réglage de son + (le plus proche réglage de son)
12
Sélection de la source – (précédent source audio)
13
Titre suivant
14
Arrêt
(1
(1
(1
Fonction disponible uniquement pour les sources audio via connecteur Lightning, Bluetooth et audio USB.
80
Page 81
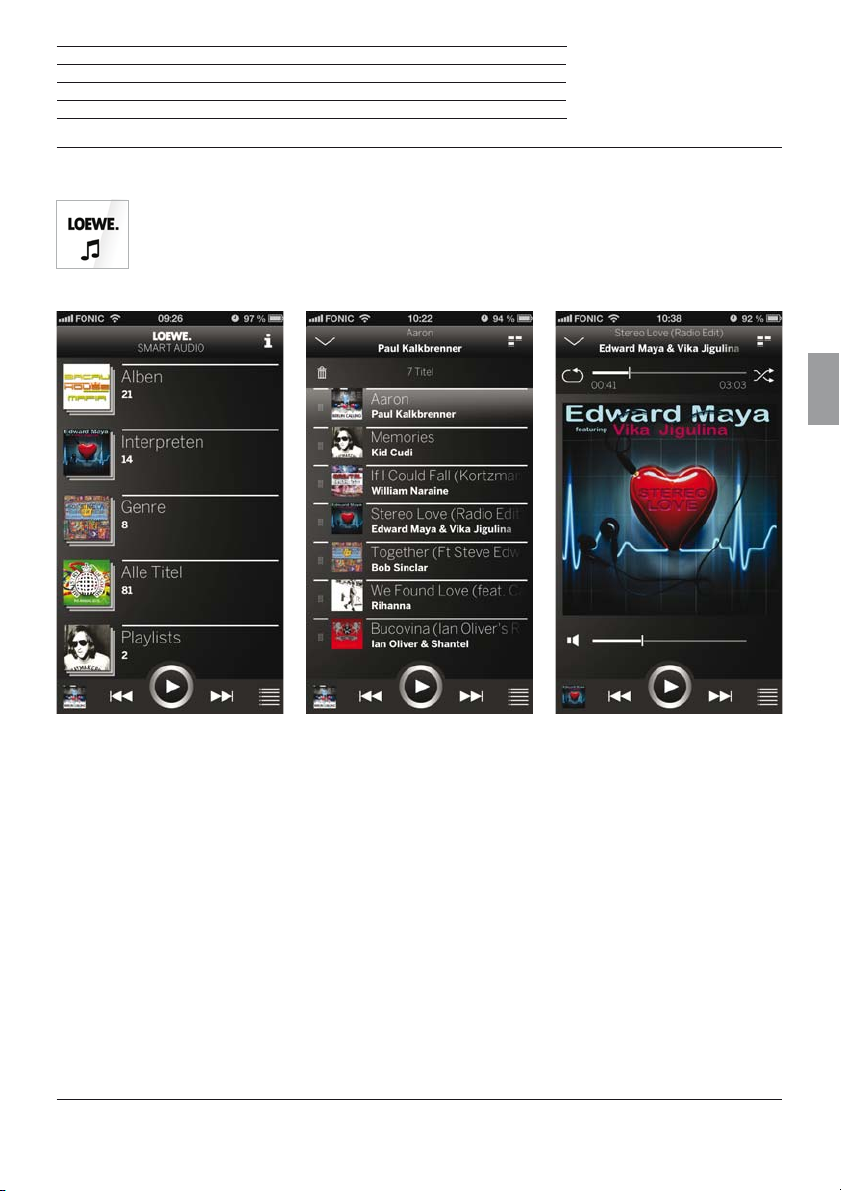
SoundPort / SoundPort Compact / SoundPort Mini
Notice d'utilisation
Accessoires
App Smart Studio
L'intelligence de bout en bout: l'App Loewe Smart Audio. Écoutez votre musique stockée sur votre
smartphone avec le lecteur audio intuitif et de haute qualité de Loewe. Disponible gratuitement
dans le Apple App Store ou Google Play Store.
Français
L'écran de démarrage fournit un
aperçu structuré de la musique
stockée localement. Consultez
le contenu en un coup d'oeil et
accédez en quelques clics au
titre de votre choix.
La totalité des titres
dernièrement écoutés seront
ajoutés automatiquement à la
liste d'écoute. Vous pouvez y
accéder à tout moment à l'aide
du symbole Listes situé en
bas à droite. Dans cette liste, il
est possible de supprimer ou
déplacer tous les titres. Utilisez
pour cela le symbole de la
corbeille ou la partie gauche de
chaque entrée de la liste.
Les coins actifs permettent non
seulement de sauter dans la
liste de lecture, mais également
d'accéder en un seul clic à l'écran
standard ou au lecteur.
Le lecteur affiche toujours la
chanson en cours de lecture
avec toutes ses options de
contrôle. Le symbole AirPlay
vous permet de sélectionner
rapidement tous les hautparleurs disponibles.
81
Page 82

SoundPort / SoundPort Compact / SoundPort Mini
Notice d'utilisation
iDevices supportés
Variantes de télécommandes pouvant être utilisées
iDevices supportés
État au 18 février 2014.
Sound Port–connecteur Lightning:
iPhone 5, iPhone 5c, iPhone 5s
iPad (4ème génération), iPad mini, iPad mini avec Retina Display, iPad Air
iPodtouch (5ème génération), iPod nano (7ème génération)
Sound Port–USB:
iPhone, iPodtouch, iPodnano
Français
Sound Port Compact – connecteur Lightning:
iPhone 5, iPhone 5c, iPhone 5s
iPad (4ème génération), iPad mini, iPad mini avec Retina Display, iPad Air
iPodtouch (5ème génération), iPodnano (7ème génération)
Sound Port Compact–USB:
iPhone, iPodtouch, iPodnano
Sound Port Mini–connecteur Lightning:
iPhone 5, iPhone 5c, iPhone 5s
iPodtouch (5ème génération), iPodnano (7ème génération)
Sound Port Mini–USB:
iPhone, iPodtouch, iPodnano
Variantes de télécommandes pouvant être utilisées
Cette liste comprend les variantes de télécommandes qui permettent de commander les fonctions du
SoundPort.
Pour savoir comment configurer la télécommande pour la commande du SoundPort, référez-vous à la
page 80.
Le code de l‘appareil 31 est disponible en fonction de la télécommande utilisée. La référence d‘article/
variante se trouve dans le compartiment de batterie de la télécommande
Assist 1 (TV) 89900A13 / 89900A14
Assist 1 (MediaVision) 89900A11
Assist 1 (HomeCinema) 89900A12
Assist 1 (SoundVision) 89900A10
Assist 1 (MultiContr. II) 89900A09
Assist 2 (TV) 89950A23
Assist 2 (SoundBox) 89950A20
Assist 2 (AirSpeaker) 89950A22
82
Page 83
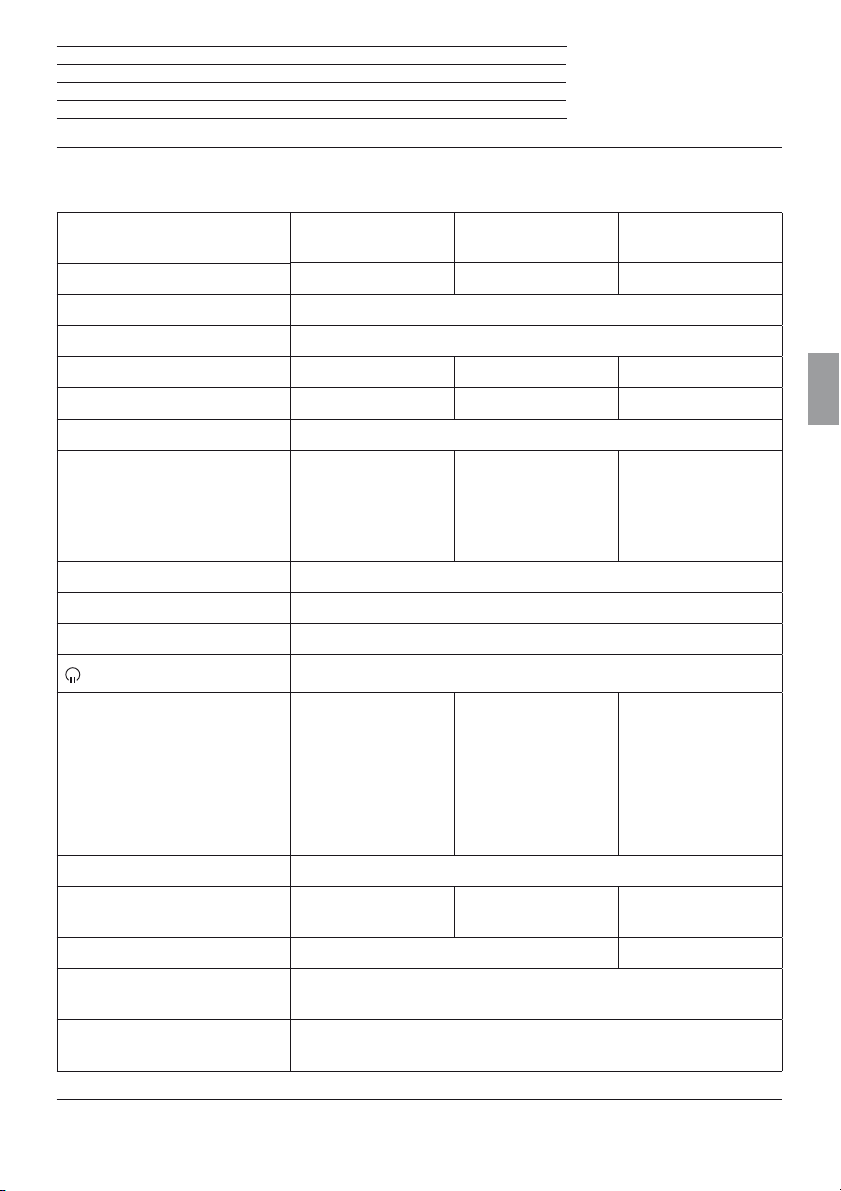
SoundPort / SoundPort Compact / SoundPort Mini
Notice d'utilisation
Caractéristiques techniques
Caractéristiques techniques
SoundPort SoundPort
Compact
SoundPort
Mini
Référence 52227x00 52228x00 52229x00
Température de fonctionnement
5°C ... 35°C
Taux d'humidité 30 % ... 85 % (pas de condensation)
Dimensions (LxHxP) (env.) 550 x 126 x 201 mm 415 x 109 x 178 mm 280 x 91 x 153 mm
Poids 5,5kg 3,6kg 1,9kg
AC-IN (tension électrique) 220-240Volt, 50/60Hz
Puissance consommée:
Mode on (puissance audio max.)
Mode on (puissance audio 1/8)
Mode Smart Standby
Mode Standby
103 W
51 W
2,1 W
< = 0,5 W
62 W
40 W
2,1 W
< = 0,5 W
48 W
35 W
0,8 W
< = 0,5 W
USB A 2.0, Type A, fonction de charge, maximum 2,1 A
USB B PC Audio, iTunes Lightning Sync
AUDIO IN Prise jack 3,5mm, 1.0Vrms, 10kOhm
Casque, 32–200 Ohm
Haut-parleurs 2 haut-parleurs
à haute fréquence,
chacun de 15 W
2 haut-parleurs à
large bande, chacun
de 20W
2 Woofer, chacun de 60W
2 haut-parleurs à
large bande, chacun
de 20 W
1 Woofer, 60 W
2 haut-parleurs à
large bande, chacun
de 8 W
1 Woofer, 20 W
Plage de transmission 65 Hz - 20 kHz
Puissance de sortie
(Sinus / Musikque)
2 x 17 W + 1 x 50 W /
2 x 34 W + 1 x 100 W
2 x 10 W + 1 x 20 W /
2 x 20 W + 1x 40 W
2 x 6 W + 1 x 10 W /
2 x 12 W + 1 x 20 W
Niveaux de volume 48 24
Transmission sans fil Bluetooth 2,4GHz, 10m de portée
NFC
Protocoles Bluetooth A2DP, 2.1+EDR, AVRCP1.4, HS, HFP1.6 (Wideband Speech)
aptX-Decoder, ATI, AEC
Français
83
Page 84
SoundPort / SoundPort Compact / SoundPort Mini
Notice d'utilisation
Protection de l'environnement
Déclaration de conformité
Protection de l'environnement
Emballage et carton
Pour la mise au rebut de l'emballage, nous avons, selon les décrets nationaux, versé une rémunération à
des entreprises de récupération pour collecter les emballages chez nos revendeurs. Nous vous conseillons
cependant de conserver le carton original et les matériaux d'emballage afin de garantir une protection
optimale de l'appareil lorsque celui-ci doit être transporté.
L‘appareil
Attention: la directive européenne 2002/96/CE réglemente la reprise, le traitement et
le recyclage en bonne et due forme des appareils électroniques usagés. C'est pourquoi
Français
Vous pourrez obtenir d’autres détails sur la reprise (valables également pour les pays non-européens)
auprès de votre administration locale.
Piles
les appareils électroniques usagés doivent être éliminés séparément des autres. Ne jetez
pas cet appareil dans la poubelle domestique normale! Si vous achetez un appareil neuf
similaire, vous pouvez déposer votre ancien appareil gratuitement dans l'un des point de
reprise indiqués, voire chez votre revendeur spécialisé.
Conformément aux réglementations concernant les piles, vous ne devez pas jeter les piles
usagées dans la poubelle domestique normale. Veuillez jeter vos piles usagées dans les
conteneurs mis à disposition chez les commerçants. Votre revendeur dispose également
d'un conteneur de collecte des piles usagées.
Déclaration de conformité
L’appareil porte le marquage CE et respecte les normes européennes légales. Vous pouvez
télécharger la déclaration de conformité complète sur notre page d'accueil.
84
Page 85
SoundPort / SoundPort Compact / SoundPort Mini
Notice d'utilisation
Informations juridiques
Mentions légales
Informations juridiques
“© 2012 CSR plc and its group companies.
The aptX® mark and the aptX logo are trade marks of CSR plc or one of its group companies and may
be registered in one or more jurisdictions.”
«Made for iPod», «Made for iPhone» et «Made for iPad» signifient qu‘un accessoire électronique a été
développé spécifiquement pour l‘iPod, l‘iPhone ou l'iPad et que son développeur certifie qu‘il répond aux
normes de performance Apple. Apple n‘est pas responsable du fonctionnement de cet accessoire, ni de
sa conformité aux normes réglementaires et de sécurité.
iPad, iPad mini et iTunes sont des marques déposées d'Apple Inc. aux États-Unis et dans d'autres pays.
SoundPort / SoundPort Compact:
SoundPort Mini:
Mentions légales
Français
Loewe Technologies GmbH
Industriestraße 11
Date de rédaction 05/14-4.0 TB
© Loewe Technologies GmbH, Kronach
D-96317 Kronach
Tous droits réservés, y compris ceux de la traduction, des modifications techniques et des erreurs.
85
Page 86

SoundPort / SoundPort Compact / SoundPort Mini
Notice d'utilisation
Français
86
Page 87

SoundPort / SoundPort Compact / SoundPort Mini
Manuale d'istruzioni
Indice
Benvenuti .......................................................................................................................................................88
Per la vostra sicurezza 8 ................................................................................................................................89
Elementi di comando ..................................................................................................................................... 91
Collegamenti .................................................................................................................................................92
Messa in funzione ..........................................................................................................................................93
Accensione/spegnimento .............................................................................................................................94
Carica di fonti audio ....................................................................................................................................... 94
Scelta della sorgente .....................................................................................................................................95
Impostazioni suoni ........................................................................................................................................96
Collegamento cavi .........................................................................................................................................97
Lightning Connector ......................................................................................................................................98
Accoppiamento Bluetooth ..........................................................................................................................100
USB-Audio ....................................................................................................................................................102
Audio PC ....................................................................................................................................................... 103
Sync ..............................................................................................................................................................104
Riproduzione audio / Regolazione del volume .......................................................................................... 105
Funzione vivavoce ........................................................................................................................................106
Modalità Smart Standby e modalità Standby ........................................................................................... 107
Accessori ......................................................................................................................................................108
iDevices supportati .......................................................................................................................................110
Varianti di telecomando utilizzabili ..............................................................................................................110
Specifiche tecniche ...................................................................................................................................... 111
Protezione dell’ambiente ..............................................................................................................................112
Dichiarazione di conformità .........................................................................................................................112
Note legali ......................................................................................................................................................113
Informazioni legali .........................................................................................................................................113
Italiano
87
Page 88

SoundPort / SoundPort Compact / SoundPort Mini
Manuale d'istruzioni
Benvenuti
Grazie mille
per aver scelto un prodotto Loewe.
Nei prodotti Loewe si coniugano i massimi requisiti tecnologici, di design e di semplicità d'uso. Questo
vale in ugual misura per apparecchi TV, video, audio e relativi accessori. A questo proposito, tecnologia
e design non sono da considerarsi separatamente, ma sono piuttosto un mezzo per il raggiungimento
di un'elevata qualità della riproduzione audio e video. Anche per quanto riguarda il design, non ci siamo
limitati a seguire mode recenti e transitorie. Quello che avete acquistato è infatti un apparecchio di alta
qualità, le cui caratteristiche lo rendono attuale ed esclusivo anche per il futuro.
Dotazione
• SoundPort o SoundPort Compact o SoundPort Mini
• Cavo di rete
• Cavo audio, jack da 3,5 mm
• Cavo USB (tipo A-B)
• Le presenti istruzioni per l’uso
Italiano
Caratteristiche prestazionali
Possibilità di collegamento
Bluetooth 2.1 + EDR
Connectivity Easy Pairing (per il collegamento con apparecchi compatibili con NFC)
Apple Lightning Connector
AUDIO IN (3,5 mm ingresso audio stereo)
USB A (USB Streaming / Caricamento di fonti audio collegate)
USB B (USB Speaker / Sync)
Presa di collegamento cuffie (uscita audio stereo 3,5 mm)
Funzioni di riproduzione
Supporto dei codec audio (aptX, SBC)
Dispositivo vivavoce Bluetooth
Informazioni sulle presenti istruzioni per l'uso
Le informazioni contenute nelle presenti istruzioni fanno riferimento al prodotto Loewe Speaker SoundPort
(n. art. 52227x00), SoundPort Compact (n. art. 52228x00), SoundPort Mini (n. art. 52229x00).
Nelle istruzioni per l'uso viene utilizzato il termine SoundPort come termine generale riferito a tutte le tre
varianti di dispositivo SoundPort. Nel caso in cui risultino divergenze nell'utilizzo delle varianti di dispositivo,
ogni variante di dispositivo SoundPort viene descritta separatamente.
Nelle istruzioni per l'uso viene utilizzato il termine iDevices come termine generale riferito a dispositivi
Apple iPhone, iPad, iPad mini e iPod.
Per consentire un impiego in sicurezza e di lunga durata dell'apparecchio, leggere prima dell'attivazione
il capitolo Sicurezza dell'utente (vedere pagina 89).
88
Page 89
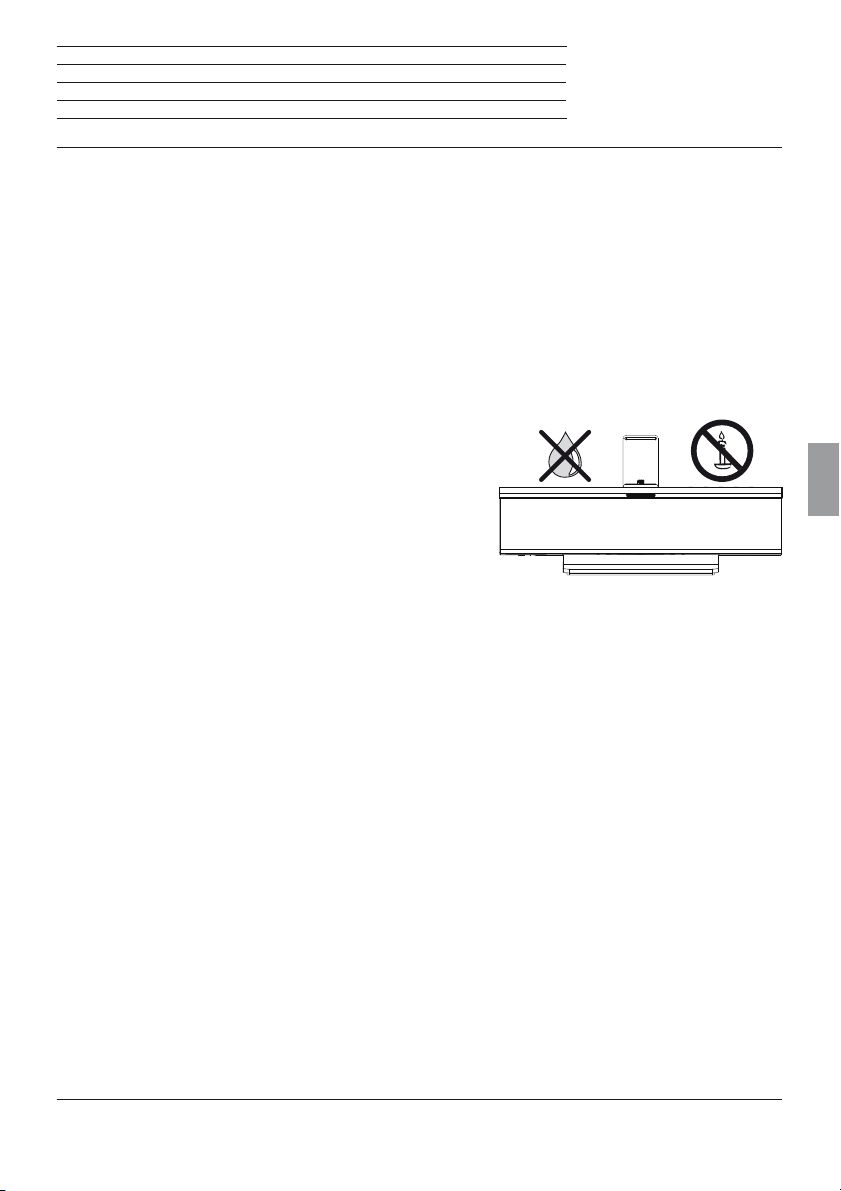
SoundPort / SoundPort Compact / SoundPort Mini
Manuale d'istruzioni
Per la vostra sicurezza
Per la vostra sicurezza e al fine di evitare inutili danni all’apparecchio, vi preghiamo di leggere
e osservare le seguenti avvertenze di sicurezza:
Impiego appropriato e condizioni ambientali
Questo apparecchio è destinato esclusivamente alla riproduzione di segnali audio. Non utilizzarlo in
ambienti che presentino un'elevata umidità dell'aria (come ad esempio bagni, saune), o un'elevata
concentrazione di polveri. La garanzia viene concessa solo per l'utilizzo dell'apparecchio negli ambienti consentiti precedentemente indicati.
Se l'apparecchio viene utilizzato all'aperto, assicurarsi di proteggerlo dall'umidità (pioggia, gocce e spruz-
zi d'acqua o condensa). L'umidità elevata e la concentrazione di polveri causano correnti di fuga nell'apparecchio. Queste condizioni possono essere sorgente di pericoli di contatto con tensioni o incendi.
Se si sposta l'apparecchio da un ambiente freddo ad uno
caldo, lasciarlo inattivo per circa un'ora in considerazione
della possibile formazione di condensa.
Non appoggiare sull'apparecchio oggetti contenenti liquidi.
Proteggere l'apparecchio da gocce e spruzzi d'acqua.
Per evitare la propagazione di incendi, è sempre necessario tenere lontano dall'apparecchio candele e altre fiamme aperte.
Non installare l'apparecchio in un luogo soggetto a vibrazioni.
Diversamente, si possono provocare danni materiali.
Italiano
Alimentazione elettrica
L'applicazione di tensioni inadeguate può provocare danni all'apparecchio. È consentito collegare
questo apparecchio solo a una rete di alimentazione elettrica con la tensione e la frequenza corrispondenti a quanto indicato sulla targhetta dell'apparecchio e utilizzando il cavo di rete in dotazione. Il con-
nettore di rete deve essere facilmente accessibile, in modo tale da poter scollegare l'apparecchio dalla
rete in qualsiasi momento. Per estrarre un connettore dalla presa di rete, non tirarlo dal cavo, ma dall'alloggiamento della spina.
Posare il cavo di rete in modo da impedirne eventuali danni. Il cavo di collegamento non deve essere
piegato né posato su spigoli acuti e non deve essere calpestato o esposto a sostanze chimiche; lo
stesso vale per l’intero apparecchio. Un cavo di rete con l'isolamento danneggiato può provocare scariche
elettriche e rappresenta un pericolo d'incendio.
Supervisione
Non consentire ai bambini di manipolare l’apparecchio TV o di giocare nelle immediate vicinanze dell’ap-
parecchio senza supervisione. Potrebbero urtare o far cadere dal supporto l'apparecchio, con conseguente rischio di lesioni. Non lasciare acceso l'apparecchio TV senza sorveglianza.
89
Page 90
SoundPort / SoundPort Compact / SoundPort Mini
Manuale d'istruzioni
Per la vostra sicurezza
Circolazione dell’aria e temperature elevate
Se colloca l'apparecchio in un armadio o su uno scaffale, sopra e ai lati dell'apparecchio mantenere una
distanza di almeno 3 cm per garantire la circolazione dell'aria.
Come qualsiasi apparecchio elettronico, il vostro apparecchio TV ha bisogno di aria per consentire il
raffreddamento. La circolazione d'aria previene il rischio d'incendio.
Evitare che parti metalliche, aghi, graffette, liquidi, cera o simili possano penetrare all'interno dell'apparecchio attraverso le aperture dei coperchi dell'apparecchio. Diversamente, si possono provocare cor-
tocircuiti nell'apparecchio e dunque potenzialmente un incendio.
Se un oggetto dovesse accidentalmente finire all'interno dell'apparecchio, scollegare immediatamen-
te la spina dell'apparecchio e rivolgersi al servizio di assistenza tecnica clienti per un controllo.
Installazione
Appoggiare l'apparecchio soltanto su una superficie piana e stabile. In caso di montaggio all‘interno
di armadi o su ripiani, l‘apparecchio non deve mai sporgere in avanti né lateralmente.
Italiano
Disporre l'apparecchio in modo da non esporlo alla luce diretta del sole e a un ulteriore riscaldamento
prodotto da termoarredi o termosifoni.
Volume
La musica ad alto volume può causare danni all'udito. Evitare il volume troppo alto, in
particolare per periodi di tempo prolungati. Prima di uscire dalla stanza, assicurarsi che
il volume dell’apparecchio sia stato abbassato o che l’apparecchio sia spento.
Temporali
In caso di temporale, staccare il connettore di rete e tutti i cavi collegati. Le sovratensioni causate dai
fulmini possono danneggiare l’apparecchio attraverso la rete elettrica. Anche in caso di assenze pro-
lungate è consigliabile staccare il connettore di rete e e tutti i cavi collegati all'apparecchio.
Riparazioni e accessori
Attenzione: non aprire né rimuovere in alcun caso le coperture della scatola, altrimenti
si potrebbe entrare in contatto con pericolose tensioni elettriche o essere esposti ad altri
pericoli. Nell’apparecchio non sono presenti componenti che possono essere riparati
dall’utente. I lavori di riparazione o di assistenza tecnica sull'apparecchio vanno eseguiti
esclusivamente da tecnici autorizzati.
Nei limiti del possibile, utilizzare esclusivamente accessori originali.
Pulizia e manutenzione
Prima di procedere alla sua pulizia, spegnere l’apparecchio.
Pulire la superficie di alluminio con un panno leggermente umido, soffice, pulito e di colore neutro senza
usare nessun detergente forte o abrasivo.
In caso di necessità, la polvere che si deposita sul tessuto dell’altoparlante si può rimuovere con un aspirapolvere, facendo molta attenzione.
90
Page 91
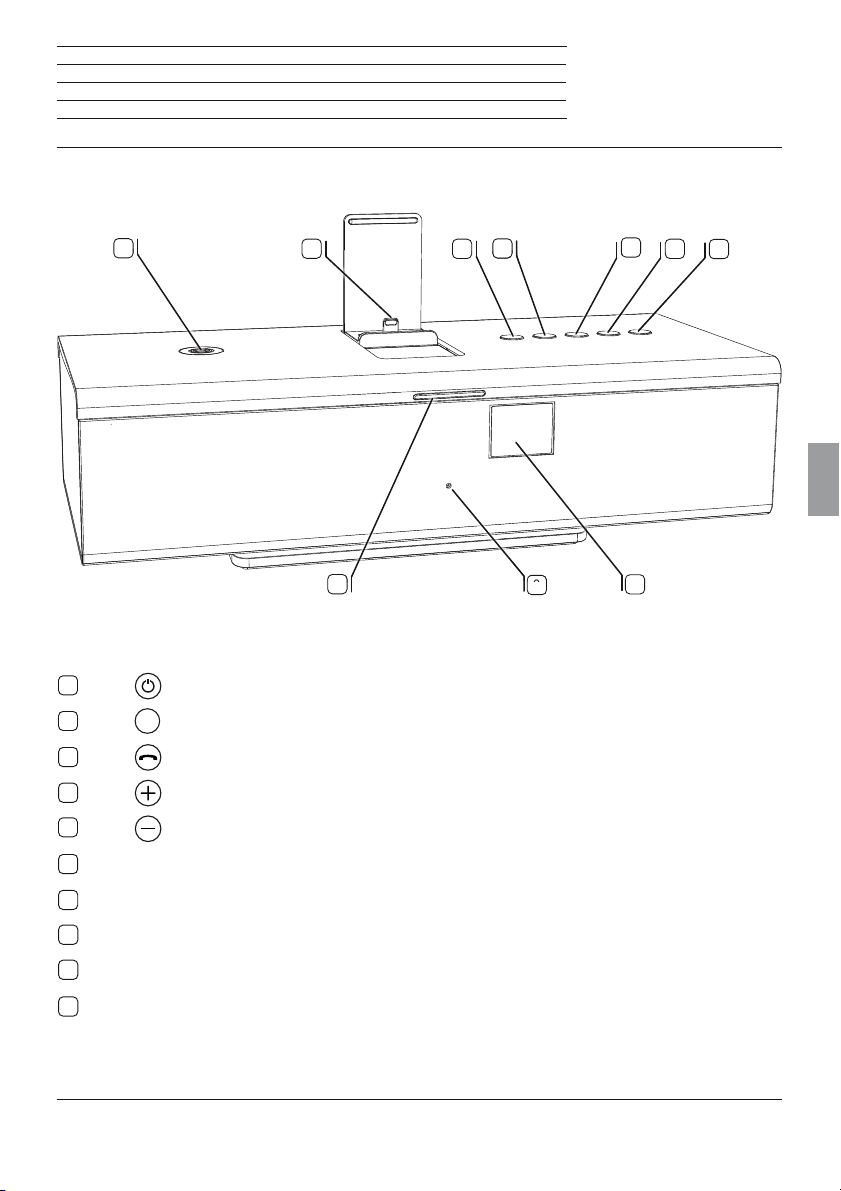
SoundPort / SoundPort Compact / SoundPort Mini
Manuale d'istruzioni
Elementi di comando
7
6
8
1
Ta s t o (Accensione/spegnimento)
2
3
4
5
SRC
Tasto
(Scelta della sorgente / Impostazioni suoni)
Tasto (Vivavoce / Accoppiamento Bluetooth)
Tasto (Volume +)
Tasto (Volume –)
4
5
9
3
2
1
Italiano
10
6
Apple Lightning Connector (max. 2.1A)
7
Antenna Connectivity Easy Pairing (per il collegamento con apparecchi compatibili con NFC)
8
Spia LED
9
Microfono per vivavoce (coperto dietro alla copertura dell'altoparlante)
10
Ricevitore a infrarossi (coperto dietro alla copertura dell'altoparlante)
91
Page 92
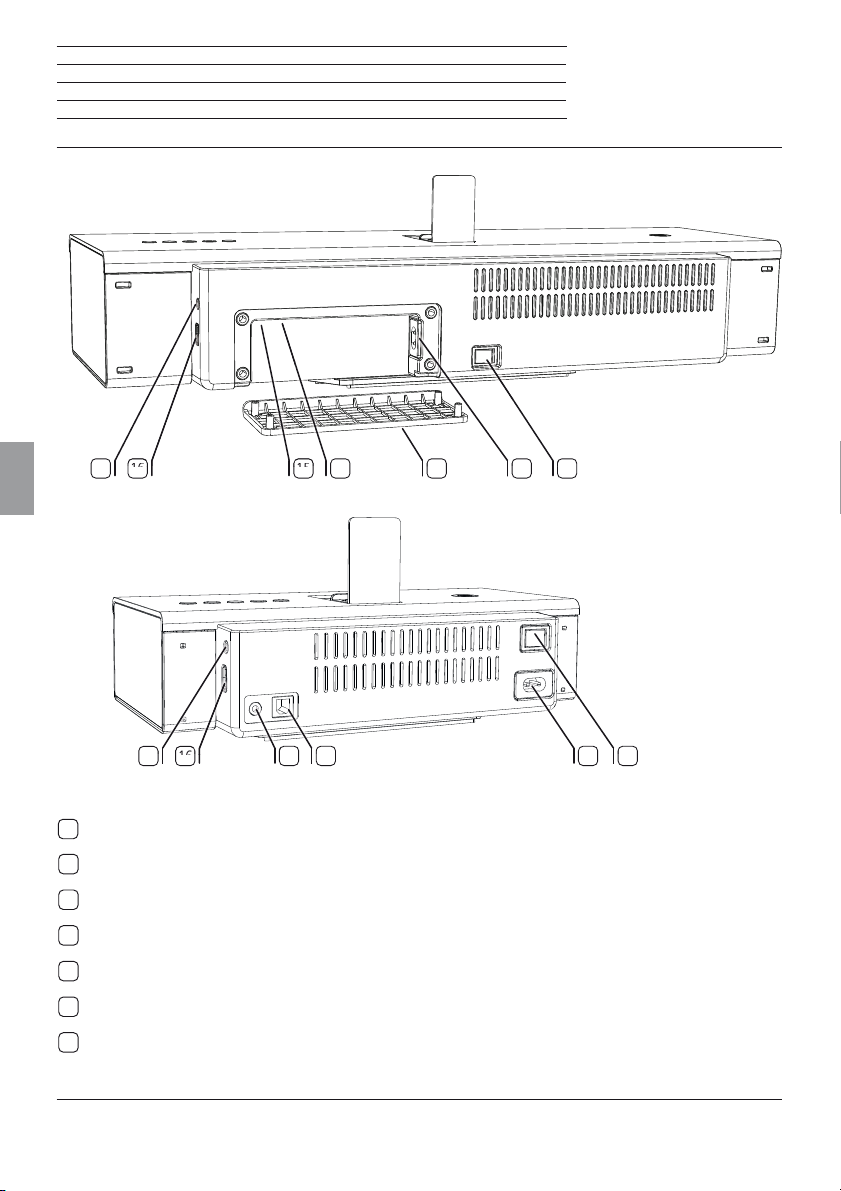
SoundPort / SoundPort Compact / SoundPort Mini
Manuale d'istruzioni
Collegamenti
SoundPort / SoundPort Compact
1617
Italiano
SoundPort Mini
1617
11
Interruttore di alimentazione
12
AC-IN (presa di alimentazione)
13
Copertura cavi (removibile)
14
AUDIO IN (ingresso audio stereo, jack da 3,5 mm)
15
USB porta B
16
USB porta A
17
Uscita cuffie (jack 3,5 mm)
1112131415
11121514
92
Page 93
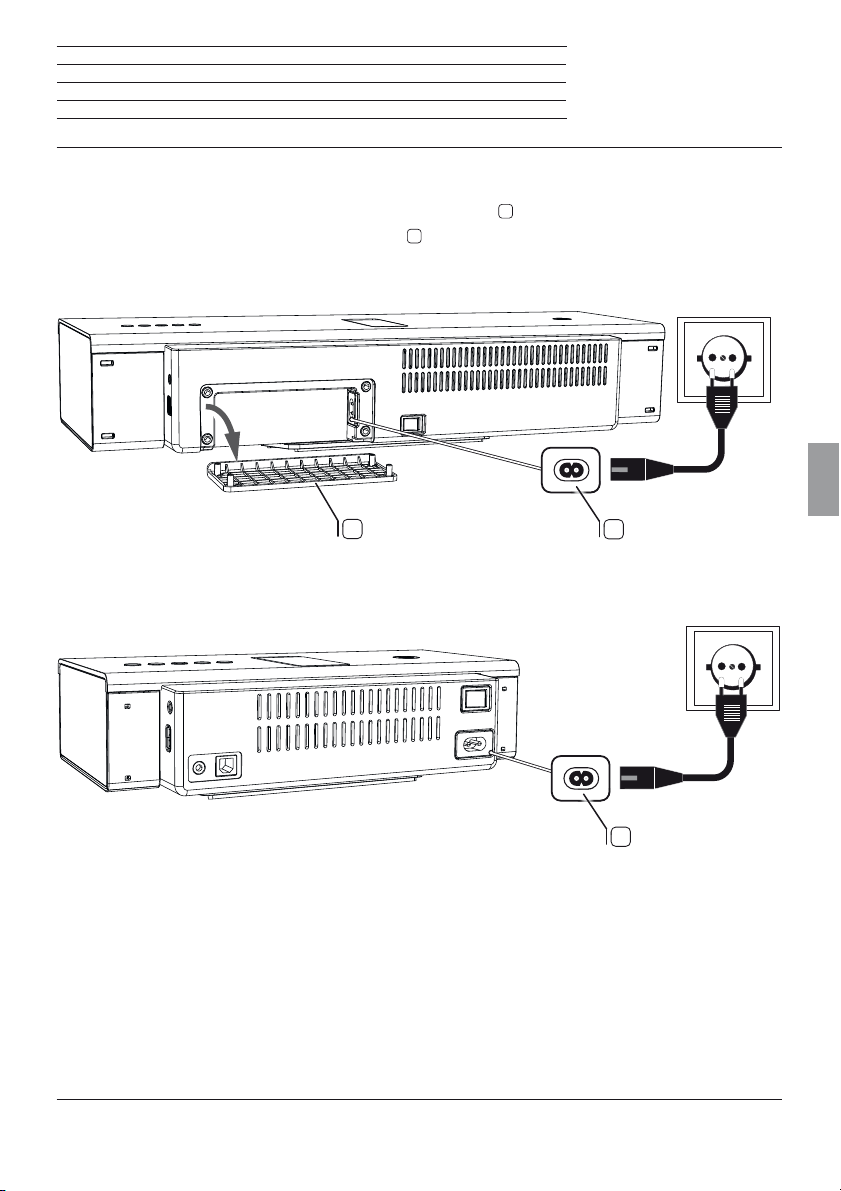
SoundPort / SoundPort Compact / SoundPort Mini
Manuale d'istruzioni
Messa in funzione
Collegamento alla rete elettrica
Rimuovere la copertura con SoundPort / SoundPort Compact 13 sul retro dell'apparecchio.
Inserire il cavo di rete nella presa di alimentazione
SoundPort / SoundPort Compact
12
e collegarlo con una presa da 220-240V 50/60 Hz.
Italiano
SoundPort Mini
13
12
12
93
Page 94
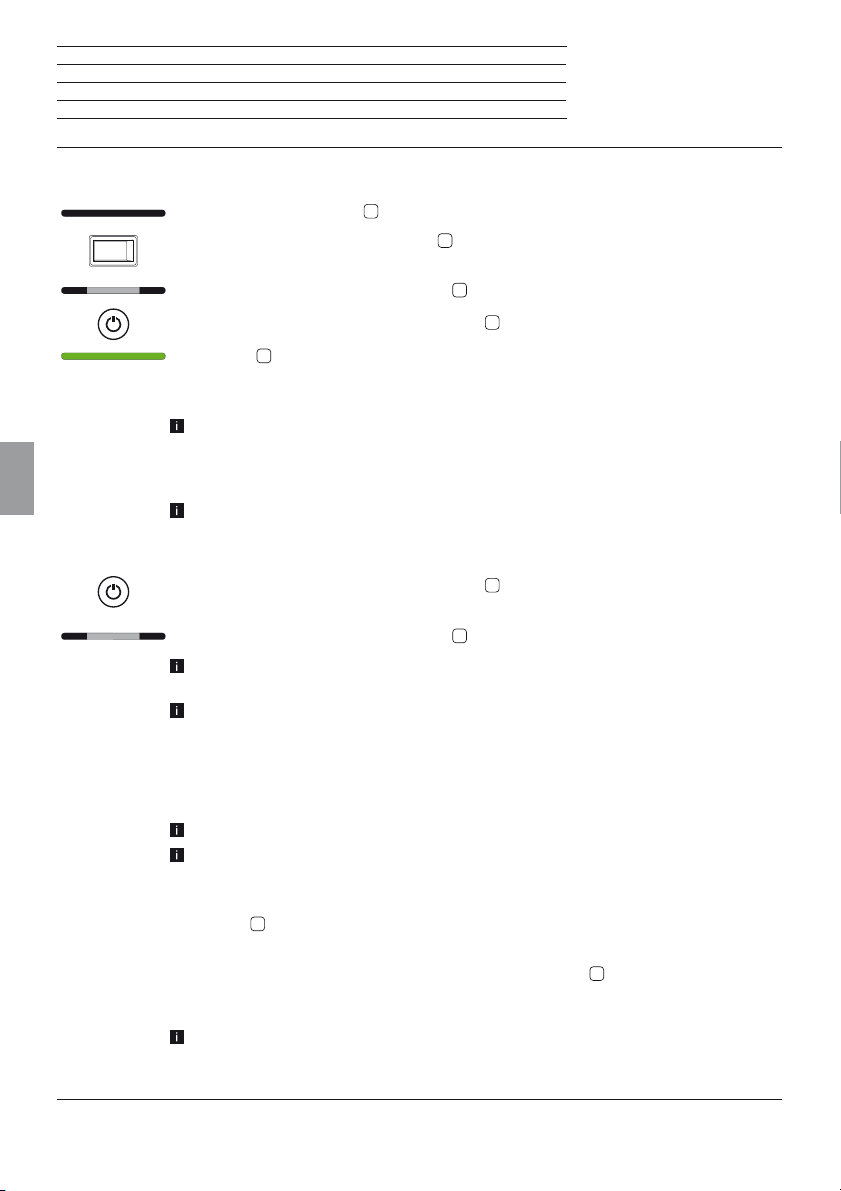
SoundPort / SoundPort Compact / SoundPort Mini
Manuale d'istruzioni
Accensione/spegnimento
Carica di fonti audio
Accensione
In stato spento, la spia LED 8 è spenta.
Portare l'interruttore di alimentazione
Il SoundPort si trova in modalità di Standby.
I due segmenti intermedi della spia LED
Premere il tasto di accensione/spegnimento
La spia LED
In caso di accensione ritardata, resta attiva l'ultima sorgente selezionata.
I colori della spia LED per le singole fonti si trova a pagina 95.
Se per 10 minuti non viene riprodotta musica, non entra né esce alcuna chiamata,
non viene premuto alcun tasto sul SoundPort o sul telecomando Assist (vedere pagina 108), non viene collegato né staccato alcun dispositivo e non è in corso alcun
Italiano
processo Sync, il SoundPort si spegne automaticamente in modalità Smart Standby.
Per maggiori informazioni sulle modalità energetiche, vedere pagina 107.
Disattivare
Premere il tasto di accensione/spegnimento 1 sull'apparecchio.
Il SoundPort si trova in modalità di Standby.
I due segmenti intermedi della spia LED
Dopo 4 ore in modalità Smart Standby, il SoundPort si accende automaticamente in
modalità Standby.
Per maggiori informazioni sulle modalità energetiche, vedere pagina 107.
11
in posizione ON.
8
si accendono smorzati.
1
sull'apparecchio.
8
si accende al primo avvio di colore vede (sorgente AUDIO IN).
8
si accendono smorzati.
Carica di fonti audio
È possibile caricare la sorgente audio, ad esempio un telefono cellulare, iPad, ecc. attraverso il proprio
SoundPort.
L'interruttore di rete del SoundPort deve essere attivato.
Dovrebbe essere caricato contemporaneamente solo un apparecchio.
Caricamento di iDevices su Lightning Connector:
Inserire il proprio iDevice con Lightning Connector sul Lightning Connector integrato nel
SoundPort
Caricamento di sorgenti audio ad USB:
Inserire il tipo di connettore A del cavo USB nella porta USB
un cavo USB adatto alla propria sorgente audio con connettore di tipo A (disponibile
presso rivenditori specializzati).
Il dispositivo collegato (Lightning/USB) viene caricato sia in modalità On come in
modalità Smart Standby del SoundPort. In modalità Standby non avviene alcun caricamento della sorgente audio.
94
6
(vedere pagina 98 e 99).
16
del SoundPort. Utilizzare
Page 95
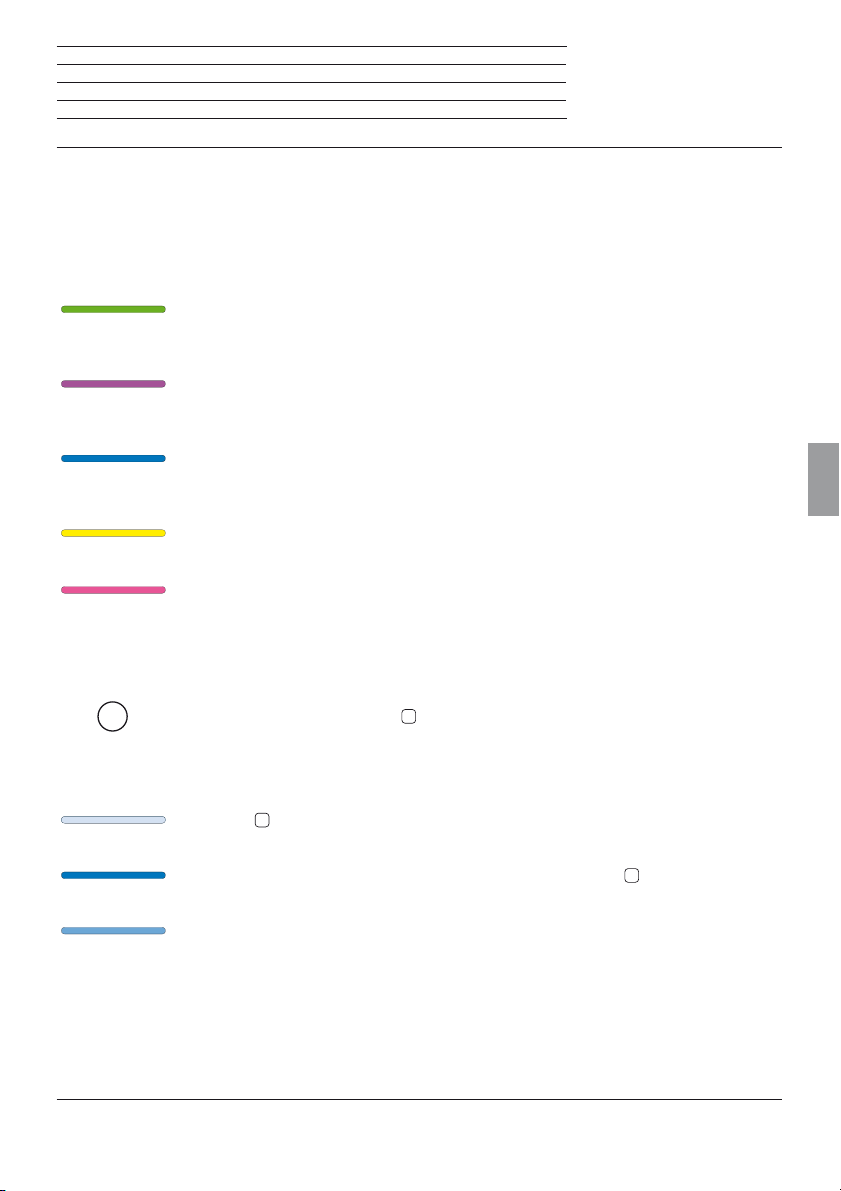
SoundPort / SoundPort Compact / SoundPort Mini
Manuale d'istruzioni
Scelta della sorgente
Scelta della sorgente
Il SoundPort offre diverse possibilità di selezionare e collegare sorgenti audio con il dispositivo. Ogni
sorgente è associata ad un colore sulla spia LED.
Colori LED per le singole sorgenti
AUDIO IN (verde)
Le modalità di collegamento di una sorgente audio attraverso un cavo stereo da 3,5 mm
all'interfaccia AUDIO IN del SoundPort sono riportate a pagina 97.
Apple Lightning Connector (viola)
Le modalità di collegamento di iDevices al Lightning Connector sono riportate alle pagine
98/99.
Bluetooth (blu)
Come accoppiare le sorgenti audio attraverso Bluetooth / NFC è descritto alle pagine
100/101.
USB-Audio (giallo)
Le modalità di collegamento delle sorgenti audio all'USB sono riportate a pagina 102.
PC-Audio (rosa)
Le modalità di collegamento del SoundPort come dispositivo USB sono riportate a
pagina 103.
Italiano
Scelta della sorgente
SRC
Ad ogni pressione del tasto SRC
La sequenza delle sorgenti corrisponde alla sequenza descritta sopra dei colori LED.
Il SoundPort, dopo la selezione della sorgente, tenta di stabilire un collegamento con la
sorgente audio dal collegamento selezionato.
La spia LED
di ricerca massimo 30 s).
In caso di ricerca avvenuta con successo, si illumina la spia LED
gente scelta.
In caso di ricerca avvenuta con successo, si illumina la spia LED smorzata nel colore della
sorgente scelta (60% di luminosità).
2
si passa alla sorgente successiva.
8
lampeggia durante la ricerca del colore della sorgente selezionata (tempo
8
nel colore della sor-
95
Page 96
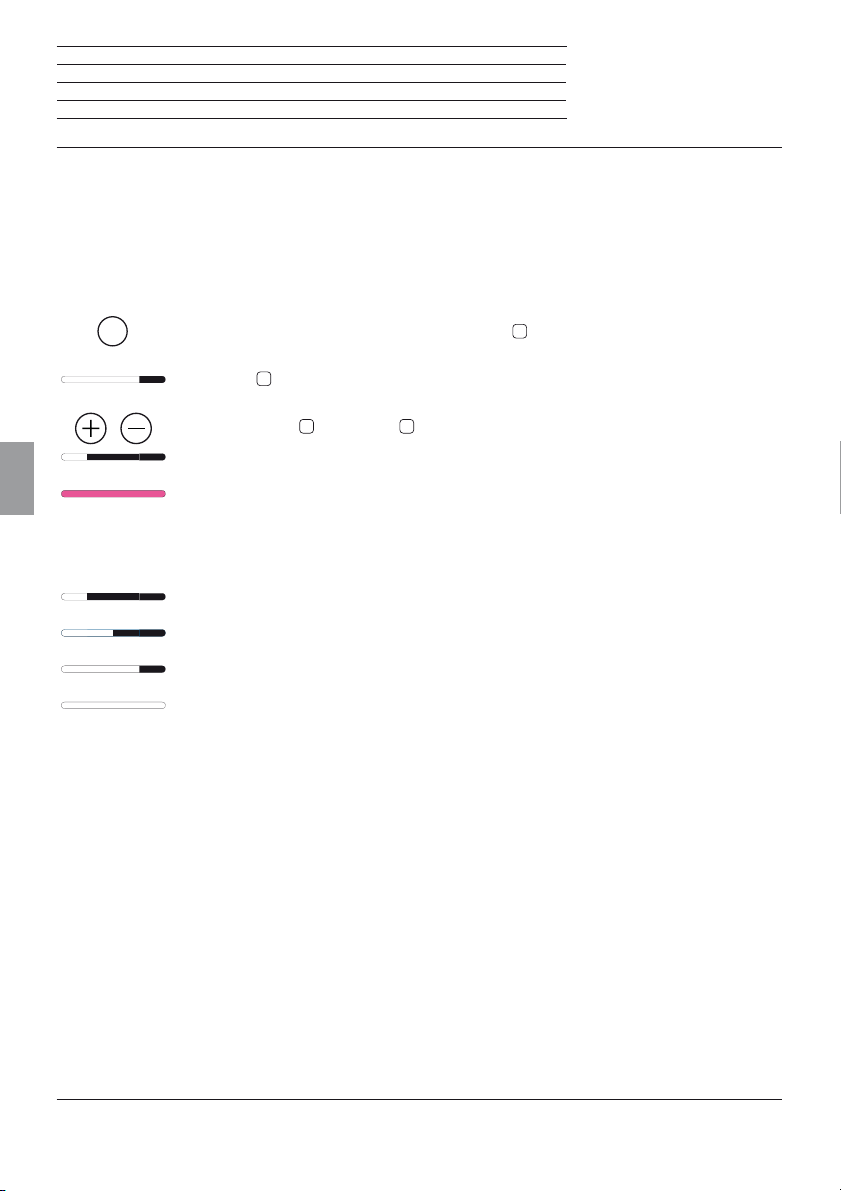
SoundPort / SoundPort Compact / SoundPort Mini
Manuale d'istruzioni
Impostazioni suoni
Impostazioni suoni
Con il SoundPort si ha la possibilità di richiamare impostazioni del suono predefinite per la riproduzione
audio.
Selezione delle impostazioni dei suoni
SRC
.Premere a lungo (circa 2 secondi) il tasto SRC
La spia LED
Premere il tasto +
stazione del suono desiderata (esempiol: flat).
Italiano
Se per alcuni secondi non viene premuto alcun tasto, visualizzare la sorgente precedentemente scelta.
Spia LED delle impostazioni suoni
1 Spia LED: Preimpostazione flat
2 Spie LED: Preimpostazione voice
3 Spie LED: Preimpostazione classic
4 Spie LED: Preimpostazione pop
2
sul SoundPort.
8
indica l'ultima impostazione dei suoni selezionata (esempio: classic).
4
o il tasto – 5 tante volte fino a quando è stata selezionata l'impo-
96
Page 97
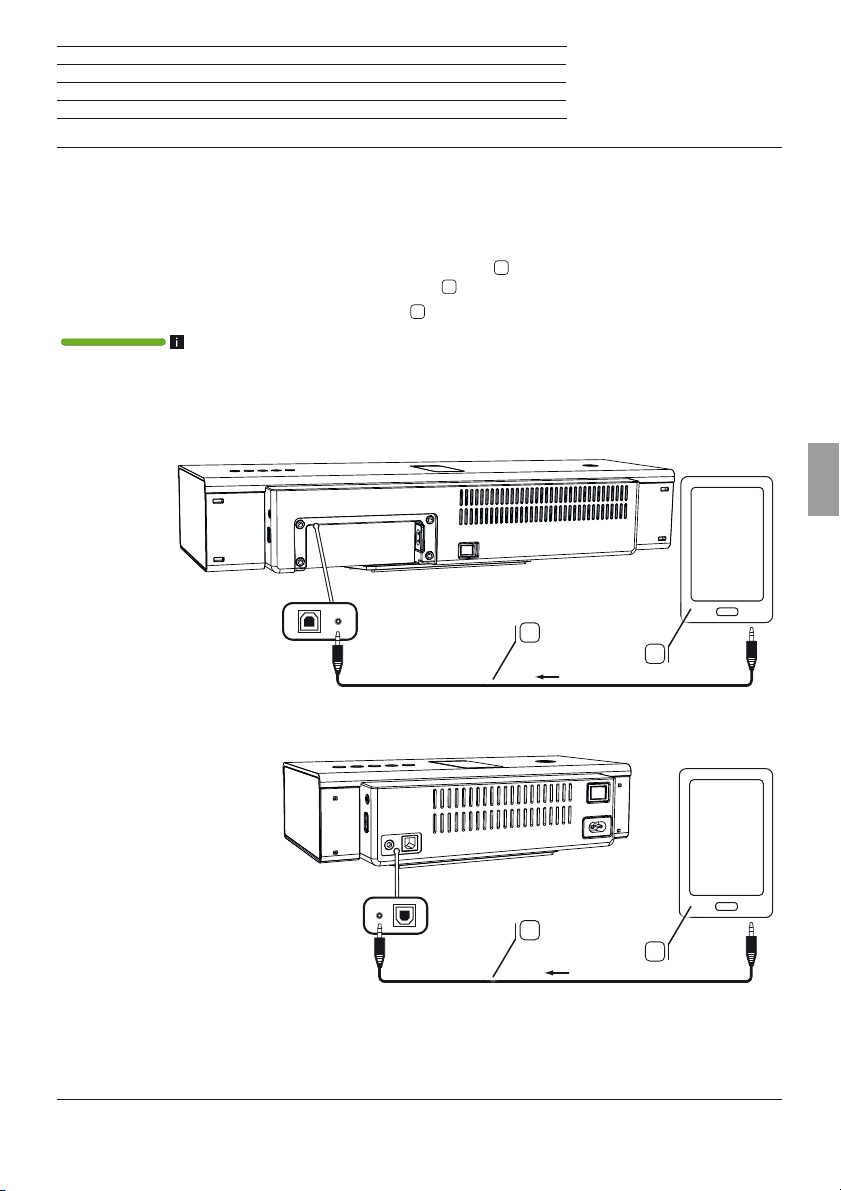
SoundPort / SoundPort Compact / SoundPort Mini
Manuale d'istruzioni
Collegamento cavi
Collegare la fonte audio ad AUDIO IN
È possibile accoppiare il SoundPort alla sorgente audio, ad esempio un telefono cellulare, un iPod ecc.,
mediante un cavo audio (con connettore jack da 3,5 mm).
Collegare l'ingresso audio stereo AUDIO IN
analogica della propria sorgente audio
Utilizzare a tale scopo il cavo audio
S
con connettore jack da 3,5 mm fornito in dotazione.
14
A
del SoundPort all'uscita audio stereo
.
Come sorgente è selezionata AUDIO IN (vedere pagina 95).
La riproduzione audio (vedere pagina 105) avviene pertanto attraverso il cavo audio.
SoundPort / SoundPort Compact
S
A
SoundPort Mini
Italiano
S
A
97
Page 98
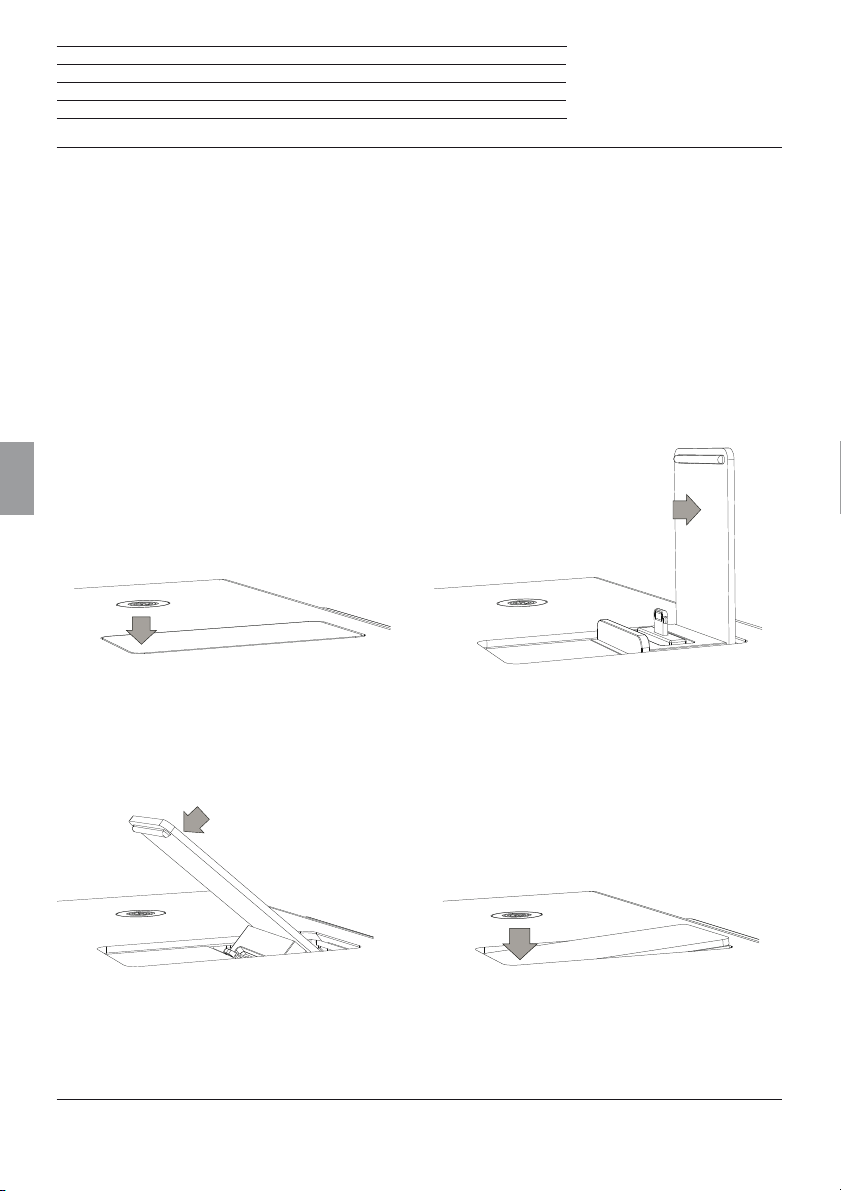
SoundPort / SoundPort Compact / SoundPort Mini
Manuale d'istruzioni
Lightning Connector
Lightning Connector
Il SoundPort è dotato di Apple Lightning Connector per iDevices (1. Così è possibile riprodurre ogni sorgente di suono (musica, video, radio internet, podcasts) dall'iDevice con Lightning Connector attraverso
l'altoparlante del SoundPort.
L‘iDevice collegato al Lightning Connector viene caricato sia in modalità On che in modalità Smart Standby
del SoundPort (vedere pagina 94).
Apertura del Lightning Connectors
Quando è chiusa, premere leggermente davanti dalla parte superiore della copertura. Il Lightning Connector si apre automaticamente non appena il blocco è superato.
Per fissare il supporto, spingere indietro la copertura in posizione di incastro. Ora è possibile utilizzare il
Lightning Connector per iDevices (vedere pagina 99).
Italiano
Chiudere il Lightning Connectors
Spingere la copertura aperta dalla posizione di incastro in avanti. Chiudere la copertura spingendola dalla
posizione finale chiusa verso il basso. Si deve sentire un incastro della copertura.
(1
iDevices supportati, si veda pagina 110.
98
Page 99
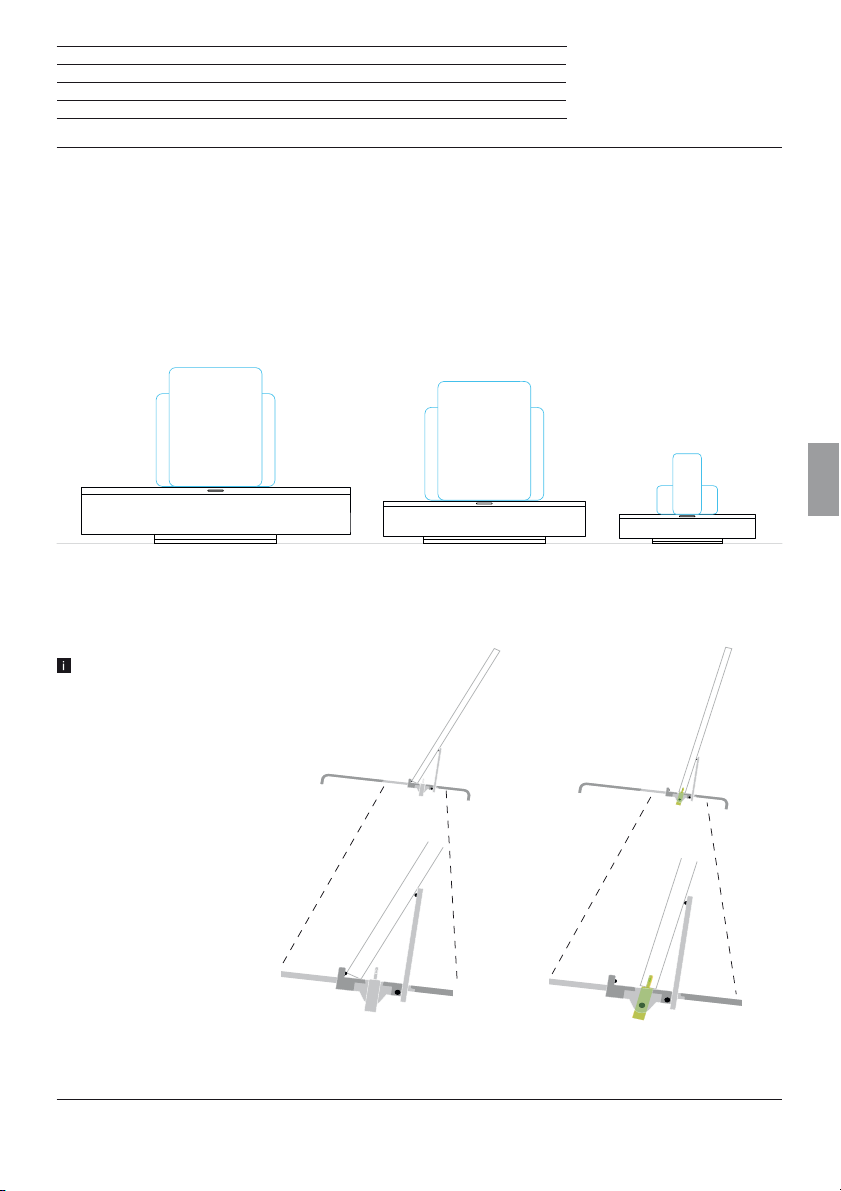
SoundPort / SoundPort Compact / SoundPort Mini
Manuale d'istruzioni
Lightning Connector
Sorgente audio al Lightning Connector
Si possono collegare iDevice con Lightning Connector in allineamento verticale con il Lightning Connector inte-
(1
grato
. Gli iDevices possono essere posizionati anche orizzontalmente. Il collegamento in questo caso avviene
mediante Bluetooth (vedere pagina 100) o mediante collegamento via cavo USB
Se l'iDevice viene inserito nel Lightning Connector del SoundPort, è pronto per la riproduzione audio
(vedere pagina 105) o per la sincronizzazione sul PC/portatile (vedere pagina 104).
Di seguito si vede quale iDevice è possibile utilizzare al massimo sulle varianti di dispositivi SoundPort
(ovvero dimensione di dispositivo).
SoundPort SoundPort Compact SoundPort Mini
iPad verticale/orizzontale iPad verticale/orizzontale iPhone 5 / iPod touch
(1
(vedere pagina 102).
verticale/orizzontale
Italiano
Rimuovere eventuali pellicole protettive pre-
senti dal proprio iDevice in modo da garantire
un collegamento affidabile con Lightning
Connector.
iDevice inserito nella copertura del
Lightning Connectors
(1
iDevices supportati, si veda pagina 110.
iDevice inserito in Lightning
Connector
99
Page 100
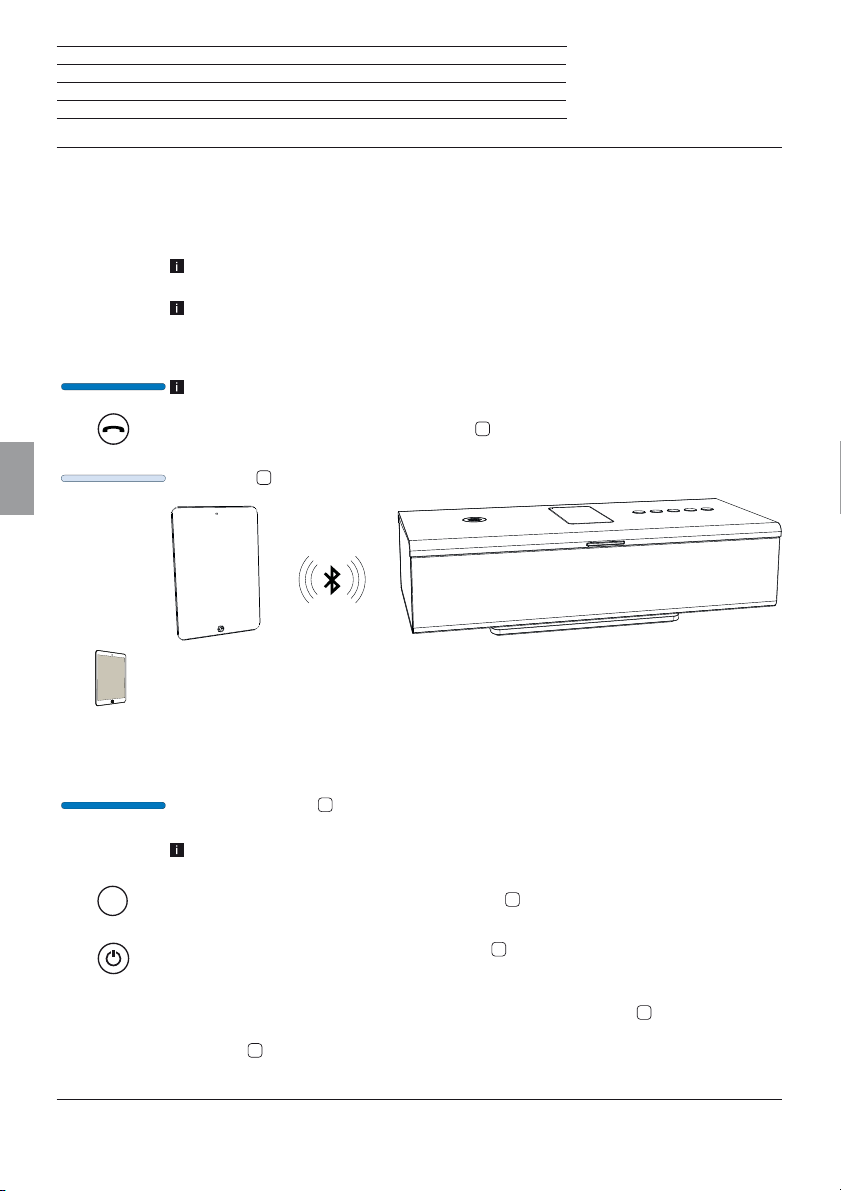
SoundPort / SoundPort Compact / SoundPort Mini
Manuale d'istruzioni
Accoppiamento Bluetooth
Accoppiamento di fonti audio attraverso Bluetooth
È possibile accoppiare il SoundPort ad una sorgente audio, ad esempio smartphone, tablet PC ecc. attraverso Bluetooth senza cavi. Le fonti audio devono supportare il Protocollo A2DP Bluetooth.
La distanza tra il SoundPort e la sorgente radio non deve essere superiore a 10 m
(collegamento visivo).
Il SoundPort salva le ultime 5 sorgenti audio accoppiate via Bluetooth. In caso di nuovo
accoppiamento, il collegamento viene ristabilito. Tuttavia, è possibile allo stesso tempo soltanto un unico collegamento attivo. Se si aggiunge una nuova sorgente audio,
la sorgente audio salvata "più vecchia" viene eliminata dall'elenco di collegamento.
Come sorgente è selezionata Bluetooth (vedere pagina 95).
Italiano
SRC
Premere a lungo (circa 3 secondi) il tasto
3
sul SoundPort.
Viene emesso un segnale acustico.
8
La spia LED
lampeggia.
Attivare la funzione Bluetooth della sorgente audio. Consultare se necessario il manuale
d'istruzioni della sorgente audio.
Attivare se necessario la funzione Bluetooth Ricerca della sorgente audio.
Viene ora effettuata la ricerca di apparecchi Bluetooth nelle vicinanze della fonte audio.
Selezionare SoundPort_xx
(1
. Se viene richiesto un codice immettere 0000.
All'allacciamento dell'accoppiamento viene emesso un segnale acustico.
Quando la spia LED
8
si accende in modo permanente, il SoundPort è pronto per la
riproduzione audio (vedere pagina 105).
Per alcune fonti audio è necessario attivare esplicitamente il collegamento, prima che
sul SoundPort possa avvenire la riproduzione musicale.
2
Quando si cambia la sorgente con il tasto SRC
viene messa in pausa/interrotta una
riproduzione musicale in corso, il collegamento della sorgente audio resta invariato.
1
Premendo il tasto di accensione/spegnimento
, il SoundPort entra in modalità Standby.
Viene messa in pausa/interrotta una riproduzione musicale in corso, il collegamento della
sorgente audio viene interrotto.
In seguito alla riaccensione con il tasto di accensione/spegnimento
1
il SoundPort cerca
nuovamente l'accoppiamento alla fonte audio. In questo stato la spia led (Bluetooth)
lampeggia
8
.
Ad accoppiamento instaurato la spia LED si illumina in modo permanente.
(1
xx sta per gli ultimi due caratteri dell‘indirizzo MAC del SoundPort.
100
 Loading...