

Loewe Individual Sound Projector User Manual
Operating Manual
3 3 1 4 9 0 2 0
Audio
Individual Sound Projector
233–33149.020

Contents
Remote Control Assist – Sound Projector Operation ....... 3
Rear View ........................................................................ 4
Front view & Display .......................................................5
Welcome ..........................................................................6
Scope of delivery ...........................................................................................6
Accessories ...................................................................................................6
Environmental Protection ..............................................................................6
Power consumption....................................................................................6
Cardboard Box and Packaging ...................................................................6
The unit ......................................................................................................6
Remote control batteries ............................................................................6
For your safety ................................................................7
Use for the intended purpose and ambient conditions .................................. 7
Supervision ................................................................................................7
Cleaning.....................................................................................................7
About this user guide ....................................................................................7
Loewe RS-232C system interface ................................................................7
Shipping the Unit ..........................................................................................7
Initial set-up ....................................................................8
Set-up in general ..........................................................................................8
Positioning in the room .................................................................................8
Position parallel to the wall ........................................................................8
Position in a corner ....................................................................................8
Set-up solutions ............................................................................................9
Wall mounting ...........................................................................................9
Mounting on a table ..................................................................................9
Mounting on a floor stand .........................................................................9
Connecting the Sound Projector ....................................................................9
Connecting to Loewe TV sets with RS-232C system interface.......................10
Connecting to Loewe TV sets without RS-232C system interface .................11
Connecting the accessories .........................................................................12
Connecting to the mains supply ..................................................................13
Using the remote control for the first time ..................................................13
Adjusting the remote control for the system being used ...........................13
Switching on/off ..........................................................................................13
Acoustic room set-up .................................................................................13
Connecting and setting up the microphone .................................................14
Auto set-up (TV sets with RS-232C System Interface) ...................................15
Auto set-up (TV sets without RS-232C System Interface) .............................17
Settings on TV set .....................................................................................17
Setting user interface language ................................................................ 17
Starting auto set-up .................................................................................17
Saving sound set-up .................................................................................18
Everyday use ..................................................................19
Playback .....................................................................................................19
Selecting signal ........................................................................................19
Switch sound on/off .................................................................................19
Adjusting volume .....................................................................................19
Other sound settings for TV sets with RS-232C System Interface ...............19
Loading listening position ...........................................................................19
TV sets with RS-232C system interface ......................................................19
TV sets with an RS-232C system interface and swivel caster control .........19
TV sets without RS-232C system interface ................................................20
Select sound mode ......................................................................................20
Selecting input mode .................................................................................. 21
Selecting signal source .............................................................................21
Decoder displays ...................................................................................... 21
Surround modes and recommended signal sources ..................................21
Playback of 2-channel signal sources with surround sound .........................22
Setting surround mode parameters ..........................................................22
Sound field programmes .............................................................................22
Activating sound field programmes ..........................................................23
Intensity of sound field programmes ........................................................23
Night mode ................................................................................................23
Bass mode ..................................................................................................23
Audio Balance.............................................................................................23
Using the test sound ................................................................................23
Sound menu functions for Loewe TV sets with RS-232C System Interface ....24
Sound mode .............................................................................................24
Subwoofer................................................................................................24
Room parameter ......................................................................................24
Dolby Digital/DTS dynamic range .............................................................24
Sound from Sound Projector .....................................................................24
Sound via .................................................................................................24
Sound menu functions for Loewe TV sets without RS-232C System Interface .....24
Troubleshooting .............................................................25
Error messages for auto set-up ...................................................................26
Special functions .........................................................................................26
Technical Specifications ................................................. 27
Masthead ...................................................................................................27
Operation of additional devices .....................................28
Setting the remote control ..........................................................................28
Operating Loewe equipment .......................................................................28
Remote control Assist – TV operation ........................... 29
Service ........................................................................... 30
- 2
Please fold out this page.
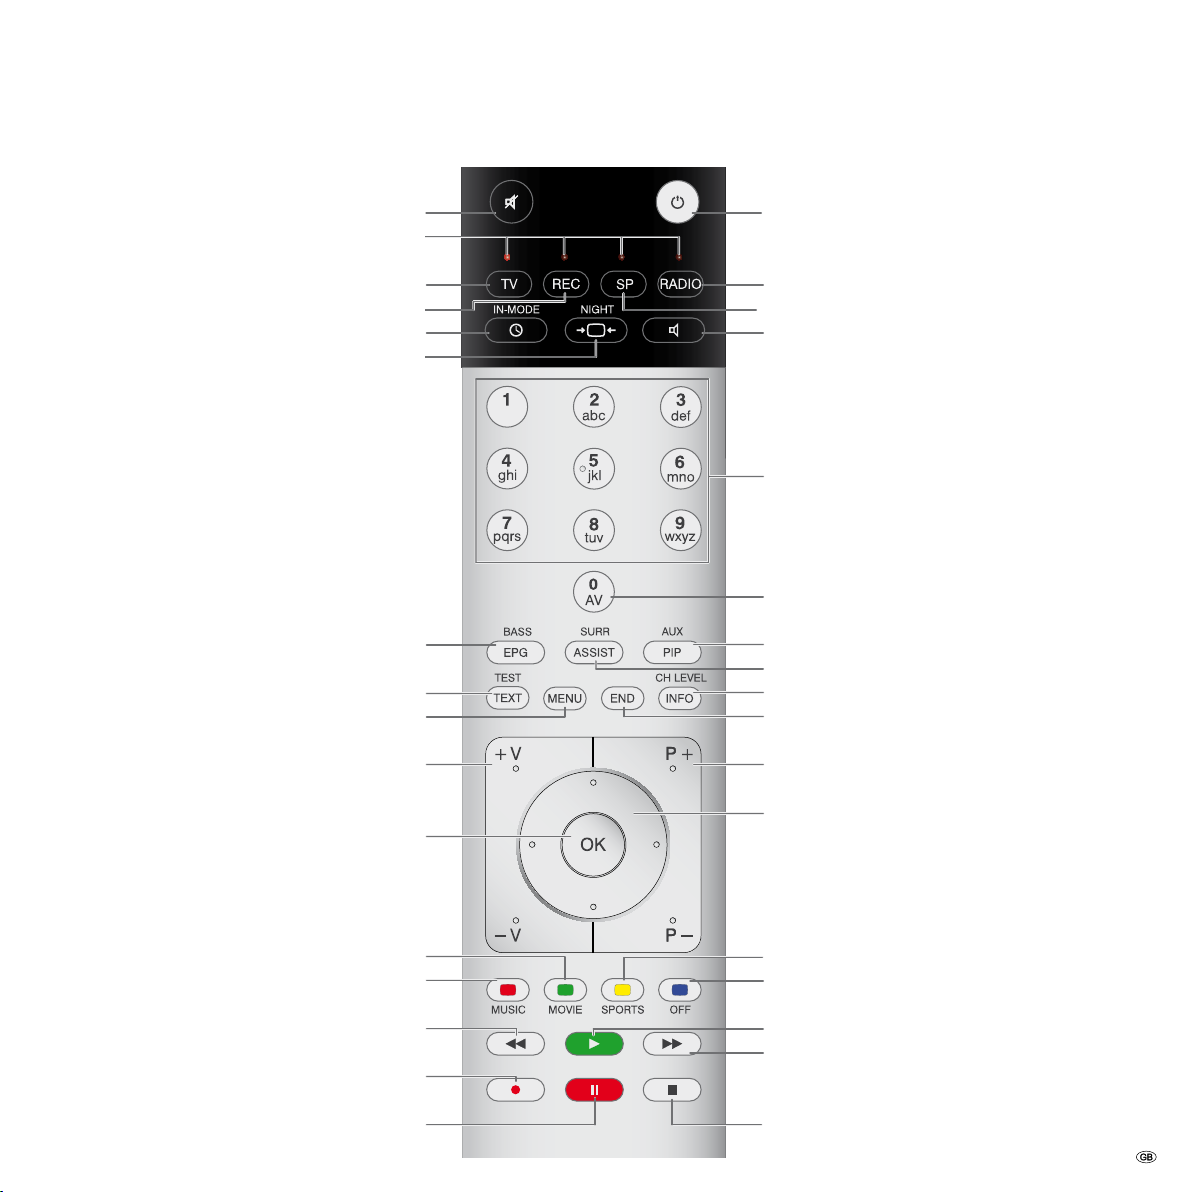
Remote Control Assist – Sound Projector Operation
Sound on / off
LED indicator for current operating mode
Switch over to operate TV
Switch over to operate DVD recorder/Auro
(page 21) .............. Input mode AUTO, DTS or ANALOGUE
(page 23) .......................................................Night mode
(page 23) ........................................................ Bass mode
(page 23) ......... short: Test sound for loudspeaker setting;
(page 13, 17) ........................................long: Auto set-up
(page 24) ...........................................short: Sound menu;
(page 20) ......................................... long: Menu Memory
(page 19) ............................................................. Volume
Switch on/off on standby ................................. (page 13)
Switch over to operate TV Radio Digital
Switch over to operate Sound Projector
Sound mode .................................................... (page 20)
Loewe TV: numbers or letters
Loewe TV: numbers or characters
Input source (TV, AUX 1, 2, 3) .......................... (page 19)
Surround mode ................................................ (page 22)
short: Channel volume; long: Menu language selection
short: Hide menu
long: Special Functions 1 .................................. (page 24)
Loewe TV: Station up/down
MENU: confirm menu selection
(page 22) ..........................Sound field programme "Film"
(page 22) ....................... Sound field programme "Music"
MENU: select/set
1)
Only for specialist staff
Sound field programme "Sport" ....................... (page 22)
Sound field programme off .............................. (page 22)
Loewe TV: Function depending on model
3 -
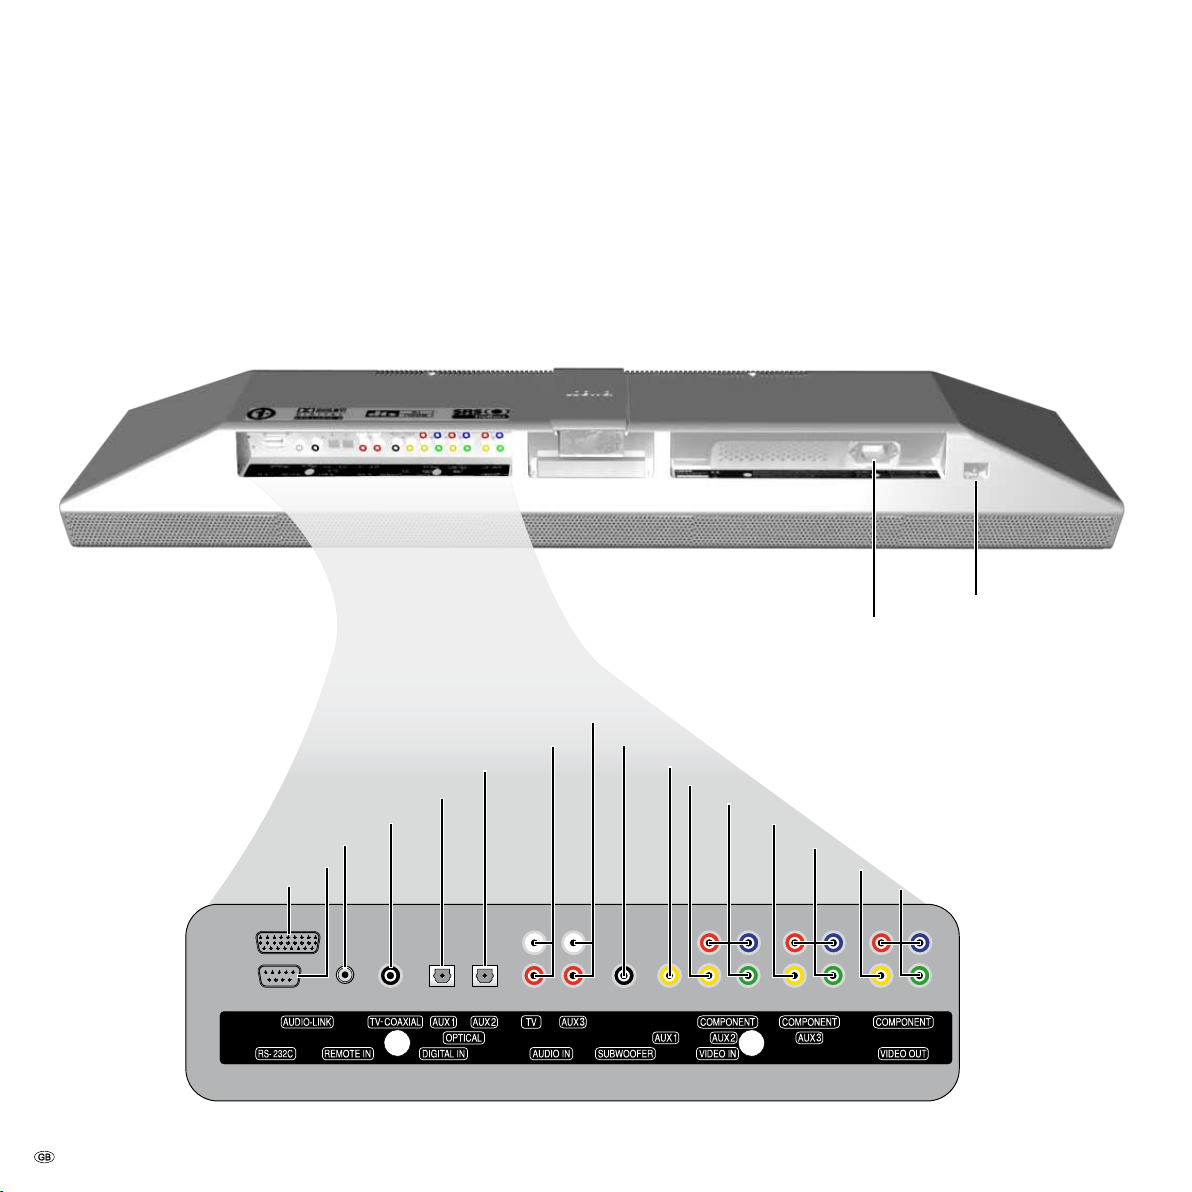
Rear View
- 4
Optical digital sound input AUX1
Digital sound input TV-COAXIAL
Loewe RS-232C system interface
Loewe Audio Link interface
Sound input left/right (analogue) AUX3
Sound input left/right (analogue) TV
Optical digital sound input AUX2
free
Mains connection
Microphone input
Subwoofer output (nor for Loewe sound systems)
Video input AUX1
Video input AUX2
Component video input AUX2
Video input AUX3
Component video input AUX3
Video output
Component video output
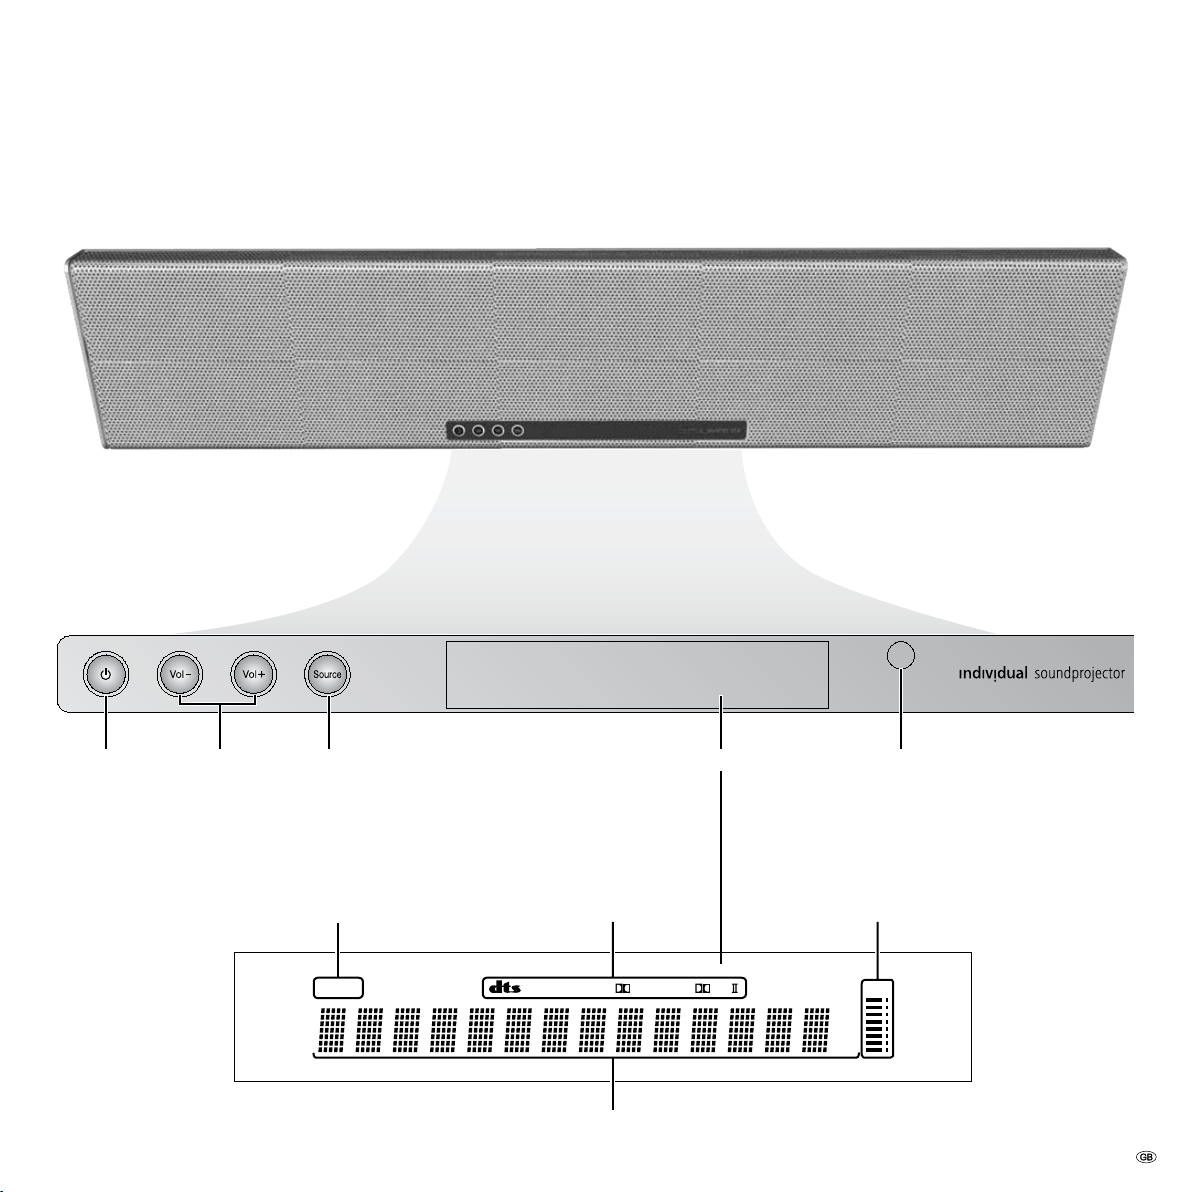
Front view & Display
NIGHT PCM PL
m
ft
mS
dB
VOLDIGITAL
On
Off
in Standby
(page 13)
Volume
quieter / louder
(page 19)
Input source
(TV, AUX 1, 2, 3)
(page 19)
Night mode
(page 23)
Decoder displays
(page 21)
Status display
Display Infrared
receiver
Volume level display
5 -
Welcome
DIGITAL
Thank you
for choosing a Loewe product. We are happy to welcome you as our customer.
At Loewe we combine the highest standards of technology, design and user
friendliness. This is equally true of TV, DVD, video, audio and accessories. Neither
technology nor design is an end in itself, but both are intended to provide our
customers with the best possible audio and visual experience. Our design is not
influenced by short-term, fashionable trends. You have, after all, purchased a
high-quality piece of equipment which you do not want to get tire of tomorrow
or the day after.
The Loewe Individual Sound Projector is the simplest way to enjoy digital surround
sound without laboriously having to arrange and connect up numerous loudspeakers
distributed around the room. We use state-of-the-art digital technology to control
several small loudspeakers in such a way that directed soundwaves and targeted
reflection off the walls of your room create the real impression of acoustic spatial
perception regardless where you are sitting - as if you were in the thick of it. And
setting up and operating the Sound Projector is quite simple.
Scope of delivery
Loewe Individual Sound Projector
•
Remote control Assist with 2 batteries
•
Mains cable
•
Digital audio cinch cable
•
Audio cinch cable
•
Video cinch cable and SCART adapter
•
Optical audio cable
•
System cable RS-232C
•
Microphone with stand
•
Wall mount, cover
•
Cable holder, adhesive holders (4x)
•
this user guide and mounting instructions
•
You can control three units using the remote control, apart from this Sound Projector,
a Loewe TV set and a Loewe recorder as well.
Trademark rights
Manufactured under licence from Dolby Laboratories. Dolby, ProLogic and the
double-D symbol
and are trademarks of Digital Theater Systems, Inc.
Manufactured under licence from 1 Ltd. Trademark protection worldwide.
The Logo and "Digital Sound Projector™" are trademarks of 1 Ltd.
TruBass, SRS and the symbol are registered trademarks of SRS Labs, Inc.
TruBass technology is manufactured under licence from SRS Labs, Inc..
This product was made with the support of YAMAHA CORPORATION.
are trademarks of Dolby Laboratories.
Accessories
Table Stand I Sound Projector Order No. 67208
Floor Stand 5 MU Order No. 67471 B10
Environmental Protection
Power consumption
Your unit has been equipped with an economical standby power supply. In standby,
power consumption falls to a low level (page 27). If you want to save even more
electricity, disconnect the unit from the mains.
Cardboard Box and Packaging
In line with national regulations regarding the disposal of packaging materials, we
pay a fee to authorised recyclers who collect packaging from dealers. Nevertheless,
we recommend that you keep the original cardboard box and the rest of the
packaging materials so that the unit can, if necessary, be transported in the safest
possible conditions.
The unit
Important: The EU Directive 2002/96 /EC governs the proper
re-acceptance, handling and recycling of used electronic
appliances. Old electronic appliances must therefore be disposed
of separately. Never dispose of this unit in the normal domestic
waste! You can hand in your old unit free of charge at identified
collection points or to your dealer if you buy a similar new unit.
Other details about re-acceptance (also for non-EU countries) are
available from your local authorities.
Remote control batteries
The batteries provided contain no harmful materials such as
cadmium, lead or mercury.
Regulations concerning used batteries mean that batteries may
no longer be thrown out with the household rubbish. You can
dispose of used batteries free of charge at the collection points
in commercial outlets. Your dealer will also have a collection point
for used batteries.
- 6

For your safety
For your own safety, and to avoid unnecessary damage to your unit, please read
and follow the safety advice below.
Use for the intended purpose and ambient conditions
This Sound Projector is intended exclusively for the reception, recording and playback of video and audio signals and is designed for the home and office and may
not be operated in rooms with high humidity (e.g. bathroom or sauna) or a high
concentration of dust (e.g. workshops).
The terms of the warranty only cover normal use of the Sound Projector.
IMPORTANT: THE MAINS CABLE OF THIS UNIT MUST BE CONNECTED TO A
SOCKET WITH PROTECTIVE GROUND.
This unit is not disconnected from the mains even when it is switched off provided
it is still plugged into the socket. This status is called Standby. In standby the unit
only uses a small amount of electricity (page 27).
During a lengthy absence the plug should be disconnected from the mains .
The mains plug must be easy to reach to ensure that the unit can be disconnected
from the mains at any time.
If you have moved the device out of the cold into a warm environment, leave it
switched off for about an hour to avoid the formation of condensation.
Always switch off your system (Sound Projector, TV set and any other audio components which may be connected) before connecting or disconnecting other
devices or loudspeakers.
PLEASE NOTE: TO AVOID RISK OF ELECTRICAL SHOCK, DO NOT REMOVE THE
COVER (OR THE REAR OF THE UNIT). THERE ARE NO PARTS INSIDE THE UNIT
THAT CAN BE REPAIRED BY THE USER. REPAIRS SHOULD ONLY BE CARRIED
OUT BY A LOEWE DEALER.
Avoid any metal objects, needles, paper clips, liquids, wax or similar getting into
the unit through the ventilation slits at the rear. This can short-circuit the unit
and possibly cause a fire.
If anything should penetrate the inside of the unit, immediately unplug from the
mains and inform customer service to check it.
Supervision
Do not allow children to use the Sound Projector/TV set unsupervised. Do not allow
children to play in the immediate vicinity of the Sound Projector/TV set. They could
knock, push or pull the equipment over and cause injury.
Cleaning
Only clean your Sound Projector with a slightly damp, soft, clean cloth (without
any aggressive cleaning agents).
About this user guide
The information in this guide refers to the Loewe product Individual Sound
Projector.
Unless stated otherwise, the instructions refer to the operating elements on the
Assist remote control.
Paragraphs beginning with the ➠ symbol indicate important hints, tips or conditions
for perfect operation.
Terms which you will find in the menu or printed on the Sound Projector are printed
in bold type.
In the functional descriptions, the necessary operating elements are arranged to
the left of the text which contains the handling instructions.
Loewe RS-232C system interface
In this user guide you will initially find out how to set up and operate the combination
of the Sound Projector with a Loewe TV set with chassis Digital+ HD100 (L2710)
or Digital+ HD (L2700) with software from V4.x upwards. This combination offers
advantages for the set-up and operation through the harmonised behaviour of the
individual components with each other and through intelligent unit communication
via the Loewe RS-232C system interface.
Afterwards, the set-up or operation is described in connection with other TV sets
which do not have this system interface.
Shipping the Unit
The original shipping box and packaging materials should be used in this case.
To protect the unit as much as possible, pack it in the same way as it was packed
when you originally received it.
Always protect the unit from moisture, cold, shock, mechanical stress and dirt .
Do not place anything containing a liquid or burning candles on top of the unit.
The batteries in the remote control may not be exposed to heat, e.g. direct sunlight,
fire etc.
As far as possible, only use original accessories such as Loewe mounting systems.
7 -
Initial set-up
Set-up in general
The unit is suitable for various set-up solutions. Please pay attention to the
•
respective mounting instructions.
Only place the unit with a table or stand on a level, firm, horizontal surface.
•
When being set up, the unit should, in particular, not protrude into or over
furniture.
Do not set up the unit near strong heat sources or in direct sunlight. Always
•
protect the unit from moisture, cold, shock and mechanical stress and dirt.
When setting up the unit, ensure that air can circulate easily and that there is
•
no heat accumulation. Do not cover the openings at the rear. Keep a distance
of at least 5 cm above, behind and below this unit.
Keep this unit away from other electrical household equipment, motors or
•
transformers to avoid crackling noises.
Set the unit up in such a way that the infrared signal from the remote control
•
can reach the Sound Projector display without being impeded.
Do not place anything containing a liquid or burning candles on top of the
•
unit.
Do not place any strong artificial light source in front of the unit. This could
•
have a detrimental effect on the infrared reception.
Incorrect voltages can damage the unit. This unit may only be connected up
•
to an electricity supply with the voltage and frequency stated on the rating
plate. Select the mains cable suitable for use in your country and connect to
a socket with a properly connected protective ground.
In thunderstorms, disconnect the TV antennae and mains plug. A voltage
•
surge caused by lightning conducted through the antenna system or the mains
could damage the unit.
During a lengthy absence the plug should be disconnected from the mains.
•
The mains plug must be easy to reach to ensure that the unit can be
•
disconnected from the mains at any time.
Position the mains cable in such a way that it can not be damaged. The mains
•
cable may not be bent or laid across sharp edges, walked on or exposed to
any chemicals; the latter applies to the whole unit.
When you want to unplug from the mains, do not pull on the cable, but on the
•
housing of the plug. The cables in the mains plug could otherwise be damaged
and could cause a short-circuit when being plugged in again.
Stop using the unit immediately if the mains cable is damaged. A mains
•
cable with damaged insulation can cause electric shocks and represents a
fire hazard.
Do not use any force when operating the controls, sockets or cables.
•
Please also read and follow the safety advice on page 7.
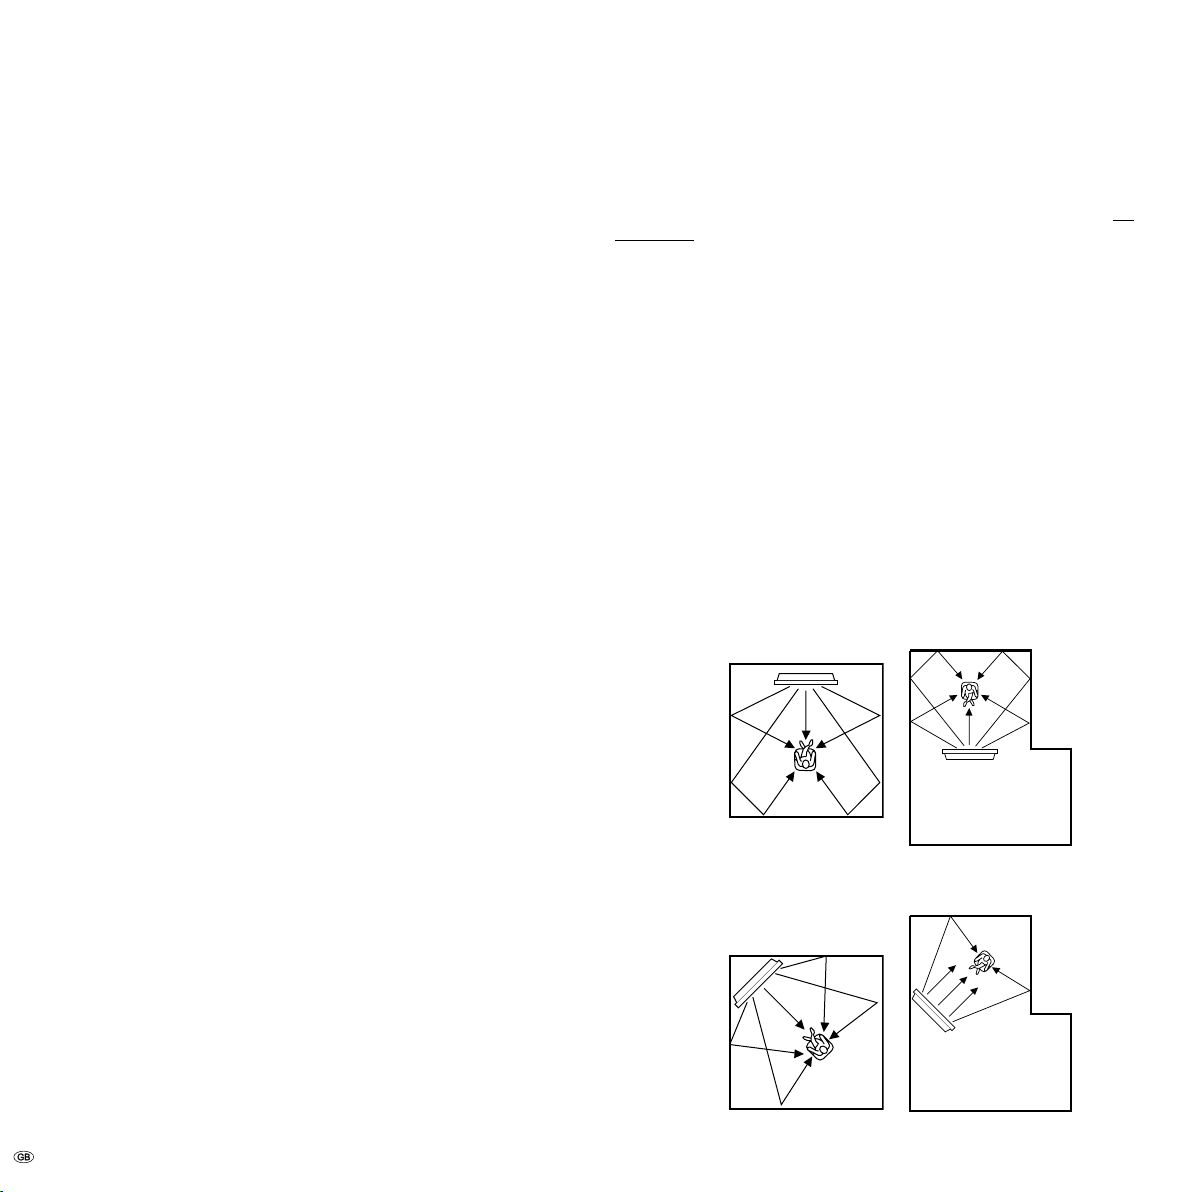
Positioning in the room
The Sound Projector gives out surround sound by reflecting projected sound waves
off the walls in your room. The surround sound effect generated by this unit may not
be sufficient if the unit is installed in a room with the following characteristics.
Rooms in which the walls are not suitable for reflecting soundwaves.
•
Rooms with sound damping surfaces.
•
Rooms with dimensions outside the following range: width (3 - 7 m) × height
•
(2 - 3.5 m) × depth (3 - 7 m).
Rooms in which the listening position is less than 1.8 m away from the
•
loudspeaker position.
Rooms in which, for example, furniture could block the path of the sound
•
beams.
Rooms in which the listening position is close to the wall.
•
Rooms in which the listening position is not in front of this unit.
•
Install the Sound Projector in a position where the path of the sound beams is not
impeded by obstacles, such as furniture. Otherwise the desired surround sound
effects may not be obtained.
You can install the unit parallel to the wall or in a corner.
Position parallel to the wall
Install the Sound Projector exactly in the middle of the wall, measured precisely
from the left and the right corner.
Position in a corner
Install the Sound Projector in a corner at an angle of 40º to 50º to the adjoining
walls.
- 8
Initial set-up
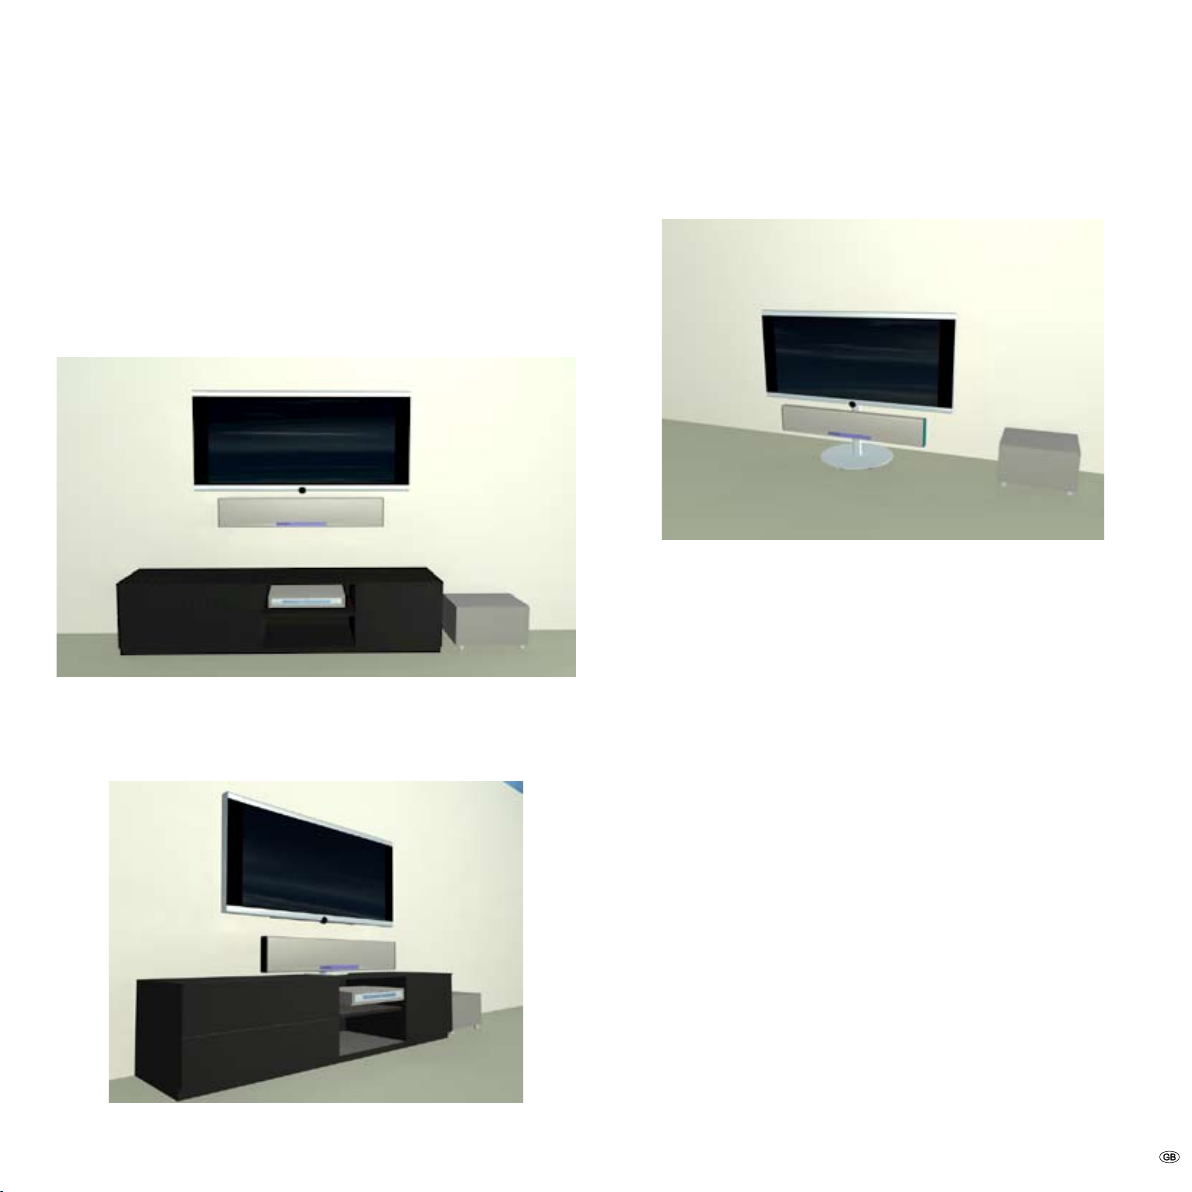
Set-up solutions
You can arrange your Sound Projector in different set-ups depending on which
other equipment you are connecting to it and the layout of the room. You are
urgently recommended to use the set-up solutions intended and tested by Loewe.
Pay attention to the advice given in the respective enclosed instructions for set-up.
Wall mounting
You can use the wall bracket supplied to mount your Sound Projectors on the wall
opposite your listening position.
Mounting on a table
You can use the "Table Stand I Sound Projector" which can be supplied as an
accessory to set up your Sound Projector on a flat surface.
Mounting on a floor stand
You can use the "Floor Stand 5 MU" which can be supplied as an accessory to set
up your Sound Projector on the floor in connection with a Loewe TV set.
Please ask your Loewe dealer about other set-up solutions.
Connecting the Sound Projector
You can connect various sound sources to the Loewe Sound Projector.
Loewe TV sets from Chassis Digital+ HD100 [L2710] upwards. The device
•
combination Loewe Sound Projector and Loewe TV set (from Chassis Digital+
HD100 [L2710]) is particularly easy to connect and operate (refer to page 10
onwards).
Loewe TV sets without RS-232C system interface (page 11).
•
Additional accessories. Refer to page 12.
•
9 -
 Loading...