

Page 1
233–33998.020
User Guide
Audio
AudioVision
Page 2
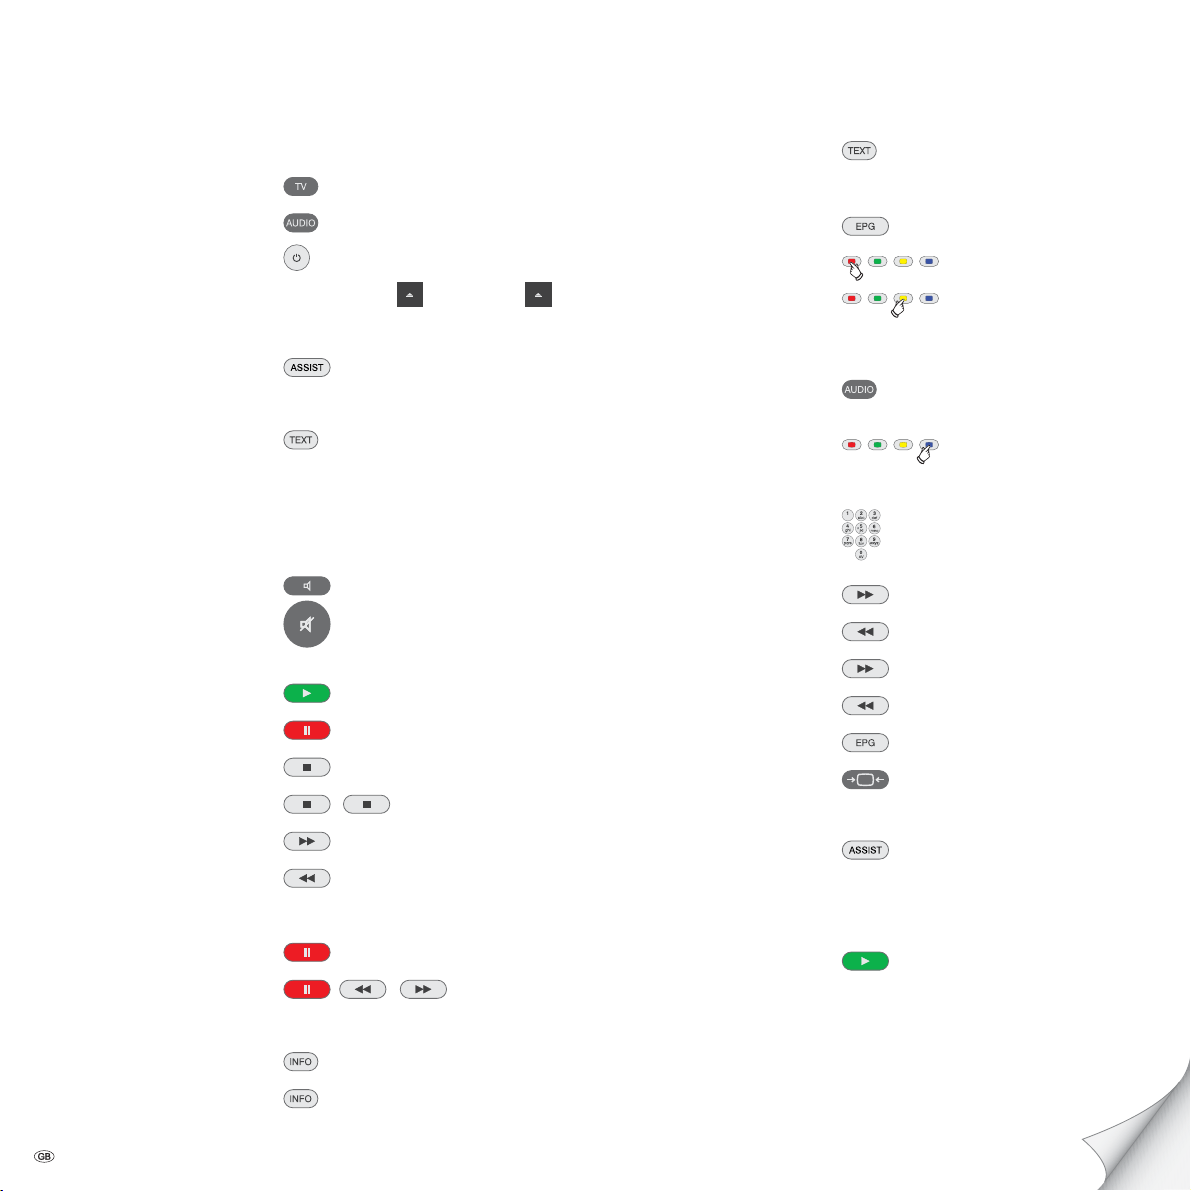
Getting Started
Preparation
TV operation
AudioVision operation press briefly
Switching device on/off
Insert disc Button on device – Insert Disc –
Operating modes
Select operating mode
(press several times)
Select media type
(press several times)
Sound
Volume V+/-
Sound mode
Sound on / off
Playback
Playback
Pause
Stop (Continue)
Stop
Search forwards (press several times)
Search backwards
Next/Previous Chapter P+/-
Individual frame (press several times)
Slow motion
DVD/CD - USB - iPod
Music - Photo - Video
(press several times)
(press several times)
/
Disc Menu (DVD)
Scroll page by page press and hold
Repeat
Screen off/on
Zoom (press several times)
Radio
AudioVision Radio operation
Station search run
Select station up/down. P+/-
Select station
Fine-tuning forwards (press several times)
Fine-tuning backwards (press several times)
Search run forwards
Search run backwards (press and hold)
Select RDS/MHz display
Mono/Stereo
iPod
Select operating mode
(press several times)
Select function OK
Playback
(press several times)
press and hold
press for an extended time
(press and hold)
(press several times)
DVD/CD - USB - iPod
(press several times)
Detail information (Media files)
Title menu
- 2
Please unfold this page.
Page 3
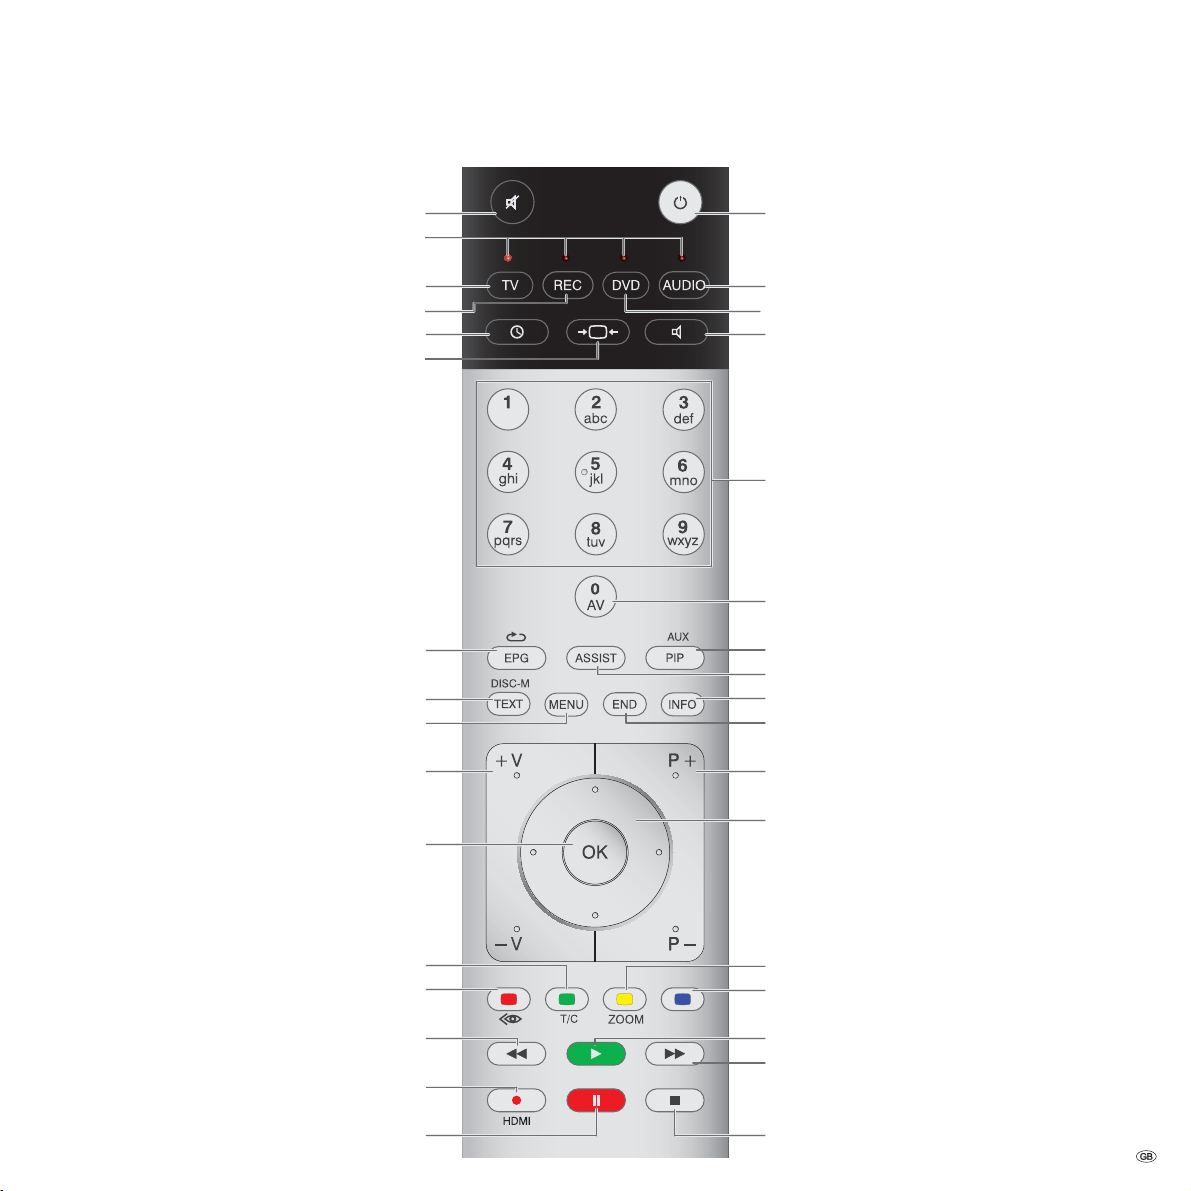
Assist Remote Control– AudioVision Operation
Sound on / off
LED indicator for current operating mode
Switch over to operate TV
Device set, e.g. Operate DVD Recorder
(Page 28) .......................................................Sleep Timer
(Page 27) .........................................RADIO: Mono/Stereo
TV Aspect
DISC: Repeat; RADIO: RDS/MHz Mode
DISC: Menu of DVD inserted; FILE: Media Type
(Page 16) .......................................................Main Menu
Volume
Confirm/call
Switch on/off in standby mode .........................(Page 14)
Device set, e.g. Operate AudioVision
AudioVision short: CD/DVD/USB/iPod; Long: FM Radio
Device set, e.g. Operate Blutech Vision
Individual Sound Settings .................................(Page 23)
Sound mode
MENU: Enter numbers or letters
RADIO: Select station
MENU: Enter numbers or letters
Select source ....................................................(Page 28)
Select mode ......................................................(Page 24)
Info Menu.........................................................(Page 22)
Hide Menu ........................................................(Page 16)
DISC: Select Title up/down ................................(Page 22)
RADIO: Select Station up/down .........................(Page 27)
Select/set
RADIO: Select station up/down
Sound mode settings
(Page 22) ..............Green button: Title / Chapter selection
(Page 23) ....................................Red button: Angle mark
DISC: Rewind
RADIO: Short: Fine-tuning down; Long: Search run down
DISC: HDMI resolution
(Page 27) ...................RADIO: Sort List of Radio Channels
Pause
Yellow button: Zoom ..............................................(Page 23)
RADIO: Long: Station scanning
DISC: Playback
DISC: Fast forward
RADIO: Short: Fine-tuning forwards; Long: Search run
forwards
Stop
3 -
Page 4

Index of key words
A
Angle 23
Area Code 19
Area Code List 32
Audio channels 22
Audio Delay 18
Audio Files 25
C
Cabling 11
Cabling AudioVision (other TV sets) 12
Chapter 22
Cleaning 9
Company and editorial details 31
Concealed Set-up 8
Conditions 20
Connecting 11, 12, 13, 20
Connection options 7
D
Device buttons 14
Digital Link HD (HDMI CEC) 15
Digital Sound Format 18
Digital Sound Formats 22
Disc Languages 16
Disc Menu 23
Disc Playback 22
Display Mode 17
Disposal 28
DivX Registration Code 19
DivX Subtitle 24
DRC 18
DVD button 14
E
Ejecting the Disc 20
Electrical Data 31
Environment , 28
F
Fast forward 21
File formats supported 31
Film language 22
FM Radio 27
Frame by Frame 21
Freeze Frame 21
Front / Rear View 6
G
Getting Started 2
Glossary 30
- 4
H
Handling Discs 20
HDMI CEC 15
HDMI Format 28
I
Inserting Discs 20
Intended Use 9
iPod 26
L
Language code list 32
M
Main Menu 16
Mains supply 15
Media Type 24
Menu Audio 18
Menu Display 17
Menu Language 16
Menu Lock 19
N
Navigation in the Menu 16
Night mode 18
O
Operating Loewe Equipment 14
Operating mode 24
Optional Expansions 8
P
Password 19
Performance 7
Photo Files 25
Playable Discs 20
Playback 21
Preampli er 18
R
Radio Operation 27
Rating 19
REC button 14
Regional Code 20
Remote Control 3, 14
Repeat 21
Resolution 28
Rewind 21
S
Safety 9
Saving the last Disc Settings 23
Scope of delivery 8
Search 21
Selecting a Title 22
Select Source 28
Service 33
Setting up 8, 10
Setting up the Assist Remote Control 14
Sleep Timer 28
Slow motion 21
Sort List of Radio Channels 27
Sound functions 14
Sound mode (Sound) 23
SPDIF Out 18
Speaker Setup 18
Stand-Alone 13
Start-up 14, 15
Subtitles 22
Supervision 9
Switching on/off 14, 15
Symbols 20
T
Technical speci cations 31
Time 22
Trademark rights 31
Troubleshooting 29
TV Aspect 17
TV button 14
TV input 18
TV Output Select 17
U
USB Operation 24
User Guide 9
V
Video Files 24
Vocal 18
Z
Zoom 23
Page 5

Contents
Getting Started ................................................................ 2
Assist Remote Control– AudioVision Operation ............... 3
Front / Rear View .............................................................6
Performance .................................................................... 7
Welcome ..........................................................................8
Scope of delivery ...........................................................................................8
Optional Expansions .....................................................................................8
Setting up .....................................................................................................8
For your Safety ..............................................................................................9
About these operating instructions ...............................................................9
Setting up ......................................................................10
Suggested setup solution: 5.1 Audio System ...............................................10
Suggested setup solution: Stereo Audio System...........................................10
Connecting up ................................................................ 11
Cabling AudioVision (from Mainframe L271x) - Integrated Network ............ 11
Cabling AudioVision (other TV sets) ............................................................. 12
AudioVision as a Stand-Alone Solution.......................................................13
Start-up .........................................................................14
Setting up the Assist Remote Control .........................................................14
Operating Loewe Equipment .......................................................................14
Connecting to the Mains Supply .................................................................15
Switching On/Off .........................................................................................15
Digital Link HD ............................................................................................15
Digital Link HD (HDMI CEC) ........................................................................15
Menu Language ..........................................................................................16
Main Menu .................................................................................................16
Navigation in the Menu ..............................................................................16
Disc Languages ...........................................................................................16
Menu Display ..............................................................................................17
Menu Audio ................................................................................................18
LOCK Menu .................................................................................................19
DivX Registration Code ...............................................................................19
Playback of DVD and CD................................................20
System Conditions .......................................................................................20
Playback of Video DVD and Audio CD ........................... 21
Playback in General ....................................................................................21
Disc Playback ..............................................................................................22
Saving the last Disc Settings .......................................................................23
Playback of Media Files ................................................. 24
Video Files ..................................................................................................24
USB Operation ............................................................................................24
Audio Files ..................................................................................................25
Photo Files ..................................................................................................25
Playback from iPod .......................................................26
Connecting iPod..........................................................................................26
iPod Operation ............................................................................................26
FM Radio ...................................................................... 27
Radio Setup ................................................................................................27
Radio Operation .......................................................................................... 27
Sort List of Radio Channels .........................................................................27
Other Functions ............................................................ 28
Sleep Timer .................................................................................................28
Select Source ..............................................................................................28
HDMI Format Setup ....................................................................................28
Environment ..................................................................28
Environmental protection ............................................................................28
Troubleshooting ............................................................. 29
Glossary ......................................................................... 30
Technical specifications ................................................. 31
Language code list ......................................................... 32
Area Code List ...............................................................32
Service ........................................................................... 33
5 -
Page 6
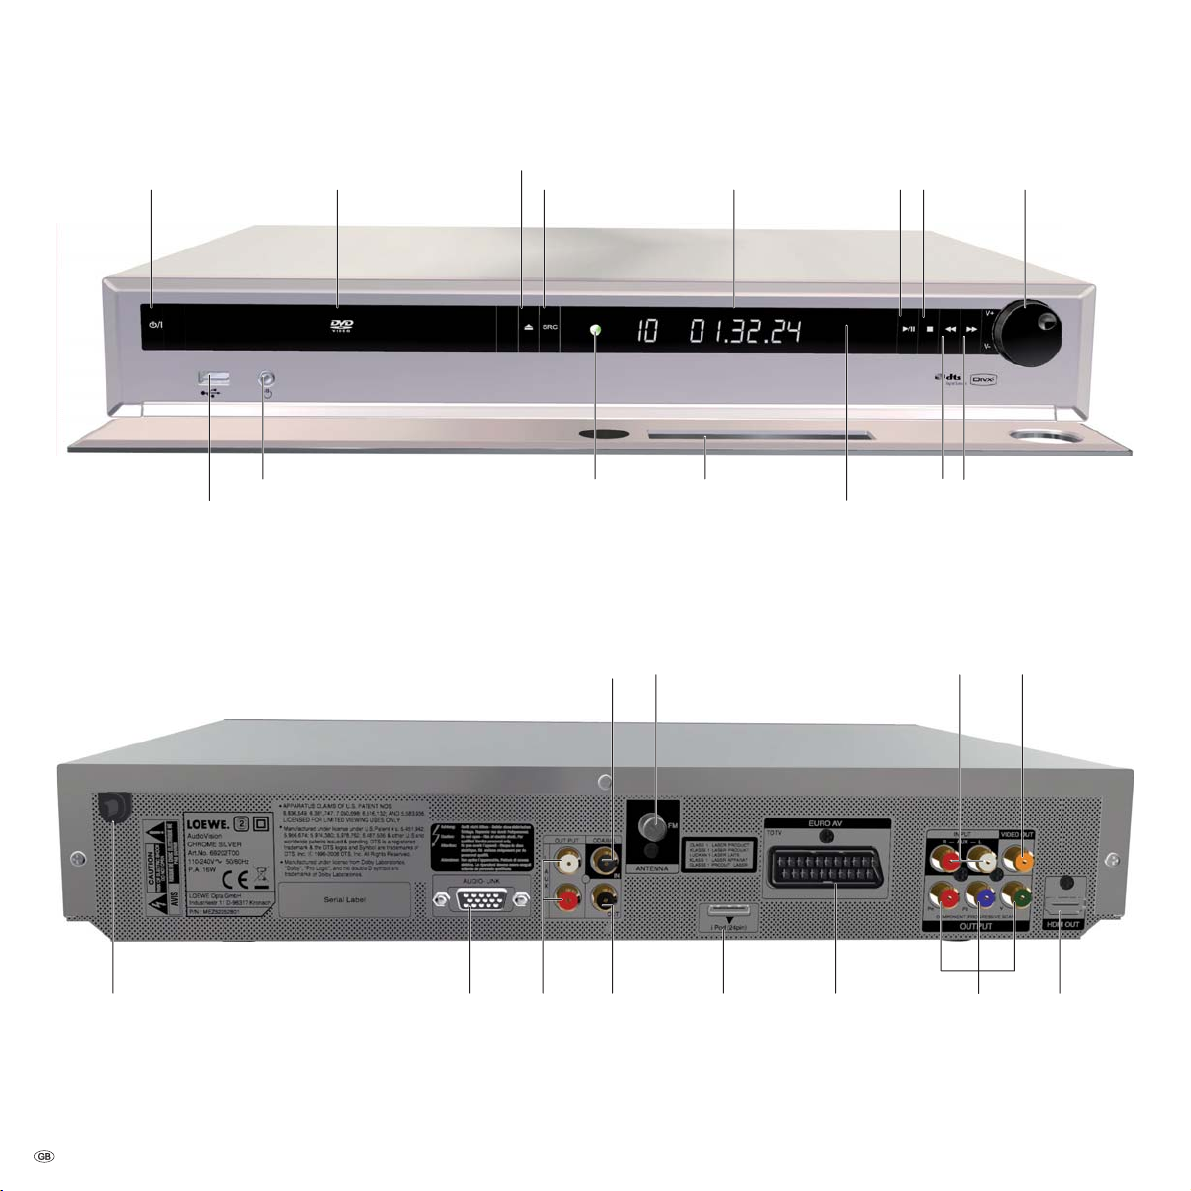
Front / Rear View
On
Switching Off in Standby
Headphones socket
USB socket
CD/DVD Drive
Disc drawer
Open / Close Disc Drawer
Source selection Volume
Operating
display
COAXIAL IN
(digital sound input)
ANTENNA FM
(FM Radio Antenna)
Display
Front ap
(opened)
Playback /
IR Receiver
Stop
Pause
Rewind
INPUT AUX R/L
(analogue sound
input stereo L/R)
Fast forward
VIDEO OUT
(TV Output Select)
Mains cable AUDIO-LINK OUTPUT
output stereo L/R)
- 6
AUX L/R
(analogue sound
COAXIAL
OUT
(digital
sound output)
iPod
(24pin)
EURO AV
(SCART)
OUTPUT
COMPONENT
(Component
TV Output
Select)
HDMI
Output
(HDMI
output)
Page 7

Performance
Your Loewe AudioVision offers you a comfortable access to your media collection.
It plays CDs and DVDs and receives FM Radio Signals via antenna or cable. You can
use digital music files from a USB stick and from data DVDs as you can from an iPod.
Connection options
USB 2.0
HDMI OUT (HDMI output)
VIDEO OUT (Video output)
OUTPUT COMPONENT (Components TV Output Select)
EURO AV (SCART)
INPUT AUX L/R (analogue sound input stereo L/R)
COAXIAL IN (digital sound input)
OUTPUT AUX L/R (analogue sound output stereo L/R)
COAXIAL OUT (digital sound output)
Headphones 3.5 mm Stereo
ANTENNA FM (FM Radio Antenna 75 Ohm)
AUDIO-LINK
iPod
CD/DVD Player
Playback from CD-R and CD-RW Discs
Playback from DVD-Video, DVD-ROM and DVD-RW Disc
DVD Upscaling (720p/1080p)
Operation using drive buttons on the device and Assist remote control
Media management
Display of ID3v1 and ID3v2 metadata
Preparing Playlists
Music Playback
Playback of MP3, WMA Audio files
Playback of AudioVision Playlists
Repeating Titles, Tracks or Directories
Random Playback
Video Playback
Playback of DivX Video Files
Playback of Subtitles
Photo Playback
Playback of JPEG photo files
Slide show
FM Radio
FM Radio with RDS Display
Memory for 40 Radio Stations
iPod Support
iPod Docking Station
Audio Playback
Control by Assist remote control
Charging iPod battery
Use with other Loewe system components
Connection of Loewe flat TV sets via Digital Link HD (HDMI CEC) (from mainframe
L271x - if necessary, a software update of the TV set must be carried out) and
operation only with one Assist remote control - also with the concealed setup
of AudioVision.
Connection of Loewe Audio Components via Audio Link
7 -
Page 8

Welcome
Thank you
for choosing a Loewe product. We are happy to welcome you as our customer.
At Loewe we combine the highest standards of technology, design and user friendliness. This is equally true of TV, DVD, video, audio and accessories. Neither technology nor design is an end in itself, but both are intended to provide our customers
with the best possible audio and visual experience. Our design is not influenced
by short-term, fashionable trends. You have, after all, purchased a high-quality
piece of equipment which you do not want to tire of tomorrow or the day after.
Scope of delivery
• AudioVision
• Assist Remote Control with 2 batteries
• iPod cable
• FM Antenna cable
• HDMI cable
• SCART cable
• These operating instructions
Optional Expansions
• Adapter cable for Center Channel Ref. No. 009-70784.001
• Loewe TV-set with HDMI input (from Mainframe L271x, Software V9.5)
• Loewe Individual Sound SubWoofer / Highline
• Loewe Individual Sound Speaker
Setting up
• Place the device on a stable, level surface.
• Do not set up the unit near strong heat sources or in direct sunlight.
• When setting up in a cupboard or enclosed shelving: Leave at least 2.5 cm of
free space around the unit to allow air to circulate freely and to prevent heat
accumulation. Do not cover the openings necessary for cooling.
• The picture and sound of a TV set, a player or a radio nearby could have their
transmissions distorted. If this is the case, do not place the device in the immediate proximity of these devices.
• Set the device up so that the infrared signal of the remote control can directly
reach the display of the Player (or, if this is not possible, refer to ” Digital Link
HD (HDMI CEC)” page 15).
• Do not place any strong artificial light source in front of the unit. This could
have a detrimental effect on the infrared reception.
• Incorrect voltages can damage the unit. This unit may only be connected up to
an electricity supply with the voltage and frequency stated on the rating plate.
• During thunderstorms, disconnect the mains plug. A voltage surge caused by
lightning conducted through the mains could damage the unit.
• If the unit is not to be used for an extended period, the plug should also be
disconnected from the mains.
• The mains plug must be easy to reach to ensure that the unit can be disconnected from the mains at any time.
• Position the mains cable in such a way that it can not be damaged. The mains
cable may not be bent or laid across sharp edges, walked on or exposed to any
chemicals; the latter applies to the whole unit. A mains cable with damaged
insulation can cause electric shocks and represents a fire hazard.
• When you want to unplug from the mains, pull on the plug housing rather
than on the cable. The cables in the mains plug could otherwise be damaged
and could cause a short-circuit when being plugged in again.
- 8
Please also read and follow the safety advice on the following pages .
Page 9
For your Safety
For your safety, and to avoid unnecessary damage to your unit, please read
and follow the safety advice below.
Please keep the safety information in a safe place.
Use for the intended purpose and ambient conditions
This unit is intended exclusively for wireless transmission and playback of picture
and audio signals. It is designed for living or office rooms and may not be used in
rooms with a high level of humidity (e.g. bathroom, sauna) or a high dust con-
centration (e.g. workshops ).
The terms of the warranty only cover the intended use of the unit.
If the unit is used outdoors, make sure that it is protected from moisture (rain,
drips, spray or dew).
High concentrations of moisture and dust lead to creepage current in the unit
which can make it dangerous if a live wire is touched or it may cause a fire.
If you have moved the unit out of the cold into a warm environment, leave it
switched off for about an hour to avoid the formation of
condensation.
Always switch off your system (AudioVision , TV set and any other components
which may be connected) before connecting or disconnecting other devices or
speakers.
Protect your device from:
• Wet conditions and moisture
• Drips of water and spray
• Knocks and mechanical stress
• Magnetic and electric fields
• Cold, heat, direct sunlight and high temperature fluctuations
• Dust
• Covers that inhibit ventilation
• Interference with the internal workings of the unit
IMPORTANT: TO PREVENT AN ELECTRIC SHOCK, DO NOT REMOVE COVER. THERE ARE NO PARTS INSIDE THE UNIT THAT CAN
BE REPAIRED BY THE USER. REPAIRS SHOULD ONLY BE CARRIED
OUT BY A LOEWE DEALER.
Only use Ori gi nal accessories and spare parts from
Loewe.
Supervision
Do not allow children to use the unit/TV set unsupervised.Do not allow children
to play in the im medi ate vicinity of the unit/TV set. The AudioVision should not
operate unsupervised. Please disconnect from the mains if you are going to be
away for a long time.
Cleaning
Only clean your unit with a slightly damp, soft, clean cloth (without any aggressive
or scouring cleaning agents).
About these operating instructions
The information in this guide refers to the Loewe product AudioVision .
Unless stated otherwise, the instructions refer to the operating elements on the
Assist remote control.
Paragraphs beginning with the
tions for perfect operation.
Terms which you will find in the menu or printed on the unit are printed in bold
type.
In the functional descriptions, the necessary operating elements are arranged to
the left of the text containing the handling instructions.
The diagrams in these operating instructions are only by way of example. This may
vary from the actual display you see.
➠ symbol indicate important hints, tips or condi-
Do not place any burning candles or anything filled with a liquid (such as vases)
on the unit.
Do not cover ventilation slits with magazines or blankets. Pay attention for example
to curtains etc.
9 -
Page 10
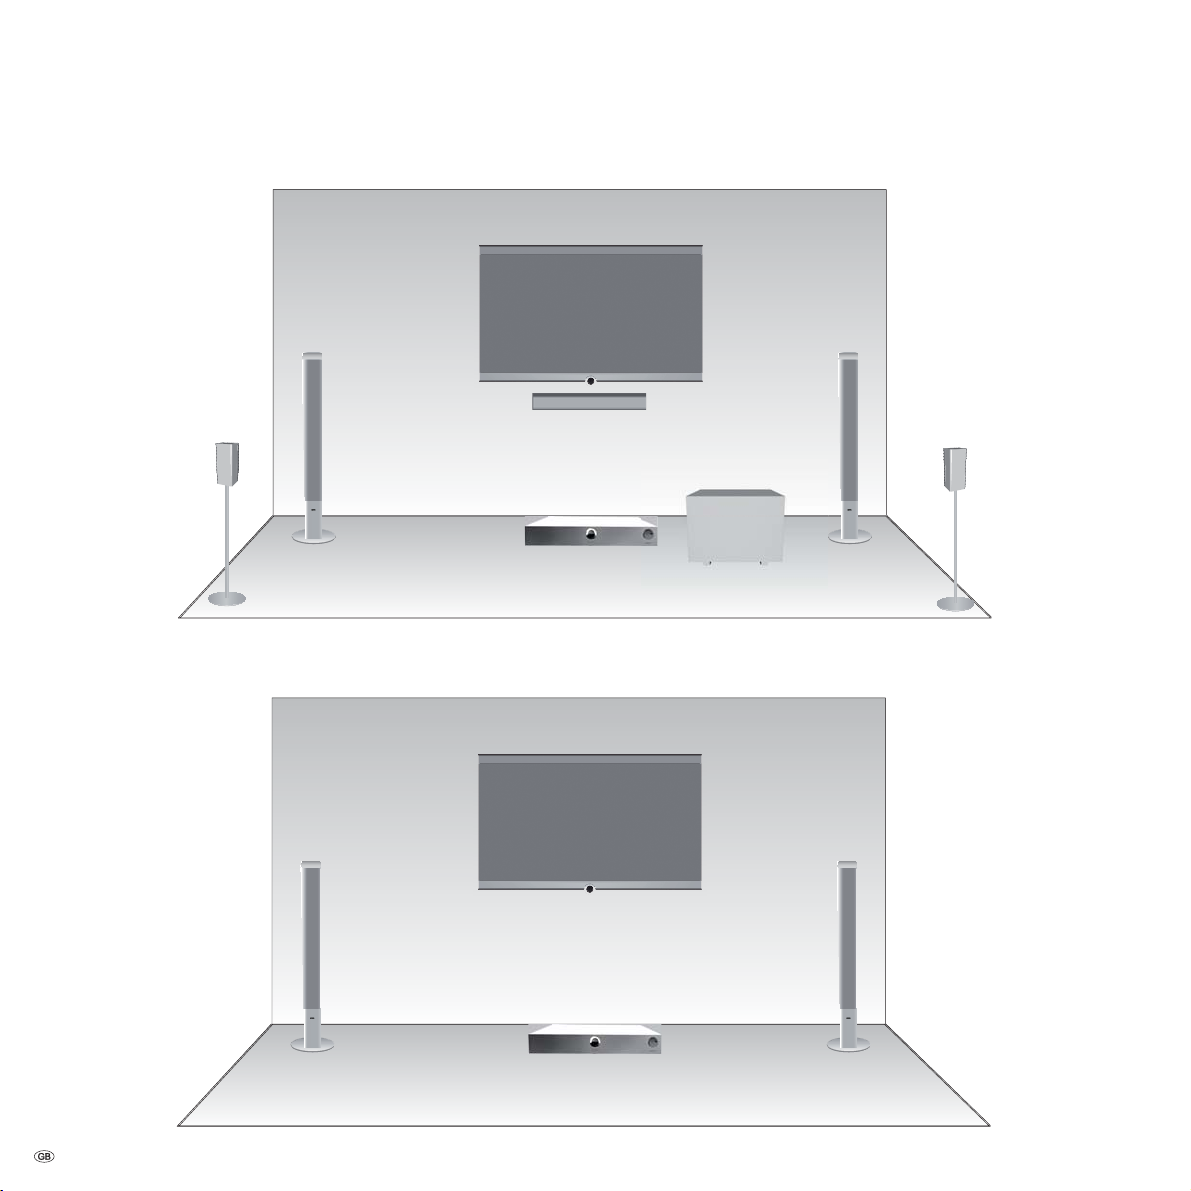
Setting up
Suggested setup solution: 5.1 Audio System
Loewe Flat TV set
Front
Speakers
right
Surround
Speakers
left
Front
Speakers
left
Center
AudioVision
Suggested setup solution: Stereo Audio System
Loewe Flat TV set
Front
Speakers
left
Surround
Speakers
right
Subwoofer
Individual Sound
Highline
Front
Speakers
right
- 10
AudioVision
Page 11
Connecting up
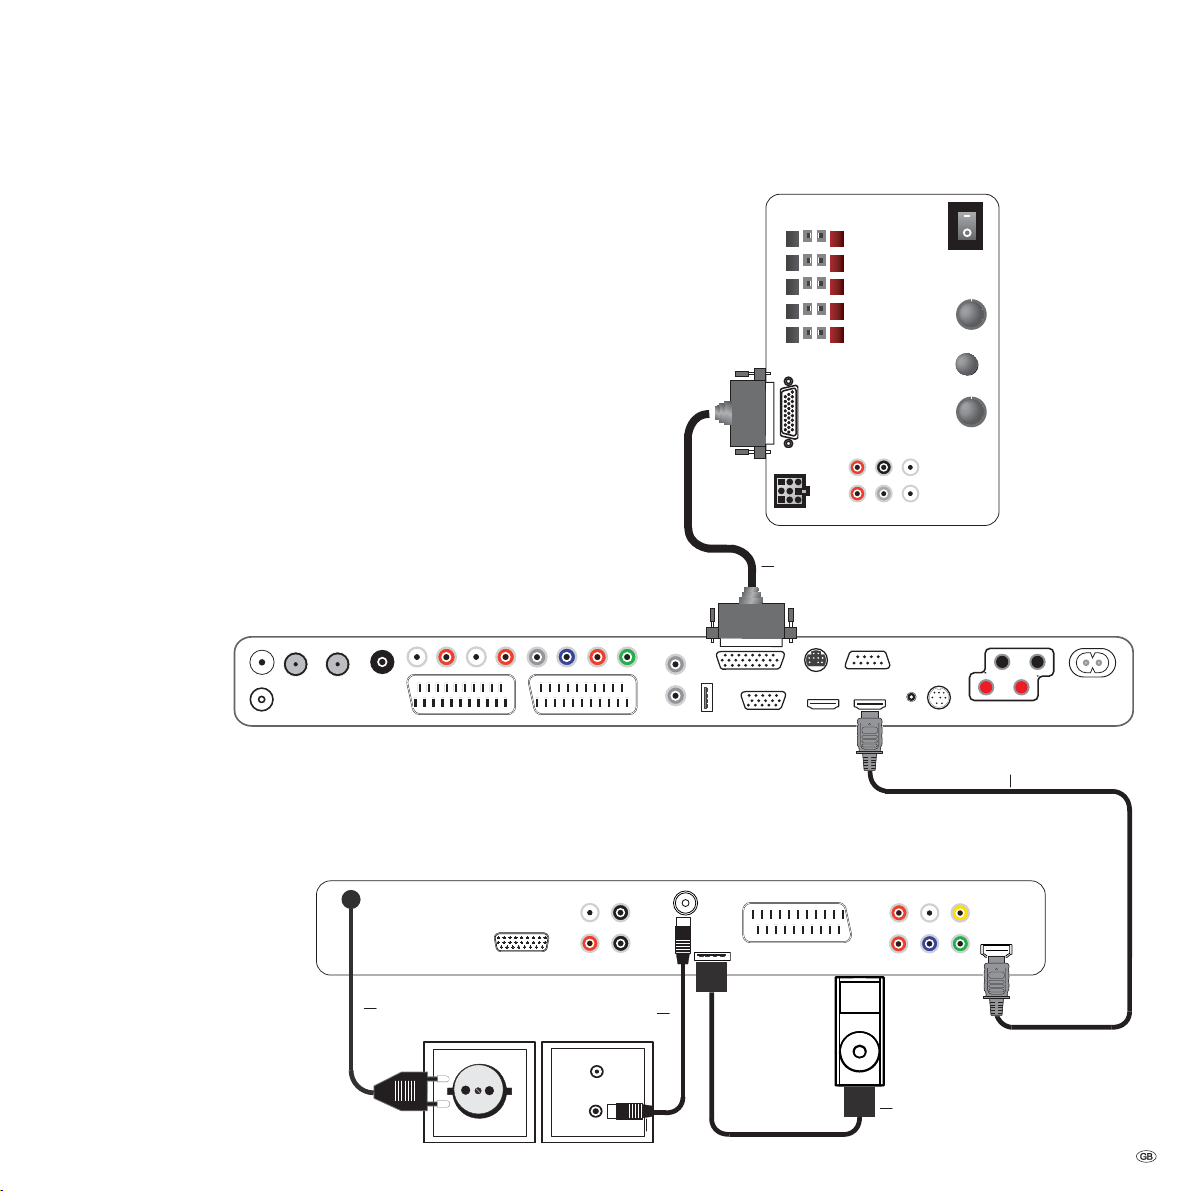
Cabling AudioVision (from Mainframe
L271x) - Integrated Network
With this configuration, the audio signals are controlled via your Loewe TV set.
AudioVision serves as an audio and video source.
Connect the socket HDMI OUT of AudioVision with the socket HDMI IN on your
TV set using the provided HDMI cable.
You can also make the connection to a TV set using a SCART cable plugged into
the socket EURO AV (however this means that the sound/picture quality and
functionality are limited).
Use an FM antenna cable to connect the socket ANTENNA FM to an antenna
socket.
Connect the iPod cable to the socket iPod (24pin).
Use the Audio Link cable to connect the AUDIO LINK socket on the TV set to the
SubWoofer. If the AUDIO LINK socket on your Loewe TV set is not available ex
works, please ask your specialist retailer about the option of having it retrofitted.
Plug the mains cable into a 220-240V 50/60 Hz wall socket.
➠ It is possible that your Loewe TV set may need a software update. Please
contact your specialist retailer.
Loewe Flat TV set (from L271x)
Loewe SubWoofer
R
L
R
Front
C
L
Audio Link
System connector
Audio link cable
Surr.
Front
Line IN
Right
Subw.
Right
Center
Bass Intensity
Min. Max.
0 180
Crossover Frequency
Left
50 250.
Left
Phase
AudioVision
Mains cable
HDMI cable
FM Antenna
iPod cable
11 -
Page 12
Connecting
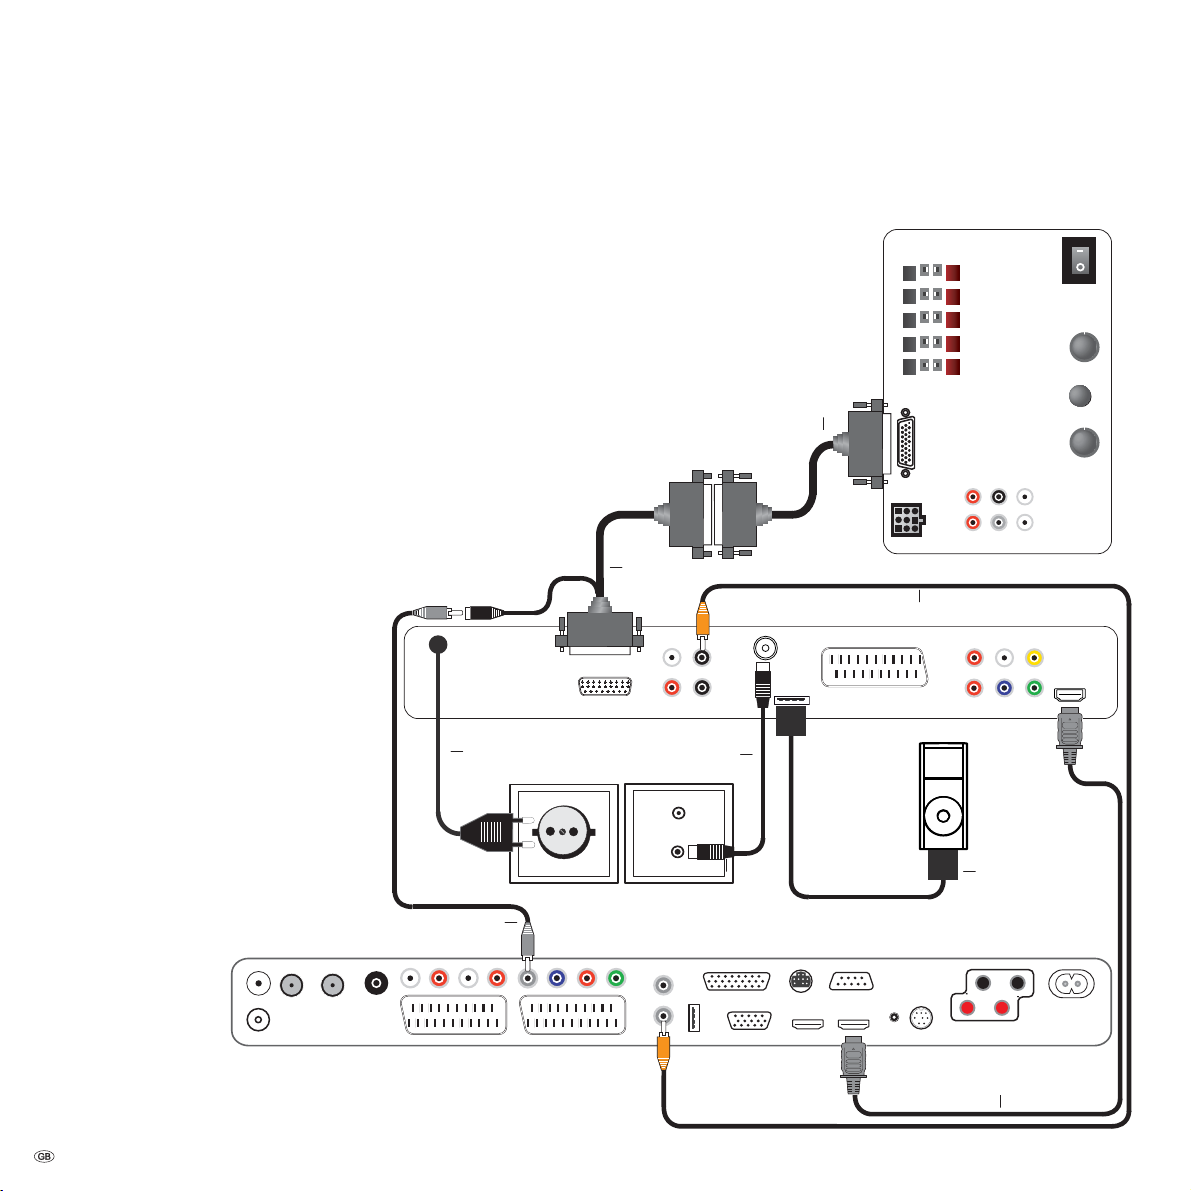
Cabling AudioVision (other TV sets)
With this configuration, the audio signals are processed via AudioVision.
Connect the socket HDMI OUT of AudioVision with one of the sockets HDMI IN
on your TV set using the provided HDMI cable.
If your TV set has no HDMI IN socket, connect the three sockets OUTPUT COM-
PONENT of AudioVision using three video suitable cinch cables plugged into the
sockets COMPONENT IN on your TV.
You can also make the connection to a TV set using a SCART cable plugged into
the socket EURO AV.
Use the antenna cable to connect the socket ANTENNA FM to an antenna socket.
Connect the iPod cable to the socket iPod (24pin).
Connect the socket AUDIO-LINK of your AudioVision with the socket of the
SubWoofer using the Audio Link cable. Should you not wish to channel centre
channel through your TV set, you can also use the optional adapter cable (order nr.
009-70784.001, available at your local specialized dealer). It must be connected
to Audio Vision`s socket and the AUDIO LINK cable to the subwoofer and the
TV set’s center in socket.
AUDIO LINK cable
Loewe SubWoofer
R
L
R
Front
C
L
Audio Link
Surr.
Front
Line IN
Right
Right
Center
Subw.
Left
Left
Bass Intensity
Min. Max.
Phase
0 180
Crossover Frequency
50 250.
To reproduce the sound of the TV set, e.g. DVB
radio, via your AudioVision/SubWoofer Sys-
tem establish a connection between the TV set
and AudioVision. For that, you should preferably use an optional, digitally suitable audio
cinch cable and connect it with the socket AU-
DIO DIGITAL OUT of the TV set and the socket
COAXIAL IN of your AudioVision. Alternatively,
you can connect the analogue Stereo sound
signal of your TV set with the sockets INPUT
AUX R/L on your AudioVision via the stereo
cinch connection.
Plug the mains cable into a 220-240V 50/60
Hz wall socket.
TV set
Mains cable
Centre Channel
Adapter cable
FM Antenna
System connector
Digital Audio Cinch Cable
iPod cable
HDMI cable
AudioVision
- 12
Page 13
Connecting up
AudioVision as a Stand-Alone Solution
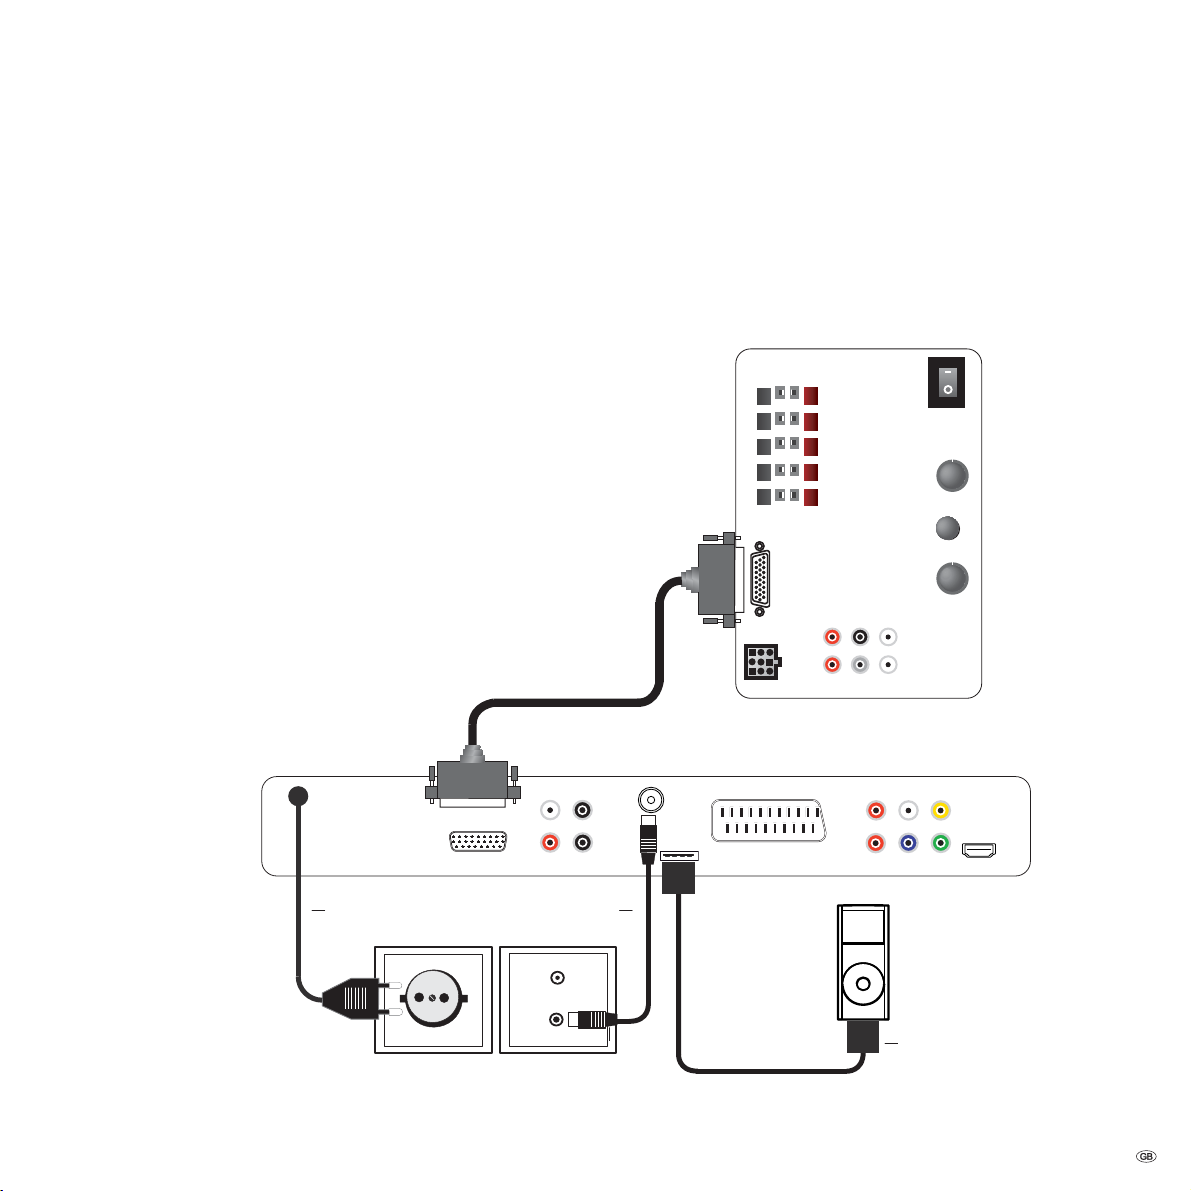
Use the antenna cable to connect the socket ANTENNA FM to an antenna socket.
If you want to connect an analogue audio source, connect it with the sockets
INPUT AUX L/R of the AudioVision.
The analogue audio signal of the AudioVision is available on the sockets OUTPUT
AUX L/R.
If you want to connect a digital audio source, connect it with the socket COAXIAL
IN of the AudioVision.
The digital audio signal of the AudioVision is available on the socket COAXIAL
OUT.
Connect the cable from the iPod Dock to the socket iPod (24pin).
Connect the socket AUDIO-LINK of your AudioVision with the socket of the
SubWoofer using the Audio Link cable.
Plug the mains cable into a 220-240V 50/60 Hz wall socket.
Audio link cable
Loewe SubWoofer
R
L
R
Front
C
L
Audio Link
Surr.
Front
Line IN
Right
Subw.
Right
Center
Bass Intensity
Min. Max.
Phase
0 180
Crossover Frequency
Left
50 250.
Left
AudioVision
Mains cable
System connector
FM Antenna
iPod cable
13 -
Page 14
Start-up
Setting up the Assist Remote Control
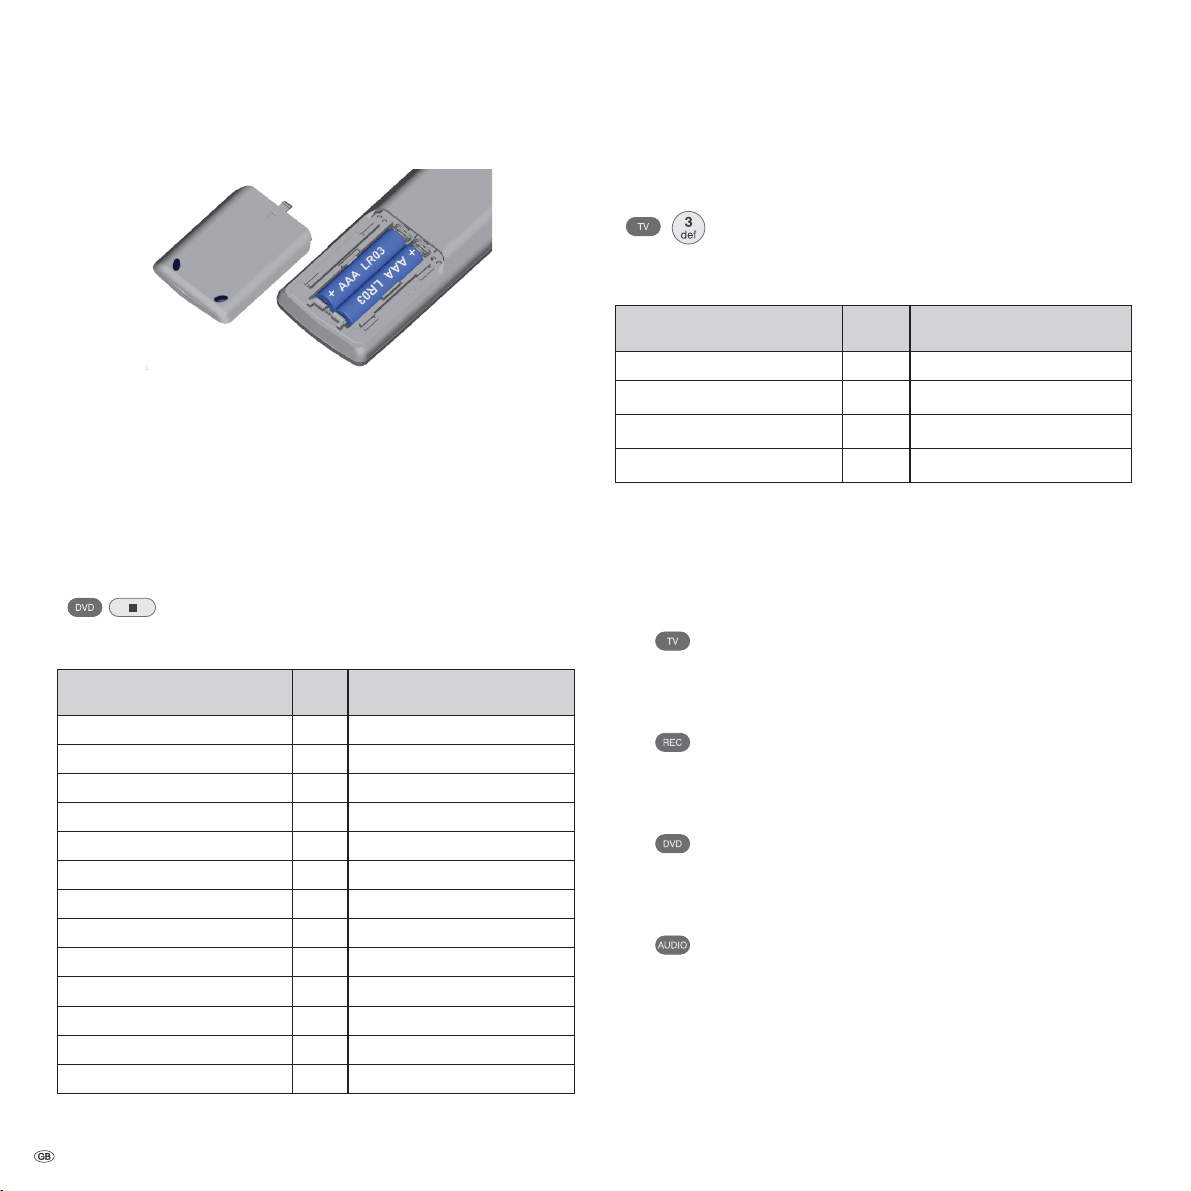
To insert or change the batteries, press on the arrow. While doing so, simply slide
the battery compartment lid down and remove it. Insert alkali manganese batteries LR 03 (AAA) and ensure the correct position of + and –. Slide the cover on
again from the bottom.
Setting up the Assist Remote Control
Other Devices
You can operate various Loewe devices using the Assist Remote Control. The device
buttons REC - DVD - AUDIO can be set up for this.
Press the required device buttons and the Stop button
simultaneously for 5 sec. until the corresponding LED display
flashes twice.
Then enter the two-digit device code from the list:
Unit Code Factory setting
Loewe ViewVision 8106 H 10
Loewe Viewvision, Centros 21x2 12
Loewe ViewVision DR+ DVB-T 13 REC
Loewe Auro 2216 PS/8116 DT 14
Loewe BlutechVision 15
Loewe Soundprojector 17
Loewe TV Radio digital 19
Loewe Mediacenter 20
Loewe BlutechVision Interactive 21 DVD
HDMI CEC Mode¾¾
Loewe AudioVision 24 AUDIO
Loewe Sound Projector SL 25
Reset to factory settings 99
22
Sound functions
It can be set on which devices the buttons with the sound functions (V+/-, sound
off and sound mode) should work.
Press the device button TV and at the same time the button
with the single digit function code from the list for 5 sec. until
the LED Display flashes twice.
Function Code Figure
Loewe AudioVision 3 page 12, page 13
Loewe Mediacenter 4
Loewe TV ¾
Loewe Soundprojector 6
¾ Factory setting
¾¾ from mainframe L271x, Software V9.5)
5 page 11
Operating Loewe Equipment
Using the remote control for a Loewe TV set
Press TV button; the LED Display above it
lights up for approx. 5 seconds
Using the remote control for a Loewe recorder
Press the REC button; the LED Display above
it lights up for approx. 5 seconds
Using the remote control for a Loewe DVD Player
Press the DVD button; the LED Display above
it lights up for approx. 5 seconds
Using the remote control for AudioVision
Press the AUDIO button; the LED Display
above it lights up for approx. 5 seconds
Every time a button is pressed, the LED display lights up for the selected operating
mode for checking purposes (TV – REC – DVD – AUDIO).
Please refer to the respective operating conditions on how to operate the individual devices.
- 14
The corresponding LED Display flashes twice.
Page 15
Start-up
Connecting to the Mains Supply
Plug the mains plug (page 6) into a mains socket 220-240V/50-60 Hz.
Switching On/Off
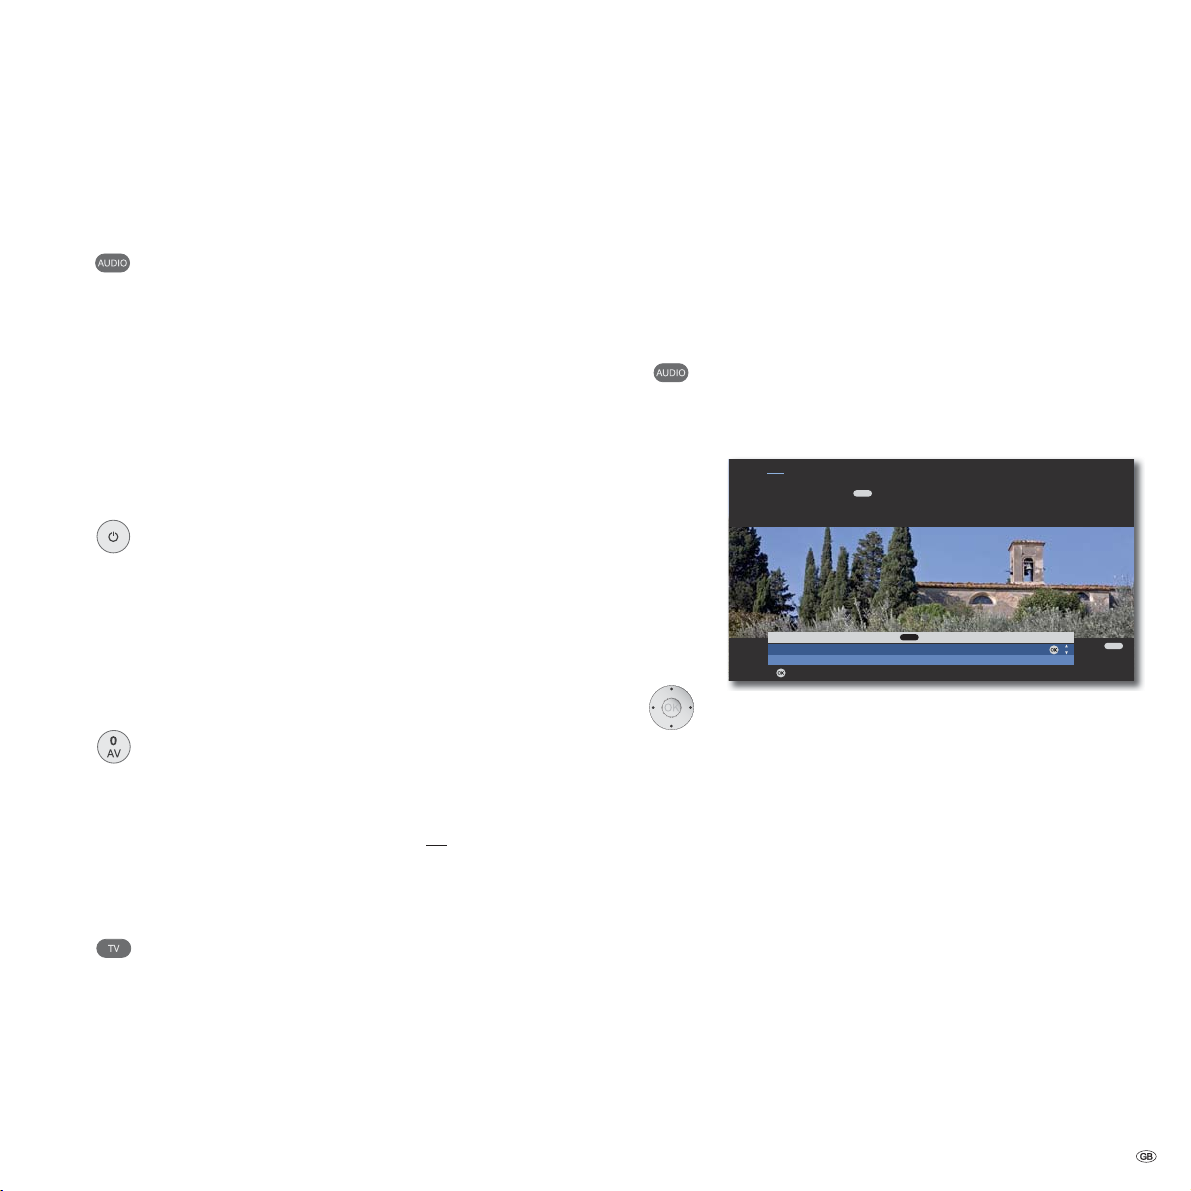
Set the remote control for AudioVision operation by briefly
pressing the button AUDIO.
Your AudioVision it getting switched on. If you have connected
a Loewe TV set (from L271x) via HDMI, then this will switch on
as well. Otherwise, switch your TV set on and set the respective
AV programme slot.
➠ If necessary, you should set your TV set to the operation of
AudioVision for the input jack used (see e.g. ”Operation of
additional devices” in the corresponding user guide of your TV
set).
As soon as AudioVision is ready to go, the green Operating
Display (page 6) lights up.
To switch the device off, press the Off/On button on the
AudioVision or on the Assist remote control again.
Digital Link HD
With the Digital Link HD, the Loewe TV sets and other TV sets supporting CEC
standard transmit the signals of the remote control via HDMI connection from
the TV set to the AudioVision. However, only the drive functions are supported.
➠ The TV set needs to be switched on.
On the TV set, select the AV programme slot for HDMI.
As long as HDMI is selected as the programme slot, most TV remote control commands (ASSIST in TV mode) will be passed on to the connected HDMI unit. Volume,
sound on/off, sound adjustment and TV aspect however, still affect operation of the
TV set. The AUDIO commands (ASSIST in AUDIO mode) are not passed on by the TV.
By pressing the TV button for a long time, you can switch between
HDMI and TV operation. Pressing the TV button briefly switches
back to TV mode.
With the TV button (press briefly), in TV operation you switch
back to the last station watched and terminate the device
control.
➠ It is possible that your Loewe TV set may need a software
update. Please contact your specialist retailer.
Digital Link HD ( HDMI CEC)
With Digital Link HD, Loewe TV sets (from Mainframe L271x, Software V9.5) pass
the signals from the remote control via the HDMI connection from the Loewe TV
set to compatible additional devices, such as AudioVision. Digital Link HD makes
sense if you want to set up AudioVision in a concealed place and all the devices
are to be controlled via the Loewe TV set.
First of all, adjust the HDMI CEC function for the Assist
remote control as described on page 14 to Code 22 on the
required device button (e.g. AUDIO).
Then carry out the allocation of the Digital Link HD function to
the HDMI interface of the TV set used by pressing the button
set above (e.g. AUDIO) for 5 sec.
A selection menu will appear.
Hint
Here you select the device which you want to switch over your remote
control to with the key. After confirming the selection with OK all
remote control commands are passed on to the selected device via the TV set
in future when you press this key.
Select HDMI device for key
AudioVision
No device
OK
Adopt
Select required device (e.g. AudioVision).
Confirm with OK.
From now on, the signals of the Assist remote control are
transmitted from the TV set to the AudioVision if the
corresponding device button (e.g. AUDIO) has been actuated
before.
➠ It is possible that your Loewe TV set may need a software
update. Please contact your specialist retailer.
➠ If you switch the screen in the DVB radio mode with the
colour button red off, only some button functions of the
Assist remote control (e.g. V+/-, P+/-, sound off) on
AudioVision will be transferred.
➠ FM radio cannot be used if there is a concealed installation
(see page 27).
AUDIO
AUDIO
END
OK
15 -
Page 16
Start-up
Menu Language
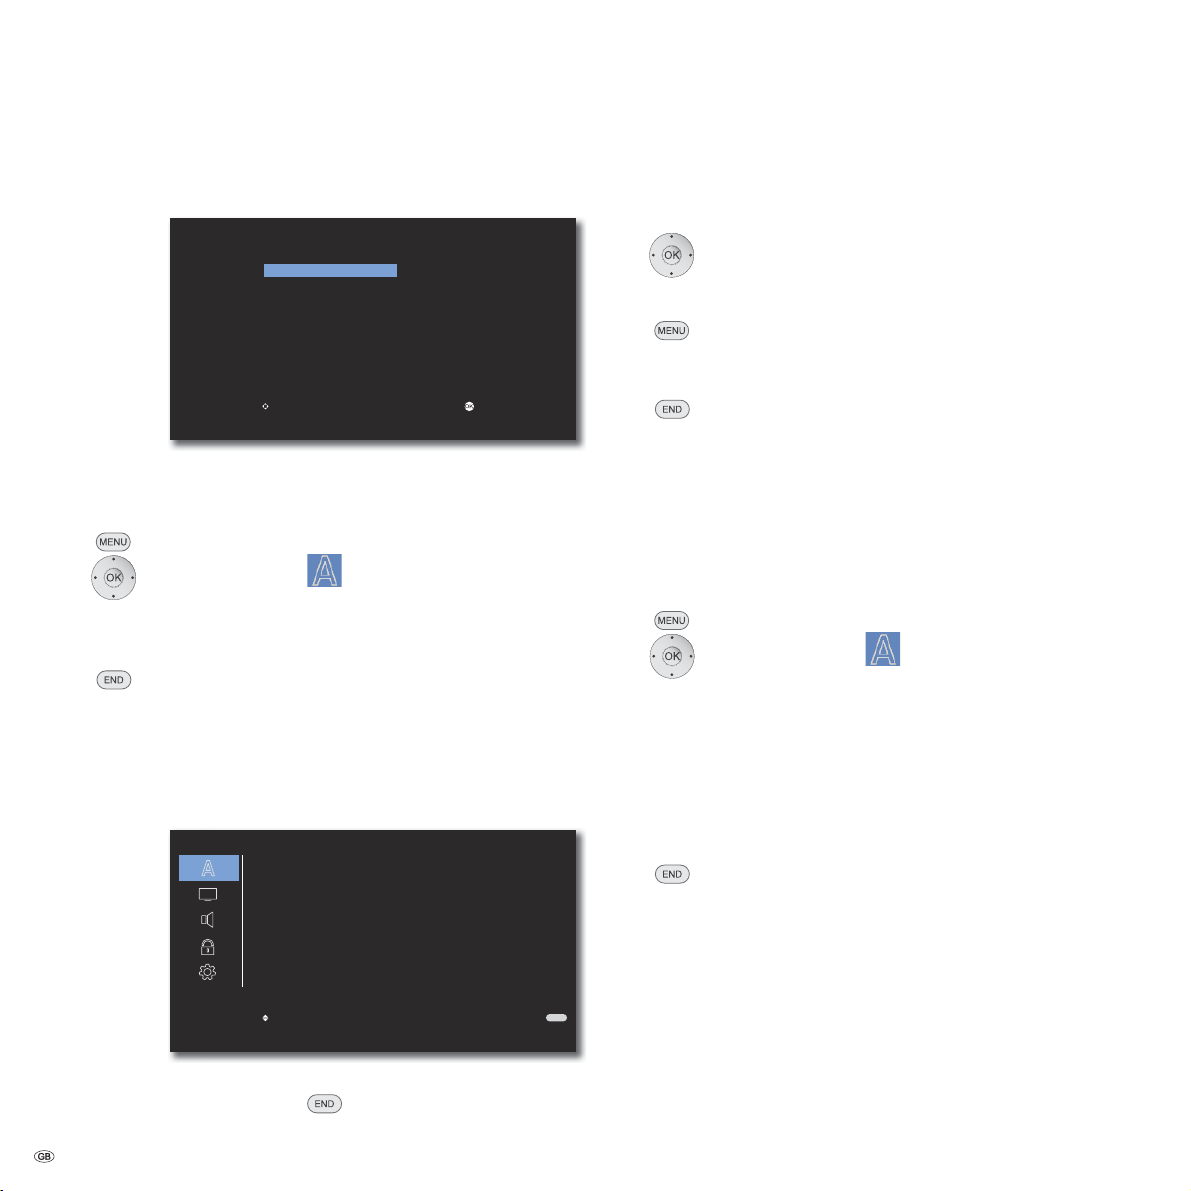
During the first operation you will be asked to choose the language you want to
use in the menus of the AudioVision.
Menu Language
Deutsch
English
Français
Italiano
Español
Nederlands
Select Adopt
Select required language.
Confirm with OK.
You can change the Menu Language at any time.
Call up Main Menu.
Select option LANGUAGE.
Select option Menu Language.
Select required language.
Confirm OK.
Close menu.
Main Menu
The menu of the AudioVision will appear on the screen of the connected TV set.
Here you can make the necessary settings.
Navigation in the Menu
In these operating instructions, the arrow buttons on the Assist Remote Control
are shown as follows:
In the text, the arrows correspond to: ””.
The OK button on the remote control is shown as OK in the text.
Call up Main Menu.
Select ”required” option.
Previous menu.
Close menu.
Confirm OK.
Disc Languages
Select a language for the menu, the sound and the subtitles of the disc. If you
want to use a language other than the ”original” version of the disc, then select
it here if it is available on the disc.
Call up Main Menu.
Select option LANGUAGE.
Select option Disc Audio, Disc Subtitles or Disc
Menu .
Select required option.
Off Switch off Subtitles on Disc
Original The original language of the disc is selected.
Others Select another language (page 32).
- 16
LANGUAGE
S
Menu Language
Disc Audio
Disc Subtitle
Disc Menu
Move
X Select
English
English
Off
English
END
➠ To be able to call up the Main Menu, if necessary close other
menus first using
.
Confirm OK.
Close menu.
Page 17
Start-up
Menu Display
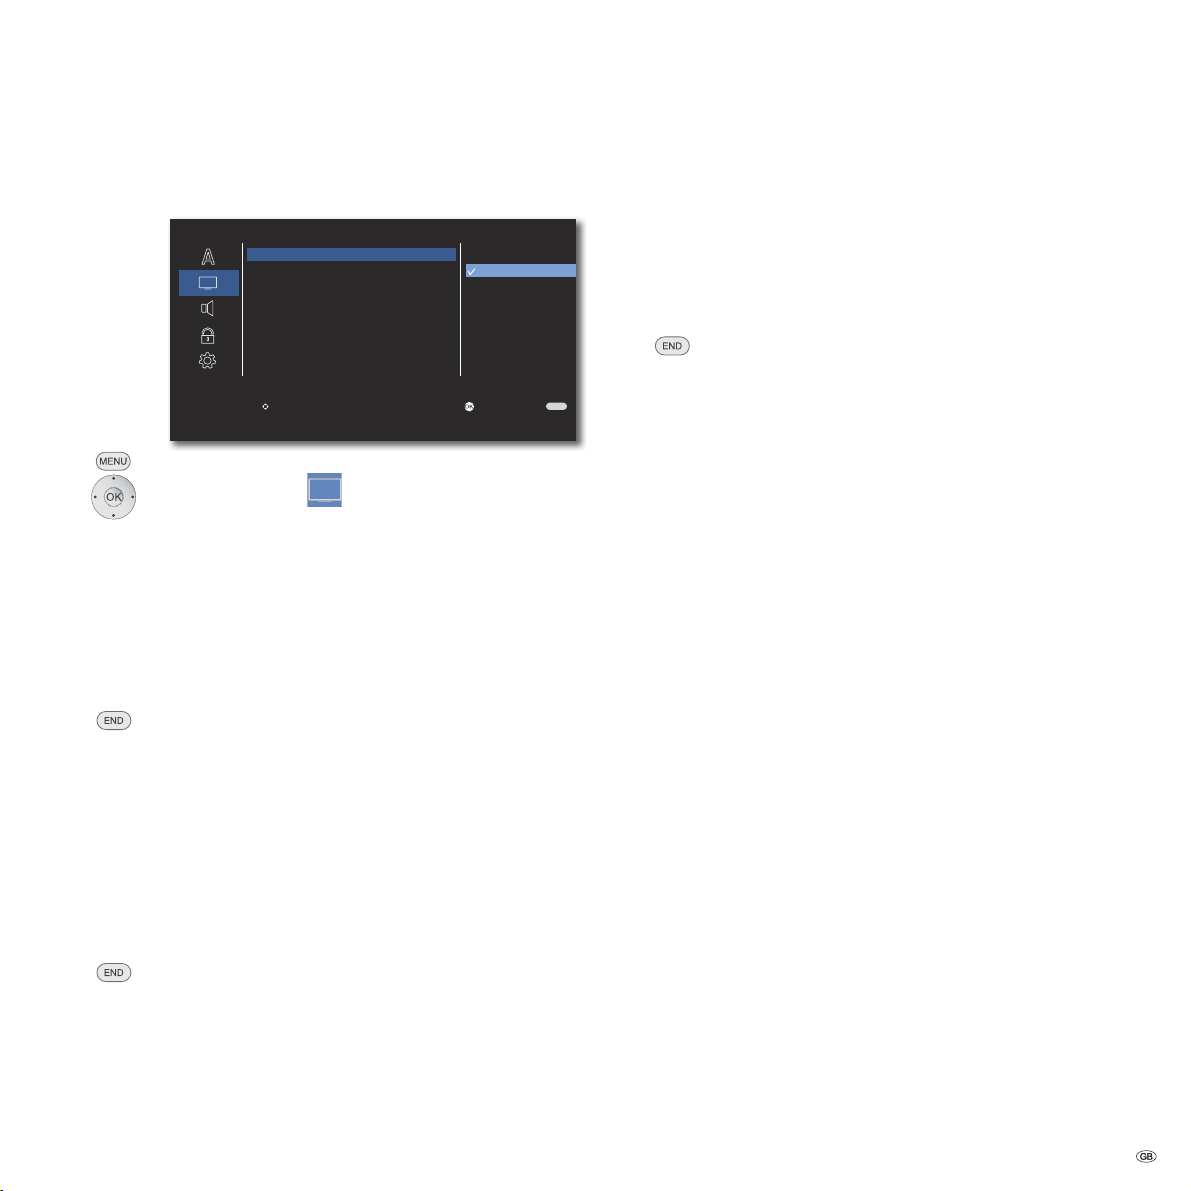
In the menu DISPLAY you can set the on-screen display of your AudioVision to
your TV set.
DISPLAY
TV Aspect
Display Mode
S
TV Output Select
W Return
Move Enter
Call up Main Menu.
Select option DISPLAY.
TV Aspect
Select option TV Aspect.
4 : 3 Select this setting if a standard TV set with the
picture format 4:3 is connected.
16 : 9 Select this setting if a wide screen TV set with
16:9 TV Aspect is connected.
Confirm OK.
Close menu.
4 : 3
16 : 9
END
TV Output Select
Select the video output signal depending on which video output
socket you use (page 11).
Select option TV Output Select.
RGB The TV set is connected to the socket EURO AV
YPbPr The TV set is connected to the OUTPUT
COMPONENT sockets
Confirm OK.
Close menu.
➠ Before changing this settings, make the necessary cable
connection so that you do not see a black screen.
➠ While using the HDMI socket this setting is not required.
Display Mode
This option is available if in the menu TV Aspect you have
selected option 4: 3.
Select option Display Mode.
Letterbox Shots in wide screen format appear with a black bar
at the top and bottom edge of the screen.
Panscan The picture fills the entire screen but if necessary cuts
off areas at both sides.
Confirm OK.
Close menu.
17 -
Page 18
Start-up
Menu Audio
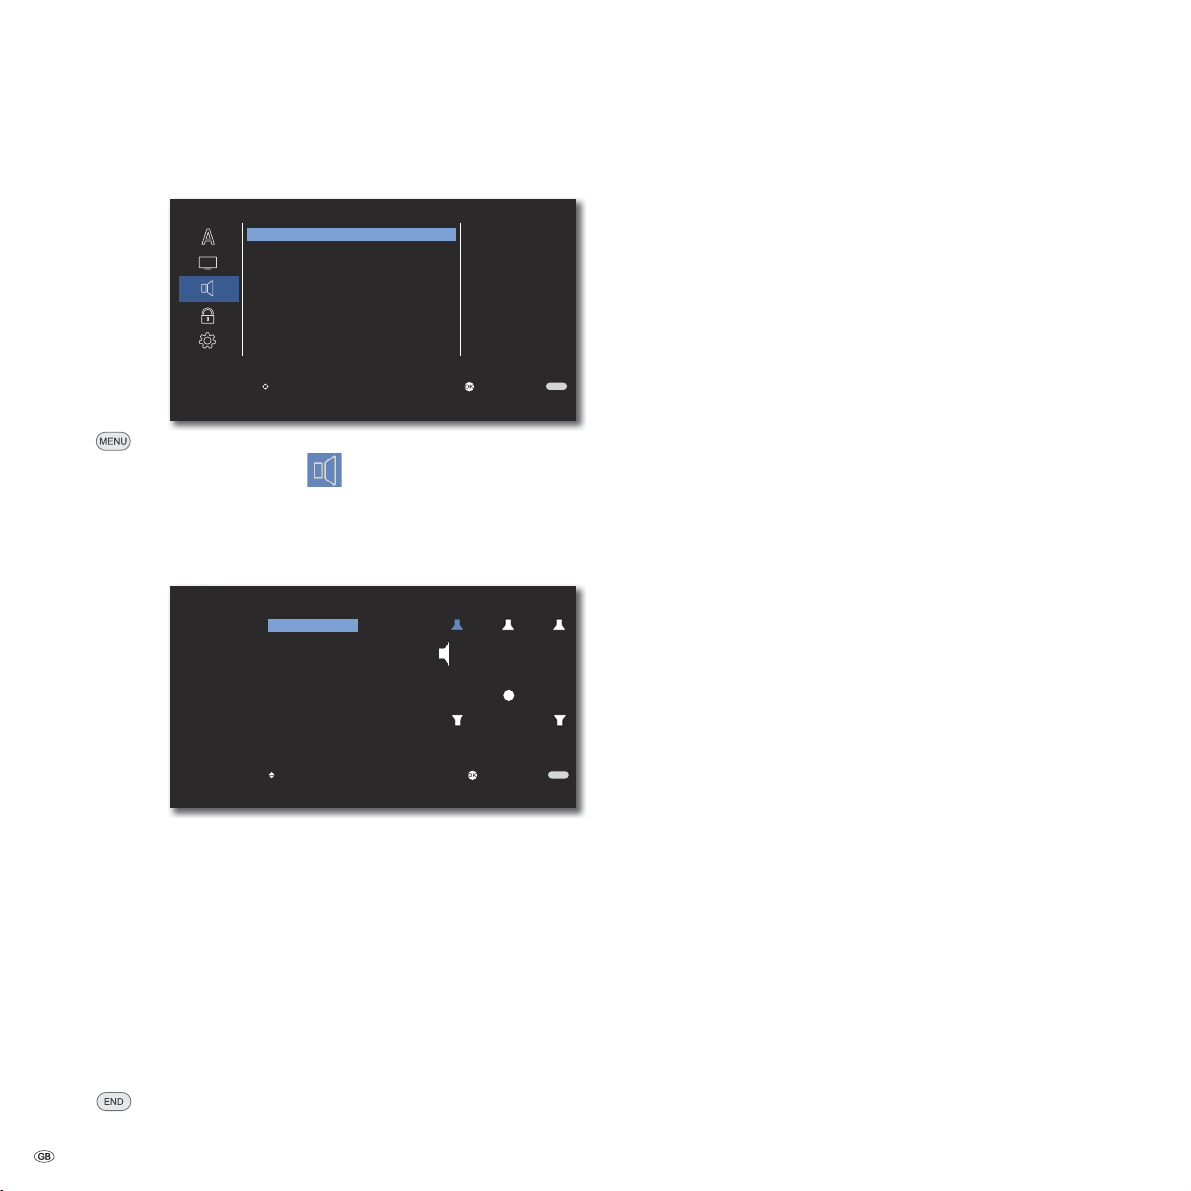
In the AUDIO menu you can make various sound settings.
AUDIO
5.1 Speaker Setup
DRC
Vocal
S
HD AV Sync
Audio Output
Preamplifier
TV input
W Prev.
Move Enter
Call up Main Menu.
Select option AUDIO.
Speaker Setup
Select this setting if you have connected an audio system directly
to the AudioVision (page 12 and page 13).
Confirm OK.
5.1 Speaker Setup
Speaker
Connection
Volume
Distance
Test
W Front L X
100Hz
0dB
3.0m
Off
Move Enter
WX Select
Select required option.
Speaker Select the speaker to be set up.
Connection Select the cut-off frequency of the connected speaker
(see technical data) or shut it Off ¾
Volume Set the volume level of the selected speaker so that
it is perceived by you in your listening position at the
same volume as the other speakers
Distance Set the distance of the speaker to your listening
position
Test Switch a test signal for the setting of the volume on/
off
Confirm OK.
Close menu.
END
END
Night Mode ( DRC)
With the setting On you can limit the dynamics (i.e., the difference between the
loudest and the softest sounds). You can therefore also play back a movie with
lower volume differences. This option is only effective if your AudioVision processes the audio signals (see preamplifier on this page).
Vocal
Switch the option Karaoke singing to On, if you want to play back a multi-channel
karaoke DVD. The karaoke channels on the disc are mixed in normal stereo sound
Audio Delay (HD AV Sync)
If you are using the HDMI socket, you can set Audio Delay (for example for lip
synchronous sound transmission).
Select a value between 0 and 300 ms (with configuration
acc. to page 12 select 100 ms).
Audio Output
You can choose which audio output (depending on the available sound format)
should be used.
COAXIAL OUT Digital sound output (Bitstream)
AUX L/R Analogue sound output stereo L/R
Preamplifier
You can use this setting to set how and where the audio signals are processed.
HDMI On Select this option, if AudioVision is to process
the audio signals (page 12) This is controlled via the
HDMI connection
On Select this option, if AudioVision is to process the
audio signals (page 13)
Off Select this option if the Loewe TV set connected is to
process the audio signals (page 11)
TV Input
You can determine the TV sound input on the AudioVision, which is used in the
option Preamplifier: HDMI on.
TV In Select this option if the sound signal is fed into the
COAXIAL IN socket
Line In1 Select this option if the sound signal is fed into the
INPUT AUX R/L socket
EURO AV Select this option if the sound signal is fed into the
EURO AV socket
¾ If the audio signals are channelled through AudioVision (page 12) and centre
channel through the TV set, please select the setting Connection: TV (100Hz).
- 18
Page 19
Start-up
LOCK Menu
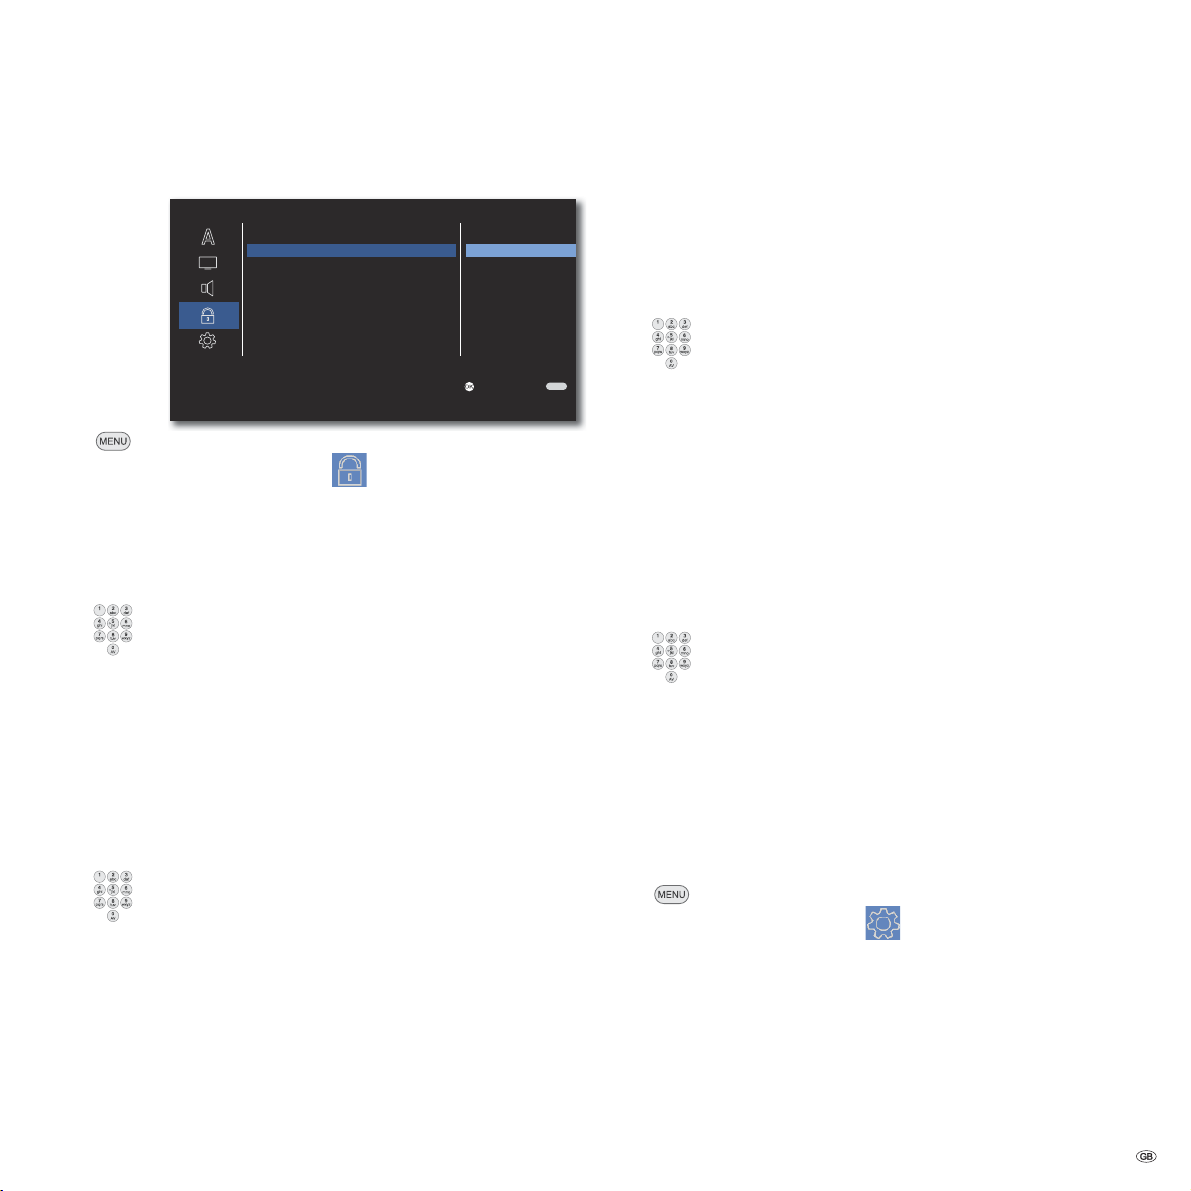
In the LOCK menu you can set playback limitations.
LOCK
Rating
Password
Area Code
S
W Prev.
Call up Main Menu.
Select the option LOCK.
Setting up a Password
First of all you have to set up a personal Password.
Select option Password.
Select option New.
Confirm OK.
Enter a four digit password using numeric keypad.
Confirm OK.
Checking password entry.
Confirm OK.
➠ If entry is incorrect, before pressing OK, press repeatedly
to cancel the numbers.
Change Password
Select option Password.
Select option Change.
Confirm OK.
Use number buttons to enter the current four-digit Password.
Confirm OK.
Use number buttons to enter the new four-digit Password.
Confirm OK.
Checking password entry.
Confirm OK.
New
Enter
➠ If you have forgotten the password, you can reset it. Remove all media (discs,
USB, iPod) and close all menus. Open the main menu with MENU. Enter the
key number (page 31) and press OK. The password is now reset.
Rating
This function limits playback of DVDs that have an adult rating, providing the discs
have a corresponding code. For full playback you are asked to enter the password.
Select option Rating.
Press button.
Use number buttons to enter the current four-digit Password.
END
Confirm OK.
Select required option.
Unlock The disc is played completely
Rating 1 to 8 Only the scenes of the disc inserted are played which
comply with the assigned security level or with a
security level below this. Level ”1” has the most
playback restrictions.
Area Code
To use playback limitations of the discs, enter the Area Code of the respective
country (list see page 32).
Select option Area Code.
Press button.
Use number buttons to enter the current four-digit Password.
Confirm OK.
Set the first letter.
Confirm OK.
Set the second letter.
Confirm OK.
DivX Registration Code
You receive the DivX® VOD (Video On Demand) registration recognition to borrow
and buy movies using the DivX® VOD service.
Call up Main Menu.
Select option OTHERS.
Press button.
Confirm OK.
The registration code valid for your device is shown. You will find
further information at: www.divx.com/vod.
19 -
Page 20
Playback of DVD and CD
System Conditions
If you have carried out the relevant steps as described in Chapters ”Setup”, ” Connect” and ”Start-up” switch your AudioVision and devices connected to it on.
Depending on which device configuration you are using (see page 11 to page 13),
set the device buttons and sound functions on the Assist remote control as de-
scribed on page 14. If you use the integrated network configuration as described
on page 11, the Loewe TV set will process the sound and sound functions of the
Assist remote control do not have to be changed. With a configuration as described
on page 12 and page 13, it is necessary to change the sound functions on the
Assist remote control as described on page 14.
Playable Discs
Only use discs that conform with conventional standards. This can be ascertained
from the logos applied.
Disc Type
DVD
Video
* only nalised discs
Regional Code
This Player can only play back DVDs for Region ”2” or ”All”.
The regional code on the labels of many DVDs shows which type of DVD player
can play back these discs. On some DVD discs, the label with the regional code is
missing, even though the disc can not be played back in all regions.
Symbols in these operating instructions
DVD ALL All DVD discs
DVD-V DVD Video Disc
CD Audio CD
DivX DivX/Xvid files
MP3 MP3 files
WMA WMA files
JPEG JPEG files
Radio Radio operation
Regional Code
2 / ALL
DVD±RW/DVD±R *
Audio CD *
CD-RW/CD-R *
Recording
Format
Video
Mode
Video
Mode
Audio CD
(CD-DA)
Audio CD
(CD-DA)
Contents Disc Size
Audio + Video
(Movie)
Audio + Video
(Movie)
Audio
Audio
12 cm
12 cm
12 cm
(5”)
(5”)
(5”)
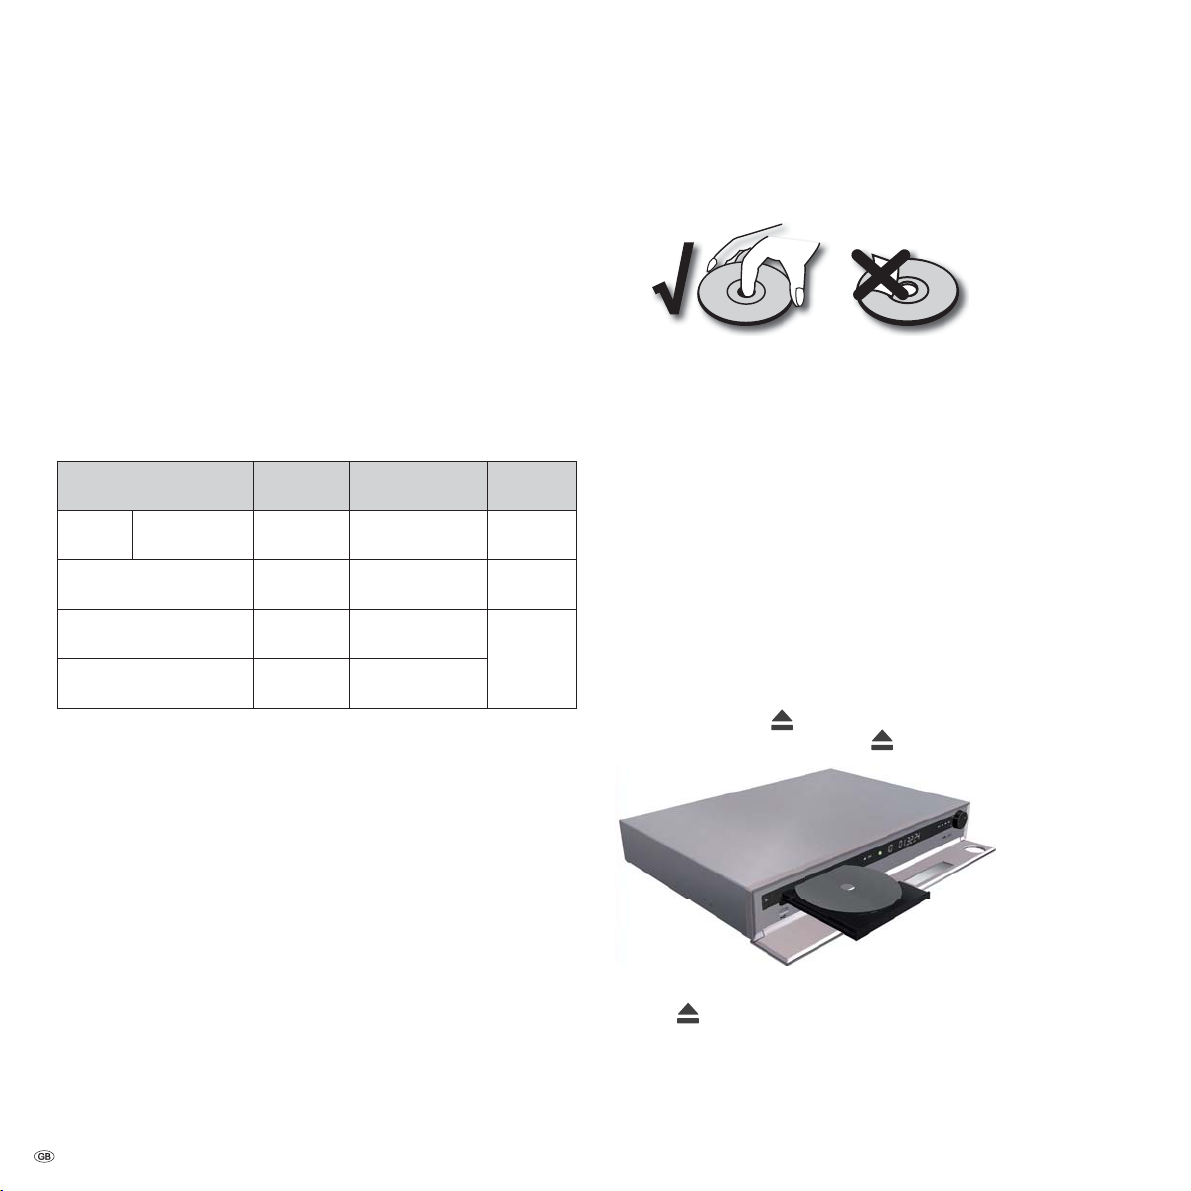
Handling Discs
Do not touch the recorded side of the disc. Hold the disc by the edges to avoid
touching the surface with your fingers. Do not apply any paper or sticky tape to
either side of the disc.
➠ DVD-R/RW, DVD+R/RW- and CD-R/RW discs written with a PC or a DVD or
CD Recorder can not be played back if the disc is damages or dirty or the
lens of the player is covered with condensation.
➠ If you write a disc with a PC, it may not be possible to play back the disc,
even though its format is compatible, possibly because of the settings in the
application software used to burn it. (You can get further information on this
from the software provider).
➠ Depending on the recording device or the CD-R/RW- (or DVD±R/±RW-) disc
itself, some CD-R/RW- (or DVD±R/±RW) discs can not be played back with
this device.
➠ Do not use any unusually shaped CDs (e.g. heart-shaped or octagonal).
Otherwise malfunction or damage can not be ruled out.
➠ Fingerprints and scratches on the disc can impair playback. Take care of the
discs.
Inserting Discs
The disc drawer of your AudioVision is behind the front flap. To open the disc
drawer, press the button
side of the disc faces upwards. Press the button again to close the disc drawer.
Ejecting the Disc
Press the
button again to remove the disc.
on the device. Insert the disc in this drawer. The printed
- 20
Page 21
Playback of Video DVD and Audio CD
Playback in General
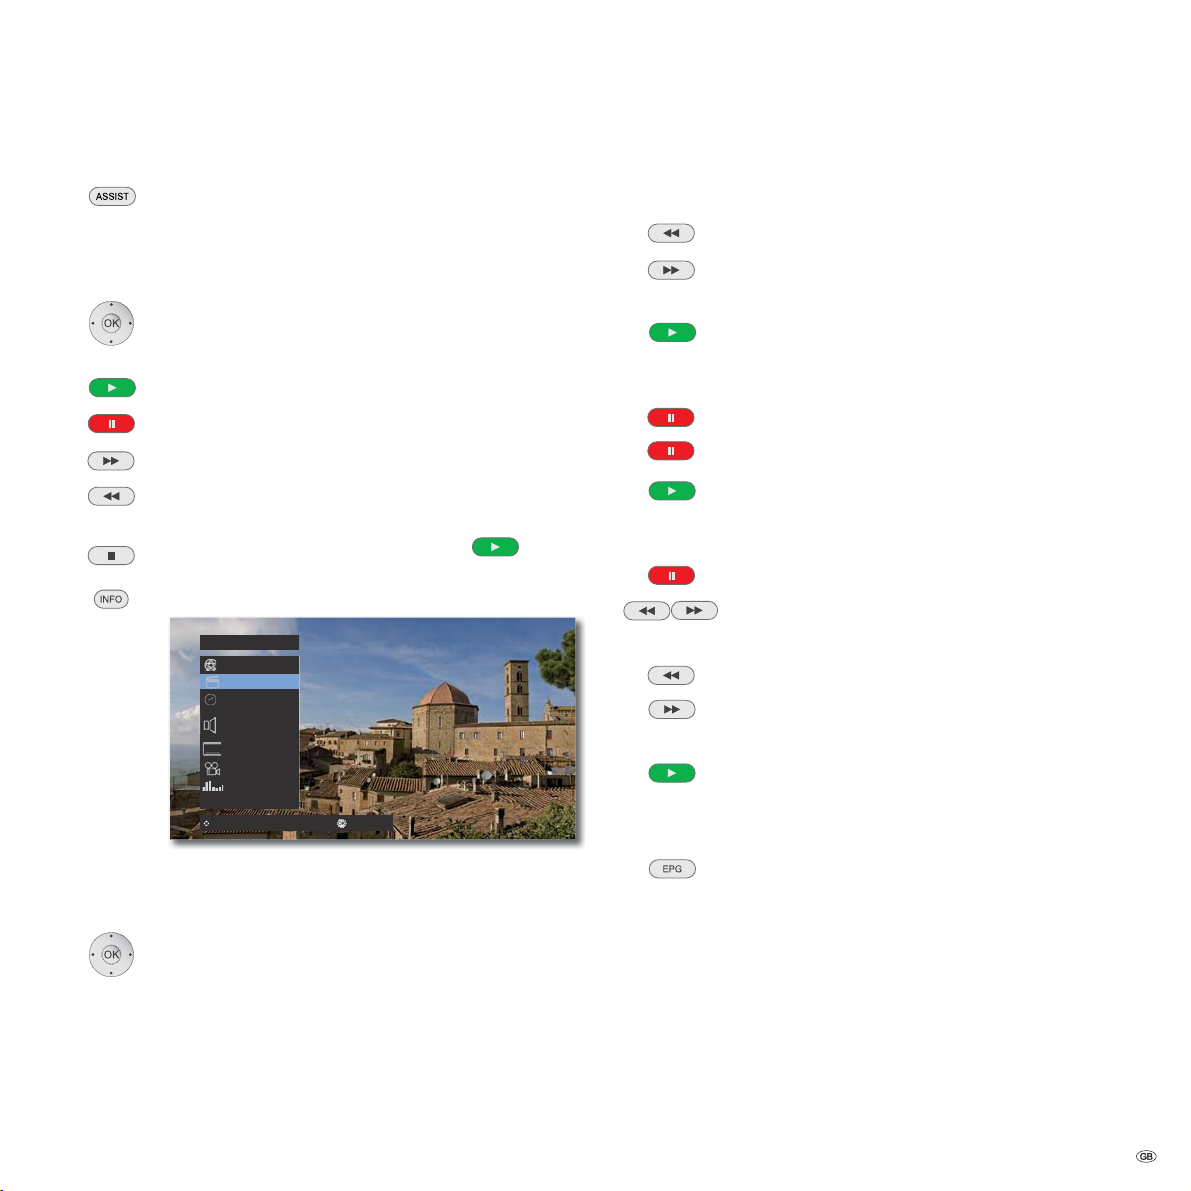
Press several times until DVD / CD appears in the display.
AudioVision tries to read the disc. The Display shows Reading.
Depending on the medium, playback starts automatically or a
disc menu is displayed. Follow the instructions on the screen or
follow the documentation with the disc.
Select title
OK Start playback.
Play Start / continue playback.
Pause Stop playback.
Fast Forward By repeatedly pressing, increase the fast forwards
speed.
Rewind By repeatedly pressing, increase the rewind speed.
Stop 1x stop playback, can be continued with . 2x end
playback.
Show DVD title menu.
Chapter
W1/12 X
00:01:24
2/0CH
Search
DVD-V DivX CD
Select the search direction and speed:
Press several times for quick search rewind.
Press several times for quick search forwards.
Speed and direction are indicated as arrows.
Close search mode and continue playback.
Freeze Frame and Frame by Frame Playback
DVD-V DivX
Pause Stop playback .
Press Pause again: Scroll forwards frame by frame.
Continue playback
Slow motion
DVD-V
Pause: Stop playback.
Switch on slow-motion mode during Pause.
Select the slow-motion direction and speed:
1/8
1
MP3
OFF
1/4
POP
1/16, 1/8, 1/4, 1/2 (rewind).
1/16, 1/8, 1/4, 1/2 (forwards).
Slow-motion speed and direction are shown.
Close Slow-motion mode and continue playback.
Move Enter0-9 Input
In the title menu you can - providing the DVD currently being
played back supports this - set a selection of options, such as
Title / Chapter selection or Subtitles.
Select option.
Set option.
Confirm with OK.
➠ If the parental control rating for the disc is higher the movie rating, then the
four-digit password has to be entered (refer to Rating on page 19).
Repeat
DVD-V CD MP3 DivX
Select type of repeat.
Random Random sequence of playback
Chapter Repeats the current Chapter
Title Repeats the current Title
Track Repeats the current Track
All Repeats all titles/tracks on the disc
-- No Repeat
21 -
Page 22
Playback of Video DVD and Audio CD
Disc Playback
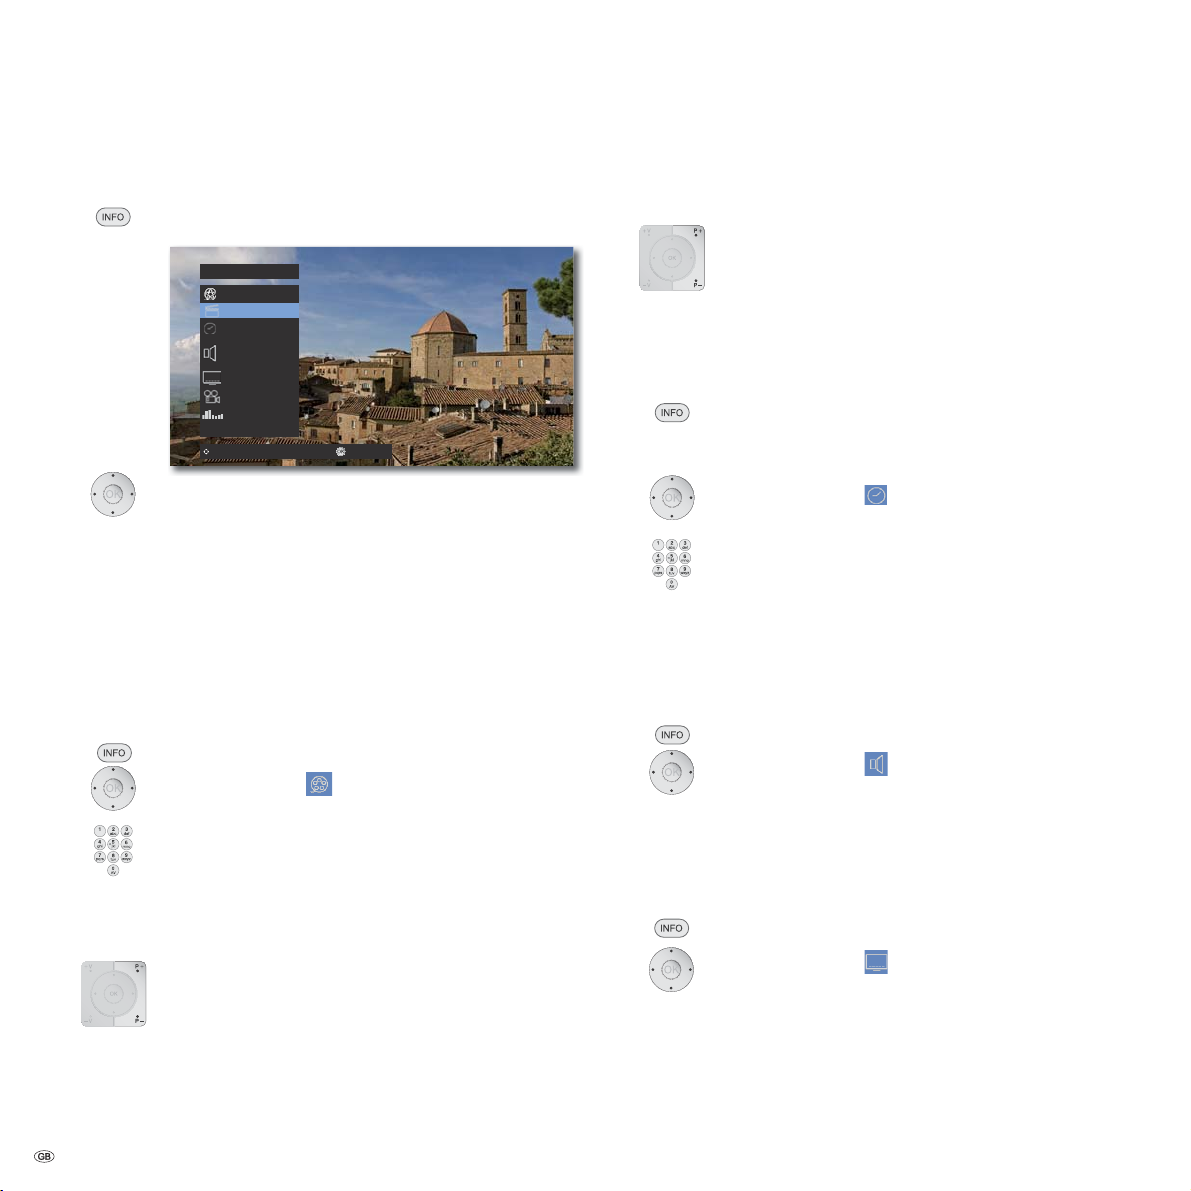
You can display various information on the screen about the disc that is inserted.
Call up the DVD title menu during the playback.
Chapter
1/8
W1/12 X
00:01:24
1
MP3
2/0CH
OFF
1/4
POP
Move Enter0-9 Input
Select the desired function.
Title Current title (or track number)/Total number of titles
Chapter Current Chapter number/Total number of Chapters
Time Play time that has elapsed, got to time with OK
Audio
Subtitle Selected Subtitles
Angle Selected view / Total number of views
Sound Selected sound mode (page 23)
Selecting a Title
DVD-V DivX
Selecting a Title
CD DivX MP3 JPEG iPod
Selected sound formats, film language and audio channels
Show DVD title menu.
Select symbol .
Select title number.
OK Start playback.
P+ during playback, to select the next title/ next photo or P- to
return to the beginning of the current title.
Press P- twice briefly to return to the previous title.
Select Chapter / Track
DVD-ALL
If a title has several Chapters/Tracks, you can select another
Chapter/ another Track as follows:
P+ or P- during playback, to select the next Chapter/ the next
Track or to return to the beginning of the current Chapter/Track.
Press P- twice briefly to return to the previous Chapter/Track.
Time (playback from ...)
DVD-V DivX
The function Time allows you to select any time for playback of a title.
Show DVD Title menu DVD-V.
In the field Time you are shown the elapsed playback time of
the current disc.
Select symbol
.
Enter the time in the format hh:mm:ss.
OK Start playback from a time you have entered.
Digital Sound Formats, Film Language and Audio
Channels
DVD-V DivX
Here you can select the digital sound format in connection with the film language.
Show DVD title menu.
Select symbol .
Select another film language resp. sound format (DVD-V
DivX) - if available.
Subtitles
DVD-V DivX
Show DVD title menu.
Select symbol .
Select the required subtitle language - if available.
- 22
Page 23
Playback of Video DVD and Audio CD
Angle
DVD-V
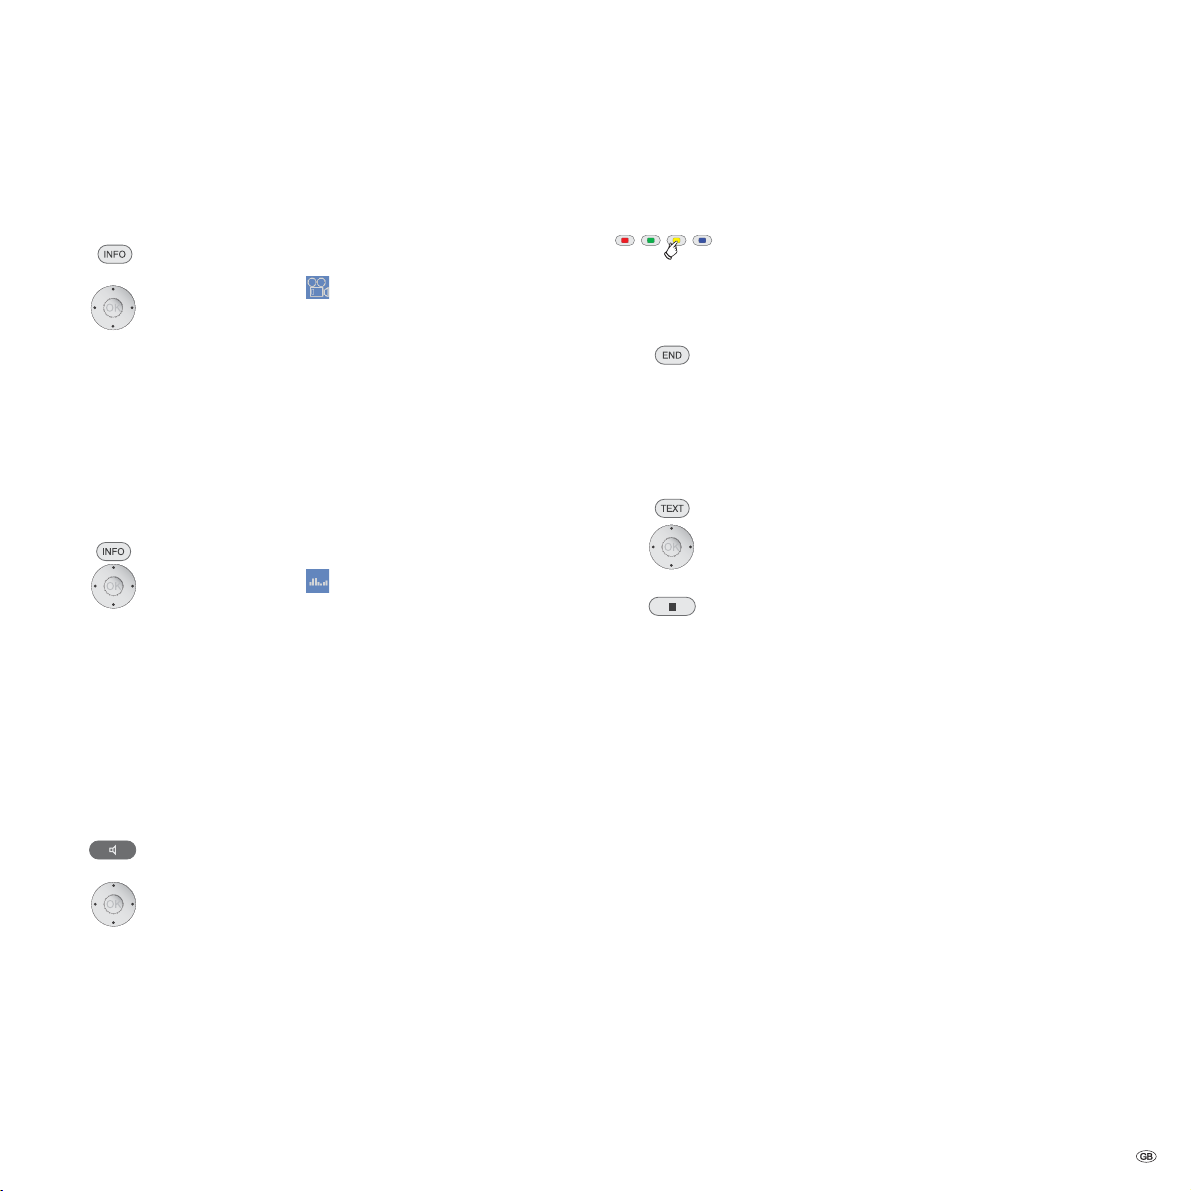
If the DVD includes scene which have been recorded from different angles, you
can change to a different camera angle during playback.
Show DVD title menu.
Select symbol .
Select required camera angle - if available. The number
of the current camera angle is shown.
➠ An angle mark symbol is shown on the screen during scenes
which have been recorded from different camera angles.
Sound mode (Sound)
DVD-V DivX MP3 Radio
AudioVision has a number of preset Surround Sound effects. The entries for the
equaliser shown on the display can vary depending on the sound sources and
effects.
Show DVD title menu.
Select symbol .
Select required option.
Normal sound without equaliser effects
CUSTOM Personal tone setting
Further sound effects are possible depending on the media type
that is played back.
Individual Sound Settings
DVD-V DivX MP3 Radio
You can set bass and treble and other sound effects.
Press several times until on the display of the AudioVision the
term CUSTOM appears.
Select required option .
Zoom
DVD-V
With the Zoom function you can increase the size of the video image and then
navigate within the zoomed in picture during playback.
Confirm several times during Playback/Freeze Frame.
Zoom stages: 100% (normal size), 400%, 1600%, scale image
vertically.
Select picture detail/scaling.
Close zoom window.
➠ The zoom function may not work on certain DVDs.
Disc Menu
DVD-V
Video DVDs usually have their own menus.
Go to Disc Menu.
Select required option.
Confirm with OK.
Close Disc Menu DVD.
Saving the last Disc Settings
DVD-V
AudioVision remembers the last scene shown on the last disc (Bought Video-DVD).
The position of the last scene is saved in the memory even if the disc is removed
from the device or the device is switched off (or respectively to standby). When this
disc is inserted again, the saved scene is automatically played back.
BASS Set bass
TREB Set treble
NIGHTMOD Switch night mode (page 18) on/off
Make required setting.
23 -
Page 24
Playback of Media Files
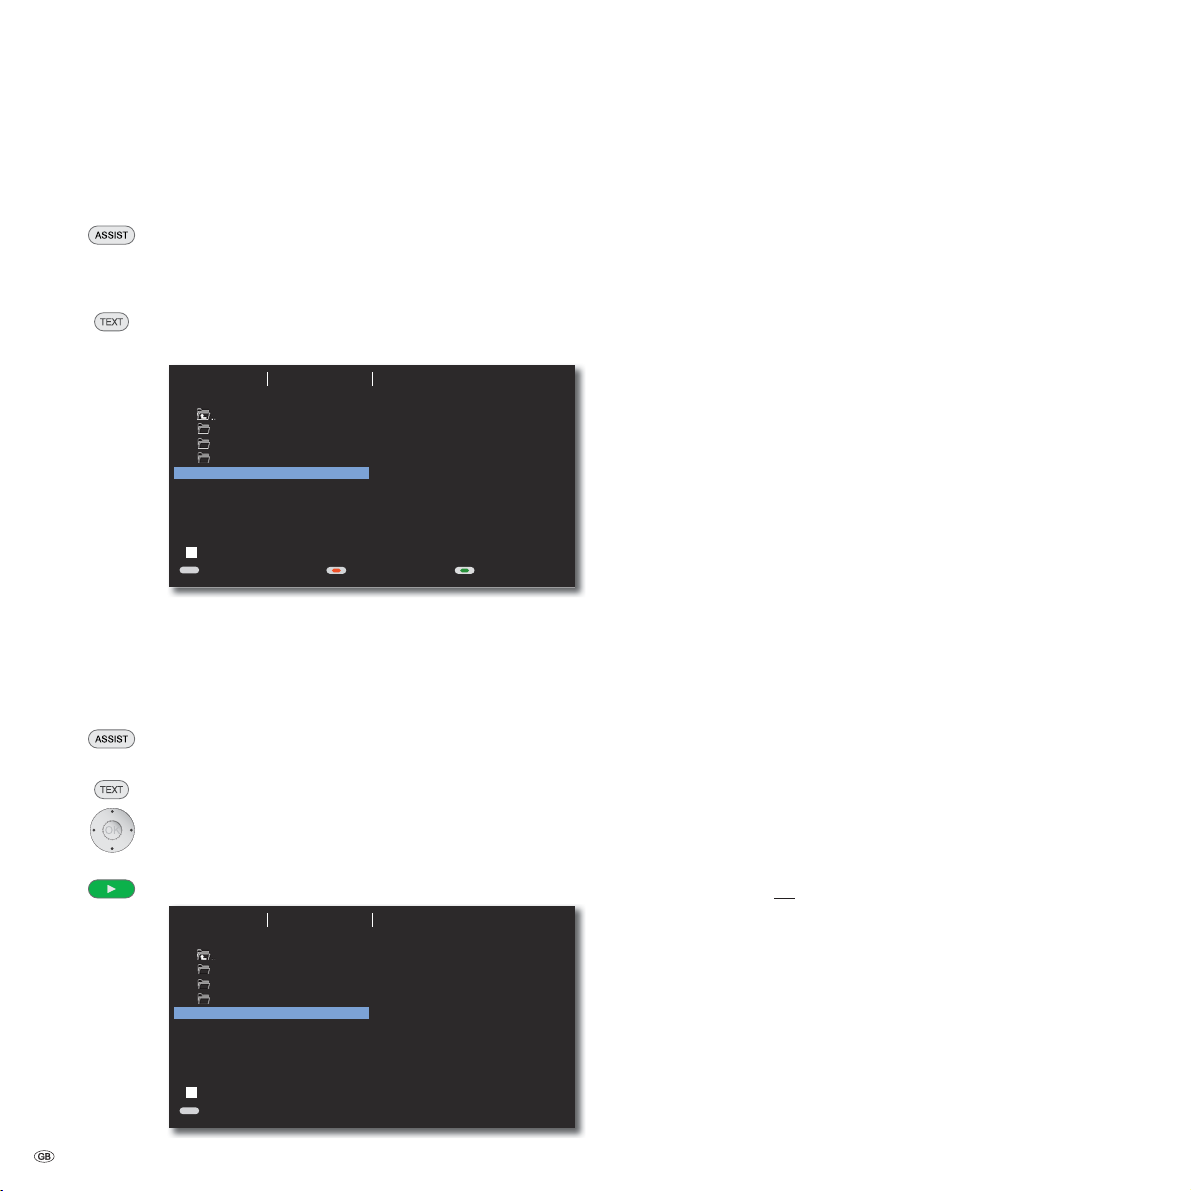
With your AudioVision you can play back the digital media files saved on discs
or USB sticks.
Select operating mode
Press several times until the display of the AudioVision shows
DVD / CD or USB.
Select Media Type
Press several times to select the required operating mode Music,
Photo or Movie .
Music Photo Movie
USB
Folder 1
Folder 2
Folder 3
01-Title1.mp3
02-Title2.mp3
03-Title3.mp3
04-Title4.mp3
05-Title5.mp3
0:00:00 1/8
TEXT
Play List
AddScreen off/onPhoto/Movie
➠ For how to control playback of media files, see Chapter ”Playback in General”
(page 21).
Video Files
Playback of Video Files
Press several times until the display of the AudioVision shows
DVD / CD or USB.
Press several times to select Movie.
Select file or folder. Press and hold to scroll through.
OK Start playback or change to folder.
Play Start / continue playback.
Music Photo Movie
List
USB
Folder 1
Folder 2
Folder 3
01-Movie1.avi
01-Movie1.avi
01-Movie1.avi
01-Movie1.avi
01-Movie1.avi
0:00:00 1/8
TEXT
Photo/Movie
DivX Subtitle
Select the Subtitles as described on page 22.
Conditions for video files
• The maximum image resolution of the DivX file is smaller or equal to 720 x
576 (W x H) pixels.
• The file name of the DivX file is a maximum of 45 characters long.
• Characters in DivX file names that can not be shown are displayed as ”_”.
• Maximum refresh rate 30 images per second.
• If the sound and video track are not synchronous, either sound or video is
played.
• Valid DivX file endings for videos are: ”.avi”, ”.divx”, ”mpg”, ”.mpeg”.
• Subtitle formats that can be played back: SubRip(*.srt/*.txt),
SAMI(*.smi), SubStation Alpha(*.ssa/*.txt), MicroDVD(*.sub/*.txt),
SubViewer 2.0(*.sub/*.txt).
• Video Codecs that can be played back: ”DivX3.xx”, ”DivX4.xx”,
”DivX5.xx”, ”MP4V3”, ”3IVX”.
• Audio Codecs that can be played back ”Dolby Digital” (AC3),
”PCM”, ”MP3”, ”DTS (only at DIGITAL OUT)”, ”WMA”.
• MP3 Bit rates: 32 - 320 kbps.
• WMA Bit rates: 40 - 192 kbps.
• Discs, that have been formatted with the Live File System can not be played
back on this device.
• If the video file and the subtitle file have different file names, then while playing
back a DivX file, it is possible that no subtitles are shown.
• It is possible that DivX files that deviate from the DivX specification may not
able to be played back.
USB Operation
• You can connect a commercially available MP3 Player with its own power
supply or a USB stick directly to the USB socket.
• The standard USB 1.1 and 2.0 is supported.
• The USB device may not be disconnected during a file transfer.
• Only the file systems FAT16 and FAT32 are supported.
• The maximum number of files is 1000. The search run can take more than
1 minute.
• Devices that require an additional software installation to be connected to a
computer are not supported.
• Other connection options than the USB connections mentioned above are
not supported.
- 24
Page 25
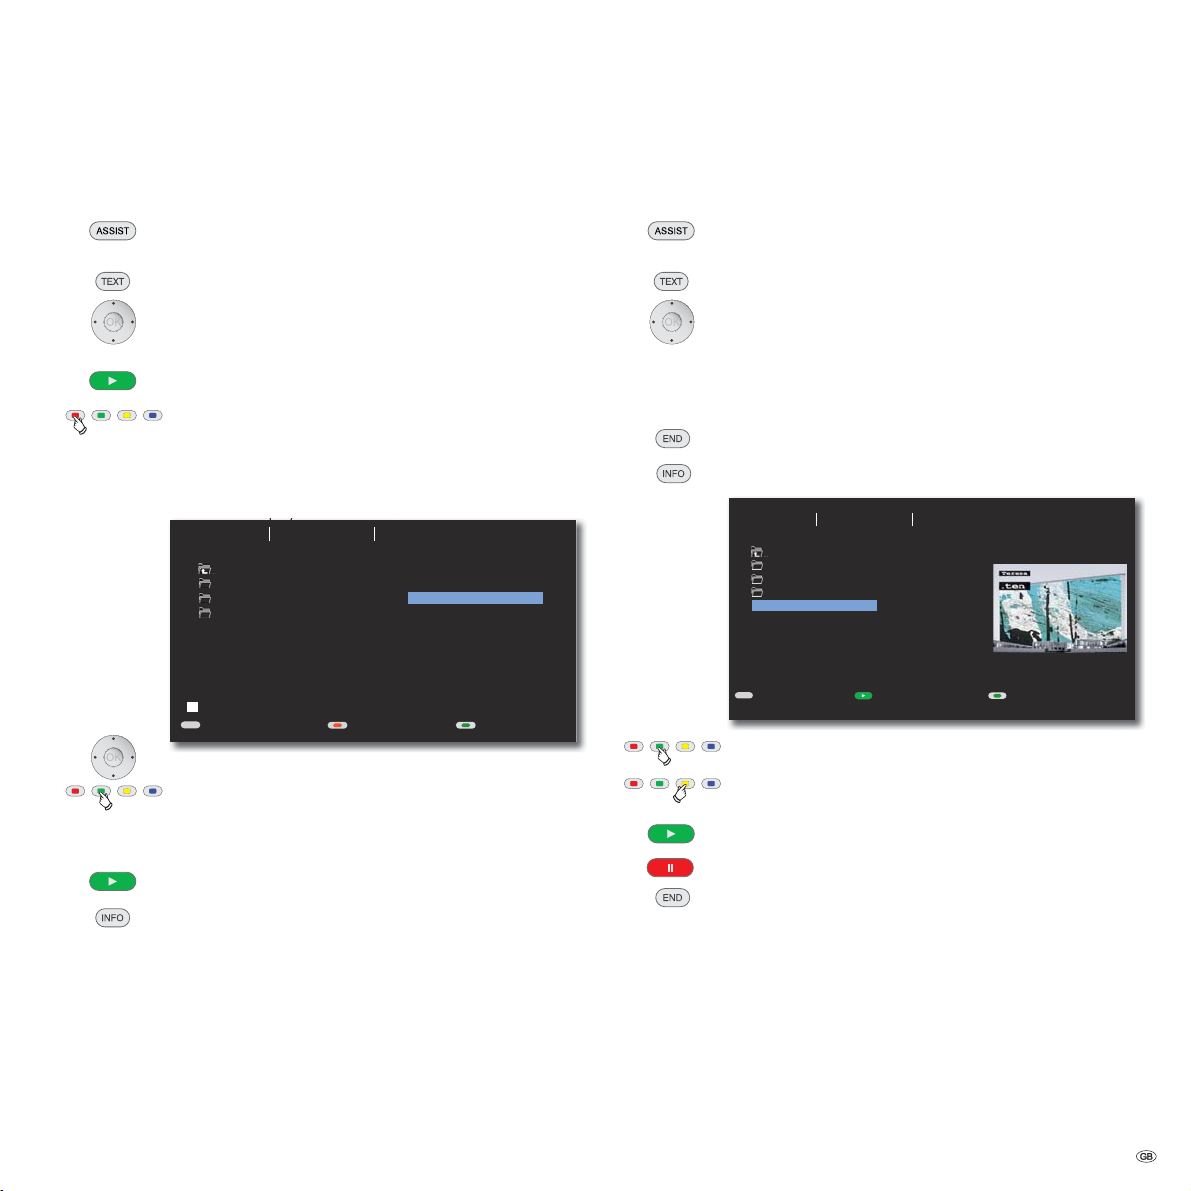
Playback of Media Files
py
Audio Files
Playback of Audio Files
Press several times until the display of the AudioVision shows
DVD / CD or USB.
Press several times to select Music.
Select file or folder.
OK Start playback or change to folder.
Play Start / continue playback.
Red button Switch screen on/off
Playlist
CD MP3 WMA
You can play back up to 30 Titles/Track on one disc or a storage medium in a
sequence you have chosen. The playlist is not saved.
Conditions for Audio files
• Sampling Frequency: 32 - 48 kHz (MP3), 32 - 48 kHz (WMA).
• Bit rate: 32 - 320kbps (MP3), 40 - 192kbps (WMA).
• Number of Files: Maximum 999.
• File extensions: ”.mp3” / ”.wma”.
Music Photo Movie
USB
01-Title1.mp3
02-Title2.mp3
03-Title3.mp3
04-Title4.mp3
05-Title5.mp3
0:00:00 1/8
TEXT
Folder 1
Folder 2
Folder 3
Play List
01-Title1.mp3
03-Title3.mp3
05-Title5.mp3
DeleteScreen off/onPhoto/Movie
Select Title/Track in the left column List.
Green button Add selected title/track to the Playlist.
Move selection bar in the right column Playlist to
the first entry.
Play Start / continue playback.
Press several times to display the file information saved in the
MP3 file (Metadata/Tags).
Photo Files
Display of photo files
Press several times until the display of the AudioVision shows
DVD / CD or USB.
Press several times to select Photo.
Select file or folder. Press and hold to scroll through.
OK Start photo display or change to folder.
Move to previous / next picture.
Rotate picture left / right by 90°.
End photo display.
Hide/Show operating options.
Music Photo Movie
USB
Folder 1
Folder 2
Folder 3
Picture1.jpg
Picture2.jpg
Picture3.jpg
Picture4.jpg
Picture5.jpg
Picture1.jpg
TEXT
Green button Set up the speed of the slide show 3/5/8 sec.
Yellow button Zoom mode setup. Move with the
image section.
Play Start the slide show.
Pause Stop/Continue the slide show.
End the slide show.
Conditions for photo files
• Max. pixel width: 2760 x 2048 pixels
• Number of Files: Maximum 999.
• File extensions: ”.jpg”
S
X Slide Show
Preview
1024X768 1/54
Time: 3secMovie/Music
25 -
Page 26
Playback from iPod
You can connect your iPod to the AudioVision and enjoy your music in high quality.
To do so, used the iPod cable supplied.
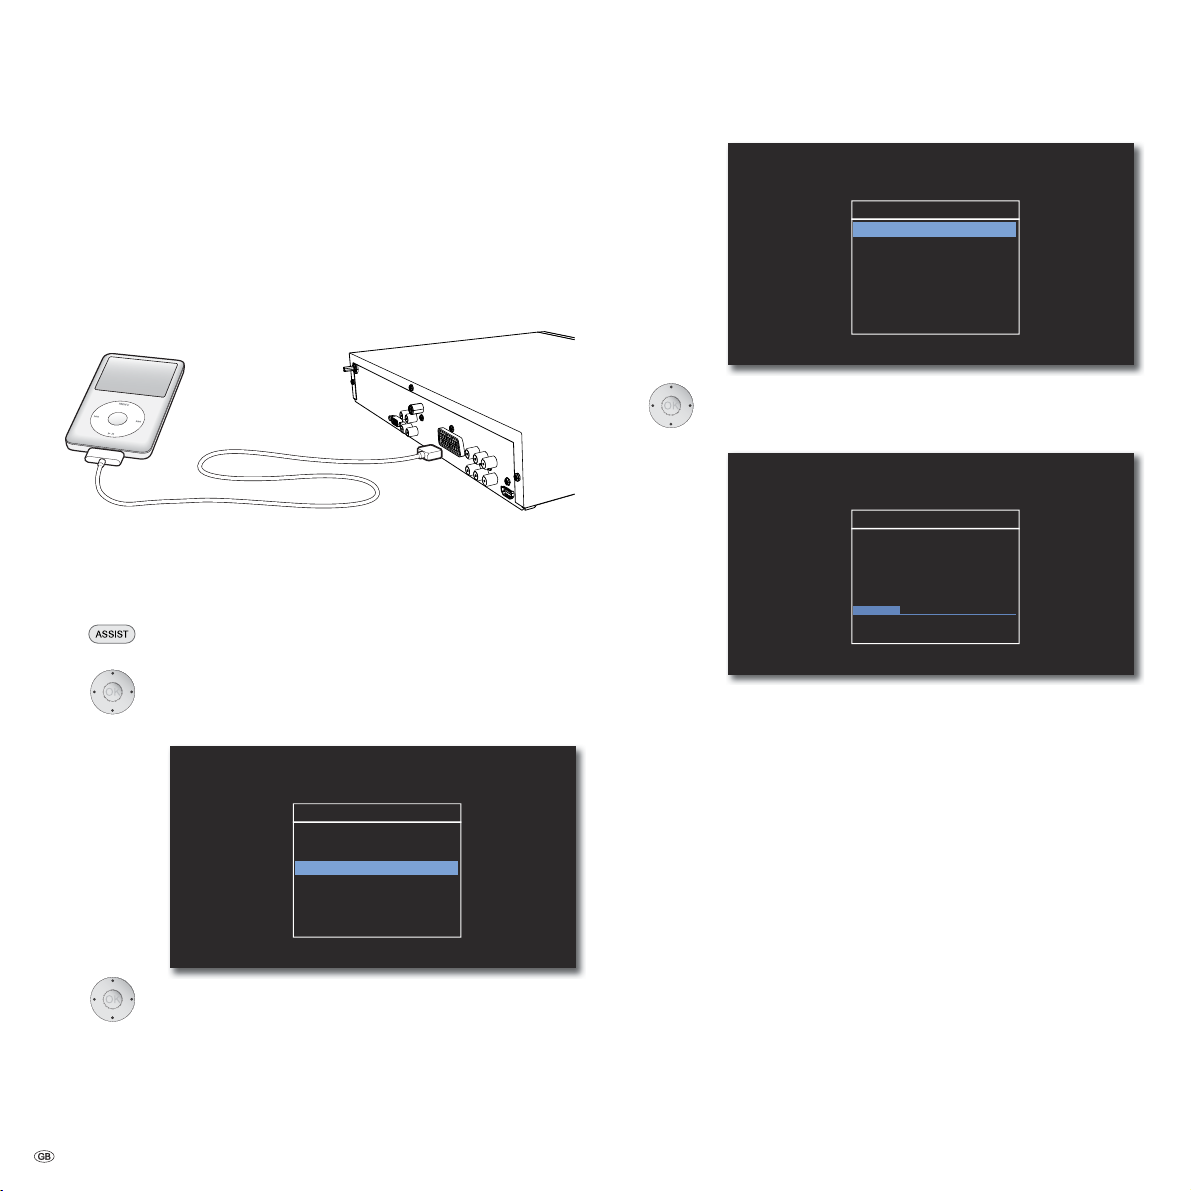
Connecting iPod
Make the connection between your iPod and the AudioVision (page 13) by plugging the contact pin of the iPod cable into the iPod (24pin) socket on the back of
your AudioVision (page 6). The arrow on the plug points upwards. Plug the other
end of the iPod cable into the dock connection on the iPod.
iPod Operation
Switch your iPod on.
Press several times until IPOD appears in the display of the
AudioVision.
Select required option, e.g. Albums.
Confirm with OK.
II IPOD
Playlists
Artists
Albums
Genres
Songs
Composers
Select required Album.
Confirm with OK.
S
II Albums
Album 1
Album 2
Album 3
Album 4
Album 5
Album 6
S
Select required Title.
Confirm with OK.
X Now Playing
01/15
Title
Artist
Album
00:30
04:12
Previous menu.
➠ For how to control functions in iPod operation, see Chapter ”Playback in Gen-
eral” (page 21).
Information for iPod operation
• Depending on the software version, it is possible that your iPod can not be
operated using the system. We recommend that you update the software of
your iPod to the newest version.
• The compatibility of your iPod can vary depending on the model.
• Depending on the iPod, disruptions may occur.
• Please make sure that when using and handling the iPod in the dock, do not
use too much force to prevent damage to the sensitive plug connections.
• The MENU has no function in iPod operation.
- 26
Page 27
FM Radio
You can receive FM radio stations with your AudioVision. The device can save up
to 40 stations. If the station transmits additional information via RDS, it can be
seen on the display of the AudioVision.
Radio Setup
Connect the AudioVision via the ANTENNA FM socket (page 6) and the antenna
cable supplied with the FM antenna socket (page 11).
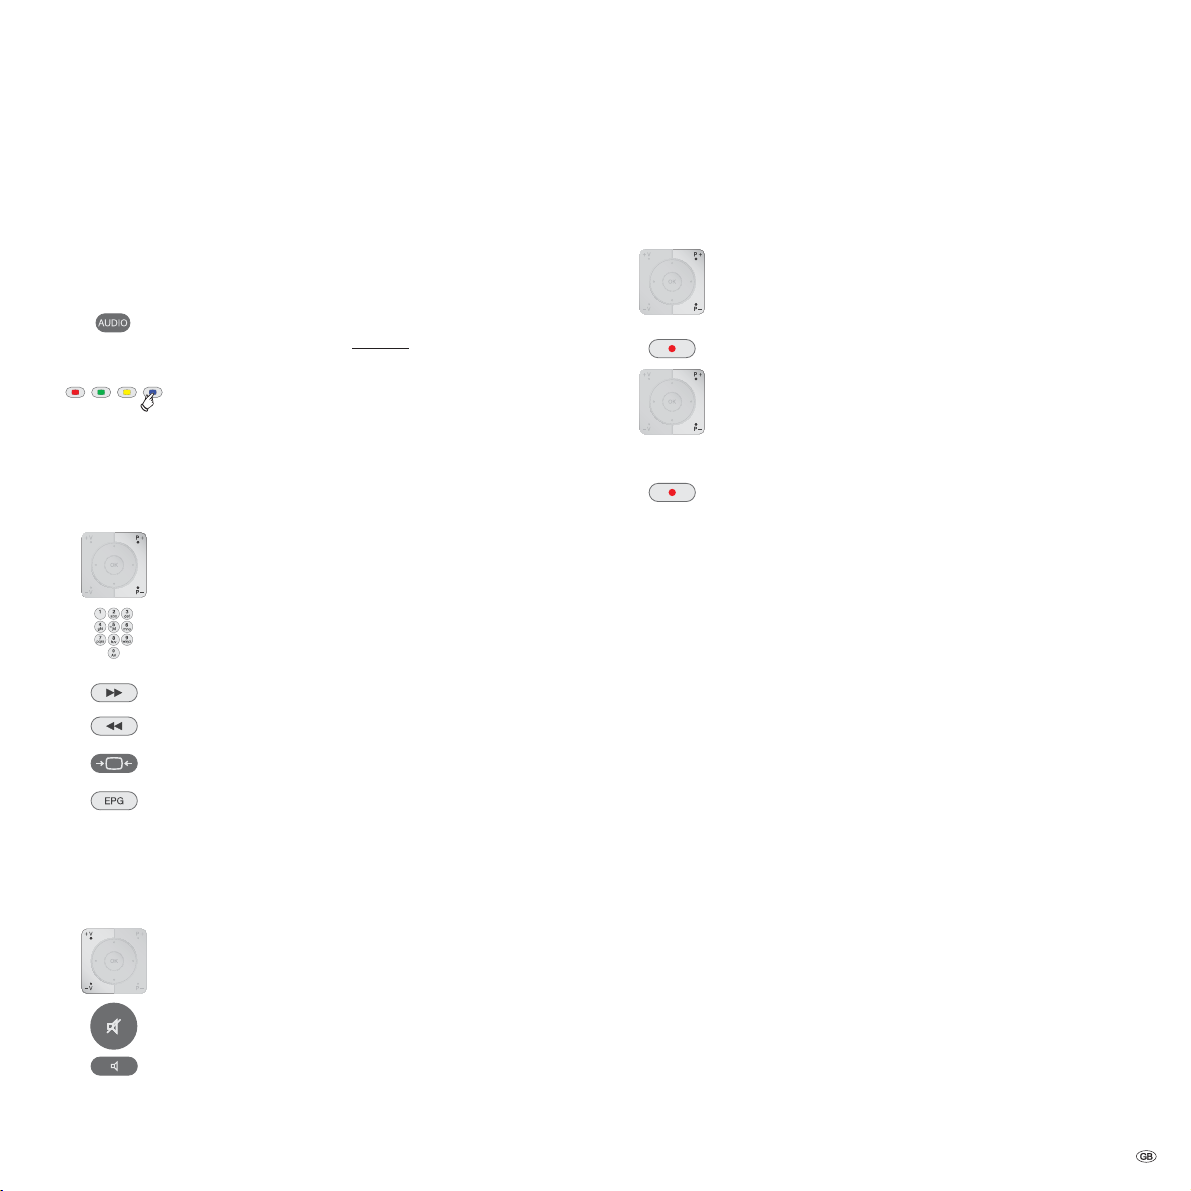
Set the remote control for AudioVision FM radio operation by
pressing the AUDIO button and hold.
Press the blue button for > 5 sec.: Automatic station search is
started.
Your AudioVision searches the entire transmission range for
receivable stations and saves them in the station list. This process takes some time.
Radio Operation
P+ / P- Select station up/down.
Enter the two digit station number.
Short: Fine-tuning forwards; Long: Search run forwards
Short: Fine-tuning down; Long: Search run down
Sort List of Radio Channels
You can change the order of the list of stations at any time. For example, you can
put your favourite station at 1st position. Please note however that the station
that was in 1st position will then be overwritten.
P+ / P- Select required station number.
Press button: The display flashes.
P+ / P- Select the new required station number.
Press button: The selected station is saved.
➠ If required, save the station in another storage space, before
overwriting it.
➠ FM radio cannot be used if there is a concealed installation
(see page 15).
Select Mono/Stereo.
Press several times: Select RDS display.
PS Station name
PTY Type of programme
RT Text messages
CT Station time
V+ / V- Volume up / down.
Sound on / off.
Select sound mode (processing of audio signals via the AudioVi-
sion) - see page 18 and page 23.
27 -
Page 28
Other Functions
Environment
Sleep Timer
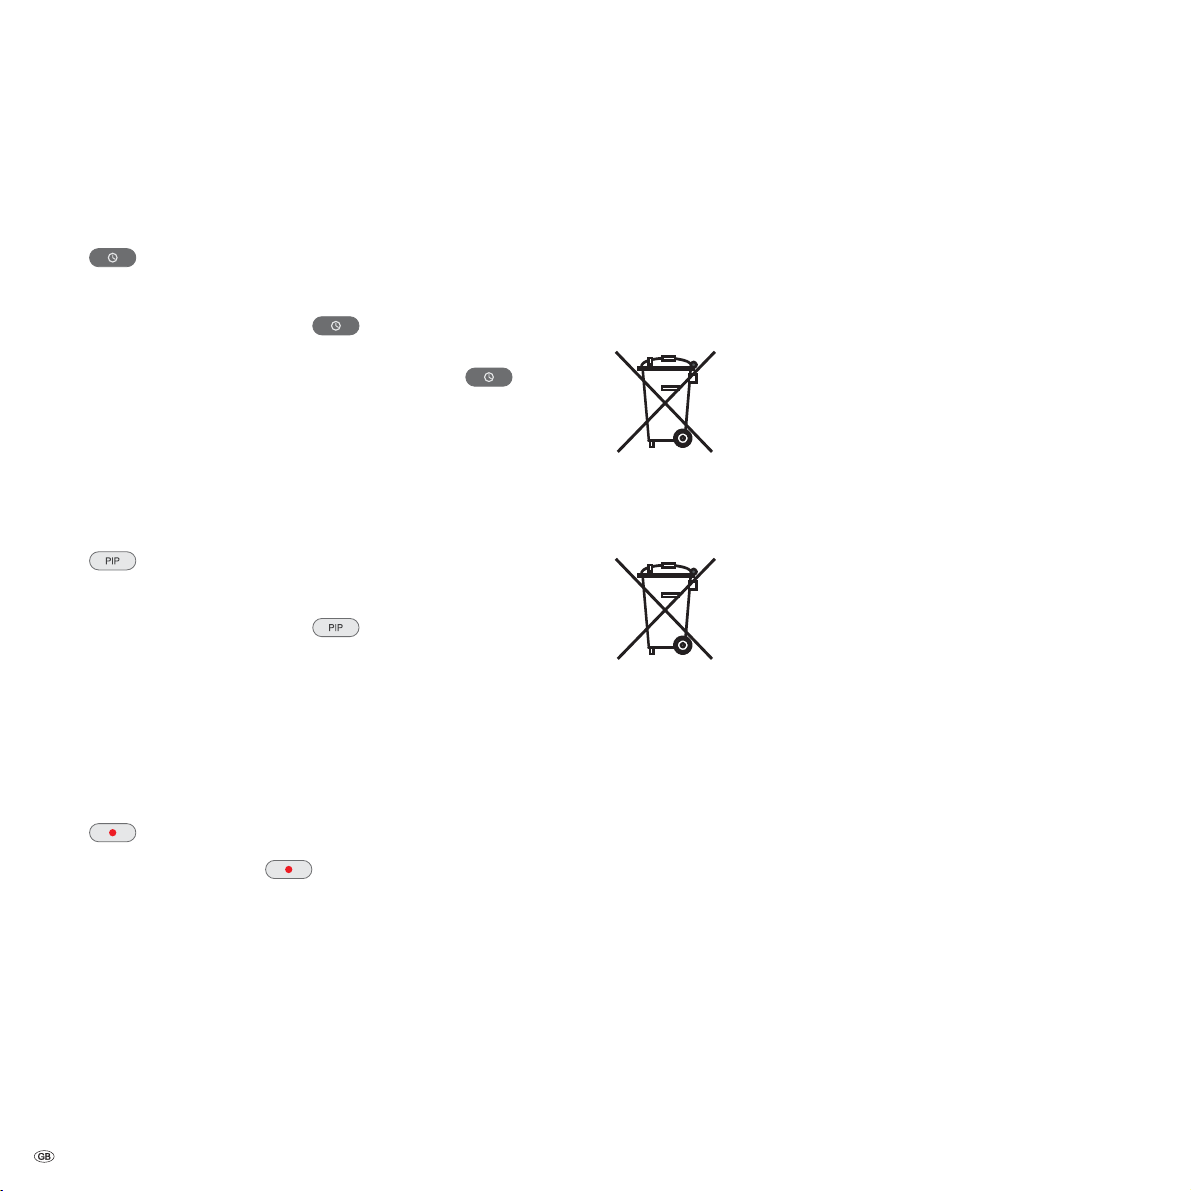
With the Sleep-Timer you can set your AudioVision to switch off after a certain
period of time set by you.
Press button.
On the display you will see: SLEEP 180.
Every time the button
cally switching off will be reduced is predetermined steps.
To deactivate the sleep timer again, press the
repeatedly until the normal display appears.
Select Source
You can also play back sound from your AudioVision from externally connected
devices.
Press button.
On the display you will see: TV-IN.
Every time the button
the other input TV-IN (COAXIAL IN) - LINE IN1 (INPUT AUX
R/L) - EURO AV is selected.
is pressed, the time to automati-
button
is pressed again, the one after
HDMI Format Setup
You can set the video- resolution of your AudioVision when using the HDMI OUT
socket to adjust the picture quality optimally to your TV set.
Environmental protection
Cardboard box and packaging
In line with national regulations regarding the disposal of packaging materials,
we pay a fee to authorised recyclers who collect packaging from dealers. Nevertheless, we recommend that you keep the original cardboard box and the rest of
the packaging materials so that the unit can, if necessary, be transported in the
safest possible conditions.
The Unit
Important: The EU Directive 2002/96 /EC governs the proper
return, handling and recycling of used electronic appliances. Old
electronic appliances must therefore be disposed of separately.
Never dispose of this unit in the normal domestic waste! You can
hand in your old unit free of charge at identified collection points
or to your dealer if you buy a similar new unit.
Other details about return (also for non-EU countries) are available from your local authorities.
Remote control batteries
The batteries provided contain no harmful materials such as
cadmium, lead or mercury. Regulations concerning used batteries
mean that batteries may no longer be thrown out with the household rubbish. You can dispose of used batteries free of charge
at the collection points in commercial outlets. Your dealer will
also have a collection point for used batteries.
- 28
Press button.
Every time the is pressed again, the resolution
switches between 576p, 720p, 1080 i and 1080p, provided
that this is supported by the TV set connected.
Page 29
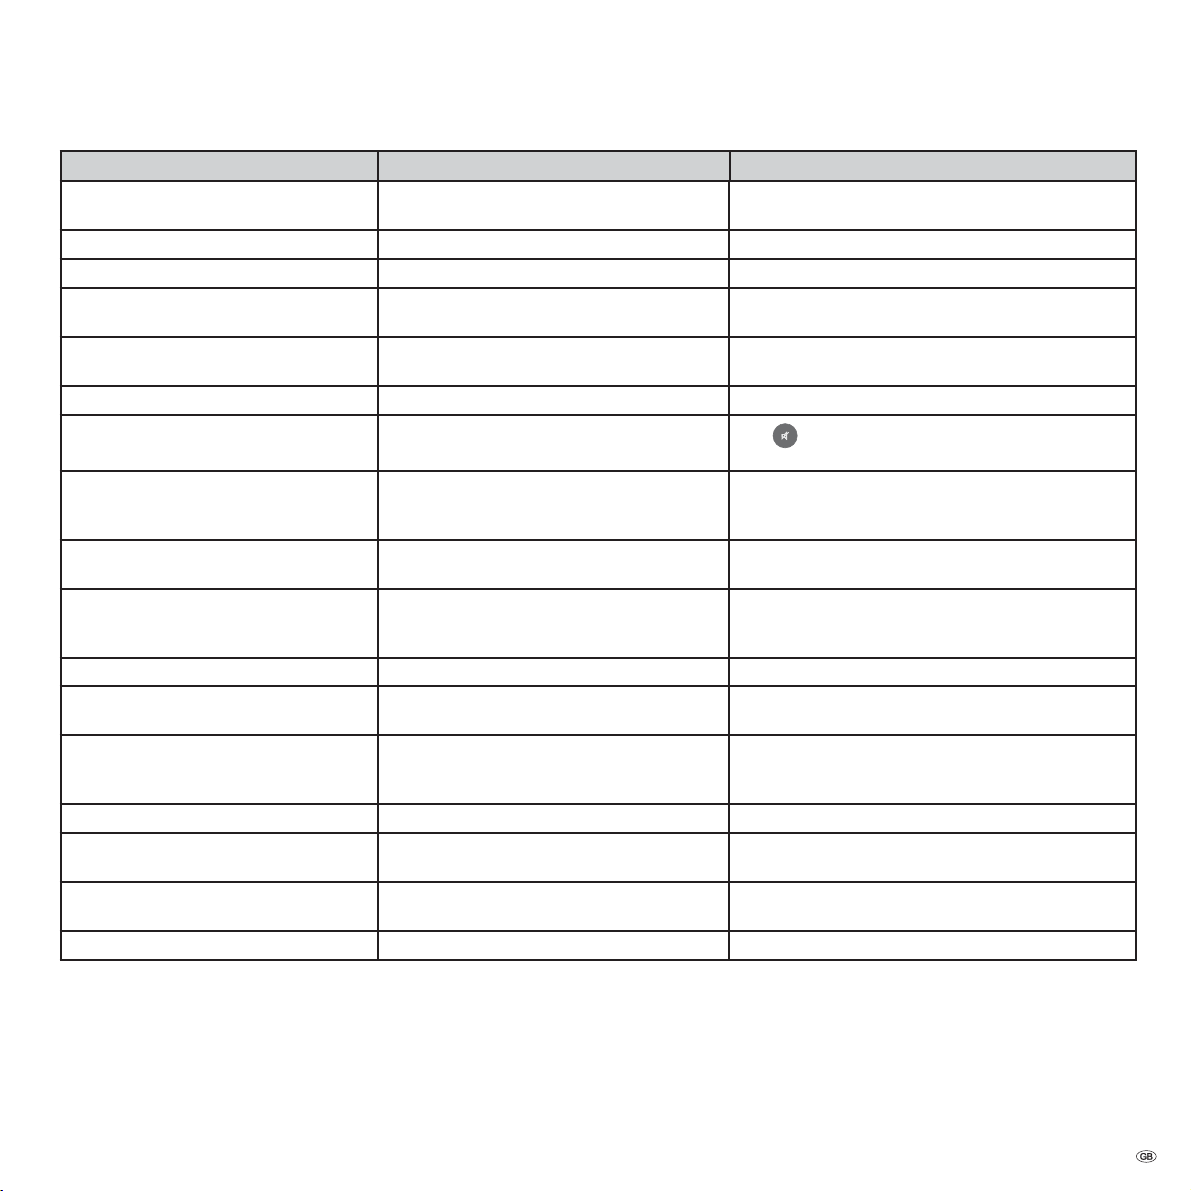
Troubleshooting
Problem Possible Cause Remedy
Not working at all Mains cable not plugged in. Plug the mains cable into a socket
No picture. The device is not connected properly. Make the connections as described on page 11-13 .
The TV set is not set up to receive DVD signals. On the TV set, select the correct AV programme slot.
The video cable is not connected properly. Check the both cable plugs to make sure they are firmly
No sound. Faulty connections of input or output cables. Connect the cables properly (page 11). If the problem persists, it is
The volume is set at minimum. Turn up the volume.
The sound is set to mute.
If the TV programme of the analogue stations is
changed, a switch noise can be heard.
The inserted disc will not play. Wrong Area Code on the Disc. Europe is in the DVD Regional code 2. DVDs that you buy in
A displayed media file cannot
be played.
No radio reception. The FM Antenna is not pointing in the right direction
The unit is not working properly. Unplug the mains plug from the mains socket and then try
The remote control is not working properly.
The external sound source is connected via TV IN
(COAXIAL IN) but the digital TV sound outlet not
active.
The external source is connected via EURO AV. Connect the external sound source via LINE IN 1 (INPUT
The Disc is dirty. Clean the disc.
The file format is not supported (page 31). On a computer, convert the file into a supported format using
or is not connected.
The signal strength of the radio channel is too low. Tune in the stations manually and switch to Mono.
The software of your Loewe TV set is
not compatible withAudioVision.
The batteries in the remote control are dead. Replace the batteries with new ones.
220-240 V 50/60 Hz.
plugged into the sockets.
possible that the cables are faulty.
Press
again and then adjust the volume.
Adjust the digital sound outlet in your TV set (for Loewe TV
sets see Sound Components - HiFi/AV amplifier).
AUX R/L).
Europe are set up for this Area Code. DVDs with other Area
Codes can not be played back.
an audio converter programme.
Check the antenna connection and if necessary realign the
antenna.
If necessary, connect an antenna.
plugging it in again after 30 seconds.
Contact your specialist retailer.
or V + on the remote control to activate audio output
29 -
Page 30

Glossary
C
CEC: Abbreviation for Consumer Electronics Control. CEC makes overall component
control functions available for consumer electronics devices (e.g. System-Standby,
One Touch Play). CEC is referred to at Loewe as Digital Link HD.
Cinch cable : Cable for transmitting sound or picture.
COMPONENT OUT: Connection via which the video signal is transmitted using
three separate cinch connections. It is made up of the brightness signal ”Y” and the
colour difference signals ”Pb” and ”Pr”. YPbPr is the original analogue version of
digital YCbCr, which colour codes the video data saved on the DVD or transmitted
with DVB per Sat, cable or antenna.
D
Digital Link HD: System for controlling units via the HDMI connection of the
Loewe TV set when they have been set up in a covered position.
Dolby Digital: Digital surround sound.
Dolby Pro Logic: Analogue surround sound.
DRM: Digital Rights Management. Processes to control copyright protected data.
To be used correctly, DRM protected contents require not only a DRM capable
device but also the possession of a license issued by the provider (to be paid for).
DTS : Digital surround sound.
DVD: Abbreviation of Digital Video Disc and later Digital Versatile Disc.
E
Euro AV socket: Interface to connect video devices to a TV set. This socket is also
called a SCART socket.
F
FM: Frequency Modulation - Name for analogue ultra short-wave radio (VHF).
H
HDMI: High Definition Multimedia Interface, is a newly developed interface for
full digital transmission of audio and video data.
I
ID3 tags: Additional information on MP3 files. Here you can save information
on the artist, title, album and album cover. This data is then processed by the PC
using an ID3 tag editor.
iPod: portable digital media playback device made by Apple.
J
JPEG/JPG: Joint Photographic Experts Group is a body that developed a standard-
ised process for compressing digital pictures. This process JPEG (abbreviated to
JPG) that was named after the body is a wide spread graphics format for photos.
M
MPEG: Digital compression process for video.
Mono: Single-channel sound
MP3: Data format for compressed audio data.
N
NTSC: American colour standard.
P
PAL : European colour standard.
PCM: Pulse Code Modulation for digital sound.
Progressive Scan: Technology for image format with real complete picture for
flicker-free presentation.
R
RDS: Radio Data System - allows transmission of text information accompanying
FM radio.
RGB: Colour signals red, green and blue.
S
Stereo: Dual channel sound.
T
Tuner: = receiver.
U
USB: Universal Serial Bus. Serial bus system for connecting external devices (USB
card reader, USB stick).
W
WMA: Abbreviation for Windows Media Audio, Microsoft own audio data format.
As with MP3 files, the content is compressed here as well.
Y
Ycc/Ypp: Colour standards for Set Top Boxes.
YCbCr: Digital colour model, see COMPONENT OUT.
YPbPr: Analogue colour model, see COMPONENT OUT.
- 30
Page 31
Technical specifications
General
AudioVision Item No. 69202 L/T00
Operating temperature º 5 °C ... 35 °C
Humidity 30 % ... 85 % (no condensation)
Dimensions (approx.) 430 x 73 x 303 mm (W x H x D)
Weight 3.7 kg
Electrical Data
Power supply AC 220 - 240V, 50/60 Hz
Power consumption Operation: 70 W
Standby: < 1 W
Interfaces
INPUT AUX R/L Analogue, Stereo 1 V, 10 kOhm, RCA socket
OUTPUT AUX R/L Analogue, Stereo, 1 V, 10 kOhm, RCA socket
COAXIAL IN SPDIF, 44,1/48/64/88,2/96 kHz, RCA socket
COAXIAL OUT Coaxial 44,1 kHz, RCA socket
OUTPUT COMPONENT (Y) 1.0 V (p-p), 75 Ohm
(Pb)/(Pr) 0.7 V (p-p), 75 ohms, RCA sockets x 3
HDMI OUT Type A, 19 Pin, LVDS digital, V1.3
EURO AV 1.0 Vp-p, 75Ohm, RGB/FBAS, SCART
VIDEO OUT RCA socket x 1 (FBAS) 0.7 V (p-p)
ANTENNA FM FM Antenna Input, 75 Ohm
Headphones jack plug 3.5 mm
USB 2x V 2.0, Type A
iPod (24pin) Contact pin for iPod
AUDIO LINK 26 pin D-SUB, Loewe System
Playback
Playback formats DVD-Video
DVD+/-R, DVD+/-RW (Video Mode),
CD, CD-R, CD-RW
Video standards TV Standard PAL / NTSC
TV Aspect 16:9, Letterbox 4:3,
Pan & Scan 4:3
Audio standards Dolby Digital (AC-3), Dolby Prologic II, DTS,
MPEG, PCM
File formats supported
Audio MP3, WMA (without DRM)
Photo JPEG
Video DivX
Company and editorial details
Loewe AG is a public limited company under German law with its Head Office
in Kronach.
Industriestrasse 11, 96317 Kronach
Telephone: + 49 (0)9261 / 99-0
Fax: + 49 (0)9261 / 99-500
E-mail: [email protected]
Trade Register: Municipal Court Coburg, No. HRB 42243
VAT ID-No.: DE 193216550
WEEE Registration number: DE 41359413
Issue 07.10. 6th edition
© Loewe Opta GmbH, Kronach
All rights reserved including translation.
Design and technical specifications are subject to change without notice.
Trademark rights
Manufactured under licence from Dolby Laboratories. Dolby, ProLogic and the
double-D symbol are trademarks of Dolby Laboratories.
”DTS” and ”DTS Digital Out” are trademarks of Digital Theater Systems Inc.
HDMI, the HDMI logo and High-Definition Multimedia Interface are trademarks
or registered trademarks of HDMI licensing LLC.
The device is DivX certified to playback DivX video.
Radio
Type PLL, RDS
FM Band 87.5 - 108.0 MHz
Station Memory 40
✄
safe place.
The key number 210499 overrides the
Please keep it in a
password and the child-proof lock.
31 -
Page 32

Language code list
Area Code List
Enter the appropriate code for the initial setting of ”Disc Audio”, ”Disc Subtitles”
and/or ”Disc Menu” (page 16).
Afar 6565
Afrikaans 6570
Albanian 8381
Amharic 6577
Arabic 6582
Armenian 7289
Azerbaijani 6590
Assamese 6583
Aymara 6588
Baschkir 6665
Basque 6985
Bengali, Bangla 6678
Bhutanese 6890
Bihari 6672
Breton 6682
Bulgarian 6671
Chinese 9072
Danish 6865
German 6869
English 6978
Esperanto 6979
Estonian 6984
Faroese 7079
Fijian 7074
Finnish 7073
French 7082
Friesian 7089
Galician 7176
Georgian 7565
Greek 6976
Greenlandic 7576
Guarani 7178
Gujarati 7185
Haussa 7265
Hebrew 7387
Hindi 7273
Indonesian 7378
Interlingua 7365
Irish 7165
Islandic 7383
Italian 7384
Javan 7487
Yiddish 7473
Canadian 7578
Kazakh 7575
Kashmir 7583
Kirghiz 7589
Korean 7579
Croatian 7282
Kurdish 7585
Lao 7679
Latin 7665
Latvian 7686
Lingala 7678
Lithuanian 7684
Madagascar 7771
Malay 7783
Malayalam 7776
Maori 7773
Marathi 7782
Macedonian 7775
Moldavian 7779
Mongolian 7778
Burmese 7789
Nauru 7865
Nepalese 7869
Dutch 7876
Norwegian 7879
Oriya 7982
Punjabi 8065
Paschto 8083
Persian 7065
Polish 8076
Portuguese 8084
Quechua 8185
Retoromanian 8277
Romanian 8279
Russian 8285
Samoan 8377
Sanskrit 8365
Scottish (Gaelic) 7168
Swedish 8386
Serbian 8382
Serbo-Croatian 8372
Shona 8378
Sindhi 8368
Singalese 8373
Slovak 8375
Slovenian 8376
Spanish 6983
Sudanese 8385
Swahili 8387
Tadjik 8471
Tagalog 8476
Tamil 8465
Telugu 8469
Thai 8472
Tongalese 8479
Czech 6783
Turkish 8482
Turkmenian 8475
Twi 8487
Ukrainian 8575
Hungarian 7285
Urdu 8582
Uzbek 8590
Vietnamese 8673
Volapük 8679
Welsh 6789
White-Russian 6669
Wolof 8779
Xhosa 8872
Yoruba 8979
Zulu 9085
Enter the appropriate code for the initial setting of the ”Area Code” (page 19).
Afghanistan AF
Egypt EG
Antilles AN
Argentina AR
Ethiopia ET
Australia AU
Belgium BE
Bhutan BT
Bolivia BO
Brazil BR
Chile CL
China CN
Costa Rica CR
Denmark DK
Germany DE
Ecuador EC
El Salvador SV
Fiji FJ
Finland FI
France FR
Greece GR
Greenland GL
Great Britain GB
Hong Kong HK
India IN
Indonesia ID
Israel IL
Italy IT
Jamaica JM
Japan JP
Cambodia KH
Canada CA
Kenya KE
Columbia CO
Croatia HR
Kuwait KW
Libya LY
Luxembourg LU
Malaysia MY
Maldives MV
Morocco MA
Mexico MX
Monaco MC
Mongolia MN
Nepal NP
New Zealand NZ
The Netherlands NL
Nigeria NG
Norway NO
Oman OM
Austria AT
Pakistan PK
Panama PA
Paraguay PY
Philippines PH
Poland PL
Portugal PT
Czech Republic CZ
Republic of Congo CG
Slovak Republic SK
Romania RO
Russian Federation RU
Saudi Arabia SA
Sweden SE
Switzerland CH
Senegal SN
Zimbabwe ZW
Singapore SG
Slovenia SI
Spain ES
Sri Lanka LK
South Africa ZA
South Korea KR
Taiwan TW
Thailand TH
Turkey TR
Uganda UG
Ukraine UA
Hungary HU
Uruguay UY
USA US
Uzbekistan UZ
Vietnam VN
- 32
Page 33

Service
Loewe Austria GmbH
Parkring 12
1010 Wien, Österreich
Tel +43 - 1 22 88 633 - 0
Fax +43 - 1 22 88 633 - 90
Email: [email protected]
International Dynamics
Australasia Pty Ltd.
129 Palmer Street
Richmond 3121, Victoria,
Australia
Tel +61 - 3 - 94 29 08 22
Fax +61 - 3 - 94 29 08 33
Email: mail@international
dynamics.com.au
Loewe Opta Benelux NV/SA
Uilenbaan 84
2160 Antwerpen, België
Tel +32 - 3 - 2 70 99 30
Fax +32 - 3 - 2 71 01 08
Email: [email protected]
Darlington Service
Kn. Klementina Street, bl. 193
1618 So a, Bulgaria
Tel +359 - 2 955 63 99
Fax +359 - 2 955 63 99
Email: [email protected]
Telion AG
Rütistrasse 26
8952 Schlieren, Schweiz
Tel +41 - 44 732 15 11
Fax +41 - 44 732 15 02
Email: [email protected]
HADJIKYRIAKOS & SONS LTD.
121 Prodromos Str., P.O Box
21587
1511 Nicosia, Cyprus
Tel +357 - 22 87 21 11
Fax +357 - 22 66 33 91
Email: savvas@hadjikyriakos.
com.cy
BASYS CS SPOL. S.R.O
Sodomkova 8/1478
10200 Praha 10 - Hostivar,
Tel +420 2 34 70 67 00
Fax +420 2 34 70 67 01
Email: of [email protected]
esko
Loewe Opta GmbH,
Customer Care Center
Industriestraße 11
96317 Kronach, Deutschland
Tel +49 1801–22256393
Fax +49 9261–99500
Email: [email protected]
Kjaerulff1 Development A/S
C.F. Tietgens Boulevard 19
5220 Odense SØ, Denmark
Tel +45 - 66 13 54 80
Fax +45 - 66 13 54 10
Email: [email protected]
Gaplasa S.A.
Conde de Torroja, 25
28022 Madrid, España
Tel +34 - 917 48 29 60
Fax +34 - 913 29 16 75
Email: [email protected]
TEDRA TRADING OY
Kuusemetsa 3
Saue 76506, Estonia
Tel +372 - 50 14 817
Fax +372 - 67 09 611
Email: raivo@futurehi .com
Loewe Opta France SAS
13 rue du Dépôt,
Parc del l‘Europe, BP 10010
67014 Strasbourg Cédex, France
Tel +33 - 3- 88 79 72 50
Fax +33 - 3- 88 79 72 59
Email: [email protected]
Karevox Oy
Museokatu 36
00100 Helsinki, Finland
Tel +358 - 9 44 56 33
Fax +358 - 9 44 56 13
Email: kare@haloradio.
Loewe UK Limited
Century Court, Riverside Way
Riverside Business Park, Irvine,
Ayrshire
KA11 5DJ, UK
Tel +44 - 1294 315 000
Fax +44 - 1294 315 001
Email: [email protected]
EISAGOGIKI EMBORIKI ELLADOS
S.A.
321 Mesogion Av.
152 31 Chalandri-Athens, Hellas
Tel +30 - 210 672 12 00
Fax +30 - 210 674 02 04
Email: [email protected]
Basys Magyarorszagi KFT
Tó park u.9.
2045 Törökbálint, Magyar
Tel +36 - 2341 56 37 (121)
Fax +36 - 23 41 51 82
Email: [email protected]
Plug&Play
Bednjanska 8, 10000 Zagreb
Hrvatska (Kroatia)
Tel +385 1 4929 683
Fax +385 1 4929 682
Email: [email protected]
Loewe Italiana S.r.L.
Largo del Perlar, 12
37135 Verona (VR), Italia
Tel +39 - 045 82 51 611
Fax +39 - 045 82 51 622
Email: [email protected]
Clear electronic entertainment
(2009) Ltd
13 Noah Mozes St.
Agish Ravad Building
Tel Aviv 67442, Israel
Tel +972 - 3 - 6091100
Fax +972 - 3 - 6961795
Email: [email protected]
Origo Ltd
Unit 23 Magna Drive
Magna Business Park, City West
Dublin 24, Republic of Ireland
Tel +353-1-4666700
Fax +353-1-4666708
Email: [email protected]
SALEM AGENCIES & SERVICES CO.
Hamad Al Haqueel Street, Rawdah, Jeddah
Kingdom of Saudi Arabia
Tel +966 (2) 665 4616 ext: 666
Fax +966 (2) 660 7864
Email: [email protected]
A Cappella
Ausros Vartu 5, Pasazo skg.
01129 Vilnius, Lithuania
Tel +370 - 52 12 22 96
Fax +370 - 52 62 66 81
Email: [email protected]
DONEO CO. LTD
34/36 Danny Cremona Street
Hamrun, HMR02, Malta
Tel +356 - 21 - 22 53 81
Fax +356 - 21 - 23 07 35
Email: [email protected]
SOMARA S.A.
377, Rue Mustapha El Maani
20000 Casablanca, Morocco
Tel +212 - 22 22 03 08
Fax +212 - 22 26 00 06
Email: [email protected]
PCE. PREMIUM CONSUMER
ELECTRONICS as
Ostre Kullerod 5
3241 Sandefjord, Norge
Tel +47 - 33 48 33 48
Fax +47 - 33 44 60 44
Email: [email protected]
International Dynamics (NZ) Pty
Ltd
PO Box 109 317, Newmarket
Auckland, New Zealand
Tel +64 9 379 0179
Fax +64 9 379 0279
Email: enquiries@international
dynamics.co.nz
Mayro Magnetics Portugal, Lda.
Rua Professor Henrique de Barros
Edifício Sagres, 2º. C
2685-338 Prior Velho, Portugal
Tel +351 - 21 942 78 30
Fax +351 - 21 942 78 30
Email: [email protected]
DSV TRADING SA
Plac Kaszubski 8
81-350 Gdynia, Polska
Tel +48 - 58 - 6 61 28 00
Fax +48 - 58 - 6 61 44 70
Email: [email protected]
Avitech Co. SRL
1/II Pipera Tunari St.
007190 Voluntari, Ilfov, Romania
Tel +40 - 21 200 64 64
Fax +40 - 21 200 64 65
Email: [email protected]
Service Center Loewe
ul. Verkhnaya Maslovka, d. 29
125083 Moscow,
Tel +7 - 495 612 50 43
Fax +7 - 495 612 47 10
Email: [email protected]
Kjaerulff 1 AB
Ridbanegatan 4, Box 9076
200 39 Malmø, Sverige
Tel +46 - 4 06 79 74 00
Fax +46 - 4 06 79 74 01
Email: [email protected]
BaSys Czech & Slovak s.r.o.
Stará Vajnorská 17/A
831 04 Bratislava, Slovakia
Tel + 421 2 49 10 66 18
Fax + 421 2 49 10 66 33
Email: [email protected]
ENKAY ELEKTRONIK SAN. Ve Tic.
Ltd. Sti.
Alemdag Cad: Site Yolu No.: 10
81230 Ümraniye/ Istanbul, Türkiye
Tel +90 - 216 634 44 44
Fax +90 - 216 634 39 88
Email: [email protected]
Dubai Audio Center
P.O. Box 32836, Sheik Zayed Road
Dubai, UAE
Tel +971 - 4 343 14 41
Fax +971 - 4 343 77 48
Email: [email protected]
THE SOUNDLAB (PTY) LTD
P.O. Box 31952, Kyalami 1684
Republic of South Africa
Tel +27 - 1 14 66 47 00
Fax +27 - 1 14 66 42 85
Email: [email protected]
© by Loewe Opta 200110
33
 Loading...