

Loctite Hysol 175 Operation Manual

®
s
EQUIPMENT
OPERATION MANUAL
Hysol 175
P/N 98035
Loctite America
1001 Trout Brook Crossing
Rocky Hill, CT 06067-3910
Loctite Brazil
Av. Prof. Vernon Krieble, 91
06690-11-Itapevi
São Paulo-Brazil
Loctite is a trademark of Loctite Corporation, U.S.A. Data in the manual is subject to change without notice.
Copyright 2001. Loctite Corporation. All rights reserved. 985132 06/01
Loctite Canada Inc.
2225 Meadowpine Boulevard
Mississauga, Ontario L5N 7P2
Loctite Company de México, S.A.d e C.V.
Calzada de la Viga s/n, Fracc. Los Laureles
Loc. Tulpetlac, C.P. 55090
Ecatepac de Morelos, Edo. de México,
México
www.loctite.com
A Company

Contents
1. Please Observe the Following.................................................................................. 2
1.1. Safety ......................................................................................................................... 2
1.2. Items supplied.............................................................................................................2
2. Description................................................................................................................ 2
3. Technical Data ..........................................................................................................2
4. Installation.................................................................................................................3
5. Operation...................................................................................................................3
5.1. The Auto Standby Feature .......................................................................................... 4
5.2. Temperature adjustment .............................................................................................4
6. Application Hints ......................................................................................................4
7. Troubleshooting........................................................................................................5
7.1. Snubber Adjustment ................................................................................................... 5
7.2. Feed mechanism adjustment .....................................................................................5
8. Care and Maintenance .............................................................................................. 6
9. Accessories and Spare Parts ................................................................................... 6
10. Warranty....................................................................................................................7
11. Appendix ...................................................................................................................8
12. Exploded Diagram. ...................................................................................................9
13. Parts List................................................................................................................. 10
Page 1

1. Please Observe the Following
1.1. Safety
Do not touch the nozzle or molten adhesive with bare skin as they are hot - the
operating temperature of the Loctite
(200ºC). Protective gloves should always be worn. Careless handling can
cause skin burns. If molten adhesive comes into contact with the skin immerse the
affected area immediately in plenty of cold water. Seek medical advice if necessary.
In addition to the safety instructions herein, any statutory regulations, local fire
insurance regulations, or other generally valid “regulations for accident prevention”
must be complied with when using this tool.
• Never use the tool if it is damaged in any way.
• Do not use this tool in damp rooms, outdoors while it is raining, or where there is
high humidity.
• Do not use this tool in the vicinity of any heat-sensitive materials, or any
flammable materials, liquids, or gases.
• Only use extension cables that meet the specification shown in “Technical data”.
• Never pull on the tool’s connecting cable.
1.2. Items supplied
Hot Melt Stick Dispenser
Plastic Stand
Manual
Plug-in Module 215°C
2. Description
The Loctite
cartridge heater which, in conjunction with it’s adjustable solid-state electronic
controller, provides both a fast 5-minute warm-up, and accuracy in temperature
control to within +/- 10°F (5°C) of the set temperature. Temperature adjustment is
achieved by changing the plug-in module – the operator simply chooses the most
appropriate module for the adhesive formulation to be used.
®
Hysol® 175 is approximately 400ºF
®
Hysol®175 Hotmelt Applicator contains a powerful 400W stainless steel
The advanced electronic controller provides an Auto Standby feature, allowing the
tool to be left on for long periods of time without the adhesive overheating (however
care should still be taken with soft formulations). If left unused for a while the tool will,
after a variable time (depending on the ambient temperature), switch to its powersaving standby-mode, reducing the temperature of the tool to approximately 160°F
(72°C); it will return to its full operating temperature when operated.
Designed to comply with worldwide safety standards, the Loctite
features a totally enclosed heater housing, and is fitted with thermal fuse protection.
3. Technical Data
Dimensions (L x H x W): approx. 12 1/4” x 9 5/8” x 2 11/16”
Total weight: approx. 2.5 lbs. (1.15Kg)
Connection cable with main plug: 10 ft (3 m) long
Operating voltage: 110-120 VAC 50/60Hz
Power consumption 400W
Heating up time: 5 - 7 minutes
Operating temperature: approx. 392°F (200°C)
Diameter of adhesive inlet: 1 11/16” (43 mm)
Extension cable: max. 65ft (20 m) long
Wire cross section: at least 16 a.w.g. (1.5 mm
®
Hysol®175 also
(approx. 312 x 245 x 70 mm)
(dependent on Plug-in Module used)
2
)
Page 2
4. Installation
Before using the tool for the first time check it carefully for signs of external damage.
If any shipping damage is found DO NOT USE THE TOOL - return it to your supplier
immediately.
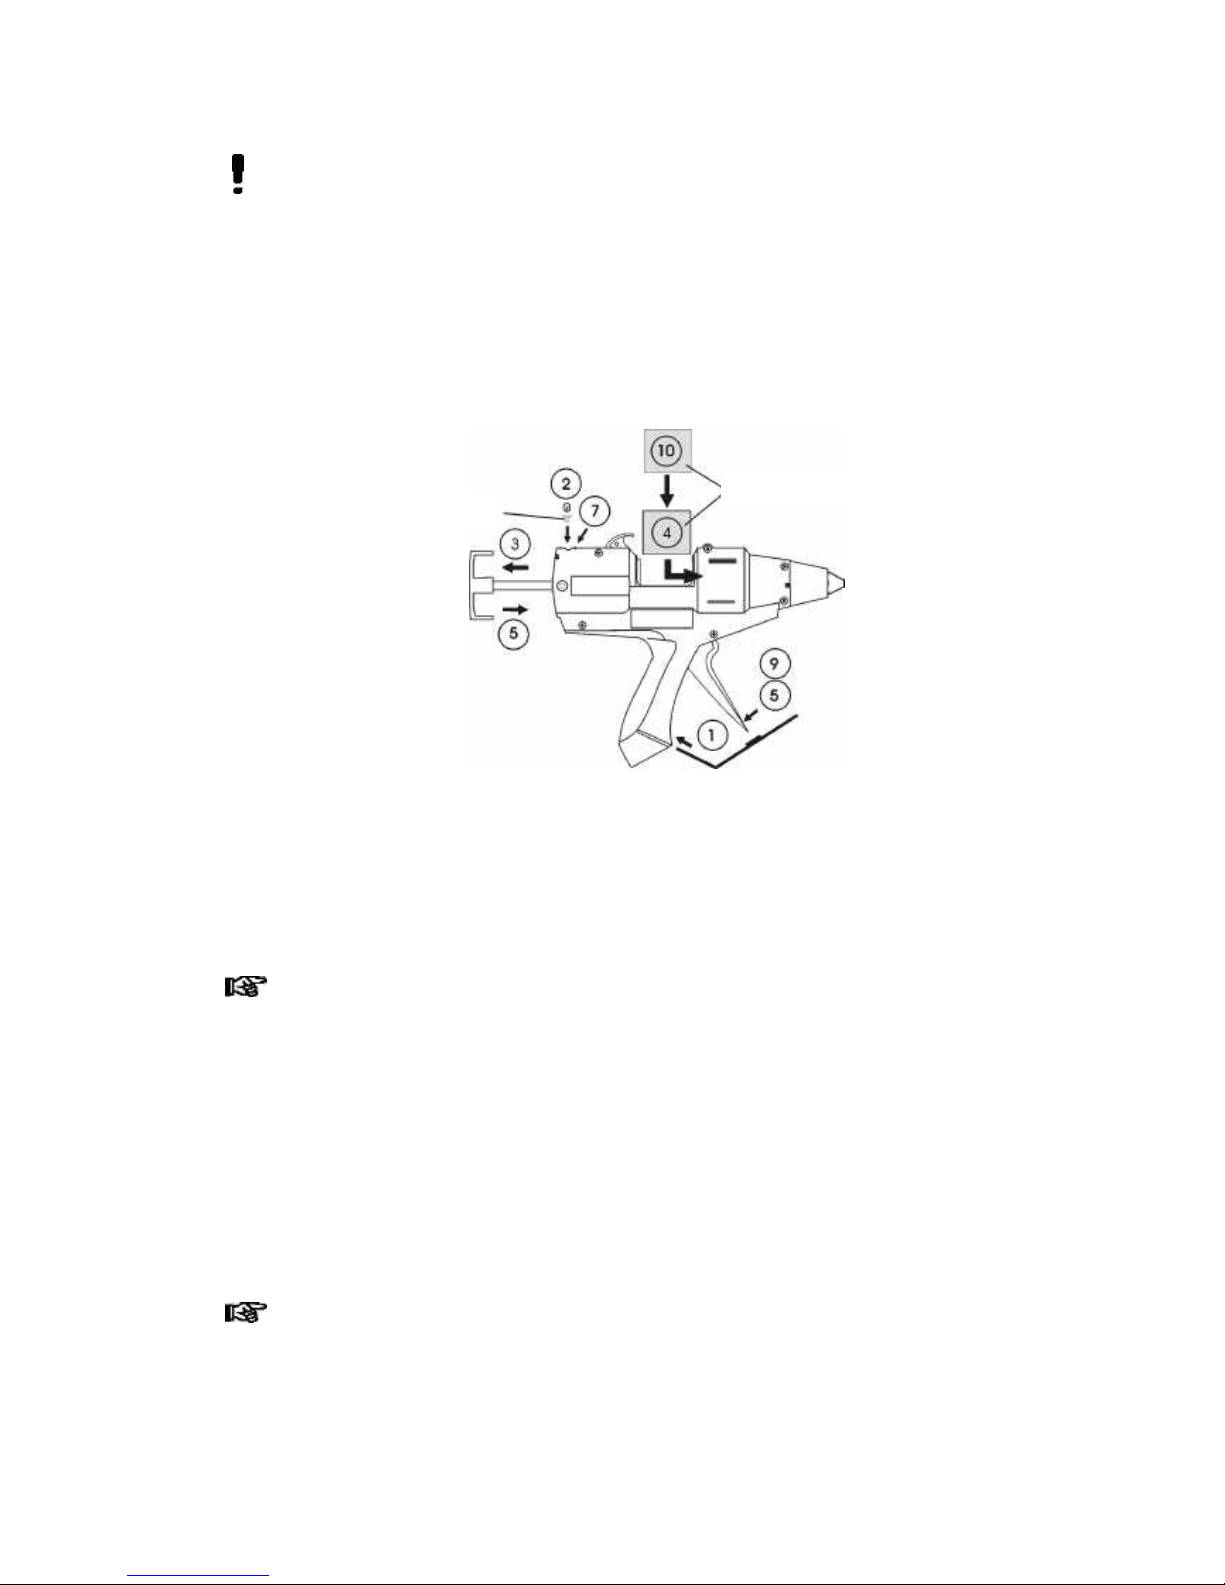
Steps 1 – 5 should be followed before connection to the main supply:
1. Locate the enclosed stand into the grooves at the base of the handle.
2. Check that the Plug-In Module is the appropriate one for the adhesive to be
3. Pull handle back fully.
4. Drop adhesive cartridge into the breach of the tool and push fully forward.
5. Advance handle/plunger to rear of the adhesive cartridge by operating trigger.
used (refer to the Spares and Accessory lists at the end of this manual).
ADHESIVE CARTRIDGES
PLUG-IN MODULE
6. Connect tool to main supply.
7. Red ‘Power On’ indicator light illuminates.
8. Allow tool to warm up for 5 minutes. Do not attempt to operate the tool until
9. Operate trigger to push the adhesive cartridge forward to the reloading point.
10. Pull handle back fully and load a second adhesive cartridge. Operate trigger
With a new tool it will be necessary to operate the trigger several times before
adhesive can be extruded; this is because air trapped in the heater housing first
needs to be evacuated.
5. Operation
Normal use:
• Fit the stand and place the tool in an upright position on a flat surface.
• Plug the tool into the power supply socket, and switch on the power.
• Wait 5 minutes for the tool to reach its normal operating temperature.
• Squeeze the trigger to advance the handle/plunger and extrude molten adhesive
through the nozzle.
• To stop extruding adhesive simply release the trigger.
During use, the plunger will advance through the breach area of the barrel as the
trigger is pulled. A point will be reached where the plunger no longer advances, but
just moves back and forth. When this occurs the tool needs reloading with another
adhesive cartridge.
• Pull the handle back fully.
• Insert a new adhesive cartridge.
• Operate the tool normally.
this time has elapsed.
to advance handle/plunger.
Page 3
 Loading...