

Page 1
EQUIPMENT
Operation Manual
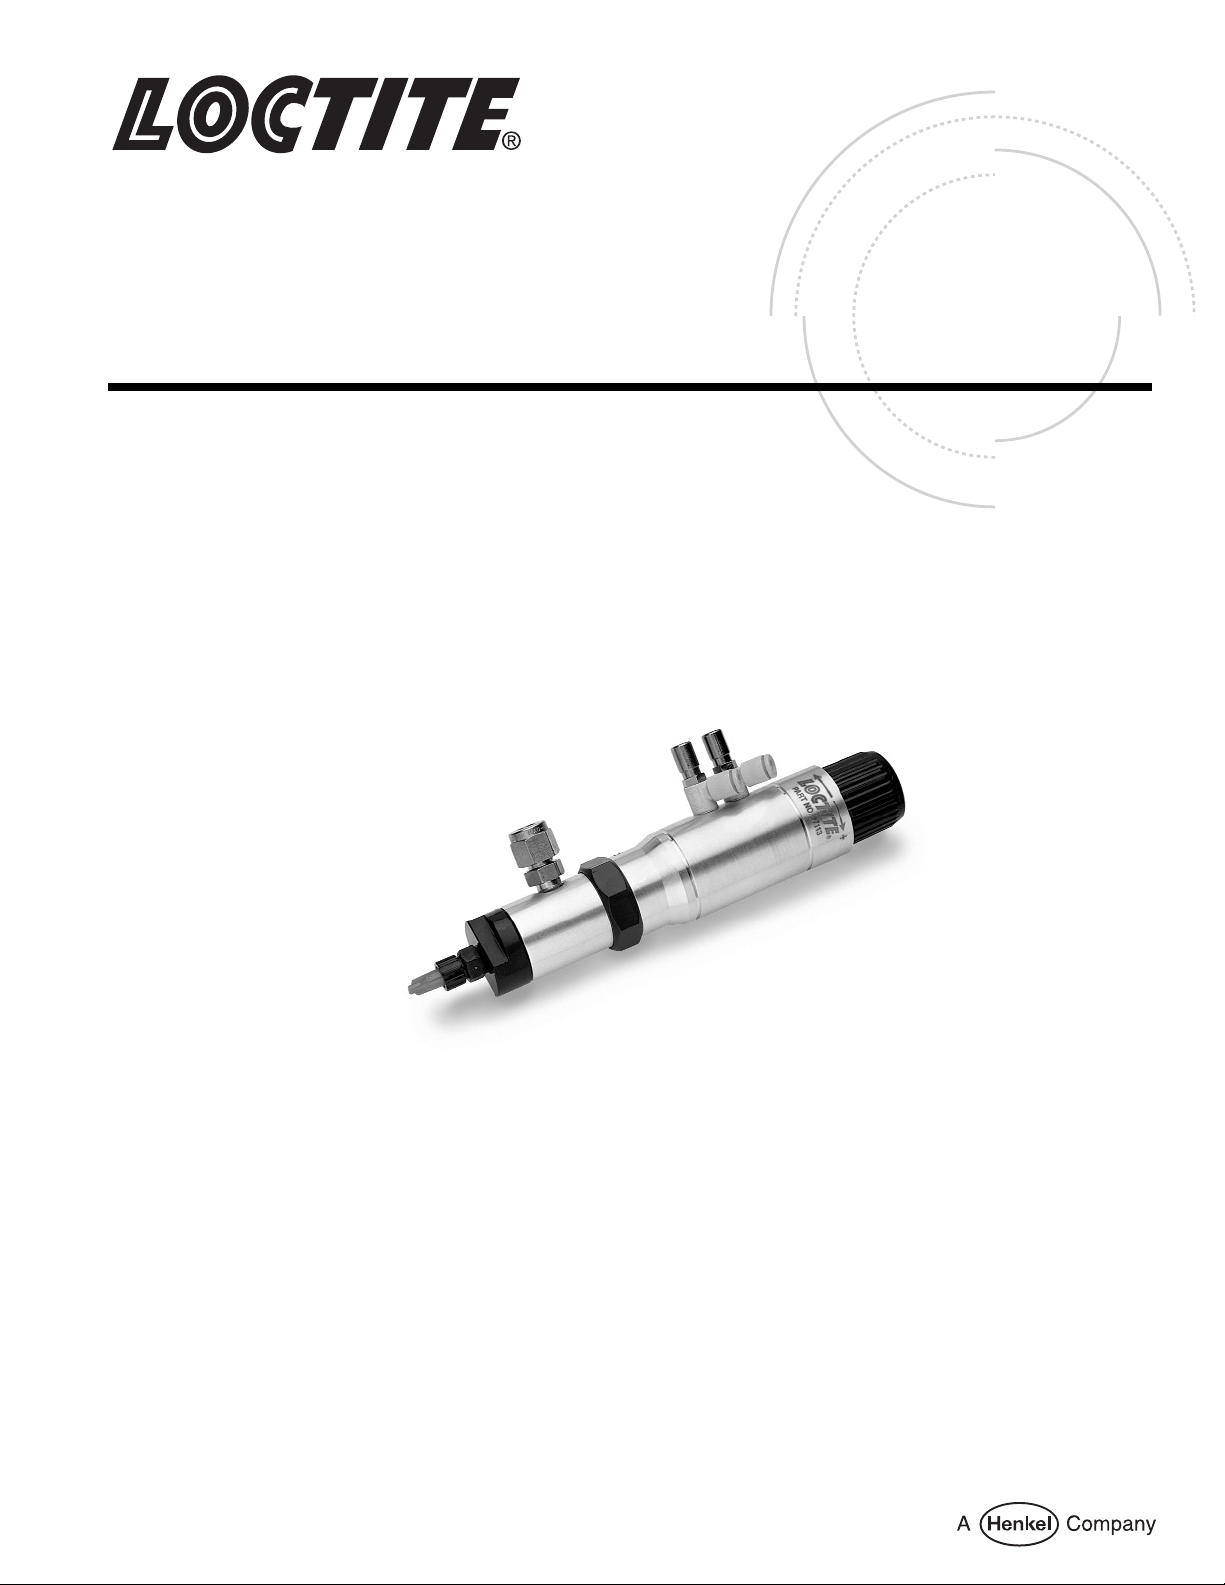
Loctite®Dispense Valve
Part Numbers 97113 and 97114
Page 2

Contents
Page No.
1 Please Observe the Following . . . . . . . . . . . . . . . . . . . . . . . . . . . . . . . . . . . . . . . . . 1-2
1.1 Emphasized Sections . . . . . . . . . . . . . . . . . . . . . . . . . . . . . . . . . . . . . . . . . . . . . . . . . . . 1
1.2 Items Supplied . . . . . . . . . . . . . . . . . . . . . . . . . . . . . . . . . . . . . . . . . . . . . . . . . . . . . . . . 1
1.3 For Your Safety . . . . . . . . . . . . . . . . . . . . . . . . . . . . . . . . . . . . . . . . . . . . . . . . . . . . . . . . 1
1.4 Features . . . . . . . . . . . . . . . . . . . . . . . . . . . . . . . . . . . . . . . . . . . . . . . . . . . . . . . . . . . . . 1
1.5 Usage . . . . . . . . . . . . . . . . . . . . . . . . . . . . . . . . . . . . . . . . . . . . . . . . . . . . . . . . . . . . . . . 2
2 Description. . . . . . . . . . . . . . . . . . . . . . . . . . . . . . . . . . . . . . . . . . . . . . . . . . . . . . . . . 2-3
2.1 Operating Elements and Connections . . . . . . . . . . . . . . . . . . . . . . . . . . . . . . . . . . . . . . 2
2.2 Theory of Operation . . . . . . . . . . . . . . . . . . . . . . . . . . . . . . . . . . . . . . . . . . . . . . . . . . . . 3
3 Technical Data. . . . . . . . . . . . . . . . . . . . . . . . . . . . . . . . . . . . . . . . . . . . . . . . . . . . . . . . 4
4 Installation. . . . . . . . . . . . . . . . . . . . . . . . . . . . . . . . . . . . . . . . . . . . . . . . . . . . . . . . . . . 5
4.1 Installing Anti-Bubbler to .5 liter and 2 liter Reservoirs . . . . . . . . . . . . . . . . . . . . . . . . . 5
4.2 Connecting the Airlines. . . . . . . . . . . . . . . . . . . . . . . . . . . . . . . . . . . . . . . . . . . . . . . . . . 5
5 Dispensing . . . . . . . . . . . . . . . . . . . . . . . . . . . . . . . . . . . . . . . . . . . . . . . . . . . . . . . . . 6-8
5.1 Priming the Dispense Valve . . . . . . . . . . . . . . . . . . . . . . . . . . . . . . . . . . . . . . . . . . . . . . 6
5.2 Adjusting the Dispensed Quantity . . . . . . . . . . . . . . . . . . . . . . . . . . . . . . . . . . . . . . . . . 6
5.2.1 Adjusting the Suck-Back Effect (Piston Stroke) . . . . . . . . . . . . . . . . . . . . . . . . . . . . . . . 6
5.2.2 Adjusting the Air (Outlet Chokes) . . . . . . . . . . . . . . . . . . . . . . . . . . . . . . . . . . . . . . . . . . 7
5.3 Shutdown . . . . . . . . . . . . . . . . . . . . . . . . . . . . . . . . . . . . . . . . . . . . . . . . . . . . . . . . . . . . 8
5.4 Returning to Operation . . . . . . . . . . . . . . . . . . . . . . . . . . . . . . . . . . . . . . . . . . . . . . . . . . 8
5.5 Disassembling the Dispense Valve. . . . . . . . . . . . . . . . . . . . . . . . . . . . . . . . . . . . . . . . . 8
6 Troubleshooting . . . . . . . . . . . . . . . . . . . . . . . . . . . . . . . . . . . . . . . . . . . . . . . . . . . . . . 9
7 Accessories and Spare Parts. . . . . . . . . . . . . . . . . . . . . . . . . . . . . . . . . . . . . . . . 10-11
8 Warranty . . . . . . . . . . . . . . . . . . . . . . . . . . . . . . . . . . . . . . . . . . . . . . . . . . . . . . . . . . . 12
9 Declaration of Conformity . . . . . . . . . . . . . . . . . . . . . . . . . . . . . . . . . . . . . . . . . . . . . 13
Page 3

1. Please Observe the Following
1
1.1 Emphasized Sections
Warning!
Refers to safety regulations and required safety measures that protect the operator or other
persons from injury or danger to life.
Caution!
Emphasizes what must be done or avoided so that the unit or other property is not damaged.
Notice:
Gives recommendations for better handling of the unit during operation or adjustment as well as
for service activities.
• Instruction steps in the illustrations are indicated
with arrows.
When several instruction steps are indicated in
an illustration, the shading of the arrow has the
following meaning:
Black arrow = 1st step
Grey arrow = 2nd step
White arrow = 3rd step
1.2 Items supplied
1 Dispense Valve - 97113 (with 6.3 mm Product Feedline connection) or Dispense Valve - 97114
(with 9.5 mm Product Feedline connection);
1 Needle Kit
1 Instruction Manual
1 Anti-Bubbler Adapter & Sleeve
As a result of technical development, the illustrations and descriptions in this instruction manual
can deviate in detail from the actual unit delivered.
1.3 For Your Safety
For safe and successful operation of the unit, read these instructions completely. If the instructions
are not observed, the manufacturer can assume no responsibility.
• Observe general safety regulations for the handling of chemicals!
• Observe manufacturer’s instructions! Request a safety data sheet for the product used!
• When working with pressurized air, wear protective glasses!
1.4 Features
• Slim, lightweight, patented sealless dispense valve
• Used in semi or fully-automatic process applications
• Two-part, modular construction equipped with a patented quick
disconnect for on-line serviceability
• Designed with a suck-back feature for dispensing accuracy and control
• Adaptable to optional reservoirs based on product package
• Dispenses Loctite innovative chemistries up to 80,000 cPs
• Worldwide Availability
• Worldwide Service
• Application support for integrating both the adhesive and
equipment interface
☞
☞
Page 4
1. Please Observe the Following (continued)
2
1.5 Usage
The Loctite®Dispense Valve is a slim, lightweight, and user-friendly valve that contains a “suckback” feature that eliminates product dripping and stringing at the end of the dispense cycle.
It also features a two-part, modular construction for on-line serviceability.
The Dispense Valve applies Loctite
®
products in dots, drops, and beads by the process means of
semi or fully automatic systems. The valve can be used in both stationary or
advancing modes.
Recommended viscosity ranges: 97113 – up to 15,000 cPs
97114 – up to 80,000 cPs
2. Description
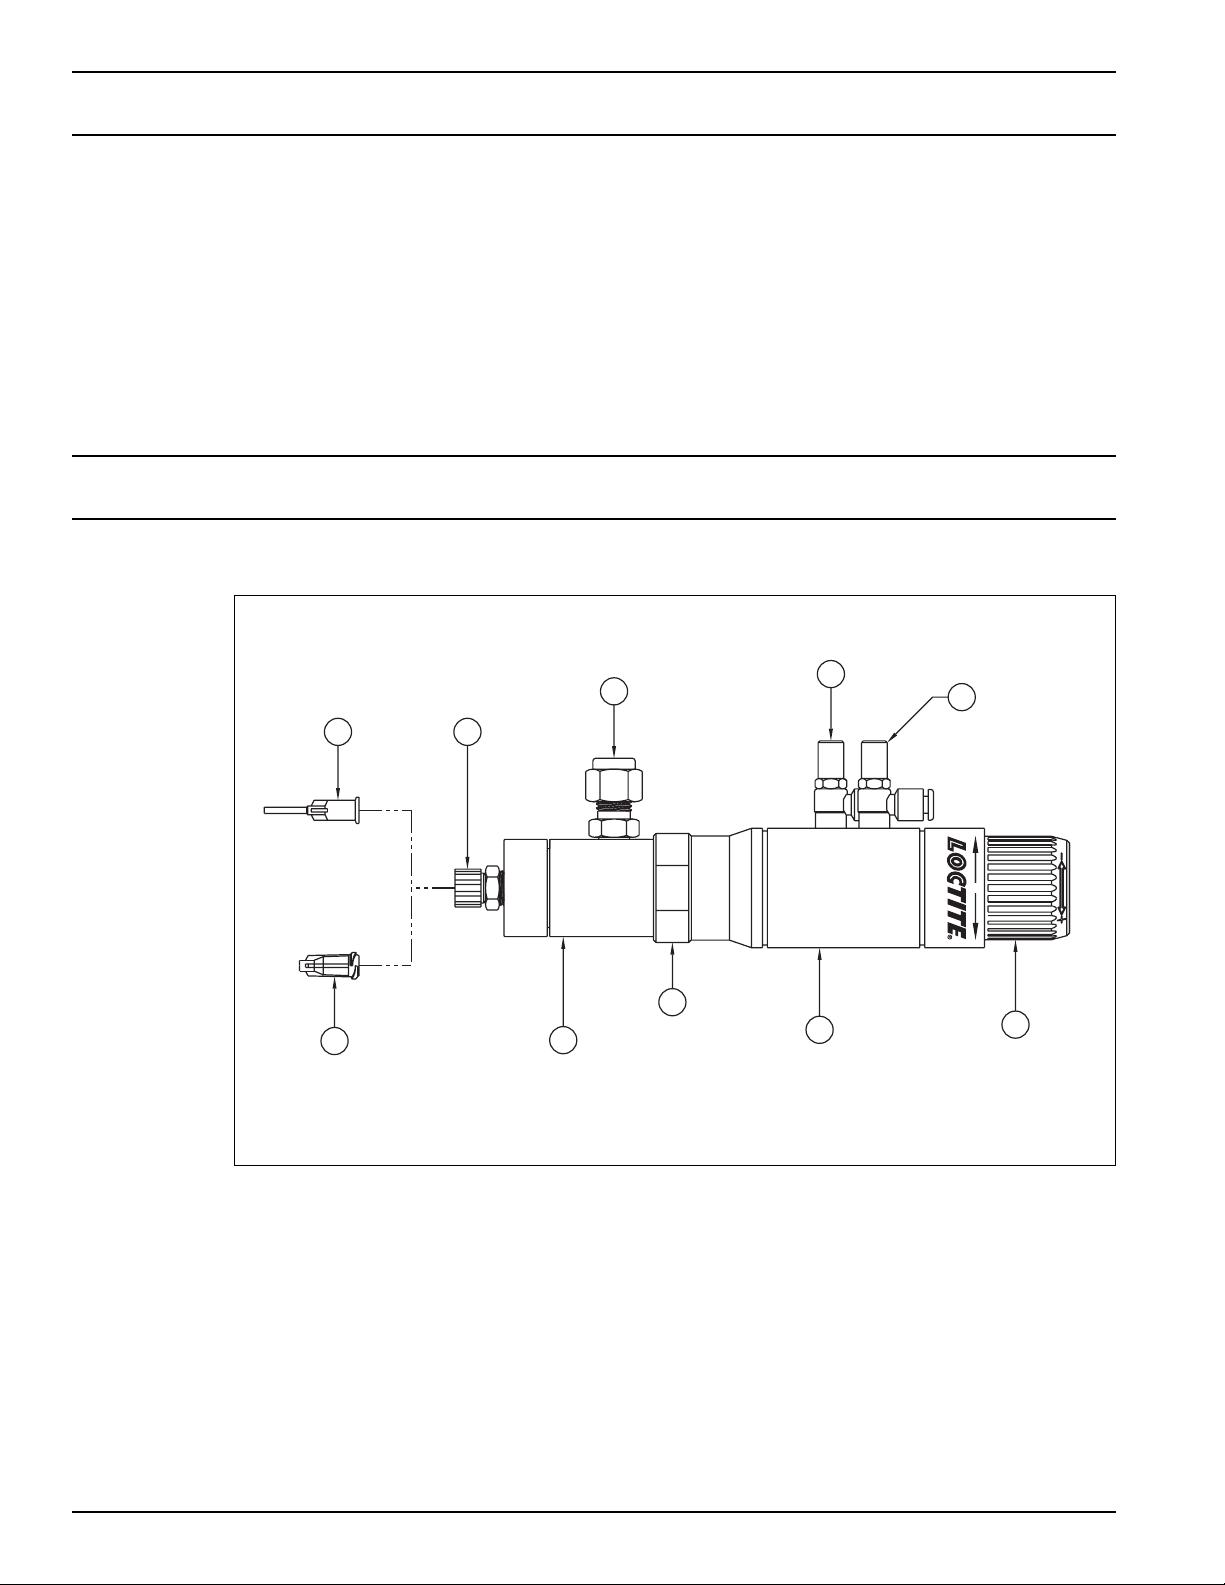
2.1 Operating Elements and Connections
1
3
5
8
9
Dispense
Needle
Luer-Lok
Adapter
Product Feed
Line Connection
Air Outlet
Choke Open
Air Outlet
Choke
Close
PART NO. 97113
10
7
6
4
2
Luer-Lok
Tip Cap
Shutoff Valve
Assembly
Locking
Nut
Actuator
Assembly
Adjustment
Knob
Figure 1. Component Identification
Locking nut
Locks the bayonet connection between the valve assembly 4 and the actuator assembly 7.
Air outlet choke
Affects the opening speed of the dispensing valve.
Air outlet choke
Affects the closing speed of the dispensing valve.
Adjustment knob
For the stroke of the shutoff piston.
Page 5

2. Description (continued)
3
2.2 Theory of Operation
An uncovered bottle of Loctite®product is placed directly into the reservoir and the reservoir lid is
clamped in place.
The reservoir is then pressurized from a Loctite controller using clean, filtered dry air. Air within the
reservoir will push down on the liquid in the bottle and force it through the product feedline to the
shutoff valve.
The amount of product dispensed is controlled by 3 main factors:
1. Amount of pressure in the reservoir.
2. Length of time the shutoff valve remains open.
3. Dispensing needle size.
With the closing of the piston in the Dispensing Valve, a negative pressure (suck-back effect) is
produced that prevents the product from continuing to run or drip out of the dispensing needle 1.
This suck-back effect can be changed by adjusting the piston stroke with the adjustment knob 10.
The main purpose of the adjusting knob is to control the amount of suck-back. There is a small
amount of flow control in the first 1/2 turn of the adjusting knob - after that point, the adjusting
knob only controls the suck-back effect.
The opening and closing of the Dispense Valve 97113 / 97114 are influenced by the speed with
which the pressurized air can escape from the double action actuator assembly.
The opening speed of the dispensing valve can be changed with the air outlet choke 8.
The closing speed of the dispensing valve can be changed with the air outlet choke 9.
With the changing of the opening and closing speed for the Dispensing Valve, the dispensed
quantity is also changed.
☞
☞
Page 6
4
3. Technical Data
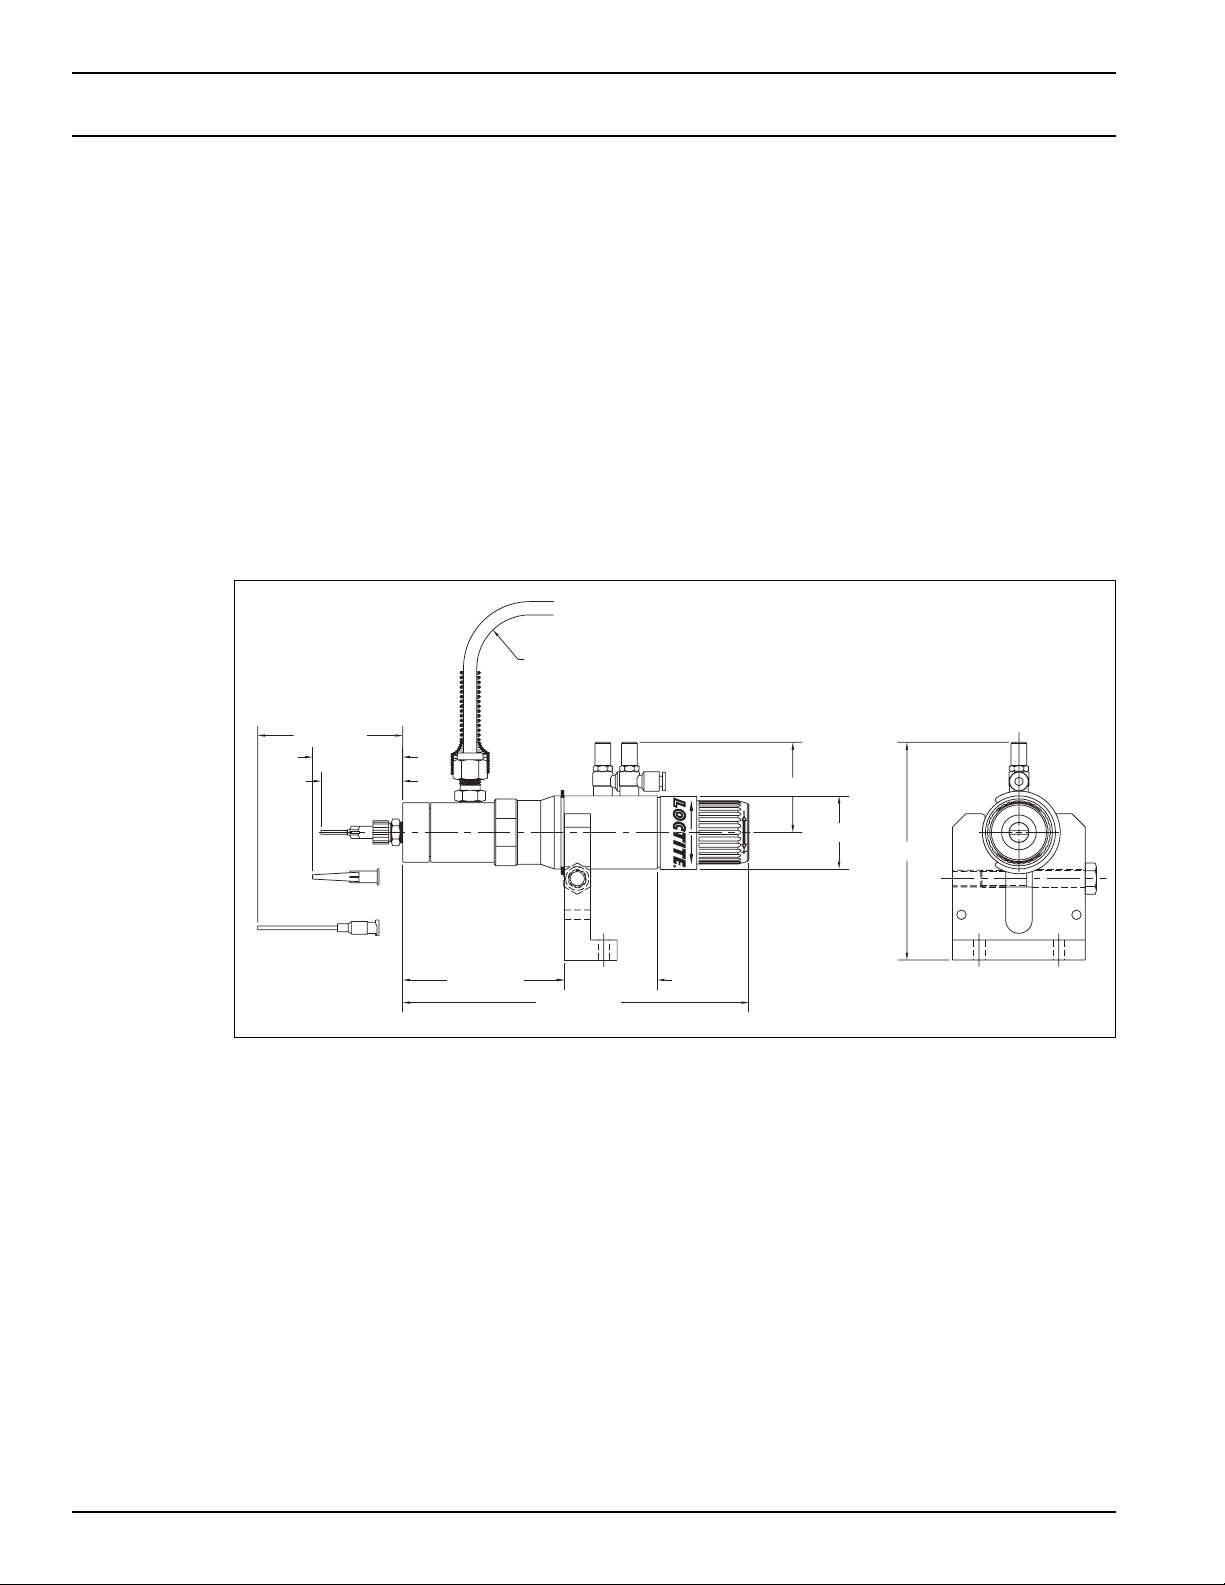
Valve Dimensions
Pneumatic supply min. 4.08 Bar (min. 60 psi)
max. 90 psi
Quality Filtered 10 µm, oil-free, non-condensing
If the required quality is not
achieved, install a LOCTITE
®
filter regulator. Accessory Order No. 97120
Pneumatic hose size, supply Minimum 1/4 I.D.
Control air connection 4 mm (.157 in.)
Product feedline 6.3 mm (1/4 in.) or 9.5 mm (3/8 in.)
Weight 0.340 kg (.75 lbs.)
R 3" [76.2mm]
MINIMUM
2.66" [67.6
1.70" [43.18 mm]
1.56" [39.6 mm]
mm]
3.03" [77.06 mm]
1.76" [44.60 mm]
6.51" [165.42 mm]
PART NO. 97113
CLAMPING
SURFACE
1.69" [43.04 mm]
1.375" [34.92 mm]
4.10" [104.01 mm]
Page 7
5
4. Installation
B. Anti-bubbler Installation - 3/8" Feedtube
Install spring guard, fitting nut, and ferrule onto the feedline. Insert feedline into fitting located in
reservoir lid. Insert anti-bubbler into 3/8" feedline. Position feedline so that the anti-bubbler is close
to the bottom of the adhesive bottle.
4.2 Connecting Airlines
Connect the blue 4 mm O.D. airline to the lower fitting/air outlet choke, farthest fitting from the
knob (see Figure 1 item 8). The other end of the airline will be connected to the normally opened
port of a 4-way solenoid valve.
Connect the yellow 4 mm O.D. airline to the upper fitting/air outlet choke closest fitting to the knob
(see Figure 1 item 9). The other end of the airline will be connected to the normally closed port of
a 4-way solenoid valve.
Adapter
Feedline to Valve
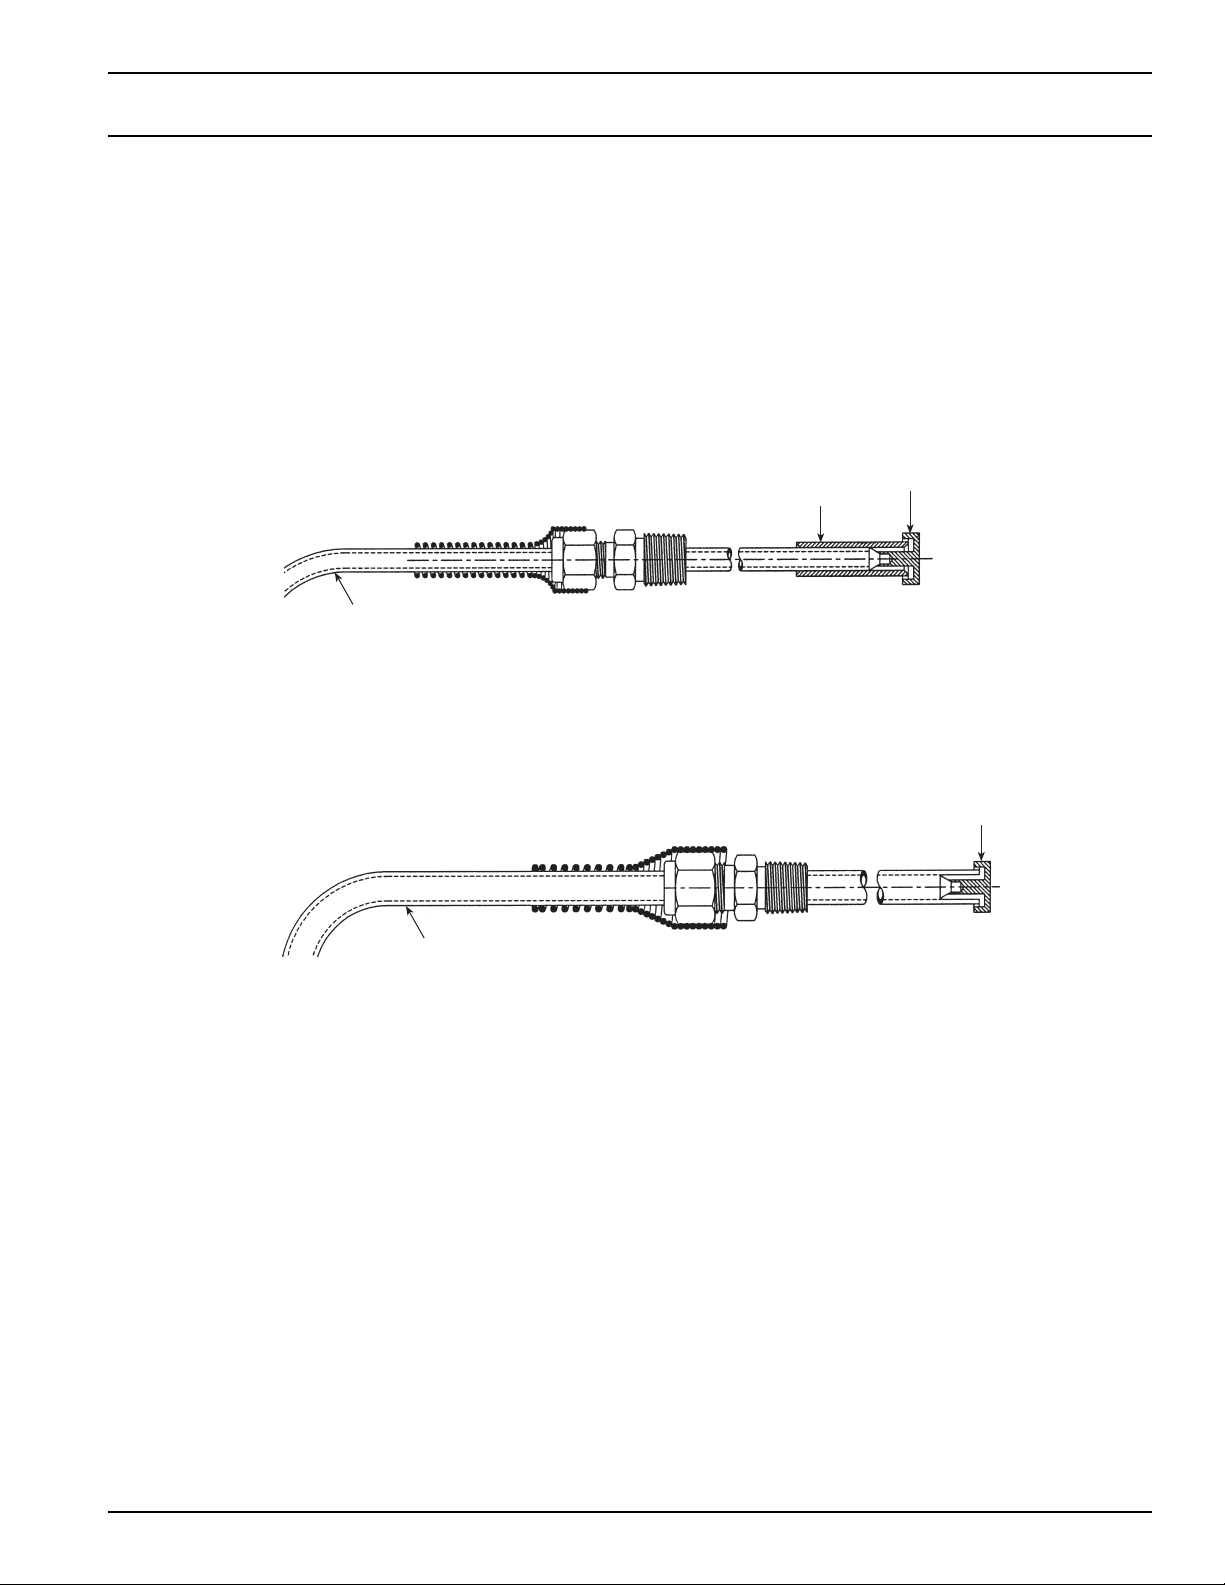
4.1 Installing the Anti-Bubbler to .5 liter and 2 liter Reservoirs
Anti-bubbler
The anti-bubbler is inserted at the end of the feedtube which resides in the product reservoir. The
purpose of the anti-bubbler is to minimize the amount of adhesive which will run out of the
feedtube when the reservoir lid is removed to re-fill the product reservoir.
A. Anti-bubbler Installation - 1/4" Feedtube
Install spring guard, fitting nut, and ferrule onto the feedline. Insert feedline into fitting located in
reservoir lid. Insert anti-bubbler into anti-bubbler connection sleeve. Push anti-bubbler connection
sleeve onto 1/4" feedline. Position feedline so that the anti-bubbler is close to the bottom of the
adhesive bottle.
Connection
Sleeve
Adapter
Feedline to Valve
Page 8
6
5. Dispensing
5.1 Priming the Dispensing Valve
To avoid air bubbles during dispensing, the product line must be filled and then purged of air. The
dispensing valve must be very carefully purged of air to achieve error-free dispensing.
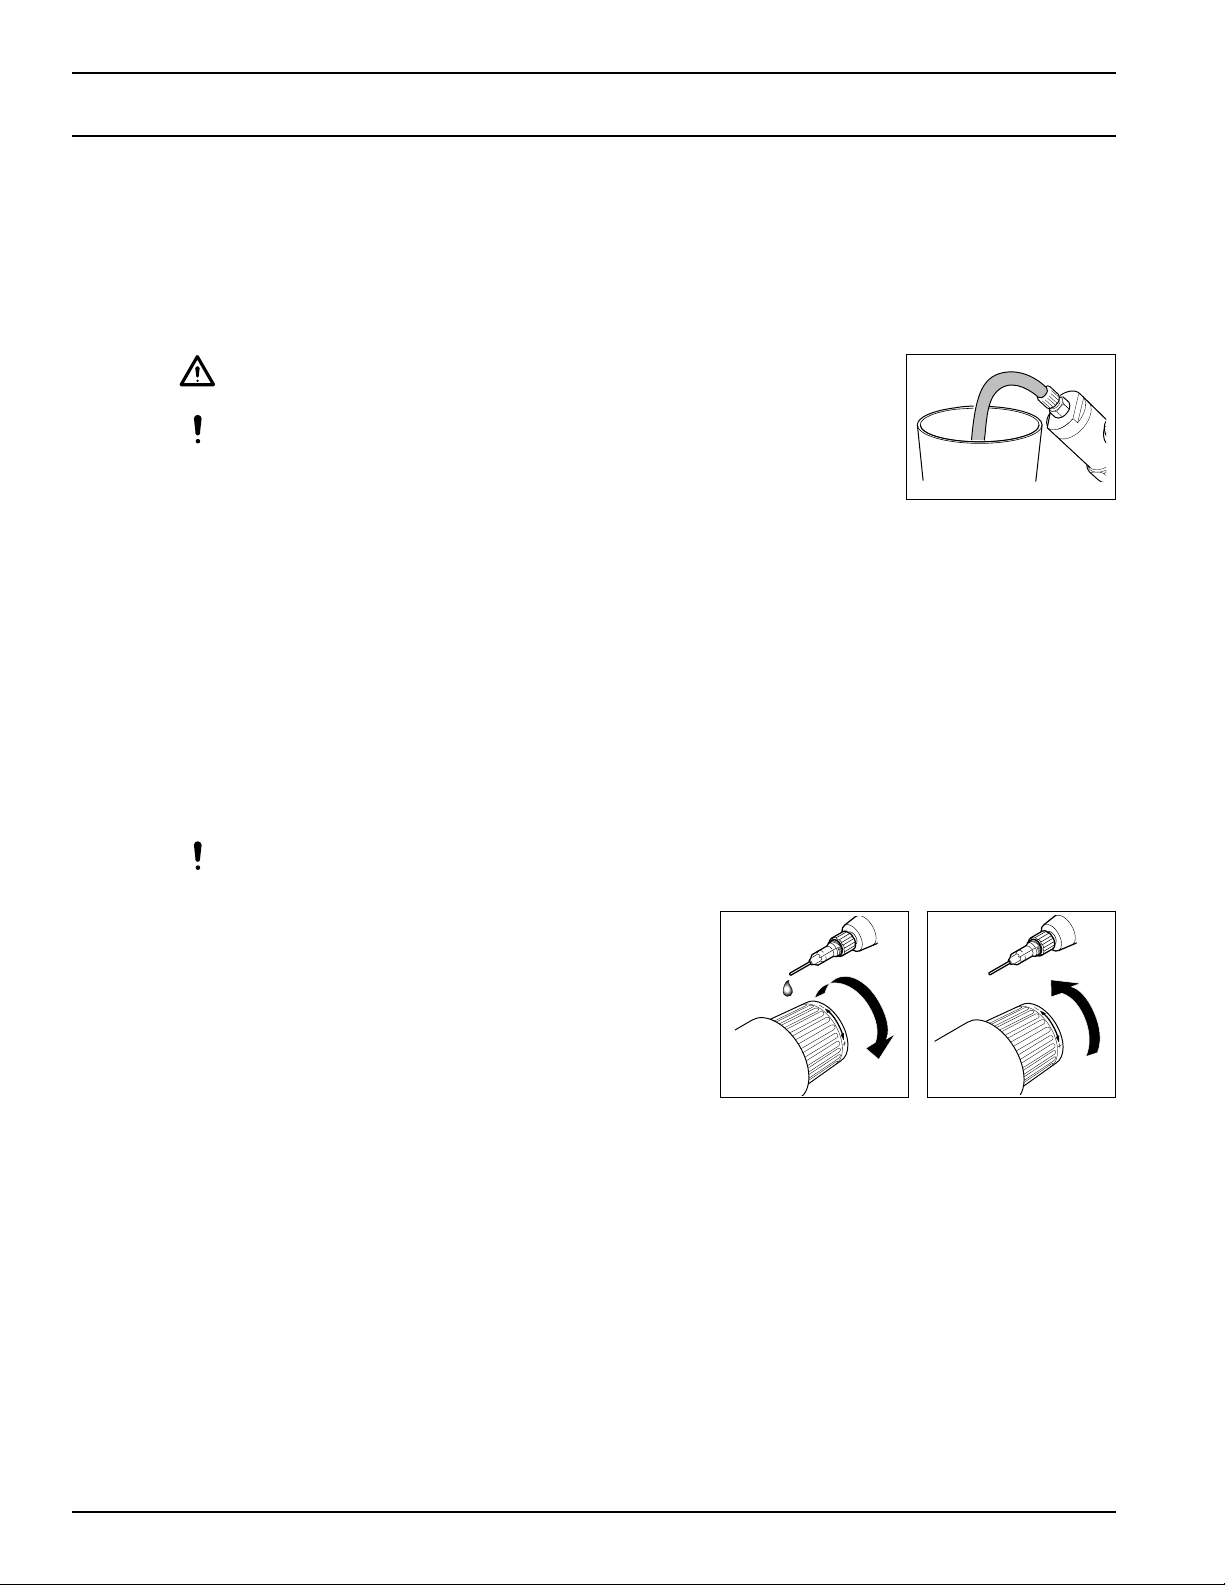
• To fill the product line, hold the dispensing valve slanted upward so that no air will be trapped
inside the valve chamber.
• Slide the silicone tubing provided over the dispensing needle.
• Bend the silicone tubing downward to avoid uncontrolled
squirting of the product.
• Place a container under the dispensing valve since the product
will flow out.
• Perform the filling of the product feedline according to the operating
instructions of the various Controllers.
5.2 Adjusting the Dispensed Quantity
Before the dispensing quantity is adjusted, the stroke of the shutoff piston should be adjusted on
the Dispensing Valve. With the changing of the piston stroke, the dispensed quantity is also
changed for the same dispensing pressure.
The opening and closing speed of the dispensing valve can be changed with the air outlet chokes.
With the changing of the opening and closing speed for the dispensing valve, the dispensed
quantity is also changed.
5.2.1 Adjusting the Suck-Back Effect (Piston Stroke)
The piston stroke should be adjusted so that the product no longer drips out of the
dispensing needle.
The product must not be sucked back too far since, when using cyanoacrylates, curing can
occur in the needle and valve and cause malfunction.
• Initiate a time-controlled dispensing start (approx.
0.50 sec. long). When necessary, change the
piston stroke with the adjustment knob 10:
Product drips:
– Turn the adjustment knob in the + direction.
The piston stroke (suck-back effect) is increased.
Product dispensing is delayed after a start:
– Turn the adjustment knob in the – direction.
• Perform the adjustment of the dispensed quantity according to the operating instructions of the
various Controllers.
☞
☞
+
–
Page 9
7
5. Dispensing (continued)
5.2.2 Adjusting the Air Outlet Chokes
For most dispensing tasks, the air outlet chokes should be completely open. The air outlet chokes
must be adjusted when:
– Very low viscosity (thin bodied) adhesive is dispensed or:
– An extremely exact point or bead application is required.
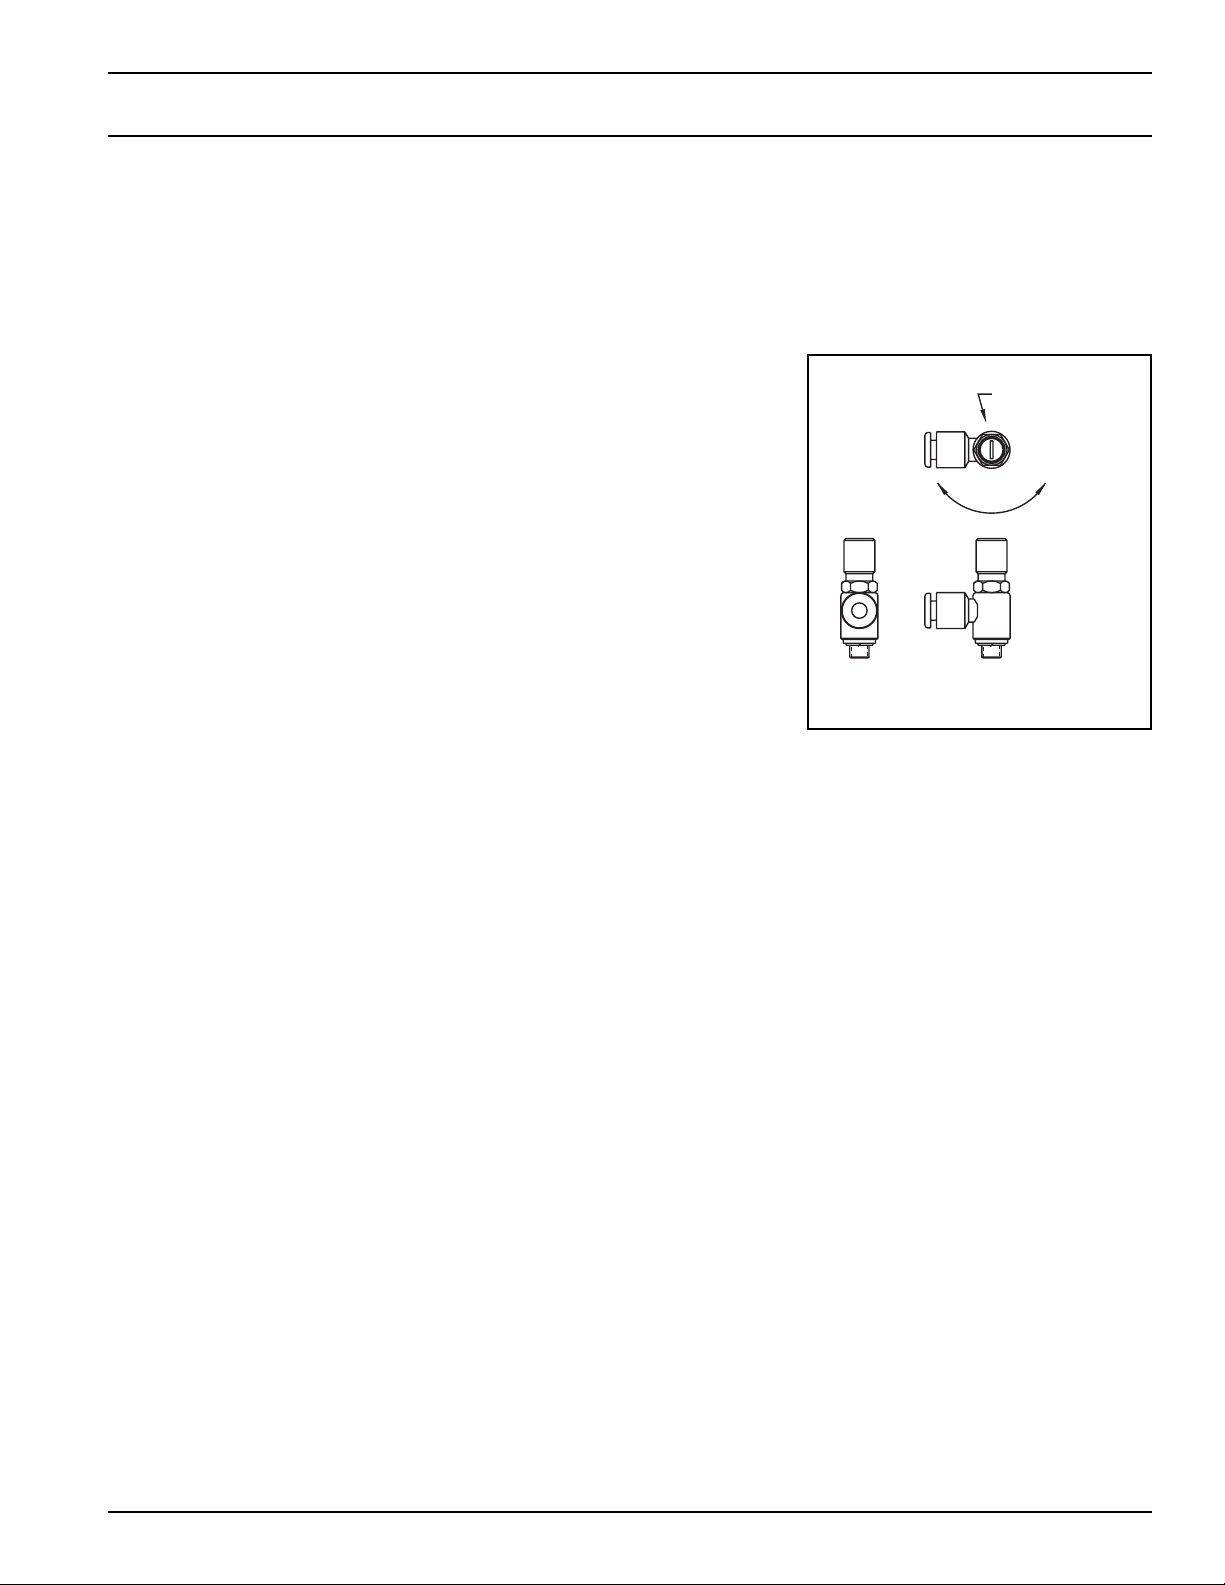
Adjustment of the air outlet chokes
The air outlet chokes are provided to slow the actuation
speed of the valve. The air outlet chokes, used on this
valve, allows air to free flow into the actuator and controls
the rate at which the exhaust air is metered out of the
actuator. Refrerring to Figure 1 the air outlet choke 8
allows pressurized air into the actuator, which shuts off
product flow. Air outlet choke 9 allows air into the actuator
to open the valve thus allowing product to flow through
the valve.
For most applications the air chokes should be set for
maximum airflow. Maximum flow is achieved by turning
the adjustment screw all the way in a counterclockwise
direction.
For bead dispensing it may be helpful to open the valve
slower to improve bead consistence from start to finish.
This is done by:
1. Locate air choke 8.
2. Turn adjustment screw all the way in a clockwise direction.
3. Turn adjustment screw one or two revolutions in the counterclockwise direction.
4. Actuate the valve and observe speed at which the valve opens.
5. Repeat steps 3 and 4 until valve is operating at desired speed.
For dispensing acrylic adhesive slowing the shut off speed of the valve may reduce micro bubbles
from forming within the product chamber of the valve. This is done by:
1. Locate air choke 9.
2. Turn adjustment screw all the way in a clockwise direction.
3. Turn adjustment screw one or two revolutions in the counterclockwise direction.
4. Actuate the valve and observe speed at which the valve opens.
5. Repeat steps 3 and 4 until valve is operating at desired speed.
☞
OUTLET CHOKE
CW CCW
SCREWDRIVER
ADJUSTMENT
Page 10
8
5. Dispensing (continued)
5.3 Shutdown
• To protect anaerobic products from curing, remove needle leaving Luer-Lok adapter exposed
to air.
• To protect all other products from curing, place a protective cap on the dispensing needle.
• If for some reason the product being dispensed changes, contact your local salesperson for
the recommended procedures.
5.4 Returning to Operation
• Remove the protective cap from the dispensing needle.
• If needed, purge the product feedline and dispensing valve of air (see Section 5.1).
Returning to Operation After Longer Periods of Non-use
• Remove the Luer-Lok tip cap.
• Purge the product feedline and dispensing valve of air (see Section 5.1).
• Perform the adjustment of the dispensing quantity according to Section 5.2.
5.5 Disassembling the Dispensing Valve
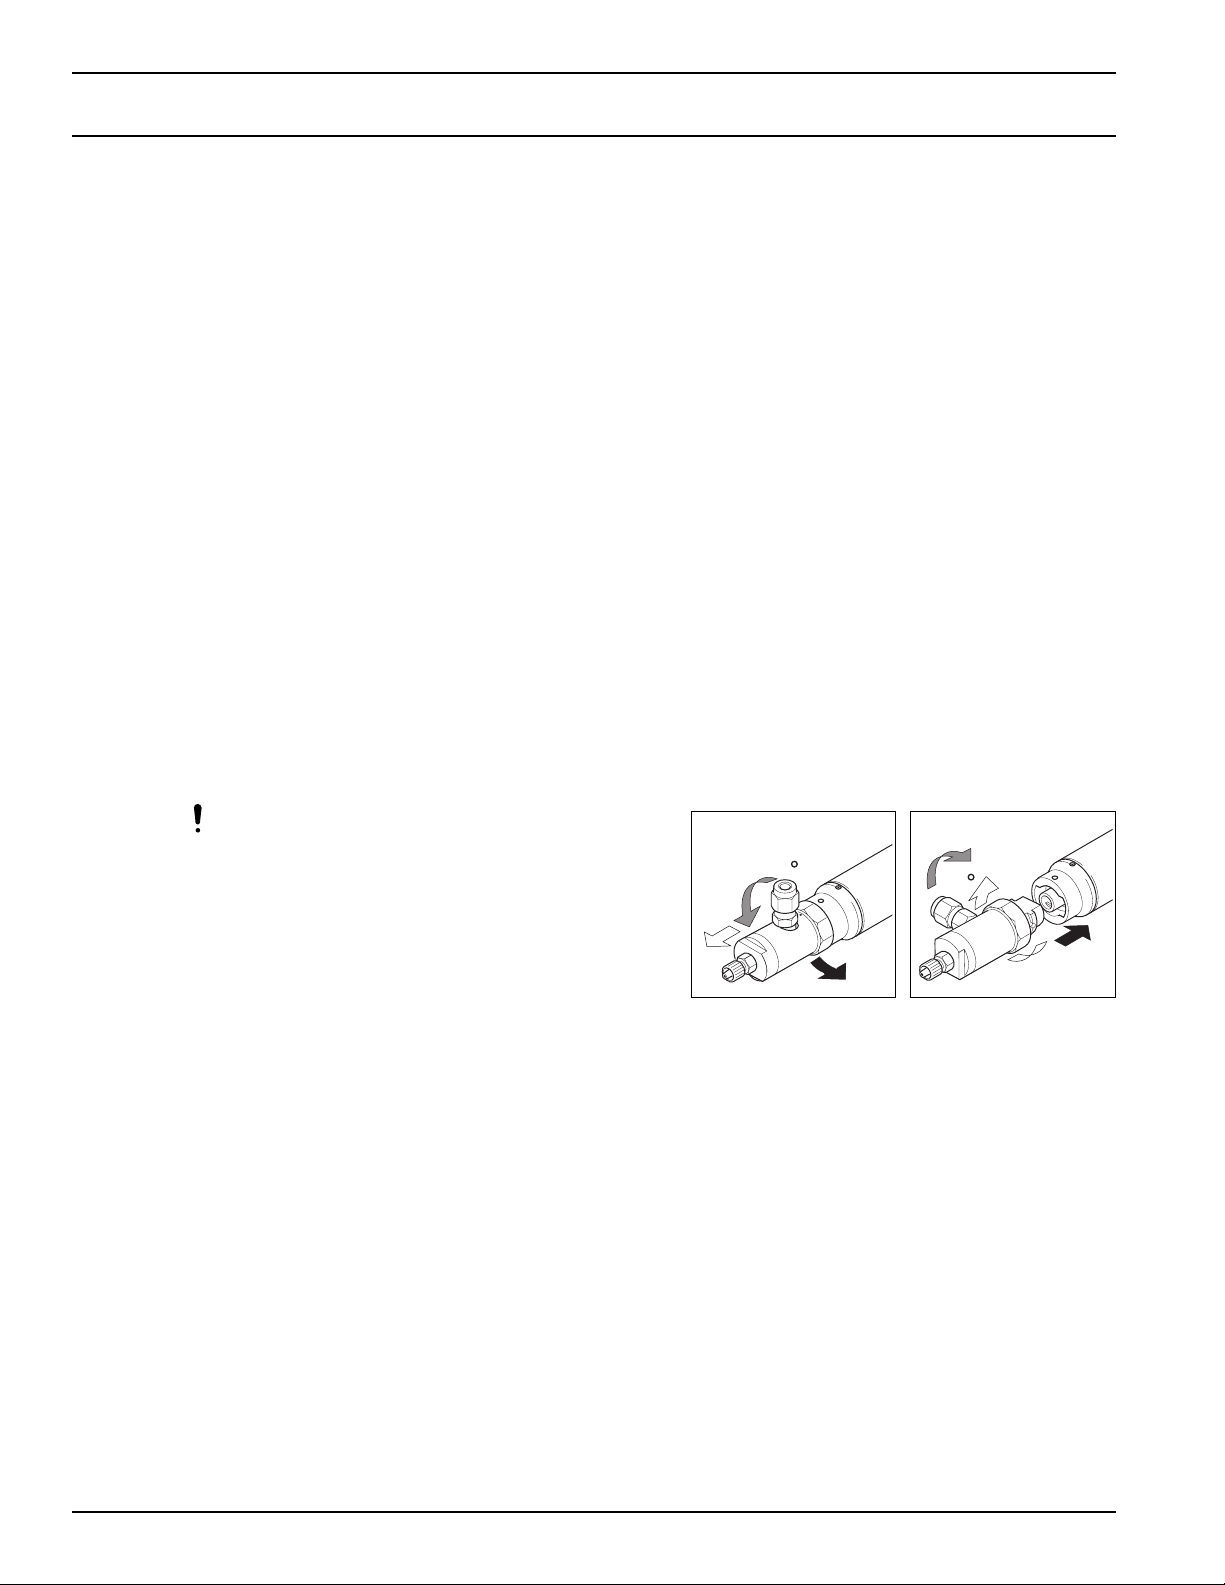
To replace the valve assembly or the actuator assembly, the bayonet lock of the dispensing valve
can easily be opened.
• Loosen the locking nut 6, turn the valve assembly 4 by 90° counterclockwise and pull out.
• Reassemble the dispensing valve with the replaced part in the reverse order. In this case,
there must not be any pneumatic pressure on the actuator.
Tighten the locking nut not only hand tight,
but also lightly with a wrench.
☞
90
90
Page 11
9
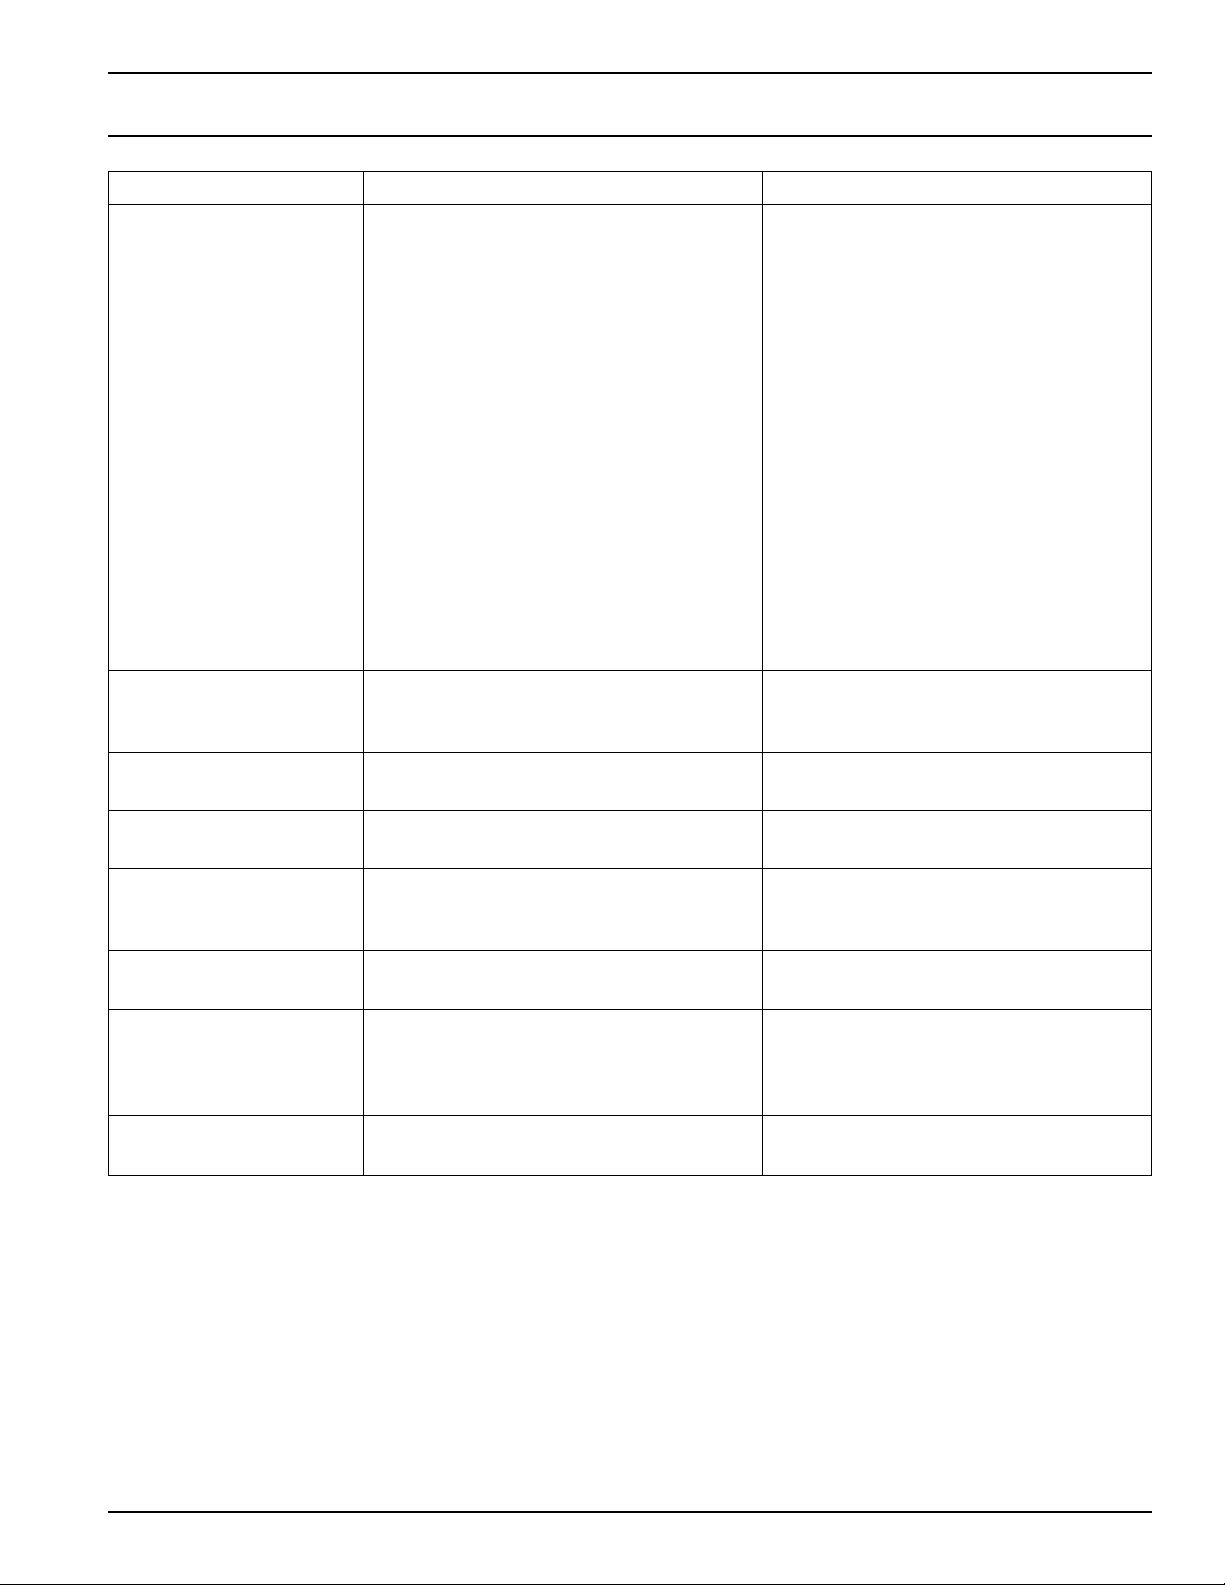
Type of Malfunction Possible Cause Correction
No product or too little – Product feedline not correctly connected. • Correctly connect the product feedline.
product. – Pneumatic hose not correctly connected. • Correctly connect the pneumatic
feedline.
– Curing in the product feedline and/or in • Replace the product hose and/or valve
the dispensing valve and/or in the assembly of the dispensing valve
dispensing needle, when the adjustment and/or dispensing needle.
knob 10 does not move for a start and
no product is dispensed.
– Air in the product feedline and/or in • Purge the product feedline, dispensing
the dispensing valve and/or in the valve and dispensing needle of air
dispensing needle, when the adjustment (section 5.1).
knob 10 moves for a start and no
product is dispensed.
– Controller incorrectly adjusted. • Check the controller (see operating .
instruction for the controller).
Loctite Service.
– Product reservoir not switched on, or • Check the reservoir (see operating
pressure is too low. instruction for the product reservoir).
– Valve is closed. • Increase stroke.
Air bubbles in – Air in the dispensing • Purge the product feedline,
product. valve/product feedline. dispensing valve and dispensing
needle of air (Section 5.1).
Product comes delayed – Piston stroke (suck-back effect) • Reduce the piston stroke.
after a start. too large.
Product drips. – Piston stroke (suck-back effect) • Increase the piston stroke.
too small.
Dispensing valve does – Air outlet choke 8 closed. • Open the air outlet choke 8.
not open. – Piston stroke set to O. • Turn the adjustment knob 10 counter-
clockwise (+ direction).
Dispensing valve – Air outlet choke 8 opened too wide. • Adjust the air outlet choke 8.
opens too fast.
Dispensing valve – Air outlet choke 9 closed. • Open the air outlet choke 9.
does not close. – Bayonet locking piece is not • Tighten counter nut 6 with a wrench.
tight enough.
– Tubing not properly seated. • Push tubing into fitting.
Dispensing valve – Air outlet choke 9 opened too wide. • Adjust the air outlet choke 9.
closes too fast.
6. Troubleshooting
Page 12
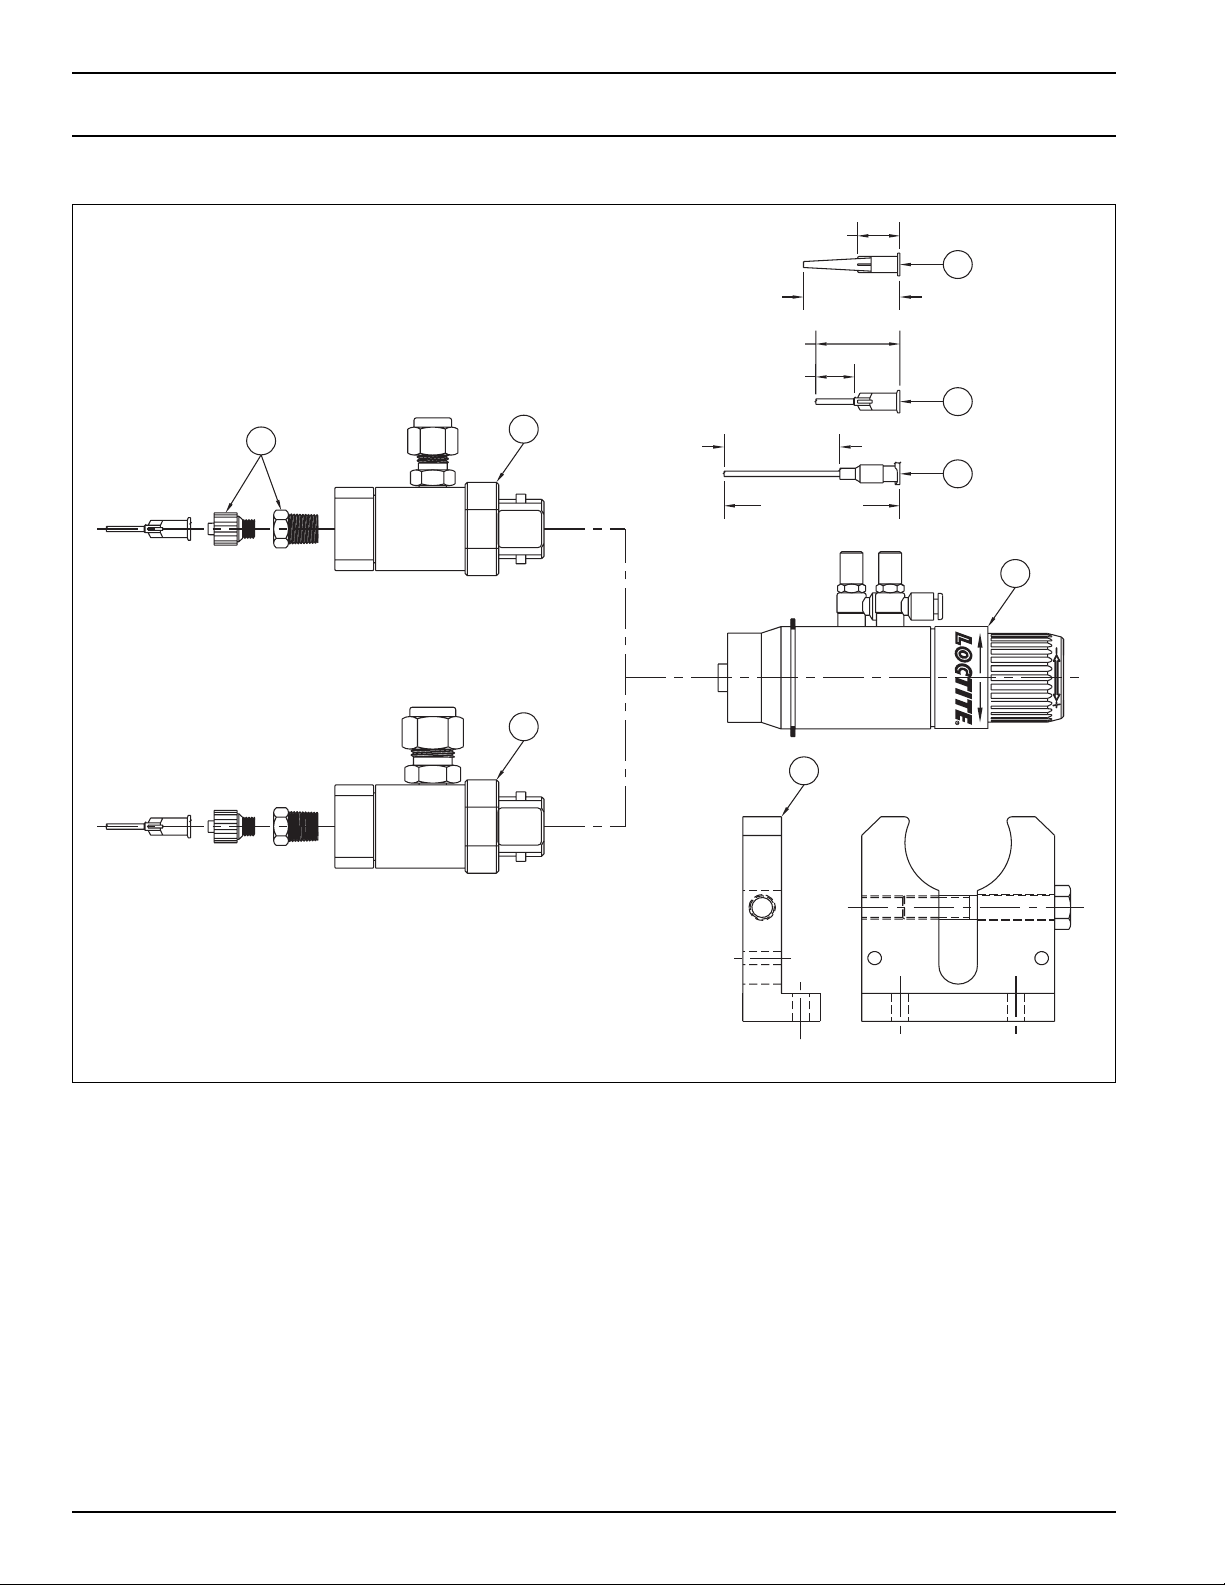
10
7. Accessories and Spare Parts
7.1 Figure 8
PART NO.
97239
PART NO.
97240
6.3MM Feed Line
9.5MM Feed Line
1
2
3
4
5
6
7
8
Taper Tip
Needle
Tip Needle
Stainless Steel
Flexible Tip
Needle
Luer-Lok
Adapter Kit
Shut-off Valve
Shut-off Valve
Actuator
Assembly
Bracket
Mounting
1.09" [27.7mm]
.50" [12.7 mm]
2.19" [55.6 mm]
1.41" [35.8 mm]
.55" [14.0 mm]
1.25" [31.8 mm]
PART NO. 97113
Page 13
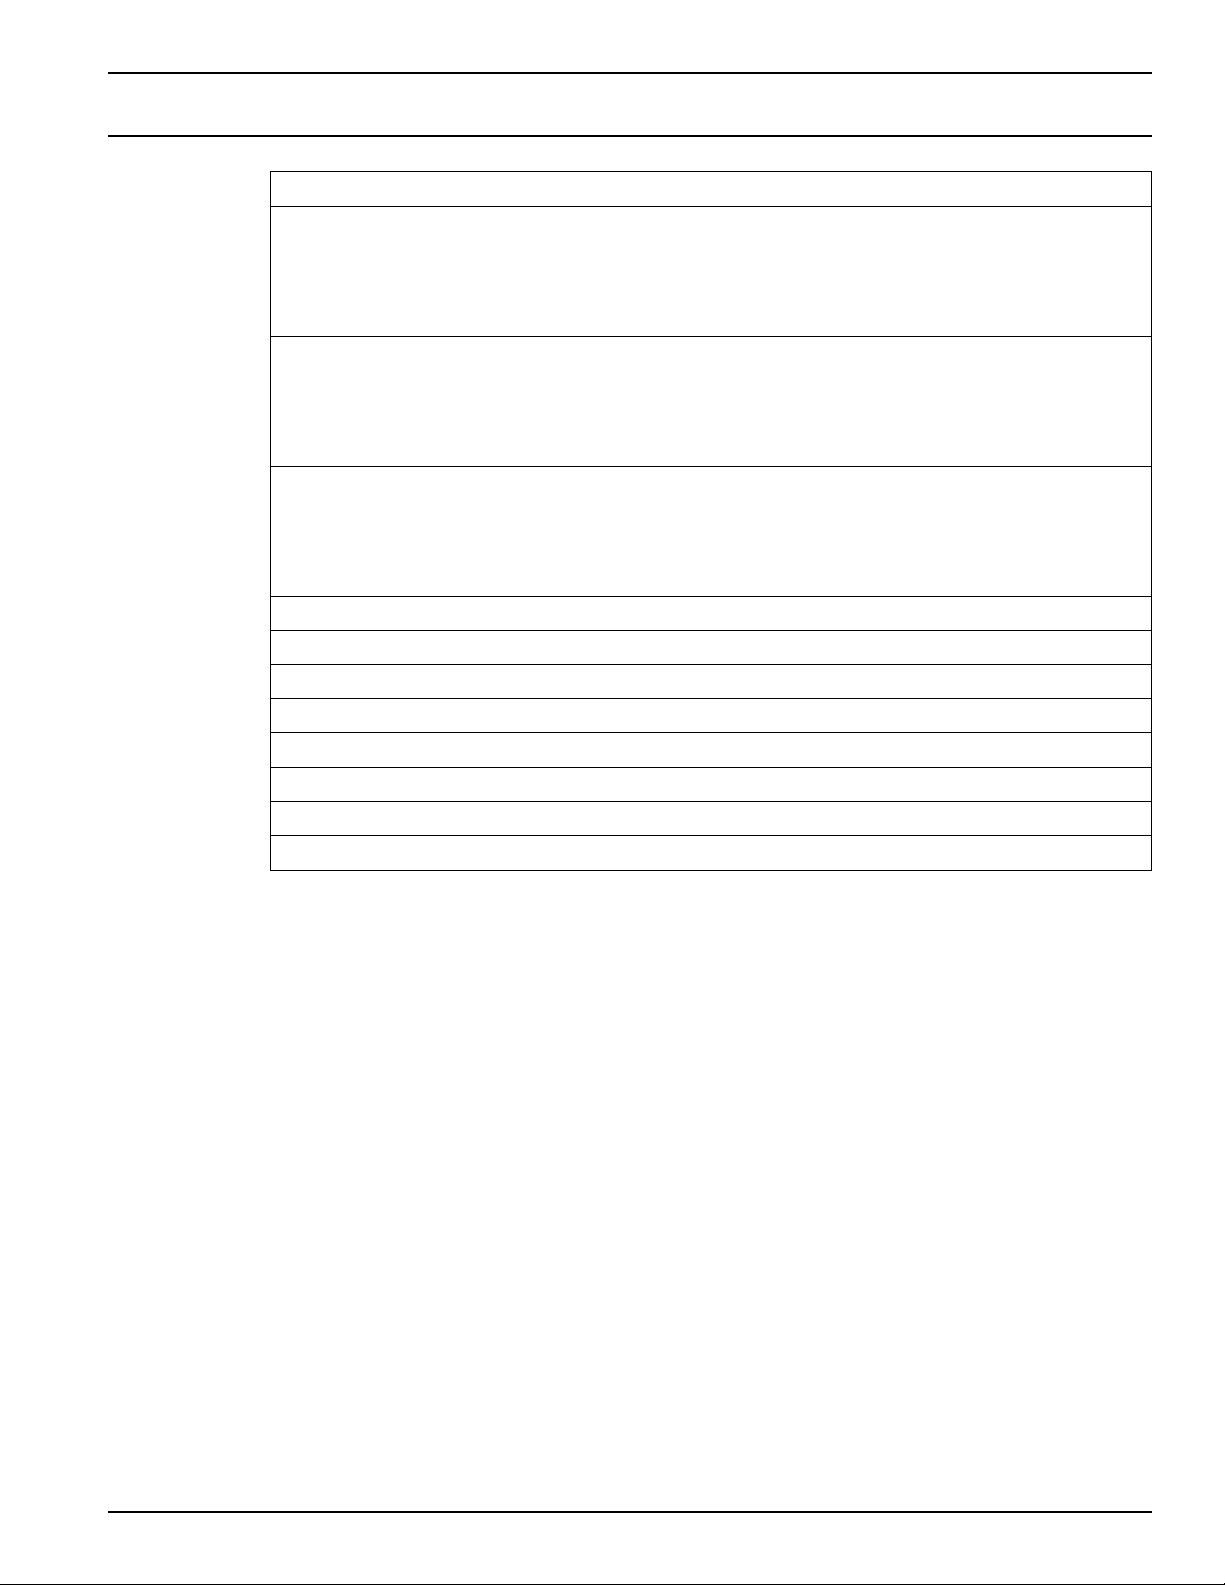
11
Pos. No. Description Loctite Order No.
1 Dispense Needle, Polyethylene – Taper Tip,
Dispense Needle 16GA (50 pcs/box), ID Size 1.20 mm, grey 97221
Dispense Needle 18GA (50 pcs/box), ID Size 0.84 mm, green 97222
Dispense Needle 20GA (50 pcs/box), ID Size 0.58 mm, pink 97223
Dispense Needle 22GA (50 pcs/box), ID Size 0.41 mm, blue 97224
2 Dispense Needle, Stainless Steel – Straight,
Dispense Needle 15GA (50 pcs/box), ID Size 1.37 mm, amber 97225
Dispense Needle 18GA (50 pcs/box), ID Size 0.84 mm, green 97226
Dispense Needle 20GA (50 pcs/box), ID Size 0.60 mm, pink 97227
Dispense Needle 25GA (50 pcs/box), ID Size 0.26 mm, red 97228
3 Dispense Needle, Polypropylene – Flexible,
Dispense Needle 15GA (50 pcs/box), ID Size 1.38 mm, grey 97229
Dispense Needle 18GA (50 pcs/box), ID Size 0.83 mm, pink 97230
Dispense Needle 20GA (50 pcs/box), ID Size 0.62 mm, yellow 97231
Dispense Needle 25GA (50 pcs/box), ID Size 0.34 mm, red 97232
4 Luer-Lok-Adapter Kit 97233
5 Shut-off Valve Assembly 6.3 mm 97239
6 Shut-off Valve Assembly 9.5 mm 97240
7 Actuator Assembly 97291
8 Mounting Bracket 97242
9 Filter Regulator (Not Shown) 97120
10 Anti-Bubbler Connection Sleeve (See section 4.1) 992663
11 Anti-Bubbler Adapter (See section 4.1) 992533
7. Accessories and Spare Parts (continued)
Page 14

12
8. Warranty
Henkel Loctite expressly warrants that all products referred to in this Instruction Manual Dispense
Valve 97113 & 97114 (hereafter called “Products”) shall be free from defects in materials and
workmanship. Liability for Henkel Loctite shall be limited, at its option, to replacing those Products
which are shown to be defective either in materials or workmanship or to credit to the purchaser
the amount of the purchase price thereof (plus freight and insurance charges paid therefore by the
user). The purchaser’s sole and exclusive remedy for breach of warranty shall be such
replacement or credit.
A claim of defect in materials or workmanship in any Products shall be allowed only when it is
submitted to Henkel Loctite in writing within one month after discovery of the defect or after the
time the defect should reasonably have been discovered and in any event, within twelve months
after the delivery of the Products to the purchaser. No such claim shall be allowed in respect of
Products which have been neglected or improperly stored, transported, handled, installed,
connected, operated, used or maintained or in the event of unauthorized modification of the
Products including, where products, parts or attachments for use in connection with the Products
are available from Henkel Loctite, the use of products, parts or attachments which are not
manufactured by Henkel Loctite.
No Products shall be returned to Henkel Loctite for any reason without prior written approval from
Henkel Loctite. Products shall be returned freight prepaid, in accordance with instructions from
Henkel Loctite.
NO WARRANTY IS EXTENDED TO ANY EQUIPMENT WHICH HAS BEEN ALTERED, MISUSED,
NEGLECTED, OR DAMAGED BY ACCIDENT, OR IF THE SYSTEM USED TO DISPENSE ANY
LIQUID MATERIAL OTHER THAN LOCTITE PRODUCTS.
EXCEPT FOR THE EXPRESS WARRANTY CONTAINED IN THIS SECTION, HENKEL LOCTITE
MAKES NO WARRANTY OF ANY KIND WHATSOEVER, EXPRESS OR IMPLIED, WITH
RESPECT TO THE PRODUCTS.
ALL WARRANTIES OF MERCHANTABILITY, FITNESS FOR A PARTICULAR PURPOSE, AND
OTHER WARRANTIES OF WHATEVER KIND (INCLUDING AGAINST PATENT OR TRADEMARK
INFRINGEMENT) ARE HEREBY DISCLAIMED BY HENKEL LOCTITE AND WAIVED BY THE
PURCHASER.
THIS SECTION SETS FORTH EXCLUSIVELY ALL OF LIABILITY FOR HENKEL LOCTITE TO
THE PURCHASER IN CONTRACT, IN TORT OR OTHERWISE IN THE EVENT OF DEFECTIVE
PRODUCTS.
WITHOUT LIMITATION OF THE FOREGOING, TO THE FULLEST EXTENT POSSIBLE UNDER
APPLICABLE LAWS, HENKEL LOCTITE EXPRESSLY DISCLAIMS ANY LIABILITY
WHATSOEVER FOR ANY DAMAGES INCURRED DIRECTLY OR INDIRECTLY IN
CONNECTION WITH THE SALE OR USE OF, OR OTHERWISE IN CONNECTION WITH, THE
PRODUCTS, INCLUDING, WITHOUT LIMITATION, LOSS OF PROFITS AND SPECIAL,
INDIRECT OR CONSEQUENTIAL DAMAGES, WHETHER CAUSED BY NEGLIGENCE FROM
HENKEL LOCTITE OR OTHERWISE.
Page 15
13
9. Declarations of Conformity
Manufacturer
declares that machine contained in this delivery is the machine designated below, is however incomplete and that its
operation is prohibited until it can be determined that the machine is in accordance with the provisions of EC machine
regulations.
Designation of the unit Stationary Applicator
Unit number 97113 or 97114
Applicable EC Regulations EG-Machine Regulations 89/392/EWG, version 93/68/EWG
Applicable harmonized standards DIN EN 292 Part 1 11.1991; DIN EN 292 Part 2 11.1991
Date / Manufacturer’s signature 1995
Information regarding the Signer President – Worldwide Manufacturing (Peter G. Dowling)
For changes to the unit that were not approved by Henkel Loctite, this declaration loses its validity.
– Declarations of Conformity
Loctite Industrial
Henkel Loctite Corporation
1001 Trout Brook Crossing
Rocky Hill, CT 06067-3910
Page 16

Loctite is a registered trademark of Henkel Loctite Corporation, U.S.A.
© Copyright 2002. Henkel Loctite Corporation. All rights reserved. Data in this operation manual is subject to change without notice.
P/N8950088 Rev. E, 01/03
Loctite Industrial
Henkel Loctite Corporation
1001 Trout Brook Crossing
Rocky Hill, CT 06067-3910
Henkel Loctite Automotive
Technology Center
2455 Featherstone Road
Auburn Hills, Michigan 48326
Henkel Loctite Canada Inc.
2225 Meadowpine Boulevard
Mississauga, Ontario L5N 7P2
Henkel Ltda. Brazil
Av. Prof.Vernon Krieble, 91
06690-11-Itapevi
São Paulo-Brazil
Henkel Mexicana, S.A. de C.V.
Calzada de la Viga s/n, Fracc. Los Laureles
Loc. Tulpetlac, C.P. 55090
Ecatepac de Morelos, Edo. de México,
México
www.loctite.com
 Loading...