

Page 1
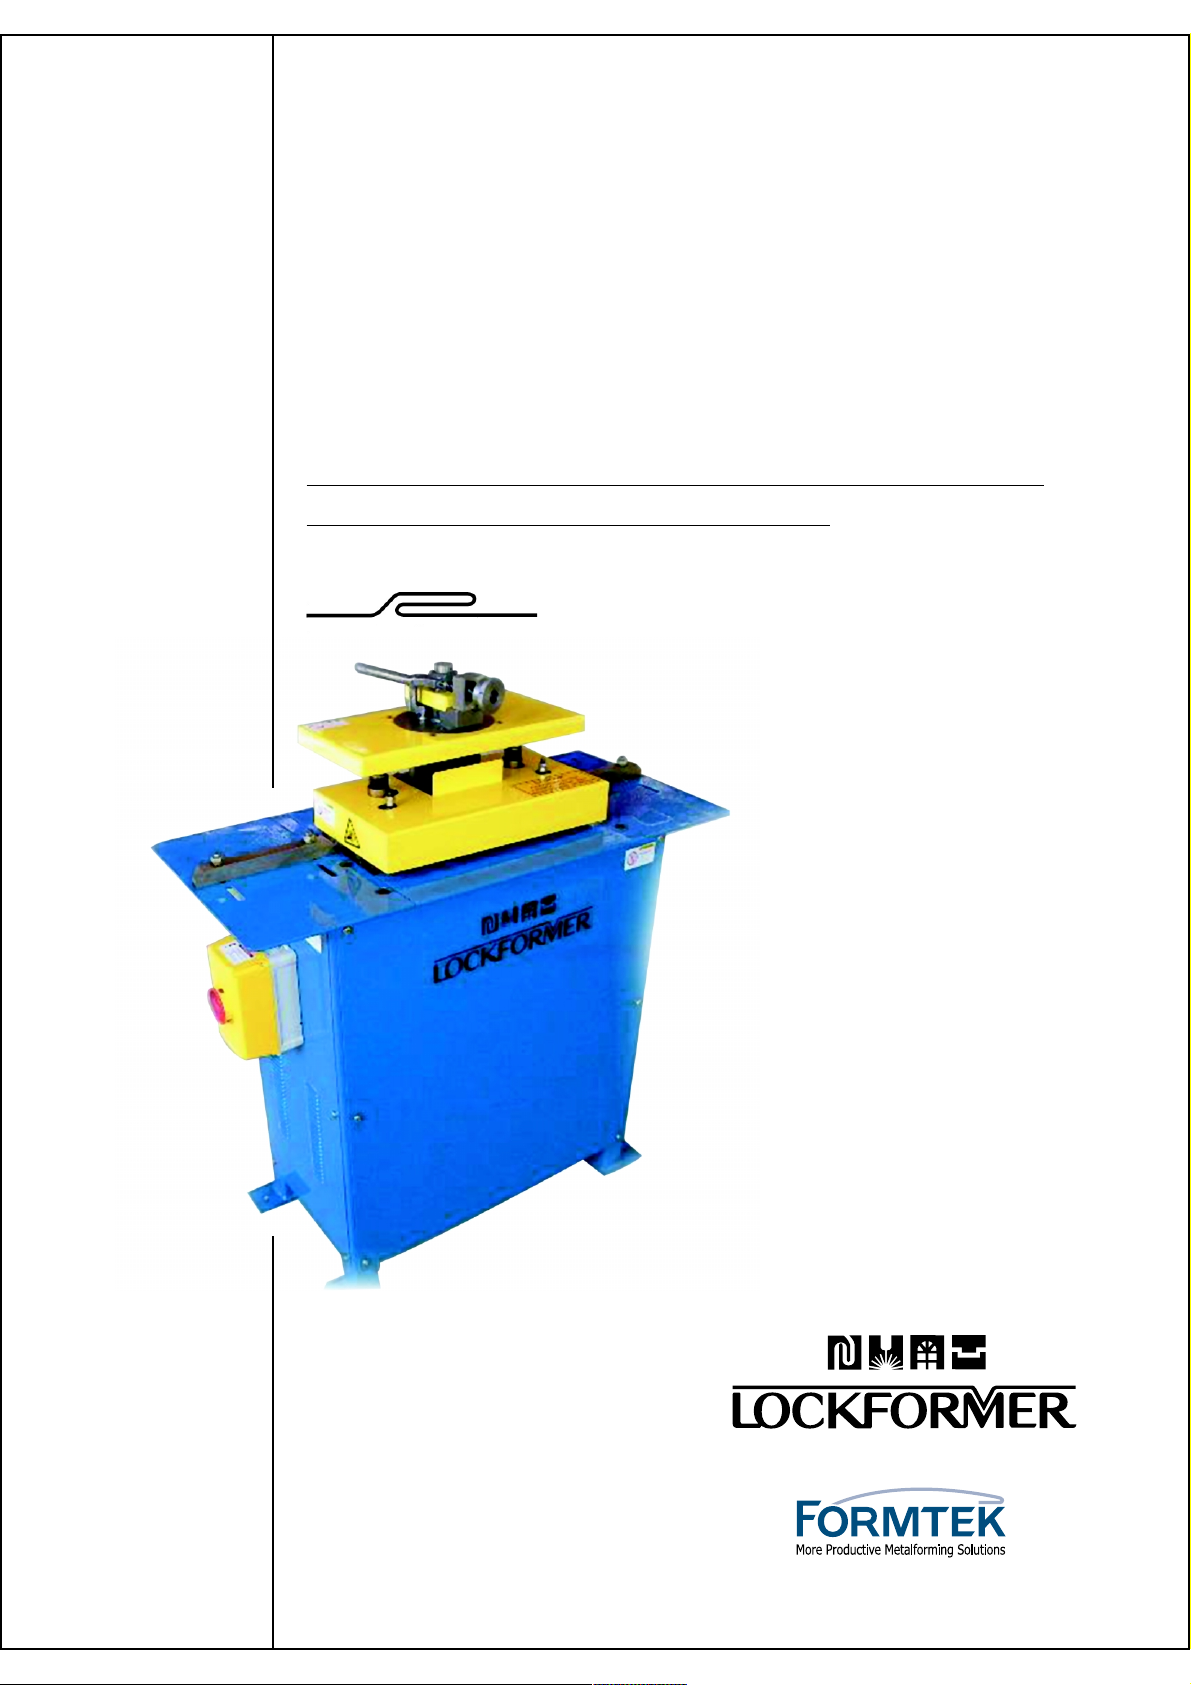
LK-20
OPERATOR’S MANUAL
PITTSBURGH LOCK MODEL 20
WITH AUTO-GUIDE POWER FLANGING ATTACHMENT
INSTRUCTIONS AND PARTS DIAGRAM
VER. US. LK20-02
11-2005
A PRODUCT OF
Page 2

WARNING
THIS EQUIPMENT IS DESIGNED TO BE OPERATED WITH ALL
COVERS SECURED IN PLACE. OPERATION WITHOUT THESE
SAFEGUARDS MAY RESULT IN CONDITIONS WHICH ARE
HAZARDOUS TO THE OPERATOR AND OBSERVERS.
SAFETY GUIDELINES
Before operating the machine, study and follow the safety precautions in this section.
These precautions are intended to prevent injury to you and your fellow workers. They
cannot, however, cover all possible situations. Therefore, EXERCISE EXTREME
CAUTION and use COMMON SENSE before performing any procedure or operation.
Safety Precautions BEFORE Starting The Machine(s)
Only one person should control the machine(s). Never allow anyone to operate the controls while
you are operating or working on this equipment. In addition to disconnecting power always use
lock outs and tagouts to prevent accidental start-up when performing maintenance procedures.
Keep your hands away from internal workings of the machinery when starting, running or
stopping.
Keep your work area clean. Remove all scrap, oil spills, rags, tools and other loose items that
could cause you to slip, trip and fall.
When cleaning the machine or any of its components, do not use toxic or flamable substances.
Do not perform any cleaning while the equipment is running.
Never override or disable any safety switch or safety interlock.
If so equipped, make sure that hydraulic and pneumatic pressures are at specified levels before
operating this equipment.
Do not operate the rollformer unless all covers and guards are in place.
Be sure that this Instruction Manual is kept near the machine so the operator can refer to it when
necessary.
Keep this equipment properly maintained.
01
Always turn off power to the machine(s) at the main disconnect before performing any
maintenance or adjustments so accidental start-up or electrocution cannot occur.
Page 3

Safety Precautions WHILE
Operating The Machine(s)
Never leave the work area while the equipment is in operation.
Never leave the machine unattended while it is under power or in operation.
Always be alert while operating machinery.
Be alert for loose, worn or broken parts. Do not attempt to operate any machinery with such parts
present or if the machinery is making unusual noises or actions.
Avoid skin contact, prolonged breathing, or eye exposure to any stock lubrication fluid being
used.
Be aware of the locations of the Power Off or Emergency Stop button in case of an emergency.
Be sure all guards and covers are in place.
Continually observe the rollforming process and related equipment. If any unusual condition
develops, immediately stop and inspect the machine.
Protect yourself ! Wear safety glasses. Do not wear loose clothing, neckties, or jewelry. If long
sleeves must be worn, avoid loose cuffs and buttons. Tie back and contain long hair.
Never adjust any roll feature or perform work near the rolls, gears or power take off while they are
running.
General
If any pneumatic or hydraulic feature is used, disconnect the main supply and exhaust pressure
and bleed the lines to prevent cycling on retained pressure.
Always shut off the power at the main disconnect switch before entering the electrical control
box.
Do not use compressed air to clean the machines. Air pressure may drive dirt and small chips
into the machine(s) bearing surfaces or cause bodily injury.
IMPORTANT
The information contained herein is to be use as a general guide only.
For further safey information obtain and read the ANSI bulletin entitled:
ANSI B11.12-1996 Rollforming and Roll-Bending Machines safety
Requirements for Construction, Care and Use.
CONTACT: American National Standards Institute
11 West 42nd Street
New York, New York 10036
02
Page 4

WARRANTY
Our warranty on the products we manufacture is limited to repair or replacement without charge,
of any part found to be defective in materials or workmanship. This warranty is for a period of
one year (unless otherwise specified) from the date of shipment from our factory, for all
mechanical features of the machine except purchased components that carry the warranty of
the original manufacturer.
This warranty is conditioned on proper installation, maintenance and use of the equipment. The
warranty will be void if the equipment is subjected to misuse or abused or if used beyond the
standards in this manual, including material dimensions and gauge.
Warranty parts and components will be shipped freight collect from FORMTEK. If the defective
part has not been returned to FORMTEK within 15 working days after receiving the replacement
part, your company will be responsible for the cost of replacement.
The warranty provided in this clause is in lieu of all other warranties, express or implied, arising
by law or otherwise, including the implied warranties of merchantability and fitness for a particular
purpose which are hereby disclaimed by FORMTEK and excluded from this agreement. This
warranty shall not be modified for any reason. In no event shall FORMTEK be liable for
consequential or incidental damages, including the cost of assembly or disassembly, lost
production or personal injury.
!!
!
!!
CAUTION
To provide clarity to points in question
the illustrations and photos appearing
in this manual are shown with covers
and guards removed.
NEVER OPERATE THIS EQUIPMENT
UNLESS ALL COVERS AND GUARDS
ARE IN PLACE.
The information in this document has been reviewed and is believed to be complete and accurate.
No responsibility is assumed for minor inaccuracies or content not addressed in this manual.
Furthermore, FORMTEK reserves the right to make changes to any products herein, at any time, to
improve reliability, function, or design. FORMTEK does not assume any liabilities arising out of any
use of any product described herein, nor does it convey any license under its trade secrets or
patent rights nor the rights of others.
03
Page 5
SAFETY FIRST
Common sense and extreme care must be used at all times during the operation and maintenance of this equipment.
It is important that ALL personnel who will operate, maintain, or supervise the use of this equipment, read and
understand the sections of this manual concerning SAFETY and the OPERATION of the equipment.
The equipment described in this manual was designed and manufactured for a specific function. It should not be
used for any other purpose or outside of the design specifications as this may result in damage to the equipment
and/or injury to the operator. Modifications or additions to this equipment should not be made. Any such modifications
or additions will void the warranty and may subject the operater to injury.
Replacement and maintenance parts must be purchased from FORMTEK or the component original equipment
manufacturer. Use of other parts may result in unsafe operation or failure of the machinery. If there is a question
to the suitability of a part, proper personnel FORMTEK should be consulted.
In general, every piece of equipment must be treated with extreme care. While operating or maintaining
this equipment, each individual must be aware of their own safety as well as the safety of all bystanders.
SAFETY SIGN-OFF SHEET
It is the employer’s responsibility to instruct all persons who may come in contact with this equipment
on the safe operation and maintenance of this equipment. If a language barrier or other restriction
limits understanding, this manual can be read to the individual with appropriate follow up questions
to verify understanding. Have each individual sign below only after demonstrating their understanding
of the safety practices described in this manual.
I verify that I have read and understand the safety and operation sections
for this equipment:
NAME DATE NAME DATE
04
Page 6
SAFETY GUIDELINES
You are NOT ready to operate this equipment if you have not read and
understood all of the safety information in this manual.
!!
!
!!
Do not wear loose clothing, neckties, improper gloves, or jewelry while operating this machine. If
long sleeves must be worn, avoid loose cuffs or buttons, Tie back or contain long hair.
Wear proper gloves to prevent lacerations caused by sharp edges of stock as it travels through the
forming operation.
Never operate this equipment unless all covers and guards are properly installed.
Be alert for loose, worn, or broken parts. Never operate this equipment unless it is in good working
condition.
WARNING:
As the stock enters the guides and feeds into the rolls, a pinch point is created as the stock advances.
Keep hands clear of area and all pinch points.
Always disconnect the main power supply power and install lock outs using a lockout / tagout procedure
when making adjustments or repairs.
When transporting, take into consideration that the machine is top heavy and may suddenly tip over.
The machine is designed for fixed installations and are not intended for portability.
Remember that the information contained in this manual is only a portion of an adequate
training program. It must be coupled with specific instructions for your application along
with full information of national and local safety regulations that may apply.
05
Page 7

INSTALLATION
Provide a clean, flat, well lighted installation site. Level the machine and anchor it to the floor.
Inspect the gears and drive assembly, and remove any debris that may have accumulated during
shipping.
ELECTRICALS
Standard electricals: motor 2H.P. (1.5KW).
110 volts, 1 phase. Grounded power supply. Provide a 110 volt receptacle at the point of operation.
If a 230 or 3 phase motor is ordered install the power supply in compliance with local and national
electrical codes. For further information, contact a certified electrician or the FORMTEK Service
Department(contact information at www.formtekinc.com).
* Electrical specifications (voltages) are specific to each region or territory.
CAPACITY
Maximum 1mm thickness (20 Gauge) black iron mild steel and Galvanized steel.
MATERIAL ALLOWANCE: = 25mm, 1”
(1) 25mm (1”), female PITTSBURGH
(2) 6mm (1/4”)90 degree (MALE)
Total amount of material (25mm Female PITTSBURGH + 6mm MALE)=31mm.
(1” Female PITTSBURGH + 1/4” MALE)= 1-1/4”
This allowance to be added for the seam formed sections for calculation of sheet sizes. The above
dimensions can be modified by moving the entrance gauge position to suit the requirements of a
specific project or material.
Note: The machine has been tested and adjusted at the factory on 0.6mm (26ga) through 1mm
(20 ga) thickness material and as delivered is ready for normal operation.
Female PITTSBURGH 90 degree (MALE)
06
Page 8
OPERATING
INSTRUCTIONS
BASIC OPERATION
Hold the material against the entrance gauge and slide it into the forming rolls. Be sure that the
material remains against the gauge until the trail edge of material is engaged in the rolls.
Note: Minimum part length is 175mm(7”).
Make hold down adjustments as outlined below, to accommodate slight variations in metal thickness
and hardness.
PITTSBURGH FEMALE HOLD DOWN
ADJUSTMENT PROCEDURE
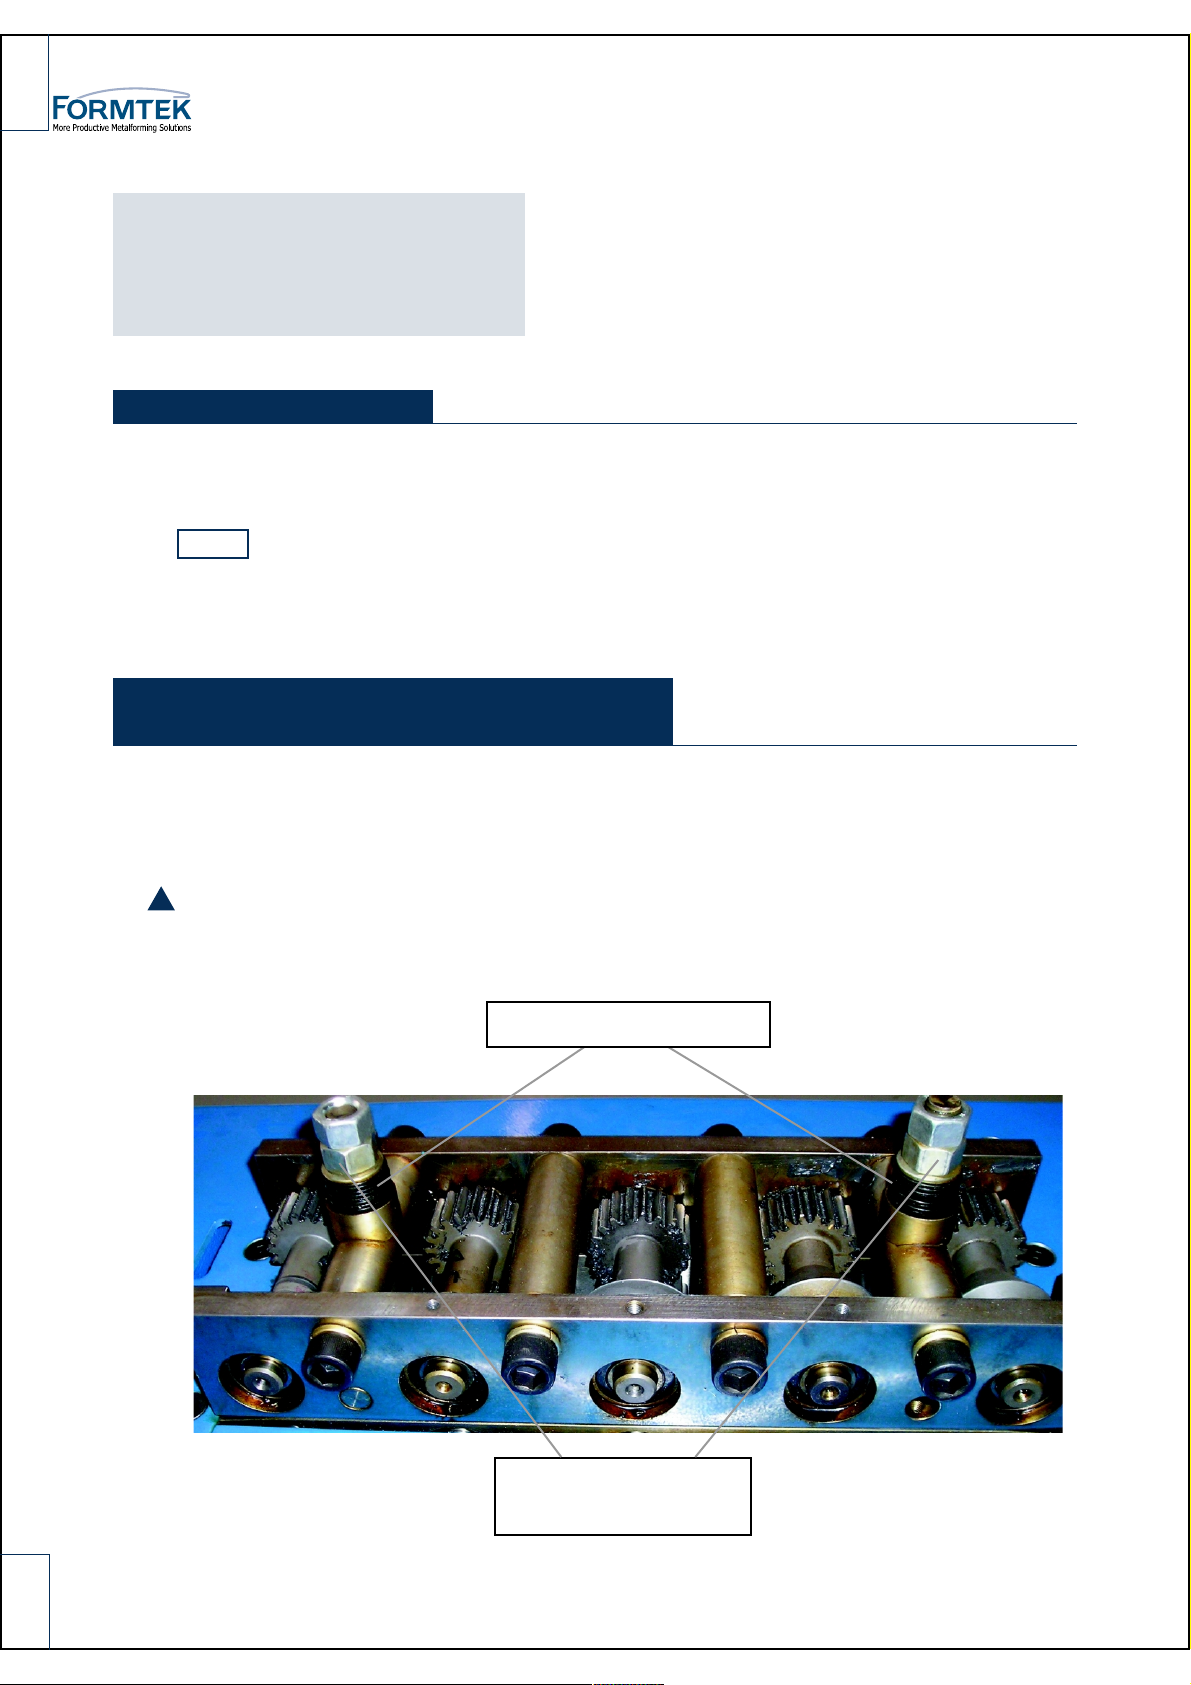
The HOLD DOWN ADJUSTMENTS NUTS are used to set the tension on the SPRING WASHERS.
These SPRING WASHERS are used to allow the top rollers to float upwards. This is necessary on
an LK-20 because of the various metal thicknesses that an LK-20 will form.
!
1. DISCONNECT POWER!
2. Install electrical lock outs to prevent accidental start up.
3. Remove top cover.
SPRING WASHERS
07
HOLD DOWN
ADJUSTMENTS
Page 9
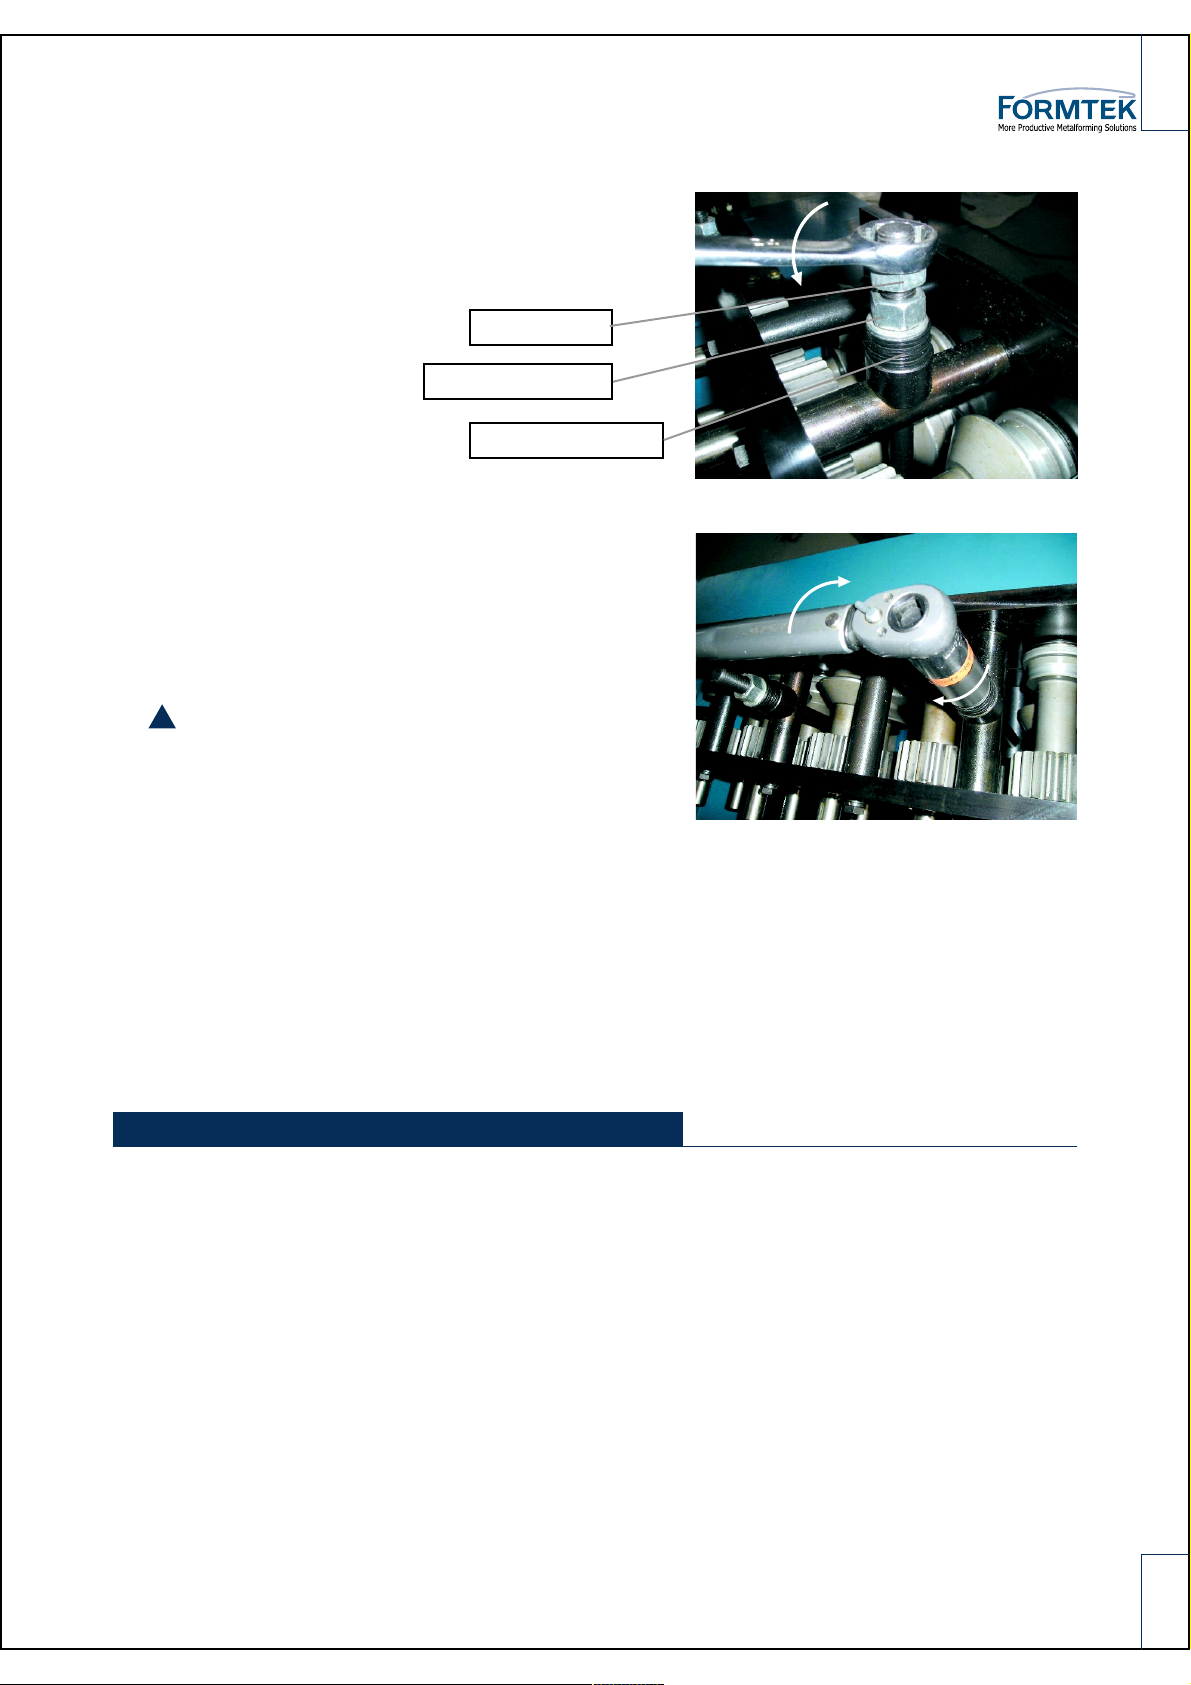
4. Loosen and remove the HOLDDOWN
lock nuts.
LOCK NUT
HOLD DOWN NUT
SPRING WASHERS
5. Tighten the hold down NUTS fully tight, or set to
a torque value of 60MN (50 ft. lbs.)
6. After tightening, loosen the NUT 1/4 turn
(90 degrees).
7. Retighten the lock NUT.
!
8. INSTALL THE COVER, remove electrical power
lock outs, restore power.
9. Run a test piece.
- If the stock slips in the rolls, tighten the hold down nuts. It may be necessary to tighten the 1
and 2nd HOLD DOWN nut unequally in order to obtain the desired result.
- If the stock curls up after forming or shows extremely pressure marks, loosen the hold down
NUTS slightly.
*Do not adjust hold downs NUTS unless the stock slips in the rolls, pulls away from the entrance
gauge, or curls when exiting the rolls.
AUXILIARY ROLL HOLD DOWN NUTS
The Standard settings for the Auxiliary HOLD DOWN nuts are as follows:
1. Tighten the Auxiliary HOLD DOWN NUTS fully tight.
3
2. Loosen Auxilary HOLD DOWN NUTS
FORMTEK Machinery offers options for Auxiliary Rolls. Specific HOLD DOWN NUT adjustments
depend on which optional rolls are installed. The
the Auxiliary Rolls installed.
/4 of a turn (270 degrees)
3
/4 turn specification may change depending on
st
08
Page 10
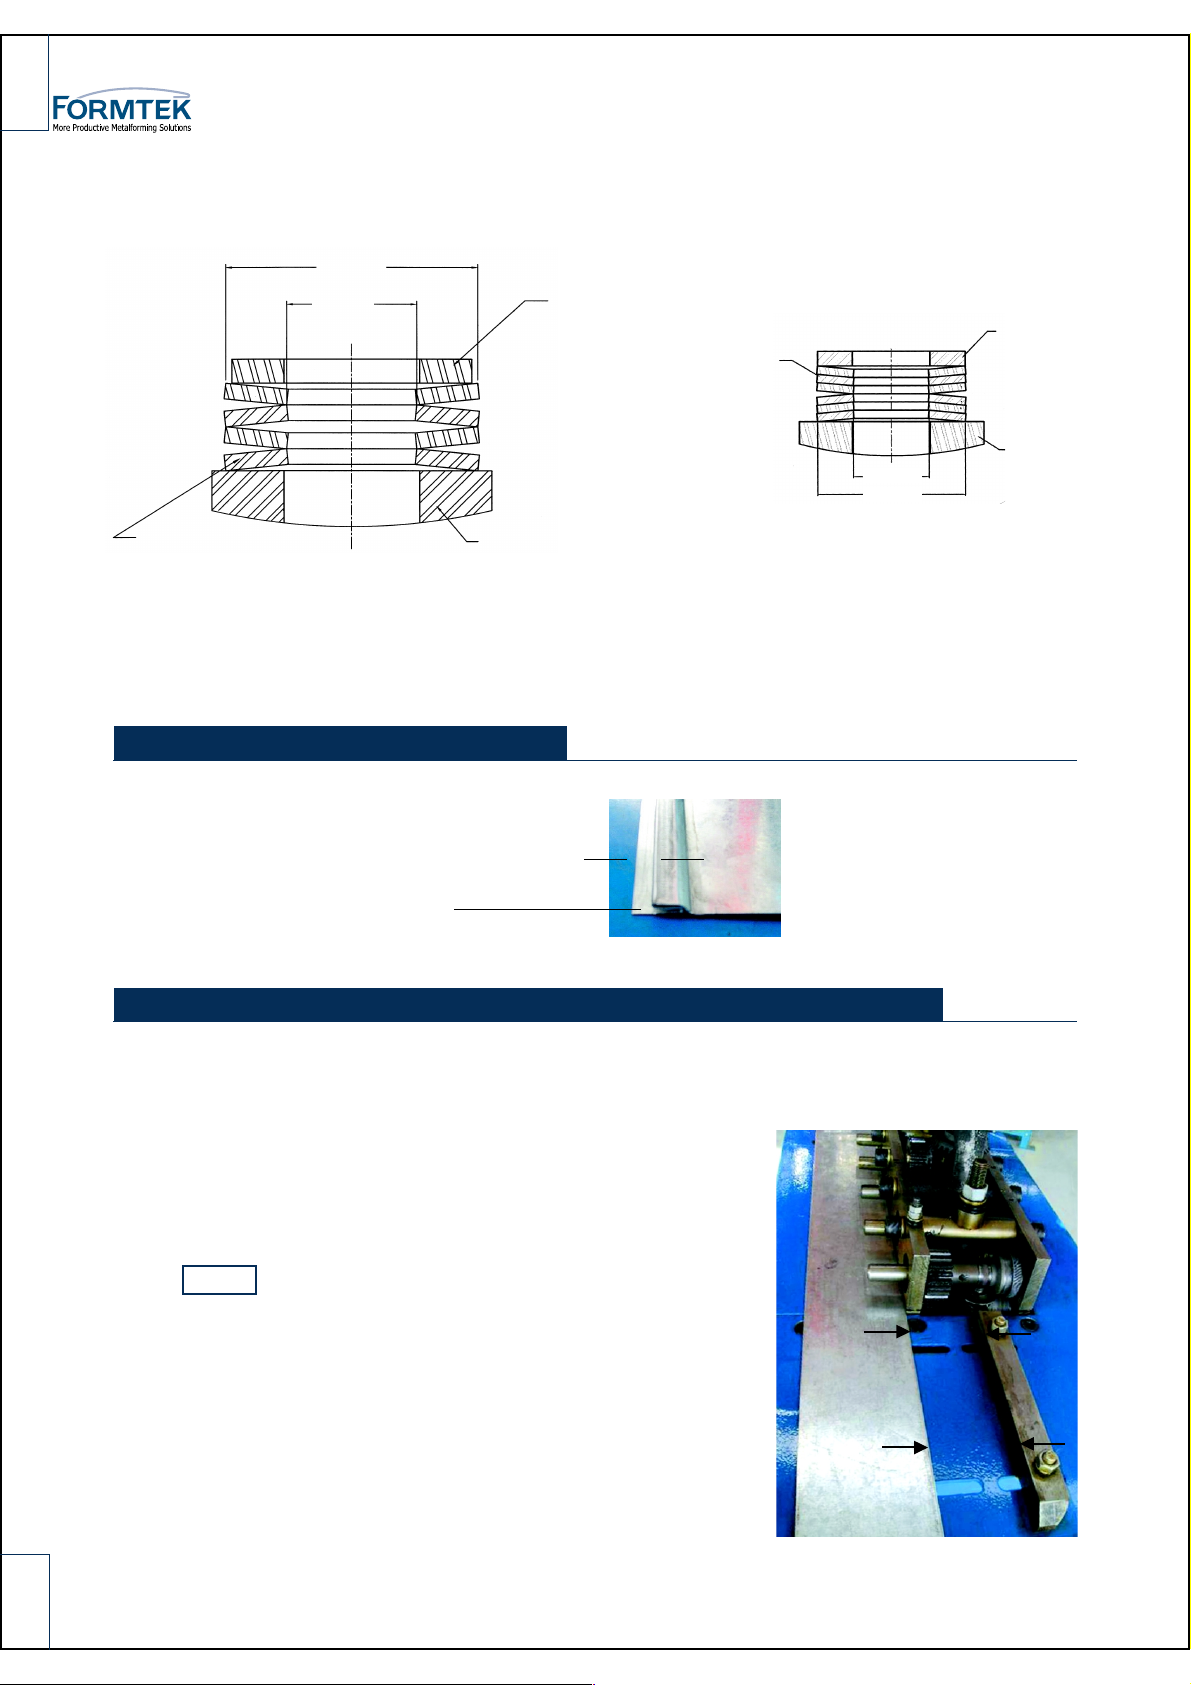
HOLD DOWN SPRING WASHERS
ø31.5(OD)
ø16.3(ID)
SCALE DOWN TO 256˚
96475K295
8 WASHERS
2 WASHERS PER GROUP
2 GROUPS PER STACK
STACK AS SHOWN
SADDLE WASHER 7X635
FEMALE PITTSBURGH LOCK
91166A310
3 WASHERS PER GROUP
2 GROUPS PER STACK
96445K236
ø8.2(ID)
ø16(OD)
SMALL SPRING WASHERS
91455A130
5S355
SCALE DOWN TO 306˚
HAMMER-OVER EDGE
HAMMER-OVER EDGE ADJUSTMENT (ENTRANCE GAUGE)
The width of the FEMALE Pittsburgh lock hammer over edge is adjustable.
Move the FEMALE PITTSBURGH lock entrance gauge to produce a larger or smaller hammer
over edge.
NOTE: There should be a deep scribe or scratch mark in
the paint along the side of the entrance gauge and exit
gauge. This is the original line location of the gauge from
the factory. Slight adjustment from this line may be
required to increase or decrease the hammer over edge
width.
62mm
(2-7/16”)
61mm
(2-13/32”)
09
Page 11
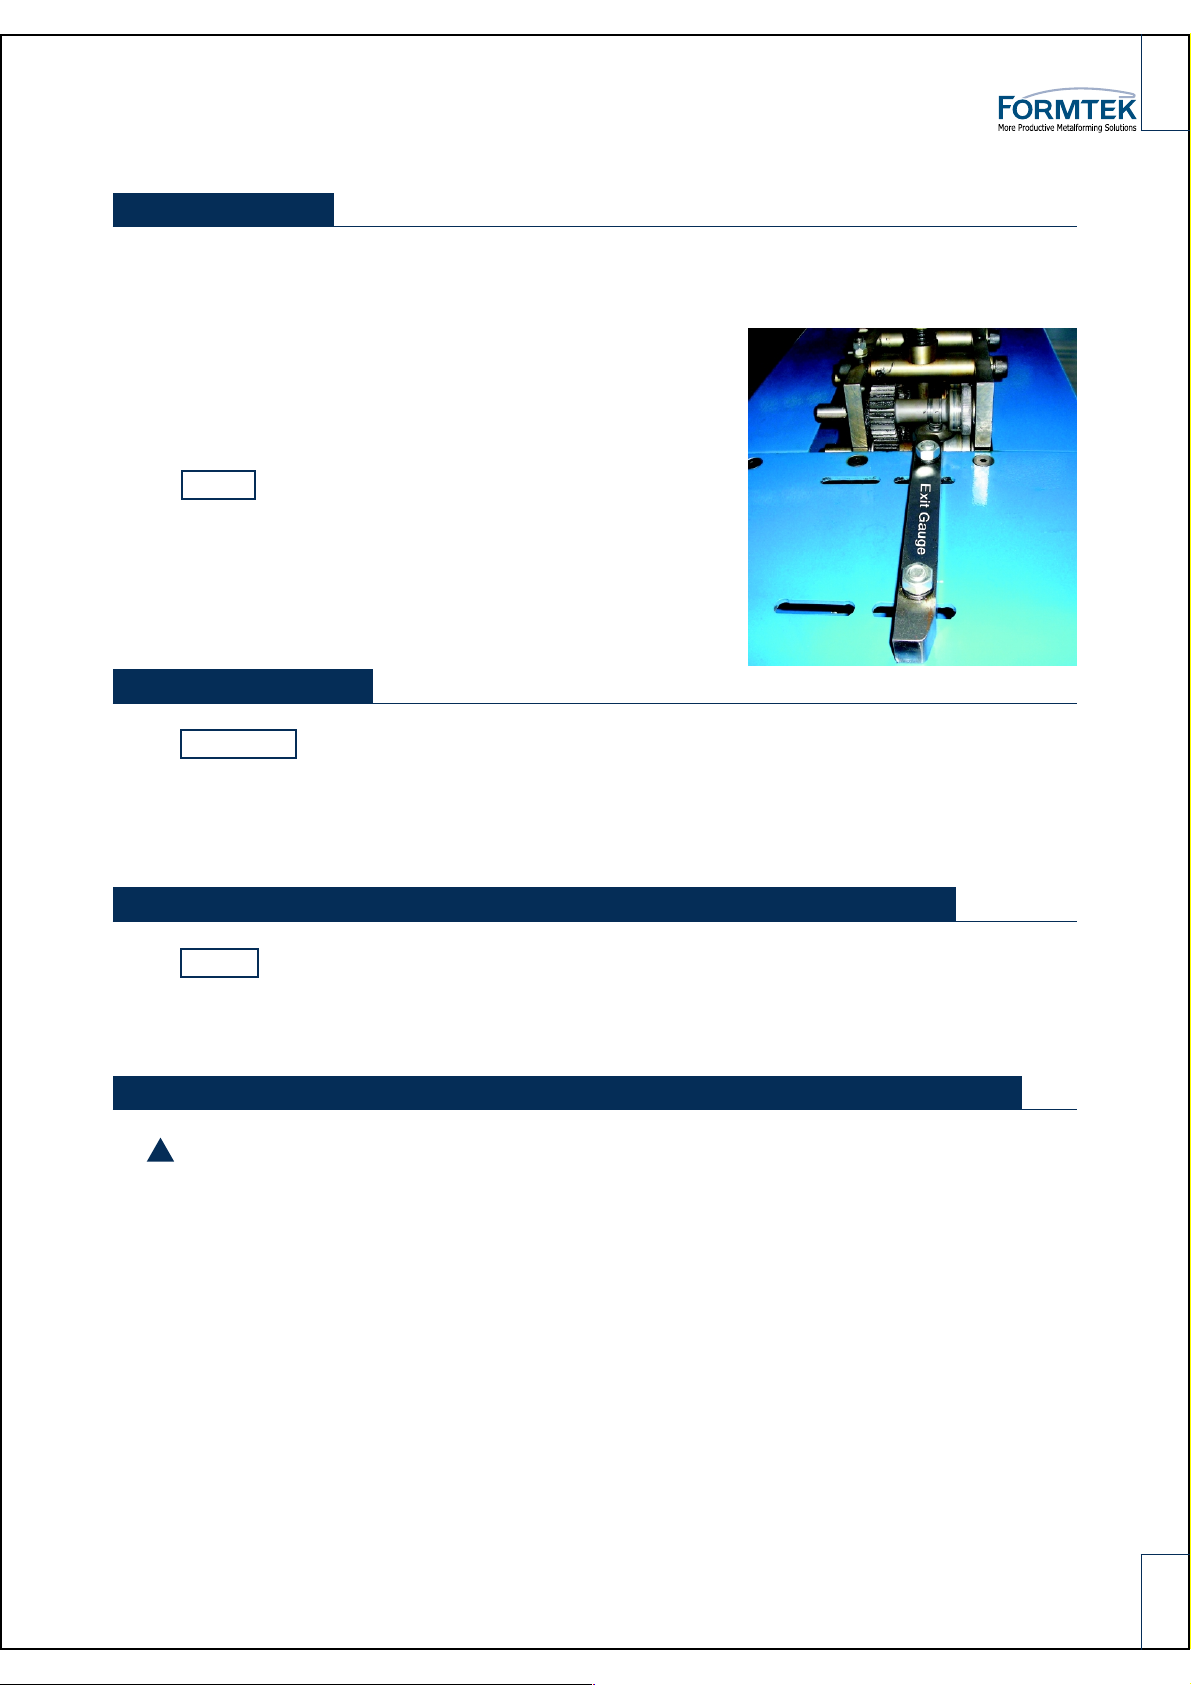
EXIT GAUGE
Never move the exit gauge bar for this roll set. This gauge is not intended to contact the material
under normal circumstances.
NOTE: There should be a deep scribe or scratch mark
along the side of the exit gauge, this is the original line
location of the exit gauge from the factory. Slight
adjustment from this line may be required.
OPENING ROLL
CAUTION: The flat roll (called the opening roll) mounted horizontally after the last roll station
maintains the opening of the gap in the PITTSBURGH lock. Twisted or bent notches should be
flattened prior to feeding stock material into the machine. Failure to do this can result in breakage
of the opening roll.
INSTALLATION AND OPERATION OF AUXILIARY ROLLS
NOTE: Standard auxiliary rolls are interchangeable between the standard LK 20 and the Super-
Speed models. Since different entrance gauges are required, the model for which the rolls are
intended should be specified.
DOUBLE SEAM or STRAIGHT RIGHT ANGLE FLANGE ROLLS
1. DISCONNECT POWER
!
2. Install lock outs to prevent accidental start up.
3. Remove the cover.
4. Unscrew and remove the right hand side table top section. This will expose the auxiliary
shafts on which the rolls will be mounted.
5. Select the first pair of rolls which are marked T1 (Top roll first station) and B1 (Bottom roll first
station). Slide them as a mated pair onto the shafts. All information stamped on the rolls must
face outward. Slide a key into each keyseat. Follow this procedure in sequence with each
remaining pair of rolls.
6. Fasten the rolls onto the shafts with the screws and washers provided.
7. Mount the entrance gauge and set it to the dimensions shown in the illustration.
8. Mount the exit gauge so the outside face of the vertical leg is parallel to the part as it passes
over the exit table. Set to allow approximately 1.5mm clearance between the part and the exit
gauge.
10
Page 12

9. Replace the table top.
!
10. INSTALL THE COVER
11. Remove the lock outs.
12. Restore power to the machine.
DRIVE CLEAT ROLLS
1. DISCONNECT POWER.
!
2. Install lock outs to prevent accidental start up.
3. Remove the cover.
4. Unscrew and remove the right hand side table top section. This will expose the auxiliary shafts
on which the rolls will be mounted.
5. Select the first pair of rolls which are marked T1 (Top roll first station) and B1 (Bottom roll first
station). Slide them as a mated pair onto the shafts. All information stamped on the rolls must
face outward. Slide a key into each key seat. Follow this this procedure in sequence with each
remaining pair of rolls.
6. Fasten all rolls except the top number 2 onto the shafts with the screws and washers provided.
Do not insert a mounting screw into the top 2 rollshaft; this allows the roll to “float” laterally, and
center itself to the bottom roll as the stock passes through.
7. Mount the entrance gauges so that the centerline of the stock aligns with the centerline of the
rolls.
8. Tighten the stud nuts so that the T5 and B5 rolls do not separate as the drive cleat passes
through.
9. Mount the exit gauge so the outside face of the vertical leg is parallel to the part as it passes
over the exit table. Set to allow approximately 1.5mm clearance between the part and the exit
gauge.
10. Replace the table top.
11. INSTALL THE COVER.
!
12. Remove the lock outs.
13. Restore power to the machine.
11
IMPORTANT: BE SURE TO CUT STOCK EXACTLY 53mm (2
ACCURATELY FORMED CLEAT.
1
/8”) WIDE TO INSURE AN
Page 13
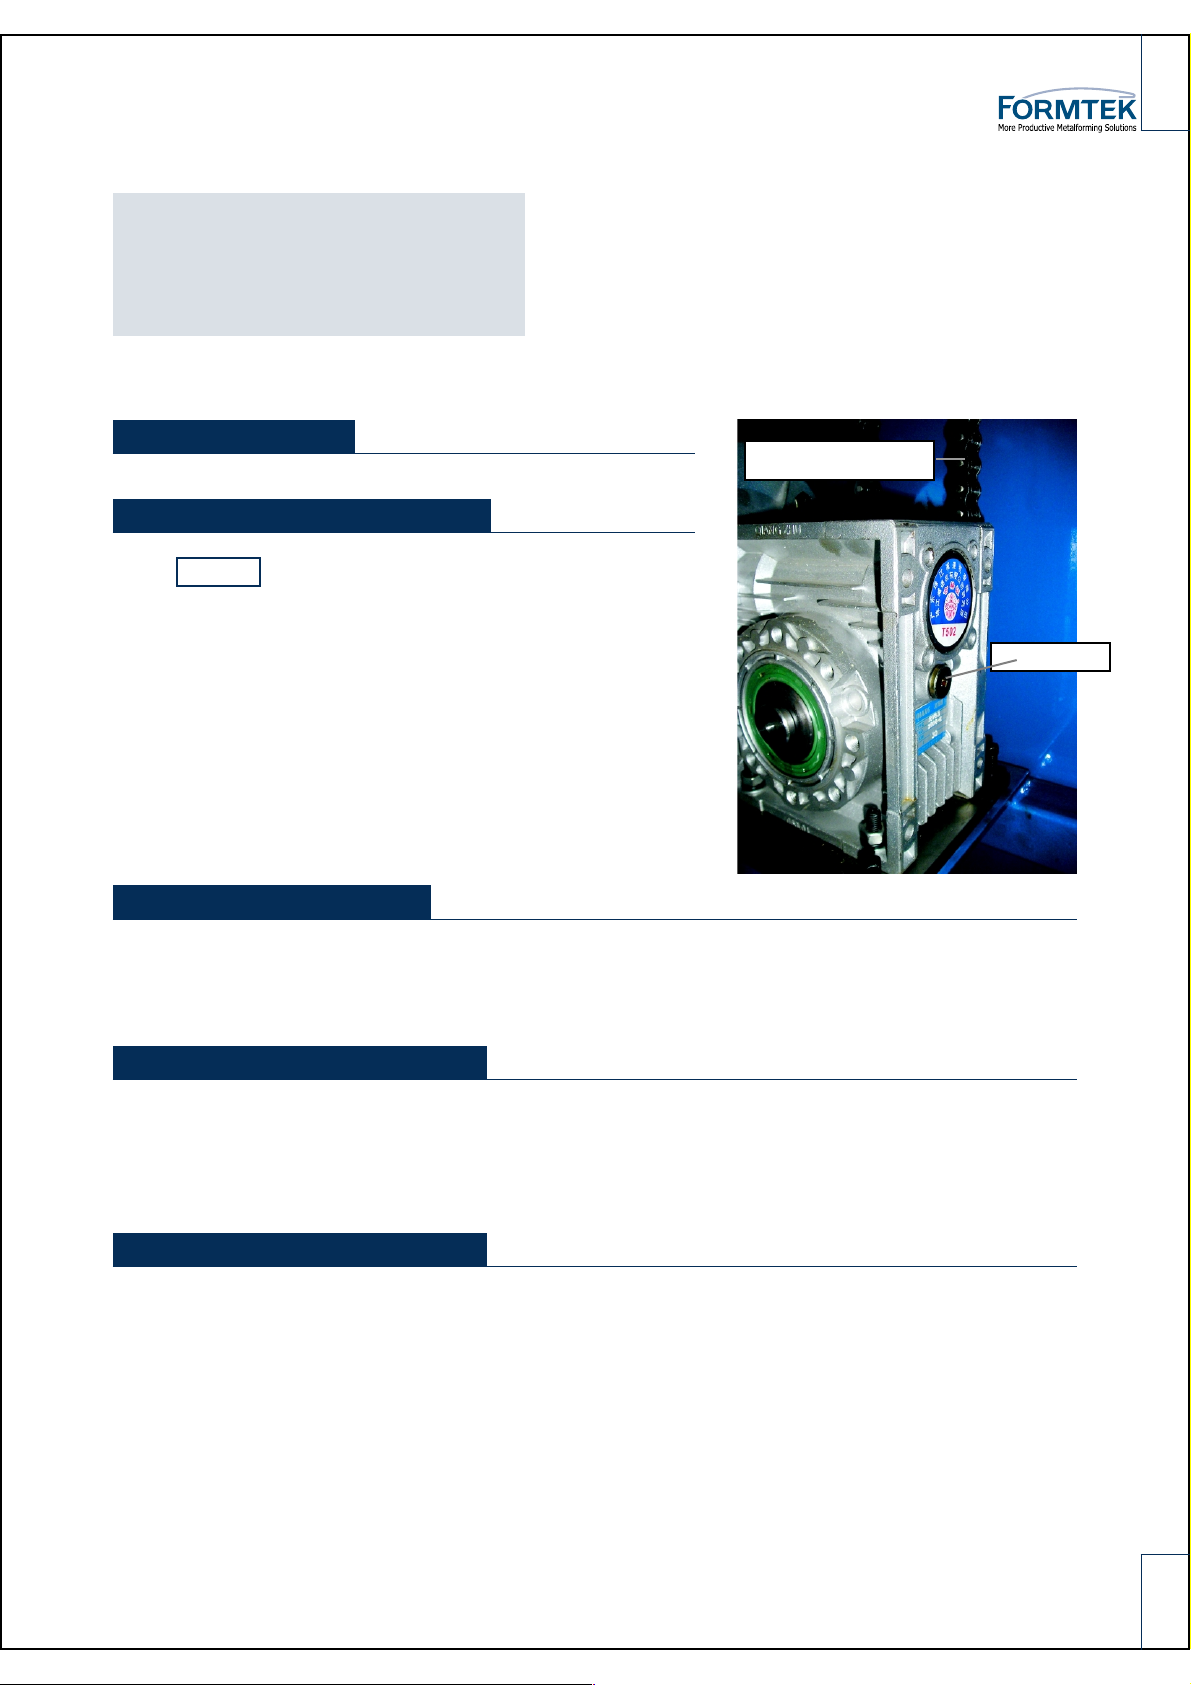
MAINTENANCE
LUBRICATION
GEAR REDUCTION UNIT
NOTE: Change oil after the initial 40 hours of machine
operation. After the first oil change the regular oil change
interval is 4000 hours of operation.
The recommended oil for the gear reduction unit is GN320W, WA460 (or 90 weight gear oil if none other is
available). There is a fill hole on the top and a level check
hole near the middle of the unit. Check oil level every 3
months of operation. When leakage is detected service
unit immediately.
LUBRICATE CHAIN
OIL CHECK
LUBRICATE CHAIN
Periodically the drive chain needs to be lubricated. A light oil should be applied when ever the
chain appears dry or every 40-80 hours of operation.
GREASE DRIVE GEARS
The recommended lubricant is Castrol Molub-Alloy 777-1 or equivalent. Apply grease to all drive
gears after every 40 hours of operation. If the machine is to be used in a damp environment, apply
a film of oil or grease to all unpainted metal surfaces to prevent rust.
CLEANING THE ROLLS
Keeping the forming rolls clean is an important step toward efficient operation of your machine.
Lockformer’s GALV-OFF aerosol spray cleaner, will soften galvanized build up so that it flakes off
by itself. Daily use is recommended. GALV-OFF cleans and lubricates, as well as protects the
forming rolls.
12
Page 14
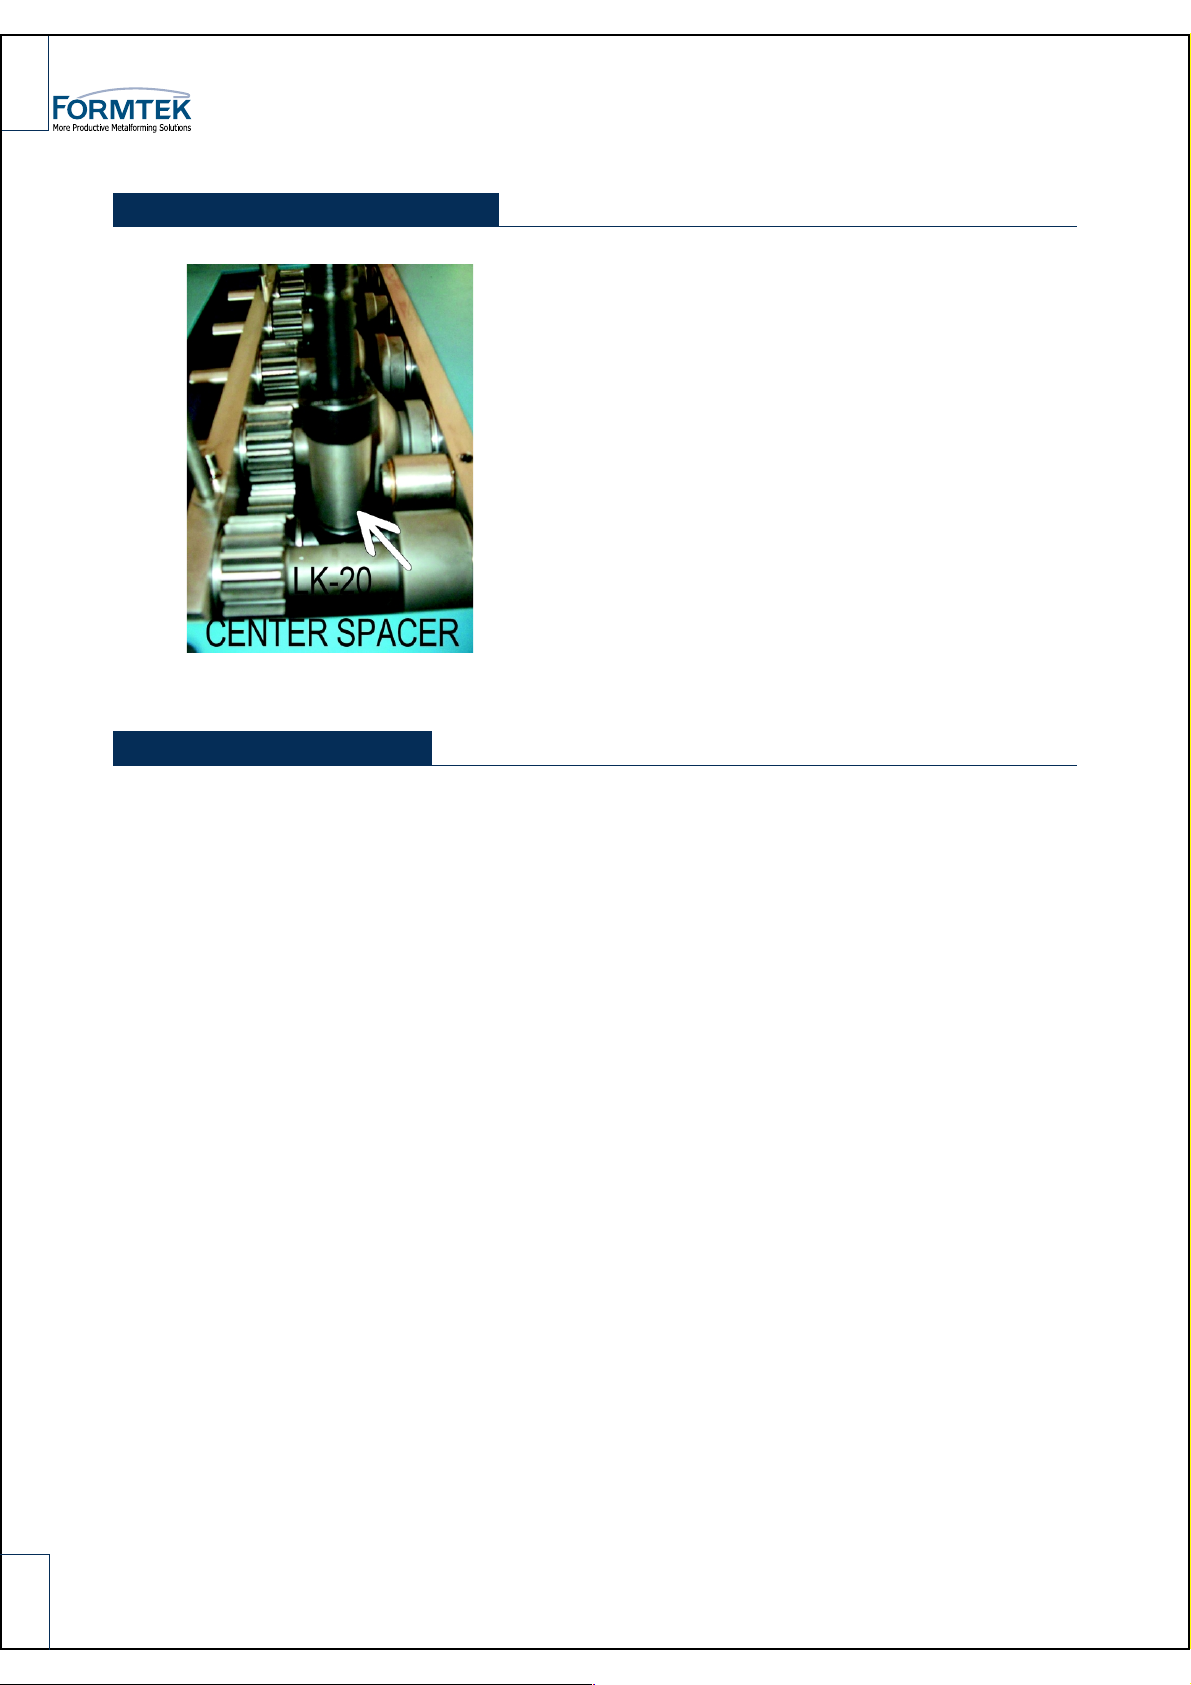
LK-20 CENTER SPACER
TROUBLE CHECKS
The CENTER SPACER is positioned between the top and
the bottom forming heads on the 2nd large hold down stud
(at the exit end of the machine near the opening roll). The
function of this spacer is to control the vertical clearances
between the top and bottom rolls at stations 4 and 5. The
vertical clearance between top and bottom rolls is set in the
factory with a feeler gauge to a clearance of 0.2-0.4mm
(0.008”-0.010”) at the outside edge of the rolls.
NOTE: It may be necessary to insert shim washers above
the spacer to obtain the proper clearance.
IMPROPERLY FORMED/DEFORMED EDGES
-It may be necessary to add a slight lubricant to the surface of the sheet being formed to aid the
flow of material through the forming rolls. Lockformer’s GALV-OFF available from FORMTEK is
recomended.
-The operator may have to experiment with hold down settings for desired results. Run test pieces
to check different settings on the hold down nuts or bolts.
RUNNOUT
Some materials may have a tendency to drift away or runnout from the entrance gauge. The edge
dimensions will be uneven from beginning to end. Check the following points when runnout is a
problem.
-Be sure to hold the material firmly against the entrance gauge. Some materials will require significantly
more pressure then others.
- Hold down settings should be checked and reset. Some materials may require settings that are
tighter then this manual specifys. Use caution when setting the holdowns tighter then normal.
Prolonged use of the machine with tighter settings will reduce the life span on some of the machines
parts.
-Due to variations of the physical characteristics of material, it may be necessary to reset the
entrance gauge bar if the material pushes away from the gauge bar or the lock is not formed
properly. There should be a scratched line along the side of the entrance gauge to locate the
original factory setting. Also it may be necessary to “Taper” the entrance gauge (set the gauge at
a slight angle) to eliminate runnout.
-The exit gauge bar can be used to push on the exiting material when the material is not flowing
straight or evenly throughout it’s length such as when the edge is running out. Difficult parts may
13
Page 15

require exit gauge pressure along the materials edge such as long heavy pieces where an awkward
weight and size make it difficult for the operator to hold the piece straight during the forming
process. This technique must be used carefully. Other conditions may be causing the runnout,
such as loose settings on the hold downs or improperly adjusted entrance gauges (those settings
should always be checked first).
Having the exit gauge bar push too hard against the material might make the situation worse. The
operator must run test pieces and inspect the formed product to determine the best adjustment
position of the exit gauge bar.
!
FOLLOW ALL SAFTEY PRECAUTIONS IN THE MANUAL WHEN MAKING ADJUSTMENTS
14
Page 16
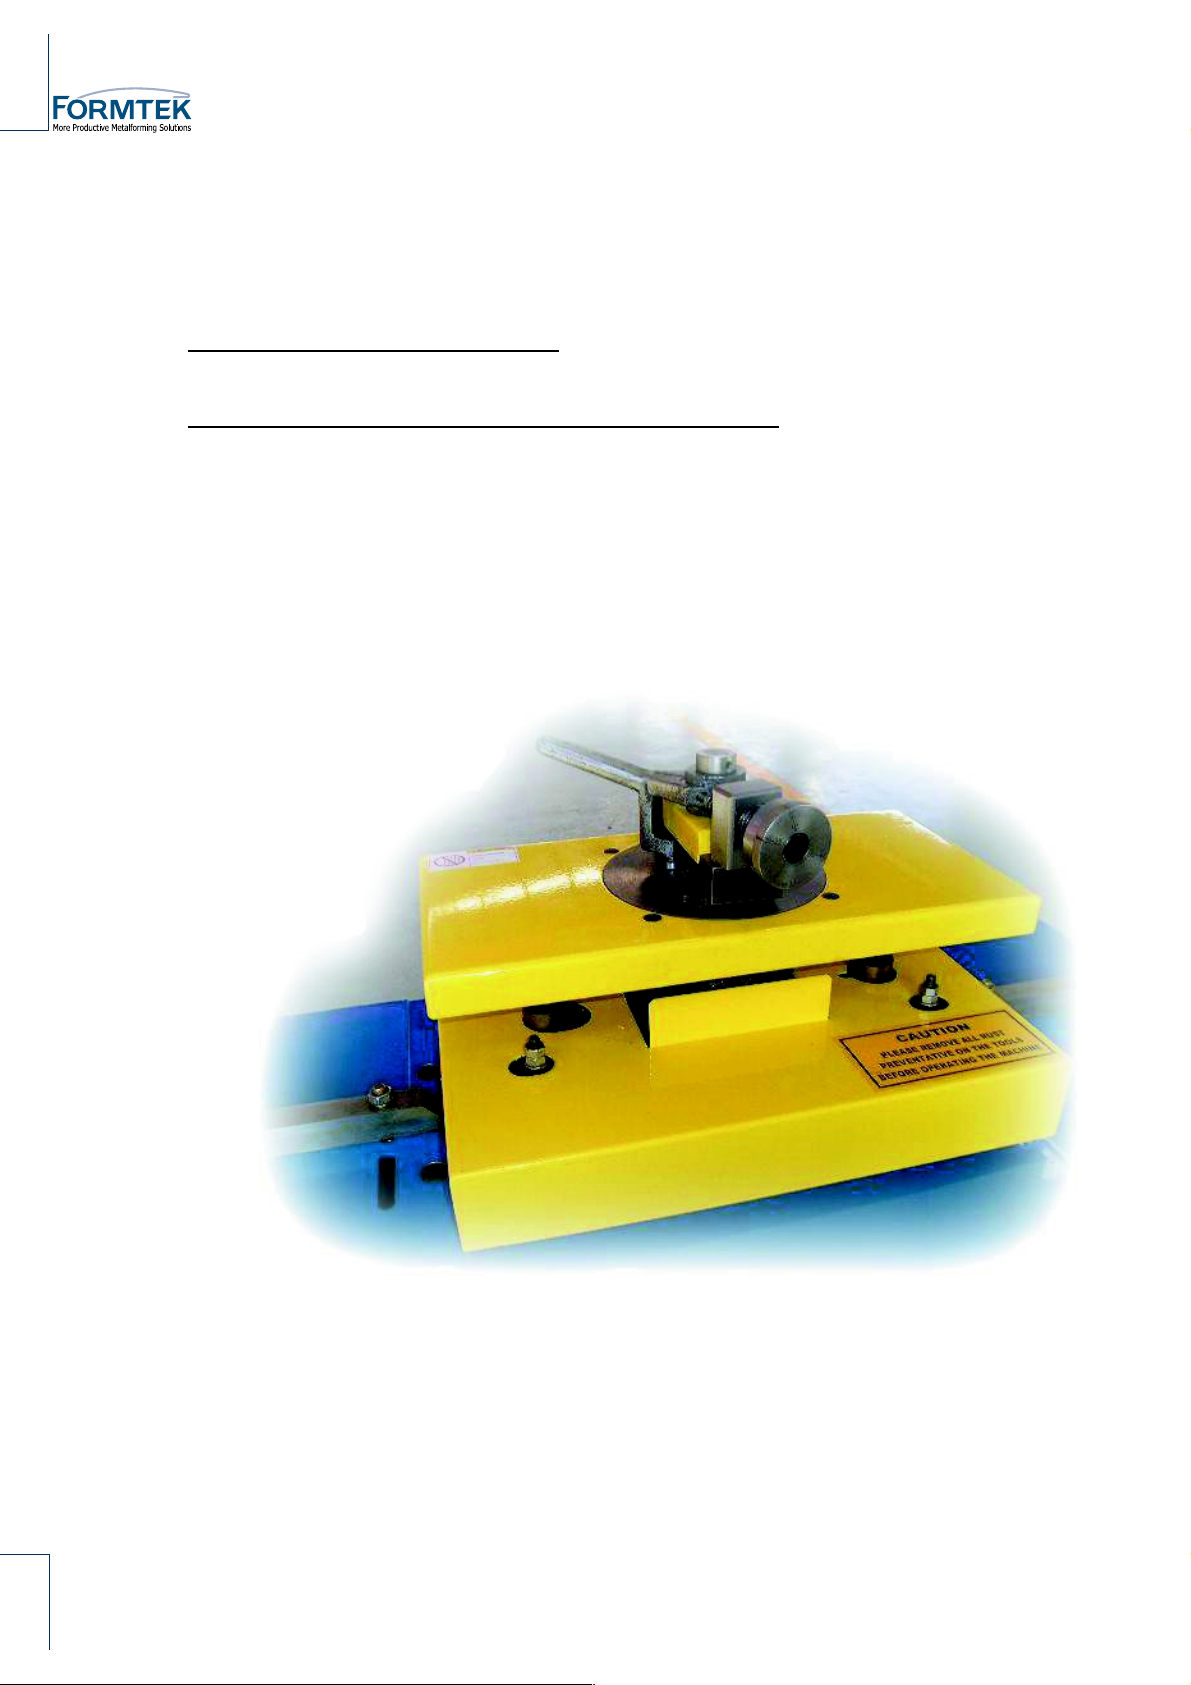
LK-20-AGF
AUTO GUIDE FLANGING ATTACHMENT
15
Page 17
OPERATING
INSTRUCTIONS
ADJUST UNIT FOR GAUGE MATERIAL TO BE USED
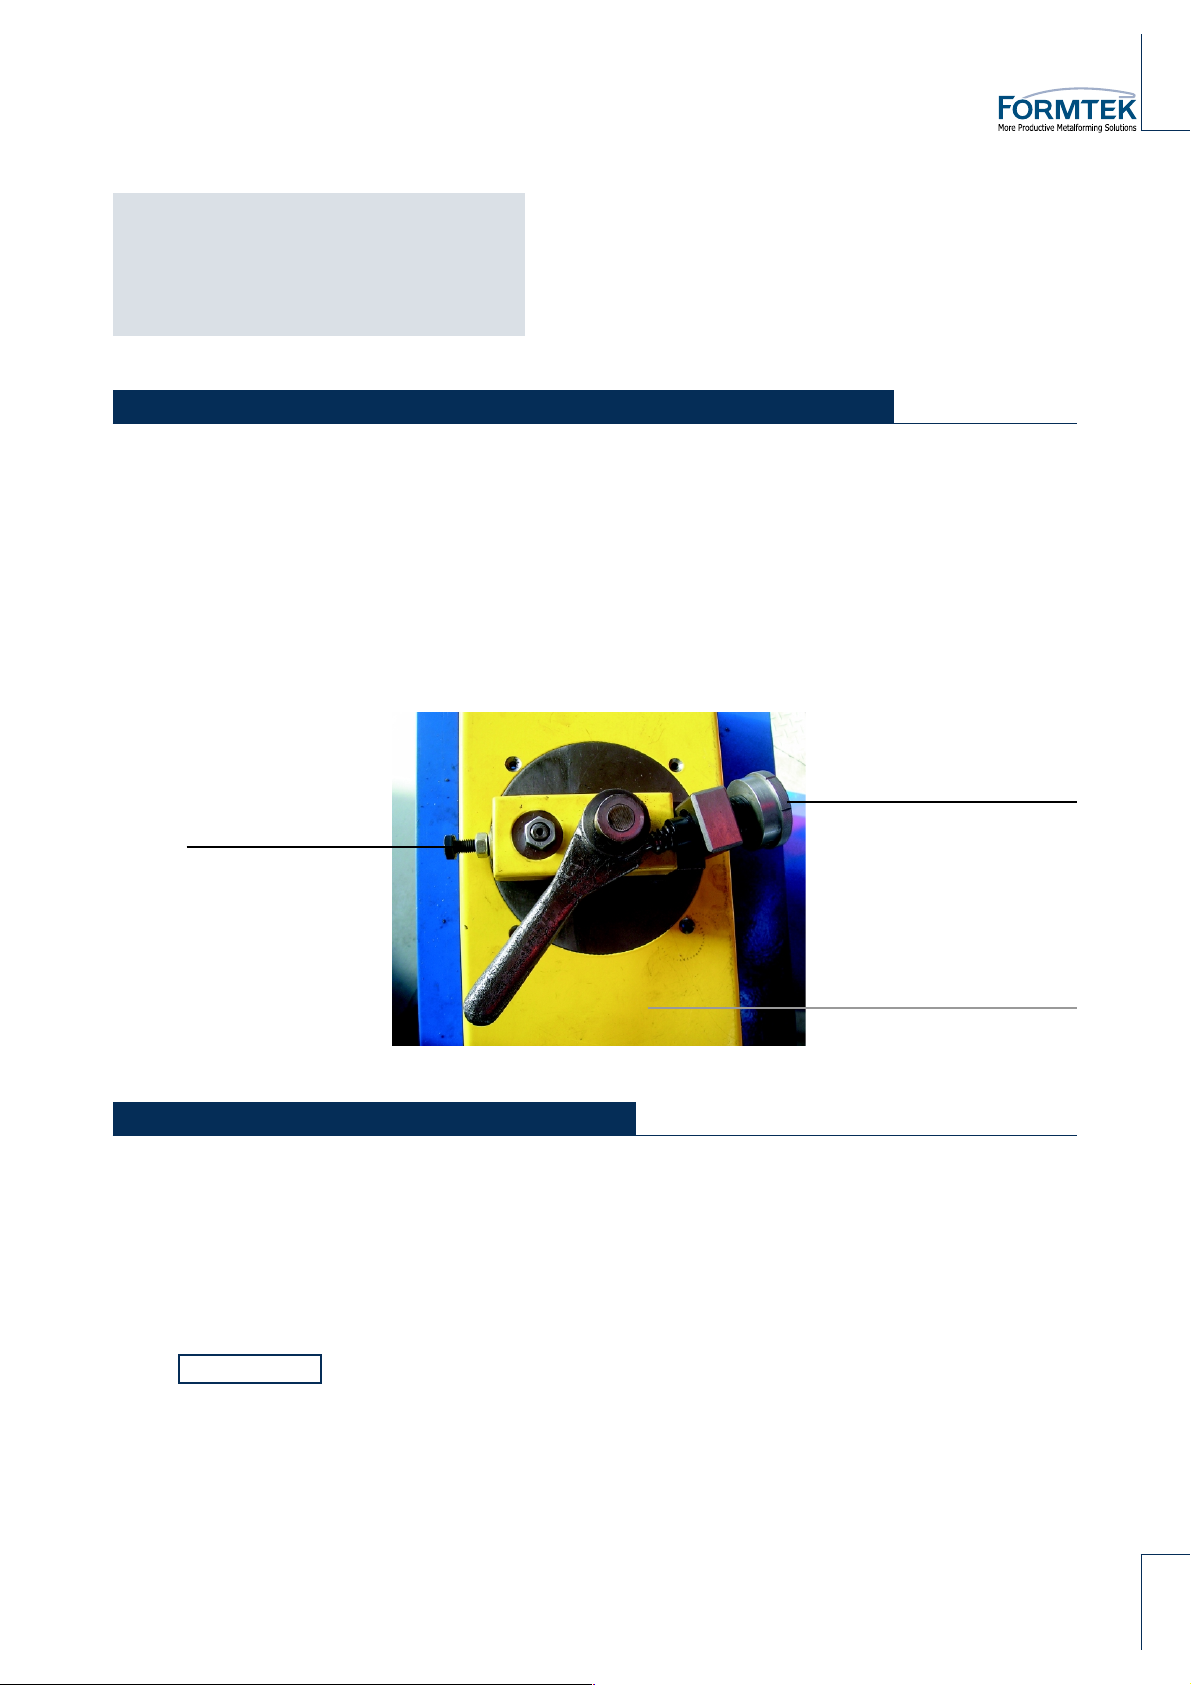
To adjust clearance between flanging rolls, tighten the adjusting screw on the front of the block of
the machine all the way, then loosen the screw approximately one eighth of a turn. (This setting is
usually correct for 26 gauge material). Do not set front gauge adjusting screw too tight. It should
be set just tight enough to draw the metal through the rolls. Too tight a setting will stretch and
wrinkle the material.
To adjust the spring tension on the compensator arm, tighten the adjusting dial on the back side of
the flanger to the stop and then turn back to the proper gauge setting shown on the adjusting dial.
BACK ADJUSTING DIAL
FRONT ADJUSTING SCREW
COMPENSATING ARM
TURN UP A “STARTING FLANGE”
Before inserting material into the rolls, turn up a “starting flange” This is done by inserting the
leading edge of the work to be flanged in the slot cut into the table and bending the piece away
from the operator approximately 45°. Start the leading edge of the material into the rolls. As the
material passes through the rolls, the compensator arm will make contact with the material and
guide it through the rolls. If the material pulls out of the rolls, it is an indication that either the front
adjusting screw is loose or the back adjusting dial is not tight enough.
IMPORTANT: When starting a partially formed part that has a radius:
1. Push the compensator arm back
2. Feed the part into the rolls
3. As the unformed part enters the rolls, move the compensator arm forward against the part
4. Push firmly on the part while watching the flange height, guide the part threw the rolls and as
the flange is forming the compensator arm should hold the part.
5. The operator should only need to hold the piece gently as the compensator arm controls the
part as it flows threw the machine.
16
Page 18
INSTALLATION AND OPERATION
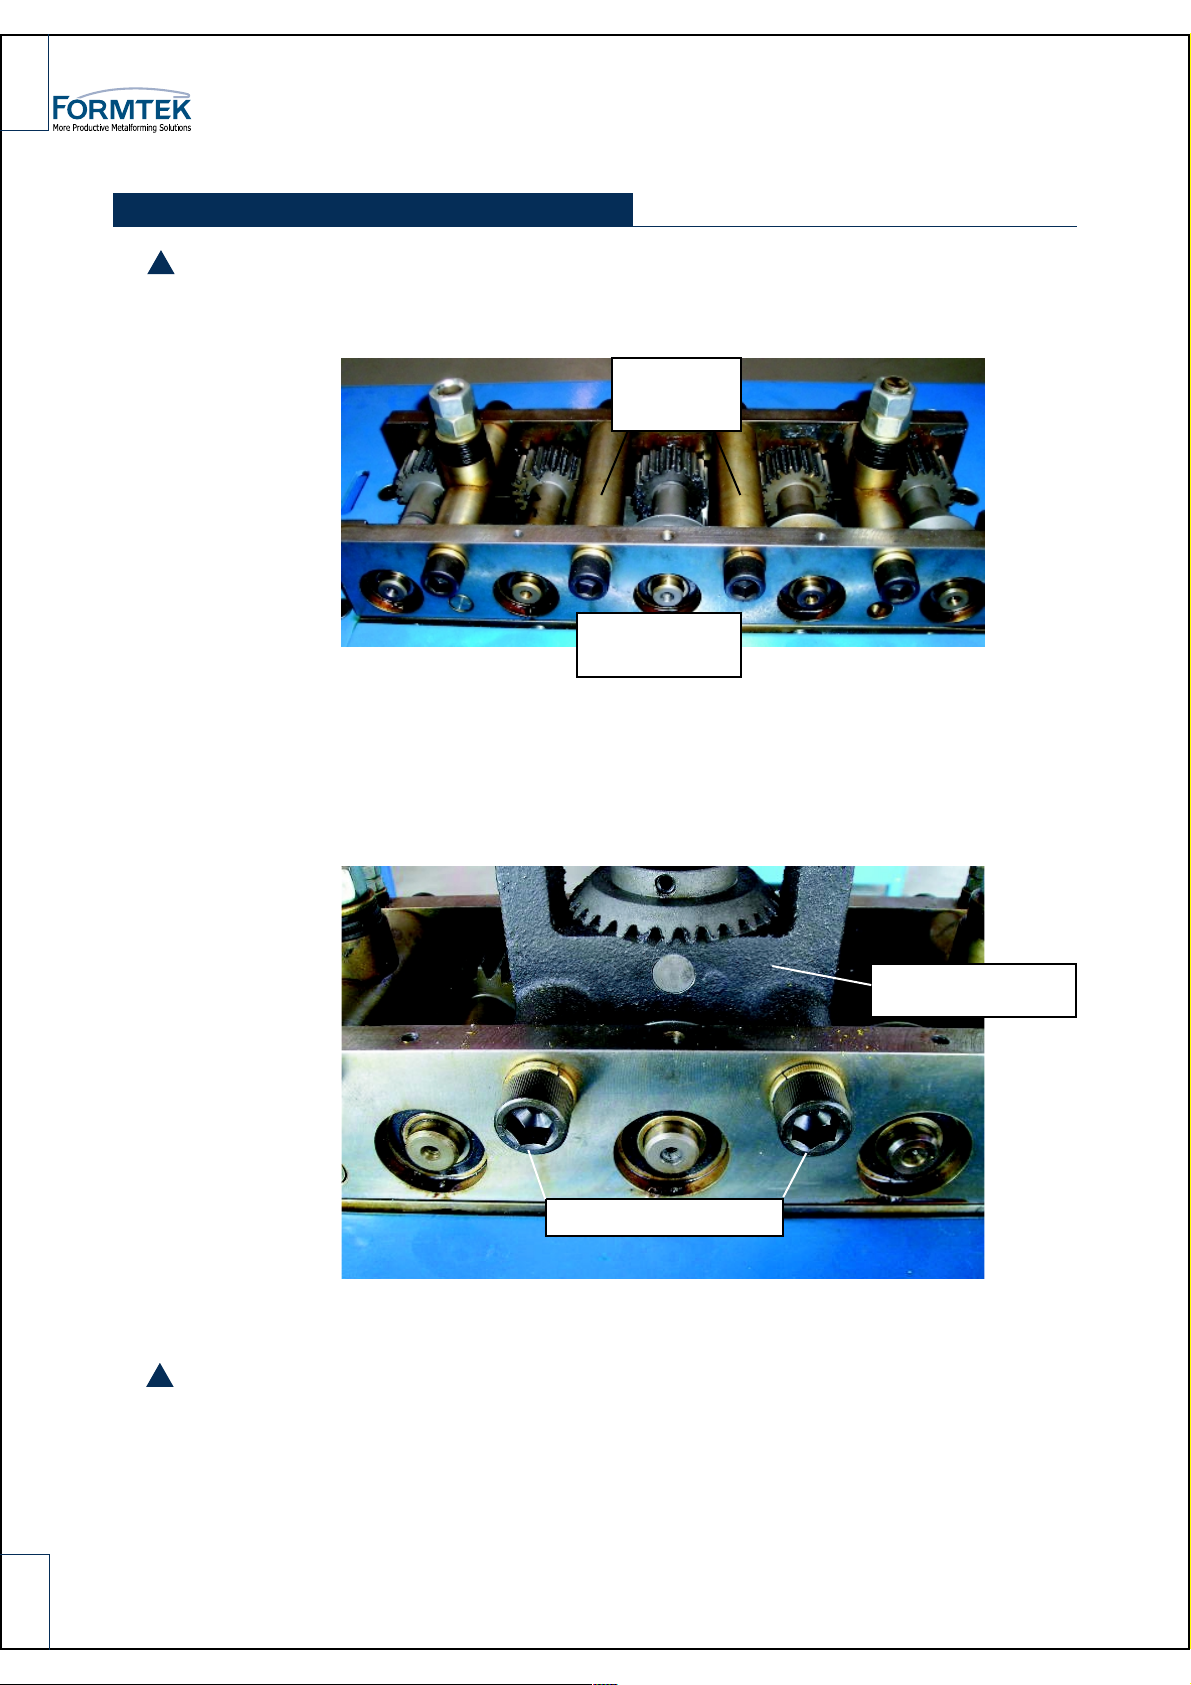
1. DISCONNECT POWER – INSTALL ELECTRICAL LOCKOUTS
!
2. Remove the top cover from the2. Loosen the front mounting screws on spacers # 1 and # 4
Remove
spacer #2
Loosen #1, #2
spacer screw
3. Remove spacers #2 and # 3 by removing their mounting screws. Install Auto Guide power
Flanger (AGF)
Installed Auto Guide
power Flanger(AGF)
17
*Be sure to allighn and mesh the gears !
!
4. Replace the top cover.
5. Remove electrical lockouts
6. Restore Power
Tigjten screw completely
Page 19
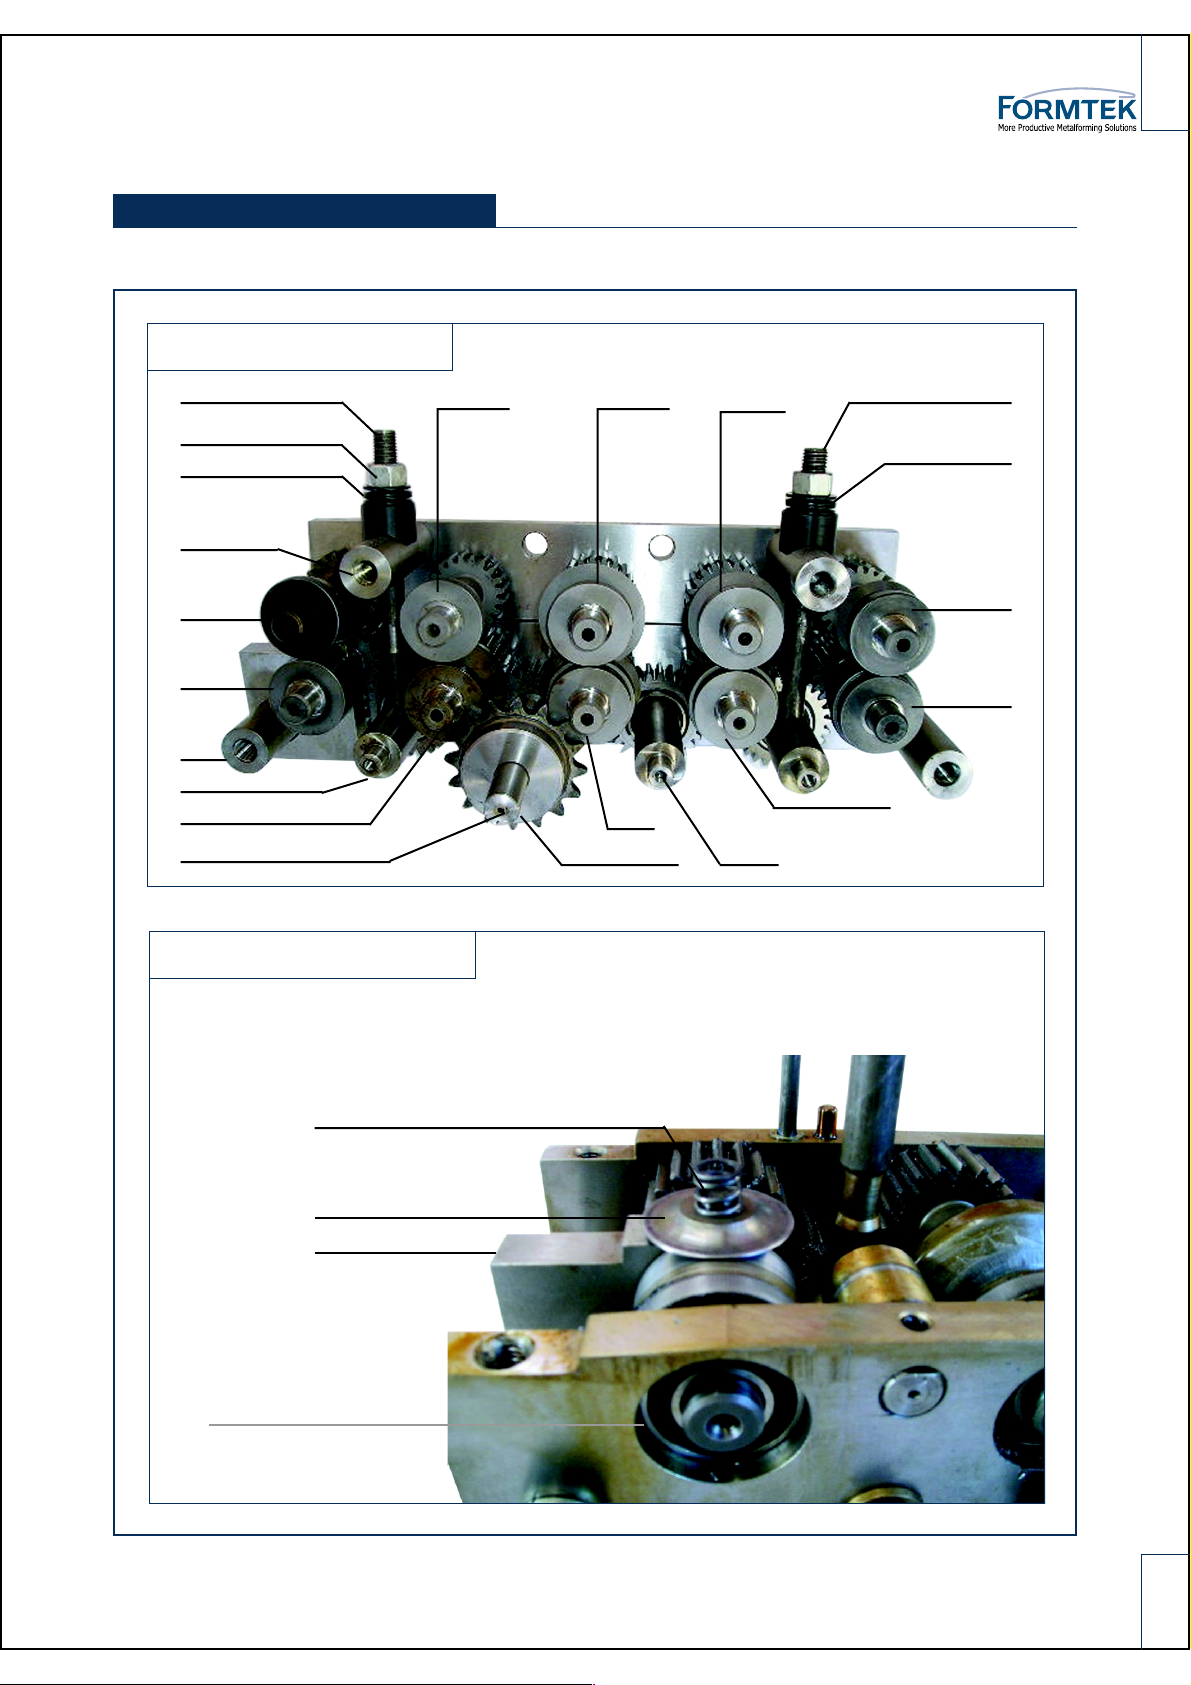
LK-20 PARTS DIAGRAM
FIG.1 Chassie
STUD 93210A64
NUT M16(4) 9068 5A120
7X635
4D510(2)
8V783
4U027
OK873
8G598(2)
GEAR 3 667
3U685
FIG.2 Opening Roll
8V783 5M845
1M838
50B16 SPROCKET
4677S
82N31
STUD 93210A64
DISC SPRING(G)
96475K2957T647
7N581
9J015
6U568
7T459 9104KDDG
BEARINGS
1H345 SPRING 91595A712 PIN
5V675 OPENING ROLL
815U6 OPENING ROLL
HOLDER
18
Page 20
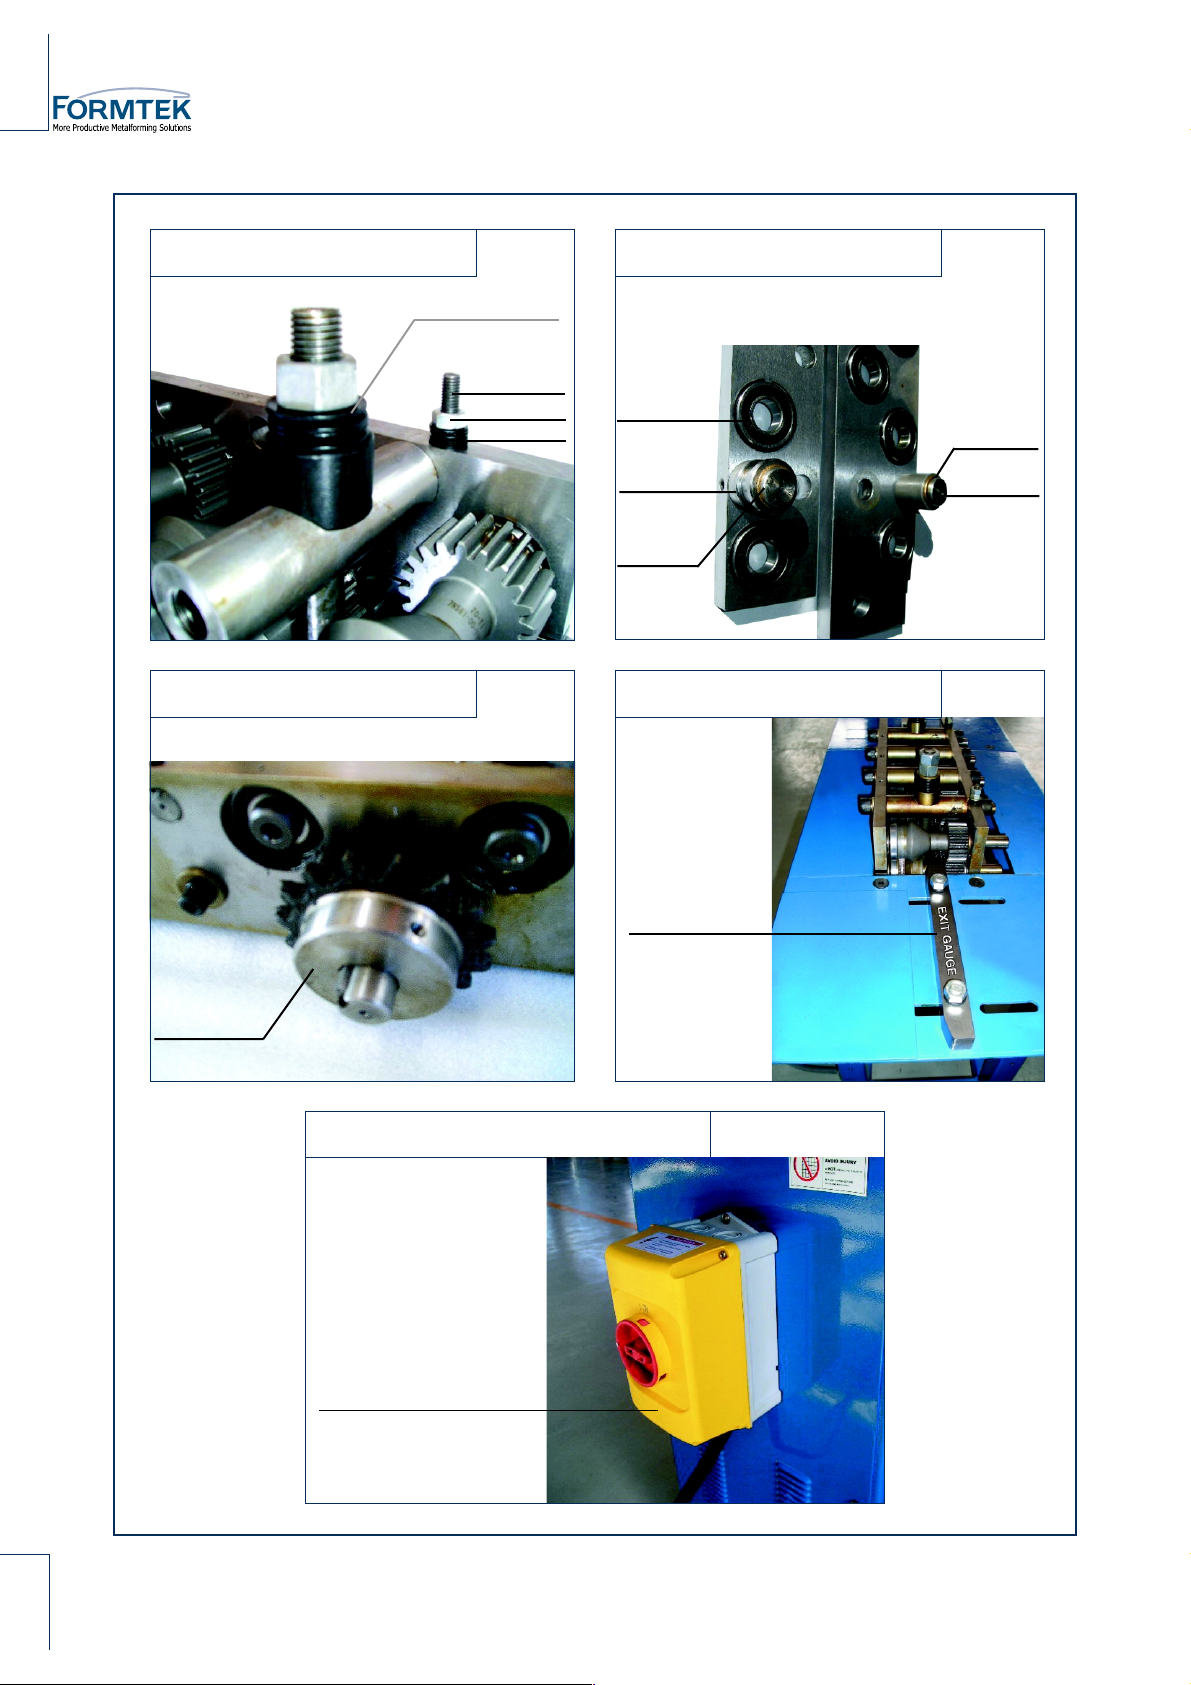
FIG.3 Hold Down FIG.4 Straightener Roll
SPRING WASHER(8) 96475K92
STUP (2) 96445K236
NUT (4) 90685A045
SPRING WASHER(12)
96445K236
BEARING 87R78
5N 261
THRUST
WASHER (3)
7814K21
3G 380
PIN (2) 5Y067
FIG.5 Top Sprocket
SPROCKET
50B16
FIG.7 Motor Control
FIG.6 Exit Gauge
5D228 (2)
19
37V73 STARTER ENCLOSURE
3905Y (380V) UNDERVOLTAGE TRIP
4E768 (4AMP) MANUAL STARTER
Page 21
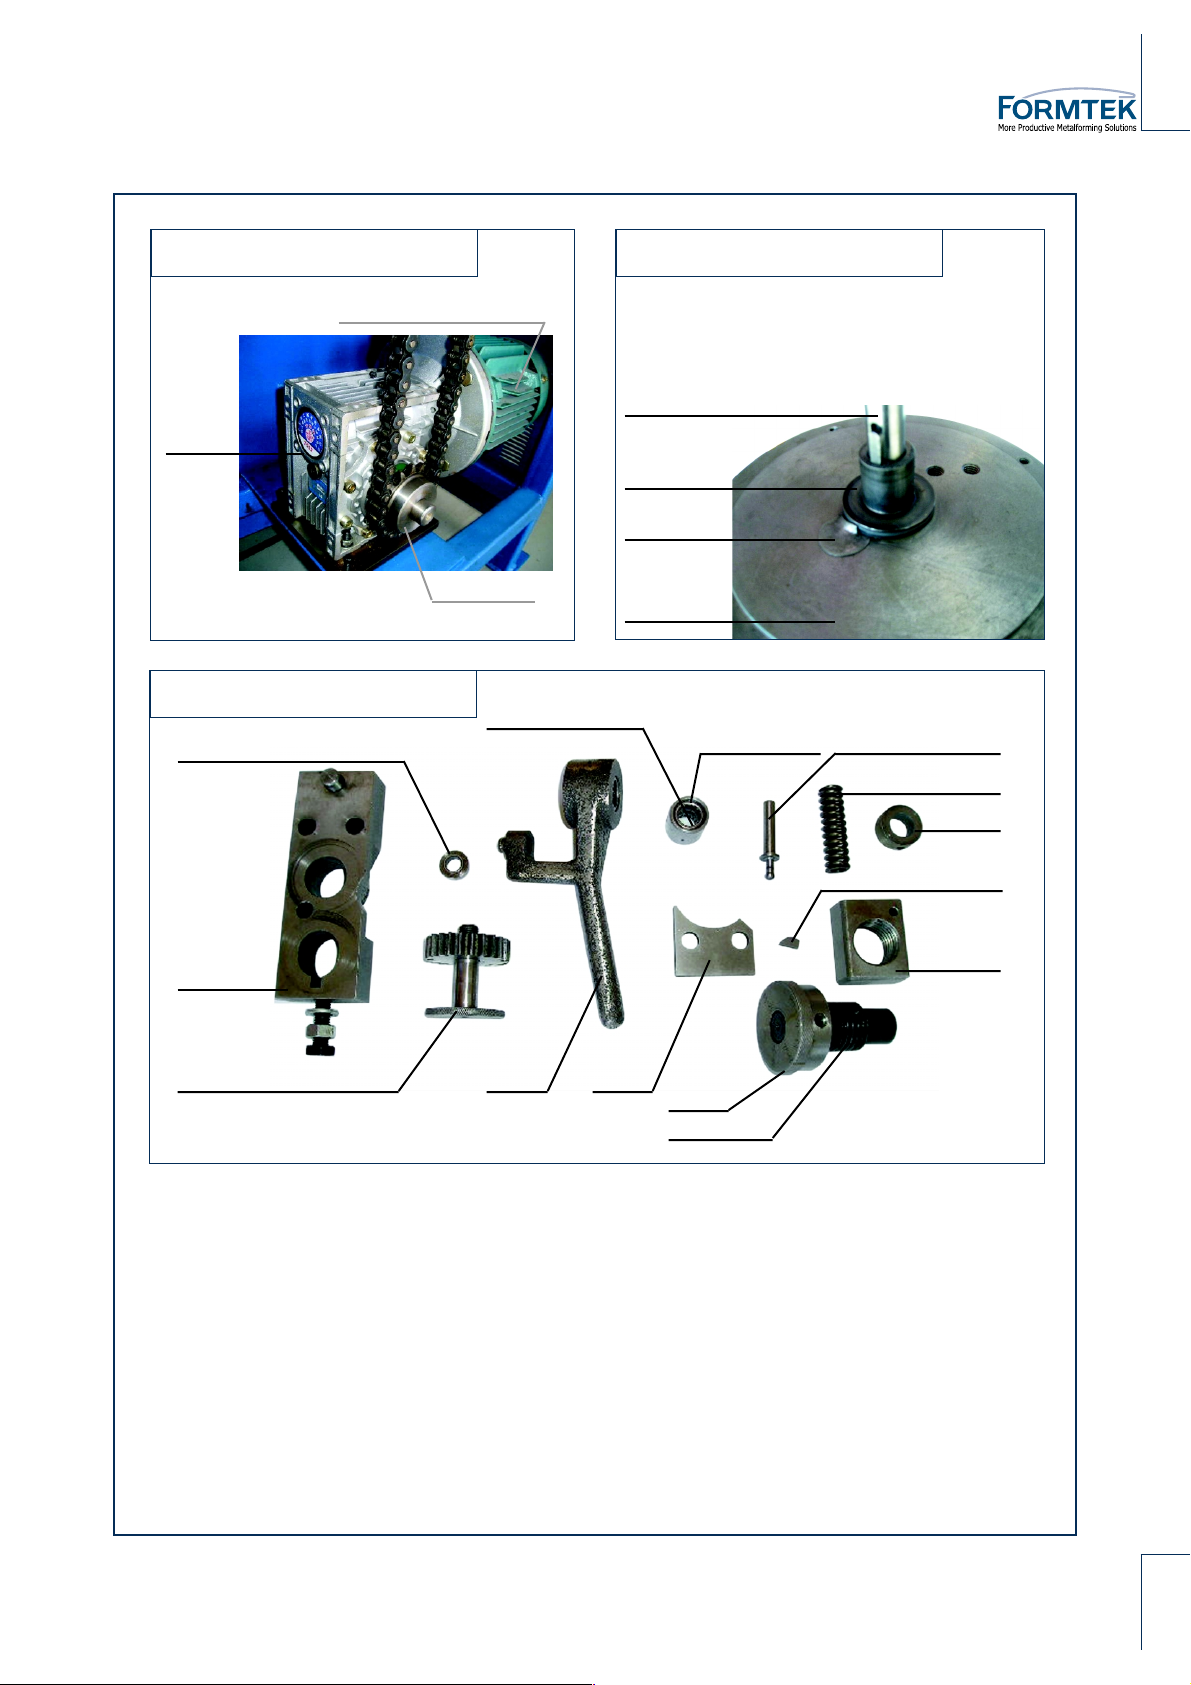
FIG.8 Motor
3F518
380V 1.1KW MOTOR 57595
SPROCKET
50B16
PIG.9FIG.9 AGF Parts
SHAFT 1B 380
1B 367
LIFTER BUTTON 7E158
CASTING 3IQ13
FIG.10 AGF Parts
BEARING (1 EACH)
OE568
39F33
128M3 2U683 2E135
5M622 6F482
RACE 96717A 210
1T385
1U339
2998H
AG22-24025
57485K73
3D799
2Y762
20
Page 22
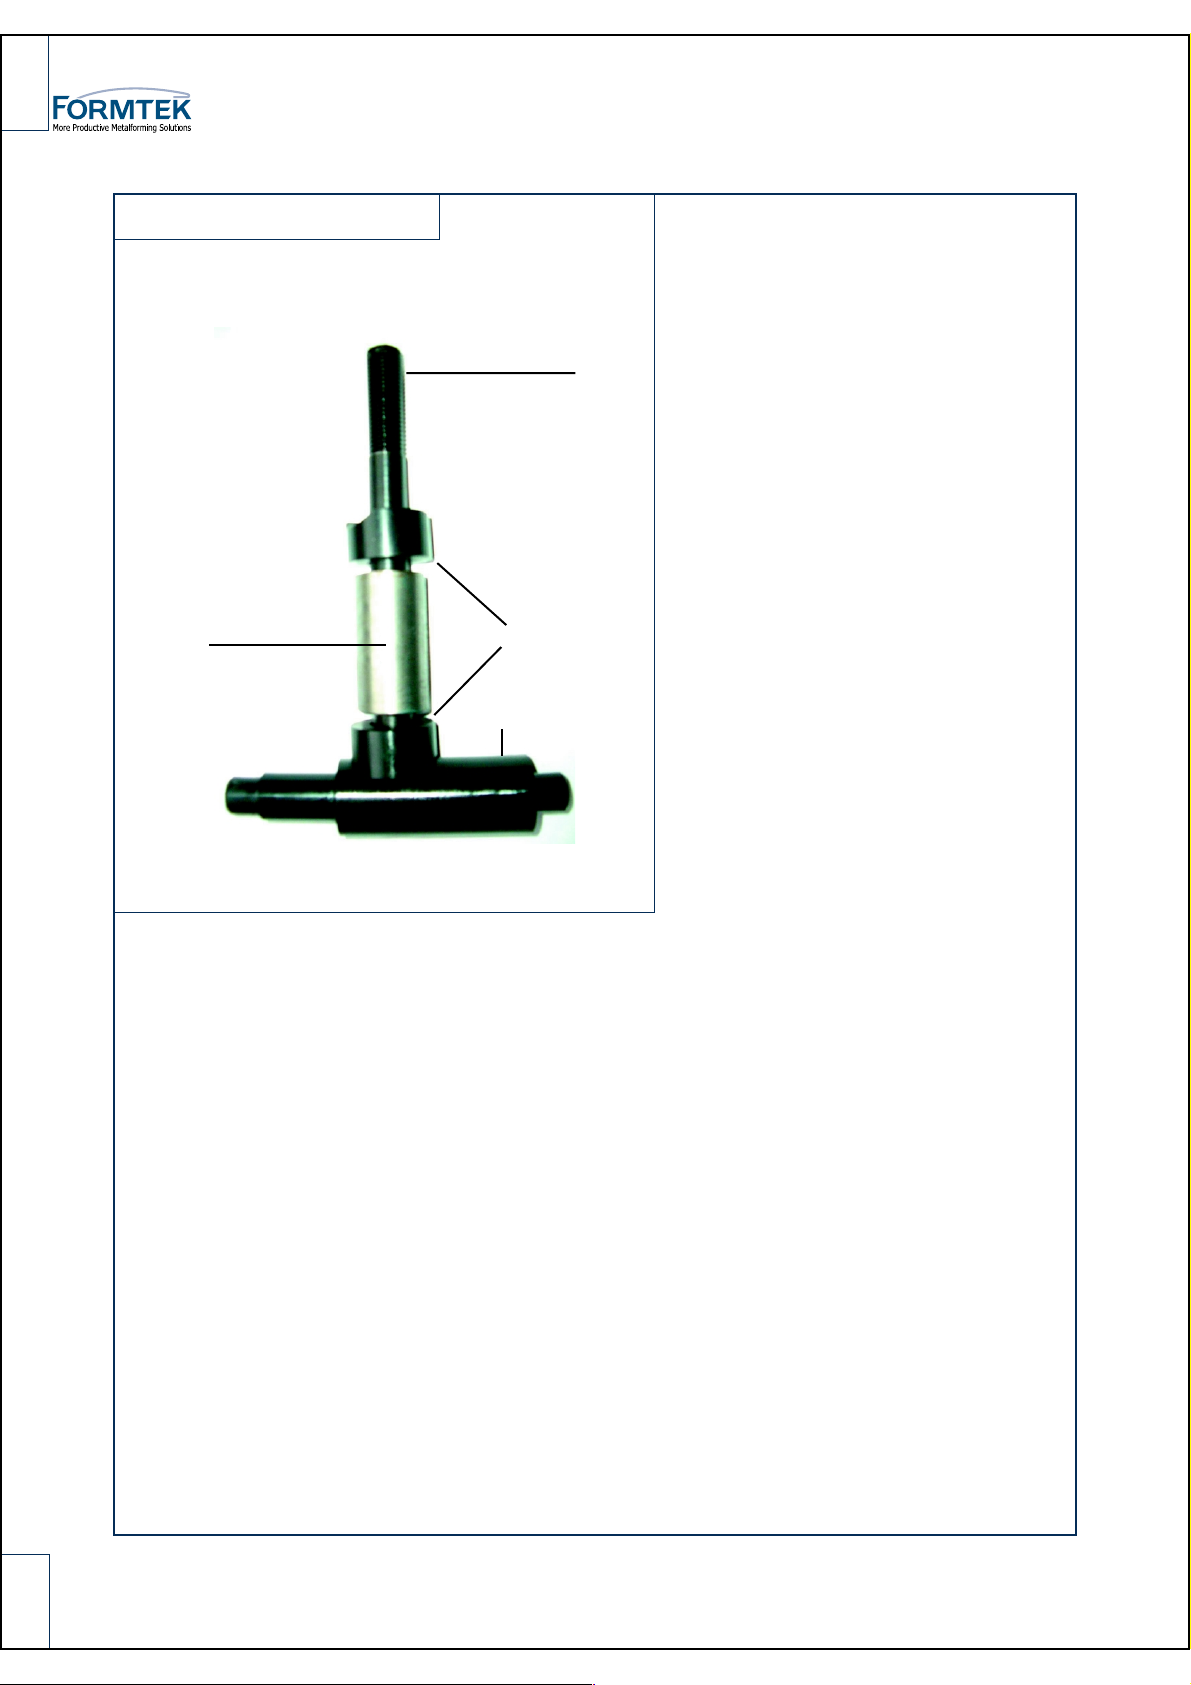
FIG.11 Center Spacer
71V86
05X23
CENTER SPACER
63J70
8G598
21
Page 23
Due to continuous improvements, FORMTEK reserves the right to modify the product
design and specifications contained herein without notice. Please contact your
Lockformer sales representative for the most current specification information.
Use, publication, or sale of any images or content without the expressed
written consent of FORMTEK is strictly prohibited.
Visit Our Web Site at:
WWW.lockformer.com
or www.formtekinc.com
VER. US. LK20-02
11-2005
22
 Loading...