

Page 1

HD-A940/960/970 Series
*
User’s Manual
HDD/DVD Recorder
* : HD-A940G, HD-A940GX, HD-A960G, HD-A960GX, HD-A970GX
*Please refer to Model Comparison Chart on the back cover for the features supported by each model.
*The HDMI connection of this DVD recorder features HDCP technology for the purpose of content protection. Connecting the recorder to
a TV via an HDMI-to-DVI cable may lead to loss of signal if the TV is not DVI/HDCP-compliant.
DVD
+R/+RW/-R/-RW
Page 2

Important Safety Instructions
1. READ INSTRUCTIONS - Read the safety and operation instructions carefully before using this product.
2. RETAIN INSTRUCTIONS - Retain the safety and operation instructions for future reference.
3. HEED WARNINGS - Observe warnings listed in the manual.
4. FOLLOW INSTRUCTIONS - Follow the safety and operation instructions when using this product.
5. CLEAN - Use a dry cloth for cleaning.
6. VENTILATION - Do not block any ventilation openings of this product.
7. MOISTURE - Do not use this product near water, and be sure to prevent this product from being exposed to any
dripping or splashing.
8. HEAT - Do not install this product near any heat sources, such as radiators, heat registers, stoves or other
devices (including amplifier) which produce heat.
9. POLARIZATION - Do not defeat the safety purpose of the polarized or grounding-type plug. A polarized plug
has two blades with one wider than the other. A grounding type plug has two blades and a third grounding prong.
The wide blade or the prong are provided for your safety. If the provided plug does not fit into your outlet, consult
an electrician for replacement of the obsolete outlet.
10. POWER CORD - Protect the power cord from being walked on or pinched, particularly at plugs, convenience
receptacles and the point where they exit from the product.
11. ACCESSORIES/ATTACHMENTS - Use only accessories/attachments specified by the manufacturer.
12. USAGE - Unplug this product during lightning storms or when it is not used for long periods of time.
13. CART - Use only cart, stand, tripod bracket or table specified by the manufacturer or sold with the product.
When a cart is used, operate carefully to prevent the objects from tip-over.
14. SERVICING - Contact qualified personnel when servicing is needed. Servicing is required when this product has
been damaged in any way, for example, when the power cord or plug is damaged; liquid has been spilled on
the product; objects have fallen into the product; the product has been exposed to rain or moisture; the product
does not work normally; or the product has been dropped.
15. BATTERY - To prevent battery leakage which may result in bodily injury, property damage or damage to the unit,
please follow the instructions listed below when using the product’s remote control.
• Install all batteries correctly, with + and - signs matching the marks indicated.
• Do not mix batteries (old and new or carbon and alkaline, etc.)
• Remove batteries when the remote is not used for a long time.
16. WASTE - End-of-life units should be discarded in accordance with your local environmental regulations. For
disposal or recycling information, please contact your local authorities or the Electronic Industries
Alliances: www.eias.org
Page 3

The lighting flash with arrowhead
symbol, within an equilateral triangle, is
intended to alert the user to the presence of
uninsulated ‘dangerous voltage’ within the
product enclosure that may be of sufficient
magnitude constitute a risk of electric shock
to humans.
The exclamation point within an equilateral
triangle is intended to alert the user to
the presence of important operating and
maintenance (servicing) instructions in the
literature accompanying the
appliance.
CAUTION!
TO REDUCE THE RISK OF ELECTRIC SHOCK, DO NOT
REMOVE THE COVER OF THIS UNIT. THERE ARE NO
USER SERVICEABLE PARTS INSIDE. REFER SERVICING TO QUALIFIED SERVICE PERSONNEL.
IMPORTANT FOR LASER PRODUCTS
1. CLASS 1 LASER PRODUCT
2. DANGER: Visible and invisible laser radiation when
open and interlock failed or defeated. Avoid direct
exposure to beam.
3. CAUTION: Do not open the top cover. There are no
user serviceable parts inside the unit; leave all servicing
to qualified service personnel.
CAUTION!
THIS PRODUCT UTILIZES A LASER.USE OF
CONTROLS OR ADJUSTMENTS OR PERFORMANCE
OF PROCEDURES OTHER THAN THOSE SPECIFIED
HEREIN MAY RESULT IN HAZARDOUS RADIATION
EXPOSURE. DO NOT OPEN THE COVER AND DO NOT
REPAIR YOURSELF. REFER SERVICING TO
QUALIFIED SERVICE PERSONNEL.
WARNING
TO REDUCE THE RISK OF FIRE, ELECTRIC SHOCK
OR PRODUCT DAMAGE, DO NOT EXPOSE THIS
APPARATUS TO MOISTURE AND ENSURE THAT
OBJECTS FILLED WITH LIQUIDS, SUCH AS VASES,
SHALL BE PLACED AWAY FROM THE UNIT.
CAUTION!
• CD-R/RW discs recorded using a personal computer or
a CD Recorder may not play if the disc is damaged or
dirty, or if there is dirt or condensation on the player lens.
• Unfinalized CD-R/RW discs can be played, but not all
time information (playing time, etc.) will be displayed.
• Check the copyright laws in your country before record-
ing from DVD VIDEO, SVCD, Video CD, Audio CD, MP3
and JPEG discs. Recording of copyrighted material may
infringe copyright laws.
CAUTION! – POWER BUTTON
Disconnect the main plug to shut the power off completely.
The POWER button in any position does not disconnect
the main line. Power can be controlled from the remote.
PRODUCTS WITH 525P/625P PROGRESSIVE SCAN
OUTPUTS NOTICE REQUIREMENTS
“CONSUMERS SHOULD NOTE THAT NOT ALL
HIGH DEFINITION TELEVISION SETS ARE FULLY
COMPATIBLE WITH THIS PRODUCT AND MAY CAUSE
ARTIFACTS TO BE DISPLAYED IN THE PICTURE. IN
CASE OF 525 OR 625 PROGRESSIVE SCAN PICTURE
PROBLEMS, IT IS RECOMMENDED THAT THE USER
SWITCH THE CONNECTION TO THE ‘STANDARD
DEFINITION’ OUTPUT. IF THERE ARE QUESTIONS
REGARDING THE TV SET COMPATIBILITY, PLEASE
CONTACT OUR CUSTOMER SERVICE CENTER.”
LEGAL NOTICES REGARDING MACROVISION
PROPERTY RIGHTS
“U.S. Patent Nos. 4,631,603; 4,577,216; 4,819,098;
4,907,093; and 6,516,132.”
“This product incorporates copyright protection technology
that is protected by U.S. patents and other intellectual
property rights. Use of this copyright protection technology
must be authorized by Macrovision, and is intended for
home and other limited viewing uses only unless otherwise
authorized by Macrovision. Reverse engineering or
disassembly is prohibited.”
This symbol indicates that used electrical and electronic equipment requires
special handling when the unit is to be
discarded. Please send the unwanted
unit to a waste collection/recycling
center near you to help protect our
environment.
SHOWVIEW is a registered trademark of Gemstar Development
Corporation. The SHOWVIEW system is manufactured under
licence from Gemstar Development Corporation.
▀ Manufactured under license from Dolby Laboratories. ‘Dolby’
and the double-D symbol are trademarks of Dolby Laboratories.
▀ DivX, DivX Certified, and associated logos are trademarks
of DivX, Inc. and are used under license.
▀ HDMI, the HDMI logo and High-Definition Multimedia
Interface are trademarks or registered trademarks of HDMI
Licensing LLC.
Warning, Caution and Others
Page 4

Table of Contents
Important Safety Instructions .........................2
Warning, Caution and Others .........................3
Table of Contents .............................................4
DISC INFORMATION
Recordable Discs ............................................................. 6
Recording Time ................................................................ 6
Playable Discs .................................................................. 7
Unplayable Discs .............................................................. 7
Region Code .................................................................... 7
Disc Preparation (Formatting) .......................................... 8
Disc Finalization ............................................................... 8
Title & Chapter ................................................................. 8
CONNECTIONS
DVD Recorder Overview ..................................9
Front View ........................................................................ 9
Display Window .............................................................. 10
Rear View ....................................................................... 10
Remote Control .............................................. 11
Preparing Remote Control .............................................. 12
Remote Control Signal ................................................... 12
Connecting the DVD Recorder ......................13
Step 1: Connecting Antenna/Satellite Cables ................. 14
Step 2: Connecting the Video Cable .............................. 14
Step 3: Connecting the Audio Cable .............................. 17
Step 4: Connecting the Decoder (If Required) ............... 20
Step 5: Connecting the Power Cord ............................... 21
SYSTEM SETTINGS
Easy Setup ......................................................22
Set Language ................................................................. 22
Set Clock Format ............................................................ 22
Set System Date ............................................................ 22
Set System Time ............................................................ 22
Set TV Channels ............................................................ 23
Complete Settings .......................................................... 23
Setup Menu .....................................................23
System ........................................................................... 24
Date/Time ....................................................................... 24
Tuner .............................................................................. 24
Video Input/Output ......................................................... 25
Audio Output .................................................................. 26
Recording / Playback ..................................................... 26
DVD Movie ..................................................................... 26
Channel Editor ................................................28
Moving up/down TV Channels ....................................... 29
Inserting TV Channels .................................................... 29
Swapping TV Channels .................................................. 29
Renaming TV Channels ................................................. 30
Enabling/Disabling TV Channels .................................... 30
Setting Decoder .............................................................. 30
Setting Channel Frequency ............................................ 30
ShowView® Programming System ................31
GETTING STARTED
Contents Menu ...............................................32
Screen Overview ........................................................... 32
Previewing Files via Contents Menu ............................. 33
On-Screen Input Keypad ...............................34
Screen Overview ........................................................... 34
Entering New Title/File Name ........................................ 35
Easy Guider ....................................................36
Screen Overview ........................................................... 36
Using Easy Guider: Play ............................................... 37
Using Easy Guider: Record ............................................ 38
Using Easy Guider: Timer Record .................................. 39
Using Easy Guider: Copy ............................................... 41
Using Easy Guider: Disc Tools ....................................... 43
RECORDING
Recording from TV .........................................47
Recording from External Sources ................48
VCR/V8 Camcorder/DVD Player .................................... 48
DV (Digital Camcorder) .................................................. 48
Recording Options .........................................50
One-Touch Recording .................................................... 50
Adding New Sessions .................................................... 50
Playing Last Recorded Title (HDD) ................................ 50
Using Chapter Mark ....................................................... 50
TIMER RECORDING
Timer Record Menu ........................................53
Info Screen 1 .................................................................. 53
Info Screen 2 .................................................................. 53
Setting Timer Program ..................................54
Date/Time Mode ............................................................. 54
ShowView® Mode ........................................................... 55
Page 5

TIME SHIFT
Pause Live TV .................................................57
Record & Play .................................................57
PLAYBACK
Navigation Menu ............................................58
Screen Overview ............................................................ 58
Playback Options ........................................................... 59
Playback (Disc) ..............................................62
DVD-Video/VCD/SVCD .................................................. 62
Audio CD ........................................................................ 62
Media Files (Video/Music/Picture) .................................. 62
Picture with Music .......................................................... 63
Playback (HDD) ..............................................64
DIGITAL VIDEO SUP
PORT
MPEG-4 Videos ...............................................65
Supported Formats ......................................................... 65
Playing MPEG-4 Files .................................................... 65
DivX® VOD .......................................................66
Navigation Menu ............................................67
EDITING
Edit Menu ........................................................69
Screen Overview ............................................................ 69
Editing Titles ...................................................70
Rename Title .................................................................. 70
Protect Title .................................................................... 70
Overwrite Title ................................................................ 71
Split Title ......................................................................... 71
Merge Titles .................................................................... 72
Erase Title ...................................................................... 72
Set Title Thumbnail ......................................................... 72
Editing Chapters ............................................73
Insert Chapter Mark ........................................................ 73
Remove Chapter Mark ................................................... 73
Hide Chapter .................................................................. 73
Show Chapter ................................................................. 74
COPYING
One-Touch Copying .......................................76
TROUBLESHOOTING
SPECIFICATIONS
GLOSSARY
RECOMMENDED DISC LIST
Page 6

6
Disc Information
Unlike traditional VCR (video casette recorder), DVD
recorder comes with a wider variety of media to
choose from for either playback or recording. Please
check the following sections before buying discs or
recording.
Recordable Discs
Type Logo Information
DVD-R
• DVD+VR mode
• Write-Once
DVD-RW
• DVD+VR mode
• Rewritable
DVD+R
• DVD+VR mode
• Write-Once
DVD+RW
• DVD+VR mode
• Rewritable
DVD+R DL
(Double
Layer)
• DVD+VR mode
• Write-Once
The DVD-R/DVD-RW/DVD+R/DVD+RW/DVD+R DL
(Double Layer) logos belong to the respective entities
holding the trademarks.
For best results, use discs with the above logos.
Recording Time
Type Mode Time
DVD
(4.7GB)
HQ 1 hour
SP 2 hours
LP 3 hours
EP 4 hours
SLP 6 hours
Just Fit Variable
DVD+R DL
(Double
Layer)
(8.5GB)
HQ 114 minutes
SP 224 minutes
LP 332 minutes
EP 443 minutes
SLP 665 minutes
Just Fit Variable
HDD
(160GB)*
HQ 34 hours
SP 68 hours
LP 101 hours
EP 135 hours
SLP 203 hours
Just Fit Variable
HDD
(250GB)*
HQ 55 hours
SP 108 hours
LP 160 hours
EP 214 hours
SLP 321 hours
Just Fit Variable
HDD
(320GB)*
HQ 70 hours
SP 139 hours
LP 206 hours
EP 275 hours
SLP 413 hours
Just Fit Variable
The ‘Just Fit’ mode is available for timer recording only.
The table lists the minimum recording time available on
each medium.
* depending on the model.
Page 7

7
Disc Information
Playable Discs
Type Logo Information
DVD-Video
• Pre-recorded
DVD-Video discs
(The region code is
printed on the rear
panel of recorder.)
DVD-R
• Recorded in DVD-
Video format and
finalized
• With JPEG/BMP
files
• With MP3/WMA/
WAV files
• With MPEG-1 files
• With MPEG-2 files
(.VOB/.DAT/.MPG)
• With MPEG-4 files
(.AVI/.DIV*/.DIVX*)
DVD-RW
DVD+R
DVD+RW
DVD+R DL
(Double
Layer)
CD-R
• With JPEG/BMP
files
• With MP3/WMA/
WAV files
• With MPEG-1 files
• With MPEG-2 files
(.VOB/.DAT/.MPG)
• With MPEG-4 files
(.AVI/.DIV*/.DIVX*)
CD-RW
Video CD
(VCD)
• CDs for video files
recorded with CD
sound, VHS quality,
MPEG-1 compression technology
Super Video
CD (SVCD)
• CDs for video
files recorded with
CD sound, SVHS
quality, MPEG-2
compression
technology
Audio CD
• CDs for music files
recorded in digital
signal, featuring
better audio quality,
less distortion and
less deterioration of
audio quality over
time
The DVD-R/DVD-RW/DVD+R/DVD+RW/DVD+R DL
(Double Layer) logos belong to the respective entities
holding the trademarks.
For best results, use discs with the above logos.
Other types of discs may not be played back with the
intended results on this DVD recorder. Do not use
irregular-shaped discs (e.g. heart-shaped), as these
can damage the recorder.
It may not be possible to play CD-R, CD-RW, DVD-R,
DVD-RW, DVD+R, DVD+RW discs in all cases due to
the type of disc or condition of the recording.
* depending on the model.
If an MP3 file name contains two-byte characters (e.g.
Chinese characters), it may not be displayed correctly.
This DVD recorder does not display ID3 (for MP3) and
WMA tags.
This DVD recorder does not support mp3PRO files.
The MP3 file bitrates supported by this DVD recorder
are: 32Kbps - 320Kbps.
This DVD recorder does not support WMA lossless
files and WMA files protected by DRM (digital rights
management) technology.
Unplayable Discs
This DVD recorder does not play back the disc types
listed below. If you try to play back these discs,
excessive noise may cause damage to your amplifiers or speakers. If an unplayable disc is inserted,
an ‘Invalid Disc’ error message will appear on screen
after attempts of trying to play the disc fail.
• Unfinalized discs recorded on other DVD/CD
recorders
• DVD Audio discs
• KODAK PHOTO CDs
• DVD-Video discs with a region code not supported
by the recorder
• DVD-RAMs
• Data discs (e.g. CD-ROMs, DVD-ROMs) which do
not contain any type of files supported by this DVD
recorder
• Standard SACDs (Hybrid type of SACDs can be
played as normal Audio CDs.)
Region Code
This DVD recorder can only play DVD-Video discs
marked with the same region code as printed on its
rear panel or the all-region discs. If you try to play
discs with different region code(s), a message saying
‘Invalid Region Code’ will appear on screen.
Example of region code :
ALL
Page 8
8
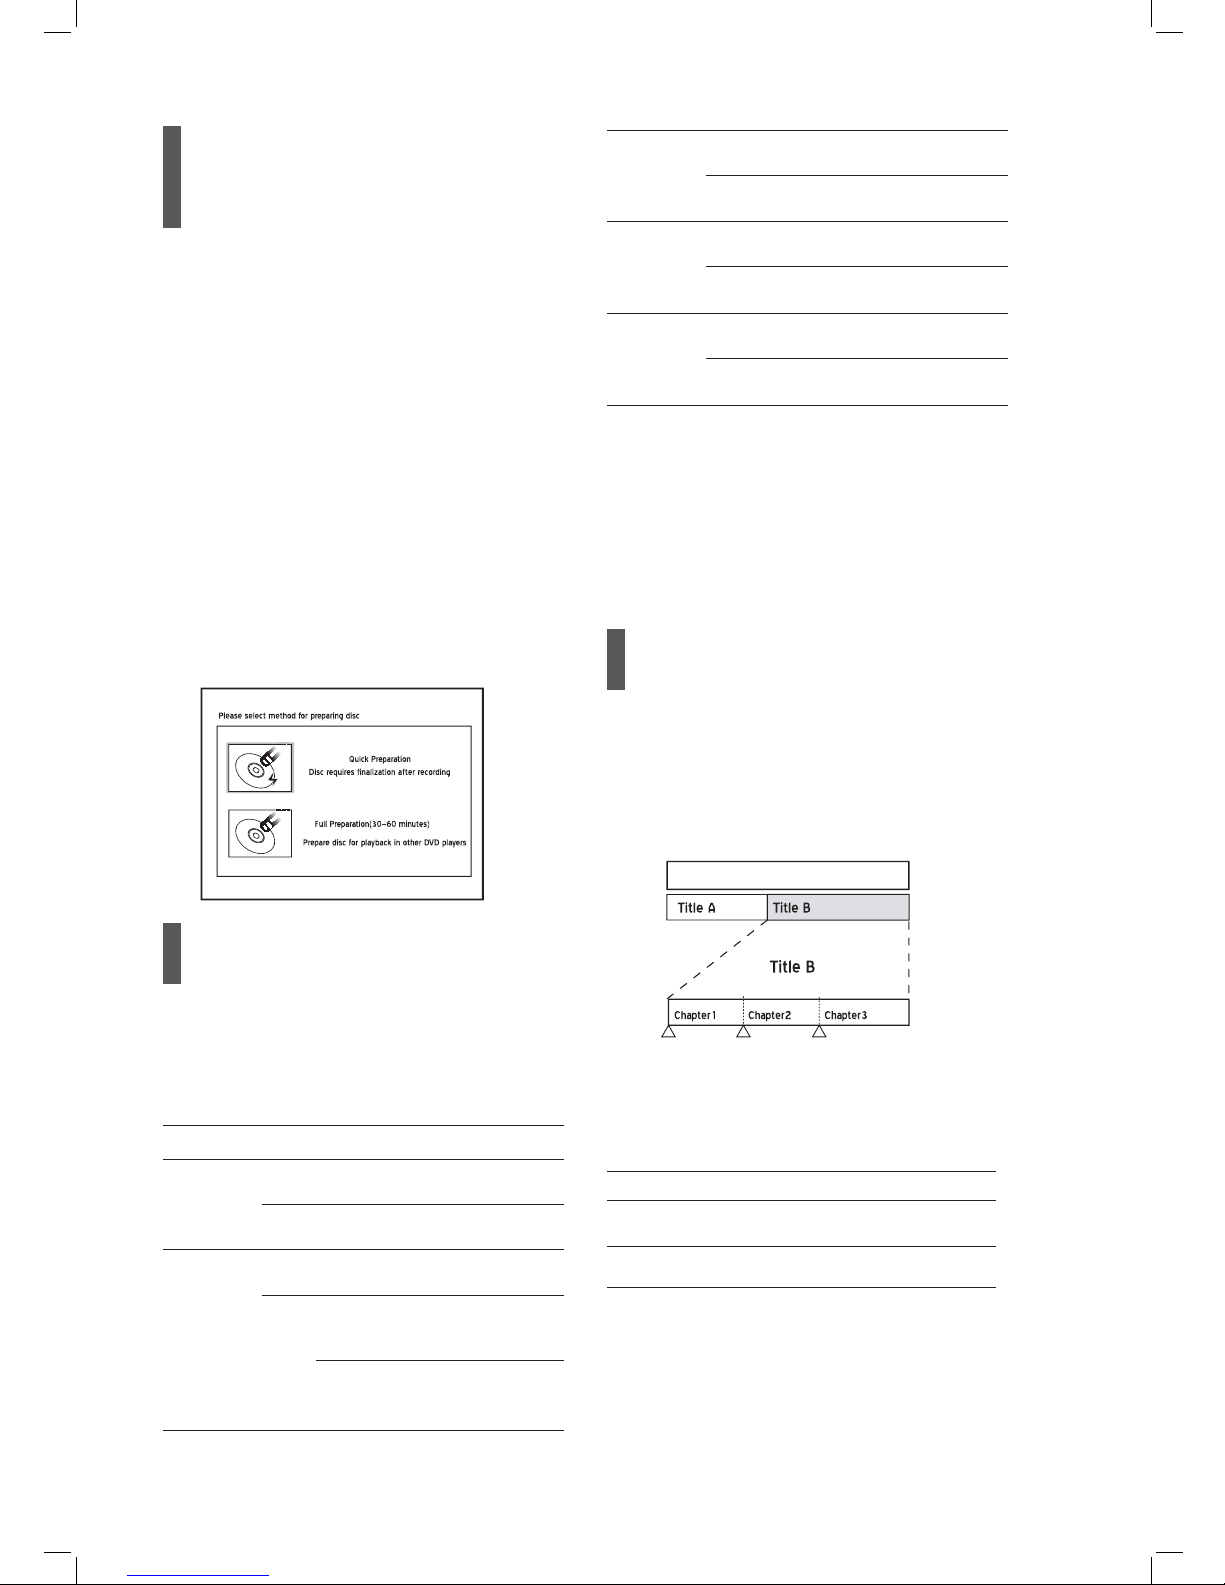
Disc Preparation
(Formatting)
If you use blank DVD-RW discs, you need to format
the discs before recording. After you insert a blank
DVD-RW disc, the disc preparation screen will
appear. Pressto select ‘Quick Preparation’ or ‘Full
Preparation’, then press ENTER.
• Quick Preparation
If you select this option, the recorder will format part
of the disc for your immediate recording. After the
recording is fi nished, you can continue recording or
play back the recorded title. If you wish to watch the
title on another DVD recorder, DVD player or PC,
you need to fi nalize the disc fi rst.
• Full Preparation
If you select this option, the recorder will format
the whole disc. The process will take a longer time
to complete. After formatting, you can repeatedly
use the disc for recording, and there is no need to
fi nalize the disc afterwards.
The preparation screen will also appear after you
erase a DVD-RW disc.
Disc Finalization
After recording or copying, you may need to fi nalize
your disc before it can be played back on another
DVD recorder, DVD player or PC. Please refer to the
following table for further information on discs you
use.
Type Finalization
Note
DVD-R
Data
File
-
Video
Title
-
DVD-RW
Data
File
-
Video
Title
When using a disc
formatted with ‘Quick
Preparation’ mode
When using a disc
formatted with ‘Full
Preparation’ mode
DVD+R
Data
File
-
Video
Title
-
DVD+RW
Data
File
-
Video
Title
-
DVD+R DL
(Double
Layer)
Data
File
-
Video
Title
-
: Not required : Required
Please note that you may not be able to play a fi nalized
disc on certain devices (e.g. older model DVD players)
due to technical incompatibility.
Only discs used to record video titles require fi naliza-
tion. Discs used to copy media fi les (such as MP3 or
JPEG fi les) are considered as data: there is no need to
fi nalize these discs.
Title & Chapter
For DVD-Video or other digital videos, disc contents
are usually divided into individual titles, which you
may preview using the disc menu. Some titles may
be further divided into a smaller unit called ‘chapter’.
To view the disc menu, press MENU on the remote
control.
Editing_00_03
Disc or HDD
During or after recording, you can create chapters by
inserting chapter marks in a video title. Depending on
the target medium you use, the number of maximum
chapters and titles you can add may vary. Please see
the table below for details.
Type Maxi. Title Maxi. Chapter
HDD 5994* -
DVD 49** 254
* For each title, you can create up to 999 chapters.
** For each title, you can create up to 99 chapters. But
you can only create a maximum of 254 chapters in one
disc.
Page 9

9
Connections
The following sections introduce a step-by-step process to set up this DVD recorder. When more than one setup
option are listed at a specifi c stage, please refer to the option most suitable for your setup condition.
DVD Recorder Overview
Front View
13
1
2
4 DISPLAY window
Shows operation information
2 OPEN/CLOSE button
Opens or closes the disc tray
7 8 9 10 11 12
3
5
6
4
14
3 Disc tray
Holds discs securely during recording or
playback
5 HDD indicator
Lights when HDD (hard disk drive) is selected
as the target device
6 DVD indicator
Lights when DVD drive is selected as the target
device
7 HDD/DVD button
Changes DVD recorder’s current mode from
HDD (hard disk drive) to DVD and vice versa
8 SOURCE button
Selects equipment connected via line inputs
13 DV-LINK (IEEE 1394) jack
Connects digital camcorder
14 LINE IN (S-Video/Composite VIDEO &
AUDIO L/R) jacks
Connects the outputs of external equipment
via S-Video or composite video/audio cables
1 POWER ON/OFF button
Switches on the DVD recorder or switches
the unit to standby mode
9 RECORD button
Starts recording on current device
10 PLAY button
Starts playback on current device
11 STOP button
Stops playback or recording
12 PUASE/STEP button
Pauses playback or recording
*Appearance of the unit may vary slightly depending on the model.
When using the LINE IN jacks
By default, this DVD recorder automatically selects S-Video signal over the composite one when both input jacks are
used to connect to other devices. If you would like your videos to be imported from a specifi c source, you can either
change the default setting through Setup → Video Input/Output → Front AV Input, or use one set of the connec-
tions at a time.
Connections
Page 10

10
Display Window
1 PLAY indicator
2 DVD indicator
3 SVCD indicator
4 VCD indicator
5 CDDA indicator
6 FILE indicator
12 Multi-information window
9 PAUSE indicator 14 CD-R/DVD-R indicator
13 DVD+RW indicator
11 TIMER RECORD indicator
10 RECORD indicator
8 DVD+R indicator
7 CD indicator
TIMER
DVD SVCD VCD CDDA CD
+R
+RW
-R
-RW
FILE
12
21 3 4 5 6 7
8
13
14
15
9
10
11
15 CD-RW/DVD-RW indicator
Rear View
8 DIGITAL AUDIO OUT (COAXIAL) jack
Connects an amplifier or a receiver with a
digital input jack
7 DIGITAL AUDIO OUT (OPTICAL) jack
Connects an amplifier or a receiver with a
digital input jack
3 COMP OUT (COMPONENT) jacks
Connects the inputs of external equipment via
component video cables
6 HDMI DIGITAL OUT jack
Connects a TV or an AV amplifier (receiver)
with HDMI input jack (via HDMI cable)
1 VHF/UHF IN/OUT jacks
Connects antenna cables
2 AV OUTPUT (VIDEO/AUDIO L/R) jacks
Connects the inputs of external equipment
via composite video/audio cables
1
2
4
5
7
8
3
9
4 SCART INPUT jack
Connects the output of external equipment
via SCART cable
5 SCART OUTPUT jack
Connects the input of external equipment
via SCART cable
9 AC IN terminal
Connects the power cord
1
*Appearance of the unit may vary slightly depending on the model.
(*for models designed with a detachable power cord)
Page 11
11
Connections
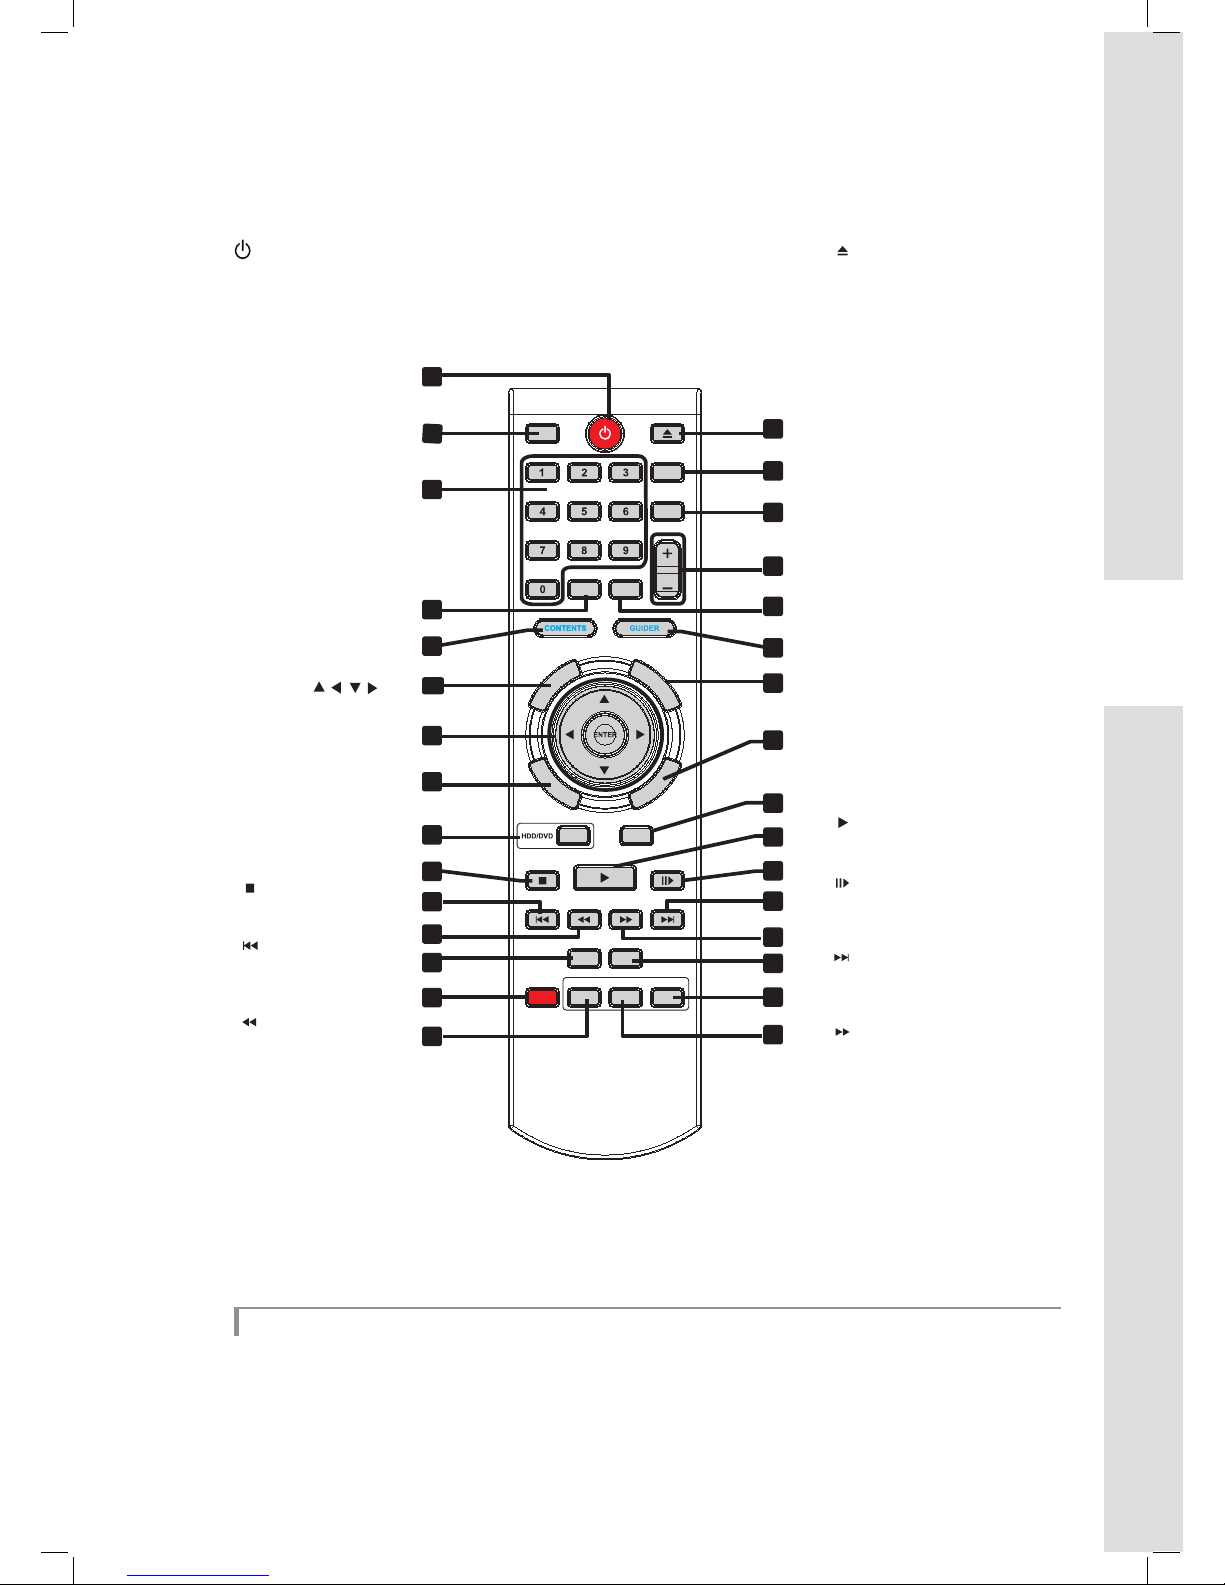
Remote Control
1
2
3
4
5
6
7
8
9
10
11
12
13
14
15
16
17
18
19
20
21
22
23
24
25
26
27
28
29
30
31
1 POWER button
Switches on the DVD
recorder or switches the
unit to standby mode
2 DISPLAY button
Displays disc/HDD
information
3 Alphabet & Number
buttons
4 TIMER button
Displays Timer Record
menu
5 CONTENTS button
Displays Contents Menu
6 TOP MENU button
Displays DVD top menu
(if available)
7 Direction ( )
& ENTER buttons
8 SETUP button
Displays Setup menu
9 HDD/DVD button
Switches to DVD or HDD
10
STOP button
Stops current operation
11 PREVIOUS button
Goes to previous item
(file/track/chapter)
13 EDIT button
Displays Edit menu
12
F. R. (Rewind) button
Reverses playback
14 RECORD button
Starts recording
15
AUDIO button
Displays and switches
audio options
16 OPEN/CLOSE button
Opens or closes disc tray
17 SOURCE button
Selects input source
18
TV (MODE) button
Switches to TV view or
SCART source view (decoder)
19
CH + / CH - button
Changes TV channels
20
ShowView button
Displays the ShowView
system menu
21
GUIDER button
Displays Easy Guider menu
22
MENU button
Displays disc menu
23 NAVI. button
Displays Navigation menu
24
TIME SHIFT button
Pauses live TV program
25 PLAY button
Starts playback
26 PAUSE/STEP button
Pauses current operation or
starts playback frame by frame
27 NEXT button
Goes to next item
(file/track/chapter)
28 F. F. (Fast Forward) button
Fast forward playback
29 COPY button
Starts copying
30
SUBTITLE button
Displays and switches
subtitle options
31
ANGLE button
Displays and switches
angle options
Using the Remote Control
Apart from the basic playback and recording buttons, the unit’s remote control is also designed with a set of quickaccess function buttons: SETUP, GUIDER, TIMER, NAVI. and CONTENTS*. Pressing these buttons will lead you
directly to their respective menus. If you would like to exit the screen, simply press the function button again.
(*The ‘CONTENTS’ button is available in HDD models only.)
Page 12
12
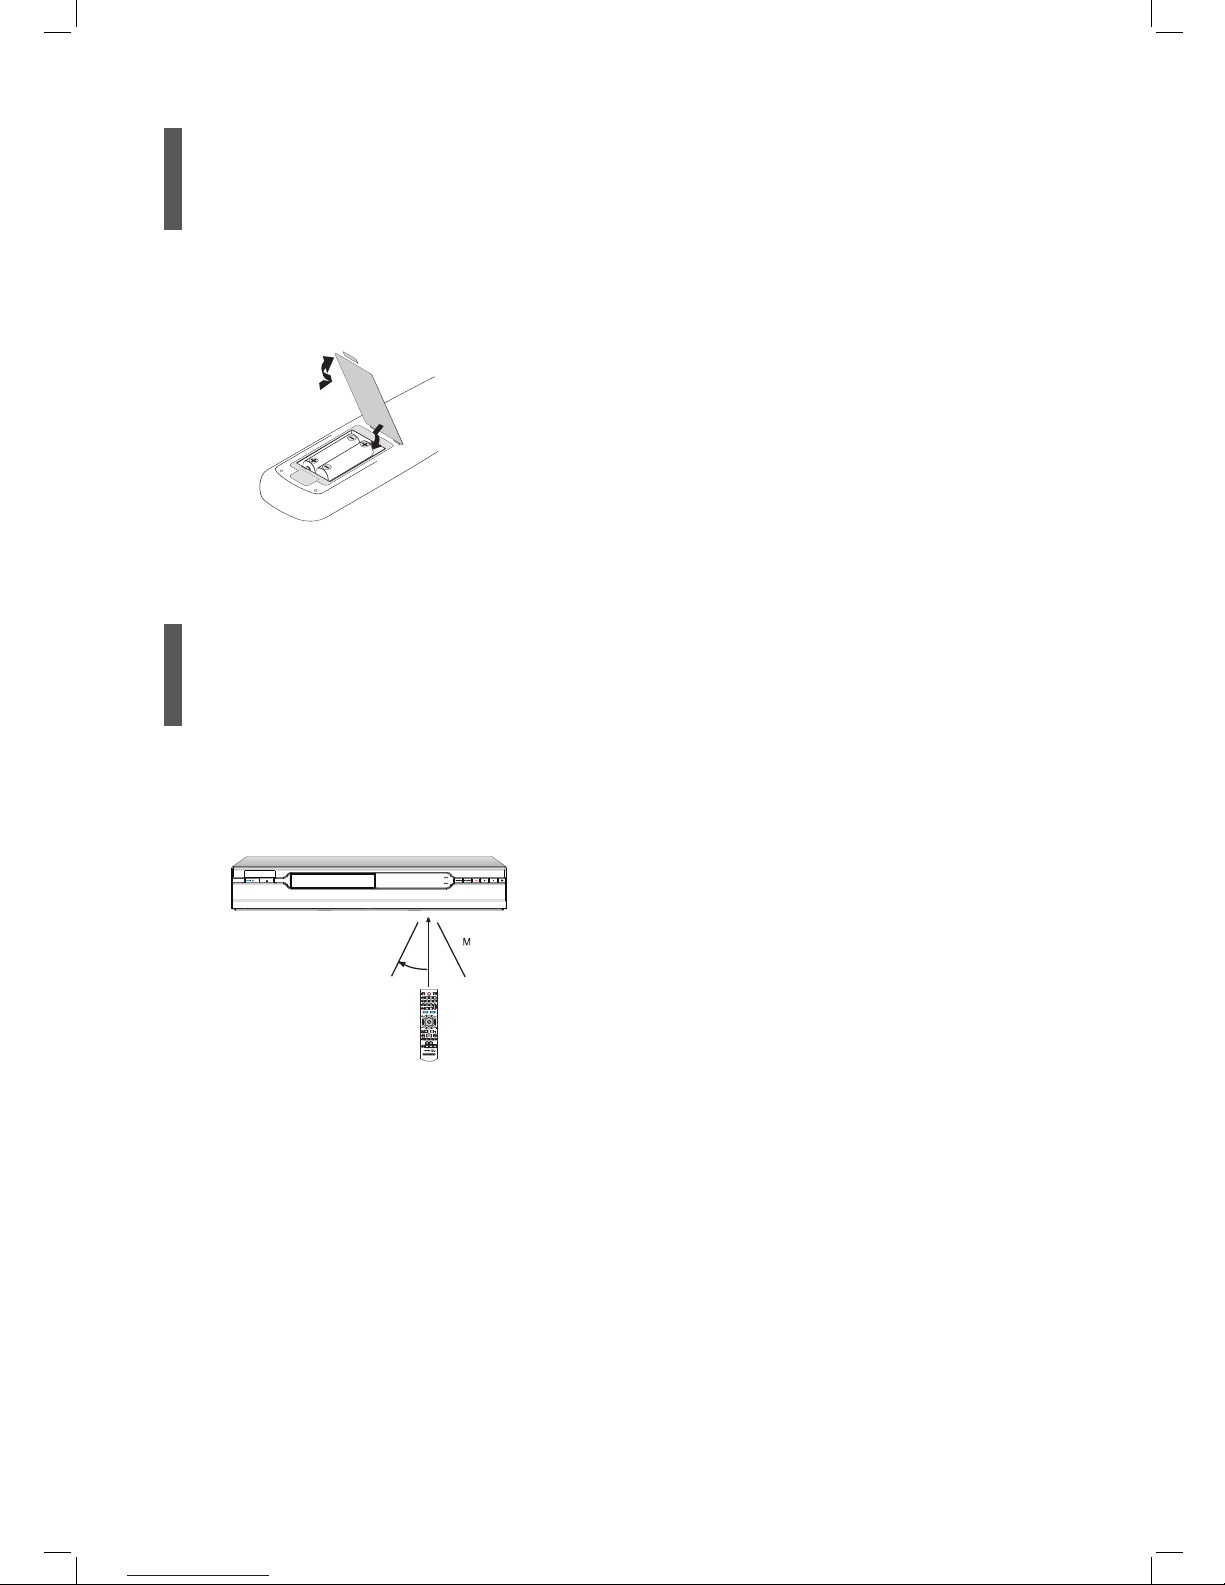
Preparing Remote
Control
Open the battery compartment and insert the batteries. Make sure the polarities (+ and -) match the
markings inside the remote control.
Using rechargeable batteries is not recommended.
Remote Control
Signal
The remote has an operating range of approximately
7.5 M, and works best when pointed directly at the
unit horizontally at angle up to 30° from the sensor
window of the DVD recorder.
30
0
7.5
Page 13

13
Connections
Connecting the DVD Recorder
Do not plug the AC power cord into the outlet until all other connections are made.
It is recommended that you connect VIDEO OUT jack of the DVD recorder directly to the video input of your TV.
Connecting VIDEO OUT jack of this recorder to a TV via a VCR may cause a viewing problem when playing
a copy-protected disc. The same viewing problem may also occur when connecting the recorder to a TV/VCR
combo system.
Connection Method
Wall → DVD Recorder → TV
Wall → DVD Recorder → VCR → TV
Before you start
► Check whether all the accessories are included in your package box.
Remote Control (1) Batteries (2)
Audio/Video Cable (1) Power Cord (1) (*depending on the model)
HDMI Cable (1) Blank DVD Disc (1) (*depending on the model)
Antenna Cable (1) User’s Manual (1)
Quick Start Guide (1)
Page 14
14
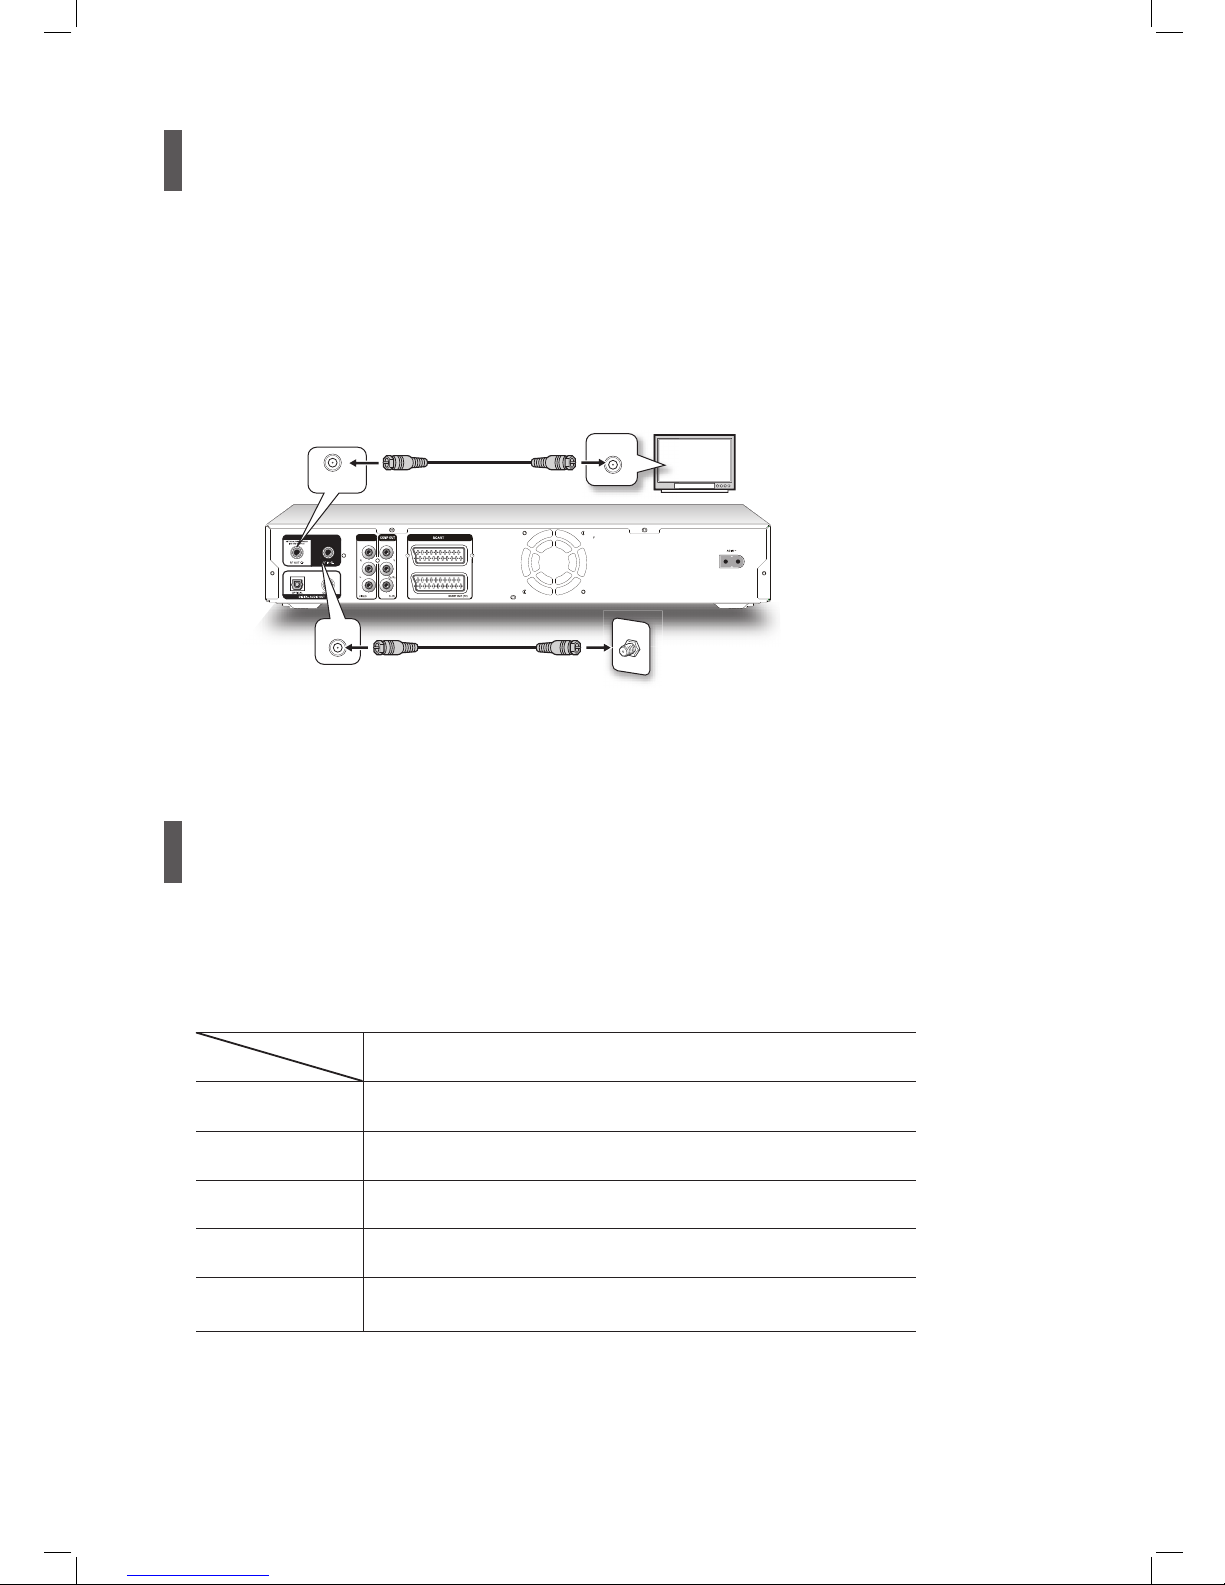
Step 1: Connecting Antenna/Satellite Cables
Wall Outlet DVD Recorder TV
1
Use an antenna cable to connect the RF IN jack on the DVD recorder to the antenna outlet on the wall.
2
Use an antenna cable to connect the RF OUT jack on the DVD recorder to the RF IN jack on the television.
(Please note that this serves as a pass-through only.)
SCART IN (AUX/DECODER)
TUNER
AV OUTPUT
T V
Wall
RF IN
RF OUT
RF IN
TUNER
Step 2: Connecting the Video Cable
The table below lists some of the options for establishing the video and audio connections of this DVD
recorder. For reference, fi rst check the top row to select a type of video cable you wish to use; then look
down the column to see what types of audio connections are applicable. Select only one of the applicable
options to connect your DVD recorder to other devices unless specifi ed otherwise.
Video
Audio
HDMI Cable
Component
Video Cable
SCART Cable
Composite Video
Cable
HDMI Cable
*
SCART Cable
*
Composite Audio
Cable
Digital Audio Cable
(Optical)**
Digital Audio Cable
(Coaxial)**
* The HDMI and SCART cables can transmit video and audio signals at the same time. Normally, if you use these two
cables for video connection, you do not need to establish an additional analog audio connection.
** If you wish to enjoy digital audio sound, you need to establish the digital audio connection (via an optical or a coaxial
cable) whatever video cable you use.
Page 15

15
Connections
Option 1 Using HDMI Cable
If your TV has an HDMI input, use an HDMI cable to connect the HDMI OUT jack on the DVD recorder
to the HDMI IN jack on the television.
The HDMI cable can transmit both video and audio signals at the same time. If you use an HDMI cable to connect
to your TV, it is recommended that you remove all other audio/video connections (component or composite cables)
between the DVD recorder and your TV to enjoy better audio/video quality.
However, if you wish to play back discs recorded in DTS format, you need to use an extra optical or coaxial cable
to connect the DVD recorder to your TV or to a stereo amplifi er/receiver.
SCART IN (AUX/DECODER)
T V
HDMI IN
HDMI Cable
HDMI Out
TUNER
HDCP (High-bandwidth Digital Content Protection)
The DVD recorder supports the HDCP technology, which is developed to prevent copying of the content transmitted
via the HDMI cable. After all connections are made, the recorder will start checking whether the connecting TV (or
other display device) is HDCP-compliant. If the verifi cation process fails, a pop-up window will appear. Press and
ENTER to try again. Otherwise, disconnect the HDMI cable and use other types of video cable for connection. If you
select ‘EXIT’ without disconnecting the cable, or if you do not select any option in 10 seconds, the pop-up window will
disappear. Next time when you try to watch HDCP-encrypted content, there will be no image shown on screen.
After all connections are made, make sure related system settings are correct on the Setup menu.
• Setup → Video Input/Output → HDMI Resolution: Select a resolution mode supported by your TV.
• Setup → Video Input/Output → HDMI Output: Select what types of signal you wish to be transmitted via HDMI cable.
Page 16

16
Option 2 Using Component Cable
If your TV has a component video input, use a component video cable (with green, blue and red
ends) to connect the COMPONENT OUT jack on the DVD recorder to the COMPONENT IN jack on the television.
SCART IN (AUX/DECODER)
Component video cable
Y
CB / PB
CR / PR
COMPONENT IN
Y
CB / PB
CR / PR
T V
Green
Blue
Red
Green
Blue
Red
TUNER
If your television supports ‘Progressive Scan’ mode, you may adjust the ‘Component Output’ setting accordingly for
better results. Please go to Setup Video Input/Output Video Output, and select ‘Component-Progressive’. You
can activate the Setup menu directly by pressing SETUP button on your remote control.
Option 3 Using SCART Cable
If your TV has a SCART input, use a SCART cable to connect the SCART OUT jack on the DVD
recorder to the SCART IN jack on the television.
SCART IN (AUX/DECODER)
T V
SCART IN
TUNER
SCART OUT
Page 17

17
Connections
Option 4 Using Composite Cable
If your TV has a composite video input, use a composite video cable to connect the VIDEO
(COMPOSITE) OUT jack on the DVD recorder to the VIDEO (COMPOSITE) IN jack on the television.
SCART IN (AUX/DECODER)
Video cable
TV
VIDEO
R
L
R
L
VIDEO IN
AUDIO IN
TUNER
Step 3: Connecting the Audio Cable
Option 1 Using HDMI Cable
If your TV has an HDMI input, use an HDMI cable to connect the HDMI OUT jack on the DVD recorder to
the HDMI IN jack on the television.
After all connections are made, make sure related system settings are correct on the Setup menu. If there is still no
sound, go to SetupAudio OutputHDMI Audio and set ‘PCM’ as the audio output mode.
If you select to use the HDMI cable in Step 2, set the HDMI output mode to ‘Video + Audio’ via SetupVideo Input/
OutputHDMI Output.
Option 2 Using SCART Cable
If your TV has a SCART input, use a SCART cable to connect the SCART OUT jack on the DVD
recorder to the SCART IN jack on the television.
Page 18
18
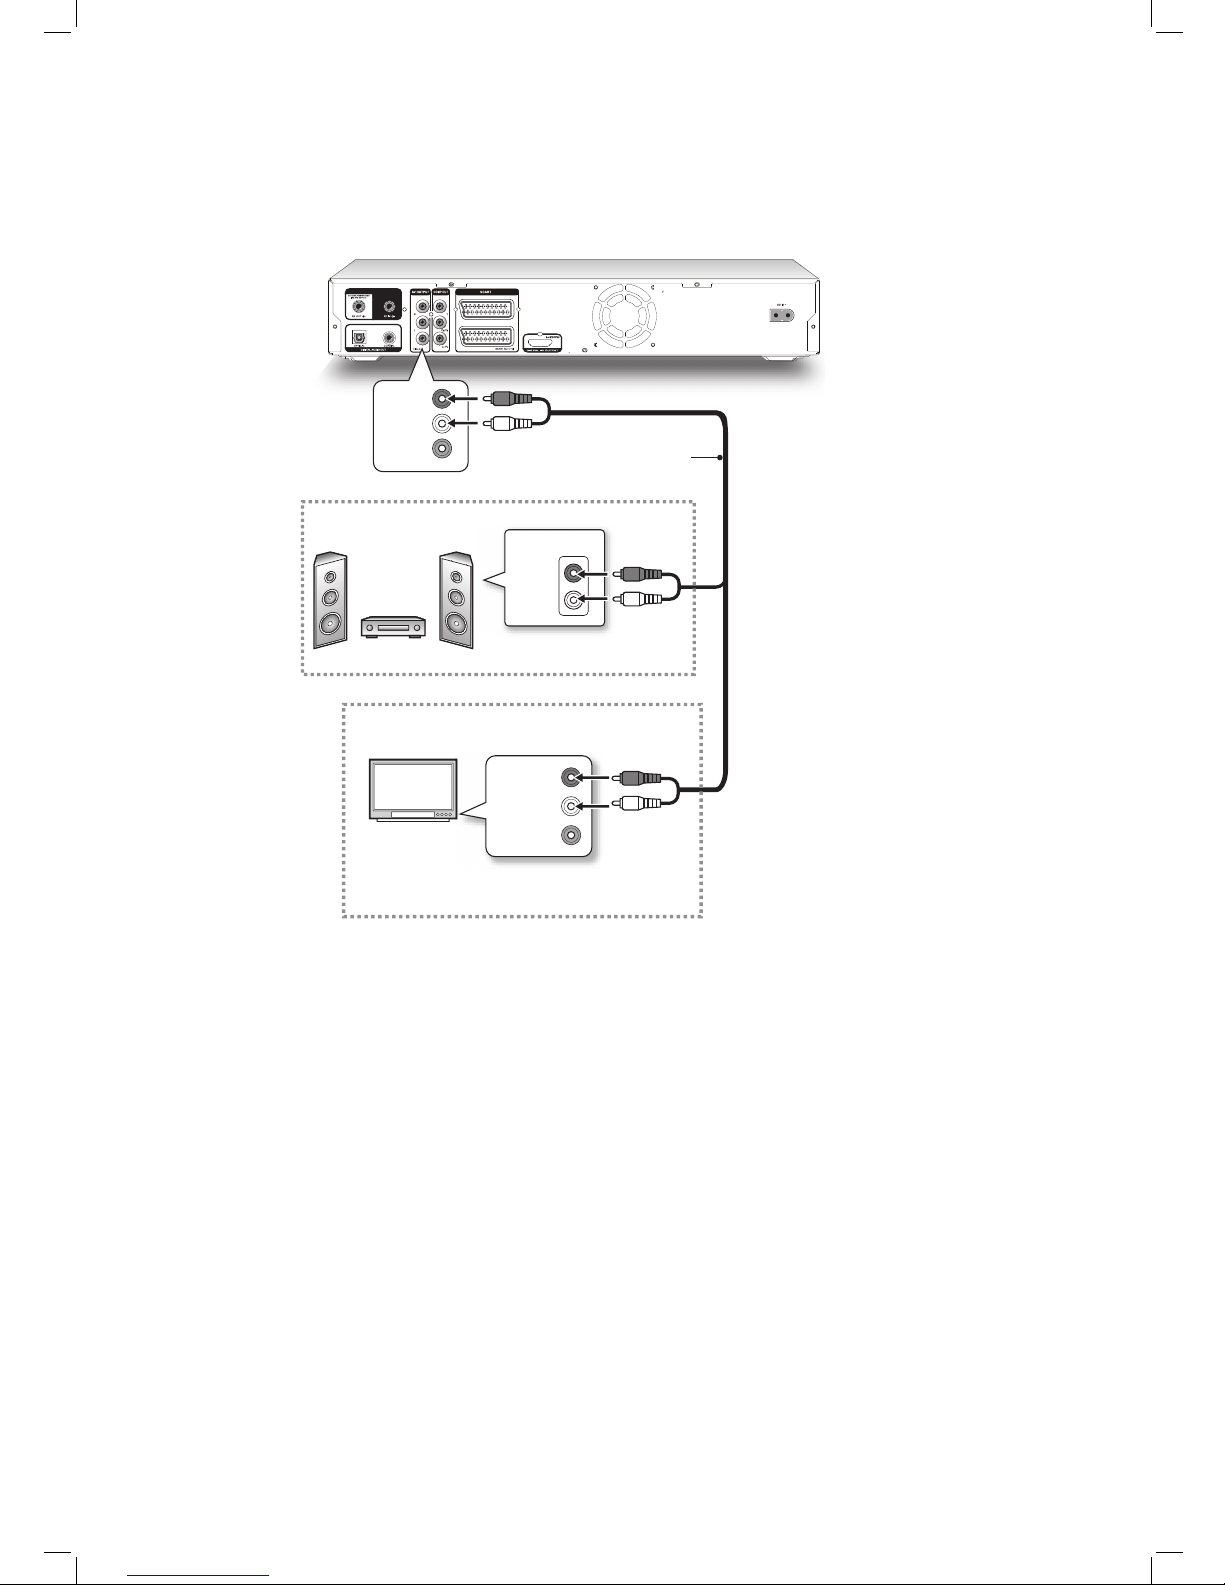
Option 3 Using Composite Cable
Use a composite audio/video or a composite audio cable (via the red and white ends) to connect the AUDIO OUT
jack on the DVD recorder to the AUDIO IN jack on a stereo amplifi er, a receiver or a TV.
White
SCART IN (AUX/DECODER)
Audio cable
IN
RIGHT
DVD
LEFT
VIDEO
R
L
Stereo audio amplifier
or receiver
Red
T V
Red
Red
White
White
or
R
L
VIDEO IN
AUDIO IN
TUNER
Page 19

19
Connections
Option 4 Using Digital Audio Cable
1
Using an Optical Cable
Use an optical cable to connect the DIGITAL OUT (OPTICAL) jack on the DVD recorder to the digital optical
input on a stereo amplifi er or a receiver.
SCART IN (AUX/DECODER)
IN
OPTICAL
COAXIAL
Optical digital cable
OPTICAL
COAXIAL
Digital Out (Optical)
DIGITAL AUDIO DEVICE
TUNER
2
Using a Coaxial Cable
Use a coaxial cable to connect the DIGITAL OUT (COAXIAL) jack on the DVD recorder to the coaxial digital
input on a stereo amplifi er or a receiver.
SCART IN (AUX/DECODER)
IN
OPTICAL
COAXIAL
OPTICAL
COAXIAL
Digital Out (Coaxial)
DIGITAL AUDIO DEVICE
Coaxial digital cable
TUNER
Page 20

20
Step 4: Connecting the Decoder (If Required)
For PAY-TV/CANAL+ subscribers, you will need to connect an additional decoder to your TV and DVD
recorder.
1
Refer to Step 1 to connect your DVD recorder to the antenna outlet on the wall, and then to the RF IN jack on the
television, if you have not established the connection.
2
Use a SCART cable to connect the SCART IN jack on the DVD recorder to the SCART OUT jack on the CANAL+
decoder.
3
Use a SCART cable to connect the SCART OUT jack on the DVD recorder to the SCART IN jack on the televi-
sion.
SCART IN (AUX/DECODER)
SCART OUT
Wall
RF IN
T V
RF OUT
SCART
OUT
RF IN
SCART IN
CANAL+ Decoder
Completed in Step 1
TUNER
SCART
IN
During recording, if you have problem watching programs imported via decoder, you can press TV (MODE) to switch to
the ‘SCART Bypass’ mode. However, you need to fi rst activate the feature through SetupVideo Input/Output TV
MODE.
Setting TV MODE/SCART Bypass (p.25)
Depending on the cable manufacturers, the SCART cable you use may not be able to detect all signals transferred via
this connection. If you have activated the ‘SCART Bypass’ mode through the Setup menu, and still have problem using
the feature, try to use a new SCART cable to connect the decoder to your DVD recorder.
Page 21

21
Connections
Step 5: Connecting the Power Cord
Connect the power cord to the DVD recorder. After all the cable connections are completed, you can now plug the
power cord of the recorder into the outlet, and start using the recorder.
If you use a model which features attached power cord, you only need to plug the power cord to the outlet at this step.
► Preparing the DVD Recorder for Further Settings
After completing the connection process, check whether you have switched your TV’s input source to corresponding
option (e.g. VIDEO 1, LINE 2, etc.), so that video from the DVD recorder can appear on screen. For further information,
please check the instruction manual offered by your TV manufacturer.
Page 22

22
System Settings
Before you start
► Check whether you have switched your TV’s input source to corresponding option (e.g. VIDEO 1, LINE 2, etc.),
so that video from the DVD recorder can appear on screen. For further information, please check the instruction
manual offered by your TV manufacturer.
Easy Setup
The ‘Easy Setup’ is designed to help you complete
basic settings step by step. On each option screen,
use or number buttons (0-9) to make necessary adjustments, then press ENTER to confi rm. If
you would like to return to the previous option, select
‘Back’. Or select ‘Exit’ if you wish to quit the setup
process.
Select a language for on-screen message
Language
The ‘Easy Setup’ guide appears automatically when
you switch on your new DVD recorder for the fi rst
time. After the fi rst-time setup, you can always access
the guide via Setup → System → Easy Setup.
English
1
Set Language
Press to select your preferred language for
the on-screen menus and messages, then press
ENTER.
2
Set Clock Format
Press to select your preferred clock format
for display, then press ENTER.
3
Set System Date
Press or number buttons (0-9) to enter
correct date information, then press ENTER.
4
Set System Time
Press or number buttons (0-9) to enter
correct time information, then press ENTER.
Page 23

23
System Settings
5
Set TV Channels
Please follow the on-screen instructions to
create a complete channel list. If you wish to
perform the channel scanning later, select ‘Skip
the Process’, then press ENTER.
►Selecting Country
Press to select your country/region, then
press ENTER.
List of countries/regions varies depending on
model types.
►Scanning TV Channels
Press to select ‘Auto Scan’, then press
ENTER.
The scanning process will start.
Otherwise, select ‘Skip’ to skip the scanning
process.
6
Complete Settings
After the scanning process is completed, press
ENTER to save the settings and exit the ‘Easy
Setup’ screen.
Setup Menu
Use the Setup menu to edit your system setting
preferences. Follow these steps to change the
default settings.
1
Press SETUP to display the Setup menu.
SETUP
Press to display
Setup menu
2
Press to select a category you wish to
change, then press ENTER.
English
3
Press to select an option you would like to
change from the sub-menu, then press ENTER.
4
Press or number buttons (0-9) (when
required) to change the settings, then press
ENTER.
5
When completed, press SETUP to exit the Setup
menu.
Page 24

24
System
Option Application
Easy Setup Use the step-by-step ‘Easy Setup’
guide to complete basic settings.
OSD Change the language of on-screen
menus and messages.
Auto Sleep Set the time period for the DVD
recorder to turn to standby mode if
there is no operation.
• Off
• 30 minutes
• 60 minutes
• 90 minutes
• 120 minutes
Restore Reset all options to default settings.
Date/Time
Option Application
Clock Format Select a preferred clock format for
display.
• M/D/Y-12Hr
• D/M/Y-12Hr
• Y/M/D-12Hr
• M/D/Y-24Hr
• D/M/Y-24Hr
• Y/M/D-24Hr
Date Set the system date.
* You can set the date up to 2099/12/31
(Year/Month/Day)
Time Set the system time.
Tuner
Option Application
Country Select your country/region.
Utilities Perform channel scanning to create a
channel list and edit the list.
• Scan Channel
• Edit Channel
TV Audio Select the type of audio signal imported
from TV tuner.
• Stereo
• Main
• SAP (Sub)
• Mono
Scanning TV Channels
When the ‘Scan Channel’ function is activated, the TV
channels are scanned and stored in a specific order. If
your TV content provider changes the channel listing,
or if you reinstall this DVD recorder, you may need to
go through this process again.
Editing Listed TV Channels
The automatic scanning process lists all available
channels in a specific order. If you would like to
change the sequence, you can further edit your
preference in ‘Channel Editor’. The ‘Channel Editor’
also offers other customizing functions (e.g. rename
channel, insert or disable channels, etc.) For more
information, please see ‘Channel Editor’ (p.28).
Setting TV Audio
Use the ‘TV Audio’ option to set a preferred audio
channel for viewing and recording TV programs
through the DVD recorder.
▌ Stereo
Select to record the stereo sound channel of a TV
program.
▌ Main
Select to record the primary language channel of a
bilingual TV program.
▌ SAP (Sub)
Select to record the second language channel of a
bilingual TV program.
▌ Mono
Select to record the mono sound channel of a TV
program.
The audio setting is applicable only when the selected
audio channel is offered.
For bilingual TV programs, you can only record one of
the language versions.
Page 25

25
System Settings
Video Input/Output
Option Application
TV MODE Enable or disable the ‘TV MODE/
SCART Bypass’ function to control the
viewing source alternation.
Front AV
Input
Prioritize the input source from the
front-panel jacks.
• Auto
(* Use S-Video signal fi rst if available)
• S-Video
• Composite
Video
Output
Select the type of video signal supported
by your TV.
• Component-Interlaced
• Component-Progressive
• SCART RGB
• SCART S-Video
HDMI
Resolution
Select a resolution mode compatible
with your HDTV or HD-ready TV.
• Auto
• 576p
• 720p
• 1080i
• 1080p
HDMI
Output
Select the type of contents for output.
• Video+ Audio
• Video Only
Setting TV MODE/SCART
Bypass
The ‘TV MODE/SCART Bypass’ feature allows you
to watch videos/programs from the SCART source
(decoder, VCR, etc.) directly at the push of a button.
You need to activate the function via the Setup menu
before using the TV (MODE) button on remote control.
After you press TV (MODE) to view videos/programs
from the SCART source, only POWER and TV
(MODE) buttons on the remote will be available to
use. You can only press POWER to switch off the
DVD recorder, or press TV (MODE) again to return
previous viewing mode.
After you press TV (MODE) to view videos/programs
from the SCART source, status indicator will light up in
the display window.
Depending on the cable manufacturers, the SCART
cable you use to connect an external device to the
DVD recorder may not be able to detect all signals
transferred via this connection. If you have activated
the ‘TV MODE/SCART Bypass’ function via the Setup
menu, and still have problem using the feature, try to
use a new SCART cable.
Setting Component Video
Output
If your TV supports ‘Progressive Scan’ mode, you can
choose to set the DVD recorder’s output accordingly
to enjoy better video quality. ‘Progressive Scan’ mode
differs from the ‘Interlaced Scan’ mode in how a video
image is updated. In ‘Progressive Scan’ mode, scan
lines for an image are refreshed in every pass and
by a sequential order. In the ‘Interlaced Scan’ mode,
image is updated by alternating sets of odd and even
scan lines.
Progressive Scan Mode:
Line 1
Line 2
Line 3
Line 4
Line 5
Line 6
Line 7
etc
Interlaced Scan Mode:
Line 1
Line 2
Line 3
Line 4
Line 5
Line 6
Line 7
etc
If you accidentally set ‘Progressive’ as the video
output mode when the DVD recorder is not connected
to a progressive-scan-compatible TV, you may lose
the video signal on your TV instantly. To recover the
problem, switch off the DVD recorder, and then switch
it on again. After the DVD recorder is switched on (in
about 30 seconds), press (right direction button),
5, 0, 2, 0, on remote control, then press ENTER. The
recorder will then be automatically switched off. The
DVD recorder’s TV output will be restored to default
when you switch on the recorder next time.
Setting HDMI Resolution
With an integrated video upscaler, this DVD recorder
can automatically enhance resolution of the output
picture up to 1080p (1080 scan lines, Progressive
mode). Select a resolution mode supported by your
TV to enjoy sharper, clearer image.
The HDMI resolution setting may affect the video
output mode of this recorder.
▌ If the HDMI resolution mode is set to ‘576p’, ‘720p’,
‘1080i’ or ‘1080p’, the recorder’s video output format
will be automatically switched to the progressive
scan mode (‘Component-Progressive’). If you
Page 26

26
disconnect the HDMI cable for other connections,
you need to either change the video output setting
on the Setup menu, or use compatible TV sets.
▌ If the HDMI resolution mode is set to ‘Auto’, the
recorder’s video output format will be automatically
switched to the last selected interlaced scan mode
(‘SCART S-Video’, ‘SCART RGB’ or ‘ComponentInterlaced’) after you disconnect the HDMI cable.
Audio Output
Option Application
Dolby
Digital
Set the digital audio output mode.
• PCM (when your amplifier does not
have an integrated Dolby Digital
decoder)
• Bit Stream (when your amplifier has an
integrated Dolby Digital decoder)
DTS
Output
Enable/disable the DTS (Digital Theater
System) feature offered by DVD-Video
discs.
• On
• Off
MPEG
Audio
Set the MPEG audio output mode.
• PCM (when your amplifier does not
have an integrated MPEG audio
decoder)
• Bit Stream (when your amplifier has an
integrated MPEG audio decoder)
HDMI
Audio
Set the audio output mode via HDMI
cable.
• Auto
• PCM
If the spoken language of your disc(s) is recorded
using the DTS format, disabling the DTS option will
result in loss of sound when watching film. Please
always check the information on disc(s) before you
decide to change options.
The DTS-encoded audio can only be transmitted
via a digital audio device. Before enabling the ‘DTS
Output’, make sure you have established a digital
audio connection. For more information, please see
‘Connecting the DVD Recorder’ (p.13)
Recording / Playback
Option Application
Recording
Mode
Select a recording mode for different
picture quality and recording time.
• HQ (High Quality)
• SP (Standard Play)
• LP (Long Play)
• EP (Extended Play)
• SLP (Super Long Play)
Chapter
Mark
Select the interval to insert chapter
marks in recorded titles.
• Off
• 5 Minutes
• 10 Minutes
• 15 Minutes
• 20 Minutes
• 25 Minutes
• 30 Minutes
Slide Time Set the still picture playback speed.
• Off
• Interval
(3-99 Seconds)
VCD PBC Enable/disable the PBC (playback
control) function offered by VCD or
SVCD.
• On
• Off
DivX (R)
VOD*
Display the registration code of the DVD
recorder.
* depending on the model
DVD Movie
Option Application
Menu Set a preferred language for displaying
the DVD menu.
Audio Set a preferred audio language when
watching a DVD-Video disc.
Subtitle Set a preferred language when display-
ing subtitles of a DVD-Video disc.
Parental
Lock
Set a preferred level to control content
access.
• Off
• 8: Adult
• 7: NC-17
• 6: R
• 5: PG-R
• 4: PG-13
• 3: PG
• 2: G
• 1: Kid Safe
Password Set password for the parental lock
function. (default: 0000 [zero])
Aspect
Ratio
Select a viewing mode supported by
your TV or display.
• 16:9 Wide
• 4:3 Pan
• 4:3 L.Box
If the DVD-Video disc is already preset to a default
language, the playback will start following this setting,
rather than your preferred option. You can later
change the default setting using the Setup menu or
Navigation menu during playback.
Navigation Menu (p.58)
Page 27

27
System Settings
Password
DVD Movie
5
When completed, pressto return to the main
menu.
6
Press or SETUP to completely exit the Setup
menu.
If you press or ENTER instead of number buttons
(0-9) when you are asked to enter a password, you
will return to the second level of the menu without
making any change.
If the password you enter is incorrect or unmatched, a
warning message will appear for 5 seconds, and then
you will be asked to enter your password again.
If you have forgotten your password, reset the DVD
recorder via Setup → System → Restore.
Setting Aspect Ratio
Aspect ratio setting affects how video images are
presented. Select 4:3 (standard) or 16:9 (widescreen)
mode which suits your television.
▌ 16:9 Wide
Select this option if you connect the DVD recorder to
a widescreen (16:9) TV.
▌ 4:3 L. Box (4:3 Letter Box)
Select this option if you connect the DVD recorder to
a standard (4:3) TV, and wish to display widescreen
image (16:9) in its original format.
For the ‘Menu’, ‘Audio’ and ‘Subtitle’ options, the
selected preference is applicable only when the discs
have the desired language versions.
Setting Parental Lock
Some DVD-Video discs are encoded with a Parental
Management Level (PML) numbered from 0 to 8. You
can set the parental control level of this DVD recorder
to one of the numbers, then only a DVD-Video disc
with the PML lower than the one you set can be
played back by this DVD recorder.
1
Enter the ‘DVD Movie’ menu via SETUP → DVD
Movie.
2
Press to select ‘Parental Lock’, then press
ENTER.
3
If the level you select is different from the one you
set before, an input box asking for password will
appear. Enter the 4-digit password by pressing
number buttons (0-9).
Parental Lock
DVD Movie
If you press or ENTER instead of number buttons,
you will return to the upper level of the menu without
making any change.
4
If the password you enter is correct, the change
you made will be applied. Otherwise, the change
will be ignored.
5
When completed, pressto return to the main
menu.
6
Press or SETUP to completely exit the Setup
menu.
Setting Password
1
Enter the ‘DVD Movie’ menu via SETUP → DVD
Movie.
2
Press to select ‘Password’, then press
ENTER.
3
Press number buttons (0-9) to enter your password.
4
If the password you enter is correct, you will
be asked to enter a new password twice. If two
passwords do not match, a warning message will
appear.
Page 28

28
The picture will be shown with black bars at the top
and bottom of the screen.
▌ 4:3 Pan (4:3 Pan & Scan)
Select this option if you connect the DVD recorder to
a standard (4:3) TV, and wish to display widescreen
image (16:9) in full-screen format.
The picture will be zoomed to fi ll the screen vertically with its left and right sides chopped off.
Some discs may not support this viewing option.
Even if you select the 4:3 Pan (4:3 Pan & Scan)
mode, the picture will still be displayed in the 4:3
L.Box (4:3 Letter Box) format.
Channel Editor
‘Channel Editor’ offers users an easy-to-manage
interface to organize your TV channel list. You can
activate ‘Channel Editor’ through the following paths.
Via Setup Menu
Press SETUP to display the Setup menu.
Press to select ‘Tuner’, then press ENTER.
Press to select ‘Utilities’, then press
ENTER.
Press to select ‘Edit Channel’, then press
ENTER.
The Channel Editor menu will appear.
Pressing EDIT Button While Viewing TV
Press TV (MODE) or SOURCE to switch to the
TV-viewing mode.
TV
Front AV
DV
SCART
By default, pressing TV (MODE) allows you to switch
to TV directly. However, if you have activated the
‘SCART Bypass’ mode earlier through Setup menu,
you can only press SOURCE to switch to TV.
If you press SOURCE, you may need to press the
button more than once to switch to ‘TV’.
Press EDIT to activate ‘Channel Editor’.
The Channel Editor menu will appear.
If you have not completed the channel scanning process before using the ‘Channel Editor’,
a pop-up box asking you to do so will appear.
Press to select desired application, then
press ENTER. If you still choose not to scan
channels, you will need to switch on the channels one by one for further applications.
Page 29

29
System Settings
CH:03
CNN News
HBO
AXN Sports
Discovery
Animax
The channel will be moved to the desired location.
4
When completed, press to select ‘Exit’ or
another option to continue, then press ENTER.
After you insert channel(s), numbers of other channels
will change accordingly.
Swapping TV Channels
1
Press to select a channel from the list,
then press ENTER.
2
Press to select ‘Swap’, then press ENTER.
3
Press or number buttons (0-9) to enter
the channel number, then press ENTER.
CNN News
HBO
AXN Sports
Discovery
Animax
CH:05
CNN News
Animax
AXN Sports
Discovery
HBO
The channel will be swapped to the designated
location.
4
To swap other TV channels, repeat steps 1-3.
5
When completed, press to select ‘Exit’ or
another option to continue, then press ENTER.
Moving up/down TV
Channels
1
Press to select a channel from the list,
then press ENTER.
CNN News
AXN Sports
HBO
Discovery
Animax
2
Press to select ‘Up’ or ‘Down’, then press
ENTER.
CH:01
AXN Sports
CNN News
HBO
Discovery
Animax
The order of the TV channel will be changed.
3
Each time when you press ENTER, the item will be
moved in your designated direction.
4
When completed, press to select ‘Exit’ or
another option to continue, then press ENTER.
Inserting TV Channels
1
Press to select a channel from the list,
then press ENTER.
2
Press to select ‘Insert’, then press ENTER.
3
Press or number buttons (0-9) to enter
the channel number, then press ENTER.
AXN Sports
CNN News
HBO
Discovery
Animax
CH:01
Page 30

30
Renaming TV Channels
1
Press to select a channel from the list, then
press ENTER.
2
Press to select ‘Rename’, then press ENTER.
The keypad screen will appear.
3
Press to select desired characters from
the keypad, then press ENTER after each entry.
For more information, please see the section ‘OnScreen Input Keypad’ (p.34).
4
When completed, press to select ‘Exit’ or
another option to continue, then press ENTER.
You can enter up to 10 characters for a name.
Enabling/Disabling TV
Channels
The automatic scanning process will list all the available channels for your reference. You can further edit
this list by activating the ‘Enable/Disable’ function,
which allows you to temporarily disable unwanted
channel(s) from the list or enable the previously
hidden channel(s) back to the list.
1
Press to select a channel from the list,
then press ENTER.
2
Press to select ‘Enable’ or ‘Disable’, then
press ENTER.
CNN News
Animax
AXN Sports
Discovery
HBO
CH:01
The channel selected will then be switched on or off.
3
To switch on or off other channels, repeat steps
1-2.
4
When completed, press to select ‘Exit’ or
another option to continue, then press ENTER.
Setting Decoder
Use this option to switch on or off the ‘Decode’
function for particular TV channel(s).
1
Press to select a channel from the list,
then press ENTER.
2
Press to select ‘Decode’, then press ENTER.
CNN News
Animax
AXN Sports
Discovery
HBO
CH:01
A key icon will appear, indicating that the ‘Decode’
function for the selected channel is switched on.
3
To set the ‘Decode’ function on or off for other TV
channels, repeat steps 1-2.
4
When completed, press to select ‘Exit’ or
another option to continue, then press ENTER.
Setting Channel Frequency
Use this option to search for better channel signal, or
to search for a particular channel which has not been
listed after the scanning process.
1
Press to select a channel from the list,
then press ENTER.
2
Press to select ‘Frequency’, then press
ENTER.
3
A pop-up box for entering the channel frequency
will appear. Press or number buttons
(0-9) to enter the channel frequency, then press
ENTER.
Page 31

31
System Settings
CNN News
Animax
AXN Sports
Discovery
HBO
4
Press to select a suitable TV system, then
press ENTER.
The DVD recorder will start searching for the
channel signal.
5
When the scanning process is completed, press
to select your desired option, then press
ENTER.
▌ OK
If the scanning result is what you want, press to
select ‘OK’, then press ENTER.
▌ Scan Next
If the scanning result is not what you want, press
to select ‘Scan Next’, then press ENTER.
The DVD recorder will then start searching for the
next available channel frequency.
CNN News
Animax
AXN Sports
Discovery
HBO
▌ Cancel
If you decide not to make any change, press to
select ‘Cancel’, then press ENTER.
6
To apply the frequency setting to other channels,
repeat steps 1-5.
7
When completed, press to select ‘Exit’ or
another option to continue, then press ENTER.
ShowView
Programming
System
The ShowView programming system is a specially-designed feature for recording TV programs. The system
greatly simplifi es the timer recording process, as it
does not require users to enter program information,
such as date, channel number and start/end time,
which are all contained in the ShowView programming
numbers. You can complete the timer recording setup
simply by inputting the ShowView number, which can
be found in most newspapers, TV listing magazines or
online sources.
As channel numbers may vary depending on
where you live, it is suggested that you build up
a matching channel list when you fi rst set up
the DVD recorder. This process will help you to
make use of the ShowView system for future
timer recording settings.
1
Press TV(MODE) or press SOURCE to set ‘TV’ as
the signal source.
By default, pressing TV(MODE) allows you to switch
to TV directly. However, if you have activated the
‘SCART Bypass’ mode earlier through Setup menu,
you can only press SOURCE to switch to TV.
If you press SOURCE, you may need to press the
button more than once to switch to ‘TV’.
2
Press EDIT to display the Channel Editor menu.
3
Press to select a TV channel, then press
ENTER.
4
Press to select ‘GCN’, then press ENTER.
CNN News
Animax
AXN Sports
Discovery
HBO
CH:01
A pop-up box for entering GCN will appear.
5
Press or number buttons (0-9) to enter
the GCN (Guide Channel Number), which is the
channel number used by the ShowView system,
then press ENTER.
6
To set GCN for other channels, repeat steps 3-5.
7
When completed, press to select ‘Exit’,
then press ENTER.
Page 32

32
This chapter introduces three specially-designed interfaces, which aim to offer you a more convenient and hasslefree operation environment. Please follow the steps listed below for the applications.
Before you start
► Check whether you have switched your TV’s input source to corresponding option (e.g. VIDEO 1, LINE 2, etc.),
so that video from the DVD recorder can appear on screen. For further information, please check the instruction
manual offered by your TV manufacturer.
► Make sure the remote control works.
Contents Menu
Contents Menu offers you a quick overview of what stored in your selected medium.
Screen Overview
File catalogue
When selected, the tab is highlighted
Press to view files or albums inside catalogue
Source Medium
Press to switch to
DVD or HDD
A title/track/file/album
Press to start playback
Page
number
Press to go to
previous page
Viewing mode
Press to switch between
‘Text’ and ‘Thumbnail’
modes
Exit button
Page
index
Press to go to
next page
Access to Contents Menu
Press CONTENTS to display the Contents Menu.
Press CONTENTS again at any time to exit the program.
Getting Started
Page 33

33
Getting Started
File Structure
In the ‘Music’ and ‘Picture’ catalogues, a
‘Default Album’ will be automatically created to
accommodate media fi les which are not grouped
under particular directories. For example, if you
organize your music and picture fi les on a disc
as follows:
Root
C
A
D1.jpg
C2.jpg
C1.jpg
B2.mp3
B1.mp3
A2.mp3
A1.mp3
these fi les will be regrouped and displayed in a
new structure shown below when you preview
them in the Contents Menu. The fi le structure on
your original disc will not be affected.
Root
Default
C
Default
A
D1.jpg
C2.jpg
C1.jpg
B2.mp3
B1.mp3
A2.mp3
A1.mp3
Picture
Music
Please allow a few seconds for the DVD recorder to
display all your fi les in the Contents Menu.
Only fi les in supported media formats will be
displayed in the Contents Menu. Normal data fi les
will not be shown.
If the name of a video fi le or title is too long, it will be
abbreviated.
The name of a video fi le or title may not be correctly
displayed, if it contains characters which use a coding page or character sets not supported by this DVD
recorder. This, however, will not affect any operation
you wish to perform.
Previewing Files via
Contents Menu
1 Press CONTENTS to display the Contents Menu.
2 Press HDD/DVD to switch to DVD or HDD. Or
press to select ‘DVD’ or ‘HDD’ as the
source medium, then press ENTER.
If you wish to view fi les on a disc, make sure the
disc is supported by the DVD recorder, and place the
disc carefully with label side facing up on the disc
tray. For more details, please see ‘Disc Information’
(p.6).
3 Press to select the type of fi les (Video/Music/
Picture) you wish to view.
4 Press ENTER or to enter the selected cata-
logue.
If you want to view a different page, use the , or
page index button to make selection.
5 If you have selected:
▌ Video
Press to select desired title or fi le, then
press ENTER to start playback.
▌ Music & Picture
Press to select desired album. Press
PLAY to start playback
Or press ENTER to go to the selected album.
Press to select desired track or fi le, then
press ENTER to start playback.
Page 34

34
On-Screen Input Keypad
On-screen input keypad offers you a simple way to enter fi le names. Entering your desired characters can be easily
done by pressing the and ENTER buttons on your remote control.
Screen Overview
Entry bar
Available
characters,
numbers,
symbols
Input Options:
[A] uppercase letters
[a] lowercase letters
[Symbol] symbols
[International] accented letters
Cursor
Move the cursor
backwards
Move the cursor
forwards
Back button
Press to delete
character one
by one
Clear button
Press to delete all
characters
Finish button
Press to confirm
setting and exit
screen
Space button
Press to insert
space in title/file
name
Cancel button
Press to discard
changes and return
to previous screen
Shortcut Buttons
You can use the number-letter shortcuts on remote
control to quickly select desired characters. When
you press one of the number buttons, corresponding
characters will be highlighted on-screen. Press
the button repeatedly until you desired character
is highlighted, then press ENTER to confi rm your
selection.
Page 35

35
Getting Started
Entering New Title/File
Name
1 When the keypad screen appears, the ‘Back’
button will be automatically highlighted.
Press ENTER to delete the characters one by one.
2 Press to select the input option button,
then press ENTER.
Press ENTER repeatedly to select your desired
input option.
3 Press to select desired characters, then
press ENTER.
You can enter up to 30 characters for a title name.
4 If you want to make changes during the process,
press to select ‘Back’, which allows you
to delete character by character in a backward
direction, then press ENTER.
If you want to delete all the characters you have
entered, press to select ‘Clear’, then
press ENTER.
4 When completed, press to select ‘Finish’,
then press ENTER.
If the entry bar is left blank, you will not be able to exit
the screen by selecting the ‘Finish’ button. Please follow
the instruction in pop-up box to complete the process.
Page 36

36
Easy Guider
Graphical and intuitive, the ‘Easy Guider’ menu guides you through all the major features available, and helps you
to complete basic functions in just a few steps. Simply follow the on-screen instructions to start playback, record a
TV show or schedule a timer program. All functions in ‘Easy Guider’ can be conveniently selected and activated by
pressing and ENTER buttons on your remote control.
Screen Overview
Select a function to start
Function
shortcut
Exit button
When selected, the
icon is highlighted.
Press ENTER to start
the function.
Back button
Press to return to
previous step
Screen window
Displays image of current video source
(* If you have been playing music files or audio CD,
the screen will be blank.)
(** If you have been playing picture files, a ‘Picture’
icon will appear.)
Access to Easy Guider
Press GUIDER to display the Easy Guider menu.
Press GUIDER again at any time to exit the program.
Page 37

37
Getting Started
Using Easy Guider:
Play
If you wish to view fi les on a disc, make sure
the disc is supported by the DVD recorder,
and place the disc carefully with label side
facing up on the disc tray. For more details,
please see ‘Disc Information’ (p.6).
Playing Media Files
(Video/Music/Picture)
1 On the Easy Guider menu, press to select
‘Play’, then press ENTER.
Select a function to start
2 Press to select ‘DVD’ or ‘HDD’ as the source
medium, then press ENTER.
Select a device to start playback
3 Press to select the types of fi les (Video/Mu-
sic/Picture) you wish to view, then press ENTER.
4 Press to select a title/fi le/album you wish
to play, then press ENTER.
▌ Video
If you have selected a video title/fi le, playback will
then start.
▌ Music
If you have selected a music album, proceed to
press to select a fi le or track to start
playback.
▌ Picture
If you have selected a picture album, proceed to
press to select a fi le to start playback.
5 Press PAUSE/STEP to pause playback.
Press PLAY to resume normal playback.
When playing picture fi les:
Press to rotate the picture clockwise, or press
to rotate it counterclockwise.
Press or to skip the picture.
6 Press STOP to stop playback at a marked stop.
(Press PLAY to start playback from where you
left off.)
Press STOP twice to bring the playback to a full
stop.
(Press PLAY to start playback from the begin-
ning.)
If you have selected DVD as the target device,
playback will begin automatically when you insert a
DVD-Video disc, VCD, SVCD or audio CD.
If an MP3 fi le name contains two-byte characters
(e.g. Chinese characters), it may not be displayed
correctly.
This DVD recorder does not support ID3 (for MP3)
and WMA tags.
This DVD recorder does not support mp3PRO fi les.
The MP3 fi le bitrates supported by this DVD recorder
are: 32Kbps - 320Kbps.
This DVD recorder does not support WMA lossless
fi les and WMA fi les protected by DRM (digital rights
management) technology.
Playing Picture with Music
1 On the Easy Guider menu, press to select
‘Play’, then press ENTER.
2 Press to select ‘DVD’ or ‘HDD’ as the source
medium, then press ENTER.
3 Press to select ‘Picture with Music’, then
press ENTER.
4 Press to select a picture album, then
press ENTER.
5 Press to select a fi le, then press ENTER.
6 The music fi le catalogue will then appear. Press
to select a music album, then press
ENTER.
7 Press to select a fi le or track, then press
ENTER to start playback.
8 Press to rotate the picture clockwise, or press
to rotate it counterclockwise.
Press or to skip picture.
Press or to skip music fi le.
Page 38

38
9 Press PAUSE/STEP to pause playback.
Press PLAY to resume normal playback.
Press STOP to stop playback.
Playing Last Recorded Title
(HDD Only)
1 On the Easy Guider menu, press to select
‘Play’, then press ENTER.
2 Press to select ‘HDD’ as the source medium,
then press ENTER.
3 Press to select ‘Last Recorded’, then press
ENTER.
4 Playback of the last recorded title will then start.
5 Press PAUSE/STEP to pause playback.
Press STOP to stop playback at a marked stop.
(Press PLAY to start playback from where you
left off.)
Press STOP twice to bring the playback to a full
stop.
(Press PLAY to start playback from the begin-
ning.)
Using Easy Guider:
Record
You may not be able to record a program
from TV or from another device connected to
this recorder, if the source material is copyprotected.
Please note that you CANNOT record/copy a
rented or purchased video/disc from another
device (video cassette recorder, DVD player,
DVD recorder, etc.) connected to this recorder.
Before you start
► Check whether you have switched your TV’s
input source to corresponding option (e.g.
VIDEO 1, LINE 2, etc.), so that video from the
DVD recorder can appear on screen. For further
information, please check the instruction manual
offered by your TV manufacturer.
► Check whether you select and insert a record-
able disc. If you use blank DVD-RW discs, you
will need to format the discs before recording.
Follow the instructions on screen to complete the
process.
Disc Information (p.6)
► Check whether there is enough space on the disc
or on the hard drive.
► Check whether the channel scanning process for
your TV is completed.
Setup Menu (Tuner) (p.24)
1 On the Easy Guider menu, press to select
‘Record’, then press ENTER.
2 Press to select the signal source, then press
ENTER.
Select a recording source
If you select ‘TV’, press to select the channel
you wish to record, then press ENTER.
3 Press to select ‘DVD’ or ‘HDD’ as the target
medium to save the recording, then press ENTER.
Page 39

39
Getting Started
Using Easy Guider:
Timer Record
You may not be able to record a program
from TV or from another device connected to
this recorder, if the source material is copyprotected.
Please note that you CANNOT record/copy a
rented or purchased video/disc from another
device (video cassette recorder, DVD player,
DVD recorder, etc.) connected to this recorder.
Before you start
► Check whether you have switched your TV’s
input source to corresponding option (e.g.
VIDEO 1, LINE 2, etc.), so that video from the
DVD recorder can appear on screen. For further
information, please check the instruction manual
offered by your TV manufacturer.
► Check whether you select and insert a record-
able disc. If you use blank DVD-RW discs, you
will need to format the discs before recording.
Follow the instructions on screen to complete the
process.
Disc Information (p.6)
► Check whether the system date/time is correct.
Setup Menu (Date/Time) (p.24)
► Check whether there is enough space on the disc
or on the hard drive.
► Check whether the channel scanning process for
your TV is completed.
Setup Menu (Tuner) (p.24)
Date/Time Mode
1 On the Easy Guider menu, press to select
‘Timer Record’, then press ENTER.
2 Press to select ‘Date/Time Setting’, then
press ENTER.
Select the mode to set a timer program
4 Press to select a recording mode, then press
ENTER.
5 If you select ‘TV’ as the signal source, press
to select the TV audio mode, then press ENTER.
6 Press to select ‘Go’, then press ENTER.
Recording will start.
7 Press STOP to stop recording.
Press PAUSE/STEP to pause recording.
Press PAUSE/STEP again to resume recording.
One recording session in double-layer discs CANNOT exceed 8 hours. Once the session has lasted
for over 8 hours, this DVD recorder will automatically
stop recording.
If you use a DVD-R, DVD+R, DVD-RW (formatted in
‘Quick Preparation’ mode), you need to fi nalize the
disc before it can be played back on other compatible
devices. You can complete the process using ‘Easy
Guider’. Please see ‘Using Easy Guider: Disc
Tools’ (p.43) for details on how to fi nalize a disc.
Page 40

40
ShowView System Mode
1 On the Easy Guider menu, press to select
‘Timer Record’, then press ENTER.
2 Press to select ‘ShowView Setting’, then
press ENTER.
Select the mode to set a timer program
3 Press to select ‘Once’, ‘Daily’ or ‘Weekly’,
then press ENTER.
4 Press number buttons (0-9) to enter the ShowView
number of a program you wish to record, then
press ENTER.
Press to switch on or off the PDC function,
then press ENTER.
(For more details, please see ‘VPS (Video Program-
ming System) & PDC (Program Delivery Control)’
(p.41) in the note section.)
Enter ShowView number of the program
5 A ‘Preset Channel’ pop-up box will appear, if the
DVD recorder fails to fi nd information of a corresponding channel.
Press to enter the channel number which
corresponds to the GCN (Guide Channel Number)
designated by the ShowView system, then press
ENTER.
Enter corresponding channel number
As the channel number of a TV station may vary
depending on where you live, you need to set up a
matching list in order to use the ShowView system
to schedule a timer program.
3 Press to select the signal source, then press
ENTER.
If you select ‘TV’, press to select the channel
you want to record, then press ENTER.
If you select ‘TV’, press to switch on or off the
PDC function, then press ENTER. (For more details,
please see ‘VPS (Video Programming System) &
PDC (Program Delivery Control)’ (p.41) in the note
section.)
4 Press to select ‘Once’, ‘Daily’ or ‘Weekly’,
then press ENTER.
Recording
Frequency
Suitable Applications
Once
To record program aired at a
specifi c date/time
Daily
To record program aired every day
at a specifi c time
Weekly
To record program aired on certain
day(s) every week at a specfi c
time
5 Press or number buttons (0-9) to enter
the date, then press ENTER.
You can set the date up to 2099/12/31 (Year/Month/
Day)
6 Press or number buttons (0-9) to enter
the Start time, then press ENTER.
7 Press or number buttons (0-9) to enter
the End time, then press ENTER.
8 Press to select ‘DVD’ or ‘HDD’ as the target
medium to save the recording , then press
ENTER.
9
Press to select a recording mode, then press
ENTER.
10
If your signal source is set to ‘TV’, press to
select a TV audio mode, then press ENTER.
11
Summary of the timer program will appear.
Press to select ‘Back’ to modify the setting.
Or press ENTER to save the setting and exit the
screen.
To modify the settings, select ‘Back’
Summary
Page 41

41
Getting Started
Using Easy Guider:
Copy
You may only use this DVD recorder to
reproduce or copy materials for which you own
the copyright; or have obtained permission
to copy from the copyright owner; or you
otherwise have a legal right to reproduce or
copy. Unless you own the copyright; or have
obtained permission from the copyright owner;
or otherwise have a legal right to reproduce or
copy, you may be violating the law, including
copyright law, and may be subject to payment
of damages and other remedies.
Before you start
► Check whether you select and insert a recordable
disc. If you use blank DVD-RW discs, you will
need to format the discs before copying. Follow
the instructions on screen to complete the
process.
Disc Information (p.6)
► Check whether there is enough space on the disc
or on the hard drive.
► Check whether there are fi les on the disc you
insert, if you would like to make copies from disc
to the hard drive.
Copying (Disc to HDD)
1 On the Easy Guider menu, press to select
‘Copy’, then press ENTER.
2 Press to select ‘DVD to HDD’, then press
ENTER.
Select how you wish to copy files
3 If you have inserted:
▌ Audio CD, VCD, SVCD
Press to select ‘Go’, then press ENTER.
The copying process will then start.
For example, on the ShowView System’s TV listings,
the X station is assigned with a GCN (2), while it
is designated to channel 4 and 15 in region A and
B, respectively. To set up the corresponding list,
enter the number 4 or 15 when the ‘Preset Channel’
pop-up box appears.
TV
Station
GCN
Preset
Channel
Region A X 2 4
Region B X 2 15
Region C X 2 56
6 Press to select ‘DVD’ or ‘HDD’ as the target
medium to save the recording, then press ENTER.
7 Press to select a recording mode, then press
ENTER.
8 If your signal source is set to ‘TV’, press to
select a TV audio mode, then press ENTER.
9 Summary of the timer program will appear. Press
ENTER to exit the screen.
Make sure a recordable disc is inserted before the
timer programs start.
VPS (Video Programming System) & PDC
(Program Delivery Control)
VPS/PDC services are used to automatically check
the time information of TV programs being aired. If
the TV stations in your area carry the service, you
can switch on the PDC function when scheduling a
timer program on this DVD recorder. With the function
activated, the recorder will check whether the start
time of your preset program has been rescheduled,
and begin recording at the most updated time
accordingly.
You can assign a maximum of 20 PDC settings.
Please note that the PDC signal can only be
monitored when DVD recorder is in standby mode.
If you have been using the DVD recorder before a
preset timer program starts, the recording will begin
following the original schedule.
You can schedule a maximum of 32 timer programs.
If the setting list is full, you need to cancel some of
the reserved programs fi rst.
This DVD recorder features ‘power-on’ timer
recording: you do not need to switch off the recorder
to activate the function.
One recording session in double-layer discs CANNOT exceed 8 hours. Once the session has lasted
for over 8 hours, this DVD recorder will automatically
stop recording.
If you use a DVD-R, DVD+R, DVD-RW (formatted in
‘Quick Preparation’ mode), you need to fi nalize the
disc before it can be played back on other compatible
devices. You can complete the process using ‘Easy
Guider’. Please see ‘Using Easy Guider: Disc
Tools’ (p.43) for details on how to fi nalize a disc.
Page 42

42
7 Press to select ‘Exit’, then press ENTER
or press GUIDER to exit the Easy Guider.
Copying (HDD to Disc)
1 On the Easy Guider menu, press to select
‘Copy’, then press ENTER.
2 Press to select ‘HDD to DVD’, then press
ENTER.
Select how you wish to copy files
3 Press to select the type of fi le you would like
to copy, then press ENTER.
Select the media type you wish to copy
4 If you have chosen:
▌ Video
Press to select desired fi le, then press
ENTER.
The copying process will then start.
▌ Music / Picture
Press to select desired album, then press
ENTER. (
Proceed to step 5)
5 Press to select desired fi le, then press
ENTER. A pop-up box showing further copying
options will appear.
▌Disc with Video Titles
A disc menu will appear.
Press to select the title you would like to
copy, then press ENTER.
Press to select ‘Go’, then press ENTER.
The copying process will then start.
▌ Disc with Data & Media Files
Press to select the type of fi le you would like
to copy, then press ENTER. (
Proceed to step 4)
Select the media type you wish to copy
4 If you have chosen:
▌ All
The copying process will then start.
▌ Video
Press to select desired fi le, then press
ENTER.
The copying process will then start.
▌ Music / Picture
Press to select desired album, then press
ENTER. (
Proceed to step 5)
5 Press to select desired fi le, then press
ENTER. A pop-up box showing further copying
options will appear.
Press to select ‘Selected File’, then press
ENTER, if you would like to copy only the selected
fi le.
Press to select ‘Whole Album’, then press
ENTER, if you would like to copy all fi les in the
album.
The pop-up box will appear when you fi rst enter the
album. If you decide to copy the whole album after
adopting the ‘Selected File’ option, you will need to
exit the album fi rst. Press to select ‘Return’,
then press ENTER to go back to the album level.
6 When completed, press to select ‘Exit’,
then press ENTER to exit the Contents Menu.
Page 43

43
Getting Started
Using Easy Guider:
Disc Tools
Use ‘Disc Tools’ to complete post-production
tasks and manage the built-in hard drive.
Media Available Tools
HDD
• Erase
• Clean up
• Defragment
Disc
• Erase
• Finalize (Make Compatible)
• Label Disc
Before using the ‘Erase’ function, please
make sure all your important fi les are safely
backed up. Once you perform this function, all
contents will be permanently deleted.
Erase (HDD & Disc)
1 On the Easy Guider menu, press to select
‘Disc Tools’, then press ENTER.
2 Press to select the medium, then press
ENTER.
▌ Tools for Hard Drive
Screen showing available options for hard drive will
appear.
Select a function
▌ Tools for Disc
Screen showing available options for disc will
appear.
Select a function
Press to select ‘Selected File’, then press
ENTER, if you would like to copy only the selected
fi le.
Press to select ‘Whole Album’, then press
ENTER, if you would like to copy all fi les in the
album.
The pop-up box will appear when you fi rst enter the
album. If you decide to copy the whole album after
adopting the ‘Selected File’ option, you will need to
exit the album fi rst. Press to select ‘Return’,
then press ENTER to go back to the album level.
6 Press to select other fi les you would like
to copy, then press ENTER.
7 When completed, press to select ‘Exit’,
then press ENTER to exit the Contents Menu.
8 Press to select ‘Exit’, then press ENTER
or press GUIDER to exit the Easy Guider.
If you use a DVD-R, DVD+R, DVD-RW (formatted in
‘Quick Preparation’ mode), you need to fi nalize the
disc before it can be played back on other compatible
devices. You can complete the process using ‘Easy
Guider’. Please see ‘Using Easy Guider: Disc
Tools’ (p.43) for details on how to fi nalize a disc.
Materials recorded on a VCD/SVCD disc CANNOT be copied to the hard drive before the disc is
fi nalized.
If you own the copyright, you may copy an entire
DVD-Video disc to the hard drive. Contents of a
DVD-Video disc can only be copied from hard drive
to a blank DVD disc.
If you copy recorded titles to a blank DVD disc (DVDR/-RW, DVD+R/+RW), you will not be able to use the
same disc to copy data fi les, and vice versa.
Page 44

44
The clean-up process will then start.
7 When completed, press ENTER to exit the screen.
The application will permanently delete selected fi les
or albums.
Overall clean-up time may vary depending on the
original recording conditions.
Defragment (HDD)
1 On the Easy Guider menu, press to select
‘Disc Tools’, then press ENTER.
2 Press to select ‘Tools for Hard Drive; then
press ENTER.
3 Press to select ‘Defragment’, then press
ENTER.
4 Press to select ‘Go’, then press ENTER.
The defragmenting process will then start.
5 When completed, press ENTER to exit the screen.
Materials on the hard drive will not be lost during this
process.
Regular defragmenting is recommended, as it helps
improve overall performance of the hard drive.
If during the process you decide to cancel the application, you can press to select ‘Exit’, then press
ENTER to exit the present screen.
3 Press to select ‘Erase’, then press ENTER.
4 Press to select ‘Go’, then press ENTER.
The erasing process will then start.
5 When completed, press ENTER to exit the screen.
Clean up (HDD)
1 On the Easy Guider menu, press to select
‘Disc Tools’, then press ENTER.
2 Press to select ‘Tools for Hard Drive; then
press ENTER.
3 Press to select ‘Clean up’, then press
ENTER.
4 Press to select ‘Delete Older Files’, ‘Delete
Larger Files’, ‘Delete Seldom Played Files’, ‘Delete
Album’, or ‘Delete All’, then press ENTER.
Select the files you wish to delete
5 If you choose to delete fi les or albums, press
to select ‘Delete’ or ‘Skip’, then press ENTER.
70 GB
Name
Date
Dimension
Format
Size
canaletto14
2000/01/12
900x542
JPEG
128 KB
Skip
6 If you choose to delete all fi les, press to
select ‘Go’, then press ENTER.
Page 45

45
Getting Started
Finalize [Make Compatible]
(Disc)
1 On the Easy Guider menu, press to select
‘Disc Tools’, then press ENTER.
2 Press to select ‘Tools for Disc; then press
ENTER.
3 Press to select ‘Finalize (Make Compatible)’,
then press ENTER.
4 Press to select ‘Go’, then press ENTER.
The finalizing process will then start.
5 When completed, press ENTER to exit the screen.
Finalizing a disc is a necessary step when you want
to share certain types of digital content with others.
Once a disc is finalized, it can be played back on
other DVD players or on PCs. For more details,
please see ‘Disc Information’ (p.6).
Only discs used to record video titles require finalization. Discs used to copy media files (such as MP3 or
JPEG files) are considered as data: there is no need
to finalize these discs.
Label Disc (Disc)
1 On the Easy Guider menu, press to select
‘Disc Tools’, then press ENTER.
2 Press to select ‘Tools for Disc; then press
ENTER.
3 Press to select ‘Label Disc’, then press
ENTER.
The on-screen keypad will appear.
4 Press and ENTER buttons to enter the
name.
On-Screen Input Keypad (p.34)
5 After finishing entering the characters, press
to select ‘Finish’, then press ENTER to
start labeling the disc.
6 When completed, press ENTER to exit the screen.
Page 46

Recording
46
DVD-R, DVD-RW, DVD+R, DVD+RW, DVD+R DL (double layer) & HDD
(integrated)
You may not be able to record a program from TV or from another device connected to this recorder, if the
source material is copy-protected.
Please note that you CANNOT record/copy a rented or purchased video/disc from another device (video
cassette recorder, DVD player, DVD recorder, etc.) connected to this recorder.
This DVD recorder adopts the DVD+VR recording format, which enjoys a relatively greater compatibility.
However, it is still likely that recordings made with this recorder may not be able to be played back on other DVD
recorders or DVD players.
One recording session in double-layer discs CANNOT exceed 8 hours. Once the session has lasted for over 8
hours, this DVD recorder will automatically stop recording.
If you use a DVD-R, DVD+R, DVD-RW (formatted in ‘Quick Preparation’ mode), you need to finalize the disc
before it can be played back on other compatible devices. You can complete the process using ‘Easy Guider’.
Please see ‘Using Easy Guider: Disc Tools’ (p.43) for details on how to finalize a disc.
Page 47

47
Recording
Recording from TV
Before you start
► Check whether you have switched your TV’s
input source to corresponding option (e.g.
VIDEO 1, LINE 2, etc.), so that signal from the
DVD recorder can appear on screen. For further
information, please check the instruction manual
offered by your TV manufacturer.
► Check whether you select and insert a record-
able disc. If you use blank DVD-RW discs, you
will need to format the discs before recording.
Follow the instructions on screen to complete the
process.
Disc Information (p.6)
► Check whether there is enough space on the disc
or on the hard drive.
► Check whether the channel scanning process for
your TV is completed.
Setup Menu (Tuner) (p.24)
1 Select a recording mode.
Press SETUP to display the Setup menu.
Press to select ‘Recording/Playback’, then
press or ENTER.
Press to select ‘Recording Mode’, then press
ENTER.
Press to select a recording mode, then press
ENTER.
Recording Mode
VCD PBC
HQ
SP
LP
EP
SLP
Recording / Playback
When completed, press SETUP to exit the Setup
menu.
2 Select the target medium to save the recording.
▌ HDD
Press HDD/DVD to switch to HDD.
▌ Disc
Press OPEN/CLOSE to open the disc tray.
Carefully place the disc in the tray with the label side
facing up, then press OPEN/CLOSE.
3 Press TV (MODE) or SOURCE to select ‘TV’ as the
signal source.
By default, pressing TV (MODE) allows you to switch
to TV directly. However, if you have activated the
‘SCART Bypass’ mode earlier through Setup menu,
you can only press SOURCE to switch to TV.
If you press SOURCE, you may need to press the
button more than once to switch to ‘TV’.
4 Press CH+ and CH- to select desired channel.
You can press number buttons (0-9) to select a channel. When completed, press ENTER for confi rmation.
(For Channel 6, press 6, then ENTER. For Channel
55, press 5, 5 and ENTER.)
5 Press RECORD to start recording.
6 Press PAUSE/STEP to pause recording
Press STOP to stop recording.
7 Press RECORD again if you need to start
another recording session.
When the DVD recorder is switched on during
recording, you can only view the recorded channel
on screen. If you would like to watch a different TV
channel, you can do so by switching your TV’s input
source to tuner device (e.g. antenna, cable box
or satellite box). This will not affect the recording
already in progress. For further information on how to
change the input source, please check the instruction
manual offered by your TV manufacturer.
Page 48

48
Recording from External Sources
VCR/V8 Camcorder/
DVD Player
Before you start
► Make sure all the cables are correctly connected
from external device’s AV OUTPUT jacks to the
recorder’s AV INPUT jacks.
Connecting via front-panel jacks
Camcorder
L
R
VIDEO
OUT
AUDIO
OUT
Audio/Video Cable
Camcorder
L
R
VIDEO
OUT
AUDIO
OUT
Audio Cable
S-VIDEO Cable
S-VIDEO
OUT
By default, this DVD recorder automatically
selects S-Video signal over the composite one
when both input jacks are used to connect to
other devices. If you would like your videos to be
imported from a specifi c source, you can either
change the default setting through Setup →
Video Input/Output → Front AV Input, or use
one set of the connections at a time.
Connecting via rear-panel jacks
SCART IN (AUX/DECODER)
SCART OUT
SCART IN
1 Press SOURCE repeatedly to select the correct
signal source.
TV
Front AV
DV
SCART
2 Press HDD/DVD to select your target medium.
If you would like to record on disc, press OPEN/
CLOSE to open the disc tray, and place a recordable
disc on the tray.
Press OPEN/CLOSE again to close the tray.
3 Start playback on the external device, and pause
the playback at the beginning of a scene you wish
to record.
4 Start playback on the external device again.
Press RECORD to start recording.
5 Press PAUSE/STEP to pause recording.
Press STOP to stop recording.
6 Press RECORD again to start another recording
session.
DV
(Digital Camcorder)
The DV-Link INPUT jack on this recorder is for
use with DV-compatible camcorders only.
Only DV signals can be input to the DV-Link
jack on this DVD recorder.
Do not connect a MICRO MV format video
camcorder to the DV-Link jack.
It is possible that your DV may not be fully
supported by the recorder. If you experience
problem using the DV-Link for recording,
please connect your DV via S-Video or
composite cables to this DVD recorder.
Page 49

49
Recording
Before you start
► Check whether the DV is correctly connected to
the inputs of this recorder.
Camcorder
DV OUT
DV / Link
DV-Link
IEEE 1394
Recording with ‘Rec Link’
The ‘Rec Link’ feature allows you to easily record
DV footage with the recorder’s remote control. This
function is enabled by default.
1 Press SOURCE repeatedly to select ‘DV’ as the
signal source.
The control bar will appear with the ‘Rec Link’ feature enabled. You can control your DV either through
the on-screen control bar using and ENTER
buttons, or through the control keys on DV.
2 Press HDD/DVD to select your target medium.
If you would like to record on disc, press OPEN/
CLOSE to open the disc tray, and place a recordable
disc on the tray.
Press OPEN/CLOSE again to close the tray.
3 Switch your DV to playback mode.
Start playback on DV, and pause the playback at
the beginning of a scene you wish to record.
4 Press RECORD to start recording.
After you press RECORD, DV will automatically
start playing back the footage.
5 Press PAUSE/STEP to pause recording.
DV will continue playing back the footage.
6 Press STOP to stop recording.
DV will stop playing back the footage.
Recording without ‘Rec Link’
1 Press SOURCE repeatedly to select ‘DV’ as the
signal source.
2 Press to select ‘Rec Link’ button on
the screen, then press ENTER to switch off the
function.
You can control your DV either through the
on-screen control bar using and ENTER
buttons, or through the control keys on DV.
3 Press HDD/DVD to select your target medium.
If you would like to record on disc, press OPEN/
CLOSE to open the disc tray, and place a recordable
disc on the tray.
Press OPEN/CLOSE again to close the tray.
4 Switch your DV to playback mode.
5 Press to select a desired function from
the on-screen control bar, then press ENTER.
Pause the playback at the beginning of a scene
you wish to record.
6 Press RECORD to start recording.
7 Press PAUSE/STEP to pause recording.
Press STOP to stop recording.
8 Press RECORD again to start another recording
session.
Page 50

50
Recording Options
One-Touch Recording
1 When all recording settings are confirmed, press
RECORD twice to instantly start a 30-minute
recording session.
2 For longer recording hours, press RECORD
repeatedly, which will offer you a length option of
up to 6 hours in 30-minute increments.
3 Press RECORD again if you need to start
another recording session.
‘One-Touch Recording’ will start with the recorder’s
default recording settings.
Setup Menu (Recording/Playback) (p.26)
The overall recording time depends on the selected
recording mode and the storage capacity available
on your target medium.
Recording will stop automatically when there is
no more space on your target medium or when it
reaches the end of your preset duration.
Adding New Sessions
1 After the previous recording is stopped, press
RECORD again to start another recording
session.
2 Press PAUSE/STEP to pause recording.
Press STOP to stop recording.
3 Press RECORD again if you need to start
another recording session.
Each new recording session is placed after the
previous session unless a certain recorded title is set
to be overwritten (applicable to DVD-RW/DVD+RW
discs only)
Overwrite Title (p.71)
Playing Last
Recorded Title (HDD)
1 Press HDD/DVD to switch to HDD.
2 Press PLAY.
3 Playback of the last recorded title will then start.
‘You can also play back the last recorded title via
GUIDER → Play → HDD → Last Recorded.
Using Easy Guider: Play (p.37)
Using Chapter Mark
During or after recording, you can create chapters by
inserting chapter marks in a video title. Depending on
the target medium you use, the number of maximum
chapters and titles you can add may vary. Please see
the table below for details.
Type Maxi. Title Maxi. Chapter
HDD 5994* -
DVD 49** 254
* For each title, you can create up to 999 chapters.
** For each title, you can create up to 99 chapters. But
you can only create a maximum of 254 chapters in one
disc.
Changing Chapter Interval
1 Press SETUP to display the Setup menu.
2 Press to select ‘Recording/Playback’, then
press ENTER.
Page 51

51
Recording
Recording Mode
VCD PBC
HQ
SP
LP
EP
SLP
Recording / Playback
3 Press to select ‘Chapter Mark’, then press
ENTER.
Chapter Mark
VCD PBC
Recording / Playback
4 Press to select your desired interval, then
press ENTER.
5 When completed, pressto return to the main
menu.
6 Press or SETUP to completely exit the Setup
menu.
New chapter division setting will take effect on future
recordings; it CANNOT be applied to titles already
recorded.
Inserting Additional Chapter
Marks
During recording, you can manually insert extra
chapter marks other than those created by system
default setting.
1 During recording, press EDIT to insert chapter
mark at your desired point.
Chpater Inserted
2 To add more chapter marks, repeat step 1.
Page 52

52
DVD-R, DVD-RW, DVD+R, DVD+RW, DVD+R DL (double layer) & HDD
(integrated)
You may not be able to record a program from TV or from another device connected to this recorder, if the
source material is copy-protected.
This DVD recorder adopts the DVD+VR recording format, which enjoys a relatively greater compatibility.
However, it is still likely that recordings made with this recorder may not be able to be played back on other DVD
recorders or DVD players.
One recording session in double-layer discs CANNOT exceed 8 hours. Once the session has lasted for over 8
hours, this DVD recorder will automatically stop recording.
If you use a DVD-R, DVD+R, DVD-RW (formatted in ‘Quick Preparation’ mode), you need to finalize the disc
before it can be played back on other compatible devices. You can complete the process using ‘Easy Guider’.
Please see ‘Using Easy Guider: Disc Tools’ (p.43) for details on how to finalize a disc.
Before you start
► Check whether the system date and time of the DVD recorder is correct.
Setup Menu (Date/Time) (p.24)
► Check whether there is enough space on the disc or on the hard drive.
► Check whether the channel scanning process for your TV is completed.
Setup Menu (Tuner) (p.24)
Timer Recording
Page 53

53
Timer Recording
Timer Record Menu
Info Screen 1
Exit button
Press to go to
previous page
Preset recording mode
System date
System time
Page index
Error
message
Target medium for
the timer program
Delete icon
The icon appears
when the timer
program is
highlighted.
Press to delete a
timer program.
Indicates the
timer program
was successfully
activated
Indicates the
timer program
was not
successfully
activated
Remaining time (available space)
(*white bar represents space available at current recording mode)
Disc
HDD
Scroll indicator.
Press to
go to Info
Screen 2 for
more details
Info Screen 2
99999
HDD
Target medium for
the timer program
Exit button
Press to enter
the timer
program setup
screen
ShowView
number of the
timer program
Recording mode
of the timer
program
---------1972623
HDD
DVD
EP
HQ
On
Mono
Mono
Timer program
set using the
Date/Time mode
PDC/VPS setting
of the timer program
TV audio
setting of the
timer program
Mono
Mono
On
On
18370524
420124
061776
HDD
HDD
DVD
DVD
HQ
EP
HQ
----------
Scroll indicator
Press to
go to Info
Screen 1 for
more details
The schedule list is automatically sorted by system according to the start time of each preset program.
You can set a maximum of 32 timer programs, which will be displayed on four separate pages. If there are fewer than 8
programs, the ‘Next Page’ button will not be shown.
Page 54

54
9 If you select ‘TV’ as the signal source, press
ENTER and to select the TV audio mode,
then press ENTER.
10 Press ENTER and to switch on or off the
PDC function, then press ENTER.
For more details, please see ‘VPS (Video Program-
ming System) & PDC (Program Delivery Control)’
(p.55) in the note section.
11 Press to select ‘OK’, then press ENTER
to save the setting and return to the Timer Record
menu.
Press to select ‘Cancel’, then press
ENTER, if you would like to discard current
setting.
If the start time coincides with that of another
preset program, the ‘OK’ button will be disabled.
Select ‘Cancel’ to discard the setting, or press
and number buttons (0-9) to revise the
time.
12 I f you would like to schedule more timer pro-
grams, press to select another item on the
list, then press ENTER.
If not, select ‘Exit’, then press ENTER. Or press
ENTER to exit the Timer Record menu.
► Stop a timer-recording session
Press STOP to stop the timer recording.
Please note that it may take a few seconds before
the program is completely brought to an end.
► Check the status during timer
recording
Press DISPLAY to bring up the Timer Record
information on screen.
Advanced Setting
If you select ‘Daily’ or ‘Weekly’ for timer recording,
it is suggested that you use further commands for
more effective application. Press to select
‘Advanced’, then press ENTER. Choose whether or
not to specify a time period for your timer programs
by selecting ‘With restriction’ or ‘Without restriction’.
Setting Timer Program
Date/Time Mode
1 Press TIMER to display the Timer Record menu.
2 Press ENTER to start new setting, or press
to select a previous setting which you would
like to modify, then press ENTER.
3 Press ENTER and to select the signal
source, then press ENTER.
If you select ‘TV’ as the signal source, press or
number buttons (0-9) to enter the channel number,
then press ENTER.
4 Press ENTER and to select the target me-
dium for saving the recording, then press ENTER.
5 Press to select a recording mode, then press
ENTER.
6 Press ENTER and to select the recording
frequency, then press ENTER.
▌ Once
If you select ‘Once’, you need to set the date. Press
or number buttons (0-9) to enter the date.
You can set the date up to 2099/12/31 (Year/Month/
Day).
▌ Daily
The timer program will be automatically set for each
day until the setting is cancelled or there is not
enough space on the target medium.
▌ Weekly
A weekly calendar will appear for you to select the
day.
Press to select desired day(s), then press
ENTER to confi rm your selection. You can select
more than one day from the pull-down menu.
When completed, press to select ‘OK’, then
press ENTER.
7 Press ENTER and (or number buttons
[0-9] ) to enter the start time, then press ENTER.
8 Press or number buttons (0-9) to enter
the end time, then press ENTER.
Page 55

55
Timer Recording
ShowView Mode
There are two ways to schedule timer programs
using the ShowView system. For more information,
please see ‘ShowView Programming System’
(p.31).
Pressing the ShowView Button
Press the ShowView button to display the
ShowView system menu.
Via Timer Record Menu
Press TIMER to display the Timer Record
menu.
Press ENTER to start new setting, or press
to select a previous setting which you would like
to modify, then press ENTER.
Press to select the ‘ShowView’ button,
then press ENTER to display the ShowView
setup menu.
1 Press or number buttons (0-9) to enter
the ShowView number of a program you wish to
record, then press ENTER.
Details of the program will appear.
2 A ‘Preset Channel’ pop-up box will appear, if the
DVD recorder fails to fi nd information of a corresponding channel.
Press or number buttons (0-9) to enter
the channel number which corresponds to the
GCN (Guide Channel Number) designated by the
ShowView system, then press ENTER.
As the channel number of a TV station may vary
depending on where you live, you need to set up a
matching list in order to use the ShowView system
to schedule a timer program.
For example, on the ShowView System’s TV listings,
the X station is assigned with a GCN (2), while it
is designated to channel 4 and 15 in region A and
B, respectively. To set up the corresponding list,
enter the number 4 or 15 when the ‘Preset Channel’
pop-up box appears.
TV
Station
GCN
Preset
Channel
Region A X 2 4
Region B X 2 15
Region C X 2 56
3 Press ENTER and to select the recording
frequency, then press ENTER.
4 Press ENTER and to select the target me-
dium for saving the recording, then press ENTER.
5 Press to select a recording mode, then press
ENTER.
6 Press ENTER and to select the TV audio
mode, then press ENTER.
7 Press ENTER and to switch on or off the
PDC function, then press ENTER.
For more details, please see ‘VPS (Video Program-
ming System) & PDC (Program Delivery Control)’
(p.55) in the note section.
8 Press to select ‘OK’, then press ENTER
to save the setting and return to the Timer Record
menu.
Press to select ‘Cancel’, then press
ENTER, if you would like to discard current
setting.
If you would like to return to the Date/Time mode,
press to select ‘Date/Time Setting’, then
press ENTER. Please note that all the settings
you have entered will be cleared once you exit the
present setup screen.
9 I f you would like to schedule more timer programs,
press to select another item on the list, then
press ENTER.
If not, select ‘Exit’, then press ENTER. Or press
ENTER to exit the Timer Record menu.
VPS (Video Programming System) & PDC
(Program Delivery Control)
VPS/PDC services are used to automatically check
the time information of TV programs being aired. If
the TV stations in your area carry the service, you
can switch on the PDC function when scheduling a
timer program on this DVD recorder. With the function
activated, the recorder will check whether the start
time of your preset program has been rescheduled,
and begin recording at the most updated time
accordingly.
Page 56

56
You can assign a maximum of 20 PDC settings.
Please note that the PDC signal can only be
monitored when DVD recorder is in standby mode.
If you have been using the DVD recorder before a
preset timer program starts, the recording will begin
following the original schedule.
You can schedule a maximum of 32 timer programs.
If the setting list is full, you need to cancel some of
the reserved programs first.
This DVD recorder features ‘power-on’ timer
recording: you do not need to switch off the recorder
to activate the function.
One recording session in double-layer discs CANNOT exceed 8 hours. Once the session has lasted
for over 8 hours, this DVD recorder will automatically
stop recording.
If you use a DVD-R, DVD+R, DVD-RW (formatted in
‘Quick Preparation’ mode), you need to finalize the
disc before it can be played back on other compatible
devices. You can complete the process using ‘Easy
Guider’. Please see ‘Using Easy Guider: Disc
Tools’ (p.43) for details on how to finalize a disc.
Why is my preset program not
completely recorded?
• Space
If there is not enough space on the target
medium, your preset program can only
be partially recorded depending on the
capacity available.
• Overlapped Settings
The unfinished recording may occur when
time settings of two timer programs overlap.
The DVD recorder will stop recording the
earlier program at the start time of the
later program. (The black bars represent
contents recorded.)
Page 57

57
Time Shift
Please note that if the source materials you are viewing are copy-protected, you will not be able to make use of
the ‘Time Shift’ function.
Before you start
► Check whether you have switched your TV’s input source to corresponding option (e.g. VIDEO 1, LINE 2, etc.),
so that signal from the DVD recorder can appear on screen. For further information, please check the instruction
manual offered by your TV manufacturer.
► Check whether the channel scanning process for your TV is completed.
Setup Menu (Tuner) (p.24)
Time Shift
Pause Live TV
1 Press CH+ and CH- to select a desired channel.
2 Press TIME SHIFT to pause the program you are
currently watching.
The scene displayed on the TV screen will be the last
picture shown when you press TIME SHIFT.
3 Press PLAY when you decide to go back to
watch the program. The program will then be
played back from where it is interrupted.
4 Press PAUSE/STEP to pause playback.
Press PLAY again to resume playback.
Press F. F. to fast-forward playack.
Press F. R. to rewind playack.
5 Press TIME SHIFT to switch off the function, and
return to the normal TV-viewing mode.
The maximum time for live program pause is 2 hours.
Record & Play
1 During recording or timer recording, press PLAY
to start playback of contents recorded on the hard
drive.
2 Playback will then start from beginning of the
recorded session.
3 Press PAUSE/STEP to pause playback.
Press PLAY again to resume playback.
Press STOP to stop playback.
Press STOP again to stop the recording
completely.
The function is applicable to video titles recorded on
hard drive only.
You can only use this function when the recording
has been in progress for at least 10 seconds.
Page 58

58
Please note that it is likely you may not be able to play back discs which contain contents recorded in other DVD
recorders.
This DVD recorder can only play DVD-Video discs marked with the same region code as printed on its rear
panel. For details on which types of discs or files can be played back on this DVD recorder, please see ‘Disc
Information’ (p.6).
If you use a DVD-R, DVD+R, DVD-RW (formatted in ‘Quick Preparation’ mode), you need to finalize the disc
before it can be played back on other compatible devices. You can complete the process using ‘Easy Guider’.
Please see ‘Using Easy Guider: Disc Tools’ (p.43) for details on how to finalize a disc.
Navigation Menu
Screen Overview
Media DVD-Video / Video Titles MPEG-1/MPEG-2 Files Audio CD / Music Files
Screen
View
Media VCD / SVCD MPEG-4 Files Picture Files
Screen
View
The options shown on the Navigation menu vary depending on the media types (e.g. DVD, audio CD, VCD, etc.) as
well as the supporting features offered by the media being played. Unavailable options will be disabled.
Access to the Navigation Menu
Press NAVI. to display the Navigation menu.
Press and ENTER to select a playback option from the menu, and set your preference.
When completed, press to select ‘Exit’, then press ENTER.
Playback
Page 59

59
Playback
Playback Options
Repeat
Use the ‘Repeat’ function to set your playback
preference.
1 Press ENTER repeatedly to choose a repeat
mode.
Type Repeat Mode
DVD-Video
Video Title
Repeat One
Repeat Off
VCD
SVCD
Repeat All
Repeat Off
Video Files
Repeat One Repeat All
Shuffle Mode
Repeat Off
Audio CD
Repeat One Repeat All
Shuffle Mode
Repeat Off
Music Files
Repeat One Repeat All
Shuffle Mode
Repeat Off
Picture Files
Repeat One Repeat All
Shuffle Mode
Zoom
The ‘Zoom’ feature allows you to enlarge the video
image and to pan through the enlarged image during
playback.
1 Press to select the (zoom in) icon,
then press ENTER repeatedly to enlarge the video
image by 100%, 200%, 300% or 400%.
Or select the (zoom out) icon, then press
ENTER repeatedly to reduce the video image by
400%, 300%, 200% or 100%.
2 To resume the normal image size, press
to select ‘100%’, then press ENTER.
3 To view different sections of the enlarged image,
go to the on-screen control pad.
Press to select the direction you would
like to apply, then press ENTER.
Press ENTER repeatedly, if necessary, to move
the image.
Picture Control
The ‘Picture Control’ function not only allows you to
enlarge or reduce the picture image, but also makes
it possible to pan through the image for more detailed
viewing.
1 Press to select the (zoom in) icon,
then press ENTER repeatedly to enlarge the
picture by 25%, 50%, 75% or 100%.
Or select the (zoom out) icon, then press
ENTER repeatedly to reduce the picture by 75%,
50% or 25%.
2 To resume the normal image size, press
to select ‘Full Size’, then press ENTER.
3 To view different sections of the enlarged picture,
go to the on-screen control pad.
Press to select the direction you would
like to apply, then press ENTER.
Press ENTER repeatedly, if necessary, to move
the image.
Page 60

60
Slow Motion
1 Press to select from the options, then press
ENTER.
···►
1/2x (forward)
···►
1/4x (forward)
◄···
1/2x (backward)
◄···
1/4x (backward)
2 Press PLAY to resume normal playback.
Search
You can search a disc which contains video fi les or
titles by entering the title/chapter number or by entering a specifi c time. A similar function is also available
when you play audio CDs or music fi les.
► Search by Title/Chapter Number
1 Press to select ‘Title/Chapter’, then press
ENTER.
2 Press or number buttons (0-9) to enter
the numbers, then press ENTER.
The bar for entering the title/chapter number will
appear.
If during the process you would like to revise the
number you enter, press to re-edit the last digit(s)
when necessary.
For more details on ‘title’ and ‘chapter’, please see
‘Disc Information (Title & Chapter)’ (p.8)
If the number you enter exceeds total title/chapter
number, an invalid icon will appear, and the recorder
will keep playing back the disc.
If you would like to see the total number of title/chapter, please go to ‘Information’ on the Navigation
menu.
► Search by Time
1 Press to select ‘Time’, then press ENTER.
2 Press or number buttons (0-9) to enter
the numbers, then press ENTER.
The bar for entering time will appear.
If during the process you would like to revise the
number you enter, press to re-edit the last digit(s)
when necessary.
If the number you enter exceeds total time, an invalid
icon will appear, and the recorder will keep playing
back the disc.
If you would like to see the overall time, please go to
‘Information’ on the Navigation menu.
A-B Repeat
1 When playback reaches the beginning of your
desired session, press to select ‘Set Point A’,
then press ENTER.
2 When playback reaches the end of the desired
session, press to select ‘Set Point B’, then
press ENTER.
Playback of the designated session will start.
3 To cancel the repeat mode, press to select
‘Cancel’, then press ENTER.
If you exit the function, setting only point A, the
preset point A will still be valid when you enter the
‘A-B Repeat’ function next time.
Page 61

61
Playback
The ‘Cancel’ function is only available when both
point A and point B are set.
The ‘A-B Repeat’ setting will be canceled when you
bring the program to a marked stop or a full stop.
Subtitle
On some pre-recorded DVDs, there may be more
than one subtitle language. If the DVD-Video disc is
already preset to a default language, the playback
will start following this setting, but you can use the
Navigation menu to select a different language at any
time during playback.
1 Press to select a subtitle language, then
press ENTER.
Audio
On some pre-recorded DVD discs, there may be
more than one audio language. If the DVD-Video disc
is already preset to a default language, the playback
will start following this setting, but you can use the
Navigation menu to select a different language at any
time during playback.
1 Press to select an audio language, then press
ENTER.
When VCD/SVCD is selected for playback, sound
options will be: Normal, SWAP, Left and Right.
Angle
Some pre-recorded DVD discs contains scenes shot
from different camera angles. You can choose to
view these camera angles during playback.
1 Press to select a camera angle, then press
ENTER.
Information
During playback, you can select to display the disc
information on the top of the screen or to hide it.
1 Press to select ‘On’ or ‘Off’, then press
ENTER.
If you select ‘On’, disc information will appear on the
top of the screen.
Different categories of information will be shown
depending on the media type.
Page 62

62
Playback (Disc)
DVD-Video/VCD/
SVCD
1 Press OPEN/CLOSE to open the disc tray.
2 Carefully place the disc on the tray with the label
side facing up, then press OPEN/CLOSE.
3 I f playback does not start automatically, press
PLAY to begin playback.
If you have inserted a DVD-Video disc, a menu may
appear when the disc is in playback mode.
Press to select an item and confirm with
ENTER.
If the titles and chapters are numbered, you can also
press number buttons (0-9) to select a desired item
and confirm with ENTER.
4 Press STOP to stop playback at a marked stop.
Press PLAY to resume playback from a marked
stop.
Press STOP twice to bring the playback to a full
stop.
5 To remove the disc, press OPEN/CLOSE.
If you would like to bring up the DVD menu, press
MENU on the remote control to display it.
This DVD recorder supports discs recorded with
multiple sessions.
Audio CD
Standard Playback
1 Press OPEN/CLOSE to open the disc tray.
2 Carefully place the disc on the tray with the label
side facing up, then press OPEN/CLOSE.
3 I f playback does not start automatically, press
PLAY to begin playback.
4 Press STOP to stop playback.
Press PLAY to resume playback.
5 To remove the disc, press OPEN/CLOSE.
Programmed Playback
1 Press OPEN/CLOSE to open the disc tray.
2 Carefully place the disc on the tray with the label
side facing up, then press OPEN/CLOSE.
3 I f playback does not start automatically, press
PLAY to begin playback.
4 Press EDIT to bring up the editing bar.
5 Press the number buttons (0-9) to enter the
number of track you would like to play and confirm
with ENTER.
6 When completed, press PLAY to begin play-
back.
Press STOP to stop playback.
Press PLAY to resume playback.
7 To remove the disc, press OPEN/CLOSE.
This DVD recorder supports discs recorded with
multiple sessions.
Media Files
(Video/Music/Picture)
1 Press OPEN/CLOSE to open the disc tray.
2 Carefully place the disc on the tray with the label
side facing up, then press OPEN/CLOSE.
3 Press CONTENTS to display the Contents Menu.
4 Press to select ‘DVD’ as the source
medium, then press ENTER.
5 Press to select the types of files
(Video/Music/Picture) you wish to play, then press
ENTER.
Page 63

63
Playback
▌ Video
Press to select a video title, then press
ENTER.
Playback will then start.
▌ Music
Press to select a music album, then press
ENTER to go into the album.
Press to select a music fi le, then press ENTER.
▌ Picture
Press to select a picture album, then press
ENTER to go into the album.
Press to select a music fi le, then press ENTER.
6 If you have chosen to play:
▌ Video
Press PREVIOUS or NEXT to advance or return
to the previous or next chapter.
Press STOP to stop playback at a marked stop.
Press PLAY to resume playback from a marked
stop.
Press STOP twice to bring the playback to a full
stop.
▌ Music
Press STOP to stop playback.
Press PLAY to resume playback.
▌ Picture
Press to skip to the previous or next picture.
Press repeatedly to rotate the picture clockwise,
or press repeatedly to rotate the picture counter-
clockwise.
Press STOP to stop playback at a marked stop.
Press PLAY to resume playback from a marked
stop.
Press STOP twice to bring the playback to a full
stop.
This DVD recorder supports discs recorded with
multiple sessions.
If an MP3 fi le name includes two-byte character, it
may not be displayed correctly.
This DVD recorder does not support ID3 (for MP3)
and WMA tags.
This DVD recorder does not support mp3PRO fi les.
The MP3 fi le bitrates supported by this DVD recorder
are: 32Kbps - 320Kbps.
This DVD recorder does not support WMA lossless
fi les and WMA fi les protected by DRM (digital rights
management) technology.
Picture with Music
If your source medium contains picture and music
fi les, you can play both types of fi les at the same
time.
Using Contents Menu
1 Press OPEN/CLOSE to open the disc tray.
2 Carefully place the disc on the tray with the label
side facing up, then press OPEN/CLOSE.
3 Press CONTENTS to display the Contents Menu.
4 Press to select ‘DVD’ as the source
medium, then press ENTER.
Page 64

64
5 Press to select ‘Picture’, then press ENTER.
6 Press to select a picture album, then
press ENTER.
7 Press to select a picture, then press
ENTER.
Playback will then start.
8 Press CONTENTS to display the Contents Menu.
9 Press to select ‘Music’, then press ENTER.
10 Press to select a music album, then
press ENTER.
11 Press to select a music file, then press
ENTER.
Playback will then start.
12 Pressto skip to the previous or next picture.
Press repeatedly to rotate the picture clockwise, or press repeatedly to rotate the picture
counterclockwise.
Using Easy Guider
For more information on how to make use of the
simultaneous playback, please see ‘Using Easy
Guider: Play’ (p.37).
Playback (HDD)
To play back files stored on the built-in hard drive,
follow the steps below.
1 Select ‘HDD’ as the source medium.
▌ HDD/DVD Button
Press HDD/DVD on the remote or the front panel to
switch to HDD mode.
Press CONTENTS to display the Contents Menu.
▌ Contents Menu
Press CONTENTS to display the Contents Menu.
Press to select ‘HDD’ as the source
medium, then press ENTER.
▌ Easy Guider
Press GUIDER to display the Easy Guider Menu.
Press to select ‘Play’, then press ENTER.
Press to select ‘HDD’ as the source medium,
then press ENTER.
2 Press to select the desired file/album,
then press ENTER.
For more information, please see ‘Using Easy
Guider: Play’ (p.37) and the ‘Playback (Disc)’
section in this chapter.
Page 65

Digital Video Sup
port
65
Digital Video Support
It is illegal to download and use unauthorized copyrighted materials. Make sure you obtain the permission or
authorization from copyright owners and related third-parties before you start using or watching the videos or
fi les. If you fail to do so, you may be subject to fi nes and/or penalties.
Before you start
► Check whether you have switched your TV’s input source to corresponding option (e.g. VIDEO 1, LINE 2, etc.),
so that signal from the DVD recorder can appear on screen. For further information, please check the instruction
manual offered by your TV manufacturer.
MPEG-4 Videos
Supported Formats
The MPEG-4 technology allows a large video
fi le, such as a two-hour movie, to be effi ciently
compressed without sacrifi cing its original video
and audio quality. If you watch an MPEG-4-based
movie, there may be subtitle fi les saved for playback
in addition to the video/audio fi les. Please check the
table below to see whether your MPEG-4 fi les are
supported by this DVD recorder.
Category
Codec
Standard
File Extension
Movie
Video
• DivX
• XviD
AVI, DIVX*,
DIV*
Audio
• MP3
• AC3
• LPCM
Subtitle --- SUB, SRT, TXT
Bitmap-based subtitles, such as idx+sub, are not
supported by this DVD recorder.
* depending on the model.
Playing MPEG-4 Files
1 Select the fi le you wish to play either through Easy
Guider or through the Contents Menu.
For more details, please see ‘Contents Menu’ (p.32)
or ‘Using Easy Guider: Play’ (p.37)
2 I f playback does not start automatically, press
PLAY to begin playback.
3 I f the fi le is not supported by the DVD recorder, a
pop-up box will appear. Press ENTER to skip the
fi le.
4 I f there are other fi les on your source medium, the
DVD recorder will start playing back the next fi le.
5 Press STOP to stop playback at a marked stop.
Press PLAY to resume playback from a marked
stop.
Page 66

66
DivX® VOD
DivX® VOD (video-on-demand) allows you to download video fi les to your PC, which you can watch on
your computer or on your TV. To protect copyrights
of these digital videos, the service features an
Internet-based copyright protection system called
DRM (digital rights management). DRM safeguards
copyrights through an online authorization process.
To watch DRM-protected video fi les, you need to
complete the registration procedure.
This feature is supported by ‘GX’ models only.
Before you start
► Make sure you have a blank recordable disc at
hand.
1
Applying for a User
Account
To watch DRM-protected video fi les, you need
to register a user account on the DivX® website
fi rst. For more information, please visit: http://
www.divx.com/vod.
2
Registering Your DVD
Recorder
►Checking Registration Code
To register your DVD recorder, you will need to
acquire the recorder’s registration code.
1
Press SETUP to display the Setup menu.
2
Press to select ‘Recording/Playback’, then
press ENTER.
3
Press to select ‘DivX(R) VOD’, then press
ENTER.
4
Press ENTER to display the registration informa-
tion.
Recording Mode
VCD PBC
VCD PBC
Recording / Playback
DivX (R) VOD
The registration code of your DVD recorder will
appear. (The code seen above serves as an example
only.)
5
When completed, press SETUP to exit the Setup
menu.
►Registering Code Online
After you acquire the ID code, go to the DivX® website,
and enter the recorder’s registration code in your
account. When you fi nish fi lling in the required details,
you will then be directed to a fi lm download link. Follow
the instructions given on the website, and burn the short
fi lm to a DVD disc.
►Playing Information Disc
To complete the registration process, you need to
play the disc which contains the downloaded fi lm on
your DVD recorder.
1 Press OPEN/CLOSE to open the disc tray.
2 Carefully place the disc on the tray with the label
side facing up, then press OPEN/CLOSE.
3 I f playback does not start automatically, press
PLAY to begin playback.
4 Your DVD recorder will be offi cially registered
when playback stops.
Page 67

67
Digital Video Support
3
Selecting Video Files
Select the video fi les you would like to watch
from various online rental or retail shops.
Normally, users pay to get the viewing rights
of these video fi les, which are downloaded to
users’ PCs. If you would like to watch them on
your TV, you need to transfer these fi les to the
recordable CD or DVD discs.
Conditions of viewing rights vary depending on
the service providers.
4
Playing Video Files
1 Press OPEN/CLOSE to open the disc tray.
2 Carefully place the disc on the tray with the label
side facing up, then press OPEN/CLOSE.
3 I f playback does not start automatically, press
PLAY to begin playback.
4 If the fi le is not protected by the DRM system,
playback will then begin.
5 If the fi le is protected by the DRM system, the
system will check whether the DVD recorder’s
registration code corresponds to the user account
which holds viewing rights of the video fi le.
6 If you have purchased the fi le, playback will then
start.
7 If you have a rental fi le, a dialogue box showing
the remaining number of viewing rights will appear.
Press to select ‘Yes’ or ‘No’, then press
ENTER.
Navigation Menu
Press NAVI to display additional viewing options
during playback. For more information, please see
‘Navigation Menu’ (p.58).
Subtitle
This DVD recorder supports the text-based subtitles
when playing back MPEG-4 videos. Activate the
function to get the most out of your viewing experience.
If you would like the subtitle to be automatically displayed when playback starts, please
make sure you have:
• Given a correct fi le name
You need to give the same fi le names to
video title and subtitle fi le, so that the DVD
recorder can match one fi le with the other. For
example, name ‘XXX.avi’ for the video title,
and ‘XXX.txt’ for the accompanied subtitle fi le.
• Placed the fi le in the same folder as
the video title, or under an appropriate
sub-directory.
In addition, you need to save the subtitle fi le
either in the same folder as the video title, or
in a sub-directory which is given one of the following names: SRT, SUB, SUBS, SUBTITLE
or SUBTITLES.
Using Text-Based Subtitle
1 Press to select ‘Subtitle’, then press ENTER
to go to the sub-menu.
2 If the subtitle fi le is in unicode format, press to
switch on or off the subtitle function.
If the subtitle fi le is in non-unicode format, press
to select an appropriate coding system
for displaying the subtitle correctly, then press
ENTER.
3 Press NAVI. again or repeatedly press to exit
the Navigation menu.
Page 68

68
Media files (e.g. video titles, music files, picture files) saved on the hard drive and the video titles saved on the
discs can be edited. Available editing options may vary depending on media types.
Type Available Options
Music / Picture Album
• Rename
• Split from
• Merge
• Erase
Music / Picture File
• Rename
• Erase
If you do not finalize a disc before playing it on another player/recorder, results of the editings you have made will
not be shown. Please see ‘Using Easy Guider: Disc Tools’ (p.43) for details on how to finalize a disc.
Please finish all editings before finalizing the discs. You CANNOT apply the editing function to a finalized disc,
except in a DVD-RW disc previously formatted in ‘Quick Preparation’ mode.
Disc Information (p.6)
Editing
Page 69

69
Editing
Edit Menu
Screen Overview
Exit button
Chapter
Editing
Options
(*unavailable
items shown in
gray)
Title Editing Options
(*unavailable items shown in gray)
Thumbnail
image
Screen window
Displays image of current
video source
Indicates
available
option
buttons on
remote
Displays
original chapter
markings of the
title
Displays current progress
of the title
Time indicator
Access to the Edit Menu (via Contents Menu)
Press CONTENTS to display the Contents Menu.
Press to select the source medium, then press ENTER.
Press to select ‘Video’, then press ENTER.
Press to select a video title.
Press EDIT to display the Edit menu.
Access to the Edit Menu (pressing EDIT button)
Start playing back a title via the Contents Menu or via DVD menu.
Press EDIT to display the Edit menu.
Page 70

70
Editing Titles
Application DVD-R DVD-RW DVD+R DVD+RW HDD
Rename Title
Protect Title
Overwrite Title
Split Title
Merge Title
Erase Title
Set Title Thumbnail
: Applicable : Not applicable
Rename Title
1 On the Edit menu, press to select ‘Rename’,
then press ENTER.
On-Screen Input Keypad (p.34)
2 Press to select ‘Clear’, then press ENTER
before starting to enter the new name.
3 Press to select desired letters, numbers
or punctuation marks, then press ENTER.
You can enter up to 30 characters for a title name.
4 If you want to make changes during the process,
press to select ‘Back’, which allows you
to delete character by character in a backward
direction, then press ENTER.
If you want to delete all the characters you have
entered, press to select ‘Clear’, then
press ENTER.
If you decide not to change the original title
name, press to select ‘Cancel’, then
press ENTER.
5 When completed, press to select ‘Finish’,
then press ENTER.
If the entry bar is left blank, you will not be able to exit
the screen by selecting the ‘Finish’ button. Please follow
the instruction in pop-up box to complete the process; or
select ‘Cancel’ to return to the Edit menu.
Different titles with identical names can all be saved on
this DVD recorder. Please make sure you do not enter a
title name already in use to avoid confusion.
Protect Title
You can protect the title from accidental erasure or unplanned editings when you activate the ‘Protect’ function.
When the function is switched on, the title CANNOT be
edited or erased. If you need to edit it, you must unlock
the file first.
1 On the Edit menu, press to select ‘Protect’.
2 Press ENTER to switch on or off the function.
3 Press to select ‘Exit’, then press ENTER to exit
the setting.
4 If you switch on the function, a lock icon will appear
next to the protected title when you return to the disc
menu or Contents Menu.
Page 71

71
Editing
Overwrite Title
When you apply the function to a title, it will be
overwritten when you record new title/program next
time.
1 On the Edit menu, press to select ‘Overwrite’.
2 Press ENTER to switch on or off the function.
3 Press to select ‘Exit’, then press ENTER to
exit the setting.
4 If you switch on the function, a pen icon will ap-
pear next to the overwritten title when you return
to the disc menu or Contents Menu.
How will the video be recorded
after the ‘Overwrite’ function is
activated?
• Location
The new video will be recorded in the location
of the overwritten title on disc.
• Space
When you set the ‘Overwrite’ function to
a title, the next title will be immediately
‘protected’ in case of accidental erasure. If the
new video is longer than the overwritten title,
or you use a recording mode of higher quality,
the video may not be recorded completely.
Title 1
Title 2
Title 3
Title 1
New
Title 3
Overwrite
The black bars represent contents recorded.
When using the overwritten space for new recording,
please note that there may be discrepancy between
the time shown on the Contents Menu screen and that
for actual recording due to diffrent recording modes
applied.
Split Title
Use this function to divide a title into two parts. After
being split, the new titles can be merged again. You can
use ‘Split’ and ‘Merge’ functions to temporarily edit out
commercials or scenes you would like to skip.
1 Start playing back the title.
2 On the Edit menu, press to select ‘Split’.
3 When the playback reaches the point where you
would like to set a dividing mark, press ENTER.
The title will be split into two new titles at where you
press ENTER.
4 To split more titles, repeat steps 1 to 4. Or press
to select ‘Exit’, then press ENTER to exit the
setting.
The split function is only applicable to video titles longer
than 6 seconds.
You will not be able to split titles, if there are already 49
titles or 99 chapters on your disc.
Disc Information (Title & Chapter) (p.8)
Page 72

72
Merge Titles
Use this function to merge two titles into one, such as
two sections of programs before and after the commercials. After being merged, the new title can be split
again.
1 Start playing back the title.
2 On the Edit menu, press to select ‘Merge’,
then press ENTER.
3 A menu showing all titles applicable for this
function will appear.
Please select a title to merge.
Text View
4 Press to select the title to be merged
with, then press ENTER.
5 To merge more titles, repeat steps 1 to 5. Or press
to select ‘Exit’, then press ENTER to exit the
setting.
For video titles recorded on a DVD+RW or a DVD-RW
disc, you can only merge the title with its previous/next
title and only when the previous/next title has the same
recording quality, TV signal, audio and video settings.
Otherwise, the function will not be applicable.
Protected and deleted titles CANNOT be merged.
Erase Title
Before using the ‘Erase’ function, please make
sure all your important fi les are safely backed
up. Once you perform this function, all contents
will be permanently deleted.
1 On the Edit menu, press to select ‘Erase’,
then press ENTER.
A pop-up box asking for confi rmation will appear.
The title selected will be erased.
2 To erase more titles, repeat steps 1 to 2. Or press
to select ‘Exit’, then press ENTER to exit the
setting.
3 After you complete the process, a deleted title will
be shown when you return to the disc menu or
Contents Menu.
You CANNOT erase recorded title(s) on a DVD-R or
DVD+R disc if the disc is fi nalized.
You CANNOT erase protected title(s).
Set Title Thumbnail
Normally the fi rst picture of a recording is used as the
thumbnail image. Use this function to reset the image.
1 Start playing back the title.
2 On the Edit menu, press to select ‘Set
Thumbnail’.
3 When the desired image appears, press ENTER to
select it as the thumbnail picture.
4 To set thumbnails for other titles, repeat steps 1 to
4. Or press to select ‘Exit’, then press ENTER
to exit the setting.
You CANNOT set thumbnail image(s) for the recorded
title(s) on a DVD+R or DVD-R disc if the disc is fi nalized.
This DVD recorder captures images on an interval
basis. As a result, there may be a slight discrepancy
between the image selected and the image ultimately
shown as the thumbnail picture.
Page 73

73
Editing
Editing Chapters
Application DVD-R DVD-RW DVD+R DVD+RW HDD
Insert Chapter Mark
Remove Chapter Mark
Hide Chapter
Show Chapter
: Applicable : Not applicable
Insert Chapter Mark
You can insert additional chapter mark(s) while playing
back a title.
1 Start playing back the title.
2 On the Edit menu, press to select ‘Insert
Chapter Mark’.
Insert Chapter Mark
Remove Chapter Mark
Hide Chapter
3 As the playback progresses, press ENTER at
desired point to insert chapter mark.
4 To insert more chapter marks, repeat step 3. Or
press to select ‘Exit’, then press ENTER to
exit the setting.
You can insert up to 99 chapter marks.
Disc Information (Title & Chapter) (p.8)
The minimum time of a valid interval between two
chapter marks is one second. If you insert two chapter
marks within one second, only the fi rst command will
be successfully executed.
This DVD recorder captures images on an interval
basis. As a result, there may be a slight discrepancy
between the point selected and the point ultimately
designated as the chapter mark.
You CANNOT insert chapter marks in recorded title(s)
on a DVD+R or DVD-R disc if the disc is fi nalized.
During recording, you can also press EDIT to insert
chapter marks in the recorded session(s) manually.
Remove Chapter Mark
You can remove chapter mark(s) while playing back a
title.
1 Start playing back the title.
2 On the Edit menu, press to select ‘Remove
Chapter Mark’.
3 As the playback progresses, press ENTER at
desired point to remove chapter mark.
4 To remove other chapter marks, repeat step 3. Or
press to select ‘Exit’, then press ENTER to
exit the setting.
The fi rst chapter mark within a video title CANNOT be
removed.
Hide Chapter
During playback you can hide chapters within a title.
1 Start playing back the title.
2 On the Edit menu, press to select ‘Hide
Chapter’.
Page 74

74
3 Press PREVIOUS or NEXT to advance to
the previous or next chapter.
4 As the playback progresses, press ENTER at
desired point to hide a chapter.
5 To hide more chapters within the title, repeat steps
3 to 4. Or press to select ‘Exit’, then press
ENTER to exit the setting.
You CANNOT hide chapters within recorded title(s) on
a DVD+R or DVD-R disc if the disc is finalized.
When viewing the title through Edit menu, a hidden
chapter will be displayed in a darker color. A message
‘hidden’ appears at the left bottom corner of the screen
window.
Show Chapter
During playback you can choose to show chapter(s)
currently hidden within a title.
1 Start playing back the title.
2 On the Edit menu, press PREVIOUS or
NEXT to select the hidden chapter you would like
to show again.
You can press PAUSE/STEP to pause playback
before you proceed to step 3 and step 4 to show the
hidden chapter.
3 Press to select ‘Show Chapter’, then press
ENTER.
4 To show more hidden chapters within the title,
repeat steps 2 to 3. Or press to select ‘Exit’,
then press ENTER to exit the setting.
Page 75

75
Copying
DVD-R, DVD-RW, DVD+R, DVD+RW, DVD+R DL (double layer) & HDD
(integrated)
You may only use this DVD recorder to reproduce or copy materials for which you own the copyright; or have
obtained permission to copy from the copyright owner; or you otherwise have a legal right to reproduce or copy.
Unless you own the copyright; or have obtained permission from the copyright owner; or otherwise have a legal
right to reproduce or copy, you may be violating the law, including copyright law, and may be subject to payment
of damages and other remedies.
Please note that you CANNOT record/copy a rented or purchased video/disc from another device (video
cassette recorder, DVD player, DVD recorder, etc.) connected to this recorder.
If you use a DVD-R, DVD+R, DVD-RW (formatted in ‘Quick Preparation’ mode), you need to finalize the disc
before it can be played back on other compatible devices. You can complete the process using ‘Easy Guider’.
Please see ‘Using Easy Guider: Disc Tools’ (p.43) for details on how to finalize a disc.
Not all discs are compatible with high-speed copying. Check with the disc manufacturer for compatibility.
Discs initialized on another recorder CANNOT be used for copying.
Copying
Page 76

76
OK
Press to select desired application, then press
ENTER.
7 When completed, press CONTENTS to exit the
Contents Menu.
Materials recorded on a VCD/SVCD disc CANNOT be
copied to the hard drive before the disc is finalized.
If you own the copyright, you may copy an entire
DVD-Video disc to the hard drive. Contents of a
DVD-Video disc can only be copied from hard drive to
a blank DVD disc.
If you copy recorded titles to a blank DVD disc, you
will not be able to use the same disc to copy data files,
and vice versa.
The ‘One-Touch Copying’ function will not be applicable, if any part of the title you wish to copy is
copy-protected.
► Use Easy Guider to Copy Files
You can also copy files using the Easy Guider
menu. For more information, please see ‘Using Easy
Guider: Copy’ (p.41).
One-Touch Copying
The one-touch copying feature allows you to copy
files from a DVD disc to hard drive and vice versa.
The DVD recorder will copy at the maximum speed
possible.
1 Press CONTENTS to display the Contents Menu.
2 Press to select ‘DVD’ or ‘HDD’ as the
source medium, then press ENTER.
3 Press to select the file catalogue which
contains files you wish to copy, then press ENTER.
4 Press to select the desired album or file,
then press COPY.
The copying process will then start.
5 If you wish to cancel the copying process, press
STOP.
If you have been copying files from hard drive to
disc and then decide to cancel the process, you
may not be able to use the disc to record or copy
again.
6 During the process:
▌ Lack of Space
If the DVD recorder detects lack of space on your
disc, a pop-up box will appear.
There is not enough space for copying.
OK
▌ Wrong Format
If the DVD recorder detects an incompatible
format on your disc, a pop-up box will appear.
Page 77

77
Troubleshooting
Troubleshooting
If you experience any problem while using the DVD recorder, please consult the following troubleshooting guide
first, as it may offer immediate solution to the condition occurred. Should the problem remain, contact a Lite-On IT’s
service point near you. For more information, please visit www.liteonit.com
Picture
Problem Possible Solutions
No image shown on the TV
screen
► Make sure the video cable (composite, component, SCART, S-Video, HDMI,
etc.) between TV and DVD recorder is correctly and securely connected.
► Check whether you have switched your TV’s input source to corresponding
option (e.g. VIDEO 1, LINE 2, etc.), so that signal from the DVD recorder can
appear on screen. For further information, please check the instruction manual
offered by your TV manufacturer.
► Make sure a disc is properly placed on the disc tray, and it is recorded in a
format compatible with your local TV system (NTSC or PAL).
► Check your setting on component video output mode (Progressive or Interlaced).
Please select the output mode supported by your TV. To reset the recorder,
press(direction button), ‘5’, ‘0’, ‘2’, ‘0’, ENTER on the remote control.
Image shown with noises
► Check if the disc is distorted or scratched.
► If the video output signal from the recorder goes via VCR to your TV set, or if
you connect the recorder to a TV/VCR set, the copyright protection code applied
to some DVD programs could affect picture quality. If you still experience
this problem even when you connect the recorder to TV, try connecting your
recorder to the TV’s S-VIDEO input.
Image imported from an external
device is distorted
► If the video signal from the external device is copy-protected, you need to
connect the device directly to your TV.
Recording
Problem Possible Solutions
Cannot record
► Check whether you have inserted a recordable disc.
► Check whether the disc you insert has been formatted or prepared for recording.
► Press DISPLAY to check whether there is enough space on the disc.
► Check whether the disc has been finalized. You CANNOT record on a finalized
disc.
► Check whether the disc you insert has already been used for recording on other
DVD recorders.
► Check whether the disc you insert has already been used for recording pro-
grams of a different type of TV signal. A disc containing NTSC-based contents
CANNOT be used to record PAL-based programs and vice versa.
Recording does not start
immediately after pressing ●
RECORD button
► This occurs as disc preparation process is taking place, which will last for a few
seconds. (Applicable to DVD-R/DVD+R/DVD+RW/DVD+R DL discs)
Page 78

78
Timer Recording
Problem Possible Solutions
Timer recording does not work
properly
► Check whether the system time/date is correct.
► Check whether the timer program is set to correct time and channel.
► Check whether you have inserted a recordable disc.
Recording result is not completed
► Check whether there is a schedule overlap. If so, go to the Timer Record menu
to reset one of the overlapped programs.
► Press DISPLAY to check whether there is enough space on the disc.
► Make sure you switch off the DVD recorder, so that the VPS/PDC setting of your
timer program can function properly.
Sound
Problem Possible Solutions
No sound
► Check whether the audio cable is correctly and securely connected.
► Check whether the audio cable is damaged.
► Check whether the input source setting on the amplifier is correct.
► There is no sound when playback is paused or is set for slow motion.
Press ► PLAY to resume regular playback.
► If the audio signal does not come through the DIGITAL OUT jacks, please check
whether related settings (on Setup menu) for the audio output are correct.
The sound from the recorder
is not presented properly or is
distorted
► Check whether the audio cable is correctly and securely connected.
► Check whether the audio cable is damaged.
► Make sure the amplifier/receiver or TV is set to the correct input and the volume
is switched on.
► If the sound is distorted, try cleaning the cable plugs.
Playback
Problem Possible Solutions
Cannot play back a disc
► Check whether the disc inserted is supported by the DVD recorder.
► If the disc inserted contains videos recorded on other DVD recorders, check
whether the disc is finalized. In some cases, the DVD recorder may not be able
to play a finalized disc due to the type of disc or condition of the recording.
► Discs recorded with copy-once materials can only be played on CPRM (Content
Protection for Recordable Media)-compatible players.
► Check whether you have inserted a blank disc.
► Check whether the way you insert the disc is correct. Insert the disc with the
label side up. If there is no label on the disc, please check with the disc retailer.
► Check whether the disc’s region code is the same as that of the recorder.
► Check whether the parental control function is switched on. If so, you have to
unlock it first. (Default password for the function: 0000 [zero])
Cannot play back from HDD
► Check whether there are titles or files on the hard drive.
► Check whether the titles or files on the hard drive are supported by the DVD
recorder for playback.
Page 79

79
Troubleshooting
The recorder starts playing a
disc automatically
► If you have selected DVD as the target device, playback will begin automatically
when you insert a DVD-Video disc, VCD, SVCD or audio CD.
TV Channels
Problem Possible Solutions
Cannot change TV channels
► Press SOURCE to switch the DVD recorder’s input source to ‘TV’.
► Check whether the antenna cables are connected correctly.
► Check whether the channel scanning process for your TV is completed.
Others
Problem Possible Solutions
The disc tray does not open/
close
► Contact your local dealer or local authorized service point.
The recorder does not respond
to commands
► Switch off the recorder and switch it on again. If the problem persists, unplug the
power cord, reconnect it and switch on the recorder one more time. If neither the
solutions work, contact your local dealer or an authorized service point.
Page 80

80
General
Power Supply ■ AC 100~240V 50/60Hz
Power Consumption ■ Approx. 50W (operation)
Operating Temperature ■ +5°C to +40°C
(+36°F to +104°F)
Operating Humidity ■ 5% to 80% RH
Dimensions (W/H/D) ■ 430 x 66 x 315 mm
Weight ■ Approx. 4.5 kg
Video/Audio
Input
Composite Video ■ Cinch (yellow) x 1
Composite Audio ■ Cinch (white/red) x 1
S-Video ■ Hosiden 4-pin x 1
SCART ■ CVBS/RGB/Decoder x 1
DV ■ IEEE 1394 4-pin x 1
Output
Composite Video ■ Cinch (yellow) x 1
Composite Audio ■ Cinch (white/red) x 1
Component Video ■ Y/Pb/Pr (green/blue/red) x 1
SCART ■ CVBS/S-Video/RGB x 1
HDMI ■ HDMI x 1
Digital Audio ■ Coaxial x 1 / Optical x 1
Video Performance
DA Converter ■ 10-bit/27MHz
Composite Video Output ■ 1 Vpp 75 Ohm
Component Video Output ■ Y: 1 Vpp 75 Ohm
■ Pb: 0.7 Vpp 75 Ohm
■ Pr: 0.7 Vpp 75 Ohm
Audio Performance
DA Converter ■ 24-bit/96KHZ
Signal-Noise (1kHz) ■ ≥90dB
Dynamic Range (1kHz) ■ ≥80dB
Channel Separation (1kHz) ■ ≥110dB
Total Harmonic Distortion (1kHz) ■ ≤-65dB
Component Video Output Mode
Progressive Scan ■ 576p output
Tuner
Input/Output
RF Input ■ Coaxial x 1
RF Output ■ Coaxial x 1
Video System ■ PAL-B/G
■ PAL-D/K
■ PAL-I
■ SECAM-L/L
Audio System ■ NICAM TV audio
Recording
Recordable Media
■ Built-in HDD
■ DVD-R/-RW
■ DVD+R/+RW
■ DVD+R Double Layer
Video Recording Format
DVD+VR (HQ/SP/LP/EP mode) ■ MPEG-2
DVD+VR (SLP mode) ■ MPEG-1
Audio Recording Format
DVD+VR ■ Dolby Digital 2-channel
Playback
Playable disc
■ DVD-Video ■ DVD-R/-RW**
■ DVD+R/+RW** ■ DVD+R Double Layer**
■ Video CD (VCD) ■ Super Video CD (SVCD)
■ Audio CD ■ CD-R/-RW**
Supported Format
Video ■ JPEG/BMP
■ MPEG-1
■ MPEG-2 files (.VOB/.DAT/.MPG)
■ MPEG-4 files (.AVI/.DIV*/.DIVX*)
Audio ■ MP3
■ WMA
■ WAV
■ LPCM
■ Dolby Digital 2-channel
■ Dolby Digital 5.1 channel (only digital out)
■ DTS (only digital out)
* depending on the model
** with files supported by this DVD recorder
The specifications and design of this product are
subject to change without notice.
Specifications
Page 81

81
▌480i/480p (576i/576p)
Indicates the number of scanning lines and scanning format
of an image signal.
480i/576i indicates 480/576 scanning lines with interlaced
format, and 480p/576p indicates 480/576 scanning lines with
progressive format.
▌Aspect Ratio
Aspect ratio refers to the length to height ratio of TV screens.
The ratio of a standard TV is 4:3, while the ratio of a highdefinition or wide-screen TV is 16:9.
▌Bit Stream
The digital form of multi-channel audio data (e.g. 5.1-channel) before it is decoded into its various channels.
▌Chapter / Title
Chapter is a division of a video title on a DVD disc.
▌Component Video
Video signals with three channels of separate information
that makes up the picture. There are several types of
component video, such as R/G/B and Y/Cb(Pb)/Cr(Pr).
▌Composite Video
A single video signal commonly used in most consumer
video products that contains all luminance, color, and
synchronization information.
▌CPRM (Content Protection for Recordable Media)
CPRM is a technology developed to prevent digital content
from being copied more than once.
▌DivX® VOD
DivX® VOD (video-on-demand) service is designed to protect
copyrights of digital videos. Through an online registration
process, DivX® VOD prevents unauthorized downloads or file
sharing. For more information, please visit: http://www.divx.
com/vod.
▌Dolby Digital
®
A six-channel system consisting of left, center, right, left
rear, right rear and LFE (Low-Frequency Effect channel, for
use with a sub-woofer) channels. It requires a Dolby Digital®
decoder, either in the player or in an external receiver to
regenerate the sound. All processing is done in the digital
domain. Not all Dolby Digital discs contain six (5.1) channels
of information.
▌DTS® (Digital Theater Systems)
DTS® is a Digital Surround audio encoding format configured
with six (5.1) channels, similar to Dolby Digital®. It requires a
DTS® decoder, either in the player or in an external receiver
to regenerate the sound. All processing is done in the digital
domain. Not all DTS discs contain six (5.1) channels of
information.
▌HDCP (High-bandwidth Digital Content Protection)
HDCP is developed by Intel Corporation to ensure the
integrity of digital content transmitted via HDMI/DVI interface.
▌HDMI (High-Definition Multimedia Interface)
HDMI is an all-digital interface which transmits
uncompressed high-definition video and multi-channel digital
audio from any audio/video source to display devices via a
single cable.
▌Interlaced / Progressive Scan
The two modes refer to the methods by which a video image
is updated. In ‘Interlaced Scan’ mode, image is updated by
alternating sets of odd and even scan lines. In ‘Progressive
Scan’ mode, scan lines for an image are refreshed in every
pass and by a sequential order.
▌JPEG (Joint Photographic Experts Group)
A popular file format for still image compression and storage.
There are two sub-types of the JPEG formats: (1) Baseline
JPEG: used for digital cameras, the web, etc. (2) Lossless
JPEG: an old type, rarely used now.
▌Linear PCM (Pulse Code Modulation) Audio
Linear PCM is a method to digitally encoding audio without
compression, and is used for the audio tracks on DVD-Video
discs, Audio CDs, etc.
▌MP3
MP3 (MPEG-1 audio layer 3) is a compressed audio file
format. Files are recognized by their file extension .mp3 or
.MP3.
▌MPEG (Motion Picture Experts Group)
MPEG is an international standard for compressing digital
video/audio content. MPEG-1 is used for VCD and music.
MPEG-2 is used for SVCD and DVD-Video. MPEG-4 is used
for DVD-Video and other digital videos.
▌NTSC (National Television System Committee)
This is the committee that established the standards for
television systems in the United States. The NTSC standard
broadcasts 525 or 480 lines of resolution per second, and
30 frames per second of refresh rate, 60 Hz field frequency.
NTSC TV system is widely used in USA, Canada, Latin
America and Taiwan etc.
▌PAL (Phase Alternation by Line)
PAL (Phase Alteration Line) is the color television broadcast
standard throughout the Western Europe (except in France,
where SECAM is the standard), Australia, China, Singapore
and Malaysia etc. It has 625 lines of vertical resolution per
second and 25 frames per second refresh rate, 50 Hz field
frequency.
▌PBC (Playback Control)
A special feature on a Video CD or Super VCD that enables
interactive use.
▌S-Video
A video signal which improves picture quality over standard
composite connections. Used on Super VHS, DVD, high-end
TV monitors, etc.
▌Track
SVCD, VCD, Audio CD discs use tracks to divide up the
content of a disc.
▌WMA (Windows Media Audio)
WMA is an audio codec standard proposed by Microsoft.
Music/audio files which are compressed using this standard
come with the file extension, .wma or .WMA.
Glossary
Page 82

82
Recommended Disc List
DVD+R
Manufacturer Disc ID
Write
Speed
1 Mitsubishi MCC 002 4x
2 RICOH RICOHJPN R01 4x
3 CMC CMC MAG F01 4x
4 MAXELL MAXELL 001 4x
5 TAIYO YUDEN TY T01 4x
6 RITEK RITEK R02 4x
7 BEALL BEALL000 P40 4x
8 MBI MBIPG101 R03 4x
9 Mitsubishi MCC 003 8x
10 RICOH RICOHJPN R02 8x
11 MAXELL MAXELL 002 8x
12 SONY SONY D11 8x
13 TAIYO YUDEN TY T02 8x
14 PRODISC PRODISC R03 8x
15 RICOH RICOHJPN R02 8x
16 MBI MBIPG101 R04 8x
17 OPTODISC OPTODISC OR8 8x
18 PRODISC PRODISC R04 8x
19 DAXON DAXON AZ2 8x
20 Plasmon Plasmon1 C01 8x
21 INFOMEDIA INFOME R20 8x
22 TDK TDK 002 8x
23 NANYA NANYA CLX 8x
24 GIGASTORAGE GIGASTORAGE H01 8x
25 LEAD DATA LD S03 8x
26 INFORDISC INFORDISC DISC R20 8x
27 Mitsubishi MCC 004 16x
28 TAIYO YUDEN YUDEN000 T03 16x
29 TDK TDK 003 16x
30 RICOH RICOHJPN R03 16x
31 MAXELL MAXELL 003 16x
32 CMC CMC MAG M01 16x
33 RITEK RITEK R04 16x
34 SONY SONY D21 16x
35 RITEK RITEK R05 16x
Manufacturer Disc ID
Write
Speed
36 NANYA NANYA FLX 16x
37 DAXON DAXON AZ3 16x
38 INTERAXIA AG VDSPMSAB 004 16x
39 DVSN Dvsn +160001 16x
40 Lead Data LD S04 16x
41 GIGASTORAGE GIGASTORAGE H02 16x
42 MUST MUST 006 16x
43 PRODISC PRODISC R05 16x
44 NEW START NEW START NSD R40 16x
45 RITEK RITEK P16 16x
46 OPTODISC OPTODISC R16 16x
47 PRODISC PRODISC R04 16x
48 MBI MBI R05 16x
49 LG LGEP16 001 16x
DVD+RW
Brand Disc ID
Write
Speed
1 Mitsubishi MCC A01 2.4x
2 RITEK RICOHJPN W01 2.4x
3 CMC CMC MAG W01 2.4x
4 OPTODISC OPTODISC OP1 2.4x
5 PRODISC PRODISC W01 2.4x
6 INFOMEDIA INFODISC A01 2.4x
7 MBI MBI W03 2.4x
8 RICOH RICOHJPN W11 4x
9 PHILIPS PHILIPS 041 4x
10 Mitsubishi MKM A02 4x
11 SONY SONY S11 4x
12 CMC CMC MAG W02 4x
13 OPTODISC OPTODISC OP4 4x
14 PRODISC PRODISC W02 4x
15 DAXON DAXON D42 4x
16 INFOMEDIA INFODISC A10 4x
Page 83

83
DVD-R
Brand Disc ID
Write
Speed
1 Ritek RITEK G03 2x
2 RITEK RITEK G04 4x
3 PRODISC PRODIS CS03 4x
4 Mitsubishi MCC 01 RG20 4x
5 SONY SONY04 D1 4x
6 CMC CMC MAG AF1 4x
7 RITEK RITEK M02 4x
8 MAXELL MXL RG02 4x
9 MBI MBI01 RG20 4x
10 POS POS POSG04 4x
11 DST Dvsn A001 4x
12 GIGASTORAGE GSC001 4x
13 TDK TDK TTH01 8x
14 TAIYO YUDEN TYG02 8x
15 Mitsubishi MCC 02 RG20 8x
16 MAXELL MAXELL RG03 8x
17 TAIYO YUDEN TYG01 8x
18 SONY SONY08 D1 8x
19 TDK TDK TTG02 8x
20 RITEK RITEK G05 8x
21 PRODISC PRODISC S04 8x
22 NANYA NANYA A01 8x
23 CMC CMC MAG AE1 8x
24 LEAD DATA LEADDA TA S03 8x
25 GIGASTORAGE GSC003 8x
26 GIGASTORAGE GSC004 8x
27 OPTODISC OPTODI SCR008 8x
28 POS POSG06 8x
29 INFOMEDIA INFOMEDIA R20 8x
30 DAXON DAXON 008S 8x
31 Fuji Fuji film M03 8x
32 PRINCO PRINCO 8X02 8x
33 SONY SONY16 D1 16x
34 Mitsubishi MCC 03 RG20 16x
35 TAIYO YUDEN TYG03 16x
36 RITEK RITEK M16 16x
37 BeALL BeALL G16001 16x
38 MAXELL MXL RG04 16x
39 CMC CMC MAG AM3 16x
40 MBI MBI01 RG40 16x
41 MBI MBI03 RG40 16x
42 PRODISC PRODISC F02 16x
43 NANYA NANYA F02 16x
44 TDK TTH02 16x
45 PRODISC PRODISC S05 16x
Brand Disc ID
Write
Speed
46 OPTODISC OPTODISC R016 16x
47 Fuji film Fuji film M04 16x
48 MUST MUST 007 16x
49 POS POS POSG08 16x
50 DST Dvsn-160 16x
51 DAXON DAXON 016S 16x
DVD-RW
Brand Disc ID
Write
Speed
1
Mitsubishi MCC 01 RW11N9 2x
2
JVC JVC_Vi ctorW7 2x
3
CMC CMC W02 2x
4
RITEK RITEK W01 2x
5
TDK TDK502 sakuM3 2x
6
PRODISC PRODISC DW04 2x
7
PRINCO PRINCO PRINCO 2x
8
Mitsubishi MCC 01 RW4X 4x
9
JVC JVC0Vi ctorD7 4x
10
TDK TDK 601saku 4x
11
RITEK RITEK W04 4x
12
PRODISC PRODIS CDW06 4x
13
OPTODISC OPTODIS CW004 4x
14
CMC CMC W03 4x
15
INFOMEDIA INFOMEDIA A20 4x
16
MBI R01RWG20 4x
17
Mitsubishi MKM 01 RW6X01 x6
18
JVC JVC1Vi ctord7 x6
19
TDK TDK 701 x6
20
CMC CMC W04 x6
21
RITEK RITEK W06 x6
Page 84

Model Comparison Chart
Some supporting features vary depending on model types. Please check the following chart before you consult
relevant sections for your desired information.
HD-A940G HD-A940GX HD-A960G HD-A960GX HD-A970GX
ShowView Programming
System
HDMI Output
MPEG-4
DivX® VOD
Hard Drive
(160GB) (160GB) (250GB) (250GB) (320GB)
DVD+R DL (Double Layer)
Recording
P/N 7819901702
▌HEAD OFFICE
Lite-On IT Corp.
12F, 392, Ruey Kuang Road, Neihu, Taipei 114, Taiwan
Tel: 886-2-8798-2886
Fax: 886-2-8798-2825
Customer Call Center: 886-3-578-7722#2604/2605
Service e-mail: dc_support@liteonit.com
▌EUROPE
Lite-On IT BV
Meerenakkerplein 16, 5652 BJ EINDHOVEN,
The Netherlands
Tel: 31-40-2508000
Fax: 31-40-2508092
Service e-mail: dceu_support@liteonit.com
▌USA
Lite-On Sales and Distribution Inc.
42000 Christy Street, Fremont, CA 94538
Tel: 1-510-687-1800
Fax: 1-510-687-1900
Customer Call Center: 1-510-824-0088 (English/Spanish)
1-510-824-0079 (French)
Service e-mail: dc_support@liteonit.com
▌Hotline Service (EU)
If you still encounter problems using your
DVD recorder, please call our local service
hotlines.
• Belgium 027001725
• France 0171230455
• Germany 06950073897
• Ireland 1850882017
• Italy 0269682194
• Netherlands 0202015094
• Switzerland 018009687
• Spain 914533459
• United Kingdom 02073652401
http: www.liteonit.com
▌Firmware
Please visit our website at http://www.liteonit.
com for latest firmware downloads and additional
supporting information.
 Loading...