


24” Widescreen LED TV with Built-in DVD Player
MODEL NO.: X24DVD-MK2
USER MANUAL
Please read this manual carefully before using, and keep it for future reference.

IMPORTANT INSTRUCTIONS
Safety information
CAUTION:
DVD/VIDEO CD/CD PLAYER IS A CLASS 1 LASER PRODUCT. HOWEVER THIS DVD/VIDEO CD/CD PLAYER USES A VISIBLE LASER BEAM WHICH COULD CAUSE HAZARDOUS RADIATION EXPOSURE IF DIRECTED. BE SURE TO OPERATE THE DVD/VIDEO CD/CD PLAYER CORRECTLY AS INSTRUCTED.
WHEN THIS DVD/VIDEO CD/CD PLAYER IS PLUGGED TO THE WALL OUTLET, DO NOT PLACE YOUR EYES CLOSE TO THE OPENING OF THE DISC TRAY AND OTHER OPENINGS TO LOOK INTO THE INSIDE OF THIS PLAYER.
USE OF CONTROLS OR ADJUSTMENTS OR PERFORMANCE OF PROCEDURES OTHER THAN THOSE SPECIFIED HEREIN MAY RESULT IN HAZARDOUS RADIATION EXPOSURE.
DO NOT OPEN COVERS AND REPAIR YOURSELF. REFER SERVICING TO QUALIFIED PERSONNEL.
WARNING:
-TO PREVENT FIRE OR SHOCK HAZARD. DO NOT USE THIS POWER CORD WITH AN EXTENSION CORD, RECEPTACLE OR OTHER OUTLET UNLESS THE BLADES CAN BE FULLY INSERTED TO PREVENT BLADE EXPOSURE.
-TO PREVENT FIRE OR SHOCK HAZARD. DO NOT EXPOSE THIS APPLIANCE TO RAIN OR MOISTURE.
CAUTION - LASER RADIATION WHEN OPEN, DO NOT STARE INTO BEAM. VENTILATION WARNING - THE NORMAL VENTILATION OF THE PRODUCT SHALL NOT BE IMPEDED FOR INTENDED USE.
The lightning flash and |
CAUTION: TO REDUCE THE RISK |
The exclamation |
arrow head within the |
OF ELECTRIC SHOCK. DO NOT |
point within the |
triangle is a warning |
REMOVE COVER (OR BACK). |
triangle is a warning |
sign alerting you of |
NO USER SERVICEABLE PARTS |
sign alerting you of |
“dangerous voltage” |
INSIDE. REFER SERVICING TO |
important |
inside the product. |
QUALIFIED SERVICE PERSONNEL. |
instructions |
|
|
accompanying the |
|
|
product. |
Always follow basic safety precautions when using electrical products, especially when children are present.
WARNING: To avoid the risk of electrical shock, make sure the product is unplugged from the electrical outlet before relocating, servicing, or cleaning it.
1

Safety precautions
Read these safety instructions before using your device and store them for possible future reference.
●If the cord is damaged, have it repaired by the manufacturer, its service or a similarly qualified person in order to avoid any hazard.
●The cord should always be readily accessible.
●The apparatus shall not be exposed to dripping or splashing of water or liquids and that no objects filled with liquids such as flowers vases shall be placed on the product.
●The normal ventilation of the product shall not be impended for intended use.
●Always leave a minimum distance of 10 cm around the unit to ensure sufficient ventilation.
●Open flame sources, such as candles, should not be placed on top of the device.
●The device is intended for use only in a temperate climate.
●CAUTION: Danger of explosion if battery is incorrectly replaced or not replaced by the same type or equivalent.
●The battery should not be exposed to excessive heat such as sunshine, fire or similar.
●Different types of batteries, new and used batteries should not be mixed.
●The battery must be installed according to the polarity.
●If the battery is worn, it must be removed from the product.
●The battery must be disposed of safely. Always use the collection bins provided (check with your dealer) to protect the environment.
LASER SAFETY
This set employs an optical laser beam system in the CD mechanism designed with built-in safeguards. Do not attempt to disassemble. Exposure to this invisible laser light beam may be harmful to the human eye. This is a Class-1 laser product. Use of controls, adjustments or procedures other than those specified herein may result in hazardous laser light beam exposure. This compact disc player should not be adjusted or repaired by anyone except qualified service personnel. The laser mechanism in the set corresponds to the stylus (needle) of a record player. Although this product uses a laser pick-up lens, it is completely safe when operated according to directions.
NOTE: The manufacturer is not responsible for any radio or TV interference caused by unauthorized modifications. Such modifications could void the user's authority to operate the equipment.
1)Operate turning controls and switches as instructed in the manual.
2)Before turning on the power for the first time, make sure that the power plug is properly installed.
3)Store your discs in a cool area to avoid damage from heat.
2

Battery Handling and Usage
●Keep batteries away from children and pets. Only adults should handle batteries.
●Never throw batteries into a fire or expose them to fire or other heat sources.
●Follow the battery safety and usage instructions.
DISC Handling and Maintenance
Handling precautions
Hold the disc by the edges so the surface will not be soiled with fingerprints. Fingerprints, dirt and scratches can cause skipping and distortion.
Do not write on the label side with a ball-point pen or other writing utensils.
Do not use record cleaning sprays, benzine, thinner, static electricity prevention liquids.
Be careful not to drop or bend the disc.
Do not install more than 1 disc on the disc compartment.
Do not try to close the disc cover when the disc is not installed properly.
Be sure to store the disc in its exclusive case when not in use.
If the surface is soiled
Wipe gently with a soft, damp (water only) cloth.
When wiping discs, always move the cloth from the center hole toward the outside, which will not cause distortion. (If you wipe the discs using a circular motion, circular scratches are likely to occur, which will cause distortion.)
If the disc is brought from a cold to a warm environment, moisture may form on the disc.
Wipe this moisture off with a soft, dry, lint-free cloth before using the disc.
Improper disc storage
You can damage discs if you store them in the following places:
Areas exposed to direct sunlight
Humid or dusty areas
Areas directly exposed to a heat outlet or heating appliance
3

ACCESSORIES
User Manual……………………………………………………………………………………x 1 |
|
Remote Control……………………………….………………………………………….……x 1 |
|
Adaptor Cable for Mini YPbPr…………………………………..…………………… |
………x 1 |
Adaptor Cable for Mini AV………………...……………………..………………… |
…………x 1 |
All the pictures in this manual are just for your reference, appearance and display should subject to the final product.
TABLE OF CONTENTS |
|
GETTING STARTED |
|
IMPORTANT INSTRUCTIONS................................................................................... |
1-3 |
ACCESSORIES………..................................... ..................................................................4 |
|
FEATURES.................................................................................................................... |
5 |
GENERAL PARTS.............................................................................................................. |
6-7 |
REMOTE CONTROL..................................................................................................... |
8-9 |
REMOTE CONTROL PREPARATION................................................................................. |
10 |
BASIC CONNECTION.................................................................................................... |
11-15 |
OPERATIONS |
|
MAIN MENU................................................................................................................... |
15-27 |
BASIC OPERATIONS.................................................................................................... |
28-41 |
DVD……………………………………………………………………………..………. 28-35 |
|
TV………………………………………………………………………………………....36-41 |
|
FOR REFERENCE |
|
MAINTENANCE.................................................................................................................. |
42 |
WALL MOUNTING………………………………………………………………………….......... |
42 |
SPECIFICATIONS............................................................................................................... |
43 |
TROUBLESHOOTING.................................................................................................... |
44-45 |
4

FEATURES
24" LED Display
This unit has a built-in LED display window to provide clear vision and low radiation.
Hotel Lock
Auto TV Scanning
Digital Broadcasting Reception
TV Guide Function
TELETEXT (Europe) Function
USB Multimedia Playback
Multi-languages On Screen Display
Full Function Remote Control
LAN, HDMI, SCART, YPBPR, AV, VGA, PC AUDIO and CI Input EARPHONE and OPTICAL Output
PVR Function
TIME SHIFT Function
BLUETOOTH Function
Detachable Stand Holder
External Antenna Jack
Built-in Speakers
5

GENERAL PARTS
MAIN UNIT
Front View |
Side View |
1.LED display screen
2.Remote control sensor / Power indicator - In standby mode the indicator light is red; when switching on the unit the indicator light is blue color.
3.Disc slotTo insert a disc according to the silk screen on the side of this slot.
4.VOL +/- buttonTo increase/decrease the volume level or move left/right.
5.CH +/- buttonTo select next/previous channel or move up/down.
6.MENU buttonTo enter menu setting page.
7.SOURCE buttonTo select the input source.
8. - To play or pause playing (DVD).
9. - To open or close the disc compartment.
10.POWER buttonTo turn the TV ON/OFF.
6

GENERAL PARTS
Back View
1.Power input (AC cord)
2.OPTICAL output terminal
3.LAN input terminal
4.HDMI input terminal
5.VGA input terminal
6.PC AUDIO input terminal
7.SCART input terminal
9.EARPHONE output terminal
10.CI+ input terminal
11.Mini AV input terminal
12.Mini YPbPr input terminal
13.RF input terminalTo connect the external antenna.
14.USB input terminal
7

REMOTE CONTROL
1POWER: Set the unit in standby mode; press it again to switch it on.
2GOTO: Jump to a different chapter of DVD.*
3ANGLE: View DVD playback from different angles, if the DVD has this feature.*
4REPEAT: Repeat different chapter/title or entire DVD.*
5FAV: Press to display your favourite program in DTV mode.
6TEXT: Switch between TV and Teletext mode.**
7SUBTITLE: Enable/disable subtitles.
8SIZE / ZOOM: Change the picture size.
9MEDIA: Select USB mode.
10 : PLAY/PAUSE in TIMESHIFT and USB mode.
11RECORDER/D-SETUP: Record / Display the main disc menu.
12 : Stop playing.
13MENU: Display the main TV menu.
14◄/►/▲/▼: Press the LEFT/RIGHT/UP/DOWN button to navigate the on-screen menus and adjust the system settings to your preference. Press OK to confirm your selection.
15SOURCE: Switch the input source.
16VOL +/-: Turn the volume up/down.
17NUMBER BUTTONS (0-9): Press to select a TV channel directly when watching TV. The channel changes after 2 seconds.
18-/--: Switch the digits.
19AUDIO / LANG: Switch the available soundtrack language (DTV/DVD).*
20P-MODE: Cycle through the different picture mode.
21S-MODE: Cycle though the different sound modes.
22 : Return to the previous channel.
23DISPLAY: Display information of the current program.
8

REMOTE CONTROL
24CH +/-: Press to play the next or previous channel; press repeatedly to scan through the channels.
25MUTE: Mute the sound. Press again or press VOL+ to restore the sound.
26GUIDE / D. MENU: Display electronic program guide; Display the main disc menu.*
27OK: Confirm selection.
28EXIT / TITLE: Exit from the main TV menu displayed on the screen; Display the DVD title menu. (DVD)*
29 : Play the previous file.
30 / INDEX: Play next file; Display the record program list (DTV).
31 : Move fast backward.
32 : Move fast forward.
33ASPECT: Press repeatedly to select the desired screen aspect ratio.
34SUBPAGE: Manually jump to previous or next subpages of Teletext.
35FREEZE: Hold the picture.
36SLEEP: Set the TV sleep timer.
37A-B: Repeat DVD scenes of your preference.
38TV/RADIO: Switch the unit between TV and radio; EJECT: Open or close the disc compartment. (DVD)*
NOTE: The functions of those buttons, which marked
with “DVD”, are available only when your TV has fitted a
DVD player.
9
REMOTE CONTROL PREPARATION
BATTERY INSTALLATION
Install the batteries as the following pictures. Be sure + and – terminals are positioned as indicated in the battery compartment (Fig1).
SERVICE LIFE OF BATTERIES
-The batteries normally last for one year although this depends on how often the remote control is used.
-If the remote control fails to work even when it is operated near the player, replace the batteries.
-Use two size AAA dry batteries.
NOTE:
●Do not drop, step on or otherwise impact the remote control. This may damage the parts or lead to malfunction.
●If the remote control is not going to be used for a long time, remove the batteries.
REMOTE CONTROL
OPERATION
Point the remote control from no more than about 6m from the remote control sensor and within about 60°of the front of the player (Fig2).
NOTES:
-The operating distance may vary according to the brightness of the room.
-Do not point bright light at remote control sensor.
-Do not place objects between the remote control and the remote control sensor.
-Do not use this remote control while simultaneously operating the remote control of any other equipments.
Fig1 |
Fig2 |
Remote Control
Sensor
Push
Open
Press
10
BASIC CONNECTION
●Ensure all the cables are disconnected from the main unit before connecting to AC power source.
●Read through the instructions before connecting other equipments.
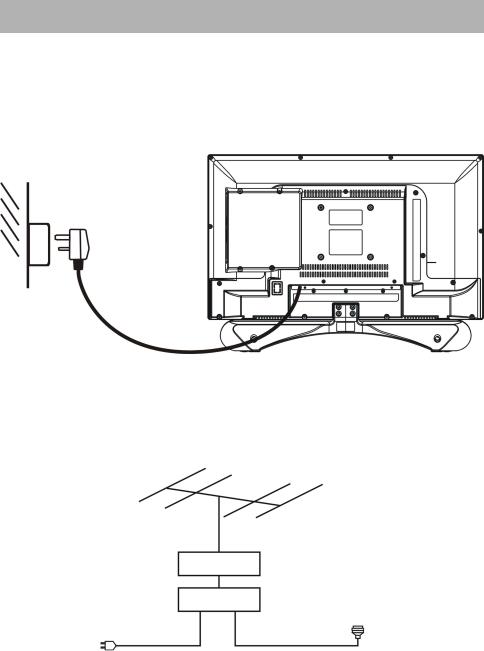
CONNECTING TO AC POWER SOURCE
To power outlet
CONNECT EXTERNAL ANTENNA TO UNIT
Install external antenna into antenna jack for best picture.
Antenna
|
Outdoor |
|
antenna |
Indoor |
amplifier |
antenna |
|
amplifier |
|
Power plug |
75 OHM |
of antenna |
antenna |
amplifier |
plug |
|
11 |

HDMI CONNECTION
HDMI cable
(Not included)
Use HDMI cable to connect the unit with other devices to receive high-definition multimedia signal.
Back of DVD/VCR
PC/VGA CONNECTION
Audio cable
VGA cable
(Not included)
(Not included)
Use VGA cable and Audio cable to connect the unit with TV or PC, and use this product as a monitor.
Back of PC
12

SCART CONNECTION
SCART cable (Not included)
Back of DVD/VCR
OPTICAL CONNECTION
Use Optical cable to connect the unit with amplifier or other audio
decoding devices for audio signal output.
(Optical cable is not included.)
LAN CONNECTION
Use a LAN cable (not included) to connect this TV with available network.
NOTE: Please connect to network for software updates.
13

AV (COMPOSITE VIDEO) CONNECTION
Adaptor Cable for
Mini AV (included)
AV cable
(Not included)
For basic connection, use the composite Audio L/R (white/red) and CVBS (yellow) cable to connect the unit with other devices.
Back of DVD/VCR
YPBPR CONNECTION
Audio L/R of AV cable (Not included)
YPbPr cable (Not included)
YPbPr & AV adaptor cables (Included)
Back of DVD/VCR
14
 Loading...