


Organ 3
Drawbar Organ
User Guide

Copyright LinPlug Virtual Instruments GmbH 2006-2014 All rights reserved
Instrument |
Peter Linsener & Pavol Markovic |
Sounds |
Big!Tone (BT), dubhad(DH), Ján Ančic (JA) |
Manual |
Tobias Birkenbeil & Peter Linsener |
All technical specifications of the products specified in this manual may be subject to change without notice. The documents may not be changed, especially copyright notices may not be removed or changed. LinPlug and all LinPlug product names are trademarks of LinPlug Virtual Instruments GmbH. Cubase and VST are registered trademarks of Steinberg Media Technologies AG. All other trademarks are the property of their respective owners.
LinPlug Organ 3 |
User Guide |
Page 2 |
Welcome
Thank you for licensing Organ 3!
In the late 1930s, Hammond released the B3 organ. Since then, the sound of the Hammond B3 has become one of the most common and most recognisable sounds in popular music. The presence of the Hammond B3 is virtually everywhere; from Gospel, Blues and Jazz, to Funk, Rock, Reggae and Dance styles. The original Hammond B3 weighed in at over 180 kilograms and required a separate Leslie speaker cabinet that was six feet tall and weighed almost as much as the organ itself!
Organ 3 is a software emulation of the original Hammond B3 and further historical electronic organs designed for creating music on your PC or Macintosh. Organ 3 features all of the controls found on the original B3. These include the drawbars, a vibrato and percussion section, as well as a sophisticated dual-effects processor with a fully sync-able LeslieEmulation. All these features have been incorporated into an easy-to-use interface, capable of producing a wide range of classic and modern organ sounds.
This manual describes all aspects of Organ 3 and is designed so that your use of this instrument is as efficient and enjoyable as possible.
At LinPlug we're very proud of Organ 3; it's the result of a long and extensive period of research into the famous Hammond B3 organ and its various components. We hope you get a lot of pleasure using Organ 3 and that it becomes an integral part of your music-making.
LinPlug Organ 3 |
User Guide |
Page 3 |
Table of Contents
INSTALLATION........................................................................... |
|
5 |
|
OVERVIEW................................................................................. |
|
6 |
|
STRUCTURE.............................................................................. |
|
7 |
|
WHAT’S NEW IN ORGAN 3........................................................ |
|
9 |
|
CONTROLS.............................................................................. |
|
10 |
|
THE MAIN SECTION................................................................ |
|
11 |
|
|
MANUAL CONTROLS................................ |
11 |
|
|
THE “DRAWBAR” SECTION....................... |
13 |
|
|
THE PRESET BROWSER ......................... |
15 |
|
THE „ORGAN“ PAGE................................................................ |
|
17 |
|
|
THE PERCUSSION SECTION..................... |
17 |
|
|
THE VIBRATO SECTION........................... |
18 |
|
|
THE MASTER SECTION........................... |
19 |
|
|
GLIDE .................................................. |
20 |
|
|
PITCH BEND........................................... |
21 |
|
|
PLAY MODE........................................... |
21 |
|
|
ECS..................................................... |
23 |
|
THE „EFFECTS“ PAGE............................................................. |
|
24 |
|
|
ROTARY................................................ |
25 |
|
|
REVERB................................................ |
28 |
|
|
DELAY.................................................. |
29 |
|
|
CHORUS............................................... |
31 |
|
|
GATOR.................................................. |
32 |
|
|
CRUSHER.............................................. |
34 |
|
THE „SETTINGS“ PAGE........................................................... |
|
36 |
|
|
B3 MODE............................................. |
38 |
|
|
ENVELOPES........................................... |
40 |
|
|
SPLIT POINTS & OCTAVE......................... |
41 |
|
APPENDIX A: MIDI IMPLEMENTATION CHART...................... |
42 |
||
APPENDIX B: PREDEFINED ECS ASSIGNMENTS................ |
43 |
||
APPENDIX C: SYNC SETTINGS.............................................. |
|
44 |
|
APPENDIX D: USING TUN FILES............................................ |
|
45 |
|
LinPlug Organ 3 |
User Guide |
|
Page 4 |
Installation
Installation on Mac
The LinPlug Organ 3 comes with its own Installer. After downloading the Organ 3 you will find a file named "OrganInstaller3xx.dmg " located in your download folder. Double-click this file to decompress and open the image, then double-click the installer program to begin the installation process. You will be guided through the installation process.
The instrument file "Organ 3" and the 3 presets will now be placed in the right directory for virtual instruments on your Mac. The next time you start your host software the LinPlug Organ 3 will be listed in the host's instrument list.
Installation on PC
The LinPlug Organ 3 comes with its own Installer. After downloading the Organ 3 you will find a file named " OrganInstaller3xx.exe " located in your download folder. Start this program to begin the installation process. The Installer will guide you through the installation process.
Make sure you choose the right directory, so your host software finds the Organ 3. Refer to your host software's manual if you are unsure about where the host software plug-in directory is located.
The instrument file "Organ3.DLL" and the presets will be placed in the chosen directory. The next time you start your host software the Organ 3 will be listed in the host's instrument list.
Common to Mac and PC
After you've installed and opened the full version of the Organ 3, go to the instrument's “Settings” tab. The S/N edit box should read "Enter here". Enter the serial number you have received into the S/N edit box. If the serial number has not been entered or it has been entered incorrectly, the full version of the Organ 3 will not play any notes.
If you have any questions regarding the installation of Organ 3 please contact our support team at www.linplug.com/support/support.htm.
LinPlug Organ 3 |
User Guide |
Page 5 |
Overview
Organ 3 is a 64 note-polyphonic* drawbar organ with some extraordinary features. It is based upon the classic drawbar organ concept und features 3 manuals (Pedal, Lower, Upper), each with independent drawbars and MIDI channel. The manuals can be combined using the various stack & split modes. The output of the drawbars is then sent to the excellent Organ 3 dual-effects processor.
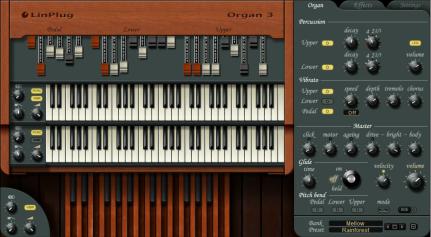
The structure of Organ 3 can be divided into the following sections: on the left you find the instrument (Main Section) with its three manuals. Located above the manuals is the Drawbar Section. To the left of each manual are individual controls for Spread, the switches for Percussion and Vibrato as well as the controls for Release and Volume.
The right side of Organ 3 contains the additional functions, divided into the menus “Organ”, “Effects” and “Settings”. You open these menus by clicking on the specific tab.
The “Organ” Menu contains the controls for Percussion, Vibrato, Master, Glide, Volume, Pitch Bend, stack/split-modes and ECS.
LinPlug Organ 3 |
User Guide |
Page 6 |
The “Effects” Section contains all controls of the dual-effects processor.
In the “Settings” menu you find the Master Tune, MIDI-settings, the tonewheel, B3 mode and the envelopes of the three manuals.
The “Preset Browser” is located at the bottom of the right side. It is always visible.
*depending on the power of your computer’s CPU.
Structure
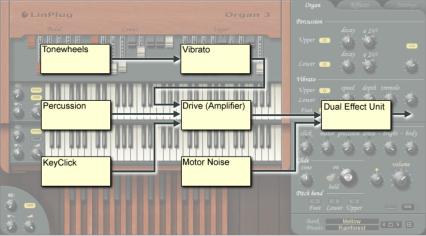
Audio signals are generated by the tonewheels using the pitch information from Organ 3´s MIDI input. The MIDI input is automatically connected to the MIDI output of your host software.
The output of the drawbars is sent to the Vibrato section. The output of the Vibrato section is then sent to the Amplifier (Drive) section. The Percussion section and the Keyclick section both send their output to the
LinPlug Organ 3 |
User Guide |
Page 7 |
Amplifier (Drive) section. The output of the Amplifier (Drive) section is then sent to the dual-effects processor. In the “Master Section” you can also add Motor Noise, Keyclick and adjust the simulated “age” of the organ.
The audio outputs of Organ 3 are automatically connected to the inputs of your host software's mixer. Here you can set the pan position of Organ 3's output.
The design of Organ 3 imitates that of a real drawbar organ. As a result, when notes in a higher keyboard range are played, the overall sound becomes less bright. This is because a drawbar organ utilises a limited range of harmonics, which wrap around at particular points in the instrument's upper range. However, this property can also be deactivated (described in the chapter “B3 mode”).
Hopefully, this chapter has given you a brief overview of how Organ 3 works. More detailed information can be found in the following chapters.
LinPlug Organ 3 |
User Guide |
Page 8 |
What’s new in Organ 3
·now 3 individual manuals (Upper, Lower, Pedal)
·manual settings can be saved/loaded and copied/pasted
·Percussion
-separately adjustable for Upper and Lower
-adjustable volume
-adjustable pitch
·separately switchable Vibrato for Upper, Lower and Pedal
·Spread for Upper, Lower and Pedal
·adjustable “age”
·drive with adjustable brightness and body
·adjustable velocity response (from off to full)
·new Glide mode with “Held” mode and adjustable time
·per manual switchable Pitch Bend response
·now two effect units with either Rotary, Reverb, Delay, Chorus, Gator or Crusher effect, all programmable
·enhanced ECS with support for endless dials and predefined settings for the NI B4D controller and the Doepfer d3c
·controller-sliders can be inverted (for use of e.g. Behringer BCF2000)
·microtonal support of TUN files
·12 tonewheels to choose from including Farfisa and Vox waves
·ADSR envelope per manual
·layer and split modes with adjustable split point
·+- 4 octaves transpose per manual
·switchable B3 compatibility
-foldback
-tonewheel sync
-drawbar volume
-percussion switch behaviour
-drawbar continuous / step mode
LinPlug Organ 3 |
User Guide |
Page 9 |
Controls
Users have the option of controlling Organ 3´s dials in either a circular or a linear manner depending on the Dial Mode setting, located under the “Settings” menu.
Holding down the ALT key while clicking on a control changes the selected control's value a minimum step upwards (when clicking in the upper half of the control) or a minimum step downwards (when clicking in the lower half of the control).
Holding down the CTRL key (PC) respectively COMMAND key (Apple) while clicking on a control sets the control to its default value (e.g. for volume controls it sets the control's value to -6 dB).
All controls can be automated using external MIDI messages. To do this you need to use Organ 3's ECS (Easy Controller Setup) which is described in the “Organ Menu”- section of this manual.
LinPlug Organ 3 |
User Guide |
Page 10 |
The Main Section
The “Main Section” of Organ 3 is located on the left side of the user interface. This section contains the drawbars, the three manuals and –to the left of the manualsthe special controls for each of the manuals.
The three manuals are called: the “Upper Manual“, the “Lower Manual” (the one in the middle) and the “Pedal” (at the bottom).
Manual Controls
To the left of the three manuals you can find individual controls for the Spread effect (the “two circles”-symbol), the Release time (the decay time of the sound after you’ve released a key) and Volume control. There are also two buttons: „Perc“ & „Vibr“. „Perc“ switches the Percussion Section on and off, „Vibr“ activates/deactivates Vibrato for the according manual.
LinPlug Organ 3 |
User Guide |
Page 11 |

The Spread dial controls the intensity of the polyphonic unison, creating a sound as if several organs were played simultaneously. Turning the Spread dial to the right detunes those “imaginary” organs and the sound of the manual becomes fatter. Spread doesn’t affect the polyphony of Organ 3 but increases the utilisation of your computer’s CPU.
Note: Pedal can’t make use of the Percussion Section.
LinPlug Organ 3 |
User Guide |
Page 12 |

The “Drawbar” Section
The Drawbar Section is the most important part of Organ 3, as this is where the instrument's overall sound is determined. The Drawbar section is located above the three manuals.
One of the reasons why the original Hammond B-3 became popular, and remains so to this day, was because of its versatility. And just like its predecessor, LinPlug's Organ 3 can sound like a wide range of instruments and ensembles ranging from a carnival, a horn section and a big band, to a small jazz combo, a funk group, a percussion section or a flute. How can all these different sounds be created with one instrument? The answer lies in the drawbars.
Organ 3's drawbars are used to set the level of the up to nine harmonics that make up the instrument's sound. Moving from left to right these harmonics are:
LinPlug Organ 3 |
User Guide |
Page 13 |
16" |
the sub-octave |
-12 semitones |
0.5th harmonic |
5 1/3" |
the fifth |
+7 semitones |
1.5th harmonic |
8" |
the fundamental |
|
|
4" |
the octave |
+12 semitones |
2nd harmonic |
2 2/3" |
one octave and one fifth higher |
+19 semitones |
3rd harmonic |
2" |
two octaves higher |
+24 semitones |
4th harmonic |
1 3/5" |
two octaves and a third higher |
+28 semitones |
5th harmonic |
1 1/3” |
two octaves and a fifth higher |
+31 semitones |
6th harmonic |
1" |
three octaves higher |
+36 semitones |
8th harmonic |
All of these except the 1 3/5" drawbar are either roots or fifths. The 1 3/5" is a third. Each drawbar's colour indicates its relationship to the fundamental pitch. The white and brown drawbars are called the “consonants” and comprise all the roots and the lower fifths. The black drawbars are called the “dissonants” and consist of the higher fifths and the third. Using this set of harmonics, a wide range of sounds can be created.
The Pedal only contains drawbars for the 16", 5 1/3", 8", 4", 2 2/3" and 2".
Each drawbar has eight continuously-variable degrees to which it can be "drawn" or pulled out. A setting of eight is the loudest, while all the way in silences the drawbar. Thus, each drawbar or "stop" can be "voiced" or individually altered, even while the instrument is being played.
On its own, the fundamental drawbar generates a sine wave, thus producing a pure flute-like tone. Adding odd harmonics creates a square wave, producing a more clarinet-like tone. The odd harmonics "squared" generate a triangle wave, thus producing a string-like tone. Finally, all harmonics together generate a sawtooth wave, producing an oboe-like tone.
Drawbar settings use the same kind of premise; various levels and volumes of harmonics are used to create different sounds. There are a limitless number of tone qualities and endless shades of dynamic level available on the LinPlug Organ 3. Drawbar setting (00 6200 000) is an example of a flute tone. Drawbar setting (00 4345 554) is an example of
LinPlug Organ 3 |
User Guide |
Page 14 |
 Loading...