

LinPlug CronoX 3.5, CronoX 3, Sophistry User Manual
C r o n o X 3 & So p h i s t r y
U s e r G u i d e
C o p y ri g h t Li n P l u g V i r t u al Ins t r u m e n t s Gm b H , 2 0 0 7 .
All rig h t s re s e r v ed .

Concept by Peter Linsener
Instrument by Peter Linsener and Pavol Markovič
Graphics by Branislav Pakić and Sean Evans
Sounds by Dubhad,
Frank “Xenox” Neumann www.particular-sound.de
Junebug – www.electronisounds.com
Marco Lehmann – www.marcolehmann.com
Nico Herz - www.bigtone.de
Philippe Favre
Sophistry Sounds exclusively by Frank Neuman of Particular Sounds
Manual by Chris Share
Many thanks to the helping hands of David Albone, Fabio D. García,
Richard Hider, Jacky Ligon, Joakim Fahlström, Matthew Tyas, Kelvin
Russell, Michael Kjeldgaard, Patrick Anglard and Patrick Robert!
All technical specifications of the products specified in this manual may be subject to change without notice. The documents
may not be changed, especially copyright notices may not be removed or changed. LinPlug and all LinPlug product names
are trademarks of LinPlug Virtual Instruments GmbH. Mac and the Mac logo are trademarks of Apple Computer, Inc.,
registered in the U.S. and other countries. The Build for Mac OS X graphic is a trademark of Apple Computer, Inc., used
under license. The Audio Units logo and the Audio Units symbol are trademarks of Apple Computer, Inc. Microsoft® and
Windows® are trademarks of Microsoft Corporation, registered in the U.S. and other countries. Cubase and VST are
registered trademarks of Steinberg Media Technologies GmbH. All other trademarks are the property of their respective
owners.
C r o n o X 3 User Guide
2

Welcome
Thank you for purchasing the CronoX 3 or the Sophistry Sample
Synthesizer. For this manual we always talk of CronoX though almost
everything is identical applicable to Sophistry.
The CronoX 3 is a fully professional, highly-flexible, easy-to-use, thirdgeneration VST (Virtual Studio Technology) software sample-synthesizer
designed for creating music on your personal computer. Sophistry is
basically the same instrument but with a large exclusive sound library by
Particular Sounds. In this manual we only speak of CronoX but everything
applies to Sophistry as well.
The CronoX 3's key features include a selection of high quality presets in a
wide range of styles, an easy-to-use interface, highly flexible generators
which include time sampling and loop sampling options, two userprogrammable stereo filters, an enormous range of processing and
modulation options including a powerful arpeggiator, as well as a
sophisticated effects section.
This manual describes all aspects of the CronoX 3 Sample Synthesizer and
is designed so that your use of this software is as efficient and as painless
as possible.
We feel that the CronoX 3 is an exceptional instrument because of its
unique audio processing capabilities. We hope you get a lot of pleasure
using the CronoX 3 sample synthesizer and that it becomes an integral part
of your music-making.
The LinPlug team, May 2007
C r o n o X 3 User Guide
3

Table of Contents
Welcome...................................................................................................... 3
Installation.................................................................................................... 7
Features....................................................................................................... 9
Main........................................................................................................... 13
Generator............................................................................................... 14
Filter....................................................................................................... 15
Effects 1/2.............................................................................................. 16
Effects 3/4/5/6........................................................................................ 17
Preset Browser/File................................................................................ 18
Glide...................................................................................................... 19
Miscellaneous........................................................................................ 20
Chord (Chord Memory)...................................................................... 21
ECS (Easy Controller Setup)............................................................. 22
Volume.............................................................................................. 22
Keyboard (“Keys”).............................................................................. 22
Gen 1 + 2 and Gen 3 + 4............................................................................ 25
Generator Output................................................................................... 26
Oscillator Generator............................................................................... 27
Time Sampler Generator....................................................................... 28
Schrader Generator............................................................................... 31
Loop Sampler Generator........................................................................ 32
Settings Window................................................................................ 33
Waveform Window............................................................................ 34
Filters......................................................................................................... 36
Filter Type.............................................................................................. 37
S Filter............................................................................................... 37
F Filter............................................................................................... 37
C r o n o X 3 User Guide
4

Cutoff / Resonance................................................................................ 37
Filter Envelope....................................................................................... 38
Effects........................................................................................................ 40
Delay...................................................................................................... 42
St (“Stereo”) Delay................................................................................. 43
Ping Pong (Delay).................................................................................. 44
Chorus................................................................................................... 45
Phaser................................................................................................... 46
Filter....................................................................................................... 47
Reverb................................................................................................... 48
Flanger................................................................................................... 49
Gator...................................................................................................... 50
Stereo Enhancer.................................................................................... 52
Parametric EQ....................................................................................... 53
Crusher.................................................................................................. 54
Modulation.................................................................................................. 56
Envelopes.............................................................................................. 57
LFO........................................................................................................ 59
Arpeggiator............................................................................................ 61
Mode ................................................................................................. 61
Retrigger ........................................................................................... 63
Step Display....................................................................................... 63
Length ............................................................................................... 64
Swing................................................................................................. 64
Velocity (Vel) ..................................................................................... 64
Step................................................................................................... 65
Octave............................................................................................... 65
Modulation Matrix................................................................................... 66
Settings...................................................................................................... 68
Registration............................................................................................ 69
C r o n o X 3 User Guide
5

Library Location / Startup Patch............................................................. 70
Global..................................................................................................... 71
Signal Flow............................................................................................. 72
Optimizing CPU Usage............................................................................... 72
Glossary..................................................................................................... 73
MIDI Implementation Chart........................................................................ 75
Appendix A: Delay Sync Settings............................................................... 76
Appendix B: Stereo and Ping Pong Delay Sync Settings............................ 76
Appendix C: Flanger Sync Settings............................................................ 76
Appendix D: LFO Sync Settings................................................................. 77
Appendix E: Arpeggiator Clock Settings..................................................... 77
Appendix F: Modulation Matrix Sources and Destinations..........................78
Modulation Sources............................................................................... 78
Modulation Destinations......................................................................... 80
Appendix G: Using TUN files in the CronoX 3............................................ 83
C r o n o X 3 User Guide
6

Installation
Installation on PC
The CronoX 3 comes with its own Installer. On the CronoX 3 CD you will
find a file named "CronoX3Installer.exe". Double-click on this file to begin
the installation process. The Installer will guide you through the installation
process. Make sure you choose the right directory, so your host software
finds the CronoX 3 instrument.
Refer to your host software's manual if you are unsure about where the host
software plug-in directory is located.
The instrument file "CronoX.DLL" and the sounds will be placed in the
chosen directory. The next time you start your host software the CronoX 3
will be listed in the VST Instrument list.
Installation on Mac
The CronoX 3 comes with its own Installer. On the CronoX 3 CD you will
find a file named "CronoX 3 Installer.dmg". Double-click on this file to open
the image, then double-click the installer program to begin the installation
process.
You will be guided through the installation process. The instrument files
"CronoX 3.vst" and “CronoX 3.component” and the sounds will now be
placed in the appropriate directories on your Mac. The next time you start
your host software the CronoX 3 will be listed in the VST or AU Instrument
list.
C r o n o X 3 User Guide
7

Common to Mac and PC
After you've installed and opened the full version of the CronoX 3, go to the
instrument's Settings panel. The Serial Number section is located in the top
left corner. The Serial Number edit box will read "Enter here". Enter the
serial number you have received via email or which is printed in your
manual into the Serial Number edit box. If the serial number has not been
entered or it has been entered incorrectly, the full version of the CronoX 3
will not play any notes.
If you have any questions regarding the installation of CronoX 3 please
contact our support team at www.linplug.com/support/support.htm.
C r o n o X 3 User Guide
8

Features
The CronoX 3 contains a range of features designed to make your musicmaking more efficient and enjoyable. These features include:
§ 4 Generator modules with 4 types of Generator. Generator
modules include Oscillator, Time Sampler, Schrader and Loop
Sampler. FM modulation and AM modulation options.
§ Analogue-modeled Oscillator Generator for analog-style
synthesis.
§ Time Sampler Generator with real-time control, separate timestretching and pitch-shifting.
§ Schrader Generator, a unique Generator that offers wavetable-like
operation using any sample.
§ Loop Sampler Generator with individually modulatable loop points
and start point.
§ 2 analog-style multimode stereo filters with modulatable cutoff
frequency and resonance.
§ ADSFR-type envelope for controlling Amplitude and Filter Cutoff
as well as two freely assignable Modulation Envelopes.
§ 4 independent LFOs with various waveforms and midi-sync
capabilities. LFO Waves have adjustable delay, attack and decay
time and waveform-symmetry.
§ Modulation Matrix which includes 10 routings with 30 sources and
56 destinations.
§ Fully recognizes Velocity, Aftertouch, Pitch bend , Modwheel and
various other MIDI controllers
§ A sophisticated effects section containing 12 effects including
various Delays, Chorus, Phaser, Filter, Reverb, Flanger, Gator,
Stereo Enhancer, Parametric EQ and Crusher.
§ Mono/Polyphonic Portamento/Glide featuring “Fingered” mode,
switchable constant Time/constant Rate and Auto-Bend Modes.
§ 32-voice polyphony (CPU dependent).
§ Adjustable voice limit (1...12, all).
§ Onscreen keyboard incorporating control of MIDI velocity.
§ Operates under all AU and VST 2.0 hosts on PC and Mac OS X.
§ Supported audio formats include WAV and AIFF up to
24bit/96kHz.
§ Sample accurate timing, full automation and settings are saved
with your song.
§ Modular design for both Generator, Filter and Effects sections.
C r o n o X 3 User Guide
9
Overview
The CronoX 3 is a 32 note-polyphonic VST sample synthesizer with some
extraordinary features. The instrument has a modular design that includes
various Generator, Filter, Effects and Modulation modules.
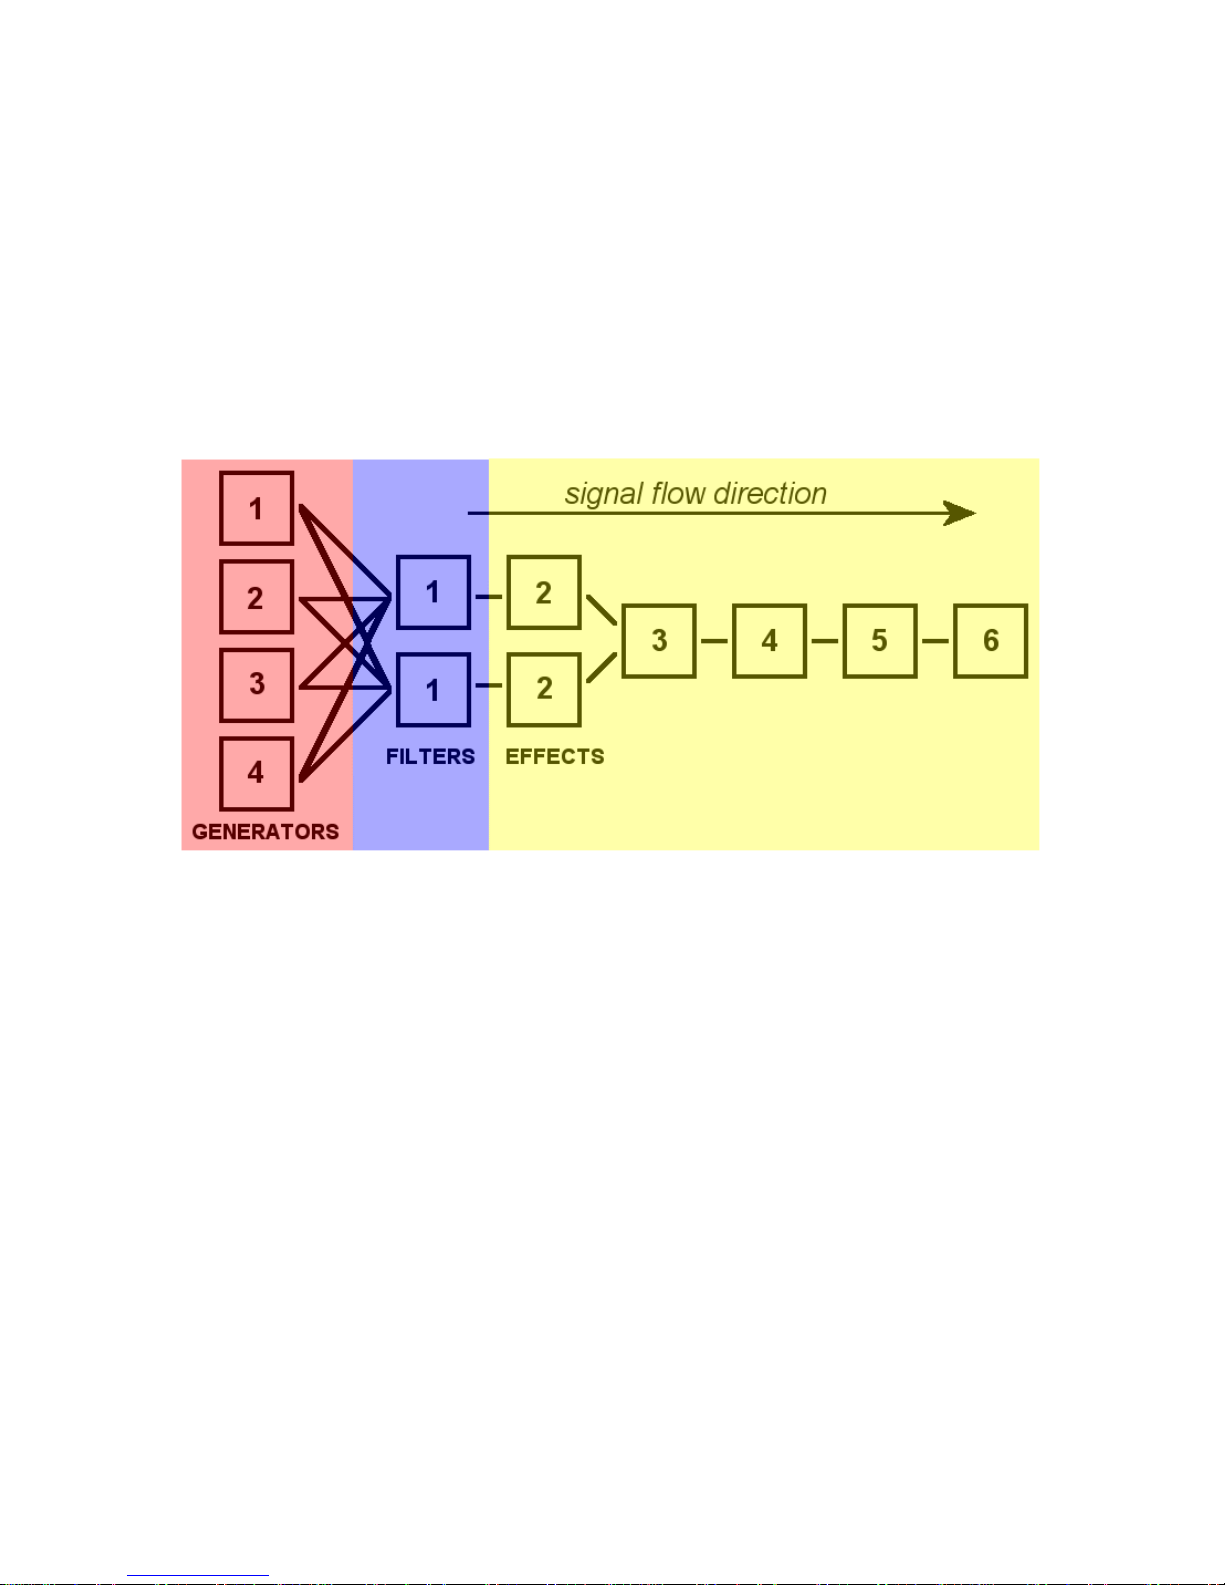
In order to understand how the CronoX 3 works it’s important to know how
the instrument’s various modules relate to one another. The block diagram
below shows the audio signal flow within the CronoX 3 sample synthesizer:
The design of the CronoX 3 can be divided into 4 main sections: Generator,
Filter, Effects and Modulation. The Modulation section contains the
instrument’s Envelopes, LFOs, Arpeggiator and Modulation Matrix.
Audio signals are created by a Generator that gets pitch information from
the synthesizer's MIDI input (either externally or from the onscreen
keyboard).
The CronoX 3 has 4 independent Generators offering a choice of 4 different
Generator modules—Oscillator, Time Sampler, Schrader and Loop
Sampler.
The output of the various Generators can be combined in any one of
several ways. The signals can be mixed together proportionately or the
outputs of Generator 1 and 3 can be used to modulate the frequency and
amplitude of Generators 2 and 4 respectively. This latter option increases
C r o n o X 3 User Guide
10

the harmonic spectrum of the modulated Generator producing very
interesting, harmonically-rich results. At this point the signals can also be
detuned and thickened using the Spread control.
The output of the Generator section is then routed through the Filter
section. The filter modifies the harmonic spectrum of the output signal. The
Filter section includes an ADSFR envelope for controlling its cutoff
parameter.
Following the Filter section is the CronoX 3's Effects section which contains
6 independent effects processors (Effects 1 and 2 are in parallel, with Effect
1 following Filter 1 and Effect 2 following Filter 2, while Effects 3, 4, 5 and 6
are in series). A wide range effects processors are available including a
modulatable delay, a stereo delay, a “ping pong” delay, a chorus, a phaser,
a filter, a reverb, a flanger, a gate, a stereo enhancer, a parametric EQ and
a bit-reduction/sample-rate reduction distortion. Each effects processor is
described in detail later in this manual.
The audio outputs of the CronoX 3 are automatically connected to the input
of your host software's mixer. Here you can set the overall pan position of
the CronoX 3's output. If you are working in 5.1, and using a host program
such as Cubase SX3 or Nuendo, you can connect the output directly to a
5.1 channel.
At various points throughout the CronoX 3’s signal path you can modulate
the audio signal using the various controls found in the instrument’s
Modulation section. Available modulation controls include 5 envelopes, 4
LFOs, a Modulation Matrix “patchbay” and an arpeggiator. MIDI Controllers
can also be used to modulate any of the CronoX 3’s parameters.
If at any stage you are unsure about the internal structure of the CronoX 3,
a signal flow diagram is provided in the upper-right section of the Settings
panel.
Hopefully, this chapter has given you a brief overview of how the CronoX 3
works. More detailed information can be found in the following chapters.
C r o n o X 3 User Guide
11

Controls
Most controls are changed by clicking and moving the mouse either
upwards to increase the parameter’s value, or downwards to decrease it.
Please note that even horizontal controls (like those used in the Effects
section) are operated vertically.
Holding down the ALT key while clicking on a control changes the selected
control's value a minimum step upwards (when clicking in the upper half of
the control) or a minimum step downwards (when clicking in the lower half
of the control).
Holding down the CTRL key while clicking on a control sets the control to its
default value (e.g. for Volume controls it sets the control's value to -6 dB).
The CronoX 3 features an “X-Y” type control. This control allows you to vary
2 different parameters simultaneously. One parameter (X) is controlled by
the horizontal position of the intersection of the two indicator lines. The
other parameter (Y) is controlled by the vertical position of the intersection
of the two indicator lines.
The CronoX 3 also includes a Circular Slider type control. This control
operates in the same way as a conventional slider, however it moves along
an arc of a circle.
All Controls can be controlled using external MIDI messages. To do this you
need to use the CronoX 3's Easy Controller Setup (ECS) which is described
in detail later in this manual.
C r o n o X 3 User Guide
12
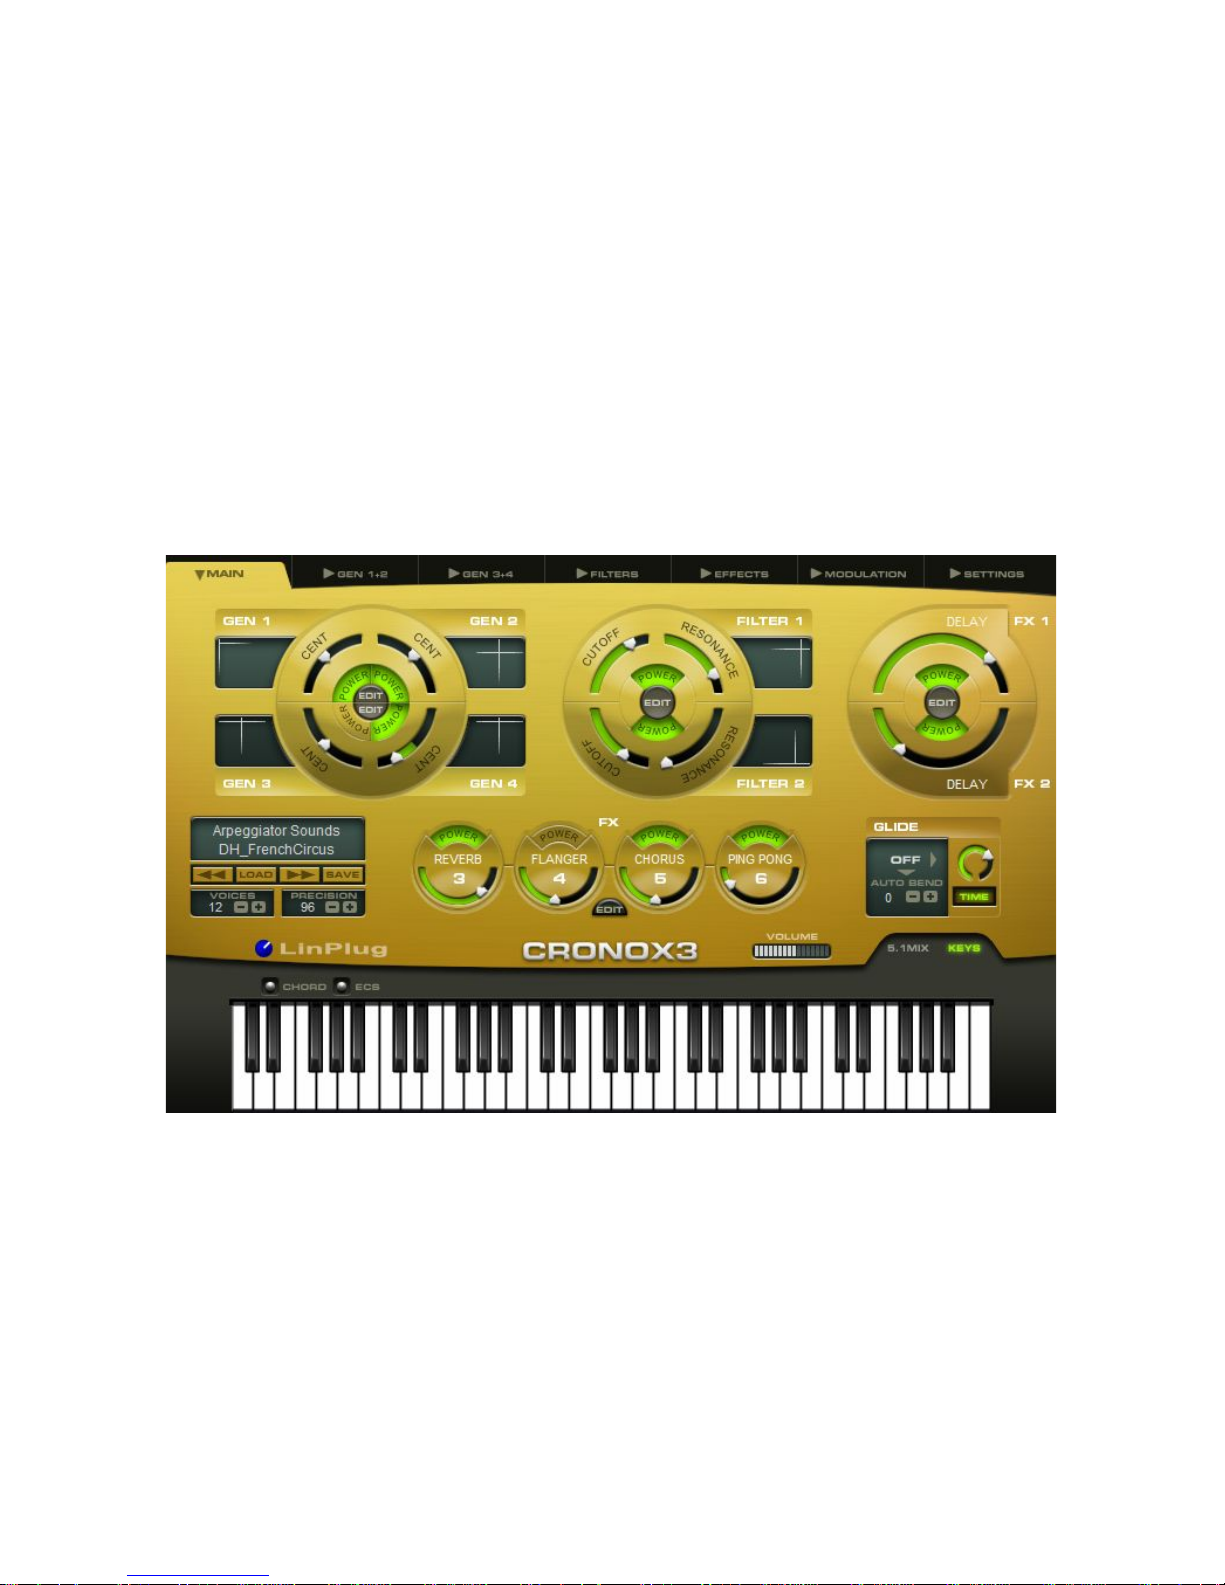
Main
The user interface of the CronoX 3 has been redesigned in order to make
using it easier and more streamlined. A major difference between the user
interface of the CronoX 3 and that of its predecessor the CronoX 2 is that
several of the most commonly used controls for the instrument’s various
sections have been grouped together on a single Main “easy edit” page.
The idea behind this is to give the user direct access to the instrument’s
most commonly used controls. It is important to remember however that
each section can still be edited in detail on its own respective panel.
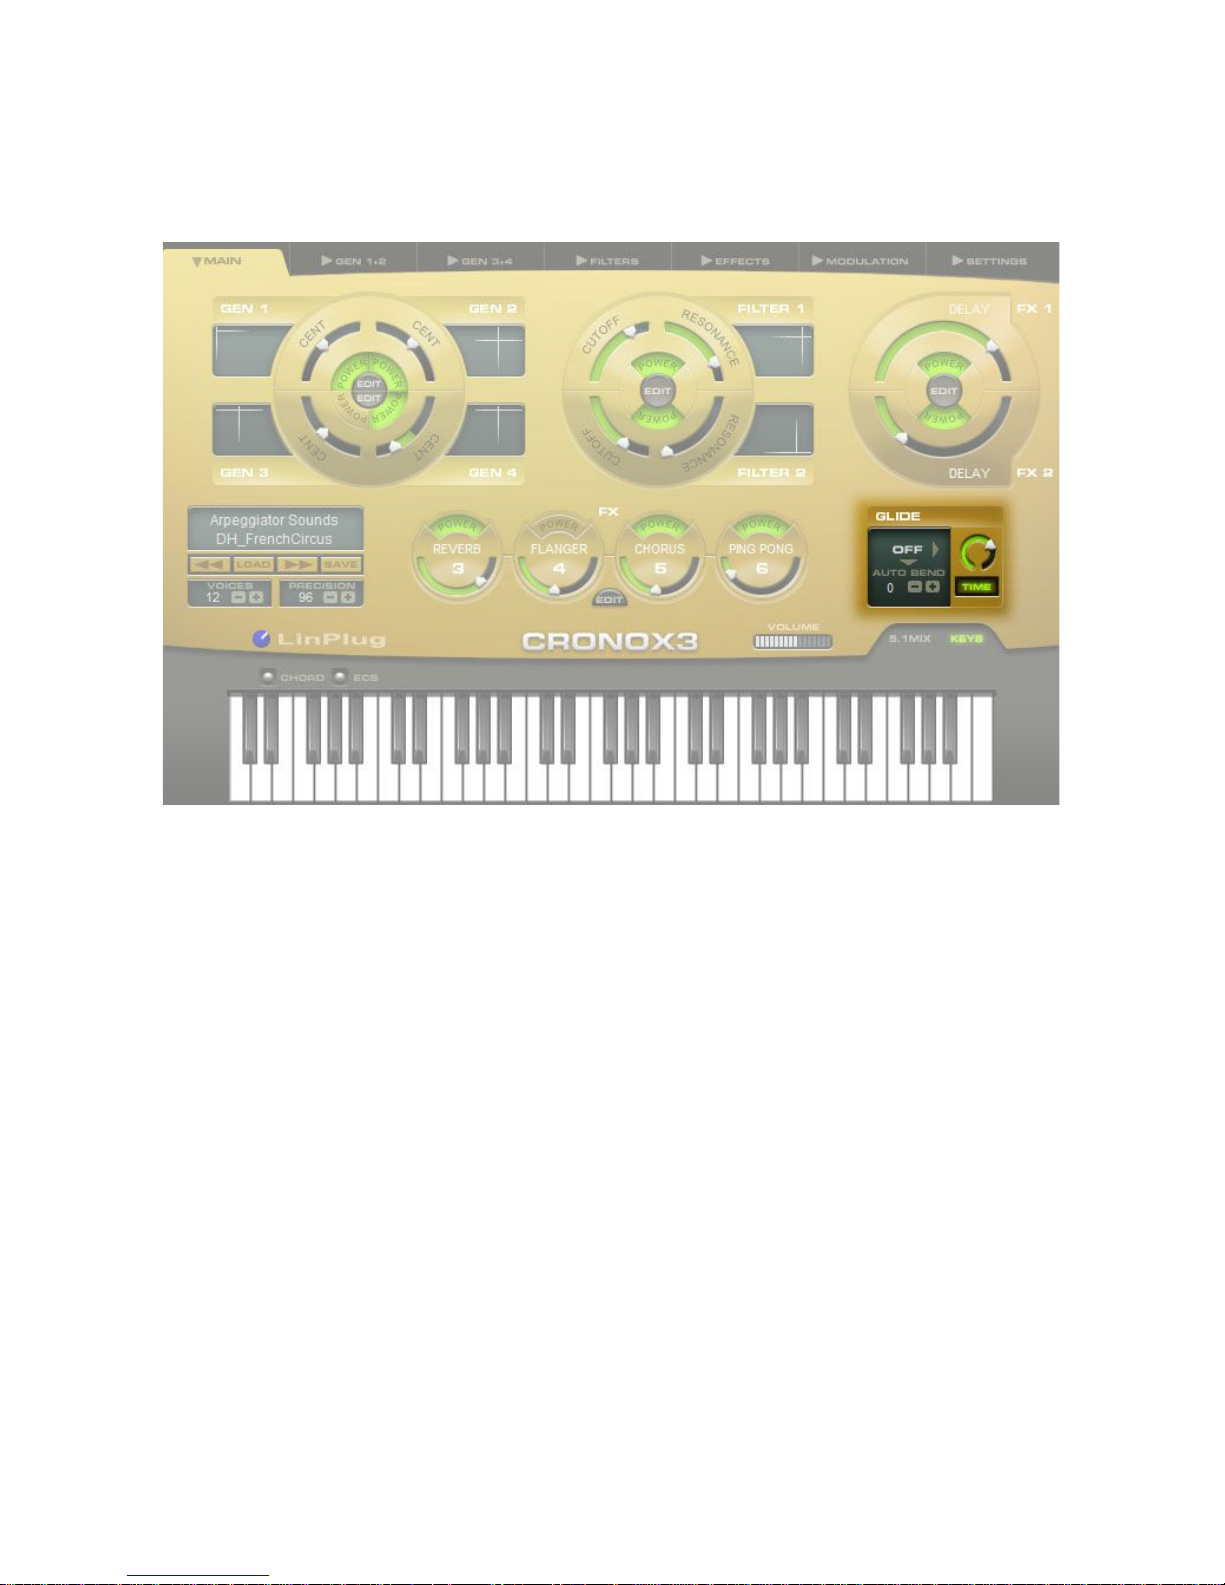
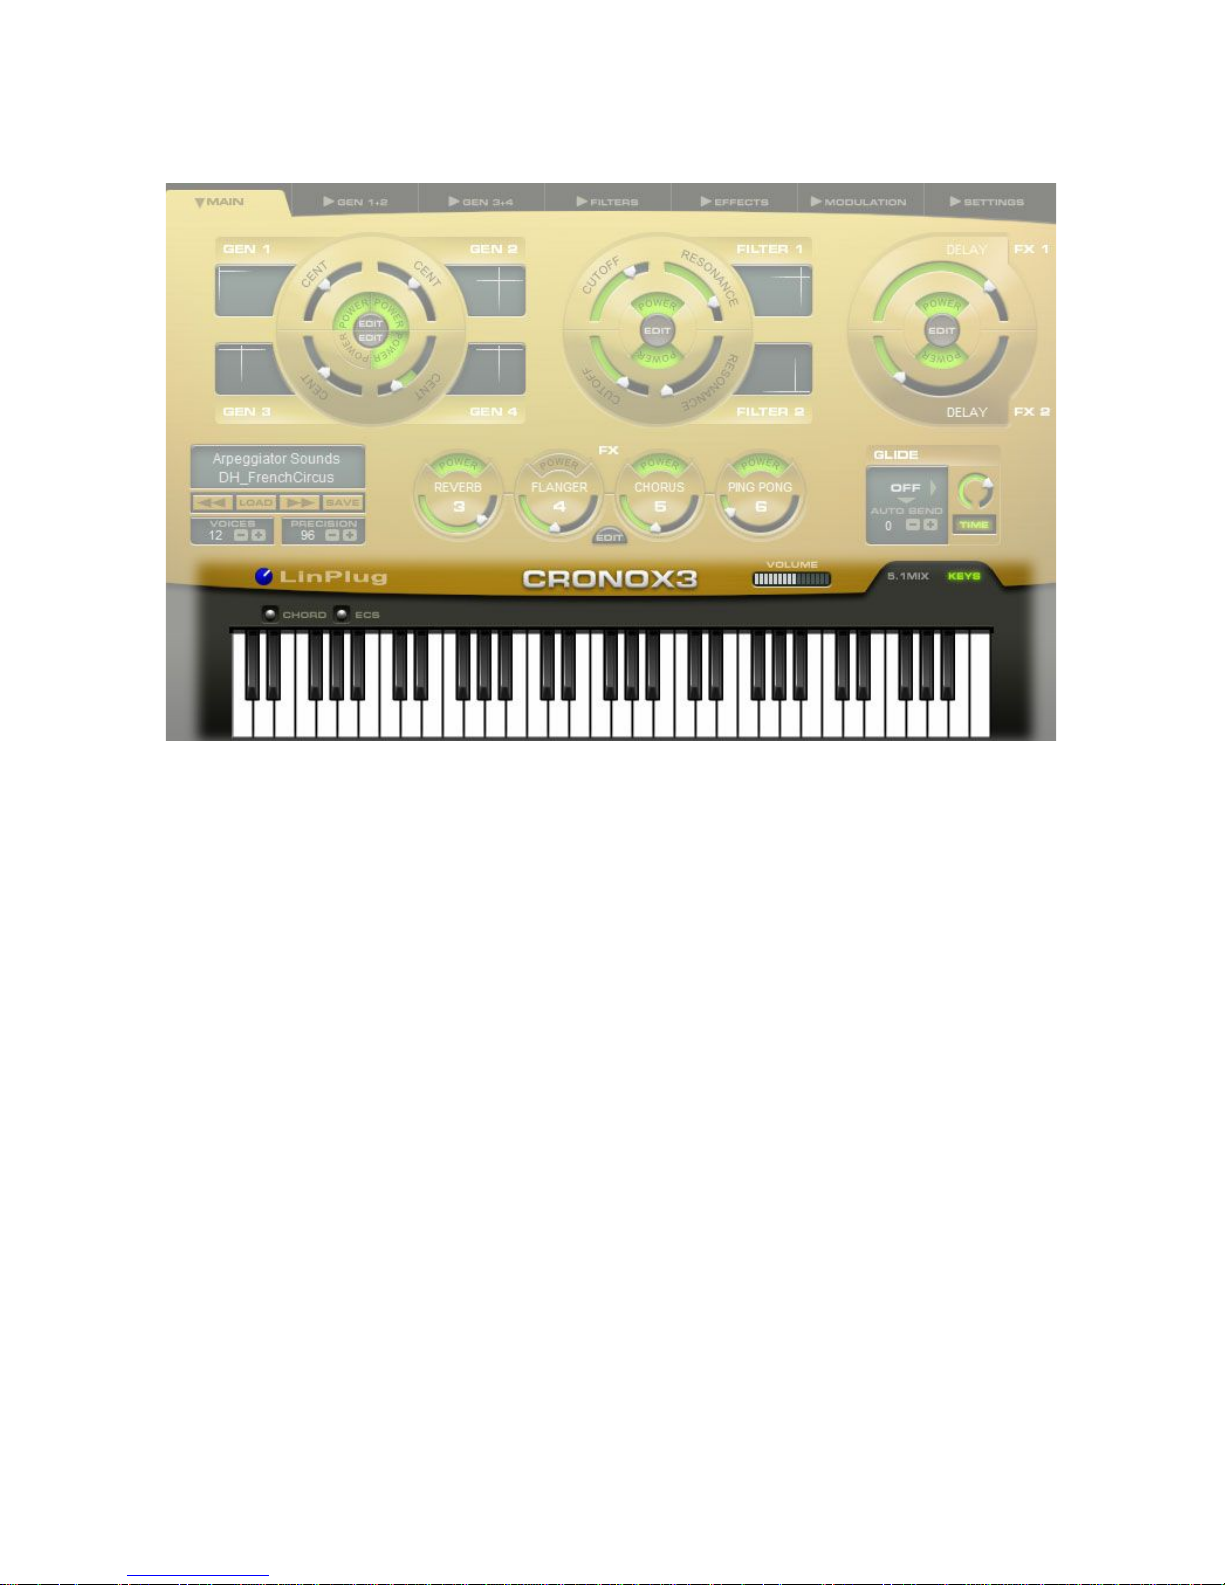
The CronoX 3’s Main panel can be divided into 7 sections: Generator, Filter,
Effects 1/2 (“FX 1/2”), Preset Browser/File, Effects 3/4/5/6 (“FX 3/4/5/6”),
Glide and Miscellaneous.
C r o n o X 3 User Guide
13
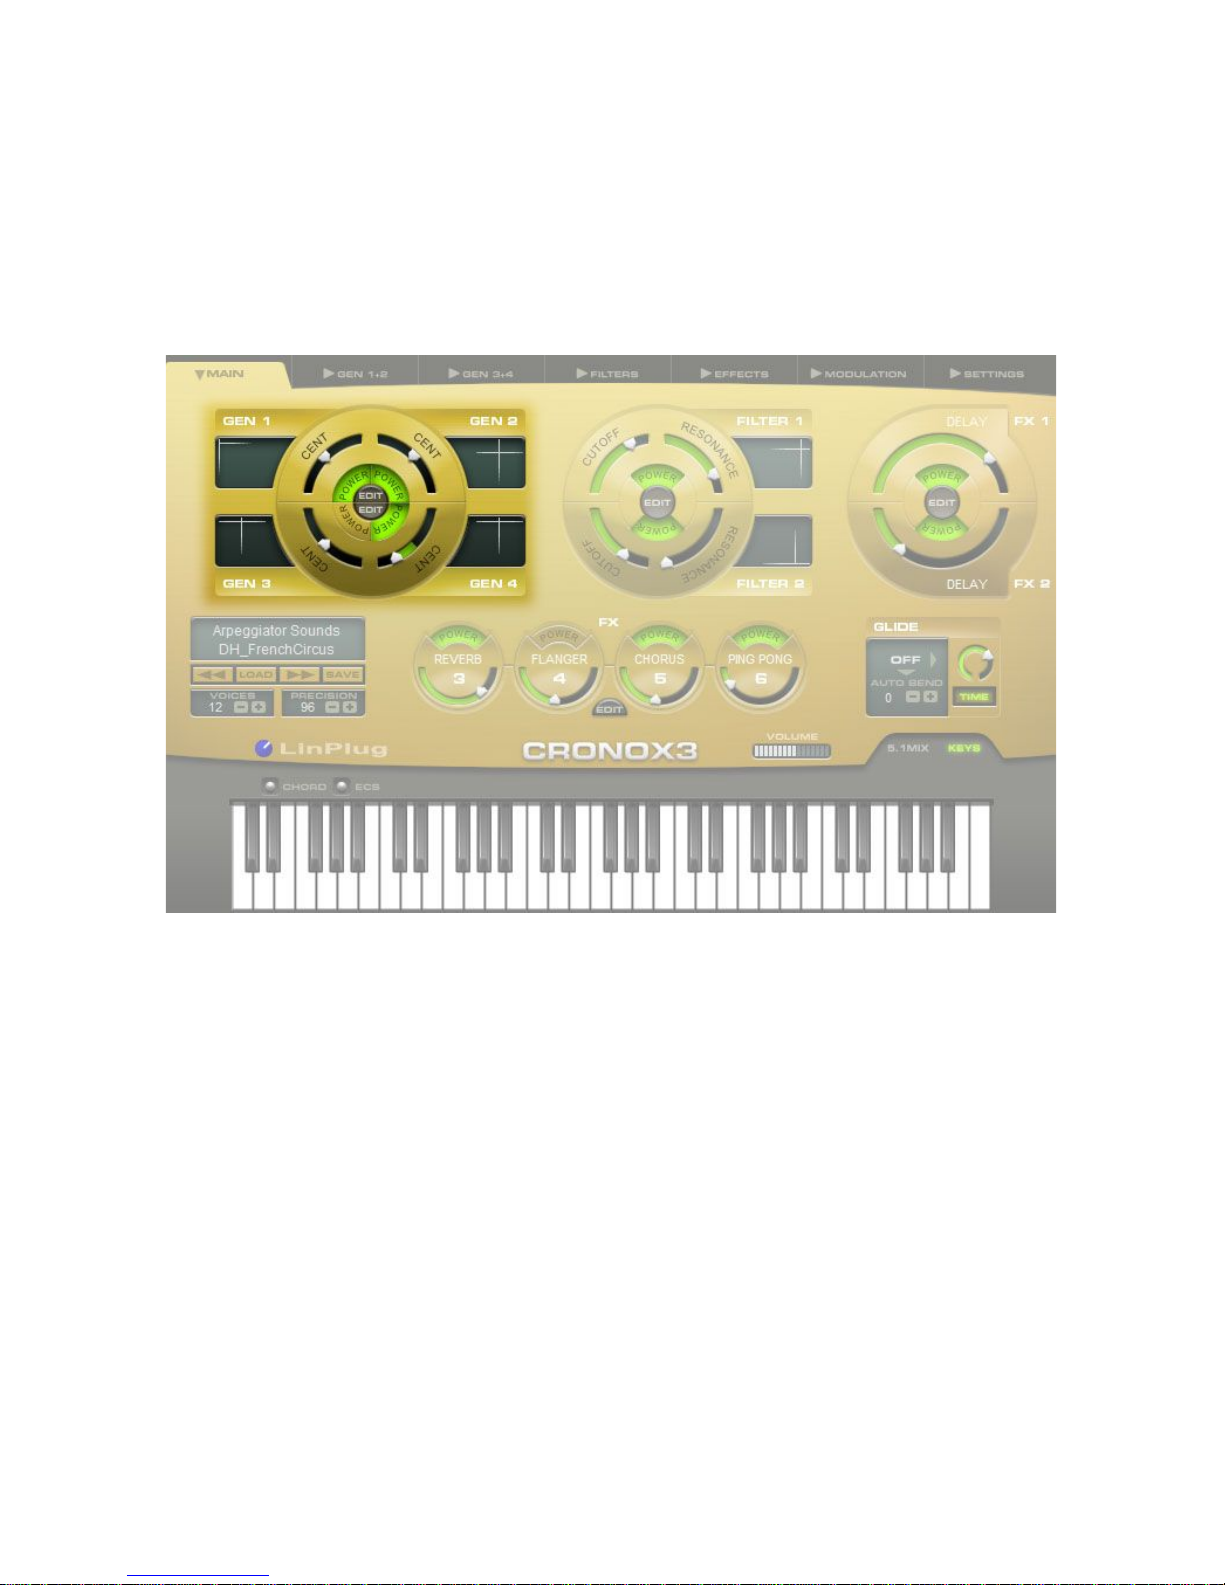
Generator
The Generator section is located on the upper left of the instrument’s Main
panel. The Generator section contains the most important controls for each
Generator. This section contains the following controls: X-Y Editor, Cent,
Power and Edit.
The X-Y Editor control is used to set the Filter-Balance (X) and the
Generator Volume (Y).
The Cent control is used to set the Generator's pitch in cents (a semitone is
equal to 100 cents). A range of -100 to +100 cents is available.
Inside the Cent control is the Power button which is used to set the status of
the Generator. This can be either On or Off. When the Generator is On, the
button is green. Clicking on the button switches the Generator on and off.
Clicking on the Edit button opens the Panel for the respective Generator.
This enables quick access to the Generator’s various parameters for more
detailed editing.
C r o n o X 3 User Guide
14
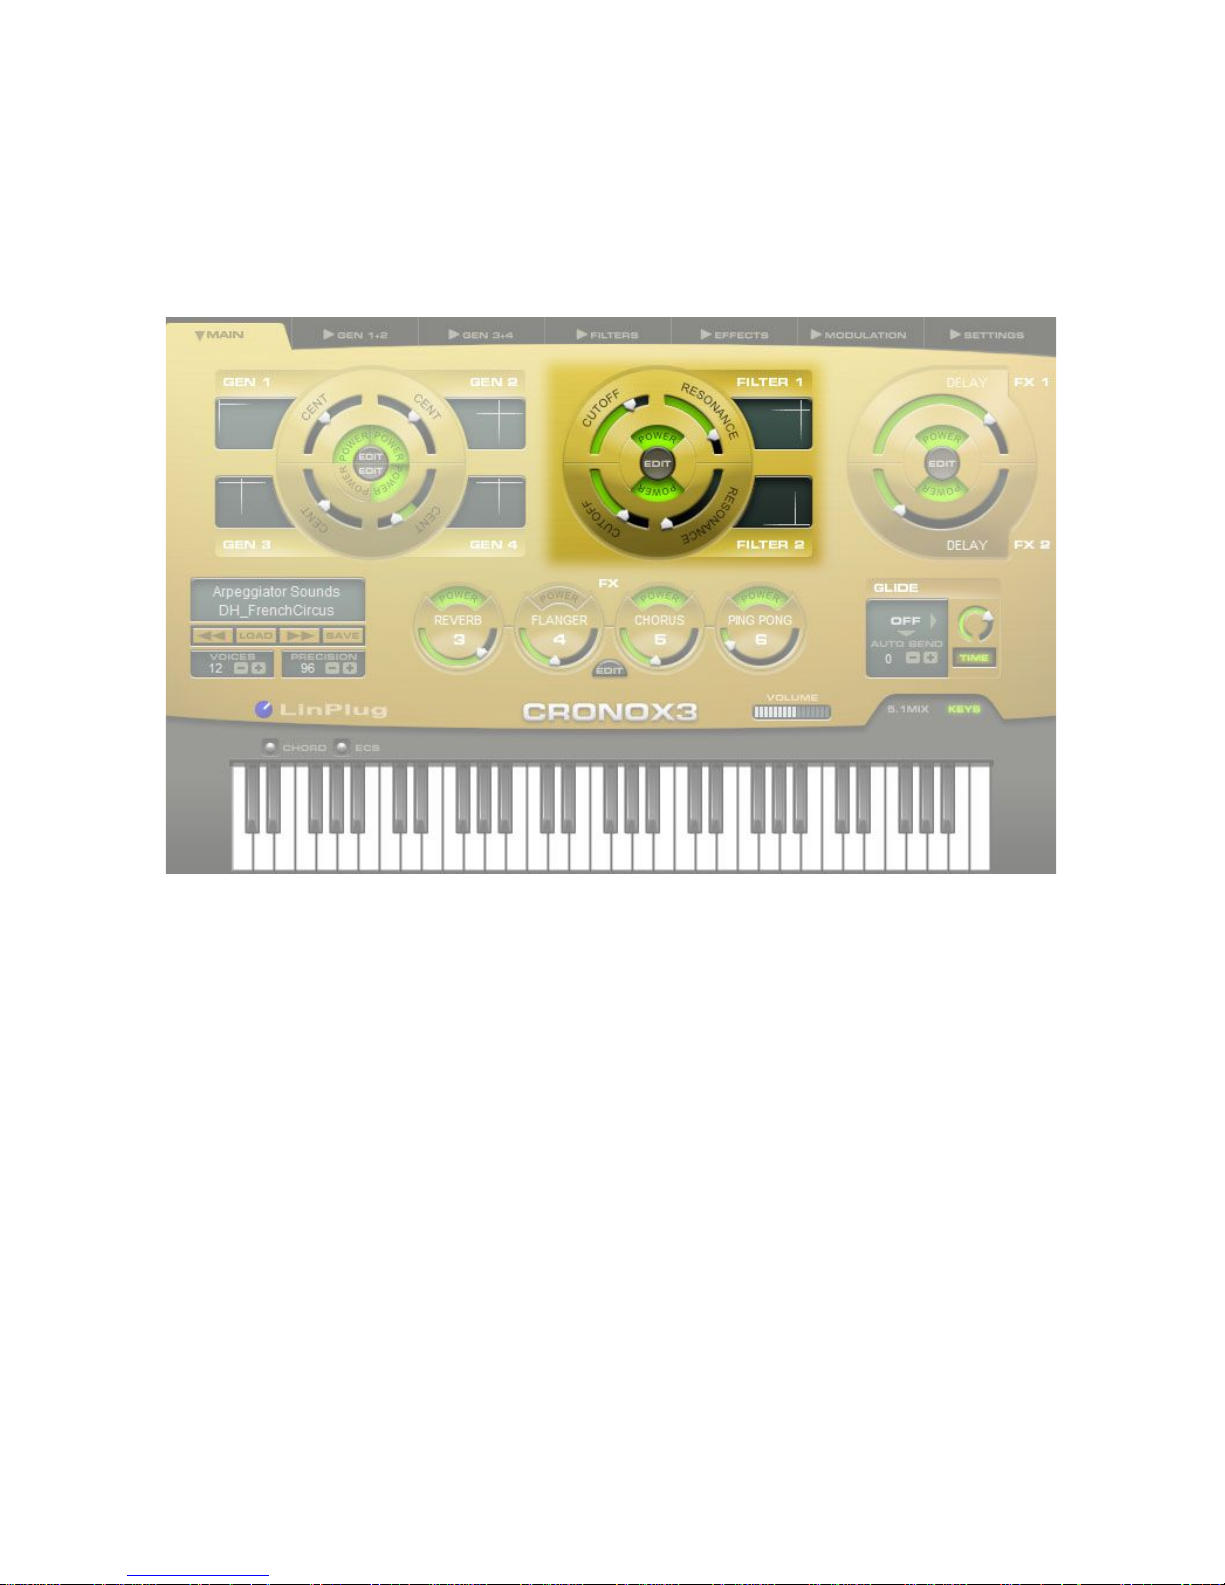
Filter
The Filter section is located on the upper middle of the instrument’s Main
panel. The Filter section contains the most important controls for each
Filter. This section contains the following controls: Cutoff, Resonance,
Power and Edit.
The Cutoff circular slider is used to set the frequency of the filter.
The Resonance circular slider is used to set the amount of emphasis
around the filter’s cutoff frequency.
Inside the Cutoff/Resonance control is the Power button which is used to
set the status of the Filter. When the Filter is On, the button is green.
Clicking on the button switches the Filter on and off. Off means that any
signal routed to the respective filter passes through the section without
filtering being applied.
Clicking on the Edit button opens the Panel for the respective Filter. This
enables quick access to the Filter’s various parameters for more detailed
editing.
In the case of Filter 1, the output signal is sent to Effect 1, while in the case
of Filter 2 the output signal is sent to Effect 2.
C r o n o X 3 User Guide
15
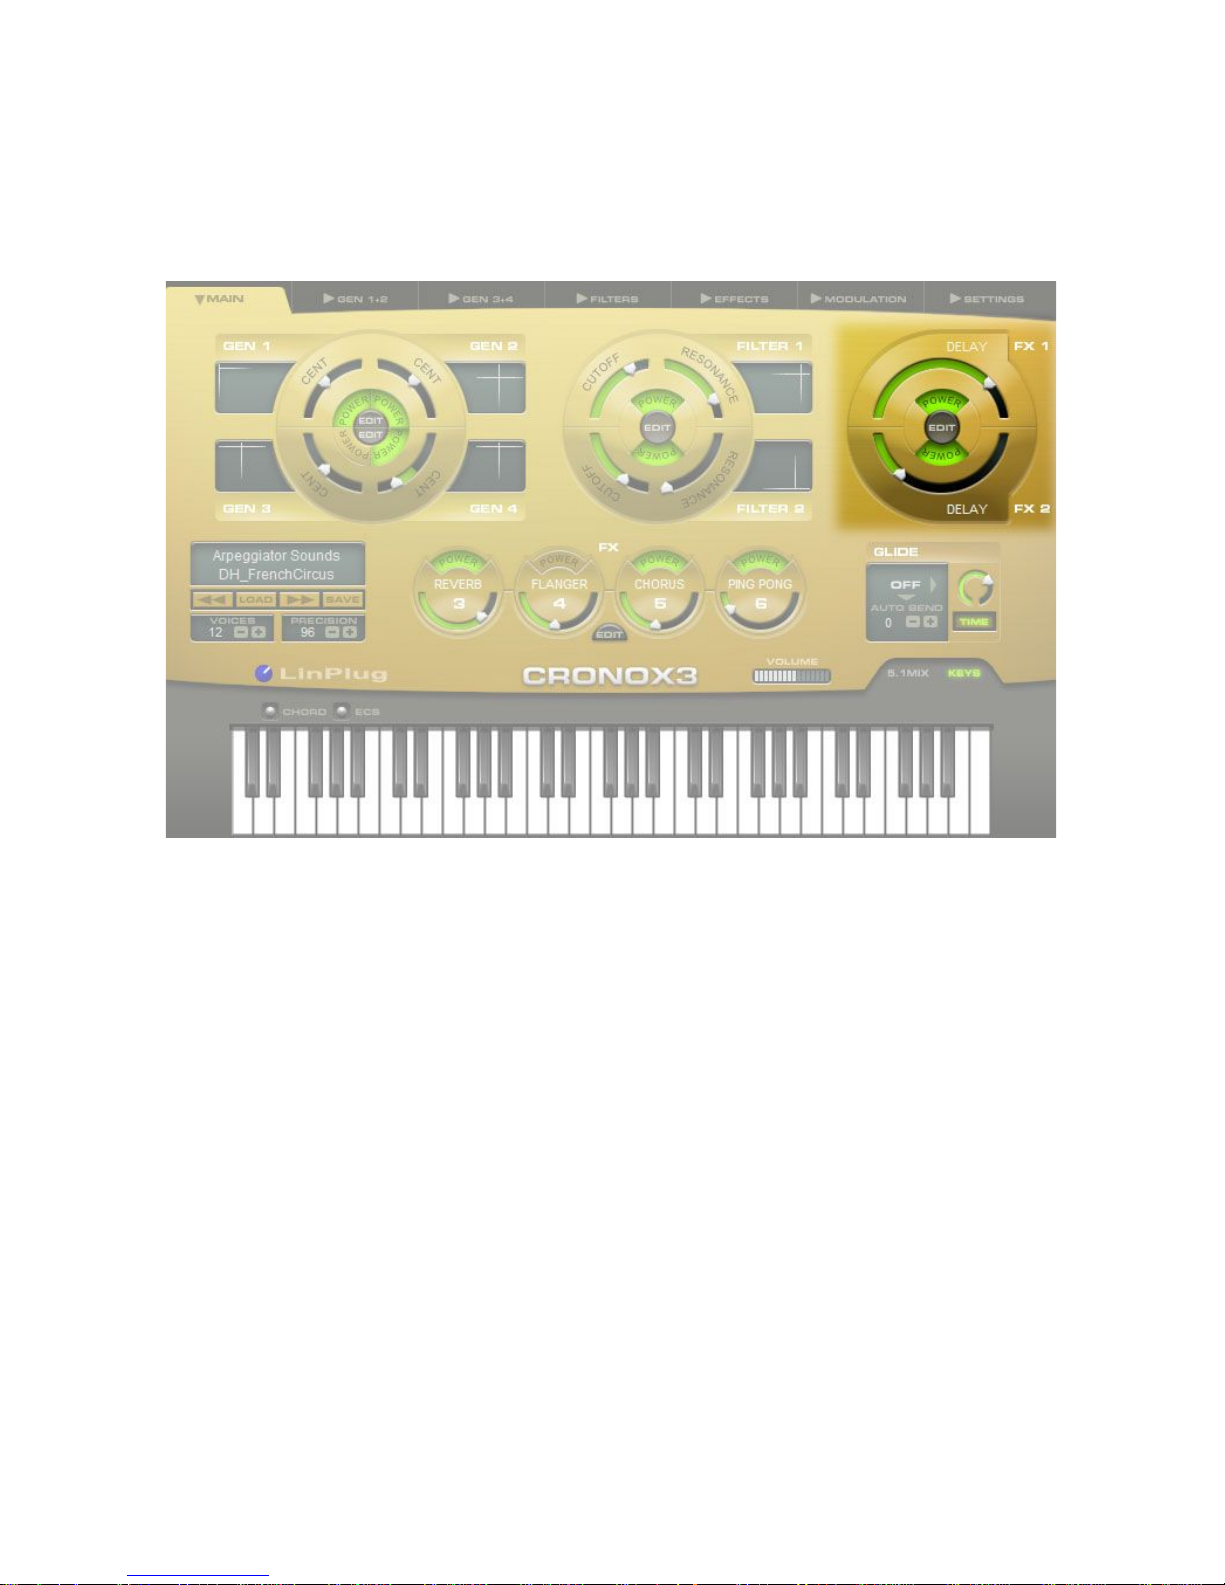
Effects 1/2
The Effects 1/2 (“FX 1/2”) section is located on the upper right of the
instrument’s Main panel. The Effects 1/2 section contains the most
important controls for the first two effects processors.
The Effect Type display shows the currently loaded effects processor and
also enables you to change the current effect. To change the current effect
click on the effect type and then select another effect from the pop-up list
that appears. For more information about the available effects processors
please see the Effects Panel section of this manual.
The Send circular slider is used to set the amount of signal sent to the input
of the respective effects unit.
Inside the Send controls is the Power button which is used to set the status
of the Effects processor. This can be either On or Off. When the Effects
processor is On, the button is green.
Clicking on the Edit button opens the Panel for the respective Effects
processor. This enables quick access to the Effect processor’s various
parameters for more detailed editing.
C r o n o X 3 User Guide
16
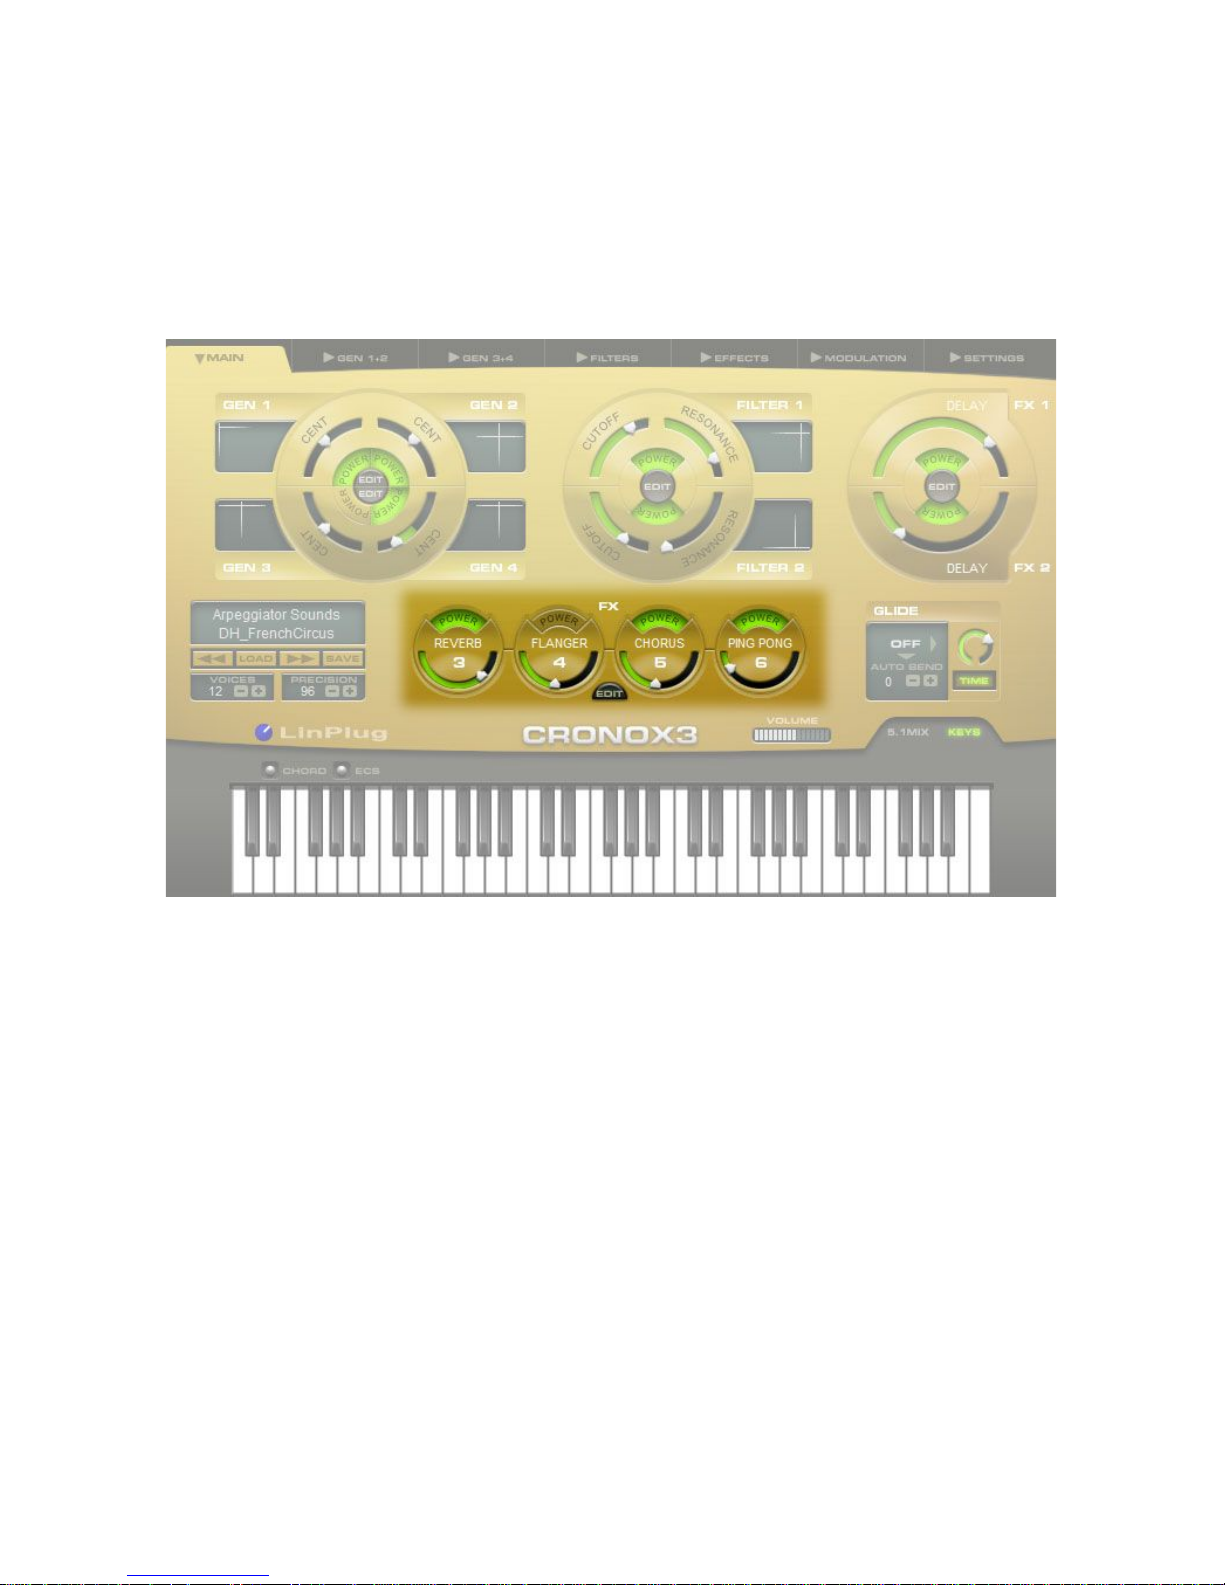
Effects 3/4/5/6
The Effects 3/4/5/6 (“FX 3/4/5/6”) section is located on the lower middle of
the instrument’s Main panel. The Effects 3/4/5/6 section contains the most
important controls for the last four effects processors. This section contains
the following controls: Effect Type, Send, Power and Edit. These are
described below.
The Effect Type display shows the currently loaded effects processor and
also enables you to change the current effect just like for Effect 1 and 2.
The Send circular slider is used to set the amount of signal sent from the
output of the filter to the input of the respective effects unit.
At the top of each Effect is the effect’s Power button which is used to set
the status of the Effects processor to either On or Off.
Clicking on the Edit button opens the Panel for the respective Effects
processor. This enables quick access to the Effect Processor’s various
parameters for more detailed editing.
C r o n o X 3 User Guide
17
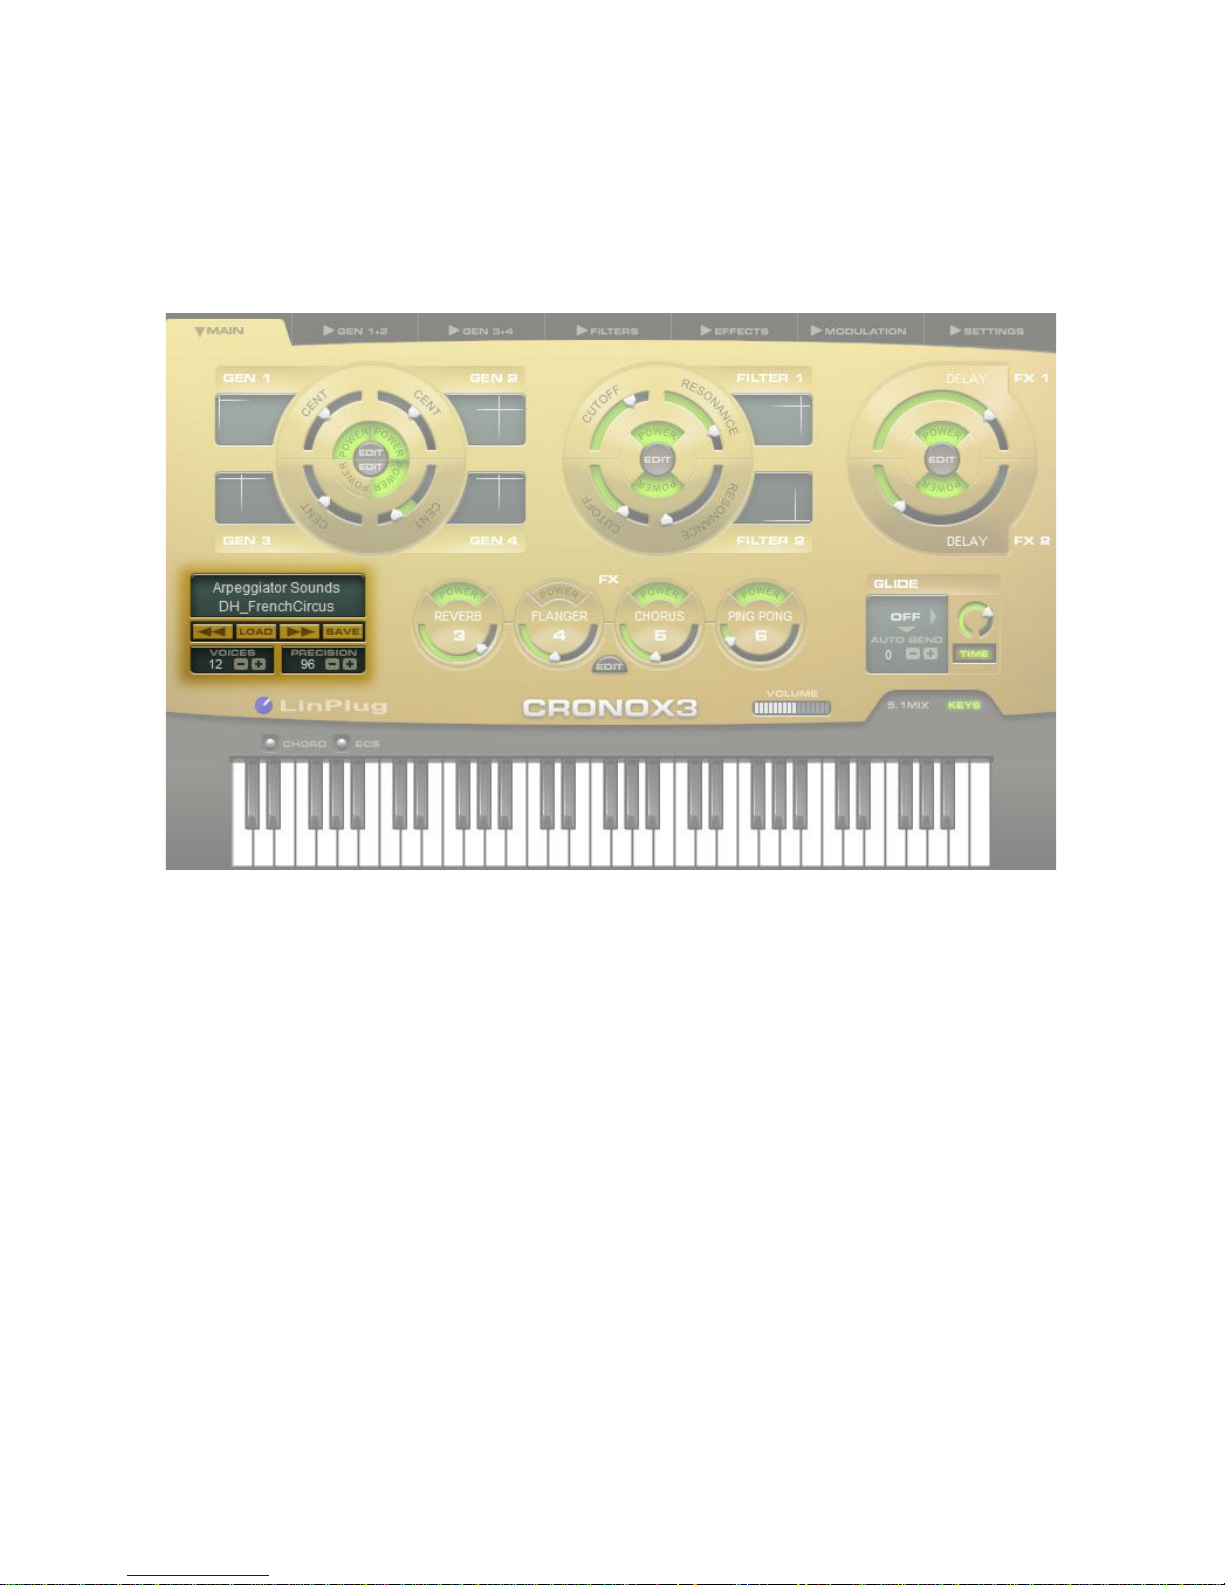
Preset Browser/File
The Preset Browser section is located on the bottom left of the Main panel.
It consists of three separate control sections: the Preset Browser/File
section, the Voices section and the Precision section.
The Preset Browser consists of a two-part display. The upper part shows
the bank and the lower one shows the preset. Whenever a preset is loaded
using the file controls below these displays, the preset name is updated with
the name of the loaded preset and the bank name with the name of the
folder from which the preset is loaded.
By default the Preset Browser points to the factory presets installed with the
CronoX 3. Presets can be changed in four ways. A new preset can be
loaded with the file controls, either by clicking the load button or by clicking
the prev/next buttons located to the left and right of the load button. You can
select the desired preset from the lower display, which turns into a menu
when you click it. And you can send a MIDI program change command to
CronoX 3.
The current bank can be changed in three ways: by loading a preset from a
different folder; by selecting the desired bank from the upper display, which
C r o n o X 3 User Guide
18

also turns into a menu when you click it; and by sending the instrument a
MIDI Bank Select message.
The File Controls are used for all File-related operations. The Load button
opens a dialog that lets you select a file for loading. The Previous and Next
buttons allow you to traverse a list of CronoX 3 presets. The Save button
allows you to save the current preset settings.
The settings of all sections are saved with the preset. The CronoX 3 loads
and saves all of its presets directly to hard disk so your computer's RAM
does not limit the number of available presets.
The Voices control is used to set the number of voices ("polyphony")
available. The maximum polyphony is 32. A variety of settings are available
for polyphony. These include "mono", "2" to "12" and "all". One thing that
may be confusing is the "mono" setting. It can be explained as follows. Say
that you hold down one key and then press and release a second key. In
the case of the "mono" voice setting, the first note will sound, and then the
second note sounds. When the second note is released the first note
sounds again. This creates a "pedal tone" effect.
The "Precision" control can be used to set the accuracy of the CronoX 3's
signal generation. When the "Precision" control is set to less than 100%
small inaccuracies are introduced into the waveform at various points in the
CronoX 3's signal chain. This is useful if you're trying to replicate the
warmth of an old analog synthesizer. Precision can be set in a range from
85% to 100%.
Glide
The Glide or "portamento" section allows you to set the CronoX 3's
portamento parameters. "Glide" continuously changes the pitch from one
note to the next, connecting the notes and letting you smoothly "glide" from
one to the other.
The Glide section has three controls: the Glide button, the Auto Bend
control, and the Time/Rate control.
The Time/Rate control has two settings: Time and Rate. These settings
determine the manner in which the pitch of one note moves to that of the
next note. When set to "Time", it takes a constant amount of time to move
from one note to the next. In this case it will take the same amount of time
to reach the destination pitch regardless of whether the preceding notes are
C r o n o X 3 User Guide
19
a semitone apart or an octave apart. When set to "Rate", the amount of
time it takes to move from one note to the next depends upon how far apart
the two notes are. The further apart the notes, the longer it will take for the
pitch of the first note to reach that of the following note.
The Glide button has 4 values: Off, Bend, Held and On. The On and Off
functions turn "Glide" on and off. When "Glide" is on, the Time/Rate circular
slider is used to set the length of time it takes for the first note to reach that
of the second note. The "Held" setting works as follows. If notes overlap
then Glide is applied, however if they don't then the notes are played
without Glide. This makes it possible to apply Glide only to selected notes.
"Bend" allows you to apply a predetermined pitch bend to each note. The
bend range is set using the Auto Bend control. A bend range of -48 to +48
semitones is available.
Miscellaneous
The CronoX 3 contains several controls that perform general functions
within the instrument. These controls are located along the lower part of the
instrument’s user interface and are available from any of the instrument’s
panels. The controls include: Chord, ECS, Volume, 5.1 Mix/Keys, Keyboard
and LinPlug/CronoX logos.
C r o n o X 3 User Guide
20
Chord (Chord Memory)
The Chord (Chord Memory) function allows you to record chords and
include them with the current preset. To access the Chord section click on
the “Chord” button which is located on the lower left of the CronoX 3’s front
panel. Clicking the Chord button opens a popup menu where you can
choose from the following options: “Off” (Chord memory is switched Off and
has no effect), “Learn” (Chord memory stores any notes (up to a maximum
of 8) that you play) and Play (any single note played will trigger the whole
chord that was entered in Learn Mode).
The Chord memory function is very useful when combined with the CronoX
3’s Arpeggiator. Note that the order in which notes are played in Learn
Mode is important: the first note is taken as the root or basic note and all
successive notes are stored by interval relative to this first note. For
example, if you "learn" the chord C-E-G by actually playing the E first, the C
is stored as -4 semitones and the G as +3 semitones. This means that if
you play a C note when in Play mode, the resulting chord will be G#-C-D#.
C r o n o X 3 User Guide
21

ECS (Easy Controller Setup)
The ECS (Easy Controller Setup) section makes it simple to control the
CronoX 3 from an external MIDI controller (either hardware or software).
To access the ECS section click on the ECS button which is located on the
lower left of the CronoX 3’s front panel. Clicking on the ECS button opens a
popup menu containing the following items: Off, Learn, Clear, Clear All,
Load and Save.
To use the CronoX 3’s ECS feature, proceed as follows. Click on the ECS
button and then select “Learn” from the popup menu. Select a CronoX 3
parameter with the mouse and then send some MIDI messages to the
CronoX 3 from your MIDI source. Then click on “Off”. That's all there is to it!
From now on you can change the selected parameter with the chosen
controller. In addition to this, more than one controller can be defined to
change a particular parameter. In fact, you can define up to 128 parametercontroller-combinations. This does not depend on the type of controller you
have nor the particular MIDI Control Change messages it sends.
ECS settings can be saved and restored using the "Load" and "Save"
functions found in the menu that pops up when you click the ECS button. In
addition, a single controller assignment can be cleared using the "Clear"
menu entry. To do this, select “Clear” from the ECS popup menu (the ECS
light goes on) and move control that you wish to be cleared (de-assigning it
from the MIDI Control Change message it is currently controlled by). Don't
forget to switch off the Clear function by clicking the “Off” button after you
have finished!
The “Clear All” menu item clears all controller-parameter assignments at
once.
Volume
The "Volume" control sets the overall CronoX 3's volume. Volume can be
set in a range from -oodB to +6dB
Keyboard (“Keys”)
The CronoX 3 gives the user the option of displaying either the keyboard or
the control section for its 5.1 mixer.The CronoX 3 features a built-in 61-note
C r o n o X 3 User Guide
22
piano keyboard that you can use to play the instrument if a hardware
controller is not available. The keyboard is displayed at the bottom of the
instrument when the Keys button is selected. The keyboard is “Velocity
Sensitive”. The lower (in the vertical screen direction) the position of the
mouse click on the keyboard note, the higher the note velocity.
5.1 Mix
The CronoX 3 contains a dedicated 5.1 Mixer that can be used in host
programs that support 5.1-format audio mixing. The 5.1 Mixer is displayed
at the bottom of the instrument when the 5.1 Mix button is selected.
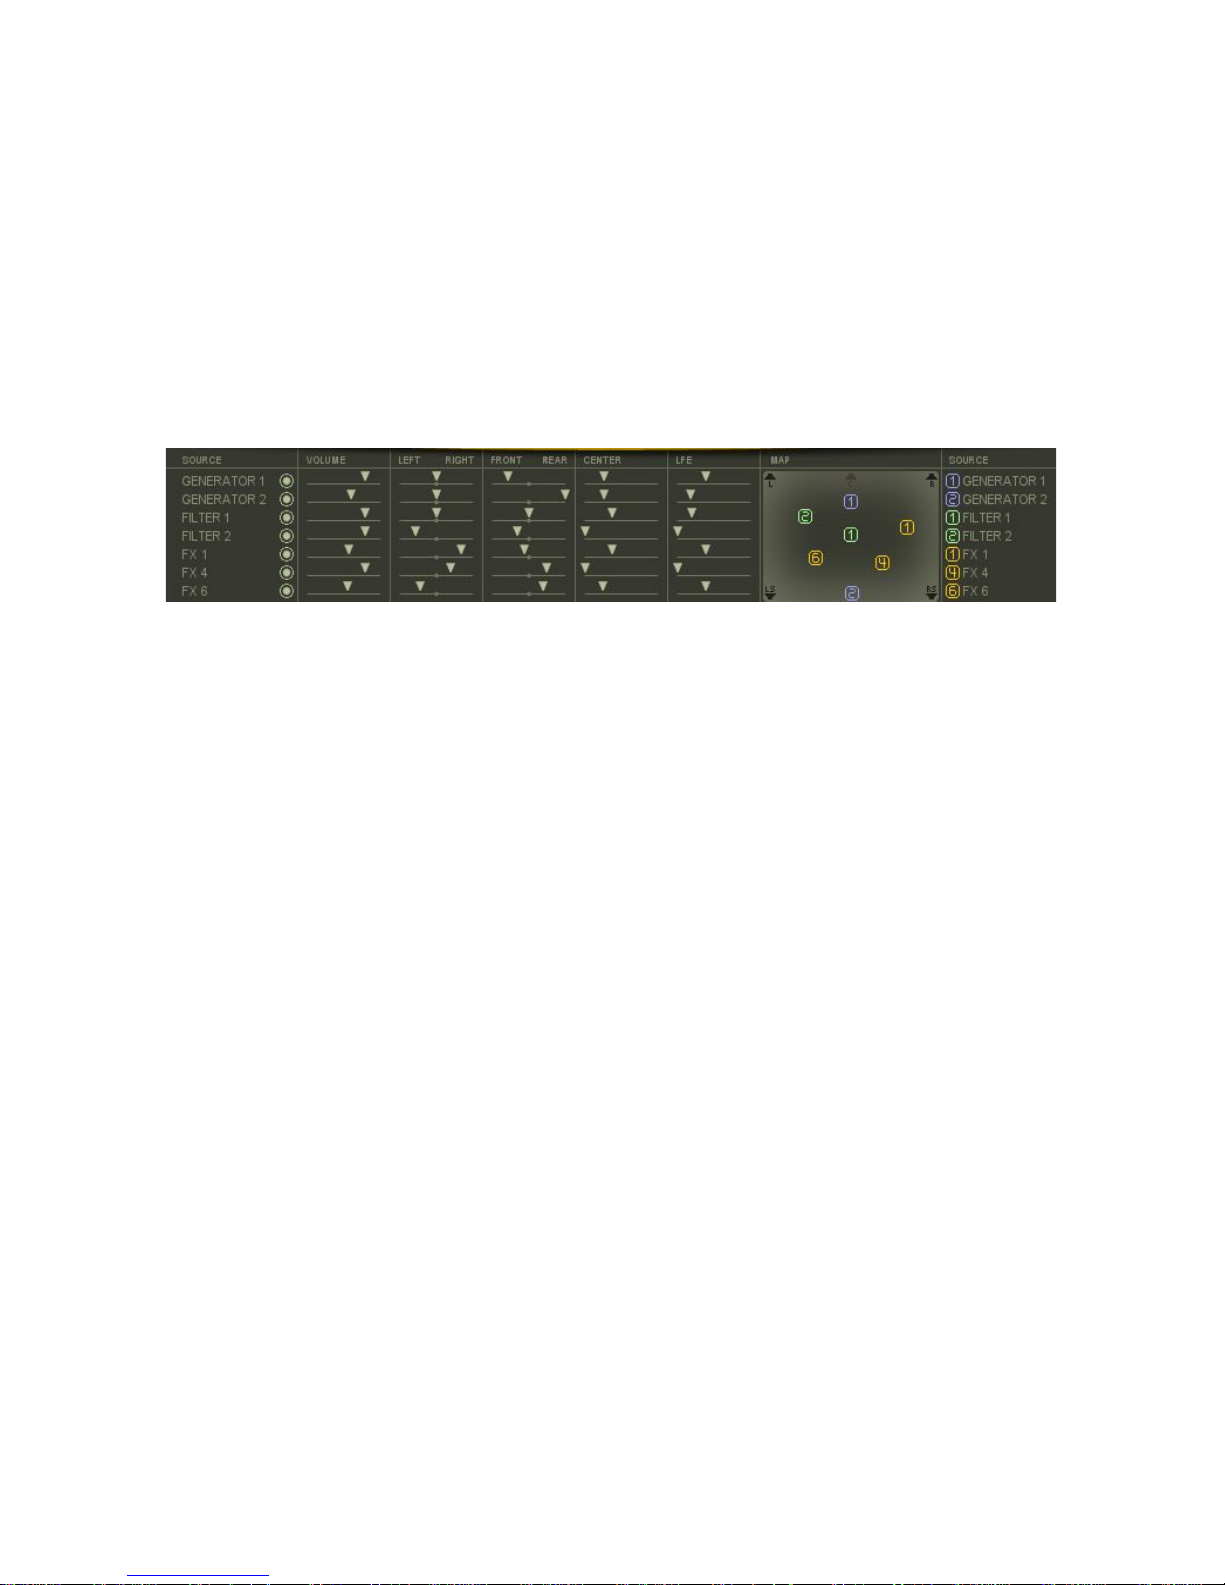
The mixer enables 7 different signal sources to be positioned within the 5.1
sound stage. The available signal sources are: Generator 1, Generator 2,
Filter 1, Filter 2, FX 1, FX 4 and FX 6.
The 5.1 Mixer contains the following sections: Source, Volume, Left/Right,
Front/Rear, Center, LFE (Low Frequency Effects) and Display.
The heart of the 5.1 Mixer is the Display section located on the right of the
mixer. It shows a virtual “room” in which the source signals can be
positioned. Each source signal appears in the Display as a number which
can be moved left and right, and forwards and backwards within the room.
To show the current position of a signal source select the source in the
Source section at the far left of the 5.1 Mixer. The selected source will then
appear as a number in the Display.
Signal sources can be positioned in two ways. The first way to reposition
the signal source is to click on its number in the Display and then drag it to
a new position. The second way to reposition the signal source is to use the
“Left/Right” and “Front/Rear” sliders to the left of the Display.
The overall volume of the source signal can also be set using the Vol
(“Volume”) slider. This control acts independently of the other controls.
The “Center” control is used to set the signal level of the Center channel.
C r o n o X 3 User Guide
23

The LFE (“Low Frequency Effects”) control is used to set the signal level of
the Low Frequency Effects channel. This channel is specifically designed to
handle low frequency signals.
Mixing for 5.1 audio systems is a complex topic, far beyond the scope of
this manual. For further information the following two books are
recommended:
Spatial Audio by Francis Rumsey
5.1 Surround Sound: Up and Running by Tomlinson Holman
When the 5.1 Mixer is used in a stereo environment only the X-axis
(Left/Right) is of relevance in terms of placing a signal in the stereo
panorama. The Center and LFE parameters should not be used in pure
stereo environment. Presets which are designed for 5.1 environments will
also play in a pure stereo environment. In this case, the Center and LFE
channel will be mixed to both left and right outputs.
HINT: When you are automating parameter changes it’s best to tweak
parameters from the main screen. This is because the amount of
automatable parameters may be limited in your host program. For
example, if you want to automate Filter 1 Cutoff, it’s best to do so from Main
panel rather than Filter panel.
C r o n o X 3 User Guide
24
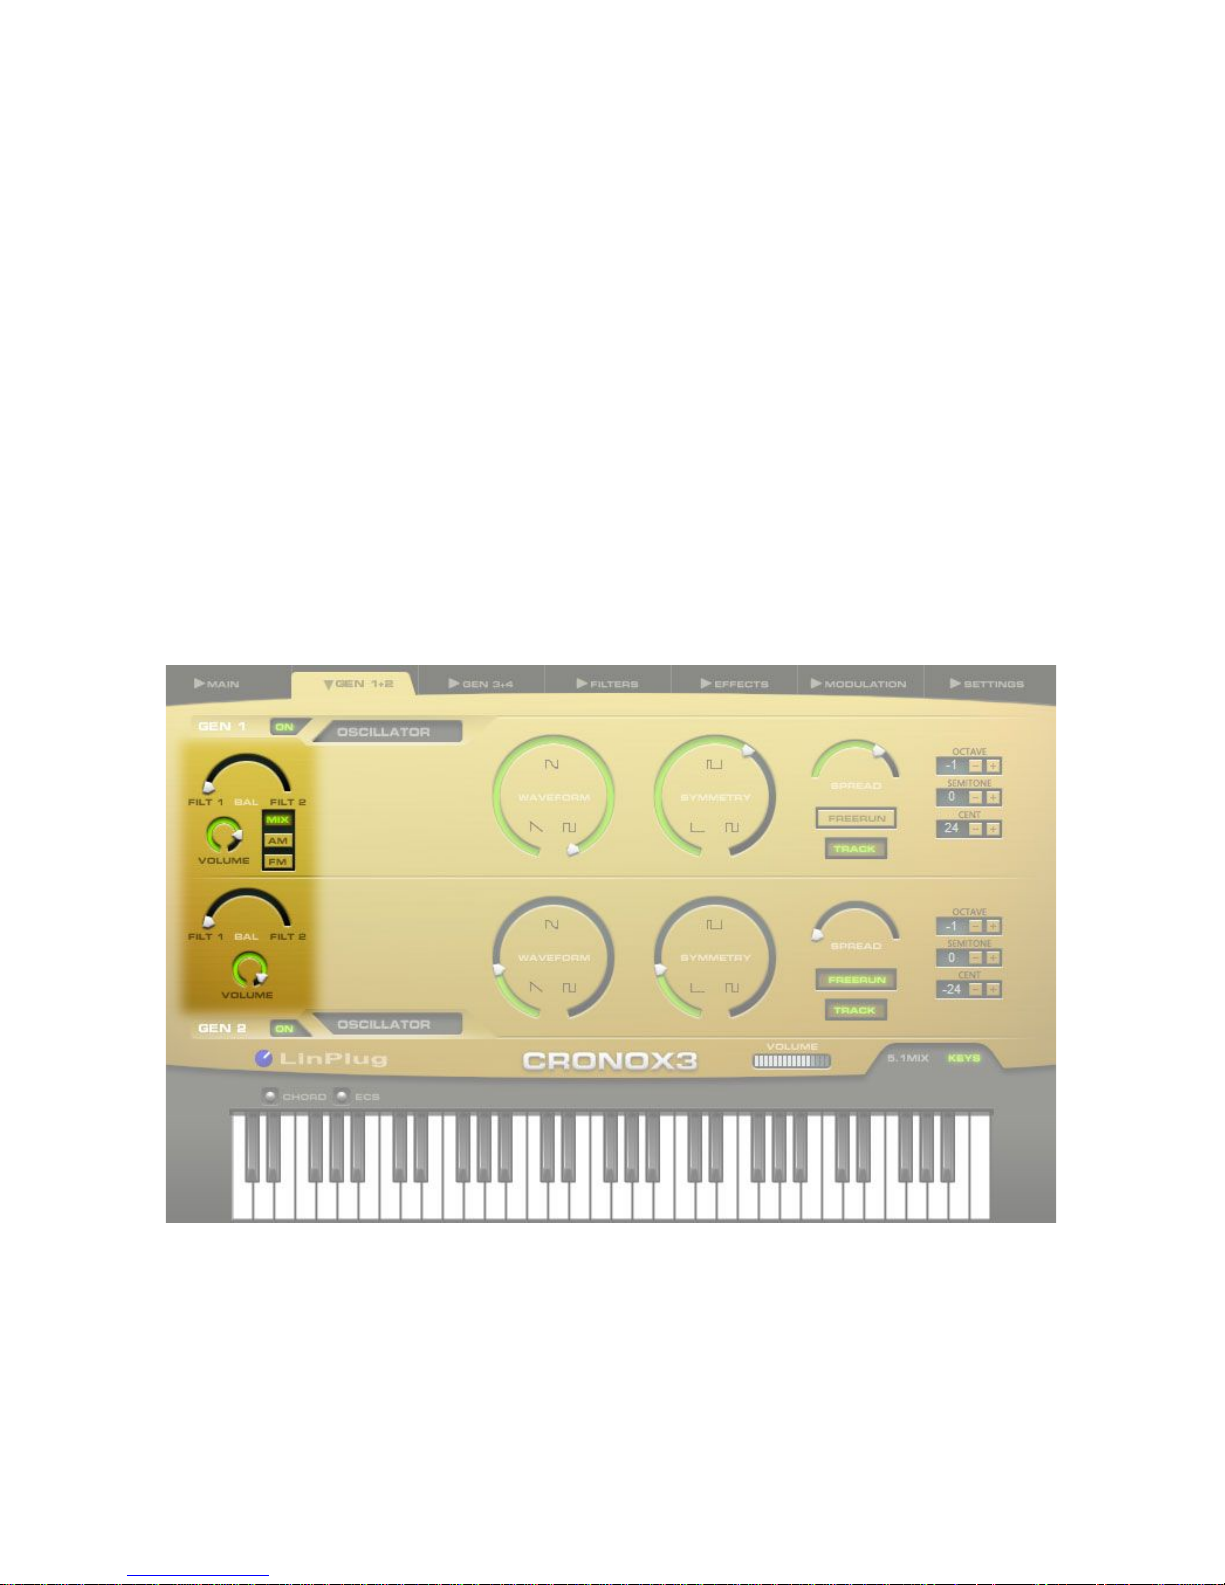
Gen 1 + 2 and Gen 3 + 4
The CronoX 3 contains 4 separate sound sources: Generator 1, 2, 3 and 4.
These can be used to produce a wide variety of sounds.
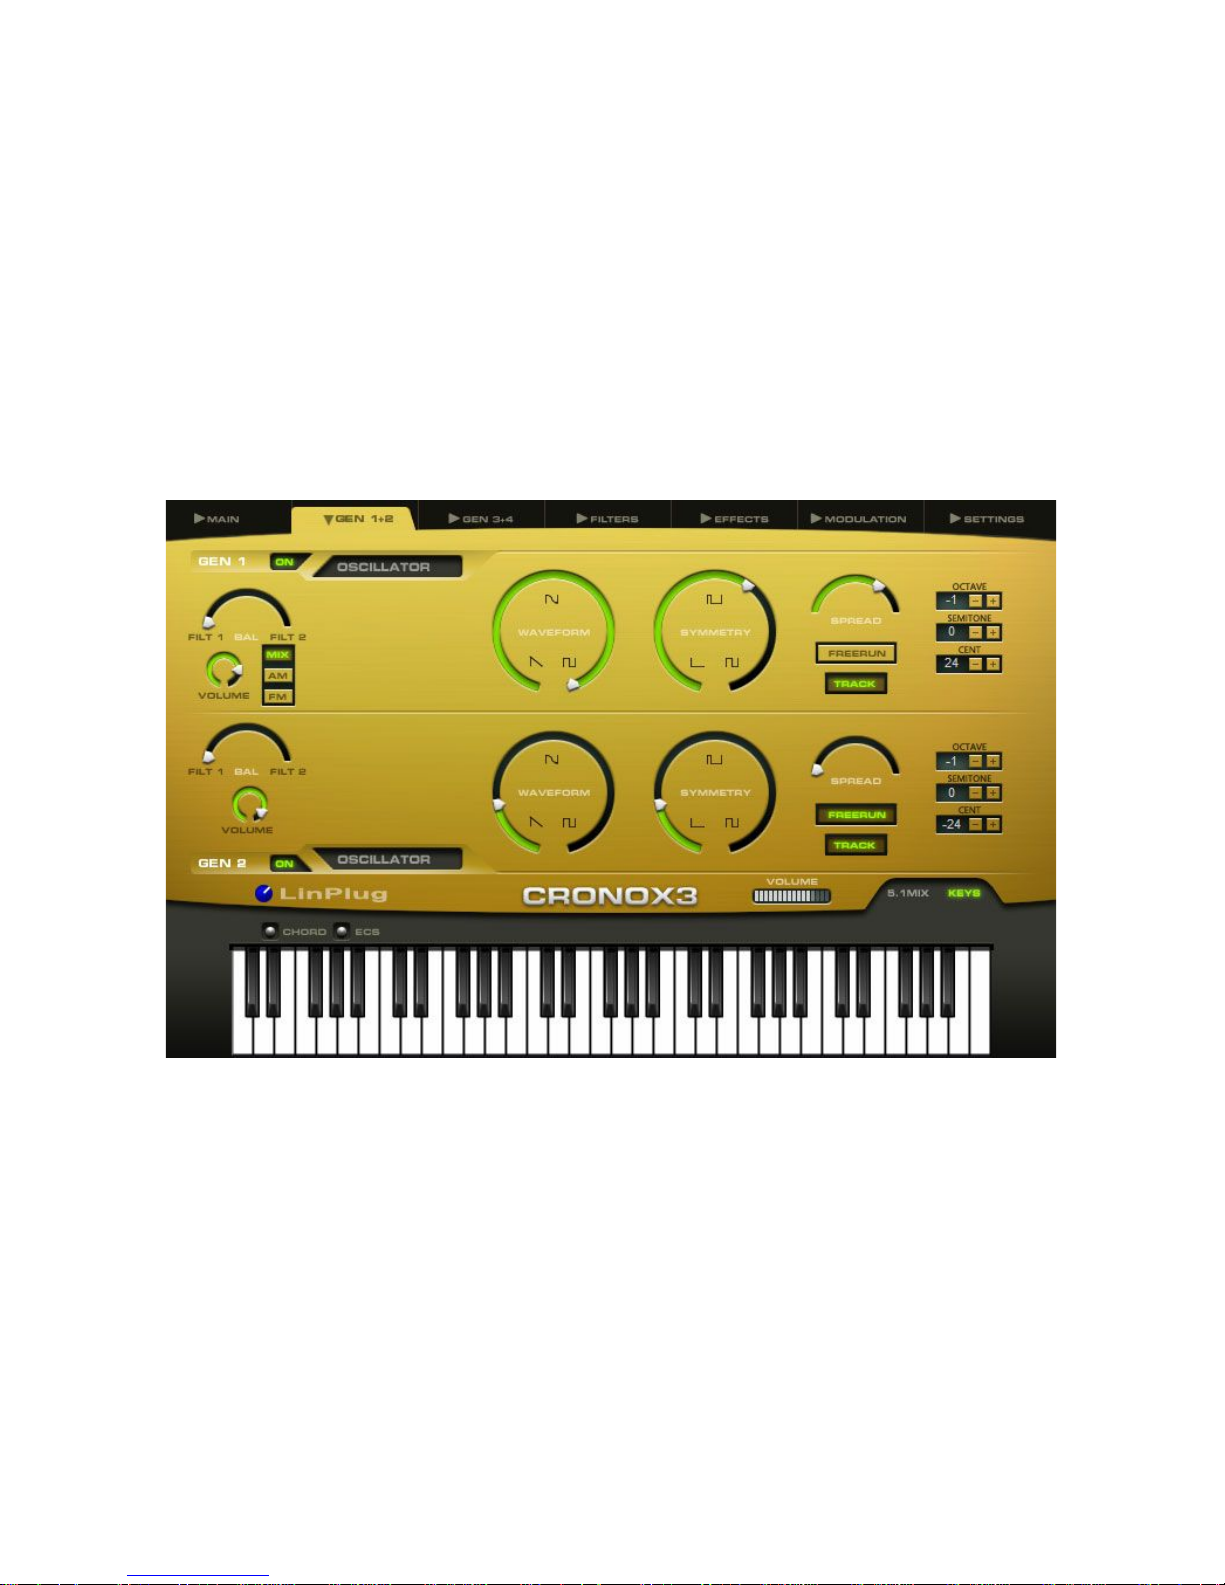
The controls for Generators 1 and 2, and Generators 3 and 4 are located on
two separate panels labeled “Gen 1 + 2” and “Gen 3 + 4”. The panels can
be accessed by clicking on the respective tab at the top of the instrument.
As these two panels are essentially the same, their descriptions have been
grouped together. The only difference between Gen 1 + 2 and Gen 3 + 4 is
that the Loop Sampler option is not available in Generators 3 and 4.
Four sound source types are available within the CronoX 3: "Oscillator",
"Time Sampler", "Schrader" and "Loop Sampler". In the case of the first
Generator, we've used the term "Oscillator" to describe waveforms that are
created in real-time much as in true analog synthesizers. To change
Generators click on the menu to the right of the Generator section's label.
Each Generator also has its own On/Off switch located to the left of the
module's menu.
C r o n o X 3 User Guide
25
If you don’t want to use one of the Generators it's best to switch it off as this
conserves CPU resources. However, make sure that at least one Generator
is switched on, otherwise the instrument will not produce any output.
Each Generator operates in a different way and has a different set of
controls, however some Generator controls operate the same way in all
Generators. The controls that are “common” to all Generators are described
first, followed by those that are unique to their respective Generator.
Generator Output
The Generator Output section of the CronoX 3 is where the mixing and
output destination of the synth's four Generators is controlled. This section
is located on the left of each Generator section. Generators 1 and 3 contain
five controls: Mix, AM and FM buttons as well as Filter Balance and Volume
circular sliders. Generators 2 and 4 contain two controls: Filter Balance and
Volume circular sliders.
The Mix, AM and FM buttons determine the output destination of
Generators 1 and 3 (these buttons are only found on Generators 1 and 3).
When the Mix button is selected the output of both Generators 1 and 2, and
Generators 3 and 4 is combined. The AM (Amplitude Modulation) button
enables the amplitude of Generator 1 to be modulated by Generator 2. This
C r o n o X 3 User Guide
26
 Loading...