

Page 1
A Division of Cisco Systems, Inc.
®
Model No.
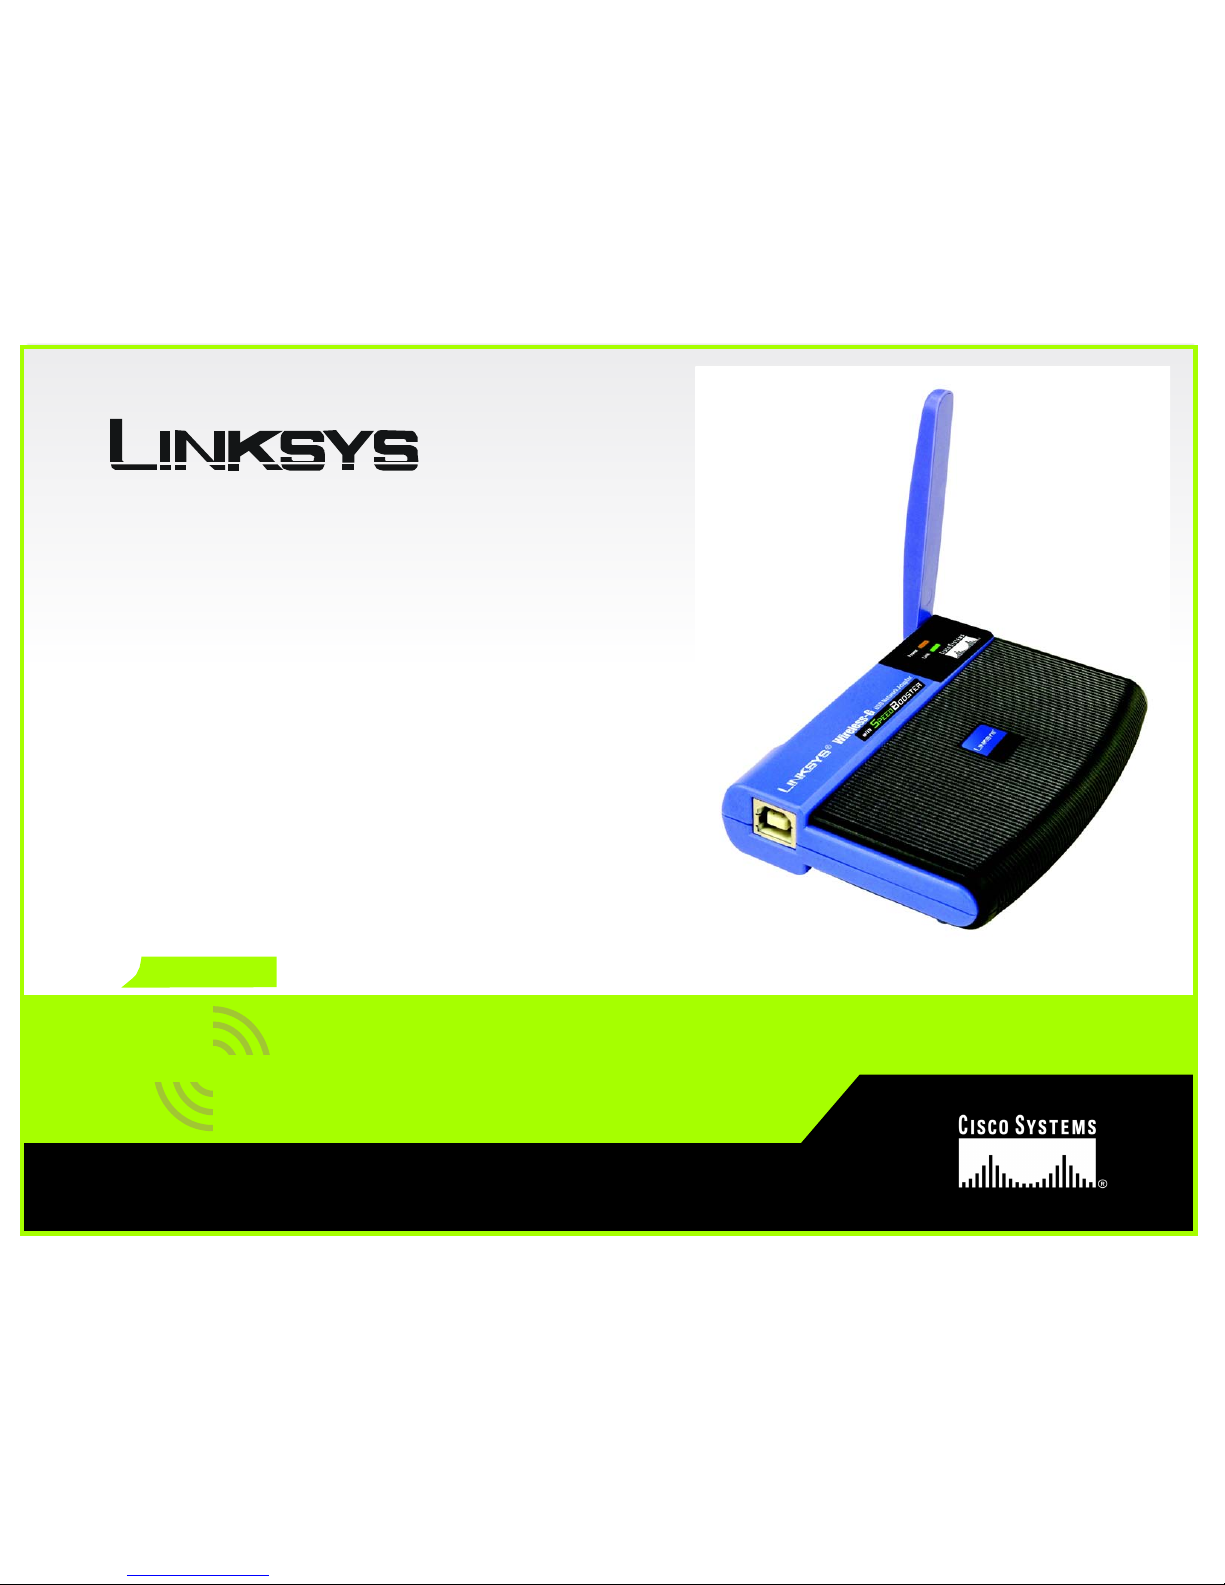
USB Network Adapter
Wireless-G
WUSB54GS (EU/LA/UK)
User Guide
WIRELESS
GHz
2.4
802.11g
with SpeedBooster
Page 2
Wireless-G USB Network Adapter with SpeedBooster
Copyright and Trademarks
Specifications are subject to change without notice. Linksys is a registered trademark or trademark of Cisco
Systems, Inc. and/or its affiliates in the U.S. and certain other countries. Copyright © 2005 Cisco Systems, Inc. All
rights reserved. Other brands and product names are trademarks or registered trademarks of their respective
holders.
How to Use this User Guide
This User Guide has been designed to make understanding networking with the Wireless-G USB Network Adapter
easier than ever. Look for the following items when reading this User Guide:
In addition to these symbols, there are definitions for technical terms that are presented like this:
Also, each figure (diagram, screenshot, or other image) is provided with a figure number and description, like
this:
Figure numbers and descriptions can also be found in the "List of Figures" section in the “Table of Contents”.
This exclamation point means there is a Caution or warning and is something that
could damage your property or the Wireless-G USB Network Adapter.
This checkmark means there is a Note of interest and is something you should
pay special attention to while using the Wireless-G USB Network Adapter.
This question mark provides you with a reminder about something you might need
to do while using the Wireless-G USB Network Adapter.
word: definition.
Figure 0-1: Sample Figure Description
WUSB54GS-UG-50907 BW
Page 3

Wireless-G USB Network Adapter with SpeedBooster
Table of Contents
Chapter 1: Introduction 1
Welcome 1
What’s in this Guide? 2
Chapter 2: Planning your Wireless Network 4
Network Topology 4
Roaming 4
Network Layout 5
Chapter 3: Setting up and Connecting the USB Network Adapter 6
Starting the Setup Wizard 6
Connecting the Adapter 7
Setting Up the Adapter 8
Chapter 4: Using the Wireless Network Monitor 20
Accessing the Wireless Network Monitor 20
Link Information Screens 20
SecureEasySetup 23
Site Survey 25
Profiles 26
Creating a New Profile 27
Appendix A: Troubleshooting 39
Common Problems and Solutions 39
Frequently Asked Questions 40
Appendix B: Using Windows XP Wireless Configuration 43
Appendix C: Wireless Security 46
Security Precautions 46
Security Threats Facing Wireless Networks 46
Appendix D: Windows Help 49
Appendix E: Glossary 50
Appendix F: Specifications 53
Appendix G: Warranty Information 55
Appendix H: Regulatory Information 56
Appendix I: Contact Information 63
Page 4

Wireless-G USB Network Adapter with SpeedBooster
List of Figures
Figure 3-1: Setup Wizard’s Welcome Screen 6
Figure 3-2: Setup Wizard’s License Agreement 6
Figure 3-3: The Connecting the Adapter Screen 7
Figure 3-4: Connecting the Adapter 7
Figure 3-5: The Adapter’s USB port 7
Figure 3-6: Available Wireless Network 8
Figure 3-7: Available Wireless Network 9
Figure 3-8: SecureEasySetup 9
Figure 3-9: The SecureEasySetup Logo and Location 9
Figure 3-10: SecureEasySetup complete 10
Figure 3-11: Available Wireless Network 11
Figure 3-12: WEP Key Needed for Connection 11
Figure 3-13: PSK Needed for Connection 12
Figure 3-14: The Congratulations screen 12
Figure 3-15: Available Wireless Network 13
Figure 3-16: Network Settings 13
Figure 3-17: Wireless Mode 14
Figure 3-18: Ad-Hoc Mode Settings 14
Figure 3-19: Wireless Security 15
Figure 3-20: Wireless Security - WEP 15
Figure 3-21: Wireless Security - PSK 16
Figure 3-22: Wireless Security - PSK + RADIUS 17
Figure 3-23: Wireless Security - RADIUS 18
Figure 3-24: Confirm New Settings 19
Figure 3-25: The Congratulations screen 19
Figure 4-1: Wireless Network Monitor Icon 20
Figure 4-2: Link Information 20
Figure 4-3: More Information - Wireless Network Status 21
Figure 4-4: More Information - Wireless Network Statistics 22
Figure 4-5: The SecureEasySetup button 23
Page 5

Wireless-G USB Network Adapter with SpeedBooster
Figure 4-6: The SecureEasySetup Logo and Location 23
Figure 4-7: SecureEasySetup 23
Figure 4-8: SecureEasySetup is complete 24
Figure 4-9: Site Survey 25
Figure 4-10: WEP Key Needed for Connection 25
Figure 4-11: PSK Needed for Connection 25
Figure 4-12: Profiles 26
Figure 4-13: Import a Profile 26
Figure 4-14: Export a Profile 26
Figure 4-15: Create a New Profile 27
Figure 4-16: Available Wireless Network 27
Figure 4-17: Available Wireless Network 28
Figure 4-18: The SecureEasySetup Logo and Location 28
Figure 4-19: SecureEasySetup 28
Figure 4-20: SecureEasySetup complete 29
Figure 4-21: Available Wireless Network 30
Figure 4-22: WEP Key Needed for Connection 30
Figure 4-23: PSK Needed for Connection 31
Figure 4-24: The Congratulations screen 31
Figure 4-25: Available Wireless Network 32
Figure 4-26: Network Settings 32
Figure 4-27: Wireless Mode 33
Figure 4-28: Ad-Hoc Mode Settings 33
Figure 4-29: Wireless Security 34
Figure 4-30: Wireless Security - WEP 34
Figure 4-31: Wireless Security - PSK 35
Figure 4-32: Wireless Security - PSK + RADIUS 36
Figure 4-33: Wireless Security - RADIUS 37
Figure 4-34: Confirm New Settings 38
Figure 4-35: The Congratulations screen 38
Figure B-1: Wireless Network Monitor Icon 43
Figure B-2: Windows XP - Use Windows XP Wireless Configuration 43
Figure B-3: Windows XP Wireless Configuration Icon 43
Page 6

Wireless-G USB Network Adapter with SpeedBooster
Figure B-4: Available Wireless Network 44
Figure B-5: No Wireless Security 44
Figure B-6: Network Connection - Wireless Security 45
Figure B-7: Wireless Network Connection 45
Page 7

1
Chapter 1: Introduction
Welcome
Wireless-G USB Network Adapter with SpeedBooster
Chapter 1: Introduction
Welcome
Thank you for choosing the Wireless-G USB Network Adapter. With this Adapter, your wireless networking
experience will be faster and easier than ever.
How does the Adapter do this? Like all wireless products, the Adapter allows for greater range and mobility
within your wireless network. Connecting to your PC via the USB port means that this Adapter leaves the PC’s
slots open for other purposes. This adapter communicates over the 802.11g wireless standard, one of the newest
wireless standards, to communicate with your network.
But what does all of this mean?
Networks are useful tools for sharing computer resources. You can access one printer from different computers
and access data located on another computer's hard drive. Networks are even used for playing multiplayer video
games. So, networks are not only useful in homes and offices, they can also be fun.
PCs equipped with wireless cards and adapters can communicate without cumbersome cables. By sharing the
same wireless settings, within their transmission radius, they form a wireless network.
And now, with SecureEasySetup, setting up your network and your Wireless-G USB Network Adapter is easier
than ever.
Use the instructions in this Guide to help you connect the Adapter, set it up, and configure it for your network.
These instructions should be all you need to get the most out of the Adapter.
802.11g: an IEEE wireless networking standard that specifies a
maximum data transfer rate of 54Mbps, an operating frequency
of 2.4GHz, and backward compatibility with 802.11b devices.
adapter: a device that adds network functionality to your PC.
network: a series of computers or devices
connected for the purpose of data sharing, storage,
and/or transmission between users.
Page 8

2
Chapter 1: Introduction
What’s in this Guide?
Wireless-G USB Network Adapter with SpeedBooster
What’s in this Guide?
This user guide covers the steps for setting up and using the Wireless-G USB Network Adapter.
• Chapter 1: Introduction
This chapter describes the Adapter’s applications and this User Guide.
• Chapter 2: Planning Your Wireless Network
This chapter discusses a few of the basics about wireless networking.
• Chapter 3: Setting Up and Connecting the USB Network Adapter
This chapter shows you how to setup and connect the Adapter.
• Chapter 4: Using the Wireless Network Monitor
This chapter show you how to use the Adapter’s Wireless Network Monitor.
• Appendix A: Troubleshooting
This appendix describes some problems and solutions, as well as frequently asked questions, regarding
installation and use of the Adapter.
• Appendix B: Using Windows XP Wireless Configuration
This appendix describes how Windows XP users can use Window’s built-in wireless configuration to monitor
their Adapter.
• Appendix C: Wireless Security
This appendix discusses security issues regarding wireless networking and measures you can take to help
protect your wireless network.
• Appendix D: Windows Help
This appendix describes how you can use Windows Help for instructions about networking, such as installing
the TCP/IP protocol.
• Appendix E: Glossary
This appendix gives a brief glossary of terms frequently used in networking.
• Appendix F: Specifications
This appendix provides the Adapter’s technical specifications.
• Appendix G: Warranty Information
This appendix supplies the Adapter’s warranty information.
Page 9

3
Chapter 1: Introduction
What’s in this Guide?
Wireless-G USB Network Adapter with SpeedBooster
• Appendix H: Regulatory Information
This appendix supplies the Adapter’s regulatory information.
• Appendix I: Contact Information
This appendix provides contact information for a variety of Linksys resources, including Technical Support.
Page 10

4
Chapter 2: Planning your Wireless Network
Network Topology
Wireless-G USB Network Adapter with SpeedBooster
Chapter 2: Planning your Wireless Network
Network Topology
A wireless network is a group of computers, each equipped with one wireless adapter. Computers in a wireless
network must be configured to share the same radio channel. Several PCs equipped with wireless cards or
adapters can communicate with one another to form an ad-hoc network.
Linksys wireless adapters also provide users access to a wired network when using an access point or wireless
router. An integrated wireless and wired network is called an infrastructure network. Each wireless PC in an
infrastructure network can talk to any computer in a wired network infrastructure via the access point or wireless
router.
An infrastructure configuration extends the accessibility of a wireless PC to a wired network, and can double the
effective wireless transmission range for two wireless adapter PCs. Since an access point is able to forward data
within a network, the effective transmission range in an infrastructure network can be doubled.
Roaming
Infrastructure mode also supports roaming capabilities for mobile users. Roaming means that you can move your
wireless PC within your network and the access points will pick up the wireless PC's signal, providing that they
both share the same channel and SSID.
Before enabling you consider roaming, choose a feasible radio channel and optimum access point position.
Proper access point positioning combined with a clear radio signal will greatly enhance performance.
access point: device that allows wirelessequipped computers and other devices to
communicate with a wired network.
ad-hoc: a group of wireless devices
communicating directly with each other (peerto-peer) without the use of an access point
infrastructure: Configuration in which a
wireless network is bridged to a wired
network via an access point.
roaming: the ability to take a wireless
device from one access point's range to
another without losing the connection.
ssid: your wireless network’s name
Page 11

5
Chapter 2: Planning your Wireless Network
Network Layout
Wireless-G USB Network Adapter with SpeedBooster
Network Layout
Linksys wireless access points and wireless routers have been designed for use with 802.11a, 802.11b, and
802.11g products. With 802.11g products communicating with the 802.11b standard and some products
incorporating both “a” and “g”, products using these standards can communicate with each other.
Access points and wireless routers are compatible with 802.11a, 802.11b and 802.11g adapters, such at the PC
Cards for your laptop computers, PCI Card for your desktop PC, and USB Adapters for when you want to enjoy USB
connectivity. Wireless products will also communicate with the wireless PrintServer.
When you wish to connect your wired network with your wireless network, network ports on access points and
wireless routers can be connected to any of Linksys's switches or routers.
With these, and many other, Linksys products, your networking options are limitless. Go to the Linksys website at
www.linksys.com/international for more information about wireless products.
802.11b: an IEEE wireless networking standard
that specifies a maximum data transfer rate of
11Mbps and an operating frequency of 2.4GHz.
switch: device that is the central point of connection for
computers and other devices in a network, so data can
be shared at full transmission speeds.
router: a networking device that connects multiple networks
together, such as a local network and the Internet.
Page 12
6
Chapter 3: Setting up and Connecting the USB Network Adapter
Starting the Setup Wizard
Wireless-G USB Network Adapter with SpeedBooster
Chapter 3: Setting up and Connecting the USB Network
Adapter
The USB Network Adapter is set up with the Setup Wizard that comes on the CD enclosed with the Adapter. This
chapter will guide you through the setup procedure.
Starting the Setup Wizard
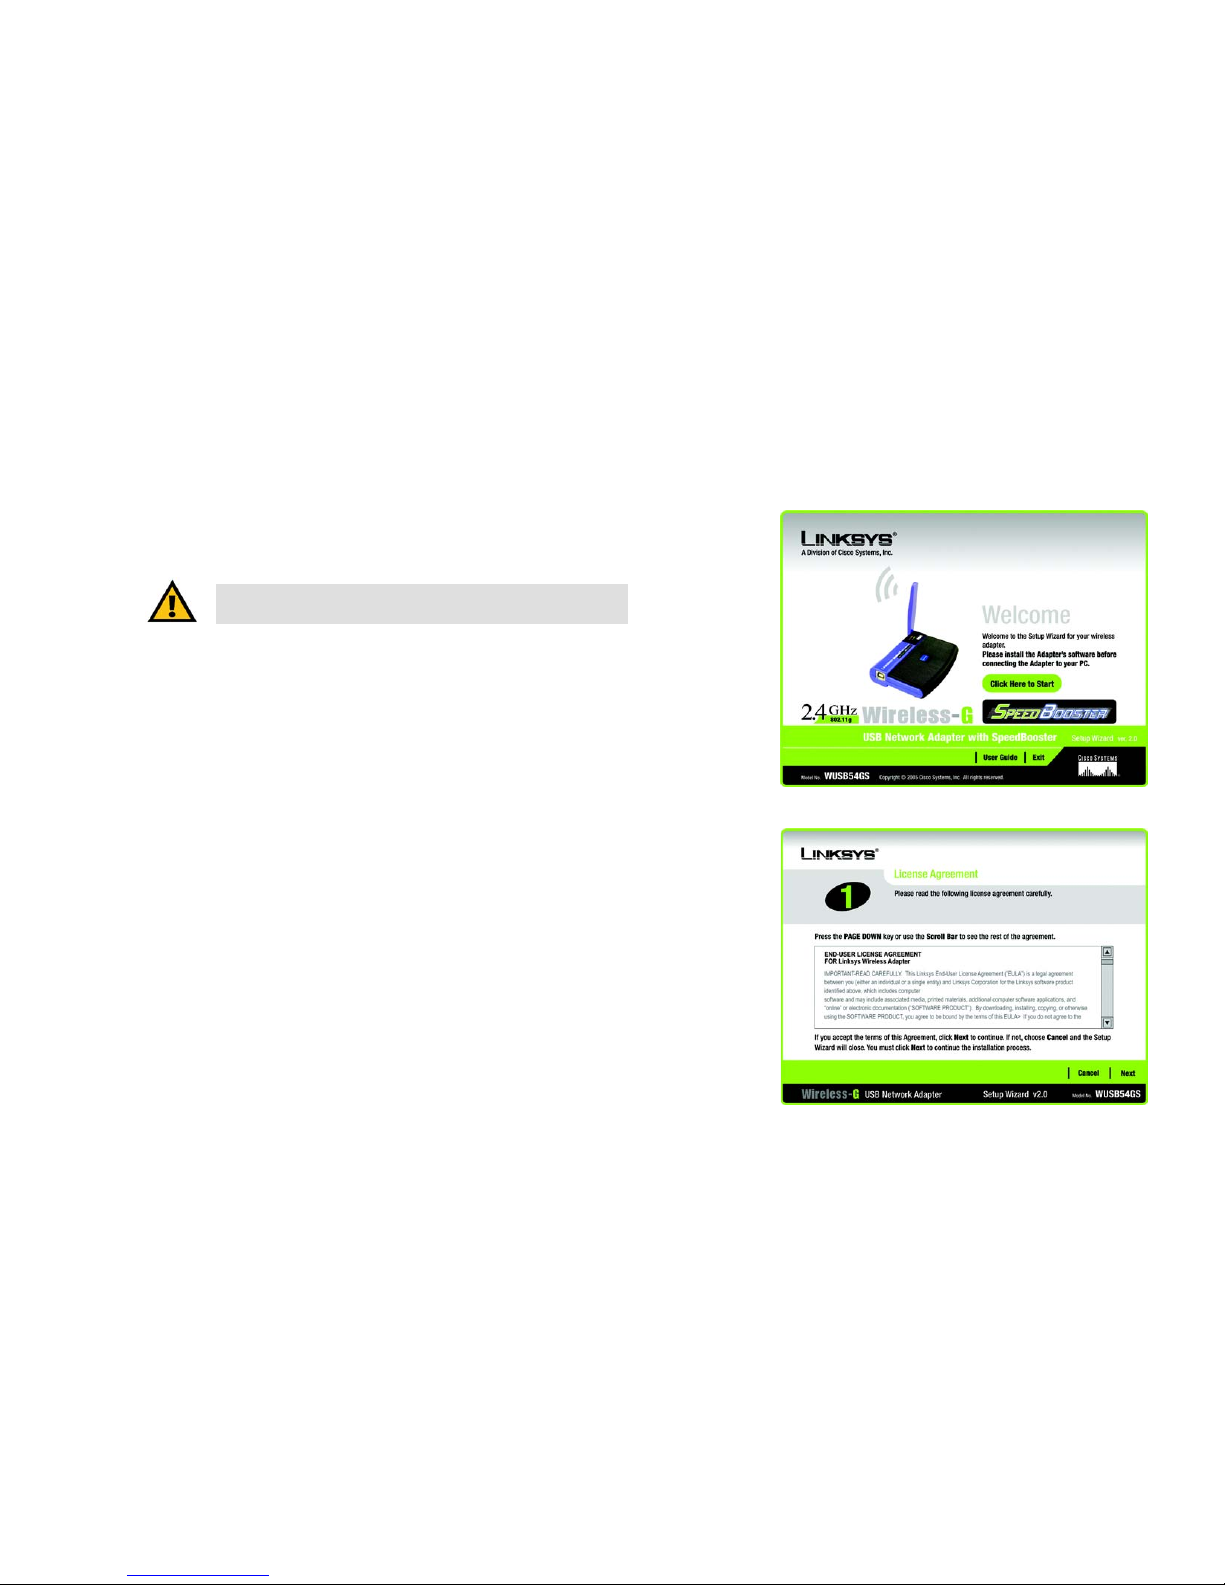
To begin the setup process, insert the Setup Wizard CD-ROM into your CD-ROM drive. The Setup Wizard should
run automatically, and the Welcome screen should appear. If it does not, click the Start button and choose Run.
In the field that appears, enter D:\setup.exe (if “D” is the letter of your CD-ROM drive).
On the Welcome screen, you have the following choices:
Click Here to Start - Click the Click Here to Start button to begin the software installation process.
User Guide - Click the User Guide button to open this User Guide.
Exit - Click Exit to exit the Setup Wizard.
1. To install the Adapter, click the Click Here to Start button on the Welcome screen.
2. After reading the License Agreement, click Next if you agree and want to continue the installation, or click
Cancel to end the installation.
Figure 3-1: Setup Wizard’s Welcome Screen
Figure 3-2: Setup Wizard’s License Agreement
IMPORTANT: Do not connect the Adapter until you are instructed to
do so or the setup will not work.
Page 13
7
Chapter 3: Setting up and Connecting the USB Network Adapter
Connecting the Adapter
Wireless-G USB Network Adapter with SpeedBooster
3. Windows will begin copying the files onto your PC.
4. The Setup Wizard will now prompt you to connect the Adapter to your PC’s USB port. Once you’ve connect,
click Next.
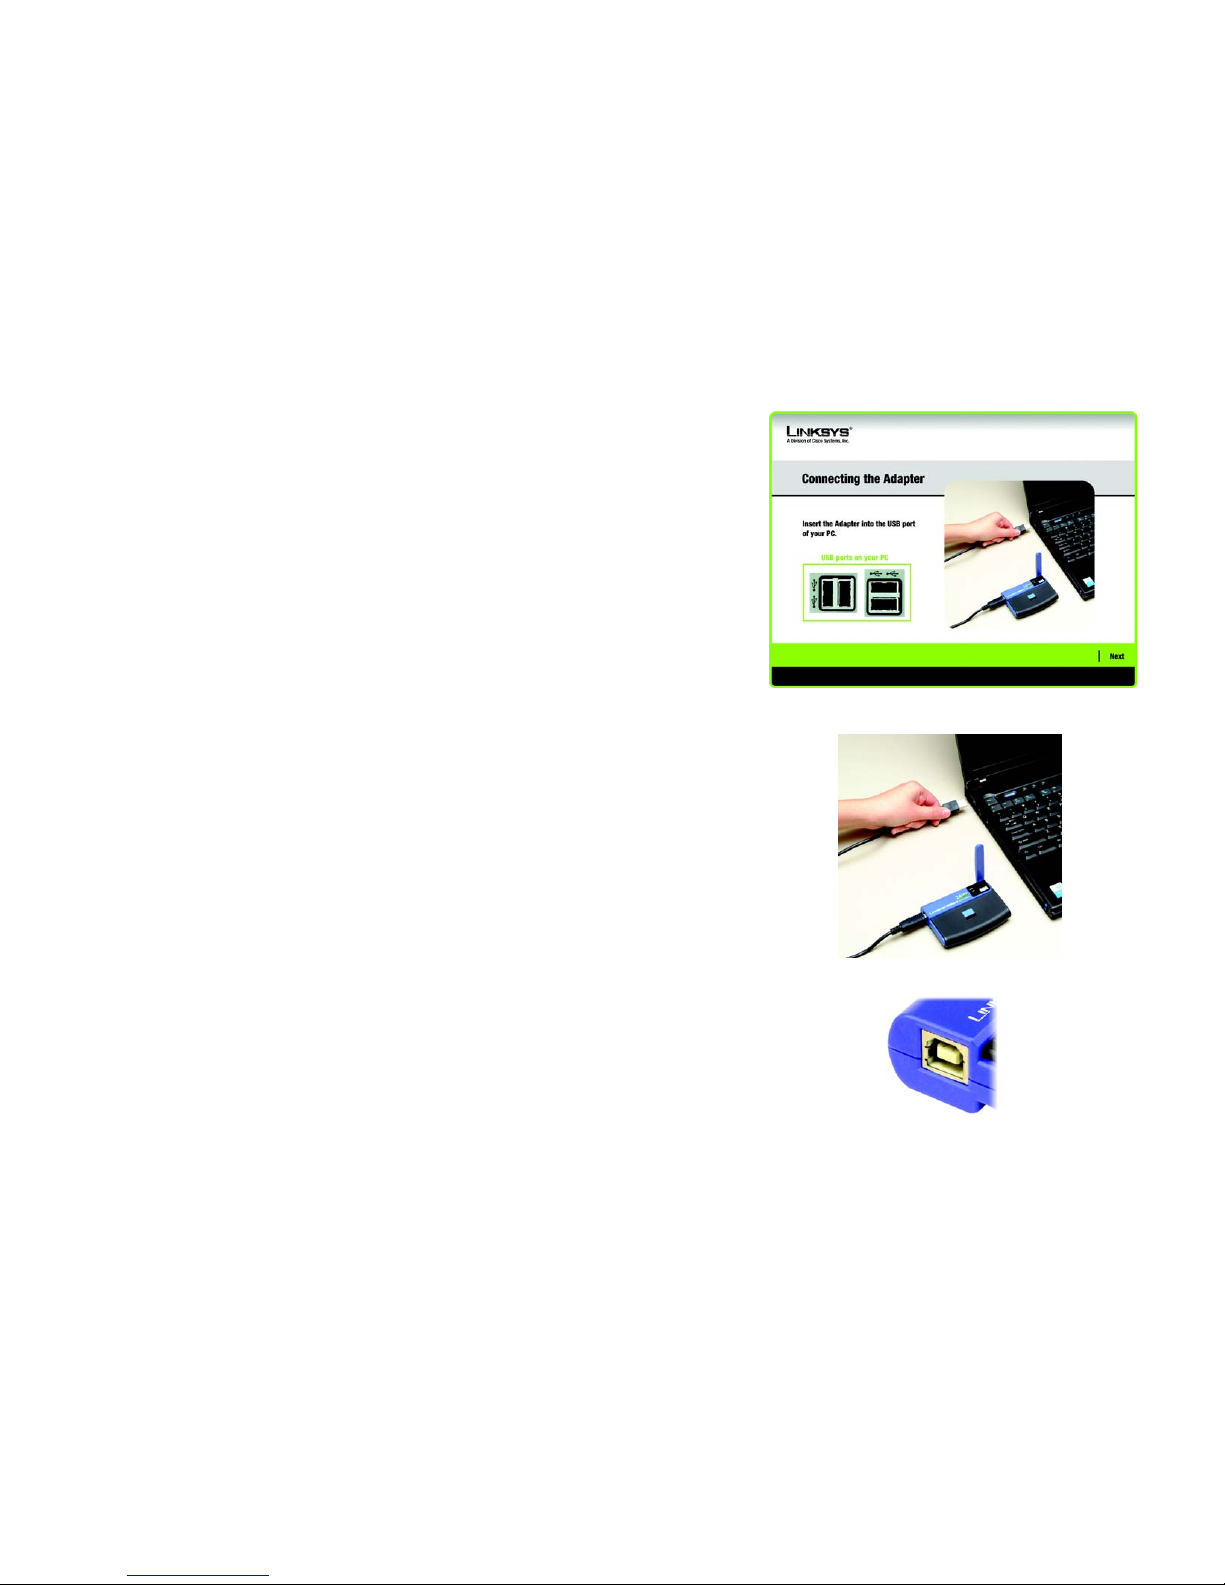
Connecting the Adapter
1. Connect one end of the included USB cable to the Adapter’s USB port.
2. Connect the other end of the cable to one of the USB ports on your computer.
3. The Power LED should light up when the Adapter is plugged in.
4. Raise the antenna. Make sure the antenna points straight up into the air, at a 90º angle from the Adapter. This
will ensure optimum wireless operating range and performance.
Figure 3-3: The Connecting the Adapter Screen
Figure 3-4: Connecting the Adapter
Figure 3-5: The Adapter’s USB port
Page 14
8
Chapter 3: Setting up and Connecting the USB Network Adapter
Setting Up the Adapter
Wireless-G USB Network Adapter with SpeedBooster
Setting Up the Adapter
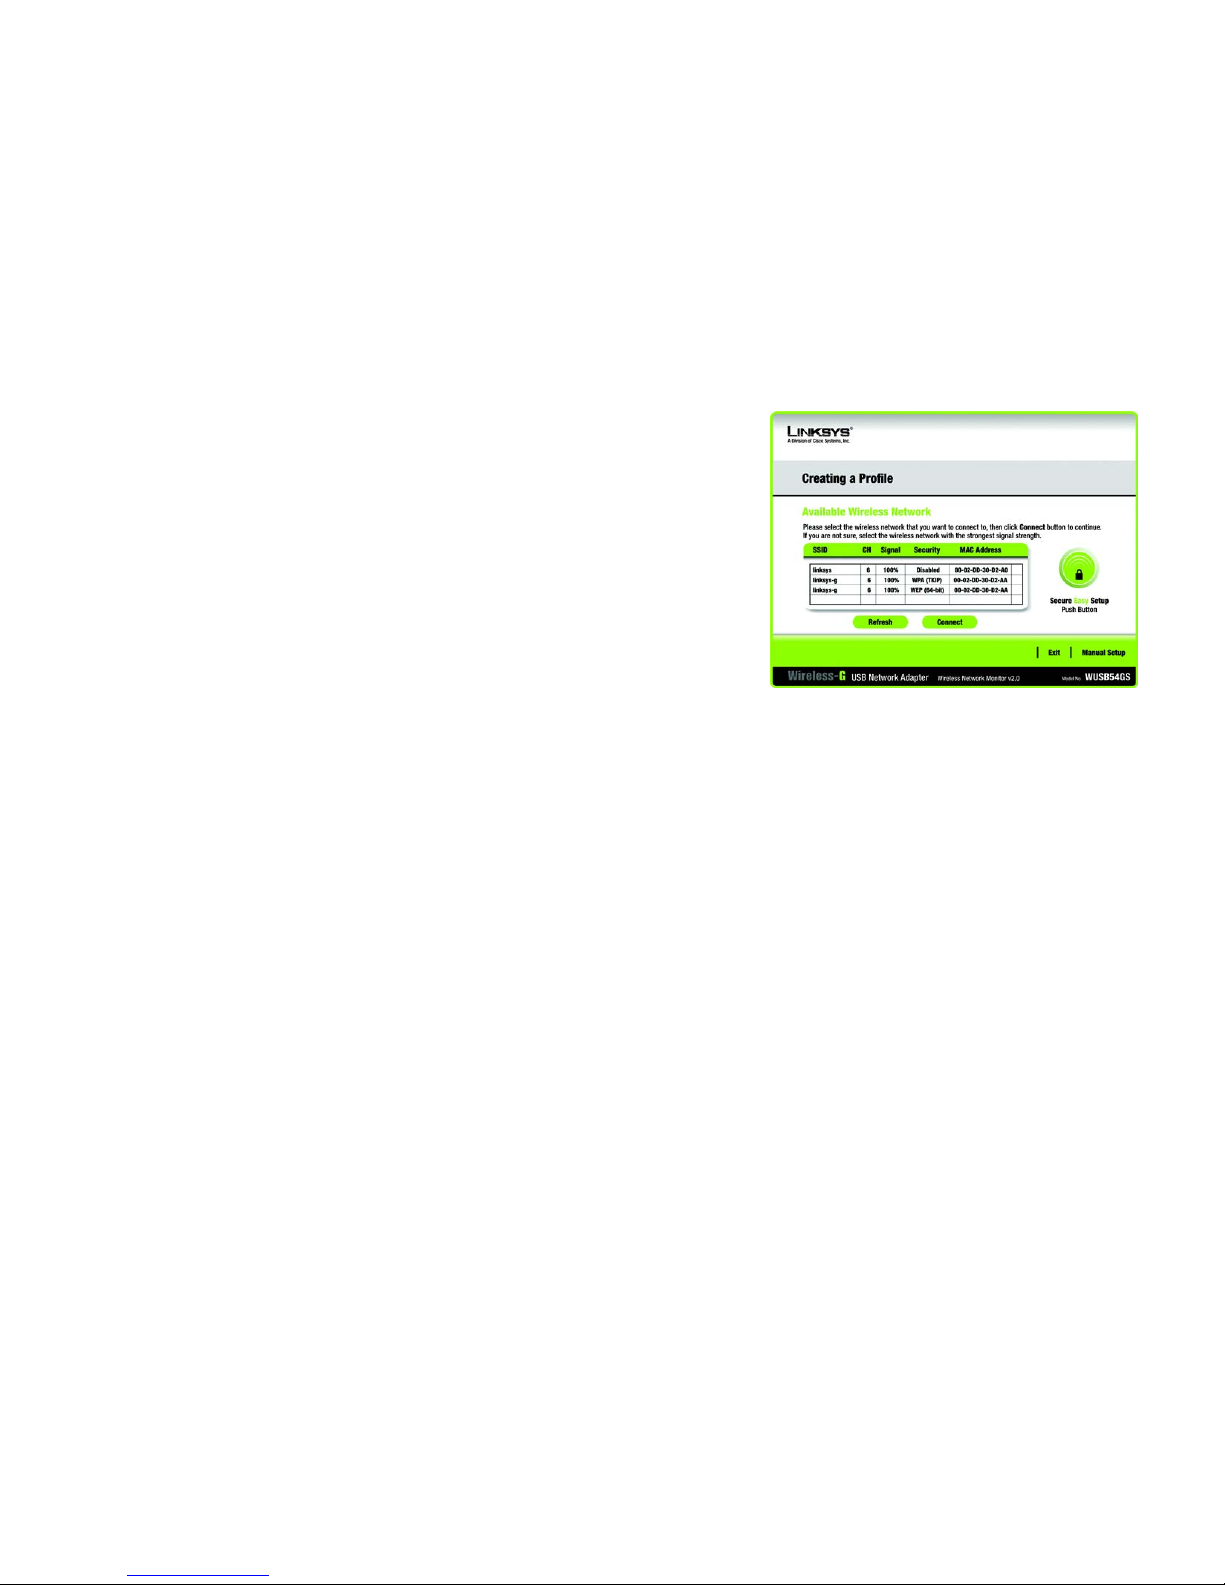
The next screen to appear will be the Available Wireless Network screen.
This screen provides three options for setting up the Adapter
• SecureEasySetup. This Adapter features SecureEasySetupSecureEasySetup. This means that you can set it
up with just the press of a button when connecting to wireless routers or access points that also feature
SecureEasySetup. Both devices on the network must feature SecureEasySetup for this to work.
• Available Wireless Network. (For most users.) Use this option if you already have a network set up with
devices that do not have SecureEasySetup. The networks available to this Adapter will be listed on this
screen. You can choose one of these networks and click the Connect button to connect to it. Click the
Refresh button to update the Available Wireless Network list.
• Manual Setup. If you are not taking advantage of SecureEasySetup and your network is not listed on this
screen, select Manual Setup to set up the adapter manually. This method of setting up the Adapter is
intended for Advanced Users only.
The setup for each option is described, step by step, under the appropriate heading on the following pages.
Click Exit to close the Setup Wizard, if you wish to set up the Adapter later.
Figure 3-6: Available Wireless Network
Page 15
9
Chapter 3: Setting up and Connecting the USB Network Adapter
Setting Up the Adapter
Wireless-G USB Network Adapter with SpeedBooster
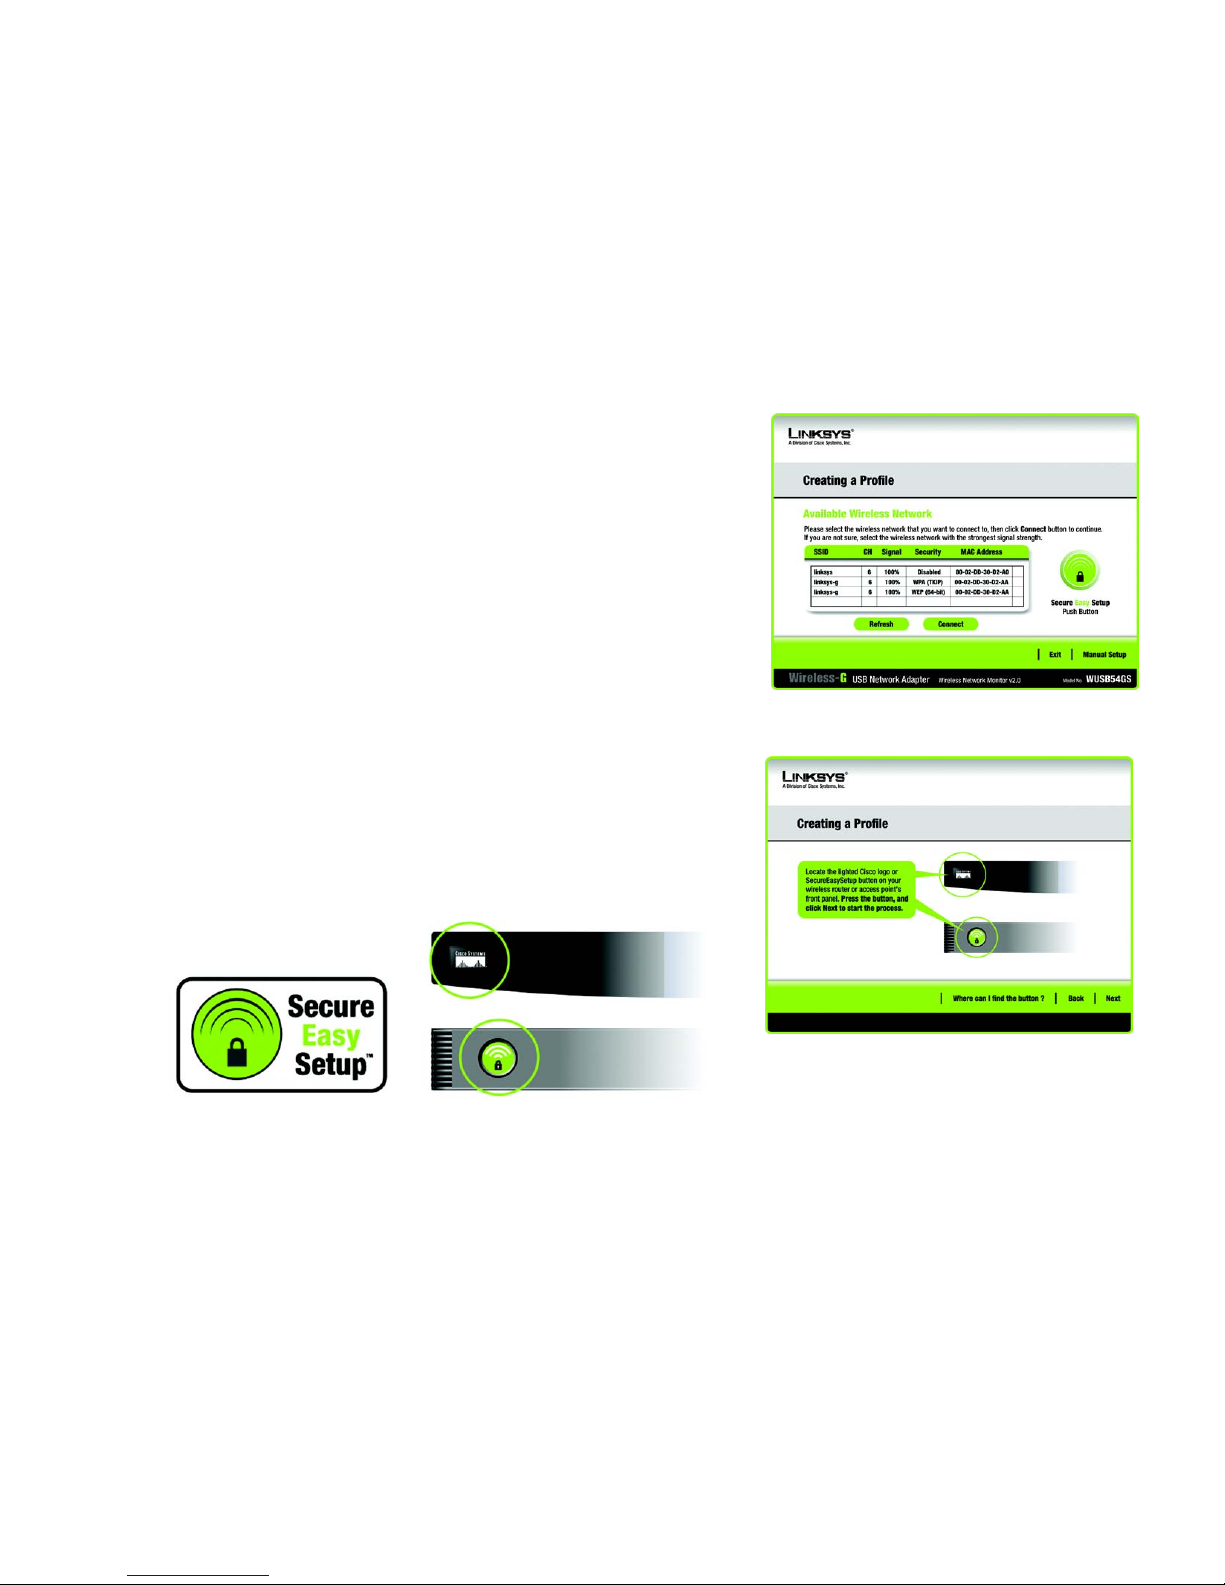
Setting Up the Adapter with SecureEasySetup
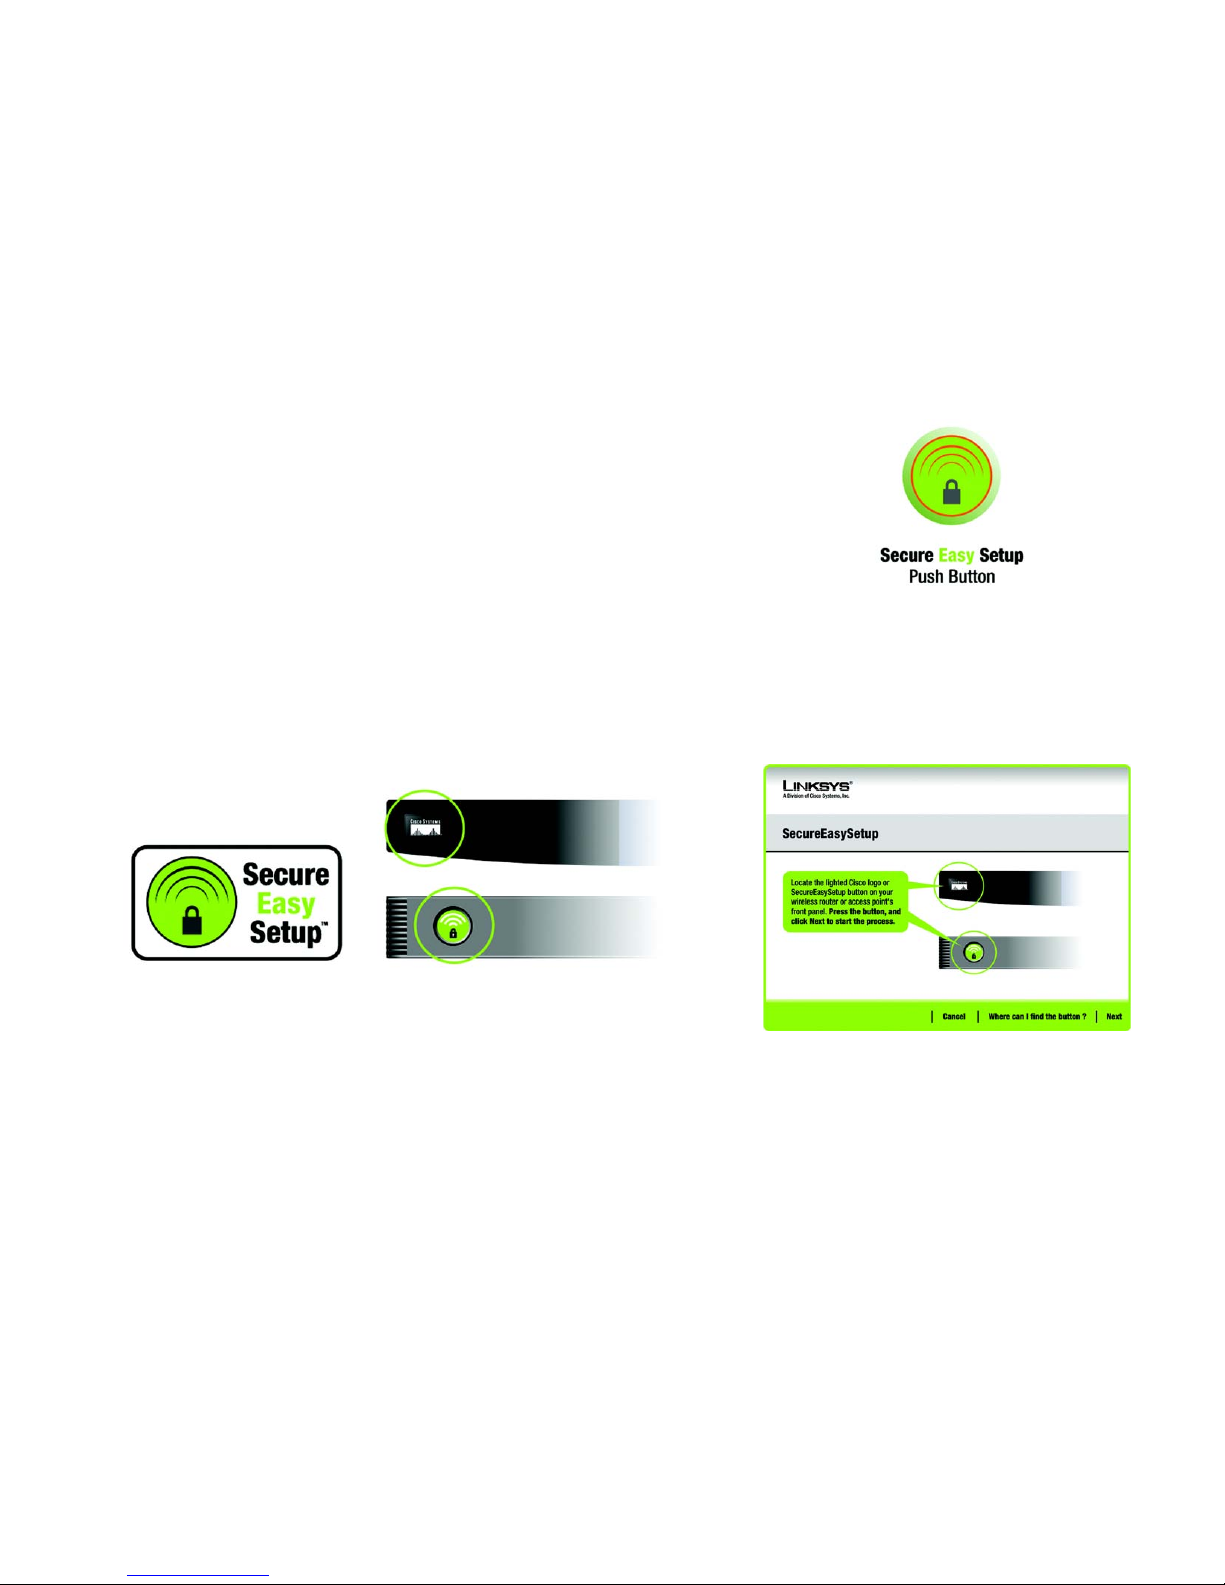
With SecureEasySetup, setting up the Adapter is as simple as pushing a couple of buttons. Before you press any
buttons, though, you should locate the SecureEasySetup button on the device you’re connecting the Adapter to,
such as a wireless router or access point.
1. Starting from the Available Wireless Network screen, click the SecureEasySetup button on the right hand
side.
2. You will be asked to locate the SecureEasySetup button on the device with which the Adapter will be
communicating. If you are not sure where to find this button, click Where can I find the button?.
This will walk you through a couple of screens to help you find the button, which is usually located on the
front of the wireless router or access point.
Figure 3-7: Available Wireless Network
Figure 3-8: SecureEasySetup
Figure 3-9: The SecureEasySetup Logo and Location
Page 16

10
Chapter 3: Setting up and Connecting the USB Network Adapter
Setting Up the Adapter
Wireless-G USB Network Adapter with SpeedBooster
3. Press the Cisco logo or SecureEasySetup button on the wireless router or access point. When it turns white
and begins to flash, click
the Next button on the
Setup Wizard screen. The
logo or button will stop
flashing on the wireless router or access point when the Adapter has been successfully added
to the network. Repeat this procedure for any additional SecureEasySetup device.
4. When SecureEasySetup is complete, you may save your configuration to a text file by clicking the Save
button, or print the configuration by clicking the Print button. Click Connect to Network to connect to your
network.
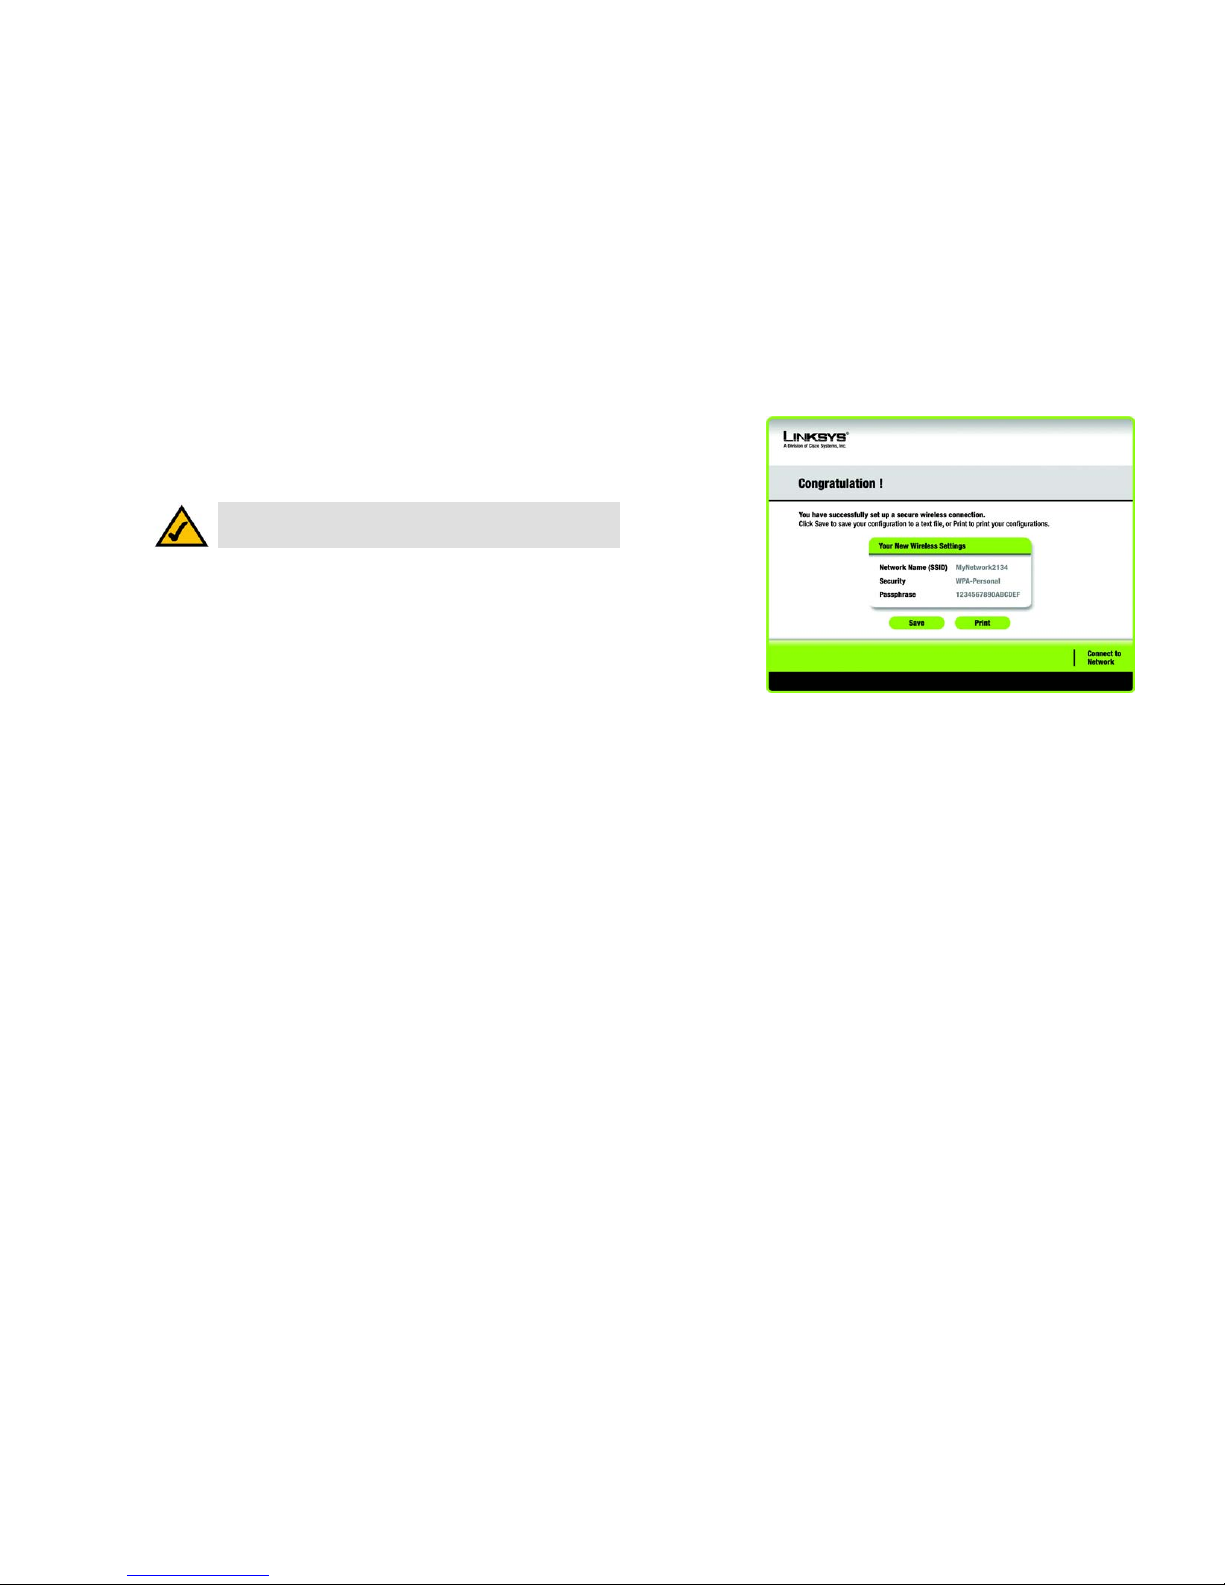
Congratulations! Setup is complete.
To check the link information, search for available wireless networks, or make additional configuration
changes, refer to Chapter 4: Using the Wireless Network Monitor.
NOTE: You can only add one SecureEasySetup device at a time.
Figure 3-10: SecureEasySetup complete
Page 17
11
Chapter 3: Setting up and Connecting the USB Network Adapter
Setting Up the Adapter
Wireless-G USB Network Adapter with SpeedBooster
Setting Up the Adapter with Available Networks
If you’re not setting up the Adapter with SecureEasySetup, another method for setting up the Adapter is with the
available networks listed on the Available Wireless Network screen. The available networks are listed in the table
on the center of the screen by SSID. Select the wireless network you wish to connect to and click the Connect
button. (If you do not see your network listed, you can click the Refresh button to bring the list up again.) If the
network utilizes wireless security, you will need to configure security on the Adapter. If not, you will be taken
directly to the Congratulations screen.
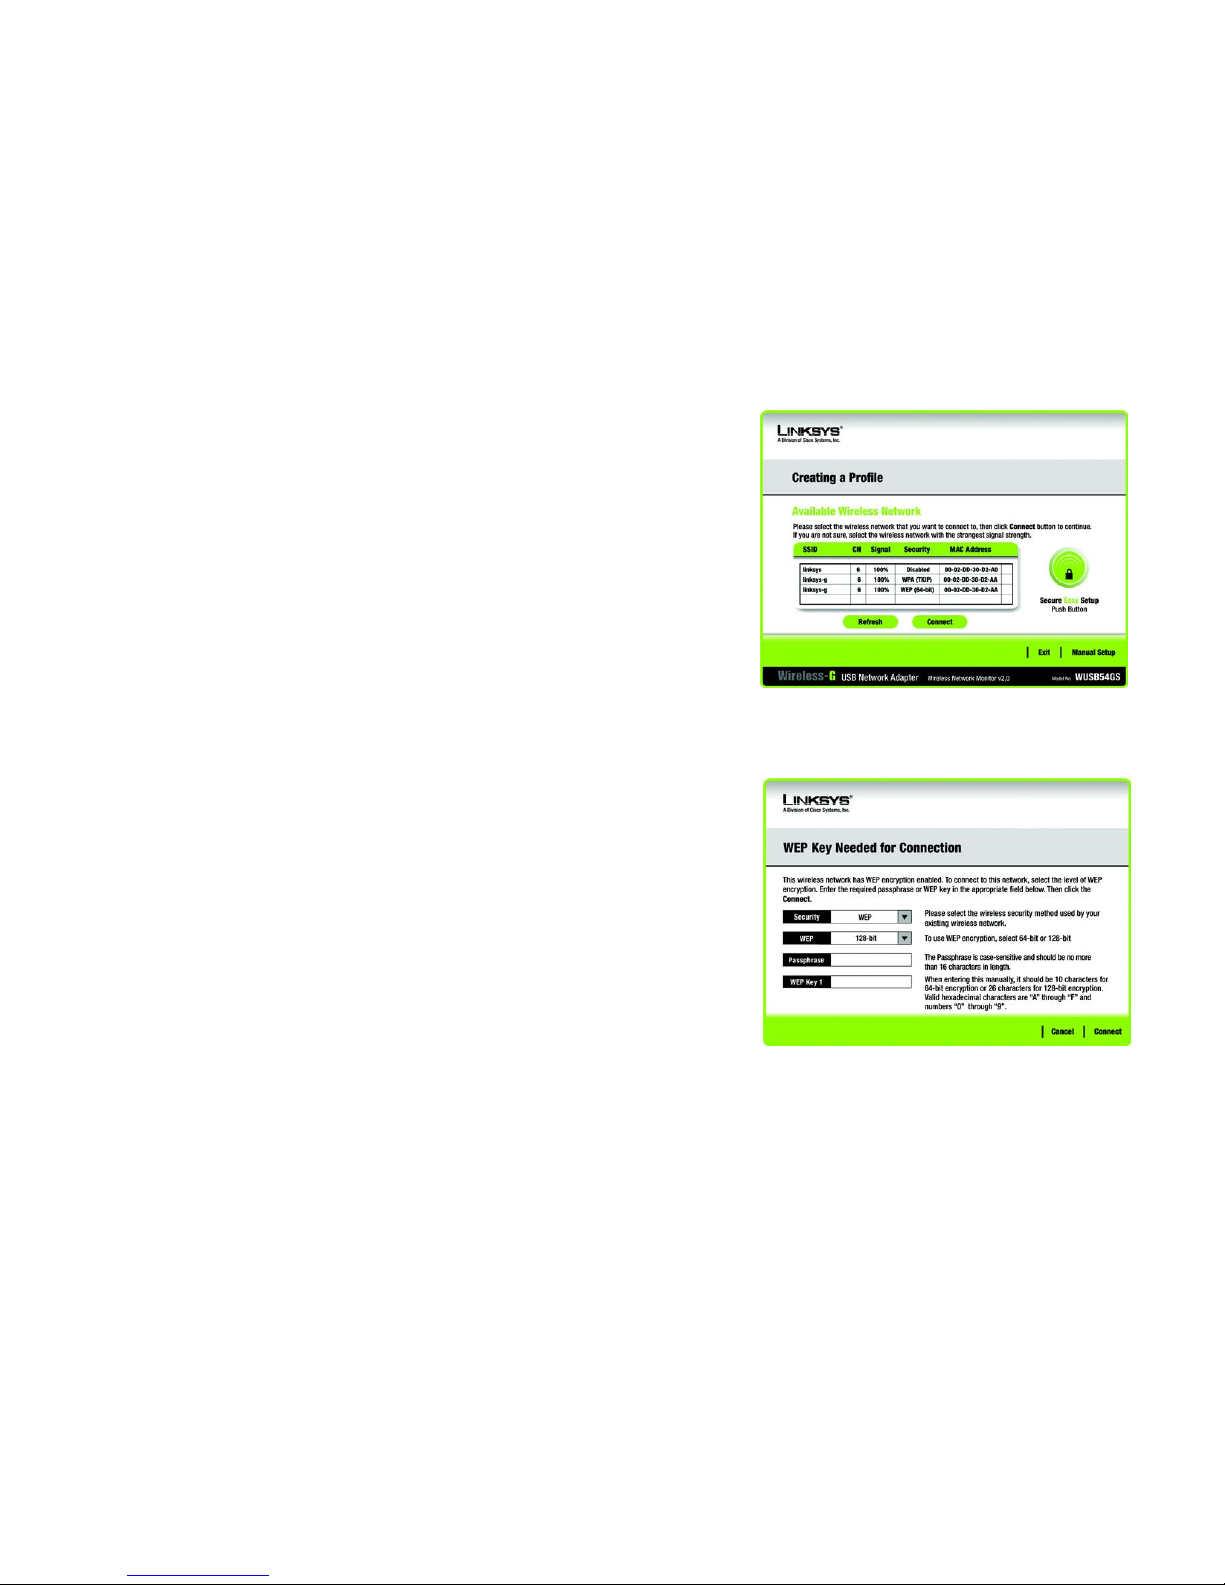
1. If wireless security has been enabled on this network, you will see a wireless security screen. If your network
utilizes WEP (Wired Equivalent Privacy) encryption, the WEP Key Needed for Connection screen will appear. If
your network utilizes PSK (Pre-Shared Key) encryption, the PSK Key Needed for Connection screen will
appear.
WEP Key Needed for Connection
Select 64-bit or 128-bit.
Then, enter a passphrase or WEP key.
Passphrase - Enter a passphrase in the Passphrase field, so a WEP key is automatically generated. The
passphrase is case-sensitive and should not be longer than 16 alphanumeric characters. It must match the
passphrase of your other wireless network devices and is compatible with Linksys wireless products only. (If
you have any non-Linksys wireless products, enter the WEP key manually on those products.)
WEP Key - The WEP key you enter must match the WEP key of your wireless network. For 64-bit encryption,
enter exactly 10 hexadecimal characters. For 128-bit encryption, enter exactly 26 hexadecimal characters.
Figure 3-11: Available Wireless Network
Figure 3-12: WEP Key Needed for Connection
wep (wired equivalent privacy): a method of encrypting network
data transmitted on a wireless network for greater security.
encryption: encoding data transmitted in a network.
Page 18

12
Chapter 3: Setting up and Connecting the USB Network Adapter
Setting Up the Adapter
Wireless-G USB Network Adapter with SpeedBooster
Valid hexadecimal characters are “0” to “9” and “A” to “F”.
Then, click Connect and proceed to the Congratulations screen. To cancel the connection, click Cancel.
PSK Needed for Connection
Encryption - Select the type of algorithm you want to use, TKIP or AES, from the Encryption drop-down
menu.
Passphrase - Enter a Passphrase, also called a pre-shared key, of 8-63 characters in the Passphrase field.
The longer and more complex your Passphrase is, the more secure your network will be.
Then, click Connect and proceed to the Congratulations screen. To cancel the connection, click Cancel.
2. After the Adapter has been configured for the network, the Congratulations screen will appear. Click Connect
to Network to connect to your network.
Congratulations! Setup is complete.
To check the link information, search for available wireless networks, or make additional configuration
changes, refer to Chapter 4: Using the Wireless Network Monitor.
Figure 3-13: PSK Needed for Connection
Figure 3-14: The Congratulations screen
Page 19
13
Chapter 3: Setting up and Connecting the USB Network Adapter
Setting Up the Adapter
Wireless-G USB Network Adapter with SpeedBooster
Setting Up the Adapter with Manual Setup
If you are not taking advantage of SecureEasySetup and your network is not listed with the available networks,
click Manual Setup on the Available Wireless Network screen to set up the adapter manually.
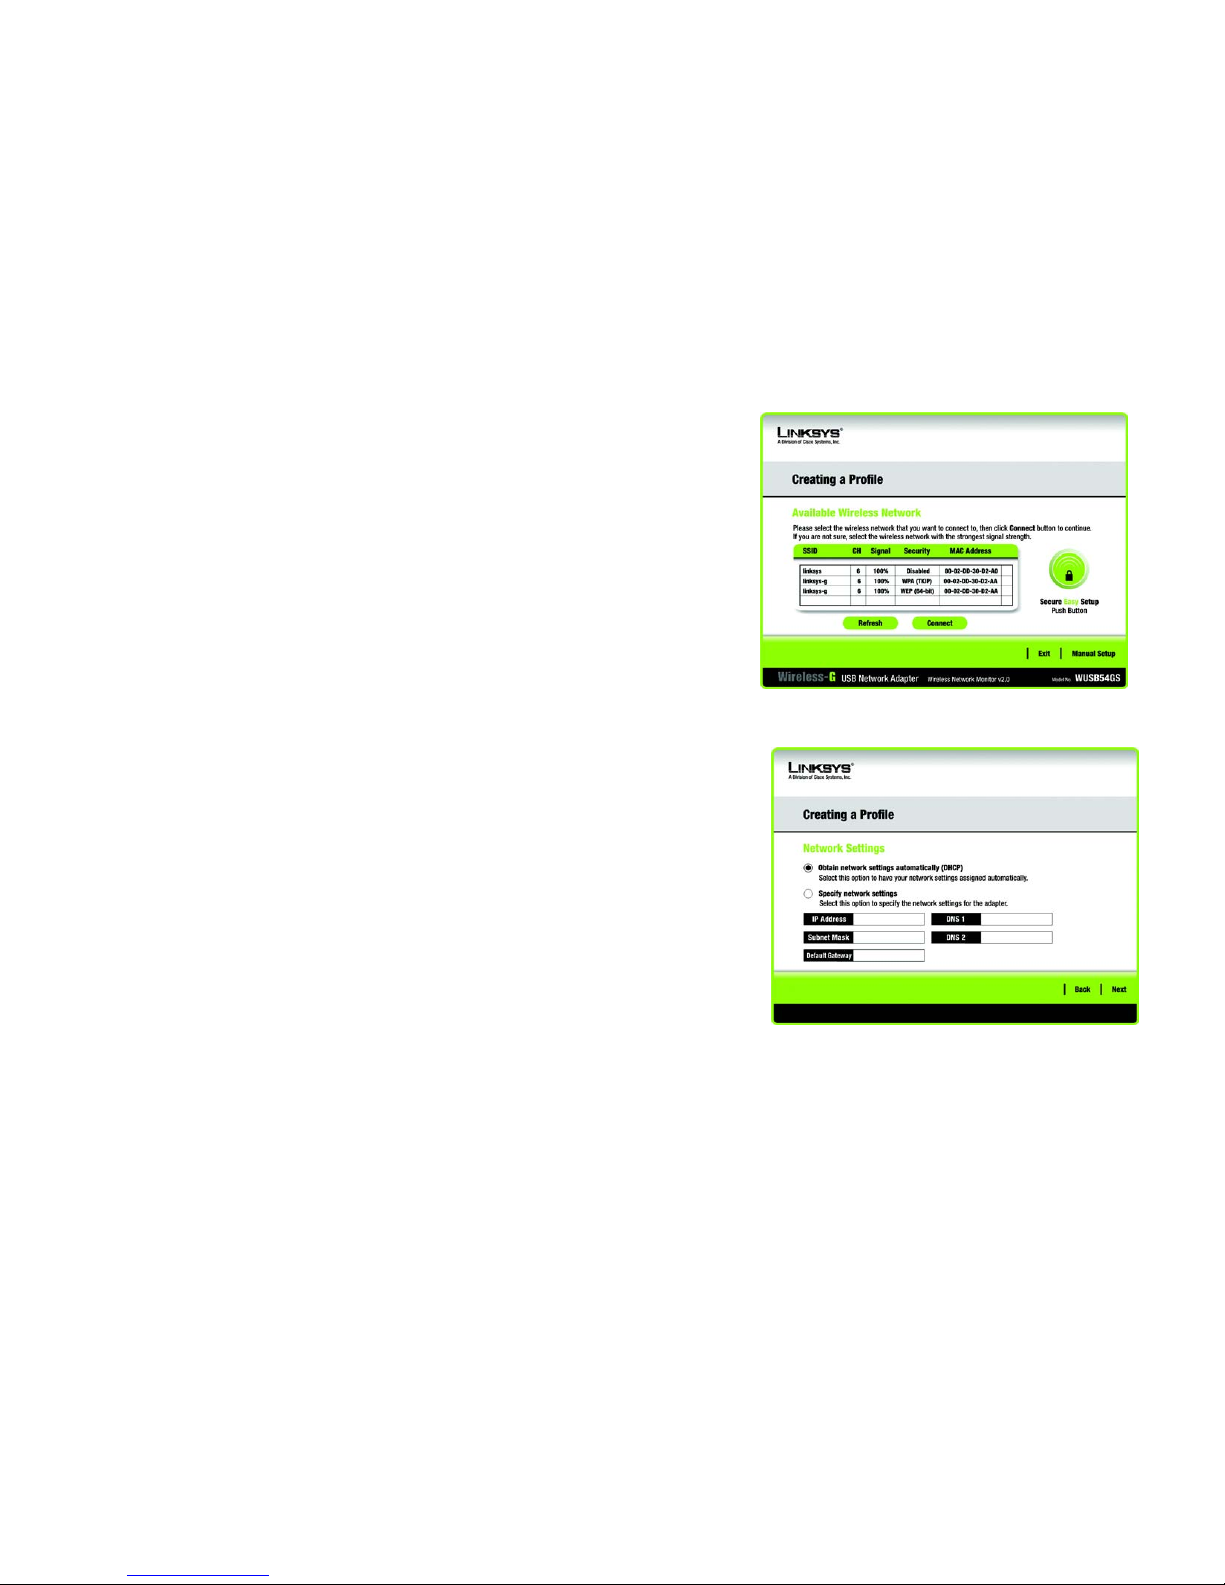
1. After clicking Manual Setup, the Network Settings screen will appear. If your network has a router or other
DHCP server, click the radio button next to Obtain network settings automatically (DHCP).
If your network does not have a DHCP server, click the radio button next to Specify network settings. Enter
an IP Address, Subnet Mask, Default Gateway, and DNS addresses appropriate for your network. You must
specify the IP Address and Subnet Mask on this screen. If you are unsure about the Default Gateway and DNS
addresses, leave these fields empty.
IP Address - This IP Address must be unique to your network.
Subnet Mask - The Adapter’s Subnet Mask must be the same as your wired network’s Subnet Mask.
Default Gateway - Enter the IP address of your network’s Gateway here.
DNS 1 and DNS 2 - Enter the DNS address of your wired Ethernet network here.
Click Next to continue, or click Back to return to the Available Wireless Network screen.
Figure 3-15: Available Wireless Network
Figure 3-16: Network Settings
Page 20
14
Chapter 3: Setting up and Connecting the USB Network Adapter
Setting Up the Adapter
Wireless-G USB Network Adapter with SpeedBooster
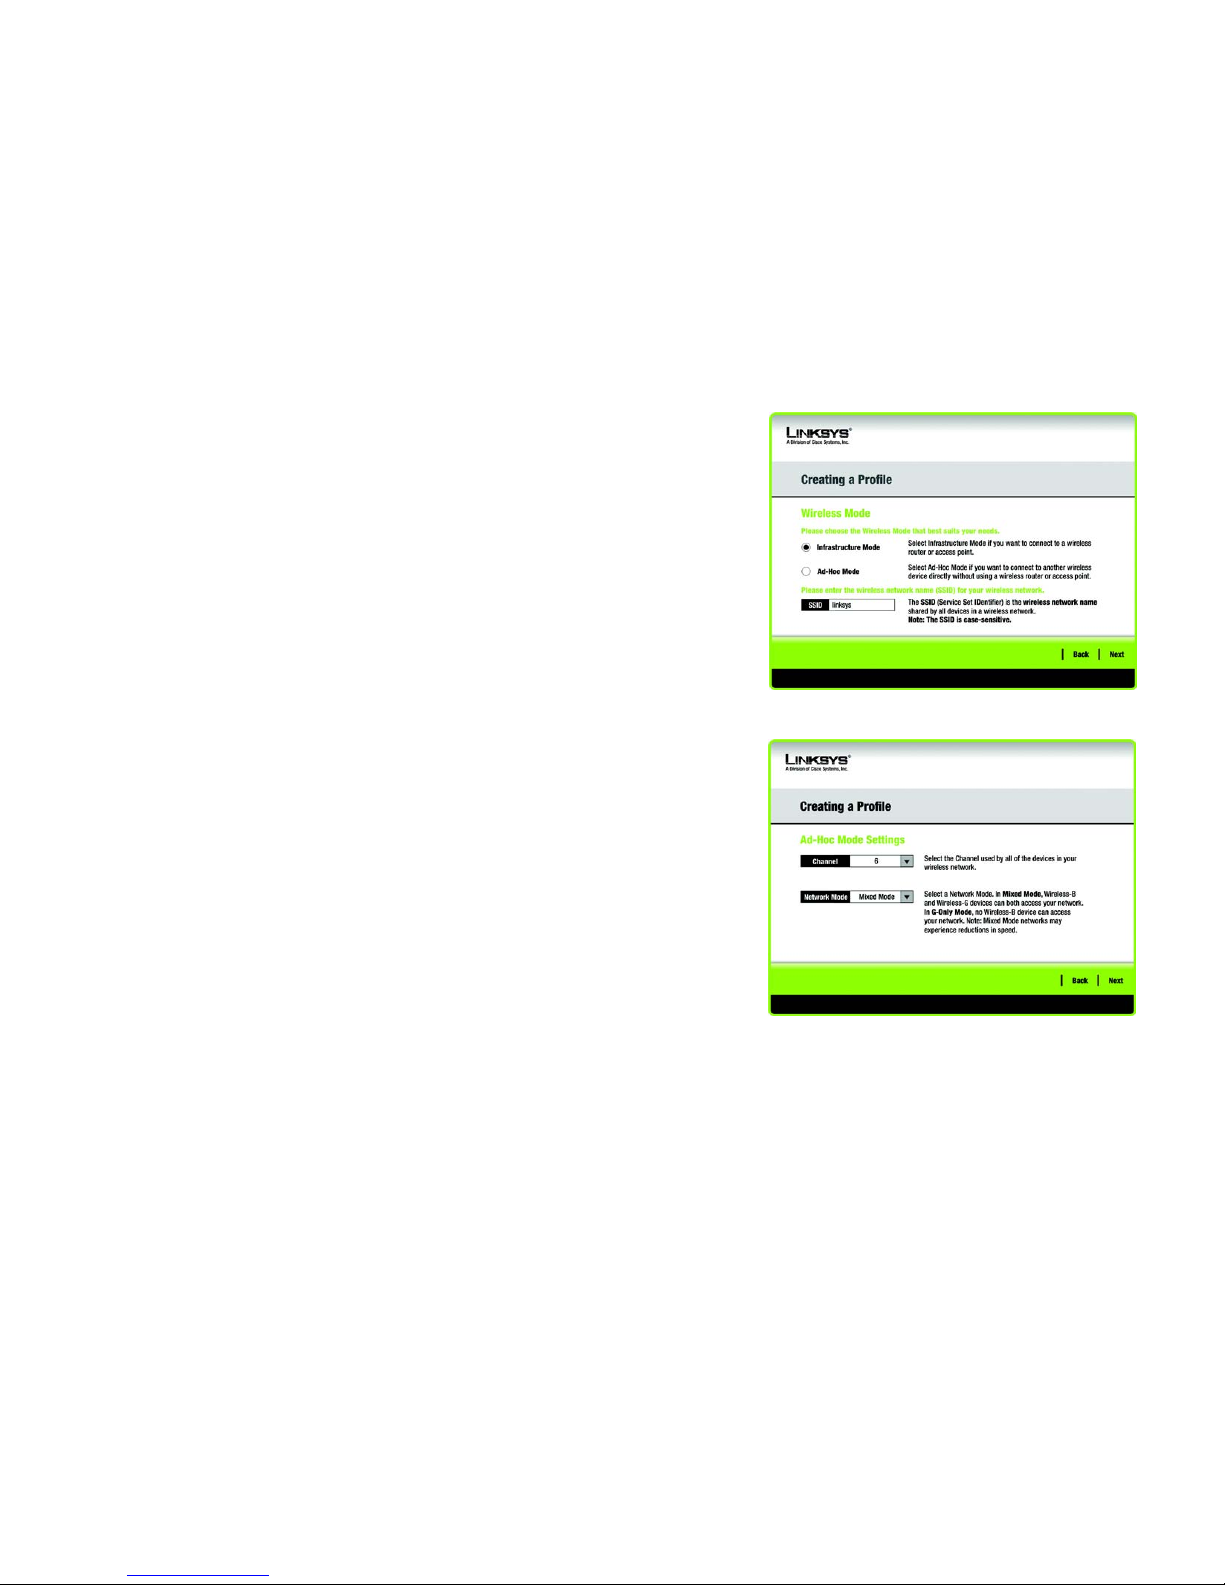
2. The Wireless Mode screen shows a choice of two wireless modes. Click the Infrastructure Mode radio
button if you want to connect to a wireless router or access point. Click the Ad-Hoc Mode radio button if you
want to connect to another wireless device directly without using a wireless router or access point. Then,
enter the SSID for your network.
Infrastructure Mode - Use this mode if you want to connect to a wireless router or access point.
Ad-Hoc Mode - Use this mode if you want to connect to another wireless device directly without using a
wireless router or access point.
SSID - This is the wireless network name that must be used for all the devices in your wireless network. It is
case- sensitive and should be a unique name to help prevent others from entering your network.
Click Next to continue or Back to return to the previous screen.
3. If you chose Infrastructure Mode, go to Step 4 now. If you chose Ad-Hoc Mode, the Ad-Hoc Mode Settings
screen will appear.
Select the correct Channel for your wireless network. The channel you choose should match the channel set
on the other devices in your wireless network. If you are unsure about which channel to use, keep the default
setting.
Then, select the Network Mode in which your wireless network will operate. In Mixed Mode, Wireless-B and
Wireless-G devices can both operate on the network, though at a slower speed. In G-Only Mode, no Wireless-
B devices can operate in the network.
Click Next to continue or click Back to change any settings.
Figure 3-17: Wireless Mode
Figure 3-18: Ad-Hoc Mode Settings
Page 21
15
Chapter 3: Setting up and Connecting the USB Network Adapter
Setting Up the Adapter
Wireless-G USB Network Adapter with SpeedBooster
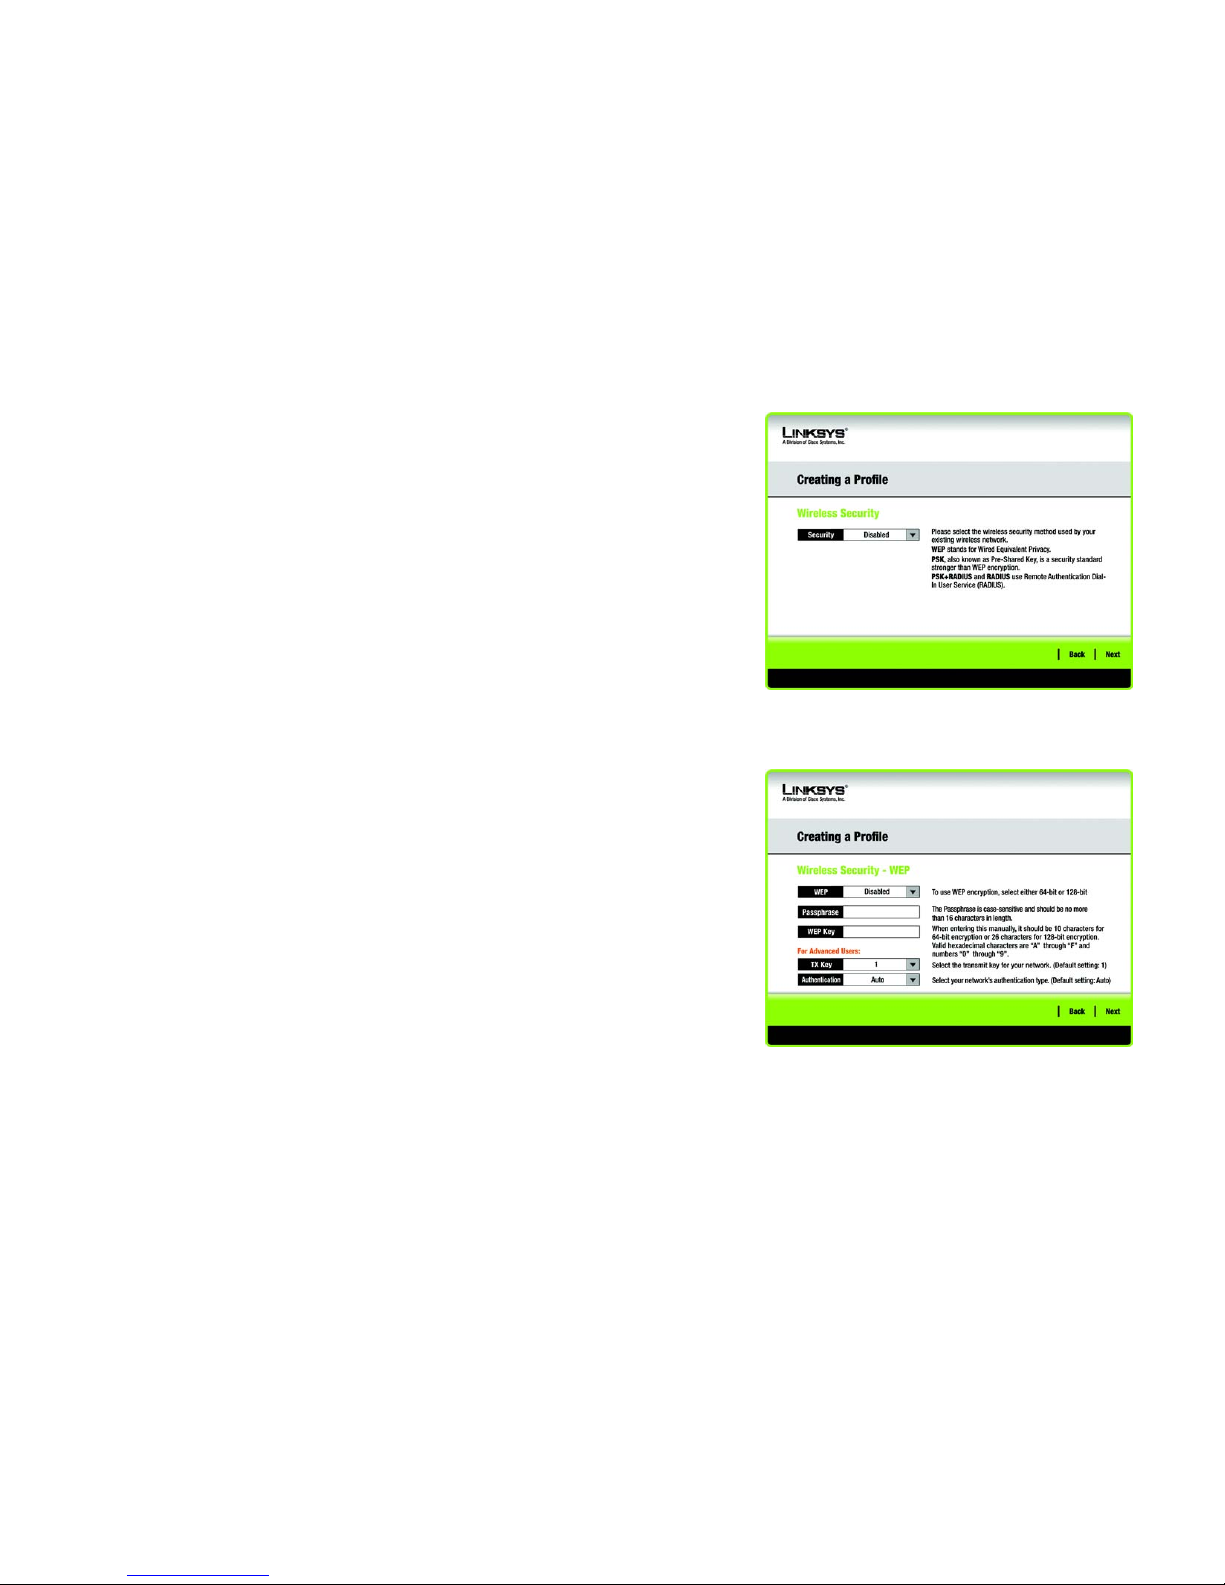
4. The Wireless Security screen will appear. This step will configure wireless security.
If your wireless network doesn’t use wireless security, select Disabled and then click the Next button to
continue. Proceed to Step 6.
Select WEP, PSK, PSK + Radius, or Radius for the Encryption Method. WEP stands for Wired Equivalent
Privacy, PSK stands for Pre-Shared Key, which is a security standard stronger than WEP encryption, and
RADIUS stands for Remote Authentication Dial-In User Service. If you don’t want to use encryption, select
Disabled. Then, click the Next button to continue or the Back button to return to the previous screen.
WEP
WEP - To use WEP encryption, select 64-bits or 128-bit characters from the drop-down menu, and enter a
passphrase or key.
WEP Key- The WEP key you enter must match the WEP key of your wireless network. If you are using 64-bit
WEP encryption, then the key must consist of exactly 10 hexadecimal characters. If you are using 128-bit
WEP encryption, then the key must consist of exactly 26 hexadecimal characters. Valid hexadecimal
characters are “0” to “9” and “A” to “F”.
Passphrase - Instead of manually entering a WEP key, you can enter a passphrase in the Passphrase field, so
a WEP key is automatically generated. This case-sensitive passphrase must match the passphrase of your
other wireless network devices and is compatible with Linksys wireless products only. (If you have any nonLinksys wireless products, enter the WEP key manually on those products.)
TX Key - The default transmit key number is 1. If your network’s access point or wireless router uses transmit
key number 2, 3, or 4, select the appropriate number from the TX Key drop-down box.
Authentication -The default is set to Auto, where it auto-detects for Shared Key or Open system. Shared
Key is when both the sender and the recipient share a WEP key for authentication. Open key is when the
sender and the recipient do not share a WEP key for authentication. All points on your network must use the
same authentication type.
Click the Next button to continue to the Confirm New Settings screen or the Back button to return to the
previous screen.
Figure 3-19: Wireless Security
encryption: encoding data transmitted in a network.
Figure 3-20: Wireless Security - WEP
wep (wired equivalent privacy): a method of encrypting network
data transmitted on a wireless network for greater security.
Page 22
16
Chapter 3: Setting up and Connecting the USB Network Adapter
Setting Up the Adapter
Wireless-G USB Network Adapter with SpeedBooster
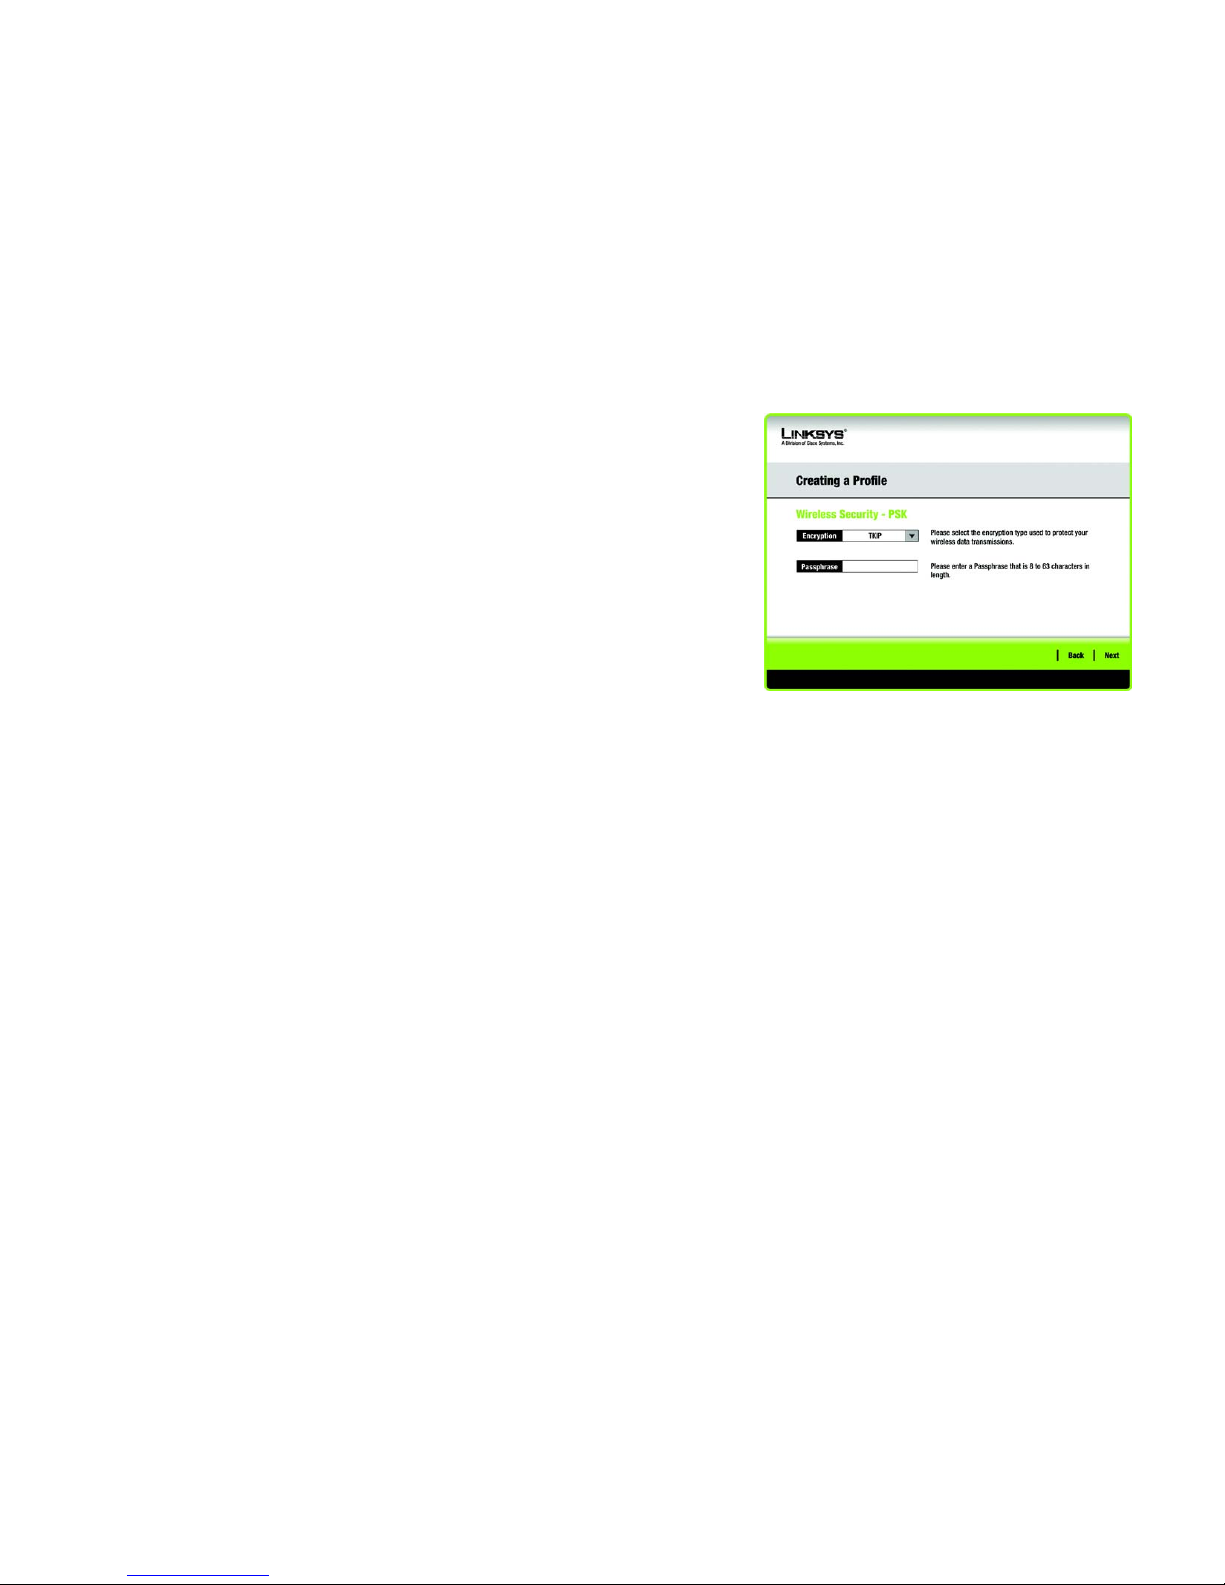
PSK
PSK offers two encryption methods, TKIP and AES, with dynamic encryption keys.
Select the type of algorithm, TKIP or AES, for the Encryption Type. Enter a Passphrase of 8-63 characters in
the Passphrase field.
Click the Next button to continue to the Confirm New Settings screen or the Back button to return to the
previous screen.
Figure 3-21: Wireless Security - PSK
Page 23
17
Chapter 3: Setting up and Connecting the USB Network Adapter
Setting Up the Adapter
Wireless-G USB Network Adapter with SpeedBooster
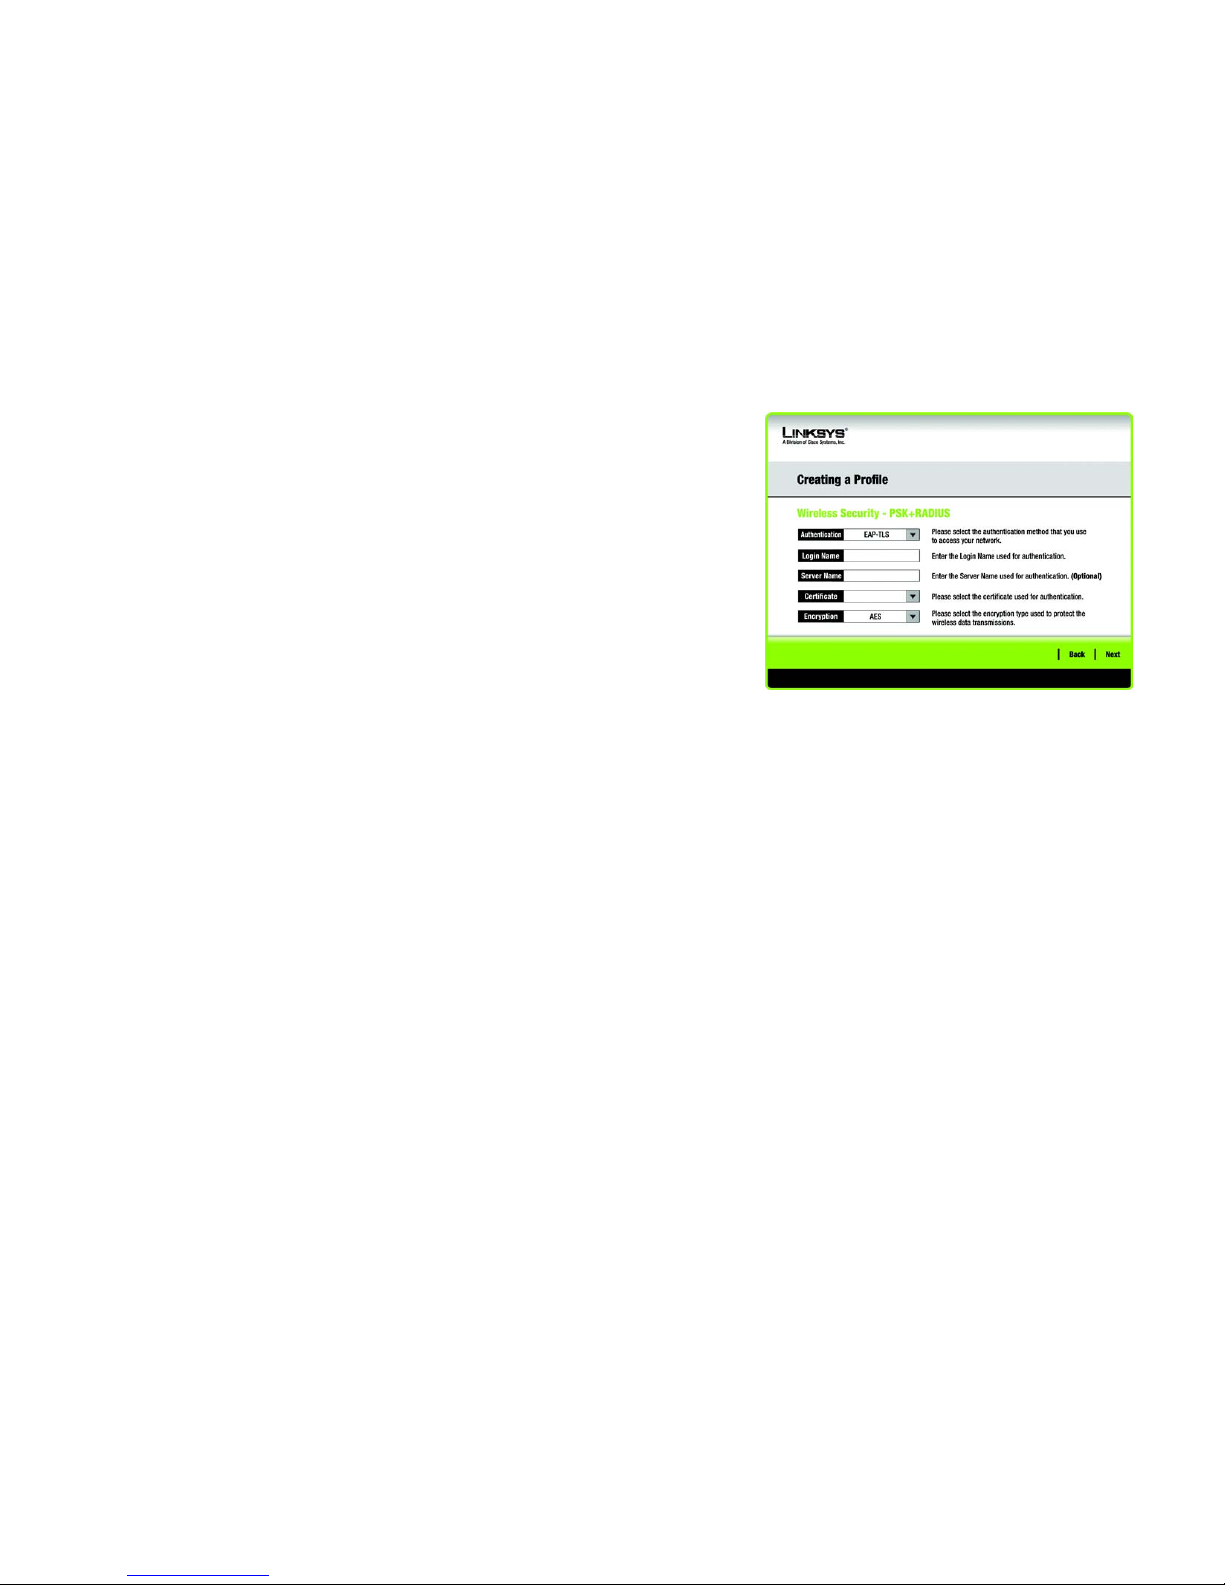
PSK + RADIUS.
PSK + RADIUS features PSK used in coordination with a RADIUS server. (This should only be used when a
RADIUS server is connected to the Router.) PSK + Radius offers two encryption methods, TKIP and AES, with
dynamic encryption keys. It offers two authentication methods: EAP-TLS and PEAP.
Select the Authentication Method from the drop-down menu on the following screen. The options are: EAP-
TLS and PEAP.
EAP-TLS: Enter the Login name of your wireless network in the Login Name field. From the Certificate
drop-down menu, select the certificate you have installed to authenticate you on your wireless network.
PEAP: Enter the Login name of your wireless network in the Login Name field. Enter the password of
your wireless network in the Password field. From the Certificate drop-down menu, select the
certificate you have installed to authenticate you on your wireless network. Also, select an Inner Authen.
(Inner Authentication Method) for authentication inside the PEAP tunnel.
Select the type of algorithm, TKIP or AES, for the Encryption Type.
Click the Next button to continue to the Confirm New Settings screen or the Back button to return to the
previous screen.
Figure 3-22: Wireless Security - PSK + RADIUS
Page 24
18
Chapter 3: Setting up and Connecting the USB Network Adapter
Setting Up the Adapter
Wireless-G USB Network Adapter with SpeedBooster
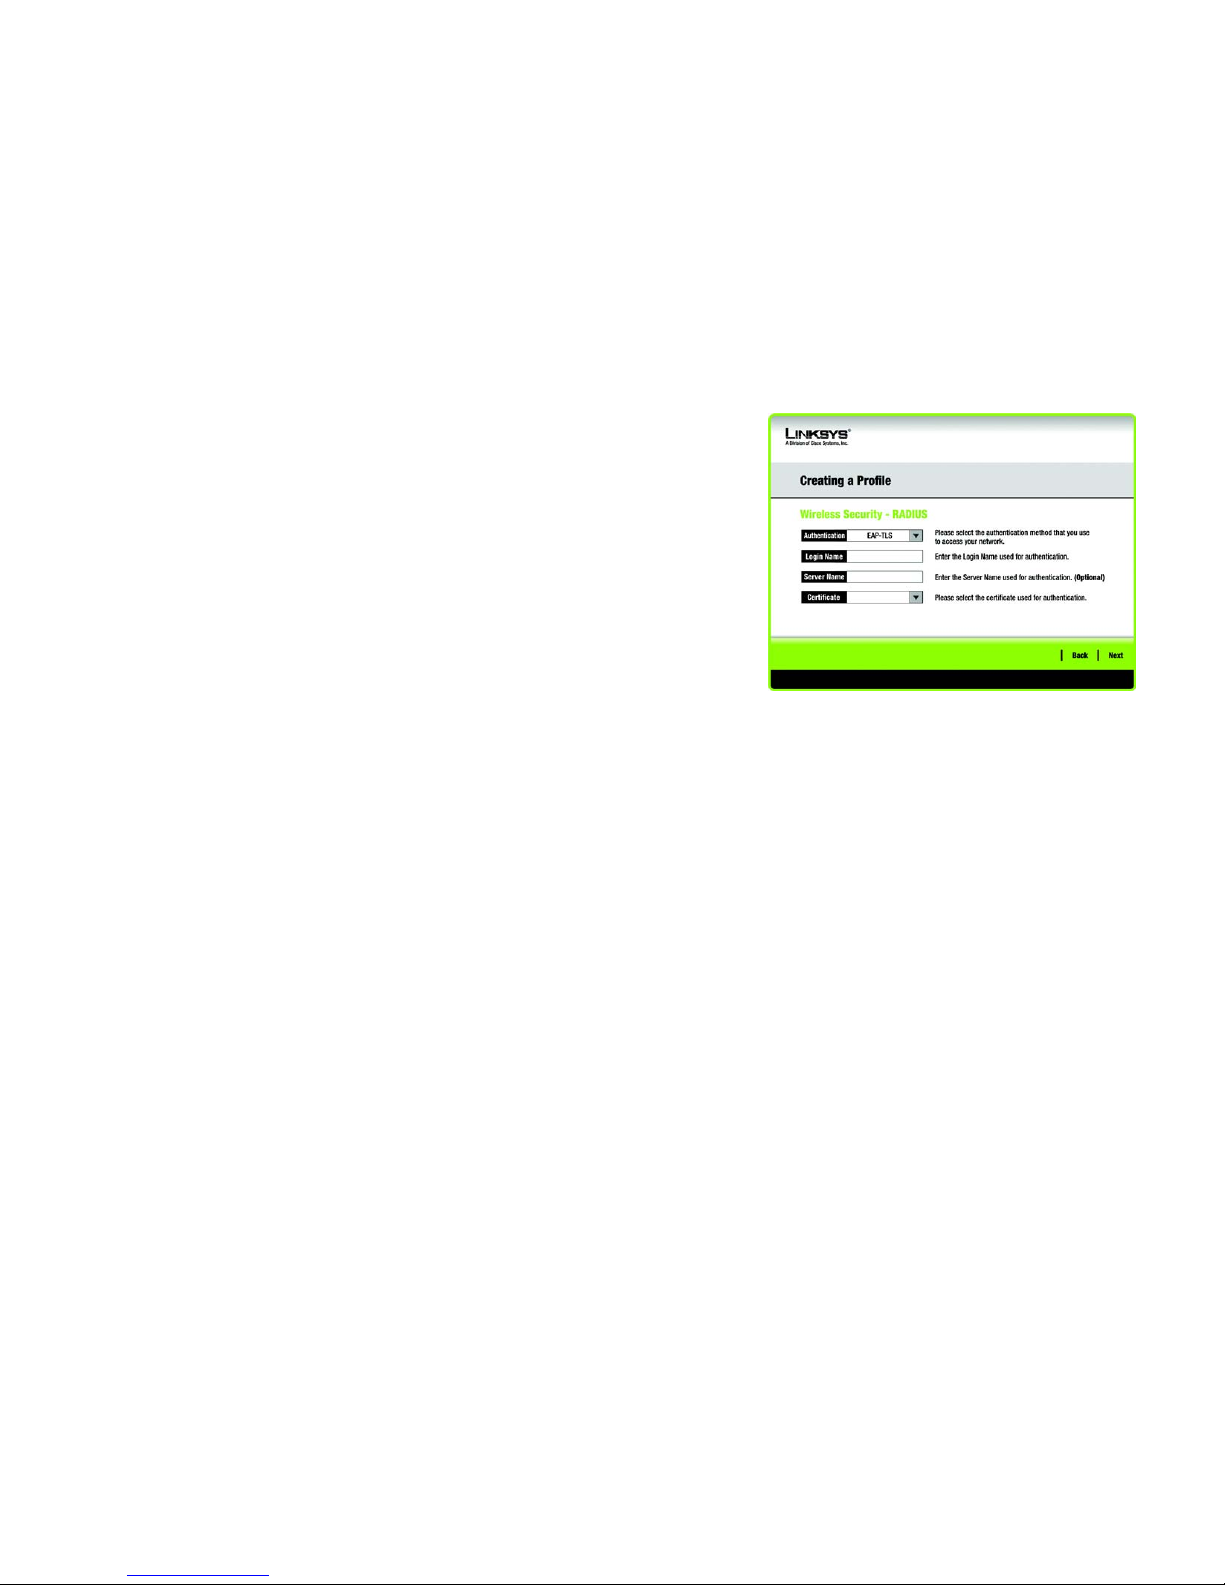
RADIUS
RADIUS uses the security of a RADIUS server. (This should only be used when a RADIUS server is connected to
the Router.) It offers two authentication methods: EAP-TLS and PEAP.
Select the Authentication Method from the drop-down menu on the following screen. The options are: EAP-
TLS and PEAP.
EAP-TLS: Enter the Login name of your wireless network in the Login Name field. From the Certificate
drop-down menu, select the certificate you have installed to authenticate you on your wireless network.
PEAP: Enter the Login name of your wireless network in the Login Name field. Enter the password of
your wireless network in the Password field. From the Certificate drop-down menu, select the
certificate you have installed to authenticate you on your wireless network. Also, select an Inner Authen.
(Inner Authentication Method) for authentication inside the PEAP tunnel.
Click the Next button to continue to the Confirm New Settings screen or the Back button to return to the
previous screen.
Figure 3-23: Wireless Security - RADIUS
Page 25
19
Chapter 3: Setting up and Connecting the USB Network Adapter
Setting Up the Adapter
Wireless-G USB Network Adapter with SpeedBooster
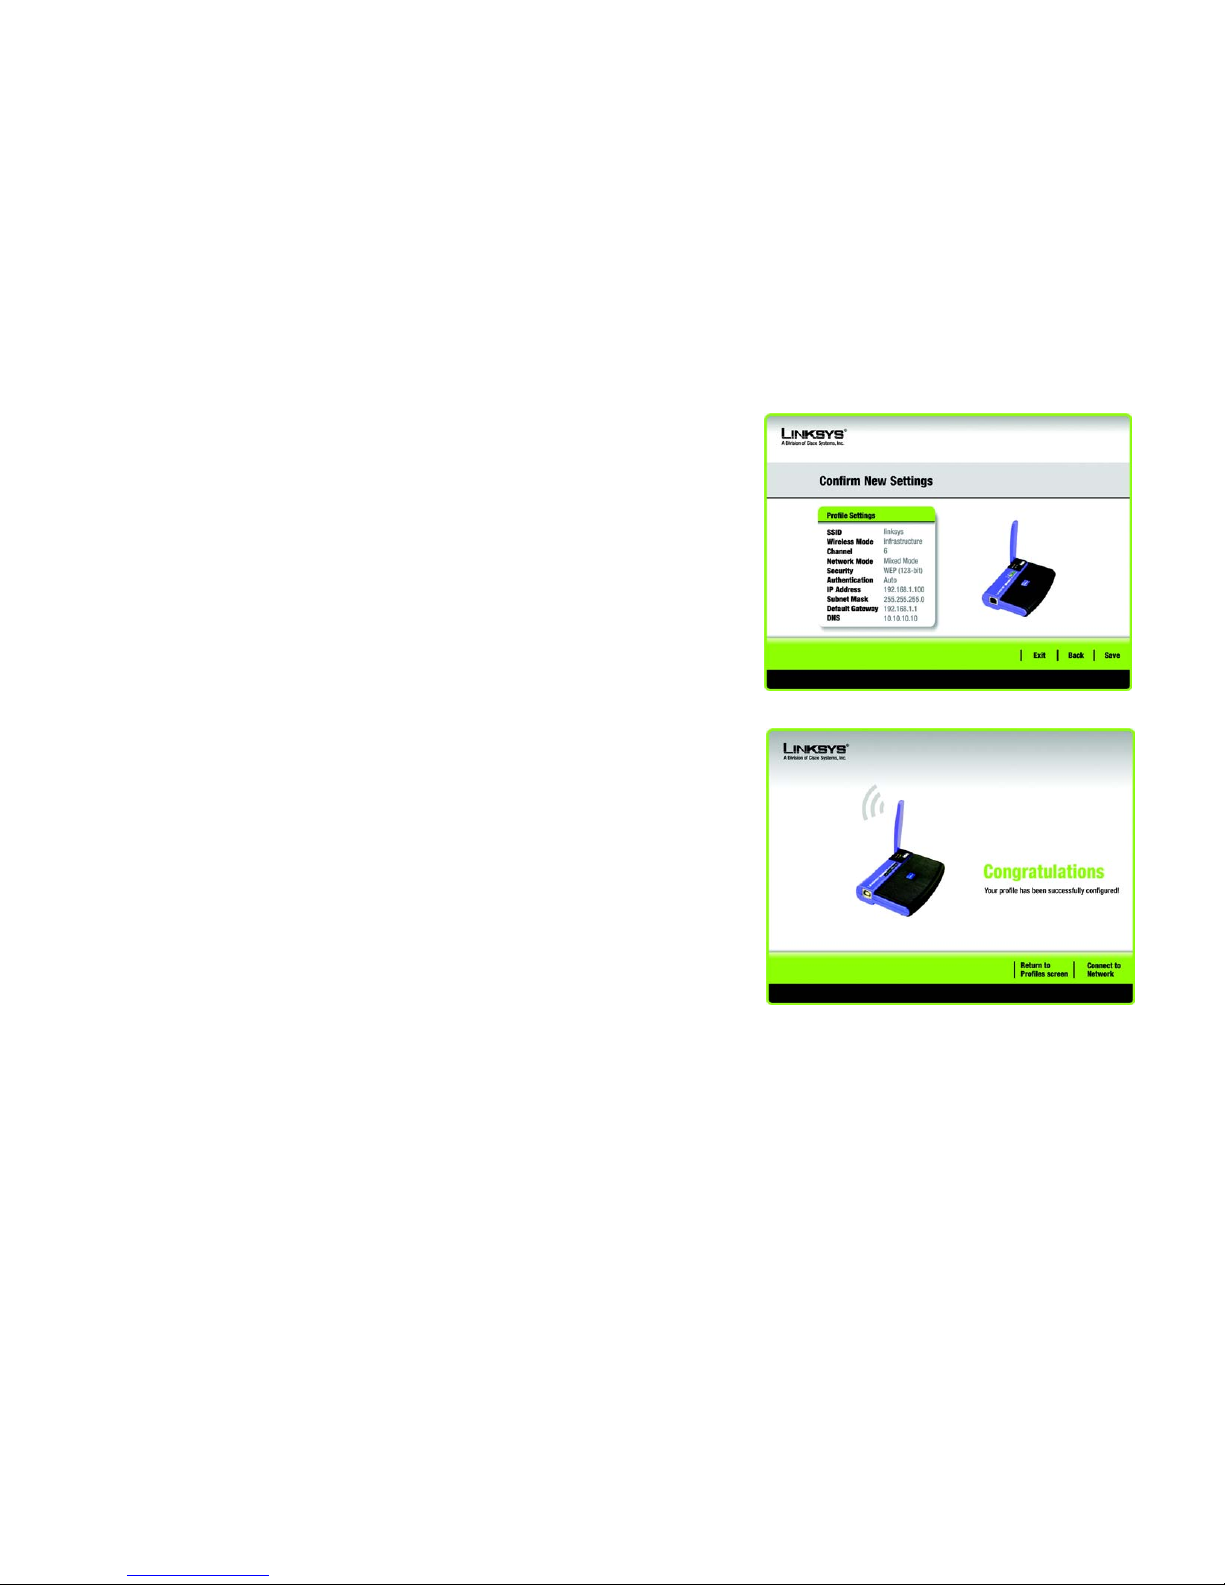
5. The next screen displays all of the Adapter’s settings. If these are correct, you can save these settings to your
hard drive by clicking Save. Click Next to continue. If these settings are not correct, click Back to change
your settings.
6. After the software has been successfully installed, the Congratulations screen will appear. Click Connect to
Network to connect to your network. Clicking Return to Profile will open the Wireless Network Monitor’s
Profiles screen. For more information about the Wireless Network Monitor, refer to Chapter 4: Using the
Wireless Network Monitor.
Congratulations! Setup is complete.
To check the link information, search for available wireless networks, or make additional
configuration changes, refer to Chapter 4: Using the Wireless Network Monitor.
Figure 3-24: Confirm New Settings
Figure 3-25: The Congratulations screen
Page 26

20
Chapter 4: Using the Wireless Network Monitor
Accessing the Wireless Network Monitor
Wireless-G USB Network Adapter with SpeedBooster
Chapter 4: Using the Wireless Network Monitor
Use the Wireless Network Monitor to check the link information, search for available wireless networks, or
create profiles that hold different configuration settings.
Accessing the Wireless Network Monitor
After Setting Up and Connecting the Adapter, the Wireless Network Monitor icon will appear in your PC’s system
tray. If the Wireless Network Monitor is enabled, then the icon will be green. If the Wireless Network Monitor is
disabled or the Adapter is not connected, then the icon will be gray.
Link Information Screens
The opening screen of the Wireless Network Monitor is the Link Information screen. From this screen, you can
find out how strong the current wireless signal is and how good the connection’s quality is. You can also click the
More Information button to view additional status and statistics about the current wireless connection. To
search for available wireless networks, click the Site Survey tab. To perform configuration changes or create
connection profiles, click the Profiles tab.
Link Information
The Link Information screen displays network mode, signal strength, and link quality information about the
current connection. It also provides a button to click for additional status information.
Ad-Hoc Mode or Infrastructure Mode - The screen indicates whether the Adapter is currently working in AdHoc or Infrastructure mode.
Signal Strength - The Signal Strength bar indicates signal strength.
Link Quality - The Link Quality bar indicates the quality of the wireless network connection.
Click the More Information button to view additional information about the wireless network connection on the
Wireless Network Status screen.
Figure 4-1: Wireless Network Monitor Icon
Figure 4-2: Link Information
NOTE: The Wireless Network Monitor should only be
accessed AFTER connecting the Adapter. For more
information on Setting Up and Connecting the
Adapter, refer to Chapter 3: Setting Up and
Connecting the USB Network Adapter.
Page 27

21
Chapter 4: Using the Wireless Network Monitor
Link Information Screens
Wireless-G USB Network Adapter with SpeedBooster
Wireless Network Status
The Wireless Network Status screen provides information on your current network settings.
Status - This shows the status of the wireless network connection.
SSID - This is the unique name of the wireless network.
Wireless Mode - The mode of the wireless network currently in use is displayed here.
Transfer Rate - The data transfer rate of the current connection is shown here.
Channel - This is the channel to which the wireless network devices are set.
Security - The status of the wireless security feature is displayed here.
Authentication - This is your wireless network’s authentication method.
IP Address - The IP Address of the Adapter is displayed here.
Subnet Mask - The Subnet Mask of the Adapter is shown here.
Default Gateway - The Default Gateway address of the Adapter is displayed here.
DNS - This is the DNS address of the Adapter.
DHCP Client - This displays the Adapter’s status as a DHCP client.
MAC Address- The MAC address of the wireless network’s access point or wireless router is shown here.
Signal Strength - The Signal Strength bar indicates the signal strength.
Link Quality - The Link Quality bar indicates the quality of the wireless network connection.
Click the Back button to return to the initial Link Information screen. Click the Statistics button to go to the
Wireless Network Statistics screen. Click the Save to Profile button to save the currently active connection
settings to a profile.
Figure 4-3: More Information - Wireless Network Status
Page 28
22
Chapter 4: Using the Wireless Network Monitor
Link Information Screens
Wireless-G USB Network Adapter with SpeedBooster
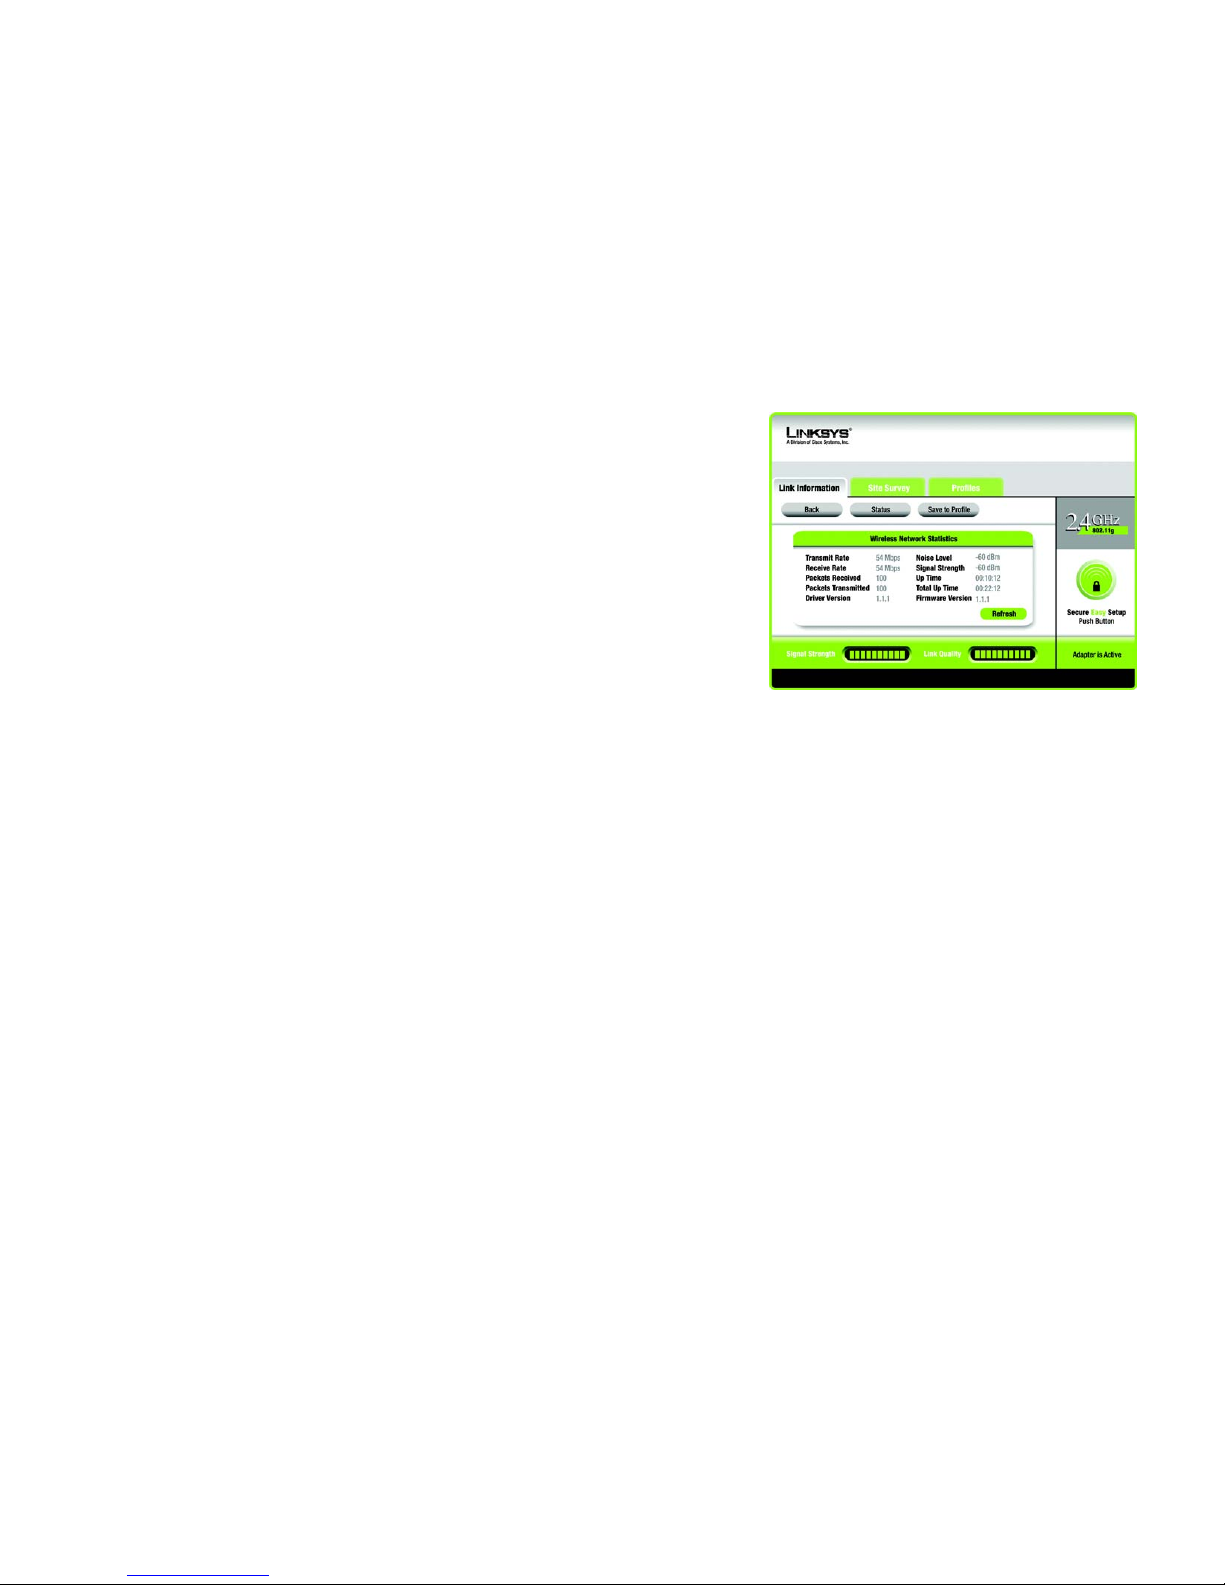
Wireless Network Statistics
The Wireless Networks Statistics screen provides statistics on your current network settings.
Transmit Rate - This is the data transfer rate of the current connection. (In Auto mode, the Adapter dynamically
shifts to the fastest data transfer rate possible at any given time.)
Receive Rate - This is the rate at which data is received.
Packets Received - This shows the packets received by the Adapter, in real time, since connecting to the
wireless network or since the Refresh Statistics button was last pressed.
Packets Transmitted - This shows the packets transmitted from the Adapter, in real time, since connecting to
the wireless network or since the Refresh Statistics button was last pressed.
Driver Version - This shows the version of the Adapter’s driver.
Noise Level - This shows the level of background noise affecting the wireless signal. A lower reading translates
into a higher quality signal.
Signal Strength - This is the intensity of the wireless signal received by the Adapter.
Up Time - This indicates the length of the most recent connection to a wireless network.
Tot al Up Tim e - This indicates the cumulative total of the Adapter’s connection time.
Firmware Version- This is the version of the firmware currently running on the Adapter.
Signal Strength - The Signal Strength bar indicates the signal strength.
Link Quality - The Link Quality bar indicates the quality of the wireless network connection.
Click the Back button to return to the initial Link Information screen. Click the Status button to go to the Wireless
Network Status screen. Click the Save to Profile button to save the currently active connection settings to a
profile. Click the Refresh button to reset the statistics.
Figure 4-4: More Information - Wireless Network Statistics
Page 29
23
Chapter 4: Using the Wireless Network Monitor
SecureEasySetup
Wireless-G USB Network Adapter with SpeedBooster
SecureEasySetup
While using the Monitor, you might see the SecureEasySetup button on the right-hand side of the screen. This
button can be used to set up the Adapter, if this has not already been done. With SecureEasySetup, setting up the
Adapter is as simple as pushing a couple of buttons. Before you press any buttons, though, you should locate the
SecureEasySetup button on the device you’re connecting the Adapter to, such as a wireless router or access
point.
1. After clicking the SecureEasySetup button, you will be asked to locate the SecureEasySetup button on the
device with which the Adapter will be communicating. If you are not sure where to find this button, click
Where can I find the button?.
This will walk you through a couple of screens to help you find the button, which is usually located on the
front of the wireless router or access point.
If you’ve clicked the button by accident or do not wish to use SecureEasySetup, you can click Cancel to return
to the previous screen.
Figure 4-5: The SecureEasySetup button
Figure 4-6: The SecureEasySetup Logo and Location
Figure 4-7: SecureEasySetup
Page 30
24
Chapter 4: Using the Wireless Network Monitor
SecureEasySetup
Wireless-G USB Network Adapter with SpeedBooster
2. Press the Cisco logo or SecureEasySetup button on the wireless router or access point. When it turns white
and begins to flash, click the Next button on the Setup Wizard screen. The logo or button will stop flashing on
the wireless router or access point when the Adapter has been successfully added to the network. Repeat
this procedure for any additional SecureEasySetup device.
3. SecureEasySetup is now complete and a configuration profile will has been created automatically. You may
save your configuration profile to a text file by clicking the Save button, or print the configuration by clicking
the Print button. Click Connect to Network to connect to your network.
Congratulations! SecureEasySetup is complete.
NOTE: You can only add one SecureEasySetup device at a time.
Figure 4-8: SecureEasySetup is complete
Page 31

25
Chapter 4: Using the Wireless Network Monitor
Site Survey
Wireless-G USB Network Adapter with SpeedBooster
Site Survey
The Site Survey screen displays a list of available networks in the table on the left. The table shows each
network’s SSID, Channel, and the quality of the wireless signal the Adapter is receiving. You may click SSID, CH
(Channel), or Signal, to sort by that field.
SSID - The SSID or unique name of the wireless network is displayed here.
CH - This is the channel that the network uses.
Signal - This is the percentage of signal strength, from 0 to 100%.
Site Information
For each network selected, the following settings are listed:
SSID - This the SSID or unique name of the wireless network.
Wireless Mode - This is the mode of the wireless network currently in use.
Channel - This is the channel to which the wireless network devices are set.
Security - The status of the wireless security feature is displayed here.
MAC Address- The MAC address of the wireless network’s access point is displayed here.
Refresh - Click the Refresh button to perform a new search for wireless devices.
Connect - To connect to one of the networks on the list, select the wireless network, and click the Connect
button. If the network has encryption enabled, a screen appear requiring security information.
If the network has the wireless security WEP encryption enabled, then you will see the WEP Key Needed for
Connection screen. Select the appropriate level of WEP encryption, 64-bit or 128-bit Then enter the network’s
Passphrase or WEP Key. To connect to the network, click Connect. To cancel the connection, click Cancel.
If the network has PSK wireless security enabled, then you will see the PSK Needed for Connection screen. Select
the appropriate encryption type, TKIP or AES. Enter the network’s Passphrase or pre-shared key in the
Passphrase field. To connect to the network, click Connect. To cancel the connection, click Cancel.
Figure 4-9: Site Survey
Figure 4-10: WEP Key Needed for Connection
Figure 4-11: PSK Needed for Connection
Page 32

26
Chapter 4: Using the Wireless Network Monitor
Profiles
Wireless-G USB Network Adapter with SpeedBooster
Profiles
The Profiles screen lets you save different configuration profiles for different network setups. The table on the left
displays a list of available profiles with their profile names and SSIDs.
Profile - The name of the profile is displayed here.
SSID - The SSID or unique name of the wireless network is displayed here.
Profile Information
For each profile selected, the following are listed:
Wireless Mode - This is the mode of the wireless network currently in use.
Channel - This is the channel to which the wireless network devices are set.
Security - The status of the wireless security feature is displayed here.
Authentication - The authentication setting for the network is shown here.
Connect - To connect to a wireless network using a specific profile, select the profile, and click the Connect
button.
New - Click New to create a new profile. See the next section, “Creating a New Profile,” for detailed instructions.
Edit - Select the profile you want to change, and then click Edit.
Import - Click Import to import a profile that has been saved in another location. Select the appropriate file, and
click the Open button.
Export - Select the profile you want to save in a different location, and click Export. Direct Windows to the
appropriate folder, and click the Save button.
Delete - Select the profile you want to delete, and then click Delete.
Figure 4-12: Profiles
Figure 4-13: Import a Profile
Figure 4-14: Export a Profile
NOTE: If you want to export more than one profile, you have to export them one at a time.
Page 33

27
Chapter 4: Using the Wireless Network Monitor
Creating a New Profile
Wireless-G USB Network Adapter with SpeedBooster
Creating a New Profile
On the Profiles screen, click the New button to create a new profile. Enter a name for the new profile, and click
the OK button. Click the Cancel button to return to the Profiles screen without entering a name.
The Available Wireless Network screen will appear. This screen provides three options for setting up the Adapter
• SecureEasySetup. This Adapter features SecureEasySetup. This means that you can set it up with just the
press of a button when connecting to wireless routers or access points that also feature SecureEasySetup.
Both point on the network must feature SecureEasySetup for this to work.
• Available Networks. Use this option if you already have a network set up with devices that do not have
SecureEasySetup. The networks available to this Adapter will be listed on this screen. You can choose one of
these networks and click the Connect button to connect to it. Click the Refresh button to update the Available
Wireless Network list.
• Manual Setup. If you are not taking advantage of SecureEasySetup and your network is not listed on this
screen, select Manual Setup to set up the adapter manually. This method of setting up the Adapter is
intended for Advanced Users only.
The setup for each option is described, step by step, under the appropriate heading on the following pages.
Click Exit to close the Setup Wizard.
Figure 4-15: Create a New Profile
Figure 4-16: Available Wireless Network
Page 34

28
Chapter 4: Using the Wireless Network Monitor
Creating a New Profile
Wireless-G USB Network Adapter with SpeedBooster
Setting Up the Adapter with SecureEasySetup
With SecureEasySetup, setting up the Adapter is as simple as pushing a couple of buttons. Before you press any
buttons, though, you should locate the SecureEasySetup button on the device you’re connecting the Adapter to,
such as a wireless router or access point.
1. Starting from the Available Wireless Network screen, click the SecureEasySetup button on the right hand
side.
2. You will be asked to locate the SecureEasySetup button on the device with which the Adapter will be
communicating. If you are not sure where to find this button, click Where can I find the button?.
This will walk you through a couple of screens to help you find the button, which is usually located on the
front of the wireless router or access point.
If you’ve clicked the button by accident or do not wish to use SecureEasySetup, you can click Cancel to return
to the previous screen.
Figure 4-17: Available Wireless Network
Figure 4-18: The SecureEasySetup Logo and Location
Figure 4-19: SecureEasySetup
Page 35

29
Chapter 4: Using the Wireless Network Monitor
Creating a New Profile
Wireless-G USB Network Adapter with SpeedBooster
3. Press the Cisco logo or SecureEasySetup button on the wireless router or access point. When it turns white
and begins to flash, click the Next button on the Setup Wizard screen. The logo or button will stop flashing on
the wireless router or access point when the Adapter has been successfully added to the network. Repeat
this procedure for any additional SecureEasySetup device.
4. SecureEasySetup is now complete and a configuration profile will has been created automatically. You may
save your configuration profile to a text file by clicking the Save button, or print the configuration by clicking
the Print button. Click Connect to Network to connect to your network.
Congratulations! SecureEasySetup is complete.
Figure 4-20: SecureEasySetup complete
NOTE: You can only add one SecureEasySetup device at a time.
Page 36

30
Chapter 4: Using the Wireless Network Monitor
Creating a New Profile
Wireless-G USB Network Adapter with SpeedBooster
Setting Up the Adapter with Available Networks
If you’re not setting up the Adapter with SecureEasySetup, another method for setting up the Adapter is with the
available networks listed on the Available Wireless Network screen. The available networks are listed in the table
on the center of the screen by SSID. Select the wireless network you wish to connect to and click the Connect
button. (If you do not see your network listed, you can click the Refresh button to bring the list up again.) If the
network utilizes wireless security, you will need to configure security on the Adapter. If not, you will be taken
directly to the Congratulations screen.
1. If wireless security has been enabled on this network, you will see a wireless security screen. If your network
utilizes WEP (Wired Equivalent Privacy) encryption, the WEP Key Needed for Connection screen will appear. If
your network utilizes PSK (Pre-Shared Key) encryption, the PSK Key Needed for Connection screen will
appear.
WEP Key Needed for Connection
Select 64-bit or 128-bit.
Then, enter a passphrase or WEP key.
Passphrase - Enter a passphrase in the Passphrase field, so a WEP key is automatically generated. The
passphrase is case-sensitive and should not be longer than 16 alphanumeric characters. It must match the
passphrase of your other wireless network devices and is compatible with Linksys wireless products only. (If
you have any non-Linksys wireless products, enter the WEP key manually on those products.)
WEP Key - The WEP key you enter must match the WEP key of your wireless network. For 64-bit encryption,
enter exactly 10 hexadecimal characters. For 128-bit encryption, enter exactly 26 hexadecimal characters.
Valid hexadecimal characters are “0” to “9” and “A” to “F”.
Then, click Connect and proceed to the Congratulations screen. To cancel the connection, click Cancel.
Figure 4-21: Available Wireless Network
Figure 4-22: WEP Key Needed for Connection
Page 37

31
Chapter 4: Using the Wireless Network Monitor
Creating a New Profile
Wireless-G USB Network Adapter with SpeedBooster
PSK Needed for Connection
Encryption - Select the type of algorithm you want to use, TKIP or AES, from the Encryption drop-down
menu.
Passphrase - Enter a Passphrase, also called a pre-shared key, of 8-63 characters in the Passphrase field.
The longer and more complex your Passphrase is, the more secure your network will be.
Then, click Connect and proceed to the Congratulations screen. To cancel the connection, click Cancel.
2. After the software has been successfully installed, the Congratulations screen will appear. Click Connect to
Network to connect to your network.
Congratulations! Setup is complete.
Figure 4-24: The Congratulations screen
Figure 4-23: PSK Needed for Connection
Page 38

32
Chapter 4: Using the Wireless Network Monitor
Creating a New Profile
Wireless-G USB Network Adapter with SpeedBooster
Setting Up the Adapter with Manual Setup
If you are not taking advantage of SecureEasySetup and your network is not listed among the available networks,
click Manual Setup on the Available Wireless Network screen to set up the adapter manually.
1. After clicking Manual Setup, the Network Settings screen will appear. If your network has a router or other
DHCP server, click the radio button next to Obtain network settings automatically (DHCP).
If your network does not have a DHCP server, click the radio button next to Specify network settings. Enter
an IP Address, Subnet Mask, Default Gateway, and DNS addresses appropriate for your network. You must
specify the IP Address and Subnet Mask on this screen. If you are unsure about the Default Gateway and DNS
addresses, leave these fields empty.
IP Address - This IP Address must be unique to your network.
Subnet Mask - The Adapter’s Subnet Mask must be the same as your wired network’s Subnet Mask.
Default Gateway - Enter the IP address of your network’s Gateway here.
DNS 1 and DNS 2 - Enter the DNS address of your wired Ethernet network here.
Click Next to continue, or click Back to return to the Available Wireless Network screen.
Figure 4-25: Available Wireless Network
Figure 4-26: Network Settings
Page 39

33
Chapter 4: Using the Wireless Network Monitor
Creating a New Profile
Wireless-G USB Network Adapter with SpeedBooster
2. The Wireless Mode screen shows a choice of two wireless modes. Click the Infrastructure Mode radio
button if you want to connect to a wireless router or access point. Click the Ad-Hoc Mode radio button if you
want to connect to another wireless device directly without using a wireless router or access point. Then,
enter the SSID for your network.
Infrastructure Mode - Use this mode if you want to connect to a wireless router or access point.
Ad-Hoc Mode - Use this mode if you want to connect to another wireless device directly without using a
wireless router or access point.
SSID - This is the wireless network name that must be used for all the devices in your wireless network. It is
case- sensitive and should be a unique name to help prevent others from entering your network.
Click Next to continue or Back to return to the previous screen.
3. If you chose Infrastructure Mode, go to Step 4 now. If you chose Ad-Hoc Mode, the Ad-Hoc Mode Settings
screen will appear.
Select the correct Channel for your wireless network. The channel you choose should match the channel set
on the other devices in your wireless network. If you are unsure about which channel to use, keep the default
setting.
Then, select the Network Mode in which your wireless network will operate. In Mixed Mode, Wireless-B and
Wireless-G devices can both operate on the network, though at a slower speed. In G-Only Mode, no Wireless-
B devices can operate in the network.
Click Next to continue or click Back to change any settings.
Figure 4-27: Wireless Mode
Figure 4-28: Ad-Hoc Mode Settings
Page 40

34
Chapter 4: Using the Wireless Network Monitor
Creating a New Profile
Wireless-G USB Network Adapter with SpeedBooster
4. The Wireless Security screen will appear. This step will configure wireless security.
If your wireless network doesn’t use wireless security, select Disabled and then click the Next button to
continue. Proceed to Step 6.
Select WEP, PSK, PSK + Radius, or Radius for the Encryption Method. WEP stands for Wired Equivalent
Privacy, PSK stands for Pre-Shared Key, which is a security standard stronger than WEP encryption, and
RADIUS stands for Remote Authentication Dial-In User Service. If you don’t want to use encryption, select
Disabled. Then, click the Next button to continue or the Back button to return to the previous screen.
WEP
WEP - To use WEP encryption, select 64-bits or 128-bit characters from the drop-down menu, and enter a
passphrase or key.
WEP Key- The WEP key you enter must match the WEP key of your wireless network. If you are using 64-bit
WEP encryption, then the key must consist of exactly 10 hexadecimal characters. If you are using 128-bit
WEP encryption, then the key must consist of exactly 26 hexadecimal characters. Valid hexadecimal
characters are “0” to “9” and “A” to “F”.
Passphrase - Instead of manually entering a WEP key, you can enter a passphrase in the Passphrase field, so
a WEP key is automatically generated. This case-sensitive passphrase must match the passphrase of your
other wireless network devices and is compatible with Linksys wireless products only. (If you have any nonLinksys wireless products, enter the WEP key manually on those products.)
TX Key - The default transmit key number is 1. If your network’s access point or wireless router uses transmit
key number 2, 3, or 4, select the appropriate number from the TX Key drop-down box.
Authentication -The default is set to Auto, where it auto-detects for Shared Key or Open system. Shared
Key is when both the sender and the recipient share a WEP key for authentication. Open key is when the
sender and the recipient do not share a WEP key for authentication. All points on your network must use the
same authentication type.
Click the Next button to continue to the Confirm New Settings screen or the Back button to return to the
previous screen.
Figure 4-29: Wireless Security
Figure 4-30: Wireless Security - WEP
Page 41

35
Chapter 4: Using the Wireless Network Monitor
Creating a New Profile
Wireless-G USB Network Adapter with SpeedBooster
PSK
PSK offers two encryption methods, TKIP and AES, with dynamic encryption keys.
Select the type of algorithm, TKIP or AES, for the Encryption Type. Enter a Passphrase of 8-63 characters in
the Passphrase field.
Click the Next button to continue to the Confirm New Settings screen or the Back button to return to the
previous screen.
Figure 4-31: Wireless Security - PSK
Page 42

36
Chapter 4: Using the Wireless Network Monitor
Creating a New Profile
Wireless-G USB Network Adapter with SpeedBooster
PSK + RADIUS.
PSK + RADIUS features PSK used in coordination with a RADIUS server. (This should only be used when a
RADIUS server is connected to the Router.) PSK + Radius offers two encryption methods, TKIP and AES, with
dynamic encryption keys. It offers two authentication methods: EAP-TLS and PEAP.
Select the Authentication Method from the drop-down menu on the following screen. The options are: EAP-
TLS and PEAP.
EAP-TLS: Enter the Login name of your wireless network in the Login Name field. From the Certificate
drop-down menu, select the certificate you have installed to authenticate you on your wireless network.
PEAP: Enter the Login name of your wireless network in the Login Name field. Enter the password of
your wireless network in the Password field. From the Certificate drop-down menu, select the
certificate you have installed to authenticate you on your wireless network. Also, select an Inner Authen.
(Inner Authentication Method) for authentication inside the PEAP tunnel.
Select the type of algorithm, TKIP or AES, for the Encryption Type.
Click the Next button to continue to the Confirm New Settings screen or the Back button to return to the
previous screen.
Figure 4-32: Wireless Security - PSK + RADIUS
Page 43

37
Chapter 4: Using the Wireless Network Monitor
Creating a New Profile
Wireless-G USB Network Adapter with SpeedBooster
RADIUS
RADIUS uses the security of a RADIUS server. (This should only be used when a RADIUS server is connected to
the Router.) It offers two authentication methods: EAP-TLS and PEAP.
Select the Authentication Method from the drop-down menu on the following screen. The options are: EAP-
TLS and PEAP.
EAP-TLS: Enter the Login name of your wireless network in the Login Name field. From the Certificate
drop-down menu, select the certificate you have installed to authenticate you on your wireless network.
PEAP: Enter the Login name of your wireless network in the Login Name field. Enter the password of
your wireless network in the Password field. From the Certificate drop-down menu, select the
certificate you have installed to authenticate you on your wireless network. Also, select an Inner Authen.
(Inner Authentication Method) for authentication inside the PEAP tunnel.
Click the Next button to continue to the Confirm New Settings screen or the Back button to return to the
previous screen.
Figure 4-33: Wireless Security - RADIUS
Page 44

38
Chapter 4: Using the Wireless Network Monitor
Creating a New Profile
Wireless-G USB Network Adapter with SpeedBooster
5. The next screen displays all of the Adapter’s settings. If these are correct, you can save these settings to your
hard drive by clicking Save. Click Next to continue. If these settings are not correct, click Back to change
your settings.
6. After the software has been successfully installed, the Congratulations screen will appear. Click Connect to
Network to connect to your network. Clicking Return to Profile will open the Wireless Network Monitor’s
Profiles screen.
Congratulations! Setup is complete.
Figure 4-34: Confirm New Settings
Figure 4-35: The Congratulations screen
Page 45

39
Appendix A: Troubleshooting
Common Problems and Solutions
Wireless-G USB Network Adapter with SpeedBooster
Appendix A: Troubleshooting
This appendix provides solutions to problems usually encountered during the installation and operation of the
Adapter. Read the description below to solve your problems. If you can't find an answer here, check the Linksys
website at www.linksys.com/international.
Common Problems and Solutions
1.My computer does not recognize the USB Network Adapter.
• Make sure that the USB Network Adapter is properly inserted into the USB port.
• Also, make sure that the USB Controller is enabled in the BIOS. Check with your motherboard User Guide for
more information.
2. The USB Network Adapter does not work properly.
• Reinsert the USB Network Adapter into the notebook or desktop’s USB port.
• Right-click on My Computer, and select Properties. Select the Adapter, then chose the Device Manager tab,
and click on the Network Adapter. You will find the USB Network Adapter if it is installed successfully. If you
see a yellow exclamation mark, the resources may be conflicting and you must follow the steps below:
• Uninstall the driver software from your PC.
• Restart your PC and repeat the hardware and software installation as specified in this User Guide.
3. I cannot communicate with the other computers linked via Ethernet in the Infrastructure
configuration.
• Make sure that the notebook or desktop is powered on.
• Make sure that your USB Network Adapter is configured on the same channel, SSID, and security settings as
the other computers in the Infrastructure configuration.
Page 46

40
Appendix A: Troubleshooting
Frequently Asked Questions
Wireless-G USB Network Adapter with SpeedBooster
Frequently Asked Questions
Can I run an application from a remote computer over the wireless network?
This will depend on whether or not the application is designed to be used over a network. Consult the
application’s user guide to determine if it supports operation over a network.
Can I play computer games with other members of the wireless network?
Yes, as long as the game supports multiple players over a LAN (local area network). Refer to the game’s user
guide for more information.
What is the IEEE 802.11b standard?
It is one of the IEEE standards for wireless networks. The 802.11b standard allows wireless networking hardware
from different manufacturers to communicate, provided that the hardware complies with the 802.11b standard.
The 802.11b standard states a maximum data transfer rate of 11Mbps and an operating frequency of 2.4GHz.
What is the IEEE 802.11g standard?
It is one of the IEEE standards for wireless networks. The 802.11g standard allows wireless networking hardware
from different manufacturers to communicate, provided that the hardware complies with the 802.11g standard.
The 802.11g standard states a maximum data transfer rate of 54Mbps and an operating frequency of 2.4GHz.
What IEEE 802.11b features are supported?
The product supports the following IEEE 802.11b functions:
• CSMA/CA plus Acknowledge protocol
• Multi-Channel Roaming
• Automatic Rate Selection
• RTS/CTS feature
• Fragmentation
• Power Management
What IEEE 802.11g features are supported?
The product supports the following IEEE 802.11g functions:
• CSMA/CA plus Acknowledge protocol
• OFDM protocol
• Multi-Channel Roaming
• Automatic Rate Selection
• RTS/CTS feature
• Fragmentation
• Power Management
Page 47

41
Appendix A: Troubleshooting
Frequently Asked Questions
Wireless-G USB Network Adapter with SpeedBooster
What is ad-hoc mode?
When a wireless network is set to ad-hoc mode, the wireless-equipped computers are configured to
communicate directly with each other. The ad-hoc wireless network will not communicate with any wired
network.
What is infrastructure mode?
When a wireless network is set to infrastructure mode, the wireless network is configured to communicate with a
wired network through a wireless access point.
What is roaming?
Roaming is the ability of a PC to communicate continuously while moving freely throughout an area greater than
that covered by a single access point. Before using the roaming function, the workstation must make sure that it
is the same channel number with the access point of dedicated coverage area.
To achieve true seamless connectivity, the wireless LAN must incorporate a number of different functions. Each
node and access point, for example, must always acknowledge receipt of each message. Each node must
maintain contact with the wireless network even when not actually transmitting data. Achieving these functions
simultaneously requires a dynamic RF networking technology that links access points and nodes. In such a
system, the user’s end node undertakes a search for the best possible access to the system. First, it evaluates
such factors as signal strength and quality, as well as the message load currently being carried by each access
point and the distance of each access point to the wired backbone. Based on that information, the node next
selects the right access point and registers its address. Communications between end node and host computer
can then be transmitted up and down the backbone.
As the user moves on, the end node’s RF transmitter regularly checks the system to determine whether it is in
touch with the original access point or whether it should seek a new one. When a node no longer receives
acknowledgment from its original access point, it undertakes a new search. Upon finding a new access point, it
then re-registers, and the communication process continues.
What is ISM band?
The FCC and their counterparts outside of the U.S. have set aside bandwidth for unlicensed use in the ISM
(Industrial, Scientific and Medical) band. Spectrum in the vicinity of 2.4 GHz, in particular, is being made available
worldwide. This presents a truly revolutionary opportunity to place convenient high-speed wireless capabilities in
the hands of users around the globe.
What is Spread Spectrum?
Spread Spectrum technology is a wideband radio frequency technique developed by the military for use in
reliable, secure, mission-critical communications systems. It is designed to trade off bandwidth efficiency for
reliability, integrity, and security. In other words, more bandwidth is consumed than in the case of narrowband
transmission, but the trade-off produces a signal that is, in effect, louder and thus easier to detect, provided that
Page 48

42
Appendix A: Troubleshooting
Frequently Asked Questions
Wireless-G USB Network Adapter with SpeedBooster
the receiver knows the parameters of the spread-spectrum signal being broadcast. If a receiver is not tuned to
the right frequency, a spread-spectrum signal looks like background noise. There are two main alternatives,
Direct Sequence Spread Spectrum (DSSS) and Frequency Hopping Spread Spectrum (FHSS).
What is DSSS? What is FHSS? And what are their differences?
Frequency-Hopping Spread-Spectrum (FHSS) uses a narrowband carrier that changes frequency in a pattern that
is known to both transmitter and receiver. Properly synchronized, the net effect is to maintain a single logical
channel. To an unintended receiver, FHSS appears to be short-duration impulse noise. Direct-Sequence SpreadSpectrum (DSSS) generates a redundant bit pattern for each bit to be transmitted. This bit pattern is called a chip
(or chipping code). The longer the chip, the greater the probability that the original data can be recovered. Even if
one or more bits in the chip are damaged during transmission, statistical techniques embedded in the radio can
recover the original data without the need for retransmission. To an unintended receiver, DSSS appears as low
power wideband noise and is rejected (ignored) by most narrowband receivers.
Would the information be intercepted while transmitting on air?
The Adapter features two-fold protection in security. On the hardware side, as with Direct Sequence Spread
Spectrum technology, it has the inherent security feature of scrambling. On the software side, the Adapter offers
the encryption function (WEP) to enhance security and access control.
What is WEP?
WEP is Wired Equivalent Privacy, a data privacy mechanism based on a 64-bit or 128-bit shared key algorithm, as
described in the IEEE 802.11 standard.
Page 49

43
Appendix B:
Wireless-G USB Network Adapter with SpeedBooster
Appendix B: Using Windows XP Wireless Configuration
If your computer is running Windows XP, then this choice will be available. If you want to use Windows XP
Wireless Configuration to control the Adapter, instead of using the Wireless Network Monitor, then right-click on
the Wireless Network Monitor and select Use Windows XP Wireless Configuration.
If you want to switch back to the Wireless Network Monitor, right-click the Wireless Network Monitor icon, and
select Use Linksys Wireless Network Monitor.
1. After installing the Adapter, the Windows XP Wireless Configuration icon will appear in your computer’s
system tray. Double-click the icon.
Figure B-1: Wireless Network Monitor Icon
Figure B-2: Windows XP - Use Windows XP
Wireless Configuration
NOTE: For more information about Windows XP Wireless Configuration, refer to Windows Help.
Figure B-3: Windows XP Wireless Configuration Icon
Page 50

44
Appendix B:
Wireless-G USB Network Adapter with SpeedBooster
2. The screen that appears will show any available wireless network. Select the network you want. Click the
Connect button.
If your network does not have wireless security enabled, go to step 3.
If your network does have wireless security enabled, go to step 4.
3. If your network does not have wireless security enabled, click the Connect Anyway button to connect the
Adapter to your network.
NOTE: Steps 2 and 3 are the instructions and
screenshots for Windows XP with Service Pack 2
installed.
Figure B-4: Available Wireless Network
Figure B-5: No Wireless Security
Page 51

45
Appendix B:
Wireless-G USB Network Adapter with SpeedBooster
4. If your network uses wireless security WEP, enter the WEP Key used into the Network Key and Confirm
network key fields. If your network uses wireless security WPA Personal, enter the Passphrase used into
the Network Key and Confirm network key fields. Click the Connect button.
5. Your wireless network will appear as Connected when your connection is active.
For more information about wireless networking on a Windows XP computer, click the Start button, select Help,
and choose Support. Enter the keyword wireless in the field provided, and press the Enter key.
The installation of the Windows XP Wireless Configuration is complete.
NOTE: Windows XP Wireless Configuration does not
support the use of a passphrase. Enter the exact WEP
key used by your wireless router or access point.
Figure B-6: Network Connection - Wireless Security
Figure B-7: Wireless Network Connection
Page 52

46
Appendix C: Wireless Security
Security Precautions
Wireless-G USB Network Adapter with SpeedBooster
Appendix C: Wireless Security
Linksys wants to make wireless networking as safe and easy for you as possible. The current generation of
Linksys products provide several network security features, but they require specific action on your part for
implementation. So, keep the following in mind whenever you are setting up or using your wireless network.
Security Precautions
The following is a complete list of security precautions to take (at least steps 1 through 5 should be followed):
1. Change the default SSID.
2. Disable SSID Broadcast.
3. Change the default password for the Administrator account.
4. Enable MAC Address Filtering.
5. Change the SSID periodically.
6. Use the highest encryption algorithm possible. Use WPA if it is available. Please note that this may reduce
your network performance.
7. Change the WEP encryption keys periodically.
Security Threats Facing Wireless Networks
Wireless networks are easy to find. Hackers know that in order to join a wireless network, wireless networking
products first listen for “beacon messages”. These messages can be easily decrypted and contain much of the
network’s information, such as the network’s SSID (Service Set Identifier). Here are the steps you can take:
Change the administrator’s password regularly. With every wireless networking device you use, keep in mind
that network settings (SSID, WEP keys, etc.) are stored in its firmware. Your network administrator is the only
person who can change network settings. If a hacker gets a hold of the administrator’s password, he, too, can
change those settings. So, make it harder for a hacker to get that information. Change the administrator’s
password regularly.
SSID. There are several things to keep in mind about the SSID:
Note: Some of these security features are
available only through the network router or
access point. Refer to the router or access
point’s documentation for more information.
Page 53

47
Appendix C: Wireless Security
Security Threats Facing Wireless Networks
Wireless-G USB Network Adapter with SpeedBooster
1. Disable Broadcast
2. Make it unique
3. Change it often
Most wireless networking devices will give you the option of broadcasting the SSID. While this option may be
more convenient, it allows anyone to log into your wireless network. This includes hackers. So, don’t broadcast
the SSID.
Wireless networking products come with a default SSID set by the factory. (The Linksys default SSID is “linksys”.)
Hackers know these defaults and can check these against your network. Change your SSID to something unique
and not something related to your company or the networking products you use.
Change your SSID regularly so that any hackers who have gained access to your wireless network will have to
start from the beginning in trying to break in.
MAC Addresses. Enable MAC Address filtering. MAC Address filtering will allow you to provide access to only
those wireless nodes with certain MAC Addresses. This makes it harder for a hacker to access your network with
a random MAC Address.
WEP Encryption. Wired Equivalent Privacy (WEP) is often looked upon as a cure-all for wireless security
concerns. This is overstating WEP’s ability. Again, this can only provide enough security to make a hacker’s job
more difficult.
There are several ways that WEP can be maximized:
1. Use the highest level of encryption possible
2. Use “Shared Key” authentication
3. Change your WEP key regularly
WPA. Wi-Fi Protected Access (WPA) is the newest and best available standard in Wi-Fi security. Two modes are
available: WPA-Personal and WPA-Enterprise. WPA-Personal gives you a choice of two encryption methods: TKIP
(Temporal Key Integrity Protocol), which utilizes a stronger encryption method and incorporates Message
Integrity Code (MIC) to provide protection against hackers, and AES (Advanced Encryption Standard), which
utilizes a symmetric 128-Bit block data encryption. WPA-Enterprise offers two encryption methods, TKIP and AES,
with dynamic encryption keys, and it uses a RADIUS (Remote Authentication Dial-In User Service) server for
authentication.
Important: Always remember that each
device in your wireless network MUST use
the same encryption method and encryption
key or your wireless network will not function
properly.
Page 54

48
Appendix C: Wireless Security
Security Threats Facing Wireless Networks
Wireless-G USB Network Adapter with SpeedBooster
WPA-Personal. If you do not have a RADIUS server, select the type of algorithm you want to use, TKIP or AES,
and enter a password in the Passphrase field of 8-63 characters.
WPA-Enterprise. WPA used in coordination with a RADIUS server. (This should only be used when a RADIUS
server is connected to the Router or other device.) WPA-Enterprise offers two encryption methods, TKIP and
AES, with dynamic encryption keys.
Implementing encryption may have a negative impact on your network’s performance, but if you are transmitting
sensitive data over your network, encryption should be used.
These security recommendations should help keep your mind at ease while you are enjoying the most flexible
and convenient technology Linksys has to offer.
Page 55

49
Appendix D: Windows Help
Wireless-G USB Network Adapter with SpeedBooster
Appendix D: Windows Help
All wireless products require Microsoft Windows. Windows is the most used operating system in the world and
comes with many features that help make networking easier. These features can be accessed through Windows
Help and are described in this appendix.
TCP/IP
Before a computer can communicate with the Access Point, TCP/IP must be enabled. TCP/IP is a set of
instructions, or protocol, all PCs follow to communicate over a network. This is true for wireless networks as well.
Your PCs will not be able to utilize wireless networking without having TCP/IP enabled. Windows Help provides
complete instructions on enabling TCP/IP.
Shared Resources
If you wish to share printers, folder, or files over your network, Windows Help provides complete instructions on
utilizing shared resources.
Network Neighborhood/My Network Places
Other PCs on your network will appear under Network Neighborhood or My Network Places (depending upon the
version of Windows you're running). Windows Help provides complete instructions on adding PCs to your
network.
Page 56

50
Appendix E: Glossary
Wireless-G USB Network Adapter with SpeedBooster
Appendix E: Glossary
802.11b - An IEEE wireless networking standard that specifies a maximum data transfer rate of 11Mbps and an
operating frequency of 2.4GHz.
802.11g - An IEEE wireless networking standard that specifies a maximum data transfer rate of 54Mbps, an
operating frequency of 2.4GHz, and backward compatibility with 802.11b devices.
Access Point - Device that allows wireless-equipped computers and other devices to communicate with a wired
network. Also used to expand the range of a wireless network.
Adapter - A device that adds network functionality to your PC.
Ad-hoc - A group of wireless devices communicating directly with each other (peer-to-peer) without the use of
an access point.
Backbone - The part of a network that connects most of the systems and networks together, and handles the
most data.
Bandwidth - The transmission capacity of a given device or network.
Bit - A binary digit.
CSMA/CA (Carrier Sense Multiple Access/Collision Avoidance) - A method of data transfer that is used to prevent
data loss in a network.
CTS (Clear To Send) - A signal sent by a device to indicate that it is ready to receive data.
Default Gateway - A device that forwards Internet traffic from your local area network.
DHCP (Dynamic Host Configuration Protocol) - A protocol that lets one device on a local network, known as a
DHCP server, assign temporary IP addresses to the other network devices, typically computers.
DNS (Domain Name Server) - The IP address of your ISP's server, which translates the names of websites into IP
addresses.
DSSS (Direct-Sequence Spread-Spectrum) - A type of radio transmission technology that includes a redundant
bit pattern to lessen the probability of data lost during transmission. Used in 802.11b networking.
Encryption - Encoding data to prevent it from being read by unauthorized people.
Page 57

51
Appendix E: Glossary
Wireless-G USB Network Adapter with SpeedBooster
Ethernet - An IEEE standard network protocol that specifies how data is placed on and retrieved from a common
transmission medium.
Firmware - 1. In network devices, the programming that runs the device. 2. Programming loaded into read-only
memory (ROM) or programmable read-only memory (PROM) that cannot be altered by end-users.
Fragmentation - Breaking a packet into smaller units when transmitting over a network medium that cannot
support the original size of the packet.
Gateway - A system that interconnects networks.
Hardware - The physical aspect of computers, telecommunications, and other information technology devices.
IEEE (The Institute of Electrical and Electronics Engineers) - An independent institute that develops networking
standards.
Infrastructure Mode - Configuration in which a wireless network is bridged to a wired network via an access
point.
IP (Internet Protocol) - A protocol used to send data over a network.
IP Address - The address used to identify a computer or device on a network.
ISM band - Radio band used in wireless networking transmissions.
ISP (Internet Service Provider) - A company that provides access to the Internet.
LAN (Local Area Network) - The computers and networking products that make up the network in your home or
office.
MAC (Media Access Control) Address - The unique address that a manufacturer assigns to each networking
device.
Mbps (Megabits Per Second) - One million bits per second; a unit of measurement for data transmission.
Network - A series of computers or devices connected for the purpose of data sharing, storage, and/or
transmission between users.
Node - A network junction or connection point, typically a computer or work station.
Page 58

52
Appendix E: Glossary
Wireless-G USB Network Adapter with SpeedBooster
OFDM (Orthogonal Frequency Division Multiplexing) - A type of modulation technology that separates the data
stream into a number of lower-speed data streams, which are then transmitted in parallel. Used in 802.11a,
802.11g, and powerline networking.
Packet - A unit of data sent over a network.
Passphrase - Used much like a password, a passphrase simplifies the WEP encryption process by automatically
generating the WEP encryption keys for Linksys products.
Port - The connection point on a computer or networking device used for plugging in a cable or an adapter.
Roaming - The ability to take a wireless device from one access point's range to another without losing the
connection.
Router - A networking device that connects multiple networks together, such as a local network and the Internet.
RTS (Request To Send) - A packet sent when a computer has data to transmit. The computer will wait for a CTS
(Clear To Send) message before sending data.
Server - Any computer whose function in a network is to provide user access to files, printing, communications,
and other services.
Software - Instructions for the computer. A series of instructions that performs a particular task is called a
"program".
Spread Spectrum - Wideband radio frequency technique used for more reliable and secure data transmission.
SSID (Service Set IDentifier) - Your wireless network's name.
Subnet Mask - An address code that determines the size of the network.
Switch - Device that is the central point of connection for computers and other devices in a network, so data can
be shared at full transmission speeds.
TCP/IP (Transmission Control Protocol/Internet Protocol) - A network protocol for transmitting data that requires
acknowledgement from the recipient of data sent.
WEP (Wired Equivalent Privacy) - A method of encrypting data transmitted on a wireless network for greater
security.
Page 59

53
Appendix F: Specifications
Wireless-G USB Network Adapter with SpeedBooster
Appendix F: Specifications
Model WUSB54GS
Standards IEEE 802.11b, IEEEE 802.11g, USB 1.1, USB 2.0
Ports USB Port
Channels 802.11b / 802.11g
11 Channels (most of North, Central, and South America)
13 Channels (most of Europe and Asia)
LEDs Power, Link
Transmitted Power 15-17dBm (Typical)@11Mbps CCK,
15-17dBm (Typical)@54Mbps OFDM
Receive Sensitivity -67dBm@54Mbps, -82dBm@11Mbps
Security features WEP Encryption, Pre-Shared Key
WEP key bits 64, 128-bit
Dimensions 91 mm x 23 mm x 71 mm
Unit Weight 0.08 kg
Certifications FCC, CE, ICES-03
Operating Temp. 0°C ~ 55°C
Storage Temp. -40°C ~ 85°C
Page 60

54
Appendix F: Specifications
Wireless-G USB Network Adapter with SpeedBooster
Operating Humidity 10% ~ 85% Non-Condensing
Storage Humidity 5% ~ 90% Non-Condensing
Page 61

55
Appendix G: Warranty Information
Wireless-G USB Network Adapter with SpeedBooster
Appendix G: Warranty Information
Linksys warrants to You that, for a period of three years (the “Warranty Period”), your Linksys Product will be substantially
free of defects in materials and workmanship under normal use. Your exclusive remedy and Linksys' entire liability under
this warranty will be for Linksys at its option to repair or replace the Product or refund Your purchase price less any rebates.
This limited warranty extends only to the original purchaser.
If the Product proves defective during the Warranty Period call Linksys Technical Support in order to obtain a Return
Authorization Number, if applicable. BE SURE TO HAVE YOUR PROOF OF PURCHASE ON HAND WHEN CALLING. If You are
requested to return the Product, mark the Return Authorization Number clearly on the outside of the package and include a
copy of your original proof of purchase. RETURN REQUESTS CANNOT BE PROCESSED WITHOUT PROOF OF PURCHASE. You
are responsible for shipping defective Products to Linksys. Linksys pays for UPS Ground shipping from Linksys back to You
only. Customers located outside of the United States of America and Canada are responsible for all shipping and handling
charges.
ALL IMPLIED WARRANTIES AND CONDITIONS OF MERCHANTABILITY OR FITNESS FOR A PARTICULAR PURPOSE ARE LIMITED
TO THE DURATION OF THE WARRANTY PERIOD. ALL OTHER EXPRESS OR IMPLIED CONDITIONS, REPRESENTATIONS AND
WARRANTIES, INCLUDING ANY IMPLIED WARRANTY OF NON-INFRINGEMENT, ARE DISCLAIMED. Some jurisdictions do not
allow limitations on how long an implied warranty lasts, so the above limitation may not apply to You. This warranty gives
You specific legal rights, and You may also have other rights which vary by jurisdiction.
This warranty does not apply if the Product (a) has been altered, except by Linksys, (b) has not been installed, operated,
repaired, or maintained in accordance with instructions supplied by Linksys, or (c) has been subjected to abnormal physical
or electrical stress, misuse, negligence, or accident. In addition, due to the continual development of new techniques for
intruding upon and attacking networks, Linksys does not warrant that the Product will be free of vulnerability to intrusion or
attack.
TO THE EXTENT NOT PROHIBITED BY LAW, IN NO EVENT WILL LINKSYS BE LIABLE FOR ANY LOST DATA, REVENUE OR PROFIT,
OR FOR SPECIAL, INDIRECT, CONSEQUENTIAL, INCIDENTAL OR PUNITIVE DAMAGES, REGARDLESS OF THE THEORY OF
LIABILITY (INCLUDING NEGLIGENCE), ARISING OUT OF OR RELATED TO THE USE OF OR INABILITY TO USE THE PRODUCT
(INCLUDING ANY SOFTWARE), EVEN IF LINKSYS HAS BEEN ADVISED OF THE POSSIBILITY OF SUCH DAMAGES. IN NO EVENT
WILL LINKSYS’ LIABILITY EXCEED THE AMOUNT PAID BY YOU FOR THE PRODUCT. The foregoing limitations will apply even if
any warranty or remedy provided under this Agreement fails of its essential purpose. Some jurisdictions do not allow the
exclusion or limitation of incidental or consequential damages, so the above limitation or exclusion may not apply to You.
This Warranty is valid and may be processed only in the country of purchase.
Please direct all inquiries to: Linksys, P.O. Box 18558, Irvine, CA 92623.
Page 62

56
Appendix H: Regulatory Information
Wireless-G USB Network Adapter with SpeedBooster
Appendix H: Regulatory Information
FCC Statement
This product has been tested and complies with the specifications for a Class B digital device, pursuant to Part 15 of the
FCC Rules. These limits are designed to provide reasonable protection against harmful interference in a residential
installation. This equipment generates, uses, and can radiate radio frequency energy and, if not installed and used
according to the instructions, may cause harmful interference to radio communications. However, there is no guarantee
that interference will not occur in a particular installation. If this equipment does cause harmful interference to radio or
television reception, which is found by turning the equipment off and on, the user is encouraged to try to correct the
interference by one or more of the following measures:
• Reorient or relocate the receiving antenna
• Increase the separation between the equipment or devices
• Connect the equipment to an outlet other than the receiver's
• Consult a dealer or an experienced radio/TV technician for assistance
FCC Radiation Exposure Statement
This equipment complies with FCC radiation exposure limits set forth for an uncontrolled environment. This equipment
should be installed and operated with minimum distance 20cm between the radiator and your body.
Industry Canada (Canada)
This device complies with Canadian ICES-003 and RSS210 rules.
Cet appareil est conforme aux normes NMB-003 et RSS210 d'Industry Canada.
Page 63

57
Appendix H: Regulatory Information
Wireless-G USB Network Adapter with SpeedBooster
Compliance Information for 2.4-GHz Wireless Products Relevant to the EU and Other Countries Following
the EU Directive 1999/5/EC (R&TTE Directive)
Declaration of Conformity with Regard to the EU Directive 1999/5/EC (R&TTE Directive)
Page 64

58
Appendix H: Regulatory Information
Wireless-G USB Network Adapter with SpeedBooster
The following standards were applied during the assessment of the product against the requirements of the
Directive 1999/5/EC:
• Radio: EN 300 328
• EMC: EN 301 489-1, EN 301 489-17
• Safety: EN 60950
NOTE: For all products, the Declaration of Conformity is available through one or more of these options:
• A pdf file is included on the product's CD.
• A print copy is included with the product.
• A pdf file is available on the product's webpage. Visit www.linksys.com/international and select your country or
region. Then select your product.
If you need any other technical documentation, see the “Technical Documents on www.linksys.com/international”
section, as shown later in this appendix.
Page 65

59
Appendix H: Regulatory Information
Wireless-G USB Network Adapter with SpeedBooster
CE Marking
For the Linksys Wireless-B and Wireless-G products, the following CE mark, notified body number (where applicable), and
class 2 identifier are added to the equipment.
Check the CE label on the product to find out which notified body was involved during the assessment.
National Restrictions
This product may be used in all EU countries (and other countries following the EU directive 1999/5/EC) without any
limitation except for the countries mentioned below:
Ce produit peut être utilisé dans tous les pays de l’UE (et dans tous les pays ayant transposés la directive 1999/5/CE) sans
aucune limitation, excepté pour les pays mentionnés ci-dessous:
Questo prodotto è utilizzabile in tutte i paesi EU (ed in tutti gli altri paesi che seguono le direttive EU 1999/5/EC) senza
nessuna limitazione, eccetto per i paesii menzionati di seguito:
Das Produkt kann in allen EU Staaten ohne Einschränkungen eingesetzt werden (sowie in anderen Staaten die der EU
Direktive 1999/5/CE folgen) mit Außnahme der folgenden aufgeführten Staaten:
Belgium
The Belgian Institute for Postal Services and Telecommunications (BIPT) must be notified of any outdoor wireless link
having a range exceeding 300 meters. Please check http://www.bipt.be for more details.
Draadloze verbindingen voor buitengebruik en met een reikwijdte van meer dan 300 meter dienen aangemeld te worden
bij het Belgisch Instituut voor postdiensten en telecommunicatie (BIPT). Zie http://www.bipt.be voor meer gegevens.
Les liaisons sans fil pour une utilisation en extérieur d’une distance supérieure à 300 mètres doivent être notifiées à
l’Institut Belge des services Postaux et des Télécommunications (IBPT). Visitez
http://www.ibpt.be pour de plus amples détails.
or
or
Page 66

60
Appendix H: Regulatory Information
Wireless-G USB Network Adapter with SpeedBooster
France
In case the product is used outdoors, the output power is restricted in some parts of the band. See Table 1 or check
http://www.art-telecom.fr/ for more details.
Dans la cas d’une utilisation en extérieur, la puissance de sortie est limitée pour certaines parties de la bande. Reportezvous à la table 1 ou visitez http://www.art-telecom.fr/ pour de plus amples détails.
Italy
This product meets the National Radio Interface and the requirements specified in the National Frequency Allocation Table
for Italy. Unless operating within the boundaries of the owner’s property, the use of this 2.4 GHz Wireless LAN product
requires a ‘general authorization’. Please check with http://www.comunicazioni.it/it/ for more details.
Questo prodotto è conforme alla specifiche di Interfaccia Radio Nazionali e rispetta il Piano Nazionale di ripartizione delle
frequenze in Italia. Se non viene installato all’interno del proprio fondo, l’utilizzo di prodotti Wireless LAN a 2.4 GHz richiede
una “Autorizzazione Generale”. Consultare http://www.comunicazioni.it/it/ per maggiori dettagli.
Product Usage Restrictions
This product is designed for indoor usage only. Outdoor usage is not recommended.
This product is designed for use with the standard, integral or dedicated (external) antenna(s) that is/are shipped together
with the equipment. However, some applications may require the antenna(s), if removable, to be separated from the
product and installed remotely from the device by using extension cables. For these applications, Linksys offers an R-SMA
extension cable (AC9SMA) and an R-TNC extension cable (AC9TNC). Both of these cables are 9 meters long and have a
cable loss (attenuation) of 5 dB. To compensate for the attenuation, Linksys also offers higher gain antennas, the HGA7S
(with R-SMA connector) and HGA7T (with R-TNC connector). These antennas have a gain of 7 dBi and may only be used
with either the R-SMA or R-TNC extension cable.
Combinations of extension cables and antennas resulting in a radiated power level exceeding 100 mW EIRP are illegal.
Table 1: Applicable Power Levels in France
Location Frequency Range (MHz) Power (EIRP)
Indoor (No restrictions) 2400-2483.5 100 mW (20 dBm)
Outdoor 2400-2454
2454-2483.5
100 mW (20 dBm)
10 mW (10 dBm)
Page 67

61
Appendix H: Regulatory Information
Wireless-G USB Network Adapter with SpeedBooster
Power Output of Your Device
To comply with your country’s regulations, you may have to change the power output of your wireless device. Proceed to
the appropriate section for your device.
Wireless Adapters
Wireless adapters have the power output set to 100% by default. Maximum power output on each adapter does not exceed
20 dBm (100 mW); it is generally 18 dBm (64 mW) or below. If you need to alter your wireless adapter’s power output,
follow the appropriate instructions for your computer’s Windows operating system:
Windows XP
1. Double-click the Wireless icon in your desktop’s system tray.
2. Open the Wireless Network Connection window.
3. Click the Properties button.
4. Select the General tab, and click the Configure button.
5. In the Properties window, click the Advanced tab.
6. Select Power Output.
7. From the pull-down menu on the right, select the wireless adapter’s power output percentage.
Windows 2000
1. Open the Control Panel.
2. Double-click Network and Dial-Up Connections.
3. Select your current wireless connection, and select Properties.
4. From the Properties screen, click the Configure button.
5. Click the Advanced tab, and select Power Output.
6. From the pull-down menu on the right, select the wireless adapter’s power setting.
If your computer is running Windows Millennium or 98, then refer to Windows Help for instructions on how to access the
advanced settings of a network adapter.
Wireless Access Points, Routers, or Other Wireless Products
If you have a wireless access point, router or other wireless product, use its Web-based Utility to configure its power
output setting (refer to the product’s documentation for more information).
NOTE: The power output setting may not be available on all wireless products. For more information, refer to
the documentation on your product’s CD or http://www.linksys.com/international.
Page 68

62
Appendix H: Regulatory Information
Wireless-G USB Network Adapter with SpeedBooster
Technical Documents on www.linksys.com/international
Follow these steps to access technical documents:
1. Browse to http://www.linksys.com/international.
2. Click the region in which you reside.
3. Click the name of the country in which you reside.
4. Click Products.
5. Click the appropriate product category.
6. Select a product.
7. Click the type of documentation you want. The document will automatically open in PDF format.
NOTE: If you have questions regarding the compliance of these products or you cannot find the information
you need, please contact your local sales office or visit http://www.linksys.com/international for more details.
Page 69

63
Wireless-G USB Network Adapter with SpeedBooster
Appendix I: Contact Information
Appendix I: Contact Information
Need to contact Linksys?
Visit us online for information on the latest products and updates to your existing products at:
http://www.linksys.com/international
If you experience problems with any Linksys product, you can e-mail us at:
In Europe E-mail Address
Austria support.at@linksys.com
Belgium support.be@linksys.com
Denmark support.dk@linksys.com
France support.fr@linksys.com
Germany support.de@linksys.com
Italy support.it@linksys.com
Netherlands support.nl@linksys.com
Norway support.no@linksys.com
Portugal support.pt@linksys.com
Spain support.es@linksys.com
Sweden support.se@linksys.com
Switzerland support.ch@linksys.com
United Kingdom & Ireland support.uk@linksys.com
Outside of Europe E-mail Address
Asia Pacific asiasupport@linksys.com (English only)
Latin America support.portuguese@linksys.com or support.spanish@linksys.com
Middle East & Africa support.mea@linksys.com (English only)
U.S. and Canada support@linksys.com
Page 70

A Division of Cisco Systems, Inc.
®
Modèle
Adaptateur
Sans fil - G
WUSB54GS (FR)
Guide de l’utilisateur
SANS FIL
réseau USB
avec SpeedBooster
GHz
802.11g
2,4
Page 71

Adaptateur réseau USB sans fil G avec Speedbooster
Copyright et marques commerciales
Les spécifications peuvent être modifiées sans préavis. Linksys est une marque déposée ou une marque
commerciale de Cisco Systems, Inc. et/ou de ses filiales aux Etats-Unis et dans certains autres pays.
Copyright © 2005 Cisco Systems, Inc. Tous droits réservés. Les autres noms de marque et de produit sont
des marques commerciales, déposées ou non, de leurs détenteurs respectifs.
Comment utiliser ce guide de l’utilisateur ?
Ce Guide de l’utilisateur a été rédigé pour faciliter au maximum votre compréhension de la mise en place d’une
infrastructure réseau avec l’adaptateur réseau USB sans fil G. Les symboles suivants sont contenus dans ce
guide de l’utilisateur :
Outre ces symboles, des définitions concernant des termes techniques sont présentées de la façon suivante :
Chaque figure (diagramme, capture d’écran ou toute autre image) est accompagnée d’un numéro et d’une
description, comme ceci :
Les numéros de figures et les descriptions sont également répertoriés dans la section « Liste des figures » de
la table des matières.
Ce point d’exclamation signale un avertissement et vous informe sur un élément
susceptible d’endommager votre infrastructure ou l’adaptateur réseau USB sans fil G.
Cette coche signale un élément digne d’intérêt et à prendre plus particulièrement en
compte au moment d’utiliser l’adaptateur réseau USB sans fil G.
Ce point d’interrogation signale à titre de rappel quelque chose que vous serez
peut-être amené à faire lors de l’utilisation de l’adaptateur réseau USB sans fil G.
mot : définition.
Figure 0-1 : Exemple de description de figure
WUSB54GS-FR-UG-50907 BW
Page 72

Adaptateur réseau USB sans fil G avec Speedbooster
Table des matières
Chapitre 1 : Introduction 1
Bienvenue 1
Contenu de ce guide 2
Chapitre 2 : Planification de votre réseau sans fil 4
Topologie réseau 4
Itinérance 4
Configuration du réseau 5
Chapitre 3 : Configuration et connexion de l’adaptateur réseau USB 6
Lancement de l’assistant de configuration 6
Connexion de l’adaptateur 7
Configuration de l’adaptateur 8
Chapitre 4 : Utilisation de Wireless Network Monitor 20
Accès au logiciel Wireless Network Monitor 20
Ecrans Link Information (Informations de liaison) 20
SecureEasySetup 23
Site Survey (Recherche de site) 25
Profiles (Profils) 26
Création d’un profil 27
Annexe A : Dépannage 39
Problèmes courants et solutions 39
Questions fréquemment posées 40
Annexe B : Utilisation de la configuration sans fil de Windows XP 43
Annexe C : Sécurité sans fil 46
Mesures de sécurité 46
Menaces liées aux réseaux sans fil 46
Annexe D : Aide - Windows 49
Annexe E : Glossaire 50
Annexe F : Spécifications 53
Annexe G : Informations de garantie 55
Annexe H : Réglementation 56
Annexe I : Contacts 63
Page 73

Adaptateur réseau USB sans fil G avec Speedbooster
Liste des figures
Figure 3-1 : Ecran Welcome (Bienvenue) de l’assistant de configuration 6
Figure 3-2 : Ecran License Agreement (Accord de licence)
de l’assistant de configuration 6
Figure 3-3 : Ecran Connecting the Adapter (Connexion de l’adaptateur) 7
Figure 3-4 : Connexion de l’adaptateur 7
Figure 3-5 : Port USB de l’adaptateur 7
Figure 3-6 : Available Wireless Network (Réseaux sans fil disponibles) 8
Figure 3-7 : Available Wireless Network (Réseaux sans fil disponibles) 9
Figure 3-8 : SecureEasySetup 9
Figure 3-9 : Logo SecureEasySetup et localisation du bouton 9
Figure 3-10 : SecureEasySetup terminé 10
Figure 3-11 : Available Wireless Network (Réseaux sans fil disponibles) 11
Figure 3-12 : WEP Key Needed for Connection
(Clé WEP requise pour la connexion) 11
Figure 3-13 : PSK Needed for Connection (PSK requise pour la connexion) 12
Figure 3-14 : Ecran Congratulations (Félicitations) 12
Figure 3-15 : Available Wireless Network (Réseaux sans fil disponibles) 13
Figure 3-16 : Network Settings (Paramètres réseau) 13
Figure 3-17 : Wireless mode (Mode sans fil) 14
Figure 3-18 : Ad-Hoc Mode Settings (Paramètres du mode Ad hoc) 14
Figure 3-19 : Wireless Security (Sécurité sans fil) 15
Figure 3-20 : Wireless Security - WEP (Sécurité sans fil - WEP) 15
Figure 3-21 : Wireless Security - PSK (Sécurité sans fil - PSK) 16
Figure 3-22 : Wireless Security - PSK + RADIUS
(Sécurité sans fil - PSK + RADIUS) 17
Figure 3-23 : Wireless Security - RADIUS (Sécurité sans fil - RADIUS) 18
Figure 3-24 : Ecran Confirm new settings
(Confirmation des nouveaux paramètres) 19
Figure 3-25 : Ecran Congratulations (Félicitations) 19
Figure 4-1 : Icône Wireless Network Monitor 20
Page 74

Adaptateur réseau USB sans fil G avec Speedbooster
Figure 4-2 : Link Information (Informations de liaison) 20
Figure 4-3 : More Information - Wireless Network Status
(Plus d’informations - Etat du réseau sans fil) 21
Figure 4-4 : More Information - Wireless Network Statistics
(Plus d’informations - Statistiques du réseau sans fil) 22
Figure 4-5 : Bouton SecureEasySetup 23
Figure 4-6 : Logo SecureEasySetup et localisation du bouton 23
Figure 4-7 : SecureEasySetup 23
Figure 4-8 : Fin de la configuration SecureEasySetup 24
Figure 4-9 : Recherche de site 25
Figure 4-10 : WEP Key Needed for Connection
(Clé WEP requise pour la connexion) 25
Figure 4-11 : PSK Needed for Connection (PSK requise pour la connexion) 25
Figure 4-12 : Profiles (Profils) 26
Figure 4-13 : Importation d’un profil 26
Figure 4-14 : Exportation d’un profil 26
Figure 4-15 : Création d’un profil 27
Figure 4-16 : Available Wireless Network (Réseaux sans fil disponibles) 27
Figure 4-17 : Available Wireless Network (Réseaux sans fil disponibles) 28
Figure 4-18 : Logo SecureEasySetup et localisation du bouton 28
Figure 4-19 : SecureEasySetup 28
Figure 4-20 : Fin de la configuration SecureEasySetup 29
Figure 4-21 : Available Wireless Network (Réseaux sans fil disponibles) 30
Figure 4-22 : WEP Key Needed for Connection
(Clé WEP requise pour la connexion) 30
Figure 4-23 : PSK Needed for Connection (PSK requise pour la connexion) 31
Figure 4-24 : Ecran Congratulations (Félicitations) 31
Figure 4-25 : Available Wireless Network (Réseaux sans fil disponibles) 32
Figure 4-26 : Paramètres réseau (Network Settings) 32
Figure 4-27 : Wireless Mode (Mode sans fil) 33
Figure 4-28 : Ad-Hoc Mode Settings (Paramètres du mode Ad hoc) 33
Figure 4-29 : Wireless Security (Sécurité sans fil) 34
Figure 4-30 : Wireless Security - WEP (Sécurité sans fil - WEP) 34
Page 75

Adaptateur réseau USB sans fil G avec Speedbooster
Figure 4-31 : Wireless Security - PSK (Sécurité sans fil - PSK) 35
Figure 4-32 : Wireless Security - PSK + RADIUS
(Sécurité sans fil - PSK + RADIUS) 36
Figure 4-33 : Wireless Security - RADIUS (Sécurité sans fil - RADIUS) 37
Figure 4-34 : Ecran Confirm new settings
(Confirmation des nouveaux paramètres) 38
Figure 4-35 : Ecran Congratulations (Félicitations) 38
Figure B-1 : Icône Wireless Network Monitor 43
Figure B-2 : Windows XP - Use Windows XP Wireless Configuration
(Utiliser la configuration sans fil Windows XP) 43
Figure B-3 : Windows XP Wireless Configuration Icon
(Icône de configuration sans fil de Windows XP) 43
Figure B-4 : Available Wireless Network (Réseaux sans fil disponibles) 44
Figure B-5 : Aucune sécurité sans fil 44
Figure B-6 : Connexion réseau : sécurité sans fil 45
Figure B-7 : Connexion réseau sans fil 45
Page 76

1
Chapitre 1 : Introduction
Bienvenue
Adaptateur réseau USB sans fil G avec Speedbooster
Chapitre 1: Introduction
Bienvenue
Merci d’avoir choisi l’adaptateur réseau USB sans fil G. Grâce à cet adaptateur, vous allez découvrir une mise
en réseau sans fil plus rapide et plus simple que jamais.
Comment l’adaptateur fonctionne-t-il ? Comme tous les produits sans fil, l’adaptateur offre une plus grande portée
et une plus grande mobilité à votre réseau sans fil. La connexion à votre ordinateur via le port USB signifie que
cet adaptateur laisse les emplacements de l’ordinateur disponibles pour d’autres utilisations. Cet adaptateur
communique en utilisant la norme sans fil 802.11g, l’une des normes sans fil les plus récentes, pour communiquer
avec votre réseau.
Que signifie tout cela ?
Les réseaux permettent de partager des ressources informatiques. Vous pouvez connecter plusieurs ordinateurs
à une même imprimante et accéder à des données stockées sur le disque dur d’un autre ordinateur. Les réseaux
sont même utilisés pour les jeux vidéo multi-joueurs. Outre leur utilité à la maison et au bureau, ils peuvent donc
servir à des activités plus ludiques.
Les ordinateurs équipés de cartes ou d’adaptateurs sans fil peuvent communiquer sans la présence de câbles
encombrants. En partageant les mêmes paramètres sans fil conformément à leur rayon de transmission, ils
forment un réseau sans fil.
Désormais, avec SecureEasySetup, la configuration de votre réseau et de votre adaptateur réseau USB sans fil G
n’a jamais été aussi simple.
Utilisez les instructions de ce Guide pour connecter l’adaptateur, l’installer et le configurer sur votre réseau.
Ces instructions devraient s’avérer suffisantes et vous permettre de tirer le meilleur parti de l’adaptateur.
802.11g : norme de mise en réseau sans fil IEEE qui spécifie
un débit de transfert de données maximum de 54 Mbit/s, une
fréquence de 2,4 GHz et une rétro-compatibilité avec les
périphériques 802.11b.
adaptateur : périphérique ajoutant de nouvelles
fonctionnalités réseau à votre ordinateur.
réseau : groupe d’ordinateurs ou de périphériques reliés
entre eux dans le but de partager et de stocker des
données, ainsi que de transmettre des données entre
des utilisateurs.
Page 77

2
Chapitre 1 : Introduction
Contenu de ce guide
Adaptateur réseau USB sans fil G avec Speedbooster
Contenu de ce guide
Ce guide de l’utilisateur présente les étapes inhérentes à l’installation et à l’utilisation de l’adaptateur
réseau USB sans fil G.
• Chapitre 1 : Introduction
Ce chapitre présente les applications de l’adaptateur ainsi que le présent Guide de l’utilisateur.
• Chapitre 2 : Planification de votre réseau sans fil
Ce chapitre décrit les éléments de base sur la mise en place d’un réseau sans fil.
• Chapitre 3 : Configuration et connexion de l’adaptateur réseau USB
Ce chapitre explique comment installer et connecter l’adaptateur.
• Chapitre 4 : Utilisation de Wireless Network Monitor
Ce chapitre explique comment utiliser le logiciel Wireless Network Monitor de l’adaptateur.
• Annexe A : Dépannage
Cette annexe expose quelques problèmes et leurs solutions, ainsi que les questions fréquemment posées
au sujet de l’installation et de l’utilisation de l’adaptateur.
• Annexe B : Utilisation de la configuration sans fil de Windows XP
Cette annexe décrit comment les utilisateurs de Windows XP peuvent contrôler leur adaptateur à l’aide de
la configuration sans fil intégrée à Windows.
• Annexe C : Sécurité sans fil
Cette annexe concerne les questions de sécurité au sujet de la mise en réseau sans fil et des mesures à
prendre pour favoriser la protection de votre réseau sans fil.
• Annexe D : Aide - Windows
Cette annexe explique comment utiliser l’aide de Windows et obtenir des instructions sur des opérations liées
aux réseaux, notamment l’installation du protocole TCP/IP.
• Annexe E : Glossaire
Cette annexe propose un glossaire des termes fréquemment utilisés dans le cadre des réseaux.
• Annexe F : Spécifications
Cette annexe contient les spécifications techniques de l’adaptateur.
• Annexe G : Informations de garantie
Cette annexe contient des informations sur la garantie de l’adaptateur.
Page 78

3
Chapitre 1 : Introduction
Contenu de ce guide
Adaptateur réseau USB sans fil G avec Speedbooster
• Annexe H : Réglementation
Cette annexe contient des informations sur la réglementation s’appliquant à l’adaptateur.
• Annexe I : Contacts
Cette annexe fournit des informations sur diverses ressources Linksys que vous pouvez contacter,
notamment le Support technique.
Page 79

4
Chapitre 2 : Planification de votre réseau sans fil
Topologie réseau
Adaptateur réseau USB sans fil G avec Speedbooster
Chapitre 2: Planification de votre réseau sans fil
Topologie réseau
Un réseau sans fil est un groupe d’ordinateurs, équipés chacun d’un adaptateur sans fil. Les ordinateurs d’un
réseau sans fil doivent être configurés de façon à partager le même canal radio. Plusieurs ordinateurs équipés de
cartes ou d’adaptateurs sans fil peuvent communiquer entre eux et constituer ainsi un réseau ad hoc.
Les adaptateurs sans fil de Linksys permettent également aux utilisateurs d’accéder à un réseau câblé lors de
l’utilisation d’un point d’accès ou d’un routeur sans fil. Un réseau sans fil et câblé intégré s’appelle un réseau
d’infrastructure. Dans un réseau de ce type, chaque ordinateur sans fil peut communiquer avec tous les
ordinateurs d’un réseau câblé via un point d’accès ou routeur sans fil.
Une configuration d’infrastructure étend l’accessibilité d’un ordinateur sans fil à un réseau câblé et peut doubler
l’étendue de transmission sans fil réelle de deux ordinateurs dotés d’un adaptateur sans fil. Etant donné qu’un
point d’accès peut transmettre des données dans un réseau, la portée de la transmission réelle d’un réseau
d’infrastructure peut être doublée.
Itinérance
Le mode Infrastructure prend également en charge les capacités d’itinérance des utilisateurs mobiles.
L’itinérance signifie que vous pouvez déplacer votre ordinateur sans fil au sein de votre réseau. Dans ce cas,
les points d’accès captent le signal de l’ordinateur sans fil (ils doivent pour cela partager le même canal et le
même SSID).
Avant d’utiliser l’itinérance, choisissez un canal radio exploitable et une position optimale pour le point d’accès.
Les performances seront considérablement améliorées en combinant un positionnement approprié du point
d’accès et un signal radio clair.
point d’accès : périphérique permettant aux
ordinateurs et aux autres périphériques sans
fil de communiquer avec un réseau câblé.
ad hoc : groupe de périphériques sans fil
communiquant directement entre eux (point à
point) sans l’intervention d’un point d’accès.
infrastructure : configuration dans laquelle un
réseau sans fil est relié à un réseau câblé par
l’intermédiaire d’un point d’accès.
itinérance : opération consistant à faire passer
un périphérique sans fil d’un point d’accès à un
autre sans perdre la connexion.
ssid : nom de votre réseau sans fil.
Page 80

5
Chapitre 2 : Planification de votre réseau sans fil
Configuration du réseau
Adaptateur réseau USB sans fil G avec Speedbooster
Configuration du réseau
Les points d’accès et les routeurs sans fil de Linksys ont été conçus pour être utilisés avec les produits 802.11a,
802.11b et 802.11g. Les produits 802.11g sont compatibles avec la norme 802.11b et certains produits sont à la
fois compatibles 802.11a et 802.11g, pour une intercommunication maximale.
Les points d’accès et les routeurs sans fil sont compatibles avec les adaptateurs 802.11a, 802.11b et 802.11g,
comme les cartes PC des ordinateurs portables, la carte PCI de votre ordinateur de bureau et les adaptateurs USB
lorsque vous souhaitez bénéficier de la connectivité USB. Les produits sans fil communiquent également avec le
serveur d’impression sans fil.
Pour connecter votre réseau câblé à votre réseau sans fil, vous pouvez connecter les ports réseau des points
d’accès et des routeurs sans fil aux commutateurs ou aux routeurs Linksys.
Fortes de tous ces éléments et des nombreux autres produits Linksys, vos possibilités en matière de
développement réseau sont illimitées. Pour plus d’informations sur les produits sans fil, accédez au site
Web de Linksys www.linksys.com/international.
802.11b : norme de mise en réseau sans fil IEEE
qui spécifie un débit de transfert de données
maximal de 11 Mbit/s et une fréquence de 2,4 GHz.
commutateur : périphérique servant de « noyau » de
connexion à des ordinateurs ou d’autres périphériques d’un
réseau et permettant le partage de données à haut débit.
routeur : périphérique de mise en réseau qui relie entre
eux plusieurs ordinateurs (réseau local, Internet).
Page 81

6
Chapitre 3 : Configuration et connexion de l’adaptateur réseau USB
Lancement de l’assistant de configuration
Adaptateur réseau USB sans fil G avec Speedbooster
Chapitre 3: Configuration et connexion de l’adaptateur
réseau USB
Vous pouvez configurer l’adaptateur réseau USB à l’aide de l’assistant de configuration disponible sur le
CD fourni avec l’adaptateur. Ce chapitre va vous guider pas à pas dans la procédure de configuration.
Lancement de l’assistant de configuration
Pour lancer le processus de configuration, insérez le CD-ROM de l’assistant de configuration dans le lecteur
de CD-ROM. L’Assistant de configuration démarre automatiquement et l’écran Welcome (Bienvenue) apparaît.
Si ce n’est pas le cas, ouvrez le menu Démarrer de Windows, puis cliquez sur Exécuter. Dans le champ qui
apparaît, saisissez D:\setup.exe (« D » représentant votre lecteur de CD-ROM).
Dans l’écran Welcome (Bienvenue), vous avez le choix entre les options suivantes :
Click Here to Start (Cliquez ici pour démarrer) : cliquez sur ce bouton pour lancer l’installation du logiciel.
User Guide (Guide de l’utilisateur) : cliquez sur ce bouton pour ouvrir le document correspondant (ce guide).
Exit (Quitter) : cliquez sur ce bouton pour quitter l’assistant de configuration.
1. Pour installer l’adaptateur, cliquez sur le bouton Click Here to Start (Cliquez ici pour démarrer) dans l’écran
Welcome (Bienvenue).
2. Après avoir lu l’accord de licence, cliquez sur le bouton Next (Suivant) pour l’accepter et poursuivre
l’installation ou sur Cancel (Annuler) pour interrompre l’installation.
Figure 3-1 : Ecran Welcome (Bienvenue) de l’assistant
de configuration
Figure 3-2 : Ecran License Agreement (Accord de licence)
de l’assistant de configuration
IMPORTANT : Ne connectez pas l’adaptateur à votre ordinateur avant
d’y être invité. L’installation pourrait échouer.
Page 82

7
Chapitre 3 : Configuration et connexion de l’adaptateur réseau USB
Connexion de l’adaptateur
Adaptateur réseau USB sans fil G avec Speedbooster
3. Windows commence à copier les fichiers sur votre ordinateur.
4. L’Assistant de configuration vous invite ensuite à connecter l’adaptateur au port USB de votre ordinateur.
Une fois que c’est fait, cliquez sur Next (Suivant).
Connexion de l’adaptateur
1. Branchez une extrémité du câble USB sur le port USB de l’adaptateur.
2. Branchez l’autre extrémité du câble USB sur l’un des ports USB de votre ordinateur.
3. Le voyant Power (Alimentation) doit s’allumer lorsque l’adaptateur est branché.
4. Relevez l’antenne. Assurez-vous que l’antenne est placée en position verticale, perpendiculairement à
l’adaptateur. Cela permet d’optimiser la plage de fonctionnement entre les périphériques sans fil ainsi
que les performances.
Figure 3-3 : Ecran Connecting the Adapter
(Connexion de l’adaptateur)
Figure 3-4 : Connexion de l’adaptateur
Figure 3-5 : Port USB de l’adaptateur
Page 83

8
Chapitre 3 : Configuration et connexion de l’adaptateur réseau USB
Configuration de l’adaptateur
Adaptateur réseau USB sans fil G avec Speedbooster
Configuration de l’adaptateur
L’écran suivant est Available Wireless Network (Réseaux sans fil disponibles).
Il propose trois options de configuration de l’adaptateur.
• SecureEasySetup. Cet adaptateur est équipé de la fonction SecureEasySetup. Cela signifie qu’il suffit de
quelques clics de souris pour le configurer lorsque vous vous connectez à des routeurs ou points d’accès
sans fil compatibles SecureEasySetup. Il est indispensable que les deux périphériques du réseau soient
compatibles SecureEasySetup pour que cette option fonctionne.
• Available Wireless Network (Réseaux sans fil disponibles). (For most users) (Pour la plupart des utilisateurs).
Utilisez cette option si vous possédez déjà un réseau configuré avec des périphériques qui ne proposent pas la
fonction SecureEasySetup. Les réseaux disponibles pour l’adaptateur s’affichent à l’écran. Vous pouvez
sélectionner l’un d’entre eux et cliquer sur le bouton Connect (Se connecter) pour vous y connecter. Cliquez sur
le bouton Refresh (Actualiser)pour mettre à jour la liste de réseaux sans fil disponibles.
• Manual Setup (Configuration manuelle). Si vous ne pouvez utiliser SecureEasySetup et que votre réseau ne
s’affiche pas à l’écran, sélectionnez Manual Setup (Configuration manuelle) pour configurer manuellement
l’adaptateur. Cette méthode est destinée uniquement aux utilisateurs avancés.
La configuration de chaque option est décrite étape par étape sur les pages suivantes.
Si vous souhaitez configurer l’adaptateur ultérieurement, cliquez sur Exit (Quitter) pour fermer l’assistant
de configuration.
Figure 3-6 : Available Wireless Network
(Réseaux sans fil disponibles)
Page 84

9
Chapitre 3 : Configuration et connexion de l’adaptateur réseau USB
Configuration de l’adaptateur
Adaptateur réseau USB sans fil G avec Speedbooster
Configuration de l’adaptateur avec SecureEasySetup
Avec SecureEasySetup, la configuration de l’adaptateur se fait en quelques clics. Toutefois, avant toute chose,
vous devez localiser le bouton SecureEasySetup sur le périphérique (routeur ou point d’accès sans fil) que vous
connectez à l’adaptateur.
1. A partir de l’écran Available Wireless Network (Réseaux sans fil disponibles), cliquez sur le bouton
SecureEasySetup dans la partie droite de la fenêtre.
2. Vous êtes ensuite invité à localiser le bouton SecureEasySetup sur le périphérique avec lequel l’adaptateur
communiquera. Si vous ne savez pas où trouver ce bouton, cliquez sur Where can I find the button? (Où se
trouve le bouton ?).
De nouveaux écrans s’affichent pour vous aider à localiser le bouton, qui est d’ordinaire placé à l’avant du
routeur ou du point d’accès sans fil.
Figure 3-7 : Available Wireless Network
(Réseaux sans fil disponibles)
Figure 3-8 : SecureEasySetup
Figure 3-9 : Logo SecureEasySetup et localisation du bouton
Page 85

10
Chapitre 3 : Configuration et connexion de l’adaptateur réseau USB
Configuration de l’adaptateur
Adaptateur réseau USB sans fil G avec Speedbooster
3. Appuyez sur le logo Cisco ou sur le bouton SecureEasySetup sur le routeur ou point d’accès sans fil. Lorsqu’il
devient blanc et commence à clignoter, cliquez sur le bouton Next (Suivant) dans l’écran de l’assistant de
configuration. Une fois l’adaptateur ajouté correctement au réseau, le logo ou bouton s’arrête de clignoter
sur le routeur ou point d’accès sans fil. Répétez cette procédure pour chaque périphérique SecureEasySetup
supplémentaire.
4. Lorsque vous avez terminé, vous pouvez enregistrer votre configuration dans un fichier texte en cliquant sur
le bouton Save (Enregistrer) ou l’imprimer en cliquant sur le bouton Print (Imprimer). Cliquez sur Connect to
Network (Se connecter au réseau) pour vous connecter à votre réseau.
Félicitations ! La configuration est terminée.
Pour vérifier les informations de liaison, rechercher les réseaux sans fil disponibles ou modifier la
configuration, reportez-vous au « Chapitre 4 : Utilisation de Wireless Network Monitor ».
REMARQUE : Vous ne pouvez ajouter qu’un seul périphérique
SecureEasySetup à la fois.
Figure 3-10 : SecureEasySetup terminé
Page 86

11
Chapitre 3 : Configuration et connexion de l’adaptateur réseau USB
Configuration de l’adaptateur
Adaptateur réseau USB sans fil G avec Speedbooster
Configuration de l’adaptateur avec les réseaux disponibles
Si vous ne configurez pas l’adaptateur à l’aide de la fonction SecureEasySetup, vous pouvez le faire à partir de la
liste des réseaux disponibles de l’écran Available Wireless Network (Réseaux sans fil disponibles). Les réseaux
disponibles sont répertoriés par SSID dans le tableau au centre de l’écran. Sélectionnez le réseau sans fil auquel
vous souhaitez vous connecter et cliquez sur le bouton Connect (Se connecter). Si votre réseau n’apparaît pas à
l’écran, vous pouvez cliquer sur le bouton Refresh (Actualiser) pour mettre la liste à jour. Si le réseau utilise la
sécurité sans fil, vous devez configurer la sécurité de l’adaptateur. Dans le cas contraire, l’écran Congratulations
(Félicitations) s’affiche.
1. Si la sécurité sans fil a été activée sur ce réseau, un écran de sécurité sans fil apparaît. Si votre réseau
utilise le cryptage WEP (Wired Equivalent Privacy), il s’agit de l’écran WEP Key Needed for Connection (Clé
WEP requise pour la connexion). Si votre réseau utilise le cryptage PSK (Pre-Shared Key, clé pré-partagée),
l’écran PSK Needed for Connection (PSK requise pour la connexion) apparaît.
WEP Key Needed for Connection (Clé WEP requise pour la connexion)
Sélectionnez 64-bit
(64 bits) ou 128-bit (128 bits).
Saisissez ensuite une phrase de passe ou une clé WEP.
Passphrase (Phrase de passe) : saisissez une phrase de passe dans le champ Passphrase (Phrase de passe).
Une clé WEP est alors générée automatiquement. La phrase de passe est sensible à la casse et ne doit pas
comporter plus de 16 caractères alphanumériques. Elle doit correspondre à celle des autres périphériques
sans fil du réseau et n’est compatible qu’avec les produits sans fil Linksys. (Si vos produits sans fil ne sont
pas des produits Linksys, saisissez la clé WEP manuellement sur ces produits.)
WEP Key (Clé WEP) : la clé WEP que vous saisissez doit correspondre à celle de votre réseau sans fil. Pour un
mode de cryptage à 64 bits, saisissez exactement 10 caractères hexadécimaux. Pour un mode de cryptage à
128 bits, saisissez exactement 26 caractères hexadécimaux. Les caractères hexadécimaux valides sont :
«0» à «9» et «A» à «F».
Cliquez ensuite sur Connect (Se connecter) pour accéder à l’écran Congratulations (Félicitations).
Pour annuler la connexion, cliquez sur Cancel (Annuler).
Figure 3-11 : Available Wireless Network
(Réseaux sans fil disponibles)
Figure 3-12 : WEP Key Needed for Connection
(Clé WEP requise pour la connexion)
wep (Wired Equivalent Privacy) : méthode permettant de crypter
les données transmises sur un réseau sans fil pour une sécurité
accrue.
cryptage : codage des données transmises sur un réseau.
Page 87

12
Chapitre 3 : Configuration et connexion de l’adaptateur réseau USB
Configuration de l’adaptateur
Adaptateur réseau USB sans fil G avec Speedbooster
PSK Needed for Connection (PSK requise pour la connexion)
Encryption (Cryptage) : sélectionnez le type d’algorithme que vous souhaitez utiliser, TKIP ou AES, dans le
menu déroulant Encryption (Cryptage).
Passphrase (Phrase de passe) : saisissez une phrase de passe, également appelée « clé pré-partagée », de
8 à 63 caractères dans le champ Passphrase (Phrase de passe). Plus votre phrase de passe est longue et
complexe, meilleure est la sécurité de votre réseau.
Cliquez ensuite sur Connect (Se connecter) pour accéder à l’écran Congratulations (Félicitations).
Pour annuler la connexion, cliquez sur Cancel (Annuler).
2. Une fois l’adaptateur configuré pour le réseau, l’écran Congratulations (Félicitations) s’affiche.
Cliquez sur Connect to Network (Se connecter au réseau) pour vous connecter à votre réseau.
Félicitations ! La configuration est terminée.
Pour vérifier les informations de liaison, rechercher les réseaux sans fil disponibles ou modifier la
configuration, reportez-vous au « Chapitre 4 : Utilisation de Wireless Network Monitor ».
Figure 3-13 : PSK Needed for Connection
(PSK requise pour la connexion)
Figure 3-14 : Ecran Congratulations (Félicitations)
Page 88

13
Chapitre 3 : Configuration et connexion de l’adaptateur réseau USB
Configuration de l’adaptateur
Adaptateur réseau USB sans fil G avec Speedbooster
Configuration manuelle de l’adaptateur
Si vous ne disposez pas de la fonction SecureEasySetup ou si votre réseau ne figure pas dans la liste des
réseaux disponibles, cliquez sur Manual Setup (Configuration manuelle) dans l’écran Available Wireless Network
(Réseaux sans fil disponibles) afin de configurer l’adaptateur manuellement.
1. Après avoir cliqué sur Manual Setup (Configuration manuelle), l’écran Network Settings (Paramètres réseau)
s’affiche. Si votre réseau utilise un routeur ou un autre serveur DHCP, cliquez sur le bouton radio situé en regard
de Obtain network settings automatically (DHCP) (Obtenir les paramètres réseau automatiquement (DHCP)).
Si votre réseau n’utilise pas de serveur DHCP, cliquez sur le bouton radio situé en regard de Specify network
settings (Spécifier les paramètres réseau). Saisissez une adresse IP, un masque de sous-réseau, une passerelle
par défaut et des adresses DNS pour votre réseau. Vous devez définir l’adresse IP et le masque de sous-réseau
dans cet écran. Si vous n’êtes pas certain de la passerelle par défaut et des adresses DNS, laissez ces champs
vides.
IP Address (Adresse IP) : doit être unique pour tout votre réseau.
Subnet Mask (Masque de sous-réseau) : doit être identique au masque de sous-réseau de votre réseau câblé.
Default Gateway (Passerelle par défaut) : adresse IP de la passerelle du réseau.
DNS 1 et DNS 2 : saisissez l’adresse DNS de votre réseau Ethernet câblé.
Cliquez sur Next (Suivant) pour continuer ou sur Back (Précédent) pour revenir à l’écran Available Wireless
Network (Réseaux sans fil disponibles).
Figure 3-15 : Available Wireless Network
(Réseaux sans fil disponibles)
Figure 3-16 : Network Settings (Paramètres réseau)
Page 89

14
Chapitre 3 : Configuration et connexion de l’adaptateur réseau USB
Configuration de l’adaptateur
Adaptateur réseau USB sans fil G avec Speedbooster
2. L’écran Wireless Mode (Mode sans fil) offre le choix entre deux modes sans fil. Cliquez sur le bouton radio
Infrastructure Mode (Mode Infrastructure) si vous souhaitez vous connecter à un routeur ou point d’accès sans
fil. Sélectionnez Ad-Hoc Mode (Mode Ad hoc) si vous souhaitez vous connecter directement à un autre
périphérique sans fil sans utiliser de routeur ou de point d’accès sans fil. Saisissez ensuite le SSID de votre
réseau.
Infrastructure Mode (Mode Infrastructure) : sélectionnez ce mode si vous souhaitez vous connecter à un
routeur ou à un point d’accès sans fil.
Ad-Hoc Mode (Mode Ad hoc) : sélectionnez ce mode si vous souhaitez vous connecter à un autre périphérique
sans fil directement sans utiliser de routeur ou de point d’accès sans fil.
SSID : il s’agit du nom de réseau sans fil qui doit être utilisé pour tous les périphériques de votre réseau sans fil.
Il est sensible à la casse et doit être unique afin d’interdire à d’autres utilisateurs d’accéder à votre réseau.
Cliquez sur le bouton Next (Suivant) pour continuer ou sur Back (Précédent) pour revenir à l’écran précédent.
3. Si vous sélectionnez Infrastructure Mode (Mode Infrastructure), passez directement à l’étape 4. Si vous
sélectionnez Ad-Hoc Mode (Mode Ad hoc), l’écran Ad-Hoc Mode Settings (Paramètres du mode Ad hoc)
s’affiche.
Sélectionnez le paramètre Channel (Canal) de votre réseau sans fil. Le canal que vous choisissez doit
correspondre au canal défini pour les autres périphériques de votre réseau sans fil. Si vous ne savez pas
quel canal utiliser, conservez le paramètre par défaut.
Sélectionnez ensuite le Network Mode (Mode réseau) déterminant le fonctionnement de votre réseau sans
fil. En Mixed Mode (Mode mixte), les périphériques sans fil B et G peuvent fonctionner sur le réseau, mais
leur vitesse est moins importante. En G-Only Mode (Mode G uniquement), aucun périphérique sans fil B ne
peut fonctionner sur le réseau.
Cliquez sur Next (Suivant) pour continuer ou sur Back (Retour) pour modifier l’un des paramètres.
Figure 3-17 : Wireless mode (Mode sans fil)
Figure 3-18 : Ad-Hoc Mode Settings
(Paramètres du mode Ad hoc)
Page 90

15
Chapitre 3 : Configuration et connexion de l’adaptateur réseau USB
Configuration de l’adaptateur
Adaptateur réseau USB sans fil G avec Speedbooster
4. L’écran Wireless Security (Sécurité sans fil) s’affiche. Cette étape permet de configurer la sécurité sans fil.
Si votre réseau sans fil n’utilise pas la sécurité sans fil, sélectionnez Disabled (Désactivée), puis cliquez sur
le bouton Next (Suivant) pour continuer. Passez à l’étape 6.
Sélectionnez WEP, PSK, PSK + Radius ou Radius comme méthode de cryptage. WEP est l’acronyme de
Wired Equivalent Privacy, PSK est l’acronyme de Pre-Shared Key et désigne une norme de sécurité plus solide
que le système de cryptage WEP. RADIUS est l’acronyme de Remote Authentication Dial-In User Service. Si
vous ne souhaitez pas utiliser le cryptage, sélectionnez Disabled (Désactivé). Ensuite, cliquez sur le bouton
Next (Suivant) pour continuer ou sur Back (Précédent) pour revenir à l’écran précédent.
WEP
WEP : pour utiliser le cryptage WEP, sélectionnez le cryptage 64 bits ou 128 bits dans le menu déroulant
et saisissez une phrase de passe ou une clé WEP.
WEP Key (Clé WEP) : elle doit correspondre à la clé WEP de votre réseau sans fil. Si vous utilisez un
cryptage WEP 64 bits, la clé doit être constituée de 10 caractères hexadécimaux. Si vous utilisez un cryptage
WEP 128 bits, la clé doit être constituée très exactement de 26 caractères hexadécimaux. Les caractères
hexadécimaux valides sont : « 0 » à « 9 » et « A » à « F ».
Passphrase (Phrase de passe) : au lieu de saisir manuellement les clés WEP, vous pouvez saisir une phrase
de passe dans le champ Passphrase (Phrase de passe). Ainsi, une clé WEP est générée automatiquement.
Cette phrase de passe sensible à la casse doit correspondre à celle des autres périphériques sans fil du
réseau et n’est compatible qu’avec les produits sans fil Linksys. (Si vos produits sans fil ne sont pas des
produits Linksys, saisissez la clé WEP manuellement sur ces produits.)
TX Key (Clé de transmission) : la clé de transmission par défaut est la clé 1. Si le point d’accès ou le routeur
sans fil de votre réseau utilise la clé de transmission 2, 3 ou 4, sélectionnez le numéro approprié dans la liste
déroulante TX Key (Clé de transmission).
Authentication (Authentification) : la valeur par défaut est Auto, ce qui signifie que l’authentification Shared
Key (Clé partagée) ou Open Key (Clé ouverte) est détectée automatiquement. Shared Key (Clé partagée)
signifie que l’émetteur et le récepteur partagent la même clé WEP pour l’authentification. Open Key (Clé
ouverte) signifie que l’émetteur et le récepteur ne partagent pas de clé WEP pour l’authentification.
Tous les points du réseau doivent utiliser le même type d’authentification.
Cliquez sur le bouton Next (Suivant) pour accéder à l’écran Confirm New Settings (Confirmer les nouveaux
paramètres) ou sur le bouton Back (Précédent) pour revenir à l’écran précédent.
Figure 3-19 : Wireless Security (Sécurité sans fil)
cryptage : codage des données transmises sur un réseau.
Figure 3-20 : Wireless Security - WEP
(Sécurité sans fil - WEP)
wep (Wired Equivalent Privacy) : méthode permettant de crypter
les données transmises sur un réseau sans fil pour une sécurité
accrue.
Page 91

16
Chapitre 3 : Configuration et connexion de l’adaptateur réseau USB
Configuration de l’adaptateur
Adaptateur réseau USB sans fil G avec Speedbooster
PSK
La norme PSK vous offre deux méthodes de cryptage, TKIP et AES, avec des clés de cryptage dynamiques.
Sélectionnez le type d’algorithme, TKIP ou AES, dans le champ Encryption (Cryptage). Saisissez une phrase
de passe de 8 à 63 caractères dans le champ Passphrase (Phrase de passe).
Cliquez sur le bouton Next (Suivant) pour accéder à l’écran Confirm New Settings (Confirmer les nouveaux
paramètres) ou sur le bouton Back (Précédent) pour revenir à l’écran précédent.
Figure 3-21 : Wireless Security - PSK
(Sécurité sans fil - PSK)
Page 92

17
Chapitre 3 : Configuration et connexion de l’adaptateur réseau USB
Configuration de l’adaptateur
Adaptateur réseau USB sans fil G avec Speedbooster
PSK + RADIUS
La méthode de cryptage PSK + RADIUS associe le système PSK à l’utilisation d’un serveur RADIUS. (Elle ne
doit être utilisée que lorsqu’un serveur RADIUS est connecté au routeur.) La méthode PSK + Radius offre deux
options de cryptage : TKIP et AES, avec des clés de cryptage dynamiques. Deux méthodes d’authentification
sont disponibles : EAP-TLS et PEAP.
Sélectionnez la méthode d’authentification (Authentication Method) dans le menu déroulant de l’écran
suivant. Vous avez le choix entre EAP-TLS et PEAP.
EAP-TLS : Entrez le nom de connexion de votre réseau sans fil dans le champ Login Name (Nom
de connexion). Dans le menu déroulant Certificate (Certificat), sélectionnez le certificat que vous
avez installé pour vous authentifier sur votre réseau sans fil.
PEAP : Entrez le nom de connexion de votre réseau sans fil dans le champ Login Name (Nom de
connexion). Saisissez le mot de passe de votre réseau sans fil dans le champ Password (Mot de passe).
Dans le menu déroulant Certificate (Certificat), sélectionnez le certificat que vous avez installé pour
vous authentifier sur votre réseau sans fil. Sélectionnez également une authentification interne (Inner
Authen.) pour l’authentification dans le tunnel PEAP.
Sélectionnez le type d’algorithme, TKIP ou AES, dans le champ Encryption (Cryptage).
Cliquez sur le bouton Next (Suivant) pour accéder à l’écran Confirm New Settings (Confirmer les nouveaux
paramètres) ou sur le bouton Back (Précédent) pour revenir à l’écran précédent.
Figure 3-22 : Wireless Security - PSK + RADIUS
(Sécurité sans fil - PSK + RADIUS)
Page 93

18
Chapitre 3 : Configuration et connexion de l’adaptateur réseau USB
Configuration de l’adaptateur
Adaptateur réseau USB sans fil G avec Speedbooster
RADIUS
La méthode de cryptage RADIUS fait appel à la sécurité d’un serveur RADIUS (à n’utiliser que lorsqu’un
serveur RADIUS est connecté au routeur). RADIUS offre deux types d’authentification : EAP-TLS et PEAP.
Sélectionnez la méthode d’authentification (Authentication Method) dans le menu déroulant de l’écran
suivant. Vous avez le choix entre EAP-TLS et PEAP.
EAP-TLS : Entrez le nom de connexion de votre réseau sans fil dans le champ Login Name (Nom de
connexion). Dans le menu déroulant Certificate (Certificat), sélectionnez le certificat que vous avez
installé pour vous authentifier sur votre réseau sans fil.
PEAP : Entrez le nom de connexion de votre réseau sans fil dans le champ Login Name (Nom de
connexion). Saisissez le mot de passe de votre réseau sans fil dans le champ Password (Mot de passe).
Dans le menu déroulant Certificate (Certificat), sélectionnez le certificat que vous avez installé pour
vous authentifier sur votre réseau sans fil. Sélectionnez également une authentification interne (Inner
Authen.) pour l’authentification dans le tunnel PEAP.
Cliquez sur le bouton Next (Suivant) pour accéder à l’écran Confirm New Settings (Confirmer les nouveaux
paramètres) ou sur le bouton Back (Précédent) pour revenir à l’écran précédent.
Figure 3-23 : Wireless Security - RADIUS
(Sécurité sans fil - RADIUS)
Page 94

19
Chapitre 3 : Configuration et connexion de l’adaptateur réseau USB
Configuration de l’adaptateur
Adaptateur réseau USB sans fil G avec Speedbooster
5. L’écran suivant affiche tous les paramètres de l’adaptateur. S’ils sont corrects, enregistrez-les sur votre
disque dur en cliquant sur Save (Enregistrer). Cliquez sur Next (Suivant) pour continuer. En cas d’erreurs,
cliquez sur Back (Retour) pour modifier vos paramètres.
6. Une fois l’installation du logiciel terminée, l’écran Congratulations (Félicitations) s’affiche. Cliquez sur
Connect to Network (Se connecter au réseau) pour vous connecter à votre réseau. En cliquant sur Return
to Profiles Screen (Revenir à l’écran Profils), vous ouvrez l’écran Profiles (Profils) de l’application Wireless
Network Monitor. Pour plus d’informations sur l’application Wireless Network Monitor, reportez-vous au
« Chapitre 4 : Utilisation de Wireless Network Monitor ».
Félicitations ! La configuration est terminée.
Pour vérifier les informations de liaison, rechercher les réseaux sans fil disponibles ou modifier la
configuration, reportez-vous au « Chapitre 4 : Utilisation de Wireless Network Monitor ».
Figure 3-24 : Ecran Confirm new settings
(Confirmation des nouveaux paramètres)
Figure 3-25 : Ecran Congratulations (Félicitations)
Page 95

20
Chapitre 4 : Utilisation de Wireless Network Monitor
Accès au logiciel Wireless Network Monitor
Adaptateur réseau USB sans fil G avec Speedbooster
Chapitre 4: Utilisation de Wireless Network Monitor
Le logiciel Wireless Network Monitor permet de vérifier les informations de liaison, de rechercher les réseaux
sans fil disponibles et de créer des profils présentant différents paramètres de configuration.
Accès au logiciel Wireless Network Monitor
Une fois l’adaptateur configuré et connecté, l’icône Wireless Network Monitor apparaît dans la barre d’état
système de votre ordinateur. Si le logiciel Wireless Network Monitor est activé, l’icône est verte. S’il est
désactivé, l’icône est grise.
Ecrans Link Information (Informations de liaison)
Le premier écran de Wireless Network Monitor est Link Information (Informations de liaison). Dans cet écran,
vous pouvez déterminer l’intensité du signal sans fil et la qualité de la connexion. Vous pouvez également cliquer
sur le bouton More Information (Plus d’informations) afin d’afficher des renseignements supplémentaires sur
l’état et les statistiques de la connexion sans fil active. Pour rechercher les réseaux sans fil disponibles, cliquez
sur l’onglet Site Survey (Recherche de site). Pour modifier la configuration ou créer des profils de connexion,
cliquez sur l’onglet Profiles (Profils).
Link Information (Informations de liaison)
L’ éc r a n Link Information (Informations de liaison) affiche le mode réseau, l’intensité de la liaison et la qualité du
signal de la connexion active. Il comporte également un bouton permettant d’obtenir des informations d’état
supplémentaires.
Ad-Hoc Mode (Mode Ad hoc) ou Infrastructure Mode (Mode Infrastructure) : cet écran indique si l’adaptateur
fonctionne en mode Ad hoc ou en mode Infrastructure.
Signal Strength (Intensité du signal) : cette barre indique l’intensité du signal.
Link Quality (Qualité de la liaison) : cette barre indique la qualité de la connexion au réseau sans fil.
Cliquez sur le bouton More Information (Plus d’informations) pour consulter des informations complémentaires
sur la connexion réseau sans fil dans l’écran Wireless Network Status (Etat du réseau sans fil).
Figure 4-1 : Icône Wireless Network Monitor
Figure 4-2 : Link Information (Informations de liaison)
REMARQUE : Vous ne pouvez accéder au logiciel
Wireless Network Monitor qu’APRES avoir connecté
l’adaptateur. Pour plus d’informations sur la
configuration et la connexion de l’adaptateur,
reportez-vous au Chapitre 3: Configuration et
connexion de l’adaptateur réseau USB.
Page 96

21
Chapitre 4 : Utilisation de Wireless Network Monitor
Ecrans Link Information (Informations de liaison)
Adaptateur réseau USB sans fil G avec Speedbooster
Etat du réseau sans fil
L’ éc r a n Wireless Network Status (Etat du réseau sans fil) fournit des informations sur vos paramètres réseau.
Status (Etat) : état de la connexion au réseau sans fil.
SSID : nom unique du réseau sans fil.
Wireless Mode (Mode sans fil) : mode du réseau sans fil utilisé.
Transfer Rate (Débit de transfert) : débit de transfert des données de la connexion.
Channel (Canal) : canal sur lequel les périphériques réseau sans fil sont configurés.
Security (Sécurité) : état de la fonction de sécurité sans fil.
Authentication (Authentification) : méthode d’authentification de votre réseau sans fil.
IP Address (Adresse IP) : adresse IP de l’adaptateur.
Subnet Mask (Masque de sous-réseau) : masque de sous-réseau de l’adaptateur.
Default Gateway (Passerelle par défaut) : adresse de la passerelle par défaut.
DNS : adresse DNS de l’adaptateur.
DHCP Client (Client DHCP) : état de l’adaptateur en tant que client DHCP.
MAC Address (Adresse MAC) : adresse MAC du point d’accès ou routeur du réseau sans fil.
Signal Strength (Intensité du signal) : cette barre indique l’intensité du signal.
Link Quality (Qualité de la liaison) : cette barre indique la qualité de la connexion au réseau sans fil.
Cliquez sur Back (Précédent) pour revenir à l’écran initial Link Information (Informations de liaison). Cliquez sur
le bouton Statistics (Statistiques) pour passer à l’écran Wireless Network Statistics (Statistiques du réseau sans
fil). Cliquez sur Save to Profile (Enregistrer dans profil) pour enregistrer les paramètres de connexion active dans
un profil.
Figure 4-3 : More Information - Wireless Network
Status (Plus d’informations - Etat du réseau sans fil)
Page 97

22
Chapitre 4 : Utilisation de Wireless Network Monitor
Ecrans Link Information (Informations de liaison)
Adaptateur réseau USB sans fil G avec Speedbooster
Statistiques du réseau sans fil
L’écran Wireless Network Statistics (Statistiques du réseau sans fil) fournit des statistiques sur vos paramètres
réseau.
Transmit Rate (Taux de transmission) : débit de transfert de données de la connexion actuelle. (En mode Auto,
l’adaptateur sélectionne à tout moment, de façon dynamique, le taux de transmission le plus élevé possible.)
Receive Rate (Taux de réception) : taux de réception des données.
Packets Received (Paquets reçus) : nombre de paquets reçus par l’adaptateur, en temps réel, depuis la
connexion au réseau sans fil ou depuis la dernière activation du bouton Refresh Statistics (Actualiser les
statistiques).
Packets Transmitted (Paquets transmis) : nombre de paquets transmis par l’adaptateur, en temps réel, depuis
la connexion au réseau sans fil ou depuis la dernière activation du bouton Refresh Statistics (Actualiser les
statistiques).
Driver Version (Version du pilote) : version du pilote de l’adaptateur.
Noise Level (Niveau de bruit) : niveau de bruit de fond affectant le signal sans fil. Plus le niveau est bas,
meilleure est la qualité du signal.
Signal Strength (Intensité du signal) : indique l’intensité du signal sans fil reçu par l’adaptateur.
Up Time (Temps d’émission) : indique la durée de la connexion la plus récente à un réseau sans fil.
Tot al Up Tim e (Temps total d’émission) : indique la durée totale de connexion de l’adaptateur.
Firmware Version (Version du micrologiciel) : version du micrologiciel en cours d’exécution sur l’adaptateur.
Signal Strength (Intensité du signal) : cette barre indique l’intensité du signal.
Link Quality (Qualité de la liaison) : cette barre indique la qualité de la connexion au réseau sans fil.
Cliquez sur Back (Précédent) pour revenir à l’écran initial Link Information (Informations de liaison). Cliquez sur
le bouton Status (Etat) pour passer à l’écran Wireless Network Status (Etat du réseau sans fil). Cliquez sur Save
to Profile (Enregistrer dans profil) pour enregistrer les paramètres de connexion active dans un profil. Cliquez sur
le bouton Refresh (Actualiser) pour réinitialiser les statistiques.
Figure 4-4 : More Information - Wireless Network Statistics
(Plus d’informations - Statistiques du réseau sans fil)
Page 98

23
Chapitre 4 : Utilisation de Wireless Network Monitor
SecureEasySetup
Adaptateur réseau USB sans fil G avec Speedbooster
SecureEasySetup
Lorsque vous utilisez Wireless Network Monitor, le bouton SecureEasySetup peut apparaître dans la partie droite
de l’écran. Ce bouton permet de configurer l’adaptateur, si cette opération n’a pas encore été effectuée. Avec
SecureEasySetup, la configuration de l’adaptateur se fait en quelques clics. Toutefois, avant toute chose, vous
devez localiser le bouton SecureEasySetup sur le périphérique (routeur ou point d’accès sans fil) que vous
connectez à l’adaptateur.
1. Après avoir cliqué sur le bouton SecureEasySetup, vous êtes invité à localiser le bouton SecureEasySetup
sur le périphérique avec lequel l’adaptateur communiquera. Si vous ne savez pas où trouver ce bouton,
cliquez sur Where can I find the button? (Où se trouve le bouton ?).
De nouveaux écrans s’affichent pour vous aider à localiser le bouton, qui est d’ordinaire placé à l’avant du
routeur ou du point d’accès sans fil.
Si vous cliquez sur ce bouton par mégarde ou ne souhaitez pas utiliser la fonction SecureEasySetup, cliquez
sur Cancel (Annuler) pour revenir à l’écran précédent.
Figure 4-5 : Bouton SecureEasySetup
Figure 4-6 : Logo SecureEasySetup et localisation du bouton
Figure 4-7 : SecureEasySetup
Page 99

24
Chapitre 4 : Utilisation de Wireless Network Monitor
SecureEasySetup
Adaptateur réseau USB sans fil G avec Speedbooster
2. Appuyez sur le logo Cisco ou sur le bouton SecureEasySetup sur le routeur ou point d’accès sans fil. Lorsqu’il
devient blanc et commence à clignoter, cliquez sur le bouton Next (Suivant) dans l’écran de l’assistant de
configuration. Une fois l’adaptateur ajouté correctement au réseau, le logo ou bouton s’arrête de clignoter sur
le routeur ou point d’accès sans fil. Répétez cette procédure pour chaque périphérique SecureEasySetup
supplémentaire.
3. La configuration SecureEasySetup est maintenant terminée et un profil de configuration a été créé
automatiquement. Vous pouvez enregistrer votre profil de configuration dans un fichier texte en cliquant sur
le bouton Save (Enregistrer) ou l’imprimer en cliquant sur le bouton Print (Imprimer). Cliquez sur Connect to
Network (Se connecter au réseau) pour vous connecter à votre réseau.
Félicitations ! La configuration SecureEasySetup est terminée.
REMARQUE : Vous ne pouvez ajouter qu’un seul périphérique
SecureEasySetup à la fois.
Figure 4-8 : Fin de la configuration
SecureEasySetup
Page 100

25
Chapitre 4 : Utilisation de Wireless Network Monitor
Site Survey (Recherche de site)
Adaptateur réseau USB sans fil G avec Speedbooster
Site Survey (Recherche de site)
L’écran Site Survey (Recherche de site) affiche une liste des réseaux disponibles dans le tableau de gauche. Ce
tableau contient le SSID et le canal de chaque réseau ainsi que la qualité du signal sans fil reçu par l’adaptateur.
Vous pouvez cliquer sur SSID, CH (Canal) ou Signal pour effectuer un tri selon le champ choisi.
SSID : SSID ou nom unique du réseau sans fil.
CH (Canal) : canal utilisé par le réseau.
Signal : intensité du signal (de 0 à 100 %).
Site Information (Informations de site)
Pour chaque réseau sélectionné, les paramètres suivants sont indiqués :
SSID : SSID ou nom unique du réseau sans fil.
Wireless Mode (Mode sans fil) : mode du réseau sans fil utilisé.
Channel (Canal) : canal sur lequel les périphériques réseau sans fil sont configurés.
Security (Sécurité) : état de la fonction de sécurité sans fil.
MAC Address (Adresse MAC) : adresse MAC du point d’accès du réseau sans fil.
Refresh (Actualiser) : cliquez sur le bouton Refresh (Actualiser) pour lancer une nouvelle recherche de
périphériques sans fil.
Connect (Connecter) : pour établir la connexion à l’un des réseaux de la liste, sélectionnez le réseau sans fil et
cliquez sur le bouton Connect (Connecter). Si le cryptage est activé sur le réseau, un écran apparaît et vous invite
à saisir vos informations de sécurité.
Si la sécurité sans fil WEP est activée sur votre réseau, l’écran WEP Key Needed for Connection (Clé WEP
requise pour la connexion) s’affiche. Sélectionnez le niveau de cryptage WEP approprié (64 bits ou 128 bits),
puis saisissez la phrase de passe ou la clé WEP du réseau. Pour vous connecter au réseau, cliquez sur Connect
(Se connecter). Pour annuler la connexion, cliquez sur Cancel (Annuler).
Si la sécurité sans fil PSK (Pre-Shared Key) est activée sur votre réseau, l’écran PSK Needed for Connection (PSK
requise pour la connexion) s’affiche. Sélectionnez le type de cryptage approprié : TKIP ou AES. Saisissez la
phrase de passe ou la clé pré-partagée du réseau dans le champ Passphrase (Phrase de passe). Pour vous
connecter au réseau, cliquez sur Connect (Se connecter). Pour annuler la connexion, cliquez sur Cancel
(Annuler).
Figure 4-9 : Recherche de site
Figure 4-10 : WEP Key Needed for Connection
(Clé WEP requise pour la connexion)
Figure 4-11 : PSK Needed for Connection
(PSK requise pour la connexion)
 Loading...