

Page 1

A Division of Cisco Systems, Inc.
®
2
GHz
4
,
802.11g
Wireless
Model No.
Model No.
Model No.
Package Contents
• Wireless-G USB Network Adapter
with SpeedBooster
• USB Cable
• Setup CD-ROM with User Guide
(English only)
• Quick Installation
Wireless-G
USB Network Adapter
with SpeedBooster
for Windows 2000 and XP
WUSB54GS (EU/LA/UK)
Quick Installation Guide
Quick Installation Guide
1
Page 2
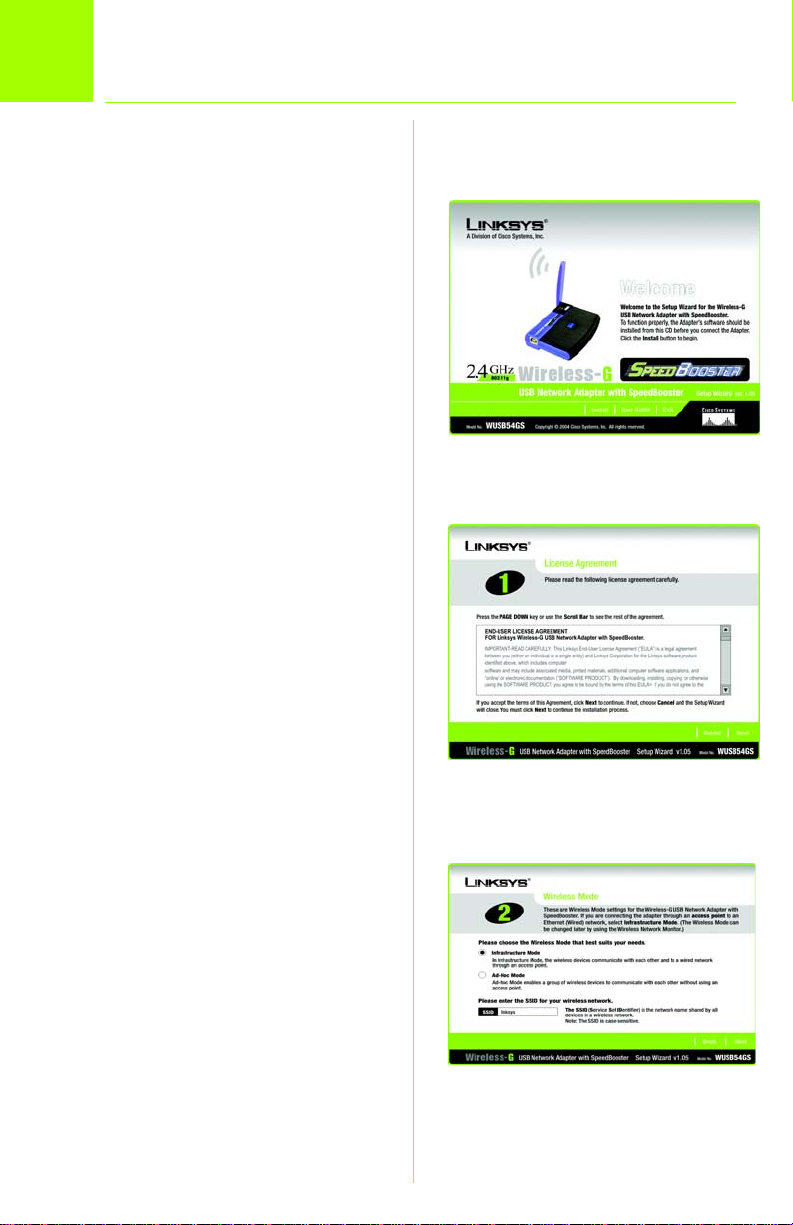
Set up the Wireless-G USB Network
1
Adapter with SpeedBooster
A Insert the Setup Wizard CD-
ROM into your CD-ROM drive.
The Setup Wizard should run
automatically, and the
Welcome screen should
appear. If it does not, click the
Start button and choose Run.
In the field that appears, enter
D:\setup.exe (if “D” is the letter
of your CD-ROM drive).
B To install the Adapter, click the
Install button on the Welcome
screen.
C After reading the License
Agreement, click Next.
D Choose a wireless network
mode. Click the Infrastructure
Mode radio button if you want
your wireless computers to
network with computers on
your wired network using a
wireless access point. Click the
Ad-Hoc Mode radio button if
you want multiple wireless
computers to network directly
with each other.
B
C
In the SSID field, enter the SSID
or name for your wireless
network. The SSID must be
identical for all devices in the
network. Click Next.
2
D
Page 3
If you chose Infrastructure
E
Mode, go to Step F now.
If you chose Ad-Hoc Mode,
select the channel that your
network uses. For the Network
Mode, select Mixed Mode to
allow both Wireless-G and
Wireless-B computers on the
network, or select G-Only
Mode to allow only Wireless-G
computers. Then click Next.
F If your network doesn’t use any
security method, select
Disabled and click Next.
Proceed to Step H.
If you want security, select the
security method you want to
use: WEP, PSK, PSK + RADIUS, or
RADIUS. (WEP stands for Wired
Equivalent Privacy, and PSK
stands for Pre-Shared Key.
RADIUS stands for Remote
Authentication Dial-In User
Service.) Then click Next and
proceed to Step G.
E
F
3
Page 4

G Proceed to the appropriate
instructions for your security
method.
1WEP
a Select 64-bit or 128-bit from
the drop-down menu.
b Enter your Passphrase in the
Passphrase field, and the WEP
key will be automatically
generated.
To manually enter the WEP key,
leave the Passphrase field
blank and enter the WEP key in
the WEP Key field.
c Click Next, and go to Step H.
2PSK
a Select the encryption method
you want to use, TKIP or AES,
from the drop-down menu.
b Enter your Passphrase or Pre-
Shared Key in the Passphrase
field.
c Then click Next and proceed
to Step H.
WEP
PSK
4
Page 5

3 PSK + RADIUS
Select the authentication method
you want to use, EAP-TLS or EAP-PEAP.
EAP-TLS
a Enter the login name in the
Login Name field.
b Enter the name of the
authentication server in the
Server Name field.
c From the Certificate drop-
down menu, select the
authentication certificate.
d Select the encryption method
you want to use, TKIP or AES.
e Click Next, and go to Step H.
EAP-PEAP
a Enter the login name in the
Login Name field.
b Enter the password in the
Password field.
c Enter the name of the
authentication server in the
Server Name field.
d From the Certificate drop-
down menu, select the
authentication certificate.
PSK + RADIUS
EAP-TLS
PSK + RADIUS
EAP-PEAP
5
Page 6

e Select the encryption method
you want to use, TKIP or AES.
f Click Next, and go to Step H.
4 RADIUS
Select the authentication method
you want to use, EAP-TLS or EAP-PEAP.
EAP-TLS
a Enter the login name in the
Login Name field.
b Enter the name of the
authentication server in the
Server Name field.
c From the Certificate drop-
down menu, select the
authentication certificate.
d Click Next, and go to Step H.
EAP-PEAP
a Enter the login name in the
Login Name field.
b Enter the password in the
Password field.
c Enter the name of the
authentication server in the
Server Name field.
6
RADIUS
EAP-TLS
RADIUS
EAP-PEAP
Page 7

d From the Certificate drop-
down menu, select the
authentication certificate.
e Click Next, and go to Step H.
H The Setup Wizard will ask you to
review your settings before it
starts to copy files. Click Next to
save these settings, or click
Back to change any settings.
I You may see a screen
indicating that a digital
signature was not found. This
software has been tested and
works properly with Windows
2000 or XP. Click the Yes or
Continue Anyway button.
J After the software has been
successfully installed, the
Congratulations screen will
appear. Click Exit.
H
Windows 2000
I
Windows XP
J
7
Page 8

Connect the Wireless-G USB Netw ork
2
Adapter with SpeedBooster
A Connect one end of the
included USB cable to the USB
port of the Adapter.
B Connect the other end to a
USB port on your PC. When the
Adapter is plugged in, the
Power LED should light up.
C For Windows XP users, a Found
New Hardware screen may
appear. Click Next.
D You may see a screen
indicating that a digital
signature was not found. This
software has been tested and
works properly with Windows
2000 and XP. Click the Yes or
Continue Anyway button.
A
D
E
E Raise the antenna. It should
point straight up into the air, at
a 90º angle from the Adapter.
F After the Adapter is installed,
the Wireless Network Monitor
icon will appear in the system
tray at the bottom right-hand
corner of your screen.
Double-click the icon if you
want to check the link
information, search for
available wireless networks, or
make additional configuration
changes.
Congratulations! The installation of
the Wireless-G USB Network Adapter
with SpeedBooster is complete.
8
For additional information or troubleshooting
help, refer to the User Guide on the CD-ROM
or the Technical Support Insert. You can also
e-mail for further support.
Website
http://www.linksys.com/international
Linksys is a registered trademark or trademark of
Cisco Systems, Inc. and/or its affiliates in the U.S.
and certain other countries. Copyright © 2004
Cisco Systems, Inc. All rights reserved.
WUSB54GS-EU-LA-UK-QIG-40927NC JL
Page 9

Addendum for Wireless Network Monitor Utility
Reminder: This is a USB 2.0 device. To utilize the full data throughput you must connect it to a PC with a USB 2.0 port and not a USB 1.1 port.
READ THIS ADDENDUM ONLY IF YOU CANNOT SUCCESSFULLY CONNECT TO YOUR NETWORK.
This only applies to users who use multiple access points in the same area or those who have problems finding the access point/ad-hoc network they want to connect
to using the Network Monitor Utility.
When using the Utility to perform a Site Survey to connect to an access point in your wireless network, note that two limitations exist on the Utility: only a range of channels can be scanned at one time, and only a maximum of five access points and/or Ad-hoc networks will appear in the list of access points. So, if the access point or Adhoc network's channel is outside the range of the monitor, it will not appear in the site survey window even if you click the Refresh button. And if there are more than 5
access points and/or Ad-hoc network in the range, only the strongest signal will appear in the Site Survey tab.
If you want to connect to an access point or Ad-hoc network that does not appear in the list, you will need to change your profile settings in the Utility. Follow these
instructions:
1. Open the Utility. To do this, double-click on the Wireless network Monitor Utility icon on your system tray.
2. Open "Chapter 5: Using the Wireless Network Monitor" of the User Guide on the CD-ROM.
3. Follow the instructions for the option that applies to your situation:
Option A.
Option B
If you know the wireless network settings (SSID, security, etc.) of the access point or Ad-hoc network you wish to connect to, click on the
Profiles tab, and create a new profile (refer to “Creating a New Profile” section in the User Guide) or click the Edit button to edit the existing profile with
the appropriate settings for the access point or Ad-hoc network. Next, you can save, and activate the profile. You should now be connected to the
access point/network if all the information you entered is correct. You can click the Link Information tab and click More Information to check the status of the connection. If you still cannot connect to your network, follow option B.
If you don't know the wireless network settings of the access point or Ad-hoc network you want to connect to, or you need to scan through a
range of channels that is not displayed by the Site survey of the Utility, we recommend that you create a new profile. Or you can edit your existing profile
(all settings in the profile will be changed when you save your new settings).
To create a new profile, click on the Profiles tab in the Wireless Network Monitor, and follow the instructions in the “Creating a New Profile” section in
the User Guide, using the default settings, but with the following exceptions:
1. Network Settings screen. Use the default setting Obtain network setting automatically (DHCP)
2. Wireless Mode screen. Select Ad-Hoc Mode. Enter the network name for the SSID or create one if you haven’t already done so.
3. Ad-Hoc Mode Settings screen. Select Channel 1 for the channel.
After completing the instructions and saving and Connecting to Network to activate the profile, return to the Site Survey tab, click Refresh, and you
should see a list of access points/Ad-Hoc networks using channels 1 to at least channel 4 (you’ll see your PC with the SSID you created as an Ad-Hoc
network in the site survey screen). You can highlight the access point or Ad-hoc network you want to connect to and click the Connect button to connect
to it (if security is enabled, you must enter the proper security settings). Save this profile as your default profile.
If the Access point or Ad-hoc network you were looking for does not appear, modify the profile you created and go to the Ad-Hoc Mode Settings screen.
Change the channel to 6. If your problems continue, change the channel to 11.
Wireless
Model No.
Wireless-G
USB Network Adapter with speedBooster
WUSB54GS-AD-41014NC BW
WUSB54GS
 Loading...