

Page 1

A Division of Cisco Systems, Inc.
®
Dual-Band
GHz
5
802.11a
4
2
,
Model No.
Model No.
Model No.
+
GHz
802.11g
WPC55AG (EU/LA/UK)
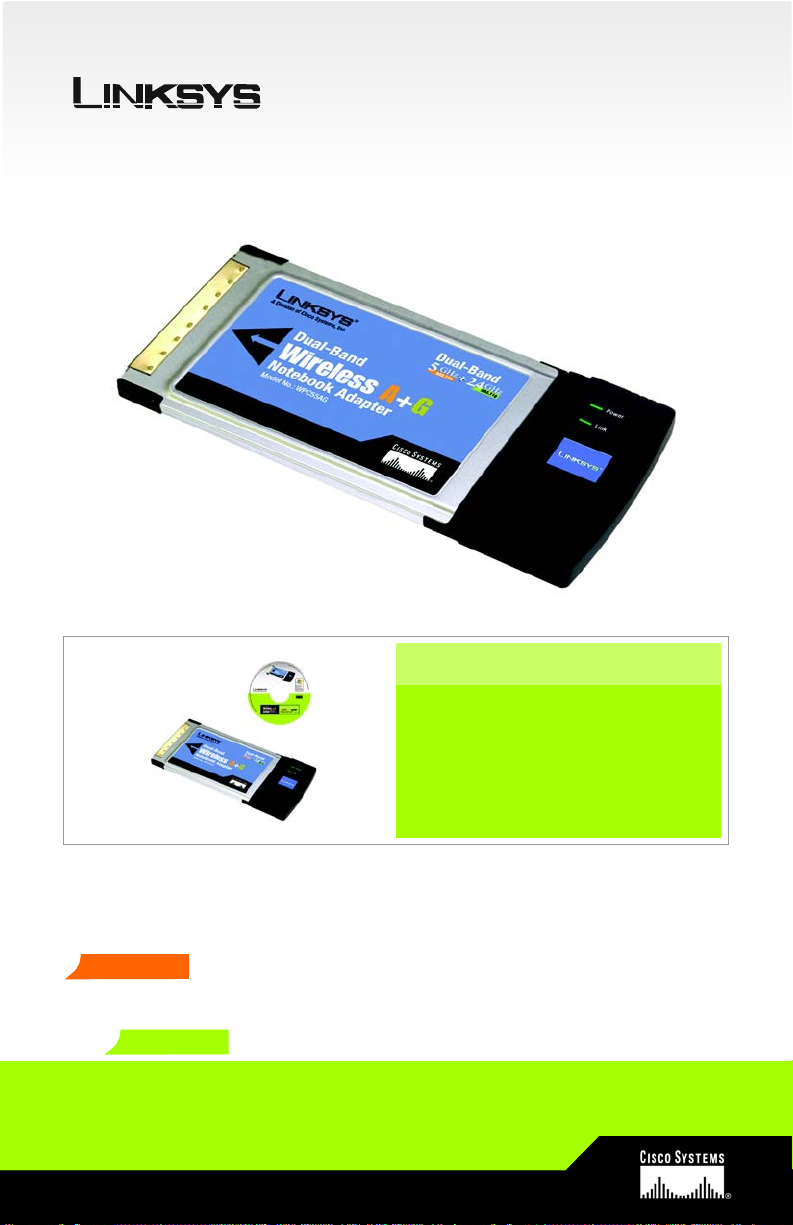
Package Contents
• Dual-Band Wireless A+G Notebook Adapter
• Setup CD-ROM
• User Guide (English only) on CD-ROM
• Quick Installation
Dual-Band
Wireless A+G
Notebook Adapter
Quick Installation Guide
Quick Installation Guide
1
Page 2

Set up the Dual-Band Wireless A+G
1
IMPORTANT: You must run the
Setup Wizard before inserting the
Adapter into your notebook
computer.
Notebook Adapter
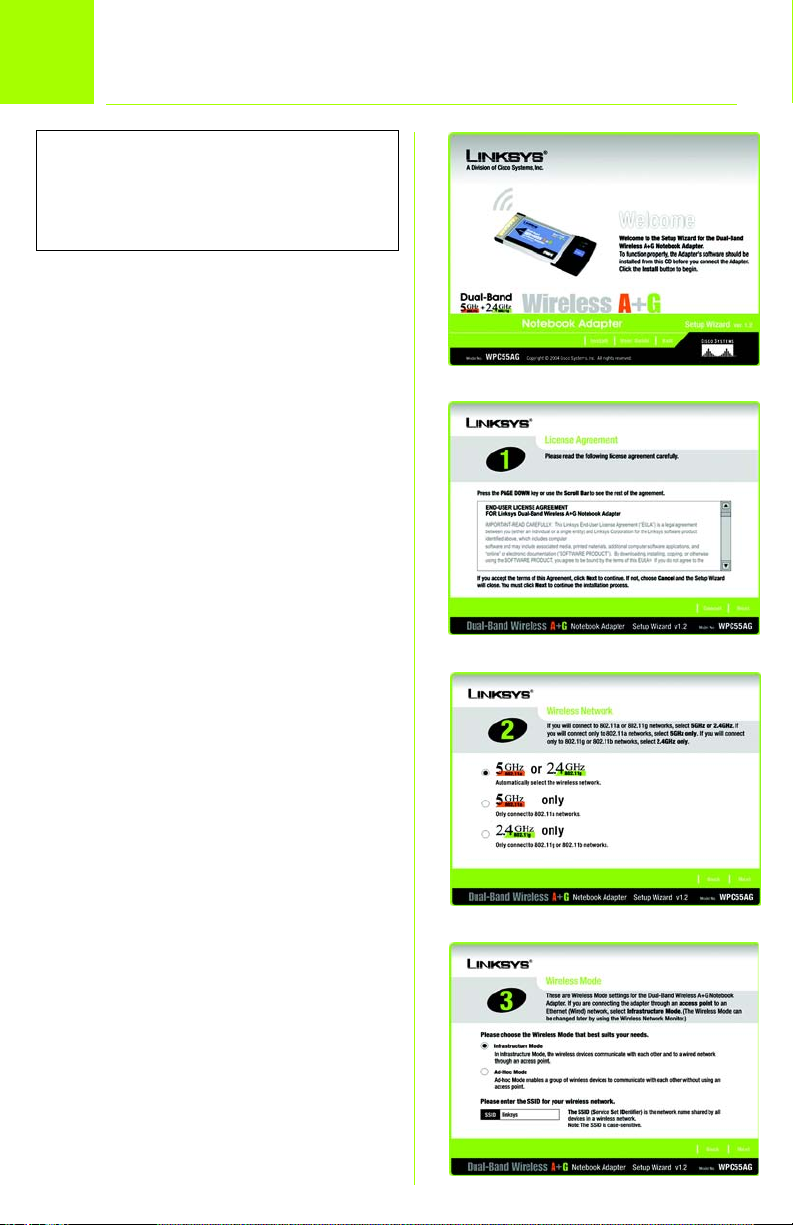
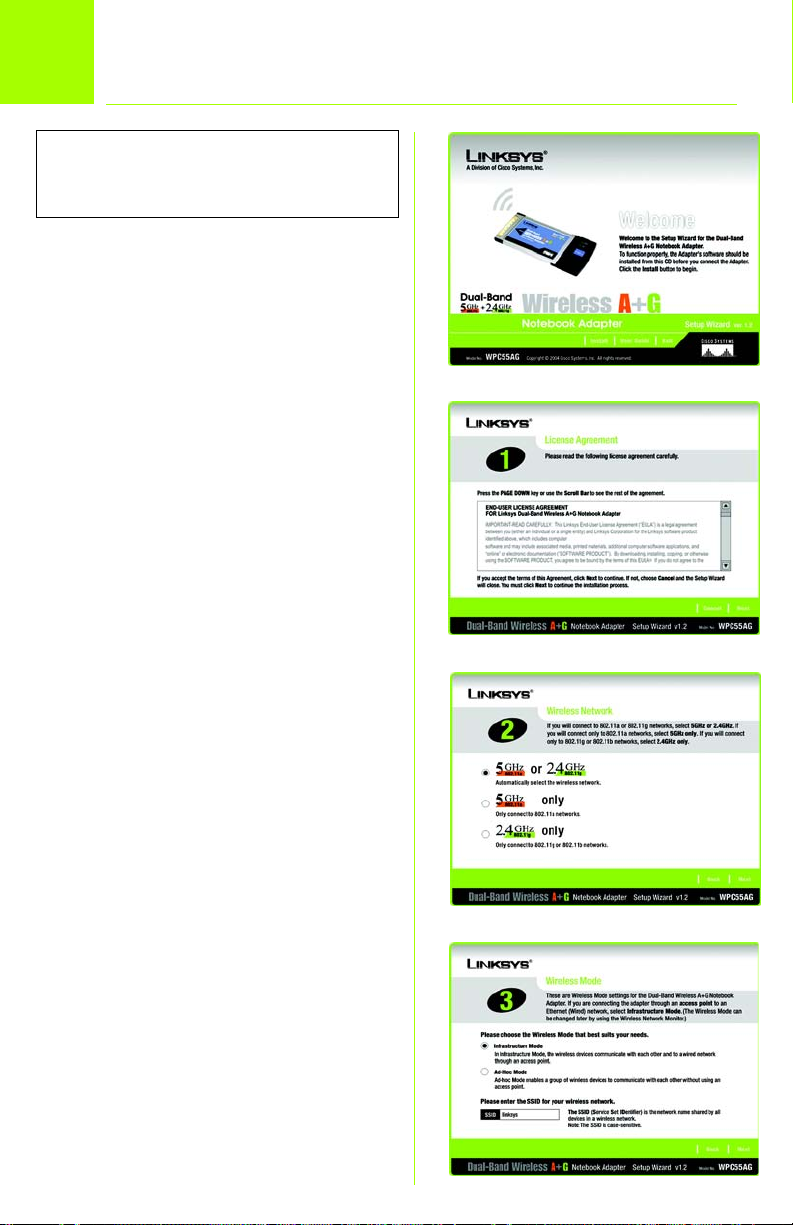
A Insert the Setup Wizard CD-
ROM into your CD-ROM drive.
The Setup Wizard should run
automatically, and the
Welcome screen should
appear. If it does not, click the
Start button and choose Run.
In the field that appears, enter
D:\setup.exe (if “D” is the letter
of your CD-ROM drive).
B To install the Adapter, click the
Install button on the Welcome
screen.
B
C After reading the License
Agreement, click Next to
accept the agreement
D Choose a network type. Select
5GHz or 2.4GHz if you will
connect to 802.11a, 802.11g,
and/or 802.11b networks.
Select 5GHz only if you will
connect only to 802.11a
networks. Select 2.4GHz only if
you will connect only to
802.11g and/or 802.11b
networks. Then click Next.
E Choose a wireless network
mode. Click the Infrastructure
Mode radio button if you want
your wireless computers to
network with computers on
your wired network using a
wireless access point. Click the
2
C
D
E
Page 3
Ad-Hoc Mode radio button if
you want multiple wireless
computers to network directly
with each other.
In the SSID field, enter the SSID
or name for your wireless
network. The SSID must be
identical for all devices in the
network. Click Next.
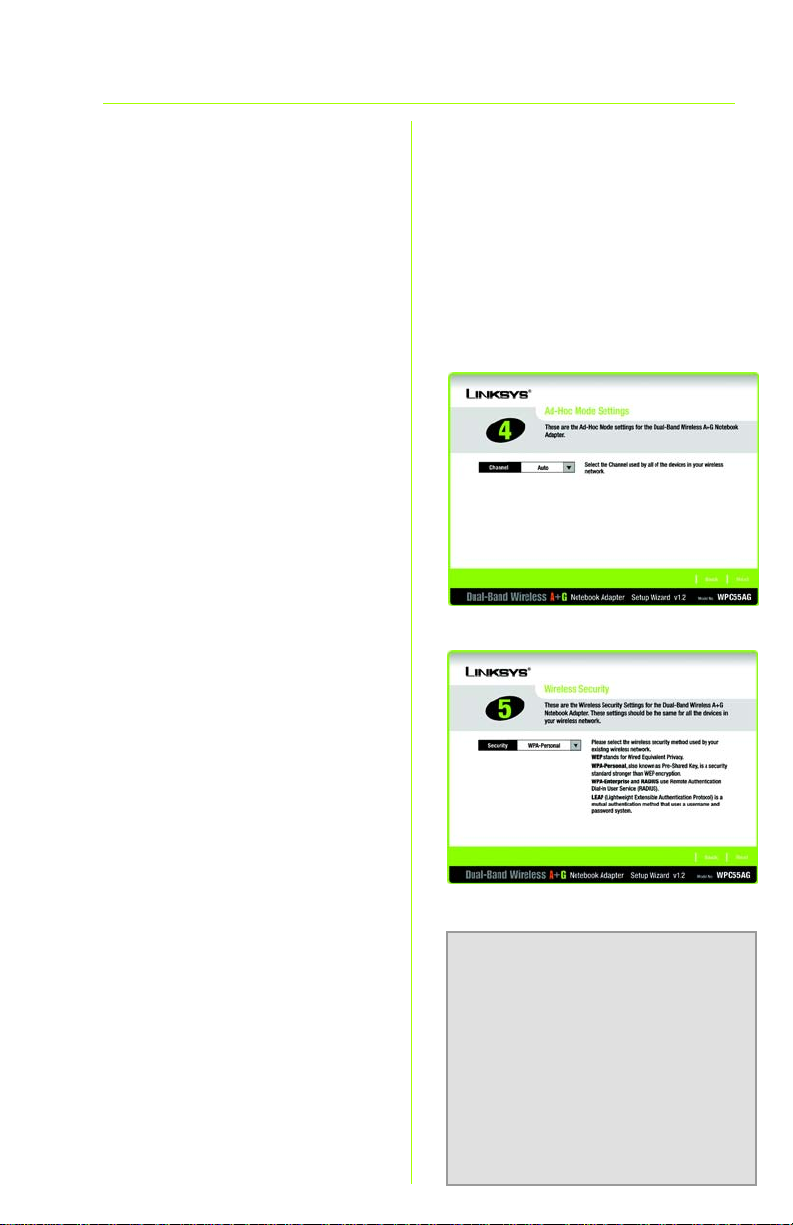
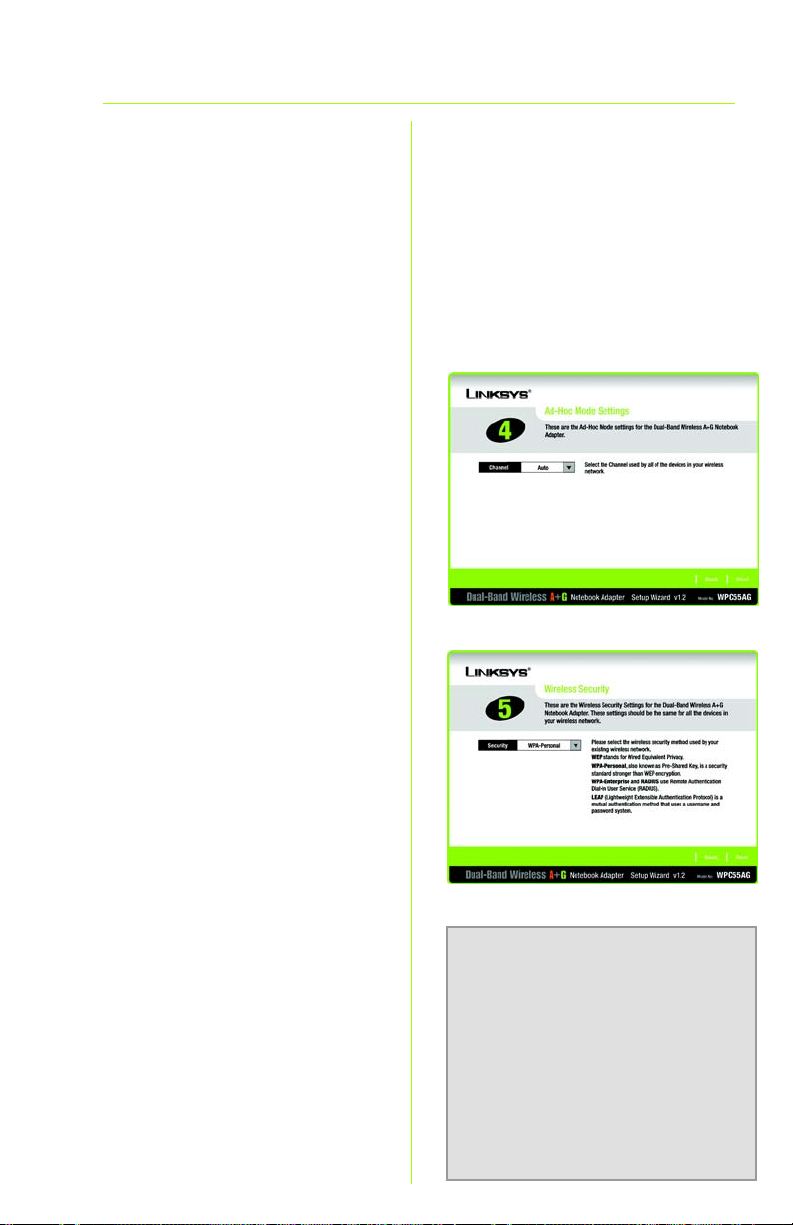
F If you chose Infrastructure
Mode, go to Step G now.
Select the correct operating
channel for your wireless
network, which must match the
channel set on the other
devices in your wireless
network. If you are unsure
about which channel to use,
keep the default setting, Auto.
Then, click Next.
F
G Select the security method you
want to use: WEP, WPAPersonal, WPA-Enterprise,
RADIUS, or LEAP. Then click
Next.
If your network doesn’t use any
security method, select
Disabled and click Next. Then
proceed to Step I.
G
NOTE: WEP stands for Wired
Equivalent Privacy. WPA stands
for Wi-Fi Protected Access and is
a stronger security method than
WEP. RADIUS stands for Remote
Authentication Dial-In User
Service, and LEAP stands for
Lightweight Extensible
Authentication Protocol.
3
Page 4
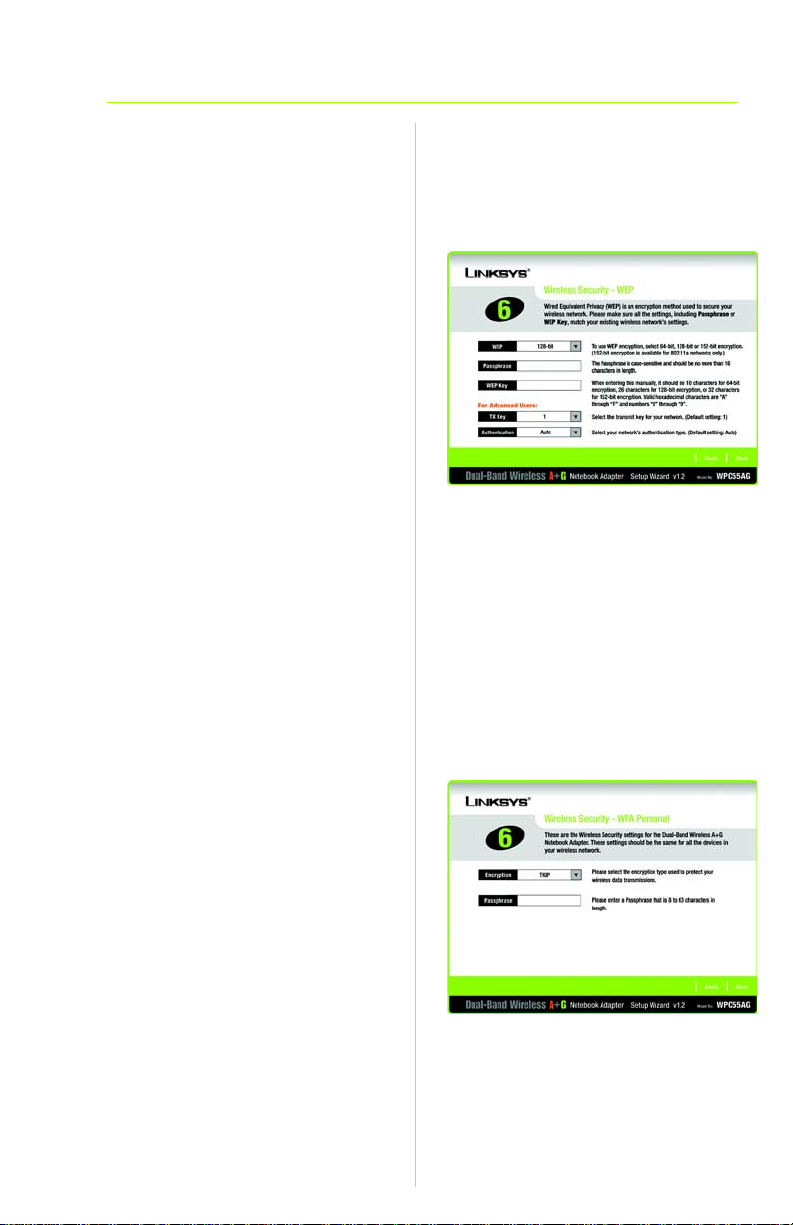
H Proceed to the appropriate
instructions for your security
method.
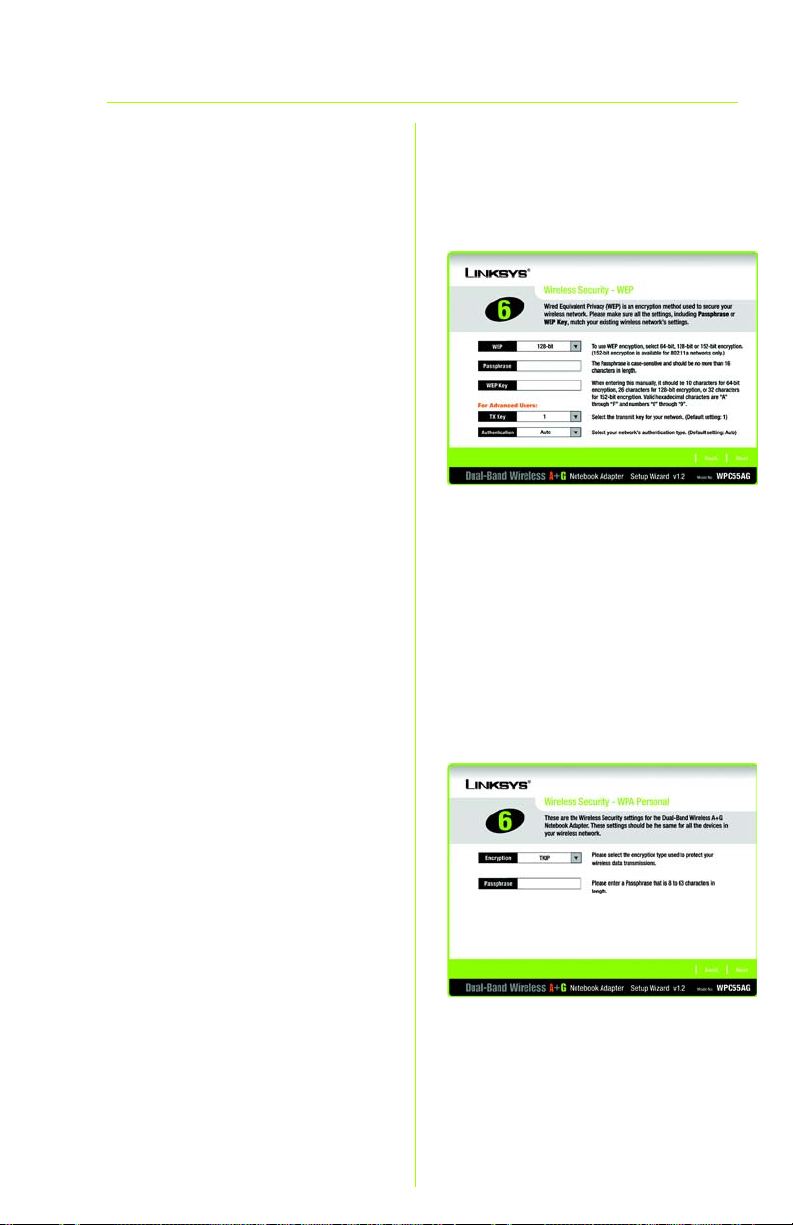
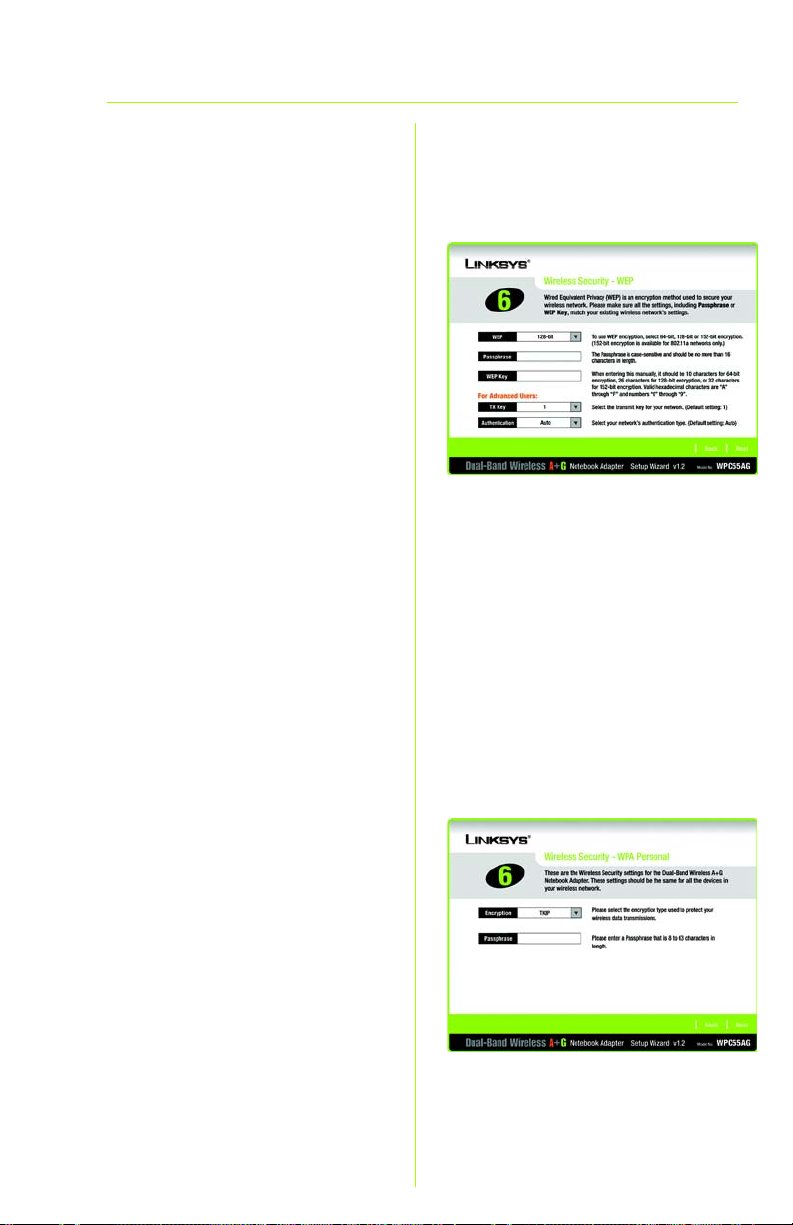
1WEP
a Select 64-bit, 128-bit, or 152-
bit from the drop-down menu
(152-bit encryption is available
only for 802.11a networking).
b Enter your Passphrase in the
Passphrase field, and the WEP
key will be automatically
generated.
To manually enter the WEP key,
leave the Passphrase field
blank and enter the WEP key in
the WEP Key field.
c Click Next, and go to Step I.
2 WPA - Personal
WEP
a Select the encryption method
you want to use, TKIP or AES,
from the drop-down menu.
b Enter your Passphrase or pre-
shared key in the Passphrase
field.
c Then click Next and proceed
to Step I.
4
WPA - Personal
Page 5

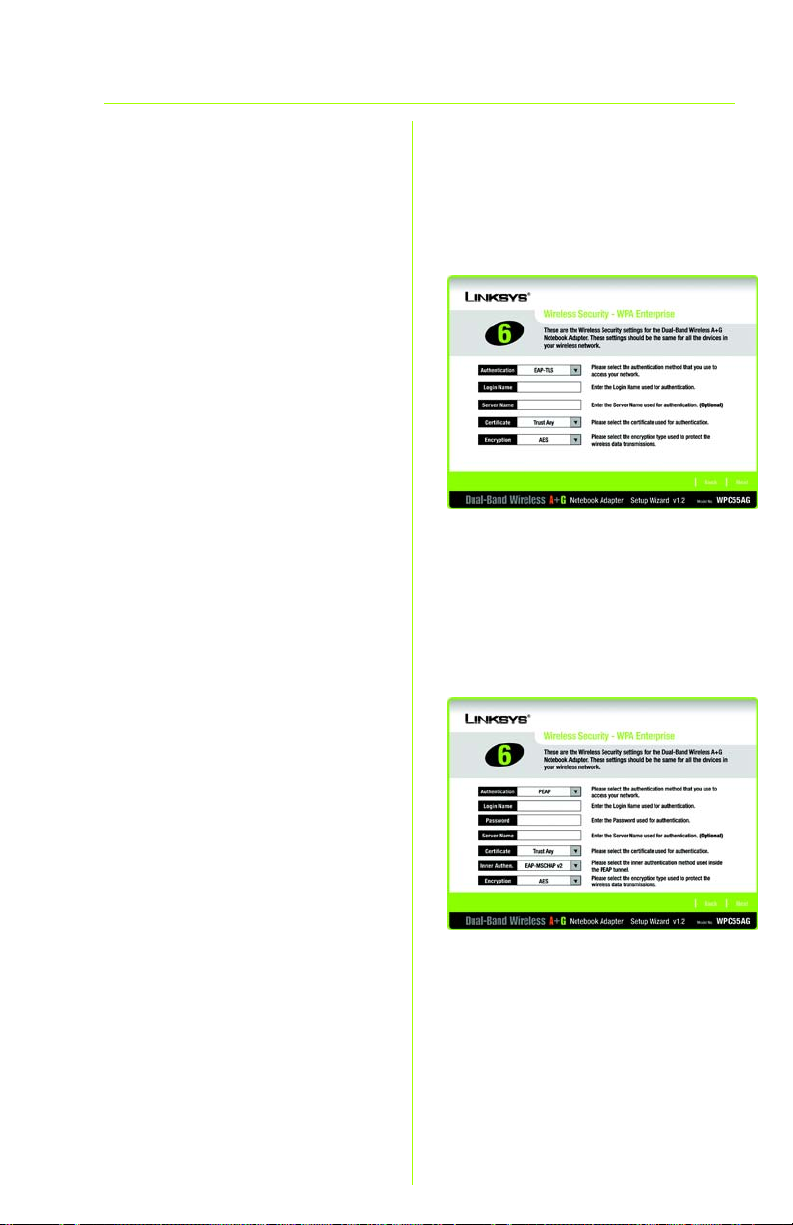
3 WPA-Enterprise
Select the authentication method
you want to use, EAP-TLS or PEAP.
EAP-TLS
a Enter the login name in the
Login Name field.
b Enter the name of the
authentication server in the
Server Name field. (optional)
c From the Certificate drop-
down menu, select the
authentication certificate.
d Select the encryption method
you want to use, TKIP or AES.
e Click Next, and go to Step I.
PEAP
WPA - Enterprise
EAP-TLS
a Enter the login name in the
Login Name field.
b Enter the password in the
Password field.
c Enter the name of the
authentication server in the
Server Name field. (optional)
d From the Certificate drop-
down menu, select the
authentication certificate.
e Select the authentication
method used inside the PEAP
tunnel, EAP-MSCHAP v2 or
Generic Token Card.
WPA - Enterprise
PEAP
5
Page 6

f Select the encryption method
you want to use, TKIP or AES.
g Click Next, and go to Step I.
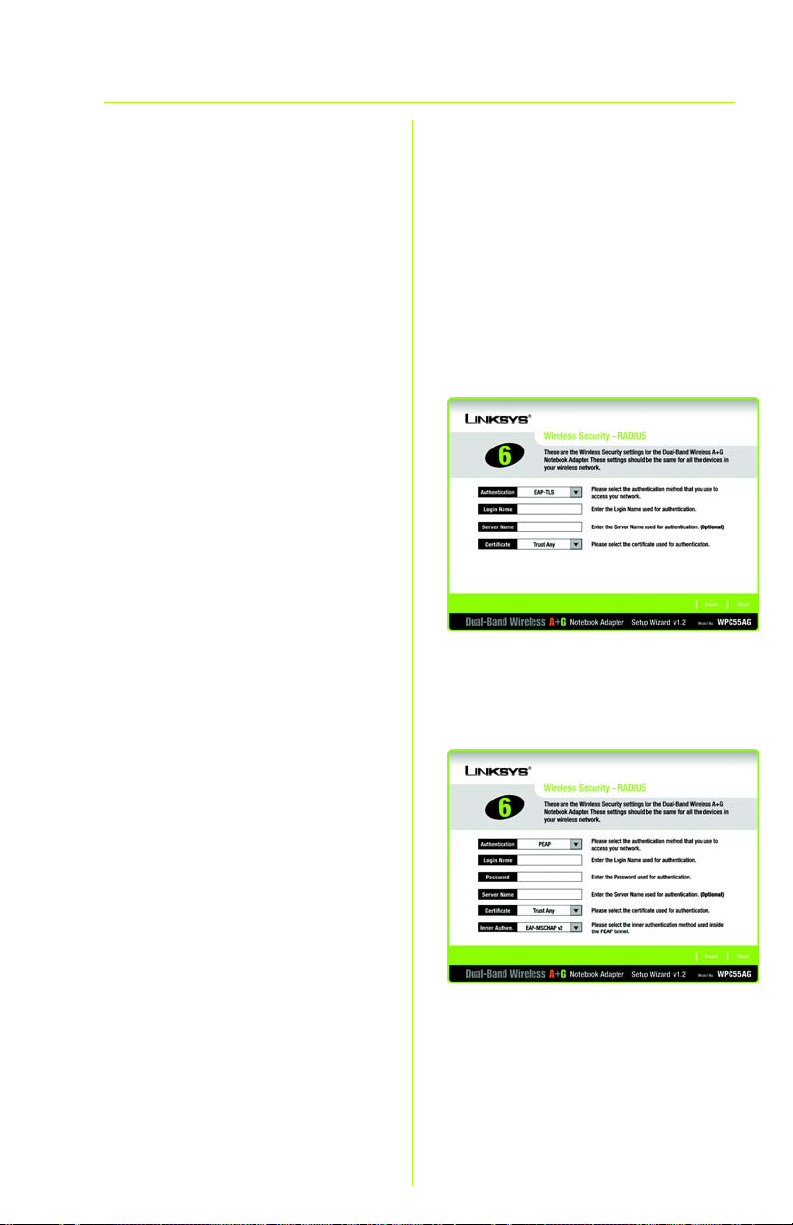
4 RADIUS
Select the authentication method
you want to use, EAP-TLS or PEAP.
EAP-TLS
a Enter the login name in the
Login Name field.
b Enter the name of the
authentication server in the
Server Name field. (optional)
c From the Certificate drop-
down menu, select the
authentication certificate.
d Click Next, and go to Step I.
RADIUS
EAP-TLS
PEAP
a Enter the login name in the
Login Name field.
b Enter the password in the
Password field.
c Enter the name of the
authentication server in the
Server Name field. (optional)
d From the Certificate drop-
down menu, select the
authentication certificate.
e Select the authentication
method used inside the PEAP
6
RADIUS
PEAP
Page 7
f tunnel, EAP-MSCHAP v2 or
Generic Token Card.
g Click Next, and go to Step I.
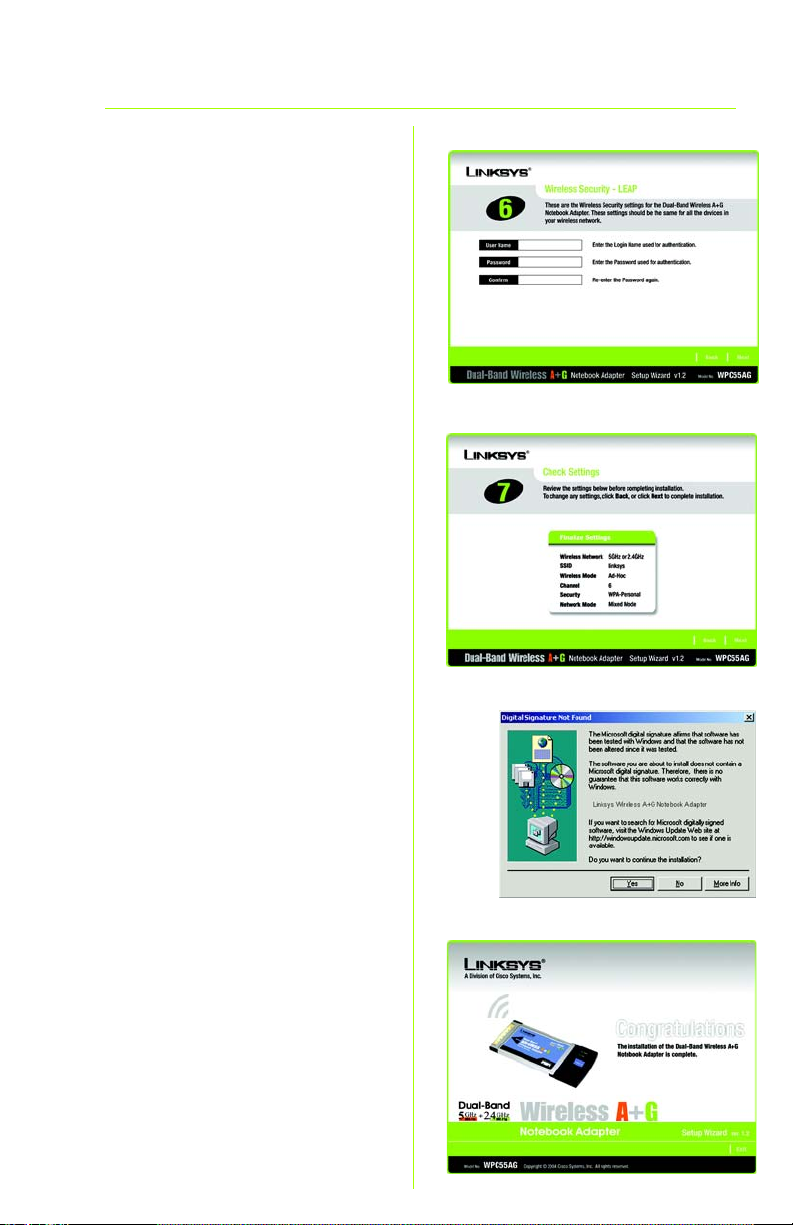
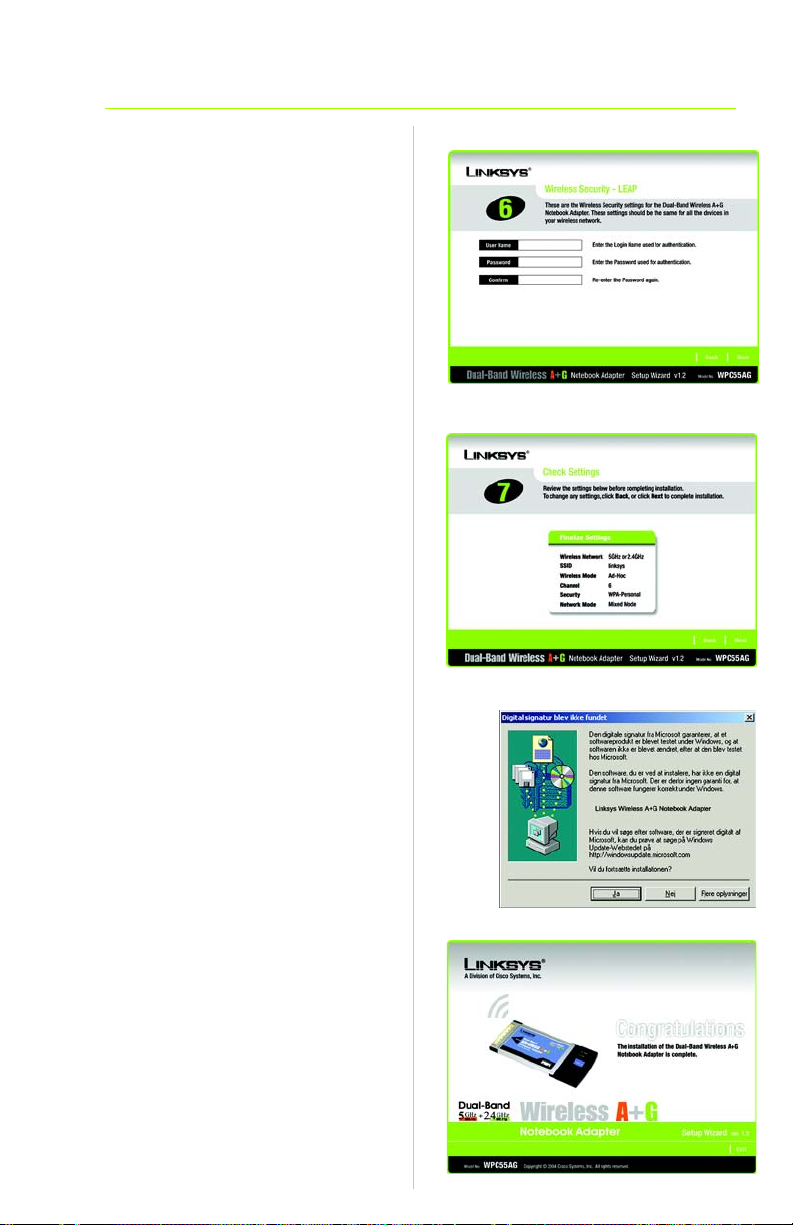
5 LEAP
a Enter the user name in the User
Name field.
b Enter your password in the
Password field.
c Enter your password again in
the Confirm field.
d Click Next, and go to Step I.
I The Setup Wizard will ask you to
review your settings before it
starts to copy files. Click Next to
save these settings, or click
Back to change any settings.
J If you are using Windows 2000,
you may see a screen
indicating that a digital
signature was not found. This
software has been tested and
works properly with Windows
2000. Click the Yes button.
K After the software has been
successfully installed, the
Congratulations screen will
appear. Click Exit.
LEAP
I
J
K
7
Page 8
Connect the Dual-Band
2
Wireless A+G Notebook Adapter
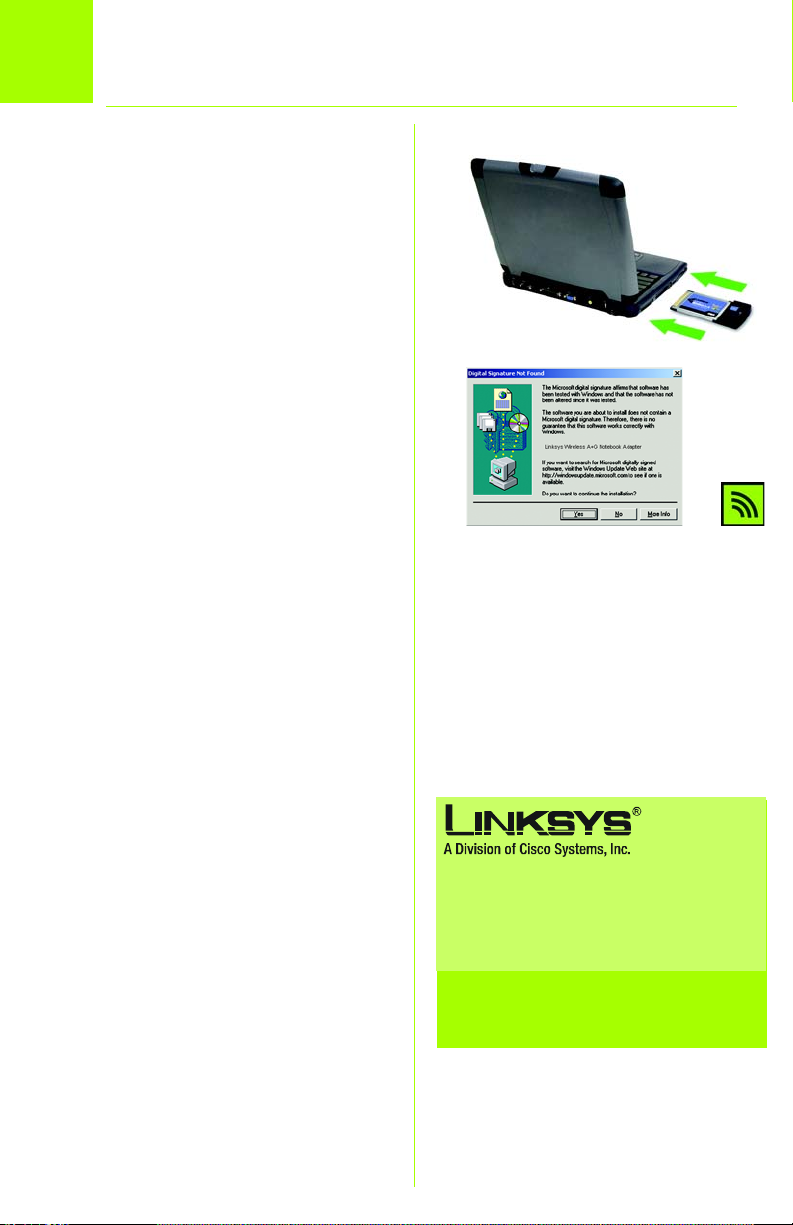
A Power down your notebook
and locate an available
CardBus slot on it.
B With the connector pin end
facing the CardBus slot and
the label facing up, slide the
Adapter into the CardBus slot
until it locks into place.
C Power on your notebook
computer. The Power LED
should light up when the
Adapter is installed correctly.
B
D If you are using Windows 2000,
you may see a screen
indicating that a digital
signature was not found. This
software has been tested and
works properly with Windows
2000. Click the Yes button.
E After the Adapter is installed,
the Wireless Network Monitor
icon will appear in the system
tray at the bottom right-hand
corner of your screen.
Double-click the icon if you
want to check the link
information, search for
available wireless networks, or
make additional configuration
changes.
Congratulations! The installation of
the Dual-Band Wireless A+G
Notebook Adapter is complete.
D
For additional information or troubleshooting
help, refer to the User Guide on the CD-ROM
or the Technical Support Insert. You can also
e-mail for further support.
Website
http://www.linksys.com/international
Linksys is a registered trademark or trademark of
Cisco Systems, Inc. and/or i ts affil iate s in the U.S.
and certain other countries. Copyright © 2005
Cisco Systems, Inc. All rights reserved.
E
8
WPC55AG-EU-LA-UK_V1.2-QIG-50110NC JL
Page 9

A Division of Cisco Systems, Inc.
®
Dual band
GHz
5
802.11a
4
2
,
Modelnr.
Modelnr.
Modelnr.
+
GHz
802.11g
WPC55AG (DK)
Pakkens indhold
• Trådløst dual band-A+G-Notebook-netværkskort
• Installations-cd-rom
• Brugervejledning (kun på engelsk) på cd-rom
• Installationsvejledning
Dual band
Trådløs-A+G
Notebook-netværkskort
Installationsvejledning
Installationsvejledning
1
Page 10
Konfiguration af det trådløse dual
1
VIGTIGT: Du skal køre den
guidede konfiguration, inden du
sætter netværkskortet i din
notebook-computer.
band-A+G-Notebook-netværkskort
A Placer cd-rom'en med guidet
konfiguration i cd-rom-drevet.
Den guidede konfiguration
køres automatisk, og
skærmbilledet Welcome
(Velkommen) vises. Hvis det
ikke er tilfældet, skal du klikke
på knappen Start og vælge
Kør. Indtast D:\setup.exe i det
felt, der vises (hvis "D" er
bogstavet for cd-rom-drevet).
B Installer kortet ved at klikke på
knappen Install (Installer) i
skærmbilledet Welcome
(Velkommen).
B
C Klik på Next (Næste), når du
har læst licensaftalen, for at
acceptere vilkårene.
D Vælg en netværkstype. Vælg
5GHz or 2.4GHz (5 GHz eller
2,4 GHz) for at tilslutte 802.11a-,
802.11g- og/eller 802.11bnetværk. Vælg 5GHz only (Kun
5 GHz) for kun at tilslutte
802.11a-netværk. Vælg
2.4GHz only (Kun 2,4 GHz) for
kun at tilslutte 802.11g- og/eller
802.11b-netværk. Klik derefter
på Next (Næste).
E Vælg en tilstand for det
trådløse netværk. Klik på
alternativknappen
Infrastructure Mode,
(Infrastrukturtilstand), hvis dine
trådløse computere, skal
oprette netværksforbindelse til
2
C
D
E
Page 11

computere i det kabelbaserede netværk ved hjælp af et
trådløst access point. Klik på
alternativknappen Ad-Hoc
Mode (Ad-hoc-tilstand), hvis
flere trådløse computere skal
oprette netværksforbindelse
direkte til hinanden.
Indtast SSID'et for eller navnet
på det trådløse netværk i feltet
SSID. SSID'et skal være identisk
for alle enheder i det trådløse
netværk. Klik på Next (Næste).
F Hvis du vælger Infrastructure
Mode (Infrastrukturtilstand), skal
du gå til trin G nu.
Vælg den korrekte kanal til det
trådløse netværk. Den valgte
kanal skal passe til den kanal,
der er indstillet på de andre
enheder i det trådløse
netværk. Hvis du ikke er sikker
på, hvilken kanal du skal bruge,
skal du beholde standardindstillingen, Auto (Automatisk).
Klik derefter på Next (Næste).
F
G Vælg den sikkerhedsmetode,
som du vil bruge: WEP, WPAPersonal, WPA-Enterprise,
RADIUS eller LEAP. Klik derefter
på Next (Næste).
Hvis netværket ikke bruger en
sikkerhedsmetode, skal du
vælge Disabled (Deaktiveret)
og klikke på Next (Næste). Gå
derefter til trin I.
G
BEMÆRK: WEP står for Wired
Equivalent Privacy. WPA står for
Wi-Fi Protected Access og er en
mere effektiv sikkerhedsmetode
end WEP. RADIUS står for Remote
Authentication Dial-In User
Service, og LEAP står for
Lightweight Extensible
Authentication Protocol.
3
Page 12
H Se den relevante
konfigurationsvejledning til din
sikkerhedsmetode.
1WEP
a Vælg 64-bit, 128-bit eller 152-
bit på rullemenuen (152-bit-
kryptering kan kun anvendes i
802.11a.-netværk).
b Indtast dit adgangsord i feltet
Passphrase (Adgangsord).
Derefter oprettes WEP-nøglen
automatisk.
Hvis du vil indtaste WEP-nøglen
manuelt, skal du lade feltet
Passphrase (Adgangsord)
være tomt og indtaste WEPnøglen i feltet WEP Key (WEPnøgle).
c Klik på Next (Næste), og gå til
trin I.
WEP
2 WPA – Personal
a Vælg den krypteringsmetode,
som du vil bruge (TKIP eller
AES), på rullemenuen.
b Indtast adgangsordet eller Pre-
Shared Key i feltet Passphrase
(Adgangsord).
c Klik derefter på Next (Næste),
og gå til trin I.
4
WPA – Personal
Page 13
3 WPA - Enterprise
Vælg den godkendelsesmetode,
som du vil bruge – EAP-TLS eller PEAP.
EAP-TLS
a Indtast logonnavnet i feltet
Login Name (Logonnavn).
b Indtast navnet på
godkendelsesserveren i feltet
Server Name (Servernavn).
(valgfrit)
c Vælg godkendelsescertifikatet
på rullemenuen Certificate
(Certifikat).
d Vælg den krypteringsmetode,
som du vil bruge – TKIP eller
AES.
e Klik på Next (Næste), og gå til
trin I.
PEAP
WPA – Enterprise
EAP-TLS
a Indtast logonnavnet i feltet
Login Name (Logonnavn).
b Indtast adgangskoden i feltet
Password (Adgangskode).
c Indtast navnet på
godkendelsesserveren i feltet
Server Name (Servernavn).
(valgfrit)
d Vælg godkendelsescertifikatet
på rullemenuen Certificate
(Certifikat).
e Vælg den godkendelses-
metode, der bruges i PEAPtunnelen, EAP-MSCHAP v2 eller
Generic Token Card.
WPA – Enterprise
PEAP
5
Page 14
f Vælg den krypteringsmetode,
som du vil bruge – TKIP eller AES.
g Klik på Next (Næste), og gå til
trin I.
4 RADIUS
Vælg den godkendelsesmetode,
som du vil bruge – EAP-TLS eller PEAP.
EAP-TLS
a Indtast logonnavnet i feltet
Login Name (Logonnavn).
b Indtast navnet på
godkendelsesserveren i feltet
Server Name (Servernavn).
(valgfrit)
c Vælg godkendelsescertifikatet
på rullemenuen Certificate
(Certifikat).
d Klik på Next (Næste), og gå til
trin I.
PEAP
RADIUS
EAP-TLS
a Indtast logonnavnet i feltet
Login Name (Logonnavn).
b Indtast adgangskoden i feltet
Password (Adgangskode).
c Indtast navnet på
godkendelsesserveren i feltet
Server Name (Servernavn).
(valgfrit)
d Vælg godkendelsescertifikatet
på rullemenuen Certificate
(Certifikat).
e Vælg den godkendelses-
metode, der bruges i PEAPtunnelen, EAP-MSCHAP v2 eller
Generic Token Card.
6
RADIUS
PEAP
Page 15
f Klik på Next (Næste), og gå til
trin I.
5 LEAP
a Indtast brugernavnet i feltet
User Name (Brugernavn).
b Indtast din adgangskode i
feltet Password
(Adgangskode).
c Indtast adgangskoden igen i
feltet Confirm (Bekræft).
d Klik på Next (Næste), og gå til
trin I.
I Den guidede konfiguration
giver dig mulighed for at
gennemse dine indstillinger, før
filerne kopieres. Klik på Next
(Næste) for at gemme disse
indstillinger, eller klik på Back
(Tilbage) for at ændre
indstillingerne.
LEAP
I
J Hvis du bruger Windows 2000,
får du muligvis vist et
skærmbillede, der angiver, at
der ikke blev fundet en digital
signatur. Softwaren er blevet
testet, og den fungerer korrekt
sammen med Windows 2000.
Klik på knappen Ja.
K Når softwaren er installeret
vises skærmbilledet
Congratulations (Tillykke). Klik
på Exit (Afslut).
K
J
7
Page 16

Tilslutning af det trådløse dual band-
2
A+G-Notebook-netværkskort
A Sluk for din notebook, og find
et ledigt CardBus-stik på den.
B Skub netværkskortet med
tilslutningsbenet forrest og
mærkatsiden opad ind i
CardBus-stikket, indtil det klikker
på plads.
C Tænd notebook-computeren.
Lysdioden Power lyser, når
netværkskortet er korrekt
installeret.
B
D Hvis du bruger Windows 2000,
får du muligvis vist et
skærmbillede, der angiver, at
der ikke blev fundet en digital
signatur. Softwaren er blevet
testet, og den fungerer korrekt
sammen med Windows 2000.
Klik på knappen Ja.
E Når du har installeret kortet,
vises ikonet for det trådløse
netværksovervågningsprogra
m på proceslinjen nederst til
højre på din skærm.
Dobbeltklik på ikonet, hvis du vil
kontrollere linkoplysningerne,
søge efter tilgængelige
trådløse netværk eller foretage
yderligere konfigurationsændringer.
Tillykke! Installationen af det
trådløse dual band-A+G-
Notebook-netværkskort er færdig.
D
Yderligere oplysninger eller hjælp til fejl find ing
finder du i brugervejledningen på cd-rom'en
eller på arket med teknisk support. Du kan også
sende en e-mail for at få yderligere support.
Websted
http://www.linksys.com/international
Linksys er et registreret varemærke tilhørende
Cisco Systems, Inc. og/eller Cisco Systems
associerede selskaber i USA og visse andre lande .
Copyright © 2005 Cisco Systems, Inc. Alle
rettigheder forbeholdes.
E
8
WPC55AG-DK_V1.2-QIG-50110NC JL
Page 17
A Division of Cisco Systems, Inc.
®
Dual-Band
GHz
5
802.11a
4
2
,
Modell-Nr.
Modell-Nr.
Modell-Nr.
+
GHz
802.11g
WPC55AG (DE)
Lieferumfang
• Dual-Band Wireless A+G Notebook-Adapter
• Installations-CD-ROM
• Benutzerhandbuch (nur Englisch)
auf CD-ROM
• Kurzanleitung
Dual-Band
Wireless A+G
Notebook-Adapters
Kurzanleitung
Kurzanleitung
1
Page 18
Einrichten des Dual-Band Wireless
1
WICHTIG: Führen Sie den SetupAssistenten vor dem Einsetzen des
Adapters in den Notebook-PC aus.
A
B
A+G Notebook-Adapters
Legen Sie die Setup Wizard CD-ROM
(Setup-Assistenten-CD-ROM) in Ihr CDROM-Laufwerk ein. Der Setup-Assistent
sollte automatisch gestartet und
Willkommensfenster angezeigt
werden. Wenn dies nicht der Fall ist,
klicken Sie auf die Schaltfläche
und wählen Sie
Geben Sie im daraufhin angezeigten
Feld
D:\setup.exe
den Buchstaben Ihres CD-ROMLaufwerks steht).
Um den Adapter zu installieren,
klicken Sie im
die Schaltfläche
Ausführen
ein (wobei „D“ für
Willkommensfenster auf
Install
(Installieren).
aus.
das
Start
C Lesen Sie die Lizenzvereinbarung,
und klicken Sie auf Next (Weiter),
um die Lizenzvereinbarung
anzunehmen.
,
B
C
D
Wählen Sie einen Netzwerktyp aus.
Aktivieren Sie die Optionsschaltfläche
5GHz or 2.4GHz
2,4 GHz), wenn Sie eine Verbindung
mit Netzwerken des Standards
802.11g bzw. 802.11b herstellen.
Aktivieren Sie die Optionsschaltfläche
5GHz only
eine Verbindung mit Netzwerken des
Standards 802.11a herstellen.
Aktivieren Sie die Optionsschaltfläche
2.4GHz only
nur eine Verbindung mit Netzwerken
des Standards 802.11g bzw.
802.11b herstellen. Klicken Sie
anschließend auf
E
Wählen Sie einen drahtlosen
Netzwerkmodus aus. Klicken Sie auf
die Schaltfläche
Mode
(Infrastrukturmodus), wenn
Ihre Wireless-Computer mit Hilfe
(5 GHz oder
(Nur 5 GHz), wenn Sie nur
(Nur 2,4 GHz), wenn Sie
Next
Infrastructure
2
D
(Weiter).
E
Page 19
eines Wireless Access Point mit
Computern auf einem
verdrahteten Netzwerk vernetzt
werden sollen. Aktivieren Sie die
Optionsschaltfläche
(Ad-Hoc-Modus), wenn mehrere
Wireless-Computer direkt
miteinander vernetzt werden sollen.
Ad-Hoc Mode
Geben Sie in das Feld
oder den Namen des WirelessNetzwerks ein. Die SSID muss für alle
Geräte im Netzwerk identisch sein.
Klicken Sie auf
F
Wenn Sie die Option
Mode
(Infrastrukturmodus)
ausgewählt haben, fahren Sie jetzt
mit Schritt G fort.
Wählen Sie für Ihr WirelessNetzwerk den entsprechenden
Betriebskanal aus, der mit dem
Kanal der anderen WirelessGeräte in Ihrem Wireless-Netzwerk
übereinstimmt. Wenn Sie nicht
sicher sind, welchen Kanal Sie
verwenden sollen, behalten Sie
die Standardeinstellung Auto
(Automatisch) bei. Klicken Sie
anschließend auf Next (Weiter).
Next
SSID
die SSID
(Weiter).
Infrastructure
G Wählen Sie die gewünschte
Sicherheitsmethode aus: WEP,
WPA-Personal, WPA-Enterprise,
RADIUS oder LEAP. Klicken Sie
anschließend auf Next (Weiter).
Wenn Sie für Ihr Netzwerk keine
Sicherheitsmethode verwenden,
wählen Sie die Option Disabled
(Deaktiviert) und klicken Sie auf
Next (Weiter). Fahren Sie dann mit
Schritt I fort.
F
G
HINWEIS:WEP ist die Abkürzung für
Wired Equivalent Privacy. WPA ist die
Abkürzung für Wi-Fi Protected
Access, welches ein höherer
Sicherheitsstandard als die WEPVerschlüsselung ist. RADIUS steht
für Remote Authentication Dial-In
User Service, und LEAP steht für
Lightweight Extensible
Authentication Protocol.
3
Page 20
H Fahren Sie mit den
entsprechenden Anweisungen für
die Sicherheitsmethode fort.
1WEP
a Wählen Sie im Dropdown-Menü
die Einstellungen 64-bit (64-Bit),
128-bit (128-Bit) oder 152-bit
(152-Bit) aus (die 152-BitVerschlüsselung steht nur für
Netzwerke des Standards 802.11a
zur Verfügung).
b Geben Sie Ihre Passphrase in das
Feld Passphrase ein, so dass
automatisch ein WEP-Schlüssel
generiert wird.
Wenn Sie den WEP-Schlüssel
manuell eingeben möchten,
lassen Sie das Feld Passphrase
leer und geben Sie den Schlüssel
in das Feld WEP Key (WEP-
Schlüssel) ein.
c Klicken Sie auf Next (Weiter),
und fahren Sie mit Schritt I fort.
2 WPA - Personal
a Wählen Sie aus dem Dropdown-
Menü die zu verwendende
Verschlüsselungsmethode, TKIP
oder AES, aus.
b Geben Sie in das Feld Passphrase
Ihre Passphrase oder den
vorläufigen gemeinsamen
Schlüssel ein.
c Klicken Sie auf Next (Weiter),
und fahren Sie mit Schritt I fort.
WEP
WPA - Personal
4
Page 21

3 WPA - Enterprise
Wählen Sie die gewünschte
Authentifizierungsmethode aus:
EAP-TLS oder PEAP.
EAP-TLS
a Geben Sie den Anmeldenamen
in das Feld Login Name
(Anmeldename) ein.
b Geben Sie den Namen des
Authentifizierungsservers in das
Feld Server Name (Servername)
ein (optional).
c Wählen Sie aus dem Dropdown-
Menü Certificate (Zertifikat) das
Zertifikat zur Authentifizierung aus.
d Wählen Sie die gewünschte
Verschlüsselungsmethode, TKIP
oder AES, aus.
e Klicken Sie auf Next (Weiter), und
fahren Sie mit Schritt I fort.
PEAP
WPA - Enterprise
EAP-TLS
a Geben Sie den Anmeldenamen
in das Feld Login Name
(Anmeldename) ein.
b Geben Sie das Kennwort in das
Feld Password (Kennwort) ein.
c Geben Sie den Namen des
Authentifizierungsservers in das
Feld Server Name (Servername)
ein (optional).
d Wählen Sie aus dem Dropdown-
Menü Certificate (Zertifikat) das
Zertifikat zur Authentifizierung aus.
e
Wählen Sie die
Authentifizierungsmethode aus, die
innerhalb des PEAP-Tunnels verwendet
wird:
EAP-MSCHAP v2
Token Card
(Allgemeine Token-Karte).
oder
Generic
WPA - Enterprise
PEAP
5
Page 22

f Wählen Sie die gewünschte
Verschlüsselungsmethode, TKIP
oder AES, aus.
g Klicken Sie auf Next (Weiter),
und fahren Sie mit Schritt I fort.
4 RADIUS
Wählen Sie die gewünschte
Authentifizierungsmethode aus:
EAP-TLS oder PEAP.
EAP-TLS
a Geben Sie den Anmeldenamen
in das Feld Login Name
(Anmeldename) ein.
b Geben Sie den Namen des
Authentifizierungsservers in das
Feld Server Name (Servername)
ein (optional).
c Wählen Sie aus dem Dropdown-
Menü Certificate (Zertifikat) das
Zertifikat zur Authentifizierung aus.
d Klicken Sie auf Next (Weiter),
und fahren Sie mit Schritt I fort.
RADIUS
EAP-TLS
PEAP
a Geben Sie den Anmeldenamen
in das Feld Login Name
(Anmeldename) ein.
b Geben Sie das Kennwort in das
Feld Password (Kennwort) ein.
c Geben Sie den Namen des
Authentifizierungsservers in das
Feld Server Name (Servername)
ein (optional).
d Wählen Sie aus dem Dropdown-
Menü Certificate (Zertifikat) das
Zertifikat zur Authentifizierung aus.
6
RADIUS
PEAP
Page 23

e Wählen Sie die
Authentifizierungsmethode aus,
die innerhalb des PEAP-Tunnels
verwendet wird: EAP-MSCHAP v2
oder Generic Token Card
(Allgemeine Token-Karte).
f Klicken Sie auf Next (Weiter),
und fahren Sie mit Schritt I fort.
5 LEAP
a Geben Sie den Benutzernamen
in das Feld User Name
(Benutzername) ein.
b Geben Sie Ihr Kennwort in das
Feld Password (Kennwort) ein.
c Geben Sie das Kennwort erneut in
das Feld Confirm (Bestätigen) ein.
d Klicken Sie auf Next (Weiter), und
fahren Sie mit Schritt I fort.
LEAP
I Der Setup-Assistent fordert Sie auf,
Ihre Einstellungen zu überprüfen,
bevor mit dem Kopieren von
Dateien begonnen wird. Klicken
Sie auf Next (Weiter), um diese
Einstellungen zu speichern, bzw.
auf Back (Zurück), um
Änderungen vorzunehmen.
J
Wenn Sie Windows 2000
verwenden, wird möglicherweise ein
Fenster mit der Mitteilung angezeigt,
dass keine digitale Signatur
gefunden wurde. Diese Software
wurde geprüft und funktioniert unter
Windows 2000 korrekt. Klicken Sie auf
die Schaltfläche
K
Nach erfolgreicher Installation der
Software wird der
Glückwunschbildschirm angezeigt.
Klicken Sie auf
Ja
.
Exit
(Beenden).
I
K
J
7
Page 24

Anschließen des Dual-Band
2
Wireless A+G Notebook-Adapters
A Schalten Sie Ihr Notebook aus,
und suchen Sie nach einem freien
CardBus-Steckplatz.
B Stecken Sie den Adapter mit der
Pin-Seite des Steckers (Etikett nach
oben) in den CardBus-Steckplatz,
bis er einrastet.
C Schalten Sie Ihren Notebook-PC
ein. Sobald der Adapter korrekt
installiert ist, sollte die Netz-LED
leuchten.
D Wenn Sie Windows 2000
verwenden, wird möglicherweise
ein Fenster mit der Mitteilung
angezeigt, dass keine digitale
Signatur gefunden wurde. Diese
Software wurde geprüft und
funktioniert unter Windows 2000
korrekt. Klicken Sie auf die
Schaltfläche Ja.
D
B
E
E Nach der Installation des
Adapters wird das Symbol für den
Wireless-Netzwerkmonitor in der
Taskleiste in der unteren rechten
Ecke Ihres Bildschirms angezeigt.
Doppelklicken Sie auf das Symbol,
um die Verbindungsdaten zu
überprüfen, nach verfügbaren
drahtlosen Netzwerken zu suchen
oder weitere Änderungen an der
Konfiguration vorzunehmen.
Herzlichen Glückwunsch! Die
Installation des Dual-Band Wireless
A+G Notebook-Adapters ist
abgeschlossen.
8
Weitere Informationen und Anleitungen zur
Fehlerbehebung finden Sie im Benutzerhandbuch
auf der CD-ROM und in der Beilage zum
technischen Support. Sie können auch per E-Mail
weitere Unterstützung anfordern.
Website
http://www.linksys.com/international
Linksys ist eine eingetragene Marke bzw. eine
Marke von Cisco Systems, Inc. und/oder deren
Zweigunternehmen in den USA und anderen
Ländern. Copyright © 2005 Cisco Systems, Inc.
Alle Rechte vorbehalten.
WPC55AG-DE_V1.2-QIG-50110NC JL
Page 25

A Division of Cisco Systems, Inc.
Guía de instalación rápida
®
Doble banda
5
GHz
802.11a
+
Doble banda
GHz
4
2
,
802.11g
Adaptador para ordenador portátil
Nº de modelo
Nº de modelo
Nº de modelo
WPC55AG (ES)
A+G inalámbrico
Contenido del paquete
• Adaptador A+G inalámbrico de doble banda
para ordenador portátil
• CD-ROM de configuración
• Guía del usuario (sólo en inglés) en CD-ROM
• Guía de instalación rápida
Guía de instalación rápida
1
Page 26

Configuración del adaptador A+G inalámbrico
1
IMPORTANTE: Debe ejecutar el
asistente de configuración antes
de insertar el adaptador en el
ordenador portátil.
A
B
de doble banda para ordenador portátil
Inserte el Setup Wizard CD-ROM
(CD-ROM del asistente de
configuración) en la unidad de
CD-ROM. El asistente de
configuración se debe ejecutar
de forma automática y debe
Ejecutar
Install
Welcome
(Instalar)
aparecer la pantalla
(pantalla de bienvenida). Si no
es así, haga clic en el botón
Inicio
y seleccione
el campo que aparece, escriba
D:\setup.exe
letra de la unidad de CD-ROM).
Para instalar el adaptador, haga
clic en el botón
de la pantalla
(pantalla de bienvenida).
(donde “D” es la
Welcome
B
. En
C
C Una vez leído el acuerdo de
licencia, haga clic en Next
(Siguiente) para aceptarlo.
D
Seleccione un tipo de red.
Seleccione
GHz o 2,4 GHz) si va a establecer
una conexión con redes 802.11a,
802.11g y/o 802.11b. Seleccione
5GHz only
establecer una conexión con
redes 802.11a. Seleccione
2.4GHz only
va a establecer una conexión
con redes 802.11g y/o 802.11b.
Haga clic en
5GHz or 2.4GHz
(Sólo 5 GHz) si sólo va a
(Sólo 2,4 GHz) si sólo
Next
(Siguiente).
(5
E Seleccione un modo de red
inalámbrica. Haga clic en el
botón de radio Infrastructure
Mode (Modo de
2
D
E
Page 27

infraestructura) si desea
conectar los ordenadores
inalámbricos a ordenadores
de la red con cables
mediante un punto de acceso
inalámbrico. Haga clic en el
botón de radio Ad-Hoc Mode
(Modo ad-hoc) si desea
conectar varios ordenadores
inalámbricos en red.
En el campo SSID, introduzca
el SSID (Identificador del
conjunto de servicios) o
nombre de la red inalámbrica.
Debe ser el mismo para todos
los dispositivos de la red. Haga
clic en Next (Siguiente).
F
Si selecciona Infrastructure
Mode (Modo de infraestructura),
vaya al paso G ahora.
Seleccione el canal operativo
correcto para la red inalámbrica,
que debe coincidir con el canal
establecido en los demás
dispositivos de la red inalámbrica.
Si no está seguro de qué canal
debe utilizar, mantenga el
parámetro predeterminado
(Automático). Haga clic en
(Siguiente).
G Seleccione el método de
seguridad que desee utilizar:
WEP, WPA-Personal, WPAEnterprise, RADIUS o LEAP.
Haga clic en Siguiente.
Si la red no utiliza ningún método
de seguridad, seleccione
Disabled
clic en
continuación, siga en el paso I.
(Desactivada) y haga
Next
(Siguiente). A
Auto
Next
F
G
NOTA: WEP significa privacidad
equivalente a conexión con
cables. WPA quiere decir acceso
protegido a Wi-Fi y es un método
de seguridad más fiable que
WEP. RADIUS significa servicio de
usuario de acceso telefónico de
autenticación remota y LEAP
quiere decir protocolo de
autenticación extensible ligero.
3
Page 28

H Siga las instrucciones
correctas para el método de
seguridad.
1WEP
a
Seleccione
152-bit
o
desplegable (la encriptación
de 152 bits sólo está disponible
para redes 802.11a).
b Introduzca la frase de paso en
el campo Passphrase (Frase
de paso) y la clave WEP se
generará automáticamente.
Para introducir manualmente
la clave WEP, deje en blanco
el campo Passphrase (Frase
de paso) e introdúzcala en el
campo WEP Key (Clave WEP).
c Haga clic en Next (Siguiente)
y vaya al paso I.
64-bit, 128-bit
en el menú
WEP
2 WPA - Personal
a Seleccione el método de
encriptación que desee
utilizar, TKIP o AES, en el menú
desplegable.
b Introduzca la frase de paso
o la clave compartida en el
campo Passphrase (Frase
de paso).
c A continuación, haga clic
en Next (Siguiente) y vaya al
paso I.
4
WPA - Personal
Page 29

3 WPA-Enterprise
Seleccione el método de autenticación
que desee utilizar,
EAP-TLS o PEAP
.
EAP-TLS
a
Introduzca el nombre de inicio de
sesión en el campo
(Nombre de inicio de sesión).
b
Introduzca el nombre del
servidor de autenticación en el
campo
de servidor). (opcional)
Server Name
Login Name
(Nombre
c En el menú desplegable
Certificate (Certificado),
seleccione el certificado de
autenticación.
d Seleccione el método de
encriptación que desee
utilizar, TKIP o AES.
e Haga clic en Next (Siguiente)
y vaya al paso I.
PEAP
a
Introduzca el nombre de inicio de
sesión en el campo
(Nombre de inicio de sesión).
b
Introduzca la contraseña en el
campo
c
Introduzca el nombre del
servidor de autenticación en el
campo
de servidor). (opcional)
Password
Server Name
Login Name
(Contraseña).
(Nombre
d En el menú desplegable
Certificate (Certificado),
seleccione el certificado de
autenticación.
e Seleccione el método de
autenticación utilizado en el
túnel PEAP, EAP-MSCHAP v2 o
Generic Token Card (Tarjeta
de testigo genérica).
WPA - Enterprise
EAP-TLS
WPA - Enterprise
PEAP
5
Page 30

f Seleccione el método de
encriptación que desee
utilizar, TKIP o AES.
g Haga clic en Next (Siguiente)
y vaya al paso I.
4 RADIUS
Seleccione el método de autenticación
que desee utilizar,
EAP-TLS
a
Introduzca el nombre de inicio de
sesión en el campo
(Nombre de inicio de sesión).
b
Introduzca el nombre del
servidor de autenticación en el
campo
de servidor). (opcional)
EAP-TLS o PEAP
Server Name
.
Login Name
(Nombre
c En el menú desplegable
Certificate (Certificado),
seleccione el certificado de
autenticación.
d Haga clic en Next (Siguiente)
y vaya al paso I.
RADIUS
EAP-TLS
PEAP
a
Introduzca el nombre de inicio de
sesión en el campo
(Nombre de inicio de sesión).
b
Introduzca la contraseña en el
campo
c
Introduzca el nombre del
servidor de autenticación en el
campo
de servidor). (opcional)
Password
Server Name
Login Name
(Contraseña).
(Nombre
d En el menú desplegable
Certificate (Certificado),
seleccione el certificado de
autenticación.
6
RADIUS
PEAP
Page 31

e Seleccione el método de
autenticación utilizado en el
túnel PEAP, EAP-MSCHAP v2 o
Generic Token Card (Tarjeta
de testigo genérica).
f Haga clic en Next (Siguiente)
y vaya al paso I.
5 LEAP
a Introduzca el nombre de
usuario en el campo User
Name (Nombre de usuario).
b
Introduzca la contraseña en el
campo
Password
(Contraseña).
c Introduzca la contraseña de
nuevo en el campo Confirm
(Confirmar).
d Haga clic en Next (Siguiente)
y vaya al paso I.
I
El asistente de configuración le
solicita que revise los
parámetros antes de comenzar
a copiar archivos. Haga clic en
Next
(Siguiente) para guardar
Back
los parámetros o en
para cambiarlos.
(Atrás)
J Si utiliza Windows 2000, es
posible que aparezca una
pantalla que informa de que
no se ha encontrado una
firma digital. Este software se
ha probado y funciona
correctamente en Windows
2000. Haga clic en el botón Sí.
LEAP
I
J
K
Una vez instalado
correctamente el software,
aparece la pantalla
Congratulations
Haga clic en
Exit
(Enhorabuena).
(Salir).
K
7
Page 32

Conexión del adaptador A+G inalámbrico
2
de doble banda para ordenador portátil
A Apague el ordenador portátil
y busque una ranura CardBus
disponible en el mismo.
B Con el extremo de las patillas
de conexión hacia la ranura
CardBus y la etiqueta hacia
arriba, inserte el adaptador en
la ranura CardBus hasta que
encaje.
C Encienda el ordenador
portátil. La luz Power
(Alimentación) se debe
encender si el adaptador está
instalado correctamente.
D Si utiliza Windows 2000, es
posible que aparezca una
pantalla que informa de que
no se ha encontrado una
firma digital. Este software se
ha probado y funciona
correctamente en Windows
2000. Haga clic en el botón Sí.
B
D E
E
Una vez instalado el adaptador,
aparece el icono del monitor de
red inalámbrica en la bandeja
del sistema, en la esquina inferior
derecha de la pantalla.
Haga doble clic en el icono
si desea comprobar la
información de enlace, buscar
las redes inalámbricas
disponibles o realizar cambios
adicionales en la configuración.
Enhorabuena. Ha finalizado la
instalación del adaptador A+G
inalámbrico de doble banda para
ordenador portátil.
8
Para obtener información adicional o ayuda
sobre solución de problemas, consulte la guía
del usuario que se incluye en el CD-ROM o el
suplemento de asistencia técnica. También
puede solicitar más asistencia mediante el
correo electrónico.
Página Web
http://www.linksys.com/international
Linksys es una marca registrada o marca
comercial de Cisco Systems, Inc. y/o sus filiales
de EE.UU. y otros países. Copyright © 2005 Cisco
Systems, Inc. Todos los derechos reservados.
WPC55AG-ES_V1.2-QIG-50110NC JL
Page 33

A Division of Cisco Systems, Inc.
Guide d'installation rapide
®
Double bande
5
GHz
802.11a
+
Double bande
GHz
4
2
,
802.11g
Adaptateur pour ordinateur portable
Modèle réf.
Modèle réf.
Modèle réf.
WPC55AG (FR)
Sans fil A+G
Contenu de l'emballage
• Adaptateur pour ordinateur portable sans fil
A+G double bande
• CD-ROM d'installation
• Guide de l'utilisateur (en anglais
uniquement) sur le CD-ROM
• Guide d'installation rapide
Guide d'installation rapide
1
Page 34

Configuration de l'adaptateur pour ordinateur
1
IMPORTANT : Vous devez
exécuter l'Assistant d'installation
avant d'insérer l'adaptateur dans
votre ordinateur portable.
A
B
portable sans fil A+G double bande
Insérez le CD-ROM de l'Assistant
de configuration dans le lecteur
de CD-ROM. L'Assistant de
configuration devrait démarrer
automatiquement et l'écran
Welcome
apparaître. Si ce n'est pas le
cas, cliquez sur le bouton
(Démarrer), puis sur
(Exécuter). Dans le champ qui
apparaît, entrez
(« D » représentant votre lecteur
de CD-ROM).
Pour installer l'adaptateur, cliquez
sur le bouton
l'écran
(Bienvenue) devrait
Run
D:\setup.exe
Install
Welcome
(Installer) de
(Bienvenue).
C Après avoir lu l'accord de
licence, cliquez sur Next
(Suivant) pour l'accepter.
Start
B
C
D
Choisissez un type de réseau.
Sélectionnez
(5 GHz ou 2,4 GHz) si vous vous
connectez à un réseau 802.11a,
802.11g et/ou 802.11b.
Sélectionnez
uniquement) si vous vous
connectez à un réseau 802.11a
uniquement. Sélectionnez
2.4GHz only
uniquement) si vous vous
connectez à un réseau 802.11g
et/ou 802.11b uniquement.
Cliquez ensuite sur
E
Sélectionnez ensuite un mode
réseau sans fil. Cliquez sur le
bouton d'option
(Mode Infrastructure) si
Mode
2
5GHz or 2.4GHz
5GHz only
(2,4 GHz
Next
Infrastructure
(5 GHz
D
(Suivant).
E
Page 35

vous voulez que vos ordinateurs
sans fil soient connectés en
réseau aux ordinateurs de votre
réseau câblé à l'aide d'un point
d'accès sans fil. Cliquez sur le
bouton d'option
(Mode Ad hoc) si vous voulez que
plusieurs ordinateurs sans fil
puissent communiquer
directement entre eux.
Dans le champ SSID, entrez le
SSID ou le nom de votre réseau
sans fil. Le nom SSID doit être
identique pour tous les
périphériques du réseau.
Cliquez sur Next (Suivant).
Ad-Hoc Mode
F Si vous avez sélectionné
Infrastructure Mode (Mode
Infrastructure), passez
directement à l'étape G.
Sélectionnez le canal de
fonctionnement correct pour
votre réseau sans fil. Il doit être
identique au canal défini sur les
autres périphériques du réseau.
Si vous ne savez pas quel canal
utiliser, conservez le paramètre
Auto
Next
(Suivant).
(Auto), puis
par défaut,
cliquez sur
G Sélectionnez la méthode de
sécurité de votre choix : WEP,
WPA-Personal, WPA-Enterprise,
RADIUS ou LEAP. Cliquez
ensuite sur Next (Suivant).
Si votre réseau n'utilise pas de
méthode de sécurité,
sélectionnez
et cliquez sur
Passez ensuite à l'étape I.
Disabled
Next
(Désactivé)
(Suivant).
F
G
REMARQUE : WEP est l'acronyme
de Wired Equivalent Privacy. WPA
est l'acronyme de Wi-Fi Protected
Access et désigne une méthode
plus sécurisée que la méthode
WEP. RADIUS est l'acronyme de
Remote Authentication Dial-In
User Service et LEAP correspond
à Lightweight Extensible
Authentication Protocol.
3
Page 36

H Reportez-vous aux instructions
appropriées relatives à votre
méthode de sécurité.
1WEP
a Sélectionnez 64-bit (64 bits),
128-bit (128 bits) ou 152-bit
(152 bits) dans le menu
déroulant (un mode de
cryptage à 152 bits est
disponible uniquement pour
un réseau 802.11a).
b Entrez votre phrase mot de
passe dans le champ
Passphrase (Phrase mot de
passe). La clé WEP sera
générée automatiquement.
Si vous souhaitez saisir
manuellement la clé WEP, ne
renseignez pas le champ
Passphrase (Phrase mot de
passe) et saisissez la clé WEP
dans le champ WEP Key
(Clé WEP).
c Cliquez sur Next (Suivant) et
passez à l'étape I.
2 WPA - Personal
a Sélectionnez la méthode de
cryptage que vous souhaitez
utiliser (TKIP ou AES) dans le
menu déroulant.
b Entrez votre mot de passe ou
la clé pré-partagée dans le
champ Passphrase (Phrase
mot de passe).
c Cliquez ensuite sur Next
(Suivant) et passez à l'étape I.
4
WEP
WPA - Personal
Page 37

3 WPA-Enterprise
Sélectionnez la méthode
d'authentification à utiliser :
EAP-TLS ou PEAP.
EAP-TLS
a Entrez le nom de connexion
dans le champ Login Name
(Nom de connexion).
b Entrez le nom du serveur
d'authentification dans le
champ Server Name (Nom du
serveur). (en option)
c
Dans le menu déroulant
Certificate
le certificat d'authentification.
(Certificat), sélectionnez
d Sélectionnez la méthode de
cryptage que vous souhaitez
utiliser (TKIP ou AES).
e Cliquez sur Next (Suivant) et
passez à l'étape I.
PEAP
WPA - Enterprise
EAP-TLS
a Entrez le nom de connexion
dans le champ Login Name
(Nom de connexion).
b
Entrez le mot de passe dans le
champ
Password
(Mot de passe).
c Entrez le nom du serveur
d'authentification dans le
champ Server Name (Nom du
serveur). (en option)
d
Dans le menu déroulant
Certificate
le certificat d'authentification.
e
Sélectionnez la méthode
d'authentification utilisée dans le
tunnel PEAP :
MSCHAP v2) ou
(Adaptateur à jeton générique).
(Certificat), sélectionnez
EAP-MSCHAP v2
Generic Token Card
(EAP-
WPA - Enterprise
PEAP
5
Page 38

f Sélectionnez la méthode de
cryptage que vous souhaitez
utiliser (TKIP ou AES).
g Cliquez sur Next (Suivant) et
passez à l'étape I.
4 RADIUS
Sélectionnez la méthode
d'authentification à utiliser :
EAP-TLS ou PEAP.
EAP-TLS
a Entrez le nom de connexion
dans le champ Login Name
(Nom de connexion).
b Entrez le nom du serveur
d'authentification dans le
champ Server Name (Nom du
serveur). (en option)
c
Dans le menu déroulant
Certificate
le certificat d'authentification.
(Certificat), sélectionnez
d Cliquez sur Next (Suivant) et
passez à l'étape I.
RADIUS
EAP-TLS
PEAP
a Entrez le nom de connexion
dans le champ Login Name
(Nom de connexion).
b
Entrez le mot de passe dans le
champ
Password
(Mot de passe).
c Entrez le nom du serveur
d'authentification dans le
champ Server Name (Nom du
serveur). (en option)
d Dans le menu déroulant
Certificate (Certificat),
sélectionnez le certificat
d'authentification.
6
RADIUS
PEAP
Page 39

e
Sélectionnez la méthode
d'authentification utilisée dans le
tunnel PEAP :
MSCHAP v2) ou
(Adaptateur à jeton générique).
EAP-MSCHAP v2
Generic Token Card
(EAP-
f Cliquez sur Next (Suivant) et
passez à l'étape I.
5 LEAP
a Entrez le nom d'utilisateur dans
le champ User Name (Nom
d'utilisateur).
b
Saisissez le mot de passe dans le
champ
Password
(Mot de passe).
c Saisissez de nouveau le mot
de passe dans le champ
Confirm (Confirmation).
d Cliquez sur Next (Suivant) et
passez à l'étape I.
I
L'Assistant de configuration vous
invite à vérifier les paramètres que
vous avez définis avant de
commencer à copier des fichiers.
Cliquez sur
enregistrer ces paramètres ou sur
Back
J
Si vous utilisez Windows 2000,
vous verrez peut-être s'afficher
un écran indiquant qu'une
signature numérique n'a pas été
trouvée. Ce logiciel a été testé
et fonctionne correctement
sous Windows 2000. Cliquez sur
le bouton
Next
(Suivant) pour
(Précédent) pour les modifier.
Oui
.
LEAP
I
J
K
Une fois l'installation du logiciel
terminée, l'écran
(Félicitations) s'affiche. Cliquez sur
Exit
(Quitter).
Congratulations
K
7
Page 40

Connexion de l'adaptateur pour ordinateur
2
portable sans fil A+G double bande
A Mettez votre ordinateur
portable hors tension et
localisez un connecteur
CardBus disponible.
B
Après avoir placé l'extrémité des
broches du connecteur face à
l'emplacement CardBus,
l'étiquette étant tournée vers le
haut, faites glisser l'adaptateur
dans l'emplacement CardBus
jusqu'à ce qu'il se bloque.
C Mettez votre ordinateur
portable sous tension. Le
voyant d'alimentation doit
s'allumer lorsque l'adaptateur
est correctement installé.
D
Si vous utilisez Windows 2000,
vous verrez peut-être s'afficher
un écran indiquant qu'une
signature numérique n'a pas été
trouvée. Ce logiciel a été testé
et fonctionne correctement
sous Windows 2000. Cliquez sur
Oui
le bouton
.
B
D E
E Une fois l'adaptateur installé,
l'icône de la fonction de
contrôle du réseau sans fil
apparaît dans la barre d'état
système, située dans l'angle
inférieur droit de l'écran.
Cliquez deux fois sur l'icône
pour vérifier les informations de
liaison, rechercher des réseaux
sans fil disponibles ou modifier
la configuration.
Félicitations ! L'installation de
l'adaptateur pour ordinateur
portable sans fil A+G double
bande est terminée.
8
Pour obtenir de plus amples informations
ou bénéficier d'une assistance technique,
reportez-vous au Guide de l'utilisateur du
CD-ROM ou à la Fiche d'assistance
technique. Pour obtenir davantage d'aide,
vous pouvez également envoyer un e-mail.
Site Web
http://www.linksys.com/international
Linksys est une marque déposée ou une marque
commerciale de Cisco Systems, Inc. et/ou ses
filiales aux États-Unis et dans certains autres
pays. Copyright © 2005 Cisco Systems, Inc.
Tous droits réservés.
WPC55AG-FR_V1.2-QIG-50110NC JL
Page 41

A Division of Cisco Systems, Inc.
Guida di installazione rapi
®
Dual band
GHz
5
802.11a
4
2
,
N. modello
N. modello
N. modello
+
GHz
802.11g
WPC55AG (IT)
Contenuto della confezione
• Adattatore per notebook Dual-Band
Wireless A+G
• Setup CD-ROM (CD per l'installazione)
• User Guide (Guida per l'utente, solo in
inglese) su CD-ROM
• Guida di installazione rapida
Dual band
Wireless A+G
Adattatore per notebook
Guida di installazione rapida
1
Page 42

Configurazione dell'adattatore per
1
IMPORTANTE: prima di installare
l'adattatore sul notebook, è
necessario eseguire
l'installazione guidata.
notebook Dual-Band Wireless A+G
A Inserire il Setup Wizard CD-ROM
(CD-ROM per l'installazione
guidata) nell'apposita unità.
L'installazione guidata
dovrebbe avviarsi
automaticamente
visualizzando la schermata
Welcome (Benvenuti). In caso
contrario, fare clic sul pulsante
Start e selezionare Esegui.
Immettere D:\setup.exe (dove
"D" è la lettera dell'unità CDROM) nel campo visualizzato.
B Per installare l'adattatore, fare
clic sul pulsante Install (Installa)
nella schermata Welcome
(Benvenuti).
B
C
C Dopo aver letto il contratto di
licenza, fare clic su Next
(Avanti) per accettarne il
contenuto.
D Scegliere un tipo di rete.
Selezionare 5GHz o 2.4GHz
per collegarsi a reti 802.11a,
802.11g e/o 802.11b.
Selezionare 5GHz only (Solo 5
GHz) per collegarsi a reti
802.11a. Selezionare 2.4GHz
only (Solo 2,4 GHz) per
collegarsi esclusivamente a
reti 802.11g e/o 802.11b. Fare
quindi clic su Next (Avanti).
E Selezionare la modalità di rete
wireless desiderata. Fare clic
sul pulsante di opzione
Infrastructure Mode (Modalità
Infrastruttura) per collegare i
2
D
E
Page 43

computer wireless con i
computer connessi alla rete
via cavo usando un punto di
accesso wireless. Fare clic sul
pulsante di opzione Ad-Hoc
Mode (Modalità ad hoc) per
collegare direttamente più
computer wireless tra di loro.
Nel campo SSID, immettere
l'identificativo SSID o il nome
della rete wireless utilizzata.
L'identificativo SSID deve
essere identico per tutti i
dispositivi collegati in rete. F
are clic su Next (Avanti).
F Se si sceglie l'opzione
Infrastructure Mode (Modalità
infrastruttura), passare
direttamente al punto G.
Selezionare il canale utilizzato
dalla rete wireless che deve
coincidere con quello
impostato sulle altre periferiche
della rete wireless. Se non si è
certi del canale da utilizzare,
non modificare quello
predefinito, Auto (Automatico).
Fare quindi clic su Next
(Avanti).
F
G Selezionare il metodo di
protezione che si desidera
utilizzare: WEP, WPA-Personal,
WPA-Enterprise, RADIUS o LEAP.
Fare quindi clic su Next
(Avanti).
Se la rete in uso non dispone di
alcun metodo di protezione,
selezionare Disabled
(Disattivato) e fare clic su Next
(Avanti). Passare al punto I.
G
NOTA WEP è l'acronimo di Wired
Equivalent Privacy. WPA è
l'acronimo di Wi-Fi Protected
Access ed è un metodo di
protezione migliore rispetto al WEP.
RADIUS è l'acronimo di Remote
Authentication Dial-In User Service,
mentre LEAP sta per Lightweight
Extensible Authentication Protocol.
3
Page 44

H Seguire le istruzioni appropriate
per il metodo di protezione
adottato.
1WEP
a Selezionare 64-bit, 128-bit o
152-bit dal menu a discesa (la
cifratura a 152 bit è disponibile
solo per reti 802.11a).
b Immettere la passphrase nel
campo Passphrase e la
chiave WEP verrà generata
automaticamente.
Per immettere la chiave WEP
manualmente, lasciare il
campo Passphrase vuoto e
inserire la chiave WEP nel
campo WEP Key (Chiave WEP).
c Fare clic su Next (Avanti)
e passare al punto I.
WEP
2 WPA - Personal
a Selezionare il metodo di
cifratura desiderato, TKIP o AES,
dal menu a discesa.
b Immettere la Passphrase
o Pre-Shared Key (Chiave
precondivisa) nel campo
Passphrase.
c Fare quindi clic su Next (Avanti)
e passare al punto I.
4
WPA - Personal
Page 45

3 WPA - Enterprise
Selezionare il metodo di
autenticazione che si desidera
utilizzare, EAP-TLS o PEAP.
EAP-TLS
a Immettere il nome di login nel
campo Login Name (Nome
login).
b Immettere il nome del server di
autenticazione nel campo
Server Name (Nome server)
(facoltativo).
c Dal menu a discesa Certificate
(Certificato), selezionare il
certificato di autenticazione.
d Selezionare il metodo di
cifratura che si desidera
utilizzare, TKIP o AES.
e Fare clic su Next (Avanti) e
passare al punto I.
PEAP
WPA - Enterprise
EAP-TLS
a Immettere il nome di login nel
campo Login Name (Nome
login).
b Immettere la password nel
campo Password.
c Immettere il nome del server
di autenticazione nel campo
Server Name (Nome server)
(facoltativo).
d Dal menu a discesa Certificate
(Certificato), selezionare il
certificato di autenticazione.
e Selezionare il metodo di
autenticazione utilizzato dal
tunnel PEAP, EAP-MSCHAP v2
o Generic Token Card.
WPA - Enterprise
PEAP
5
Page 46

f Selezionare il metodo di
cifratura che si desidera
utilizzare, TKIP o AES.
g Fare clic su Next (Avanti)
e passare al punto I.
4 RADIUS
Selezionare il metodo di
autenticazione che si desidera
utilizzare, EAP-TLS o PEAP.
EAP-TLS
a Immettere il nome di login nel
campo Login Name (Nome
login).
b Immettere il nome del server
di autenticazione nel campo
Server Name (Nome server)
(facoltativo).
c Dal menu a discesa
Certificate (Certificato),
selezionare il certificato di
autenticazione.
d Fare clic su Next (Avanti)
e passare al punto I.
PEAP
a Immettere il nome di login nel
campo Login Name (Nome
login).
b Immettere la password nel
campo Password.
c Immettere il nome del server
di autenticazione nel campo
Server Name (Nome server)
(facoltativo).
d Dal menu a discesa
Certificate (Certificato),
selezionare il certificato di
autenticazione.
6
RADIUS
EAP-TLS
RADIUS
PEAP
Page 47

e Selezionare il metodo di
autenticazione utilizzato dal
tunnel PEAP, EAP-MSCHAP v2
o Generic Token Card.
f Fare clic su Next (Avanti)
e passare al punto I.
5 LEAP
a Immettere il nome utente nel
campo Login Name (Nome
login).
b Immettere la password nel
campo Password.
c Immettere nuovamente la
password nel campo Confirm
(Conferma).
d Fare clic su Next (Avanti) e
passare al punto I.
I Prima di iniziare a copiare i file,
l'installazione guidata chiede
di confermare le impostazioni.
Fare clic su Next (Avanti) per
salvare tali impostazioni
oppure su Back (Indietro) per
modificarle.
LEAP
I
J Se si utilizza il sistema operativo
Windows 2000, potrebbe
essere visualizzata una
schermata in cui viene
notificato che non è stato
possibile trovare la firma
digitale. Questo software è
stato collaudato ed è risultato
compatibile con Windows
2000. Fare clic sul pulsante Sì.
K Dopo aver installato il software,
viene visualizzata la schermata
Congratulations
(Congratulazioni). Fare clic su
Exit (Esci).
K
J
7
Page 48

Collegamento dell'adattatore per
2
notebook Dual-Band Wireless A+G
A Spegnere il notebook e
individuare uno slot CardBus
disponibile.
B Orientando il lato con i pin di
connessione verso lo slot
CardBus e con l'etichetta
rivolta verso l'alto, inserire
l'adattatore nello slot CardBus
fino a quando si blocca in
posizione.
C Accendere il computer
notebook. Quando
l'adattatore viene installato
correttamente, si accende
l'indicatore LED di
alimentazione.
D Se si utilizza il sistema operativo
Windows 2000, potrebbe
essere visualizzata una
schermata in cui viene
notificato che non è stato
possibile trovare la firma
digitale. Questo software è
stato collaudato ed è risultato
compatibile con Windows
2000. Fare clic sul pulsante Sì.
D
B
E
E Dopo aver installato
l'adattatore, nell'angolo
inferiore destro dello schermo,
sulla barra delle applicazioni,
viene visualizzata l'icona del
monitor Wireless Network.
Fare doppio clic sull'icona
se si desidera controllare le
informazioni relative al
collegamento, ricercare le reti
wireless disponibili oppure
apportare ulteriori modifiche
alla configurazione.
Congratulazioni! L'installazione
dell'adattatore per notebook
Dual-Band Wireless A+G è
8
stata completata.
Per ulteriori informazioni o istruzioni relative
alla risoluzione dei problemi, consultare la User
Guide (Guida per l'utente) su CD-ROM oppure il
supplemento per l'assistenza tecnica. È
possibile ricevere ulteriore assistenza anche
inviando un messaggio di posta elettronica.
Sito Web
http://www.linksys.com/international
Linksys è un marchio registrato o un marchio di
Cisco Systems, Inc. e/o dei relativi affiliati negli
Stati Uniti e in altri Paesi. Copyright © 2005 Cisco
Systems, Inc. Tutti i diritti riservati.
WPC55AG-IT_V1.2-QIG-50110NC JL
Page 49

A Division of Cisco Systems, Inc.
Manual de Instalação Ráp
®
Dual band
5
GHz
802.11a
+
Dual band
GHz
4
2
,
802.11g
Modelo n.º
Modelo n.º
Modelo n.º
WPC55AG (PT)
Sem fios A+G
Placa para computador portátil
Conteúdo da embalagem
• Placa para computador portátil sem fios
A+G dual band
• CD-ROM de configuração
• Manual do Utilizador (disponível apenas
em inglês) no CD-ROM
• Instalação Rápida
Manual de Instalação Rápida
1
Page 50

Configurar a Placa para computador
1
IMPORTANTE: É necessário executar
o Setup Wizard (Assistente de
configuração) antes de colocar
a Placa no computador portátil.
A
portátil sem fios A+G dual band
Coloque o CD-ROM do Setup
Wizard (Assistente de
configuração) na unidade de
CD-ROM. O Setup Wizard
(Assistente de configuração)
deverá ser executado
automaticamente e deverá ser
apresentado o ecrã
(Bem-vindo). Se tal não
acontecer, clique no botão
Iniciar
e seleccione
campo apresentado, introduza
D:\setup.exe
à letra da unidade de CD-ROM).
(se “D” corresponder
Welcome
Executar
. No
B Para instalar a Placa, clique no
botão Install (Instalar) no ecrã
Welcome (Bem-vindo).
B
C
C
Depois de ler o Contrato de
licença, clique em
(Seguinte) para aceitar o contrato
D
Escolha o tipo de rede.
Seleccione
GHz ou 2,4 GHz) se for ligar a
redes 802.11a, 802.11g e/ou
802.11b. Seleccione
(Só 5 GHz) se for ligar apenas a
redes 802.11a. Seleccione
2.4GHz only
ligar apenas a redes 802.11g e/
ou 802.11b. Em seguida, clique
Next
em
E
Escolha um modo de rede sem
fios. Clique no botão de opção
Infrastructure Mode
infra-estrutura) se pretender que
os computadores sem fios sejam
2
5GHz or 2.4GHz
(Seguinte).
Next
(Só 2,4 GHz) se for
(5
5GHz only
D
(Modo de
E
Page 51

ligados aos computadores da
rede com fios utilizando um
ponto de acesso sem fios. Clique
no botão de opção
(Modo ad hoc) se
Mode
pretender que vários
computadores sem fios se liguem
directamente uns aos outros.
No campo
ou o nome da rede sem fios. O
SSID tem de ser idêntico para
todos os dispositivos na rede.
Clique em
F
Se tiver escolhido Infrastructure
Mode (Modo de infra-estrutura),
vá agora para o Passo G.
Seleccione o canal de
funcionamento correcto da rede
sem fios, que tem de
corresponder ao canal definido
nos outros dispositivos da rede
sem fios. Se não tiver a certeza
quanto ao canal que deve
utilizar, mantenha a predefinição,
Auto
(Automático). Em seguida,
clique em
SSID
Next
Next
Ad-Hoc
, introduza o SSID
(Seguinte).
(Seguinte).
F
G
G Seleccione o método de
segurança que pretende
utilizar: WEP, WPA-Personal,
WPA-Enterprise, RADIUS ou
LEAP. Em seguida, clique em
Next (Seguinte).
Se a rede não utilizar nenhum
método de segurança,
seleccione Disabled
(Desactivado) e clique em
Next (Seguinte). Em seguida,
avance para o Passo I.
NOTA:
WEP quer dizer Wired
Equivalent Privacy (Privacidade
equivalente com fios). WPA quer
dizer Wi-Fi Protected Access
(Acesso protegido sem fios) e é um
método de segurança mais forte
que o WEP. RADIUS quer dizer
Remote Authentication Dial-In User
Service (Serviço de autenticação
remota de utilizadores de acesso
telefónico) e LEAP quer dizer
Lightweight Extensible
Authentication Protocol (Protocolo
leve de autenticação extensível).
3
Page 52

H Avance para as instruções
adequadas ao método de
segurança utilizado.
1WEP
a Seleccione 64-bit, 128-bit ou
152-bit (64 bits, 128 bits ou
152 bits) a partir do menu
pendente (a encriptação de
152 bits só está disponível
para redes 802.11a).
b Introduza a frase-passe no
campo Passphrase (Frasepasse) e a chave WEP será
gerada automaticamente.
Para introduzir manualmente
a chave WEP, deixe o campo
Passphrase (Frase-passe) em
branco e introduza a chave
WEP no campo WEP Key
(Chave WEP).
c Clique em Next (Seguinte)
e vá para o Passo I.
WEP
2 WPA - Personal
a Seleccione o método de
encriptação que pretende
utilizar, TKIP ou AES, a partir
do menu pendente.
b Introduza a frase-passe ou
a chave pré-partilhada no
campo Passphrase
(Frase-passe).
c Em seguida, clique em Next
(Seguinte) e avance para o
Passo I.
4
WPA - Personal
Page 53

3 WPA-Enterprise
Seleccione o método de
autenticação que pretende utilizar,
EAP-TLS ou PEAP.
EAP-TLS
a Introduza o nome de início de
sessão no campo Login Name
(Nome de início de sessão).
b Introduza o nome do servidor
de autenticação no campo
Server Name (Nome do
servidor). (opcional)
c
A partir do menu pendente
Certificate
o certificado de autenticação.
(Certificado), seleccione
d Seleccione o método de
encriptação que pretende
utilizar, TKIP ou AES.
e Clique em Next (Seguinte) e
vá para o Passo I.
PEAP
WPA - Enterprise
EAP-TLS
a Introduza o nome de início de
sessão no campo Login Name
(Nome de início de sessão).
b
Introduza a palavra-passe no
campo
Password
(Palavra-passe).
c Introduza o nome do servidor
de autenticação no campo
Server Name (Nome do
servidor). (opcional)
d
A partir do menu pendente
Certificate
o certificado de autenticação.
(Certificado), seleccione
e Seleccione o método de
autenticação utilizado no
túnel PEAP, EAP-MSCHAP v2 ou
Generic Token Card.
WPA - Enterprise
PEAP
5
Page 54

f Seleccione o método de
encriptação que pretende
utilizar, TKIP ou AES.
g Clique em Next (Seguinte)
e vá para o Passo I.
4 RADIUS
Seleccione o método de
autenticação que pretende utilizar,
EAP-TLS ou PEAP.
EAP-TLS
a Introduza o nome de início de
sessão no campo Login Name
(Nome de início de sessão).
b Introduza o nome do servidor
de autenticação no campo
Server Name (Nome do
servidor). (opcional)
c
A partir do menu pendente
Certificate
o certificado de autenticação.
(Certificado), seleccione
d Clique em Next (Seguinte)
e vá para o Passo I.
RADIUS
EAP-TLS
PEAP
a Introduza o nome de início de
sessão no campo Login Name
(Nome de início de sessão).
b Introduza a palavra-passe no
campo Password (Palavrapasse).
c Introduza o nome do servidor
de autenticação no campo
Server Name (Nome do
servidor). (opcional)
d
A partir do menu pendente
Certificate
o certificado de autenticação.
6
(Certificado), seleccione
RADIUS
PEAP
Page 55

e Seleccione o método de
autenticação utilizado no
túnel PEAP, EAP-MSCHAP v2
ou Generic Token Card.
f Clique em Next (Seguinte)
e vá para o Passo I.
5 LEAP
a Introduza o nome de utilizador
no campo User Name (Nome
de utilizador).
b
Introduza a palavra-passe no
campo
Password
(Palavra-passe).
c Introduza novamente a
palavra-passe no campo
Confirm (Confirmar).
d Clique em Next (Seguinte)
e vá para o Passo I.
I
O Setup Wizard (Assistente de
configuração) solicitará que
verifique as definições antes de
começar a copiar os ficheiros.
Clique em
guardar estas definições ou
clique em
alterar as definições.
Next
(Seguinte) para
Back
(Anterior) para
LEAP
I
J
Se estiver a utilizar o Windows
2000, poderá ser apresentado
um ecrã a indicar que não foi
encontrada nenhuma assinatura
digital. Este software foi testado e
é compatível com o Windows
2000. Clique no botão
K
Depois de o software ter sido
instalado com êxito, será
apresentado o ecrã
Congratulations
Clique em
(Parabéns).
Exit
(Sair).
Sim
J
.
K
7
Page 56

Ligar a Placa para computador
2
portátil sem fios A+G dual band
A Desligue o computador
portátil e localize uma ranhura
CardBus disponível.
B Com o pino do conector
virado para a ranhura CardBus
e a etiqueta virada para cima,
introduza a Placa na ranhura
CardBus até encaixar.
C Ligue o computador portátil.
O LED Power (Alimentação)
deverá permanecer aceso
quando a Placa for
correctamente instalada.
D Se estiver a utilizar o Windows
2000, poderá ser apresentado
um ecrã a indicar que não foi
encontrada nenhuma
assinatura digital. Este software
foi testado e é compatível
com o Windows 2000. Clique
no botão Sim.
D
B
E
E Depois de a Placa ser
instalada, o ícone Wireless
Network Monitor (Monitor de
redes sem fios) será
apresentado no tabuleiro do
sistema, no canto inferior
direito do ecrã.
Faça duplo clique no ícone
se pretender consultar as
informações da ligação,
procurar redes sem fios
disponíveis ou efectuar
alterações adicionais à
configuração.
Parabéns! A instalação da Placa
para computador portátil sem fios
A+G dual band está concluída.
8
Para obter informações adicionais ou ajuda
para resolução de problemas, consulte o
Manual do Utilizador no CD-ROM ou a Folha
de Suporte Técnico. Também poderá enviar
uma mensagem de correio electrónico para
obter suporte.
Web site
http://www.linksys.com/international
Linksys é uma marca registada ou marca
comercial da Cisco Systems, Inc. e/ou das
respectivas afiliadas nos E.U.A. e noutros países.
Copyright © 2005 Cisco Systems, Inc. Todos os
direitos reservados.
WPC55AG-PT_V1.2-QIG-50110NC JL
Page 57

A Division of Cisco Systems, Inc.
Snabbinstallationshandbo
®
Dualband
GHz
5
802.11a
4
2
,
Modellnummer
Modellnummer
Modellnummer
+
GHz
802.11g
WPC55AG (SE)
Innehåll i förpackningen
• Wireless A+G Adapter för bärbar dator
med dualband
• Installations-cd
• Användarhandbok (endast engelska)
på cd-skiva
• Snabbinstallation
Dualband
Wireless A+G
Adapter för bärbar dator
Snabbinstallationshandbok
1
Page 58

Konfigurera Wireless A+G Adapter
1
VIKTIGT! Du måste köra
Installationsguiden innan du
ansluter adaptern till den bärbara
datorn.
A
B
för bärbar dator med dualband
Sätt in installations-cd:n i
cd-enheten. Guiden startas
och skärmen
(Välkommen) visas automatiskt.
Om skärmen inte visas klickar
du på knappen
Kör
. I det fält som visas anger
du
D:\setup.exe
cd-enhetens beteckning).
Installera adaptern genom att
klicka på
skärmen
Welcome
Start
Install
(Installera) på
Welcome
och väljer
(om "D" är
(Välkommen).
B
C Läs igenom licensavtalet och
klicka på Next (Nästa) om du
accepterar villkoren.
D
Välj nätverkstyp. Välj
2.4GHz
om du vill ansluta till nätverk av
typen 802.11a, 802.11g och/
eller 802.11b. Välj
(endast 5 GHz) om du vill
ansluta endast till 802.11
a-nätverk. Välj
(endast 2,4 GHz) om du vill
ansluta endast till nätverk av
typen 802.11g och/eller
802.11b. Klicka på
(5 GHz eller 2,4 GHz)
5GHz or
5GHz only
2.4GHz only
Next
(Nästa).
E Välj ett trådlöst nätverksläge.
Klicka på radioknappen
Infrastructure Mode
(Infrastrukturläge) om du vill att
de trådlösa datorerna ska
bilda nätverk med datorer på
2
C
D
E
Page 59

det trådanslutna nätverket
med hjälp av en trådlös
accesspunkt. Klicka på Ad-Hoc
Mode (Ad-hoc-läge) om du vill
att flera trådlösa datorer ska
kopplas till varandra.
Skriv det trådlösa nätverkets
SSID eller namn i fältet SSID.
SSID:t måste vara identiskt för
alla enheter i nätverket. Klicka
på Next (Nästa).
F Om du valde infrastrukturläget
går du vidare till steg G.
Välj rätt driftskanal för det
trådlösa nätverket, som måste
överensstämma med den
kanal som har ställts in för övriga
enheter i det trådlösa nätverket.
Om du är osäker på vilken kanal
du ska använda behåller du
standardinställningen
Klicka sedan på
Next
Auto
.
(Nästa).
F
G Välj den säkerhetsmetod du vill
använda: WEP, WPA-Personal
(WPA – privat), WPA-Enterprise
(WPA – företag), RADIUS eller
LEAP. Klicka på Next (Nästa).
Om någon säkerhetsmetod
inte används i nätverket väljer
du Disabled (Avaktiverad) och
klickar på Next (Nästa). Gå
sedan vidare till steg I.
G
OBS! WEP står för Wired
Equivalent Privacy. WPA står för
Wi-Fi Protected Access och har
större säkerhet än WEP. RADIUS
står för Remote Authentication
Dial-In User Service och LEAP
står för Lightweight Extensible
Authentication Protocol.
3
Page 60

H Gå vidare till instruktionerna för
din säkerhetsmetod.
1WEP
a Välj 64-bit (64-bitars), 128-bit
(128-bitars) eller 152-bit (152bitars) i listrutan. (152-bitars
kryptering finns bara tillgänglig
för 802.11a-nätverk).
b Ange lösenord i fältet
Passphrase (Lösenord) så
genereras WEP-nyckeln
automatiskt.
Om du vill ange WEP-nyckeln
manuellt lämnar du fältet
Passphrase (Lösenord) tomt
och anger WEP-nyckeln i fältet
WEP Key (WEP-nyckel).
c Klicka på Next (Nästa) och gå
vidare till steg I.
WEP
2 WPA - Personal
a Välj den krypteringsmetod du
vill använda, TKIP eller AES, i
listrutan.
b Ange lösenord eller PSK i fältet
Passphrase (Lösenord).
c Klicka sedan på Next (Nästa)
och gå vidare till steg I.
4
WPA – Personal
Page 61

3 WPA-Enterprise
Välj den autentiseringsmetod du vill
använda, EAP-TLS eller PEAP.
EAP-TLS
a Ange användarnamn i fältet
Login Name (Användarnamn).
b Ange namnet på
autentiseringsservern i fältet
Server Name (Servernamn).
(valfritt)
c I listrutan Certificate
(Certifiering) väljer du
autentiseringscertifikat.
d Välj den krypteringsmetod du
vill använda, TKIP eller AES.
e Klicka på Next (Nästa) och gå
vidare till steg I.
PEAP
WPA - Enterprise
EAP-TLS
a Ange användarnamn i fältet
Login Name (Användarnamn).
b Ange lösenord i fältet Password
(Lösenord).
c Ange namnet på
autentiseringsservern i fältet
Server Name (Servernamn).
(valfritt)
d I listrutan Certificate
(Certifiering) väljer du
autentiseringscertifikat.
e Välj den autentiseringsmetod
som används i PEAP-tunneln:
EAP-MSCHAP v2 eller Generic
Token Card.
WPA - Enterprise
PEAP
5
Page 62

f Välj den krypteringsmetod du
vill använda, TKIP eller AES.
g Klicka på Next (Nästa) och gå
vidare till steg I.
4 RADIUS
Välj den autentiseringsmetod du vill
använda, EAP-TLS eller PEAP.
EAP-TLS
a Ange användarnamn i fältet
Login Name (Användarnamn).
b Ange namnet på
autentiseringsservern i fältet
Server Name (Servernamn).
(valfritt)
c
I listrutan
väljer du autentiseringscertifikat.
Certificate
(Certifiering)
d Klicka på Next (Nästa) och gå
vidare till steg I.
RADIUS
EAP-TLS
PEAP
a Ange användarnamn i fältet
Login Name (Användarnamn).
b Ange lösenord i fältet Password
(Lösenord).
c Ange namnet på
autentiseringsservern i fältet
Server Name (Servernamn).
(valfritt)
d
I listrutan
väljer du autentiseringscertifikat.
Certificate
(Certifiering)
e Välj den autentiseringsmetod
som används i PEAP- tunneln,
EAP-MSCHAP v2 eller Generic
Token Card.
6
RADIUS
PEAP
Page 63

f Klicka på Next (Nästa) och gå
vidare till steg I.
5 LEAP
a Ange användarnamn i fältet
User Name (Användarnamn).
b Ange lösenord i fältet Password
(Lösenord).
c Ange lösenordet en gång till
i fältet Confirm (Bekräfta).
d Klicka på Next (Nästa) och gå
vidare till steg I.
I Du ombeds att kontrollera
inställningara innan filerna
börjar kopieras. Klicka på Next
(Nästa) om du vill spara
inställningarna, eller på Back
(Tillbaka) om du vill ändra dem.
LEAP
I
J Om du använder Windows
2000 kanske du ser en skärm
som visar att ingen digital
signatur hittades.
Programvaran har testats och
fungerar ordentligt med
Windows 2000. Klicka på Ja.
K När programvaran har
installerats visas skärmen
Congratulations (Klart). Klicka
på Exit (Avsluta).
K
J
7
Page 64

Ansluta Wireless A+G Adapter
2
för bärbar dator med dualband
A Stäng av den bärbara datorn
och leta upp en tillgänglig
CardBus-kortplats på den.
B
Skjut in adaptern i
CardBus-kortplatsen med
anslutningsstiftet mot CardBuskortplatsen och etikettsidan
upp tills den sitter fast ordentligt.
C Sätt på den bärbara datorn.
Strömlysdioden tänds när
adaptern har kopplats in på
rätt sätt.
B
D Om du använder Windows
2000 kanske du ser en skärm
som visar att ingen digital
signatur hittades.
Programvaran har testats och
fungerar ordentligt med
Windows 2000. Klicka på Ja.
E
När du har installerat adaptern
visas ikonen Wireless Network
Monitor (övervakare för trådlösa
nätverk) i systemfältet i nedre
högra hörnet på skärmen.
Dubbelklicka på ikonen
om du vill kontrollera
länkinformationen, söka efter
tillgängliga trådlösa nätverk
eller göra ytterligare ändringar
i konfigurationen.
Klart! Installationen av Wireless
A+G Adapter för bärbar dator med
dualband är slutförd.
D
Mer information samt felsökningshjälp finns
i användarhandboken på cd-skivan och
i supportbilagan. Du kan också skicka e-post
till vår supportavdelning.
Webbplats
http://www.linksys.com/international
Linksys är ett registrerat varumärke eller ett
varumärke som tillhör Cisco Systems, Inc. och/
eller dess samarbetspartner i USA och i vissa
andra länder. Copyright © 2005 Cisco Systems,
Inc. Med ensamrätt.
E
8
WPC55AG-SE_V1.2-QIG-50110NC JL
 Loading...