

Page 1
A Division of Cisco Systems, Inc.
®
2
4
,
WMP54GS (EU/UK/LA)
GHz
802.11g
Wireless-G
PCI Adapter with SpeedBooster
Wireless
Model No.
Quick Installation for Windows 98SE, Me, & 2000
WMP54GS (EU/UK/LA)
Package Contents
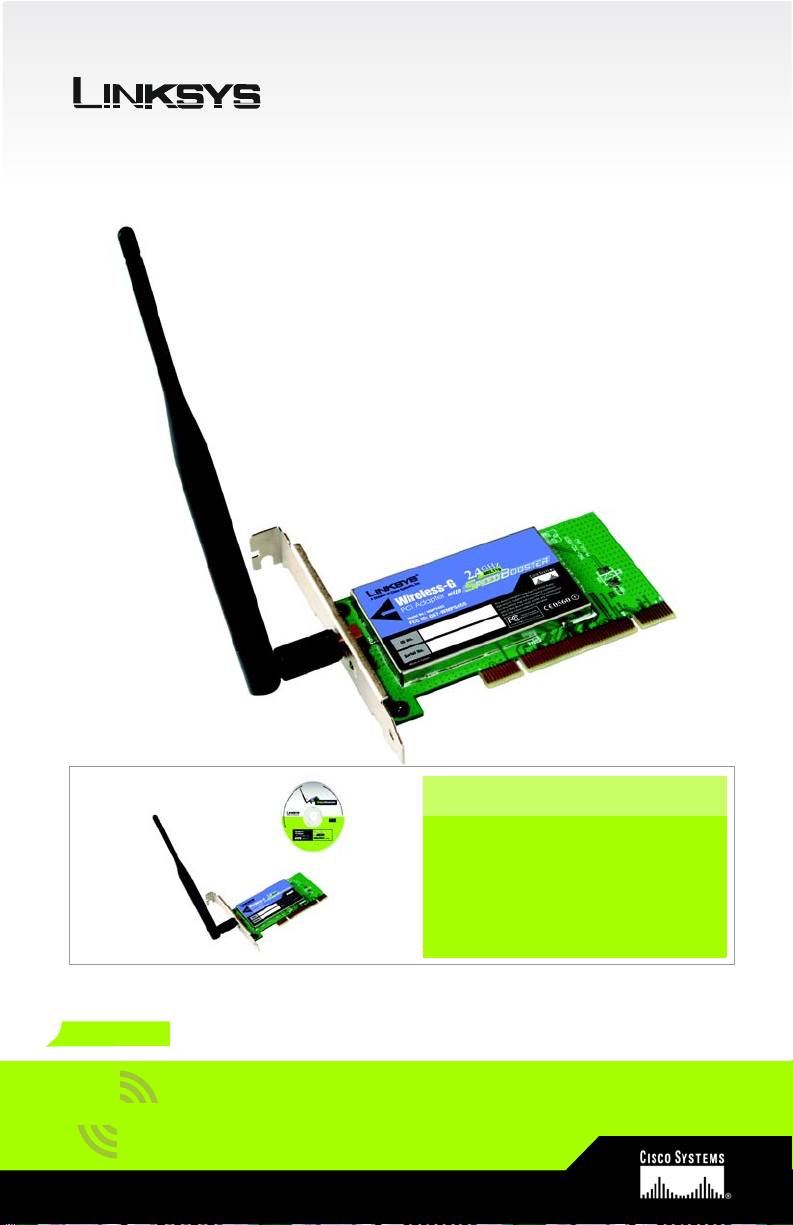
• Wireless-G PCI Adapter with SpeedBooster
• External Antenna
• Setup Wizard CD-ROM
• User Guide on CD-ROM
• Quick Installation
1
Page 2
1
The Setup Wizard will guide you
through the installation procedure
for Windows 98SE, Millennium, or
2000. The Setup Wizard will install the
Wireless Network Monitor and driver,
as well as configure the Adapter.
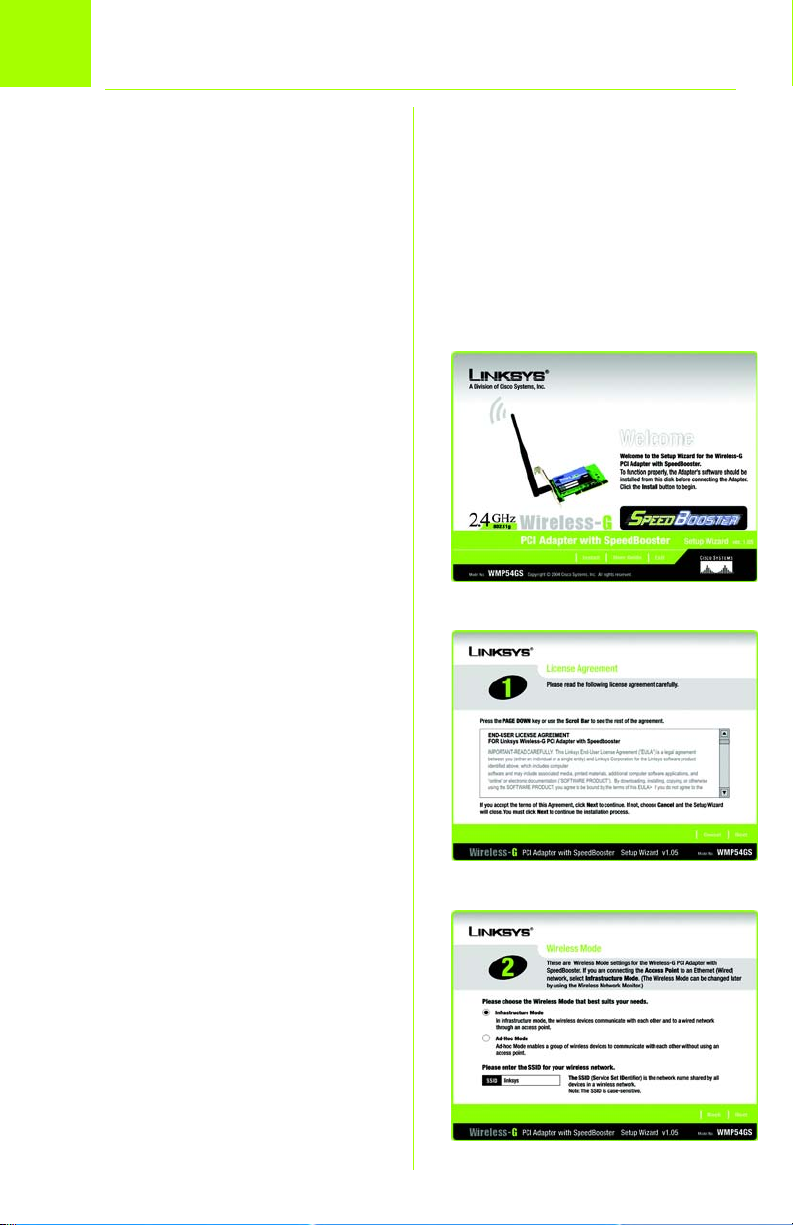
Install the Adapter’s Software
A Insert the Setup Wizard CD-
ROM into your CD-ROM drive.
The Setup Wizard should run
automatically, and the
Welcome screen should
appear. If it does not, click the
Start button and choose Run.
In the field that appears, enter
D:\setup.exe (if “D” is the letter
of your CD-ROM drive).
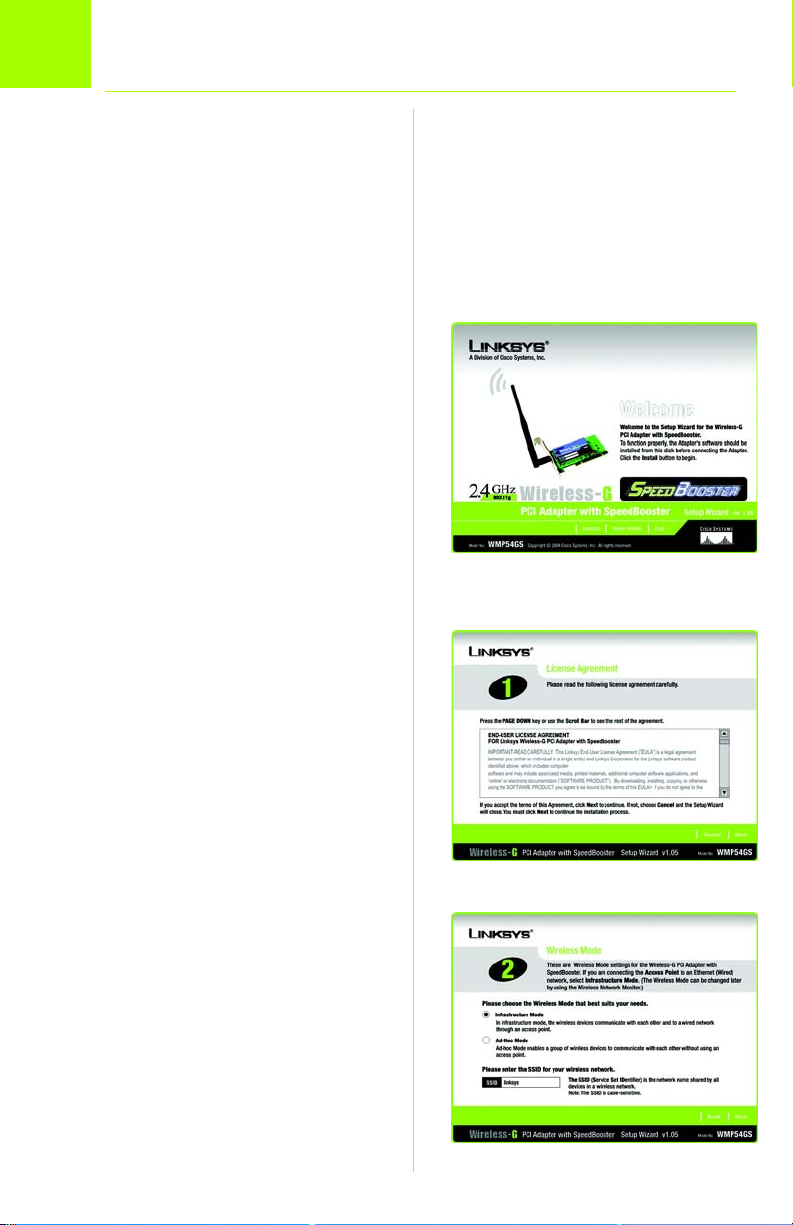
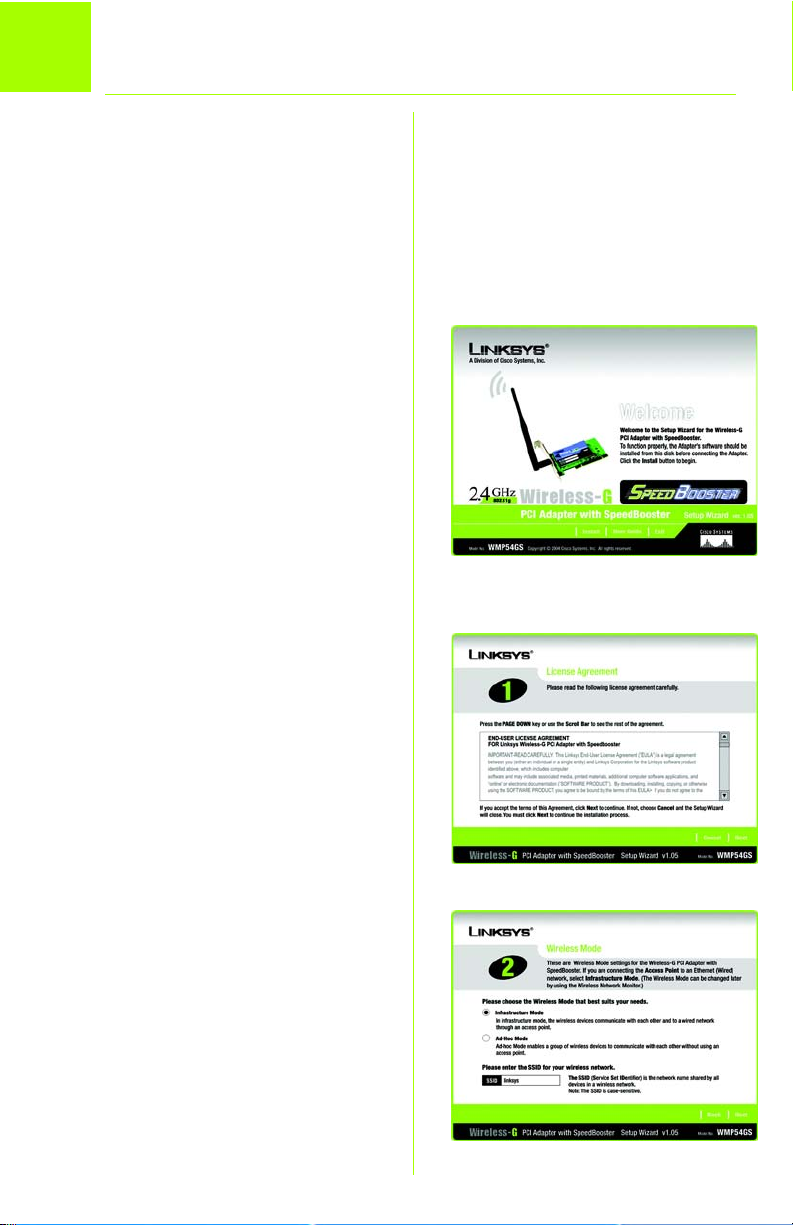
B To install the Adapter, click
Install on the Welcome
screen.
A
C Read the License Agreement,
and click Next to continue the
installation. If you click Cancel,
you will end the installation.
D The Wireless Mode screen will
appear. Click the
Infrastructure Mode radio
button if you want your wireless
computers to communicate
with your wired network using a
wireless access point. Click the
Ad-Hoc Mode radio button if
you want multiple wireless
computers to network directly
with each other.
2
C
D
Page 3
In the SSID field, enter the SSID
of your wireless network. The
SSID is the network name and
must be identical for all
devices in the network. The
default setting is linksys (all
lowercase).
Then click Next.
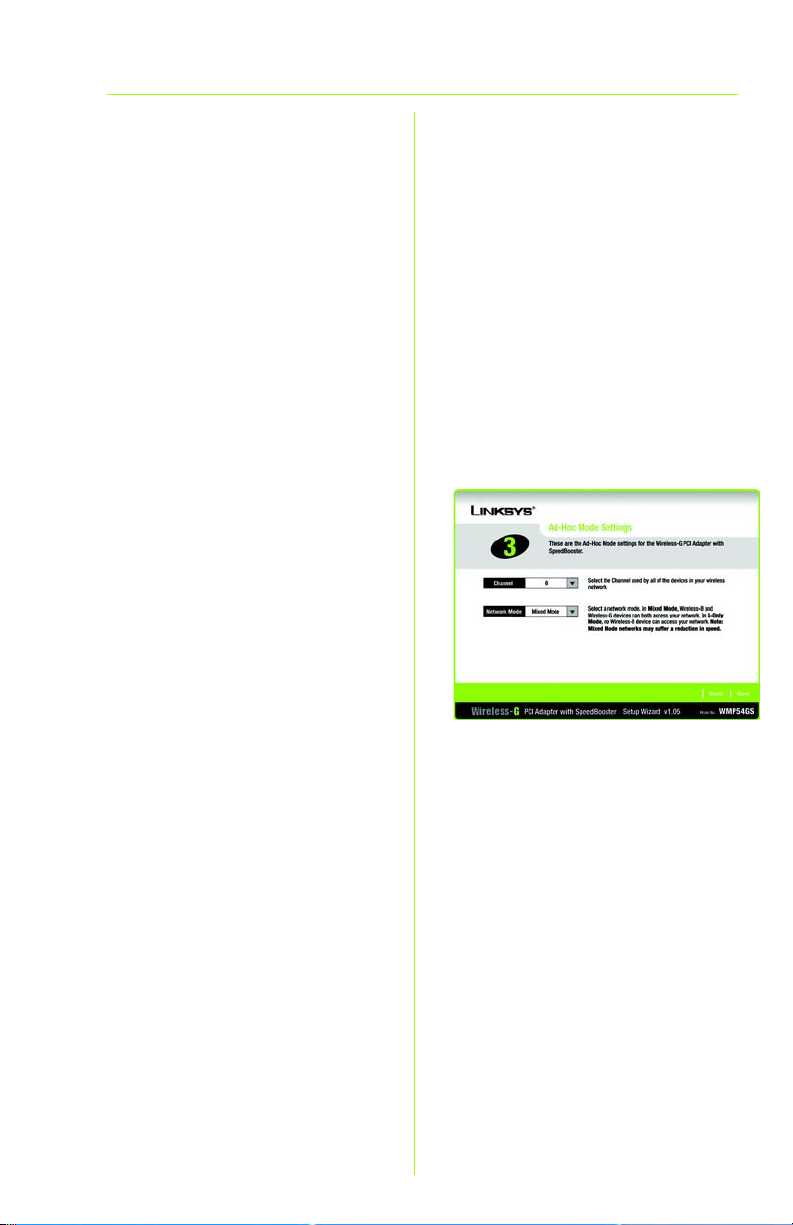
E If you chose Infrastructure
Mode, go to Step F now.
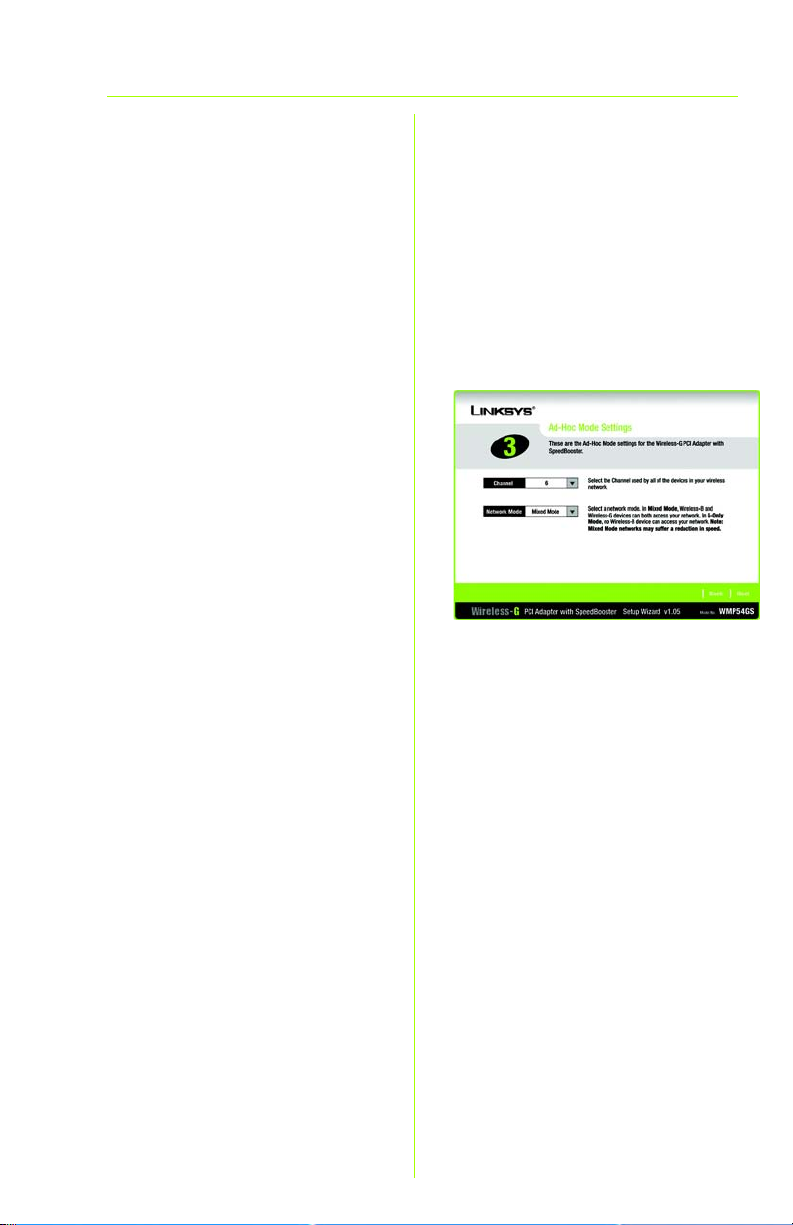
If you chose Ad-Hoc Mode,
select the correct operating
channel for your network from
the Channel drop-down menu.
The channel you choose
should match the channel set
on the other devices in your
wireless network.
Select the Network Mode from
the drop-down menu. Keep
the default setting, Mixed
Mode, if you have Wireless-G
and Wireless-B devices in your
network. Select G-Only Mode if
you have only Wireless-G
devices in your network.
Then click Next.
E
3
Page 4

F The Wireless Security screen
allows you to set the security
level for your network. If your
network has WEP encryption
disabled, keep the default,
Disabled, and proceed to
Step G.
If your network has WEP
encryption enabled, then
select the level of WEP
encryption, 64-bit or 128-bit.
Enter a Passphrase, and the
WEP key will be automatically
generated.
If you want to manually enter
the WEP key, leave the
Passphrase field blank and
enter the WEP key in the WEP
Key field.
From the TX Key drop-down
menu, select the transmit key
used by your network. If you
are not using multiple WEP
keys, keep the default, 1.
F
From the Authentication dropdown menu, select the
authentication method used
by your network. If you are not
sure which method to select,
keep the default, Auto.
Then click Next.
4
Page 5
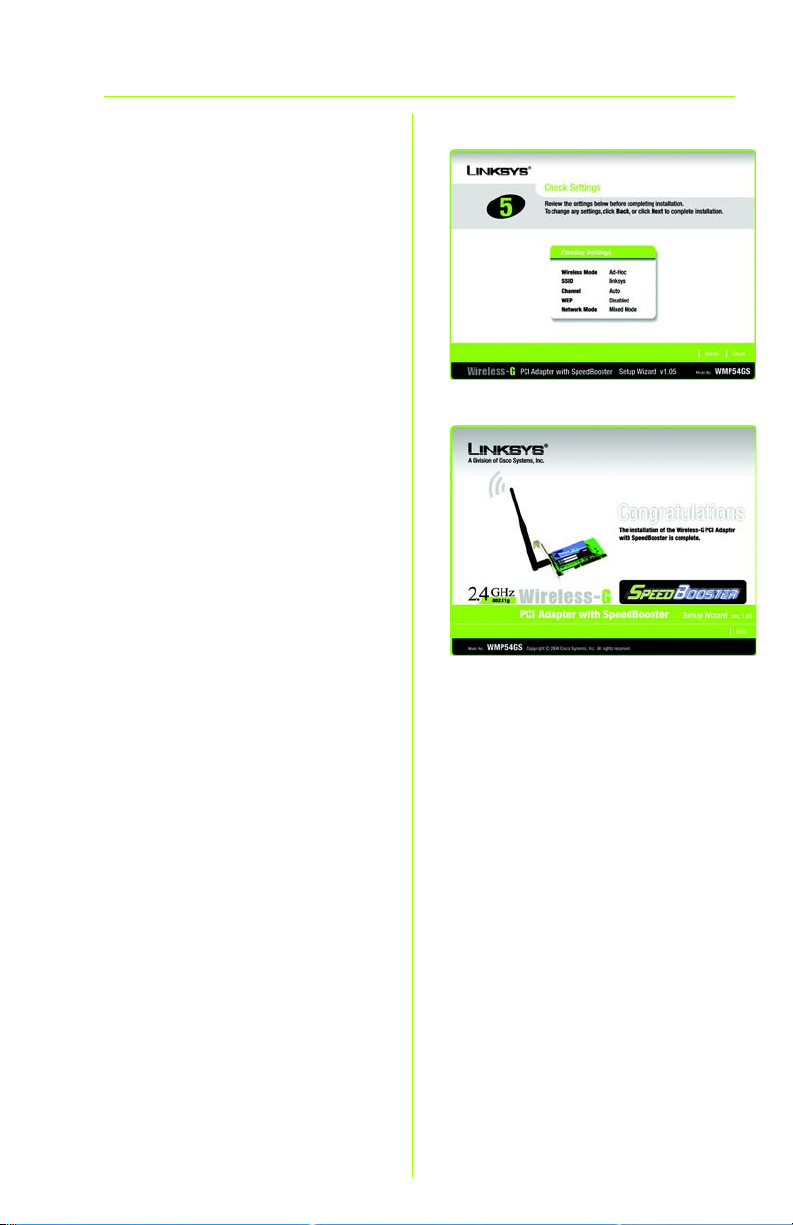
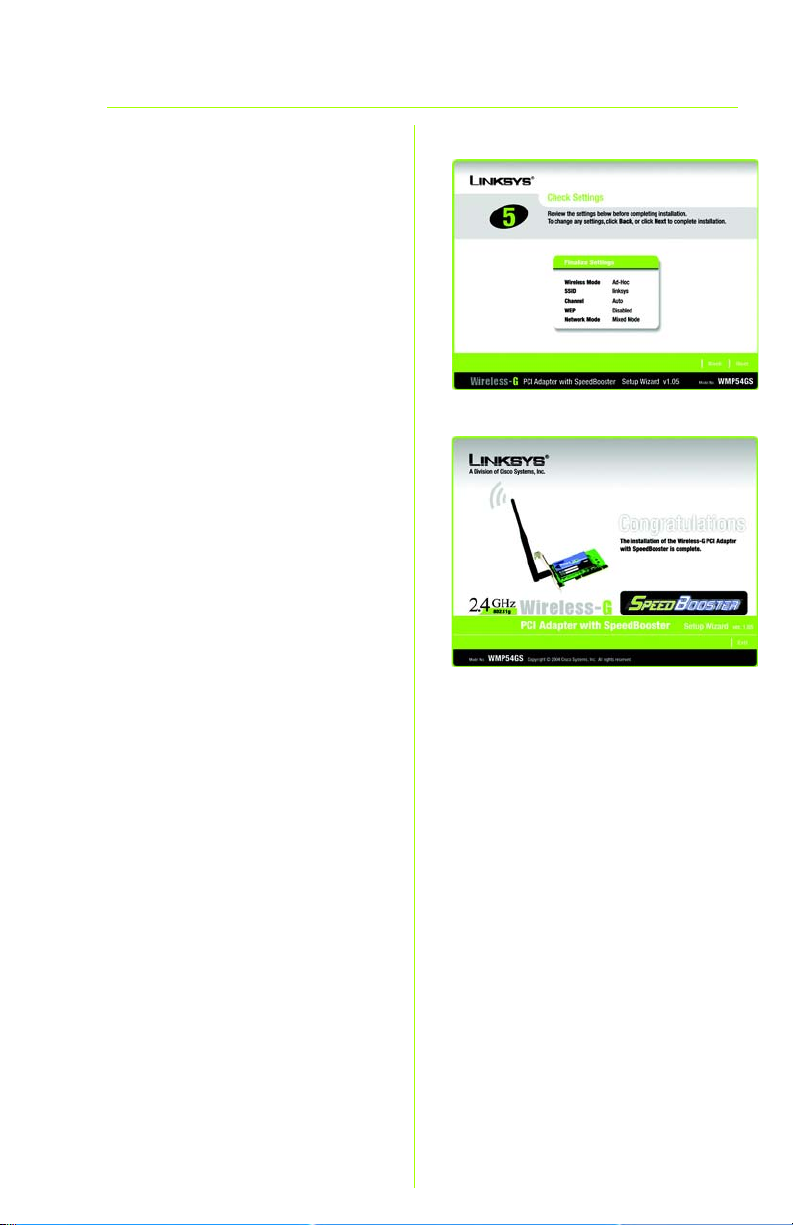
G The Setup Wizard will ask you to
review your settings before it
starts to copy files. Click Next to
save these settings, or click
Back to change any settings.
H After the files have been
successfully copied, the
Congratulations screen will
appear. Click Exit.
G
H
5
Page 6
2
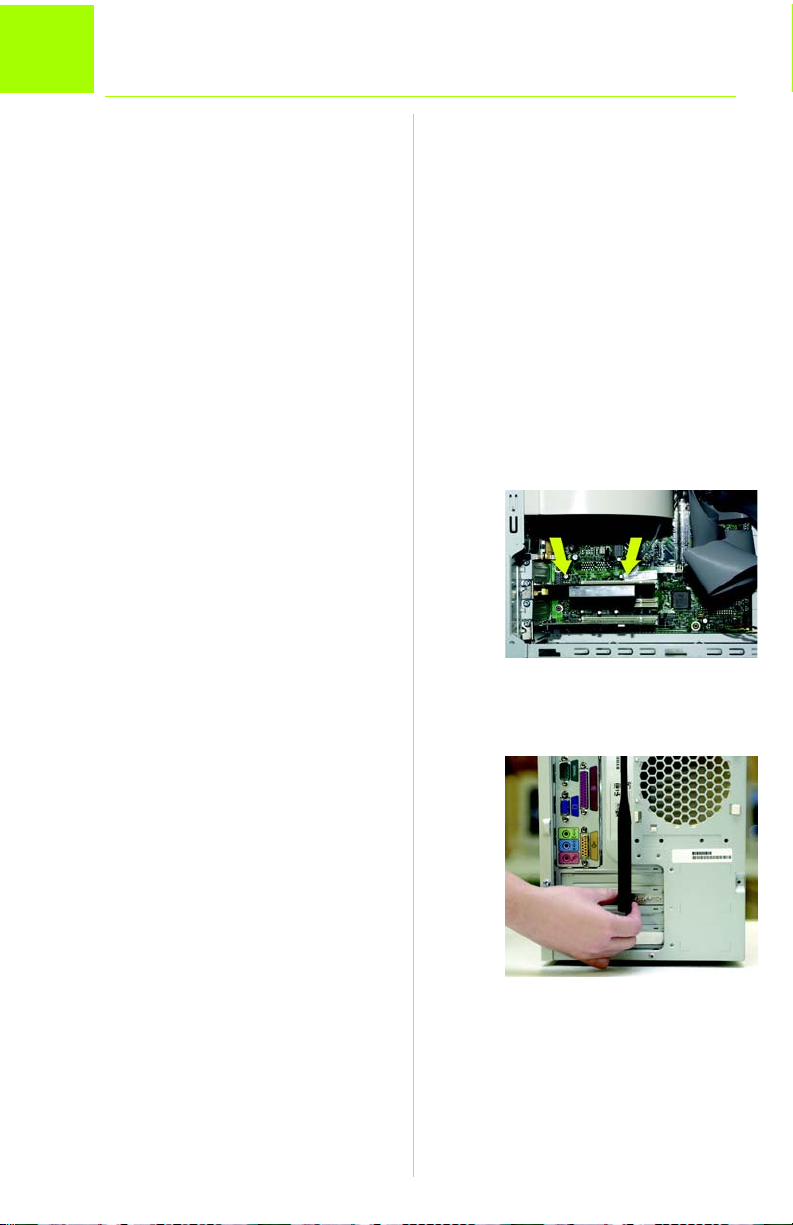
Install the Adapter
A Power off your desktop PC.
B Open your PC case, and
locate an available PCI slot on
the motherboard. Check with
your computer manufacturer
for instructions.
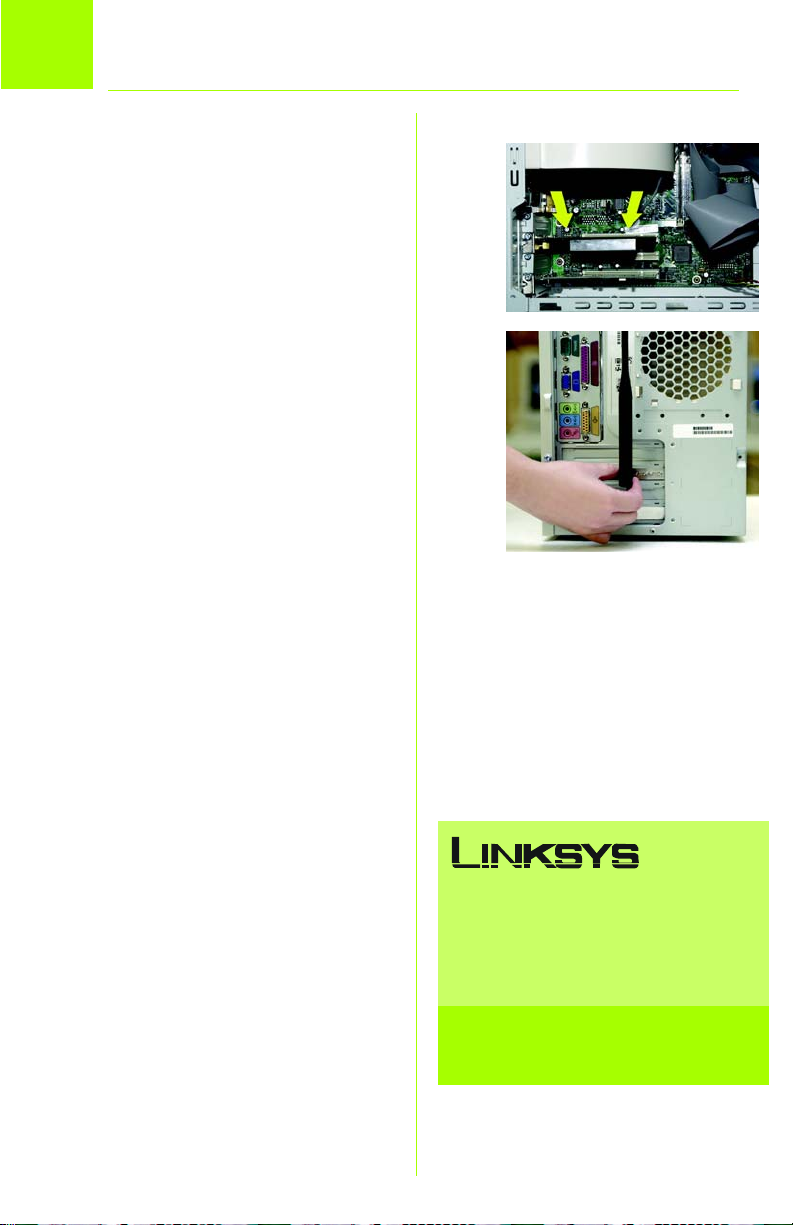
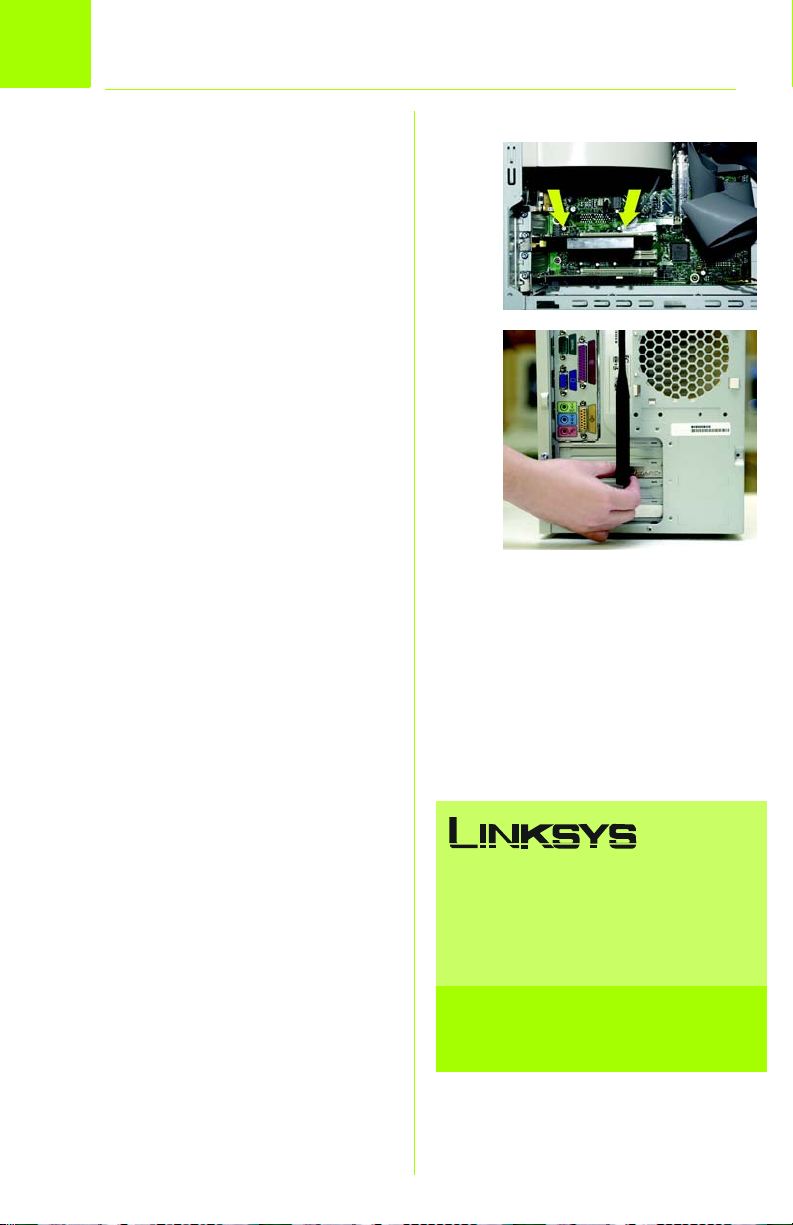
C Slide the Adapter into the PCI
slot. Make sure that all of its
pins are touching the slot’s
contacts. You may have to
apply a bit of pressure to slide
the Adapter all the way in.
C
D After the Adapter is set firmly in
place, secure its fastening tab
to your PC’s chassis with a
mounting screw. Then close
your PC case.
E Attach the external antenna to
the Adapter’s antenna port.
F Power on your desktop PC.
NOTE: A screen stating that a
digital signature was not
found may appear. The
Adapter has been
tested and found to
work properly with
Windows 2000.
Click Yes.
Congratulations! The installation of
the Wireless-G PCI Adapter with
SpeedBooster is complete.
6
E
®
A Division of Cisco Systems, Inc.
For additional information or troubleshooting
help, refer to the User Guide on the CD-ROM
or the T echnical Support Insert. You can also
e-mail for further support.
Website
http://www.linksys.com/international
Linksys is a registered trademark or trademark of
Cisco Systems, Inc. and/or its affiliates in the U.S.
and certain other countries. Copyright © 2004
Cisco Systems, Inc. All rights reserved.
WMP54GS-QIG_98SE_Me_2000-uk/eu/la-40517NC KL
Page 7

A Division of Cisco Systems, Inc.
®
2
4
,
WMP54GS (EU/UK/LA)
GHz
802.11g
Wireless-G
PCI Adapter with SpeedBooster
Wireless
Model No.
WMP54GS (EU/UK/LA)
Package Contents
• Wireless-G PCI Adapter with SpeedBooster
• External Antenna
• Setup Wizard CD-ROM
• User Guide on CD-ROM
• Quick Installation
Quick Installation for Windows XP
1
Page 8
1
Install the Adapter
To install the Adapter in a PC running
Windows XP, physically install the
Adapter first. Then install and
configure the Adapter’s driver.
A Power off your desktop PC.
B Open your PC case, and
locate an available PCI slot on
the motherboard. Check with
your computer manufacturer
for instructions.
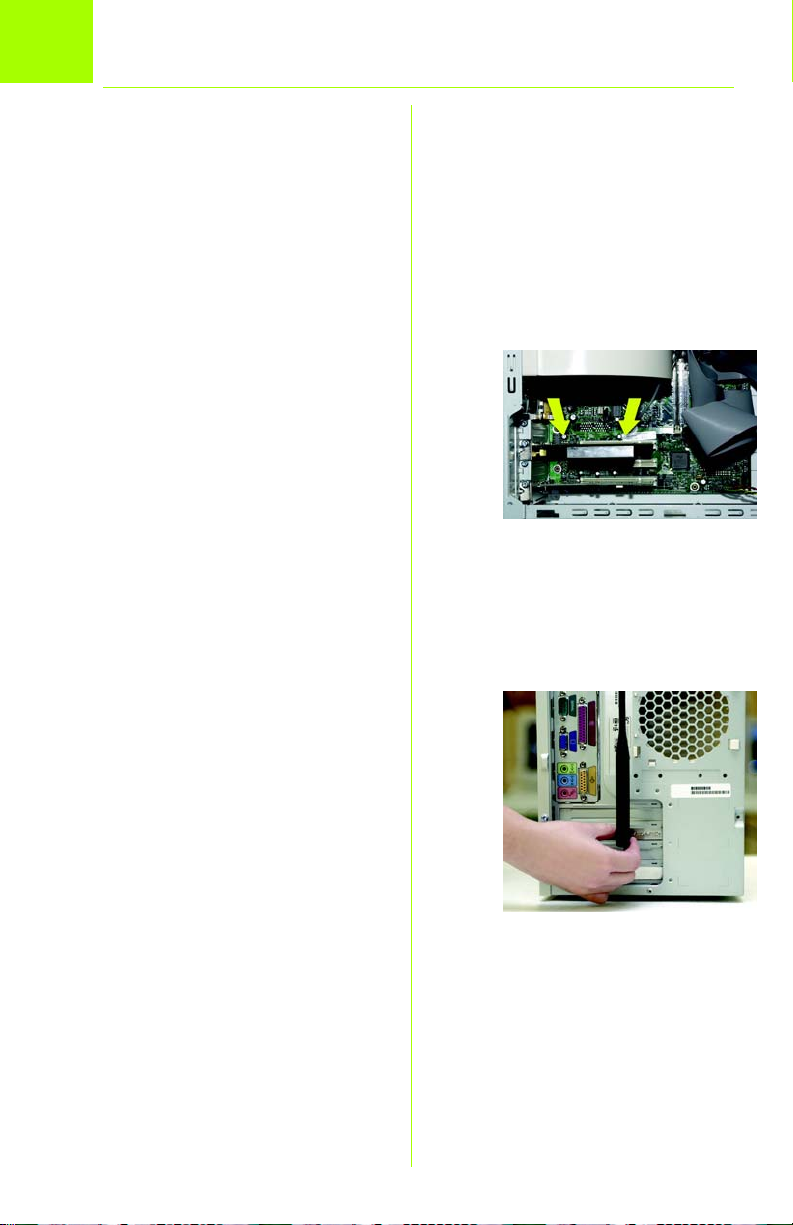
C Slide the Adapter into the PCI
slot. Make sure that all of its
pins are touching the slot’s
contacts. You may have to
apply a bit of pressure to slide
the Adapter all the way in.
C
D After the Adapter is set firmly in
place, secure its fastening tab
to your PC’s chassis with a
mounting screw. Then close
your PC case.
E Attach the external antenna to
the Adapter’s antenna port.
F Power on your desktop PC.
2
E
Page 9
2
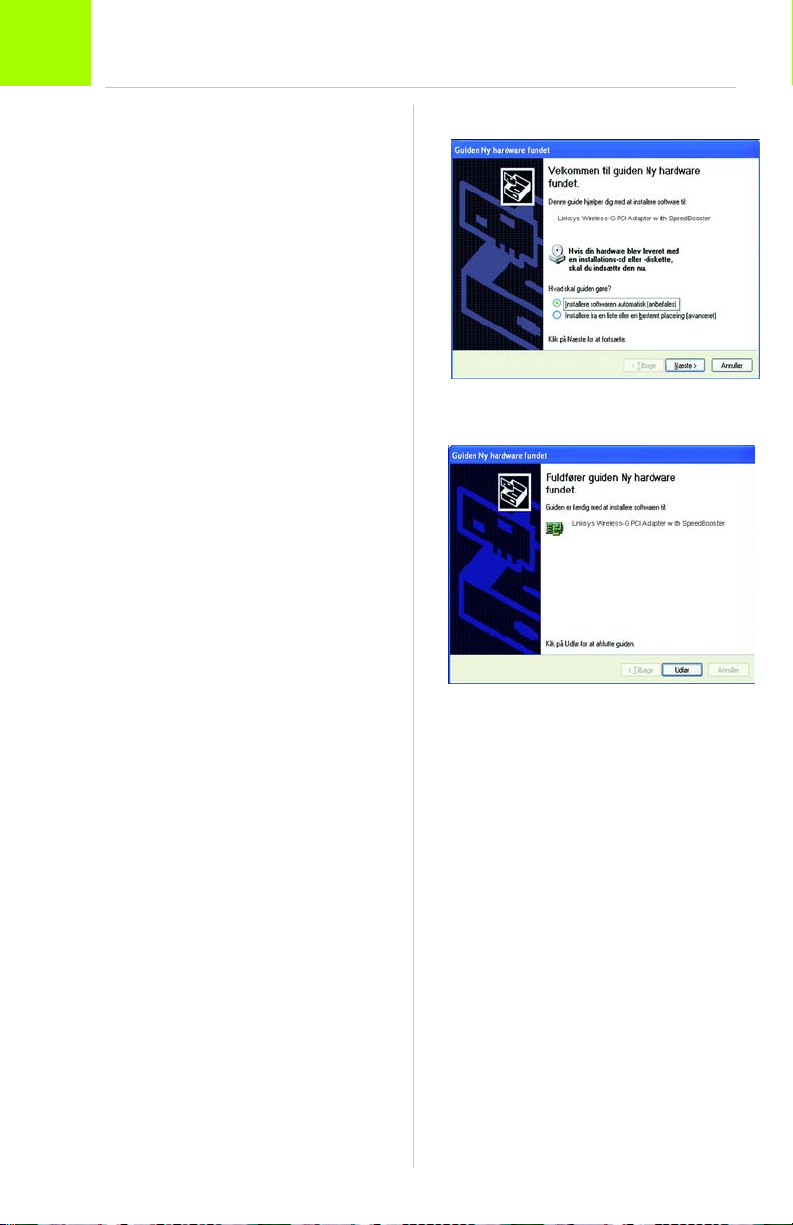
Install the Adapter’s Driver
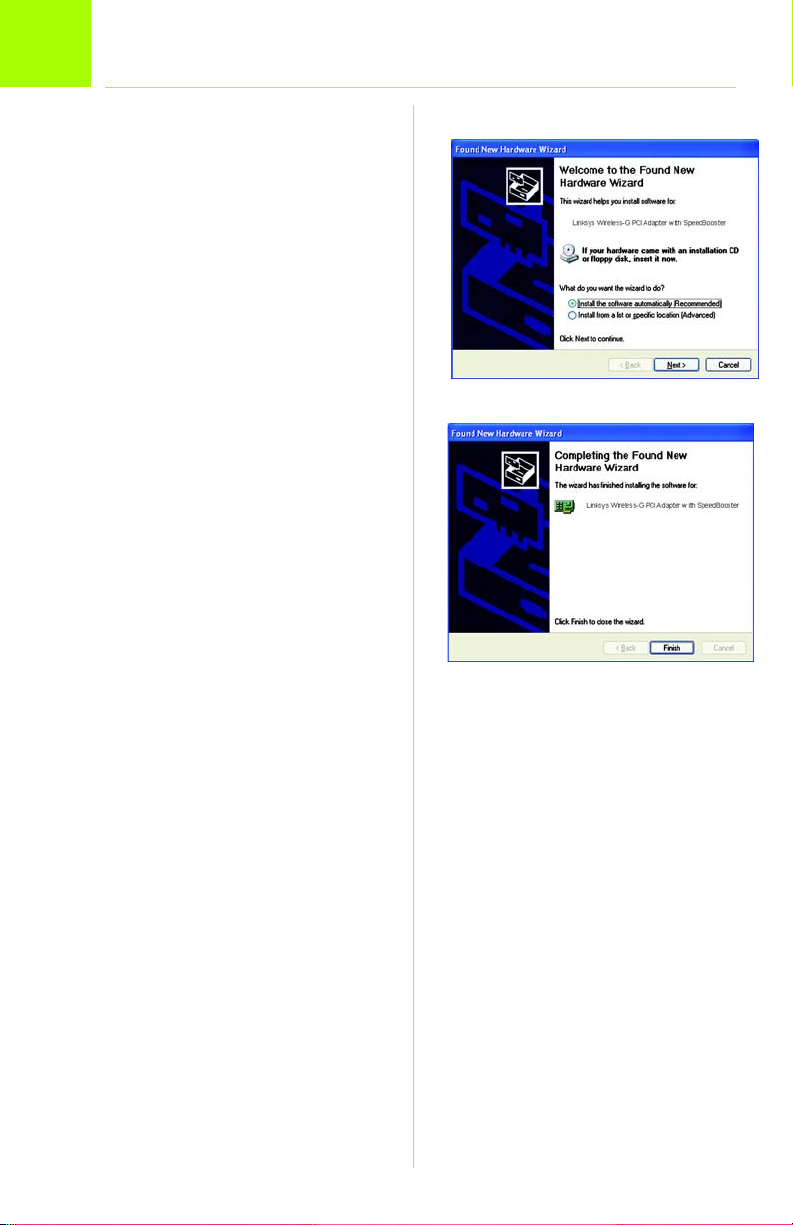
A Windows XP will automatically
detect the Adapter. Insert the
Setup Wizard CD-ROM into the
CD-ROM drive. Click the radio
button next to Install the
software automatically
(Recommended). Then click
Next.
B After Windows has finished
installing the driver, click Finish.
A
B
3
Page 10
3
Configure the Adapter
A After installing the Adapter, the
Windows XP Wireless Zero
Configuration icon will appear
in your computer’s system tray.
Double-click the icon.
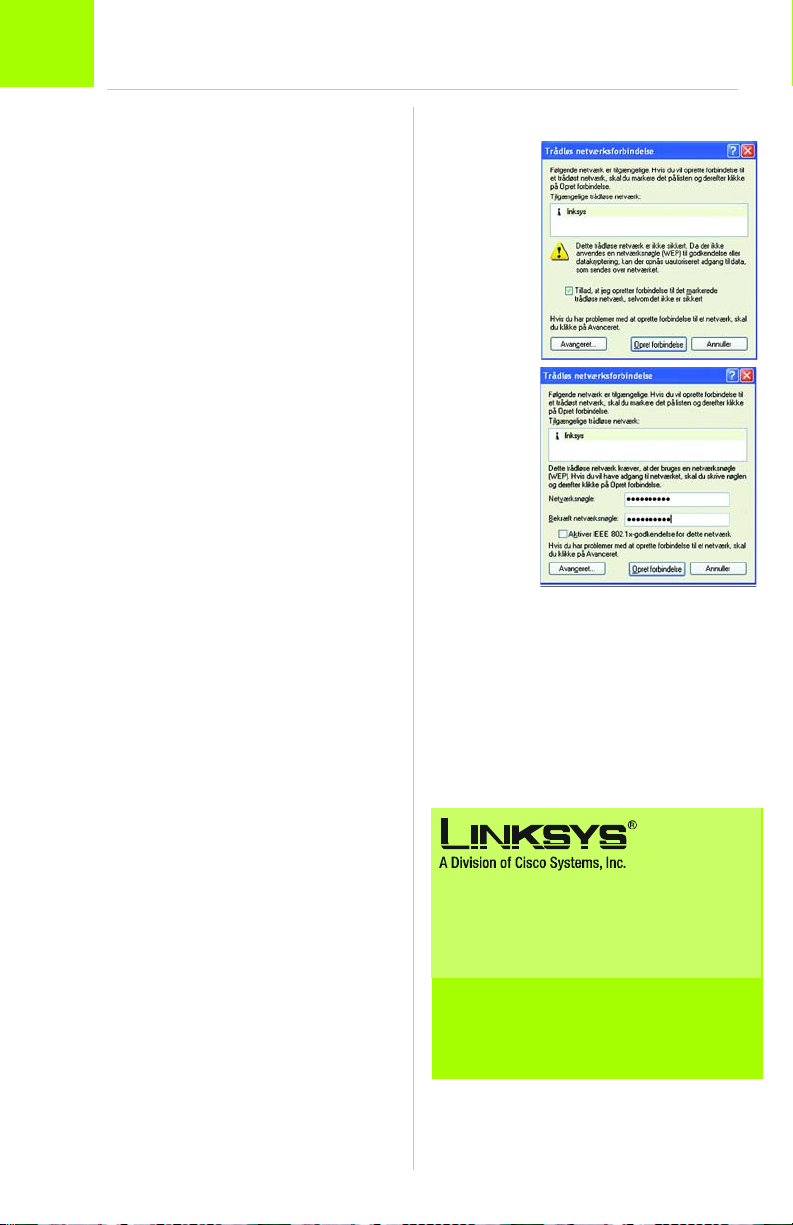
B The screen that appears will
show any available wireless
network. Select the network you
want.
If this network has WEP
encryption enabled, go to
Step C.
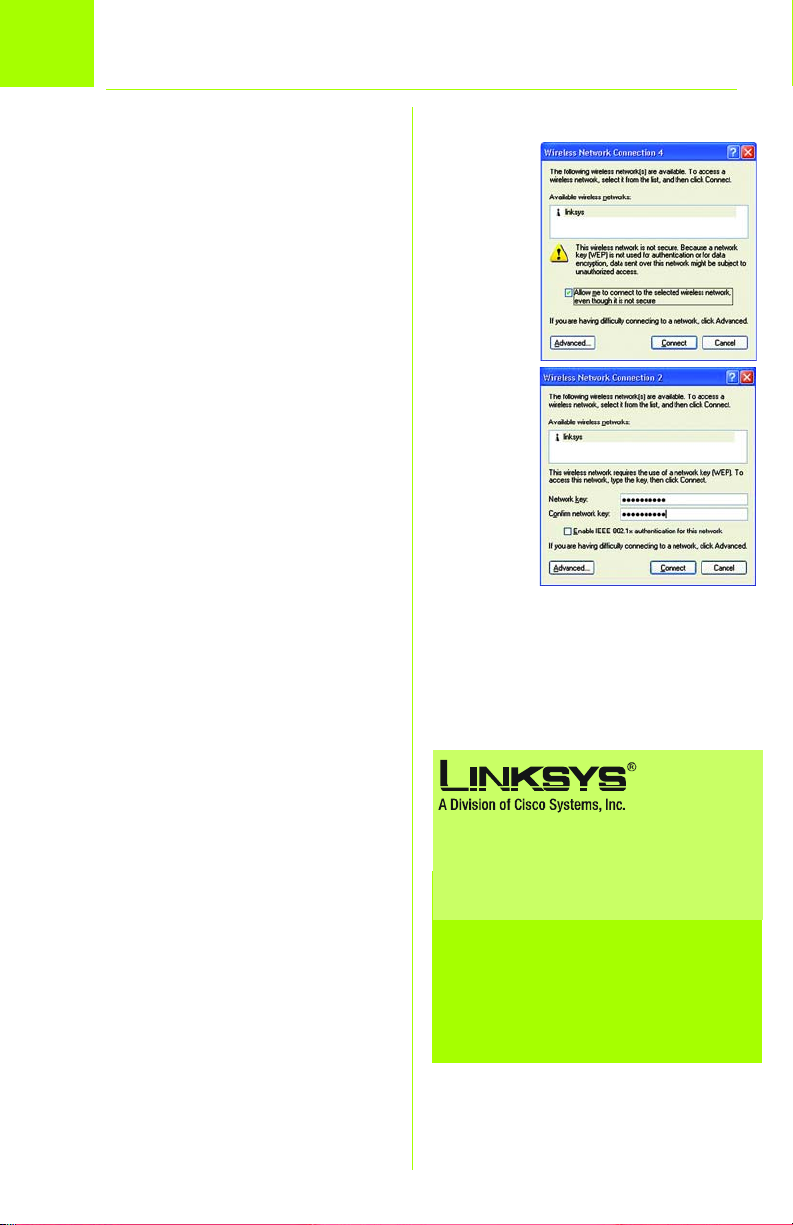
If this network does not have
WEP encryption enabled, the
screen shown in Figure B will
appear. Make sure the box
next to Allow me to connect to
the selected wireless network,
even though it is not secure is
checked. Then click Connect,
and go to Step D.
B
C
C The screen shown in Figure C
will appear. Enter the WEP key
of your wireless network in the
Network key field, and re-enter
it in the Confirm network key
field. Then click Connect.
D The Wireless Zero Configuration
icon in your system tray will
notify you if your connection is
active.
Congratulations! The installation of
the Wireless-G PCI Adapter with
SpeedBooster is complete.
4
For additional information or troubleshooting
help, refer to the User Guide on the CD-ROM
or the Technical Support Insert. You can also
e-mail for further support.
Website
http://www.linksys.com/international
Linksys is a registered trademark or tr ademark of
Cisco Systems, Inc. and/or its affiliates in the U.S.
and certain other countries. Copyright © 2004
Cisco Systems, Inc. All rights reserved.
WMP54GS-QIG_XP-uk/eu/la-40517NC KL
Page 11

A Division of Cisco Systems, Inc.
®
2
4
,
GHz
802.11g
Wireless
Modelnr.
Pakkens indhold
• Trådløs-G PCI-adapter med SpeedBooster
• Ekstern antenne
• Cd-rom med guidet konfiguration
• Brugervejledning på cd-rom
• Installationsvejledning
Trådløs-G
PCI-adapter med SpeedBooster
Installationsvejledning til Windows 98SE, Me og 2000
WMP54GS (DK)
1
Page 12
1
Den guidede konfiguration fører dig
igennem installationen i Windows 98SE,
Millennium eller 2000. Den guidede
konfiguration installerer desuden
overvågningsprogrammet til trådløse
netværk og driveren og konfigurerer
adapteren.
Installation af softwaren til adapteren
A Placer cd-rom'en med den
guidede konfiguration i cd-romdrevet. Den guidede konfiguration
køres automatisk, og skærmbilledet
Welcome (Velkommen) vises. Hvis
det ikke er tilfældet, skal du klikke på
knappen Start og vælge Run (Kør).
Indtast D:\setup.exe i det felt, der
vises (hvis "D" er bogstavet for cdrom-drevet).
B Installer adapteren ved at klikke på
Install (Installer) i skærmbilledet
Welcome (Velkommen).
A
C Læs licensaftalen, og klik på
Next (Næste) for at fortsætte
installationen. Hvis du klikker på
Cancel (Annuller), afslutter du
installationen.
D Skærmbilledet Wireless Mode
(Trådløs tilstand) vises. Klik på
alternativknappen Infrastructure
Mode (Infrastrukturtilstand), hvis
dine trådløse computere skal
kommunikere med det
kabelbaserede netværk ved
hjælp af et trådløst access point.
Klik på alternativknappen Ad-Hoc
Mode (Ad-hoc-tilstand), hvis flere
trådløse computere skal oprette
netværksforbindelse direkte til
hinanden.
2
C
D
Page 13

Indtast SSID'et for det trådløse
netværk i feltet SSID. SSID'et er
netværkets navn og skal være
identisk for alle enheder i det
trådløse netværk.
Standardindstillingen er linksys
(små bogstaver).
Klik derefter på Next (Næste).
E Hvis du vælger Infrastructure
Mode (Infrastrukturtilstand), skal du
gå til trin F nu.
Hvis du vælger Ad-Hoc Mode (Adhoc-tilstand), skal du vælge den
korrekte kanal til netværket i
rullemenuen Channel (Kanal).
Den valgte kanal skal passe til den
kanal, der er indstillet på de andre
enheder i det trådløse netværk.
Vælg netværkstilstanden i
rullemenuen. Behold
standardindstillingen Mixed Mode
(Blandet tilstand), hvis du har
trådløs-G- og trådløs-B-enheder i
dit netværk. Vælg G-Only Mode
(Kun-G-tilstand), hvis du
udelukkende har trådløs-Genheder i dit netværk.
E
Klik derefter på Next (Næste).
3
Page 14

F
Du kan indstille sikkerhedsniveauet
for netværket i skærmbilledet
Wireless Security (Trådløs
sikkerhed). Hvis WEP-kryptering er
deaktiveret i netværket, skal du
beholde standarden Disabled
(Deaktiveret) og fortsætte til trin G.
Hvis WEP-kryptering er aktiveret i
netværket, skal du vælge et
WEP-krypteringsniveau: 64-bit
eller 128-bit. Indtast et
adgangsord, og WEP-nøglen
bliver genereret automatisk.
Hvis du vil indtaste WEP-nøglen
manuelt, skal du undlade at
udfylde feltet Passphrase
(Adgangsord) og indtaste WEPnøglen i feltet WEP Key (WEP-nøgle).
Vælg den transmissionsnøgle, der
bruges i dit netværk i rullemenuen
TX Key (TX-nøgle). Hvis du ikke
bruger flere WEP-nøgler, skal du
beholde standarden: 1.
F
Vælg den godkendelsesmetode,
der bruges i dit netværk, i
rullemenuen Authentication
(Godkendelse). Hvis du ikke er
sikker på, hvilken metode du skal
vælge, skal du beholde
standarden: Auto (Automatisk).
Klik derefter på Next (Næste).
4
Page 15
G Den guidede konfiguration giver
dig mulighed for at gennemse
dine indstillinger, før filerne
kopieres. Klik på Next (Næste) for
at gemme disse indstillinger, eller
klik på Back (Tilbage) for at ændre
indstillingerne.
H Når alle filer er kopieret korrekt,
vises skærmbilledet
Congratulations (Tillykke). Klik på
Exit (Afslut).
G
H
5
Page 16
2
Installation af adapteren
A Sluk computeren.
B Åbn pc'ens kabinet, og find et
tilgængeligt PCI-stik på
bundkortet. Henvend dig til din
computerleverandør for at få
yderligere vejledning.
C Skub adapteren ind i PCI-stikket.
Kontroller, at alle stikbenene
berører kontaktpunkterne i stikket.
Det kan være nødvendigt at trykke
temmelig hårdt for at skubbe
adapteren helt ind i stikket.
D Når du har placeret adapteren
korrekt, skal du skrue den fast på
pc'ens chassis ved hjælp af
fastgørelsesbøjlen. Luk derefter
pc'ens kabinet.
C
E
E Tilslut den eksterne antenne i
adapterens antennestik.
F Tænd pc'en.
BEMÆRK: Der vises måske et
skærmbillede med
oplysninger om, at
den digitale signatur
ikke blev fundet.
Adapteren er blevet
testet, og den
fungerer korrekt
sammen med
Windows 2000.
Klik på Yes (Ja).
Tillykke! Installationen af Trådløs-G
PCI-adapteren med SpeedBooster
er færdig.
6
®
A Division of Cisco Systems, Inc.
Yderligere oplysninger eller hjælp til
fejlfinding finder du i brugervejledningen på
cd-rom'en eller ved at kontakte Teknisk
support (se arket om teknisk support).
Websted
http://www.linksys.com/international
Linksys er et registreret varemærke tilhørende
Cisco Systems, Inc. og/eller Cisco Systems
associerede selskaber i USA og viss e andre lande .
Copyright © 2004 Cisco Systems, Inc. Alle
rettigheder forbeholdes.
WMP54GS-QIG_98SE_Me_2000-dk-40517NC KL
Page 17
A Division of Cisco Systems, Inc.
®
2
4
,
GHz
802.11g
Wireless
Modelnr.
Pakkens indhold
• Trådløs-G PCI-adapter med SpeedBooster
• Ekstern antenne
• Cd-rom med guidet konfiguration
• Brugervejledning på cd-rom
• Installationsvejledning
Trådløs-G
PCI-adapter med SpeedBooster
Installationsvejledning til Windows XP
WMP54GS (DK)
1
Page 18
1
Hvis du vil installere adapteren på en
pc, der kører Windows XP, skal du først
foretage den fysiske installation af
adapteren. Derefter skal du installere og
konfigurere adapterens driver.
Installation af adapteren
A Sluk computeren.
B Åbn pc'ens kabinet, og find et
tilgængeligt PCI-stik på
bundkortet. Henvend dig til din
computerleverandør for at få
yderligere vejledning.
C Skub adapteren ind i PCI-stikket.
Kontroller, at alle stikbenene
berører kontaktpunkterne i
stikket. Det kan være
nødvendigt at trykke temmelig
hårdt for at skubbe adapteren
helt ind i stikket.
D Når du har placeret adapteren
korrekt, skal du skrue den fast på
pc'ens chassis ved hjælp af
fastgørelsesbøjlen. Luk derefter
pc'ens kabinet.
E Tilslut den eksterne antenne i
adapterens antennestik.
F Tænd pc'en.
2
C
E
Page 19
2
Installation af driveren til adapteren
A Windows XP finder automatisk
adapteren. Placer cd-rom'en
med den guidede konfiguration i
cd-rom-drevet. Klik på
alternativknappen ud for
Installere softwaren automatisk
(anbefales). Klik derefter på
Næste.
B Klik på Udfør, når Windows er
færdig med at installere driveren.
A
B
3
Page 20
3
Konfiguration af adapteren
A Når du har installeret adapteren,
vises ikonet for Windows XP Wireless
Zero Configuration (Automatisk
konfiguration af trådløse enheder)
på computerens proceslinje.
Dobbeltklik på ikonet.
B I det skærmbillede, der vises,
kan du se alle tilgængelige
trådløse netværk. Vælg det
ønskede netværk.
Hvis dette netværk har WEP-kryptering
aktiveret, skal du gå til trin C.
Hvis dette netværk ikke har WEPkryptering aktiveret, vises
skærmbilledet i figur B. Kontroller, at
feltet Tillad, at jeg opretter
forbindelse til det markerede
trådløse netværk, selvom det ikke
er sikkert er markeret. Klik derefter
på Opret forbindelse, og gå til trin
D.
B
C
C Skærmbilledet i figur C vises.
Indtast WEP-nøglen for dit trådløse
netværk i feltet Netværksnøgle,
og indtast det igen i feltet Bekræft
netværksnøgle. Klik derefter på
Opret forbindelse.
D Ikonet for Windows XP Wireless Zero
Configuration (Automatisk
konfiguration af trådløse enheder) på
computerens proceslinje fortæller
dig, om din forbindelse er aktiv.
Tillykke! Installationen af Trådløs-G PCI-
adapteren med SpeedBooster er færdig.
4
Yderligere oplysninger eller hjælp til
fejlfinding finder du i brugervejledningen på
cd-rom'en eller ved at kontakte Teknisk
support (se arket om teknisk support).
Websted
http://www.linksys.com/international
Linksys er et registreret varemærke tilhør ende Cisco
Systems, Inc. og/eller Cisco Systems associerede
selskaber i USA og visse andre lande. Copyright ©
2004 Cisco Systems, Inc. Alle rettigheder forbeholdes.
WMP54GS-QIG_XP-DK-40517NC KL
Page 21

A Division of Cisco Systems, Inc.
®
2
4
,
GHz
802.11g
Sans fil
Modèle réf.
Contenu de l'emballage
• Carte PCI sans fil G avec SpeedBooster
• Antenne externe
• CD-ROM de l'Assistant de configuration
• Guide de l'utilisateur sur CD-ROM
• Guide d'installation rapide
Sans fil G
Carte PCI avec SpeedBooster
Guide d'installation rapide pour Windows 98SE,
Me et 2000
WMP54GS (FR)
1
Page 22
1
L'Assistant de configuration de la
Installation du logiciel de la carte PCI
carte PCI sans fil vous guidera tout au
long de la procédure d'installation
pour Windows 98SE, Millennium ou
2000. L'Assistant de configuration
installera la fonction de contrôle du
réseau sans fil ainsi que le pilote de
périphérique et configurera la carte.
A Insérez le CD-ROM Assistant de
configuration dans le lecteur
de CD-ROM. L'Assistant de
configuration s'exécute
automatiquement et l'écran
Welcome (Bienvenue) s'affiche.
Si ce n'est pas le cas, cliquez
sur le bouton Démarrer, puis sur
Exécuter. Dans le champ qui
apparaît, entrez D:\setup.exe
(« D » représentant votre lecteur
de CD-ROM).
B Pour installer la carte, cliquez sur
le bouton Install (Installer) de
l'écran Welcome (Bienvenue).
A
C Lisez l'accord de licence, puis
cliquez sur Next (Suivant) pour
continuer l'installation. Si vous
cliquez sur Cancel (Annuler),
l'installation est interrompue.
D L'écran Wireless Mode (Mode
sans fil) s'affiche. Cliquez sur le
bouton Infrastructure Mode
(Mode d'infrastructure) si vous
souhaitez que vos ordinateurs
sans fil communiquent avec
votre réseau sans fil via un
point d'accès sans fil. Cliquez
sur le bouton Ad-Hoc Mode
(Ad hoc) si vous voulez que
plusieurs ordinateurs sans fil
puissent communiquer
directement entre eux.
C
D
2
Page 23
Dans le champ SSID, entrez le
SSID de votre réseau sans fil.
Le SSID est le nom de réseau.
Il doit être identique pour tous
les périphériques du réseau.
Le paramètre par défaut est
linksys (minuscules).
Cliquez ensuite sur Next (Suivant).
E Si vous avez sélectionné
Infrastructure Mode (Mode
d'infrastructure), passez
directement à l'étape F.
Si vous avez sélectionné AdHoc Mode (Mode Ad hoc),
sélectionnez le canal de
fonctionnement correct pour
votre réseau dans le menu
déroulant Channel (Canal). Le
canal que vous choisissez doit
correspondre au canal défini
pour les autres périphériques
de votre réseau sans fil.
E
Sélectionnez le mode du
réseau dans le menu déroulant.
Conservez le paramètre par
défaut Mixed Mode (Mode
mixte) si votre réseau comporte
des périphériques sans fil G et B.
Sélectionnez G-Only Mode
(G uniquement) si votre réseau
comporte des périphériques
sans fil G.
Cliquez ensuite sur Next (Suivant).
3
Page 24

F
L'écran Wireless Security
(Sécurité du réseau) permet de
définir le niveau de sécurité du
réseau. Si le cryptage WEP est
désactivé sur votre réseau,
conservez le paramètre par
défaut Disabled (Désactivé) et
passez à l'étape G.
Si le cryptage WEP est activé sur
votre réseau, sélectionnez le
niveau de cryptage WEP, 64-bit
(64 bits) ou 128-bit (128 bits).
Entrez ensuite une phrase mot
de passe pour générer
automatiquement une clé WEP.
Si vous souhaitez saisir
manuellement la clé WEP, ne
renseignez pas le champ
Passphrase (Phrase mot de passe)
et saisissez la clé WEP dans le
champ WEP Key (Clé WEP).
F
Dans le menu déroulant TX Key
(Clé TX), sélectionnez la clé de
transmission utilisée par votre
réseau. Si vous n'utilisez pas
plusieurs clés WEP, conservez la
clé par défaut, 1.
Dans le menu déroulant
Authentication (Authentification),
sélectionnez la méthode
d'authentification utilisée par
votre réseau. Si vous avez des
doutes quant à la méthode à
sélectionner, Linksys vous
recommande de conserver le
paramètre par défaut Auto.
Cliquez ensuite sur Next (Suivant).
4
Page 25

G L'Assistant de configuration
vous demandera de vérifier les
paramètres que vous avez
définis avant de commencer
à copier des fichiers. Cliquez
sur Next (Suivant) pour
enregistrer ces paramètres, ou
sur Back (Précédent) pour les
modifier.
H Une fois les fichiers correctement
copiés, l'écran Congratulations
(Félicitations) apparaît. Cliquez
sur Exit (Quitter).
G
H
5
Page 26

2
Installation de la carte
A Mettez votre ordinateur hors tension.
B Ouvrez le boîtier de l'ordinateur
et recherchez un connecteur
pour carte PCI disponible sur la
carte mère. Pour plus
d'instructions, adressez-vous au
fabricant de votre ordinateur.
C Enfoncez la carte dans le
connecteur PCI. Assurez-vous
que toutes les broches de la
carte sont enfichées dans le
connecteur. Pour ce faire, vous
devrez peut-être appuyer un
peu sur la carte pour l'enfoncer
complètement.
D Une fois la carte en place, fixez
sa tige métallique sur le châssis
de votre ordinateur à l'aide
d'une vis. Remettez le boîtier
de l'ordinateur en place.
C
E
E Fixez l'antenne externe au port
d'antenne de la carte.
F Allumez votre ordinateur de bureau.
REMARQUE : Un écran indiquant
qu'une signature numérique n'a
pas été trouvée peut s'afficher.
La carte a été testée et est
compatible avec Windows 2000.
Cliquez sur Yes (Oui).
Félicitations ! L'installation de la
carte PCI sans fil G avec
SpeedBooster est terminée.
6
®
A Division of Cisco Systems, Inc.
Pour obtenir plus d'informations ou une aide
technique, reportez-vous au Guide de
l'utilisateur qui figure sur le CD-ROM ; pour
prendre contact avec le service d'assistance
technique, reportez-vous à la Fiche
d'assistance technique.
Site Web
http://www.linksys.com/international
Linksys est une marque déposée ou une marque
commerciale de Cisco Systems, Inc. et/ou ses filiales
aux Etats-Unis et dans certains autres pays. Copyright ©
2004 Cisco Systems, Inc. Tous droits réservés.
WMP54GS-QIG_98SE_Me_2000-fr-40517NC KL
Page 27

A Division of Cisco Systems, Inc.
®
2
4
,
GHz
802.11g
Sans fil
Modèle réf.
Contenu de l'emballage
• Carte PCI sans fil G avec SpeedBooster
• Antenne externe
• CD-ROM de l'Assistant de configuration
• Guide de l'utilisateur sur CD-ROM
• Guide d'installation rapide
Sans fil G
Carte PCI avec SpeedBooster
Guide d'installation rapide pour Windows XP
WMP54GS (FR)
1
Page 28

1
Si votre ordinateur fonctionne sous
Windows XP, commencez par
installer la carte. Ensuite, installez et
configurez le pilote de la carte.
Installation de la carte
A Mettez votre ordinateur hors
tension.
B Ouvrez le boîtier de l'ordinateur
et recherchez un connecteur
pour carte PCI disponible sur la
carte mère. Pour plus
d'instructions, adressez-vous au
fabricant de votre ordinateur.
C Enfoncez la carte dans le
connecteur PCI. Assurez-vous
que toutes les broches de la
carte sont enfichées dans le
connecteur. Pour ce faire, vous
devrez peut-être appuyer un
peu sur la carte pour
l'enfoncer complètement.
D Une fois la carte en place,
fixez sa tige métallique sur le
châssis de votre ordinateur à
l'aide d'une vis. Remettez le
boîtier de l'ordinateur en
place.
C
E Fixez l'antenne externe au port
d'antenne de la carte.
F Allumez votre ordinateur de
bureau.
2
E
Page 29

2
Installation du pilote de la carte
A Windows XP détectera
automatiquement la carte.
Insérez le CD-ROM de
l'Assistant de configuration
dans le lecteur correspondant.
Cliquez sur le bouton en
regard de Installer le logiciel
automatiquement
(recommandé). Cliquez
ensuite sur Suivant.
B Une fois que Windows a fini
d'installer le pilote, cliquez sur
Terminer.
A
B
3
Page 30

3
Configuration de la carte
A Une fois la carte installée,
l'icône de configuration
automatique de réseau sans fil
de Windows XP apparaît dans
la barre d'état système de
l'ordinateur. Cliquez deux fois
sur cette icône.
B L'écran qui apparaît indique
tous les réseaux sans fil
disponibles. Sélectionnez le
réseau qui vous intéresse.
Si vous avez activé le
cryptage WEP sur ce réseau,
passez à l'étape C.
Si vous avez désactivé le
cryptage WEP sur ce réseau,
l'écran suivant (figure B)
apparaît. Vérifiez que la case
en regard de Me permettre
de me connecter au réseau
sans fil sélectionné, même s'il
n'est pas sécurisé est cochée.
Cliquez ensuite sur Connexion,
puis passez à l'étape D.
C L'écran de la figure C apparaît.
Entrez la clé WEP de votre
réseau sans fil dans le champ
Clé réseau, puis entrez-la de
nouveau dans le champ
Confirmez clé réseau. Cliquez
ensuite sur Connexion.
D L'icône de configuration
automatique de réseau sans fil
de la barre d'état vous avertit si
votre connexion est active.
Félicitations ! L'installation de la
carte PCI sans fil G avec
SpeedBooster est terminée.
4
B
C
Pour obtenir plus d'informations ou une aide
technique, reportez-vous au Guide de
l'utilisateur qui figure sur le CD-ROM ; pour
prendre contact avec le service d'assistance
technique, reportez-vous à la Fiche
d'assistance technique.
Site Web
http://www.linksys.com/international
Linksys est une marque déposée ou une marque
commerciale de Cisco Systems, Inc . et/ou ses filiales
aux Etats-Unis et dans certains autres pays. Copyright
© 2004 Cisco Systems, Inc. Tous droits réservés.
WMP54GS-QIG_XP-FR-40517NC KL
Page 31

A Division of Cisco Systems, Inc.
®
2
4
,
GHz
802.11g
Wireless
Modell-Nr.
Lieferumfang
• Wireless-G PCI-Adapter mit SpeedBooster
• Externe Antenne
• Setup-Assistenten-CD-ROM
• Benutzerhandbuch auf CD-ROM
• Kurzanleitung
Wireless-G
PCI-Adapter mit SpeedBooster
Kurzanleitung für Windows 98 SE, ME und 2000
WMP54GS (DE)
1
Page 32

1
Der Setup-Assistent führt Sie durch den
Installationsvorgang für Windows 98SE, ME
oder 2000. Der Setup-Assistent installiert
den Wireless-Netzwerk-Monitor sowie den
Treiber und konfiguriert den Adapter.
Installieren der Adapter-Software
A Legen Sie die Setup Wizard CD-ROM
(Setup-Assistenten-CD-ROM) in Ihr CDROM-Laufwerk ein. Der Setup-Assistent
sollte automatisch gestartet und das
Willkommensfenster angezeigt
werden. Wenn dies nicht der Fall ist,
klicken Sie auf die Schaltfläche Start
und wählen Sie Ausführen aus.
Geben Sie im daraufhin angezeigten
Feld D:\setup.exe ein (wobei „D“ für
den Buchstaben Ihres CD-ROMLaufwerks steht).
B Um den Adapter zu installieren,
klicken Sie im Willkommensfenster
auf die Schaltfläche Install
(Installieren).
A
C Lesen Sie die Lizenzvereinbarung,
und klicken Sie auf Next (Weiter), um
sie zu akzeptieren. Wenn Sie auf
Cancel (Abbrechen) klicken, wird
die Installation abgebrochen.
D Das Fenster Wireless Mode (Wireless-
Modus) wird angezeigt. Klicken Sie
auf die Schaltfläche Infrastructure
Mode (Infrastrukturmodus), wenn
die drahtlosen Computer mit Hilfe
eines Wireless Access Point mit
einem verdrahteten Netzwerk
kommunizieren sollen. Klicken Sie
auf die Optionsschaltfläche Ad-Hoc
Mode (Ad-Hoc-Modus), wenn
mehrere drahtlose Computer direkt
miteinander vernetzt werden sollen.
Geben Sie in das Feld SSID (SS-ID)
die SS-ID des drahtlosen Netzwerks
ein. Bei der SS-ID handelt es sich um
den Netzwerk-Namen, der für alle.
2
C
D
Page 33

Geräte im Netzwerk identisch sein
muss. Die Standardeinstellung ist
linksys (Kleinbuchstaben).
Klicken Sie anschließend auf Next
(Weiter).
E Wenn Sie die Option Infrastructure
Mode (Infrastrukturmodus)
ausgewählt haben, fahren Sie jetzt
mit Schritt F fort.
Wenn Sie die Option Ad-Hoc Mode
(Ad-Hoc-Modus) ausgewählt
haben, wählen Sie im DropdownMenü Channel (Kanal) den richtigen
Betriebskanal für Ihr Netzwerk aus.
Der von Ihnen angegebene Kanal
muss mit dem Kanal
übereinstimmen, den Sie auf denen
anderen Geräten Ihres drahtlosen
Netzwerks eingestellt haben.
Wählen Sie aus der DropdownListe den Netzwerkmodus aus.
Behalten Sie die
Standardeinstellung Mixed Mode
(Gemischter Modus) bei, wenn
Wireless-G- und Wireless-B-Geräte
im Netzwerk vorhanden sind.
Wählen Sie den Modus G-Only
(Nur G), wenn ausschließlich
Wireless-G-Geräte im Netzwerk
vorhanden sind.
E
Klicken Sie anschließend auf Next
(Weiter).
3
Page 34

Im Fenster Wireless Security
F
(Sicherheit im WirelessNetzwerkbetrieb) können Sie die
Sicherheitsstufe des Netzwerks
einstellen. Wenn die WEPVerschlüsselung für Ihr Netzwerk
deaktiviert ist, behalten Sie die
Standardeinstellung Disabled
(Deaktiviert) bei und fahren Sie mit
Schritt G fort.
Wenn Sie für Ihr Netzwerk die WEPVerschlüsselung aktiviert haben,
wählen Sie die WEPVerschlüsselungsebene, 64-bit oder
128-bit, aus. Geben Sie eine
Passphrase ein und der WEPSchlüssel wird automatisch erstellt.
Wenn Sie den WEP-Schlüssel
manuell eingeben möchten, lassen
Sie das Feld Passphrase leer, und
geben Sie den Schlüssel in das Feld
WEP-Key (WEP-Schlüssel) ein.
Wählen Sie aus dem DropdownMenü TX Key (TX-Schlüssel) den vom
Netzwerk verwendeten
Übertragungsschlüssel aus. Wenn
Sie nicht mehrere WEP-Schlüssel
verwenden, behalten Sie die
Standardeinstellung 1 bei.
Wählen Sie aus dem DropdownMenü Authentication
(Authentifizierung) die vom Netzwerk
verwendete
Authentifizierungsmethode aus.
Wenn Sie sich nicht sicher sind,
welche Methode Sie wählen sollen,
behalten Sie die Standardeinstellung
Auto (Automatisch) bei.
F
Klicken Sie anschließend auf Next
(Weiter).
4
Page 35

G Der Setup-Assistent fordert Sie auf,
Ihre Einstellungen zu überprüfen,
bevor mit dem Kopieren von
Dateien begonnen wird. Klicken Sie
auf Next (Weiter), um diese
Einstellungen zu speichern bzw. auf
Back (Zurück), um Änderungen
vorzunehmen.
H Nach erfolgreichem Kopieren der
Dateien wird der
Glückwunschbildschirm angezeigt.
Klicken Sie auf Exit (Beenden).
G
H
5
Page 36

2
Installieren des Adapters
A Schalten Sie den Desktop-PC aus.
B Öffnen Sie das PC-Gehäuse, und
suchen Sie einen freien PCISteckplatz auf der Systemplatine.
Weitere Anweisungen erhalten Sie
von Ihrem Computerhersteller.
C Stecken Sie den Adapter in den
PCI-Steckplatz. Stellen Sie sicher,
dass alle Pins die Kontakte des
Steckplatzes berühren. Sie müssen
beim Einstecken des Adapters u. U.
ein wenig Druck ausüben, damit er
fest im Steckplatz verankert ist.
D Wenn sich der Adapter in der
richtigen Position befindet, befestigen
Sie die Lasche mit einer Schraube
am PC-Rahmen. Schließen Sie dann
das PC-Gehäuse.
E Befestigen Sie die externe Antenne
am Antennenanschluss des
Adapters.
C
E
F Schalten Sie Ihren Desktop-PC ein.
HINWEIS: Unter Umständen wird ein
Fenster angezeigt, in dem Ihnen
mitgeteilt wird, dass keine digitale
Signatur gefunden wurde. Dieser
Adapter wurde geprüft und
funktioniert nur unter Windows 2000
korrekt. Klicken Sie auf Ja.
Herzlichen Glückwunsch! Die Installation
des Wireless-G PCI-Adapters mit
SpeedBooster ist hiermit abgeschlossen.
6
®
A Division of Cisco Systems, Inc.
Weitere Informationen und Anleitungen zur
Fehlerbehebung finden Sie im
Benutzerhandbuch auf der Installations-CDROM. Informationen zur Kontaktaufnahme
mit dem technischen Kundendienst finden
Sie in der technischen Support-Beilage.
http://www.linksys.com/international
Linksys ist eine eingetragene Marke bzw . eine Marke von
Cisco Systems, Inc. und/oder deren Zweigunternehmen
in den USA und anderen Ländern. Copyright © 2004
Cisco Systems, Inc. Alle Rechte vorbehalten.
WMP54GS-DE-QIG_98SE_Me_2000-40517NC KL
Page 37

A Division of Cisco Systems, Inc.
®
2
4
,
GHz
802.11g
Wireless
Modell-Nr.
Lieferumfang
• Wireless-G PCI-Adapter mit SpeedBooster
• Externe Antenne
• Setup-Assistenten-CD-ROM
• Benutzerhandbuch auf CD-ROM
• Kurzanleitung
Wireless-G
PCI-Adapter mit SpeedBooster
Kurzanleitung für Windows XP
WMP54GS (DE)
1
Page 38

1
Installieren Sie zuerst den Adapter
physisch, um den Adapter auf
einem PC mit dem Betriebssystem
Windows XP zu installieren.
Installieren und Konfigurieren Sie
anschließend den Adaptertreiber.
Installieren des Adapters
A Schalten Sie den Desktop-PC aus.
B Öffnen Sie das PC-Gehäuse,
und suchen Sie einen freien
PCI-Steckplatz auf der
Systemplatine. Weitere
Anweisungen erhalten Sie von
Ihrem Computerhersteller.
C Stecken Sie den Adapter in
den PCI-Steckplatz. Stellen Sie
sicher, dass alle Pins die
Kontakte des Steckplatzes
berühren. Sie müssen beim
Einstecken des Adapters u. U.
ein wenig Druck ausüben,
damit er fest im Steckplatz
verankert ist.
C
D Wenn sich der Adapter in der
richtigen Position befindet,
befestigen Sie die Lasche mit
einer Schraube am PC-Rahmen.
Schließen Sie dann das
PC-Gehäuse.
E Befestigen Sie die externe
Antenne am Antennenanschluss
des Adapters.
F Schalten Sie Ihren Desktop-PC
ein.
2
E
Page 39

2
Installieren des Adaptertreibers
A Windows XP stellt den Adapter
automatisch fest. Legen Sie die
Setup Wizard CD-ROM (SetupAssistenten-CD-ROM) in das
CD-ROM-Laufwerk ein. Klicken
Sie auf die Optionsschaltfläche
neben Software automatisch
installieren (Empfohlen).
Klicken Sie anschließend auf
Weiter.
B Nachdem Windows den
Treiber installiert hat, klicken Sie
auf die Schaltfläche Fertig
stellen.
A
B
3
Page 40

3
Konfigurieren des Adapters
A Nach der Installation des
Adapters wird das Symbol von
Windows XP für die
konfigurationsfreie drahtlose
Verbindung in der Taskleiste
des Computers angezeigt.
Doppelklicken Sie auf das Symbol.
B Im folgenden Fenster werden
alle verfügbaren drahtlosen
Netzwerke angezeigt. Wählen Sie
das gewünschte Netzwerk aus.
Wenn für dieses Netzwerk die
WEP-Verschlüsselung aktiviert ist,
fahren Sie mit Schritt C fort.
Wenn für dieses Netzwerk keine
WEP-Verschlüsselung aktiviert ist,
wird das in Abbildung B
dargestellte Fenster angezeigt.
Das Kontrollkästchen neben
Verbindungsherstellung mit
dem drahtlosen Netzwerk
ermöglichen, auch wenn das
Netzwerk nicht sicher ist muss
aktiviert sein. Klicken Sie auf
Verbinden, und fahren Sie mit
Schritt D fort.
B
C
C Es wird der in Abb. C dargestellte
Bildschirm angezeigt. Geben Sie
den WEP-Schlüssel Ihres
drahtlosen Netzwerks zunächst in
das Feld Netzwerkschlüssel
und dann noch einmal in das
Feld Netzwerkschlüssel
bestätigen ein. Klicken Sie
dann auf Verbinden.
D Das Symbol für die
konfigurationsfreie drahtlose
Verbindung in der Taskleiste zeigt
an, ob Ihre Verbindung aktiv ist.
Herzlichen Glückwunsch! Die
Installation des Wireless-G PCI-
Adapters mit SpeedBooster ist
hiermit abgeschlossen.
4
Weitere Informationen und Anleitungen zur
Fehlerbehebung finden Sie im
Benutzerhandbuch auf der Installations-CDROM. Informationen zur Kontaktaufnahme mit
dem technischen Kundendienst finden Sie in
der technischen Support-Beilage.
http://www.linksys.com/international
Linksys ist eine eingetragene Marke bzw. eine Marke von
Cisco Systems, Inc. und/oder deren Zweigunternehmen
in den USA und anderen Ländern. Copyright © 2004
Cisco Systems, Inc. Alle Rechte vorbehalten.
WMP54GS-QIG_XP-de-40517NC KL
Page 41

A Division of Cisco Systems, Inc.
®
2
4
,
GHz
802.11g
Wireless
N. modello
Contenuto della confezione
• Adattatore PCI Wireless-G con SpeedBooster
• Antenna esterna
• Setup Wizard CD-ROM (CD per l'installazione
guidata)
• User Guide (Guida per l'utente) su CD-ROM
• Guida di installazione rapida
Wireless-G
Adattatore PCI con SpeedBooster
Guida di installazione rapida per Windows 98SE,
Me e 2000
WMP54GS (IT)
1
Page 42

1
Installazione del software
dell'adattatore
L'installazione guidata contiene
istruzioni per l'installazione con i sistemi
operativi Windows 98SE, Millennium o
2000. L'installazione guidata installerà
il driver e il monitor Wireless Network e
configurerà l'adattatore.
A Inserire Setup Wizard CD-ROM
(CD-ROM per l'installazione
guidata) nell'unità CD-ROM.
L'installazione guidata dovrebbe
avviarsi automaticamente
visualizzando la schermata
Welcome (Benvenuti). In caso
contrario, fare clic sul pulsante
Start e selezionare Esegui.
Immettere D:\setup.exe (dove
"D" è la lettera dell'unità CDROM) nel campo visualizzato.
B Per installare l'adattatore, fare
clic su Install (Installa) nella
schermata Welcome
(Benvenuti).
A
C Leggere il contratto di licenza
e fare clic su Next (Avanti) per
proseguire l'installazione. Se si
desidera interrompere
l'installazione fare clic su
Cancel (Annulla).
D Viene visualizzata la schermata
Wireless Mode (Modalità
wireless). Fare clic sul pulsante di
opzione Infrastructure Mode
(Modalità infrastruttura) se si
desidera che i computer wireless
comunichino con la rete
cablata utilizzando un punto di
accesso wireless. Fare clic sul
pulsante di opzione Ad-Hoc
Mode (Modalità ad hoc) per
collegare direttamente più
computer wireless tra di loro.
2
C
D
Page 43

Nel campo SSID, immettere
l'SSID della rete wireless. L'SSID
è il nome della rete e deve
essere identico per tutte le
periferiche collegate in rete.
L'impostazione predefinita è
linksys (tutto in minuscolo).
Fare quindi clic su Next (Avanti).
E Se si sceglie l'opzione
Infrastructure Mode (Modalità
infrastruttura), passare
direttamente alla Fase F.
Se si sceglie l'opzione Ad-Hoc
Mode (Modalità ad hoc),
selezionare il canale operativo
corretto per la rete dal menu a
discesa Channel (Canale).
Il canale scelto deve coincidere
con quello impostato sulle
altre periferiche della rete
wireless.
E
Selezionare l'opzione Network
Mode (Modalità di rete) dal
menu a discesa. Lasciare
l'impostazione predefinita,
Mixed Mode (Modalità mista),
se sono collegate in rete
periferiche Wireless-G e
Wireless-B. Selezionare G-Only
Mode (Modalità Solo G) se
sono collegate in rete solo
periferiche Wireless-G.
Fare quindi clic su Next (Avanti).
3
Page 44

La schermata Wireless Security
F
(Sicurezza wireless) consente di
impostare il livello di sicurezza
per la rete. Se sulla rete non è
attivata la cifratura WEP, lasciare
l'impostazione predefinita
Disabled (Disabilitata) e
continuare con la fase G.
Se sulla rete è attivata la
cifratura WEP, selezionarne il
livello, 64 bit o 128 bit.
Immettere una passphrase e
la chiave WEP verrà generata
automaticamente.
Se si desidera immettere la
chiave WEP manualmente,
lasciare il campo Passphrase
vuoto e inserire la chiave WEP nel
campo WEP Key (Chiave WEP).
Dal menu a discesa TX Key
(Chiave TX), selezionare la
chiave di trasmissione utilizzata
dalla rete. Se non si utilizzano
più chiavi WEP, lasciare
l'impostazione predefinita, 1.
Dal menu a discesa
Authentication (Autenticazione),
selezionare il metodo di
autenticazione utilizzato dalla
rete. Se non si è sicuri del
metodo da selezionare,
lasciare l'impostazione
predefinita, Auto (Automatico),
F
Fare quindi clic su Next (Avanti).
4
Page 45

G Prima di iniziare a copiare i file,
l'installazione guidata chiede
di confermare le impostazioni.
Fare clic su Next (Avanti) per
salvare tali impostazioni
oppure su Back (Indietro) per
modificarle.
H Dopo che i file saranno stati
copiati, verrà visualizzata la
schermata Congratulations
(Congratulazioni). Fare clic su
Exit (Esci).
G
H
5
Page 46

2
Installazione dell'adattatore
A Spegnere il PC.
B Aprire il case del PC e
individuare uno slot PCI libero
sulla scheda madre. Per
istruzioni al riguardo, consultare
il materiale di riferimento fornito
dal produttore del computer.
C Inserire l'adattatore nello slot PCI.
Assicurarsi che tutti i piedini
tocchino i contatti dello slot.
Potrebbe essere necessaria una
leggera pressione per inserire
fino in fondo l'adattatore.
D Una volta che l'adattatore è
ben posizionato, fissarlo al
telaio del PC con una vite,
quindi chiudere il case.
C
E
E Collegare l'antenna esterna
alla porta dell'antenna
dell'adattatore.
F Accendere il PC.
NOTA Potrebbe essere
visualizzata una
schermata in cui viene
notificata all'utente
l'assenza di una firma
digitale. L'adattatore è
stato collaudato ed è
risultato compatibile
con Windows 2000.
Fare clic su Yes (Sì).
Congratulazioni! L'installazione
dell'adattatore PCI Wireless-G con
SpeedBooster è completata.
6
®
A Division of Cisco Systems, Inc.
Per ulteriori informazioni o istruzioni relative
alla risoluzione dei problemi, consultare la
User Guide (Guida per l'utente) contenuta nel
CD-ROM o il Supplemento per l'assistenza
tecnica per contattare l'Assistenza tecnica.
Sito Web
http://www.linksys.com/international
Linksys è un marchio registrato o un marchio di
Cisco Systems, Inc. e/o dei relativi affiliati negli
Stati Uniti e in altri paesi. Copyright © 2004 Cisco
Systems, Inc. Tutti i diritti riservati.
WMP54GS-QIG_98SE_Me_2000-IT-40517NC KL
Page 47

A Division of Cisco Systems, Inc.
®
2
4
,
GHz
802.11g
Wireless
N. modello
Contenuto della confezione
• Adattatore PCI Wireless-G con SpeedBooster
• Antenna esterna
• Setup Wizard CD-ROM (CD per l'installazione
guidata)
• User Guide (Guida per l'utente) su CD-ROM
• Guida di installazione rapida
Wireless-G
Adattatore PCI con SpeedBooster
Guida di installazione rapida per Windows XP
WMP54GS (IT)
1
Page 48

1
Per installare l'adattatore in un PC
con sistema operativo Windows XP,
procedere prima all'installazione
fisica dell'adattatore. Quindi
installare e configurare il driver
dell'adattatore.
Installazione dell'adattatore
A Spegnere il PC.
B Aprire il case del PC e
individuare uno slot PCI libero
sulla scheda madre. Per
istruzioni al riguardo, consultare
il materiale di riferimento
fornito dal produttore del
computer.
C Inserire l'adattatore nello slot
PCI. Assicurarsi che tutti i
piedini tocchino i contatti dello
slot. Potrebbe essere
necessaria una leggera
pressione per inserire fino in
fondo l'adattatore.
D Una volta che l'adattatore è
ben posizionato, fissarlo al
telaio del PC con una vite,
quindi chiudere il case.
E Collegare l'antenna esterna
alla porta dell'antenna
dell'adattatore.
F Accendere il PC.
2
C
E
Page 49

2
Installazione del driver dell'adattatore
A Windows XP rileva
automaticamente
l'adattatore. Inserire il Setup
Wizard CD-ROM (CD-ROM per
l'installazione guidata) nell'unità
CD-ROM. Fare clic sul pulsante
di opzione accanto a Installa
il software automaticamente
(scelta consigliata), quindi
fare clic su Avanti.
B Al termine dell'installazione del
driver, fare clic su Fine.
A
B
3
Page 50

3
Configurazione dell'adattatore
A Dopo aver installato l'adattatore,
l'icona di Zero Configuration reti
senza fili di Windows XP apparirà
sulla barra delle applicazioni del
computer. Fare doppio clic su
questa icona.
B Viene visualizzata una schermata
con le reti wireless disponibili.
Selezionare la rete desiderata.
Se sulla rete è attivata la cifratura
WEP, passare alla Fase C.
Se sulla rete non è attivata la
cifratura WEP, viene visualizzata
la schermata riportata nella
figura B. Accertarsi che sia
selezionata la casella Consenti
la connessione alla rete
wireless selezionata, anche se
non protetta, quindi fare clic su
Connetti e passare al punto D.
B
C
C Viene visualizzata la schermata
mostrata nella Figura C.
Immettere la chiave WEP della
rete wireless nel campo Chiave
di rete, quindi immetterla
nuovamente nel campo
Conferma chiave di rete e
infine fare clic su Connetti.
D L'icona di Zero Configuration
reti senza fili visualizzata sulla
barra delle applicazioni notifica
l'attivazione della connessione.
Congratulazioni! L'installazione
dell'adattatore PCI Wireless-G con
SpeedBooster è completata.
4
Per ulteriori informazioni o istruzioni relative
alla risoluzione dei problemi, consultare la
User Guide (Guida per l'utente) contenuta nel
CD-ROM o il Supplemento per l'assistenza
tecnica per contattare l'Assistenza tecnica.
Sito Web
http://www.linksys.com/international
Linksys è un marchio registrato o un marchio di
Cisco Systems, Inc. e/o dei relativi affiliati negli
Stati Uniti e in altri paesi. Copyright © 2004 Cisco
Systems, Inc. Tutti i diritti riservati.
WMP54GS-QIG_XP-IT-40517NC KL
Page 51

A Division of Cisco Systems, Inc.
®
2
4
,
GHz
802.11g
Wireless
Modelo n.º
Conteúdo da embalagem
• Placa PCI sem fios G com SpeedBooster
• Antena externa
• CD-ROM do Setup Wizard (Assistente de
configuração)
• Manual do Utilizador em CD-ROM
• Cartão de Registo
Sem fios G
Placa PCI com SpeedBooster
Instalação Rápida para o Windows 98SE, Me e 2000
WMP54GS (PT)
1
Page 52

1
O Setup Wizard (Assistente de configuração)
orientá-lo-á no processo de instalação
para o Windows 98SE, Millennium ou 2000.
O assistente de configuração instalará o
Wireless Network Monitor (Monitor de redes
sem fios) e o controlador, e procederá à
configuração da Placa.
Instalar o software da placa
A Coloque o CD-ROM do Setup
Wizard (Assistente de configuração)
na unidade de CD-ROM. O
assistente de configuração deverá
ser executado automaticamente e
deverá ser apresentado o ecrã
Welcome (Bem-vindo). Se tal não
acontecer, clique no botão Iniciar
e seleccione Executar. No campo
apresentado, introduza
D:\setup.exe (se “D” corresponder
à letra da unidade de CD-ROM).
A
B Para instalar a Placa, clique em
Install (Instalar) no ecrã Welcome
(Bem-vindo).
C Leia o Contrato de licença e
clique em Next (Seguinte) para
prosseguir com a instalação. Se
clicar em Cancel (Cancelar),
terminará a instalação.
D Será apresentado o ecrã Wireless
Mode (Modo sem fios). Clique no
botão de opção Infrastructure
Mode (Modo de infra-estrutura) se
pretender que os computadores
sem fios comuniquem com a rede
com fios utilizando um ponto de
acesso sem fios. Clique no botão
de opção Ad-Hoc Mode (Modo
ad hoc), se pretender que vários
computadores sem fios se liguem
directamente uns aos outros.
2
C
D
Page 53

No campo SSID, introduza o SSID
da rede sem fios. O SSID é o
nome da rede e tem de ser
idêntico para todos os dispositivos
na rede. A predefinição é linksys
(em minúsculas).
Em seguida, clique em Next
(Seguinte).
E Se tiver escolhido Infrastructure
Mode (Modo de infra-estrutura),
vá para o Passo F.
Se tiver escolhido Ad-Hoc Mode
(Modo ad hoc), seleccione o
canal de funcionamento
correcto para a rede a partir do
menu pendente Channel
(Canal). O canal escolhido
deverá corresponder ao canal
definido nos outros dispositivos da
rede sem fios.
Seleccione o Network Mode
(Modo de rede) a partir do menu
pendente. Mantenha a
predefinição, Mixed Mode (Modo
misto), se existirem dispositivos
Sem fios G e Sem fios B na rede.
Seleccione G-Only Mode (Modo
só G) se apenas existirem
dispositivos Sem fios G na rede.
Em seguida, clique em Next
(Seguinte).
E
3
Page 54

F
O ecrã Wireless Security
(Segurança sem fios) permite
definir o nível de segurança da
rede. Se a encriptação WEP da
rede estiver desactivada,
mantenha a predefinição,
Disabled (Desactivada) e avance
para o Passo G.
Se a encriptação WEP da rede
estiver activada, seleccione o
nível de encriptação WEP, 64 bits
ou 128 bits. Introduza a Frasepasse e a chave WEP será
gerada automaticamente.
Se pretender introduzir
manualmente a chave WEP,
deixe o campo Passphrase
(Frase-passe) em branco e
introduza a chave WEP no
campo WEP Key (Chave WEP).
A partir do menu pendente TX Key
(Chave TX), seleccione a chave
de transmissão utilizada pela
rede. Se não estiver a utilizar
várias chaves WEP, mantenha a
predefinição, 1.
F
A partir do menu pendente
Authentication (Autenticação),
seleccione o método de
autenticação utilizado pela rede.
Se não tiver a certeza quanto ao
método a seleccionar, mantenha
a predefinição, Auto (Automático).
Em seguida, clique em Next
(Seguinte).
4
Page 55

G O Setup Wizard (Assistente de
configuração) solicitará que
verifique as definições antes de
começar a copiar os ficheiros.
Clique em Next (Seguinte) para
guardar estas definições ou
clique em Back (Anterior) para
alterar as definições.
H Depois de os ficheiros terem sido
copiados com êxito, será
apresentado o ecrã
Congratulations (Parabéns).
Clique em Exit (Sair).
G
H
5
Page 56

2
Instalar a placa
A Desligue o computador.
B Abra a caixa do computador e
localize uma ranhura PCI
disponível na placa de sistema.
Consulte o fabricante do
computador para obter
instruções.
C Introduza a Placa na ranhura PCI.
Certifique-se de que todos os
pinos estão em contacto com os
contactos da ranhura. Poderá ser
necessário pressionar
ligeiramente a Placa para a
encaixar completamente.
C
D Depois de a Placa estar bem
encaixada, fixe a patilha ao
chassis do computador com um
parafuso de montagem. Em
seguida, feche a caixa do
computador.
E Ligue a antena externa à porta
de antena da Placa.
F Ligue o computador.
NOTA: Poderá ser apresentado um
ecrã a indicar que não foi
encontrada nenhuma
assinatura digital. A Placa
foi testada e verificou-se a
respectiva compatibilidade
com o Windows 2000.
Clique em Sim.
Parabéns! A instalação da Placa PCI
sem fios G com SpeedBooster está
concluída.
6
E
®
A Division of Cisco Systems, Inc.
Para obter informações adicionais ou ajuda
para resolução de problemas, consulte o
Manual do Utilizador no CD-ROM, ou para
contactar o Suporte técnico, consulte a Folha
de suporte técnico.
Web site
http://www.linksys.com/international
Linksys é uma marca registada ou marca comercial
da Cisco Systems, Inc. e/ou das respectivas afiliadas
nos E.U.A. e noutros países. Copyright © 2004 Cisco
Systems, Inc. Todos os direitos reservados.
WMP54GS-QIG_98SE_Me_2000-PT-40517NC KL
Page 57

A Division of Cisco Systems, Inc.
®
2
4
,
GHz
802.11g
Wireless
Modelo n.º
Conteúdo da embalagem
• Placa PCI sem fios G com SpeedBooster
• Antena externa
• CD-ROM do Setup Wizard (Assistente de
configuração)
• Manual do Utilizador em CD-ROM
• Cartão de Registo
Sem fios G
Placa PCI com SpeedBooster
Instalação Rápida para o Windows XP
WMP54GS (PT)
1
Page 58

1
Para instalar a Placa num
computador com o Windows XP,
primeiro instale fisicamente a Placa.
Em seguida, instale e configure o
controlador da Placa.
Instalar a placa
A Desligue o computador.
B Abra a caixa do computador
e localize uma ranhura PCI
disponível na placa de
sistema. Consulte o fabricante
do computador para obter
instruções.
C Introduza a Placa na ranhura
PCI. Certifique-se de que
todos os pinos estão em
contacto com os contactos
da ranhura. Poderá ser
necessário pressionar
ligeiramente a Placa para a
encaixar completamente.
C
D Depois de a Placa estar bem
encaixada, fixe a patilha ao
chassis do computador com
um parafuso de montagem.
Em seguida, feche a caixa do
computador.
E Ligue a antena externa à
porta de antena da placa.
F Ligue o computador.
2
E
Page 59

2
Instalar o controlador da placa
A O Windows XP detectará
automaticamente a Placa.
Coloque o CD-ROM do Setup
Wizard (Assistente de
configuração) na unidade de
CD-ROM. Clique no botão de
opção junto a Instalar o
software automaticamente
(recomendado). Em seguida,
clique em Seguinte.
B Depois de o Windows concluir
a instalação do controlador,
clique em Concluir.
A
B
3
Page 60

3
Configurar a placa
A Depois de instalar a Placa,
será apresentado o ícone
Configuração nula sem fios do
Windows XP no tabuleiro do
sistema do computador.
Faça duplo clique no ícone.
B O ecrã apresentado mostrará
as redes sem fios disponíveis.
Seleccione a rede pretendida.
Se a encriptação WEP da rede
estiver activada, vá para o
Passo C.
Se a encriptação WEP da rede
não estiver activada, será
apresentado o ecrã da Figura B.
Certifique-se de que a caixa junto
a Permitir ligar-me à rede sem
fios seleccionada, apesar de não
ser segura está seleccionada.
Em seguida, clique em Ligar e vá
para o Passo D.
B
C
C Será apresentado o ecrã da
Figura C. Introduza a chave
WEP da rede sem fios no
campo Chave de rede e volte
a introduzi-la no campo
Confirmar chave de rede.
Em seguida, clique em Ligar.
D O ícone Configuração nula
sem fios no tabuleiro do
sistema notificará o utilizador
se a ligação estiver activa.
Parabéns! A instalação da Placa
PCI sem fios G com SpeedBooster
4
está concluída.
Para obter informações adicionais ou ajuda
para resolução de problemas, consulte o
Manual do Utilizador no CD-ROM, ou para
contactar o Suporte técnico, consulte a Folha
de suporte técnico.
Web site
http://www.linksys.com/international
Linksys é uma marca registada ou marca comercial
da Cisco Systems, Inc. e/ou das respectivas afiliadas
nos E.U.A. e noutros países. Copyright © 2004 Cisco
Systems, Inc. Todos os direitos reservados.
WMP54GS-QIG_XP-PT-40517NC KL
Page 61

A Division of Cisco Systems, Inc.
®
2
,
4
GHz
802.11g
Wireless
Nº de modelo
Contenido del paquete
• Adaptador PCI Wireless-G con SpeedBooster
• Antena externa
• Asistente de configuración en CD-ROM
• Guía del usuario en CD-ROM
• Guía de instalación rápida
Wireless-G
Adaptador PCI con SpeedBooster
Guía de instalación rápida para Windows 98SE,
Me y 2000
WMP54GS (ES)
1
Page 62

Instale el software del adaptador
1
El asistente de instalación le guía por el
proceso de instalación en Windows
98SE, Millennium o 2000. El asistente de
configuración instala el monitor de red
inalámbrico y el controlador y configura
el adaptador.
A Inserte el Setup Wizard CD-ROM
(CD-ROM del asistente de
configuración) en la unidad de
CD-ROM. El asistente de
configuración se debe ejecutar
de forma automática y debe
aparecer la pantalla Welcome
(pantalla de bienvenida). Si no es
así, haga clic en el botón Inicio y
seleccione Ejecutar. En el campo
que aparece, escriba
D:\setup.exe (donde “D” es la
letra de la unidad de CD-ROM).
A
B Para instalar el adaptador, haga
clic en Install (Instalar) en la
pantalla Welcome (pantalla de
bienvenida).
C Lea el acuerdo de licencia y
haga clic en Next (Siguiente) para
continuar la instalación. Si hace
clic en Cancel (Cancelar), finalizará
la instalación.
D Aparece la pantalla Wireless
Settings (Configuración
inalámbrica). Haga clic en el
botón de radio Infrastructure
Mode (Modo de infraestructura) si
desea conectar los ordenadores
inalámbricos a ordenadores de la
red con cables mediante un
punto de acceso inalámbrico.
Haga clic en el botón de radio Ad-
Hoc Mode (Modo ad-hoc) si desea
conectar varios ordenadores
inalámbricos en red.
2
C
D
Page 63

En el campo SSID, introduzca el
SSID (Identificador del conjunto
de servicios) de la red
inalámbrica. El SSID es el nombre
de red y debe ser el mismo para
todos los dispositivos de la red. El
parámetro predeterminado es
linksys (todo minúsculas).
Haga clic en Next (Siguiente).
E Si selecciona Infrastructure Mode
(Modo de infraestructura), vaya al
paso F ahora.
Si selecciona Ad-Hoc Mode
(Modo Ad-Hoc), elija el canal
operativo adecuado para la red
en el menú desplegable Channel
(Canal). El canal seleccionado
debe coincidir con el canal
definido en los demás dispositivos
de la red inalámbrica.
Seleccione el modo de red en el
menú desplegable Network
Mode (Modo de red). Mantenga
el parámetro predeterminado,
Mixed Mode (Modo Mixto), si en
la red hay dispositivos Wireless-G y
Wireless-B. Seleccione G-Only
Mode (Modo sólo G), si sólo hay
dispositivos Wireless-G en la red.
E
Haga clic en Next (Siguiente).
3
Page 64

F
En la pantalla Wireless Security
(Parámetros de seguridad
inalámbrica) puede establecer el
nivel de seguridad para la red. Si
la encriptación WEP está
desactivada en la red, mantenga
el parámetro predeterminado,
Disabled (Desactivada) y vaya al
paso G.
Si la encriptación WEP está
activada en la red, seleccione el
nivel de encriptación 64-bit o
128-bit. Introduzca una frase de
paso (Passphrase) y la clave WEP
se genera automáticamente.
Si desea introducir manualmente
la clave WEP, deje en blanco el
campo Passphrase (Frase de
paso) e introdúzcala en el campo
WEP Key (Clave WEP).
En el menú desplegable TX Key
(Clave TX), seleccione la clave de
transmisión que utiliza la red. Si no
utiliza varias claves WEP,
mantenga el parámetro
predeterminado, 1.
En el menú desplegable
Authentication (Autenticación),
seleccione el método de
autenticación que utiliza la red. Si
no está seguro del método que
debe seleccionar, mantenga el
parámetro predeterminado Auto
(Automático).
F
Haga clic en Next (Siguiente).
4
Page 65

G El asistente de configuración le
solicita que revise los parámetros
antes de comenzar a copiar
archivos. Haga clic en Next
(Siguiente) para guardar los
parámetros o en Back (Atrás)
para cambiarlos.
H Una vez copiados correctamente
los archivos, aparece la pantalla
Congratulations (Enhorabuena).
Haga clic en Exit (Salir).
G
H
5
Page 66

2
Instalación del adaptador
A Apague el PC de escritorio.
B Abra la carcasa del PC y busque
alguna ranura PCI disponible en
la placa base. Consulte las
instrucciones del fabricante del
ordenador.
C Inserte el adaptador en la ranura
PCI. Asegúrese de que todas las
patillas tocan los contactos de la
ranura. Quizá tenga que
presionar un poco para que el
adaptador encaje
completamente.
D Una vez que el adaptador esté
colocado firmemente en su sitio,
asegure la lengüeta de sujeción
de forma correcta a la carcasa
del PC mediante un tornillo de
montaje. A continuación, cierre la
carcasa del PC.
C
E
E Conecte la antena externa al
puerto de antena del adaptador.
F Encienda el PC de escritorio.
NOTA: Es posible que aparezca
una pantalla en la que
se indica que no se ha
encontrado una firma
digital. Este adaptador
se ha probado y se ha
demostrado que
funciona correctamente
en Windows 2000.
Haga clic en Yes (Sí).
Enhorabuena. La instalación del
adaptador PCI Wireless-G PCI con
SpeedBooster ha finalizado.
6
®
A Division of Cisco Systems, Inc.
Para obtener información adicional o ayuda
sobre solución de problemas, consulte la guía
del usuario en CD-ROM o consulte el suplemento
de asistencia técnica para obtener asistencia.
Página Web
http://www.linksys.com/international
Linksys es una marca comercial registrada o
marca comercial de Cisco Systems, Inc. y/o sus
filiales de EE.UU. y otros países. Copyright © 200 4
Cisco Systems, Inc. Todos los derechos reservados.
WMP54GS-QIG_98SE_Me_2000-es-40517NC KL
Page 67

A Division of Cisco Systems, Inc.
®
2
,
4
GHz
802.11g
Wireless
Nº de modelo
Contenido del paquete
• Adaptador PCI Wireless-G con SpeedBooster
• Antena externa
• Asistente de configuración en CD-ROM
• Guía del usuario en CD-ROM
• Guía de instalación rápida
Wireless-G
Adaptador PCI con SpeedBooster
Guía de instalación rápida para Windows XP
WMP54GS (ES)
1
Page 68

1
Para instalar el adaptador en un
ordenador con Windows XP,
coloque el adaptador primero.
A continuación, instale y configure
el controlador del adaptador.
Instalación del adaptador
A Apague el PC de escritorio.
B Abra la carcasa del PC y
busque alguna ranura PCI
disponible en la placa base.
Consulte las instrucciones del
fabricante del ordenador.
C Inserte el adaptador en la
ranura PCI. Asegúrese de que
todas las patillas tocan los
contactos de la ranura. Quizá
tenga que presionar un poco
para que el adaptador encaje
completamente.
D Una vez que el adaptador
esté colocado firmemente en
su sitio, asegure la lengüeta de
sujeción de forma correcta a
la carcasa del PC mediante
un tornillo de montaje.
A continuación, cierre la
carcasa del PC.
C
E Conecte la antena externa al
puerto de antena del
adaptador.
F Encienda el PC de escritorio.
2
E
Page 69

2
Instalación del controlador
del adaptador
A Windows XP detecta el
adaptador de forma
automática. Inserte el Setup
Wizard CD-ROM (CD-ROM del
asistente de configuración) en
la unidad de CD-ROM. Haga
clic en el botón de radio
situado junto a Instalar
automáticamente el software
(recomendado). Haga clic en
Siguiente.
B Cuando Windows termine de
instalar el controlador, haga
clic en Finalizar.
A
B
3
Page 70

3
Configuración del adaptador
A Una vez instalado el adaptador,
aparece el icono de
configuración inalámbrica rápida
en Windows XP en la bandeja del
sistema del ordenador. Haga
doble clic en dicho icono.
B La pantalla que aparece
muestra todas las redes
inalámbricas disponibles.
Seleccione la que desee.
Si la red tiene activada la
encriptación WEP, vaya al paso C.
Si no la tiene activada,
aparece la pantalla de la
figura B. Asegúrese de que el
cuadro que aparece junto a
Permitir conexión a las redes
inalámbricas seleccionadas
aun si no es seguro está
activado. Haga clic en
Conectar y vaya al paso D.
B
C
C Aparece la pantalla que se
muestra en la figura C.
Introduzca la clave WEP de la
red inalámbrica en el campo
Clave de red y vuelva a
introducirla en el campo
Confirmar clave. A continuación,
haga clic en Conectar.
D El icono de configuración
inalámbrica rápida de la
bandeja del sistema indica si
la conexión está activa.
Enhorabuena. La instalación del
adaptador PCI Wireless-G PCI con
SpeedBooster ha finalizado.
4
Para obtener información adicional o ayuda
sobre solución de problemas, consulte la guía
del usuario en CD-ROM o consulte el
suplemento de asistencia técnica para obtener
asistencia.
Página Web
http://www.linksys.com/international
Linksys es una marca comercial registrada o marca
comercial de Cisco Systems, Inc. y/o sus filiales de
EE.UU. y otros países. Copyright © 2004 Cisco
Systems, Inc. T odos los derechos reservados.
WMP54GS-QIG_XP-ES-40517NC KL
Page 71

A Division of Cisco Systems, Inc.
®
2
4
,
GHz
802.11g
Wireless
Modellnr
Innehåll i förpackningen
• Wireless-G PCI-adapter med SpeedBooster
• Extern antenn
• Cd-skiva med Installationsguide
• Användarhandbok på cd-skiva
• Snabbinstallation
Wireless-G
Wireless-G PCI-adapter med SpeedBooster
Snabbinstallation för Windows 98SE, Me och 2000
WMP54GS (SE)
1
Page 72

1
Installera programv aran för adaptern
Installationsguiden vägleder dig
genom installationen för Windows
98SE, Millennium och 2000. Med
Installationsguiden kan du installera
Wireless Network Monitor (övervakare
för trådlösa nätverk) och drivrutinen,
samt konfigurera adaptern.
A Sätt in installations-cd:n i
cd-enheten. Guiden startas
och skärmen Welcome
(Välkommen) visas automatiskt.
Om skärmen inte visas klickar
du på knappen Start och väljer
Kör. I det fält som visas anger
du D:\setup.exe (om "D" är
cd-enhetens beteckning).
B Installera adaptern genom att
klicka på Install (Installera) på
skärmen Welcome (Välkommen).
A
C Läs igenom licensavtalet och
klicka på Next (Nästa) om du
vill fortsätta med installationen.
Om du klickar på Cancel
(Avbryt) avslutas installationen.
D Skärmen Wireless Mode (Trådlöst
läge) visas. Klicka på knappen
Infrastructure Mode
(Infrastrukturläge) om du vill att
de trådlösa datorerna ska
kommunicera med det
trådanslutna nätverket med
hjälp av en trådlös accesspunkt.
Klicka på Ad-Hoc Mode (Adhoc-läge) om du vill att flera
trådlösa datorer ska kopplas till
varandra.
2
C
D
Page 73

Skriv det trådlösa nätverkets SSID
i fältet SSID. SSID (Service Set
Identifier) är nätverksnamnet.
Det måste vara identiskt för alla
enheter i nätverket.
Standardinställningen är linksys
(med små bokstäver).
Klicka därefter på Next (Nästa).
E Om du valde infrastrukturläget
ska du gå vidare till steg F.
Om du valde ad-hoc-läget ska
du välja korrekt driftskanal för
nätverket i listrutan Channel
(Kanal). Kanalen som du väljer
ska överensstämma med den
kanal som har ställts in för
övriga enheter i det trådlösa
nätverket.
Välj nätverksläge i listrutan.
Behåll standardinställningen,
Mixed Mode (Blandat läge)
om enheter av typen Wireless-G
och Wireless-B ingår i nätverket.
Välj G-Only Mode (Endast
G-läge) om alla enheter i
nätverket är av typen Wireless-G.
Klicka därefter på Next (Nästa).
E
3
Page 74

F På skärmen Wireless Security
(Trådlös säkerhet) kan du ställa
in säkerhetsnivån för nätverket.
Om WEP-kryptering är
avaktiverad för nätverket behåller
du standardinställningen
Disabled (Avaktiverad) och
fortsätter till steg G.
Om WEP-kryptering är aktiverad
väljer du WEP-krypteringsnivå:
64-bit eller 128-bit. När du
anger ett lösenord genereras
WEP-nyckeln automatiskt.
Om du vill ange WEP-nyckeln
manuellt lämnar du fältet
Passphrase (Lösenord) tomt
och anger WEP-nyckeln i fältet
WEP Key (WEP-nyckel).
I listrutan TX Key (TX-nyckel)
väljer du den överföringsnyckel
som används i nätverket. Om du
inte använder flera WEP-nycklar
behåller du standardvärdet 1.
I listan Authentication (Verifiering)
väljer du den verifieringsmetod
som används i nätverket. Om
du är osäker på vilken metod
du ska välja behåller du
standardinställningen Auto.
F
Klicka därefter på Next (Nästa).
4
Page 75

G Du blir ombedd att läsa
igenom dina inställningar
innan filerna börjar kopieras.
Klicka på Next (Nästa) om du
vill spara inställningarna, eller
klicka på Back (Tillbaka) om du
vill ändra dem.
H När filerna har kopierats visas
skärmen Congratulations
(Grattis). Klicka på Exit (Avsluta).
G
H
5
Page 76

2
Installera adaptern
A Stäng av datorn.
B Öppna datorhöljet och leta
rätt på en ledig PCI-kortplats
på moderkortet. Kontakta
datortillverkaren för anvisningar.
C Skjut in adaptern i PCI-kortplatsen.
Se till att alla stift vidrör
kontaktytorna i kortplatsen.
Du kan behöva använda viss
kraft för att skjuta in adaptern
hela vägen.
D När adaptern sitter på plats
monterar du fästanordningen
på datorhöljet med hjälp av
en skruvmejsel. Stäng därefter
datorhöljet.
C
E
E Anslut den externa antennen i
adapterns antennport.
F Starta datorn.
OBS! Du kanske får ett
varningsmeddelande om
att ingen digital signatur
hittades. Adaptern har
testats och fungerar
korrekt med Windows
2000. Klicka på Ja.
Grattis! Installationen av Wireless-G
PCI-adapter med SpeedBooster
är klar.
6
®
A Division of Cisco Systems, Inc.
Mer information och felsökningshjälp finns i
användarhandboken på cd-skivan.
Information om hur du kontaktar vår tekniska
supportavdelning finns i den särskilda
bilagan.
Webbplats
http://www.linksys.com/international
Linksys är ett registrerat varumärke eller ett
varumärke som tillhör Cisco Systems, Inc. och/eller
dess samarbetspartner i USA och vissa andra länder.
Copyright © 2004 Cisco Systems, Inc. Med ensamrätt.
WMP54GS-QIG_98SE_Me_2000-se-40517NC KL
Page 77

A Division of Cisco Systems, Inc.
®
2
4
,
GHz
802.11g
Wireless
Modellnr
Innehåll i förpackningen
• Wireless-G PCI-adapter med SpeedBooster
• Extern antenn
• Cd-skiva med Installationsguide
• Användarhandbok på cd-skiva
• Snabbinstallation
Wireless-G
Wireless-G PCI-adapter med SpeedBooster
Snabbinstallation för Windows XP
WMP54GS (SE)
1
Page 78

1
Om du installerar adaptern i en
dator som kör Windows XP måste du
först installera adaptern. Sedan kan
du installera och konfigurera
adapterns drivrutin.
Installera adaptern
A Stäng av datorn.
B Öppna datorhöljet och leta
rätt på en ledig PCI-kortplats
på moderkortet. Kontakta
datortillverkaren för anvisningar.
C Skjut in adaptern i PCI-
kortplatsen. Se till att alla stift
vidrör kontaktytorna i
kortplatsen. Du kan behöva
använda viss kraft för att skjuta
in adaptern hela vägen.
D När adaptern sitter på plats
monterar du fästanordningen
på datorhöljet med hjälp av
en skruvmejsel. Stäng därefter
datorhöljet.
E Anslut den externa antennen i
adapterns antennport.
F Starta datorn.
2
C
E
Page 79

2
Installera adapterns drivrutin
A Windows XP identifierar
adaptern automatiskt. Sätt in
installations-cd:n i cd-enheten.
Klicka på alternativknappen
bredvid Installera
programvaran automatiskt
(rekommenderas). Klicka
därefter på Nästa.
B Klicka på Slutför när
installationen av drivrutinen
är klar.
A
B
3
Page 80

3
Konfigurera adaptern
A När adaptern är installerad
visas ikonen för Windows XP
Wireless Zero Configuration i
datorns systemfält.
Dubbelklicka på ikonen.
B Alla tillgängliga trådlösa
nätverk visas på skärmen.
Välj önskat nätverk.
Gå till steg C om WEP-kryptering
har aktiverats för det aktuella
nätverket.
Om WEP-kryptering inte har
aktiverats för nätverket visas
skärmen i bild B. Se till att
kryssrutan bredvid Låt mig
ansluta till det trådlösa
nätverket trots att det inte är
säkert är markerad. Klicka på
Anslut och gå till steg D.
B
C
C Skärmen i bild C visas. Ange
WEP-nyckeln till det trådlösa
nätverket i fältet Nätverksnyckel
och bekräfta den i fältet
Bekräfta nyckel. Klicka sedan
på Anslut.
D Ikonen för Wireless Zero
Configuration i systemfältet
meddelar dig om anslutningen
är aktiv.
Grattis! Installationen av Wireless-G
PCI-adapter med SpeedBooster
är klar.
4
Mer information och felsökningshjälp finns i
användarhandboken på cd-skivan.
Information om hur du kontaktar vår tekniska
supportavdelning finns i den särskilda
bilagan.
Webbplats
http://www.linksys.com/international
Linksys är ett registrerat varumärke eller ett va rumärke
som tillhör Cisco Systems, Inc. och/eller dess
samarbetspartner i USA och vissa andra länder.
Copyright © 2004 Cisco Systems, Inc. Med ensamrätt.
WMP54GS-QIG_XP-SE-40517NC KL
 Loading...